

Each web page rebuild begins with the similar query: how a lot time will this take? The Divi 5 Design System was once designed to get you off and operating as briefly as conceivable. As an alternative of rebuilding from scratch, you rebrand what already exists. Trade colours, fonts, sizes, and presets, and watch a whole web page change into.
We’ve selected to present 3 detailed examples of ways simple it’s to totally trade the design machine to suit your wishes. Each and every Segment transformation required fewer than 25 movements. No customized CSS overrides. No element-by-element changes. Simply planned adjustments to Design Variables and Presets that cascade via a whole web page.
That is the second-to-last day of our Cyber Monday sale. In case you’ve been comparing whether or not Divi delivers the potency it guarantees, those examples supply direct proof. The Design Device isn’t a characteristic you’ll use now and again. It’s a whole paradigm for the way forward for designing with Divi. Whether or not you select to customise it or be informed from how our designers arrange Divi, the Design Device for Divi 5 is a useful useful resource you’ll stay coming again to.
Actual-International Rebranding Examples
The next transformations use precise sections from the Divi 5 Design Device library. Each and every instance begins with a pre-built structure and applies a centered collection of adjustments to succeed in a fully other emblem identification. The method stays constant: trade world variables first, practice presets strategically, and make module-level changes final.
Company to Journey Hero Segment
This change takes Hero Segment #28 from the Sections library and converts it into an journey tourism touchdown phase.
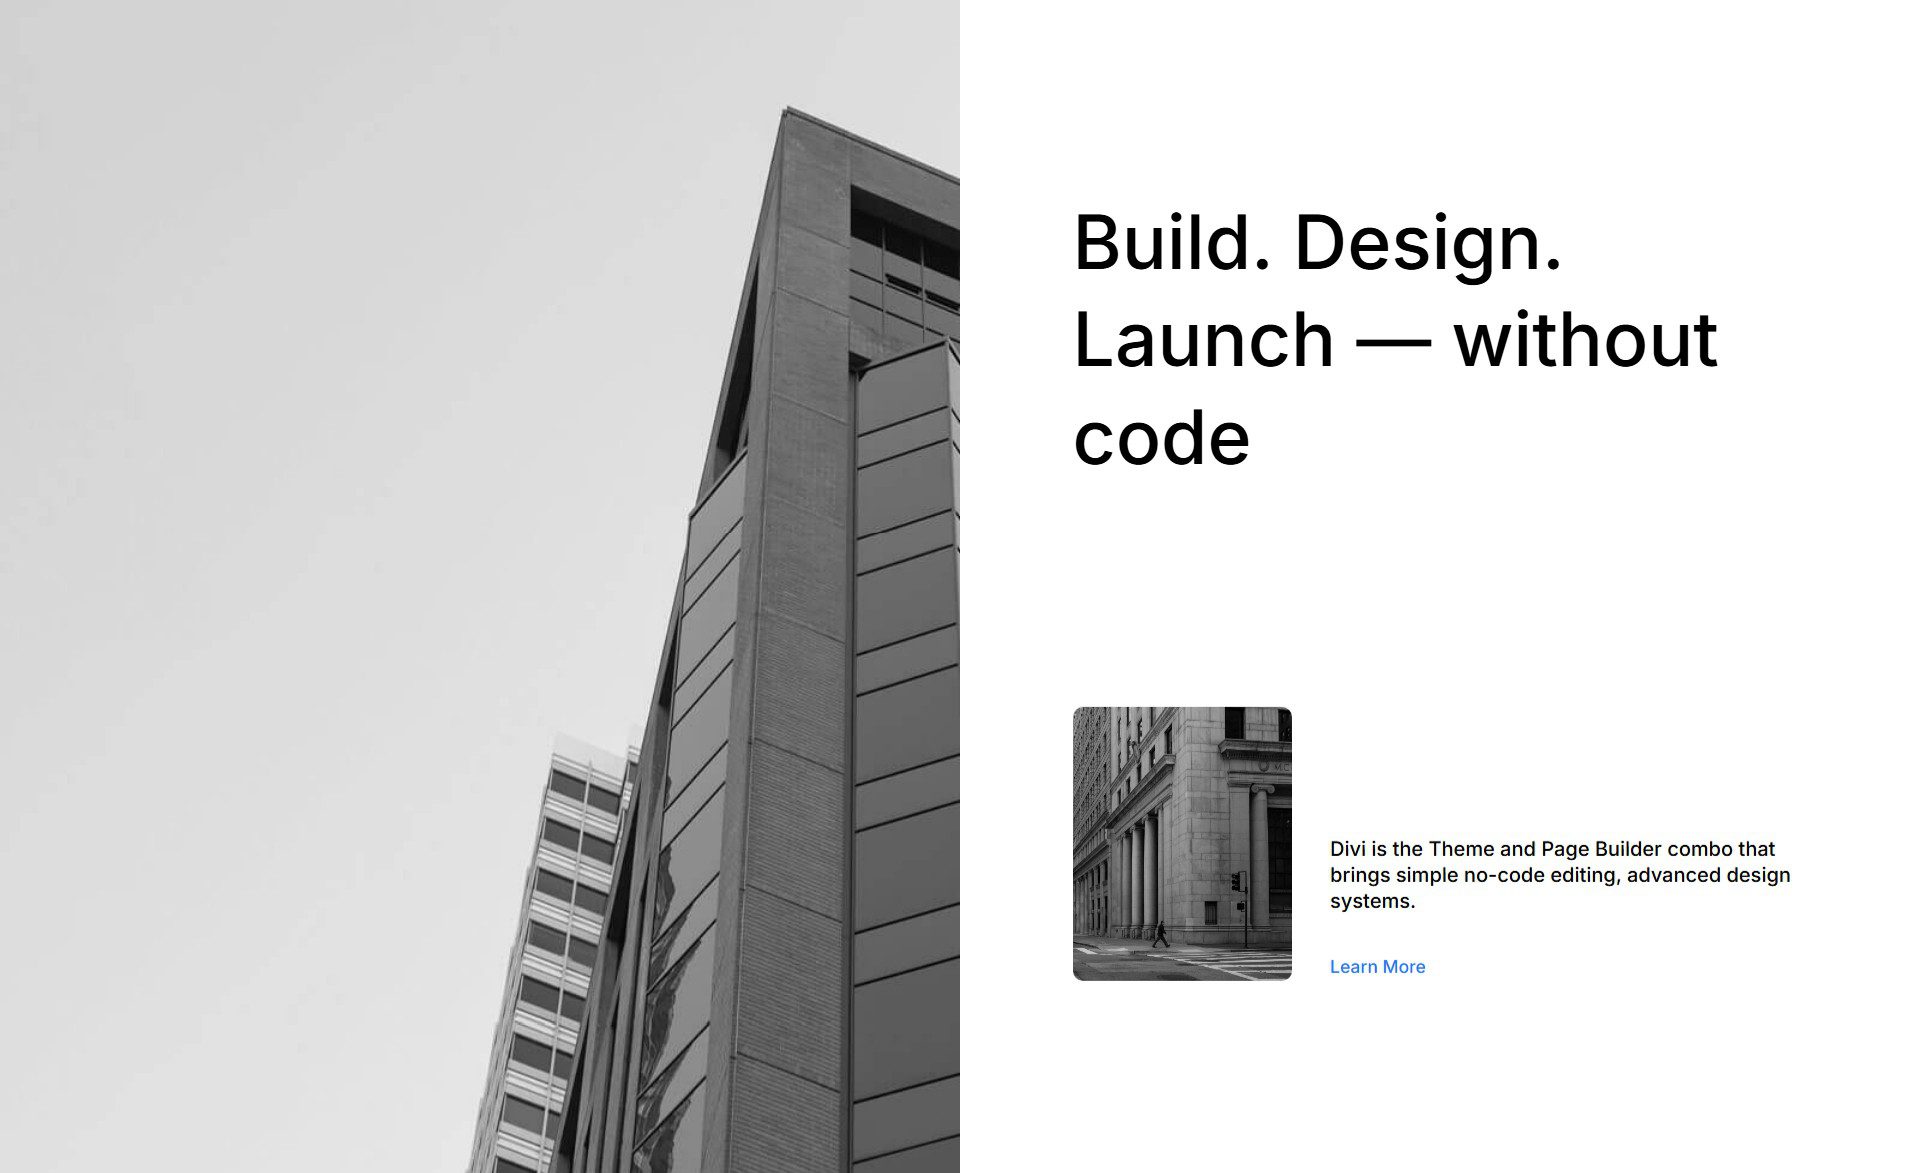
The transformation calls for ~17 movements. General implementation time for a median Divi person: roughly 8 mins.

After
World Adjustments by the use of WordPress Customizer
Open the WordPress Customizer.
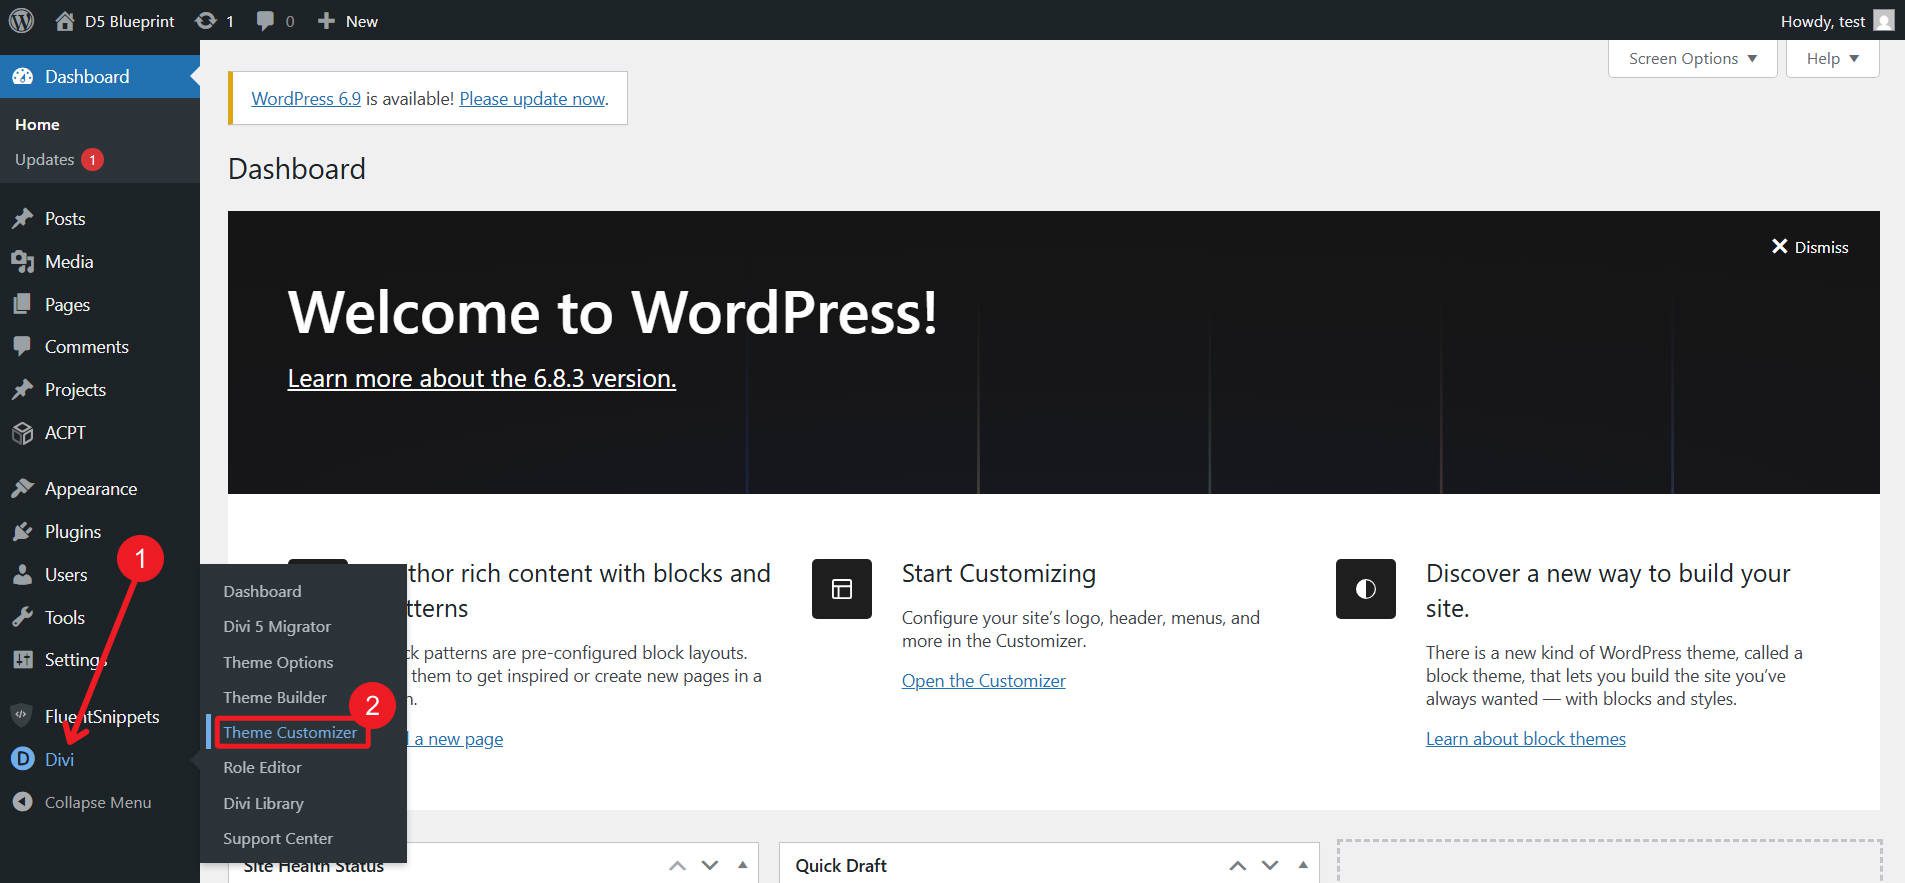
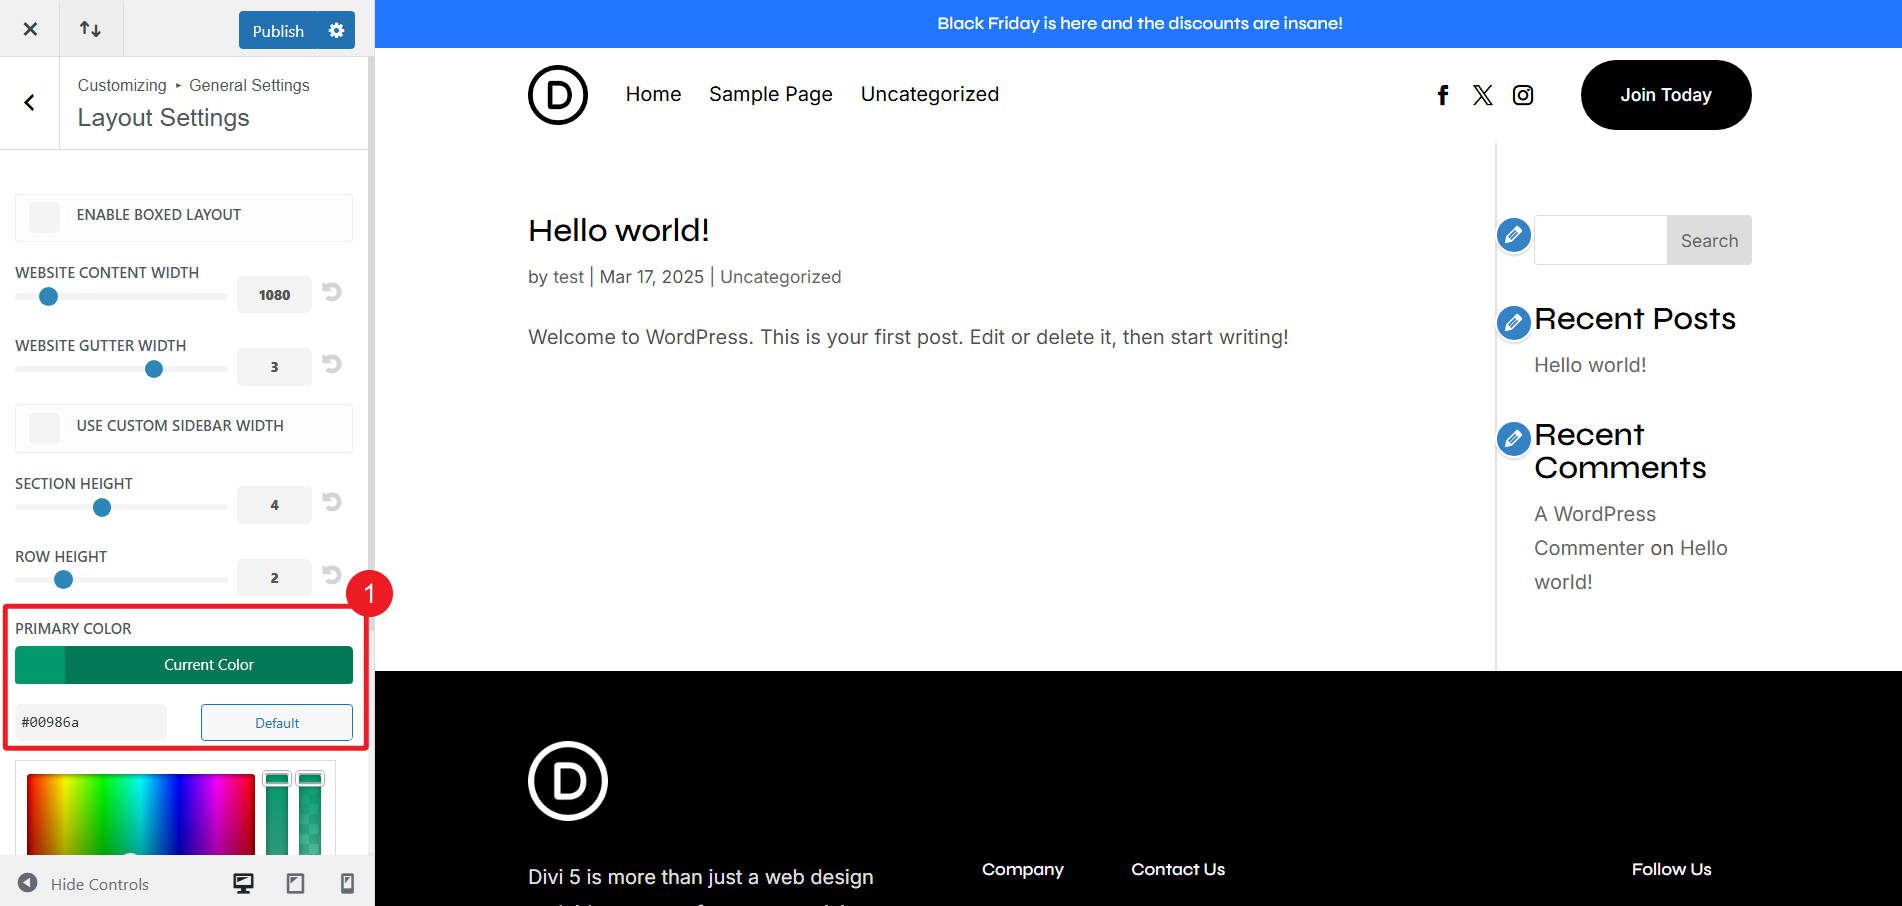
Navigate to Normal Settings > Structure Settings. Trade the Number one Colour variable to #11435B.
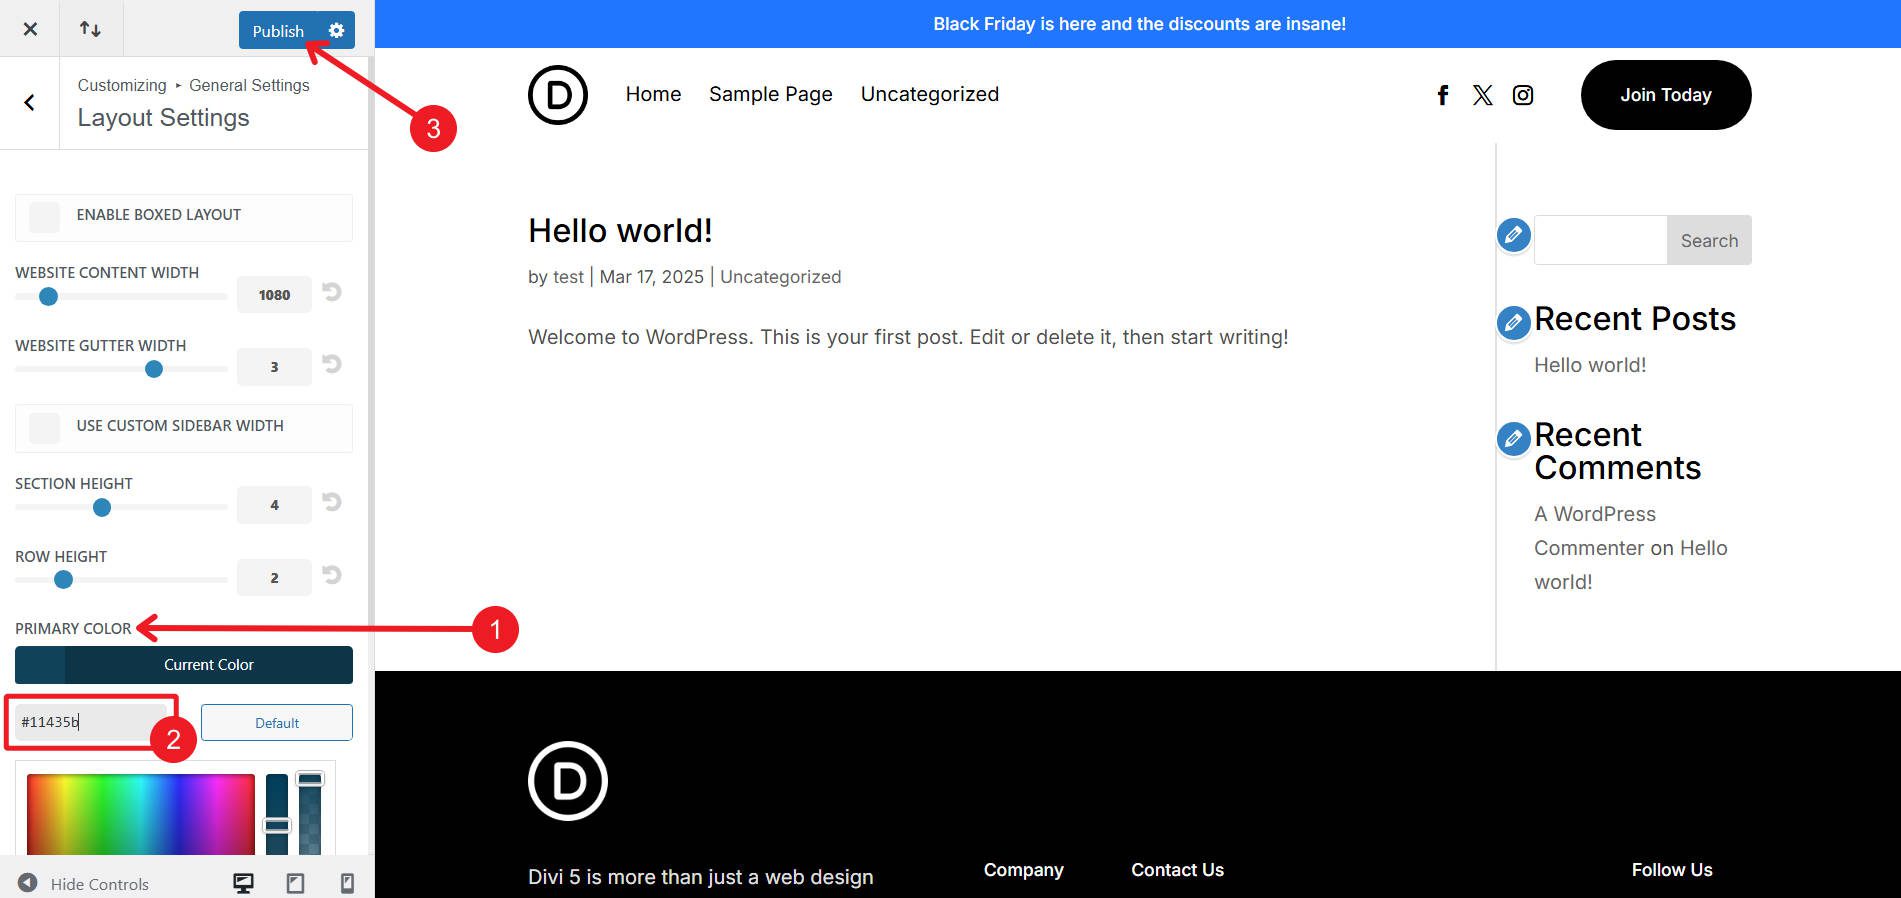
The main colour will also be simply modified in Divi 5’s Colour Design Variable Supervisor.
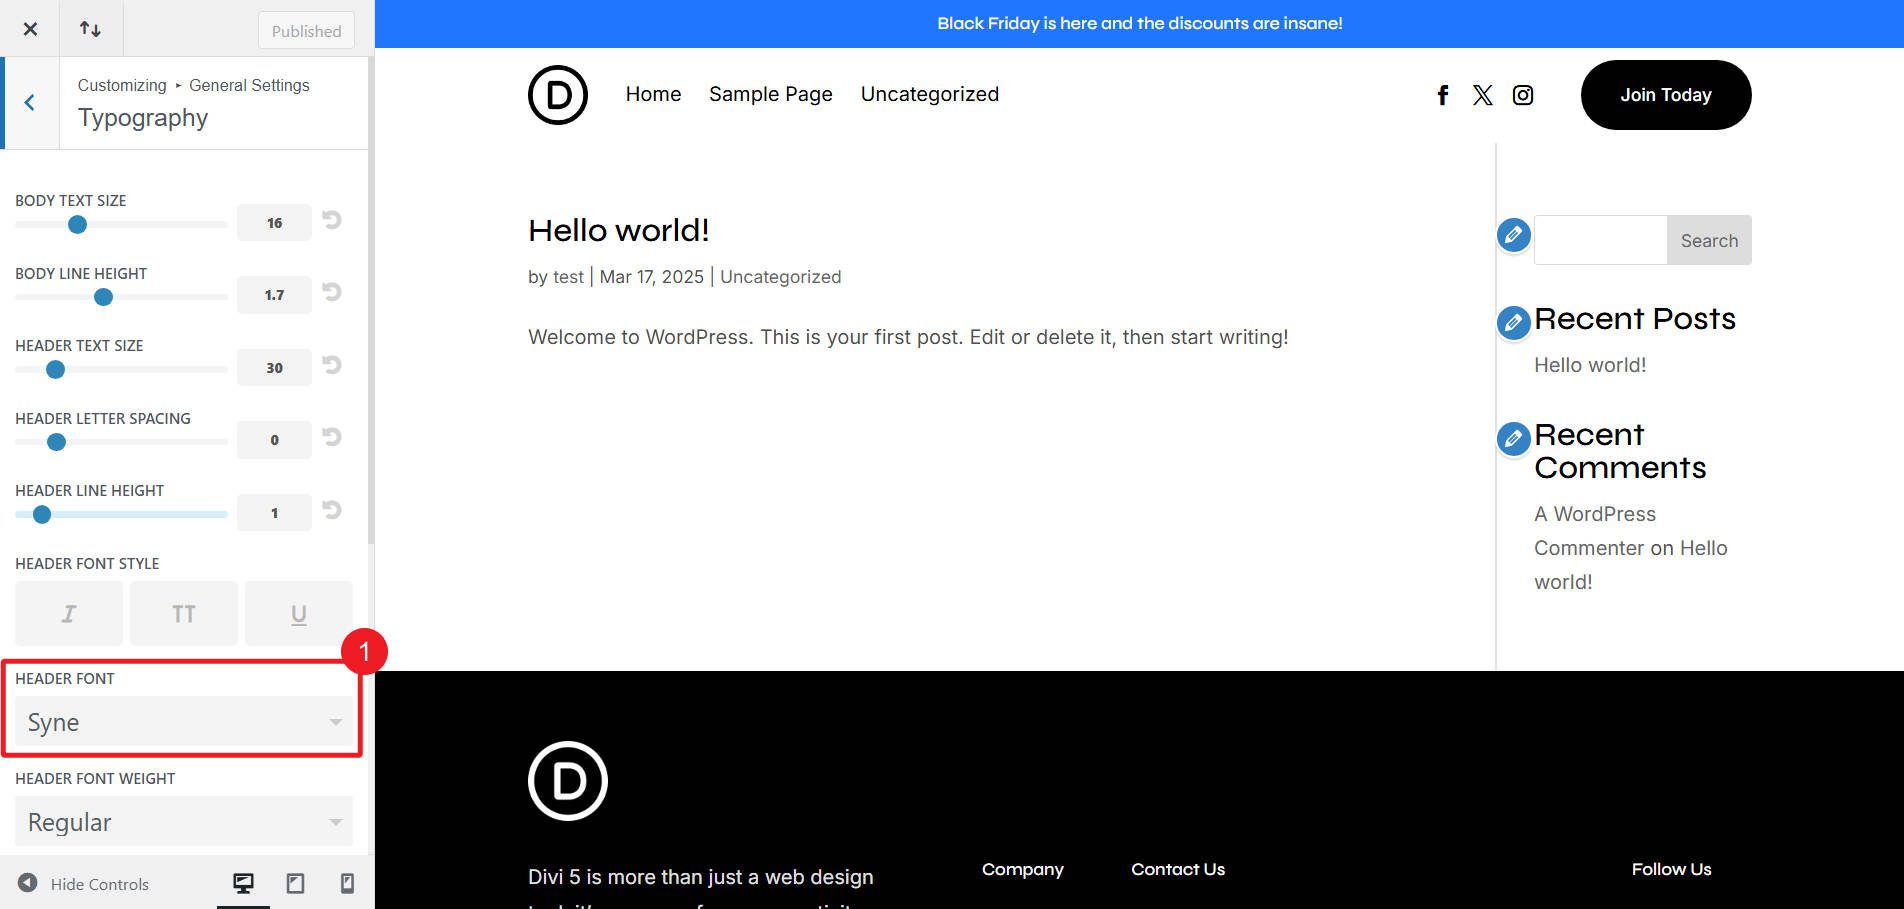
Throughout the WordPress Customizer, navigate to Normal Settings >Typography. Trade the Header Font Circle of relatives to Roboto Condensed. Whilst there, additionally set the Header Font Taste to All Caps.
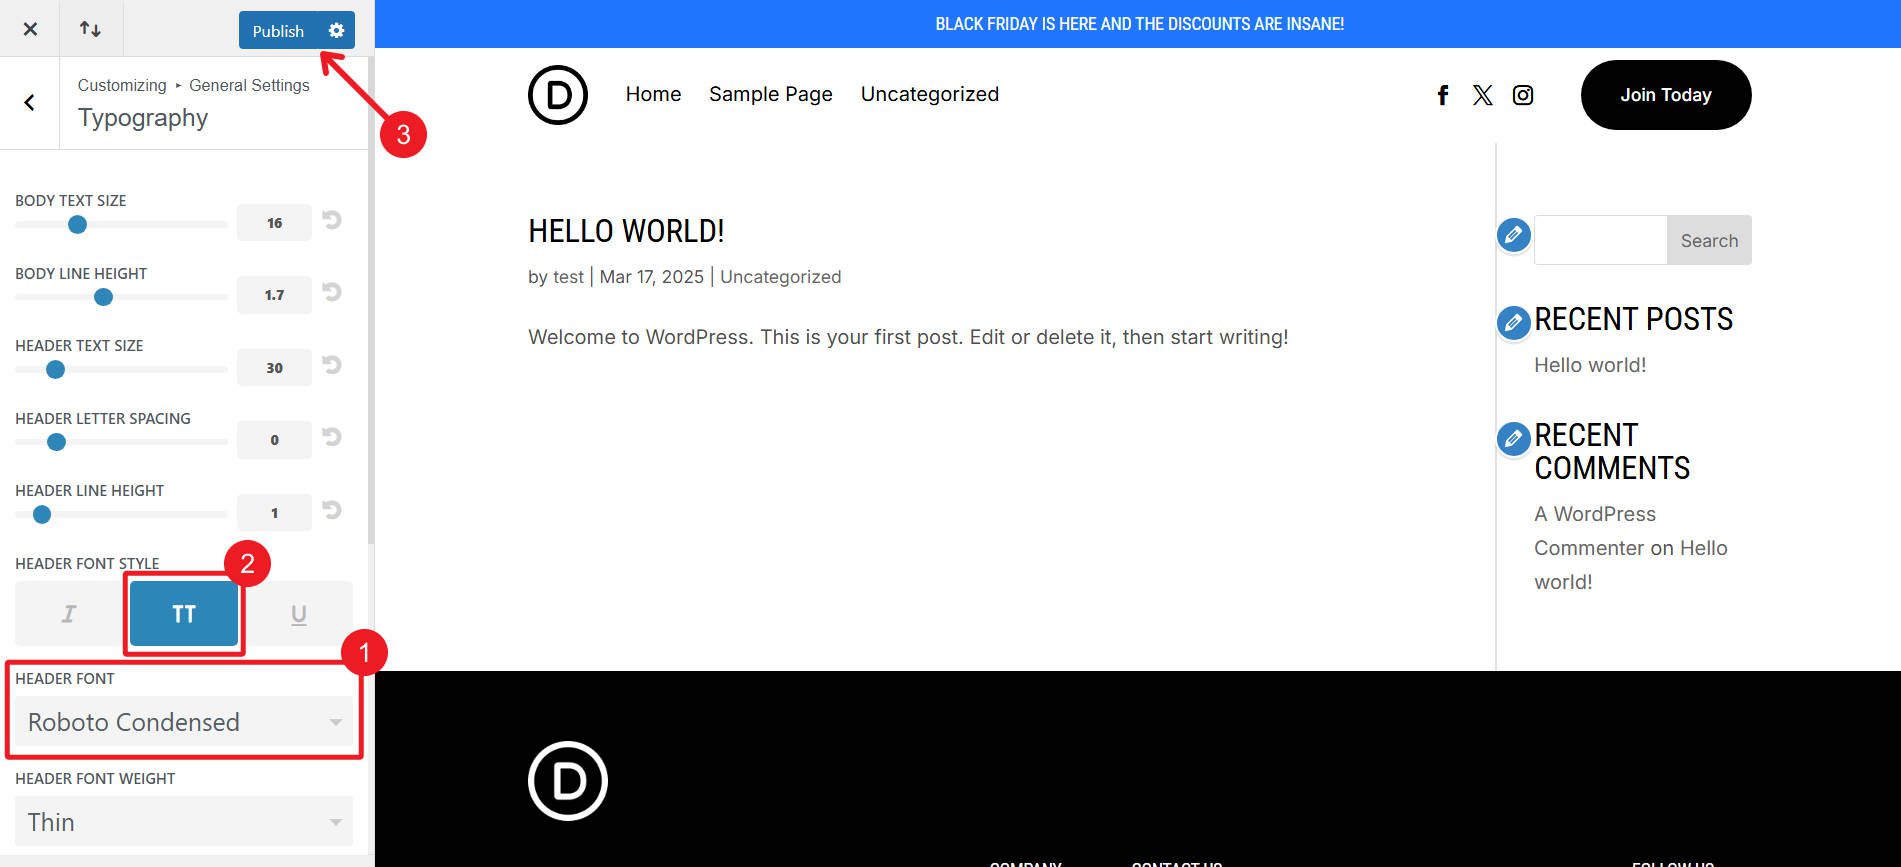
The Heading Font will also be modified simply in Divi 5’s Font Design Variable Supervisor. All caps may also be executed with Default and different Presets, however this can be a unmarried step within the customizer.
Put up all Customizer adjustments.
Structural and Design Adjustments
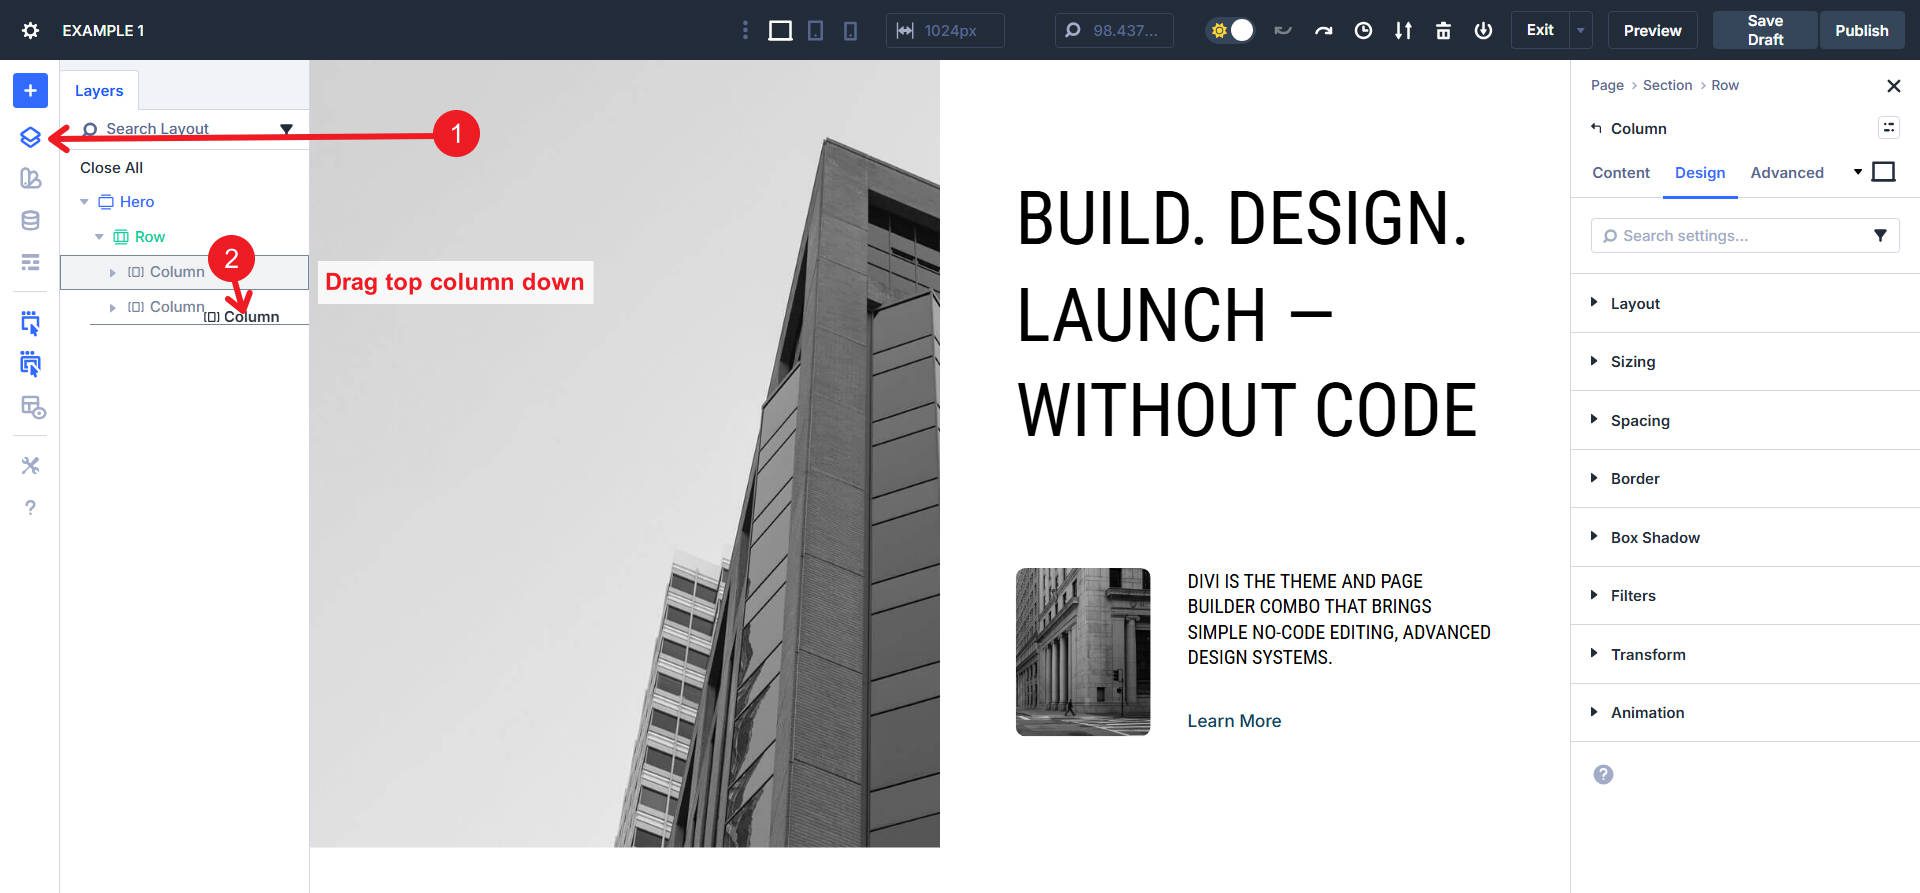
First, switch the order of the 2 primary columns within the dad or mum row. That is absolute best executed within the Layers panel through dragging the primary column down.
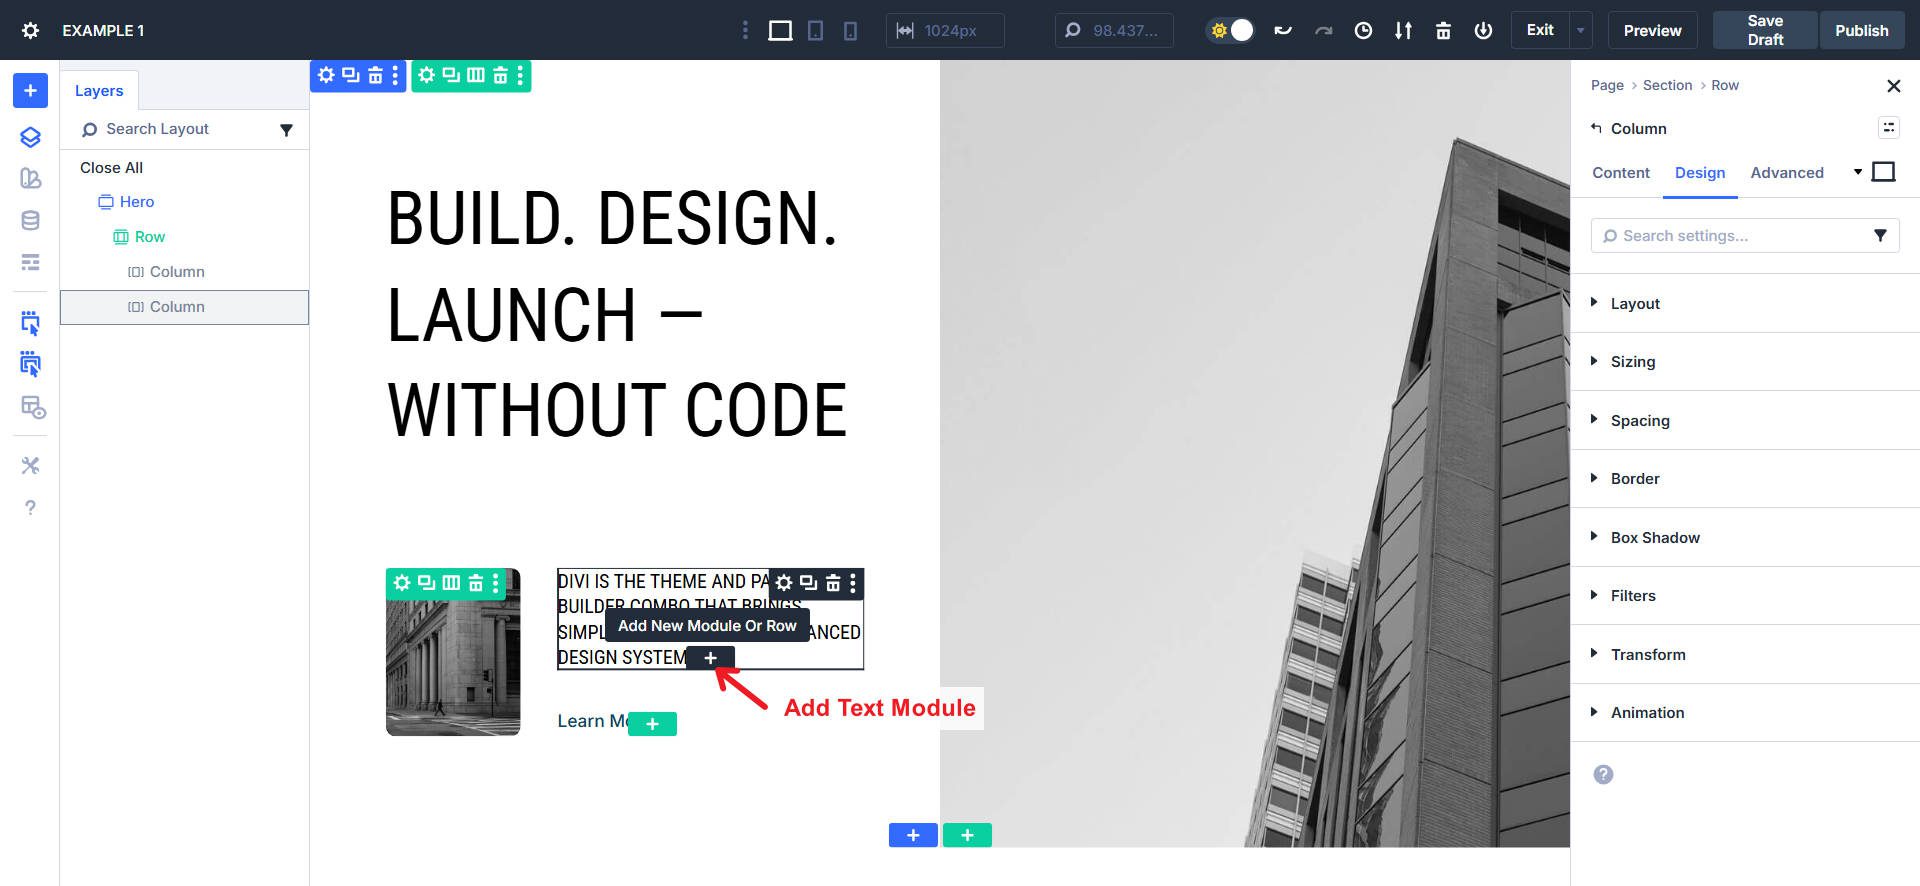
Upload a Textual content Module below this Heading Module. Replica the textual content (or upload the up to date content material) from the heading module, position it into the brand new Textual content Module, and delete the outdated Heading Module.
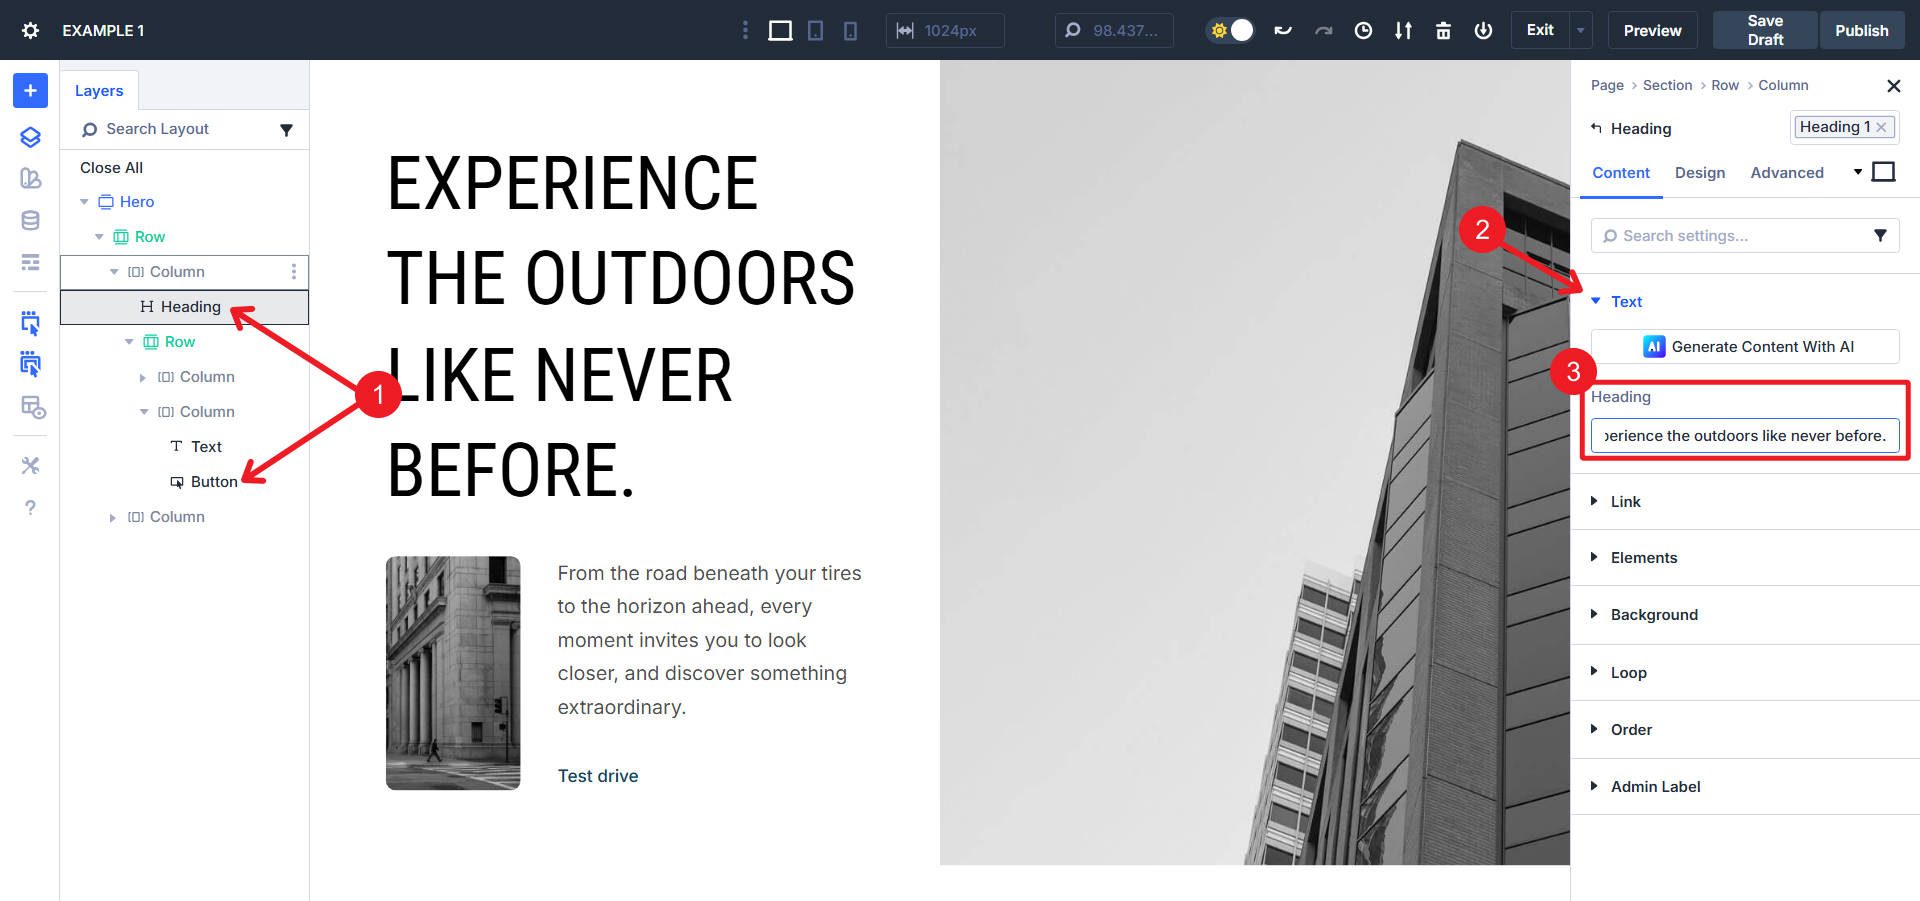
Click on the Primary Heading (and after it, the button). Within the Content material tab, replace the heading textual content after which the button textual content.
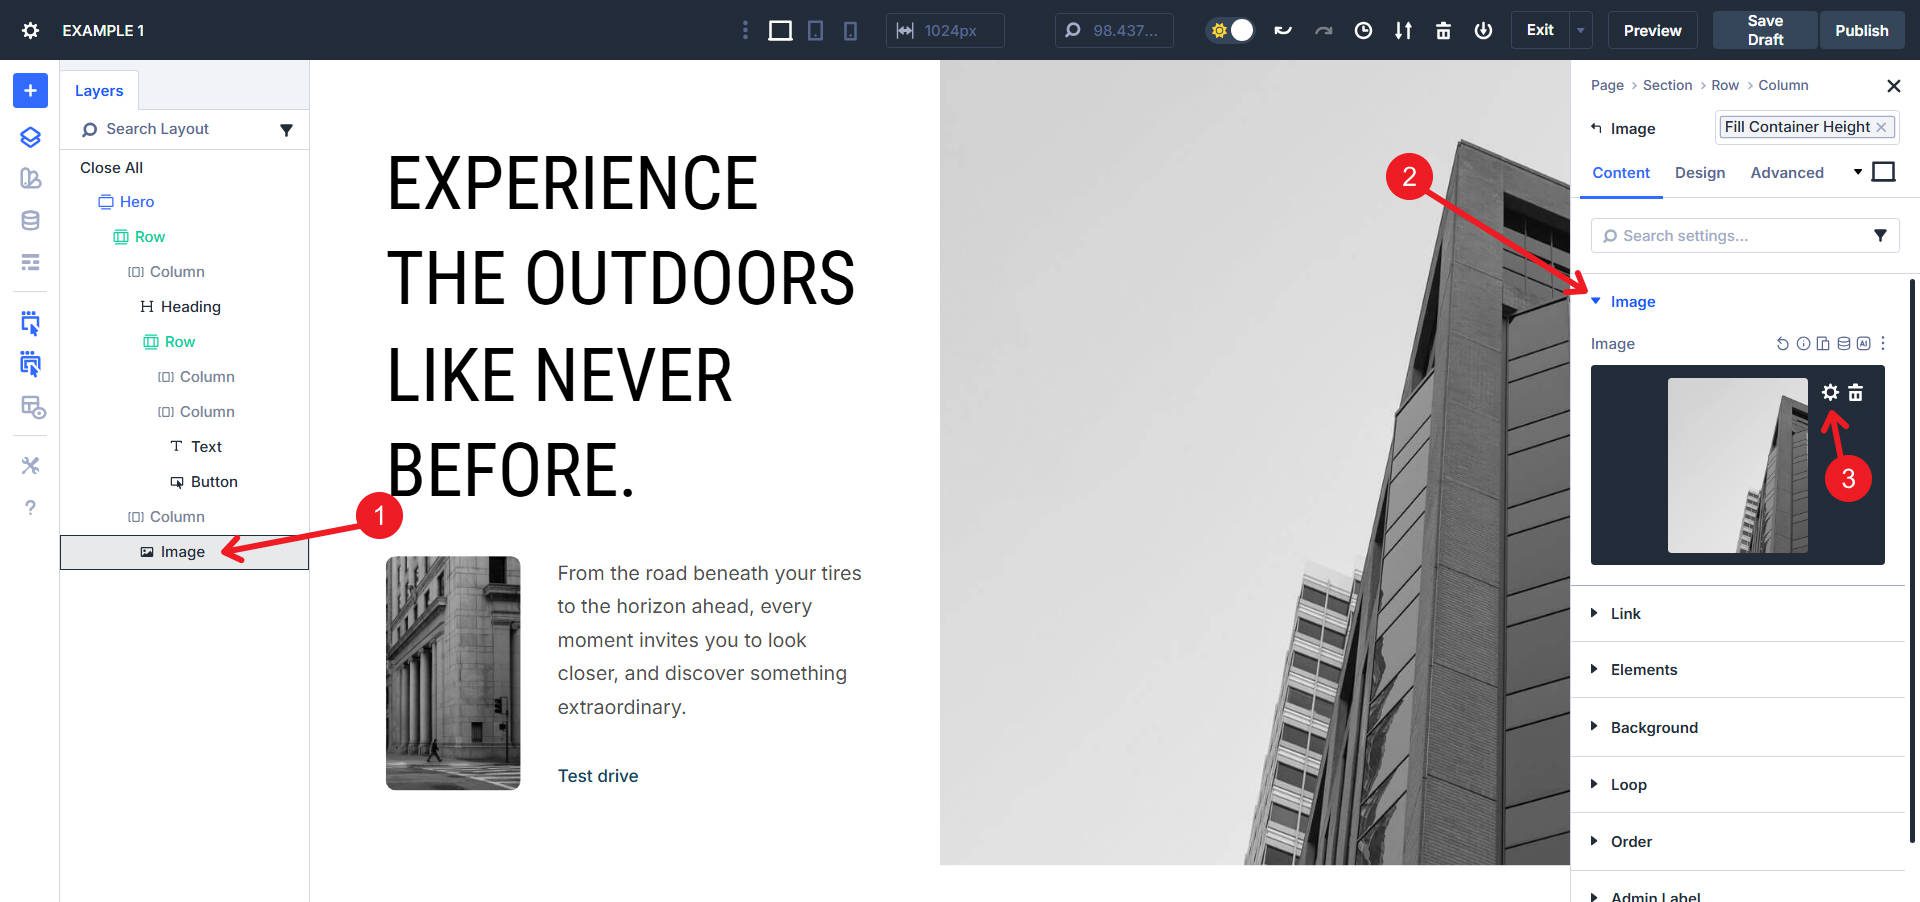
Click on on each and every symbol module in column two. Within the Content material tab, click on the Tools Icon and choose the brand new symbol from the media library. You’ll discover a an identical symbol on Unsplash.
Click on at the row containing the principle heading and frame textual content. Within the settings panel, find the Column Construction choice below the Design tab. Select the 2/5 – 3/5 configuration.
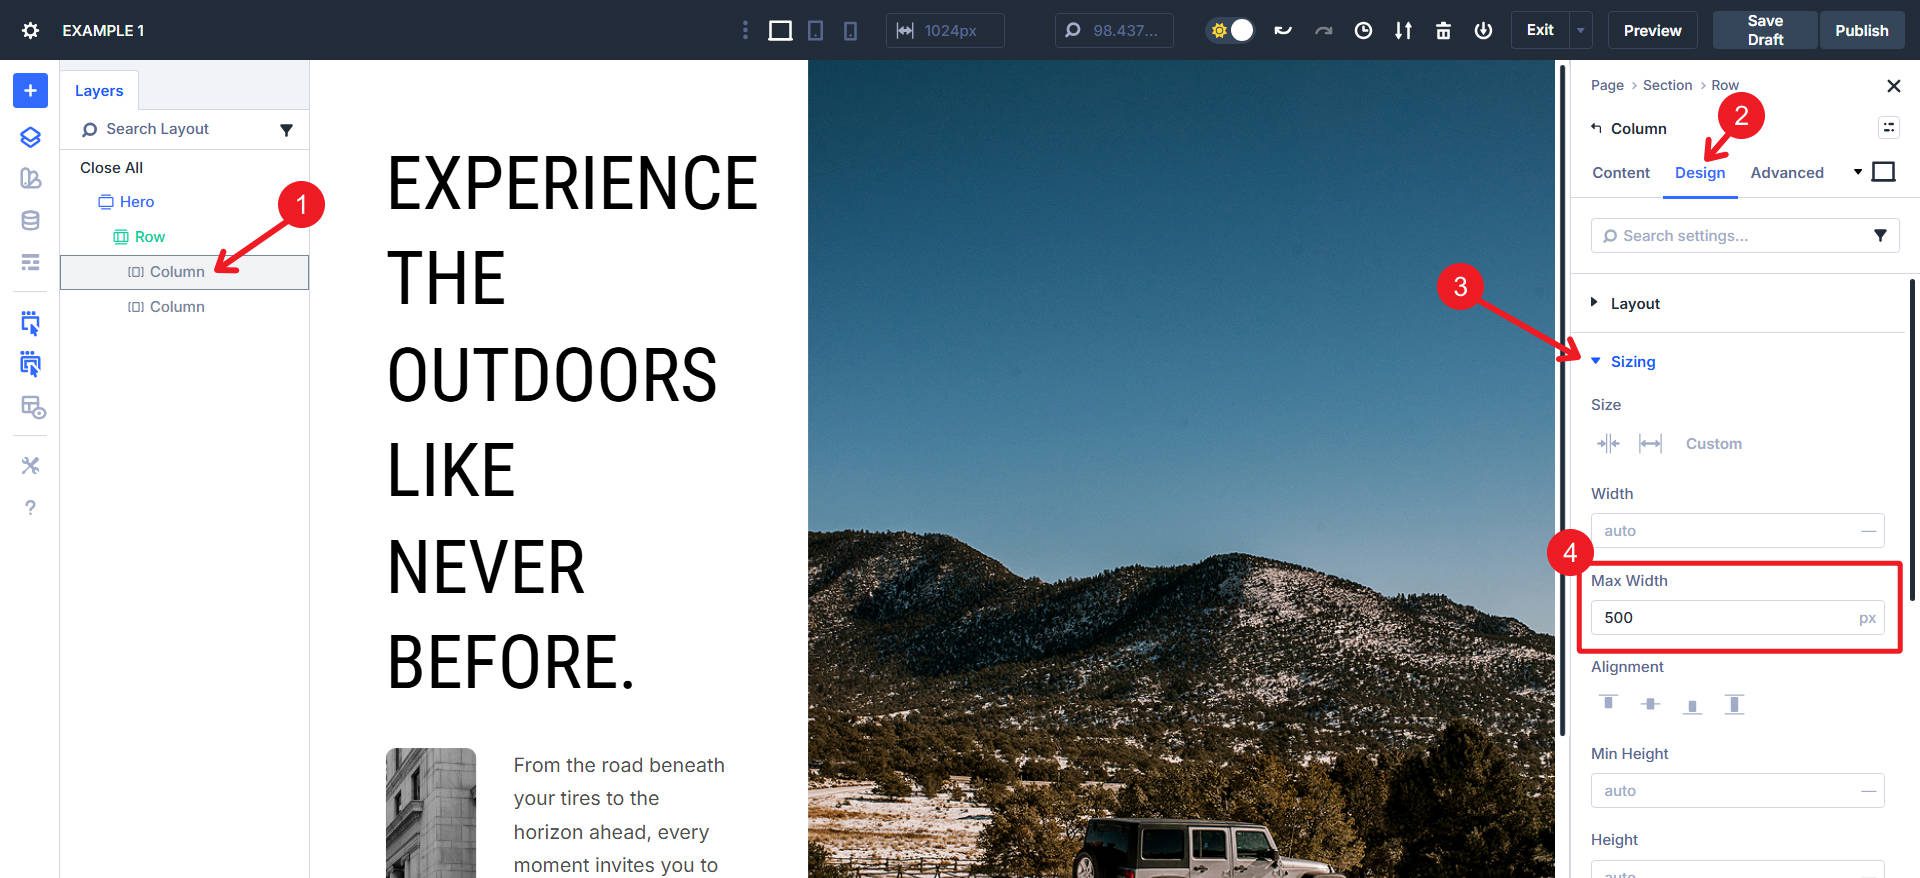
Click on at the left column. Within the Sizing Choice Staff below the Design tab, input 500px within the Max Width box.
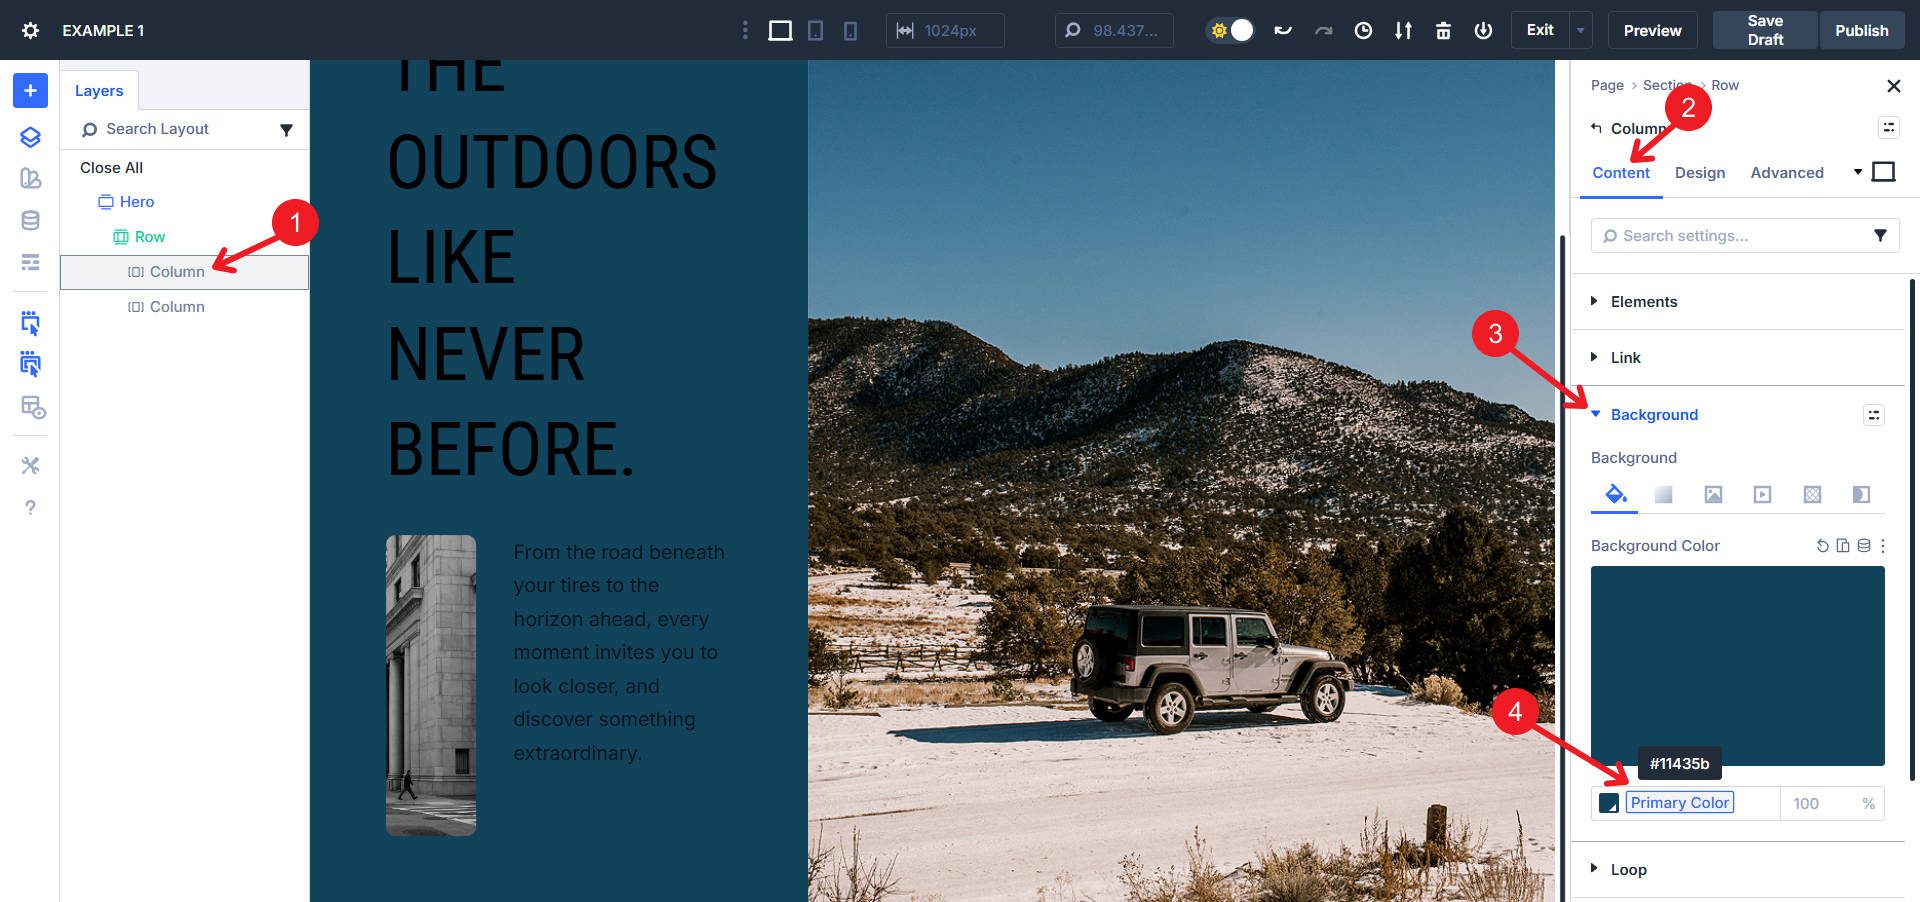
With the left column decided on, open Background. Make a selection Number one Colour from the Design Variable choices for Background Colour.
Trade the Heading and Frame Textual content colour of the entire parts within the left column to white.
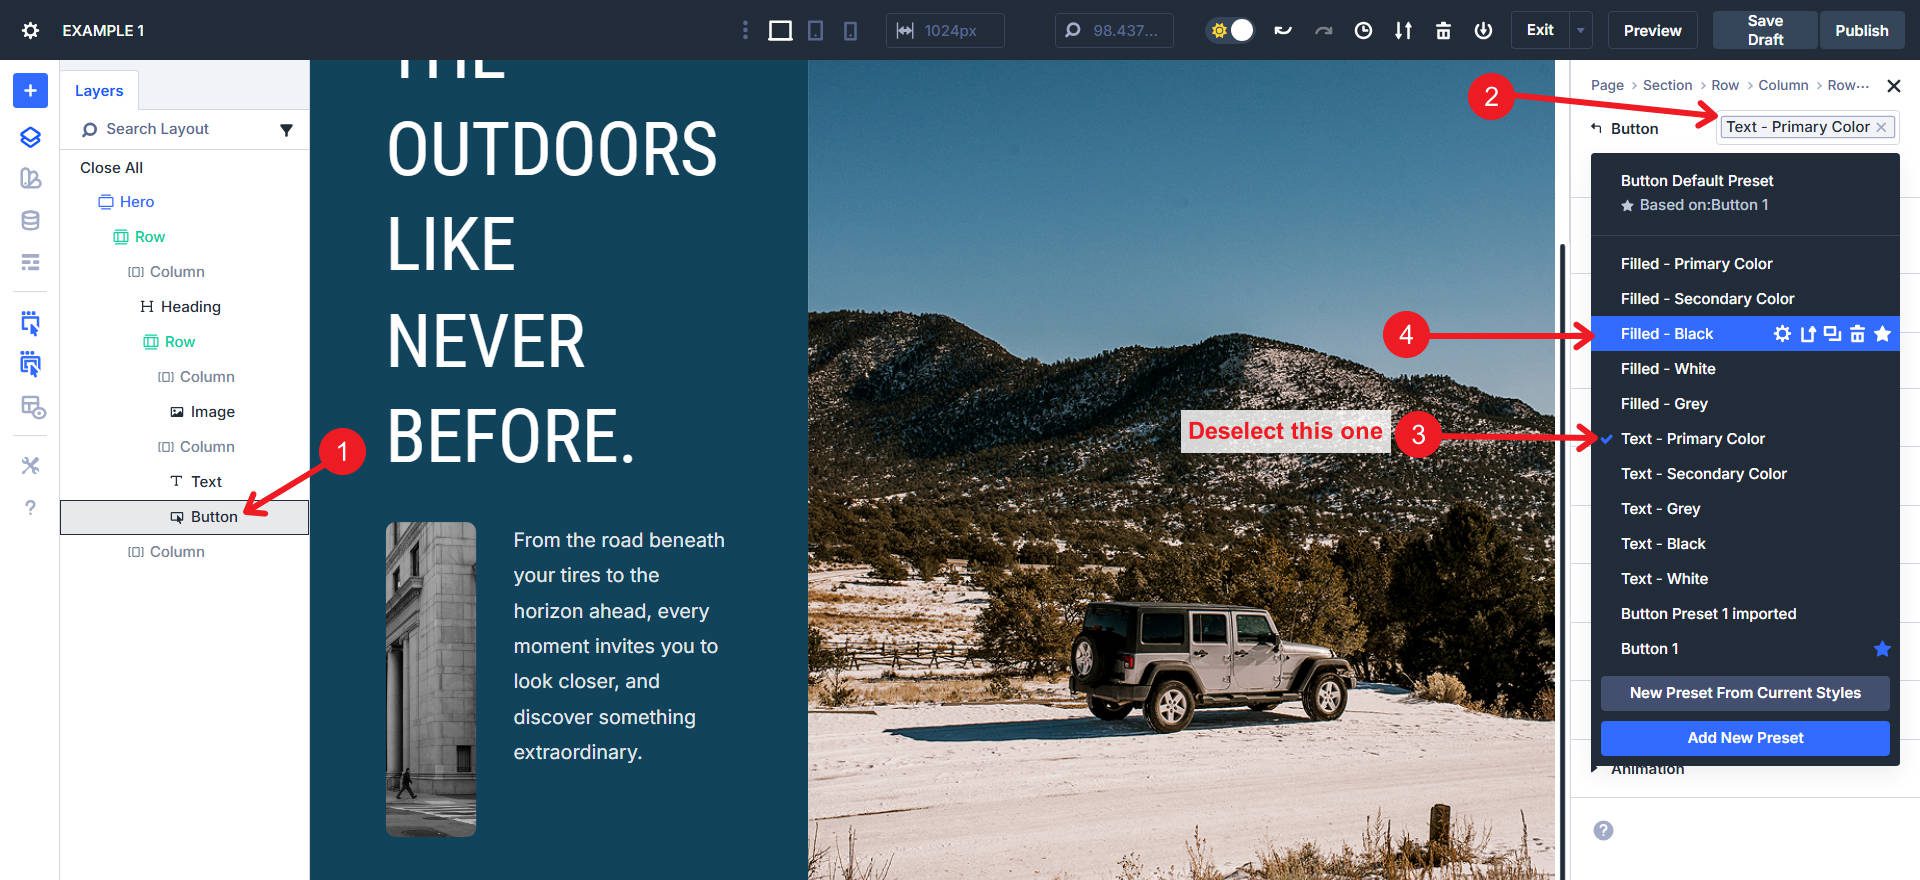
Trade the Button’s Component Preset to Stuffed – Black. Deselect the former preset to keep away from styling conflicts and overstyling.
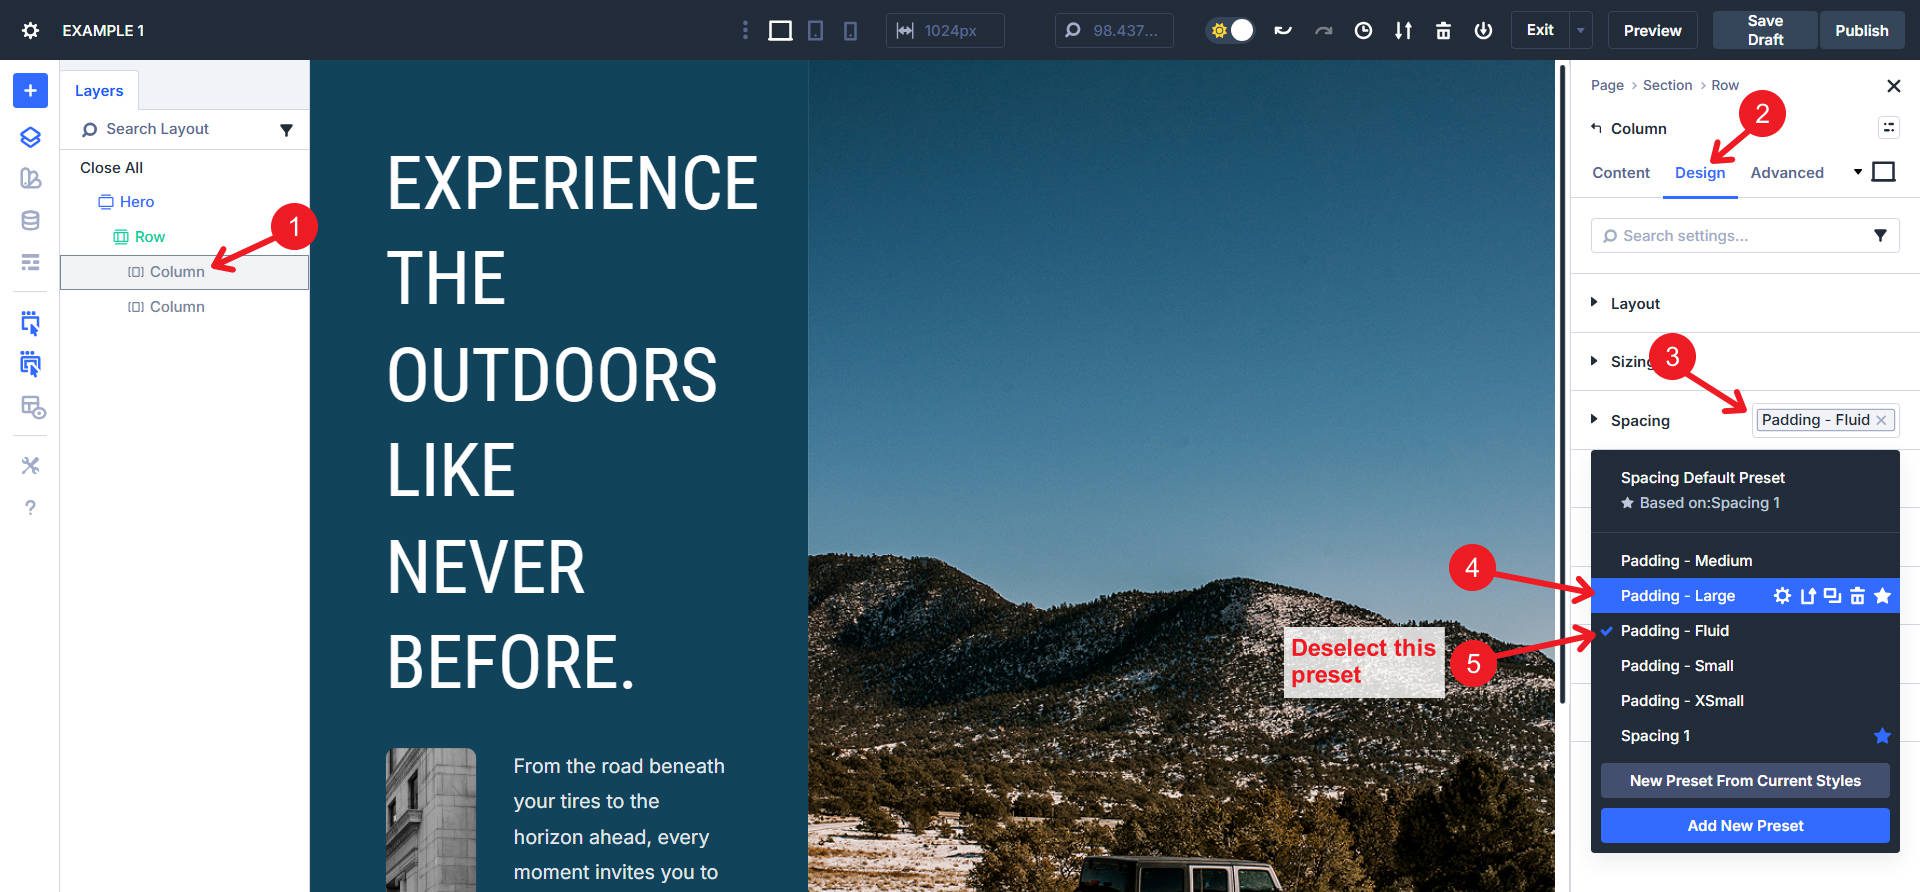
With the left column decided on, click on the Design tab and scroll to Spacing. Click on the preset chip and choose Padding – Massive. Deselect Padding – Fluid.
Find the Interior Row of the left column. Open its settings and below Components, trade the Column Construction to 2/5 – 3/5.
If the phase is just too tall on your liking, you’ll check out cropping or adjusting the picture measurement in the appropriate column.
Minimalist to Heat About Us Segment
This change turns About Segment #5 from the Sections library right into a heat, inventive non-public emblem remark.
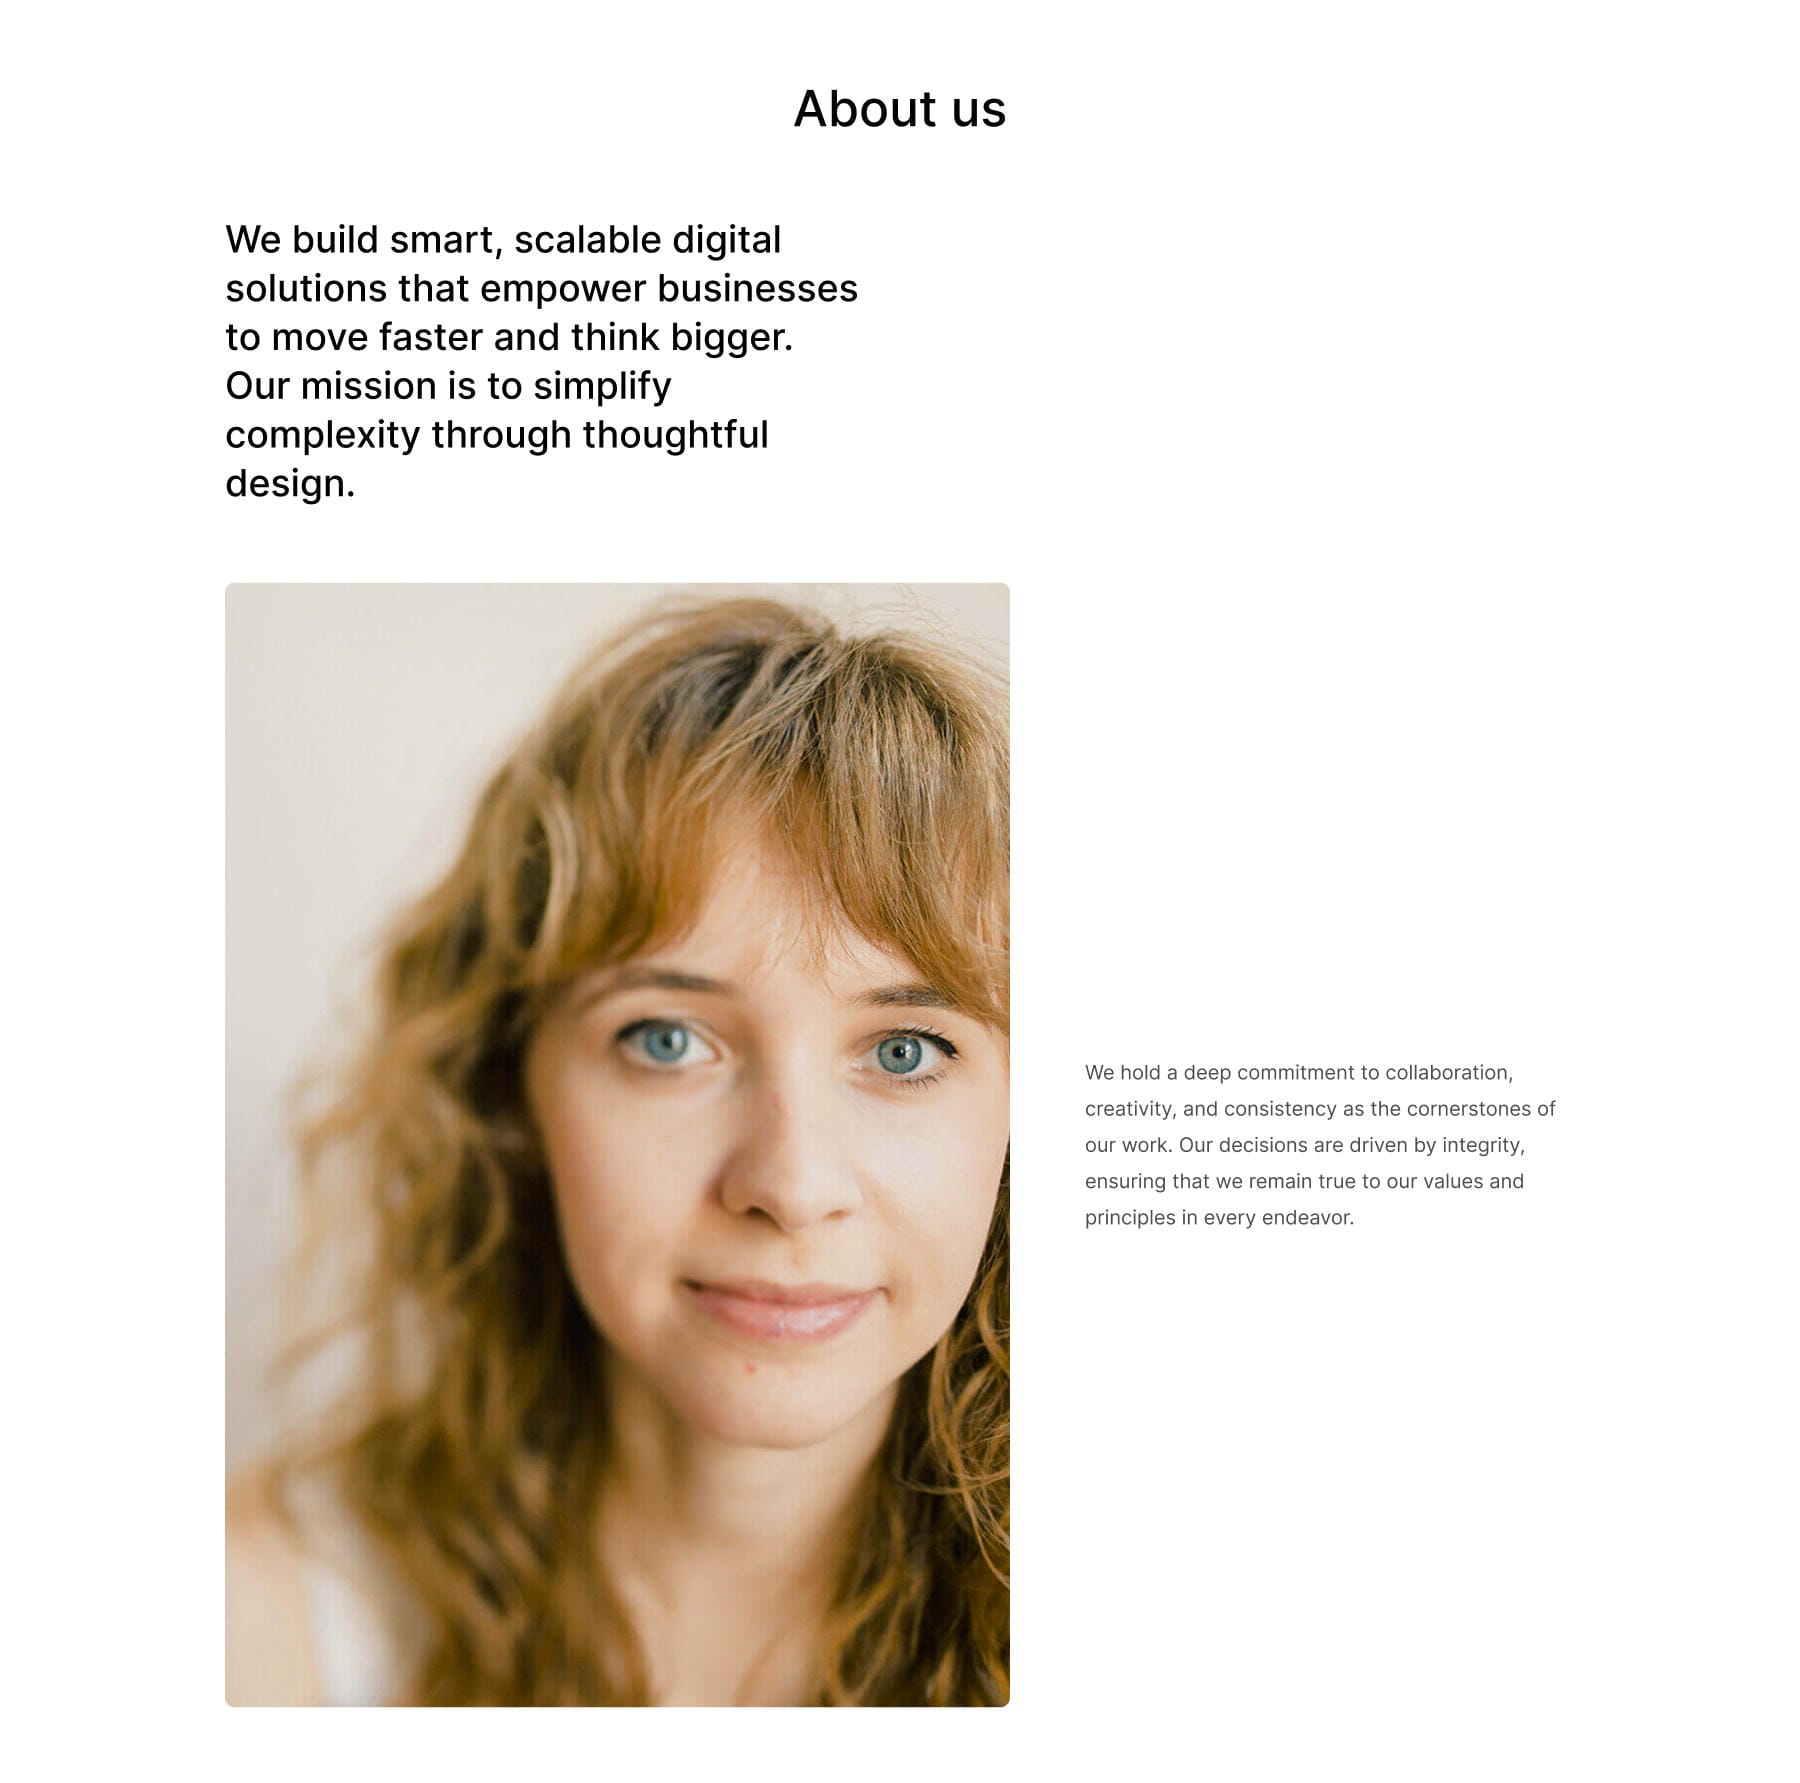
Prior to
The transformation calls for ~23 movements throughout WordPress Customizer, Design Variable Supervisor, and preset changes. Implementation time: roughly 12-Quarter-hour.
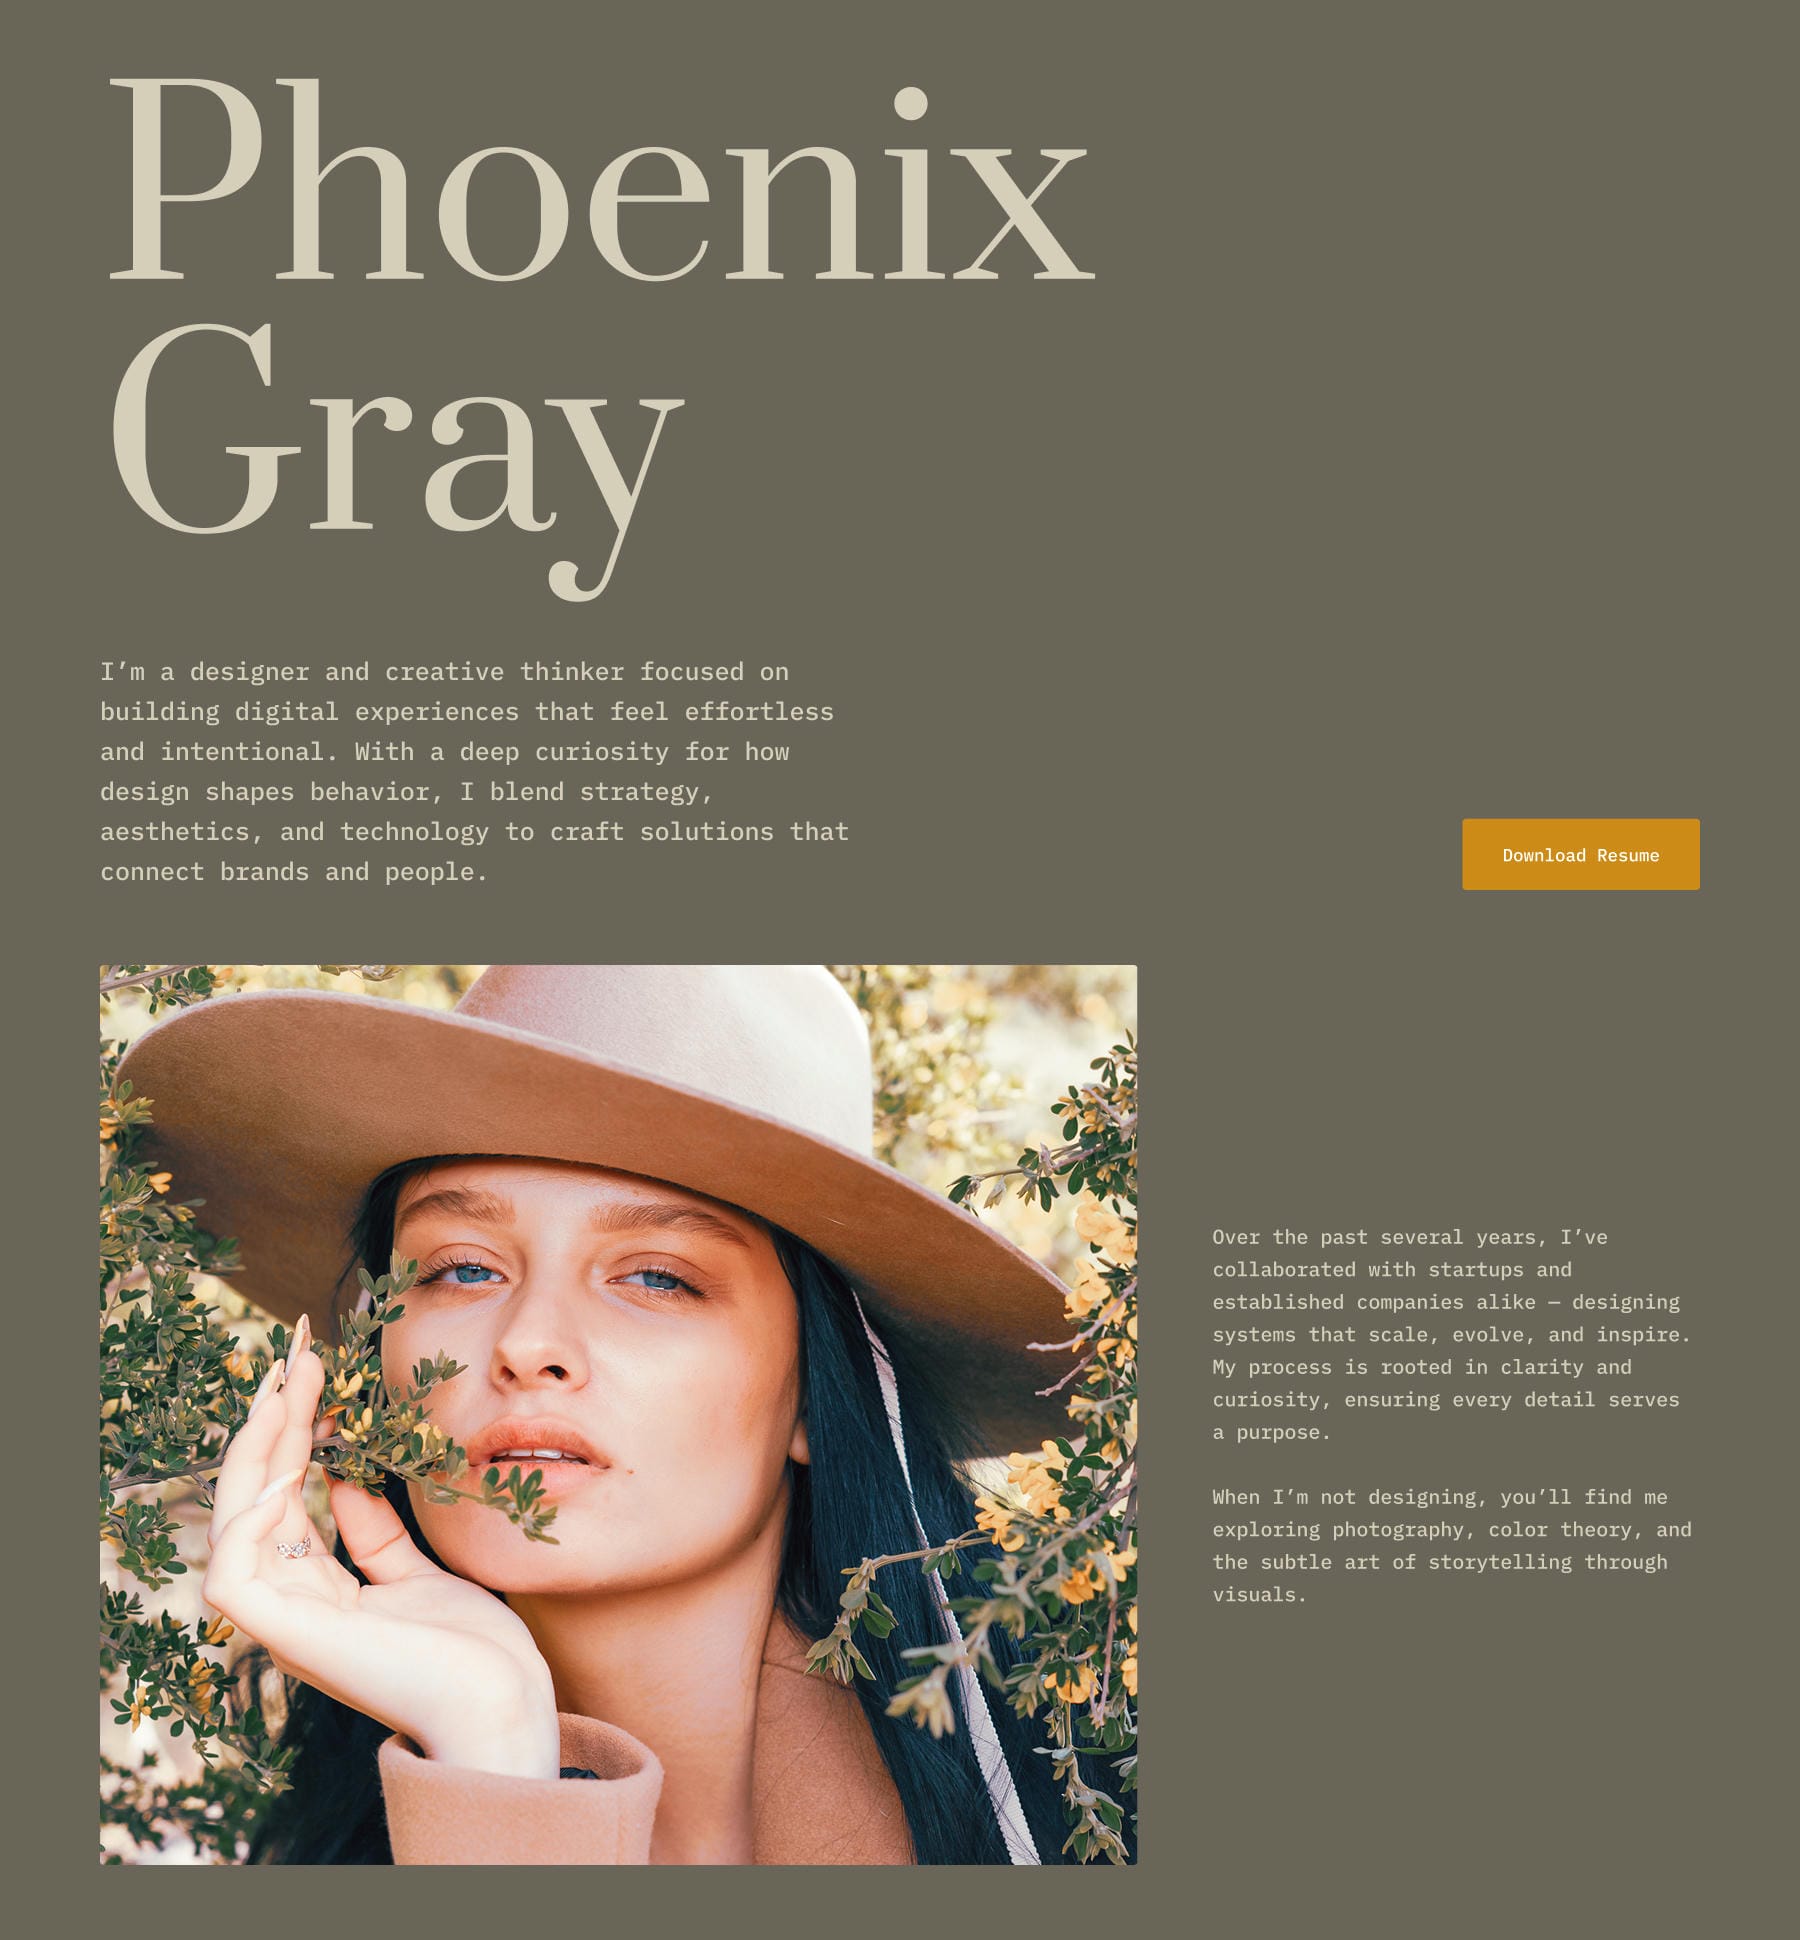
After
World Customizer Adjustments
Open Divi > Customizer and navigate to Normal Settings > Typography. Trade the Heading Textual content Font to Prata. Trade the Frame Textual content Font to IBM Plex Mono.
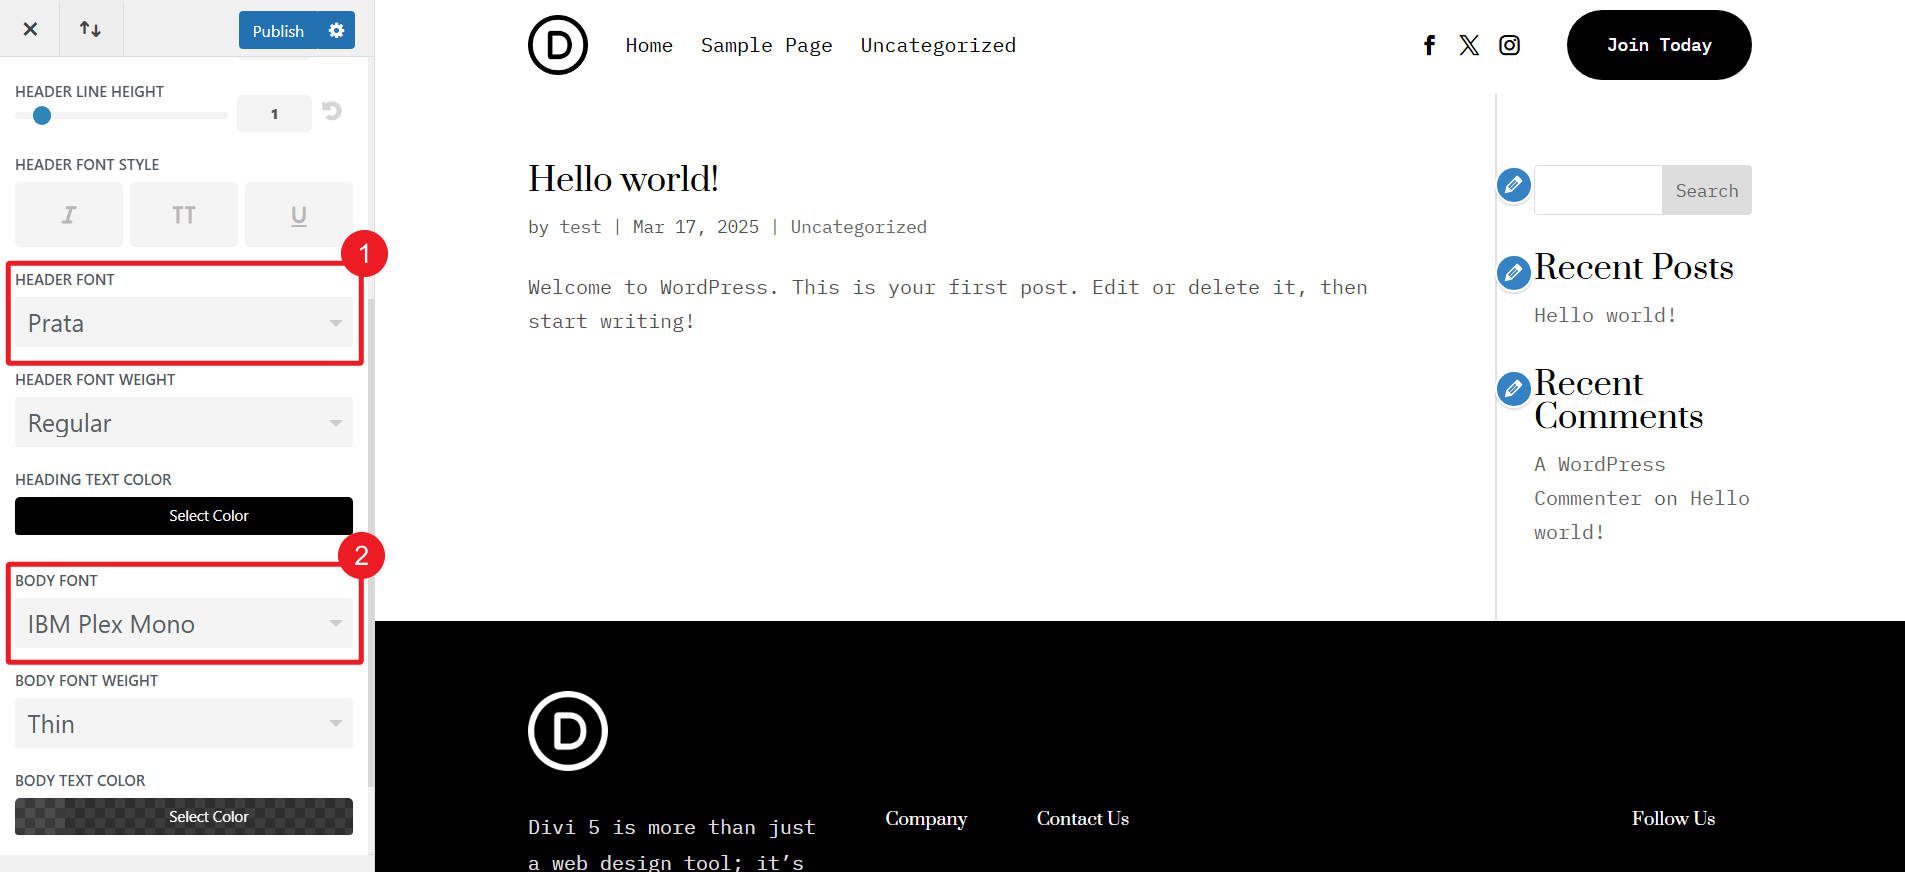
That is simply executed by the use of the Design Variable Supervisor
Pass to Normal Settings > Structure Settings and alter the Number one Colour to #F4AA2C. Additionally, set the Web page Content material Width to 1280px.
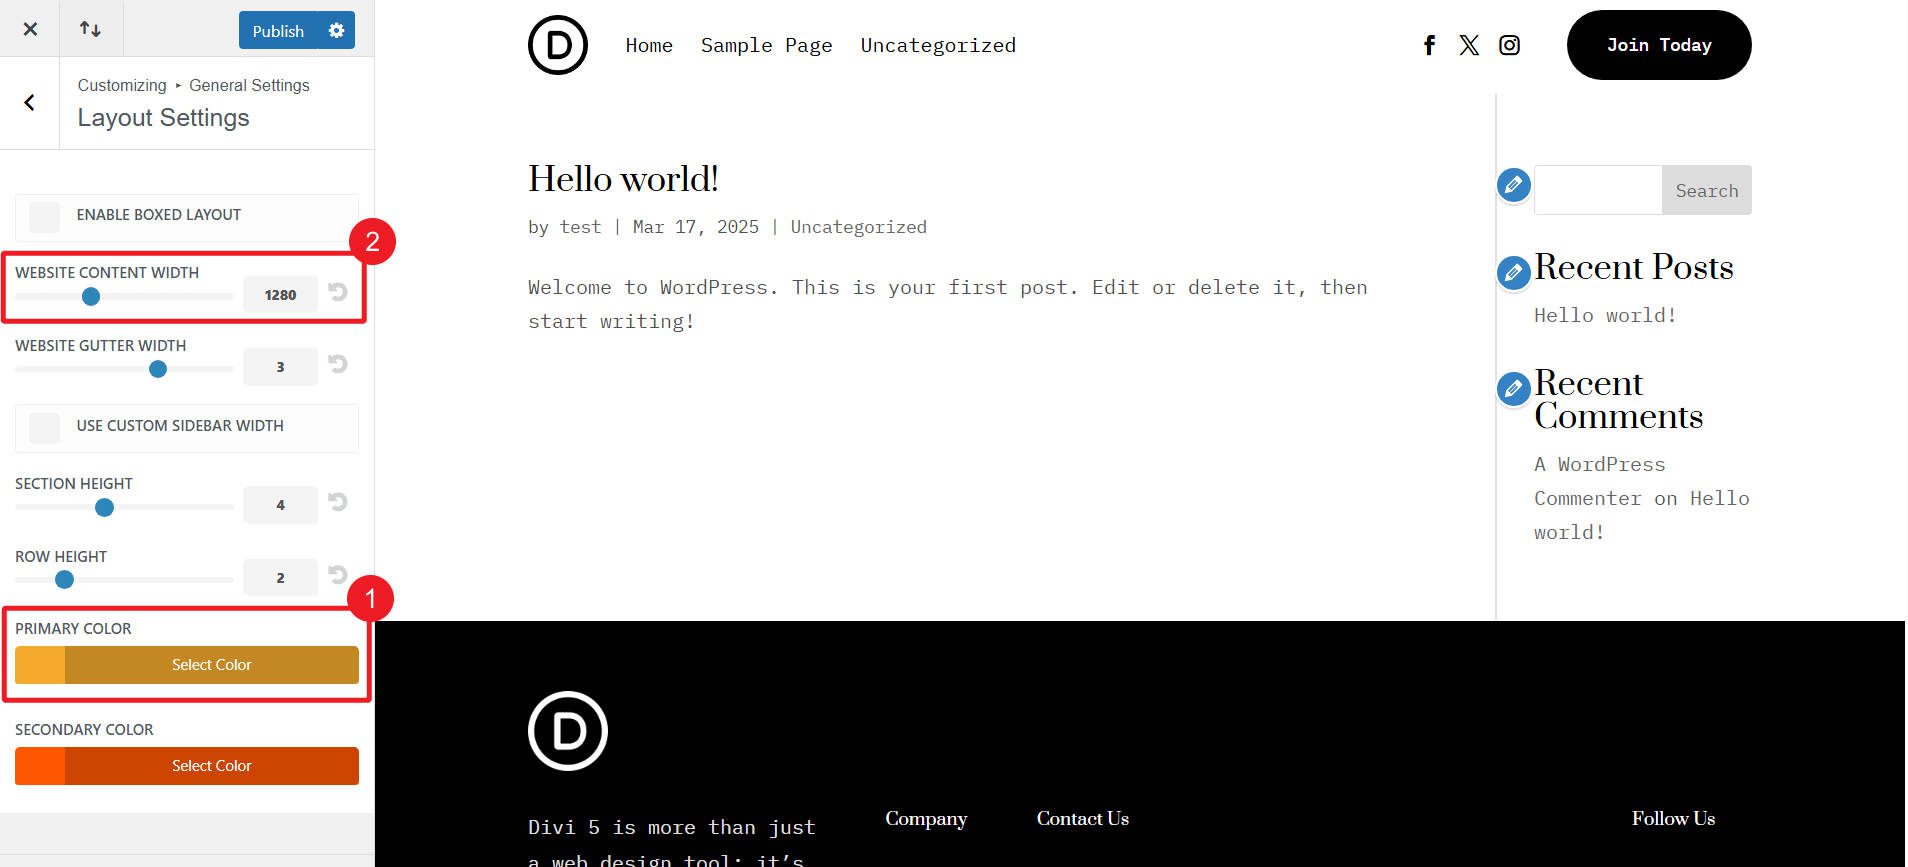
The Number one colour is well edited by the use of the Design Variable Supervisor, whilst the Web page Content material Width can simply be edited in Divi 5 through converting the default Preset for Rows and adjusting its width environment.
Put up all Customizer adjustments.
Design Variable Supervisor Adjustments
As soon as the About Us structure is added to the web page, open the Design Variable Supervisor from the Power Left Sidebar. Make those adjustments:
Find Heading Textual content Colour – Mild and Frame Textual content Colour – Mild within the Colour Variables phase. Trade their colour worth to #D6CEBB.
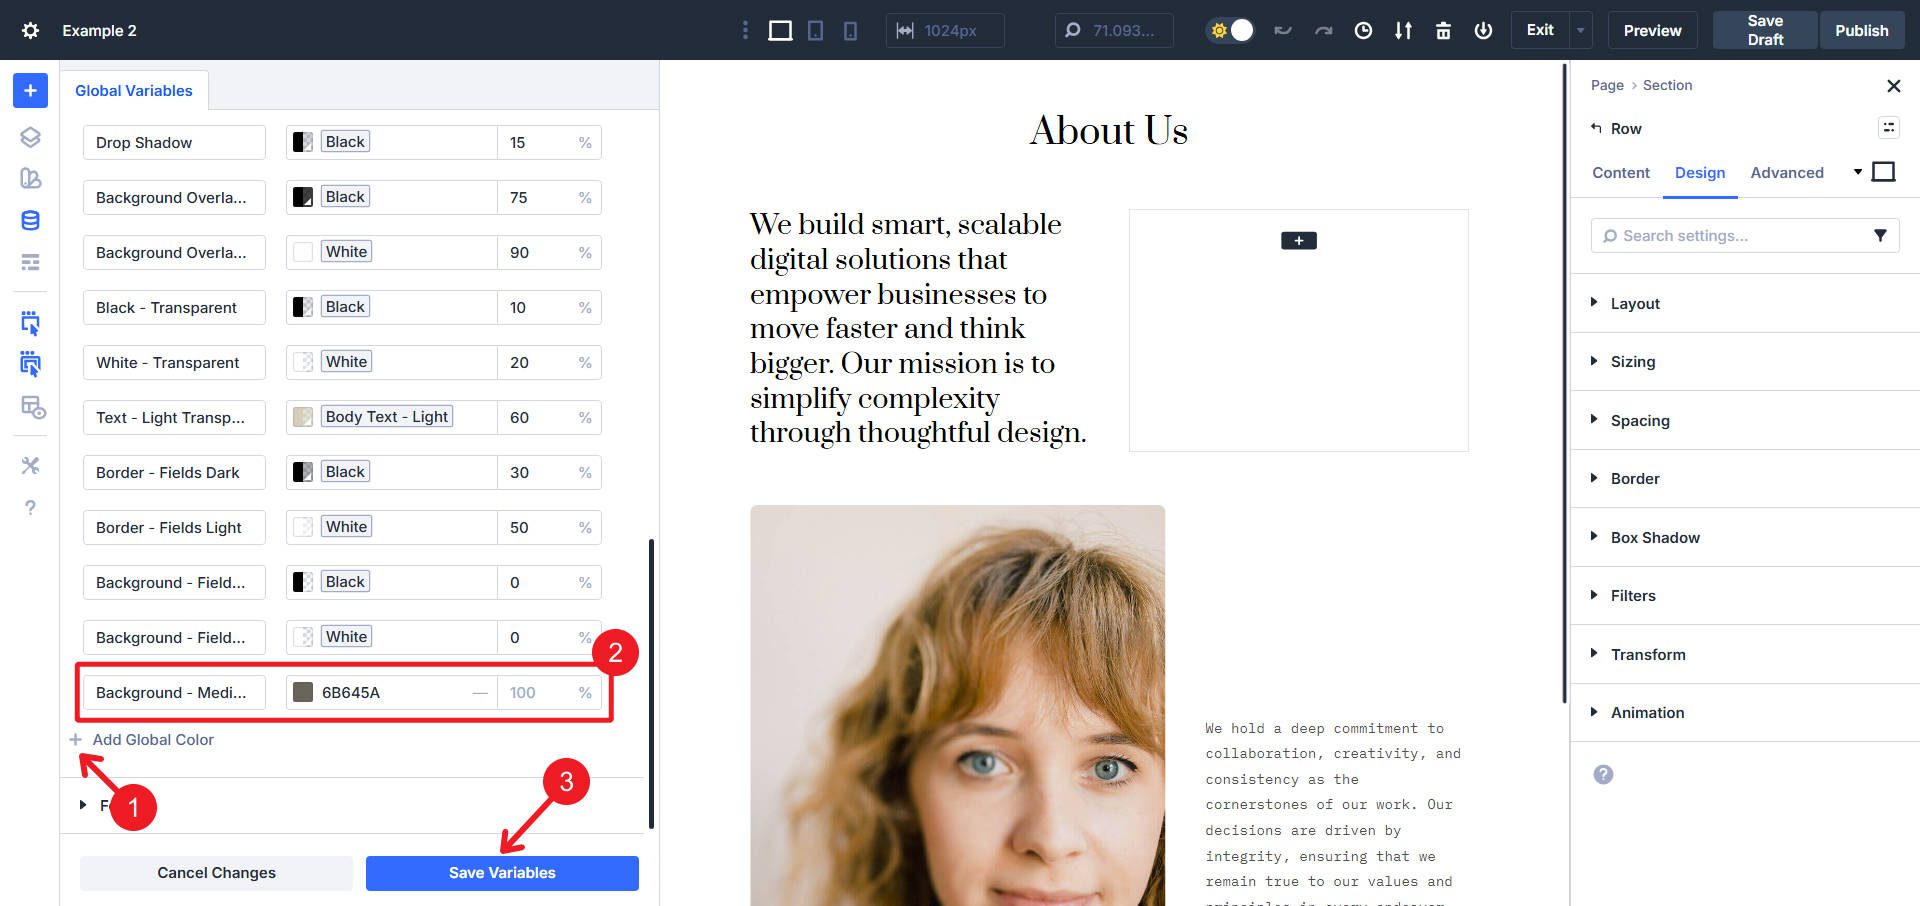
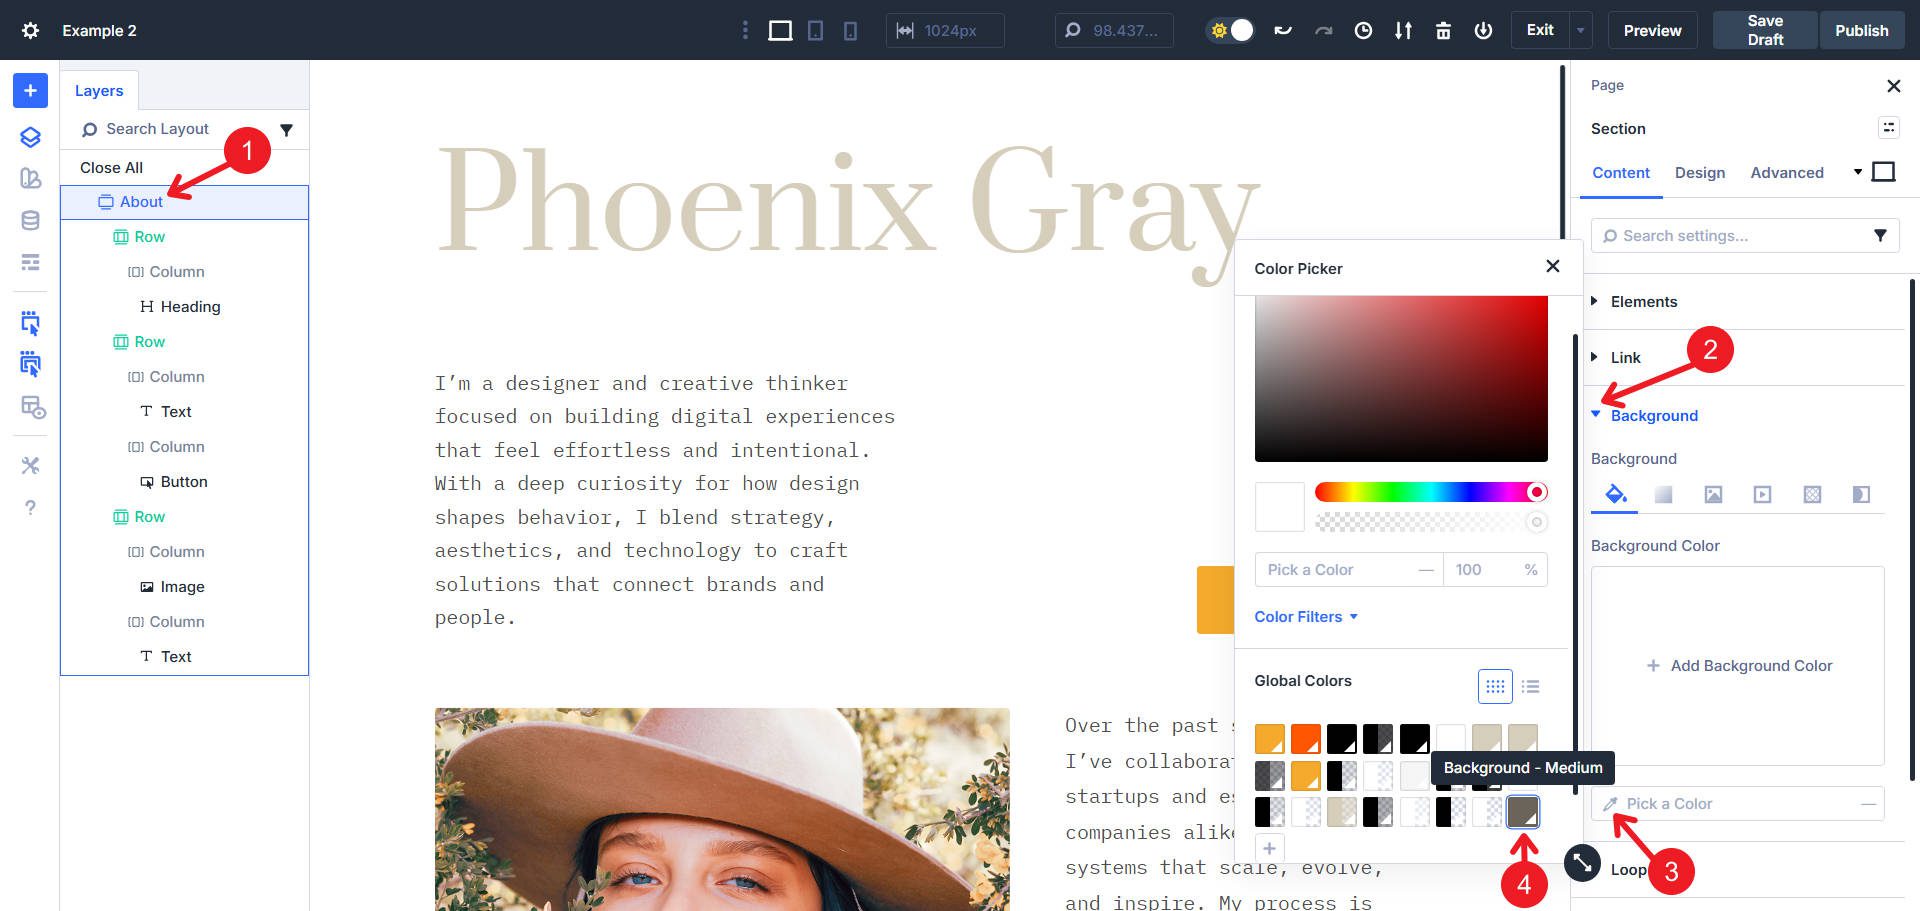
Then, Upload World Colour within the Colour Variables phase. Title it Background – Medium and set the price to #6B645A. Click on Save.
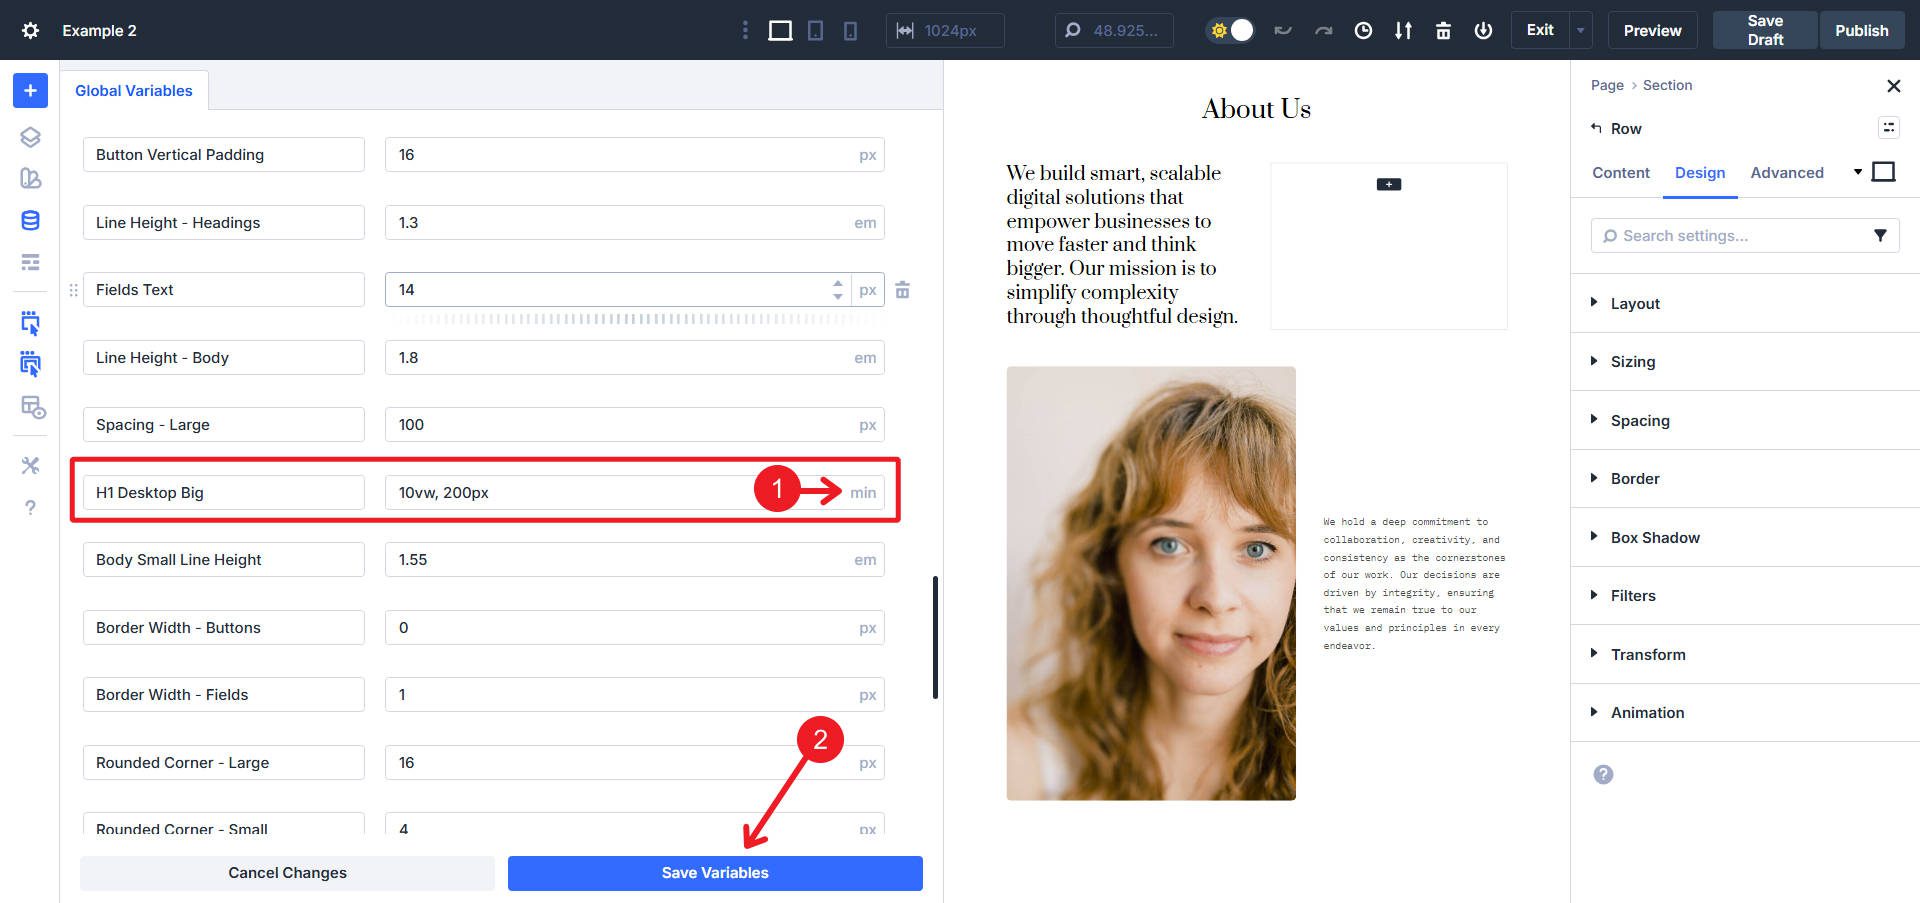
Navigate to Quantity Variables and alter H1 Desktop Large to min(10vw, 200px).
Then, trade Rounded Corners – Buttons and Rounded Corners – Common to 3px.
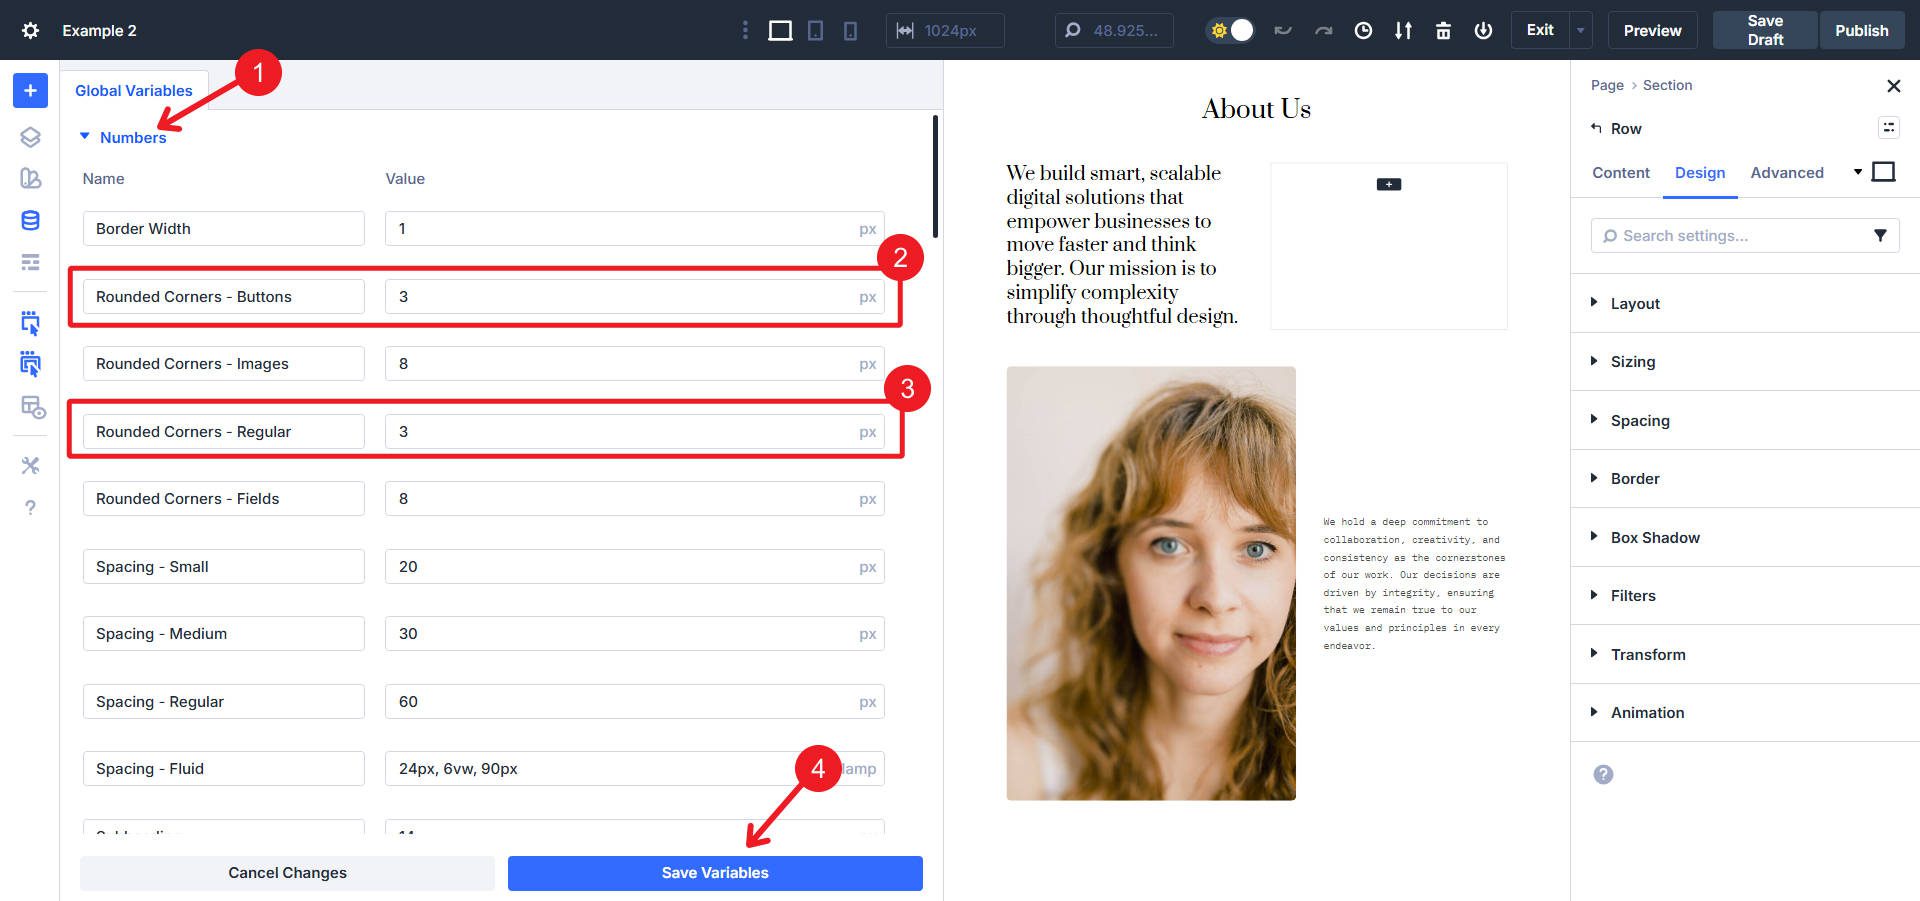
Make sure you Save Variables.
Structural and Design Adjustments
The Heading Module that claims “We construct good…” must be swapped with a Textual content Module. Upload a Textual content Module below it and delete the Heading Module. If you are at that, additionally trade the textual content with the brand new non-public emblem messaging throughout all Heading and Textual content Modules.
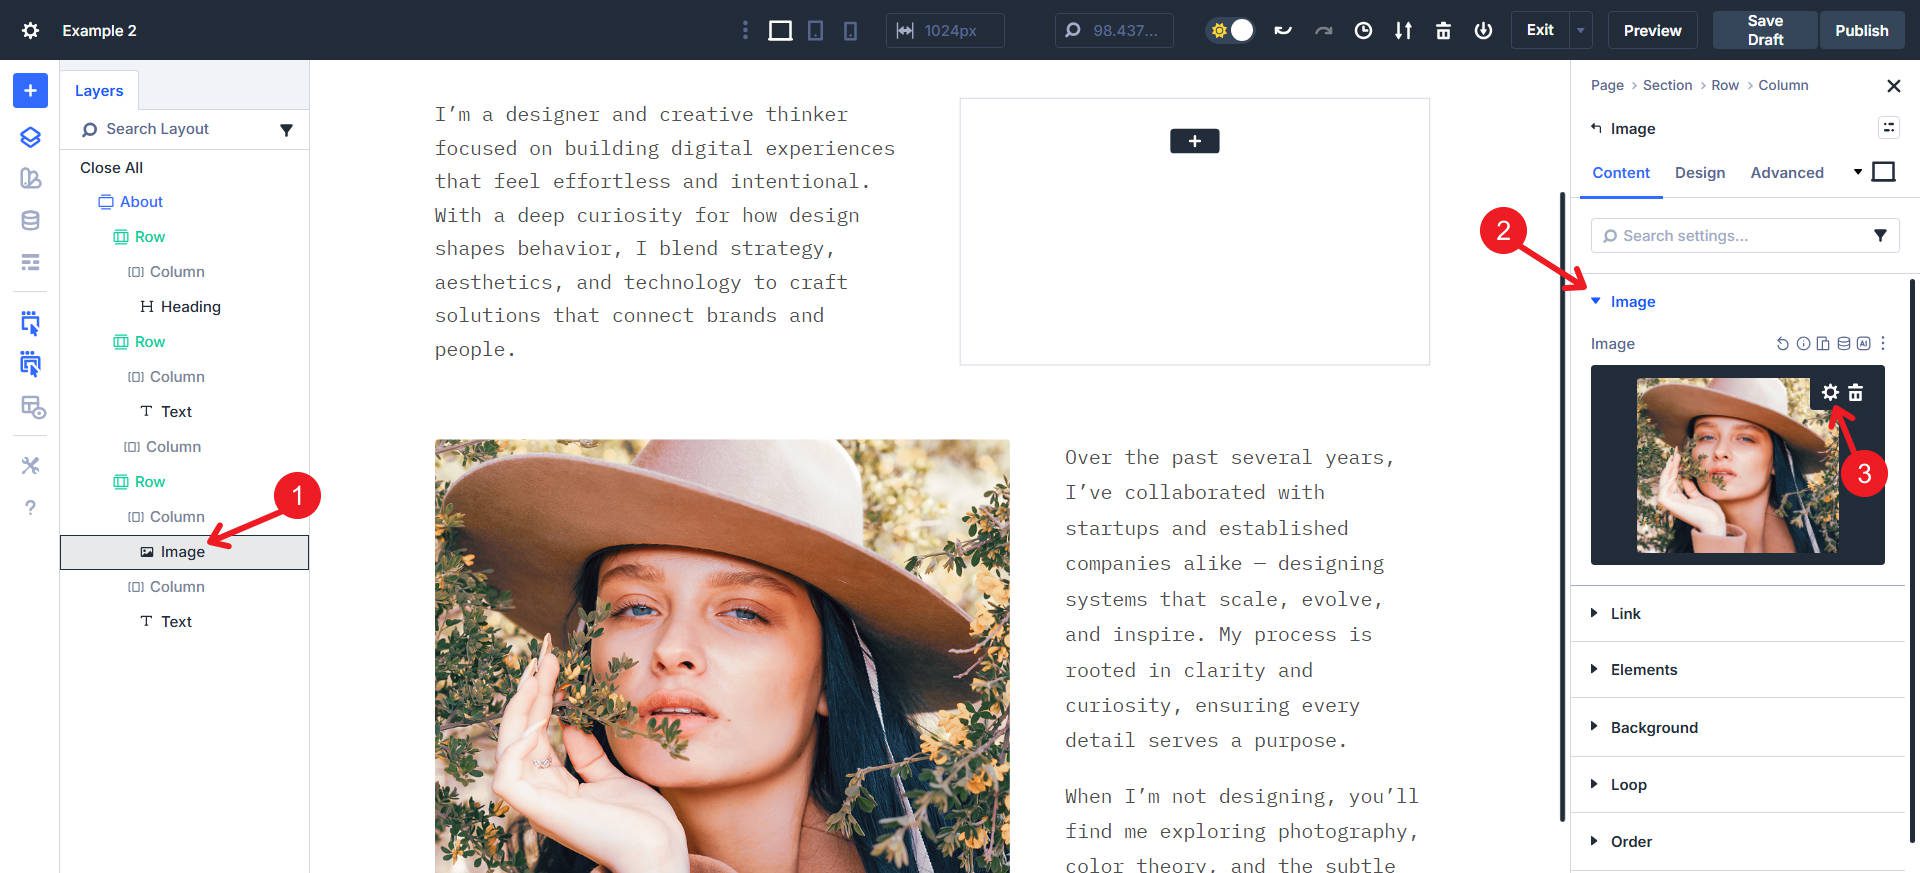
For the Symbol Module, change the picture with a distinct one that fits the colour scheme. A sq. symbol works smartly right here (or a panorama).
Subsequent, we want to upload the lacking Button Module within the empty proper column of Interior Row two. Give it the Component Preset Stuffed – Number one. Replace the button textual content to Obtain Resume and permit Proper alignment for the button.
Click on on the second one Interior Row itself and pass into Design > Structure > Align Pieces and set it to Finish.
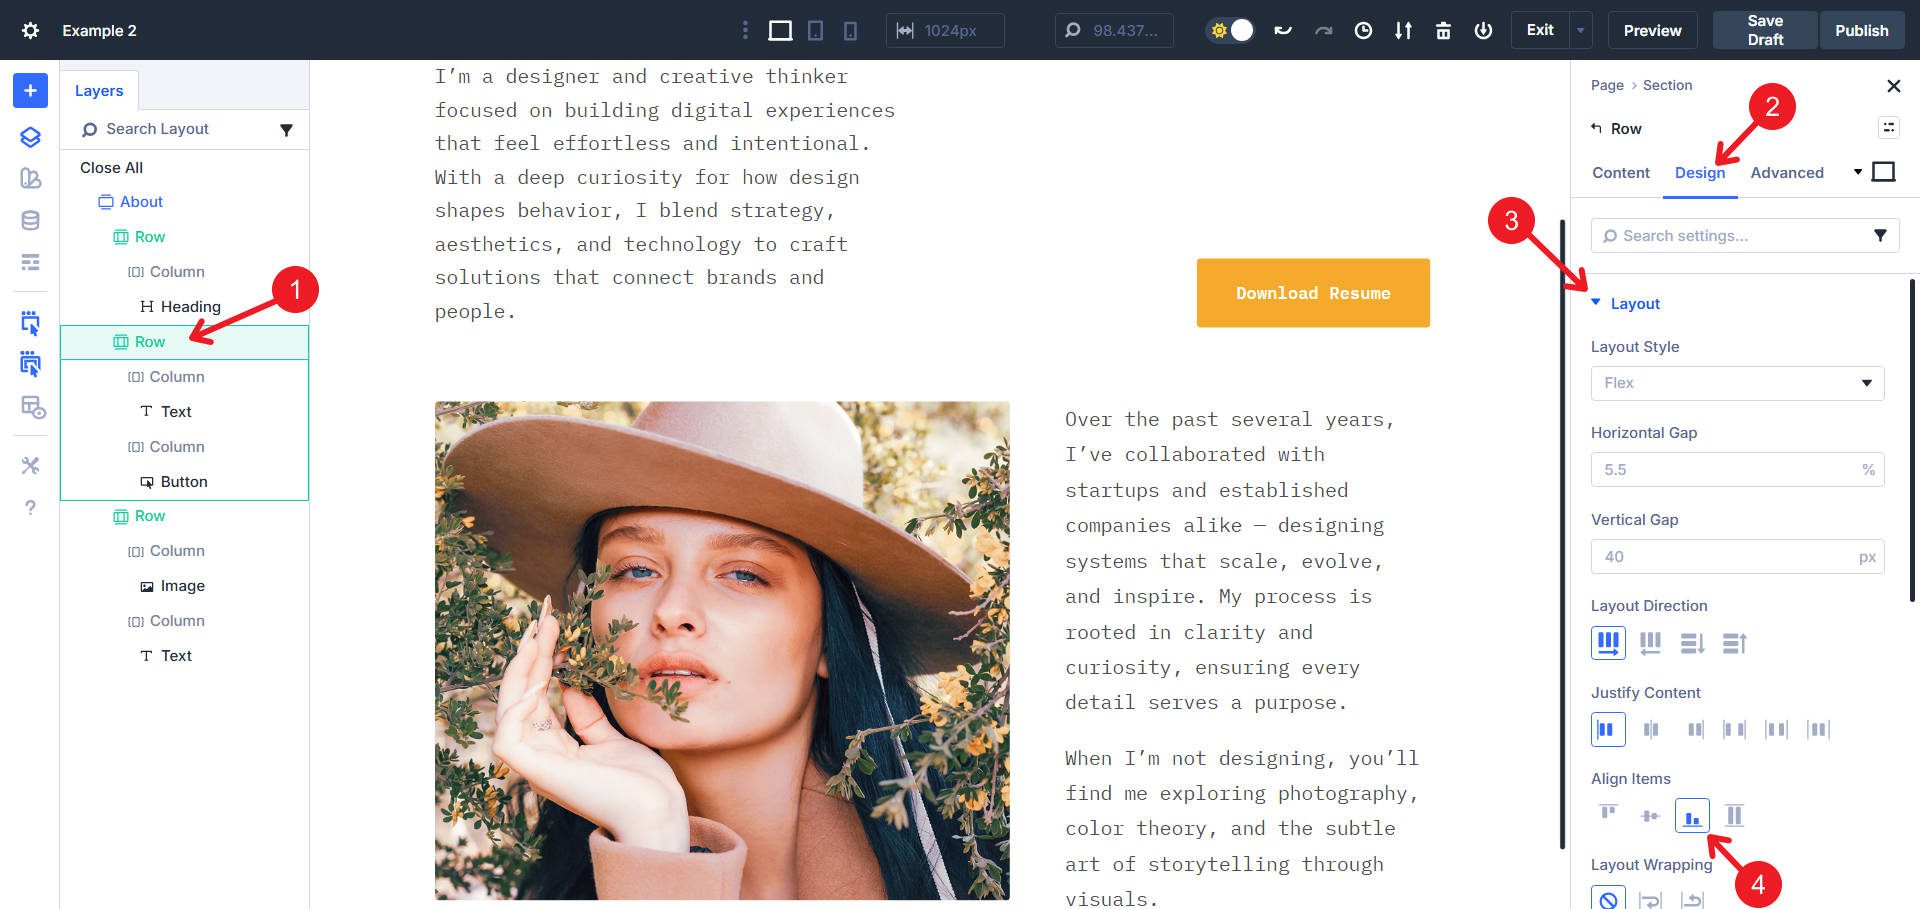
Click on at the primary heading module and set the Component Preset to Heading 1 Large and take away the Heading 2 Preset. Then, pass to Design > Heading Textual content and set the textual content alignment to ‘Left’. Finally, within the Textual content Colour box, choose Heading Textual content – Mild from the colour variable listing.
Now for some colour changes. Click on at the About phase and set its Background colour to the variable Background – Medium.
For each Textual content Modules, click on on their settings and navigate to Design > Textual content > OG Preset dropdown, then choose Mild Textual content.
Click on at the Interior Row containing the primary Textual content Module. Within the Construction Template picker, choose the 2/3 – 1/3 construction.
And that’s a wrap for this modification. You noticed how the Design Variables had been already integrated in most of the Presets, making adjustments really easy.
Tech to Healthcare Hero Segment
This change takes Hero Segment #5 from the Sections library from a daring company tech structure to a blank healthcare phase.
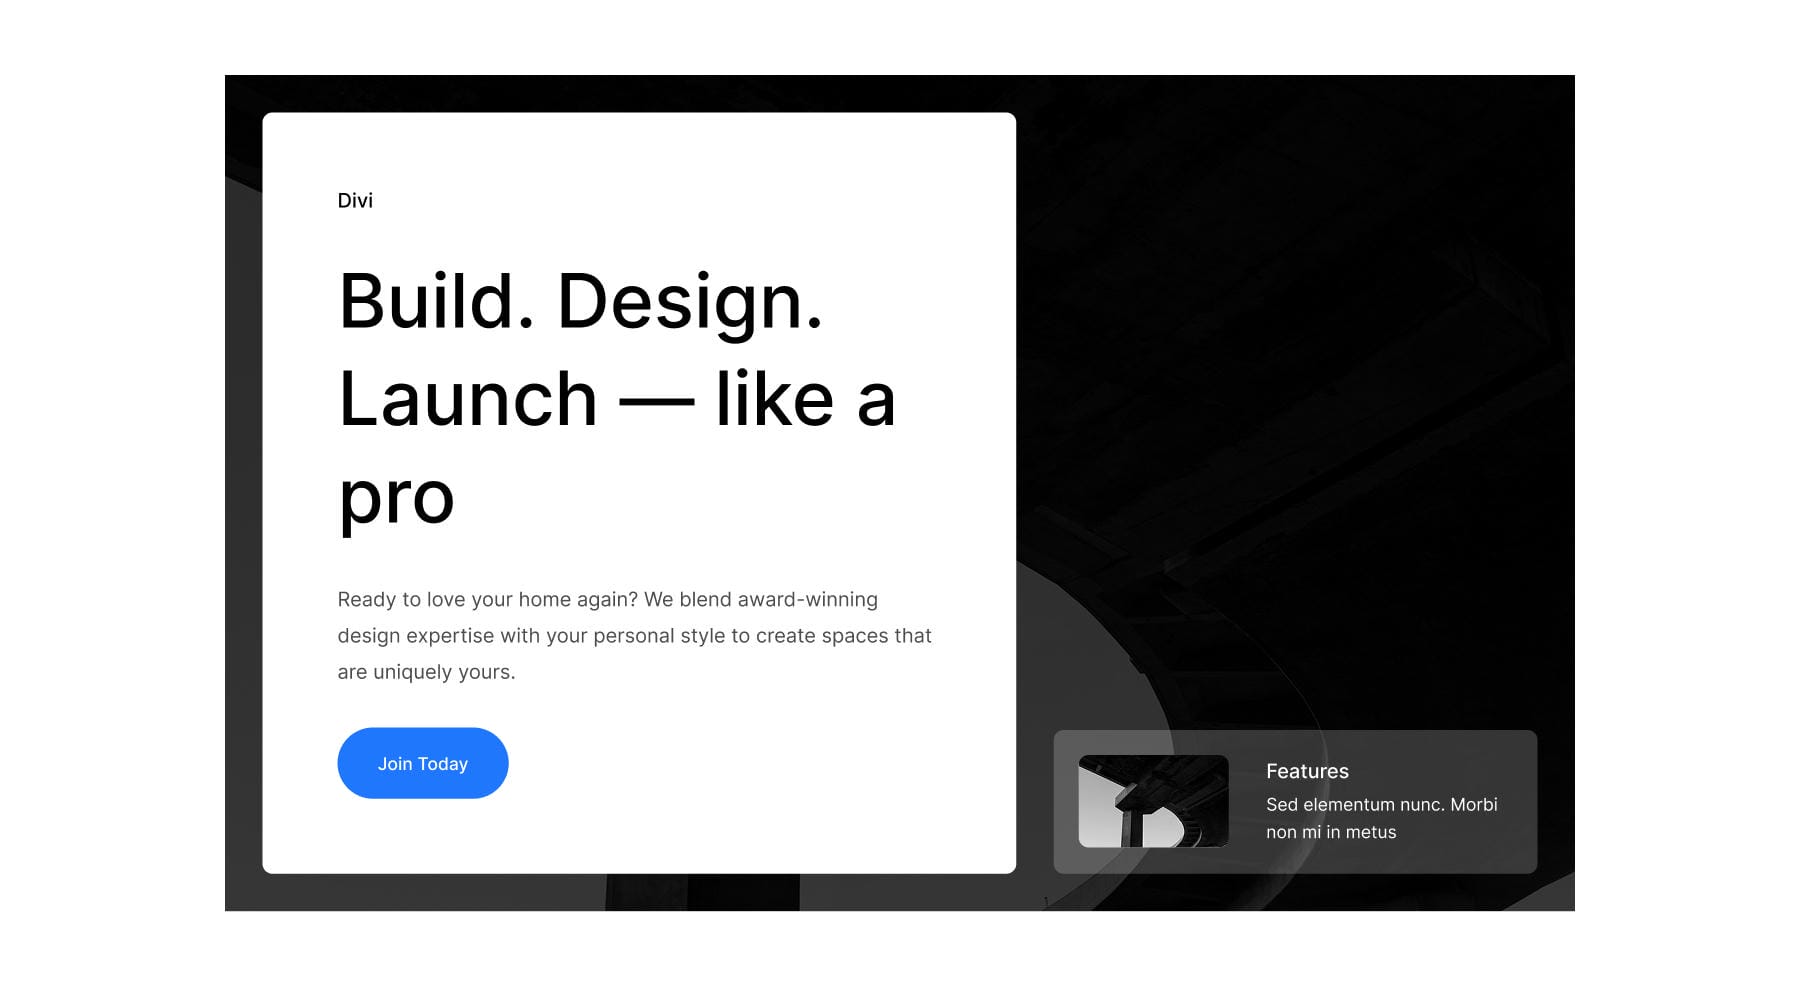
Prior to
The transformation calls for ~23 steps throughout WordPress Customizer, Design Variable Supervisor, and intensive structure restructuring. Implementation time: roughly 15-18 mins.
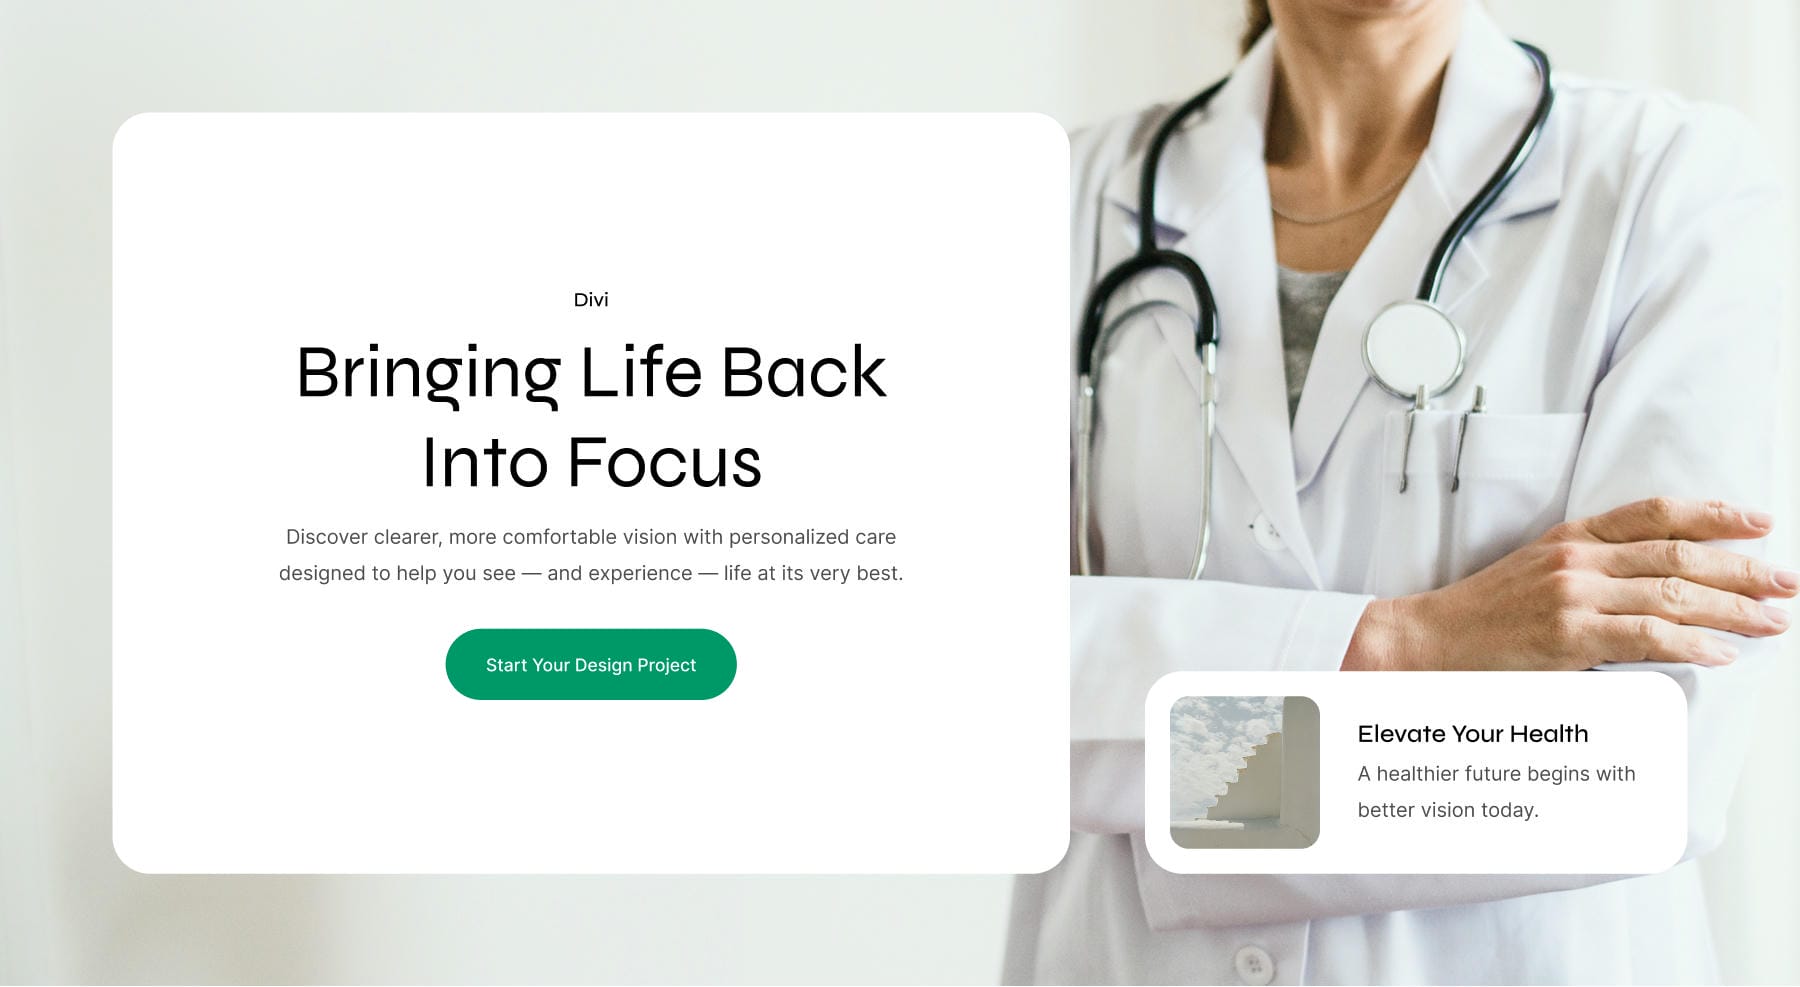
After
World Customizer Adjustments
Open the Divi Theme Customizer and navigate to Normal Settings > Typography. Trade the Heading Textual content Font to Syne.
This may be simply executed throughout the Visible Builder within the Design Variable Supervisor below Fonts
Pass to the Normal Settings > Structure Settings and alter the Number one Colour to #00986A.
This may be simply executed throughout the Visible Builder within the Design Variable Supervisor below Colours
Then, submit the Customizer adjustments.
Structural and Design Adjustments
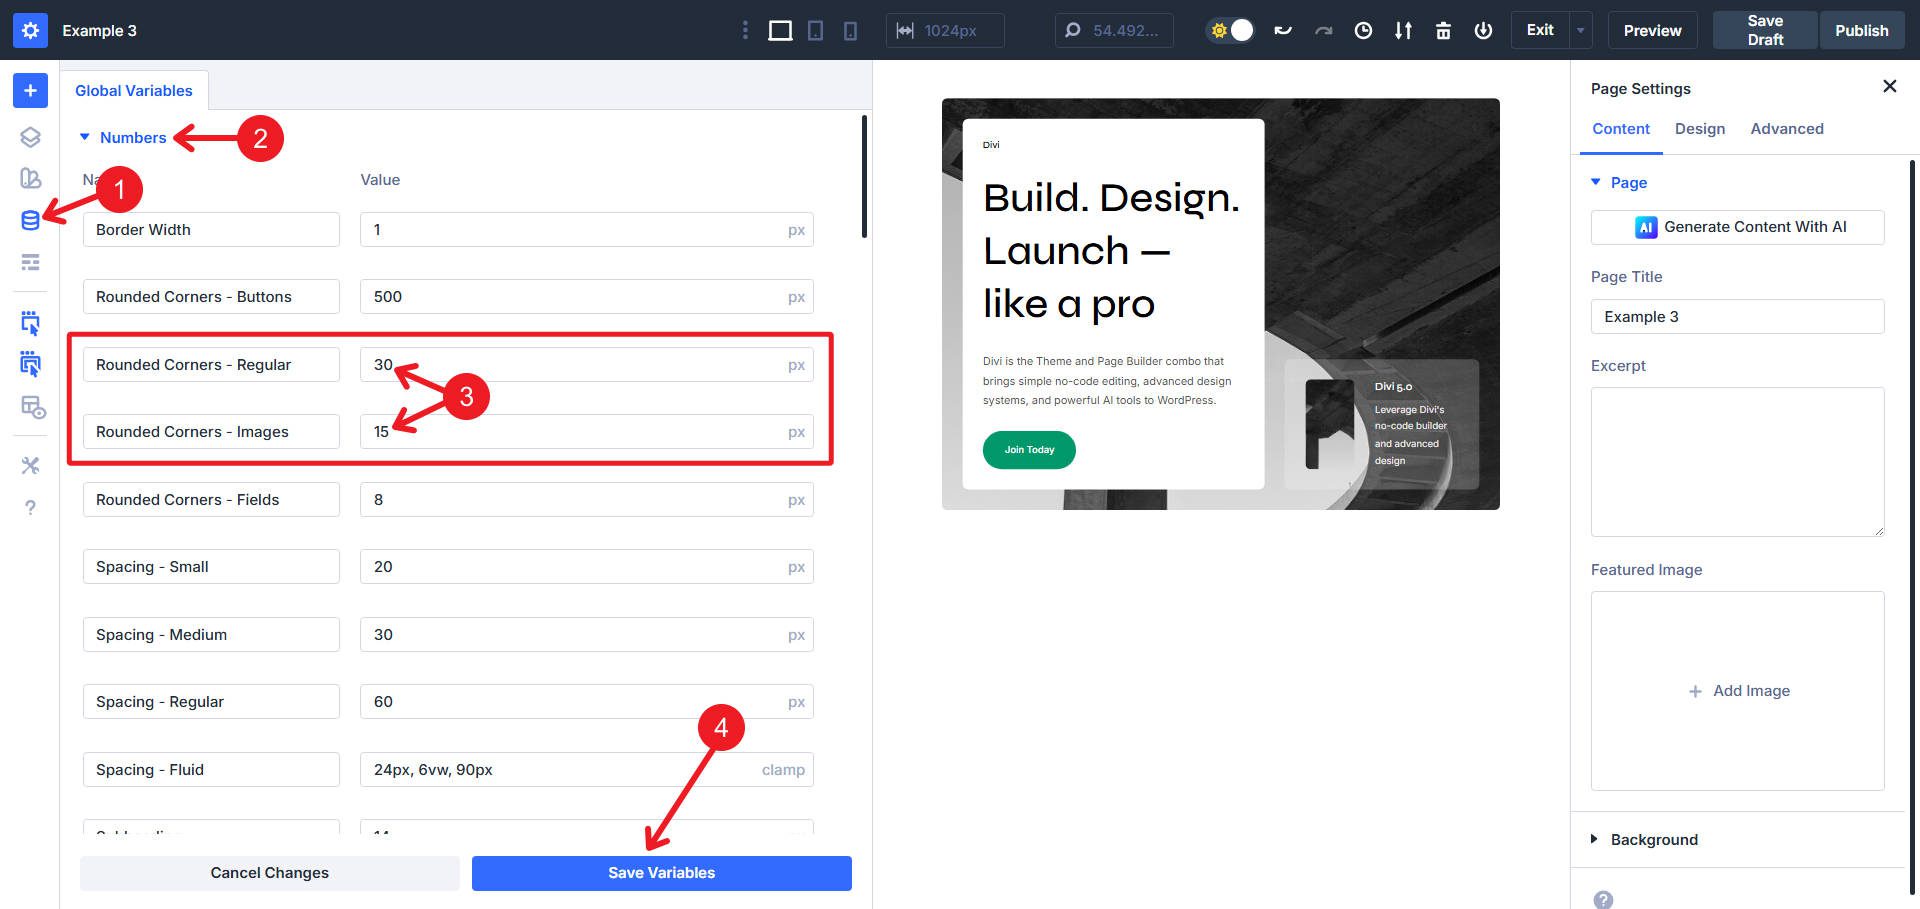
After including the structure to a brand new web page, open the Design Variable Supervisor. Navigate to Quantity Variables and find Rounded Corners – Common and alter it to 30px. Whilst there, trade Rounded Corners – Photographs to 15px.
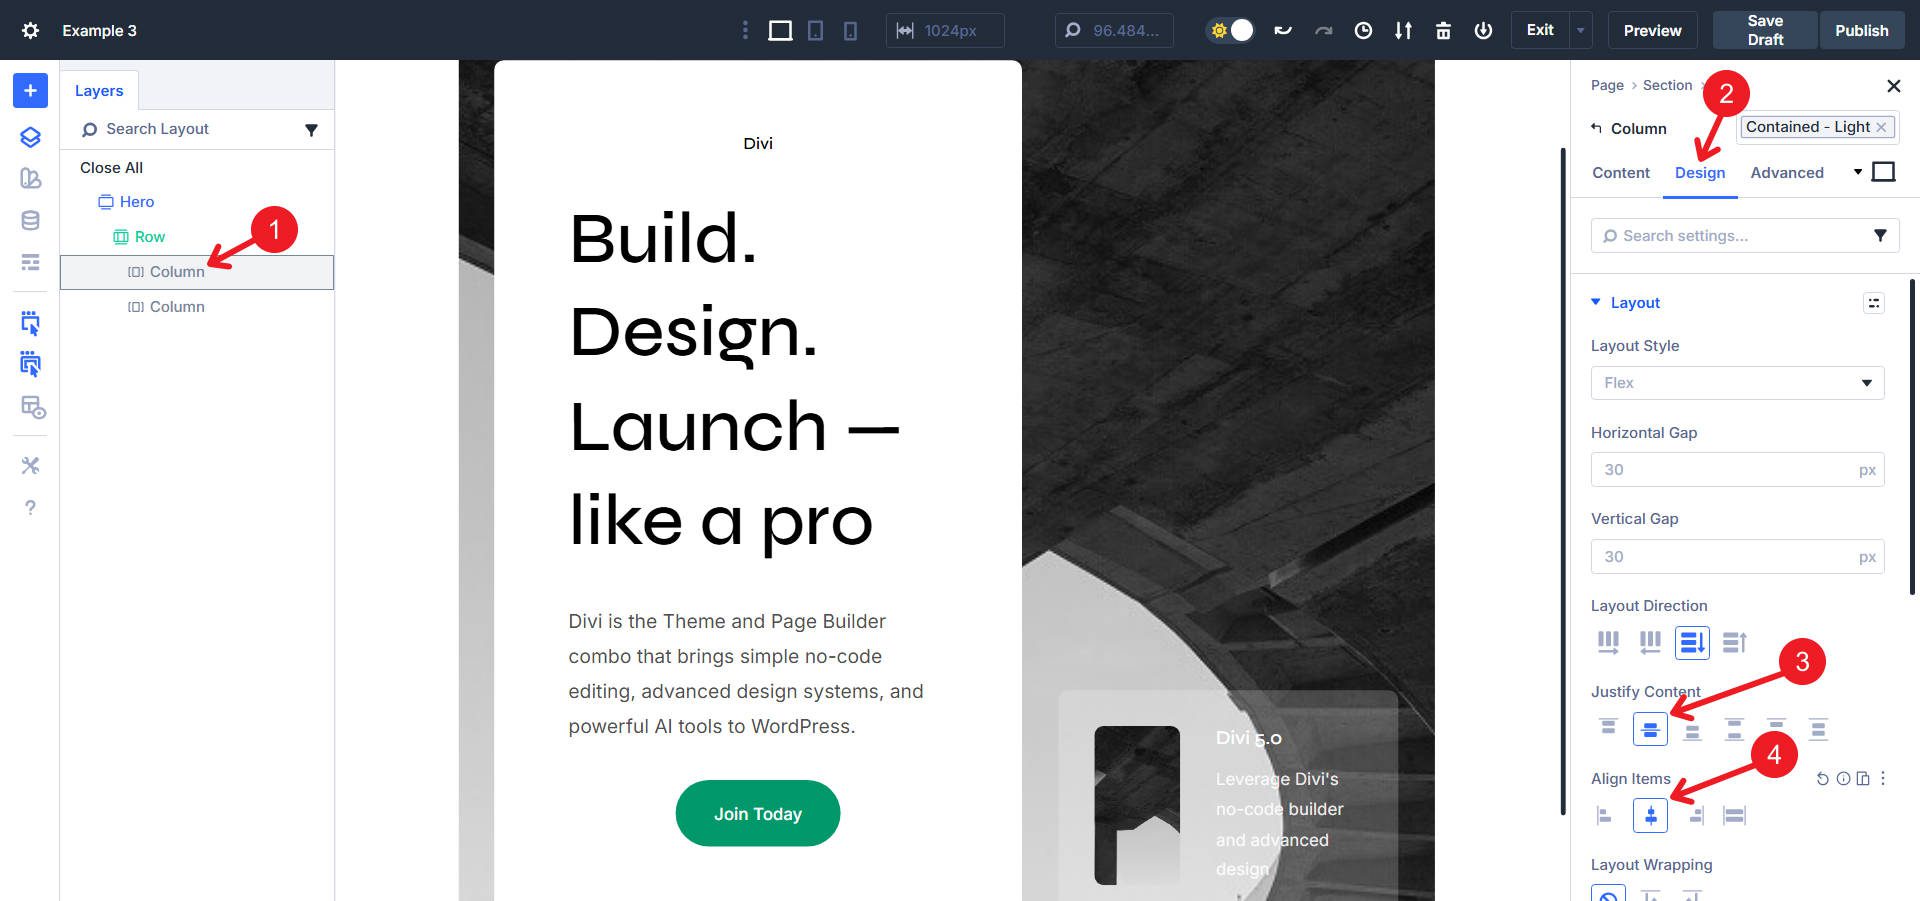
Click on at the left column. In Design > Spacing, trade the preset from “Padding – Medium” to “Padding – Fluid“.
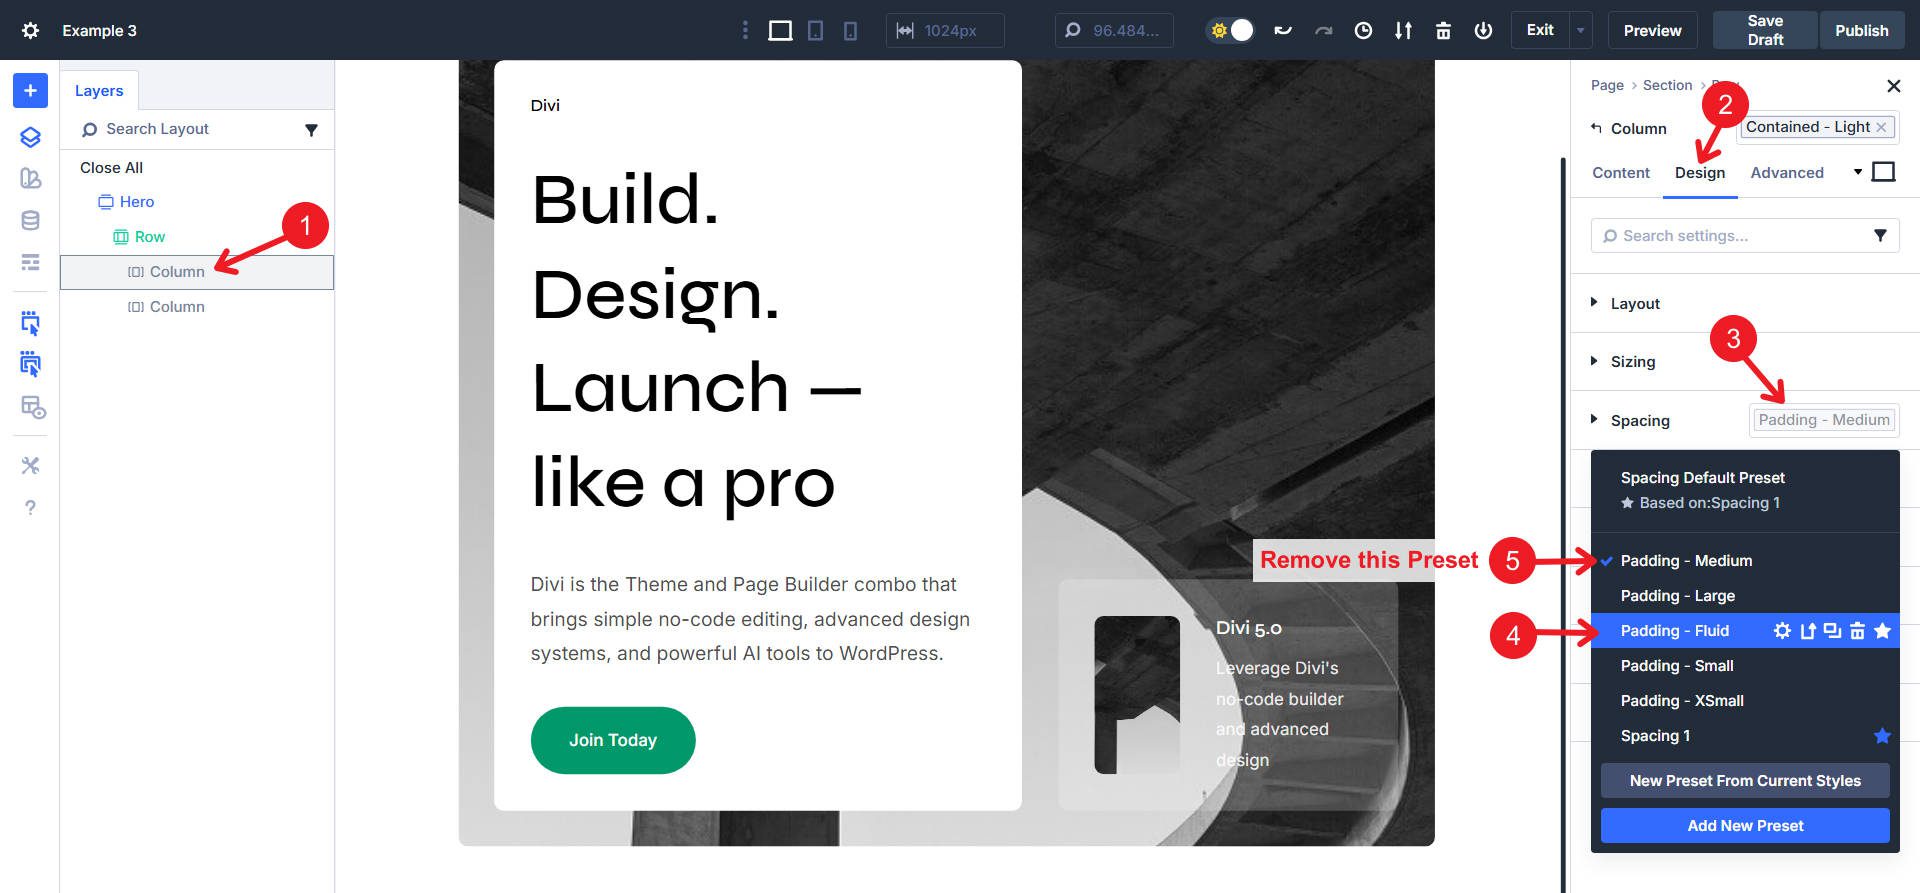
You could want to make this variation throughout the ‘Contained – Mild’ Component Preset (take into account that you’ll now nest unique presets in detail presets).
In Design > Structure, set “Justify Content material” to Heart and “Align Pieces” to Heart.
Click on the Upload New Module icon within the left column, choose the Staff Module, and drag all present parts into this new Staff. Within the Staff’s Structure choices, set Align Pieces to Heart. Whilst within the Staff settings, pass to Sizing and set max width to 510px
Set the Textual content Alignment to Heart for all Textual content and heading modules throughout the Staff.
Within the Proper column, we will be able to reset the Heading Textual content Choice Staff at the Heading Module and reset the Background at the Interior Row. We will be able to additionally take away the Mild Textual content Preset from the Textual content Module. This may get our background and textual content colours the place we’d like them.
Click on at the primary Row and Reset all Background kinds, and upload a brand new scientific Background Symbol.
Then, in the similar Row, take away the Contained – Mild Component Preset. In Design > Sizing, trade Width to 100% and Max Width to none. Additionally, set the Minimal Peak to 80vh and permit Develop to Fill. In Design > Spacing, upload the Fluid – Spacing Preset.
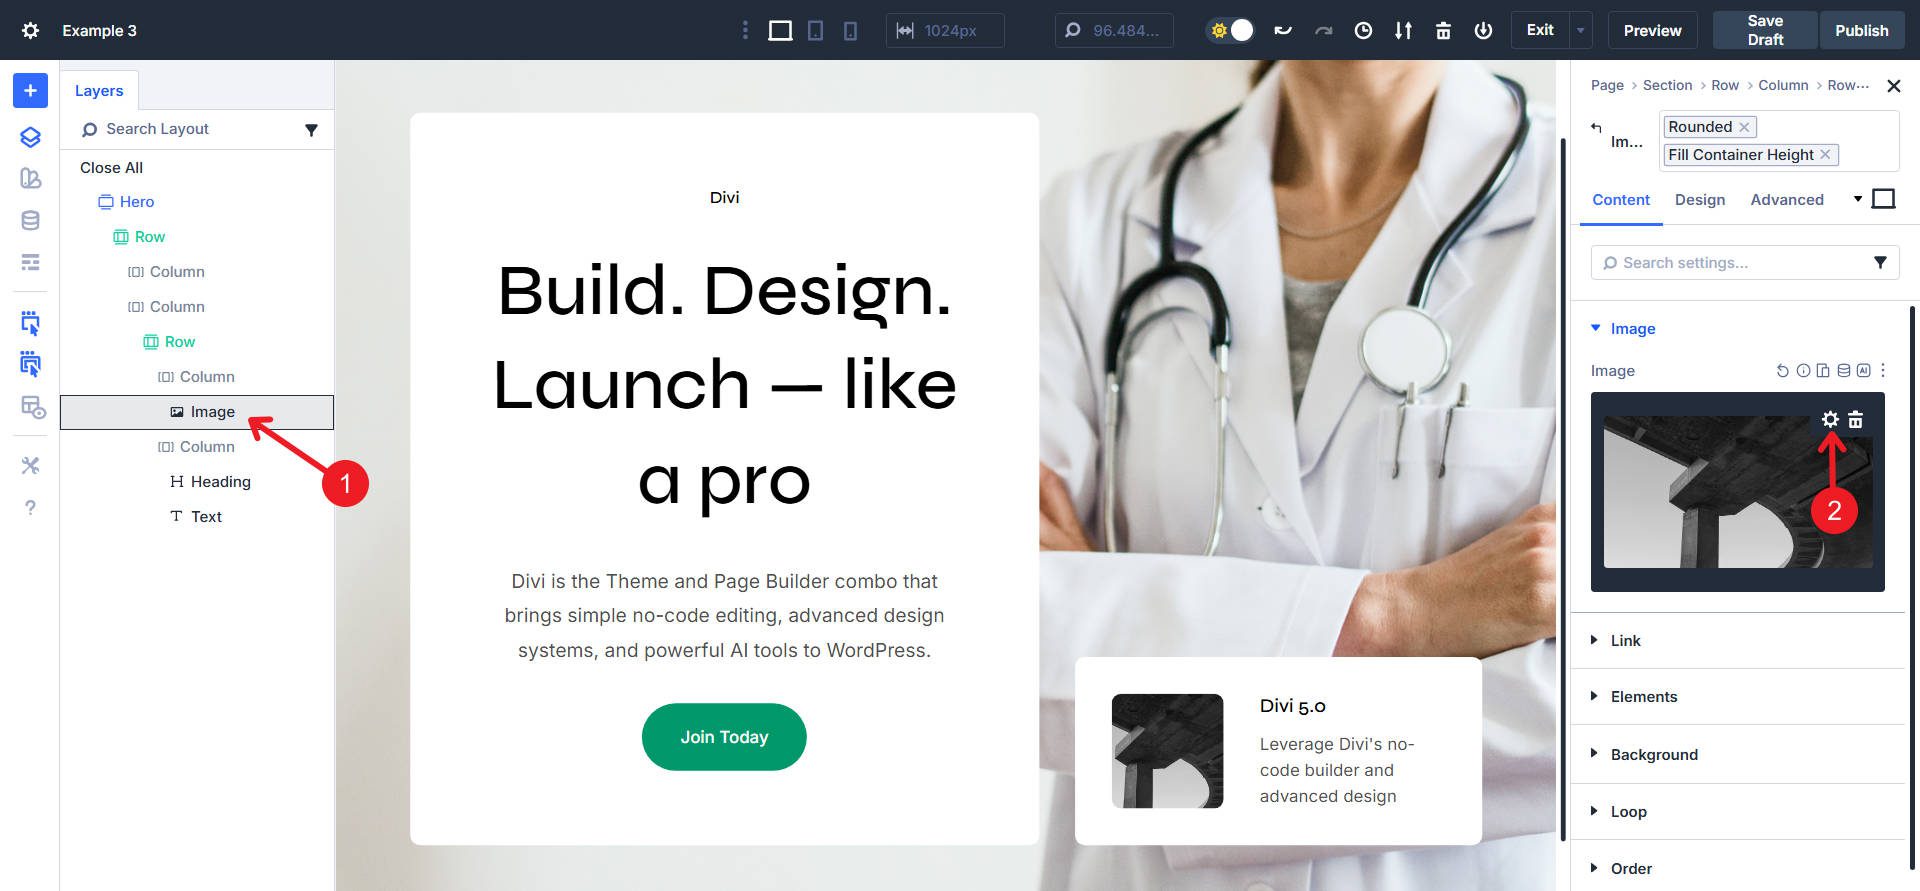
Click on at the small symbol module. Within the Content material tab, click on Change Symbol and choose the brand new healthcare thumbnail.
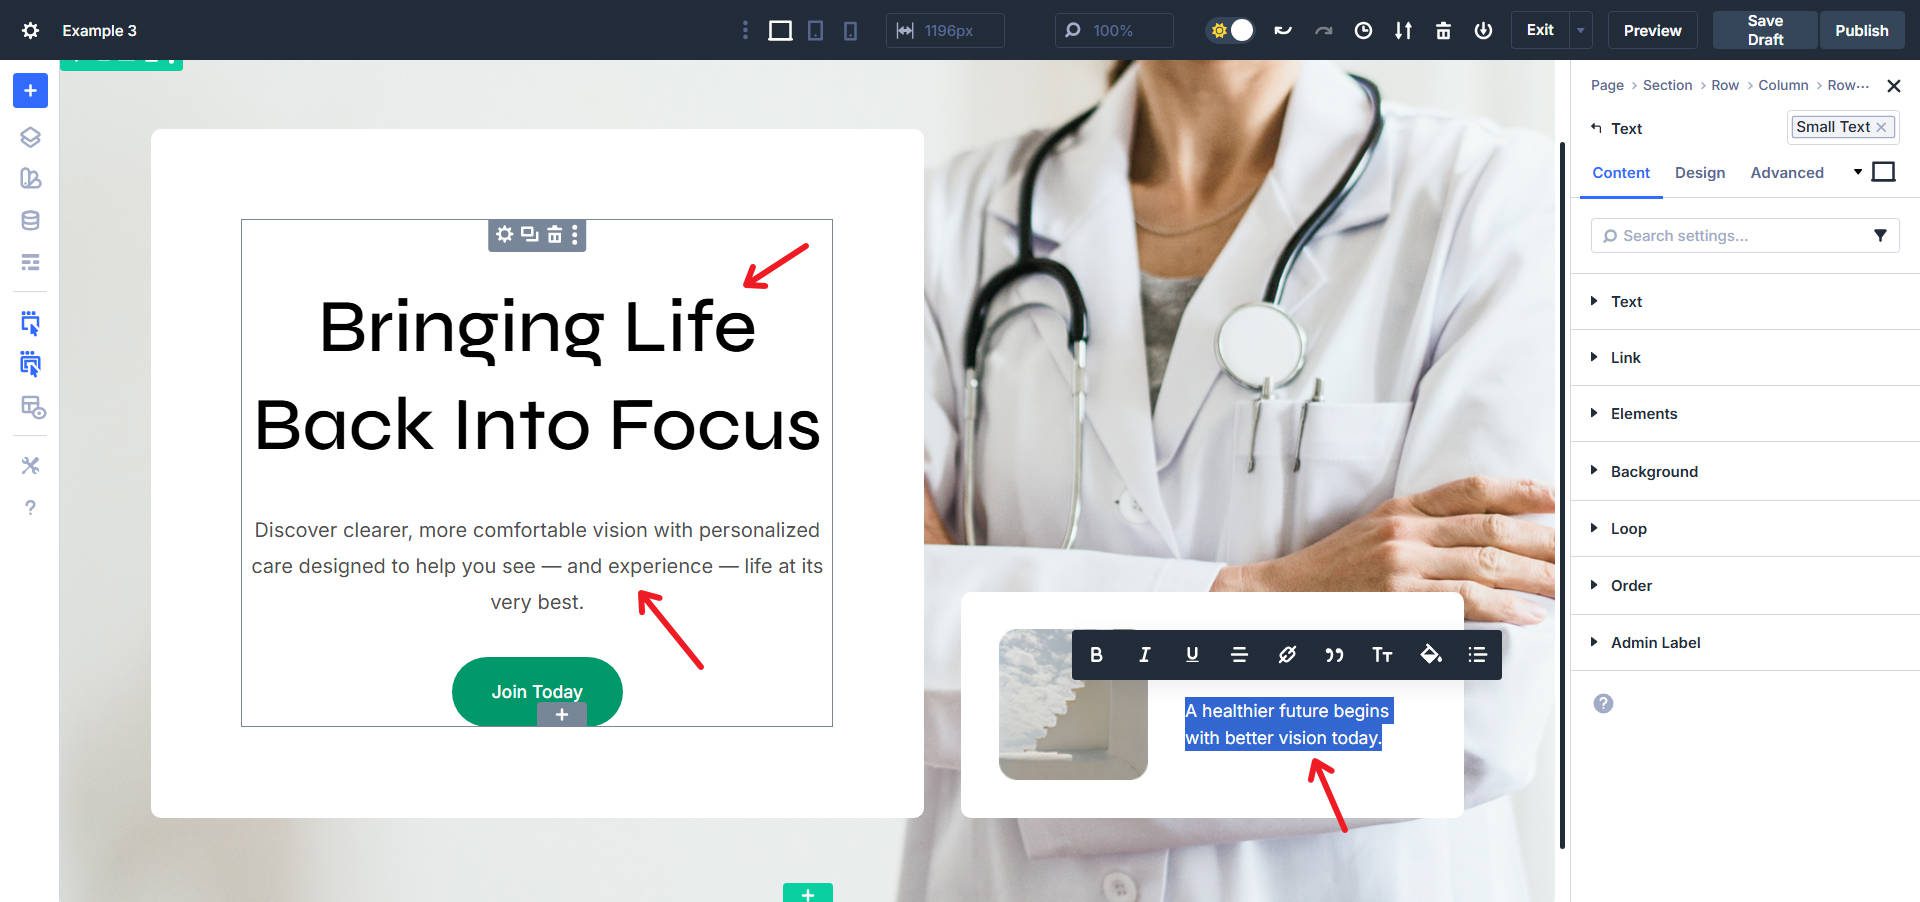
Click on on each and every textual content module. Replace the content material to replicate healthcare messaging.
And now we’re executed with this CTA Hero transformation!
Working out Design Device Potency
The transformations above proportion an ordinary order. World variables do so much for us proper at the start. They continuously made adjustments within Presets, leading to a large number of cascading updates in brief order. In some circumstances, we modified out Presets or just got rid of one, however that was once nonetheless extremely rapid. Finally, we continuously implemented adjustments to explicit boxes and parts within the Design > Structure/Sizing/Spacing tabs.
Modifying with Design Variables first, then Presets, and after all making Component-level adjustments guarantees we’re being the best (with regards to each our time and the CSS implemented to our designs). Ranging from a Design Device like this makes it simply adaptable and will provide you with so much to paintings with proper off the bat.
In case you needed to arrange most of these Design Variables and Presets and in addition construct most of these Segment Layouts, you’d have sunk dozens of hours up entrance. Then again, with the program, you get pleasure from the whole lot running in combination from the beginning.
Get The Unique Design Device Prior to It’s Long gone!
The Divi 5 Design Device gets rid of having to make a choice from velocity and high quality. Those transformations end up that complete rebranding doesn’t require complete rebuilding. When your design selections go with the flow via a unmarried supply of reality, world variables controlling presets controlling modules, you convert the whole lot through converting little or no.
The following day, this Cyber Monday be offering expires. The query isn’t whether or not the Design Device delivers potency — those examples supply that proof. The query is whether or not you’ll have get right of entry to to the program when your subsequent challenge time limit arrives. Each transformation you simply noticed, each potency acquire demonstrated right here, each hour stored turns into to be had the instant you buy any of those qualifying merchandise:
- Divi Professional (80% Off) — The whole Divi ecosystem, together with Divi 5, Divi AI, Divi Cloud, Divi VIP, Divi Groups, Divi Sprint, all DonDivi plugins, and a $50 Divi Market credit score. Available in lifetime and yearly options.
- Club Repackaging (As much as 80% Off) — Present individuals can upgrade to Divi Pro to cut back subscription prices whilst taking advantage of merchandise like Divi AI, Cloud, Groups, VIP Make stronger, DonDivi plugins, and a $50 market credit score.
- Divi AI (70% Off) — AI-powered design, writing, and coding without delay in Divi. Generates layouts, content, and images instantly.
- Divi Cloud (44% Off) — Cloud-sync your whole Divi Library throughout all websites (together with this Design Device!). Save and reuse layouts anywhere for faster client delivery.
- Divi Groups (44% Off) — Workforce collaboration with shared get right of entry to, roles, and permissions. Built for agencies managing multiple clients.
- Divi VIP (44% Off) — Precedence give a boost to with 30-minute reaction instances, 24/7 availability, and 10% off all Marketplace products.
- Market Bundles (70% Off) — Curated collections of Divi modules, kid subject matters, advertising gear, ecommerce options, and weblog upgrades. Five Cyber Monday-only bundles, all Divi 5-ready.
After finishing a qualifying acquire, obtain the Design Device throughout the Perks section on your Chic Topics Participants’ House.
The Design Device library contains loads of pre-built sections, all designed to paintings with this similar variable-driven method. Your subsequent web page rebrand takes hours, no longer days. However provided that you act ahead of middle of the night the next day to come. Get Divi Pro now whilst this be offering nonetheless stands.
The publish 3 Real-World Examples: Rebranding The Divi 5 Design System With Global Variables seemed first on Elegant Themes Blog.
Contents
- 1 Actual-International Rebranding Examples
- 2 Working out Design Device Potency
- 3 Get The Unique Design Device Prior to It’s Long gone!
- 4 9 Sponsorship E mail Examples I Love (For Your Inspiration)
- 5 12 Top-Changing Touchdown Web page Examples That In fact Paintings
- 6 How To Deploy a Hugo Website to Kinsta for Unfastened With Static Website Web hosting

0 Comments