

Designing a WooCommerce Checkout Web page in most cases comes to complex customization to the PHP template record within the backend and a just right little bit of customized CSS. However with Divi’s Woo Modules, this procedure has turn into simple and stress-free! While you edit of a bathroom Checkout Web page the use of Divi, that WC shortcode will change into right into a structured format of dynamic Woo Checkout Modules which can be in a position to be designed visually the use of robust integrated design choices. This provides you with complete regulate over the design of the checkout web page.
On this educational, we can be appearing you the way to create a fully customized WooCommerce Checkout Web page from scratch with Divi. First, we’ll design the WooCommerce Checkout Web page the use of the dynamic Woo Modules to be had for the checkout web page. As soon as accomplished, we’ll display you the way to upload the checkout web page design to a checkout web page template within the Theme Builder. So, whether or not you wish to have to customise the true Checkout Web page or create a Checkout Web page Template, Divi has you coated. You’ll be to your technique to designing surprising checkout pages very quickly.
Let’s get began!
Sneak Peek
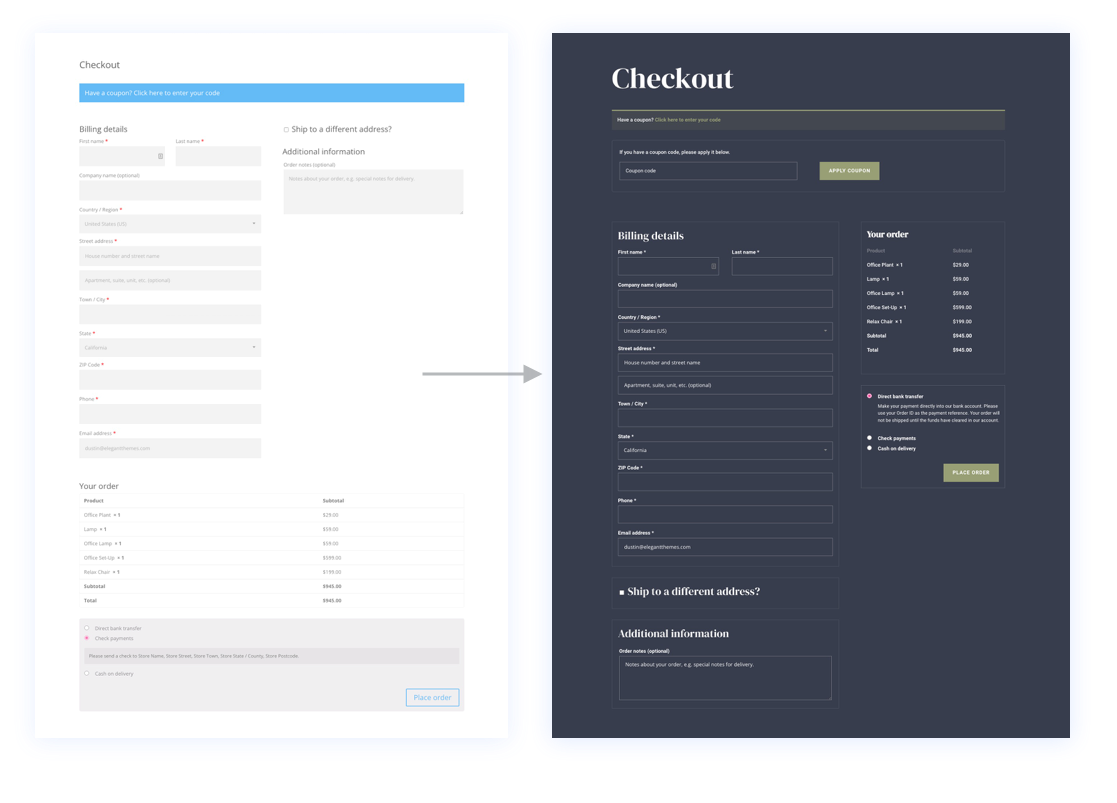
The Prior to and After
Here’s a fast take a look at Divi’s default Checkout web page in comparison to the brand new Checkout web page we’ll design on this educational.
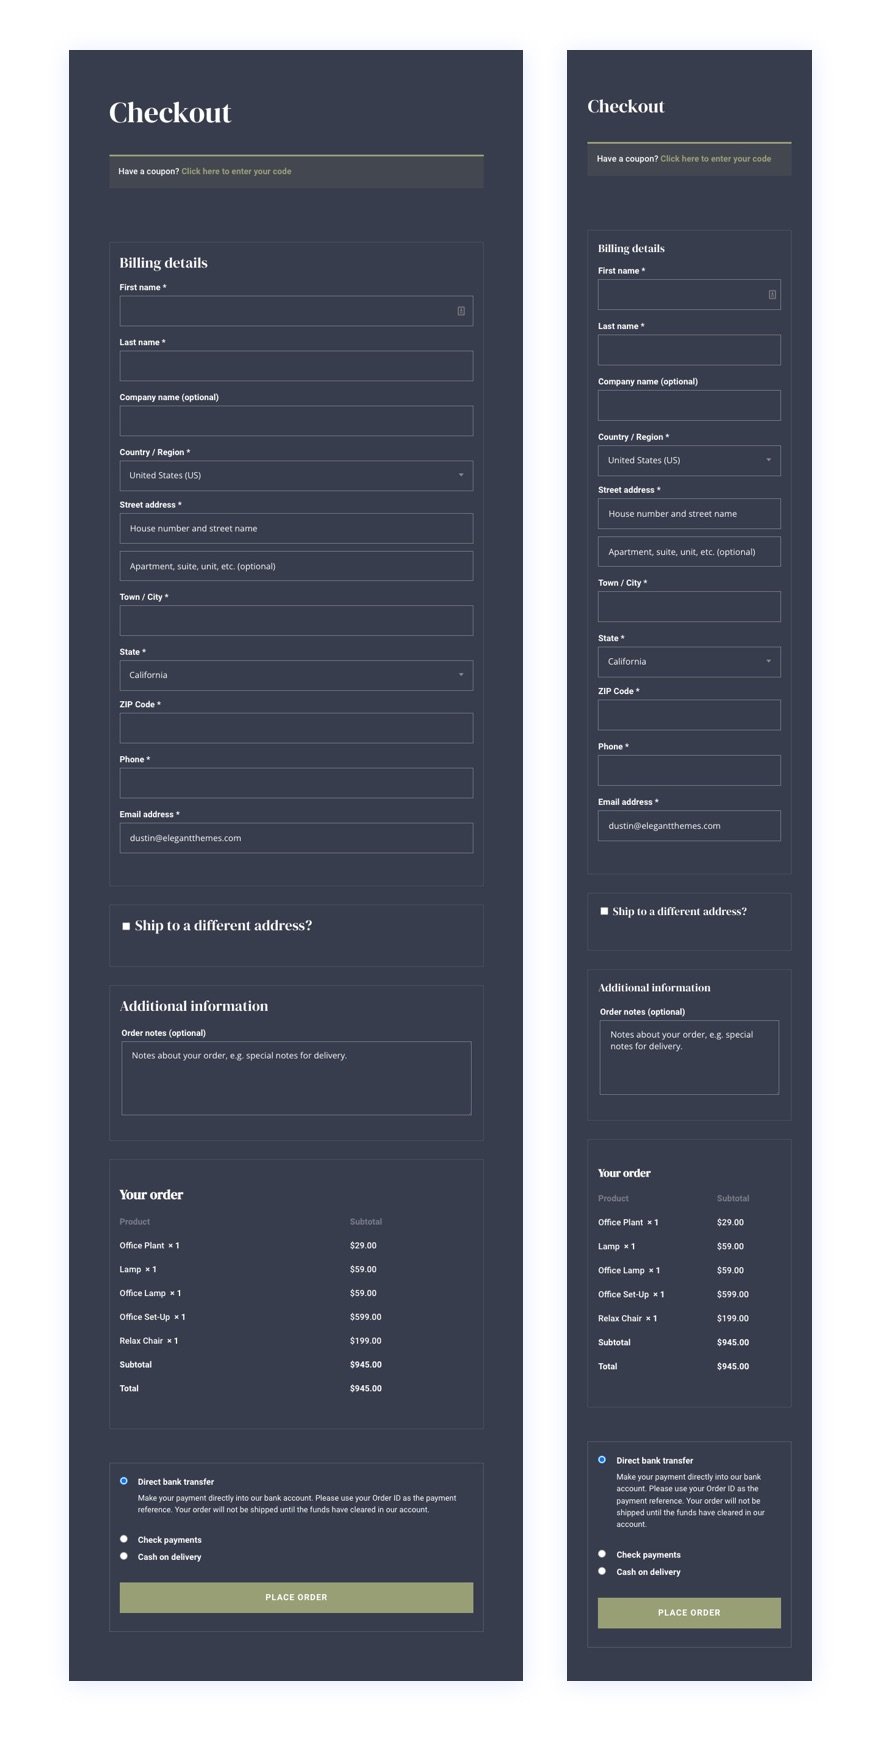
And here’s a nearer take a look at the Checkout web page design on desktop and cell.

You’ll additionally take a look at the live demo of this checkout web page design.
Obtain the Checkout Web page Structure for FREE
To put your arms at the Checkout web page template design from this educational, you are going to first want to obtain it the use of the button under. To realize get admission to to the obtain it is important to subscribe to our Divi Day by day electronic mail listing by way of the use of the shape under. As a brand new subscriber, you are going to obtain much more Divi goodness and a loose Divi Structure pack each Monday! For those who’re already at the listing, merely input your electronic mail cope with under and click on obtain. You’re going to now not be “resubscribed” or obtain additional emails.
@media best display and ( max-width: 767px ) {.et_bloom .et_bloom_optin_1 .carrot_edge.et_bloom_form_right .et_bloom_form_content:sooner than { border-top-color: #ffffff !necessary; border-left-color: clear !necessary; }.et_bloom .et_bloom_optin_1 .carrot_edge.et_bloom_form_left .et_bloom_form_content:after { border-bottom-color: #ffffff !necessary; border-left-color: clear !necessary; }
}.et_bloom .et_bloom_optin_1 .et_bloom_form_content button { background-color: #f92c8b !necessary; } .et_bloom .et_bloom_optin_1 .et_bloom_form_content .et_bloom_fields i { colour: #f92c8b !necessary; } .et_bloom .et_bloom_optin_1 .et_bloom_form_content .et_bloom_custom_field_radio i:sooner than { background: #f92c8b !necessary; } .et_bloom .et_bloom_optin_1 .et_bloom_border_solid { border-color: #f7f9fb !necessary } .et_bloom .et_bloom_optin_1 .et_bloom_form_content button { background-color: #f92c8b !necessary; } .et_bloom .et_bloom_optin_1 .et_bloom_form_container h2, .et_bloom .et_bloom_optin_1 .et_bloom_form_container h2 span, .et_bloom .et_bloom_optin_1 .et_bloom_form_container h2 robust { font-family: “Open Sans”, Helvetica, Arial, Lucida, sans-serif; }.et_bloom .et_bloom_optin_1 .et_bloom_form_container p, .et_bloom .et_bloom_optin_1 .et_bloom_form_container p span, .et_bloom .et_bloom_optin_1 .et_bloom_form_container p robust, .et_bloom .et_bloom_optin_1 .et_bloom_form_container shape enter, .et_bloom .et_bloom_optin_1 .et_bloom_form_container shape button span { font-family: “Open Sans”, Helvetica, Arial, Lucida, sans-serif; } p.et_bloom_popup_input { padding-bottom: 0 !necessary;}

Obtain For Loose
Sign up for the Divi E-newsletter and we can electronic mail you a duplicate of without equal Divi Touchdown Web page Structure Pack, plus heaps of alternative superb and loose Divi assets, guidelines and tips. Observe alongside and you are going to be a Divi grasp very quickly. In case you are already subscribed merely kind for your electronic mail cope with under and click on obtain to get admission to the format pack.
You’ve gotten effectively subscribed. Please test your electronic mail cope with to verify your subscription and get get admission to to loose weekly Divi format packs!
To import the segment format in your Divi Library, navigate to the Divi Library.
Click on the Import button.
Within the portability popup, choose the import tab and make a choice the obtain record out of your laptop.
Then click on the import button.
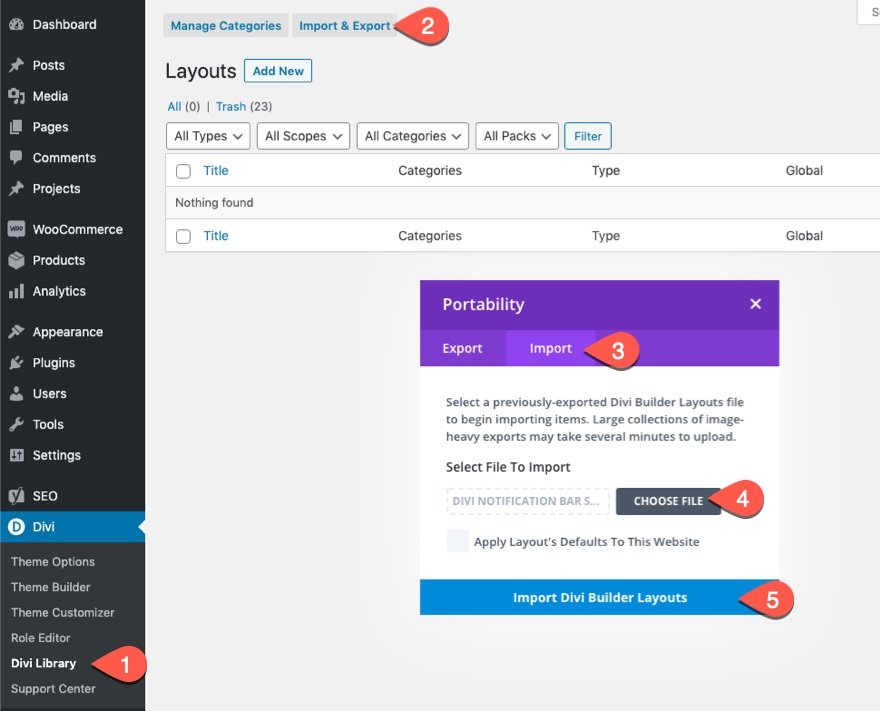
As soon as accomplished, the segment format will probably be to be had within the Divi Builder.
Obtain the Cart & Checkout Web page Template Units for Divi
This Checkout Web page design could also be to be had for obtain as part of our FREE cart & checkout page template sets for Divi.
Let’s get to the educational, lets?
In regards to the WooCommerce Checkout Web page and Divi
Every time you put in WooCommerce to your Divi web page, WooCommerce (WC) will generate key WC pages together with a store web page, a cart web page, a checkout web page, and an account web page. The content material of the web page is deployed via using a shortcode at the backend WordPress block editor.
For those who turn on the Divi Builder in this Checkout web page, every of the content material parts of the WooCommerce Checkout web page will probably be loaded as Divi Woo Modules that can be utilized to taste the web page.
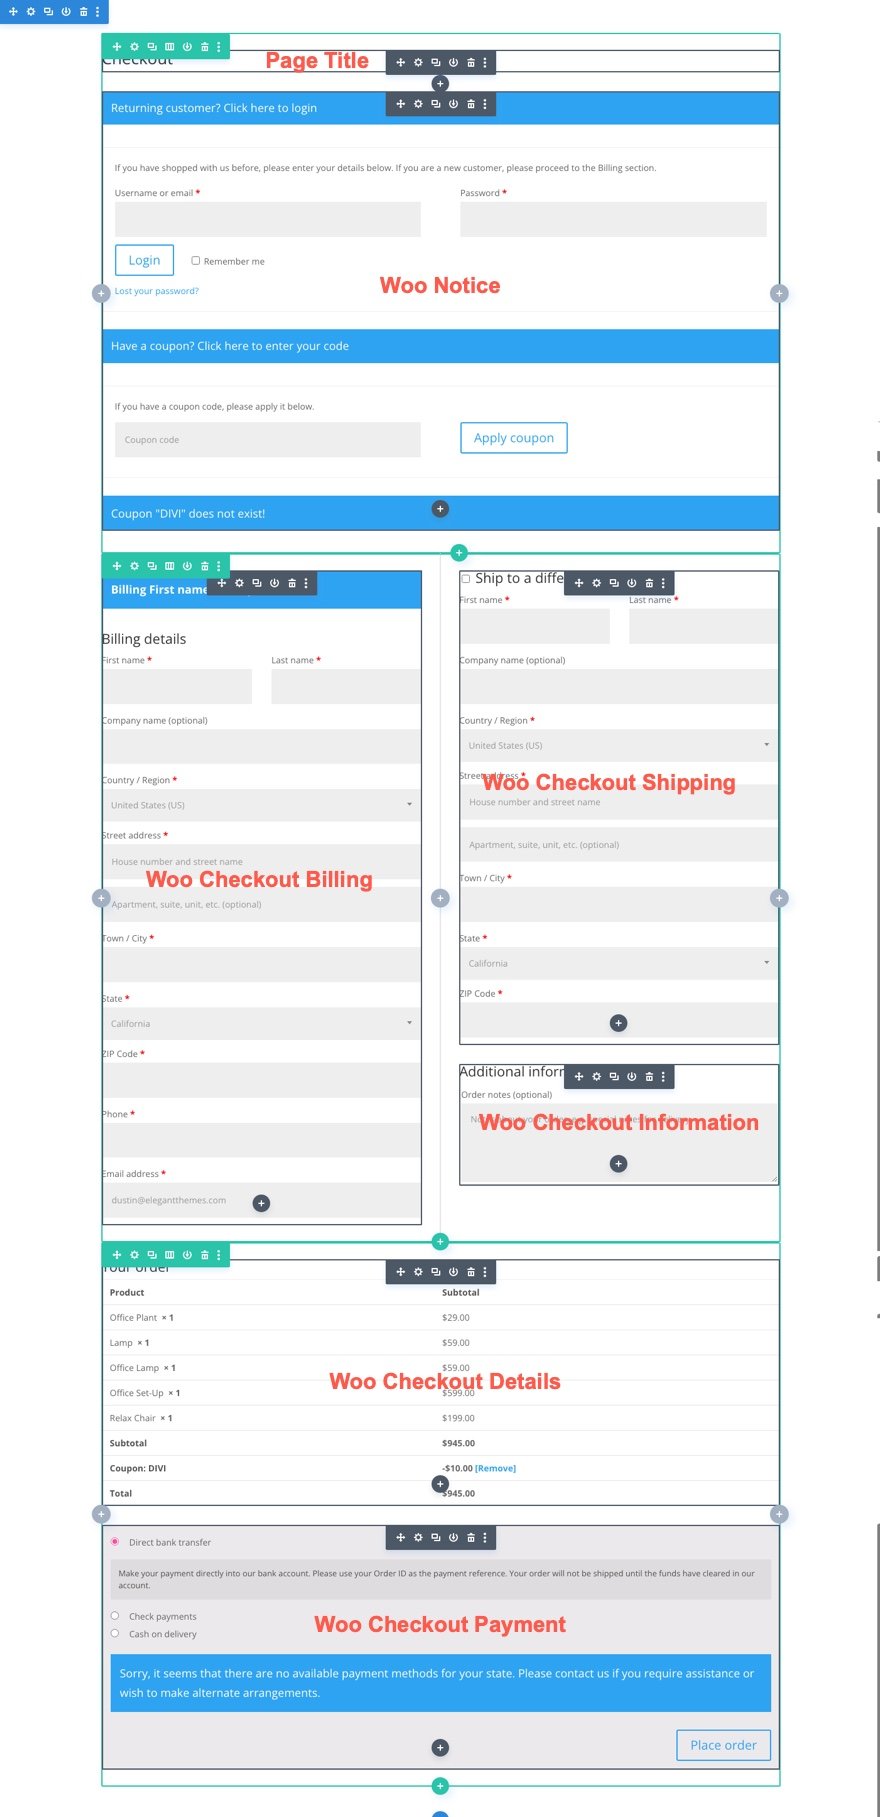
Woo Modules for Designing a Checkout Web page in Divi
Divi comes with various modules which can be key to including dynamic content material to a web page template. A few of these come with Woo Modules particular to the Checkout web page.
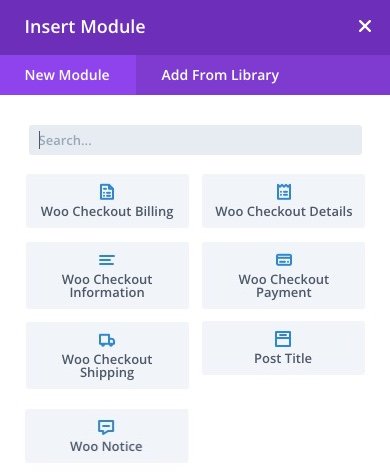
The Modules which can be key to construction the Checkout web page or template come with:
- Put up Identify – This will likely show the identify of the Checkout web page dynamically when construction a Checkout web page template.
- Woo Understand – This module may also be set to other web page varieties (cart web page, product web page, checkout web page). It is going to show necessary notifications to the consumer dynamically as wanted.
- Woo Checkout Billing – This module shows the billing main points shape used throughout checkout.
- Woo Checkout Transport – This module shows the delivery main points shape used throughout checkout.
- Woo Checkout Knowledge – This module shows the extra knowledge shape used throughout checkout.
- Woo Checkout Main points – This module shows order main points, together with the goods being bought and their costs, throughout checkout.
- Woo Checkout Fee – This module shows the fee kind variety and fee shape main points throughout checkout.
Every other non-compulsory woo module:
- Woo Breadcrumbs – This will likely show the WooCommerce Breadcrumb navigation bar.
Design a Checkout Web page or Template
As discussed, we will simply use the Divi Woo Modules to design a customized WooCommerce Checkout web page. Then again, you’ll additionally make a choice to construct a customized Checkout template as smartly the use of the similar design procedure. For this educational, we’re going to construct a customized Checkout web page format for the checkout web page. Then we’ll display you the way to use the customized checkout web page format to create a Checkout Web page Template the use of the Divi Theme Builder.
Designing a WooCommerce Checkout Web page Structure with Divi
For this WooCommerce Checkout Web page educational, the objective is to create a customized web page format for the WooCommerce Checkout Web page this is designated because the WooCommerce Checkout Web page in WooCommerce. On the finish of the educational, we’ll display you the way to simply save and import this checkout web page format to create a brand new Checkout Web page Template the use of the Theme Builder.
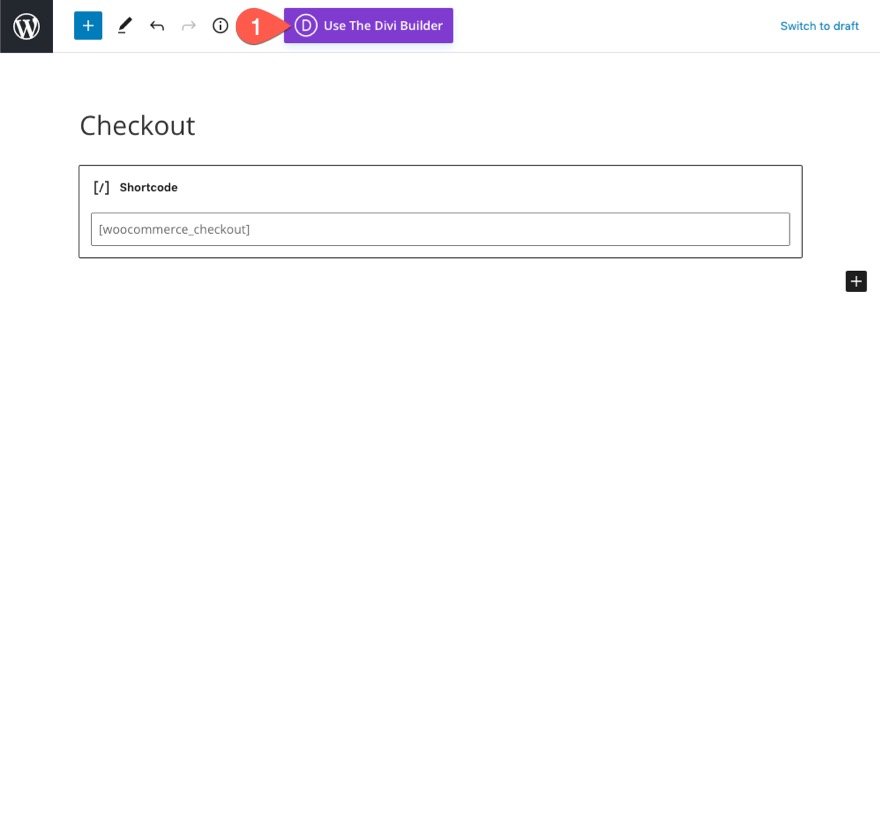
Gettings Began: Enhancing the WooCommerce Checkout Web page
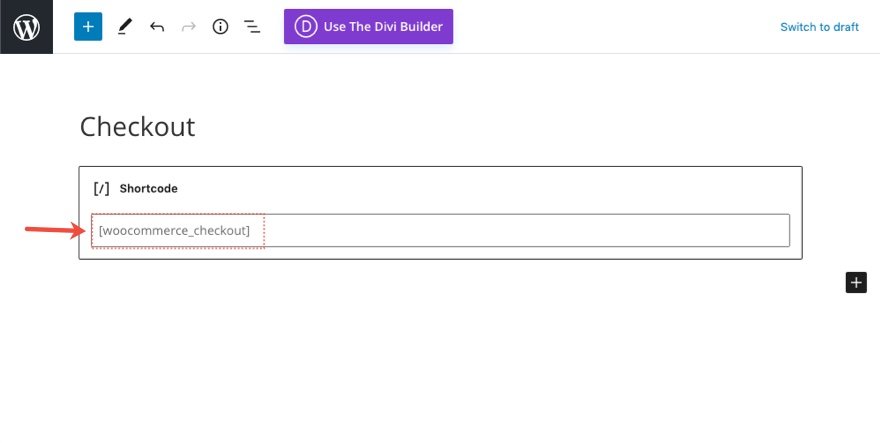
From the WordPress Dashboard, click on to edit the WooCommerce Checkout Web page. Via default, the web page will best include the shortcode used to generate the checkout web page content material.
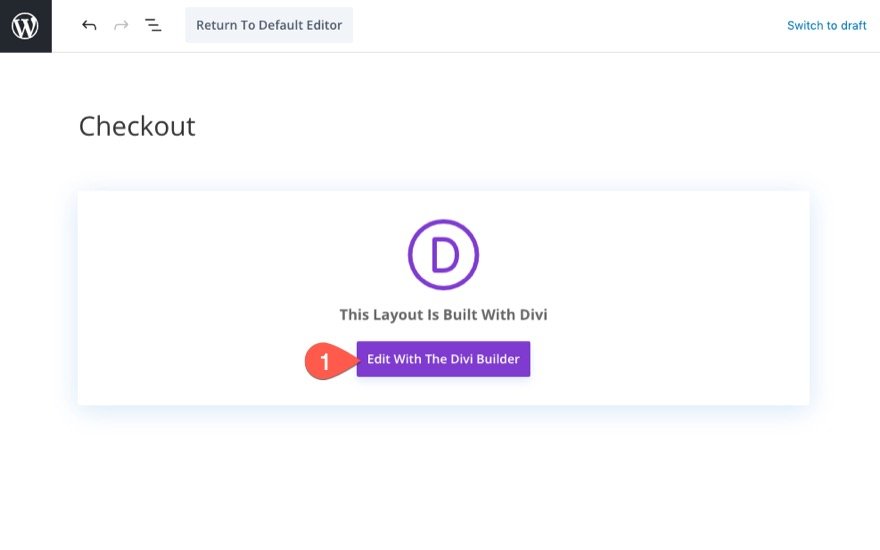
Click on the Use The Divi Builder button on the peak of the web page editor.
Then click on the Edit With The Divi Builder button to release the Divi Builder.
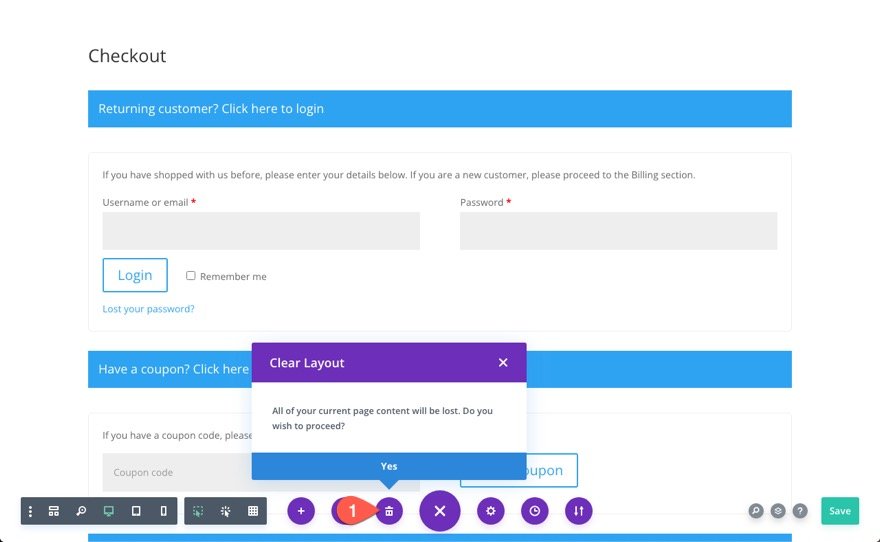
Clearing the Structure to Get started From Scratch
As prior to now discussed, the web page will load with all of the customizable Divi Modules (together with the important thing Woo Modules) that make up the content material of the Checkout Web page. You’ll use the prevailing format and get started customizing the modules which can be already there if you wish to have. However for this educational, we’re going to get started from scratch.
To transparent the format, open the settings menu on the backside of the web page and click on that Transparent Structure button (the rubbish can icon) and choose YES.
Making a Phase, Row, and Column
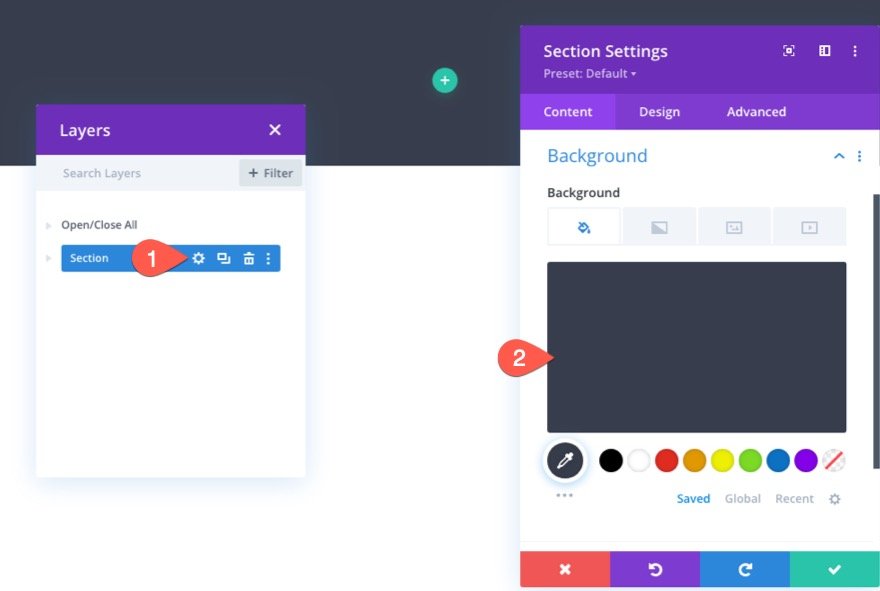
Phase Background
To get began, upload a background colour to a brand new common segment as follows:
- Background Colour: #f7f3f0
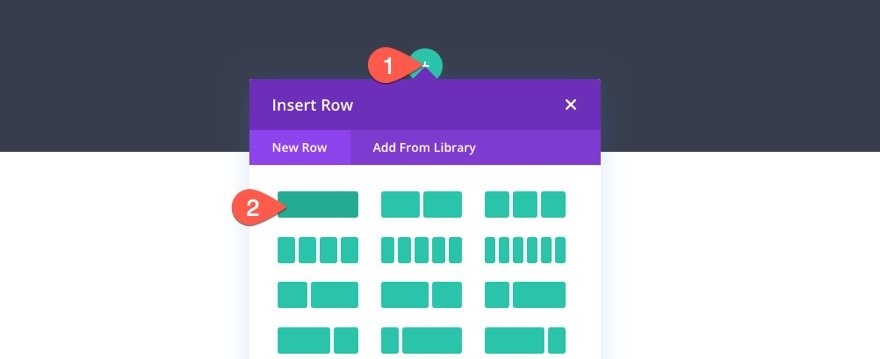
Row and Column
Subsequent, upload a one-column row to the segment
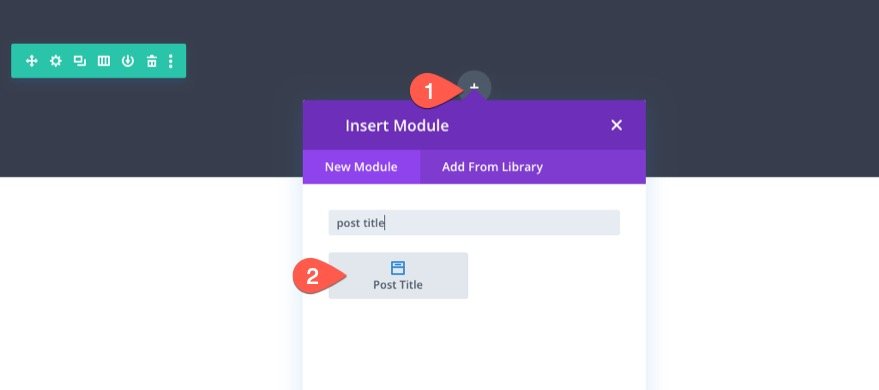
Developing the Dynamic Checkout Web page Identify
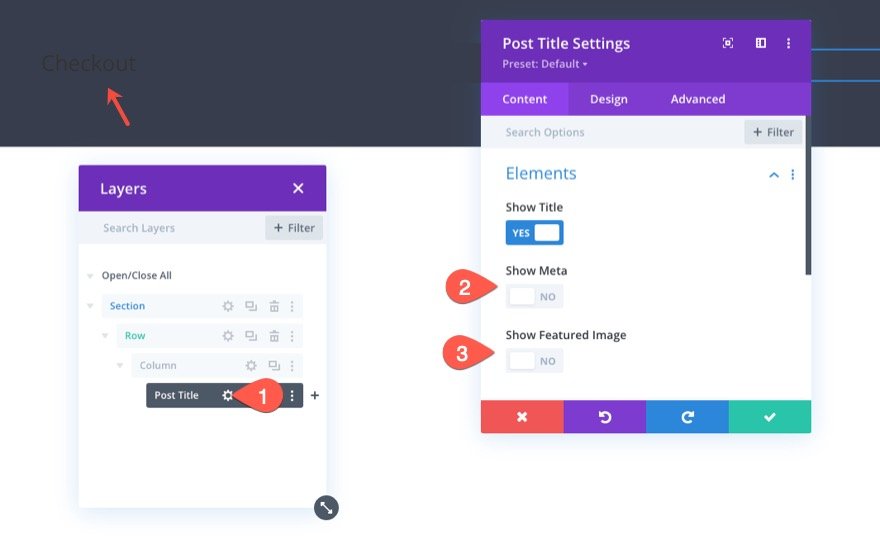
To create the dynamic web page identify wanted for the checkout web page, upload a put up identify module to the column.
Put up Identify Content material
Within the put up identify settings, replace the weather to turn best the identify as follows:
- Display Identify: YES
- Display Meta: NO
- Display Featured Symbol: NO
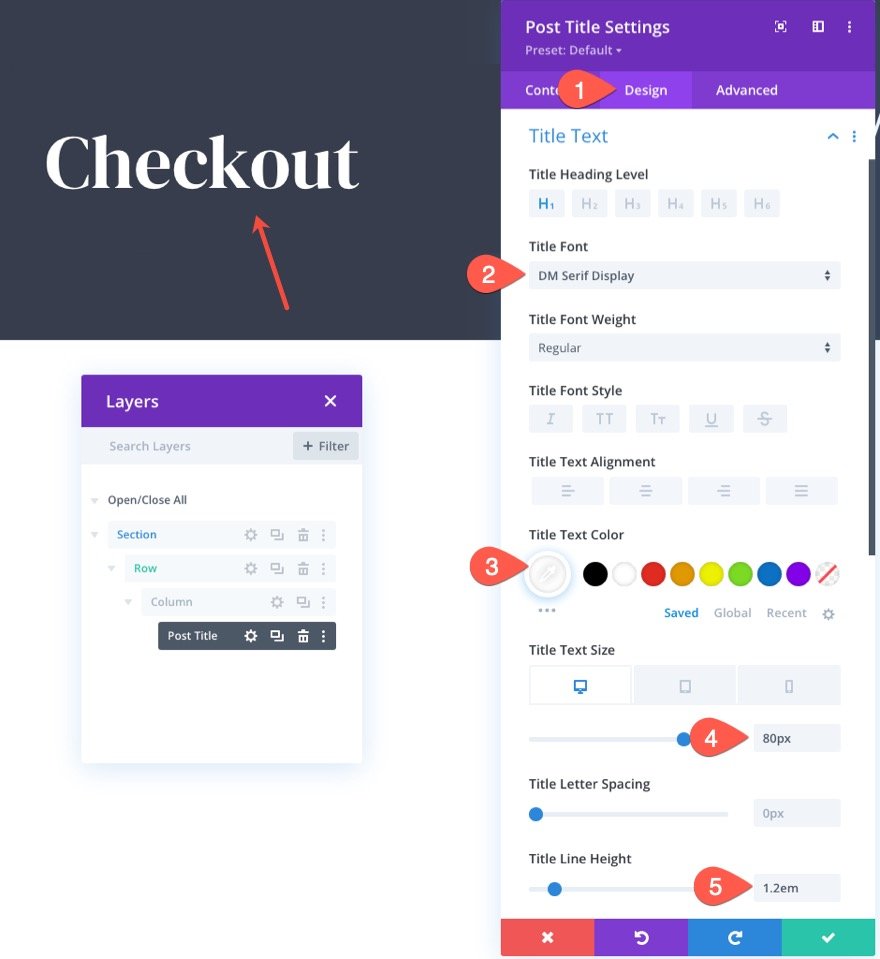
Put up Identify Textual content
To taste the put up identify textual content, replace the next beneath the design tab:
- Identify Font: DM Serif Show
- Identify Textual content Colour: #fff
- Identify Textual content Measurement: 80px (desktop), 60px (pill), 42px (telephone)
- Identify Line Top: 1.2em
Designing the Dynamic Woo Understand Module for the Checkout Web page
It’s at all times a good suggestion so as to add the Woo Understand module on the peak of the web page in order that the notices will probably be maximum visual to customers when interacting with the checkout web page. Understand that we’re designing notices that will probably be displayed best when wanted.
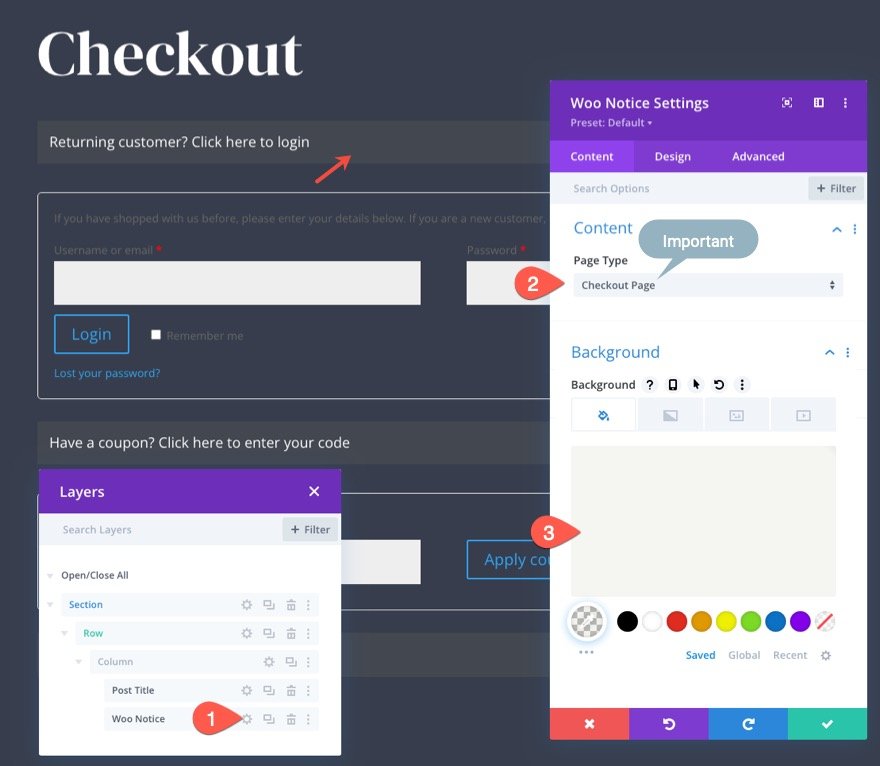
So as to add the Woo Understand Module, click on so as to add a brand new Woo Understand module beneath the put up identify module.

Woo Understand Web page Kind and Background
Subsequent, replace the Web page Kind and Background colour of the Woo Understand as follows:
- Web page Kind: Checkout Web page
- Background Colour: rgba(153,158,117,0.1)
IMPORTANT: Be sure that to choose the Checkout Web page because the Web page Kind in order that the woo notices will paintings correctly.
Woo Understand Identify Textual content
Below the design tab, replace the identify textual content taste as follows:
- Identify Font: Roboto
- Identify Font Weight: Medium
- Identify Textual content Colour: #fff
- Identify Textual content Measurement: 14px
- Identify Line Top: 1.8em
Then choose the hyperlink tab and replace the identify hyperlink textual content colour:
- Hyperlink Textual content Colour: #999e75

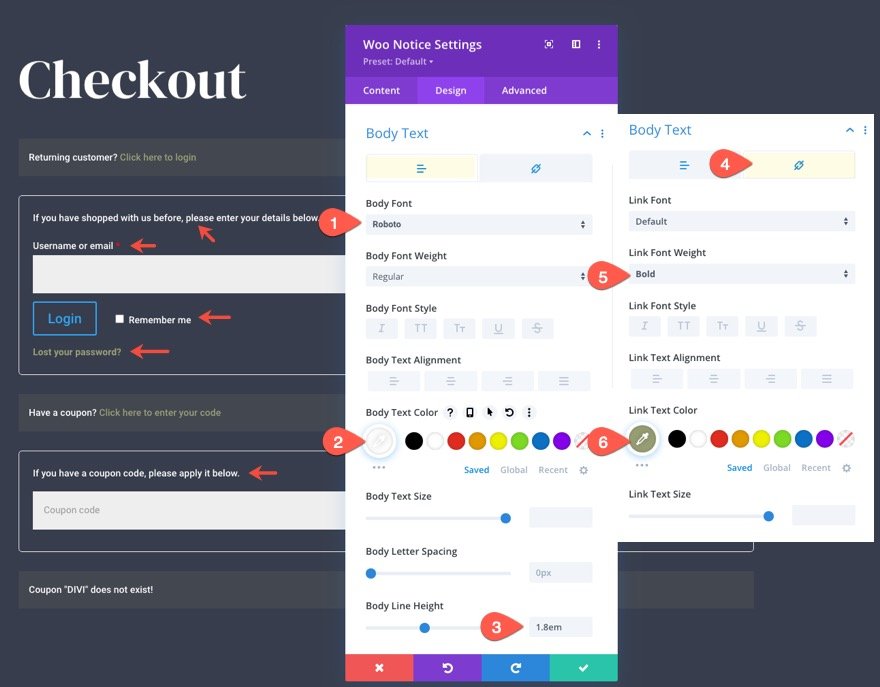
Woo Understand Frame Textual content
After the identify textual content, replace the frame textual content as follows:
- Frame Font: Roboto
- Frame Textual content Colour: #fff
- Frame Line Top: 1.8em
Then choose the hyperlink tab and replace the hyperlink textual content:
- Hyperlink Font Weight: Daring
- Hyperlink Textual content Colour: #999e75
Woo Understand Box Labels
The Checkout Web page Notices come with fields and box labels for such things as a login shape and a chit code. To edit the way of the sector labels for those fields, replace the next:
- Required Box Indicator Colour: #fff
- Box Label Font: Roboto
- Box Label Font Weight: Daring
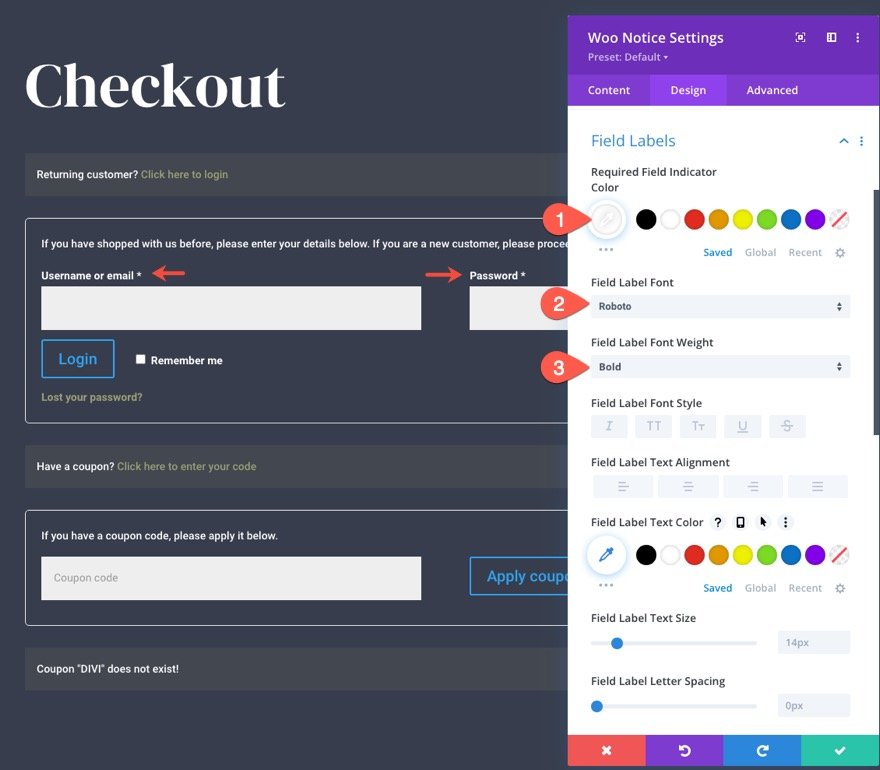
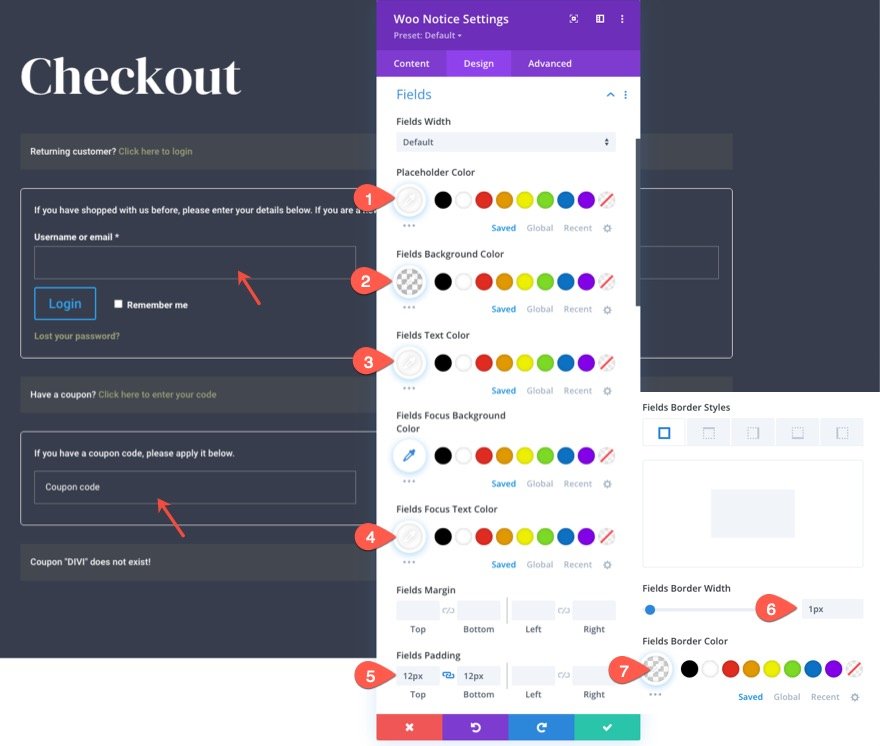
Woo Understand Fields
Subsequent, replace the fields taste choices as follows:
- Placeholder Colour: #fff
- Fields Background Colour: clear
- Fields Textual content Colour: #fff
- Fields Center of attention Textual content Colour: #fff
- Fields Padding: 12px peak, 12px backside
- Fields Border Width: 1px
- Fields Border Colour: rgba(255,255,255,0.32)
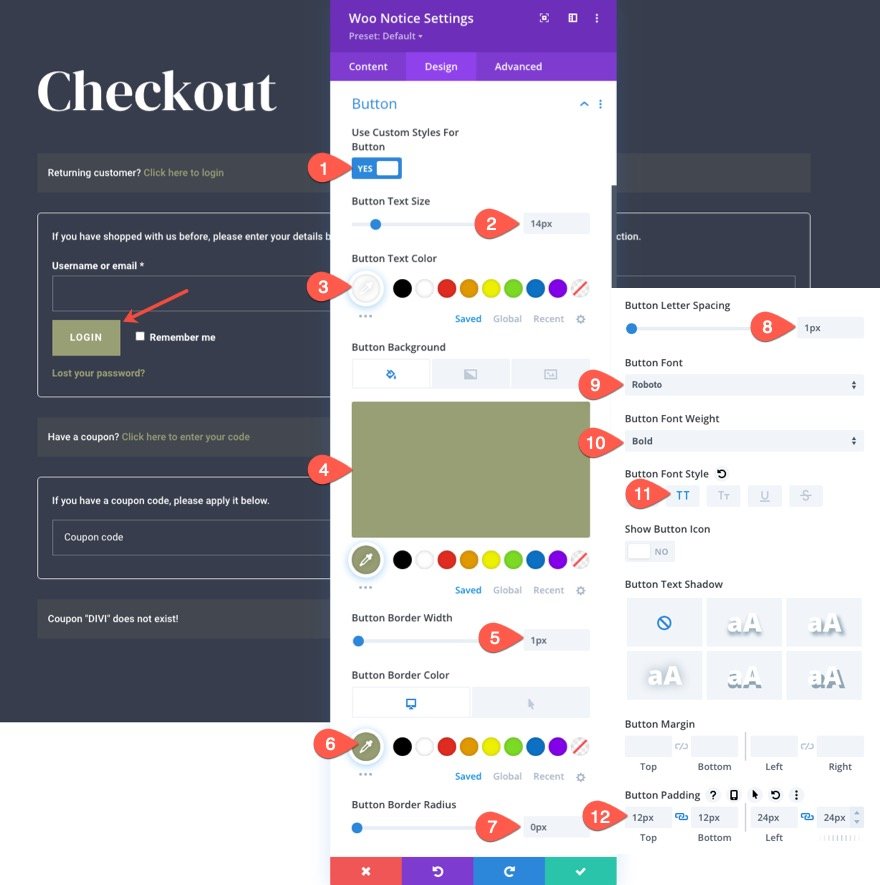
Woo Understand Button
- Use Customized Types for Button: YES
- Button Textual content Measurement: 14px
- Button Textual content Colour: #fff
- Button Background Colour: #999e75
- Button Border Width: 1px
- Button Border Colour: #999e75
- Button Border Radius: 0px
- Button Letter Spacing: 1px
- Button Font: Roboto
- Button Font Weight: Daring
- Button Font Taste: TT
- Button Padding: 12px peak, 12px backside, 24px left, 24px appropriate
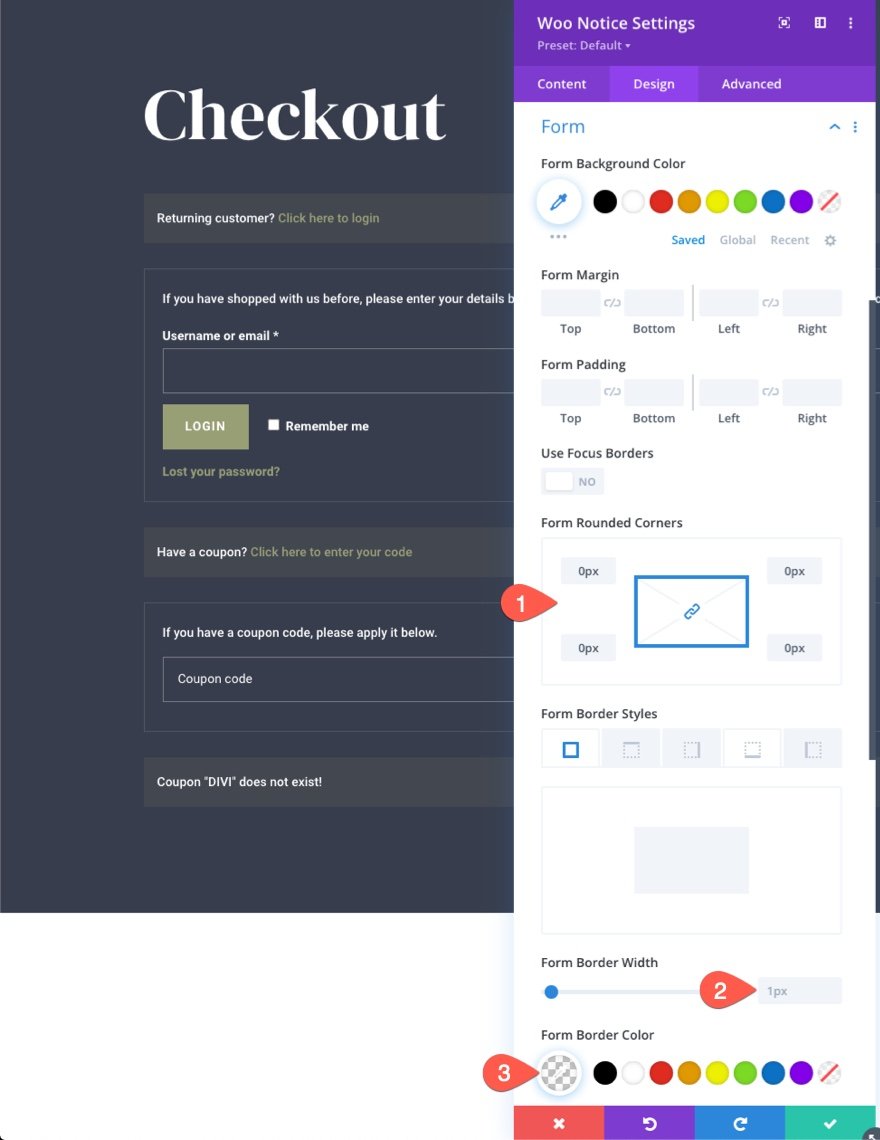
Woo Understand Shape
Each and every of the awareness paperwork may also be styled beneath the Shape choice staff. To offer the paperwork a gentle border, replace the next:
- Shape Rounded Corners: 0px
- Shape Border Width: 1px
- Shape Border Colour: rgba(255,255,255,0.32)
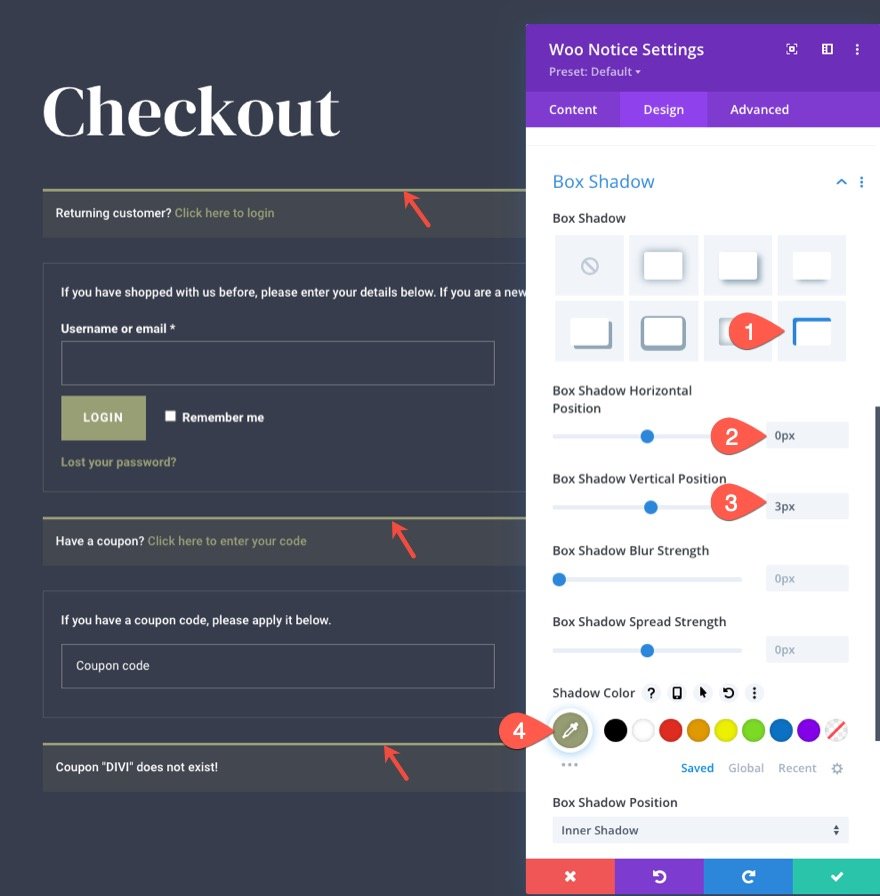
Woo Understand Field Shadow
To offer the woo understand bar a peak border-like design, replace the box-shadow choices as follows:
- Field Shadow: see screenshot
- Field Shadow Horizontal Place: 0px
- Field Shadow Vertical Place: 3px
- Shadow Colour: #999e75
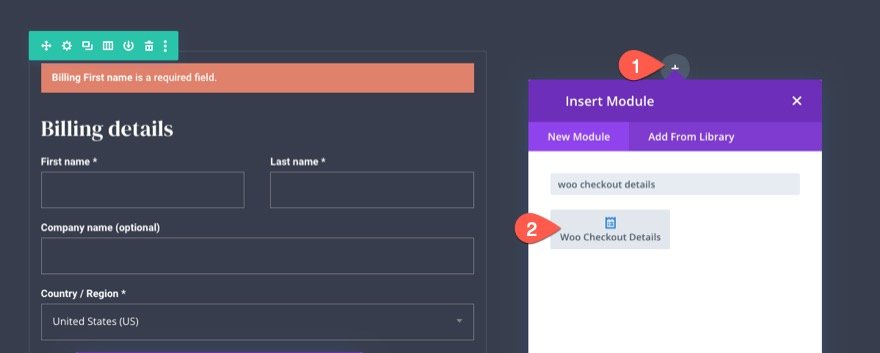
Designing the Woo Checkout Billing Module
Now that our web page identify and notices are in position, we’re in a position so as to add the Woo Checkout Billing content material, some other key part to the checkout web page.
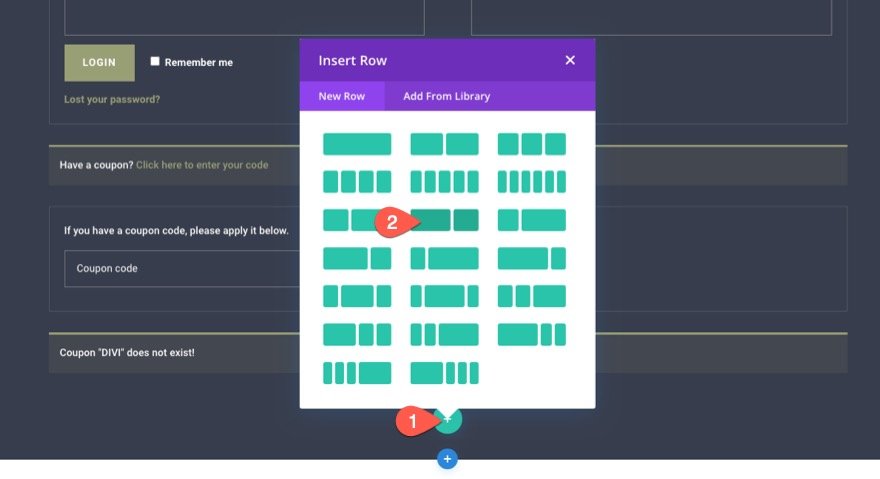
Prior to we upload the billing content material, create a brand new row with a three-fifths two-fifths column construction.
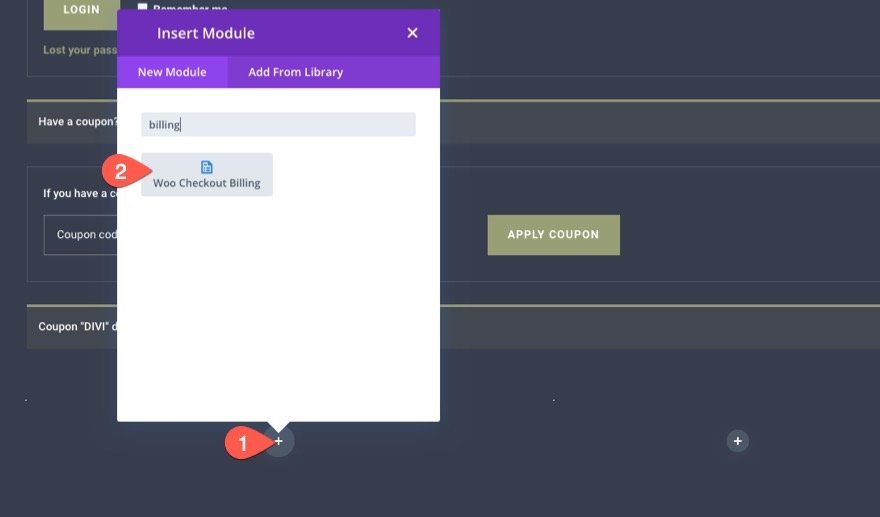
In column 1, upload a Woo Checkout Billing module.
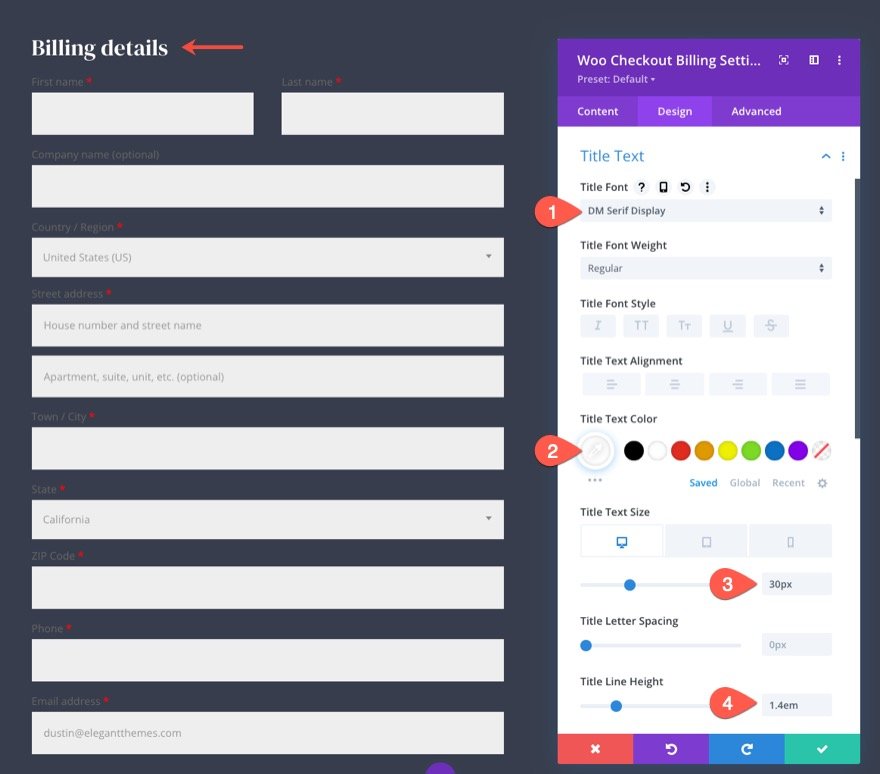
Woo Checkout Billing Identify Textual content
We will be able to goal the identify textual content by way of customizing the identify textual content choices.
Open the Woo Checkout Billing settings modal and, beneath the design tab, replace the next:
- Identify Font: DM Serif Show
- Identify Textual content Colour: #fff
- Identify Textual content Measurement: 30px (desktop), 24px (pill), 18px (telephone)
- Identify Line Top: 1.4em
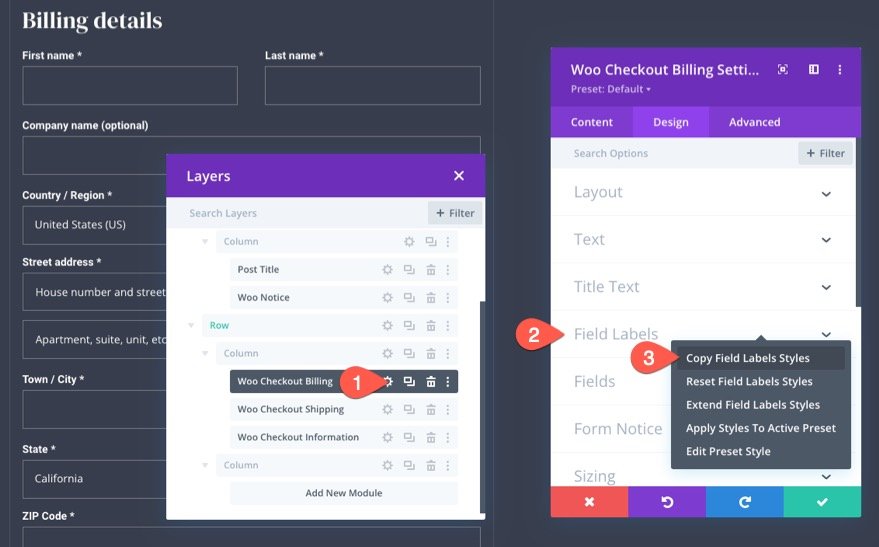
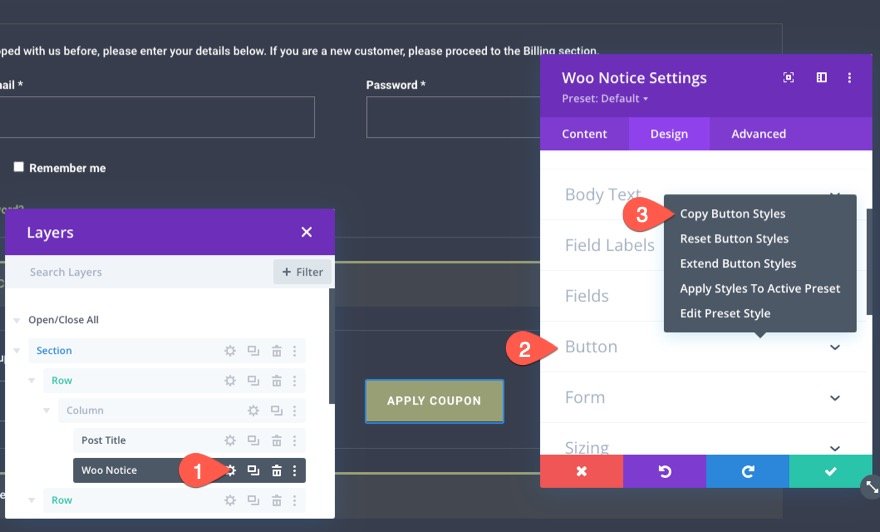
Woo Checkout Billing Box and Box Labels
Similar to the Understand Module, this module additionally has choices to taste the sector and box labels. Since we wish all of our box and box labels to compare during the web page, we will replica the sector and box label kinds from the Understand module already created and paste the ones kinds to the Woo Checkout Billing module.
Right here’s the way to do it:
- Open the settings of the Understand Module on the peak of the web page.
- Proper-click at the Box Labels choice staff beneath the design tab.
- Make a selection “Replica Box Labels Types” from the right-click menu.
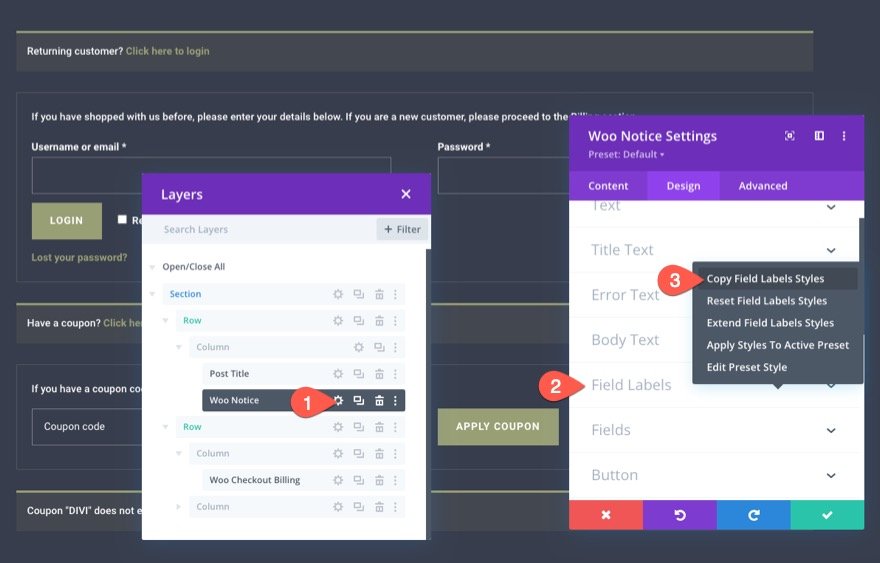
With the way now copied, open the extra settings menu within the peak menu bar of the Woo Checkout Billing module. Then choose “Paste Box Labels Types” from the menu.
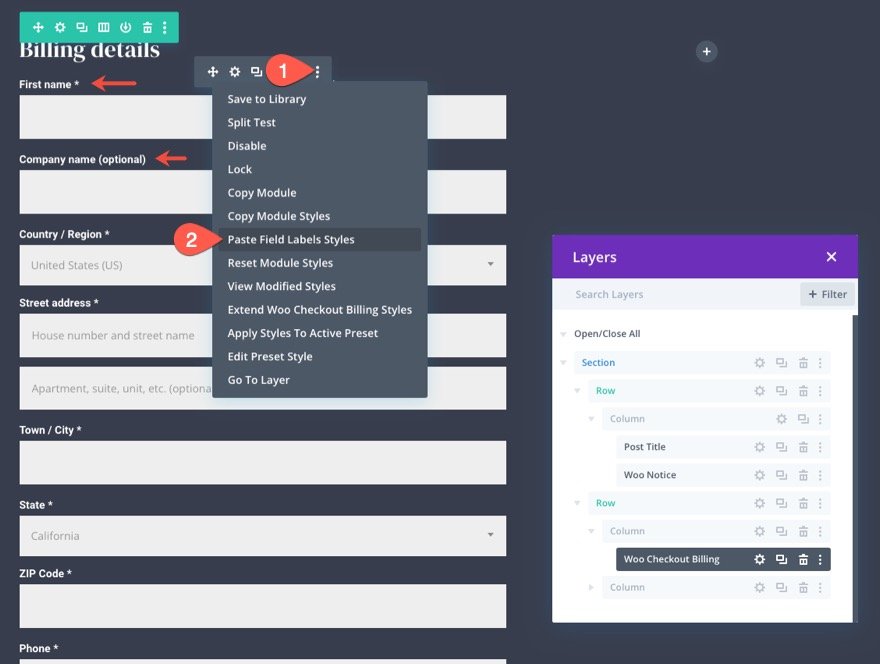
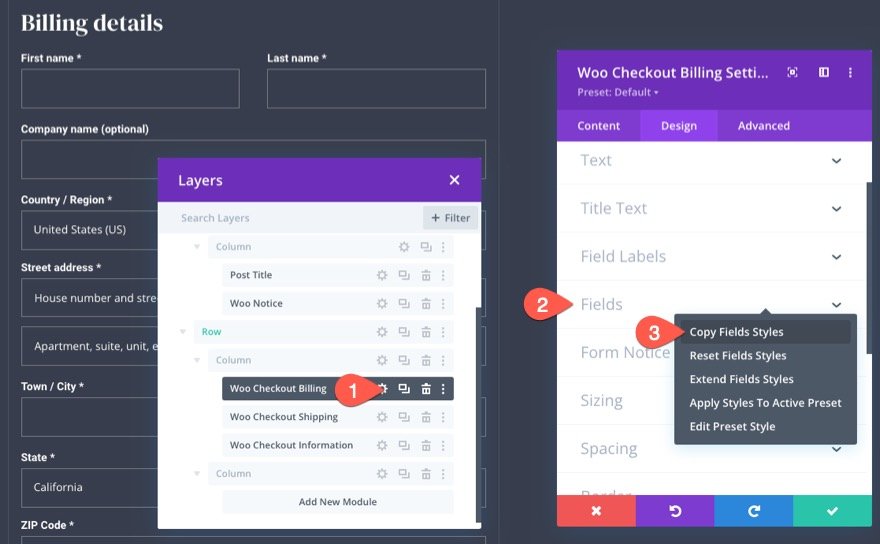
We will be able to repeat the similar procedure to duplicate over the sector kinds as smartly.
Right here’s the way to do it:
- Open the settings of the Understand Module on the peak of the web page.
- Proper-click at the Box choice staff beneath the design tab.
- Make a selection “Replica Box Types” from the right-click menu.
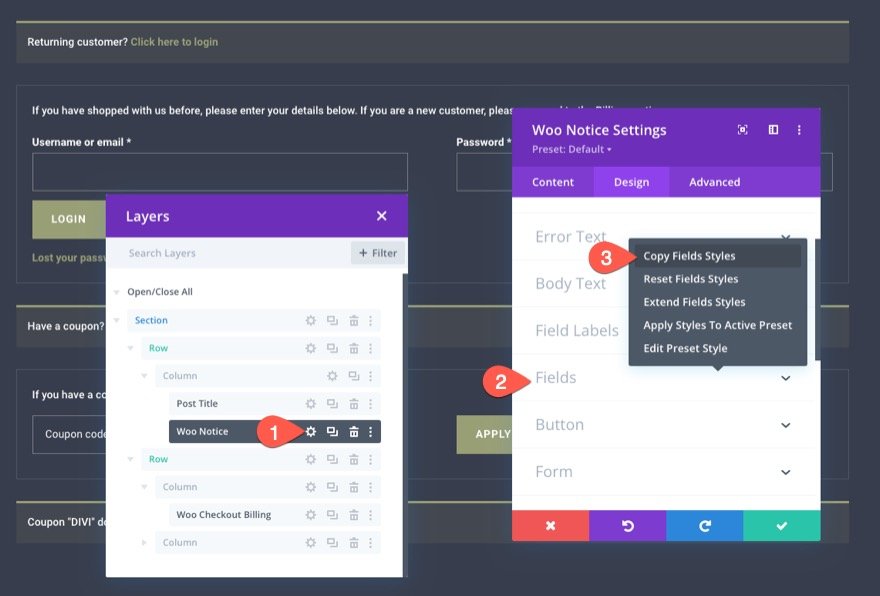
With the way now copied, open the extra settings menu within the peak menu bar of the Woo Checkout Billing module. Then choose “Paste Box Types” from the menu.

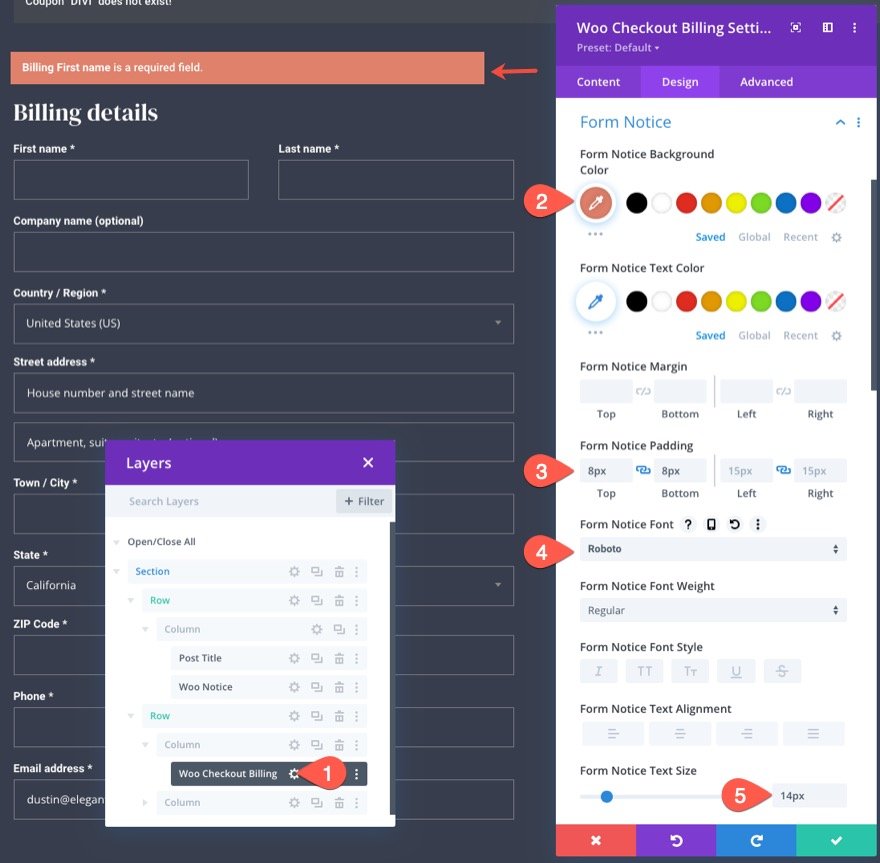
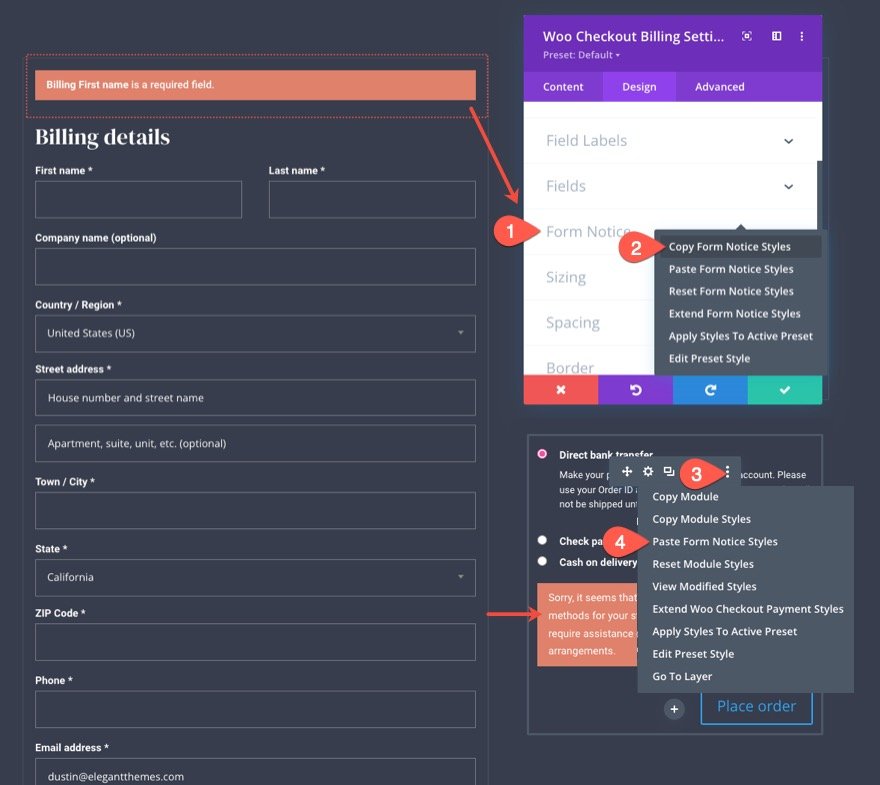
Woo Checkout Billing Shape Understand
The shape understand is what dynamically shows any notifications or mistakes that can rise up when filling out the shape. To taste the shape understand, open the Woo Checkout Billing settings and replace the next:
- Shape Understand Background Colour: #e0816b
- Shape Understand Padding: 8px peak, 8px backside
- Shape Understand Font: Roboto
- Shape Understand Textual content Measurement: 14px
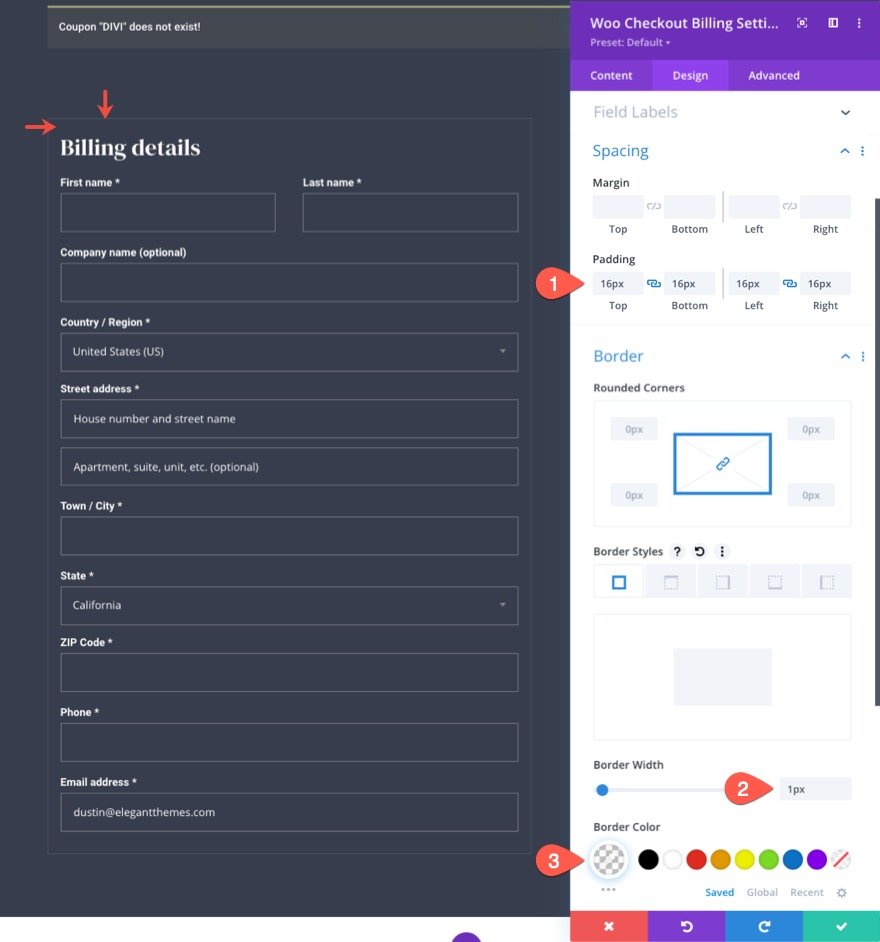
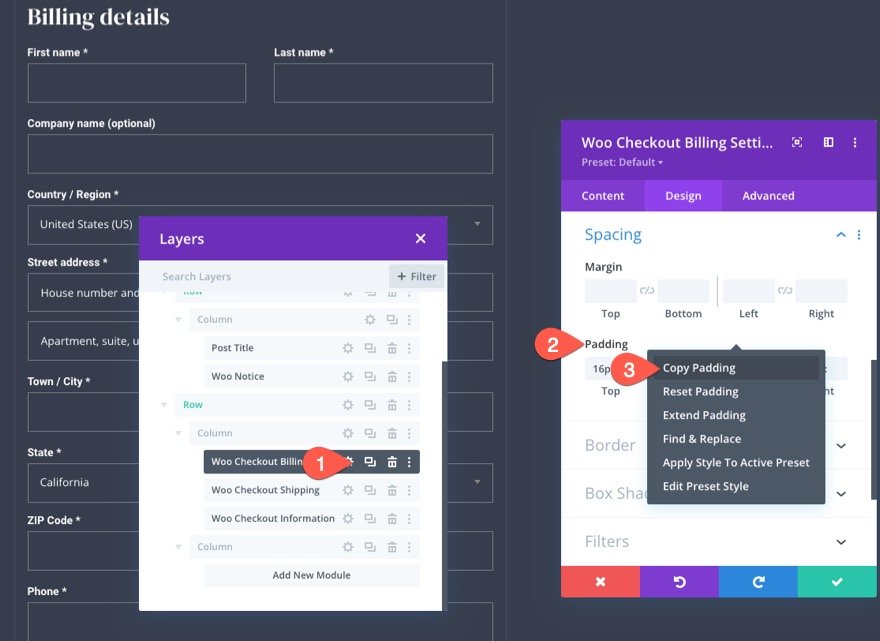
Woo Checkout Billing Spacing and Border
To complete off the design, let’s give a bit padding and a gentle border the module as follows:
- Padding: 16px peak, 16px backside, 16px left, 16px appropriate
- Border Width: 1px
- Border Colour: rgba(255,255,255,0.1)
Designing the Woo Checkout Transport and Woo Checkout Knowledge
The following key parts we want to create the checkout web page template are the Woo Checkout Transport module and the Woo Checkout Knowledge module. The Woo Checkout Transport module shows the shape wanted for coming into delivery knowledge sooner than finishing checkout. And the Woo Checkout Knowledge module shows an access shape that permits customers to go into any additional info sooner than checkout.
Upload Woo Checkout Transport Module
For this format, move forward and upload a brand new Woo Checkout Transport module without delay beneath the Woo Checkout Billing module.

Upload Woo Checkout Transport Module
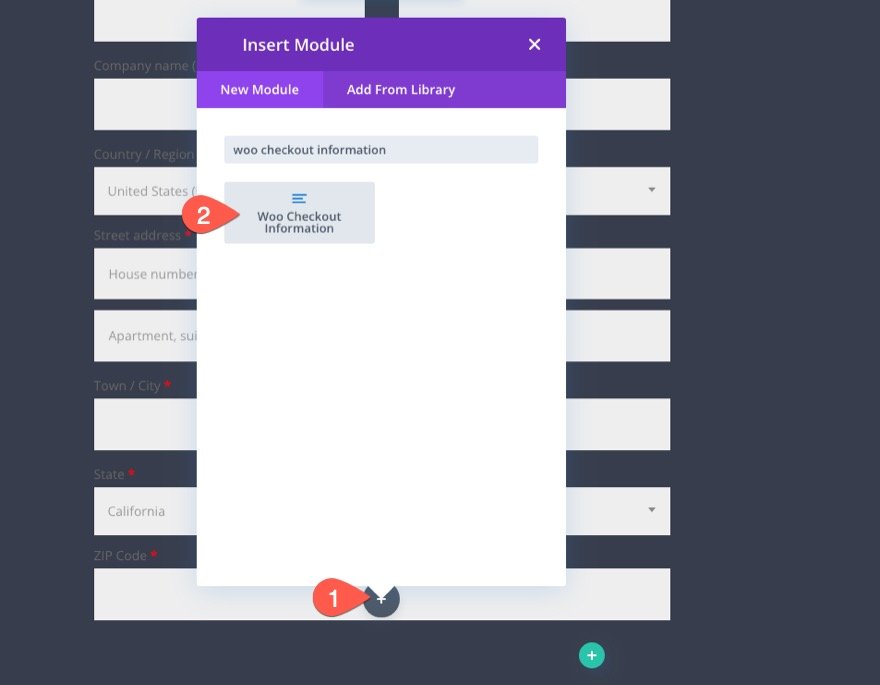
Below the Woo Checkout Transport module, move forward and upload a Woo Checkout Knowledge module.
Styling the Woo Checkout Transport and Woo Checkout Knowledge Modules
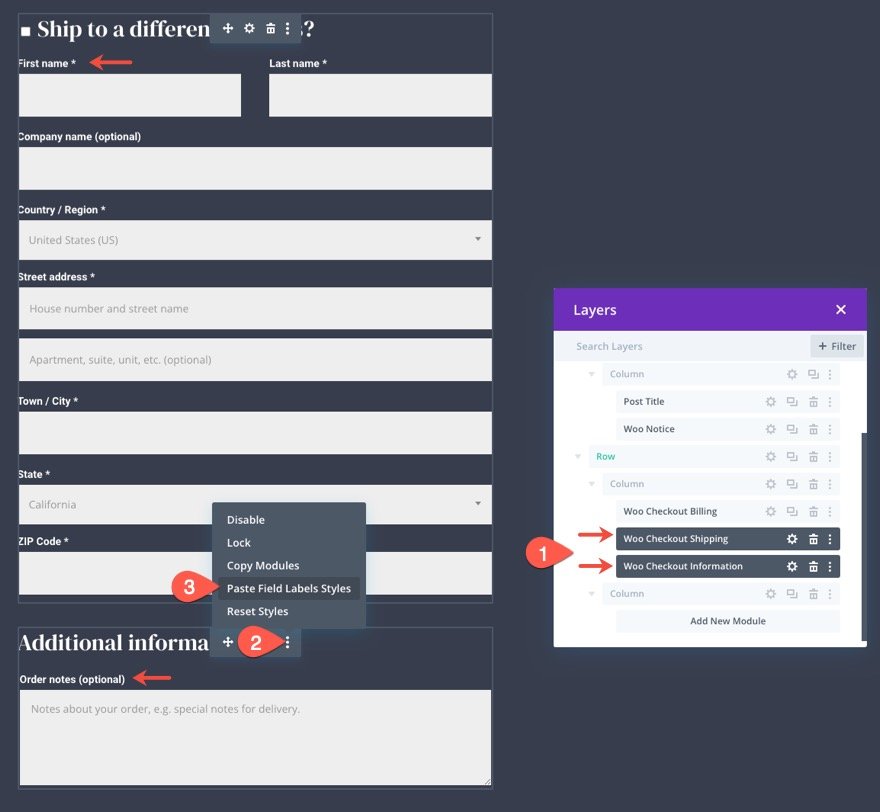
As a result of either one of those woo modules (Checkout Transport and Checkout Knowledge) want to fit the design of the Woo Checkout Billing module, we will replica the kinds we want over to every one.
Copying and Pasting the Identify Textual content Types
Let’s get started with the Identify Textual content kinds. Open the settings for the Woo Checkout Billing module and duplicate the Identify Textual content Types the use of the right-click menu.
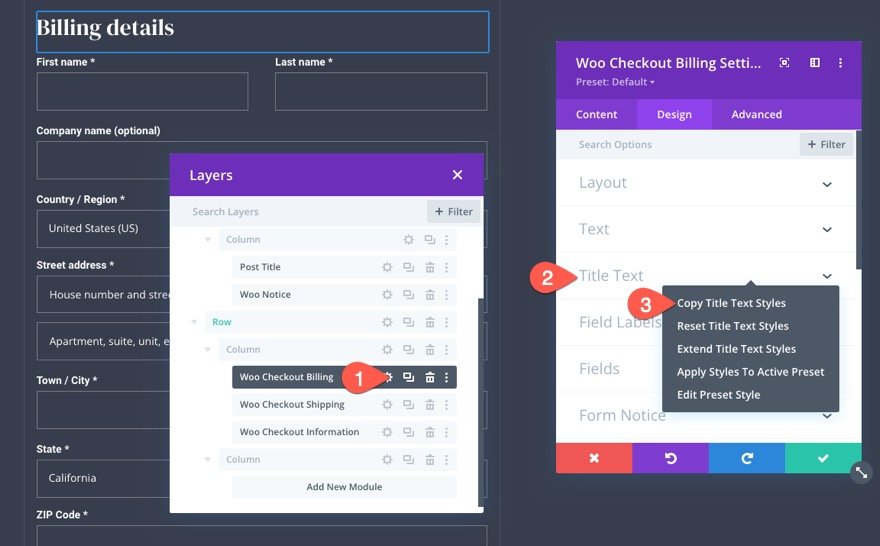
Then use the multi-select function to choose each the Woo Checkout Transport and Woo Checkout Knowledge Modules. Then paste the identify textual content kinds to one of the vital decided on modules.
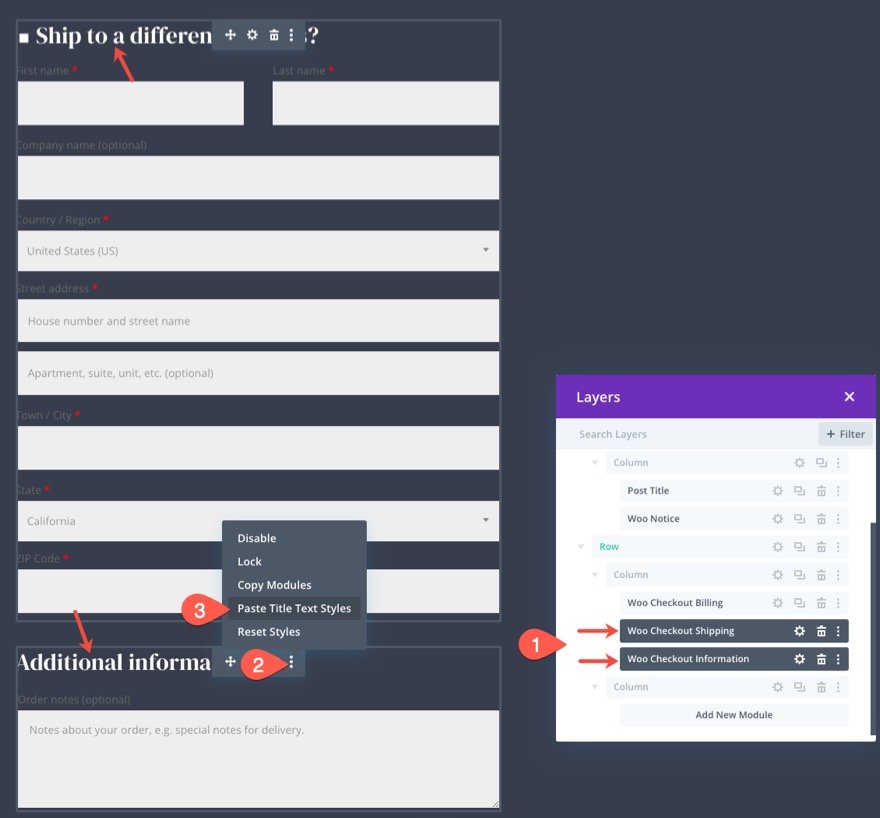
Copying and Pasting the Box Labels Types
Repeat the similar procedure to duplicate and paste the sector labels kinds as smartly.
Open the settings for the Woo Checkout Billing module and duplicate the Box Labels Types the use of the right-click menu.
Then use the multi-select function to choose each the Woo Checkout Transport and Woo Checkout Knowledge Modules. Then paste the sector labels kinds to one of the vital decided on modules.
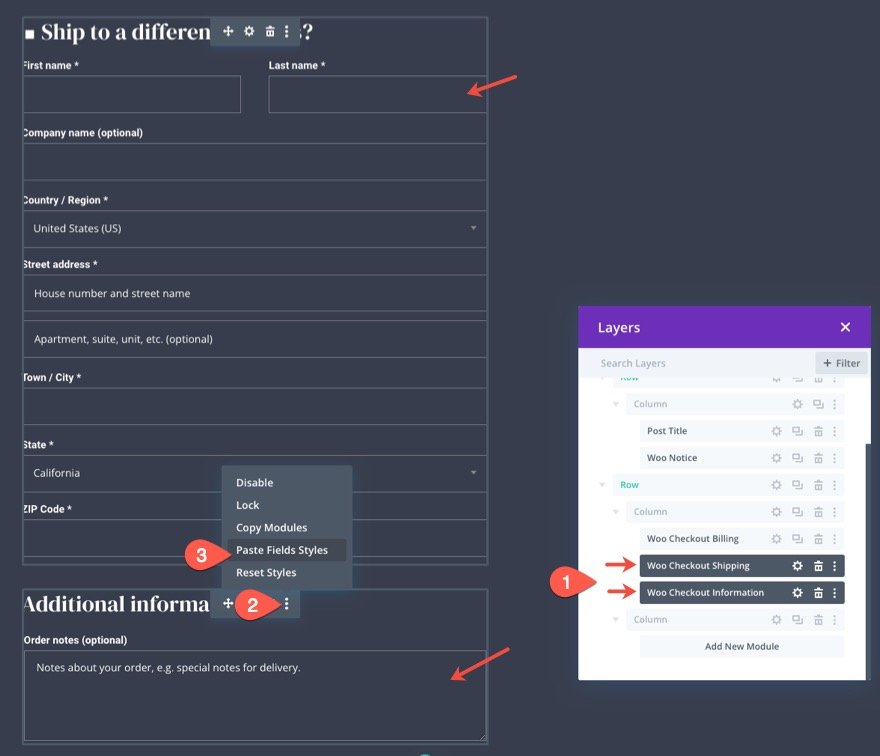
Copying and Pasting the Fields Types
Repeat the similar procedure to duplicate and paste the fields’ kinds as smartly.
Open the settings for the Woo Checkout Billing module and duplicate the Fields’ Types the use of the right-click menu.
Then use the multi-select function to choose each the Woo Checkout Transport and Woo Checkout Knowledge Modules. Then paste the fields kinds to one of the vital decided on modules.
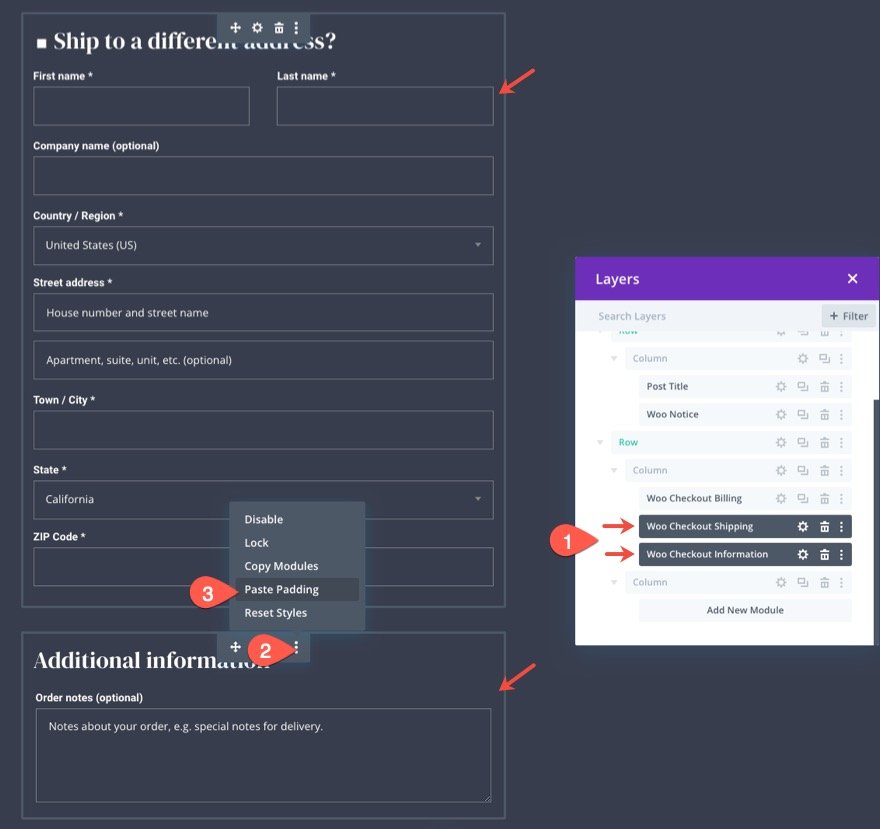
Copying and Pasting the Padding
Repeat the similar procedure to duplicate and paste the padding as smartly.
Open the settings for the Woo Checkout Billing module and duplicate the padding the use of the right-click menu.
Then use the multi-select function to choose each the Woo Checkout Transport and Woo Checkout Knowledge Modules and paste the padding to one of the vital decided on modules.
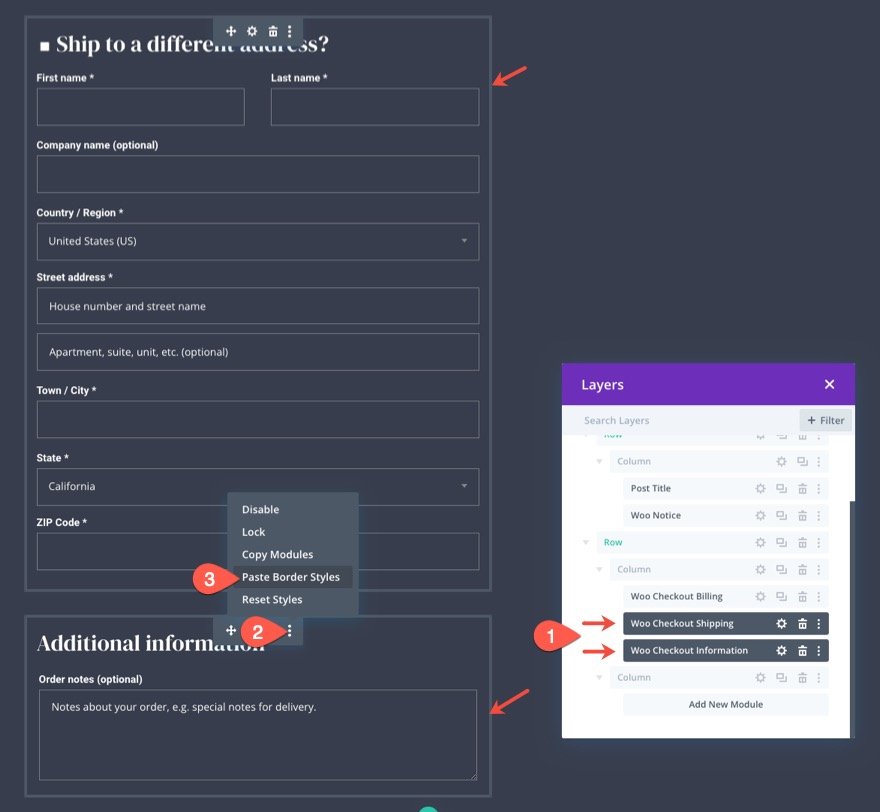
Copying and Pasting the Border
Repeat the similar procedure to duplicate and paste the border as smartly.
Open the settings for the Woo Checkout Billing module and duplicate the border the use of the right-click menu.
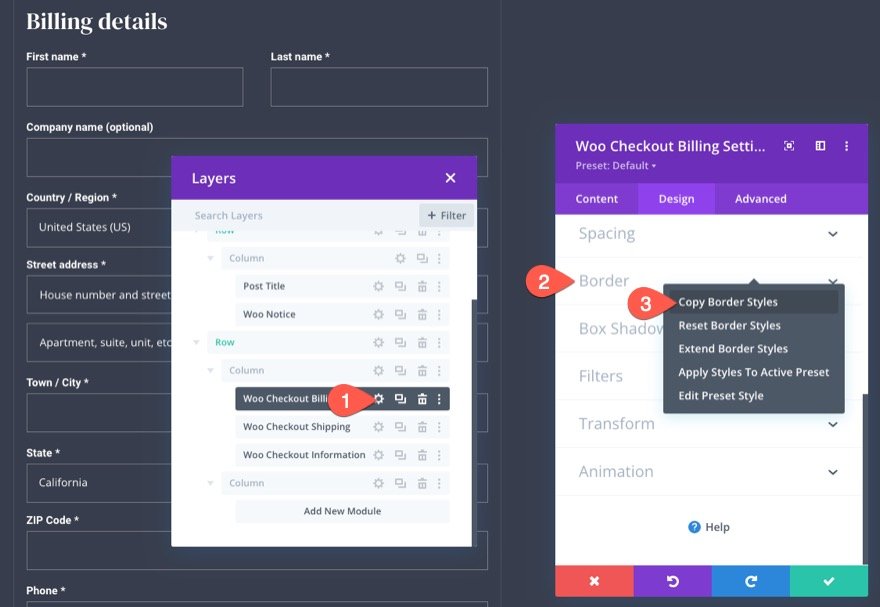
Then use the multi-select function to choose each the Woo Checkout Transport and Woo Checkout Knowledge Modules and paste the border kinds to one of the vital decided on modules.
Designing the Woo Checkout Main points Module
Now that our delivery and extra knowledge content material is designed, we’re in a position so as to add the Woo Checkout Main points content material. That is some other key part to the checkout web page that shows the main points of the acquisition order. It contains the listing of goods, subtotals, and the whole quantity of the acquisition. It additionally shows any coupon reductions which can be implemented that may be got rid of with a hyperlink.
To the checkout main points, upload a brand new Woo Checkout Main points module to column 2 in the similar row.
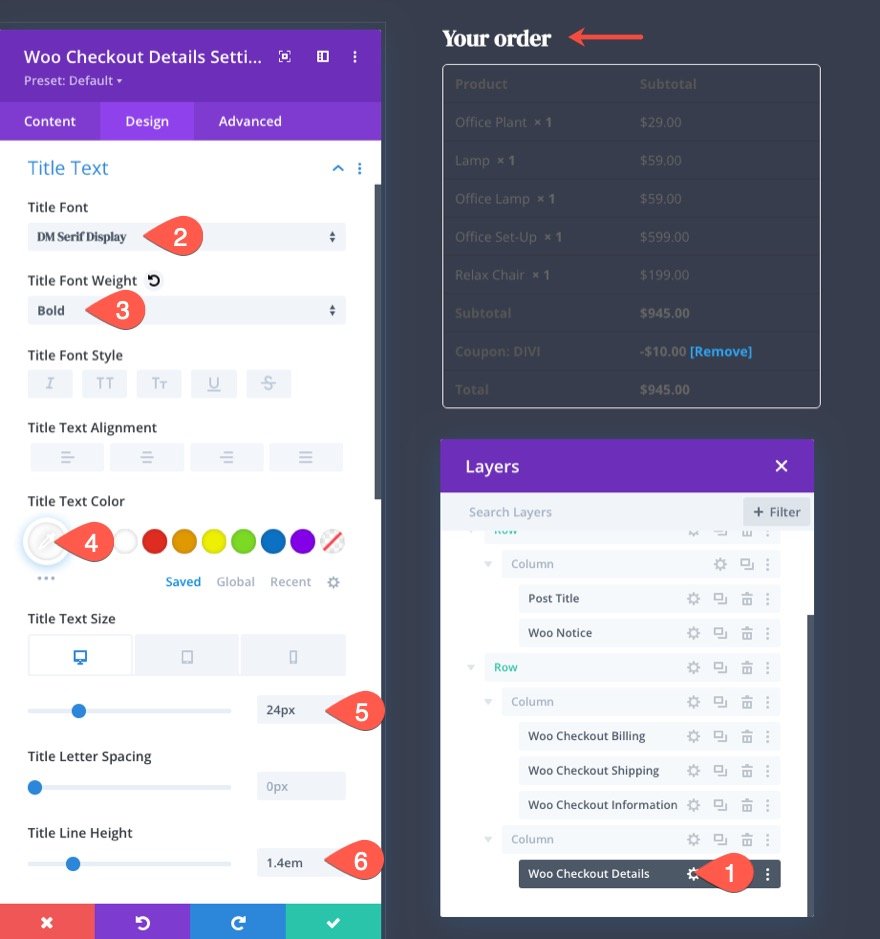
Woo Checkout Main points Identify Textual content
Within the Woo Checkout Main points settings modal, move to the design tab and replace the Identify textual content as follows:
- Identify Font: DM Serif Show
- Identify Font Weight: Daring
- Identify Textual content Colour: #fff
- Identify Textual content Measurement: 24px (desktop), 22px (pill), 18px (telephone)
- Identify Line Top: 1.4em
Woo Checkout Main points Column Label
To taste the column labels, replace the next:
- Column Label Font: Roboto
- Column Label Font Weight: Daring
- Column Label Textual content Colour: rgba(255,255,255,0.32)

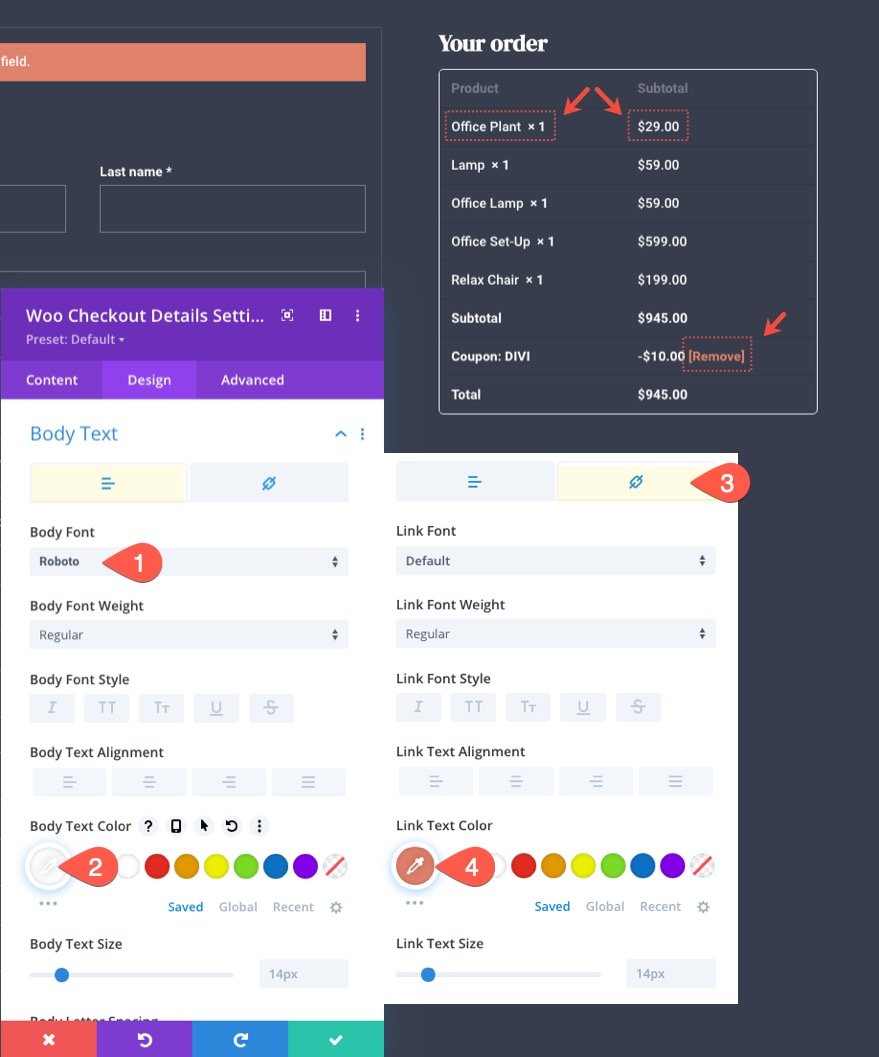
Woo Checkout Main points Frame Textual content
To taste the frame textual content that goals the pieces beneath every column within the listing, replace the next:
- Frame Font: Roboto
- Frame Textual content Colour: #fff
Below the hyperlink tab, replace the hyperlink textual content colour:
- Hyperlink Textual content Colour: #e0816b
Woo Checkout Main points Desk Border
For this design, we’re going to take out the desk border altogether. To do that, replace the next:
- Desk Border Width: 0px
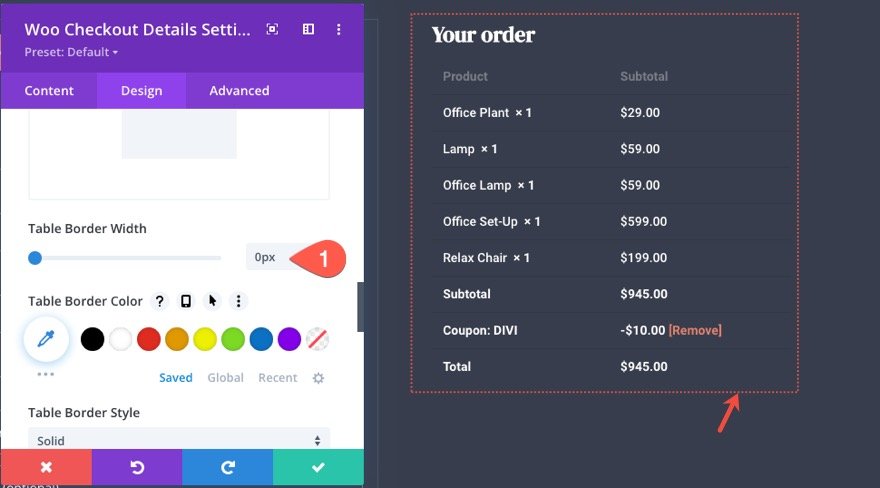
Woo Checkout Main points Desk Mobile
To taste the desk cells inside the desk, replace the next:
- Desk Mobile Padding: 0px left
- Desk Mobile Border Taste: none
This aligns the content material inside the desk cells to the left and eliminates the desk cellular border totally.
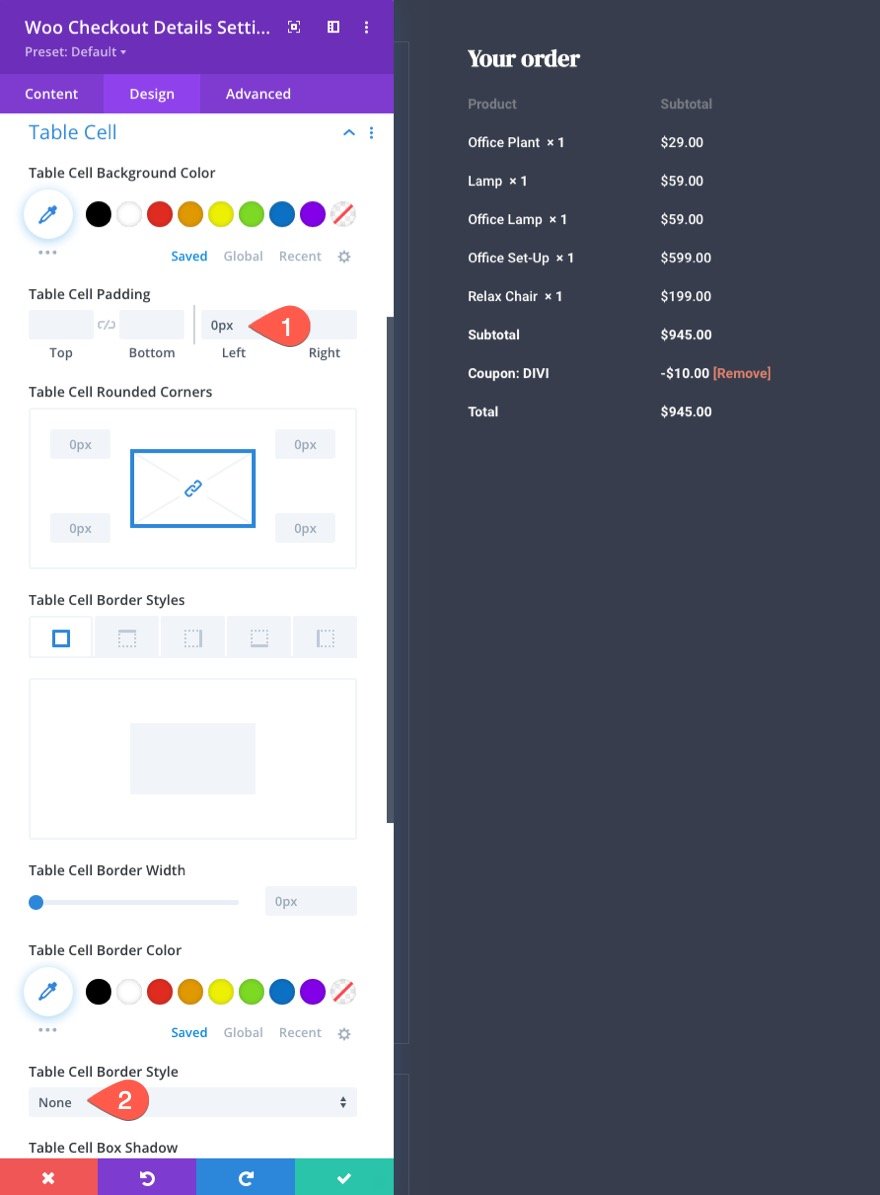
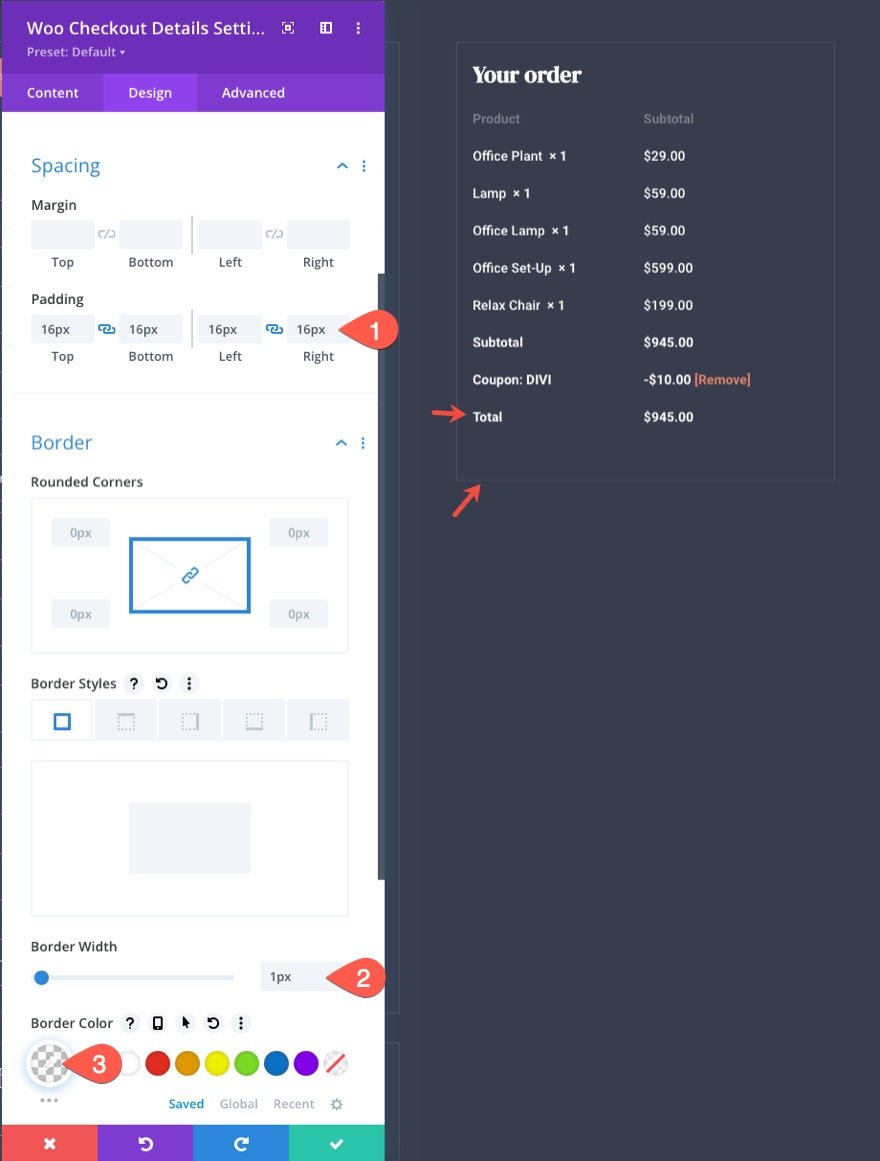
Woo Checkout Main points Padding and Border
To stay the module’s design in line with the opposite modules, replace the padding and border as follows:
- Padding: 16px peak, 16px backside, 16px left, 16px appropriate
- Border Width: 1px
- Border Colour: rgba(255,255,255,0.1)
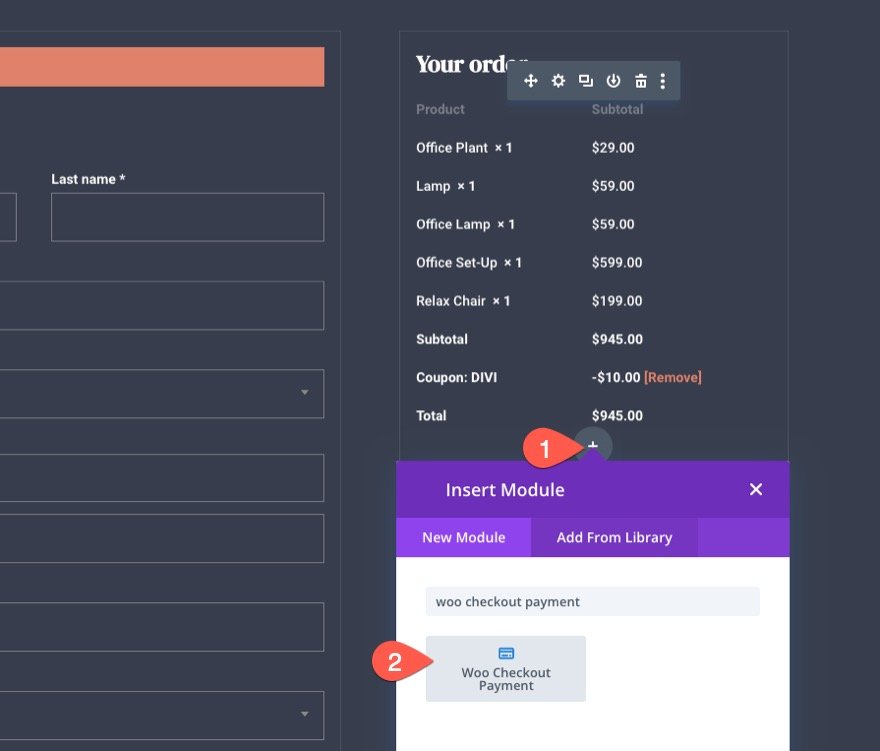
Designing the Woo Checkout Fee Module
Now that our checkout main points content material is whole, we’re in a position so as to add the Woo Checkout Fee content material. That is the overall key part to the checkout web page. It contains clickable radio button toggles for various fee choices in addition to the primary checkout button. It additionally contains integrated shape notices.
So as to add the checkout fee content material, upload a brand new Woo Checkout Fee module beneath the checkout main points in column 2.
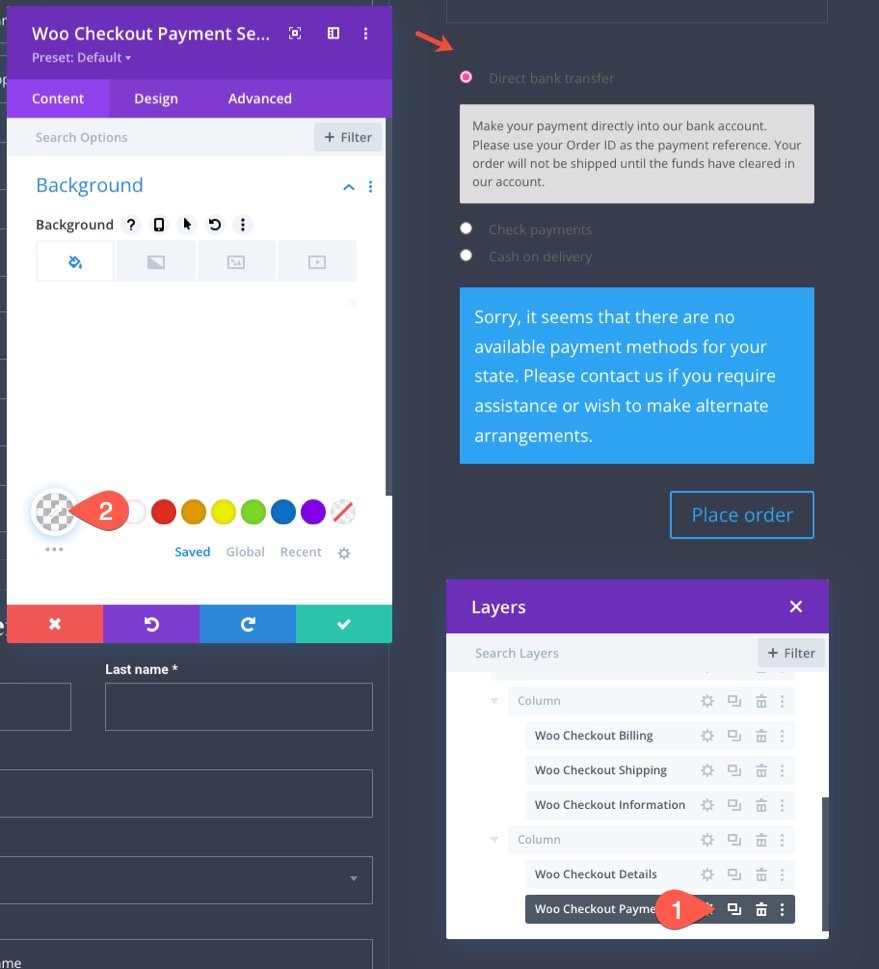
Woo Checkout Fee Background
Open the Woo Checkout Fee settings and provides the module a clear background:
- Background Colour: clear
Woo Checkout Fee Frame Textual content
Subsequent, replace the frame textual content taste as follows:
- Frame Font: Roboto
Below the hyperlink tab replace the hyperlink textual content colour:
- Hyperlink Textual content Colour: #999e75
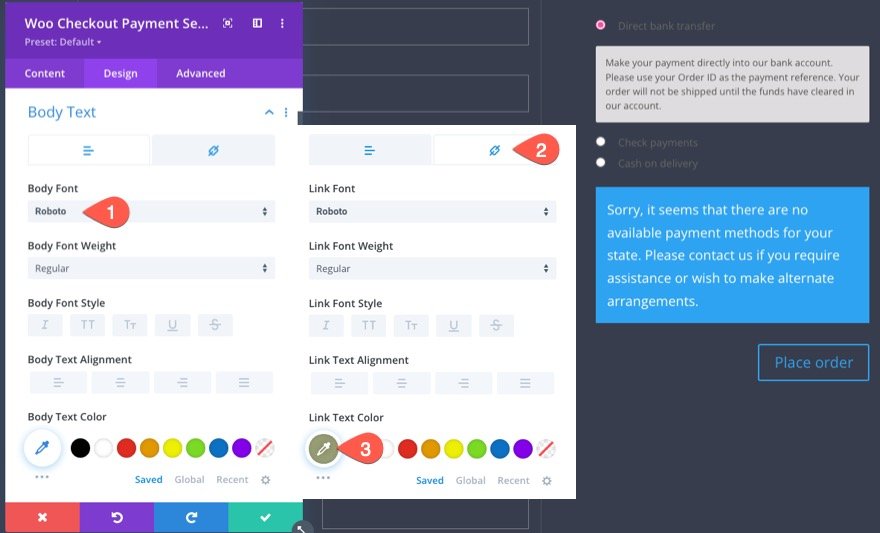
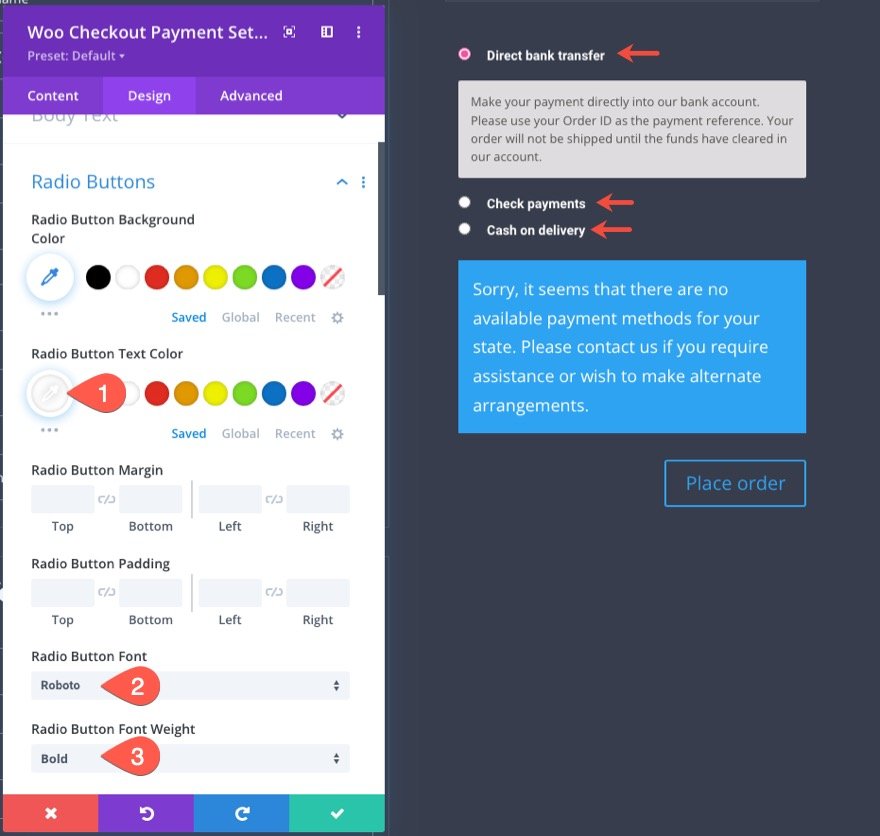
Woo Checkout Fee Radio Buttons
Subsequent, replace the way of the radio buttons as follows:
- Radio Button Textual content Colour: #fff
- Radio Button Font: Roboto
- Radio Button Font Weight: Daring
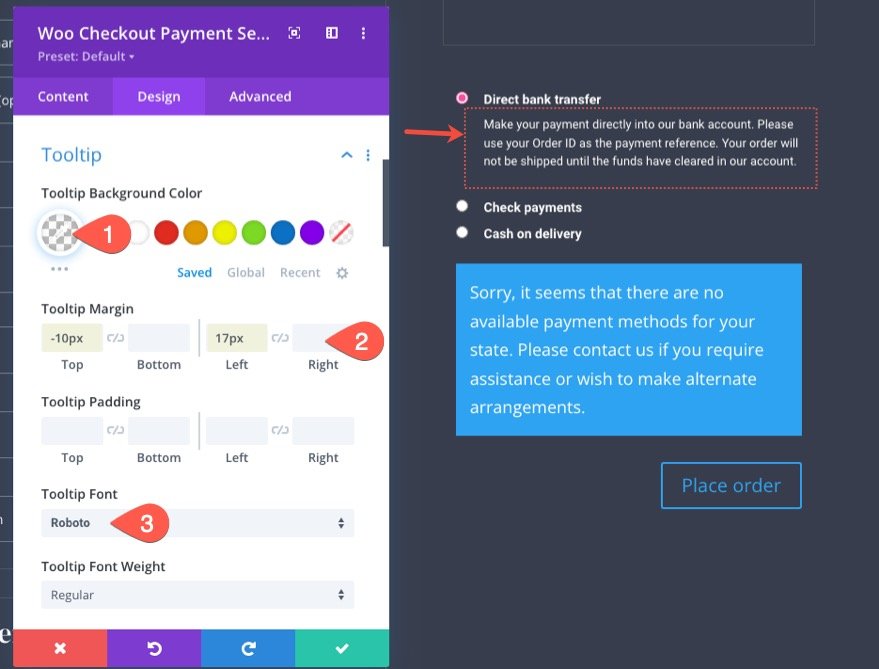
Woo Checkout Fee Tooltips
The tooltip is the textual content field that shows when a radio button toggle is open.
Let’s replace the tooltip kinds as follows:
- Tooltip Background Colour: clear
- Tooltip Margin: -10px peak, 17px left
- Tooltip Font: Roboto
Woo Checkout Fee Shape Understand
Since the Woo Checkout Fee module stocks the similar Shape Understand choice, we will replica the prevailing shape understand kinds from the Woo Checkout Billing module and paste them to the Woo Checkout Fee module.
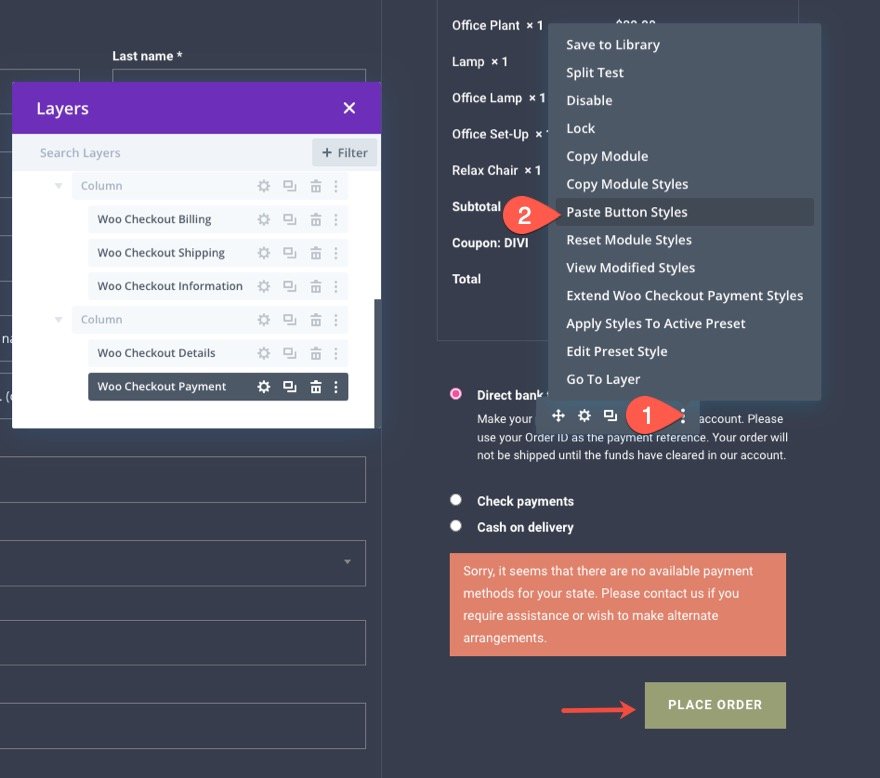
Woo Checkout Fee Button
To taste the checkout button for the Woo Checkout Fee module, replica the button kinds from the Woo Understand module.
Then paste the button kinds to the Woo Checkout Fee module.
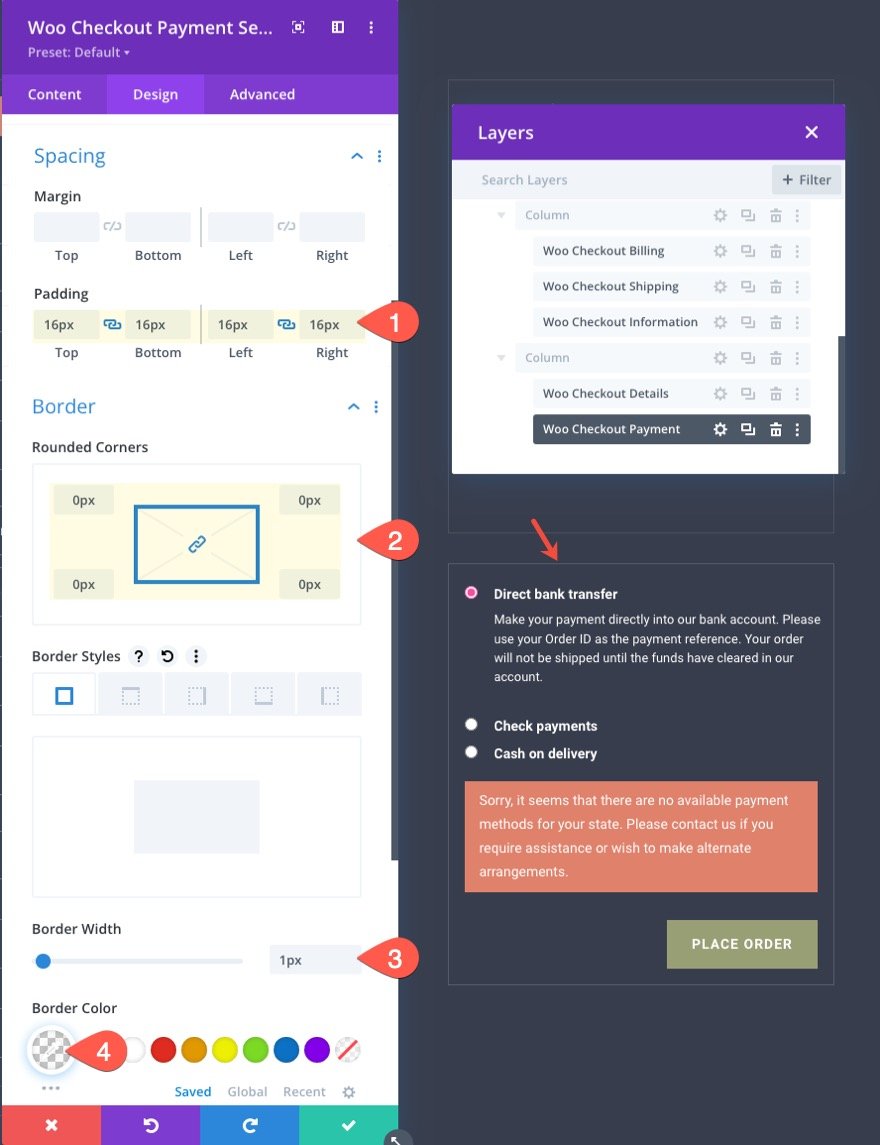
Woo Checkout Fee Padding and Border
To complete the design, upload padding and border as follows:
- Padding: 16px peak, 16px backside, 16px left, 16px appropriate
- Rounded Corners: 0px
- Border Width: 1px
- Border Colour: rgba(255,255,255,0.1)
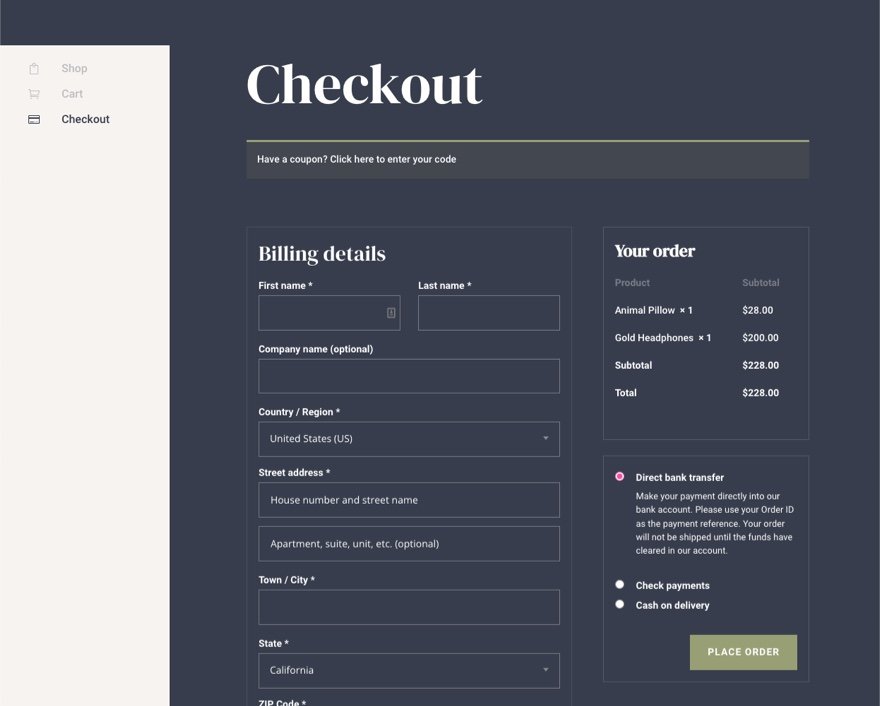
The Consequence
Here’s what our checkout web page looks as if now!
Upload Extra Content material as Wanted
At this level, we’ve got all of the key parts for our checkout web page template. However you don’t have to prevent right here. You’ll upload any content material you wish to have to the web page as wanted.
For our featured demo of this checkout web page template (available for download here), we integrated a hard and fast sidebar with some customized navigation hyperlinks.
Making a Customized Template for the Checkout Web page
If you wish to create a Checkout Web page Template, you’ll use the Theme Builder to create a checkout web page template format similar to we did with the Checkout web page template. Then again, since we have already got a web page format designed from this educational, we will merely upload this format to a checkout web page template.
Save WooCommerce Web page Structure to Divi Library
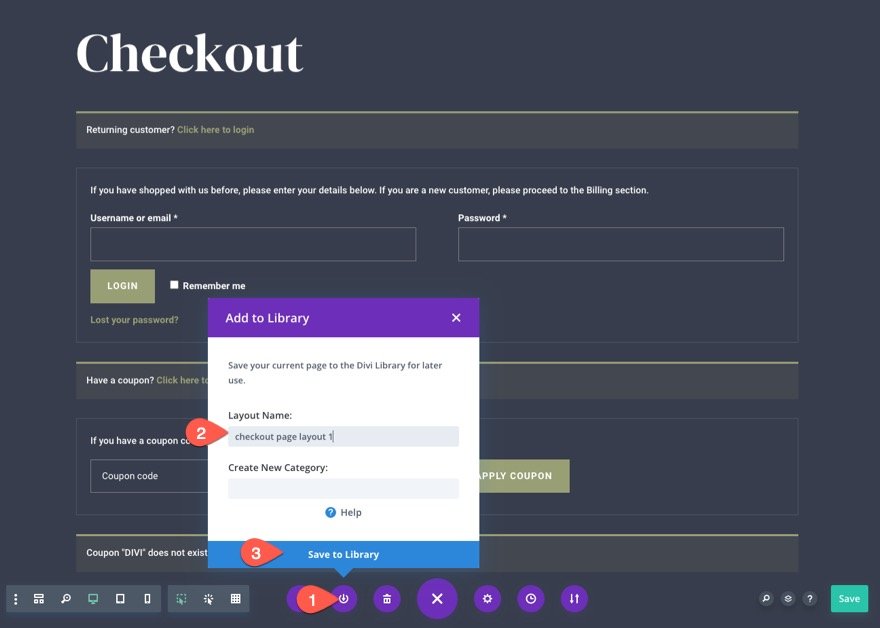
Prior to we will upload the checkout web page format to a checkout web page template, we should first save the web page format to the Divi Library.
To do that, open the Divi Builder settings menu on the backside of the checkout web page. Click on the Upload to Library icon, give the Structure a reputation, then click on Save to Library.
Create New Checkout Web page Template
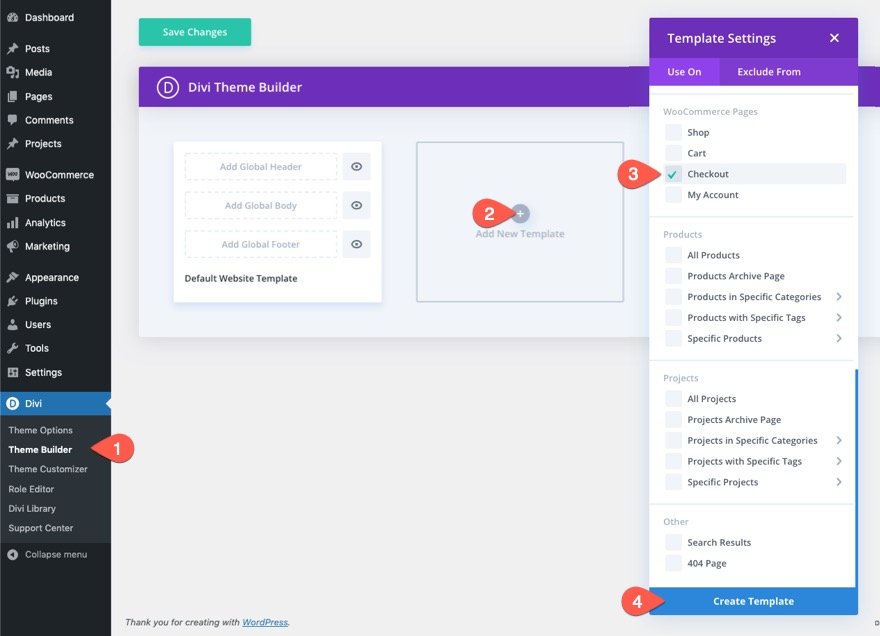
As soon as the checkout web page format is stored to the library, we’re in a position to create a brand new checkout web page template.
Right here’s the way to do it:
- Move in your WordPress Dashboard and navigate to Divi > Theme Builder.
- Then click on the Upload New Template plus icon throughout the empty grey field space so as to add a brand new template.
- Within the Template Settings modal, beneath the “Use On” tab, choose Checkout beneath the WooCommerce Pages listing.
- In spite of everything, click on Create Template.
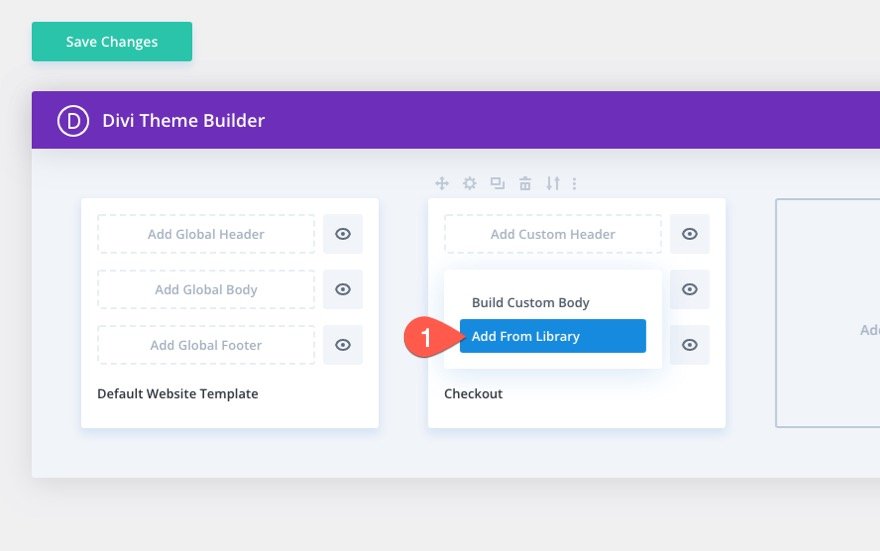
Upload Checkout Web page Structure to the Checkout Template
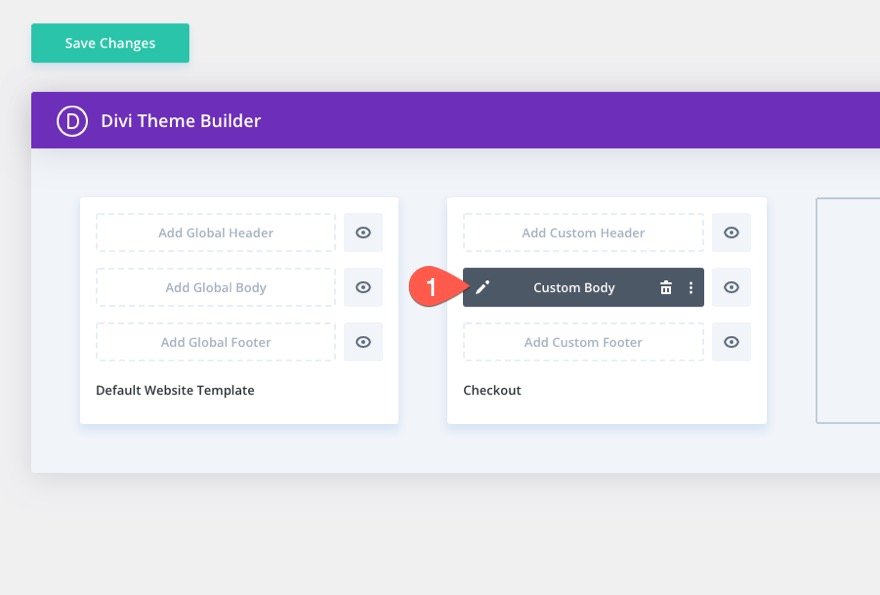
As soon as the brand new Checkout template has been created, click on the “Upload Customized Frame” space of the template. Within the popup listing, choose Upload From Library.
From the Load From Library popup, beneath the Your Stored Layouts tab, choose the checkout web page format you will have stored to the library.
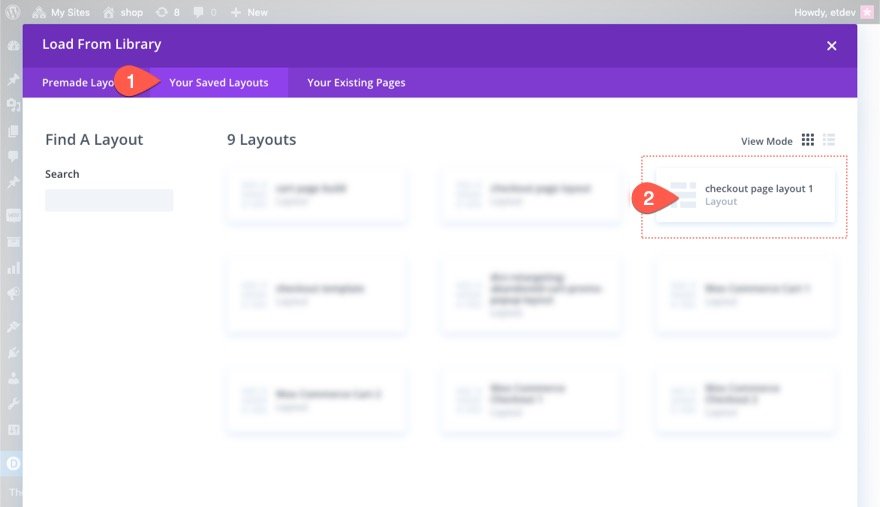
As soon as accomplished, the Checkout template will probably be to be had within the Theme Builder. To edit the template, click on the edit icon at the frame space of the template.
Ultimate Consequence
Let’s take a look at the overall results of our checkout web page template.

And here’s the way it appears on pill and get in touch with units.
Ultimate Ideas
The method of designing a customized WooCommerce Checkout Web page template is greatly simplified and amplified with Divi’s robust visible web page builder and intuitive Woo Modules. On this educational, we targeting incorporating the important thing parts that make up a checkout web page. However, bear in mind, all the different robust Divi modules and contours are at your disposal to take your checkout pages to an entire new degree. With a bit of luck, this will likely lend a hand spice up your Divi design abilities and, extra importantly, result in extra conversions.
For extra, take a look at the way to design a WooCommerce Cart Web page Template in Divi or download our awesome FREE Cart & Checkout Page Template Sets for Divi.
I look ahead to listening to from you within the feedback.
Cheers!
.inline-code{padding: 0px 4px; colour: purple; font-family: Monaco,consolas,bitstream vera sans mono,courier new,Courier,monospace!necessary} video.with-border {border-radius: 8px;box-shadow: 0 8px 60px 0 rgba(103,151,255,.11), 0 12px 90px 0 rgba(103,151,255,.11);show:block;margin: 0 auto;}
The put up How to Create a WooCommerce Checkout Page Template with Divi seemed first on Elegant Themes Blog.
0 Comments