
Divi’s integrated condition options let us show content material according to a Web page Discuss with situation. This lets you show any Divi component provided that the consumer has visited a selected web page for your web page. In different phrases, the content material will stay hidden till the consumer has visited the web page. This capability is excellent for retargeting guests with a press release bar when they consult with a touchdown web page. Since the guests have confirmed to have an interest (they got here again to the touchdown web page), we will leverage this through exhibiting bulletins (reductions, limited-time provides, promotions, and so on.) to steer them in the precise route.
On this instructional, we’ll display you how one can retarget a touchdown web page consult with with a press release bar in Divi through making the most of Divi’s integrated situation choices. All it takes is a couple of clicks.
Let’s get began!
Sneak Peek
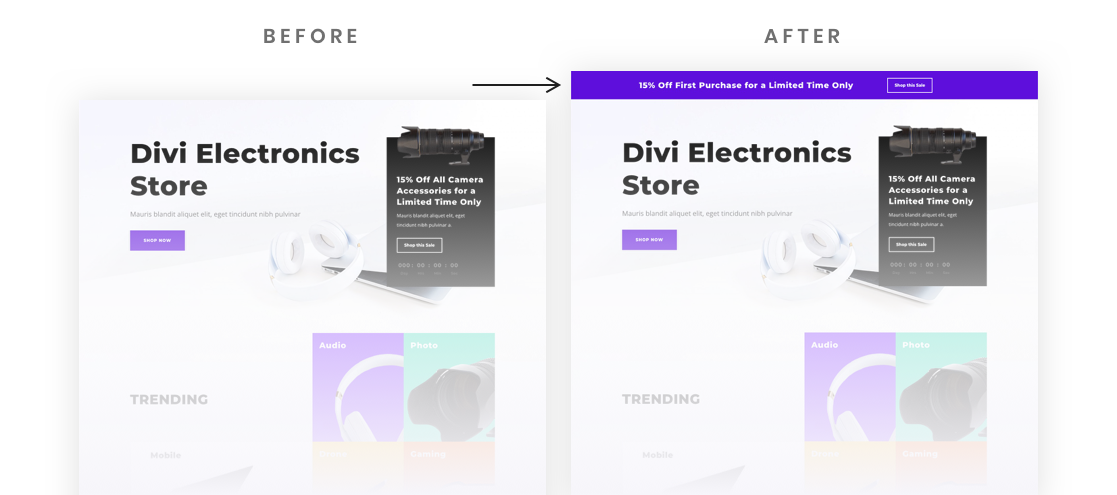
Here’s a fast take a look at the design we’ll construct on this instructional.
This Announcement Bar will probably be displayed after a consumer visits the web page.
Obtain the Format for FREE
To put your arms at the structure from this instructional, you are going to first want to obtain it the use of the button underneath. To achieve get right of entry to to the obtain it is important to subscribe to our Divi Day by day e mail listing through the use of the shape underneath. As a brand new subscriber, you are going to obtain much more Divi goodness and a unfastened Divi Format pack each Monday! In case you’re already at the listing, merely input your e mail deal with underneath and click on obtain. You’re going to now not be “resubscribed” or obtain further emails.
@media most effective display screen and ( max-width: 767px ) {.et_bloom .et_bloom_optin_1 .carrot_edge.et_bloom_form_right .et_bloom_form_content:prior to { border-top-color: #ffffff !necessary; border-left-color: clear !necessary; }.et_bloom .et_bloom_optin_1 .carrot_edge.et_bloom_form_left .et_bloom_form_content:after { border-bottom-color: #ffffff !necessary; border-left-color: clear !necessary; }
}.et_bloom .et_bloom_optin_1 .et_bloom_form_content button { background-color: #f92c8b !necessary; } .et_bloom .et_bloom_optin_1 .et_bloom_form_content .et_bloom_fields i { shade: #f92c8b !necessary; } .et_bloom .et_bloom_optin_1 .et_bloom_form_content .et_bloom_custom_field_radio i:prior to { background: #f92c8b !necessary; } .et_bloom .et_bloom_optin_1 .et_bloom_border_solid { border-color: #f7f9fb !necessary } .et_bloom .et_bloom_optin_1 .et_bloom_form_content button { background-color: #f92c8b !necessary; } .et_bloom .et_bloom_optin_1 .et_bloom_form_container h2, .et_bloom .et_bloom_optin_1 .et_bloom_form_container h2 span, .et_bloom .et_bloom_optin_1 .et_bloom_form_container h2 robust { font-family: “Open Sans”, Helvetica, Arial, Lucida, sans-serif; }.et_bloom .et_bloom_optin_1 .et_bloom_form_container p, .et_bloom .et_bloom_optin_1 .et_bloom_form_container p span, .et_bloom .et_bloom_optin_1 .et_bloom_form_container p robust, .et_bloom .et_bloom_optin_1 .et_bloom_form_container shape enter, .et_bloom .et_bloom_optin_1 .et_bloom_form_container shape button span { font-family: “Open Sans”, Helvetica, Arial, Lucida, sans-serif; } p.et_bloom_popup_input { padding-bottom: 0 !necessary;}

Obtain For Loose
Sign up for the Divi Publication and we can e mail you a replica of without equal Divi Touchdown Web page Format Pack, plus heaps of different wonderful and unfastened Divi assets, guidelines and tips. Observe alongside and you are going to be a Divi grasp very quickly. If you’re already subscribed merely sort to your e mail deal with underneath and click on obtain to get right of entry to the structure pack.
You’ve gotten effectively subscribed. Please test your e mail deal with to substantiate your subscription and get get right of entry to to unfastened weekly Divi structure packs!
To import the phase structure in your Divi Library, navigate to the Divi Library.
Click on the Import button.
Within the portability popup, choose the import tab and make a selection the obtain document out of your pc.
Then click on the import button.
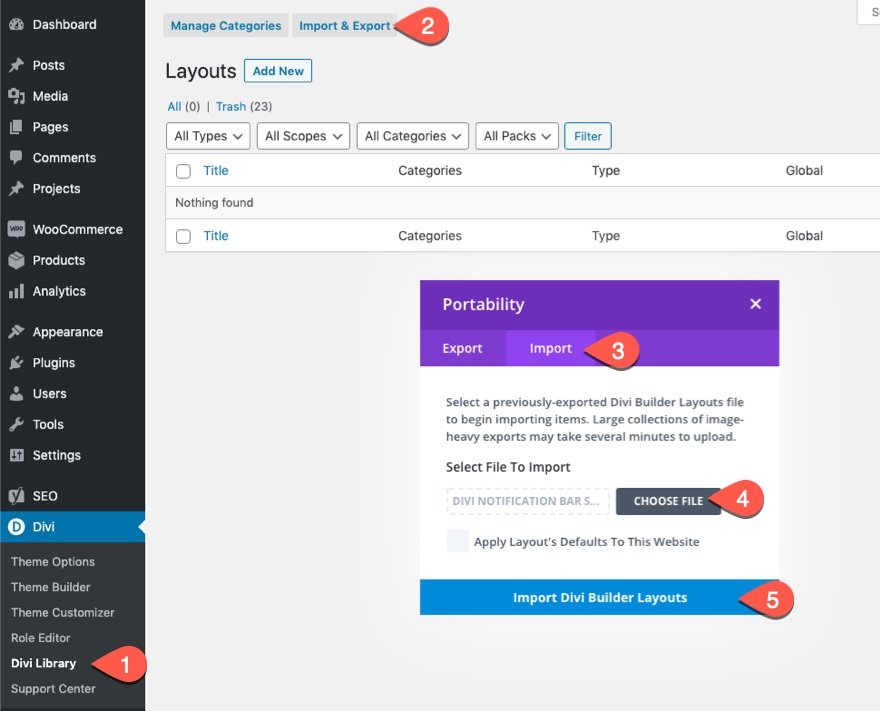
As soon as achieved, the phase structure will probably be to be had within the Divi Builder.
The Key Thought
The best way to Show a Phase Provided that a Customer has Visited a Particular Web page
As up to now discussed, Divi’s integrated situation choices come with a Web page Discuss with situation that lets you show any Divi component provided that the consumer has visited a selected web page for your web page. In different phrases, the content material will stay hidden till the consumer has visited the web page.
However, you’ll make a selection to show a Divi component provided that the consumer has now not visited a selected web page. In different phrases, the content material will stay hidden to the consumer till they consult with the web page.
On this instructional, we’re going to use Divi’s situation choices to show a press release bar provided that a consumer has visited the touchdown web page. The announcement bar can also be constructed simply the use of the Divi Builder to incorporate any form of content material or design you need. As soon as constructed, you’ll upload the Web page Discuss with situation to the announcement bar (which on this case is a Divi phase) through doing those easy steps:
- Open the phase settings for the phase used to create the announcement bar.
- Below the complex tab, click on the plus icon below Show Stipulations so as to add a brand new situation to the phase.
- From the situation dropdown, choose the Web page Discuss with situation from the listing.
- Within the Web page Discuss with situation settings popup, choose the method to show provided that the consumer has visited a selected web page.
- Make a selection the particular web page from the listing of pages out of your web page (which on this case will be the Touchdown Web page).
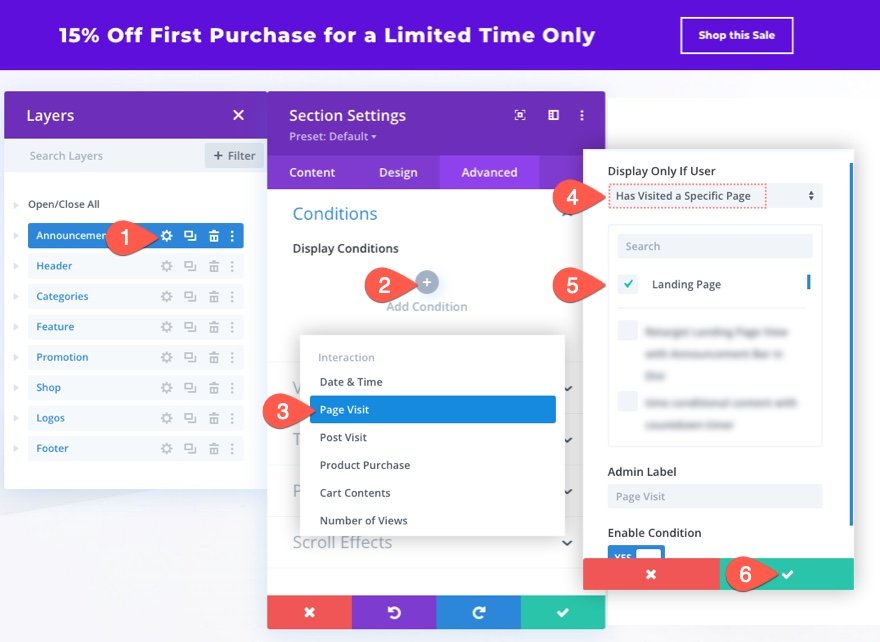
That’s it! As soon as achieved the announcement bar (or phase) won’t seem to customers till they have got first visited the Touchdown web page up to now.
Now that you’ve a seize at the key thought, let’s get to the educational, we could?
What You Wish to Get Began
To get began, it is important to do the next:
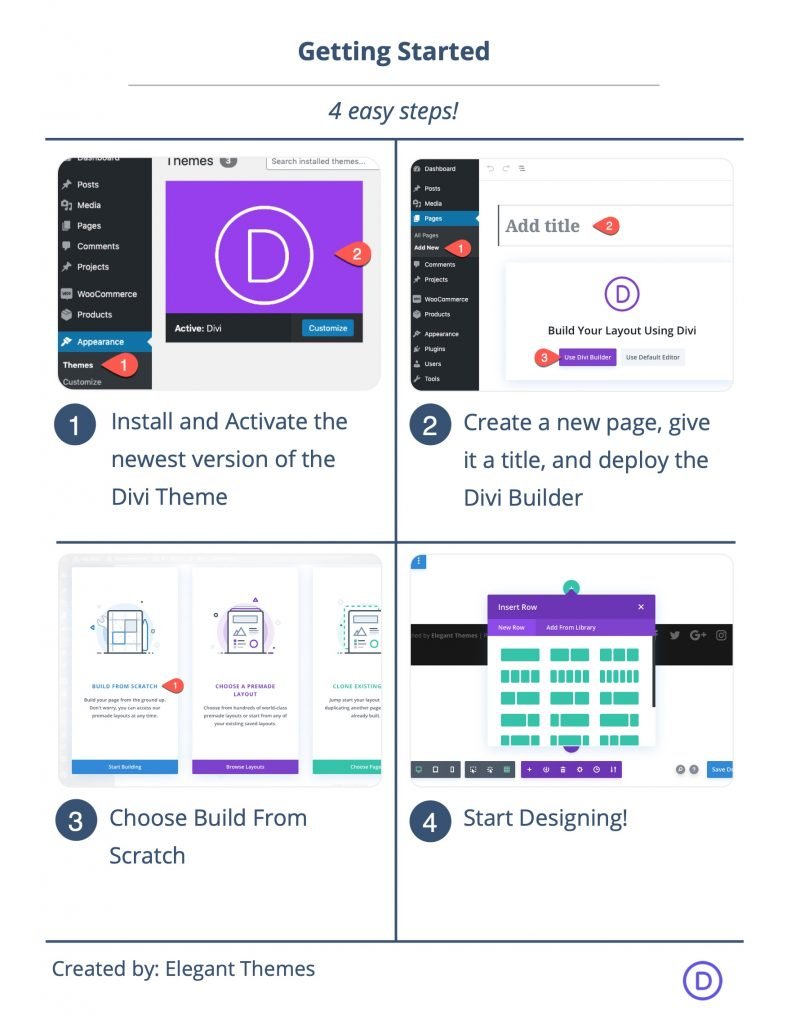
- In case you haven’t but, install and activate the Divi Theme.
- Create a brand new web page in WordPress and use the Divi Builder to edit the web page at the entrance finish (visible builder).
- Make a selection the choice “Construct From Scratch”.
After that, you are going to have a clean canvas to begin designing in Divi.
The best way to Retarget a Touchdown Web page Discuss with with an Announcement Bar in Divi
Phase 1: Loading the Electronics Retailer Touchdown Web page Format
Prior to we will retarget a touchdown web page, we want to construct one first.
To hurry up the method, we’re going to use the Electronics Retailer Touchdown Web page Format from Divi’s Electronics Store Layout Pack which is to be had from throughout the Divi Builder.
To load the structure to the web page, click on the Upload From Library button (the plus icon) from the settings menu. Below the premade layouts tab, choose the Electronics Retailer Touchdown Web page structure and click on the Use This Format button.
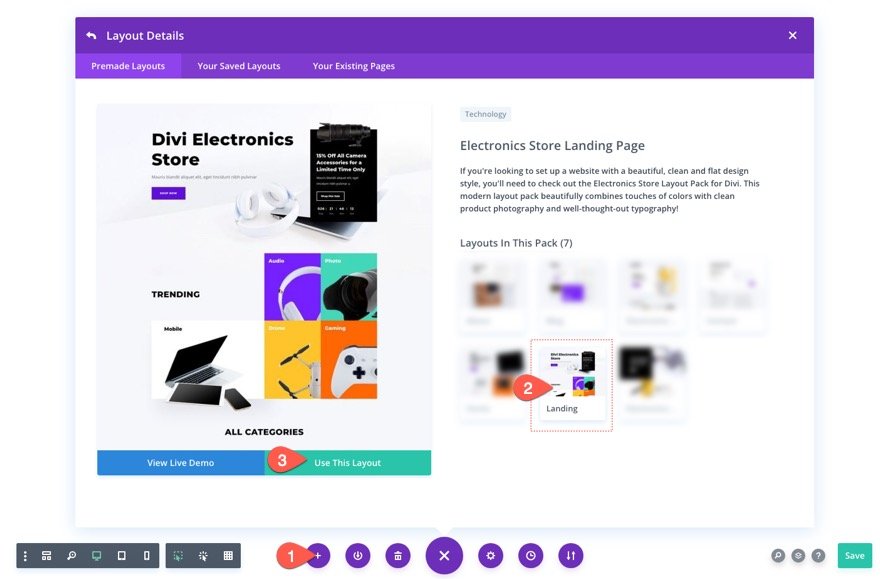
You’ll want to, after all, use an current touchdown web page for your web page, or make a selection to construct one by yourself. However for now, this may increasingly paintings.
Phase 2: Making a Phase with The Web page Discuss with Situation
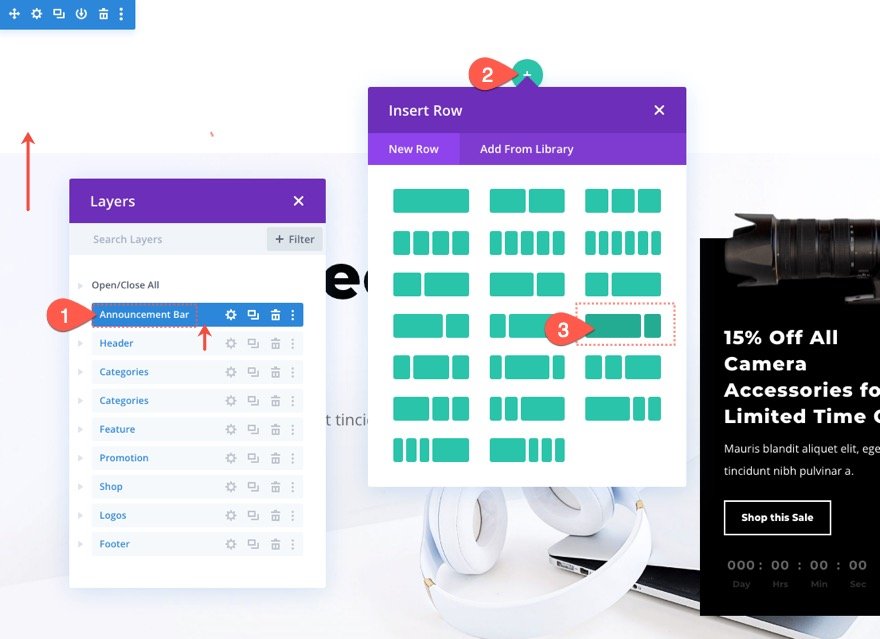
With a view to construct the announcement bar, we’re going to use a Divi Phase. Cross forward and upload a brand new common phase below the prevailing peak phase of the structure.
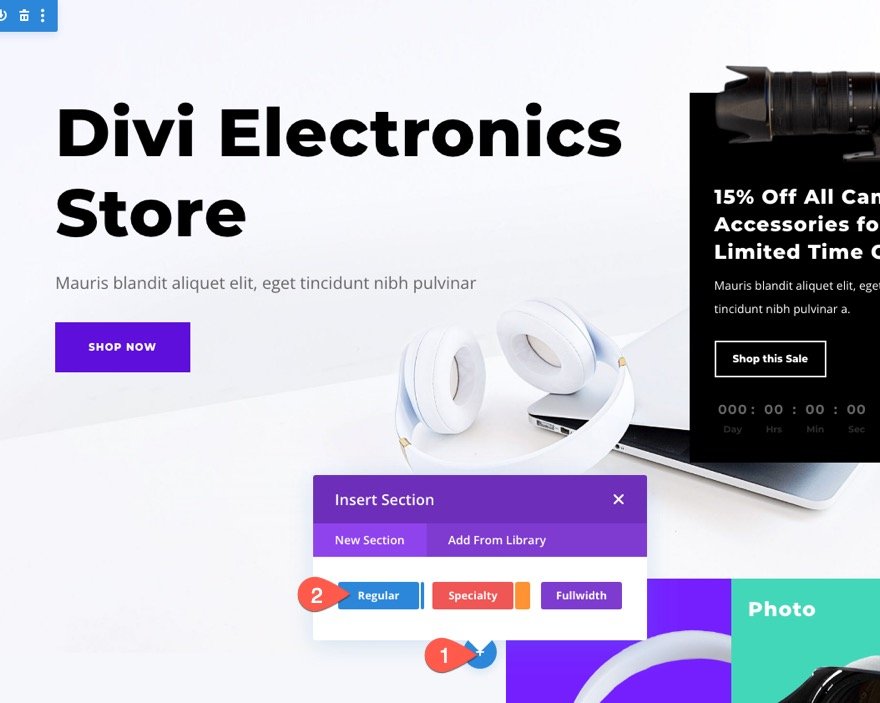
As soon as added, drag the phase to the highest of the web page structure and upload a three-fourths 0ne-fourth row to the phase.
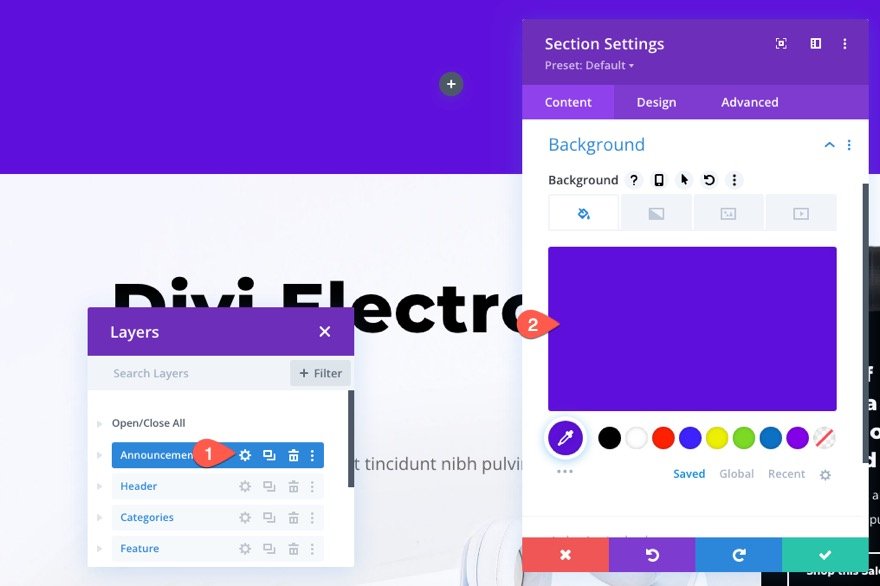
Open the phase settings and upload the next background shade to the phase:
- Background Colour: #5e10da
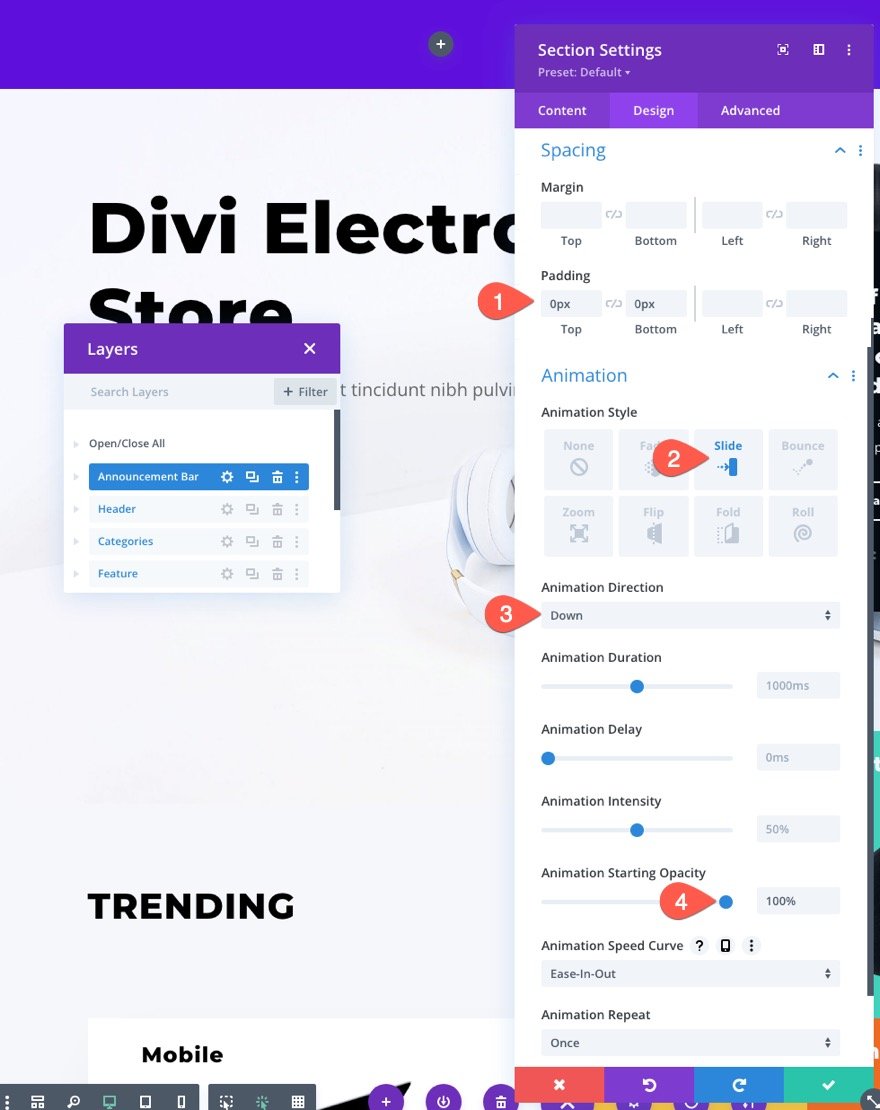
Below the design tab, replace the spacing and upload an animation impact to the phase as follows:
- Padding: 0px peak, 0px backside
- Animation Taste: Slide
- Animation Course: Down
- Animation Beginning Opacity: 100%
This may occasionally shorten the peak of the announcement bar in addition to give it an crowd pleasing animation impact when the web page lots.
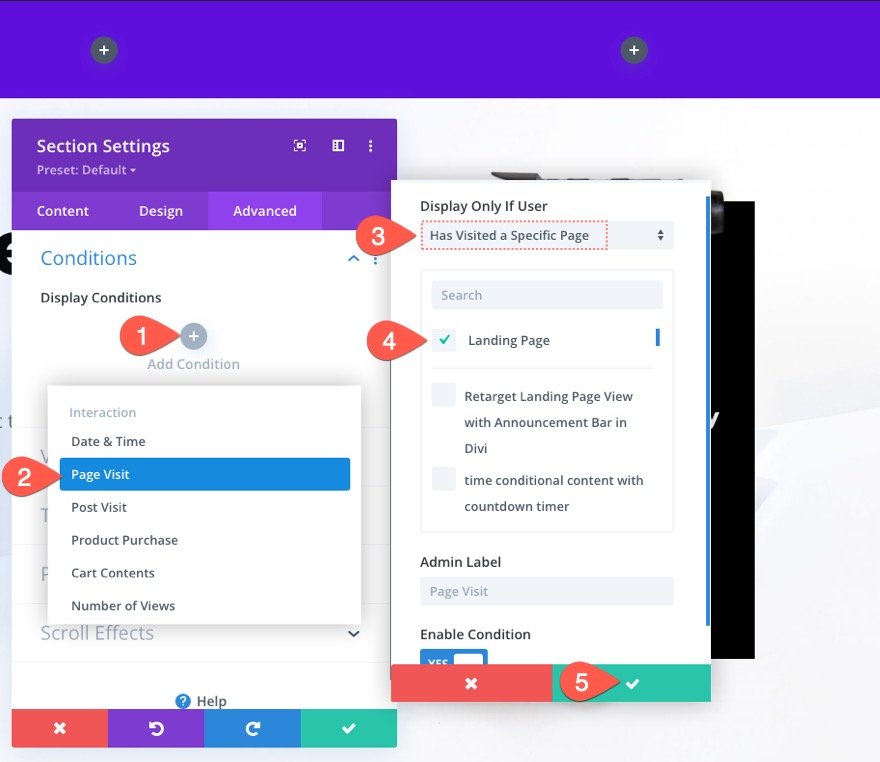
Below the complex tab, upload a brand new show situation through doing the next:
- Click on the plus icon below Show Stipulations so as to add a brand new situation to the phase.
- From the situation dropdown, choose the Web page Discuss with situation from the listing.
- Within the Web page Discuss with situation settings popup, choose the method to show provided that the consumer has visited a selected web page.
- Make a selection the particular web page from the listing of pages out of your web page (which on this case will be the Touchdown Web page).
- Save Settings.
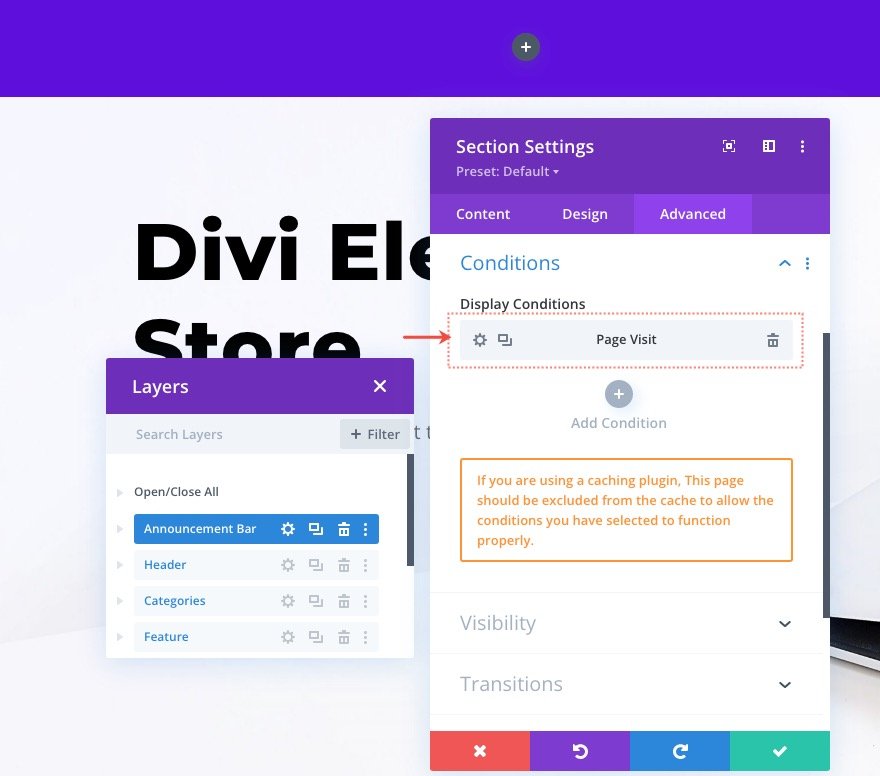
Now you are going to have a brand new Web page Discuss with show situation for the phase.
Notice: If you’re the use of a caching plugin, this web page will have to be excluded from the cache to permit the show situation to serve as correctly.
Phase 3: Developing the Announcement Bar Content material
At this level, we have now the phase and row for our announcement bar in position. And our phase has the Web page View show situation energetic. So, any content material we upload within the phase will inherit the show situation of its dad or mum container (the phase). All we want to do now could be fill the phase with content material to complete the introduction of the announcement bar.
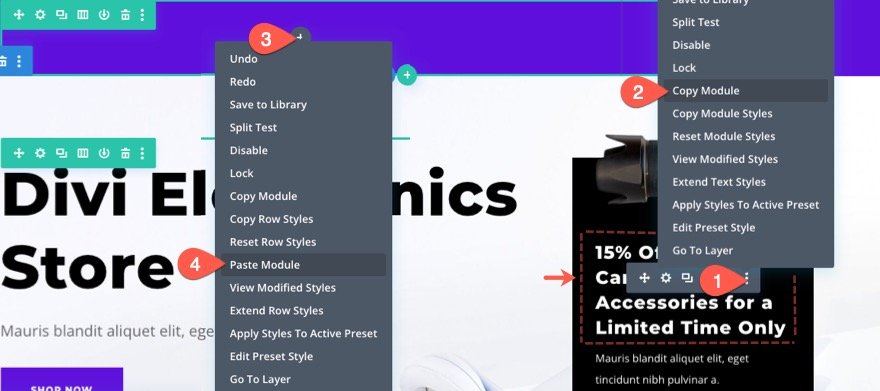
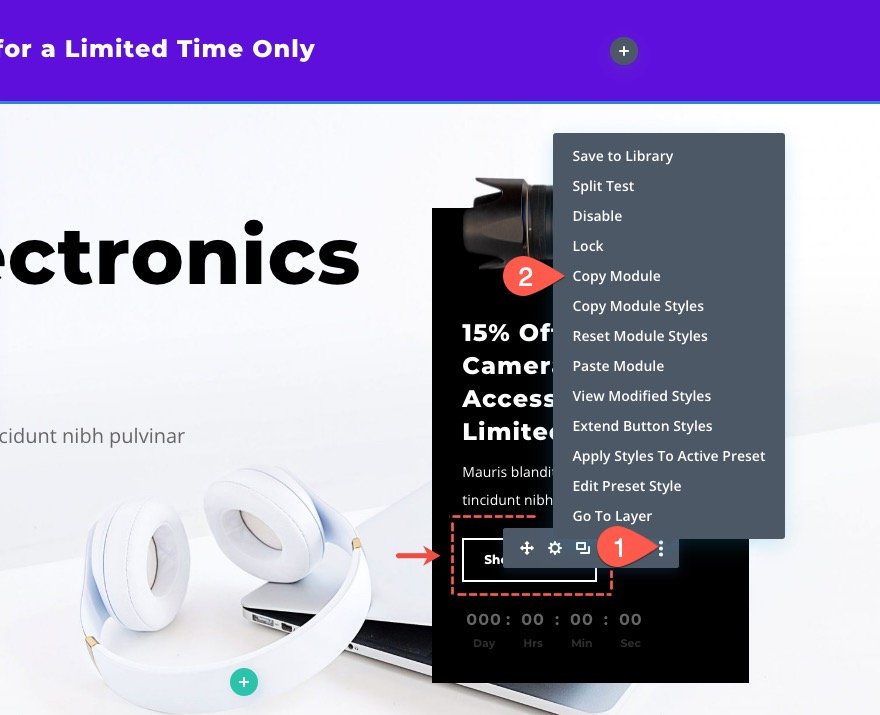
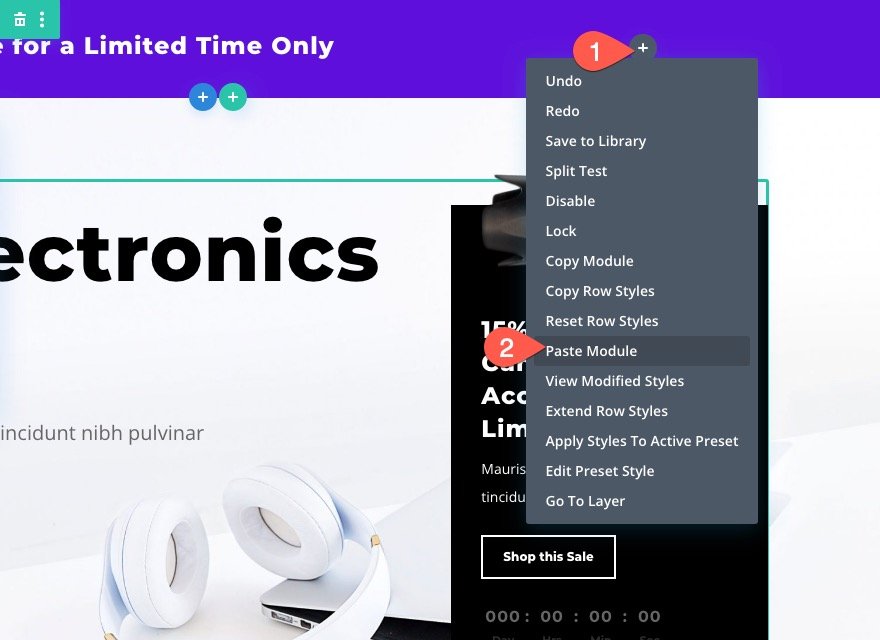
The primary piece of content material would be the announcement bar textual content. So as to add the textual content, replica the textual content module underneath the digicam symbol in the precise column of the row within the current header phase of the structure. Then paste the textual content module within the left column of the row within the announcement bar phase.
As soon as the brand new textual content module is added, open the textual content settings and replace the next:
- Heading 3 Textual content Alignment (pill and make contact with): Middle
- Heading 3 Textual content Measurement (telephone): 12px
- Padding: 5px peak
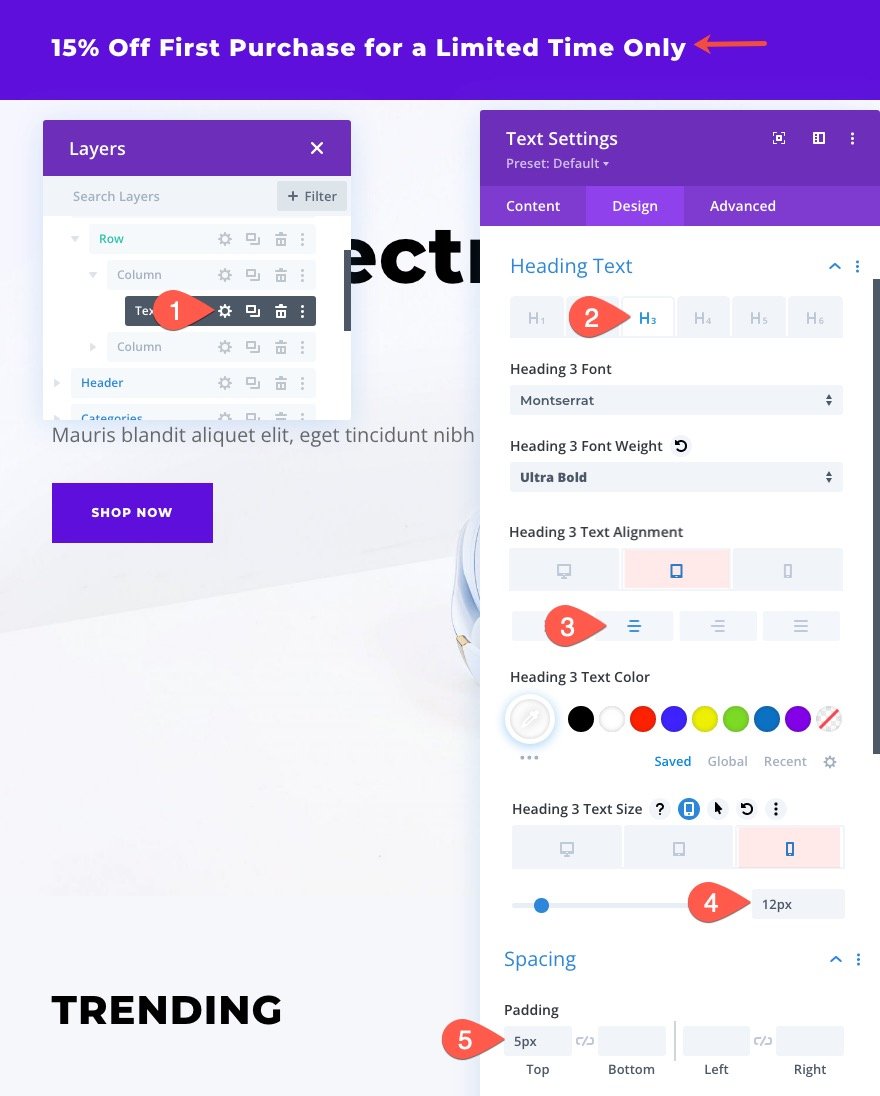
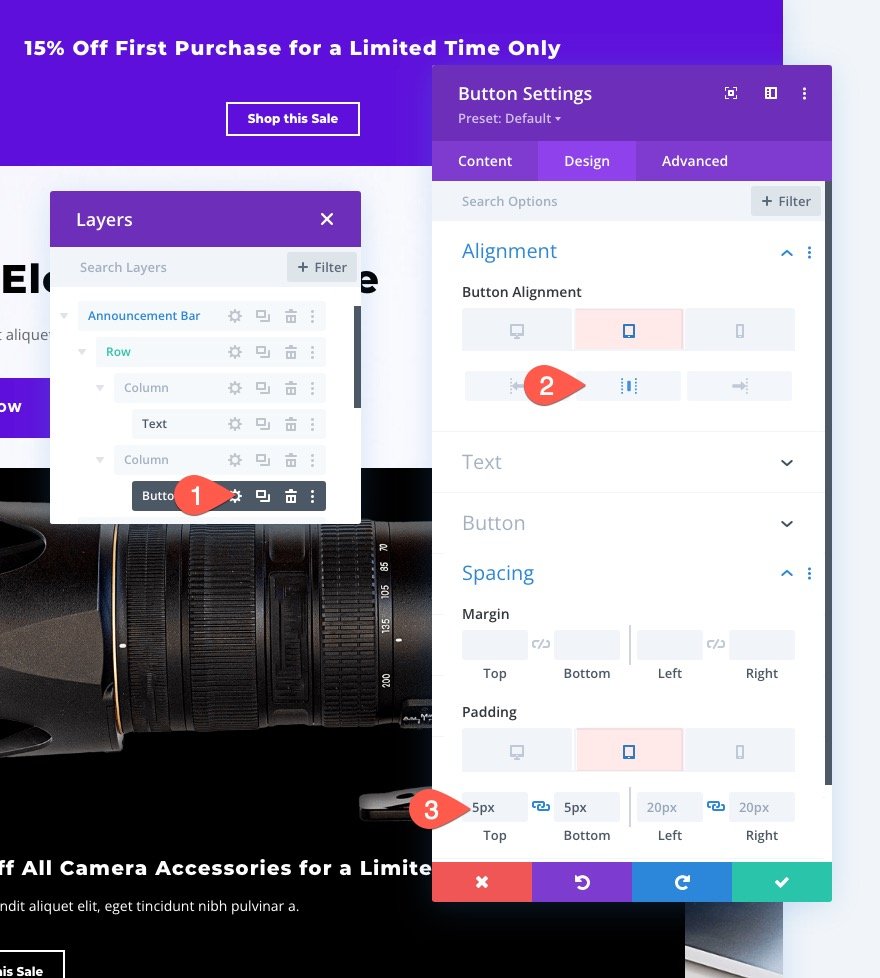
In the precise column of the announcement bar, we’re going to upload a button. To try this, replica the prevailing button module above the countdown timer in the precise column of the row within the current header phase of the structure.
Then paste the button module within the precise column of the row within the announcement bar phase.
As soon as added, open the settings for the button module and replace the next:
- Button Alignment (pill and make contact with): Middle
- Padding (pill and make contact with): 5px peak, 5px backside
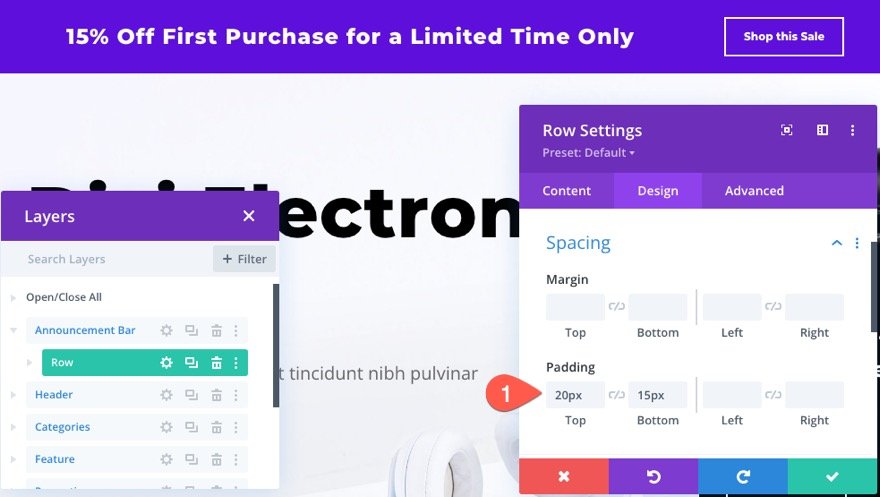
Phase 4: Adjusting the Row Settings
To position the overall touches at the design of the announcement bar, open the settings for the row and replace the sizing choices as follows:
- Gutter Width: 1
- Width: 95%
- Max Width: 980px
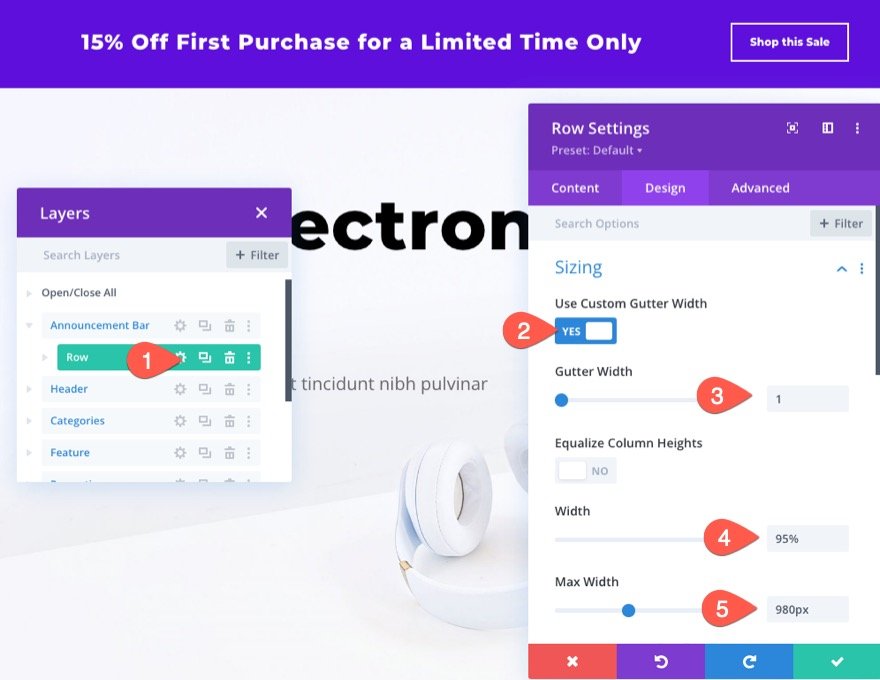
- Padding: 20px peak, 15px backside
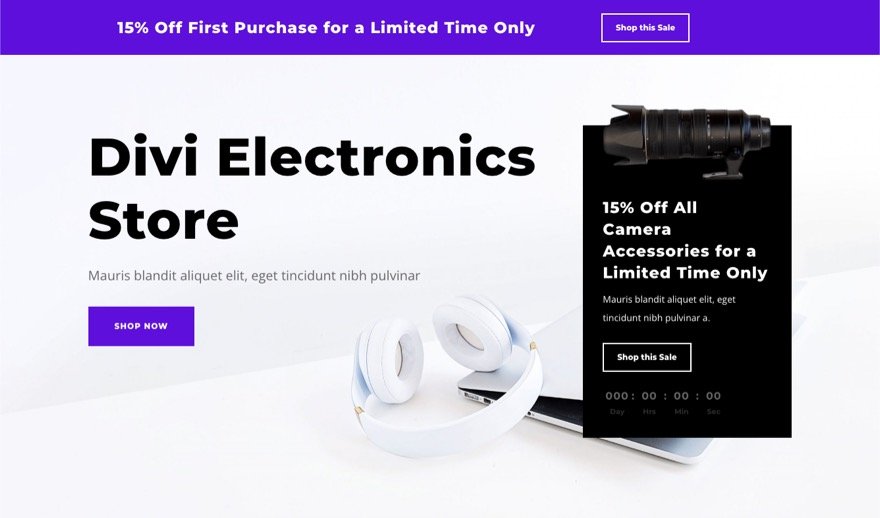
Ultimate Outcome
That’s it! To try the end result at the reside web page, keep in mind that you are going to now not see the announcement bar till you consult with the touchdown web page (or no matter web page you decided on for the Web page View situation).
Here’s what the announcement bar will appear to be as soon as it does seem.
And this is the animation of the announcement bar on web page load.
Ultimate Ideas
The Web page View show situation highlighted on this instructional is most effective one of the condition options to be had in Divi. Be happy to mix the web page view situation with different stipulations that make sense for a press release bar. As an example, it’s essential to additionally come with the Product Acquire situation to provide a first-time acquire cut price most effective to guests who’ve now not made a purchase order. Plus, you’ll additionally experiment with exhibiting different content material but even so a press release bar as neatly. Have amusing!
I sit up for listening to from you within the feedback.
Cheers!
.inline-code{padding: 0px 4px; shade: pink; font-family: Monaco,consolas,bitstream vera sans mono,courier new,Courier,monospace!necessary} video.with-border {border-radius: 8px;box-shadow: 0 8px 60px 0 rgba(103,151,255,.11), 0 12px 90px 0 rgba(103,151,255,.11);show:block;margin: 0 auto;}
The submit How to Retarget a Landing Page Visit with an Announcement Bar in Divi seemed first on Elegant Themes Blog.
Contents
- 1 Sneak Peek
- 2 Obtain the Format for FREE
- 3 Obtain For Loose
- 4 You’ve gotten effectively subscribed. Please test your e mail deal with to substantiate your subscription and get get right of entry to to unfastened weekly Divi structure packs!
- 5 The Key Thought
- 6 What You Wish to Get Began
- 7 The best way to Retarget a Touchdown Web page Discuss with with an Announcement Bar in Divi
- 8 Ultimate Outcome
- 9 Ultimate Ideas
- 10 Observe Google Set of rules Updates in WordPress
- 11 5 Techniques to Edit HTML With out Being an Knowledgeable Coder
- 12 50 Amusing Company Staff-Construction Actions & Trip Concepts Everybody Will Experience

0 Comments