

When designing a sticky header to your web page, switching the brand can open up new design alternatives. For instance, you could need to use a special background coloration for the sticky header however desire a other brand to make the design paintings. Or, you could desire a other model of the brand that doesn’t stand out as a lot and distract customers.
On this educational, we’re going to display you how one can transfer your brand on a sticky header in Divi. The use of the Divi theme builder, we’re going to construct a brand new header with two emblems that transfer when the person engages the header’s sticky state.
Let’s get began!
Sneak Peek
Here’s a fast take a look at the design we’ll construct on this educational.
Obtain the Structure for FREE
To put your arms at the designs from this educational, you are going to first wish to obtain it the use of the button under. To achieve get admission to to the obtain it is very important subscribe to our Divi Day by day e mail listing through the use of the shape under. As a brand new subscriber, you are going to obtain much more Divi goodness and a unfastened Divi Structure pack each Monday! Should you’re already at the listing, merely input your e mail cope with under and click on obtain. You’re going to now not be “resubscribed” or obtain further emails.
@media simplest display screen and ( max-width: 767px ) {.et_bloom .et_bloom_optin_1 .carrot_edge.et_bloom_form_right .et_bloom_form_content:ahead of { border-top-color: #ffffff !essential; border-left-color: clear !essential; }.et_bloom .et_bloom_optin_1 .carrot_edge.et_bloom_form_left .et_bloom_form_content:after { border-bottom-color: #ffffff !essential; border-left-color: clear !essential; }
}.et_bloom .et_bloom_optin_1 .et_bloom_form_content button { background-color: #f92c8b !essential; } .et_bloom .et_bloom_optin_1 .et_bloom_form_content .et_bloom_fields i { coloration: #f92c8b !essential; } .et_bloom .et_bloom_optin_1 .et_bloom_form_content .et_bloom_custom_field_radio i:ahead of { background: #f92c8b !essential; } .et_bloom .et_bloom_optin_1 .et_bloom_border_solid { border-color: #f7f9fb !essential } .et_bloom .et_bloom_optin_1 .et_bloom_form_content button { background-color: #f92c8b !essential; } .et_bloom .et_bloom_optin_1 .et_bloom_form_container h2, .et_bloom .et_bloom_optin_1 .et_bloom_form_container h2 span, .et_bloom .et_bloom_optin_1 .et_bloom_form_container h2 robust { font-family: “Open Sans”, Helvetica, Arial, Lucida, sans-serif; }.et_bloom .et_bloom_optin_1 .et_bloom_form_container p, .et_bloom .et_bloom_optin_1 .et_bloom_form_container p span, .et_bloom .et_bloom_optin_1 .et_bloom_form_container p robust, .et_bloom .et_bloom_optin_1 .et_bloom_form_container shape enter, .et_bloom .et_bloom_optin_1 .et_bloom_form_container shape button span { font-family: “Open Sans”, Helvetica, Arial, Lucida, sans-serif; } p.et_bloom_popup_input { padding-bottom: 0 !essential;}

Obtain For Unfastened
Sign up for the Divi E-newsletter and we can e mail you a duplicate of without equal Divi Touchdown Web page Structure Pack, plus heaps of alternative wonderful and unfastened Divi assets, pointers and tips. Observe alongside and you are going to be a Divi grasp very quickly. If you’re already subscribed merely kind to your e mail cope with under and click on obtain to get admission to the format pack.
You’ve got effectively subscribed. Please test your e mail cope with to substantiate your subscription and get get admission to to unfastened weekly Divi format packs!
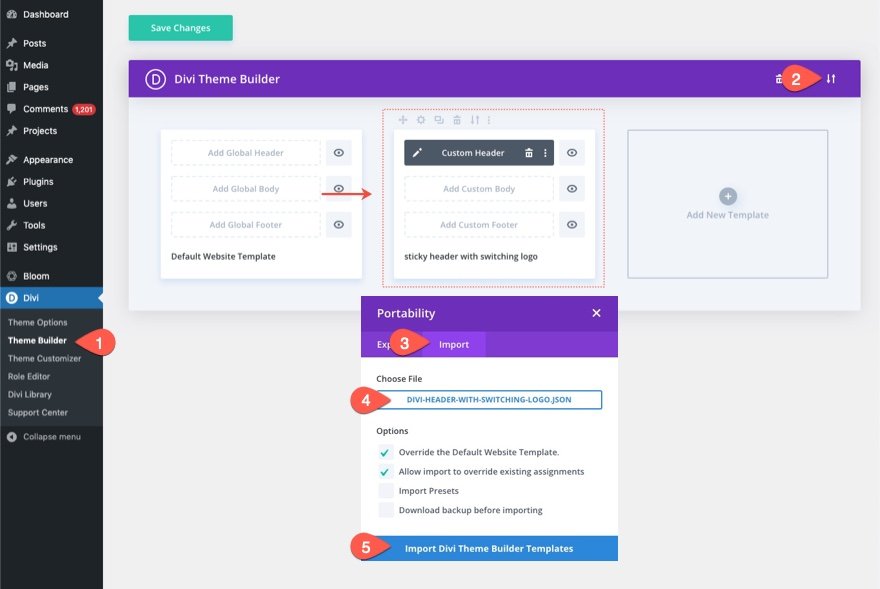
Import the Header Template to the Divi Theme Builder
To import the header template, it is very important navigate to Divi > Theme Builder.
Then use the portability icon on the peak proper of the web page to import the JSON document.
Let’s get to the academic, we could?
Switching Your Brand on a Sticky Header in Divi
Section 1: Development a New Header within the Divi Theme Builder
For this educational, we’re going to construct a brand new header the use of the Theme Builder.
To try this, navigate to the Theme Builder.
Upload a brand new template and assign it to All Pages (or to a check web page). Then click on to construct a brand new header within the new template.
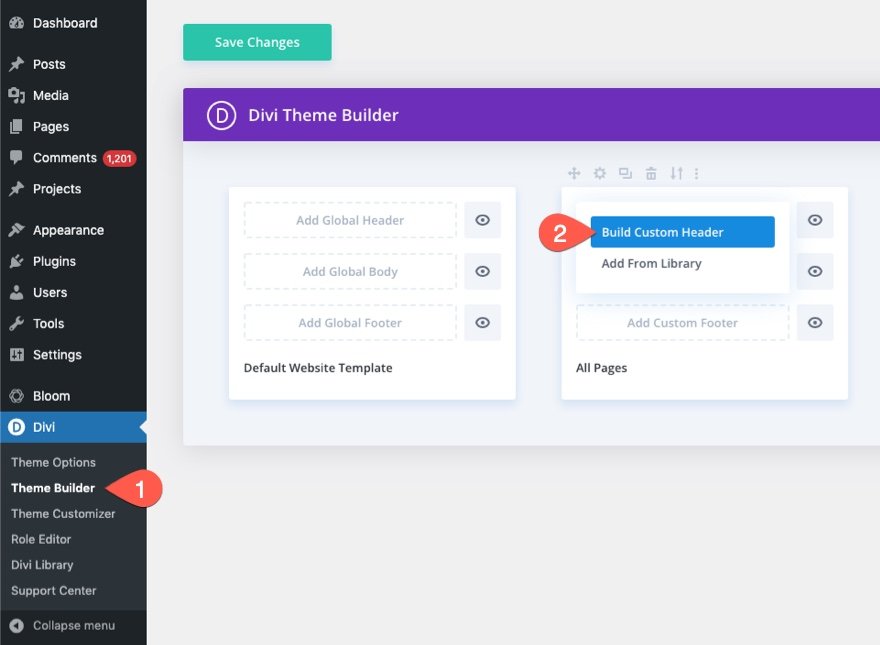
This may occasionally open the header template editor so we will get started development the header from scratch.
Section 2: Developing the Sticky Segment and Row
Upload Row
To kick issues off, cross forward and upload a one-fourth three-fourths column row to the default common phase.
![]()
Segment Settings
To make this a sticky header, we’re going to upload a sticky place to the phase. Open the phase settings and, underneath the complex tab, replace the sticky place as follows:
- Sticky Place: Stick with Best
![]()
Underneath the content material tab, upload a background coloration for the desktop and for the sticky state as follows:
- Background Colour (desktop): #f6f0e7
- Background Colour (sticky): #000000
![]()
Underneath the design tab, replace the padding:
- Padding: 0px peak, 0px backside
![]()
Row Settings
Now that the phase is whole, we’re in a position to replace the row settings. Open the settings for the row and replace the next design settings:
- Gutter Width: 1
- Width: 96%
- Padding: 10px peak, 10px backside
![]()
Section 3: Including the Switching Emblems
To be able to create the switching brand impact every time the header is within the sticky state, we’re going to create two photographs that slide out and in of view. The primary brand will probably be displayed first of all after which a brand new sticky state brand will slide into view as soon as the person scrolls down the web page
Developing the Major Brand
To create the principle brand, upload a brand new symbol module to the left column.
![]()
Add an emblem symbol to the module (round 200px through 67px). You’ll additionally upload a dynamic hyperlink to the homepage as neatly.
![]()
Underneath the design tab, give the picture a max top as follows:
- Max Peak: 67px (desktop), 45px (pill and speak to)
![]()
Then replace the next change into translate possibility within the sticky state:
- Grow to be Translate Y-axis (sticky): -100%
This may occasionally transfer the brand up out of doors of the column to cover it from view within the sticky state.
![]()
Developing the Sticky State Brand
To create the sticky state brand, reproduction the picture module with the brand we simply created.
![]()
Open the settings of the reproduction symbol module and add a brand new brand symbol (the only you wish to have to turn within the sticky state. For absolute best effects, the brand will have to be the similar measurement.
![]()
Underneath the complex tab, give the picture an absolute place.
- Place: Absolute
The brand will have to now take a seat immediately on peak of the principle brand.
![]()
Underneath the design tab, replace the change into choices as follows:
- Grow to be Translate Y Axis (desktop): 100%
- Grow to be Translate Y Axis (sticky): 0%
![]()
This may occasionally make the brand take a seat under the principle brand symbol first of all after which slide up into position as soon as the header is within the sticky state.
Section 4: Trade Column Overflow to Hidden
Lately, the sticky state brand will stay visual out of doors of the column. To modify this, we wish to replace the overflow visibility of the column as follows:
- Horizontal Overflow: Hidden
- Vertical Overflow: Hidden
![]()
The End result
At this level, the switching brand capability is in position. Here’s a preview of the switching emblems.
Section 5: Developing the Menu
To complete off the design, we wish to upload a menu to the header. To try this, upload a brand new menu module to the precise column of the row.
![]()
Underneath the menu settings, make a choice the menu you wish to have to make use of and provides the menu a clear background.
![]()
Underneath the design tab, replace the next:
- Menu Font: Roboto
- Menu Font Weight: Daring
- Menu Textual content Colour: #000 (desktop), #fff (sticky)
- Menu Textual content Dimension: 18px
- Menu Line Peak: 1.3em
- Textual content Alignment: proper
- Dropdown Menu Background Colour: #fff
- Dropdown Menu Line Colour: #000
- Dropdown Menu Textual content Colour: #000 (desktop), #000 (sticky)
- Cell Menu Background Colour: #fff
- Cell Menu Textual content Colour: #000 (desktop), #000 (sticky)
- Hamburger Menu Icon Colour: #000 (desktop), #fff (sticky)
- Margin (desktop): 14px peak
- Margin (pill and speak to): 5px peak
- Padding (pill and speak to) 5px backside
- Rounded Corners: 3px
- Border Width (pill and speak to): 1px
- Border Colour : #ddd (desktop), #333 (sticky)
![]()
Ultimate End result
Ultimate Ideas
With Divi, you don’t need to stay the similar brand in your sticky headers. We simply confirmed you the way simple it’s to do the use of Divi’s integrated choices. No further code is wanted. If you release the ability of Divi’s sticky choices, you’ll be able to get beautiful inventive with the way you transition the emblems out and in of view. Optimistically, this little trick will come in useful to your subsequent challenge!
I look ahead to listening to from you within the feedback.
Cheers!
.inline-code{padding: 0px 4px; coloration: red; font-family: Monaco,consolas,bitstream vera sans mono,courier new,Courier,monospace!essential} video.with-border {border-radius: 8px;box-shadow: 0 8px 60px 0 rgba(103,151,255,.11), 0 12px 90px 0 rgba(103,151,255,.11);show:block;margin: 0 auto;}
The put up Switching Your Logo on a Sticky Header in Divi seemed first on Elegant Themes Blog.
Contents
- 1 Sneak Peek
- 2 Obtain the Structure for FREE
- 3 Obtain For Unfastened
- 4 You’ve got effectively subscribed. Please test your e mail cope with to substantiate your subscription and get get admission to to unfastened weekly Divi format packs!
- 5 Switching Your Brand on a Sticky Header in Divi
- 6 Ultimate End result
- 7 Ultimate Ideas
- 8 Topical Content material vs. Evergreen Content material: How Each can Spice up Visitors
- 9 Affordable WordPress Web hosting Choices With Just right Options / Unlocking Your…
- 10 New Starter Site for Sustainability (Quick Install)

0 Comments