
Divi’s Fullwidth Header module makes it easy to design a shocking hero section on your web site in merely minutes. A hero section is the very first section of your web site that your visitors will see, in order that you’ll want it to be branded, informative, and compelling. Thankfully, the Divi Fullwidth Header comes filled with content material subject material possible choices: header text, subtitle text, body text, two photos, and two buttons. We’ll be the use of all of the ones portions in our fullwidth headers nowadays.
In this publish, we’re going to show 3 ways to design your fullwidth header’s background with eye-catching designs. Able to get started? Let’s dive in!
Design Preview
Let’s take a look at the 3 fullwidth headers we’ll be designing nowadays.
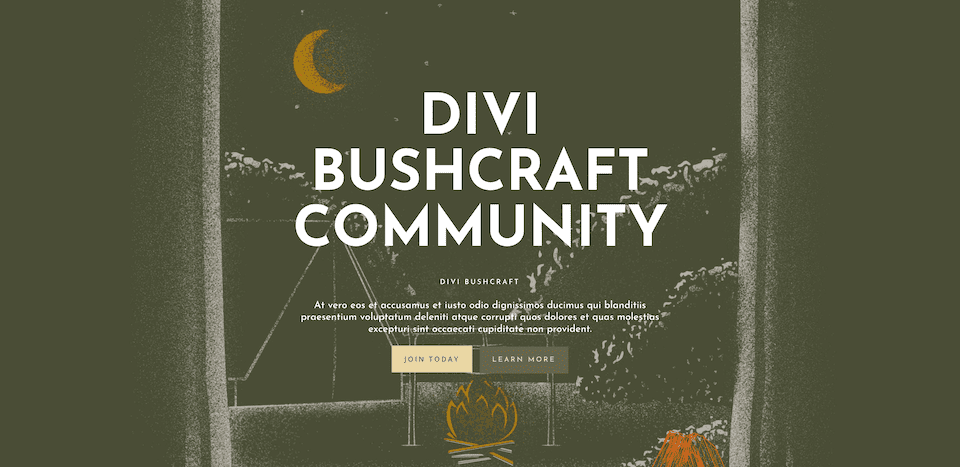
Divi Bushcraft Staff
The main design uses Divi’s background image possible choices to create a textured background that is unique and on-brand for the Bushcraft Staff.
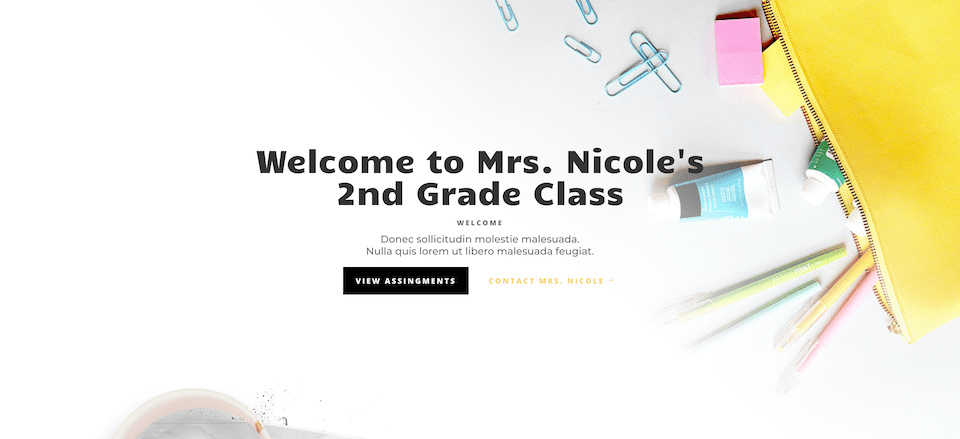
Mrs. Nicole’s 2d Grade
This second design uses a background image and background gradient to create a clean, fashionable, and up to date welcome header for Mrs. Nicole’s 2d-grade class.
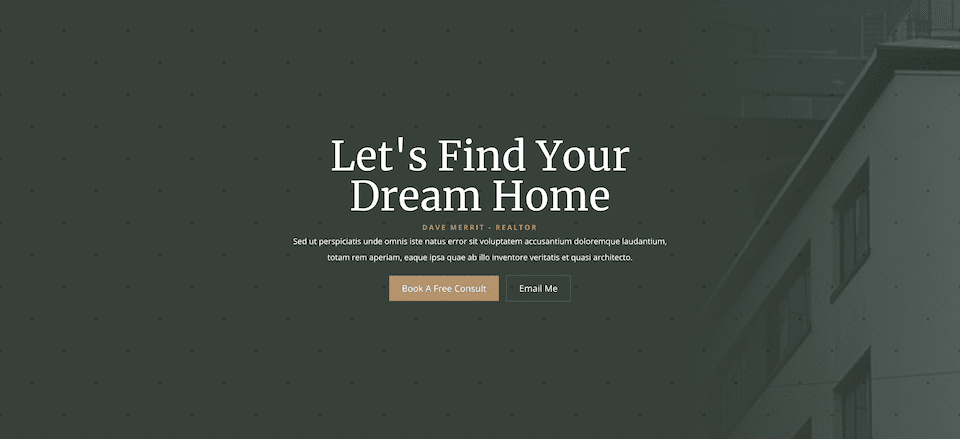
Realtor Header
The third design uses a background image, background gradient, and background construction, all combined to create an larger however refined design for a realtor’s area internet web page.
Download the Layouts for FREE
To place your fingers on the designs from this tutorial, you’re going to first want to download it the usage of the button underneath. To appreciate get right to use to the download you will need to subscribe to our newsletter by the use of the usage of the form underneath. As a brand spanking new subscriber, you’re going to procure a lot more Divi goodness and a unfastened Divi Structure pack each and every Monday! Should you’re already on the file, simply enter your electronic mail deal with underneath and click on on download. You’ll not be “resubscribed” or download further emails.
@media best show and ( max-width: 767px ) {.et_bloom .et_bloom_optin_1 .carrot_edge.et_bloom_form_right .et_bloom_form_content:forward of { border-top-color: #ffffff !very important; border-left-color: transparent !very important; }.et_bloom .et_bloom_optin_1 .carrot_edge.et_bloom_form_left .et_bloom_form_content:after { border-bottom-color: #ffffff !very important; border-left-color: transparent !very important; }
}.et_bloom .et_bloom_optin_1 .et_bloom_form_content button { background-color: #f92c8b !very important; } .et_bloom .et_bloom_optin_1 .et_bloom_form_content .et_bloom_fields i { colour: #f92c8b !very important; } .et_bloom .et_bloom_optin_1 .et_bloom_form_content .et_bloom_custom_field_radio i:forward of { background: #f92c8b !very important; } .et_bloom .et_bloom_optin_1 .et_bloom_border_solid { border-color: #f7f9fb !very important } .et_bloom .et_bloom_optin_1 .et_bloom_form_content button { background-color: #f92c8b !very important; } .et_bloom .et_bloom_optin_1 .et_bloom_form_container h2, .et_bloom .et_bloom_optin_1 .et_bloom_form_container h2 span, .et_bloom .et_bloom_optin_1 .et_bloom_form_container h2 tough { font-family: “Open Sans”, Helvetica, Arial, Lucida, sans-serif; }.et_bloom .et_bloom_optin_1 .et_bloom_form_container p, .et_bloom .et_bloom_optin_1 .et_bloom_form_container p span, .et_bloom .et_bloom_optin_1 .et_bloom_form_container p tough, .et_bloom .et_bloom_optin_1 .et_bloom_form_container form input, .et_bloom .et_bloom_optin_1 .et_bloom_form_container form button span { font-family: “Open Sans”, Helvetica, Arial, Lucida, sans-serif; } p.et_bloom_popup_input { padding-bottom: 0 !very important;}

Download For Loose
Join the Divi Publication and we will be able to electronic mail you a reproduction of the ultimate Divi Landing Internet web page Structure Pack, plus a variety of other superb and unfastened Divi resources, pointers and strategies. Follow along and also you’re going to be a Divi take hold of in no time. In the event you’re already subscribed simply type on your electronic mail deal with underneath and click on on download to get right to use the layout pack.
You’ve gotten successfully subscribed. Please check your electronic mail deal with to verify your subscription and get get right to use to unfastened weekly Divi layout packs!
To import the header template for your Divi Library, do the following:
- Navigate to the Divi Theme Builder.
- Click on at the Import button at the height right kind of the internet web page.
- Throughout the portability popup, make a selection the import tab
- Choose the download record from your computer (make sure you unzip the record first and use the JSON record).
- Then click on at the import button.
Once completed, the section layout might be available throughout the Divi Builder.
Let’s get to the learning, we could?
What You Need to Get Started
To get started, you will need to do the following:
- Set up Divi to your WordPress web site.
- Add a Internet web page, give it a reputation, and submit it.
- Allow the Visual Builder.
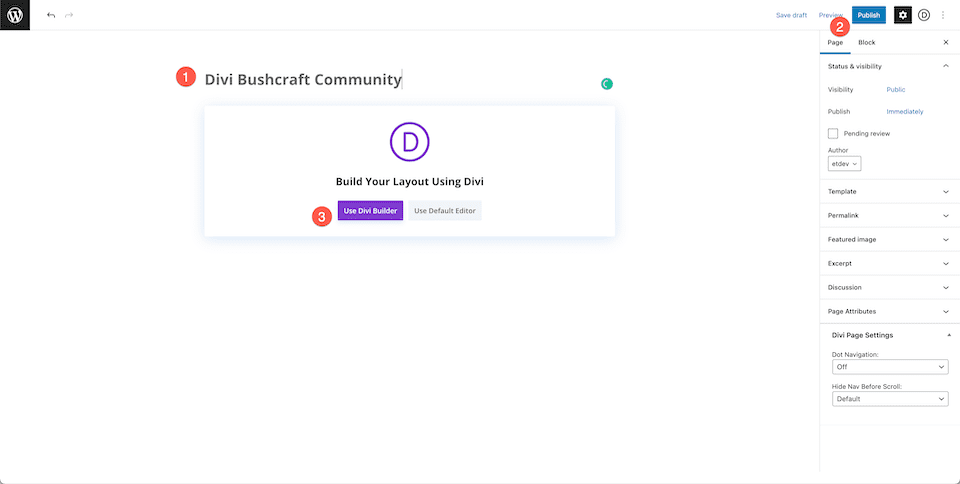
Environment Up Our Internet web page
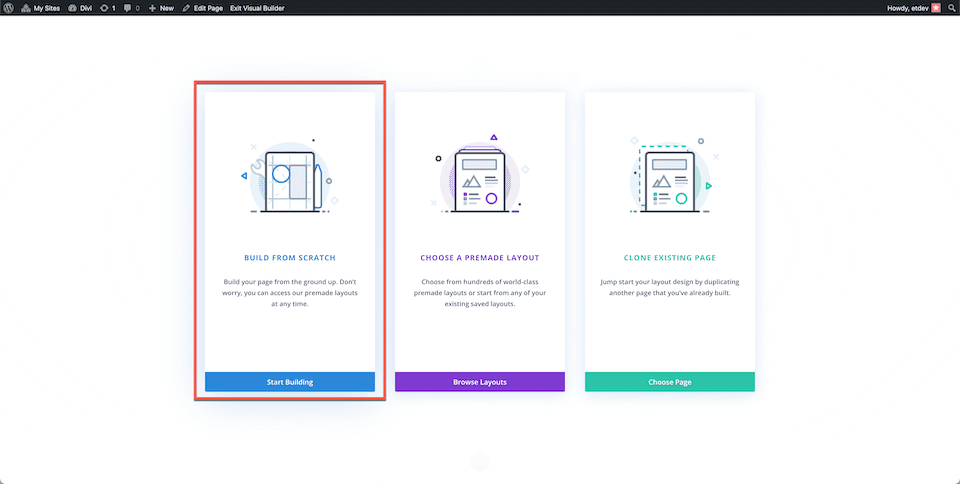
Each time you click on at the “Use Divi Builder” button the internet web page will reload the usage of Divi’s drag and drop builder interface. 3 possible choices will pop up and for nowadays’s purposes make a selection “Assemble From Scratch” in order that we’ve were given a blank slate where we will be able to assemble our fullwidth headers.
Tips about the right way to Design the Divi Bushcraft Staff Fullwidth Header
Add a Fulldwith Section and Fullwidth Header
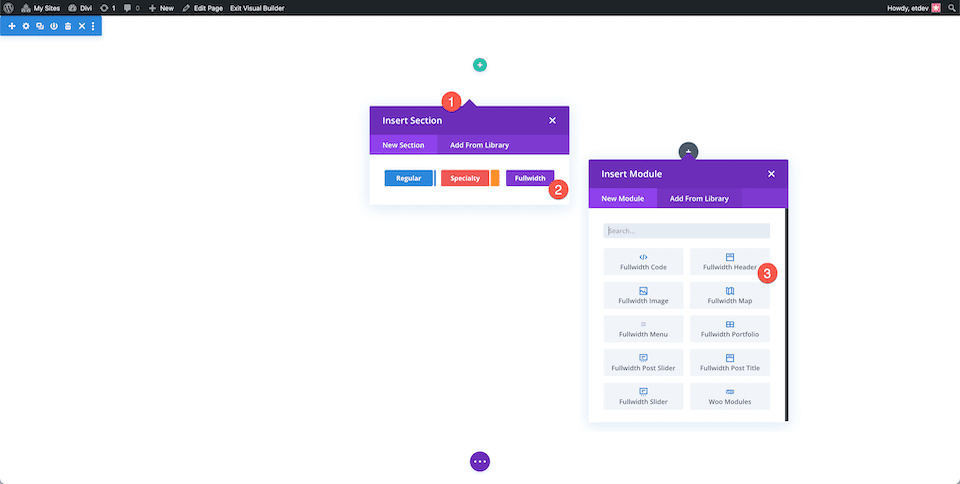
First, we’ll want to add a fullwidth section to our internet web page. Click on on on the “+” icon to hold up the section possible choices and then click on on “Fullwidth”. This will load the fullwidth module library where you’ll be in a position to select “Fullwidth Header” from the selections. This will load the fullwidth header module for your internet web page.
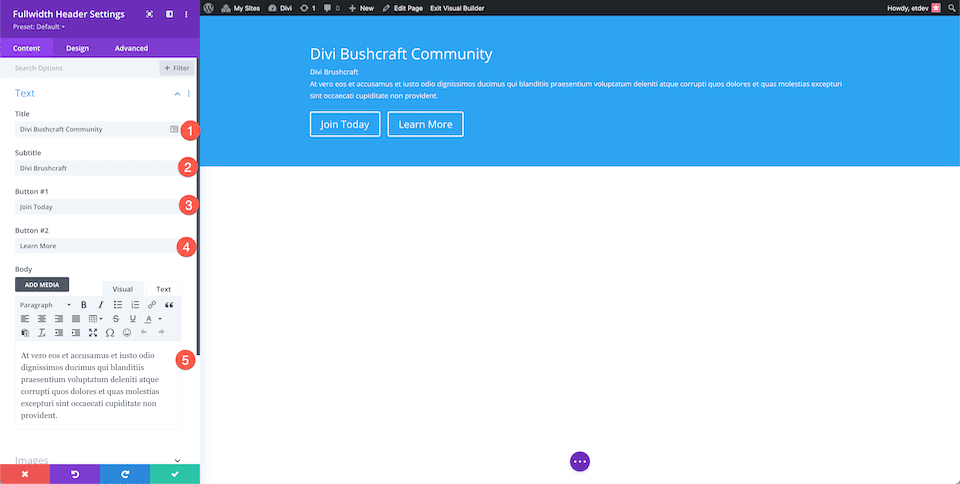
Add The Content material subject material
Now we’re going in an effort to upload our module content material subject material throughout the Text tab. Configure the following settings:
- Header Text: Divi Bushcraft Staff
- Subtitle Text: Divi Bushcraft
- Button #1: Join Nowadays
- Button #2: Learn Additional
- Body Text: At vero eos et accusamus et iusto odio dignissimos ducimus qui blanditiis praesentium voluptatum deleniti atque corrupti quos dolores et quas molestias excepturi sint occaecati cupiditate non provident.
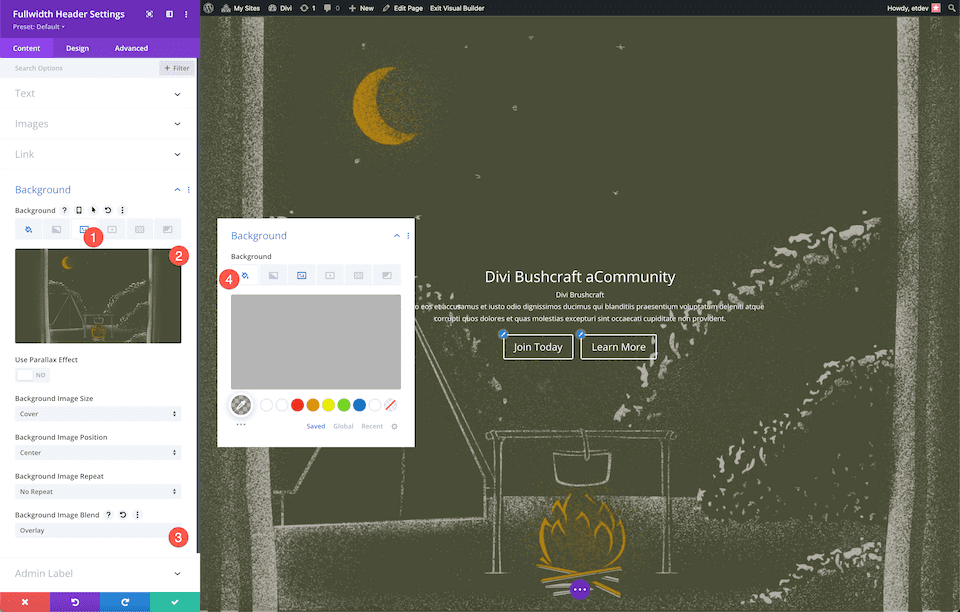
Style the Background
This design uses a background image from the unfastened Divi Bushcraft pre-made layout pack. You’ll get all of the photos from that layout pack on this submit. Simply scroll all of the technique to the bottom of the publish and click on on to procure the high-res photos.
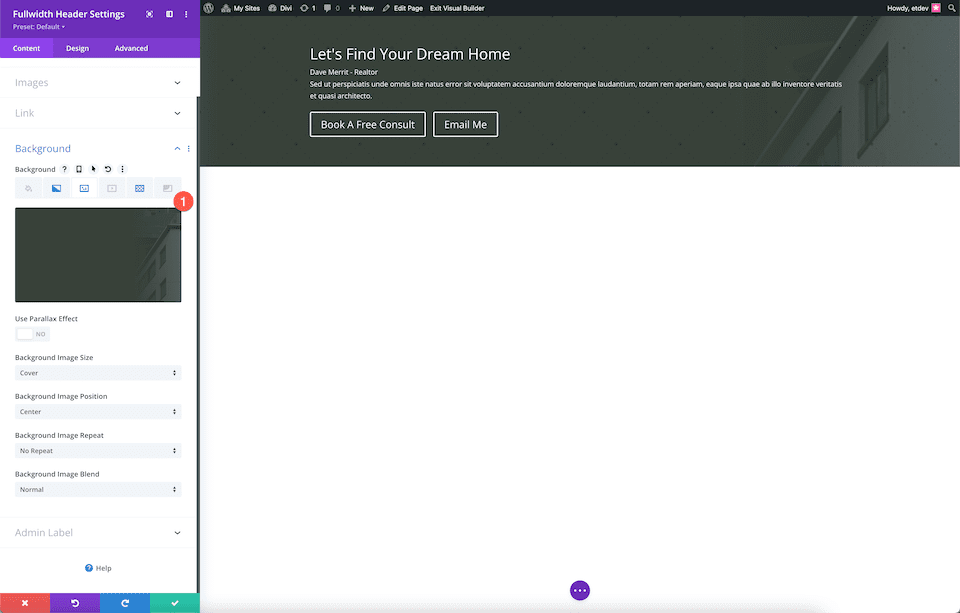
Add Background Image
After you have the photos, add a background image.
- Click on at the third icon, the image icon.
- Click on on “Add Background Image”. This will elevate up the media library where you’ll be capable of upload a brand spanking new image or make a selection {a photograph} from your media library.
- The set the Background Image Combine Mode to Overlay.
- Click on at the number one icon, the paint bucket icon, and set a background colour of: rgba(10,10,10,0.3)
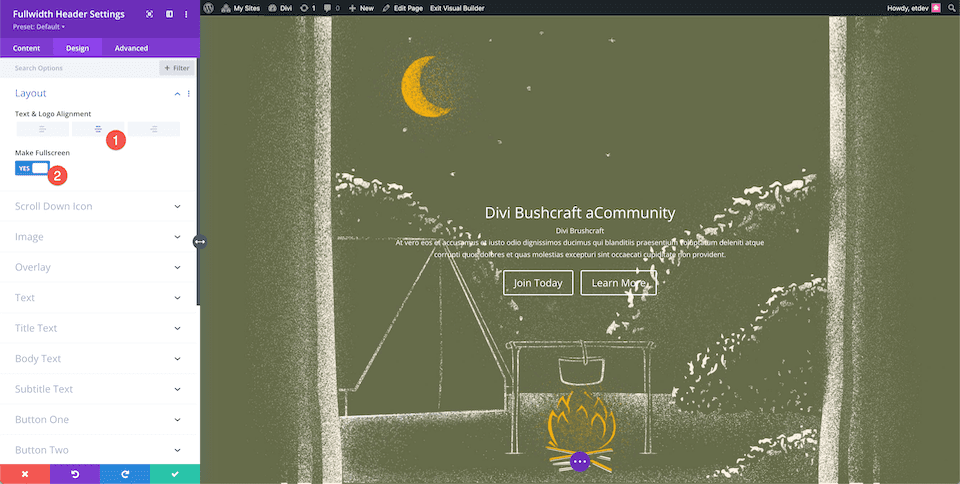
Choose the Structure
Underneath the Design settings, throughout the Structure tab, make a selection center alignment. Toggle the “Make Fullscreen” approach to “certain”.
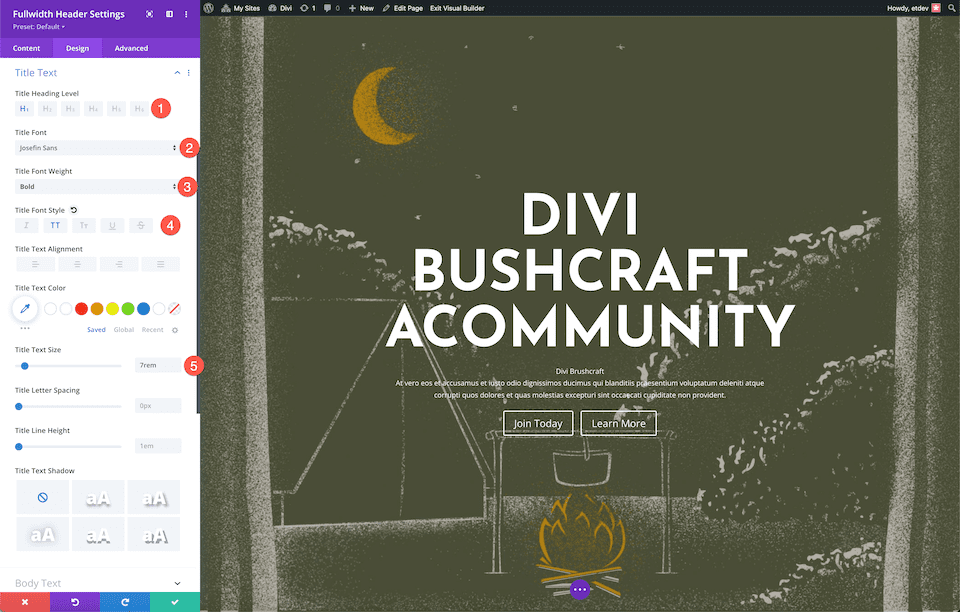
Style Identify Text
Style the Identify Text by the use of configuring the ones settings:
- Identify Heading Level: H1
- Identify Font: Josefin Sans
- Identify Font Weight: Bold
- Identify Font Style: Uppercase
- Identify Text Size: 7rem
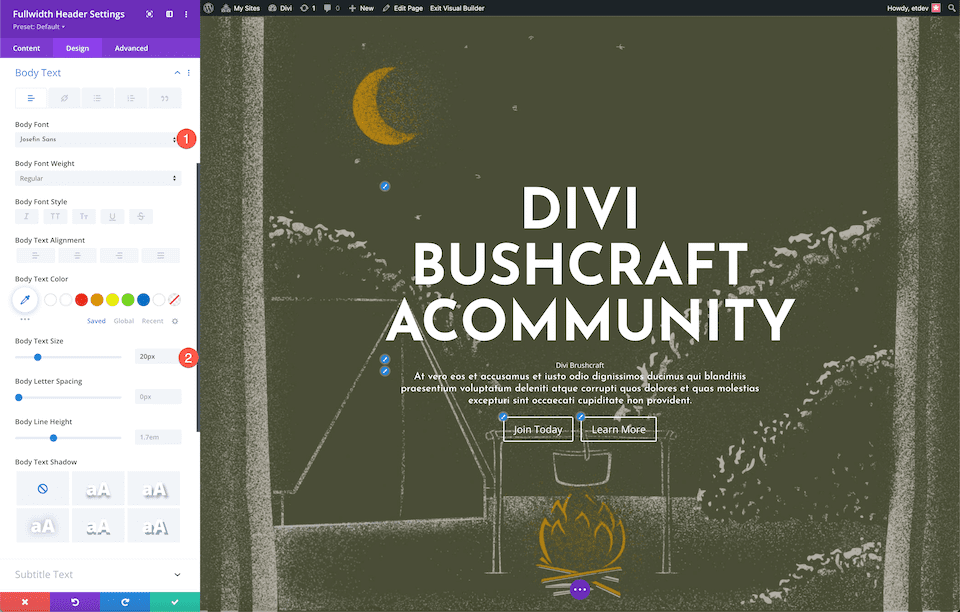
Style Body Text
Style the body text by the use of configuring the ones settings:
- Body Font: Josefin Sans
- Body Text Size: 20px
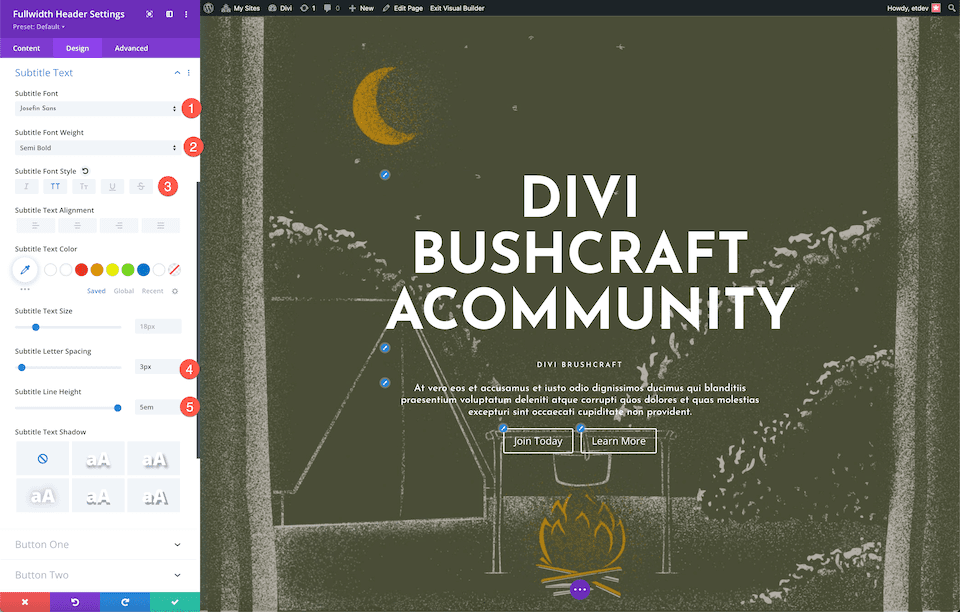
Style Subtitle Text
Style the subtitle text by the use of configuring the ones settings:
- Subtitle Font: Josefin Sans
- Subtitle Font Weight: Semi Bold
- Subtitle Font Style: Uppercase
- Subtitle Letter Spacing: 3px
- Subtitle Line Height: 5em
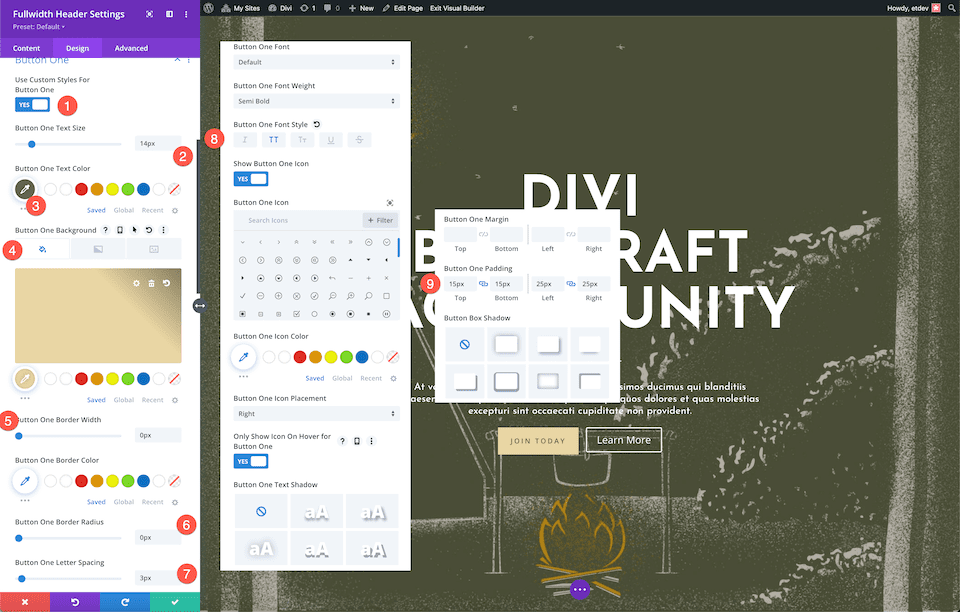
Style Button #1
Now let’s style the buttons! For button one, configure the ones settings:
- Use Custom designed Sorts For Button One: Positive
- Button One Text Size: 14px
- Button One Text Color: #666b4a
- Button One Background: #ead5a4
- Button One Border Width: 0px
- Button One Border Radius: 0px
- Button One Letter Spacing: 3px
- Button One Font Style: Uppercase
- Button One Padding: 15px height and bottom; 25px left and right kind.
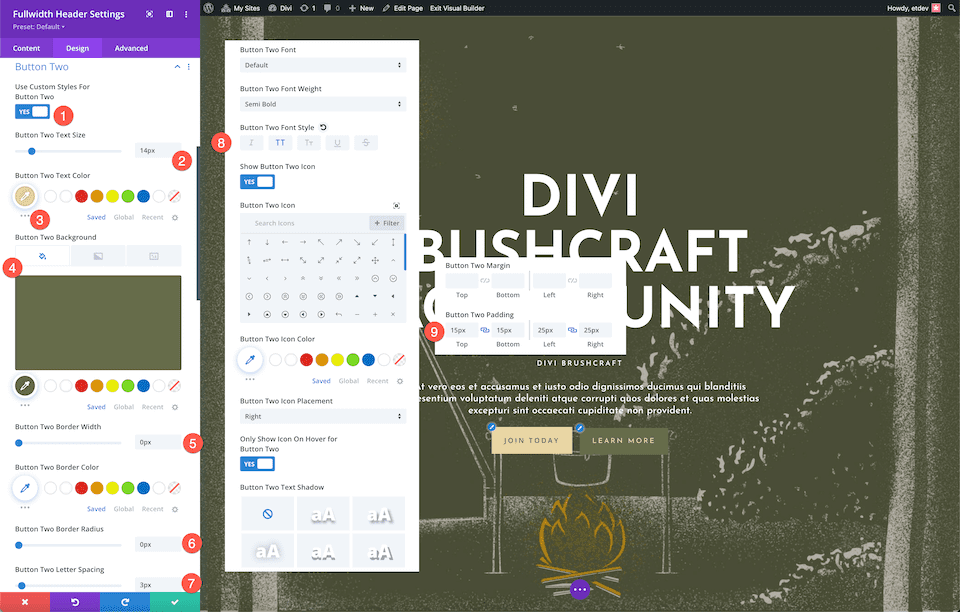
Style Button #2
To style button #2, configure the following settings:
- Use Custom designed Sorts For Button One: Positive
- Button One Text Size: 14px
- Button One Text Color: #ead5a4
- Button One Background: #666b4a
- Button One Border Width: 0px
- Button One Border Radius: 0px
- Button One Letter Spacing: 3px
- Button One Font Style: Uppercase
- Button One Padding: 15px height and bottom; 25px left and right kind.
And, voila! You’ve gotten a wonderfully styled fullwidth header with a textured background image with an overlay for the Divi Bushcraft Staff.
Tips about the right way to Design Mrs. Nicole’s Fullwidth Header
Now let’s design a fullwidth header for Mrs. Nicole’s 2d-grade class! This header uses a background image and gradient to create a a laugh and up to date design. Let’s get started!
Add a brand spanking new internet web page, then add a Fullwidth Section and Fullwidth Header
First, we’ll want to add a fullwidth section to our internet web page. Click on on on the “+” icon to hold up the section possible choices and then click on on “Fullwidth”. This will load the fullwidth module library where you’ll be in a position to select “Fullwidth Header” from the selections. This will load the fullwidth header module for your internet web page.
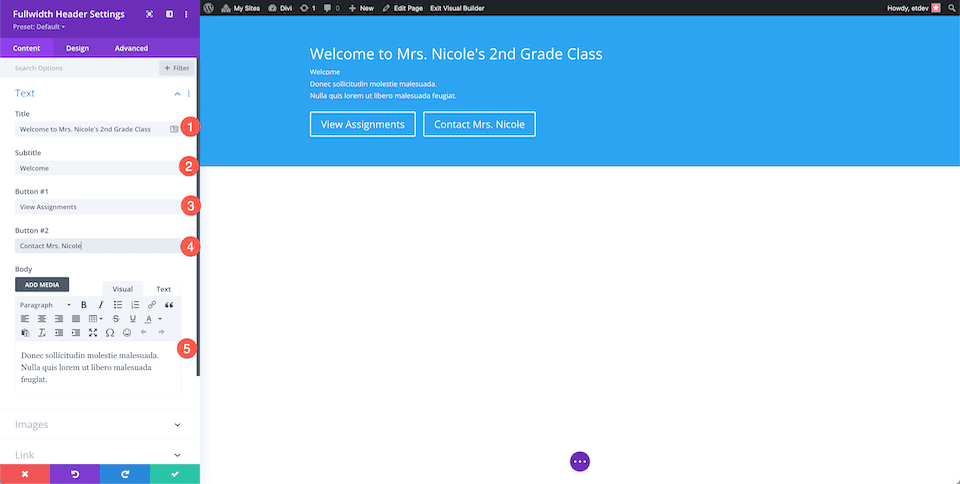
Add The Content material subject material
Now we’re going in an effort to upload our module content material subject material throughout the Text tab. Configure the following settings:
- Header Text: Welcome To Mrs. Nicole’s 2d Grade Magnificence
- Subtitle Text: Welcome
- Button #1: View Assignments
- Button #2: Contact Mrs. Nicole
- Body Text: Donec sollicitudin molestie malesuada. Nulla quis lorem ut libero malesuada feugiat.
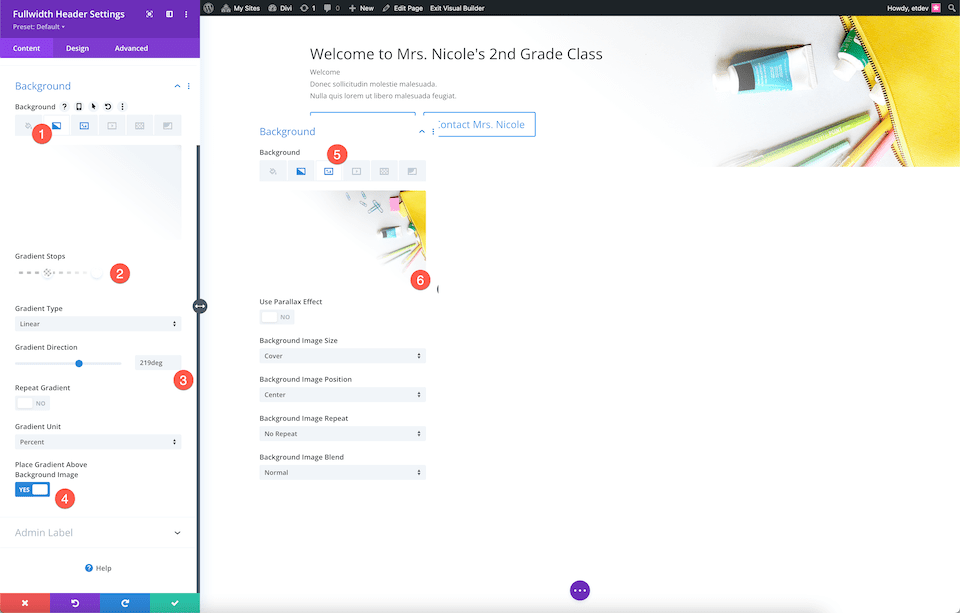
Style the Background
This design makes use of images from the unfastened Classroom pre-made layout pack. You’ll download the full-res photos by the use of scrolling to the bottom of this submit.
Style the background by the use of configuring the ones settings:
- Click on on the second tab, the gradient icon.
- Set the gradient stops to: #ffffff at 40%, and transparent at 18%.
- Set the gradient path to 219 ranges.
- Toggle “certain” for the Place Gradient Above Background Image.
- Click on on on the third icon, the image icon, and click on on “Add Background Image”.
Choose the Structure
Right here’s where we’re going to align the module content material subject material to the center and make it fullscreen.
- Text & Logo Alignment: Center
- Make Fullscreen: Positive

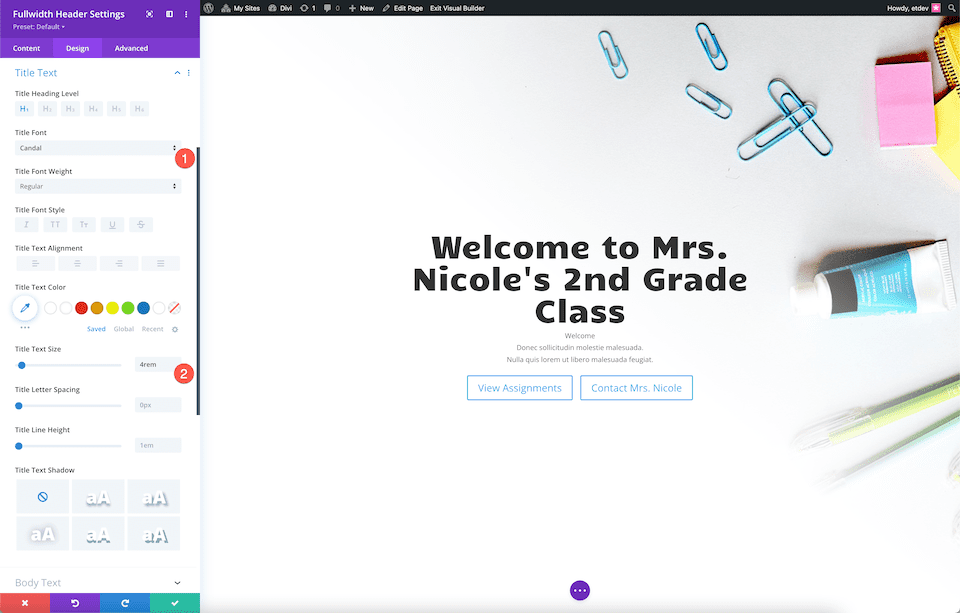
Style the Identify Text
Style the title text by the use of configuring the ones settings:
- Identify Font: Candal
- Identify Text Size: 4rem
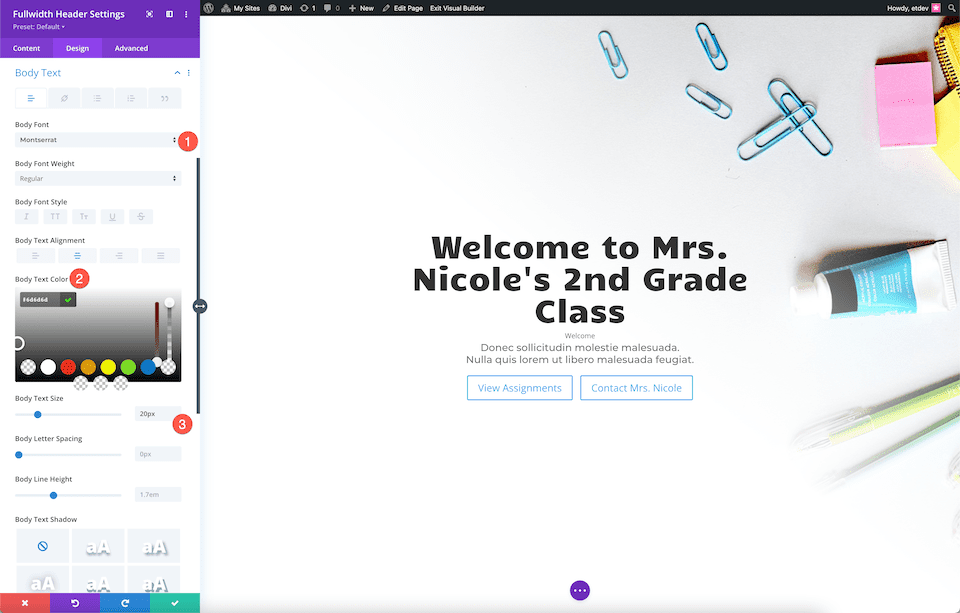
Style the Body Text
Style the body text by the use of configuring the ones settings:
- Body Font: Montserrat
- Body Text Color: #6d6d6d
- Body Text Size: 20px
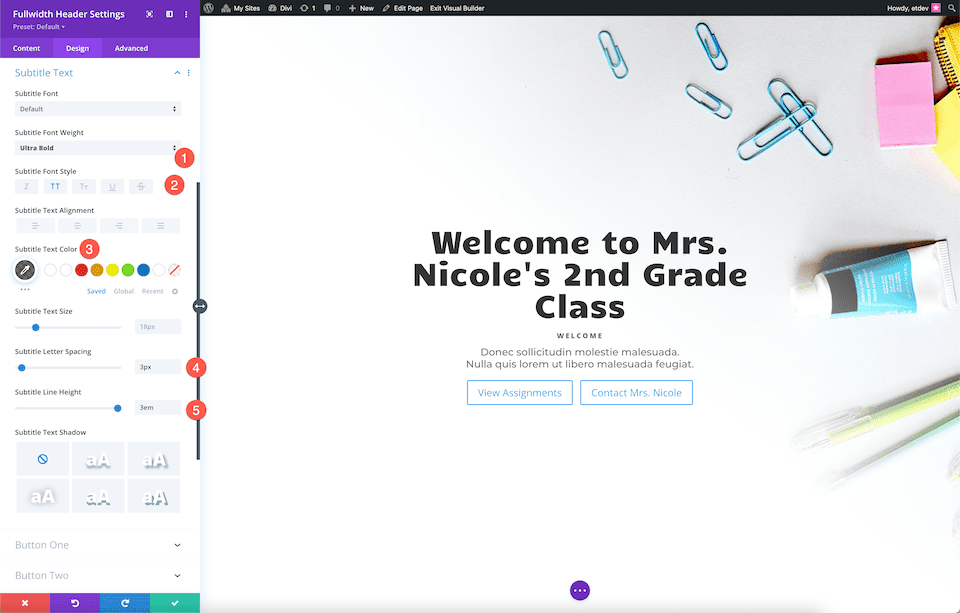
Style the Subtitle Text
Style the subtitle text by the use of configuring the ones settings:
- Subtitle Font Weight: Extraordinarily Bold
- Subtitle font Style: Uppercase
- Subtitle Text Color: rgba(28,10,10,0.6)
- Subtitle Letter Spacing: 3px
- Subtitle Line Height: 3em
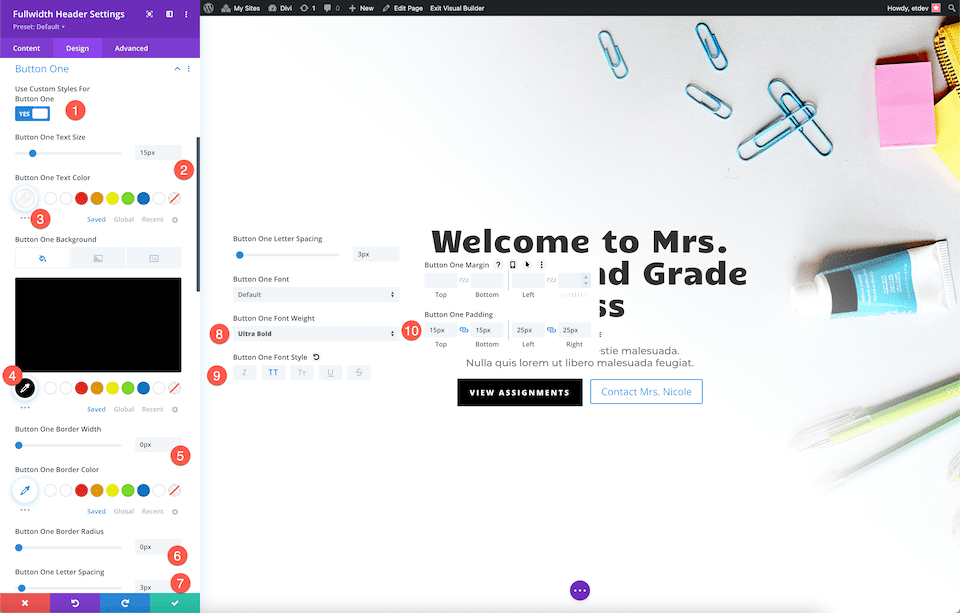
Style Button #1
Style button #1 by the use of configuring the ones settings:
- Use Custom designed Sorts For Button One: Positive
- Button One Text Size: 15px
- Button One Text Color: #ffffff
- Button One Background: #000000
- Button One Border Width: 0px
- Button One Border Radius: 0px
- Button One Letter Spacing: 3px
- Button One Font Weight: Extraordinarily Bold
- Button One Font Style: Uppercase
- Button One Padding: 15px height and bottom; 25px left and right kind.
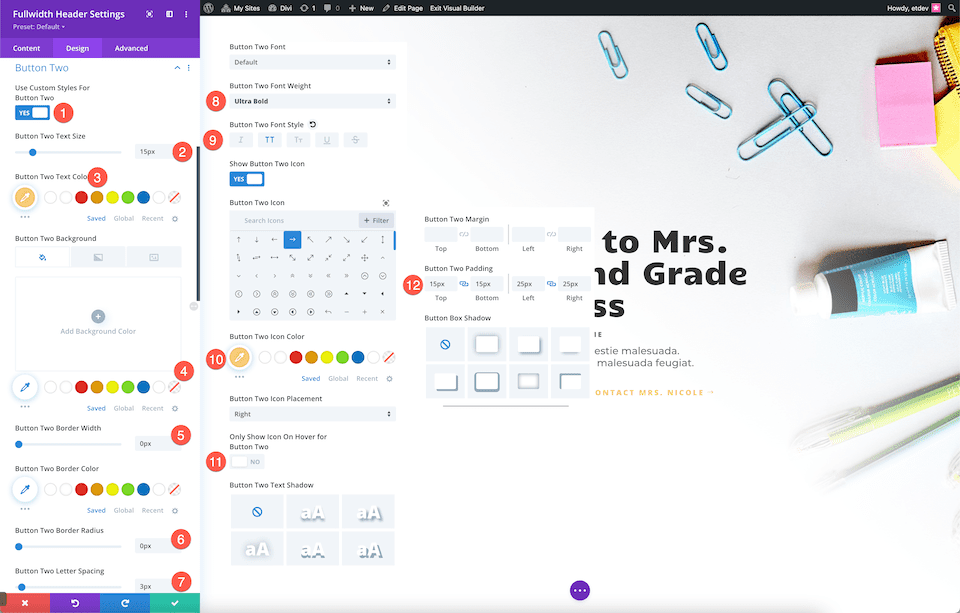
Style Button #2
Style button #2 by the use of configuring the ones settings:
- Use Custom designed Sorts For Button Two: Positive
- Button Two Text Size: 15px
- Button Two Text Color: #ffd078
- Button Two Background: transparent
- Button Two Border Width: 0px
- Button Two Border Radius: 0px
- Button Two Letter Spacing: 3px
- Button Two Font Weight: Extraordinarily Bold
- Button Two Font Style: Uppercase
- Button Two Icon Color: #ffd078
- Best Show Icon On Hover For Button Two: No
- Button Two Padding: 15px height and bottom; 25px left and right kind.
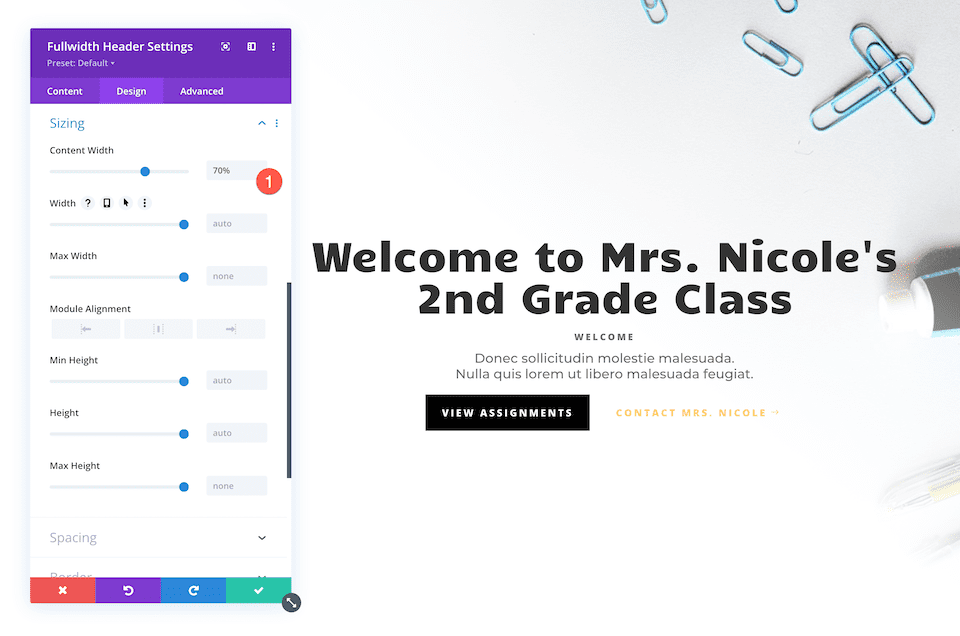
Sizing
Set the content material subject material width to 70%.
Voila! You at the moment have a fully designed fullwidth header for Mrs. Nicole’s 2d grade class.
Tips about the right way to Design a Realtor’s Fullwidth Header
Let’s design this chic and classy fullwidth header for a realtor’s web site. This section uses a background image, background gradient, AND a background construction. Let’s get to artwork!
Add a brand spanking new internet web page, then add a Fullwidth Section and Fullwidth Header
First, we’ll want to add a fullwidth section to our internet web page. Click on on on the “+” icon to hold up the section possible choices and then click on on “Fullwidth”. This will load the fullwidth module library where you’ll be in a position to select “Fullwidth Header” from the selections. This will load the fullwidth header module for your internet web page.
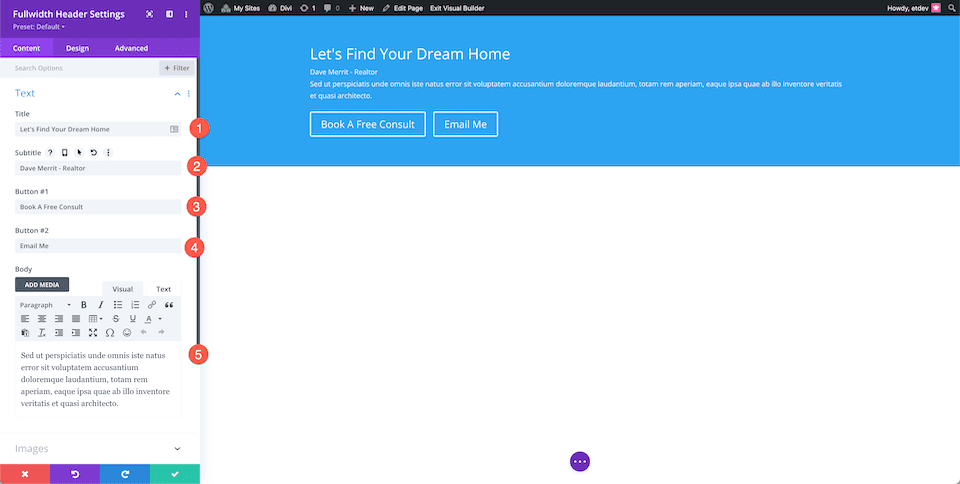
Add Content material subject material
First, let’s add the content material subject material sought after for this module throughout the Text tab:
- Identify: Let’s To search out Your Dream Space
- Subtitle: Dave Merrit – Realtor
- Button #1 – Guide A Loose Search the recommendation of
- Button #2 – Email Me
- Body Text: Sed ut perspiciatis unde omnis iste natus error sit down down voluptatem accusantium doloremque laudantium, totam rem aperiam, eaque ipsa quae ab illo inventore veritatis et quasi architecto.
Style the Background
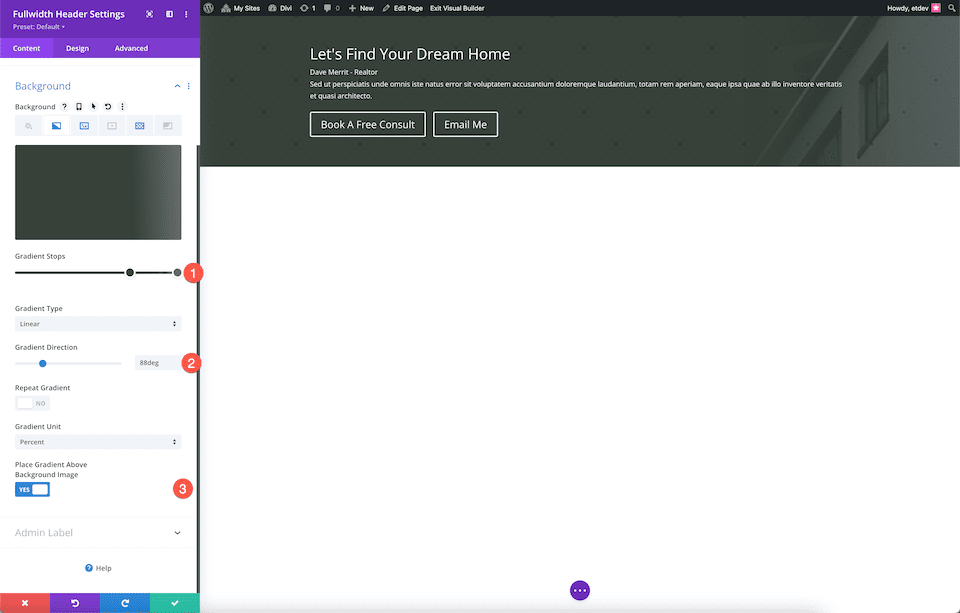
Add a Gradient
Throughout the background tab, click on on the second icon, the gradient icon, and configure the ones settings:
- Gradient Stops: rgba(56,65,58,0.74) at 100% and #38413a at 70%
- Gradient Direction: 88deg
- Place Gradient Above Background Image: Positive
Add Image
Click on at the third icon, the image icon, and then click on on “Add Background Image” so as to add your image. This demonstration makes use of images from the unfastened Realtor pre-made layout pack. You’ll download the full-resolution photos by the use of scrolling to the bottom of this submit.
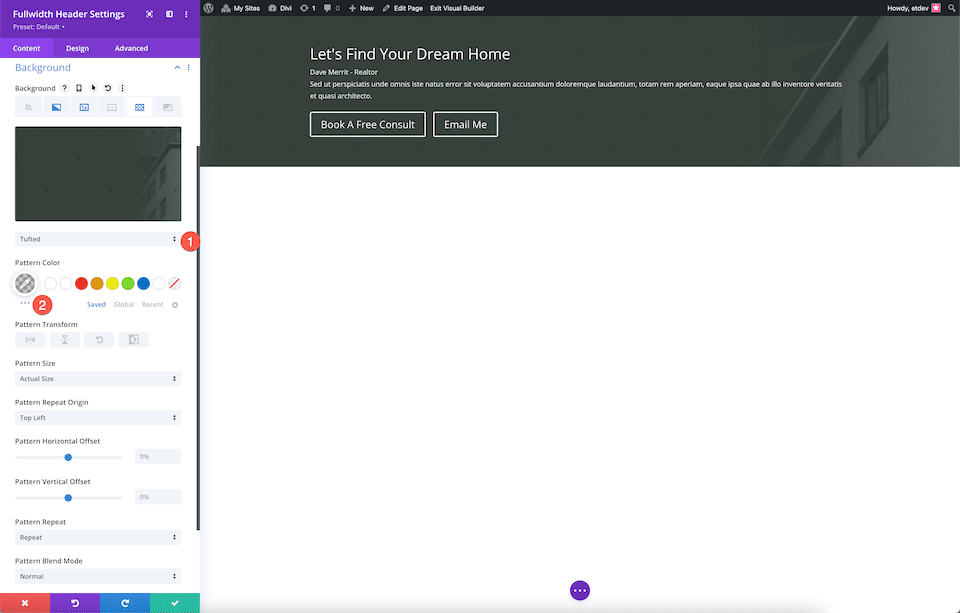
Add a Background Building
Add a background construction by the use of configuring the ones settings:
- Choose Tufted from the dropdown.
- Building Color: rgba(0,0,0,0.2)
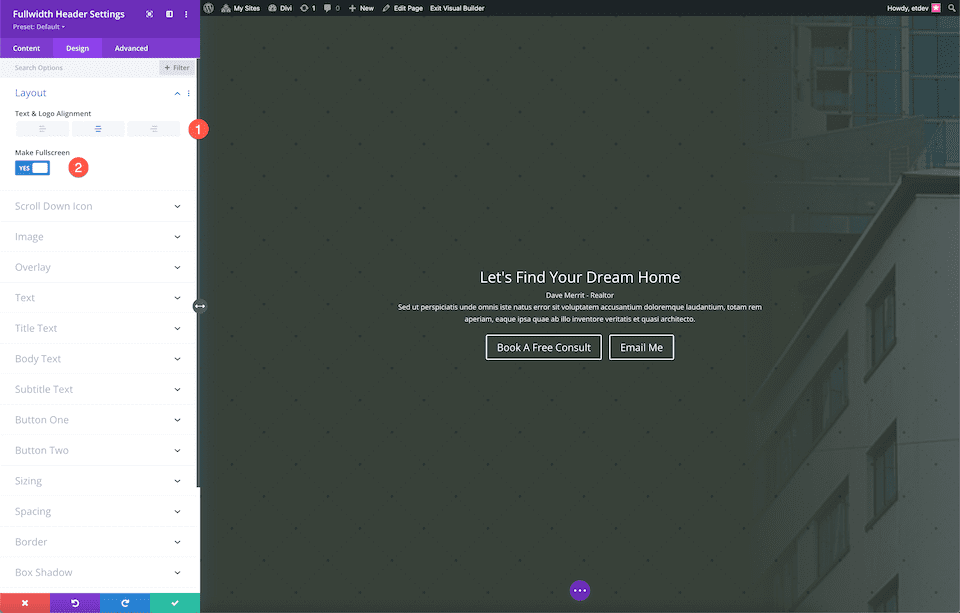
Choose the Structure
Right here’s where we’re going to align the module content material subject material to the center and make it fullscreen.
- Text & Logo Alignment: Center
- Make Fullscreen: Positive
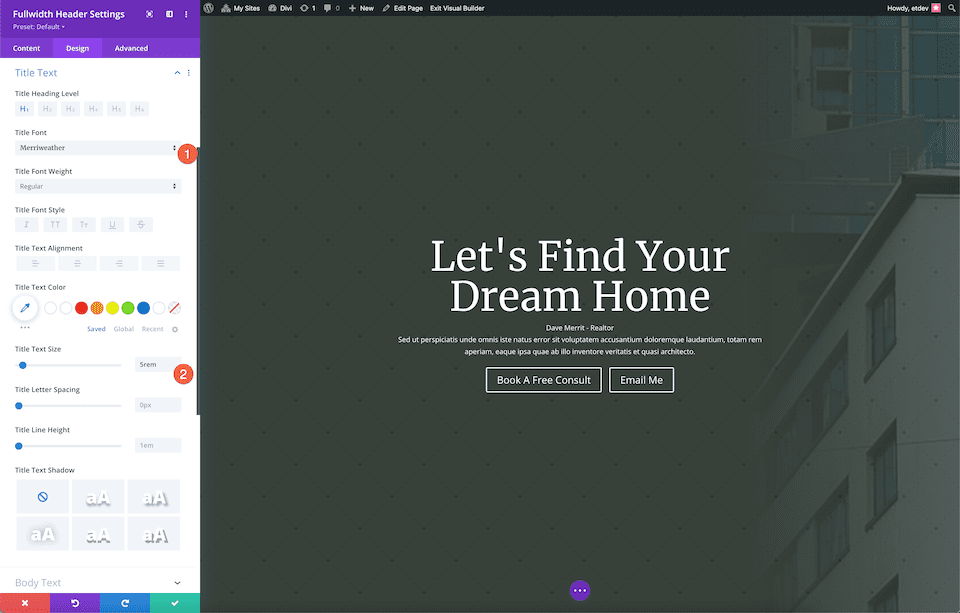
Style the Identify Text
Style the title text by the use of configuring the ones settings:
- Identify Font: Merriweather
- title Text Size: 5rem
Style the Body Text
Style the body text by the use of configuring the ones settings:
- Body Font: Open Sans
- Body Text Size: 16px
- Body Line Height: 2em

Style the Subtitle Text
Style the subtitle text by the use of configuring the ones settings:
- Subtitle Font: Open Sans
- Subtitle Font Weight: Bold
- Subtitle Font Style: Uppercase
- Subtitle Text Color: #b4926b
- Subtitle Letter Spacing: 3px

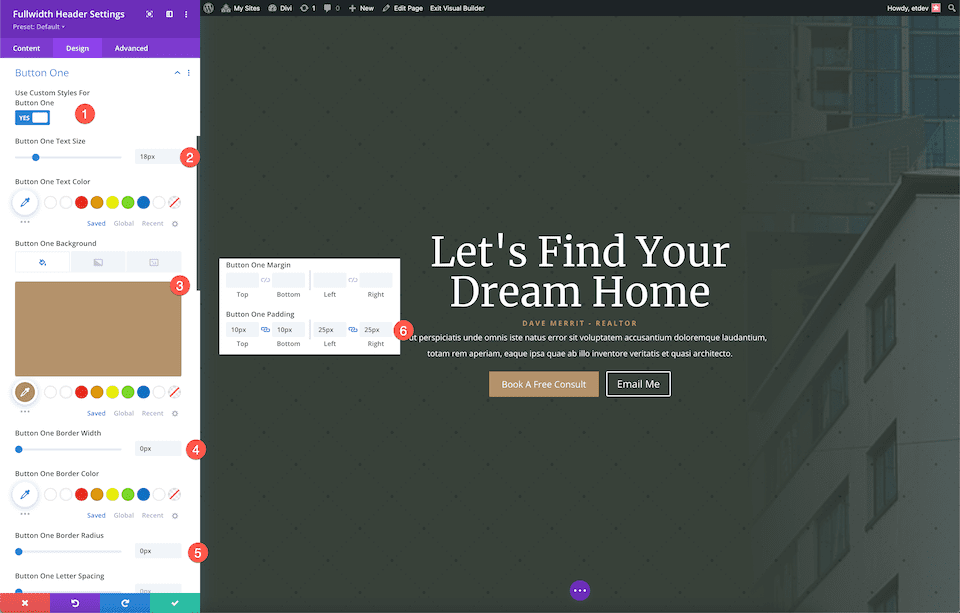
Style Button #1
Style button #1 by the use of configuring the ones settings:
- Use Custom designed Sorts For Button One: Positive
- Button One Text Size: 18px
- Button One Background: #b4926b
- Button One Border Width: 0px
- Button One Border Radius: 0px
- Button One Padding: 10px height and bottom; 25px left and right kind.
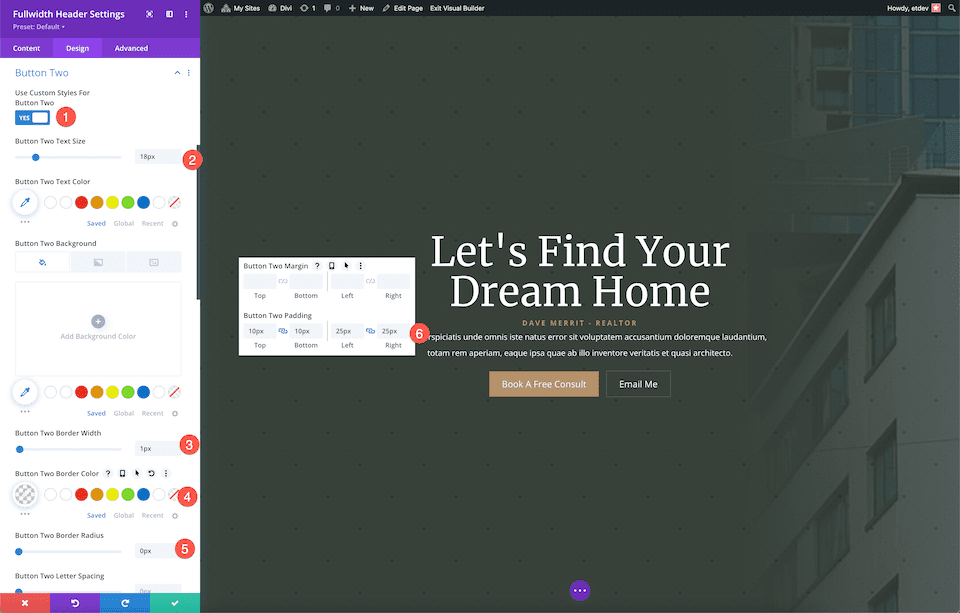
Style Button #2
Style button #2 by the use of configuring the ones settings:
- Use Custom designed Sorts For Button Two: Positive
- Button Two Text Size: 18px
- Button Two Border Width: 1px
- Button Two Border Color: rgba(255,255,255,0.19)
- Button Two Border Radius: 0x
- Button Two Padding: 10px height and bottom; 25px left and right kind
Voila! Now you will have a ravishing fullwidth header for a realtor web site.
Final Concepts
The Divi Fullwidth Header is a handy guide a rough and easy technique to assemble a shocking web site hero section on your web site. Since web site hero sections are so a very powerful in creating a in point of fact absolute best first affect, it’s very important that your design is branded, eye-catching, and informative. With the Fullwidth Header, it’s easy to build a header that hits all the ones objectives within of 1 module. Now that you just’ve spotted what’s possible with the Fullwidth Header, how are you able to design yours?
The publish Tips on how to Taste Your Fullwidth Header Module’s Background appeared first on Sublime Topics Weblog.
Contents
- 1 Design Preview
- 2 Download the Layouts for FREE
- 3 Download For Loose
- 4 You’ve gotten successfully subscribed. Please check your electronic mail deal with to verify your subscription and get get right to use to unfastened weekly Divi layout packs!
- 5 What You Need to Get Started
- 6 Tips about the right way to Design the Divi Bushcraft Staff Fullwidth Header
- 7 Tips about the right way to Design Mrs. Nicole’s Fullwidth Header
- 7.1 Add a brand spanking new internet web page, then add a Fullwidth Section and Fullwidth Header
- 7.2 Add The Content material subject material
- 7.3 Style the Background
- 7.4 Choose the Structure
- 7.5 Style the Identify Text
- 7.6 Style the Body Text
- 7.7 Style the Subtitle Text
- 7.8 Style Button #1
- 7.9 Style Button #2
- 7.10 Sizing
- 8 Tips about the right way to Design a Realtor’s Fullwidth Header
- 8.1 Add a brand spanking new internet web page, then add a Fullwidth Section and Fullwidth Header
- 8.2 Add Content material subject material
- 8.3 Style the Background
- 8.4 Choose the Structure
- 8.5 Style the Identify Text
- 8.6 Style the Body Text
- 8.7 Style the Subtitle Text
- 8.8 Style Button #1
- 8.9 Style Button #2
- 9 Final Concepts
- 10 Automattic Corporate Tradition And Values » The Automattic Method: A…
- 11 60 Absolute best On-line Native Industry Directories & Record Websites
- 12 Climb the Ratings, Rapid: Find out how to Automate WordPress Search engine optimization

0 Comments