
Extracting text from photos has been a popular problem in tool engineering for long. Optical Persona Recognition (OCR) has been a pioneer technology used extensively to get to the bottom of this problem. With its ability to turn into photos containing text into machine-readable wisdom, OCR has revolutionized quite a lot of industries, from document processing automation to language translation.
While industry OCR solutions exist, development your individual OCR API in Python, a versatile and strong programming language, offers an a variety of benefits, along side customization, keep watch over over wisdom privacy, and the possibility of worth monetary financial savings.
This data will walk you through rising your individual OCR API the usage of Python. It explores the necessary libraries, ways, and issues for rising an effective OCR API, empowering you to harness the ability of OCR on your applications.
Must haves
To use along, you wish to have a elementary working out of Python & Flask and an area reproduction of Python installed to your mechanical device.
Creating the OCR API
In this knowledge, you learn to assemble a Flask application that allows shoppers so as to add photos through a POST endpoint, which then loads the usage of Pillow, and processes the usage of the PyTesseract wrapper (for the Tesseract OCR engine). Finally, it returns the extracted text since the response to the request.
You’ll be capable to further customize this API to provide possible choices related to template-based classification (extracting line items from invoices, inputs in tax forms, and so forth.) or OCR engine possible choices (you’ll be capable to to find additional OCR engines right here).
To start out out off, create a brand spanking new checklist on your undertaking. Then, prepare a brand spanking new virtual environment throughout the folder by the use of working the following directions:
python3 -m venv env
provide env/bin/activate
Next, arrange Flask, PyTesseract, Gunicorn, and Pillow by the use of working the following command:
pip3 arrange pytesseract flask pillow gunicornOnce the ones are installed, you wish to have to position within the Tesseract OCR engine to your host mechanical tool. The arrange instructions for Tesseract will vary in keeping with your host operating mechanical device. You’ll be capable to to find the right kind instructions right here.
For instance, on MacOS, you’ll be capable to arrange Tesseract the usage of Homebrew by the use of working the following command:
brew arrange tesseractOnce this is completed, the PyTesseract wrapper will be capable of be in contact with the OCR engine and process OCR requests.
Now, you are ready to put in writing the Flask application. Create a brand spanking new checklist named ocrapi and a brand spanking new file in this checklist with the name primary.py. Save the following contents in it:
from flask import Flask, request, jsonify
from PIL import Image
import pytesseract

app = Flask(__name__)

@app.route('/ocr', methods=['POST'])
def ocr_process():
    if request.method == 'POST':
        image_file = request.knowledge['image']
        image_data = Image.open(image_file)

        # Perform OCR the usage of PyTesseract
        text = pytesseract.image_to_string(image_data)

        response = {
            'status': 'just right fortune',
            'text': text
        }

        return jsonify(response)
The code above creates a elementary Flask app that has one endpoint—/ocr. While you send a POST request to this endpoint with an image file, it extracts the file, uses the pytesseract wrapper to perform OCR the usage of its code_to_string() method, and sends once more the extracted text as part of the response.
Create a wsgi.py file within the identical ocrapi checklist and save the following contents in it:
from ocrapi.primary import app as application

if __name__ == "__main__":
    application.run()
You’ll be capable to now run the app the usage of the following command:
gunicorn ocrapi.wsgiYour elementary OCR API is able, and it’s time to test it!
Checking out the OCR API In the neighborhood
You’ll be capable to use the built-in cURL CLI to send requests for your API or switch to an extensive API testing tool related to Postman. To test the API, you will need to download a trend image that has some text. You’ll be capable to use this straightforward one, or this scribbled one for now.
Download either one of the ones to the undertaking checklist and gives it a straight forward name, related to simple-image.png or scribbled-image.png, depending on the image you choose.
Next, open your terminal and navigate for your undertaking’s checklist. Run the following command to test the API:
curl -X POST -F “image=@scribbled-image.png” localhost:5000/ocrThis sends a request for your OCR API and returns a similar response:
{
"status": "just right fortune",
"text": "This seems find it irresistible was once as soon as written in a hucrynn"
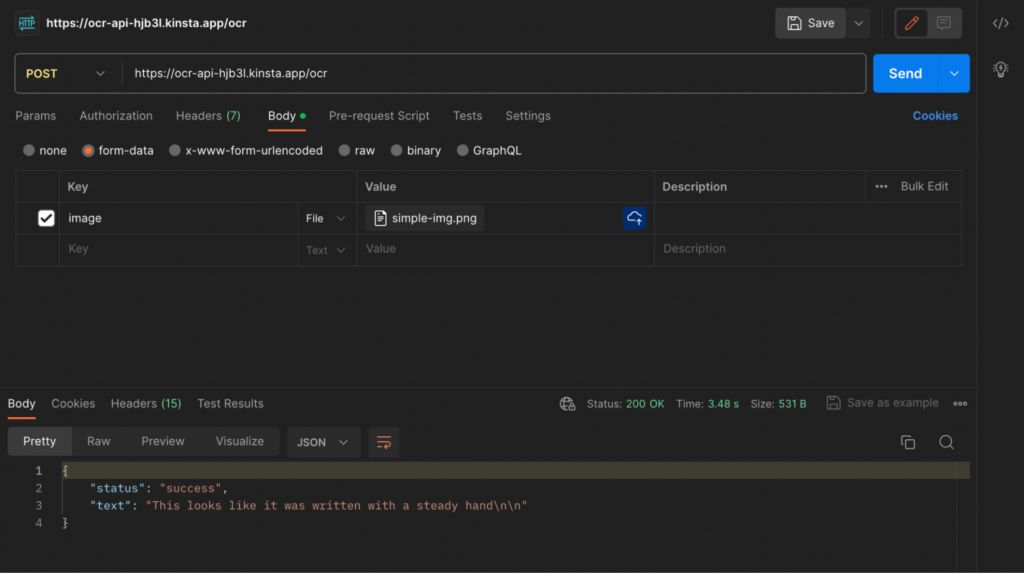
}This confirms that your OCR API has been prepare as it should be. You’ll be capable to moreover check out with the easy image, and proper right here’s what the response should appear to be:
{
  "status": "just right fortune",
  "text": "This seems find it irresistible was once as soon as written with a gradual handnn"
}
This moreover demonstrates the accuracy of the Tesseract OCR engine. You’ll be capable to now proceed to host your OCR API on the Kinsta Software Website hosting so it can be accessed online.
Deploying Your OCR API
To deploy your app to Kinsta, you first want to push your undertaking code to a Git provider (Bitbucket, GitHub, or GitLab).
Previous than you push your code, you wish to have to prepare Tesseract separately to your host mechanical device in an effort to use the PyTesseract wrapper with it. So that you could use the wrapper on the Kinsta application platform (or any other environment, generally), you will need to set it up there as well.
For many who have been operating with a ways off compute circumstances (related to AWS EC2), it’s just right to SSH into the compute instance and run the right kind command for putting in place the package on it.
Alternatively, application platforms don’t provide you with direct get admission to to the host. It is very important use a solution like Nixpacks, Buildpacks, or Dockerfiles to prepare the initial must haves of your application’s environments (which is in a position to include setting up the Tesseract package in the community) and then arrange the appliance.
Add a nixpacks.toml file for your undertaking’s checklist with the following contents:
# nixpacks.toml

providers = ["python"]

[phases.setup]
nixPkgs = ["...", "tesseract"]

[phases.build]
cmds = ["echo building!", "pip install -r requirements.txt", "..."]

[start]
cmd = "gunicorn ocrapi.wsgi"
This may increasingly more and more instruct the assemble platform to
- Use the Python runtime to build and run your application
- Prepare the Tesseract package for your application’s container.
- Get began the app the usage of
gunicorn.
Moreover, run the following command to generate a must haves.txt file that the appliance platform can use to position within the requirement Python programs all over assemble:
pip3 freeze > must haves.txtOnce your Git repository is able, follow the ones steps to deploy your OCR API to Kinsta:
- Log in to or create an account to view your MyKinsta dashboard.
- Authorize Kinsta along side your Git provider.
- On the left sidebar, click on on Techniques and then click on on Add Software.
- Make a choice the repository and the dept you wish to have to deploy from.
- Make a choice one of the vital available wisdom center puts from the checklist of 35 possible choices. Kinsta robotically detects the assemble settings on your applications through your Nixpack file — so leave the start command field blank.
- Choose your application property, related to RAM and disk area.
- Click on on Create application.
As quickly because the deployment is whole, reproduction the deployed app’s link and run the following command to your CLI:
curl -x POST -F “image=@simple-image.png” /ocrThis should return the identical response as you received in the community:
{"status":"just right fortune","text":"This seems find it irresistible was once as soon as written with a gradual handnn"}You’ll be capable to moreover use Postman to test the API.
This completes the improvement of a elementary OCR API. You’ll be capable to get admission to the entire code for this mission on GitHub.
Summary
You at the moment have a operating self-hosted OCR API that you just’ll be capable to customize for your liking! This API can extract text from photos, providing a precious tool for wisdom extraction, document digitization, and other applications.
As you continue to increase and refine your OCR API, consider exploring complicated choices like multi-language strengthen, image pre-processing ways, and integrating with cloud storage services and products for storing and getting access to photos.
What serve as do you think is indispensable for a self-hosted OCR API? Let us know throughout the comments beneath!
The publish How To Construct Your Personal OCR API in Python gave the impression first on Kinsta®.
Contents
- 1 Must haves
- 2 Creating the OCR API
- 3 Checking out the OCR API In the neighborhood
- 4 Deploying Your OCR API
- 5 Summary
- 6 How To Upload Social Icons To Any WordPress Put up Or Web page – For Loose (Video Educational)
- 7 10+ Equipment to Crop and Resize Pictures On-line (With out Photoshop)
- 8 Harnessing third-party APIs: complicated WordPress methods on Kinsta

0 Comments