
Do you wish to have to create a WordPress form with a date picker?
A date picker field is a at hand method to snatch date-related wisdom for your WordPress forms. For example, chances are high that you’ll wish to know your consumers’ birthdates, or you wish to have them to easily agenda an appointment to your services and products and merchandise by way of your forms.
In this article, we will be able to show you recommendations on how one can merely create a WordPress form with a date picker.

Why Create a WordPress Form With a Date Picker?
A date picker field in a WordPress form comes in handy when you wish to have consumers to go into dates. Now not ordinary examples include:
- Registration paperwork that ask consumers to enter their birthdates.
- Order paperwork for choosing a provide date and time for an order.
- Apartment products forms for selecting a pickup or dropoff date for a condominium products.
- Callback request paperwork to allow consumers to will will let you know when they want to be contacted about your products or services and products and merchandise.
- Leave request forms to allow staff to enter the start and end dates for their day without work.
- Appointment or reserving paperwork for accommodation or service web websites.
A date input field is a far easier way for patrons to insert dates compared to manually typing them out. It promises that the date construction remains consistent all over all form submissions, decreasing errors and bettering the patron experience.
Having discussed that, let’s see recommendations on how one can merely create a WordPress form with a date picker. You’ll use the ones rapid links to navigate by way of this article:
Step 1: Arrange the WPForms Plugin and Choose a Template
The first step is to place in WPForms. It’s the perfect WordPress touch shape plugin to be had in the marketplace that makes it super easy to create all sorts of forms for your WordPress internet website online, along side forms with date picker fields.
For detailed instructions, chances are high that you’ll want to see our step-by-step knowledge on tips on how to set up a WordPress plugin.
Understand: For this knowledge, you want to use a top class model of WPForms, as that’s where the date picker field is available. That being discussed, for those who use our WPForms coupon, then you definitely’ll have the ability to get 50% off of the typical price.
Upon activation, head over to the WPForms » Add New internet web page from your WordPress dashboard.
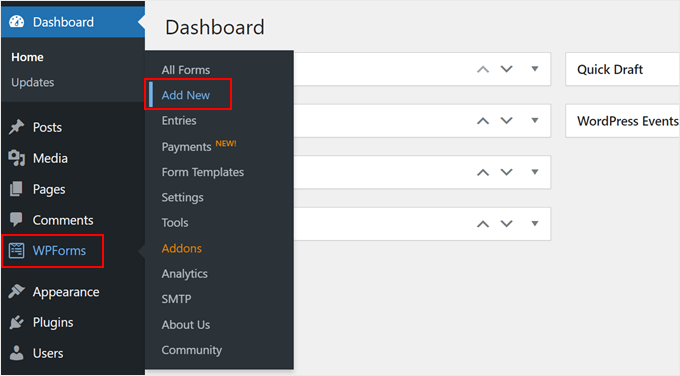
This may occasionally direct you to the ‘Make a choice a Template’ internet web page.
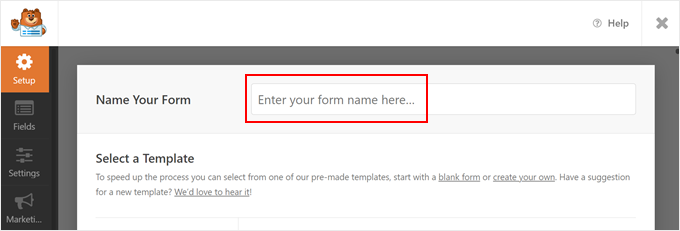
Previous to choosing a template, it’s a good idea to name your WordPress form to be able to merely identify it later.
Scrolling down, you’re going to look a lot of pre-made form templates available proper right here, a variety of which already have the date picker field built-in.
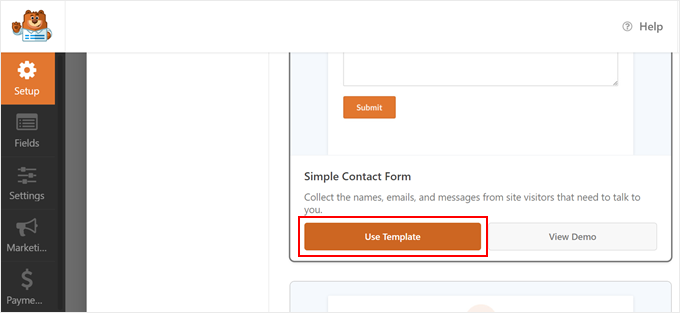
For the sake of example, we will be able to use the Simple Contact Form template and then add the date picker field to it. Alternatively feel free to make a choice a template that matches you highest.
After getting made your variety, merely click on at the ‘Use Template’ button.
Step 2: Add a Date Picker Field to Your WordPress Form
Now, you’re going to reach at the WPForms form builder. You’ll understand the field possible choices inside the left column and a kind preview at the right kind side of the computer screen.
By the use of default, the Simple Contact Form template most simple has the determine, e mail cope with, and comments field added to the form.
For demonstration purposes, we will be able to show you recommendations on how one can add the date picker field for your WordPress form. But if your template already has it, then you definitely’ll have the ability to skip to the improving portion of this step.
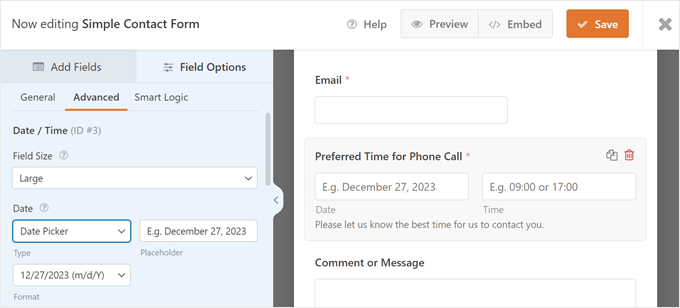
What you want to do is scroll proper all the way down to the Fancy Fields segment inside the left column, where you’re going to look the ‘Date / Time’ field.
Simply drag and drop that field to where you wish to have it for your form. In this tutorial, we’ve located it reasonably below the E mail field.

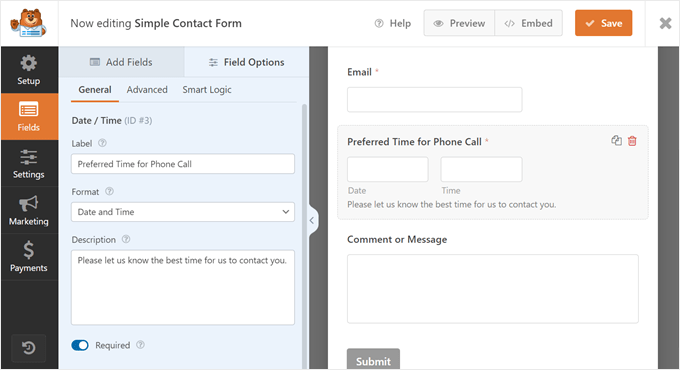
If you happen to’ve achieved that, click on on on the ‘Date/ Time’ field to edit it. This may occasionally open up the ‘Field Possible choices’ tab on the left-hand side of your computer screen.
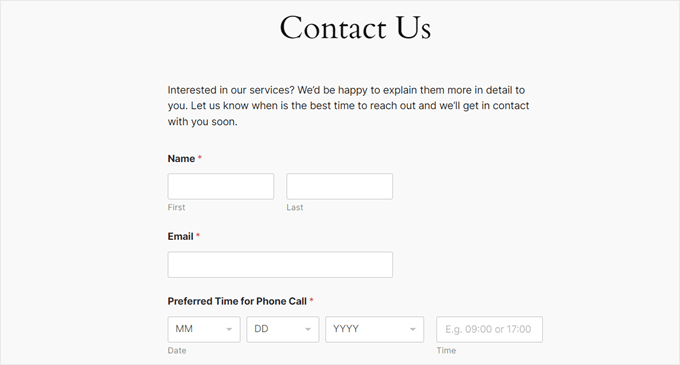
From proper right here, you’ll have the ability to exchange the label of the field, which defaults to ‘Date / Time.’ We’re going to make use of ‘Hottest Time for Phone Identify’ for our field.
You’ll moreover exchange the date construction of the field using the Construction dropdown menu. The selections are Date and Time, Date, or Time most simple. This can also be useful if you want to use just a date without a time field to assemble consumers’ birthdates.
Reasonably than that, you’ll have the ability to fill out the description text to supply further context on what the patron needs to enter inside the field.
After all, you’ll be ready to check out the ‘Required’ box if you want to make this a mandatory field. This means the patron will have to choose a date and time previous to they are able to submit the form.
After getting achieved that, merely click on at the ‘Save’ button on the most efficient to store your form settings.
Skilled Tip: In case you run an accommodation internet website online and want consumers to insert particular dates for their stay, then you definitely’ll have the ability to use the Resort Reservation Shape template. It accommodates two date picker fields: one for the approaching date and the other for the departure date.
Step 3: Configure the Difficult Possible choices for the Date Time Picker
By the use of default, the date picker field for your WordPress form could be a calendar with a time dropdown menu next to it.
The existing date can also be made up our minds on, alternatively the patron can exchange it to make a choice a singular date. The date construction is month/day/twelve months.
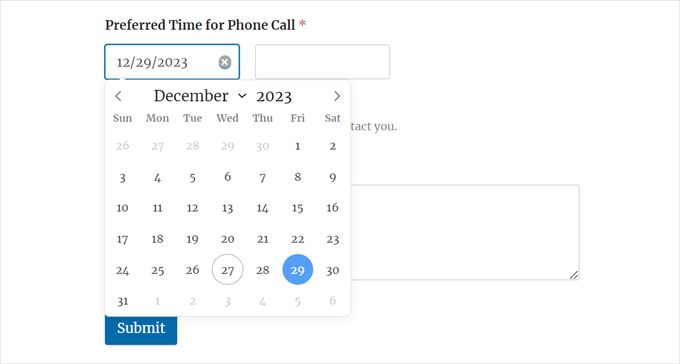
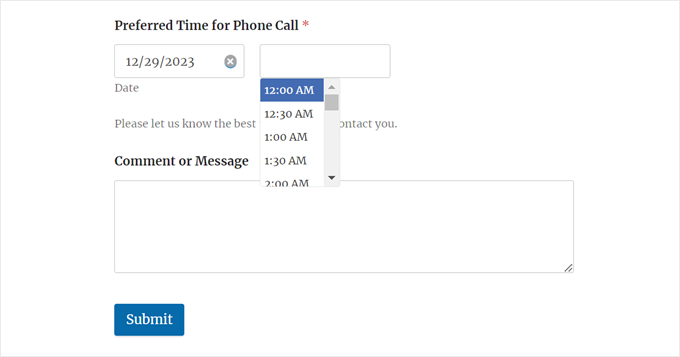
Within the interim, the time dropdown defaults to a 12-hour clock with 30-minute periods.
Shoppers can then choose a time slot that works highest for them.
In some cases, chances are high that you’ll want to exchange the date picker settings. For example, possibly your country follows the day/month/twelve months or 24-hour date and time codecs somewhat than the default ones.
To do this, you’ll need to switch to the ‘Difficult’ tab on the most efficient of the left-side panel.
Proper right here, you’ll have the ability to keep watch over the dimensions of the date picker field. Then, inside the Date segment, you’ll have the ability to exchange the date picker from a calendar to a date dropdown menu.
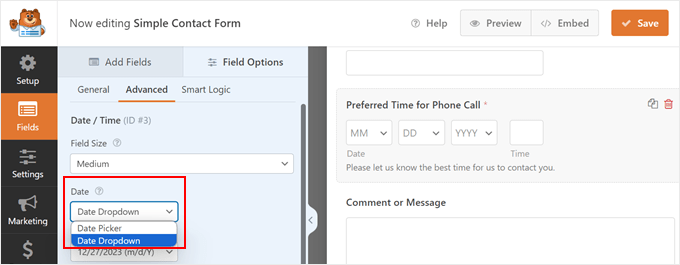
Switching the date calendar picker to a date dropdown menu is a good idea if the form has limited area and the calendar seems to be like somewhat small.
Proper right here’s what the date dropdown menu looks like:
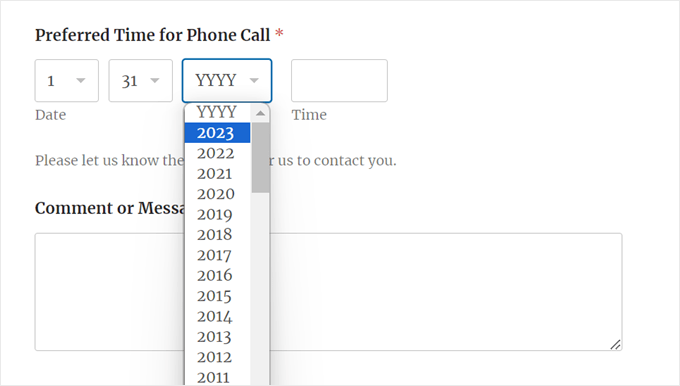
Beneath that, you’ll have the ability to exchange the date construction from month/day/twelve months (1/31/2024) to day/month/twelve months (31/1/2024) or Month Day, 12 months (January 31, 2024).
If you choose the calendar date picker, then you definitely’ll have the ability to moreover insert placeholder text inside the ‘Date’ field. You’ll fill it along side your date construction to let consumers know what construction you could be using so that they don’t get at a loss for words.
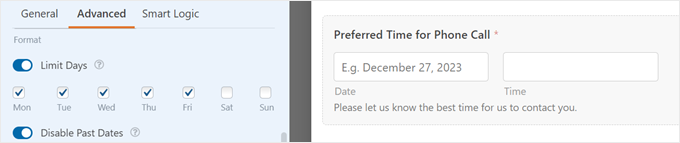
Additionally, you’ll have the ability to permit the ‘Limit Days’ switch to keep watch over the date range that can be made up our minds on. This can also be useful for those who most simple run your services and products and merchandise all over the place the weekdays.
Be happy to moreover disable earlier dates to prevent previous dates from being made up our minds on.
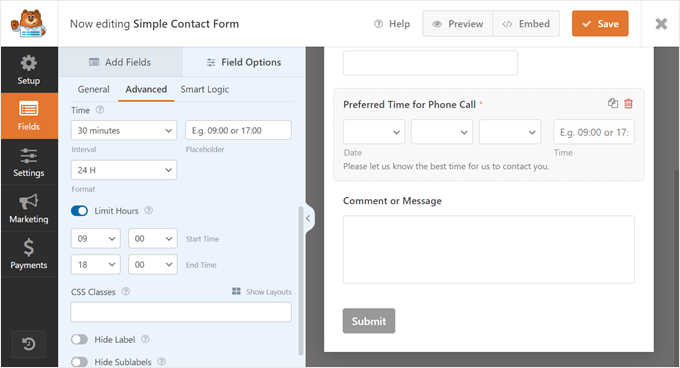
Next, let’s switch proper all the way down to the ‘Time’ segment to change the time picker.
Proper right here, you’ll have the ability to exchange the duration to 15 minutes or 1 hour as an alternative of 30 minutes. It’s moreover good to go into placeholder text proper right here to show what time construction you could be using.
The time picker defaults to a 12-hour clock, alternatively you’ll have the ability to switch this to a 24-hour clock for those who want.
Moreover, feel free to turn on the ‘Limit Hours’ setting to specify the start and end events of your services and products and merchandise. This way, consumers can’t make an appointment outside of your trade hours.
Reasonably than that, you’ll have the ability to enter a CSS elegance determine for the date picker field. That could be a subtle and no longer mandatory function, alternatively you’ll have the ability to use this to override the way of the form using code later.
Ultimate alternatively not least, you’ll have the ability to cover the form field label and/or sublabel if vital.
Once you could be satisfied along side your form, you’ll have the ability to save it by means of clicking the ‘Save’ button inside of the most efficient correct corner of the computer screen.
Step 4: Embed the WordPress Form on Your Internet website online
You’re in truth ready to be able to upload your new form with the date picker for your WordPress web page. To do this, simply click on at the ‘Embed’ button on the most efficient part of the form builder.
A popup will appear asking you to choose an present internet web page to be able to upload the form to or create a brand spanking new internet web page for the form from scratch. Each and every possible choices use the block editor, so the steps are stunning similar.

Add the WPForms Block to an Provide or New Internet web page
To insert the form in an present internet web page, click on at the ‘Make a choice Provide Internet web page’ button. After that, make a selection one of the most the most important pages you already have for your WordPress weblog or internet web page and click on on ‘Let’s Transfer!’
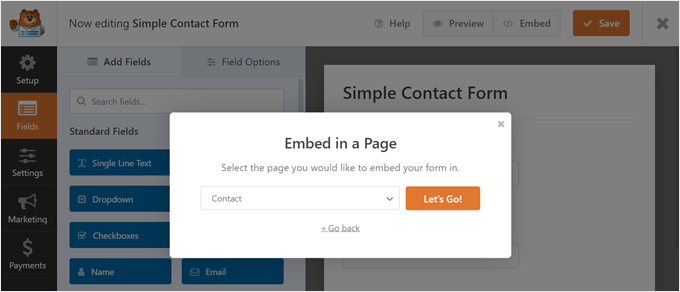
If you want to add the form to a brand spanking new internet web page, merely click on at the ‘Create New Internet web page’ button.
Then, give your new internet web page a name, and click on on ‘Let’s Transfer!’

Both a type of methods will put across you to the block editor, where you’re going to look some instructions on recommendations on how one can add the WPForms block.
First, click on at the ‘+’ add block button.
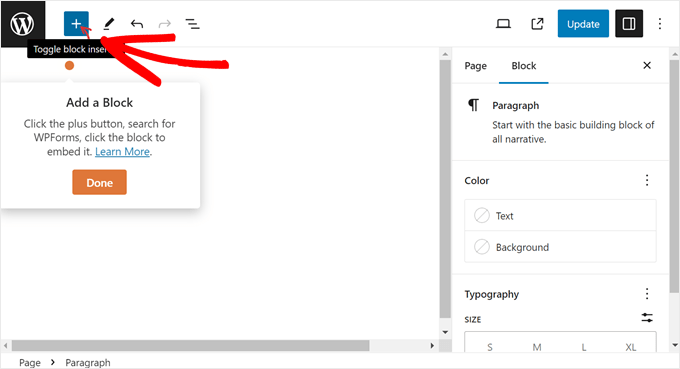
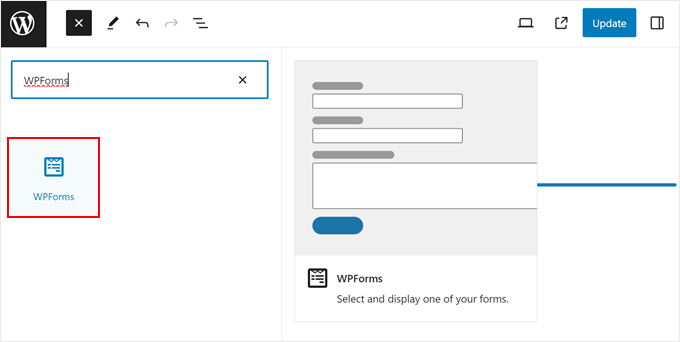
Then, type ‘WPForms’ into the block search bar.
Simply drag and drop the block anywhere seems to be like highest on the internet web page.
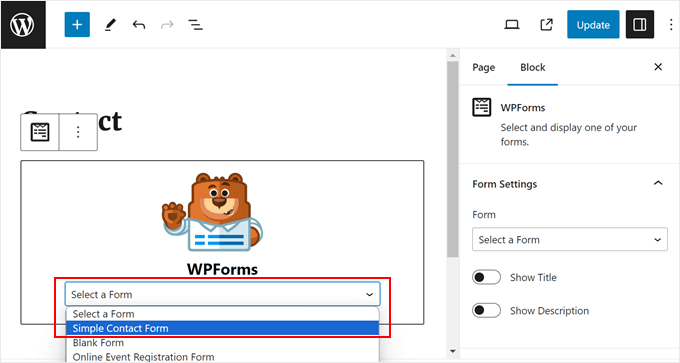
All you want to do now might be click on at the dropdown menu.
Then, make a selection the form you merely created.
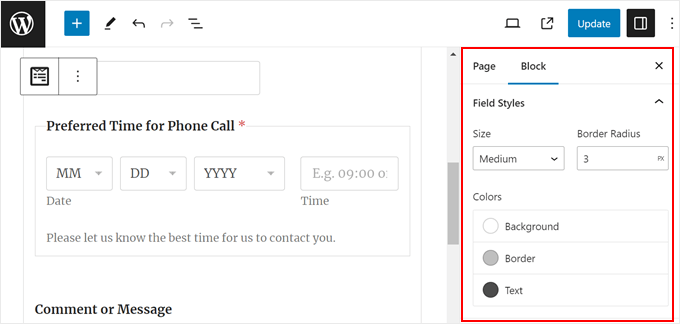
Throughout the Block settings sidebar, you’ll have the ability to customise the shape field, label, and button sorts to lead them to look nicer along side your WordPress theme.
You’ll exchange each part’s dimension, border radius, and colors.
You’ll now click on at the ‘Exchange’ or ‘Publish’ button to make the form continue to exist your internet web page.
It’ll need to look something like this for your WordPress internet web page:
If you want to insert the form in a put up reasonably than a web page, then you definitely’ll have the ability to create a brand spanking new submit or open an present one inside the block editor.
After that, merely observe the identical steps to be able to upload the WPForms block to a internet web page like in this way.
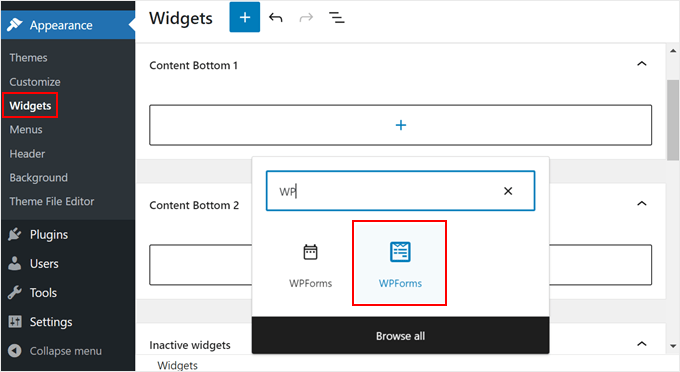
Add the WPForms Block to a Widget-Ready House
In case you use a antique WordPress theme, then chances are high that you’ll want to display your form in a widget-ready header, footer, or sidebar house. It is a excellent recommendation if your form is gorgeous temporary and doesn’t soak up quite a lot of area.
Understand: If you are using a block theme, then this system won’t art work to your internet web page.
To do this, merely cross to Glance » Widgets from the WordPress admin house. Then, navigate for your desired widget-ready house and click on at the white ‘+’ add block button inside of it. After that, you’ll have the ability to search for the WPForms block.
In case you see two possible choices, you’ll be ready to make a choice each one as every do the identical issue.
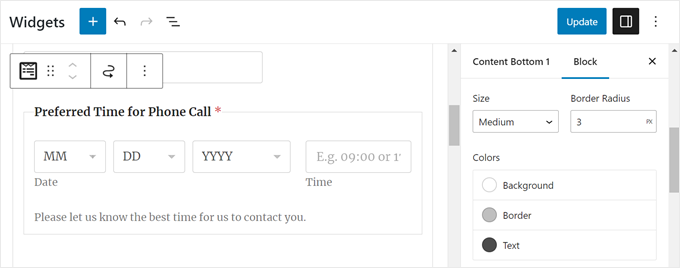
Like inside the previous way, simply make a selection the form you merely created earlier. Throughout the Block settings sidebar, you’ll have the ability to configure the design so that it fits upper along side your WordPress theme.
Once you could be proud of the edits, merely click on at the ‘Exchange’ button.
That’s it!
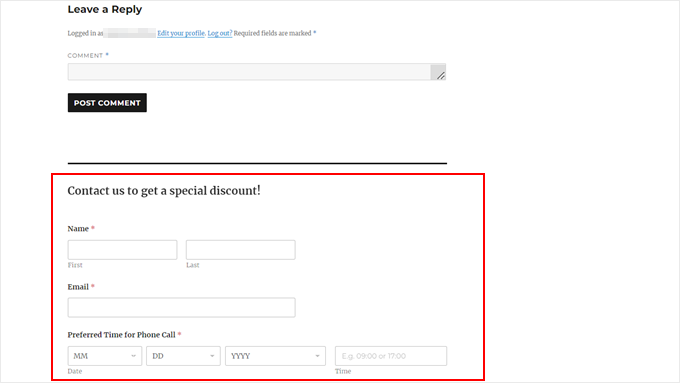
Proper right here’s what our form looks like at the bottom of a WordPress weblog put up:
Embed Your WordPress Form With a Shortcode
If the WPForms block or widget doesn’t art work, then you definitely’ll have the ability to moreover add your WordPress form using a shortcode.
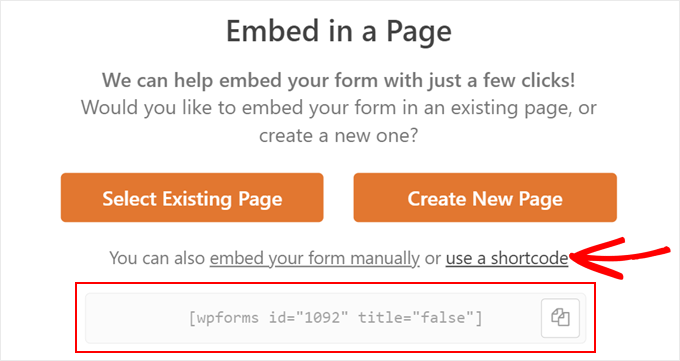
Throughout the ‘Embed in a Internet web page’ popup, simply click on at the ‘use a shortcode’ link. You’ll then see a shortcode that you just’ll have the ability to copy and paste to a internet web page, submit, or widget-ready house.
For more information on recommendations on how one can use shortcodes, be told our article on tips on how to upload a shortcode in WordPress.
Ultimate Tips to Optimize Your WordPress Form
Now that you know how to create a WordPress form with a date picker, let’s quilt the most productive tips to take your forms to the next degree:
- Ship affirmation emails for your form submitters – This way, consumers will get a notification that you just’ve were given successfully won their get right of entry to, and they won’t overlook what date or time they’ve decided on.
- Settle for on-line bills on your paperwork – WPForms is helping in taste price gateways like Stripe, PayPal, Sq., and Authorize.internet. You’ll acquire one-time or peculiar expenses, and there aren’t any more transaction fees.
- Make your longer forms conversational – When you’ve got an match or client registration form that are meant to snatch slightly a large number of wisdom, then making it conversational can increase the form crowning glory price.
- Save you touch shape junk mail – You’ll permit WPForms’ built-in anti-spam protection and reCAPTCHA check out box to filter out our spammy form entries.
We hope this article helped you discover ways to create a WordPress form with a date picker. You may additionally want to check out our article on tips on how to create an e mail publication and our ultimate record of the perfect WordPress survey plugins.
In case you most popular this article, then please subscribe to our YouTube Channel for WordPress video tutorials. You’ll moreover to seek out us on Twitter and Fb.
The submit The right way to Create a WordPress Shape With a Date Picker (Simple Means) first appeared on WPBeginner.
Contents
- 0.0.1 Why Create a WordPress Form With a Date Picker?
- 0.0.2 Step 1: Arrange the WPForms Plugin and Choose a Template
- 0.0.3 Step 2: Add a Date Picker Field to Your WordPress Form
- 0.0.4 Step 3: Configure the Difficult Possible choices for the Date Time Picker
- 0.0.5 Step 4: Embed the WordPress Form on Your Internet website online
- 0.0.6 Ultimate Tips to Optimize Your WordPress Form
- 0.1 Related posts:
- 1 Easy methods to Upload a Slide Panel Menu in WordPress Topics
- 2 The way to Use Google Assistant Voice Keep an eye on on Home windows PC
- 3 How We Boosted Our Divi Online Store Sales

0 Comments