

Considered one of Divi 5‘s newest releases introduces the Group Carousel Module, a characteristic for developing customized, enticing sliders and carousels in your WordPress web site. You’ll simply show off your portfolio, merchandise, an immersive hero, or a fullscreen slider, and take your web site’s design to new heights.
On this submit, we’ll supply a step by step information to making a fullscreen slider the usage of the Team Carousel module. Let’s dive in!
Figuring out The Team Carousel Module
The Team Carousel Module is a flexible addition to Divi 5, enabling you to create dynamic sliders and carousels.
Not like conventional modules, it helps a variety of layouts, from easy symbol carousels to advanced, post-based sliders powered through the Loop Builder. This adaptability makes it best for showcasing content material like portfolios, testimonials, or product galleries in a compelling means.
Key Options Of The Team Carousel Module
The Team Carousel Module shines with powerful options. It helps dynamic content material loops, permitting you to drag in posts, pages, or customized submit sorts immediately into your slider the usage of the Loop Builder.
The module additionally lets you use any Divi module to construct gorgeous, enticing sliders the usage of Nested Rows and Module Groups. You’ll customise navigation with arrows and pagination dots, customizing their place, shade, and different kinds to check your web site.
Autoplay choices, adjustable speeds, and pause-on-hover options supply an crowd pleasing revel in in your guests, making sure they keep for your web site longer. Moreover, the module is totally customizable, permitting you to create fullscreen and fullwidth layouts, making it superb for hero, provider, or characteristic sections for your web site.
How To Construct A Fullscreen Slider With Divi 5’s Team Carousel Module
On this educational, we’ll display you the way to use the Team Carousel Module to construct a fullscreen slider in your upcoming Divi 5 internet sites. By means of the tip, you’ll have the ability set to construct charming sliders to inspire your guests to behave.
Step 1: Environment Up A New Web page
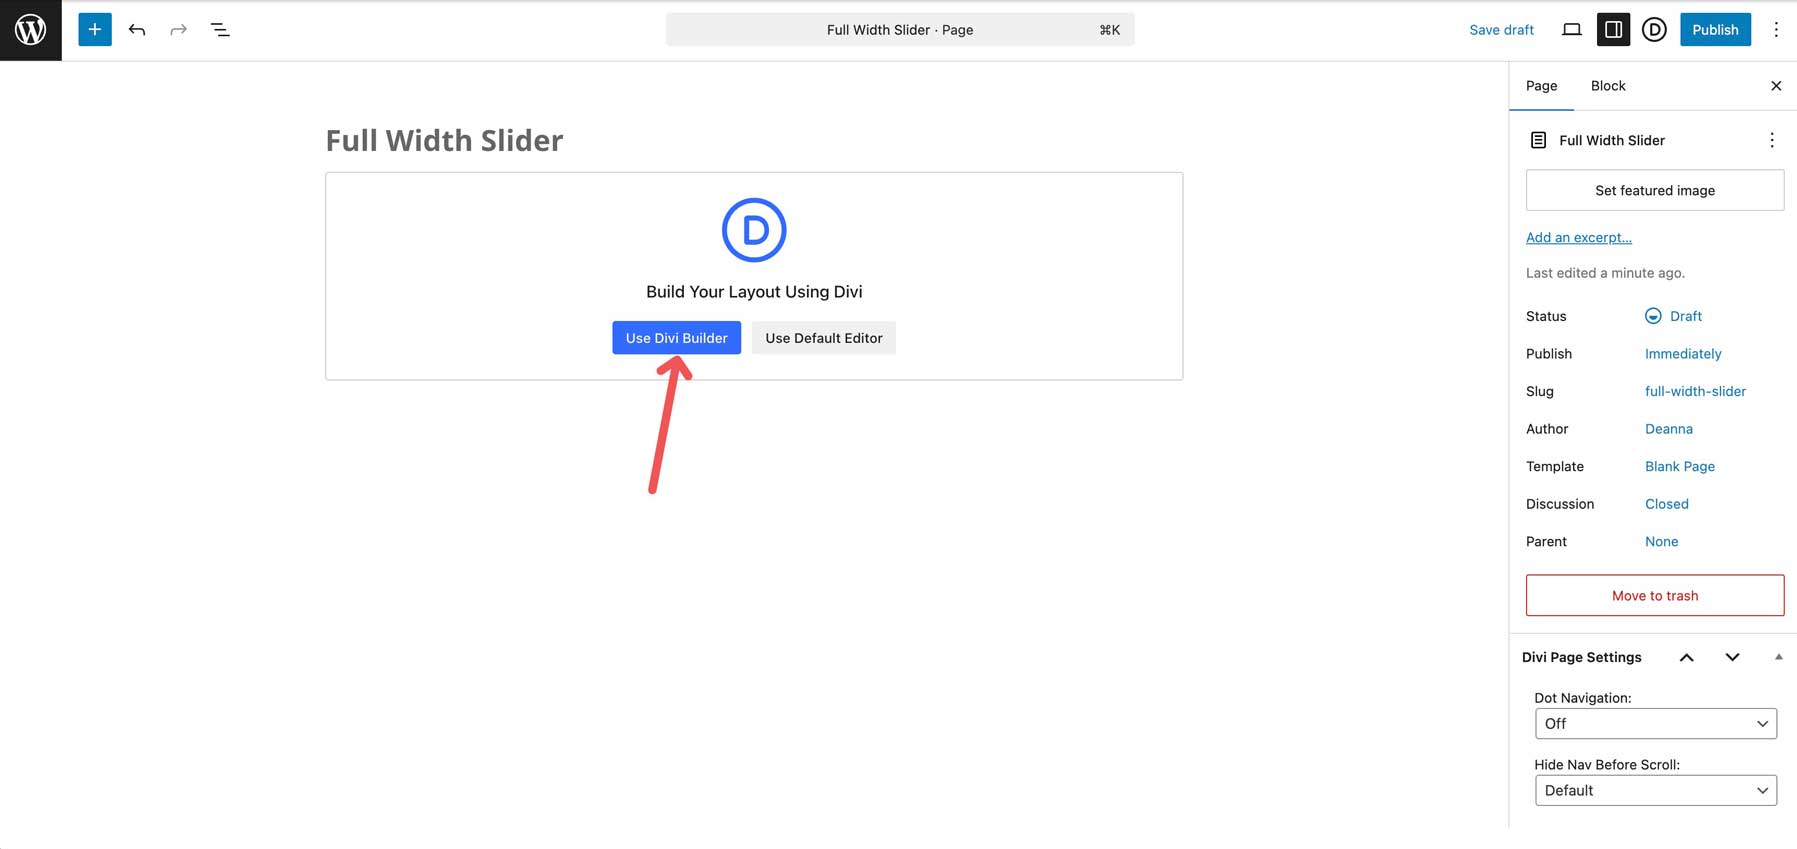
Create a brand new web page, upload a name, and click on Use Divi Builder to get began.
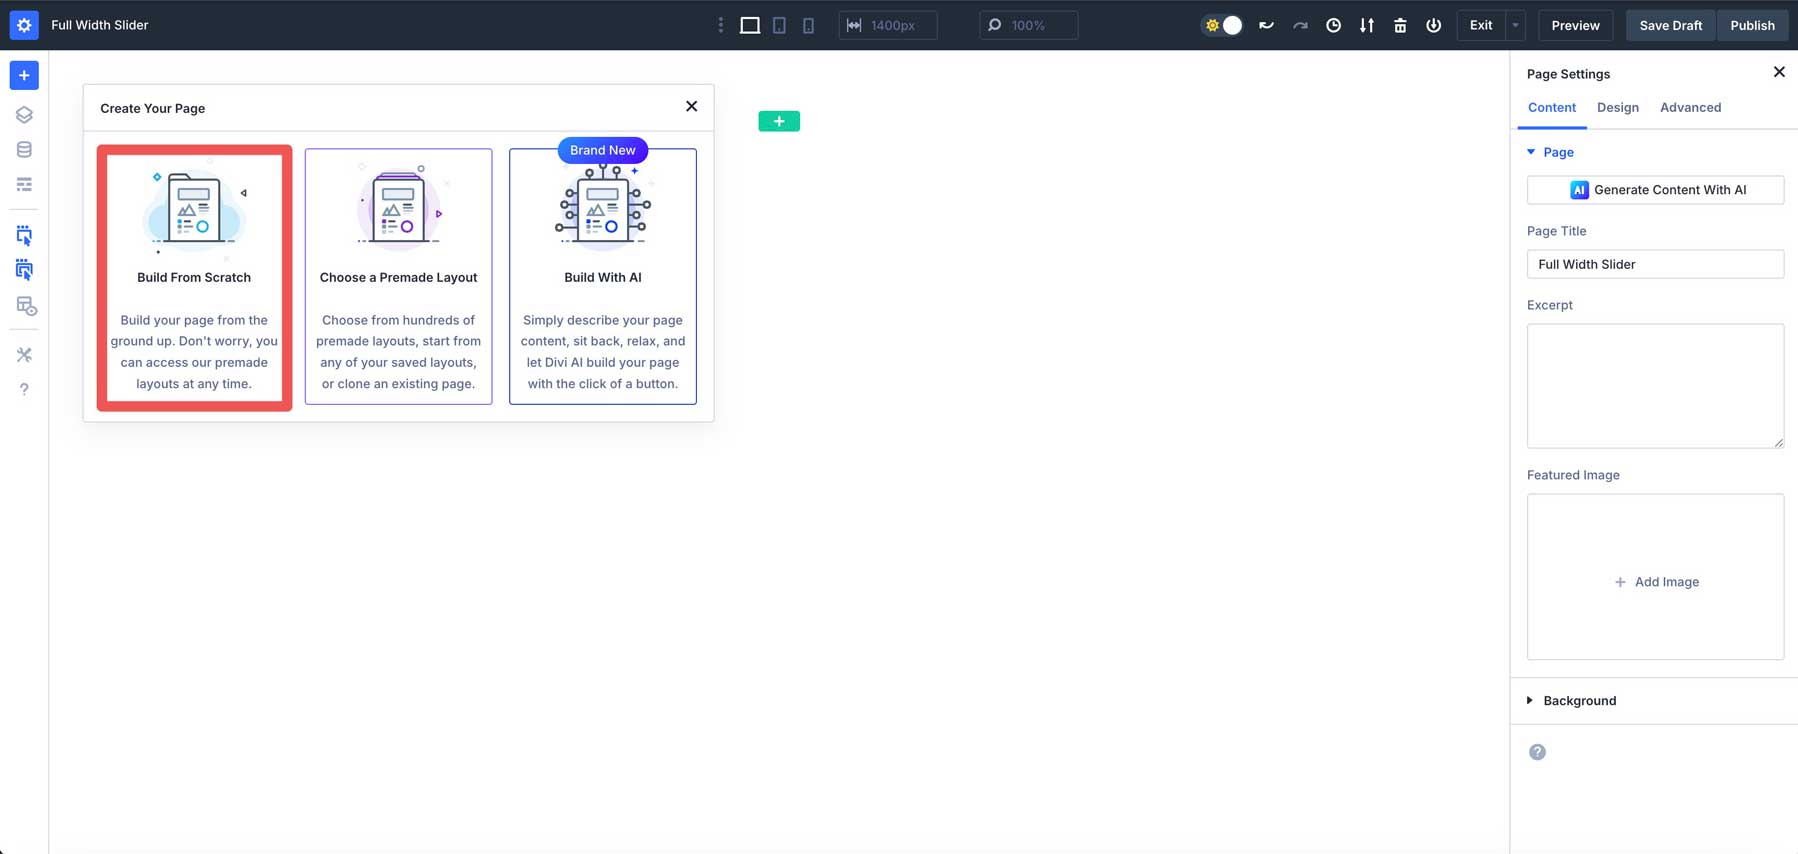
When the Visible Builder opens, make a selection Construct From Scratch beneath the Create Your Web page choices.
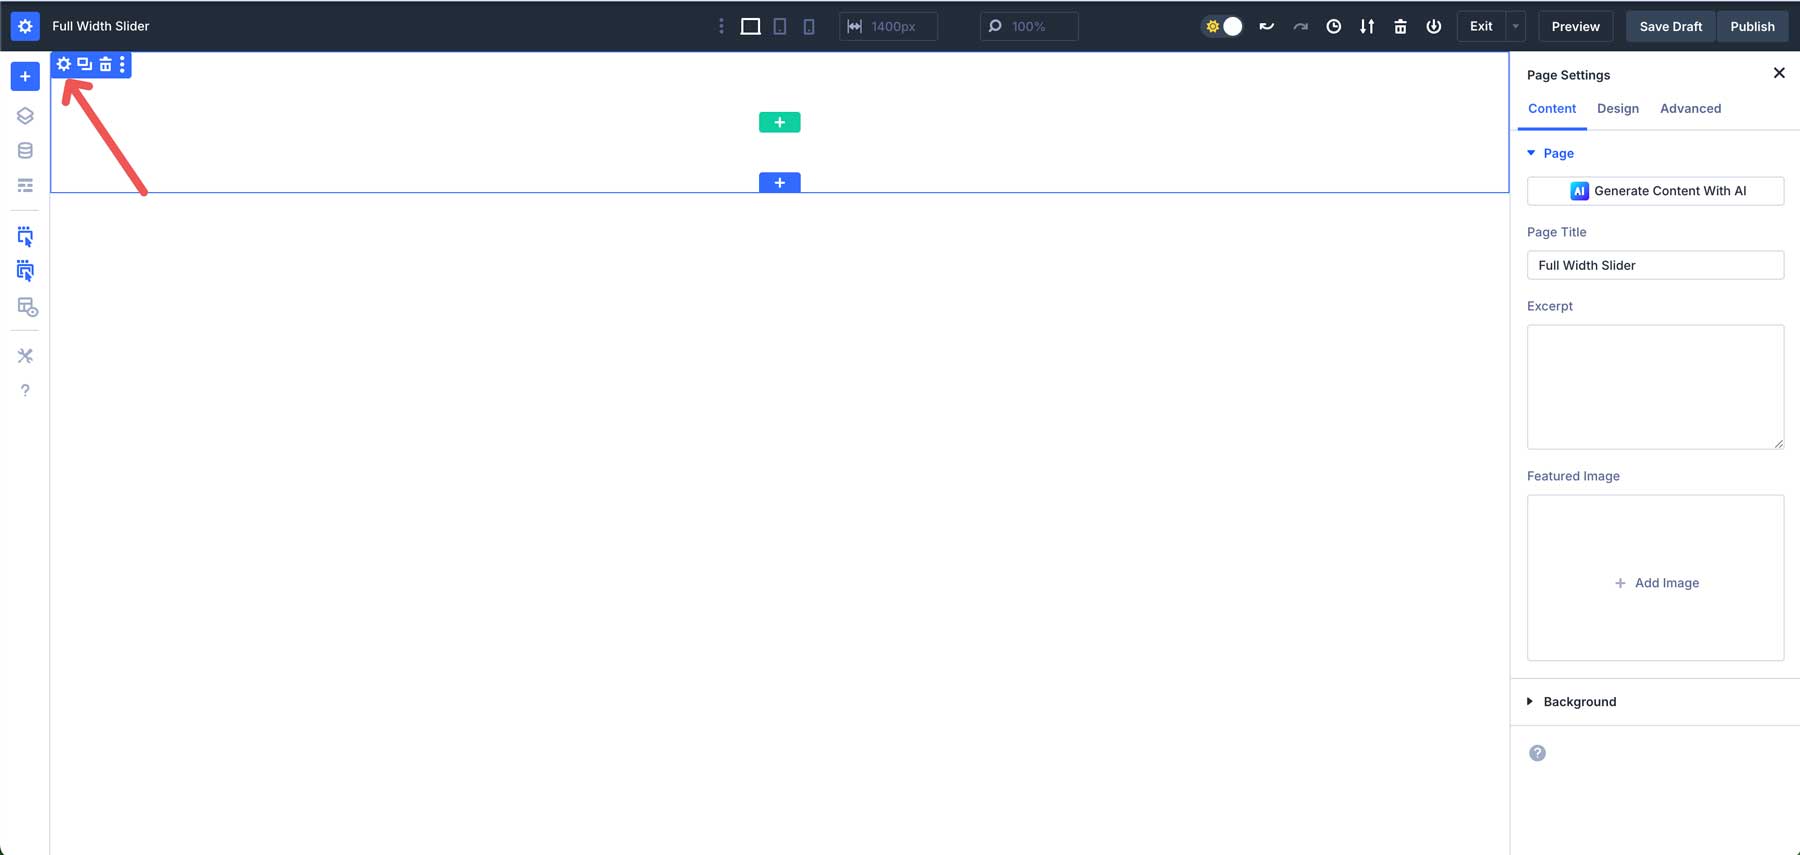
Hover over the segment for your new web page to expose the settings icon. Click on on it to expose the segment’s settings.
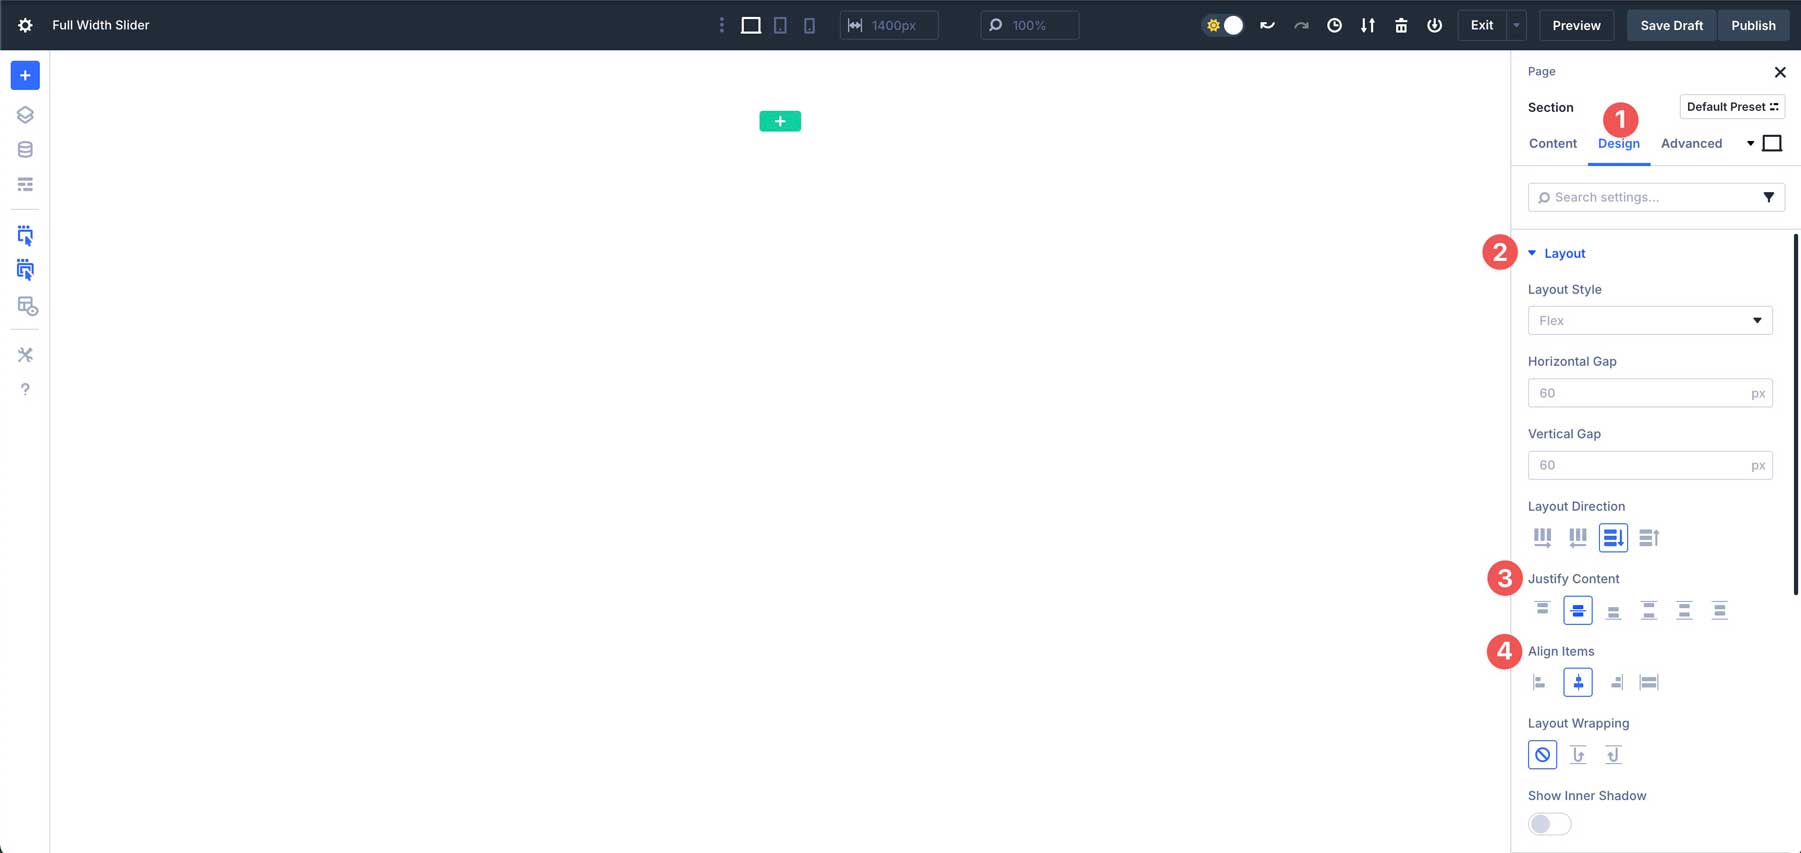
Navigate to the design tab. Click on the Format dropdown menu. Beneath Justify Content material, make a selection heart. Within the Align Pieces box, make a selection heart. This may occasionally permit our segment’s content material to be focused horizontally and vertically.
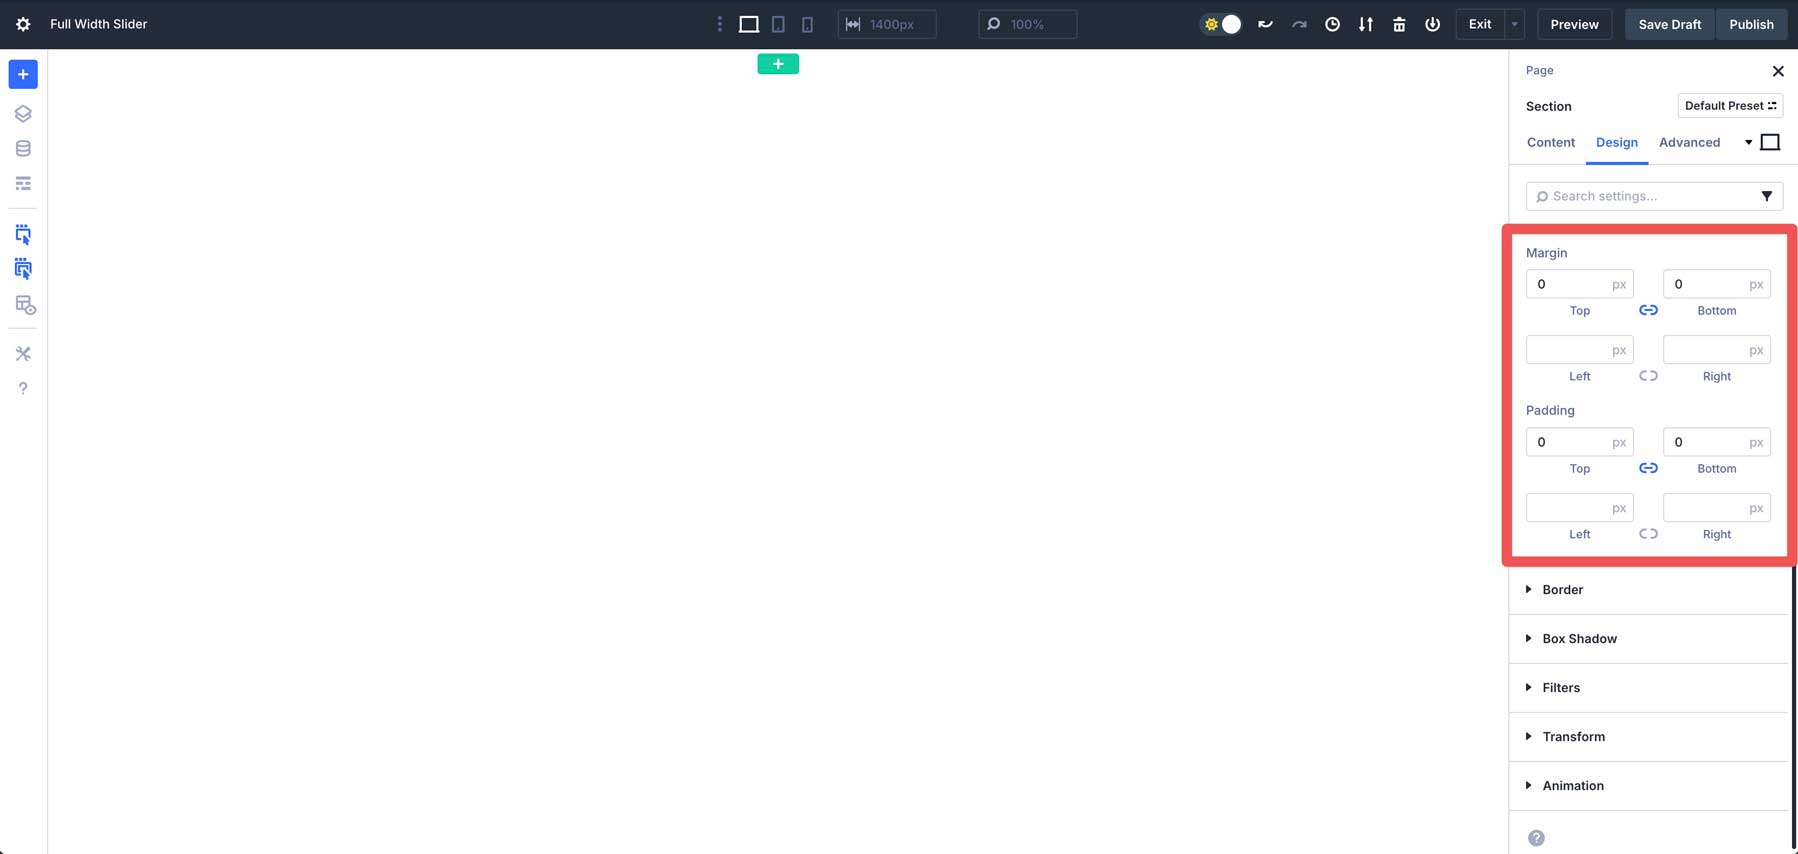
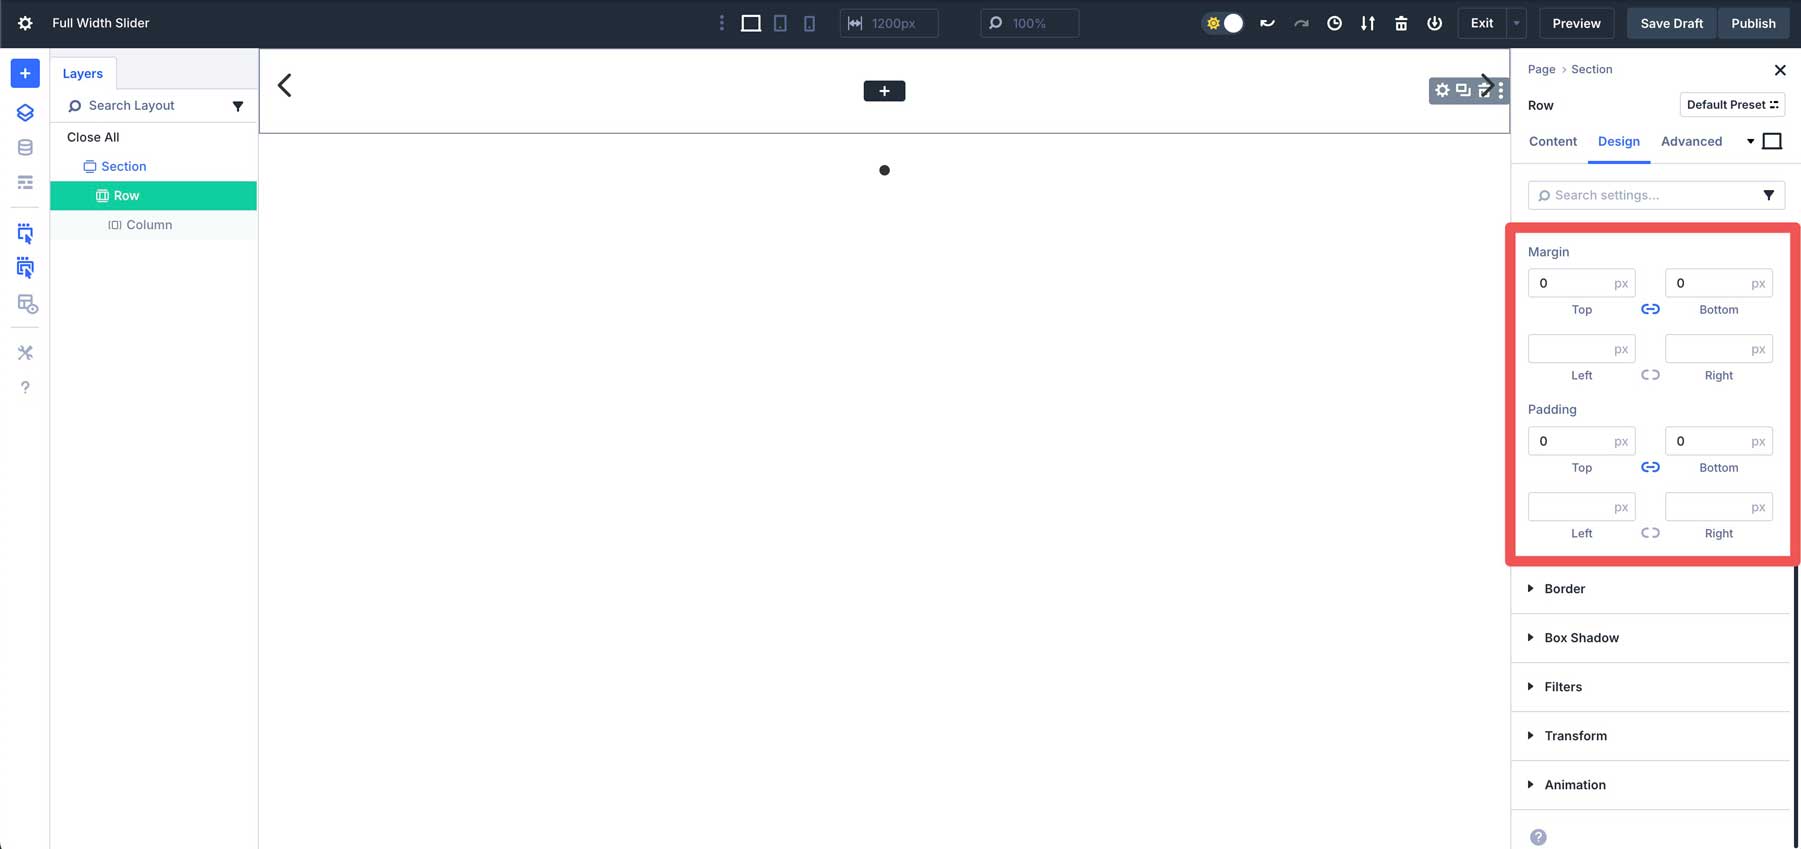
Subsequent, we’ll modify the spacing settings for the segment. Make bigger the Spacing dropdown menu. Set the margin to 0px, height and backside. Beneath padding, set the highest and backside to 0px.
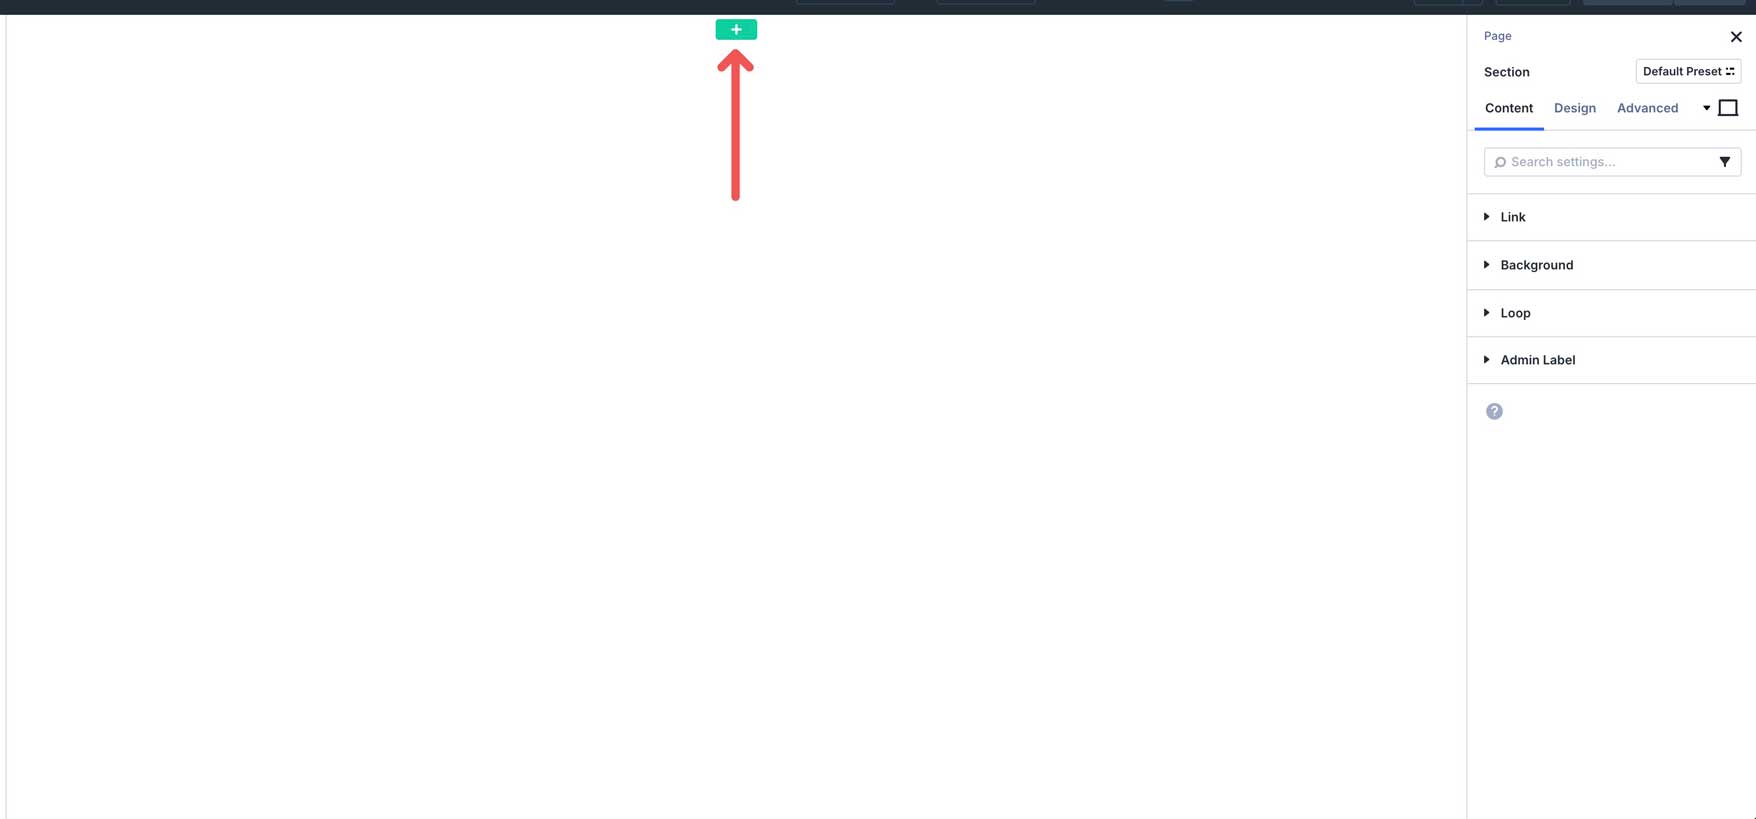
With the segment’s settings in position, click on the inexperienced + icon so as to add a brand new row.
Make a choice the single-column row beneath Equivalent Columns.

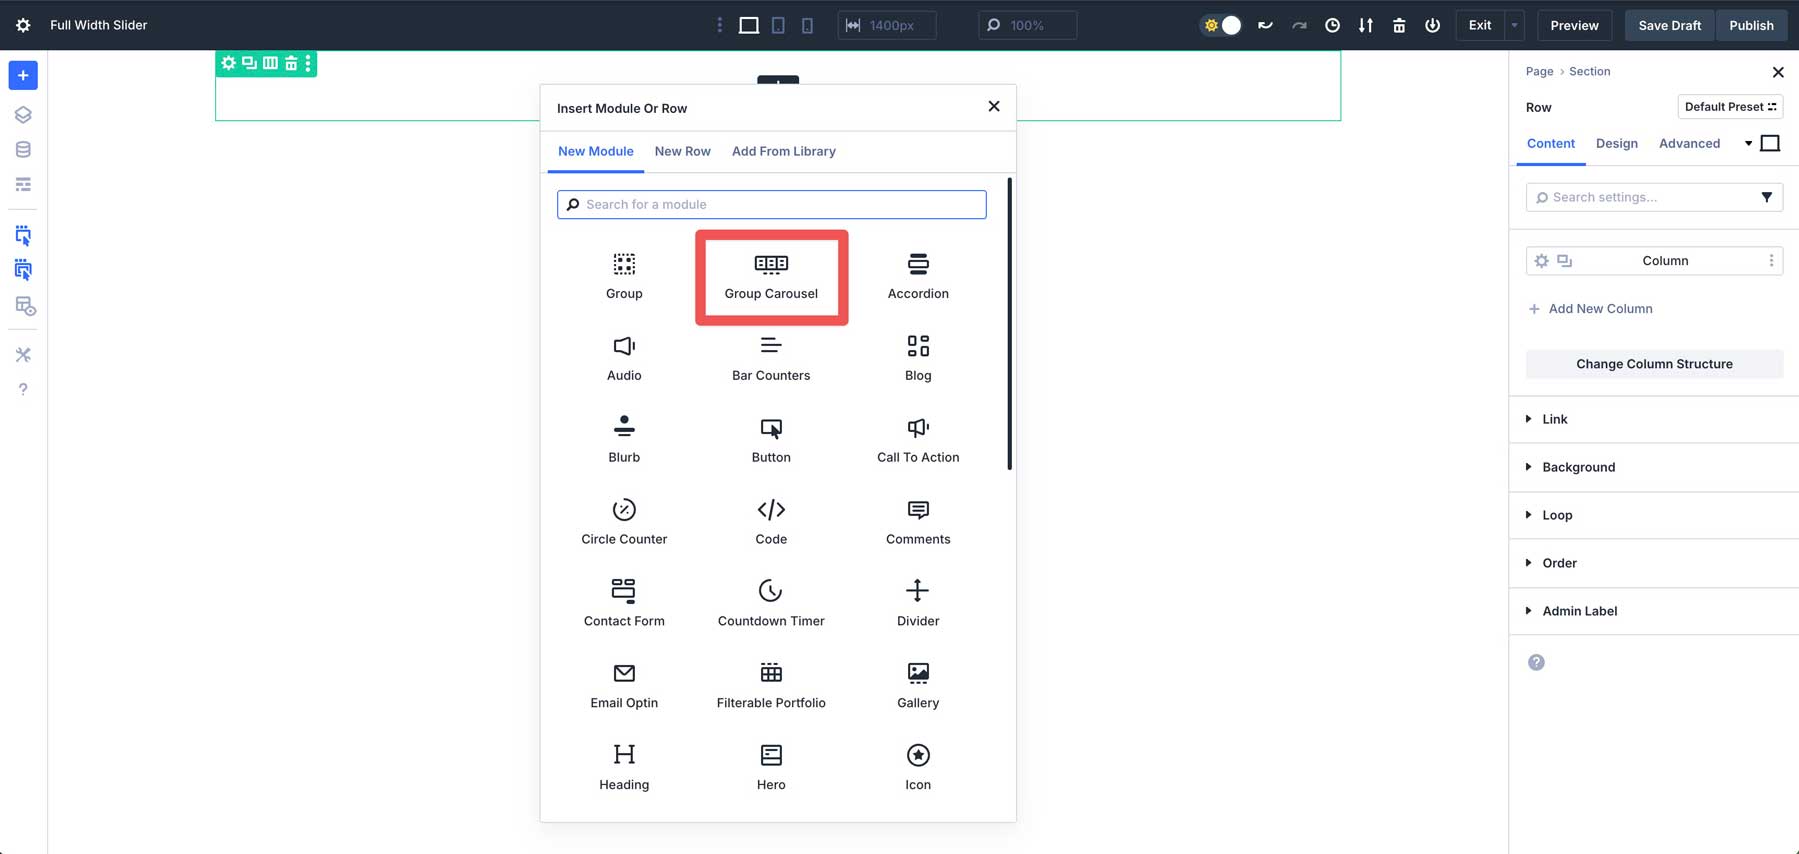
Subsequent, upload the Team Carousel Module to the row.
Prior to including content material, we should arrange the row and Team Carousel Module with Flexbox and spacing controls.
Step 2: Configure The Row Settings
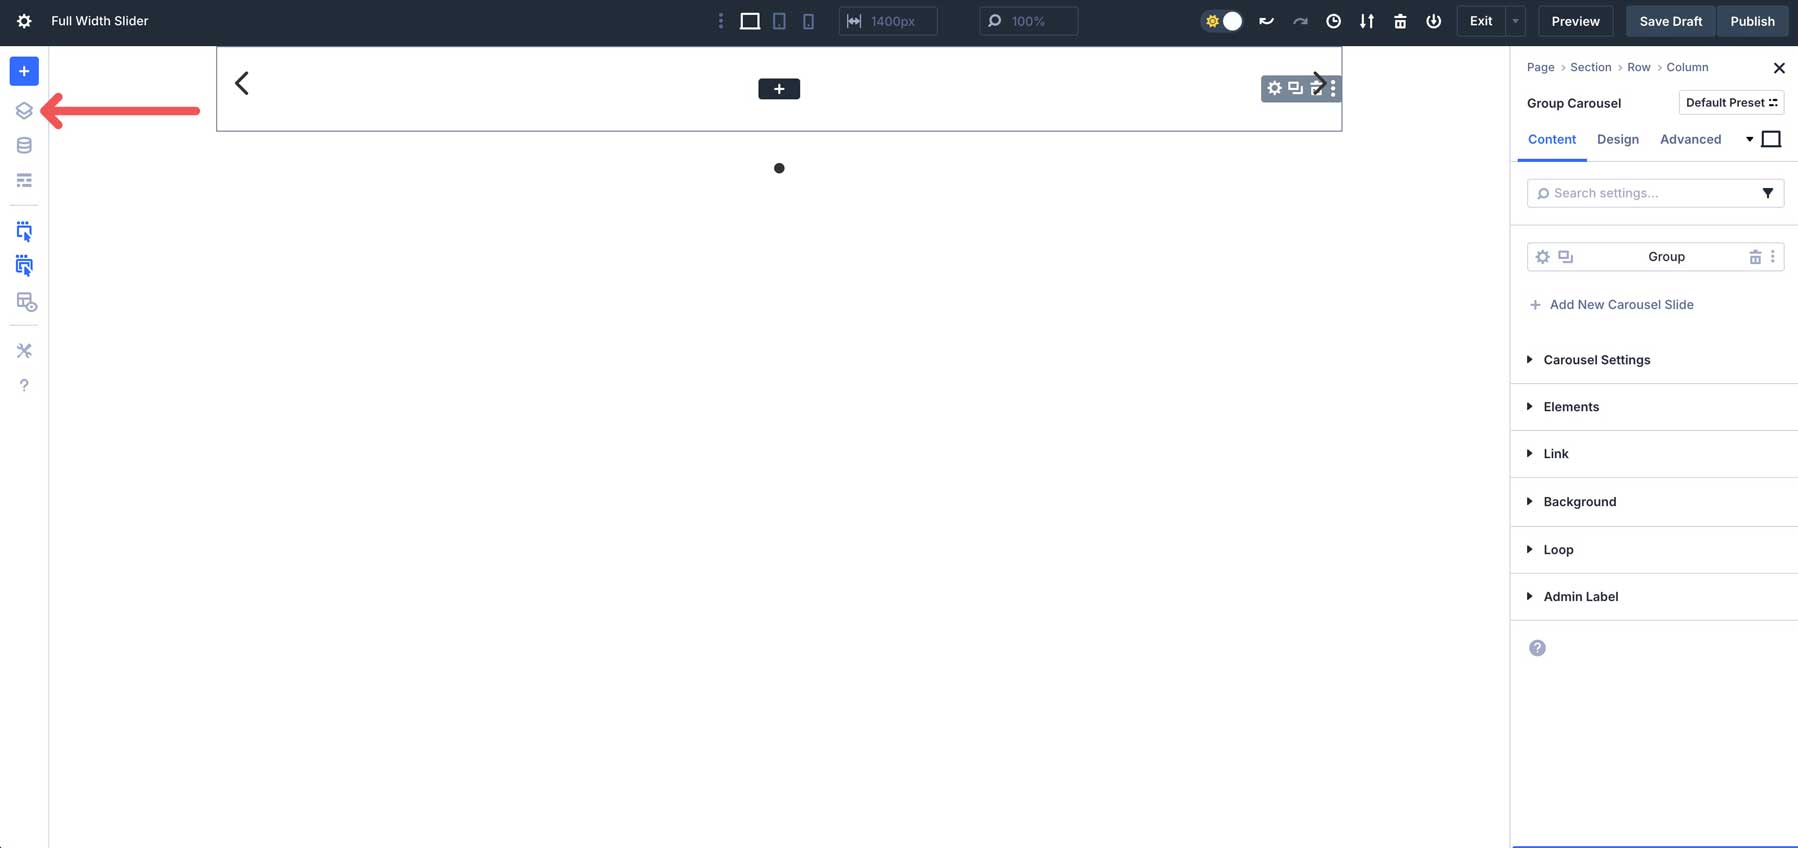
Making a fullscreen slider calls for us to set the row and the Team Carousel Module to 100% width. Click on the Layers icon to simply modify sections. That is an important when running with fullwidth sections and rows, particularly when padding and margin had been set to 0. It makes it more straightforward to peer the format construction of your web page
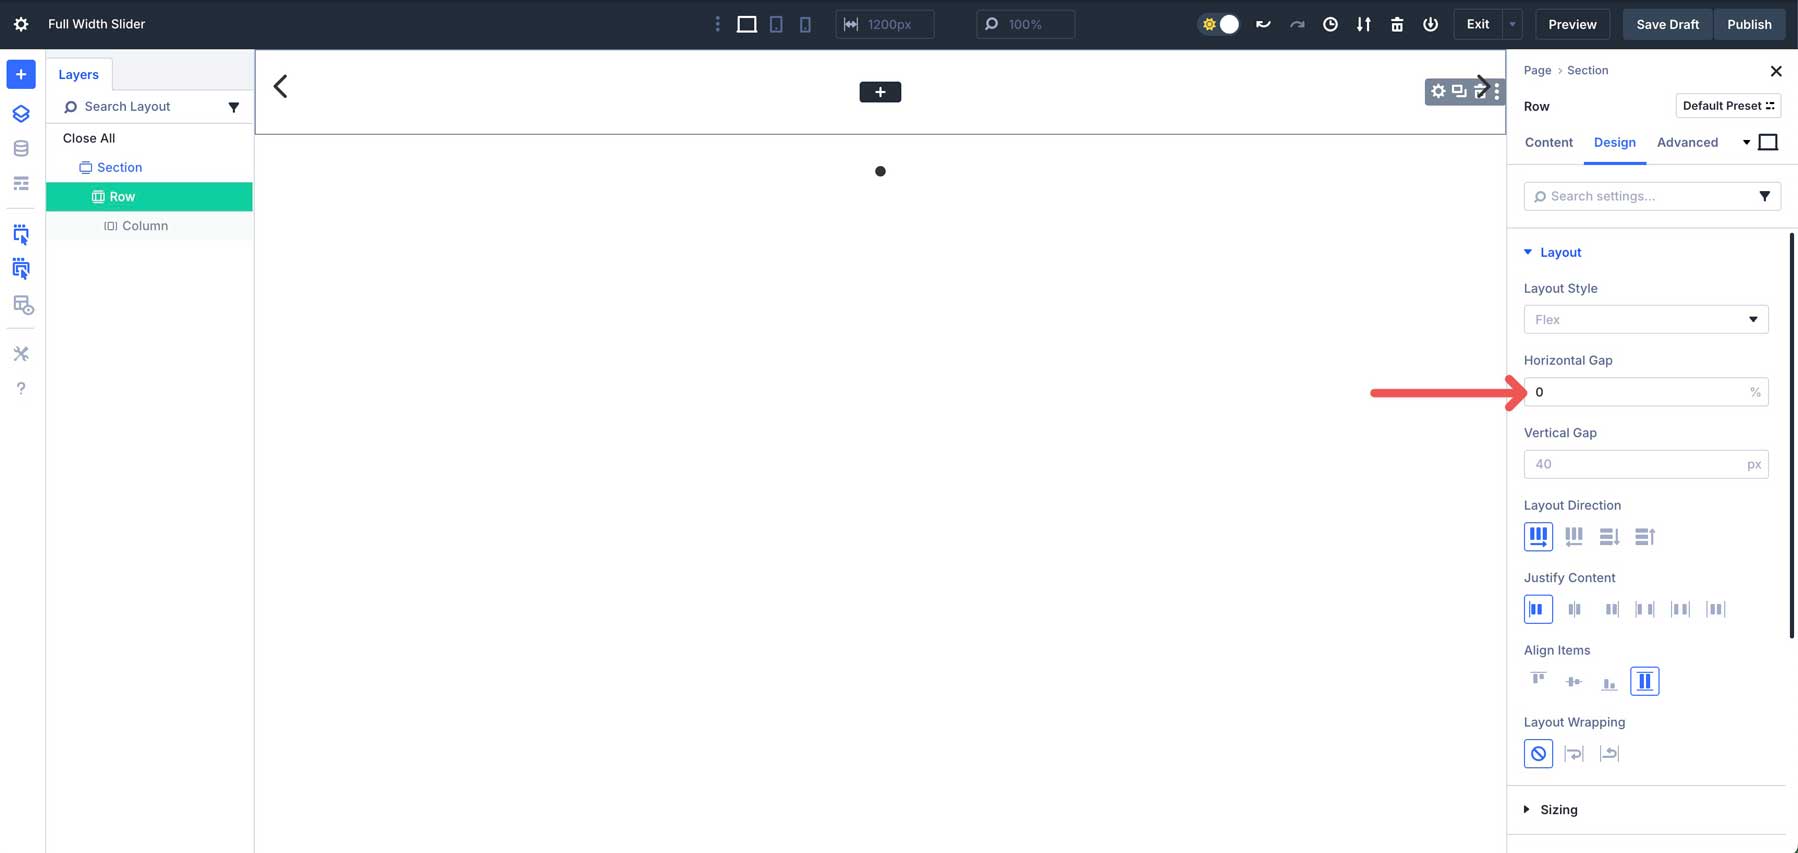
Within the layers view, click on to choose the single-column row that properties the Team Carousel Module. Navigate to the design settings. Within the Format dropdown menu, modify the horizontal hole to 0.
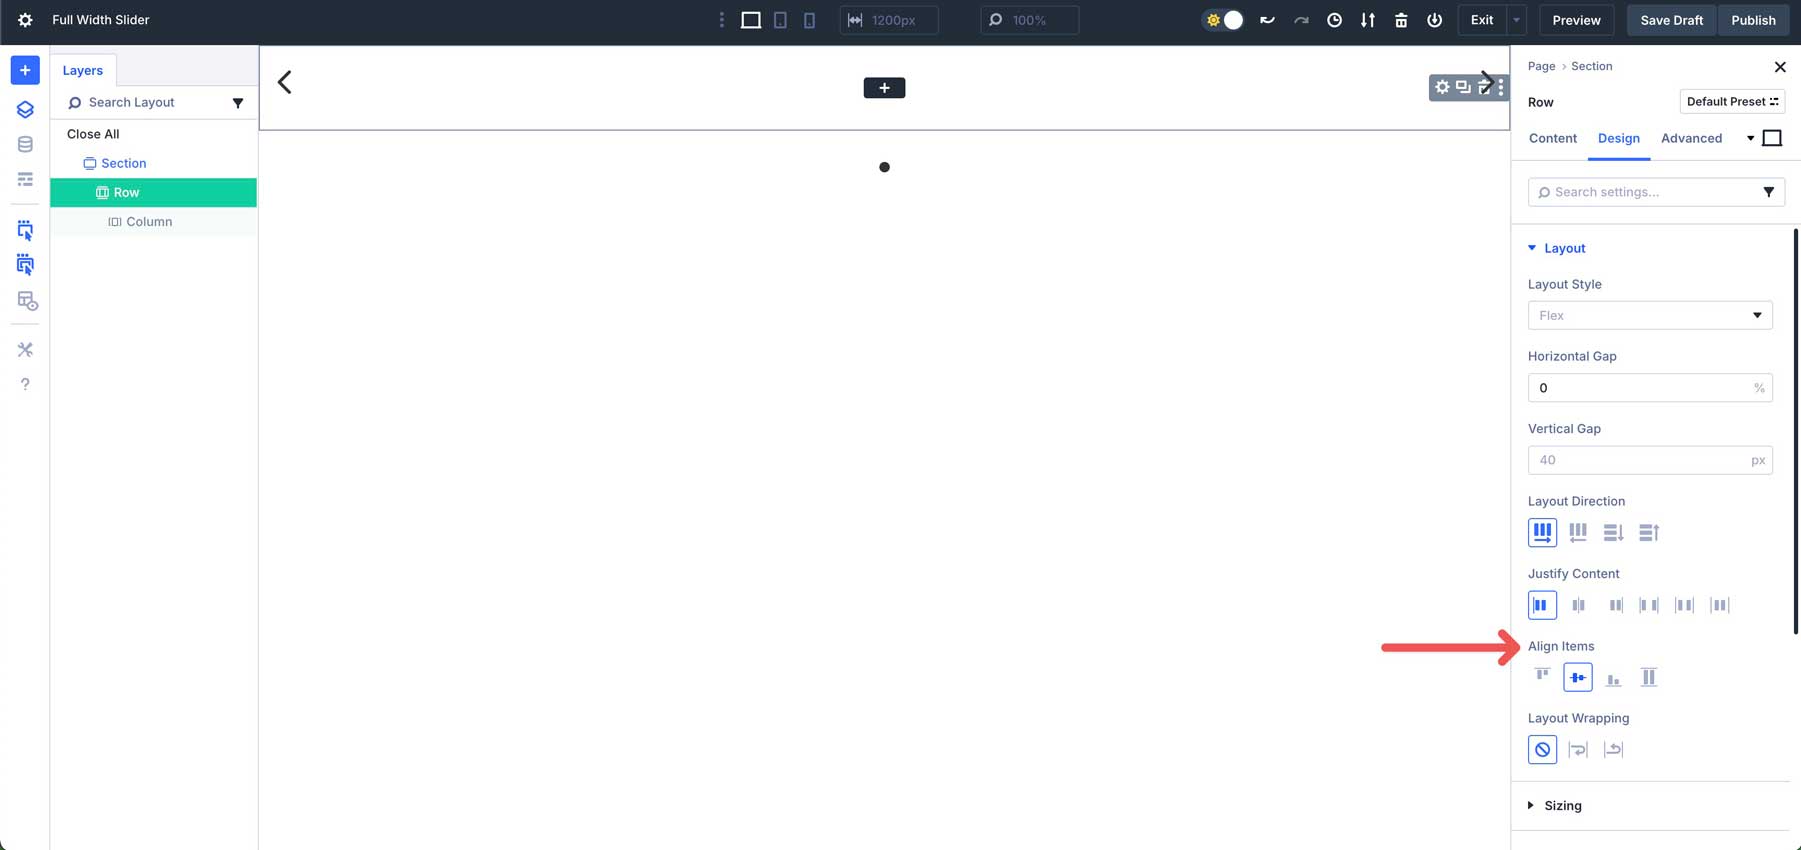
Additionally, set Align Pieces to heart for the row.
Set the width and max width within the sizing tab to 100%.

Within the spacing tab, set the highest and backside margin and padding to 0px.
Step 3: Configure The Team Carousel Settings
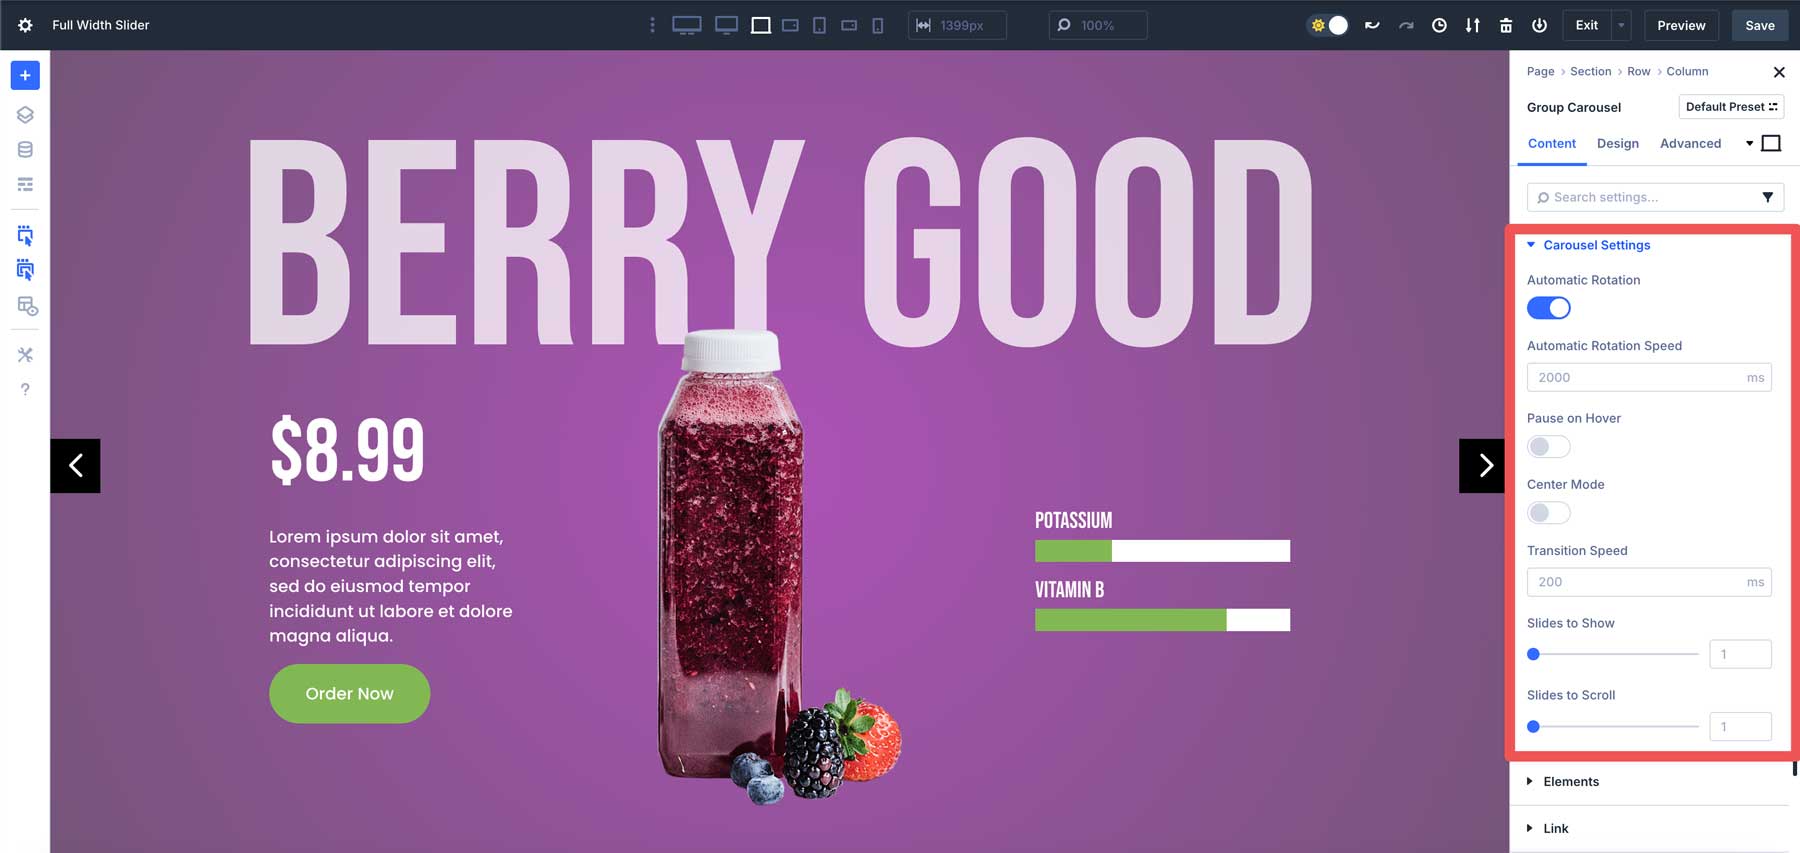
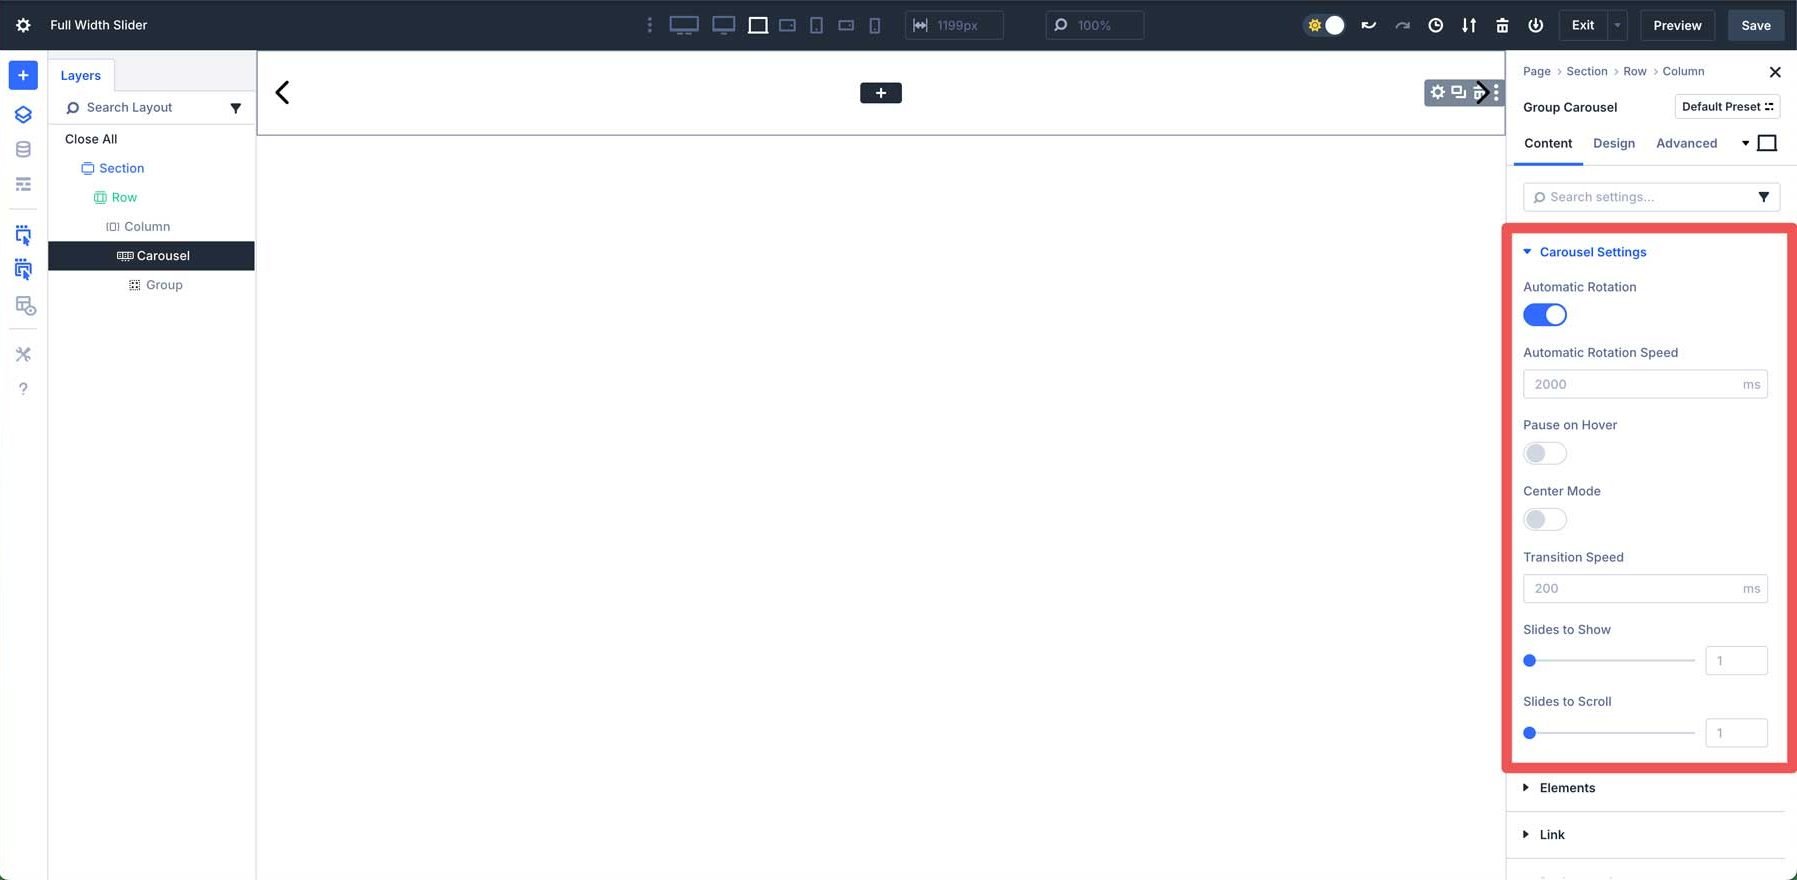
Subsequent, we’ll configure the Team Carousel settings. Make bigger the Carousel Settings dropdown menu within the content material tab. You’ll toggle Computerized Rotation on, make a selection the Computerized Rotation Pace on the default surroundings of 2000ms, and permit Pause on Hover.
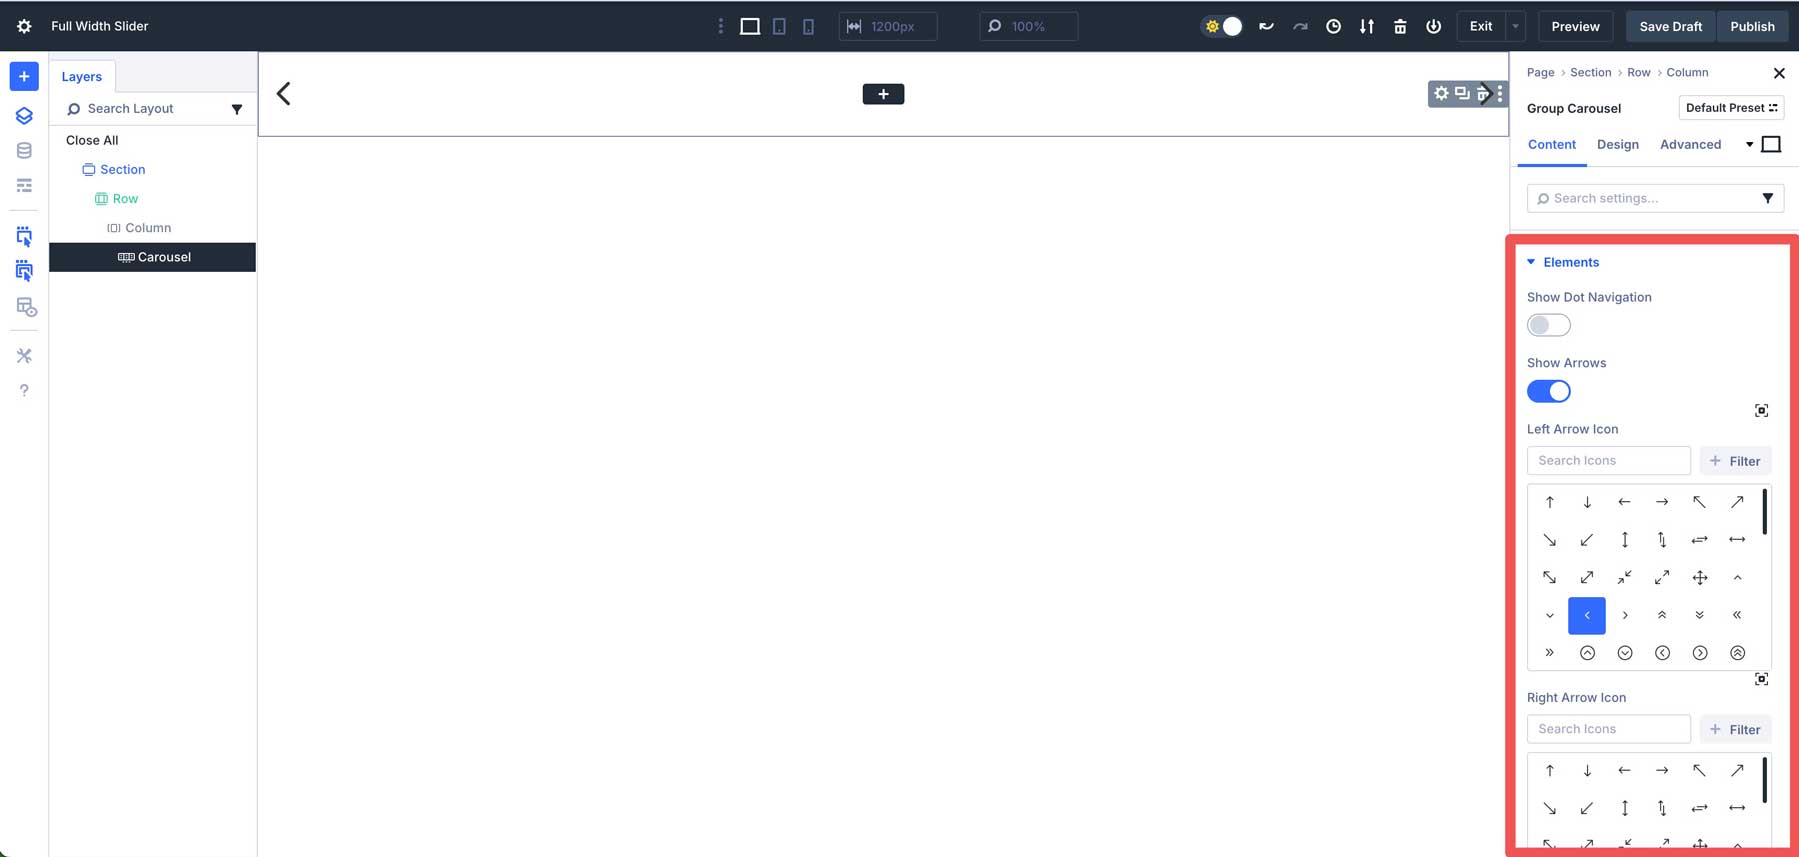
Within the Components tab, disable Display Dot Navigation and depart Display Arrows enabled. You’ll additionally make a selection a customized icon for the left and correct arrows.
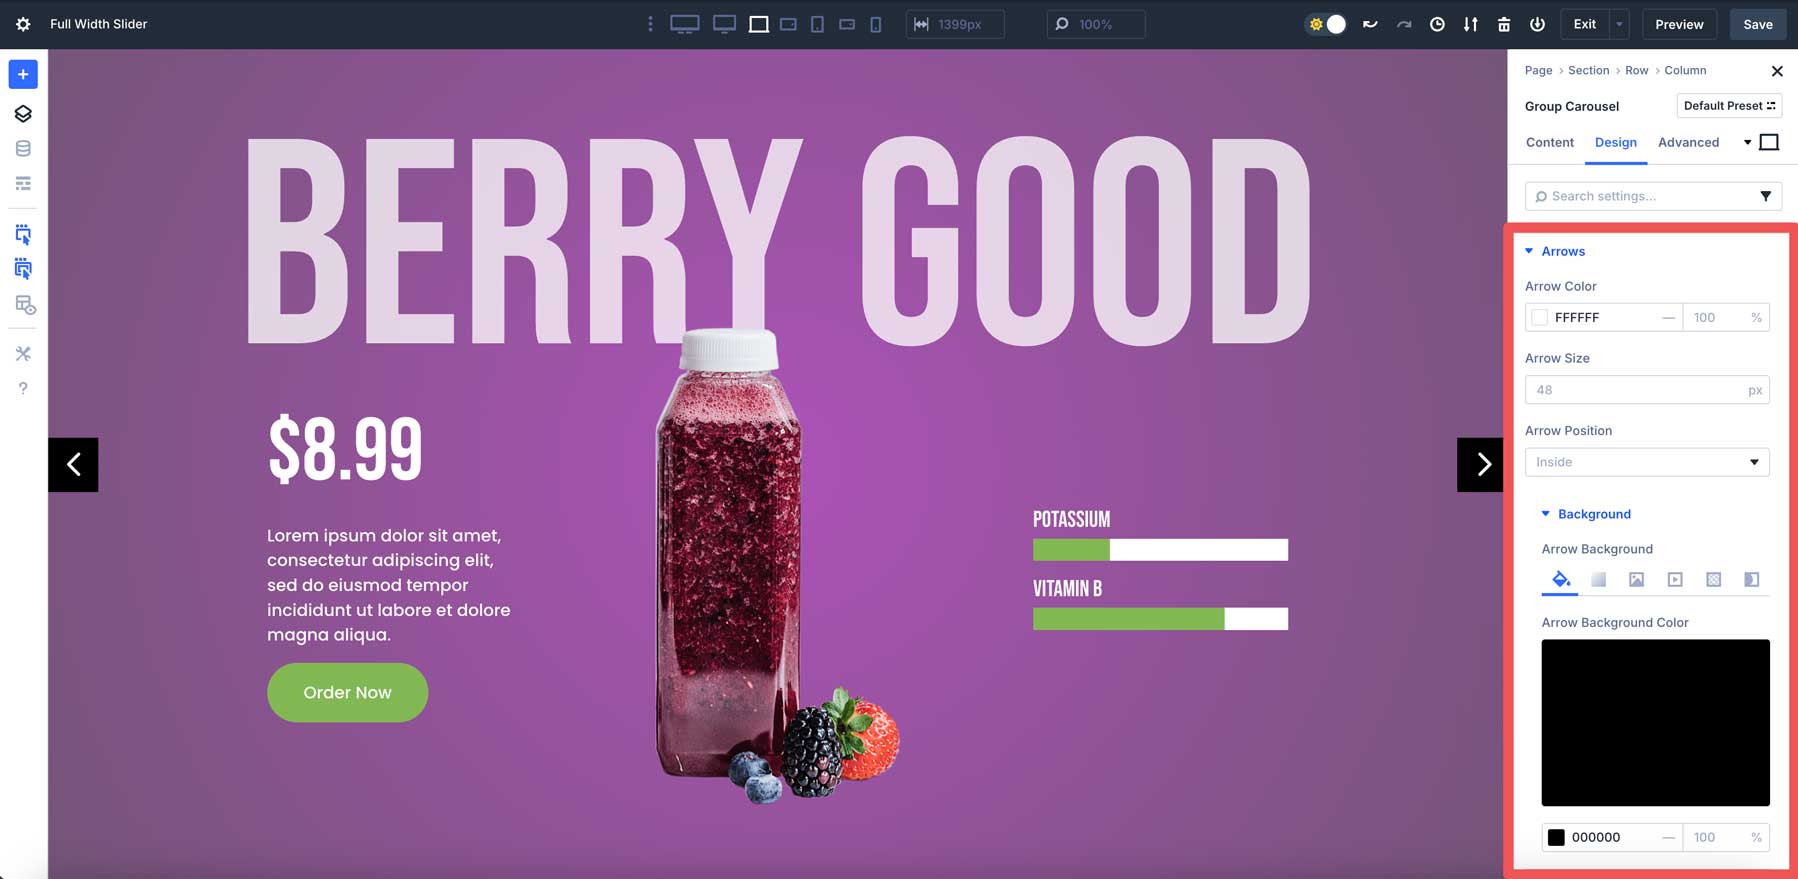
Click on to extend the Arrows tab within the Design tab. Assign #ffffff because the Arrow Colour, depart the Arrow Dimension on the default 48px, and depart Arrow Place set to Inside of.
![]()
Make bigger the Background tab and assign #000000 because the Background Colour.
![]()
Step 4: Taste The First Team
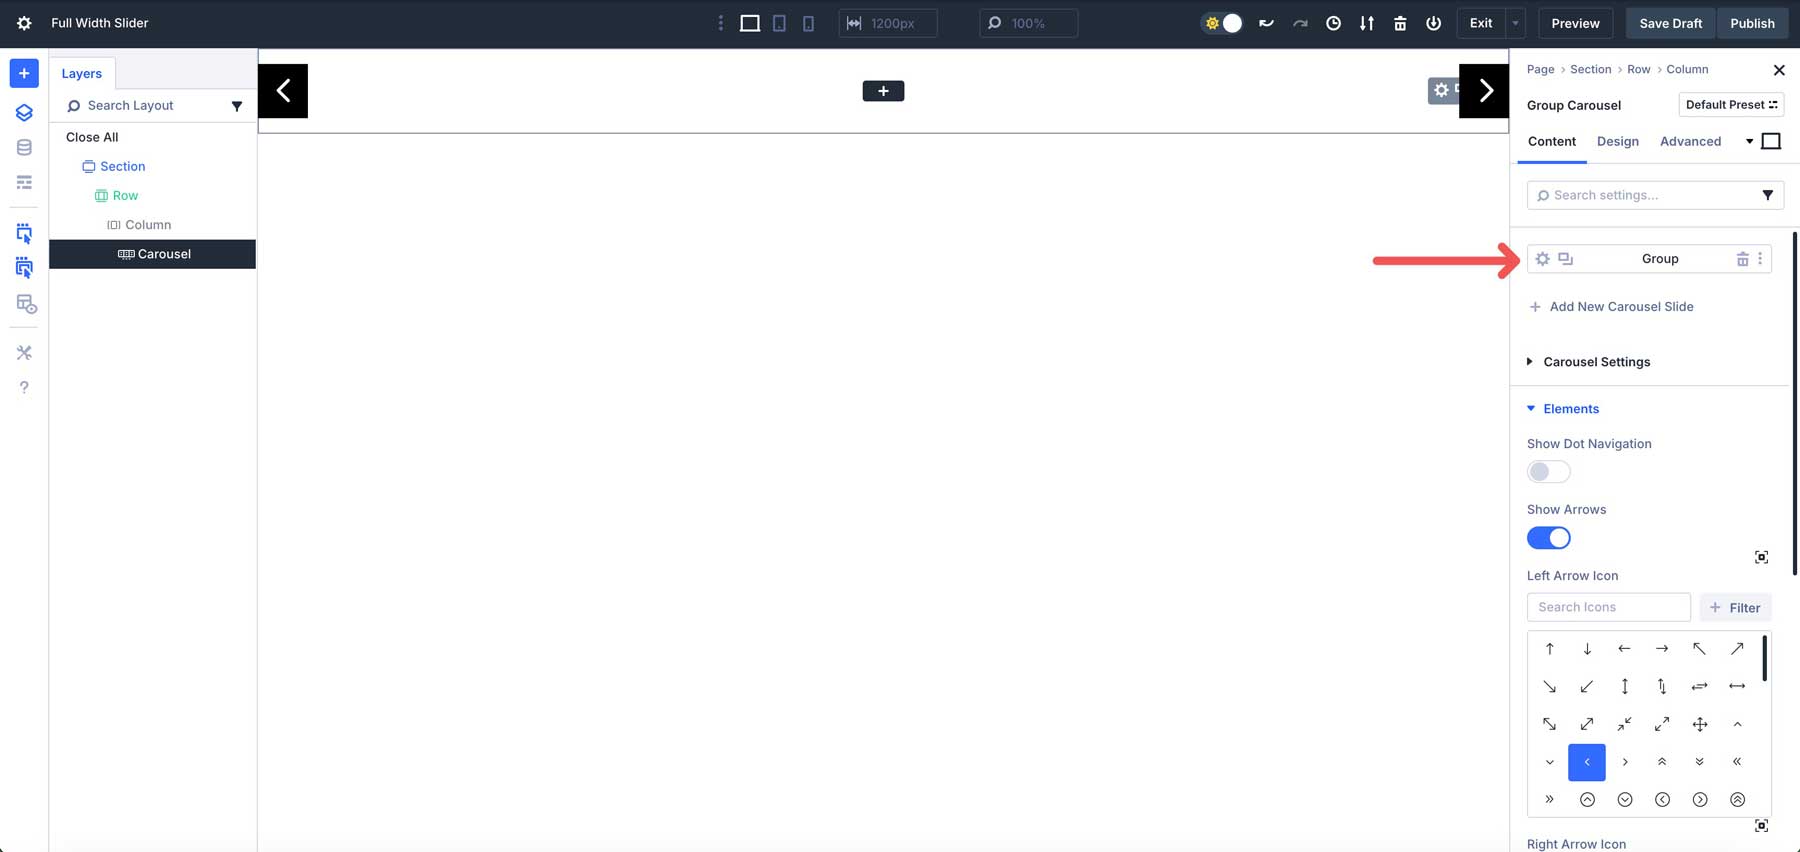
We will be able to upload content material to the primary slide with the segment, row, and Team Carousel settings in position. Click on the content material tab within the Team Carousel Module and click on the settings icon for the Team.
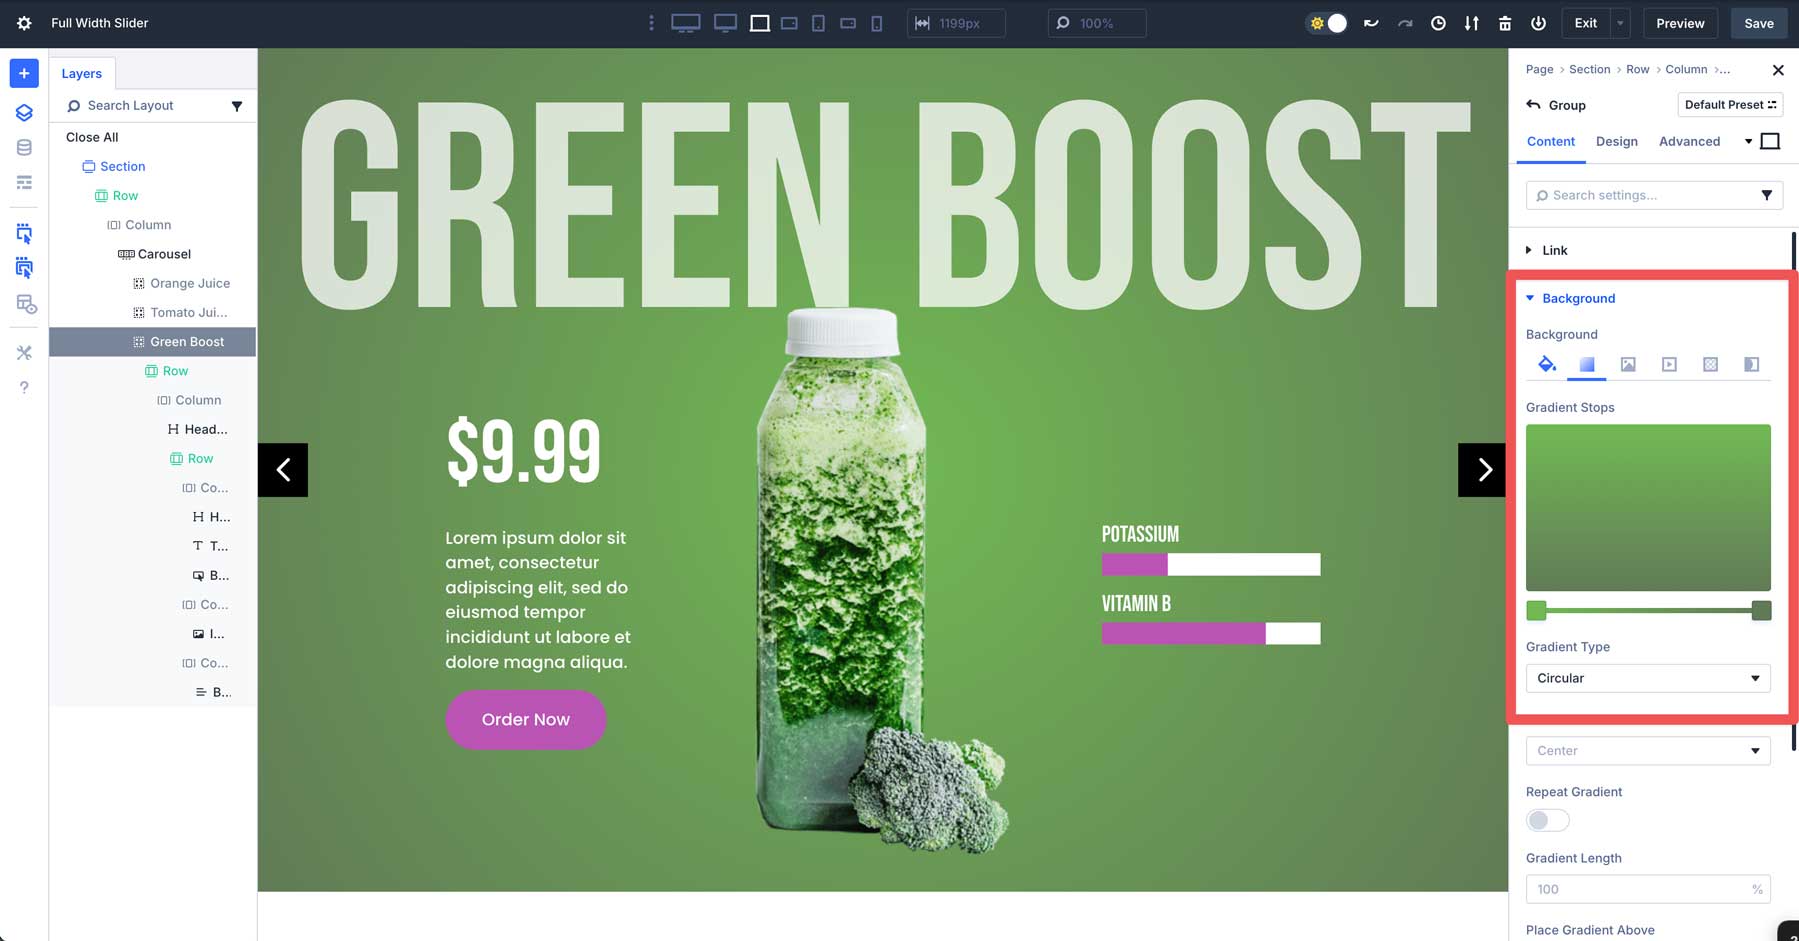
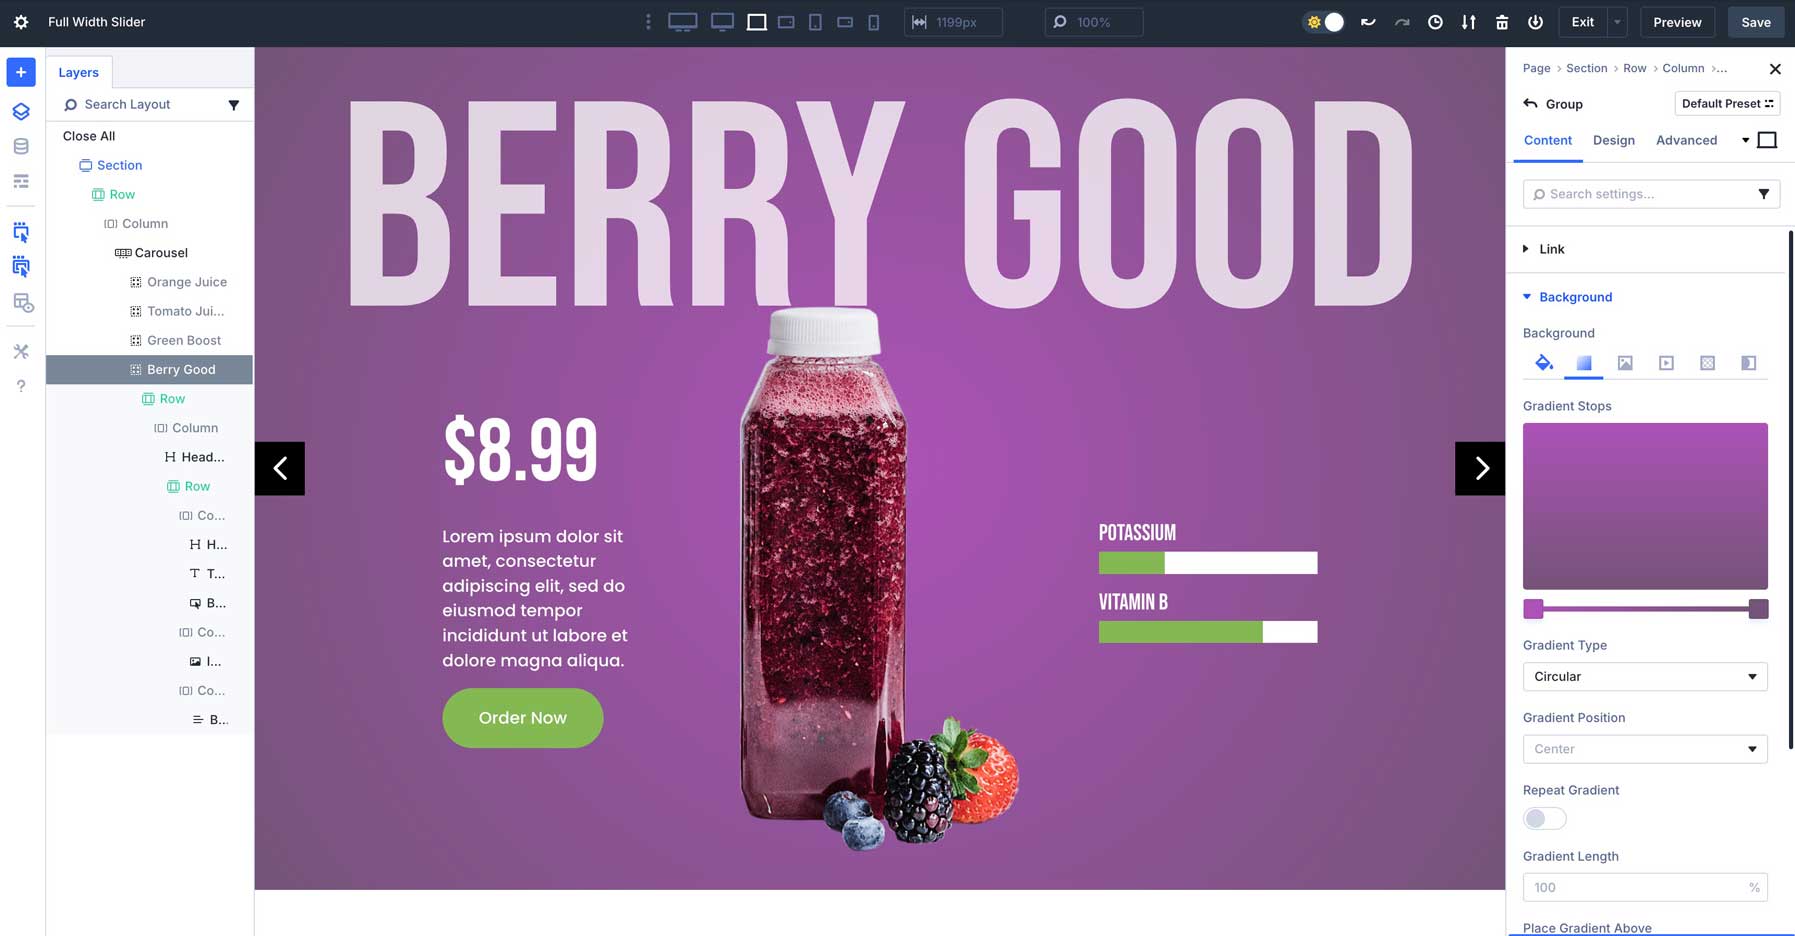
Make bigger the Background dropdown menu and make a selection the Gradient tab.
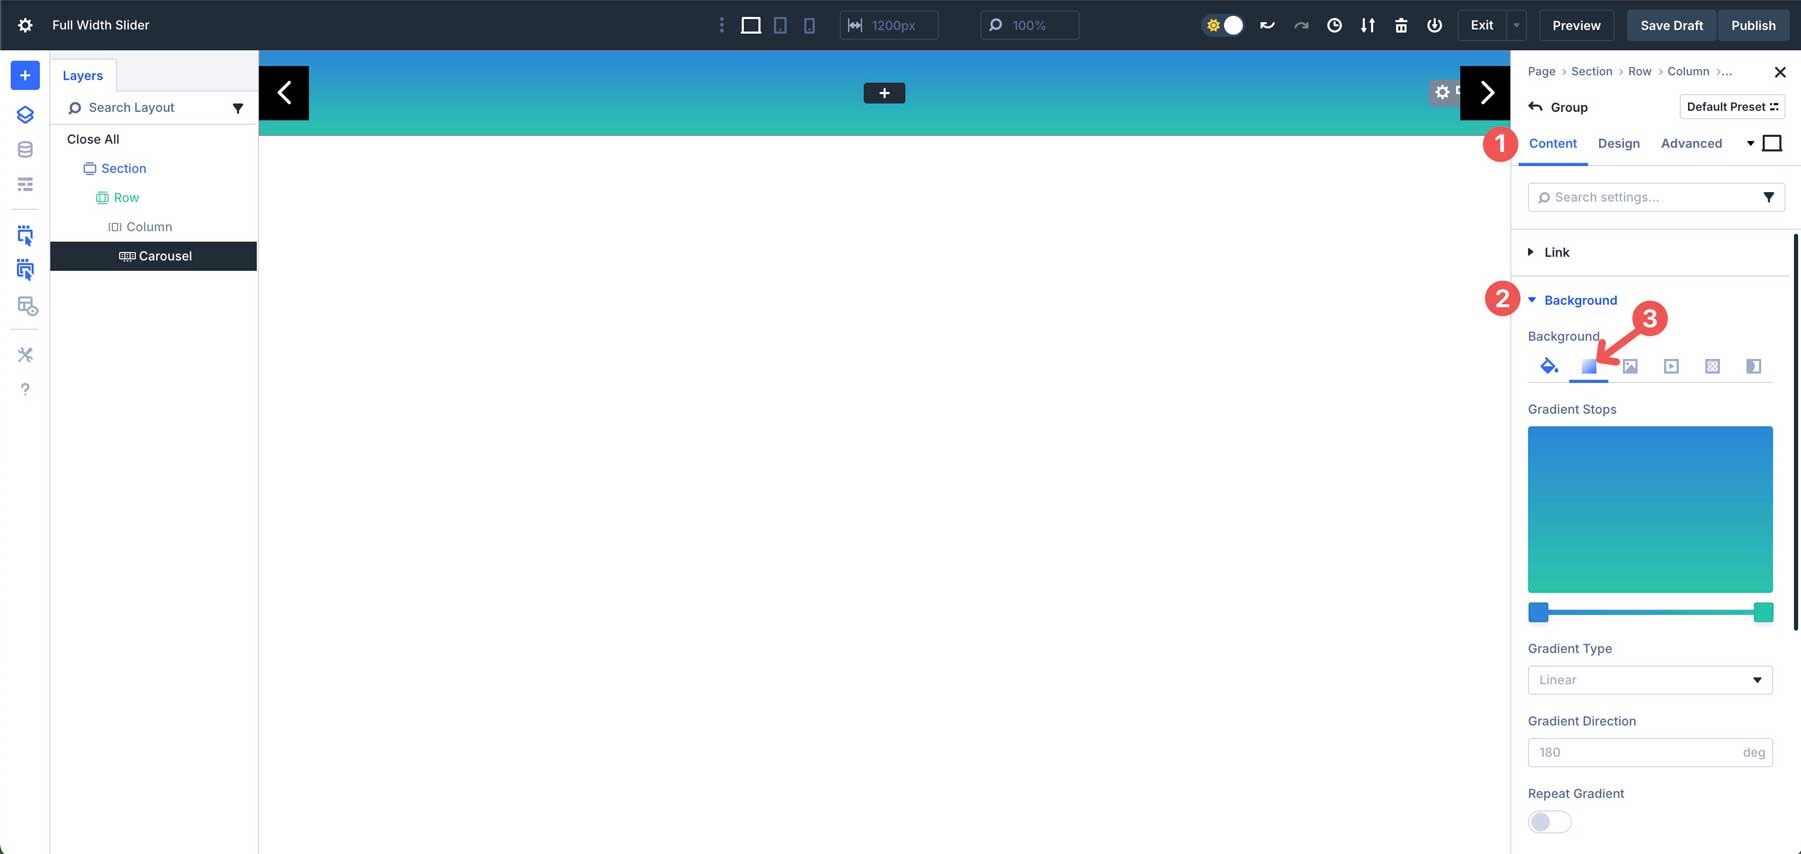
Click on the primary Gradient Slider to assign a brand new shade. Input #efb648 into the shade box.
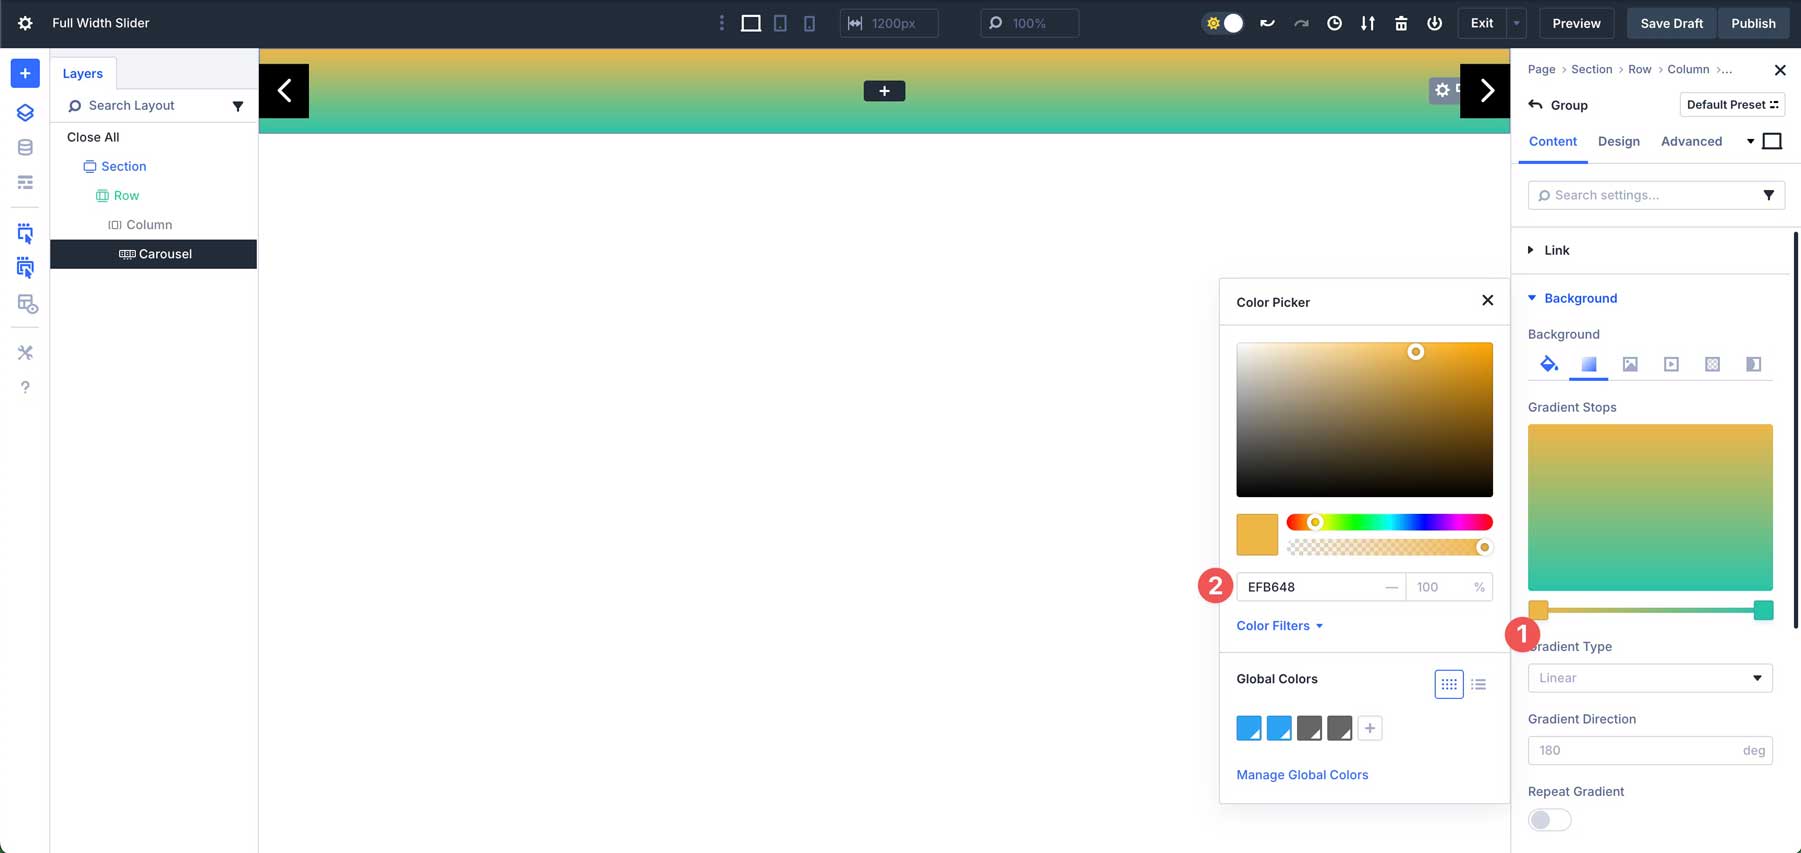
Subsequent, click on into the second Gradient Slider and assign #f28f52 as the colour.
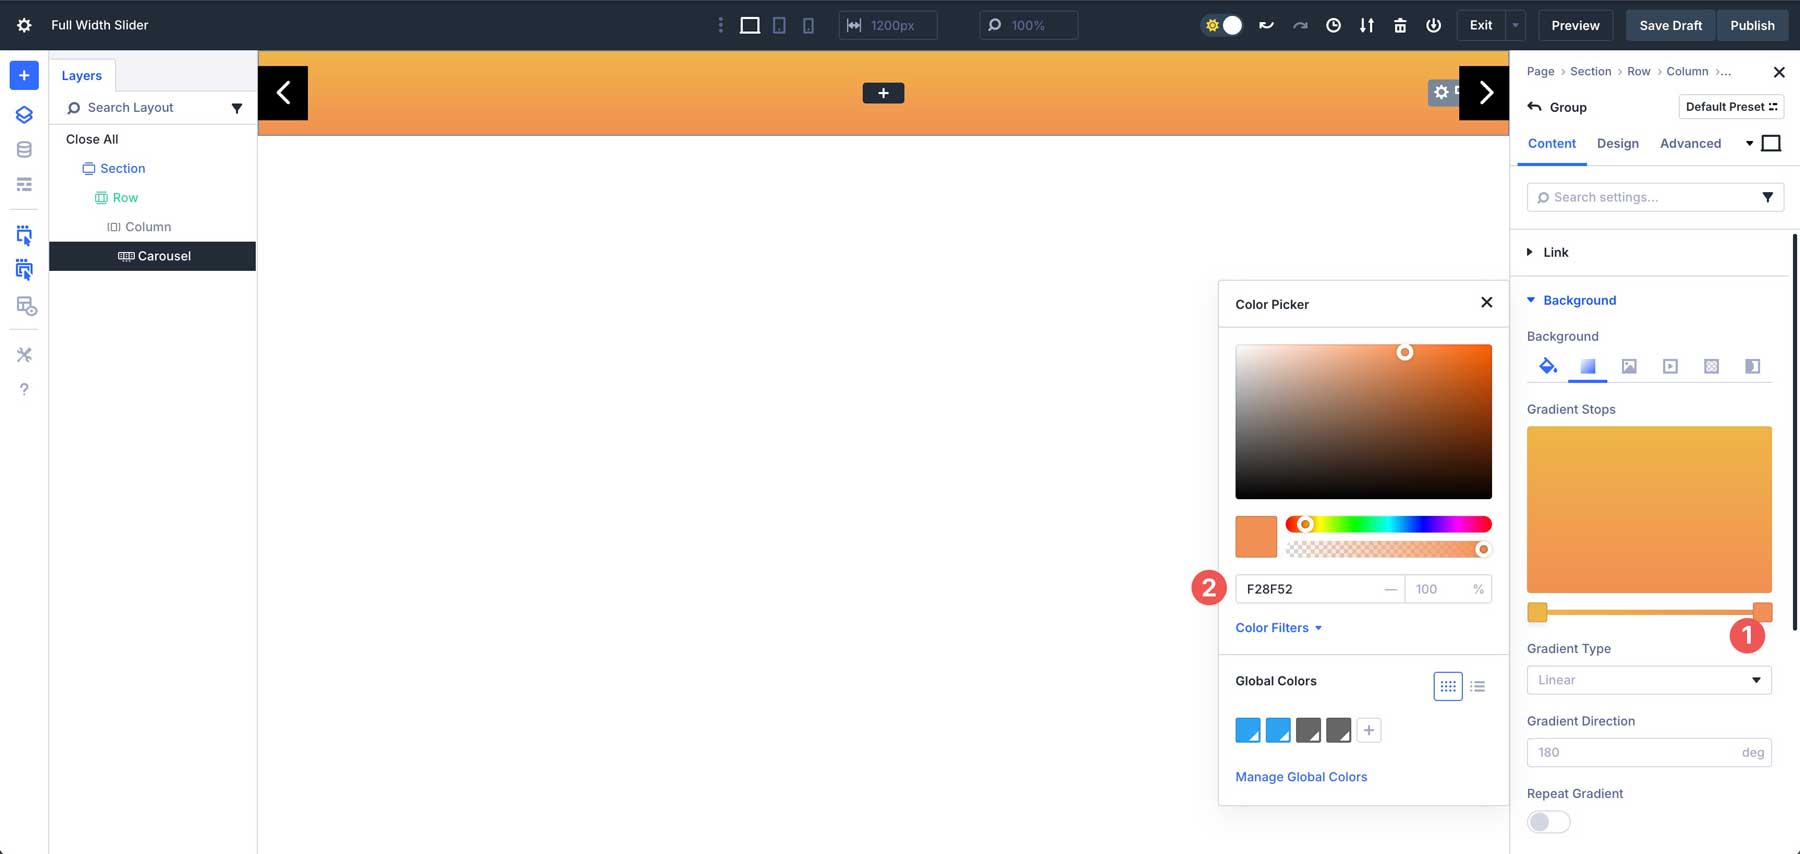
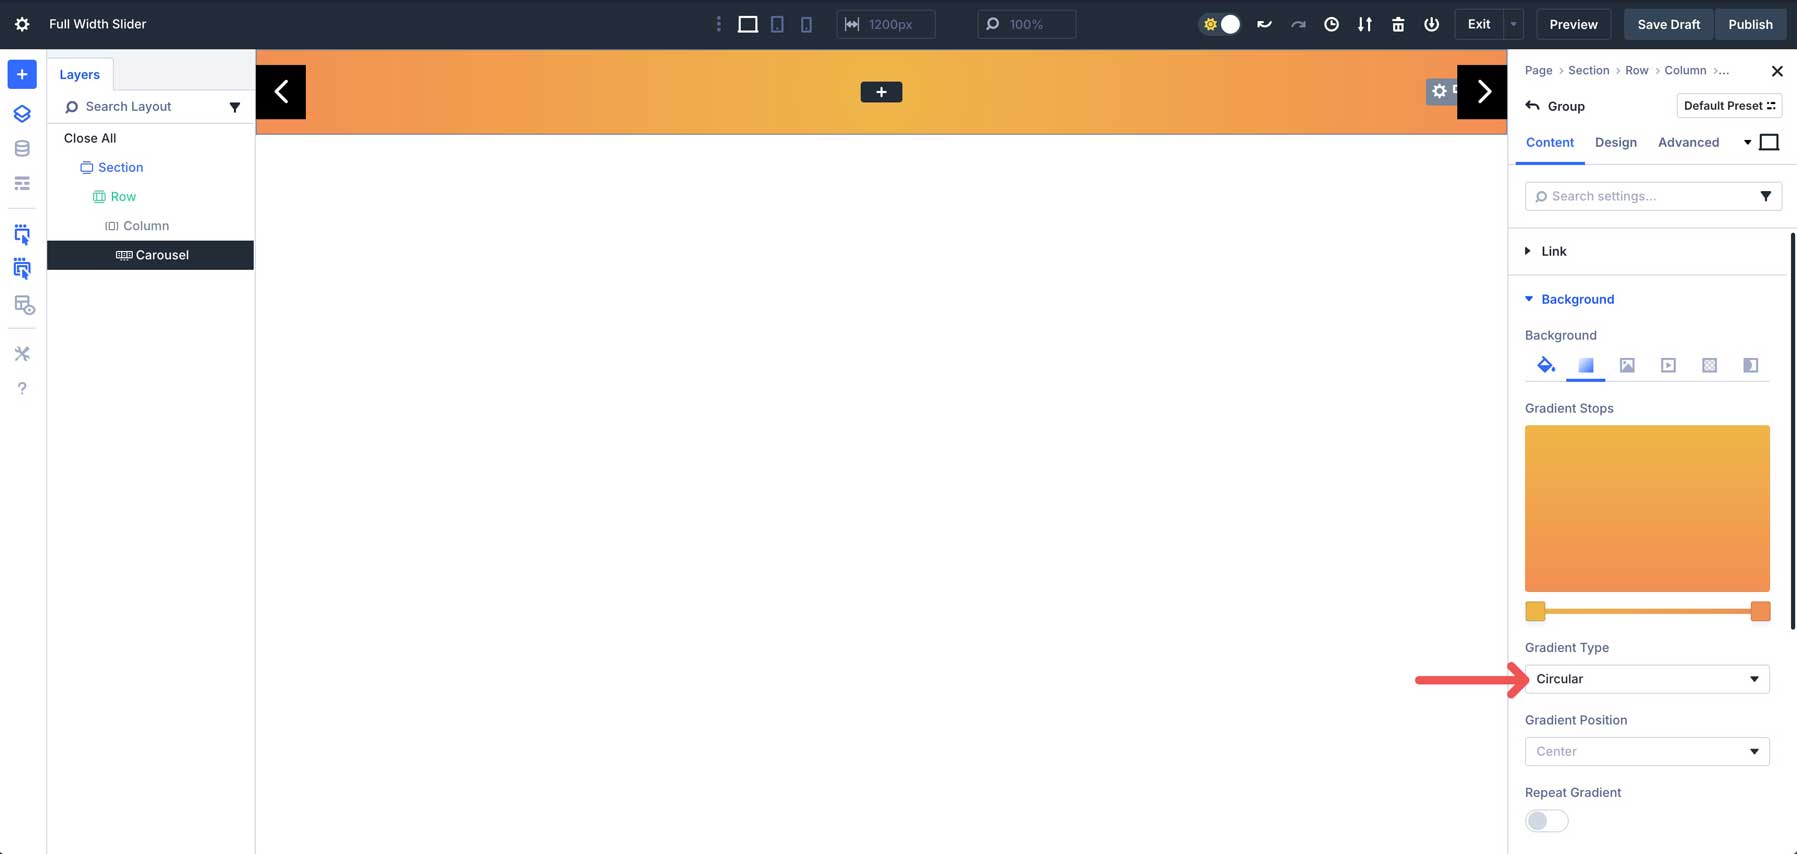
Within the Gradient Sort box, make a selection Round.
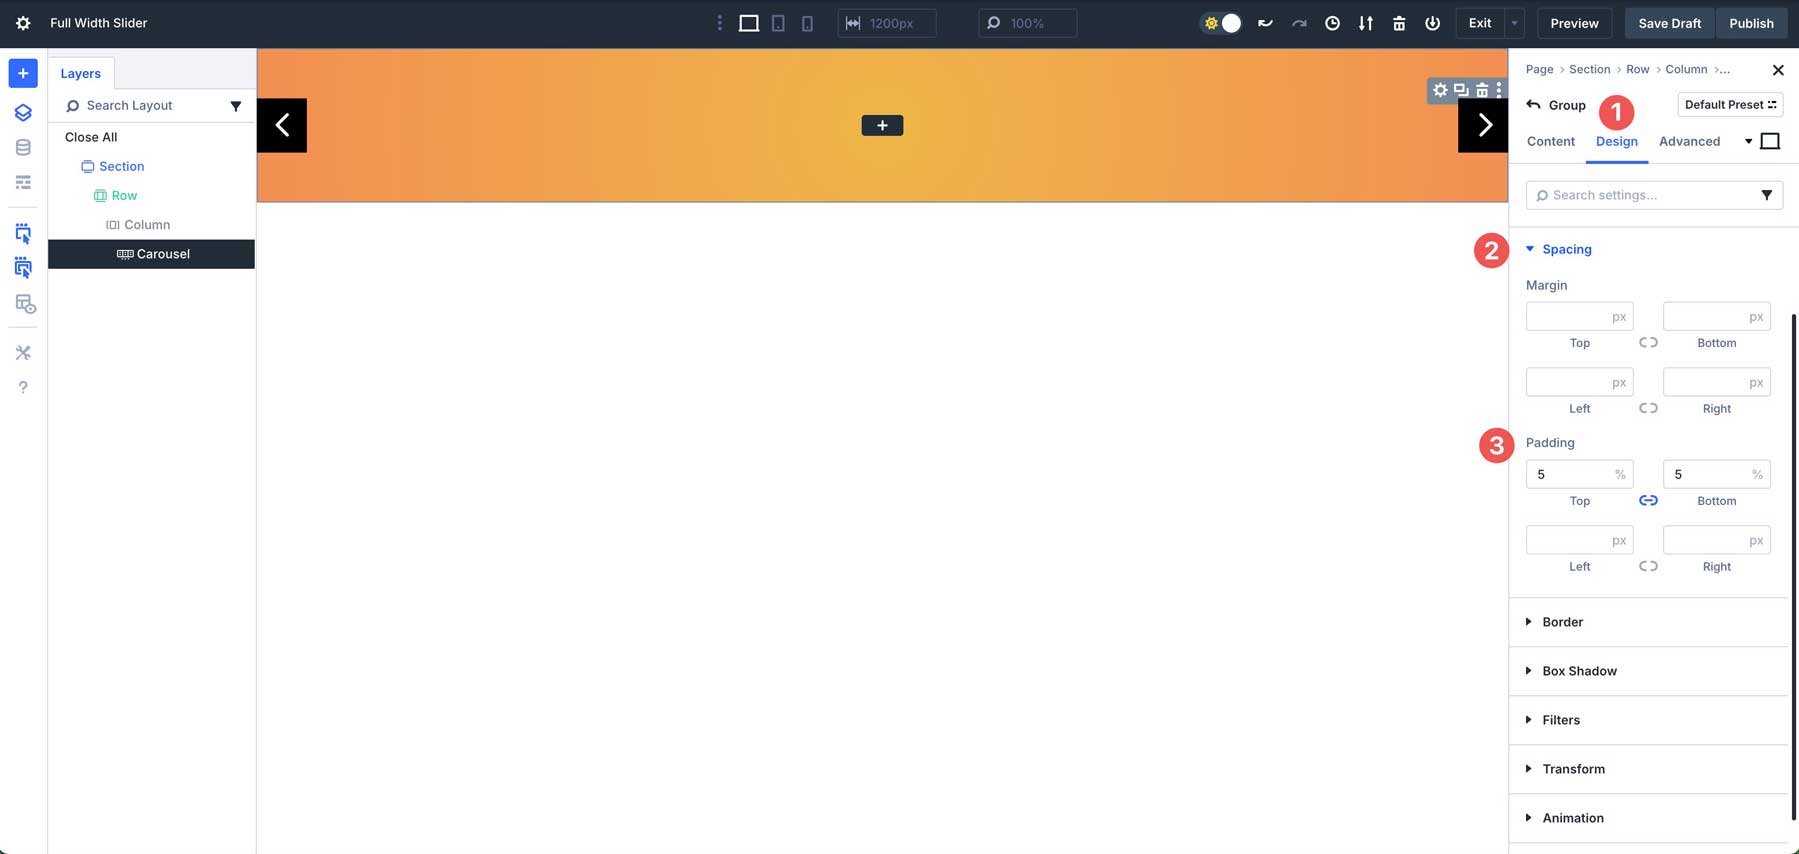
Subsequent, navigate to the Design tab. Make bigger the Spacing tab and assign 5% padding to the highest and backside of the Team.
Step 5: Upload Content material To The First Team
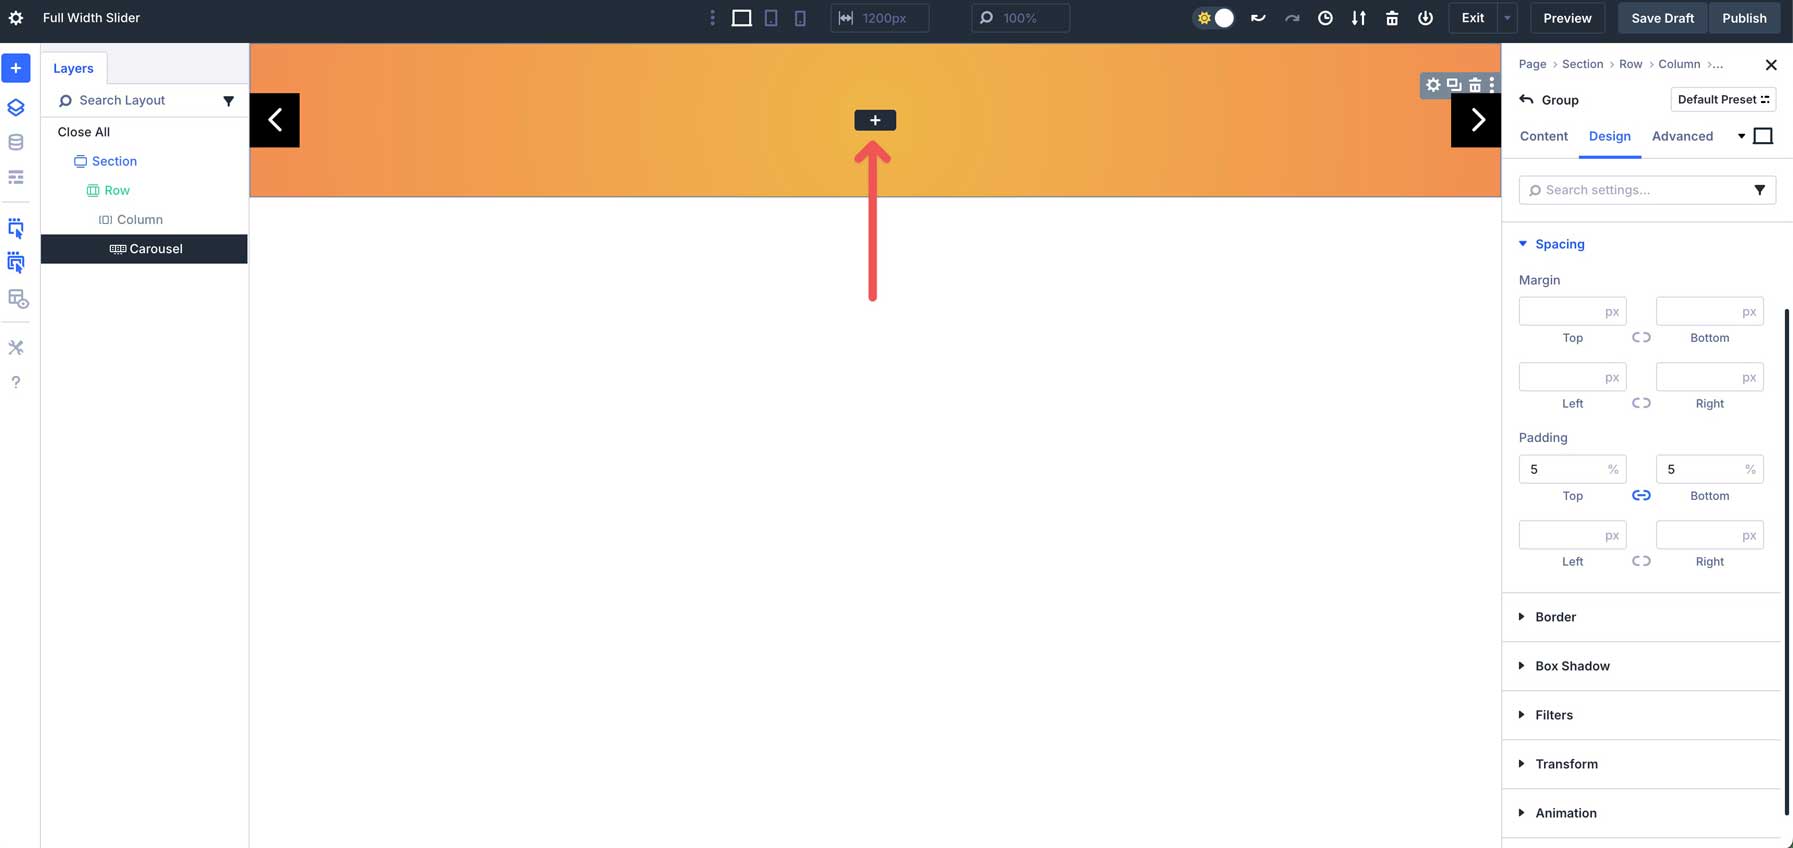
Now that our Team’s settings are configured, we will be able to get started including content material to the Team. Click on the black + icon so as to add a module.
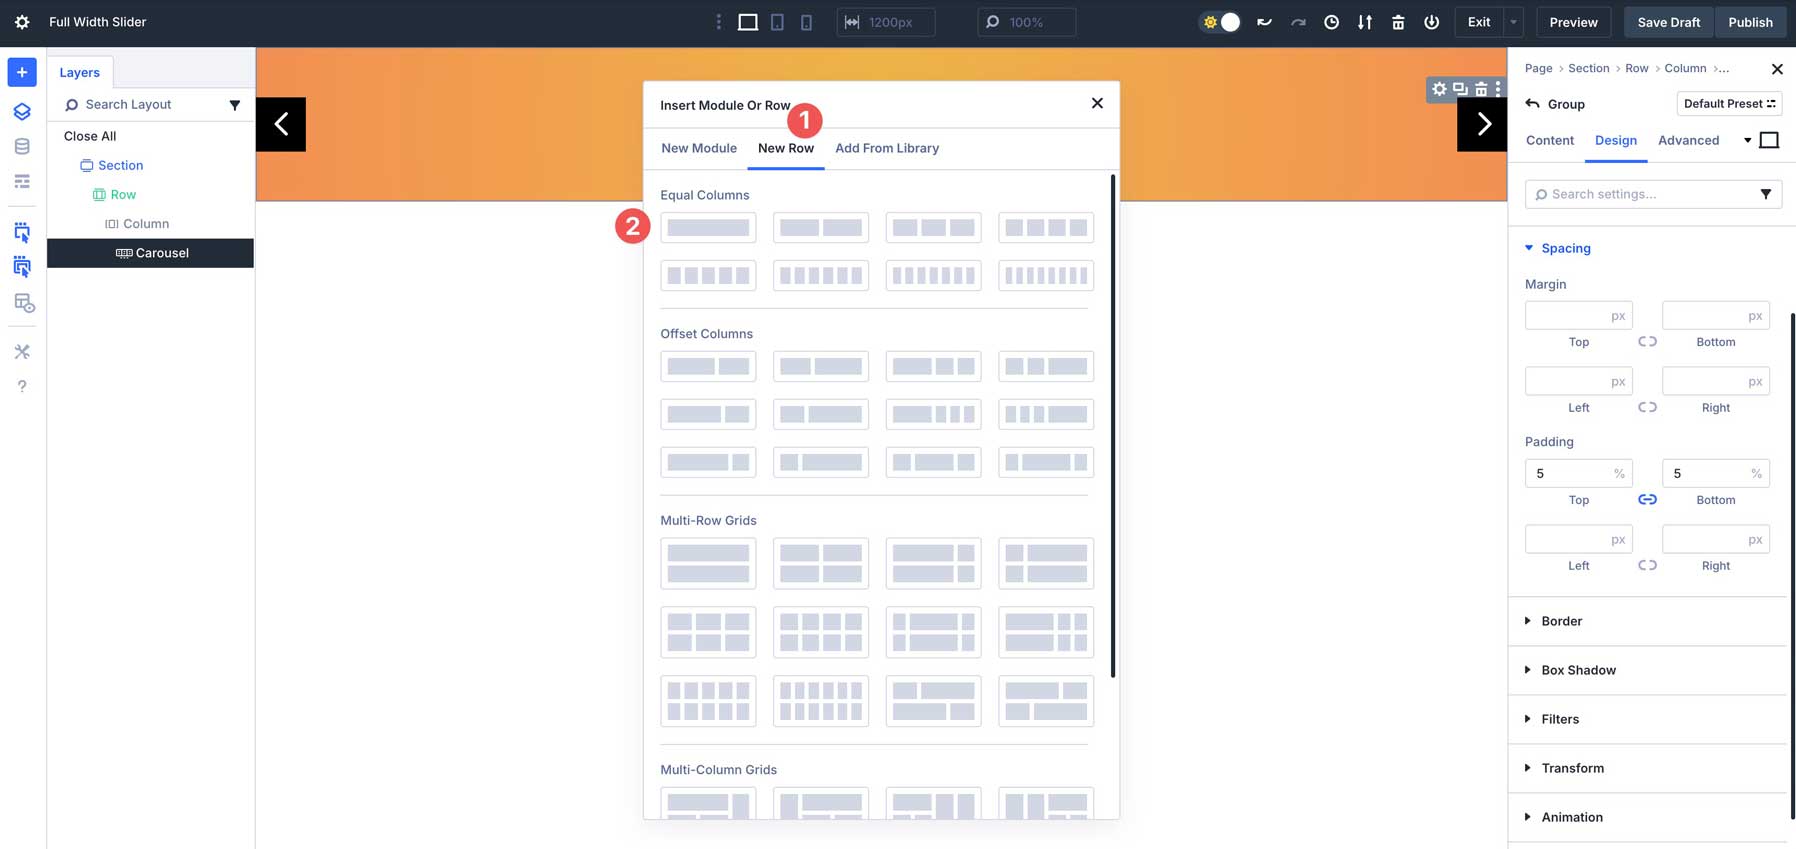
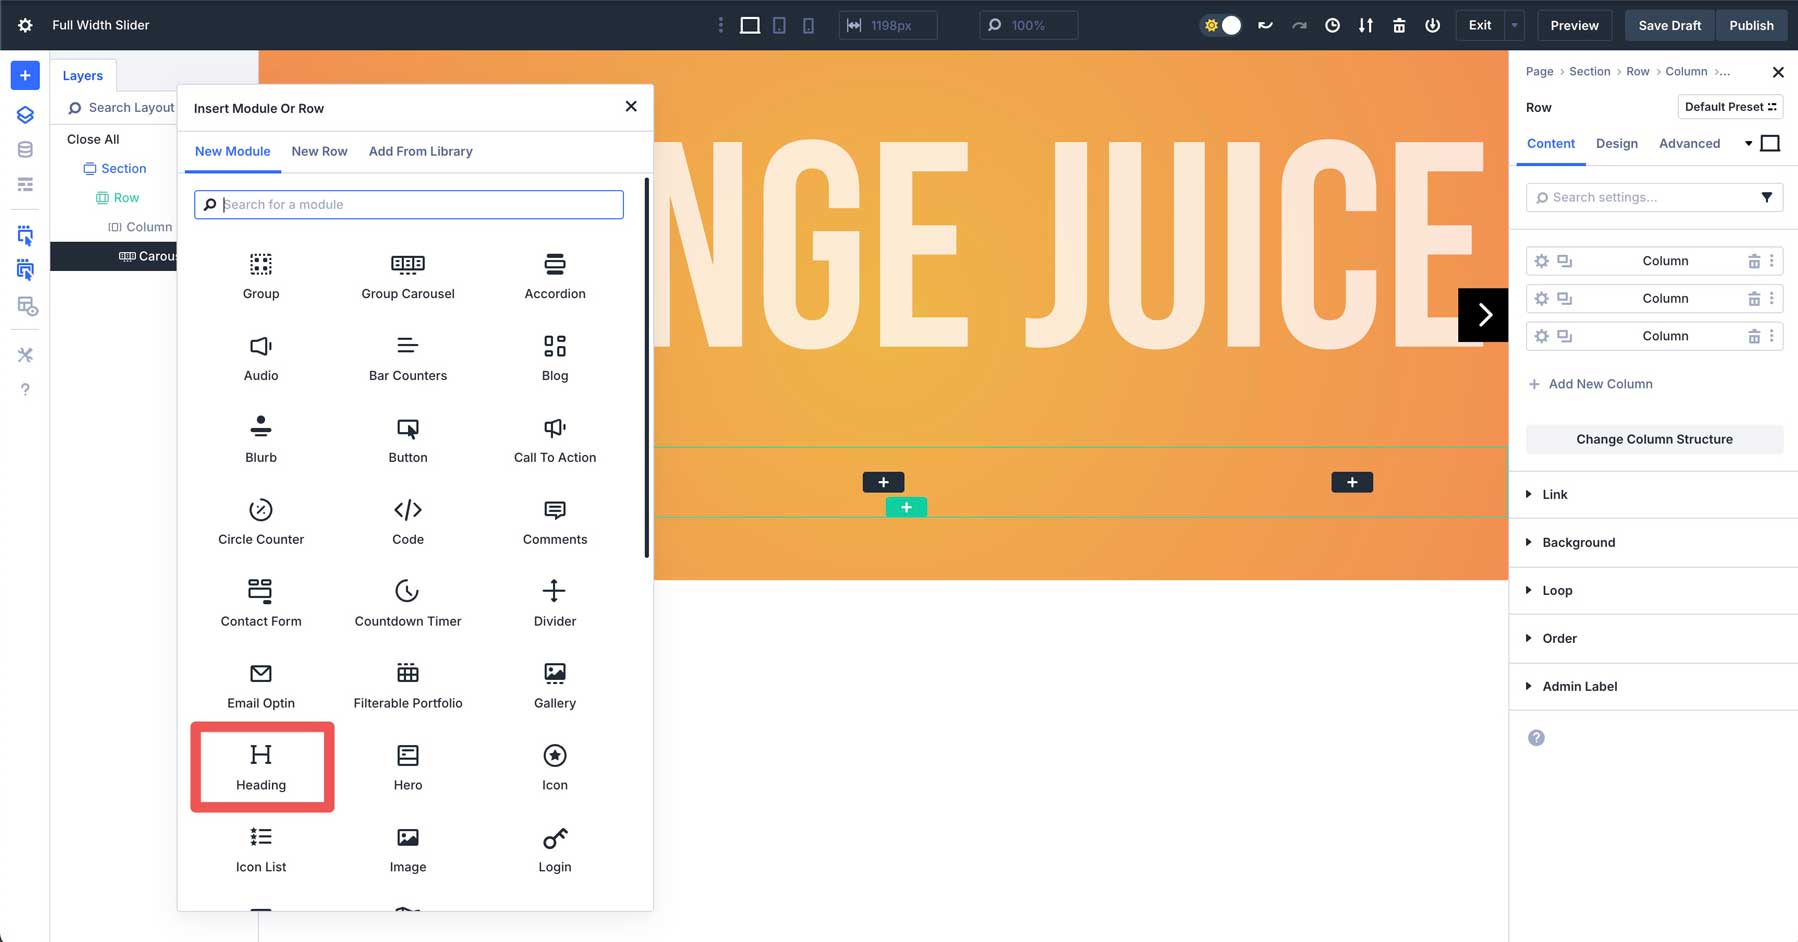
When the Insert Module or Row conversation field seems, click on the New Row tab. Beneath the Equivalent Columns segment, make a selection the unmarried column row.
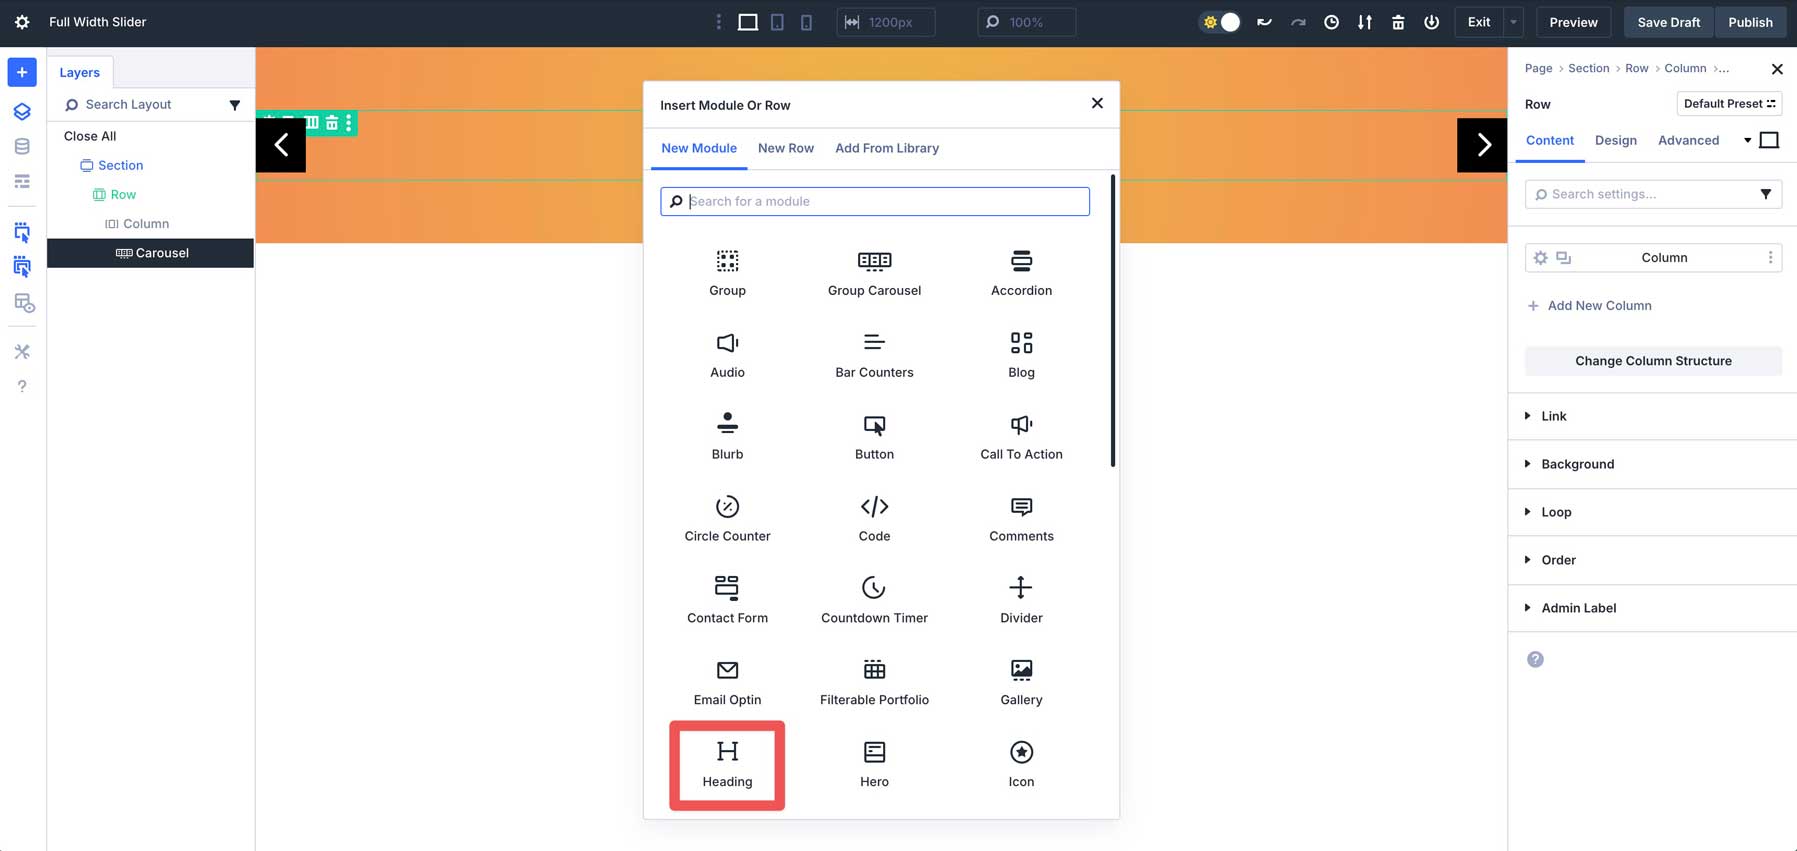
Upload A Heading Module
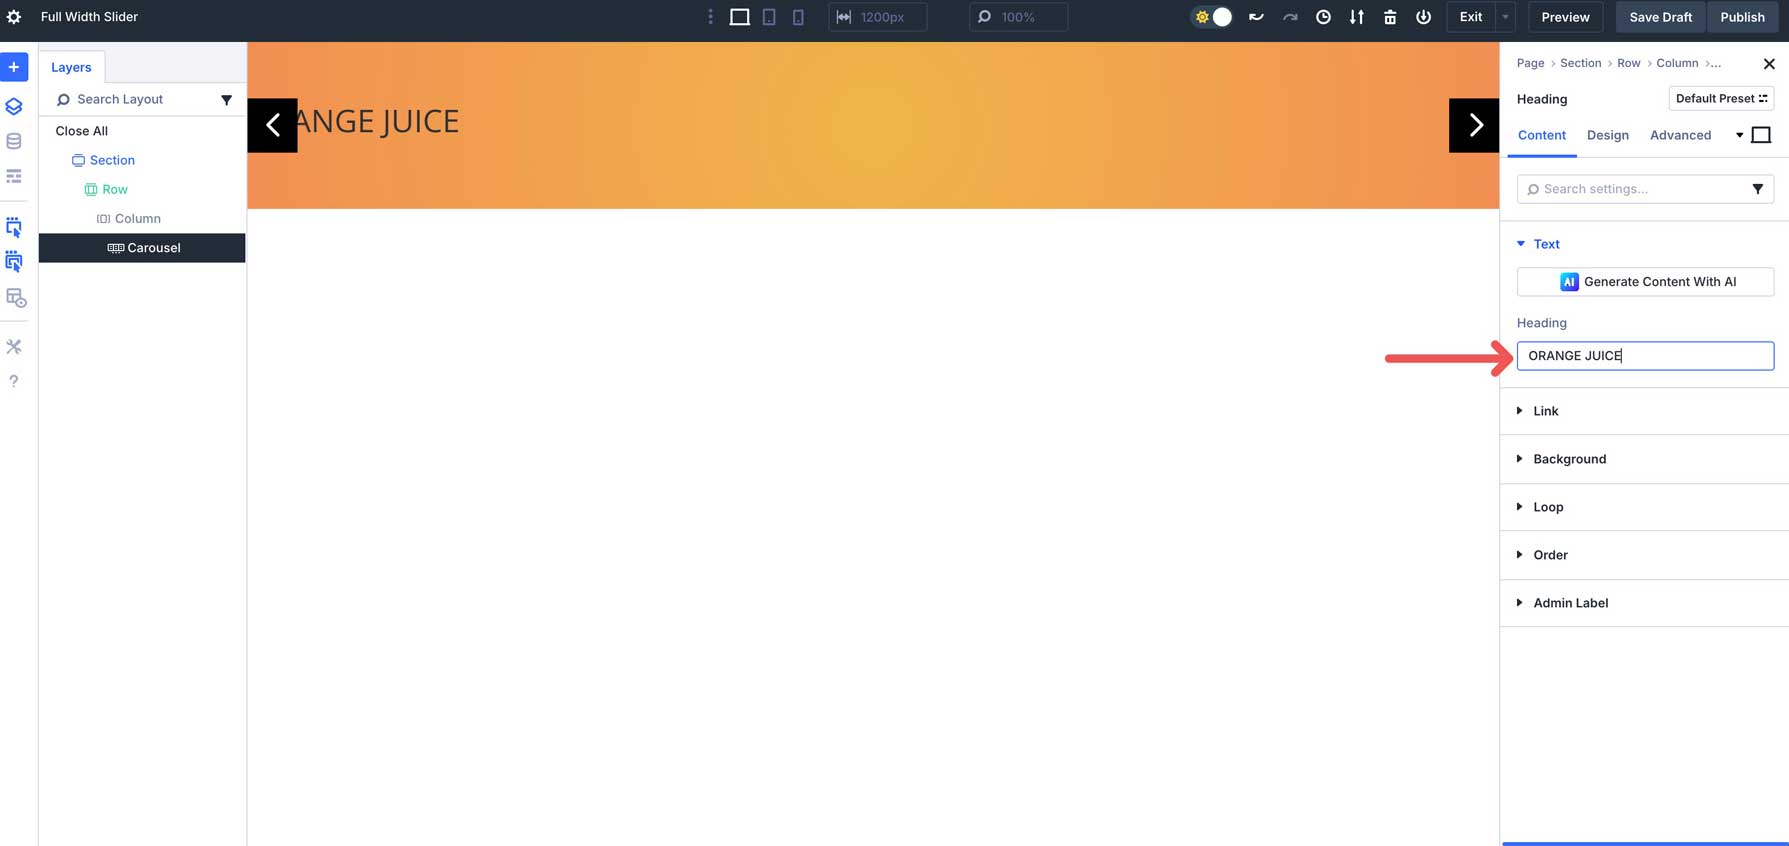
Make a choice and insert the Heading Module.
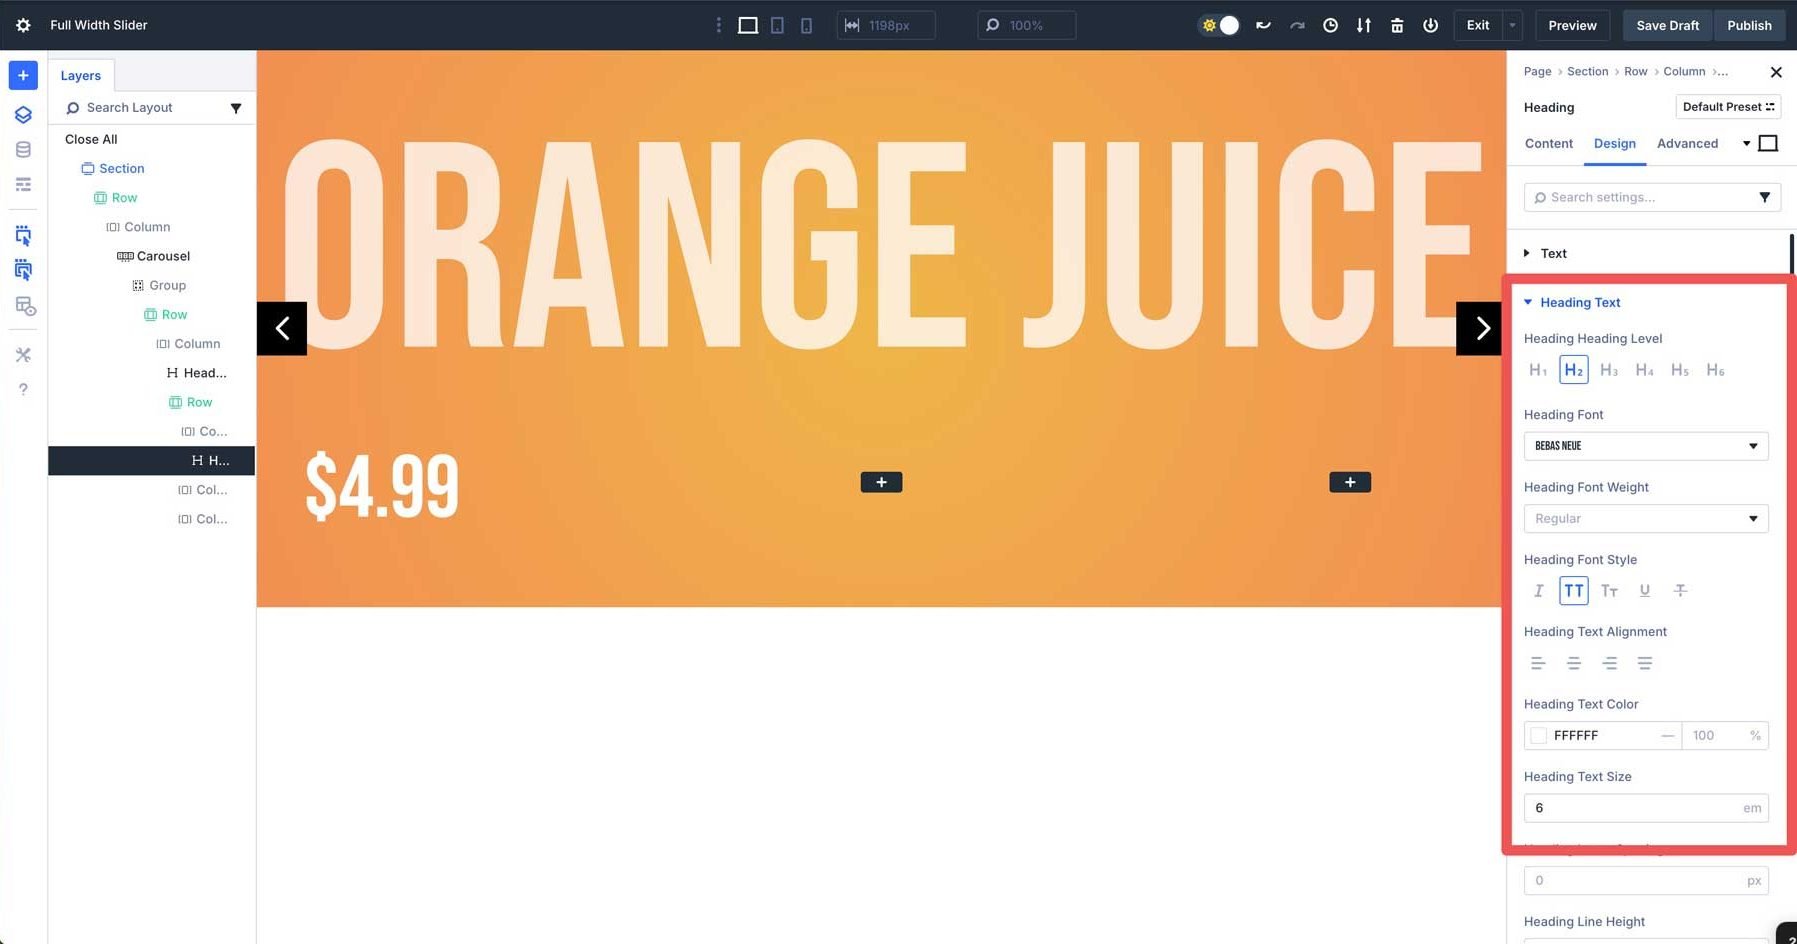
Make bigger the Textual content dropdown menu and input Orange Juice because the Identify.
Navigate to the Design tab. Make bigger the Heading Textual content dropdown menu. Make a choice H1 because the Heading Degree, use Bebas Neue because the Heading Font, set the Heading Font Taste to uppercase, the Heading Textual content Alignment to heart, the Heading Textual content Colour to #ffffff, and the Heading Textual content Dimension to 20em.
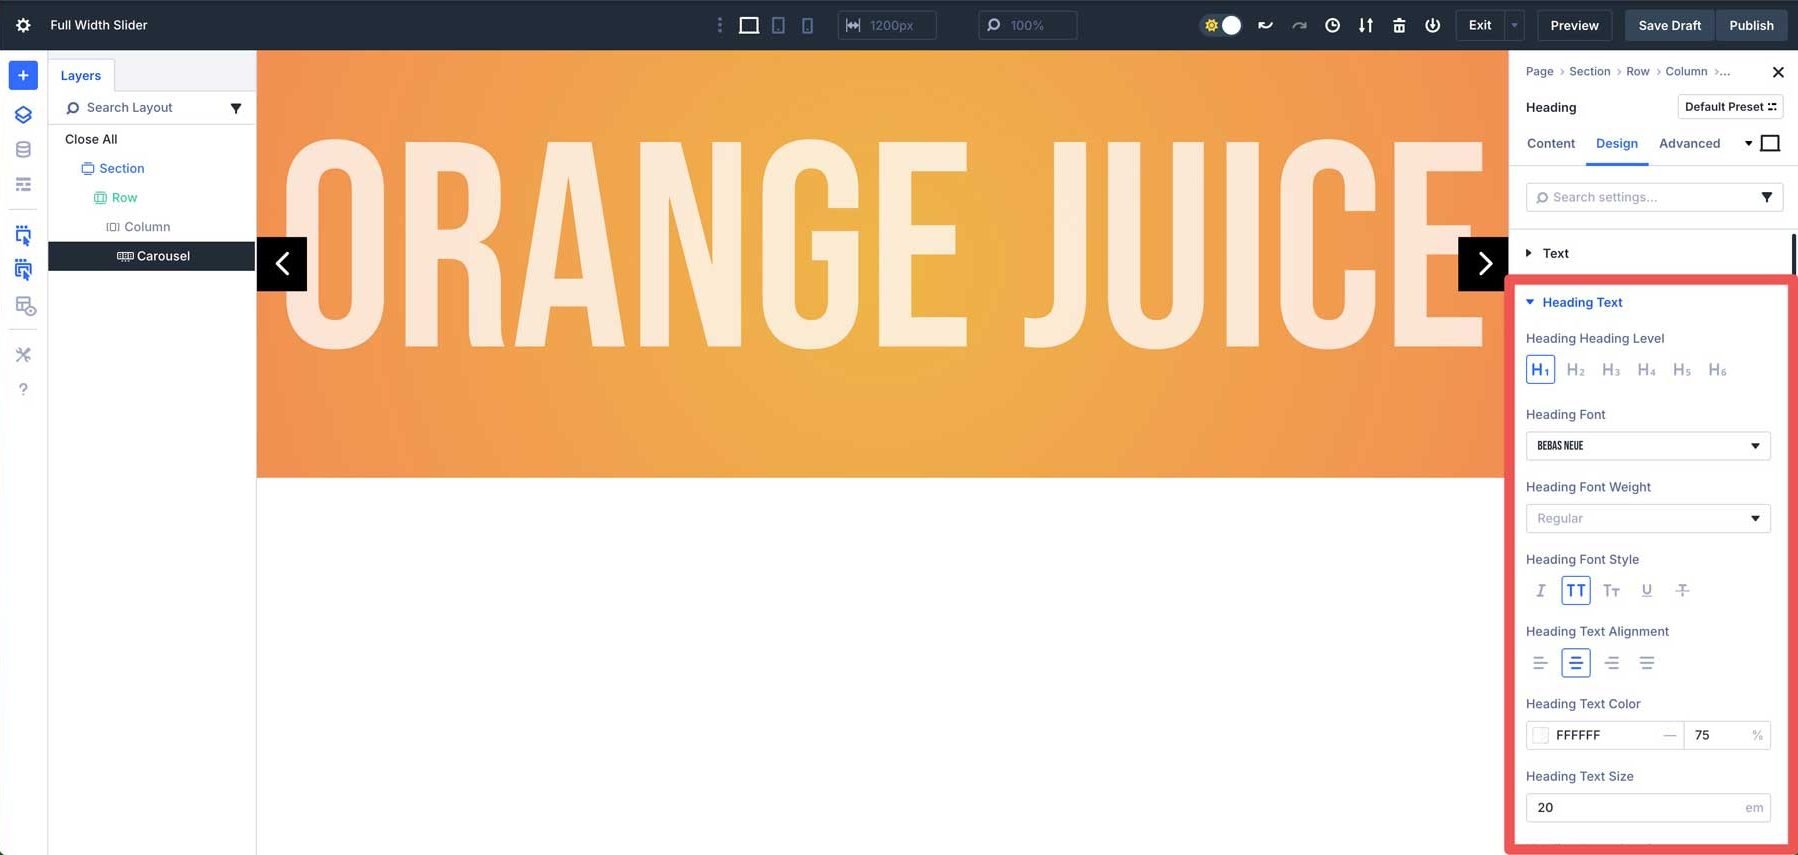
Use Divi 5’s Responsive controls to regulate the Heading Textual content Dimension to 15em on pill, and 8em on cell.
Upload A New Row
Subsequent, we’ll upload a brand new row beneath the single-column row containing the Heading Module. Click on the black + icon so as to add a brand new module.
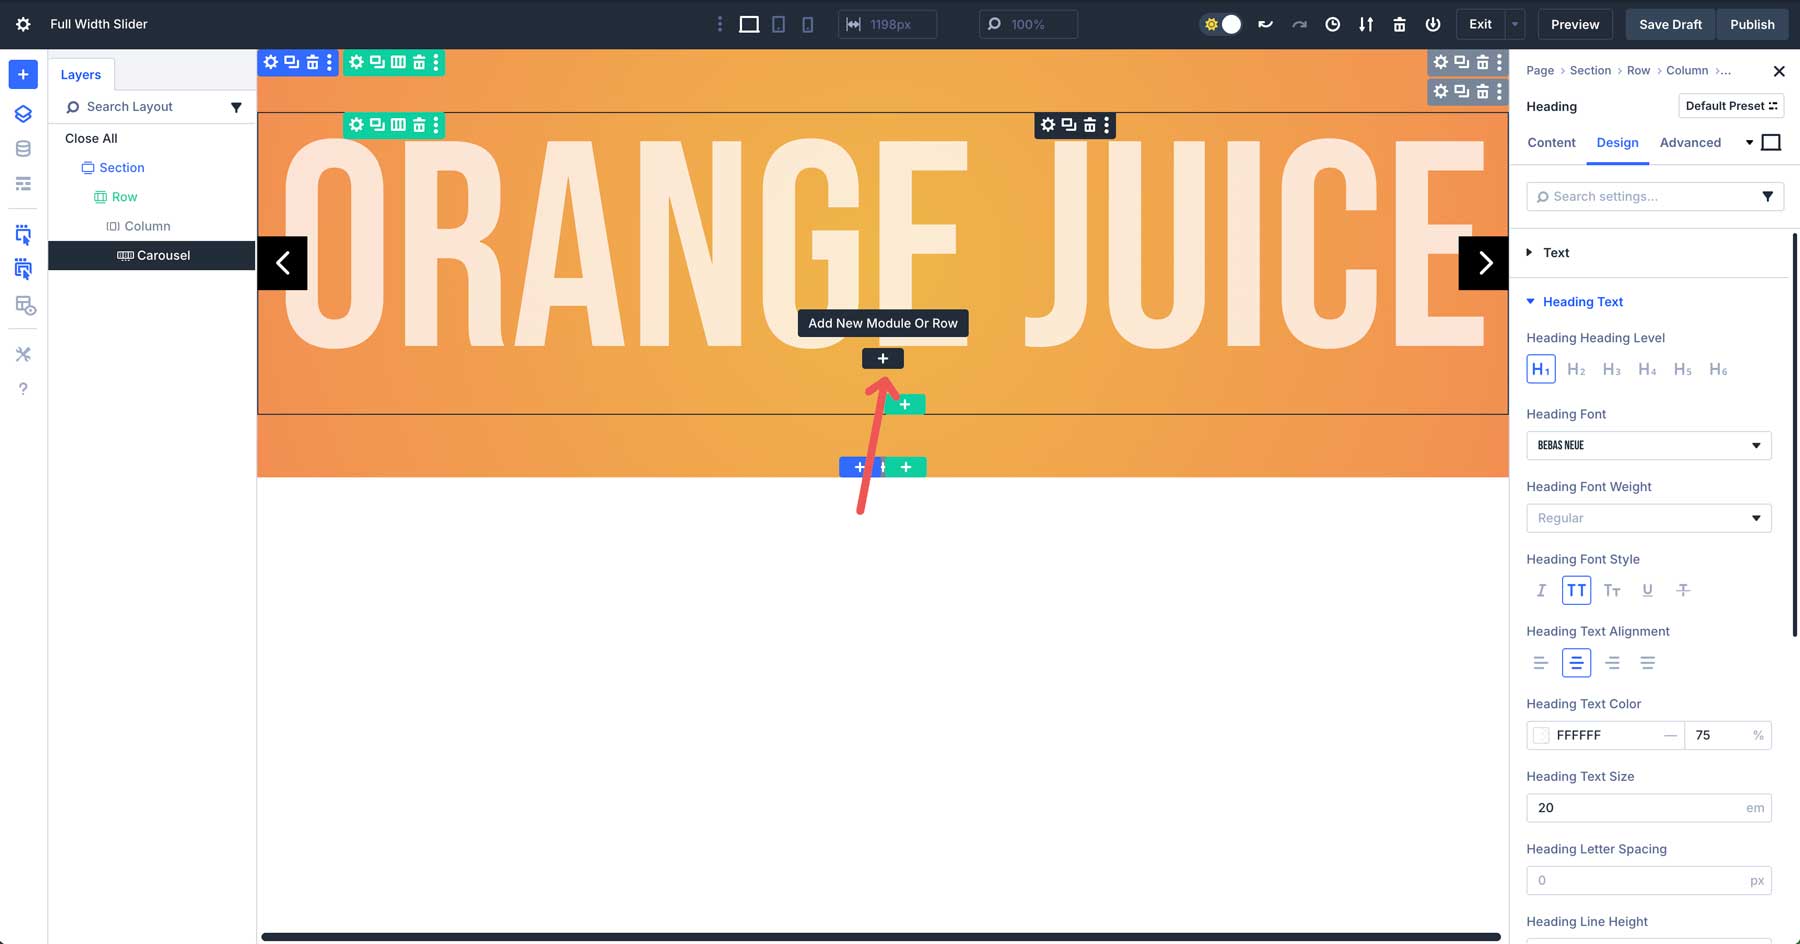
Click on the New Row tab. Beneath Offset Columns, make a selection the 1/4 + 1/2 + 1/4 choice.

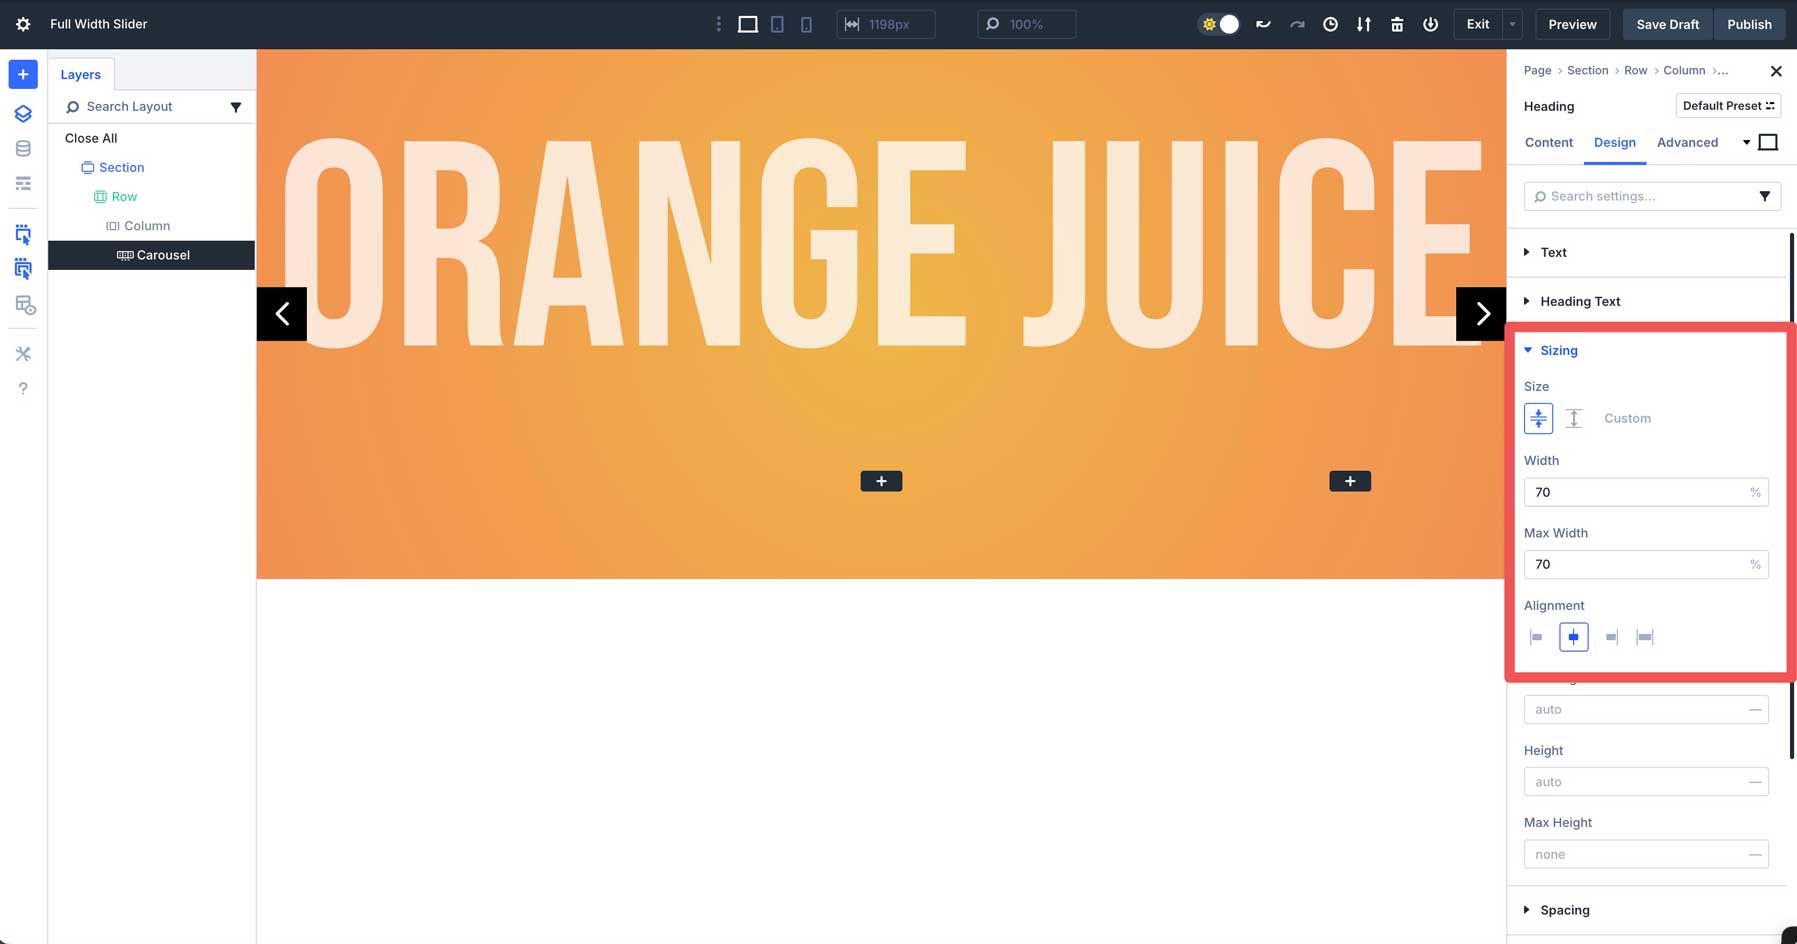
Within the Design tab, extend the Sizing tab and input 70% for the width and max width. Set the Alignment to heart.
Upload A Heading Module
Make a choice the Heading Module and upload it to the first column.
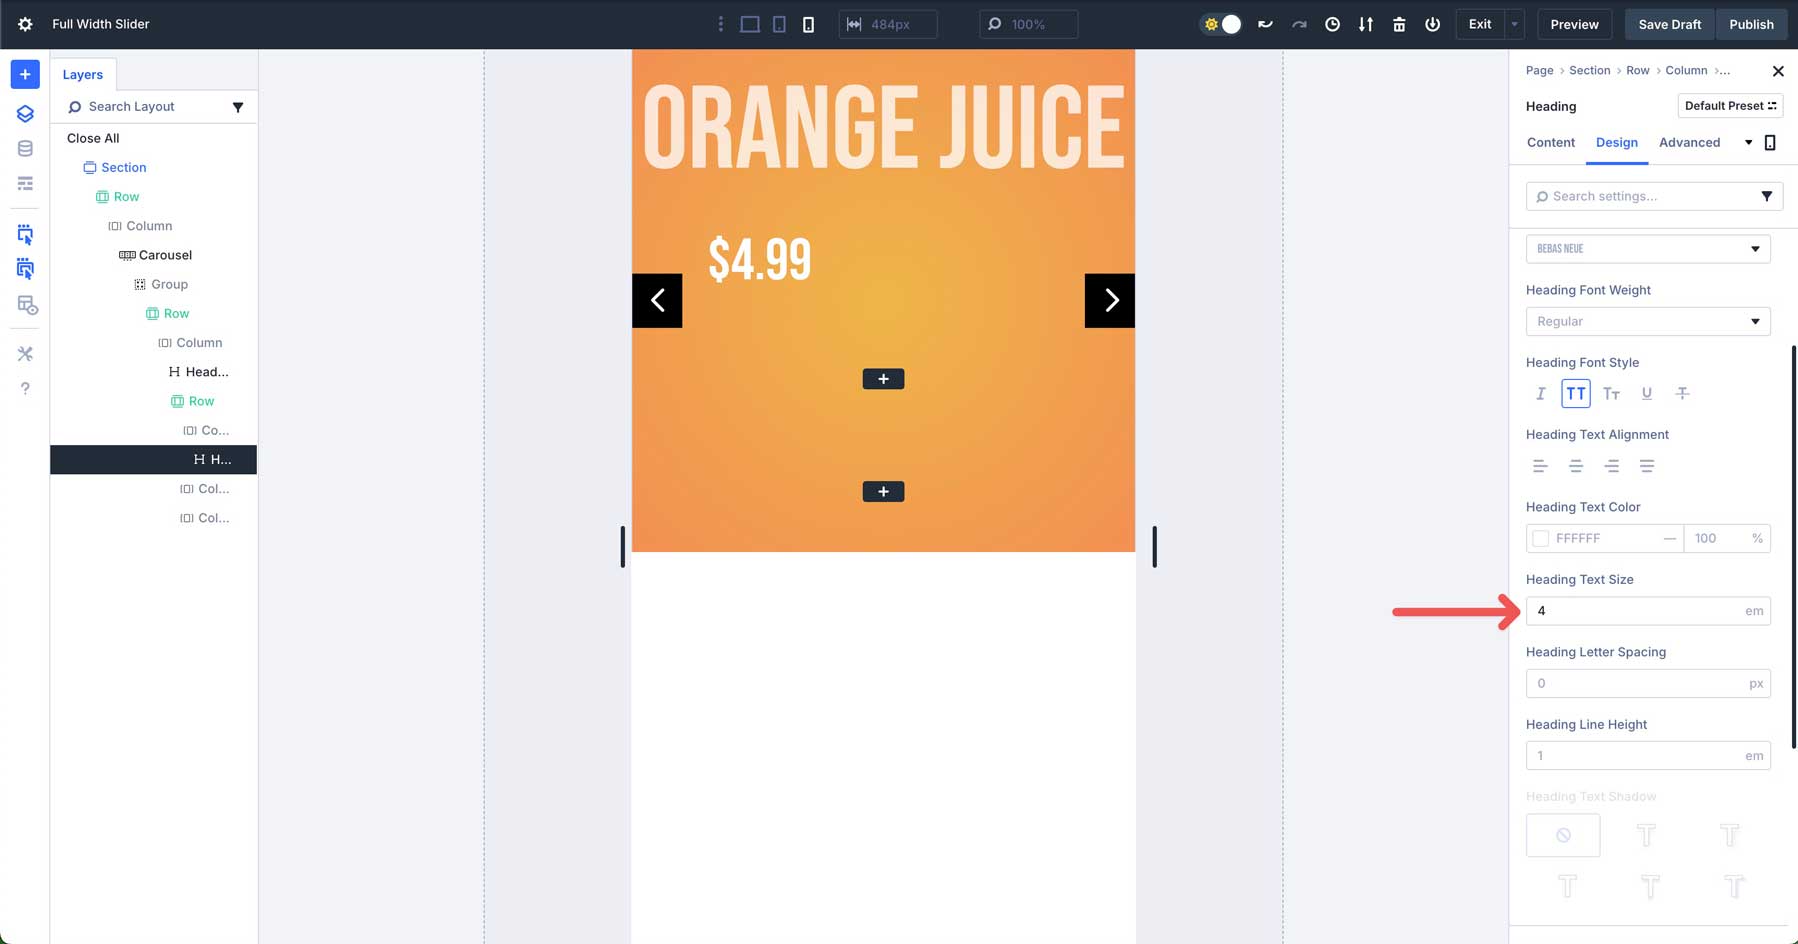
Give the Heading a name and head to the Design tab. Make bigger the Heading Textual content dropdown menu. Make a choice H2 for the Heading Degree, Bebas Neue because the Heading Font, uppercase because the Heading Font Taste, #ffffff because the Heading Textual content Colour, and 6em because the Heading Textual content Dimension.
Use Divi’s responsive controls to regulate the Heading Textual content Dimension to 4em.
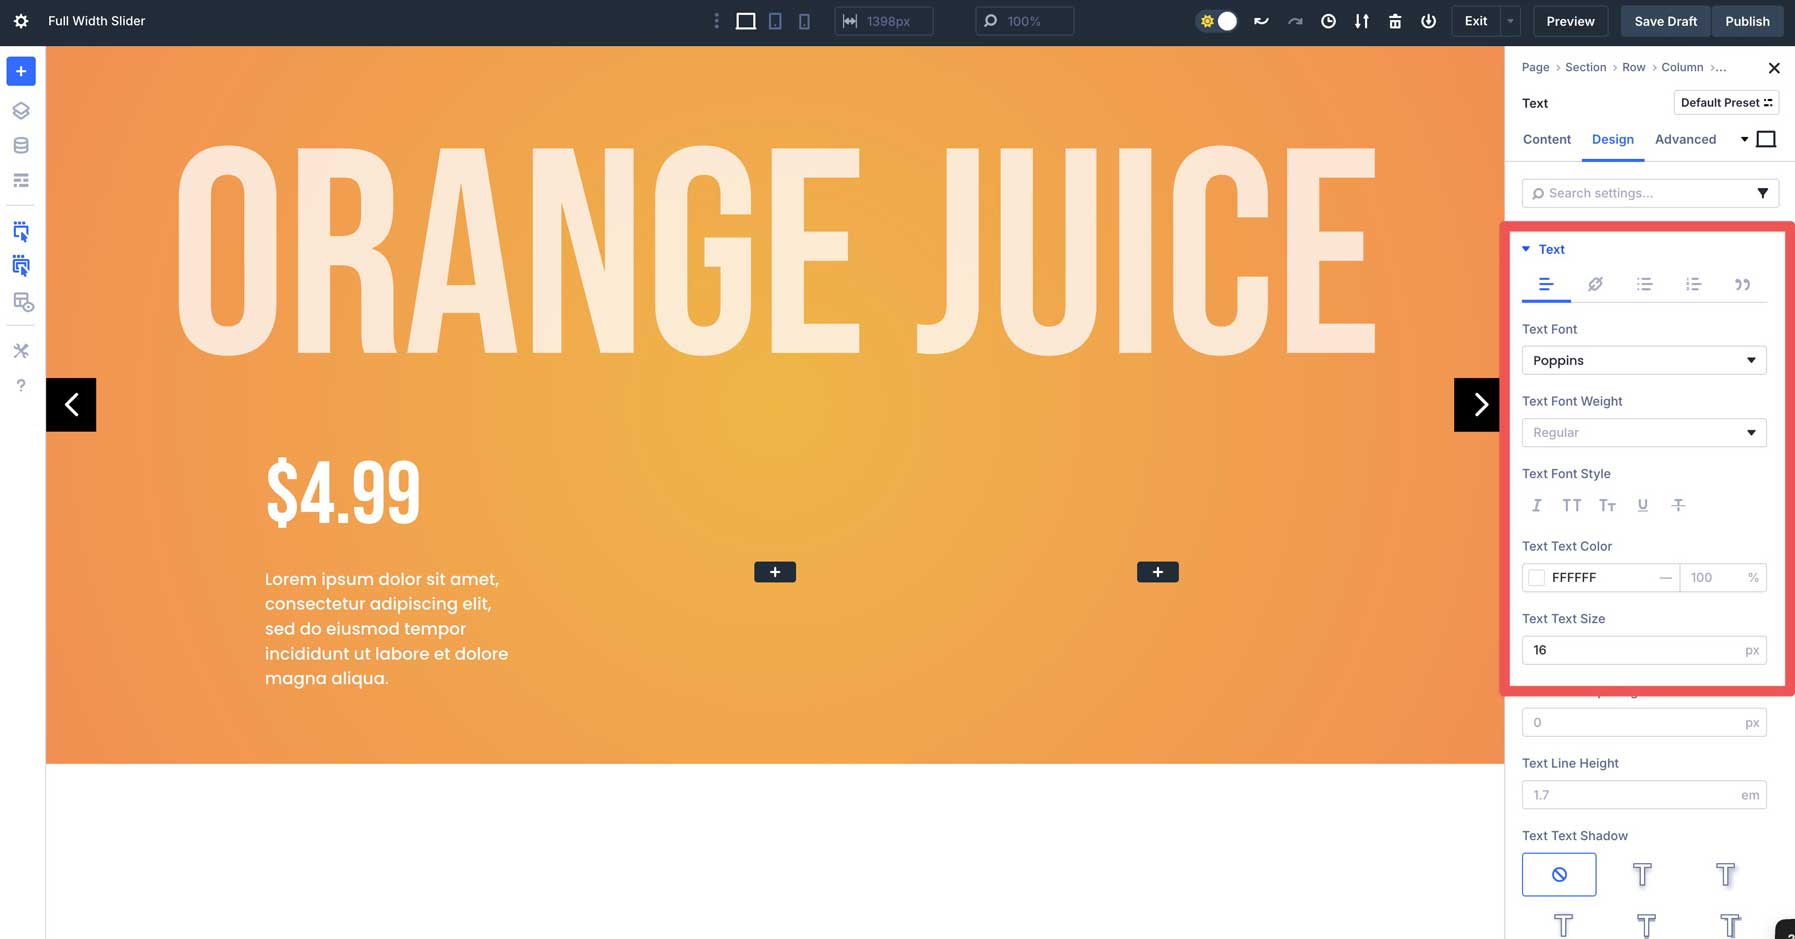
Upload A Textual content Module
Upload a Textual content Module beneath the Heading within the first column. Input some frame textual content, and turn to the design tab. Make a choice Poppins because the Textual content Font, set the Textual content Colour to #ffffff, and the Textual content Dimension to 16px.
Upload A Button Module
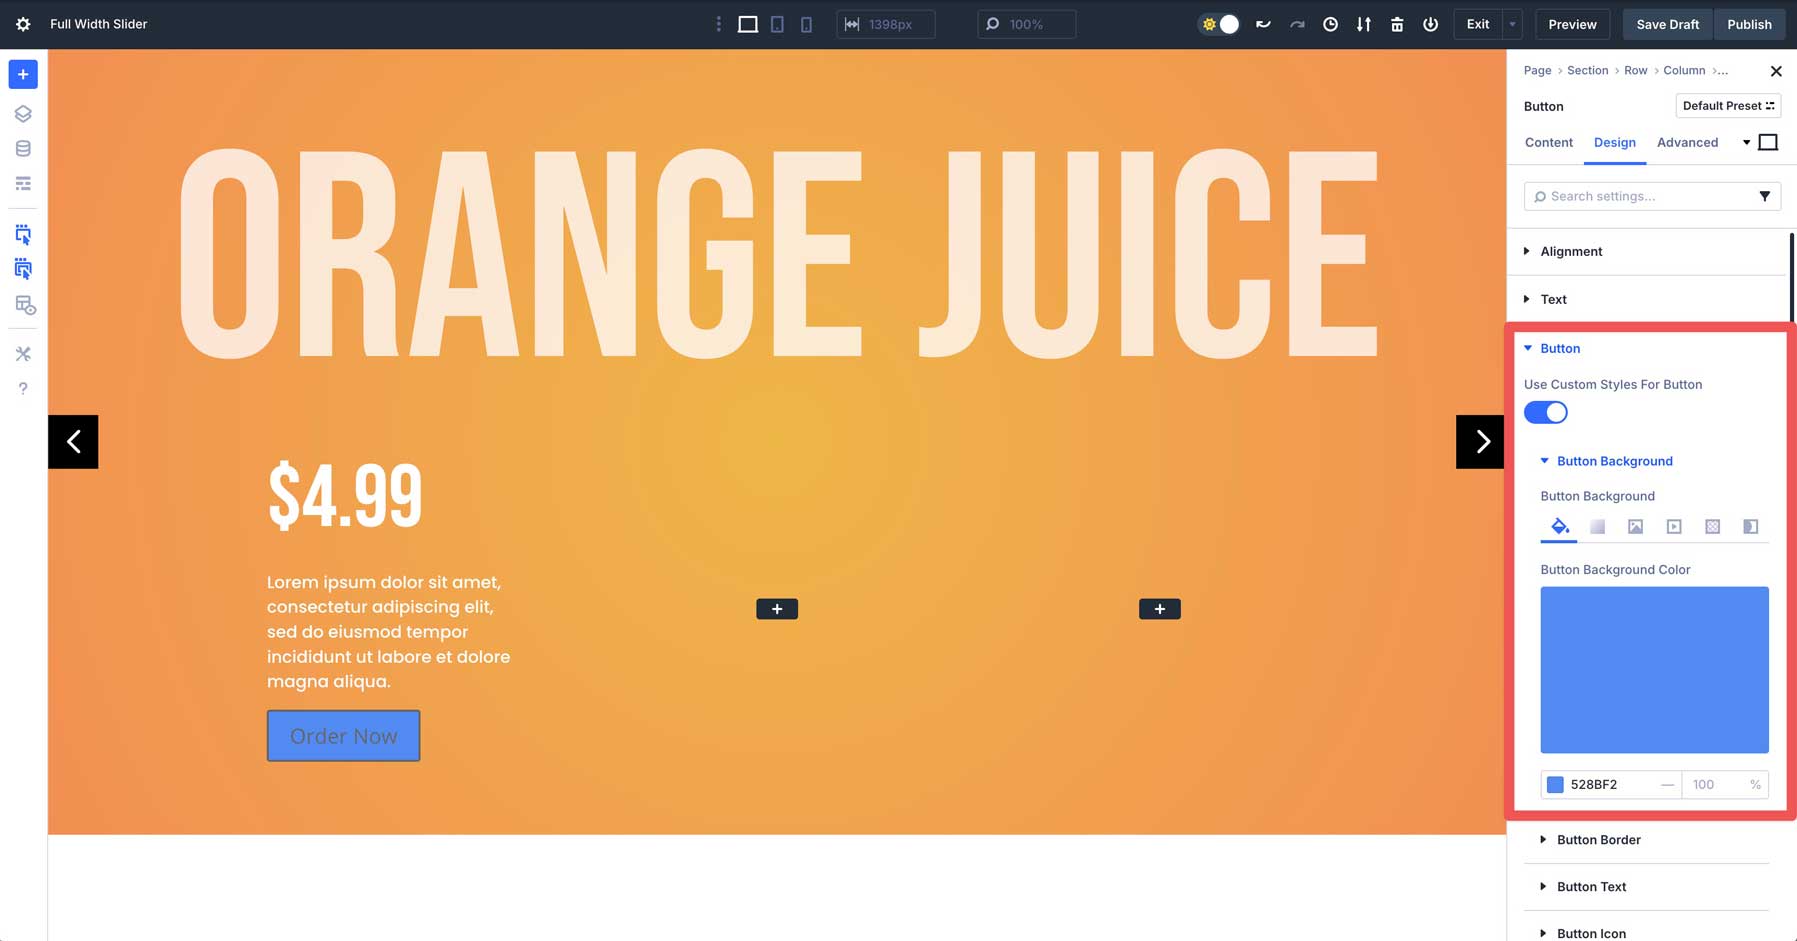
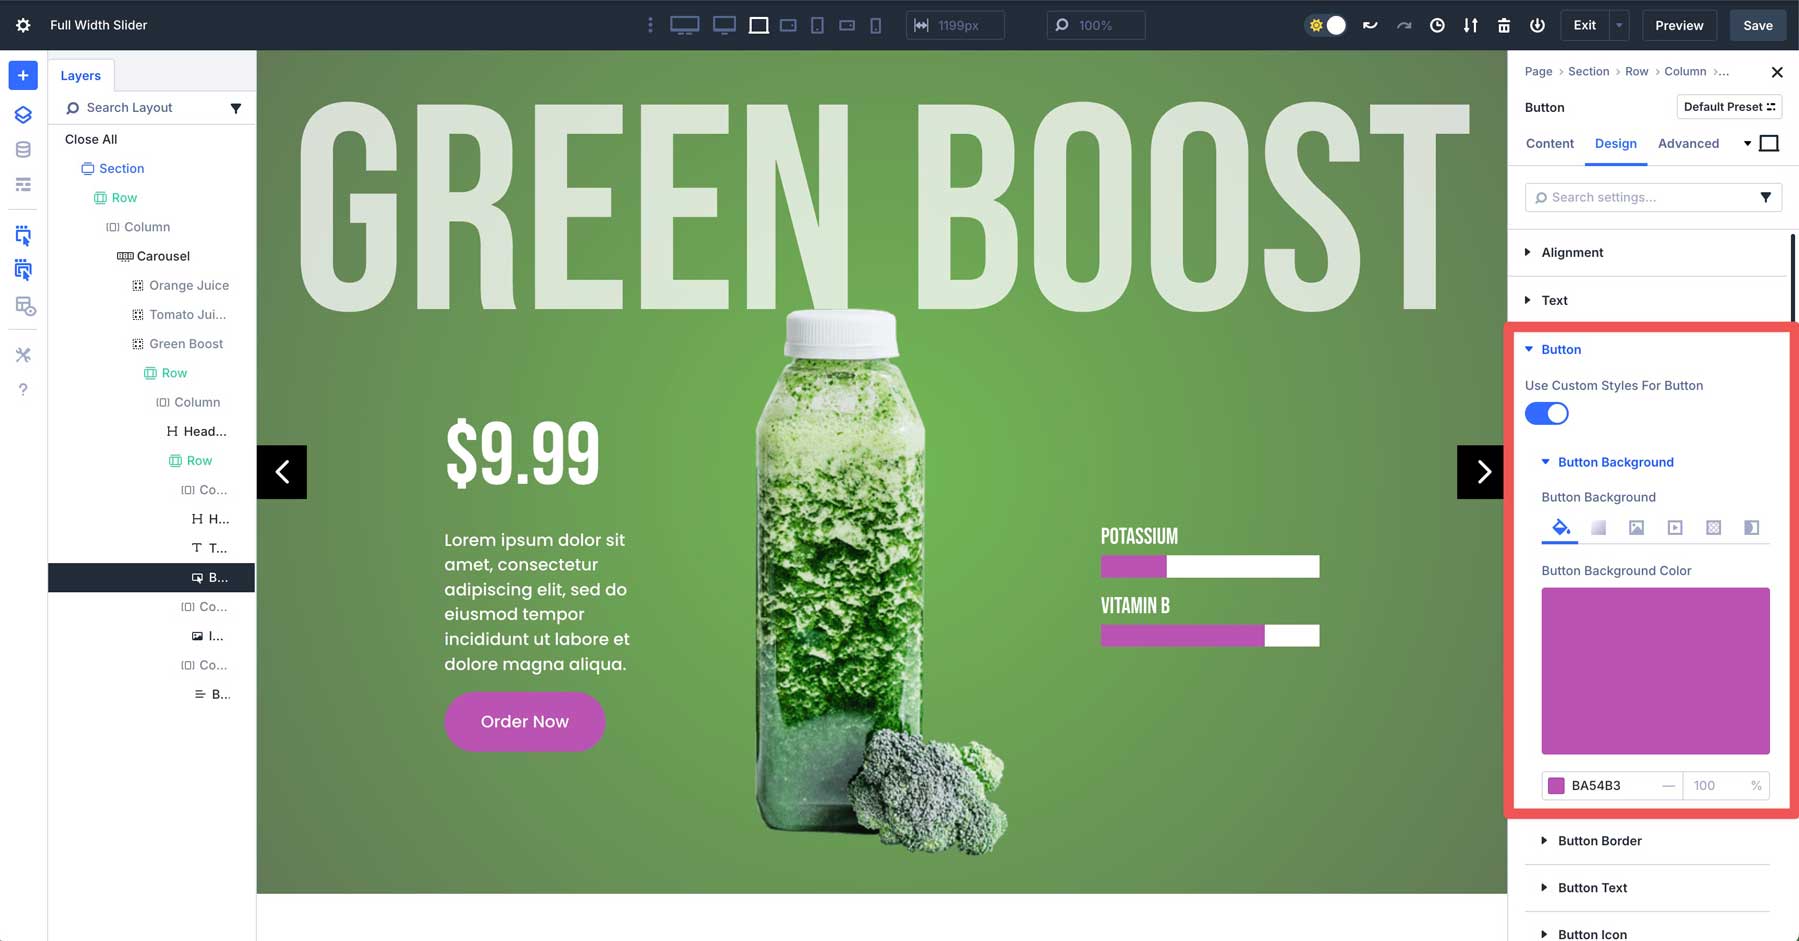
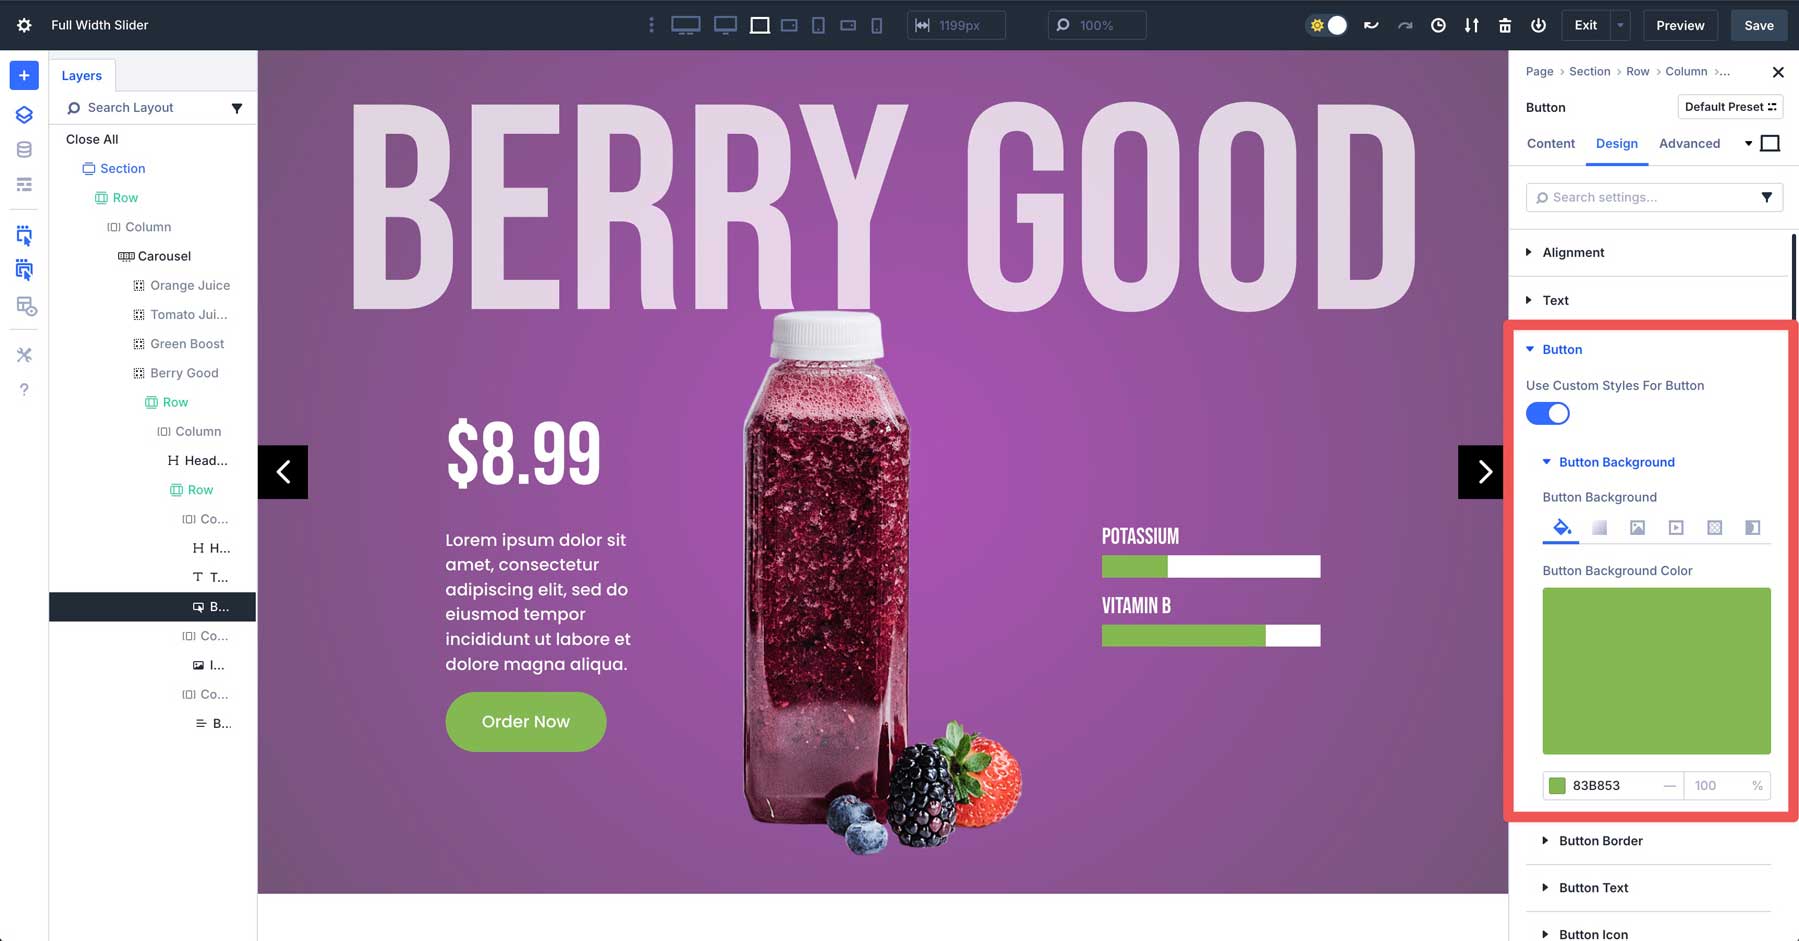
Upload a Button Module beneath the Textual content Module within the first column. Assign textual content to the button within the content material tab and change to the design tab. Make bigger the Button dropdown menu and permit Use Customized Kinds for Button. Then extend the Button Background menu. Within the Background Colour tab, upload #528bf2 because the button’s shade.
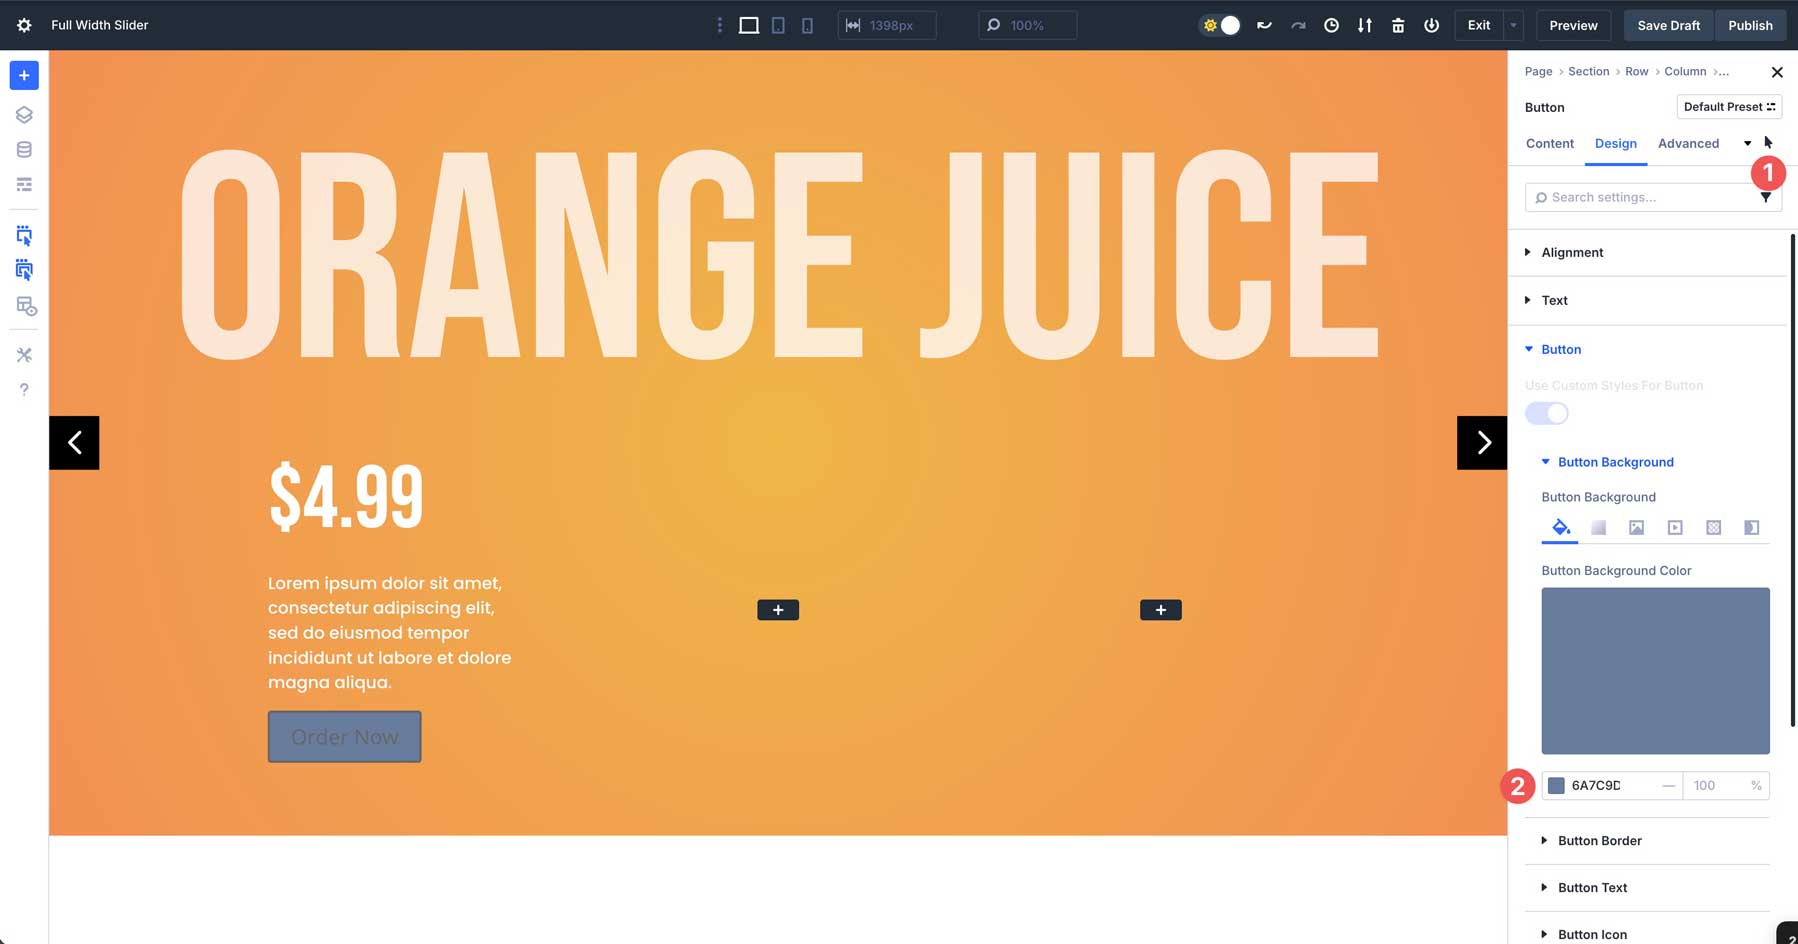
Use Divi 5’s hover controls to assign #6a7c9d because the hover shade for the button.
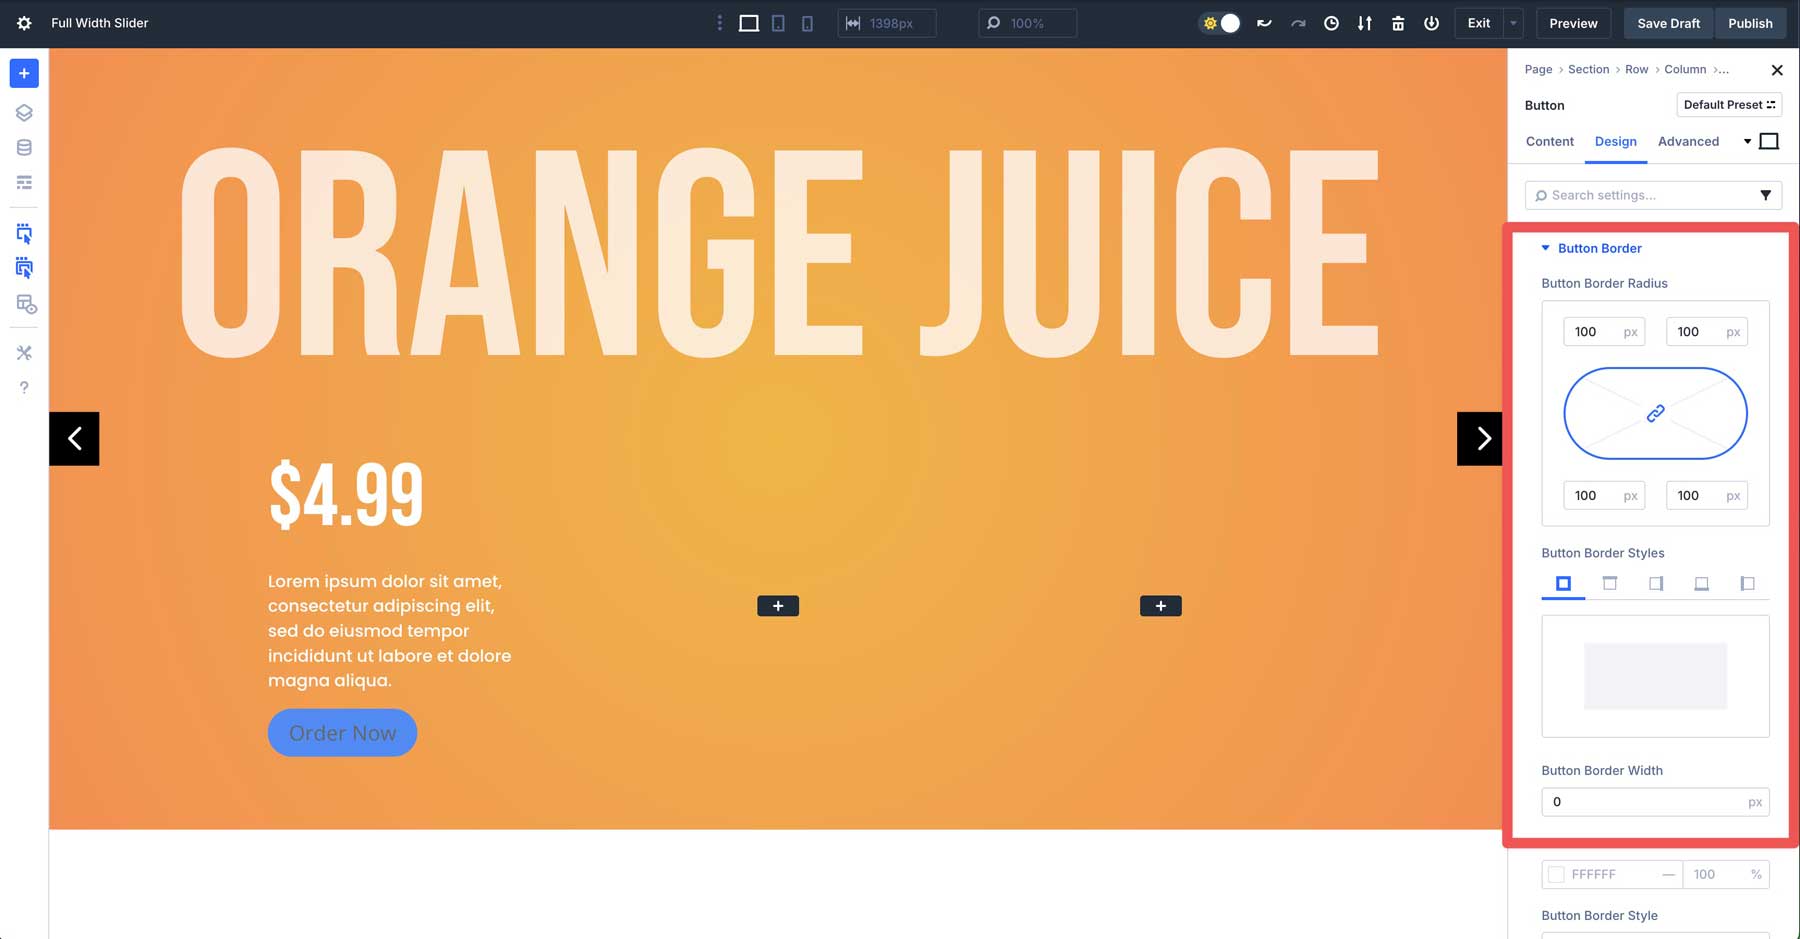
Transfer again to the desktop view. Make bigger the Button Border dropdown tab. Upload 100px beneath Button Border Radius and set the Button Border Width to 0px.
Make bigger the Button Textual content dropdown menu. Assign Poppins because the Button Font, #ffffff because the Button Textual content Colour, and 16px because the Button Textual content Dimension.
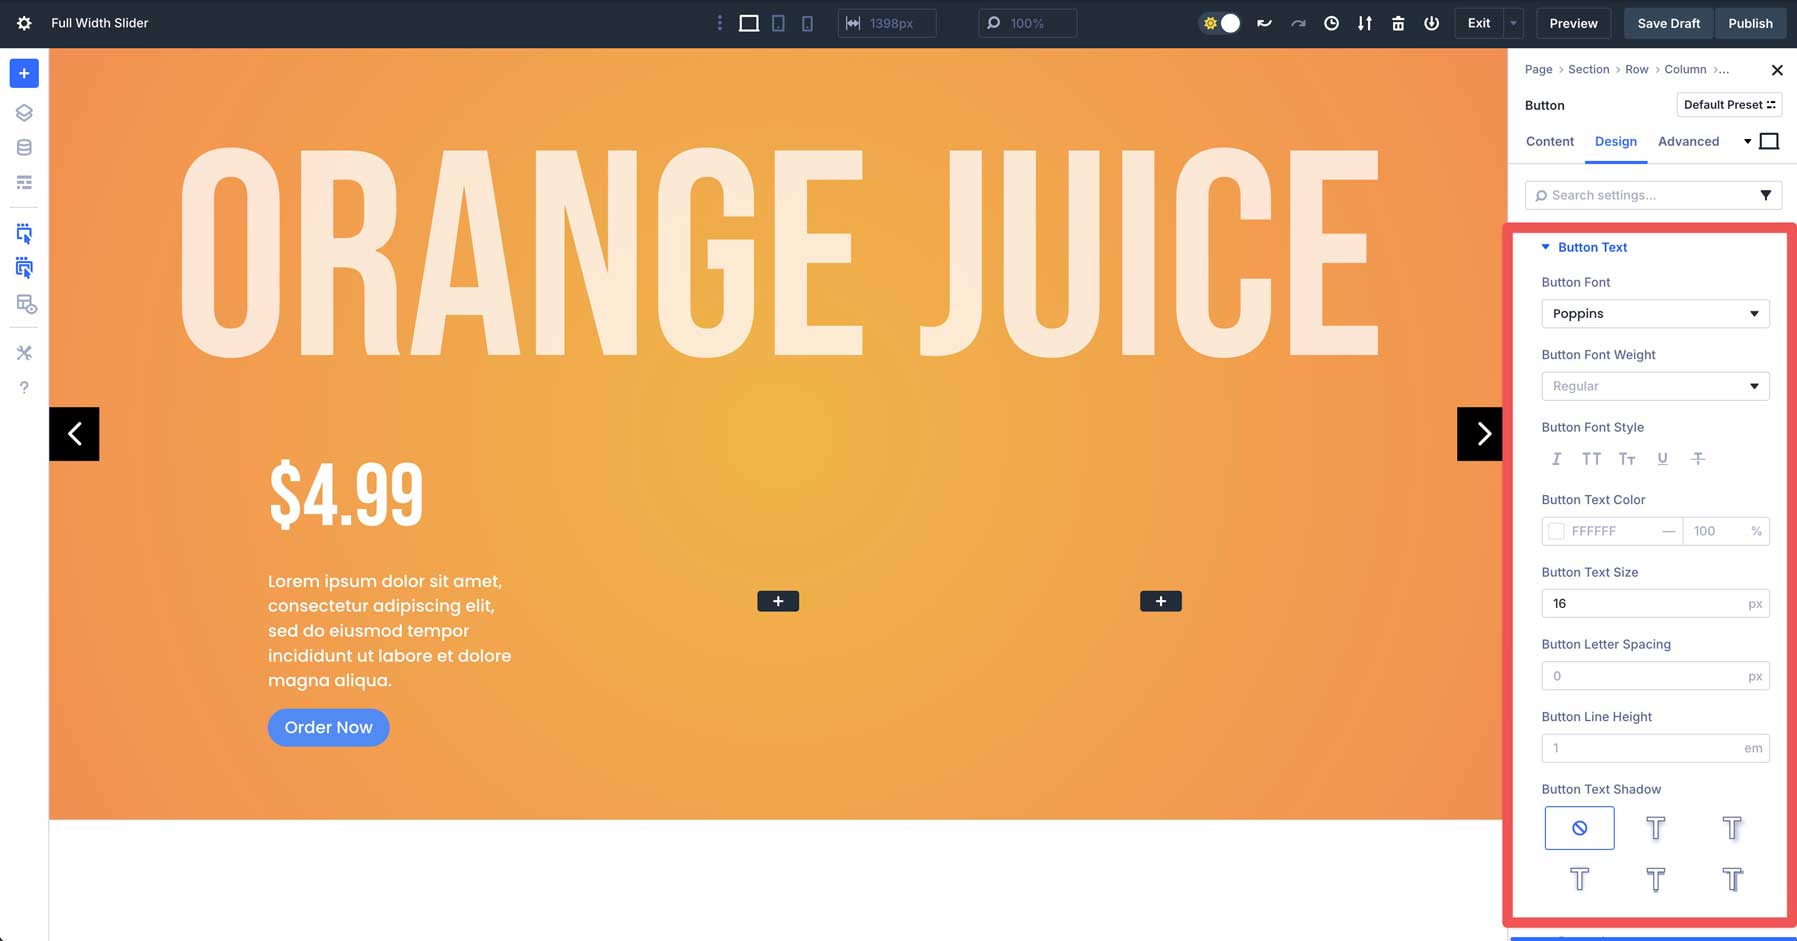
Make bigger the Button Icon settings and disable the Display Button Icon toggle.
![]()
After all, extend the Spacing dropdown menu. Upload 15px padding to the highest and backside and 35px to the left and correct.

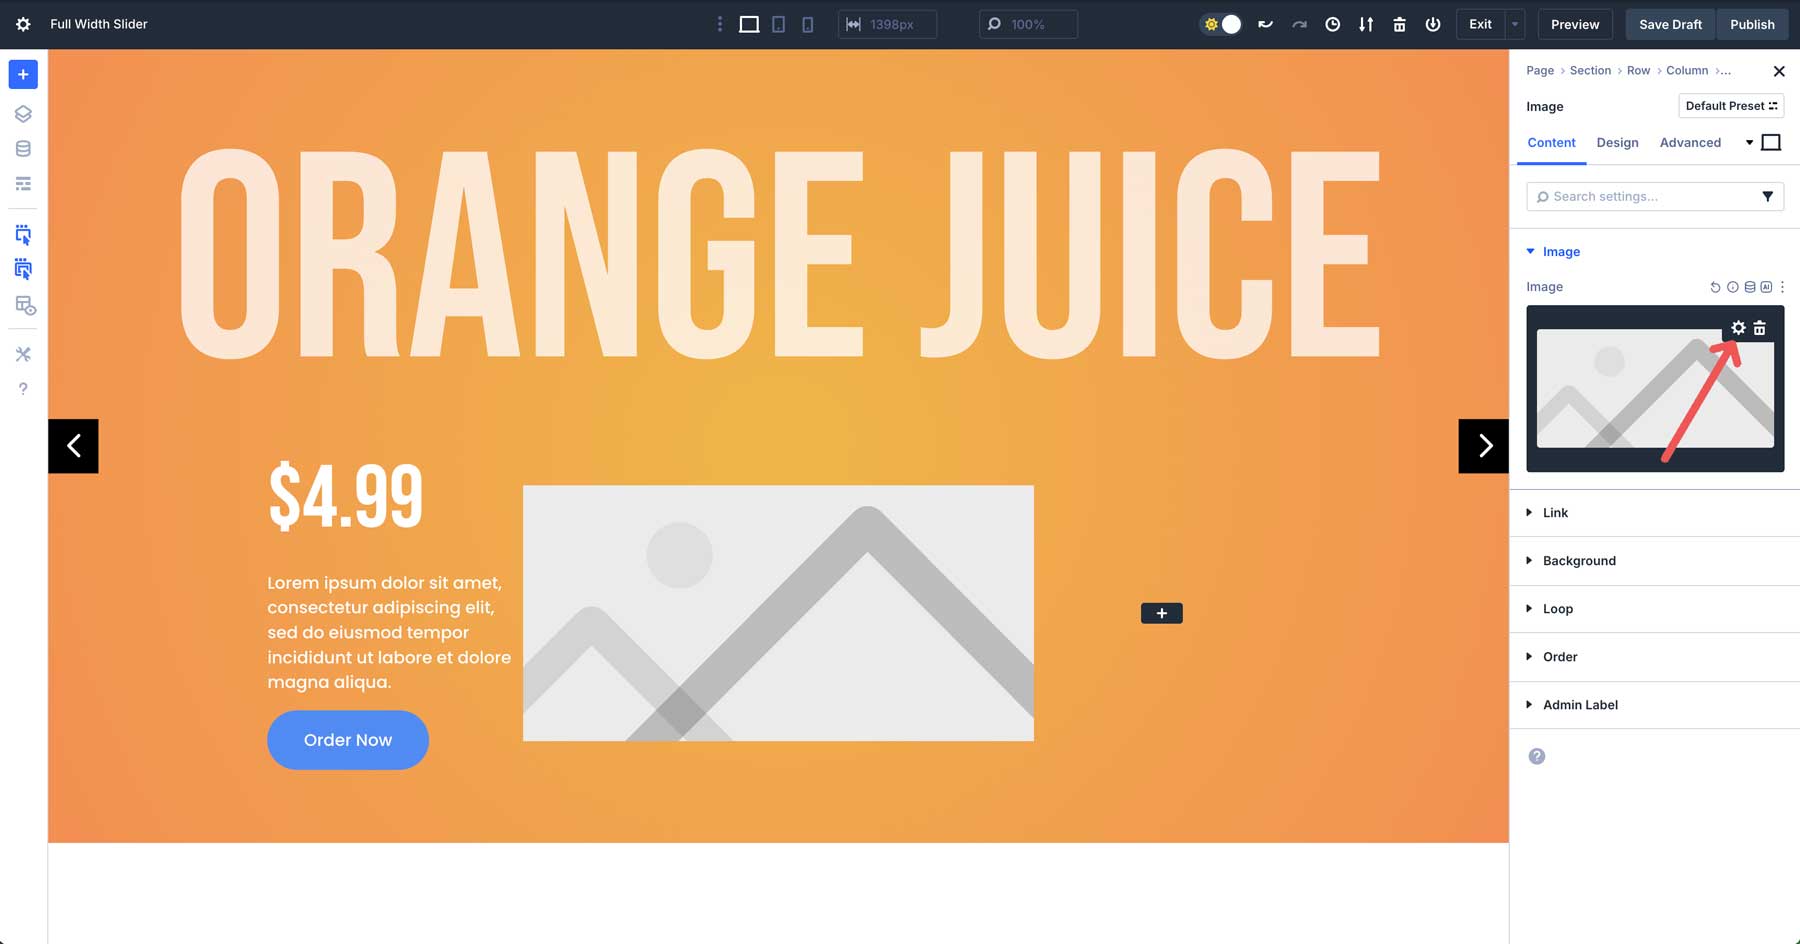
Upload An Symbol Module
Position an Symbol Module in the second one column. When the settings seem, hover over the picture box to expose the settings. Click on the settings icon to load the Media Library and add a picture to the module.
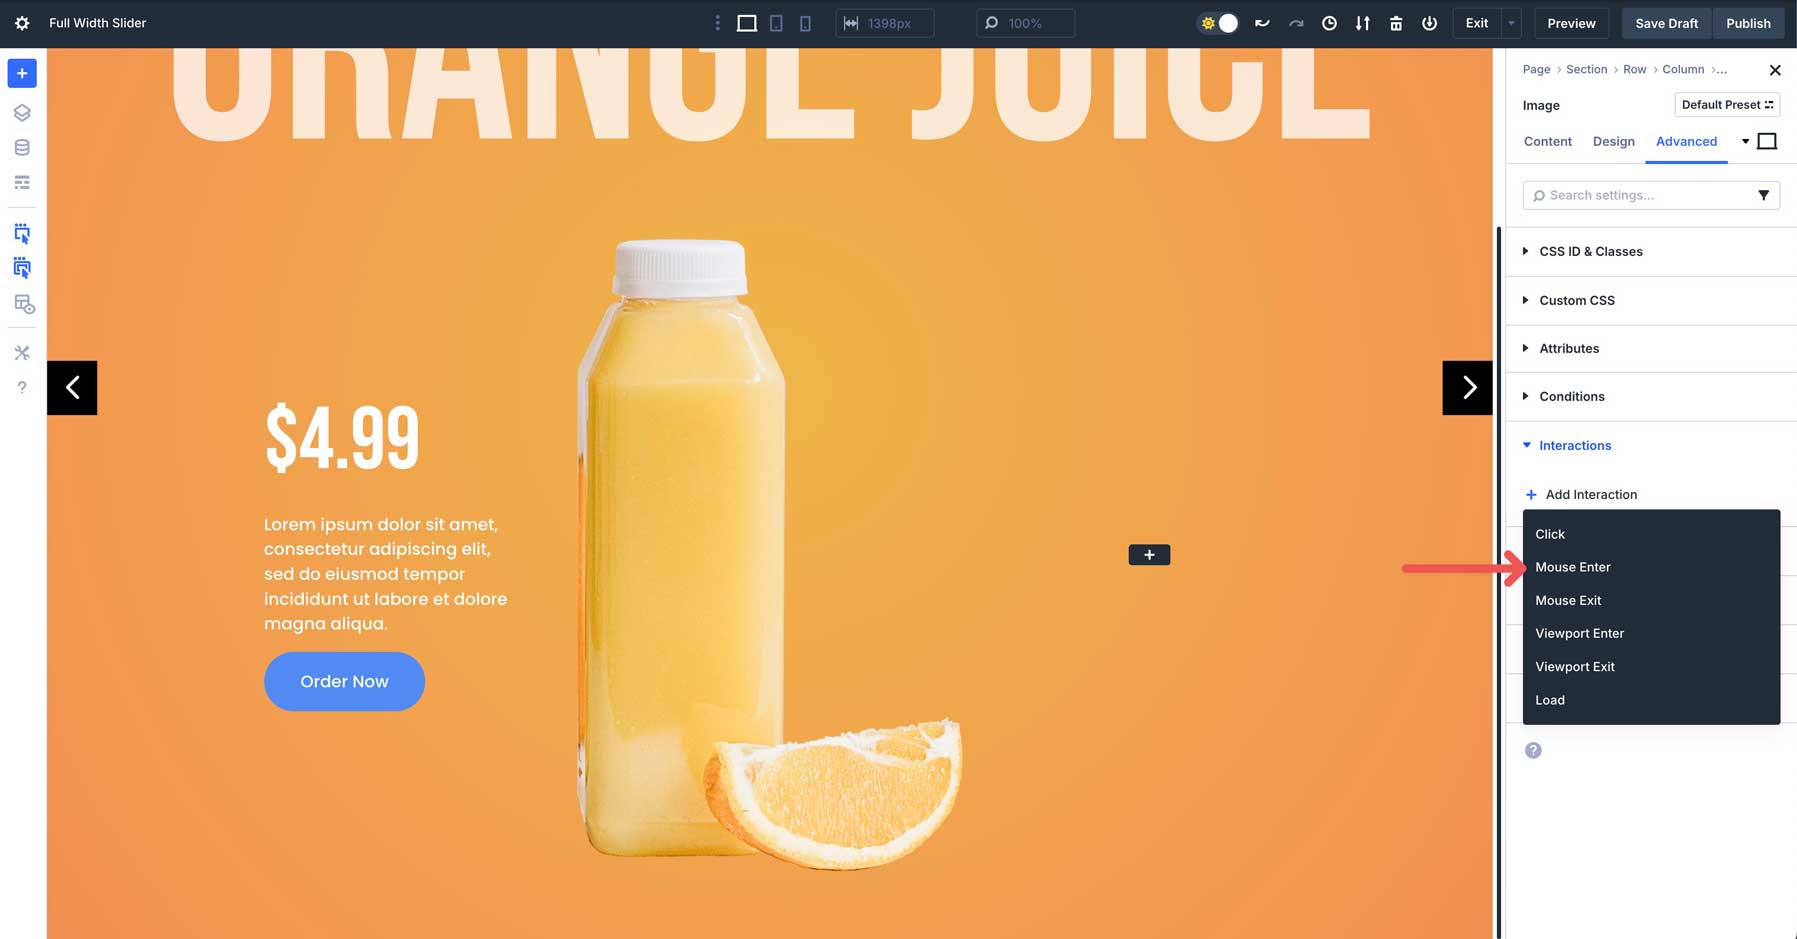
Subsequent, we’ll upload an Interaction to the picture to create a mouse-over impact. Navigate to the Complex tab. Make bigger the Interactions menu to expose its settings. Click on the +Upload Interplay button.

Make a choice Mouse Input when the choices seem.
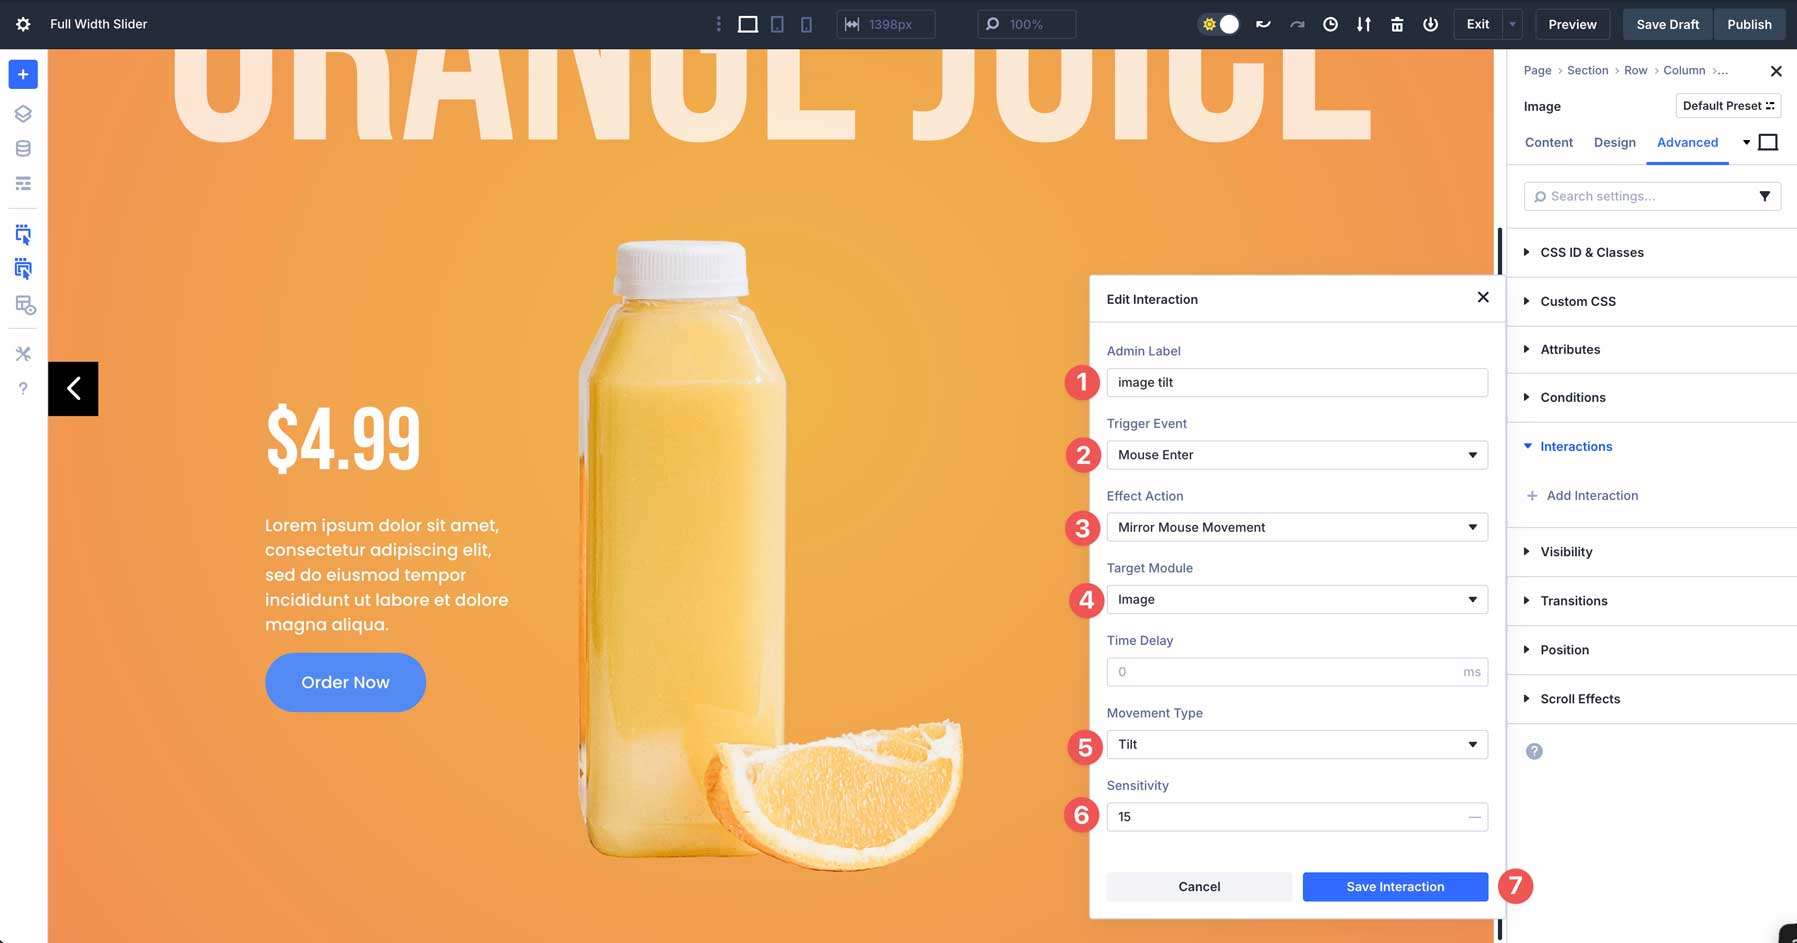
Input symbol tilt within the Admin Label box, make a selection Mouse Input because the Cause Match, Reflect Mouse Motion because the Impact Motion, make a selection the picture because the Goal Module, Tilt because the Motion Sort, and 15 for Sensitivity. After all, click on the Save Interplay button to permit the Interplay.
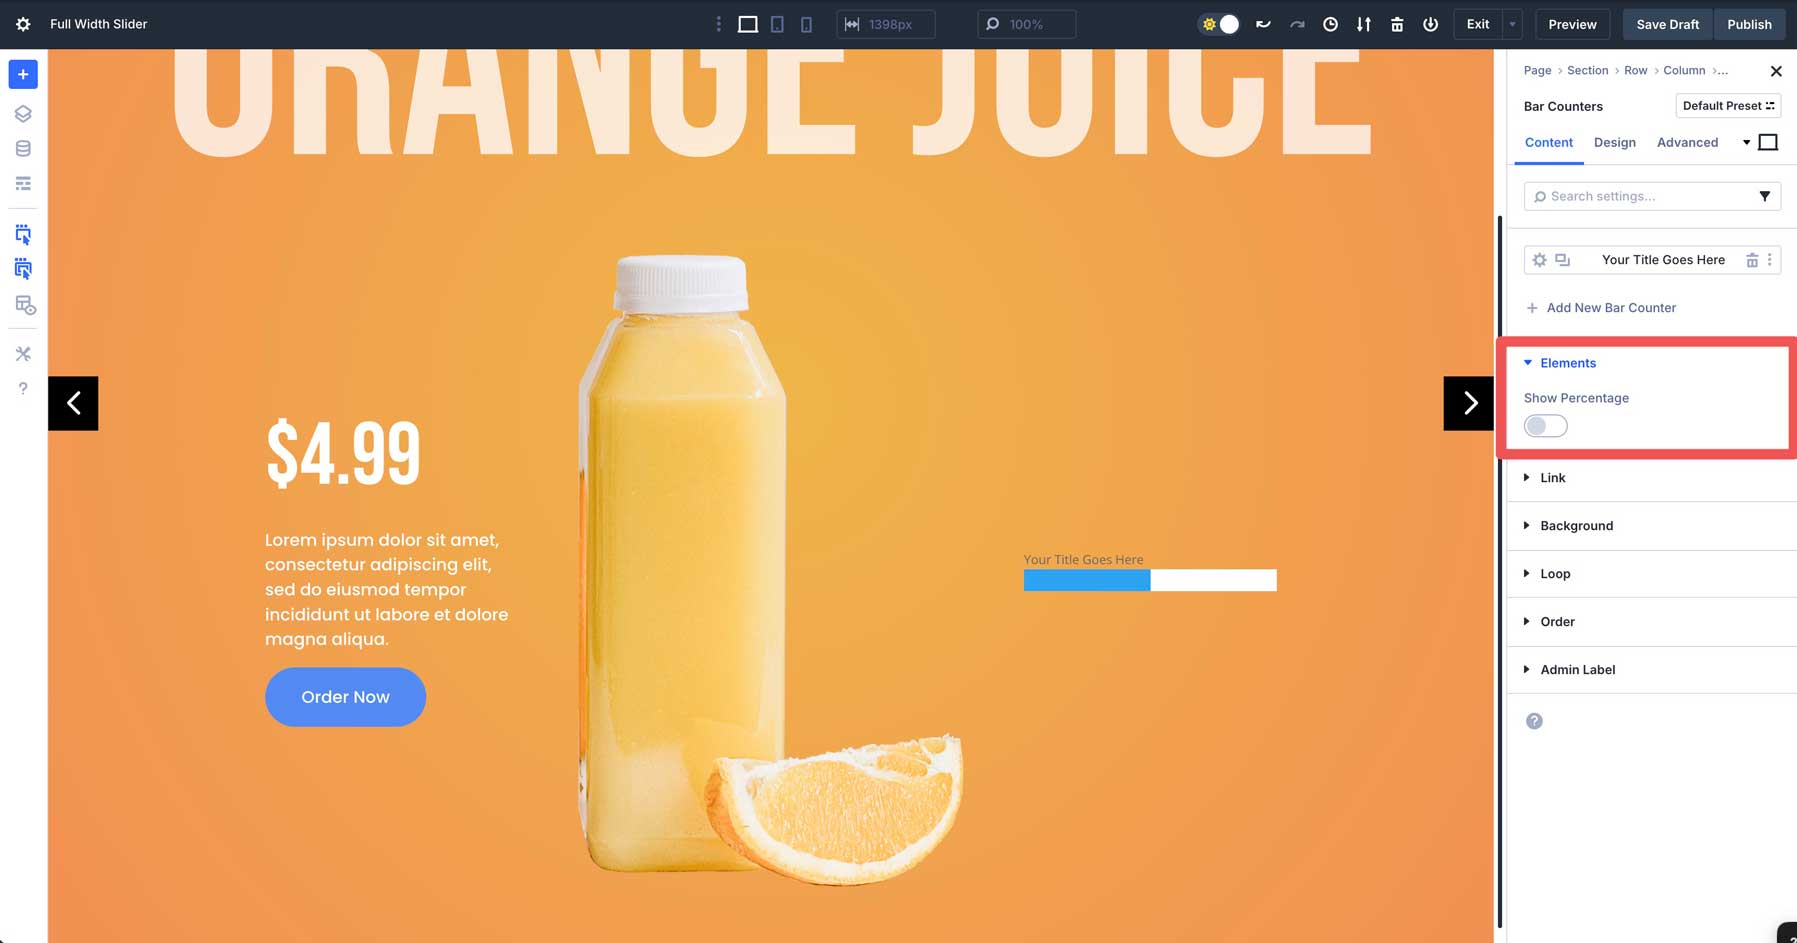
Upload A Bar Counters Module
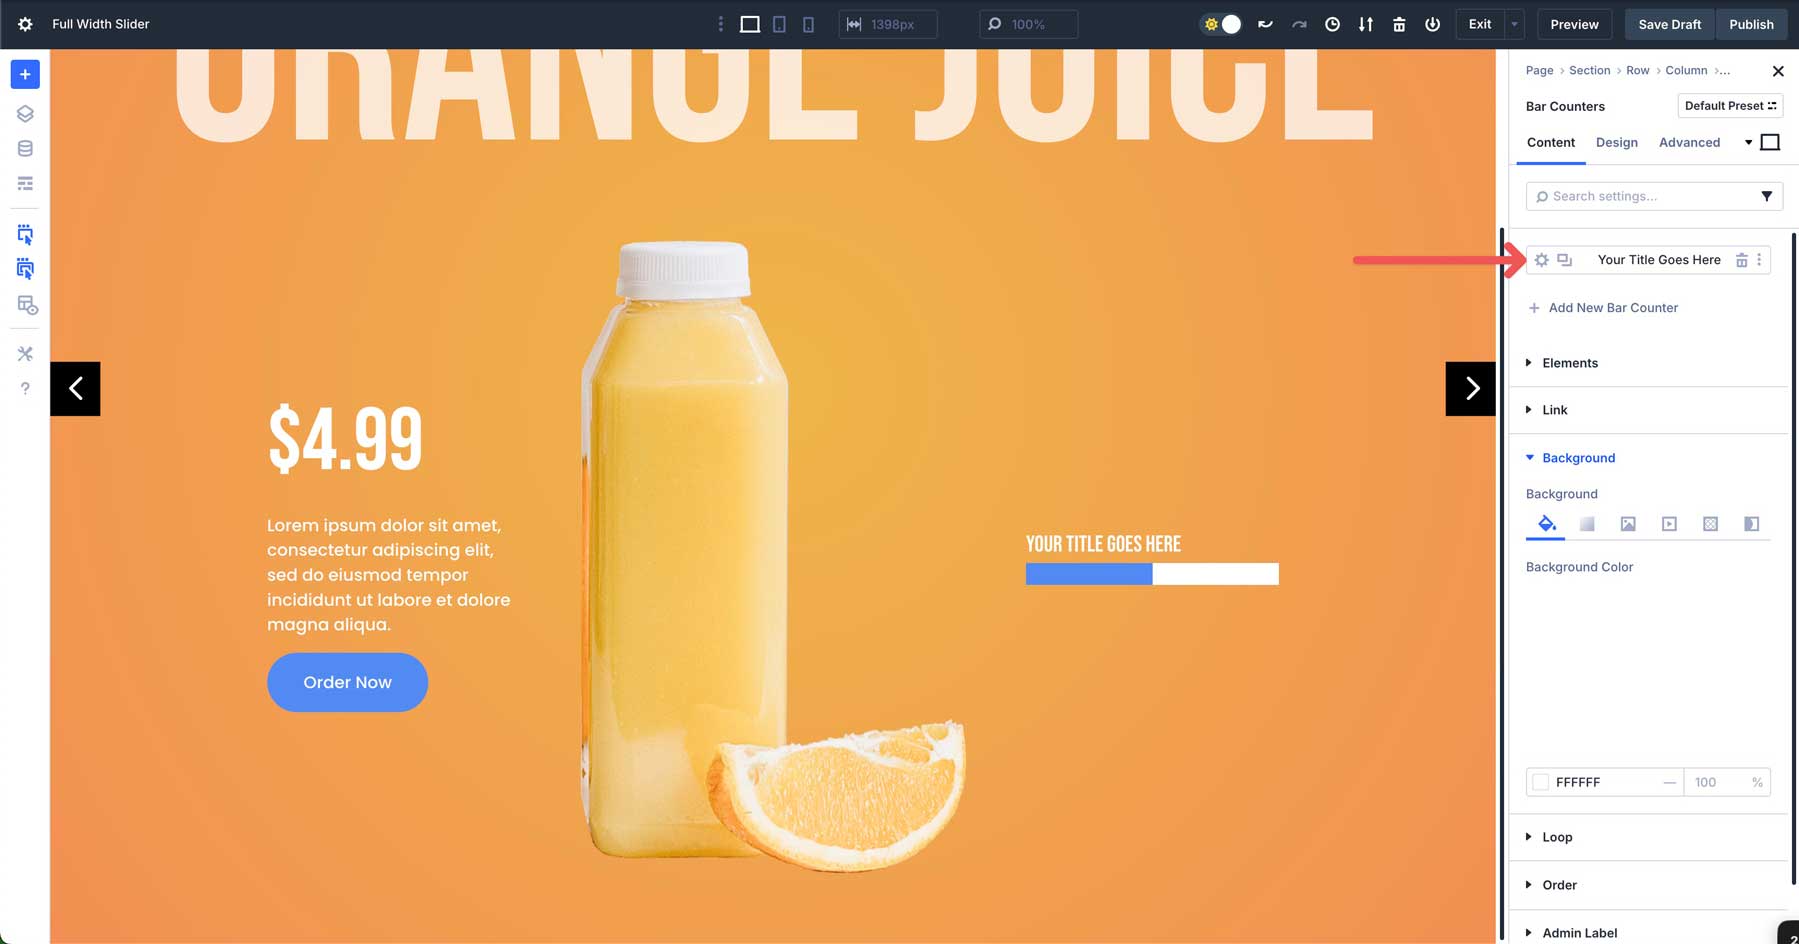
Click on so as to add the Bar Counters Module within the third column. Within the content material tab. Within the Components tab, disable Display Proportion.
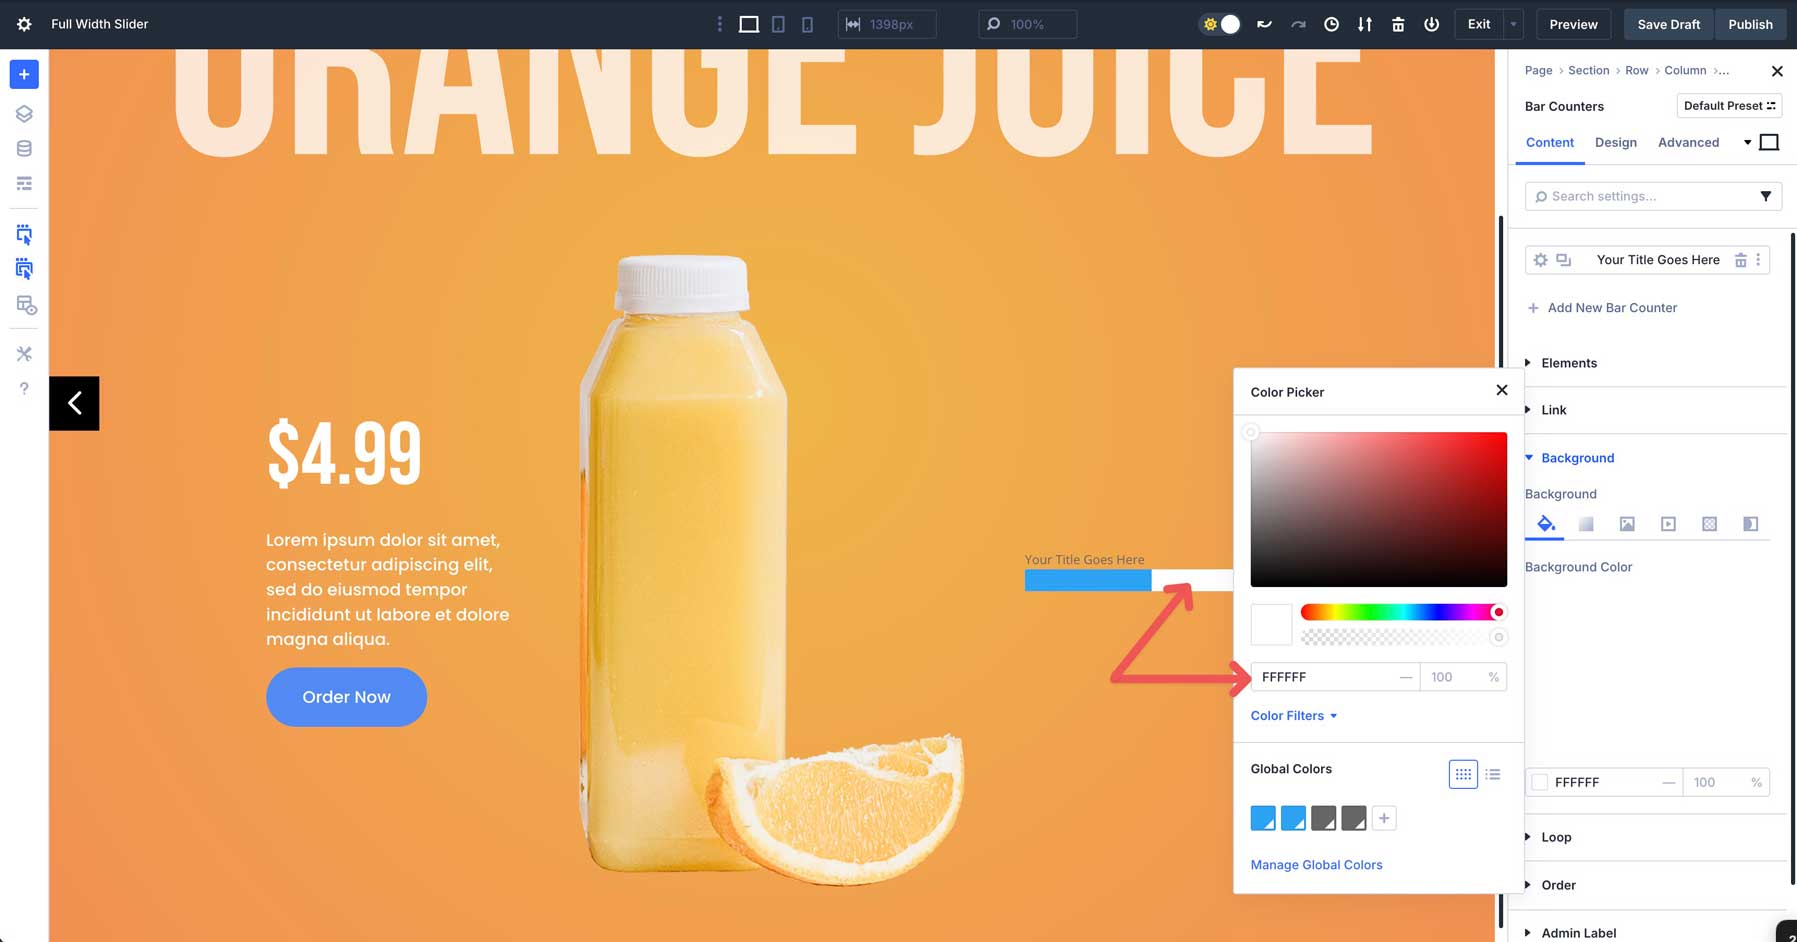
Subsequent, extend the Background tab. Upload #ffffff because the Background Colour.
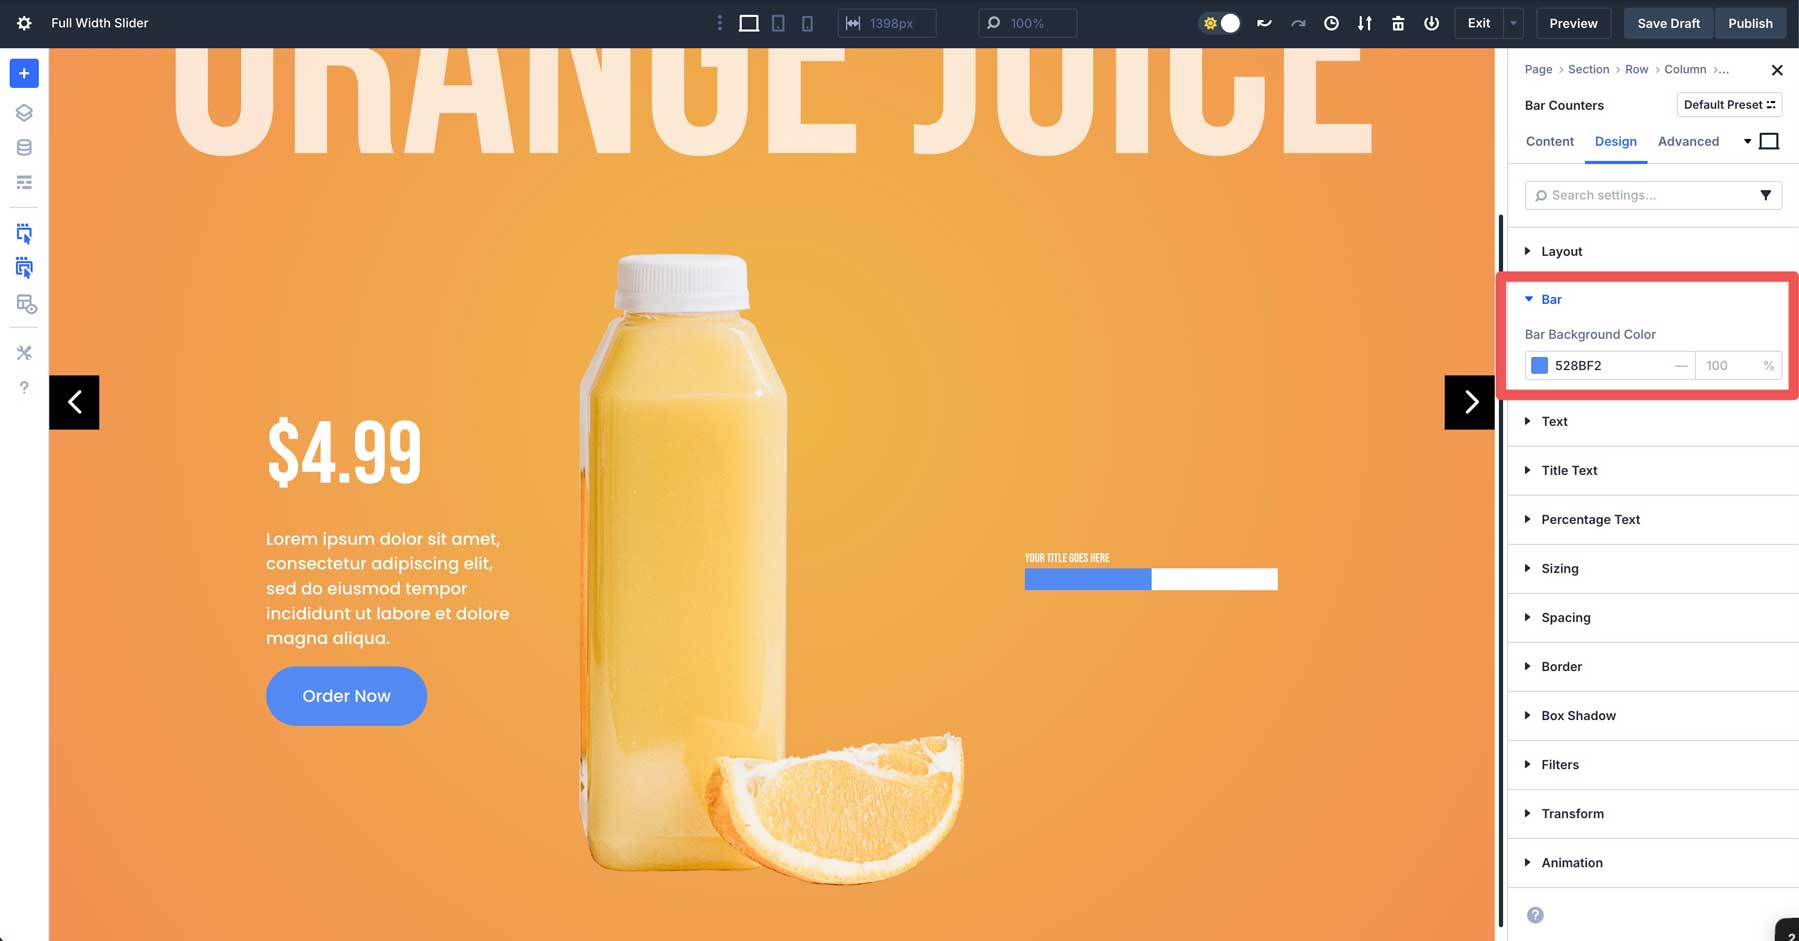
Change to the Design tab and extend the Bar dropdown menu. Within the Bar Background Colour box, upload #528bf2 as the colour.
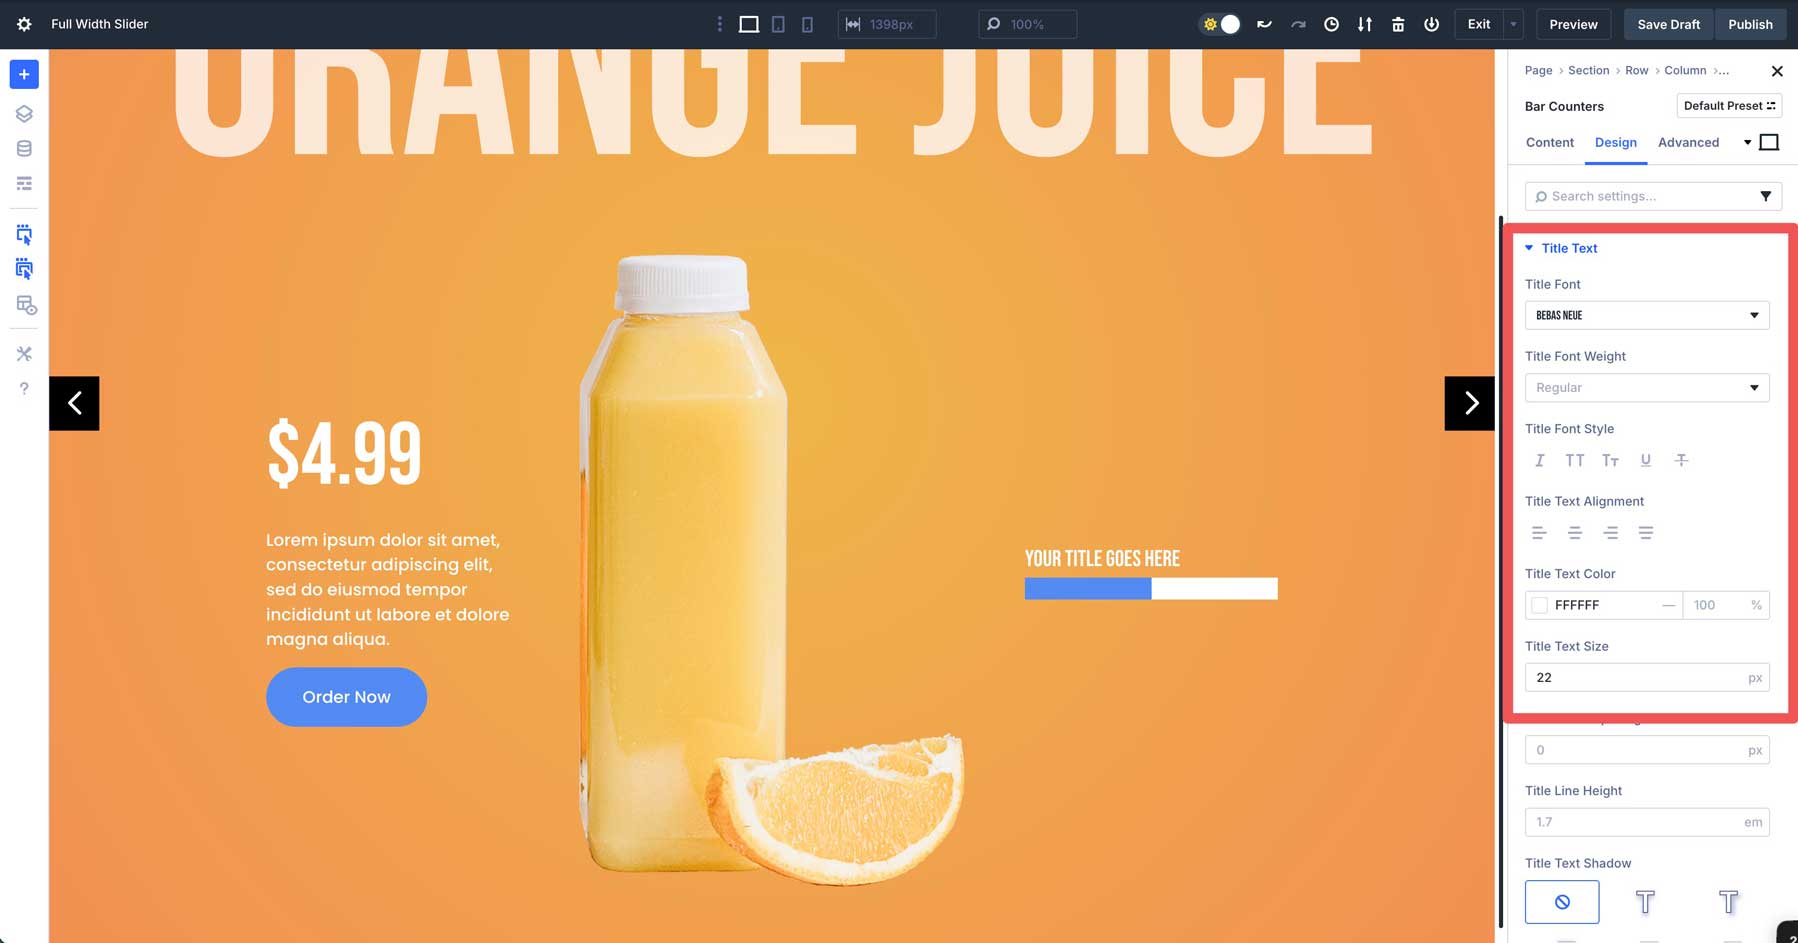
Make bigger the Identify Textual content dropdown menu. Within the Identify Font box, make a selection Bebas Neue. Make a choice #ffffff because the Identify Textual content Colour and 22px because the Identify Textual content Dimension.
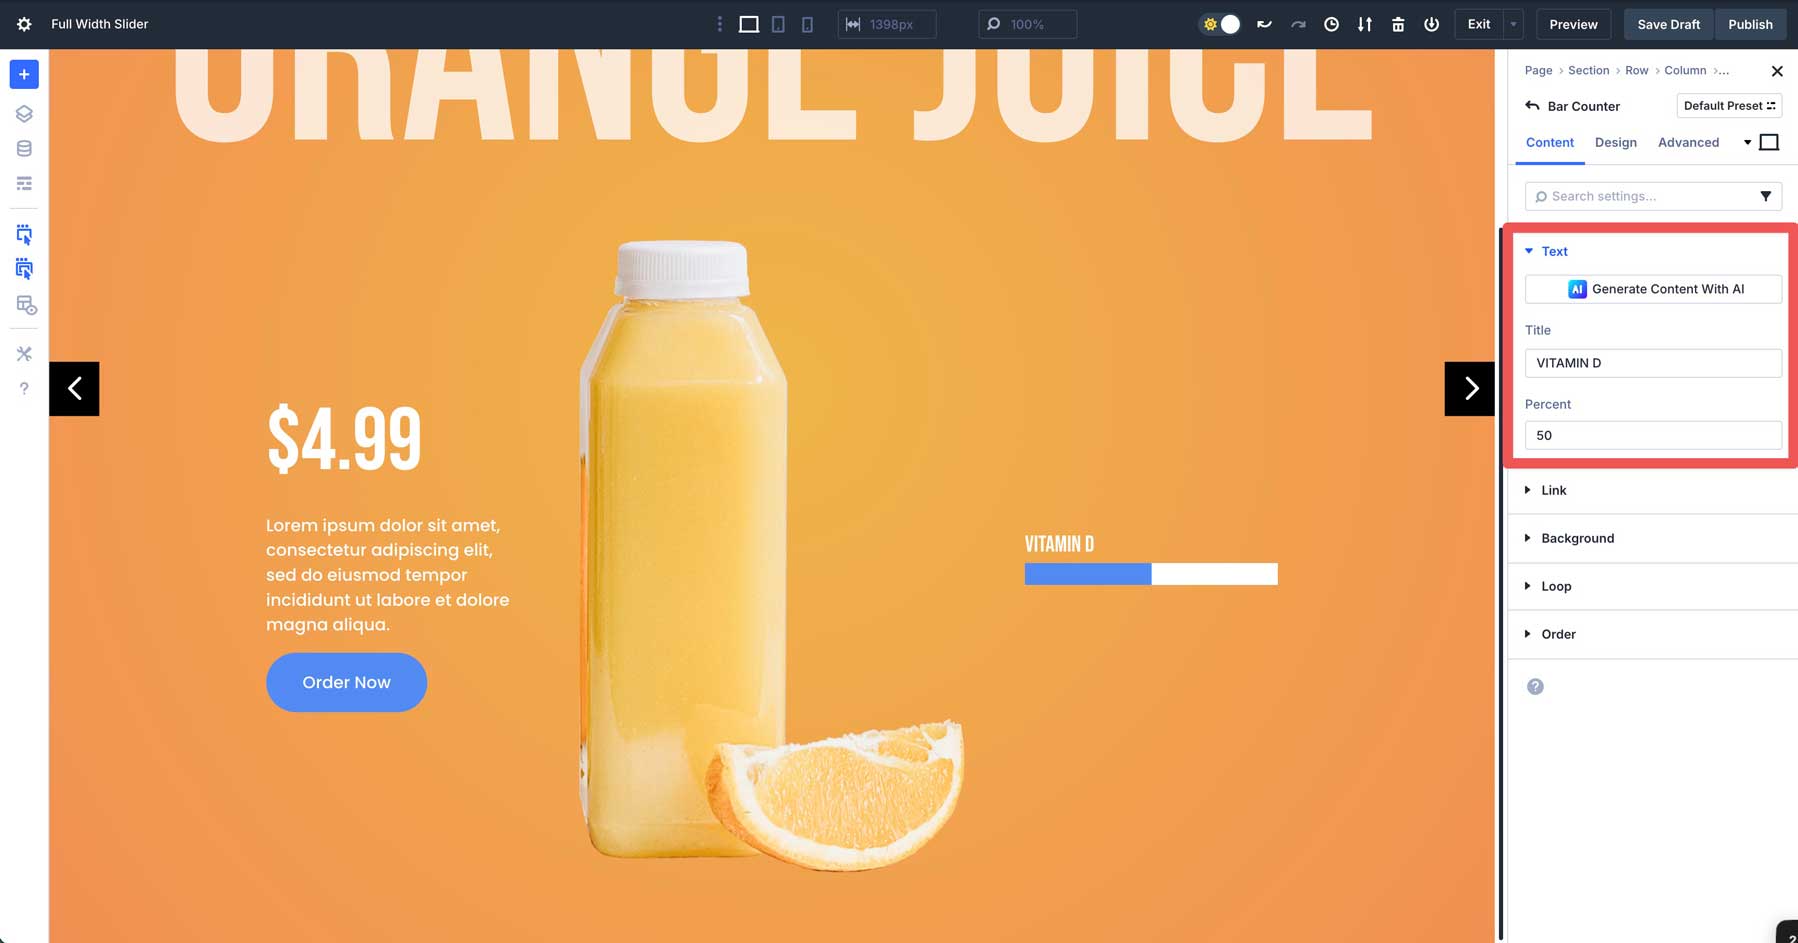
Change again to the content material tab. This time, click on the settings icon for the primary Bar Counter merchandise.
Input textual content into the Identify box and set the P.c box to 75.
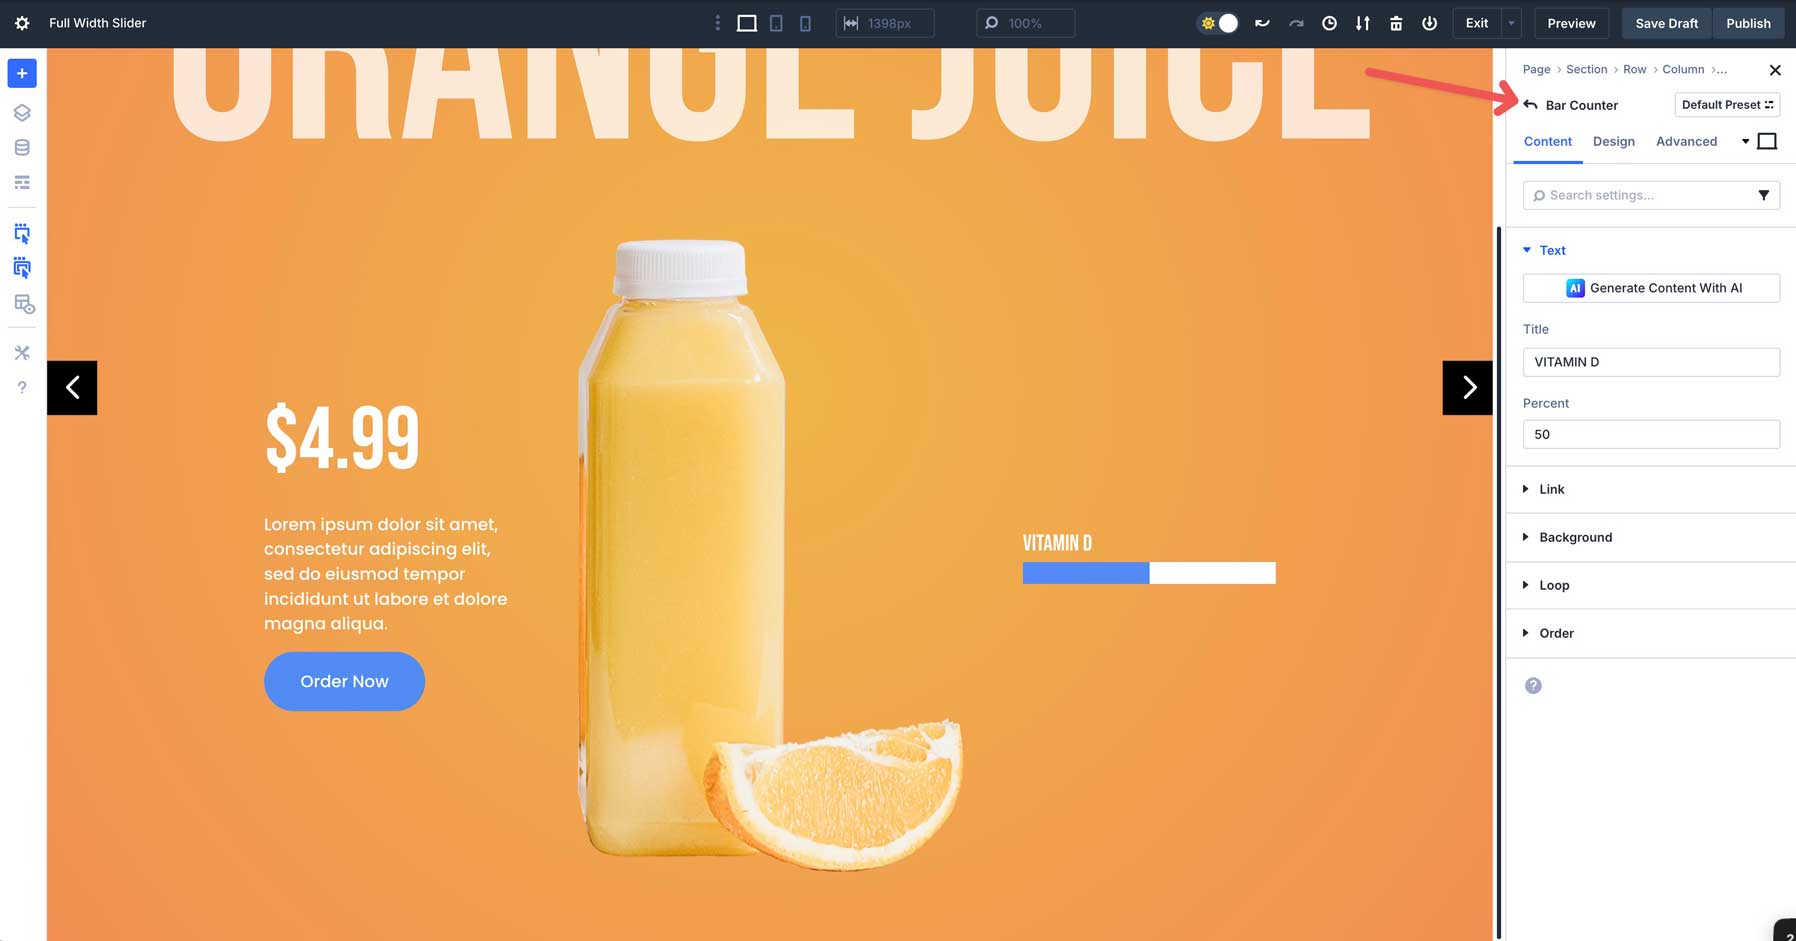
Click on to return to the principle content material tab for the Bar Counters Module.
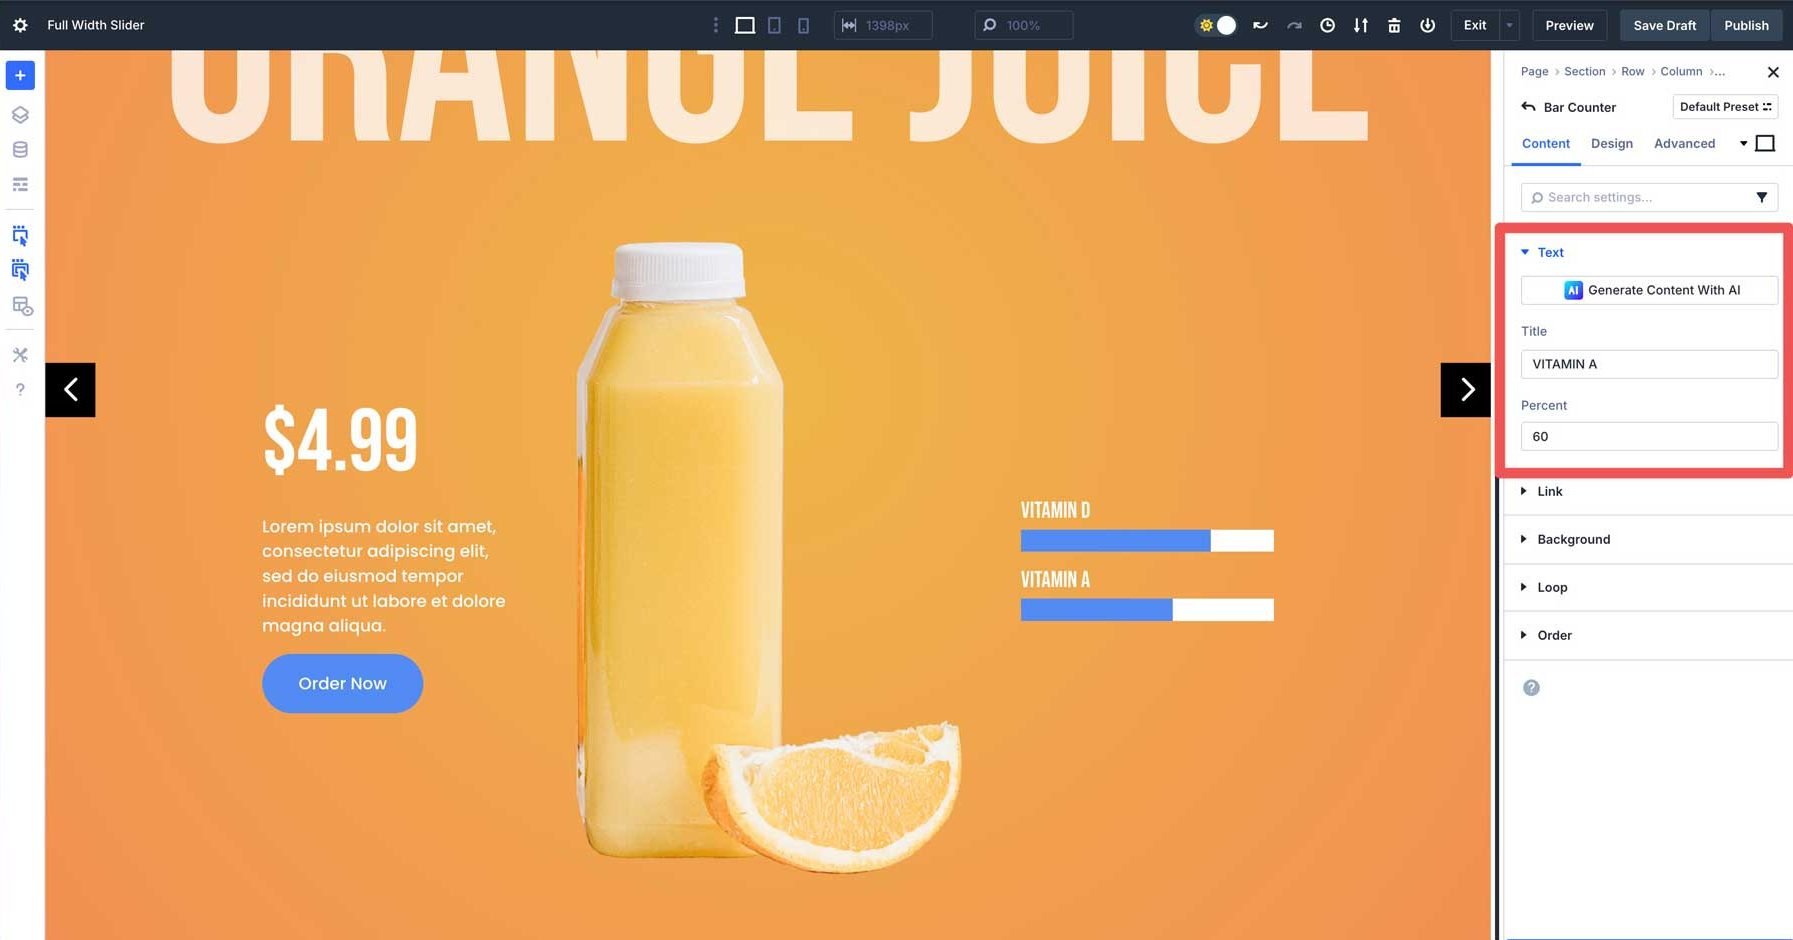
Now that our design settings are set, you’ll be able to simply reproduction the primary Bar Counter merchandise to maintain the settings.
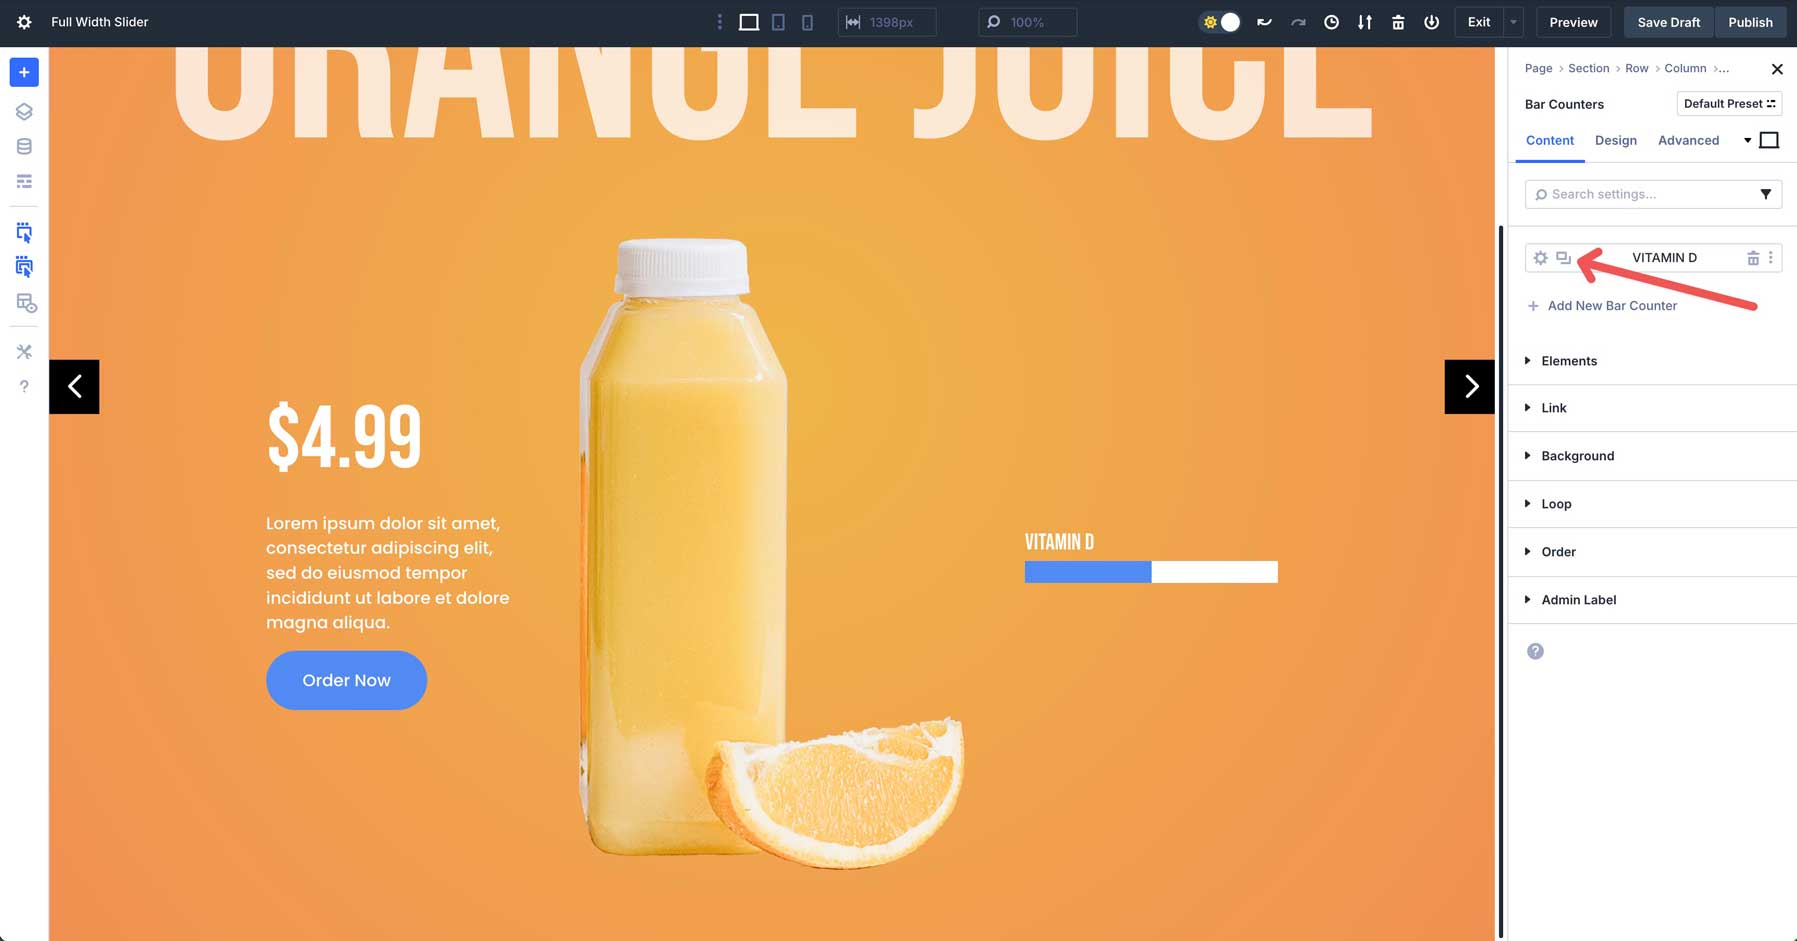
Reproduction the Bar Counter merchandise and alter the name and p.c for your desired settings.
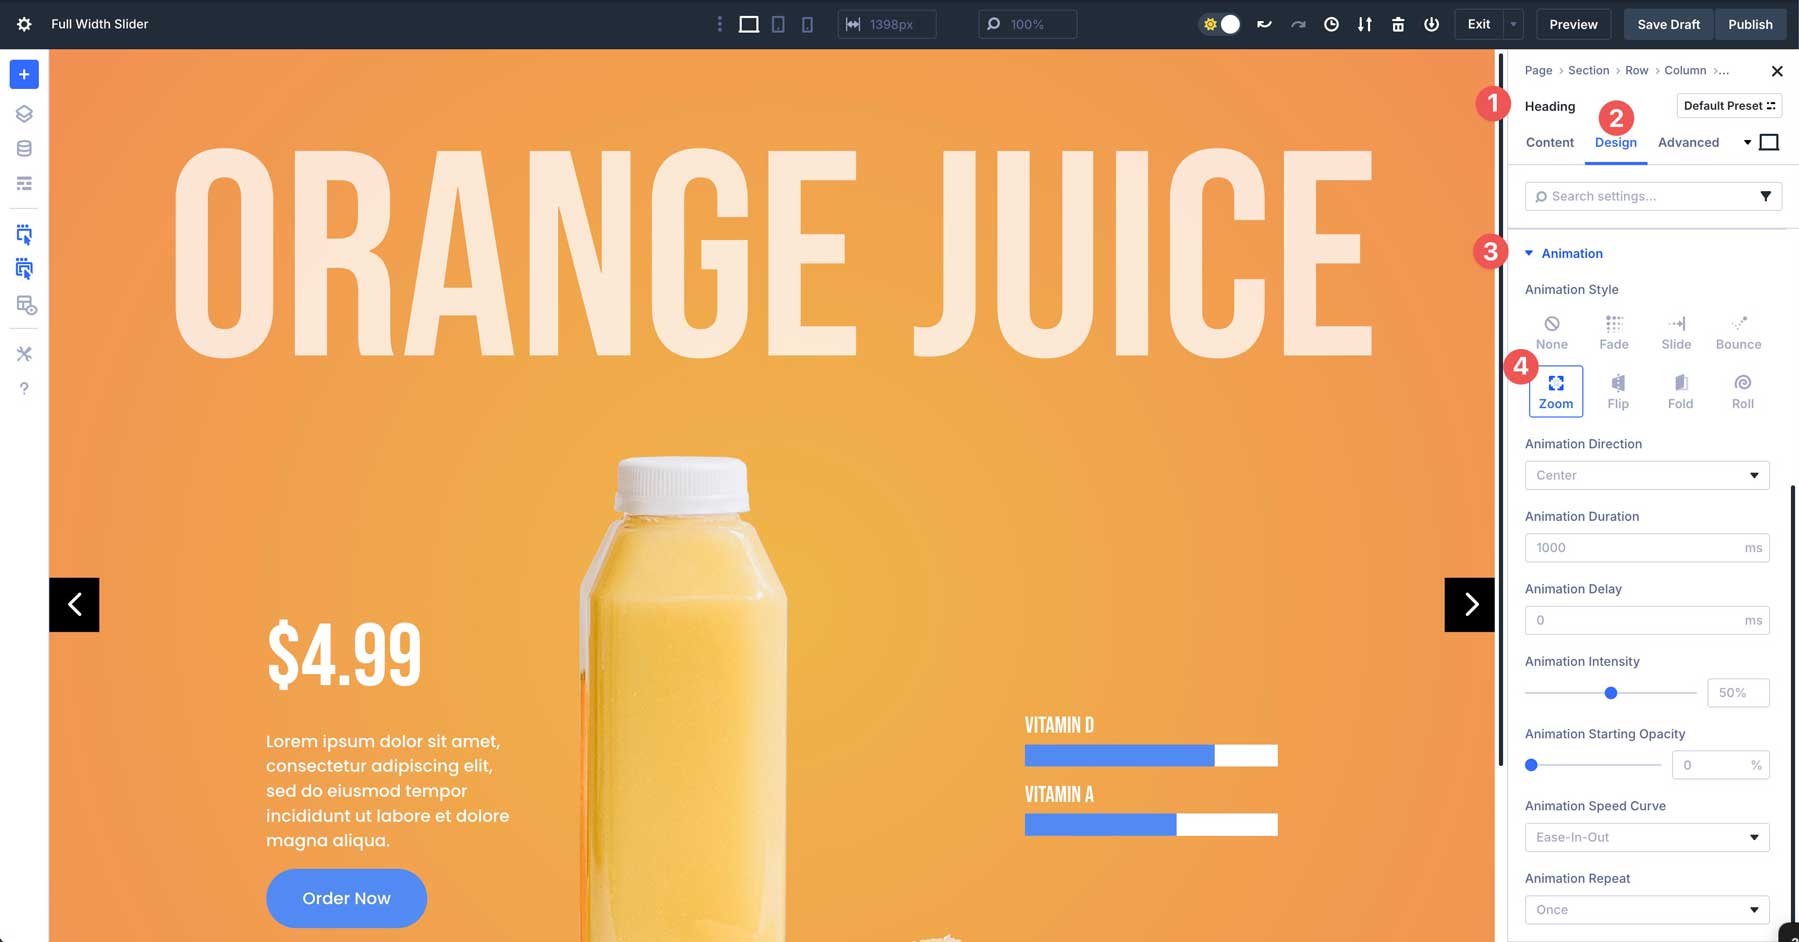
Step 6: Upload Animations
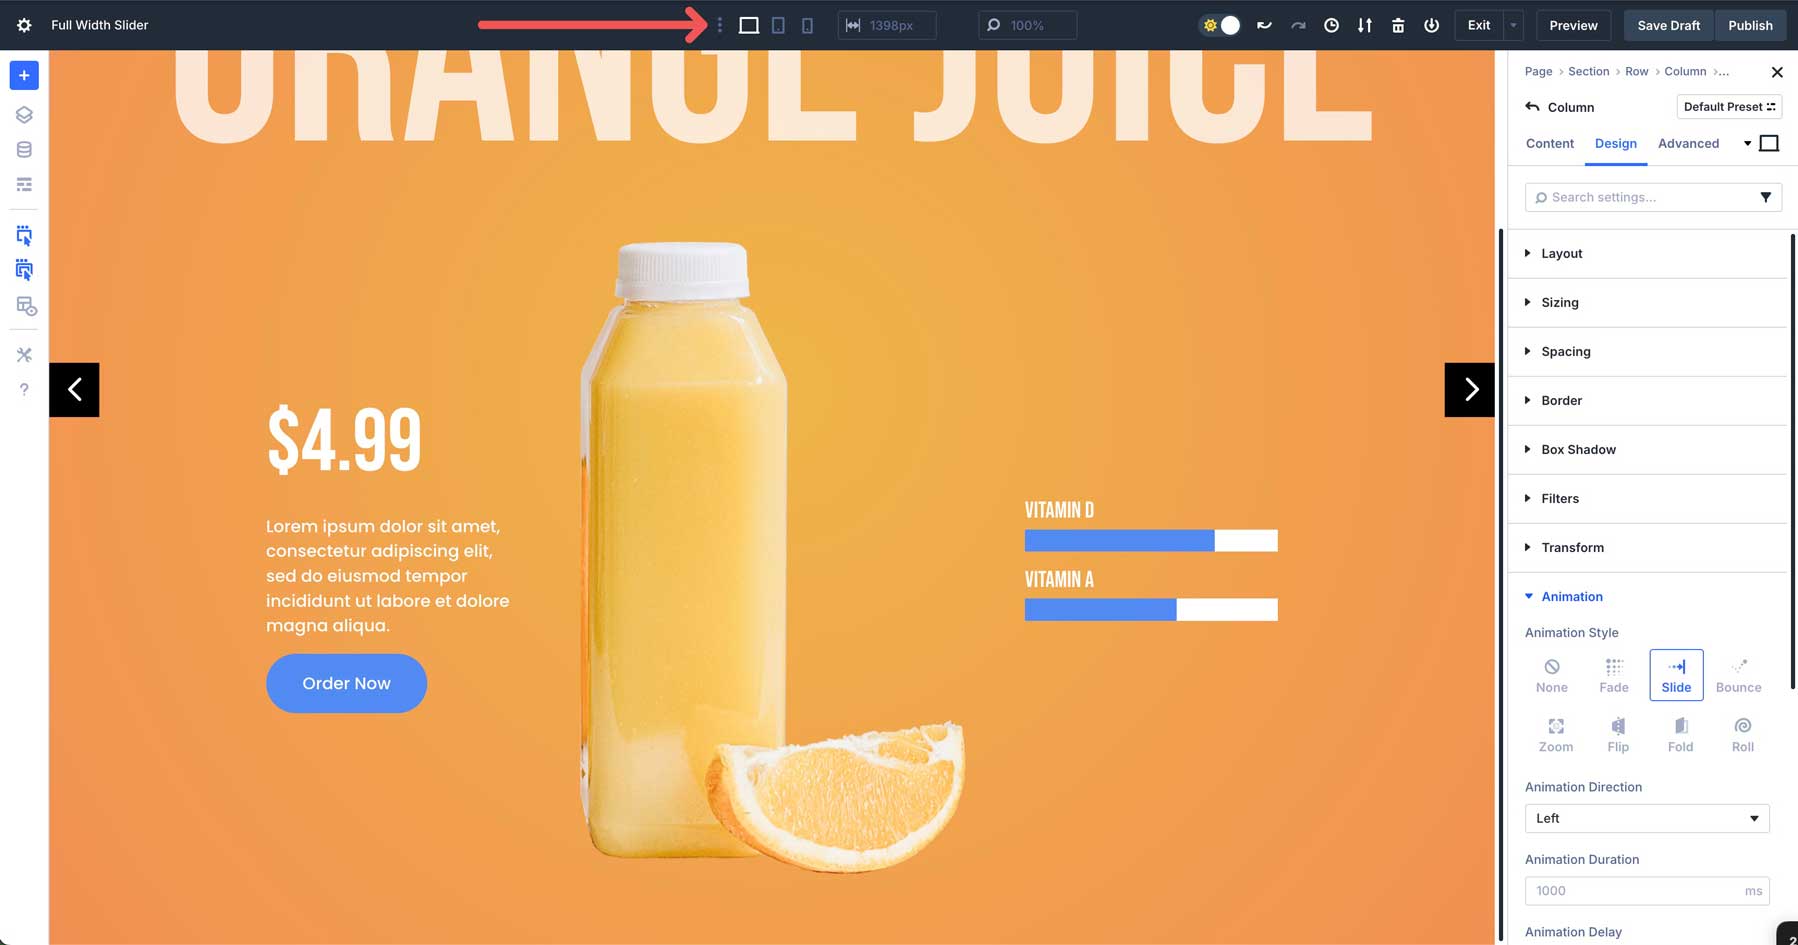
To make the Team extra immersive, we’ll upload some animation results. First, we’ll upload a zoom impact to our primary Heading. Click on to choose the principle Heading for the Team. Navigate to the Design tab and scroll all the way down to extend the Animation tab. Make a choice Zoom for the animation. Go away the entire settings as is.
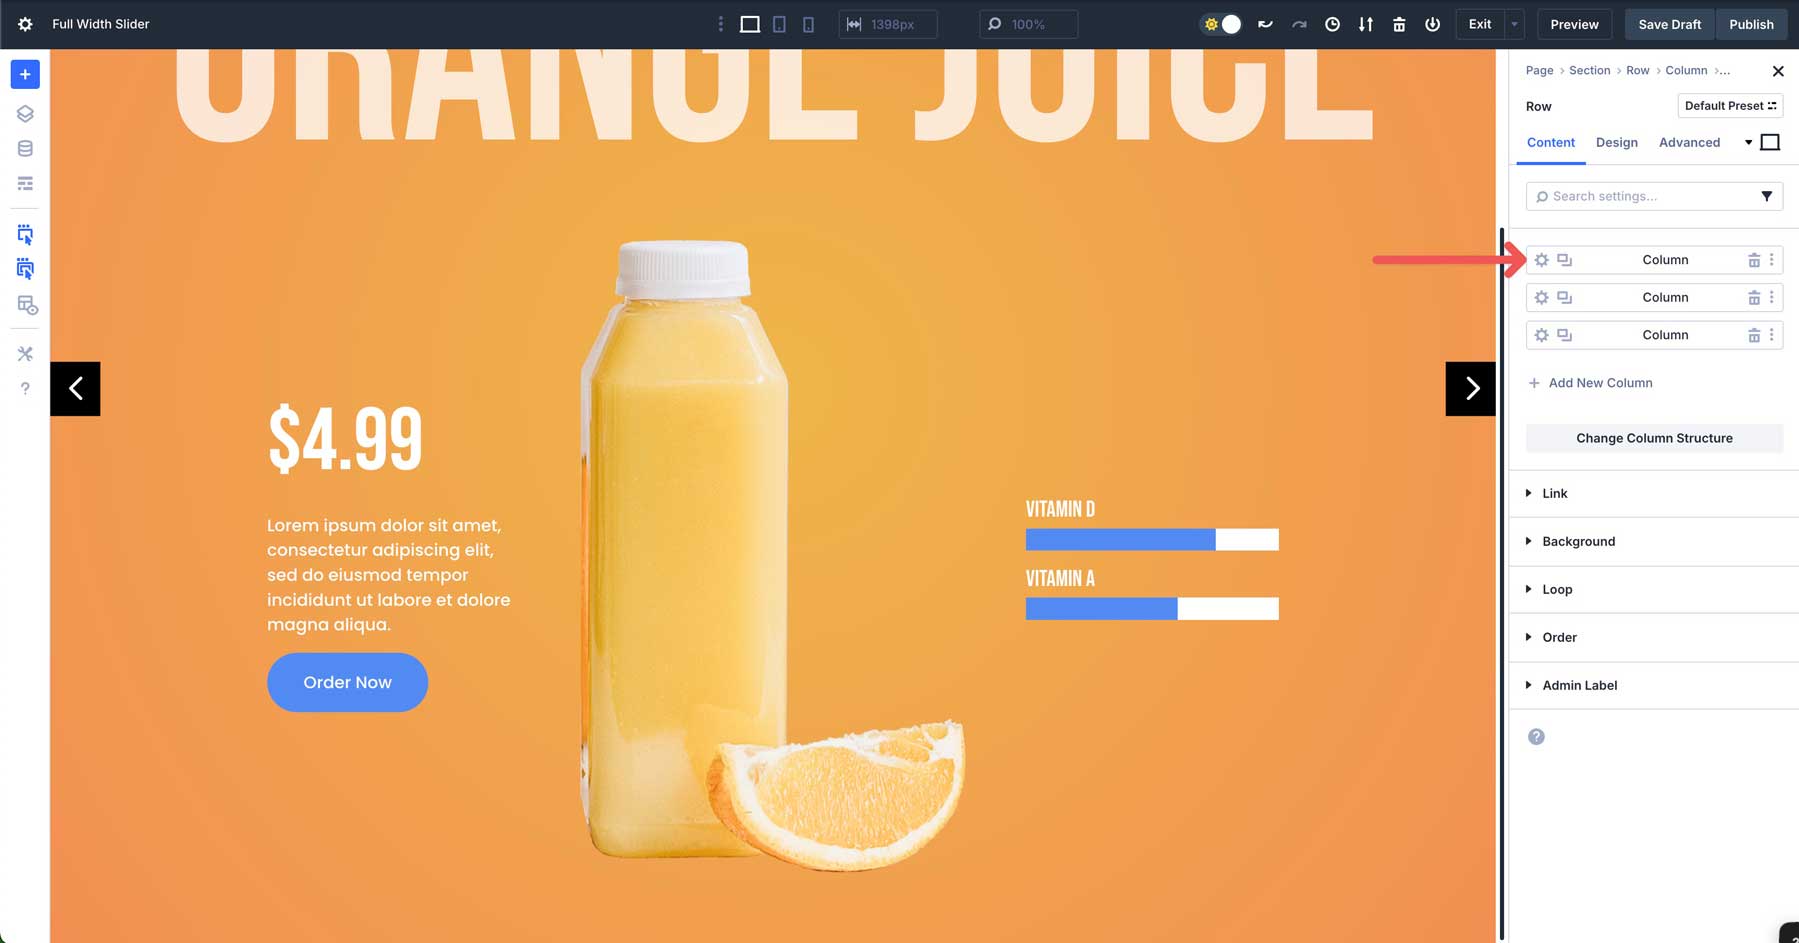
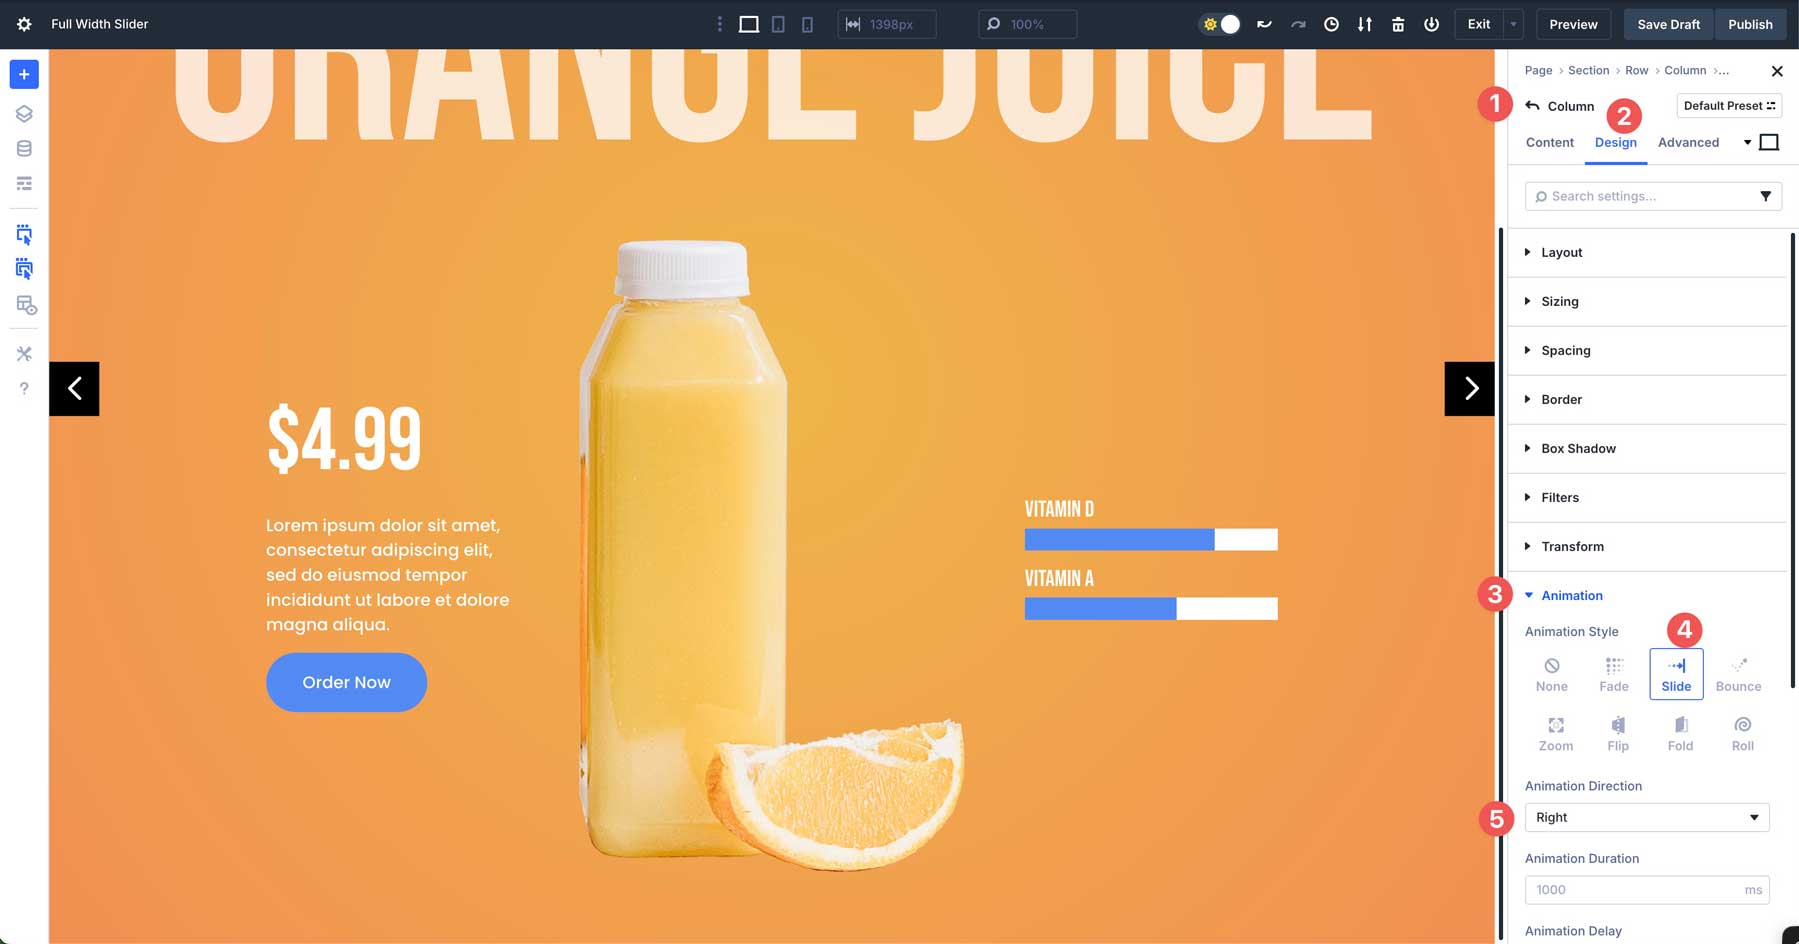
Subsequent, click on to extend the second row (three-column row). Click on into the primary column’s settings.
Click on the Design tab and scroll down to expose the Animation tab. Make a selection Slide for the Animation Taste and Proper for the Animation Course. Go away all different settings as is.
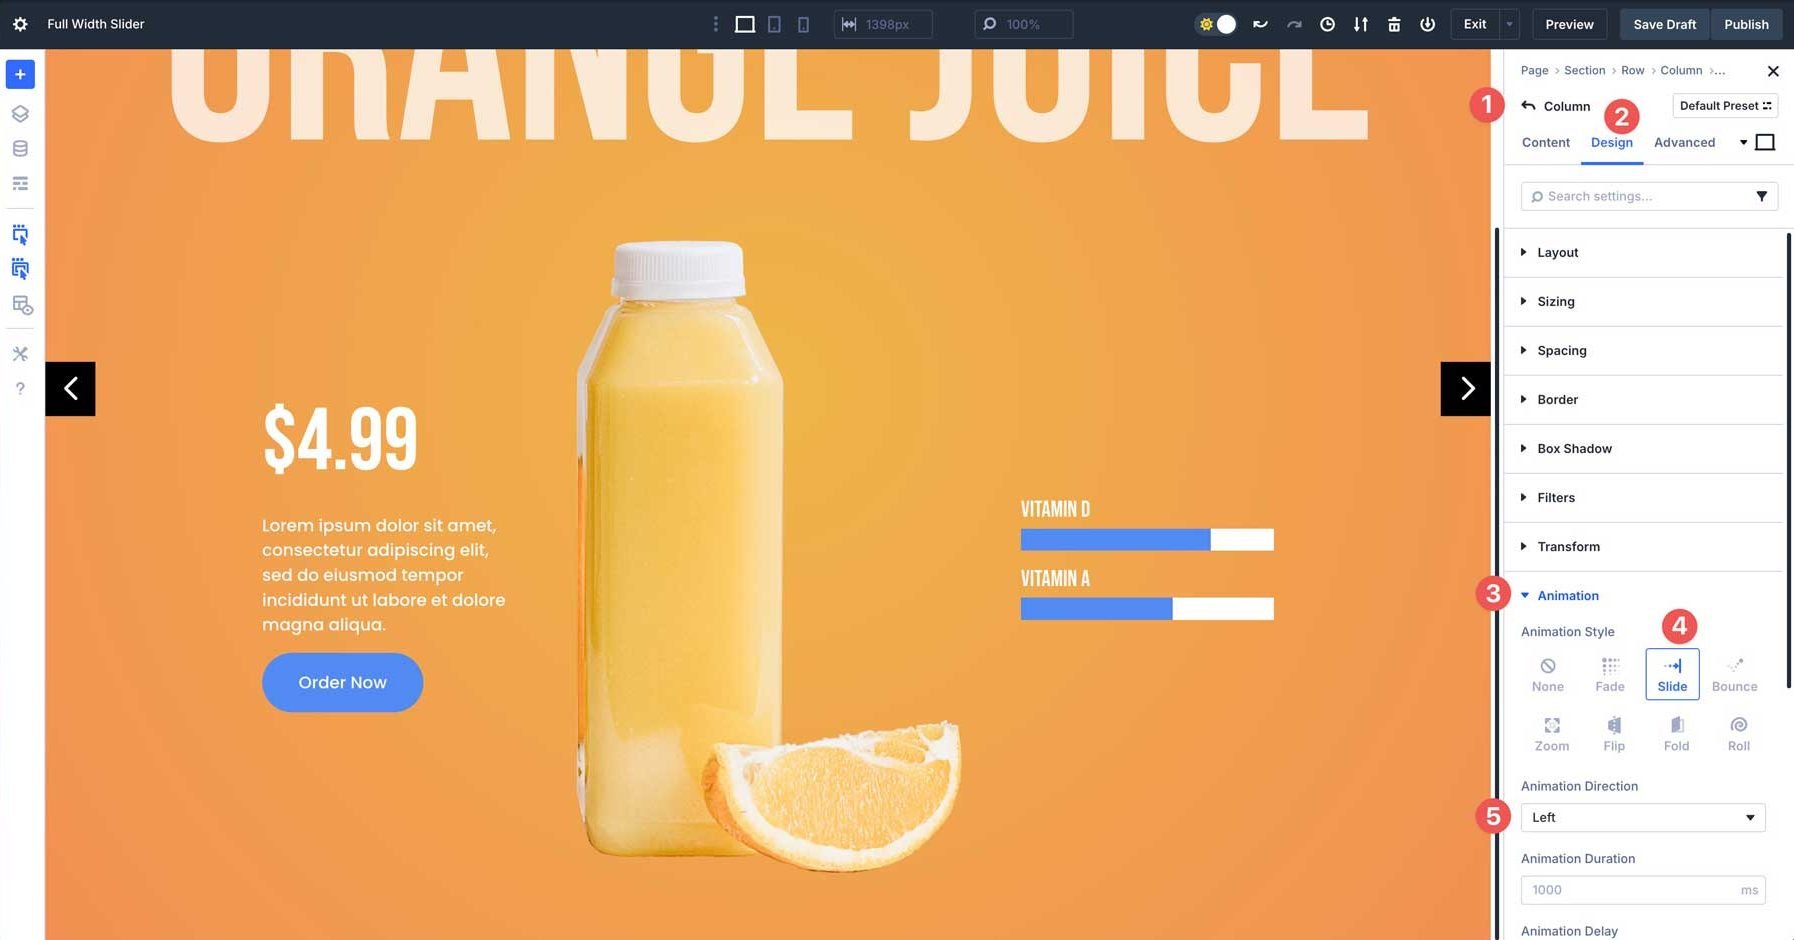
Click on again to the principle content material tab for the row. This time, make a selection the third column. Navigate to the Design tab, extend the Animation tab, and make a selection Slide > Left for the animation. Go away the opposite settings at their defaults.
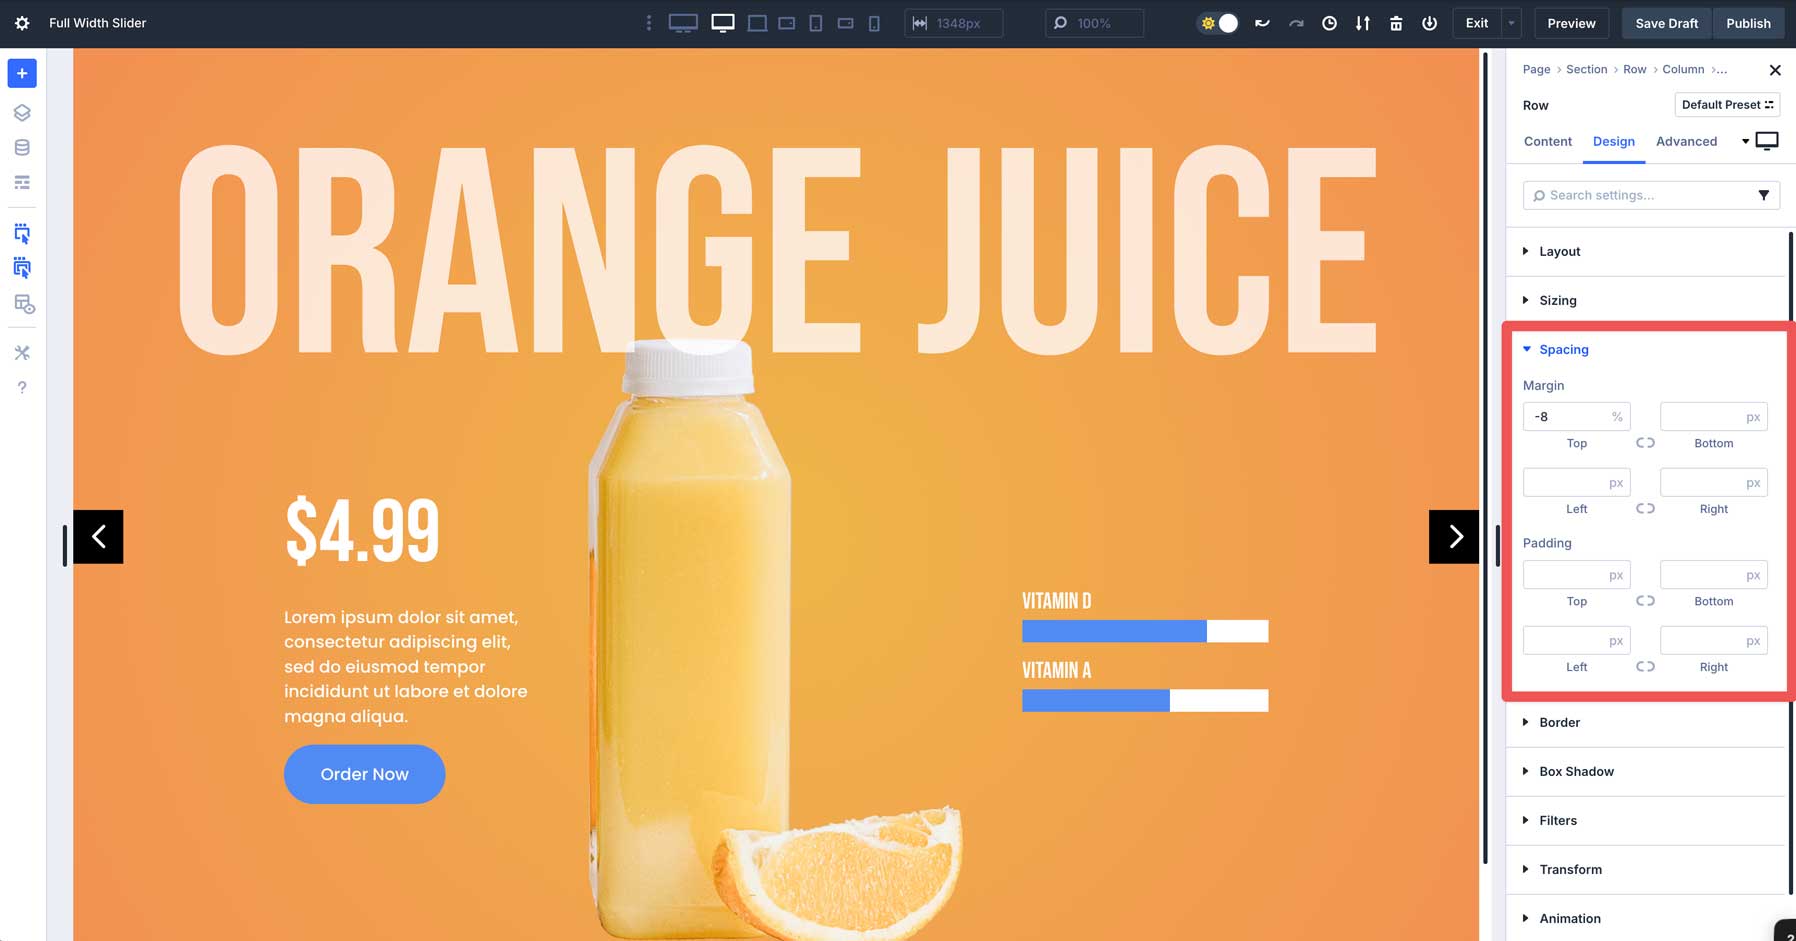
Step 7: Overlapping Rows
So as to add just a little further aptitude to the format, we’ll modify the margin at the second row to create an overlap impact. This may occasionally push the row upward, permitting it to overlap the principle Heading for a pleasing impact. Make a choice the second row within the format and navigate to the design tab. Make bigger the Spacing tab to expose the settings. Within the height margin, set the price to -8%.
Subsequent, we’ll observe a Z index price to put the second row above the first. Navigate to the Complex tab, extend the Place settings, and observe 999999 to the Z Index box.

While you preview the slider, you’ll see that the second row has been driven as much as fairly overlap the first row, developing a pleasing overlap impact.
Step 8: Take a look at Responsiveness
Prior to we reproduction the primary Team, it’s a good suggestion to check the responsiveness of the format. Use Divi 5’s Customizable Responsive Breakpoints to make any changes.
In Divi 5, there at the moment are 7 breakpoints as a substitute of Divi 4’s 3. You’ll use those breakpoints to make sure your format appears implausible on any display screen dimension. Navigate in the course of the breakpoints and make the vital tweaks prior to we reproduction the primary Team.
Probably the most perfect new options in Divi 5 is the facility to modify the order of columns for cell gadgets. It is a nice strategy to stay the design useful and efficient on all display screen sizes. Whilst in cell view, make a selection the second column of the second row in our format (3-column row).
Within the content material tab, extend the Order tab. From there, set the Show Order to -1. That may position the column with the picture on the height, permitting the picture to overlay the Heading because it does on desktop and pill perspectives.

Step 9: Duplicating Teams
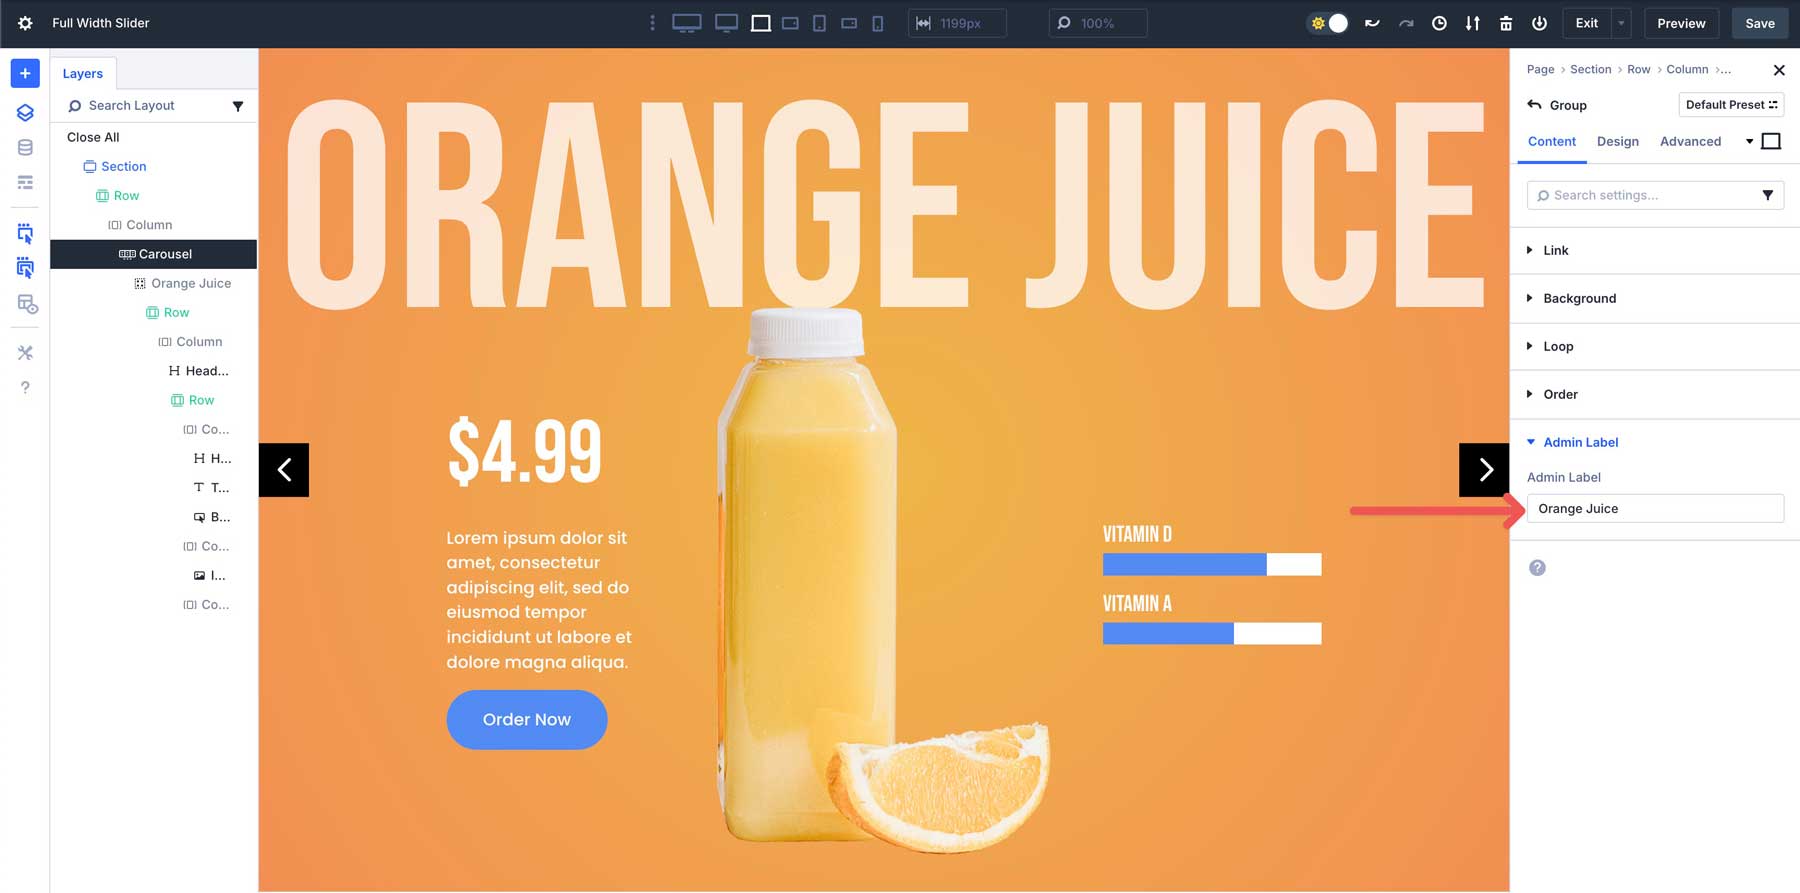
As soon as now we have the whole thing squared away, we will be able to simply reproduction the primary Team and alter the background gradient, textual content, and symbol with out repeating all of the steps. In the principle Carousel Team content material tab, click on to replicate the primary Team.
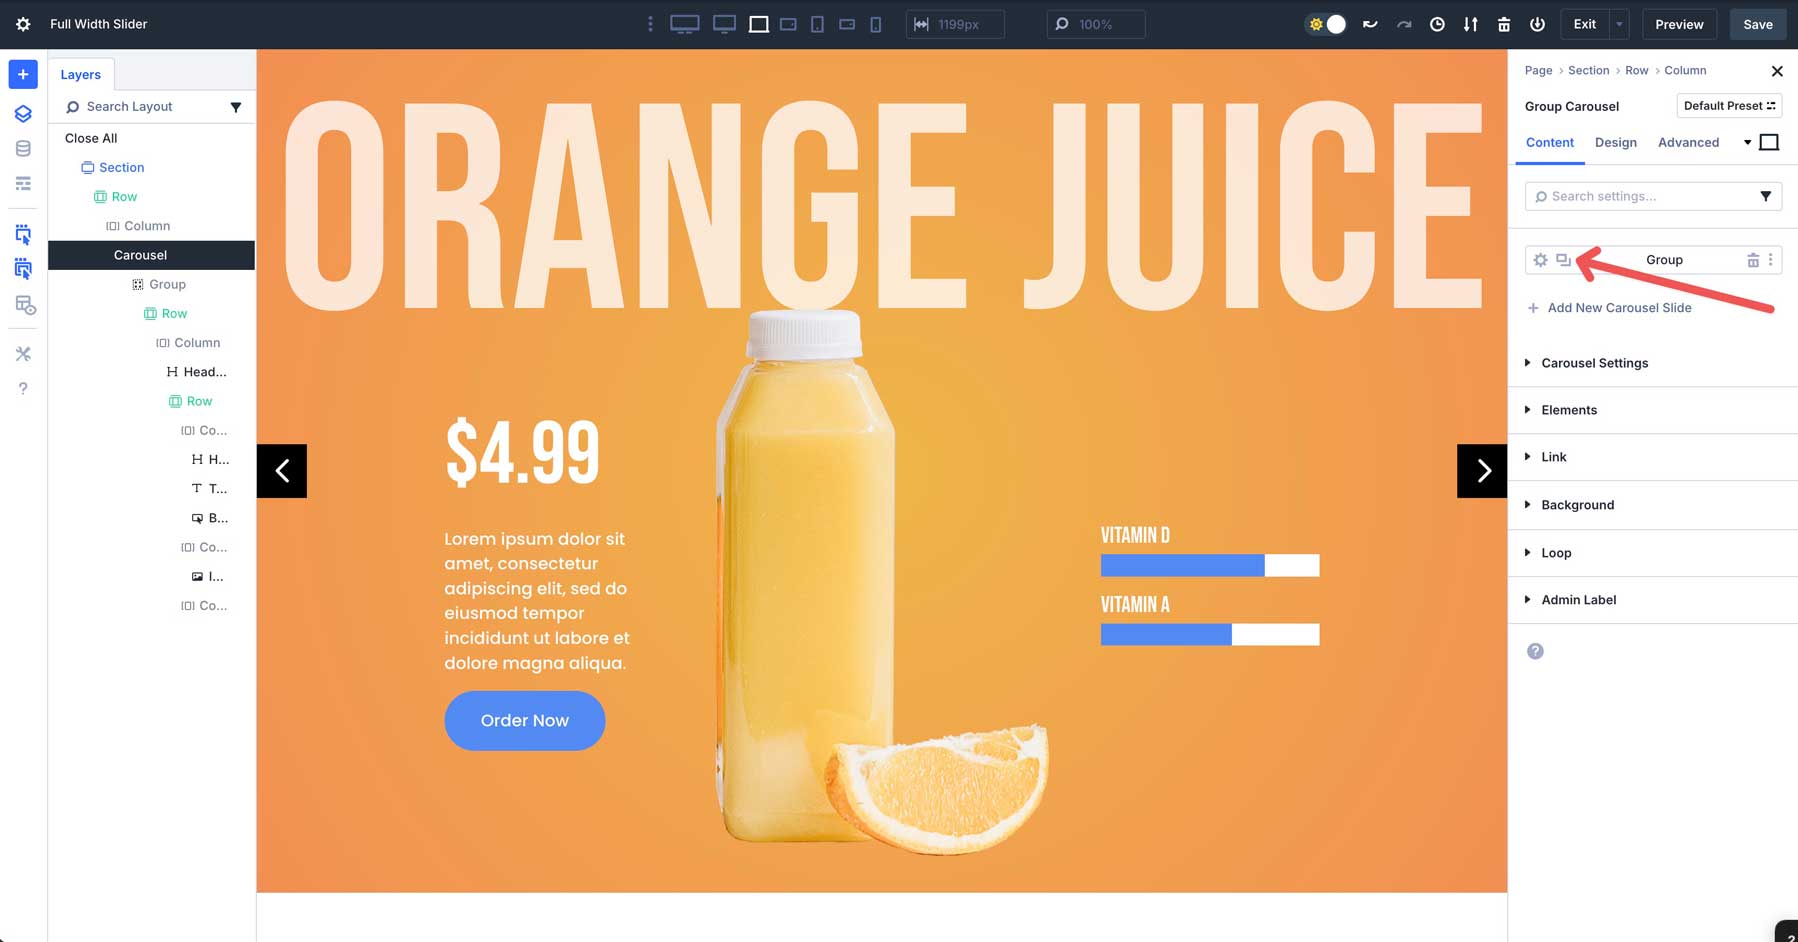
Prior to copying, assign an Admin Label to the Team to make figuring out it more straightforward.
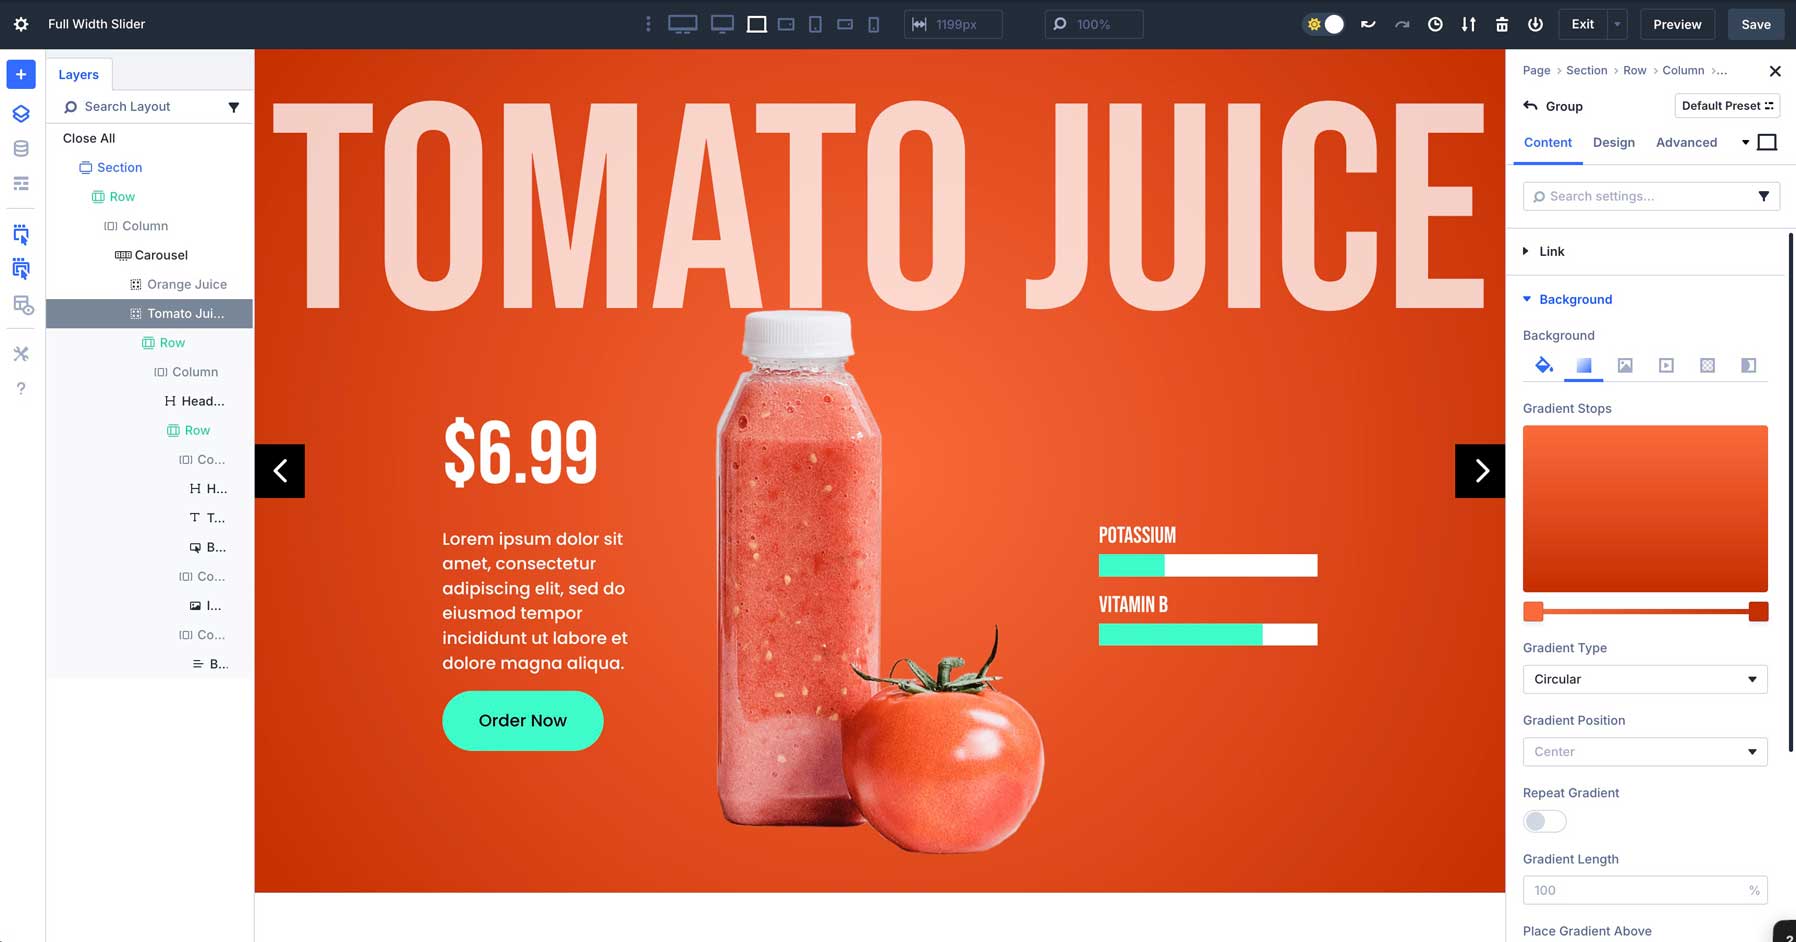
From there, trade the name, change the picture, and assign a brand new background gradient to the Team. Use #fc6a3c for the primary Gradient Slider and #c52f00 for the second one.
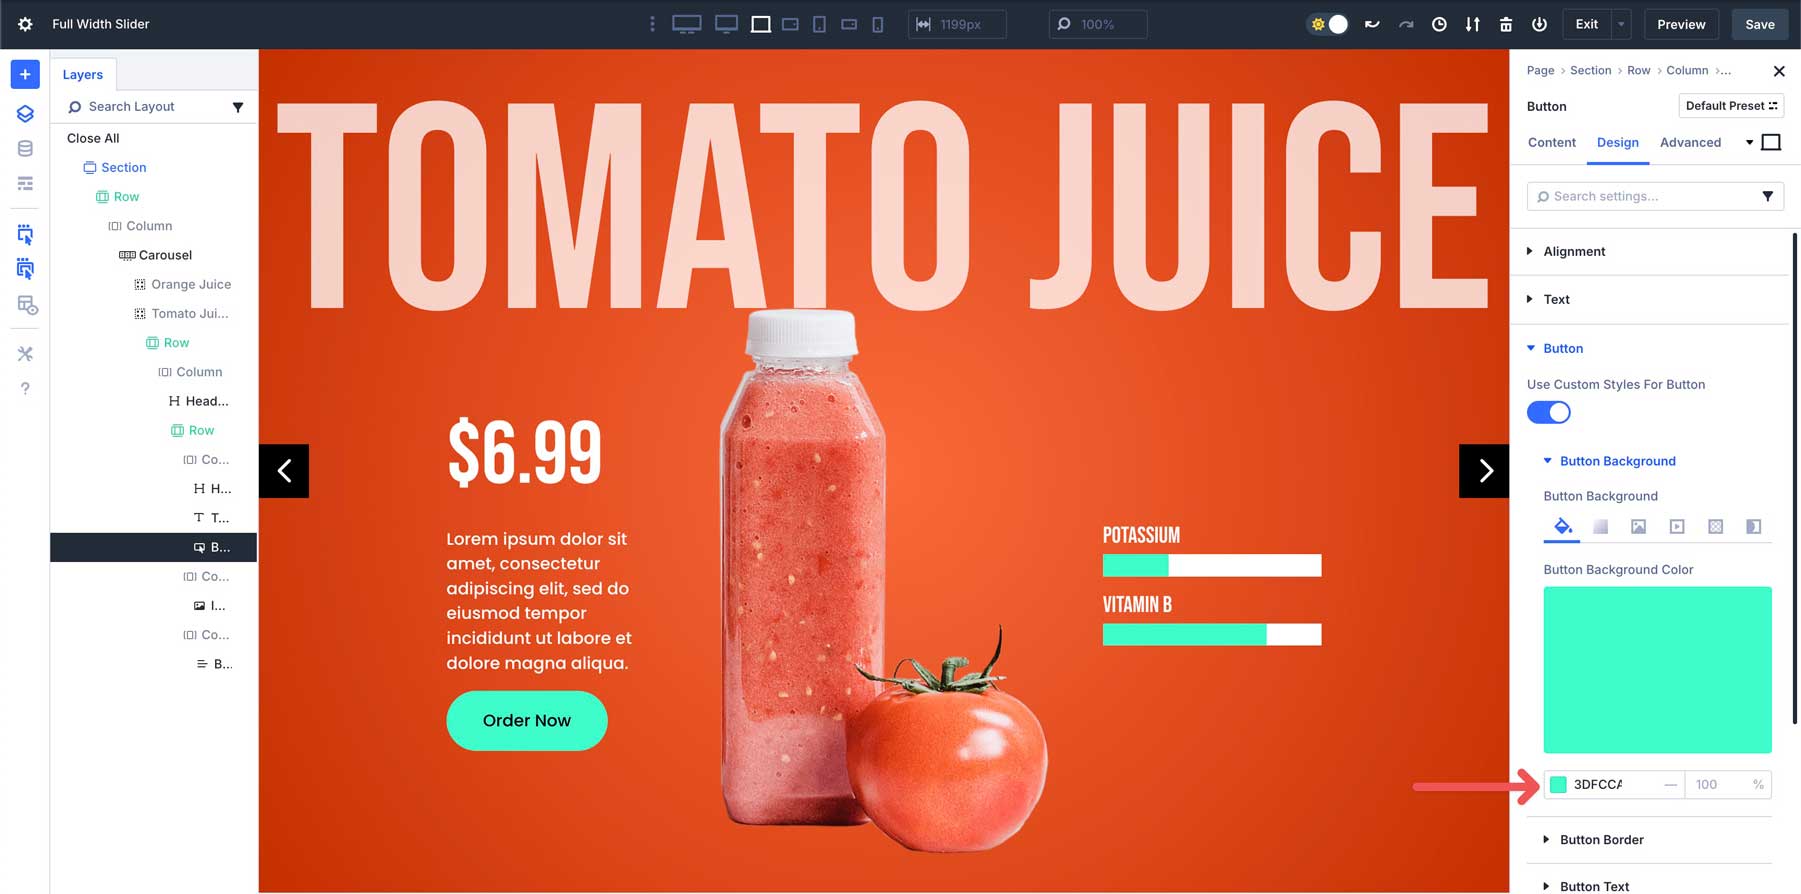
You’ll additionally need to trade the button and bar counter colours to #3dfcca and #c52f00 on hover.
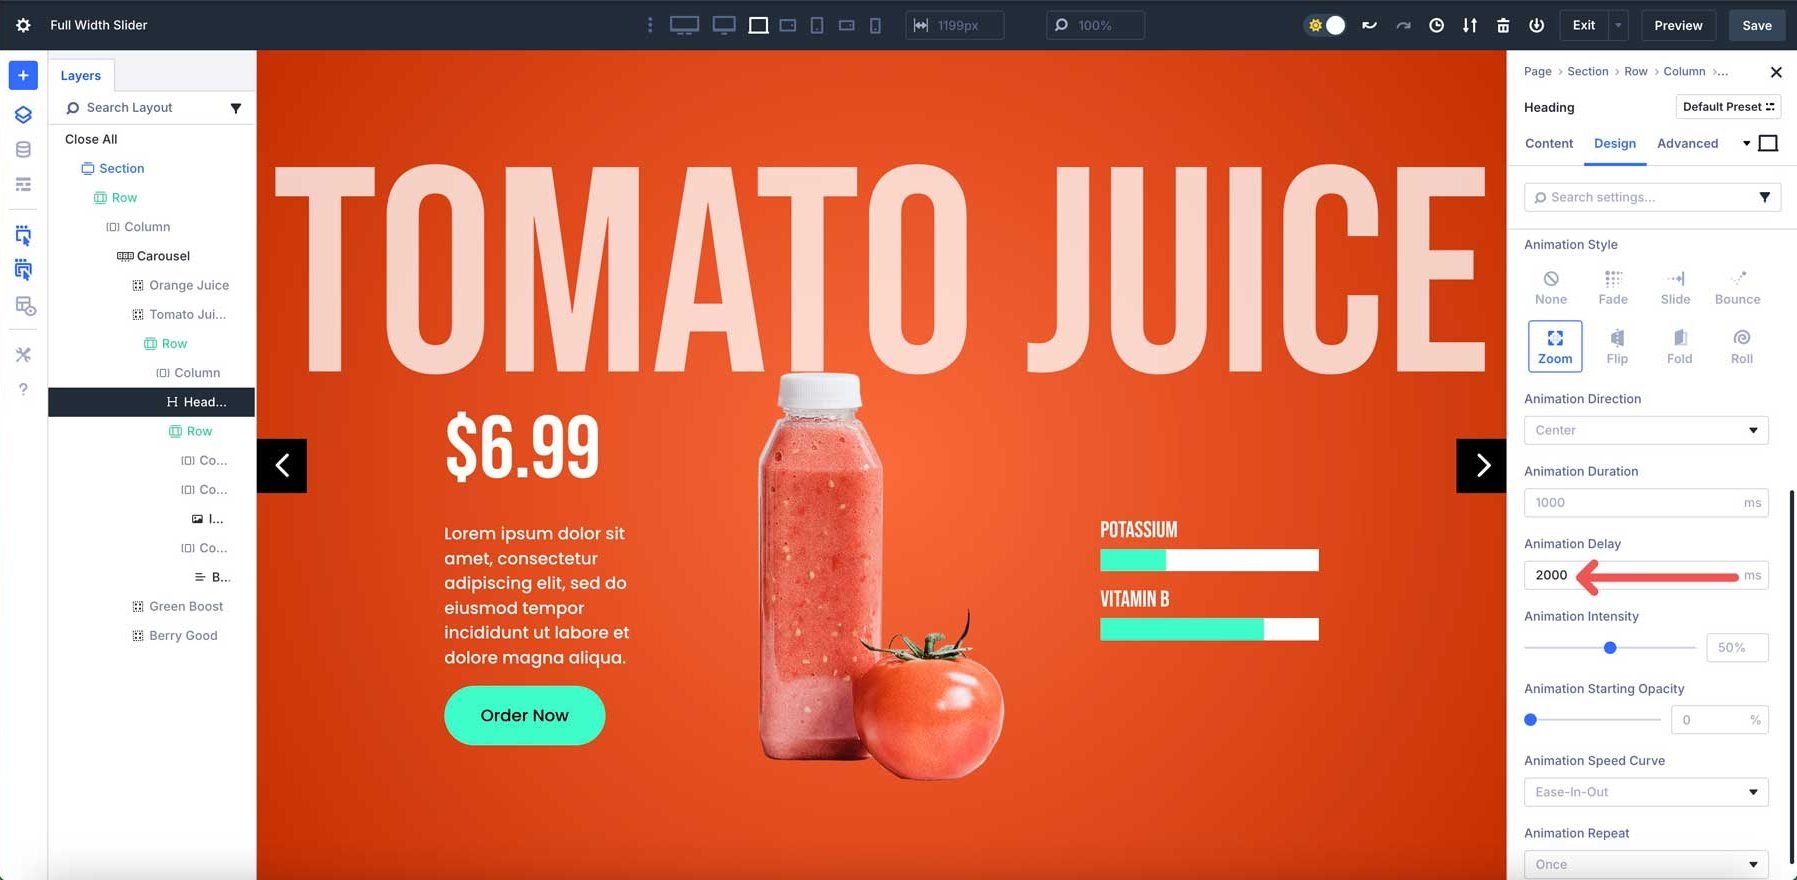
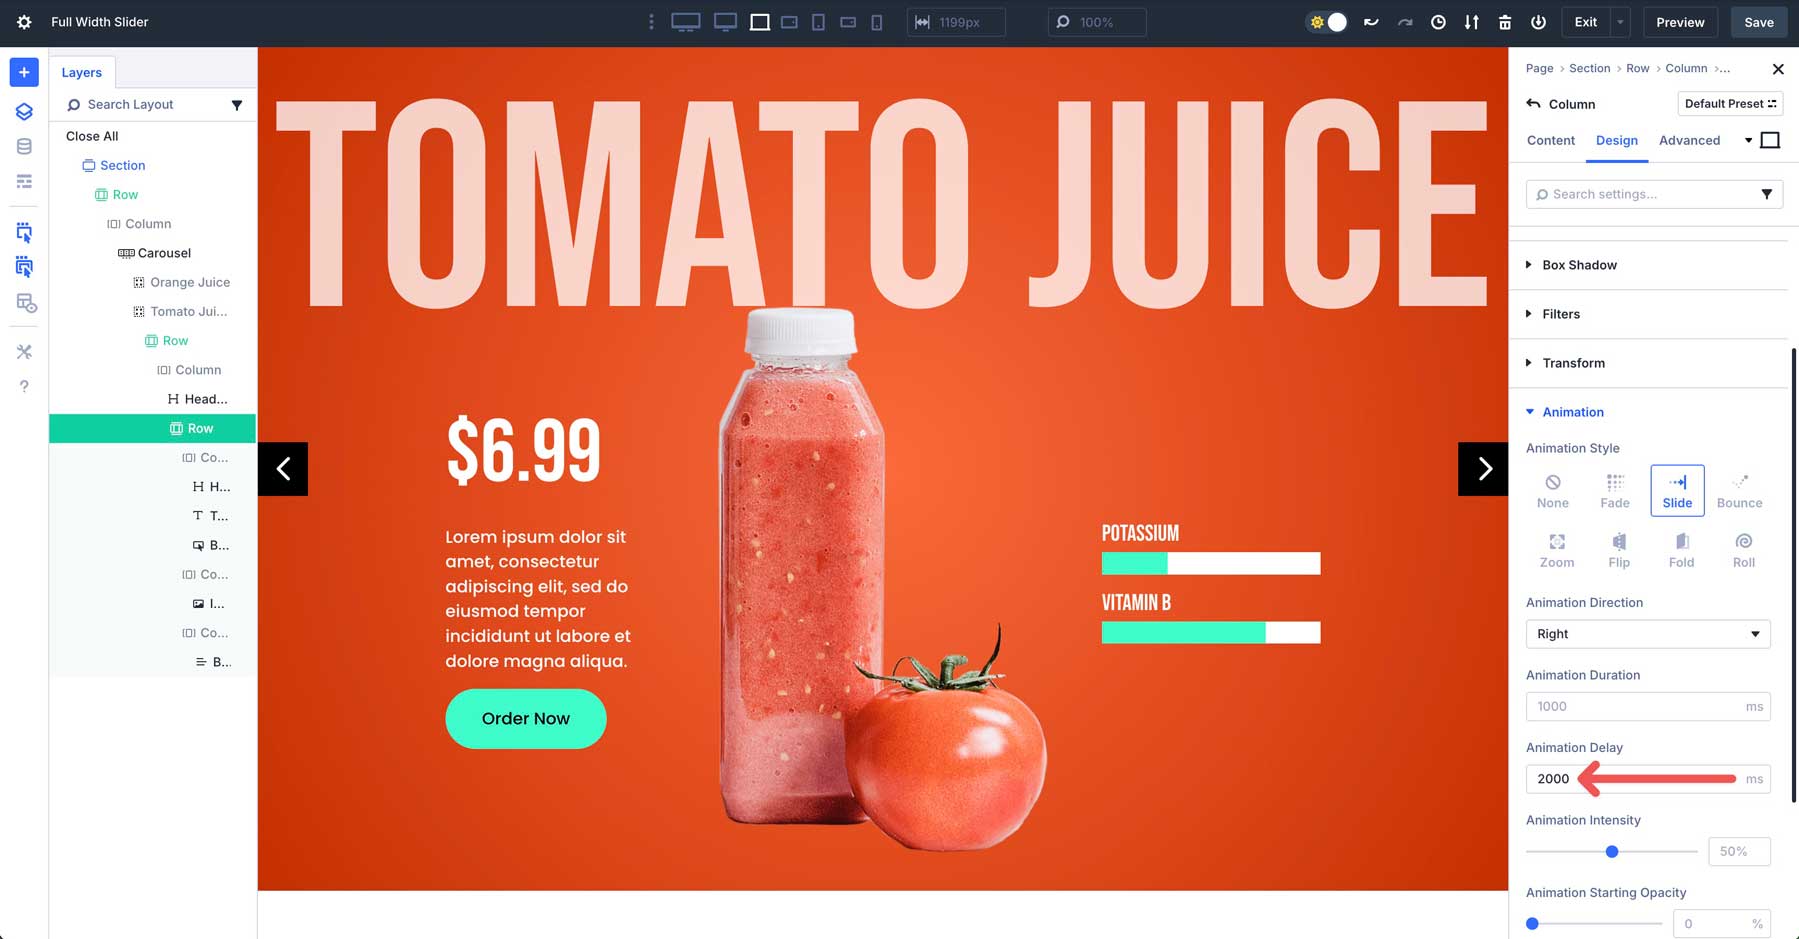
We’ll additionally wish to modify the animation timing for the second Team. This guarantees the animations gained’t load for different slides till the slider advances. In the principle Heading Module, navigate to the Design tab, extend the Animation menu, and set the Animation Prolong to 2000ms.
Do the similar for the 3-column row. Within the first and 3rd columns, set the Animation Prolong to 2000ms.
Adjustments To The 3rd Team
For the third Team, use #71b953 and #617a56 for the Background Gradient.
For the Button and Bar Counters Modules, use #ba54b3 and #654f64 for the hover shade.
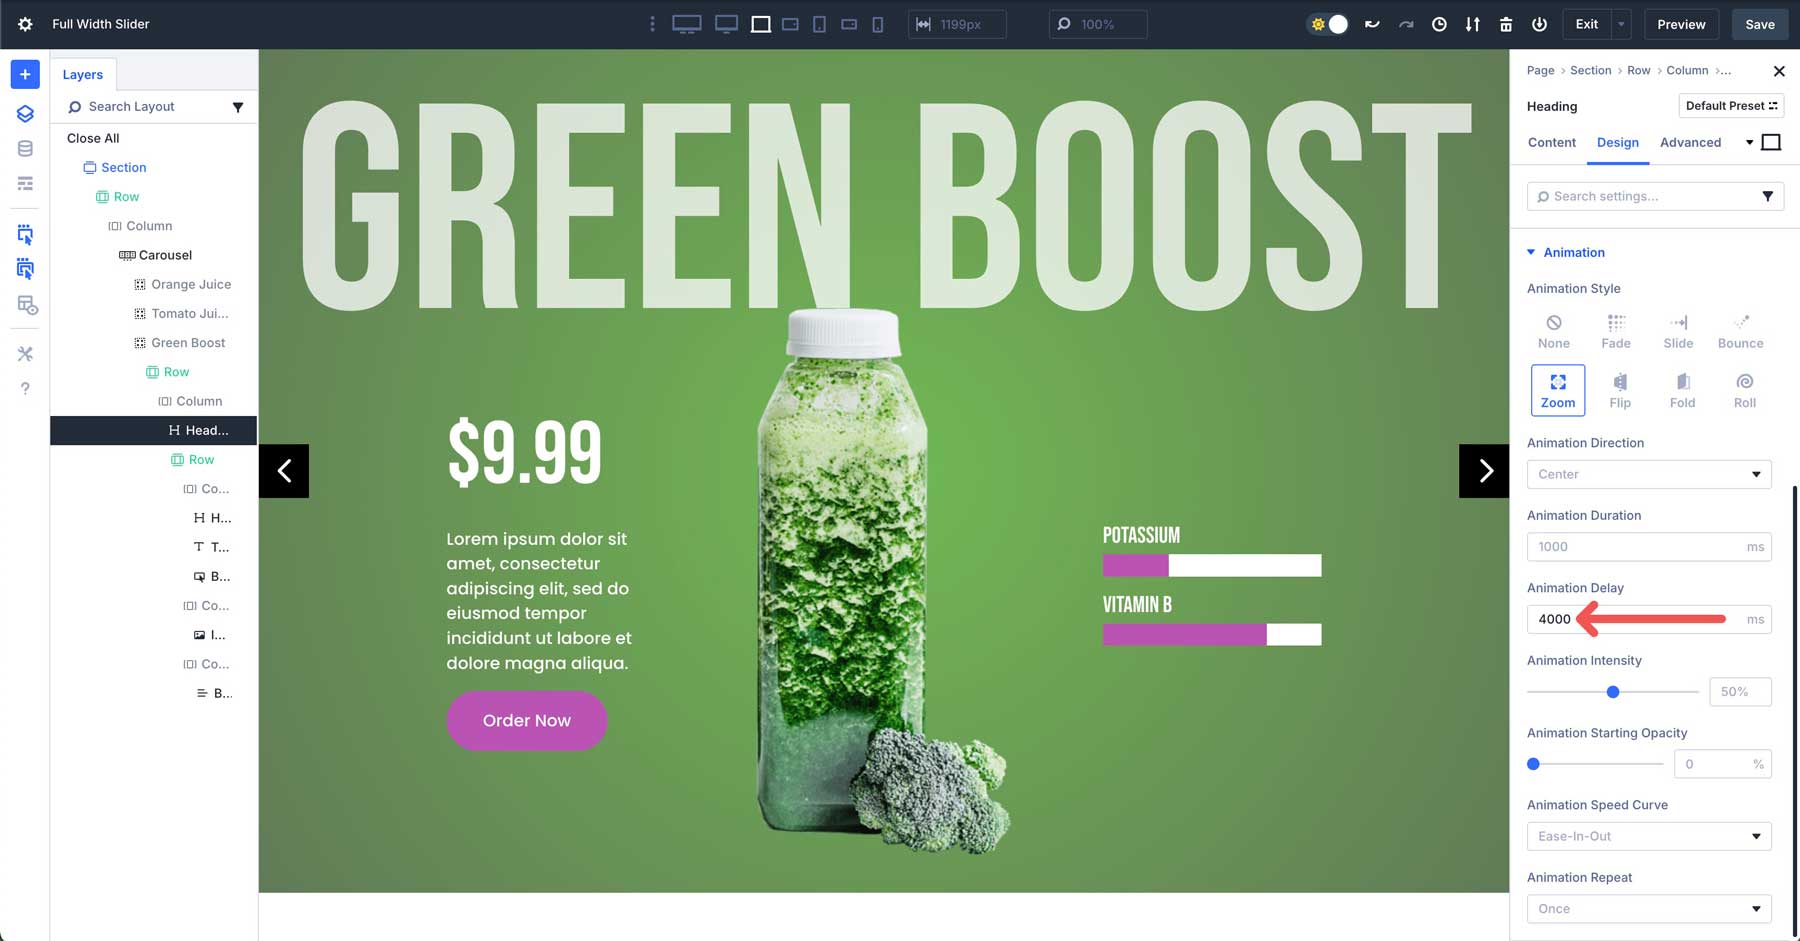
You’ll additionally wish to trade the Animation Prolong at the Heading Module and first and 3rd columns of the second row to 4000ms.
Adjustments To The Fourth Team
For the Background Gradient, use #ad52b7 and #ad52b7.
Use #83b853 and #83b853 for the Bar Counter and Button Modules.
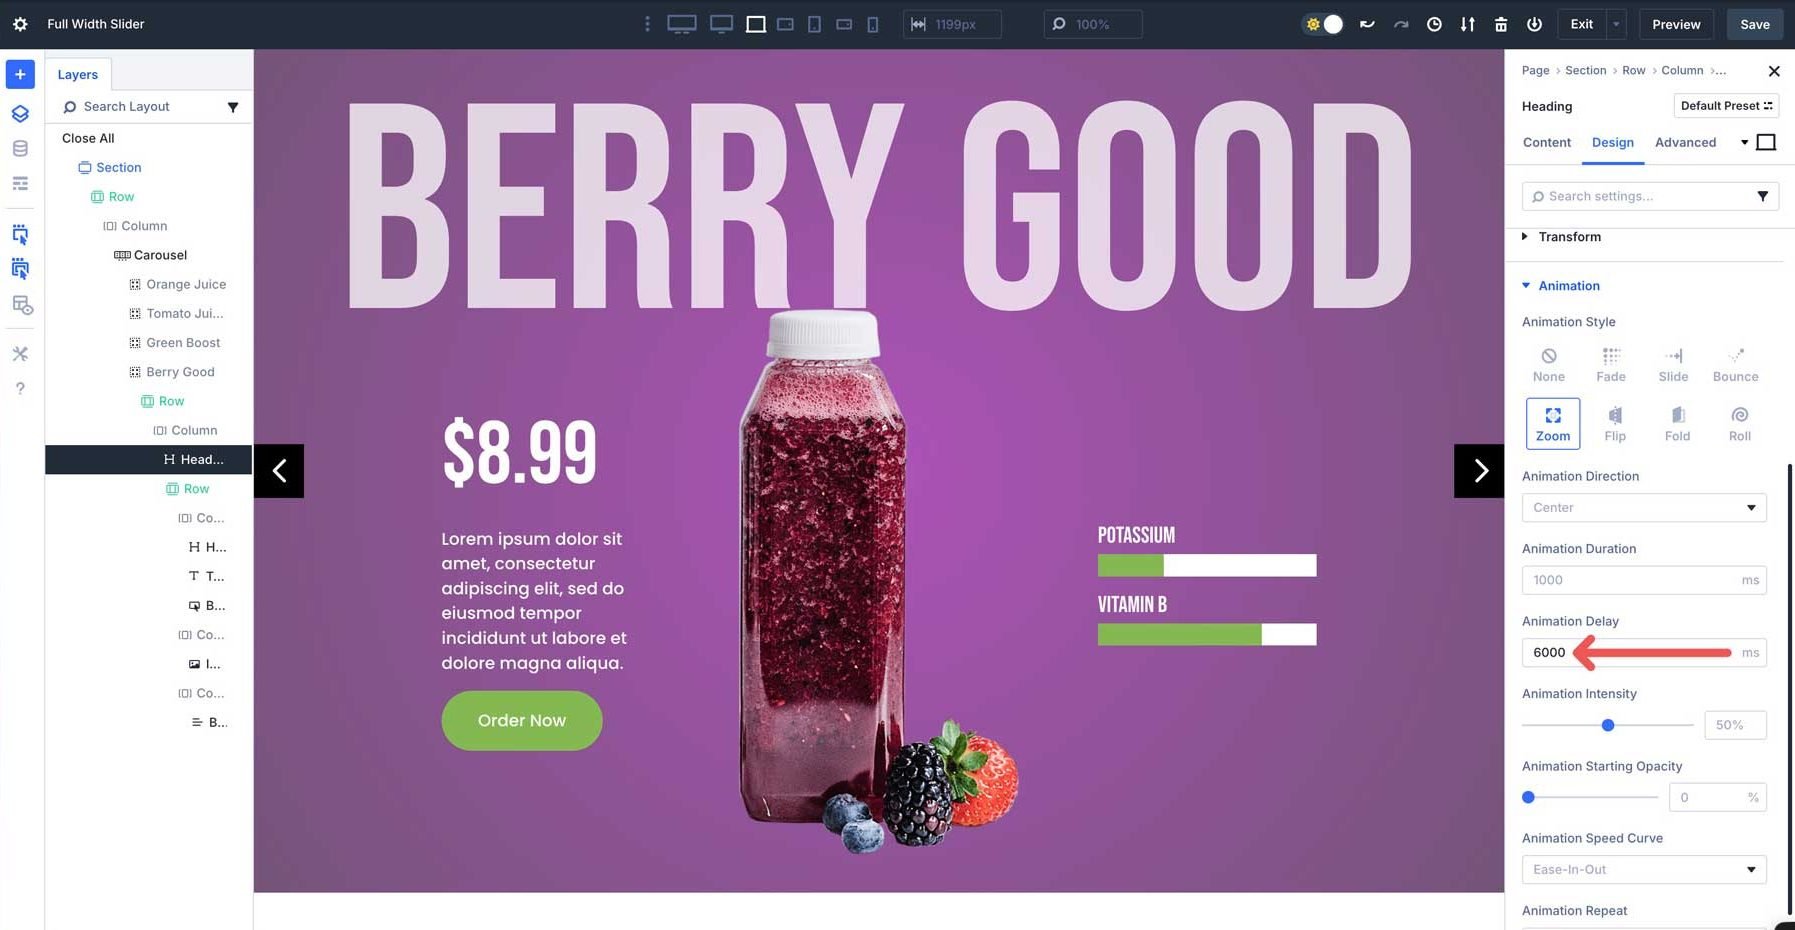
After all, set the Animation Prolong to 6000ms at the primary Heading within the Team, along side the primary and 3rd columns of the 3-column row.
Step 10: Preview And Save The Slider
The overall step is to save lots of the format and preview it to make sure no steps have been ignored. Within the Visible Builder, click on the Save button on the height right-hand nook.
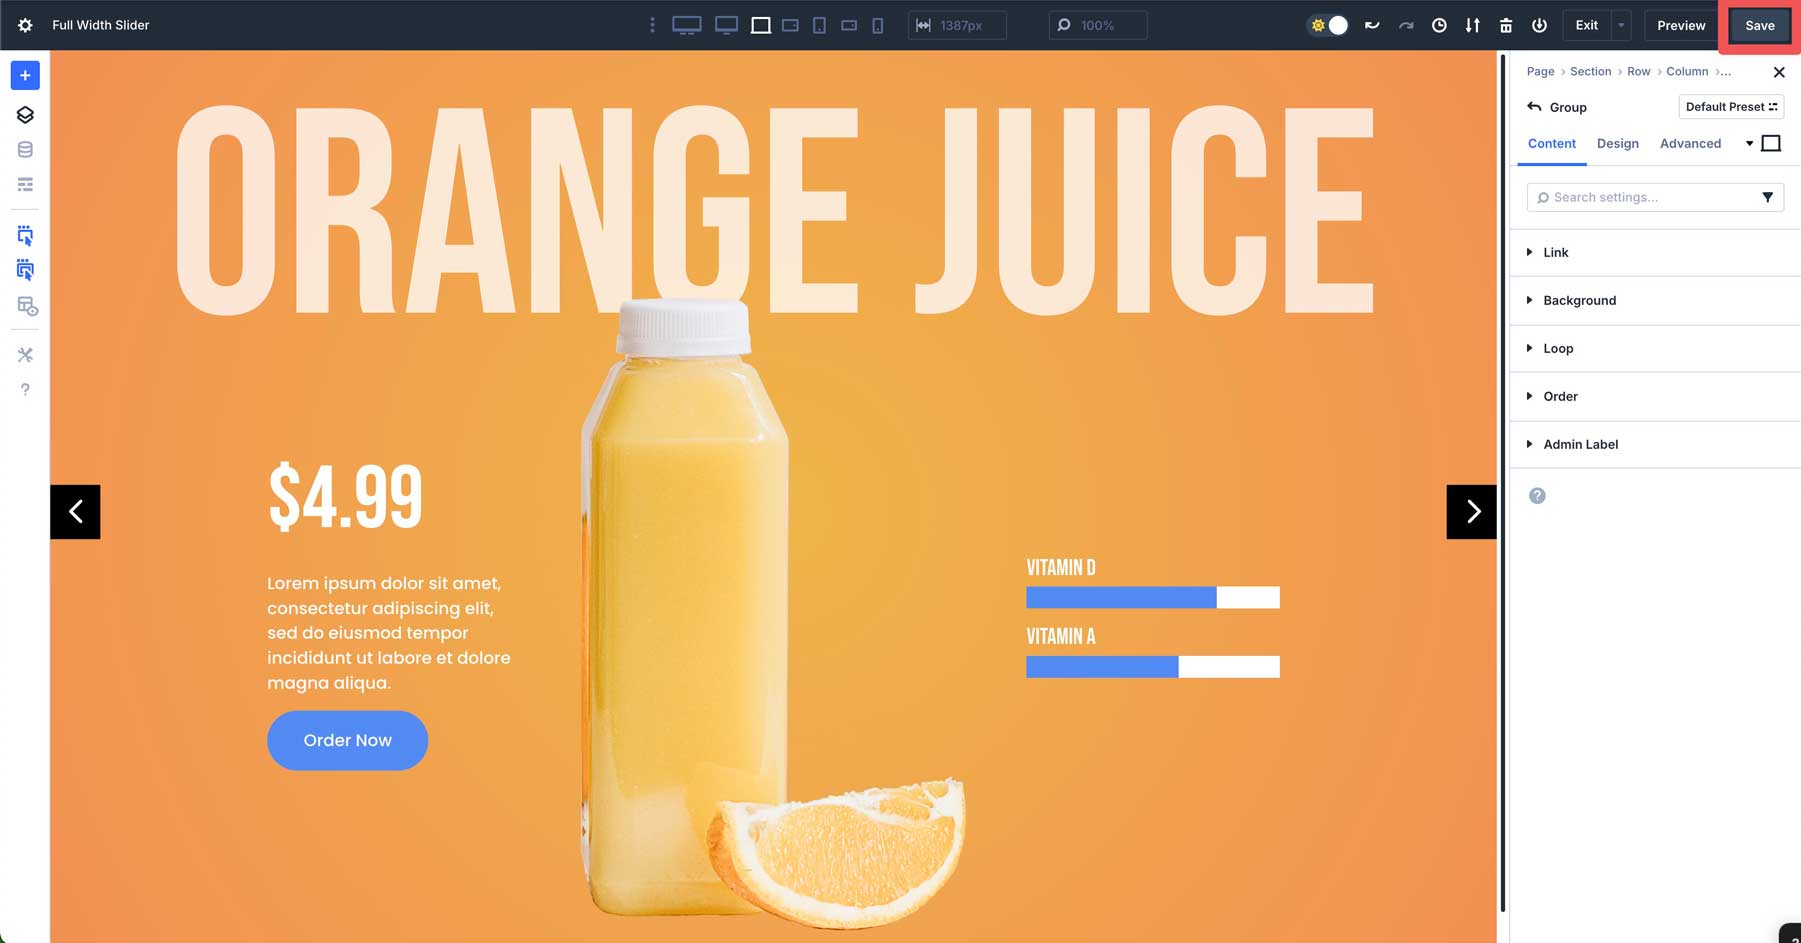
Click on the Preview button to open the format in a brand new tab.
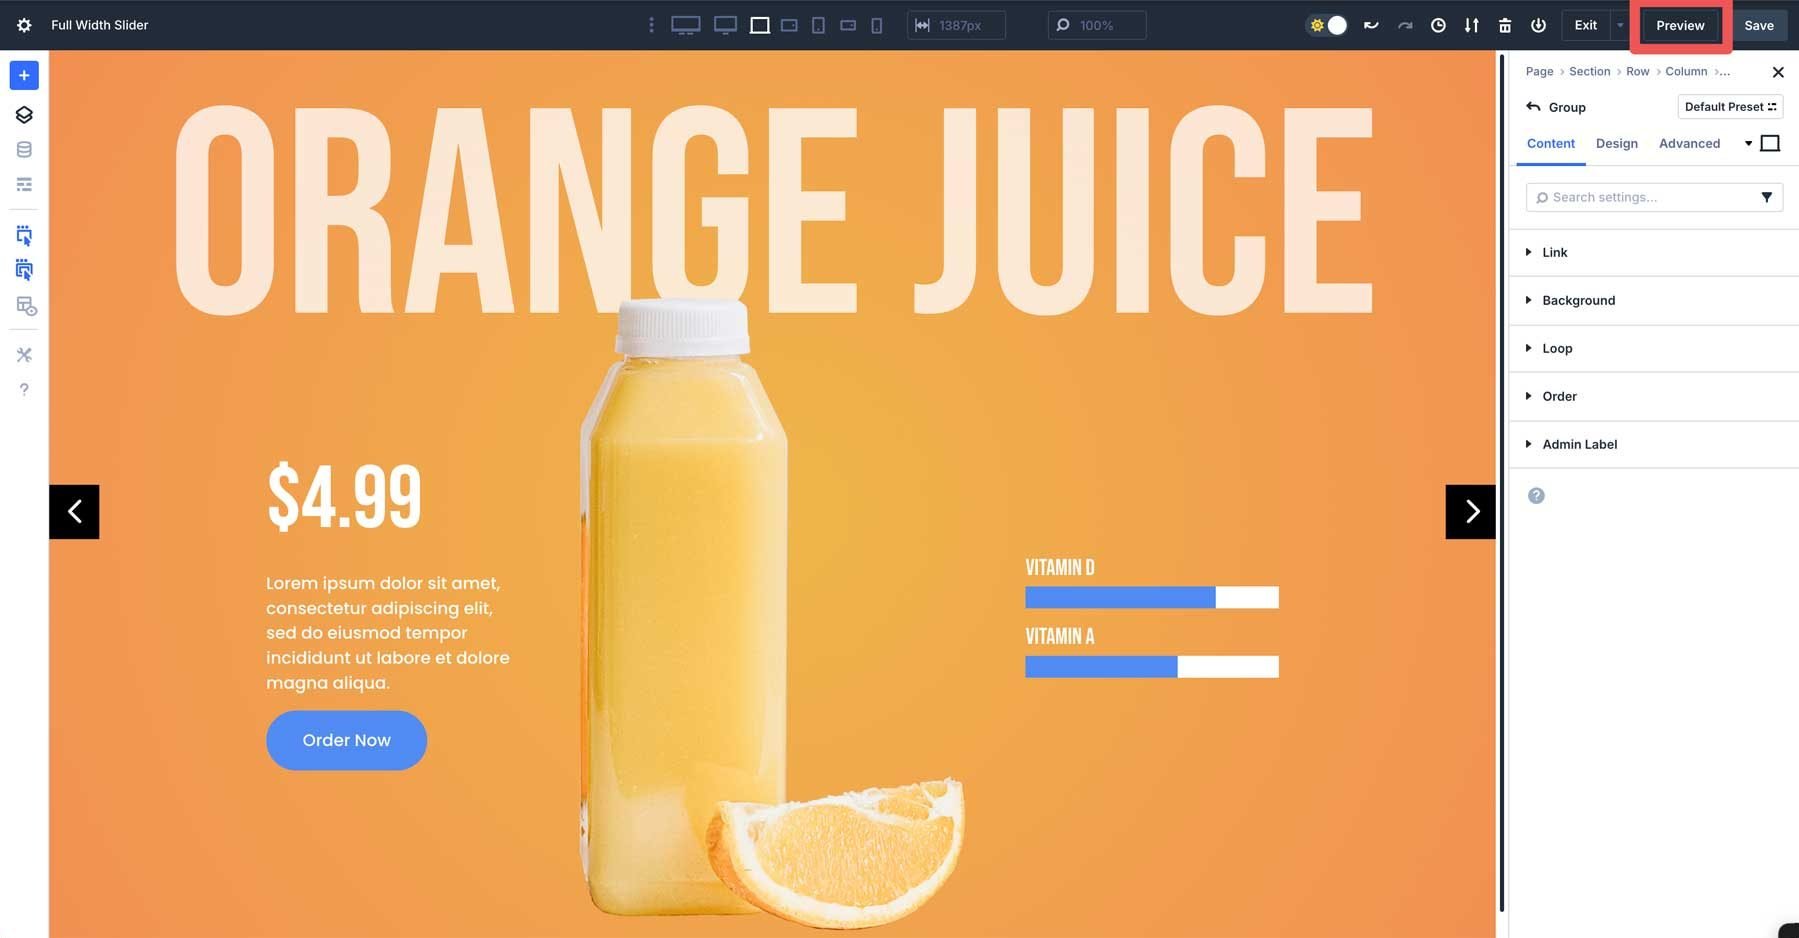
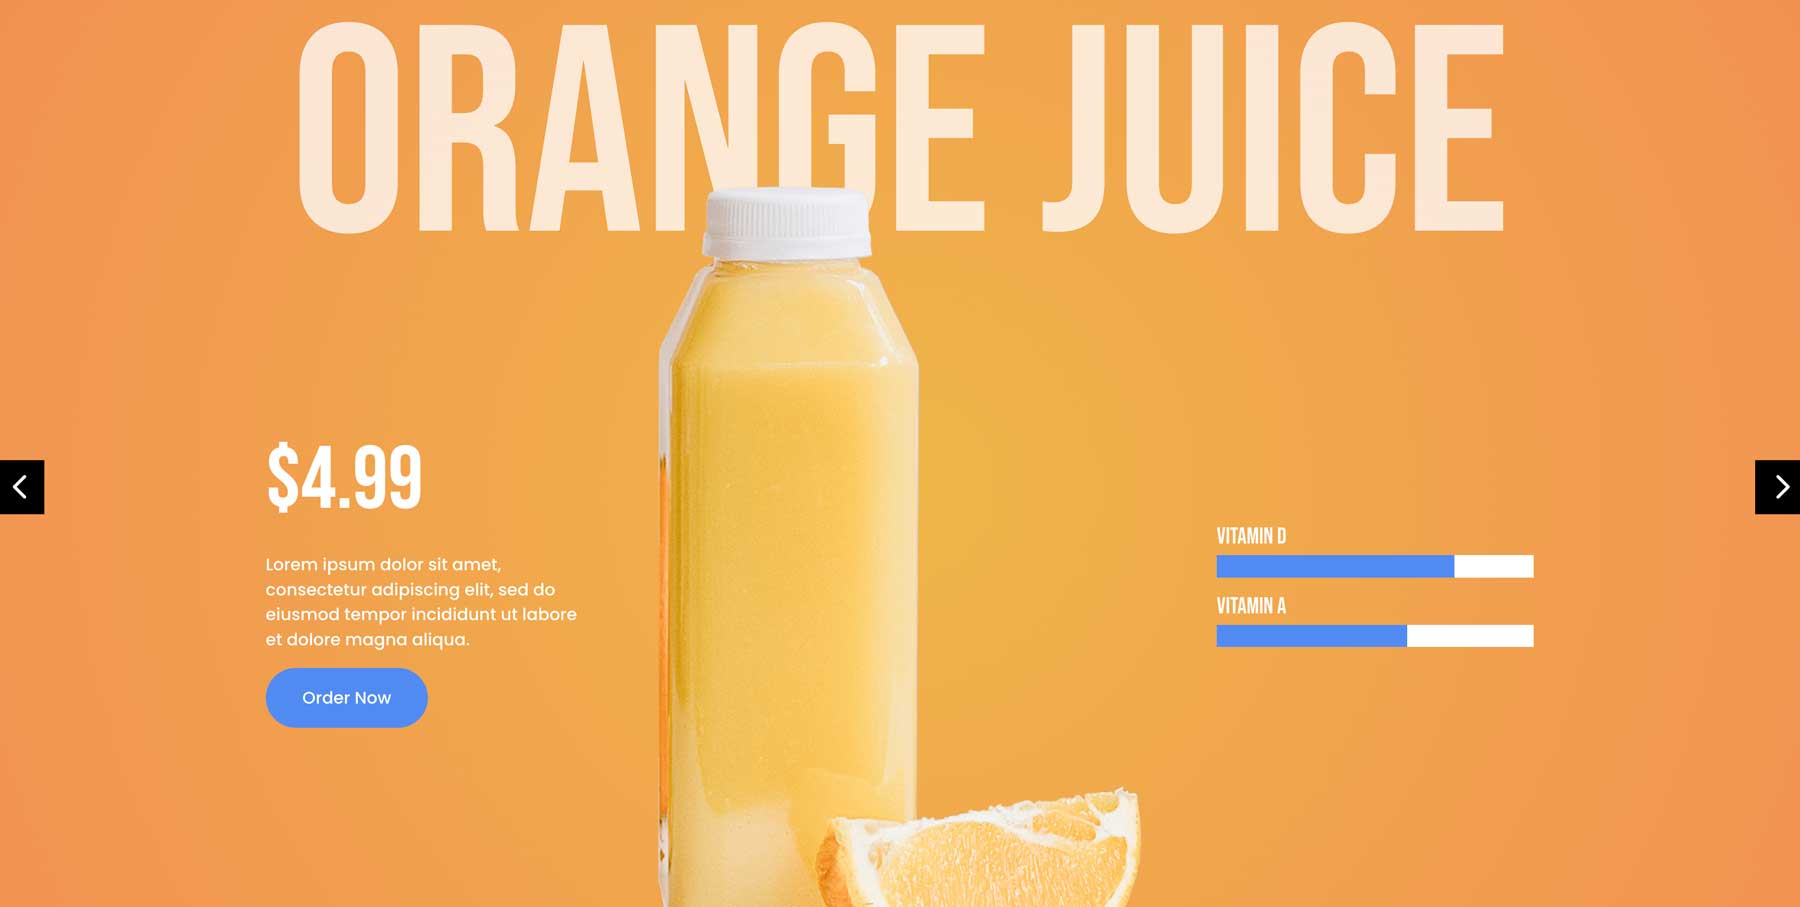
As soon as entire, your slider will have to appear to be this:
That’s it! The Team Carousel Module is a flexible new addition to Divi 5. It lets you create sliders and carousels for any mission and gives limitless customization choices.
Obtain The Fullscreen Carousel Format
If you wish to use the format we’ve recreated on this submit, you’ll be able to get admission to it in the course of the shape beneath. When you’ve downloaded and unzipped the folder, you’ll discover a JSON record. Navigate for your Divi Library to add the record so you’ll be able to get admission to and use it for any web page you construct.
@media most effective display screen and ( max-width: 767px ) {.et_bloom .et_bloom_optin_1 .carrot_edge.et_bloom_form_right .et_bloom_form_content:prior to { border-top-color: #ffffff !vital; border-left-color: clear !vital; }.et_bloom .et_bloom_optin_1 .carrot_edge.et_bloom_form_left .et_bloom_form_content:after { border-bottom-color: #ffffff !vital; border-left-color: clear !vital; }
}.et_bloom .et_bloom_optin_1 .et_bloom_form_content button { background-color: #f92c8b !vital; } .et_bloom .et_bloom_optin_1 .et_bloom_form_content .et_bloom_fields i { shade: #f92c8b !vital; } .et_bloom .et_bloom_optin_1 .et_bloom_form_content .et_bloom_custom_field_radio i:prior to { background: #f92c8b !vital; } .et_bloom .et_bloom_optin_1 .et_bloom_border_solid { border-color: #f7f9fb !vital } .et_bloom .et_bloom_optin_1 .et_bloom_form_content button { background-color: #f92c8b !vital; } .et_bloom .et_bloom_optin_1 .et_bloom_form_container h2, .et_bloom .et_bloom_optin_1 .et_bloom_form_container h2 span, .et_bloom .et_bloom_optin_1 .et_bloom_form_container h2 sturdy { font-family: “Open Sans”, Helvetica, Arial, Lucida, sans-serif; }.et_bloom .et_bloom_optin_1 .et_bloom_form_container p, .et_bloom .et_bloom_optin_1 .et_bloom_form_container p span, .et_bloom .et_bloom_optin_1 .et_bloom_form_container p sturdy, .et_bloom .et_bloom_optin_1 .et_bloom_form_container shape enter, .et_bloom .et_bloom_optin_1 .et_bloom_form_container shape button span { font-family: “Open Sans”, Helvetica, Arial, Lucida, sans-serif; } p.et_bloom_popup_input { padding-bottom: 0 !vital;}

Obtain For Unfastened
Sign up for the Divi Publication and we can e mail you a replica of without equal Divi Touchdown Web page Format Pack, plus heaps of alternative superb and unfastened Divi sources, guidelines and tips. Practice alongside and you’ll be a Divi grasp very quickly. If you’re already subscribed merely kind to your e mail cope with beneath and click on obtain to get admission to the format pack.
You have got effectively subscribed. Please take a look at your e mail cope with to substantiate your subscription and get get admission to to unfastened weekly Divi format packs!
Construct Your First Carousel In Divi 5 Lately
Making a customized fullscreen slider with Divi 5‘s Group Carousel Module opens up an international of chances for developing enticing reports for your internet sites. Following the stairs on this submit, you’ve discovered the way to use the module’s options, from complex customization choices like animations, responsive breakpoints, and interactive results. The Team Carousel Module’s flexibility lets you construct slides for the rest you’ll be able to consider, all whilst keeping up a unbroken, skilled glance throughout all display screen sizes.
Download the latest Divi 5 Public Alpha, experiment with the Team Carousel Module, and tell us what you assume within the feedback or on our social media channels.
The submit How To Build A Custom Fullscreen Slider With Divi 5 (Free Download) seemed first on Elegant Themes Blog.
Contents
- 1 Figuring out The Team Carousel Module
- 2 How To Construct A Fullscreen Slider With Divi 5’s Team Carousel Module
- 2.1 Step 1: Environment Up A New Web page
- 2.2 Step 2: Configure The Row Settings
- 2.3 Step 3: Configure The Team Carousel Settings
- 2.4 Step 4: Taste The First Team
- 2.5 Step 5: Upload Content material To The First Team
- 2.6 Step 6: Upload Animations
- 2.7 Step 7: Overlapping Rows
- 2.8 Step 8: Take a look at Responsiveness
- 2.9 Step 9: Duplicating Teams
- 2.10 Step 10: Preview And Save The Slider
- 3 Obtain The Fullscreen Carousel Format
- 4 Obtain For Unfastened
- 5 You have got effectively subscribed. Please take a look at your e mail cope with to substantiate your subscription and get get admission to to unfastened weekly Divi format packs!
- 6 Construct Your First Carousel In Divi 5 Lately
- 7 31 Ways You Can Use AI Today (2023 Guide)
- 8 How you can Create a Staff in Gmail
- 9 WP FixAll Vs. [Competing Plugin] Comparability » Unlocking WordPress Safety:…

0 Comments