

Two of Divi 5‘s newest options, Interactions and the Group Carousel module, be offering a option to create interactive, sliding carousels that can assist you show off merchandise, workforce contributors, testimonials, or the rest you’ll be able to believe.
On this submit, we’ll display you the way to create an interactive content material expose carousel that mixes those two options to spice up engagement, stay guests to your website online longer, and carry their surfing revel in. Let’s dive in!
What Is The Crew Carousel Module?
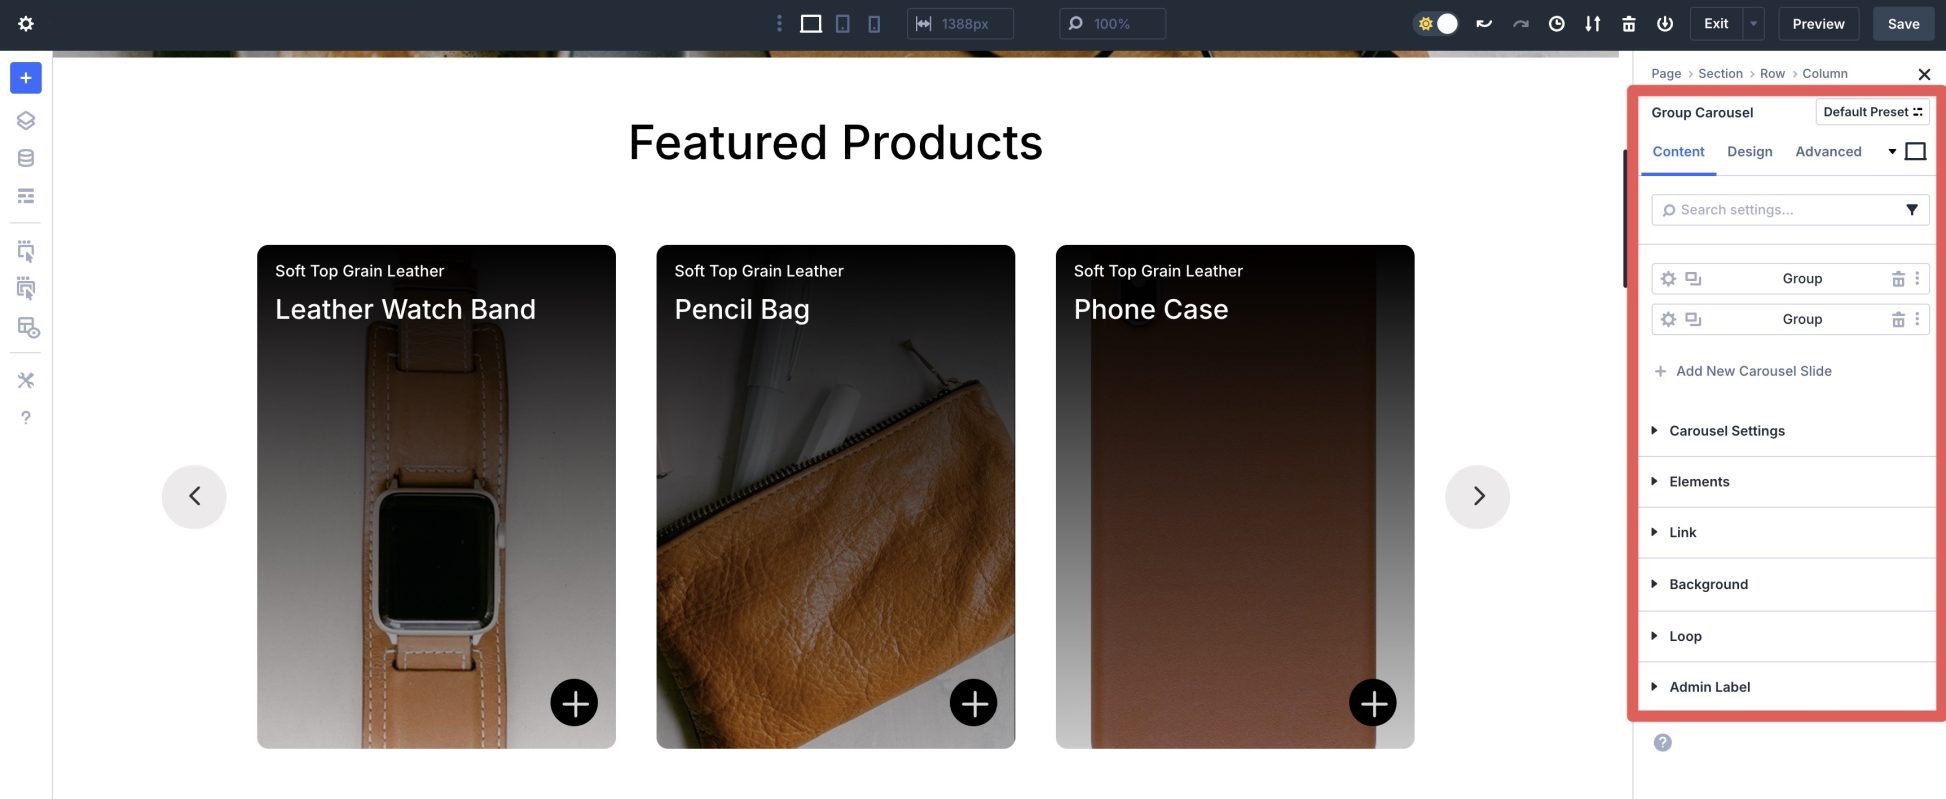
The Group Carousel module means that you can construct dynamic, responsive carousels or sliders for any content material kind, from static pictures to dynamic posts pulled in by means of the Loop Builder. With integrated navigation choices like arrows and dots, customizable layouts, and mobile-friendly responsive gear, the module supplies a very good option to create enticing carousels and sliders.
Its integration with Divi’s design settings and intensive styling features let you create complex results, akin to animated transitions or hover-based triggers, making it a formidable device for developing enticing, interactive designs.
- What It Is: A versatile module for developing carousels and sliders of teams — both static or dynamic with the Loop Builder — supporting navigational controls, transition velocity, and collection of slides to show.
- Key Settings: More than one format choices, together with full-width, multi-column, and integration with options like Nested Rows.
- Customization Choices: Taste slides, together with colours, spacing, background choices, hover results, and transitions, and upload customized content material in keeping with slide. It additionally absolutely integrates with Design Variables.
- Pair With Interactions: Simply create content material finds by the use of a cause.
What Is Divi 5 Interactions?
Divi 5 Interactions is a standout function that permits customers to create dynamic, no-code interactivity by means of including triggers, results, and animations to any component inside the Visible Builder. The program means that you can outline triggers, akin to clicks, viewport input or go out, or mouse over results, that start up results like toggling visibility for content material finds, switching taste presets, or making use of animations on hover. Being able to goal explicit modules, rows, or sections, Interactions permit exact keep watch over over user-driven reports.
Key Parts of Interactions
There are 3 primary portions to Interactions. Right here’s how they paintings:
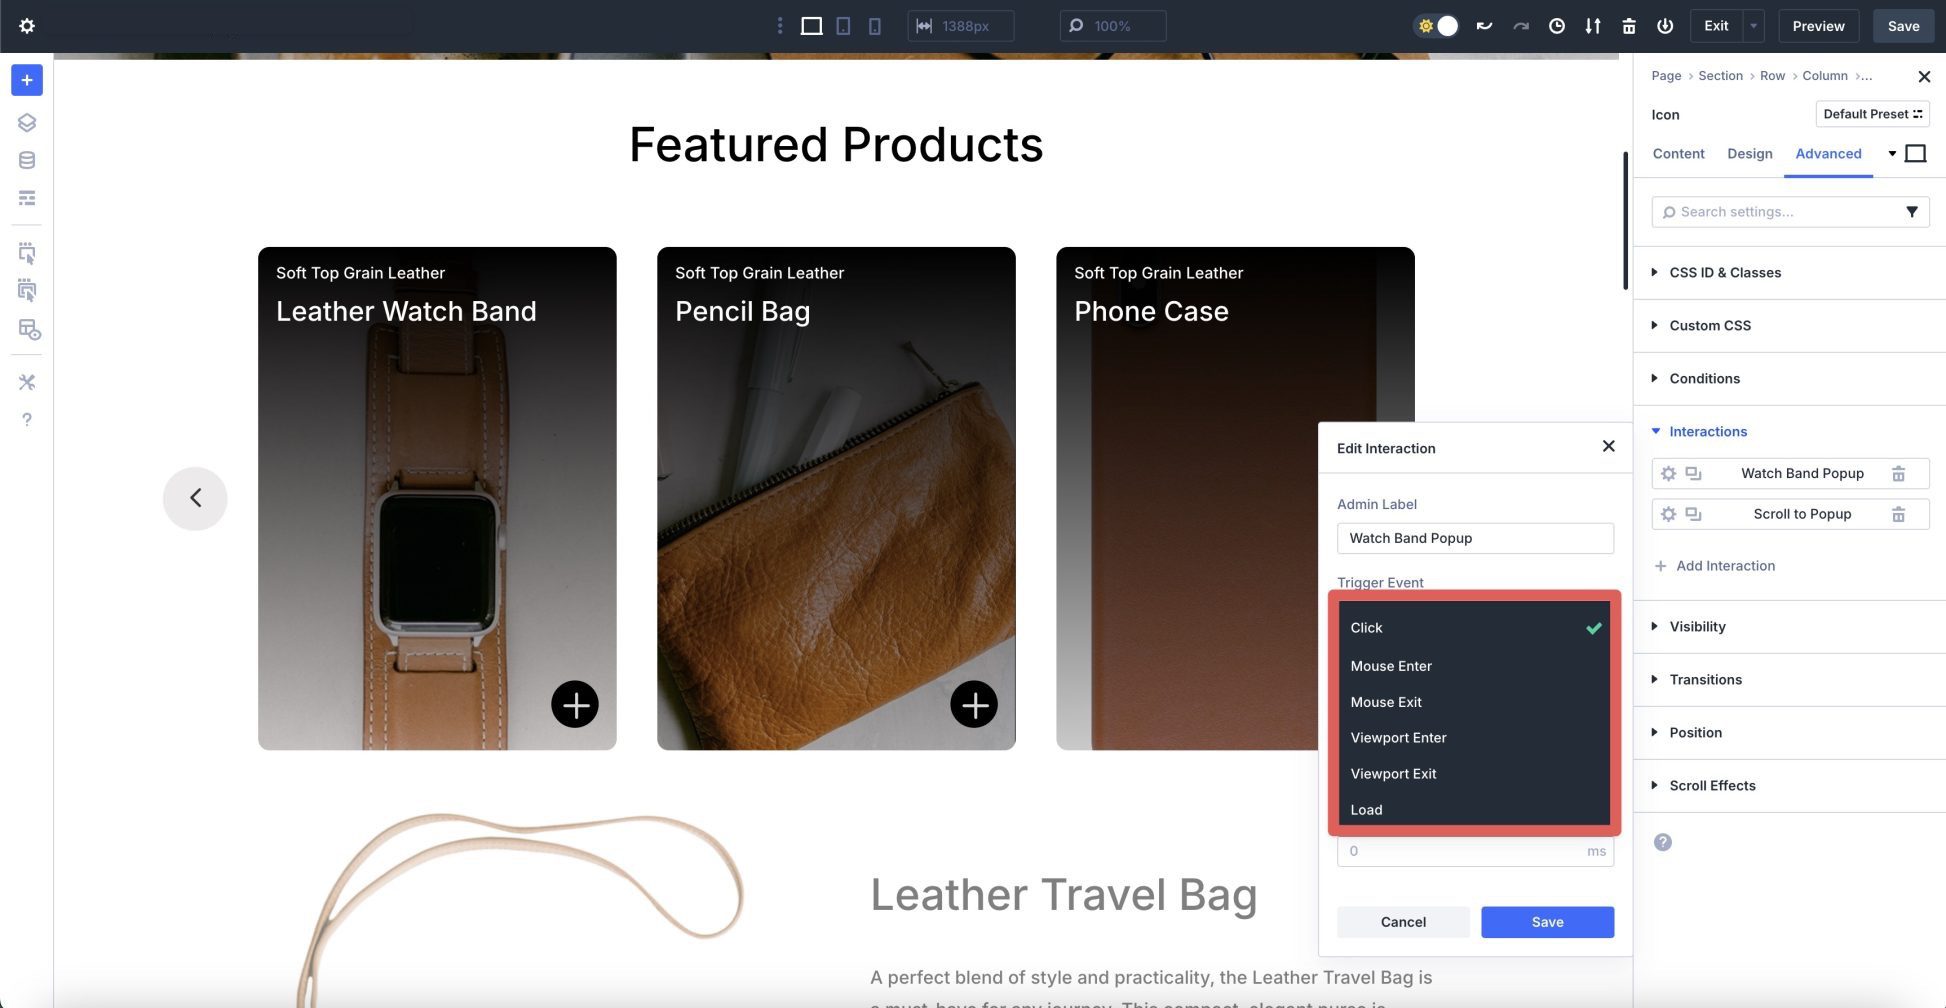
Cause Occasions
Triggers start up the Interplay. You’ll be able to create them to cause movements like pop-ups, content material finds, results on parts when soaring, scroll-based results, and time-based results like pop-ups loading after a time lengthen. Listed below are the to be had triggers:
- Click on: Assign to a button, symbol, or different design module to release an interplay (akin to a content material expose).
- Mouse Input/Go out: Turns on an interplay when the consumer enters or leaves the component with their mouse.
- Viewport Input/Go out: Introduces results because the component enters or leaves the visual house of the display.
- Load: This tournament triggers a component to begin when the web page rather a lot or after a time lengthen
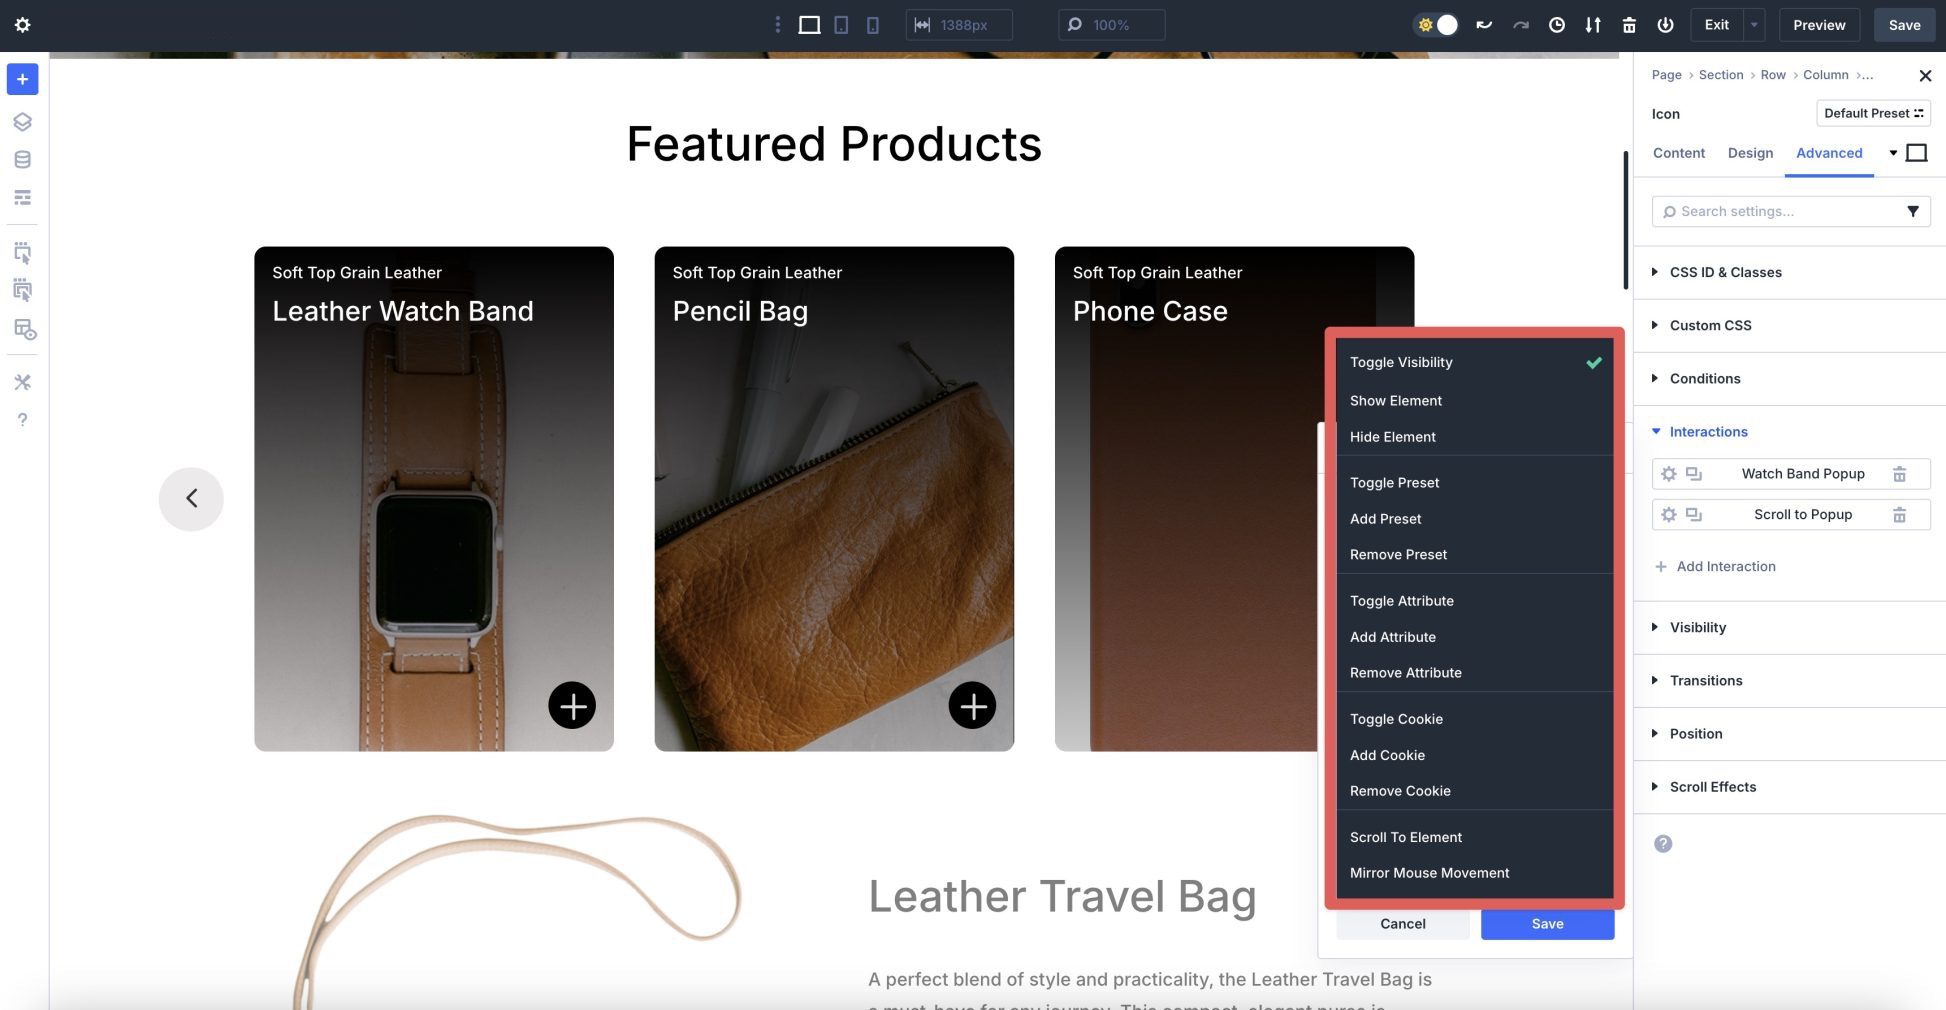
Impact Movements
Impact movements resolve what occurs after a cause is activated. You’ll be able to display or disguise parts, animate with quite a lot of results, or observe preset transitions to change types because the consumer scrolls.
- Toggle Visibility: Impacts a component’s state, between visual and hidden.
- Display/Disguise Component: Toggles the visibility of a component
- Toggle Preset: Toggles a design component’s preset on or off, with an way to exchange the present preset.
- Upload Preset: Used so as to add a preset taste magnificence to a component.
- Take away Preset: Clears the preset taste from a component.
- Toggle Characteristic: Units or unsets a selected HTML characteristic worth on a component, akin to a CSS ID and sophistication
- Upload Characteristic: Assigns a selected HTML characteristic worth, akin to a CSS magnificence or ID, to a component if it’s lately lacking.
- Take away Characteristic: Gets rid of a selected characteristic from a component.
- Toggle Cookie: Use this so as to add or take away a cookie worth. For instance, it is advisable to set a cookie when a pop-up seems and use Divi 5’s conditional settings to verify it best seems as soon as.
- Upload Cookie: Use this to position a customized cookie worth in a consumer’s browser.
- Take away Cookie: Use this to delete a up to now set cookie.
- Scroll to Component: Easily scrolls the web page to a specified component
- Reflect Mouse Motion: This permits you to outline a mouse-tracking motion for a component. You’ll be able to set the component to translate, scale, trade opacity, tilt, or rotate, and regulate the motion sensitivity.
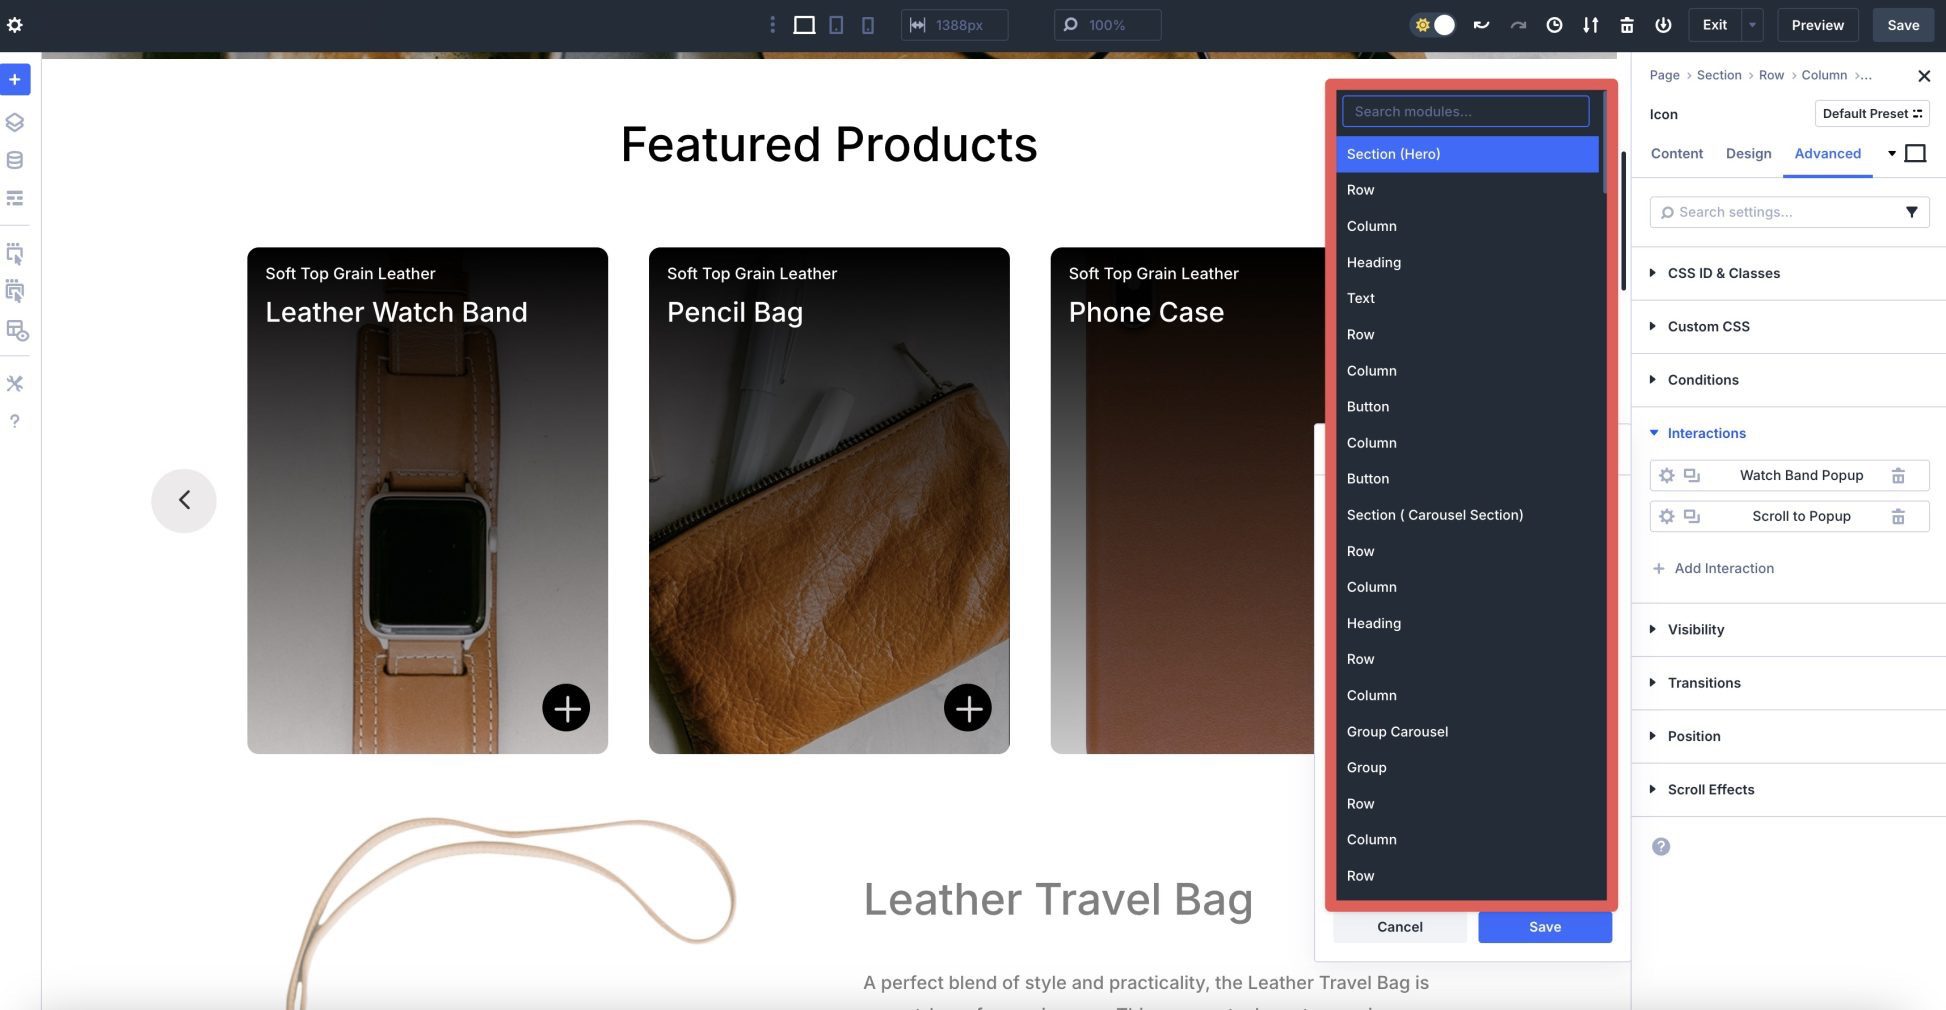
Goal Module
The objective is the component that the Interplay impacts, like a module, row, column, or phase. You’ll be able to goal the component itself or some other component at the web page, supplying you with the versatility to create extra complicated interactions.
How The Crew Carousel Module and Interactions Paintings In combination
The Crew Carousel module and Divi 5 Interactions mixed can create interactive content material expose carousels that captivate customers with dynamic content material and responsive habits. The Crew Carousel module serves because the core content material show, enabling you to construct a graceful slider full of static or dynamic content material, like merchandise. Divi 5 Interactions complements this by means of including triggers and results.
Interactions can create hover-based results (akin to scaling or tilting pictures) to make portions of every slide extra enticing. Combining the Crew Carousel module and Divi 5 Interactions is a good way to stay customers engaged and probably build up gross sales, conversions, and decrease soar charges.
How To Create An Interactive Content material Disclose Carousel With Divi 5
On this phase, we’ll stroll you during the steps to create an interactive content material expose carousel that includes merchandise on a Divi web site. By means of the tip, you’ll have a greater working out of ways the Crew Carousel module works together with Interactions to create a fascinating product show.
We received’t use the Loop Builder on this submit to simplify issues. Read this post for those who’d like to be informed extra about the way to use it to create dynamic loops.
Step 1: Upload And Configure The Crew Carousel Module
Create a brand new web page for your WordPress web site. Permit the Visible Builder and click on the inexperienced + button so as to add a brand new row.
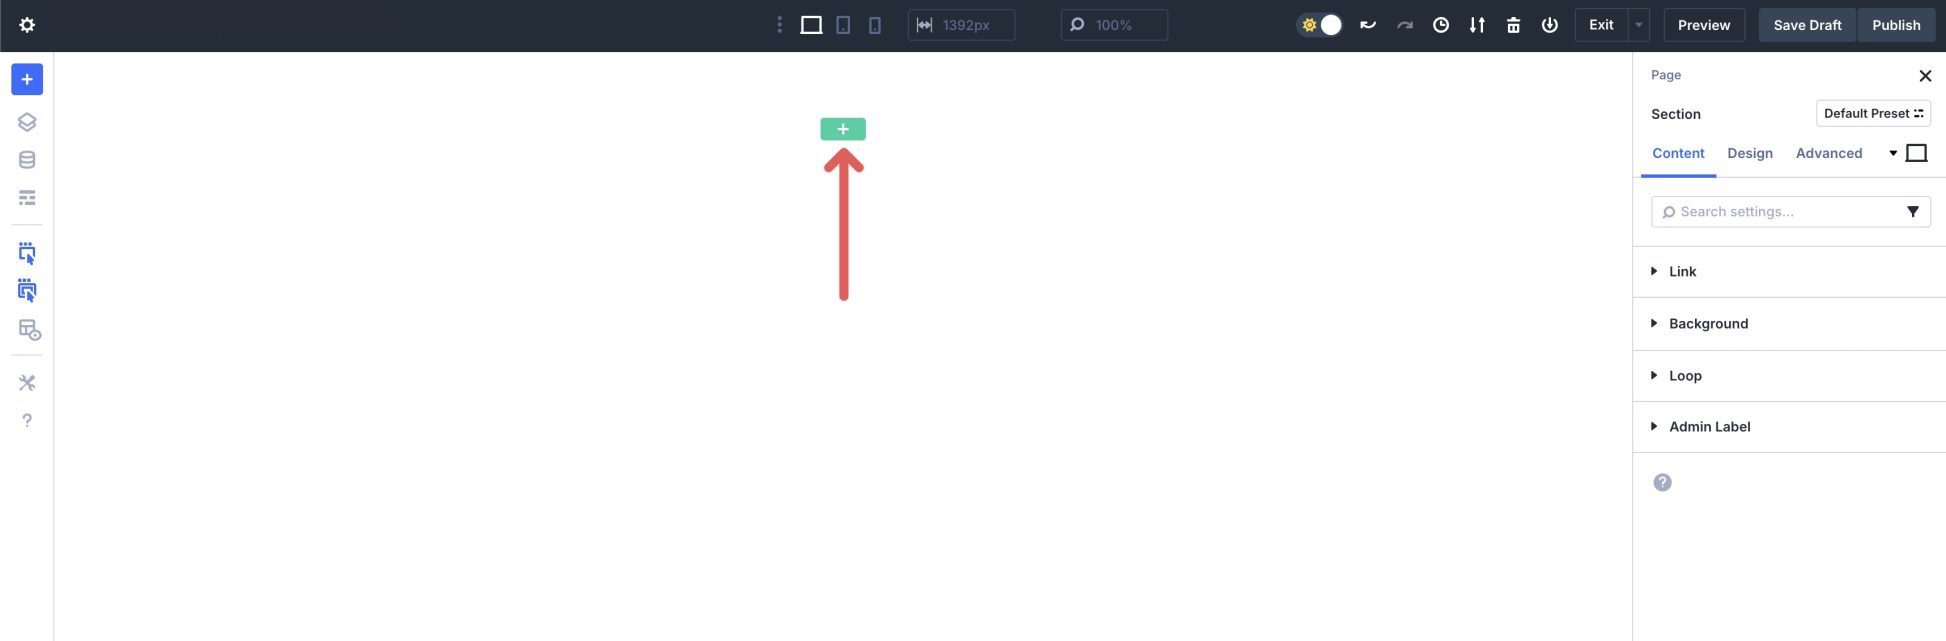
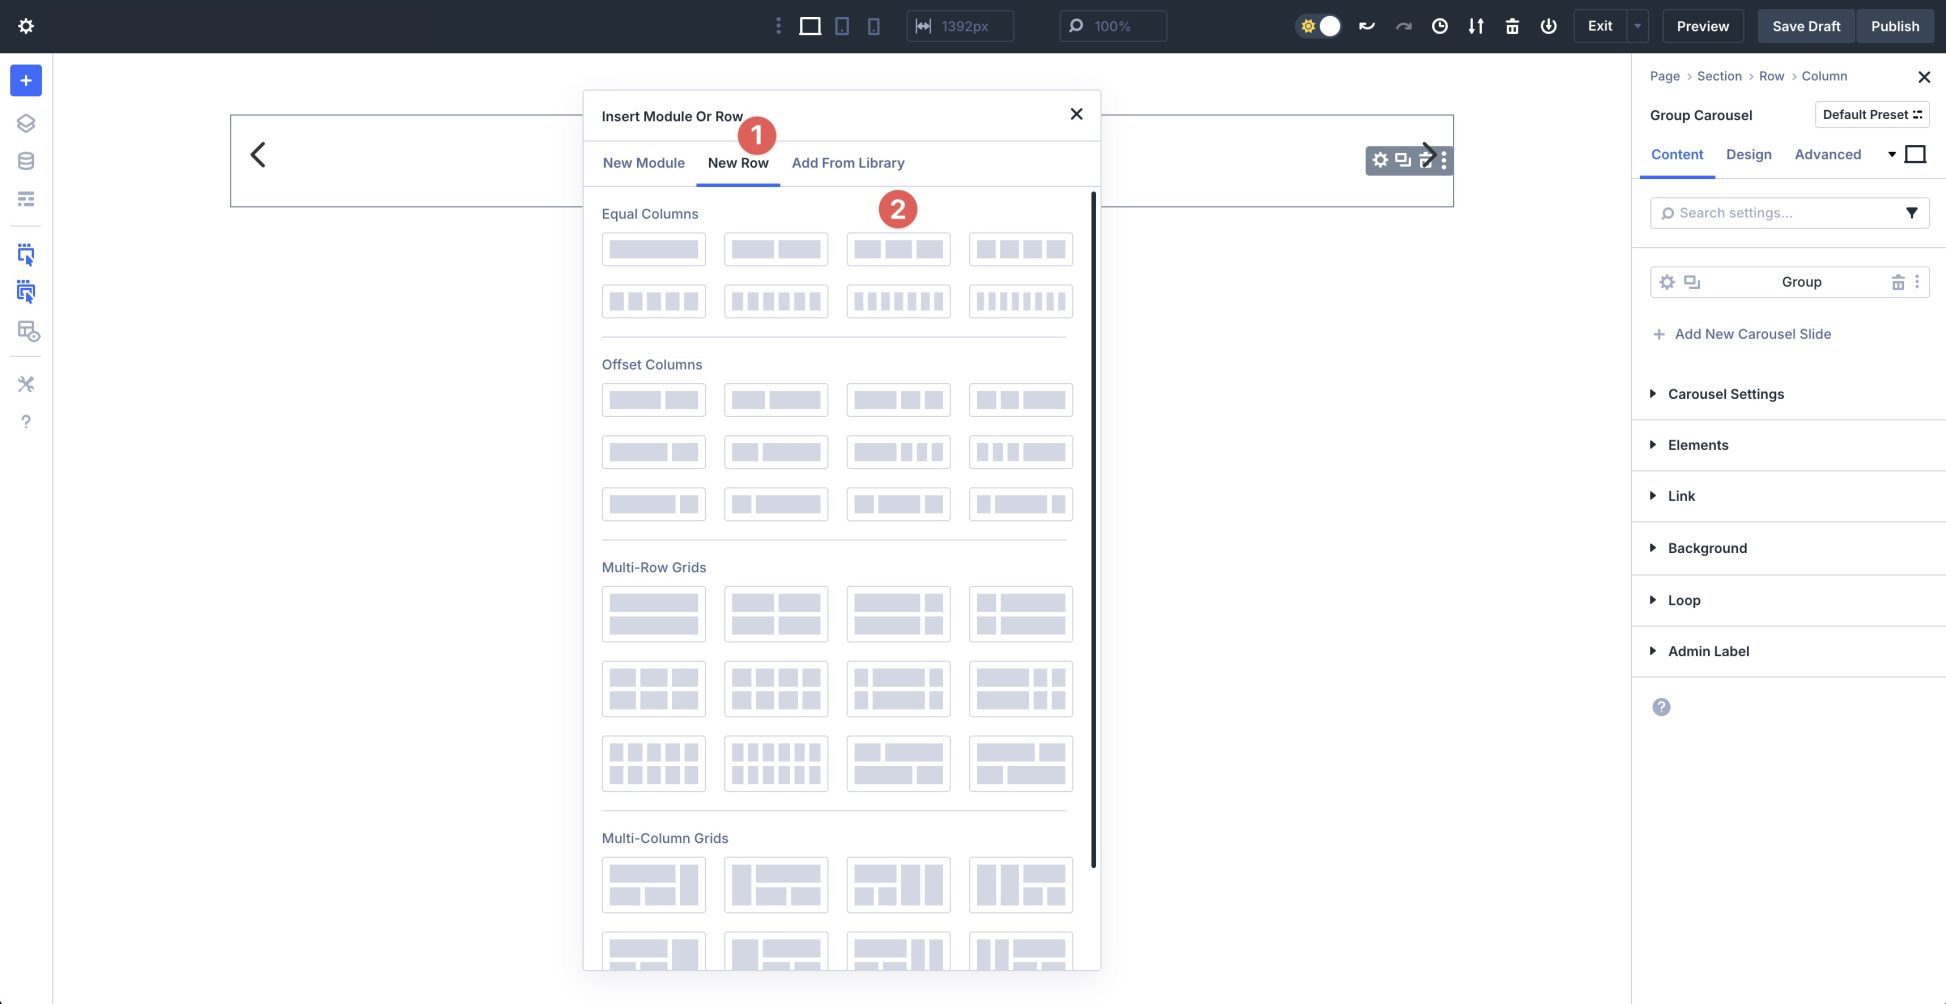
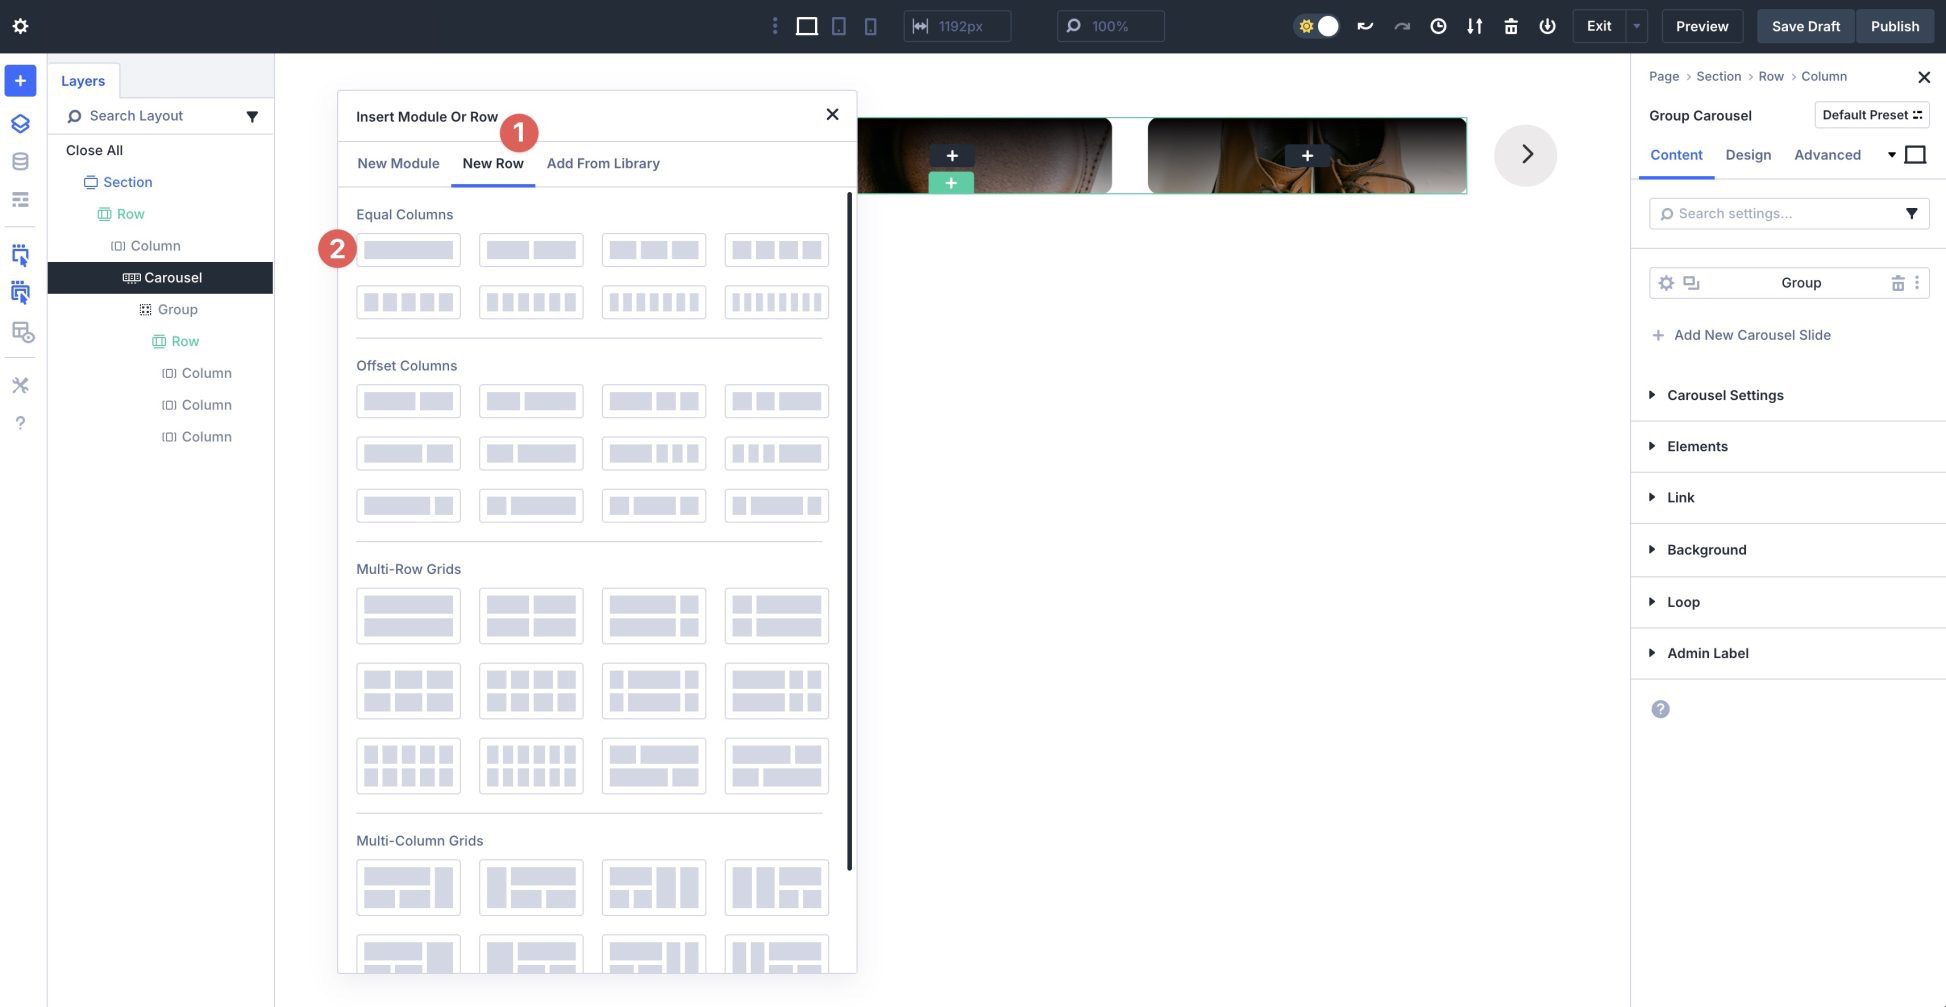
When the Insert Row conversation field seems, make a selection a unmarried column row beneath Equivalent Columns.
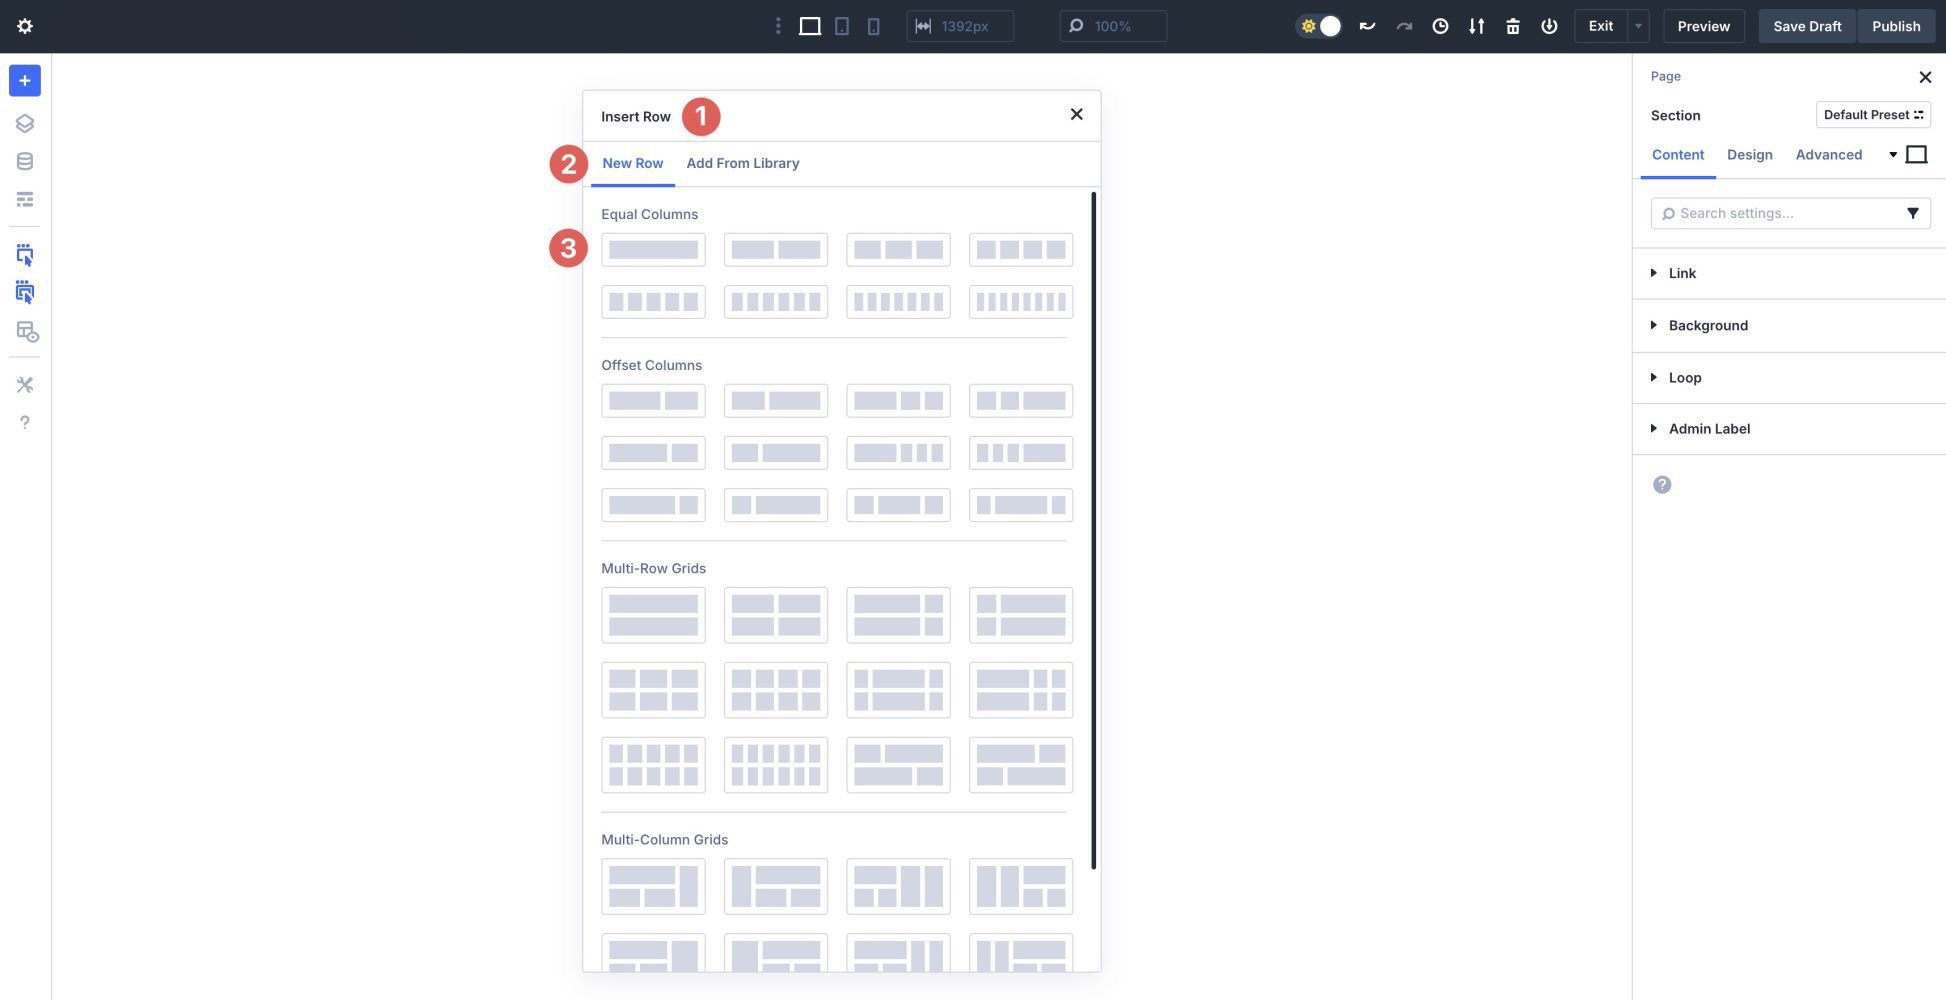
Make a choice the Crew Carousel module from the to be had choices within the Insert Module Or Row conversation field.
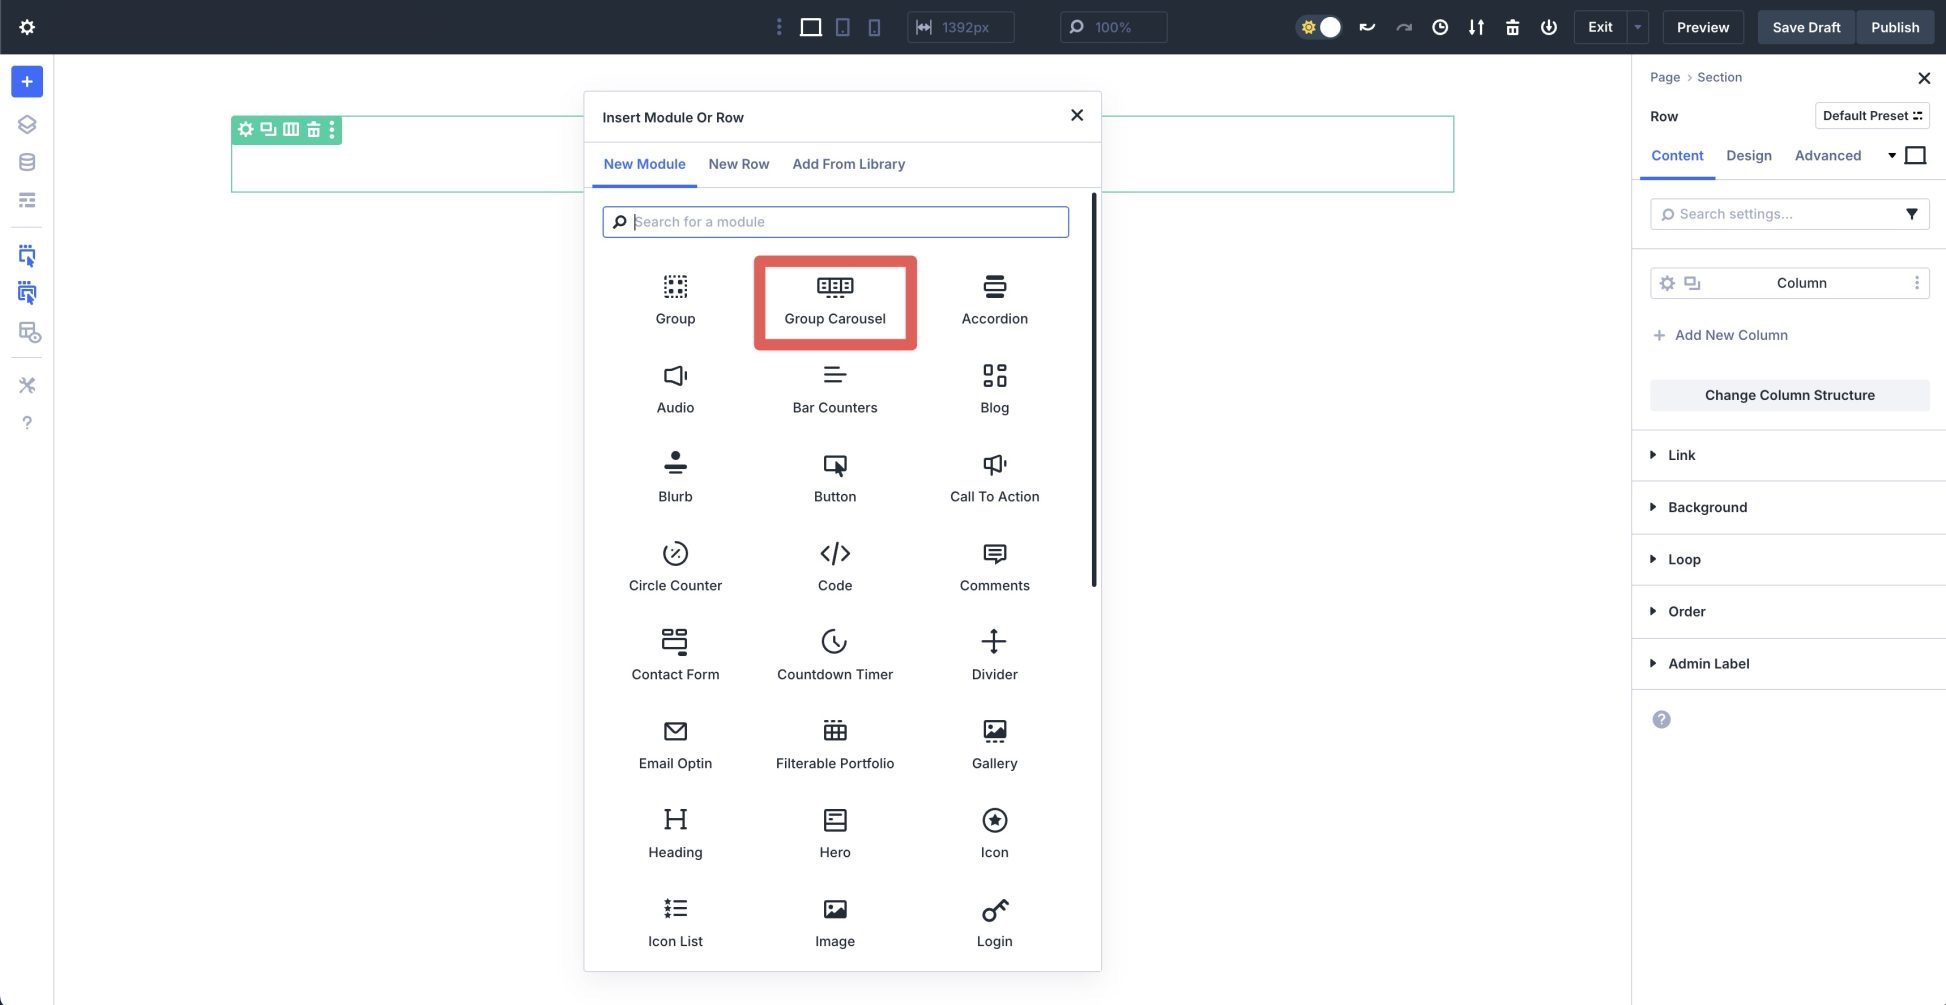
Click on the black + icon so as to add a brand new module throughout the Crew Carousel module.
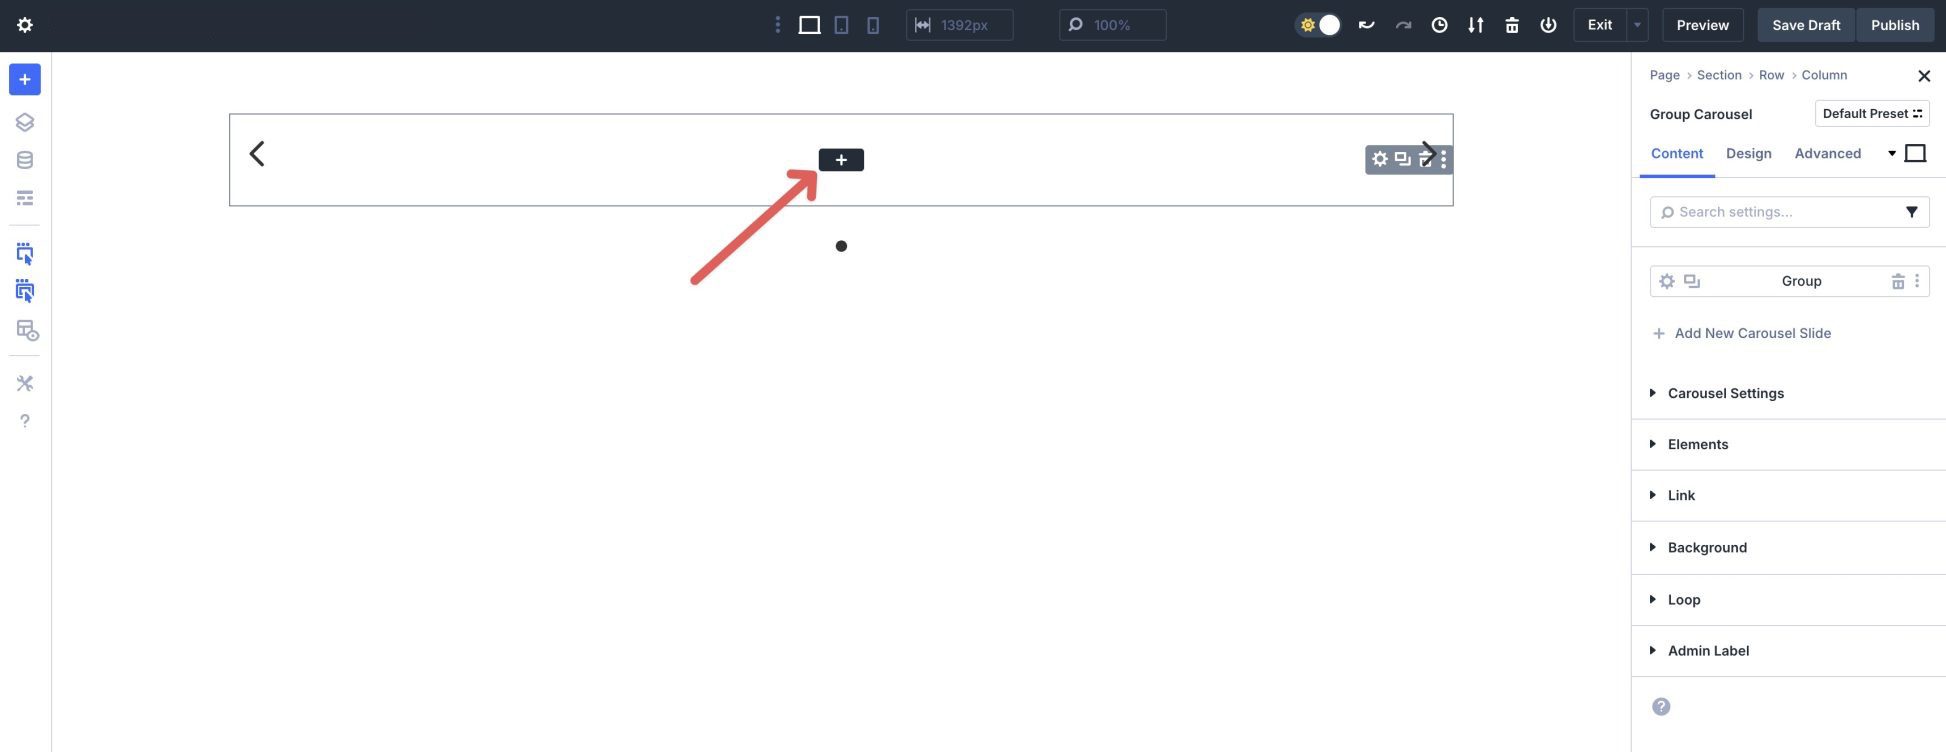
Click on the New Row tab and make a selection a three-column row.
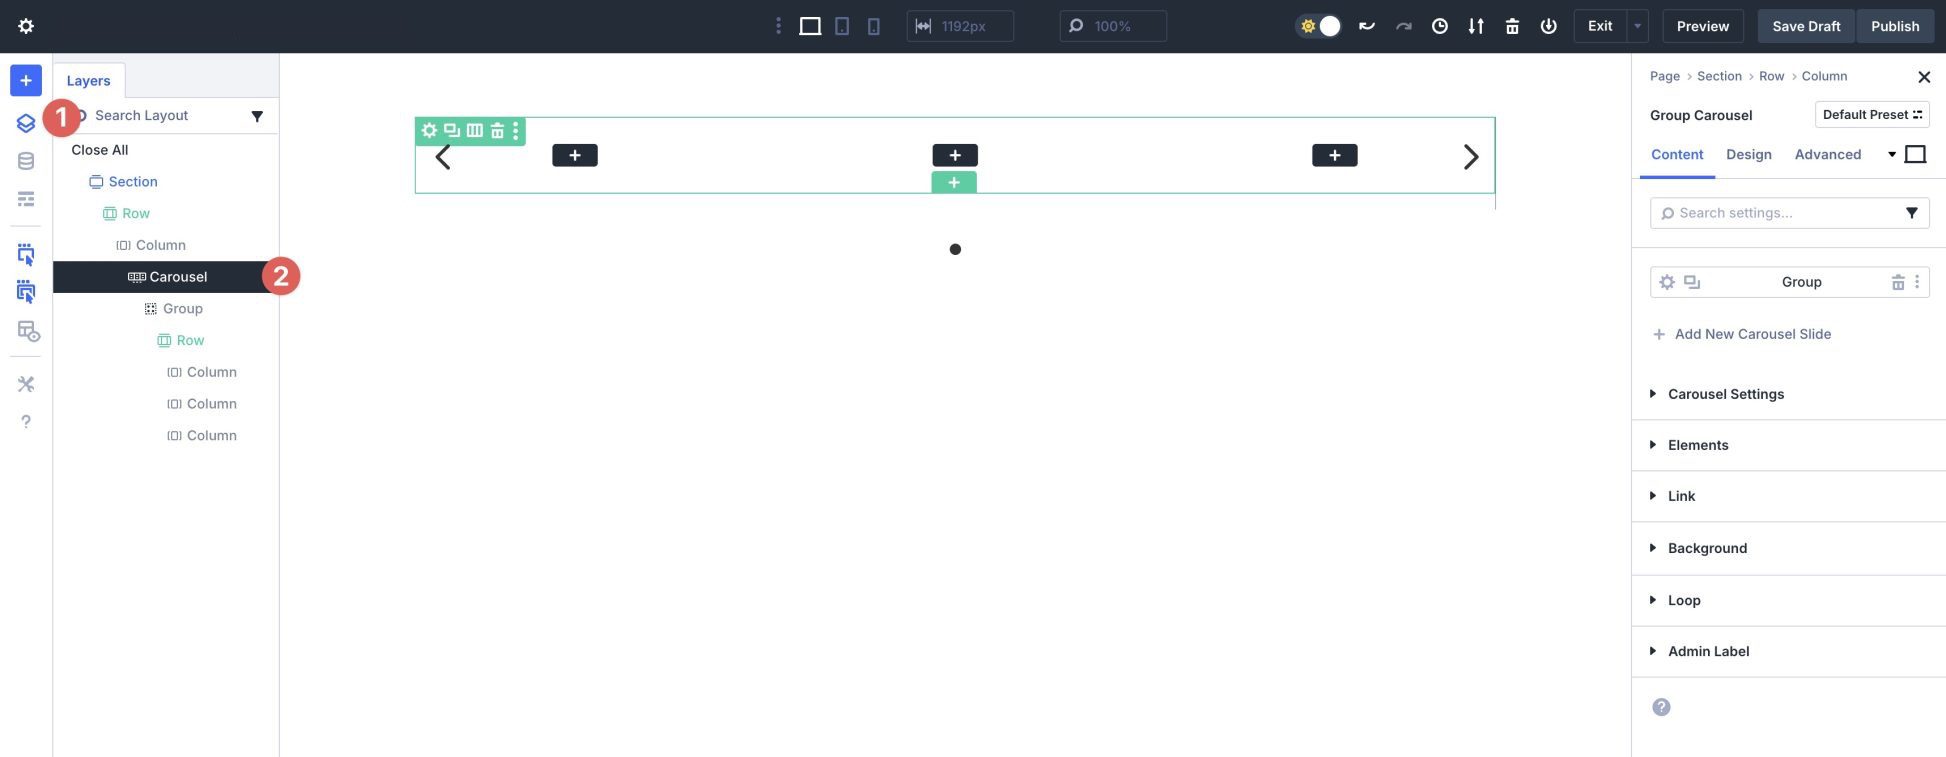
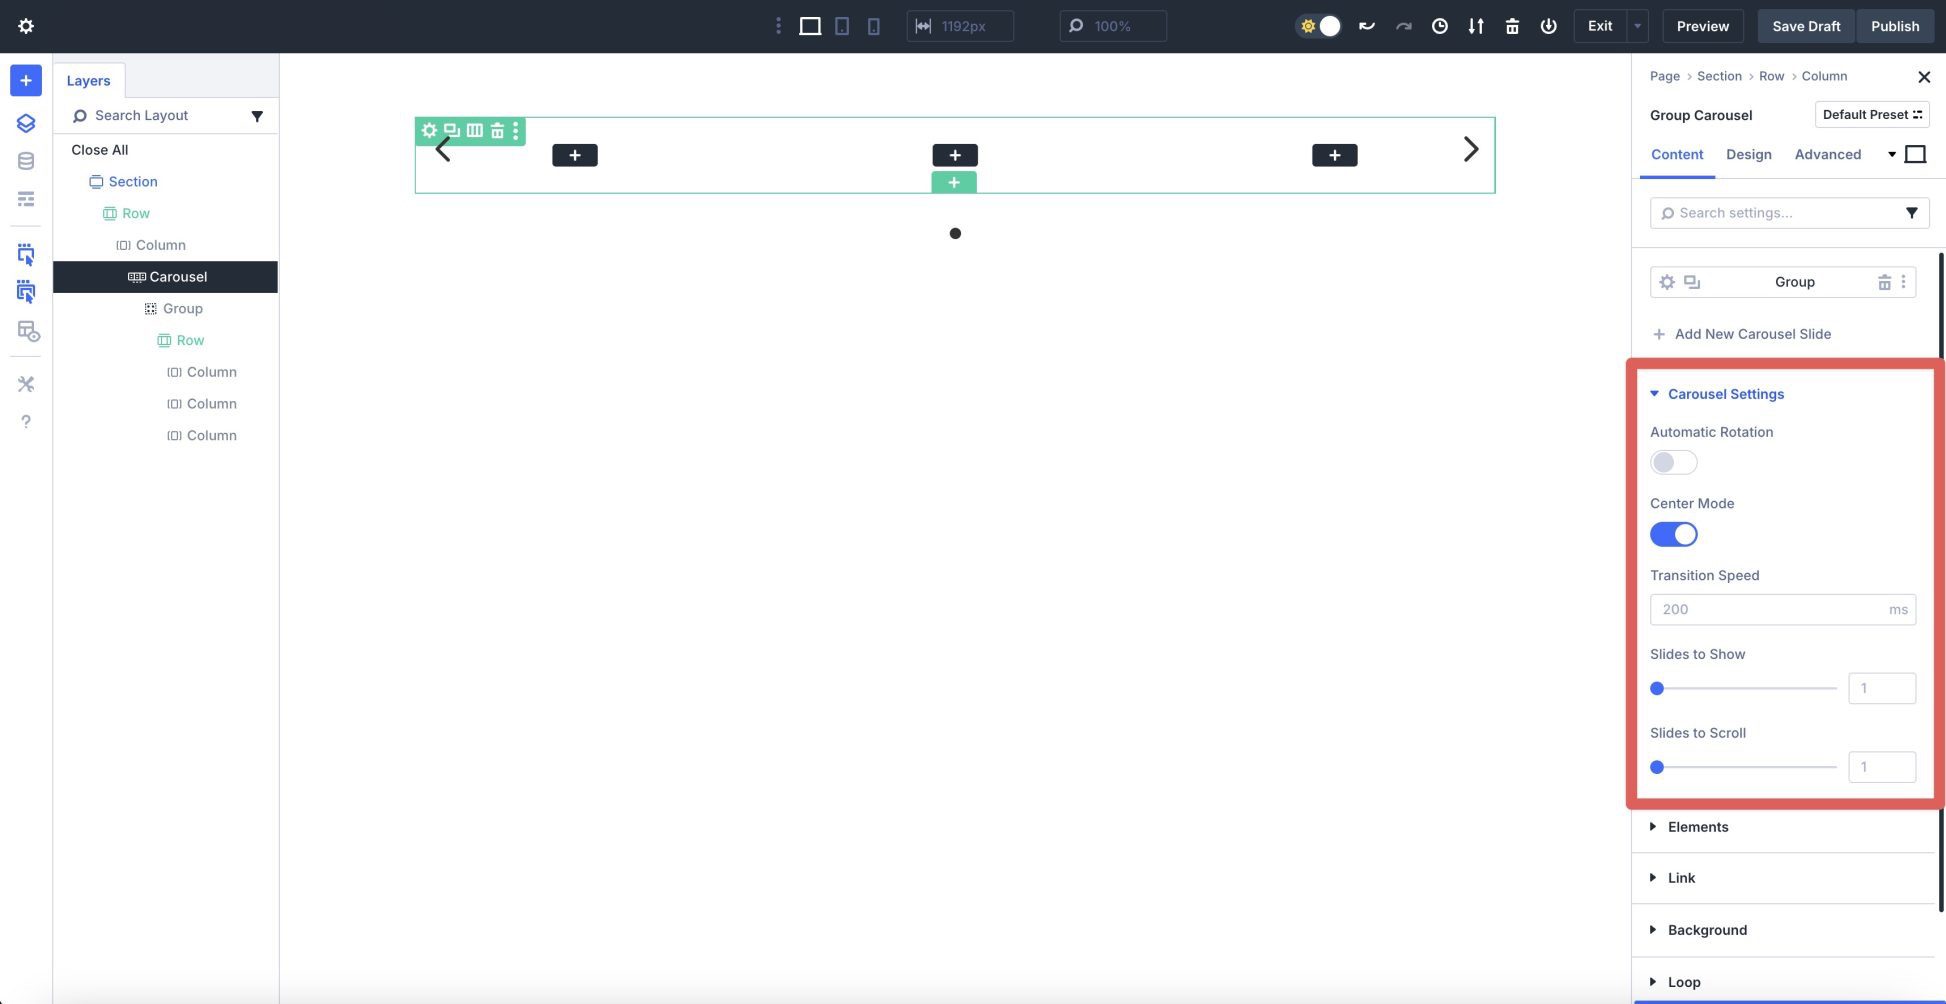
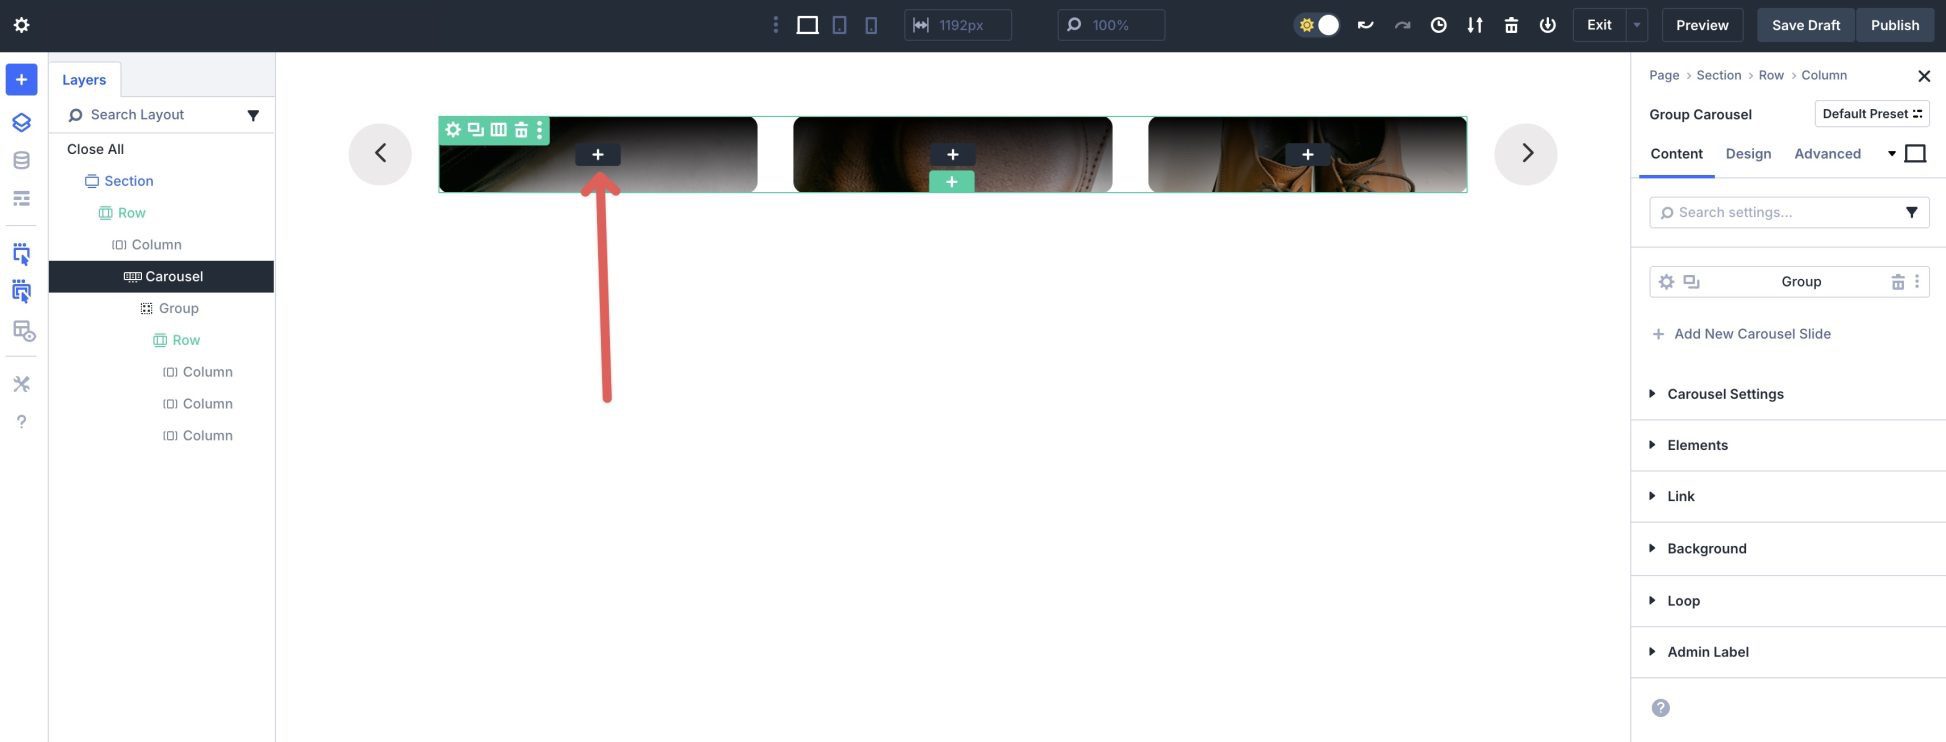
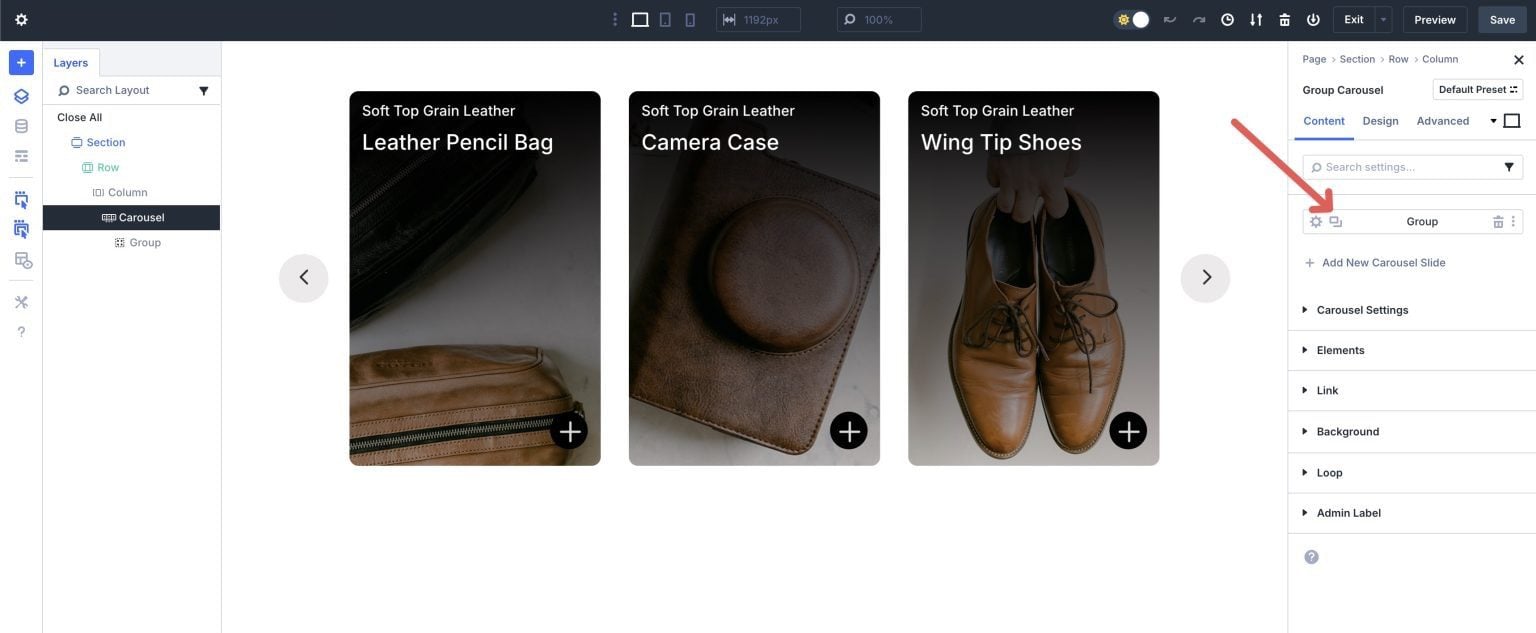
Prior to including content material to our Crew Carousel, we want to configure the module’s settings. Within the Layers panel, make a selection the Crew Carousel module. Amplify the Carousel Settings dropdown menu.
Go away Automated Rotation toggled to off and permit Middle Mode.
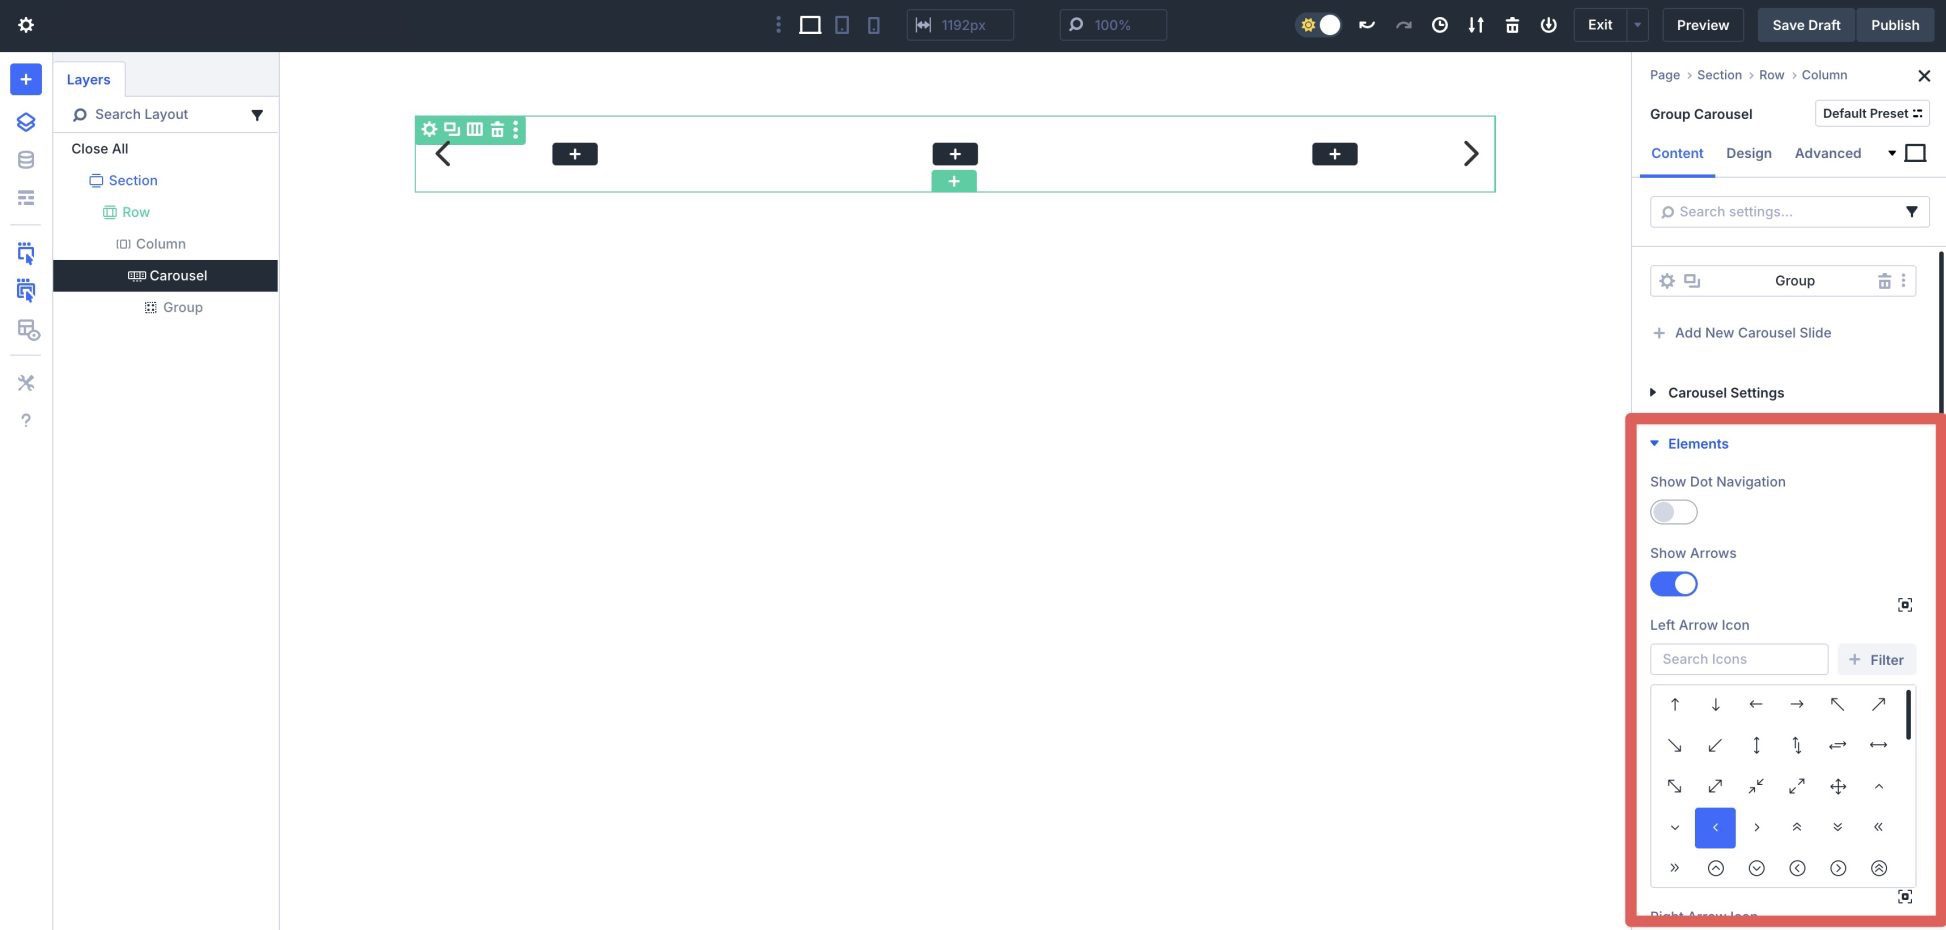
Subsequent, extend the Components dropdown menu. Flip Display Dot Navigation off however depart Display Arrows enabled. Arrow icons are decided on by means of default, however you’ll be able to make a choice the glance you need from Divi’s huge icon library.
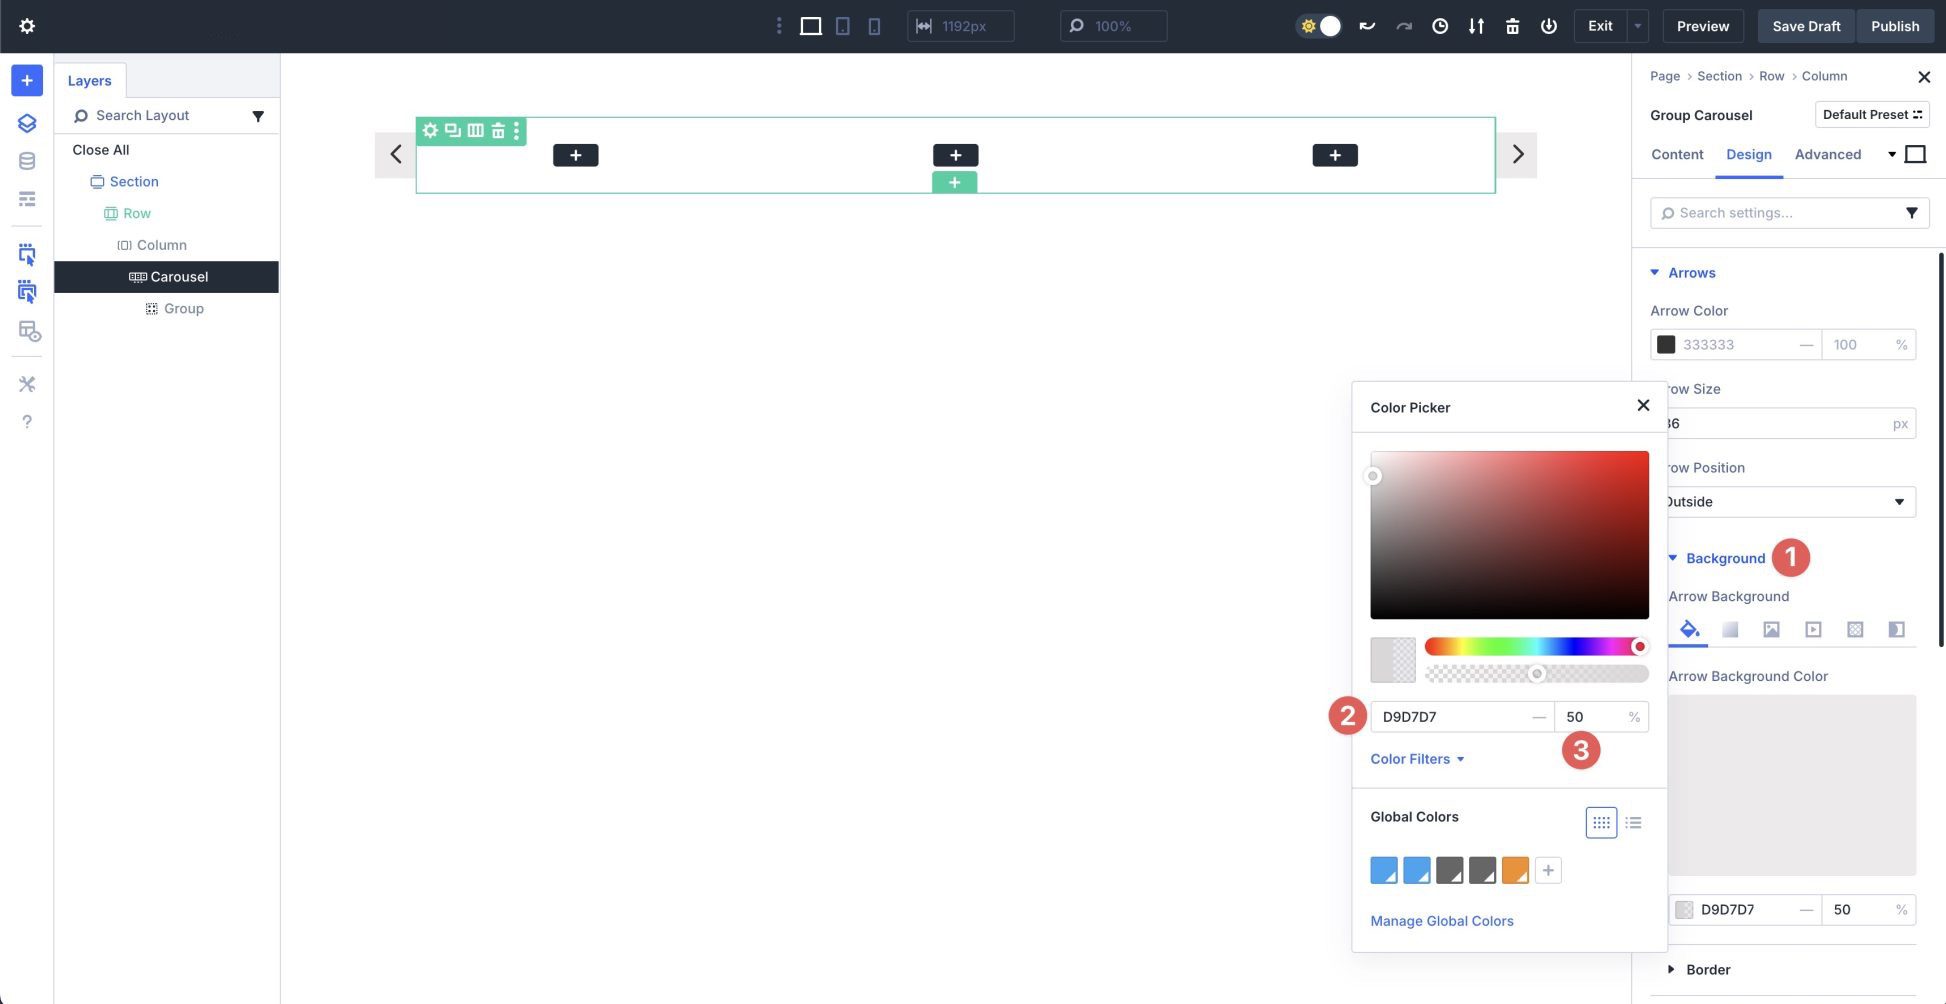
Navigate to the Design tab. Amplify the Arrows dropdown menu. Use #333333 because the Arrow Colour and set the Arrow Measurement to 36px. Set the Arrow Place to Out of doors.
![]()
Amplify the Background dropdown menu. Within the Arrow Background Colour tab, click on + Upload Background Colour. Upload #D9D7D7 because the background shade and set the Opacity to 50%.
Within the Border dropdown menu within the Arrows settings, assign a 100px Arrow Border Radius.
![]()
After all, extend the Spacing dropdown menu within the Arrows settings. Upload .75% Arrow Padding to the height & backside and 1% to the left & proper.
![]()
Step 2: Configure The Row’s Settings
Now, we’ll get started including content material to the row. Use the Layers panel to click on into the first column. Amplify the Background tab and click on the Background Symbol settings. Upload a picture to the background.
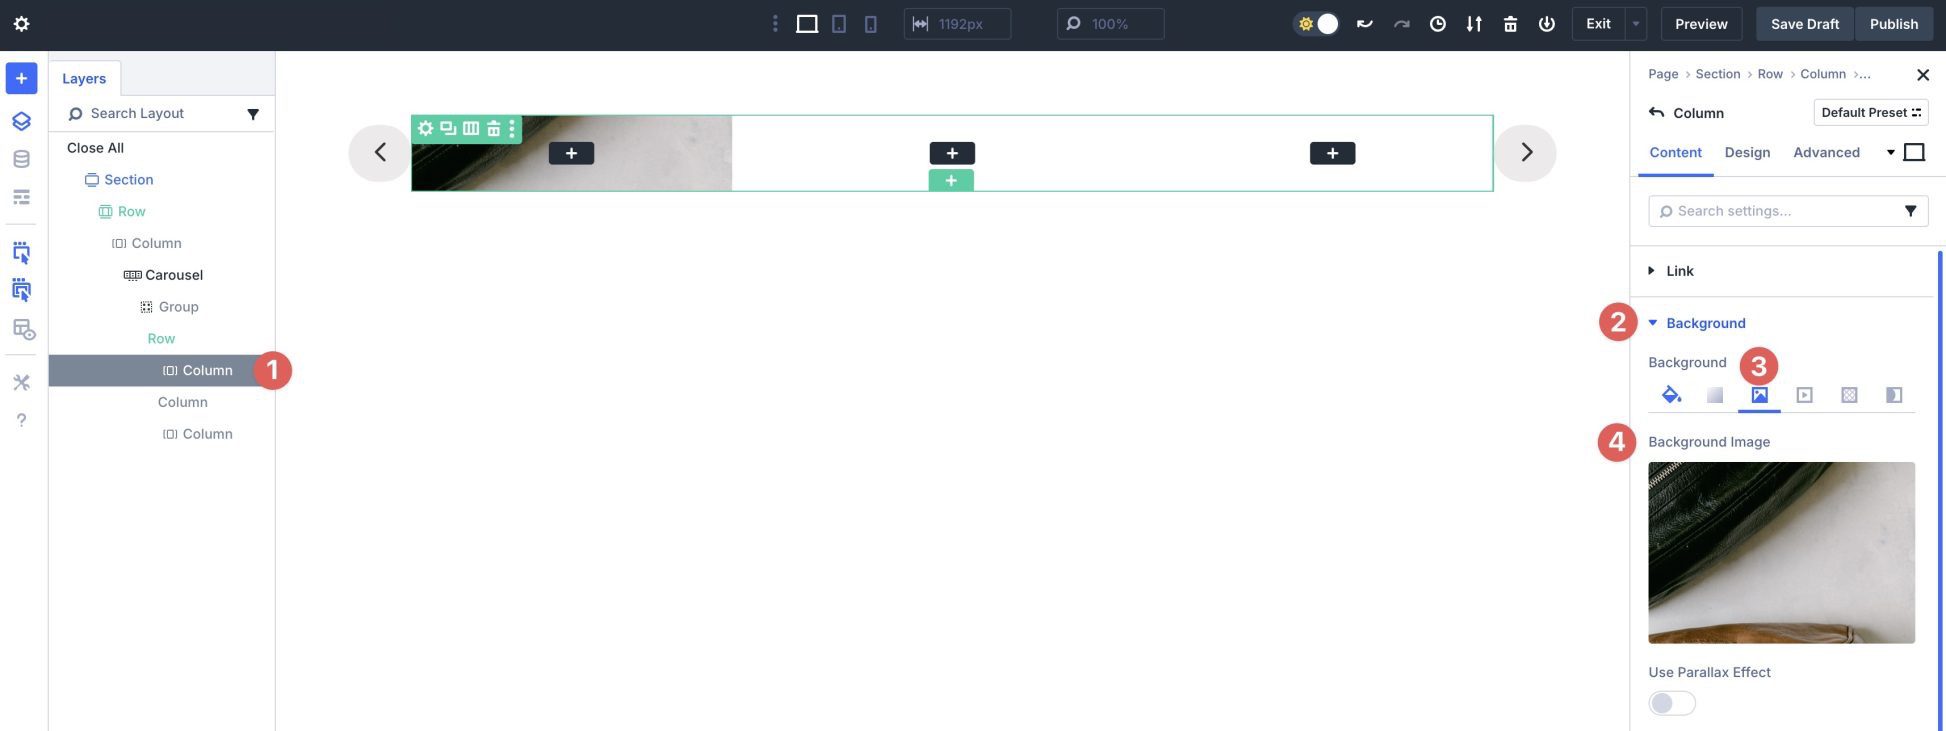
Open the Background Gradient settings. Click on + Upload Background Gradient.
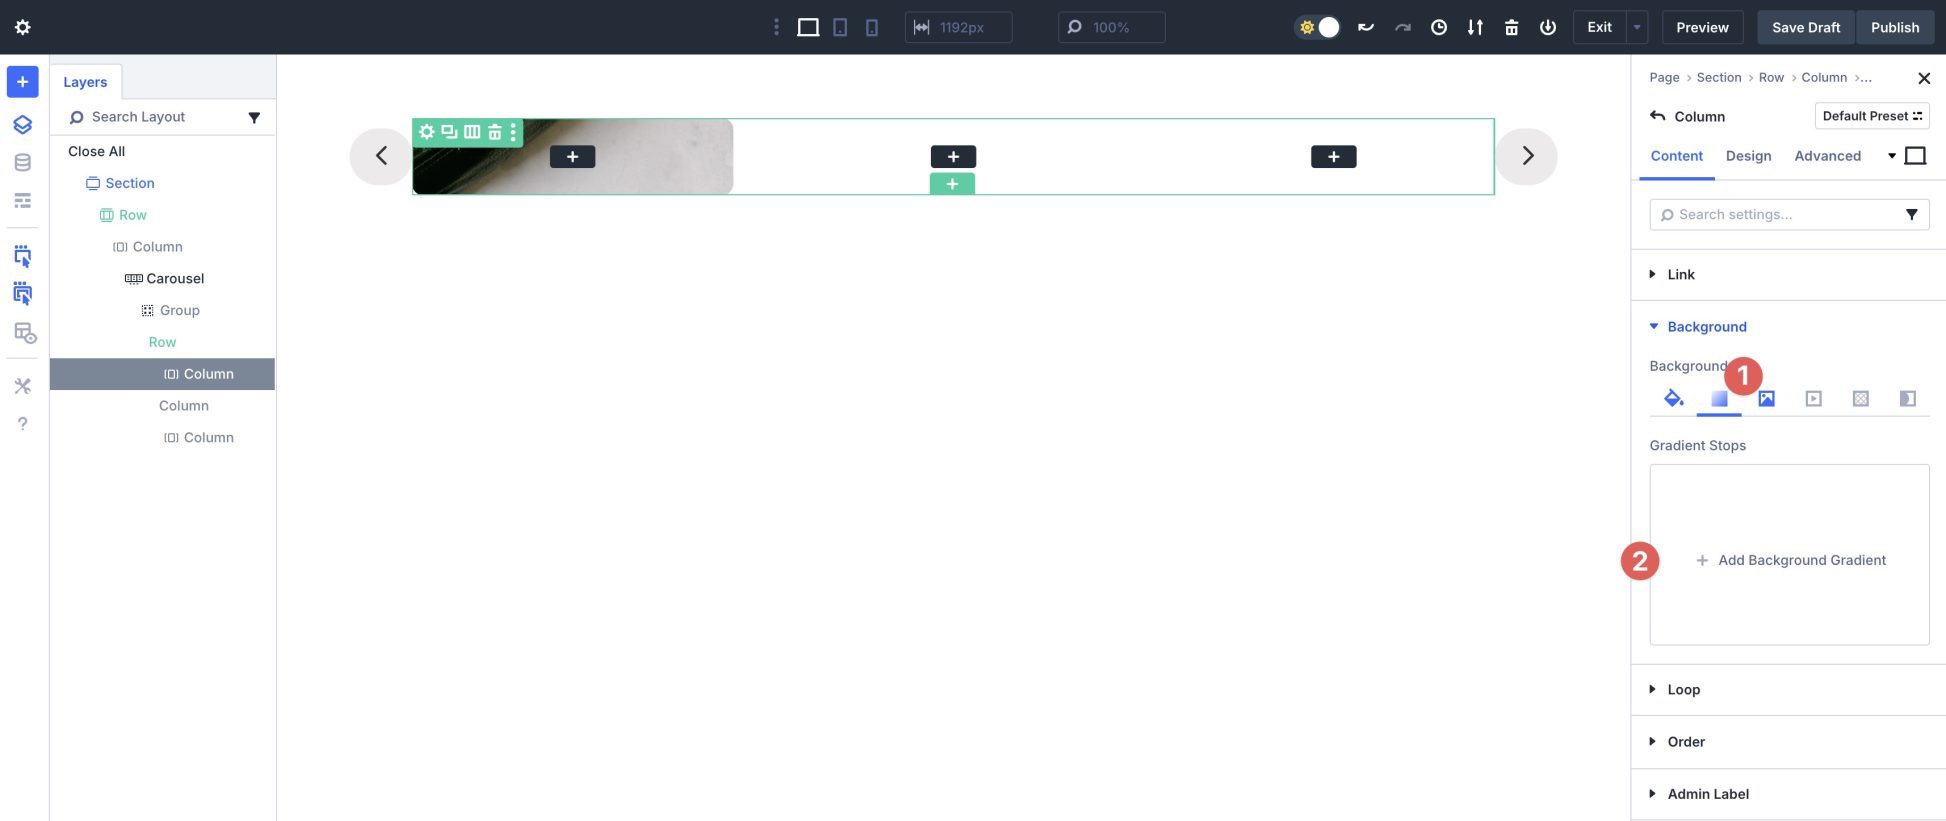
Click on the primary Gradient Forestall to regulate the colour.
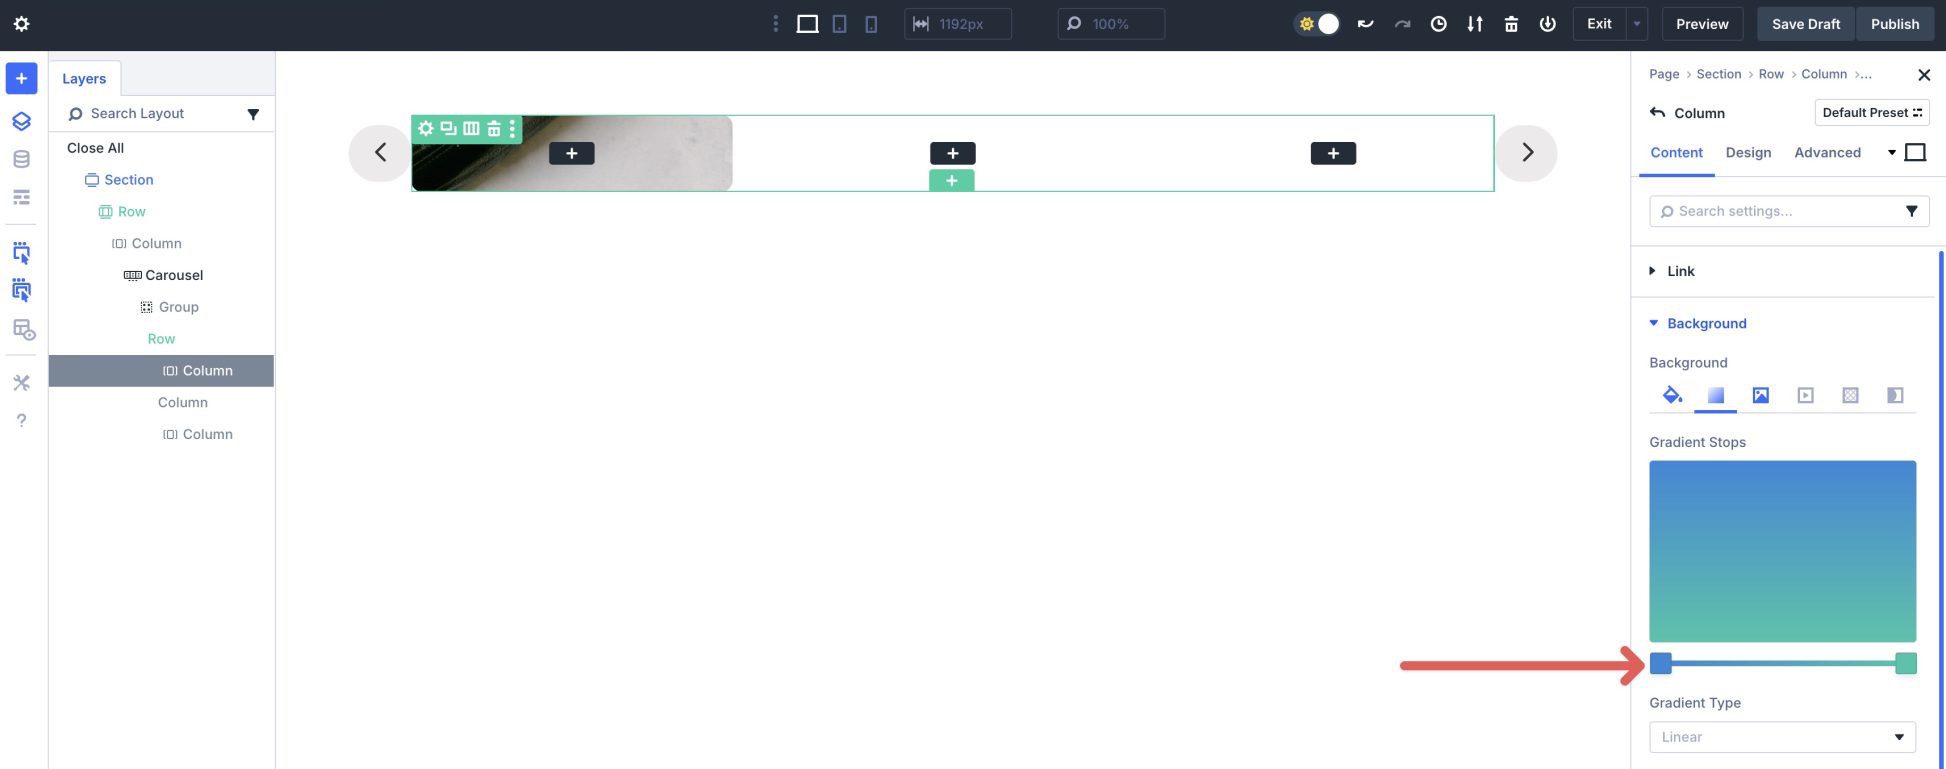
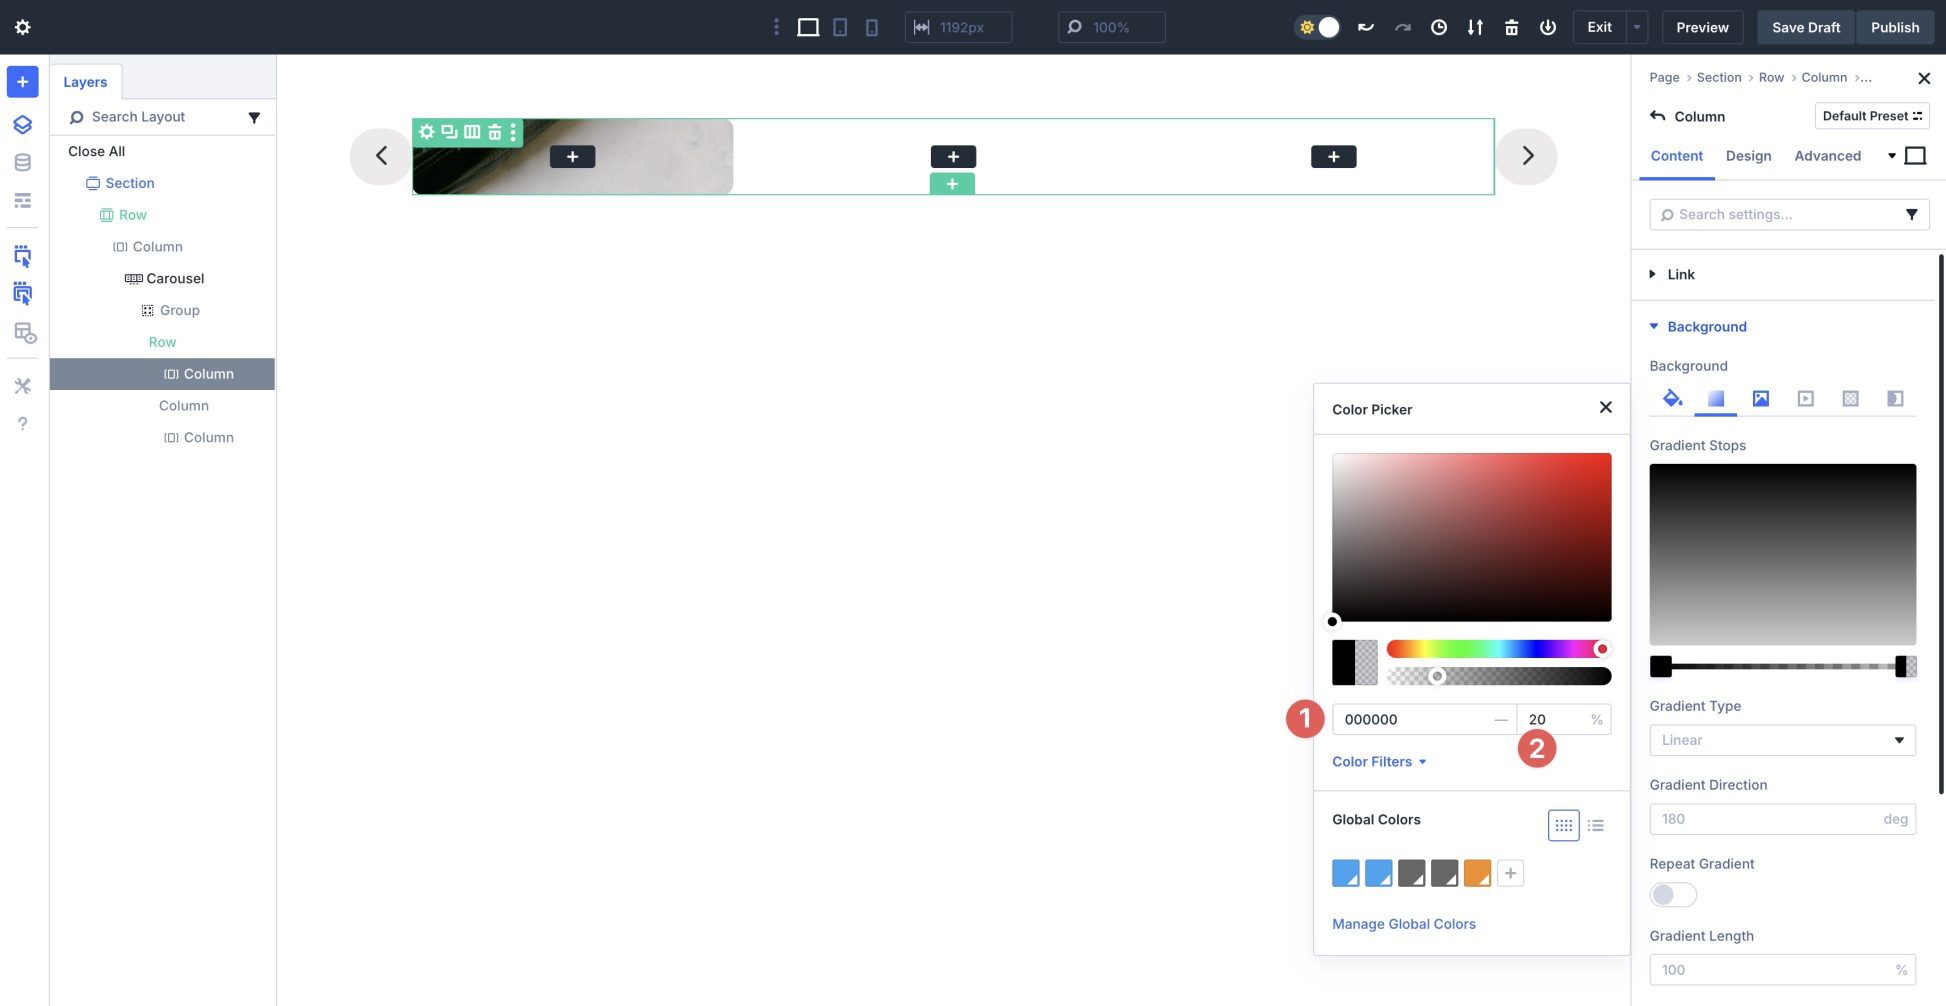
Select #000000 as the colour.
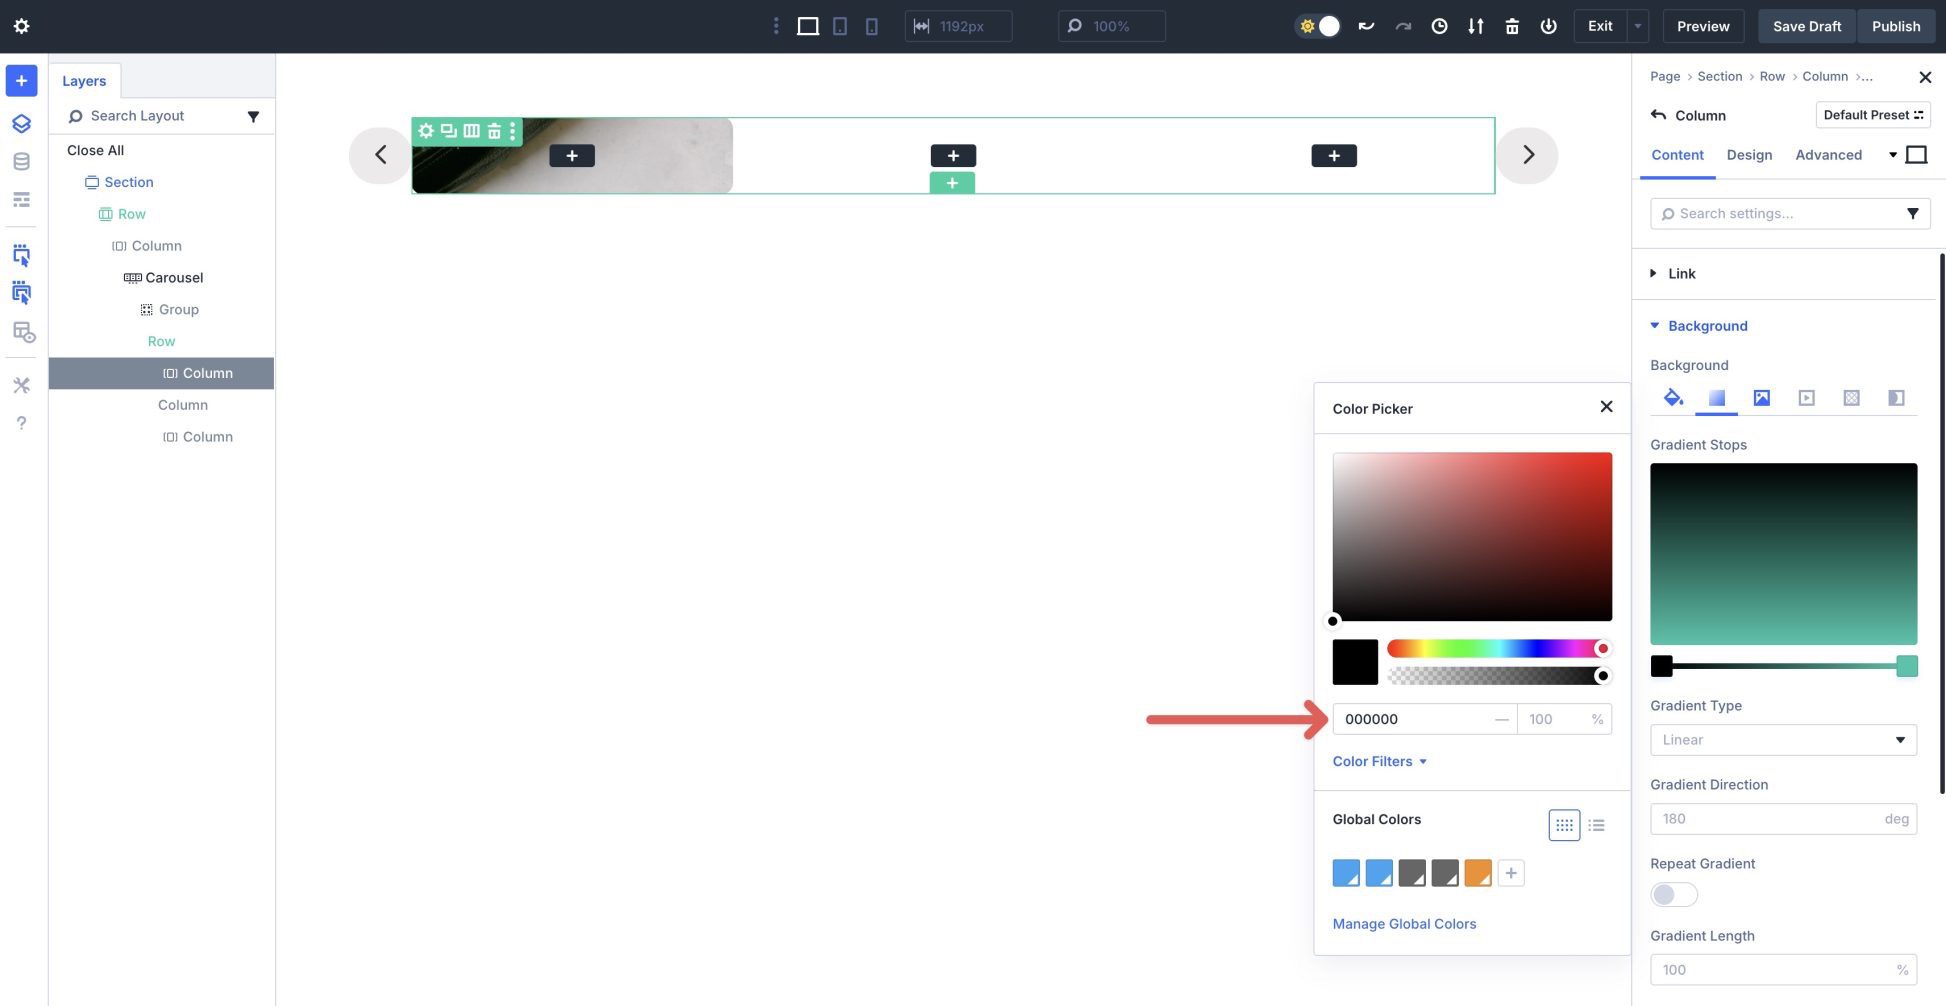
Subsequent, click on the second one Gradient Forestall. Use #000000 as the colour and set the Opacity to 20%.
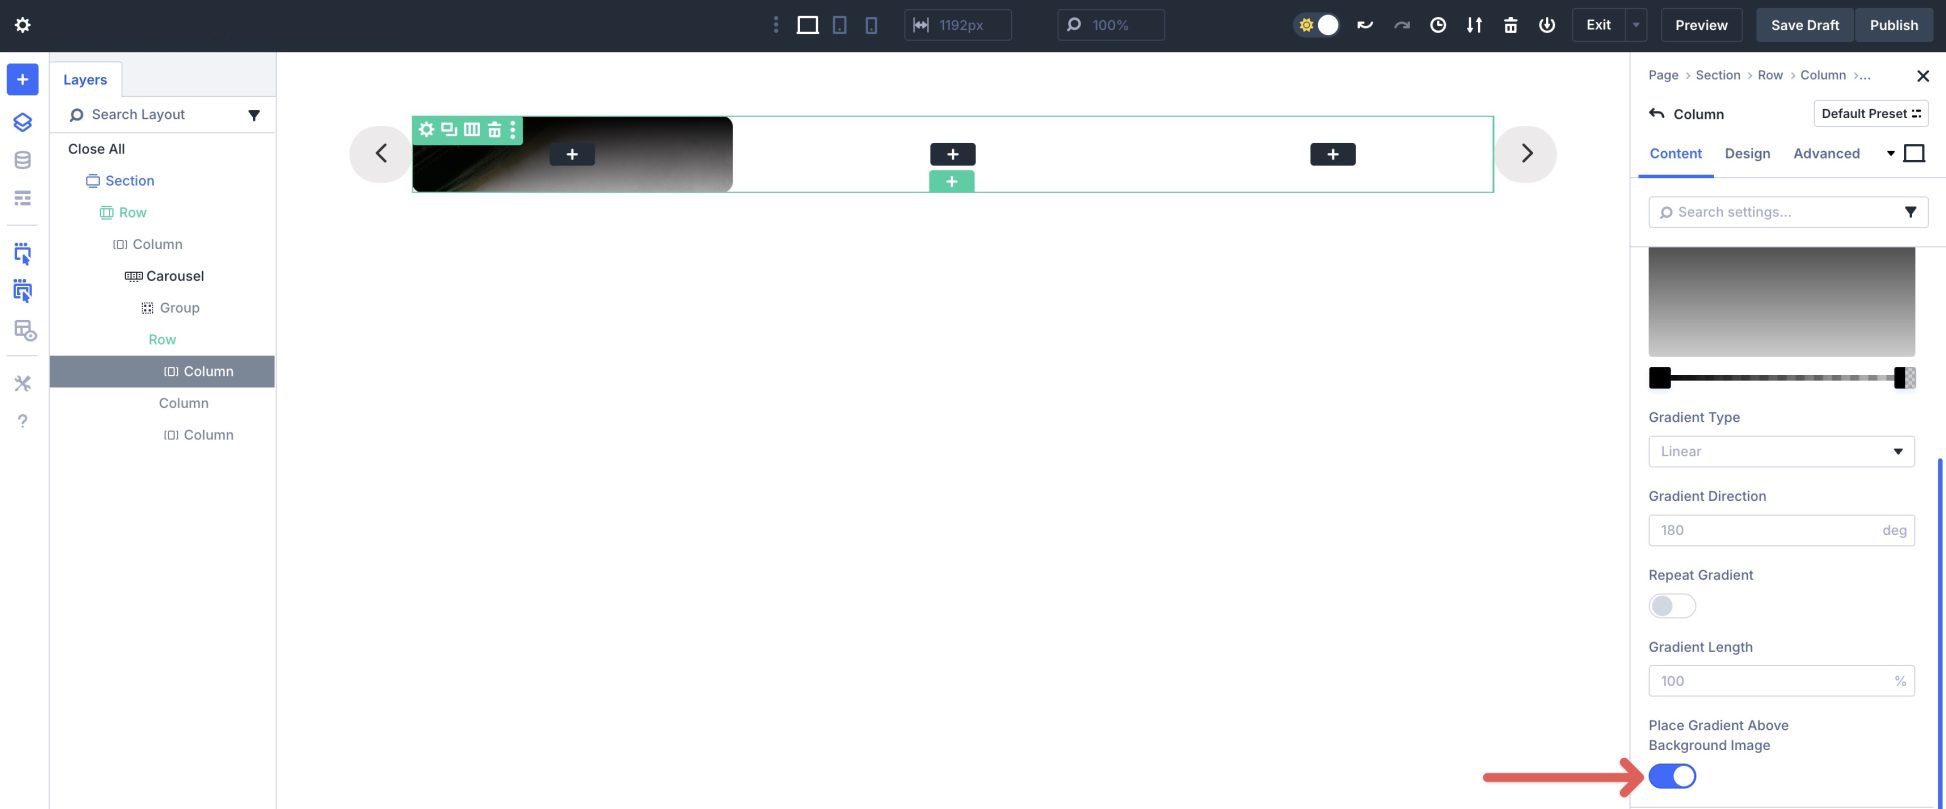
Scroll down and permit Position Gradient Above Background Symbol.
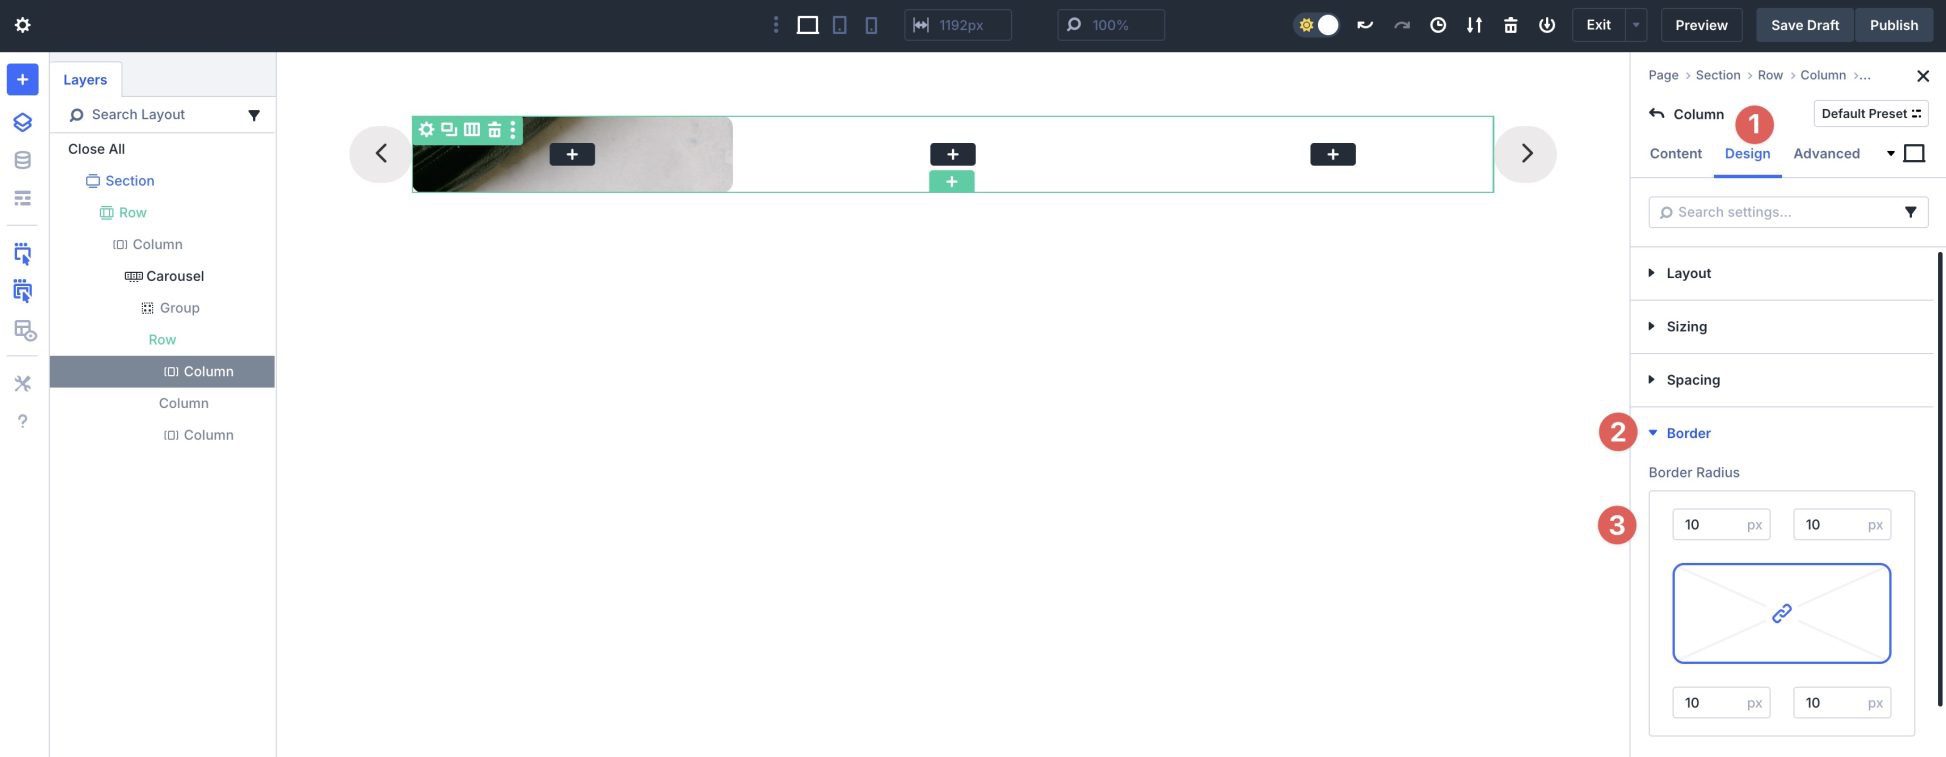
Subsequent, click on the Design tab. Amplify the Border dropdown menu to show the settings. Assign a 10px Border Radius to the column.
Repeat the stairs so as to add a Background Symbol, Background Gradient, and Border Radius to columns two and 3. As soon as finished, your format must glance very similar to the picture underneath.
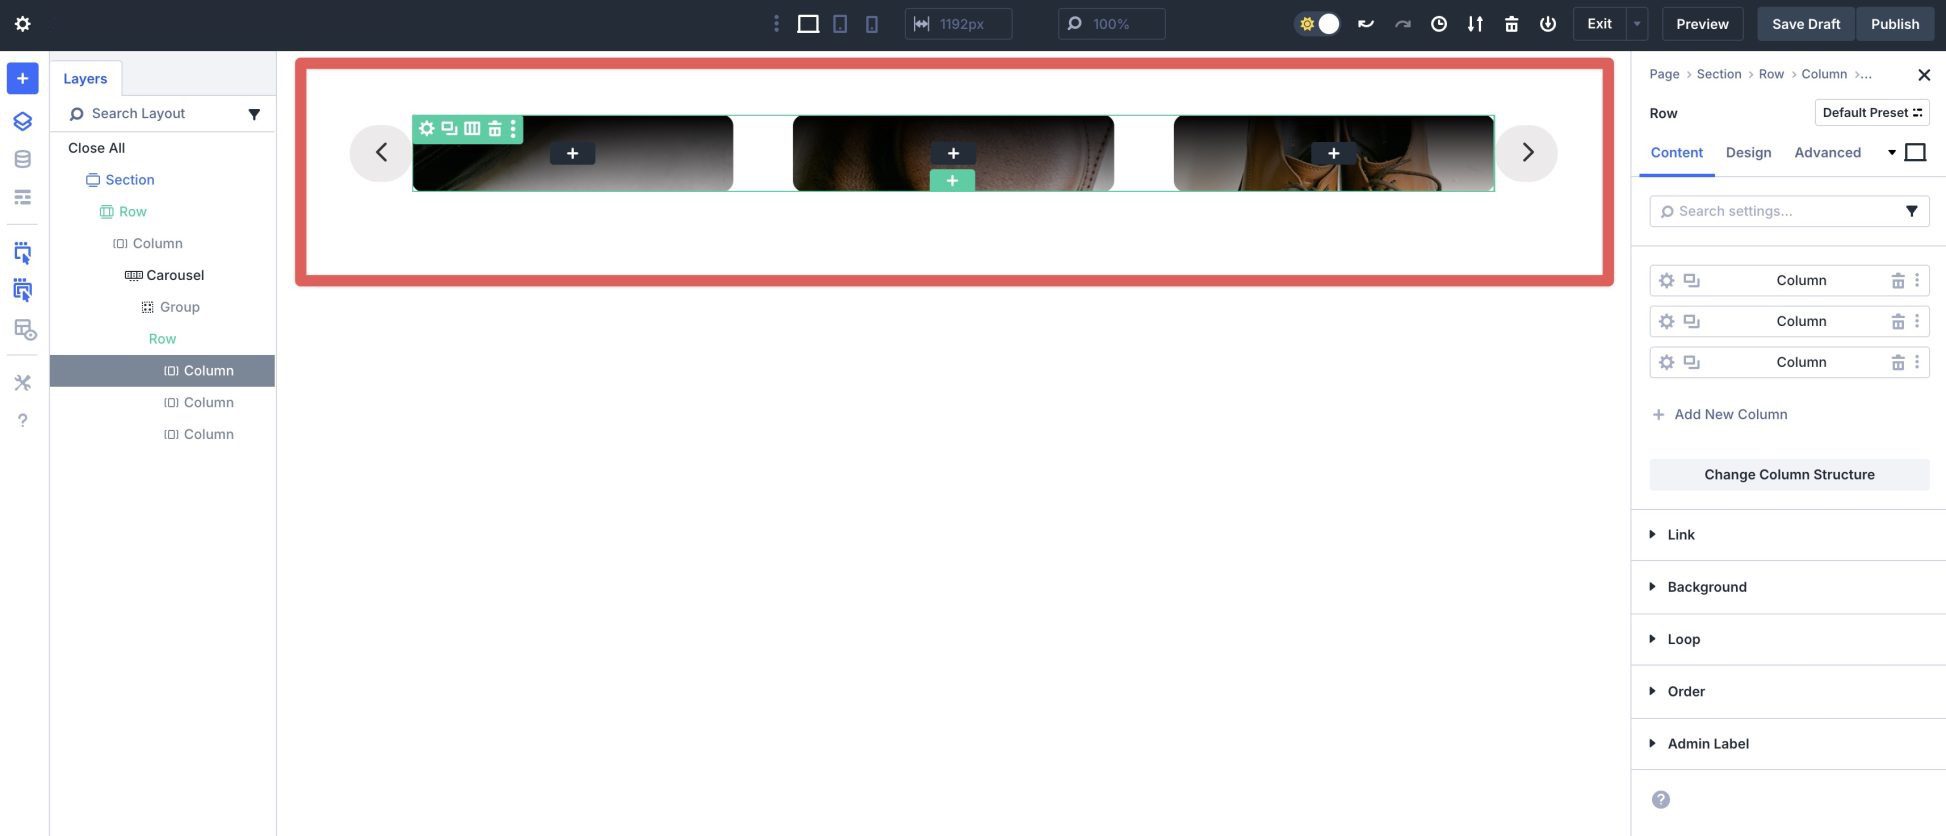
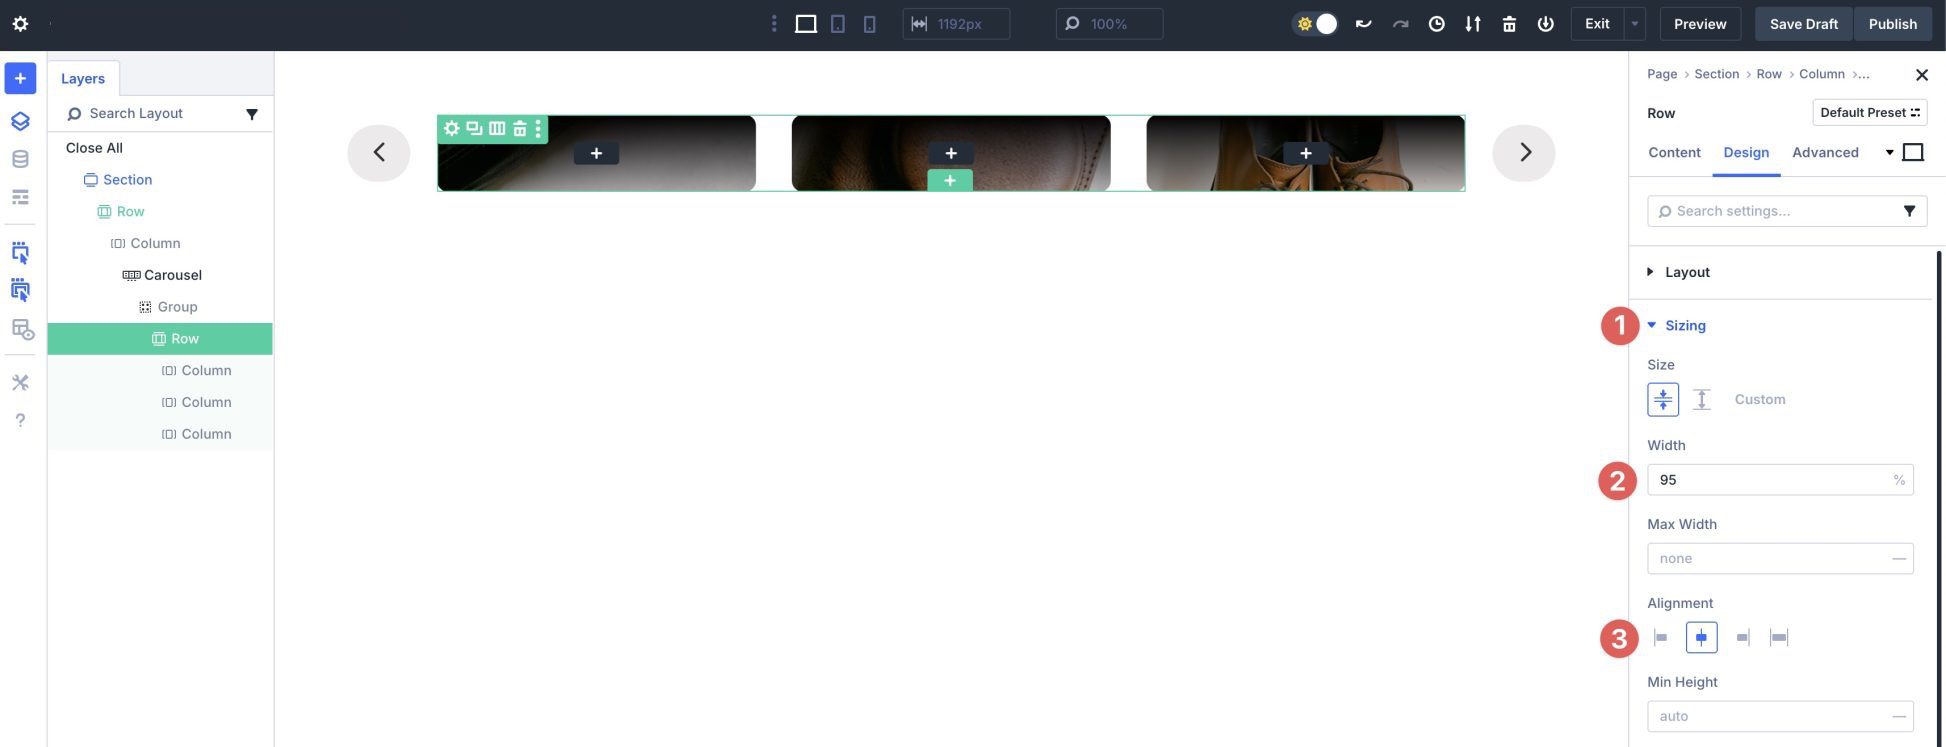
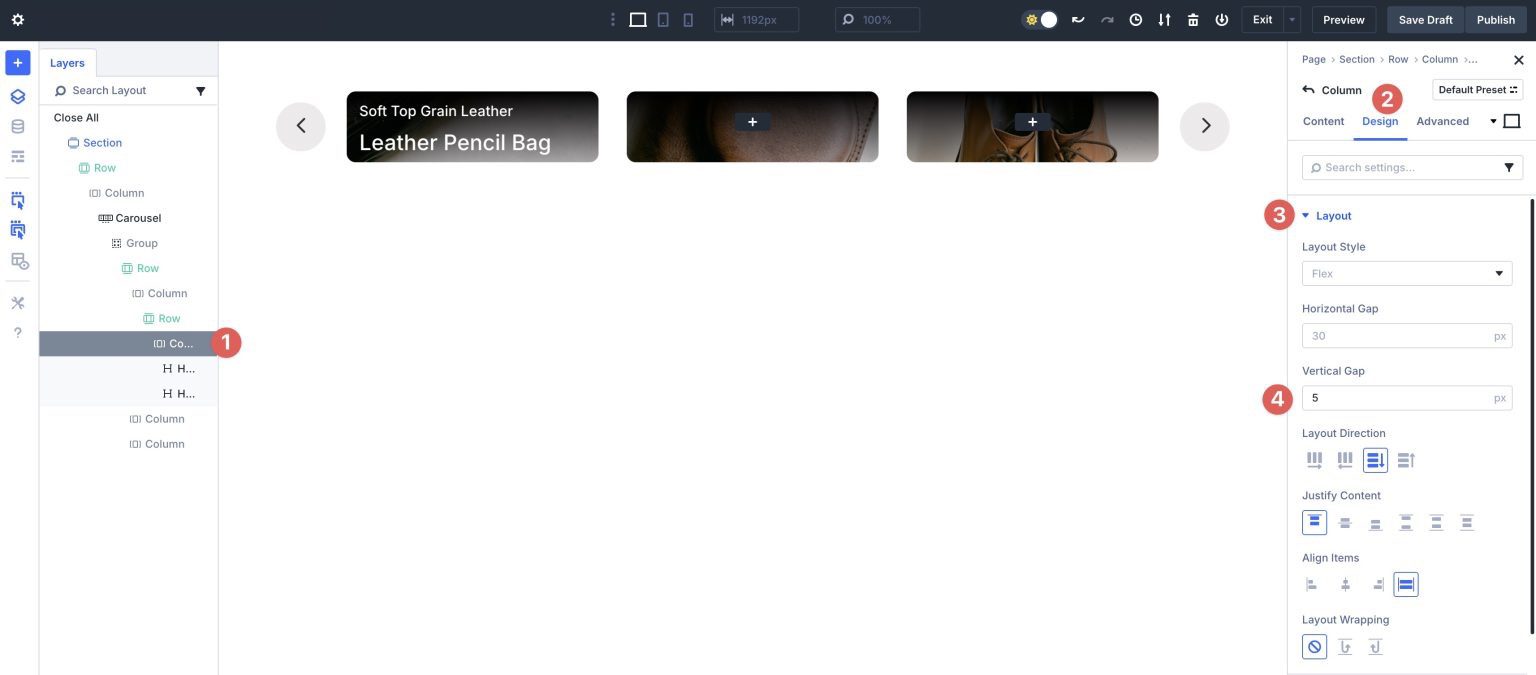
Now we should regulate the row’s width and Flex settings. Click on the Design tab for the row. Amplify the Format dropdown menu and regulate the Horizontal Hole to 3.5. Go away all different settings as is.
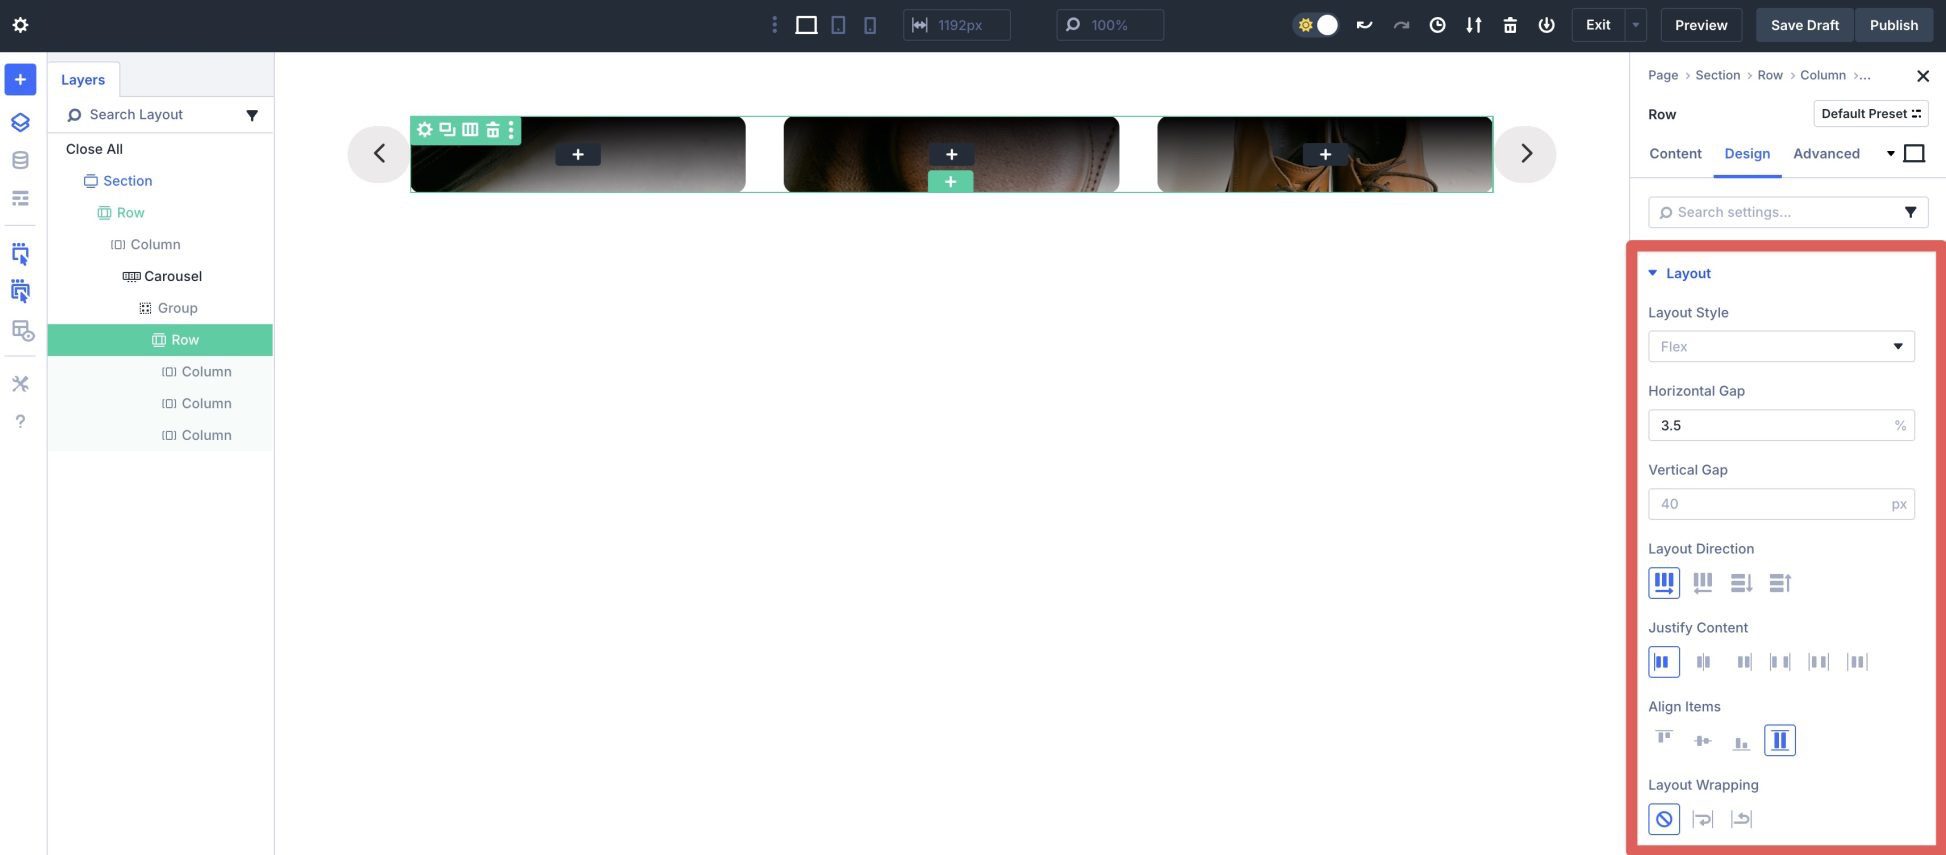
Amplify the Sizing dropdown menu. Set the Width to 95% and the Alignment to Middle. This may give the arrows within the slide just a little of respiring room.
Step 3: Upload Content material To The Row
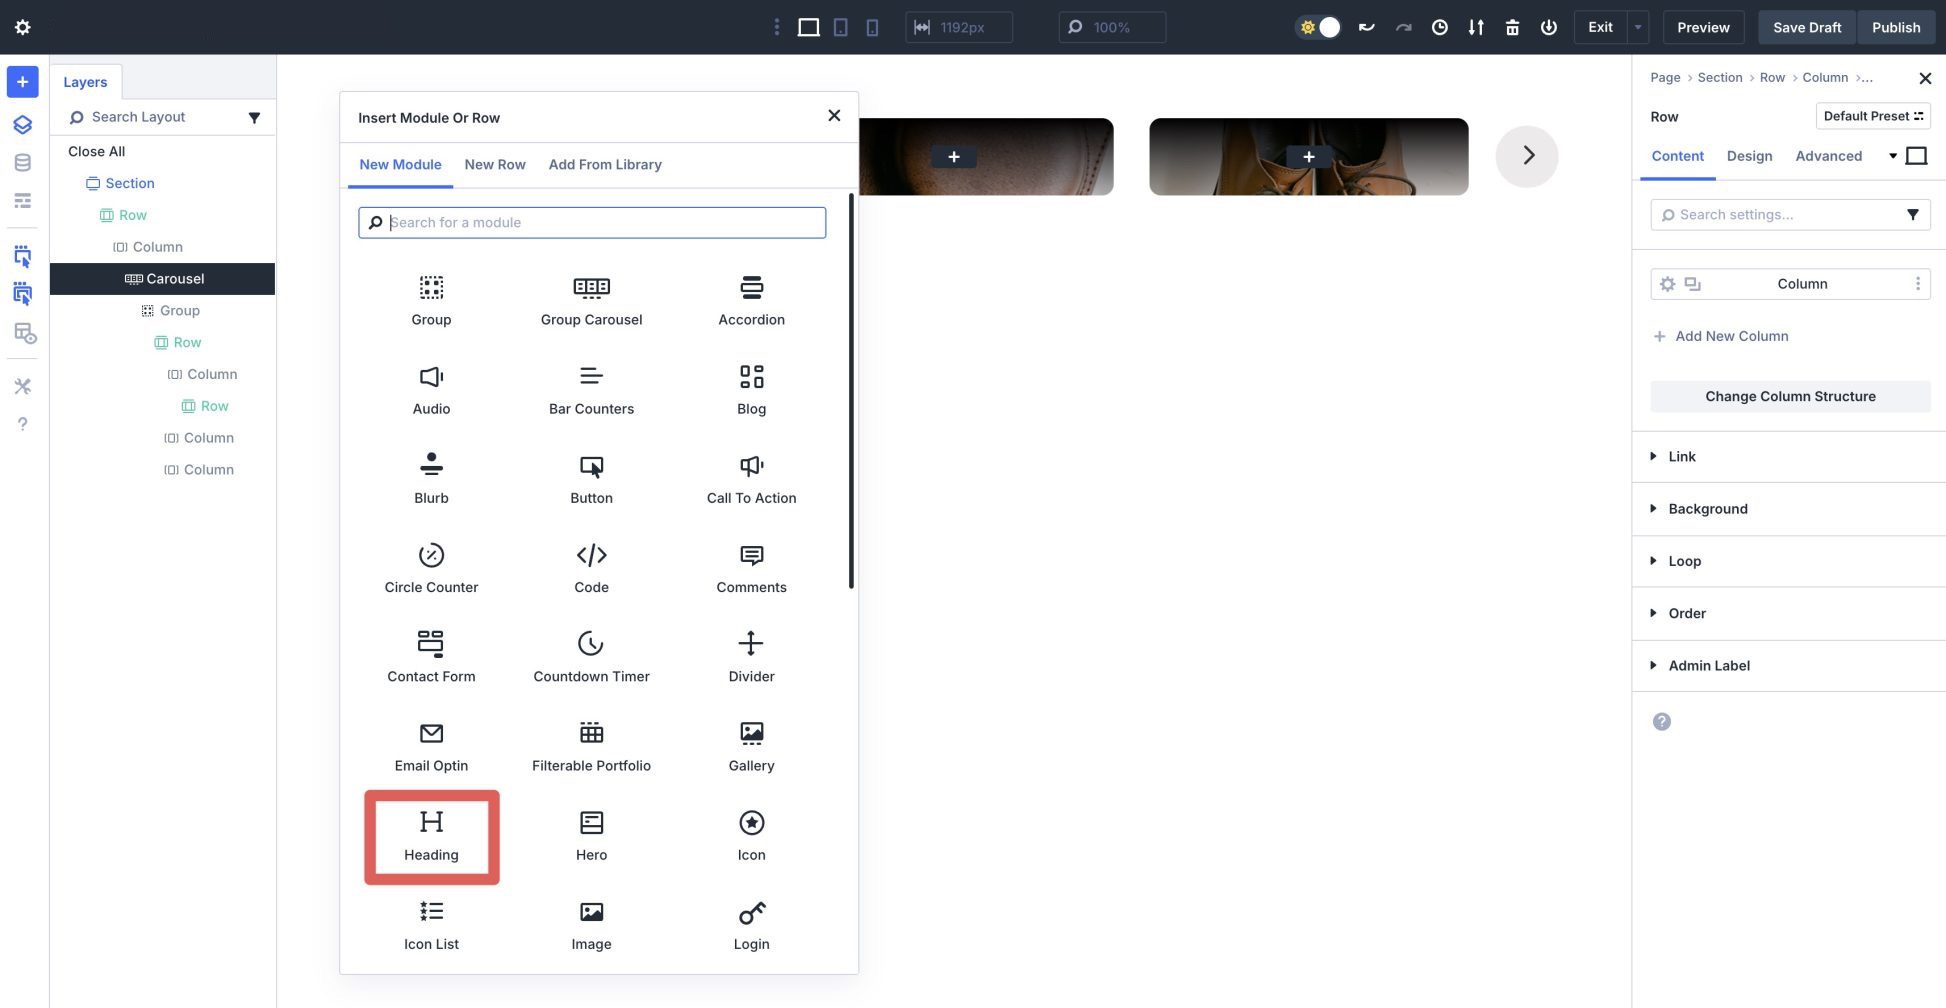
Click on at the black + icon within the first column so as to add a brand new module.
Click on the New Row tab and make a selection a unmarried column row.
Upload A Heading Module
Find the Heading module and upload it to the first column.
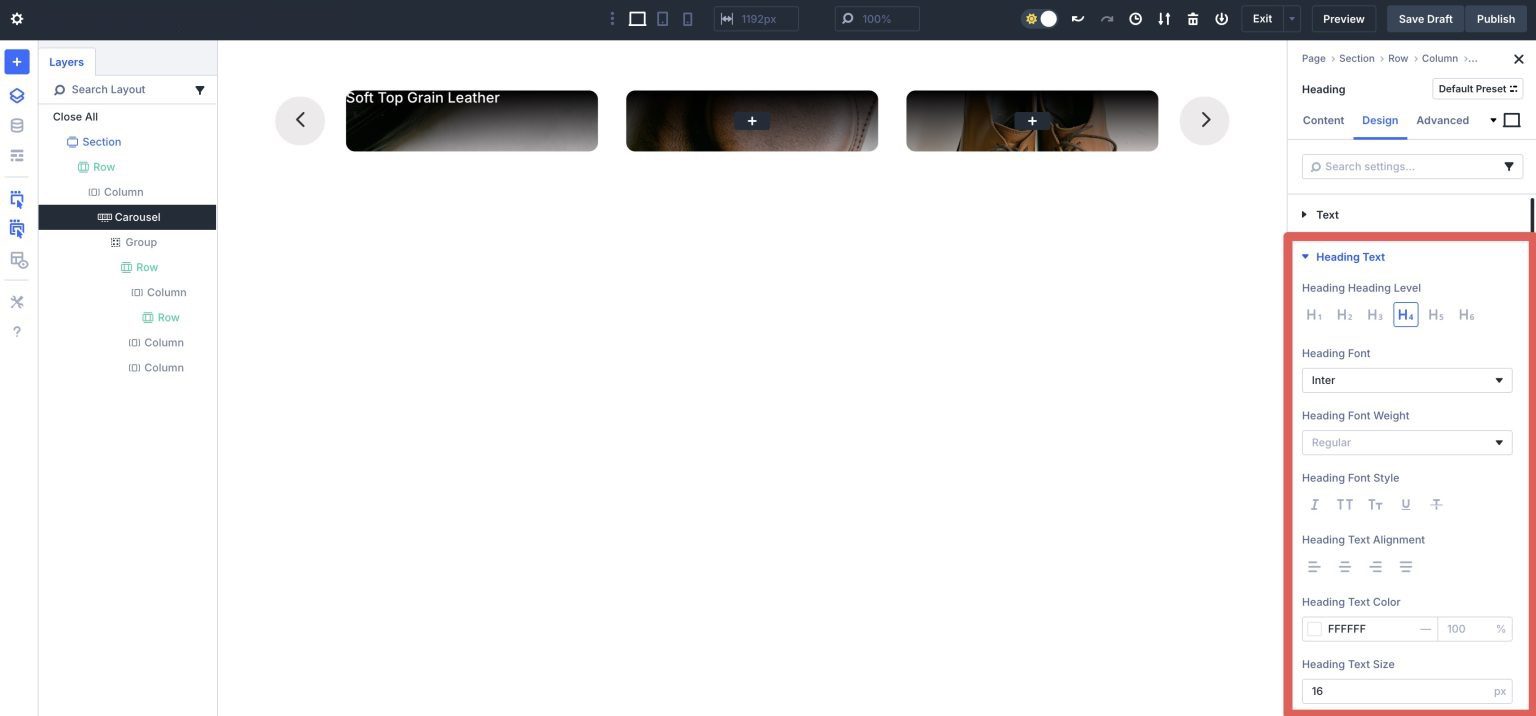
Give the Heading module a Name after which click on the Design tab.
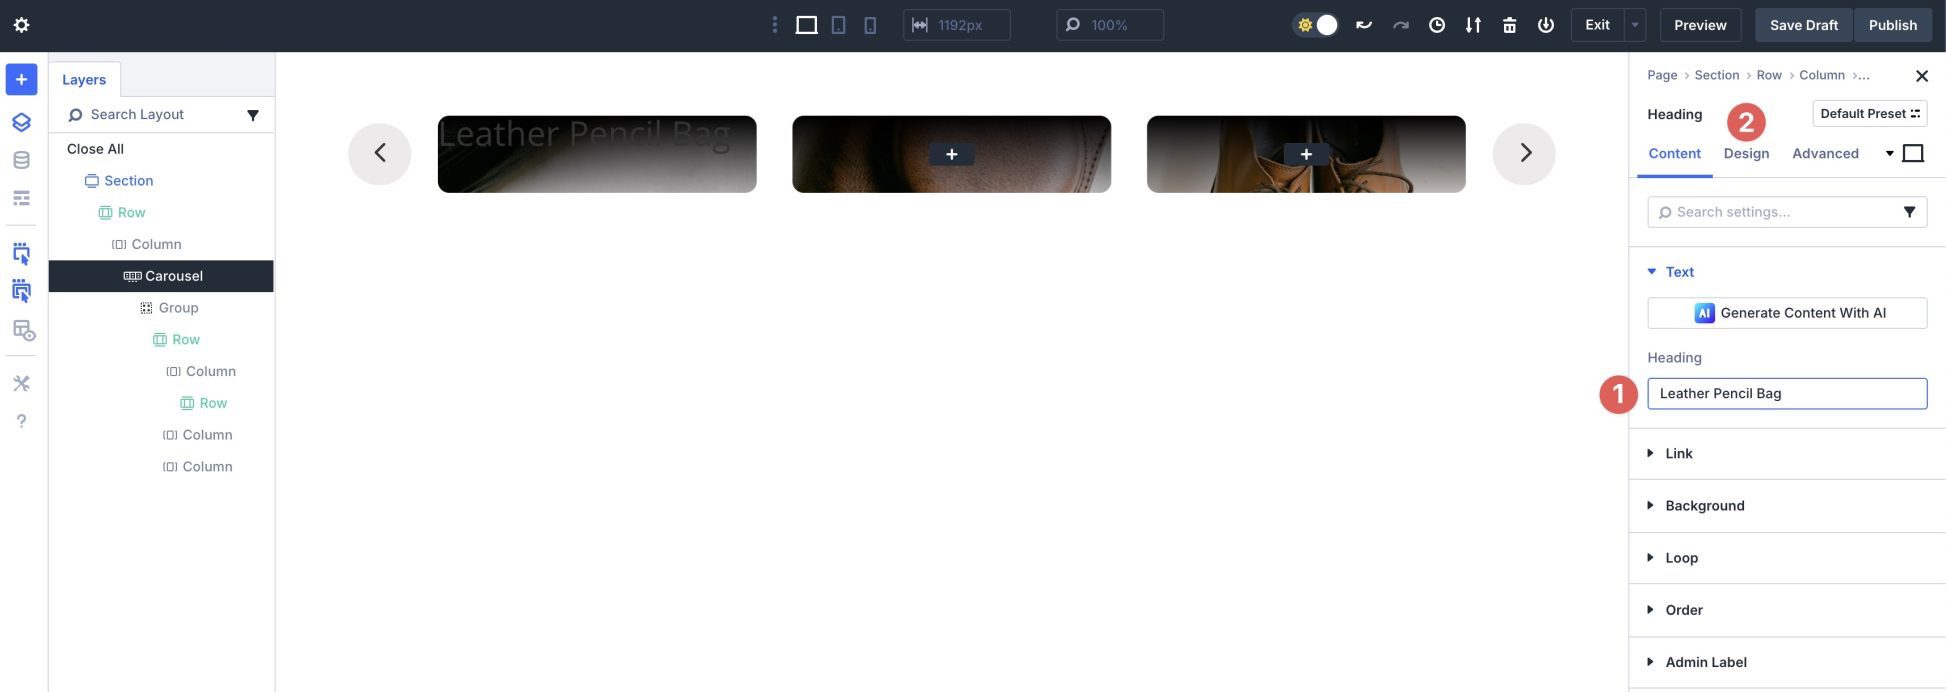
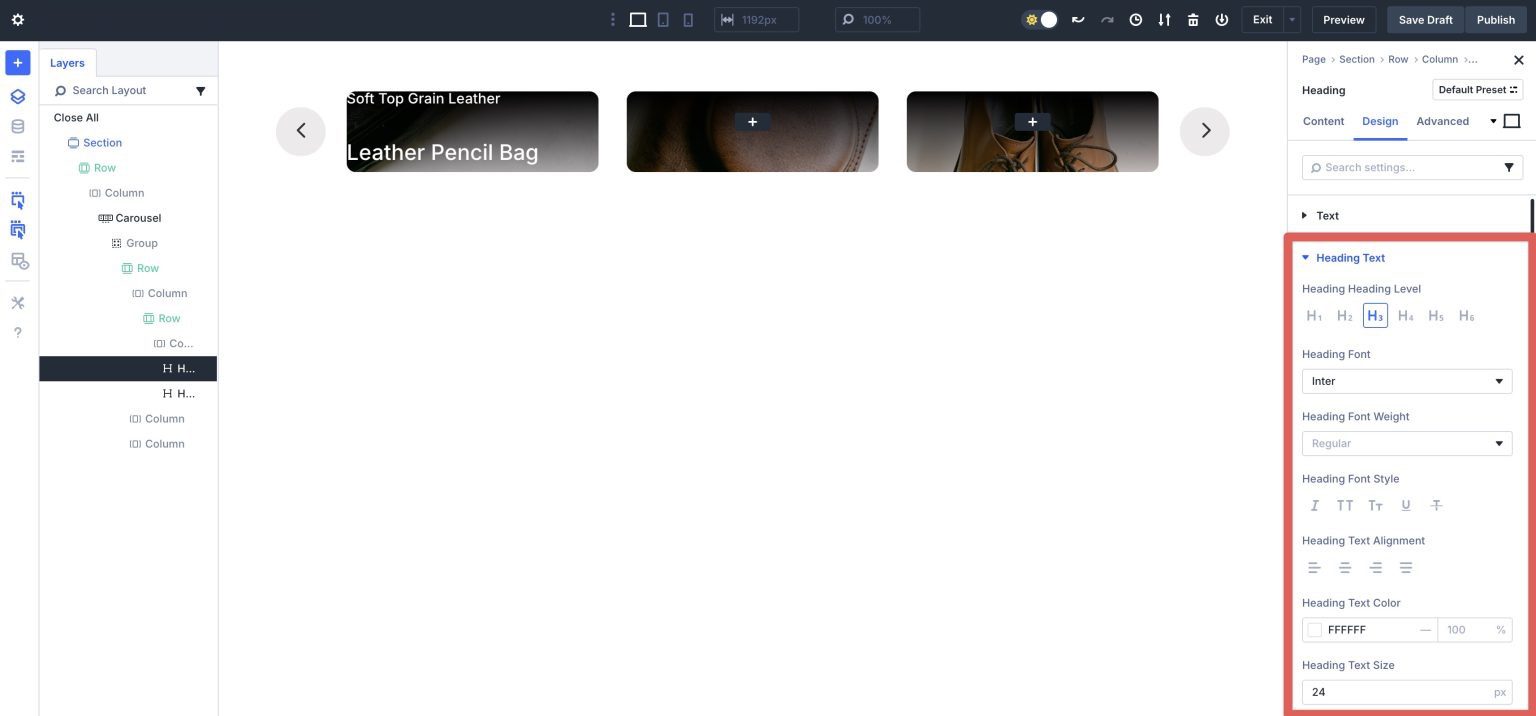
Amplify the Heading Textual content dropdown menu. Set the Heading Degree to H4. Make a choice Inter because the Heading Font, and #ffffff because the Heading Textual content Colour. Set the Heading Textual content Measurement to 16px.
Upload A 2d Heading Module
Upload some other Heading module beneath the primary one within the first column. Give it a Name, and navigate to the Design tab. Set the Heading Heading Degree to H3, Heading Font to Inter, Heading Textual content Colour to #ffffff, and the Heading Textual content Measurement to 24px.
Use the Layers panel to make a choice the row we added to the first column. We will be able to regulate the row’s spacing. Underneath the Spacing dropdown menu, upload 5% padding to the height, left, and proper.
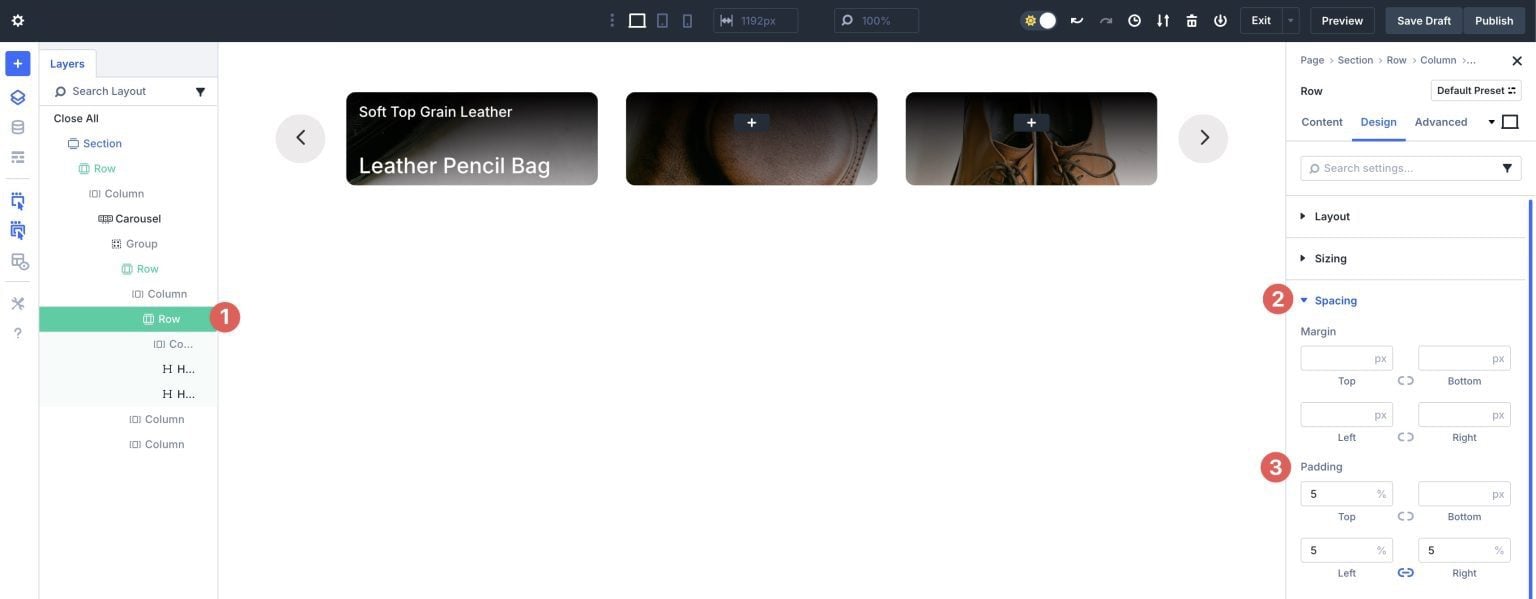
Now click on into that row’s column. Click on at the Design tab and extend the Format settings. Within the Vertical Hole box, upload 5px.
Reproduction this row and upload it to the second one and 3rd columns. Trade the titles for every of the heading modules.
Upload An Icon Module
Upload a brand new unmarried column row to the primary column. Click on the black + icon so as to add a brand new module and make a selection the Icon module.
![]()
When the Icon module’s settings seem, make a selection the + icon from the Divi icon library.
![]()
Within the Background dropdown menu, make a selection #000000 because the Background Colour.
![]()
Navigate to the Design tab. Amplify the Icon dropdown menu. Assign #d9d7d7 because the Icon Colour and set the Icon Measurement to 42px.
![]()
Amplify the Alignment tab and set the Icon Alignment to Proper.
![]()
Amplify the Spacing dropdown menu. Upload 5% Margin to the backside and proper for the icon.
![]()
After all, extend the Border dropdown menu and assign a 100px Border Radius to the icon.
![]()
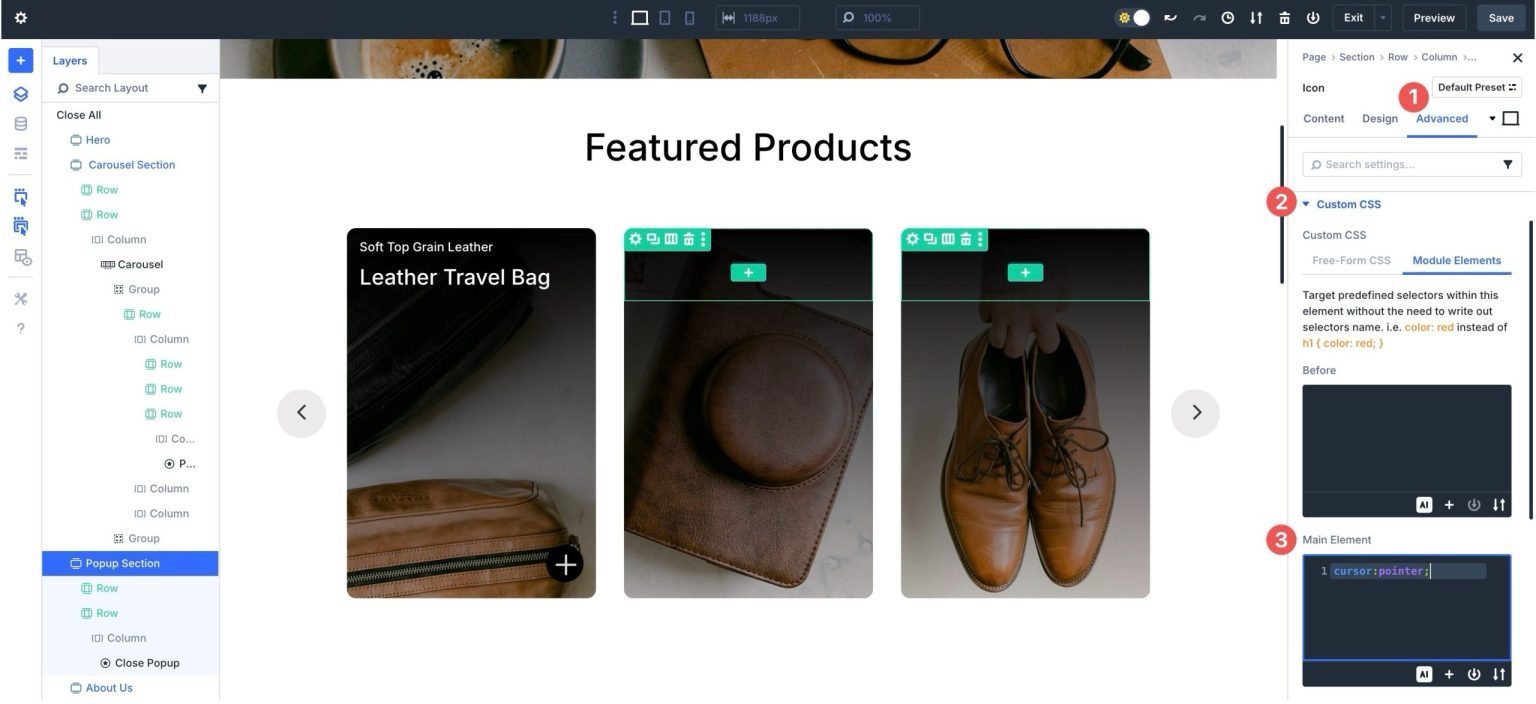
As a result of we’ll use the Icon module to near the content material expose phase, we’ll want to upload just a little of CSS to let the consumer are aware of it’s a clickable merchandise. Navigate to the Complex tab and extend the Customized CSS dropdown menu. Click on Module Components and upload cursor:pointer; into the Major Component box:
Reproduction the row with the Icon module and upload it to the second one and 3rd columns.
Step 4: Reproduction The First Crew
As soon as the primary Crew is added and styled, you’ll be able to simply replica it and alter pictures and headlines. In the principle settings panel for the Crew Carousel module, click on the Reproduction icon to duplicate the primary Crew.
Click on the Layers view to make a choice the second one Crew.

Repeat the stairs above to switch background pictures and textual content. As soon as whole, preview the Crew Carousel to verify it really works as supposed.
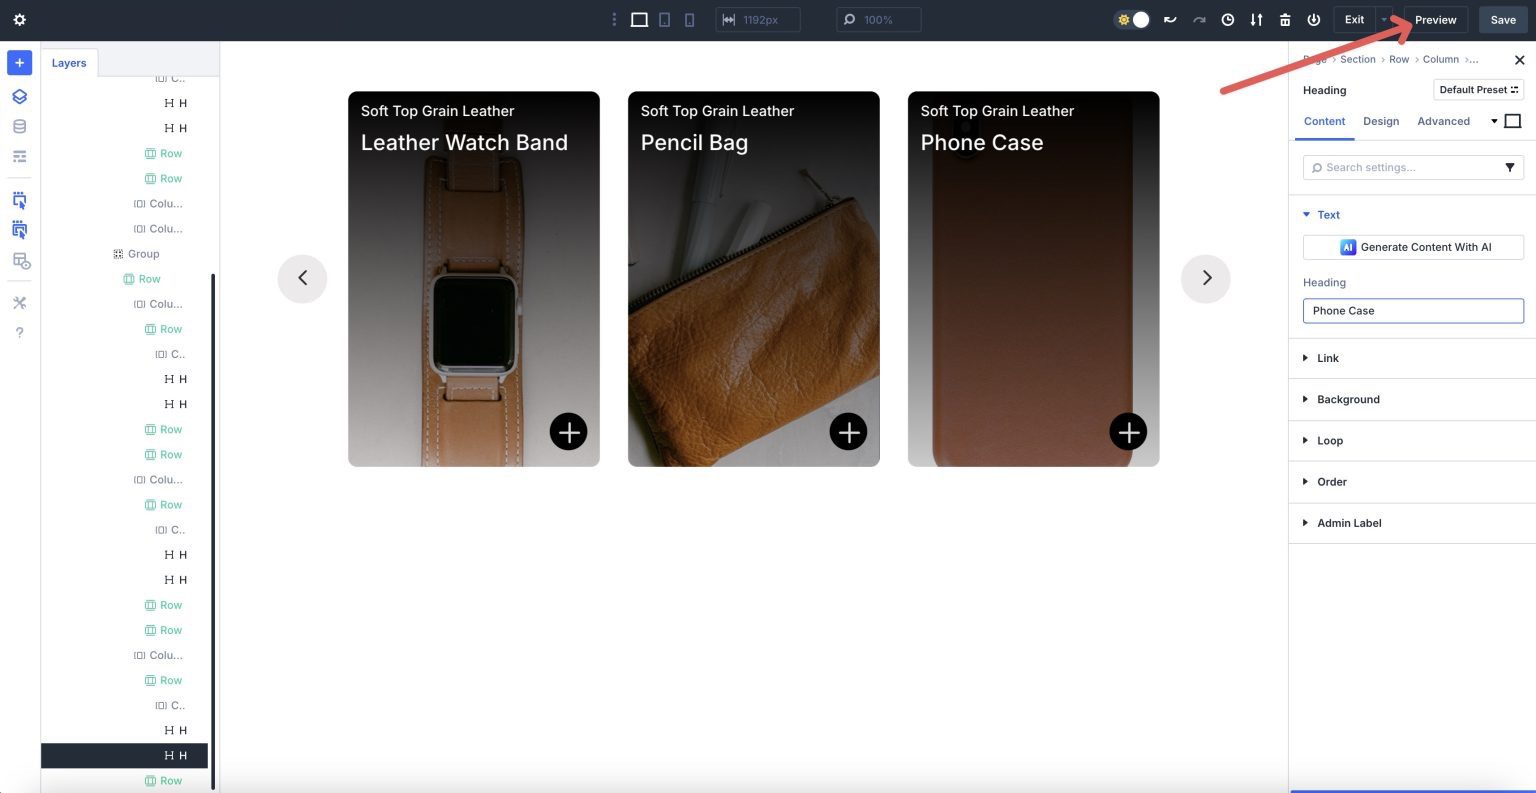
Divi will open the web page in a brand new tab, permitting you to view the format.
Again within the Visible Builder, use Divi 5’s Customizable Responsive Breakpoints to make any adjustments vital to the Crew Carousel prior to we continue with your next step.
Step 5: Create The Content material Disclose Phase
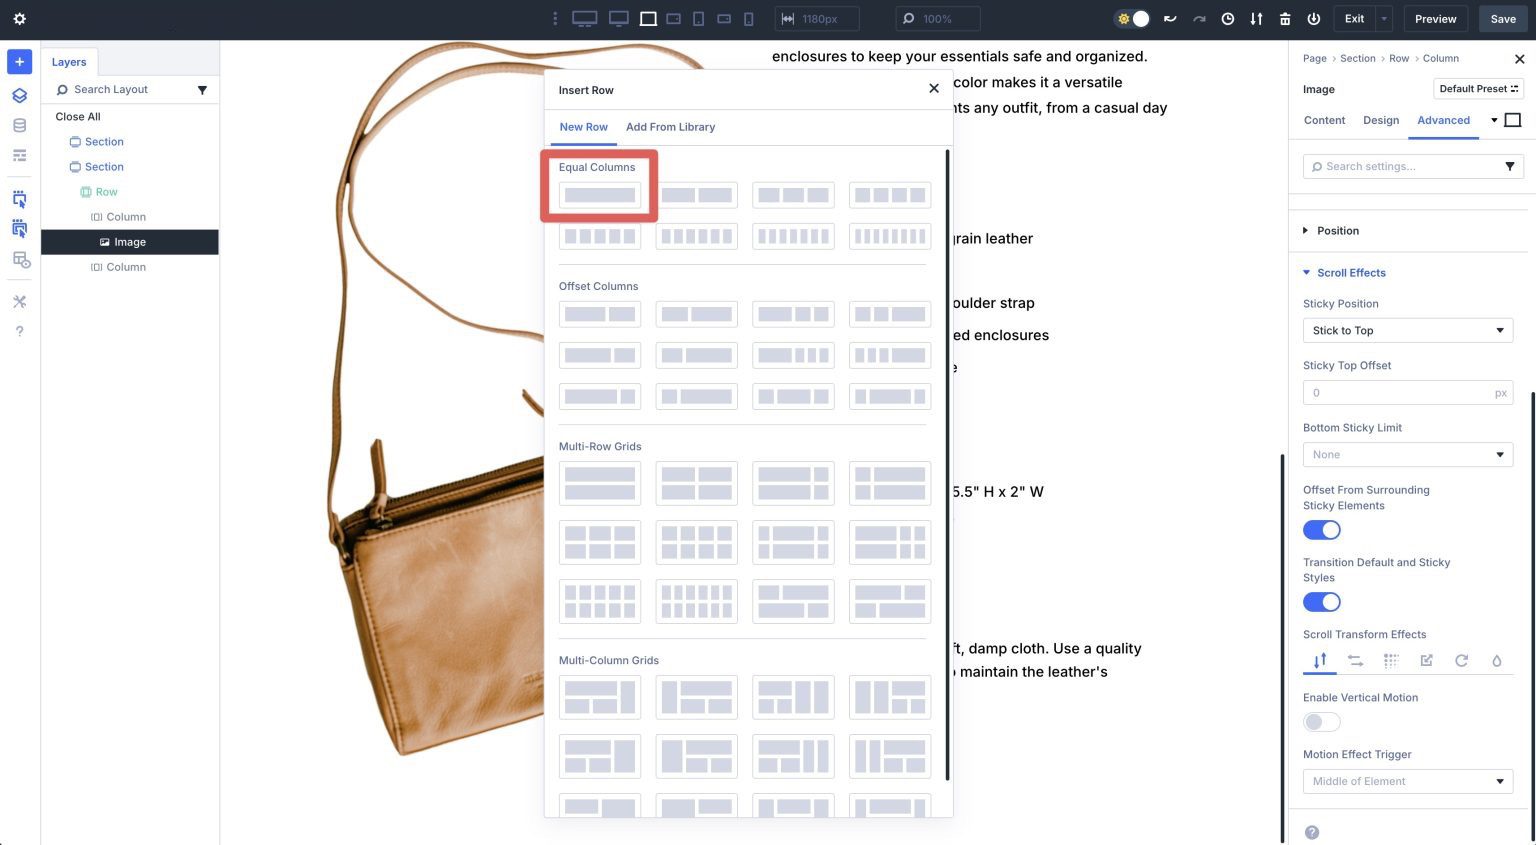
Get started by means of developing a brand new phase beneath our Crew Carousel phase. When the Insert Phase conversation field seems, click on so as to add a two-column row.

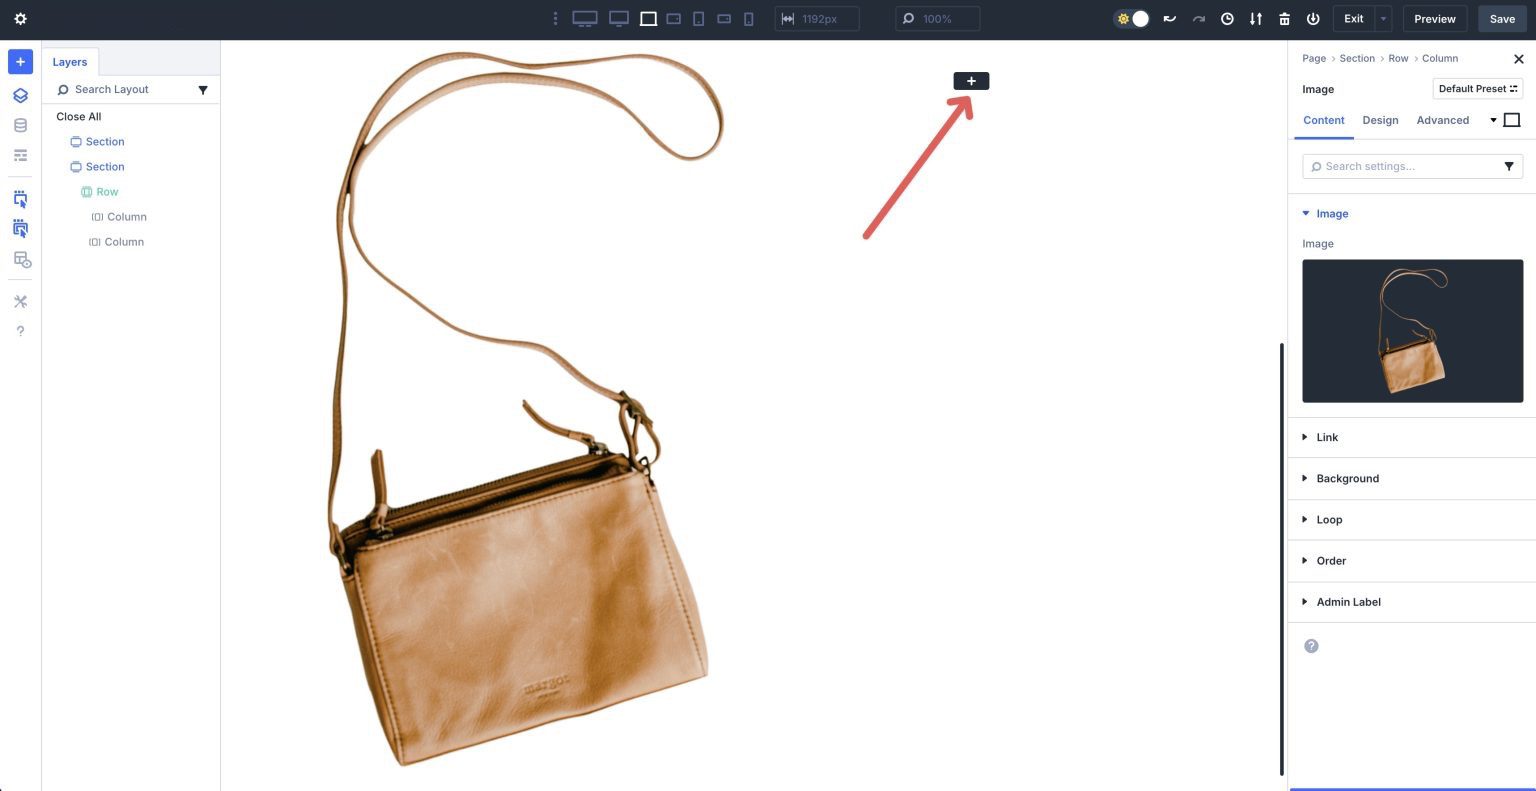
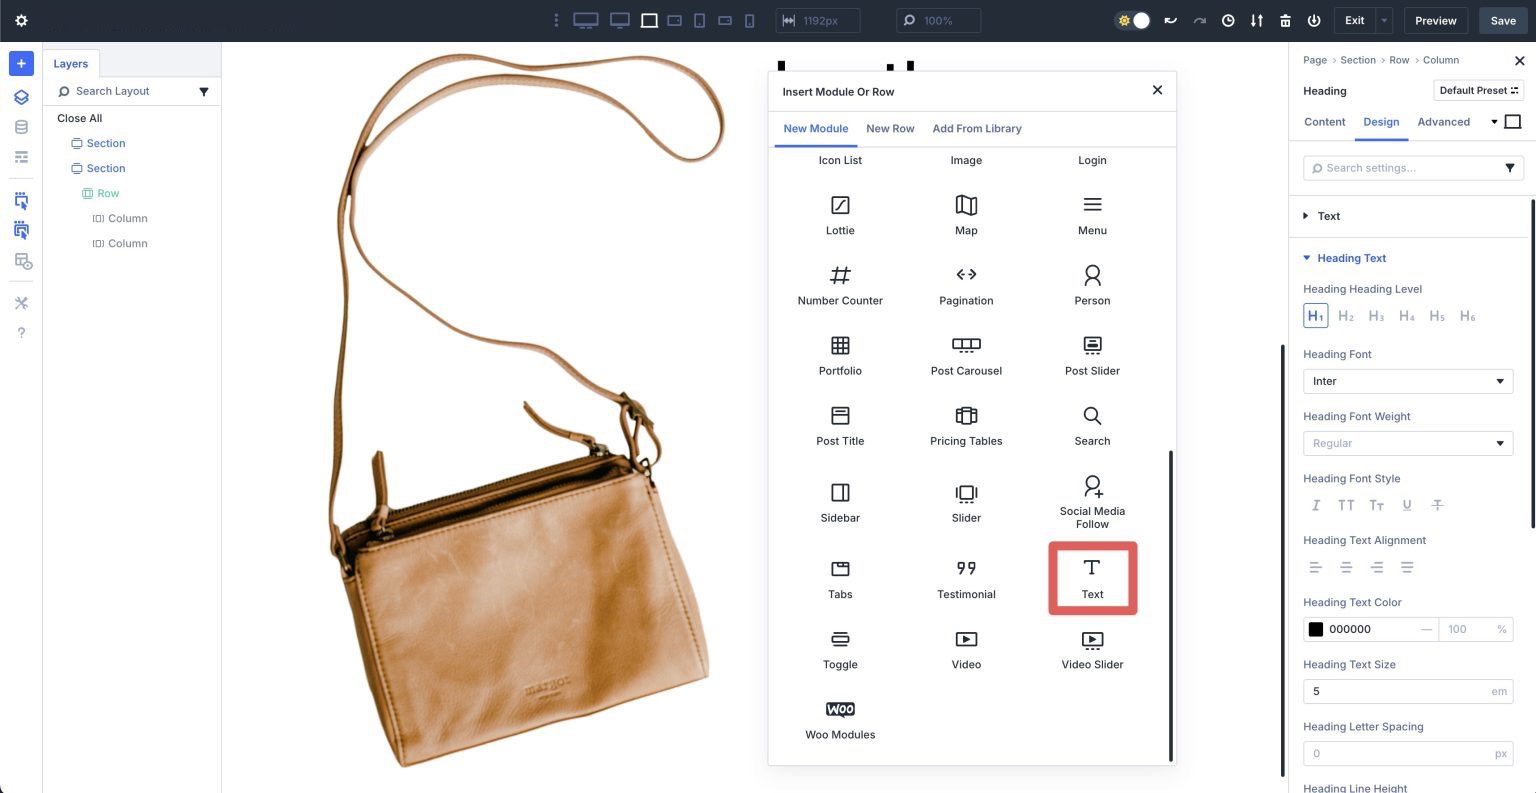
Upload An Symbol Module
Make a choice the Symbol module and upload it to the first column.
Click on the black + icon so as to add a module to the 2d column.
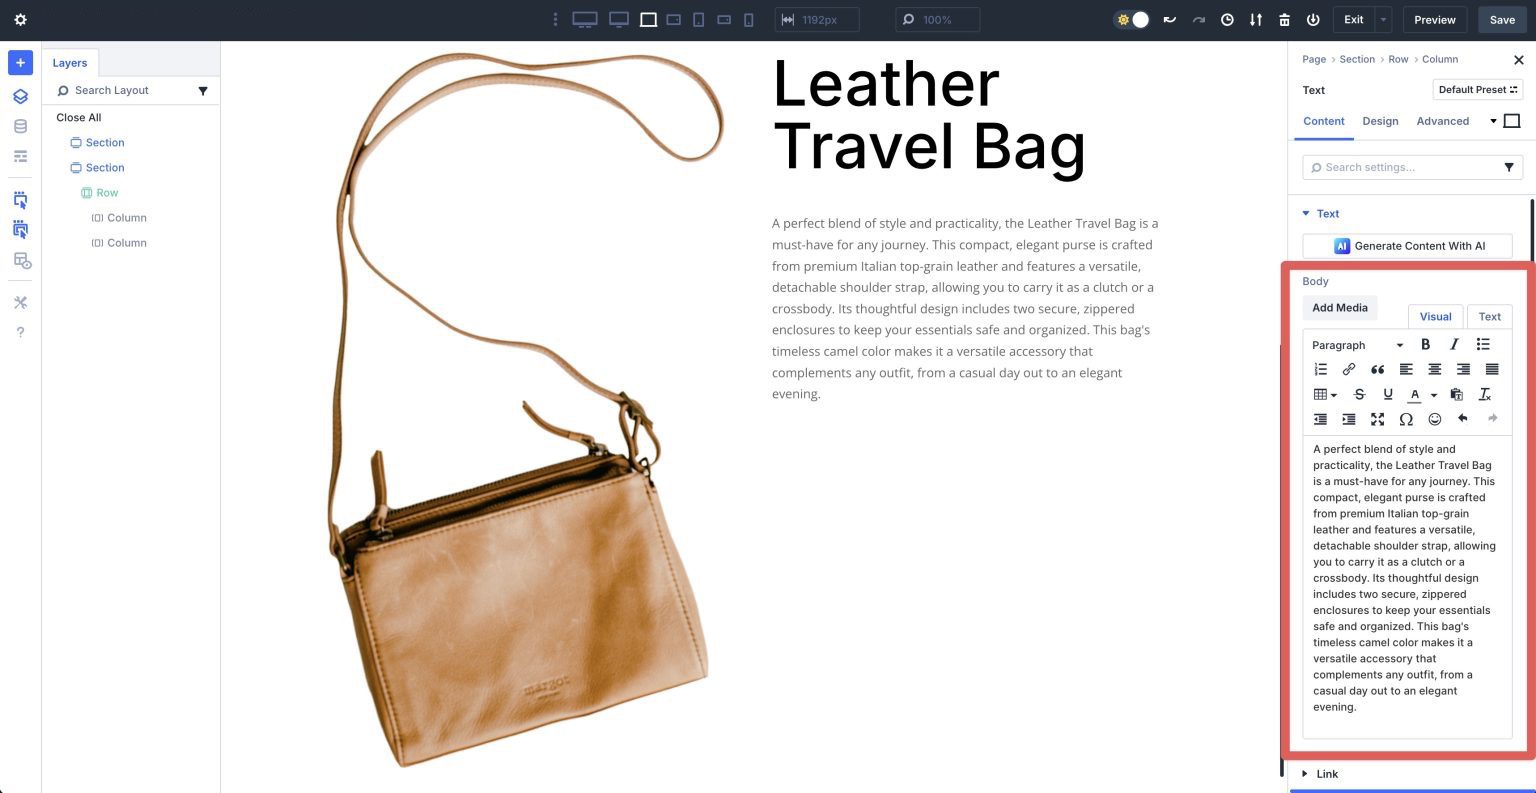
Upload Textual content Modules
Upload a Heading module, give it a Name, and extend the Heading Textual content dropdown menu. Set the Heading Heading Degree to H1, Heading Font to Inter, Heading Textual content Colour to #000000, and the Heading Textual content Measurement to 5em.

Upload a Textual content module beneath the Heading module.
Input textual content within the Frame box or use Divi AI that can assist you generate an outline.
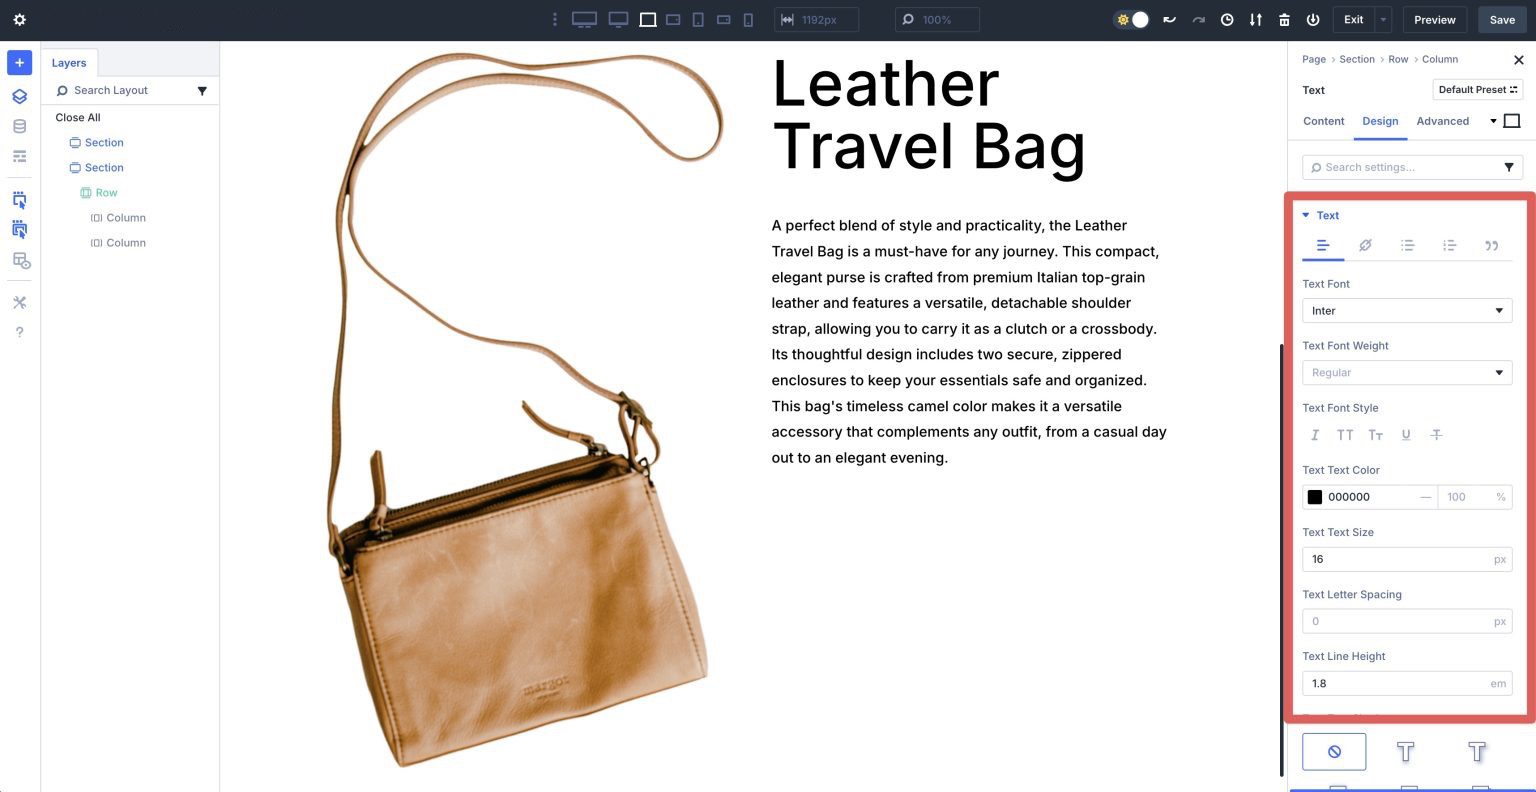
Change to the Design tab. Amplify the Textual content dropdown menu. Set the Textual content Font to Inter, the Textual content Textual content Colour to #000000, and the Textual content Textual content Measurement to 16px. Modify the Textual content Line Peak to 1.8em.
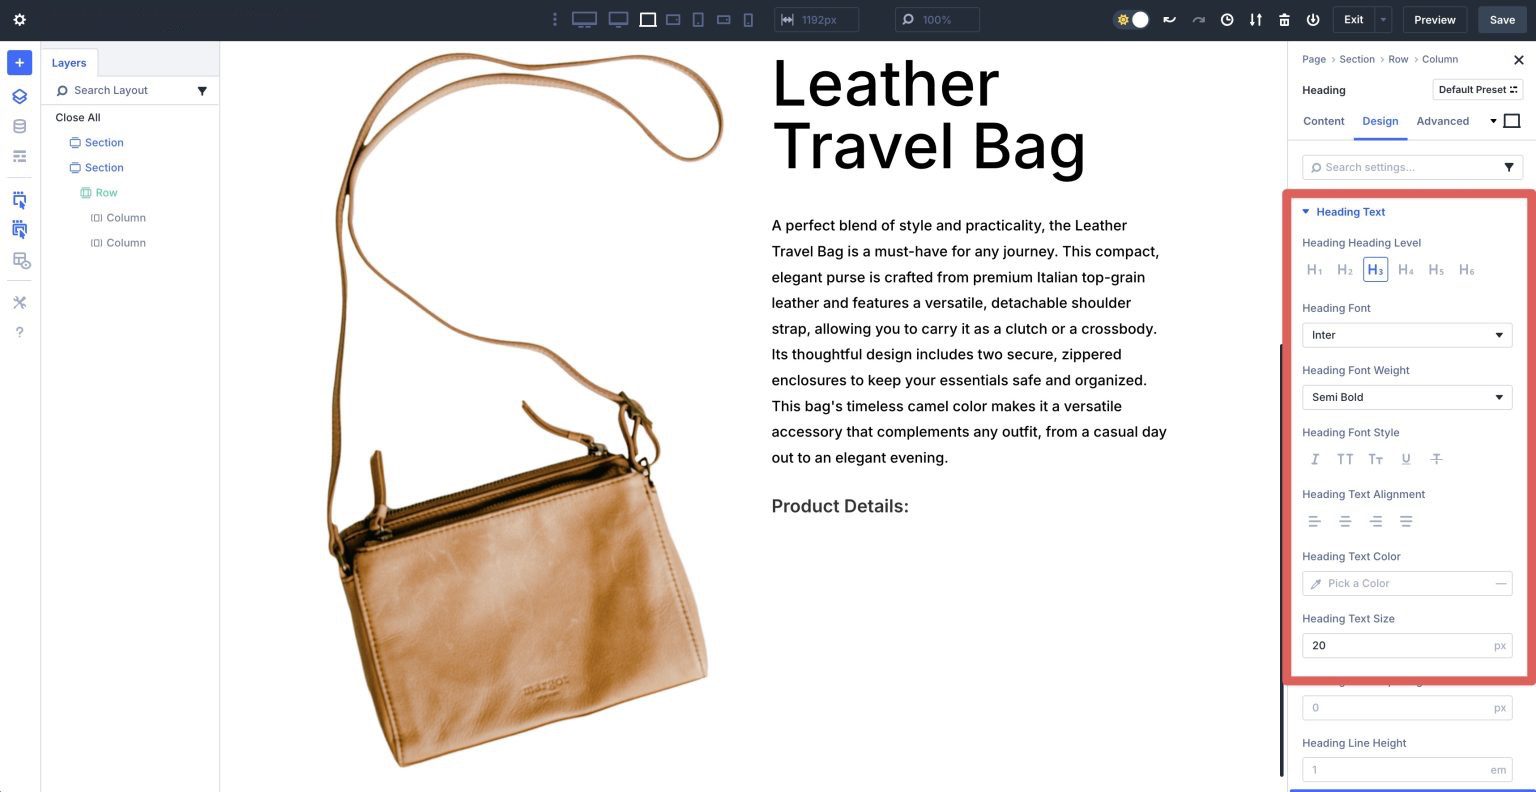
Upload a brand new Heading module beneath the Textual content module. Upload a Name and change to the Design tab. Amplify the Heading Textual content dropdown menu. Assign H3 because the Heading Heading Degree, Inter because the Heading Font, Semi Daring because the Heading Font Weight, and 20px because the Heading Textual content Measurement.
Upload An Icon Listing Module
Subsequent, in finding and make a selection the Icon Listing module so as to add it to the 2d column.
![]()
The Icon List module settings expose 3 listing pieces. To edit its content material, click on at the Settings Icon within the first Icon Listing Merchandise.
![]()
Amplify the Textual content dropdown menu and assign textual content to the Textual content box.
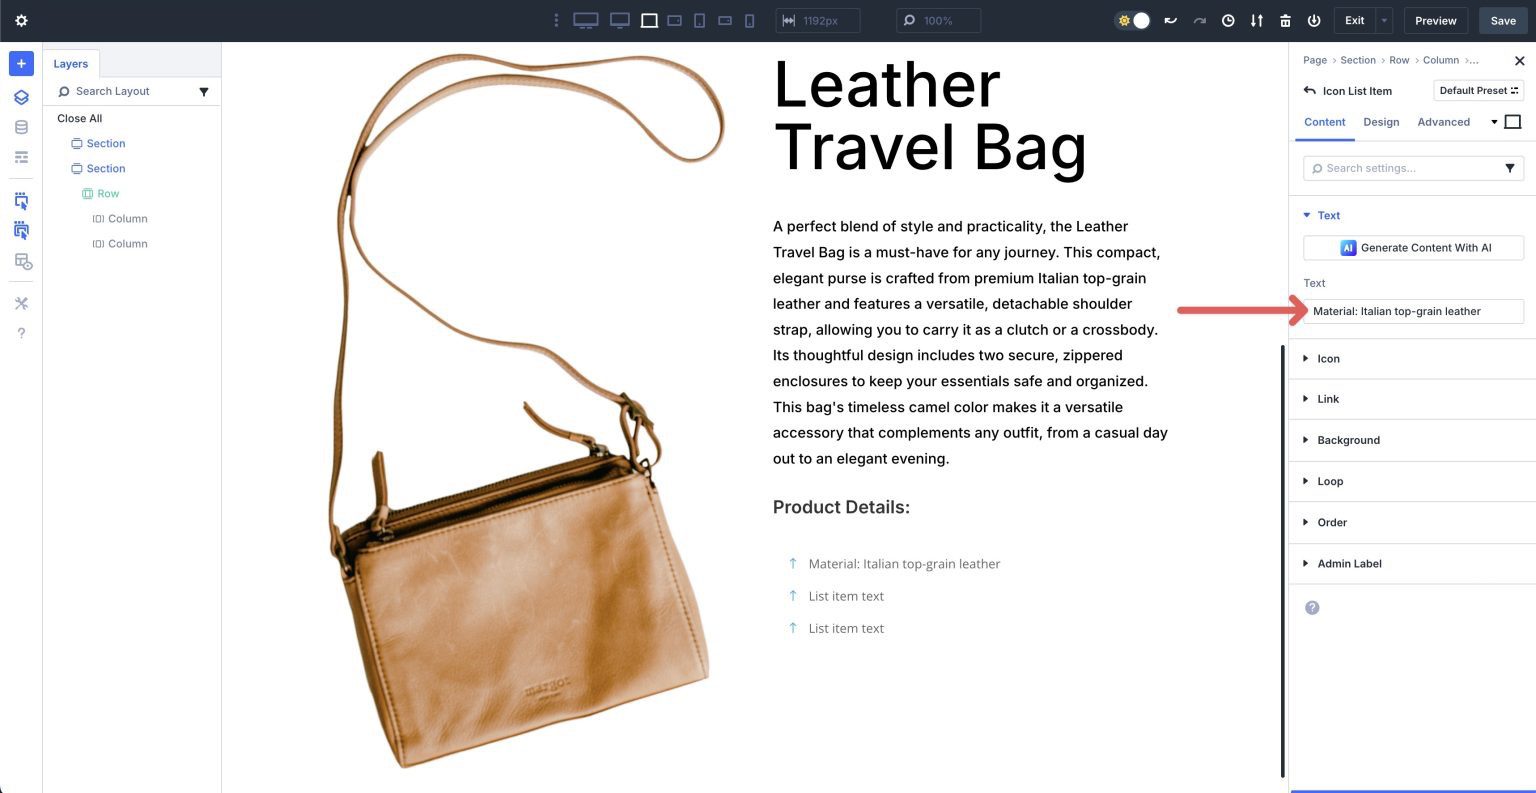
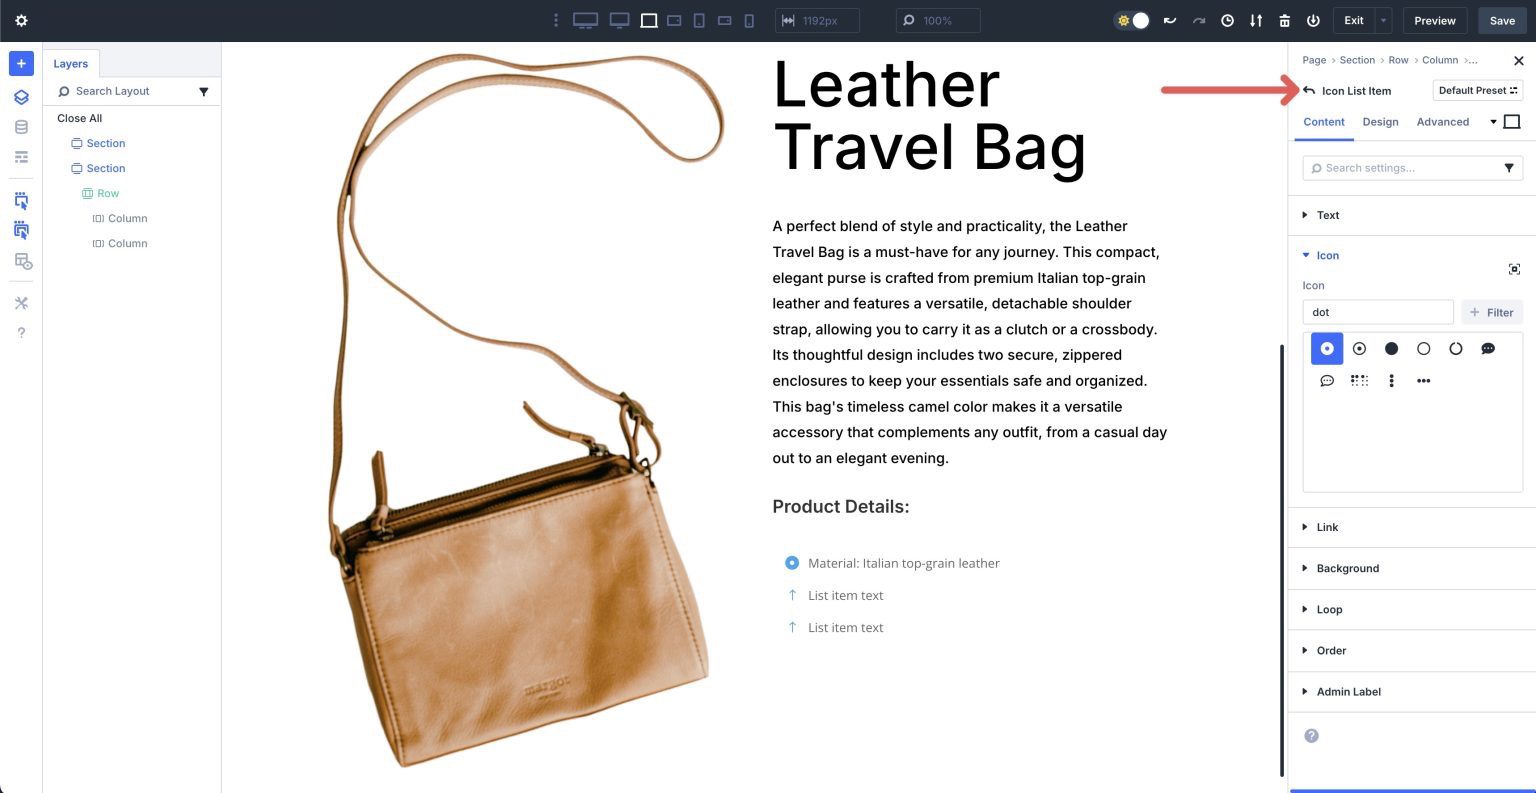
Make a choice an icon for the Icon Listing Merchandise within the Icon dropdown menu.
![]()
Click on the go back arrow on the height left of the Icon Listing Merchandise’s settings to go back to the module’s primary settings.
Repeat the stairs above so as to add textual content and assign an icon for the remainder Icon Listing Pieces. Click on the Reproduction icon so as to add further Icon Listing Pieces as vital.
![]()
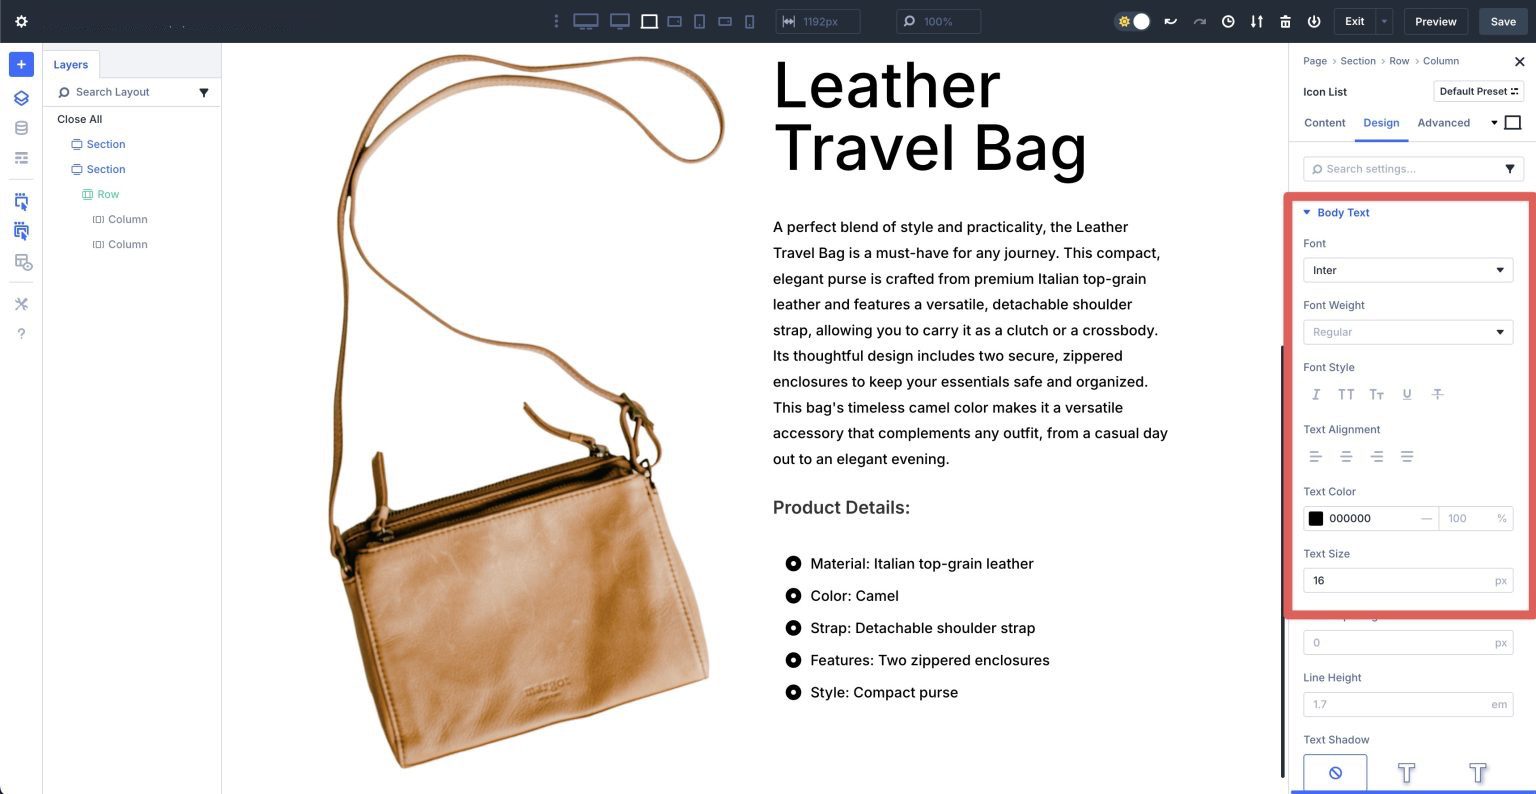
As soon as all listing pieces are in position, click on the Design tab to make taste adjustments. Amplify the Icon dropdown menu and assign #000000 to the Icon Colour box. Set the Icon Measurement to 18px.
![]()
Amplify the Frame Textual content dropdown menu. Assign Inter because the Font, #000000 because the Textual content Colour, and 16px because the Textual content Measurement.
Reproduction The Heading And Icon Listing Modules
Subsequent, replica the H3 Heading module we created and drag it underneath the Icon Listing module in the second one column.
Go away all design settings the similar, however give the Heading module a distinct name. Reproduction the Icon Listing module and drag it underneath the brand new Heading module we simply created. Trade the textual content for every of the Icon Listing Pieces. Go away all taste settings as is.
Repeat the stairs above to replicate the Heading and Icon Listing modules once more.
Upload A Button Module
Upload a Button beneath the remaining Icon Listing module within the 2d column. When the Button’s settings seem, upload Button Textual content and click on the Design tab. Amplify the Button dropdown menu and permit Use Customized Kinds For Button.
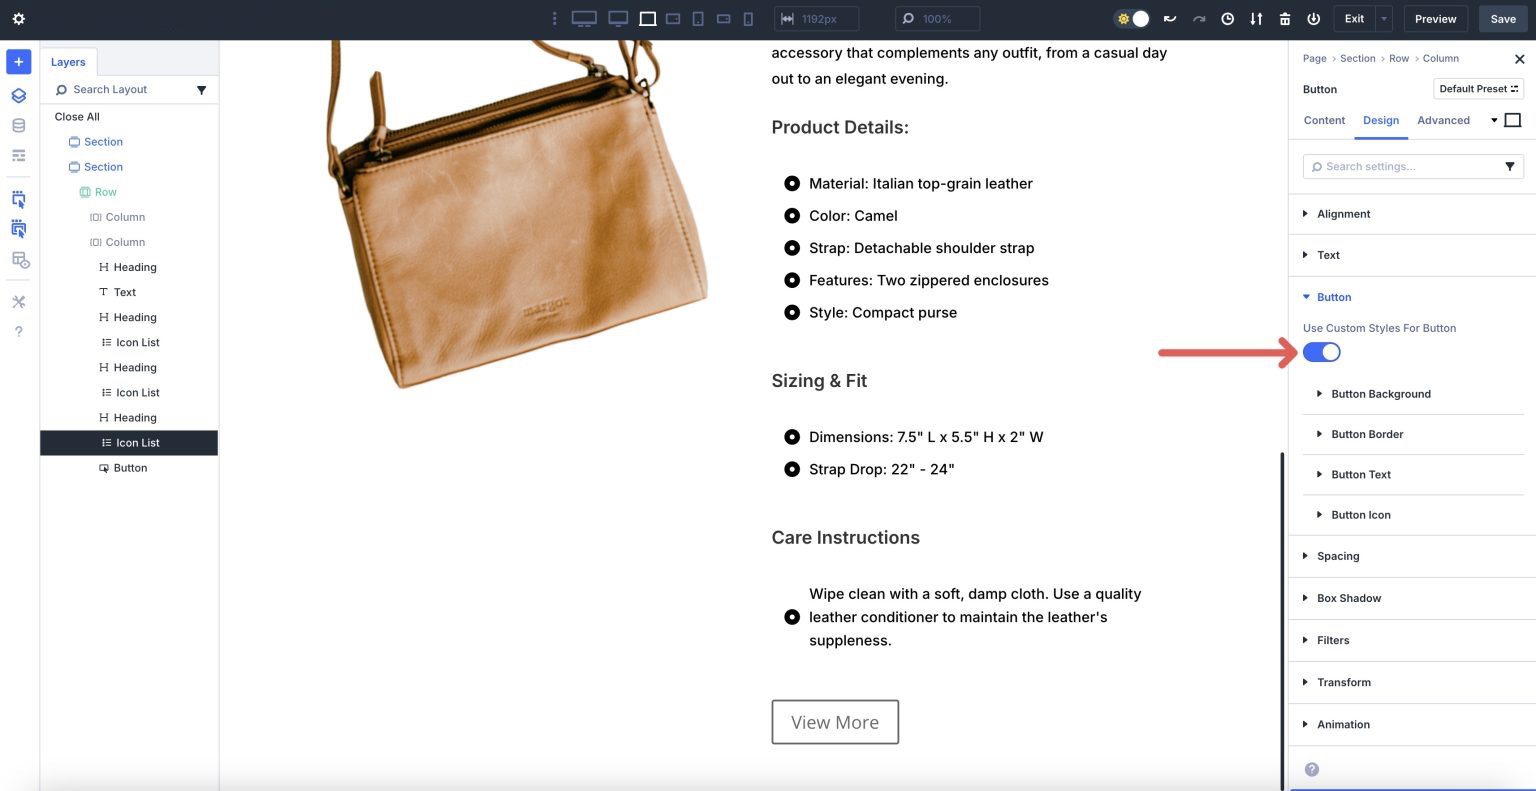
Amplify the Button Background dropdown menu and assign #000000 because the Background Colour.
Subsequent, extend the Button Border dropdown menu. Assign a 100px Button Border Radius. Upload 0px to the Button Border Width beneath Button Border Kinds.

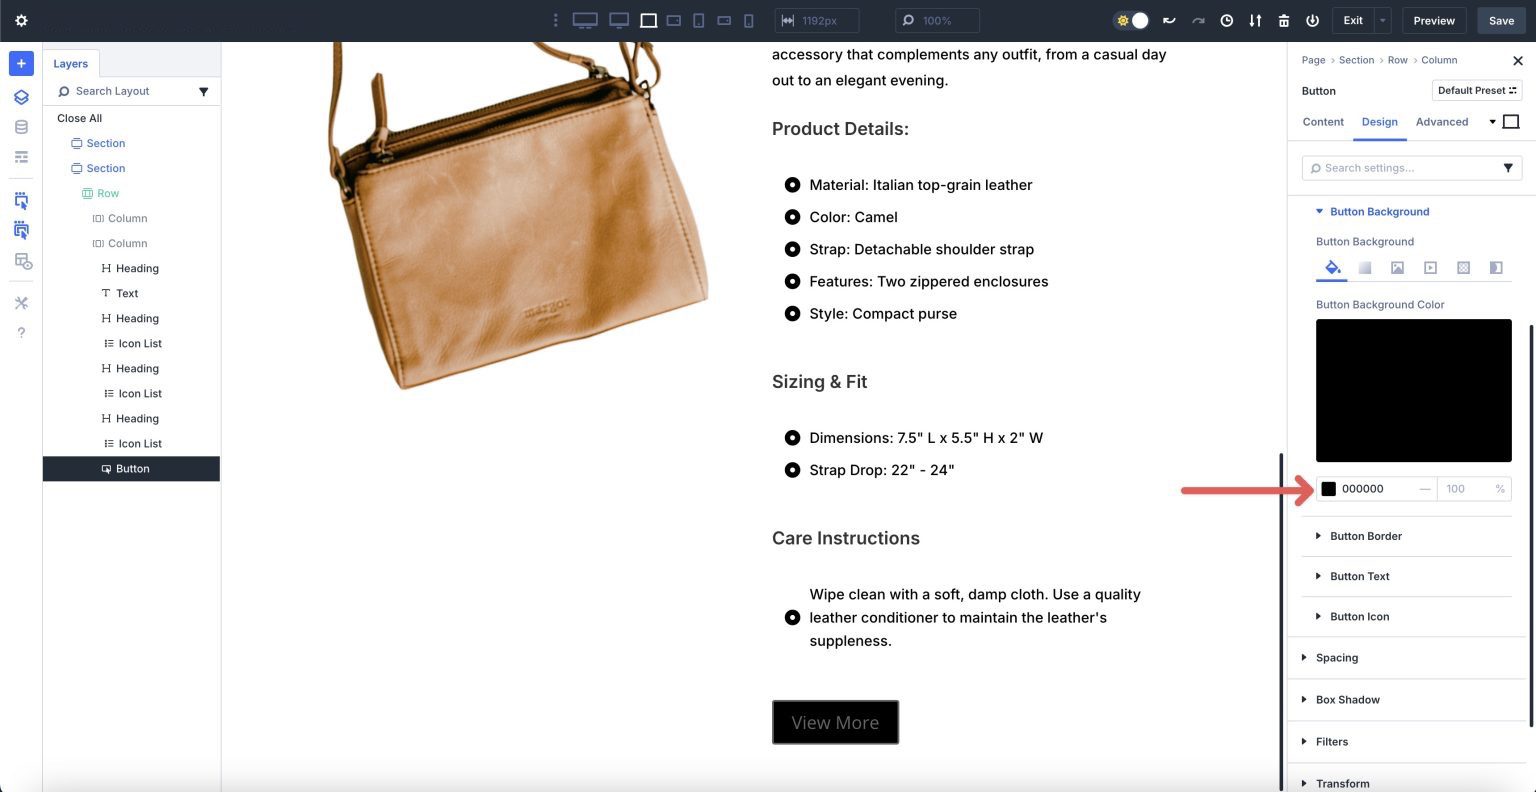
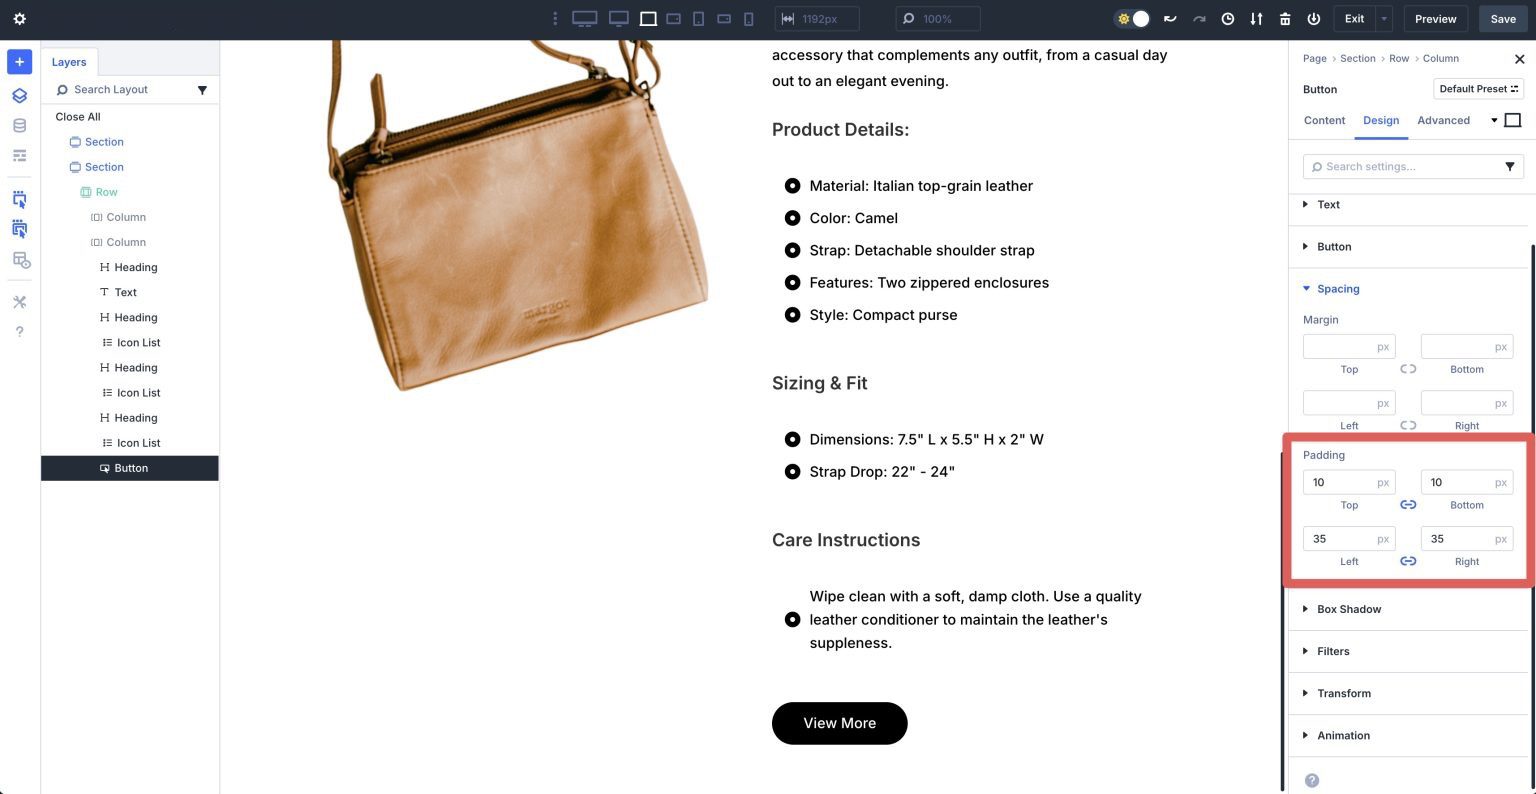
Within the Button Textual content dropdown menu, set the Button Font to Inter, Button Textual content Colour to #ffffff, and Button Textual content Measurement to 16px.
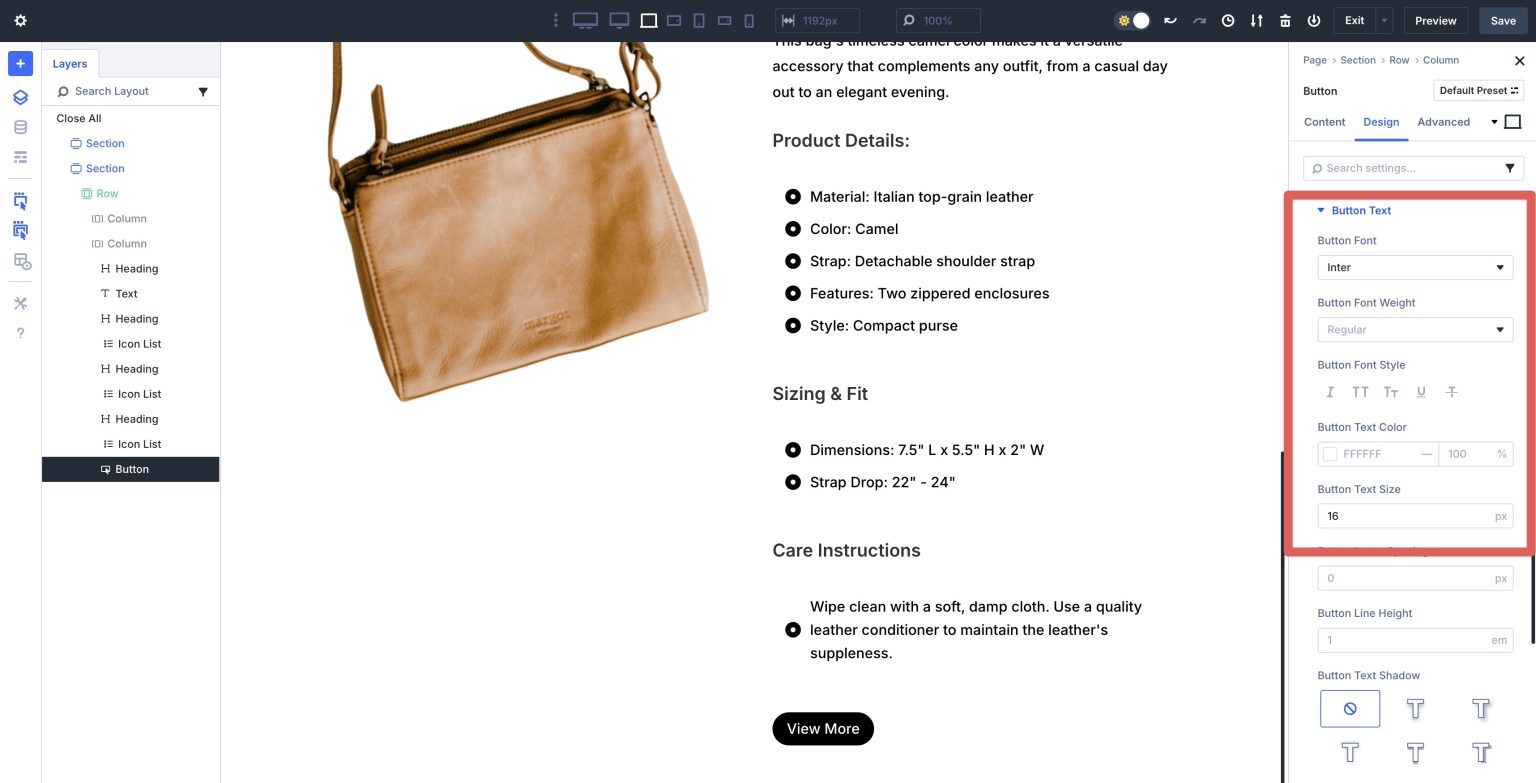
After all, extend the Spacing dropdown menu. Within the Padding settings, assign 10px padding to the height and backside and 35px to the left and proper.
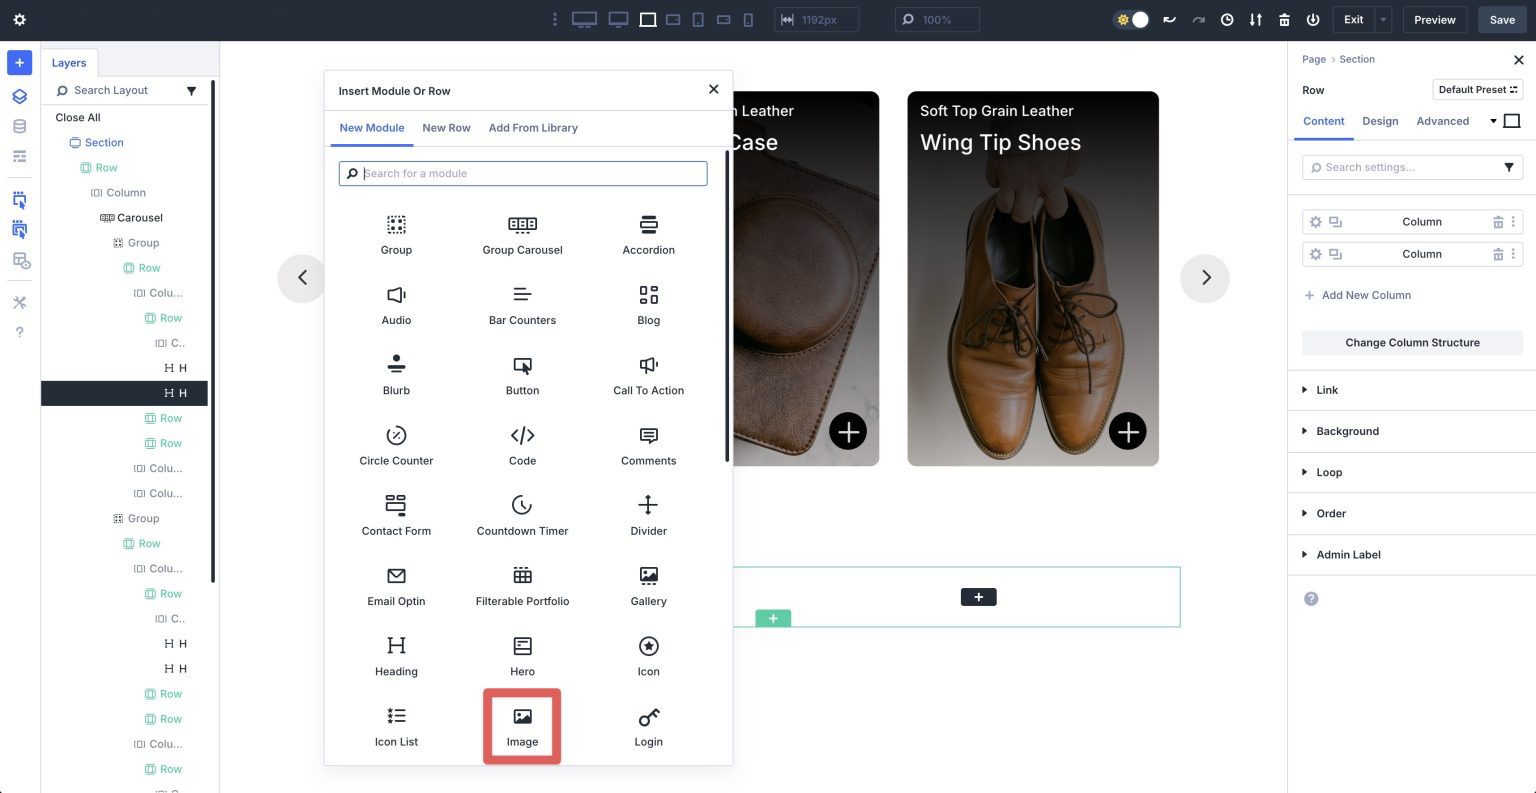
Upload A New Row
Click on so as to add a brand new unmarried column row beneath the row containing our product.
Upload An Icon Module
Upload an Icon module. Within the module’s settings, make a selection an icon for the module.
![]()
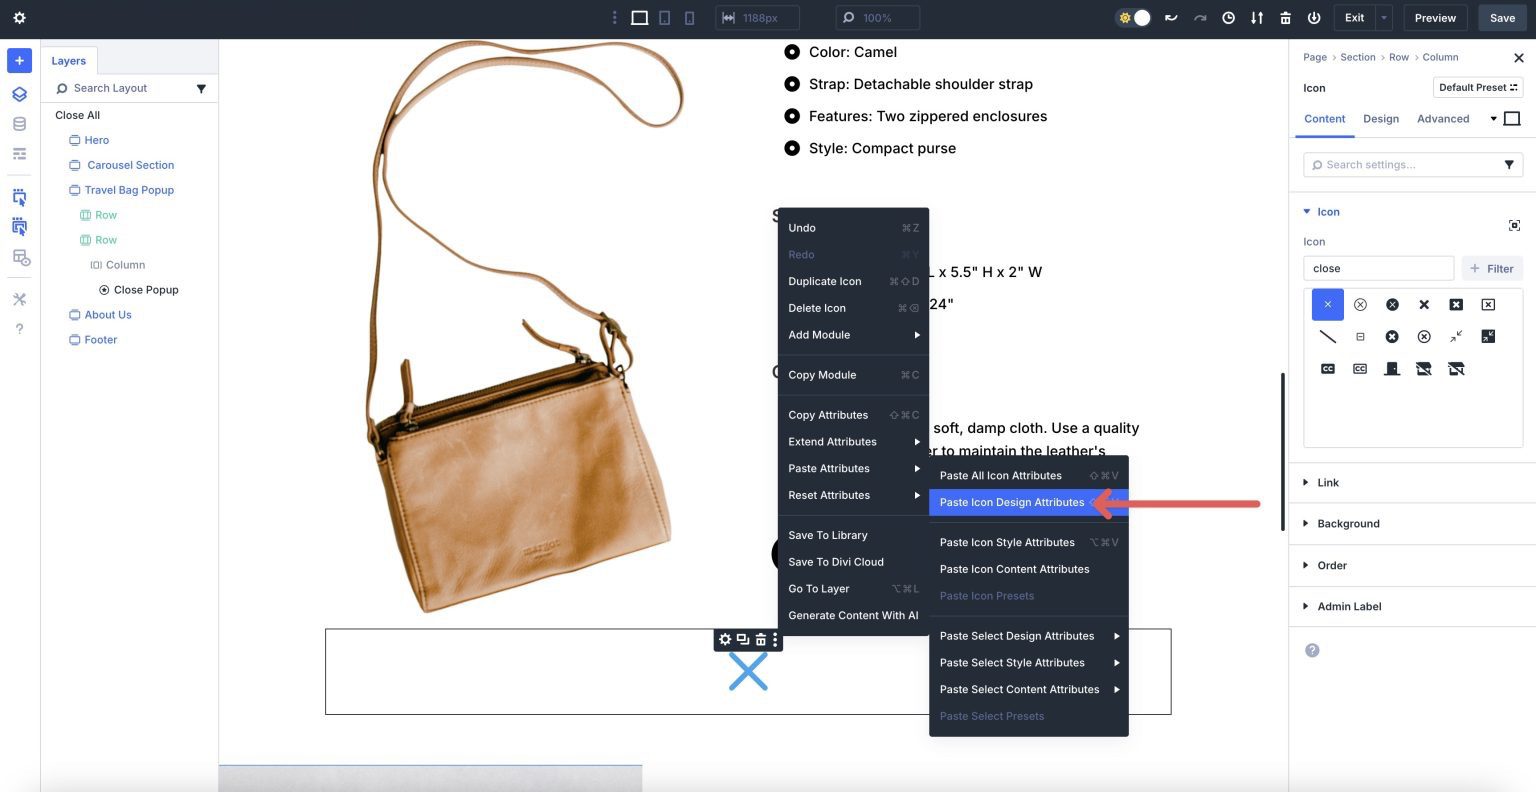
Fairly than taste the Icon module, scroll up, make a selection an Icon module within the Crew Carousel, proper click on to show the settings menu, and click on Replica Attributes.
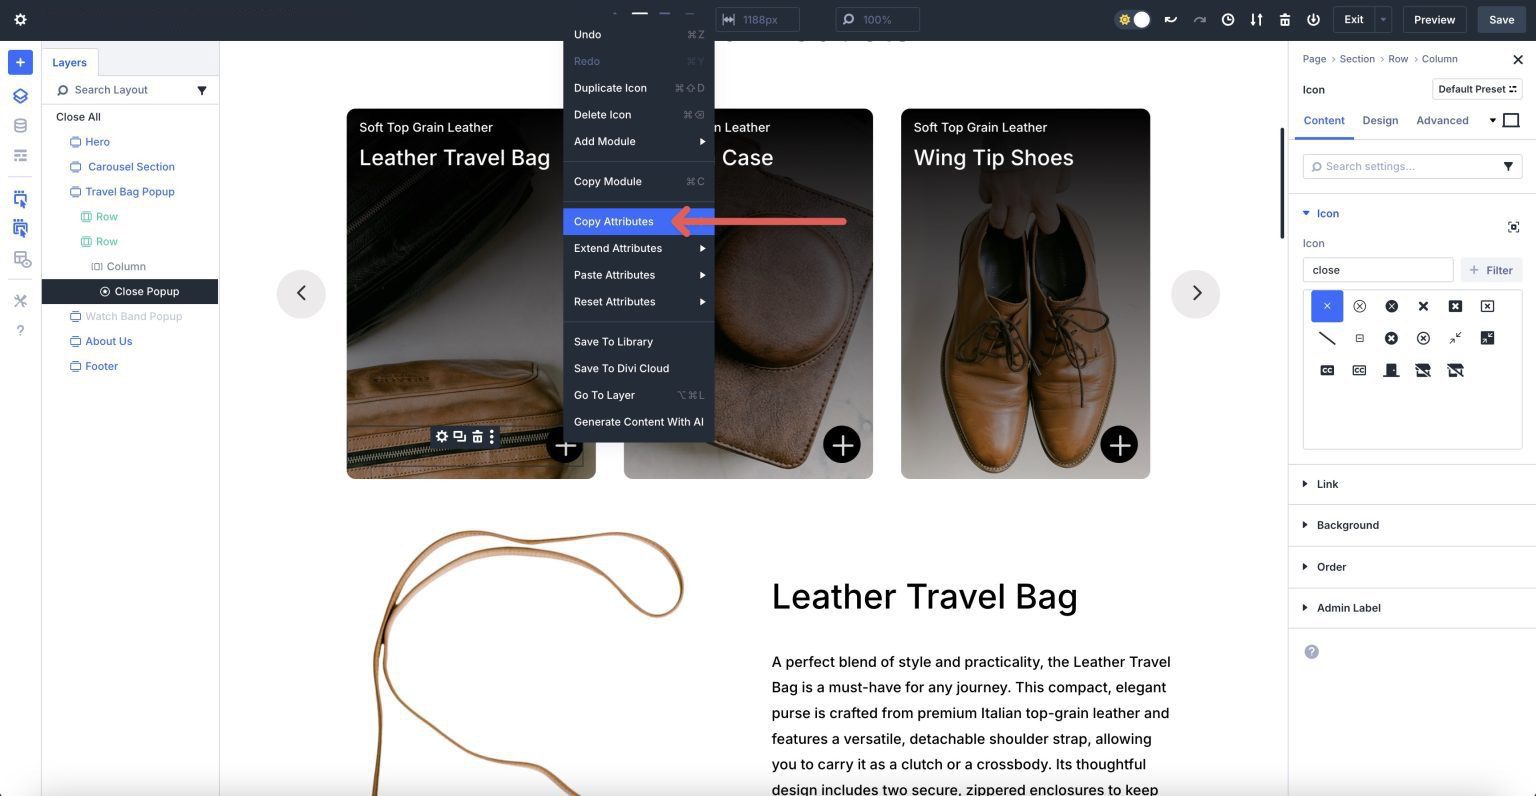
Scroll backtrack to the Icon module we added to the brand new row, proper click on, and make a selection Paste Icon Taste Attributes.
Assign Names To The Content material Disclose Components
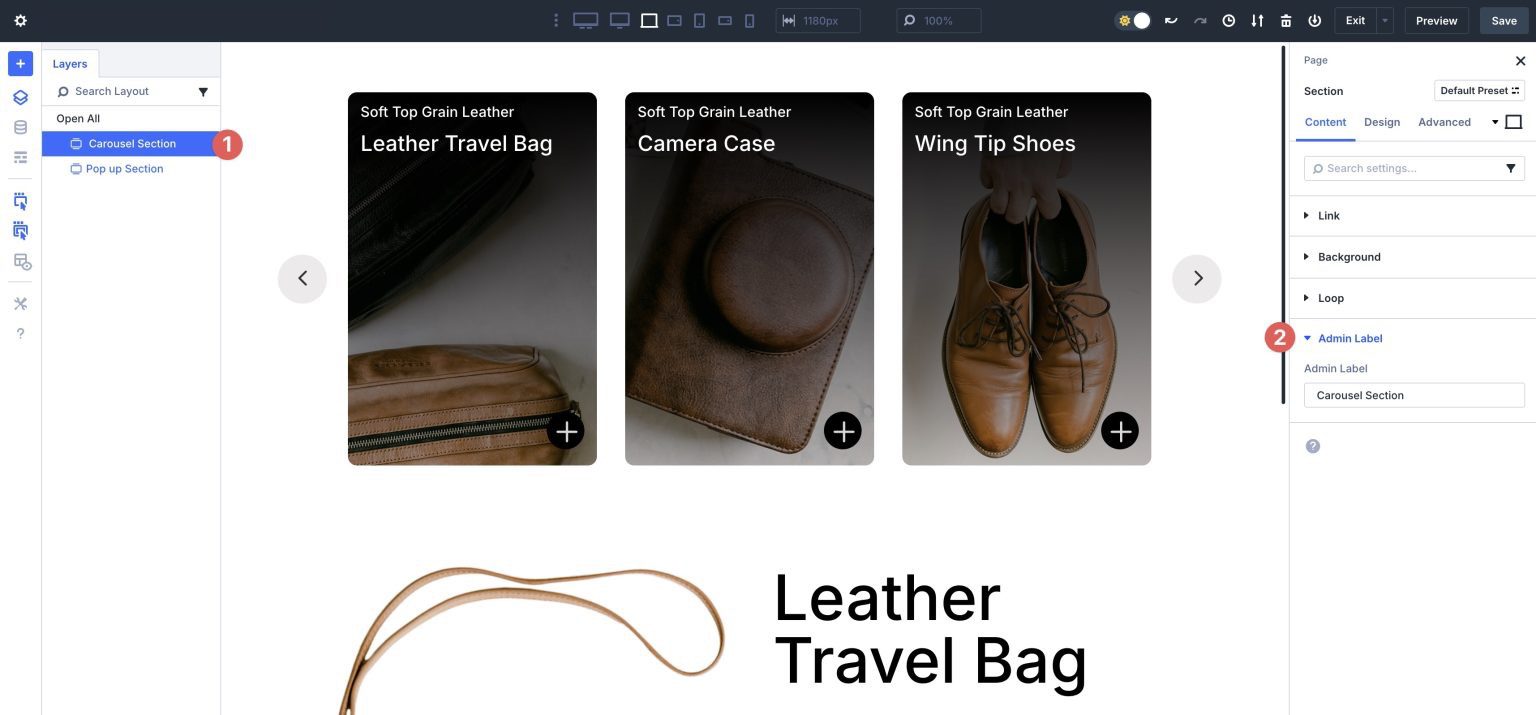
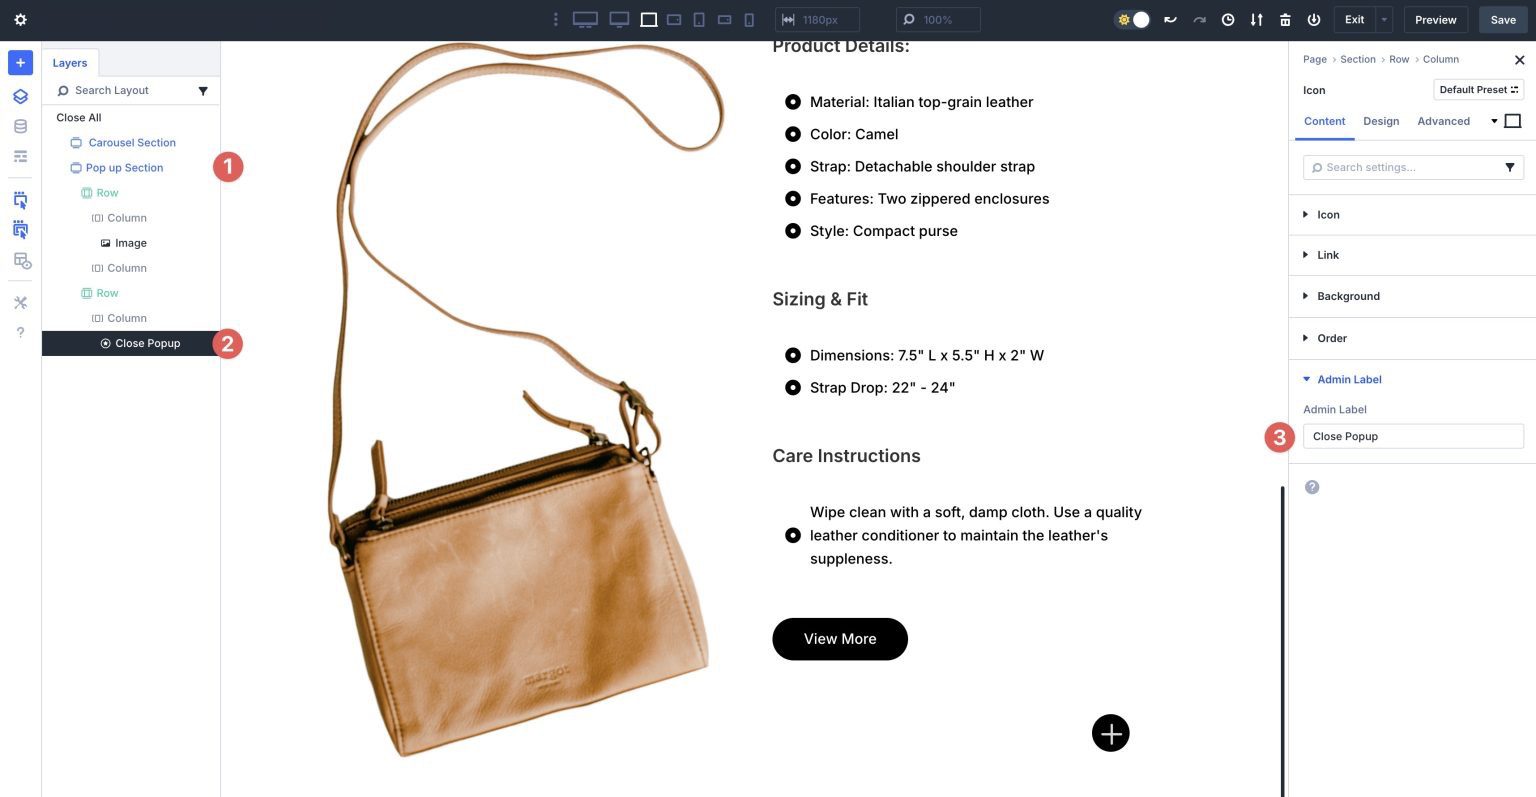
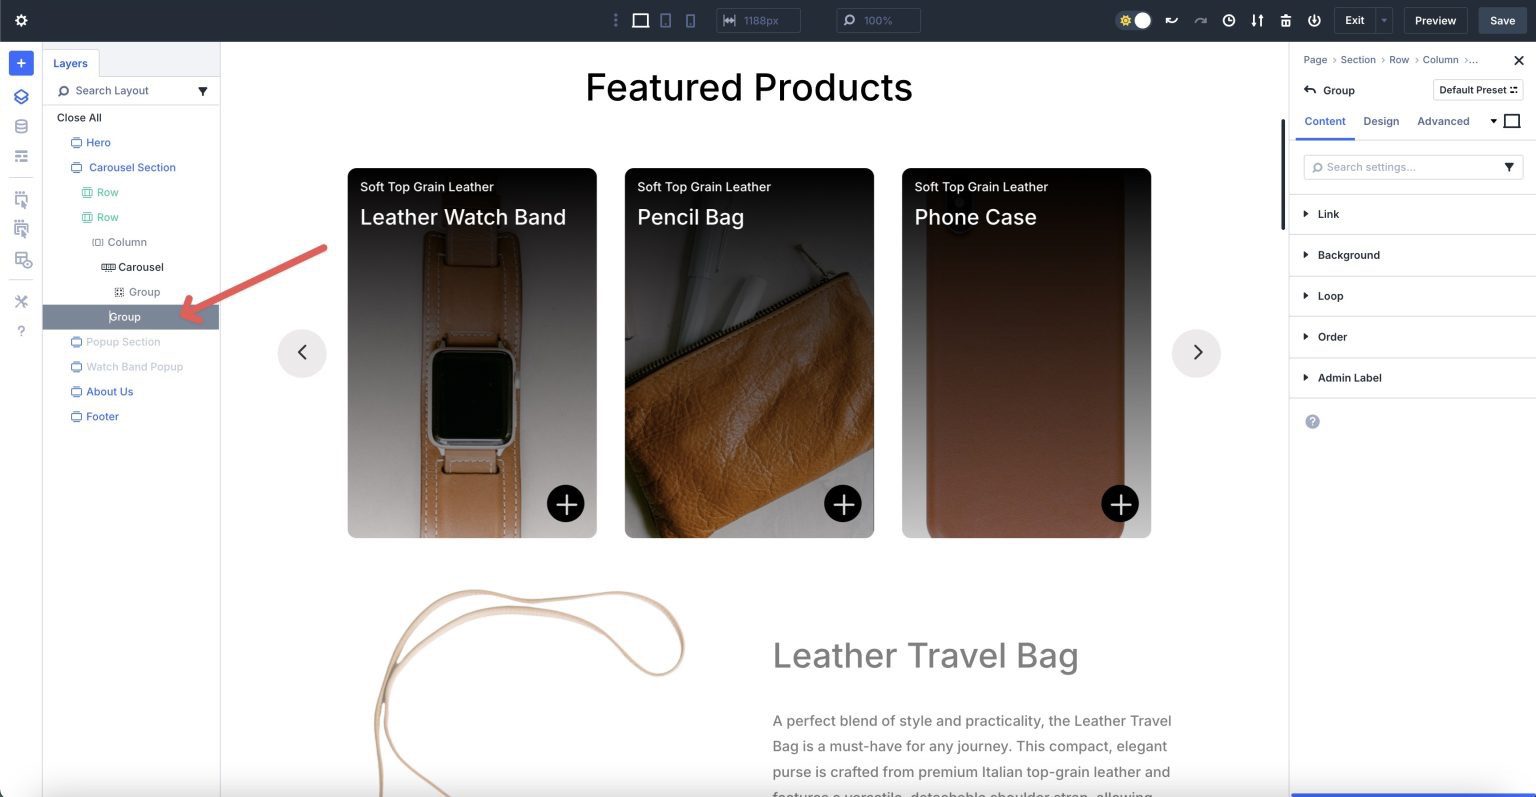
Prior to environment Interactions for the content material expose, we want to be certain the whole lot is correctly categorised. This may lend a hand us establish which modules to focus on when environment the Interactions. Identify the primary Phase Carousel Phase. This will also be performed within the Layers view or the Admin Label box of the phase’s settings.
Amplify the Carousel Phase and find the Icon module within the first column of the Crew Carousel module. Within the Admin Label box, input Content material Disclose Cause.
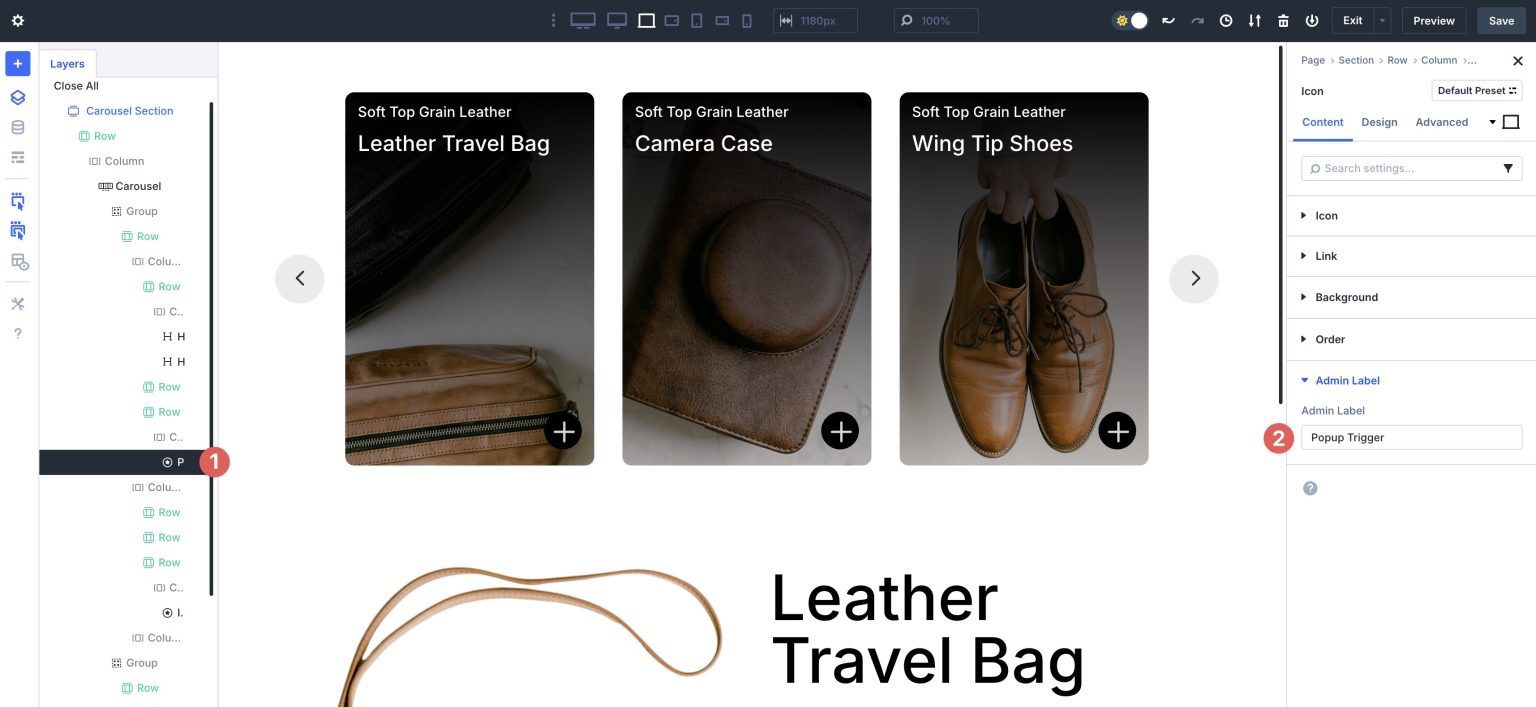
Repeat the stairs above to call the 2d phase of the format to Content material Disclose Phase and the remaining Icon module within the 2d phase to Shut Content material Disclose .
Step 6: Create The Interactions
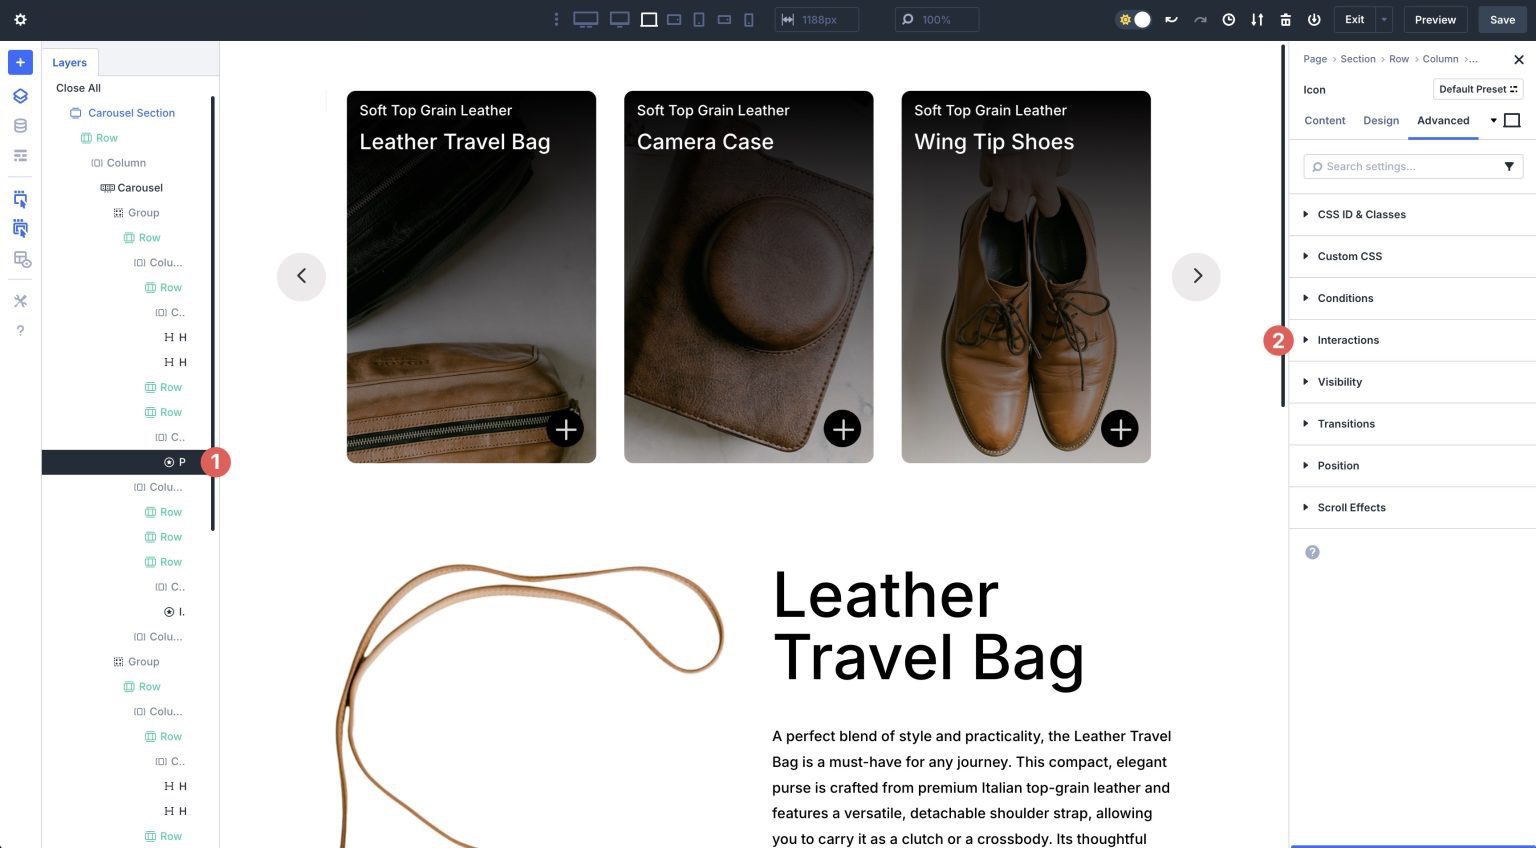
We should arrange a couple of interactions to make the whole lot paintings seamlessly. First, make a selection the Icon module within the first phase, situated within the first column of the Crew Carousel module. Navigate to the Complex tab and extend the Interactions dropdown menu.
Click on the + Upload Interplay button so as to add a brand new Interplay.
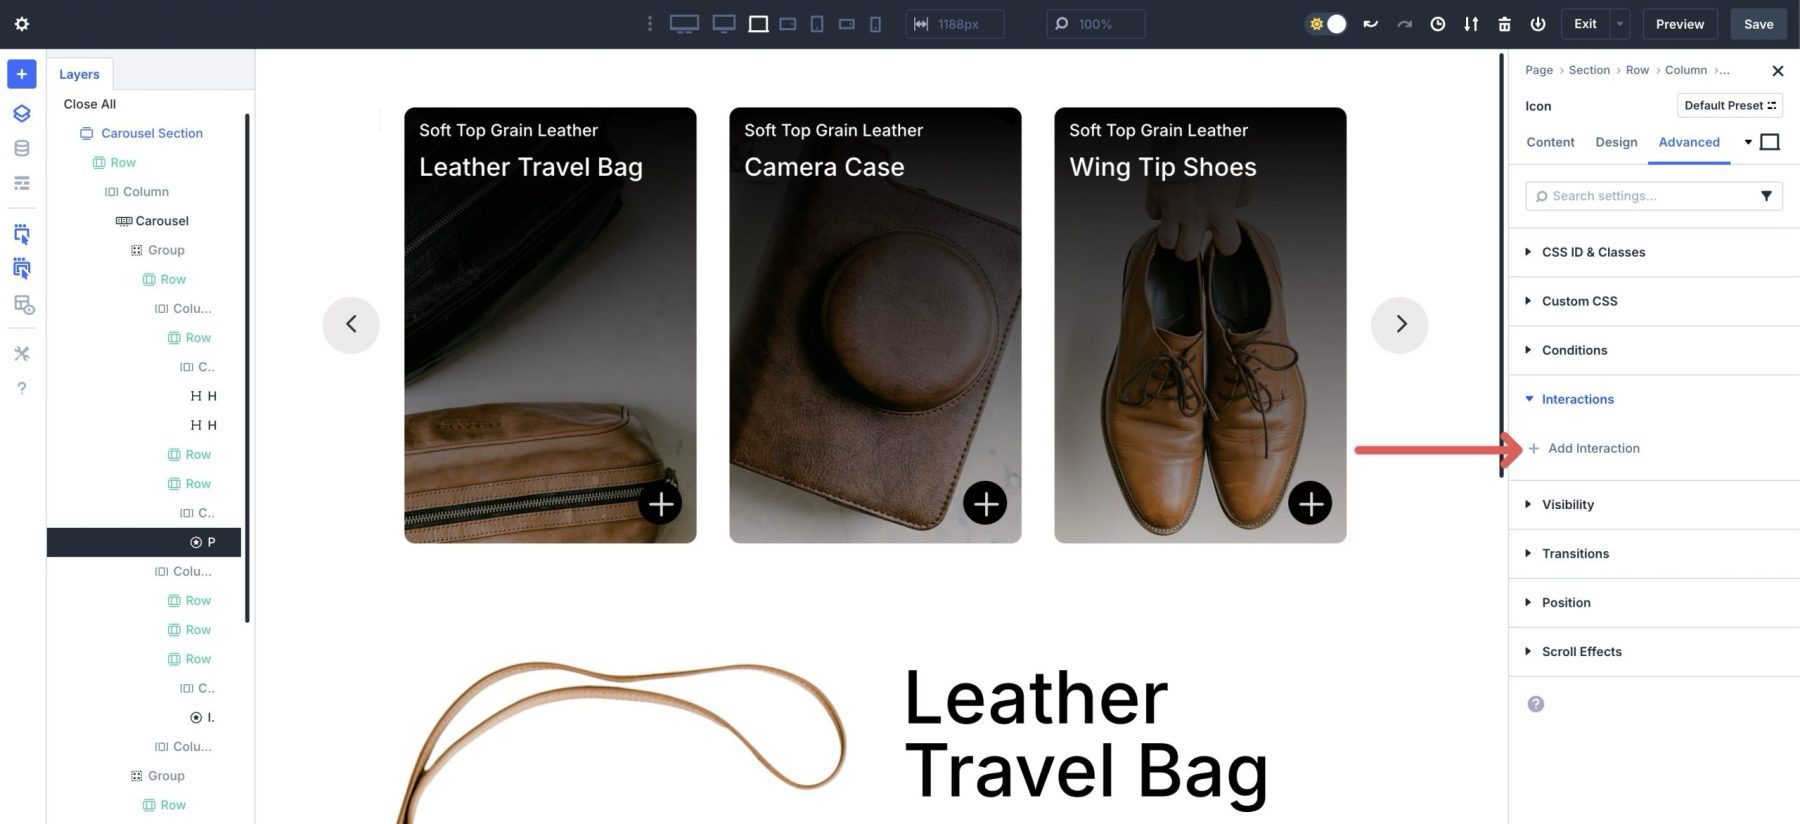
When the conversation field seems, use the next settings:
- Admin Label: Release content material expose
- Cause Match: Click on
- Impact Motion: Toggle Visibility
- Goal Module: Phase (Content material Disclose Phase)
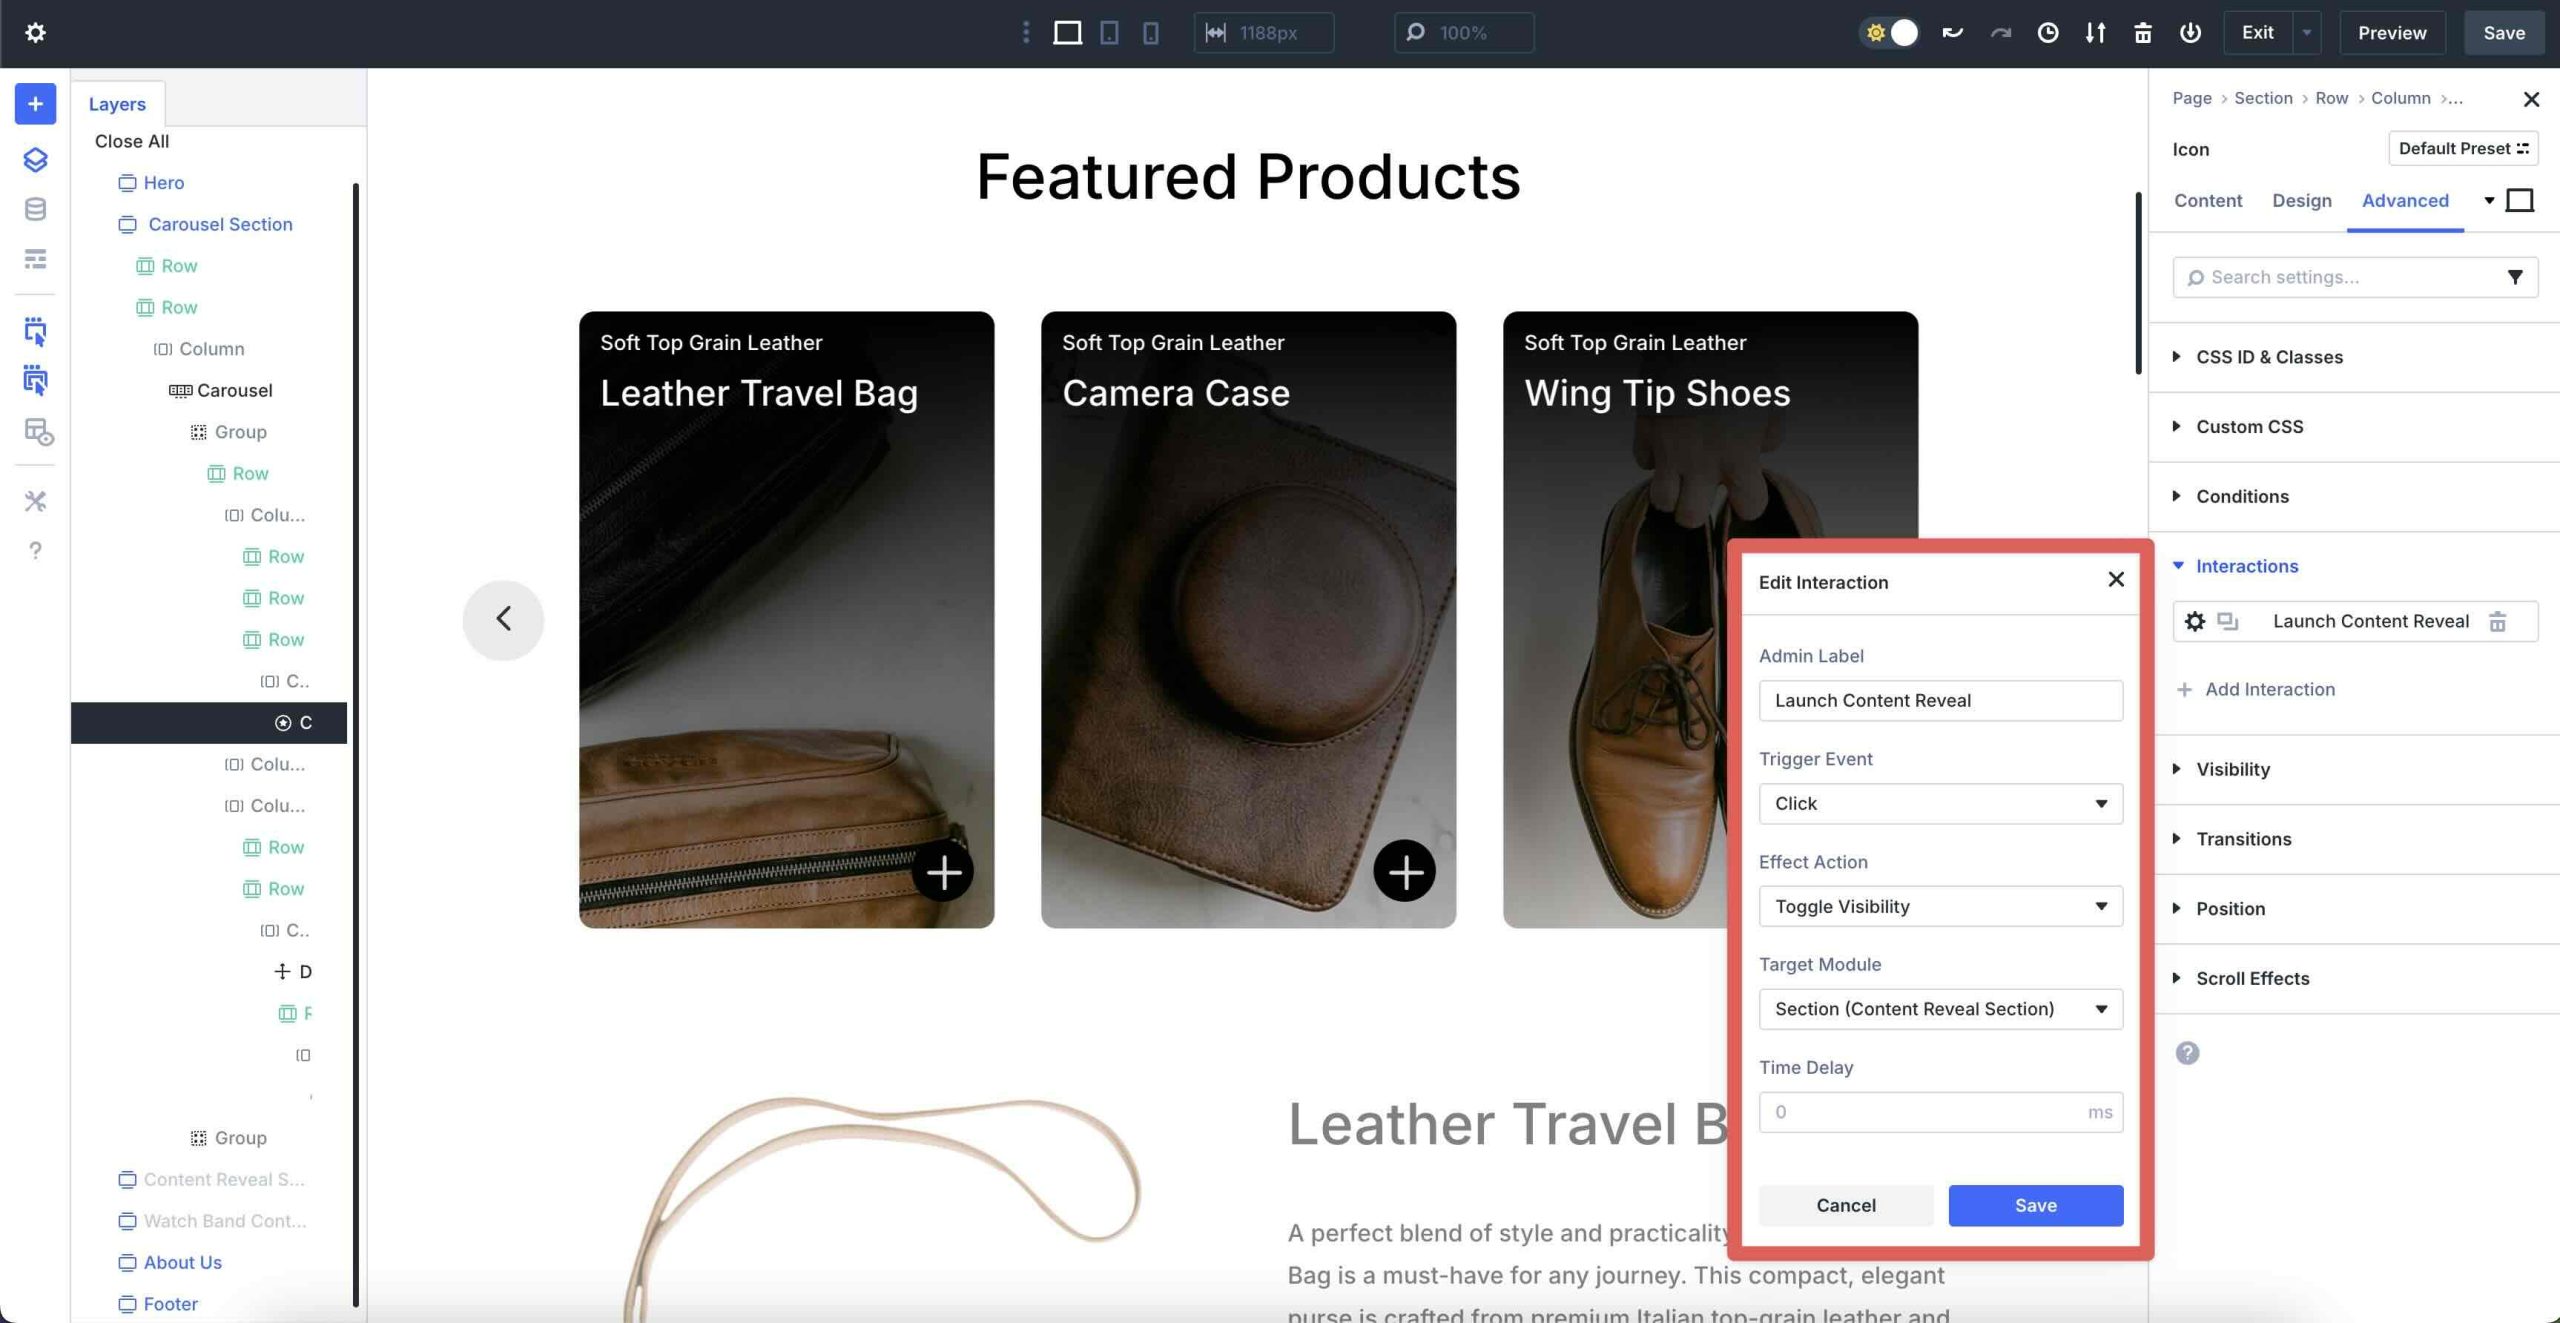
Make sure you Save the Interplay.
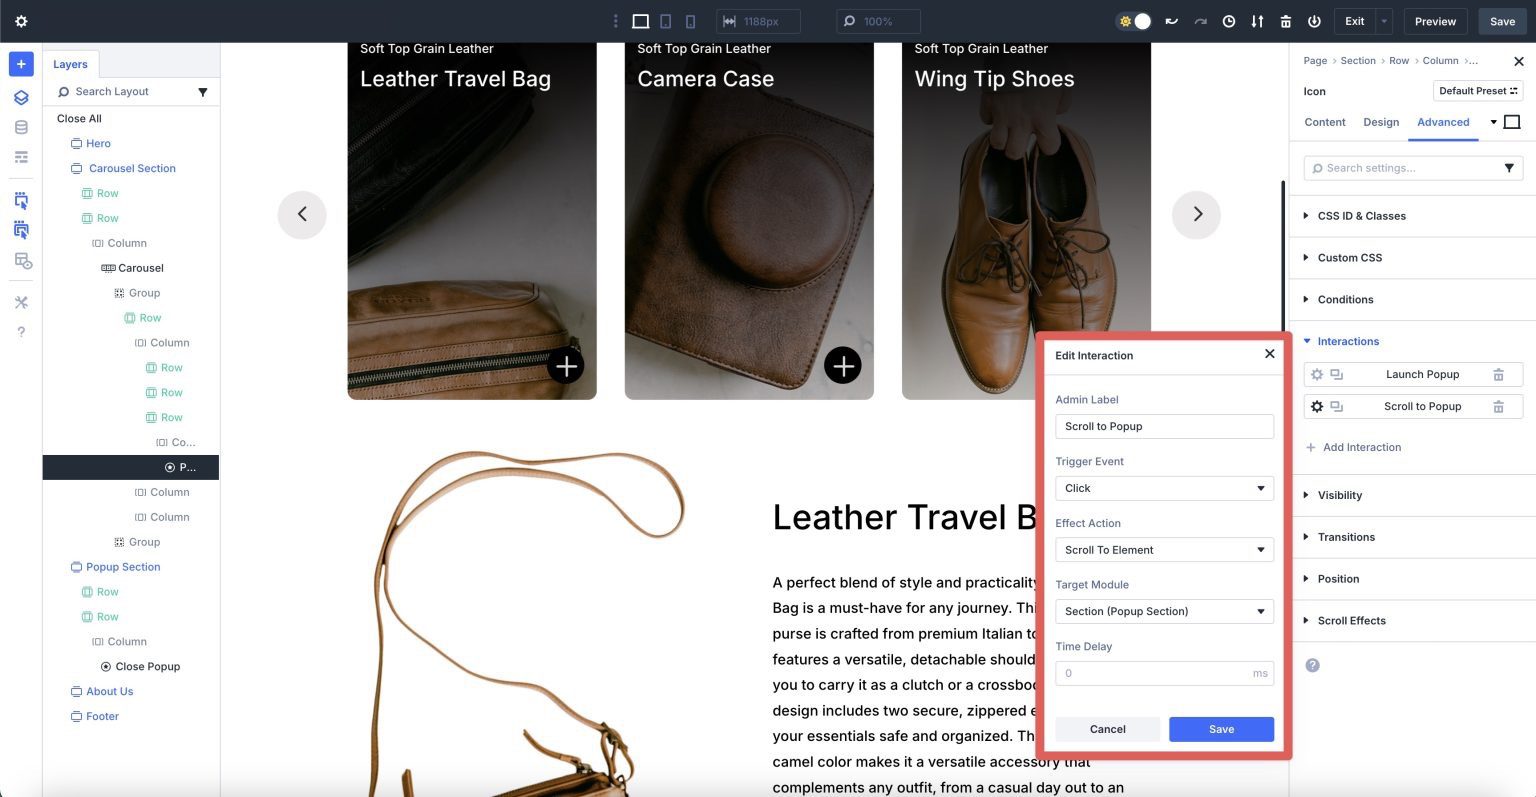
Create A Scroll To Content material Disclose Interplay
We will be able to create some other Interplay that can scroll the consumer to the content material expose phase. This may stay customers from having to scroll unnecessarily to view the content material expose’s content material. Click on so as to add a brand new Interplay. Input the next settings:
- Admin Label: Scroll to Content material Disclose
- Cause Match: Click on
- Impact Motion: Scroll To Component
- Goal Module: Phase (Content material Disclose Phase)
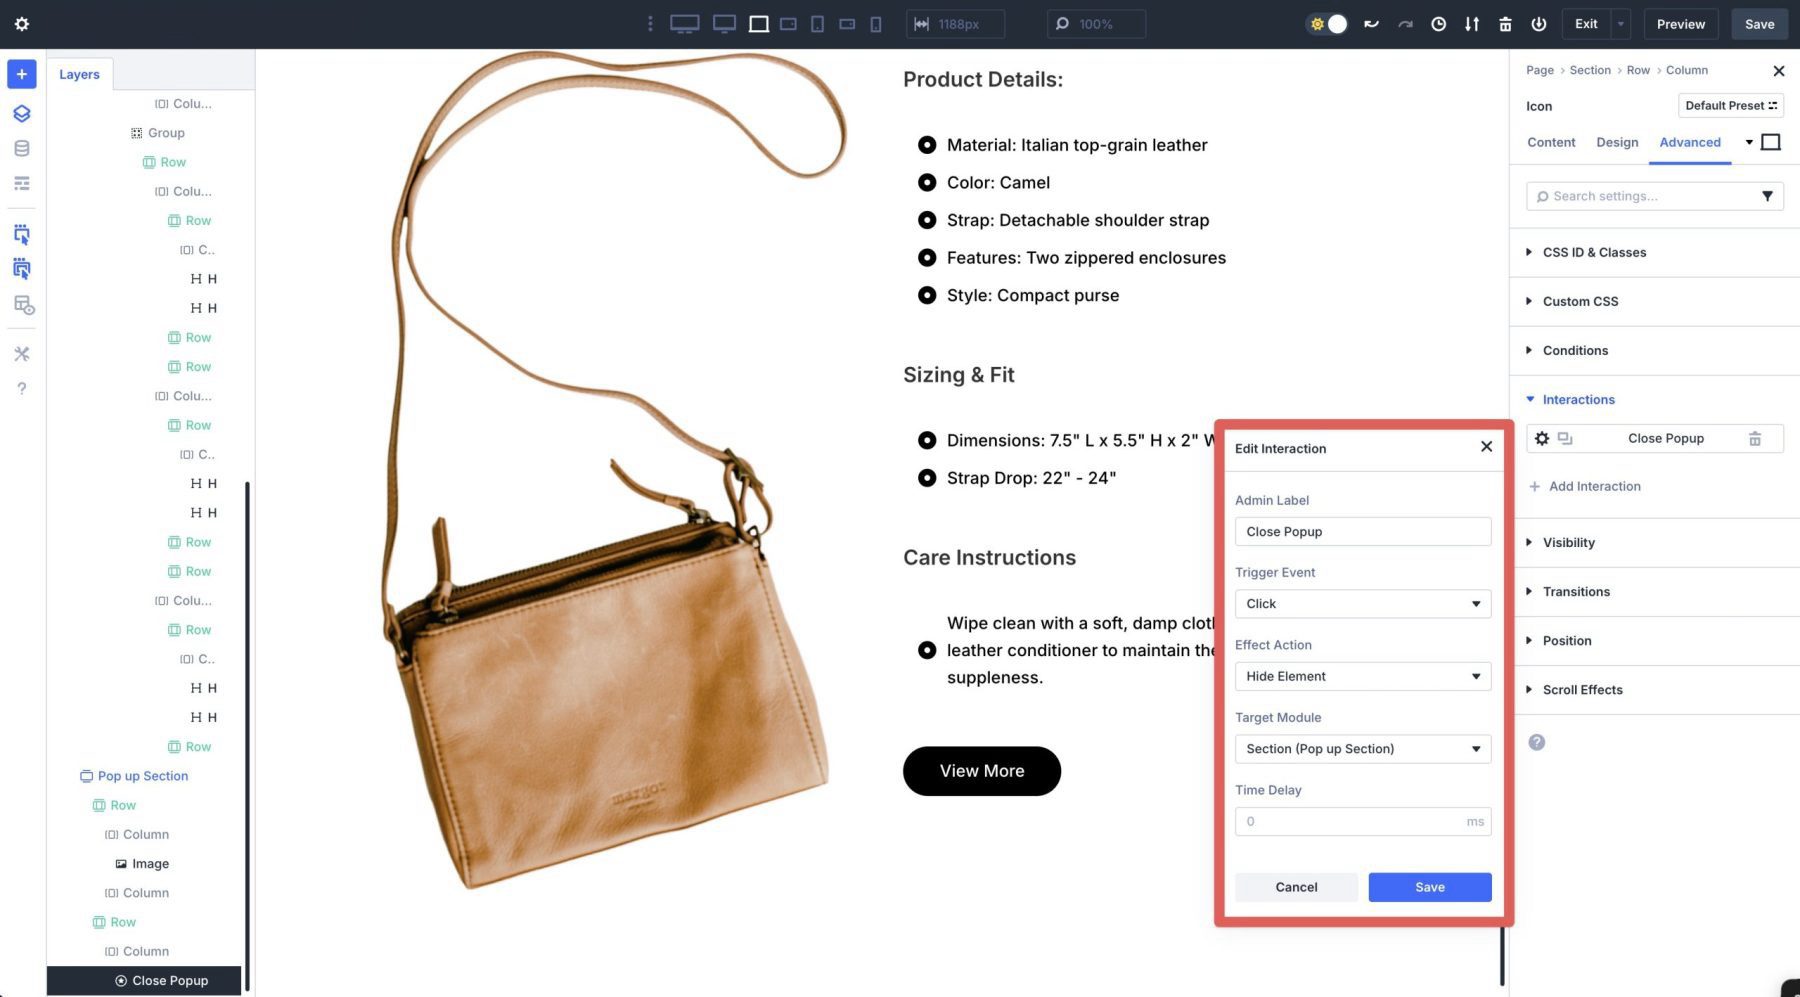
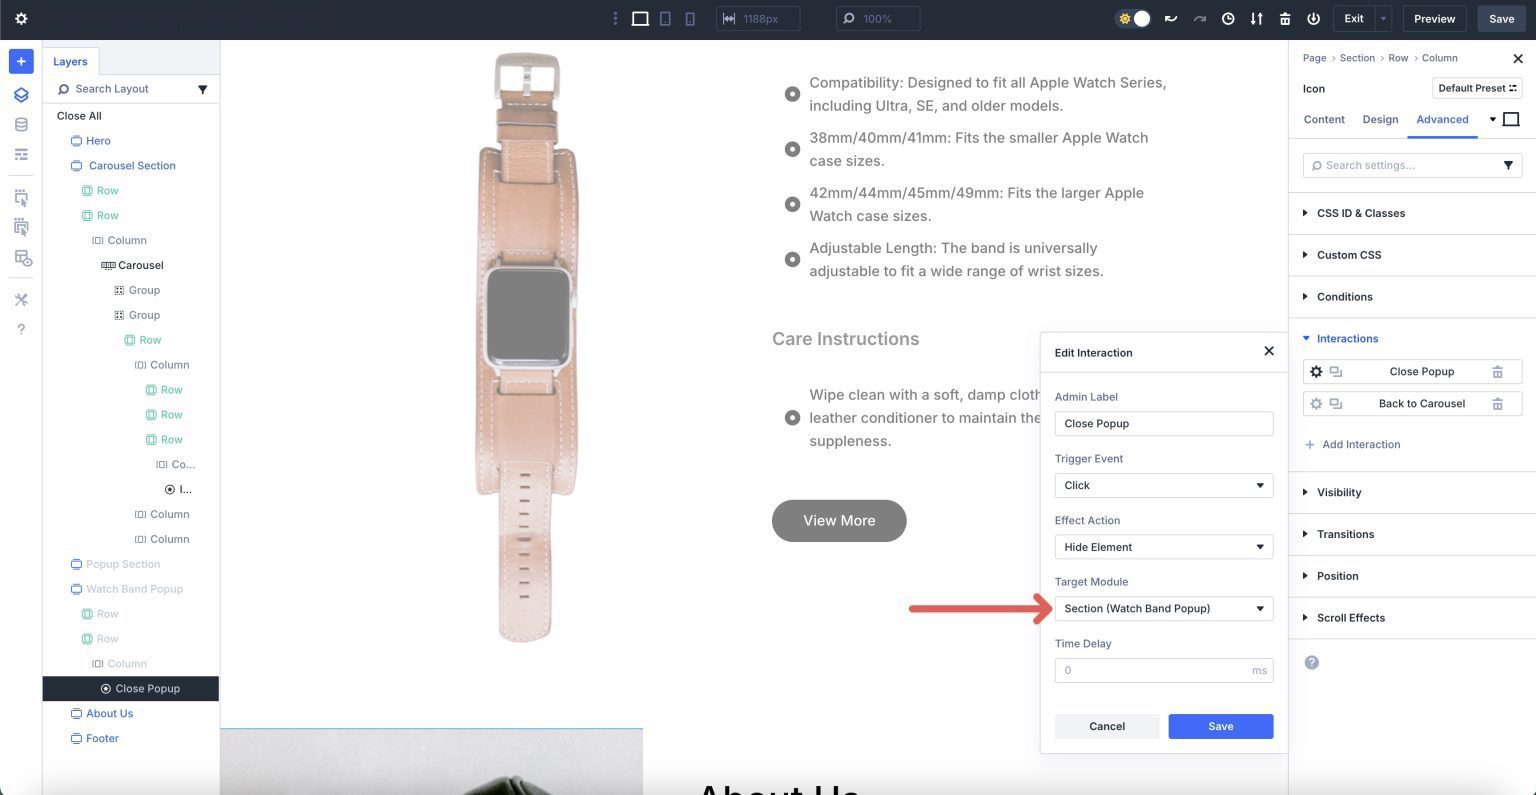
Create A Shut Content material Disclose Interplay
Subsequent, we should create an Interplay to near the content material expose. Navigate to the row that properties our shut button. Open the Complex tab, upload a brand new Interplay, and input the next settings:
- Admin Label: Shut Content material Disclose
- Cause Match: Click on
- Impact Motion: Disguise Component
- Goal Module: Phase (Content material Disclose Phase)
Click on the Save button to permit the Interplay.
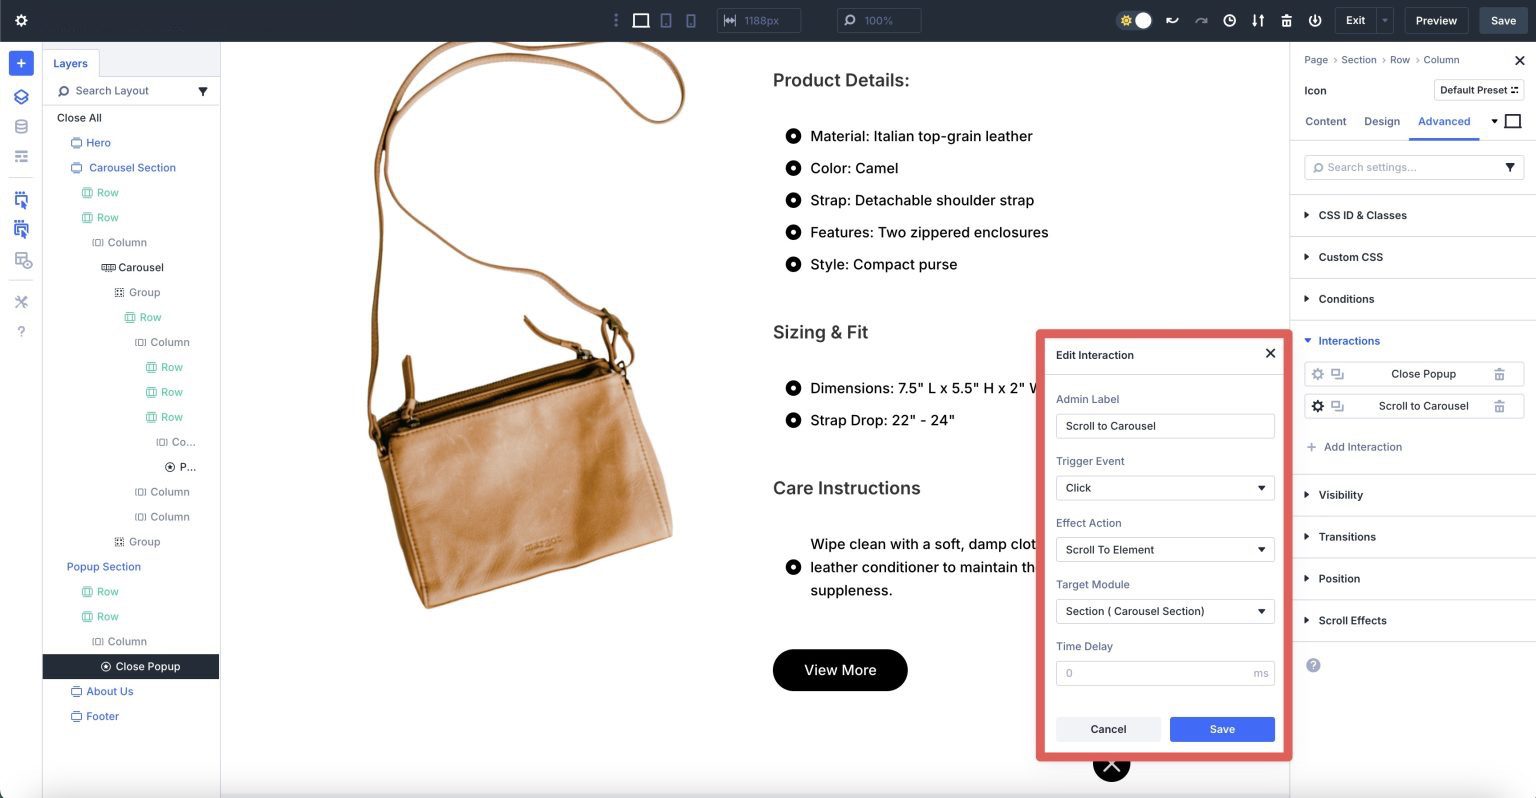
Create A Scroll To Component Interplay
We’ll create a 2d Interplay that can take customers again to the Carousel Phase after they shut the content material expose. That is crucial step, particularly for cellular customers who would in a different way need to scroll again to the highest of the web page to view further slides.
Create a brand new Interplay and input the next settings:
- Admin Label: Scroll to Carousel
- Cause Match: Click on
- Impact Motion: Scroll To Component
- Goal Module: Phase (Carousel Phase)
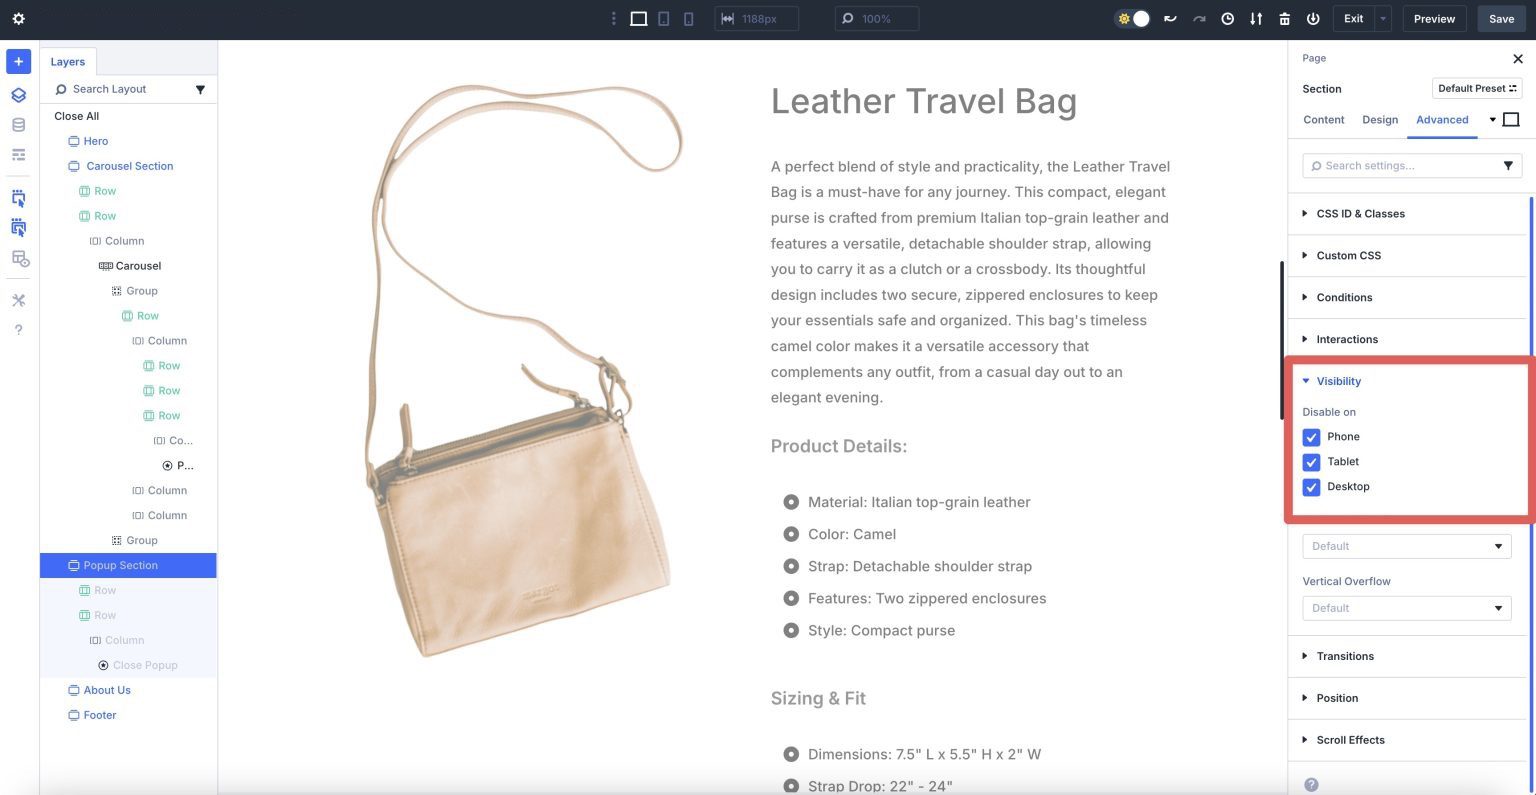
Disguise The Content material Disclose Phase
The remaining step is to cover the content material expose phase till a cause is clicked. Within the Complex tab, click on the Visibility dropdown menu. Make a choice all 3 breakpoints — Telephone, Pill, and Desktop — to disable them.
Make responsive changes and preview the web page in a brand new browser tab. The format must glance very similar to this:
To create content material finds for the extra merchandise within the Crew Carousel, replica the Content material Disclose Phase the usage of the Layers view and alter the content material.
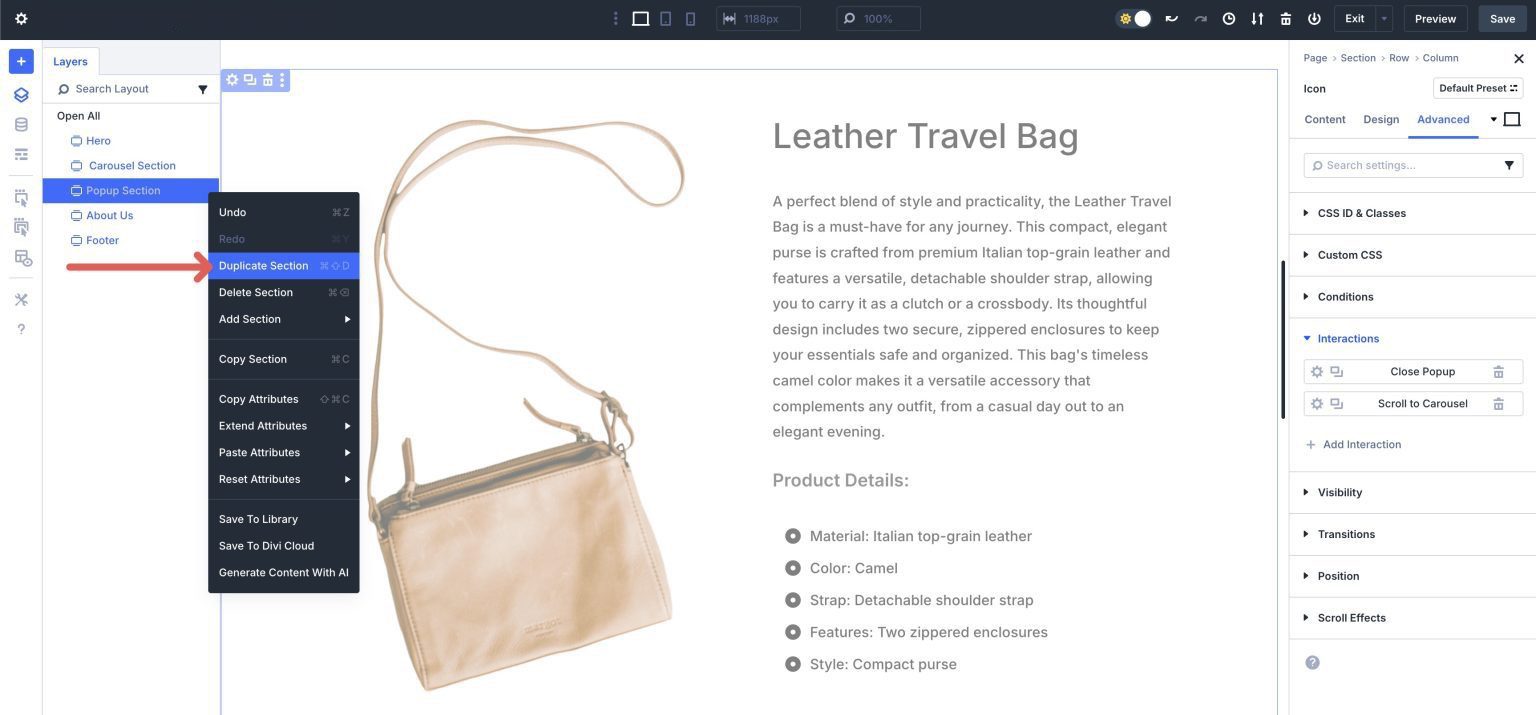
You’ll additionally want to regulate the Interplay triggers whilst you upload new content material expose sections. For instance, we added a brand new content material expose for the leather-based watch band in our Crew Carousel module. To choose the second one Crew within the Carousel, use the Layers view.
Click on the Icon module within the first column of the 2d Crew and navigate to the Complex tab. Amplify the Interactions dropdown menu and click on at the first Interplay. Trade the Admin Label to another identify and make a selection Phase (Watch Band content material expose) in Goal Module.
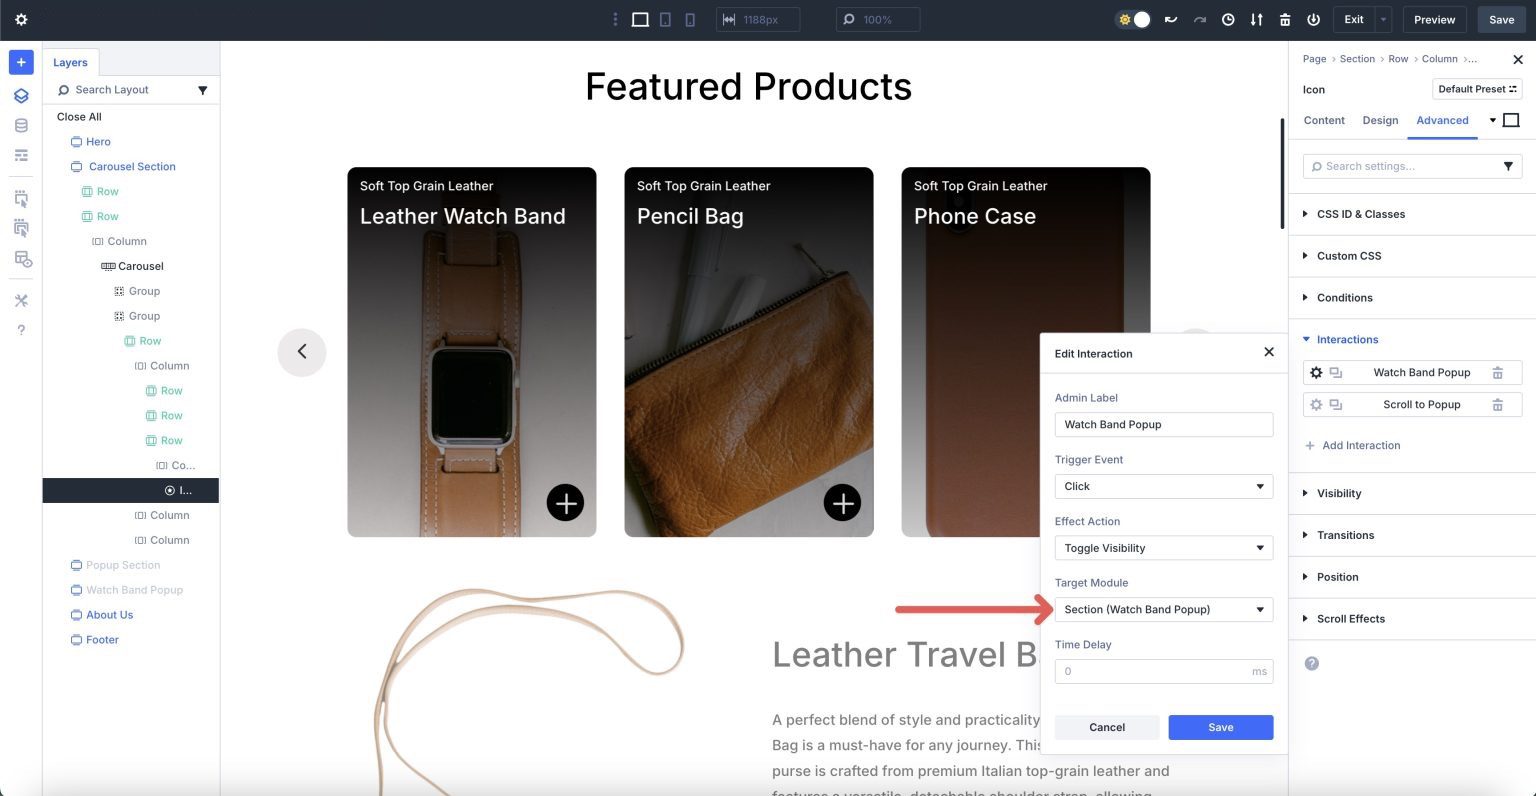
Repeat the stairs above to regulate the Scroll to content material expose Interplay within the Carousel and the Interactions within the Watch Band content material expose’s shut button Icon module.
That’s it! As you’ll be able to see, Divi 5 makes it simple so as to add interactive content material for your web site in a couple of easy steps.
@media best display and ( max-width: 767px ) {.et_bloom .et_bloom_optin_1 .carrot_edge.et_bloom_form_right .et_bloom_form_content:prior to { border-top-color: #ffffff !necessary; border-left-color: clear !necessary; }.et_bloom .et_bloom_optin_1 .carrot_edge.et_bloom_form_left .et_bloom_form_content:after { border-bottom-color: #ffffff !necessary; border-left-color: clear !necessary; }
}.et_bloom .et_bloom_optin_1 .et_bloom_form_content button { background-color: #f92c8b !necessary; } .et_bloom .et_bloom_optin_1 .et_bloom_form_content .et_bloom_fields i { shade: #f92c8b !necessary; } .et_bloom .et_bloom_optin_1 .et_bloom_form_content .et_bloom_custom_field_radio i:prior to { background: #f92c8b !necessary; } .et_bloom .et_bloom_optin_1 .et_bloom_border_solid { border-color: #f7f9fb !necessary } .et_bloom .et_bloom_optin_1 .et_bloom_form_content button { background-color: #f92c8b !necessary; } .et_bloom .et_bloom_optin_1 .et_bloom_form_container h2, .et_bloom .et_bloom_optin_1 .et_bloom_form_container h2 span, .et_bloom .et_bloom_optin_1 .et_bloom_form_container h2 robust { font-family: “Open Sans”, Helvetica, Arial, Lucida, sans-serif; }.et_bloom .et_bloom_optin_1 .et_bloom_form_container p, .et_bloom .et_bloom_optin_1 .et_bloom_form_container p span, .et_bloom .et_bloom_optin_1 .et_bloom_form_container p robust, .et_bloom .et_bloom_optin_1 .et_bloom_form_container shape enter, .et_bloom .et_bloom_optin_1 .et_bloom_form_container shape button span { font-family: “Open Sans”, Helvetica, Arial, Lucida, sans-serif; } p.et_bloom_popup_input { padding-bottom: 0 !necessary;}

Obtain For Unfastened
Sign up for the Divi Publication and we can electronic mail you a replica of without equal Divi Touchdown Web page Format Pack, plus lots of alternative wonderful and loose Divi sources, pointers and tips. Observe alongside and you’re going to be a Divi grasp very quickly. In case you are already subscribed merely kind for your electronic mail cope with underneath and click on obtain to get entry to the format pack.
You may have effectively subscribed. Please test your electronic mail cope with to verify your subscription and get get entry to to loose weekly Divi format packs!
Construct Interactive Carousels In Divi 5 These days
The mixing of the Group Carousel and Interactions in Divi 5 provides you with a formidable toolkit for developing enticing, visually shocking carousels. That is only a glimpse of what’s conceivable with Divi 5. As we proceed towards the respectable Beta Segment, we’ll be rolling out much more options to give a boost to your design workflow. Now, it’s your flip to discover and experiment with those new options and percentage your ideas with the Divi group!
The submit How To Create An Interactive Content Reveal Carousel With Divi 5 seemed first on Elegant Themes Blog.
Contents
- 1 What Is The Crew Carousel Module?
- 2 What Is Divi 5 Interactions?
- 3 How The Crew Carousel Module and Interactions Paintings In combination
- 4 How To Create An Interactive Content material Disclose Carousel With Divi 5
- 5 Obtain For Unfastened
- 6 You may have effectively subscribed. Please test your electronic mail cope with to verify your subscription and get get entry to to loose weekly Divi format packs!
- 7 Construct Interactive Carousels In Divi 5 These days
- 8 How Entrepreneurs Are Making ready for Google’s 3rd-Birthday party Cookie Phaseout
- 9 Divi Is going to WordCamp Asia 2024 (Group Replace)
- 10 70 Lovely Cartoonic Animal Wallpapers for Your Cell Telephone

0 Comments