
Appearing a timeline in your internet web page permits you to sing their own praises your emblem’s milestones or problem history, providing visual hobby for your visitors. Divi 5‘s Team Carousel module offers a contemporary solution to display this content material subject material in a scrollable, engaging format, best for storytelling in your internet web page.
In this put up, you’ll discover how you’ll be able to use the Crew Carousel module to build a timeline carousel in a few simple steps. We’ll quilt what the module is, its choices and benefits, and provide a step-by-step knowledge on creating your personal timeline.
Let’s dive in.
What Is The Crew Carousel Module?
The Team Carousel module is a versatile tool for creating custom designed carousels and sliders immediately inside the Visual Builder. It allows you to assemble dynamic, scrollable presentations for reasonably numerous content material subject material types, making it final for timelines, portfolios, product showcases, and further. At its core, the module acts as a container that holds a couple of slides, each and every functioning as a Crew where you’ll have the ability to add and prepare content material subject material manually or generate it dynamically the use of Divi 5’s Loop Builder.
Every slide inside the Crew Carousel is a fully editable personnel, this means that you’ll have the ability to nest any Divi module to build custom designed layouts. You’ll have the ability to configure the Carousel to turn a single slide at a time for a focused slider or a couple of slides for a broader view, depending in your needs. Navigation is handled through customizable dots and arrows, with alternatives to control the number of slides that scroll, ensuring a blank shopper experience.
Key Choices
- It Serves As A Blank Canvas: Every slide is helping Nested Rows and Flexbox, giving you complete control over the design, from simple text and image mixtures to difficult multi-column arrangements.
- Dynamic Content material subject material With The Loop Builder: The module integrates with the Loop Builder to pull content material subject material from posts, words, shoppers, or custom designed fields, enabling computerized updates as new content material subject material is added.
- Slides Are Completely Customizable: The Crew Carousel is completely customizable, very similar to some other Divi module. You’ll have the ability to add background pictures and gradients, style borders, apply transforms, filters, shadows, and animations to create cohesive and polished designs.
- Display Controls: Modify slides consistent with view, scroll amount consistent with click on on, animation speed, and navigation controls, allowing you to fine-tune the Carousel’s behavior and responsiveness.
Benefits Of The Crew Carousel Module
The Crew Carousel module in Divi 5 offers numerous advantages that make it a great tool for creating engaging, surroundings pleasant, and dynamic carousels.
It’s Extraordinarily Flexible
Against this to standard sliders with fastened layouts, the Crew Carousel’s blank canvas way allows you to design slides with complete freedom. You’ll have the ability to create the remainder from simple slides to difficult layouts, all with no need third-party plugins. This saves time and assists in keeping your internet website streamlined by means of reducing plugin dependency.
Create Dynamic, Scalable Content material subject material
With Loop Builder integration, the module can routinely retrieve content material subject material from posts, words, shoppers, or custom designed fields, very similar to Sophisticated Custom designed Fields (ACF) repeater fields. For timelines, as a result of this new events may also be added as posts or wisdom entries, and the carousel updates routinely without requiring information edits. It’s final for emerging web sites, very similar to blogs, portfolios, or e-commerce stores, where content material subject material evolves steadily.
Potency And Ease Of Use
Built on Divi 5’s lightweight construction, the Crew Carousel is optimized for speedy loading, ensuring your internet website remains responsive even with dynamic or media-heavy slides. Its intuitive interface makes setup and customization easy, even for purchasers with little to no experience with Divi.
Endless Creative Conceivable
The module is helping Divi’s robust styling alternatives, like animations, transforms, Integrations, and filters, allowing you so to upload refined effects that improve the timeline’s visual enchantment. Integration with apparatus like WooCommerce or Lottie animations opens up a lot more creative probabilities, serving to have interaction visitors and keep them in your internet website longer.
How To Assemble A Timeline Carousel With Divi 5
Now that you just’ve a elementary thought of what the Crew Carousel module is and what you’ll have the ability to do with it, we will starting development our construction. By the use of the end, you’ll have a fully responsive timeline carousel you’ll have the ability to use in your internet web page.
Step 1: Set Up The Container
The first step is to configure the mummy or father container for the Crew Carousel. Create a brand spanking new internet web page or open an provide one. Create a brand spanking new segment and add a single-column Flex row to the internet web page.
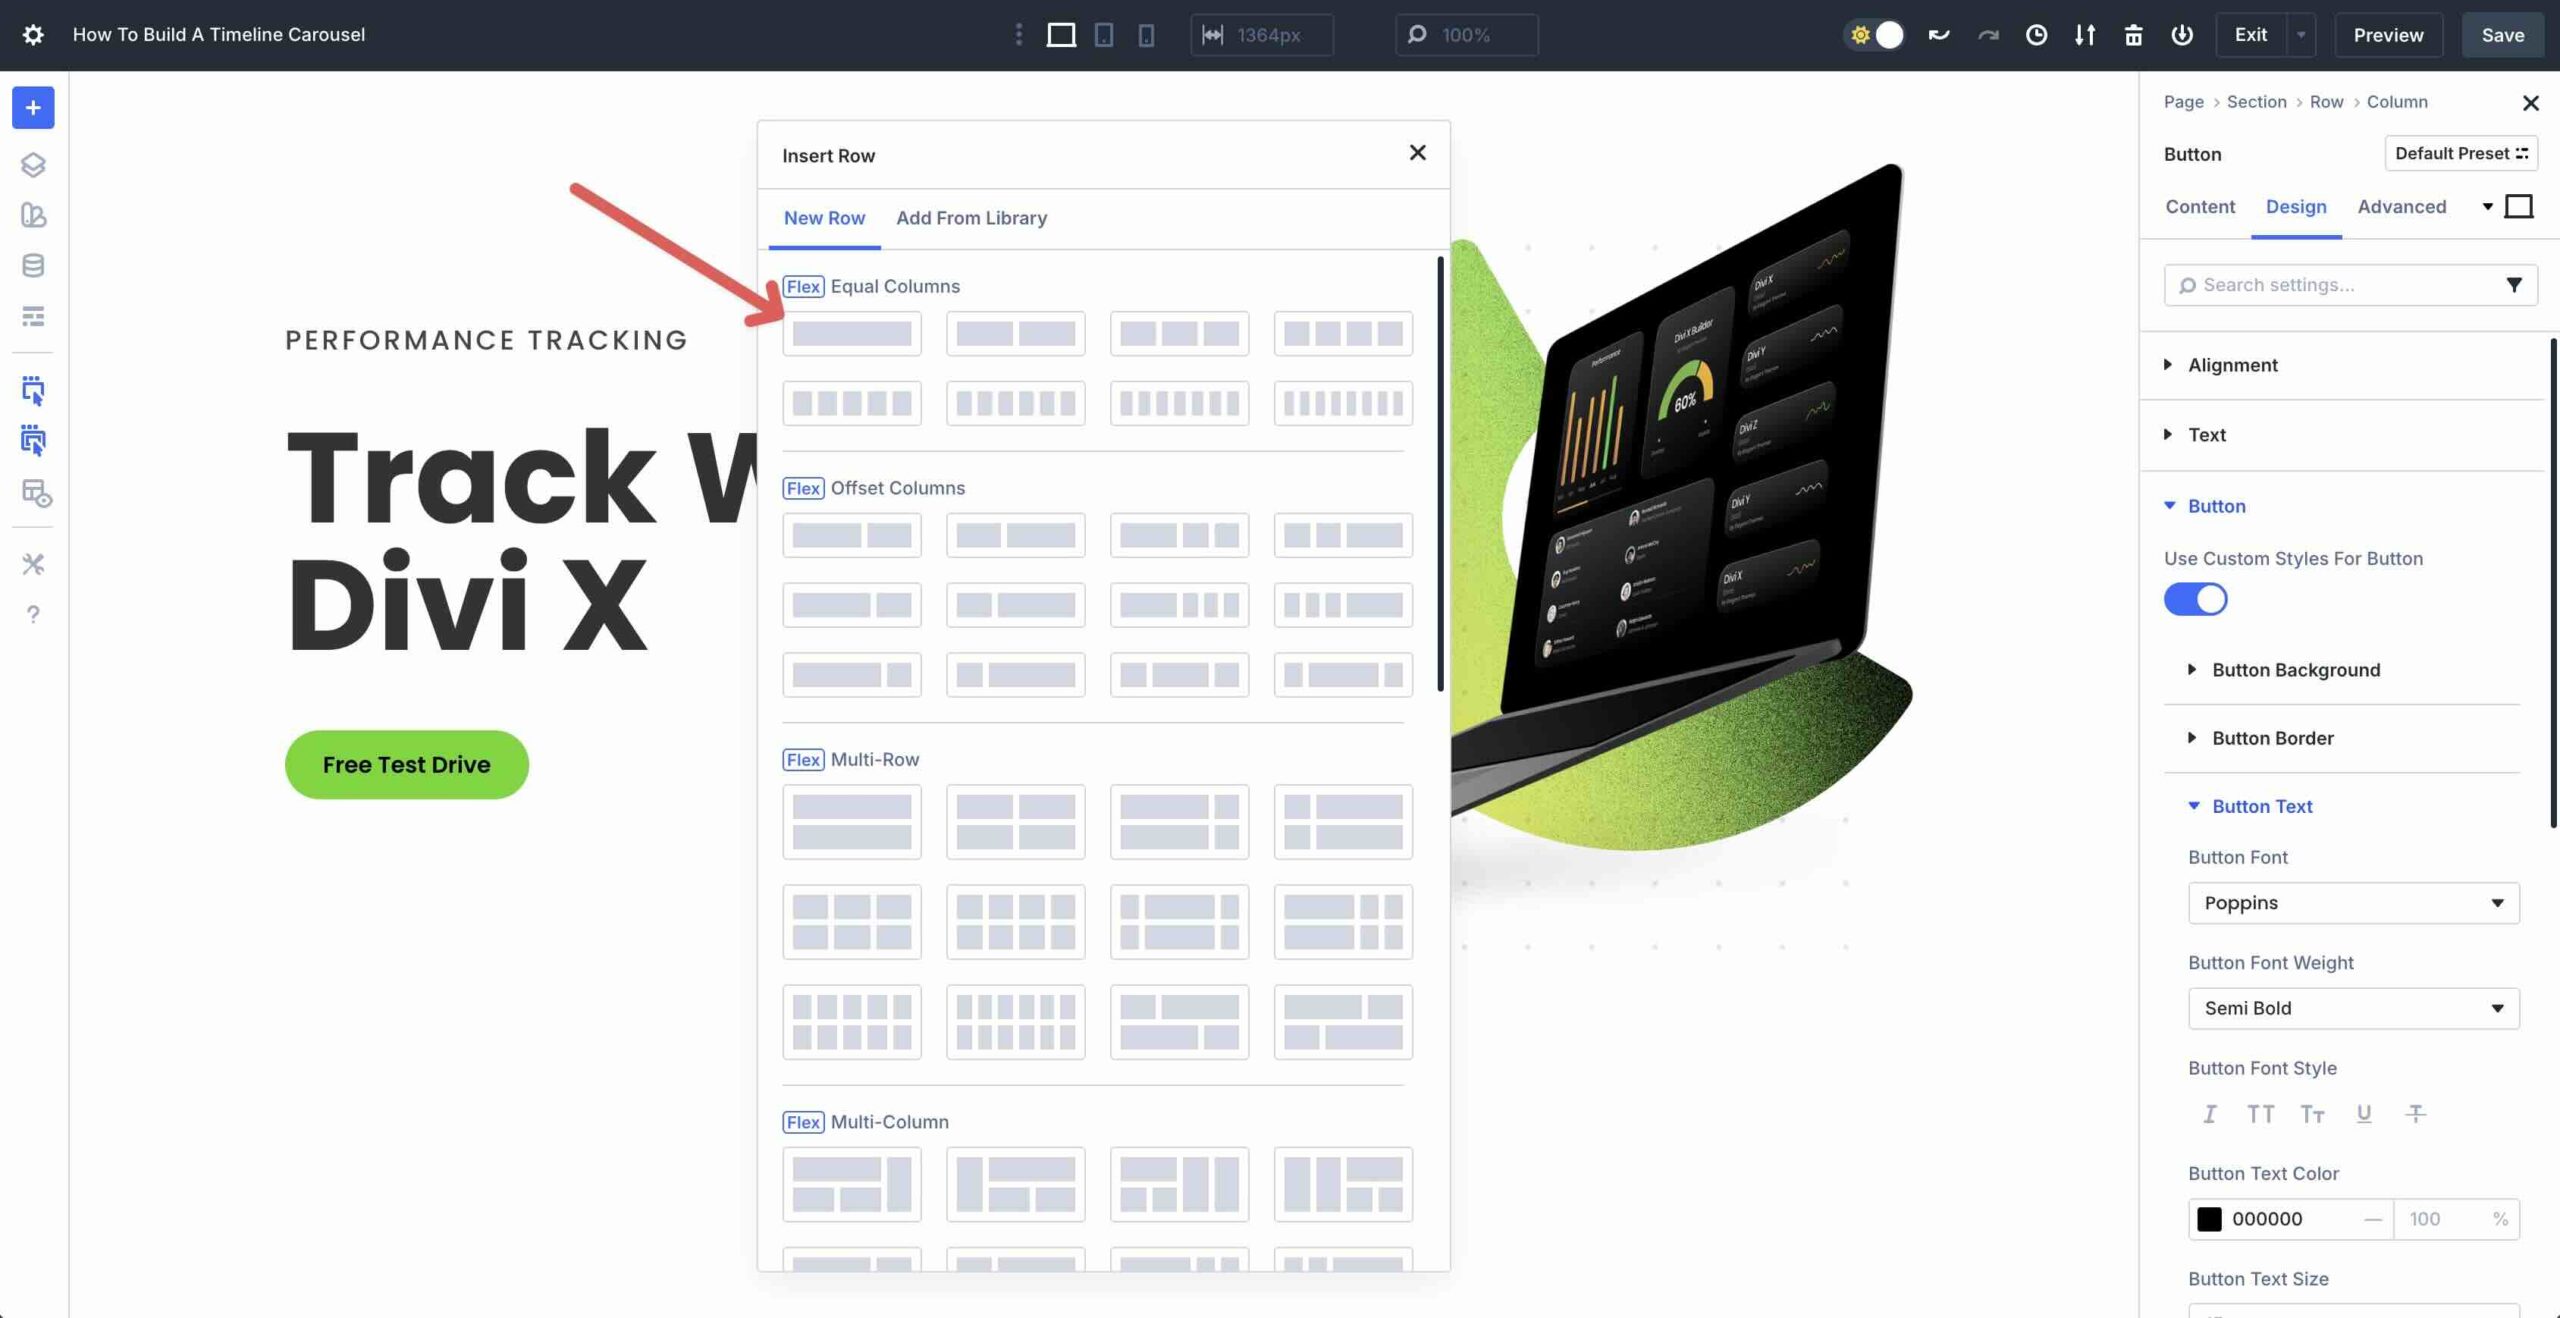
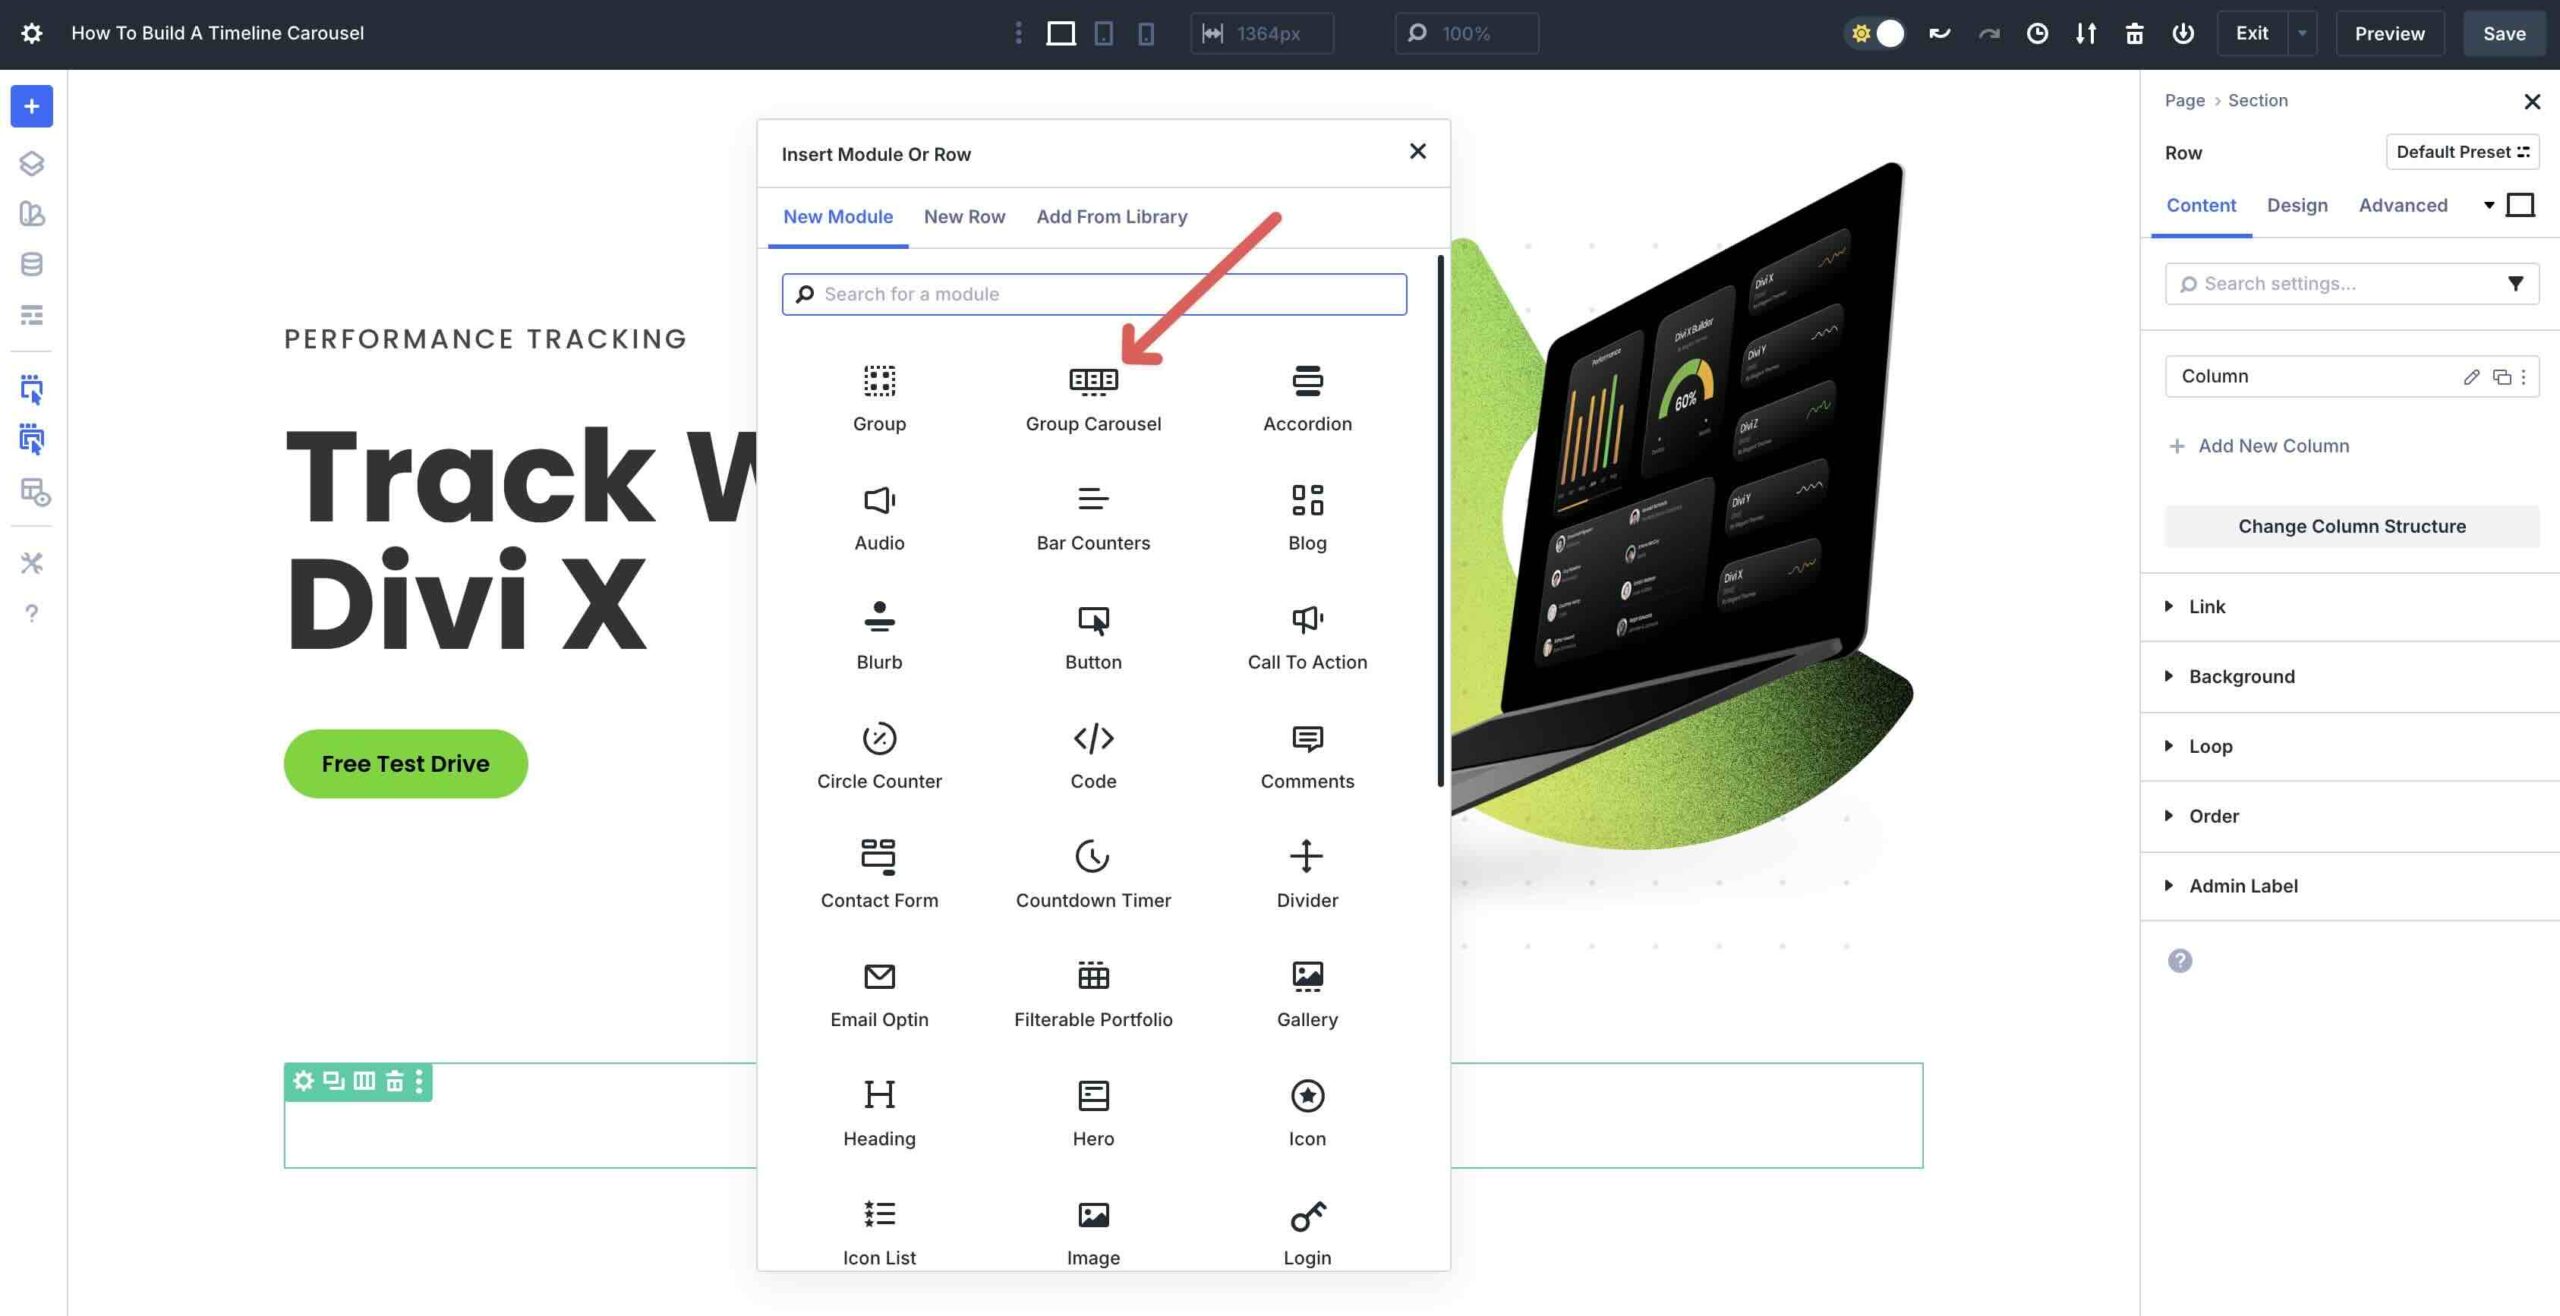
Next, we’ll add the Crew Carousel module to the row.
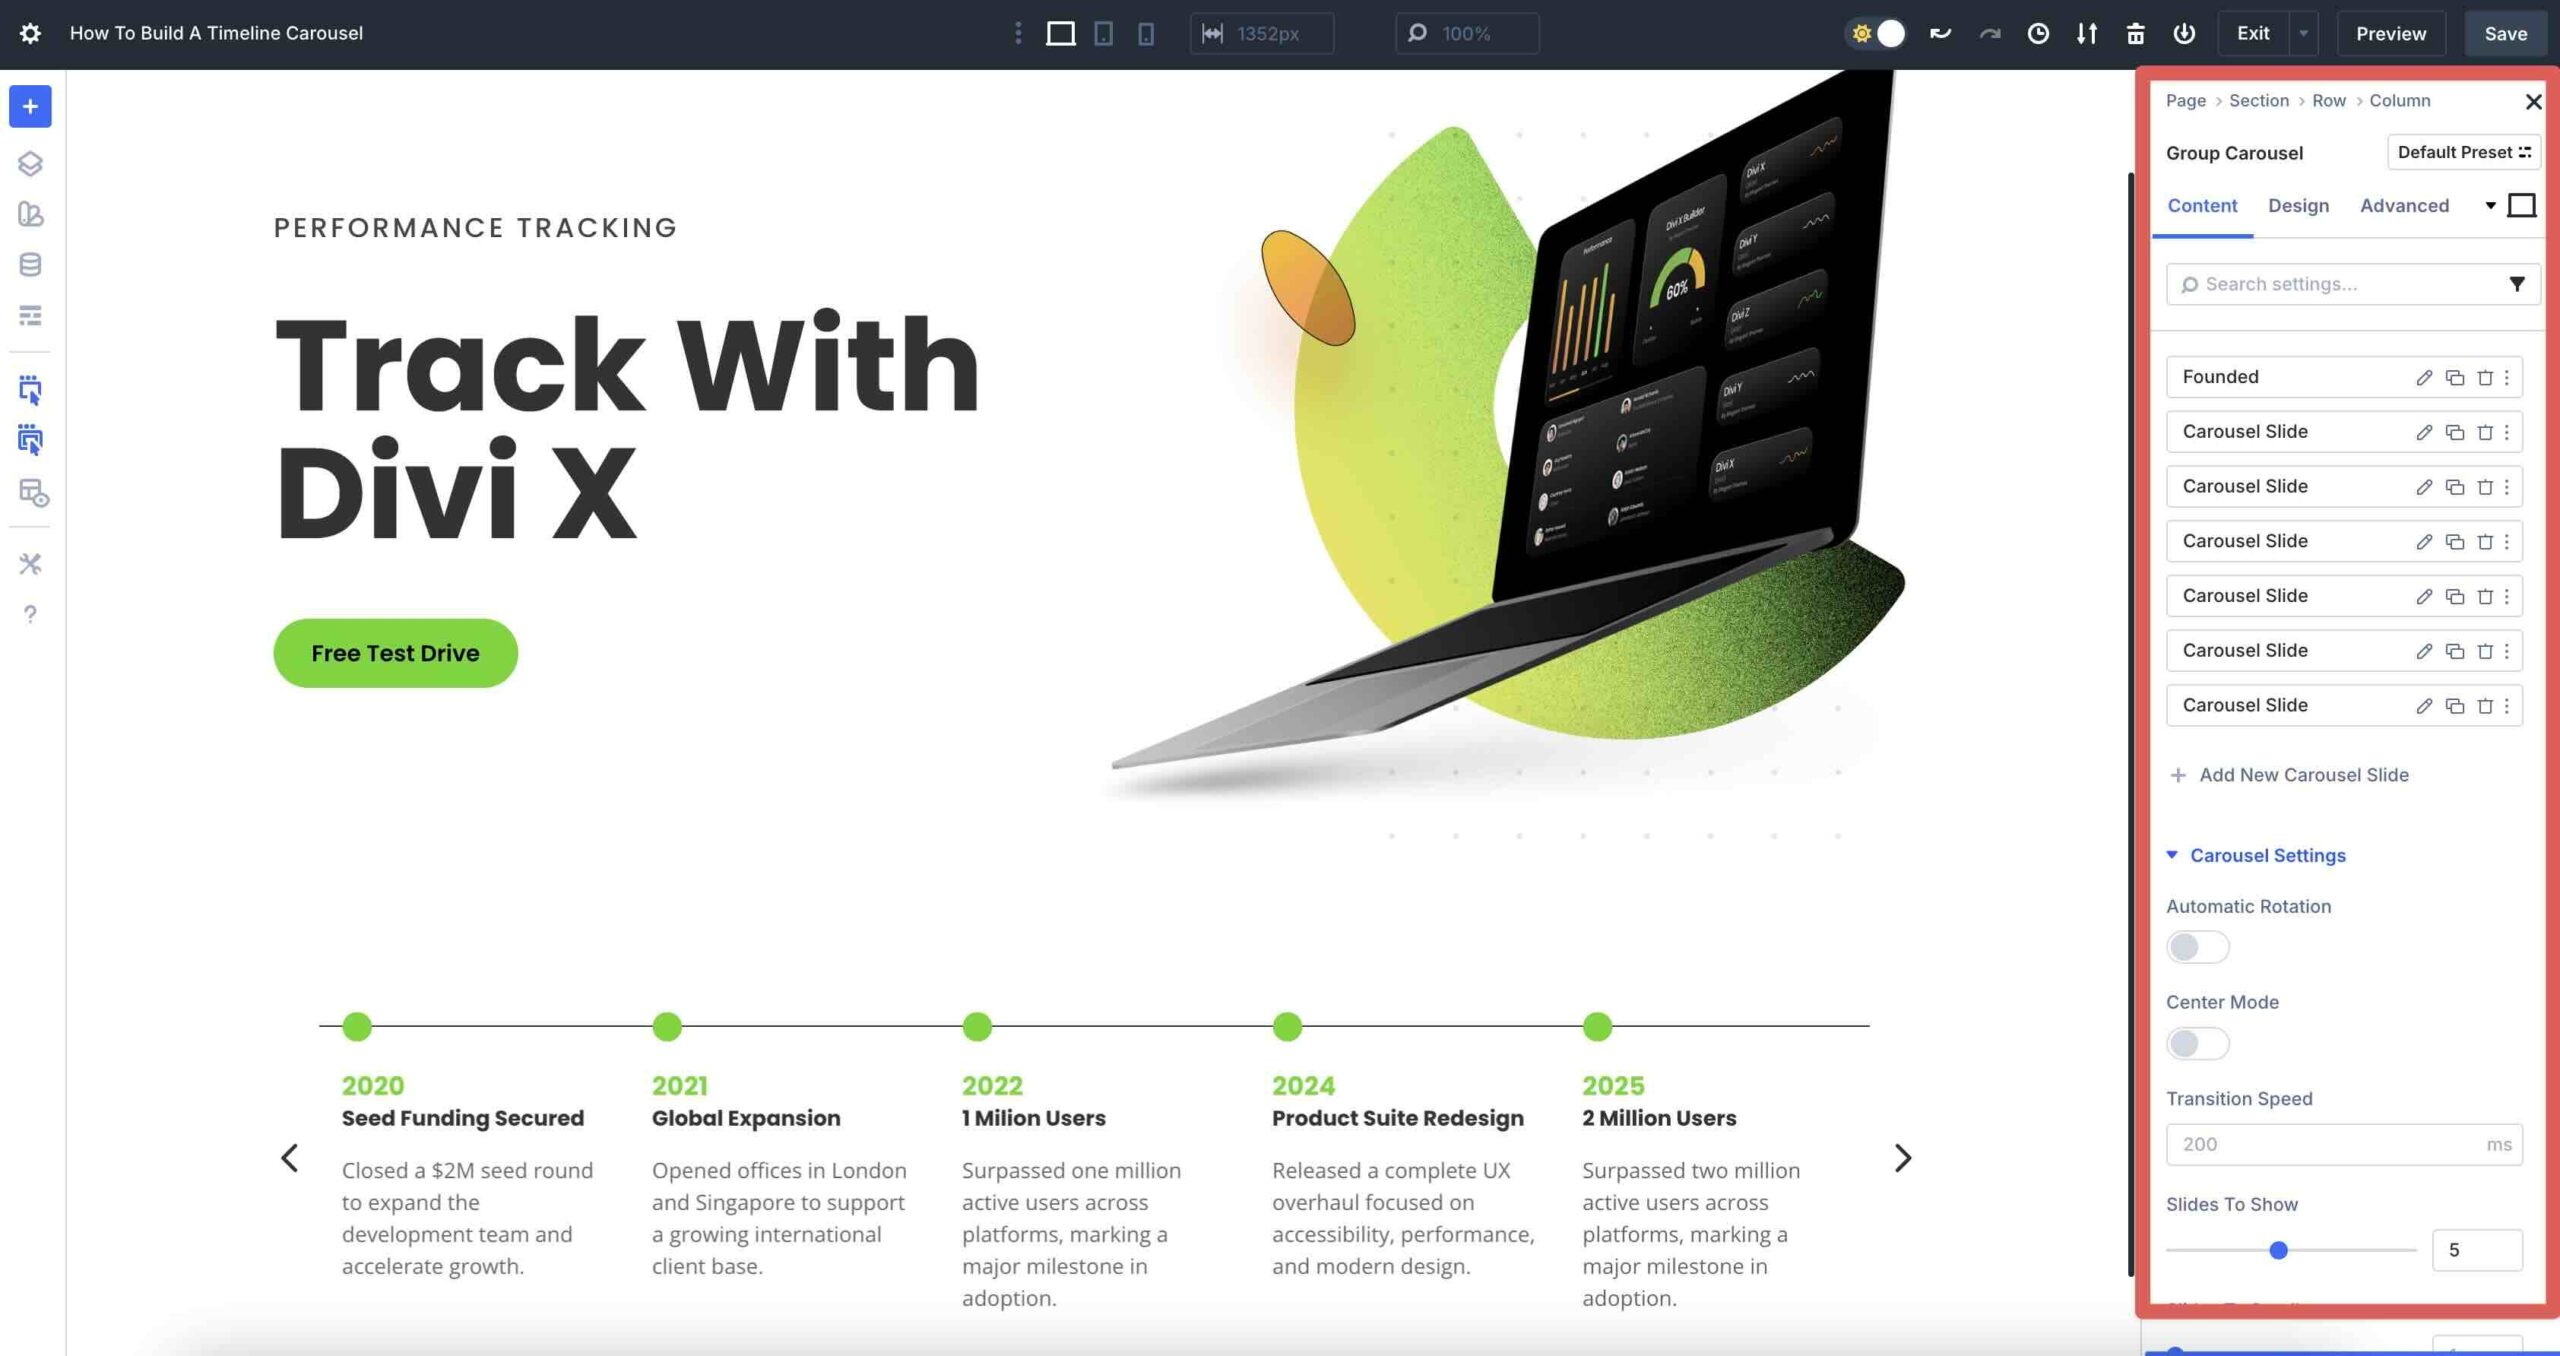
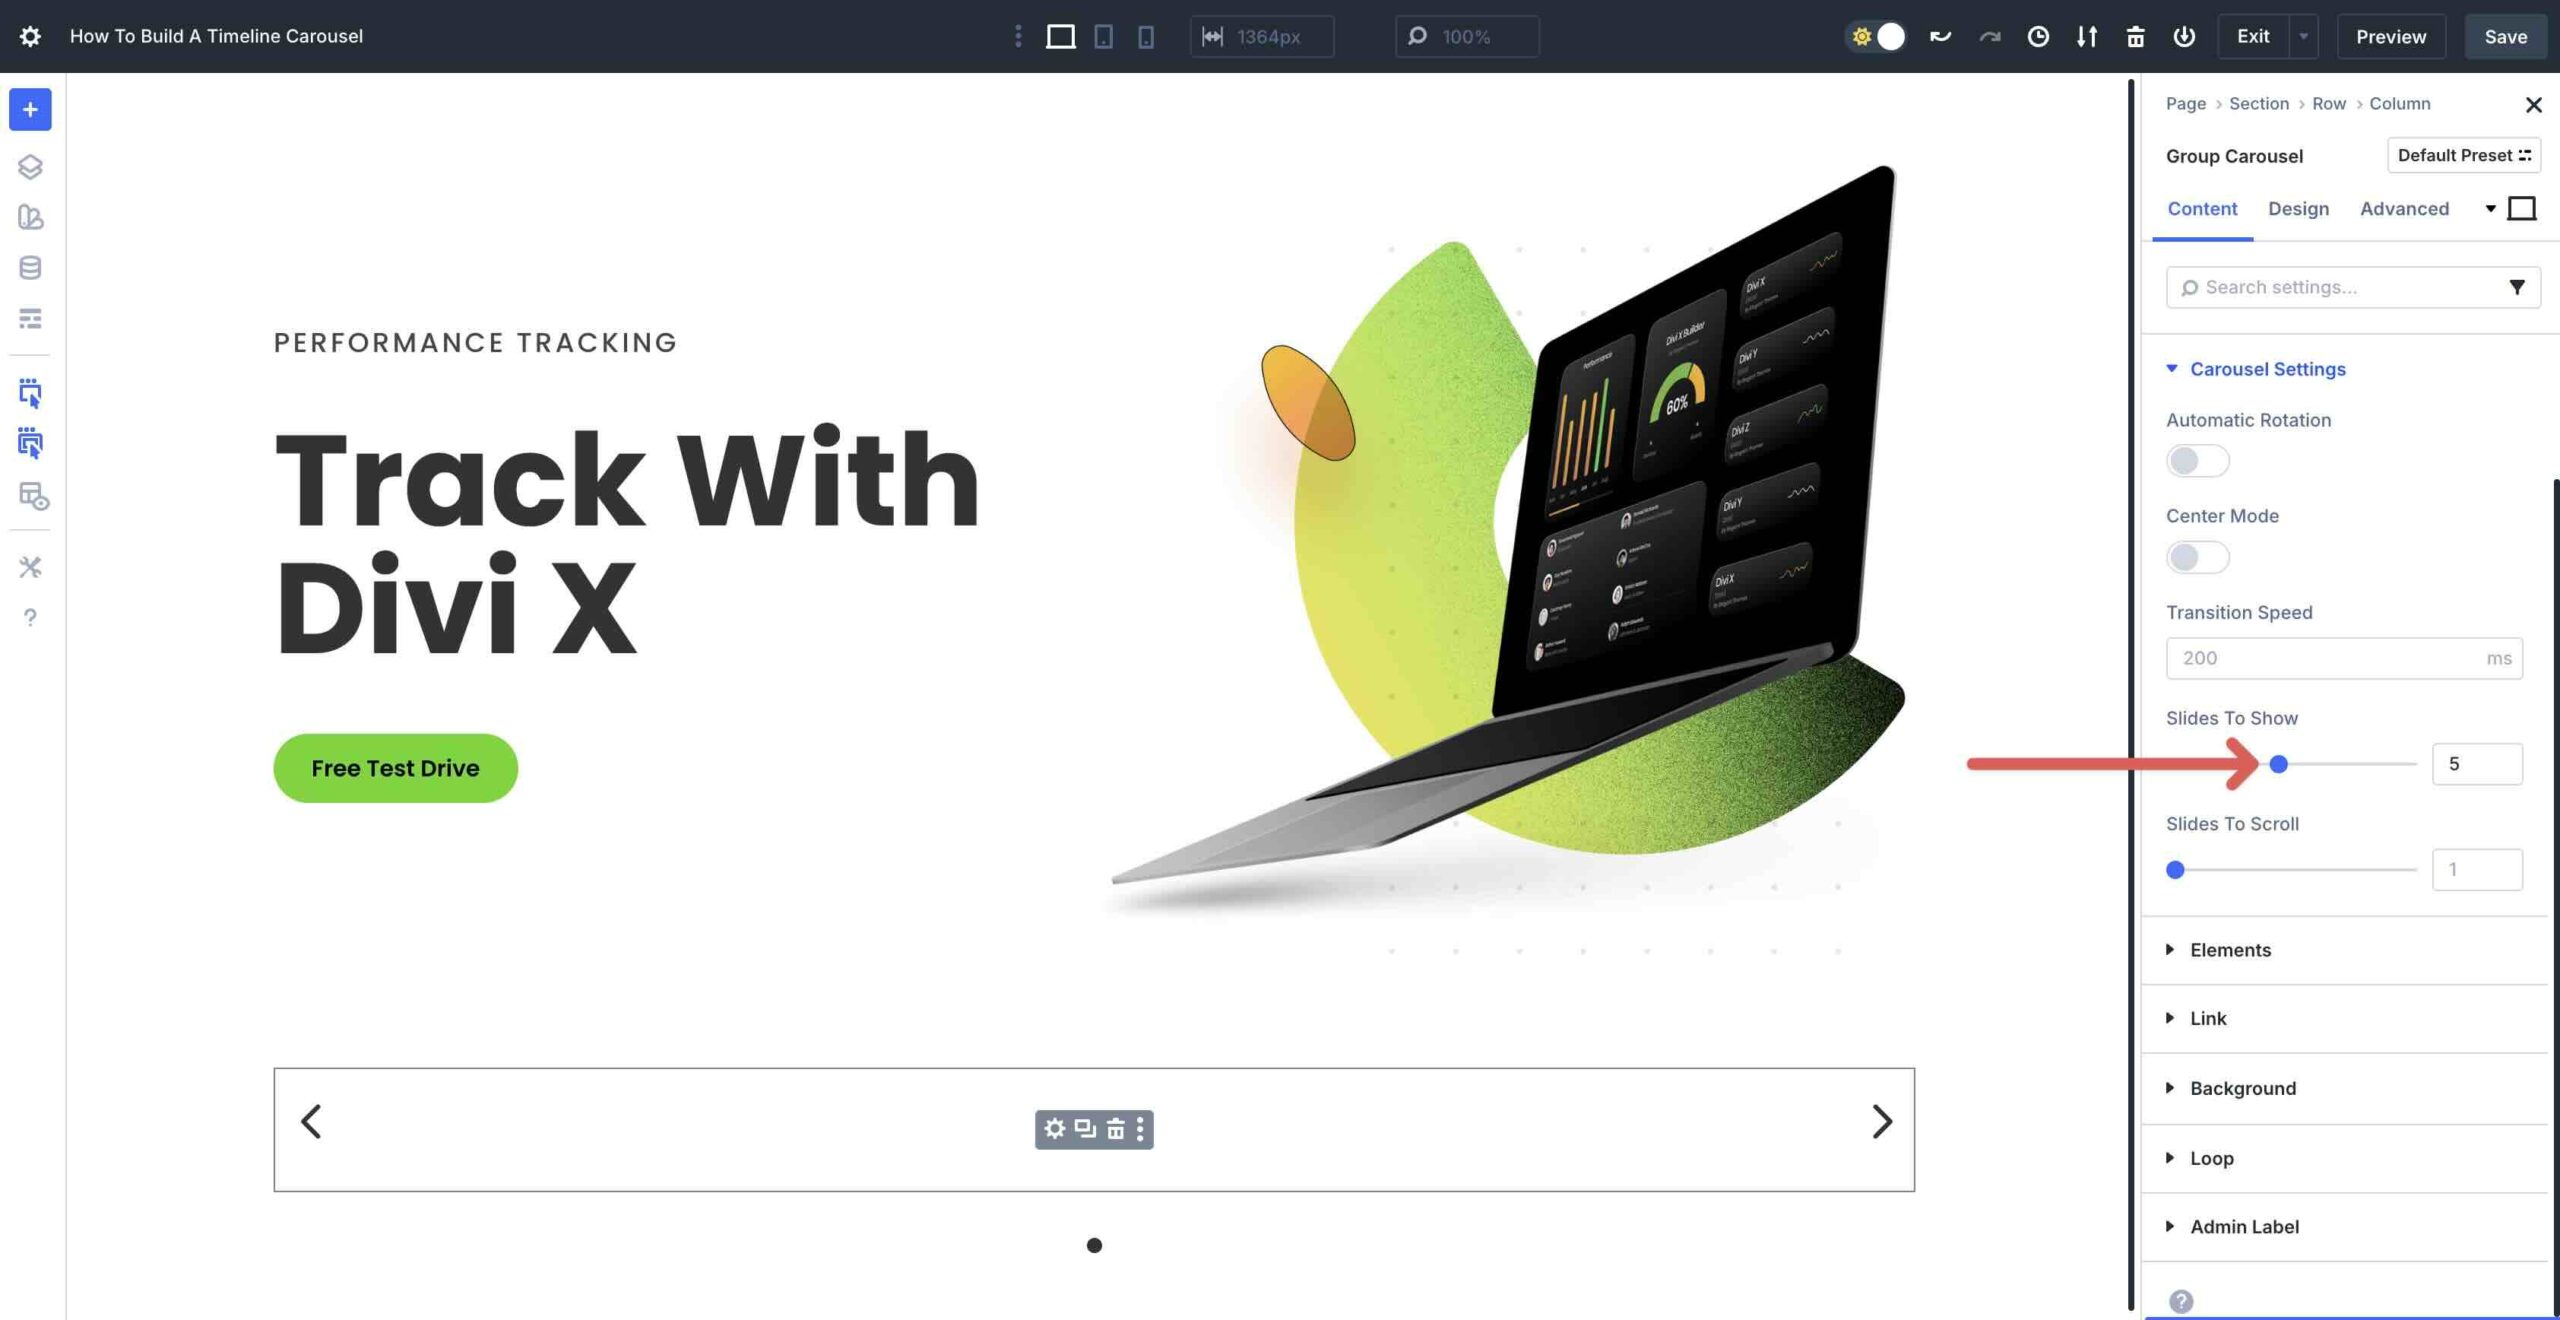
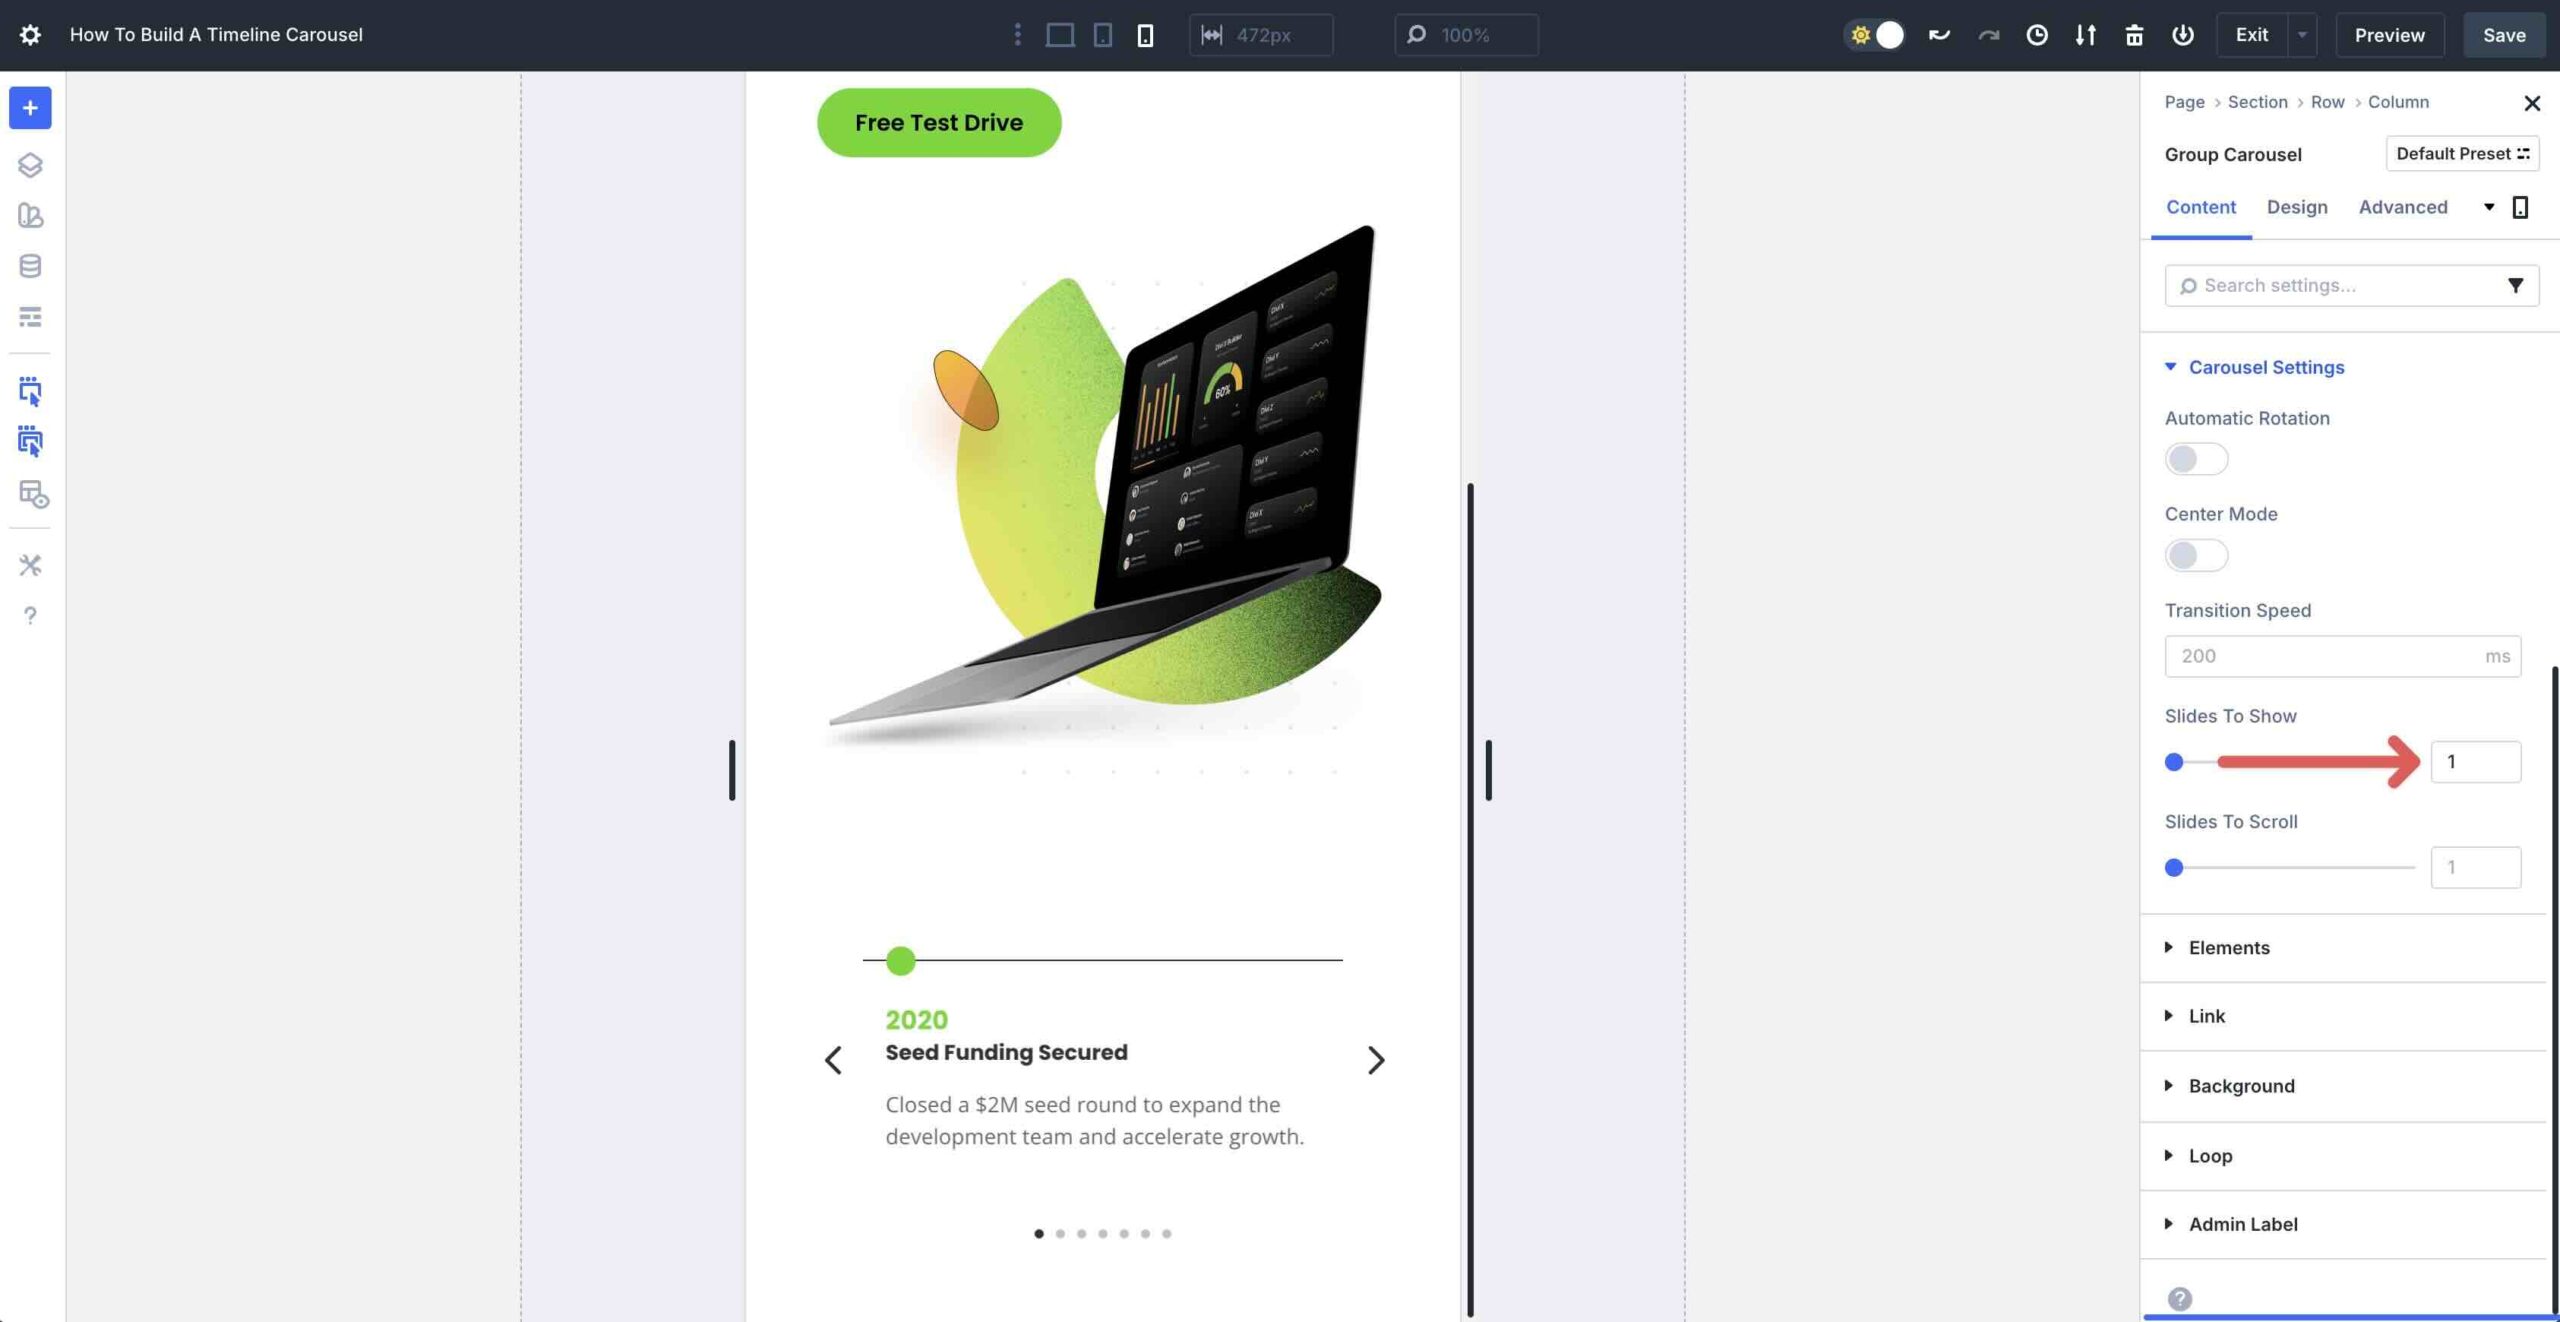
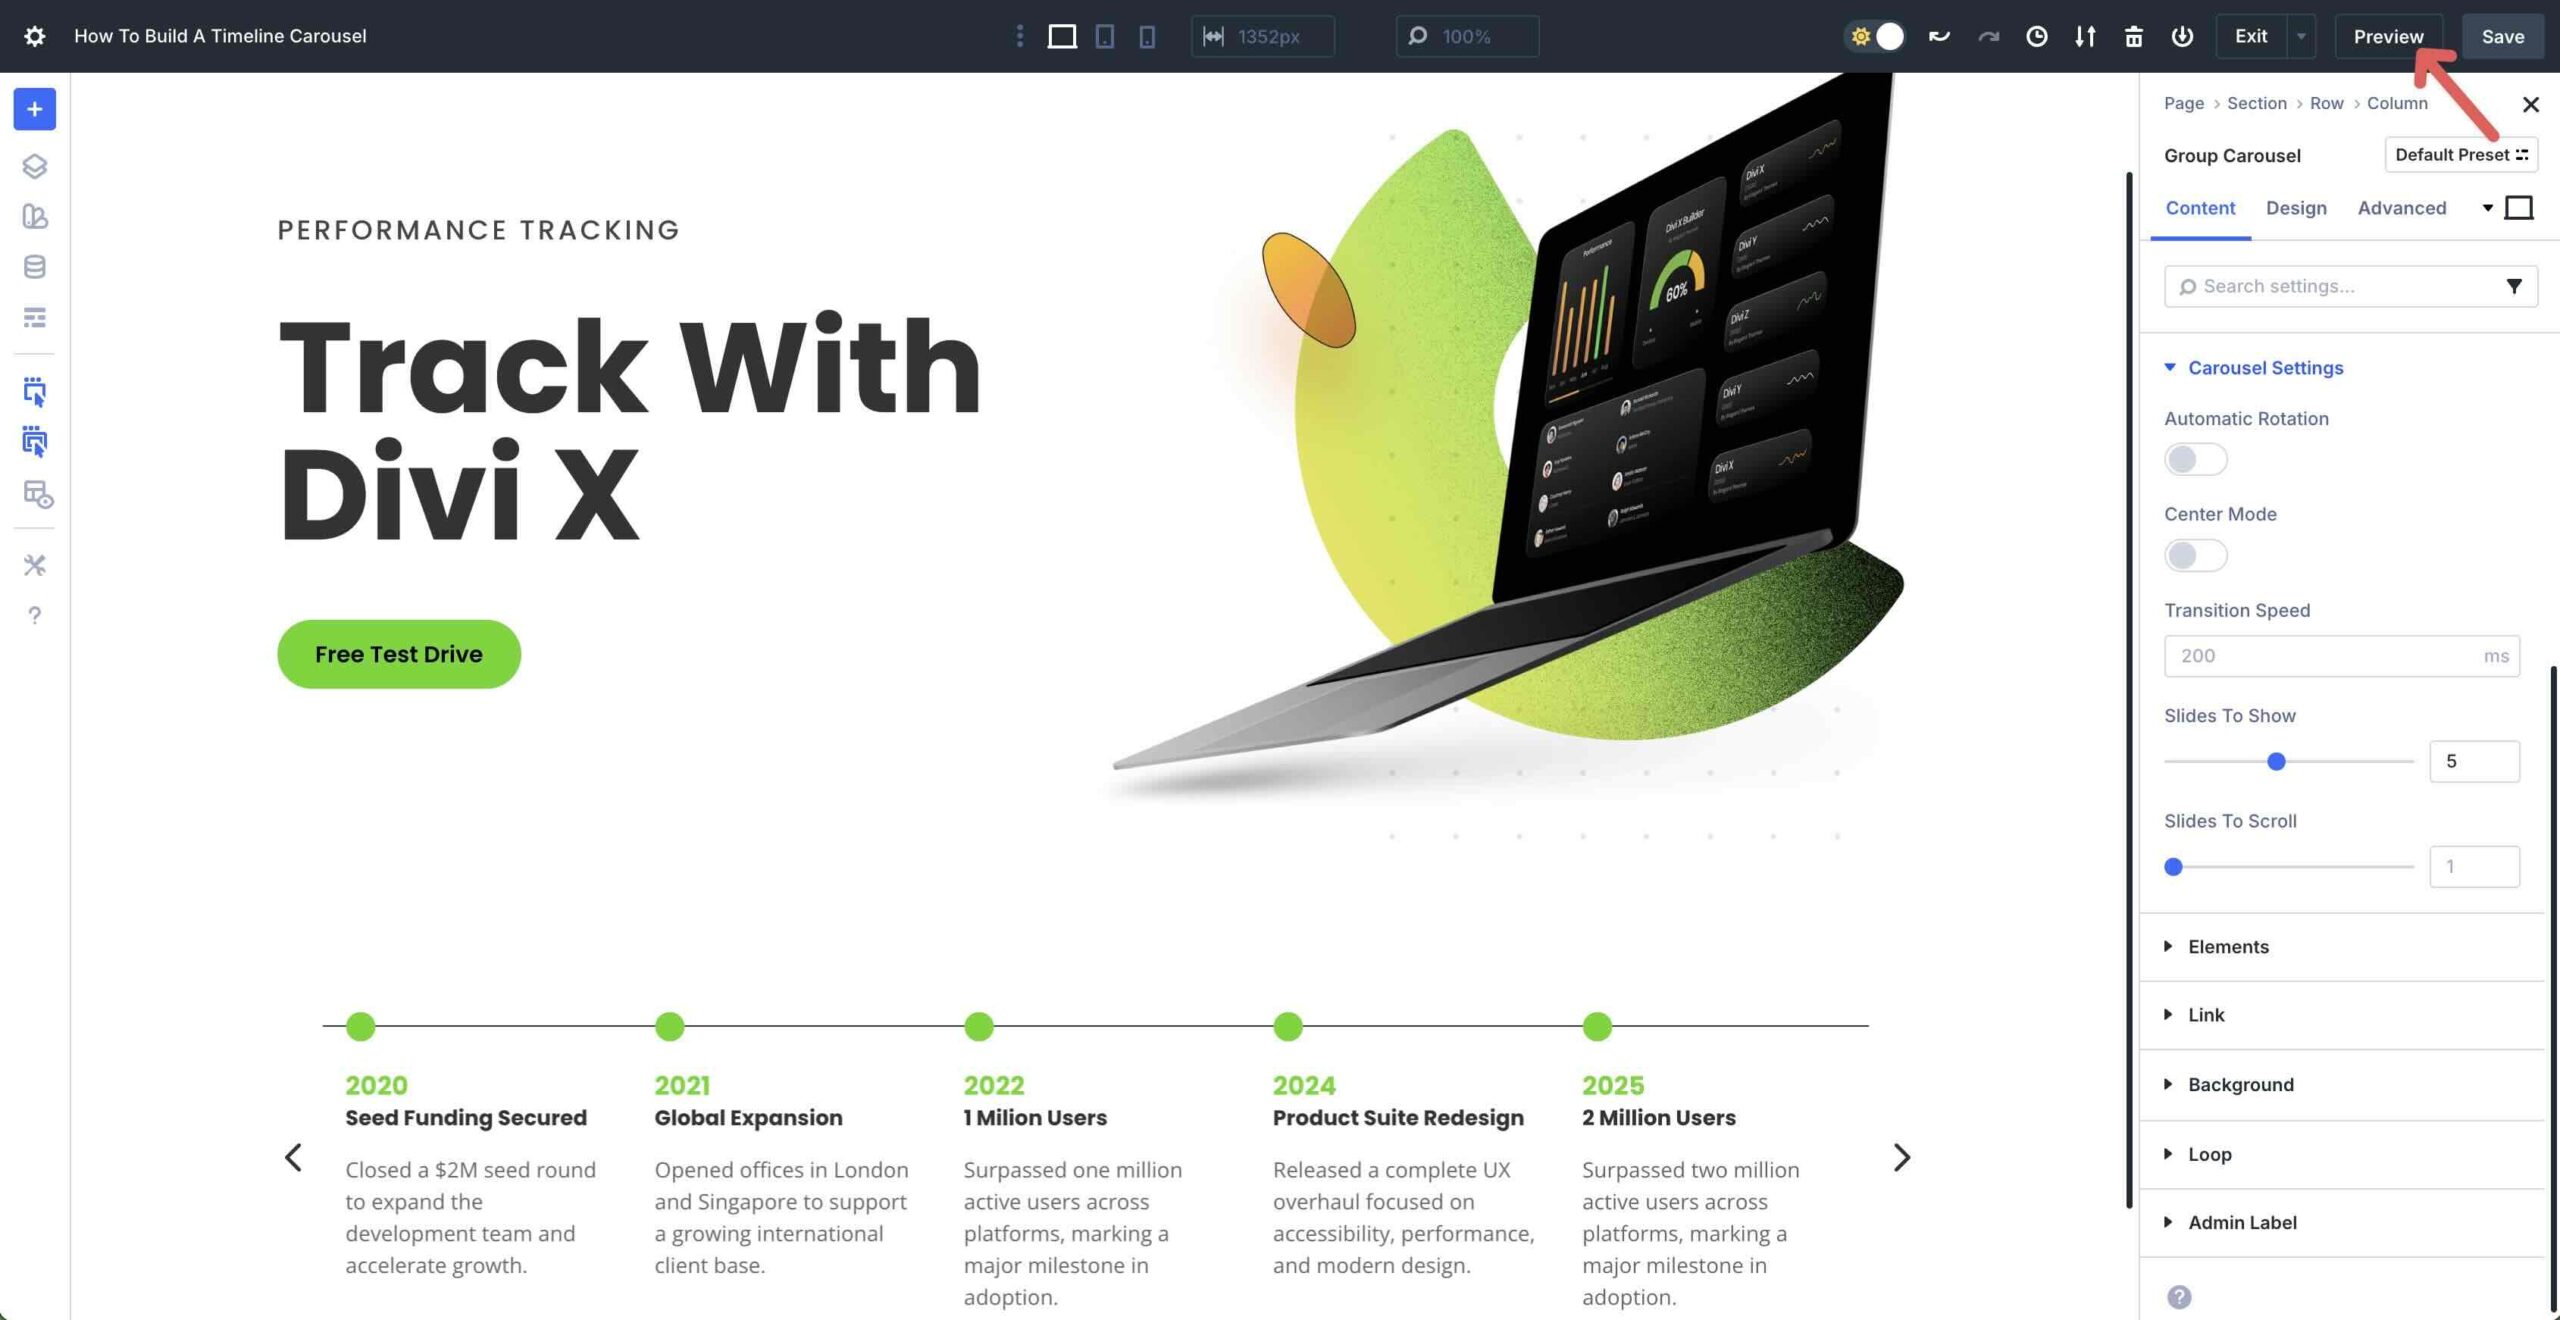
Throughout the Content material subject material tab, build up the Carousel Settings menu. Move away all settings at their defaults, alternatively set the Slides To Show to 5.
Switch to the Design tab and build up the Arrows menu. Set the Arrow Size to 40px and the Arrow Position to Outside.
![]()
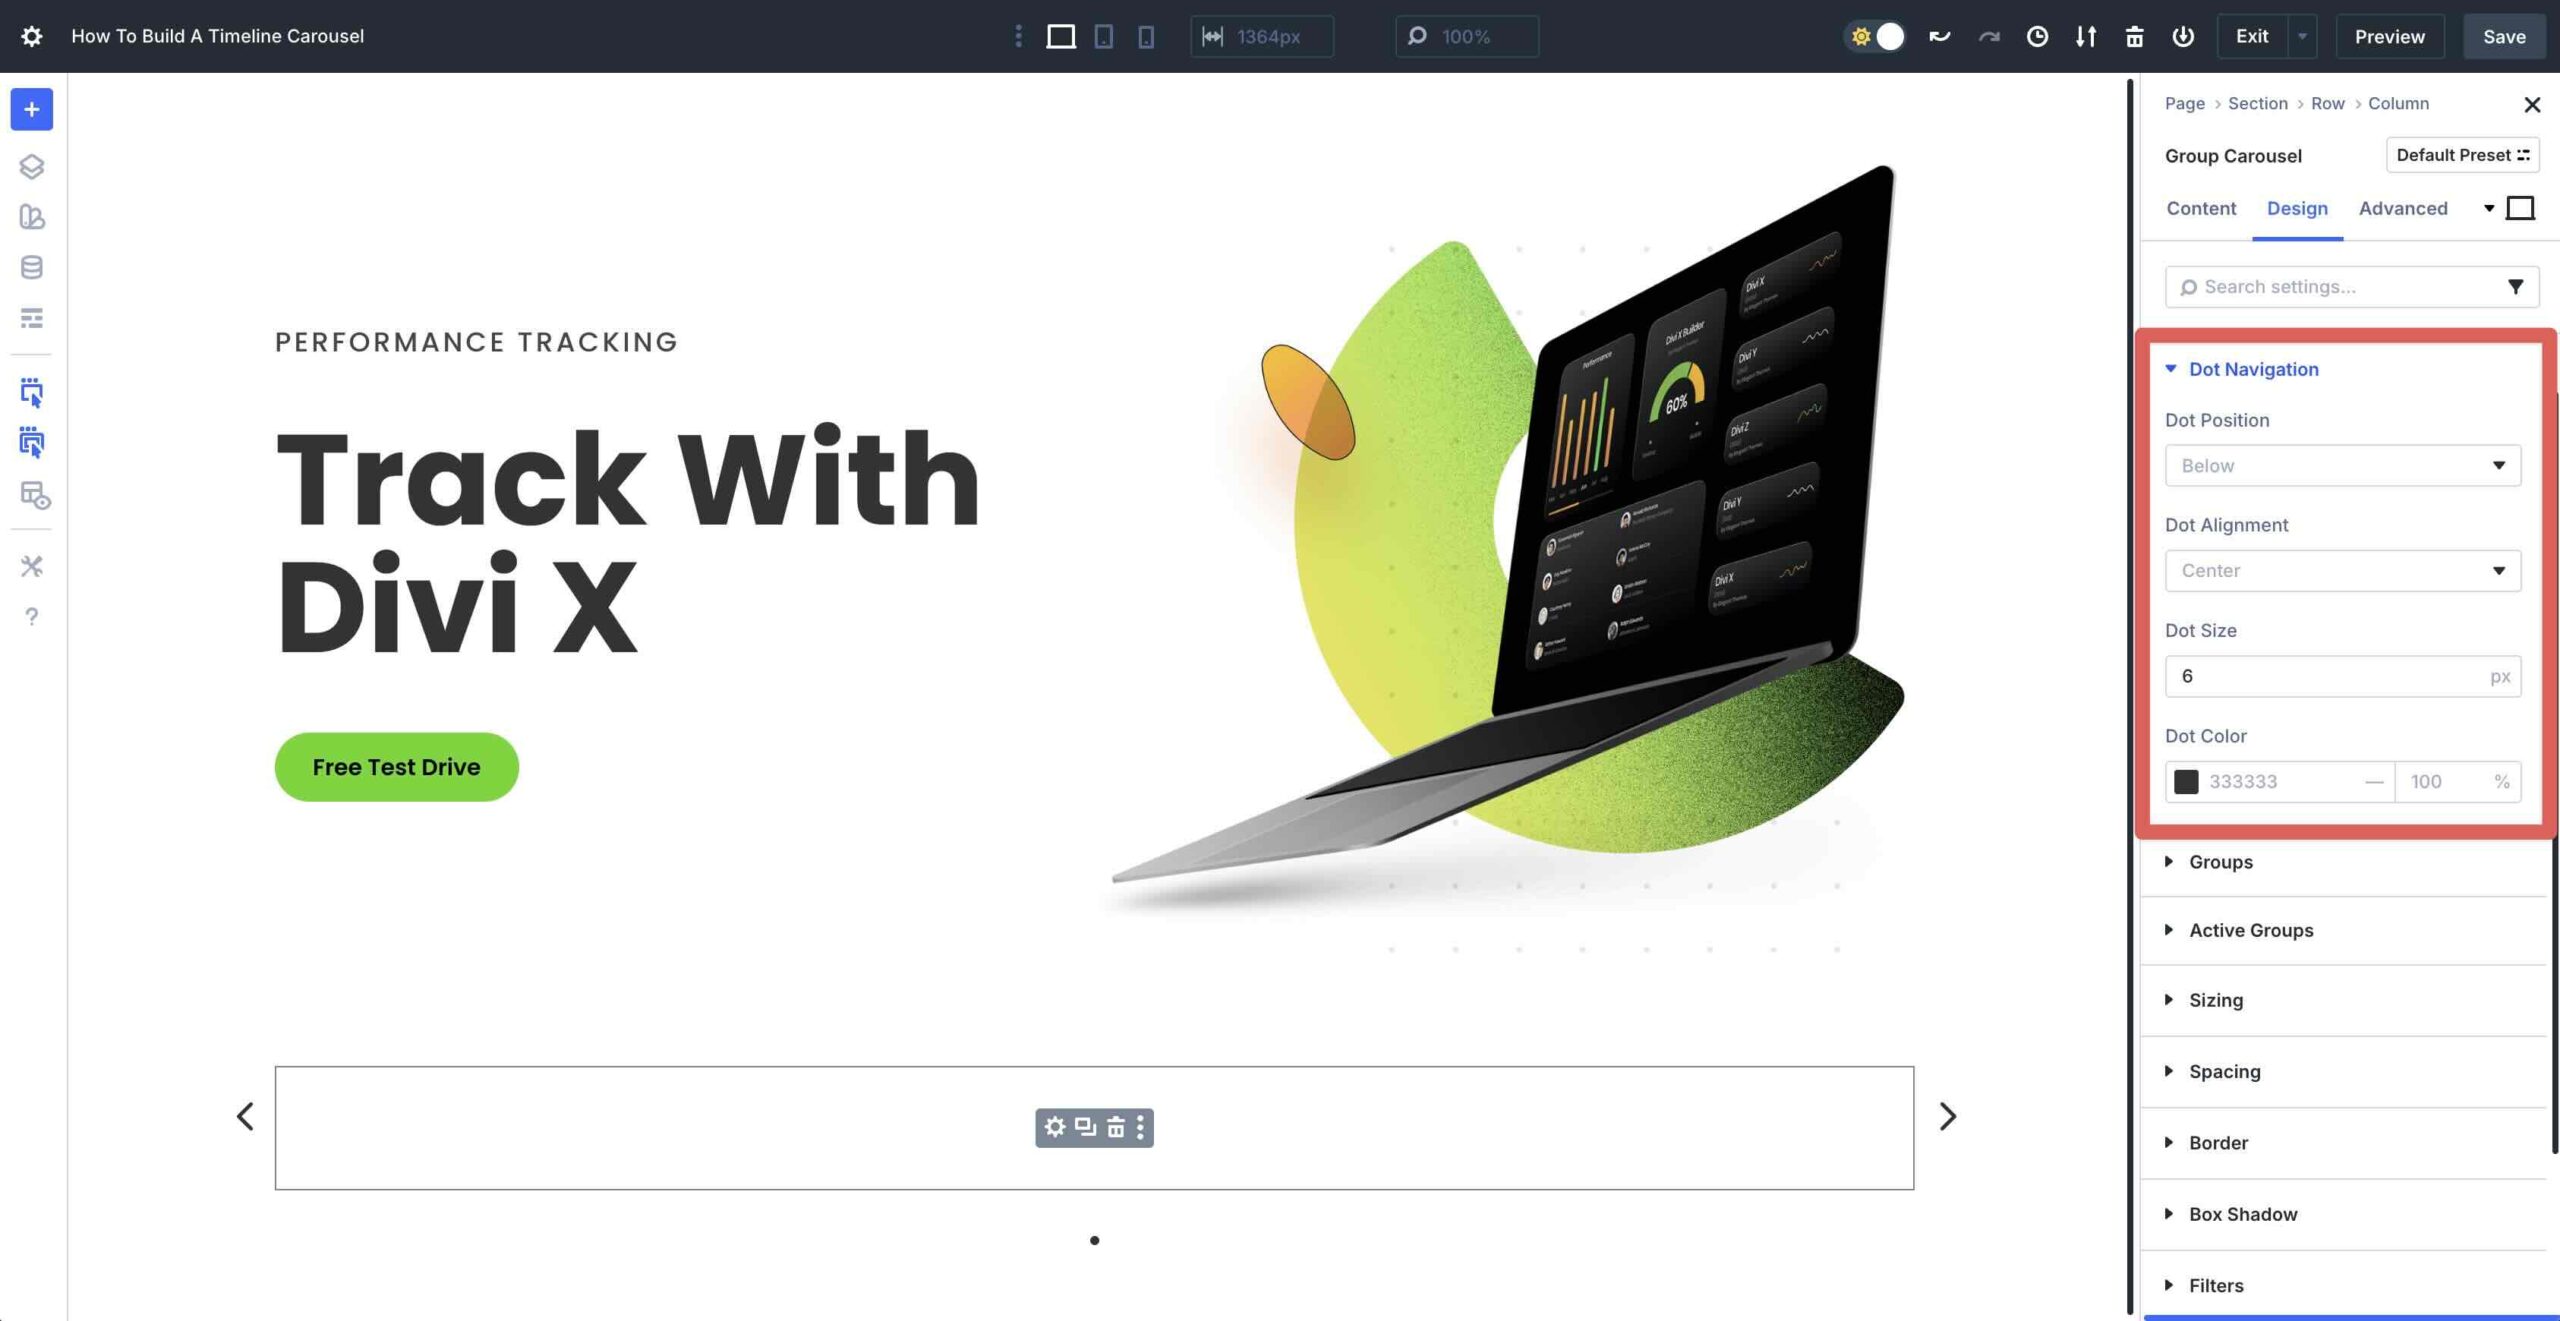
Next, build up the Dot Navigation menu. Set the Dot Size to 6px.
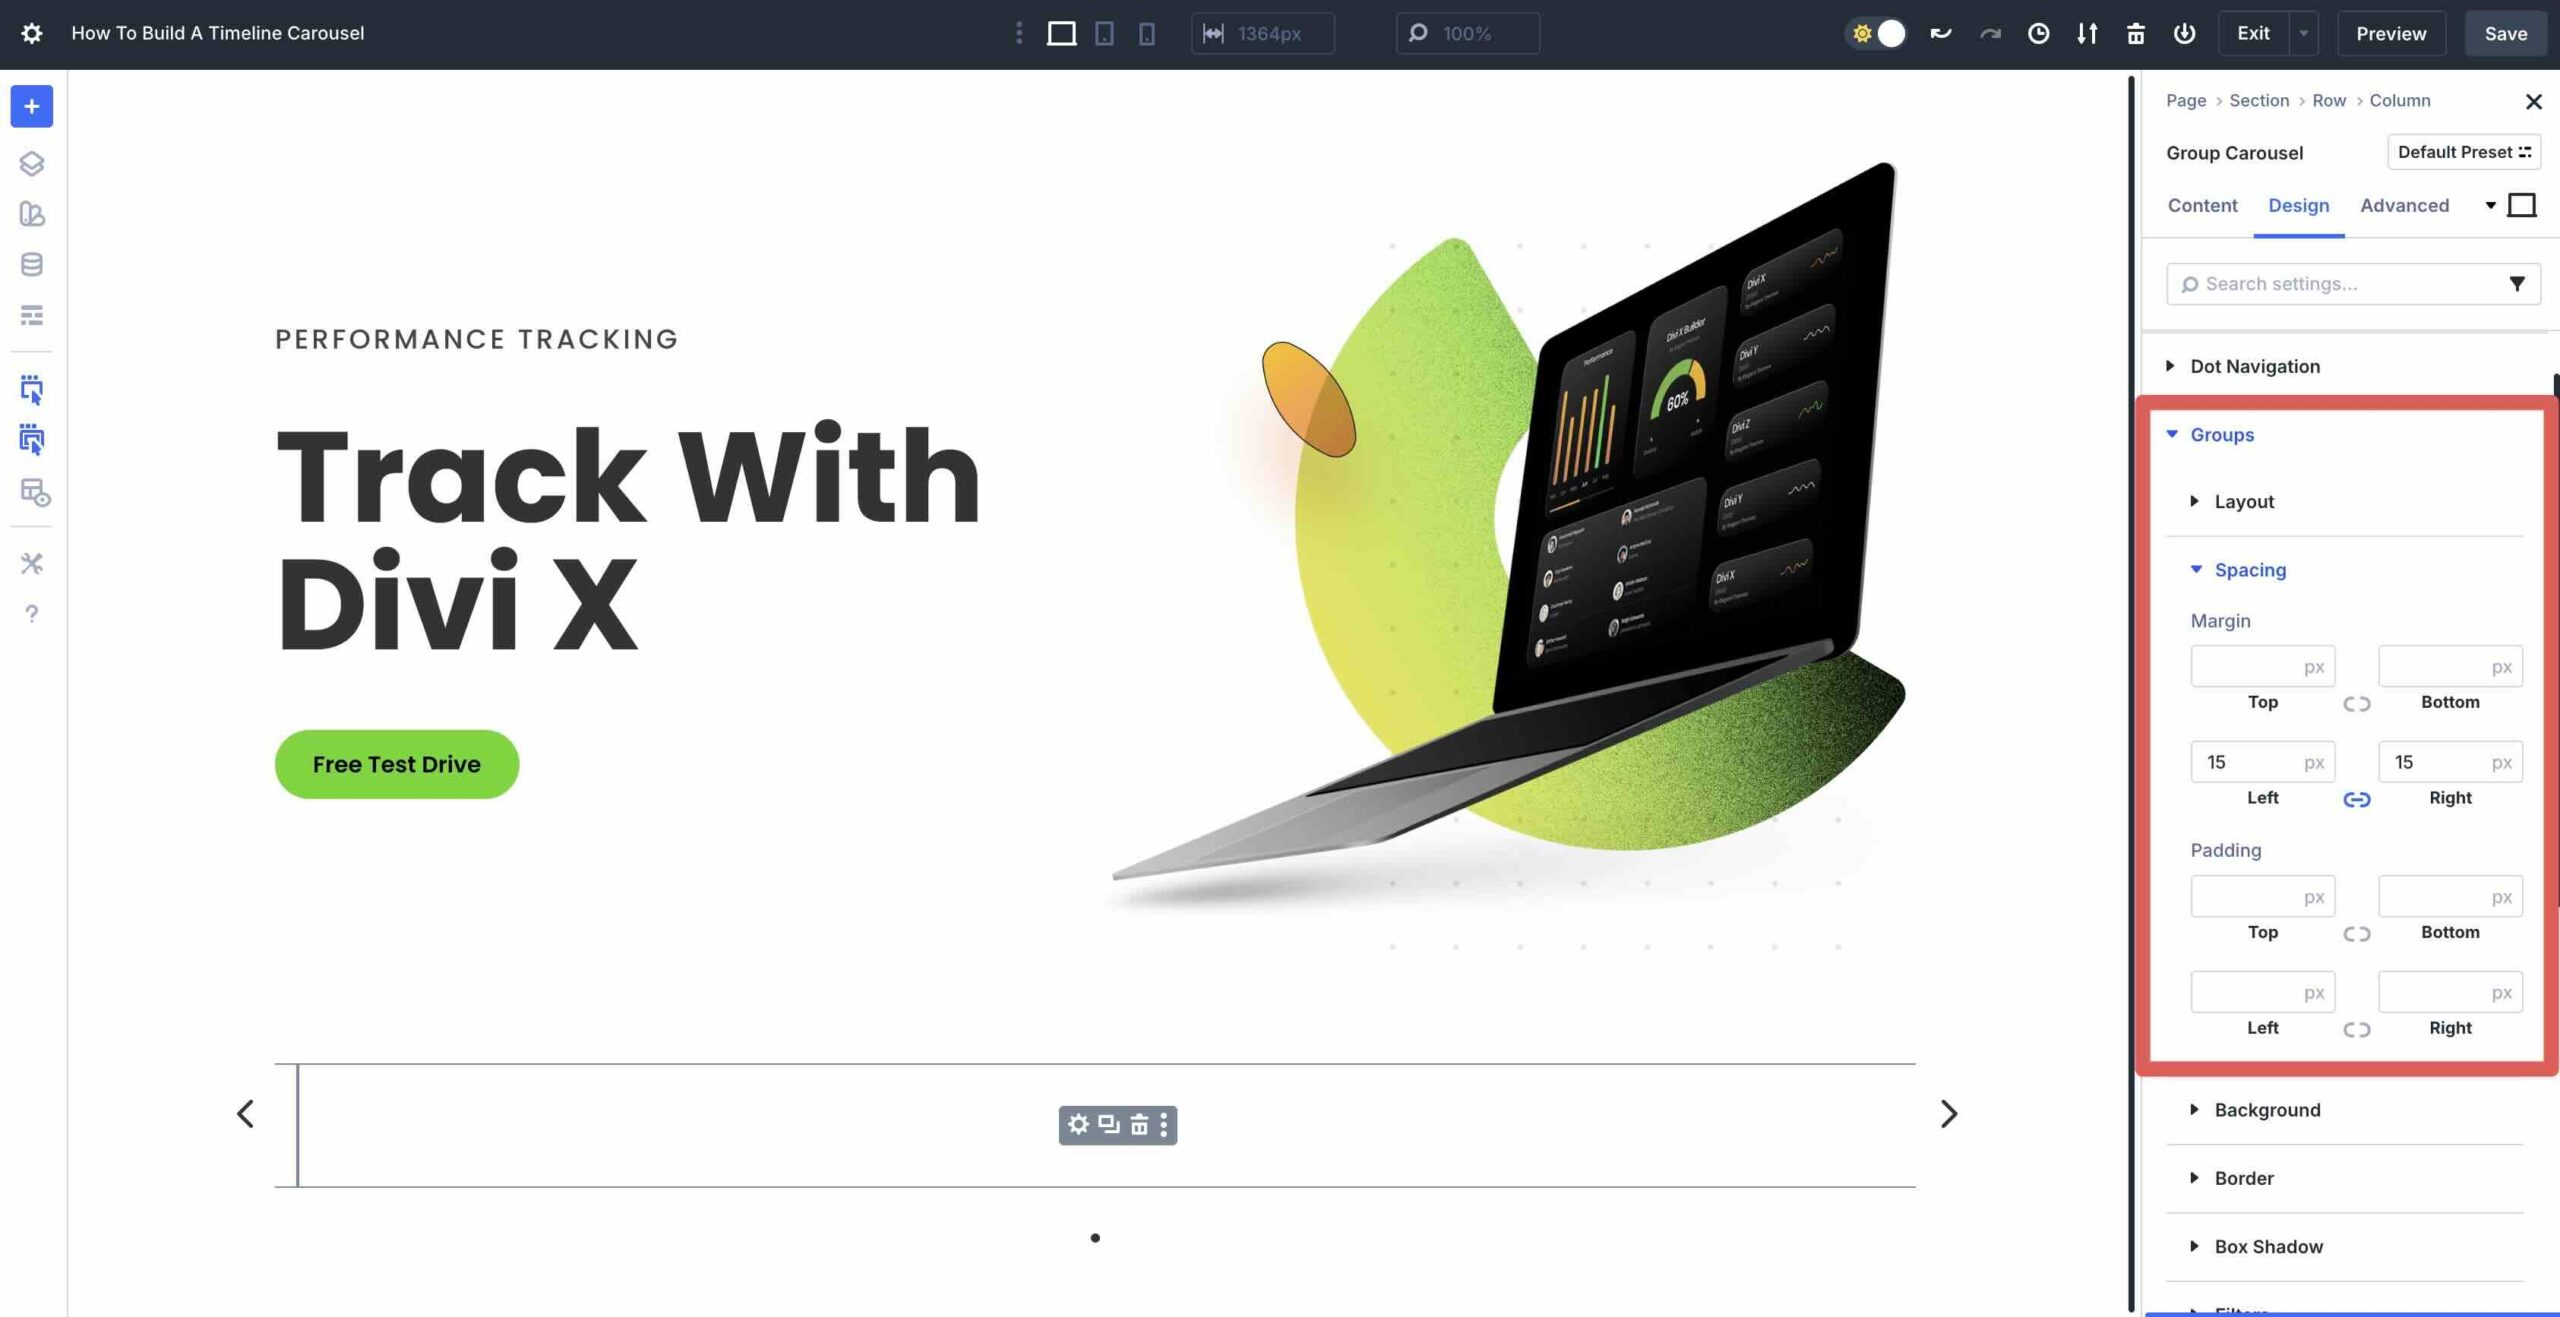
Build up the Groups > Spacing menu and add 15px Margin to the Left and Right kind.
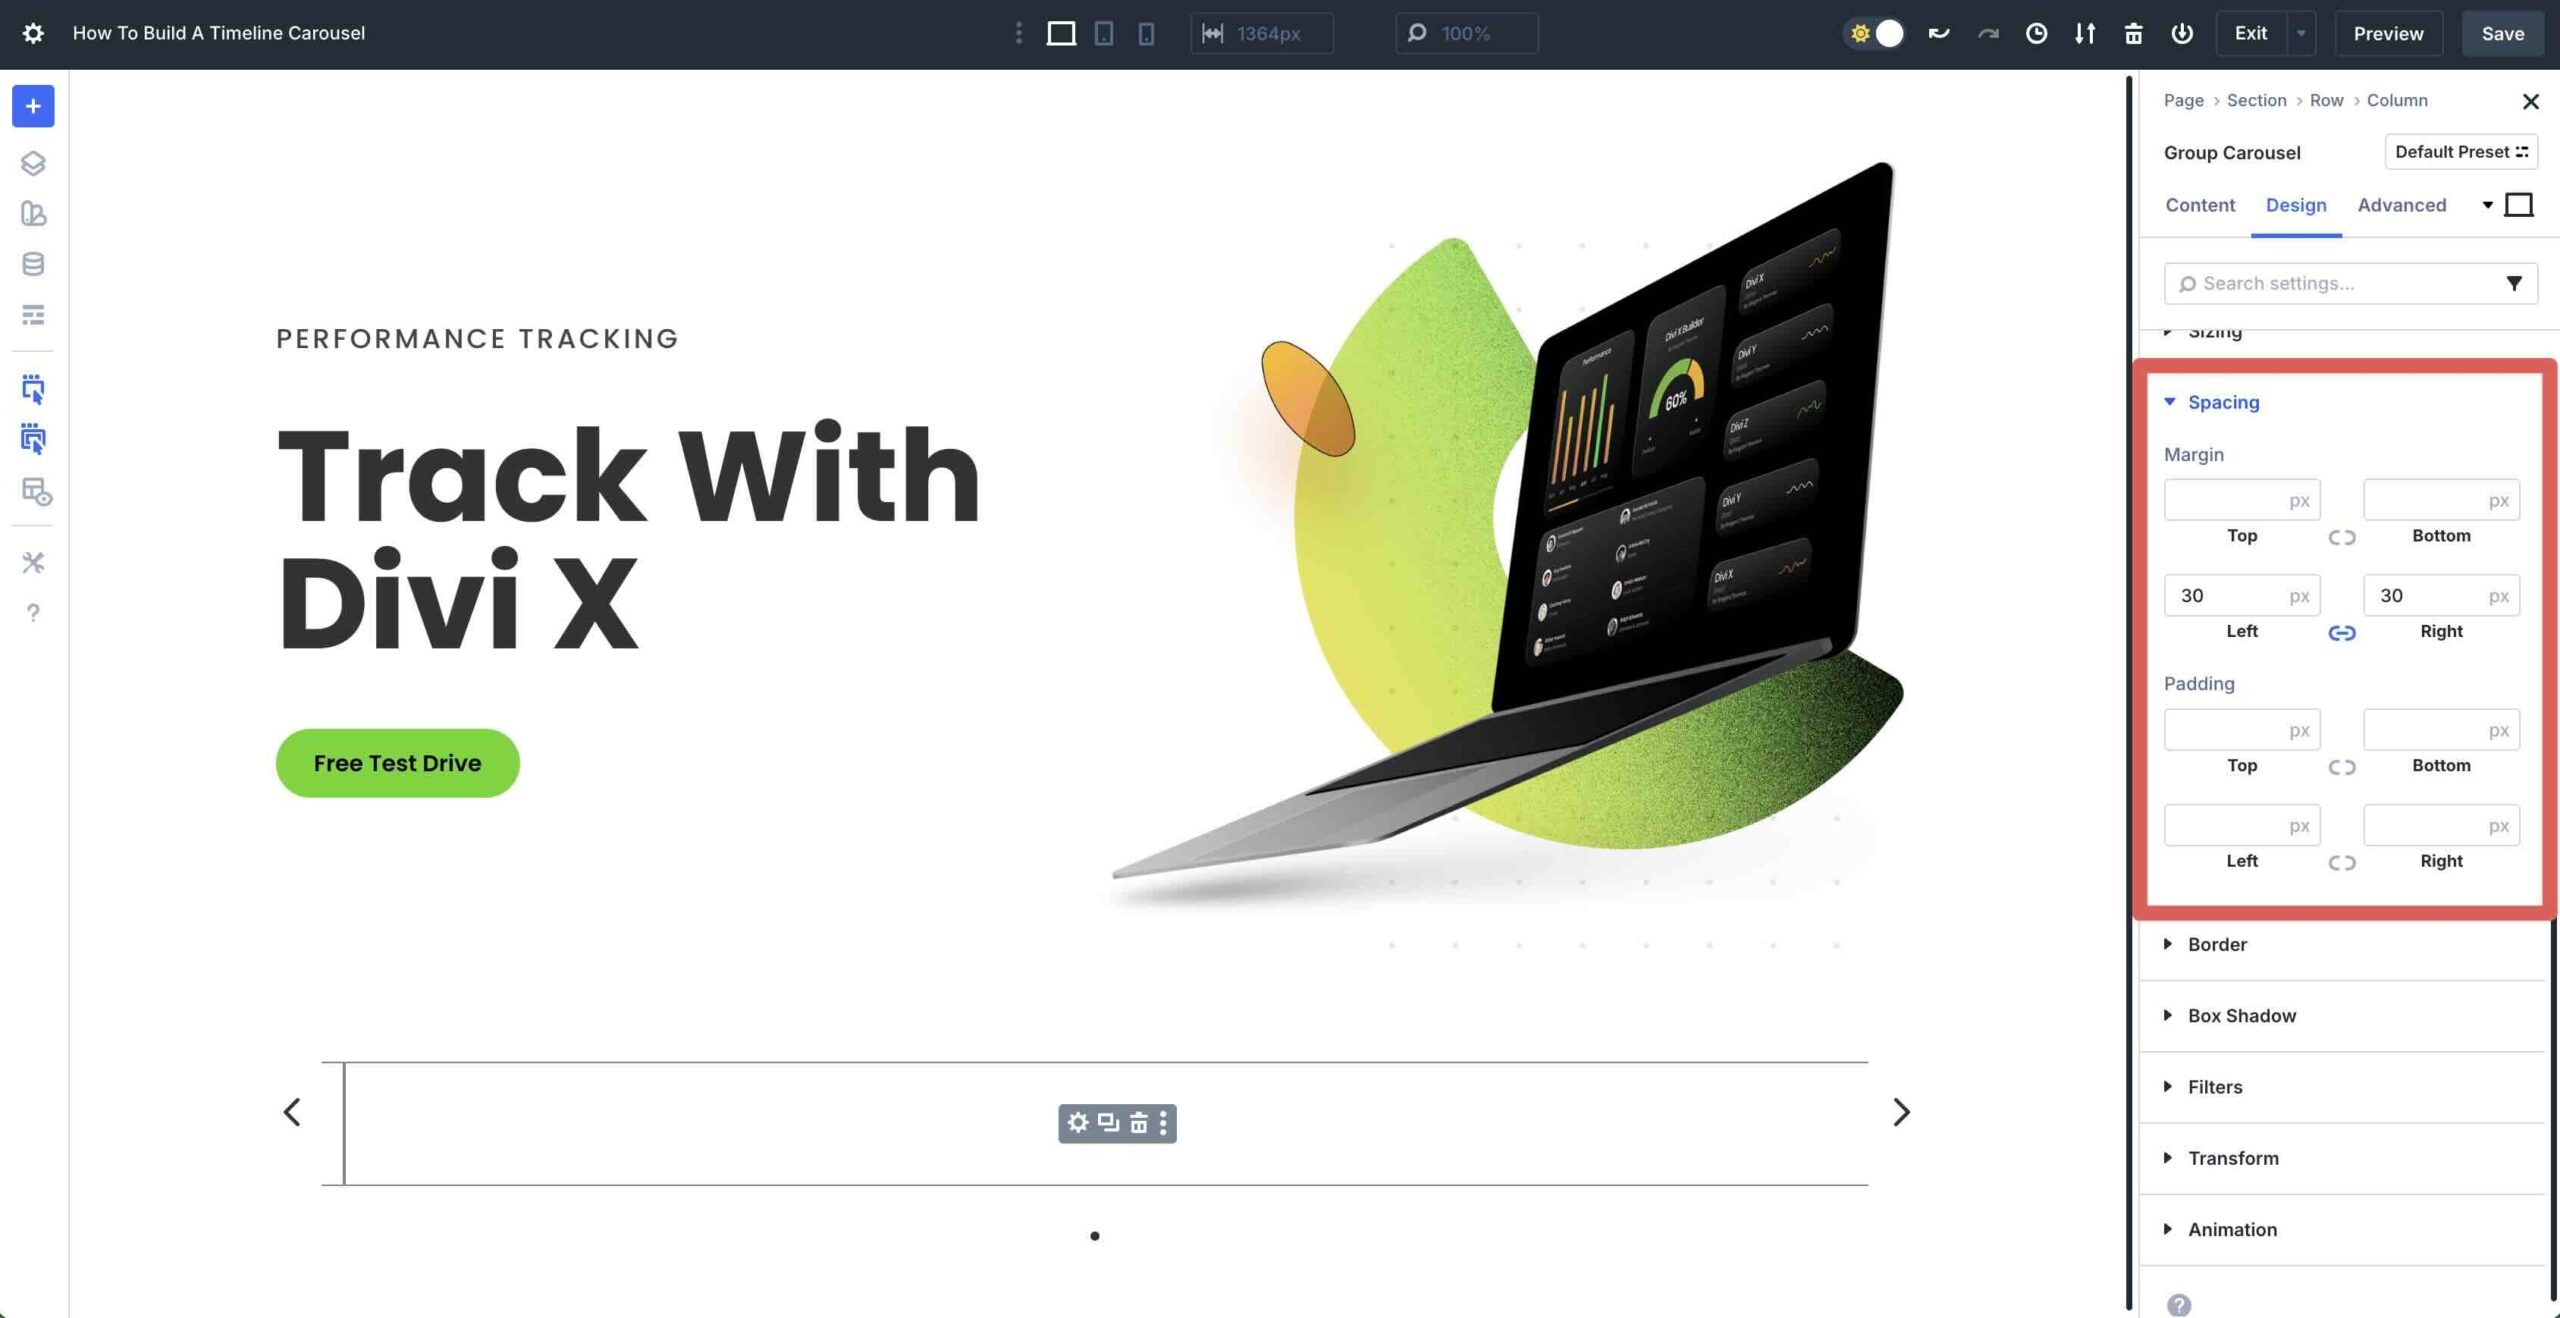
Scroll down and build up the Spacing menu. Add 30px Margin to the Left and Right kind.
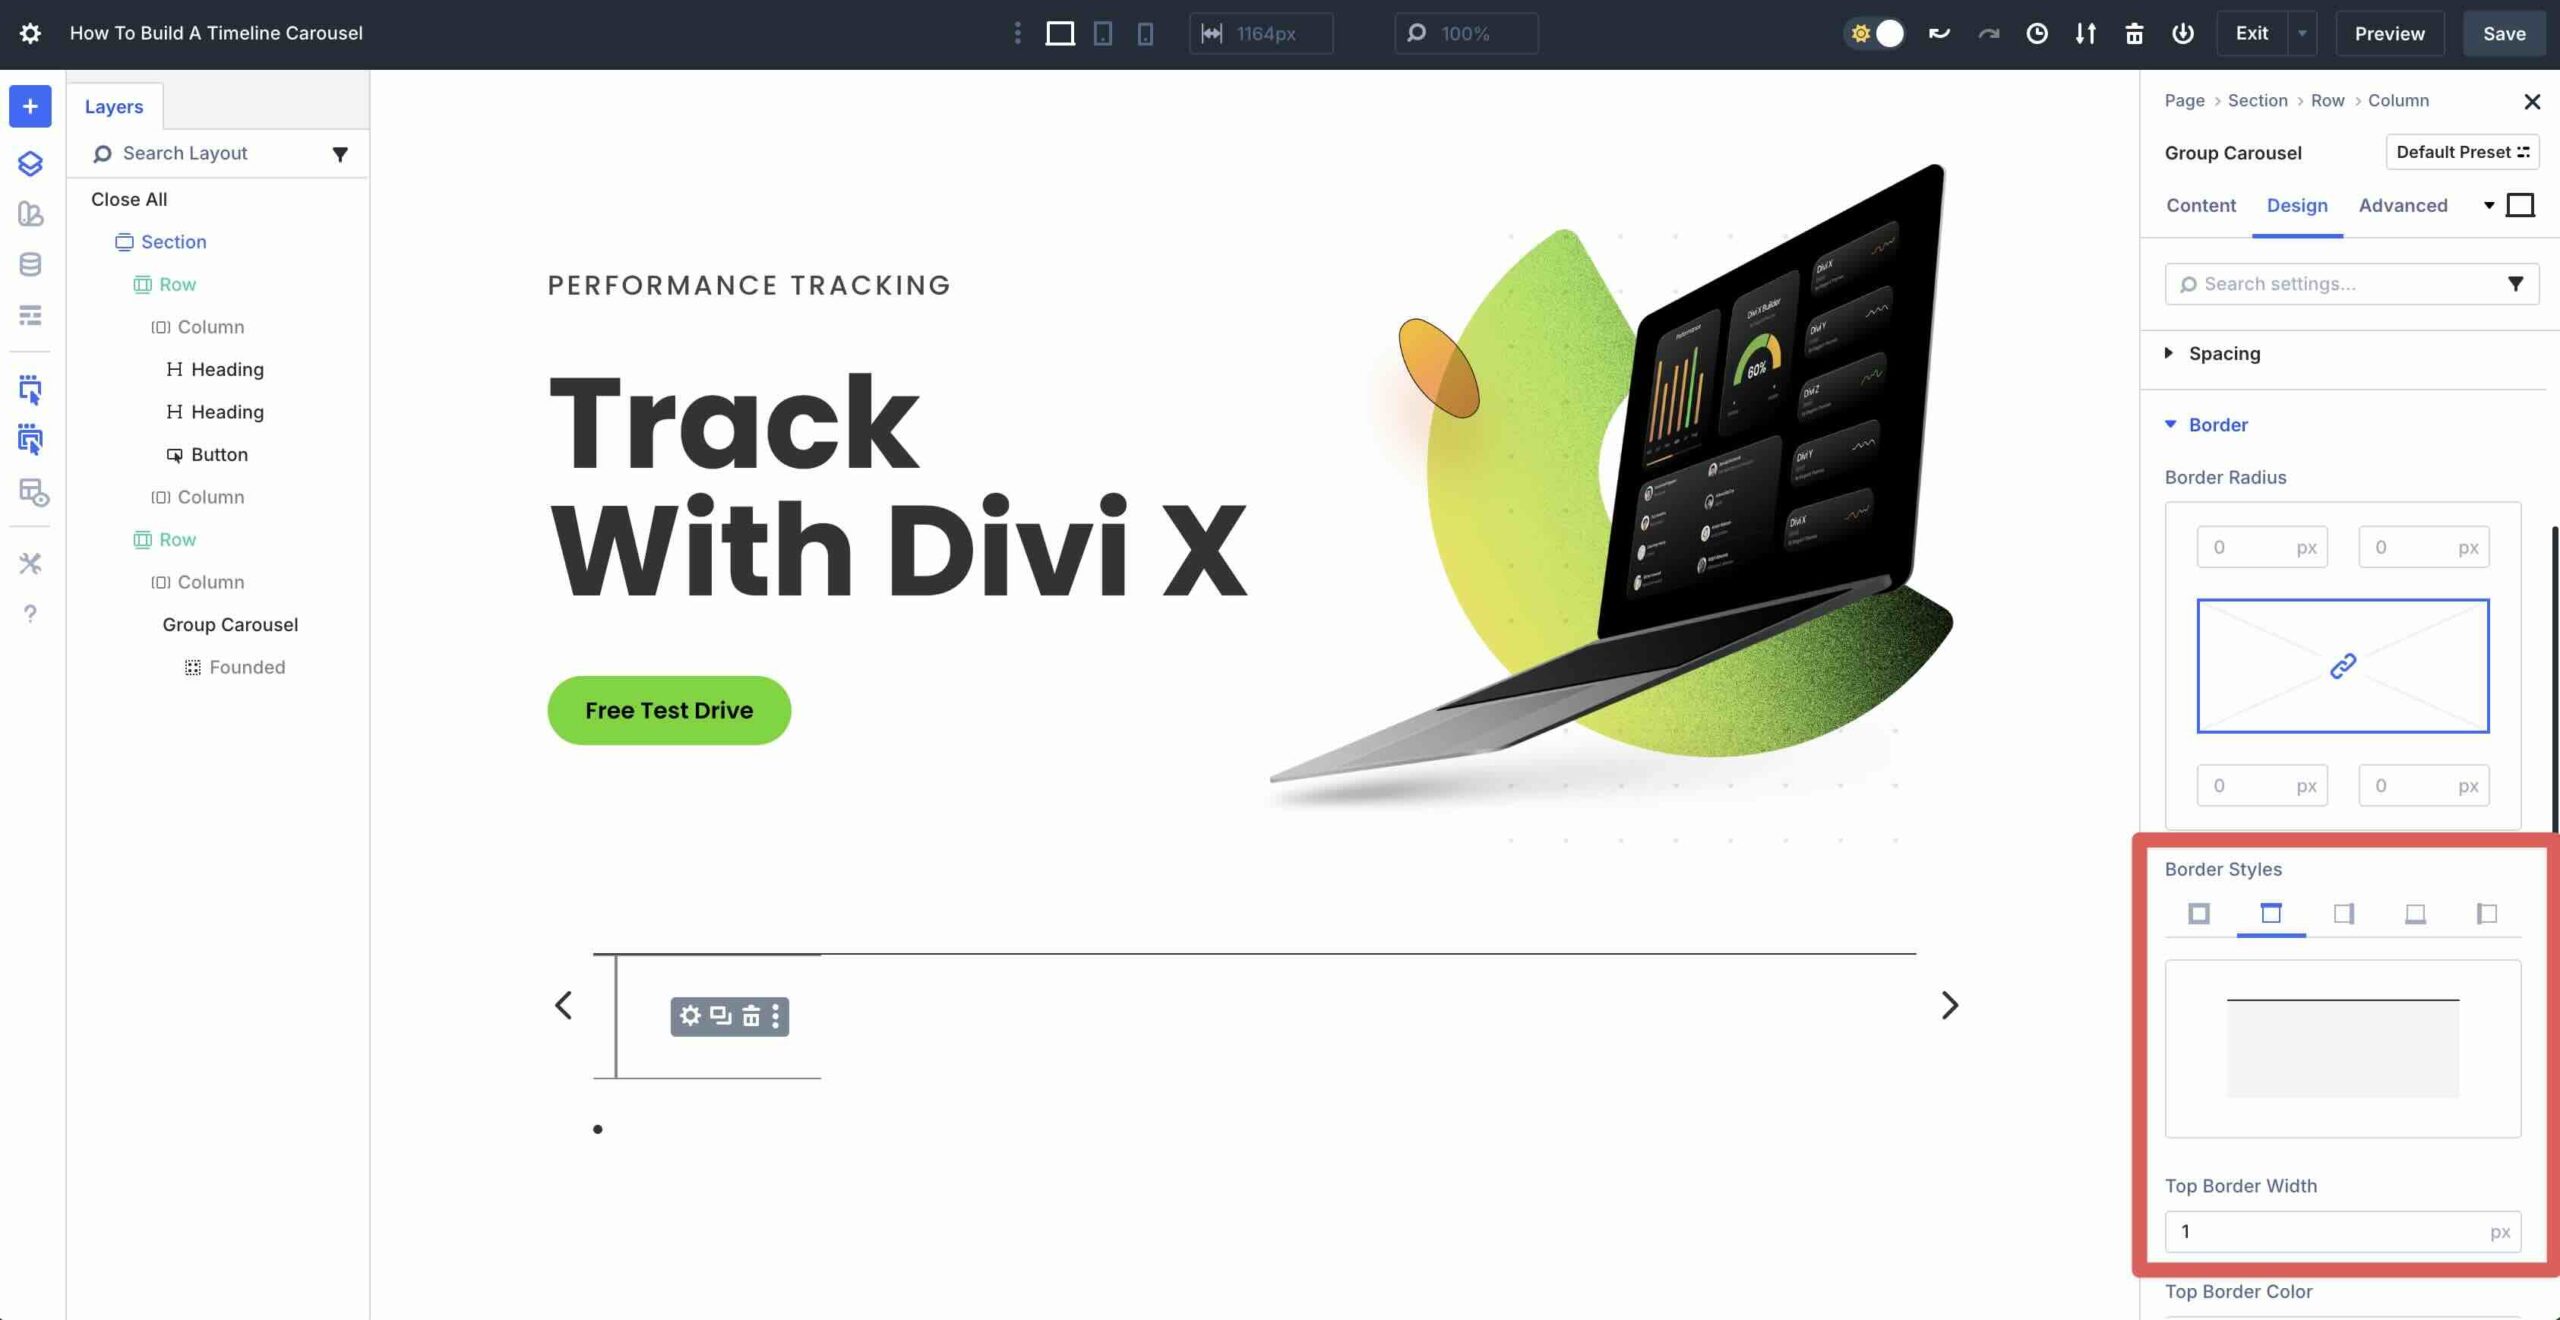
Build up the Border menu. Beneath Border Types, click on at the Border Best tab. Enter 1px Best Border Width.
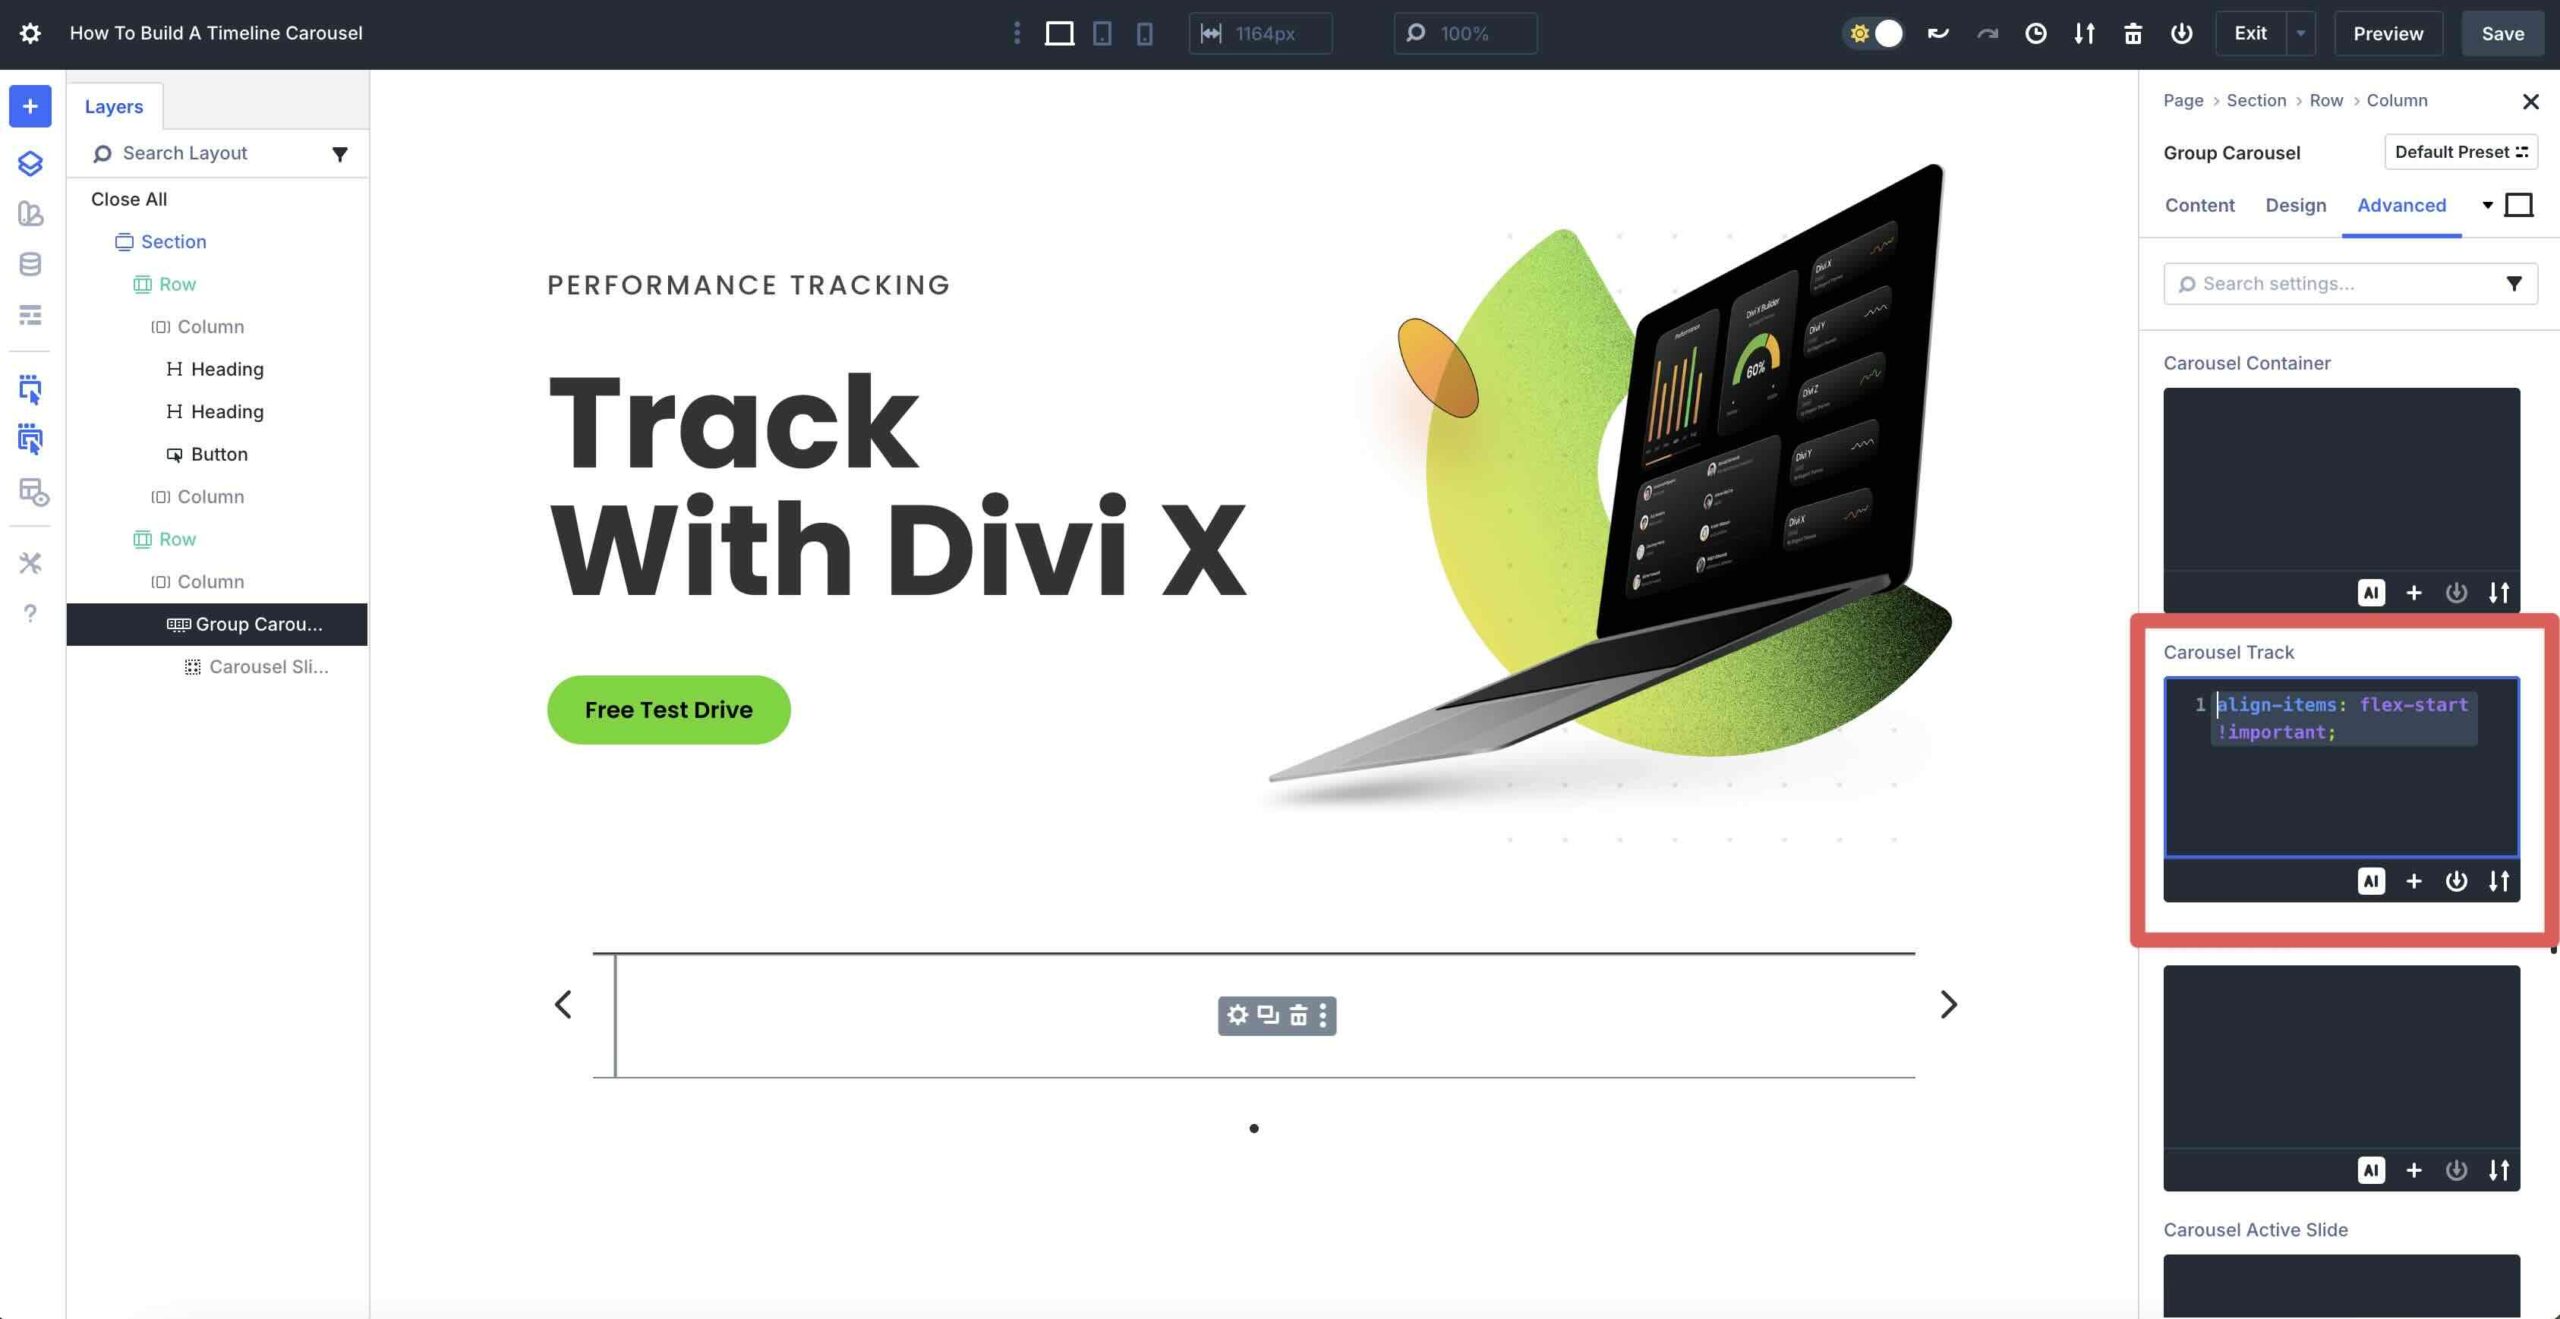
Next, navigate to the Sophisticated tab. Build up the CSS dropdown menu, tab over to Module Portions, and place the following code inside the Carousel Practice field:
align-items: flex-start !important;
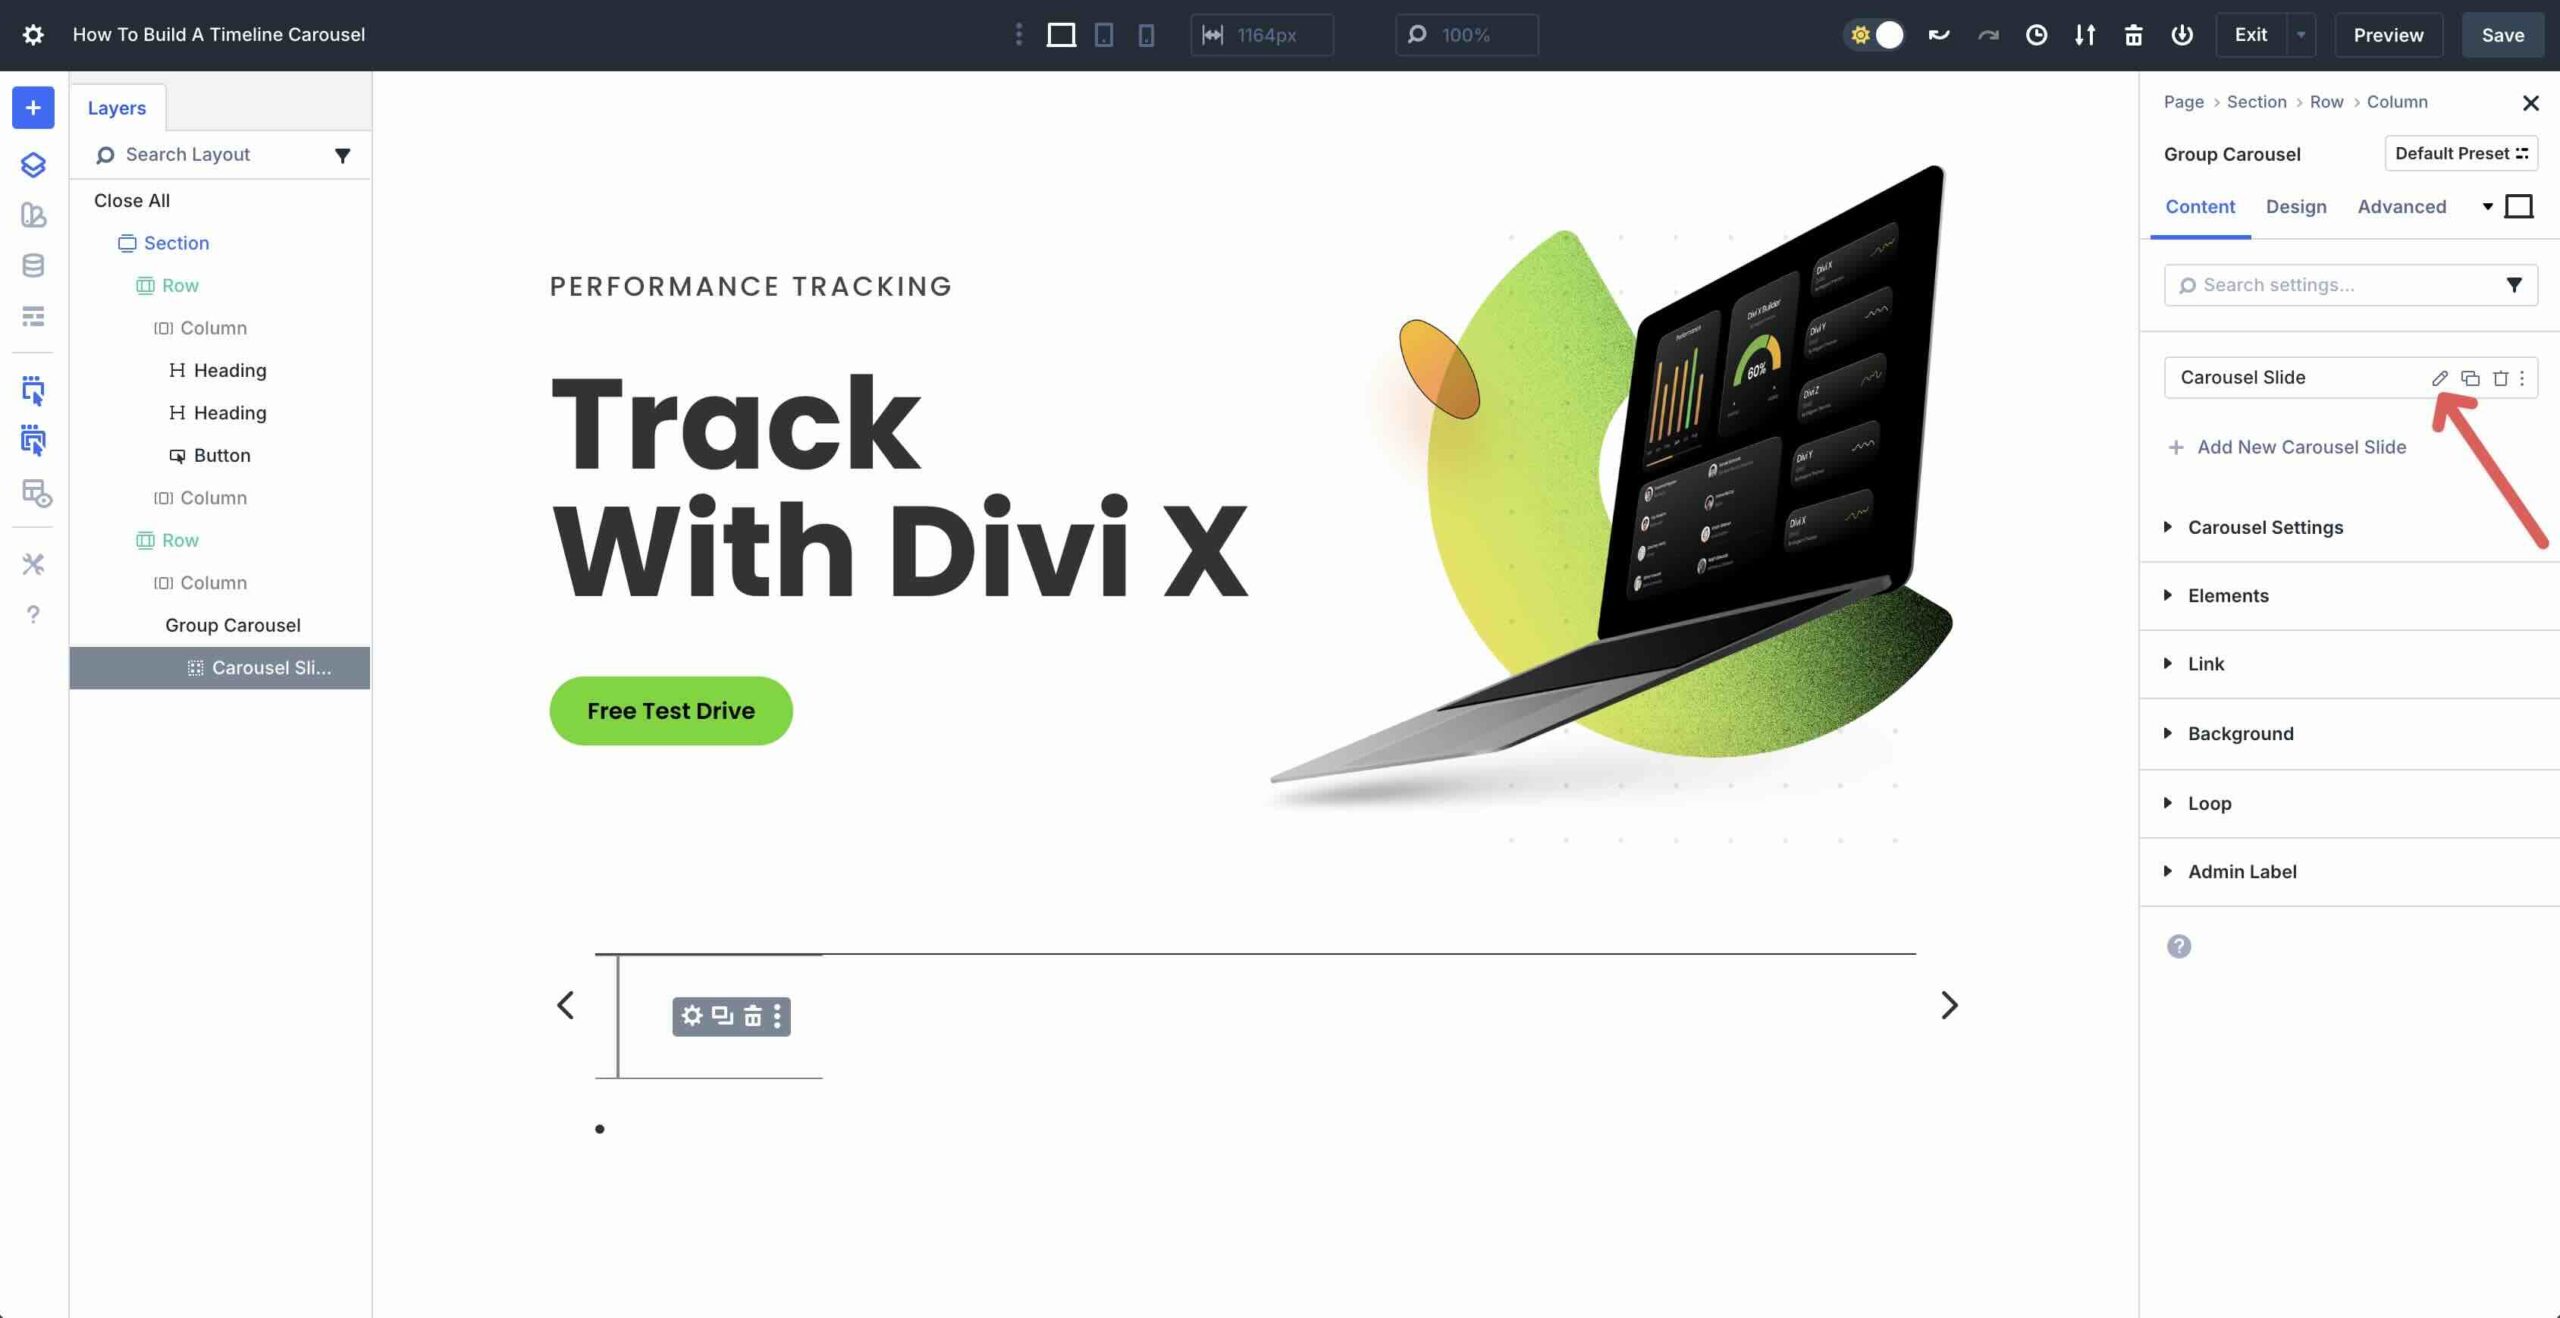
Step 2: Add The First Crew
With our Crew Carousel settings in place, we will starting designing the principle Crew. Click on directly to edit the only Crew inside the Crew Carousel module.
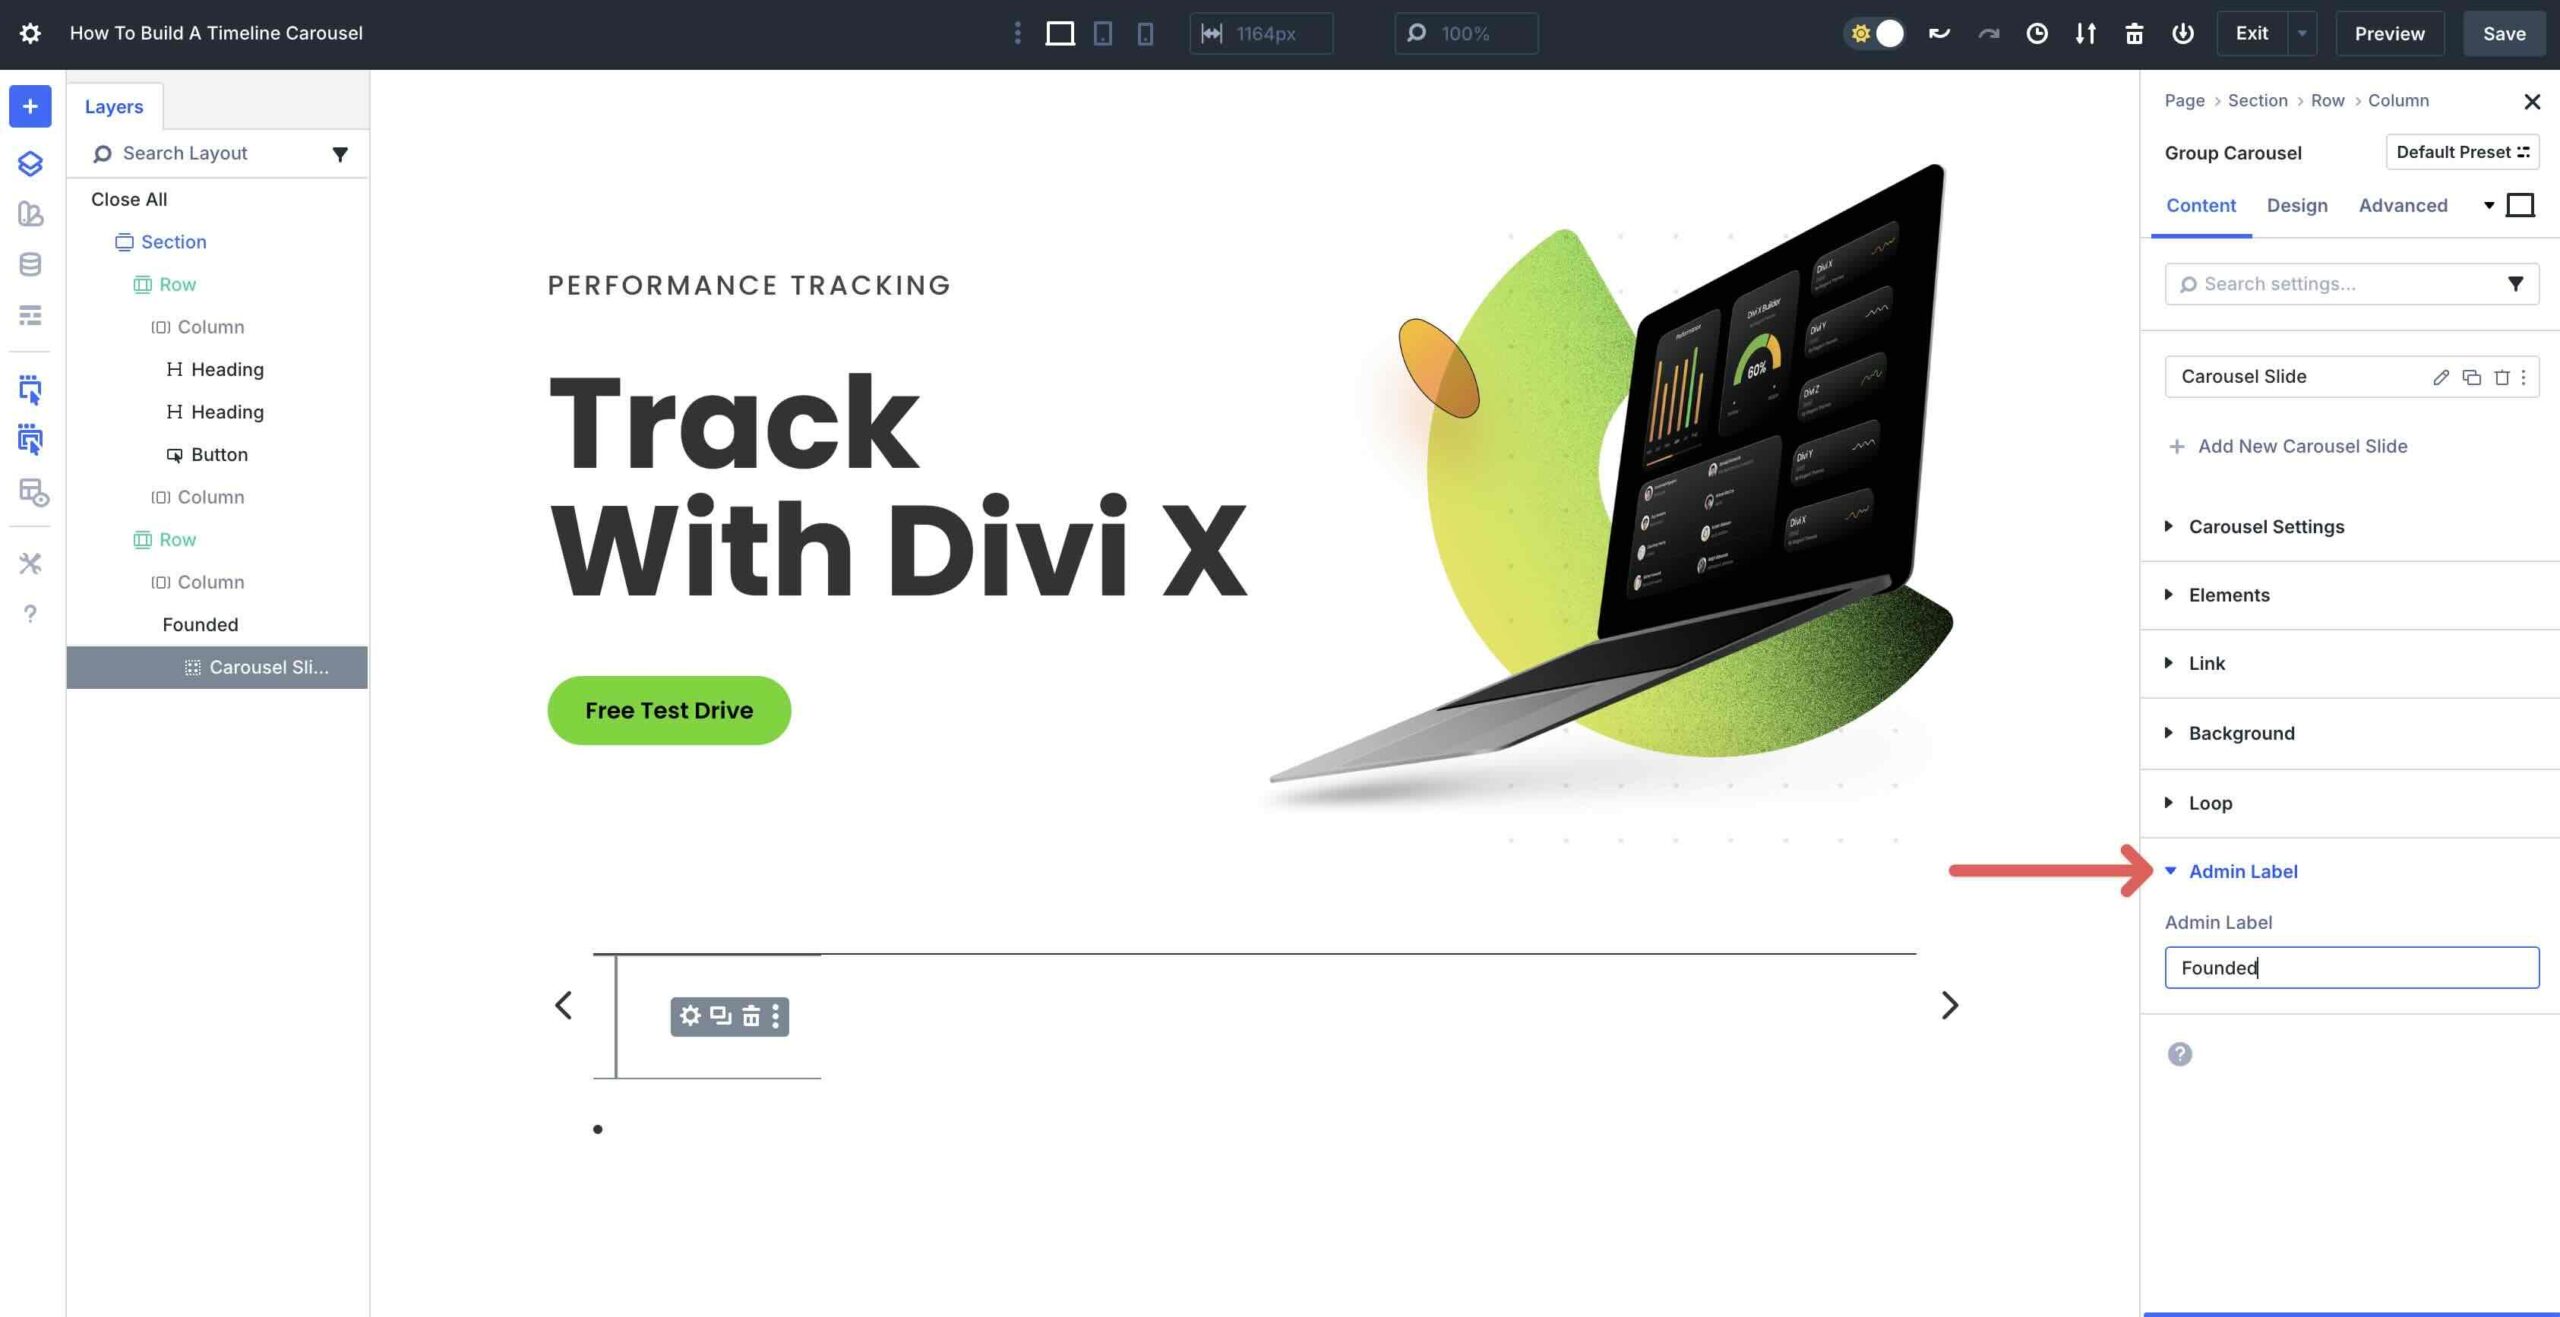
Build up the Admin Label field and assign a name to it. That is serving to decide groups inside the Layers View.
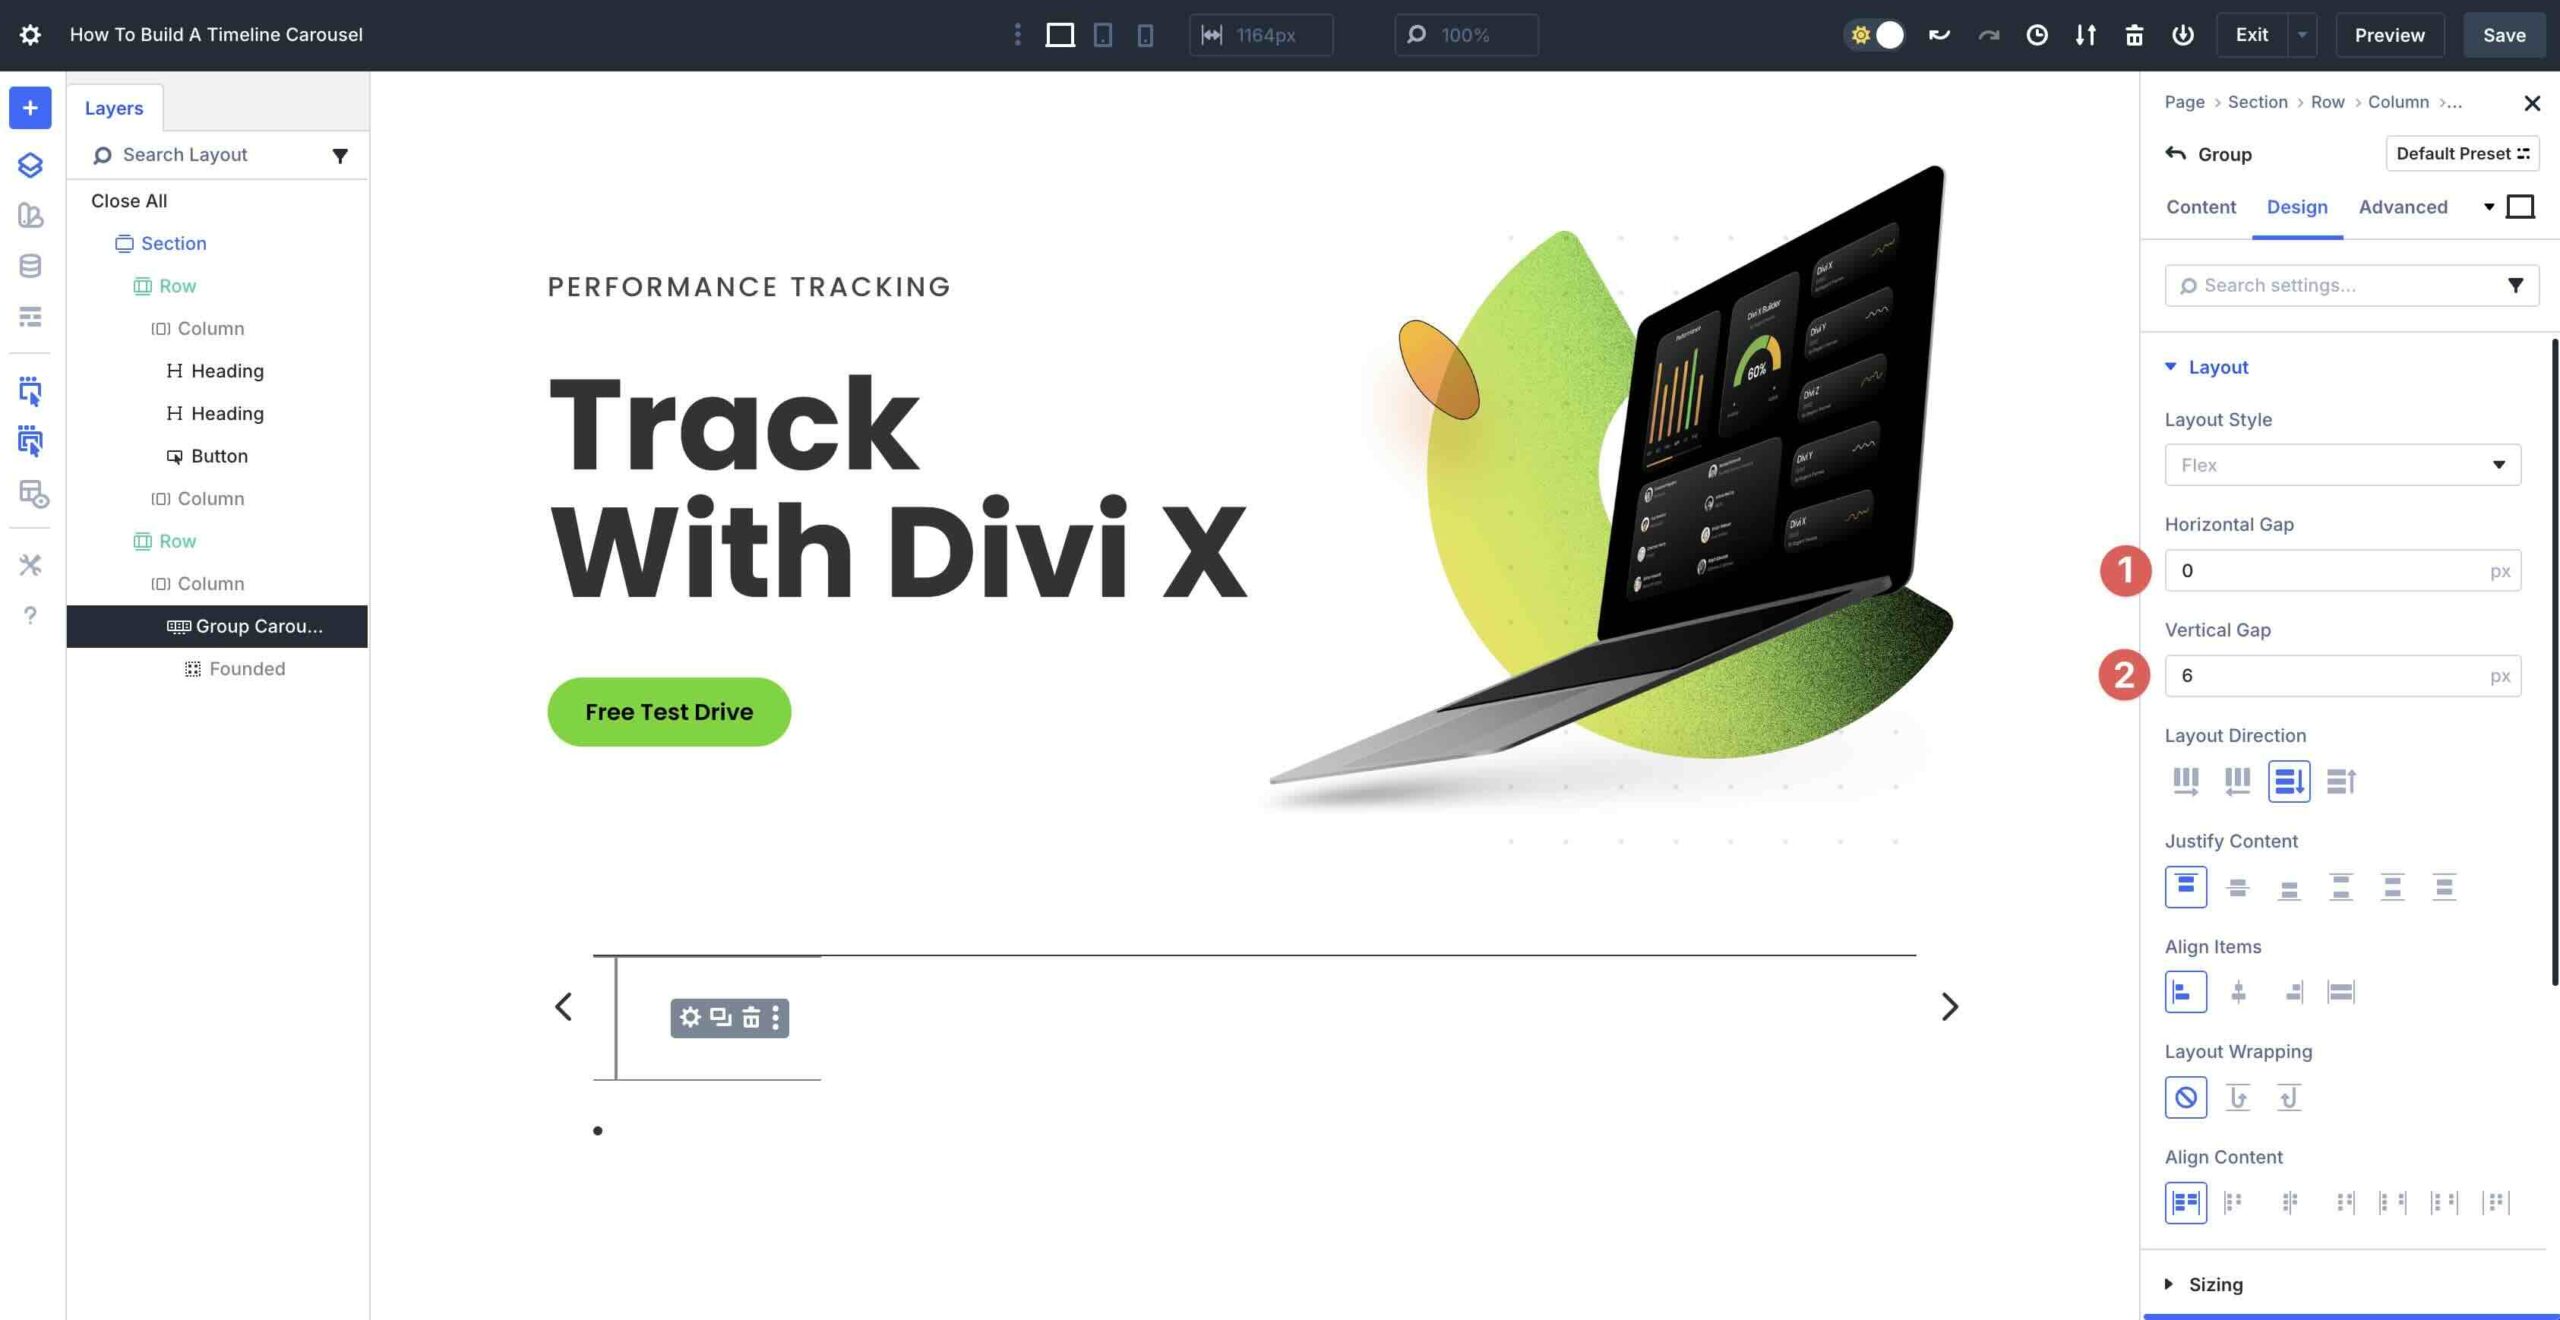
Tab over to the Design settings. Build up the Layout menu and add 0px inside the Horizontal Hollow field. Throughout the Vertical Hollow field, enter 6px.
Add An Icon Module
Click on on so to upload the Icon module to the principle Crew. Build up the Icon menu and make a choice an icon.
![]()
Navigate to the Design tab and build up the Icon menu. Assign #62d60a for the reason that Icon Color, and 20px for the reason that Icon Size.
![]()
Build up the Alignment menu. Set the Icon Alignment to Left.
![]()
Next, we wish to set Transforms for the Icon. Build up the Transforms menu and tab over to Develop into Translate. Disable the link and set the Y axis to -50%.
Next, click on at the Develop into Starting tab. Set the Starting to Left Center.

After all, click on at the Sophisticated tab, scroll down and build up the Position menu, and enter 999 inside the Z Index field. This may occasionally most probably place the Icon above the border of the Crew Carousel.
![]()
Add A Heading Module
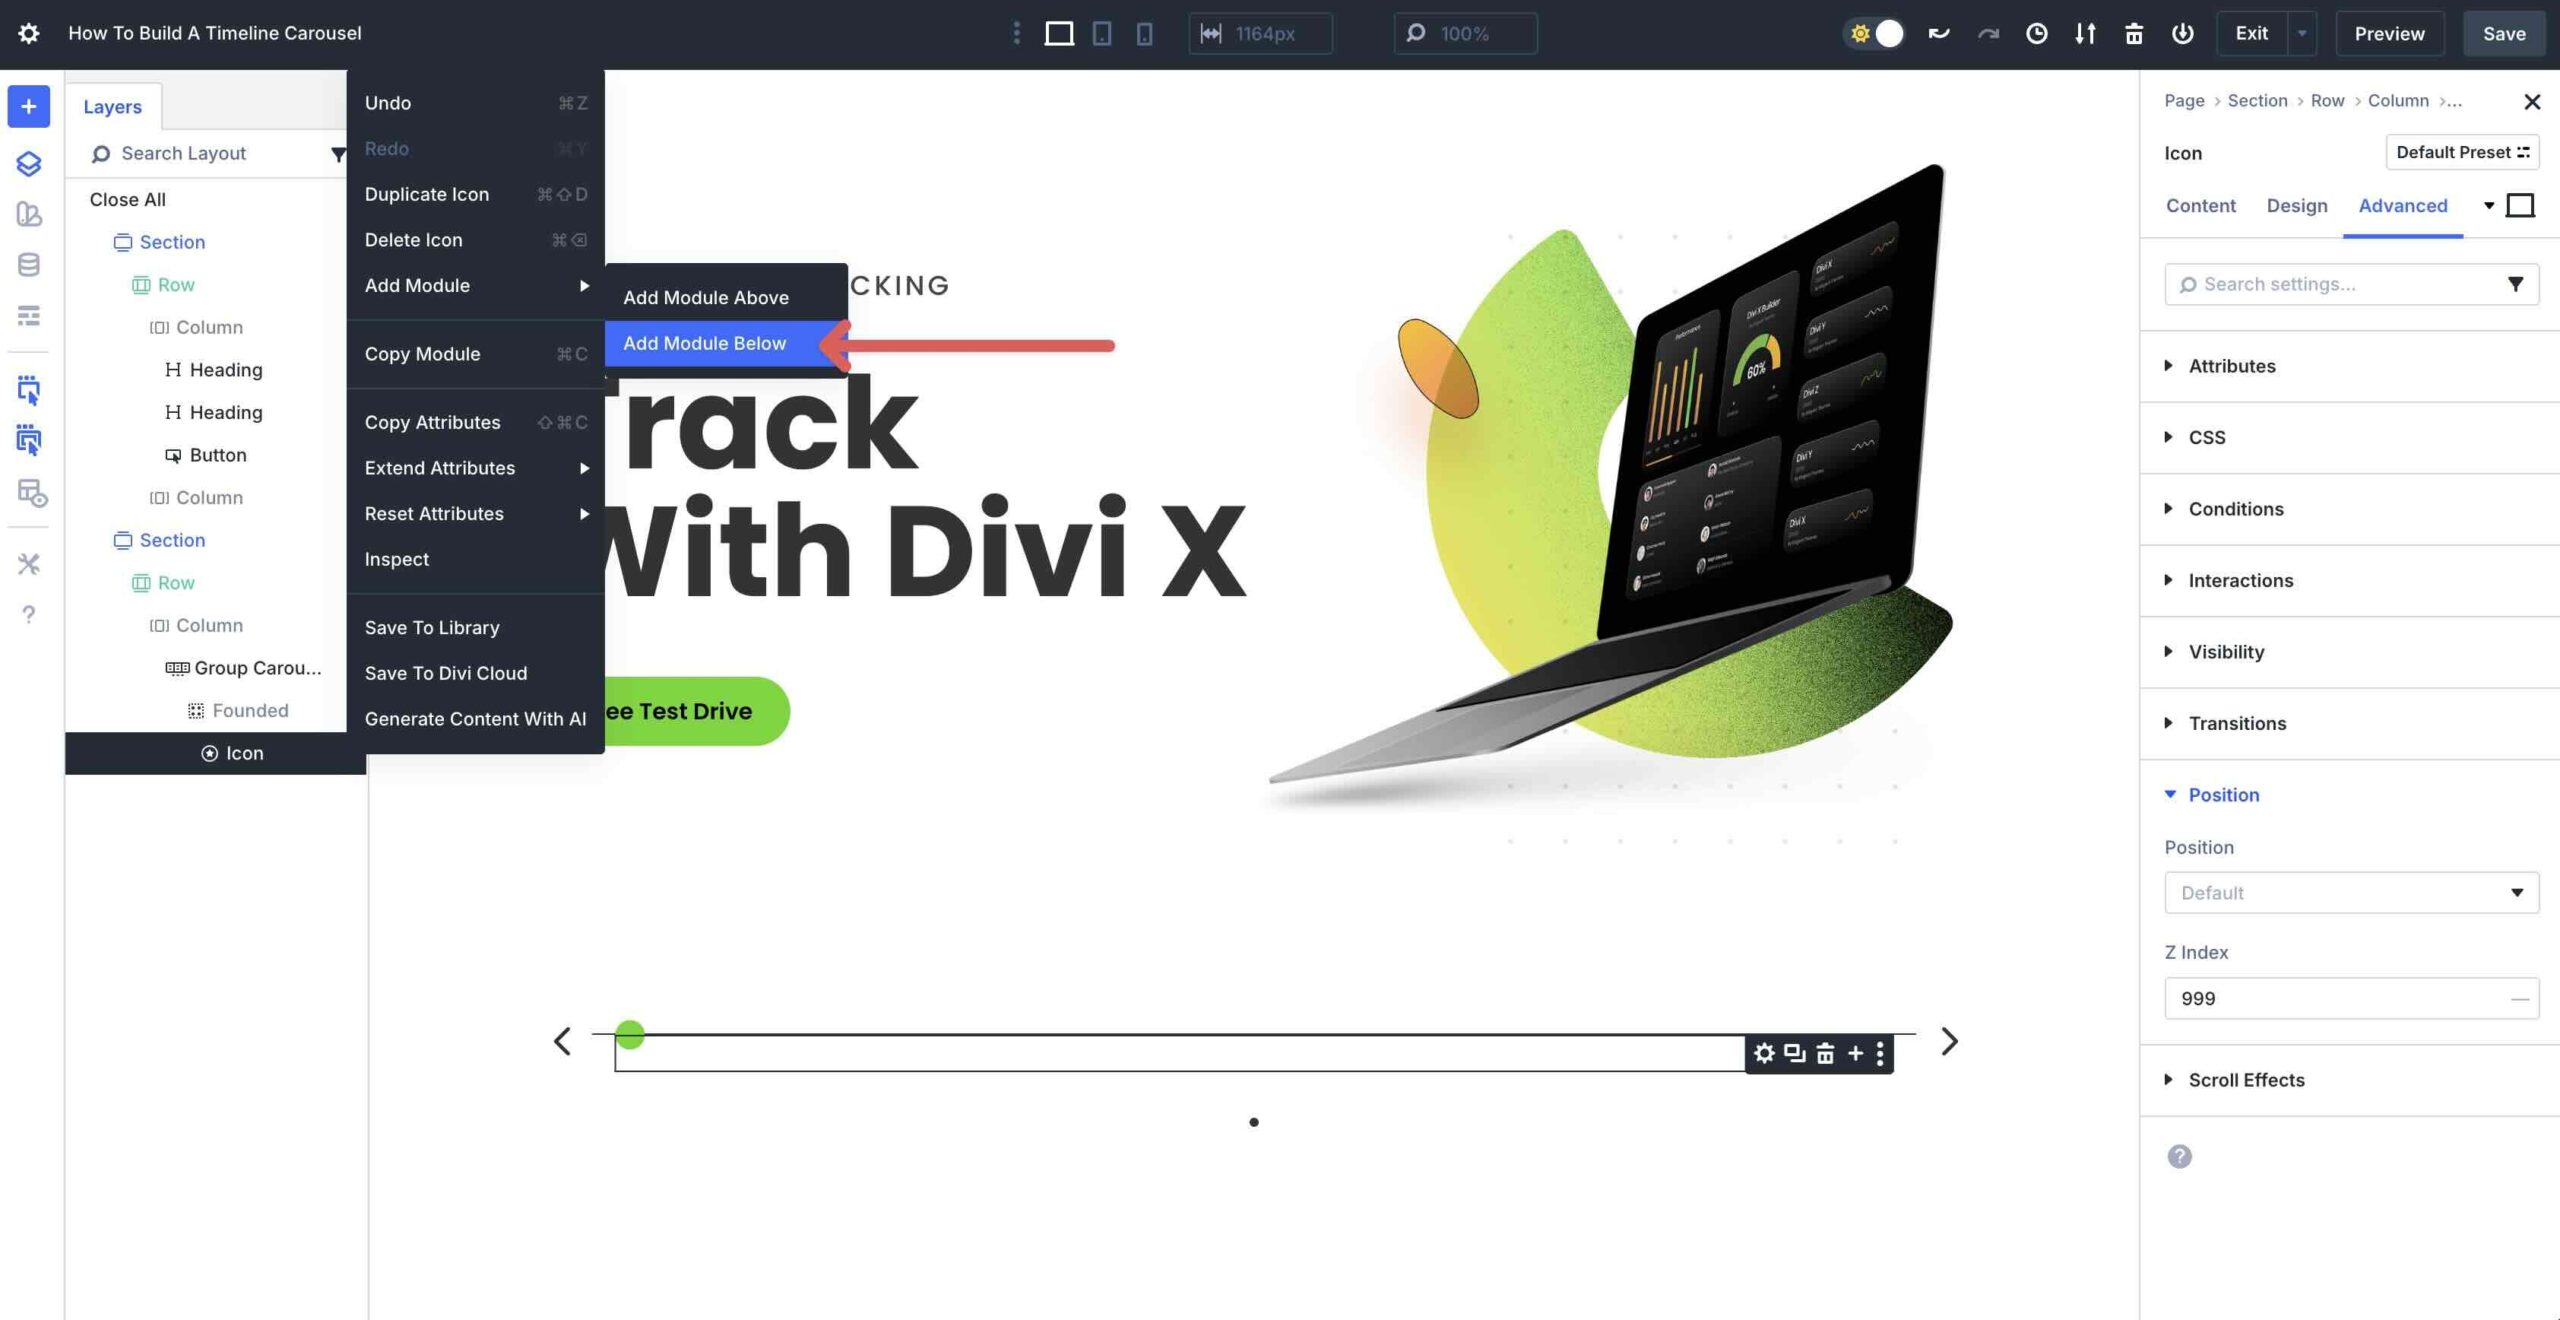
Next, we wish to add a Heading module to the principle Crew. Open the Layers View so to upload a brand spanking new module beneath the Icon module.
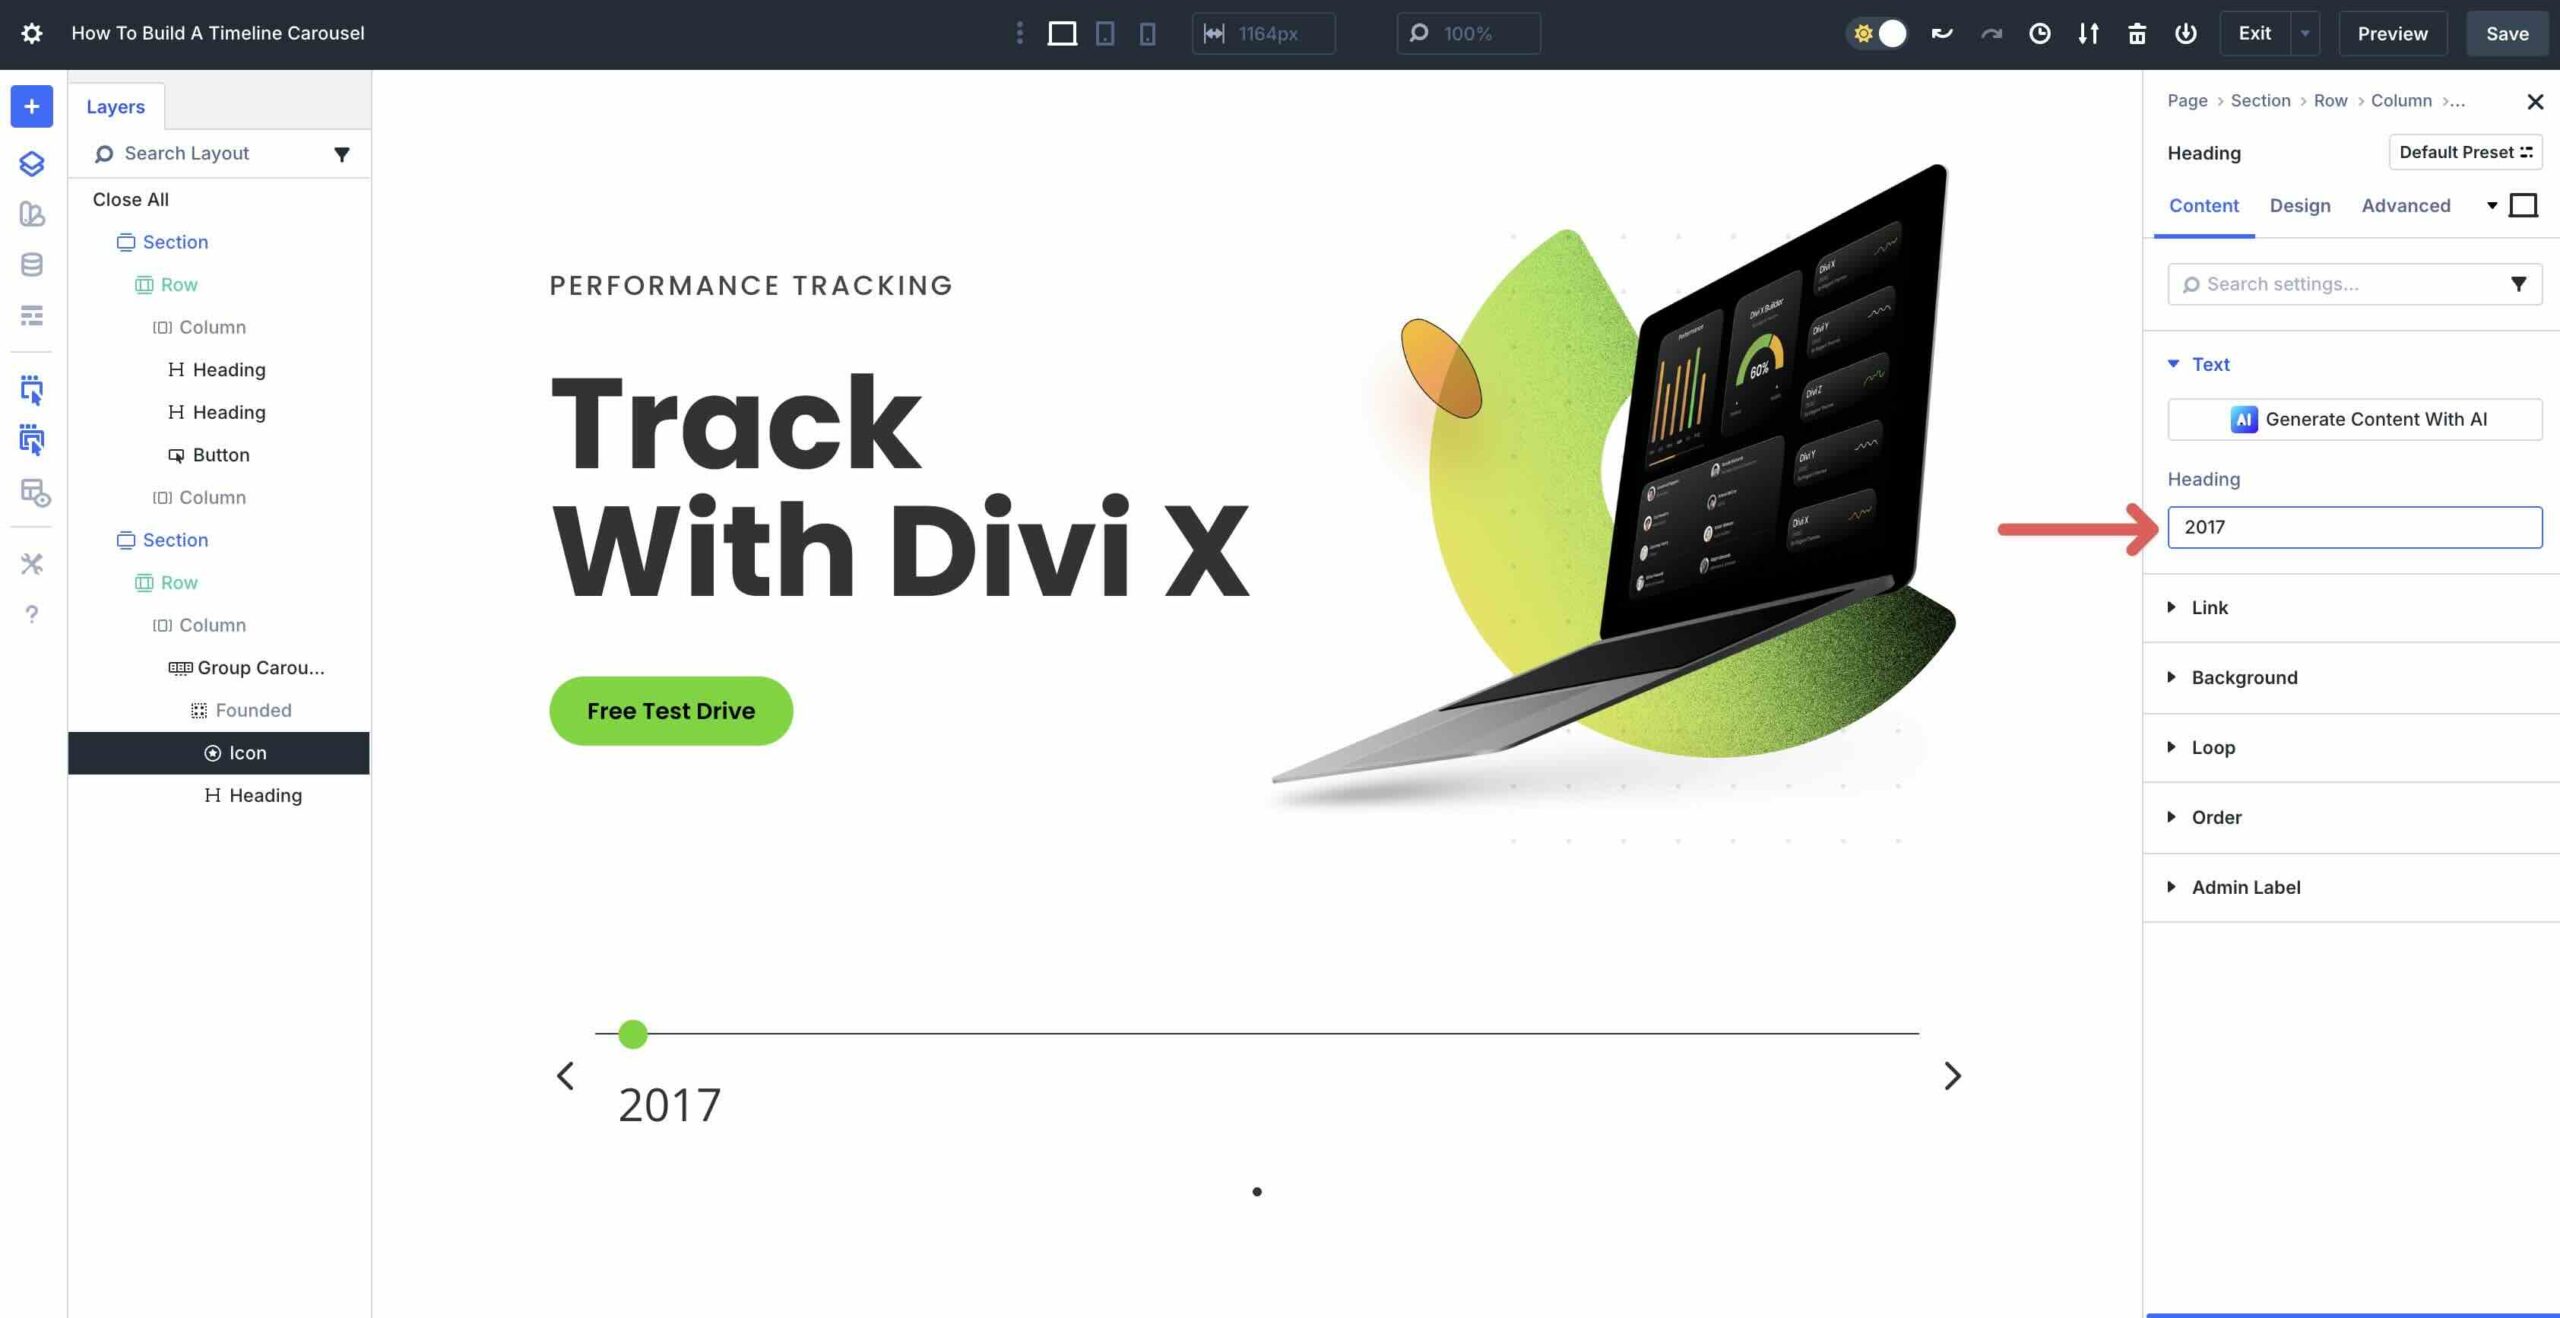
Throughout the Content material subject material tab, give the Heading a determine.
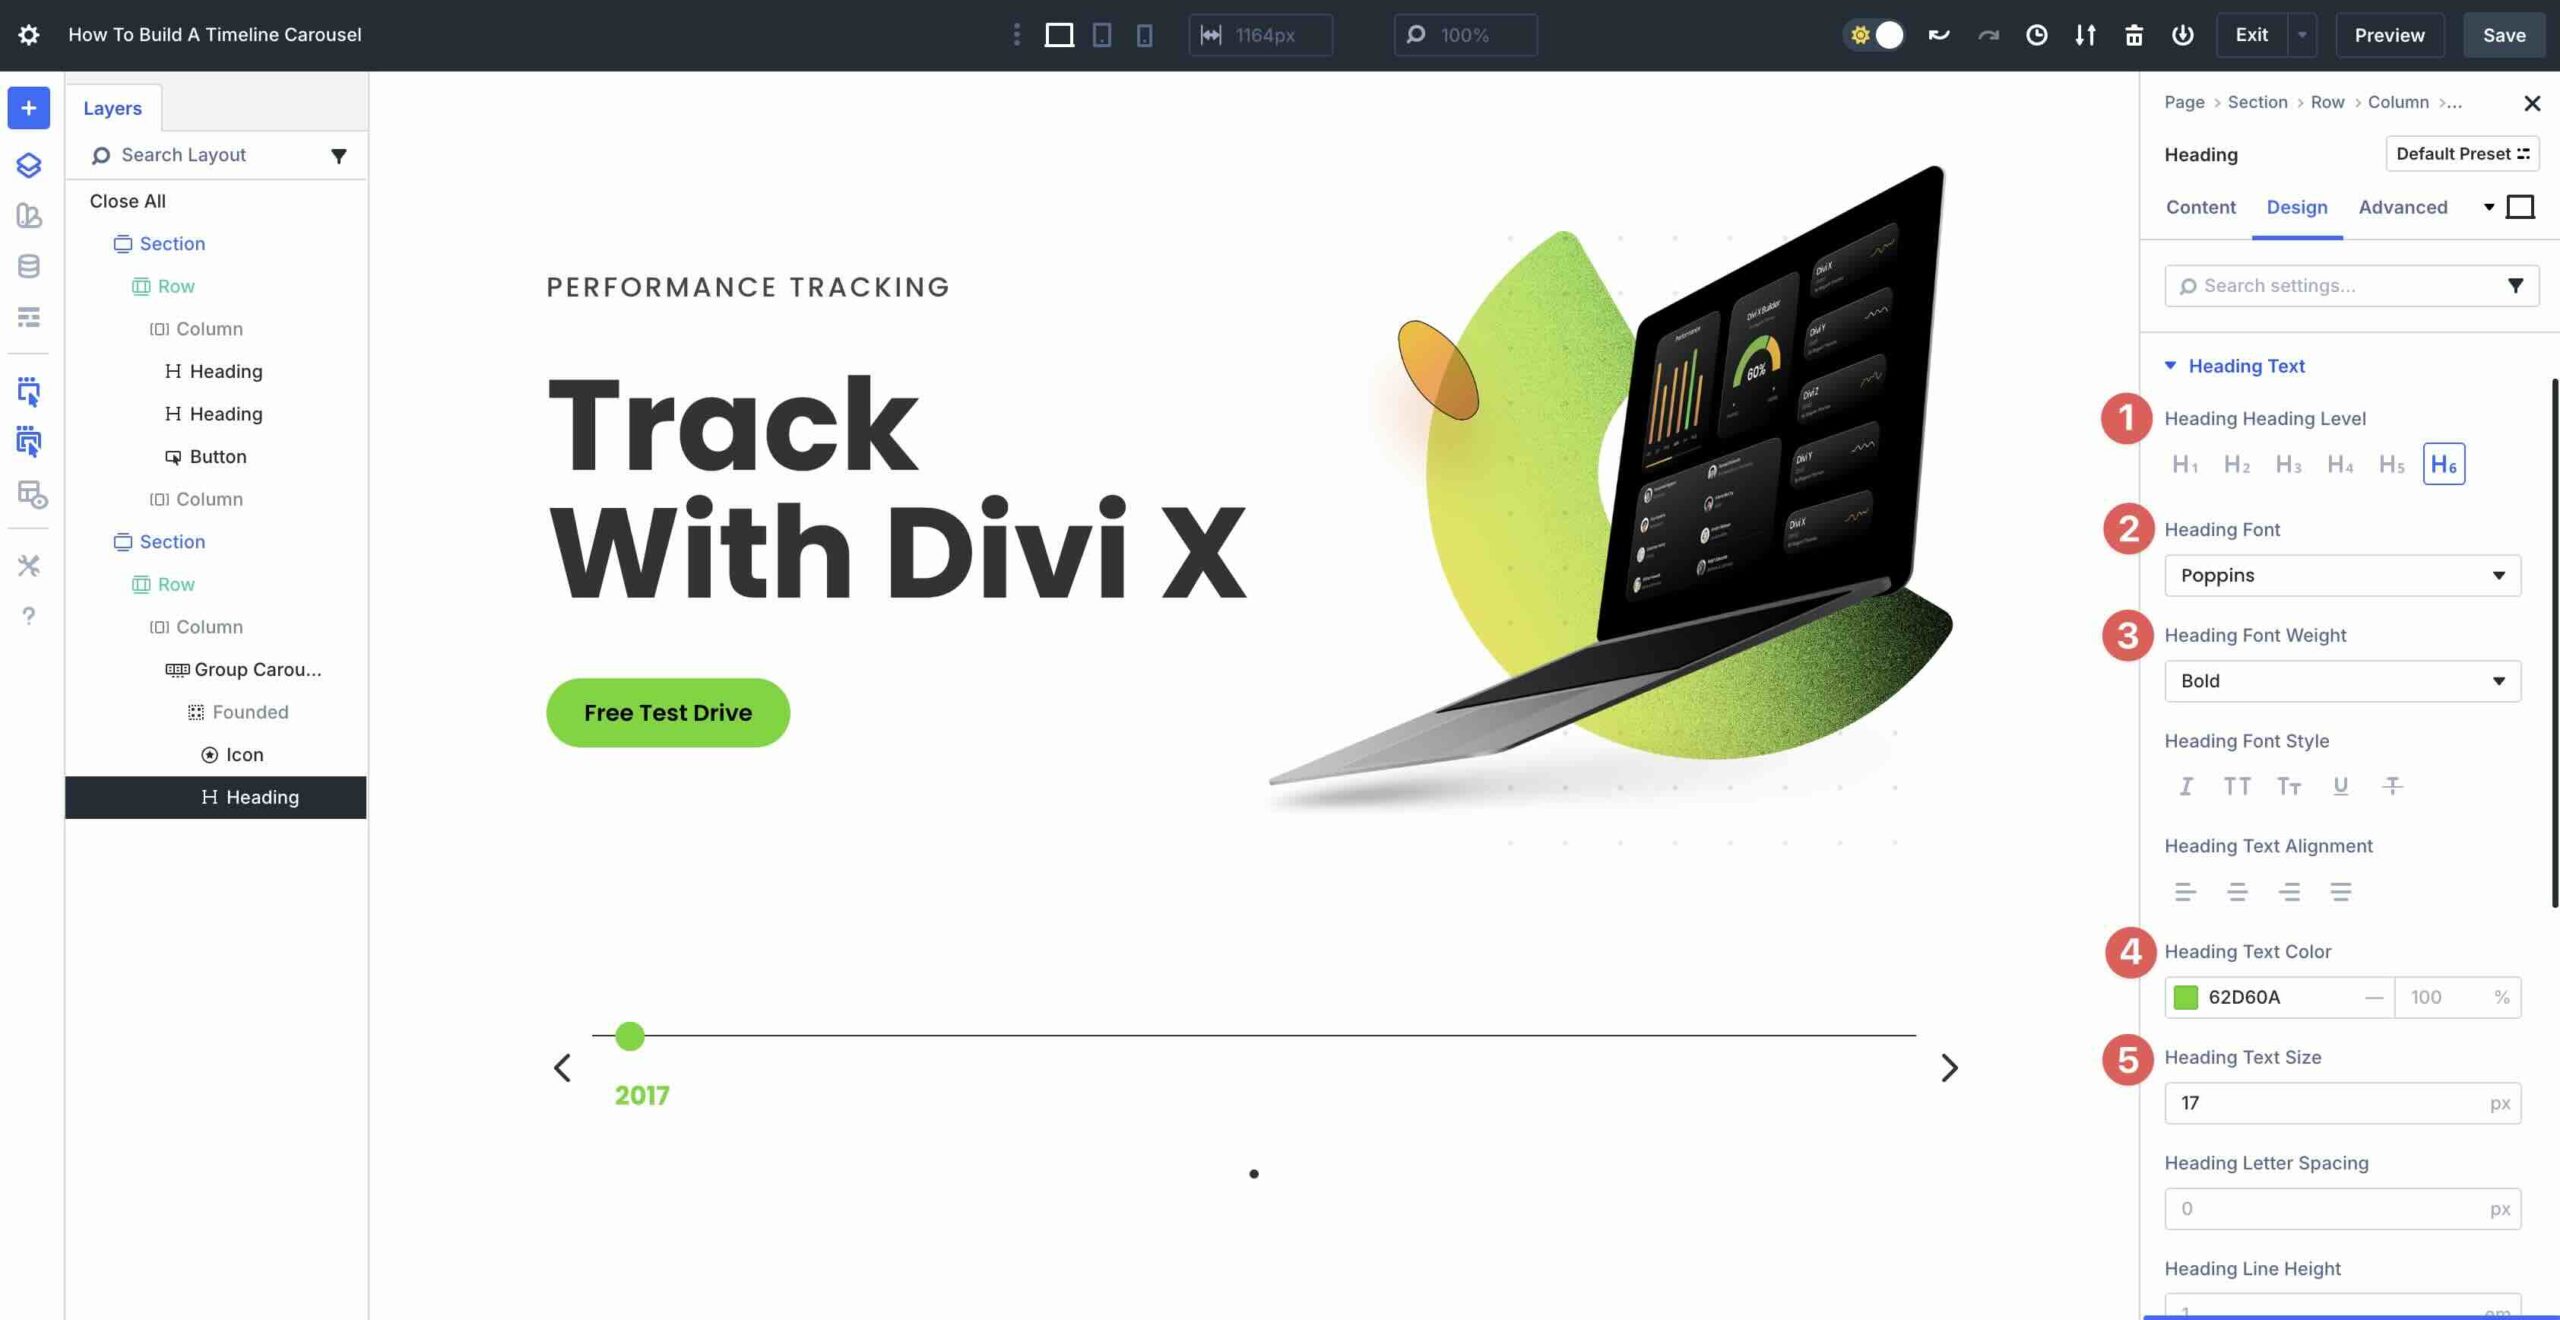
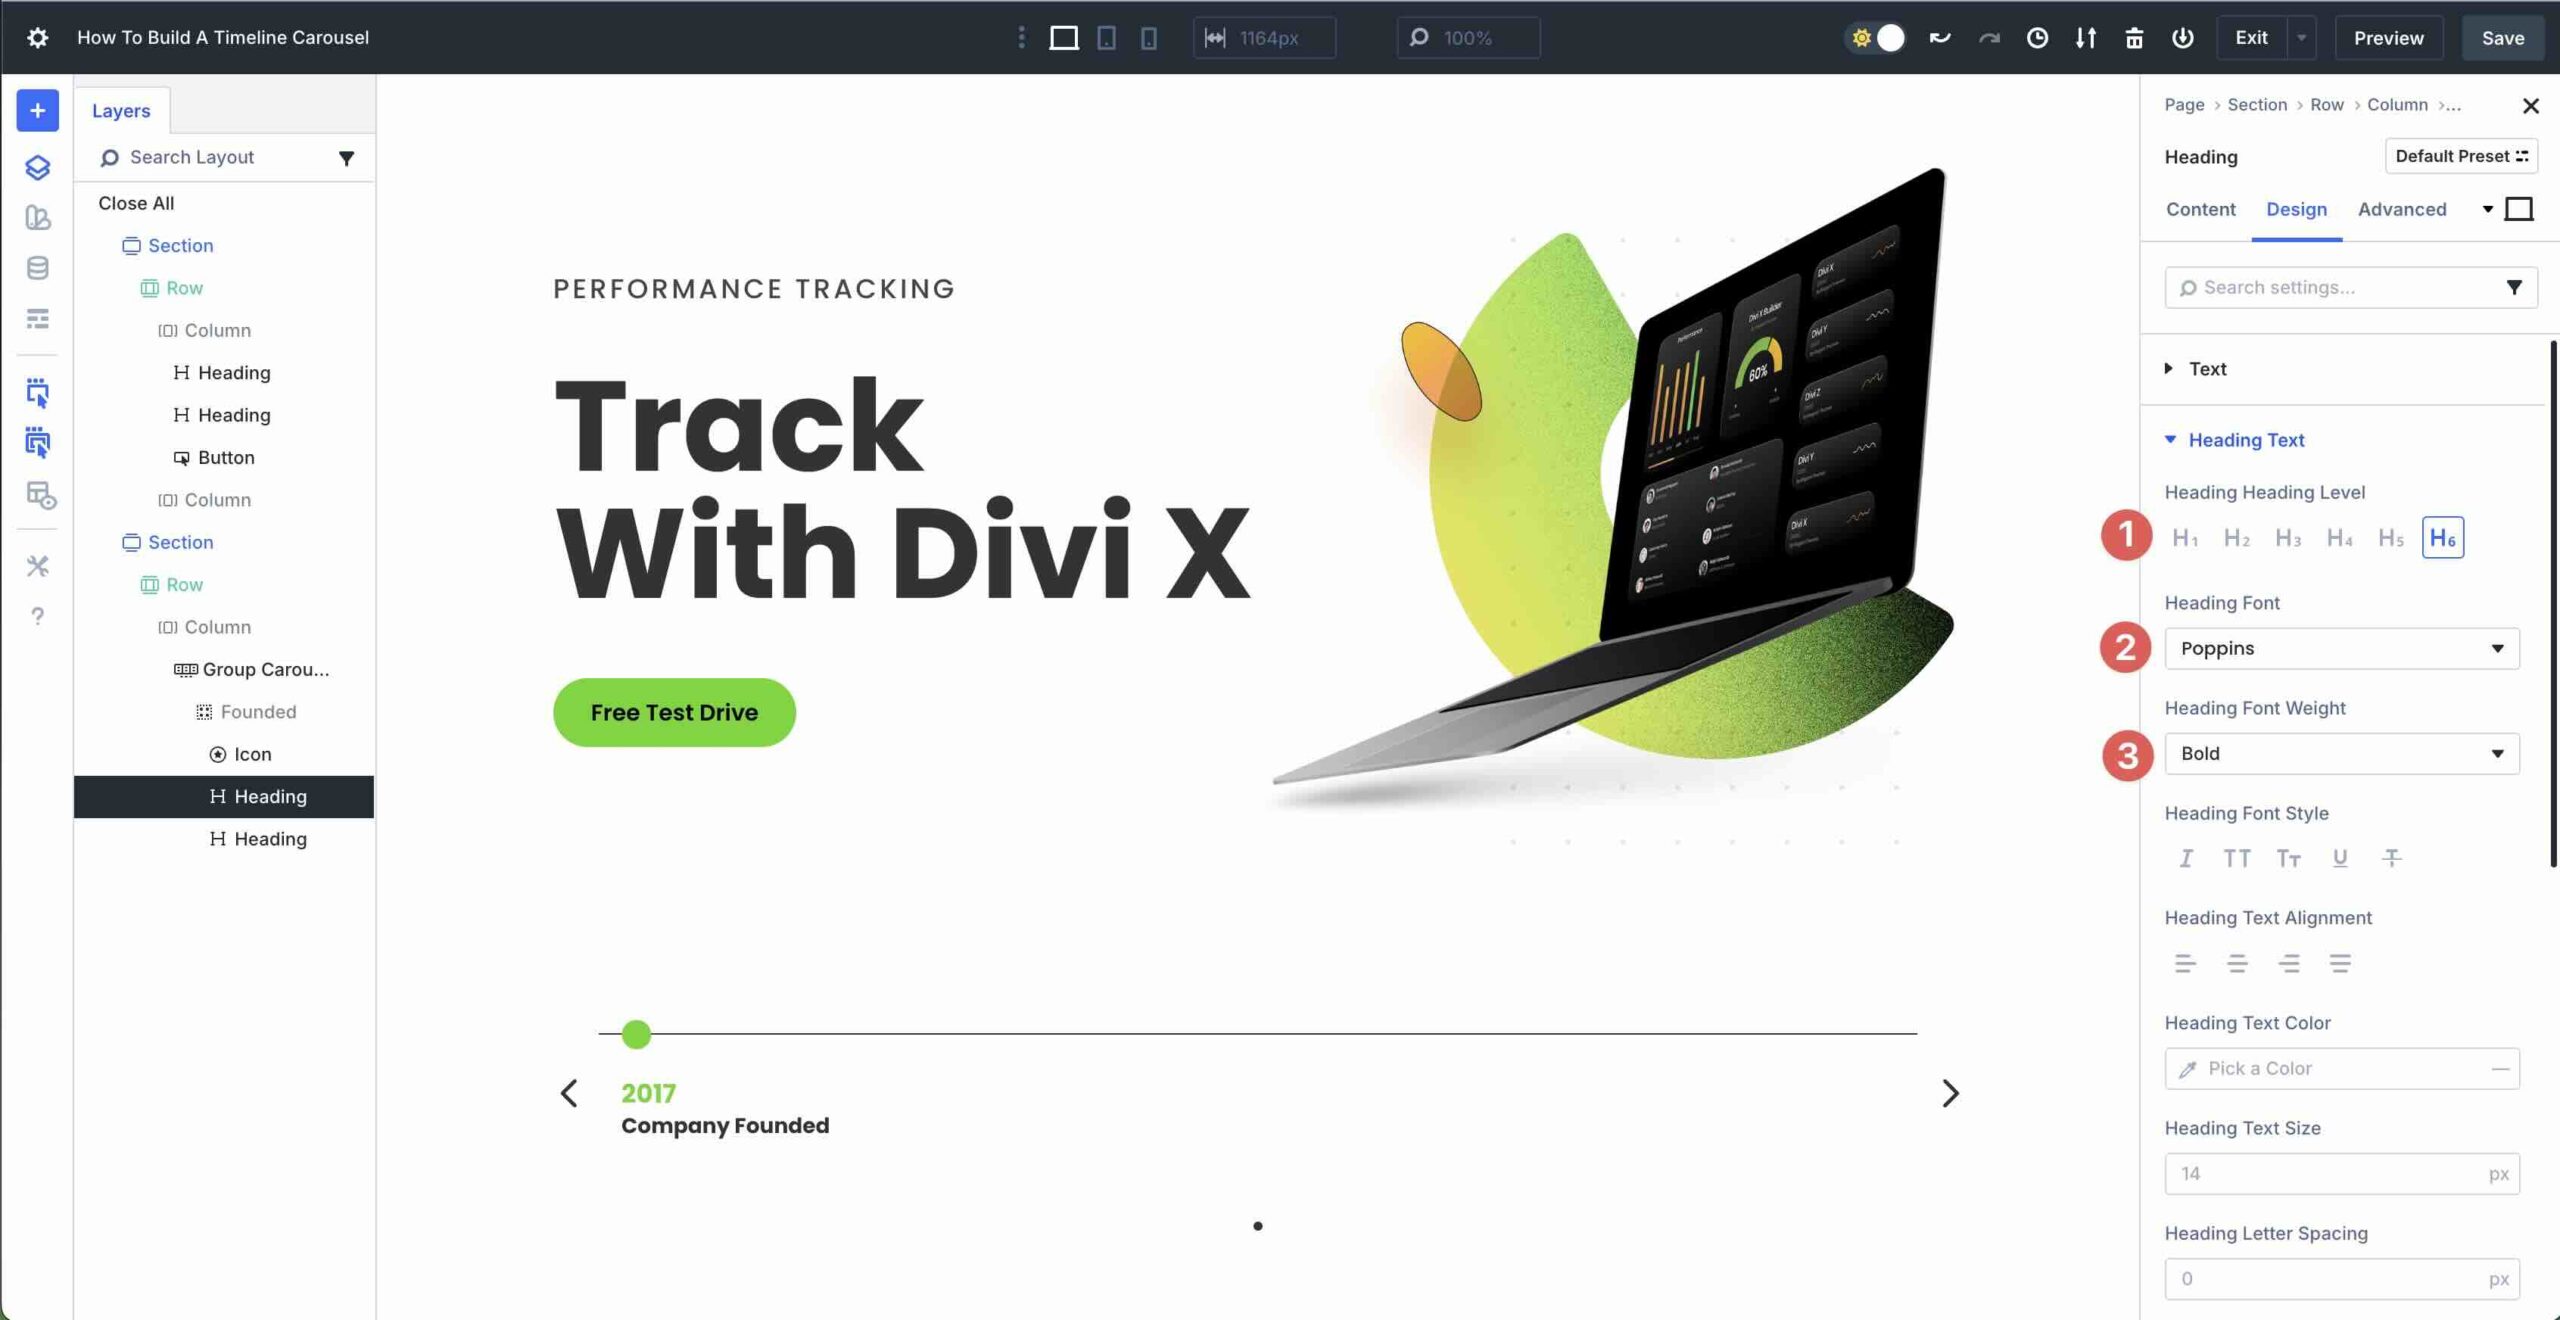
Switch to the Design tab and build up the Heading Text menu. Select H6 for the reason that Heading Heading Degree, Poppins for the reason that Heading Font, and Bold for the Heading Font Weight. Assign #62d60a for the reason that Heading Text Color and set the Heading Text Size to 17px.
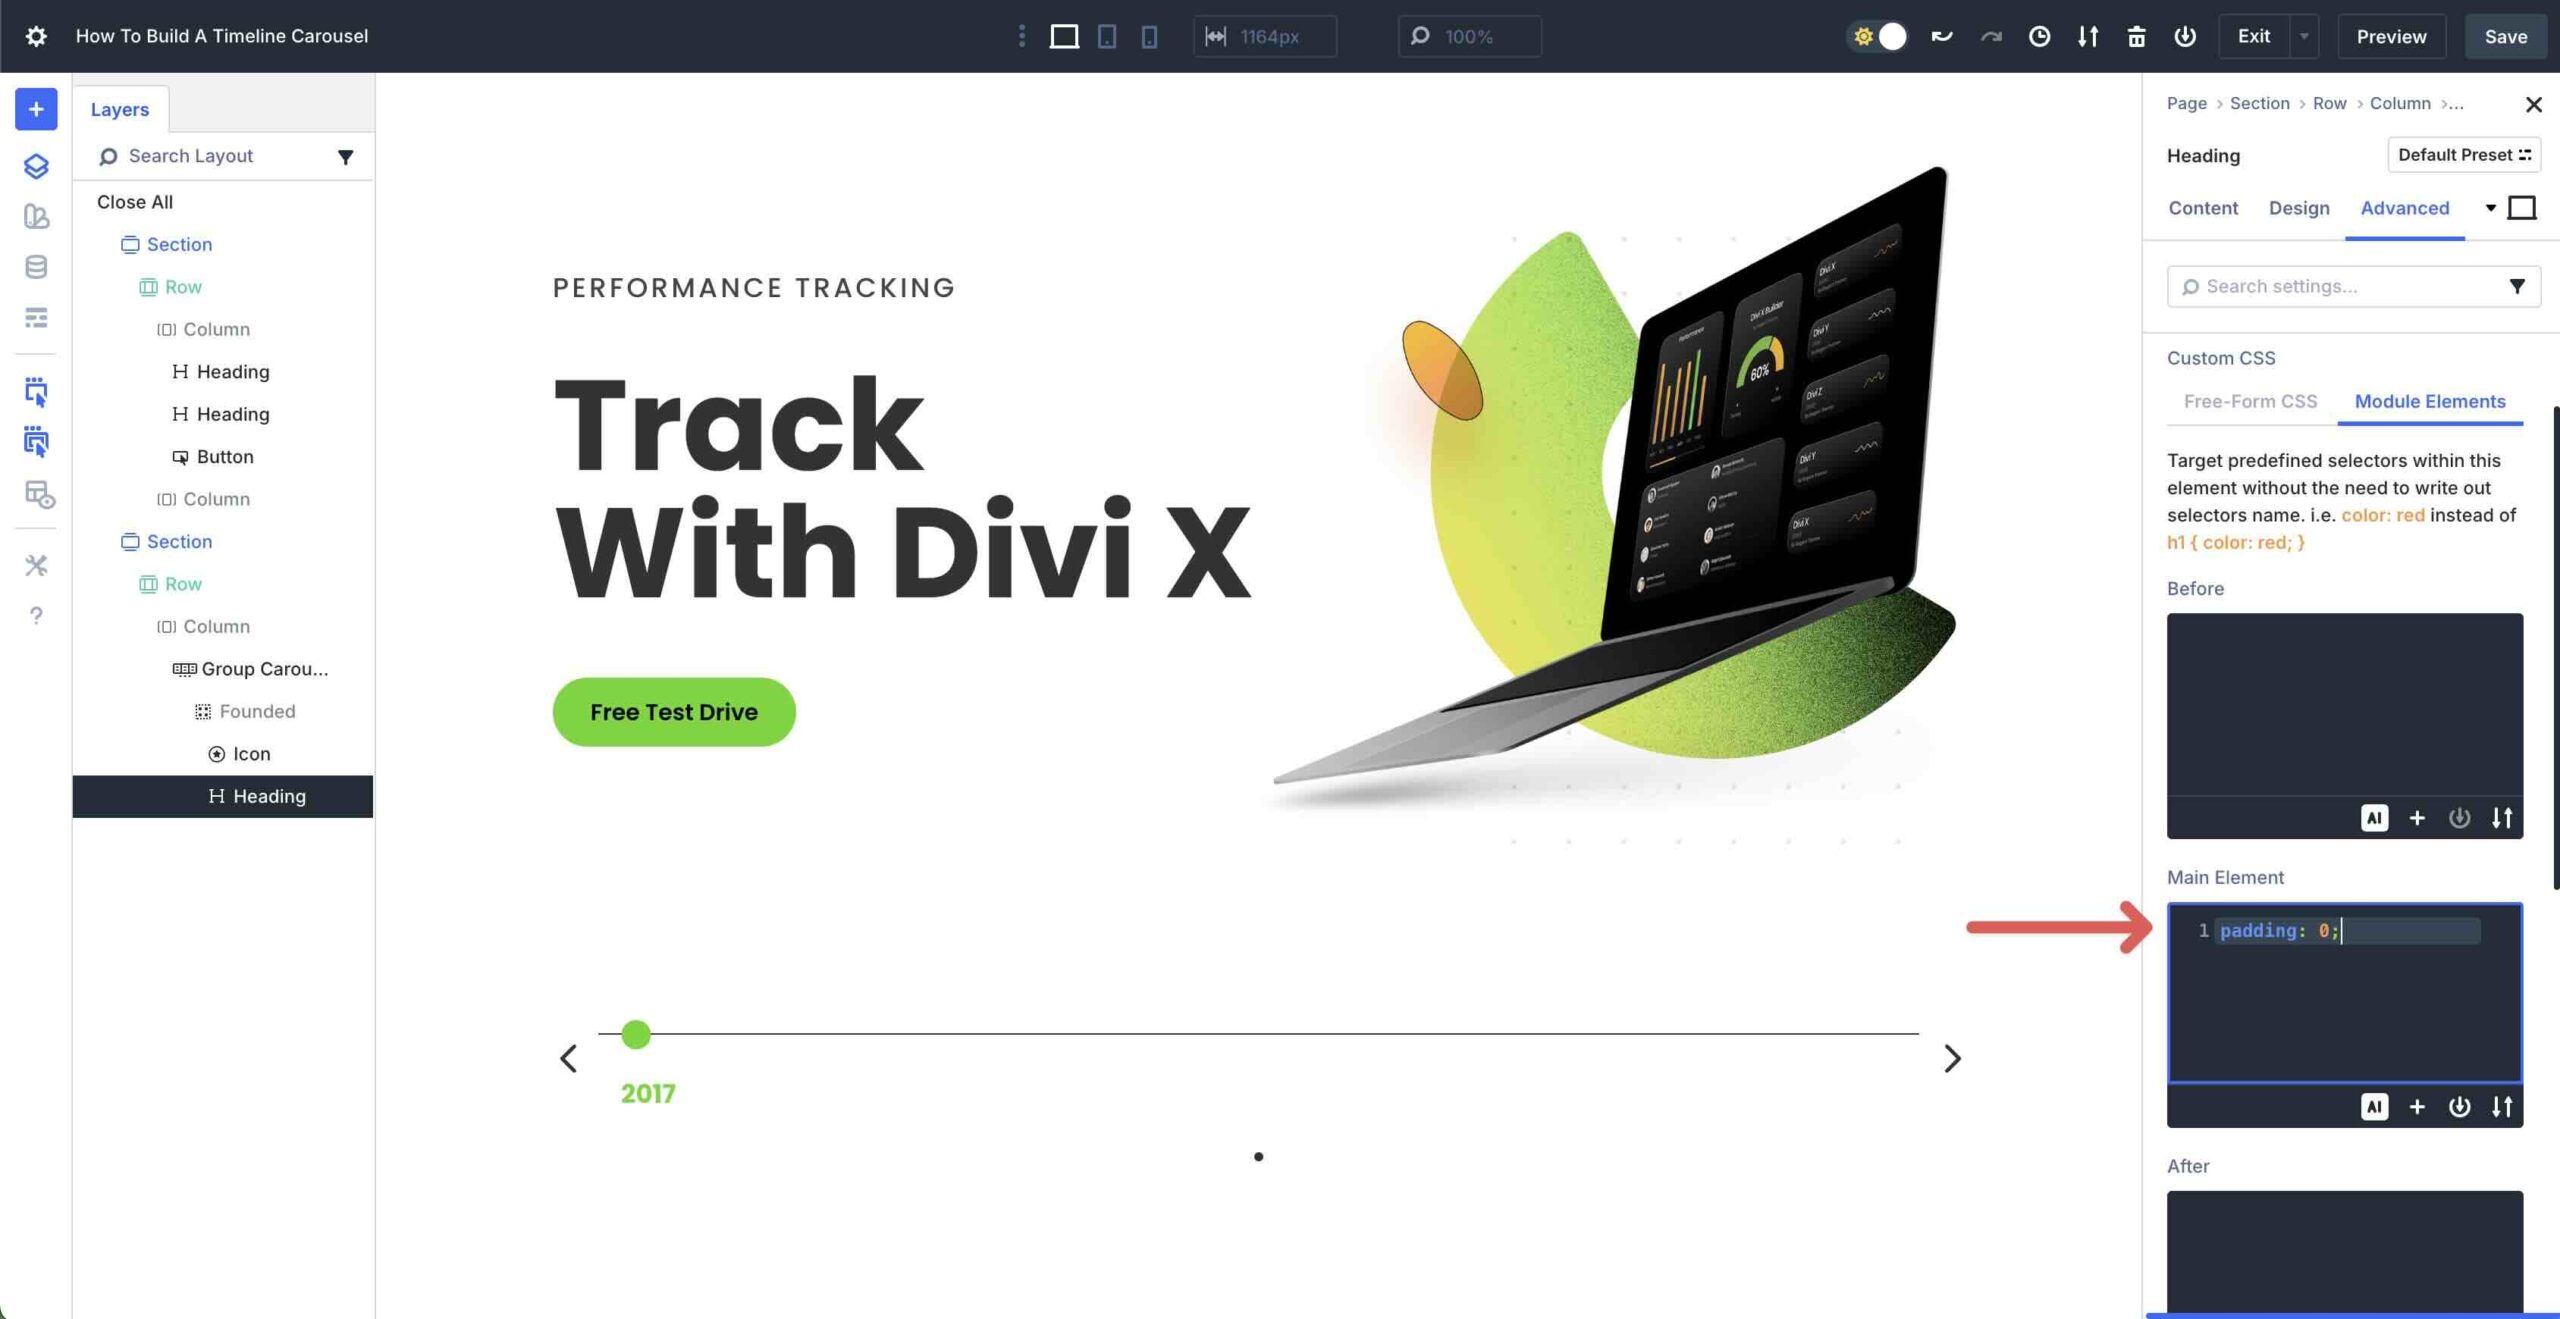
Click on at the Sophisticated tab > Module Portions. Enter padding: 0; inside the Main Section field.
Add A 2nd Heading Module
Click on on so to upload a 2nd Heading module to the Crew. Click on at the Design tab, and set the Heading Heading Degree to H6. Select Poppins Bold for the reason that Heading Font and Font Weight. Move away all other settings at their defaults.
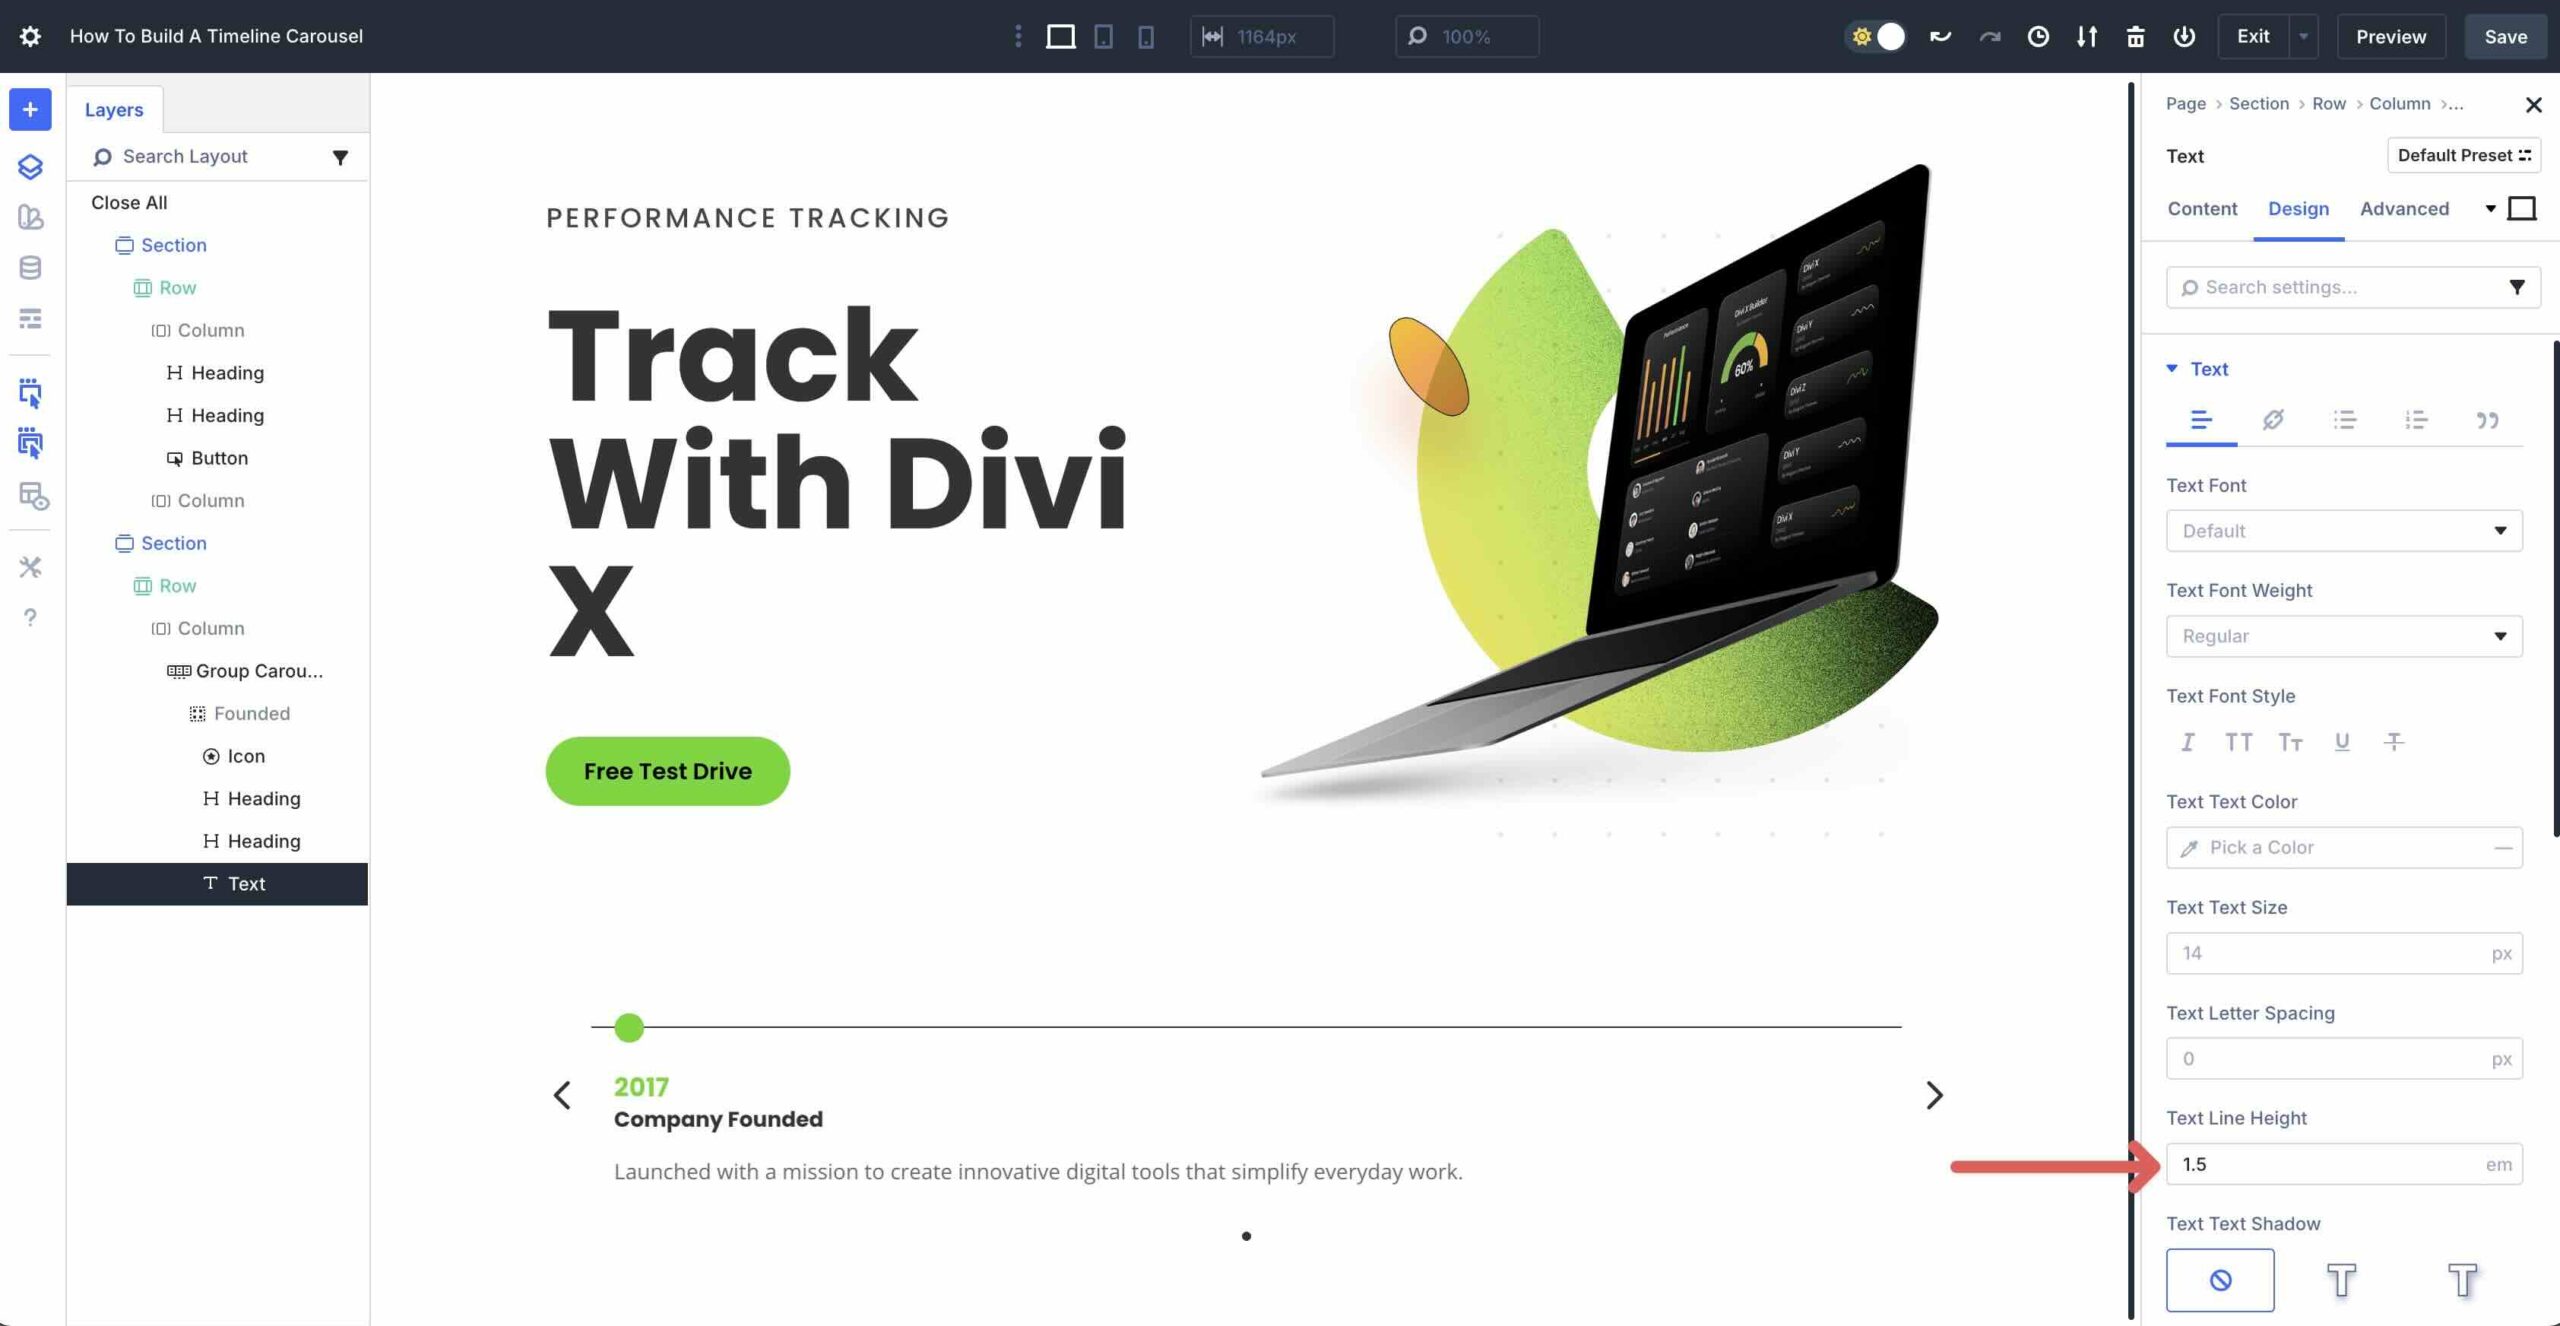
Add A Text Module
Without equal step is so to upload a Text module underneath the Heading module inside the first Crew. Add text into the Body field inside the Content material subject material tab, and then navigate to the Design tab. The only environment we wish to change right here’s the Text Line Most sensible inside the Text menu. Set it to 1.5em.
Step 3: Add Additional Groups
With the principle Crew styled, we will switch at once to together with additional Groups to the Crew Carousel module. Navigate to the principle Content material subject material tab for the Crew Carousel. Click on at the Copy icon for our first Crew to replicate it.
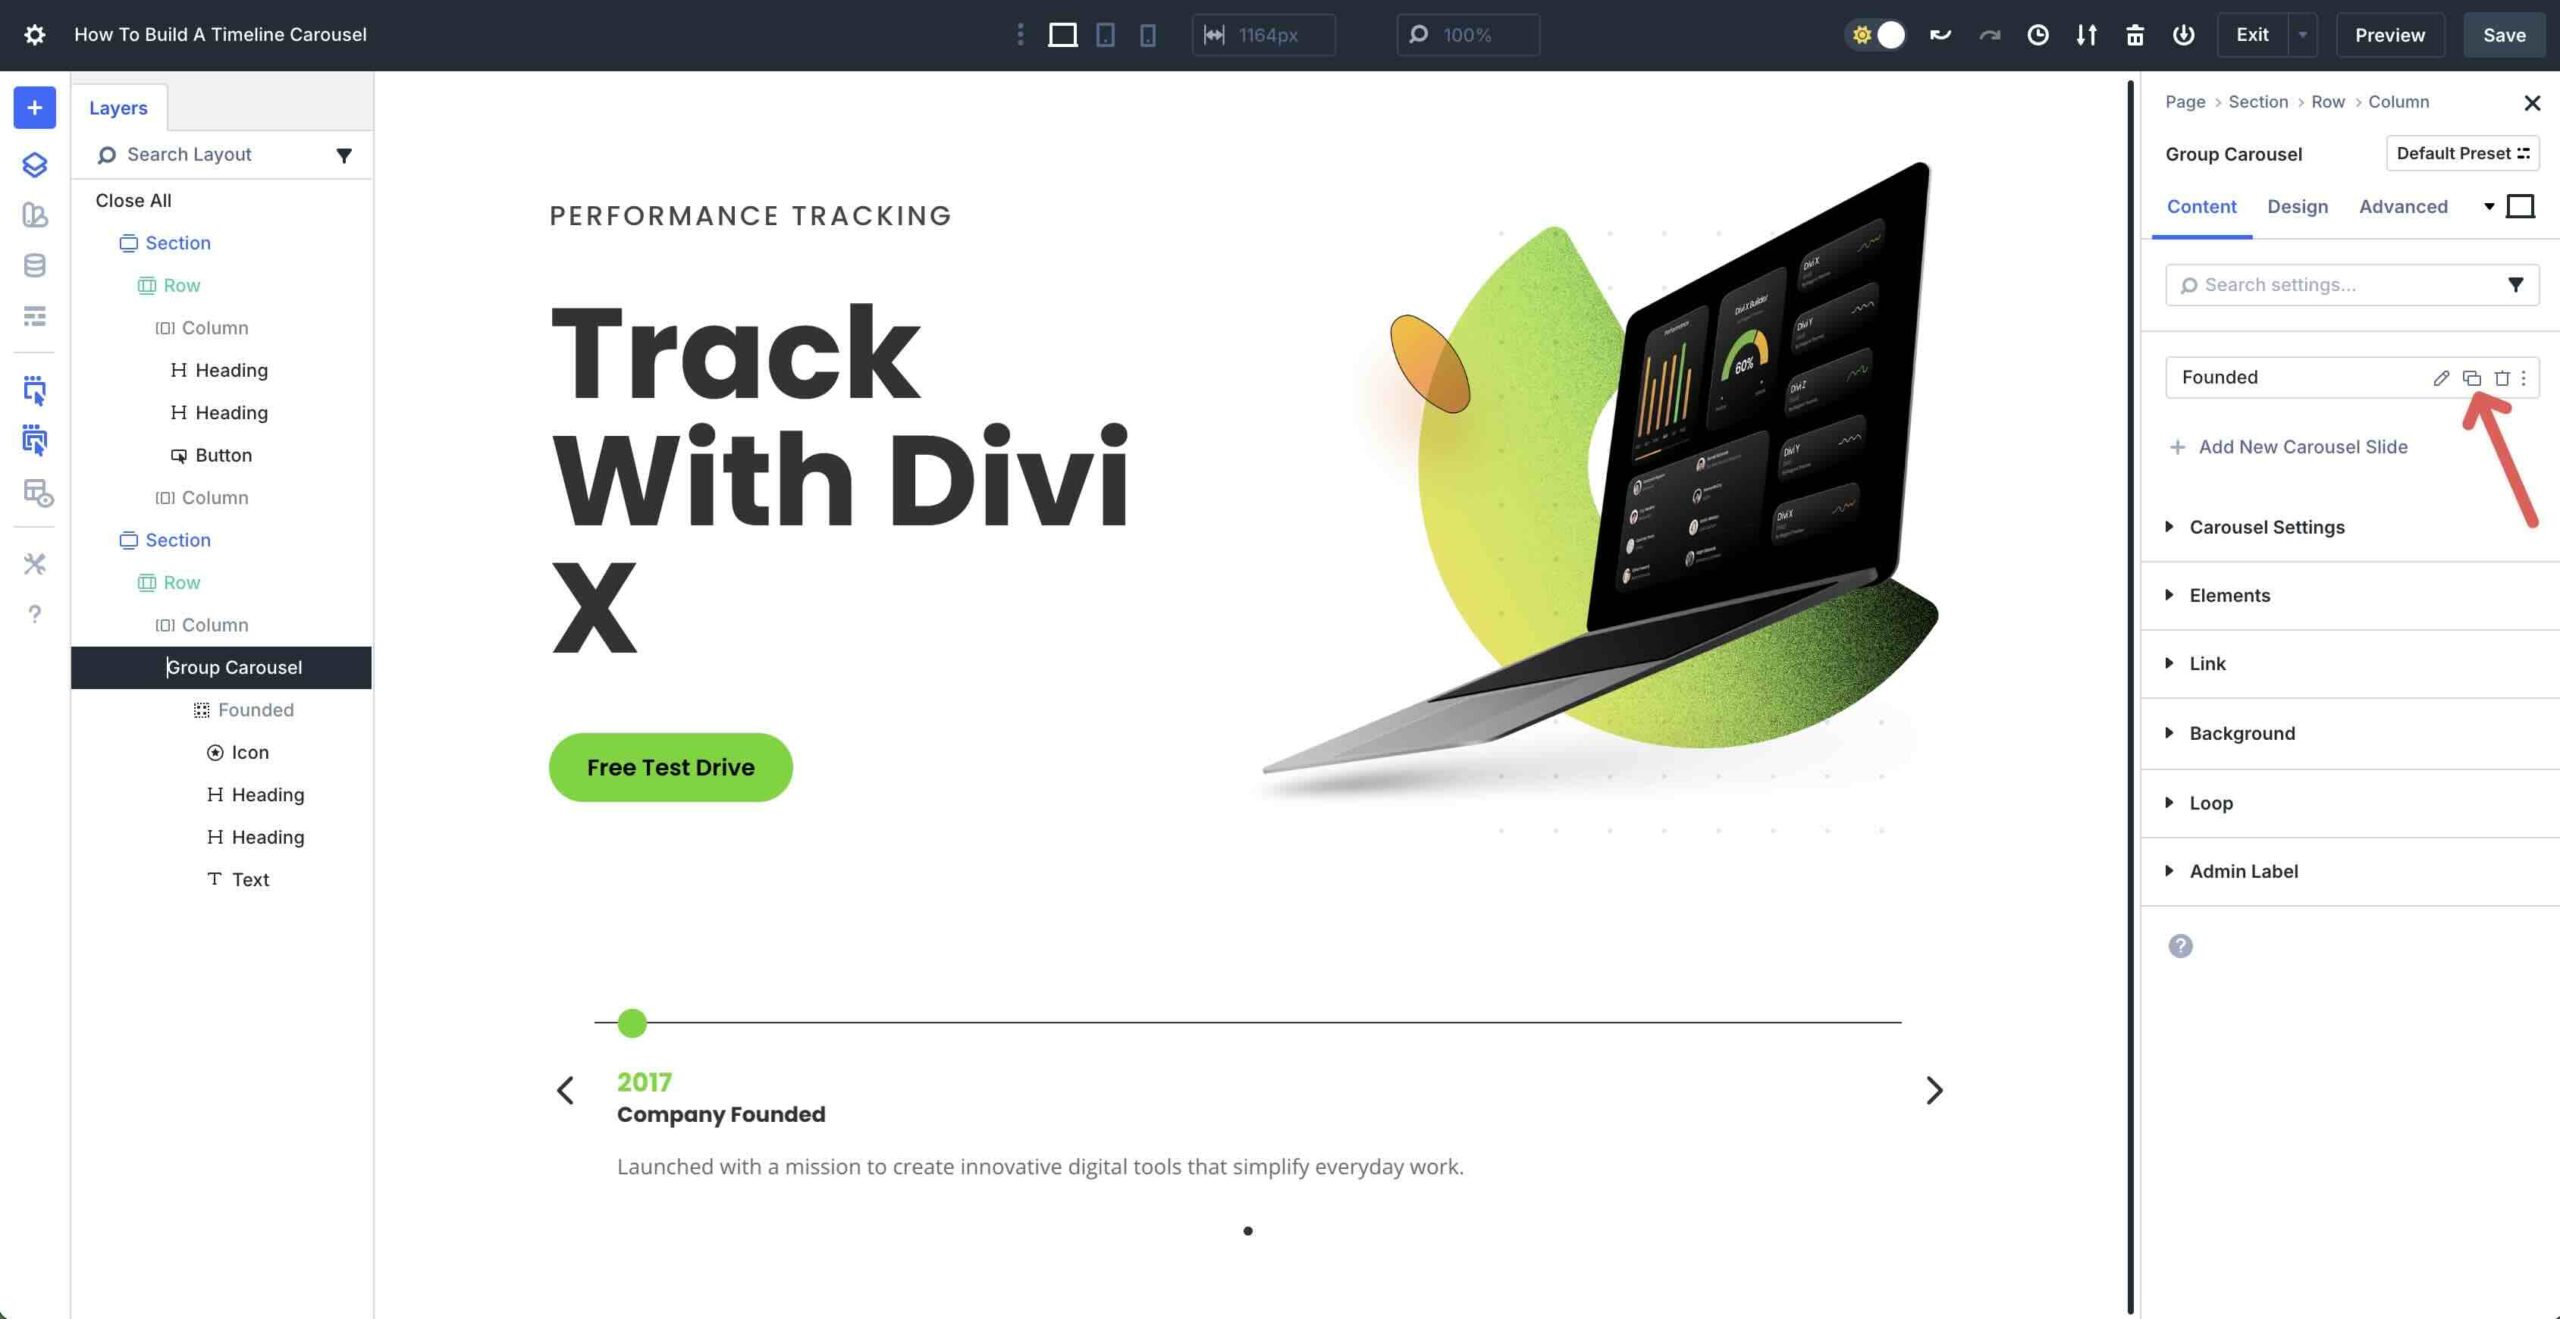
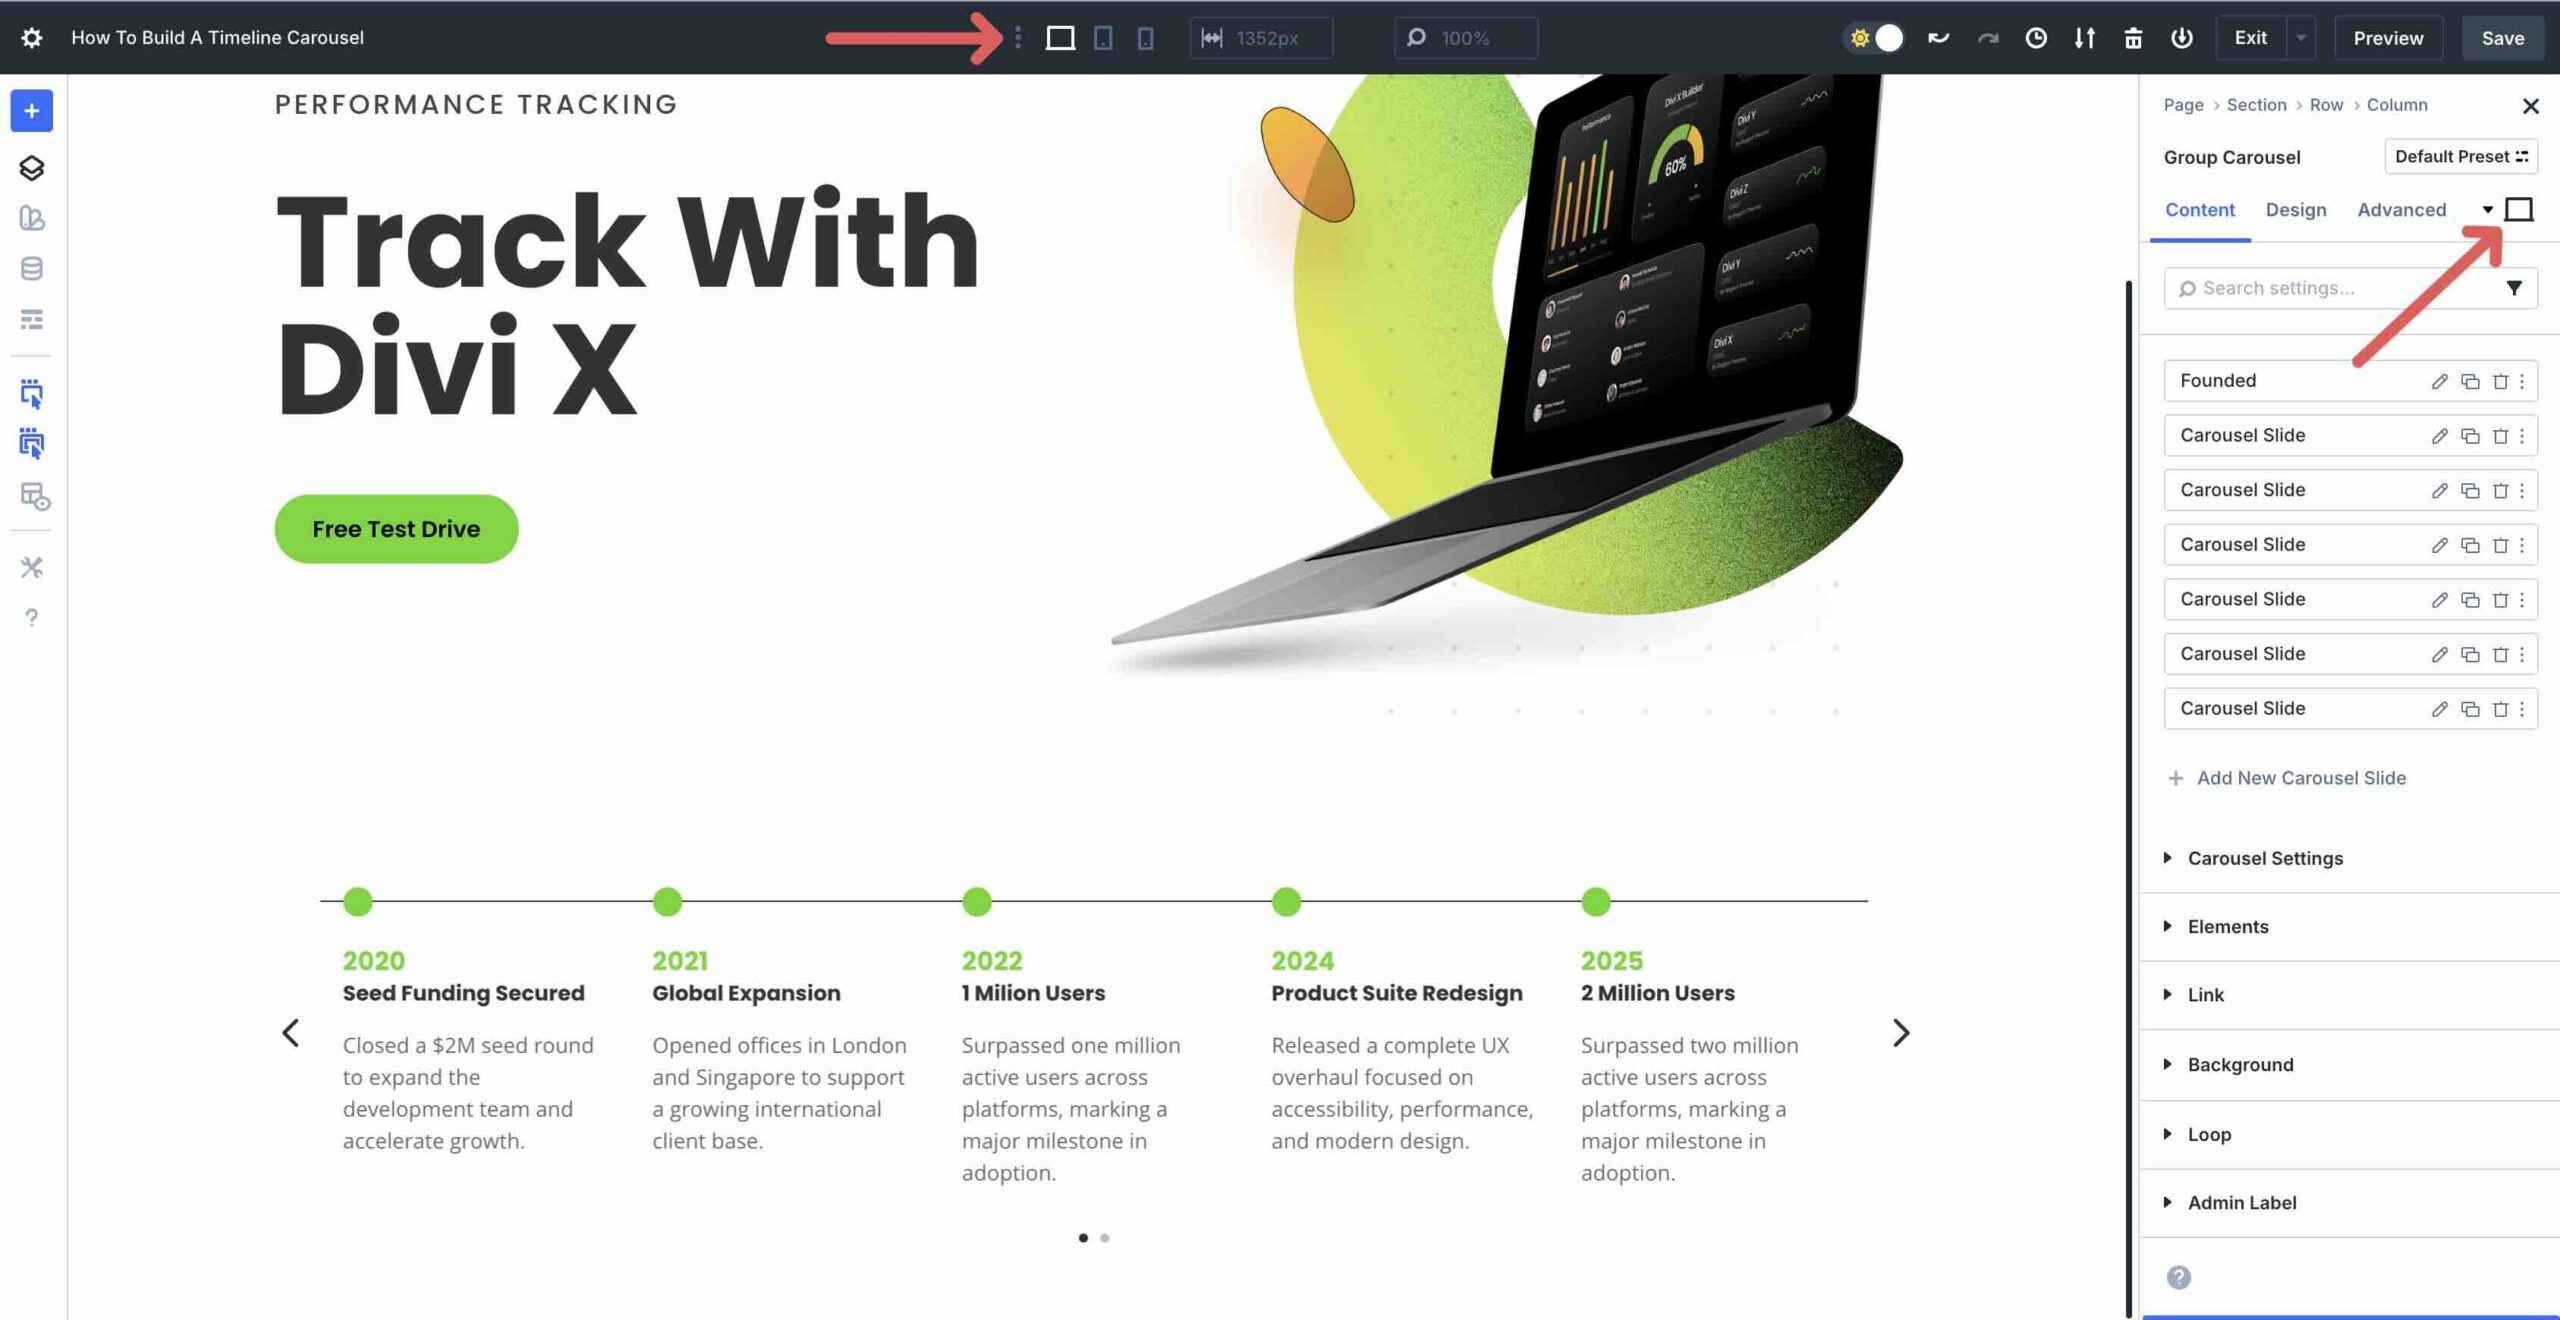
This movement will place the second Crew into the Carousel, horizontally. Repeat this step 5 cases to populate the Carousel.
From there, simply alter the content material subject material of the slides as sought after.
Step 4: Take a look at For Responsiveness
Once all content material subject material is in place, you’ll have the ability to control the Carousel’s settings the use of Divi 5’s Customizable Responsive Breakpoints or Responsive Editor.
One environment that should be adjusted is the number of slides on mobile devices. Click on on into the Crew Carousel‘s number one Content material subject material tab. Build up the Carousel Settings and control the Slides To Show. Throughout the Tablet View, control the Slides To Show to 3.

Throughout the Phone View, set the Slides To Show to 1.
Use the responsive settings to make any very important adjustments.
Step 5: Preview And Save The Internet web page
The overall step is to preview your construction to make sure that the entire thing functions as expected. To preview the internet web page, click on at the Preview button at the peak correct of the Visual Builder.
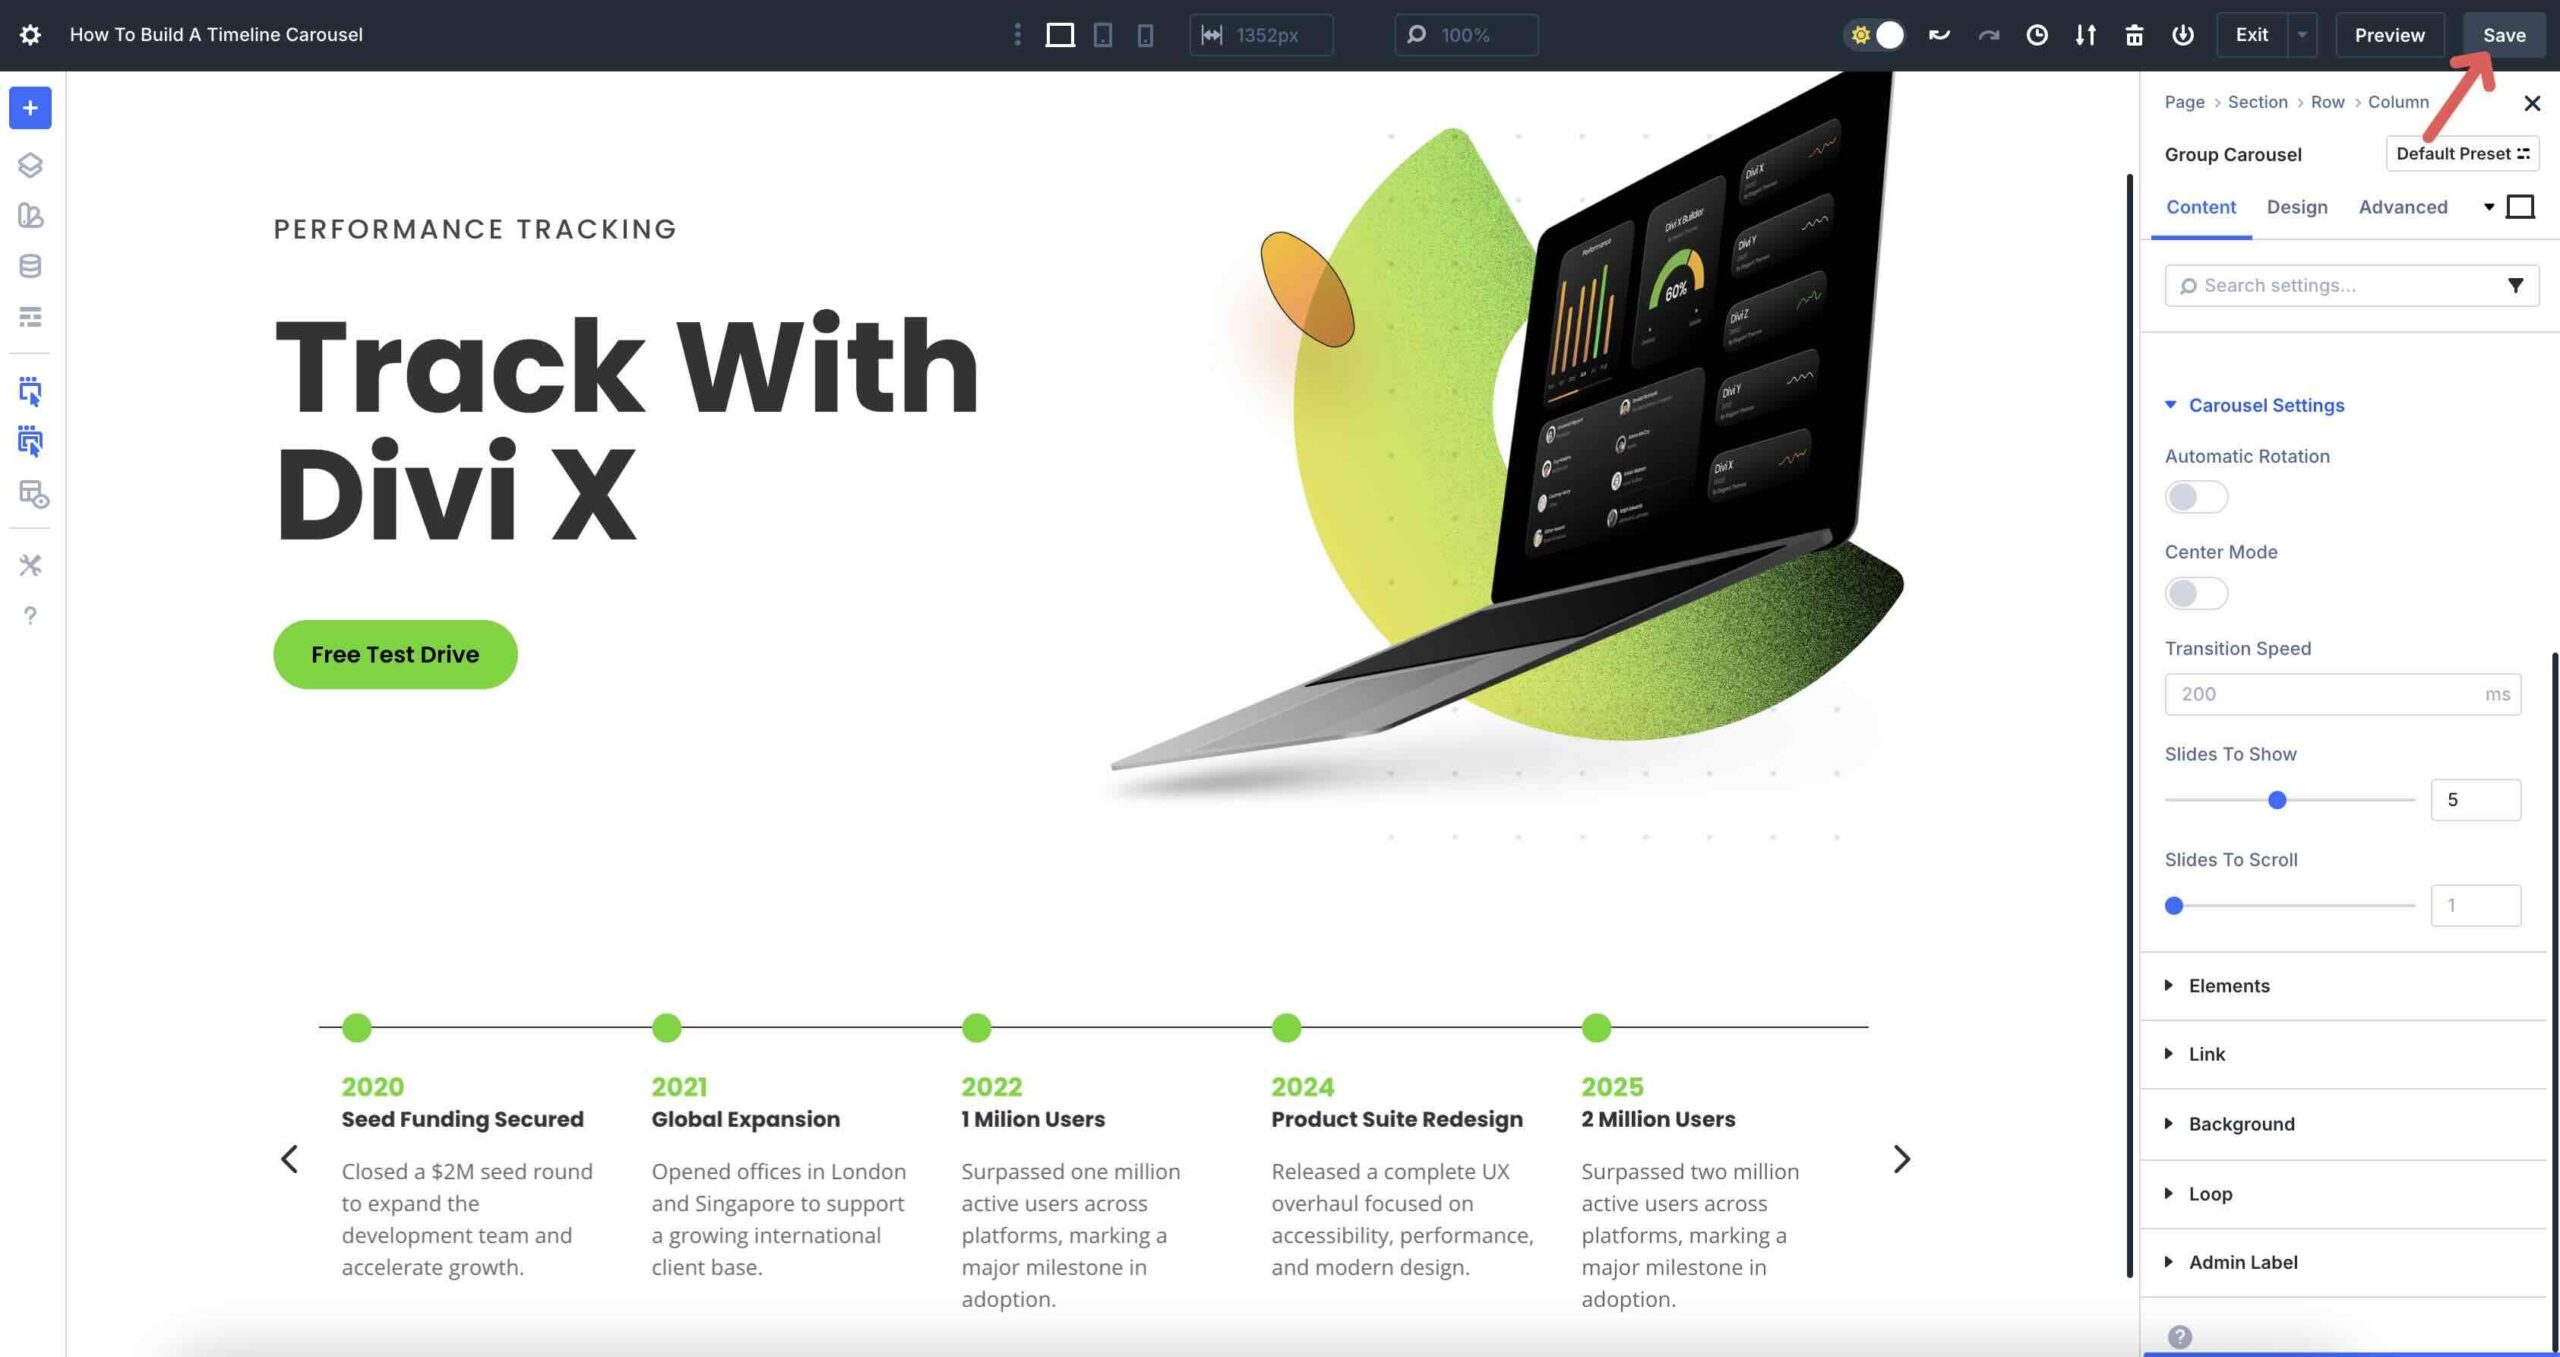
Whilst you’ve confirmed the entire thing appears to be very good, return to the Visual Builder to save some the internet web page.
That’s it! You’ve successfully created a timeline carousel that you just’ll have the ability to use in your internet web page. If you’d love to acquire the file to preview the settings previous than development your personal Carousel, fill out the form below.
@media best show and ( max-width: 767px ) {.et_bloom .et_bloom_optin_1 .carrot_edge.et_bloom_form_right .et_bloom_form_content:previous than { border-top-color: #ffffff !important; border-left-color: transparent !important; }.et_bloom .et_bloom_optin_1 .carrot_edge.et_bloom_form_left .et_bloom_form_content:after { border-bottom-color: #ffffff !important; border-left-color: transparent !important; }
}.et_bloom .et_bloom_optin_1 .et_bloom_form_content button { background-color: #f92c8b !important; } .et_bloom .et_bloom_optin_1 .et_bloom_form_content .et_bloom_fields i { color: #f92c8b !important; } .et_bloom .et_bloom_optin_1 .et_bloom_form_content .et_bloom_custom_field_radio i:previous than { background: #f92c8b !important; } .et_bloom .et_bloom_optin_1 .et_bloom_border_solid { border-color: #f7f9fb !important } .et_bloom .et_bloom_optin_1 .et_bloom_form_content button { background-color: #f92c8b !important; } .et_bloom .et_bloom_optin_1 .et_bloom_form_container h2, .et_bloom .et_bloom_optin_1 .et_bloom_form_container h2 span, .et_bloom .et_bloom_optin_1 .et_bloom_form_container h2 strong { font-family: “Open Sans”, Helvetica, Arial, Lucida, sans-serif; }.et_bloom .et_bloom_optin_1 .et_bloom_form_container p, .et_bloom .et_bloom_optin_1 .et_bloom_form_container p span, .et_bloom .et_bloom_optin_1 .et_bloom_form_container p strong, .et_bloom .et_bloom_optin_1 .et_bloom_form_container form input, .et_bloom .et_bloom_optin_1 .et_bloom_form_container form button span { font-family: “Open Sans”, Helvetica, Arial, Lucida, sans-serif; } p.et_bloom_popup_input { padding-bottom: 0 !important;}

Download For Unfastened
Join the Divi E-newsletter and we will e-mail you a duplicate of the ultimate Divi Landing Internet web page Layout Pack, plus a variety of selection excellent and unfastened Divi resources, tips and strategies. Observe along and also you’re going to be a Divi take hold of in no time. If you are already subscribed simply type for your e-mail handle below and click on on download to get admission to the construction pack.
You’ve gotten successfully subscribed. Please check out your e-mail handle to make sure your subscription and get get admission to to unfastened weekly Divi construction packs!
Assemble A Timeline Carousel Merely With Divi 5
The Crew Carousel module in Divi 5 makes it simple to create a timeline carousel that brings your emblem’s milestones or problem history to life. Its intuitive design, dynamic content material subject material purposes, and flexible styling mean you can assemble a visually engaging, responsive timeline without relying on difficult coding or third-party plugins.
Now that you just’ve walked all over the stairs to build your personal timeline carousel, it’s time to put it into movement. Obtain the most recent Divi 5 Beta to find the Crew Carousel module and starting experimenting with its choices. We’d love to hear the best way you’re the use of this feature to improve your internet website. Drop a statement below or share your concepts on our social media channels.
The put up How To Construct A Timeline Carousel With Divi 5 gave the impression first on Sublime Topics Weblog.
Contents
- 1 What Is The Crew Carousel Module?
- 2 How To Assemble A Timeline Carousel With Divi 5
- 3 Download For Unfastened
- 4 You’ve gotten successfully subscribed. Please check out your e-mail handle to make sure your subscription and get get admission to to unfastened weekly Divi construction packs!
- 5 Assemble A Timeline Carousel Merely With Divi 5
- 6 New Divi Starter Website for Actual Property (Fast Set up)
- 7 29 of My Favourite Visible Content material Advent Gear
- 8 Get a Unfastened Attractiveness Salon Format Pack for Divi

0 Comments