

With Divi 5, CSS Grid is constructed into the Visible Builder, so you’ll create true two-dimensional layouts the usage of rows and columns in combination with out touching a stylesheet. That makes sticky sidebar layouts a lot more straightforward to construct, particularly when it’s time to cause them to responsive.
On this publish, we will be able to stroll thru a step by step educational to construct a sticky sidebar that remains blank throughout desktop, pill, and call with out writing a unmarried line of CSS.
Let’s get began!
What Is CSS Grid?
CSS Grid is a two-dimensional format machine that permits you to create complicated grids with rows and columns inside of a unmarried container. Not like Flexbox or older strategies like floats, CSS Grid provides you with complete regulate over each axes. Merely outline the construction as soon as, and the content material snaps into position.
Key ideas come with the grid container (the guardian with show: grid), grid pieces (the direct kids), specific tracks (rows/columns), implicit tracks (auto-crated for overflow), and site controls like grid-row to span complete top or grid-column to stretch throughout columns. Offered in 2017 and now supported in 95% of browsers, CSS Grid is a light-weight and semantic format machine. Absolute best of all, Divi 5 brings it immediately into the Visible Builder.
Key Options Of CSS Grid In Divi 5
Divi 5 transforms CSS Grid from a developer’s instrument into a visible enjoy that any one can wield proper within the Visible Builder. As an alternative of writing code, you’ll uncover pre-built Grid templates able to drop into the web page. Select one, tweak it, and watch your format come alive in actual time. Now not best is that this a sooner development enjoy, but it surely additionally permits you to experiment freely and land on designs that really feel custom-created with out touching a CSS stylesheet.
The whole thing occurs inside an intuitive settings panel the place clickable choices permit customers to regulate gaps, outline column widths, and align pieces very easily.

You’ll be able to create tradition offset laws that make each fourth merchandise span two columns, offering immediate visible rhythm, all with out the will for plugins or tradition categories.
While you pair this with Divi 5’s Loop Builder, you’ll loop weblog posts, WooCommerce merchandise, workforce bios, or any tradition publish kind, with out being limited to Divi 4’s legacy weblog, store, and portfolio modules.

For those who’ve been looking forward to a explanation why to check out Divi 5, that is it: professional-grade layouts, 0 code, and effects that load sooner than ever.
Advantages Of CSS Grid In Divi 5
CSS Grid in Divi 5 isn’t only a function — it’s an entire machine that makes reputable design sooner, extra versatile, and available to everybody.
Fast Twine-Framing
With CSS Grid in Divi 5, pace is the secret. Twine-framing a fancy format that when took hours of trial and blunder now occurs in mins. Drag a template, regulate column spans, and fine-tune gaps at the fly to peer adjustments straight away. Whether or not you need to create a sidebar for a weblog roll web page or sidebar navigation for a portfolio, Divi 5 permits you to construct, take a look at, and refine in a ways much less time.
Final Design Freedom
Design freedom is not for pro builders. You’ll be able to use offset laws to create repeating patterns, stagger photographs throughout rows for a masonry glance, or craft magazine-style symmetry with out a unmarried line of CSS. Divi 5’s visible controls liberate creativity, empowering you to design layouts that in point of fact stand out.
Constructed-In Responsiveness
Responsiveness is constructed into CSS Grid in Divi 5. Transfer to cellular view the usage of Customizable Responsive Breakpoints or the Responsive Editor, and cave in your 3-column format right into a unmarried stack with one click on. Alter Column and Row spans for each and every breakpoint, reorder content material visually, and switch the sticky sidebar right into a fullwidth menu on smaller displays. No media queries to put in writing, no surprises in checking out, simply constant, reputable effects each time.
It’s A Scalable Device
Divi 5’s CSS Grid machine scales with you. Rookies can get started with drag-and-drop templates, whilst professional builders can dive into tradition monitor definitions and actual placement. Both manner, there’s no use for tradition answers or third-party plugins that upload useless bloat in your site. As a result of Divi 5 generates blank, semantic CSS, your websites render sooner than ever.
Briefly, Divi 5’s CSS Grid machine permits sooner builds, bolder designs, and progressed efficiency.
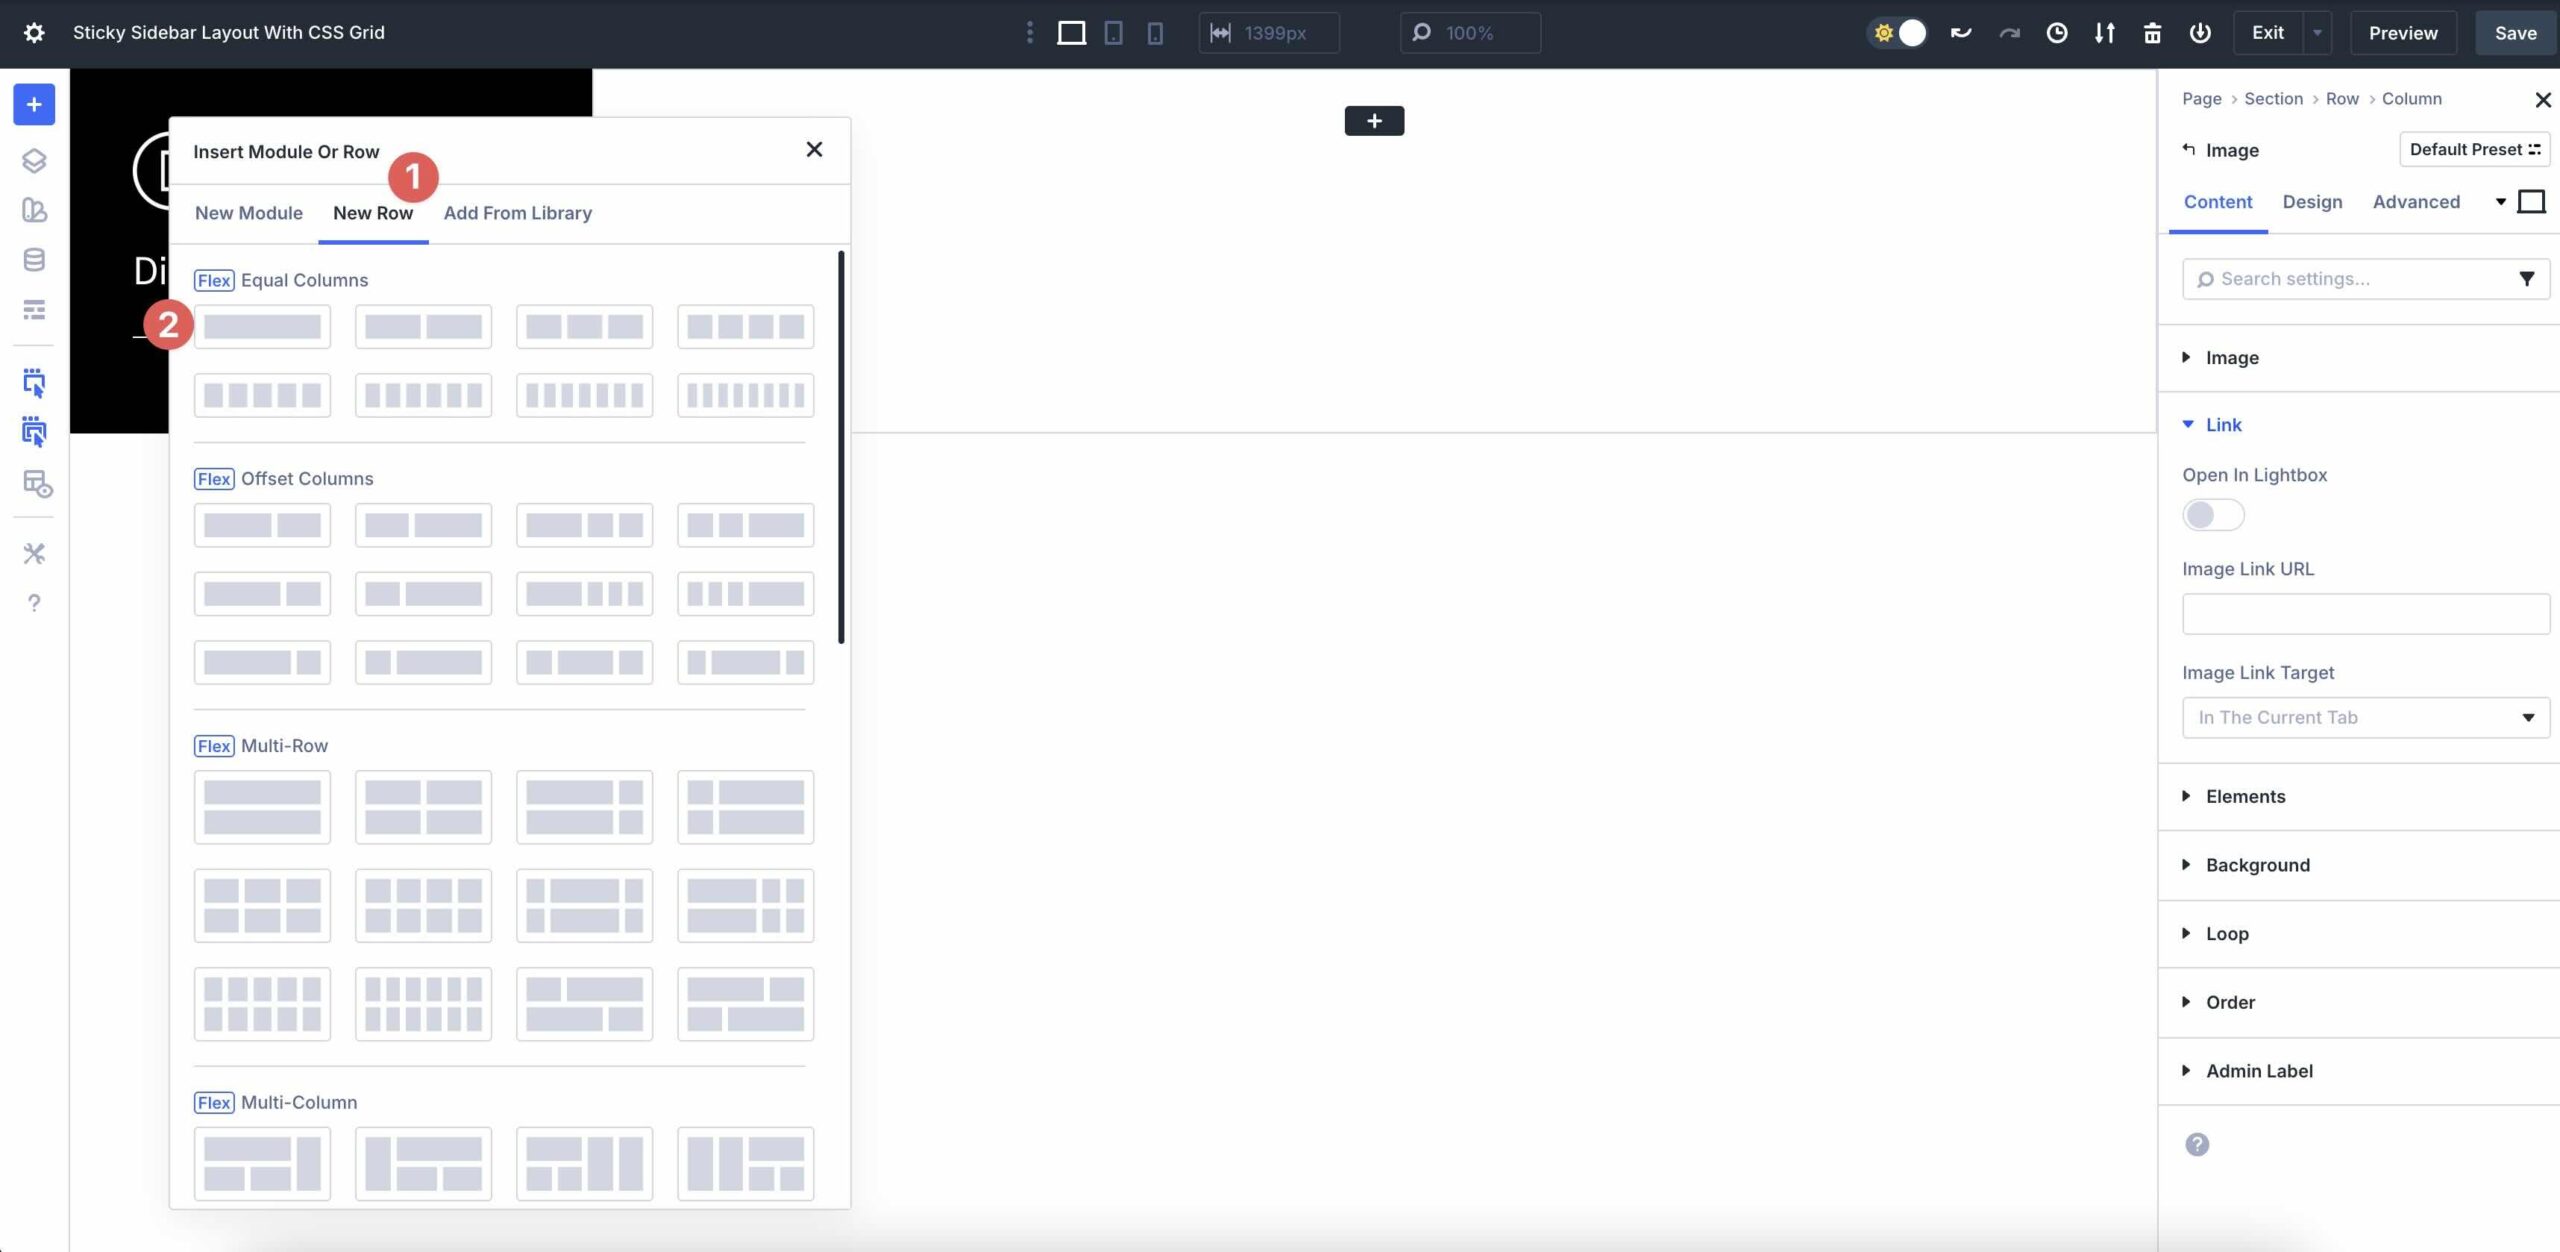
How To Construct A Sticky Sidebar Structure With CSS Grid In Divi 5
On this phase, we’ll stroll you during the steps to create a sticky sidebar format the usage of CSS Grid in Divi 5. All of the procedure takes just a few mins, due to Divi 5’s intuitive interface.
Step 1: Create the Grid Construction
Create a brand new web page in Divi or open an current one. When the Visible Builder a lot, click on the blue + icon so as to add a brand new phase.
Upload a Unmarried Column Flex Row to the phase.
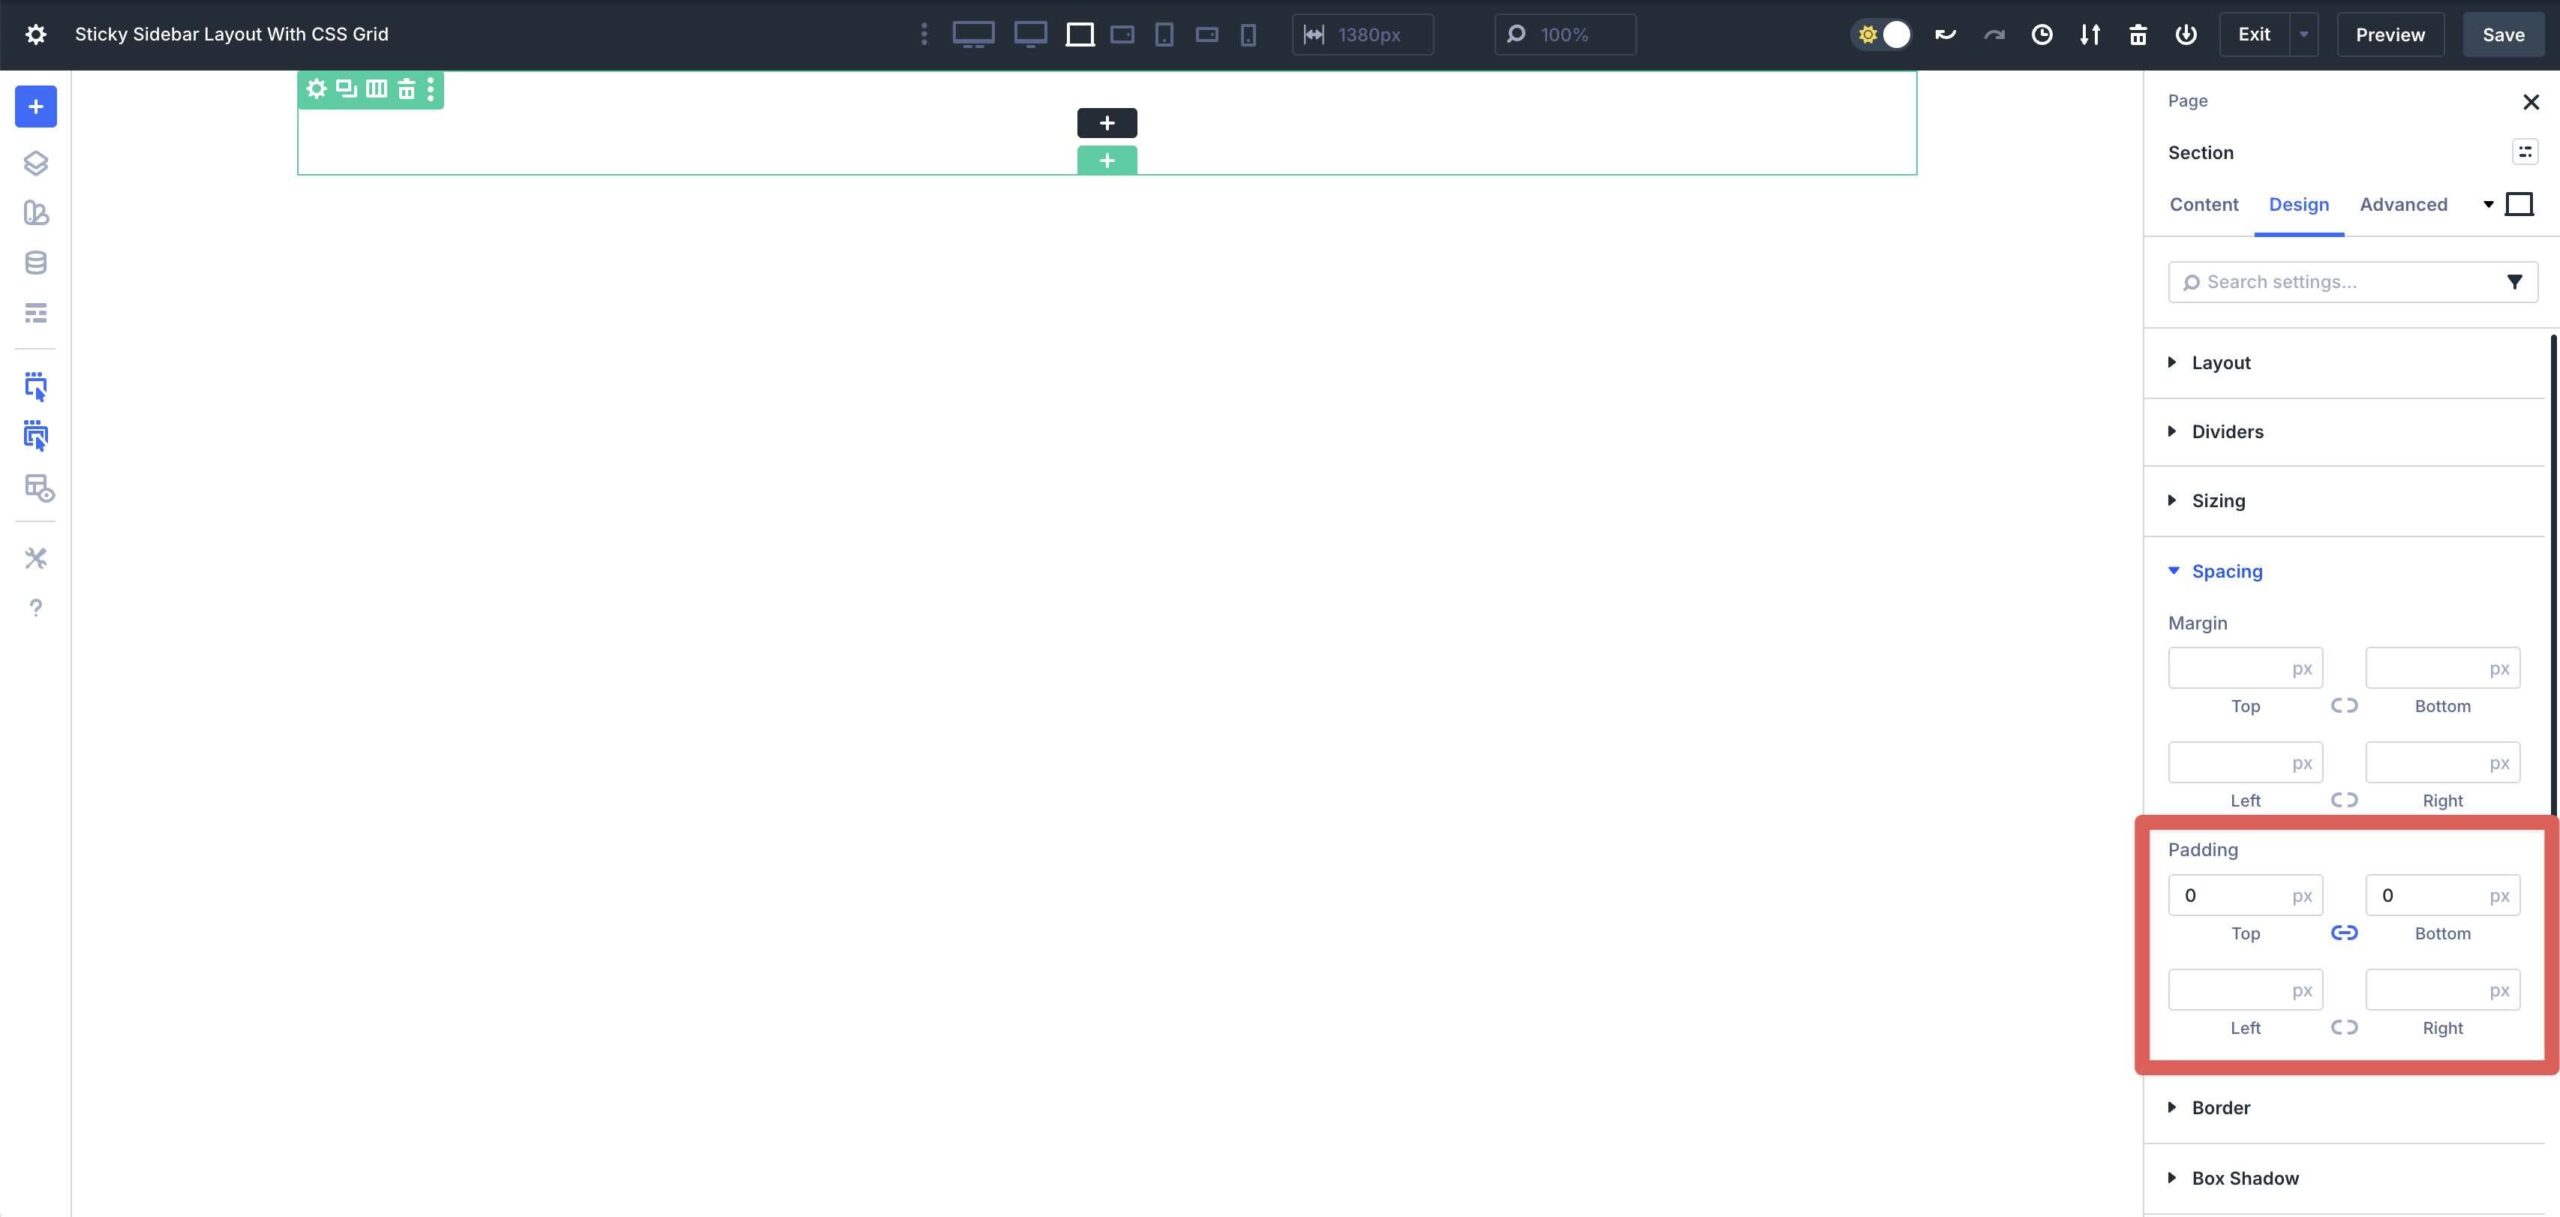
Click on into the Phase’s Design tab, make bigger the Spacing menu, and input 0px Padding to the peak and backside.
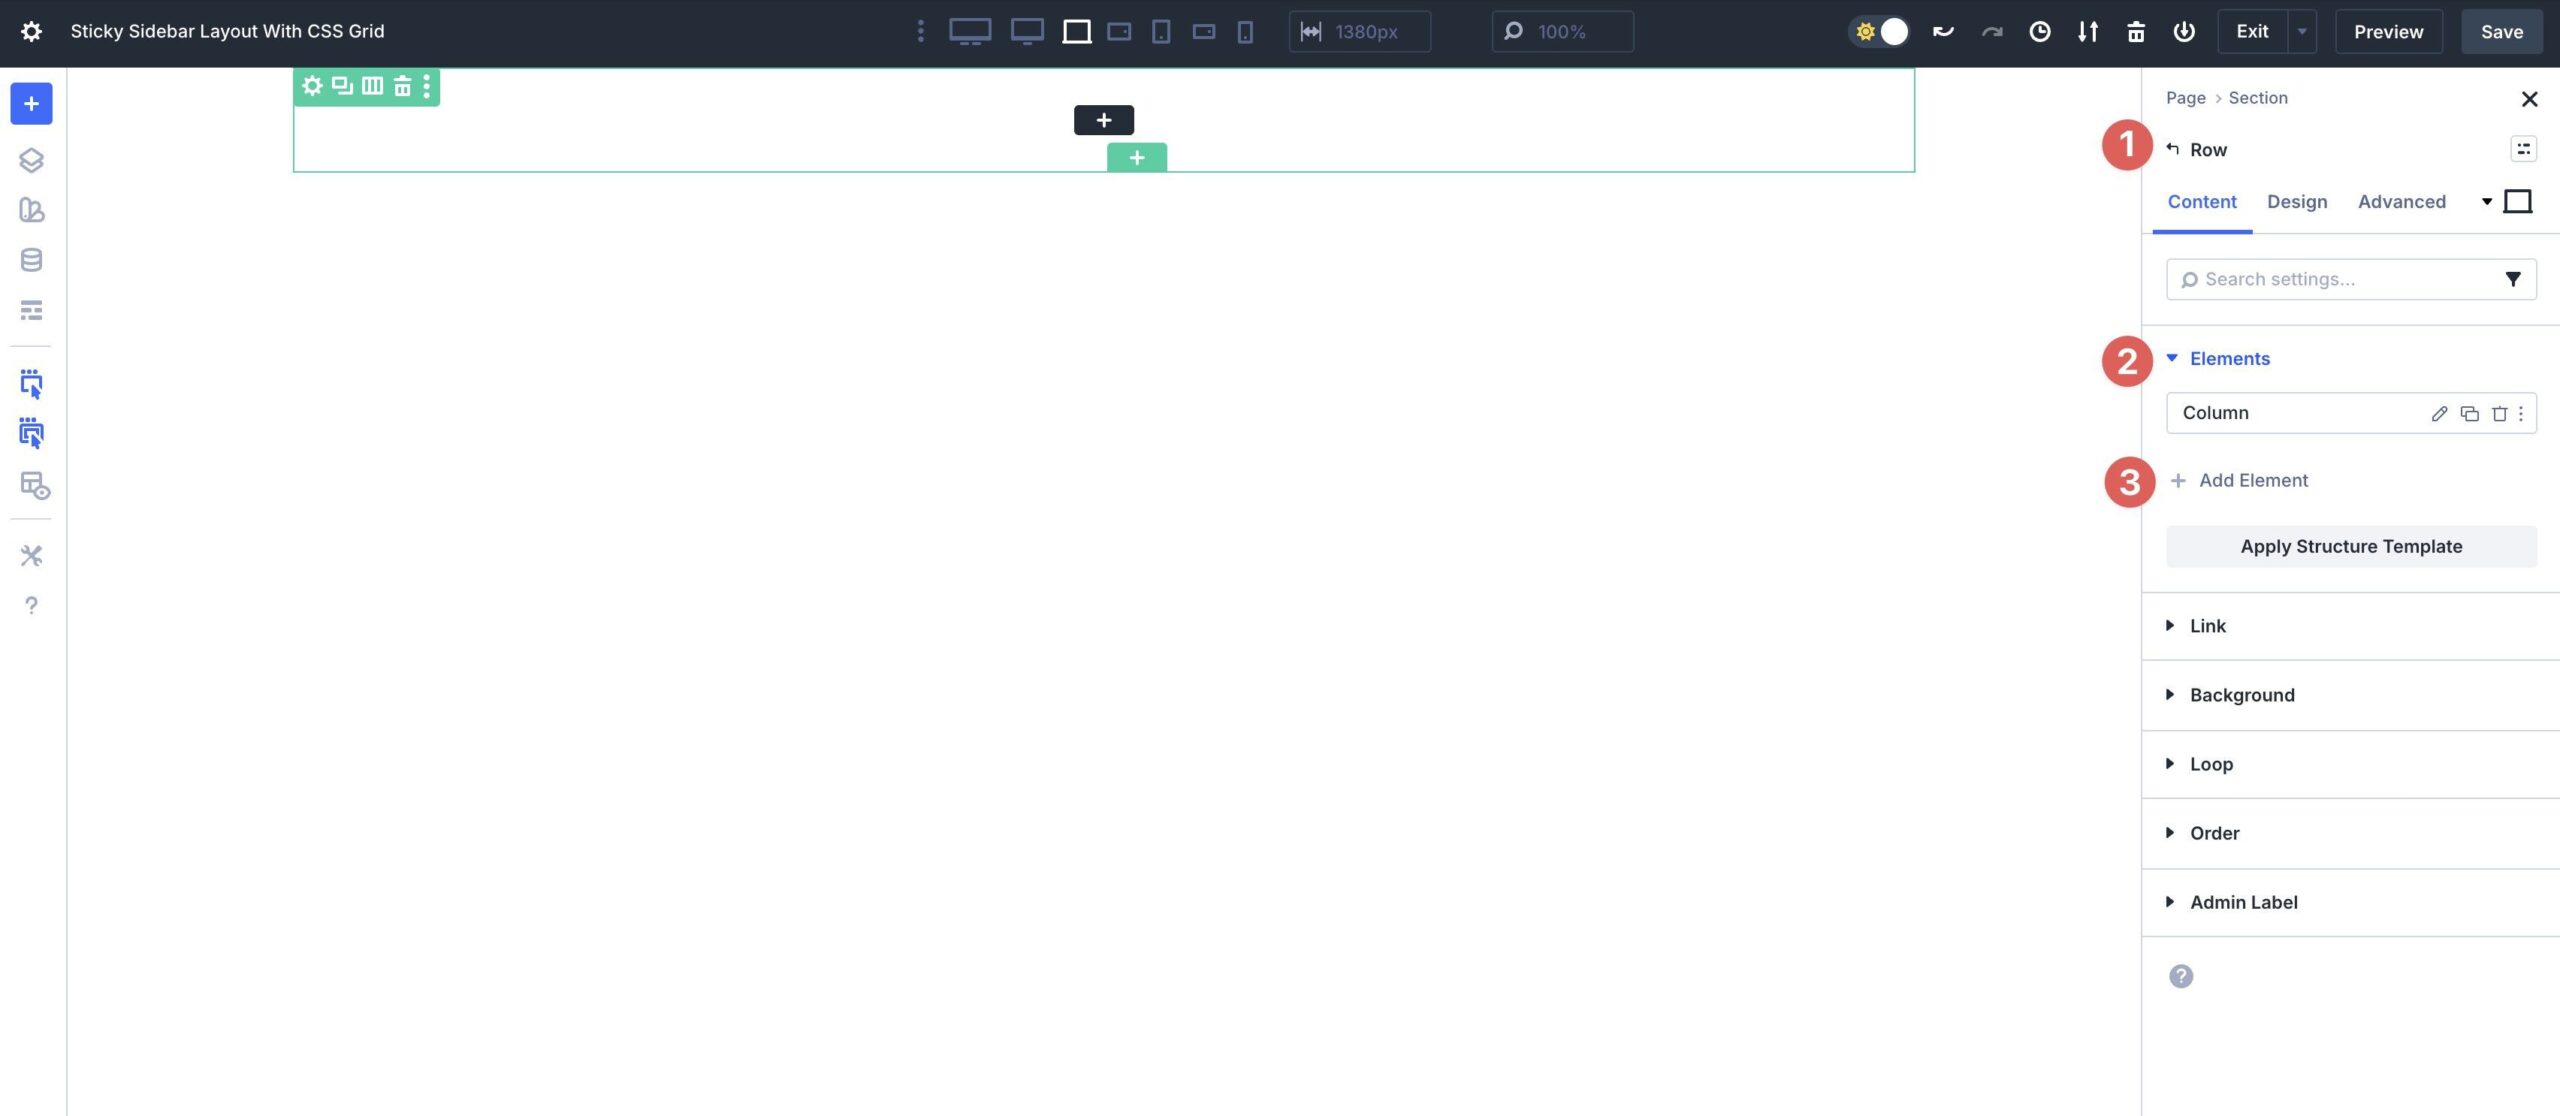
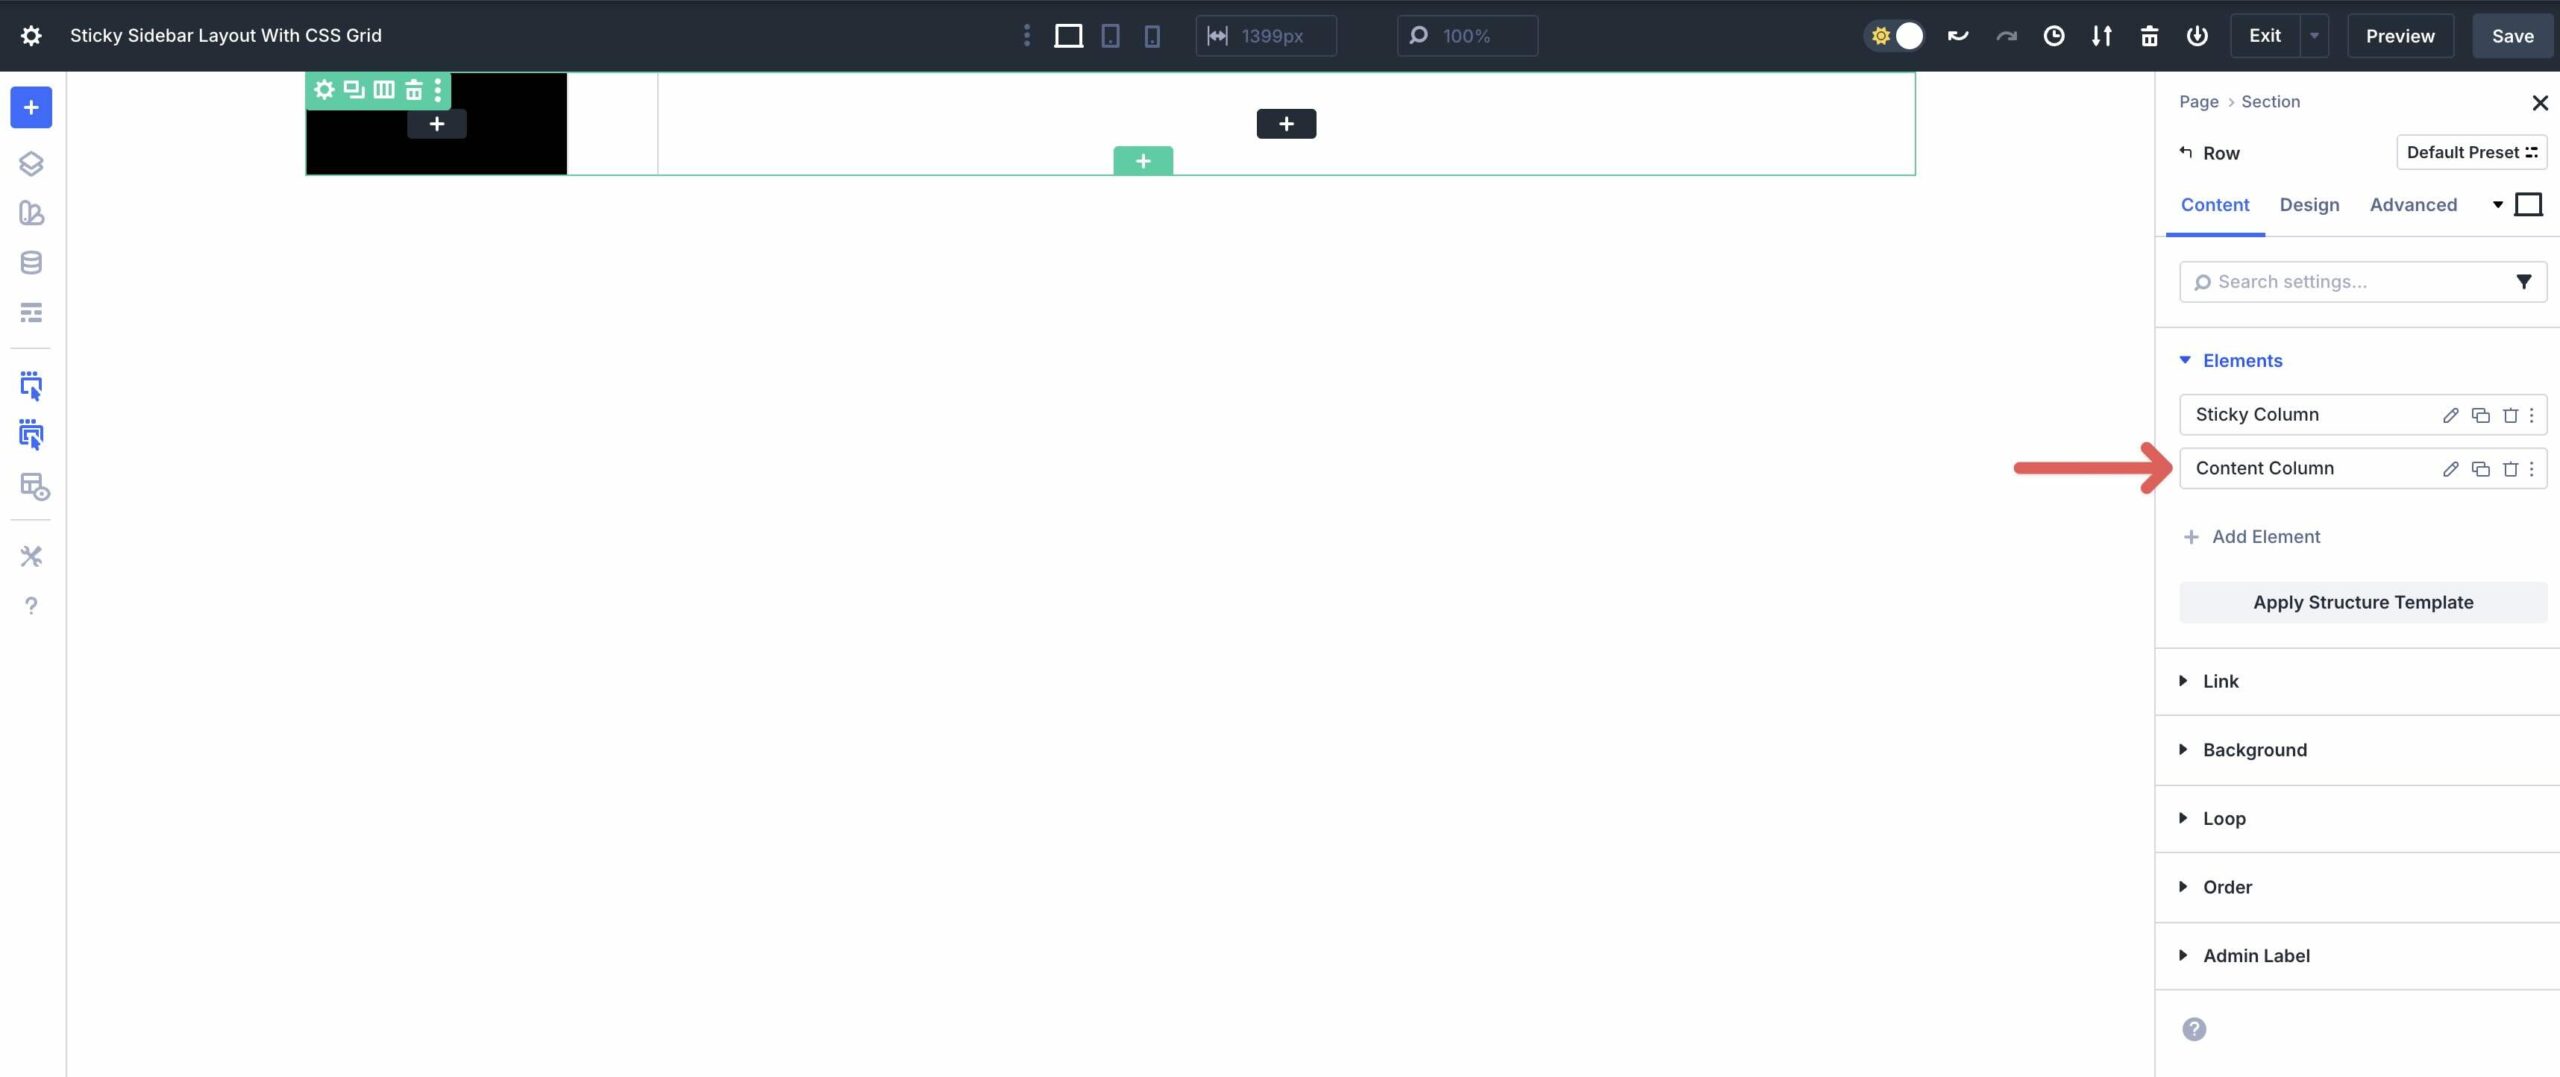
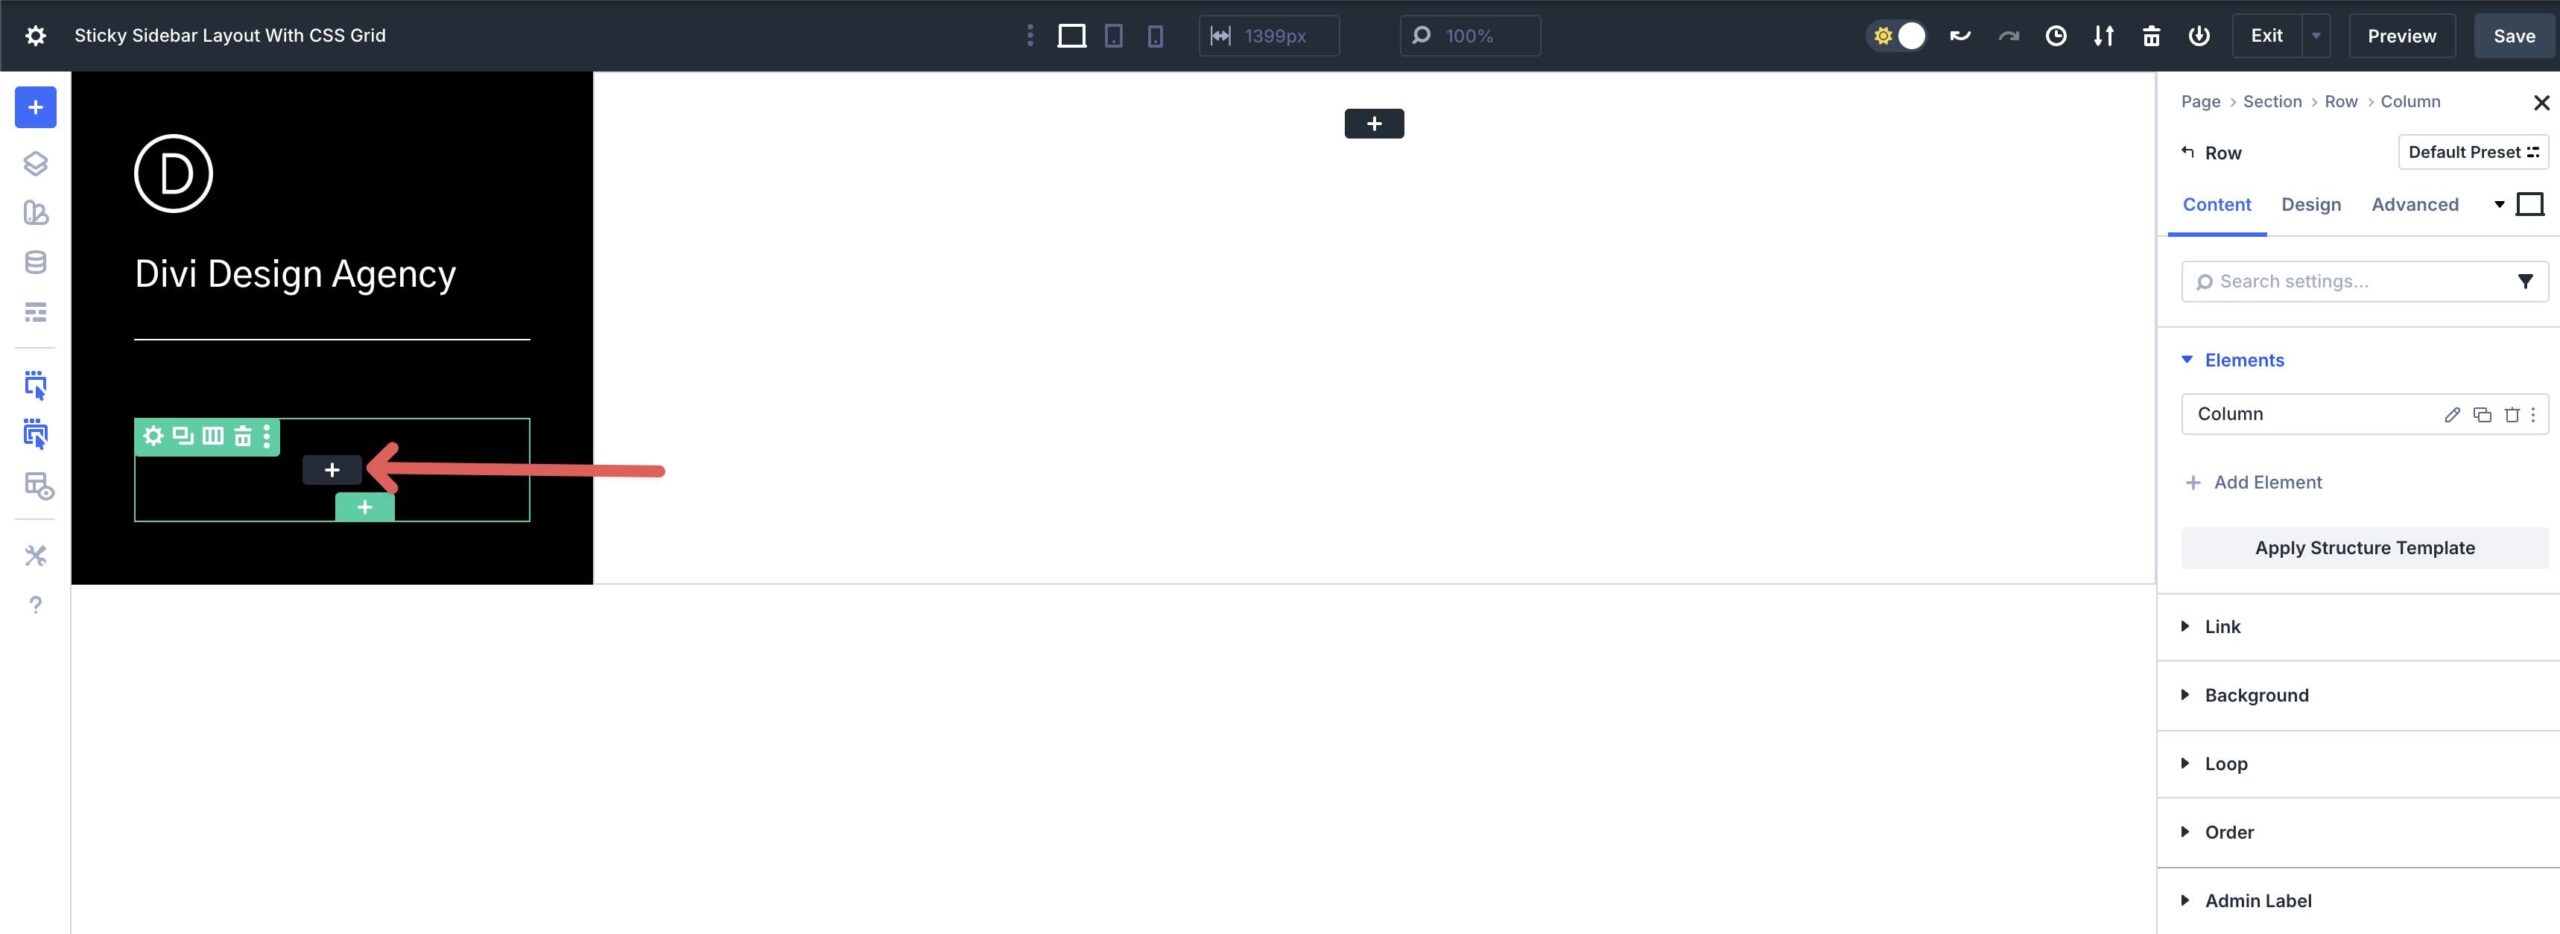
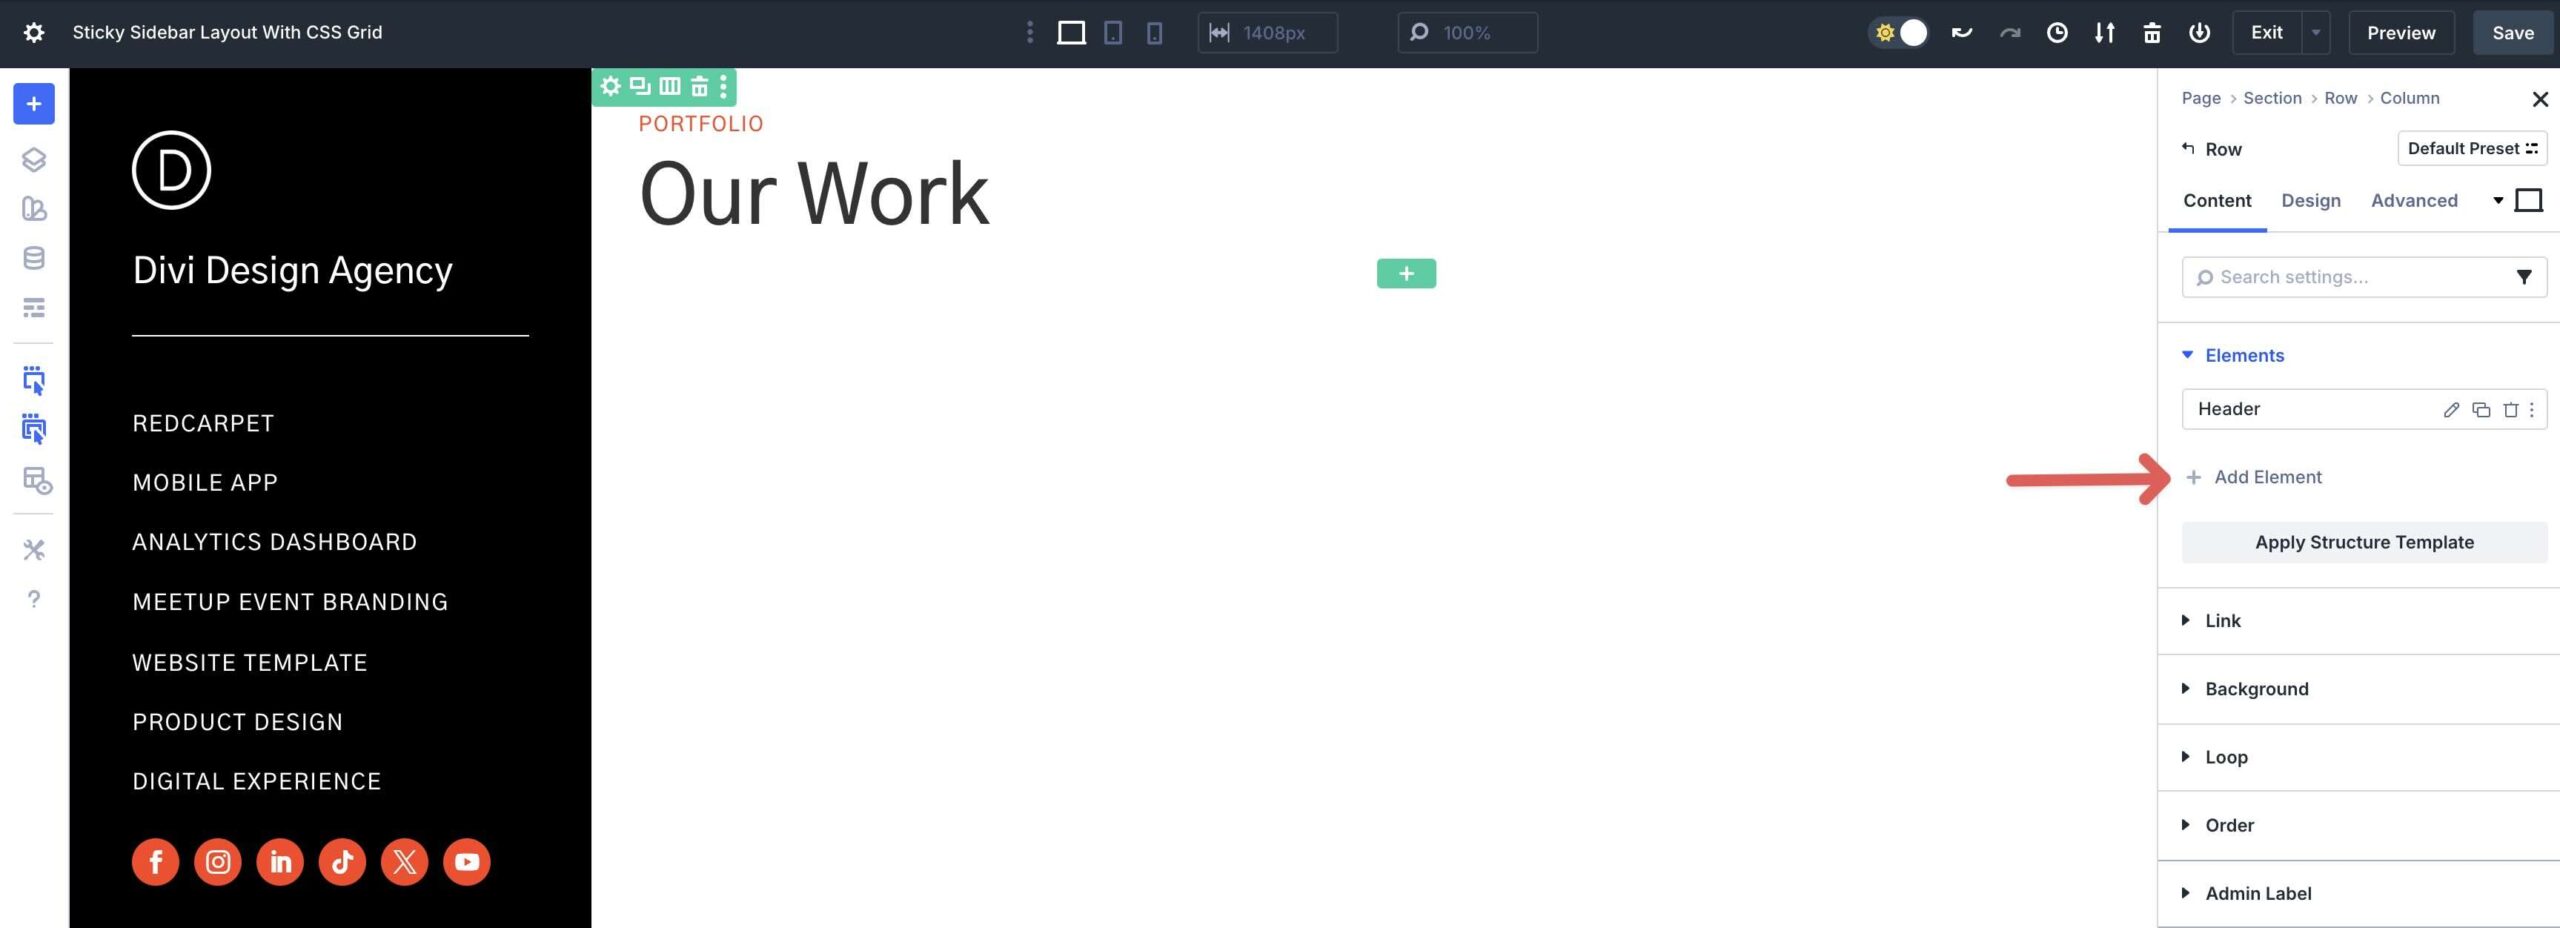
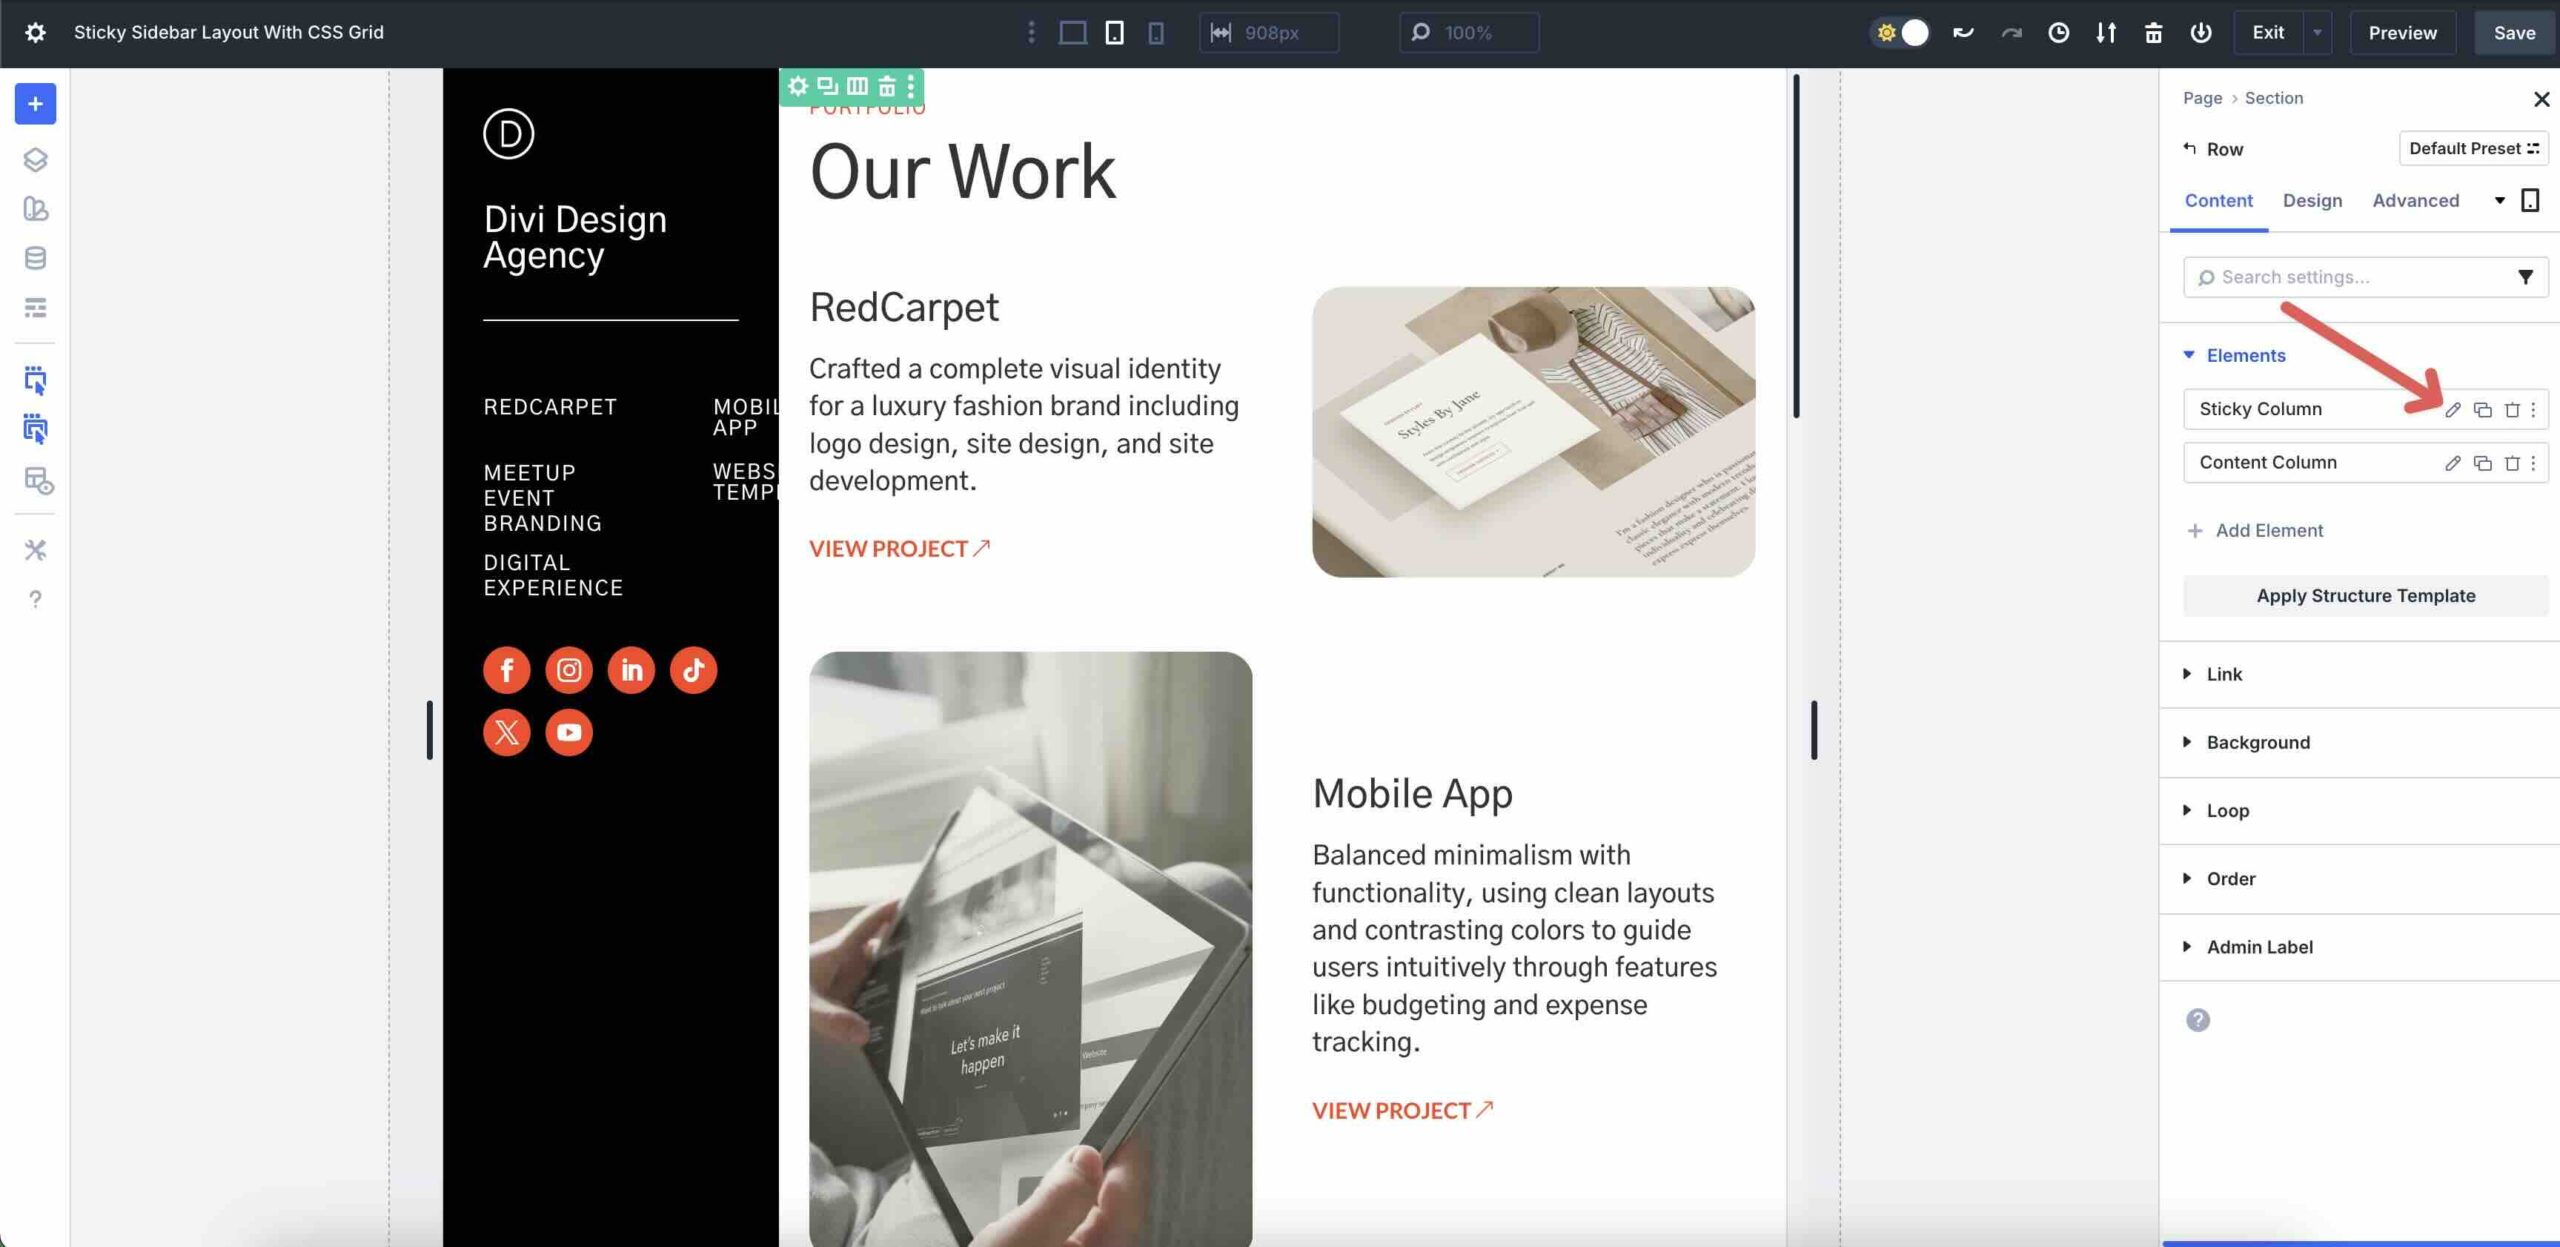
Now transfer to the Row settings. Within the Content material tab, make bigger the Components menu. Click on + Upload Part so as to add a brand new Column to the Row.
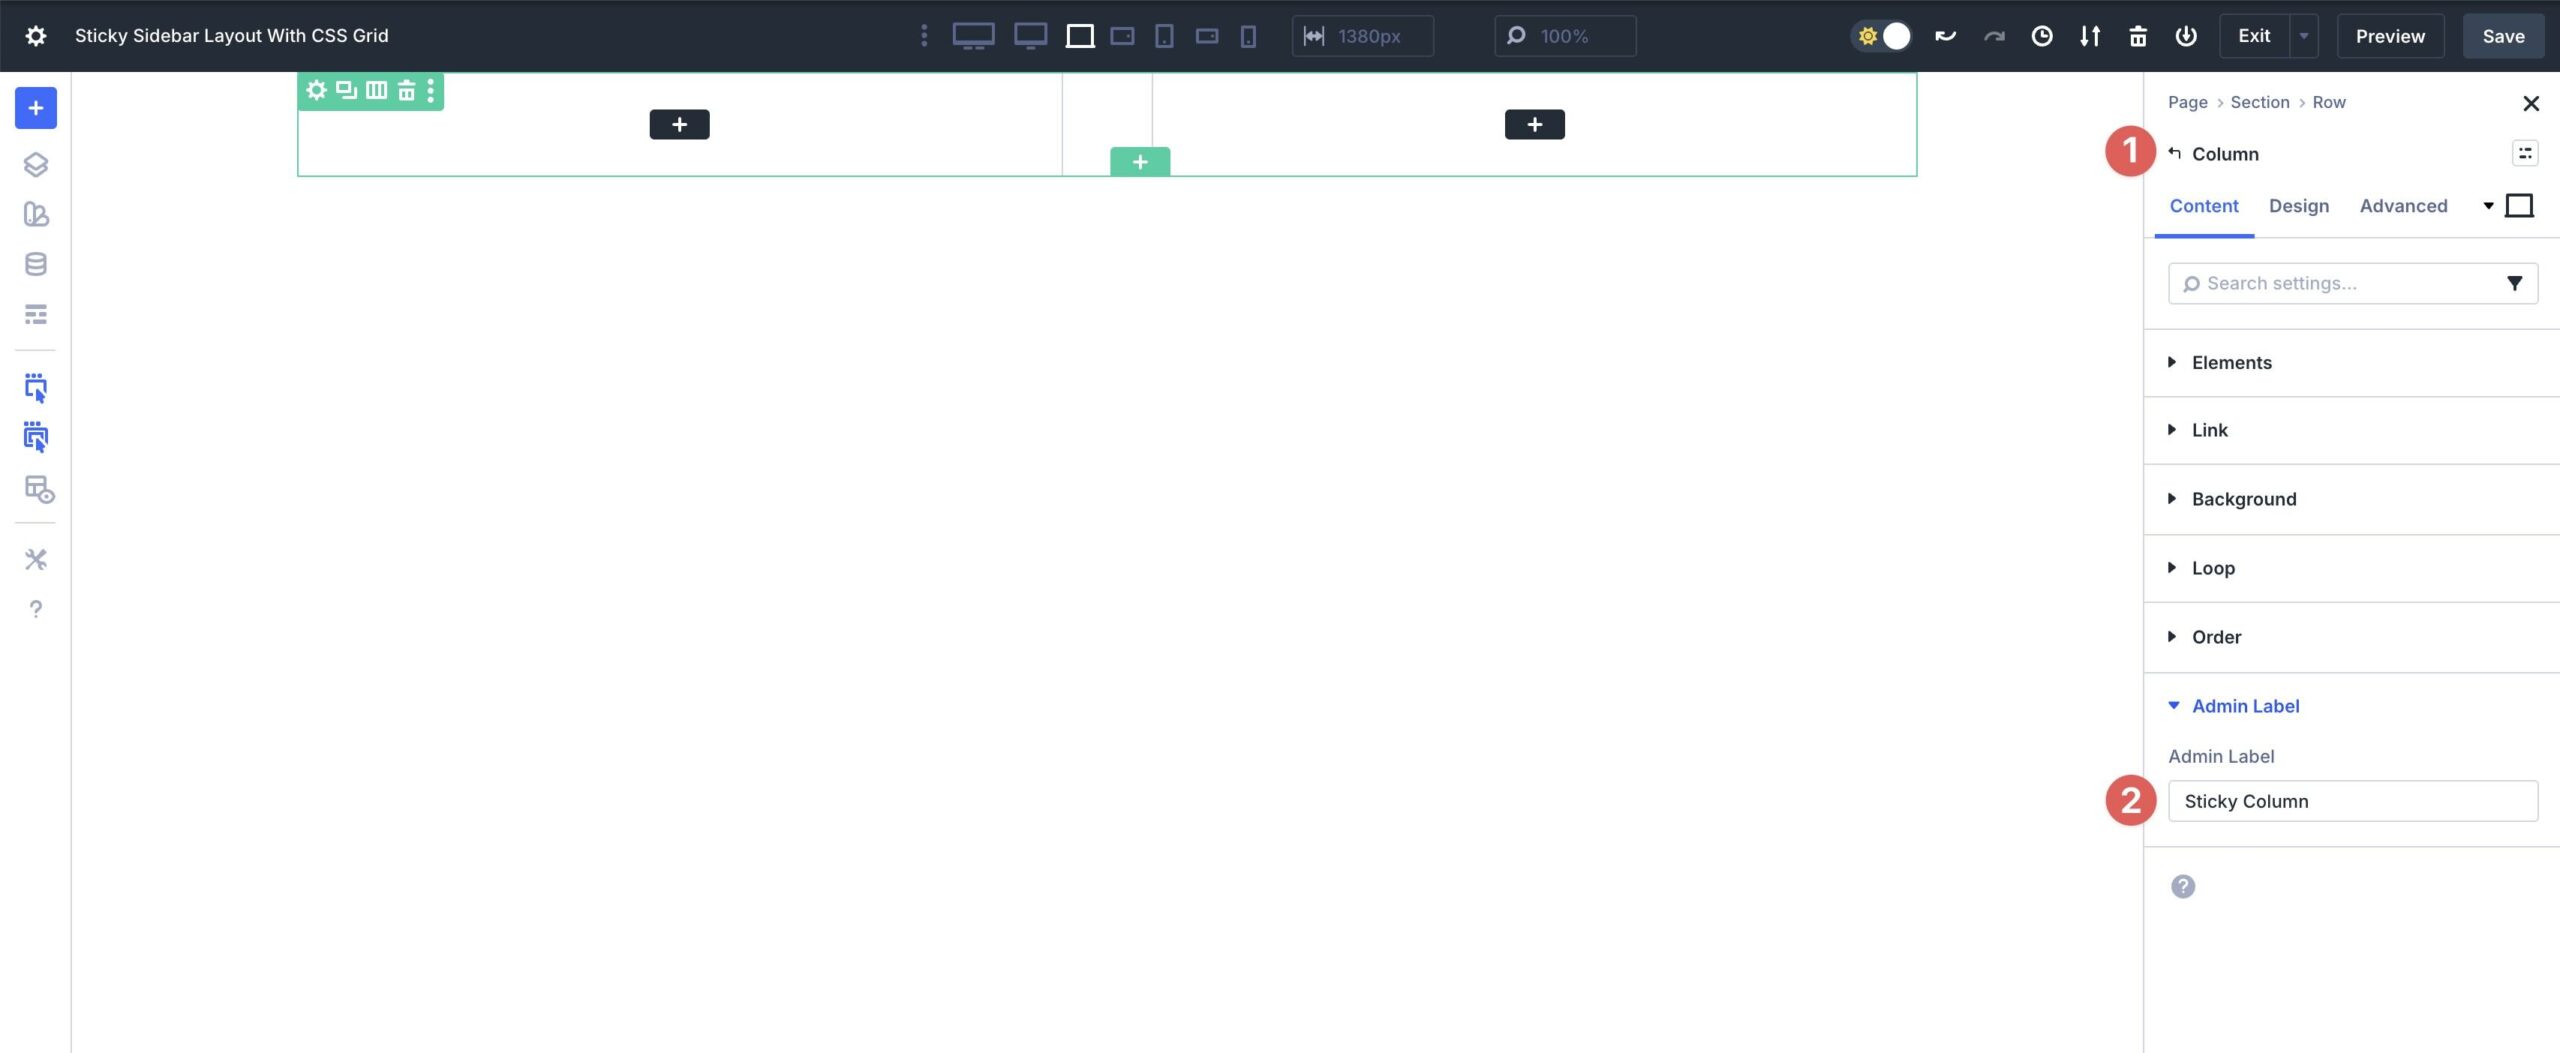
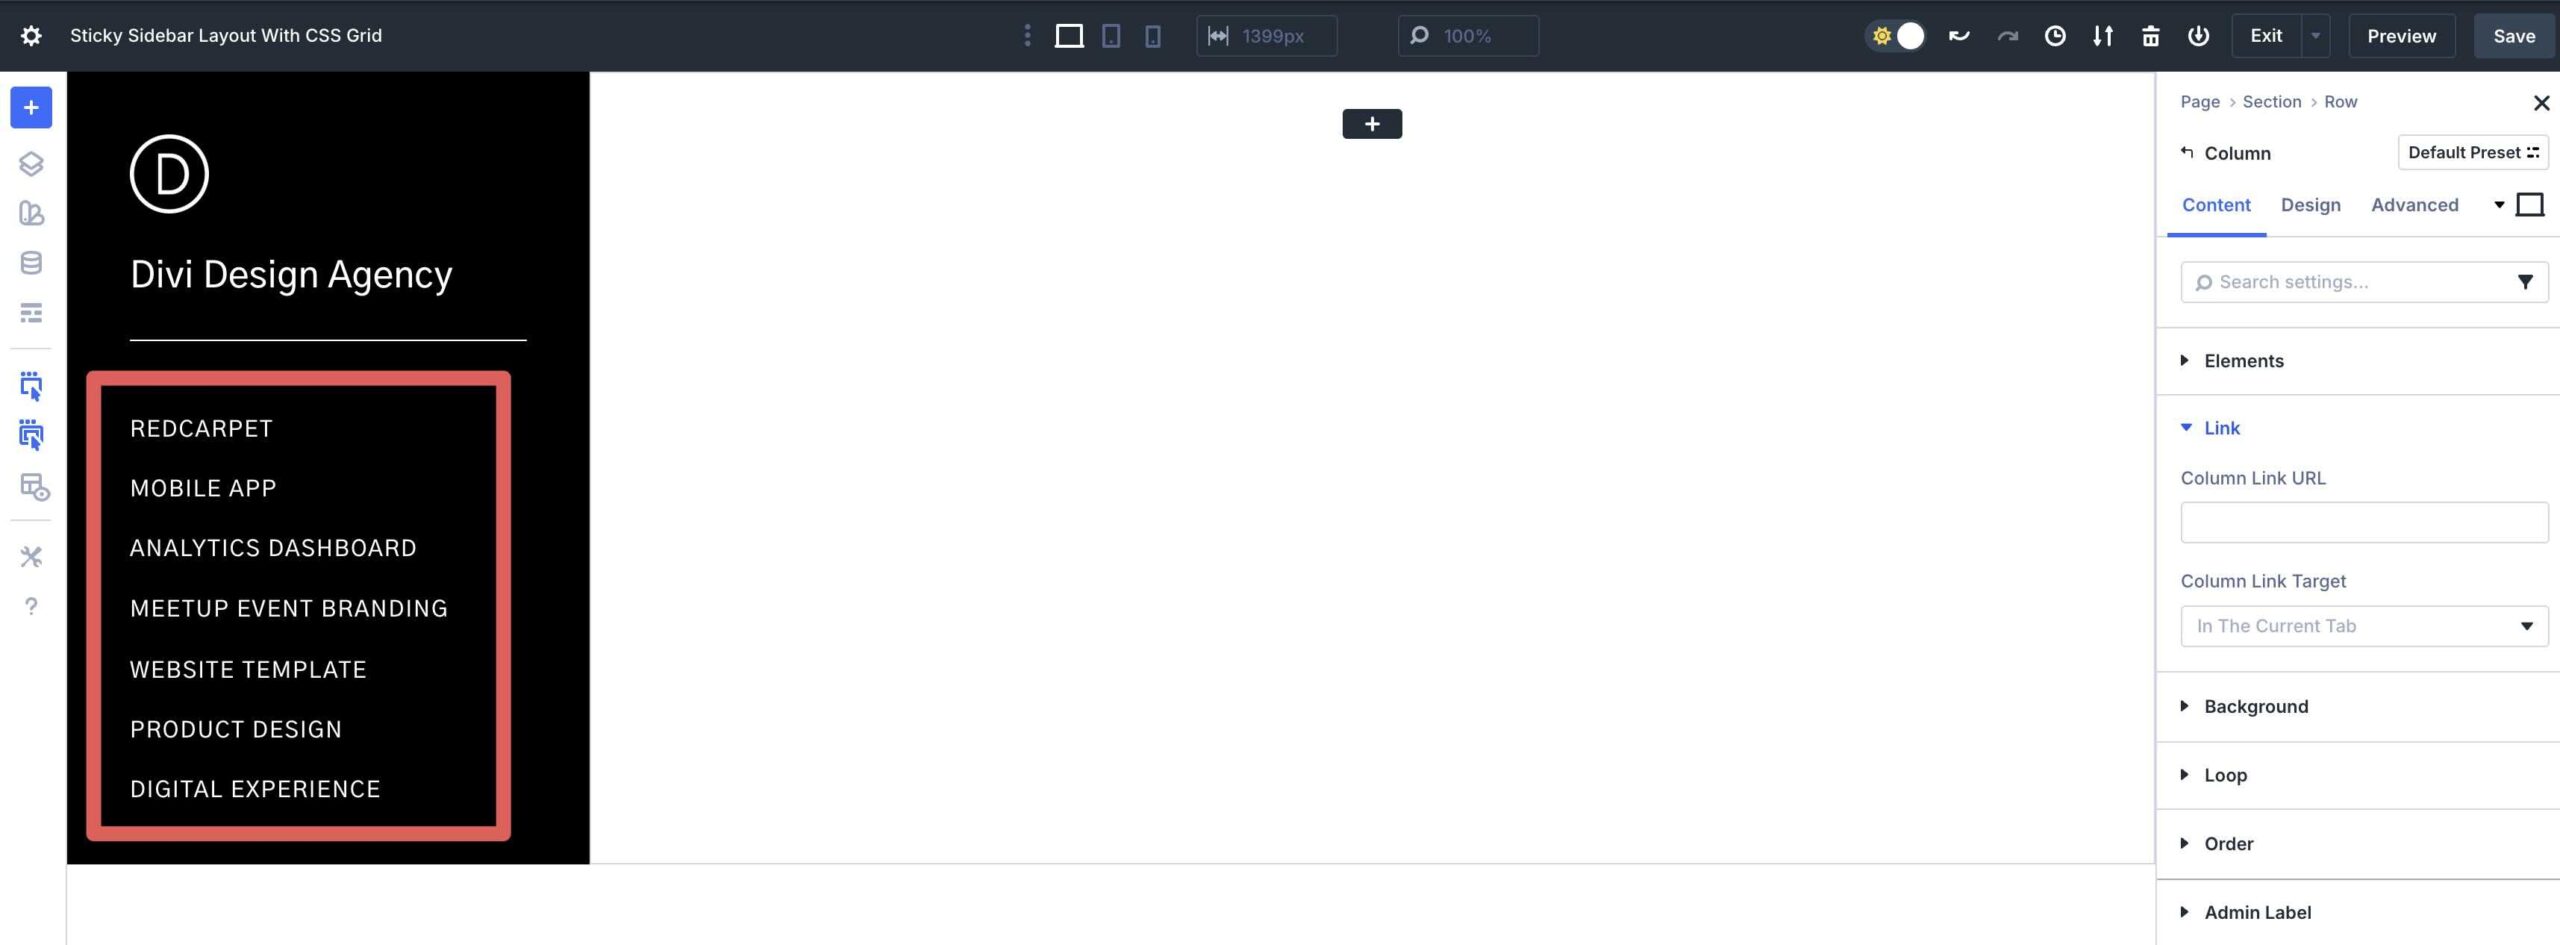
Click on into the primary Column and assign an Admin Label to it. When running with complicated layouts, it’s useful to identify the weather to cause them to more straightforward to spot as we upload content material to them.
Repeat the step to rename the 2d Column.
Alter The Column Settings
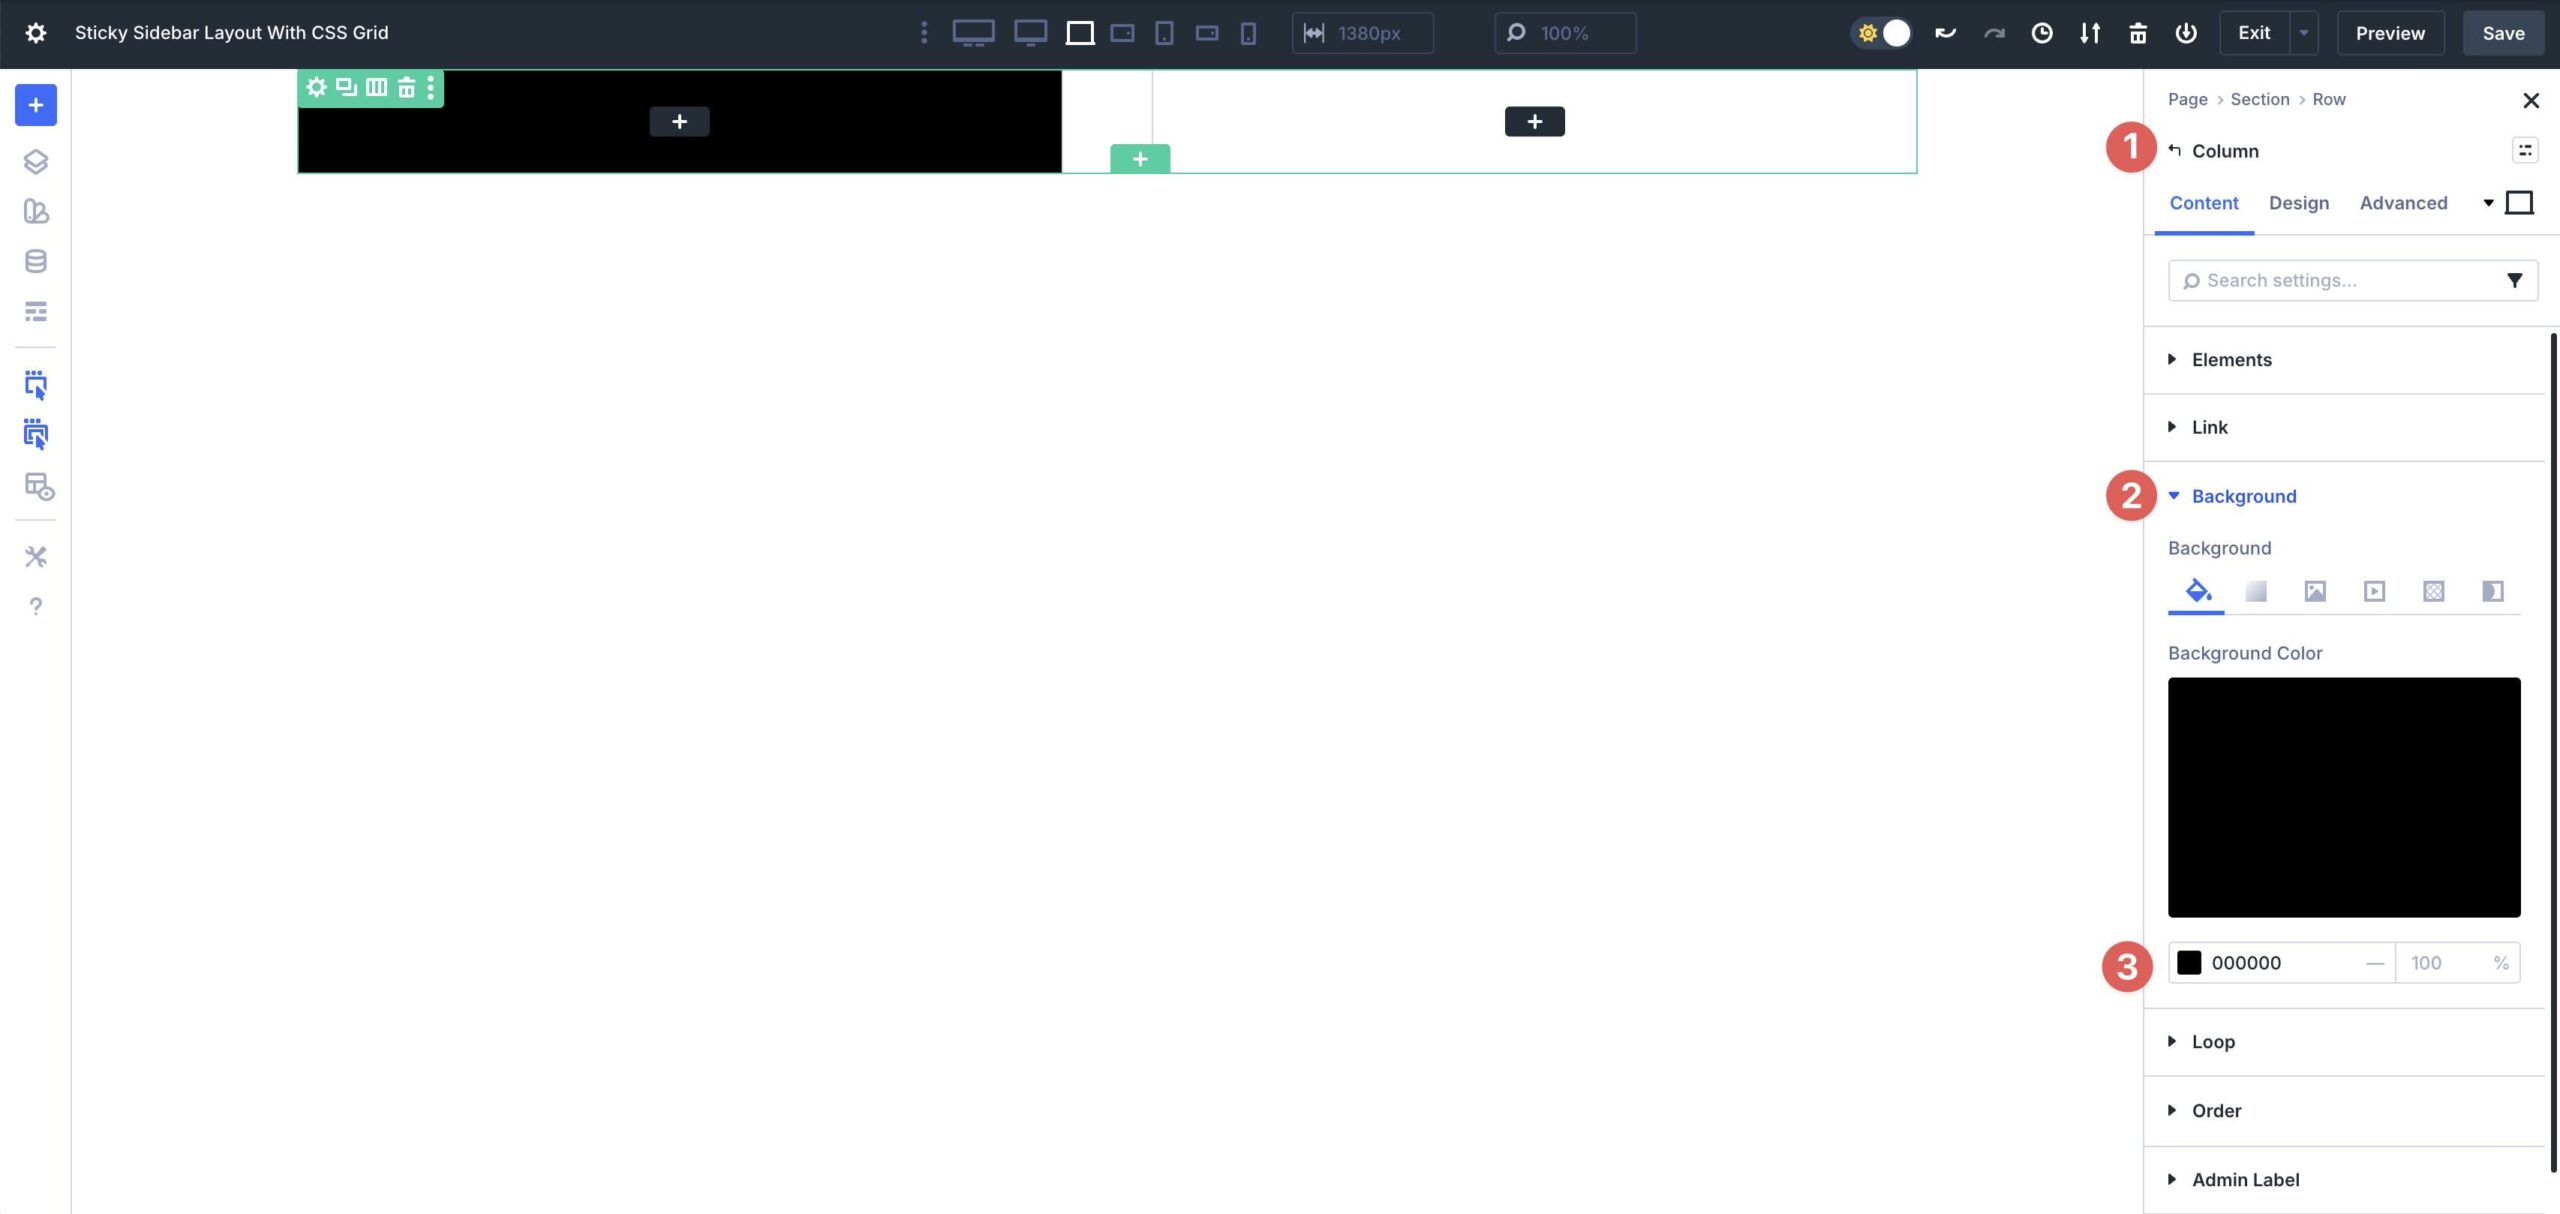
Within the first Column, assign #000000 because the Background Colour.
Within the Design tab, make bigger the Sizing menu and alter the Column Elegance to 1/4.
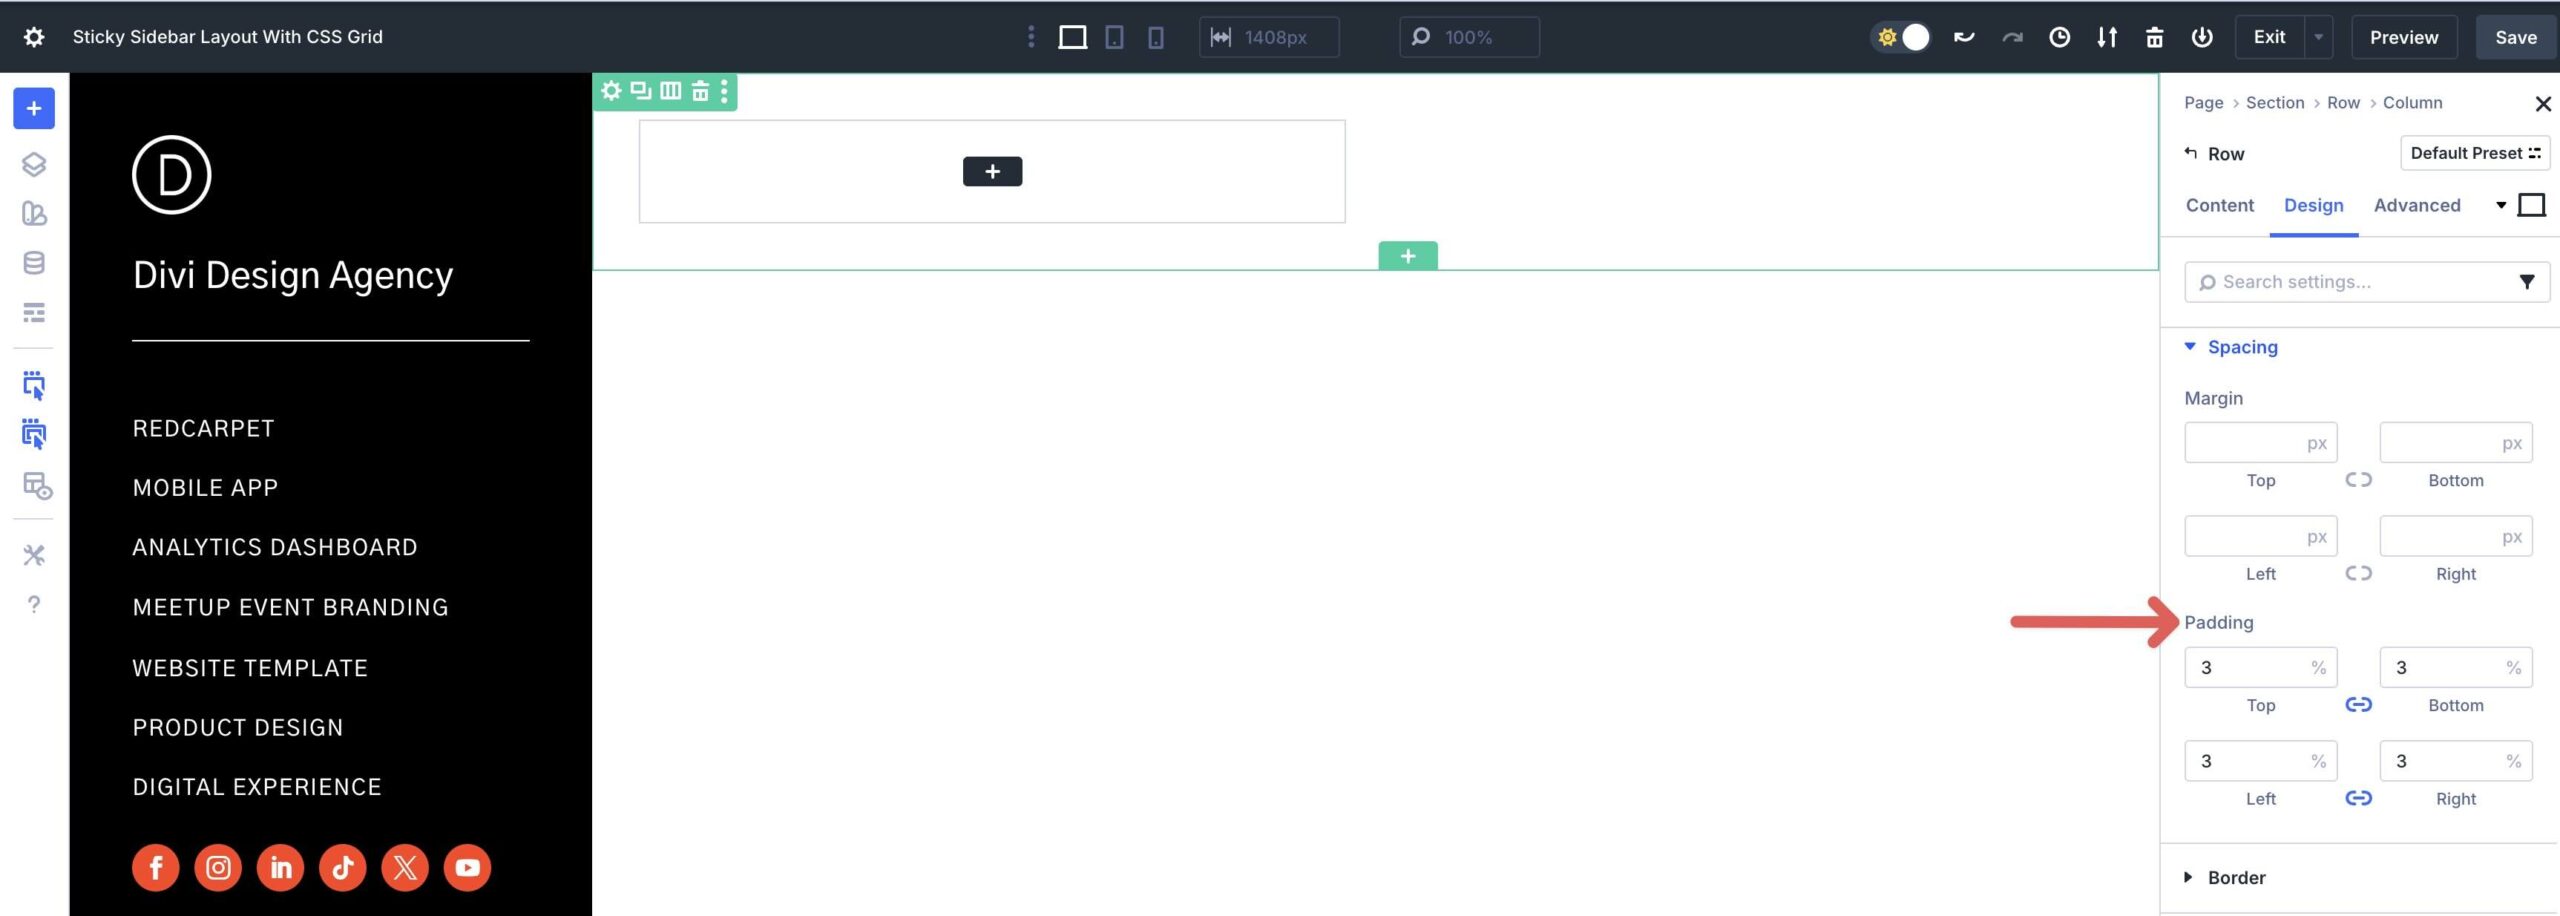
Subsequent, make bigger the Spacing menu. Observe 3% Padding to either side.
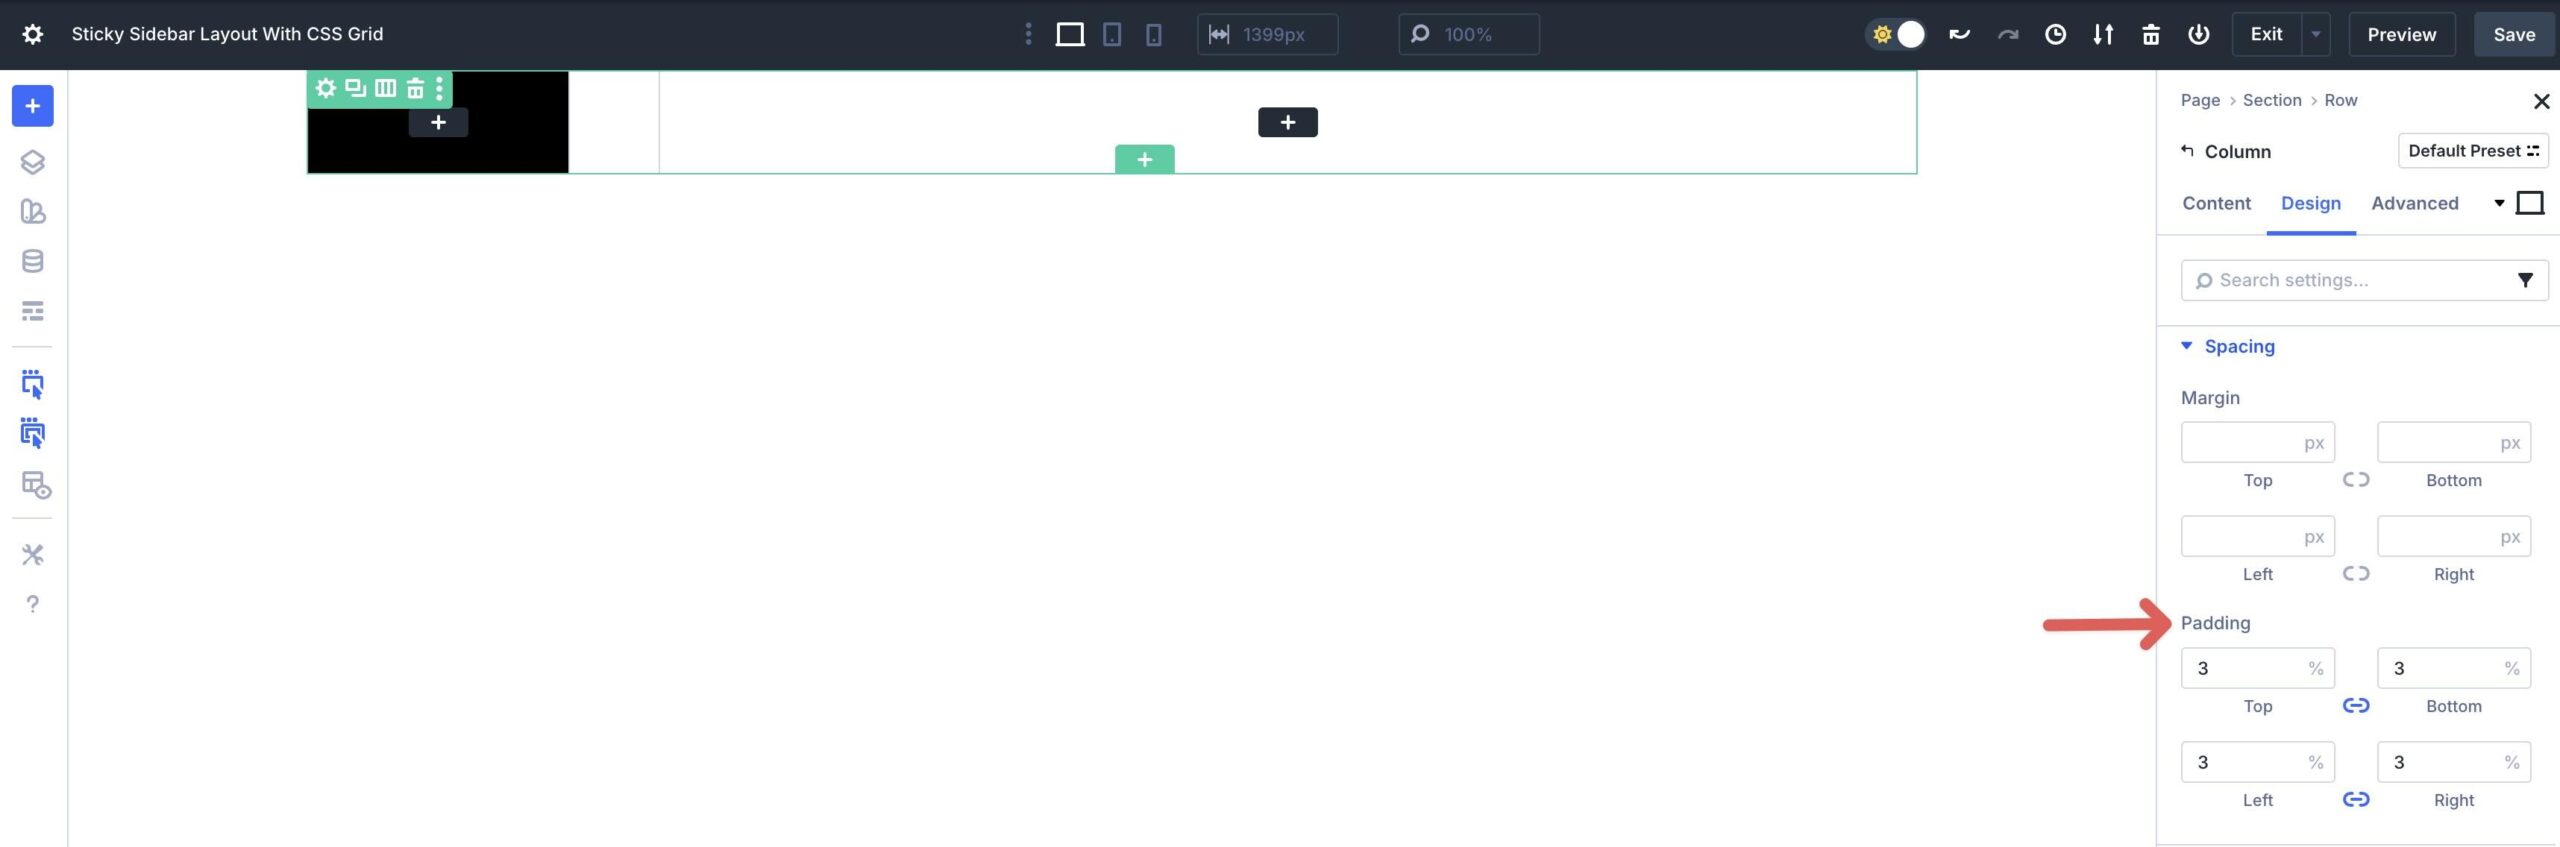
Click on into the 2d Column of the Dad or mum Row.
Assign #ffffff because the Background Colour within the Content material tab. Within the Design tab, make bigger the Sizing menu and follow a 3/4 Column Elegance.
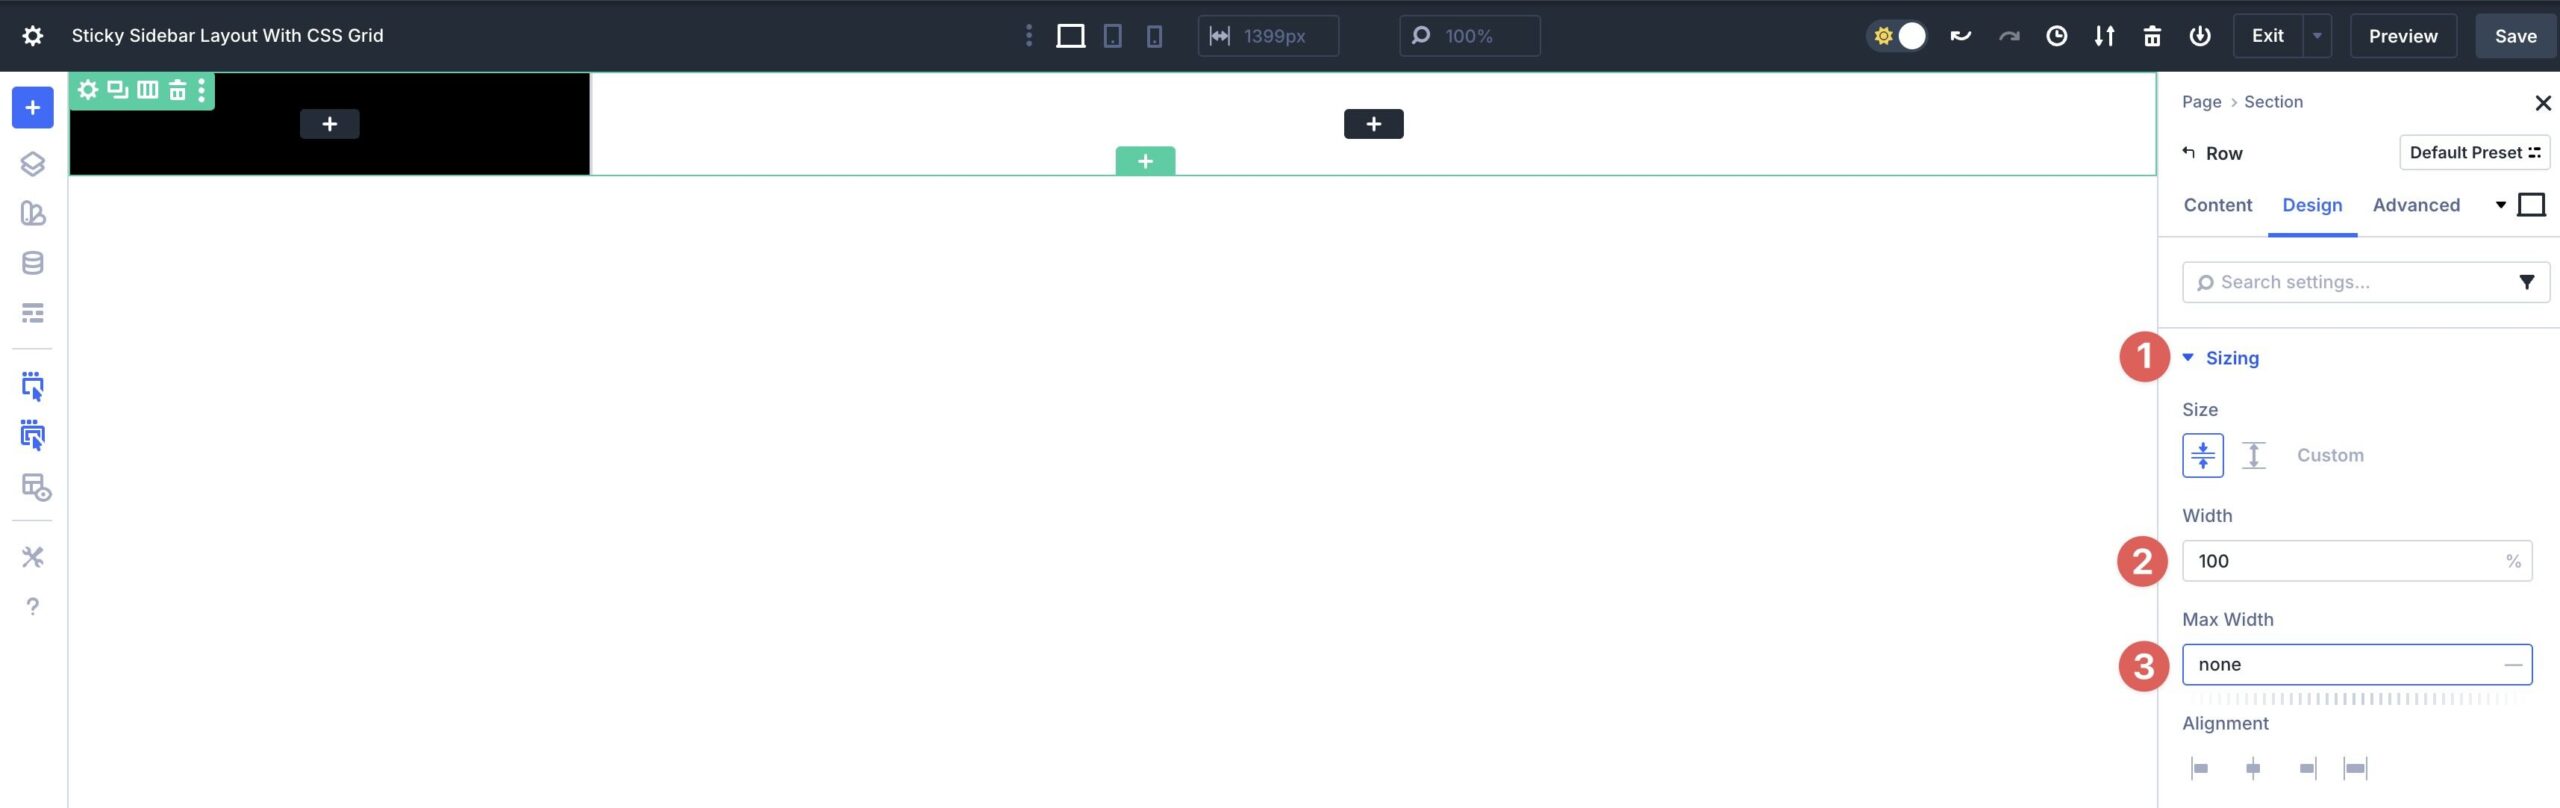
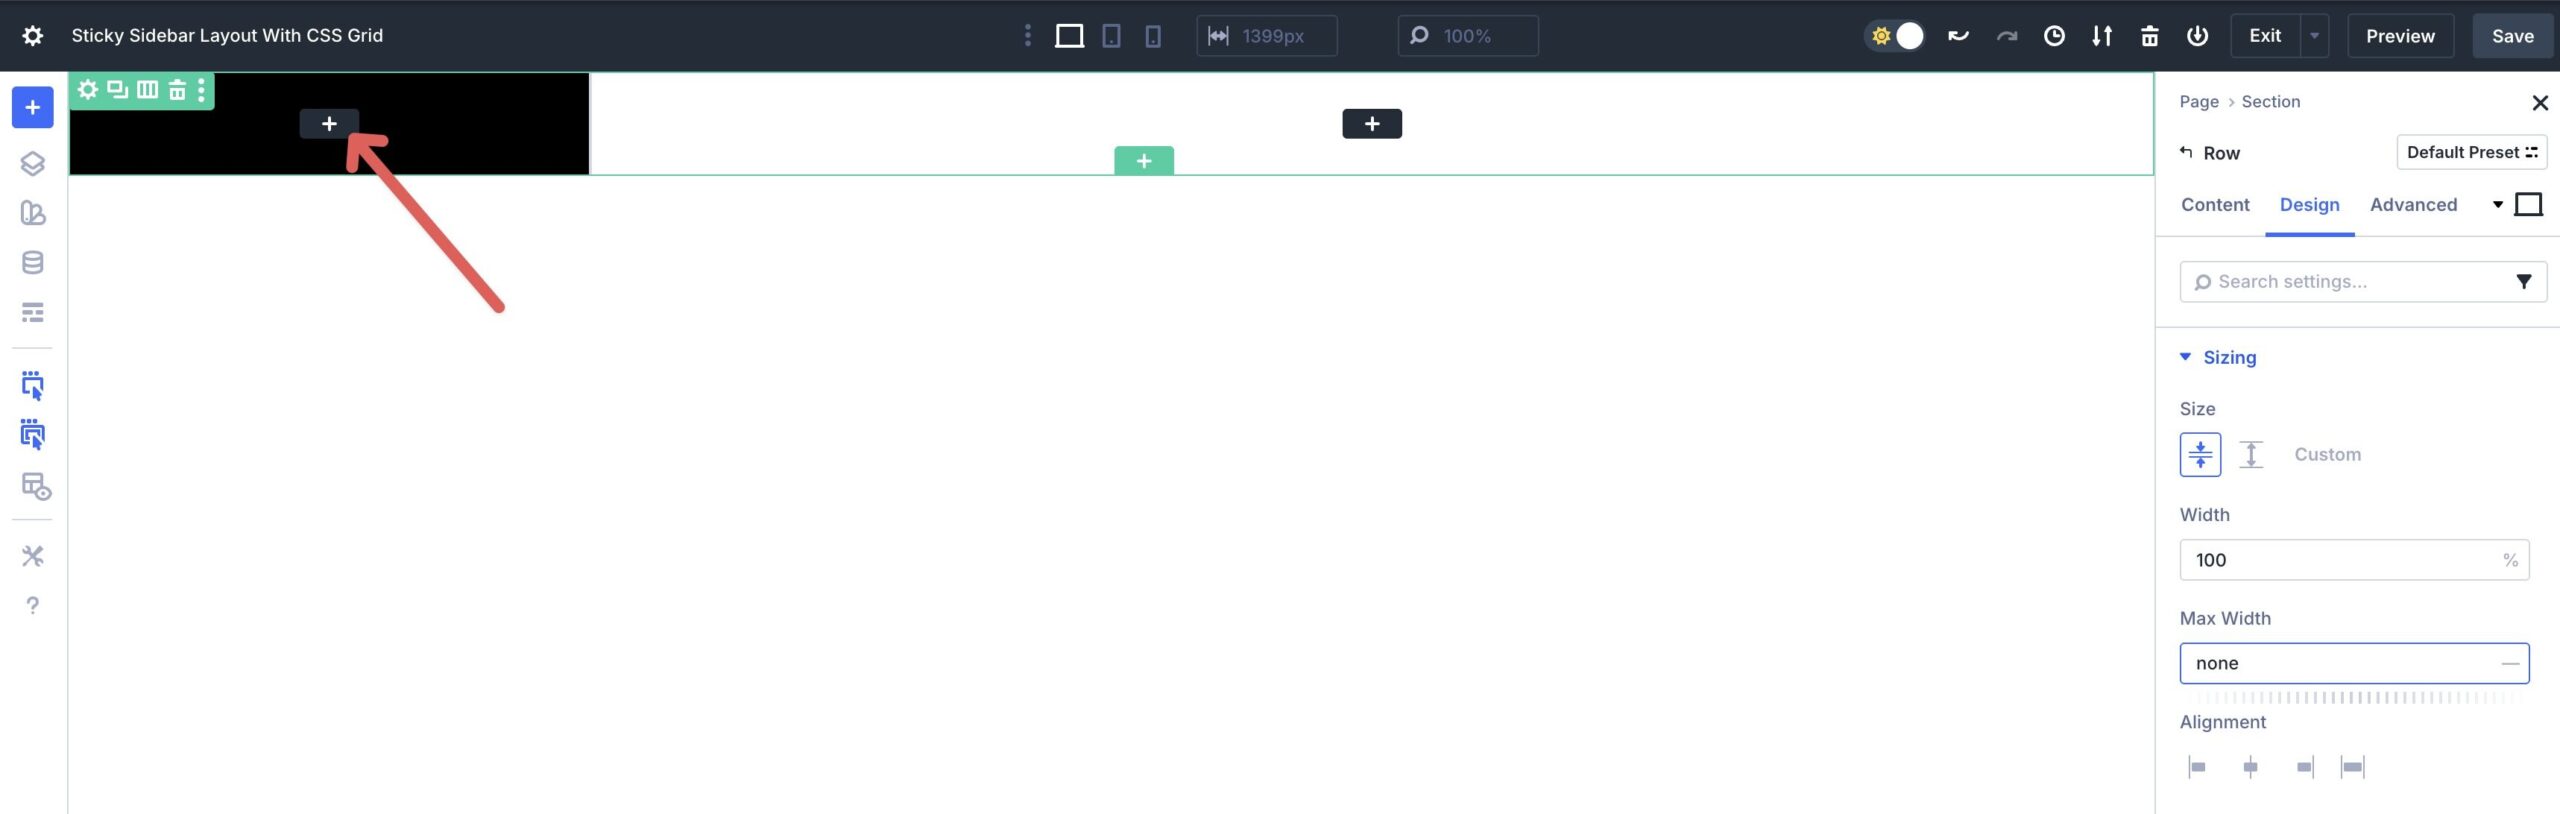
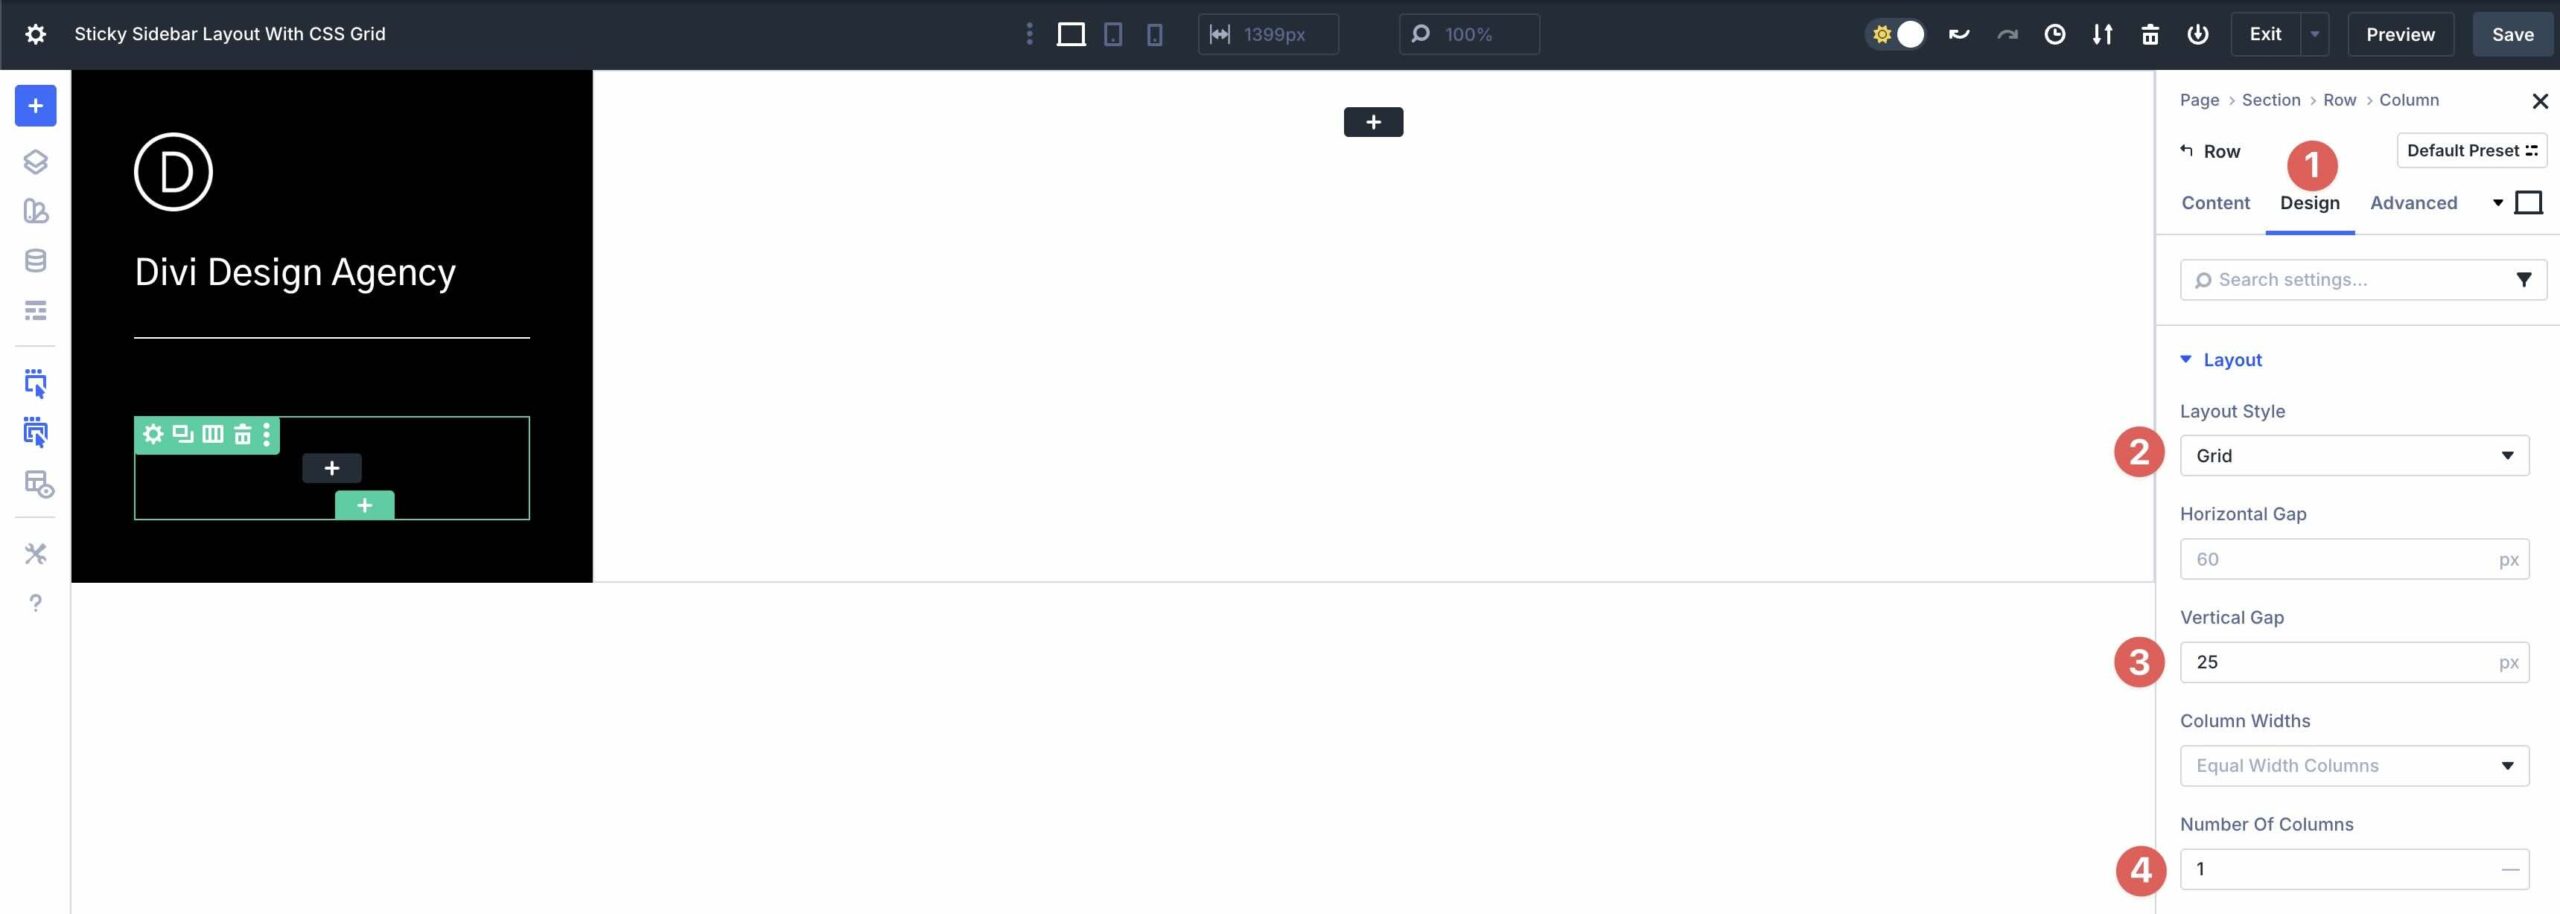
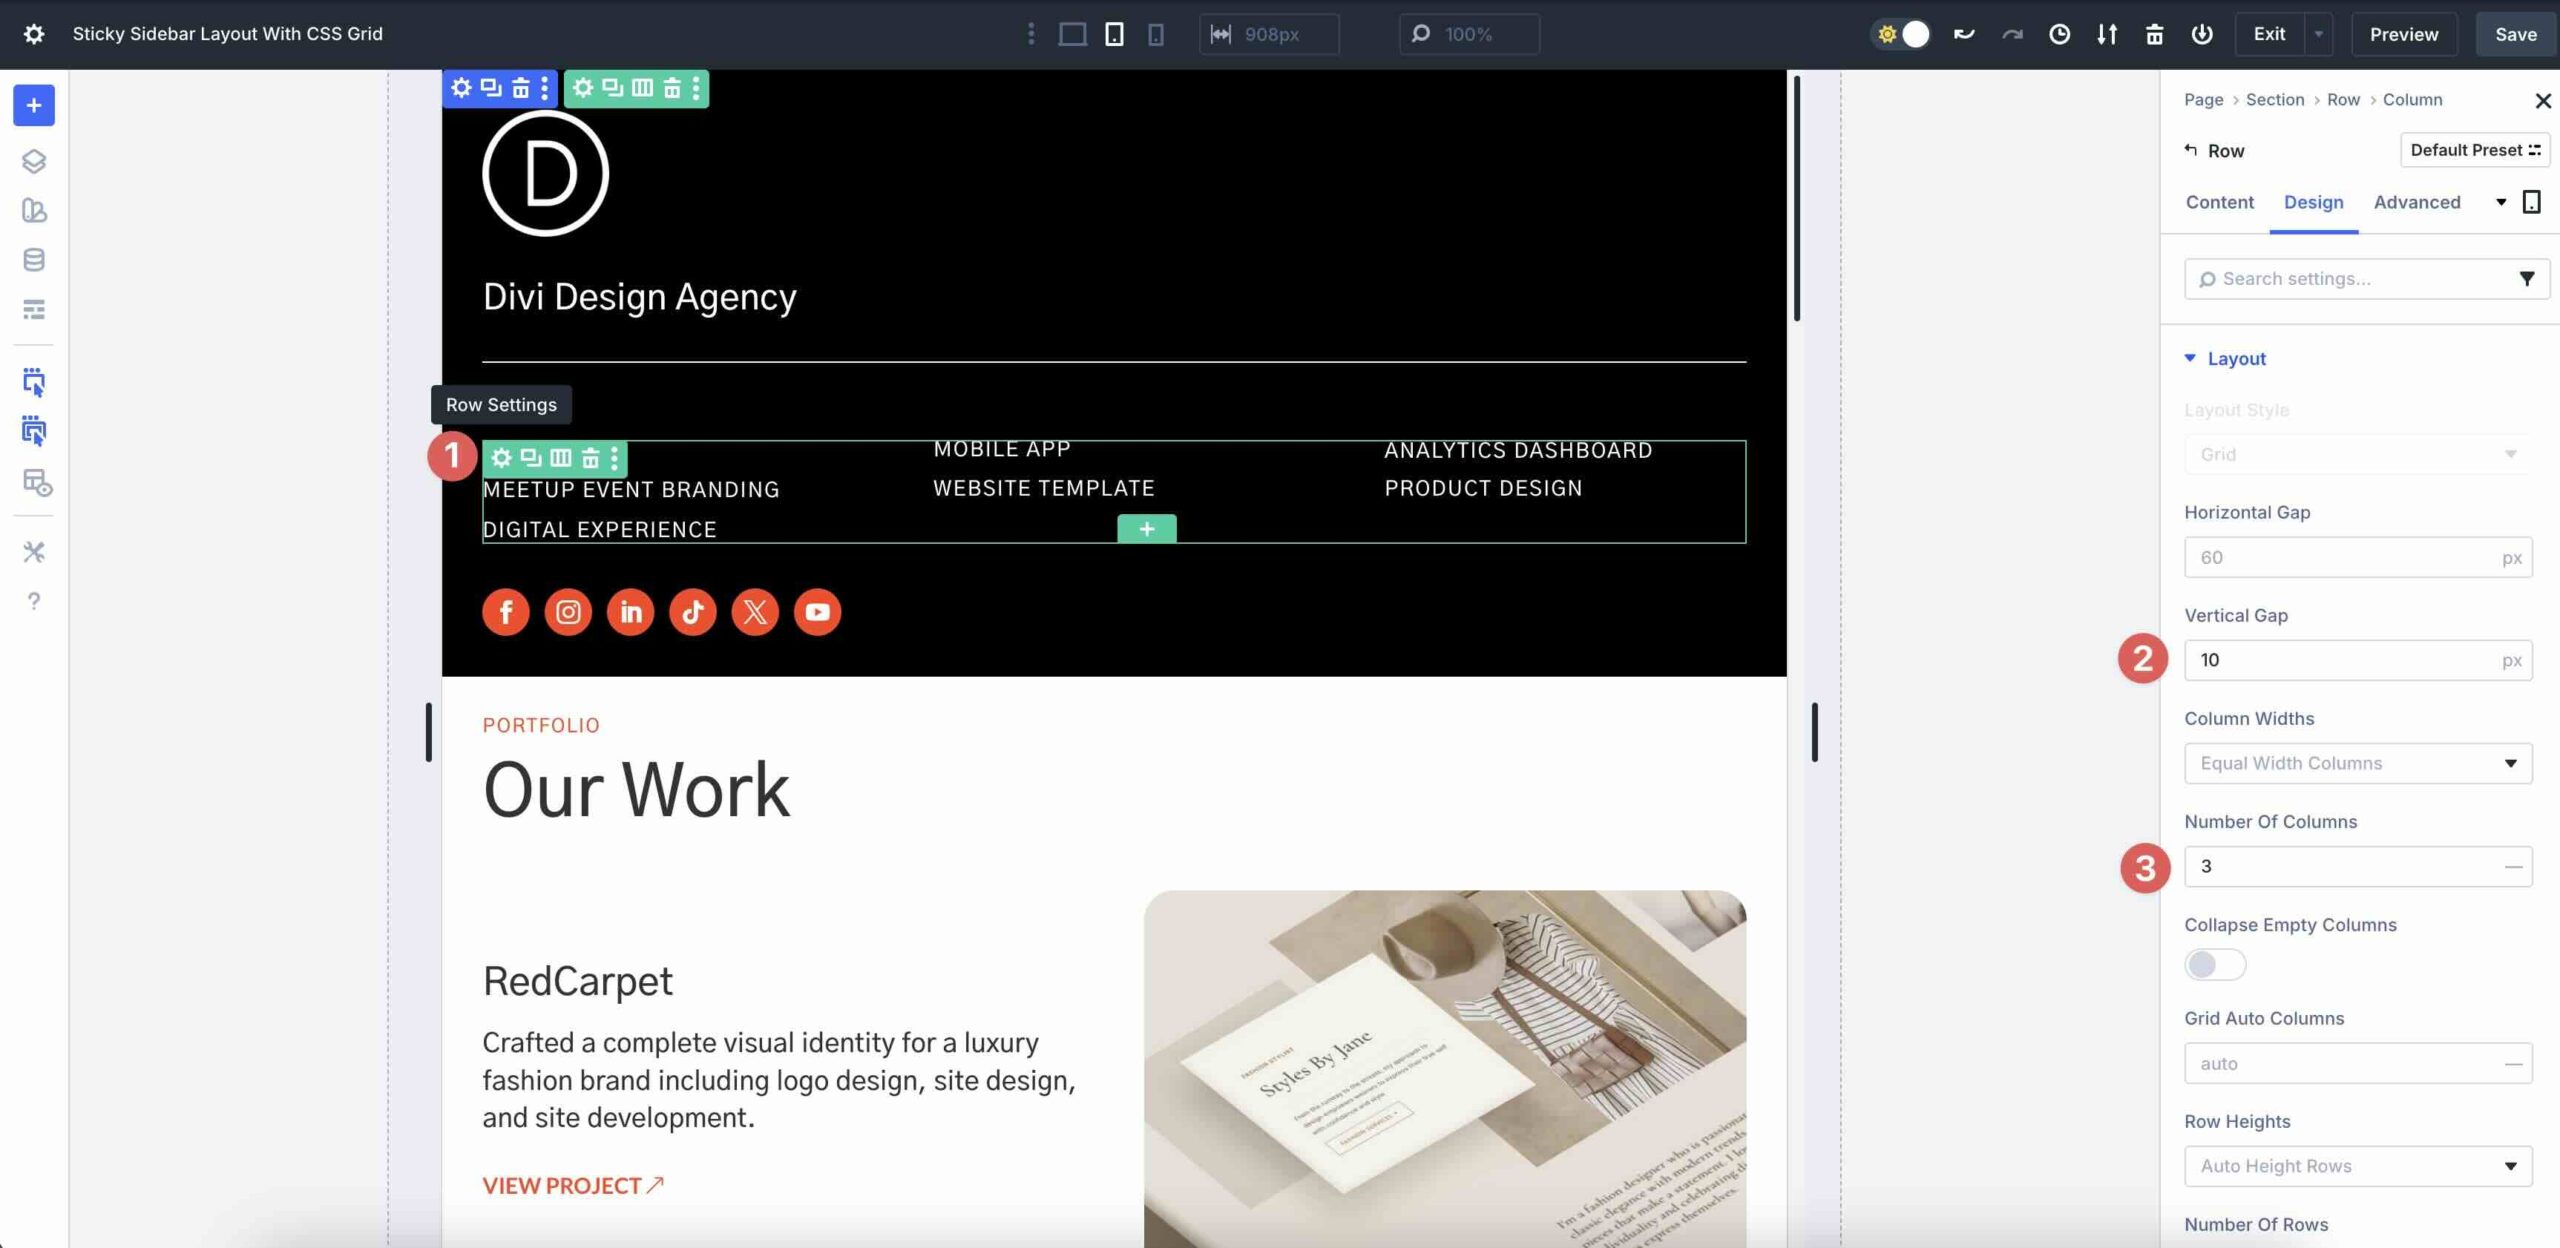
Alter The Row Settings
Now we wish to regulate the Dad or mum Row’s settings. Within the Content material tab, assign #000000 because the Background Colour. Within the Design tab, make bigger the Structure menu. Alter the Row’s Horizontal and Vertical Hole to 0px.
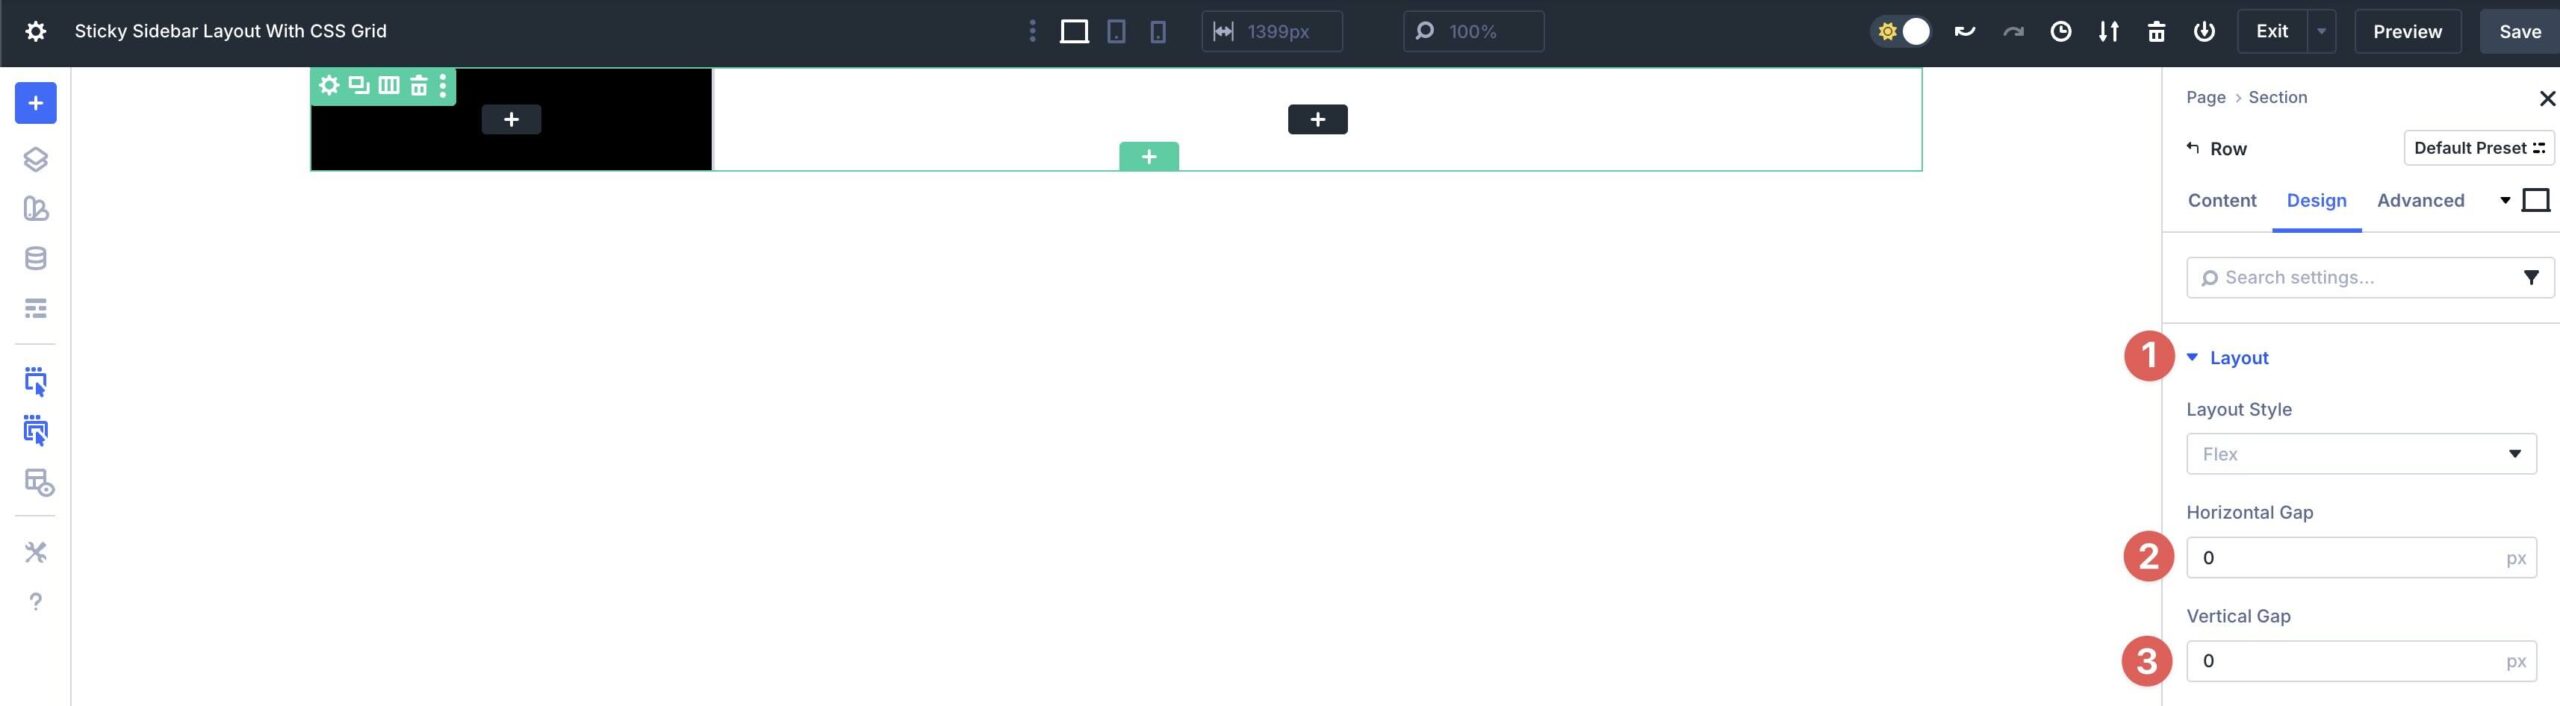
Make bigger the Sizing menu and set the Width to 100% and the Max Width to none.
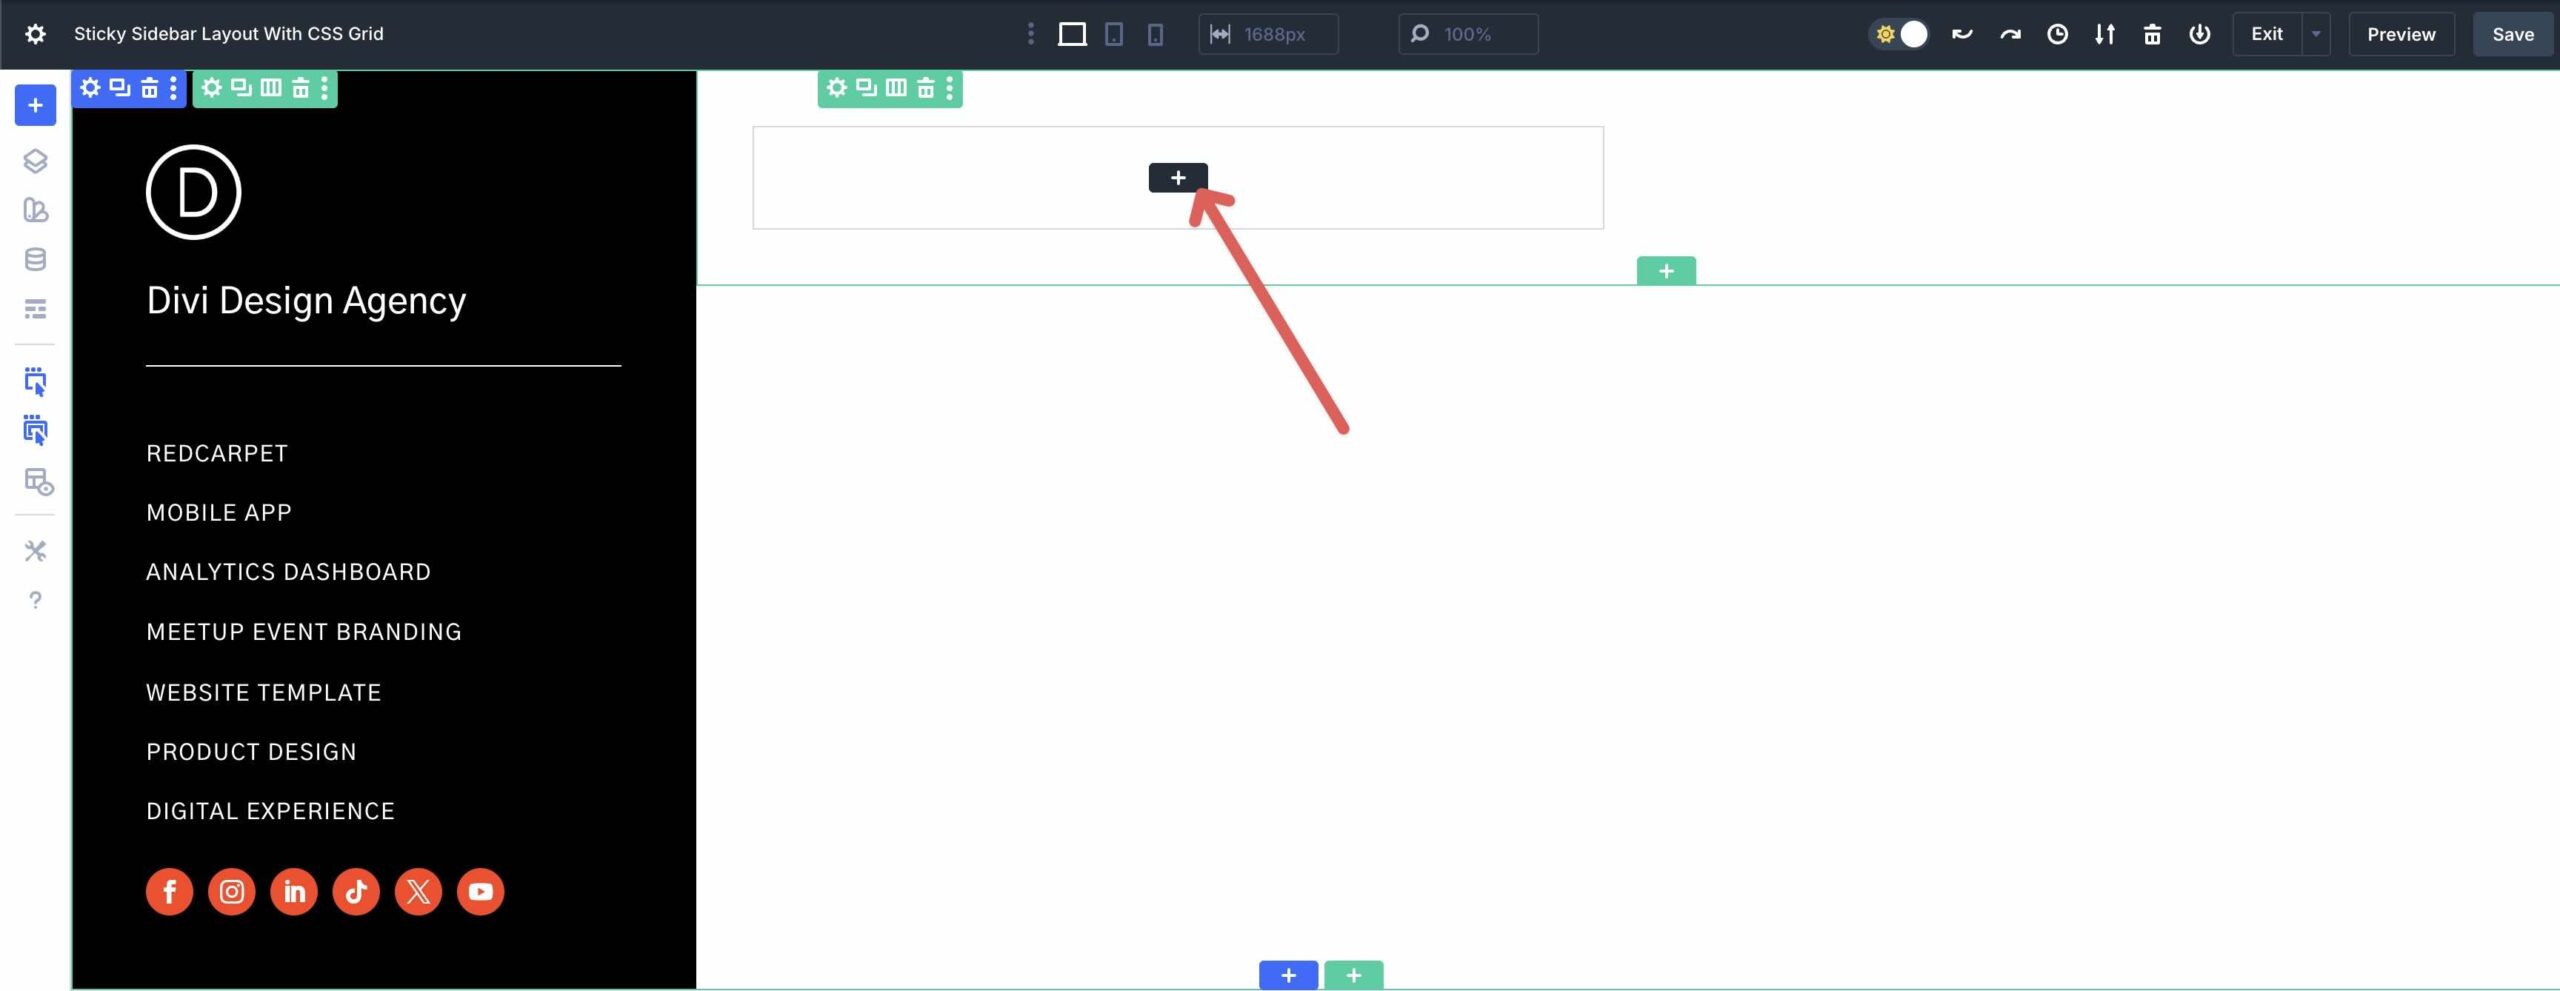
Step 2: Upload Content material To The First Column
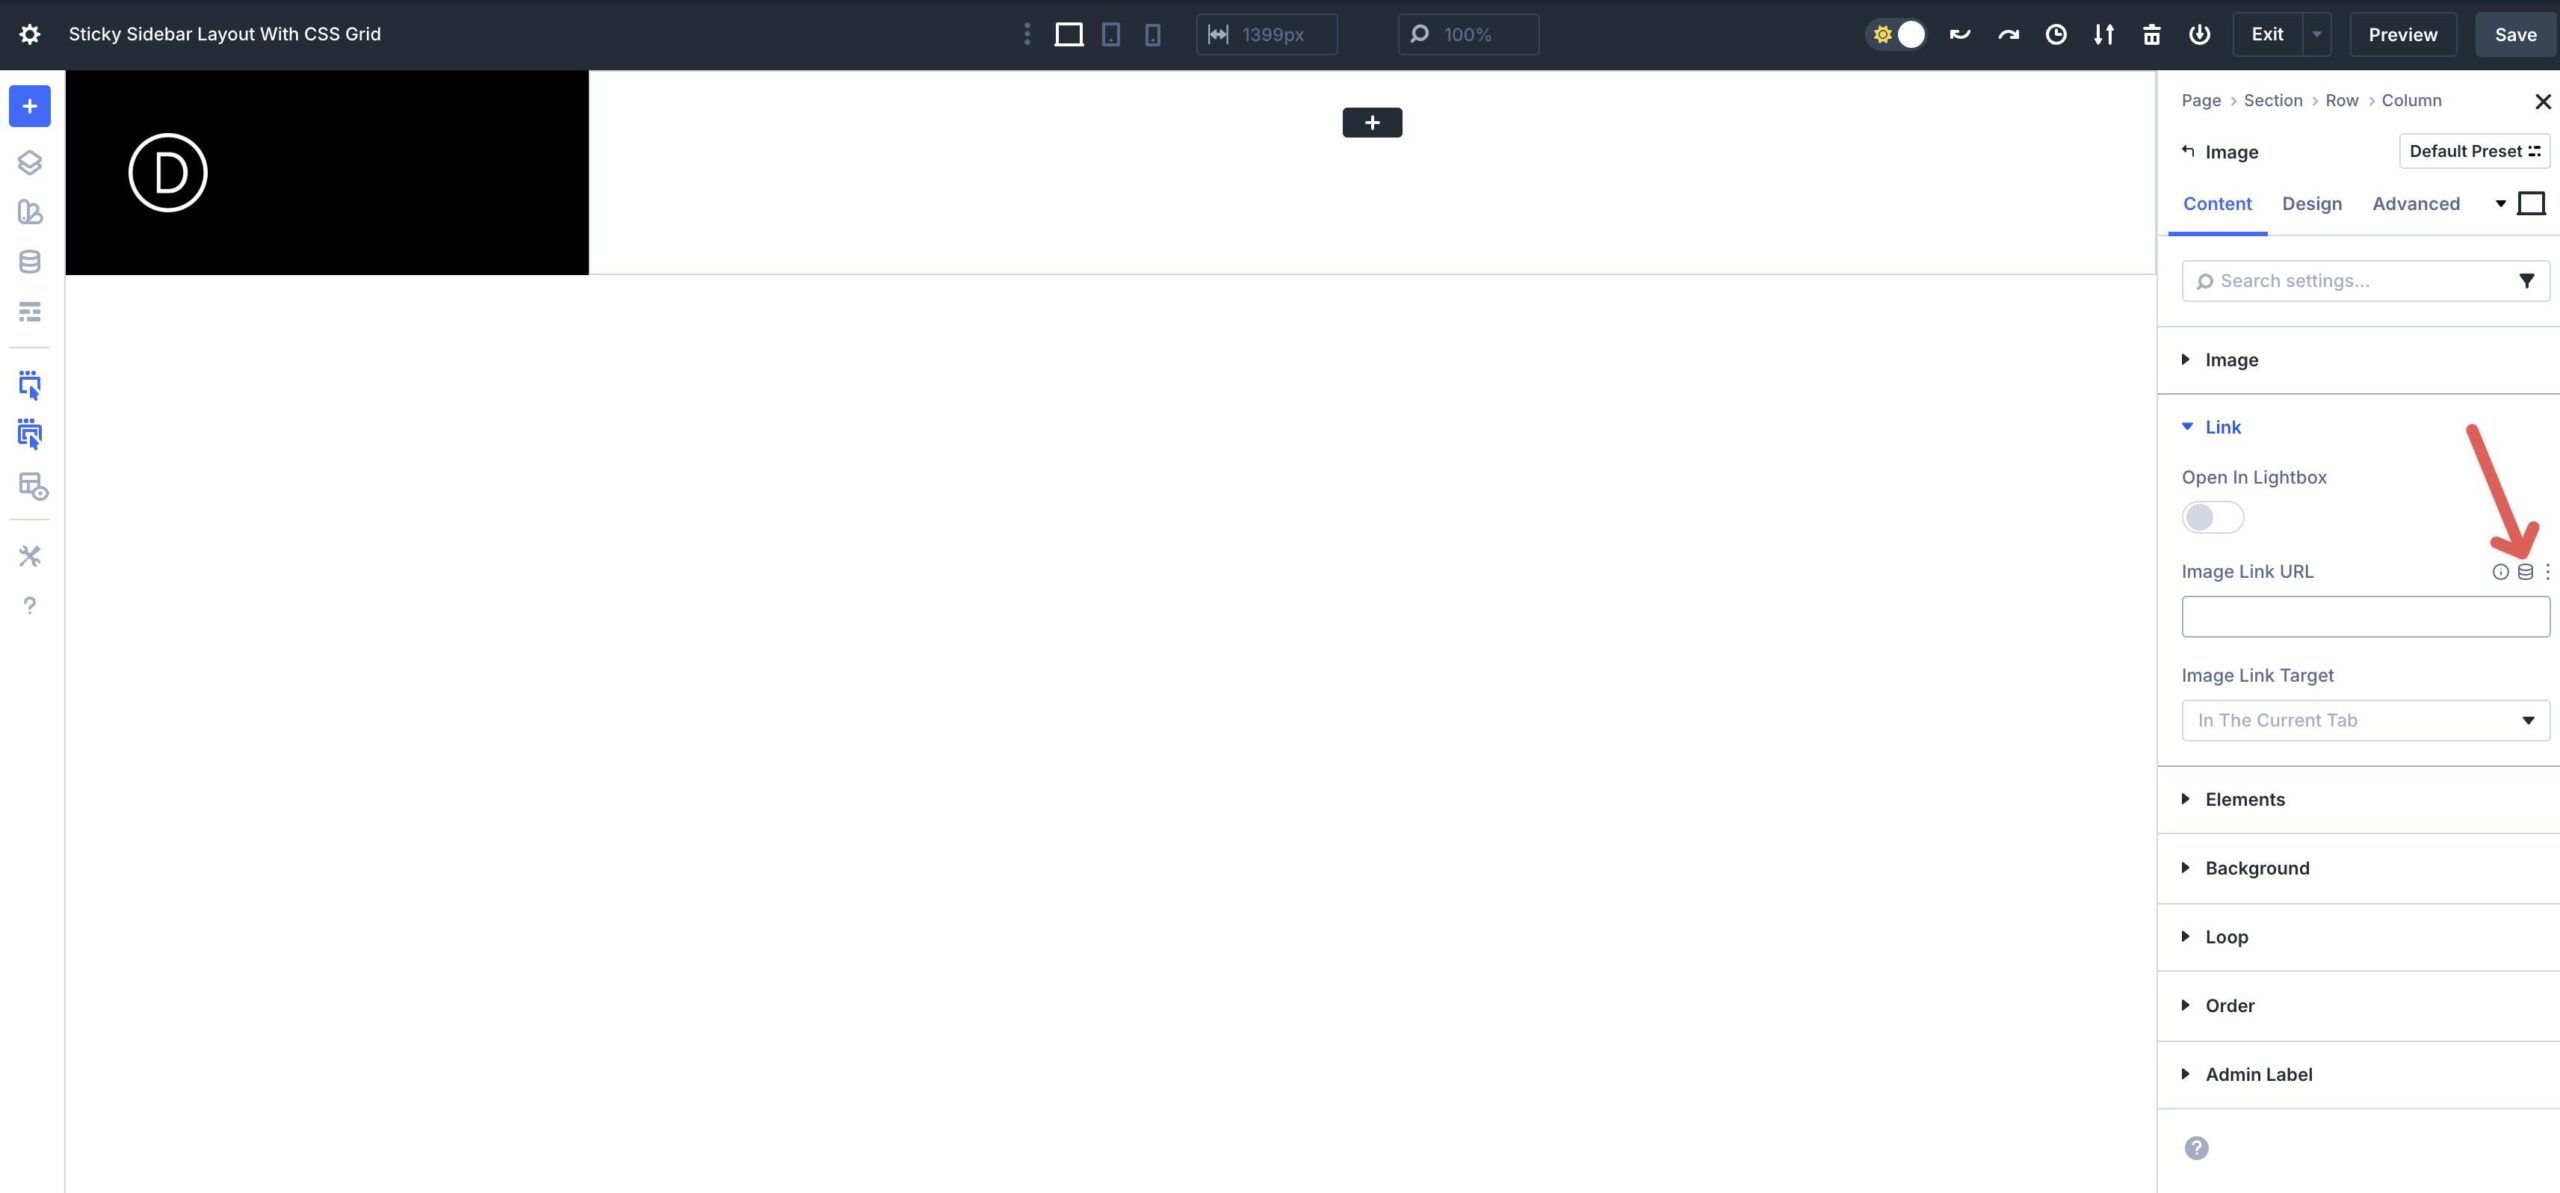
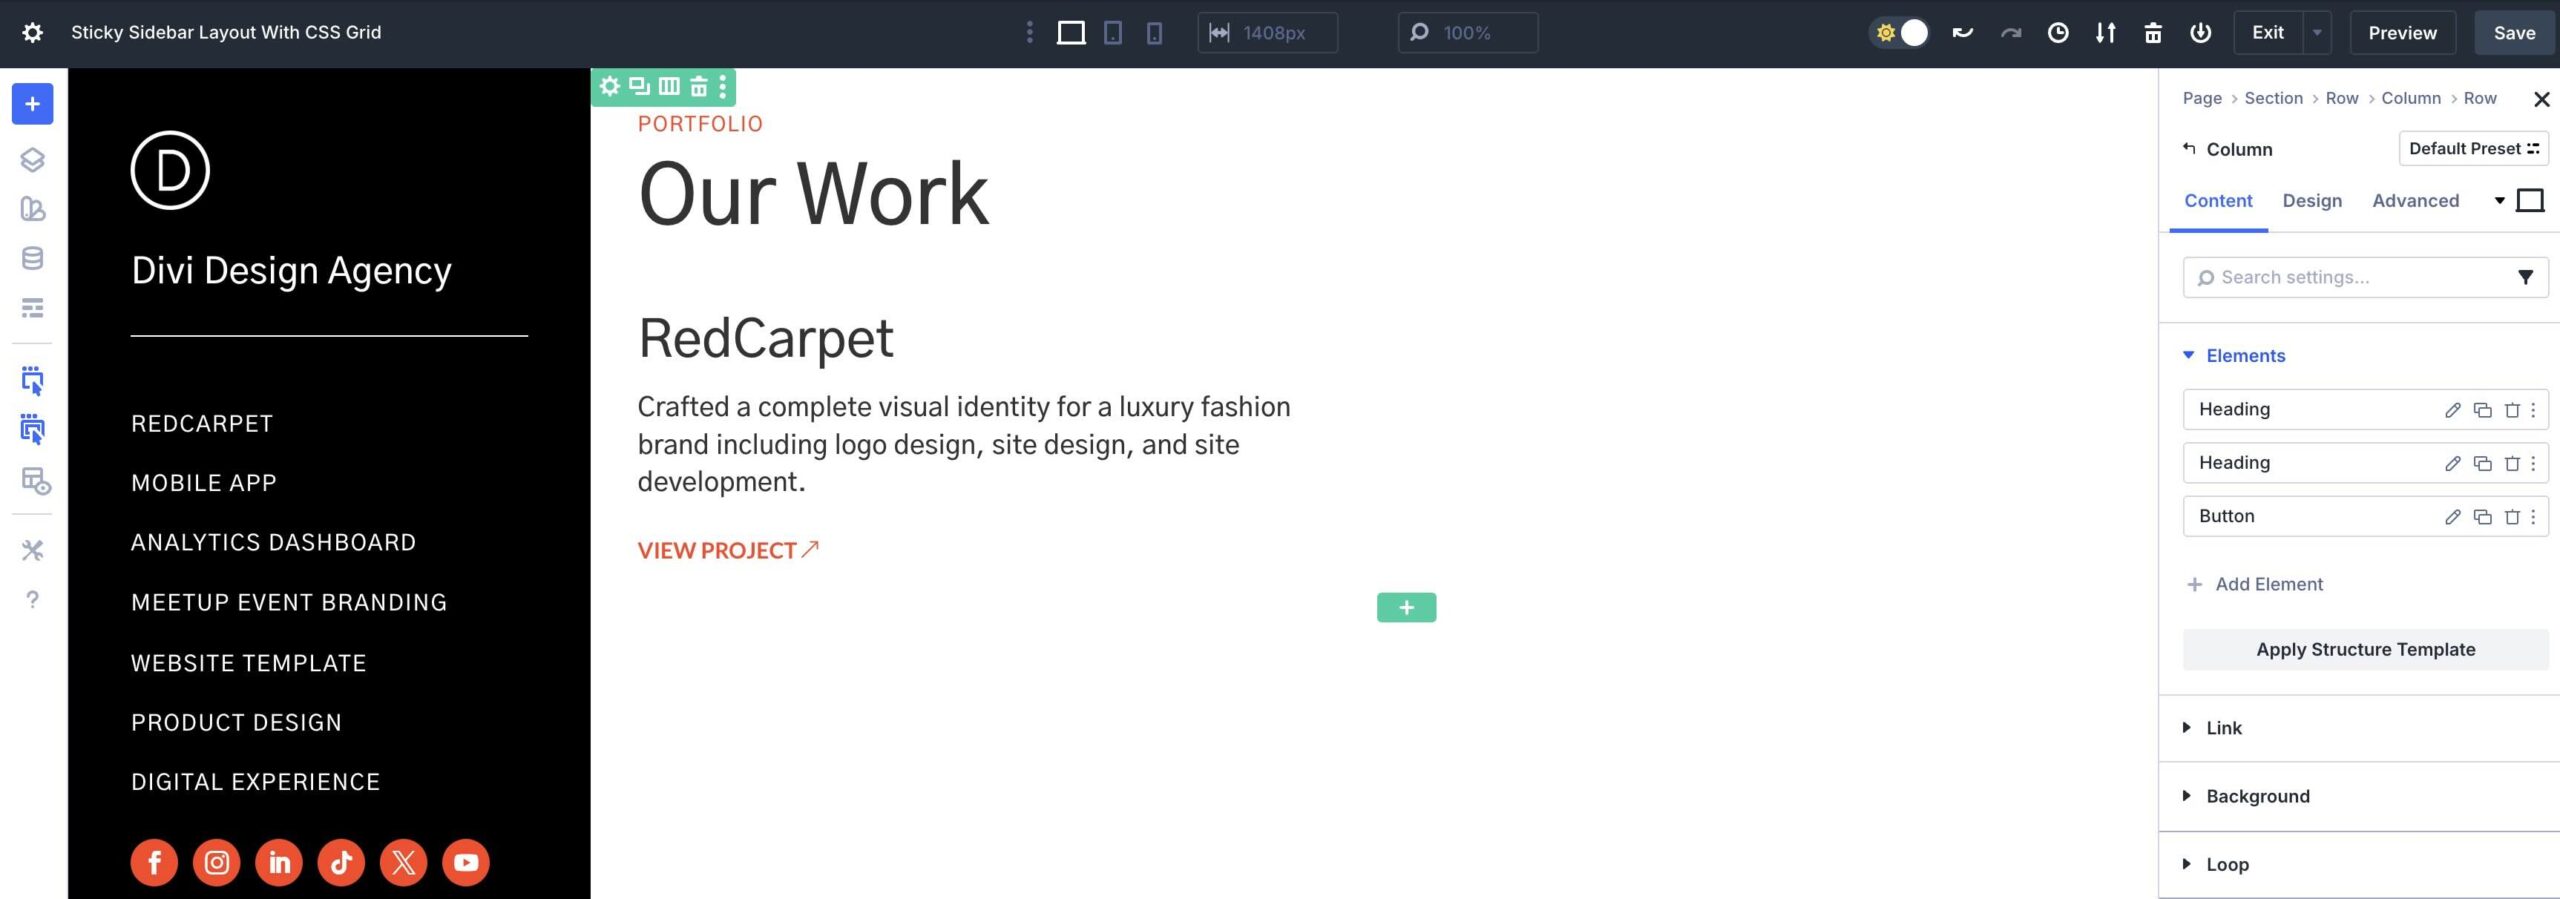
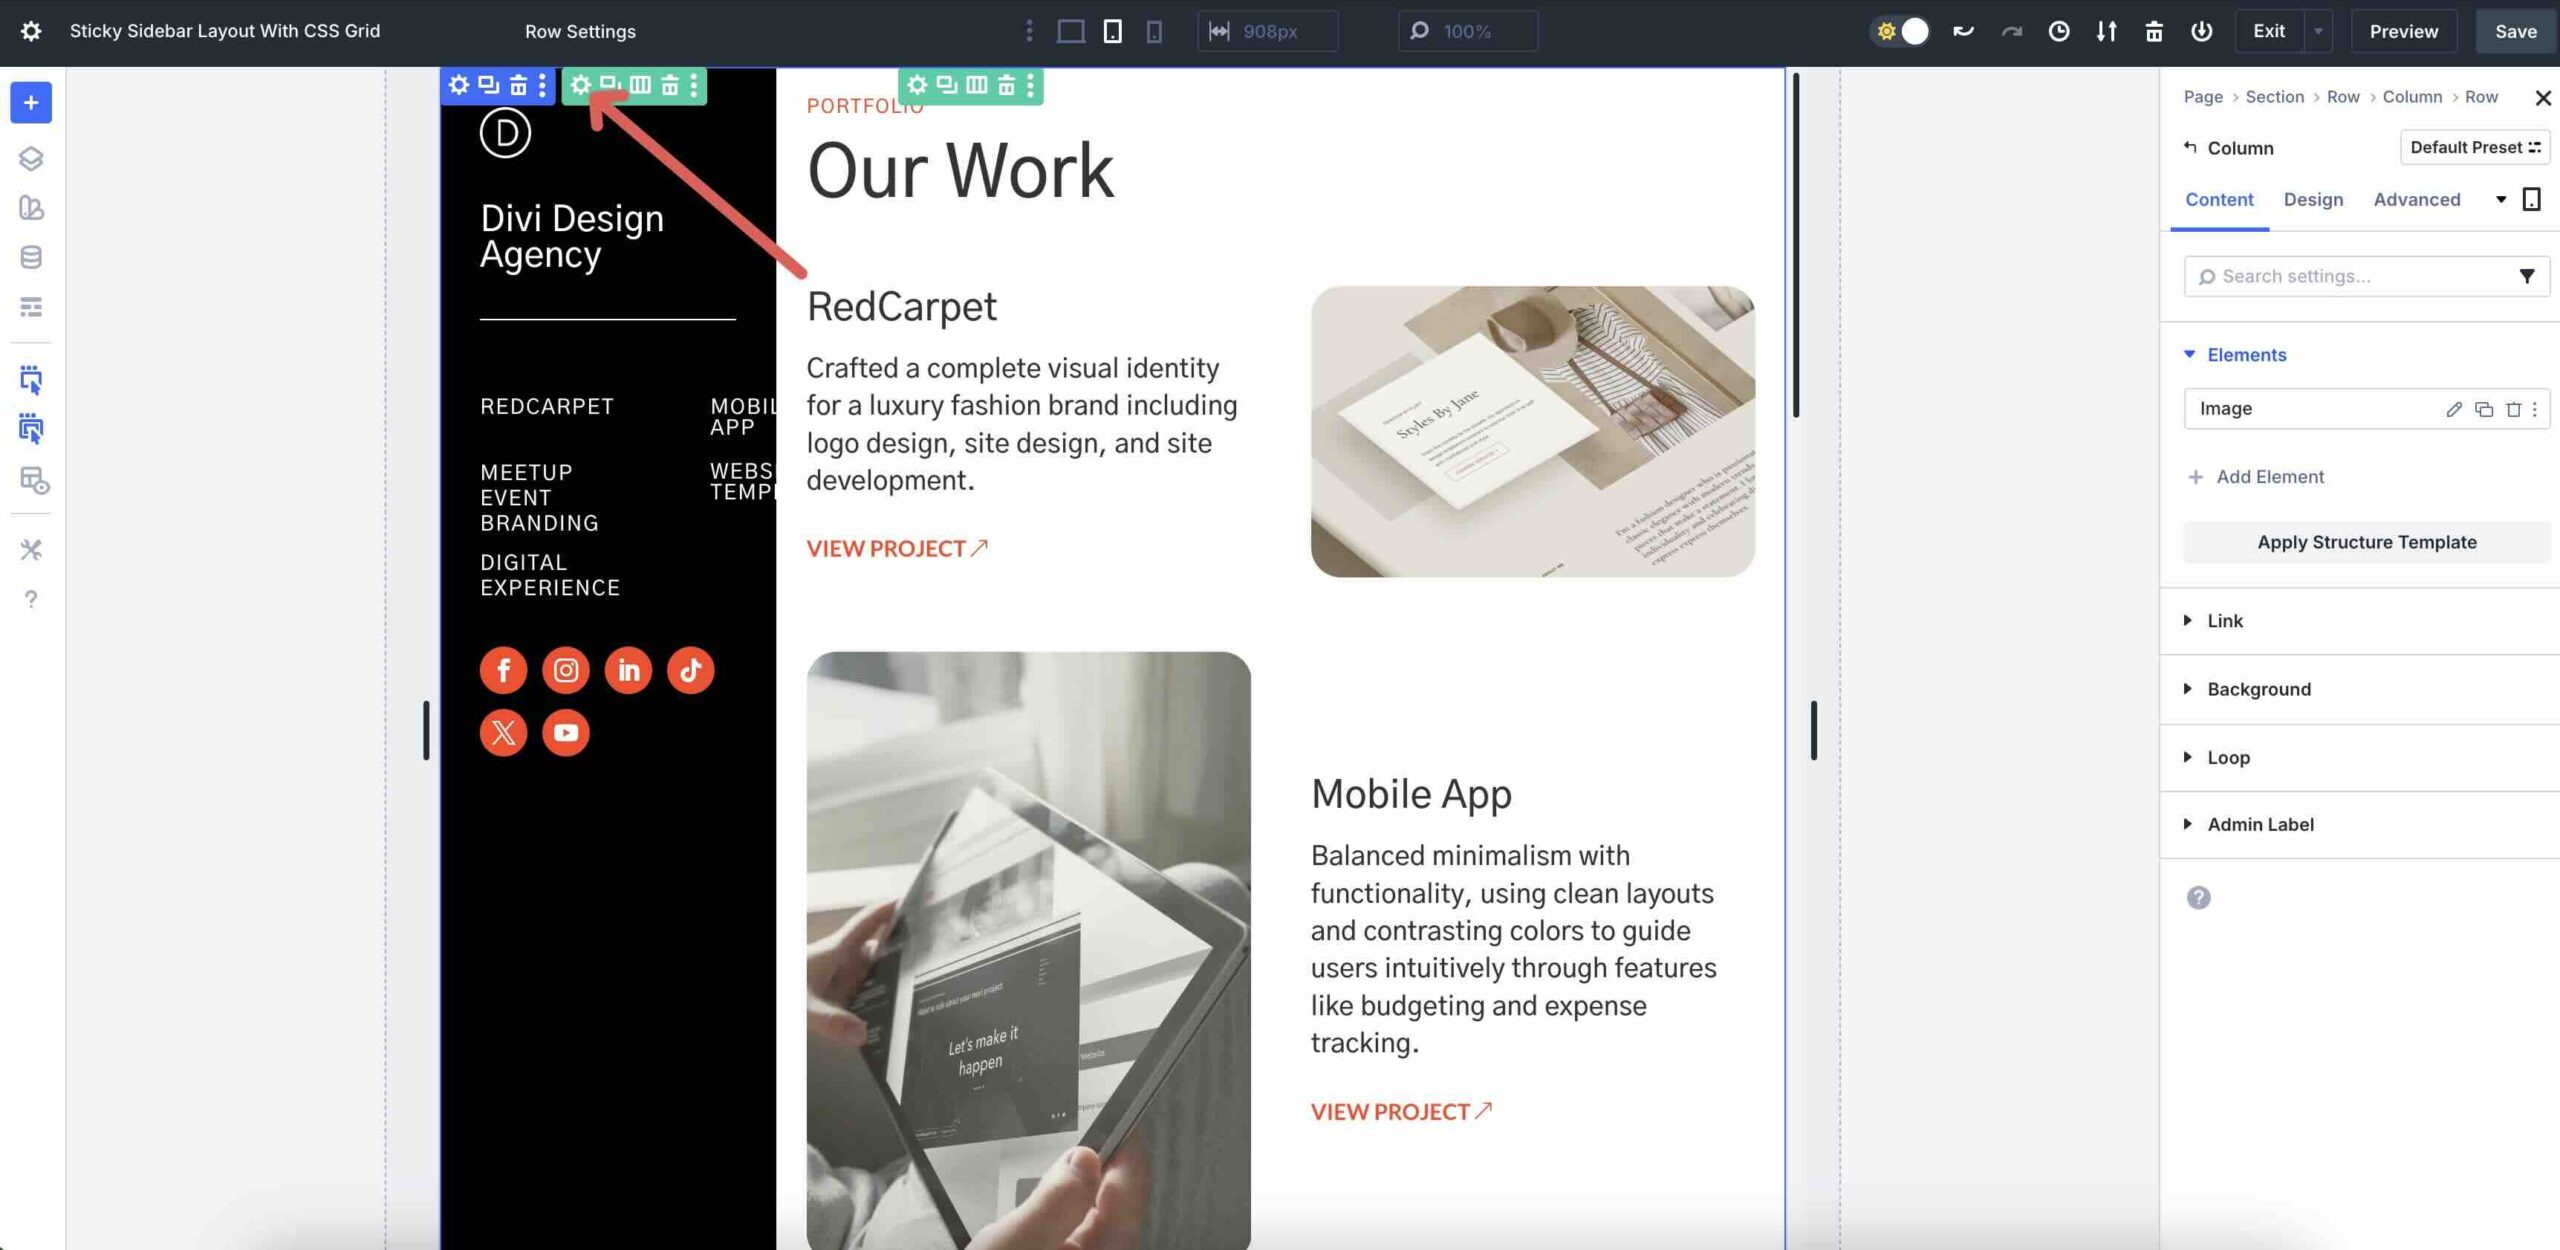
With our Row construction in position, we will be able to start including content material to the primary Column. Click on the black + icon so as to add a picture module.
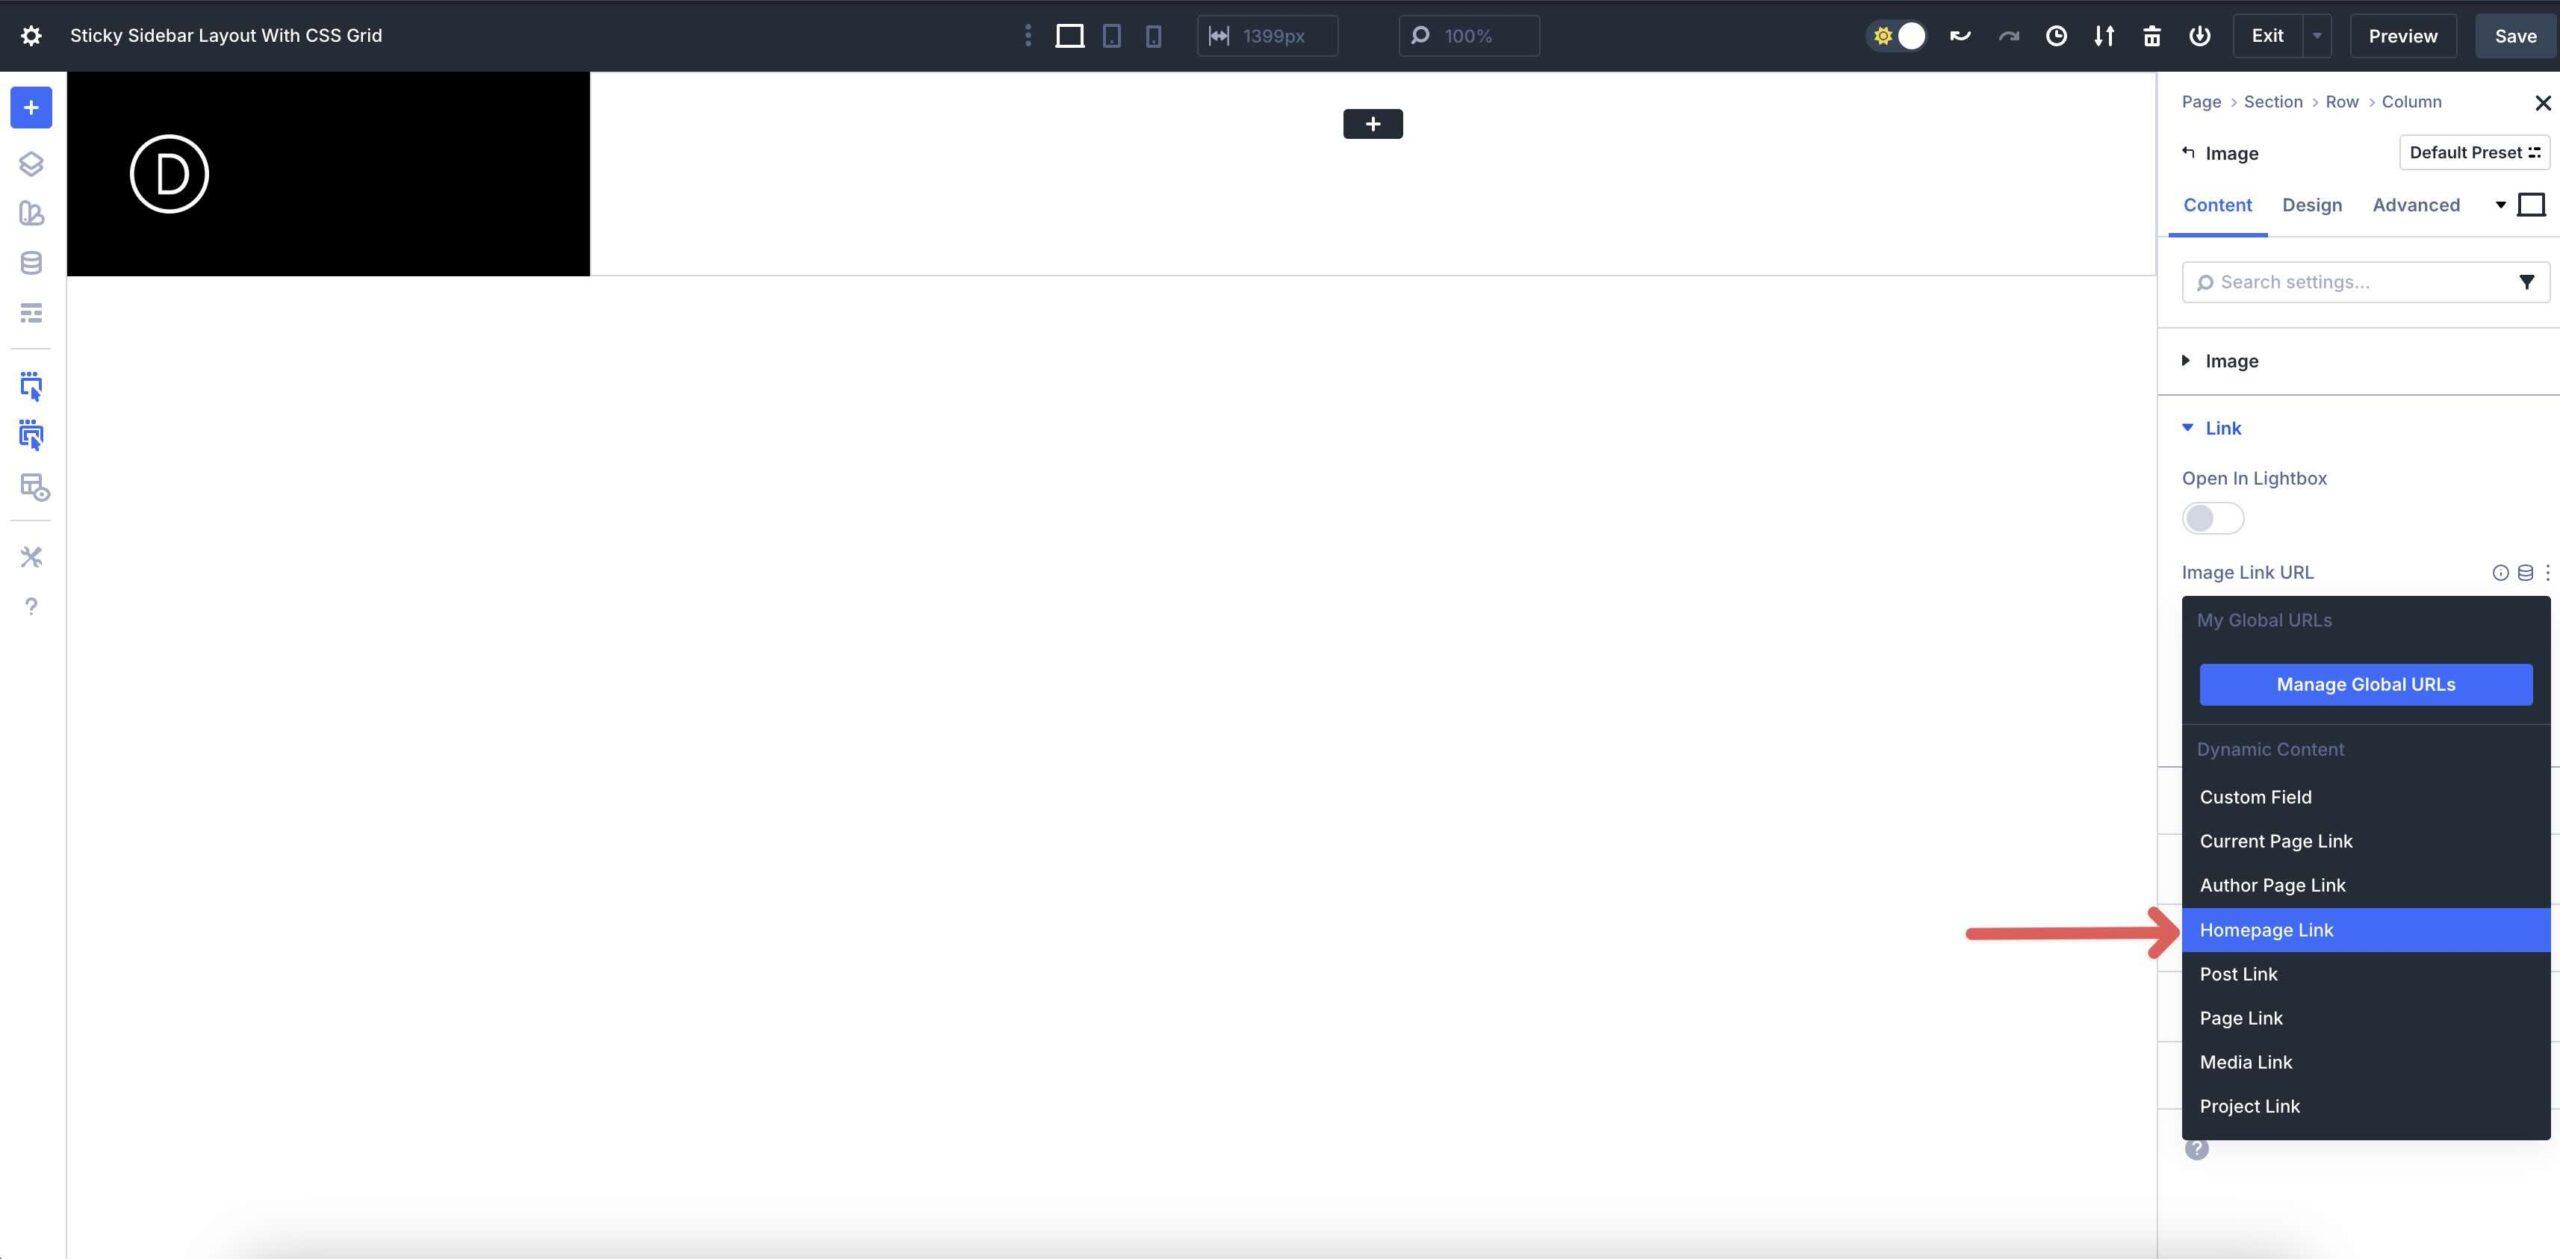
Add a picture, genre the module as desired, and upload a Homepage Hyperlink the usage of Divi 5’s Dynamic Content material icon.
Make a selection Homepage Hyperlink from the to be had choices.
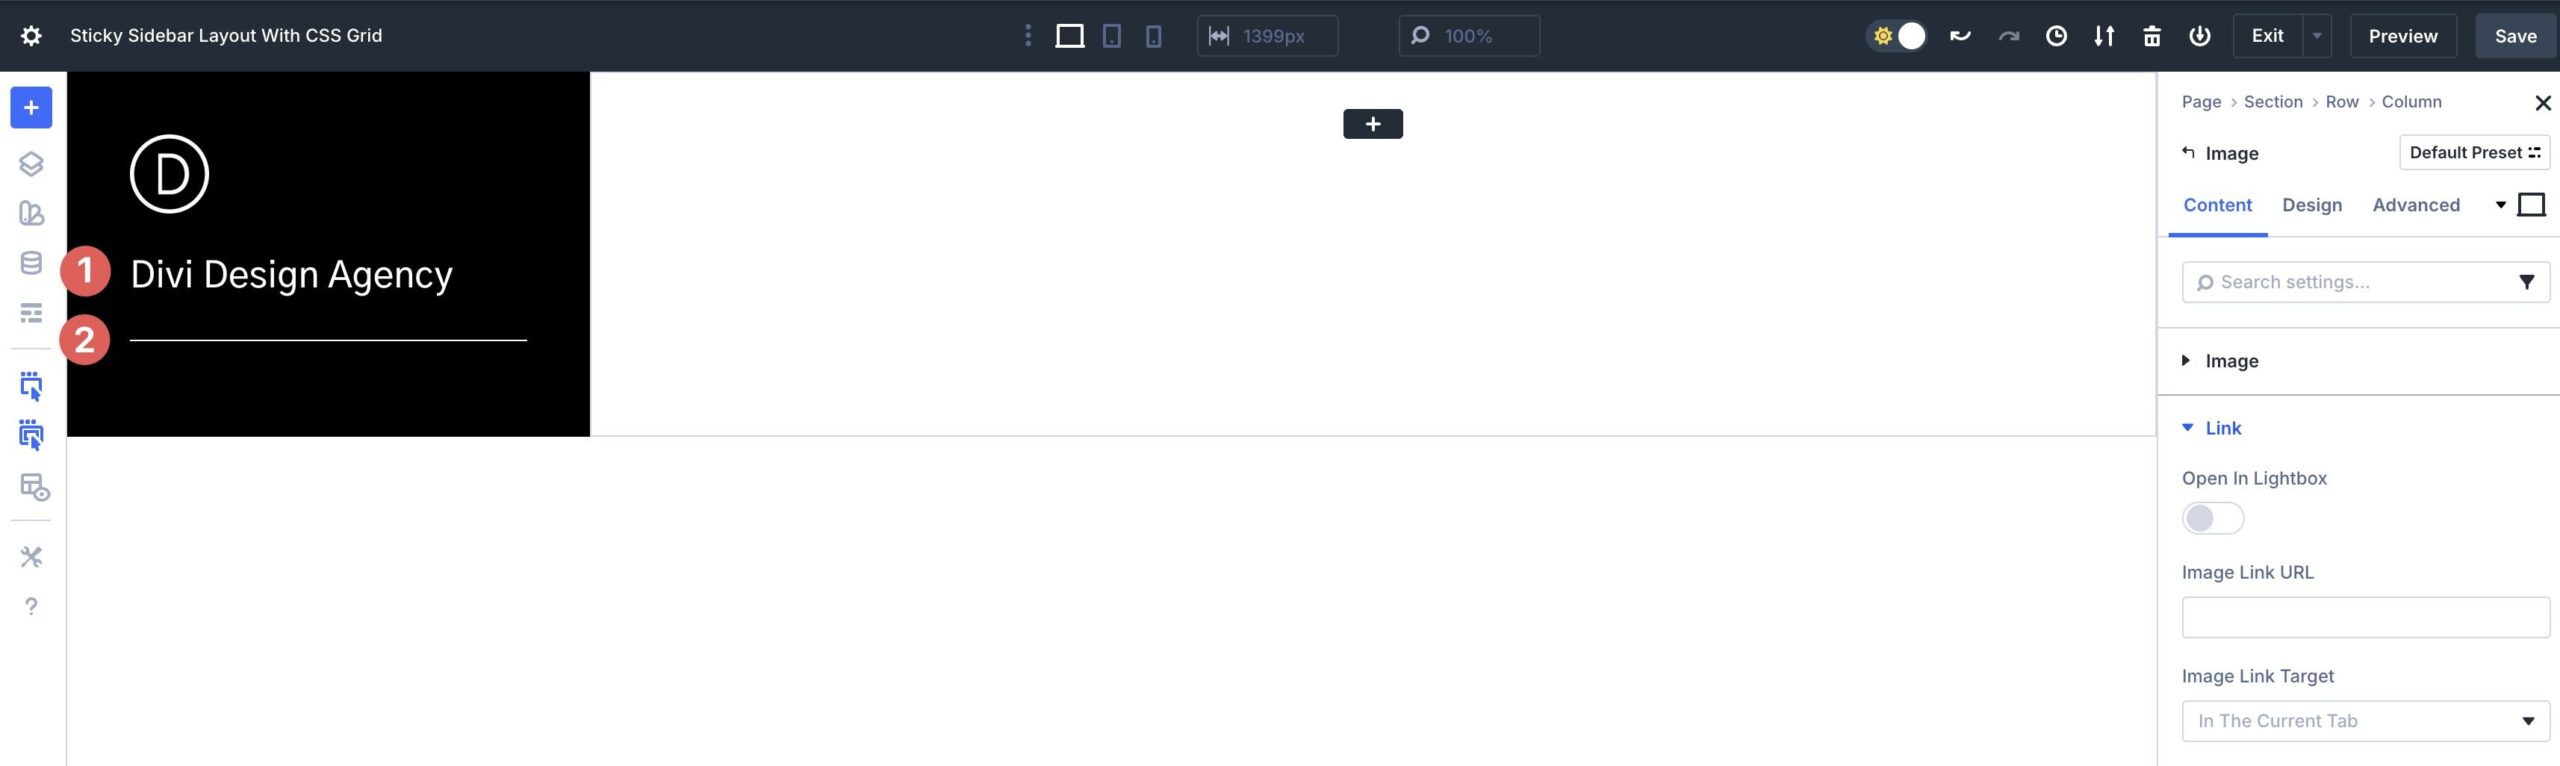
Upload a Heading module, adopted by way of a Divider module, then genre as desired.
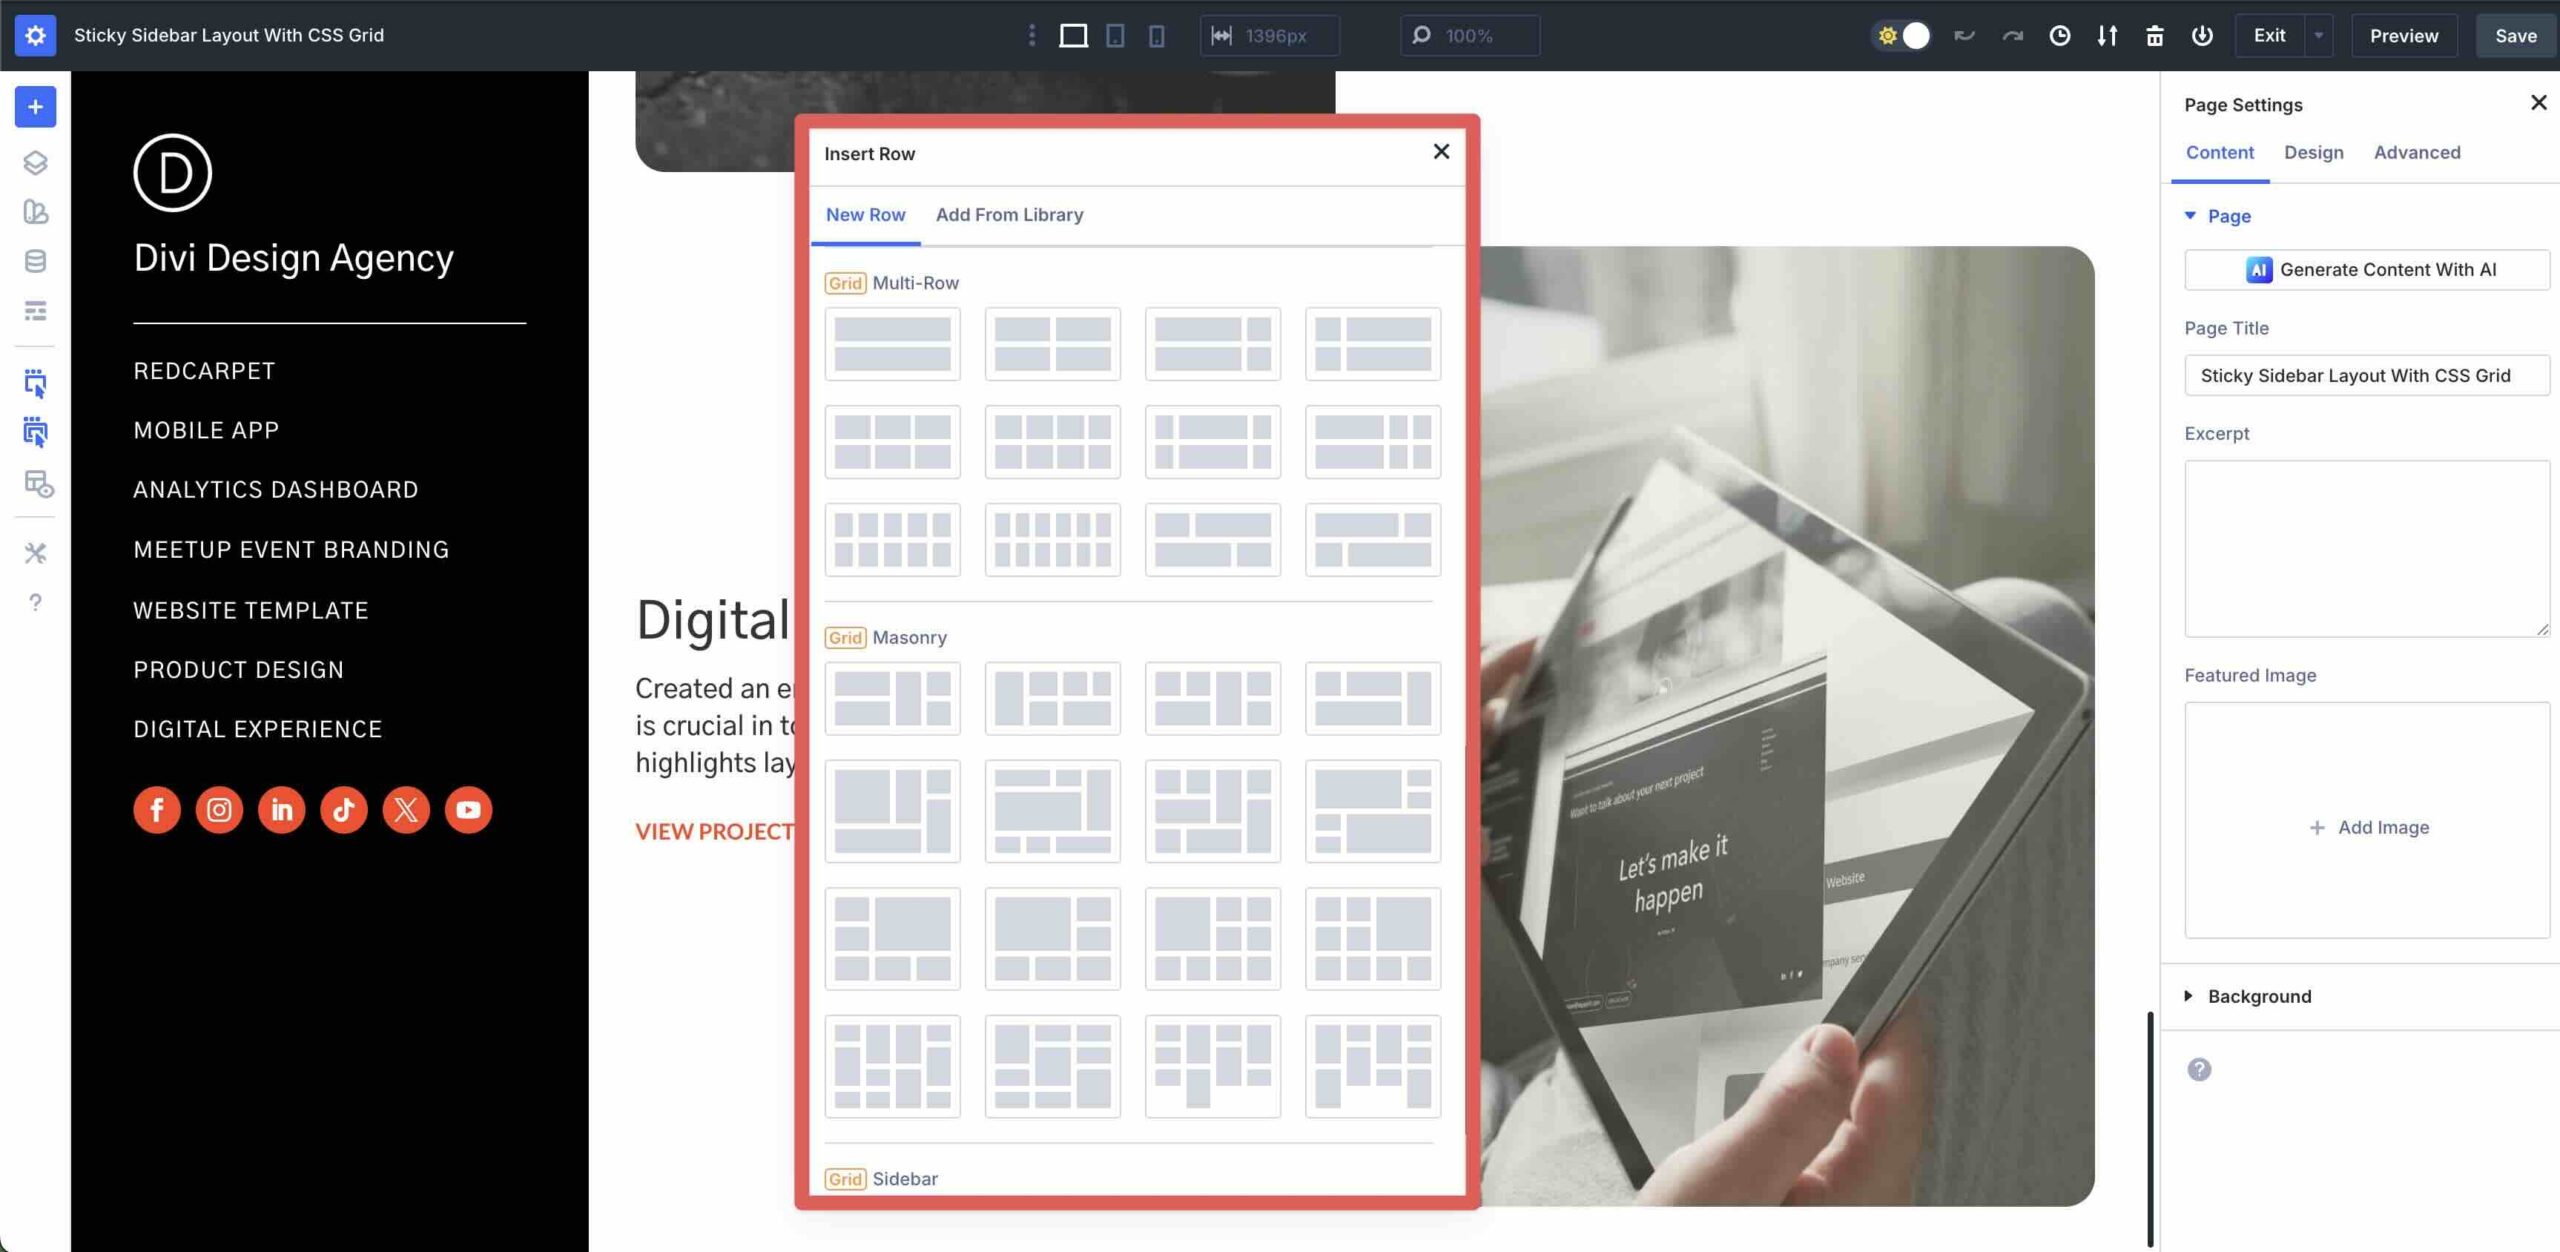
Subsequent, upload a Unmarried Column Nested Row to the Column. This will likely area the hyperlinks for our format.
Navigate to the Design tab and make a choice Grid because the Structure Taste. Set a Vertical Hole of 25, and set the Collection of Columns to 1.
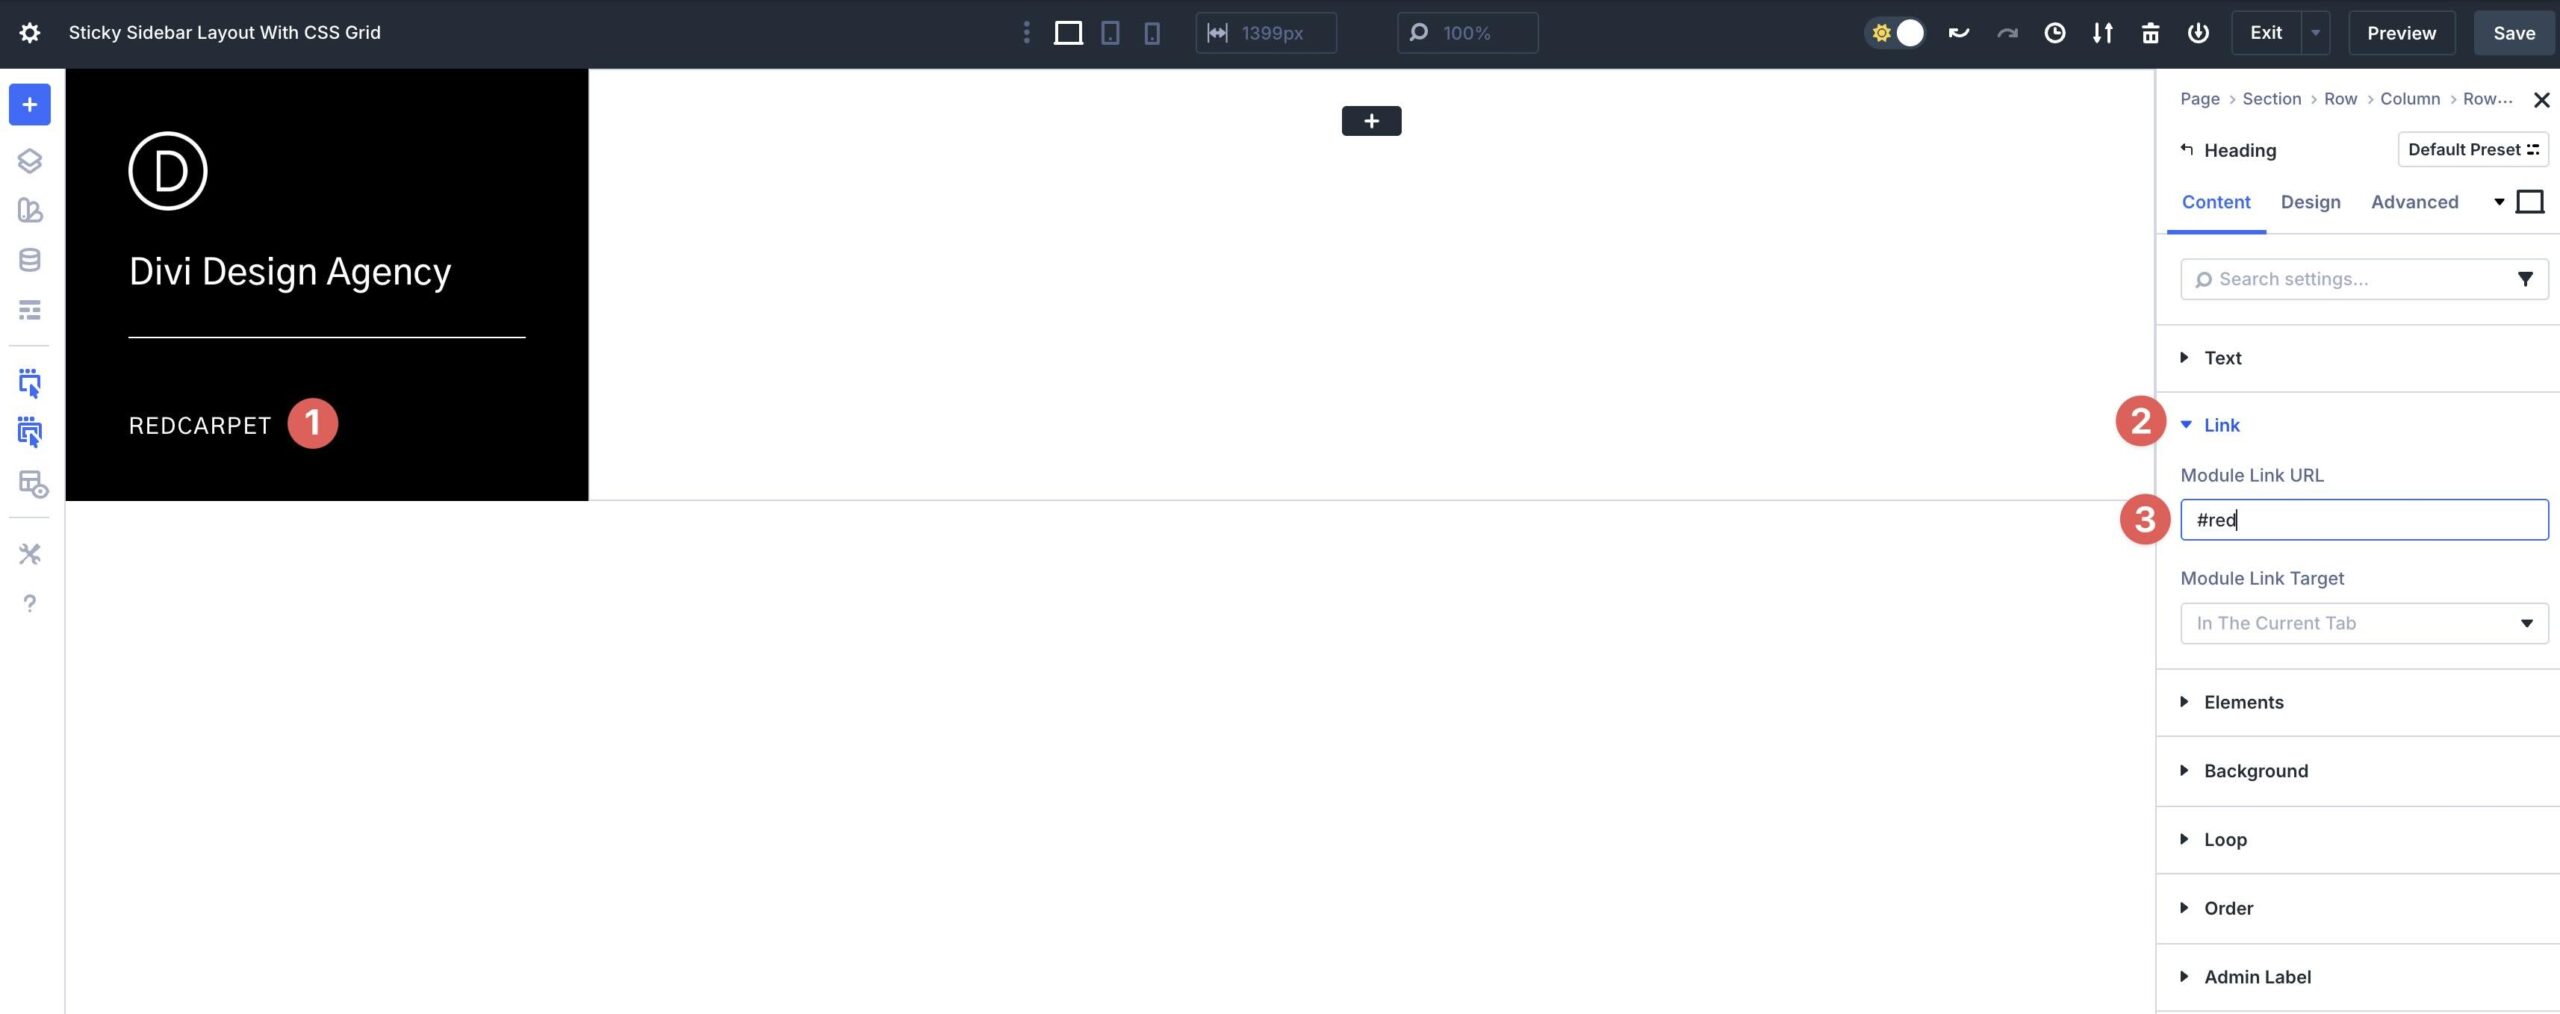
Click on the black + icon so as to add a Heading module. Taste the Heading as desired.
Make bigger the Hyperlink menu. Within the Module Hyperlink URL box, input an anchor hyperlink (as an example, #pink). This will likely help you bounce to the matching phase at the web page for simple navigation.
Repeat the stairs so as to add as many menu hyperlinks (Heading modules) as desired.
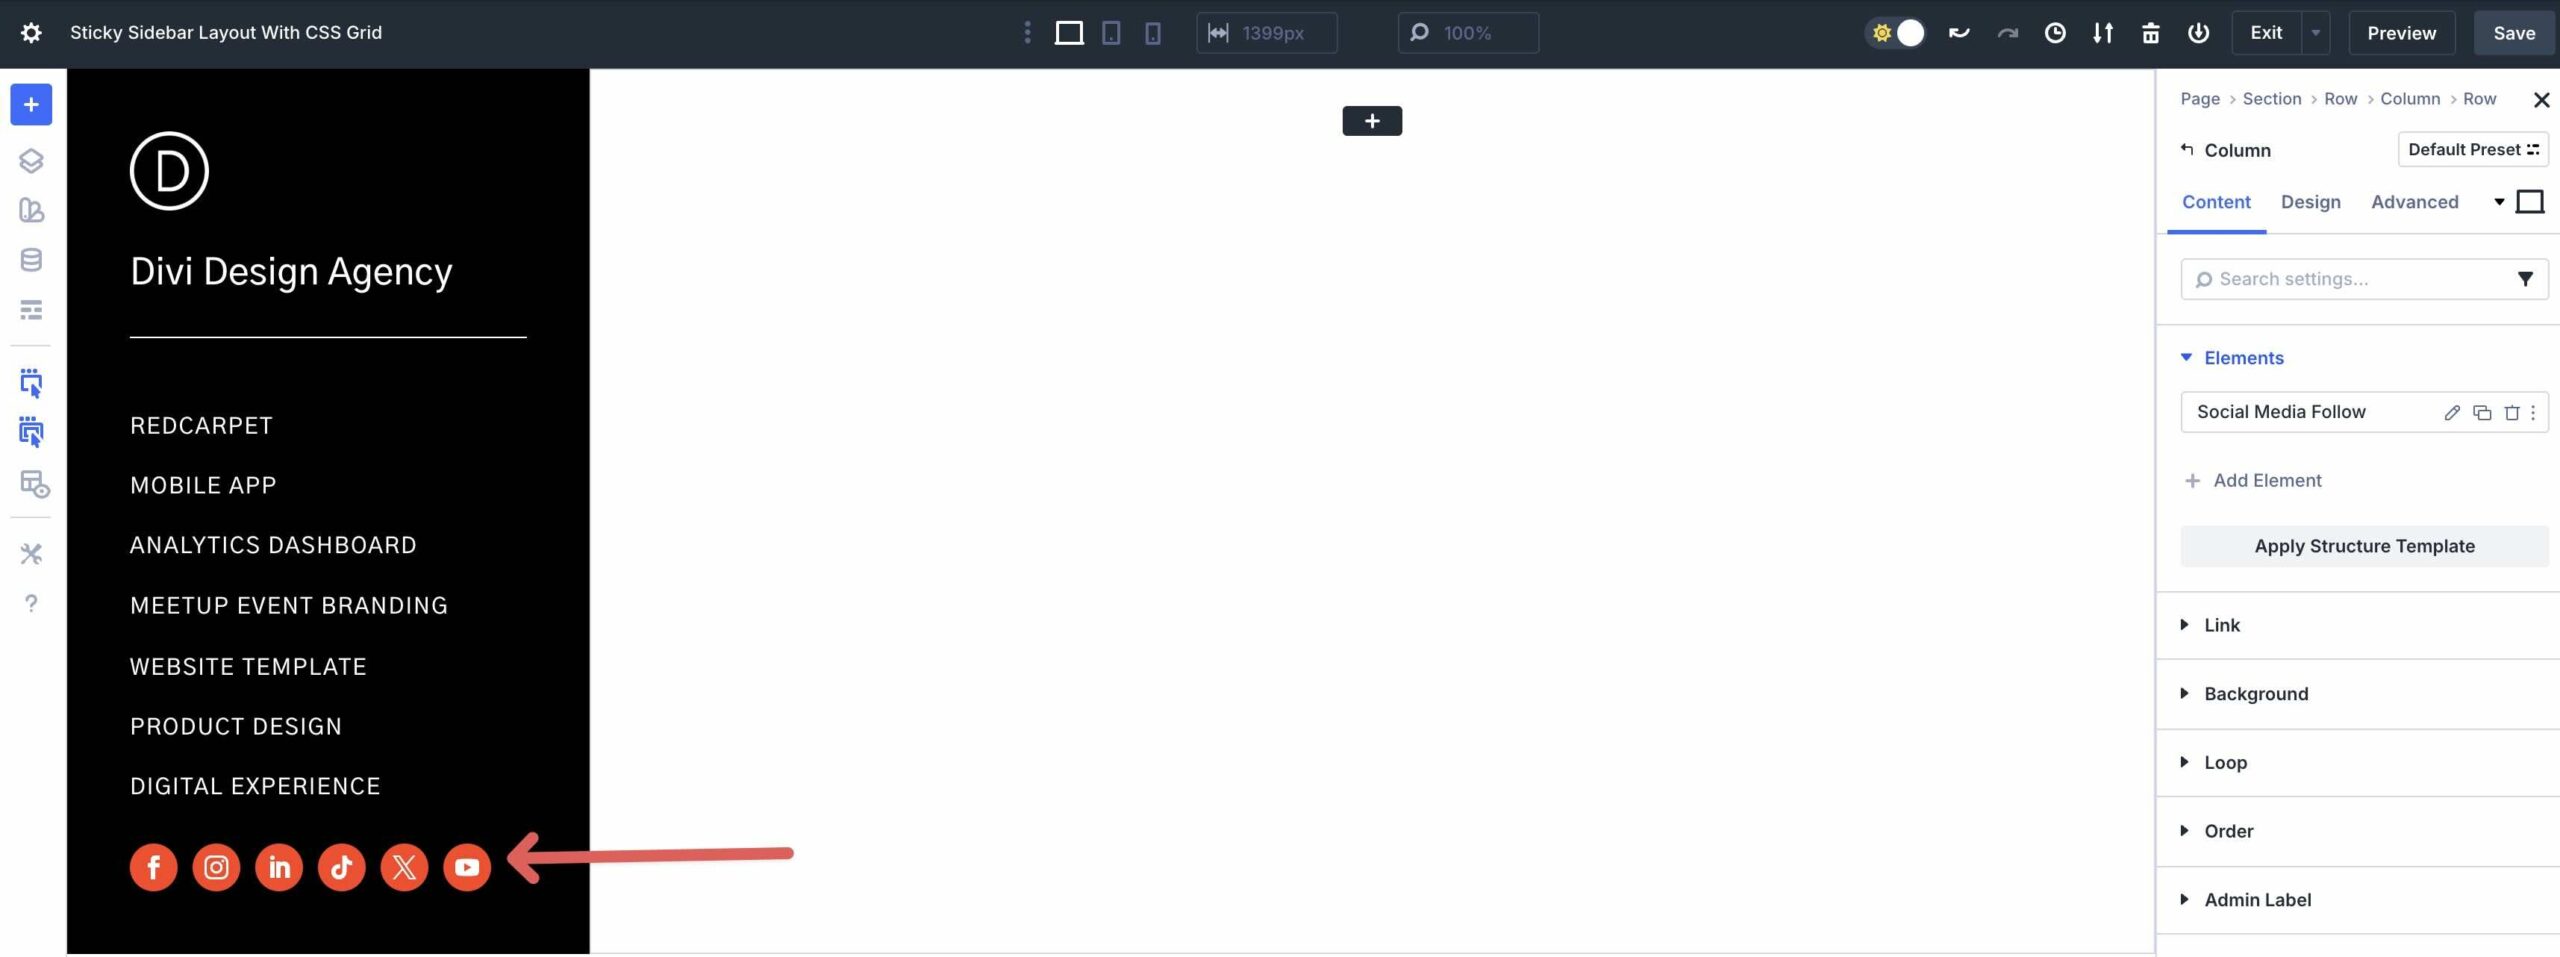
Subsequent, upload a brand new Unmarried Column Row to the Column, adopted by way of a Social Media Practice module.
Upload Social Networks and magnificence the module as desired.
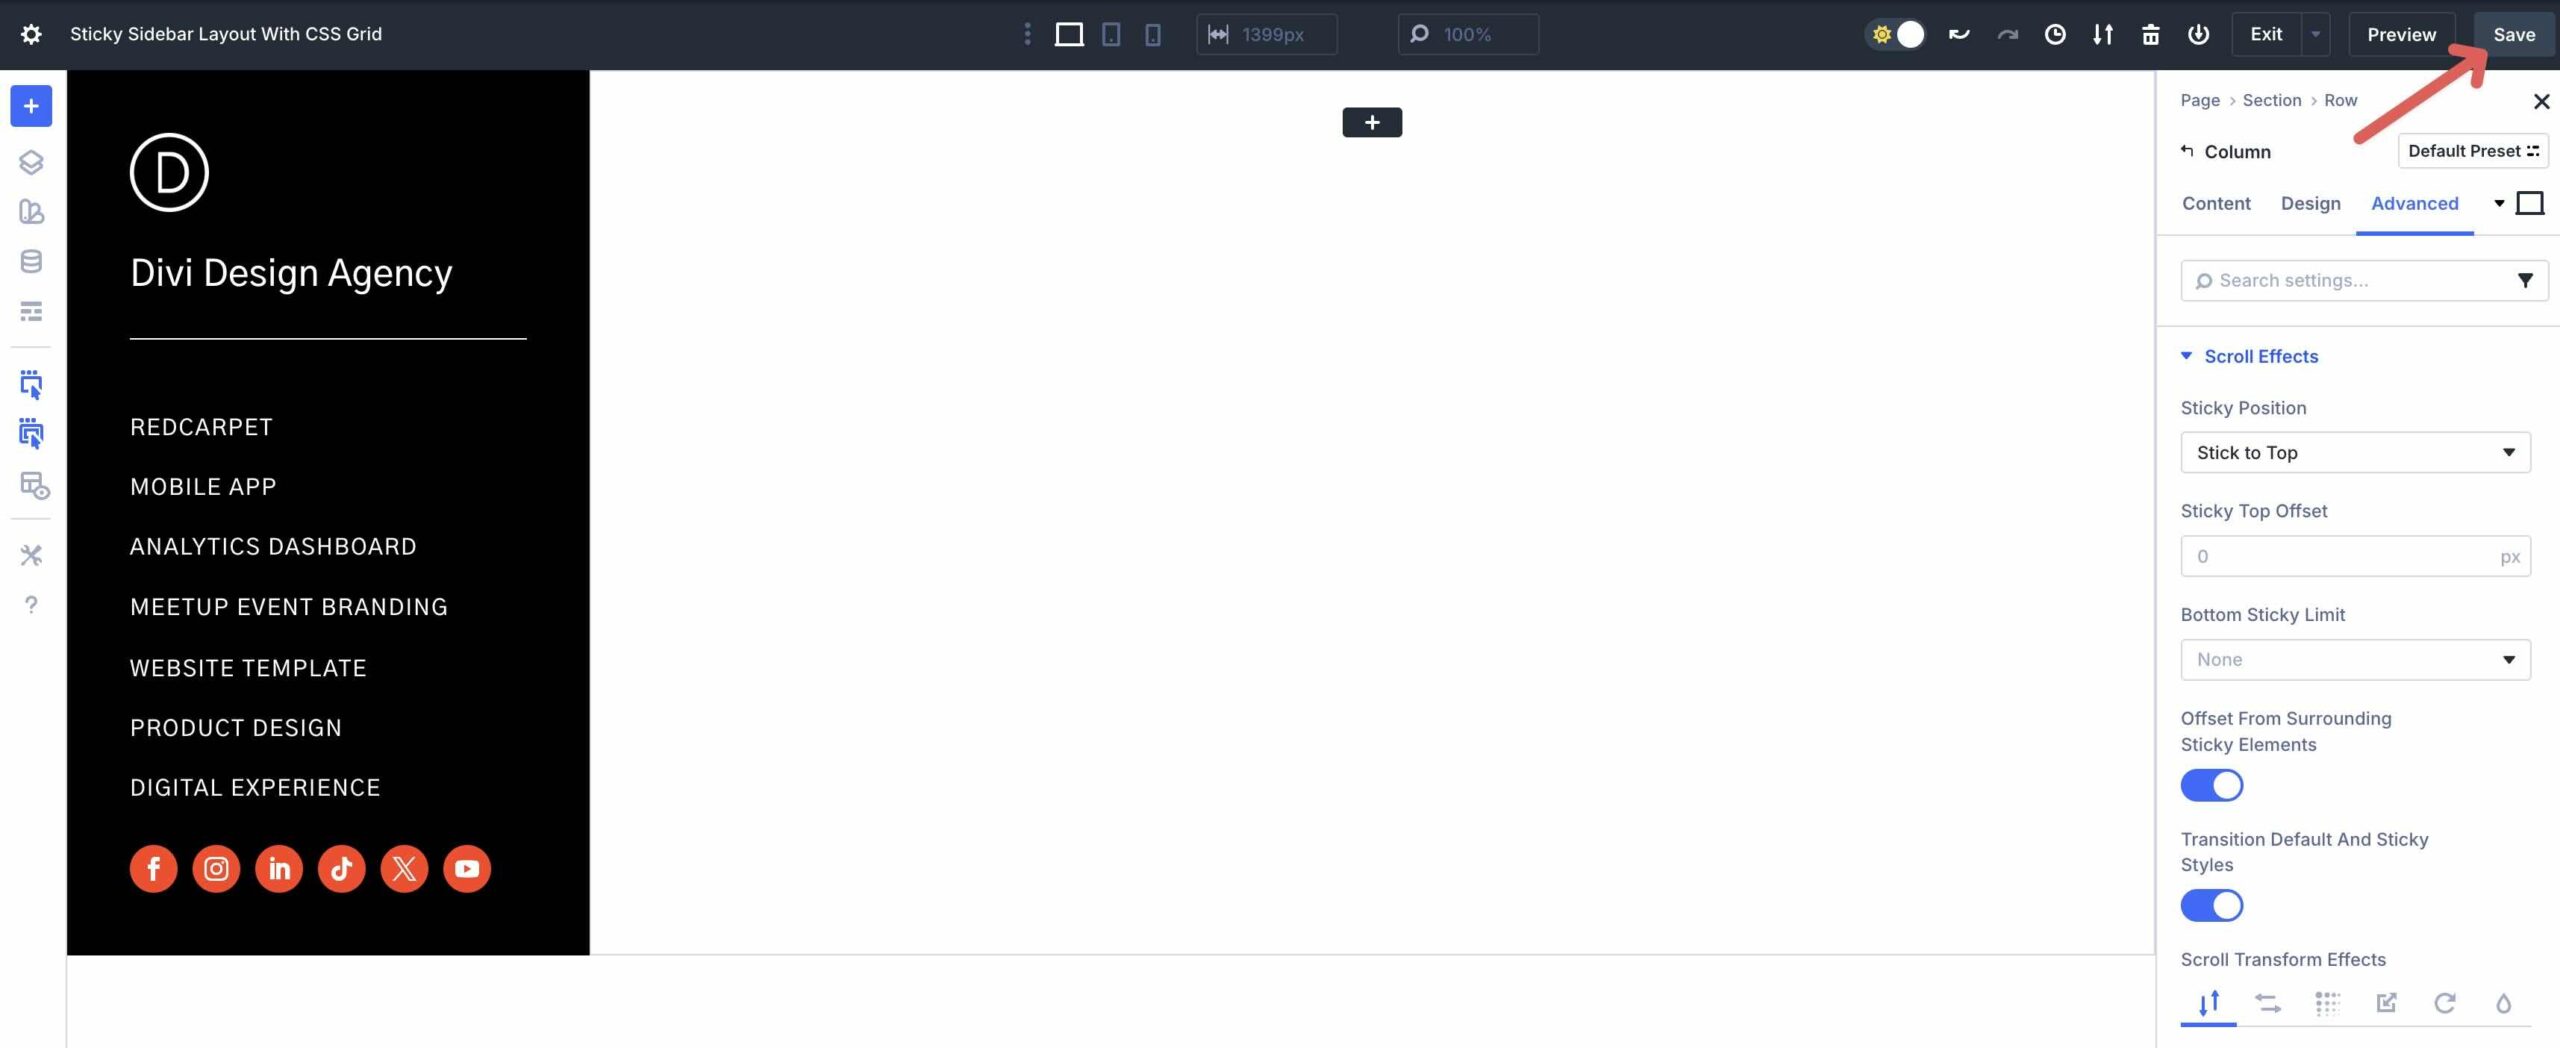
Make The Sidebar Sticky
Ahead of we continue to putting in place the second one Column, we wish to configure the Sticky choices. Within the Column’s settings, click on the Complicated tab. Make bigger the Scroll Results menu and set the Sticky Place to Keep on with Most sensible.

Ahead of continuing to your next step, save your development by way of clicking the Save button on the peak proper of the Visible Builder.
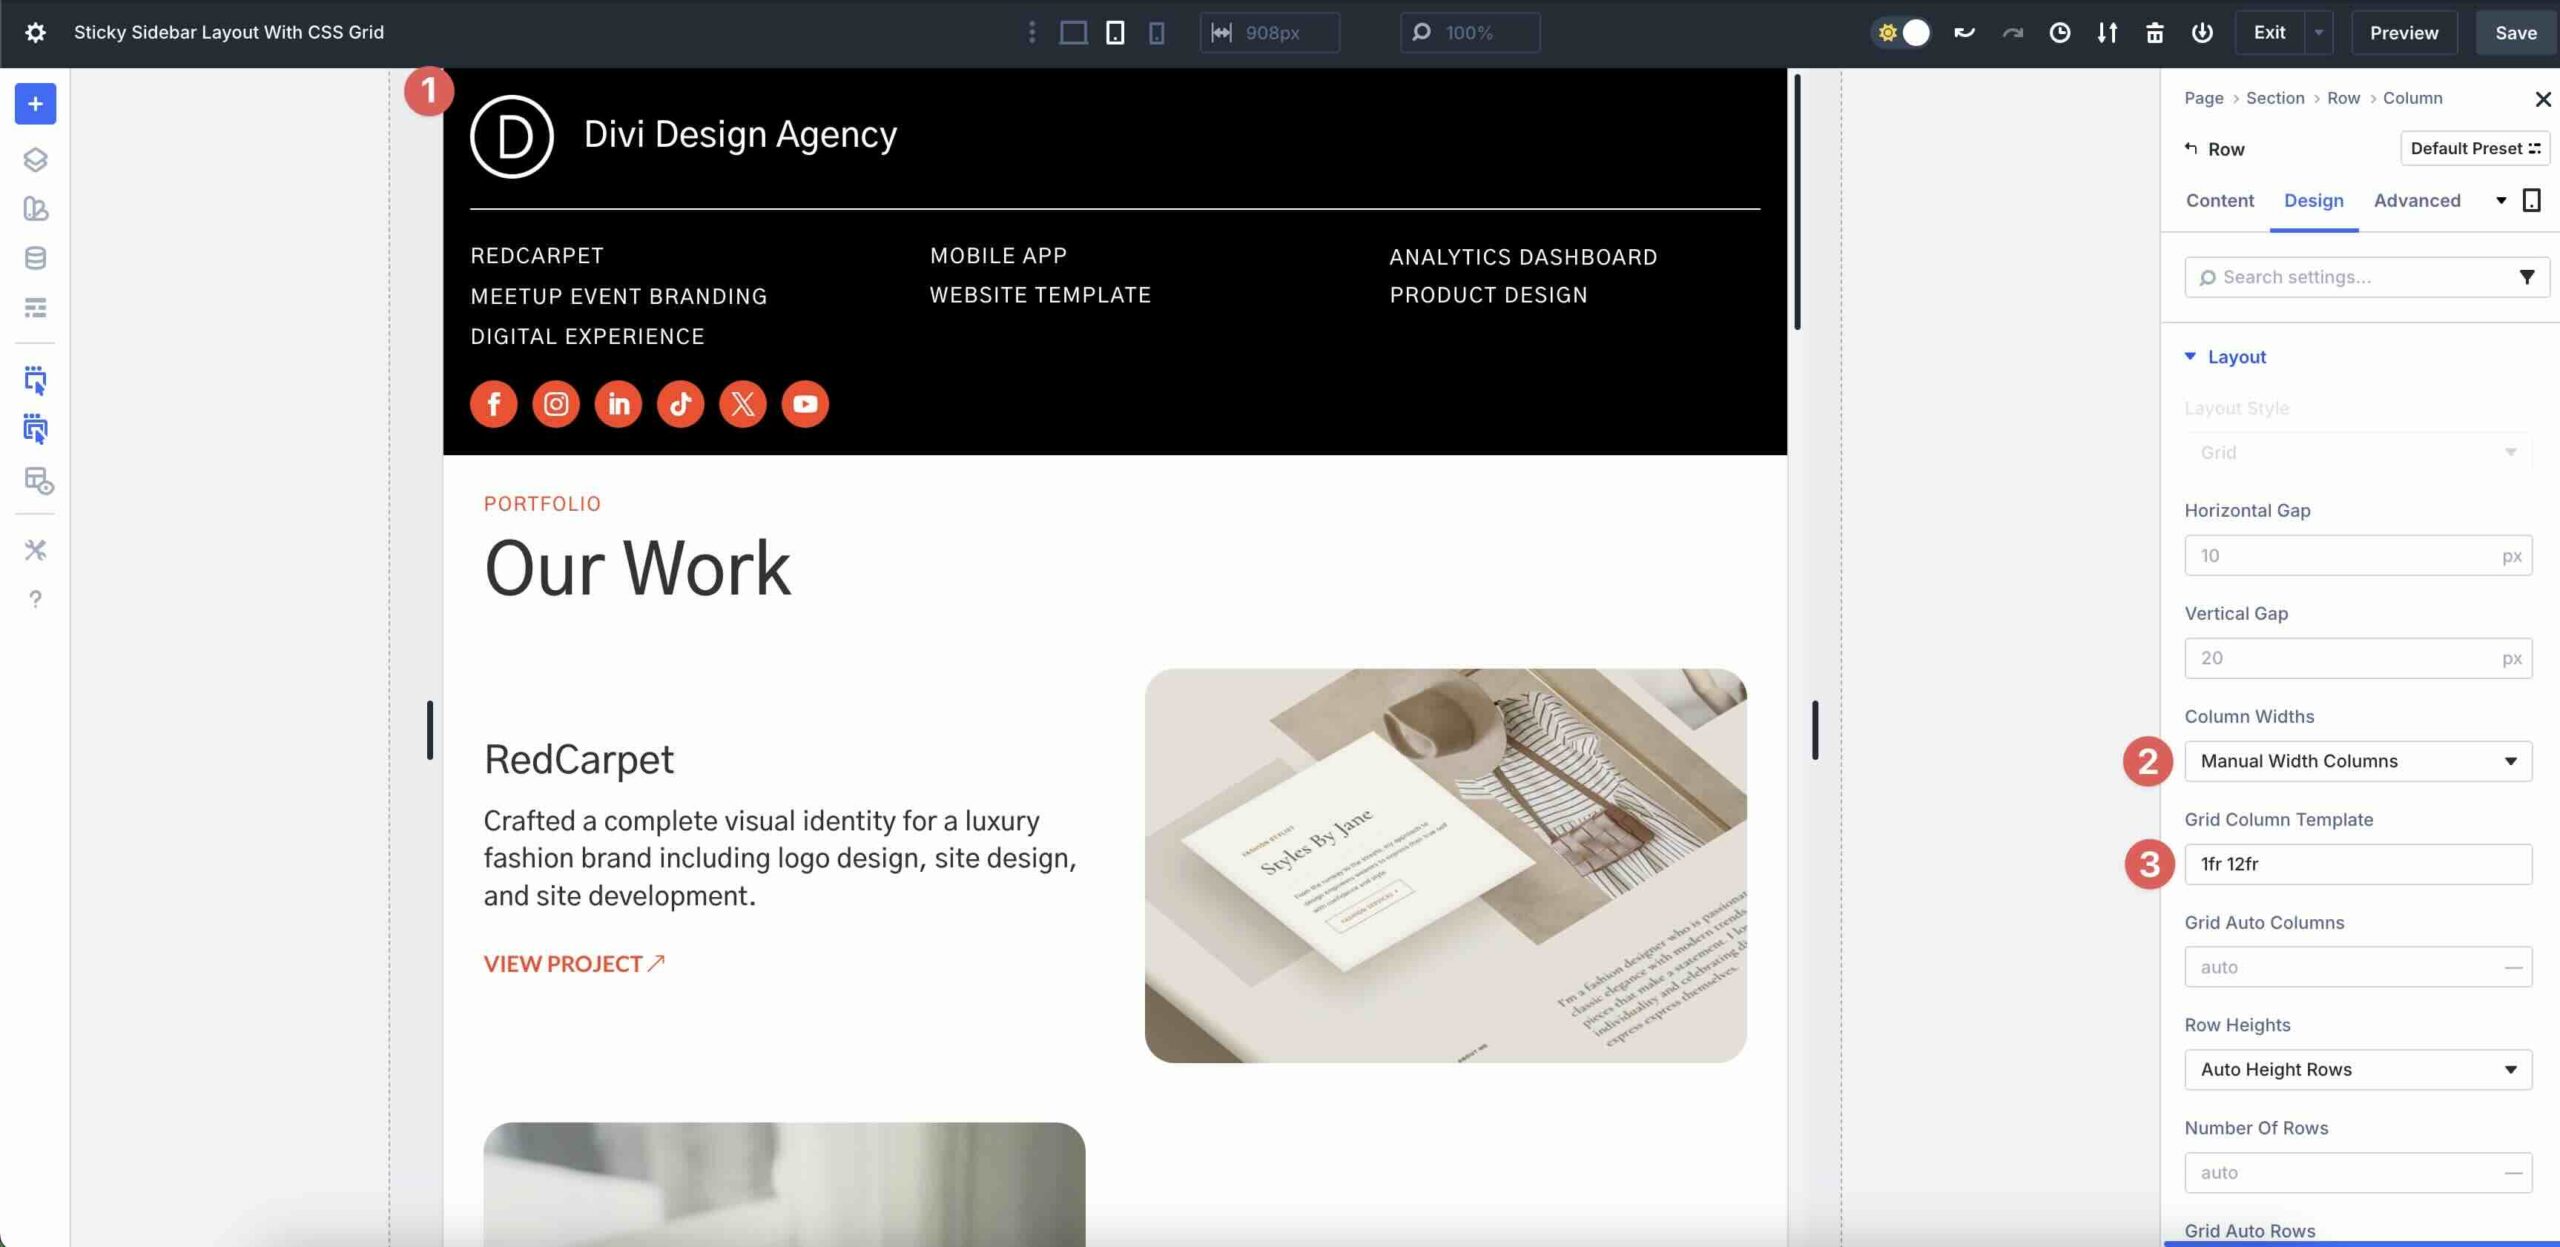
Step 3: Set Up The 2nd Column
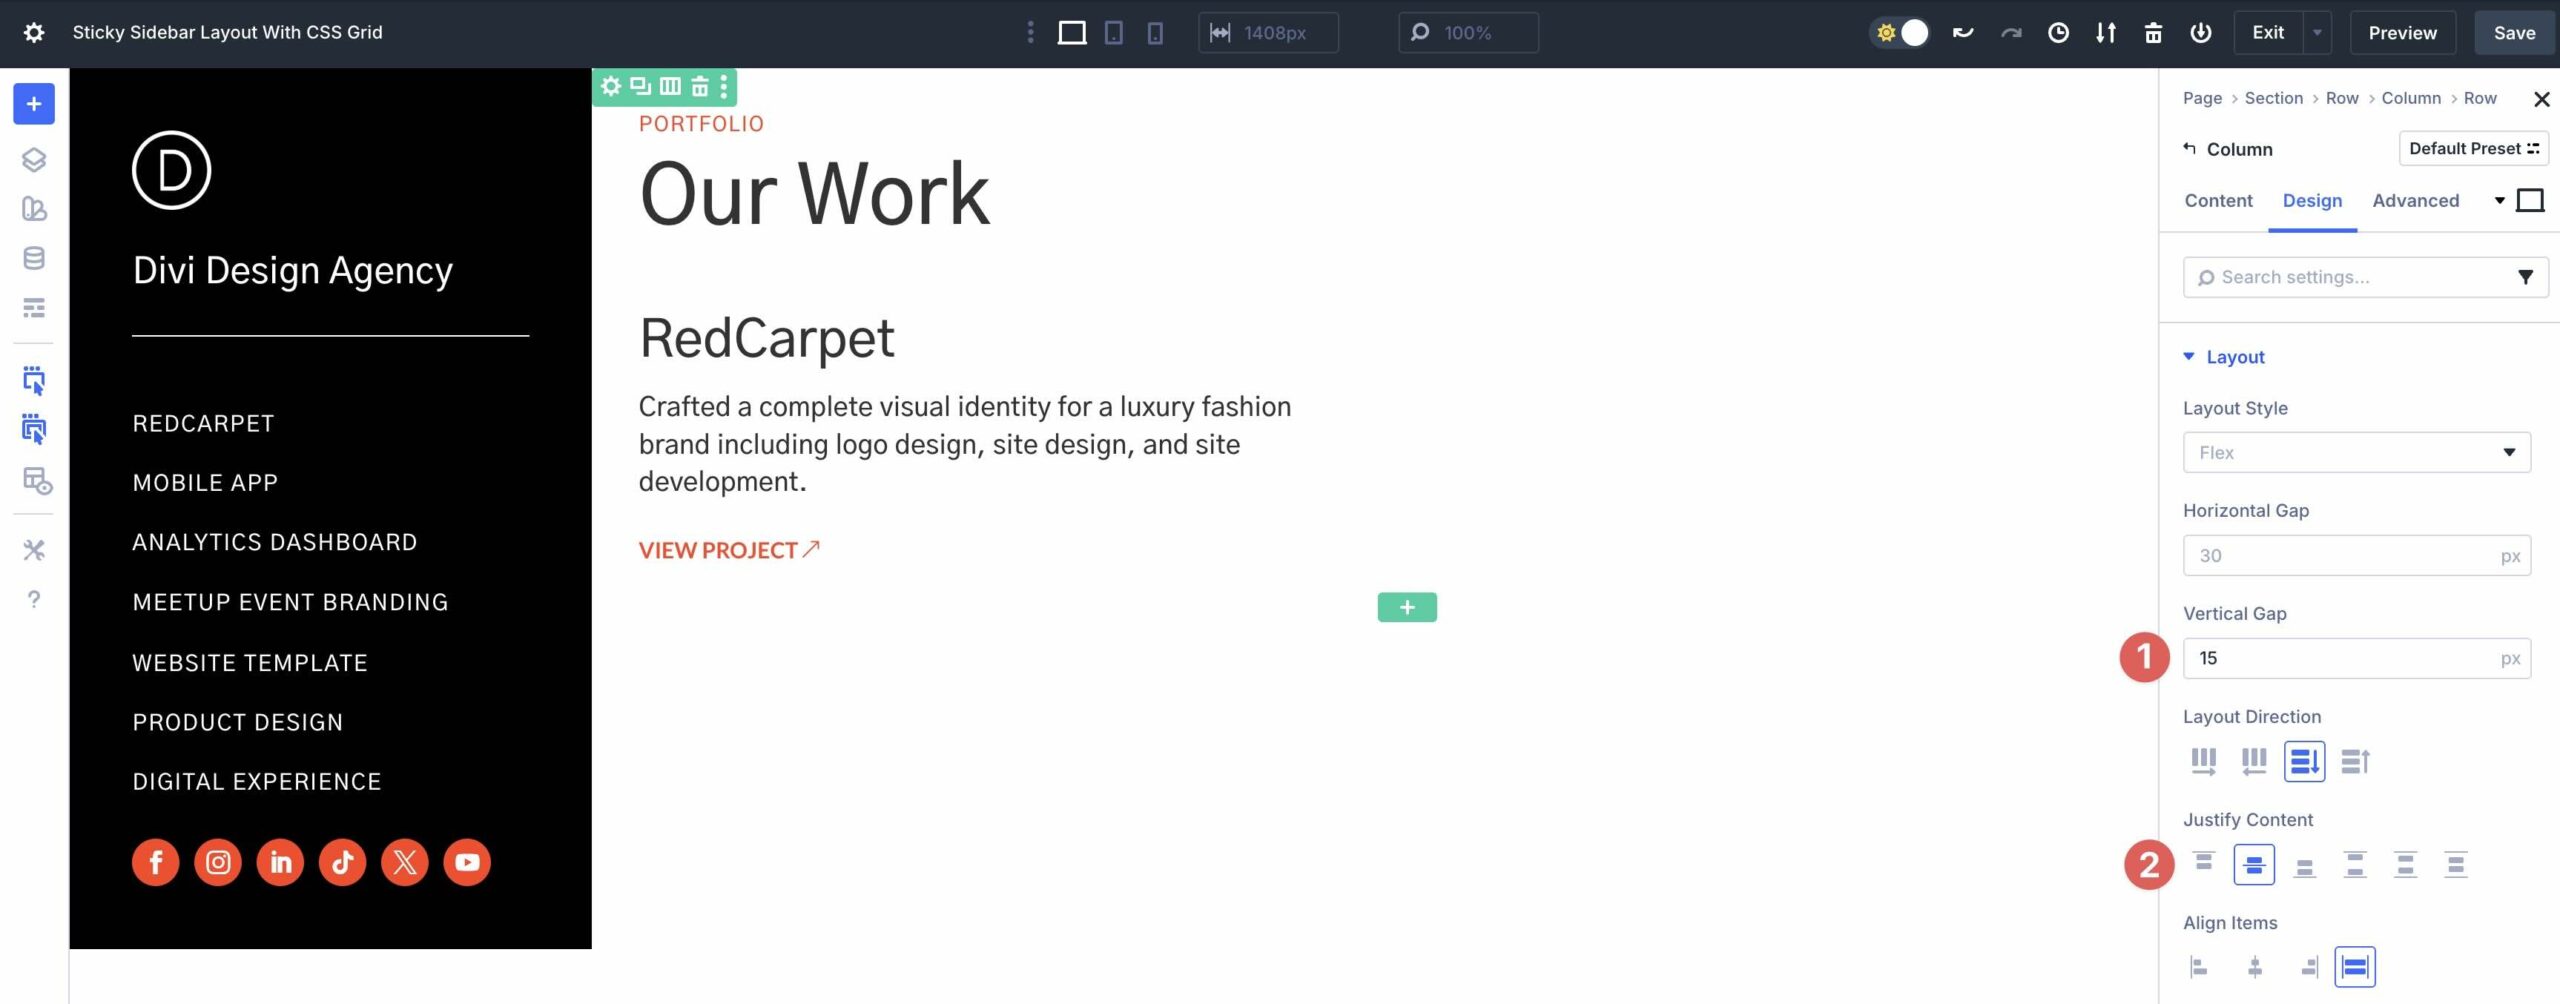
In the second one Column, upload a brand new Unmarried Column Nested Row. Within the Design tab, set the Row to Grid in Structure Taste. Set the Horizontal and Vertical Hole to 40px. Within the Column Widths box, make a choice Equivalent Width Columns. Set the Quantity Of Columns to 2.
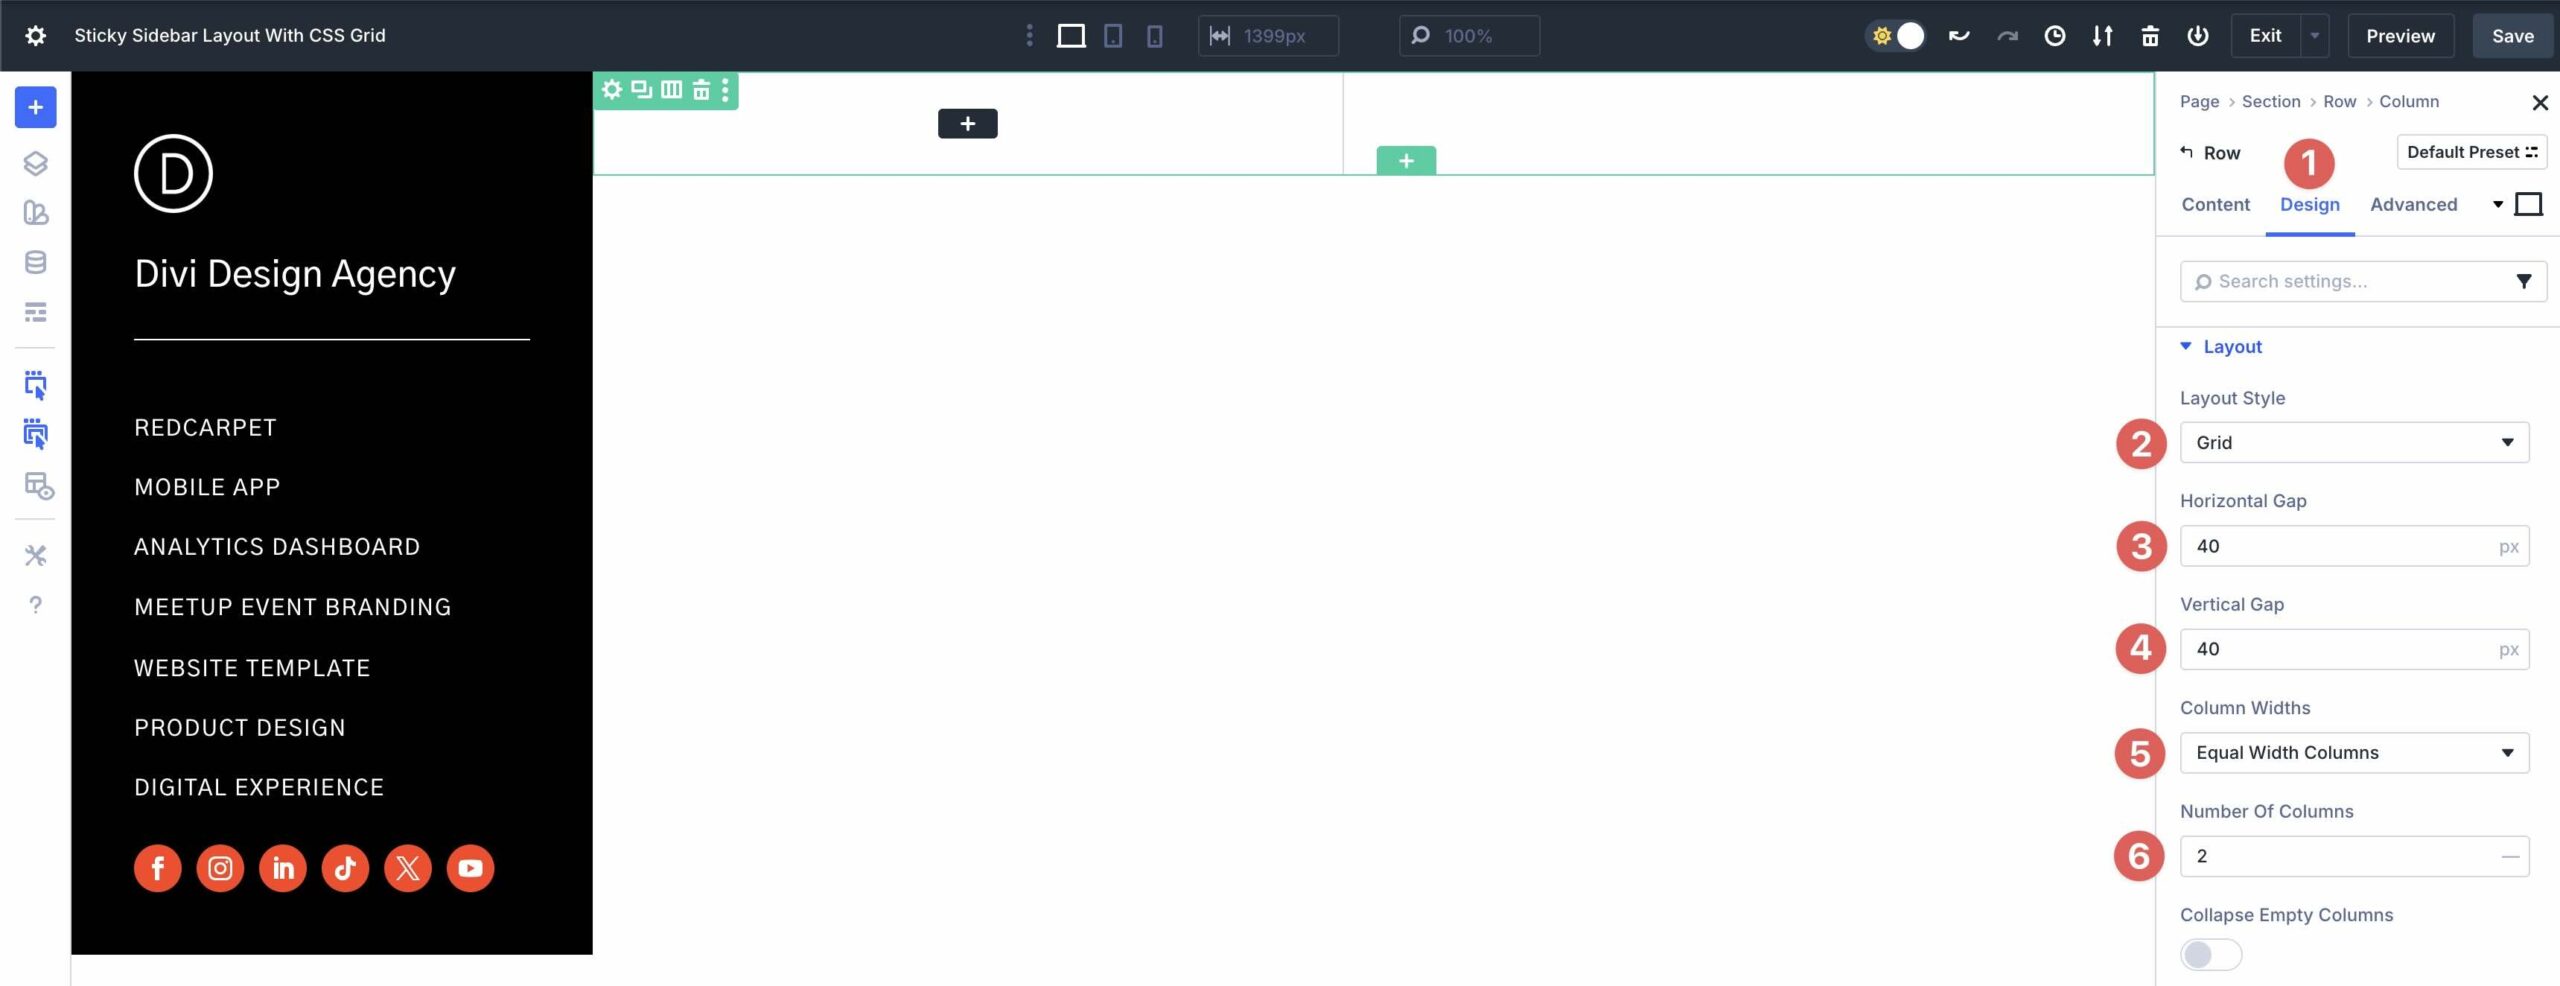
Make bigger the Spacing menu and assign 3% Padding to all 4 facets.
Step 4: Upload Content material To The 2nd Column
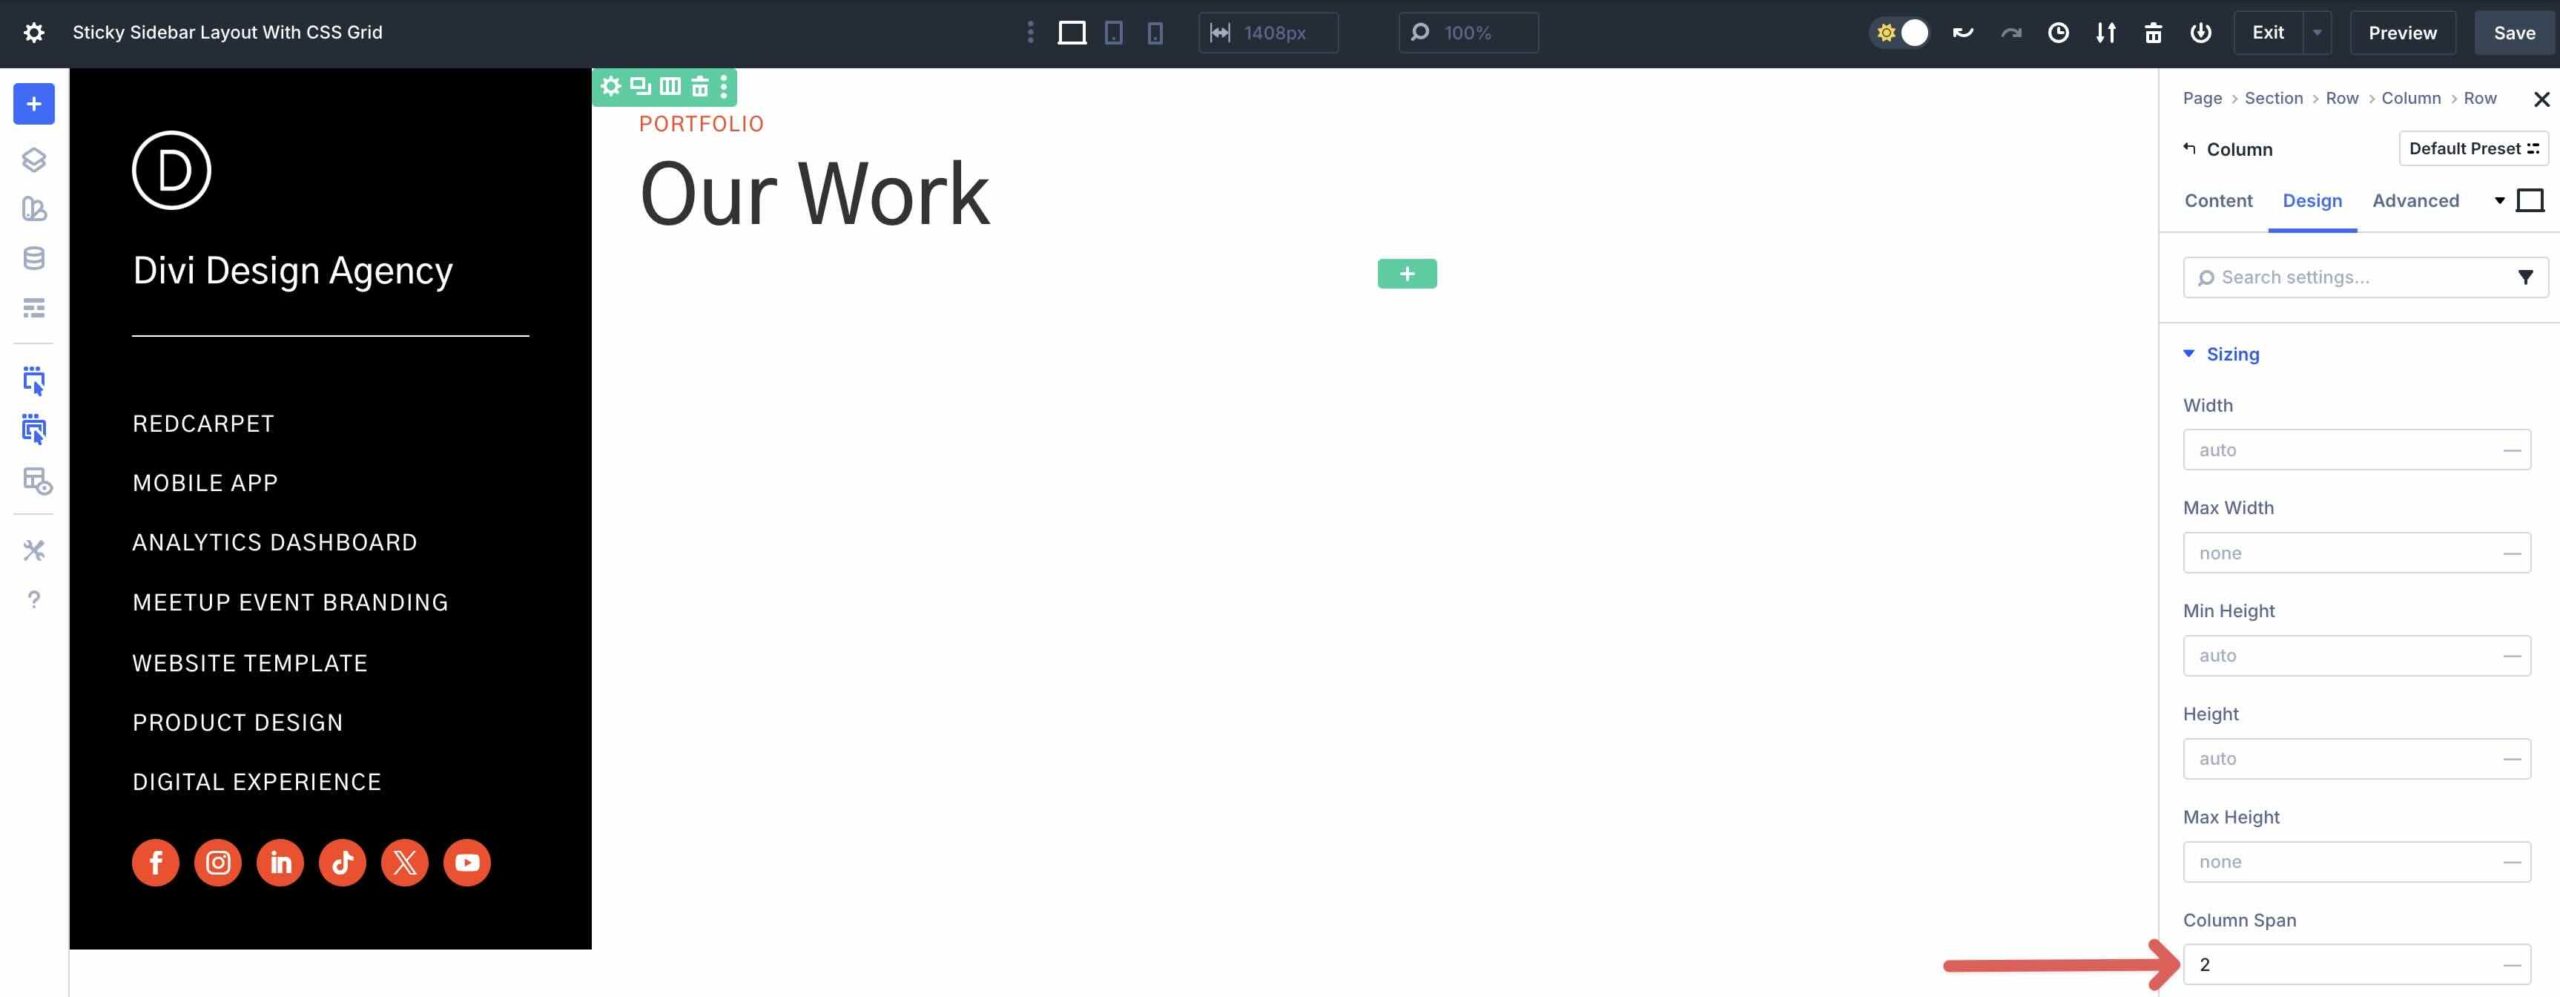
With the Grid settings in position, we will be able to get started including modules. Within the first Grid merchandise, upload two Heading modules. Taste them as desired.
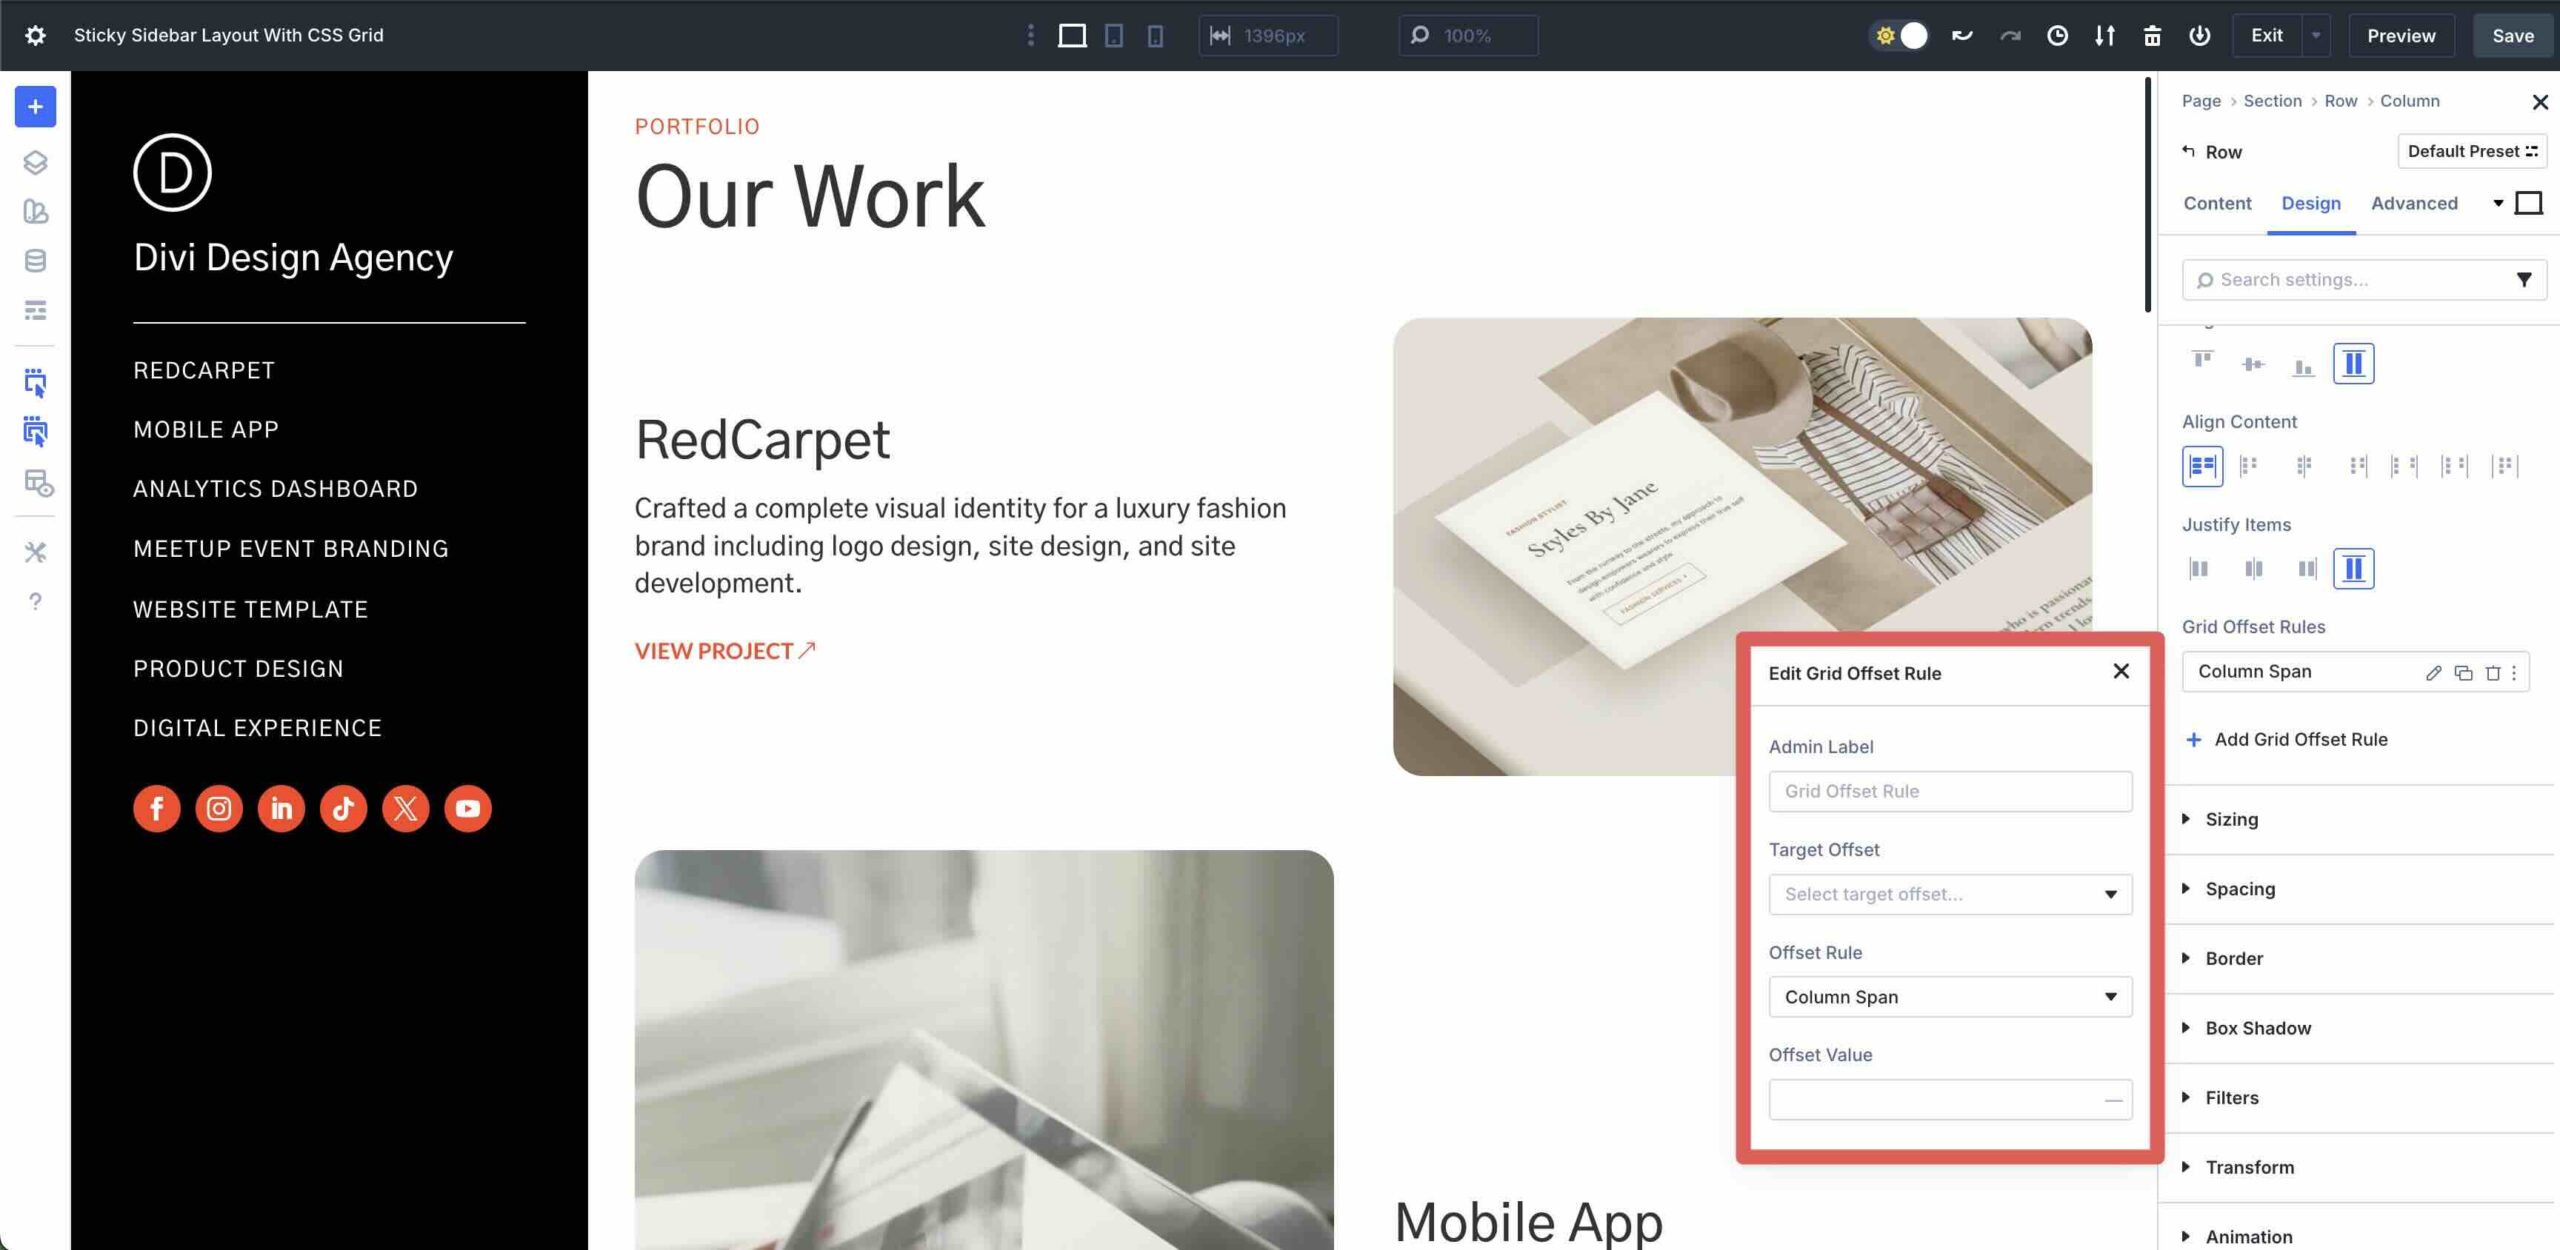
Within the Grid Merchandise settings, assign 15px Vertical Hole.
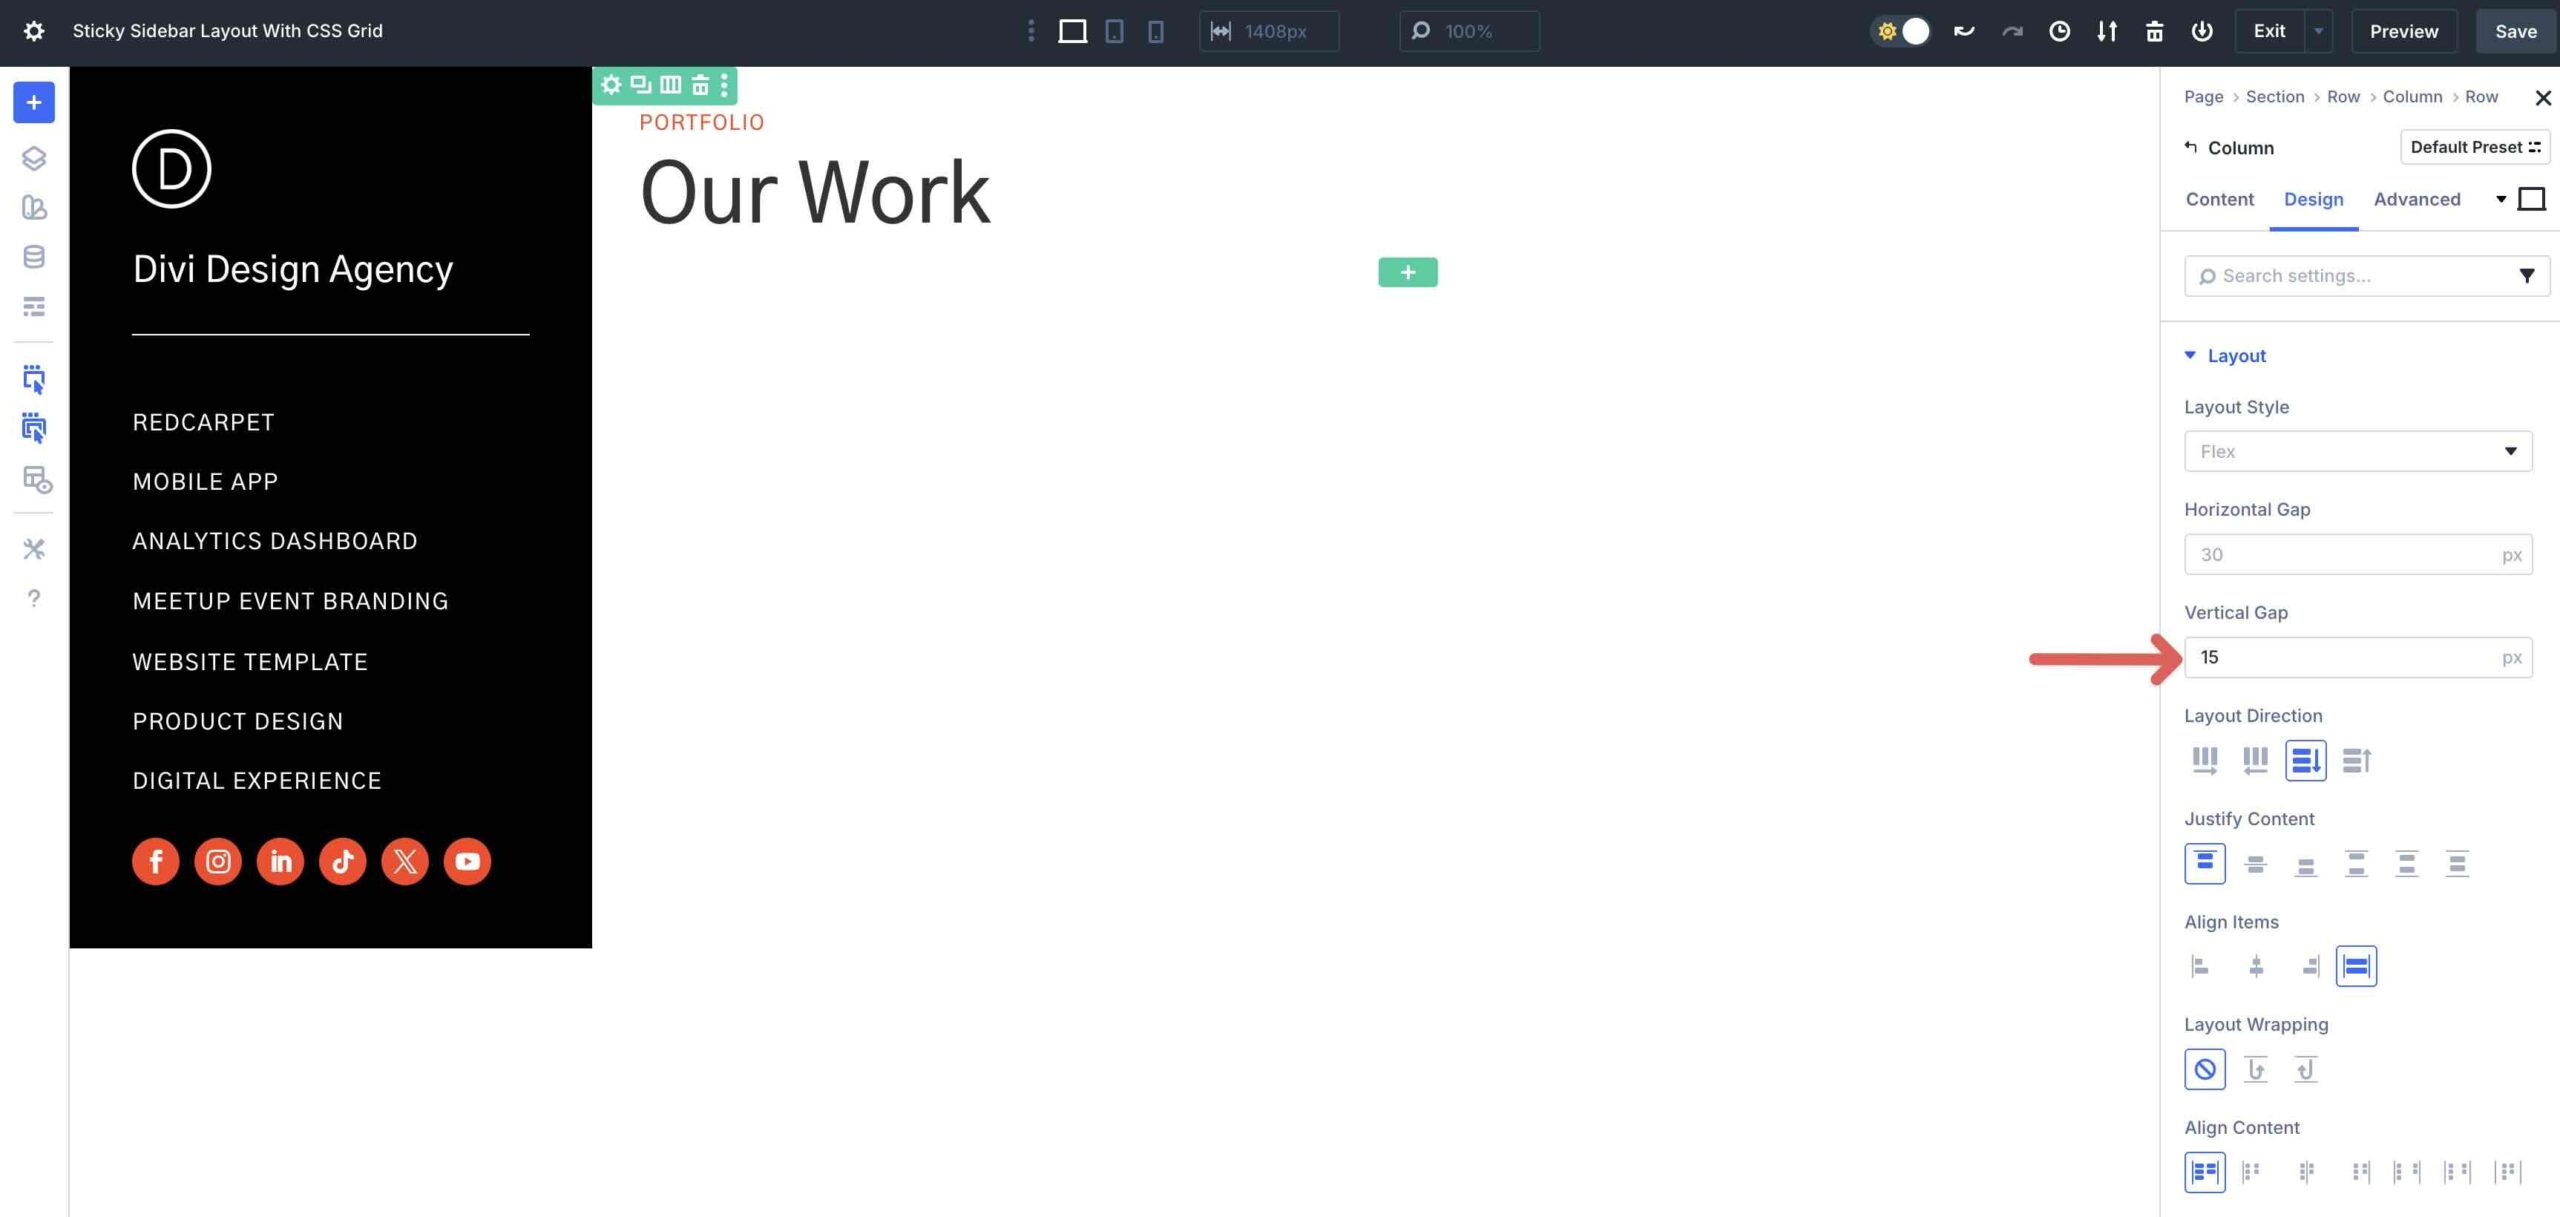
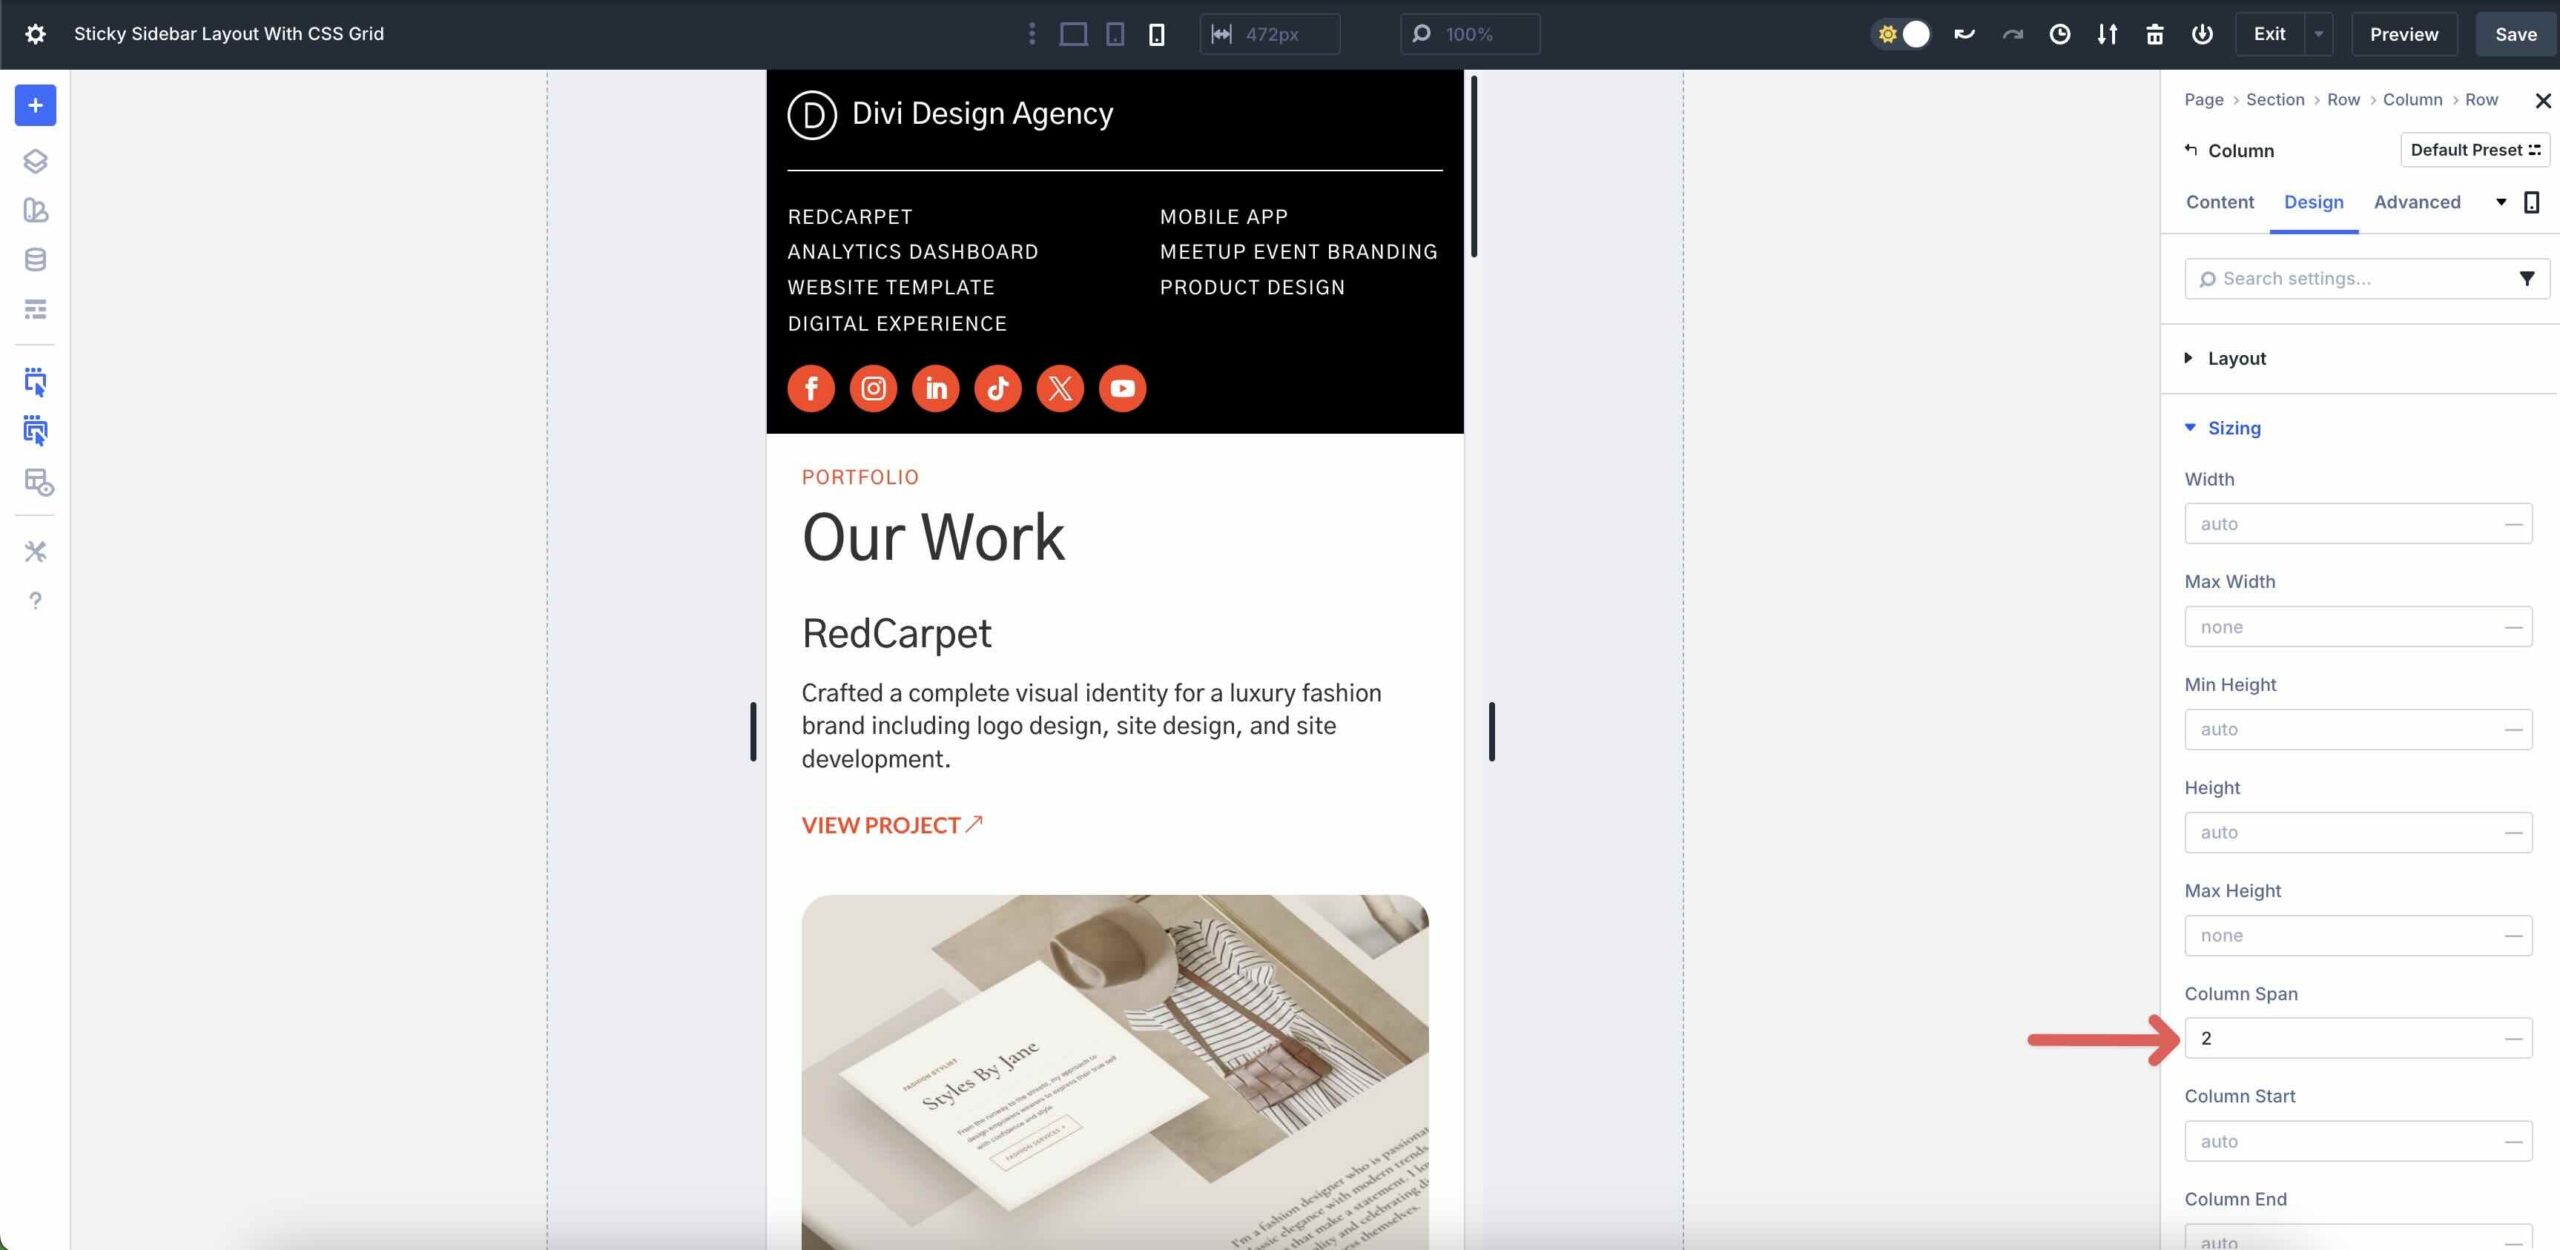
Make bigger the Sizing menu and find the Column Span box. Input 2 as the price. This tells Divi to make bigger the Grid Merchandise to the entire width of the Row, which is ready to two Columns.
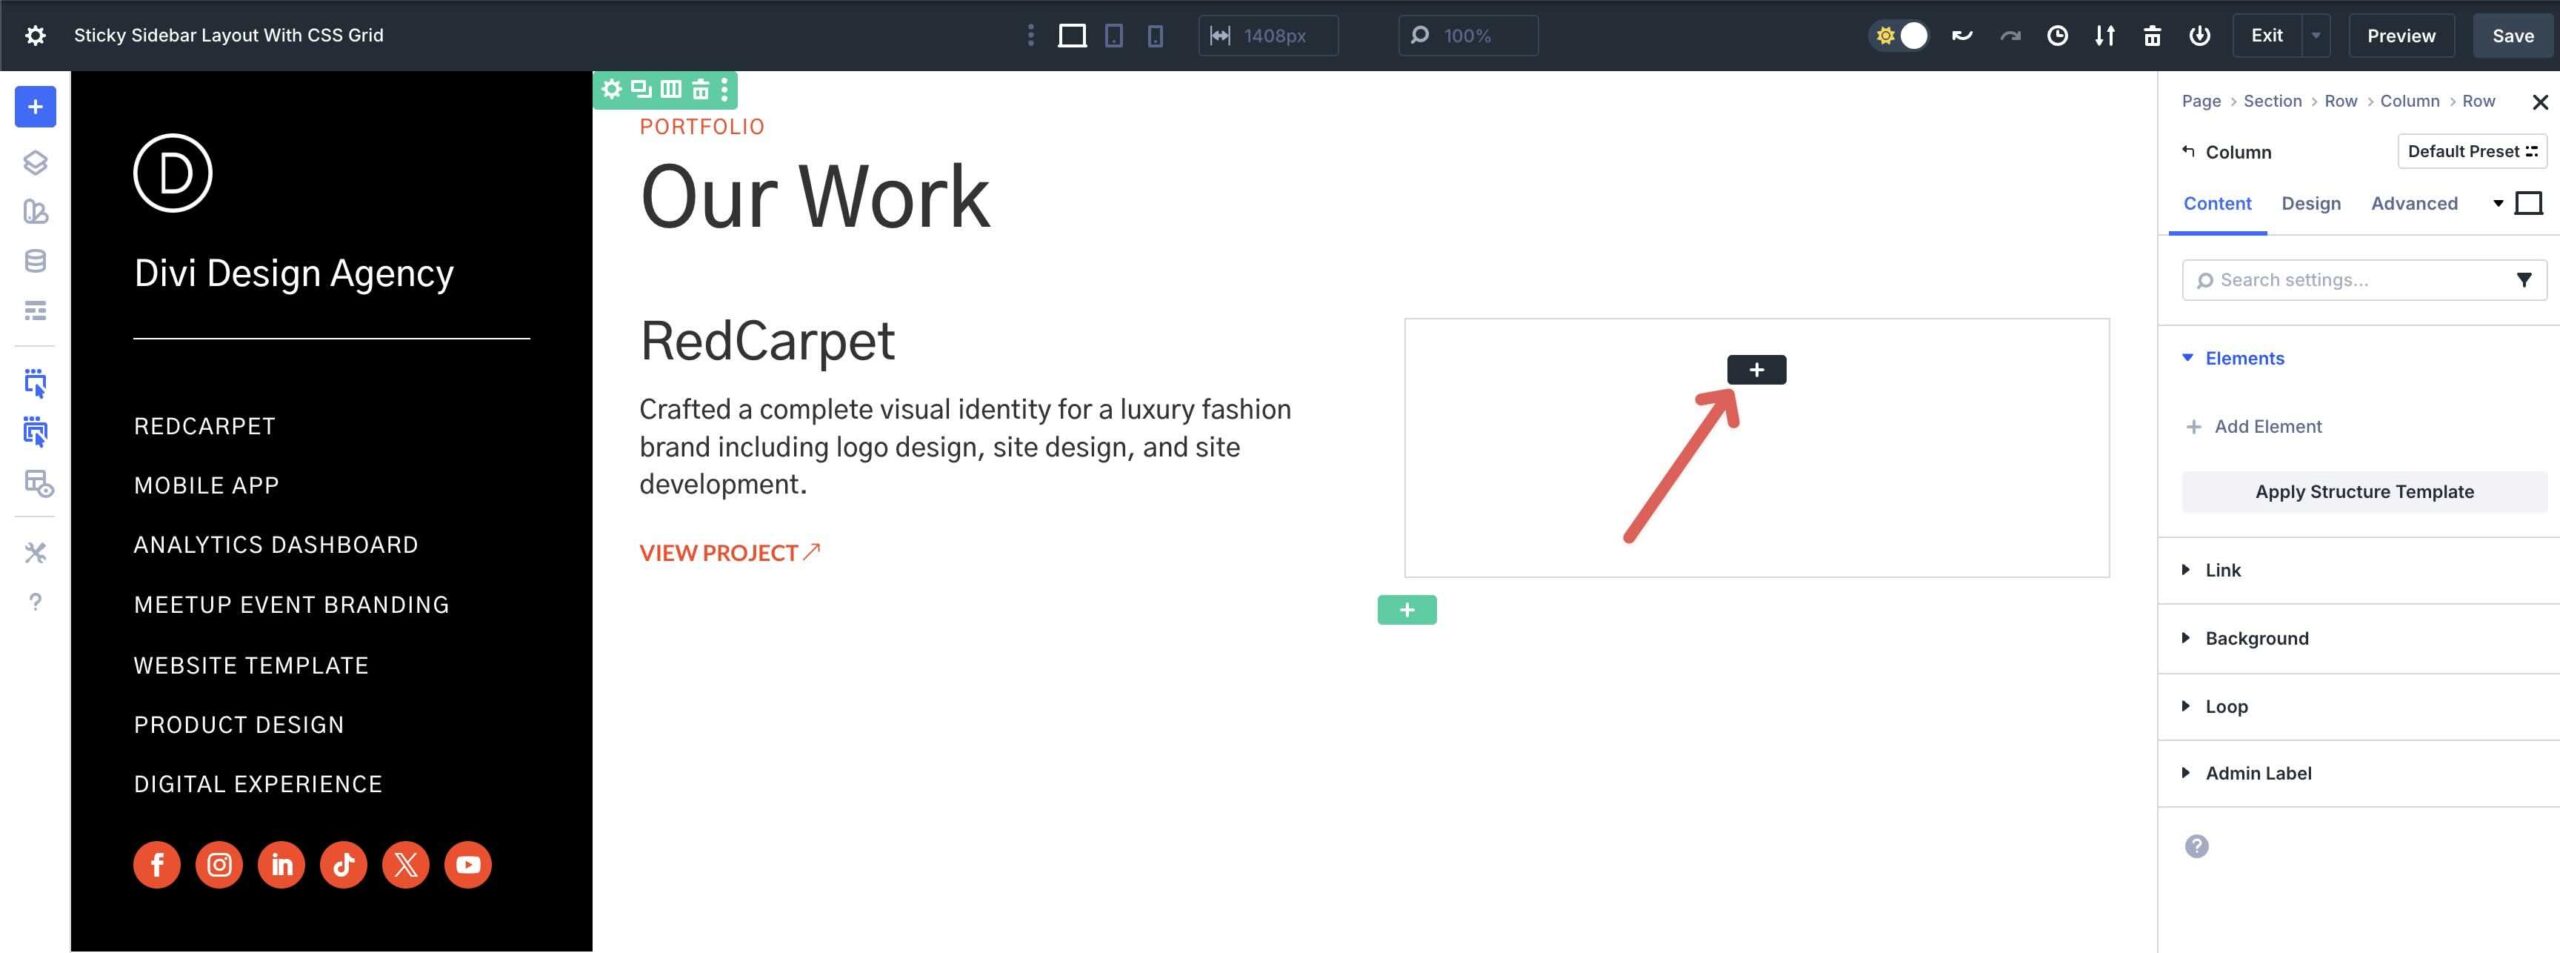
Navigate again to the Grid Row’s major Content material tab. Click on + Upload Part so as to add a brand new Grid Merchandise.
Divi will stack the brand new Grid Merchandise vertically, putting it in the second one Row of the Grid.

On this Grid Merchandise, we’ll upload Heading, Textual content, and Button modules. Taste them as desired.
Open the Design tab. Within the Structure menu, assign 15px Vertical Hole and set Justify Content material to Heart.
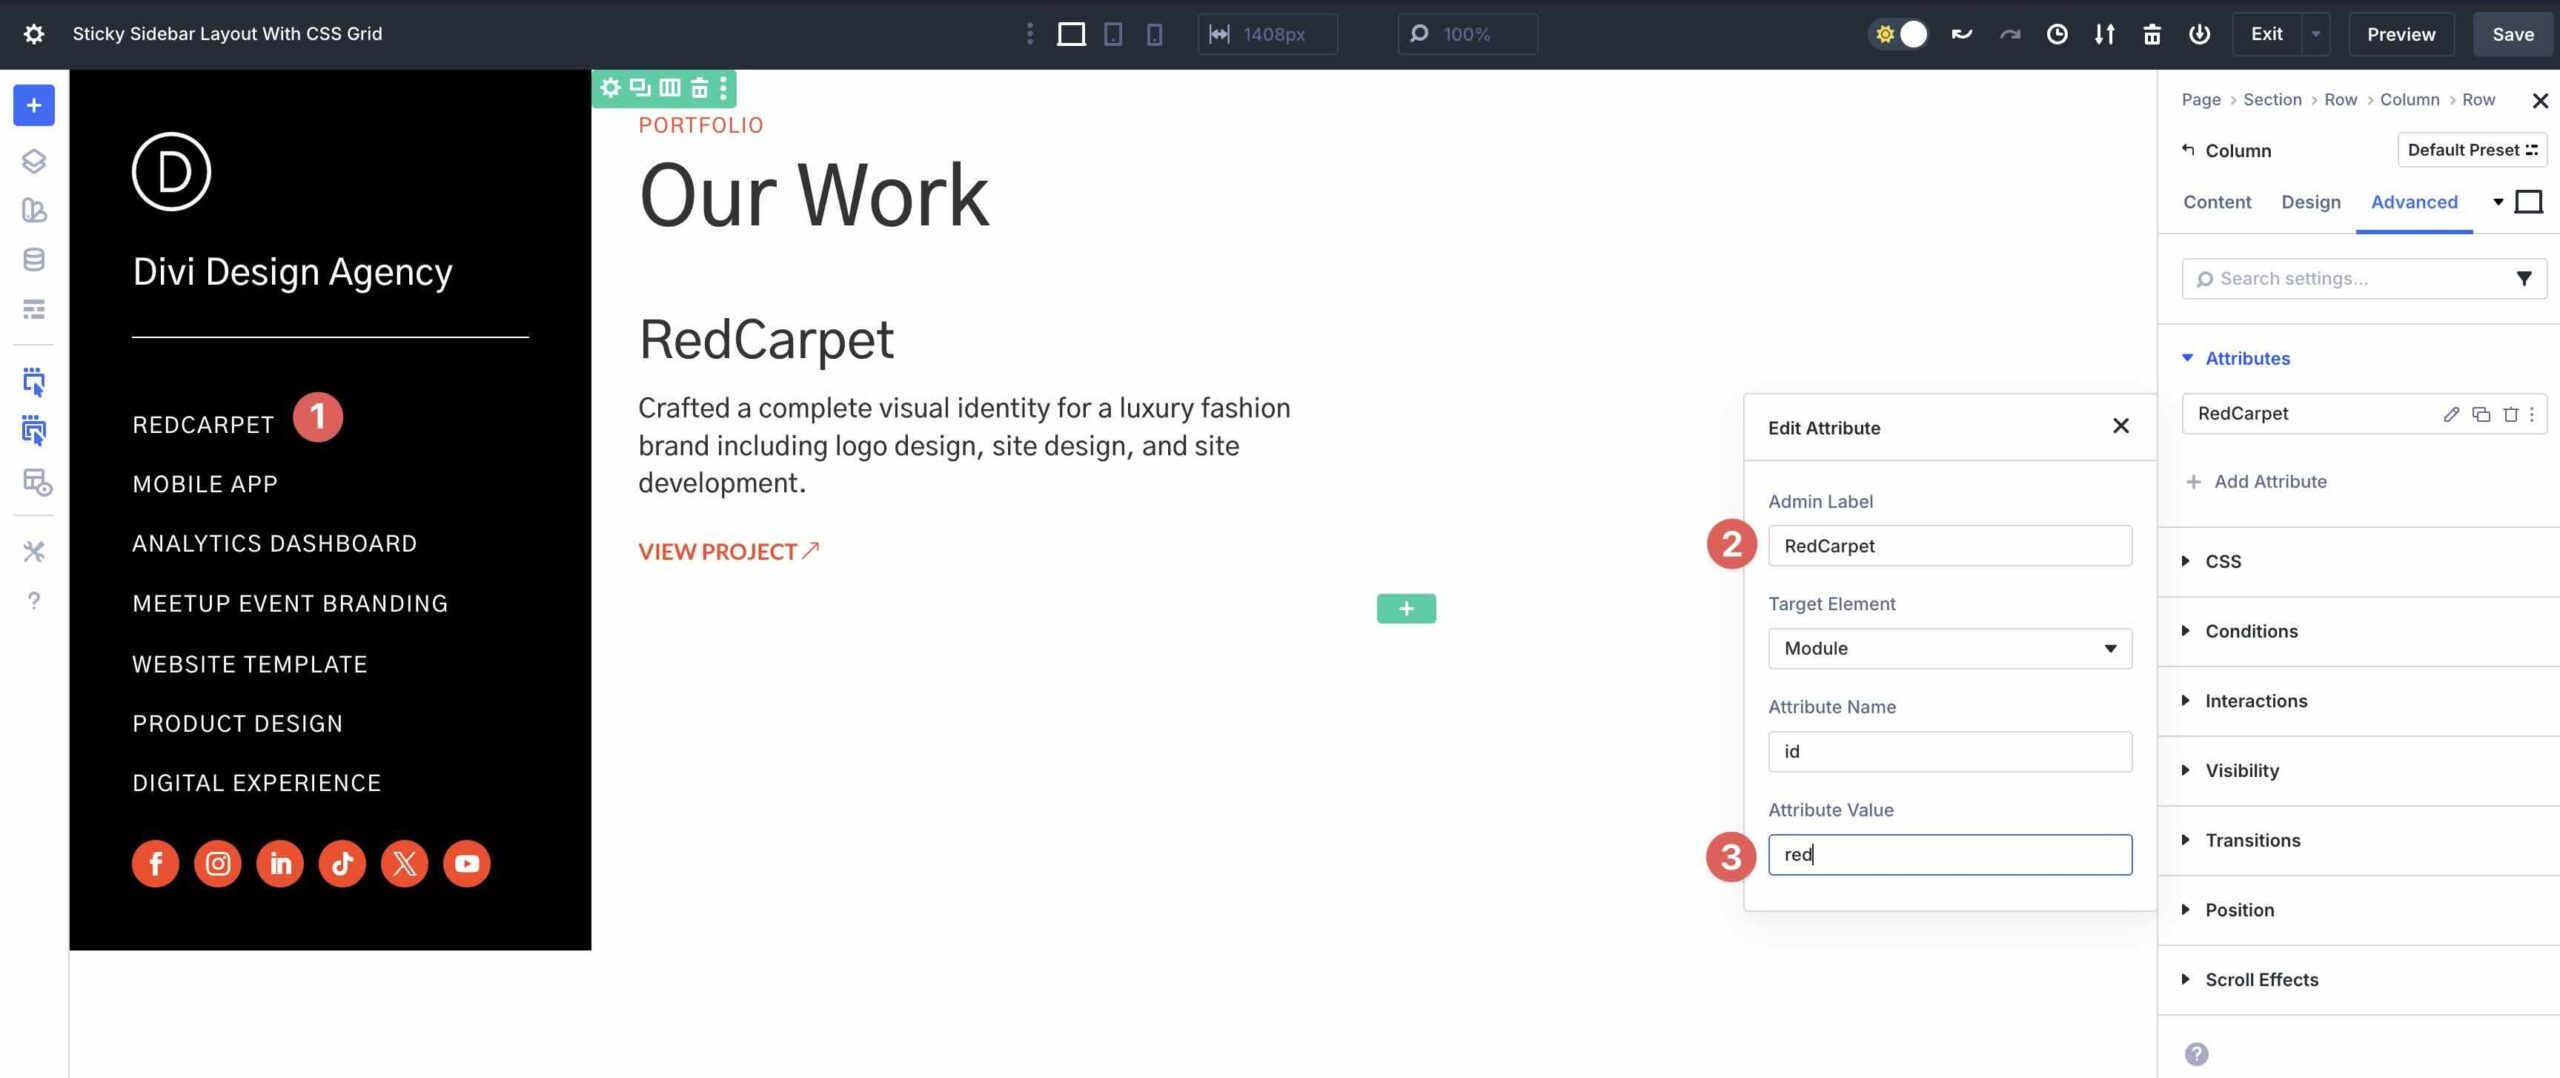
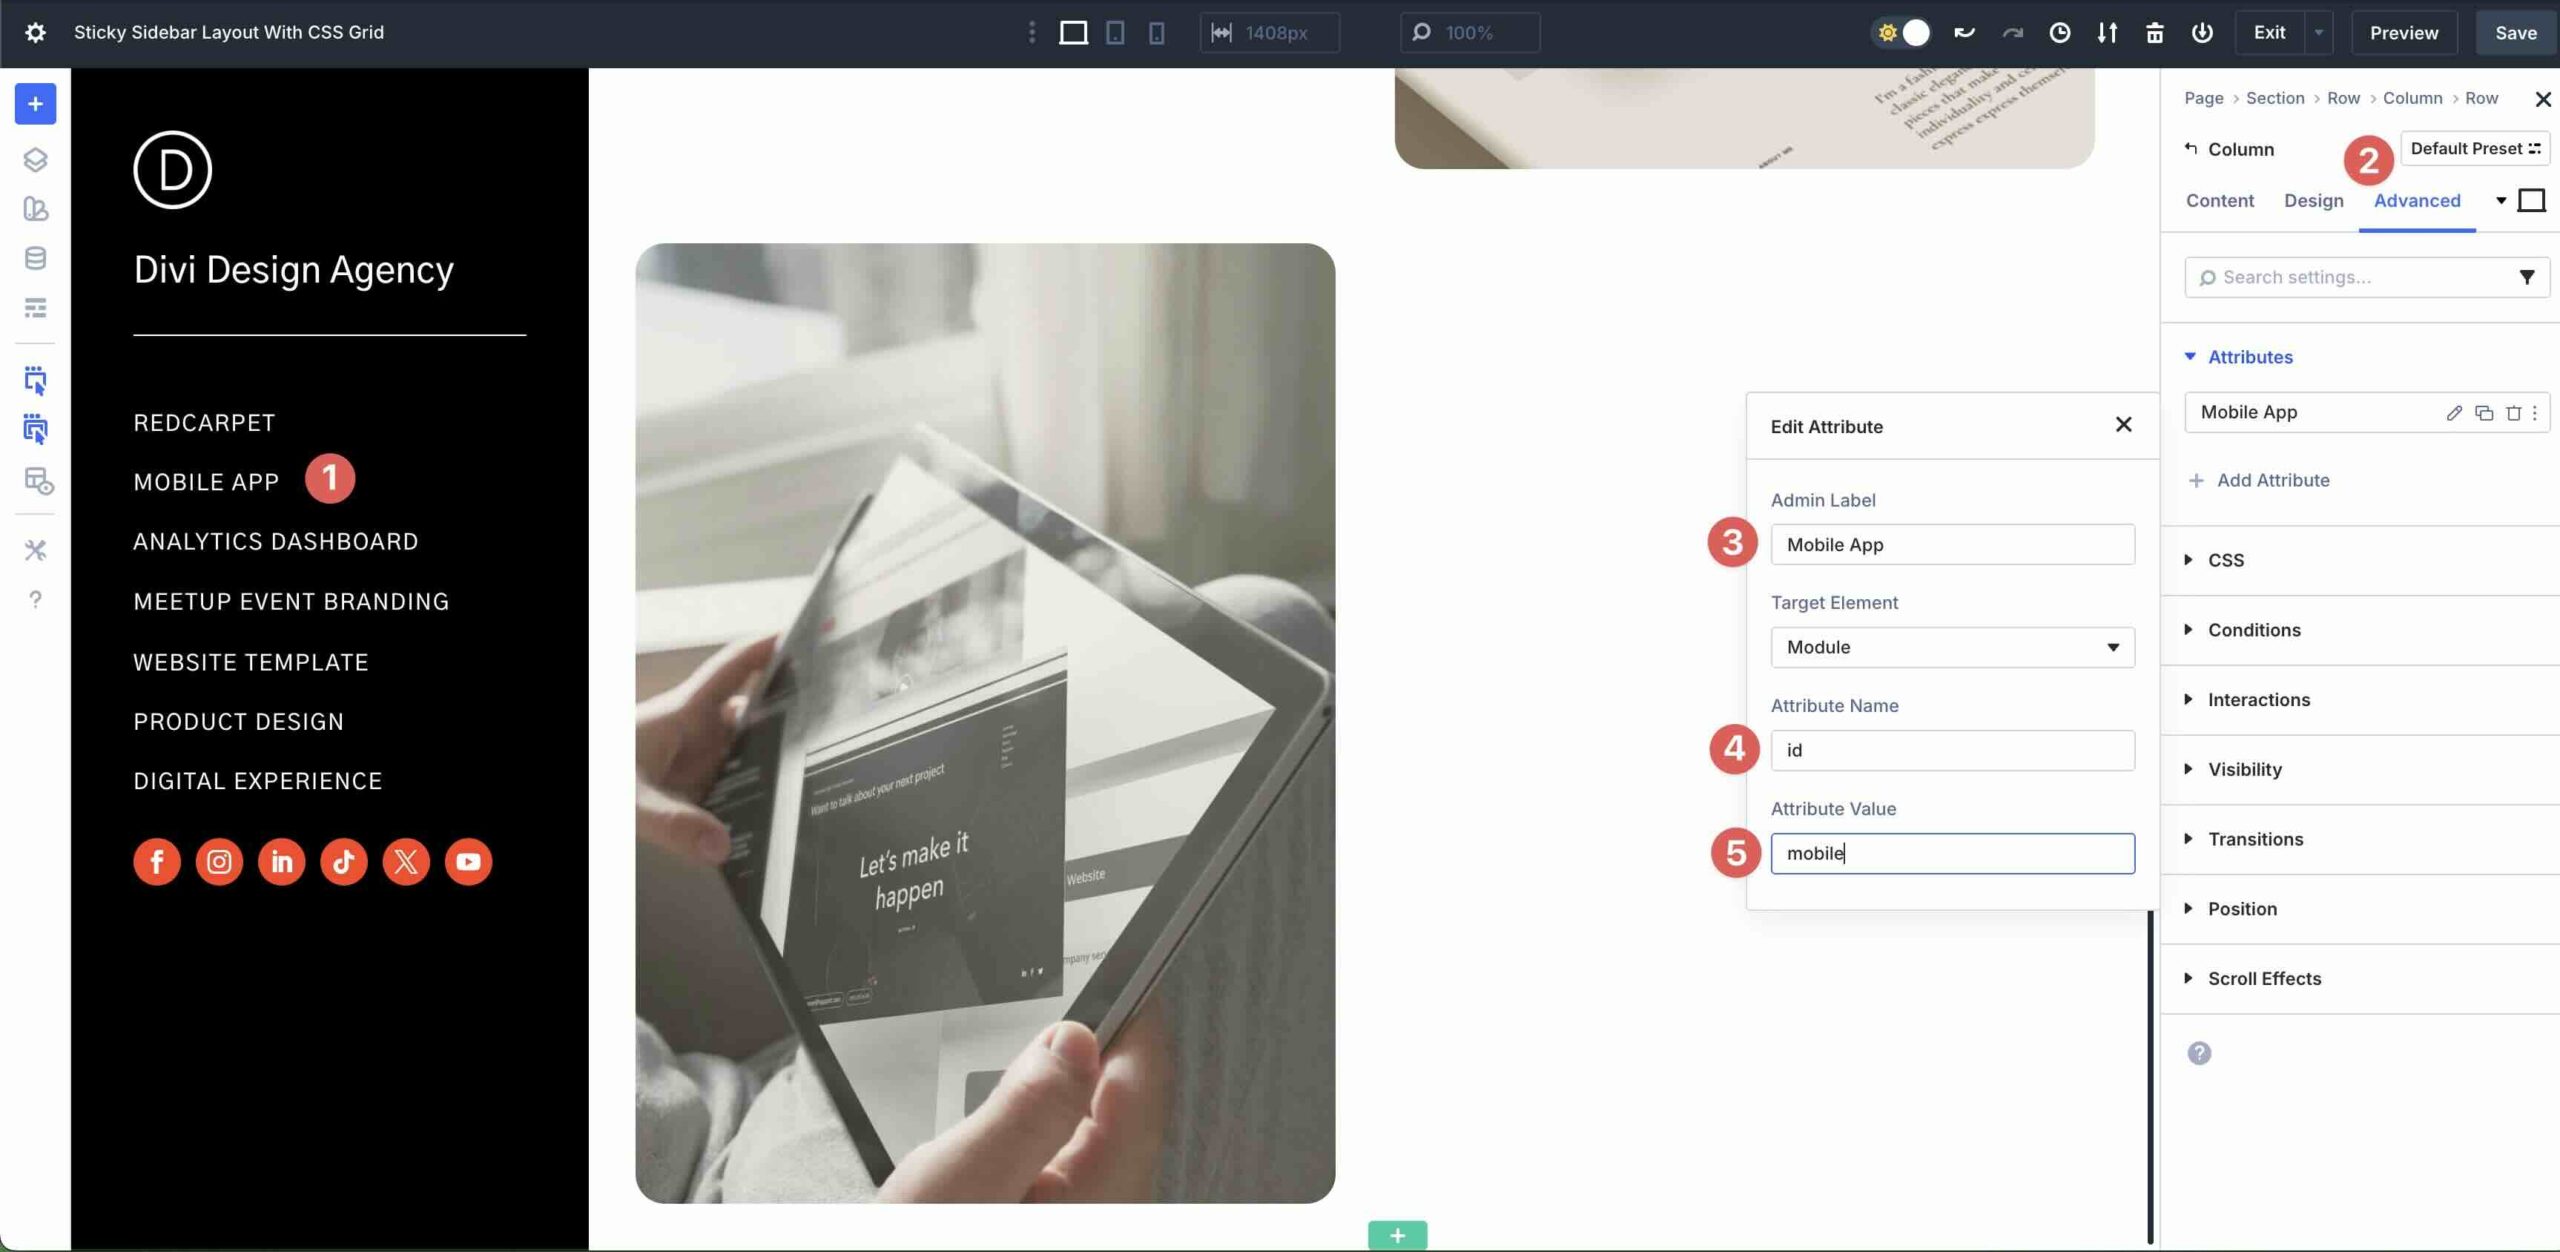
Navigate to the Complicated tab. We’ll wish to set an anchor hyperlink that corresponds to the primary menu merchandise within the first Column. Make bigger the Attributes menu. Click on the + Upload Characteristic button.

Make a selection identification from the to be had choices.
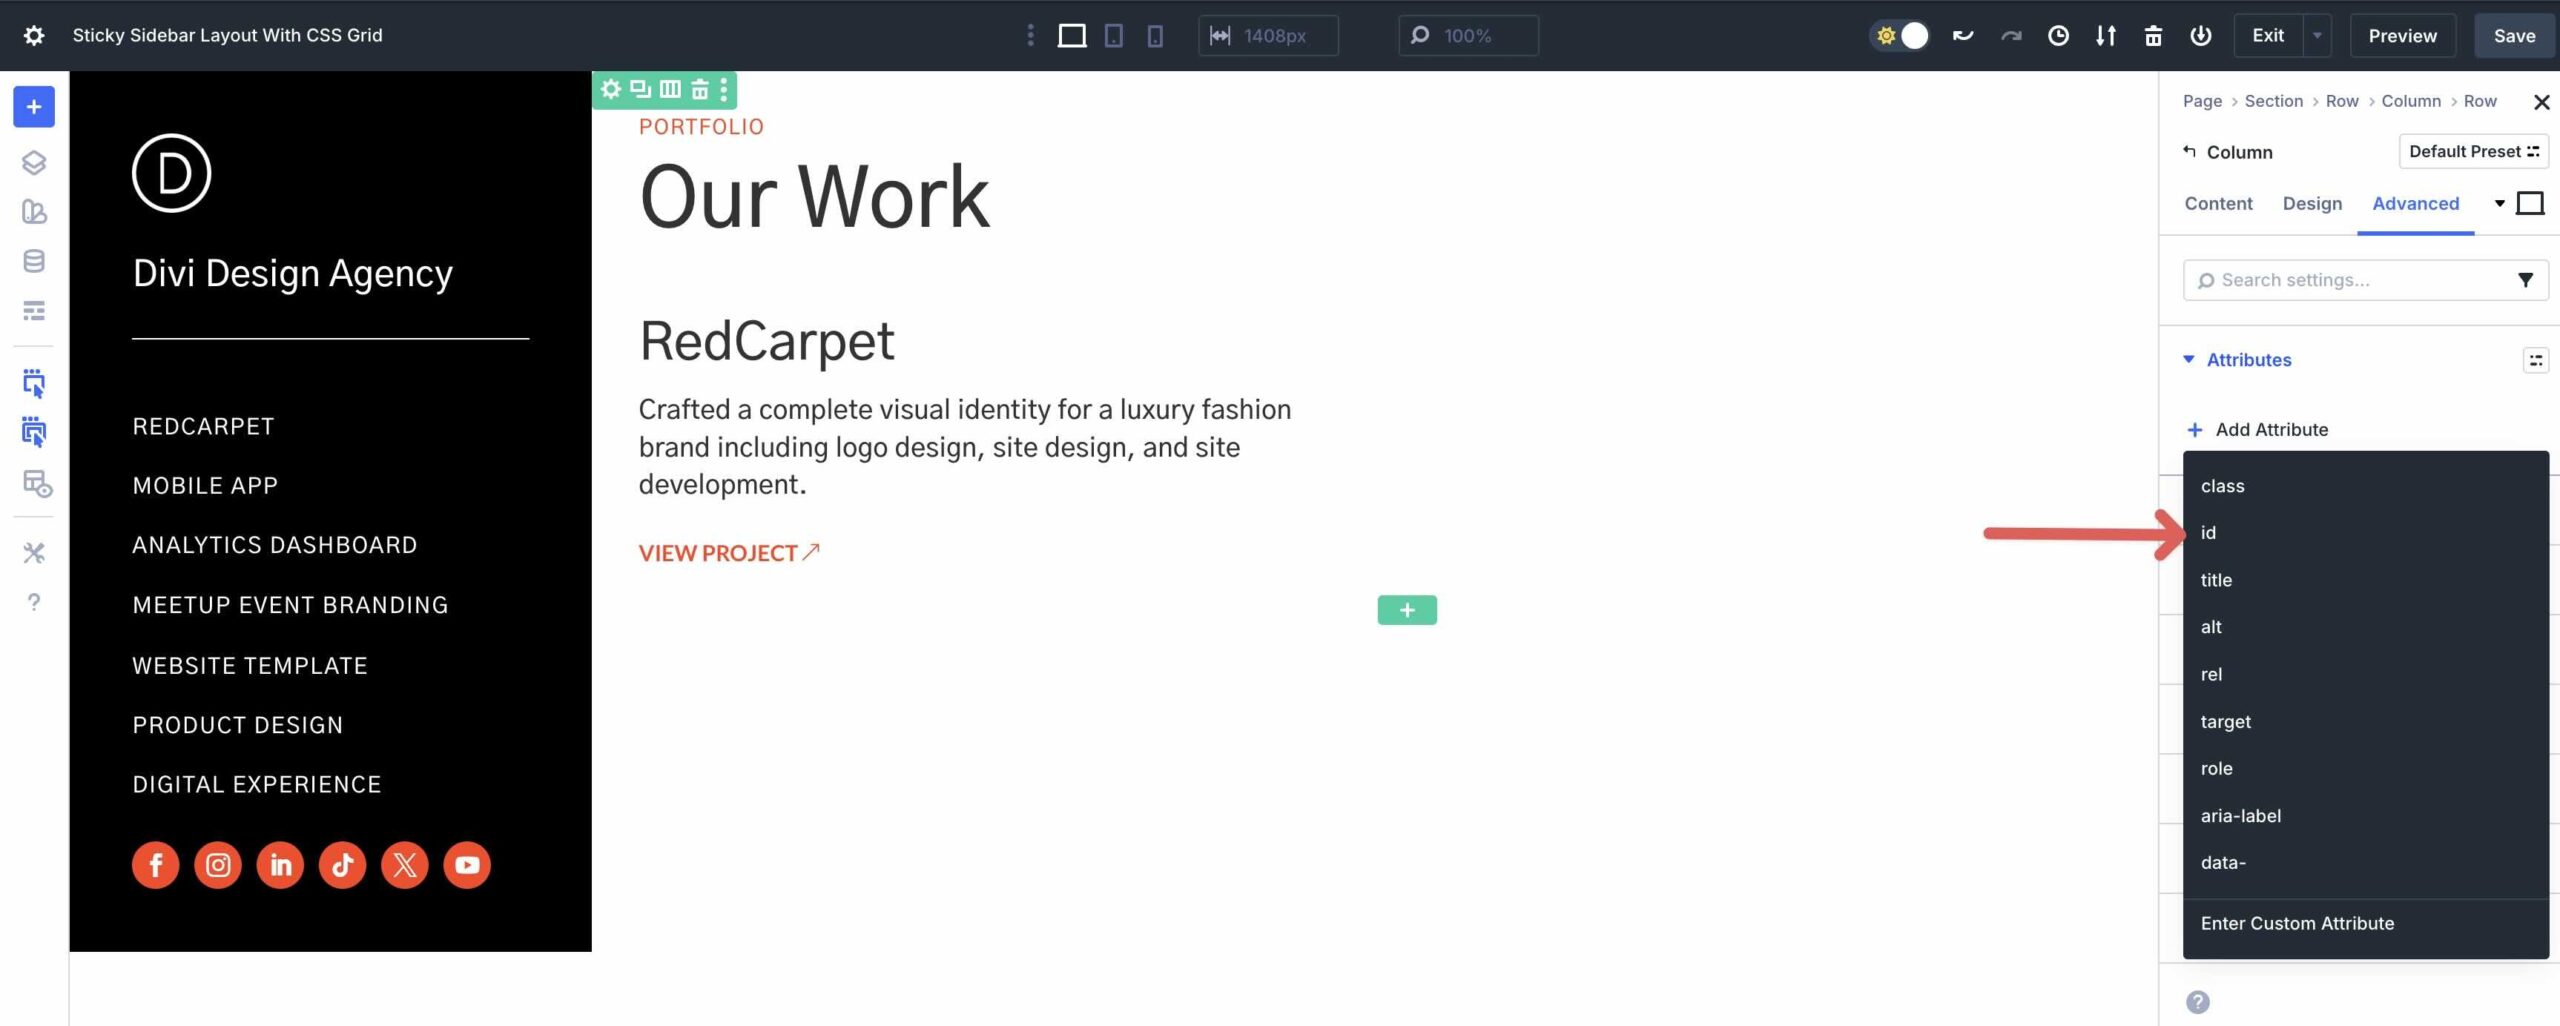
Upload an Admin Label for the Characteristic. Within the Characteristic Price box, input the anchor hyperlink you specified for the primary heading module within the menu phase.
Upload A New Grid Merchandise
Click on again to the Row’s Content material tab and upload a brand new Grid Merchandise. This time, upload an Symbol module and magnificence it as desired.
This serves as the elemental construction of the Grid.
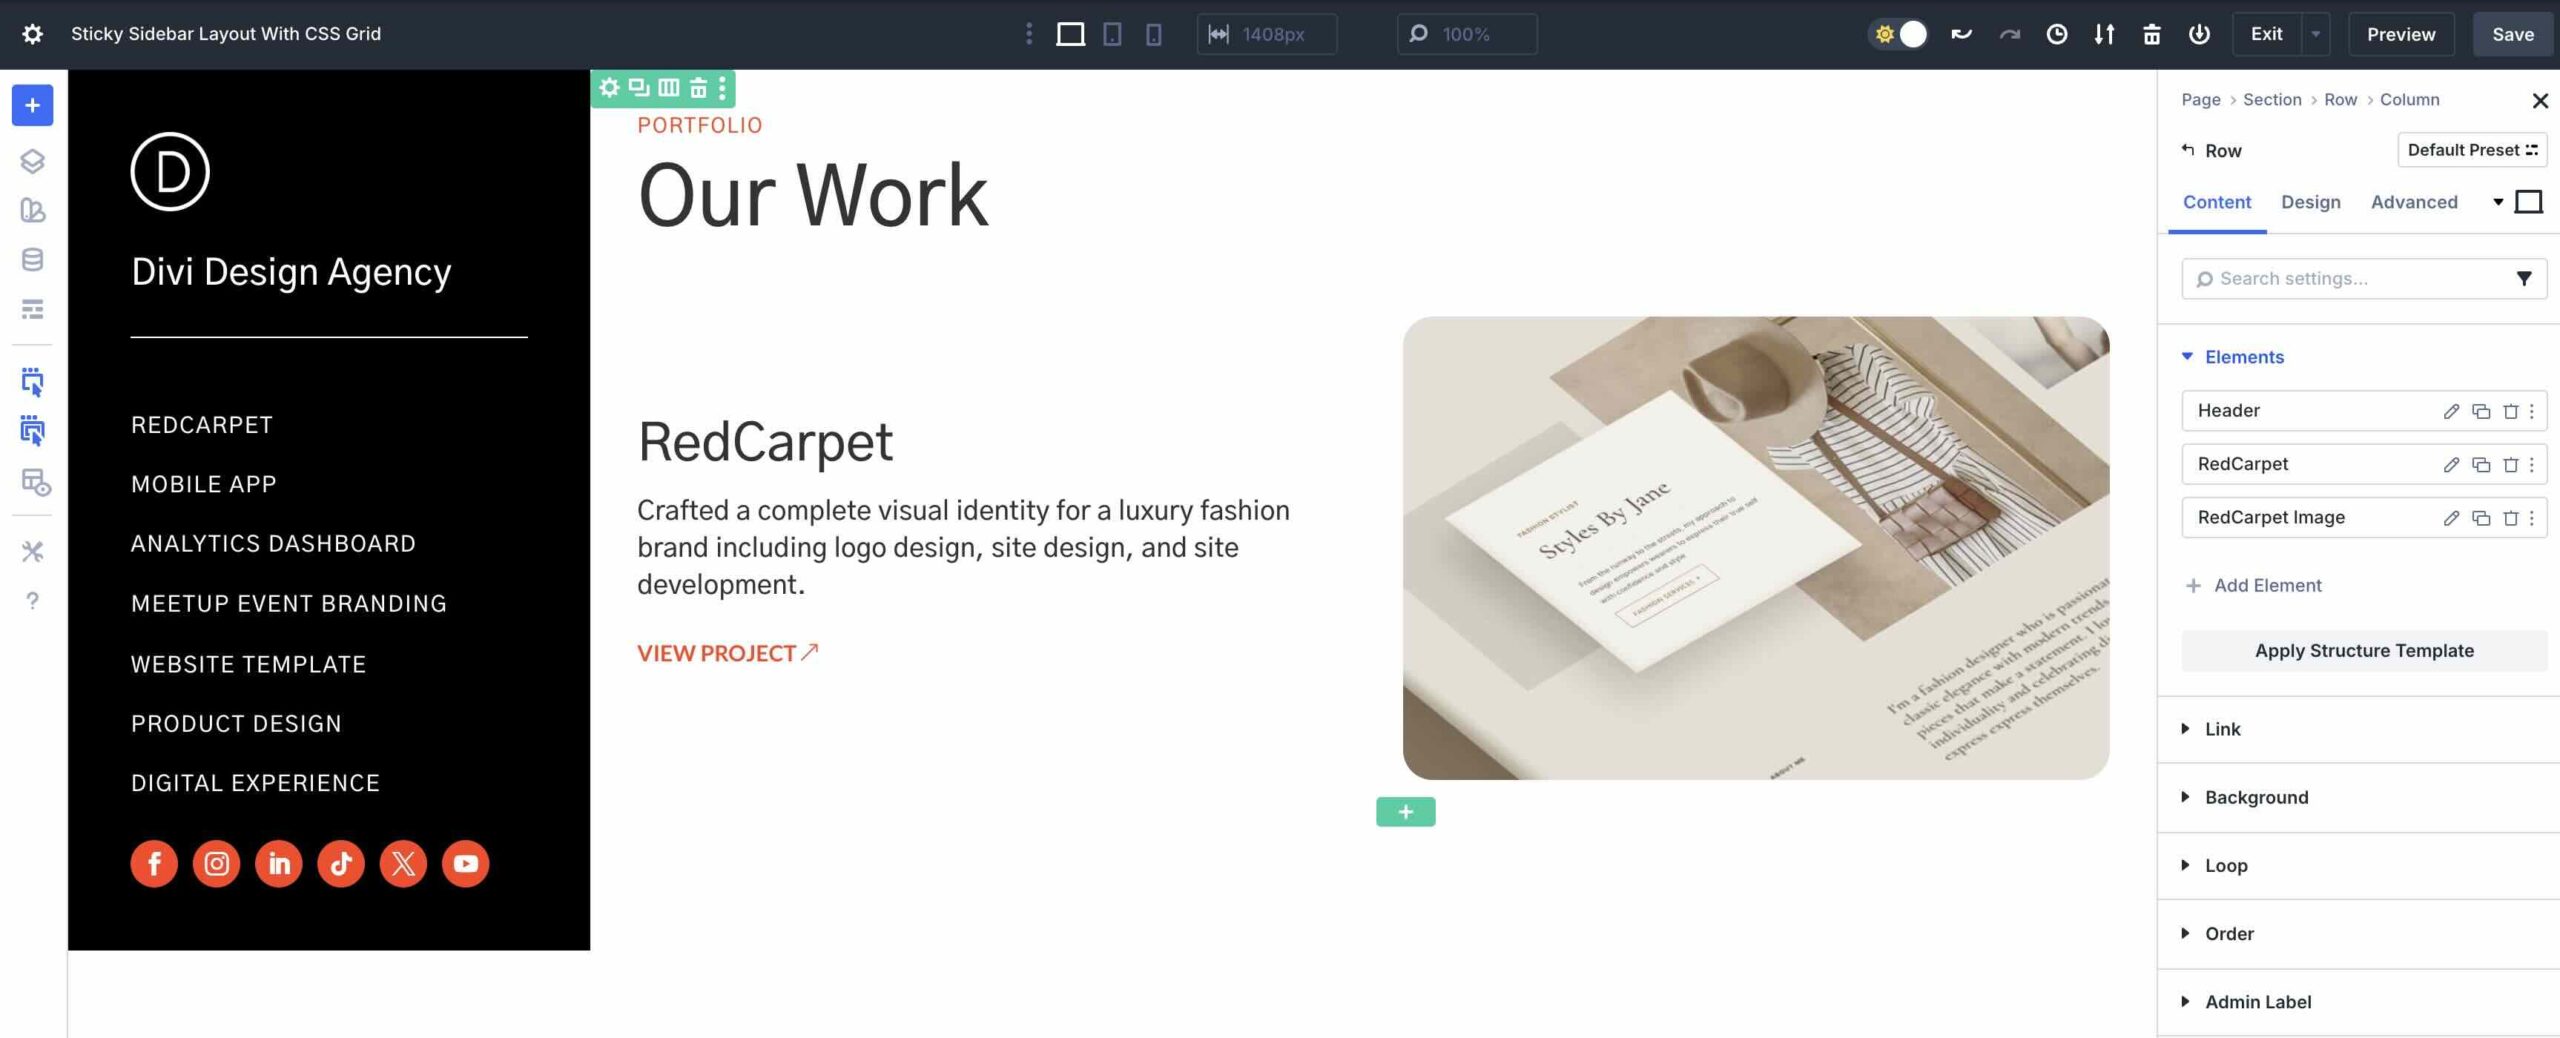
Reproduction And Edit Grid Pieces
To make issues simple, you’ll replica Grid Pieces by way of clicking at the Reproduction Merchandise icon.
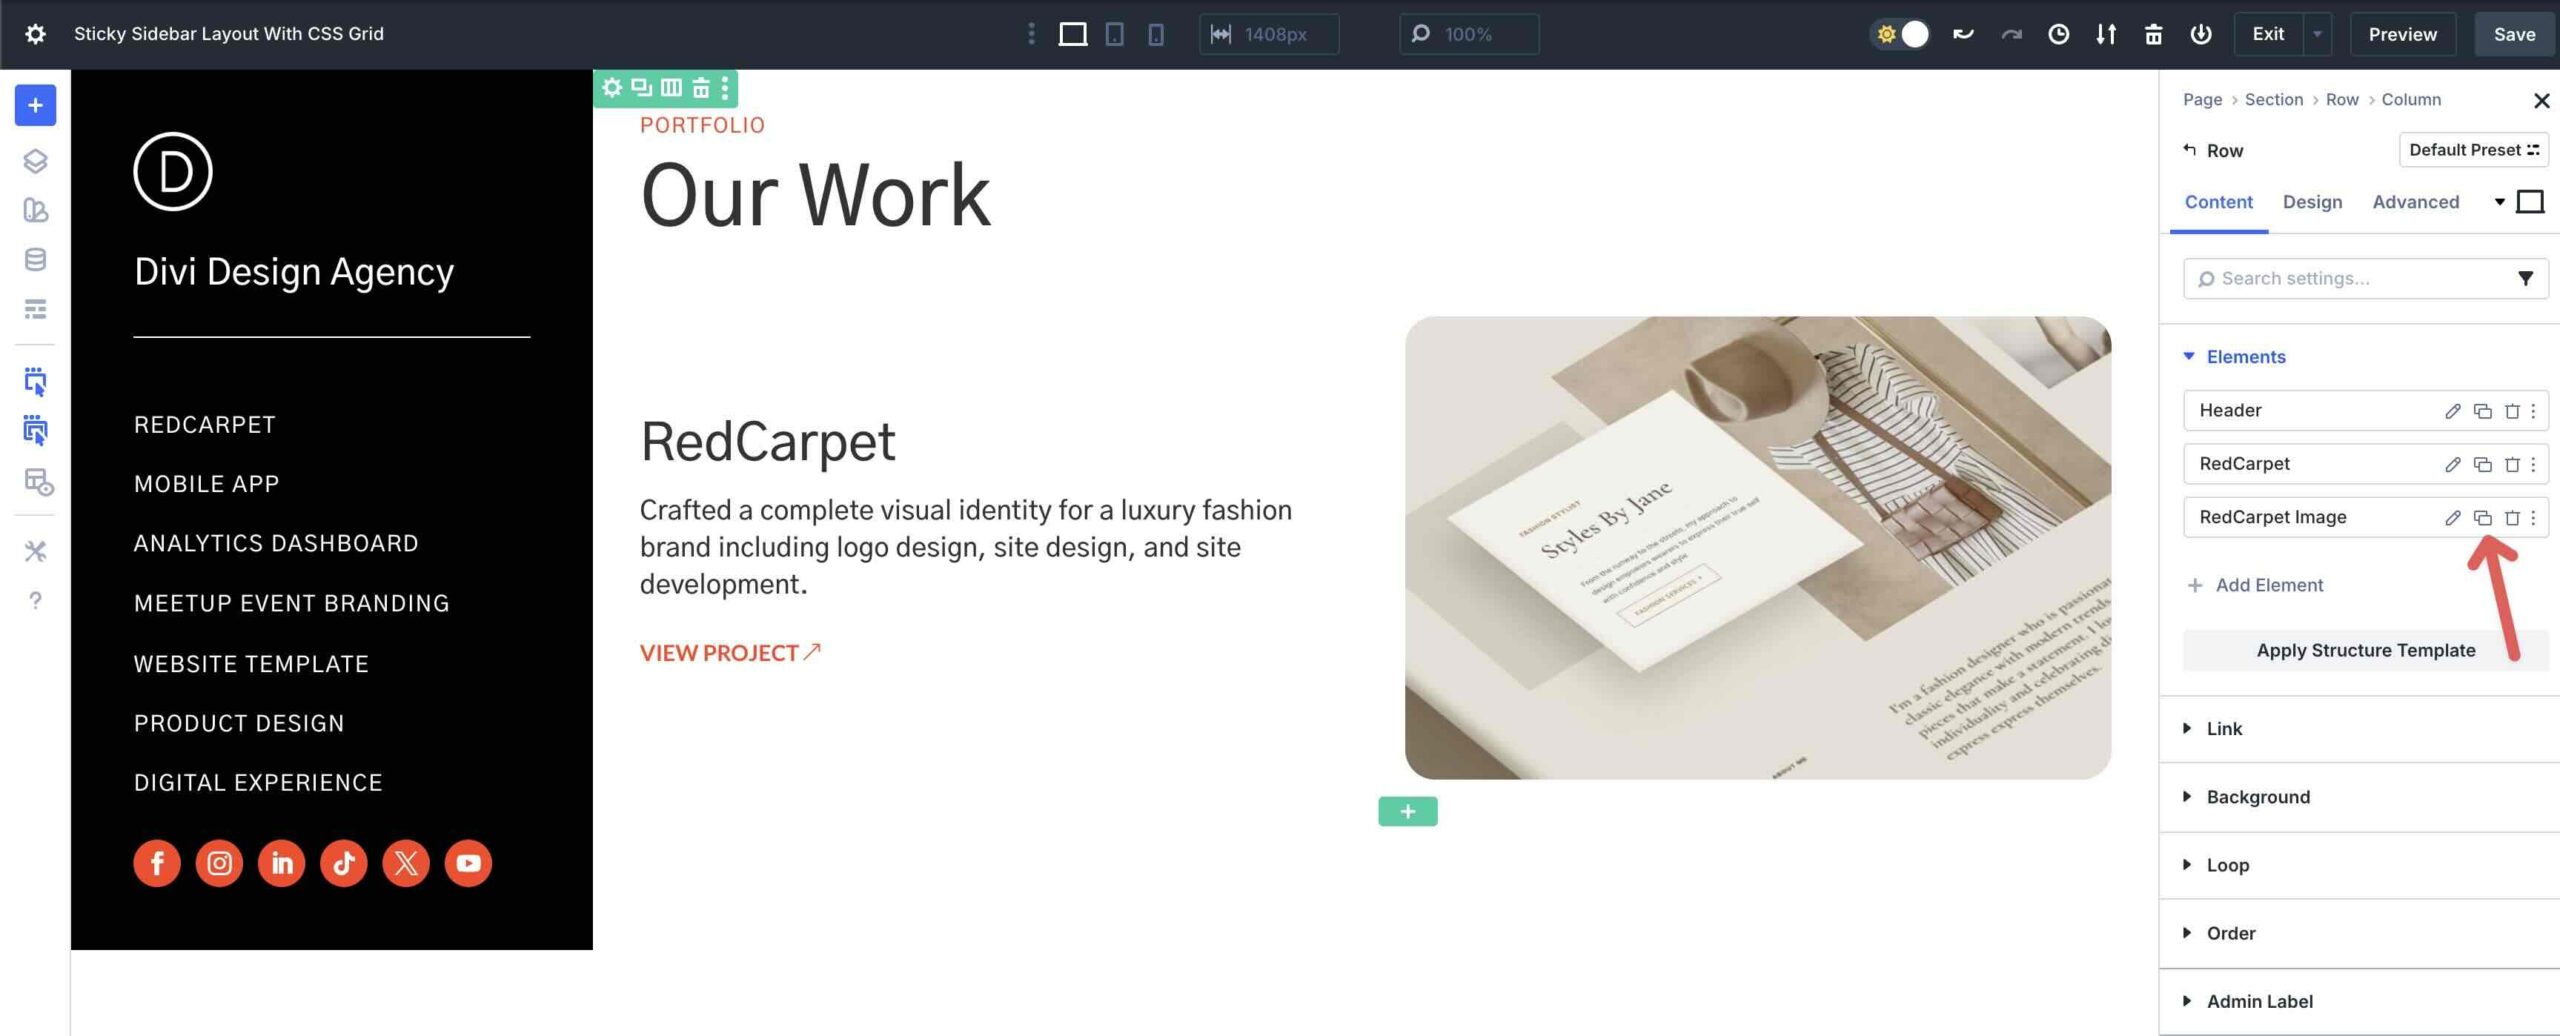
You’ll want to upload Attributes for each and every new phase of the Grid that corresponds with their menu merchandise hyperlinks.
Reposition Grid Pieces by way of clicking and dragging them during the Grid.
From there, merely edit the module’s content material whilst retaining types intact during the Grid.
Repeat those steps so as to add as many pieces as wanted. Make certain that you assign anchor hyperlinks (Attributes) to ONLY the textual content Grid Pieces. We can duvet why in your next step.
Step 5: Alter Settings For Responsive Breakpoints
Our design appears to be like nice on Desktop, but if navigating thru Divi 5’s Customizable Responsive Breakpoints, you’ll see that we wish to make some adjustments.
Fortunately, Divi 5 makes it simple to make fast adjustments to Pill and Telephone breakpoints, making sure your format appears to be like flawless on all display sizes. Whilst within the Pill Breakpoint, click on the Settings icon for the primary Row.
Click on at the Pencil icon to edit the primary Column’s settings.
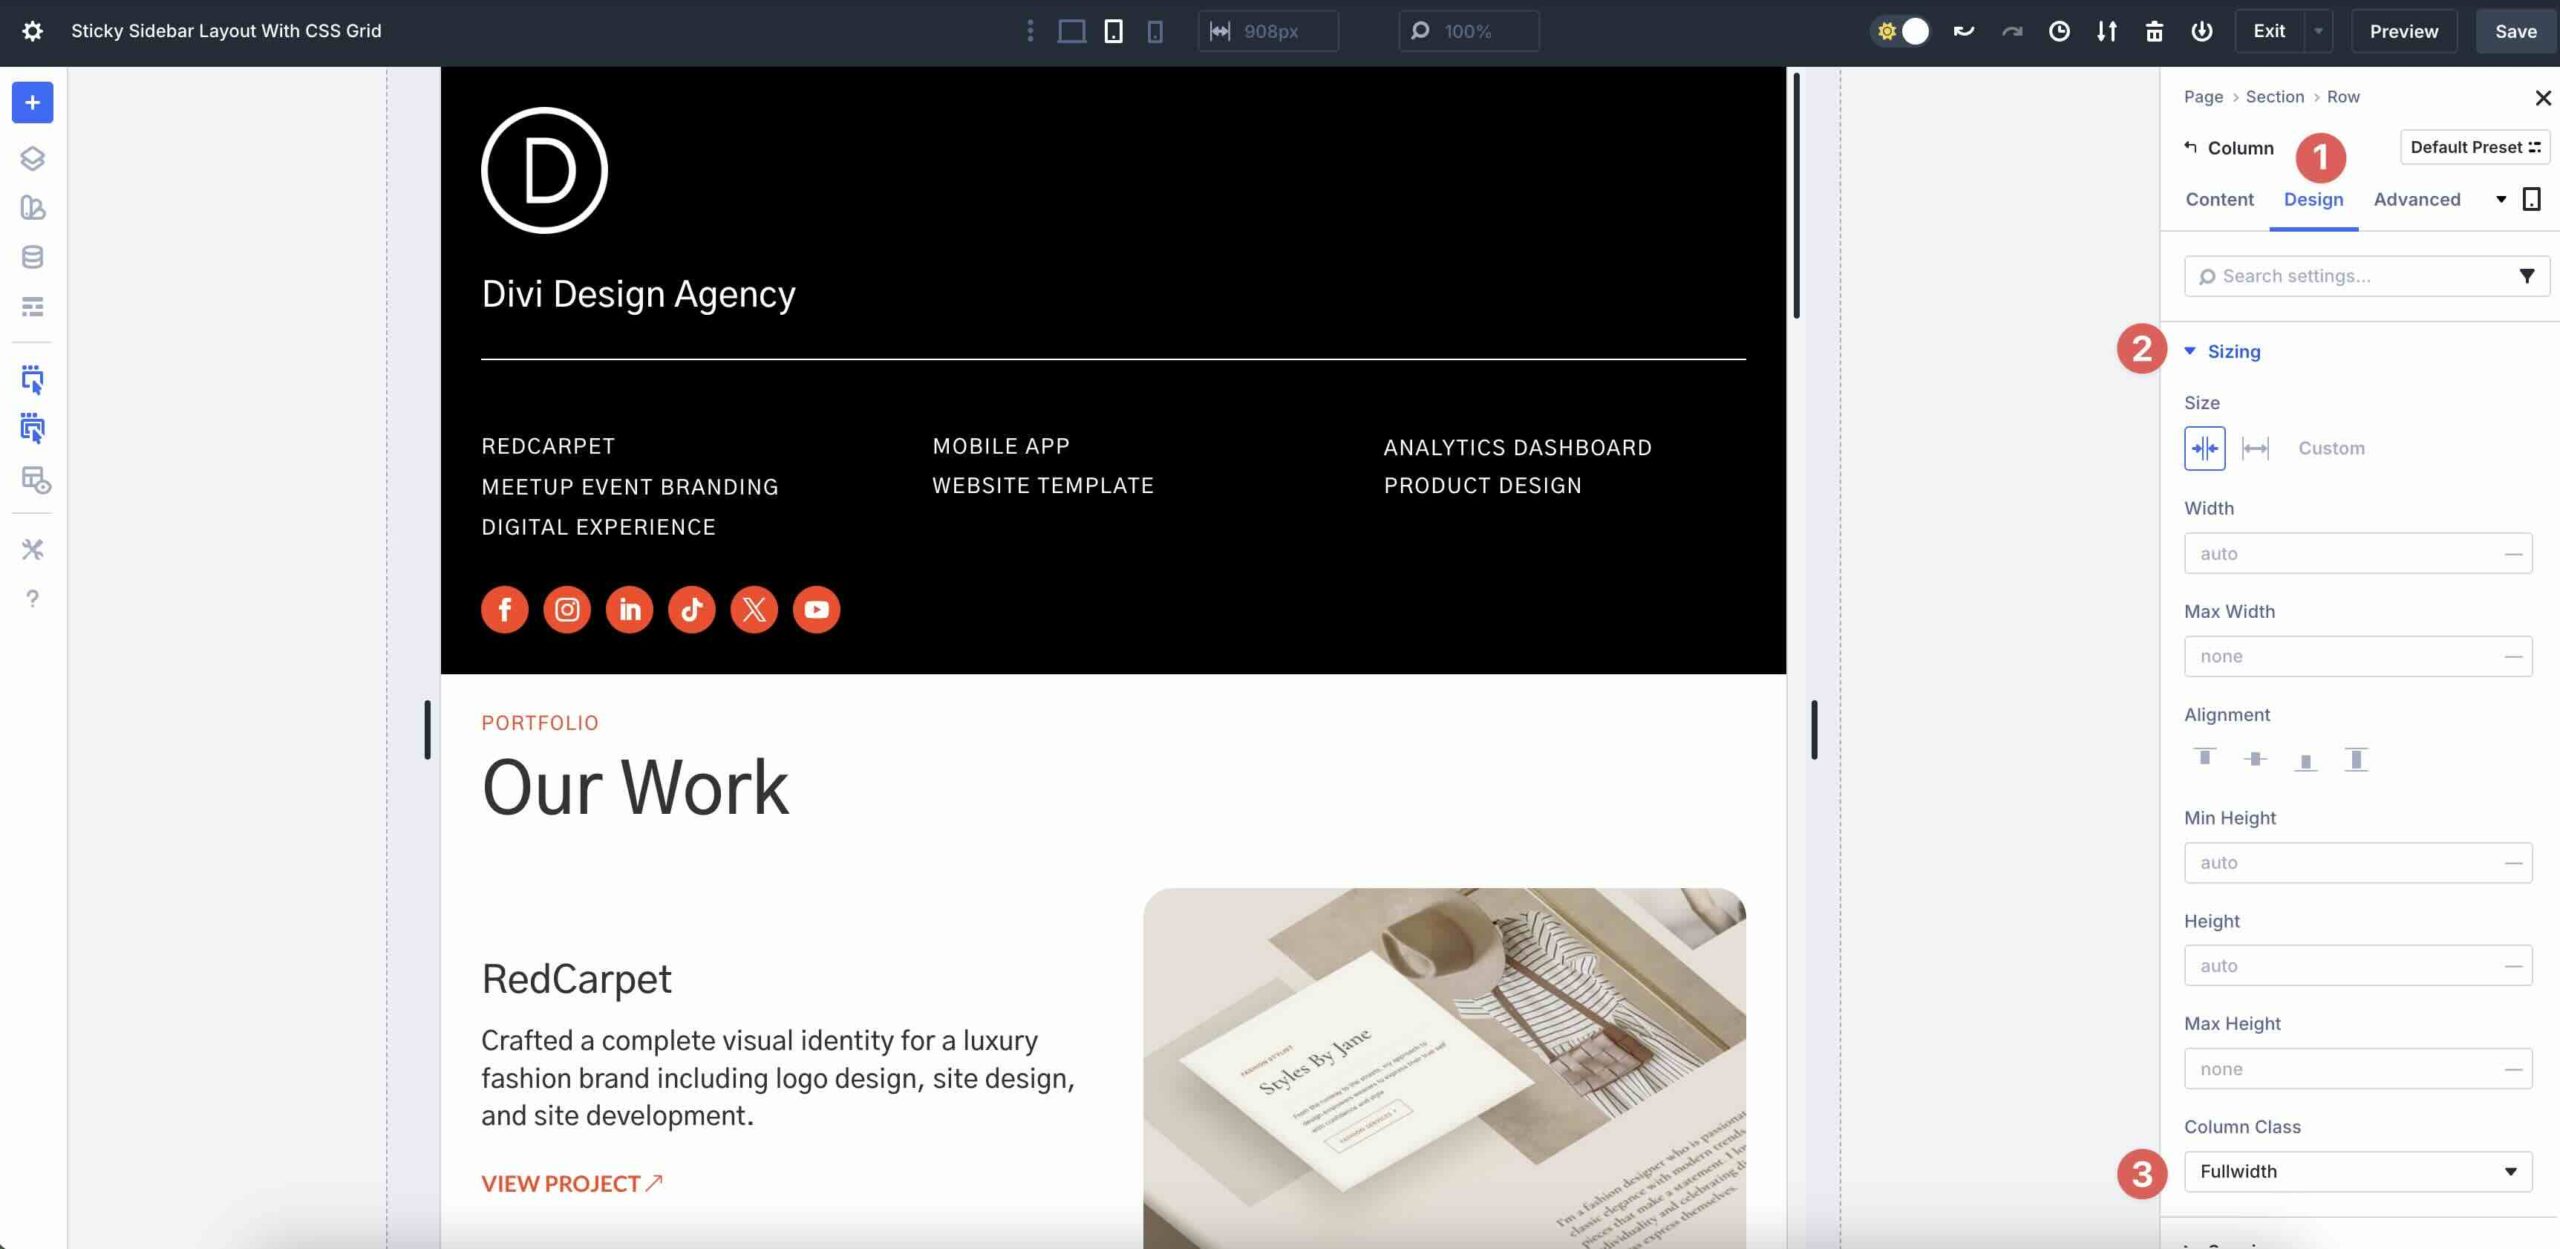
Navigate to the Design tab and make bigger the Sizing menu. Set the Column Elegance to Fullwidth. This will likely make bigger the Sticky Column’s width to fill all of the Row.
Hover over the Column within the Visible Builder canvas. Click on the Settings icon for the Row containing the menu hyperlinks. Within the Design tab, set the Vertical Hole to 10px and set the Quantity Of Columns to 3.
Scroll during the Sticky Column’s settings to make tweaks to Spacing or Gaps.
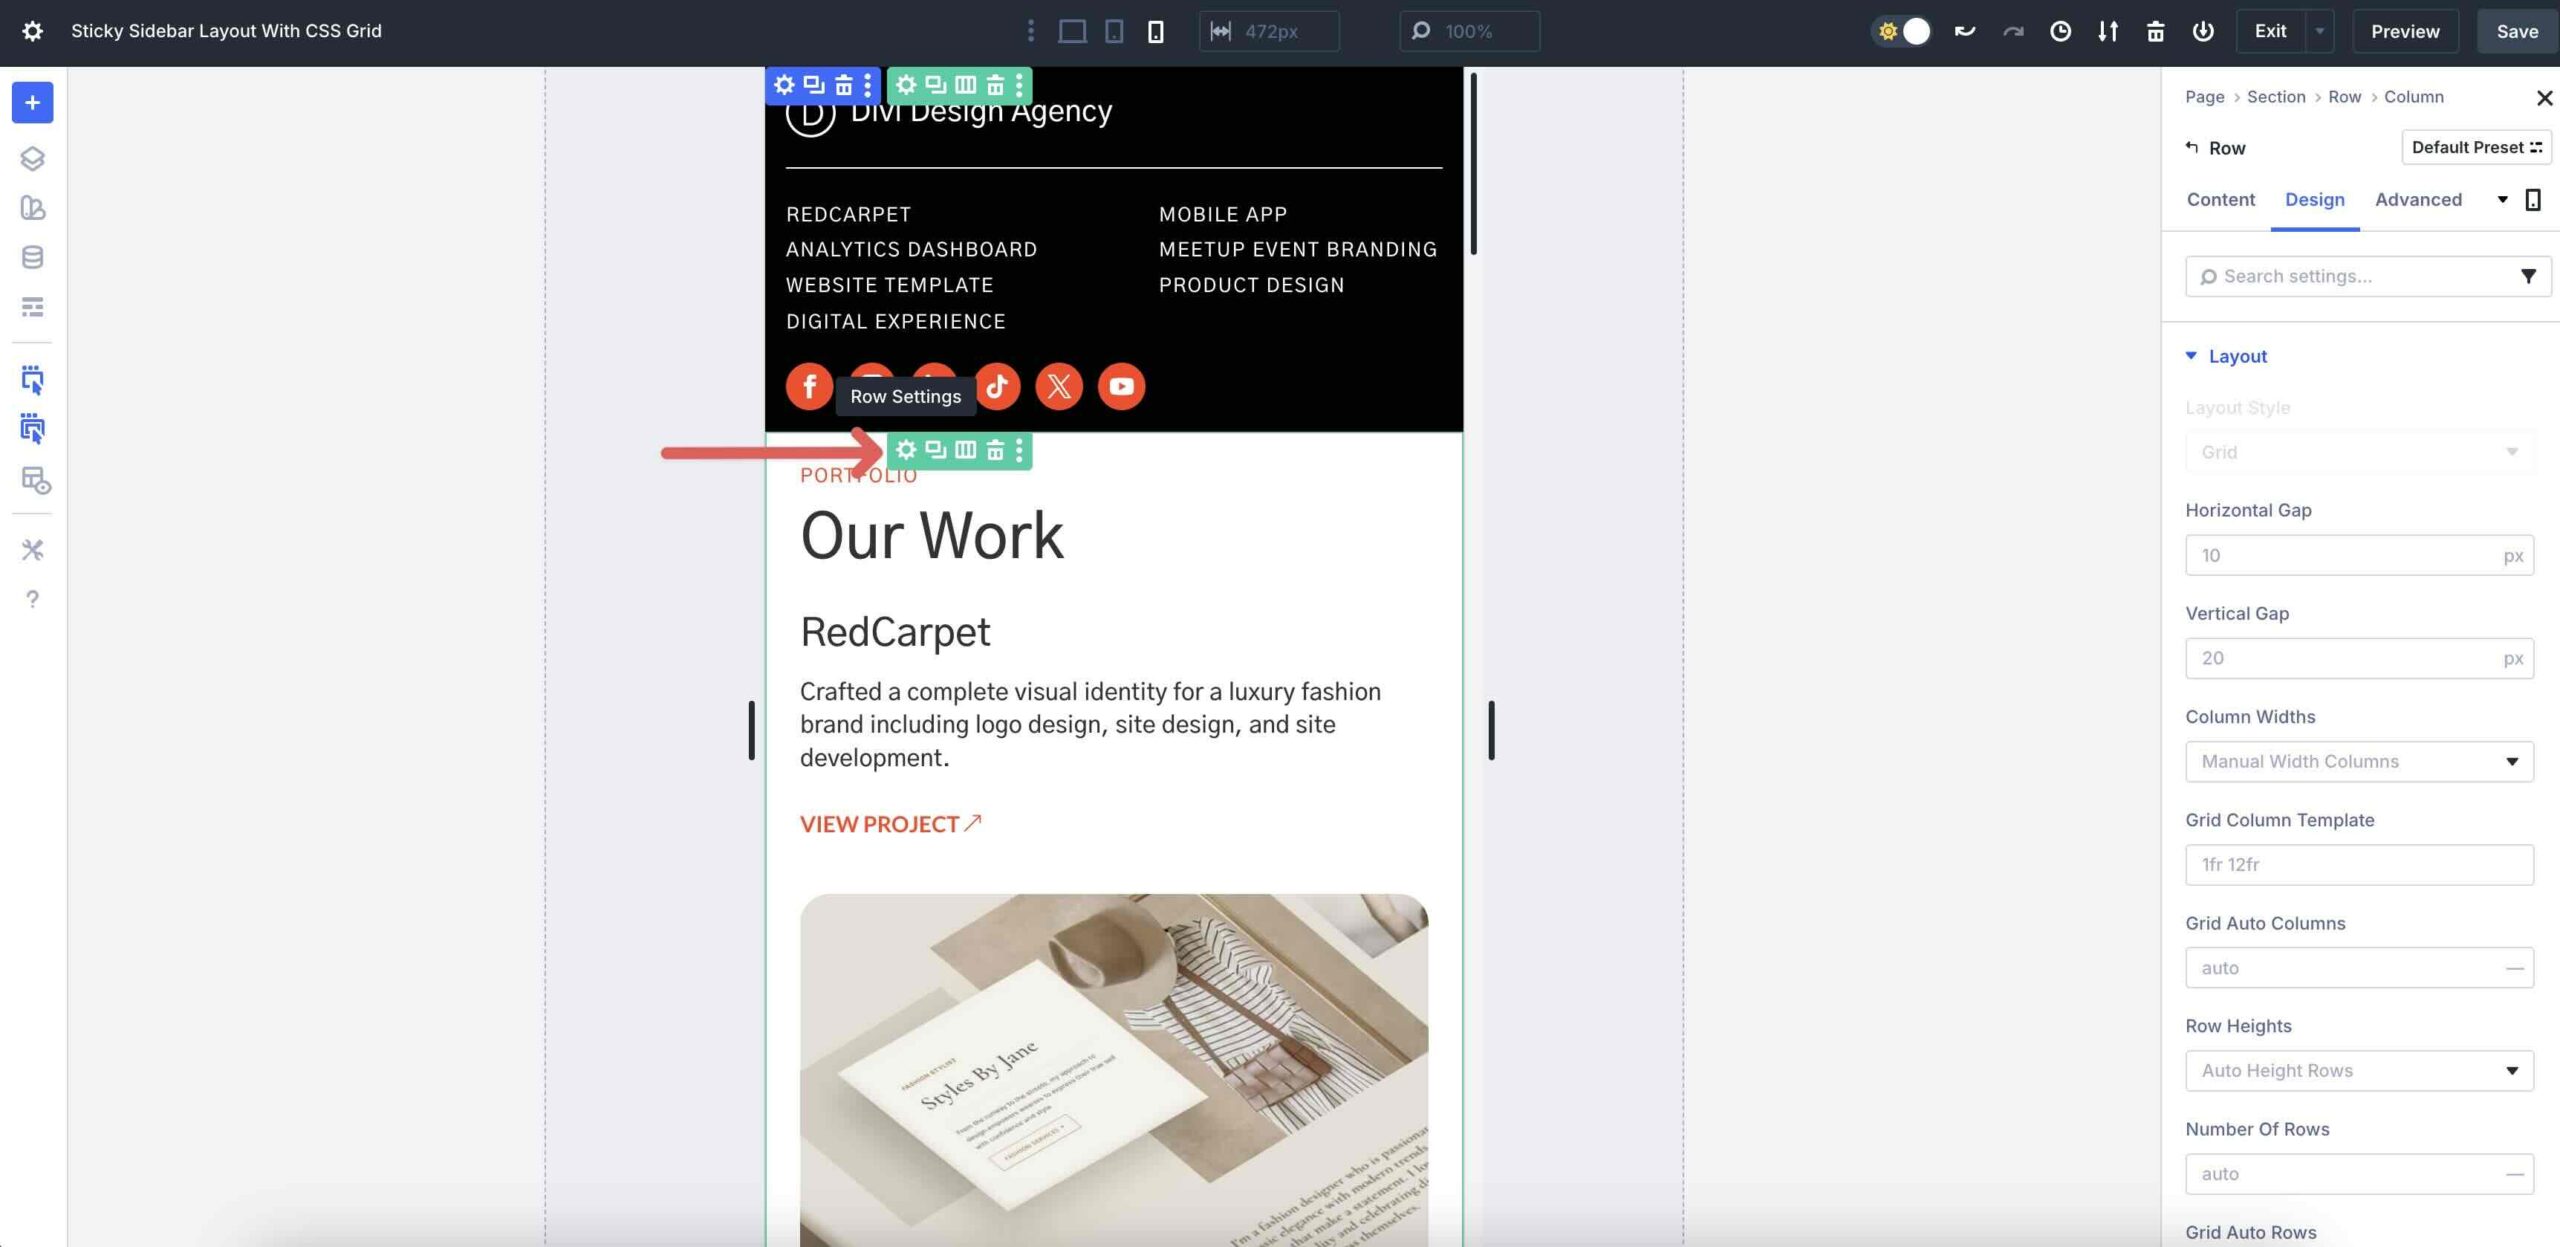
Make changes to the Row settings that area the brand (Symbol module) and identify to make sure it appears to be like just right on small software displays. As an example, you’ll assign Column Widths to Handbook Width Columns and specify a tradition Grid Column Template, reminiscent of 1fr 12fr, to stack pieces horizontally as a substitute of vertically.
Alter The Grid Row For Responsiveness
Transfer to Telephone view. Click on the Settings icon for the Grid Row.
Click on the pencil icon of the 2d Grid Merchandise to regulate its settings.
Navigate to the Design tab. Alter the Column Span to 2. This will likely permit the content material to occupy the entire width of the Row. Repeat the stairs to regulate the rest Grid Pieces to 2.
As you scroll down the web page, you’ll understand that the Grid Pieces are all occupying 2 Columns, however the order isn’t what we’d like.
To mend this, we will be able to regulate each and every Column’s Row Get started and Row Finish values to align them completely. Because the first two Grid Pieces (which occupy 4 “Rows” on cellular) are aligned the way in which we wish, we wish to regulate the fifth Grid Merchandise in order that they stack correctly.
Click on at the fifth Grid Merchandise and navigate to the Design tab. Make bigger the Sizing Menu and find the Row Get started and Row Finish fields.
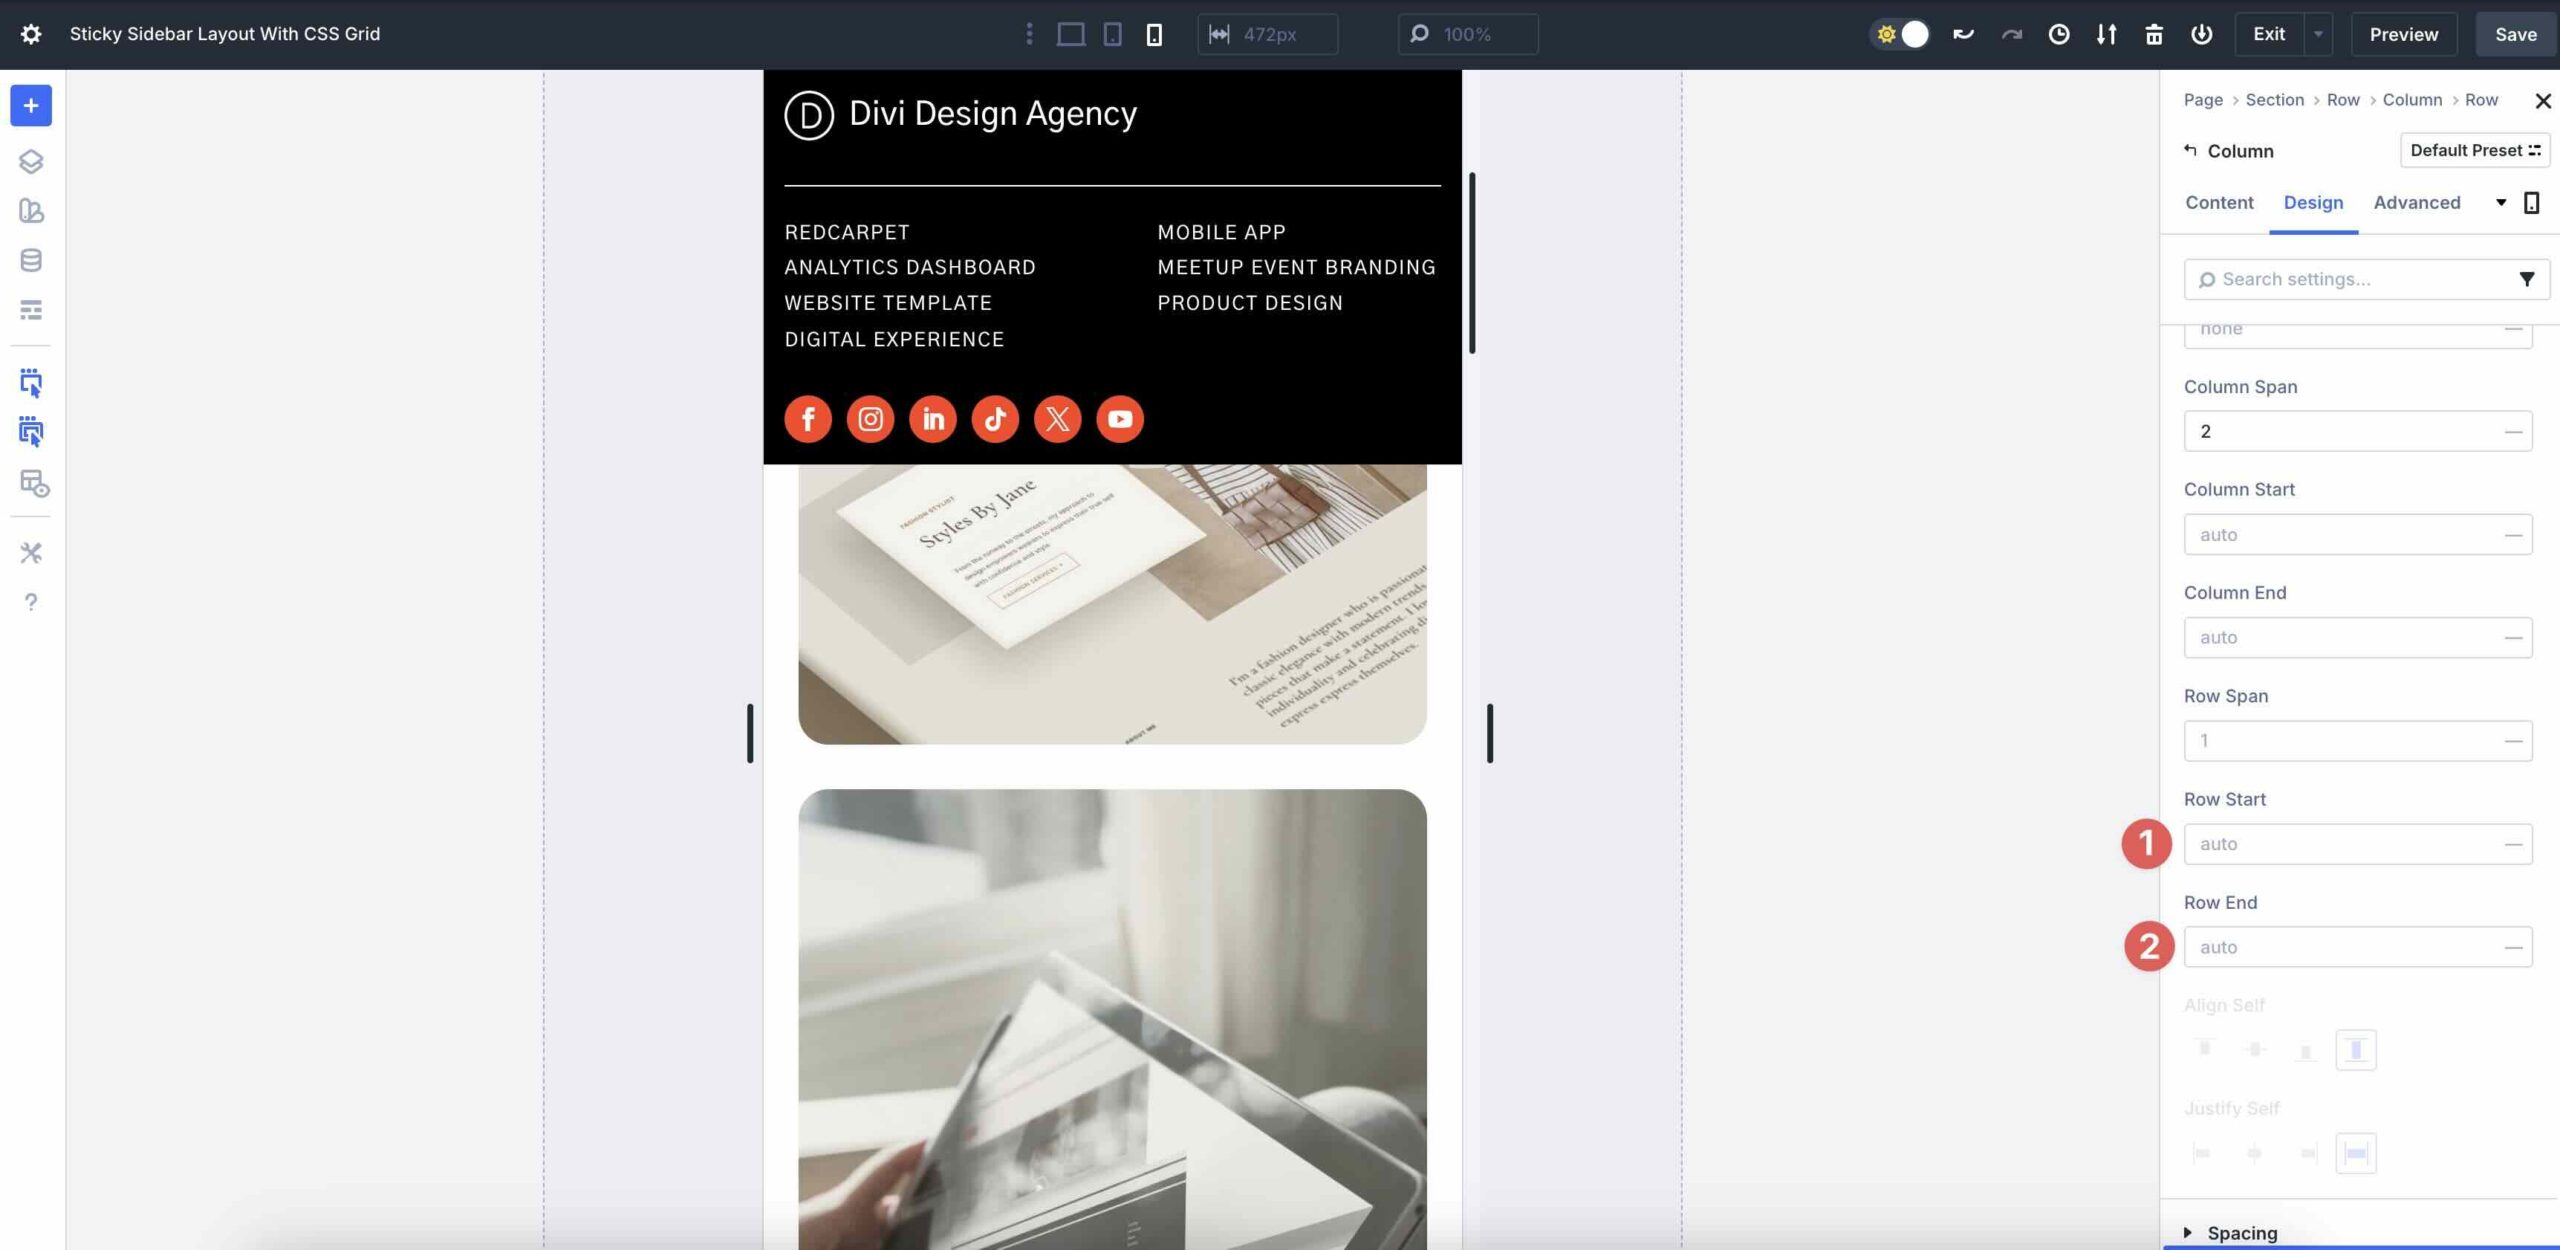
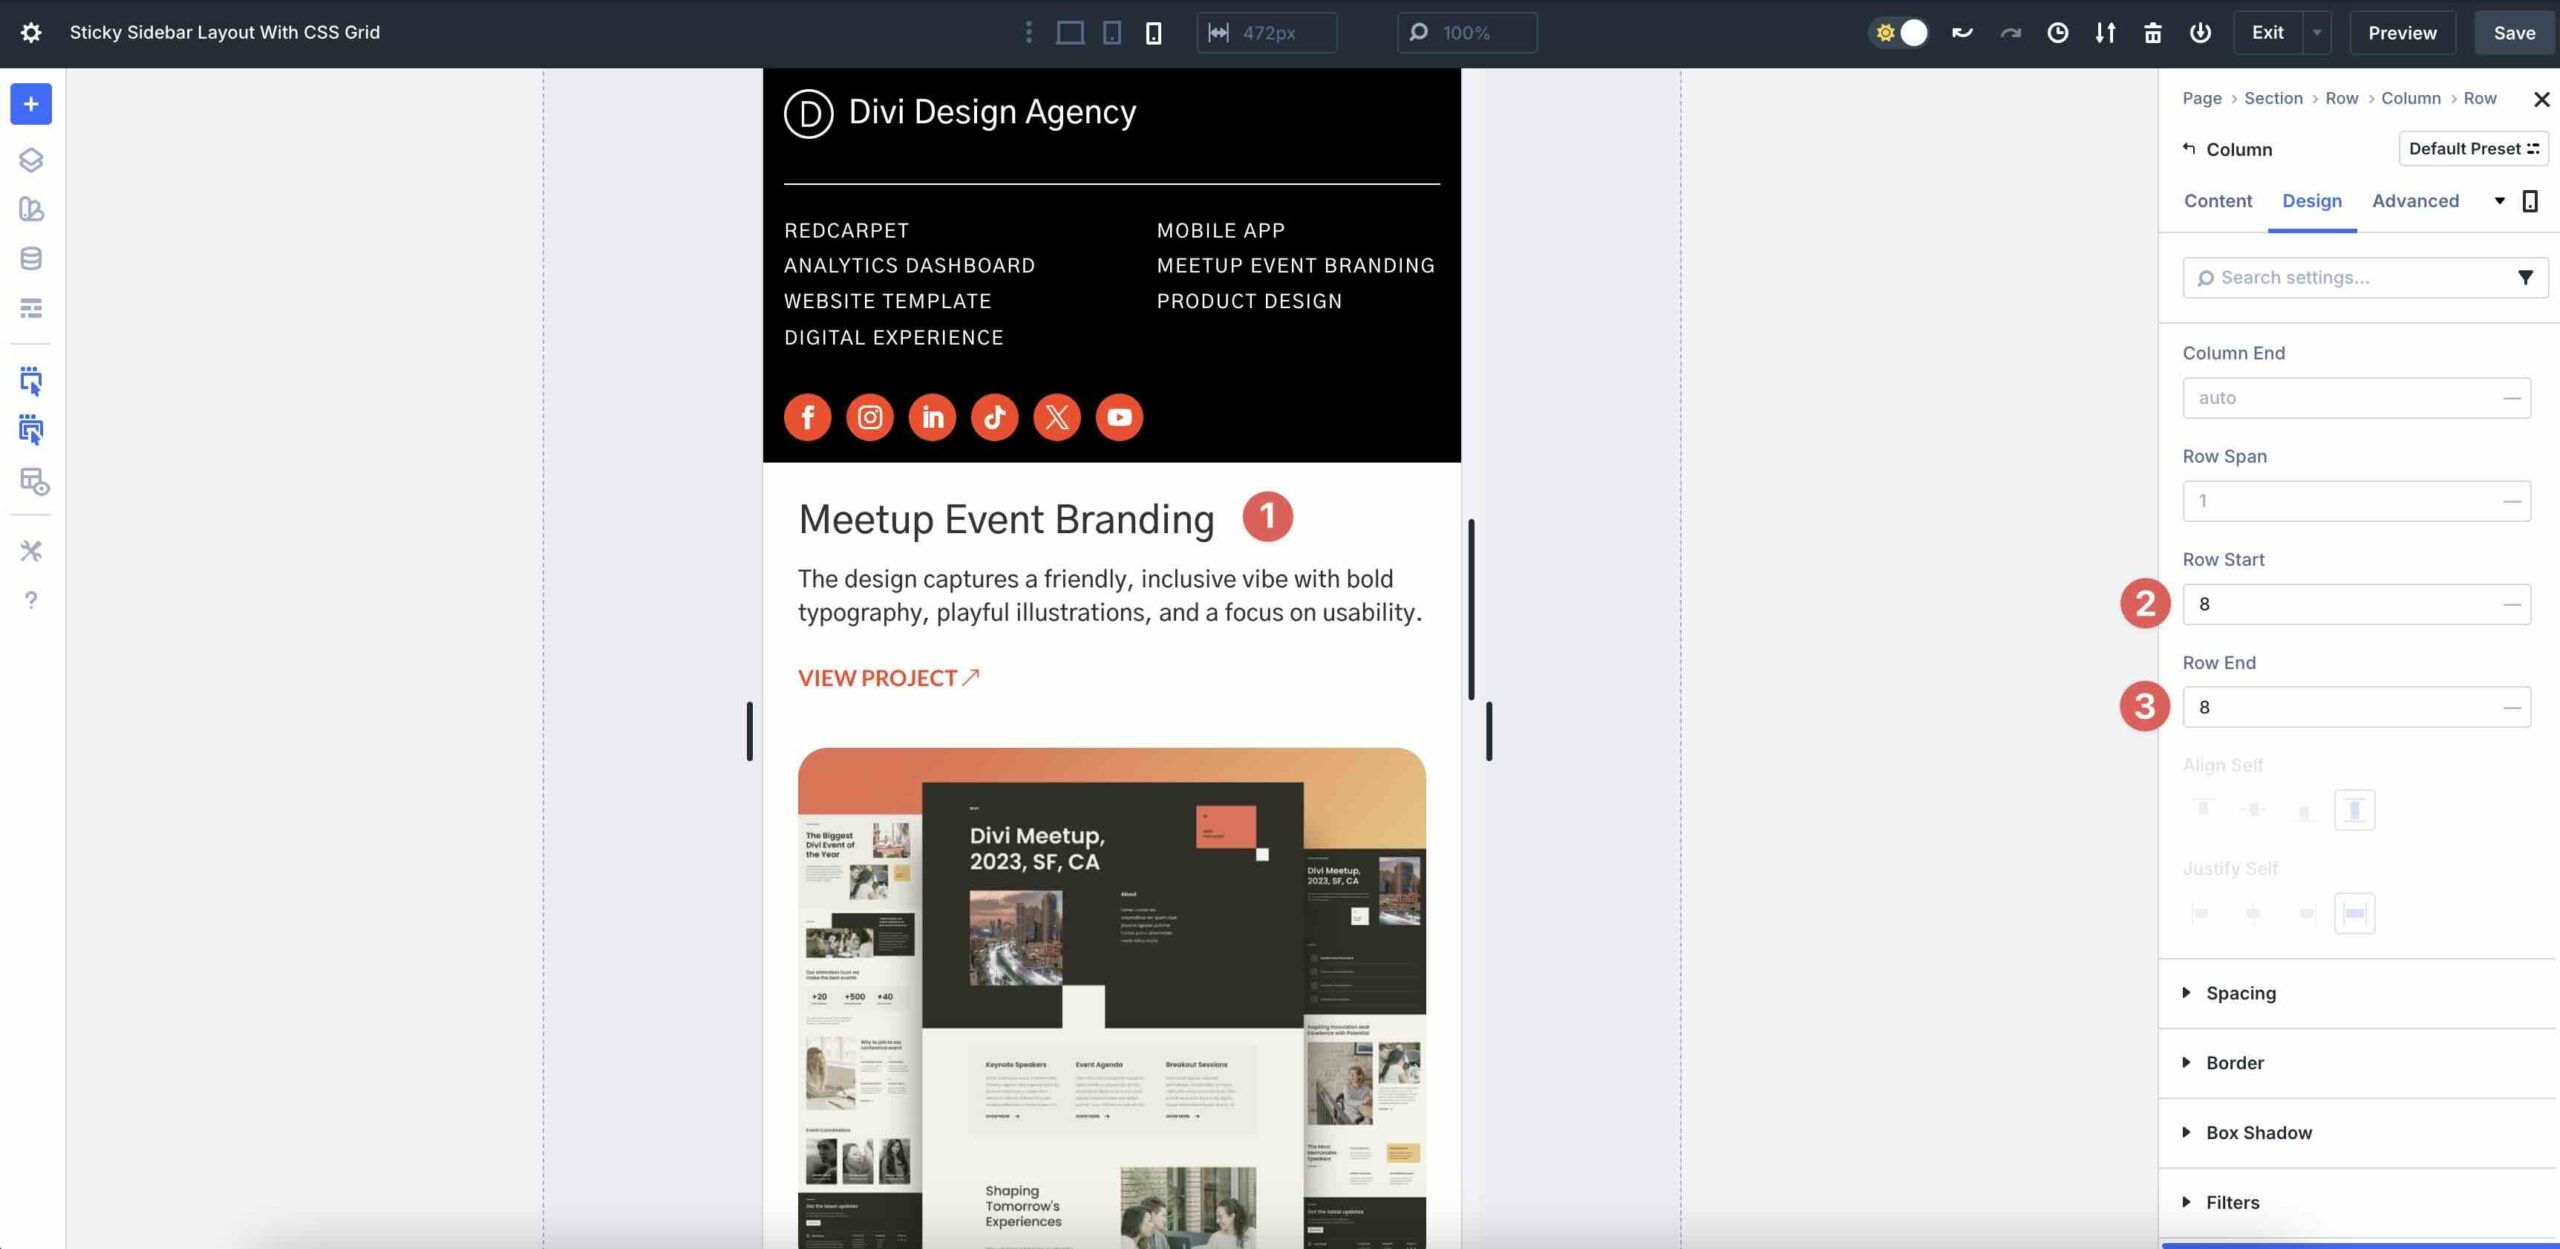
Alter each and every price to 4. Divi will then align the textual content above the picture for a extra polished look.
Repeat the stairs to regulate some other Grid Pieces the place the picture seems first within the design. Alter the price by way of 4 for each and every adjustment. As an example, the ninth Grid Merchandise would have Row Get started/Finish values of 8, the thirteenth Grid Merchandise would have values of 12, and so forth.
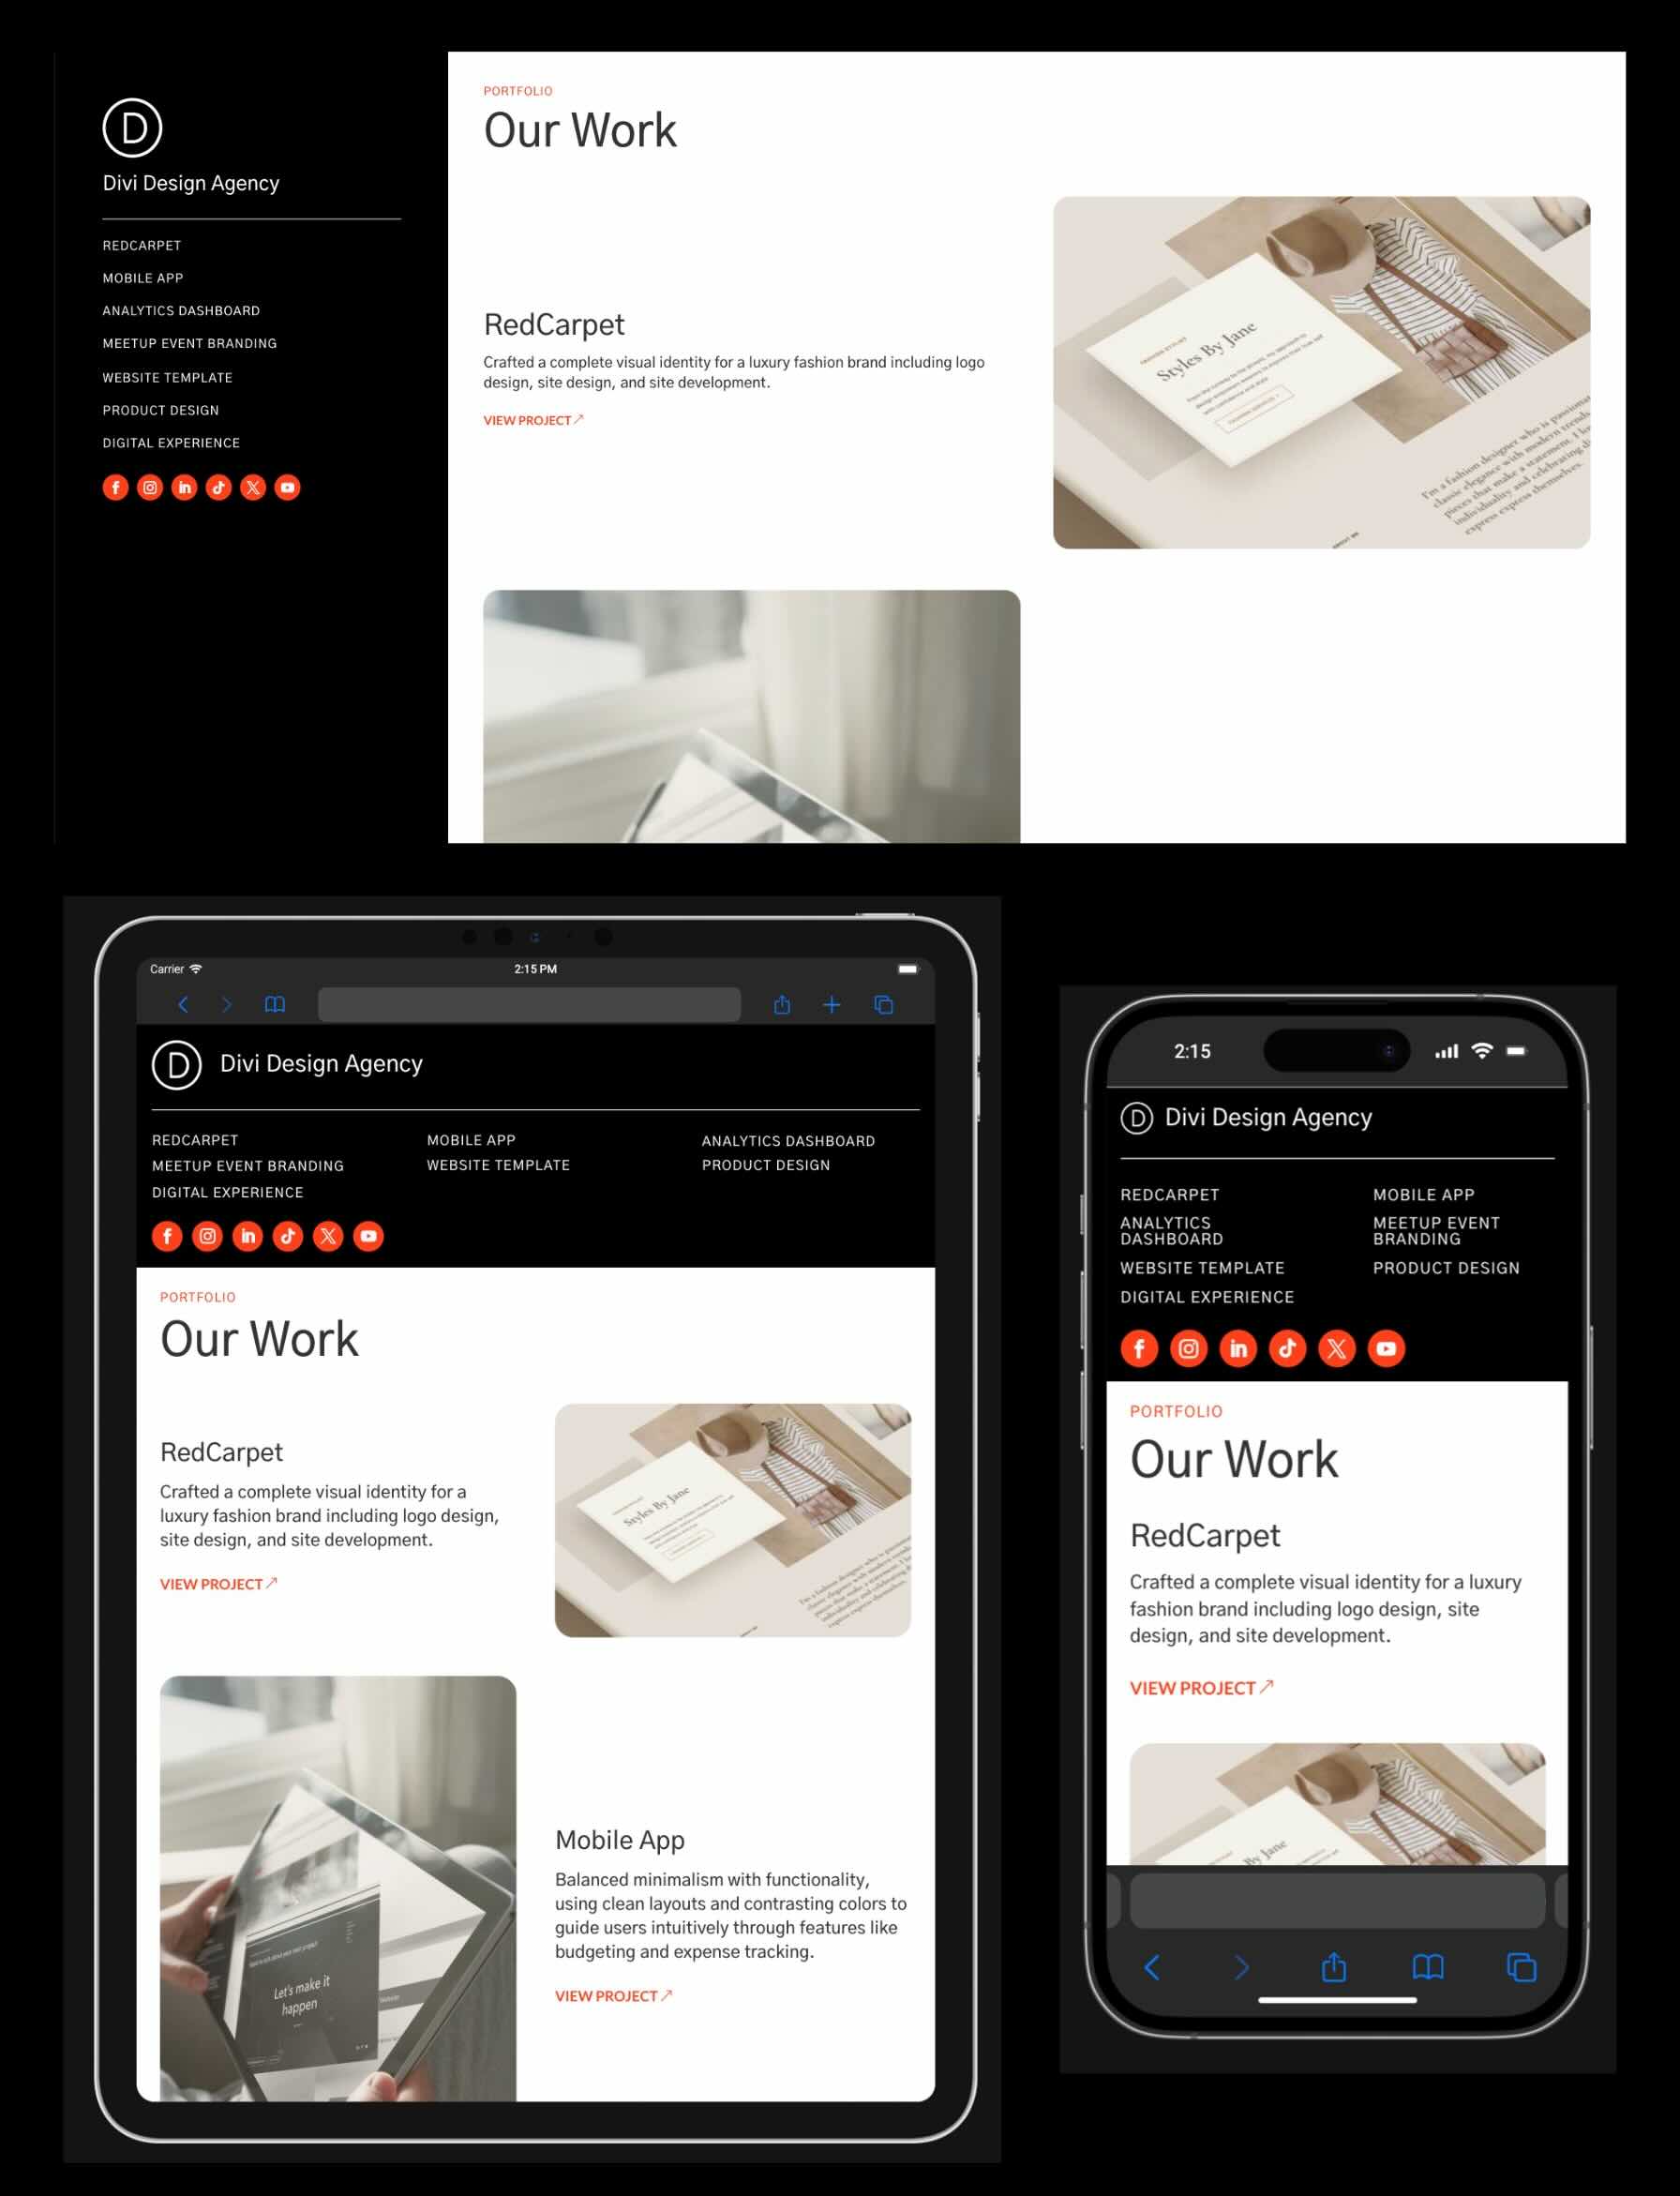
That’s it! As you’ll see, Divi 5 makes it fast and simple to create an absolutely responsive sticky sidebar format with CSS Grid.
@media best display and ( max-width: 767px ) {.et_bloom .et_bloom_optin_1 .carrot_edge.et_bloom_form_right .et_bloom_form_content:earlier than { border-top-color: #ffffff !necessary; border-left-color: clear !necessary; }.et_bloom .et_bloom_optin_1 .carrot_edge.et_bloom_form_left .et_bloom_form_content:after { border-bottom-color: #ffffff !necessary; border-left-color: clear !necessary; }
}.et_bloom .et_bloom_optin_1 .et_bloom_form_content button { background-color: #f92c8b !necessary; } .et_bloom .et_bloom_optin_1 .et_bloom_form_content .et_bloom_fields i { colour: #f92c8b !necessary; } .et_bloom .et_bloom_optin_1 .et_bloom_form_content .et_bloom_custom_field_radio i:earlier than { background: #f92c8b !necessary; } .et_bloom .et_bloom_optin_1 .et_bloom_border_solid { border-color: #f7f9fb !necessary } .et_bloom .et_bloom_optin_1 .et_bloom_form_content button { background-color: #f92c8b !necessary; } .et_bloom .et_bloom_optin_1 .et_bloom_form_container h2, .et_bloom .et_bloom_optin_1 .et_bloom_form_container h2 span, .et_bloom .et_bloom_optin_1 .et_bloom_form_container h2 robust { font-family: “Open Sans”, Helvetica, Arial, Lucida, sans-serif; }.et_bloom .et_bloom_optin_1 .et_bloom_form_container p, .et_bloom .et_bloom_optin_1 .et_bloom_form_container p span, .et_bloom .et_bloom_optin_1 .et_bloom_form_container p robust, .et_bloom .et_bloom_optin_1 .et_bloom_form_container shape enter, .et_bloom .et_bloom_optin_1 .et_bloom_form_container shape button span { font-family: “Open Sans”, Helvetica, Arial, Lucida, sans-serif; } p.et_bloom_popup_input { padding-bottom: 0 !necessary;}

Obtain For Unfastened
Sign up for the Divi E-newsletter and we will be able to electronic mail you a replica of without equal Divi Touchdown Web page Structure Pack, plus heaps of alternative wonderful and loose Divi sources, guidelines and tips. Practice alongside and you’re going to be a Divi grasp very quickly. If you’re already subscribed merely kind on your electronic mail deal with beneath and click on obtain to get entry to the format pack.
You will have effectively subscribed. Please test your electronic mail deal with to verify your subscription and get get entry to to loose weekly Divi format packs!
Liberate CSS Grid in Divi 5 Now
With Divi 5‘s integrated CSS Grid function, sticky sidebars are not a headache. In only some mins, you’ll construct a format that’s responsive and polished. From fast wireframing to seamless cellular stacking, CSS Grid within the Visible Builder permits sooner builds, bolder designs, and a smoother consumer enjoy that helps to keep guests engaged.
Able to stage up with Divi 5? Head to the Divi Individuals Space and obtain the newest Divi 5 Public Beta to experiment with CSS Grid lately. Tell us what you suppose within the feedback, or drop us a touch upon our social media platforms.
The publish How To Build A Sticky Sidebar Layout With CSS Grid In Divi 5 seemed first on Elegant Themes Blog.
Contents
- 1 What Is CSS Grid?
- 2 How To Construct A Sticky Sidebar Structure With CSS Grid In Divi 5
- 3 Obtain For Unfastened
- 4 You will have effectively subscribed. Please test your electronic mail deal with to verify your subscription and get get entry to to loose weekly Divi format packs!
- 5 Liberate CSS Grid in Divi 5 Now
- 6 Learn how to Prepare or Reorder WordPress Pages with Drag & Drop
- 7 The best way to Require Phrases of Carrier Settlement in WordPress
- 8 Using a Fullwidth Layout vs Grid in Divi’s Filterable Portfolio Module

0 Comments