
With Divi 5, CSS Grid is built into the Visual Builder, so that you’ll have the ability to create true two-dimensional layouts the usage of rows and columns together without touching a stylesheet. That makes sticky sidebar layouts much more straight forward to build, in particular when it’s time to cause them to responsive.
In this post, we will be able to walk via a step-by-step instructional to build a sticky sidebar that is still clean all over desktop, tablet, and contact without writing a single line of CSS.
Let’s get started!
What Is CSS Grid?
CSS Grid is a two-dimensional construction gadget that allows you to create difficult grids with rows and columns inside a single container. No longer like Flexbox or older methods like floats, CSS Grid will provide you with entire control over each and every axes. Simply define the development once, and the content material subject matter snaps into place.
Key concepts include the grid container (the mummy or dad with display: grid), grid items (the direct children), particular tracks (rows/columns), implicit tracks (auto-crated for overflow), and site controls like grid-row to span entire height or grid-column to stretch all over columns. Introduced in 2017 and now supported in 95% of browsers, CSS Grid is a lightweight and semantic construction gadget. Very best of all, Divi 5 brings it straight away into the Visual Builder.
Key Choices Of CSS Grid In Divi 5
Divi 5 transforms CSS Grid from a developer’s software into a visual experience that anyone can wield correct inside the Visual Builder. Instead of writing code, you’ll discover pre-built Grid templates in a position to drop into the internet web page. Select one, tweak it, and watch your construction come alive in exact time. Not simplest is this a faster construction experience, however it moreover implies that you’ll experiment freely and land on designs that in reality really feel custom-created without touching a CSS stylesheet.
The entire thing happens within an intuitive settings panel where clickable alternatives allow shoppers to control gaps, define column widths, and align items very simply.

You’ll create custom offset regulations that make each and every fourth products span two columns, providing speedy visual rhythm, all without the need for plugins or custom classes.
When you pair this with Divi 5’s Loop Builder, you’ll have the ability to loop blog posts, WooCommerce products, crew bios, or any custom post type, without being restricted to Divi 4’s legacy blog, retailer, and portfolio modules.

While you’ve been having a look forward to a the reason why to try Divi 5, this is it: professional-grade layouts, 0 code, and results that load faster than ever.
Benefits Of CSS Grid In Divi 5
CSS Grid in Divi 5 isn’t just a serve as — it’s a whole gadget that makes original design faster, further flexible, and to be had to everyone.
Speedy Wire-Framing
With CSS Grid in Divi 5, tempo is the name of the game. Wire-framing a complicated construction that once took hours of trial and blunder now happens in minutes. Drag a template, control column spans, and fine-tune gaps on the fly to appear changes straight away. Whether or not or no longer you want to create a sidebar for a blog roll internet web page or sidebar navigation for a portfolio, Divi 5 means that you can assemble, check out, and refine in a ways a lot much less time.
Ultimate Design Freedom
Design freedom is no longer for professional developers. You’ll use offset regulations to create repeating patterns, stagger footage all over rows for a masonry look, or craft magazine-style symmetry and no longer the usage of a single line of CSS. Divi 5’s visual controls unlock creativity, empowering you to design layouts that if truth be told stand out.
Built-In Responsiveness
Responsiveness is built into CSS Grid in Divi 5. Switch to mobile view the usage of Customizable Responsive Breakpoints or the Responsive Editor, and cave to your 3-column construction proper right into a single stack with one click on on. Regulate Column and Row spans for each breakpoint, reorder content material subject matter visually, and turn the sticky sidebar proper right into a fullwidth menu on smaller displays. No media queries to put in writing, no surprises in checking out, merely consistent, original results each and every time.
It’s A Scalable Device
Divi 5’s CSS Grid gadget scales with you. Green individuals can get began with drag-and-drop templates, while authentic developers can dive into custom track definitions and precise placement. Each means, there’s no need for custom solutions or third-party plugins that add needless bloat in your internet web page. On account of Divi 5 generates clean, semantic CSS, your web pages render faster than ever.
Briefly, Divi 5’s CSS Grid gadget allows faster builds, bolder designs, and stepped ahead potency.
How To Assemble A Sticky Sidebar Construction With CSS Grid In Divi 5
In this phase, we’ll walk you at some point of the stairs to create a sticky sidebar construction the usage of CSS Grid in Divi 5. The entire process takes only a few minutes, because of Divi 5’s intuitive interface.
Step 1: Create the Grid Building
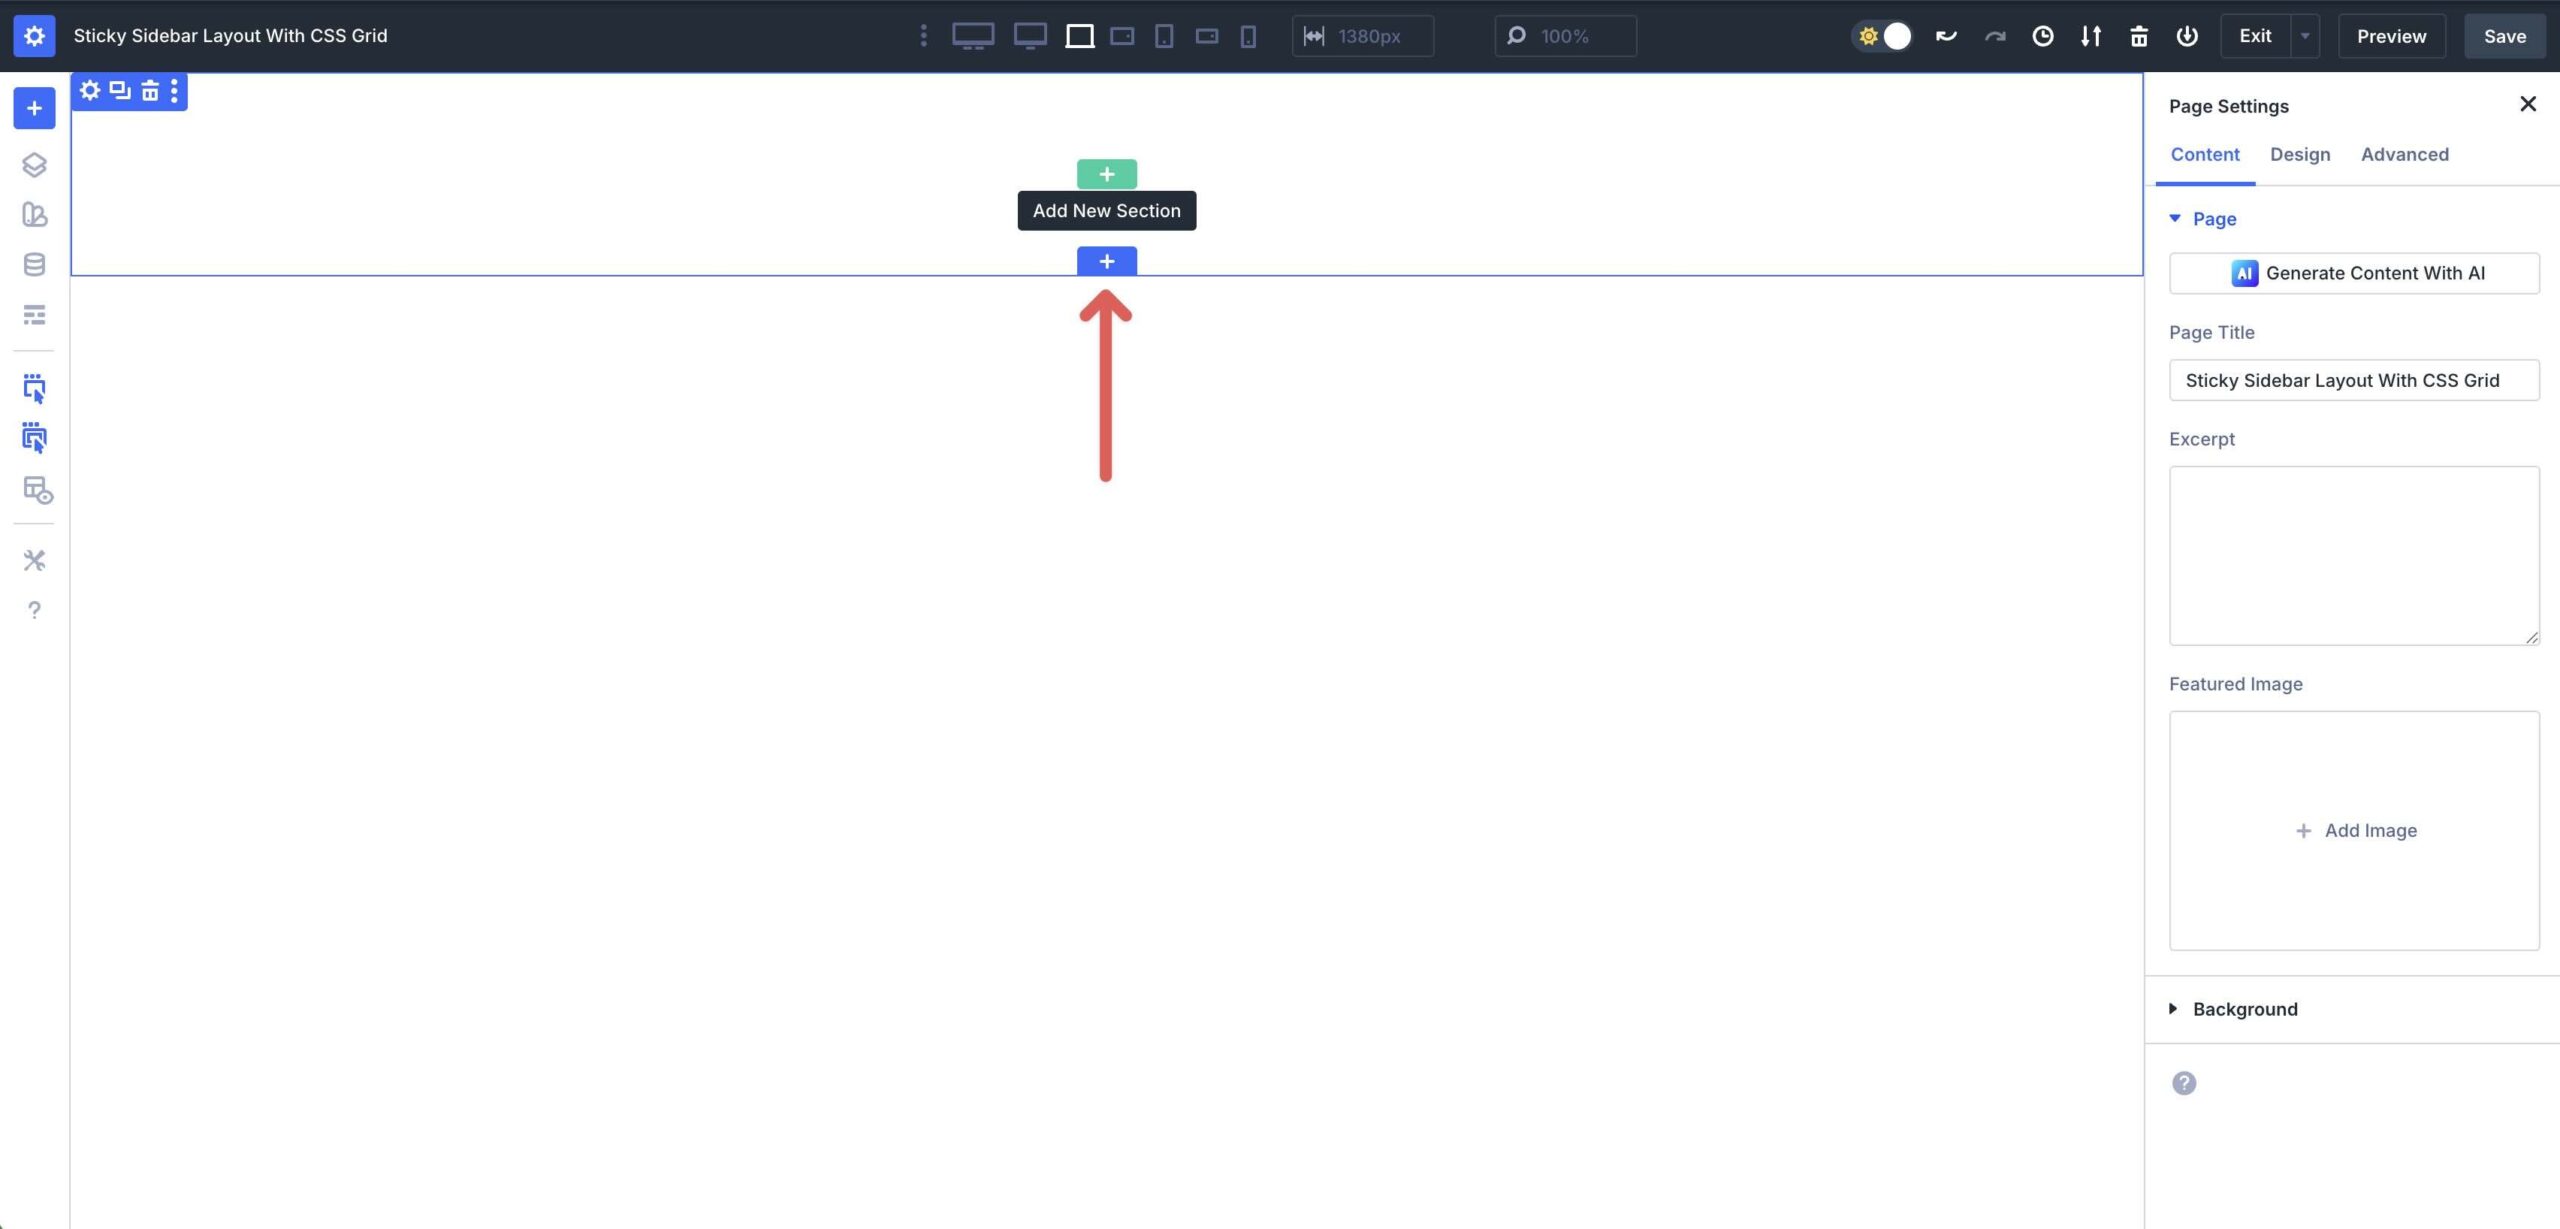
Create a brand spanking new internet web page in Divi or open an present one. When the Visual Builder somewhat a bit of, click on at the blue + icon in an effort to upload a brand spanking new phase.
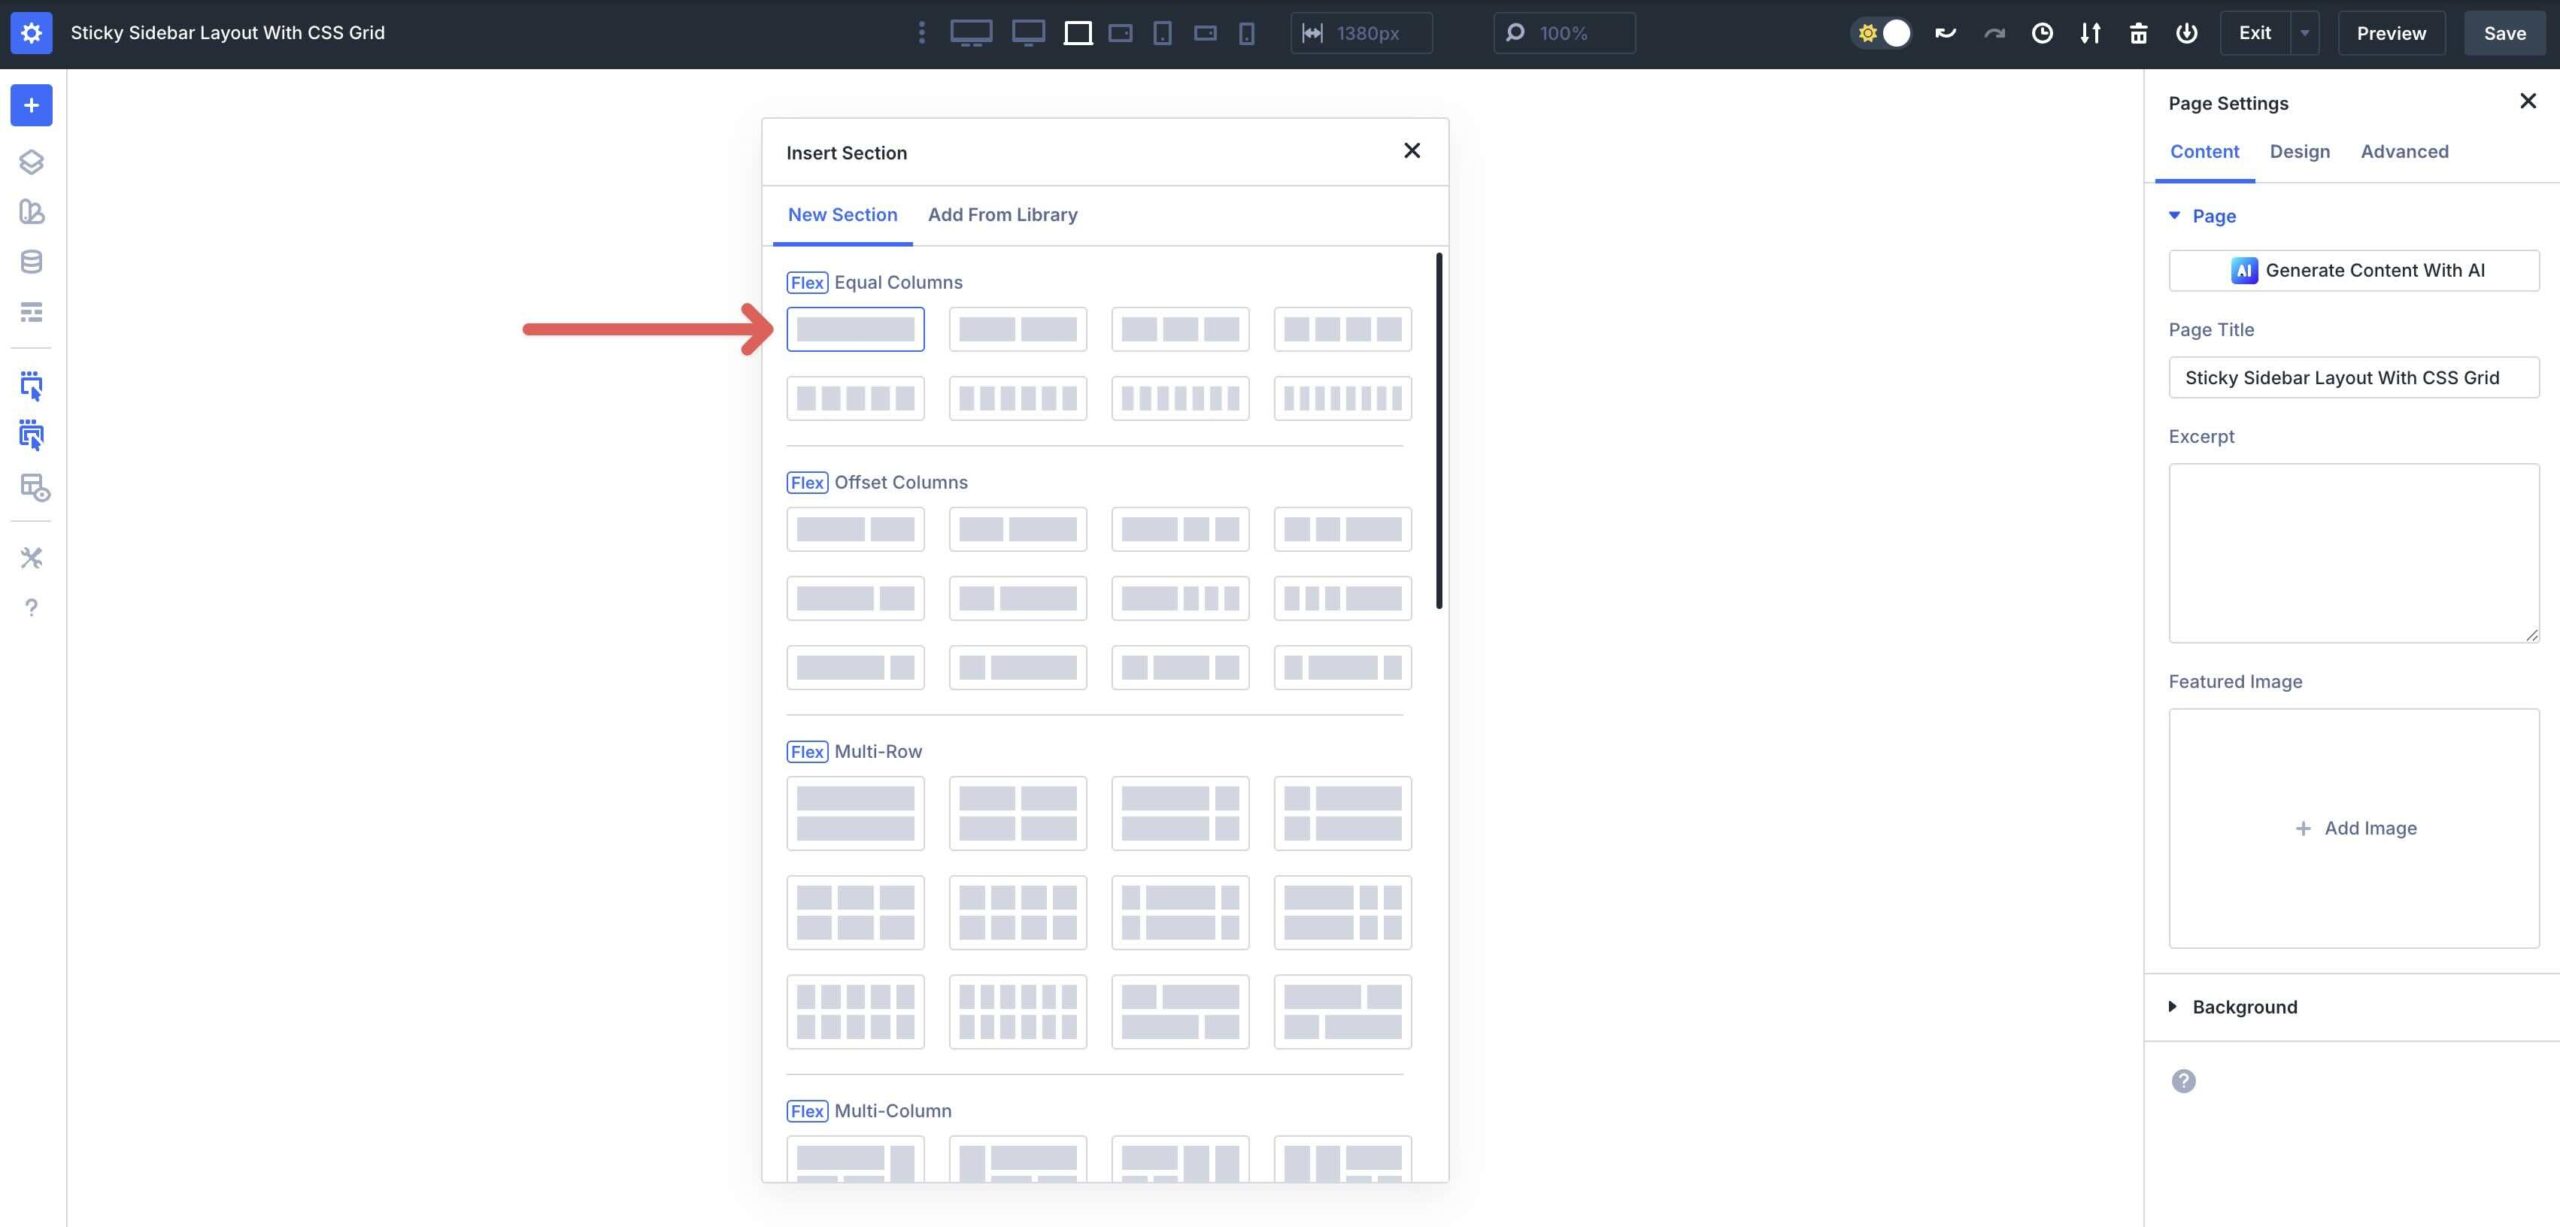
Add a Single Column Flex Row to the phase.
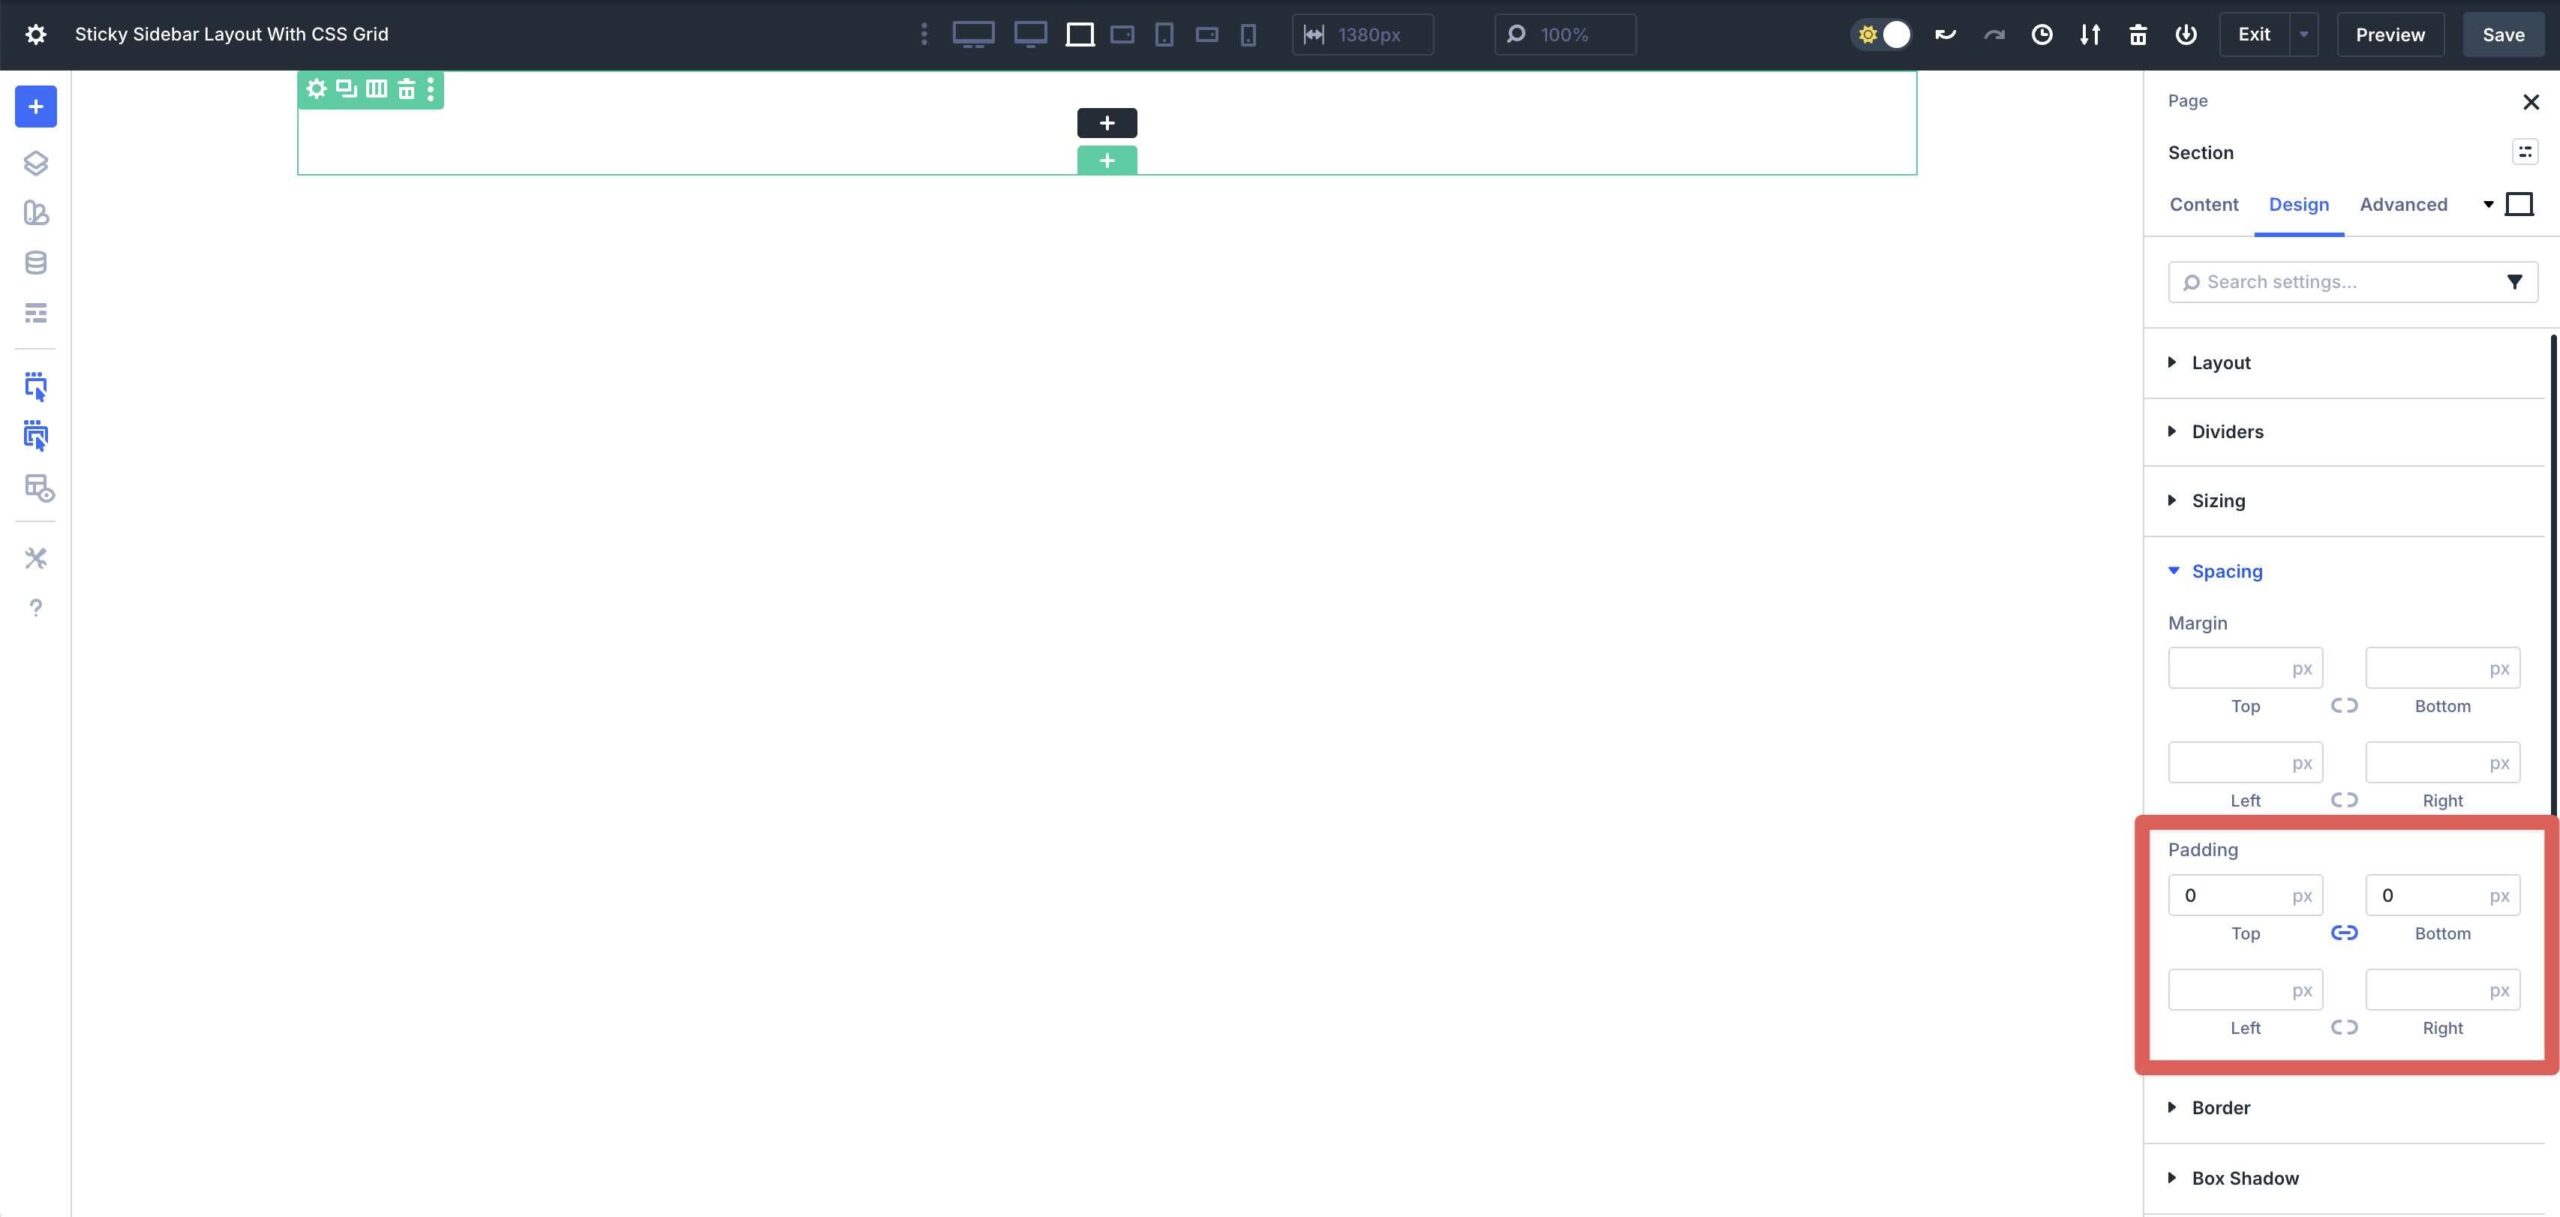
Click on on into the Section’s Design tab, make larger the Spacing menu, and enter 0px Padding to the top and bottom.
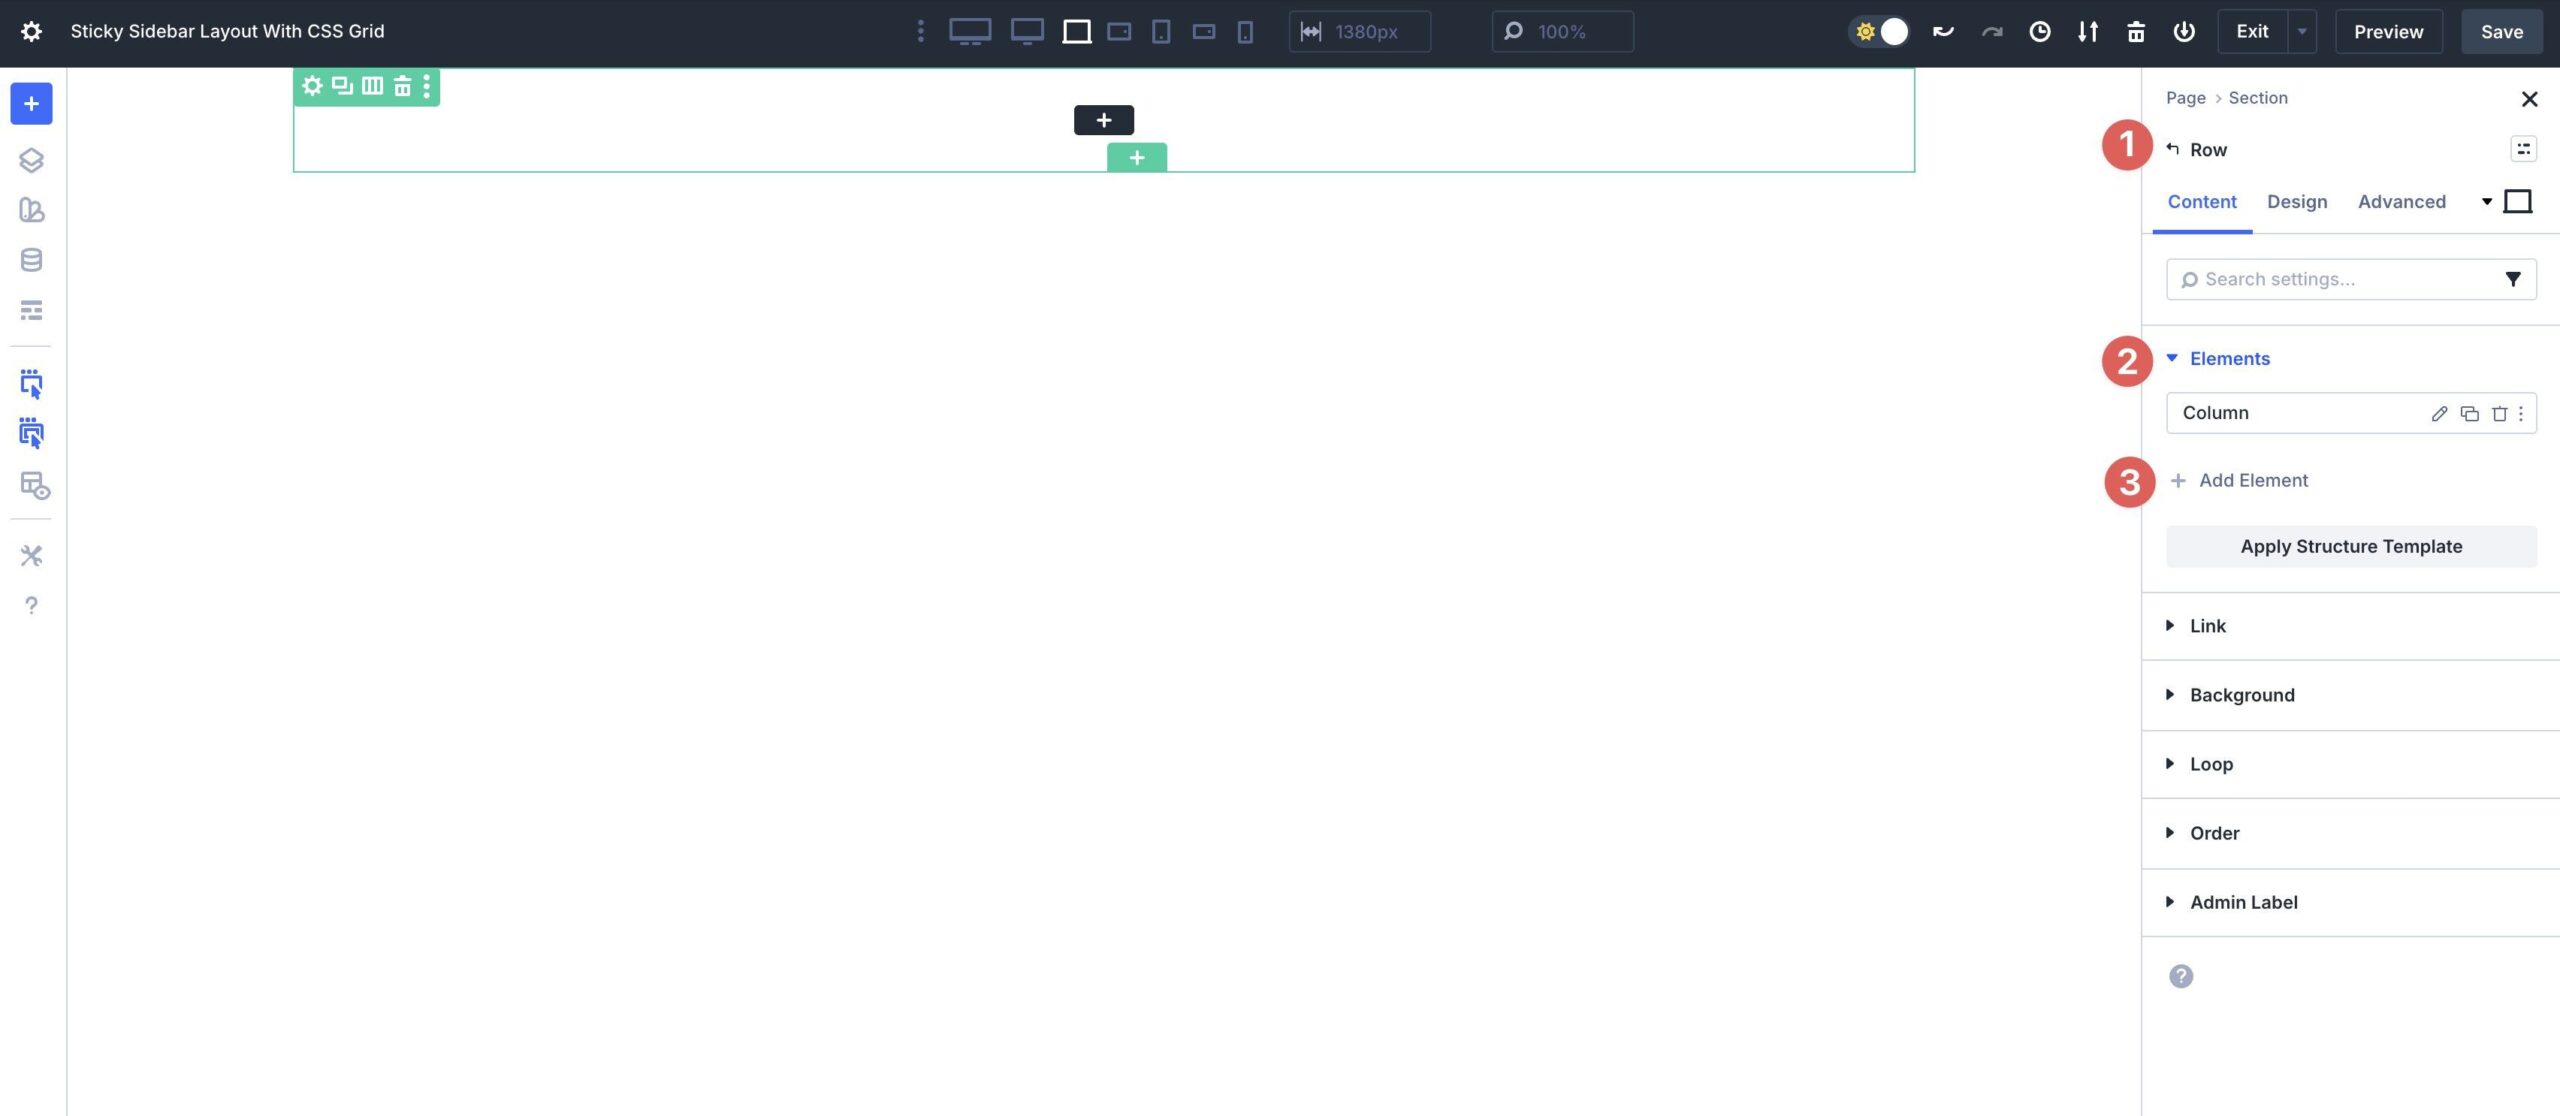
Now switch to the Row settings. Inside the Content material subject matter tab, make larger the Portions menu. Click on on + Add Phase in an effort to upload a brand spanking new Column to the Row.
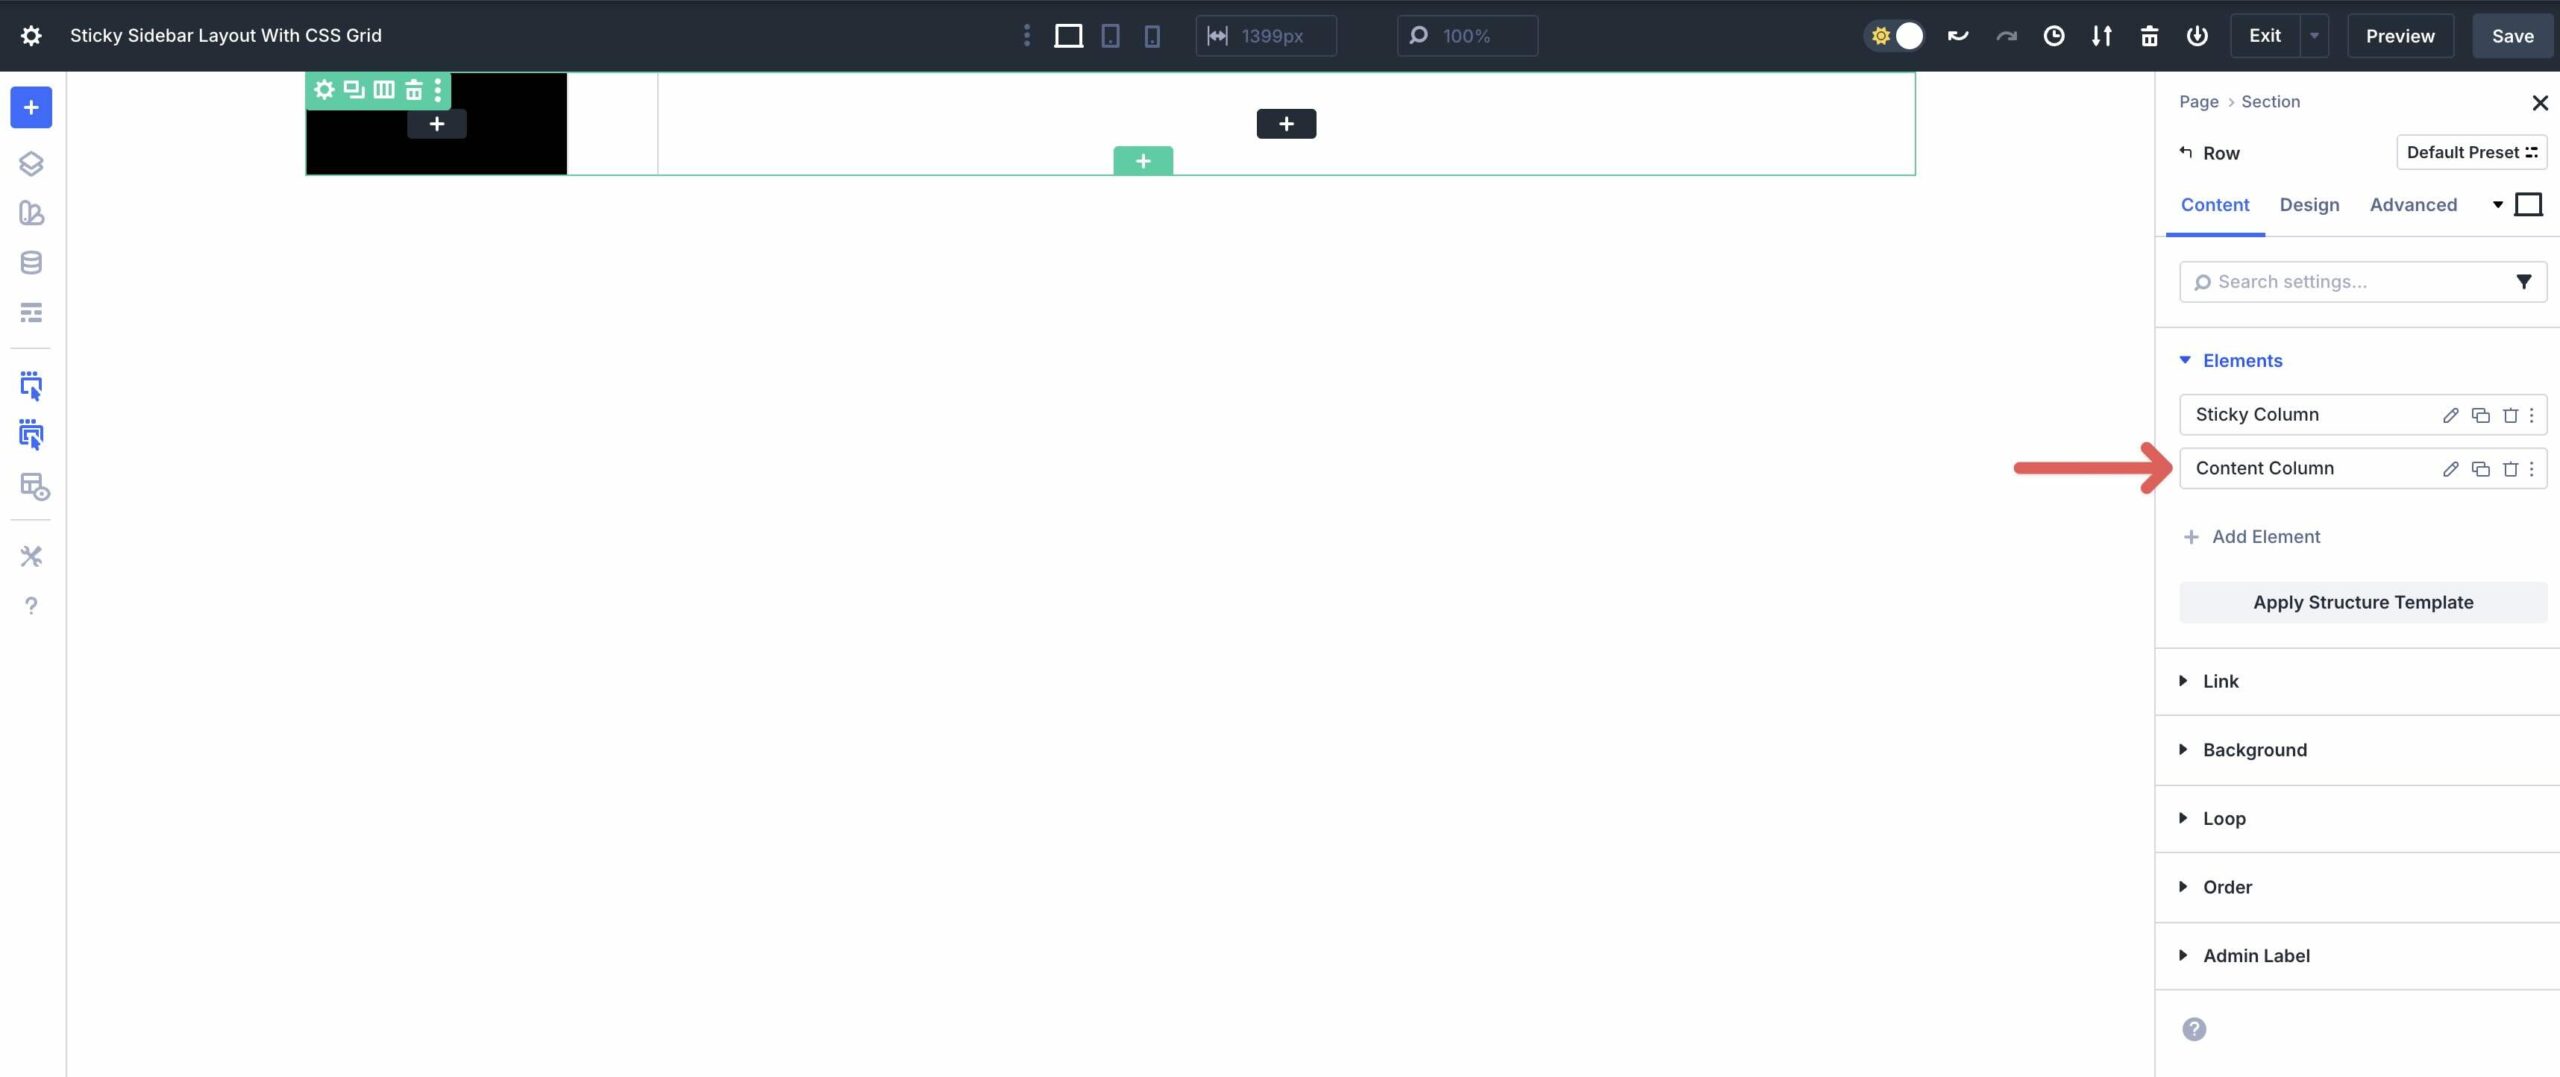
Click on on into the principle Column and assign an Admin Label to it. When working with difficult layouts, it’s helpful to call the elements to cause them to more straightforward to identify as we add content material subject matter to them.
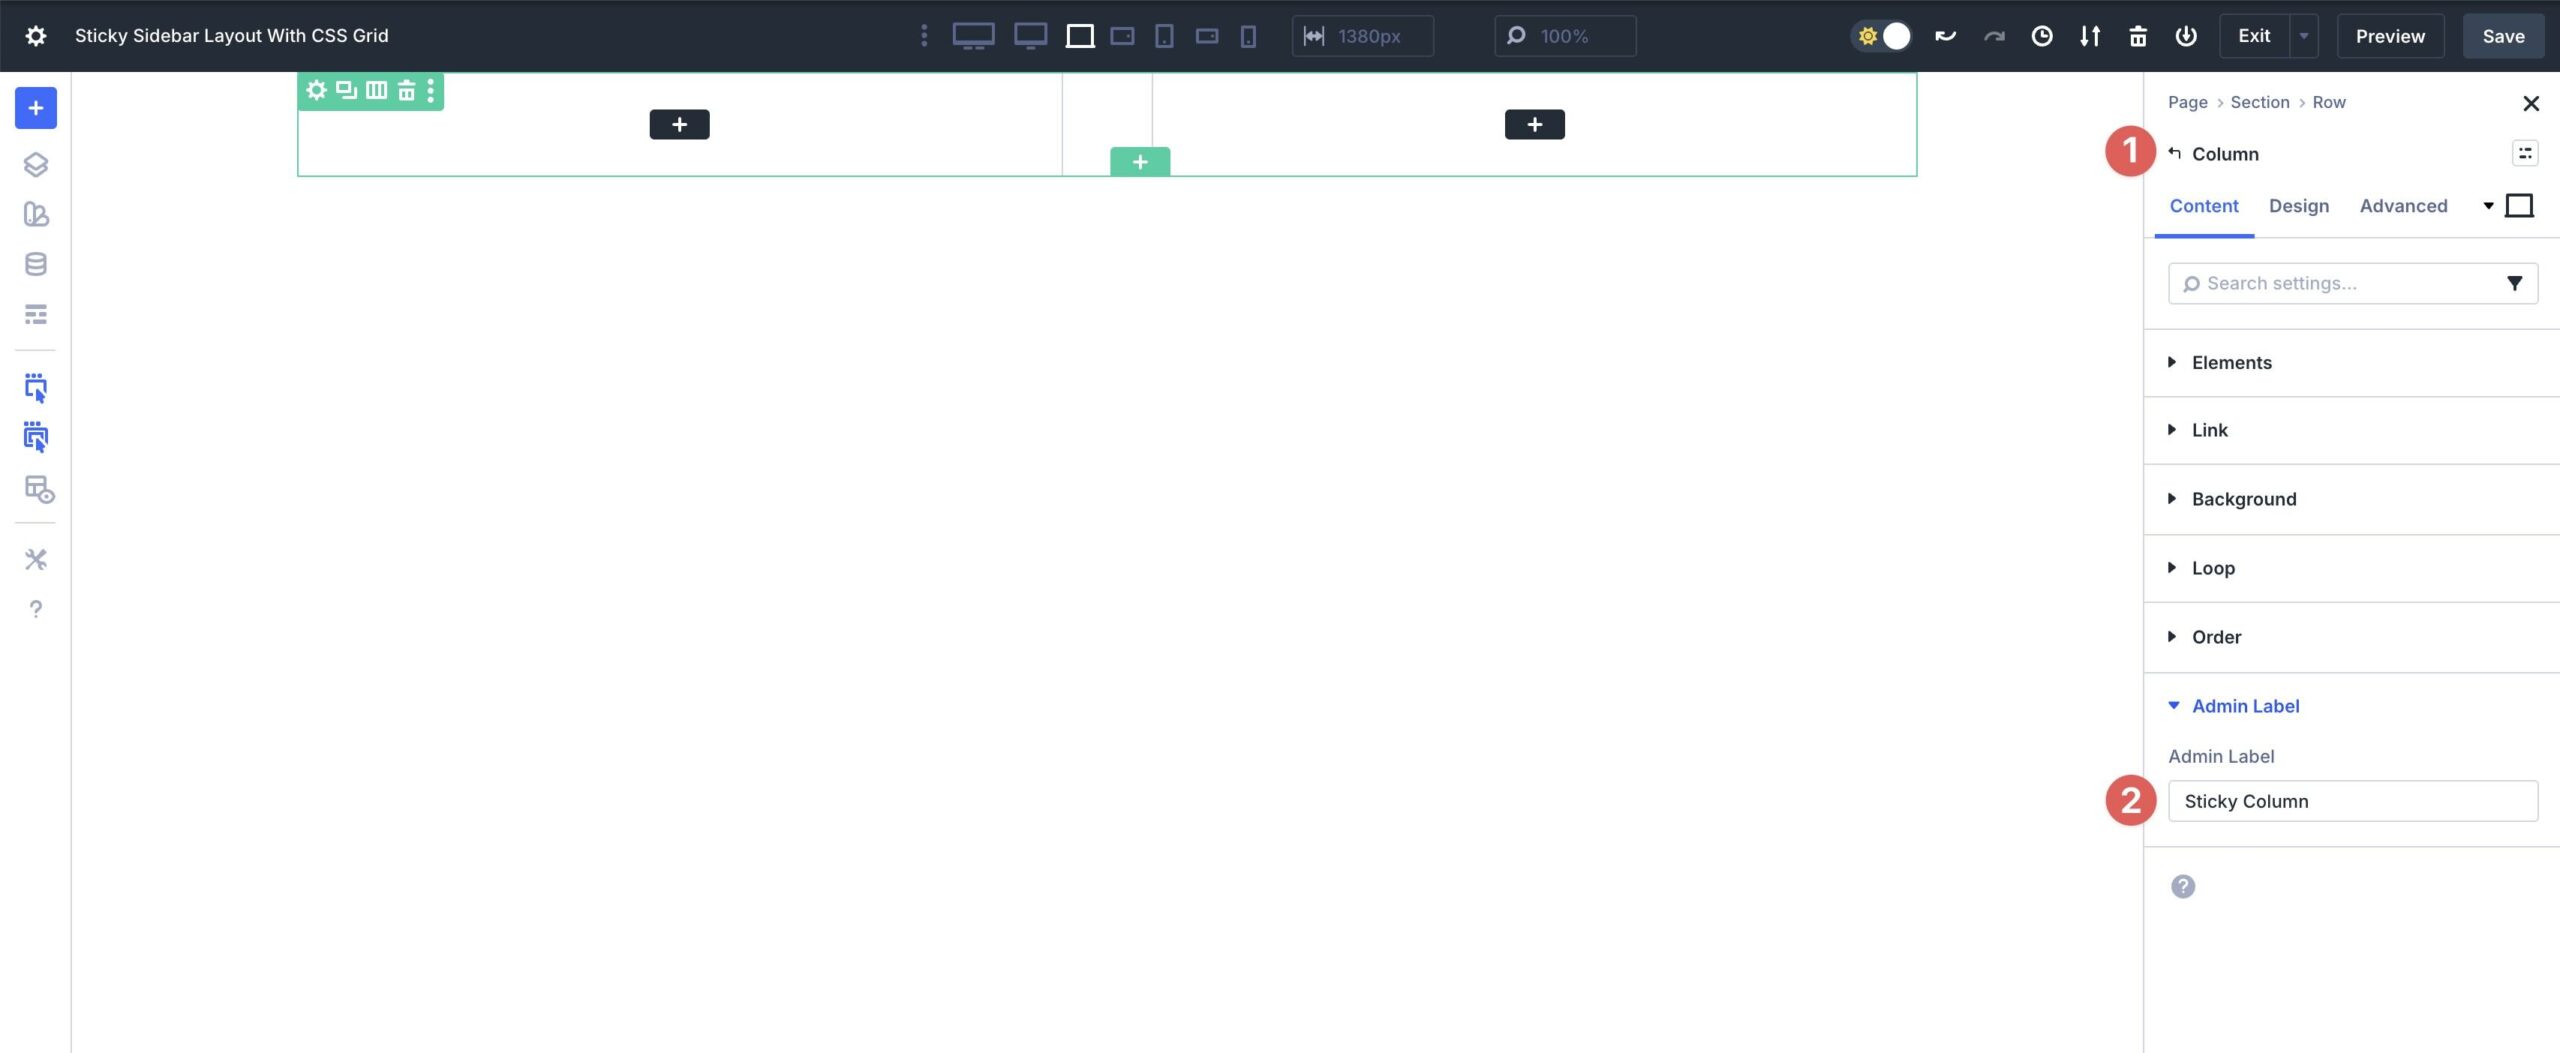
Repeat the step to rename the second Column.
Regulate The Column Settings
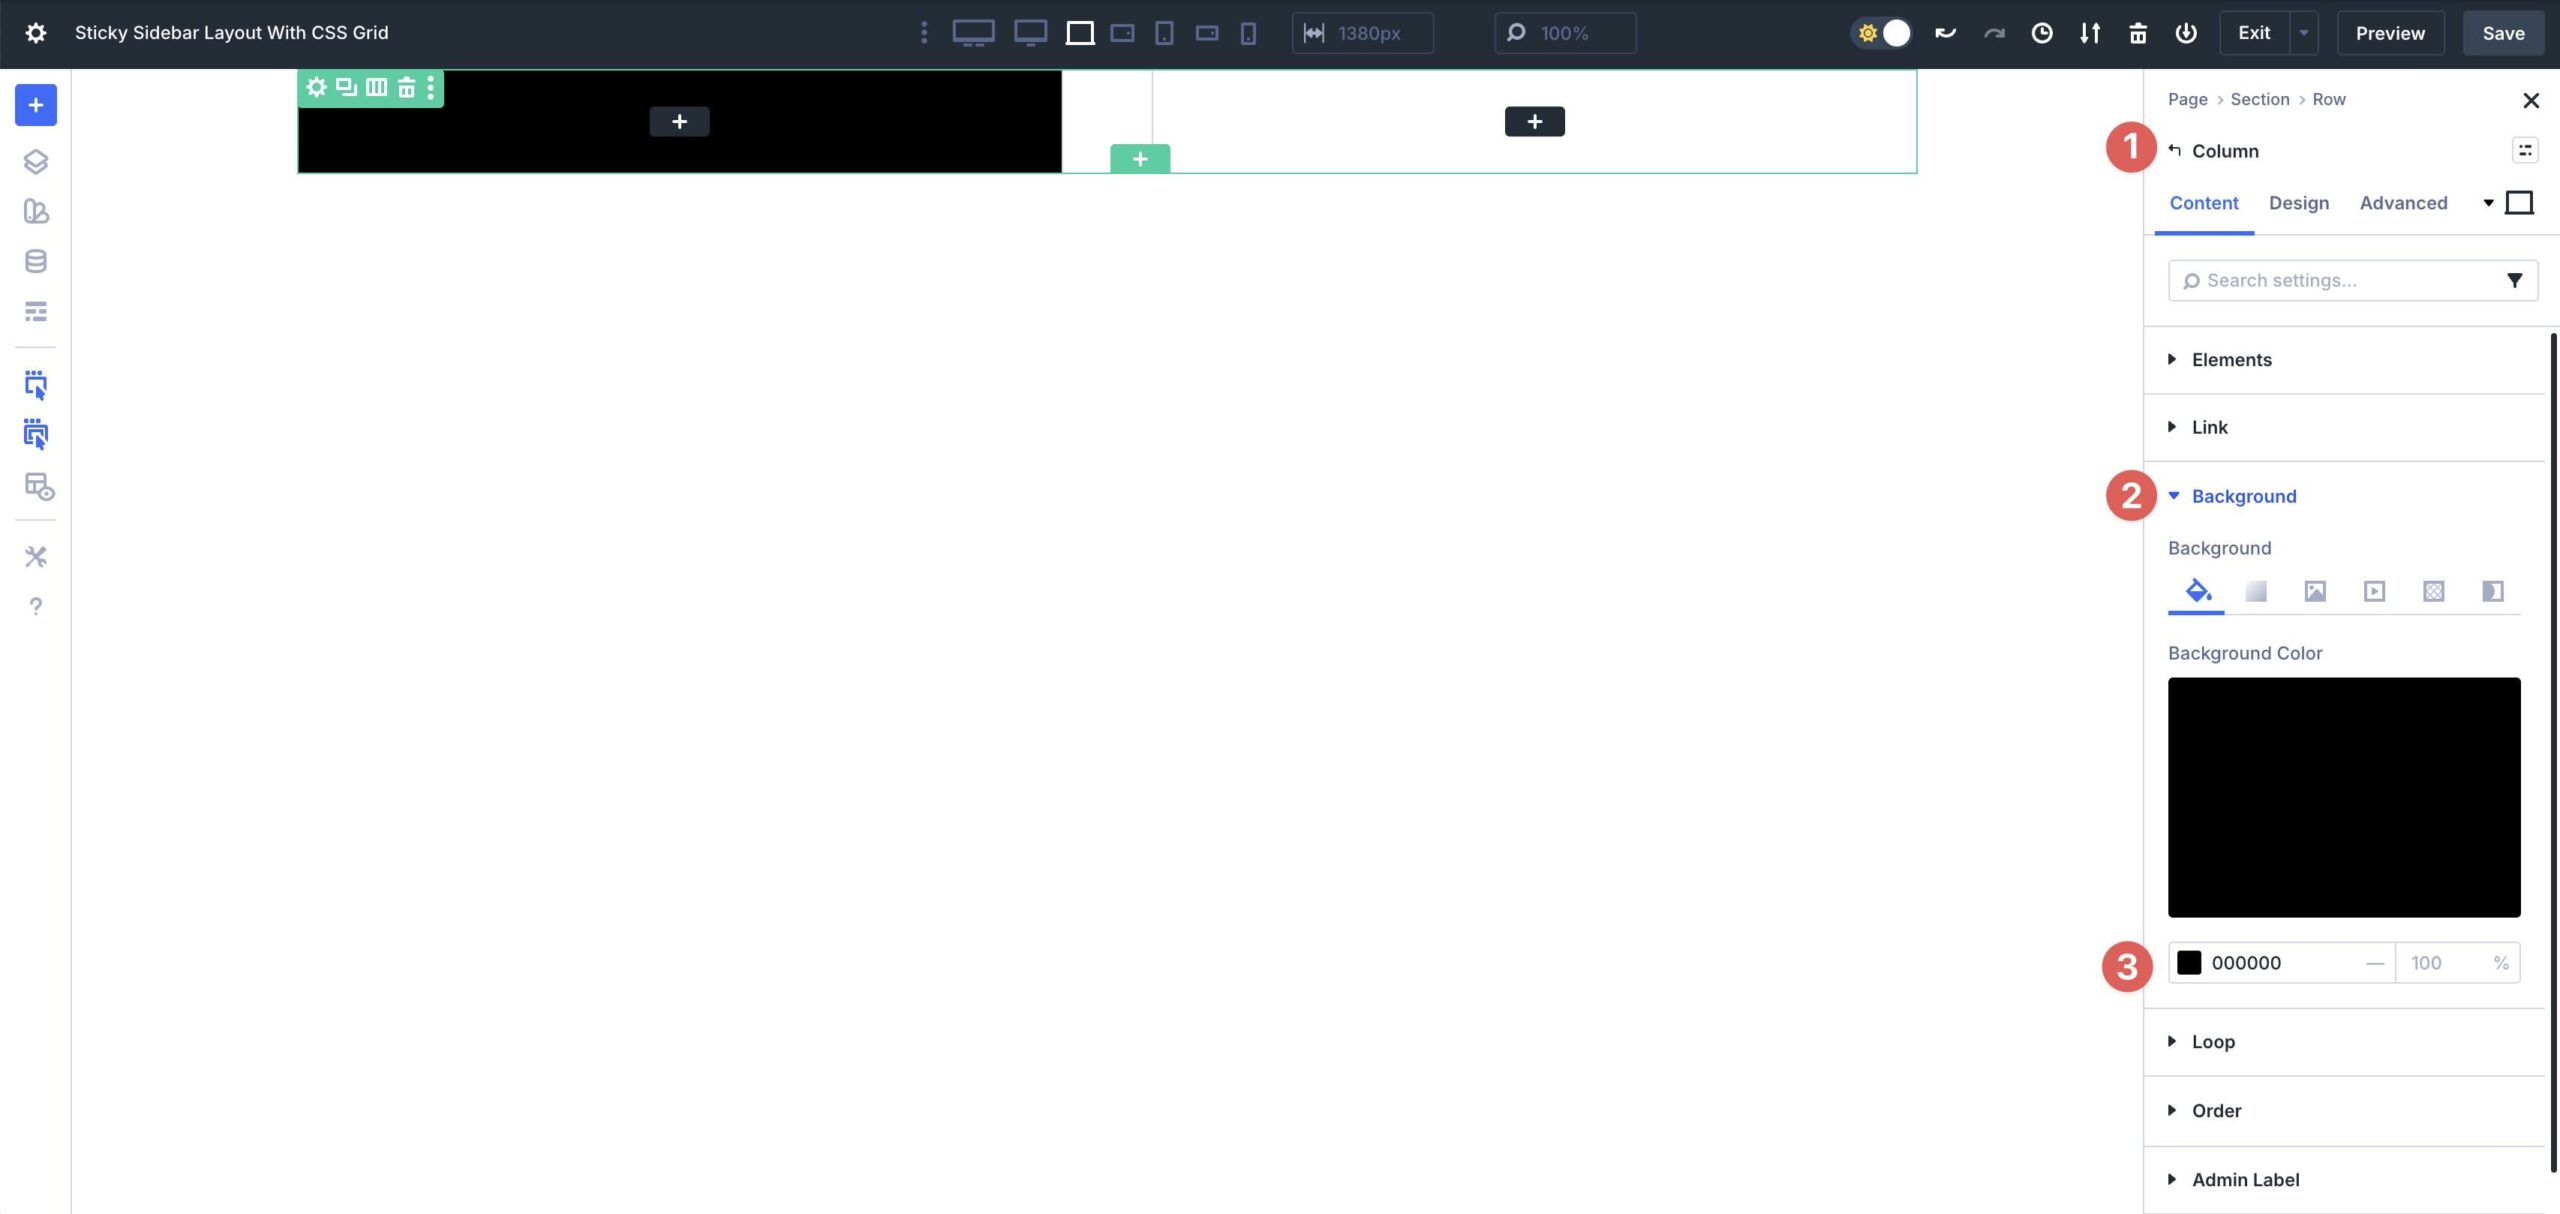
Inside the first Column, assign #000000 since the Background Color.
Inside the Design tab, make larger the Sizing menu and change the Column Magnificence to 1/4.
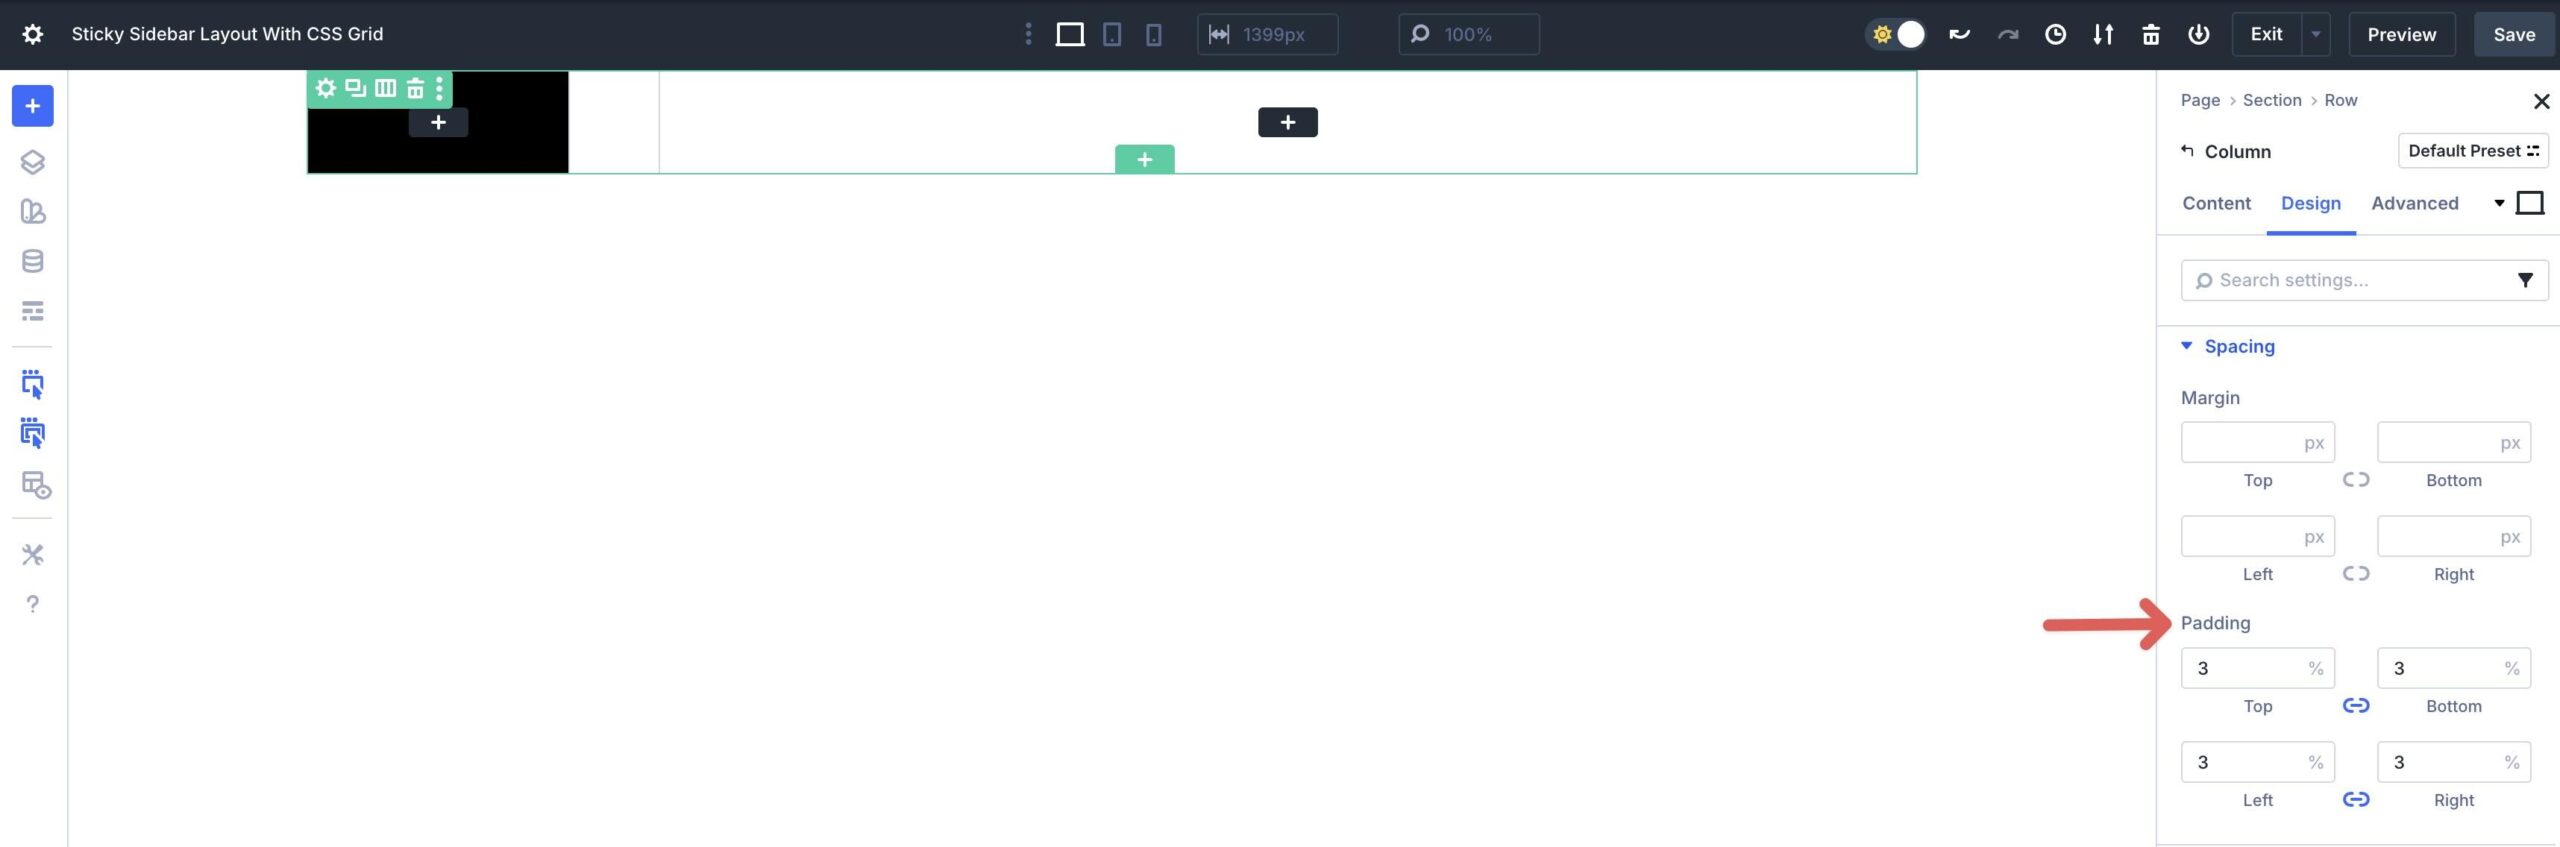
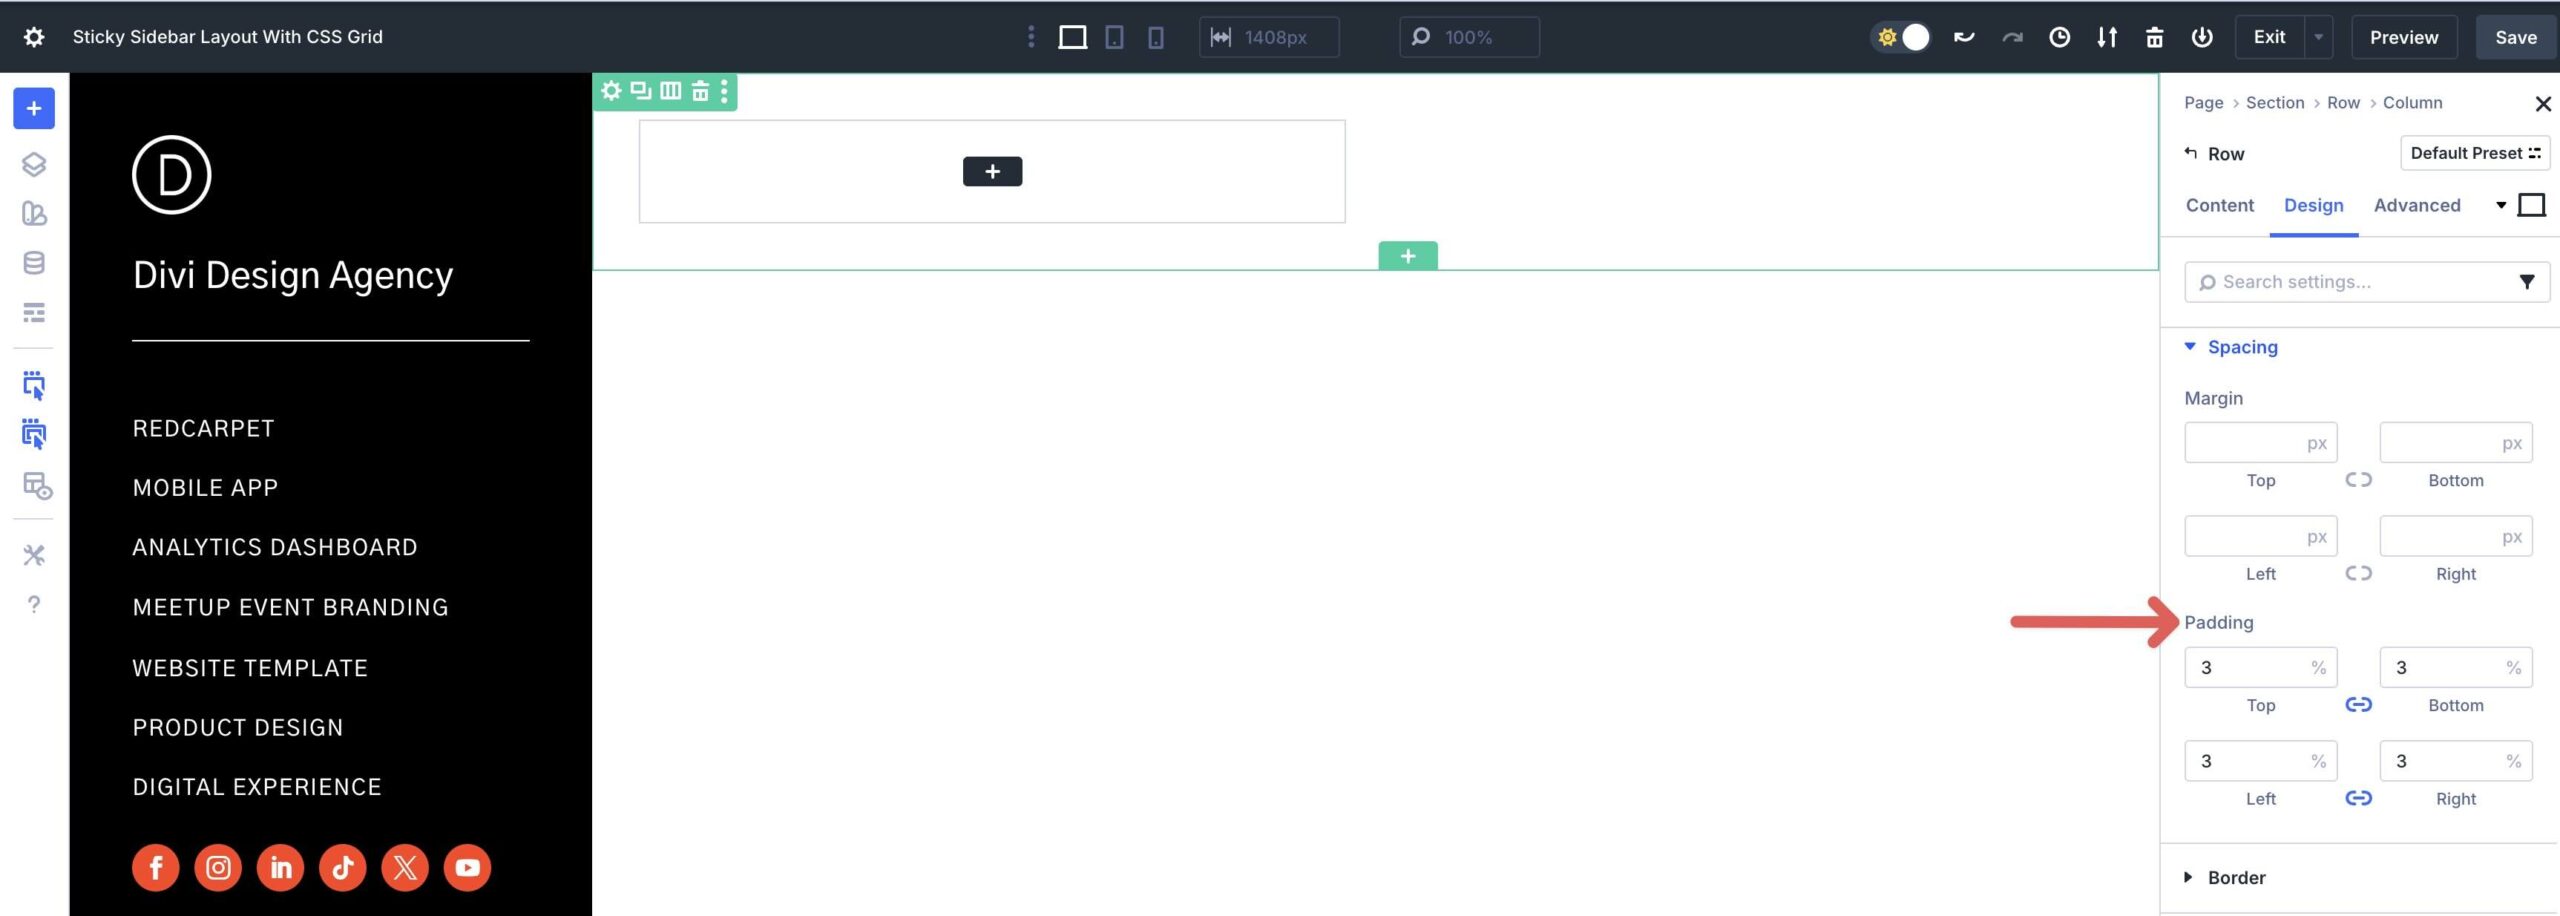
Next, make larger the Spacing menu. Apply 3% Padding to all sides.
Click on on into the second Column of the Guardian Row.
Assign #ffffff since the Background Color inside the Content material subject matter tab. Inside the Design tab, make larger the Sizing menu and apply a 3/4 Column Magnificence.
Regulate The Row Settings
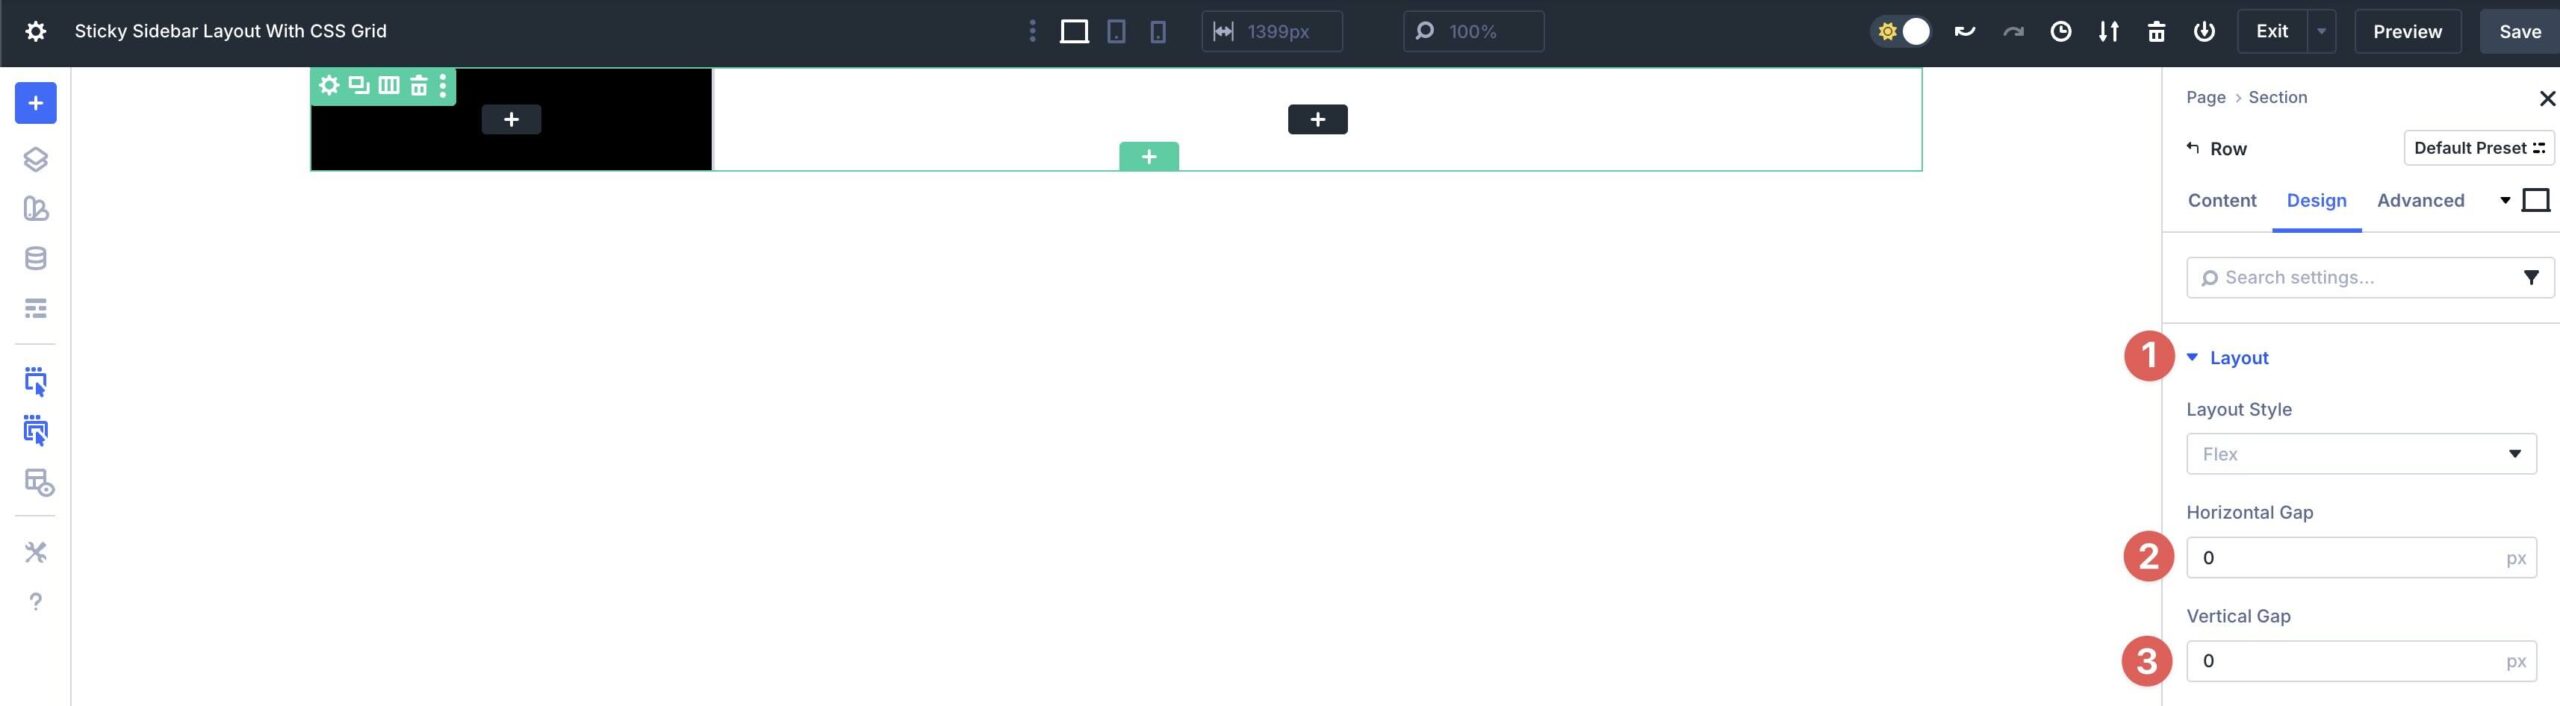
Now we need to control the Guardian Row’s settings. Inside the Content material subject matter tab, assign #000000 since the Background Color. Inside the Design tab, make larger the Construction menu. Regulate the Row’s Horizontal and Vertical Hollow to 0px.
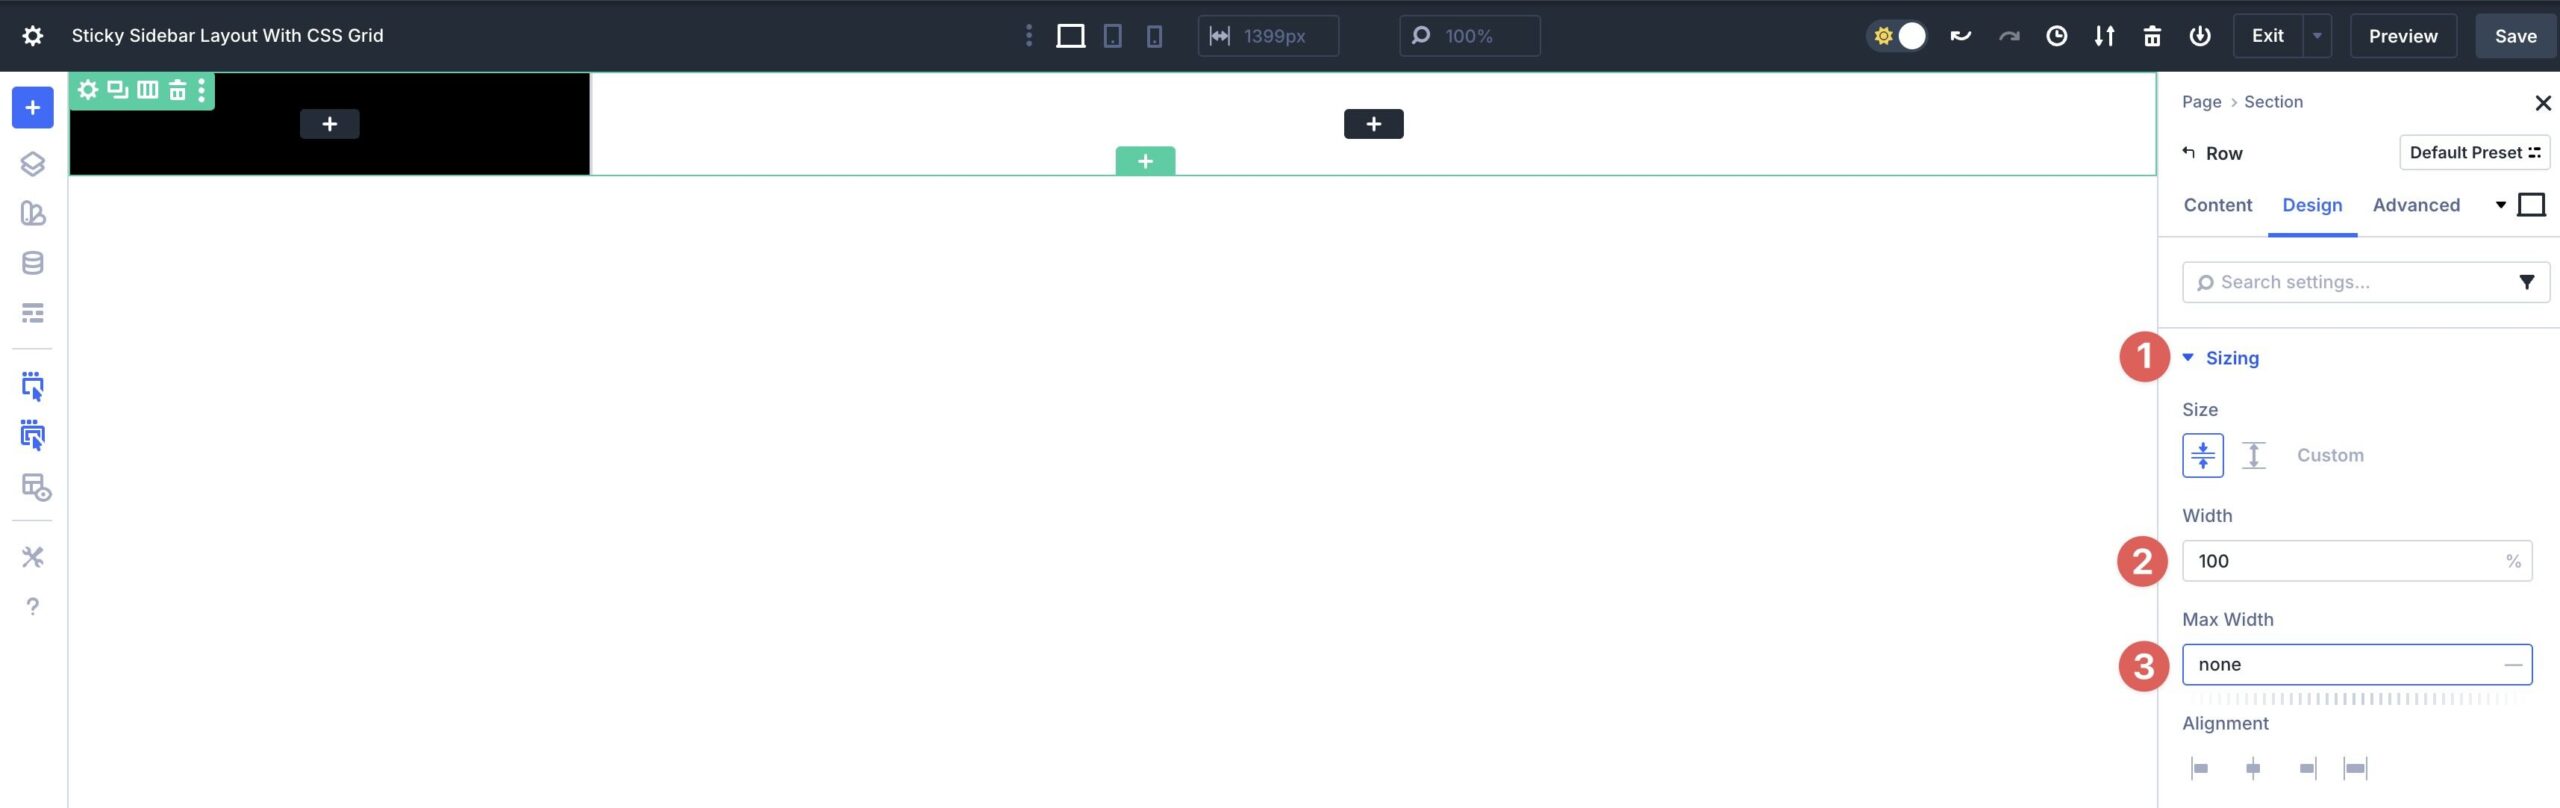
Enlarge the Sizing menu and set the Width to 100% and the Max Width to none.
Step 2: Add Content material subject matter To The First Column
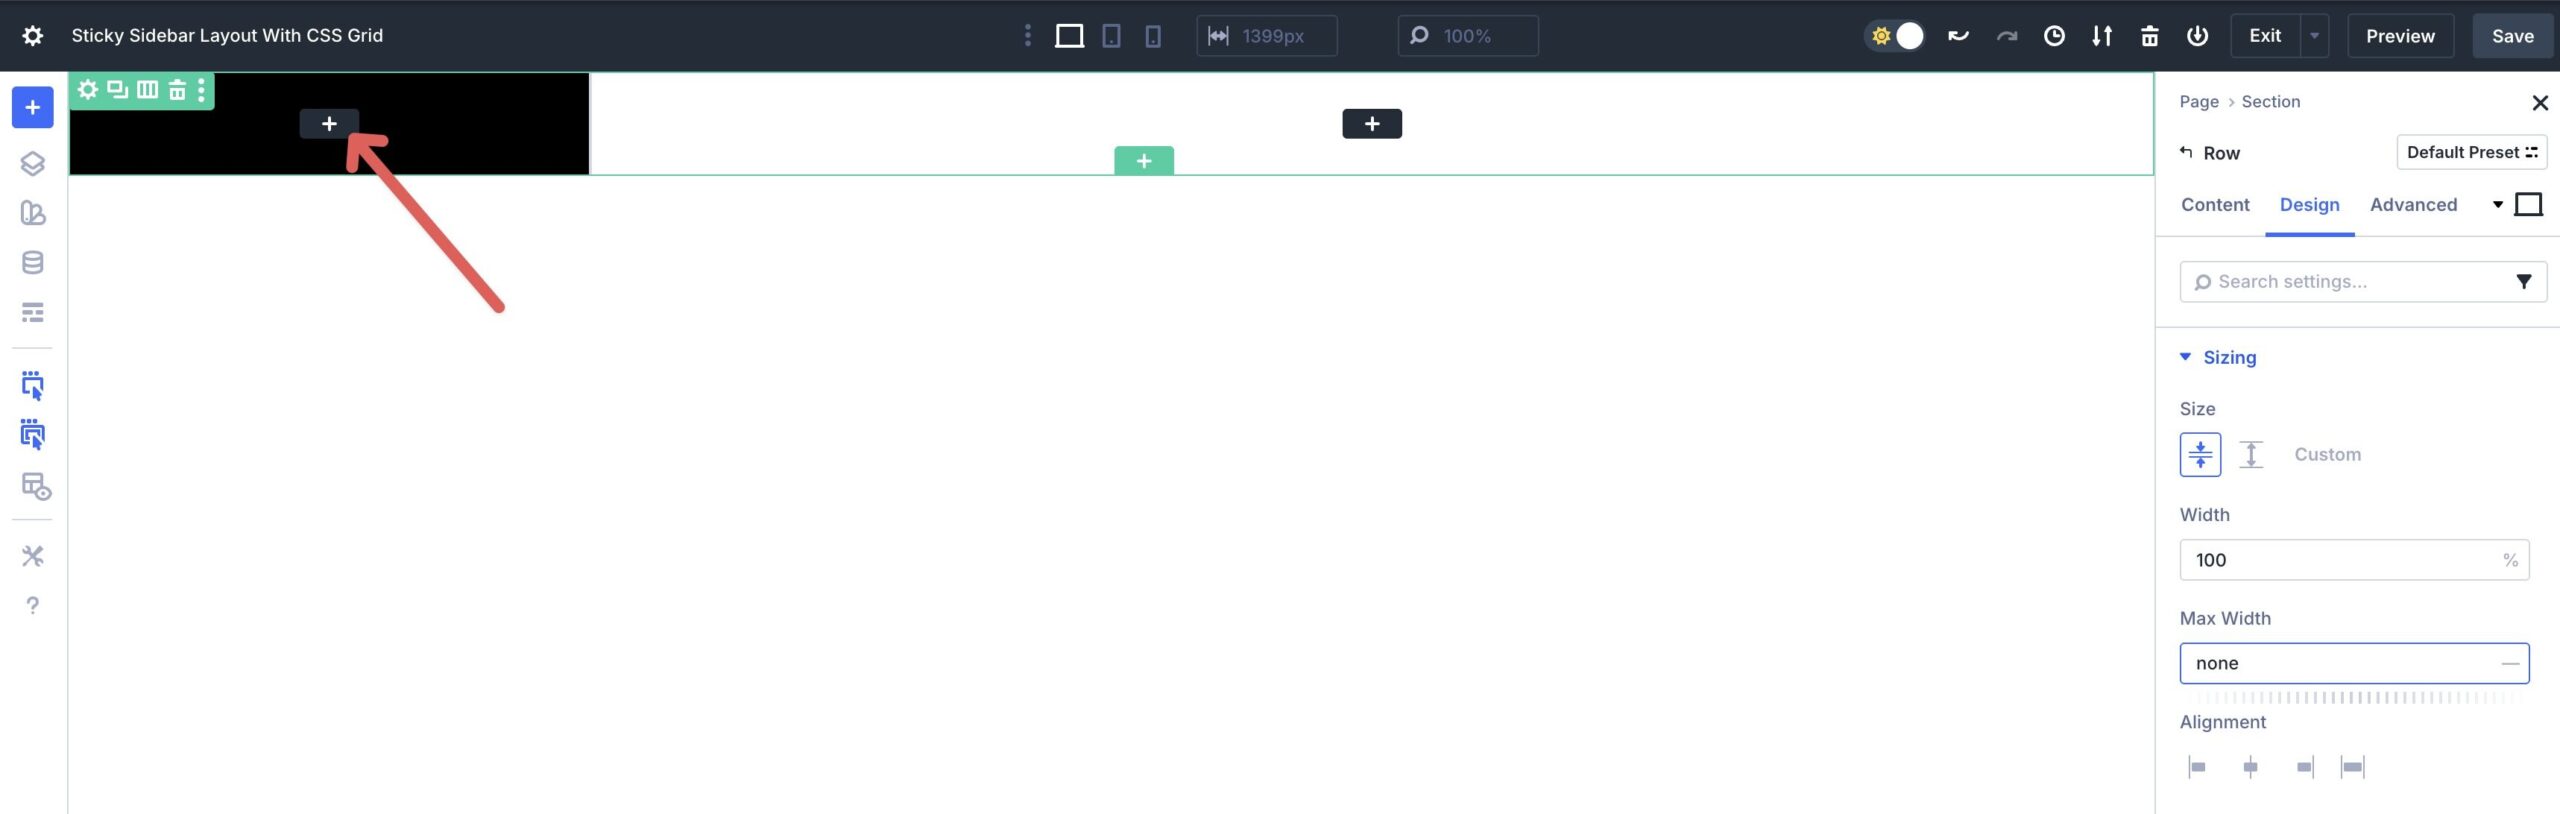
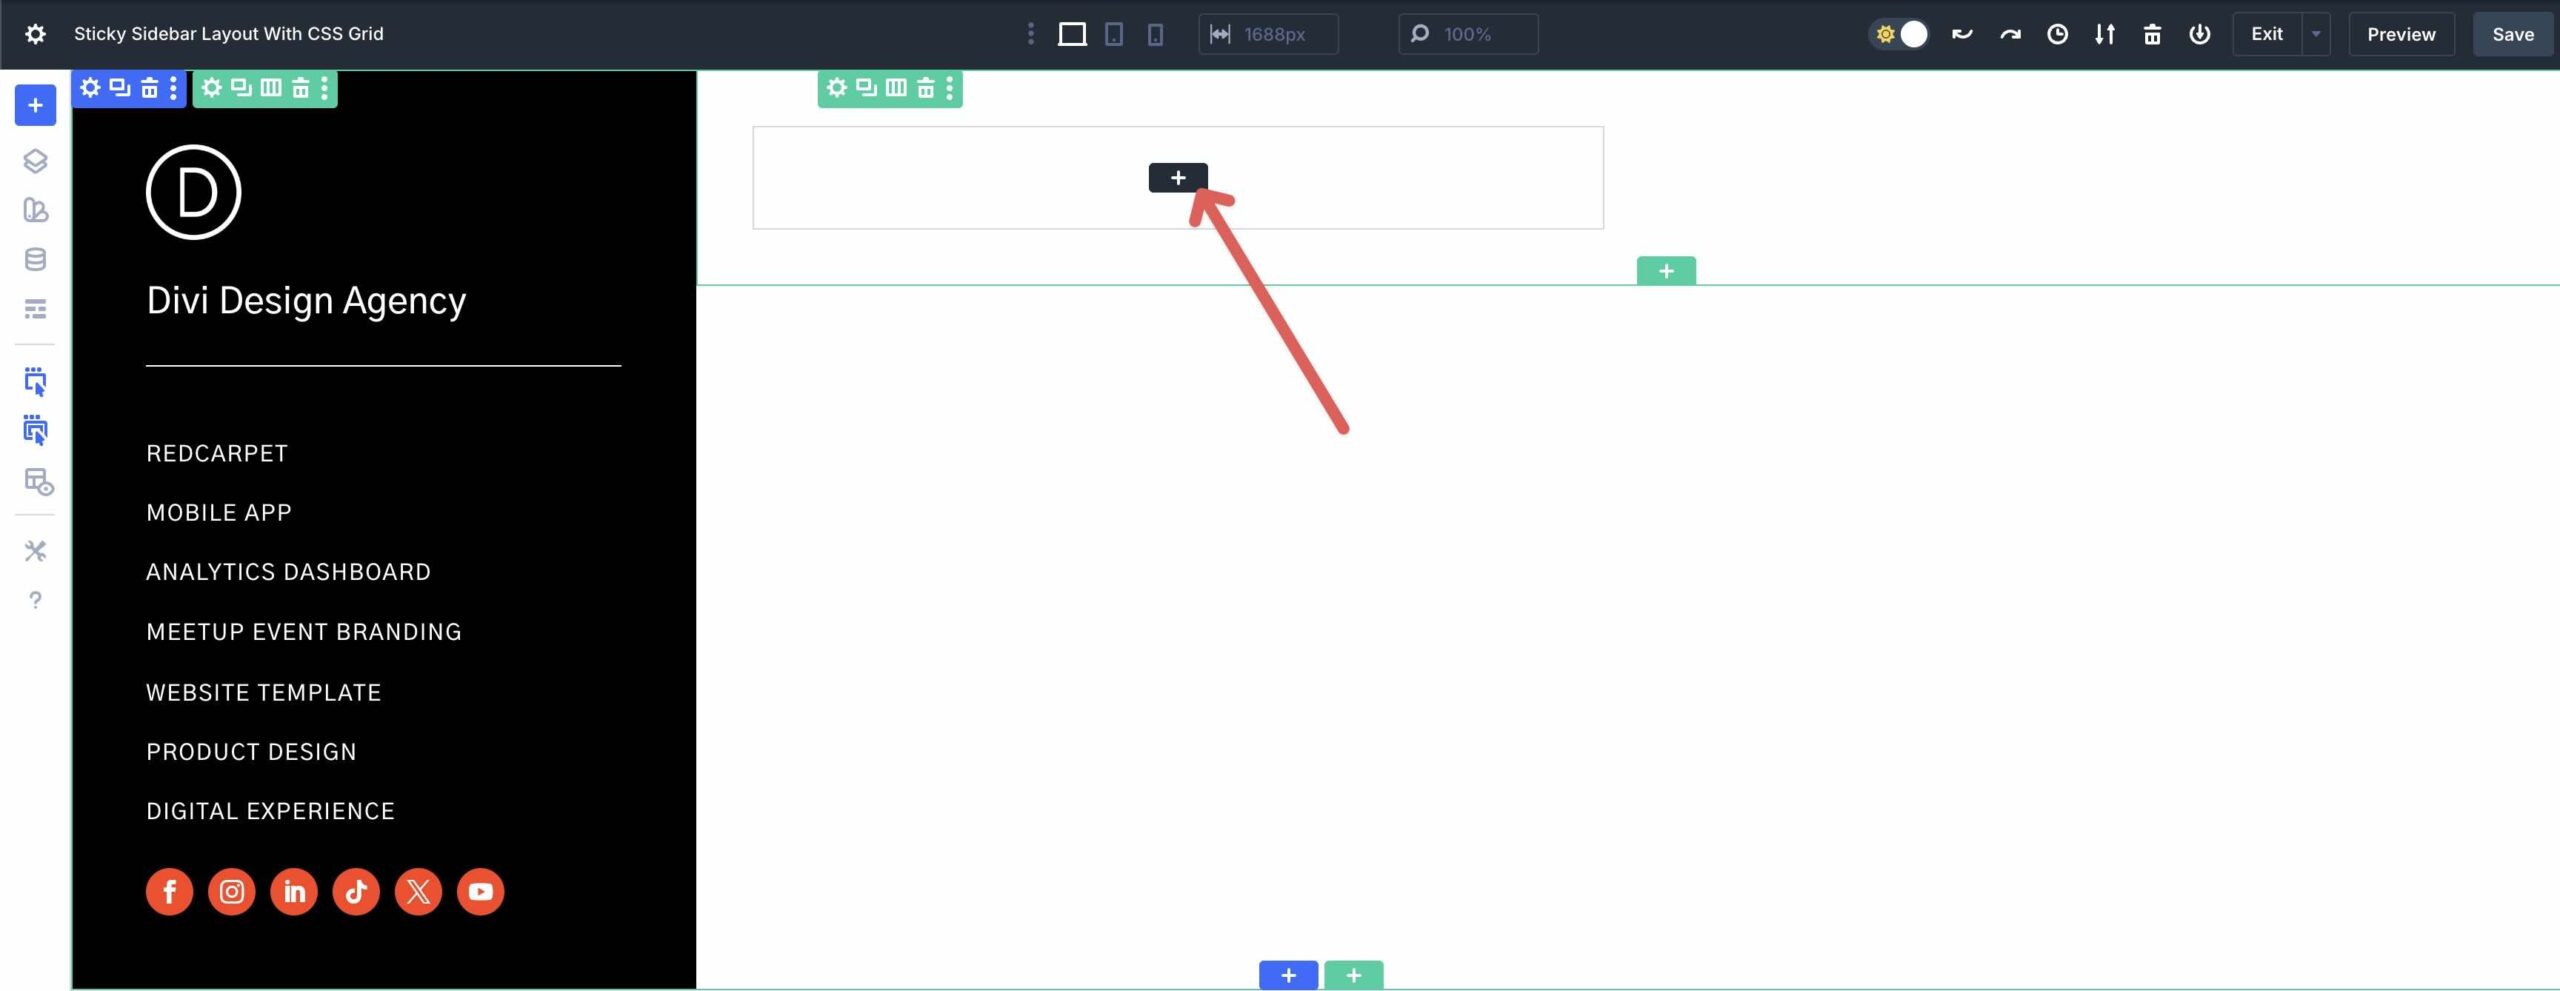
With our Row development in place, we can get started together with content material subject matter to the principle Column. Click on at the black + icon in an effort to upload an image module.
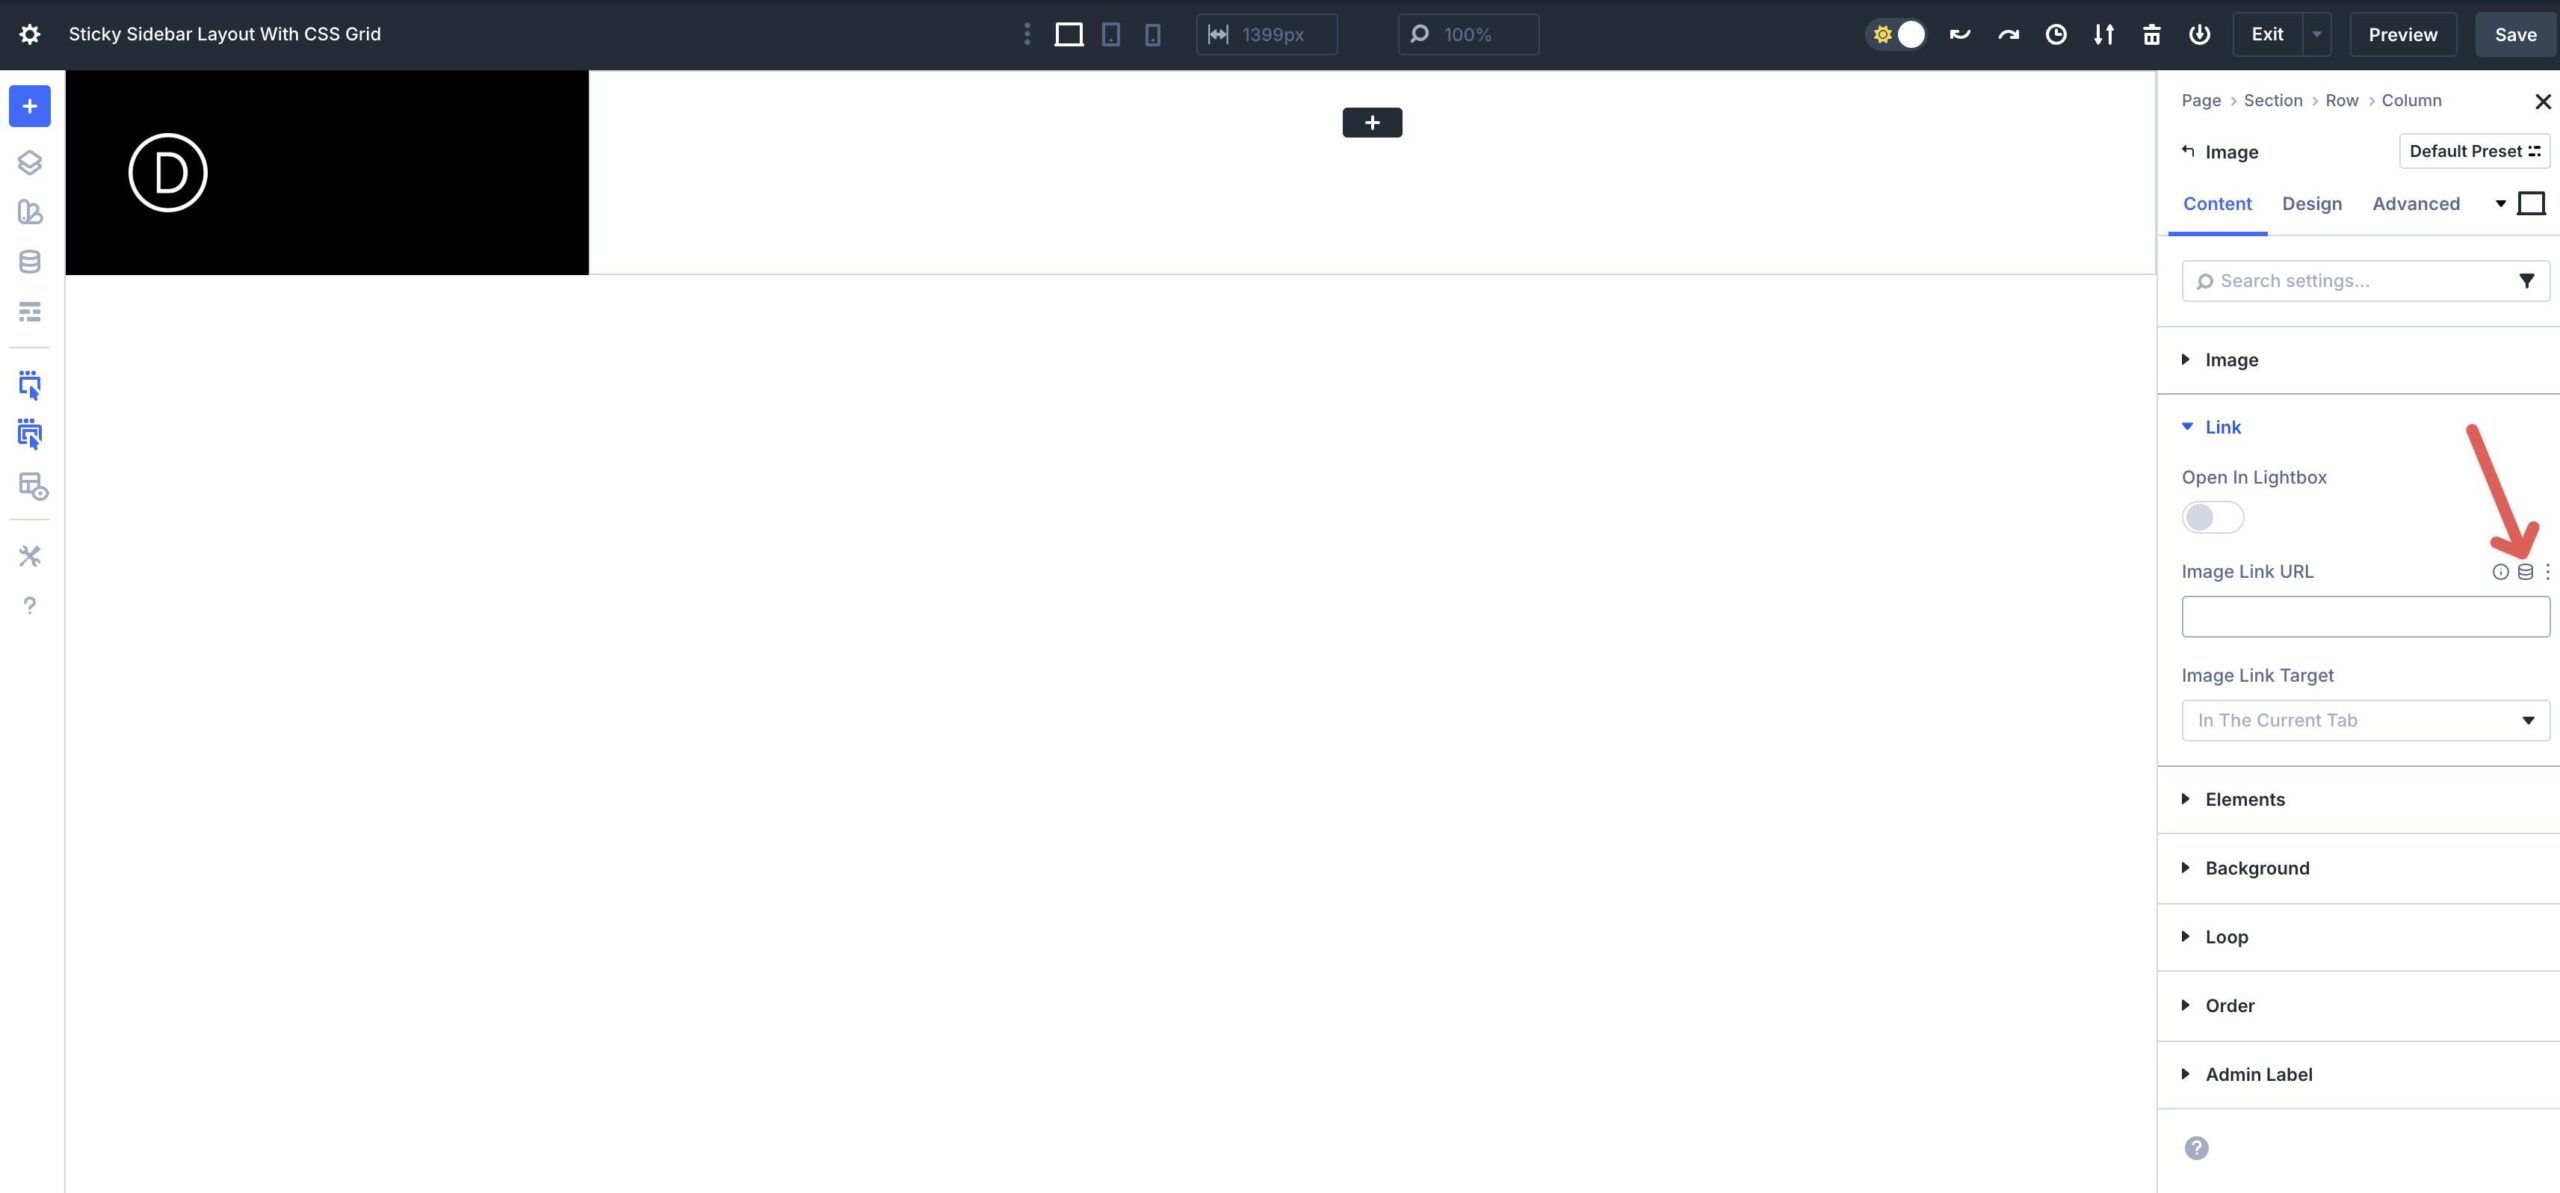
Upload an image, style the module as desired, and add a Homepage Link the usage of Divi 5’s Dynamic Content material subject matter icon.
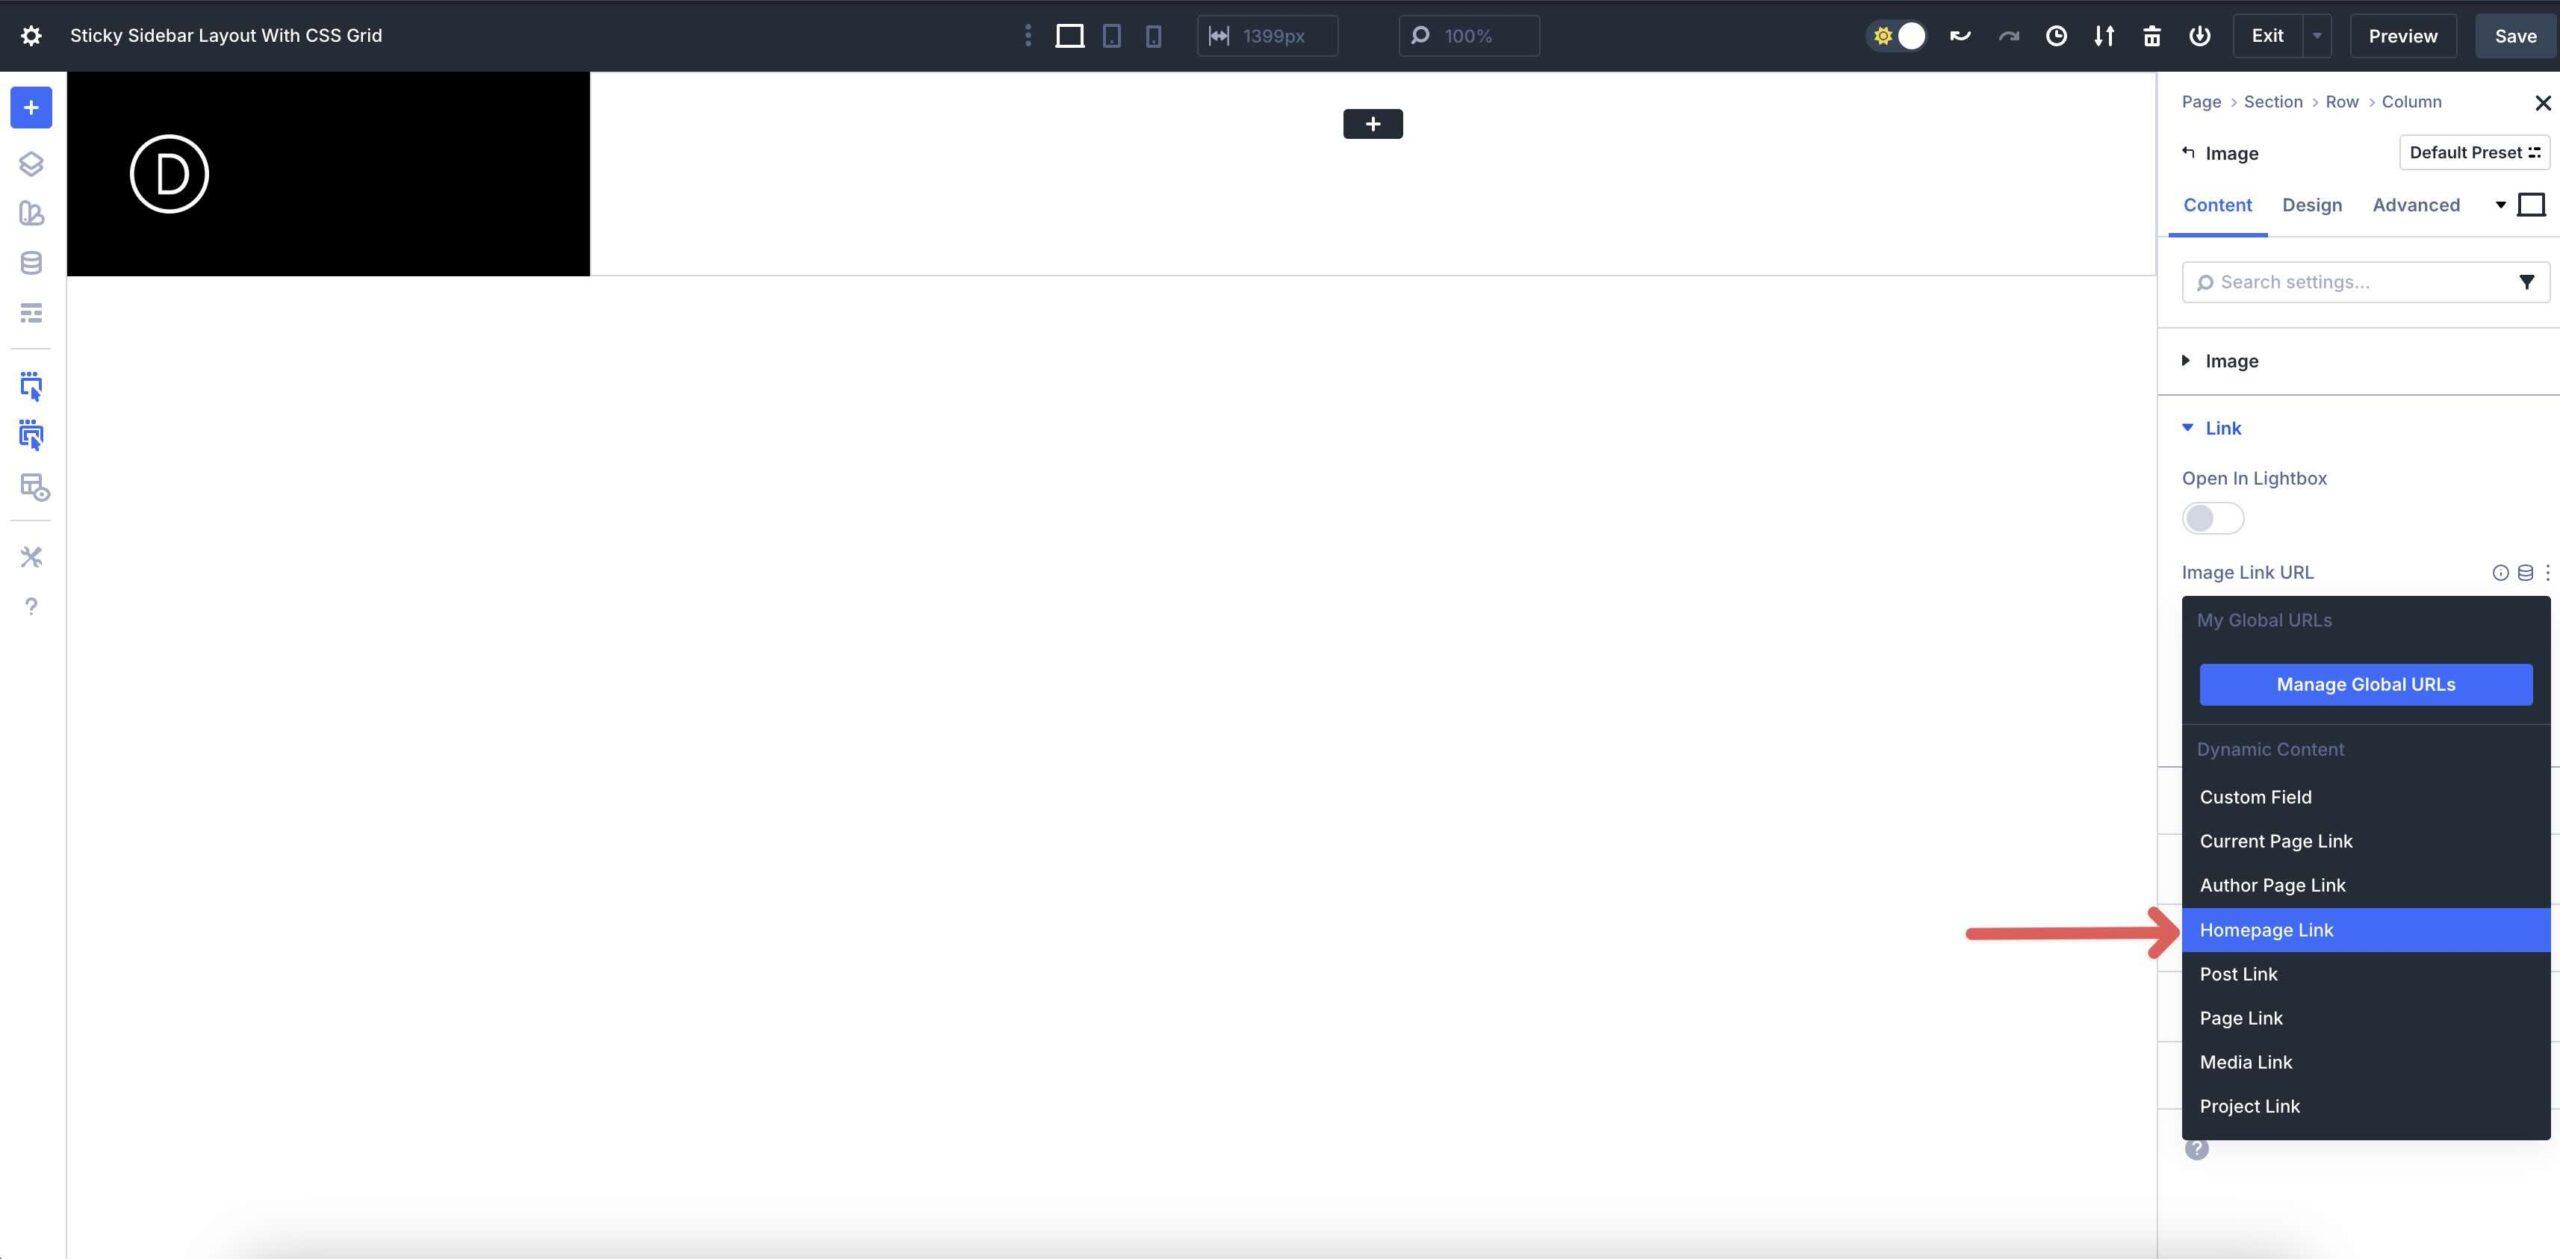
Make a selection Homepage Link from the available alternatives.
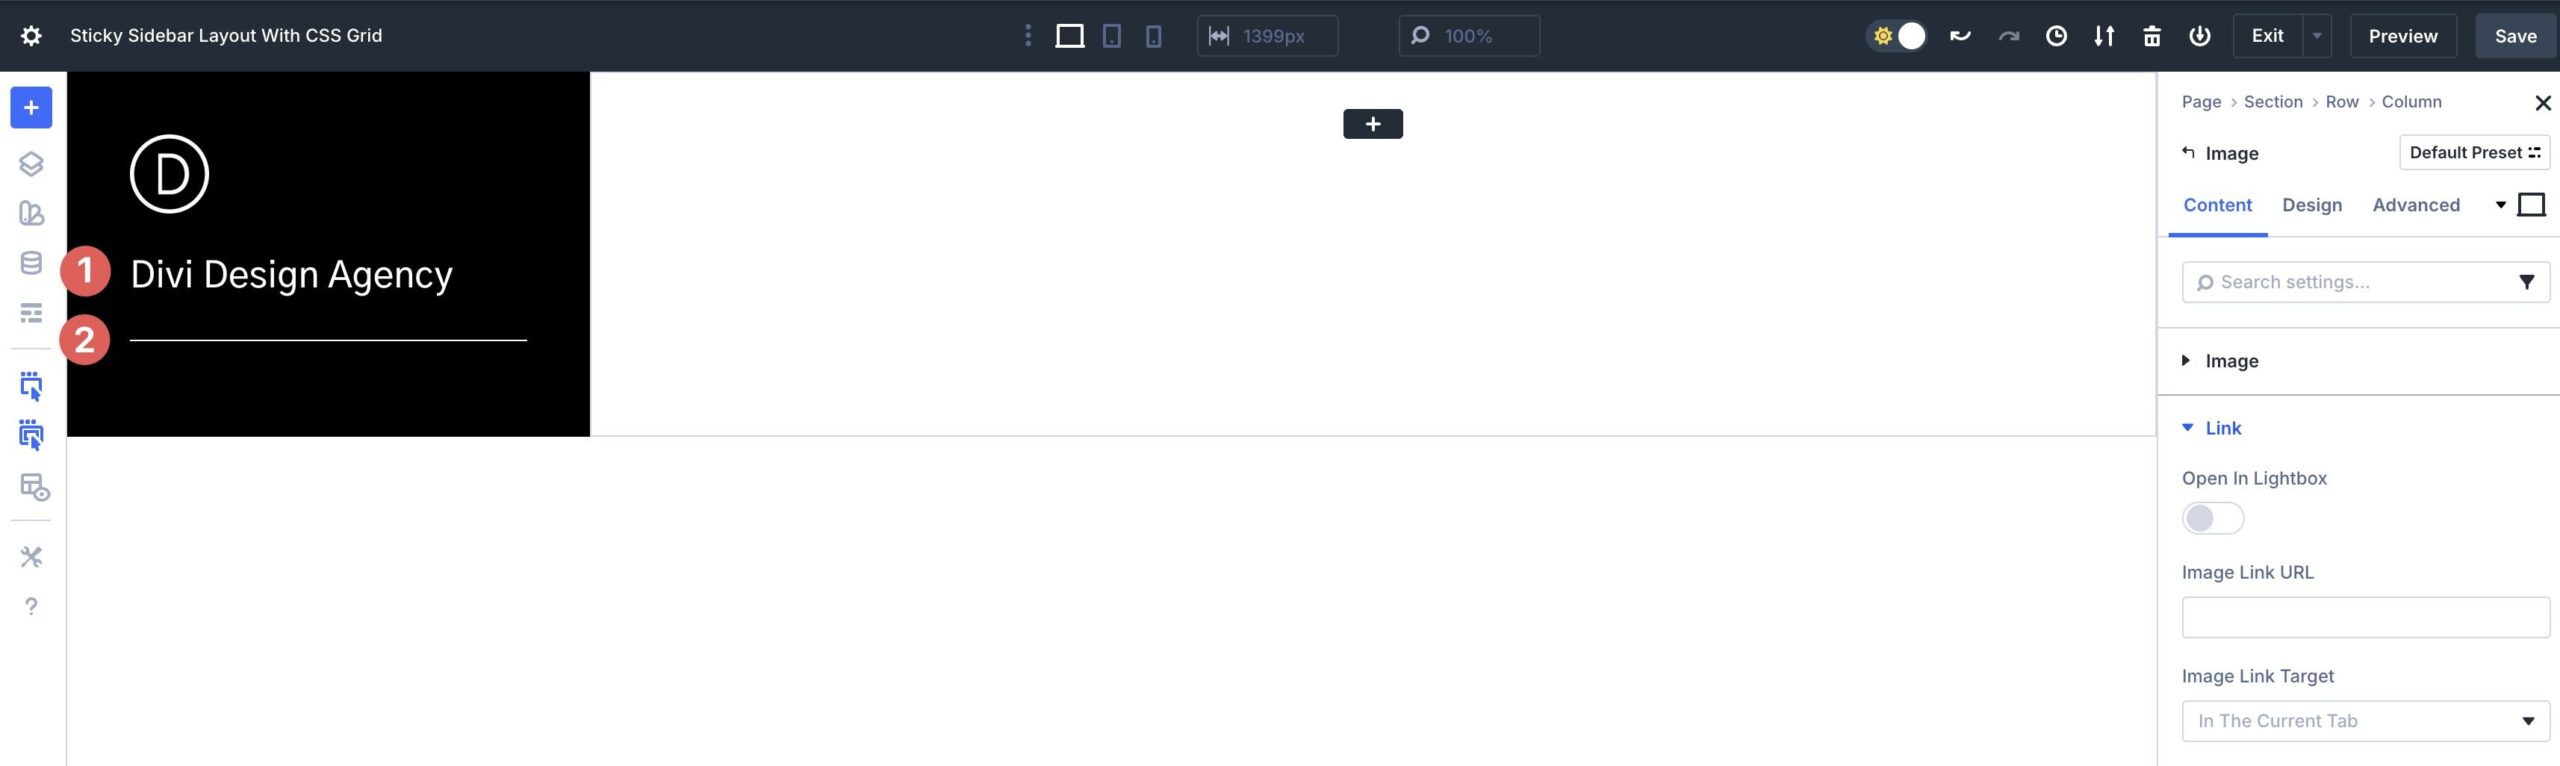
Add a Heading module, followed via a Divider module, then style as desired.
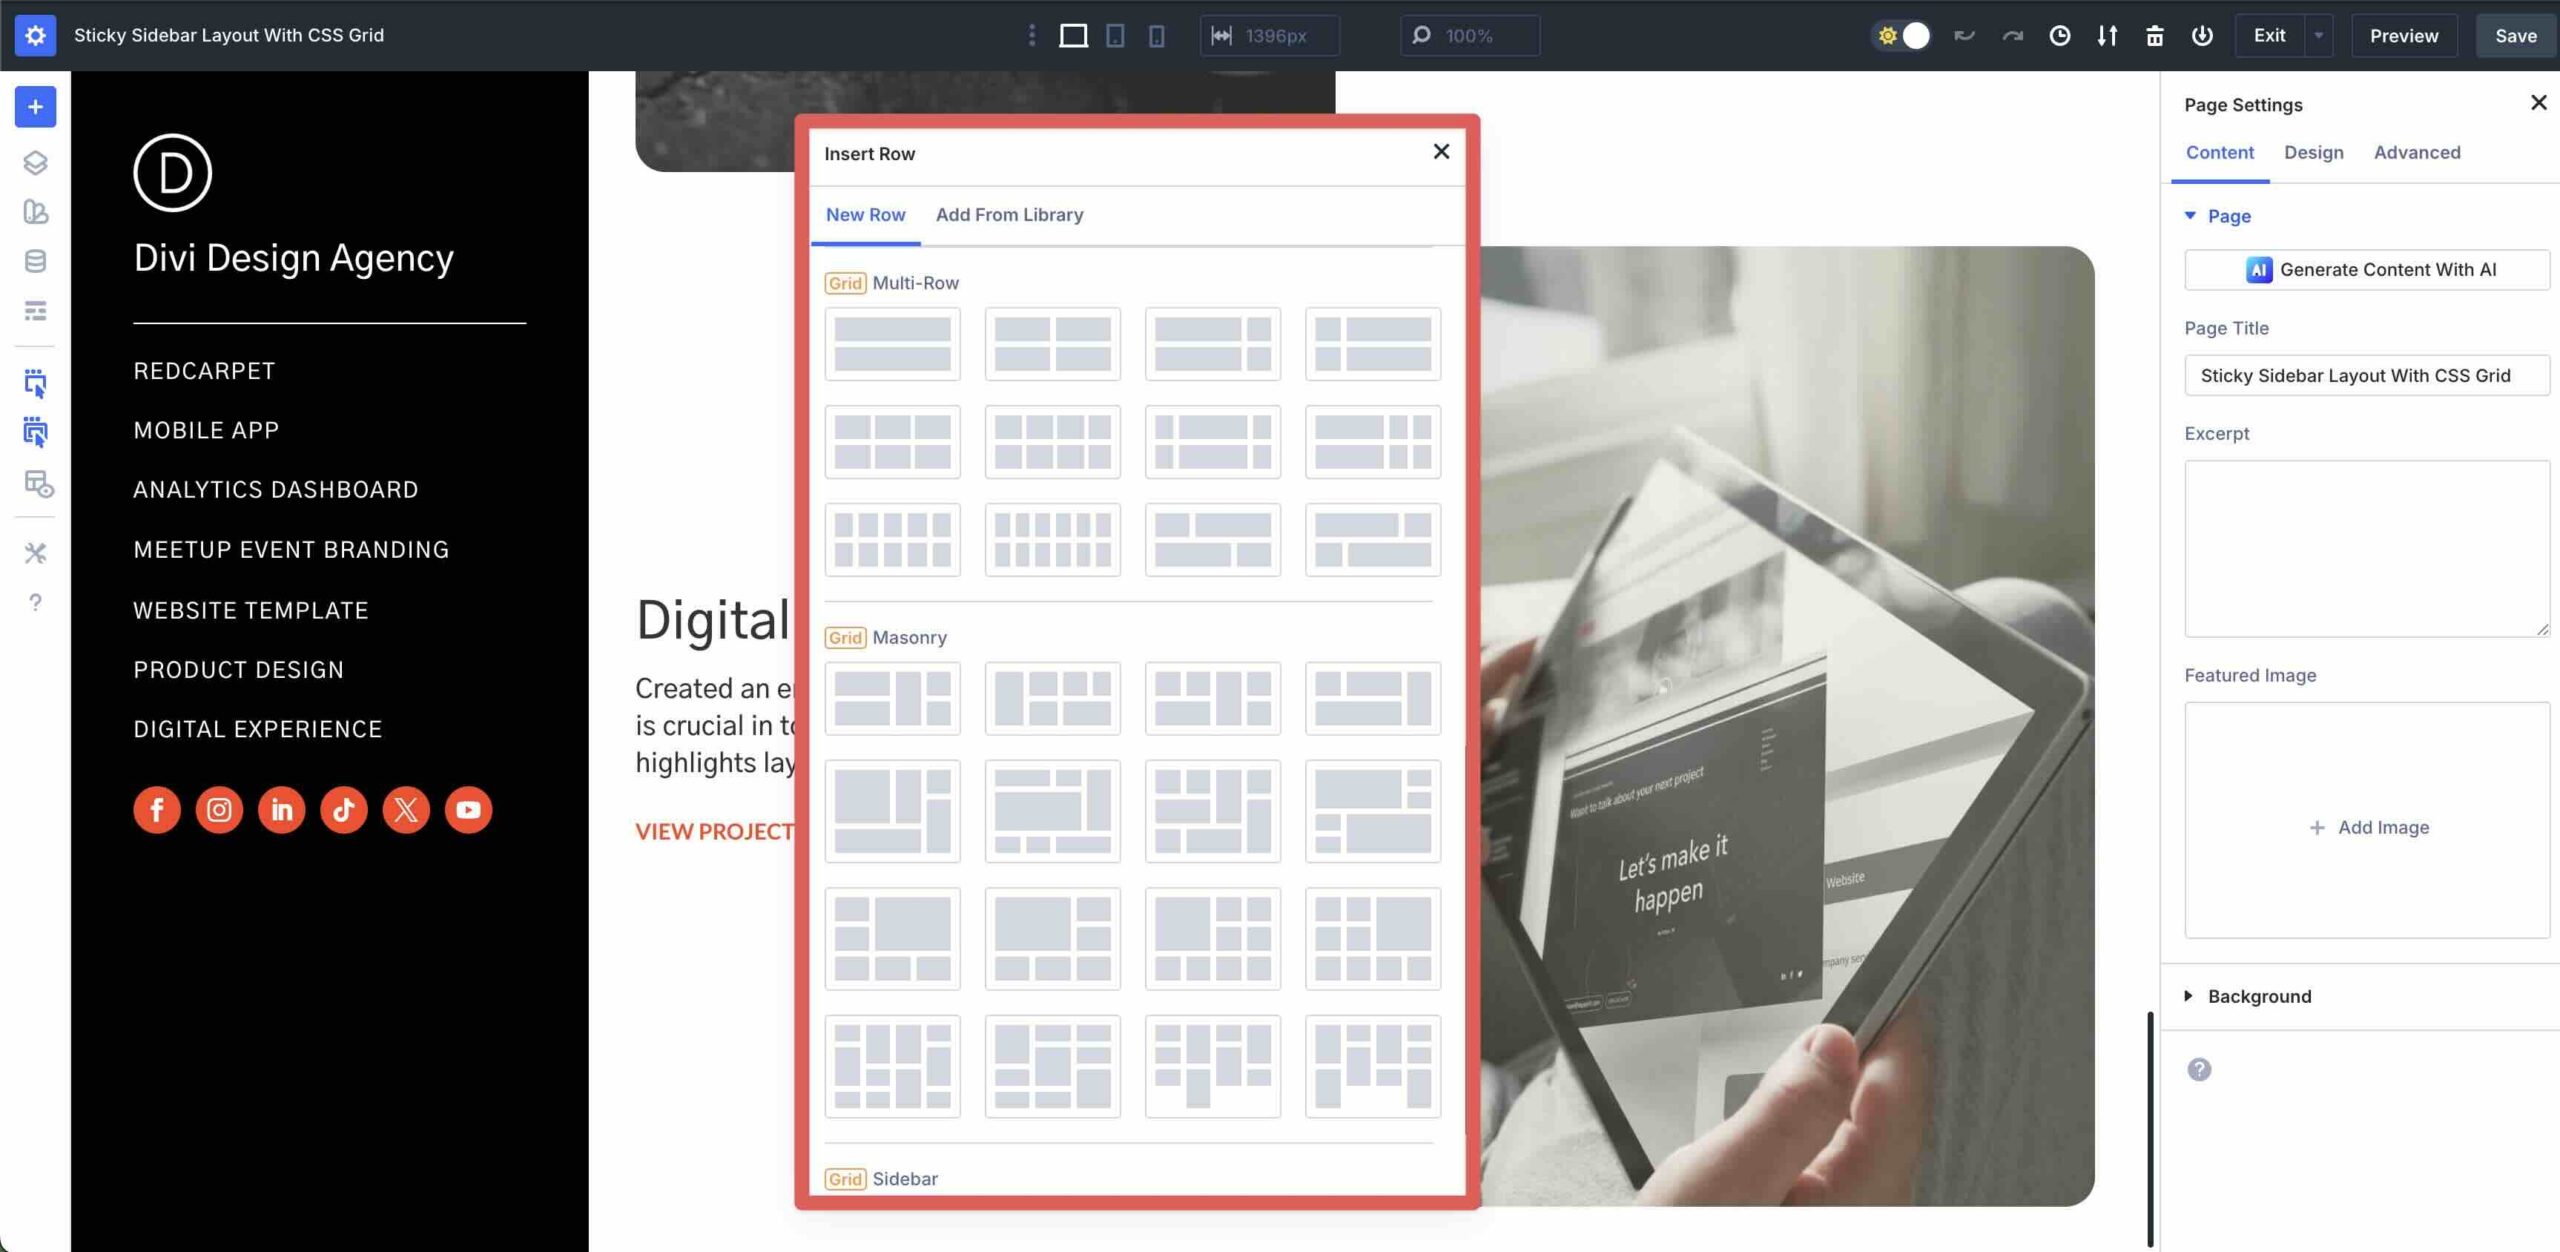
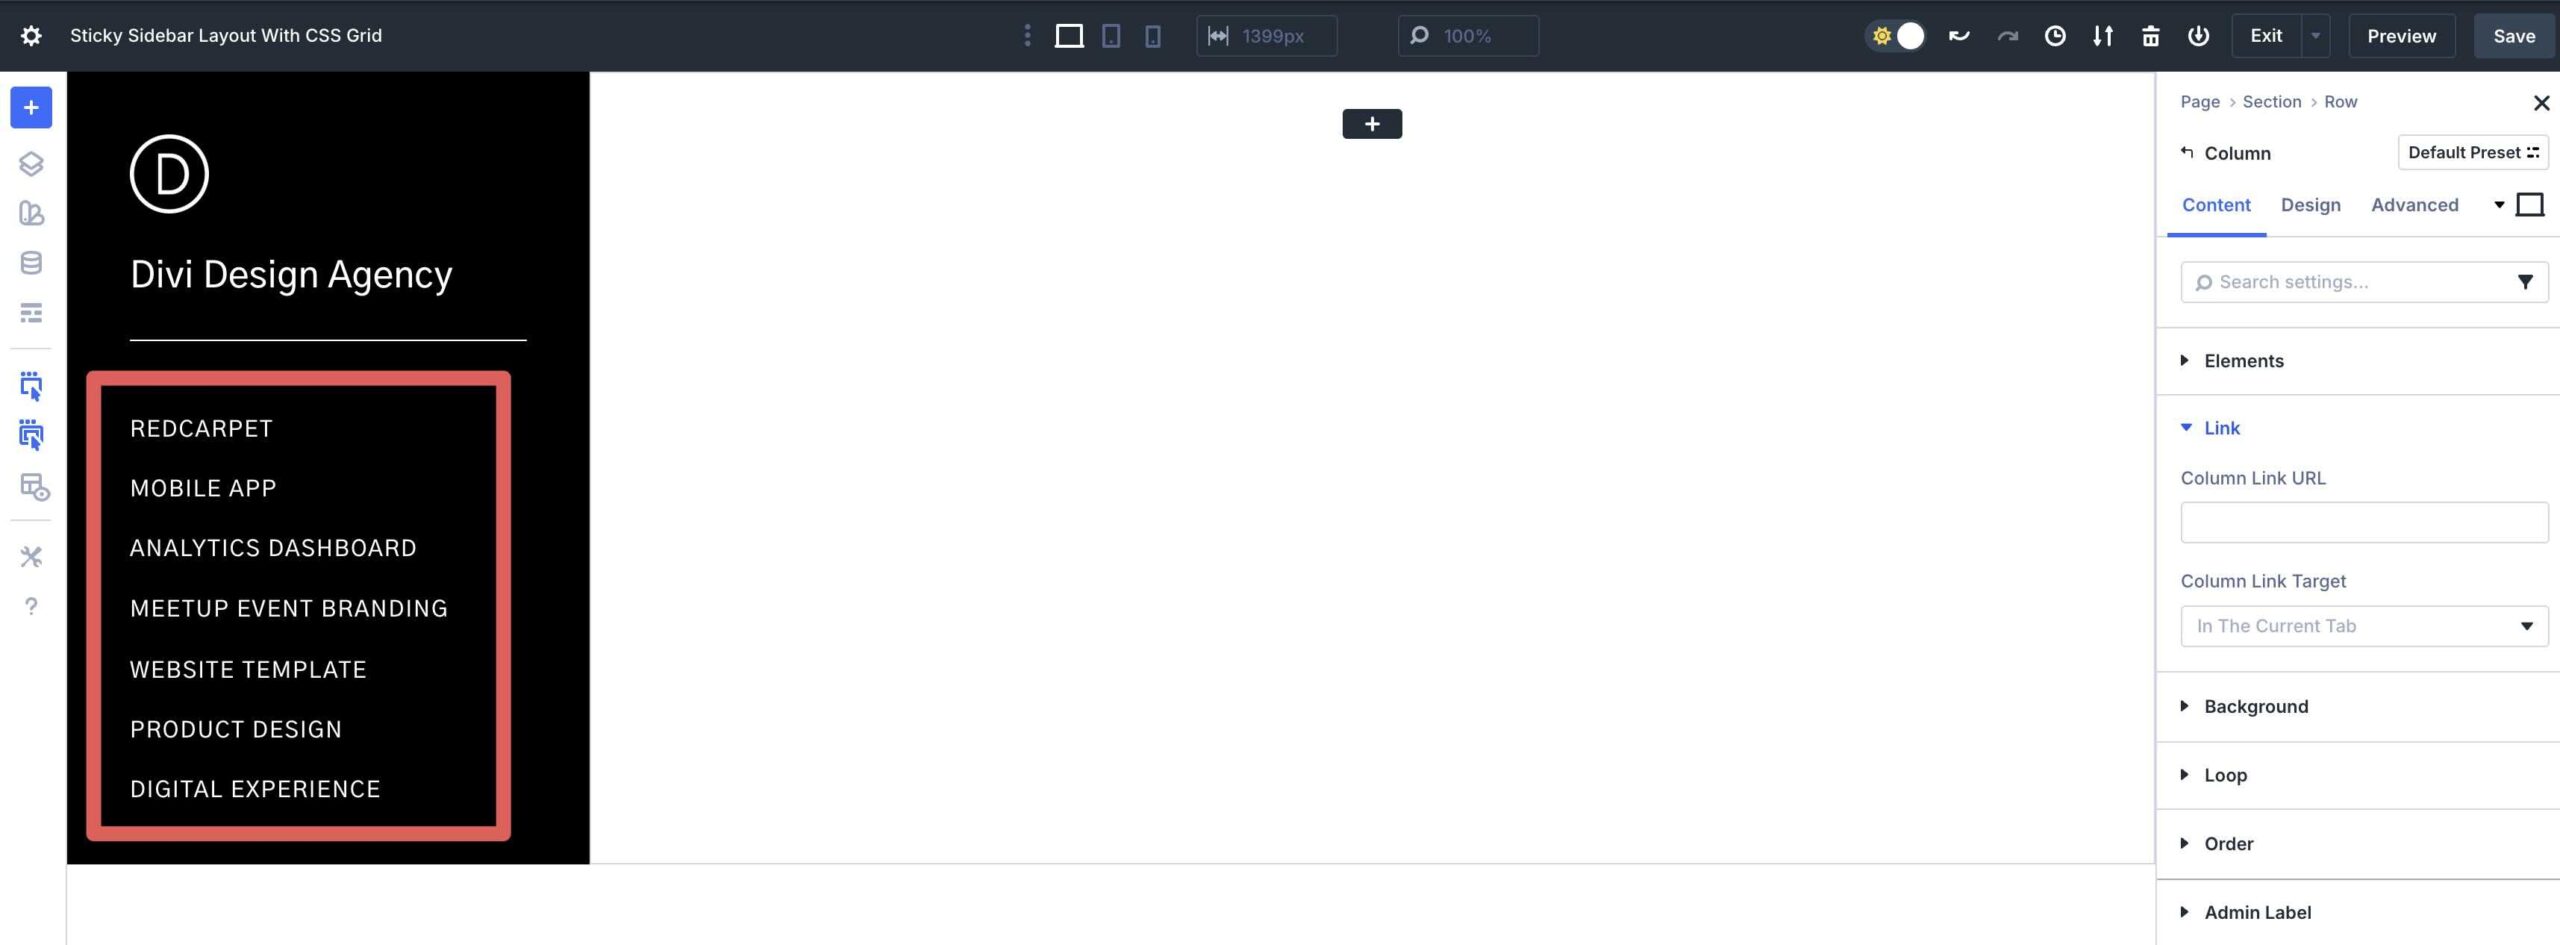
Next, add a Single Column Nested Row to the Column. This may occasionally most probably area the links for our construction.
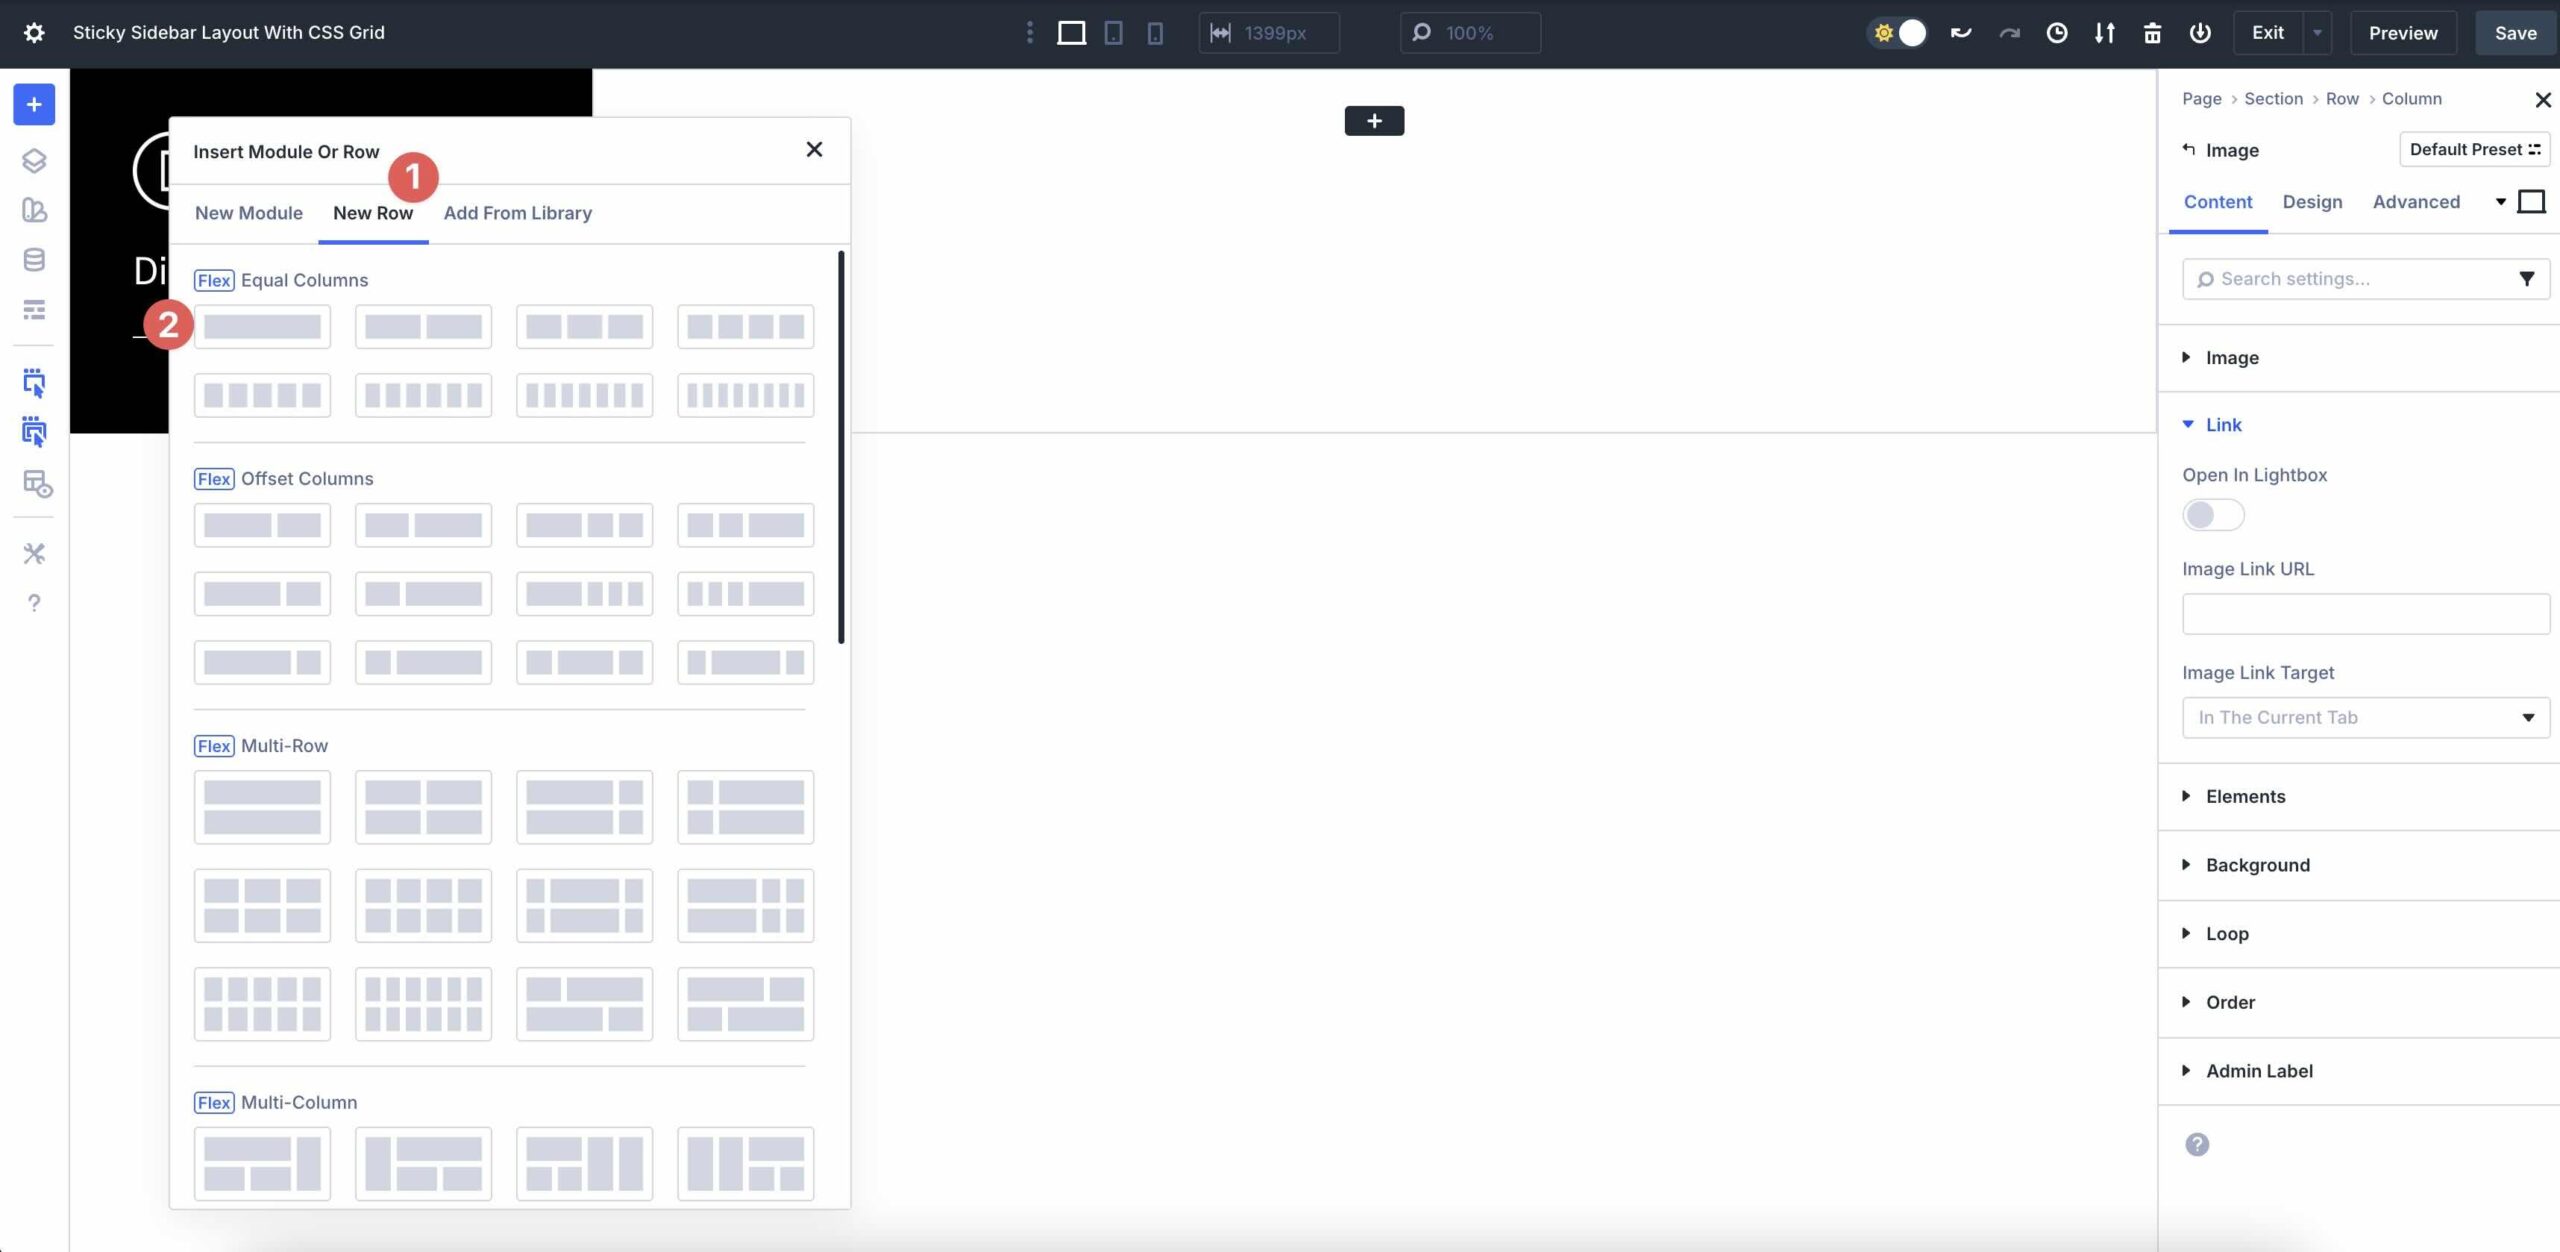
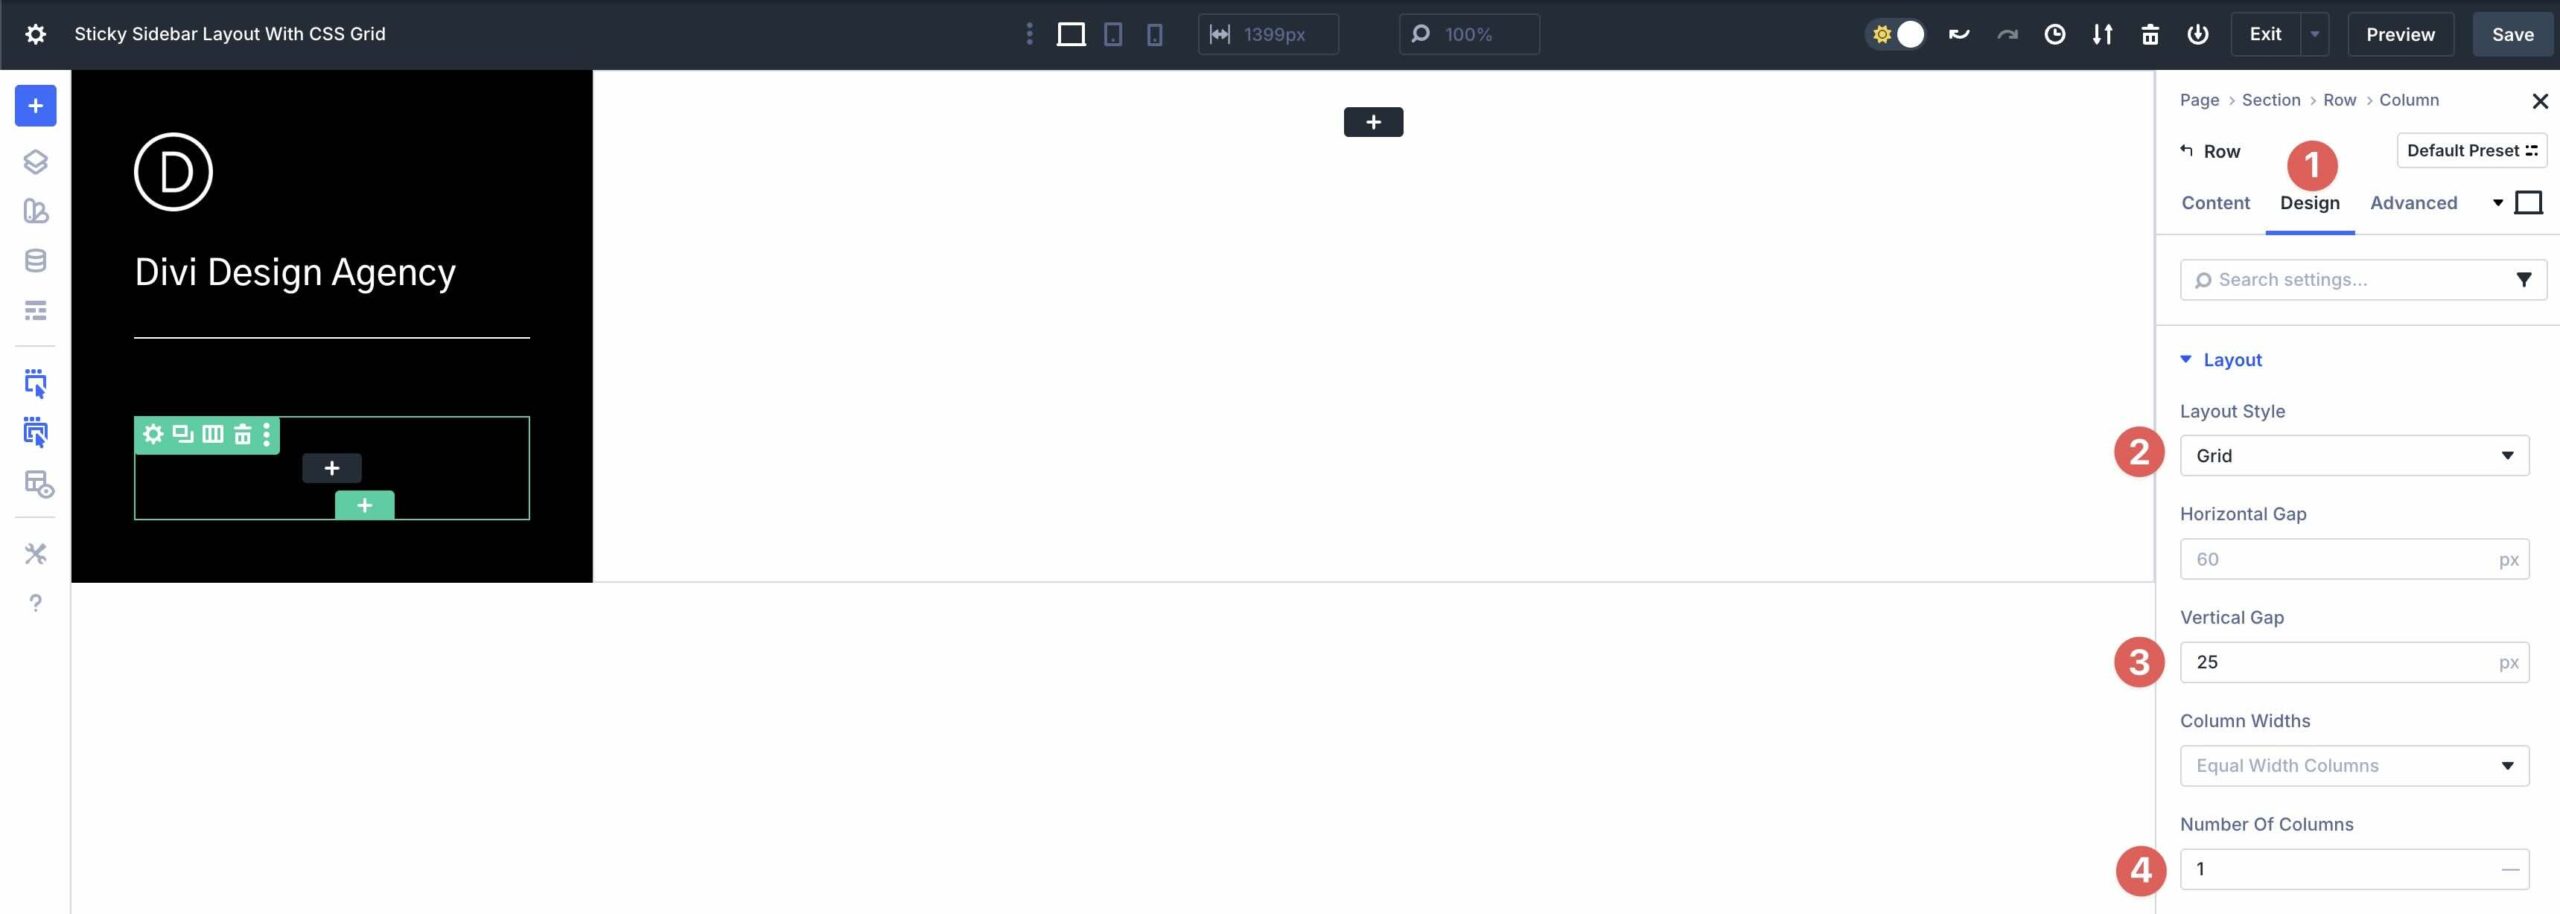
Navigate to the Design tab and select Grid since the Construction Style. Set a Vertical Hollow of 25, and set the Selection of Columns to 1.
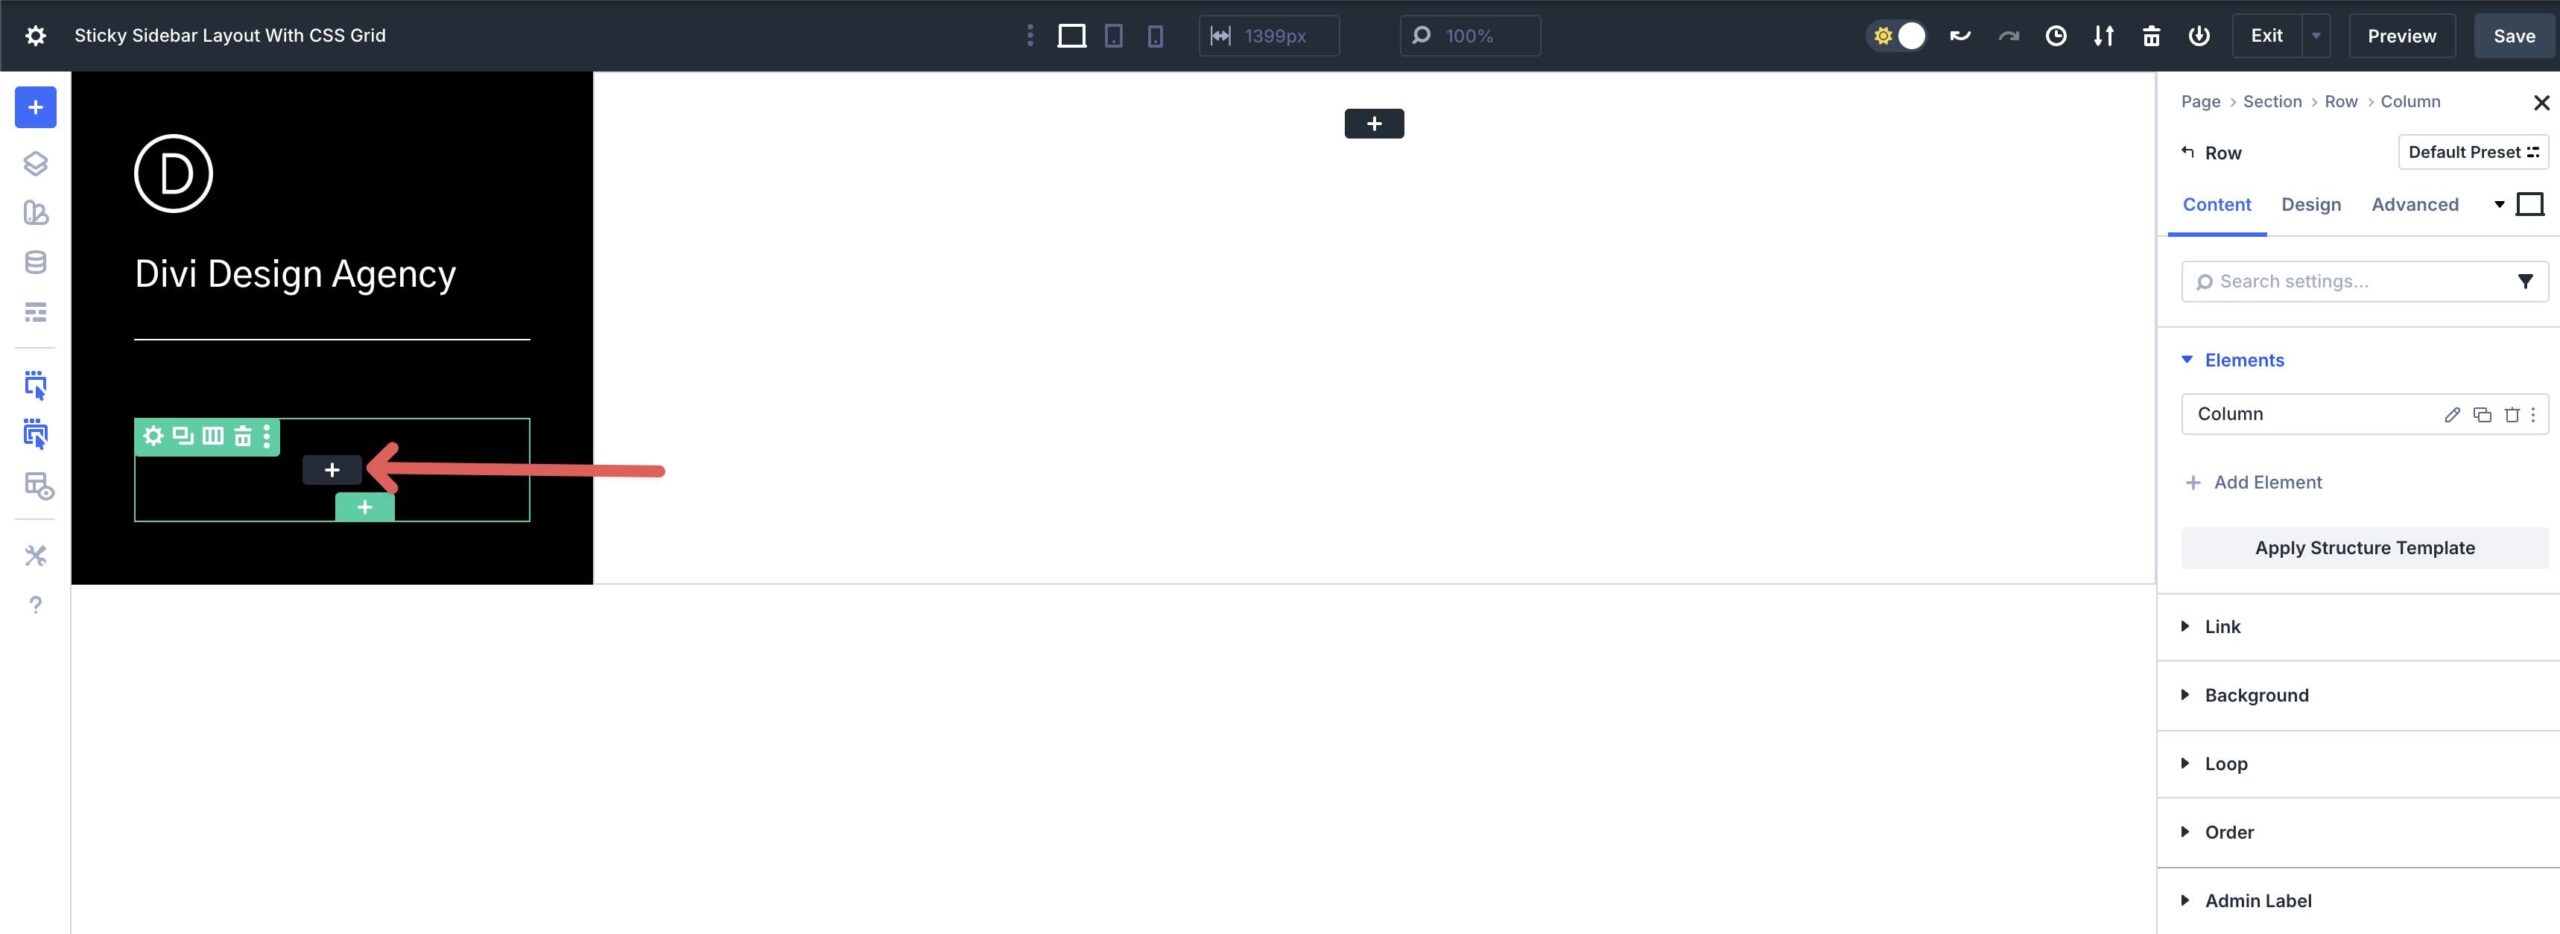
Click on at the black + icon in an effort to upload a Heading module. Style the Heading as desired.
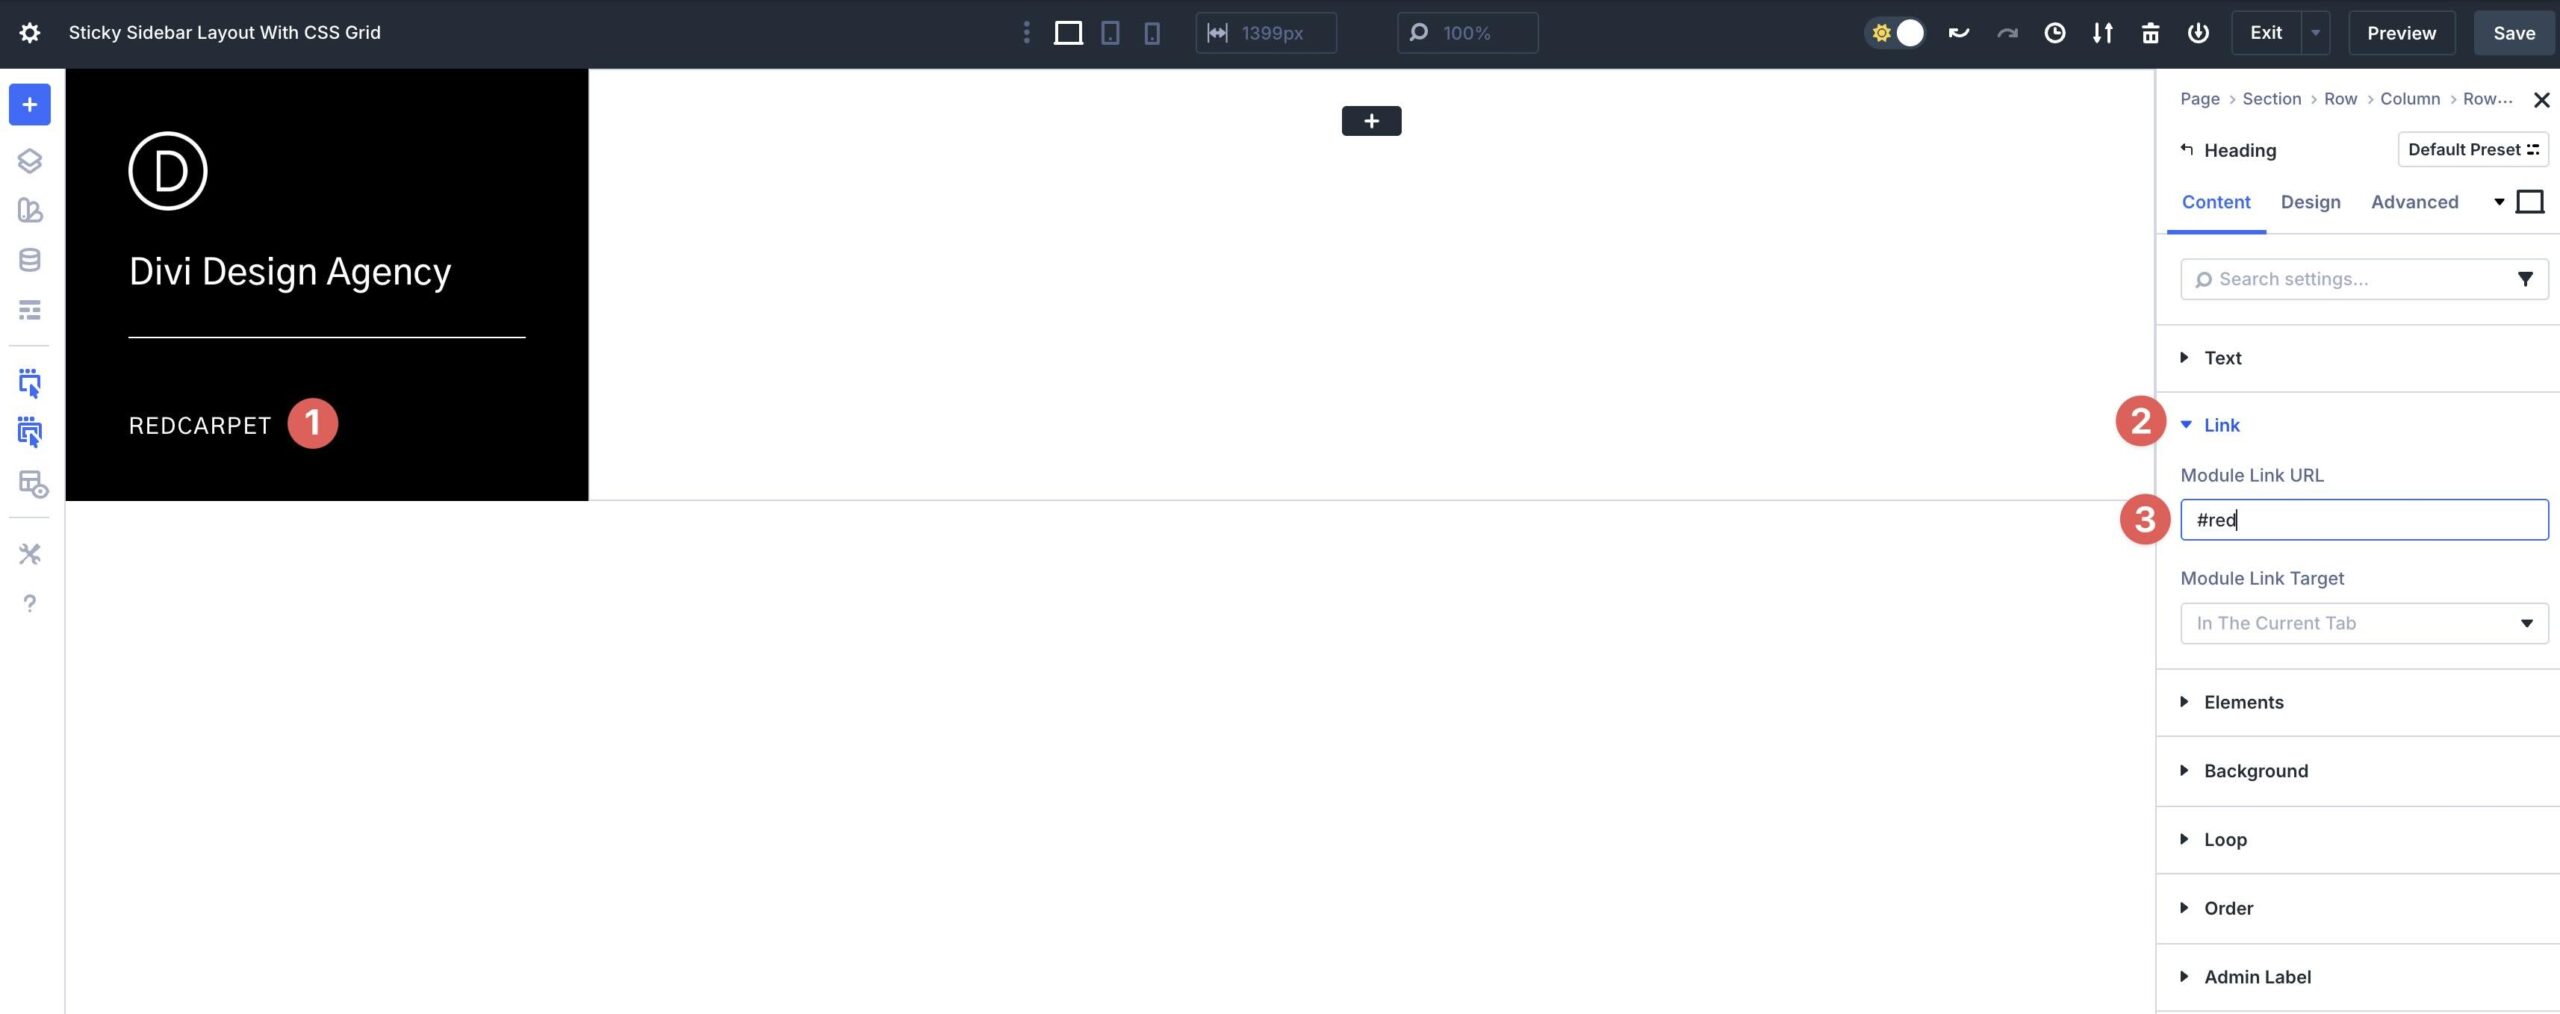
Enlarge the Link menu. Inside the Module Link URL field, enter an anchor link (for example, #red). This may occasionally most probably imply you’ll soar to the matching phase on the internet web page for easy navigation.
Repeat the steps in an effort to upload as many menu links (Heading modules) as desired.
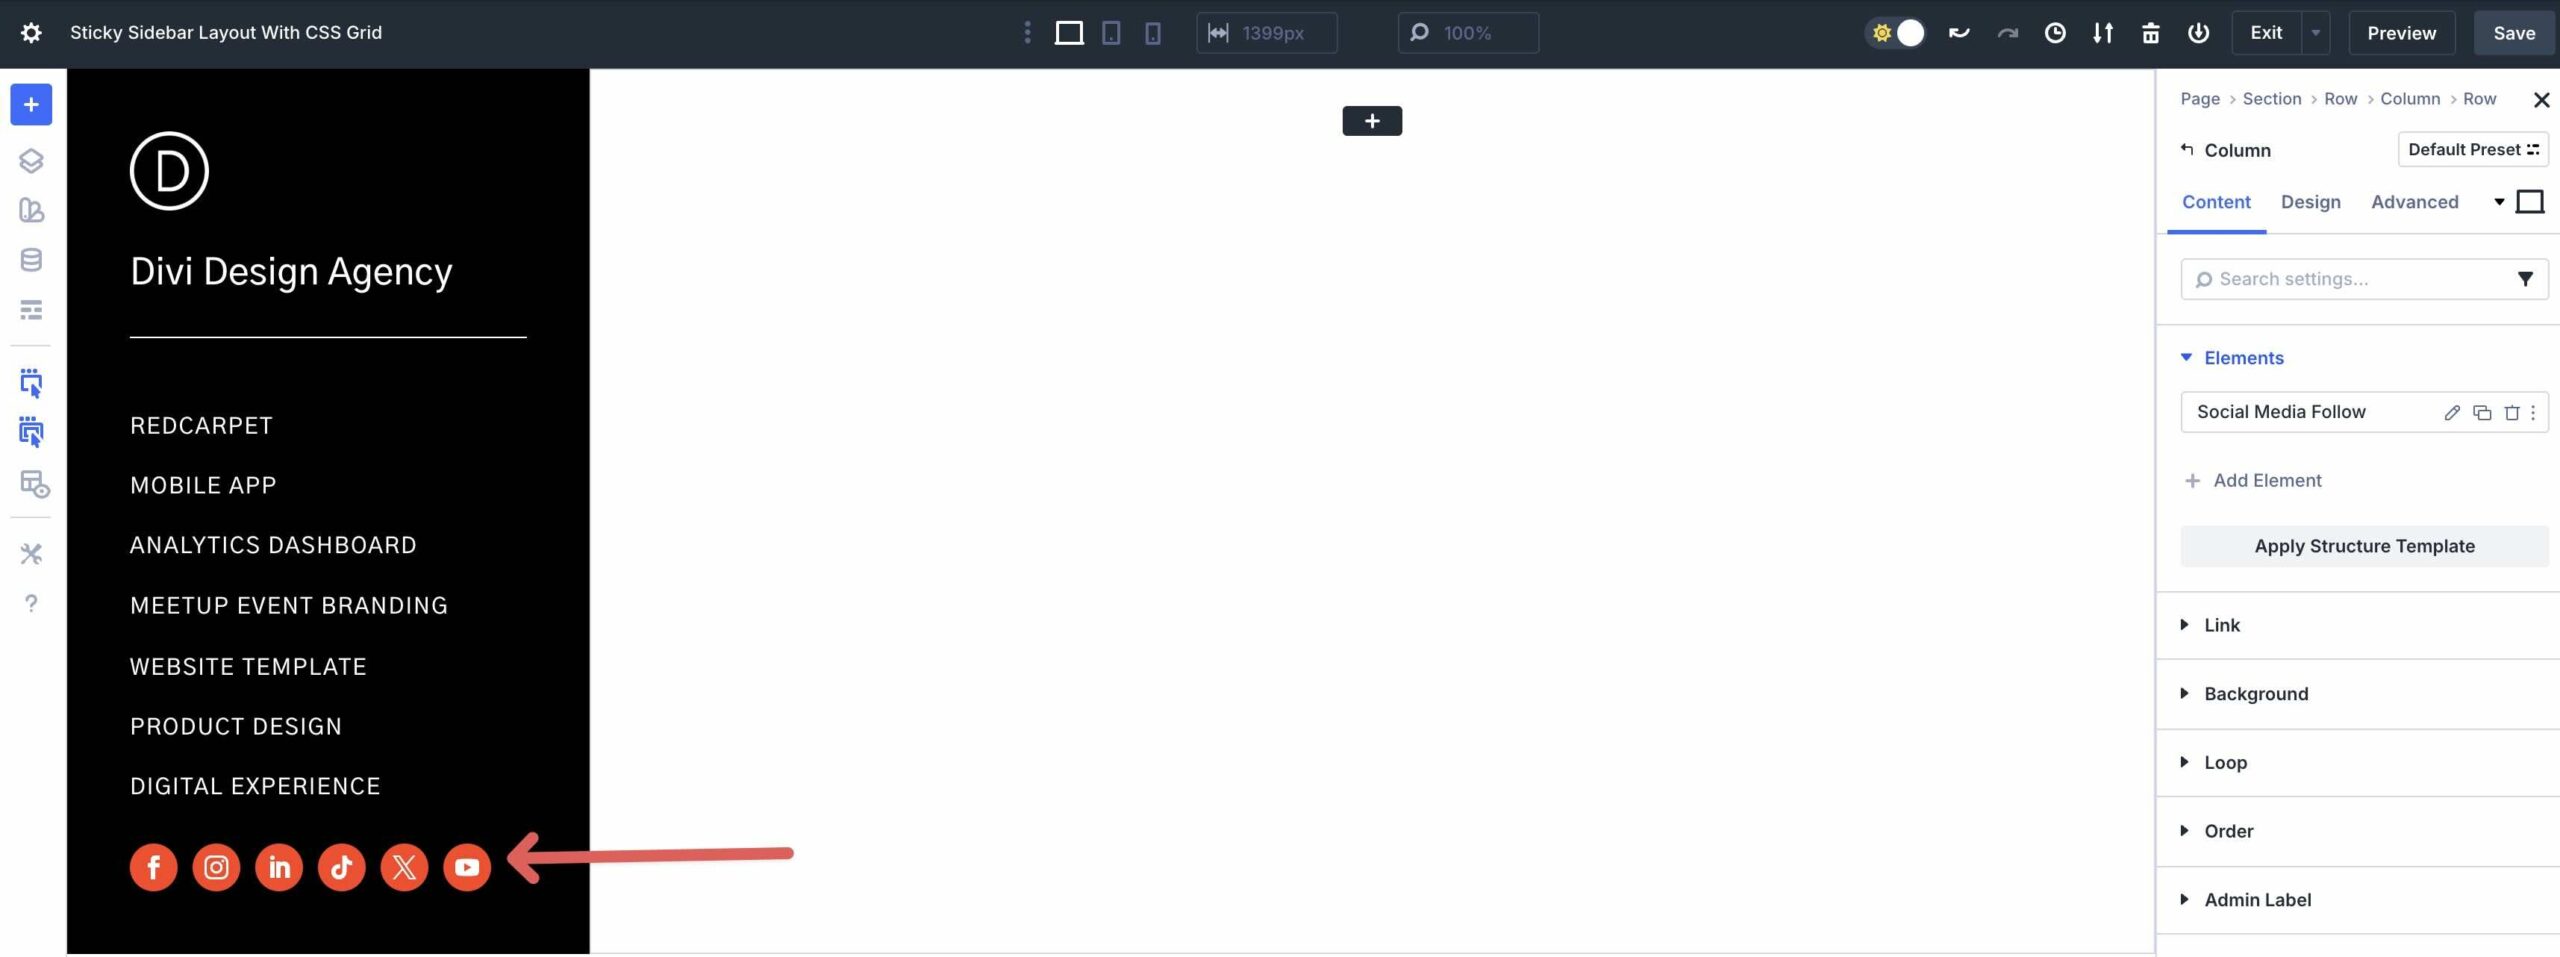
Next, add a brand spanking new Single Column Row to the Column, followed via a Social Media Apply module.
Add Social Networks and style the module as desired.
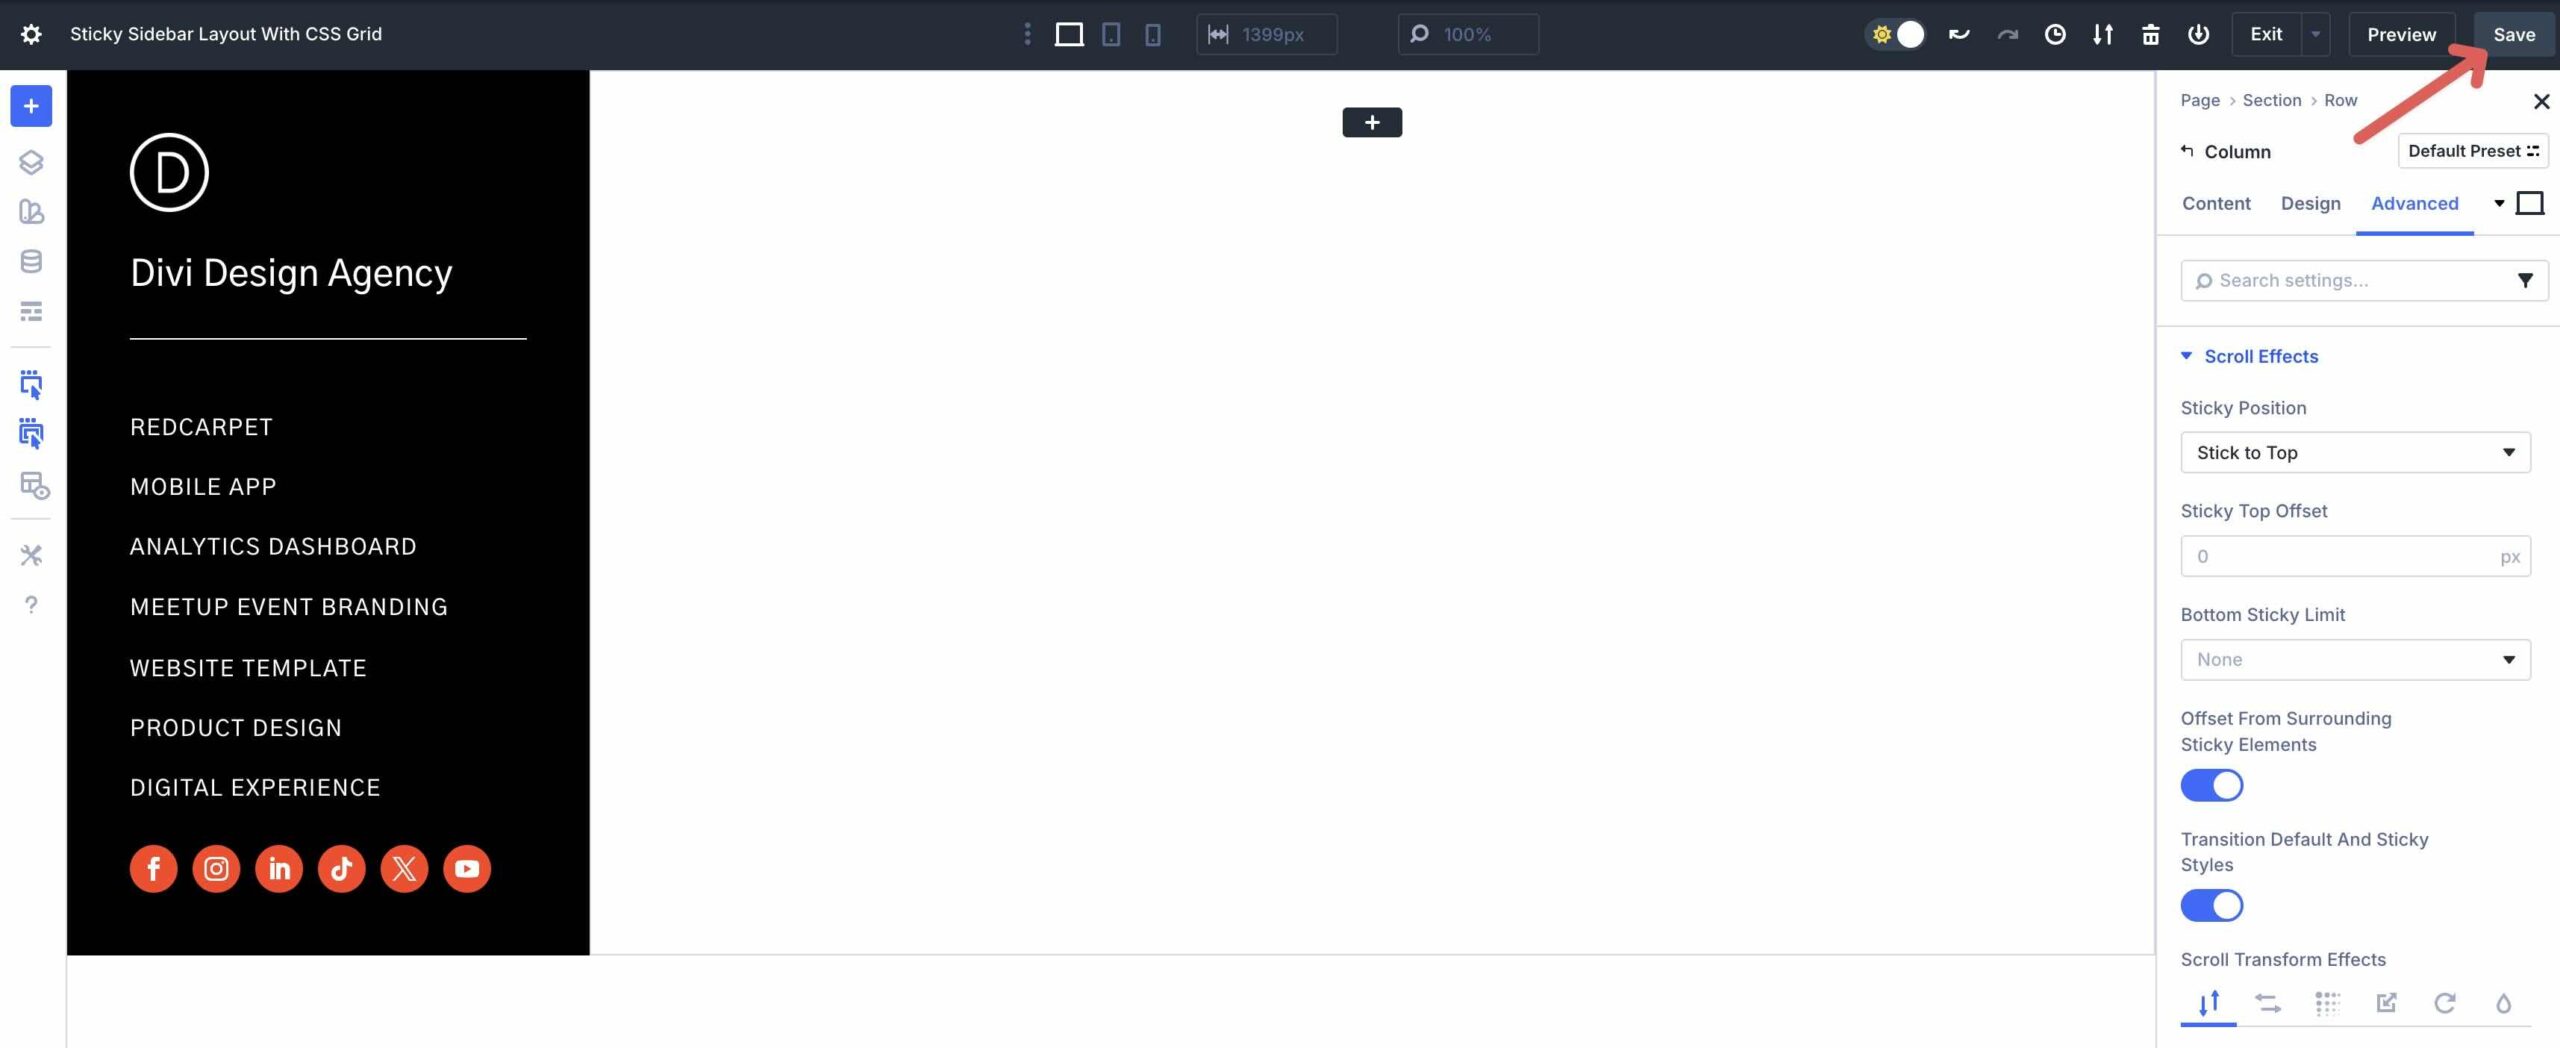
Make The Sidebar Sticky
Forward of we proceed to putting in place the second Column, we need to configure the Sticky alternatives. Inside the Column’s settings, click on at the Sophisticated tab. Enlarge the Scroll Effects menu and set the Sticky Position to Stick to Very best.

Forward of continuous to the next step, save your expansion via clicking the Save button at the top correct of the Visual Builder.
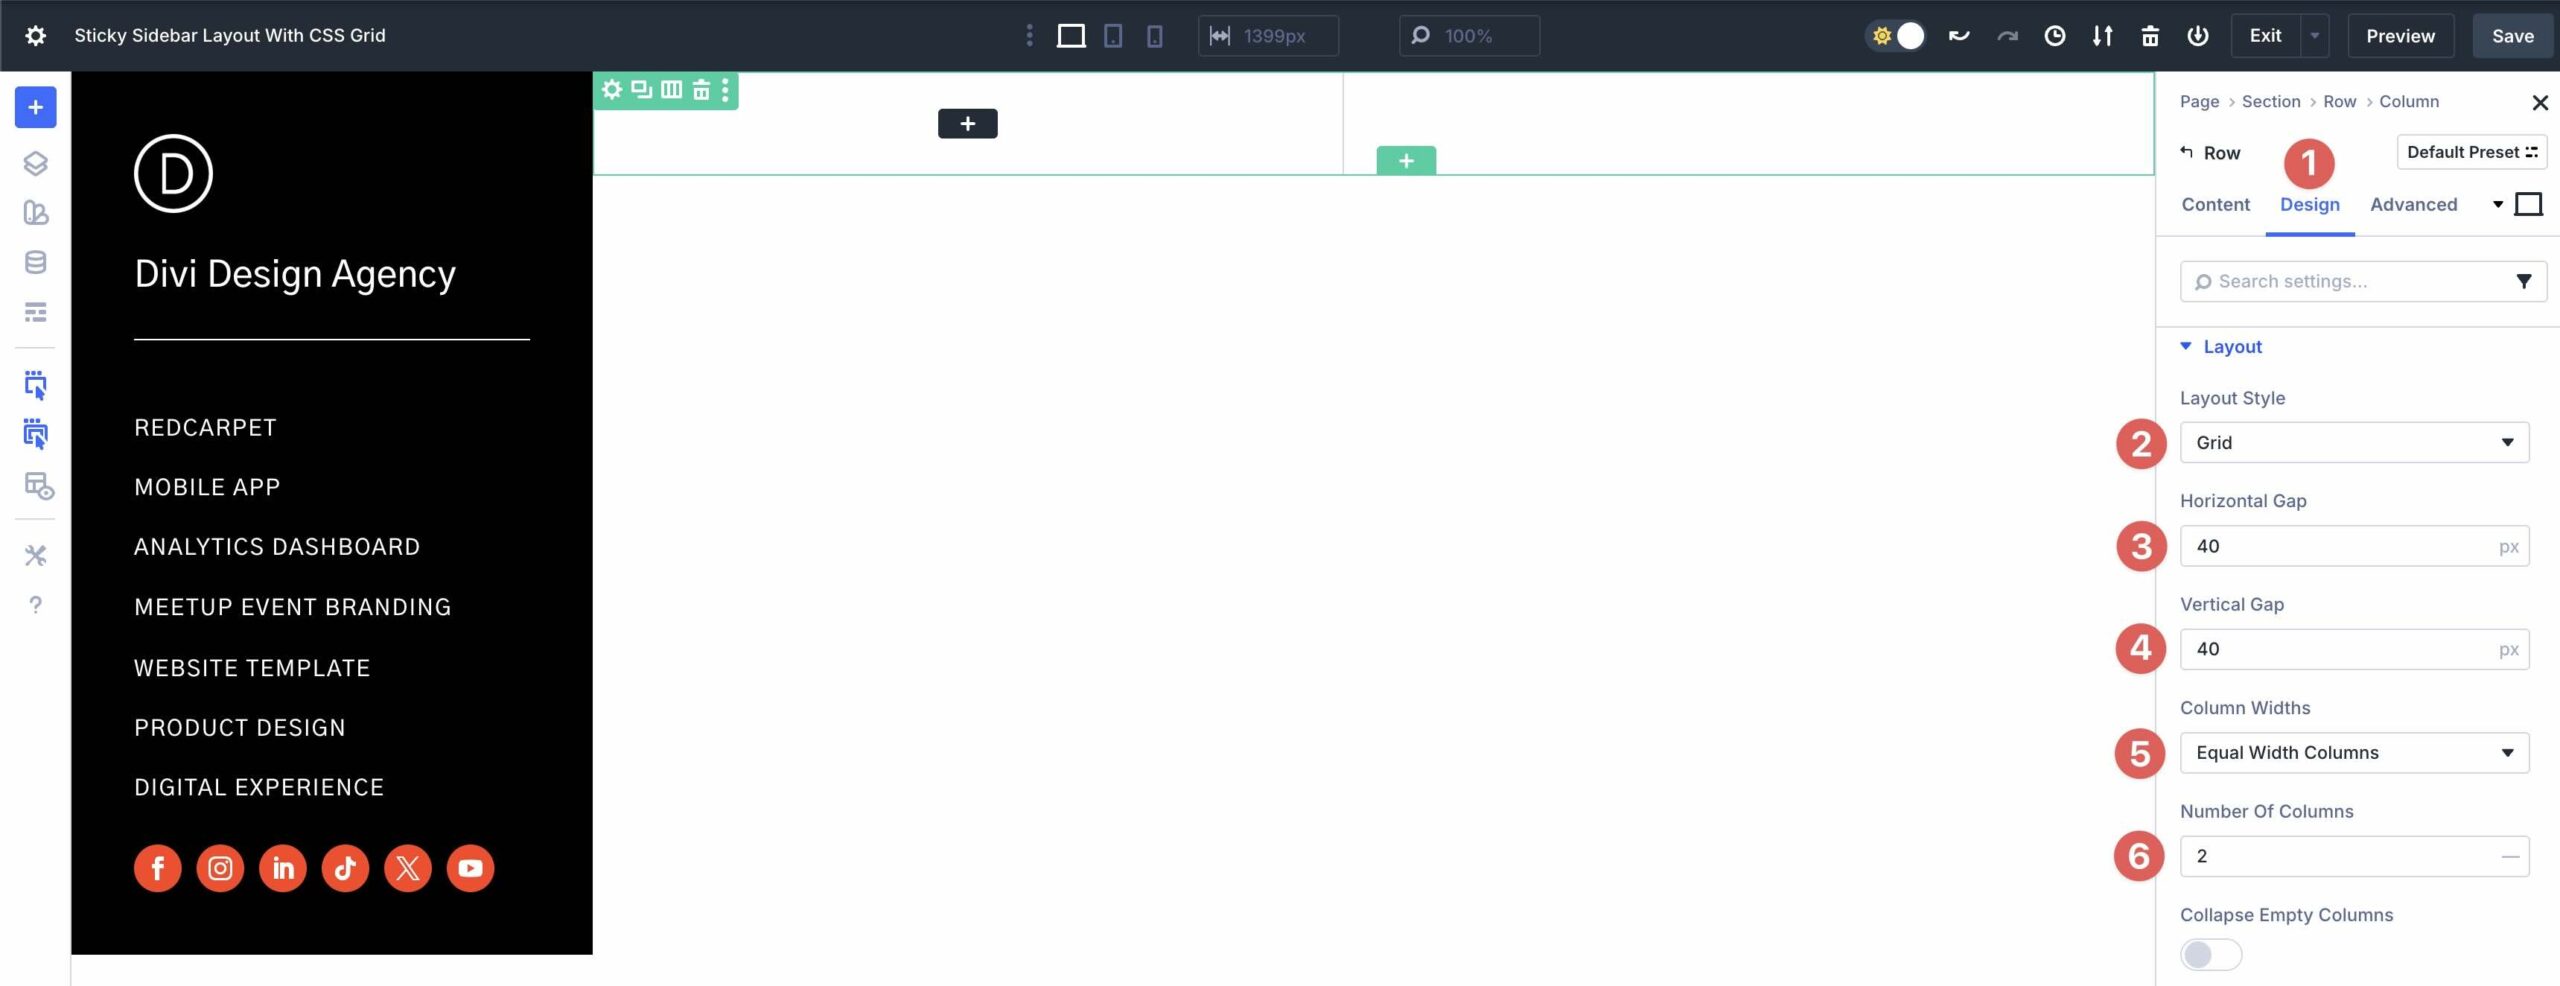
Step 3: Set Up The second Column
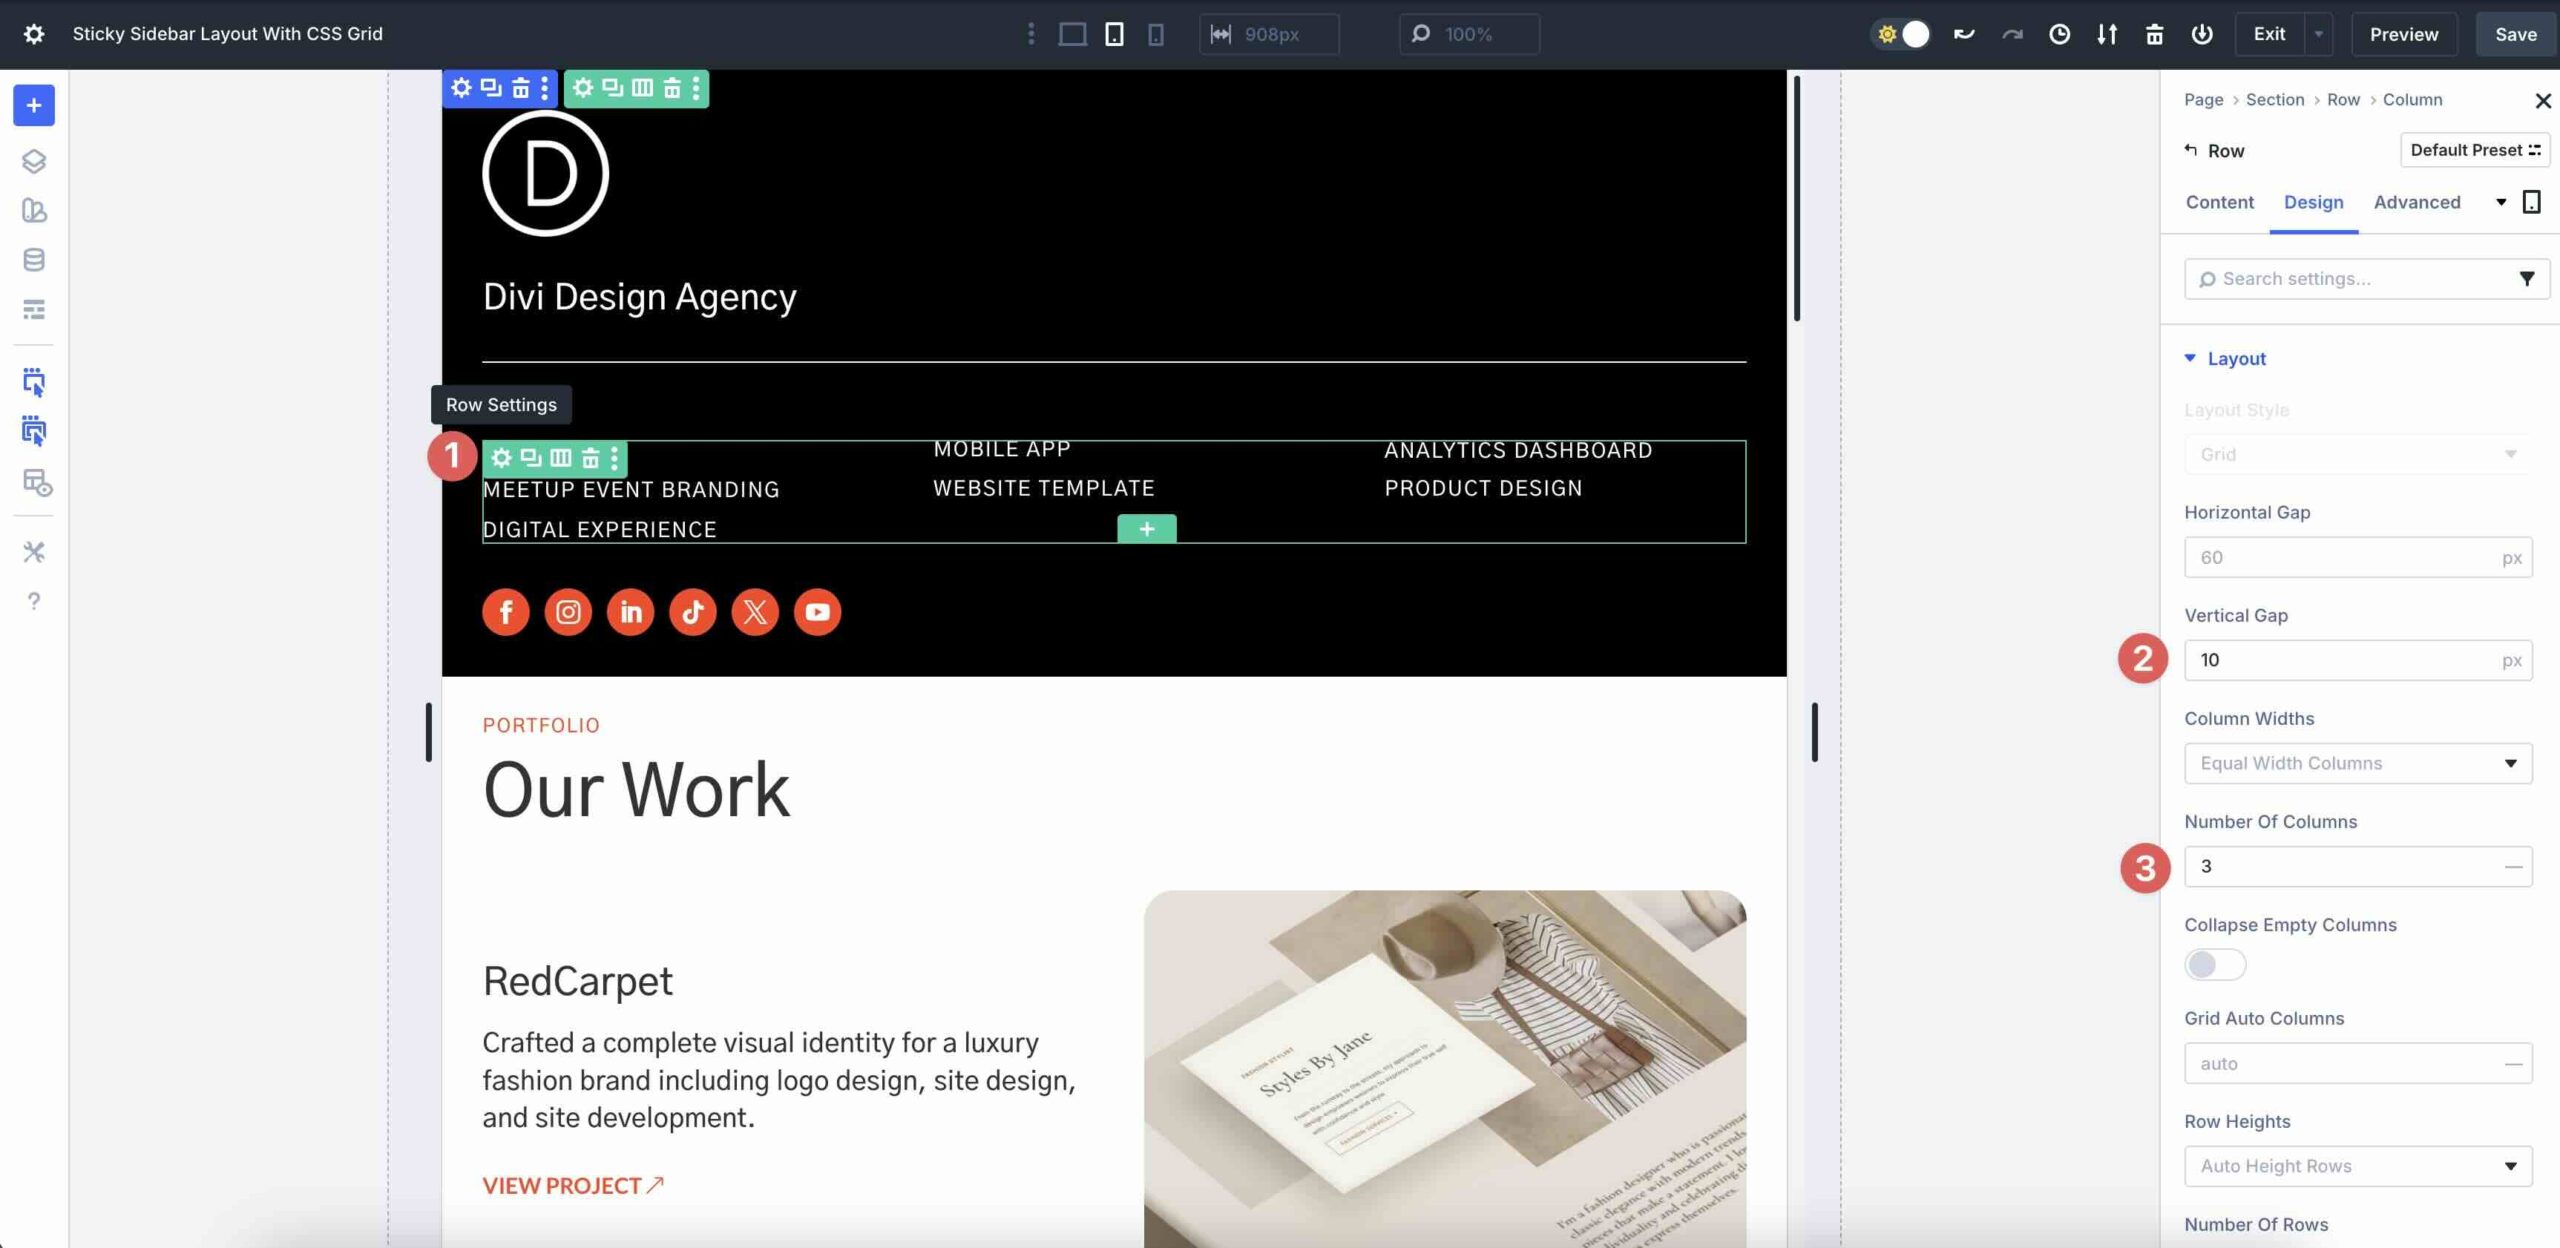
In the second Column, add a brand spanking new Single Column Nested Row. Inside the Design tab, set the Row to Grid in Construction Style. Set the Horizontal and Vertical Hollow to 40px. Inside the Column Widths field, choose An identical Width Columns. Set the Amount Of Columns to 2.
Enlarge the Spacing menu and assign 3% Padding to all 4 facets.
Step 4: Add Content material subject matter To The second Column
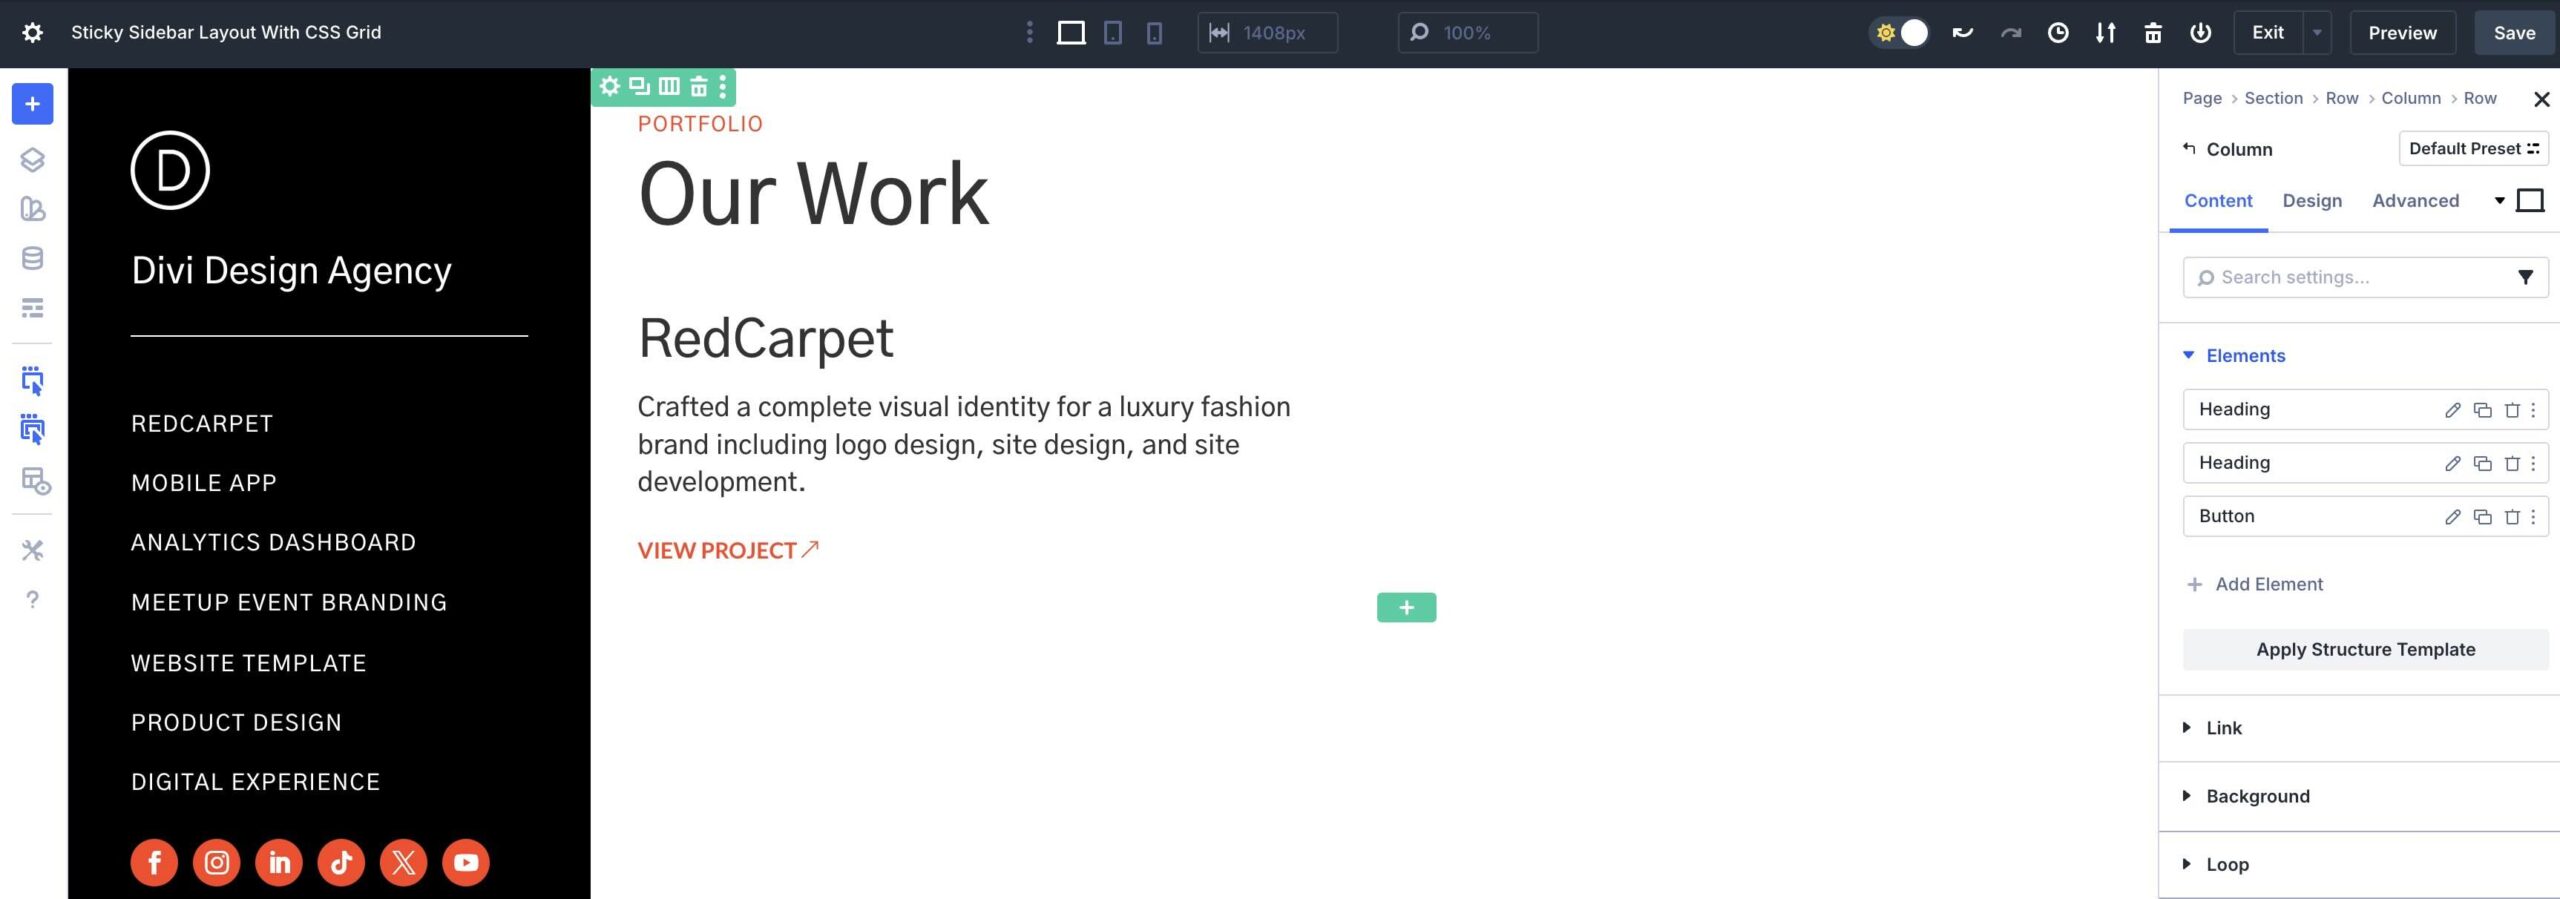
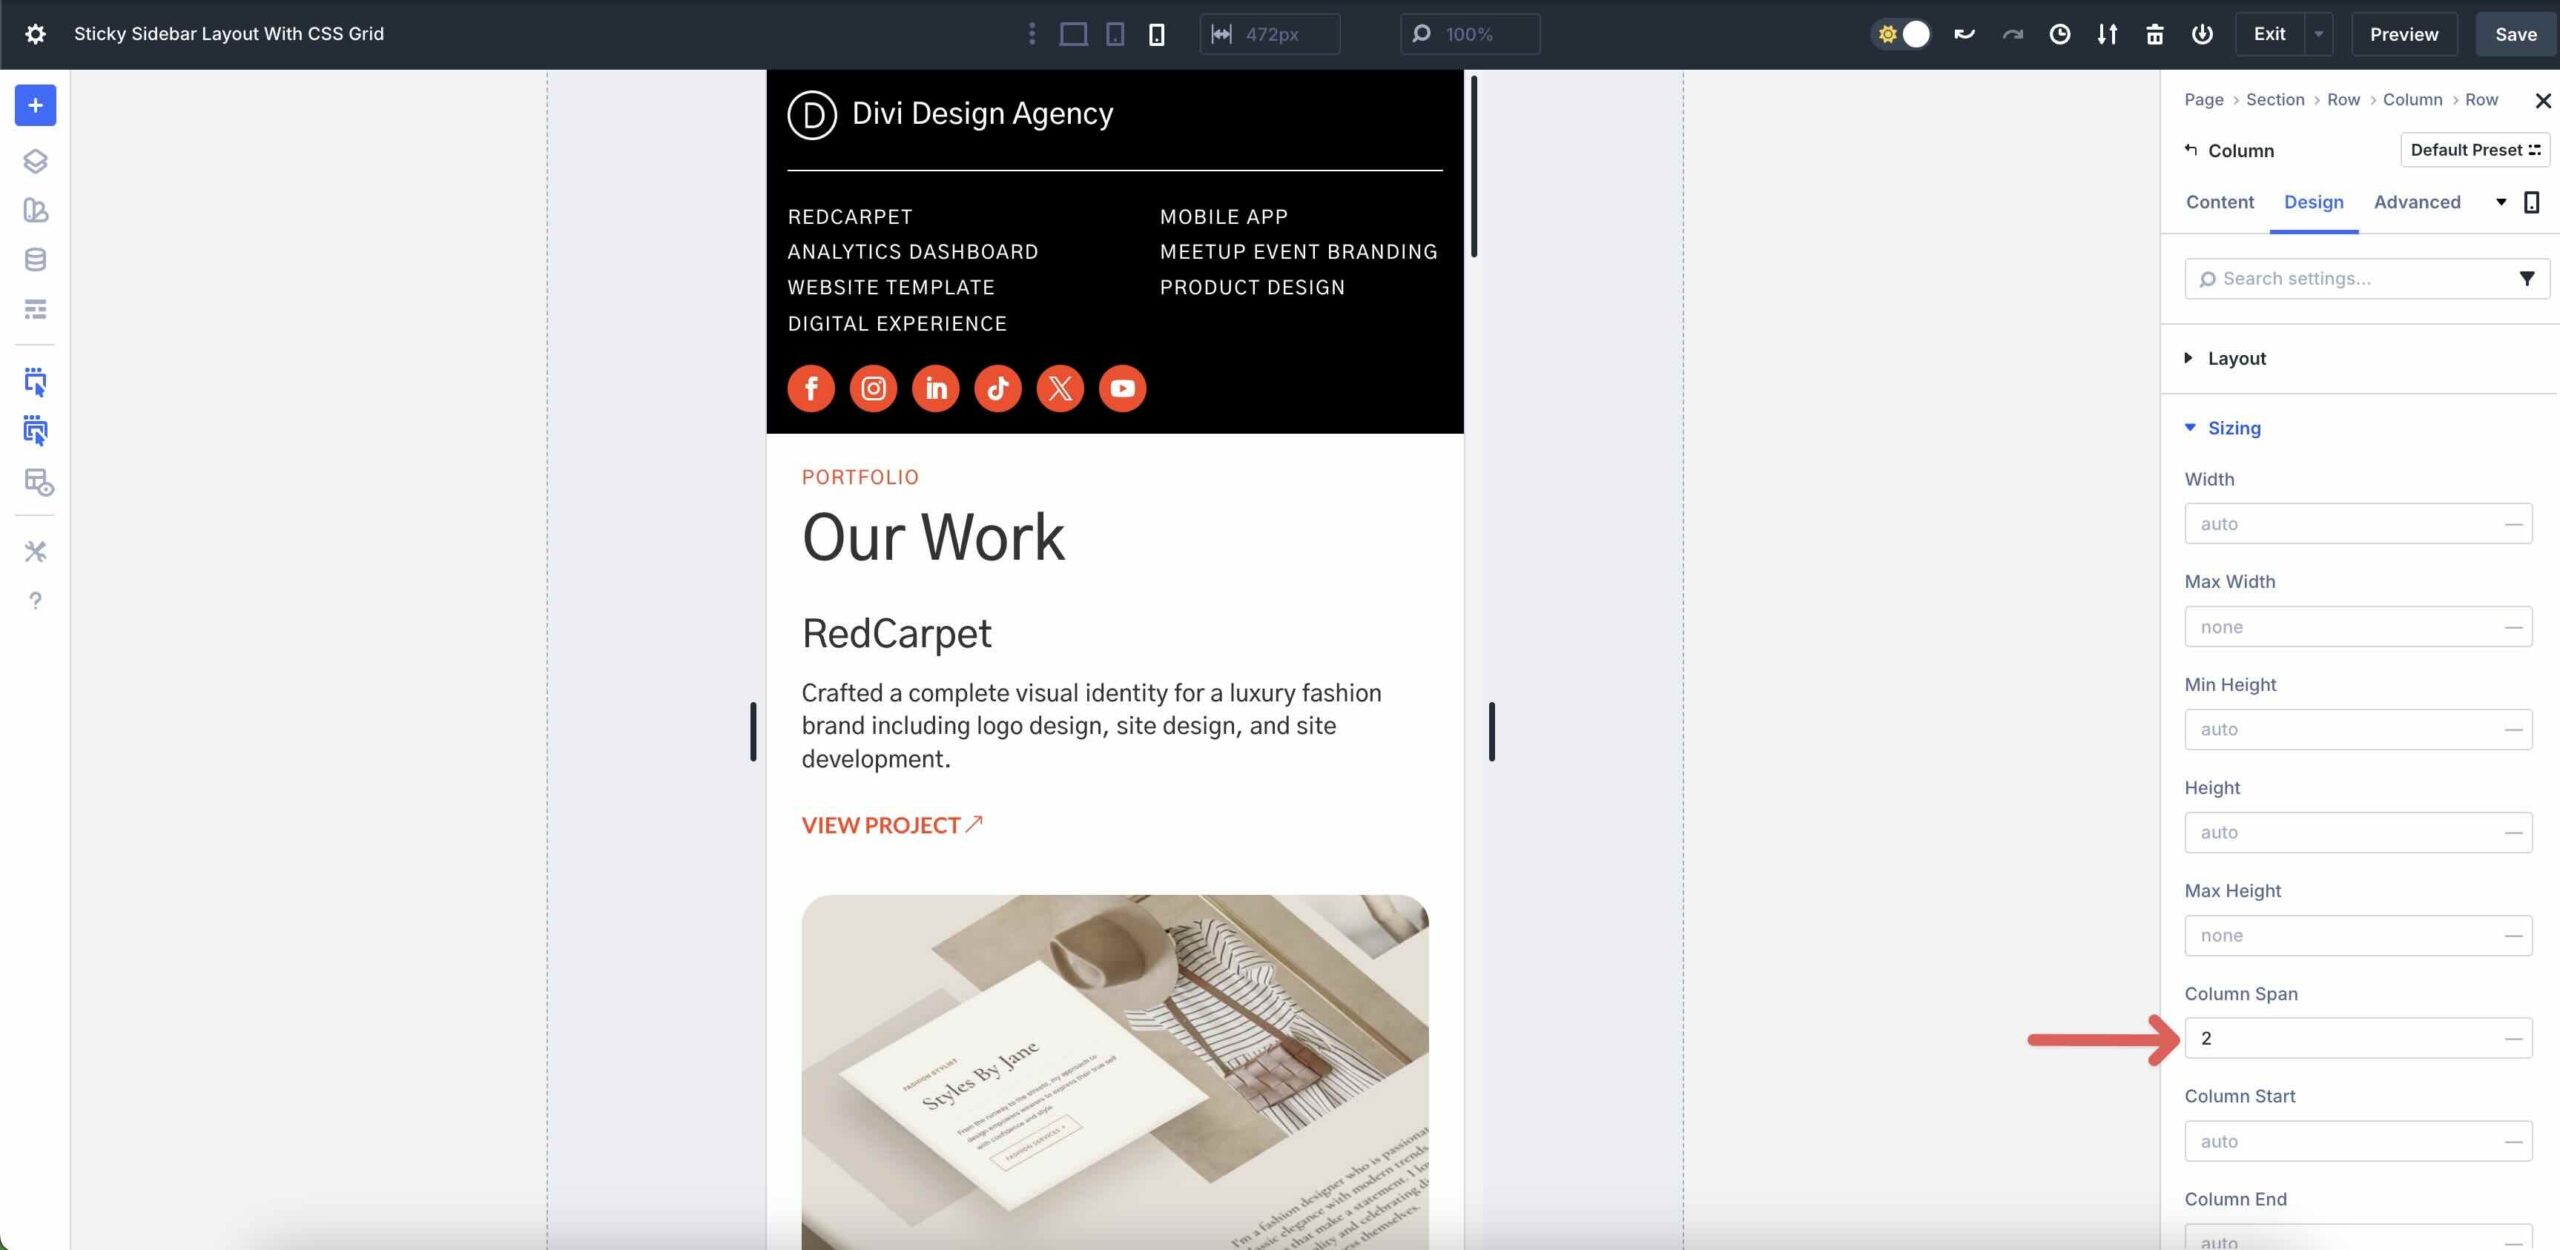
With the Grid settings in place, we can get began together with modules. Inside the first Grid products, add two Heading modules. Style them as desired.
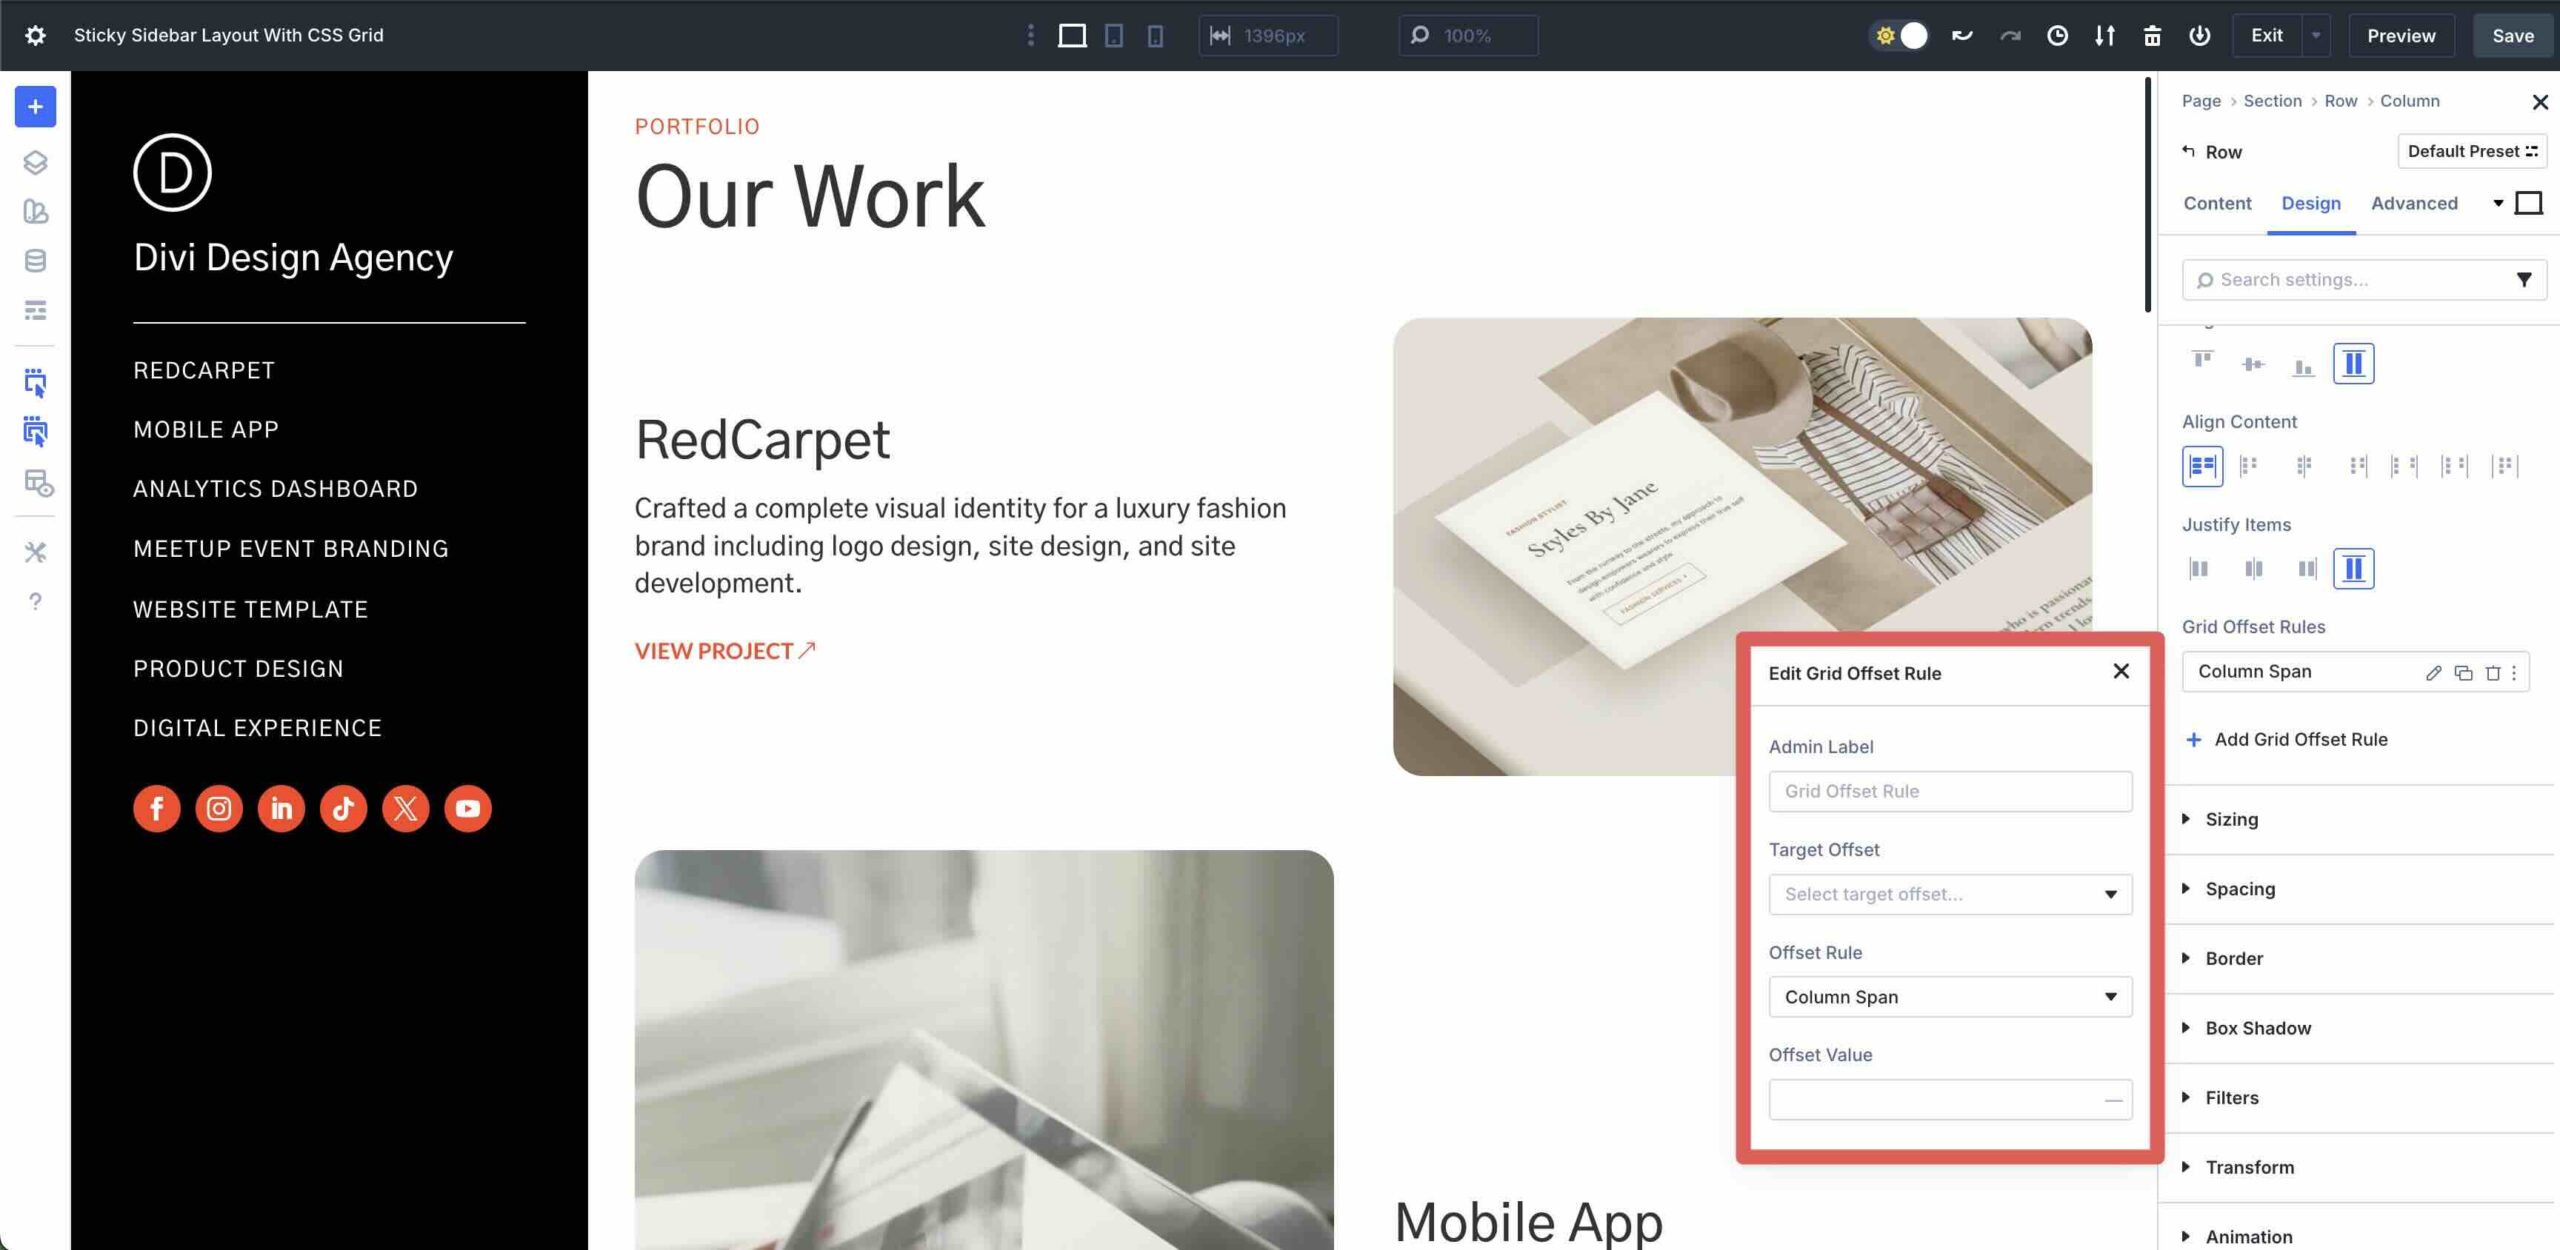
Inside the Grid Products settings, assign 15px Vertical Hollow.
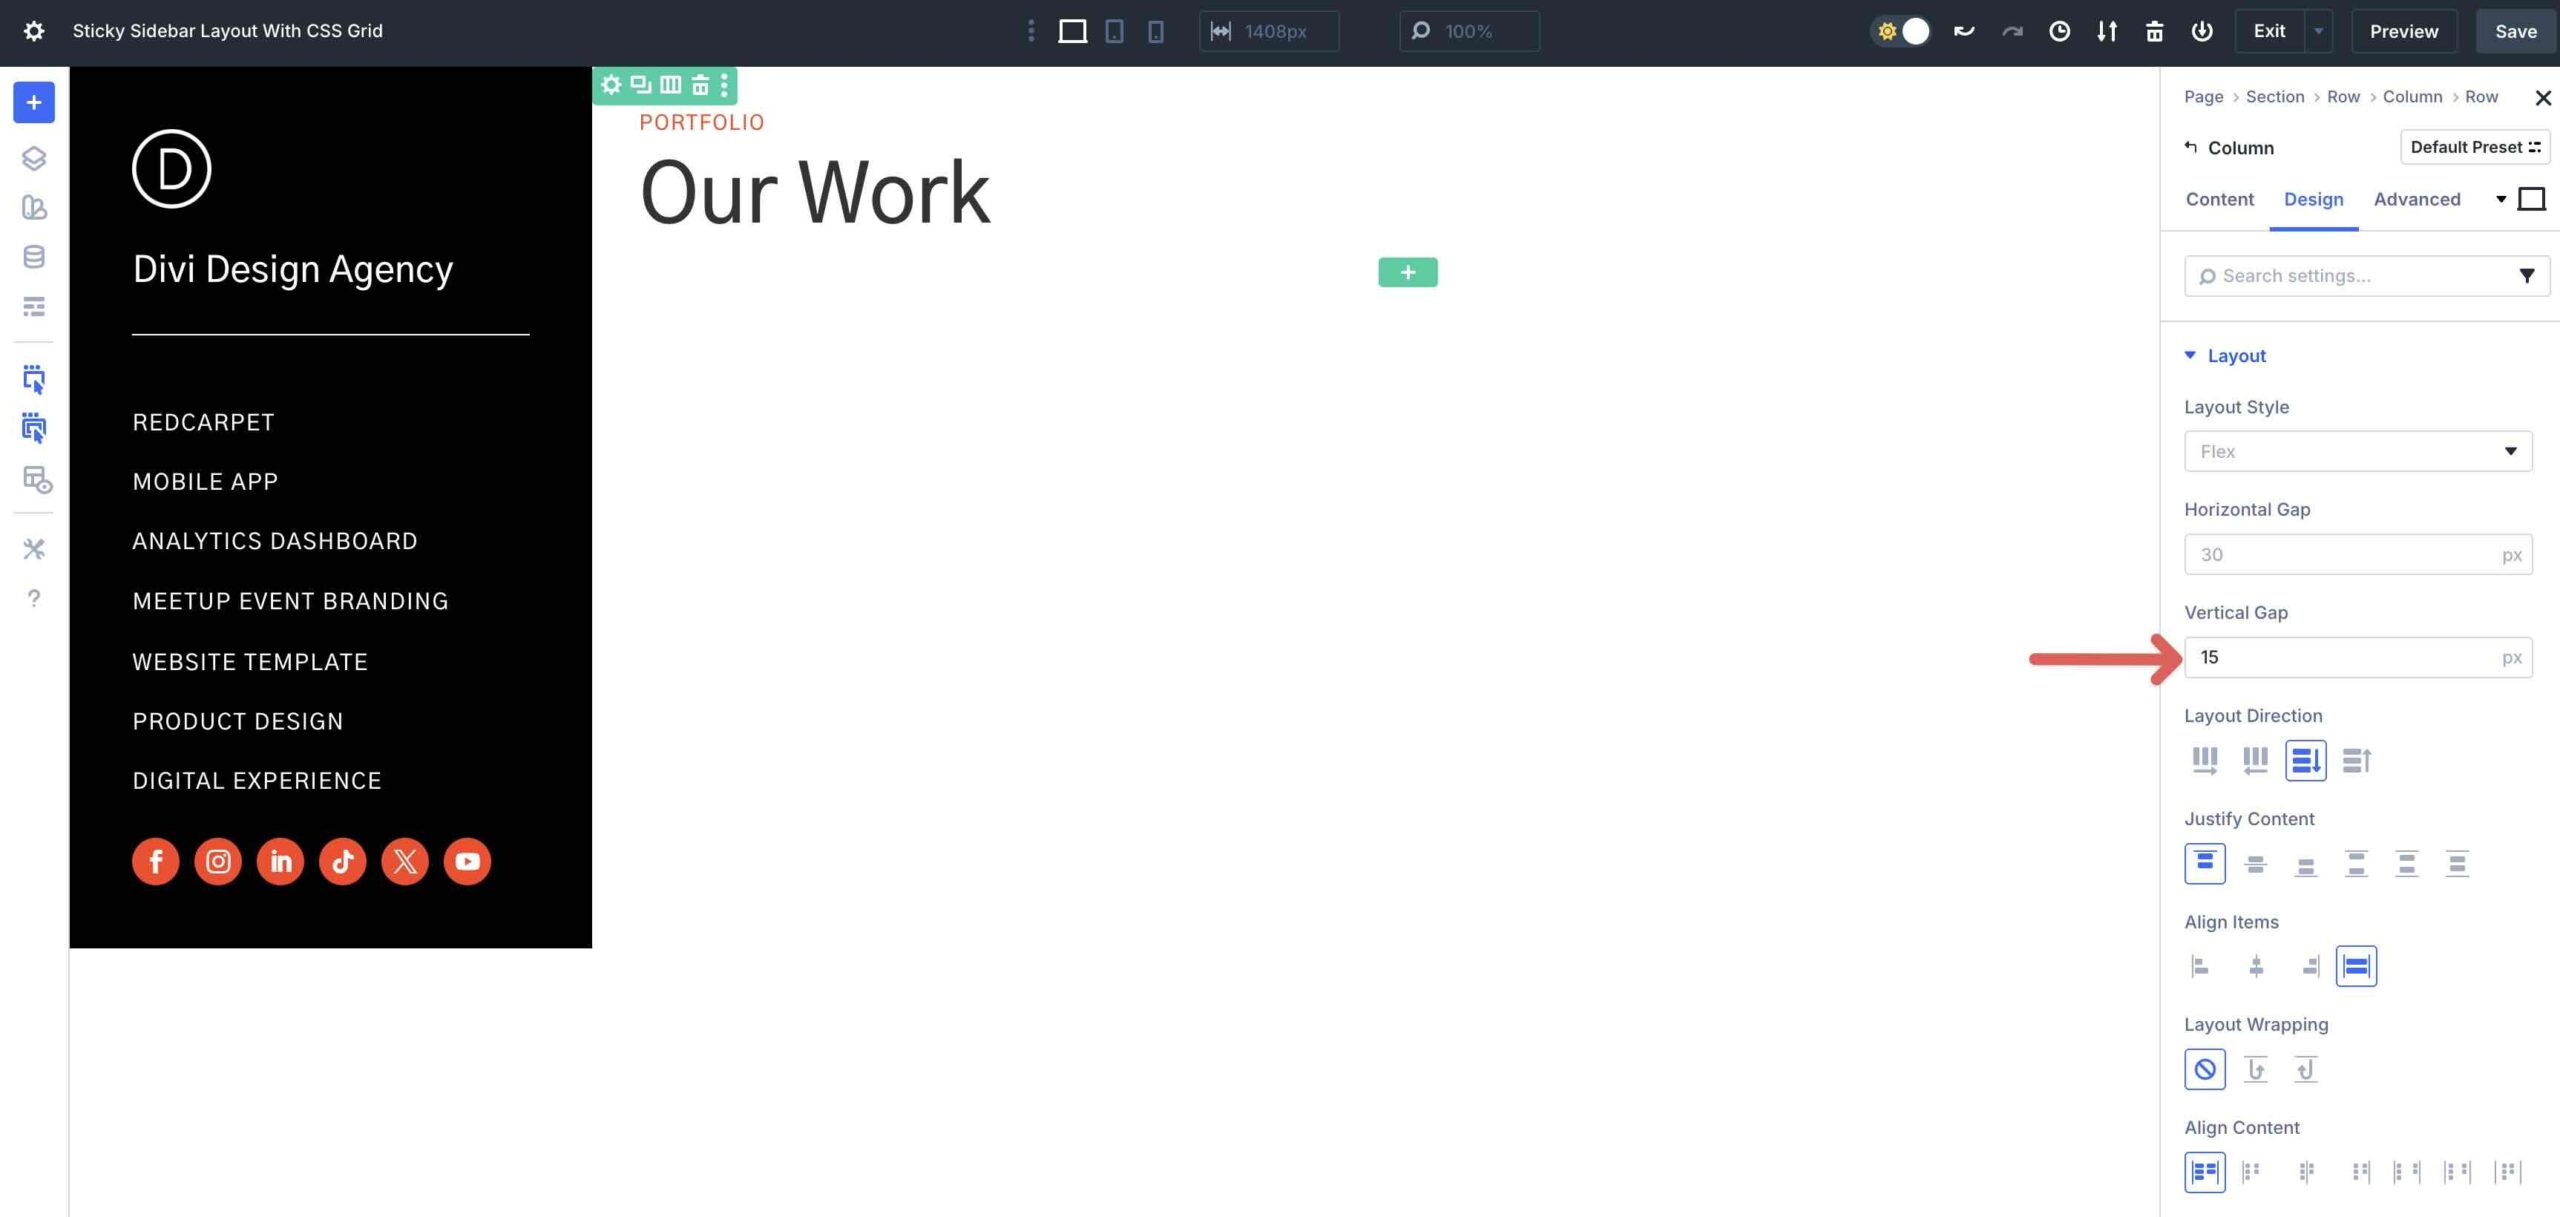
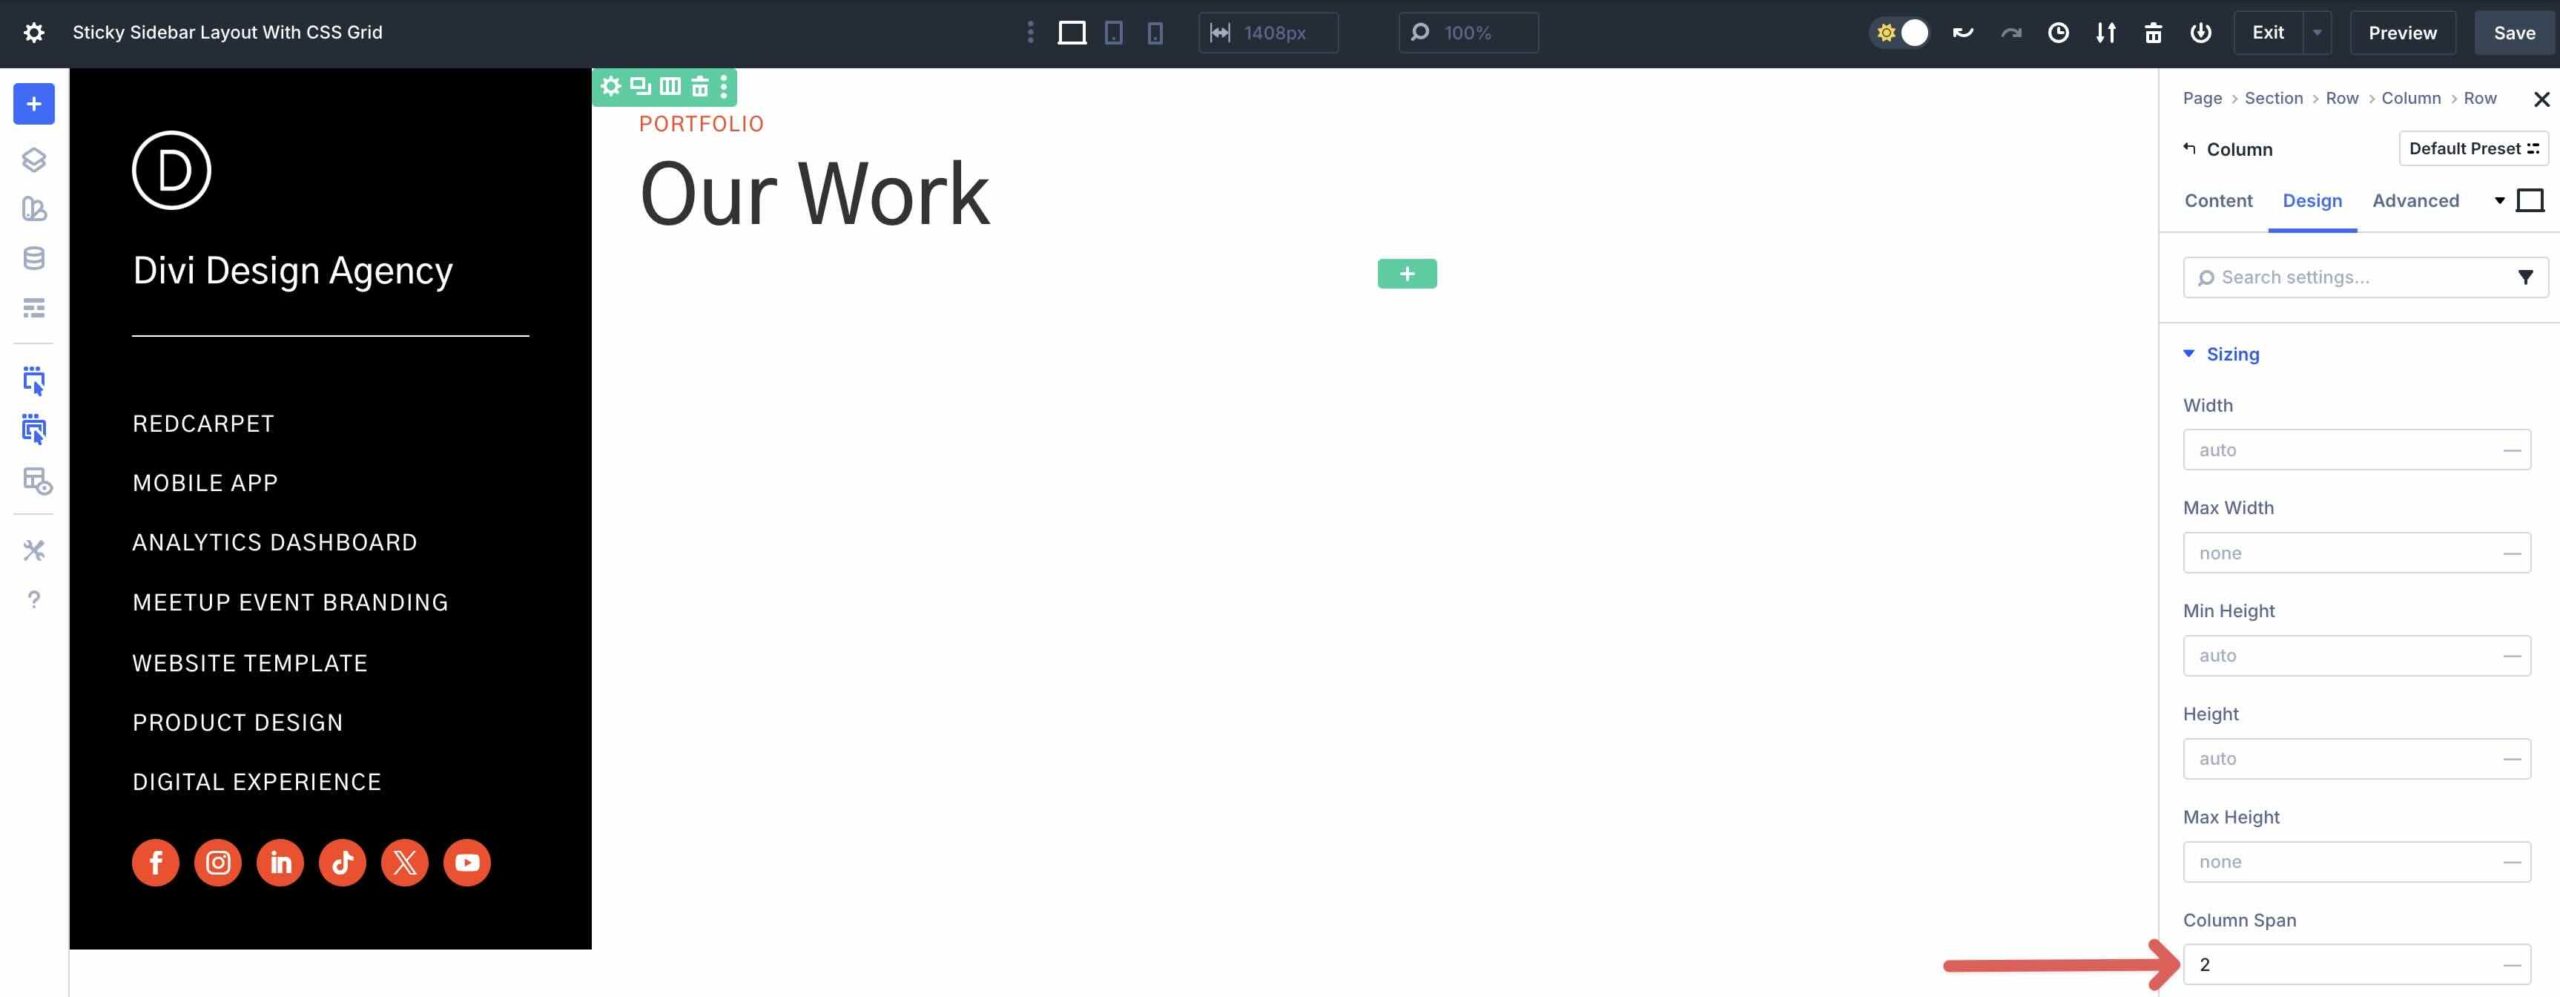
Enlarge the Sizing menu and to find the Column Span field. Enter 2 as the fee. This tells Divi to make larger the Grid Products to the entire width of the Row, which is able to two Columns.
Navigate once more to the Grid Row’s primary Content material subject matter tab. Click on on + Add Phase in an effort to upload a brand spanking new Grid Products.
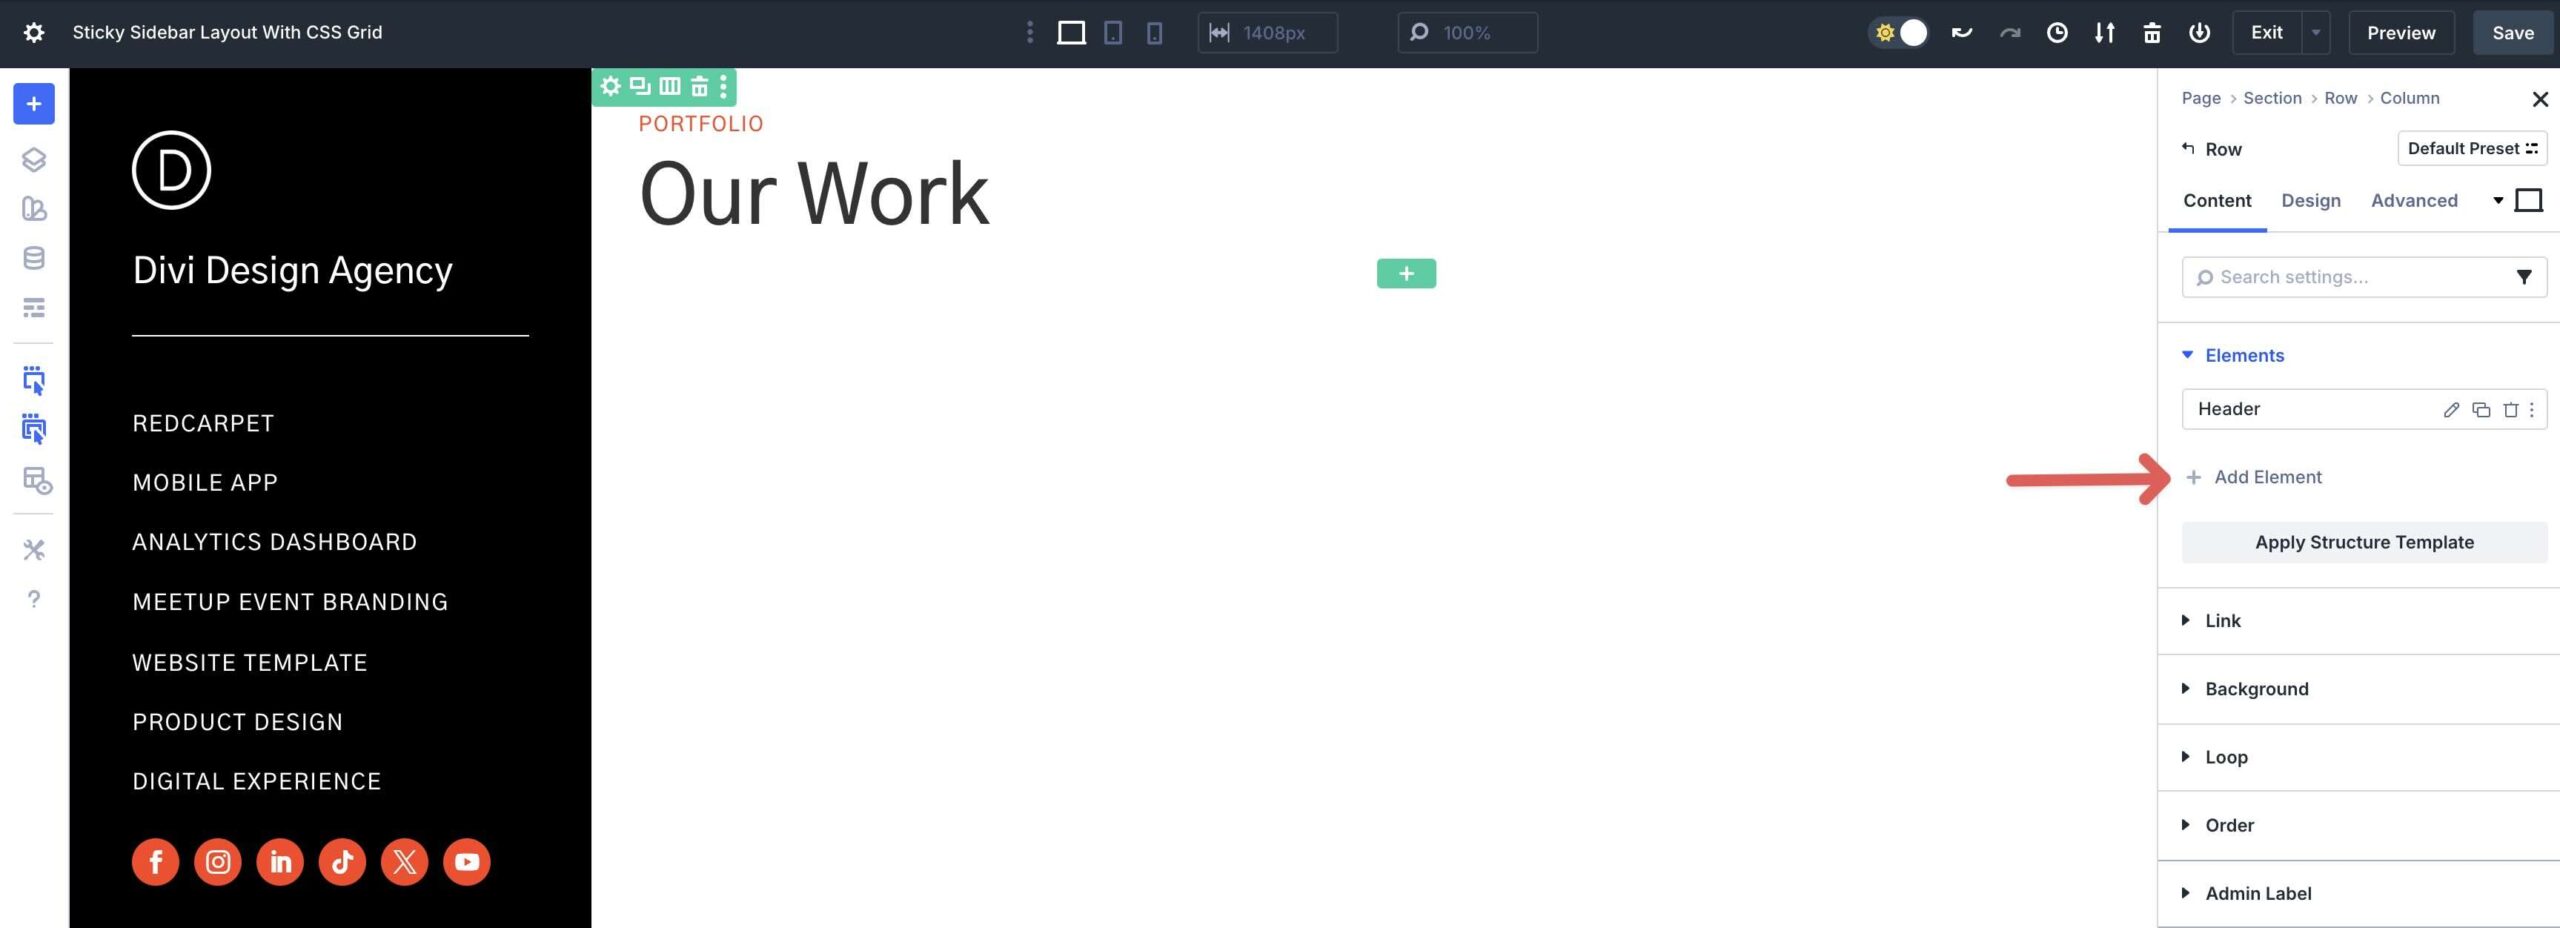
Divi will stack the new Grid Products vertically, putting it in the second Row of the Grid.

In this Grid Products, we’ll add Heading, Text, and Button modules. Style them as desired.
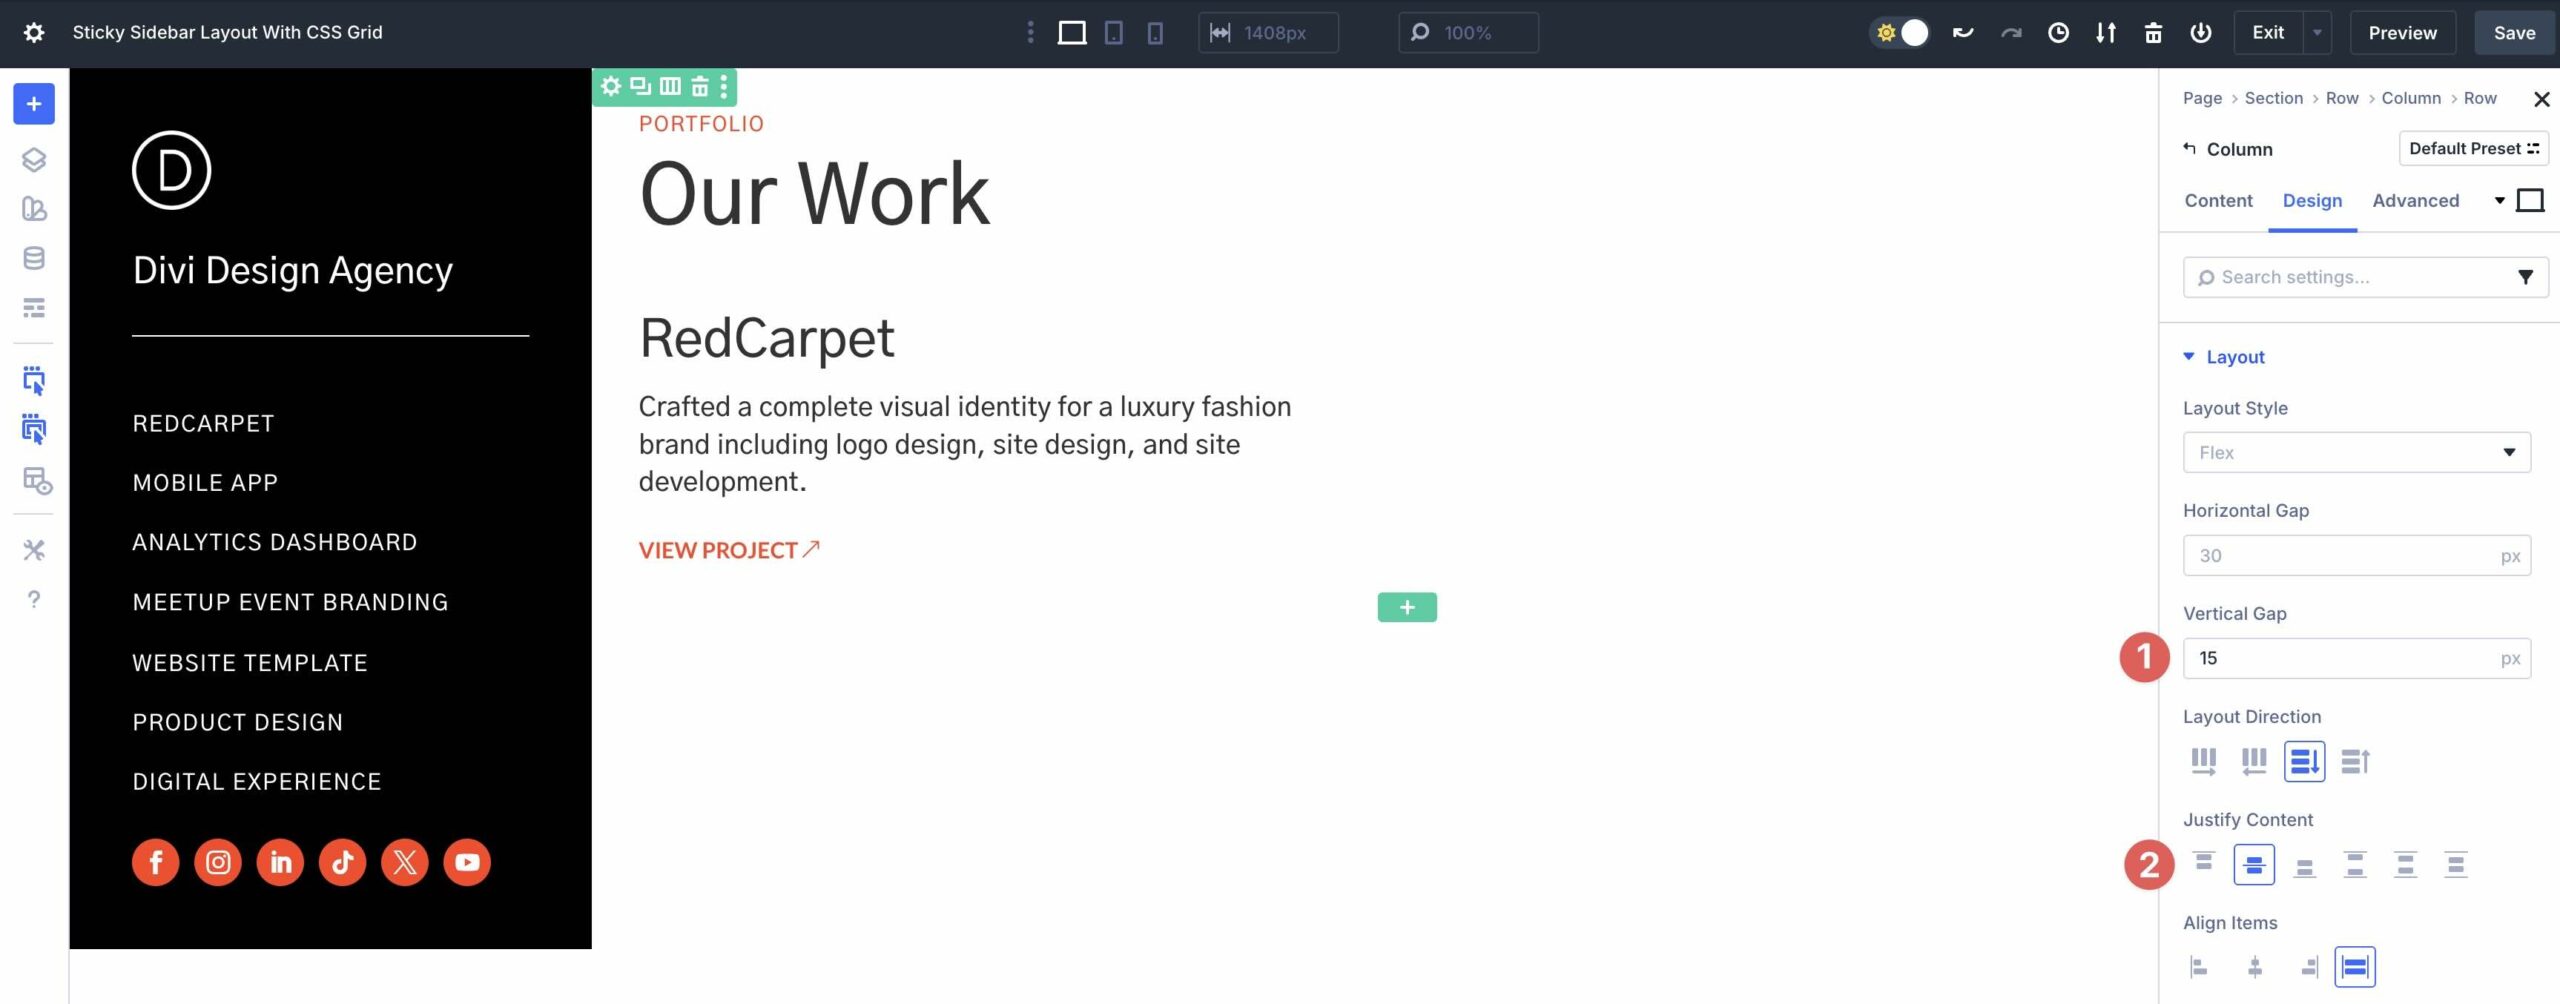
Open the Design tab. Inside the Construction menu, assign 15px Vertical Hollow and set Justify Content material subject matter to Heart.
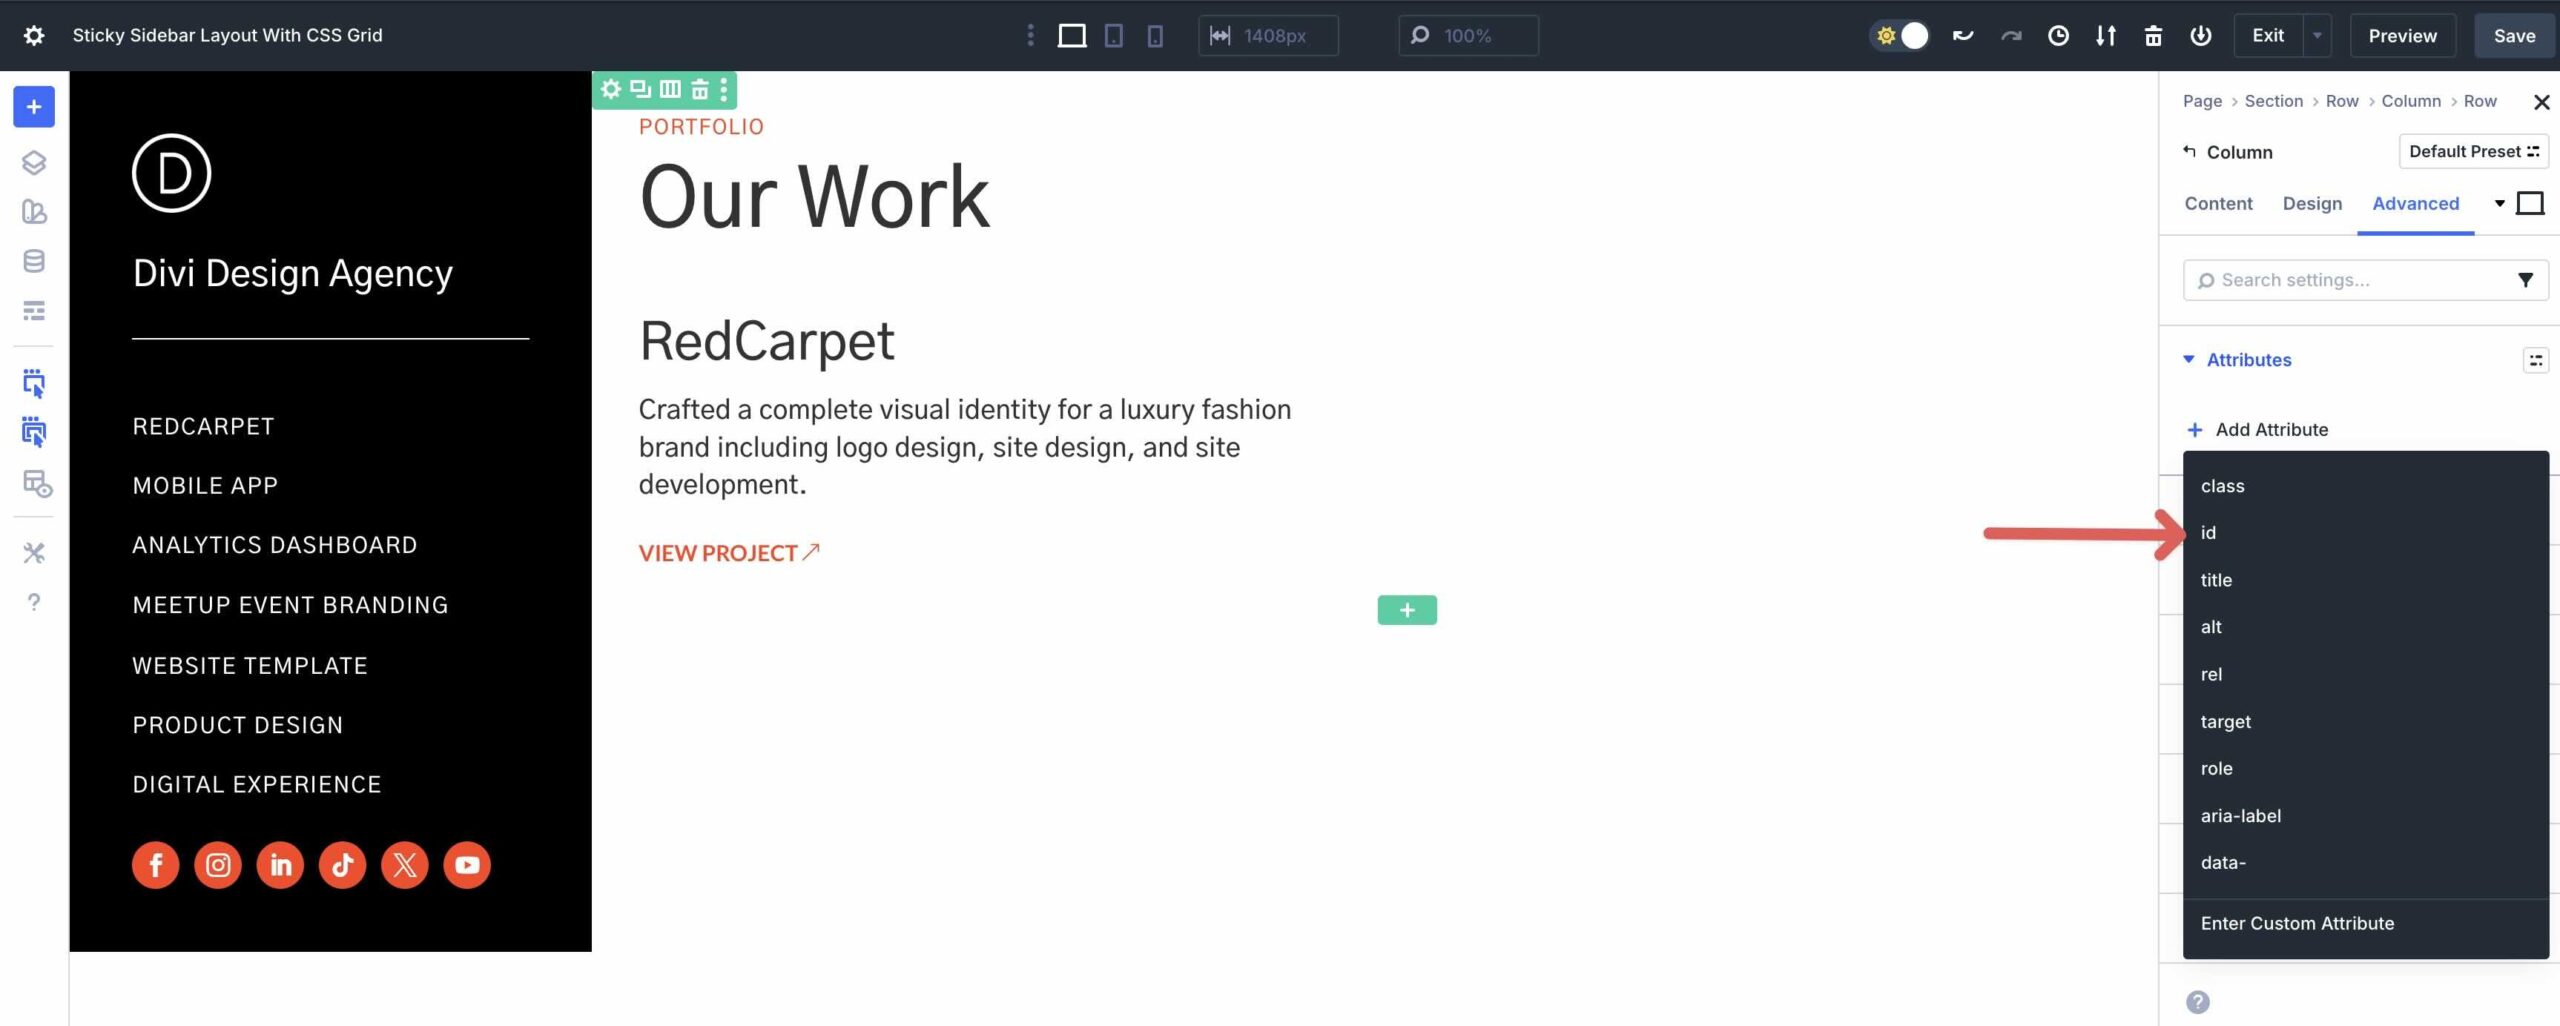
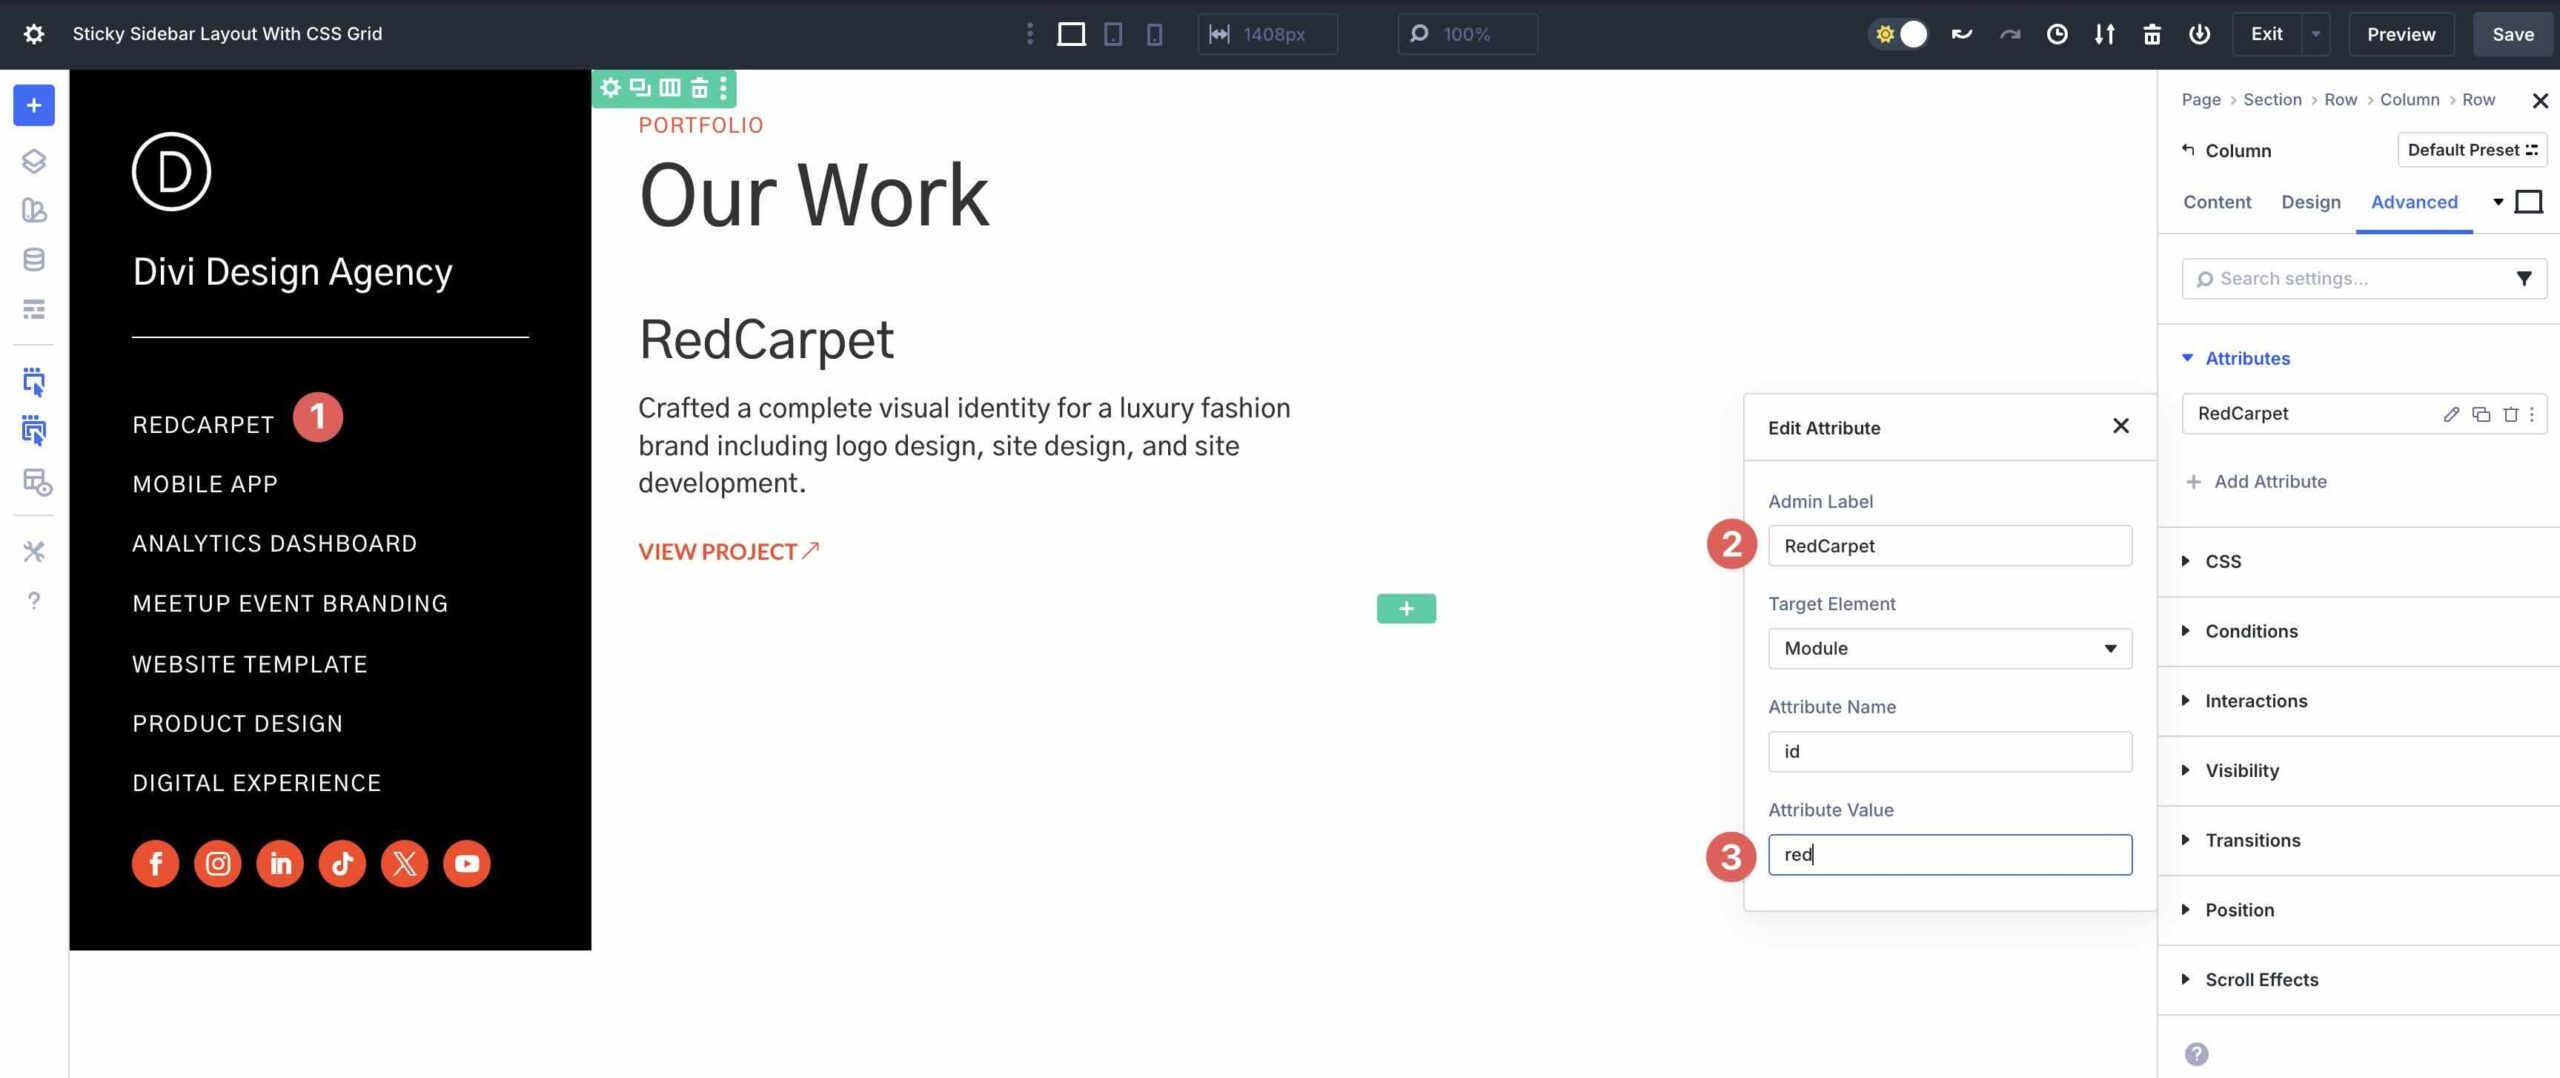
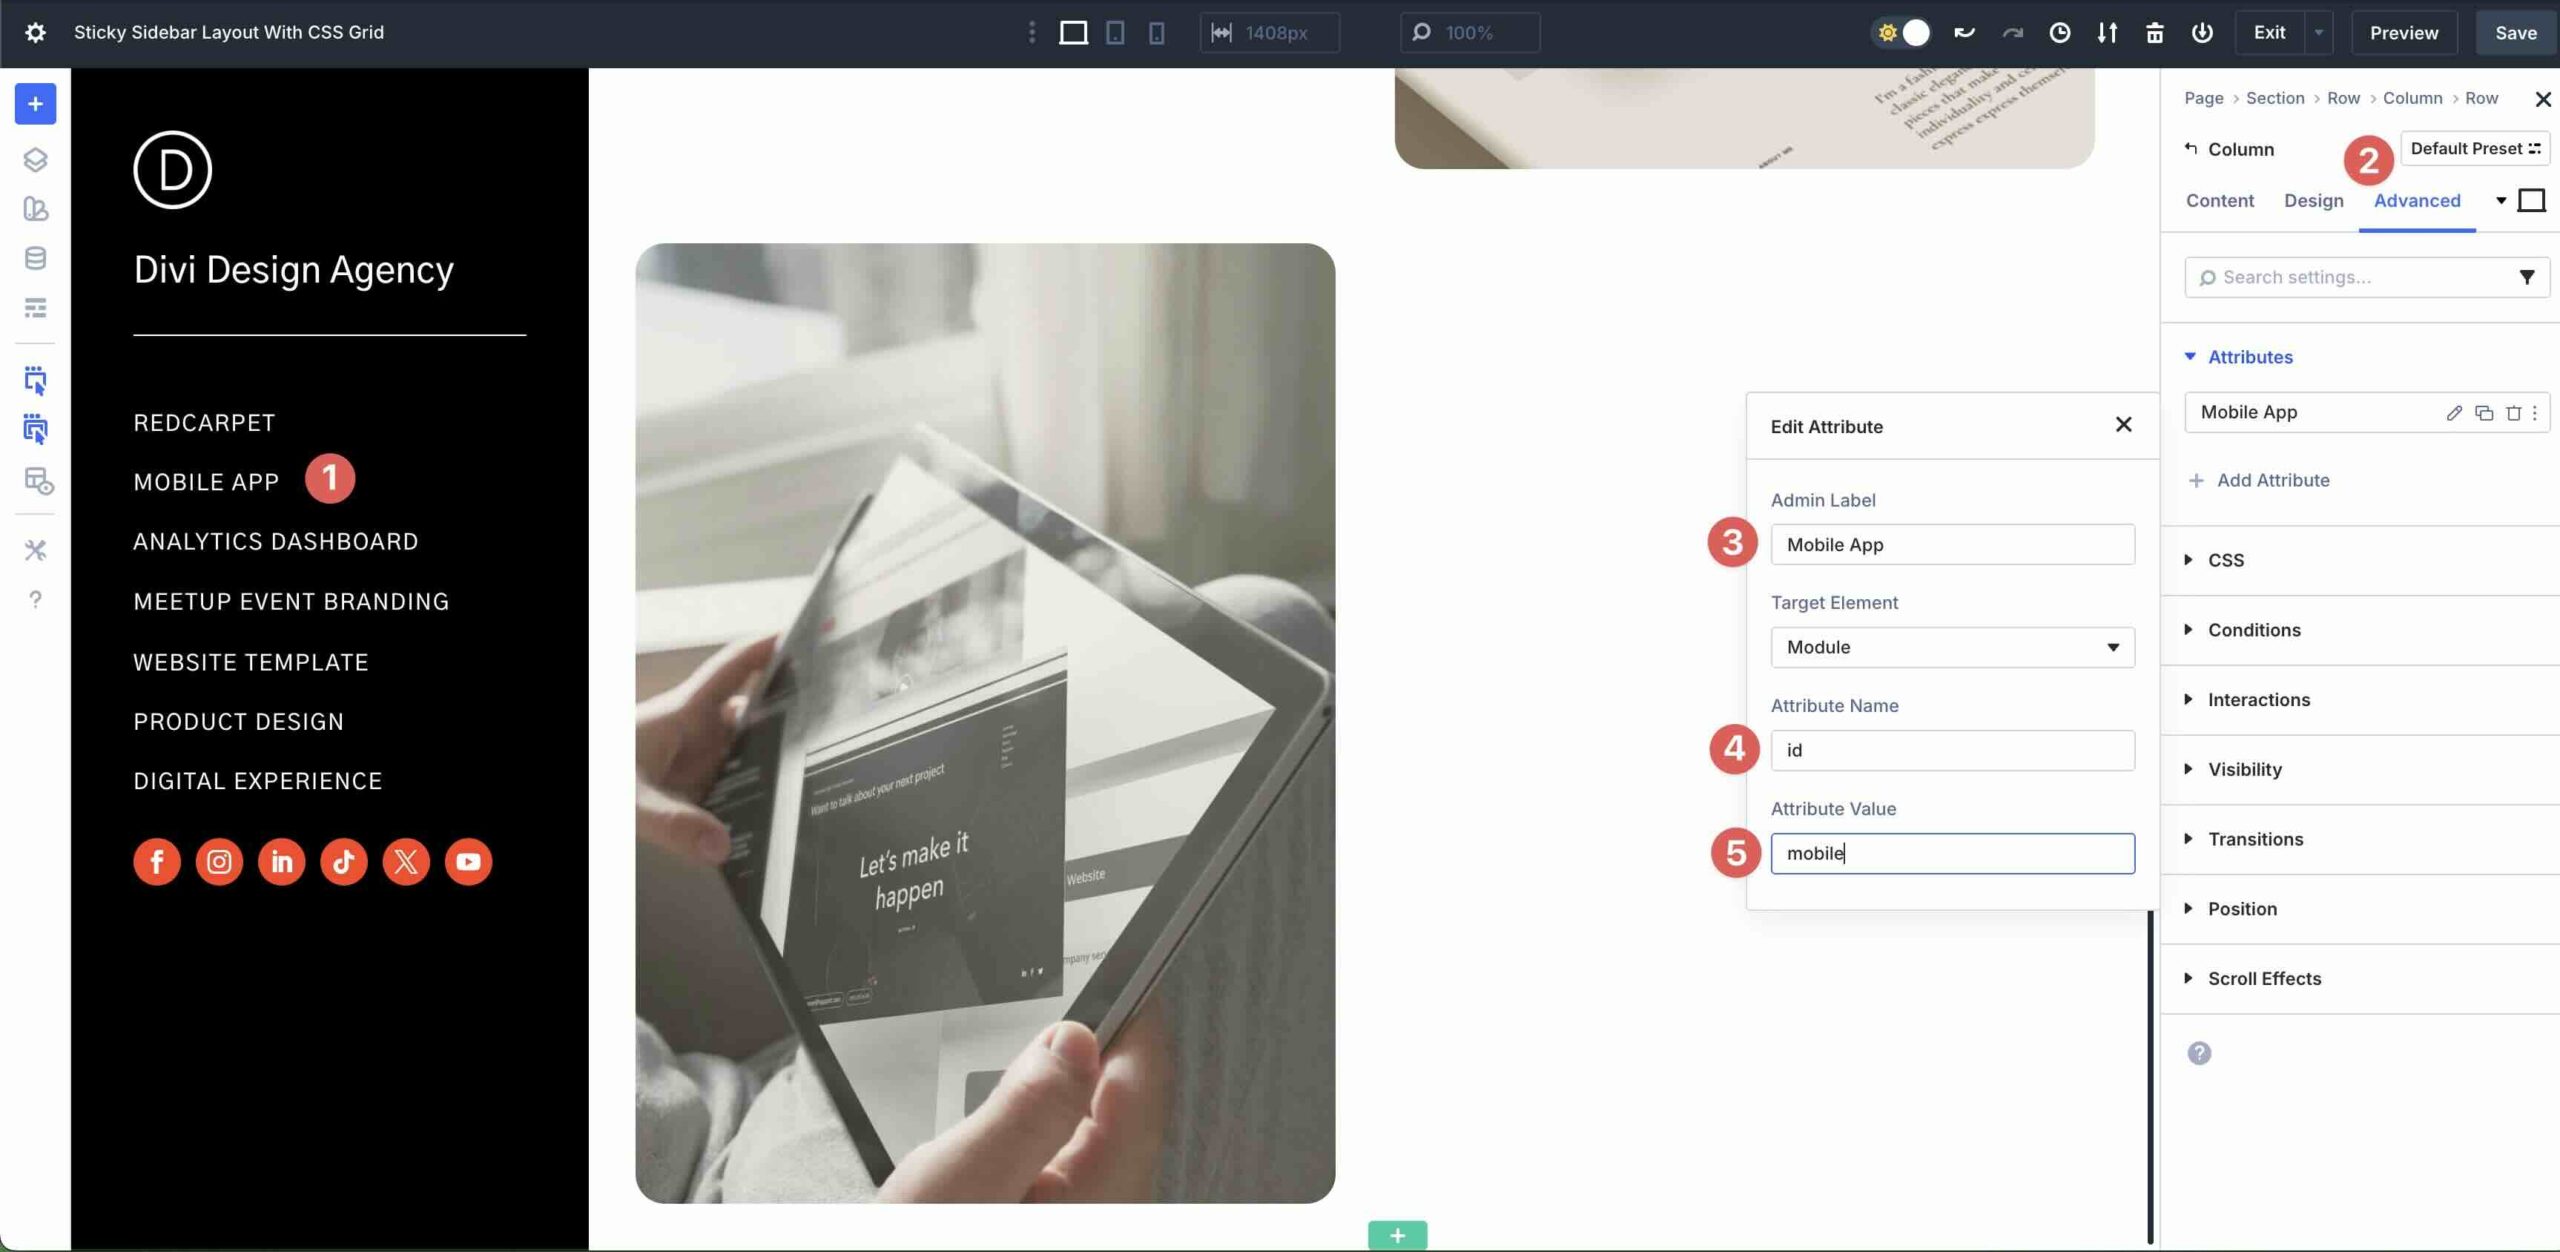
Navigate to the Sophisticated tab. We’ll need to set an anchor link that corresponds to the principle menu products inside the first Column. Enlarge the Attributes menu. Click on at the + Add Feature button.

Make a selection identity from the available alternatives.
Add an Admin Label for the Feature. Inside the Feature Worth field, enter the anchor link you specified for the principle heading module inside the menu phase.
Add A New Grid Products
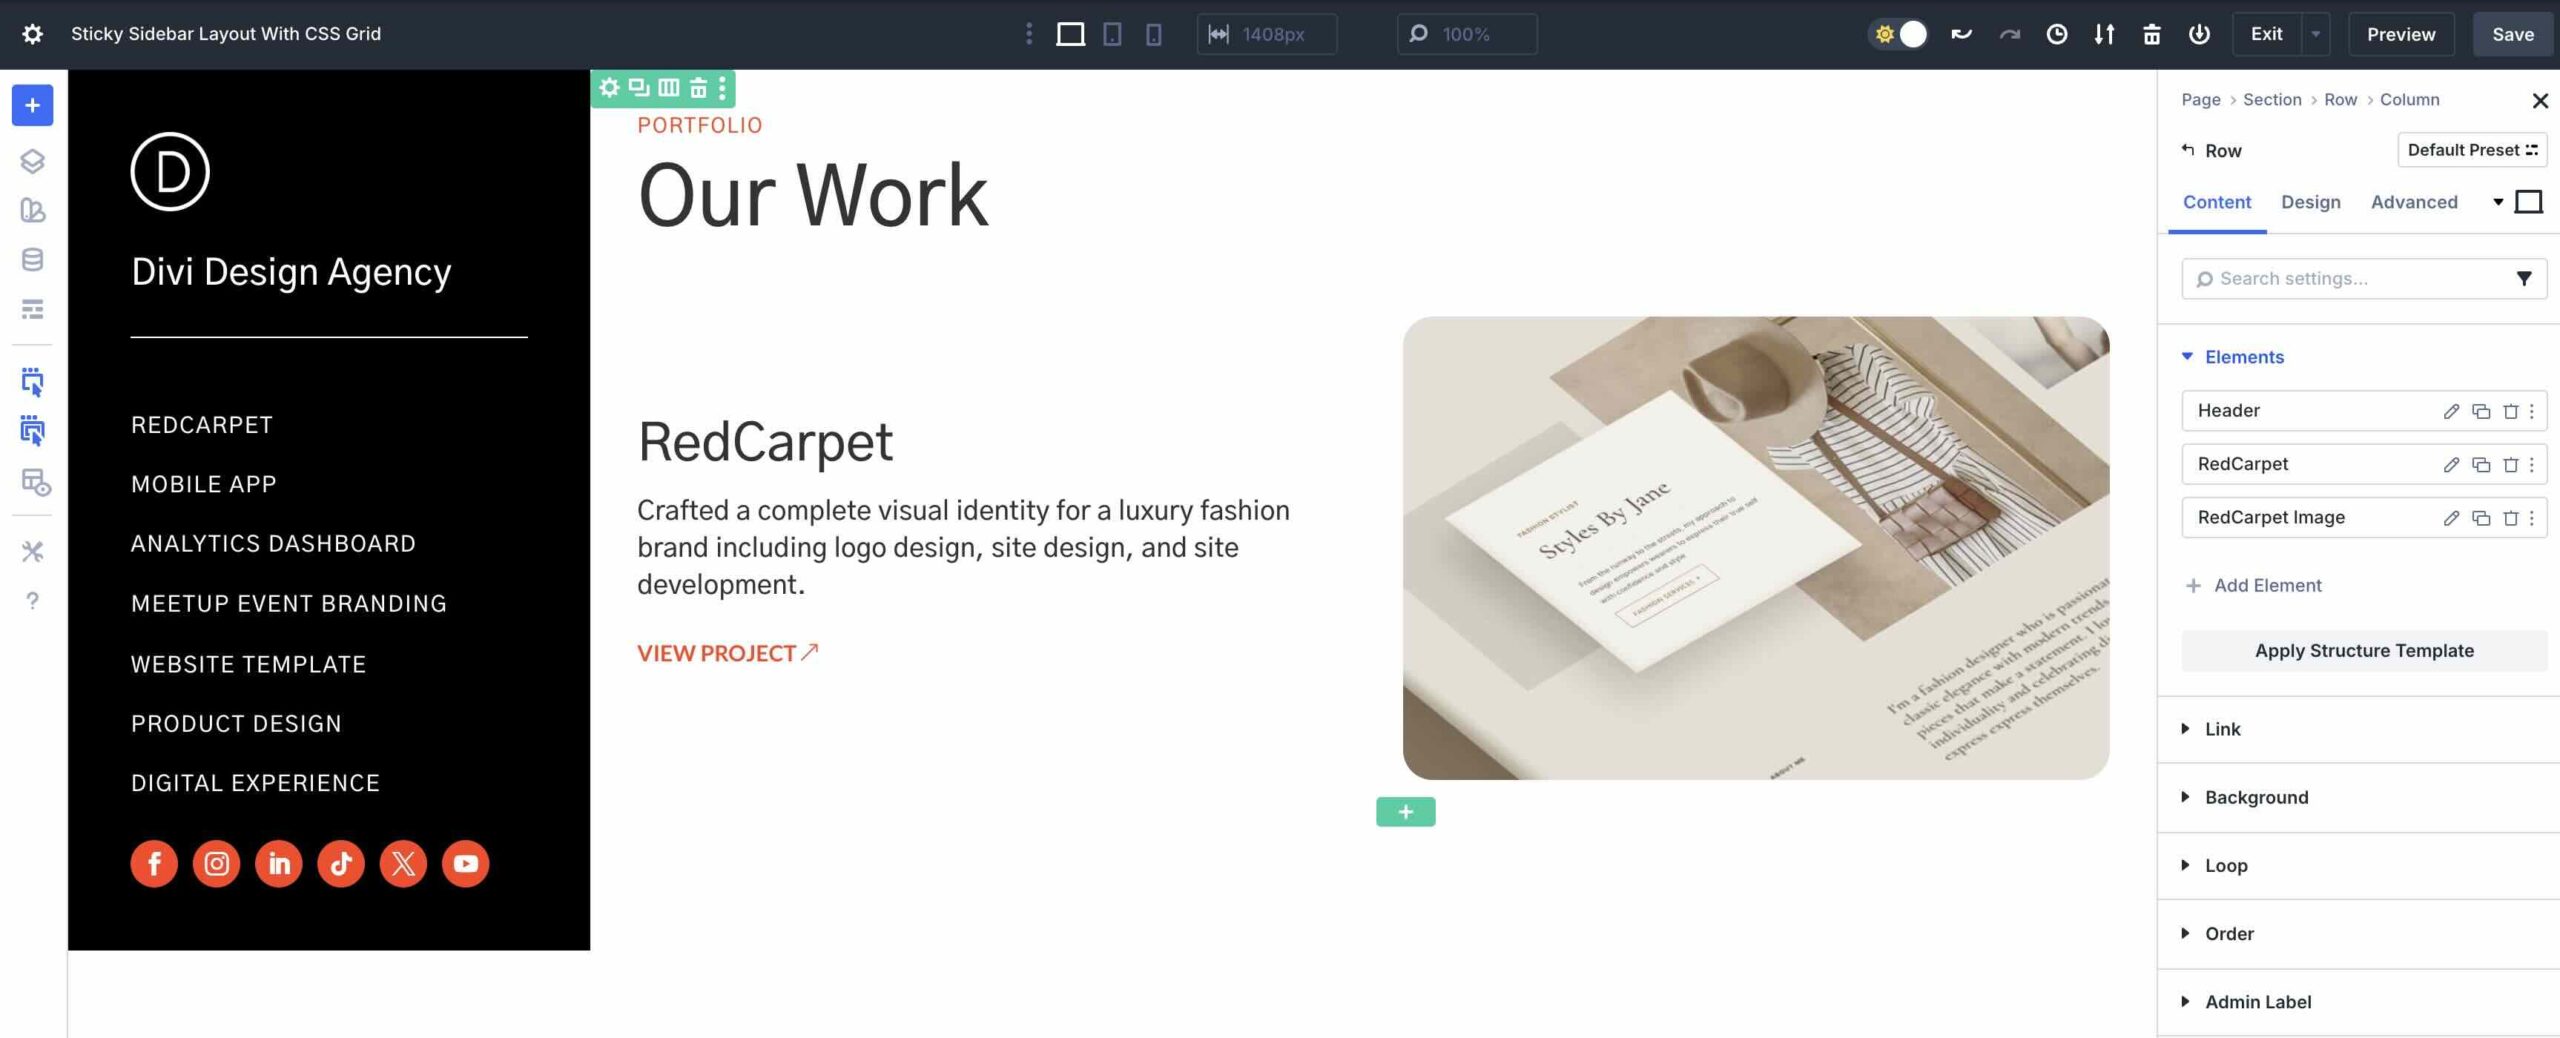
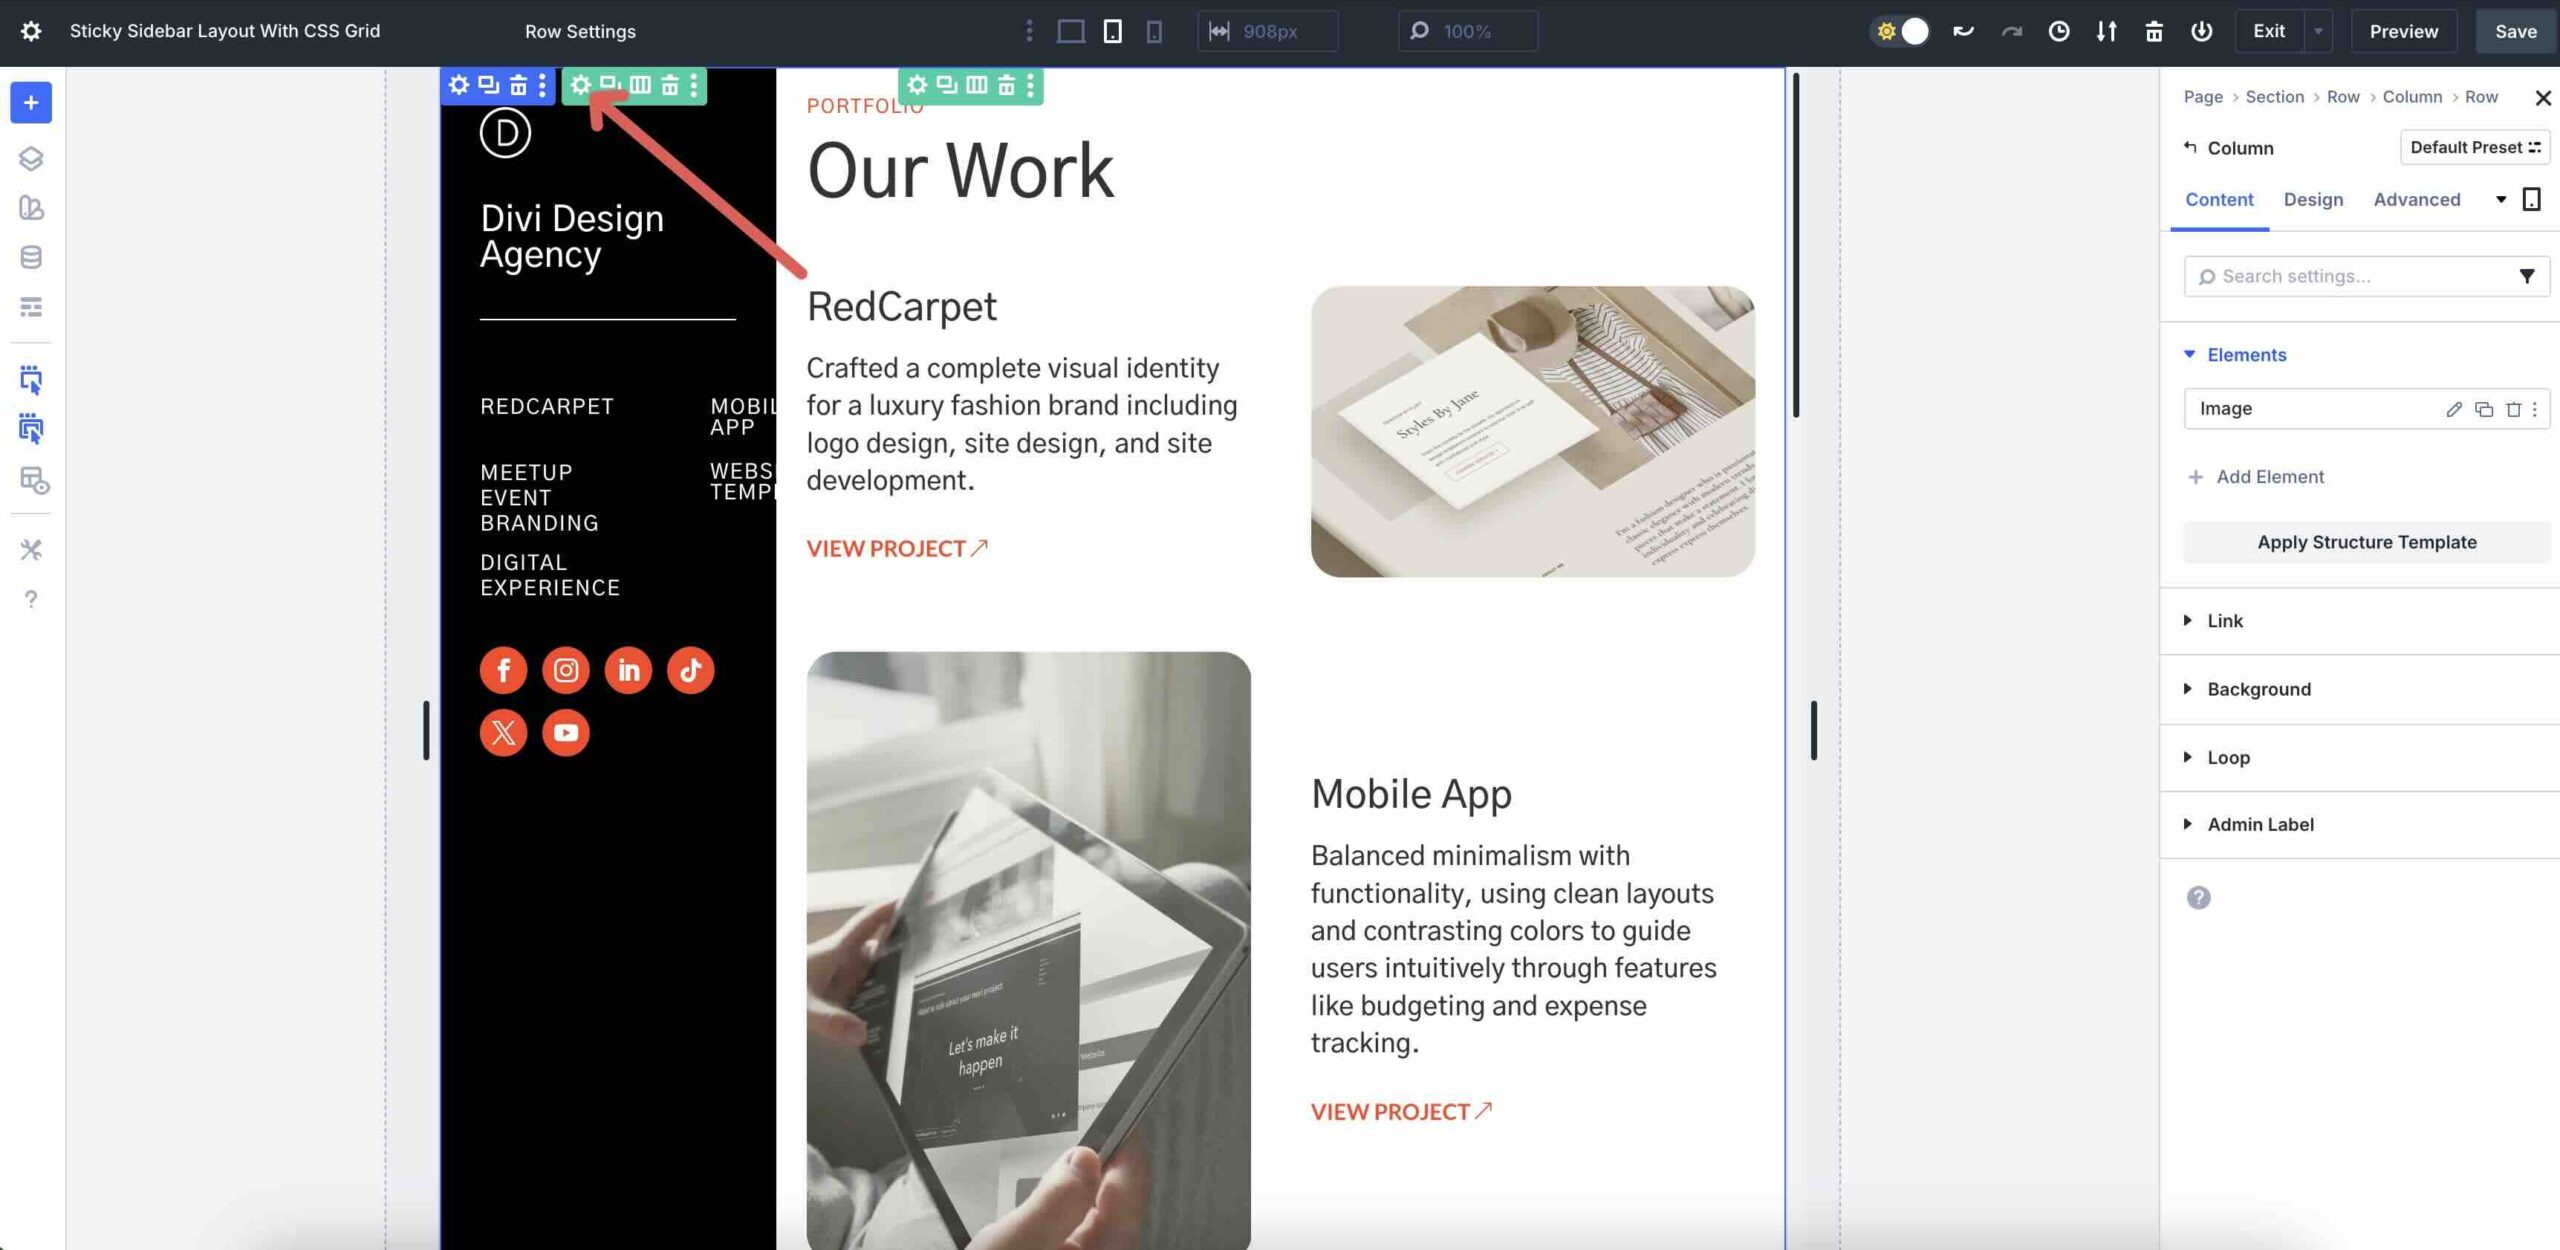
Click on on once more to the Row’s Content material subject matter tab and add a brand spanking new Grid Products. This time, add an Image module and style it as desired.
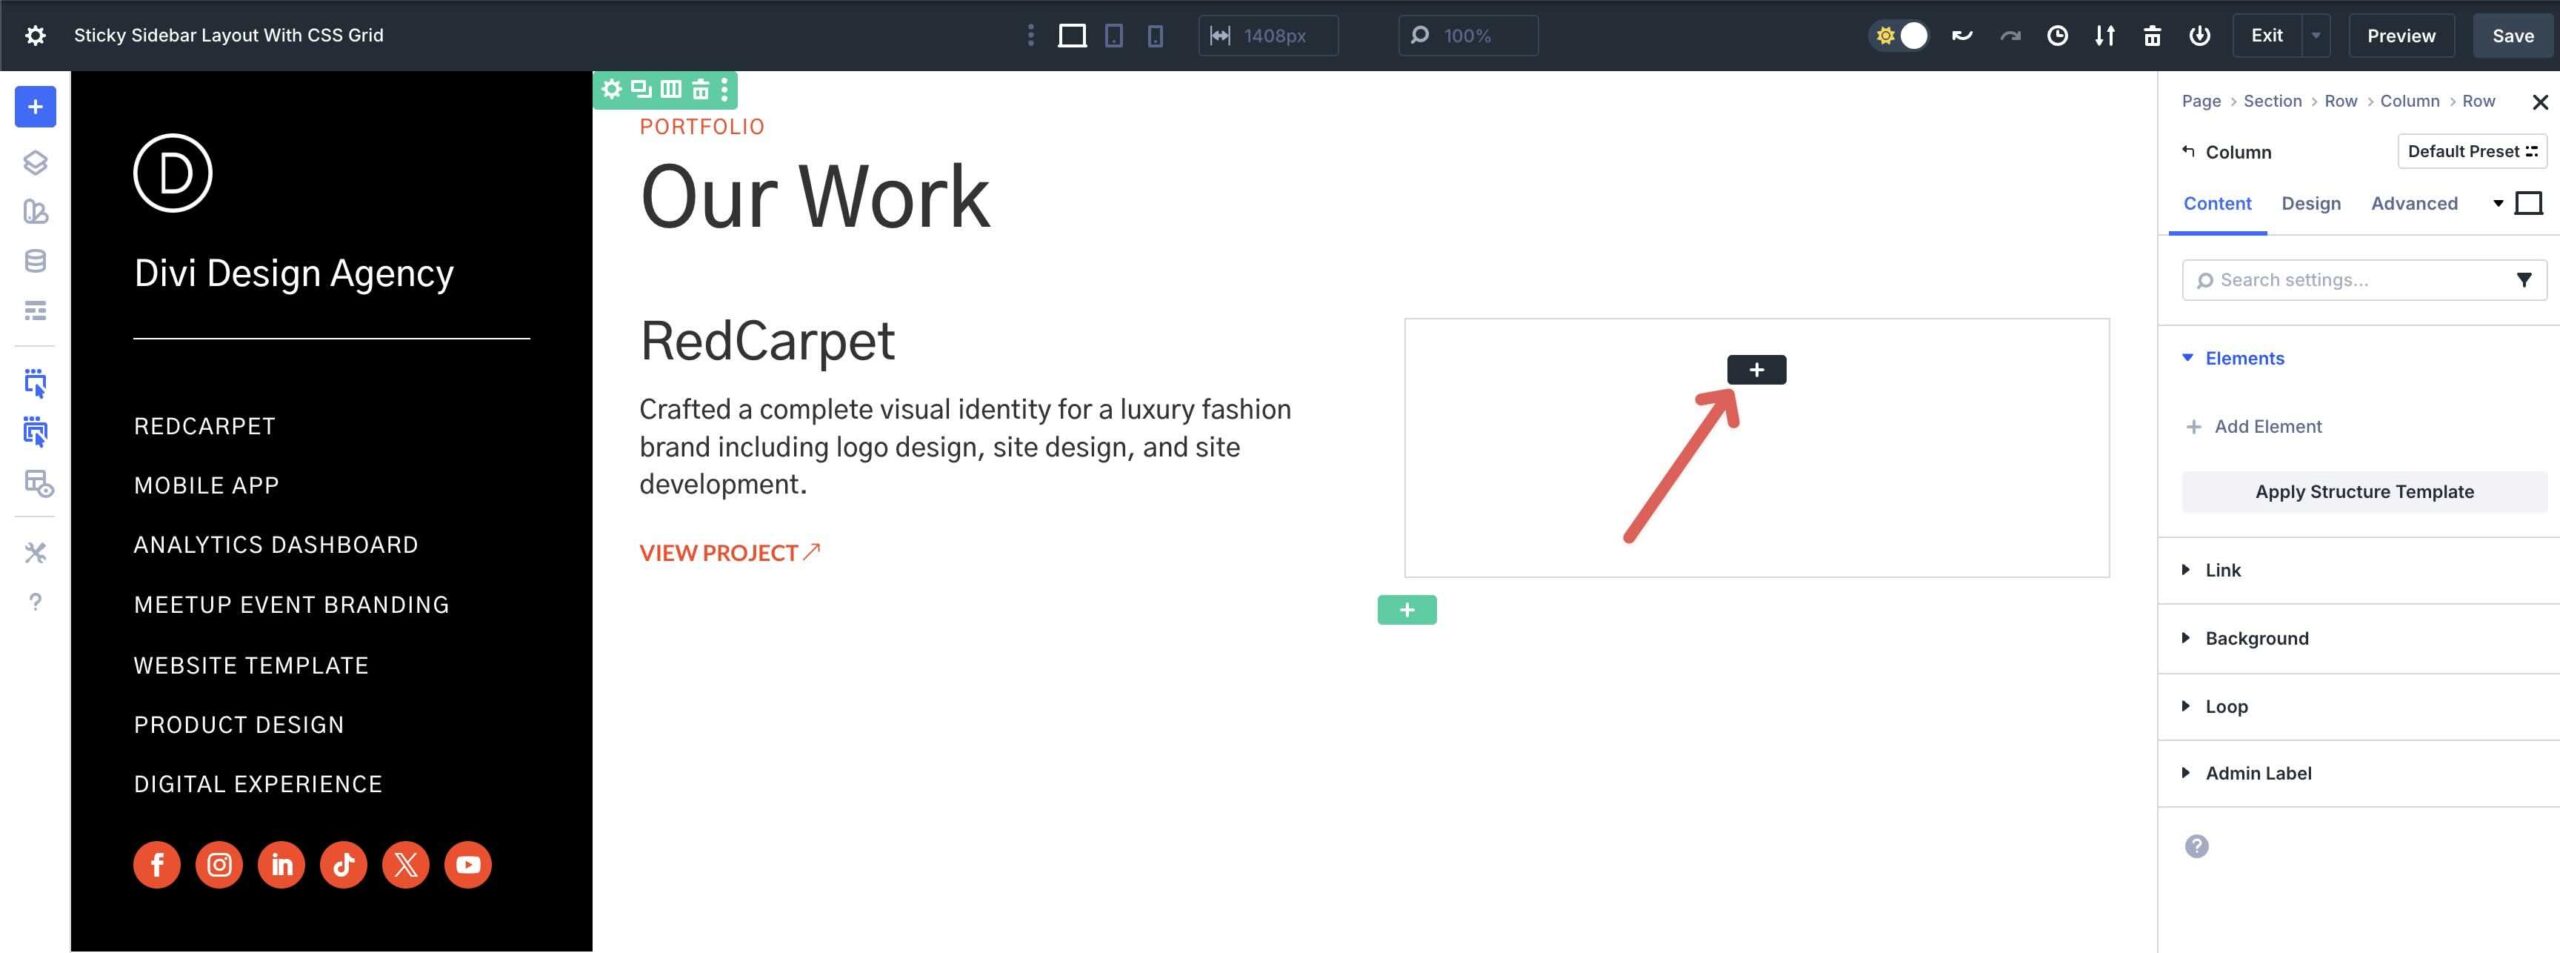
This serves as the elemental development of the Grid.
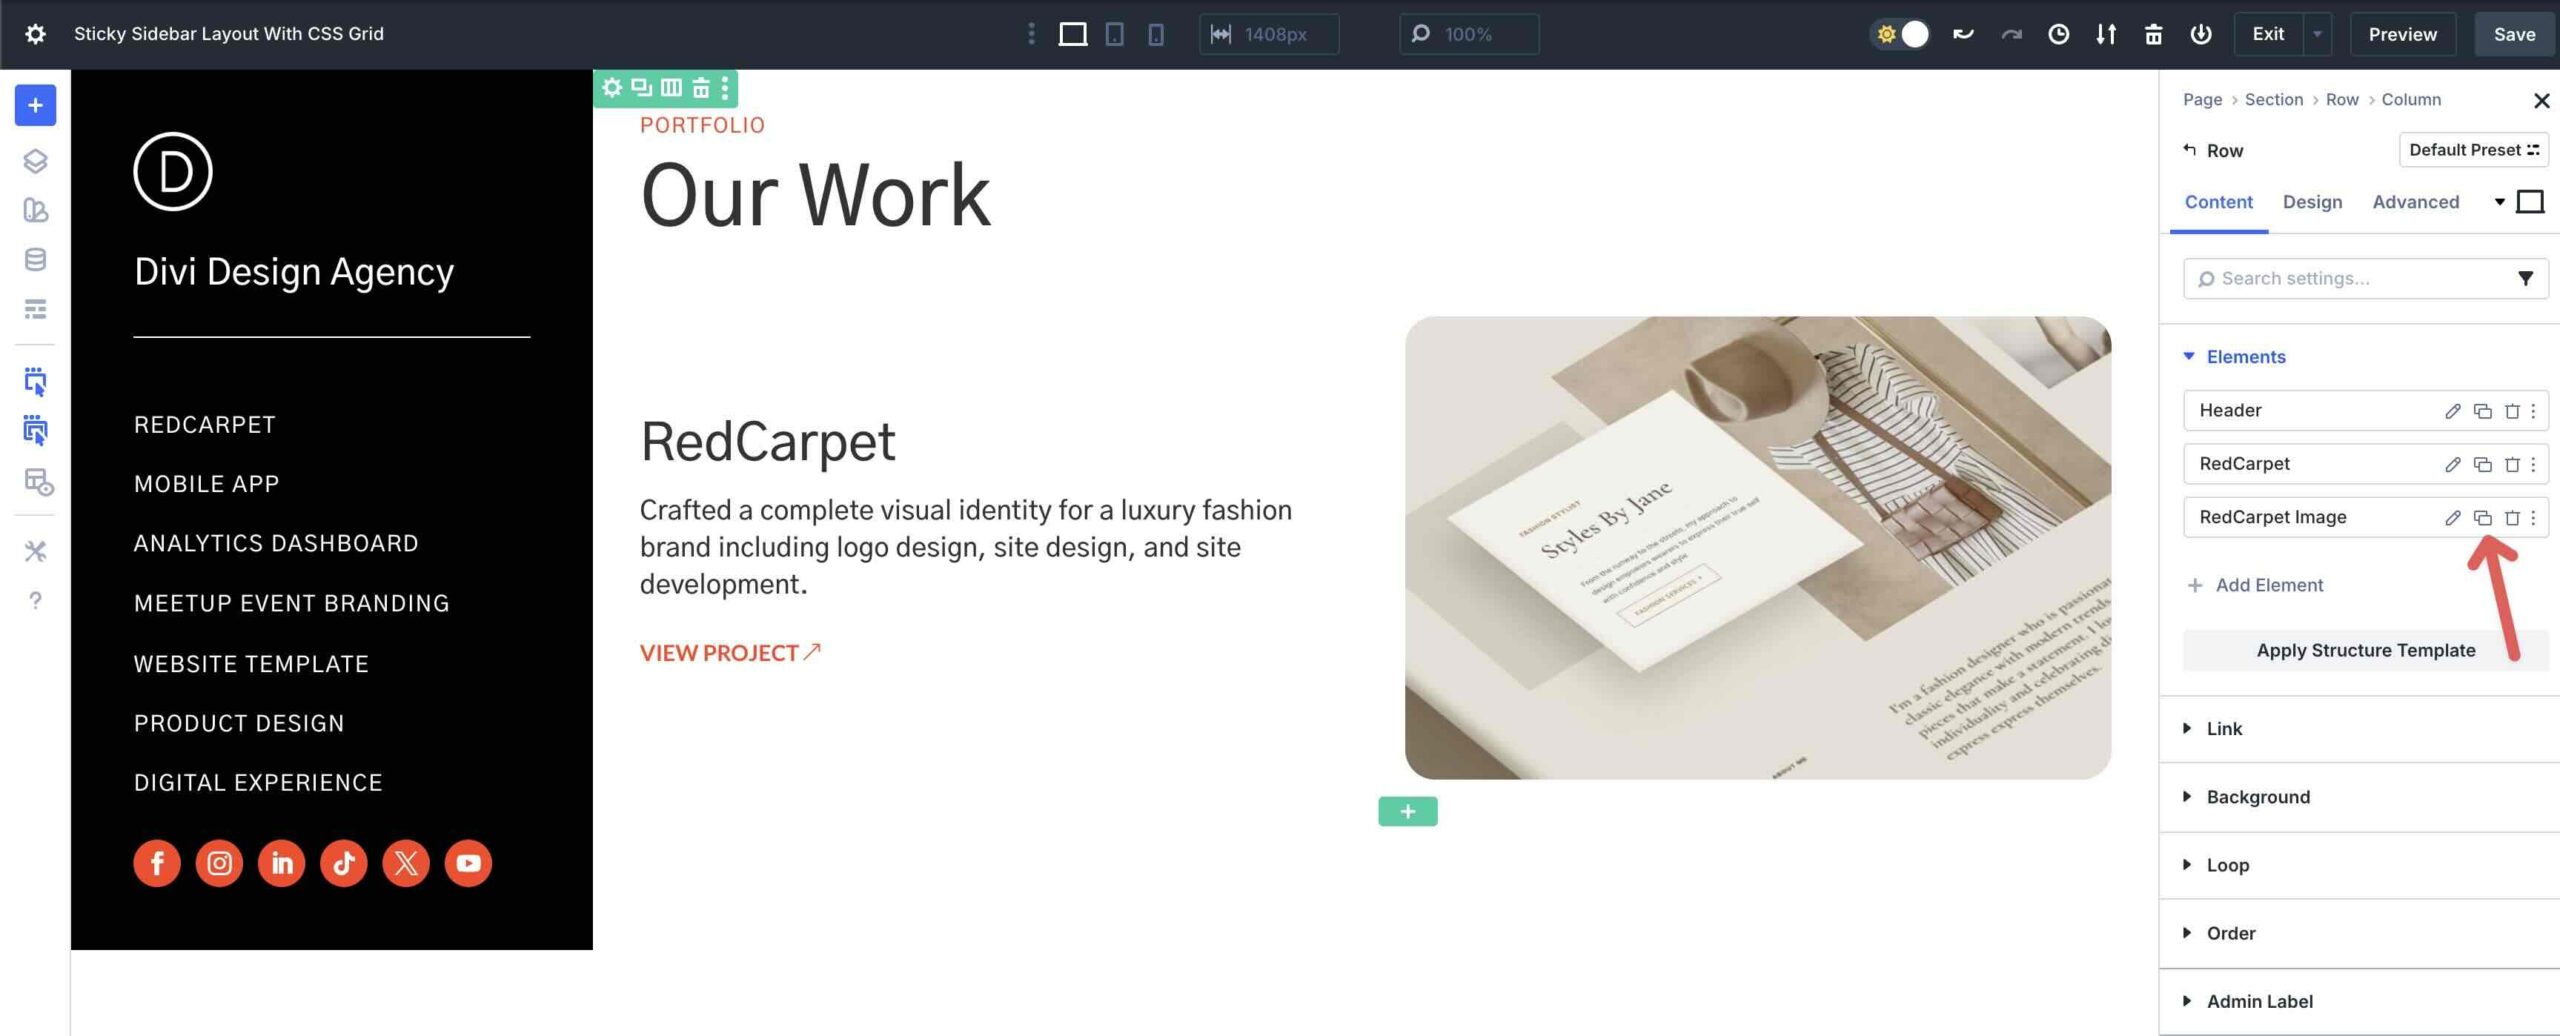
Copy And Edit Grid Items
To make problems easy, you’ll have the ability to reproduction Grid Items via clicking on the Copy Products icon.
Be sure to add Attributes for each new phase of the Grid that corresponds with their menu products links.
Reposition Grid Items via clicking and dragging them in every single place the Grid.
From there, simply edit the module’s content material subject matter while preserving varieties intact in every single place the Grid.
Repeat the ones steps in an effort to upload as many items as sought after. Ensure that you assign anchor links (Attributes) to ONLY the text Grid Items. We will quilt why in the next step.
Step 5: Regulate Settings For Responsive Breakpoints
Our design turns out great on Desktop, but when navigating via Divi 5’s Customizable Responsive Breakpoints, you’ll see that we need to make some changes.
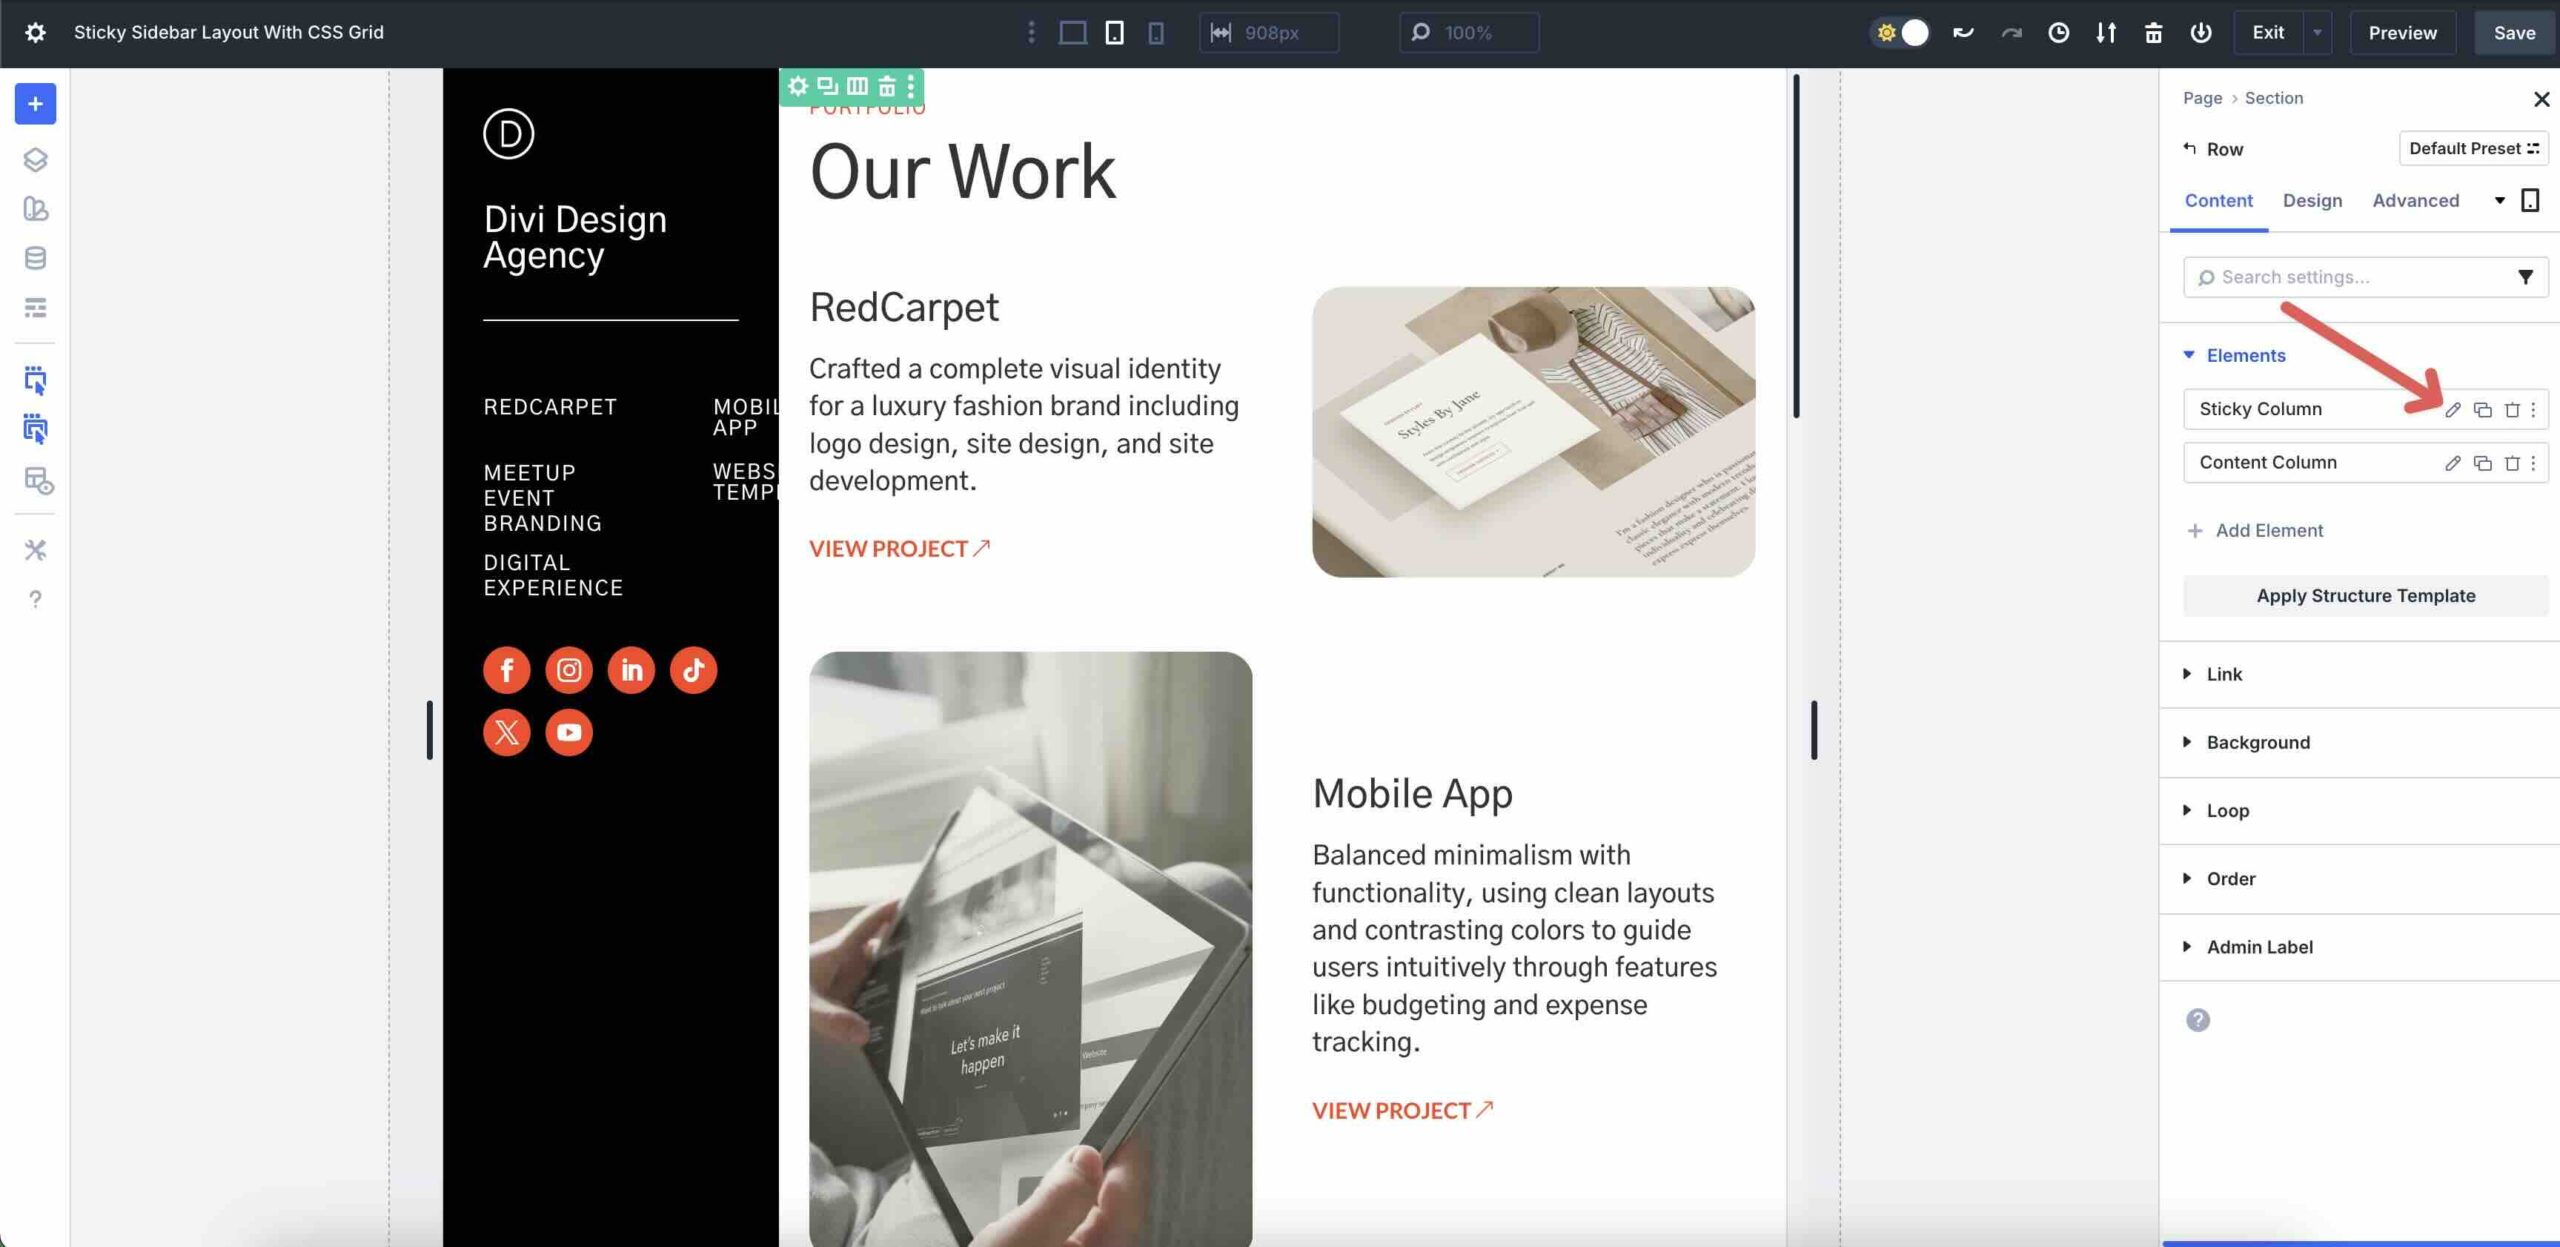
Thankfully, Divi 5 makes it easy to make speedy changes to Tablet and Phone breakpoints, ensuring your construction turns out flawless on all computer screen sizes. While inside the Tablet Breakpoint, click on at the Settings icon for the main Row.
Click on on on the Pencil icon to edit the principle Column’s settings.
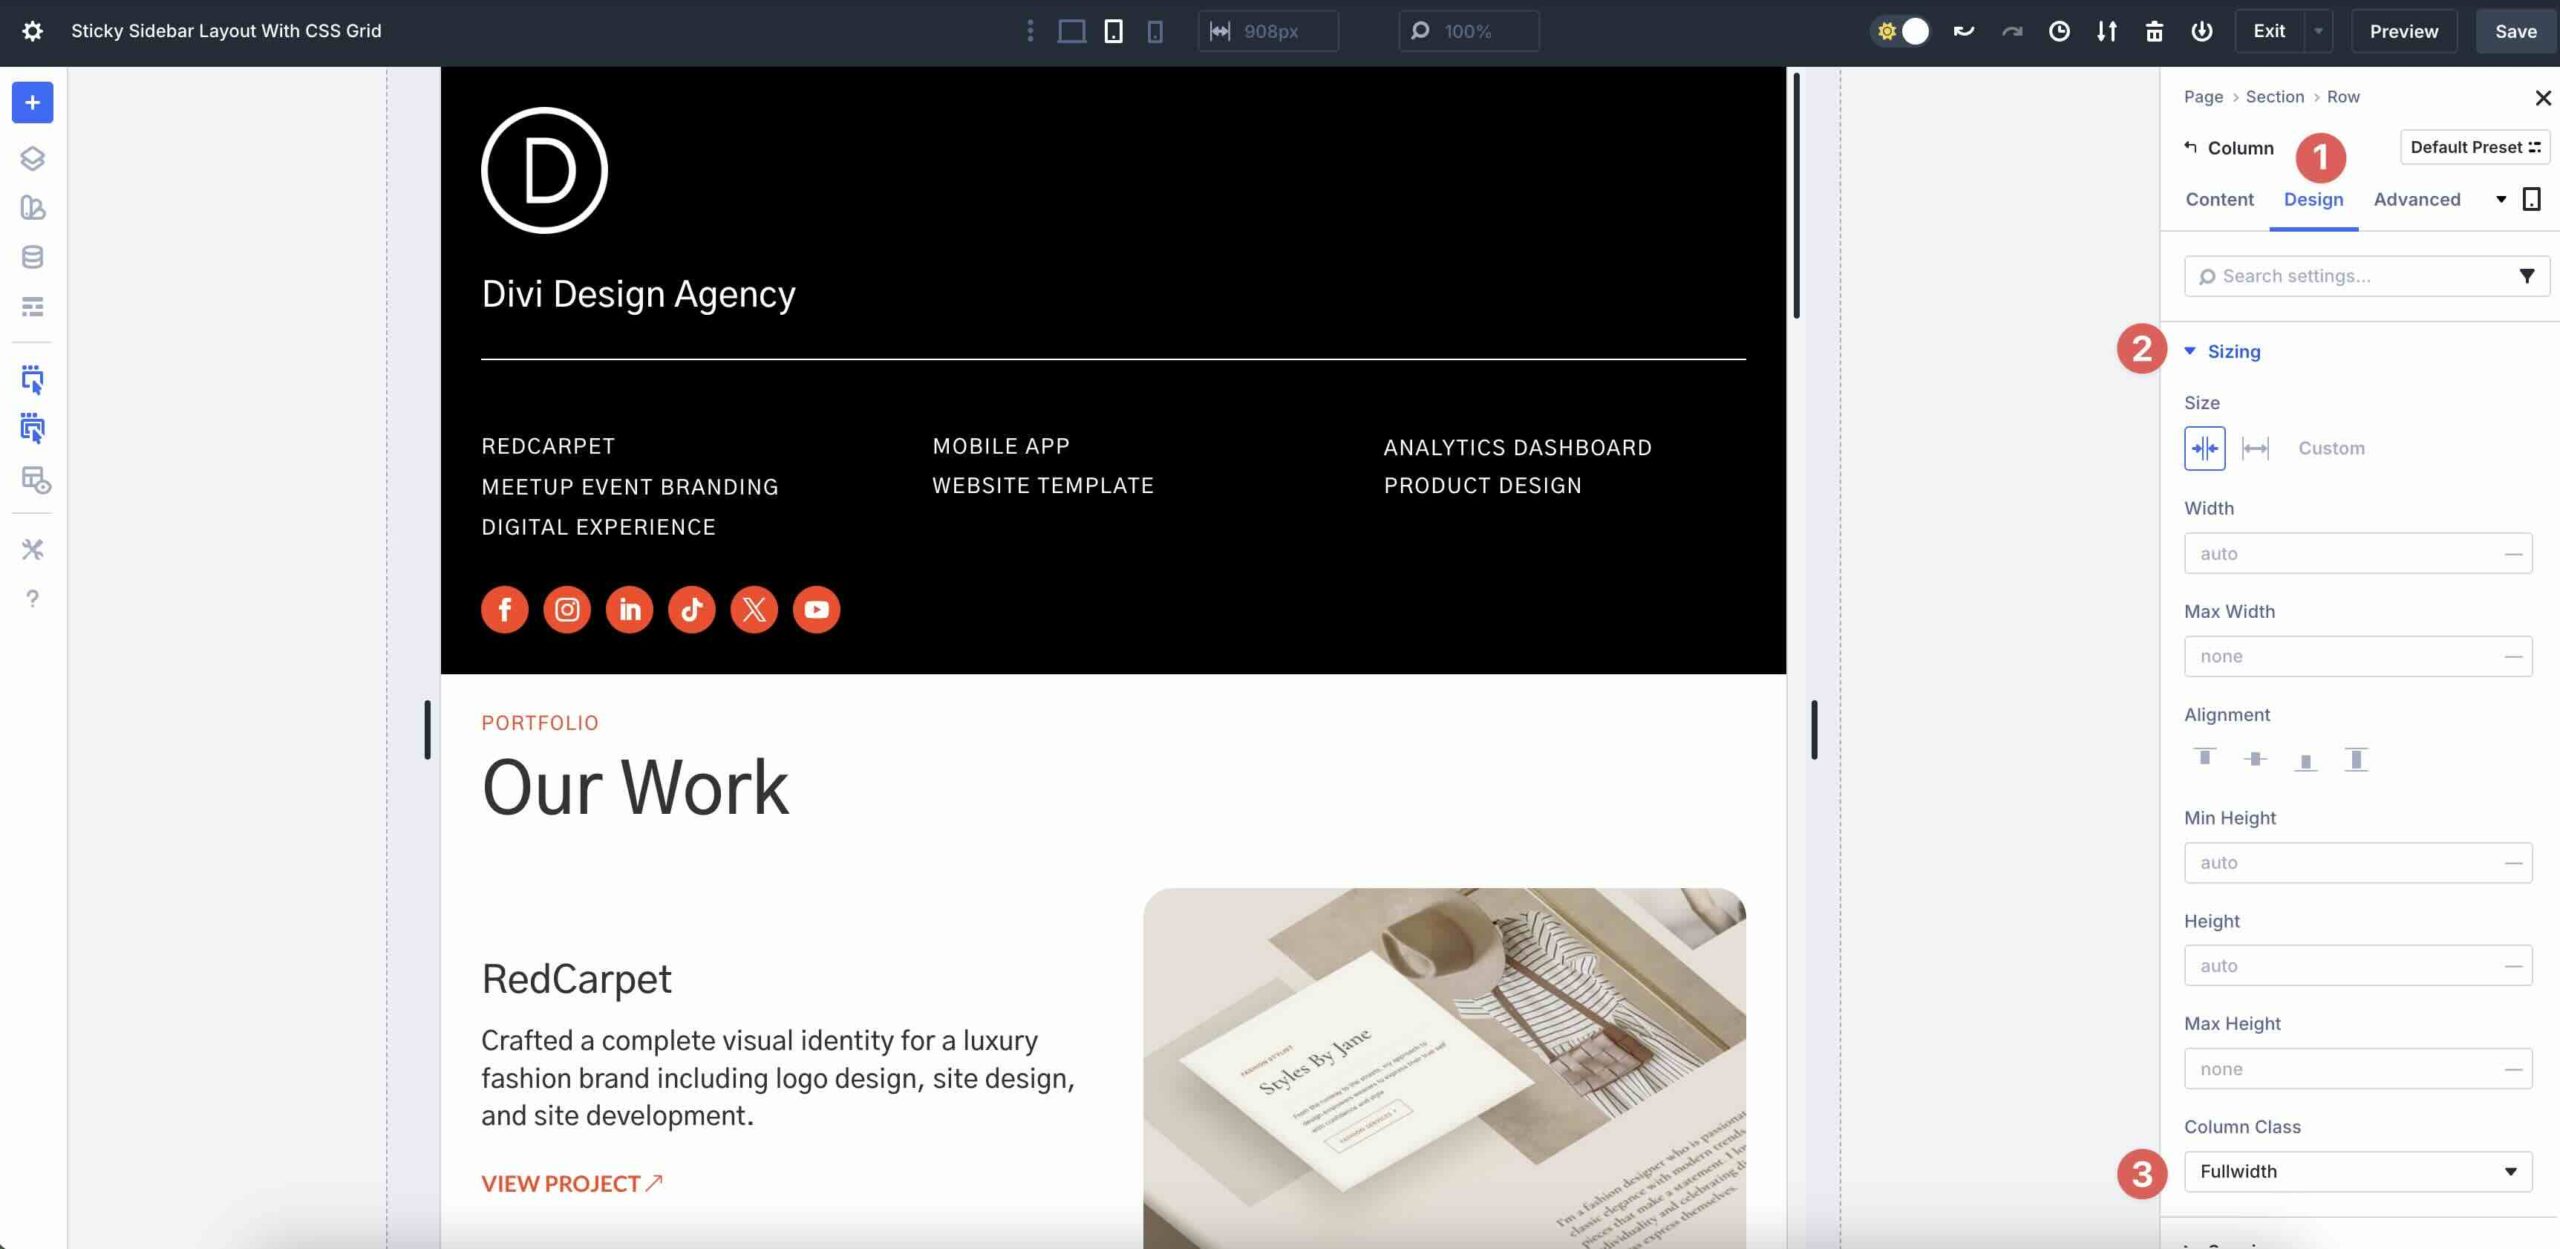
Navigate to the Design tab and make larger the Sizing menu. Set the Column Magnificence to Fullwidth. This may occasionally most probably make larger the Sticky Column’s width to fill the entire Row.
Hover over the Column inside the Visual Builder canvas. Click on at the Settings icon for the Row containing the menu links. Inside the Design tab, set the Vertical Hollow to 10px and set the Amount Of Columns to 3.
Scroll at some point of the Sticky Column’s settings to make tweaks to Spacing or Gaps.
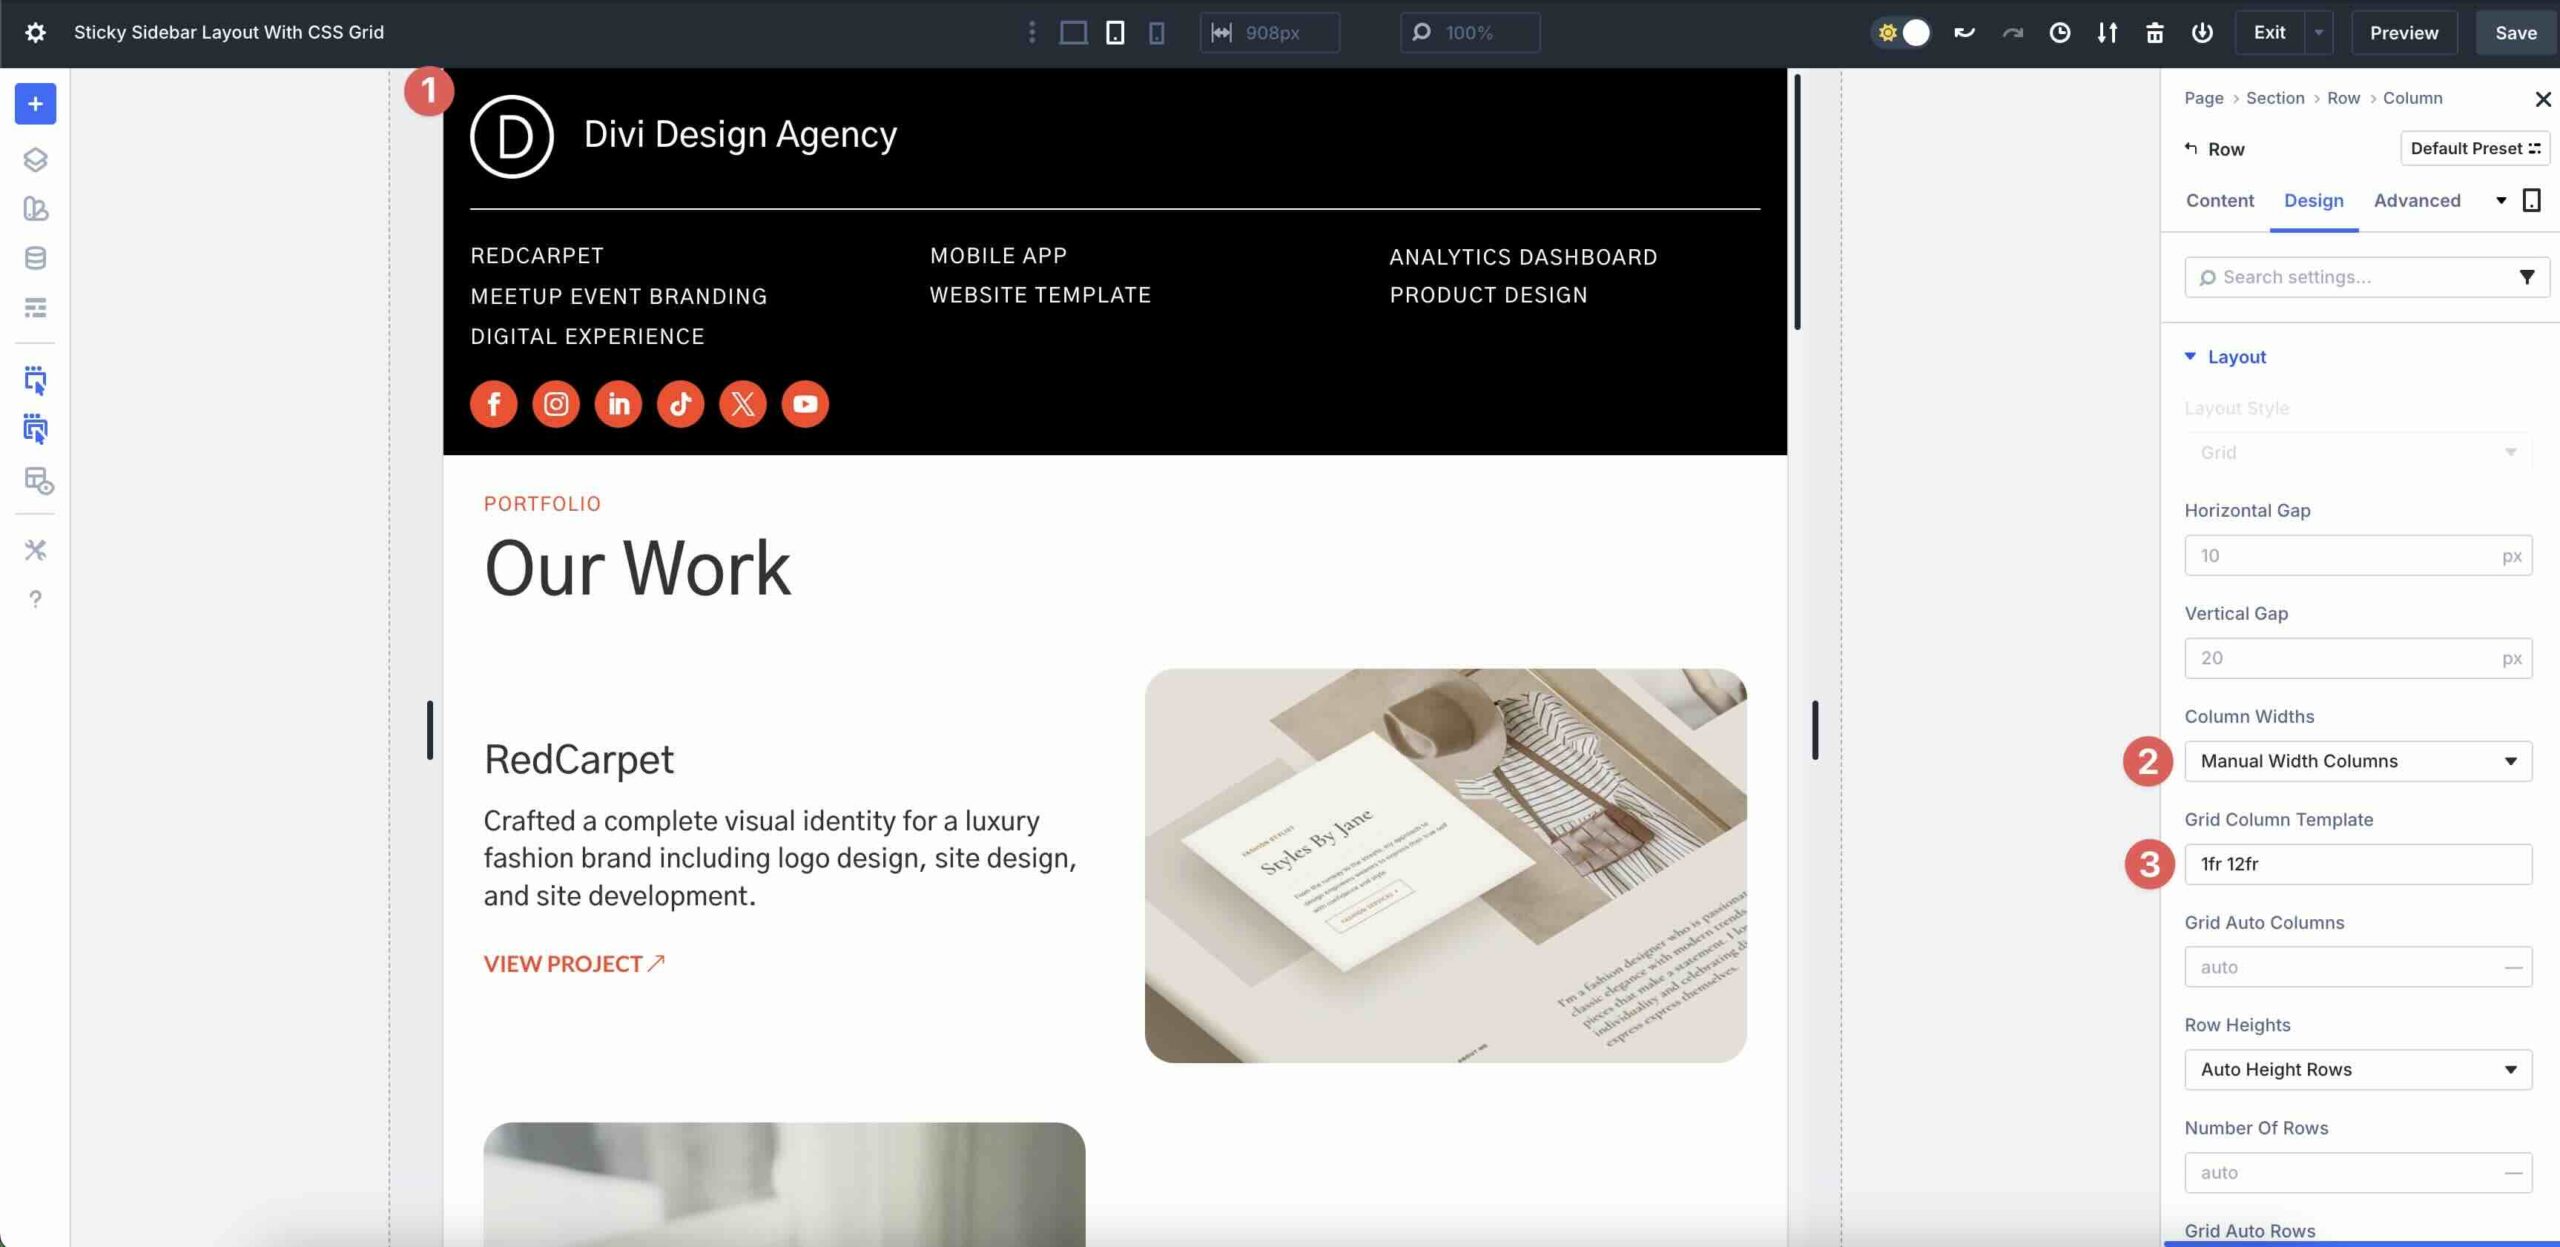
Make adjustments to the Row settings that area the emblem (Image module) and title to ensure it kind of feels excellent on small instrument displays. For instance, you’ll have the ability to assign Column Widths to Manual Width Columns and specify a practice Grid Column Template, akin to 1fr 12fr, to stack items horizontally as an alternative of vertically.
Regulate The Grid Row For Responsiveness
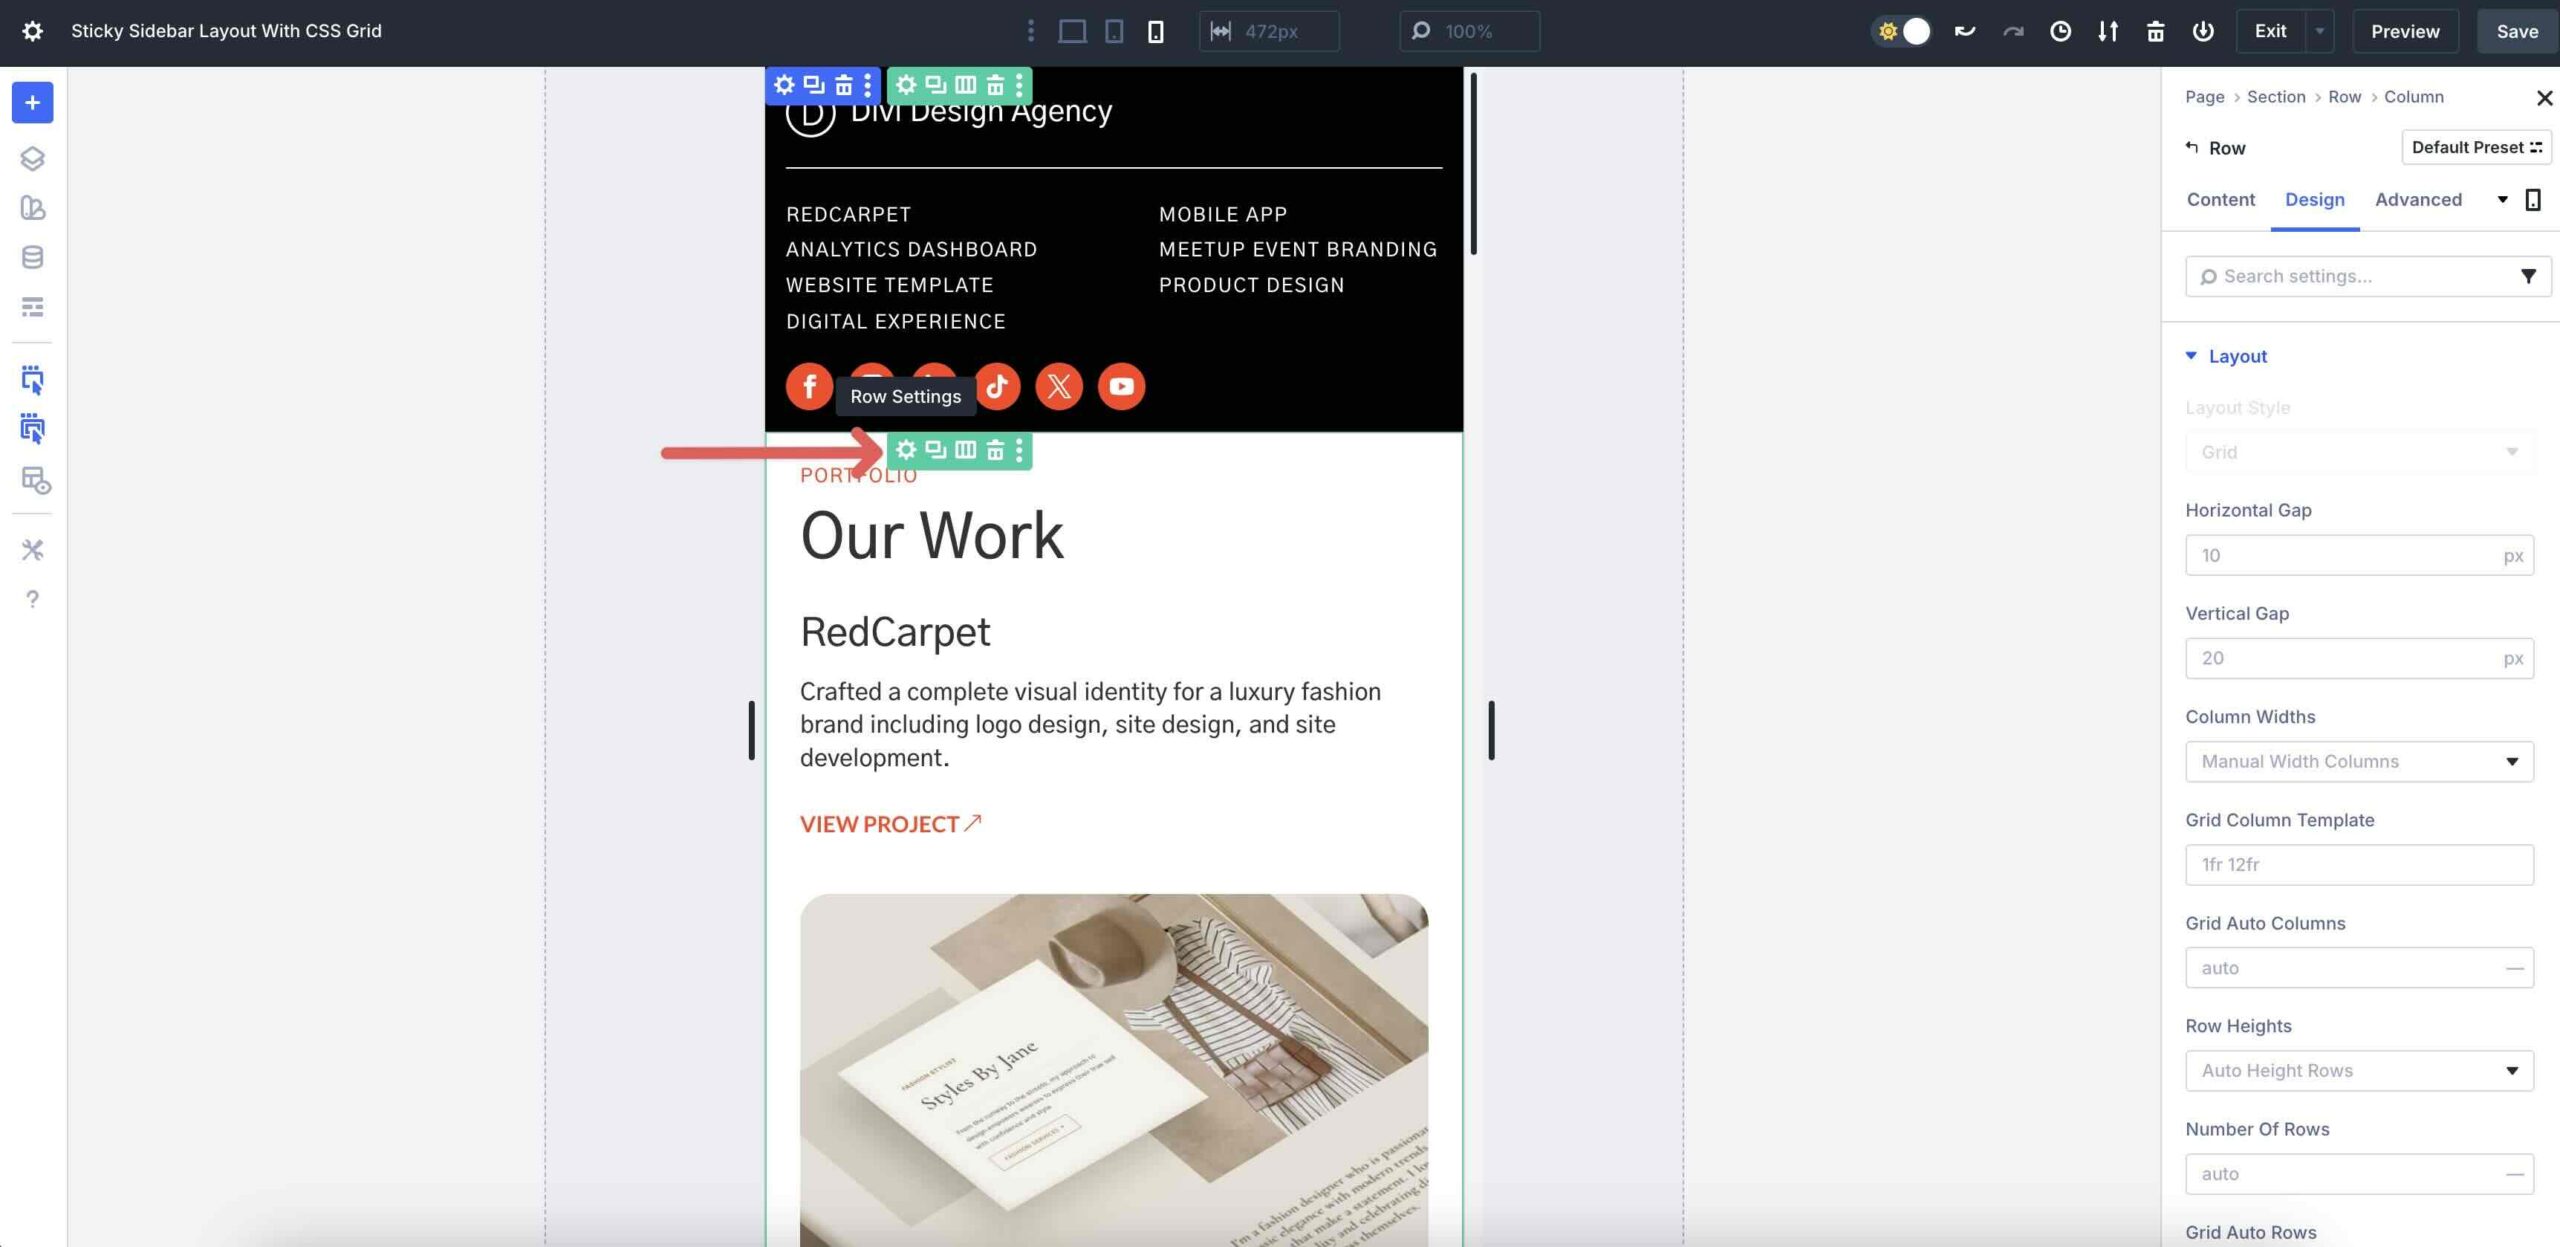
Switch to Phone view. Click on at the Settings icon for the Grid Row.
Click on at the pencil icon of the second Grid Products to control its settings.
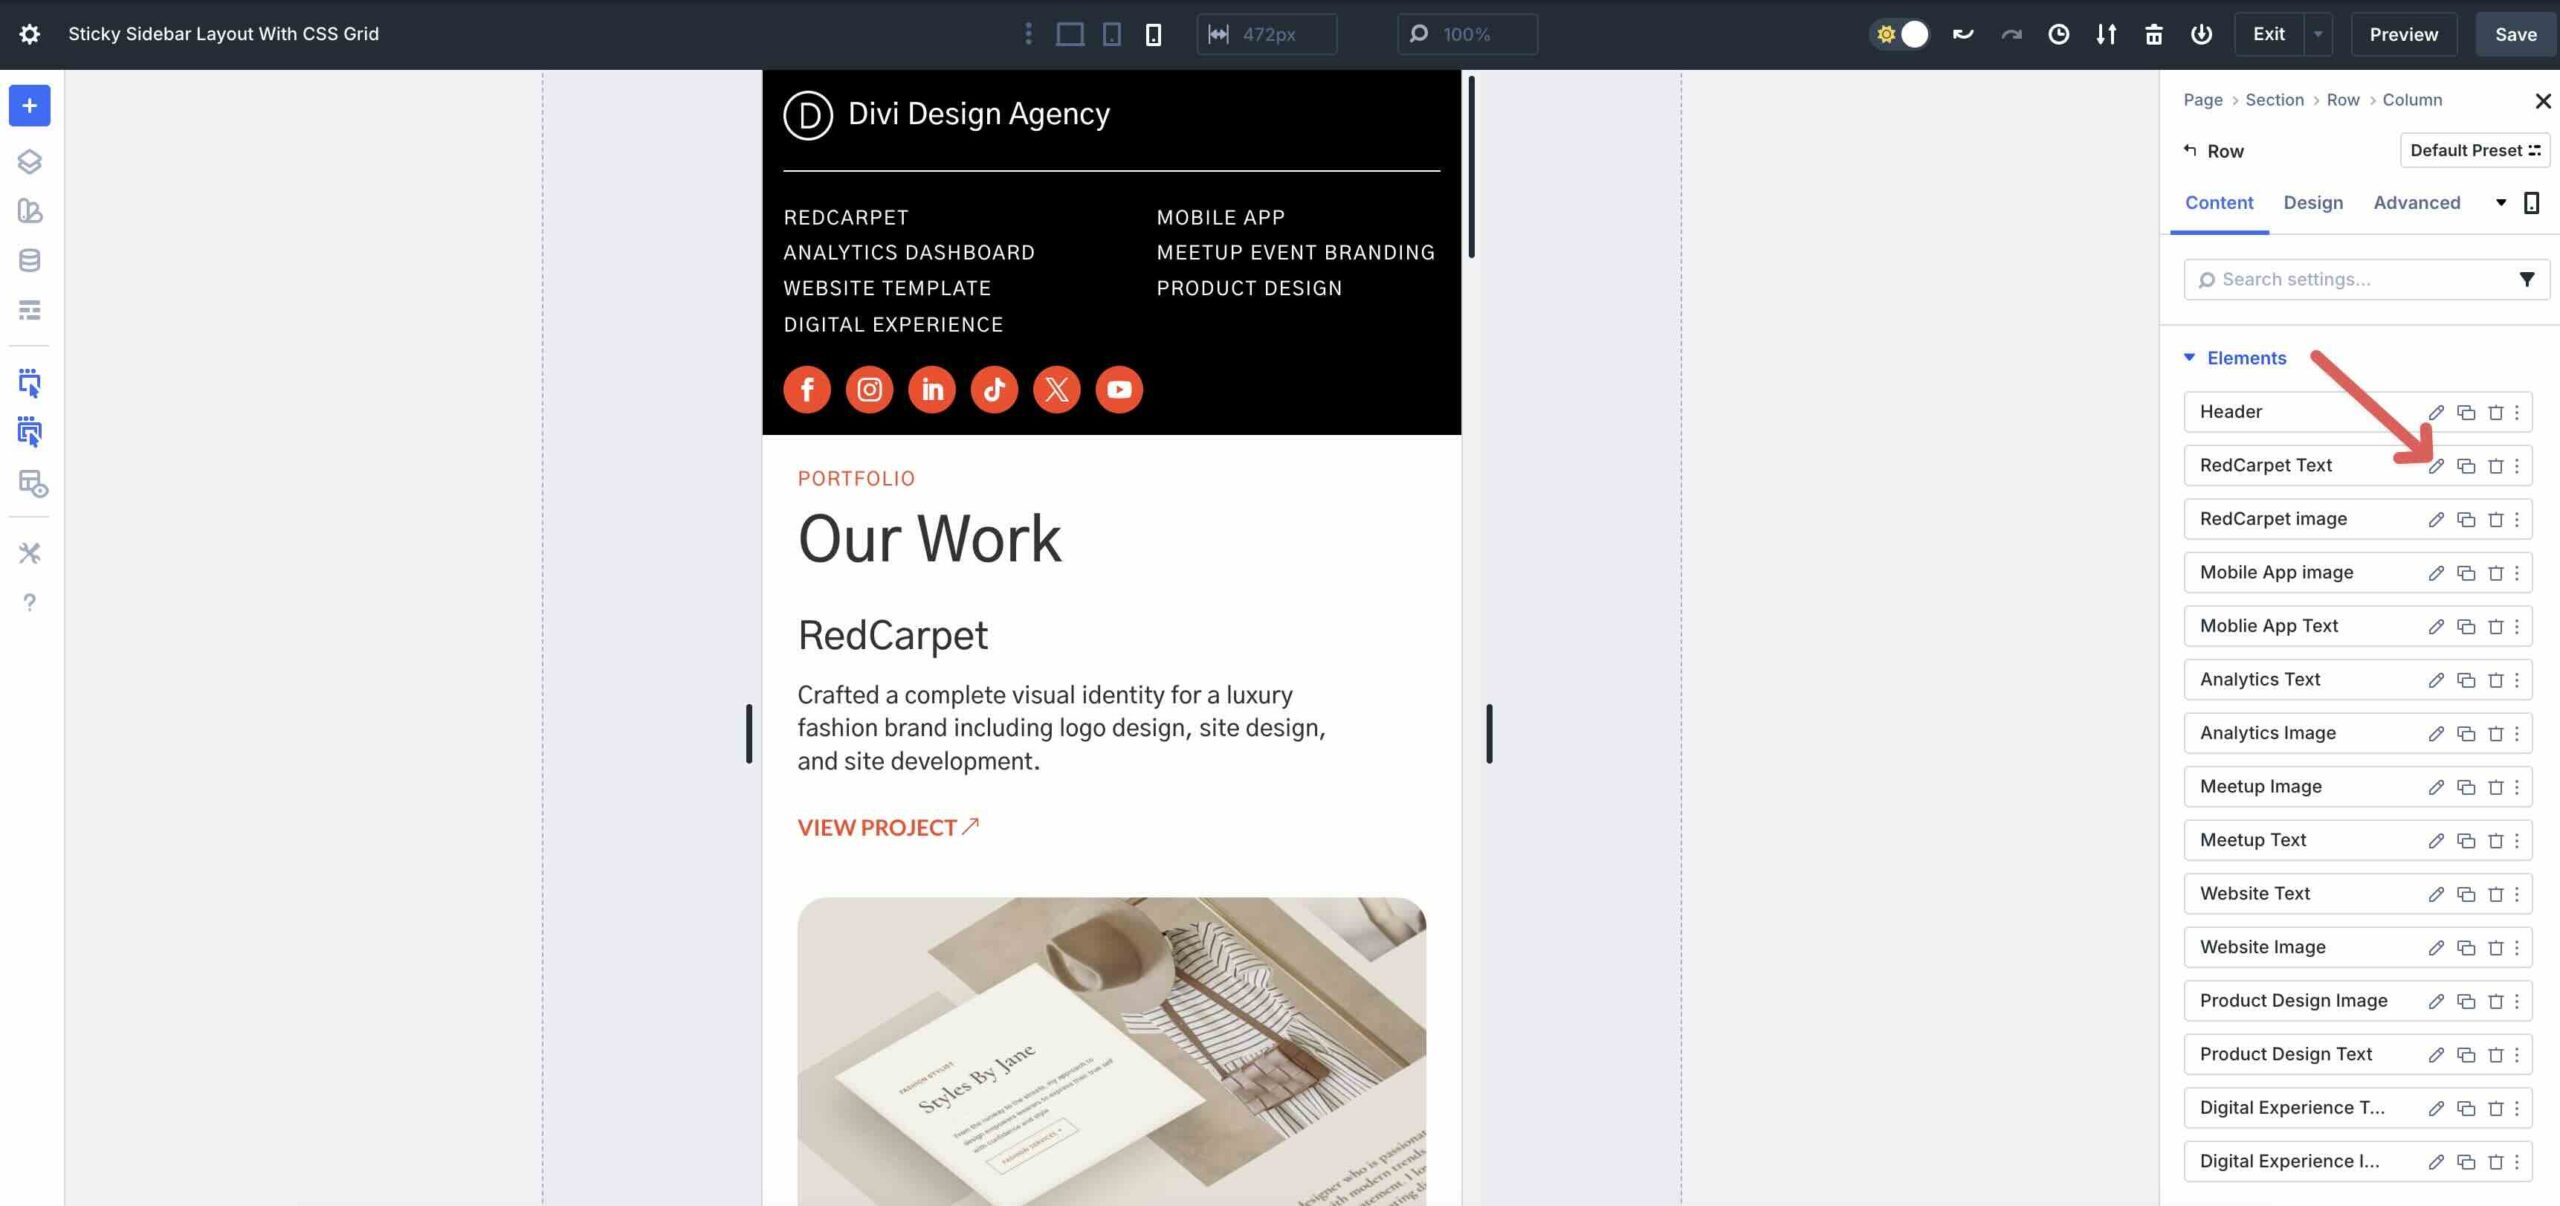
Navigate to the Design tab. Regulate the Column Span to 2. This may occasionally most probably allow the content material subject matter to occupy the entire width of the Row. Repeat the steps to control the rest Grid Items to 2.
As you scroll down the internet web page, you’ll needless to say the Grid Items are all occupying 2 Columns, on the other hand the order isn’t what we’d like.
To fix this, we can control each Column’s Row Get began and Row End values to align them totally. For the reason that first two Grid Items (which occupy 4 “Rows” on mobile) are aligned the best way wherein we want, we need to control the 5th Grid Products so that they stack accurately.
Click on on on the 5th Grid Products and navigate to the Design tab. Enlarge the Sizing Menu and to find the Row Get began and Row End fields.
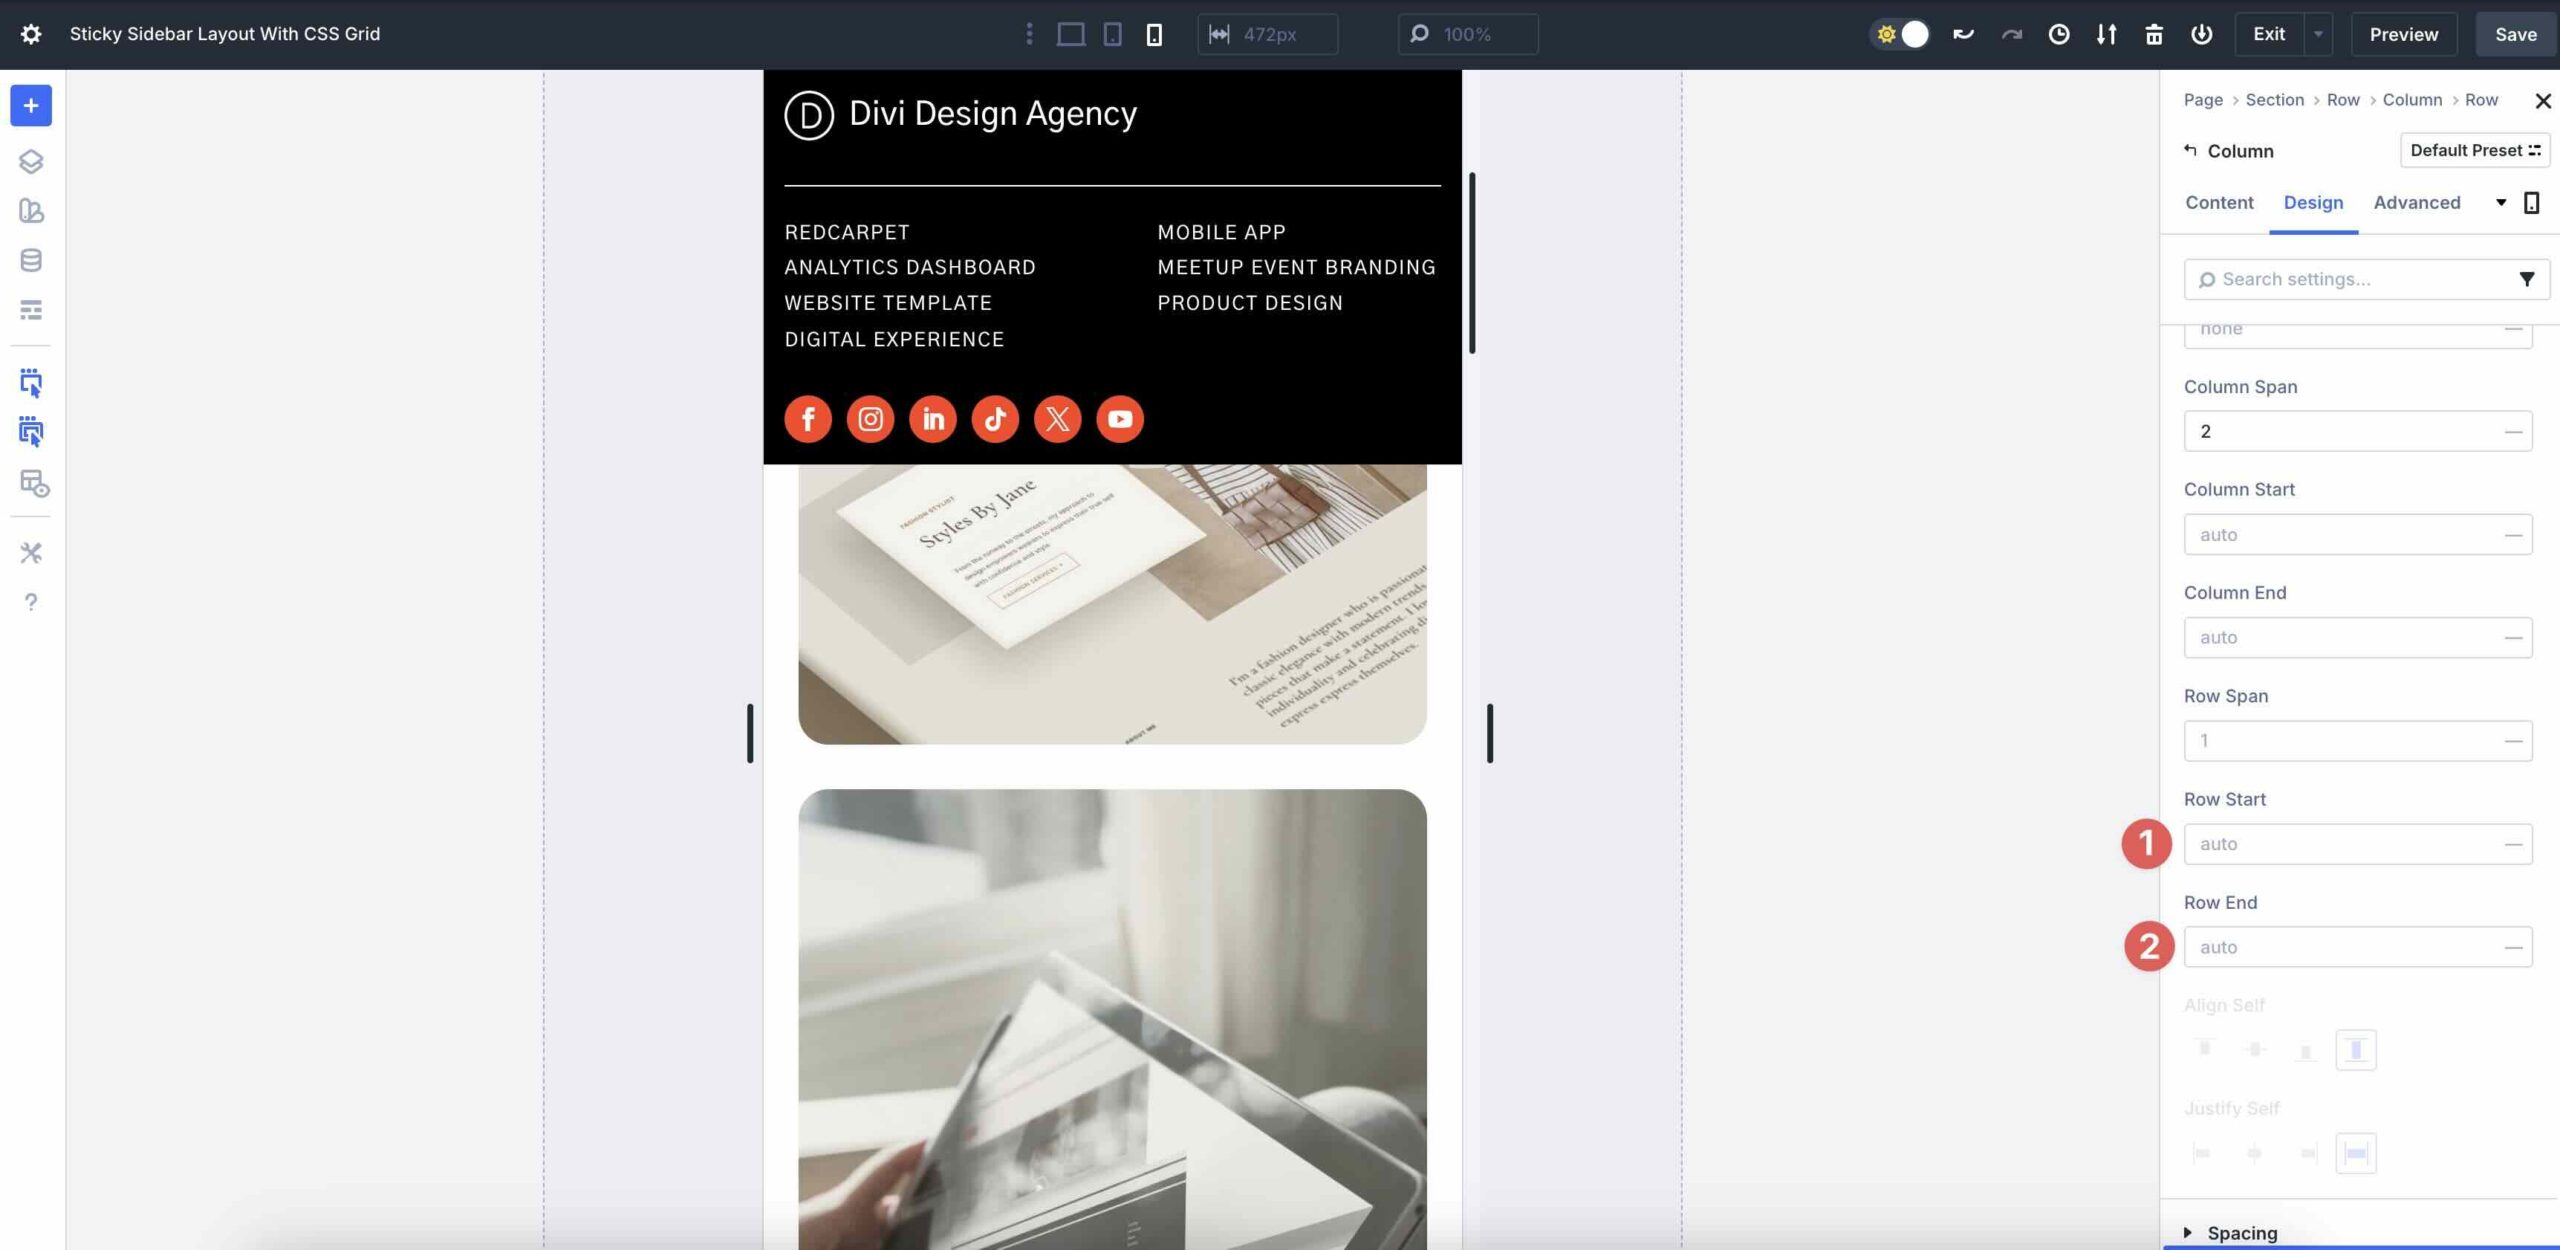
Regulate each value to 4. Divi will then align the text above the image for a further polished glance.
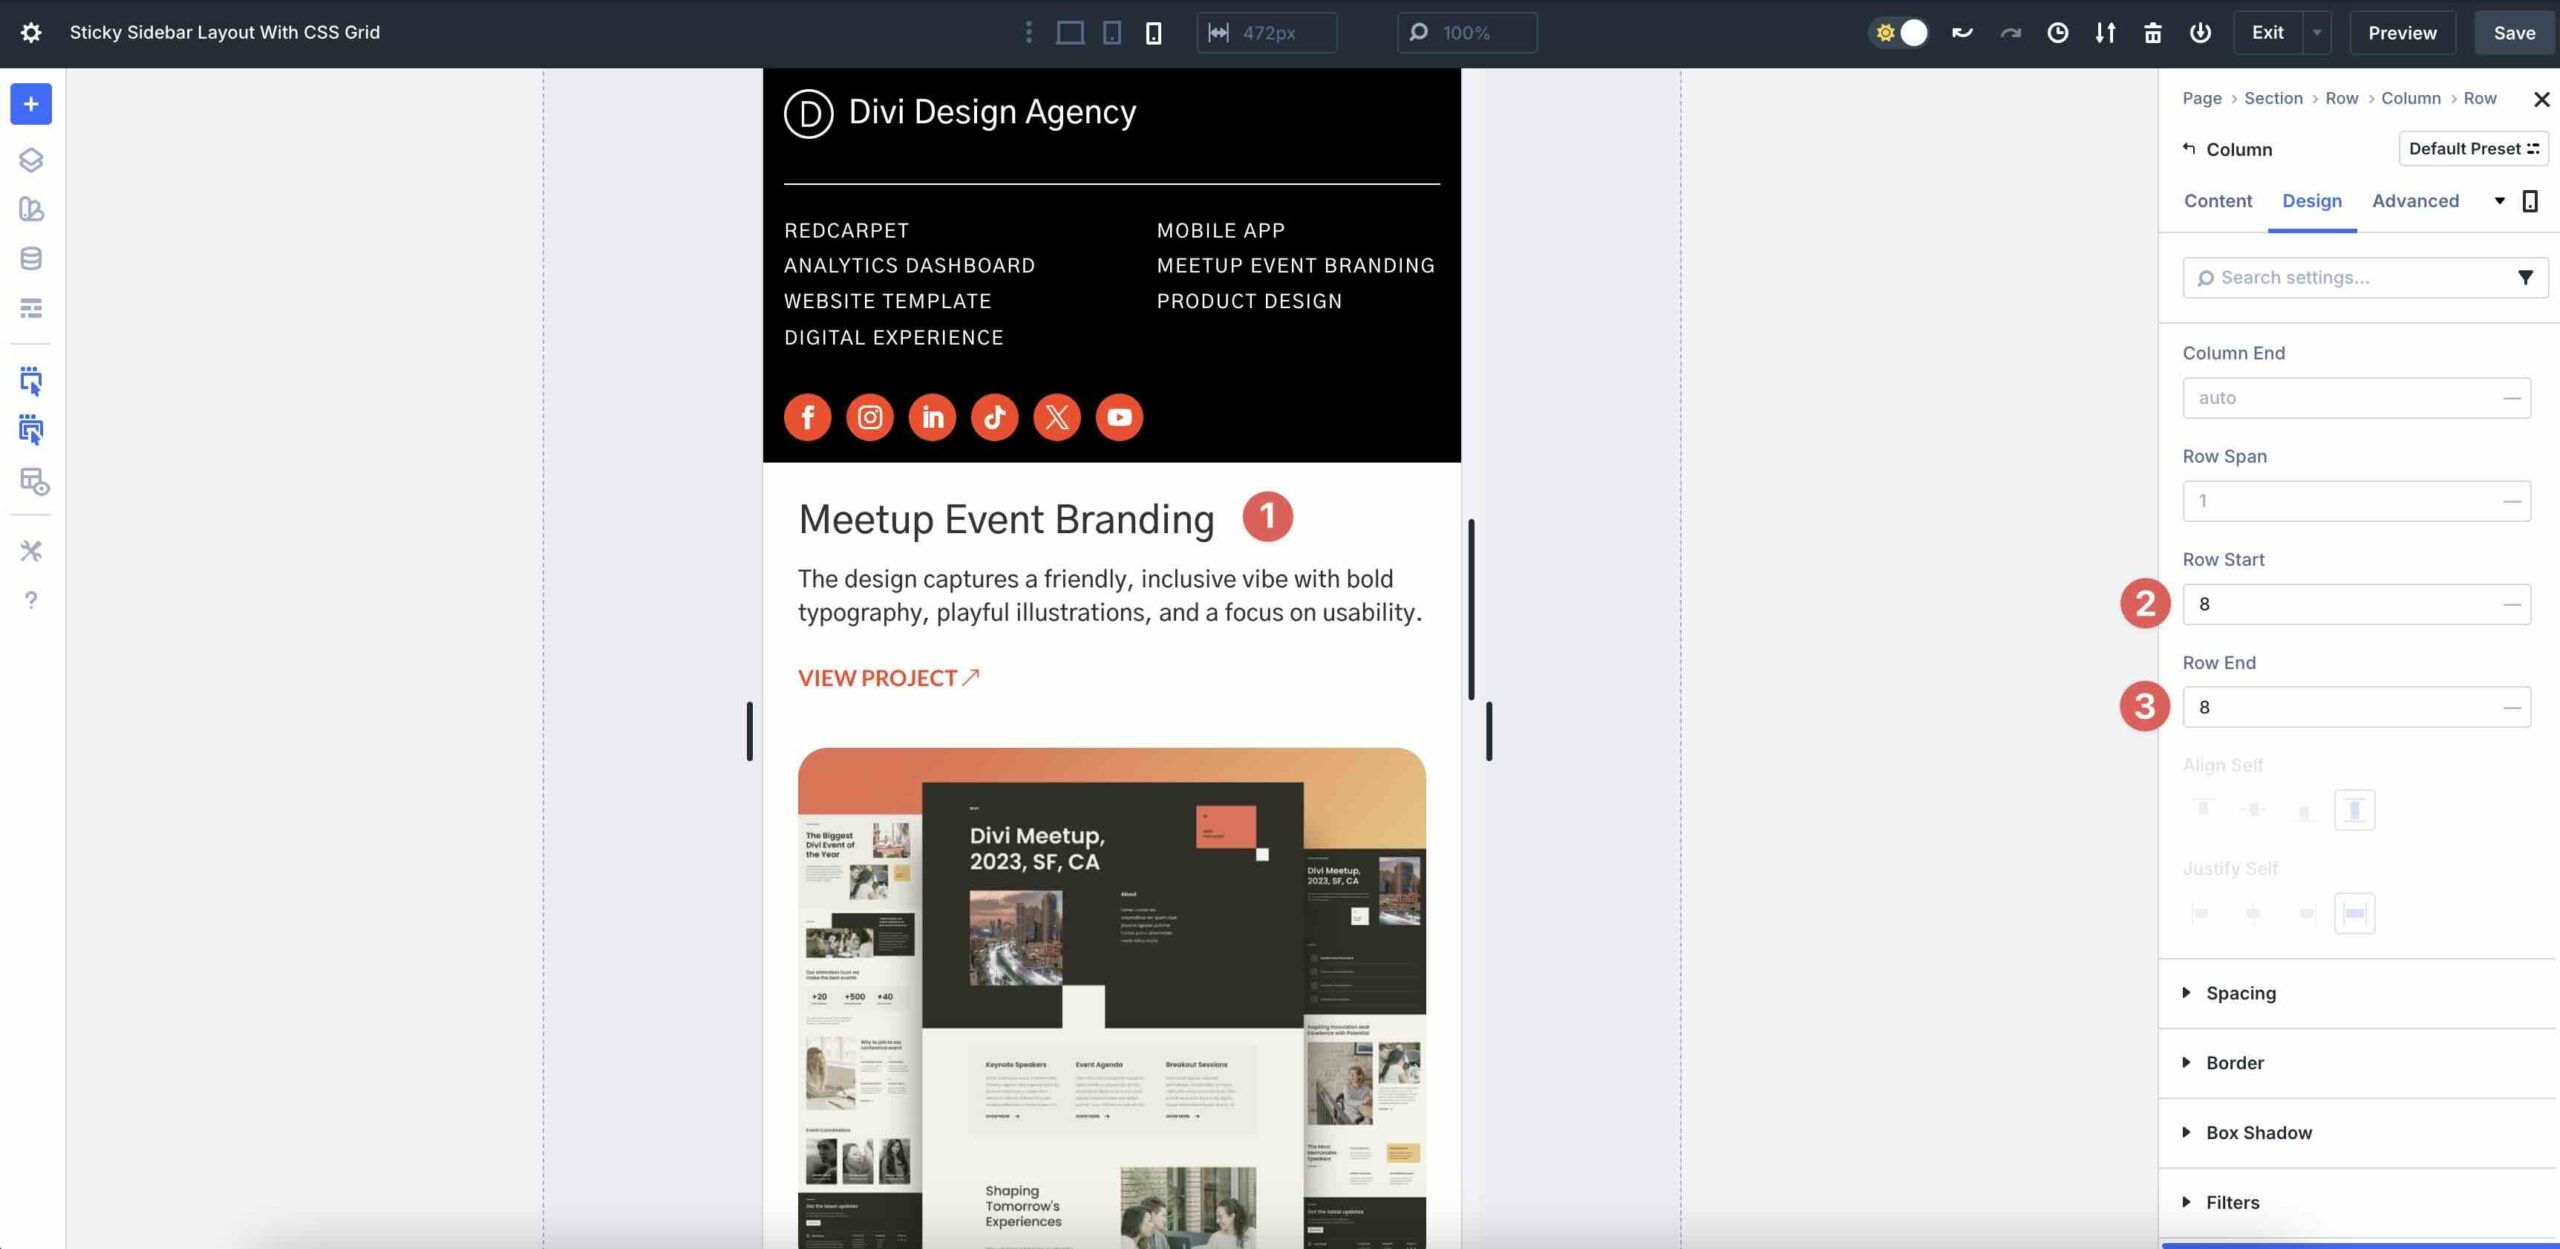
Repeat the steps to control every other Grid Items where the image turns out first inside the design. Regulate the fee via 4 for each adjustment. For instance, the 9th Grid Products would have Row Get began/End values of 8, the 13th Grid Products would have values of 12, and so on.
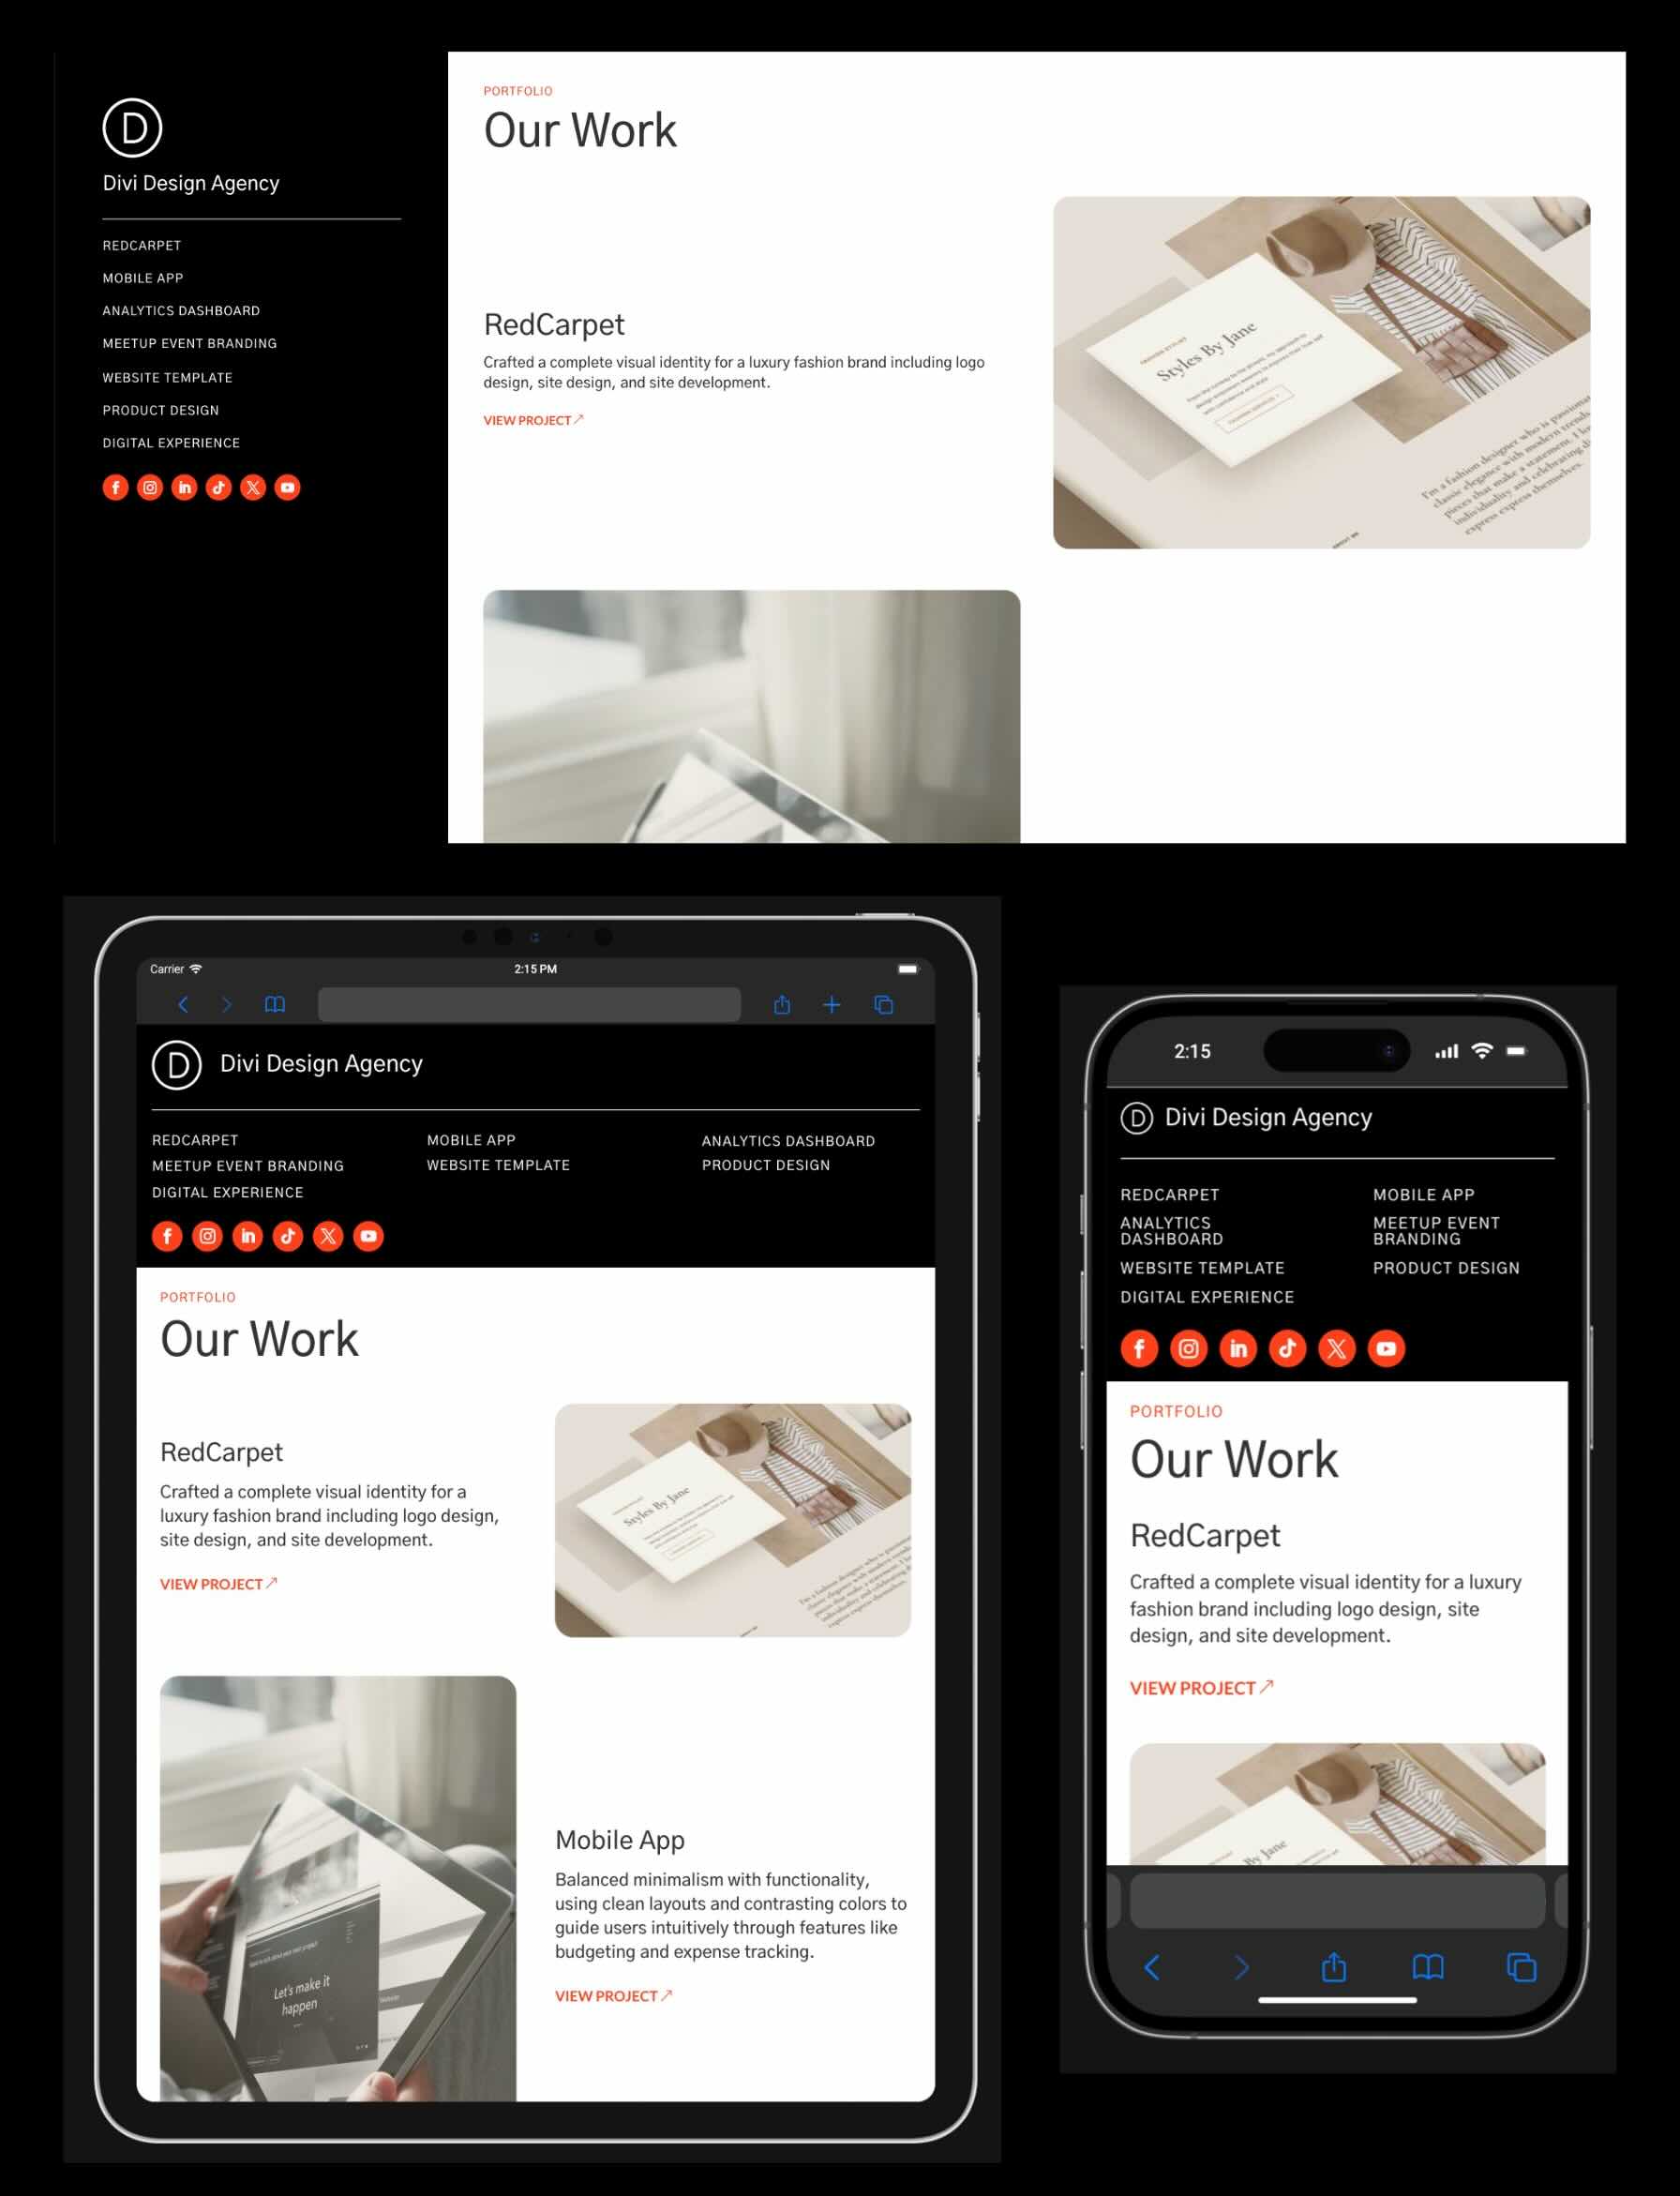
That’s it! As you’ll have the ability to see, Divi 5 makes it speedy and easy to create an absolutely responsive sticky sidebar construction with CSS Grid.
@media simplest computer screen and ( max-width: 767px ) {.et_bloom .et_bloom_optin_1 .carrot_edge.et_bloom_form_right .et_bloom_form_content:previous than { border-top-color: #ffffff !crucial; border-left-color: transparent !crucial; }.et_bloom .et_bloom_optin_1 .carrot_edge.et_bloom_form_left .et_bloom_form_content:after { border-bottom-color: #ffffff !crucial; border-left-color: transparent !crucial; }
}.et_bloom .et_bloom_optin_1 .et_bloom_form_content button { background-color: #f92c8b !crucial; } .et_bloom .et_bloom_optin_1 .et_bloom_form_content .et_bloom_fields i { colour: #f92c8b !crucial; } .et_bloom .et_bloom_optin_1 .et_bloom_form_content .et_bloom_custom_field_radio i:previous than { background: #f92c8b !crucial; } .et_bloom .et_bloom_optin_1 .et_bloom_border_solid { border-color: #f7f9fb !crucial } .et_bloom .et_bloom_optin_1 .et_bloom_form_content button { background-color: #f92c8b !crucial; } .et_bloom .et_bloom_optin_1 .et_bloom_form_container h2, .et_bloom .et_bloom_optin_1 .et_bloom_form_container h2 span, .et_bloom .et_bloom_optin_1 .et_bloom_form_container h2 tough { font-family: “Open Sans”, Helvetica, Arial, Lucida, sans-serif; }.et_bloom .et_bloom_optin_1 .et_bloom_form_container p, .et_bloom .et_bloom_optin_1 .et_bloom_form_container p span, .et_bloom .et_bloom_optin_1 .et_bloom_form_container p tough, .et_bloom .et_bloom_optin_1 .et_bloom_form_container form input, .et_bloom .et_bloom_optin_1 .et_bloom_form_container form button span { font-family: “Open Sans”, Helvetica, Arial, Lucida, sans-serif; } p.et_bloom_popup_input { padding-bottom: 0 !crucial;}

Download For Unfastened
Join the Divi Newsletter and we will be able to e mail you a duplicate of the ultimate Divi Landing Internet web page Construction Pack, plus quite a lot of other superb and unfastened Divi assets, guidelines and strategies. Apply along and also you’ll be a Divi seize in no time. For those who’re already subscribed simply type on your e mail take care of beneath and click on on download to get right to use the construction pack.
You might want to have successfully subscribed. Please take a look at your e mail take care of to confirm your subscription and get get right to use to unfastened weekly Divi construction packs!
Liberate CSS Grid in Divi 5 Now
With Divi 5‘s built-in CSS Grid serve as, sticky sidebars at the moment are no longer a headache. In only a few minutes, you’ll have the ability to assemble a construction that’s responsive and polished. From speedy wireframing to seamless mobile stacking, CSS Grid inside the Visual Builder allows faster builds, bolder designs, and a smoother shopper experience that assists in keeping visitors engaged.
Ready to level up with Divi 5? Head to the Divi Members House and acquire the latest Divi 5 Public Beta to experiment with CSS Grid in this day and age. Let us know what you assume inside the comments, or drop us a marginally upon our social media platforms.
The post How To Construct A Sticky Sidebar Structure With CSS Grid In Divi 5 appeared first on Sublime Topics Weblog.
Contents
- 1 What Is CSS Grid?
- 2 How To Assemble A Sticky Sidebar Construction With CSS Grid In Divi 5
- 3 Download For Unfastened
- 4 You might want to have successfully subscribed. Please take a look at your e mail take care of to confirm your subscription and get get right to use to unfastened weekly Divi construction packs!
- 5 Liberate CSS Grid in Divi 5 Now
- 6 80+ Podcasting Statistics You Should Know in 2024 (Entire Roundup)
- 7 Imani Ellis’ Information to The use of Analysis and Discovery to Construct Your Match
- 8 20 Best possible B2B Lead Era Equipment

0 Comments