
Divi 5 helps you have in mind and reuse your design picks. Using presets, you’ll set your logo colors, button sorts, heading sizes, and spacing once, and each and every new phase you add can routinely follow those laws. This transforms your styling proper right into a reusable system that maintains consistency without the repetitive artwork of styling each phase in my view.
Stacked and Nested Presets take that system further. You’ll be capable to now layer sorts on easiest of each other, assemble variations without duplicating artwork, and assemble construction patterns that adapt as your design evolves. This submit guides you by way of how presets artwork together and demonstrates how you can create a design system that scales at the side of your internet web page. Let’s get to it!
Divi 5’s Preset-Primarily based completely Design Device At A Glance
Whilst you style a button with explicit colors, shadows, and spacing, you’ll save those exact settings as a preset. Once saved, you’ll follow that preset to other buttons, they in most cases straight away inherit the equivalent look.
This means you design the button once and reuse it in every single place, so while you industry the preset, each and every button the use of it updates routinely during all your internet web page. To make this artwork at scale, you need to grasp where presets may also be applied.
Divi’s construction development flows from large packing containers proper all the way down to individual design possible choices. Sections contain Rows, Rows contain Columns, Columns contain Modules, and Modules have Selection Groups (like Typography, Spacing, Borders). Because of presets may also be applied at any of the ones levels, you get to keep watch over exactly how so much stays consistent and how much stays flexible.
Proper right here’s how the opposite preset types artwork together:
1. Phase Presets
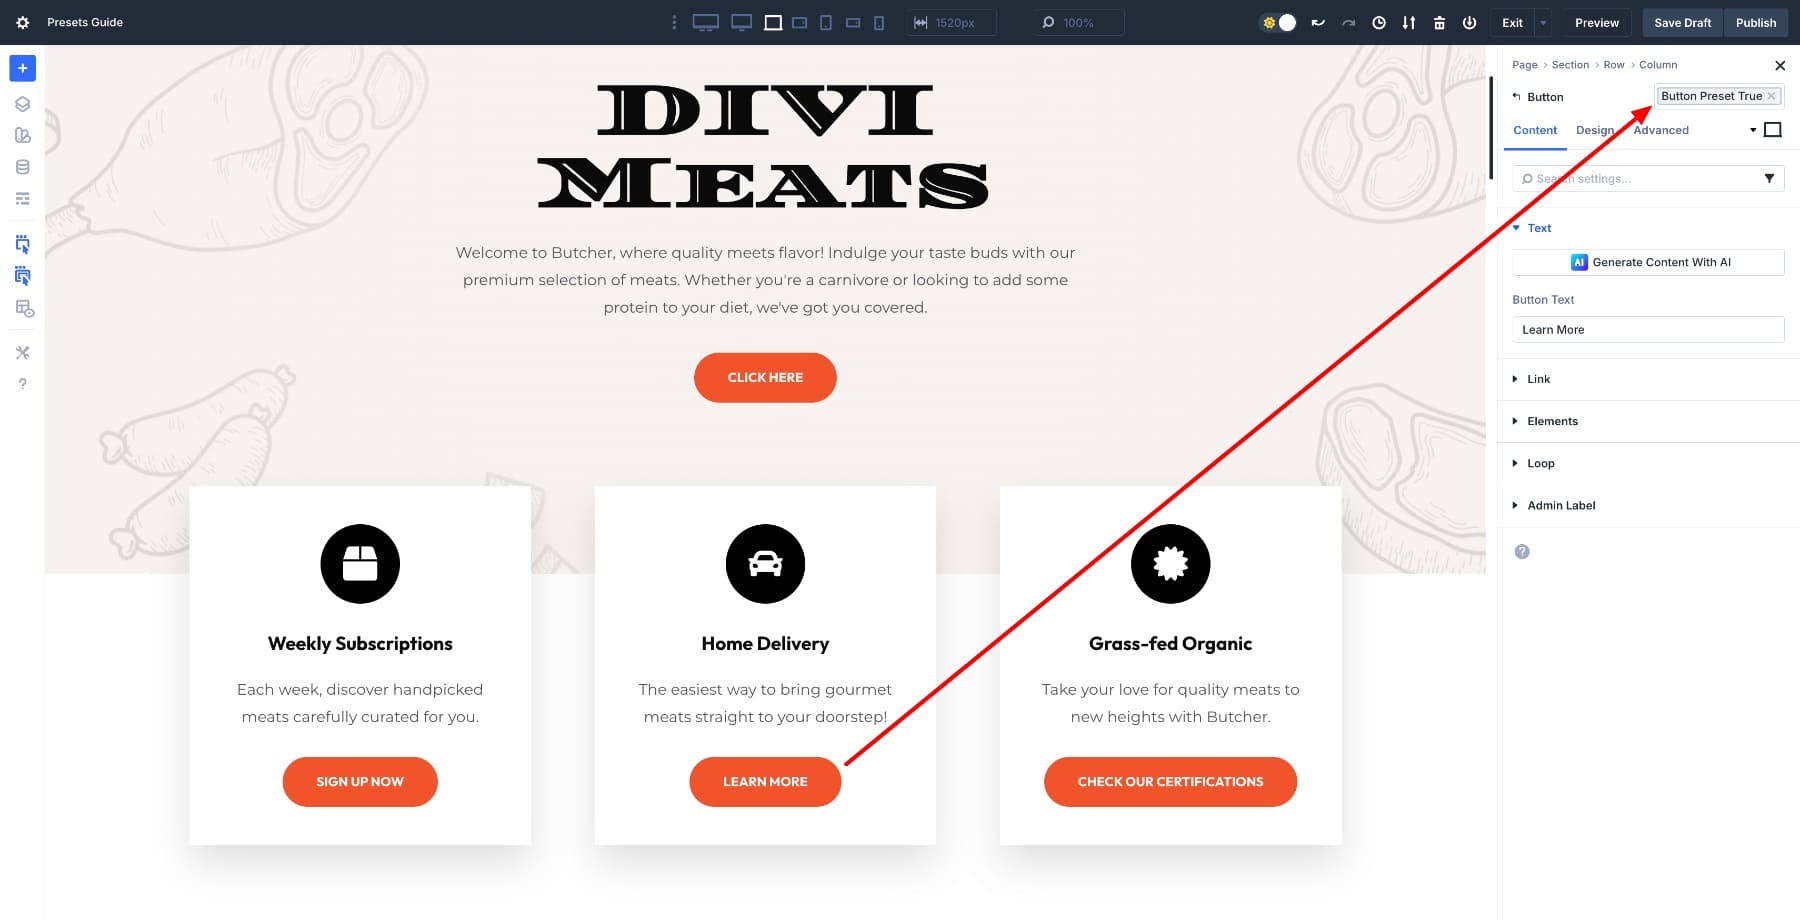
The ones are saved sorts for explicit parts, similar to Button, Blurb, or Image modules. Whilst you create a Button preset, it saves each and every modified setting for that button, and that preset most efficient works on other Button modules. This assists in keeping your design organized via phase type. You’ll follow an Phase Preset at the phase stage throughout the settings.
2. Default Presets
Each and every module type has a default preset that determines its glance the moment you add it in your internet web page. You assign it via clicking the well-known individual on a preset. On every occasion you edit the default Button preset, each and every new button you create gets began with those settings, because of this that you simply’re defining your internet web page’s baseline design from the start.
You’ll be capable to even design all of your web site the usage of simply default presets.
3. Selection Group Presets
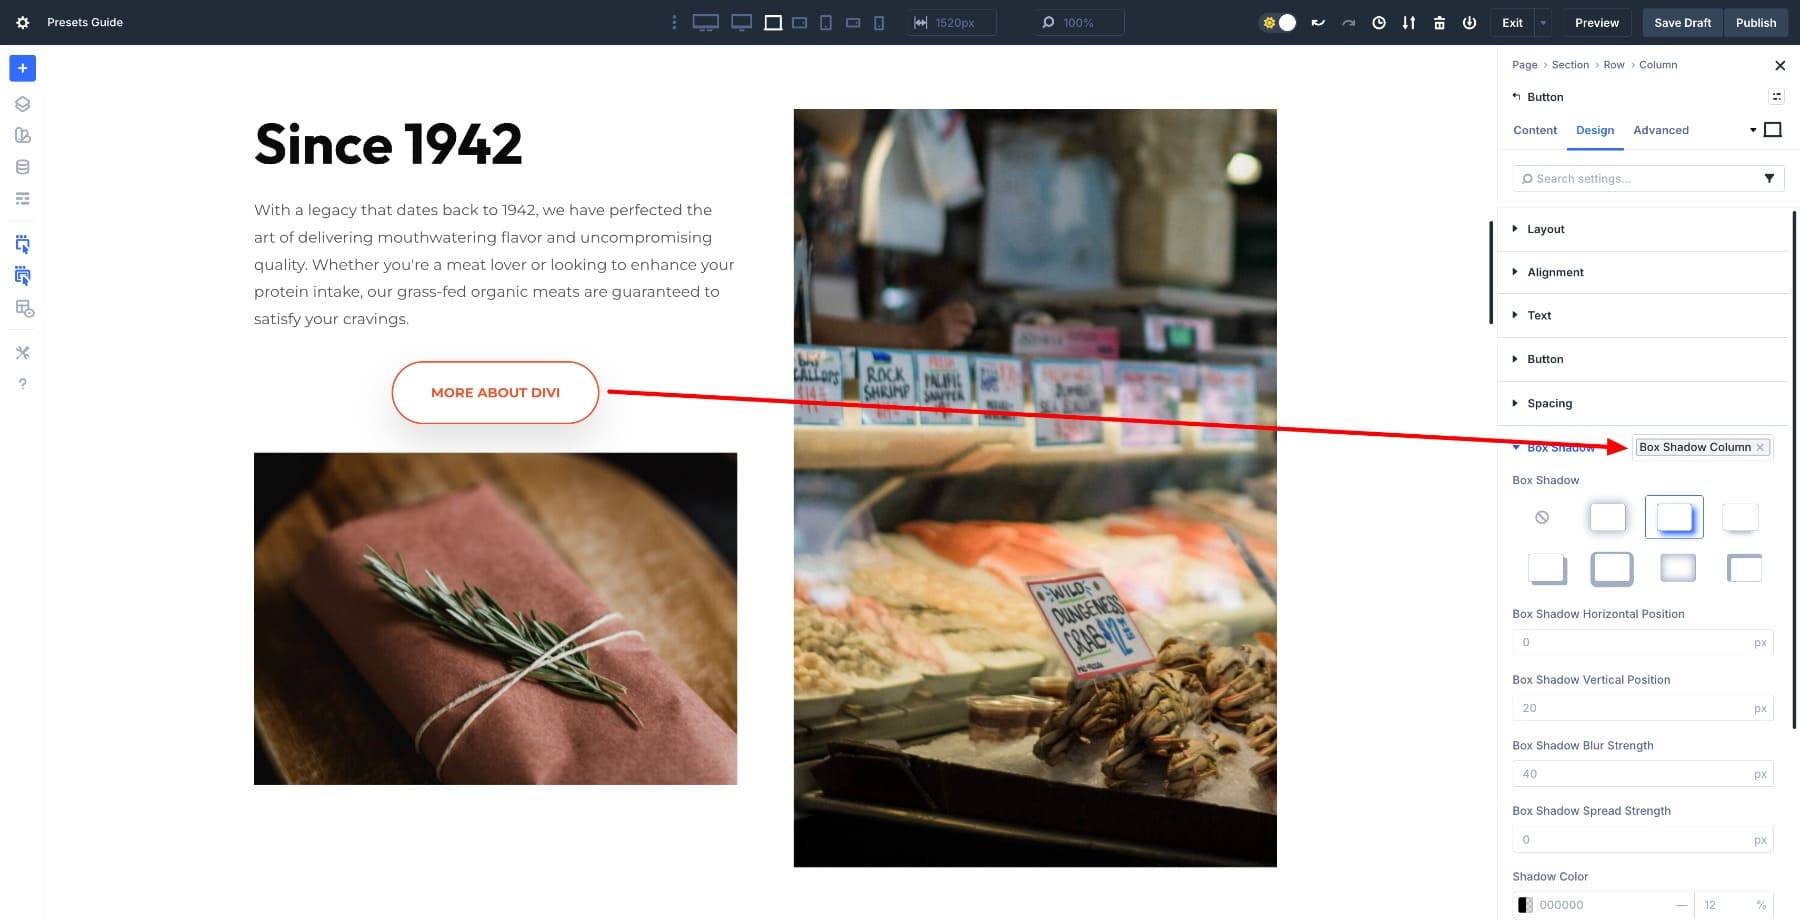
The ones presets are scoped to express design categories (Typography, Spacing, Borders, Shadows, and Transforms), and by contrast to Phase Presets, they artwork during any phase type. Save a shadow configuration as an Choice Crew Preset, and also you’ll apply it to buttons, pictures, columns, or sections.
This lets you reuse one facet of styling without saving whole modules. You’ll follow OGPs throughout the comparable Selection Group’s settings. Be informed the distinction between Part and Choice Crew Presets.
The ones 3 preset types artwork together to get a hold of flexibility at each and every stage. Defaults set the baseline, Phase Presets bundle deal up whole modules, and Selection Group Presets mean you can reuse individual styling picks any place.
Introducing Stacked & Nested Presets
Divi’s preset-based design system already saved time, however it was once as soon as incomplete. You will have to create presets for modules and risk groups, on the other hand mixing variations or construction reusable parts with inside styling nevertheless required a lot of guide artwork. Stacked and Nested Presets whole the system via making presets behave additional like actual design system layers.
Subscribe To Our YouTube Channel
1. Stack A few Presets On Highest Of Each Other
Stacked Presets will help you follow a couple of presets to the equivalent phase and layer them, enabling Divi to combine their sorts. For example, you’ll have a Default button preset and other explicit ones for alignment and shadows. To supply your hero button the emphasis it needs, follow all 3 presets to the equivalent button.
The button gets the entire thing from the ground preset, plus the adjustments from each variant stacked on easiest. This means you no longer need ten separate button presets to cover each and every state of affairs on account of your base design stays intact while you add adjustments for explicit scenarios.
When you need a light-text fashion for dark sections, you stack a “Delicate Text” Selection Group Preset on easiest of your base button. When you need an oversized hero button, you stack the “Hero Size” preset. The ground certainly not changes, on the other hand the variations layer cleanly on easiest of it, in order that you’re working with a core set of base sorts plus controlled variations that appear exactly when and where you need them.
Realize: When two Stacked Presets define the equivalent property, the last one applied wins. Order problems. This is similar to the CSS cascade: later laws override earlier ones after they purpose the equivalent property. Excluding you’re doing it visually without touching the code.
2. Nest Selection Group Presets Inside of Phase Presets
You’ll be capable to now nest Selection Group Presets inside Phase Presets. Whilst you follow the Phase Preset, it routinely comprises the entire Selection Gropu Presets nested inside it, and those nested presets stay attached to their provide.
Say you create an Phase Preset known as Column Preset that defines a column with a border and other settings. Then you definitely unquestionably create a shadow risk staff preset. Add that risk staff preset while bettering the column preset, and any new parts that use it’ll moreover inherit the shadow.
Because of they inherit from the nested preset fairly than copying it, updating the OGP later updates all instances during your internet web page at the same time as.
You organize small design picks once (like a shadow affect) and embed them into higher presets. Your modules transform actual parts that follow inside design laws routinely. The shadow preset doesn’t merely follow to a minimum of one card. It’s a reusable token that can be nested inside any preset that requires it, during all module types.
This turns your preset library from a flat report of one-off sorts proper right into a structured, token-based system where small picks propagate by way of higher patterns.
How Stacked And Nested Presets Art work Together
The ones two choices artwork in tandem to create a complete design system.
- Nested Presets maintain the internal just right judgment of a component. They define what a card is thru controlling its spacing, typography, shadow, and border radius. The ones are the consistent, structural laws that keep unchanged without reference to context.
- Stacked Presets maintain variation. They define how the equivalent card adapts to different contexts, similar to creating use of a darker background for hero sections, tighter spacing for sidebars, or inverted colors for testimonials. The ones are contextual overrides that layer on easiest without breaking the ground development.
Together, this combination provides you with a number of advantages. Parts keep consistent during your internet web page on account of their inside presets are nested and attached, because of this that variations don’t replica artwork, as they stack on easiest of base sorts fairly than converting them. As a result of this development, global design settings exchange in every single place while you industry them once, supplying you with keep watch over over each and every development and flexibility at the equivalent time.
Be told The whole thing About Stacked Presets In Divi 5
Your Divi 5 Design Device Starter Plan
Now that you understand how presets artwork together, you’ll assemble a simple design system that assists in keeping your internet web page consistent without locking you into rigid structures. You don’t need twenty presets to get this right kind. A handful of thoughtful picks that drift during your pages will artwork while you’re starting out.
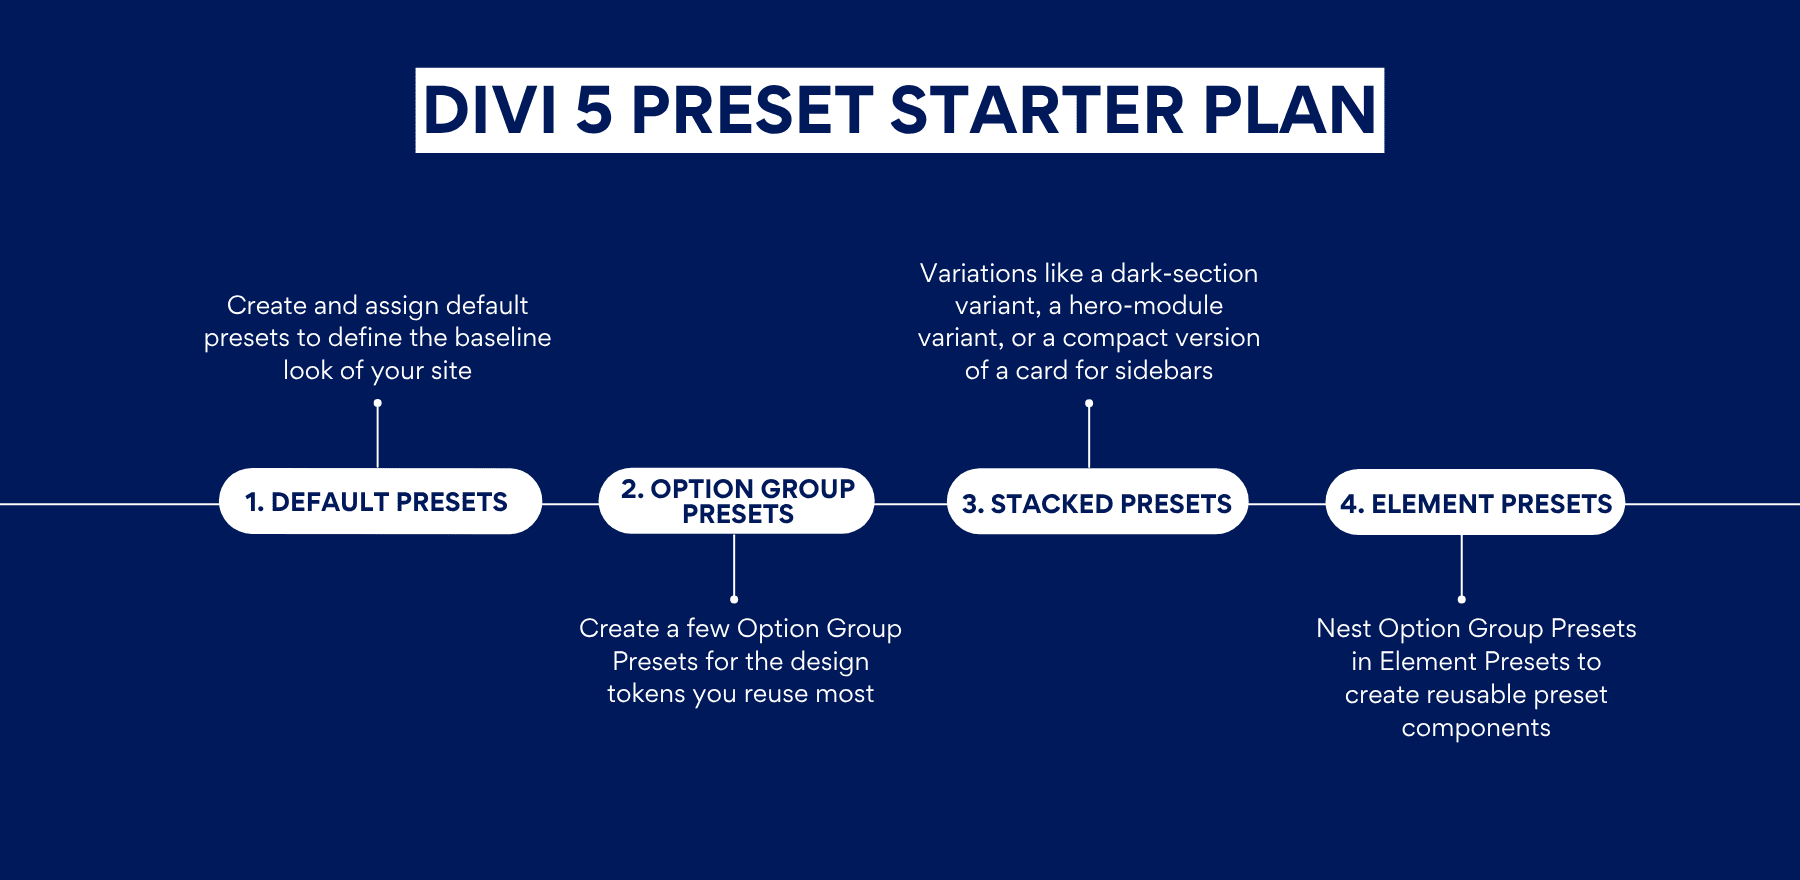
1. Get started With Your Default Presets
Forward of creating any layouts or parts, set your baseline. Default Presets define how new parts look the moment you add them to the internet web page, so locking the ones in first approach the entire thing you assemble in a while starts from a relentless foundation.
Get began throughout the Variable Manager and outline your international Design Variables. Set your logo colors, select your fonts, and establish a elementary typography scale for body text and headings. The ones variables form the foundation that each and every preset draws from, keeping up longer term changes centralized in one place.
Once your variables are in place, create a single, clean “base” preset for each module you use most incessantly. Style the ones presets the use of your variables, on account of this assists in keeping them tied in your central design system. Keep them simple. They’re the default diversifications you’d want to use in most scenarios, so that they should be unbiased enough to artwork during different contexts.
After testing each preset via together with a up to date module to the internet web page, assign some of the incessantly used one for the reason that default. To do so, hover over the preset you wish to have to assign as default and click on on on the well-known individual icon.
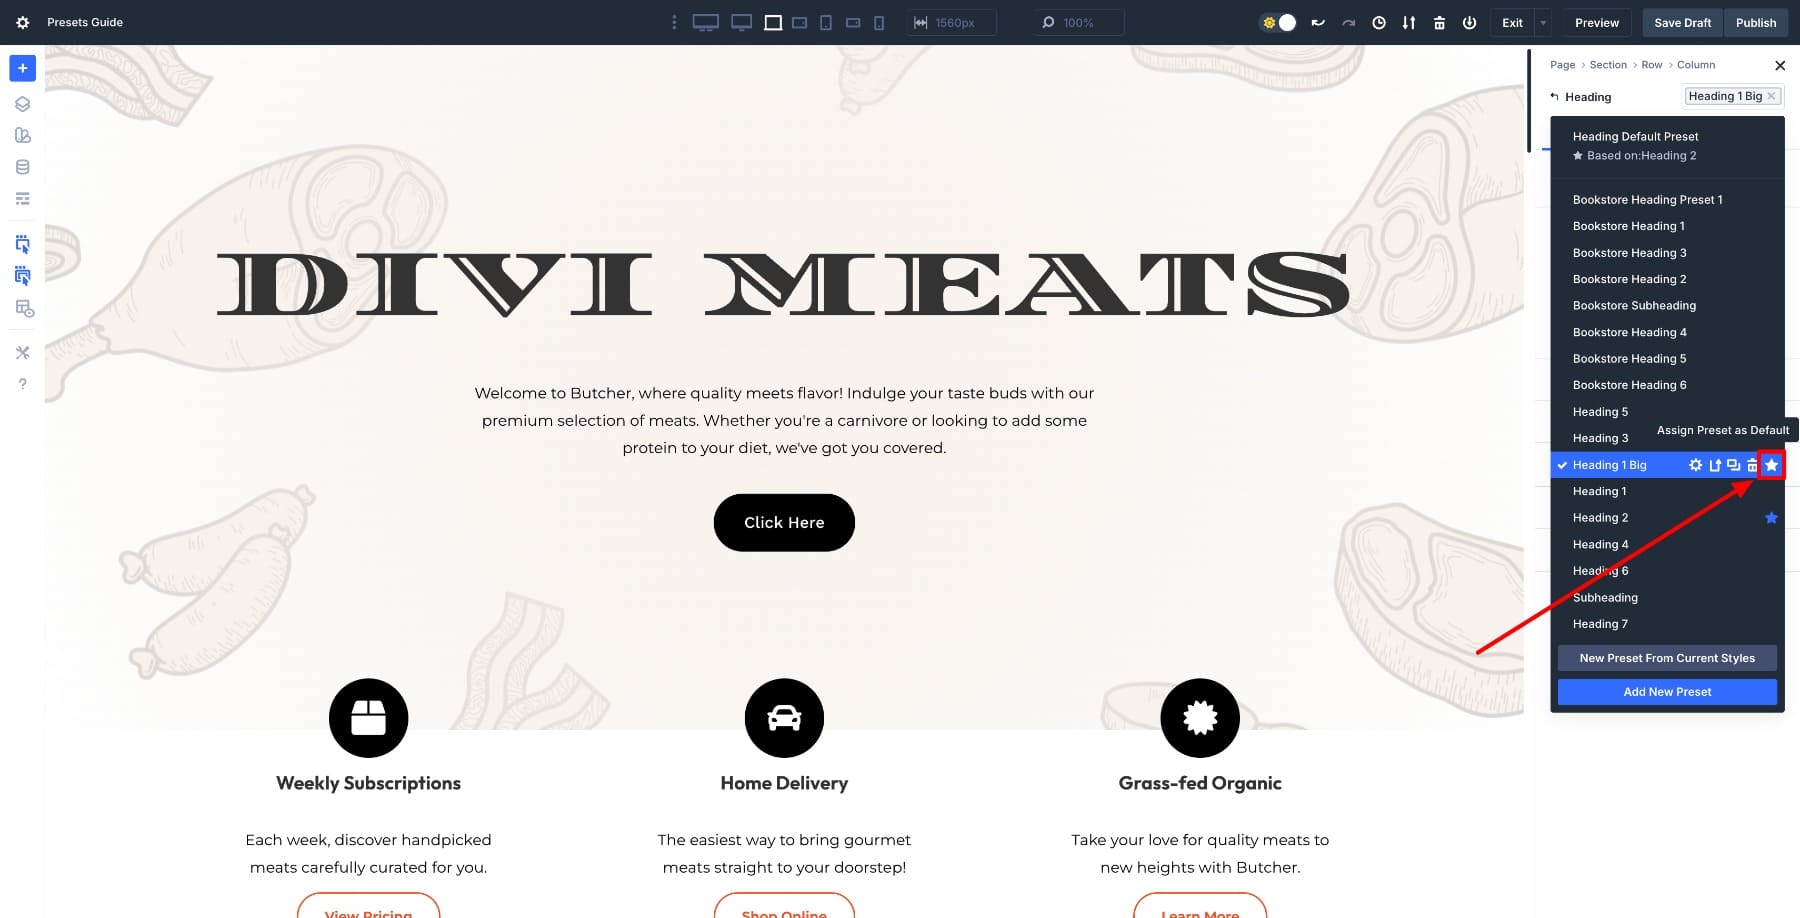
From this degree on, each and every new heading you add will inherit the types from your default preset, because of this that you simply’re starting at the side of your core design already applied.
Do this for various base parts, similar to buttons, packing containers, or text blocks. That single step removes the want to restyle the equivalent parts time and again as you assemble, because the defaults maintain the repetitive be simply best for you.
2. Create Selection Group Presets For Your Reusable Design Settings
Once your default presets are set, your next step is breaking your design into reusable parts, which is where Selection Group Presets are to be had in.
As an alternative of taking into consideration relating to whole modules, pick one incessantly used container and analyze how it’s built. A Row is a wonderful position to start because it maximum incessantly carries a couple of design picks straight away, similar to background color, padding, border radius, and shadow.
Open a Row and style it the best way wherein you maximum incessantly would. Set the background, regulate the padding, add rounded corners, and follow a shadow. Now, as an alternative of saving this entire configuration as one preset, reduce up each design choice into its non-public Selection Group Preset.
For example:
- Save the padding as a Spacing Selection Group Preset
- Save the shadow as a Shadow Selection Group Preset
- Save the border radius as a Border Selection Group Preset
- Save the background style as a Background Selection Group Preset
Each preset represents a single, reusable rule, because of this that you simply’re no longer saving a row’s Phase Preset on the other hand fairly different Selection Group Presets that define how rows behave during your internet web page.
The convenience becomes clear straight away. That exact same padding preset may also be applied to sections, columns, or modules, and the equivalent shadow may also be reused on enjoying playing cards, pictures, or callouts. You’re construction a shared design language fairly than duplicating sorts in a couple of Phase Presets, so each design choice turns right into a reusable token that can be applied any place.
At this degree, focus on understanding patterns. Whilst you follow the equivalent padding, shadow, or border radius in a couple of place, it deserves its non-public Selection Group Preset, as the ones presets will later combine and layer cleanly, supplying you with flexibility without compromising consistency.
3. Nest Your Selection Group Presets Inside of Phase Presets
Once Selection Group Presets are in place, they can be blended to form structured, reusable parts by way of Phase Presets. That’s the position individual design picks begin to artwork together as a cohesive system, fairly than provide as separate settings.
A common example is the design of your row packing containers. The equivalent spacing, border radius, and shadow Selection Group Presets may also be nested inside a couple of Row Phase Presets, ensuring that the ones structural laws keep consistent in every single place they’re used.
What changes between presets isn’t the development, on the other hand the context. For example, one Row Phase Preset can nest a light-weight background Selection Group Preset, while another nests a depressing background preset. Each and every share similar padding, corners, and shadow conduct, on the other hand visually adapt to different sections of the internet web page because the background layer changes while the structural layer stays the equivalent.
This implies works specifically neatly for gentle and dark layouts, where the underlying part remains the equivalent and most efficient the outside styling shifts. Because of the ones presets inherit from the equivalent Selection Group Presets, updates stay synchronized.
Adjust the spacing or shadow once, and each and every gentle and dark container updates together without dropping its meant difference or place, in order that you maintain each and every consistency and variation at the same time as.
Nesting Selection Group Presets this way turns Phase Presets into actual parts. They communicate inside design laws routinely, while nevertheless allowing you to create helpful variations via recombining the equivalent design settings in a lot of ways.
4. Create Variation Layers Using Stacked Presets
Once your base parts are defined by way of Nested Presets, Stacked Presets transform a strategy to adapt those parts to different contexts without changing their development.
For example, the equivalent container row preset can be used during most of the internet web page, on the other hand stacked with a variation preset when the context changes. A container located in a hero segment would most likely require higher padding, in order that you stack a distinct padding preset on easiest of the ground part.
The equivalent container inside a sidebar would most likely stack a compact spacing preset, and in a depressing segment, it would stack a light-text or inverted-color preset. The underlying part remains untouched on account of its inside spacing, border radius, and shadow continue to go back from the equivalent nested Selection Group Presets. The stacked preset simply layers contextual adjustments on easiest, in order that you’re enhancing most efficient what needs to modify for that exact scenario.
This is specifically useful for patterns like gentle and dark sections, hero layouts, or featured content material subject material blocks. Quite than creating separate Phase Presets for each state of affairs, you stack small, centered presets that override most efficient what needs to modify in that 2d, which assists in keeping your preset library manageable while nevertheless protecting all your use cases.
Stacked And Nested Presets Complete Divi’s Design Device
Divi 5 transforms presets proper into an entire design system. With defaults, Selection Group Presets, and Phase Presets in place, each and every new module starts with a plan in place.
Stacked and Nested Presets whole that workflow via letting you nest design settings inside parts and stack variations on easiest when context requires it. This means you’ll exchange whole patterns with a single edit. Get began via defining a few solid defaults and assemble a small preset library spherical them. Your pages will come together additional quickly and keep consistent as your internet web page grows.
The submit The Final Information To Presets In Divi 5 (Together with New Options) appeared first on Sublime Topics Weblog.
Contents
- 1 Divi 5’s Preset-Primarily based completely Design Device At A Glance
- 2 Introducing Stacked & Nested Presets
- 3 Your Divi 5 Design Device Starter Plan
- 4 Stacked And Nested Presets Complete Divi’s Design Device
- 5 Affordable WordPress Web hosting Choices With Just right Options / Unlocking Your…
- 6 Find out how to Get right of entry to Blocked Web pages (9 Techniques)
- 7 The entirety You Want To Know About Divi 5’s Customized Attributes

0 Comments