
Automating your WordPress website online doesn’t will have to in reality really feel like rocket science.
Equipment like Make.com are powerful, on the other hand for a lot of beginners, they are able to in reality really feel overwhelming. Between further connection steps and sophisticated setups (like webhooks), it’s easy to get stuck previous than anything in fact works.
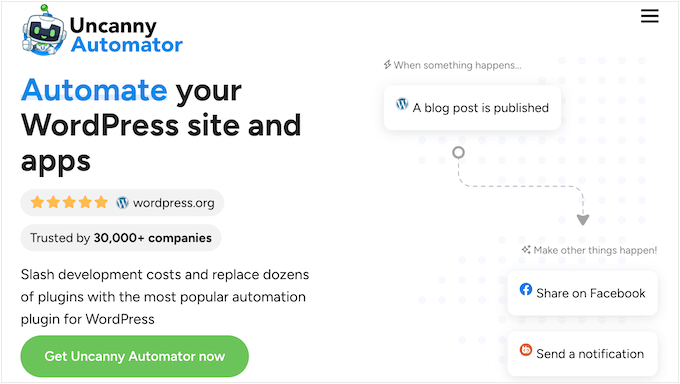
That’s where a plugin like Uncanny Automator makes a big difference. It permits you to assemble Make.com–style workflows in WordPress using a simple setup that feels familiar and easy to stay with.
You’ll be capable to connect your favorite plugins, purpose actions based on what consumers do on your website online, and even add AI-powered tasks in just a few minutes.
In this data, I’ll show you tactics I automated my WordPress website online to art work like Make.com.
The target is understated: spend a lot much less time on repetitive tasks, keep problems working simply, and focal point further on emerging your website online instead of managing it.
💡Speedy Solution: Easy methods to Add Make.com-Style Automation in WordPress
You’ll be capable to create Make.com-style automation in WordPress using Uncanny Automator by the use of putting in a simple “if this happens, then do that” workflow, referred to as a recipe. You choose a purpose, like publishing a brand spanking new post, then come to a decision what’s going to must happen next, similar to generating an AI summary and saving it to Google Sheets. As quickly because the recipe is able to Live, it runs automatically each time that purpose occurs.
That is an overview of the entire topics that I’ll be covering in this data:
- Why I Moved Clear of Make.com (And You Can Too)
- 🌟The Answer: Why Uncanny Automator Feels Like Make.com However More uncomplicated
- Actual-Global Workflow: Methods to Automate Weblog Put up Summaries with Uncanny Automator
- Step 1: Set up and Turn on Uncanny Automator
- Step 2: Attach OpenAI to Uncanny Automator
- Step 3: Attach Uncanny Automator to Google Sheets
- Step 4: Create Your Recipe in Uncanny Automator
- Step 5: Upload the OpenAI Motion to Generate Weblog Put up Summaries
- Step 6: Upload the Google Sheets Motion to Retailer Summaries
- Step 7: Save and Turn on Your Recipe
- Subsequent Steps for Development Make.com-Taste Workflows Proper in WordPress
- Continuously Requested Questions About Uncanny Automator vs. Make.com
- Further Assets to Take Your Automations to the Subsequent Degree
Why I Moved Transparent of Make.com (And You Can Too)
I moved transparent of Make.com because it become harder to control as my website online grew. While it’s a robust automation instrument, the setup and maintenance can in reality really feel like quite a lot of for those who merely want problems to art work inside of WordPress.
Make.com is a visual automation platform this is serving to you connect different apps and services and products using workflows referred to as scenarios.
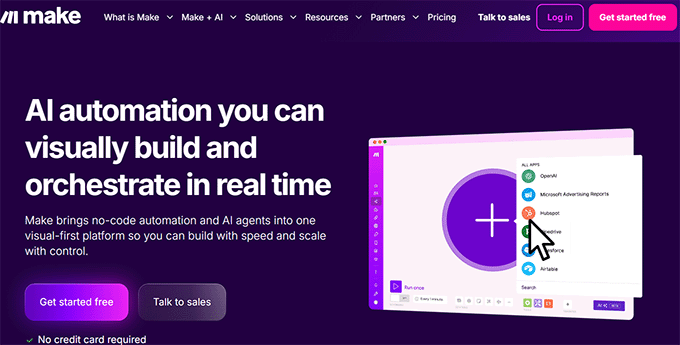
You assemble the ones workflows by the use of dragging and connecting blocks, so when something happens in one app, it triggers actions in each different.
It’s a great tool, on the other hand for a lot of WordPress website online homeowners, it’s going to in reality really feel disconnected from how WordPress in fact works on a regular basis.
Over the years, I wanted one more thing sensible and further tightly integrated with my website online.
3 Not easy scenarios That Made Me Switch Away From Make.com
Make.com stopped operating for me once frequently automations began taking overtime to organize and maintain than the tasks themselves.
Listed below are the three largest reasons I decided to move away:
| Drawback | What It Means | Why It Problems |
|---|---|---|
| Steep Studying Curve | Even simple workflows require hours of tutorials to understand modules like Routers, Iterators, and Aggregators. | Newbies can get stuck previous than automations even get began operating. |
| Unpredictable Pricing | Costs depend on “operations,” on account of this you pay for each single inside step, filter, and logical check—not merely the overall result. Processing the exact same 500 WooCommerce orders can fee significantly further for those who add a simple filter. | Exhausting to value vary as your website online website online guests or product sales broaden. |
| Additional Complexity with WordPress | Integrating Make.com requires APIs, webhooks, and third-party connections. Workflows can wreck when plugins change, | Ongoing troubleshooting slows you down and offers force. |
At the moment, I realized I sought after an automation solution that felt simpler, further predictable, and built specifically for WordPress.
What Make.com Does Actually Well
In easy English, Make.com is superb when you need various ‘if this, then that’ paths and in addition you’re connecting many apps outside WordPress.
For instance, it has:
- A visual flowchart builder that lets you design automations by the use of connecting steps visually, making it easy to understand how data moves from one movement to the next.
- Built-in branching and routing using Router modules, so different actions can run based on necessities you set.
- A large integration library, with get entry to to 1000’s of apps and services and products that you simply’ll be capable to connect without development the whole thing from scratch.
- Difficult automation not unusual sense, along with Iterators and Aggregators for operating with lists of knowledge, plus filters to keep an eye on when actions run.
The ones choices are great when you need detailed keep an eye on over difficult workflows. Alternatively, for a lot of frequently WordPress automations, they are able to in reality really feel like more than you in fact need.
When Does Using Make.com However Make Sense?
Even if I moved transparent of Make.com, there are scenarios where it however works well:
- For Apps Outdoor WordPress – If you want to have to connect equipment that Uncanny Automator doesn’t strengthen, then Make.com provides you with get entry to to 1000’s of apps.
- Already Intently Invested – For individuals who’ve built a large number of workflows in Make.com, then switching the whole thing might not be worth it right away.
- Difficult HTTP Modules – While Automator Skilled handles most webhook needs, some very difficult HTTP requests might however be easier in Make.com.
In most frequently WordPress use circumstances, Automator handles the whole thing simply, but it surely without a doubt’s superb to seize Make.com can however be useful in the ones scenarios.
🌟The Solution: Why Uncanny Automator Feels Like Make.com Alternatively More straightforward
After working into too many hard scenarios with Make.com, I finally found out a solution that exams the entire bins: Uncanny Automator.
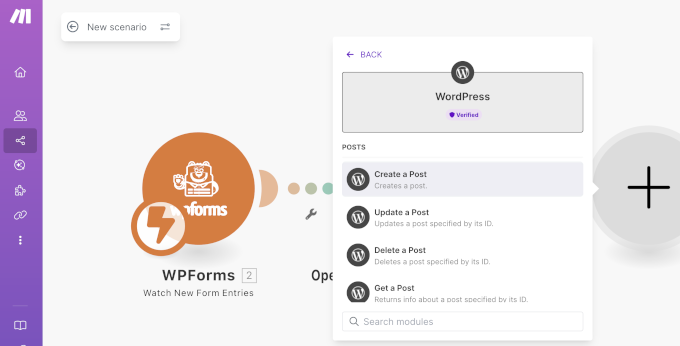
It’s the perfect WordPress automation plugin that lets you connect your favorite plugins, WordPress choices, and much of external apps. You assemble workflows—referred to as Recipes—using a simple visual builder.
It in reality works like Make.com, on the other hand the whole thing happens inside of WordPress, so setup is faster, regulate is simpler, and scaling your website online is easier.
With Automator, you get the power of difficult automation without learning new modules, dealing with broken workflows, or gazing your per month costs spike unexpectedly.
How Uncanny Automator Saves You Money
One amongst Uncanny Automator’s largest advantages is cost-effectiveness. Because you pay a flat annual fee for countless Recipes and actions, you avoid the unpredictable per-operation costs that Make.com can add up to.
| Usage Scenario | Make.com Est. Annually Worth | Automator Skilled Annually Worth | Annual Monetary financial savings |
|---|---|---|---|
| 500 difficult WooCommerce orders/month | $183 | $149 | $34+ |
| 1,000 form submissions/month | $348 | $149 | $199+ |
💡 Key receive advantages: Automator permits you to create countless workflows and actions inside of WordPress. While external equipment like OpenAI would possibly however value usage fees, you won’t pay further to Automator just for working the automation itself.
If you want to see exactly how Automator compares to Make.com in frequently WordPress workflows—and why it’s simpler and faster—merely lengthen the section underneath:
Technical Feature Showdown: Make.com vs. Automator
| Feature | Make.com | Automator | Why Automator Wins |
|---|---|---|---|
| Conditional Just right judgment | Add a Router module, configure filter necessities, and connect paths | Add Scenario → choose field, operator, value → actions run based on true/false | More straightforward to create regulations based on client behavior |
| Processing Lists | Requires the “Iterator” module to split data lists using difficult mapping | “Run an movement for each products in an inventory” → map repeater field → create movement inside of loop | Automates repeated tasks like coping with orders or form submissions quickly |
| Wisdom Transformation | Write components, JSON, or RegEx | Use tokens ({{user_email}}) + visual Wisdom Formatter (get a divorce text, math, AI summary) | Signifies that you’ll business and format data visually without coding |
| WordPress-Native Receive advantages | Requires API/webhooks → slight delays | Direct database get entry to → fast triggers | Faster, further unswerving, a lot much less troubleshooting |
Precise-World Workflow: Easy methods to Automate Blog Submit Summaries with Uncanny Automator
With Uncanny Automator, you’ll be capable to create difficult workflows much more merely than with Make.com. You don’t need to concern about APIs or webhooks on account of the whole thing happens right kind inside of WordPress.
Listed below are a few examples of what you’ll be capable to do:
- Robotically add new WooCommerce orders to a Google Sheet for easy reporting.
- Send notifications or emails on each instance a brand spanking new post goes are living.
- Summarize post content material subject matter using AI and store it in a spreadsheet for easy reference.
In this article, I’m going to show you create a workflow that automatically generates an AI summary and offers it to Google Sheets on each instance a brand spanking new blog post is published.
Proper right here’s the way it’s going to art work:
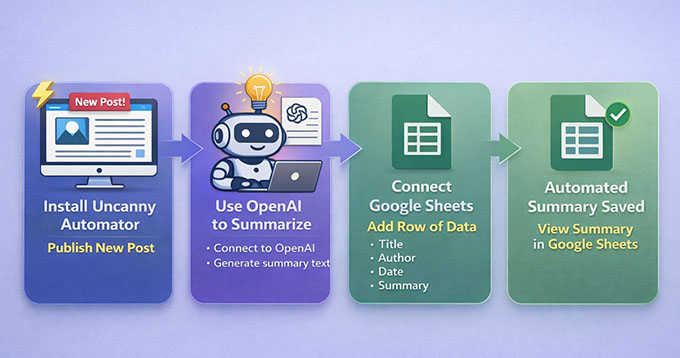
Even if you not at all store blog summaries in Google Sheets, this workflow teaches you the right pattern you’ll use for automating bureaucracy, WooCommerce orders, electronic message research, and AI content material subject matter during your website online.
Once this setup, you’ll be capable to reuse the identical steps for almost each different automation on your WordPress internet website online.
What You’ll Need for This Tutorial:
- A WordPress internet website online where you’ll be capable to arrange plugins (administrator get entry to).
- Uncanny Automator. You’ll need the Skilled fashion for this OpenAI + Google Sheets workflow.
- An OpenAI Platform account with prepaid credit score added.
- A Google account with get entry to to Google Sheets.
- A Google Sheet in a position. Even a blank one works, but it surely without a doubt helps as a way to upload column headings upfront, like Submit Establish, URL, Date, and Summary.
Step 1: Arrange and Activate Uncanny Automator
The first thing you need to do is in a position up Uncanny Automator on your WordPress website online.
Get began by the use of signing up for an account on the Uncanny Automator internet website online. Merely click on at the ‘Get Uncanny Automator now’ button and keep on with the steps to create your account.
📍Practice: The free fashion incorporates limited credit score to check out app integrations. Alternatively, for a long-lasting workflow that runs automatically like this one, you’re going to wish the Professional plan.
Next, transfer for your WordPress dashboard to place within the plugins. First, arrange the loose core plugin from the WordPress repository. Then, arrange the highest charge plugin using the ZIP file you’ll be capable to download from your Uncanny Automator account.
The highest charge plugin unlocks the integrations you need for OpenAI and Google Sheets. For individuals who’re not sure how to do that, check our step-by-step data on putting in WordPress plugins.
Upon arrange, it’s time to show for your license. Transfer to Automator » Settings to your WordPress dashboard and enter the license key from your Uncanny Automator account.
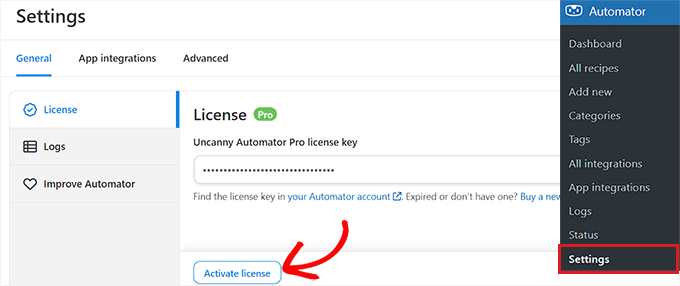
Click on at the ‘Activate License’ button, and your internet website online shall be capable to start rising automation workflows.
Step 2: Connect OpenAI to Uncanny Automator
For this workflow to art work, you need to connect your OpenAI account to Uncanny Automator. This allows OpenAI to automatically generate summaries of your blog posts previous than they’re added for your Google Sheets research.
The good news is you most efficient have to connect it once.
To get started, you’ll need your OpenAI secret key. A secret key’s a novel code that tells OpenAI it’s if truth be told you using their provider. It assists in keeping your account safe and shall we in Uncanny Automator to get entry to OpenAI safely.
To hunt out your secret key, log in on your OpenAI account and transfer to the ‘API Keys’ tab inside the left-hand menu. Proper right here, click on at the ‘Create new secret key’ button.
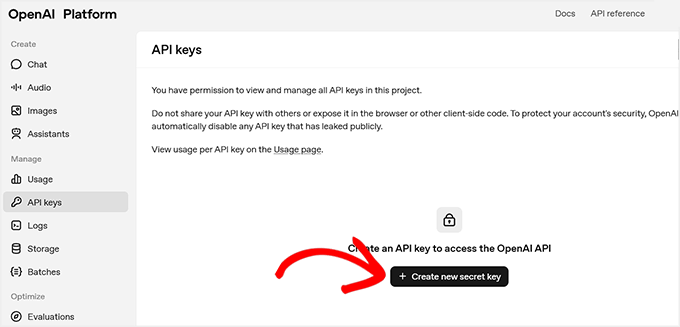
You’ll be caused to provide it a name—this is merely for your reference, so that you’ll be capable to identify it later.
📍Essential: Your OpenAI API account is completely lower free a ChatGPT Plus subscription. You must gain pre-paid credit score to your OpenAI Platform billing settings for the API key to art work. With out a credit score ranking steadiness, the automation will fail.
Each time you’ve added credit score, click on on ‘Create Secret Key’.
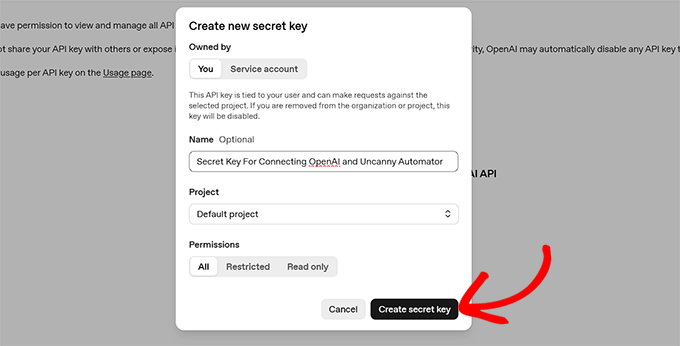
OpenAI will generate the vital factor and display it in a popup.
Copy this key and store it somewhere safe, because you won’t be able to see it all over again.
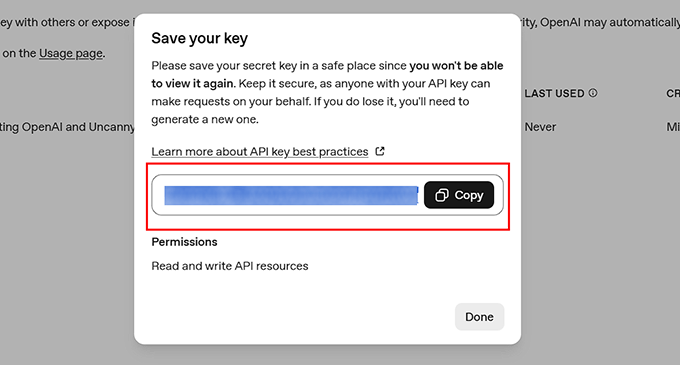
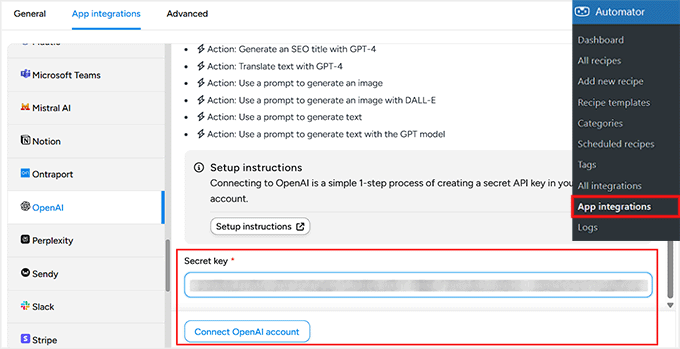
Next, transfer for your WordPress dashboard and open the Automator » App Integrations internet web page. Then, switch to the ‘OpenAI’ tab on the left and paste your secret key into the ‘Secret Key’ field.
After that, click on on ‘Connect OpenAI Account’. Once this is completed, your Uncanny Automator and OpenAI accounts are attached.
Now you’re in a position as a way to upload triggers and actions using OpenAI to your workflows. This connection means that you can automatically summarize posts or perform other AI-powered tasks on each instance a workflow runs.
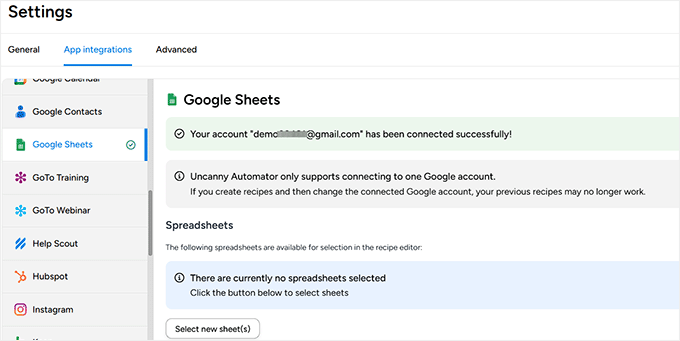
Step 3: Connect Uncanny Automator to Google Sheets
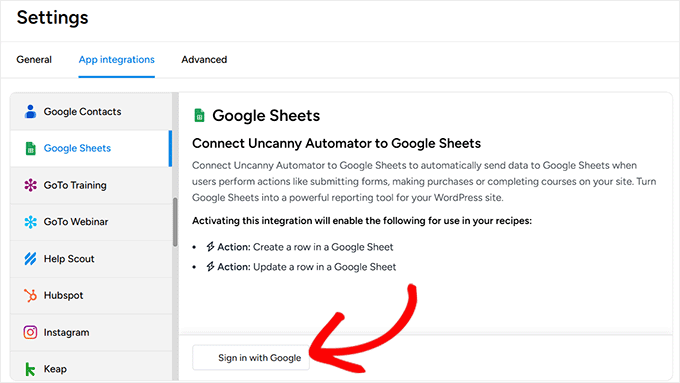
The next step is to connect Uncanny Automator to Google Sheets. This may increasingly every now and then allow all your blog post summaries to be added for your decided on spreadsheet.
To get started, transfer to Automator » App Integrations to your WordPress dashboard and choose ‘Google Sheets’ from the left-hand menu.
Click on at the ‘Test in with Google’ button and choose the account you wish to have to link. If your account isn’t listed, you’ll be capable to add it using the ‘Use Each and every different Account’ selection.
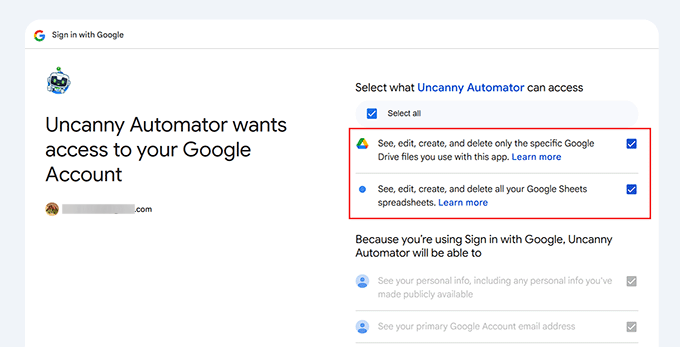
Next, Google will ask for permissions so Uncanny Automator can get entry to your spreadsheets.
This is utterly usual, and the plugin most efficient uses the ones permissions as a way to upload new rows to the spreadsheets you select.
Each time you approve, you’ll be redirected once more for your WordPress dashboard with a confirmation that your Google account is connected.
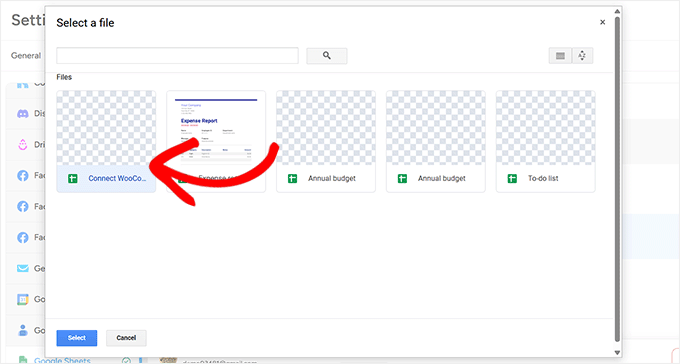
In any case, click on on ‘Select new sheet(s)’ and choose the spreadsheet you wish to have to use for storing your post summaries.
You’ll be capable to add multiple spreadsheets if sought after, and all attached sheets will appear inside the recipe editor when development automations.
If you wish to have a further detailed data, check out our instructional on attach WooCommerce to Google Sheets.
Once your spreadsheet is connected, you’re in a position to start development a workflow that summarizes posts and automatically sends them directly to Google Sheets.
Step 4: Create Your Recipe in Uncanny Automator
Each time you’ve successfully attached OpenAI and Google Sheets, it’s time to create a recipe in Uncanny Automator.
In Automator, a recipe is what defines your automation. Each recipe has two number one parts: the purpose, which starts the automation, and the movement, which is what happens next.
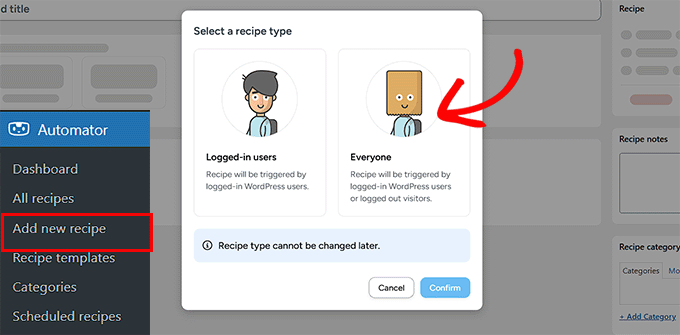
To start, transfer to Automator » Add New Recipe from your WordPress dashboard. You’ll be asked to choose from a ‘Logged-in’ recipe and an ‘Everyone’ recipe. Logged-in recipes most efficient run when a shopper is signed in.
For this workflow, I love to suggest deciding on Everyone.
Proper right here’s why: For individuals who agenda posts to be published automatically at some point, WordPress publishes them inside the background (using the machine cron) rather than using a logged-in client. Settling on ‘Everyone’ promises the automation runs reliably for scheduled posts, too.
Next, give your recipe a name this is smart, like ‘Blog Submit Summary to Google Sheets’. This may increasingly every now and then imply you’ll identify it later when you create further recipes.
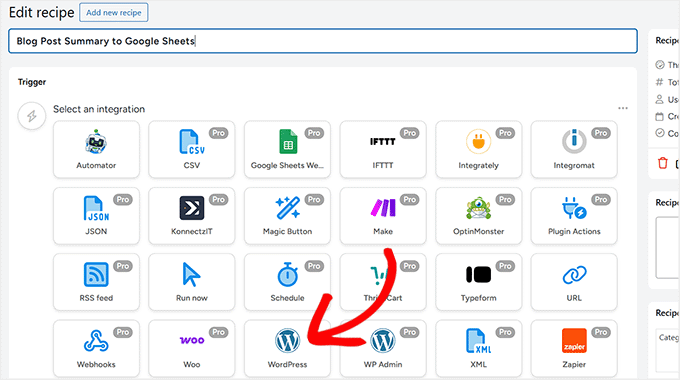
After that, Uncanny Automator will show an inventory of all plugins and services and products installed on your website online. Select ‘WordPress’ as the mix platform for your purpose.
Then, choose the advance that are supposed to get began the recipe. For this workflow, choose ‘A post is published’.
This promises that each time a brand spanking new post goes are living, the recipe will run automatically.
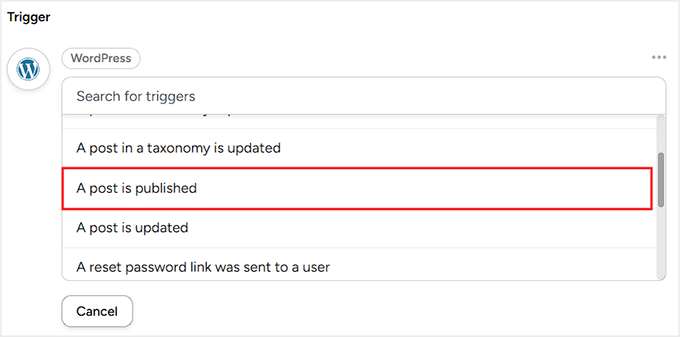
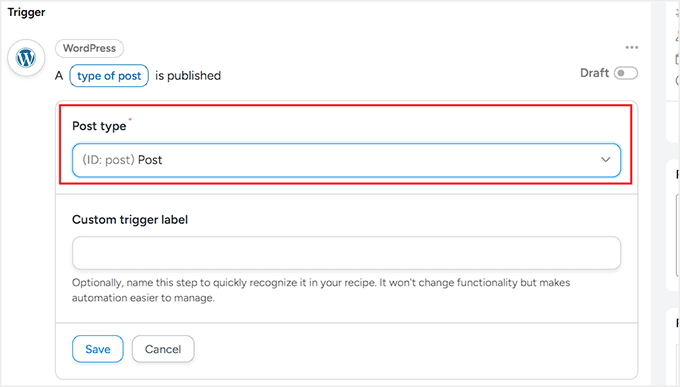
In any case, you’ll need to select the put up sort. By the use of default, Uncanny Automator applies the purpose to all post sorts, along with posts, pages, and products.
Since this workflow is only for WordPress blog posts, choose ‘Submit’ from the dropdown menu. Once that’s completed, click on on ‘Save’ to show for your purpose.
Step 5: Add the OpenAI Movement to Generate Blog Submit Summaries
Now that your purpose is in a position, it’s time as a way to upload the principle movement for your recipe: generating a summary of the blog post using OpenAI.
To start, click on at the ‘Add Movement’ button inside of your recipe.
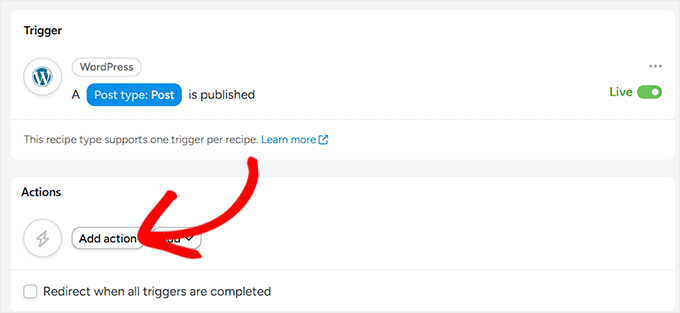
This may increasingly every now and then open an inventory of integrations for your movement.
Since you’ve already attached OpenAI, click on on on it to select the platform.
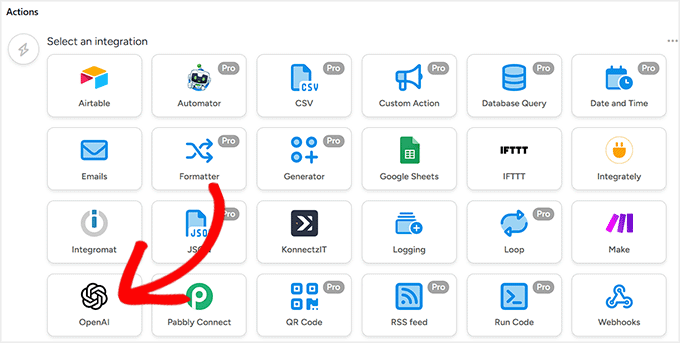
You’ll see an inventory of actions OpenAI can perform.
For this workflow, choose ‘Use a instructed to generate text’. This tells OpenAI exactly what content material subject matter to create.

Next, choose the OpenAI model. I love to suggest the latest available model, as it produces one of the vital natural and right kind summaries.
Now, set the Temperature. This controls how carefully the AI sticks to the guidelines versus how ingenious it is going to get. For a blog summary, you wish to have the AI to be predictable and factual, so I love to suggest surroundings the temperature to 0.
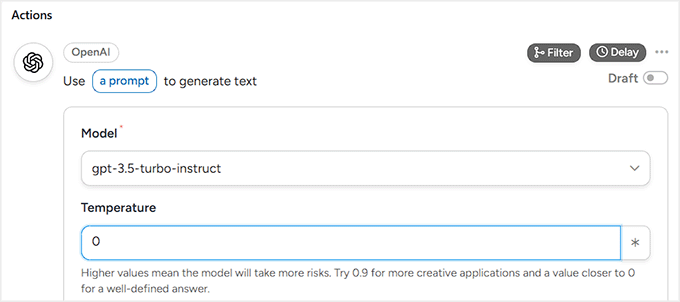
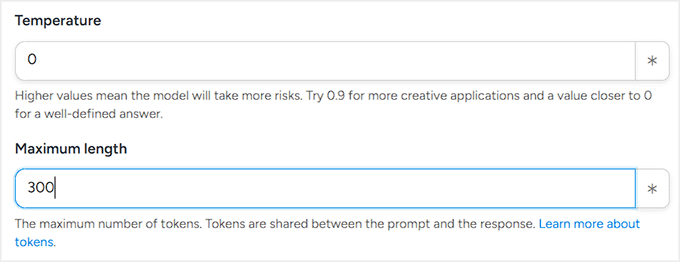
Set the maximum number of tokens next. Tokens are the units OpenAI uses to measure text. Kind of speaking, 1 token is ready 1 remember or 4 characters. So a 200-word summary would need spherical 300–350 tokens.
Tokens moreover impact pricing. Understand that OpenAI charges for each and every the text it reads (your blog post) and the text it writes (the summary). Environment the Maximum Tokens to 300 promises the summary doesn’t get too long, helping you keep an eye on your costs.
In any case, set your instructed. A superb instructed clearly tells OpenAI what you wish to have. For this workflow, that you simply will have to use something like:
‘Create a concise summary of the following blog post content material subject matter in spherical 200 words. Focal point on the main points and key takeaways: {{Submit Content material subject matter (Formatted)}}.‘
For individuals who’re new to creating turns on for AI, please take a look at our data to the perfect AI activates for bloggers, entrepreneurs, and social media.
Proper right here, the {{Submit Content material subject matter (Formatted)}} token promises OpenAI is acutely aware of exactly which blog put as much as summarize. This is different from an OpenAI API token (the secret key you attached earlier).
The OpenAI token grants Automator get entry to to OpenAI, while the ones recipe tokens tell the AI which content material subject matter to include inside the generated text.
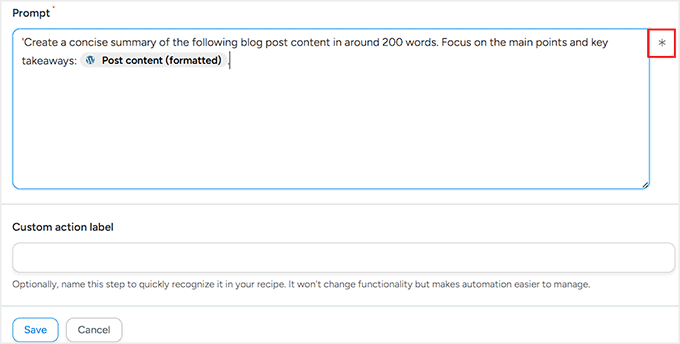
You’ll be capable to add the ones tokens by the use of clicking the asterisk inside the instructed editor. Uncanny Automator will display an inventory of available tokens, such for the reason that post title, creator name, e-newsletter date, and further.
Once the whole thing is in a position, click on on ‘Save’ to store the movement. Your recipe now has a purpose and a number one movement that generates concise, AI-powered summaries on each instance a brand spanking new post is published.
Step 6: Add the Google Sheets Movement to Store Summaries
Now it’s time as a way to upload the second movement for your workflow. This movement will automatically create a row to your decided on Google Sheet and add the summary generated by the use of OpenAI.
That’s what makes the workflow in reality useful on account of all your post summaries can be automatically stored and organized.
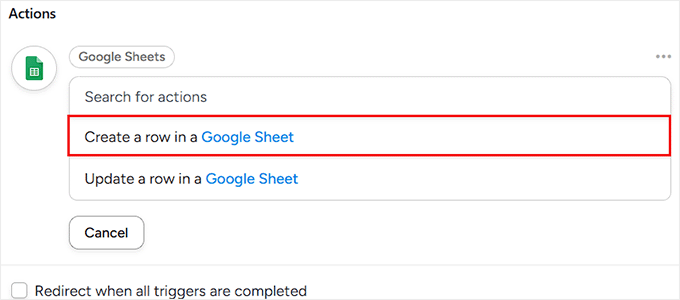
As a way to upload this movement, click on at the ‘Add Movement’ button all over again to your recipe. Select Google Sheets as the mix this time.
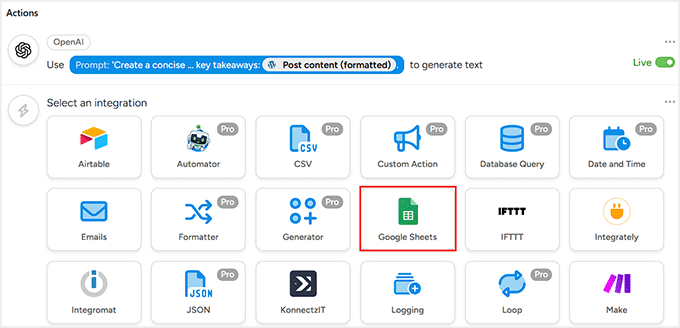
Uncanny Automator will then show an inventory of actions it’s going to perform. For this workflow, choose ‘Create a row in a Google Sheet’.
This tells Automator as a way to upload a brand spanking new row for your spreadsheet on each instance OpenAI generates a summary for a brand spanking new blog post.
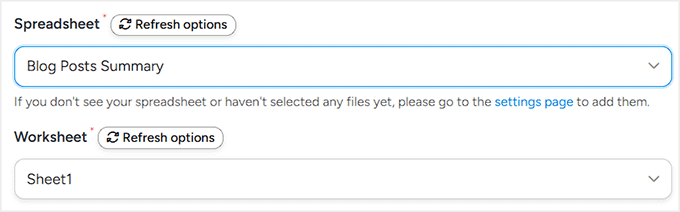
Next, you’ll see a dropdown to select the Google Spreadsheet you attached earlier. Make a selection the spreadsheet where you wish to have to store your blog post summaries.
Then, choose the worksheet (tab) inside of that spreadsheet.
If your file most efficient has one sheet, you don’t need to concern. But if your spreadsheet has multiple tabs, be certain that to select the correct one so your data doesn’t in spite of everything finally end up inside the fallacious place.
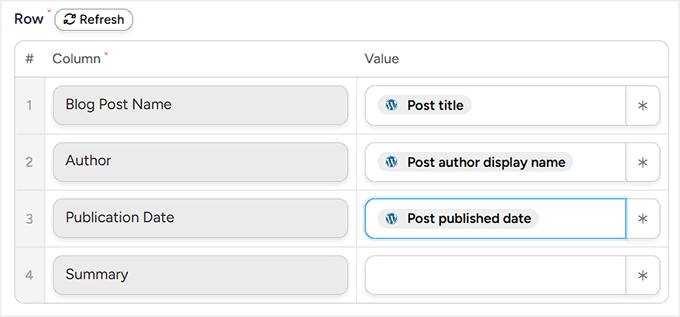
After that, scroll all of the means right down to the ‘Rows’ section. That’s the position you map your blog post data to the columns to your Google Sheet.
Don’t concern, on account of mapping is simpler than it sounds. You’re merely matching each column to your spreadsheet with the right piece of information from your post or the OpenAI summary.
To start mapping, click on at the asterisk (*) icon next to a field. This opens an inventory of available data that Automator can pull from the purpose (your blog post) and the OpenAI movement.
Underneath the Triggers section, you’ll see alternatives like post title, creator name, published date, and further.
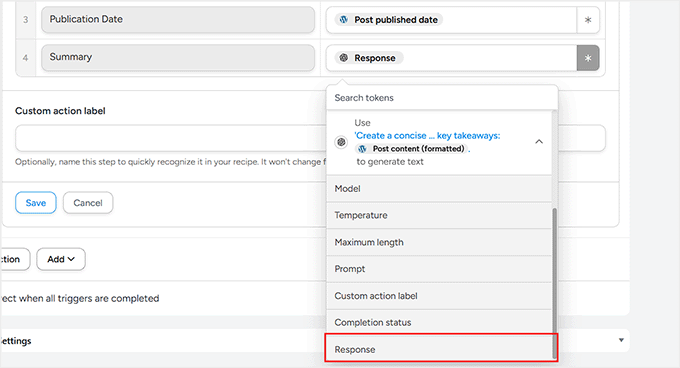
Underneath the Actions section, you’ll to search out ‘OpenAI Response’, which is the summary generated by the use of AI.
Be certain to select ‘Response’ for the summary column to your sheet. This promises the summary is automatically added to the correct column.
Take your time mapping each column carefully.
Each time you’ve matched the entire fields, click on on ‘Save’ to store your settings.
Step 7: Save and Activate Your Recipe
Now that each and every your purpose (a brand spanking new post published) and your actions (generating a summary with OpenAI and together with it to Google Sheets) are prepare, it’s time to make your recipe are living.
Previous than activating, take a 2nd to double-check all your mappings. Be certain the columns in Google Sheets are compatible the blog post wisdom, and that the OpenAI summary is mapped to the correct column.
This promises that each new post is added as it should be without errors.
Each time you’re confident the whole thing is right kind, toggle the Purpose and Movement switches to ‘Live. Then, inside the right-hand column, business the recipe status from ‘Draft’ to ‘Live’.
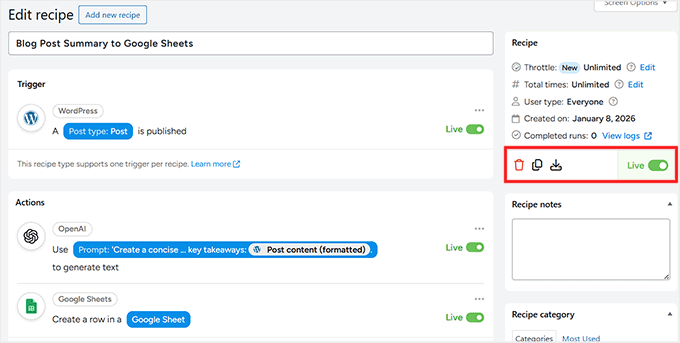
And that’s it! Your automation is now lively.
To test it, simply transfer to Posts » Add New and post a weblog put up (or change an present one for those who set the purpose to interchange).
Give it a few seconds, then check your Google Sheet. You’ll have to see a brand spanking new row appear automatically along with your AI-generated summary.
Next Steps for Construction Make.com-Style Workflows Correct in WordPress
Normal, after rising workflows with each and every Make.com and Uncanny Automator, I will with a bit of luck say that development difficult automations with Uncanny Automator is any such lot easier.
Slightly than the blog post summary workflow I showed above, you’ll be capable to moreover create workflows like the ones, they normally’re much more sensible to organize in Uncanny Automator compared to Make.com:
| Workflow Example | Why It’s More straightforward in Uncanny Automator | Make.com Complexity |
|---|---|---|
| Ship automatic electronic mail notifications when a shopper submits a type, places an order, or completes a trail | Direct purpose from WordPress bureaucracy, WooCommerce, or LMS, with simple dropdowns for actions | Requires putting in webhooks, parsing JSON, and mapping multiple apps |
| Add new WooCommerce orders to spreadsheets for reporting or bookkeeping | Connect WooCommerce → Google Sheets in minutes, with field mapping inside of WordPress | Needs multiple modules, API keys, and data parsing for each order |
| Generate AI-powered summaries or content material subject matter for posts, emails, or inside research | OpenAI integration directly inside of WordPress, and tokens maintain content material subject matter dynamically | Must configure HTTP modules, API calls, and maintain JSON manually |
| Sync client data between plugins (memberships, LMS, CRM) | Automator reads plugin data natively, and the triggers and actions are simple | Each plugin requires a separate API setup and webhooks |
| Time table follow-ups automatically (membership renewals, trail completions) | Native WordPress events purpose actions, with no external scheduler | Multiple modules, time delays, and additional setup consistent with platform |
Once your first workflow is are living, you’ll be capable to with a bit of luck uncover and create new automations that save time, streamline processes, and make your WordPress website online smarter.
Frequently Asked Questions About Uncanny Automator vs. Make.com
Now that you simply’ve noticed how Uncanny Automator can simplify Make.com-style workflows in WordPress, when you have a few questions.
To make problems easier, I’ve spoke back probably the most most now not odd questions about AI, automation, and the way in which the ones equipment art work together:
Can Uncanny Automator maintain difficult workflows like Make.com?
Positive! For workflows that the majority recurrently comprise WordPress and its plugins, Uncanny Automator can maintain them very similar to Make.com—on the other hand without the extra setup, APIs, or webhooks.
Do I would love coding talents to use Uncanny Automator?
No coding is wanted. The visual Recipe builder and tokens make rising automations as simple as point-and-click.
What’s the difference between the Free and Skilled diversifications of Uncanny Automator?
The Free fashion provides you with countless recipes with the entire basic triggers and actions you need to get started.
The Professional model steps it up with conditional not unusual sense, loops, scheduled automations, over 150 integrations, and even multisite strengthen—mainly the whole thing you need for additonal difficult workflows.
Will using Uncanny Automator slow down my WordPress website online?
Not significantly. Automator runs actions asynchronously, so website online potency is minimally affected—maximum recurrently limited by the use of your server property.
Will Uncanny Automator summarize my present blog posts?
By the use of default, this recipe most efficient runs when a new post is published. It’ll not go back and summarize your out of date posts automatically. Alternatively, Uncanny Automator Professional includes a feature to run recipes on present content material subject matter if you want to must bulk-update your website online.
Can I migrate my present Make.com workflows to Uncanny Automator?
There’s no one-click migration. You’ll need to manually rebuild workflows: Router → Scenario, Iterator → Loop, HTTP → Webhook. Alternatively once prepare, Uncanny Automator’s WordPress-native integration makes repairs much more simple.
Additional Property to Take Your Automations to the Next Stage
For individuals who’re in a position to get a lot more out of Uncanny Automator, there’s a ton you’ll be capable to uncover.
From difficult workflows to AI-powered automations, listed below are some articles that can assist you out:
- Methods to Upload n8n Like Automation in WordPress (More uncomplicated & Inexpensive)
- How I Use AI to Autogenerate WooCommerce Product Descriptions
- Methods to Routinely Put up to Threads From WordPress
- Methods to Routinely Put up to Fb From WordPress
- My Information to Routinely Submit from WordPress to Instagram
For individuals who favored this article, then please subscribe to our YouTube Channel for WordPress video tutorials. You’ll be capable to moreover to search out us on Twitter and Fb.
The post How I Went From 0 to Make.com-Like Automation in WordPress (The Simple Approach) first gave the impression on WPBeginner.
Contents
- 0.0.1 💡Speedy Solution: Easy methods to Add Make.com-Style Automation in WordPress
- 0.0.2 Why I Moved Transparent of Make.com (And You Can Too)
- 0.0.3 🌟The Solution: Why Uncanny Automator Feels Like Make.com Alternatively More straightforward
- 0.0.4 Precise-World Workflow: Easy methods to Automate Blog Submit Summaries with Uncanny Automator
- 0.0.4.1 Step 1: Arrange and Activate Uncanny Automator
- 0.0.4.2 Step 2: Connect OpenAI to Uncanny Automator
- 0.0.4.3 Step 3: Connect Uncanny Automator to Google Sheets
- 0.0.4.4 Step 4: Create Your Recipe in Uncanny Automator
- 0.0.4.5 Step 5: Add the OpenAI Movement to Generate Blog Submit Summaries
- 0.0.4.6 Step 6: Add the Google Sheets Movement to Store Summaries
- 0.0.4.7 Step 7: Save and Activate Your Recipe
- 0.0.5 Next Steps for Construction Make.com-Style Workflows Correct in WordPress
- 0.0.6 Frequently Asked Questions About Uncanny Automator vs. Make.com
- 0.0.7 Additional Property to Take Your Automations to the Next Stage
- 0.1 Related posts:
- 1 Most sensible 5 Static Web site Turbines in 2021 (and When to Use Them)
- 2 How To Create a CI/CD Pipeline With GitHub Movements and Kinsta API
- 3 The way to Create a Social Media Record [Free Template]

0 Comments