
I used to ask people to email me their photos for my internet website. Profile footage for membership web sites, headshots for staff pages, even simple ID verification photos – and each single time, it turn out to be a back-and-forth mess.
Folks would forget to attach the file. Or they’d send {a photograph} that used to be as soon as method too massive. Every so often they’d take a screenshot of {a photograph} as an alternative of sending the actual image, and the usual may well be terrible.
Then I realized that I would possibly simply let people take photos and record films by means of my WordPress bureaucracy. They just want to click on on a button, snap {a photograph} (or record a to hand information a coarse video), and that’s it.
In this knowledge, I’ll show you add this camera take hold of feature in your WordPress bureaucracy so that you’ll be capable of skip the entire headaches I went by means of.
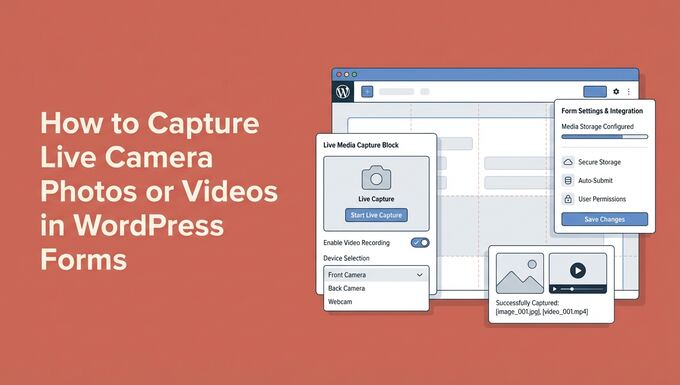
Why Add Reside Camera Grasp in WordPress Bureaucracy?
Reside camera take hold of on your WordPress bureaucracy makes it so much sooner and more uncomplicated for people to put up photos or films. This can lead to additional consumers in truth completing your form.
Believe what happens whilst you ask anyone so as to add {a photograph} in your touch shape. They’ve to prevent what they’re doing, open their camera app, take the image, close the camera, to find the image in their gallery, and then come once more so as to add it.
That’s a large number of steps. And each further step is every other likelihood for anyone to give up and abandon your shape.
With a reside camera take hold of self-discipline, people can take photos or record films without ever leaving the form. They click on on one button, the camera opens suitable there in their browser, they usually’re finished in seconds.

This problems more than chances are high that you’ll suppose. I’ve spotted shape crowning glory charges jump significantly just by eliminating the friction of typical file uploads.
Listed below are some precise eventualities where camera take hold of makes a huge difference:
| Website online Varieties | Use Instances |
|---|---|
| Purchaser Support Teams | Let people show their problem as an alternative of taking a look to explain it in words. |
| Belongings/Actual Property Websites | Get tenants to file repairs issues on the spot as an alternative of texting photos back and forth. |
| Faculties/eLearning Platforms | Achieve student photos during online admissions without asking other folks to email separate files. |
| Insurance plans Companies | Boost up claims thru having customers {{photograph}} hurt straight away. |
The most productive section about using a plugin for this purpose is that the whole thing gets organized automatically.
When anyone submits your form, their image or video is attached to their get admission to along side all their other information. Now not extra looking out by means of your email inbox taking a look to suit photos with the appropriate person. ✨
With that mentioned, I’ll show you the entire steps so that you can upload a camera take hold of feature in your WordPress bureaucracy. Proper right here’s the whole thing I’ll quilt in this knowledge:
- Step 1: Set up and Turn on WPForms Professional
- Step 2: Upload the Digicam Box to Your Shape
- Step 3: Configure Your Shape’s Digicam Box
- Step 4: Set Up Button Taste, Garage, and Get admission to Settings
- Step 5: Set Up Shape Notifications and Confirmations
- Step 6: Take a look at and Embed Your Shape
- FAQs About Shooting Are living Digicam Pictures or Movies in WordPress Paperwork
- Extra Guides to The use of WordPress Paperwork
Step 1: Arrange and Activate WPForms Skilled
In this knowledge, I’m going to use WPForms, which is the very best touch shape plugin for WordPress. I picked this plugin because it has a camera take hold of self-discipline, which you’ll be capable of merely add with a simple drag-and-drop.
You’ll moreover use WPForms to create a large number of different bureaucracy, along side contact bureaucracy, on-line order paperwork with expenses, polls and surveys, and e-newsletter signups.
At WPBeginner, we use WPForms for all our bureaucracy – contact bureaucracy, web page migration requests, the yearly readers’ survey, and additional. We’re extensive enthusiasts of this device, and also you’ll be capable of be informed additional about it in our whole WPForms evaluation.
First, head over to the WPForms web site to create an account. Click on at the ‘Get WPForms Now’ button, make a selection a plan that fits your needs, and full the signup.

💡 Remember: You’ll need WPForms Professional to get get right of entry to to the camera take hold of feature, plus extras like conditional commonplace sense and form problems. That mentioned, you’ll be capable of nevertheless get started with the loose WPForms model if you want to have to check out out the plugin first.
After signing up, you will have to have the ability to to find the plugin’s zip file and license key on your WPForms account dashboard. You’ll keep this tab open or store your file and key somewhere secure, like a password supervisor.
Now, let’s transfer in your WordPress dashboard and navigate to Plugins » Add New Plugin.
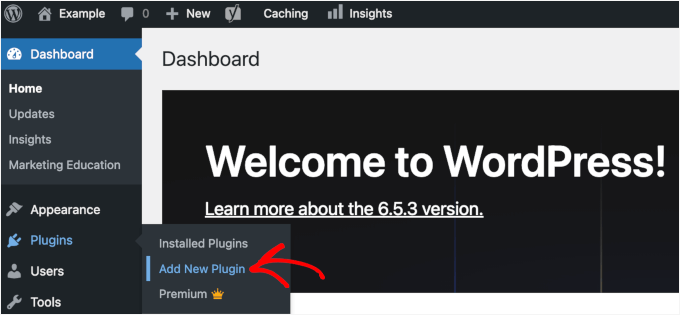
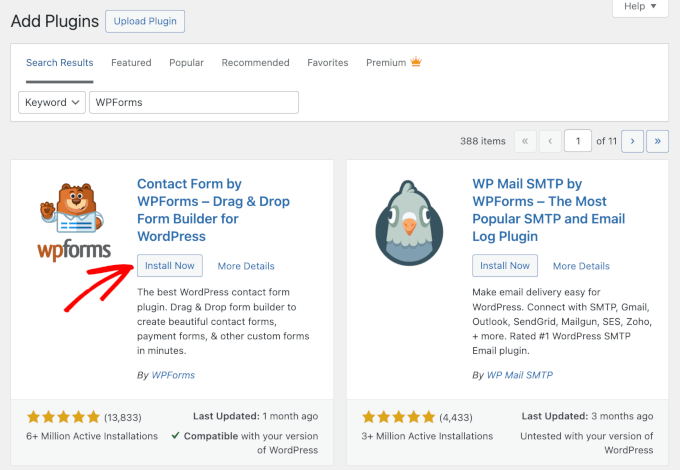
On the next show, you’ll be capable of use the hunt bar to seek for the WPForms plugin.
Click on on ‘Arrange Now’ inside the search finish end result and ‘Activate’ when it appears.
If you wish to have be in agreement, see our step-by-step knowledge on set up a WordPress plugin.
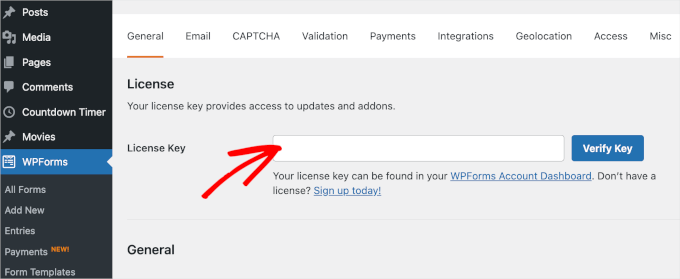
Upon activation, transfer to WPForms » Settings from your admin house to show in your WPForms Skilled license.
Simply copy your license key and paste it into the sphere. Then click on at the ‘Read about Key’ button.
WPForms will confirm that your license is energetic. You’re now ready to start out construction bureaucracy with camera take hold of.
Step 2: Add the Camera Field to Your Form
In this step, you’ll create a type with the camera take hold of feature.
To start out out, you’ll be capable of navigate to WPForms » Add New on your WordPress admin dashboard.
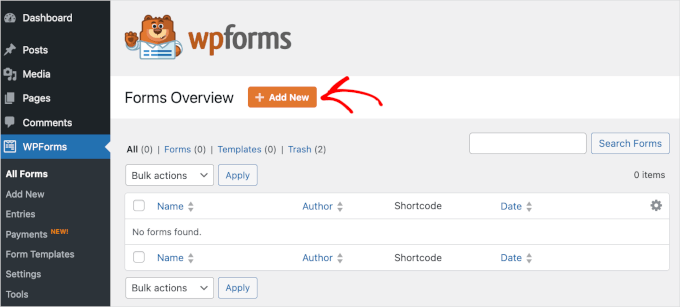
This will likely more and more take you to the Setup internet web page, where you’ll be capable of establish your form.
This is on your reference absolute best, on the other hand I love to suggest using a clear, descriptive establish for more uncomplicated team as you create additional WordPress paperwork.
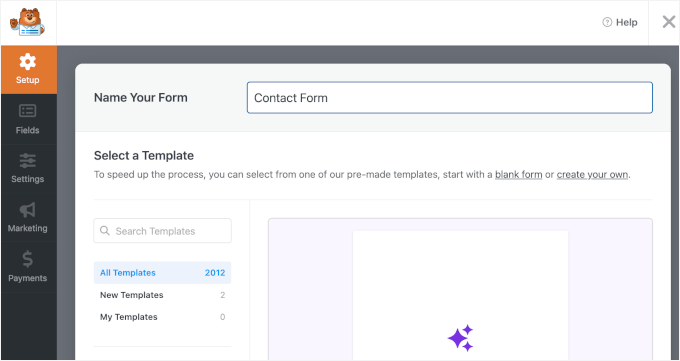
Next, you’ll make a selection the best way you’ll assemble your form.
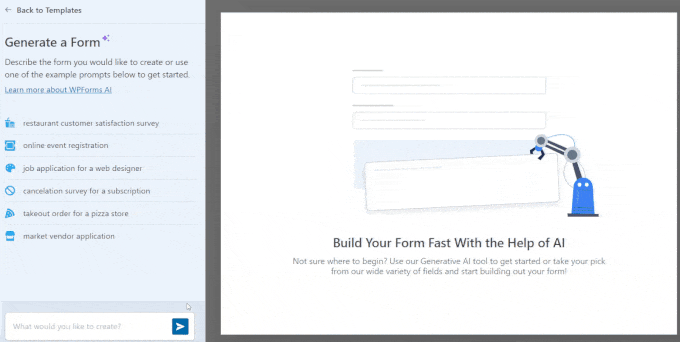
WPForms implies that you’ll create bureaucracy using a blank canvas, an AI-powered shape builder, or a ready-made template.
With WPForms AI, all it’s a will have to to do is write a simple suggested. The AI form builder will generate it for you in a few seconds.
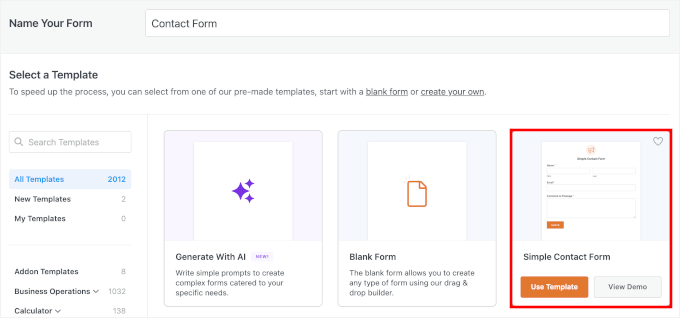
For this instructional, even though, I’m going to use the Simple Contact Form template.
WPForms comes with 2,000+ premade form templates, so it’s easy to look out one that fits your needs.
If you want to have step-by-step instructions, see our knowledge on create a touch shape in WordPress.
Once your form opens inside the builder, take a look on the left sidebar where the entire form fields are listed. Scroll down until you to find the section categorised ‘Fancy Fields.’
Correct there, next to the File Upload self-discipline, you’ll see the ‘Camera’ self-discipline. You’ll drag and drop it anywhere you want it to search for your form.
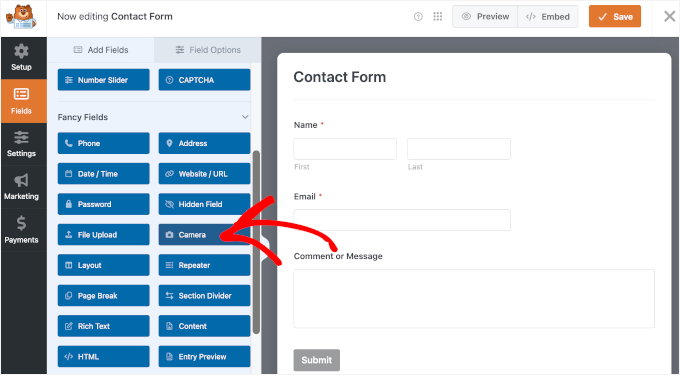
💡 Remember: The Report Add self-discipline could be very absolute best for amassing files consumers already have on their software, like saved photos or PDFs. For this instructional, the Camera self-discipline works upper because it lets consumers take hold of {a photograph} or video on the spot without leaving the form.
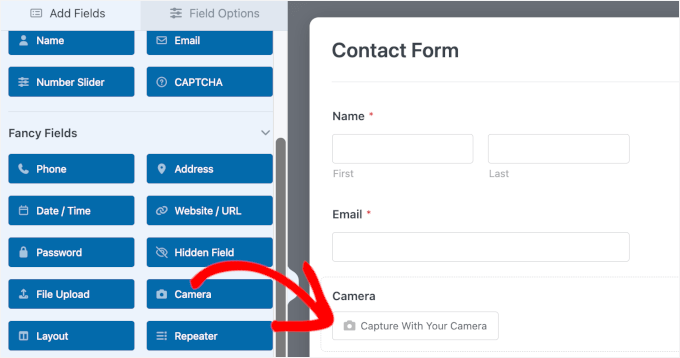
You’ll perceive a small camera icon displays up on your form preview. That’s what your consumers will click on directly to take hold of their image or video.
One thing I came upon eye-catching with this feature is that when anyone clicks the camera button on a pc or desktop, they’ll see a nice 3-second countdown previous than take hold of. This gives them merely enough time to smile or modify their perspective.
Proper right here’s what it will seem to be inside the preview:
There you might have it – I knowledgeable you this section used to be as soon as speedy!
Step 3: Configure Your Form’s Camera Field
From appropriate right here, you’ll be capable of configure your Camera self-discipline.
Cross ahead and click on on on the ‘Camera’ self-discipline you merely added to open up the ‘Field Alternatives’ panel on the left side. That’s the position you’ll customize how the camera take hold of works.
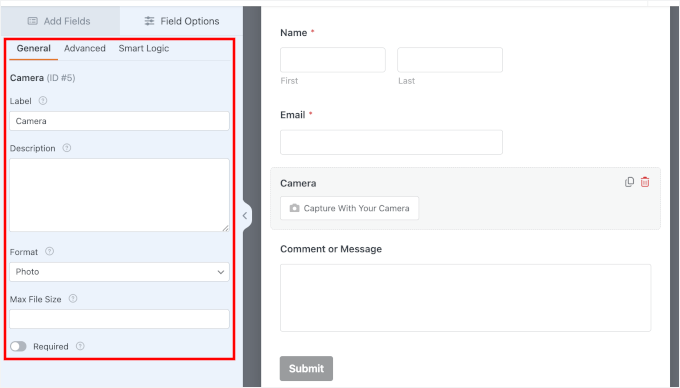
The first thing you’ll see is the ‘Label’ environment.
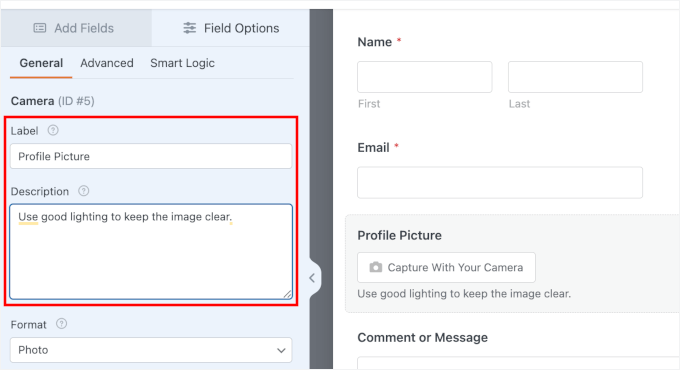
By the use of default, the field is referred to as Camera, on the other hand you’ll be capable of rename it to check what you’re amassing. As an example: Profile Symbol, Error Screenshot, or Harm {Photograph}, depending on your use case.
In ‘Description,’ you’ll be capable of add a short lived phrase with any further details or instructions, like what will have to be visible inside the image or any top quality must haves.
As an example:
- “Use superb lighting fixtures to stick the image clear,” for profile footage.
- “Make sure that all text is readable,” for error screenshots.
- “Include all of the assets inside the frame,” for hurt tales.
This assists in keeping the label fast and scannable, and uses the description only for helpful steering.
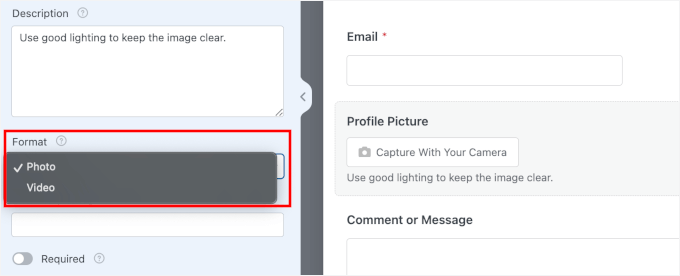
Then, there’s the ‘Structure’ environment, where you’ll see two imaginable possible choices:
- {Photograph} – works neatly for profile footage, ID taking part in playing cards, or any state of affairs where you wish to have a to hand information a coarse snapshot.
- Video – absolute best imaginable when you want people to record fast introductions, testimonials, or explain something that’s more uncomplicated to show than describe.
By the use of default, WPForms gadgets it to ‘{Photograph},’ on the other hand you’ll be capable of switch between them at any time.
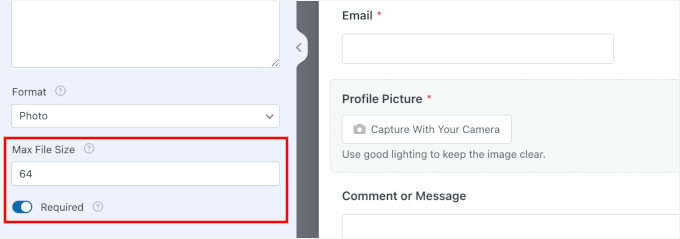
Now, you’ll be capable of scroll appropriate all the way down to the ‘Max File Size’ environment, where you’ll be capable of keep an eye on how massive the user-submitted record will also be.
You’ll enter any collection of megabytes (MB) you want. Whilst you cross away this blank, WPForms will use your server’s default limit, which is generally spherical 64 MB. You’ll moreover build up your max record add measurement if sought after.
I love to suggest environment an inexpensive limit in step with what you in truth need. Smaller file sizes be in agreement your bureaucracy load sooner and save space on your server.
Don’t forget to toggle on the ‘Required’ button so consumers can’t skip this self-discipline.
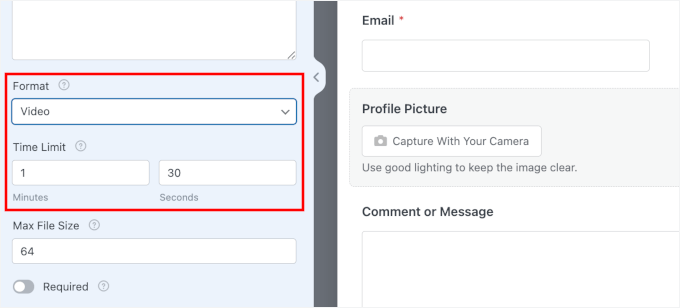
Whilst you decided on ‘Video’ as your construction, you’ll moreover see a ‘Time Prohibit’ selection. The default is 1 minute and 30 seconds, which goes neatly for lots of eventualities.
🧑💻 Skilled Tip: Video files can get massive and hurt your WordPress efficiency. This self-discipline is ok for short clips (less than 30 seconds). But if you wish to have consumers to put up long films (5+ minutes), then it’s upper to have them upload to a cloud service and share the link.
See our knowledge on why you must by no means add a video to WordPress to learn additional.
You’ll play with the ones settings to suit your needs.
Step 4: Set Up Button Style, Storage, and Get right of entry to Settings
Proper right here, I’ll walk you right through the sophisticated settings on your Camera self-discipline. That’s the position you fine-tune how the camera feature appears to be and where your captured files are stored.
To get started, switch to the ‘Advanced’ tab at the top of the Field Alternatives panel.
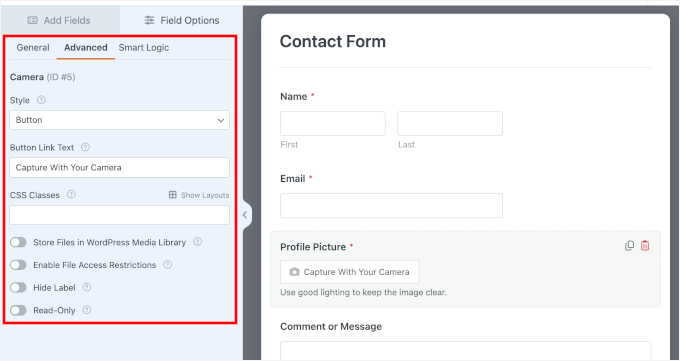
Let’s spoil down each and every of the ones configuration possible choices.
Customize Camera Button Style and Text
First, to find the ‘Style’ dropdown. You’ll make a selection to show a button icon or display it as a simple link.
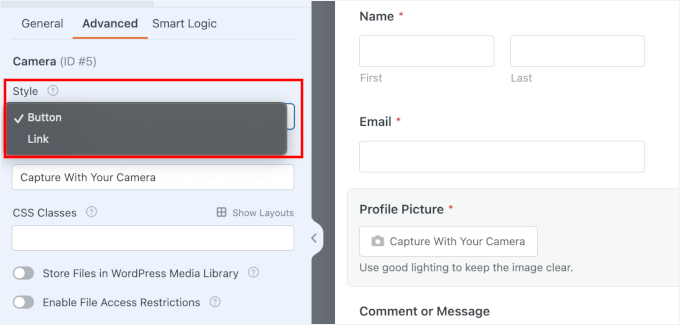
I generally keep on with the button style because it’s additional obtrusive and more uncomplicated to click on on, on the other hand the link selection works neatly if you want to have a cleaner, additional minimal look.
Correct beneath that, you’ll see the ‘Button Link Text’ self-discipline. This is your likelihood to make the camera button look additional personal or on-brand.
Instead of the default text, that you just will have to write something like “Snap Your Symbol” or “File a Video.” I’ve even spotted people use a laugh phrases like “Say Cheese!” for profile symbol bureaucracy.
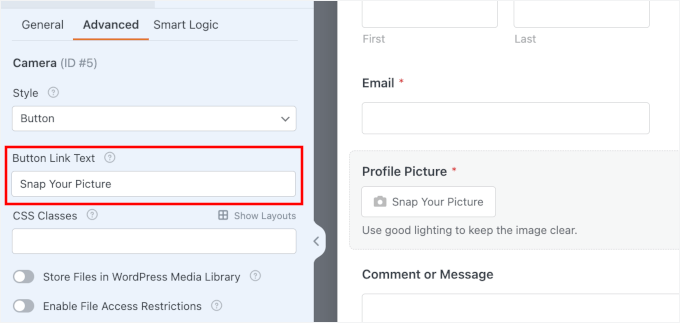
The ones small touches make your touch shape truly really feel additional welcoming and less robotic.
Style Further with CSS Classes
Next, you’ll see the CSS Classes self-discipline. This lets you add a practice class establish so that you’ll be capable of style this camera self-discipline another way with CSS.
As an example, that you just will have to add a class like custom-camera-btn appropriate right here. This doesn’t automatically style the button, nevertheless it undoubtedly means that you can (or a developer) upload tradition CSS on your theme settings to concentrate on this specific button later.
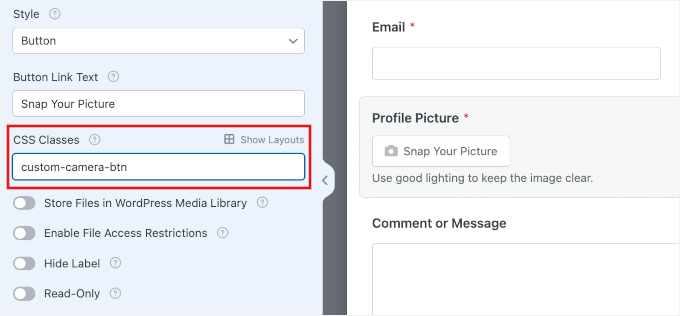
If you want to add a few CSS Elegance, then you definitely’ll be capable of separate them with spaces, like this:camera-field large-button.
I can cross away this blank to stick the styling in step with the rest of my form fields.
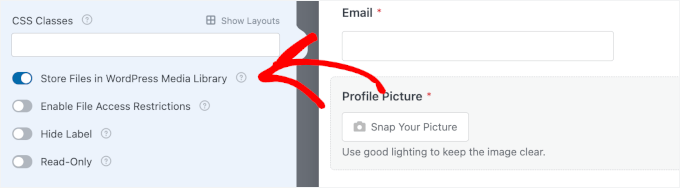
Make a choice Where to Store Captured Knowledge
By the use of default, WPForms saves all captured photos and films on your web page’s ‘Uploads’ folder, in particular during the WPForms checklist.
Then again when you select retaining your entire media in one place, toggle on the selection that says ‘Store file in WordPress Media Library.’
Merely remember that files inside the Media Library are often more uncomplicated for most people to get right of entry to, so keep this environment changed into off in the event you’re amassing refined bureaucracy.
🧑💻 Skilled Tip: You’ll moreover attach WPForms with Dropbox or Google Power if you want to store files externally. That comes in handy while you’re nervous about using up a great deal of server space or if you want to have automatic cloud backups.
Irrespective of where you store the files, you’ll be capable of always view them on your ‘Entries’ dashboard, attached suitable to each and every form submission.
Restrict Get right of entry to to Uploaded Knowledge
If your form collects refined information, related to ID photos or personal bureaucracy, you’ll want to lock down who can view the ones files. Scroll down and turn on ‘Allow File Get right of entry to Restrictions.’
Whilst you permit this, you get two protection possible choices. The main one is that you just’ll be capable of restrict get entry to in order that best logged-in WordPress customers can view the files.
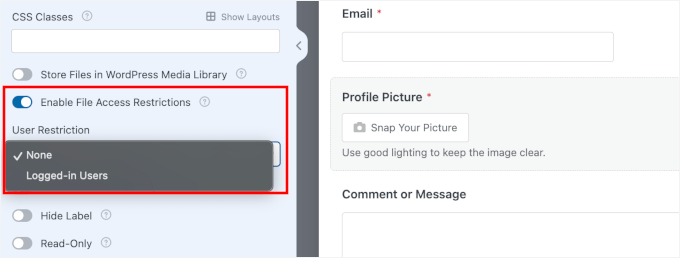
The other selection is so that you can upload password coverage on your shape for an extra layer of protection.
This is in particular crucial for bureaucracy used in healthcare, legal products and services and merchandise, or every other context where you’re coping with personal information.
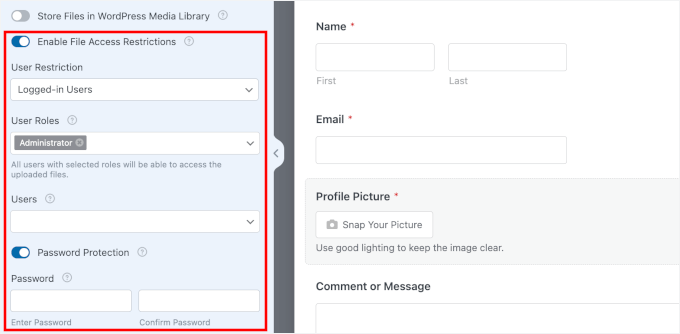
Without the ones restrictions, somebody with the file URL would possibly simply probably view the uploaded media.
You’ll take your time configuring the ones sophisticated possible choices previous than moving on.
Step 5: Set Up Form Notifications and Confirmations
Now that your camera self-discipline is working, you wish to have to you’ll wish to in truth get notified when anyone submits your form.
To do this, you’ll be capable of head over to Settings » Notifications inside the shape builder.
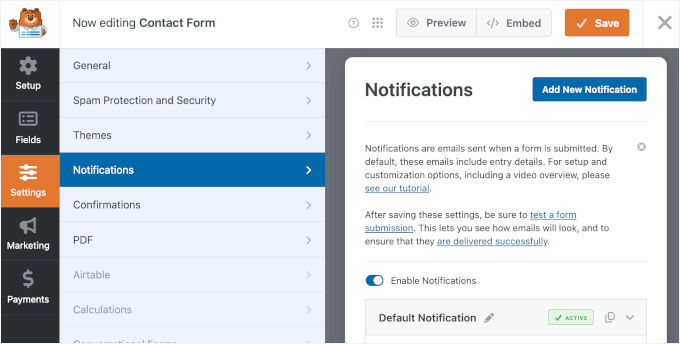
WPForms automatically gadgets up a elementary email notification that can get sent in your WordPress admin e-mail cope with. Each time anyone submits your form with a captured image or video, you’ll download an email with the entire details.
You’ll customize who receives the ones notifications thru changing the ‘Send To Electronic mail Maintain’ self-discipline. If you want to have multiple people notified, merely enter the entire email addresses, environment aside them with commas.
You’ll moreover use a wise tag to send notifications dynamically, for instance, to the email deal with submitted inside the form.
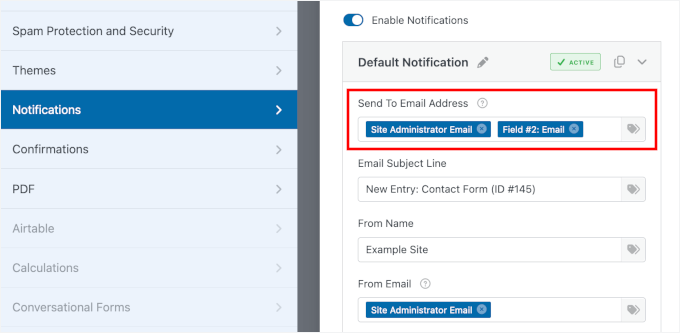
See our knowledge on create a touch shape with more than one recipients for details.
The notification email will include a direct link to view the captured image or video. This allows you to preview the file straight away from your inbox without logging in to the WordPress dashboard first.
💡 Remember: WordPress doesn’t always send emails reliably, and from time to time form notifications transfer to direct mail or don’t get sent the least bit. To fix this, I love to suggest using the WP Mail SMTP plugin. For details, see repair WordPress no longer sending emails.
After anyone submits your form, they want to realize it used to be as soon as a luck.
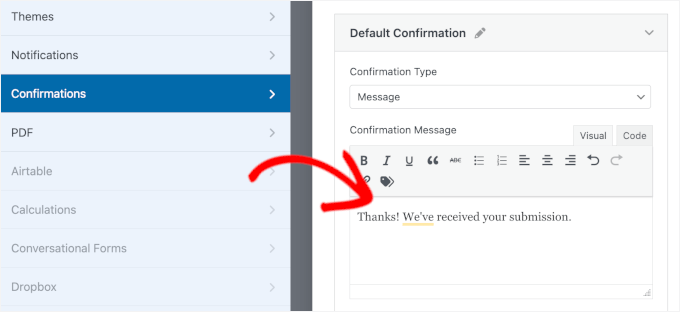
Let’s transfer to the ‘Confirmations’ panel to make a decision what happens after anyone submits the form:
- The Message confirmation – displays a simple text message suitable on the an identical internet web page after submission, like “Thanks! We’ve gained your submission.”
- The Show Internet web page confirmation – redirects people to every other internet web page on your web page. This works neatly if you want to send them to a tradition thank-you web page with additional information.
- The Redirect confirmation – sends people to any URL you want, even on a definite internet website. I’ve used this to send people to a reserving web page or a definite offer when they put up.
You’ll make a selection whichever selection makes sense on your state of affairs.
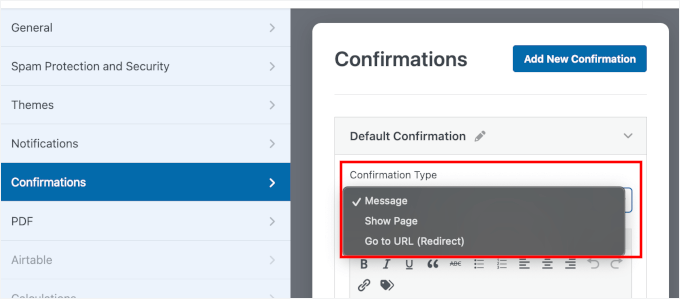
I generally keep on with the ‘Message’ confirmation because it’s simple and people know straight away that their submission worked.
If you want to use it too, I love to suggest rewriting the default message so it fits your fashion’s voice:
Step 6: Check out and Embed Your Form
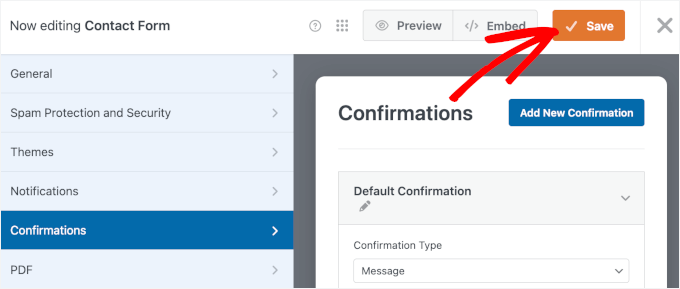
Quicker than you share your form with the field, you wish to have to ensure the camera take hold of in truth works.
Get began thru clicking the ‘Save’ button at the top suitable of the form builder to save some your entire changes.
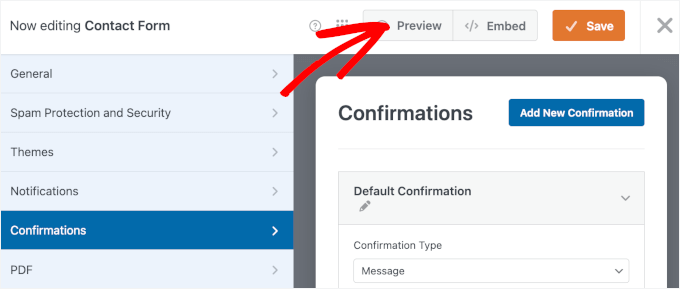
Now let’s preview this sort on a internet web page so that you’ll be in a position to check out it.
Cross ahead and click on at the ‘Preview’ button to open your form preview in a brand spanking new tab.
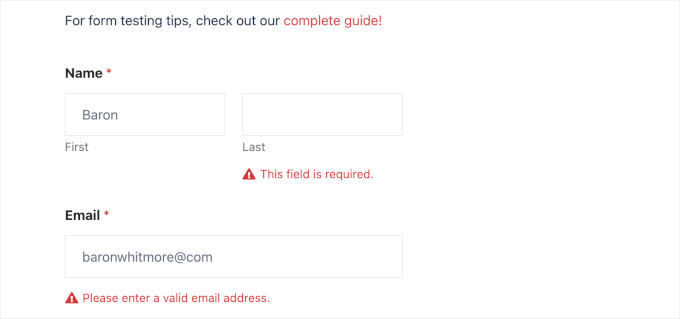
On the preview, you’ll be capable of fill out your form fields with dummy knowledge.
To make sure validation is working, check out coming into a typo or leaving a required self-discipline blank.
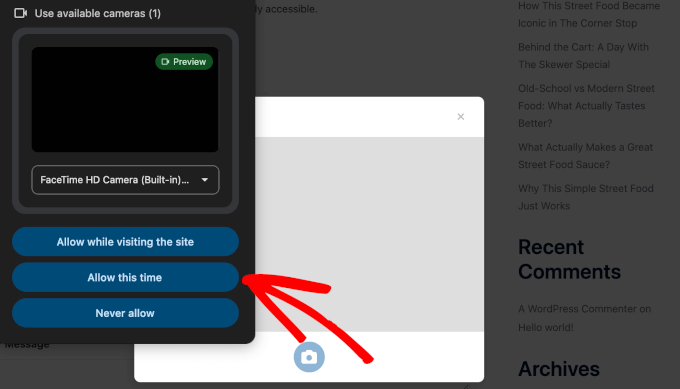
Next, click on on on the camera button on your form.
Your browser will then ask for permission to get right of entry to your camera. Cross ahead and click on on ‘Allow this time’ or ‘Allow while visiting the web page’ to grant permission.
Remember: For protection reasons, some browsers will block camera get right of entry to if your web page isn’t using HTTPS. Be certain an SSL certificates is put in, or else the camera button isn’t going to art work.
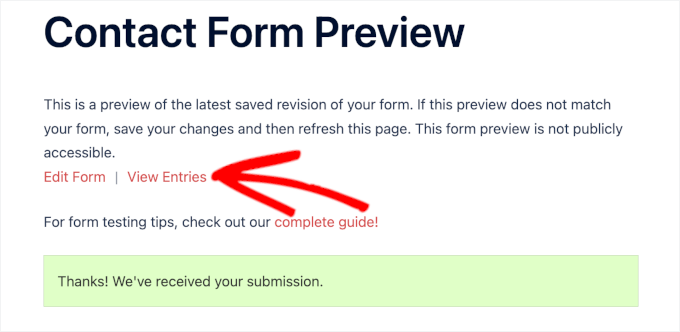
You will have to now see yourself on show with a 3-second countdown. Smile and let it take hold of your image or video.
When you’ve stuffed out the whole thing, hit ‘Post’ and see if your confirmation message turns out superb. You’ll then click on at the ‘View Entries’ link to seem if the form submission went by means of.
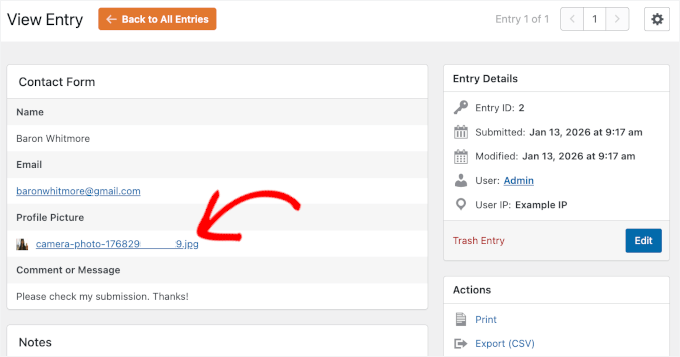
On the next show, you will have to see your submission check out.
Inside the Actions column, click on on ‘View’ to seem the get admission to.
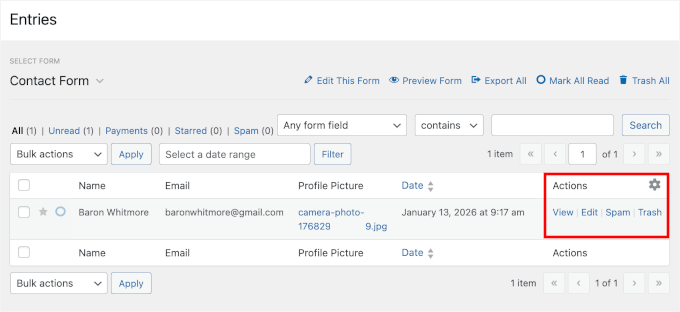
Now, you’ll be capable of scroll down to seem your captured image or video attached suitable there.
Proper right here’s what it seems like on my show:
Once the whole thing checks out, you’ll be capable of add this sort in your WordPress web site.
Click on at the ‘Embed’ button to unencumber the wizard.
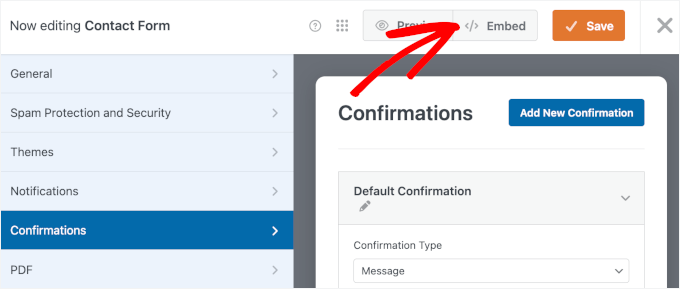
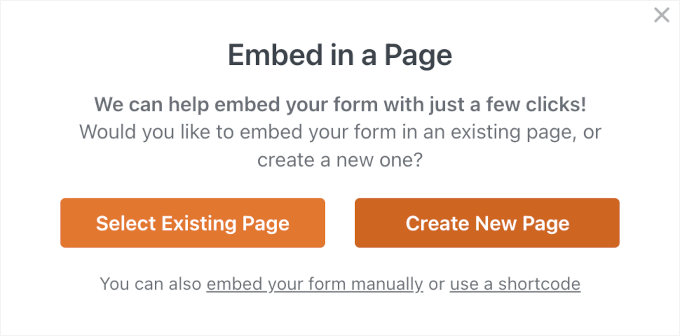
This will likely more and more open a popup where you’ll be capable of each make a selection an present internet web page or create a brand spanking new one on your form.
- Make a selection Provide Internet web page: A dropdown will show the entire pages on your WordPress web page.
- Create New Internet web page: A ‘Determine Your Internet web page’ self-discipline will appear with the intention to enter a establish.
For this knowledge, I’ll make a selection ‘Create New Internet web page’.
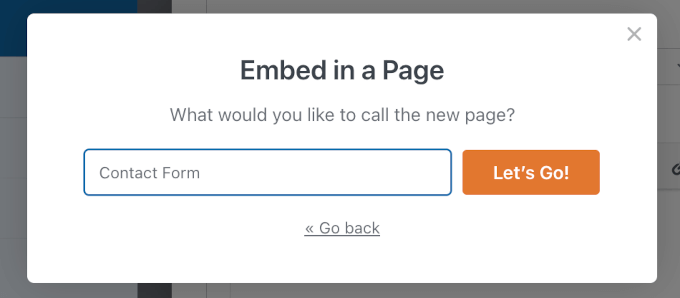
Next, enter a name on your new internet web page, for instance, I’m calling mine “Contact Form.”
Click on on ‘Let’s Cross!’
You’ll then land on the internet web page’s block editor along side your form already loaded.
From appropriate right here, you’ll be capable of tweak the ‘Form Settings’ inside the right-hand panel.
By the use of default, the form establish is hidden, so chances are high that you’ll want to turn it on to supply visitors additional context. You’ll moreover permit the description while you’ve added one.
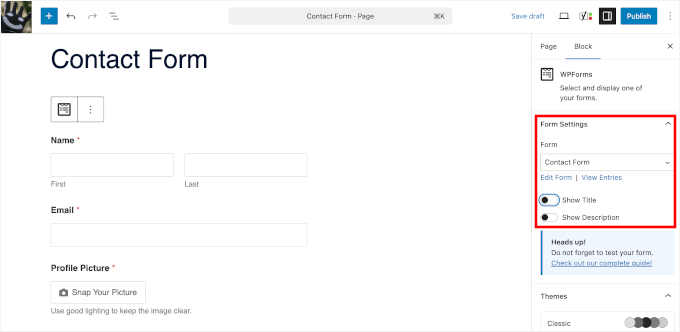
To make it look even upper, taste the shape to check your web page’s theme.
Cross ahead and make a selection a theme from the Topic issues section.
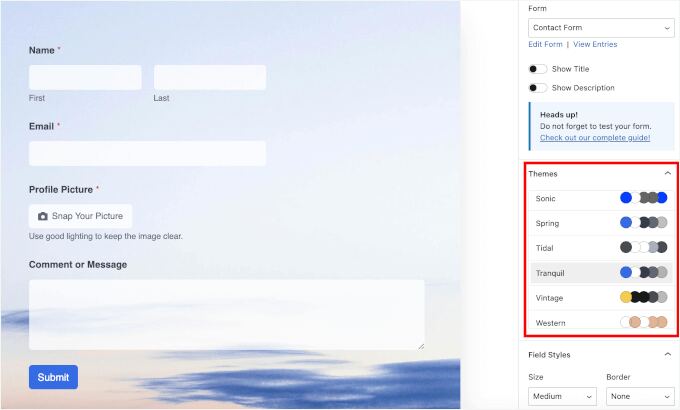
When you’re pleased with the best way it kind of feels to be, click on on ‘Save’.
With that finished, put up or exchange your internet web page and click on on ‘View Internet web page’ to seem the reside fashion on your WordPress web page:
For details, see our knowledge on embed paperwork in WordPress.
🧑💻 Skilled Tip: Whilst you embed your form, remember to open the internet web page on your cellular software to ensure the camera opens simply and feels natural on a smaller show.
FAQs About Capturing Reside Camera Photos or Motion pictures in WordPress Bureaucracy
Quicker than we wrap up, listed here are answers to some not unusual questions people have about using camera uploads and file fields in bureaucracy.
How do I gain photos in Google Bureaucracy?
Google Bureaucracy is helping file uploads, nevertheless it undoubtedly lacks a loyal Just right Camera self-discipline. While consumers can manually choose a file, WPForms supplies a unbroken integration that triggers the camera immediately, making it so much sooner for patrons to snap and put up.
Can WordPress bureaucracy have a camera?
Positive. Some WordPress form plugins, like WPForms, strengthen a camera self-discipline that lets consumers take photos or record films immediately from their software and put up them with the form.
What’s a file upload self-discipline?
A file upload self-discipline lets consumers attach files like photos, PDFs, or films when submitting a type. It’s useful for things like image uploads, resumes, or bureaucracy.
How do I take a picture in WordPress bureaucracy?
You add a camera or file upload self-discipline in your form using a shape plugin that is helping it, like WPForms. When consumers open the form on a device with a camera, they are able to take {a photograph} immediately as an alternative of uploading an present file.
Can WordPress bureaucracy take webcam footage?
Positive. If the form plugin is helping reside camera input, consumers can take photos using their webcam on a desktop or the camera on their phone and put up them in an instant.
Further Guides to The usage of WordPress Bureaucracy
I hope this instructional has helped you add a camera self-discipline to let consumers take reside photos or films immediately on your WordPress bureaucracy.
Next, chances are high that you’ll want to be informed:
- Learn how to Upload Symbol Possible choices in WordPress Paperwork
- Learn how to Display a Floating Touch Shape in WordPress
- Learn how to Use Touch Paperwork to Develop Your E mail Record in WordPress
- Techniques to Use Conditional Good judgment in WordPress Paperwork
- Final Information to The use of WordPress Paperwork (All You Want to Know)
Whilst you preferred this text, then please subscribe to our YouTube Channel for WordPress video tutorials. You’ll moreover to find us on Twitter and Fb.
The put up How I Let Customers Take Are living Pictures and Movies in My WordPress Paperwork first appeared on WPBeginner.
Contents
- 0.0.1 Why Add Reside Camera Grasp in WordPress Bureaucracy?
- 0.0.2 Step 1: Arrange and Activate WPForms Skilled
- 0.0.3 Step 2: Add the Camera Field to Your Form
- 0.0.4 Step 3: Configure Your Form’s Camera Field
- 0.0.5 Step 4: Set Up Button Style, Storage, and Get right of entry to Settings
- 0.0.6 Step 5: Set Up Form Notifications and Confirmations
- 0.0.7 Step 6: Check out and Embed Your Form
- 0.0.8 FAQs About Capturing Reside Camera Photos or Motion pictures in WordPress Bureaucracy
- 0.0.9 Further Guides to The usage of WordPress Bureaucracy
- 0.1 Related posts:
- 1 Repair iPhone Caught on Apple Brand
- 2 What’s Coming in WordPress 6.4 (Options and Screenshots)
- 3 How to Secure WordPress with a Password Policy Plugin

0 Comments