

Divi’s Menu module handles many navigation wishes, however from time to time you need extra choices and regulate. Customized header designs, distinctive hover results, or particular semantic HTML necessities can push you past what the Menu Module provides. Divi 5‘s semantic elements and HTML wrappers mean you can construct navigation from scratch the use of fundamental modules whilst outputting legitimate, obtainable HTML.
This instructional demonstrates the way to construct a navigation menu the use of an Symbol Module for the emblem, Textual content Modules for the text-based nav hyperlinks, and a Button Module for a decision to motion. The result’s a semantic <nav> construction with right kind <ul> and <li> parts that browsers, display screen readers, and search engines like google interpret accurately.

The Menu Module works for out-of-the-box navigation, however custom-built navigation provides benefits in particular situations. The use of particular person modules will provide you with get entry to to their complete styling choices. You’ll use CSS Grid or Flexbox to regulate your individual format inside the navigation (as a substitute of the Menu Module’s predefined format). You’ll additionally come with a styled button as a part of the navigation itself — semantically within the <nav> component the place it belongs — reasonably than floating outdoor it.
Divi 5’s semantic component settings make this a viable and legit method. You regulate what HTML tags every module outputs, making sure your tradition navigation stays totally obtainable and semantically proper.
The Goal HTML Construction
The very first thing to find out about semantic construction is that there are legitimate tactics of doing it. Invalid tactics of enforcing semantic parts and context are regularly worse than no longer making an attempt them in any respect. So, sooner than construction this in Divi, it’s useful to know the HTML construction and laws you’re seeking to mimic. Here’s a simplified exemplar:
<header>
 <nav>
 <ul>
 <li>
 <a><img></a>
 </li>
 <li>
 <ul>
 <li><a>House</a></li>
 <li><a>About</a></li>
 <li><a>Services and products</a></li>
 <li><a>Touch</a></li>
 </ul>
 </li>
 <li>
 <a>CTA Button</a>
 </li>
 </ul>
 </nav>
</header>
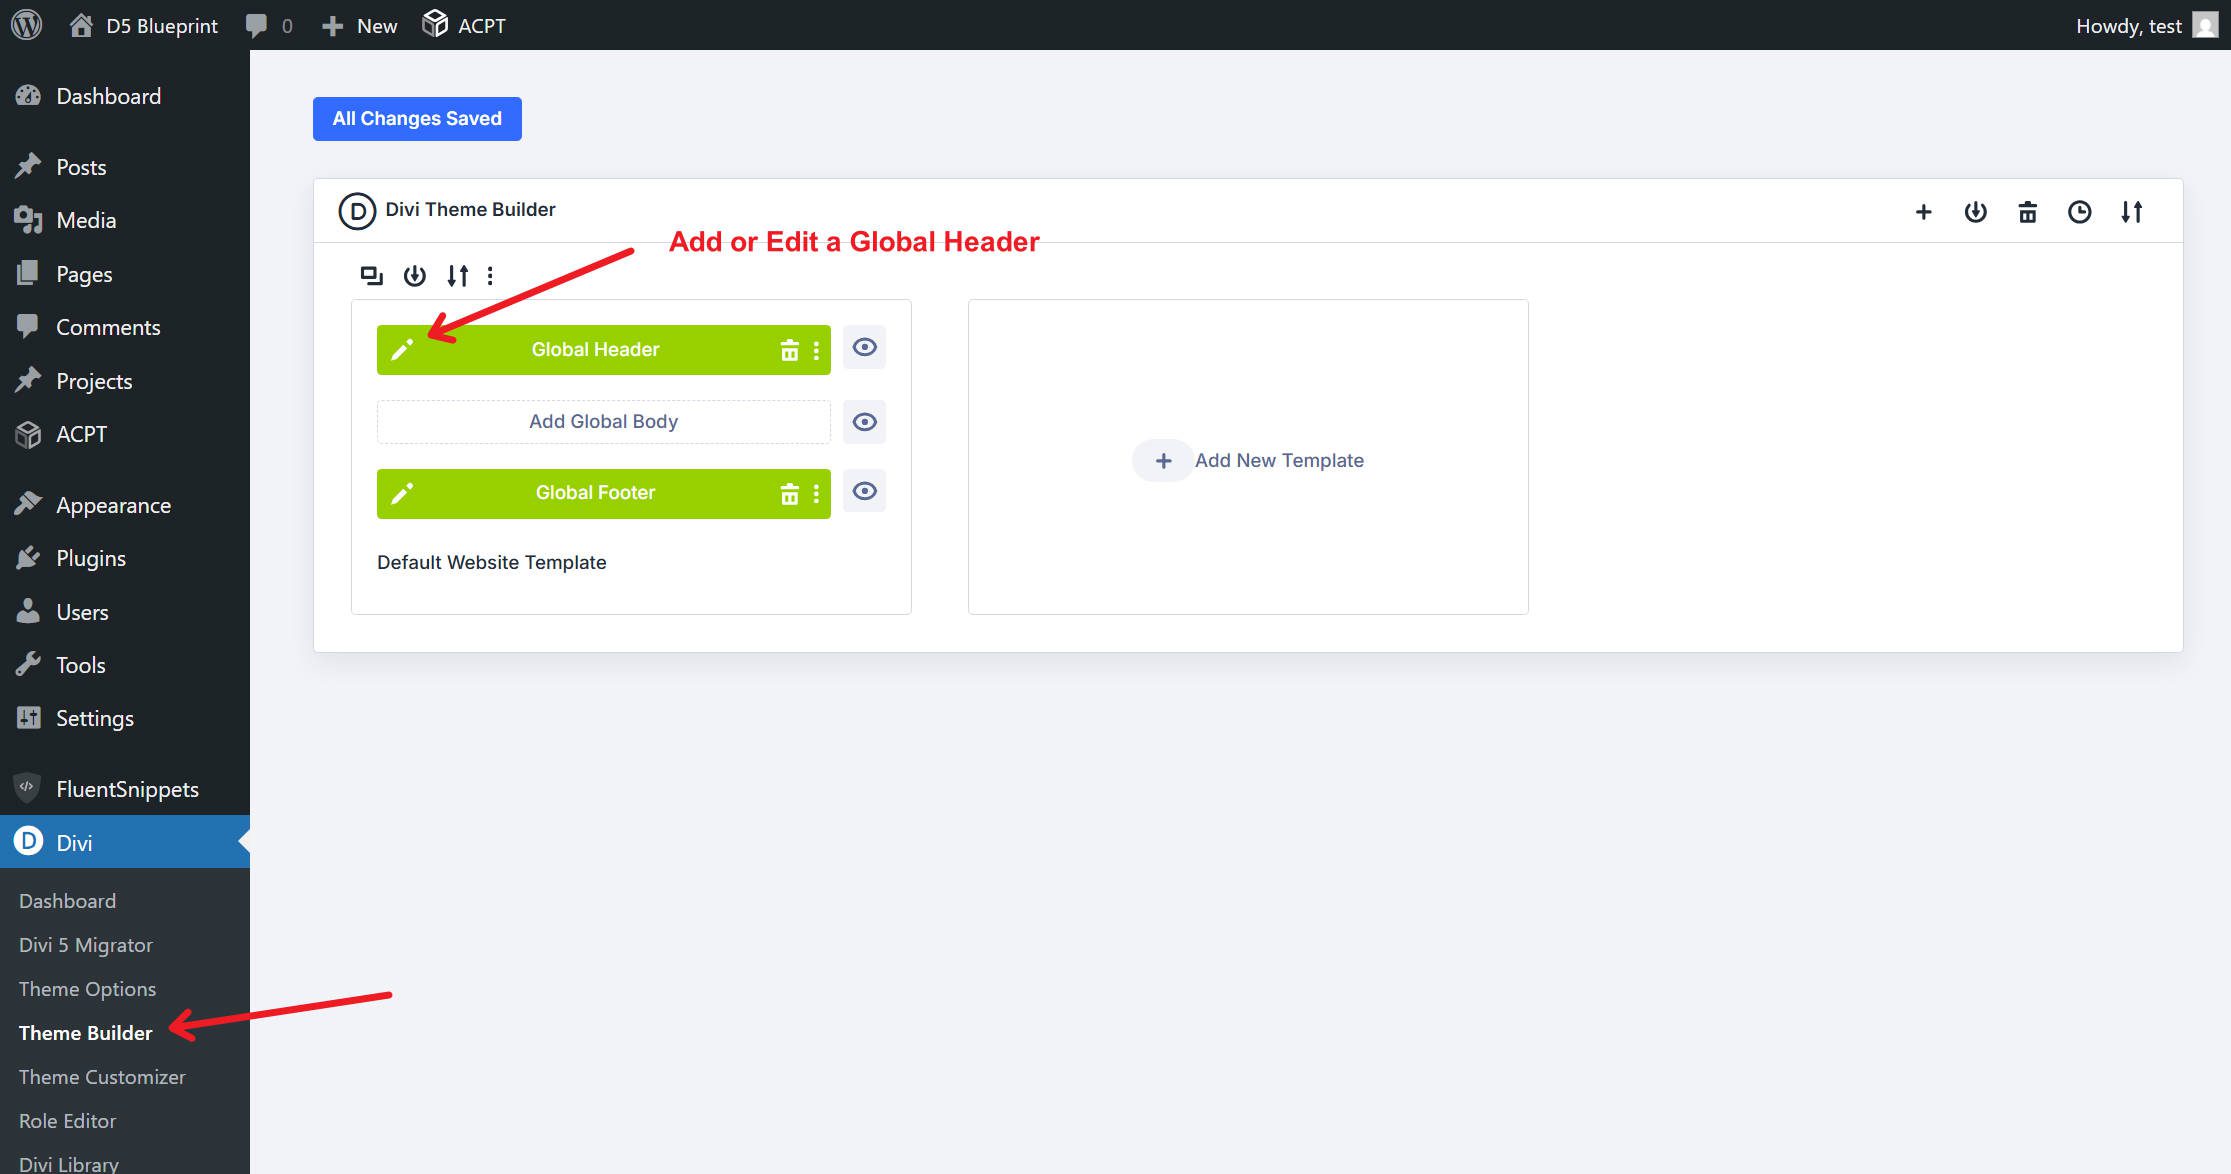
We will be able to construct this in Divi’s Theme Builder the use of a International Header. Doing this mechanically assigns the <header> tag for you.
From there, all navigation parts move inside of a <nav> landmark. You recognize that a component must be within the Navigation tag if it has a hyperlink (in order that contains the emblem and button, on this case). The outer <ul> incorporates 3 record pieces (<li>): the emblem, a nested record of nav hyperlinks, and the CTA button. Display screen readers announce this as a navigation area, and the record semantics keep up a correspondence the connection between menu pieces. We now have a sub-list the use of any other <ul> for the textual content hyperlinks, with every textual content hyperlink wrapped in a <li>.
Now, Divi modules have more than one layers. We will be able to from time to time trade a Module’s HTML component immediately, however different occasions we want to upload a semantic layer above it, so we can additionally use the Ahead of and After HTML choices. The use of either one of the ones choices present in Complicated > HTML shall be all we want for this straightforward navigation and menu to have right kind semantic construction.
Step 1: Create the Container Construction
Open the Theme Builder and edit your International Header template. Once more, the Theme Builder mechanically wraps header templates in a <header> component, so that you don’t want to concern about that component.
Upload the Segment
There must be an empty Segment already within the editor. This instructional will simply practice the naked minimal kinds.
Set the Segment’s peak and backside padding on your most popular worth — we’re the use of clamp(0.9rem, 0.8rem + 0.2vw, 1.1rem). Set the website online gutter the use of left and correct padding with one thing like clamp(24px, 6vw, 90px). We’re the use of Design Variables for either one of those.
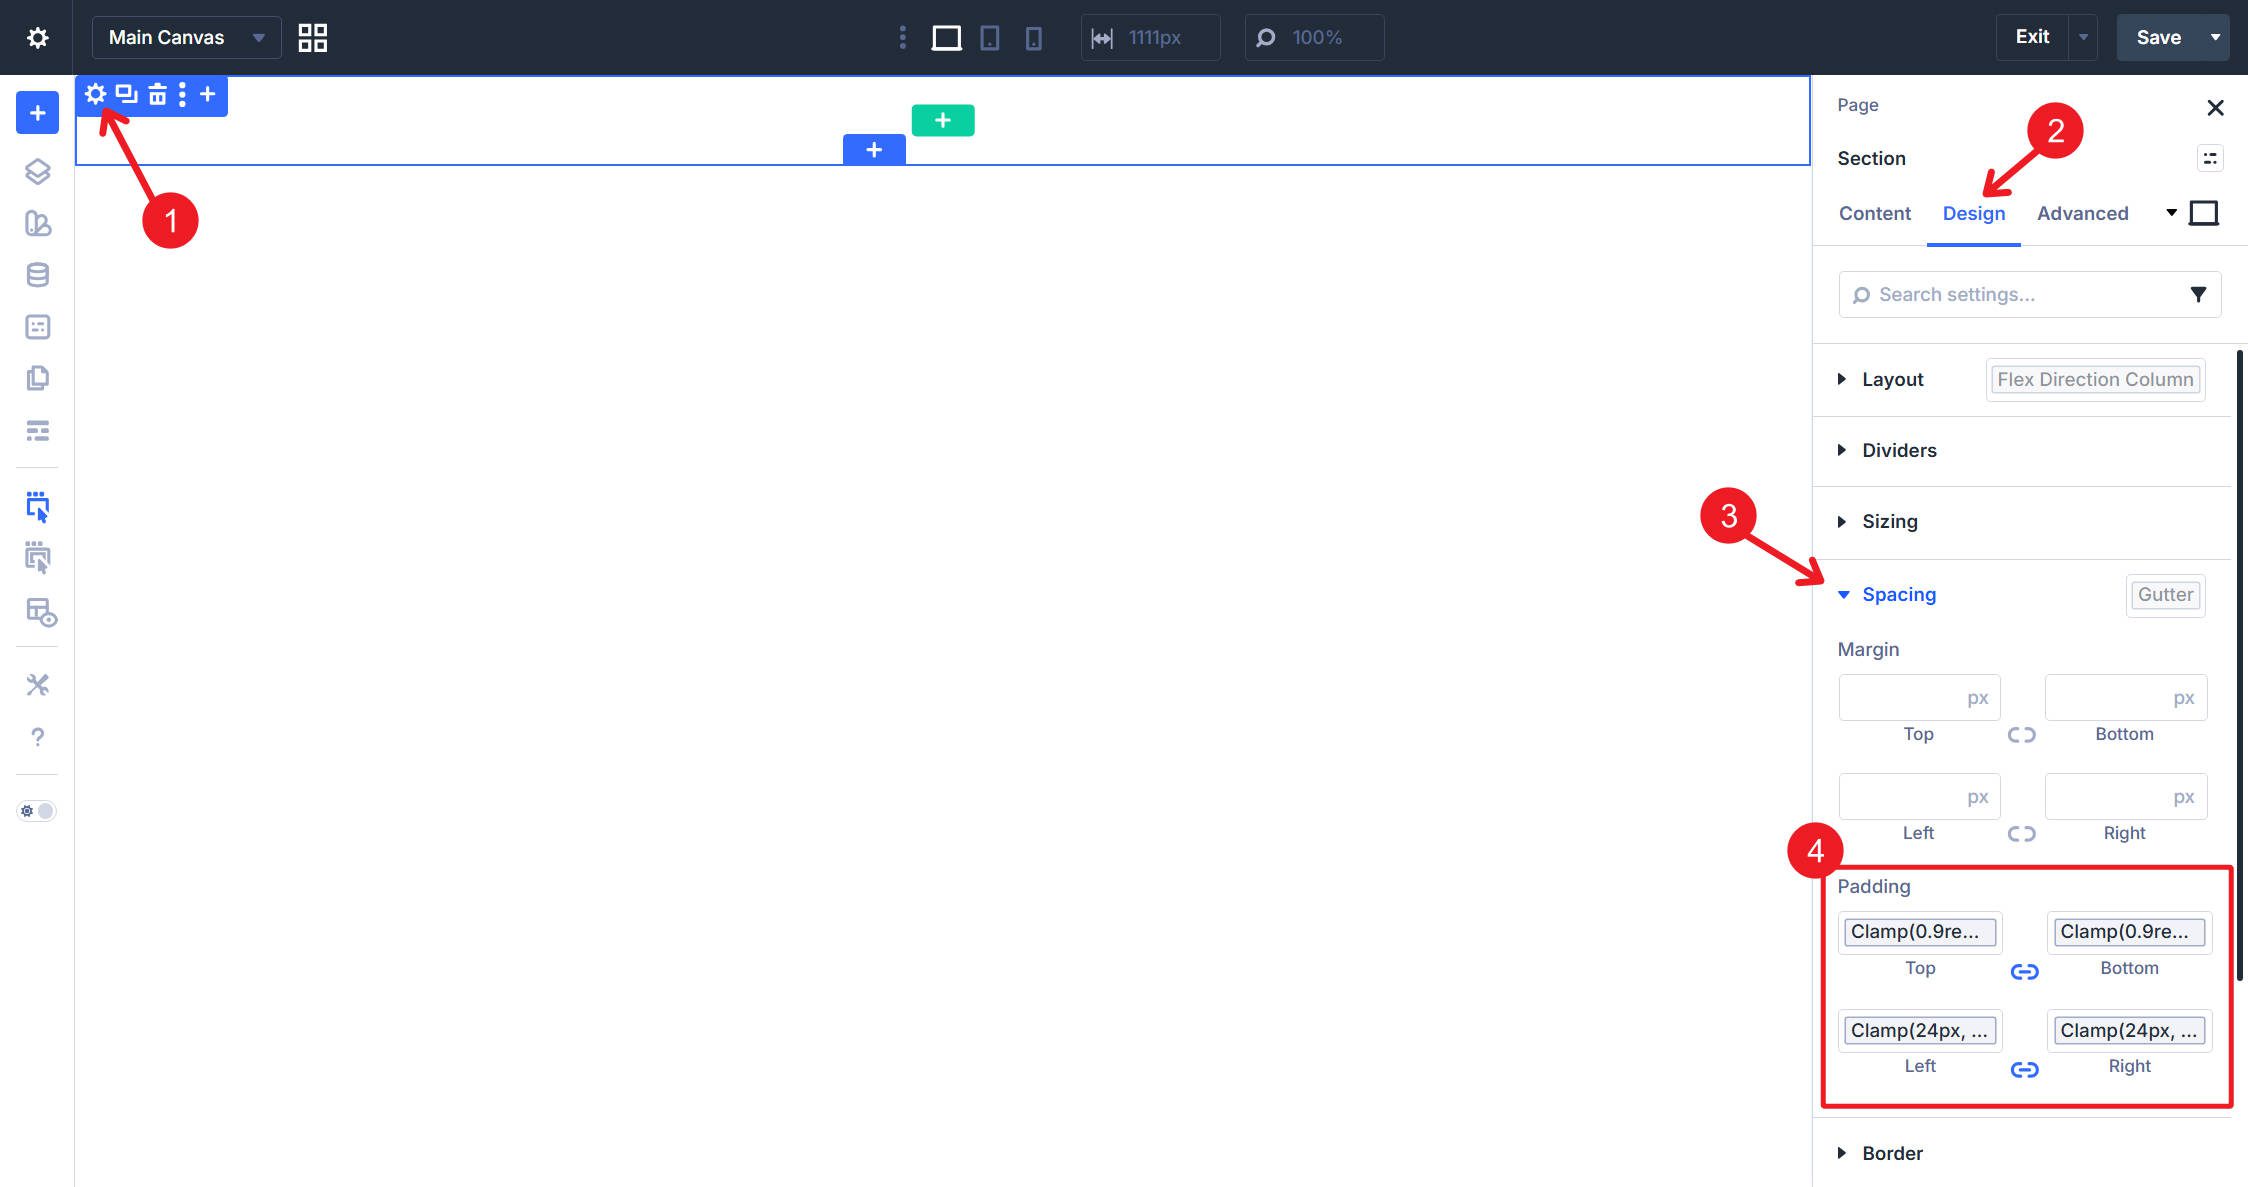
I will be able to additionally upload a background colour.

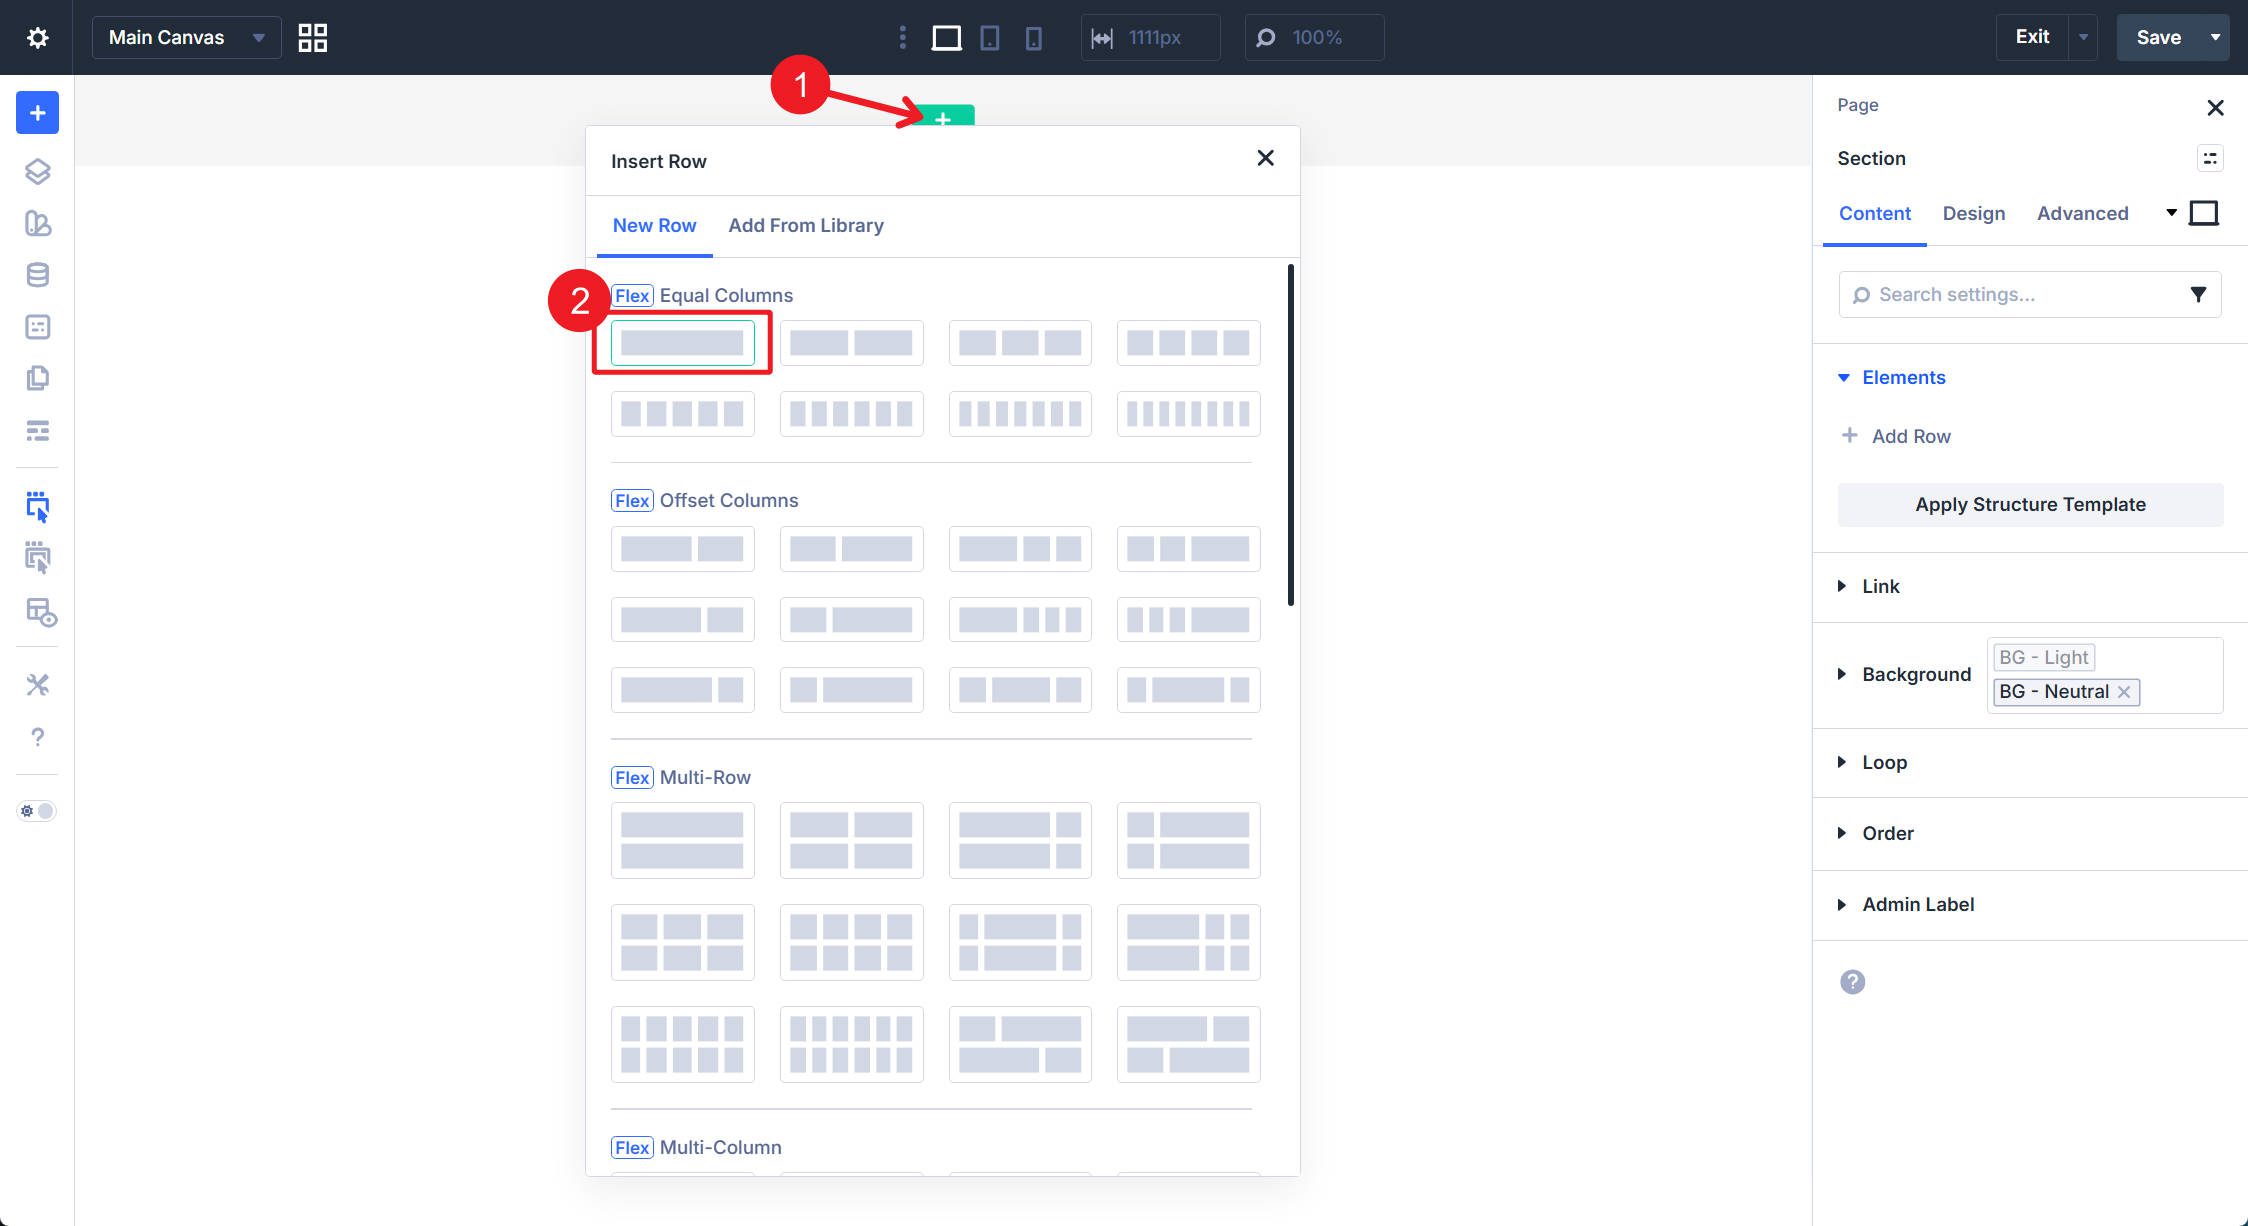
Upload the Row
Upload a Row within the Segment. This Row will later change into the <nav> component. Choose the single-column Flex Row.
Upload the Column
When including a Row, the primary Column will all the time be populated. Since we had a single-column format choose, that is the one column we want.
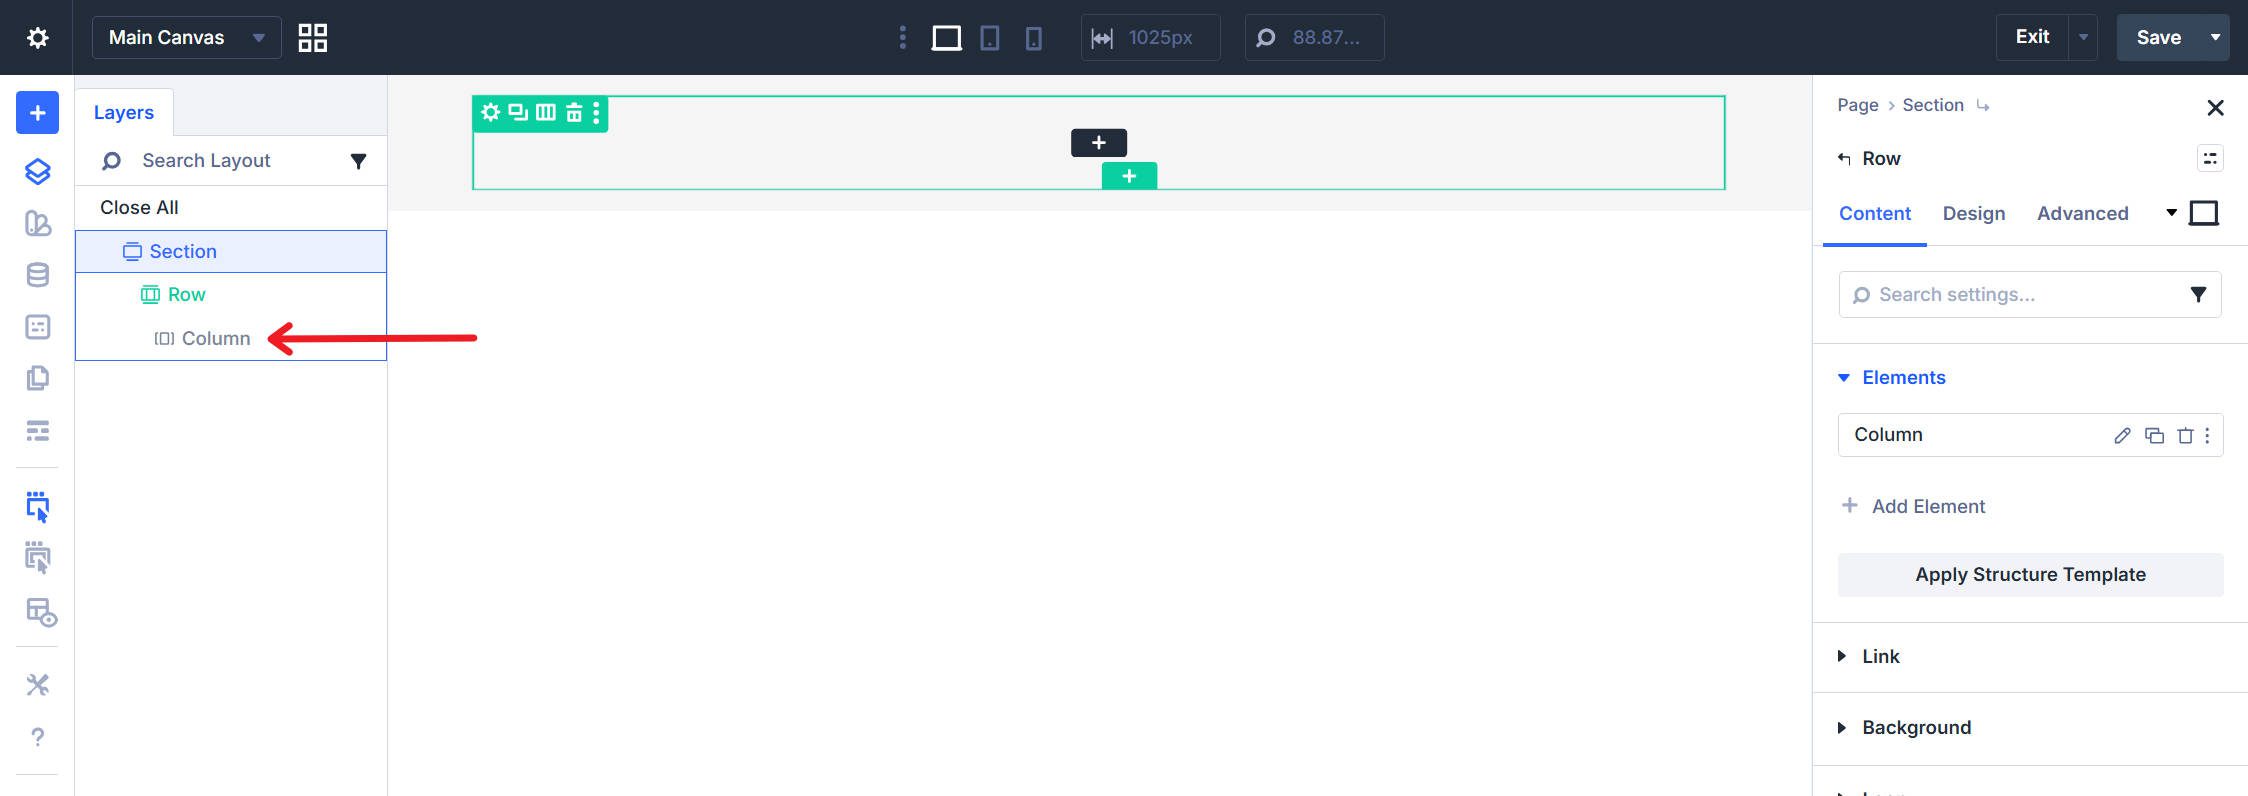
The Column will function the outer <ul> containing all navigation parts.
Step 2: Upload the Modules
With the primary boxes in position, we now transfer directly to including the modules that can shape the navigation parts.
Upload the Emblem (Symbol Module)
Upload an Symbol Module as the primary component within the Column.
Add or choose your brand symbol. Set the picture’s Hyperlink URL on your homepage. This hyperlink is very important — with out it, the emblem gained’t correctly serve as as a navigation merchandise.
Upload the Textual content Hyperlinks (Staff Module with Textual content Modules)
Upload a Group Module after the Symbol within the Column. The Staff serves twin functions: it visually teams the nav hyperlinks and can later output the nested <ul> construction.
Within the Staff, upload 4 Textual content Modules—one for every textual content navigation hyperlink. In every Textual content Module’s content material box, upload the hyperlink textual content and set the link within the Wealthy Textual content editor (Ctrl + Ok). Don’t use the module’s Hyperlink choice staff; the anchor must be inside the textual content content material for right kind semantic output.
Give every a novel textual content and hyperlink as you notice have compatibility.

Upload the CTA Button
The very last thing so as to add is a Button module within the Column after the Staff.
Set the Button Textual content and Button Hyperlink URL. You’ll additionally upload any button kinds you prefer.

Step 3: Configure Structure Settings
Now that each one our construction and inside modules are in position, we want to regulate some Flexbox settings to prepare them horizontally.
Column Structure
Choose the Column and open the Design tab. Beneath Structure, set Structure Course to Row (horizontal) and set Justify Content material to House Between for logo-left, nav-center, button-right distribution. Additionally set Align Pieces to Middle.
Staff Structure
Choose the Staff Module and open the Design tab > Structure. Set Structure Course to Row. Set Justify Content material to House Round and use an non-compulsory tradition hole worth for constant spacing between nav hyperlinks.
Step 4: Set Semantic Parts
The design and format can actually be no matter you need them to be. However now shifting into Semantic construction, we’ll turn out to be generic <div> parts into legitimate navigation HTML.
In the event you upload any or rearrange the weather, the precise steps under may want to be tweaked. However assuming you might be rather with reference to the construction defined above, the stairs under offers you a completely legitimate implementation.
Choose the Row. Open the Complicated tab. In finding the HTML choice staff and the Component Kind dropdown. Trade it from the default to <nav>. The Row now outputs as <nav magnificence=”…”> as a substitute of <div magnificence=”…”>.
Column: Set to ul
Choose the Column. Within the Complicated tab > HTML choice staff, set Component Kind to <ul>. The Column turns into the outer unordered record containing all navigation pieces.
It’s also totally legitimate to make use of the <menu> Component sort on this context if you need. It is a uncommon case the place those two parts are semantically interchangeable on this context.
Symbol Module: Set to li
Choose the Symbol Module. Within the Complicated tab, set Component Kind to <li>. The emblem turns into a listing merchandise inside the navigation record. Needless to say the picture/brand right here must have a hyperlink.
![]()
Staff Module: Set to ul with li Wrapper
The Staff Module calls for two semantic adjustments. First, within the Complicated tab, in finding HTML Ahead of and input <li>. In finding HTML After and input </li>. This wraps all the Staff in a listing merchandise component. This guarantees the guardian <ul> (the Column) maintains a legitimate HTML construction with all of its direct kids (which must be <li>).
Subsequent, set the Component Kind to <ul> — this makes the Staff output as a nested unordered record. That is vital once we achieve the Textual content Modules inside the Staff.

Vital Word: Previous, we discussed that <menu> and <ul> are interchangeable. This is, in truth, true with the top-most <ul> or <menu>. Alternatively, for the reason that Staff Module is already nested inside a <ul>/<menu>, we will be able to’t use <menu> right here and should use <ul>.
Textual content Modules: Set to li
Choose every Textual content module within the Staff. Set Component Kind to <li> for all 4. Each and every nav hyperlink turns into a listing merchandise inside the nested record.
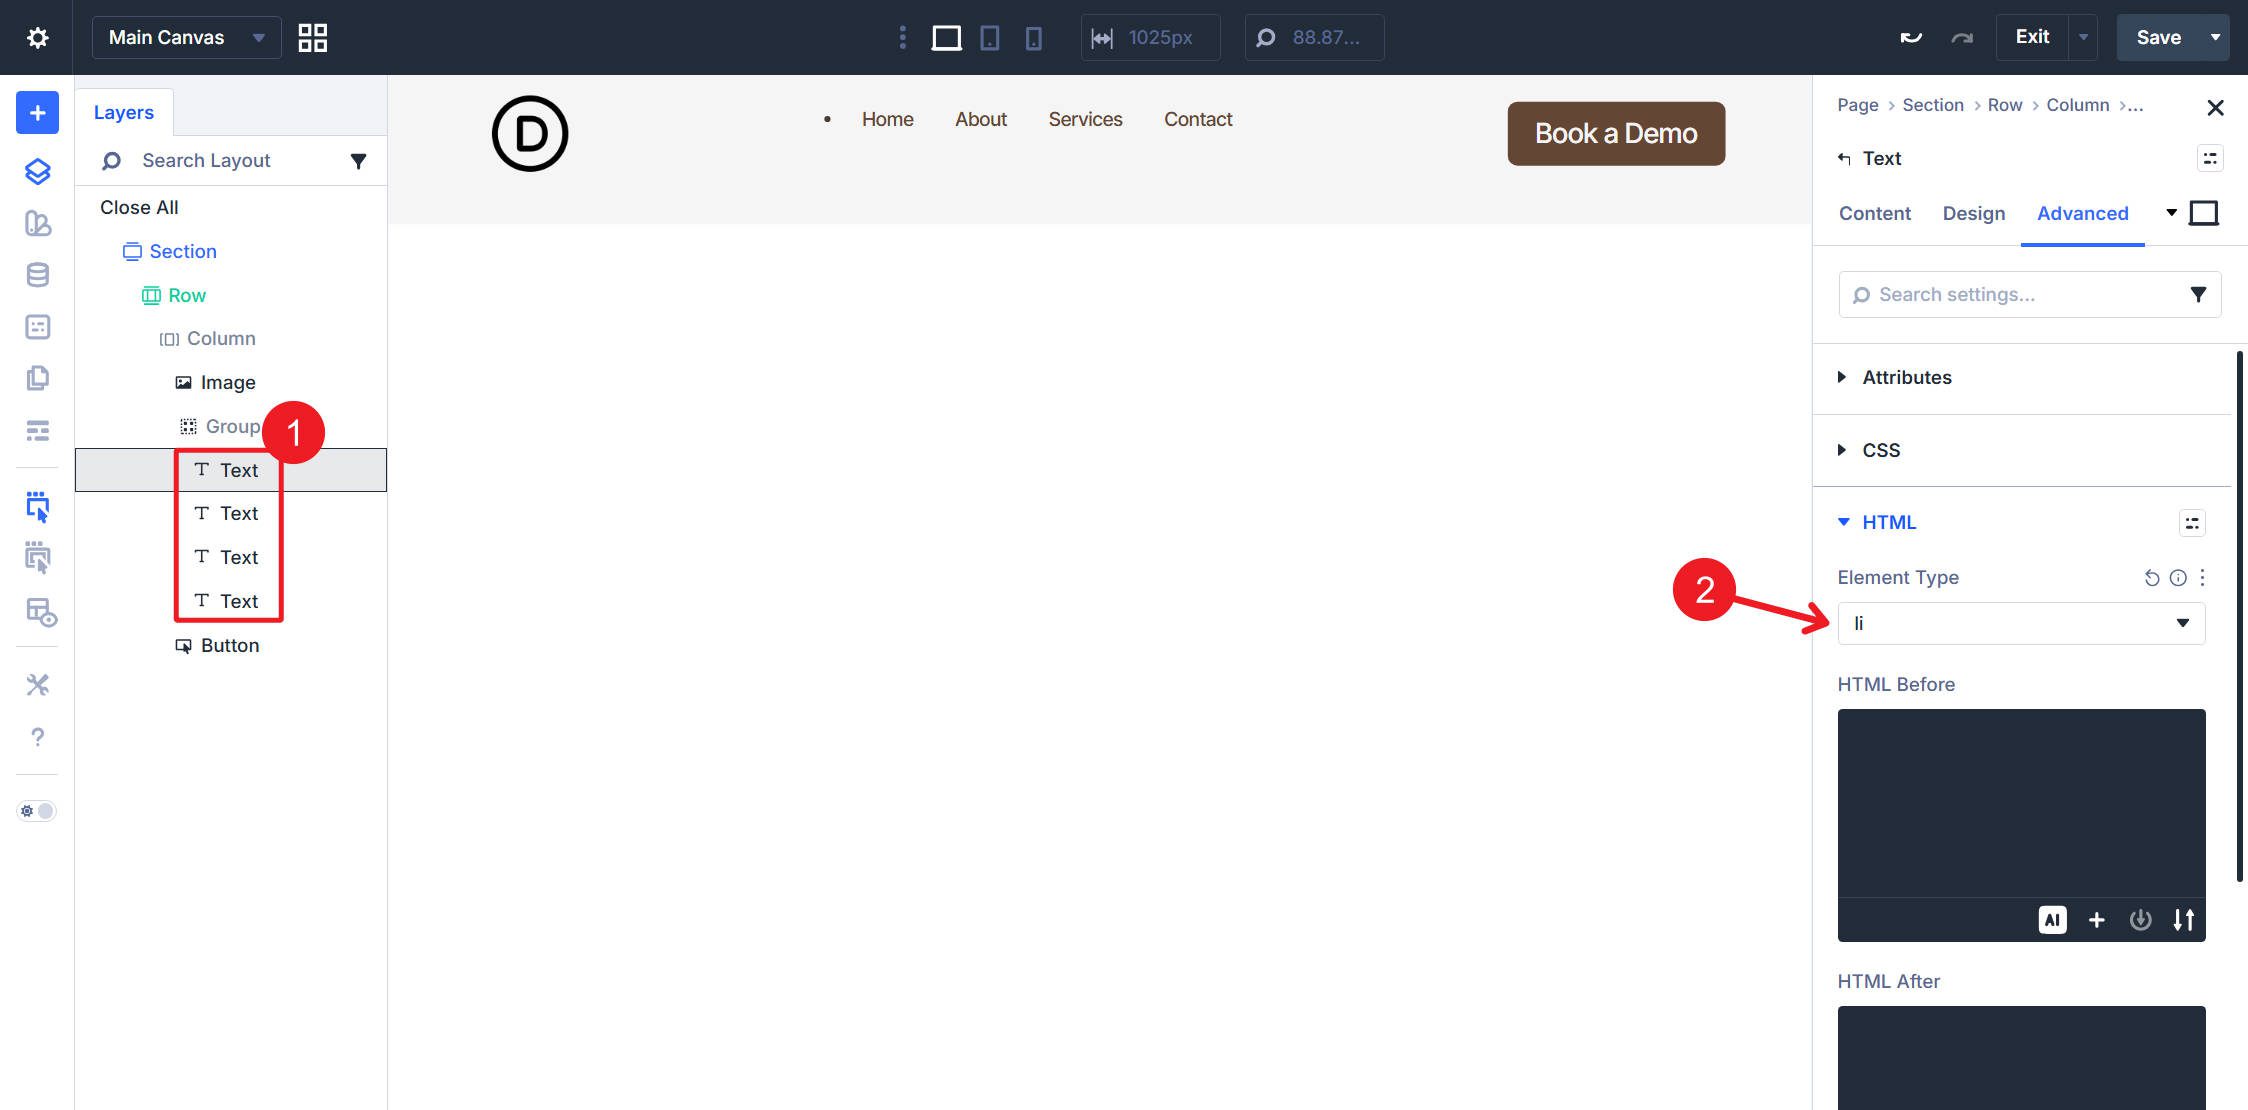
And since we added hyperlinks to the textual content of every within the module’s Wealthy Textual content editor, additionally they have the vital <a> tags.
Button Module: Set to a with li Wrapper
Choose the Button Module subsequent. Divi mechanically assigned the button an Component Form of <a>, and we wish to stay this. Alternatively, we want to upload <li> to HTML Ahead of and </li> to HTML After.

The button turns into a listing merchandise containing an anchor tag, matching the construction of alternative navigation parts.
Step 5: Configure Spacing
You almost certainly see some record dots and off-center spacing. This is as a result of, when introducing a few of the ones HTML parts, we may have added undesired spacing to the format. Specifically, lists regularly practice default styling that we’ll counteract now.

The packing containers right here display some added spacing, whilst the arrows display record bullet issues
You’ll activate X-Ray Mode to get a way of one of the crucial added spacing.

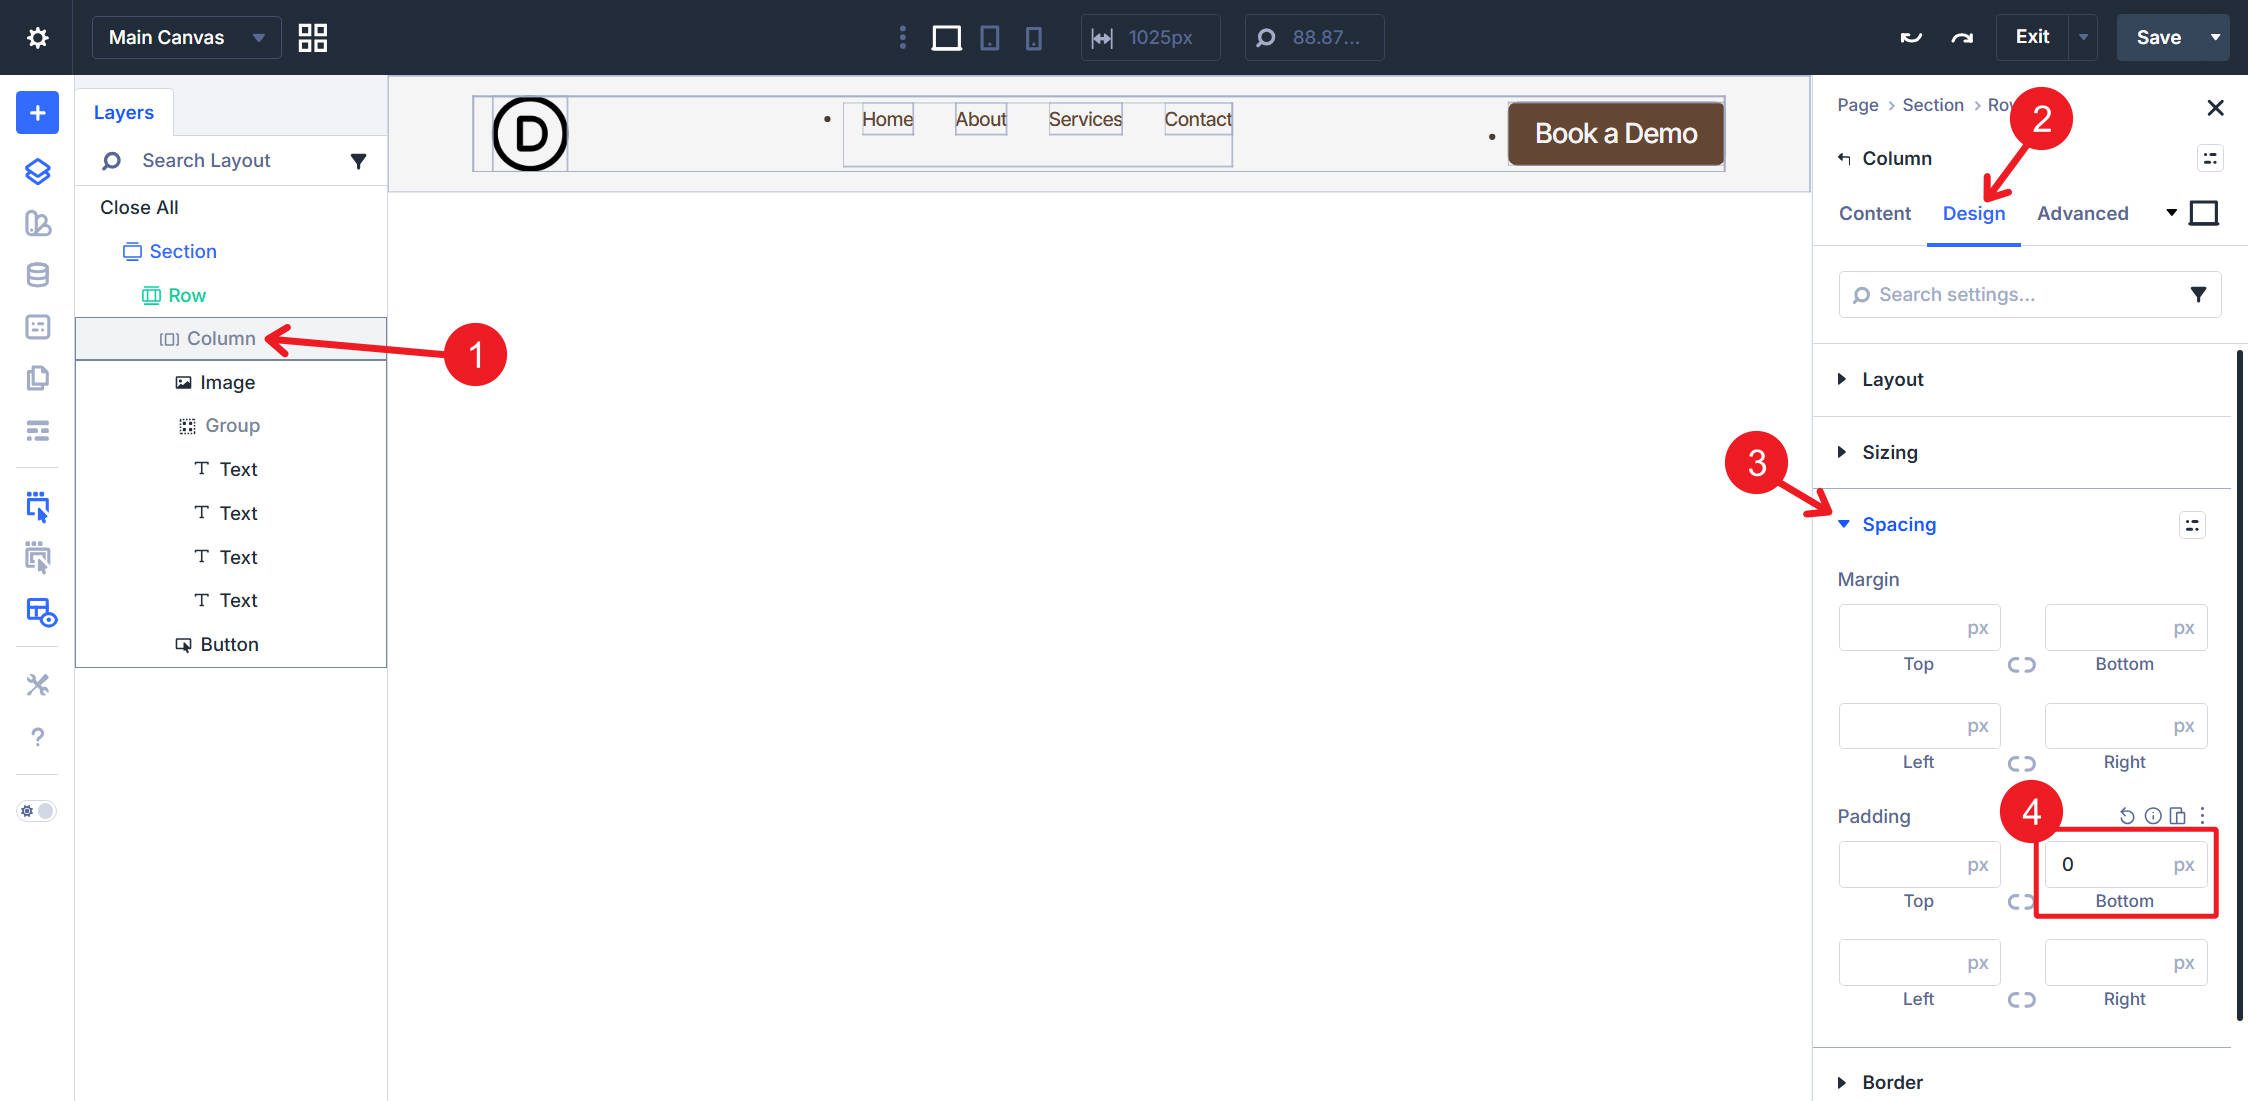
Column Spacing
Choose the <nav> Column. Within the Design tab underneath Spacing, set Padding Backside to 0px.
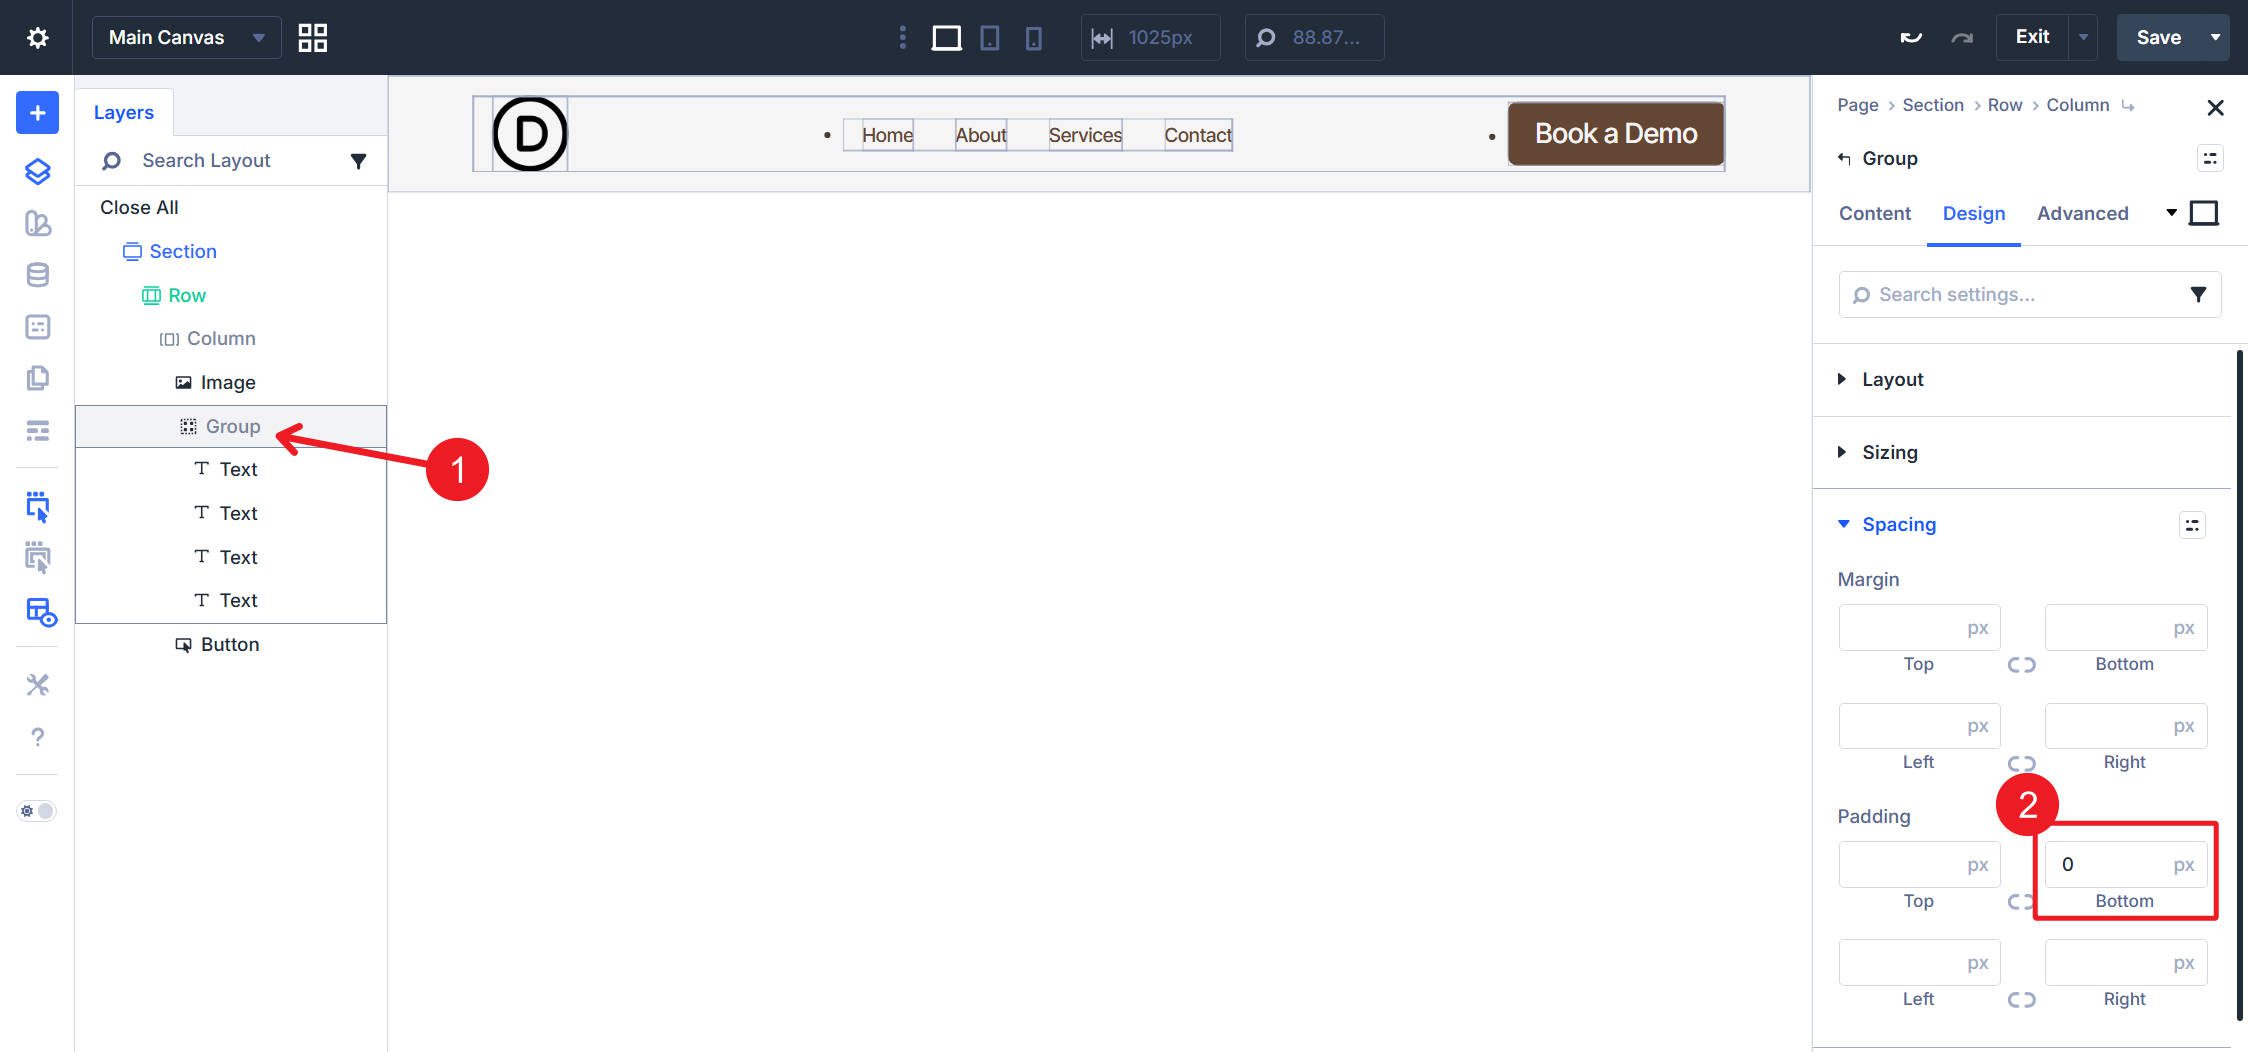
Staff Spacing
Choose the Staff Module as a result of we want to do the similar factor. Set Padding Backside to 0px.
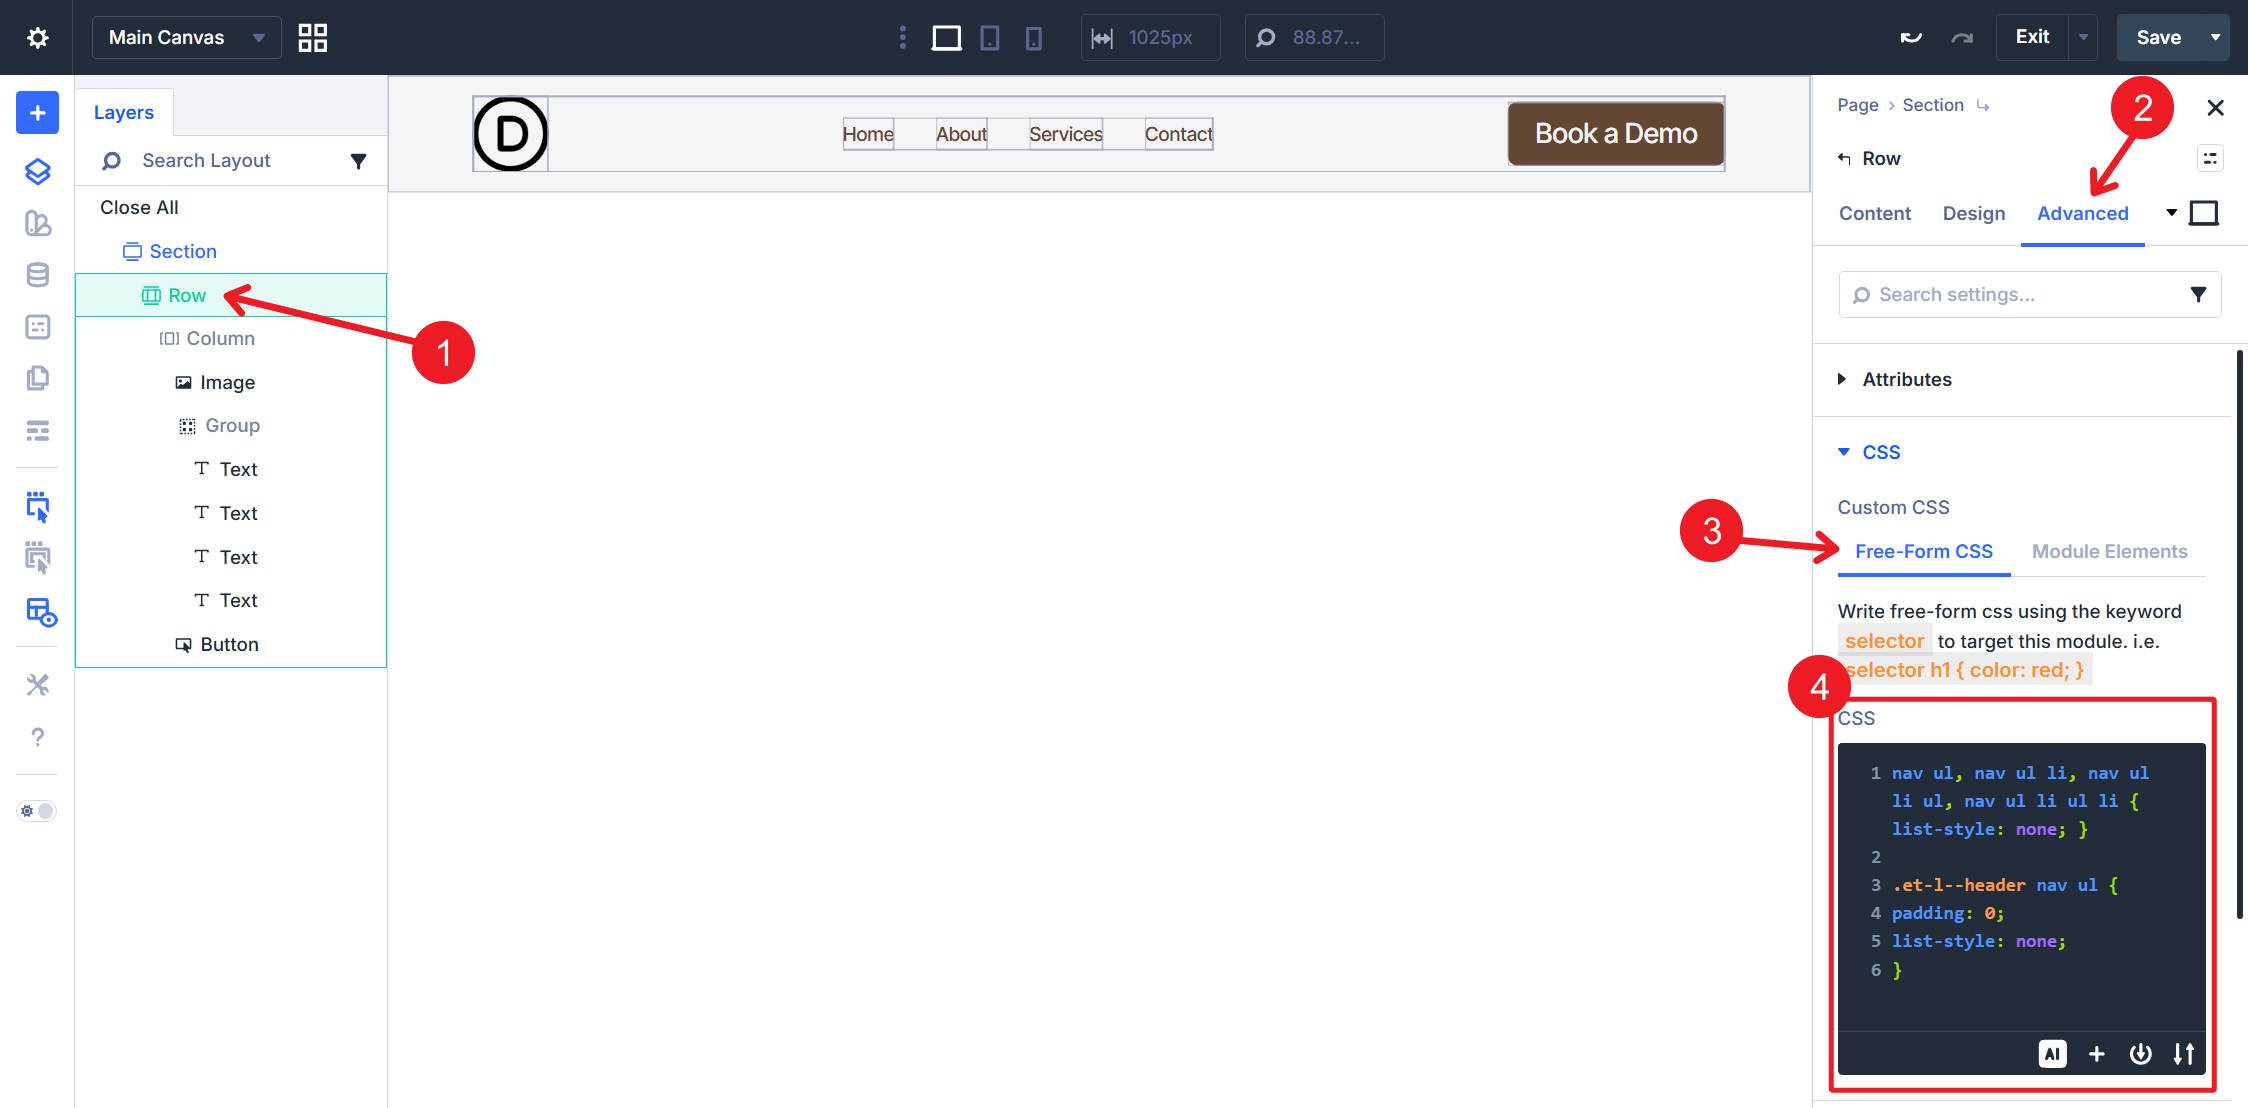
Step 6: Upload CSS Reset
Having addressed the undesirable spacing, we will be able to now temporarily maintain the undesirable bullet issues within the record parts. Choose the Row and open the Complicated tab > CSS. Within the Loose-Shape CSS box, upload this CSS:
nav ul,
nav ul li,
nav ul li ul,
nav ul li ul li {
list-style: none;
}
.et-l--header nav ul {
padding: 0;
list-style: none;
}
The primary a part of this CSS gets rid of record bullets from all record parts inside the navigation. The second one section gets rid of the ultimate little bit of <ul> spacing that isn’t simply obtainable in Divi’s spacing choices.
At this level, you’ll be able to flip off X-Ray Mode as a result of our spacing is mounted.
Ultimate Consequence
Save, then move to the entrance finish of your website online to view the header. The visible end result fits a typical navigation format: brand at the left, nav hyperlinks within the middle, CTA button at the correct. The underlying HTML, on the other hand, is now semantically proper.

Check out the component within the browser developer gear to peer the construction:
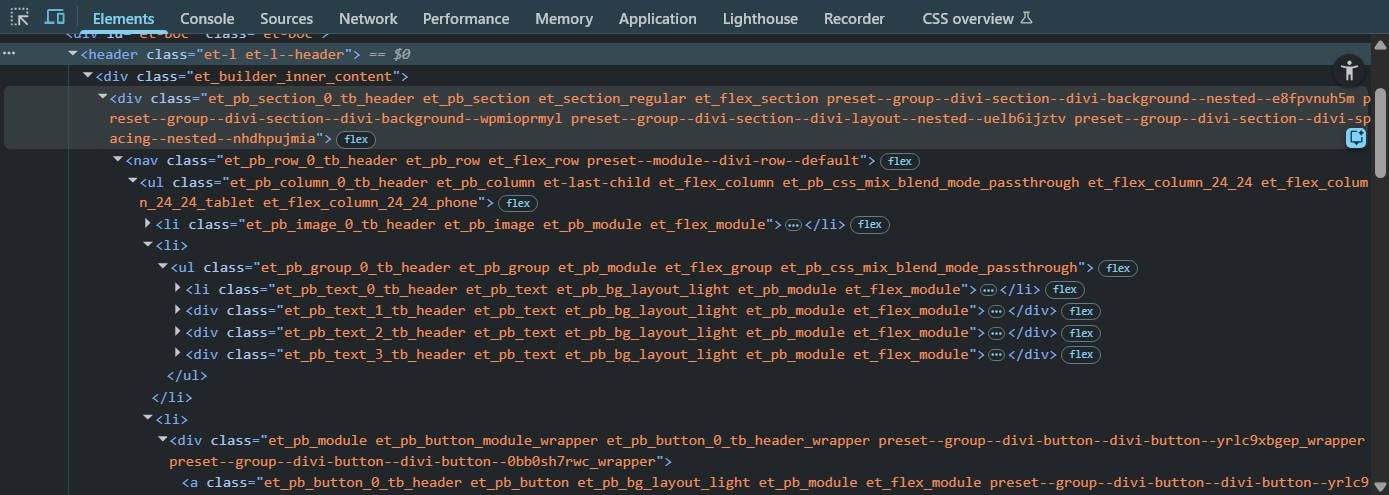
In the event you deviated from the construction and module make-up that we used on this instructional, this is completely ok. Alternatively, the precise manner you wish to have to use the nav, ul, li, and a tags may range rather. This may also be difficult as a result of few people are professionals in semantic construction.
What I’ve discovered useful is copying the HTML of my header from my Browser’s DevTools and supplying it to my AI of selection.
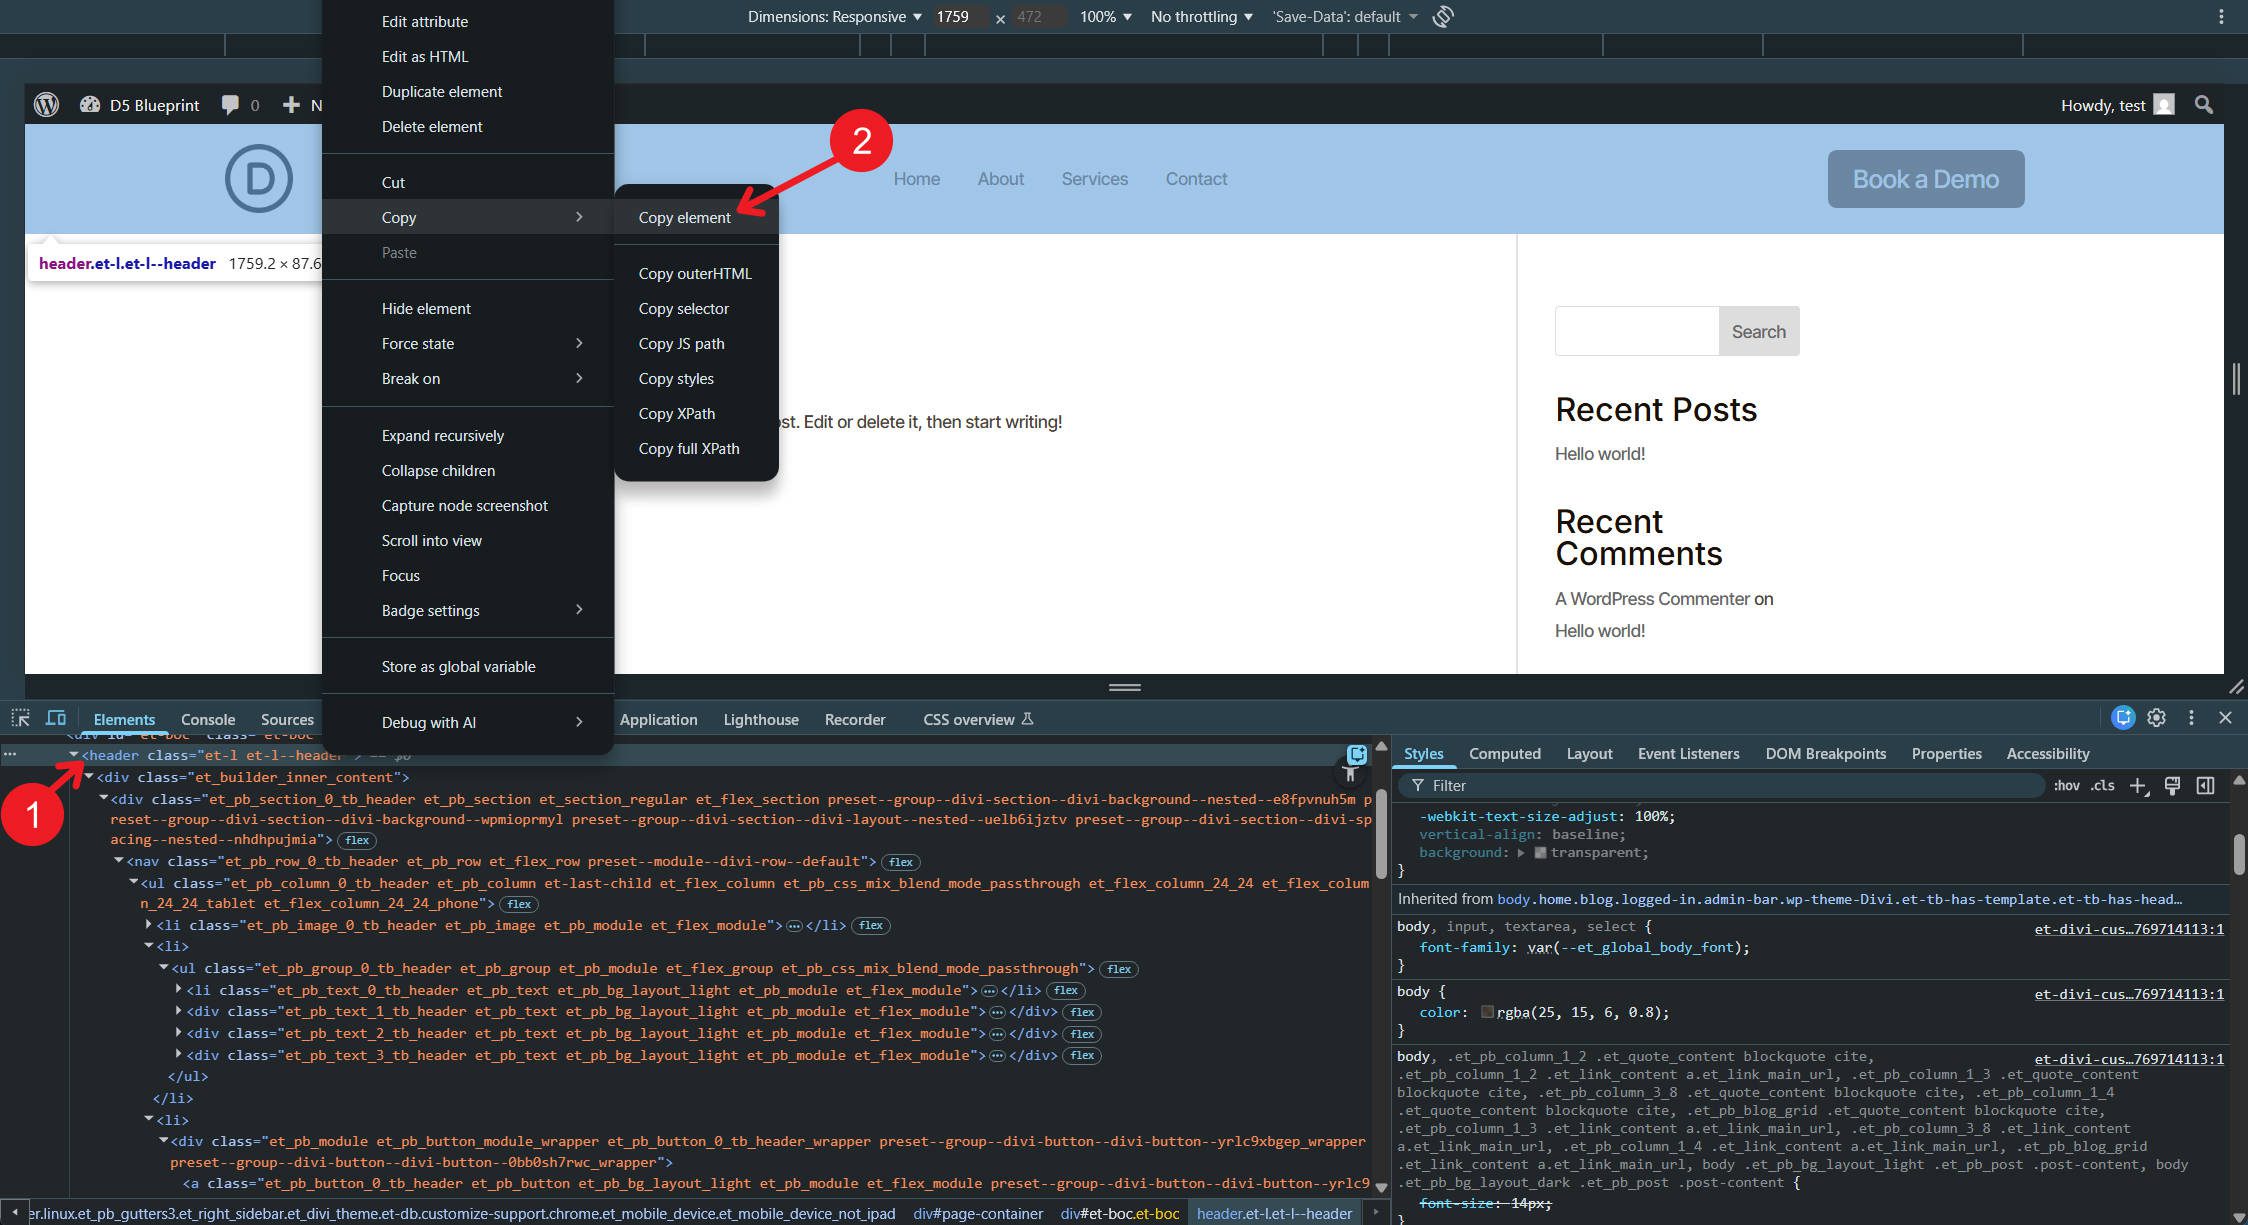
From there, ask whether or not the semantic construction is legitimate and what wishes to switch to make it legitimate. You’ll even give the AI the URL of this weblog submit so it may possibly learn up on some Divi 5 context and supply higher directions that can assist you achieve your required finish end result.
Get started Development In Divi 5 As of late!
Divi 5‘s semantic component controls liberate development strategies that earlier variations of Divi couldn’t toughen. Development navigation from atomized modules is now imaginable, and with it, the assigning of semantic parts.
The Component Kind atmosphere, blended with HTML Ahead of and HTML After fields, supplies the regulate vital to output legitimate HTML5 constructions from any module aggregate. Development a navigation is one utility — the similar method applies to construction tradition footers, sidebars, article layouts, and any element requiring particular semantic markup.
Divi customers now have the gear to construct obtainable, semantic HTML with out leaving behind the Visual Builder workflow. The distance between “what Divi outputs” and “what legitimate HTML calls for” has closed.
The submit How To Build A Simple Navigation Menu With Divi 5 (Including HTML Structure) gave the impression first on Elegant Themes Blog.
Contents
- 1 Why Construct Customized Navigation?
- 2 The Goal HTML Construction
- 3 Step 1: Create the Container Construction
- 4 Step 2: Upload the Modules
- 5 Step 3: Configure Structure Settings
- 6 Step 4: Set Semantic Parts
- 7 Step 5: Configure Spacing
- 8 Step 6: Upload CSS Reset
- 9 Ultimate Consequence
- 10 Get started Development In Divi 5 As of late!
- 11 WordPress Theme Building Instructional For Inexperienced persons: Unharness Your Inside Internet…
- 12 The Divi Black Friday Sale Is Coming! Win A Free MacBook Pro While You Wait
- 13 Demystifying Advertising and marketing’s 6 Greatest Blended Messages of 2024 with Jasper’s Head of U...

0 Comments