
OpenClaw is an excellent open-source instrument that transforms AI into an self sustaining agent. No longer like fundamental chatbots which could be confined to a browser tab or an app, OpenClaw shall we in AI to execute tasks directly on your gadget, identical to managing data, working terminal directions, learning calendars, and even sending messages to WhatsApp, Telegram, and Discord.
While OpenClaw supplies seamless, out-of-the-box make stronger for business giants like OpenAI, Anthropic, and Google Gemini, unfortunately, it in recent years lacks native integration for DeepSeek.
It is a important hurdle because of DeepSeek provides a kind, DeepSeek v3, that competition GPT-5, then again at a staggering 95% less expensive value.
In this data, we’ll walk you throughout the stairs, applying a few information configurations, so we can have the most productive of all sides: OpenClaw’s automation purposes with DeepSeek’s cost-efficient intelligence.
Let’s get started.
Should haves
Forward of we switch further, make sure that you have the following able.
- Node.js (v22 or higher) and NPM
- DeepSeek API key
Once you have them able, you’ll proceed to place in and organize OpenClaw.
Step 1: Putting in place OpenClaw
First, fire up your terminal and then hit the following command to place in OpenClaw:
npm arrange -g openclaw
Apply: This arrange step might take a while depending on your internet connection tempo.
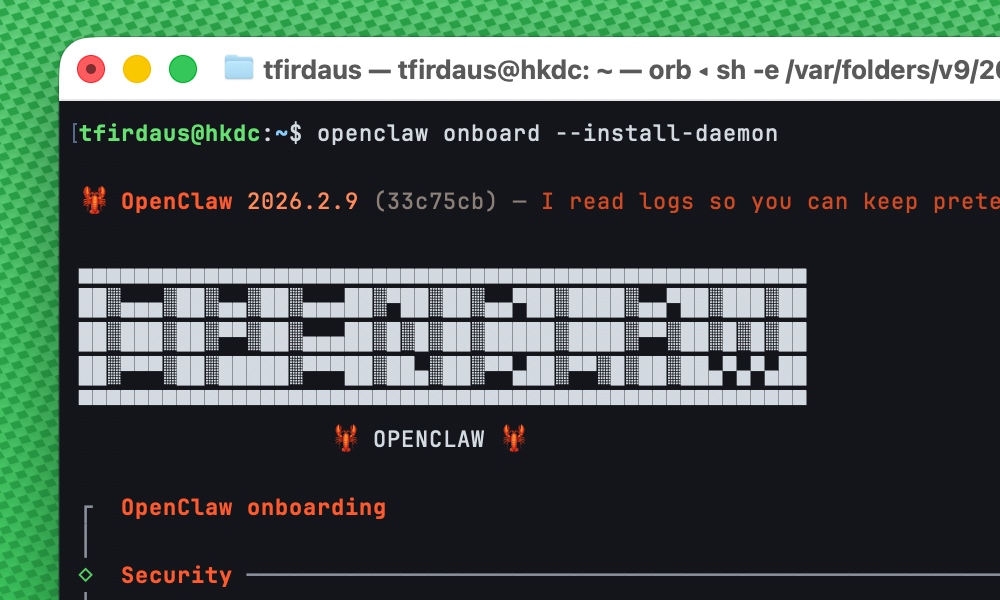
Step 2: Run Onboarding
Next, we need to run the onboarding process.
openclaw onboard --install-daemon
This will arrange the OpenClaw daemon and knowledge you through selecting models, providers, and verbal alternate channels.
In this example, we’re going to focus on integrating DeepSeek. When brought about, use the left and correct arrow keys to toggle between possible choices, and hit Return to make a choice the specified risk. Proper right here’s the way you’ll answer the following questions:
- I understand this is tricky and inherently bad. Continue? Positive
- Onboarding mode. Quickstart
- Type/auth provider. Skip for now
- Clear out models by way of provider. Minimax (Simply because it has 2 models, which makes it more straightforward to make a choice and cleanup later)
- Default kind. minimax/MiniMax-M2
- Select channel. Skip for now
- Configure skills now? No (We can always reconfigure it later)
- Allow hooks? Skip for now (hit House to make a choice)
- How do you want to hatch your bot? Do this later (This present day, it received’t art work since we haven’t configured DeepSeek however)
Whilst you see Onboarding complete. Use the dashboard link above to keep an eye on OpenClaw.
, you’ll hit Ctrl + C to head out the onboarding process, and proceed to our next step.
Step 3: Configure DeepSeek Models
We’ll need to keep an eye on the configuration file which is located inside the ~/.openclaw/openclaw.json file. We’ll get started with defining DeepSeek models by way of editing the models segment inside the configuration file.
Now, let’s add the DeepSeek models configuration to the configuration file:
{
    "models": {
        "mode": "merge",
        "providers": {
            "deepseek": {
                "baseUrl": "https://api.deepseek.com/v1",
                "apiKey": "${DEEPSEEK_API_KEY}",
                "api": "openai-completions",
                "models": [
                {
                    "id": "deepseek-chat",
                    "name": "DeepSeek Chat (v3.2)",
                    "reasoning": false,
                    "input": [
                    "text"
                    ],
                    "fee": {
                        "input": 2.8e-7,
                        "output": 4.2e-7,
                        "cacheRead": 2.8e-8,
                        "cacheWrite": 2.8e-7
                    },
                    "contextWindow": 128000,
                    "maxTokens": 8192
                },
                {
                    "identity": "deepseek-reasoner",
                    "name": "DeepSeek Reasoner (v3.2)",
                    "reasoning": true,
                    "input": [
                    "text"
                    ],
                    "fee": {
                        "input": 2.8e-7,
                        "output": 4.2e-7,
                        "cacheRead": 2.8e-8,
                        "cacheWrite": 2.8e-7
                    },
                    "contextWindow": 128000,
                    "maxTokens": 65536
                }
                ]
            }
        }
    }
}
Understand that the apiKey is the usage of an environment variable ${DEEPSEEK_API_KEY}. This is to ensure that the API key isn’t exposed inside the configuration file. Later we’ll need to set this environment variable previous than working OpenClaw.
Step 4: Configure Agents
Next, we need to configure the agents segment, which devices the tick list of models and the default kind to be used by way of the agent.
In this case, we’ll keep an eye on the agents segment to use DeepSeek models that we’ve merely defined inside the previous step, as follows:
{
    "agents": {
        "defaults": {
            "kind": {
                "primary": "deepseek/deepseek-chat"
            },
            "models": {
                "deepseek/deepseek-chat": {},
                "deepseek/deepseek-reasoner": {}
            },
            "workspace": "~/.openclaw/workspace",
            "compaction": {
                "mode": "safeguard"
            },
            "maxConcurrent": 4,
            "subagents": {
            "maxConcurrent": 8
            }
        }
    }
}
Step 5: Set Setting Variable
Now, we need to set the environment variable DEEPSEEK_API_KEY to the price of our DeepSeek API key.
Linux and macOS
On Linux and macOS, you’ll run the following command on your terminal:
export DEEPSEEK_API_KEY="your_api_key_here"
To persist the API key right through categories, you’ll moreover add the above line on your ~/.bashrc, ~/.zshrc, or /and so forth/environment file.
Don’t put out of your mind to modify your_api_key_here together with your precise DeepSeek API key. And must you’ve merely added it in some of the data, you’ll need to restart your terminal for the changes to take affect.
House home windows
On House home windows, you’ll set the environment variable for the existing session in Command Urged:
set DEEPSEEK_API_KEY=your_api_key_here
Or, setx, as an example:
setx DEEPSEEK_API_KEY "your_api_key_here"
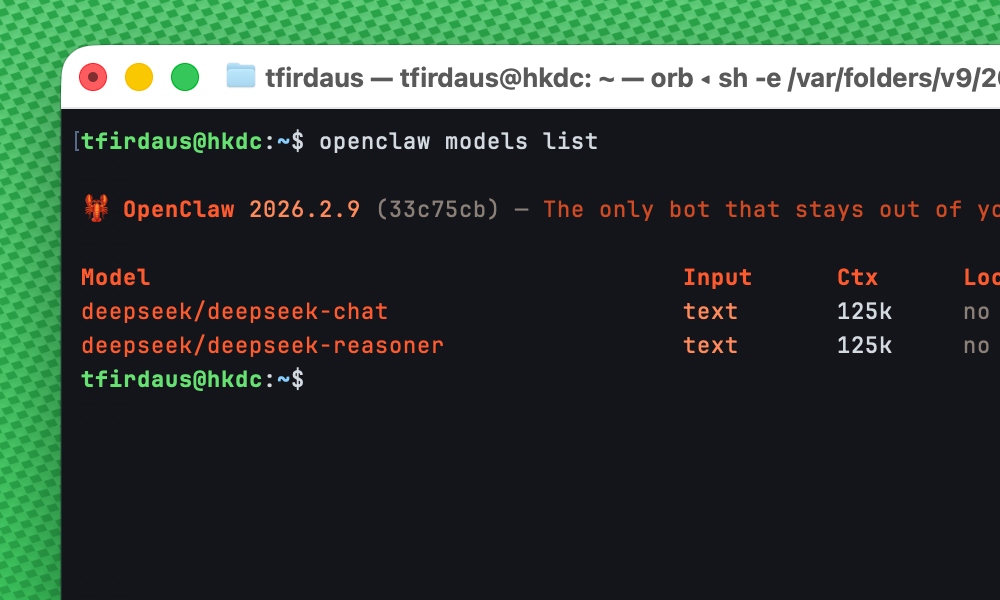
Step 6: Make certain that DeepSeek Models are on the File
Now that we’ve configured the models and set the environment variable, we can take a look at that the DeepSeek models are available to OpenClaw by way of working the following command:
openclaw models tick list
You will have to see the following output:
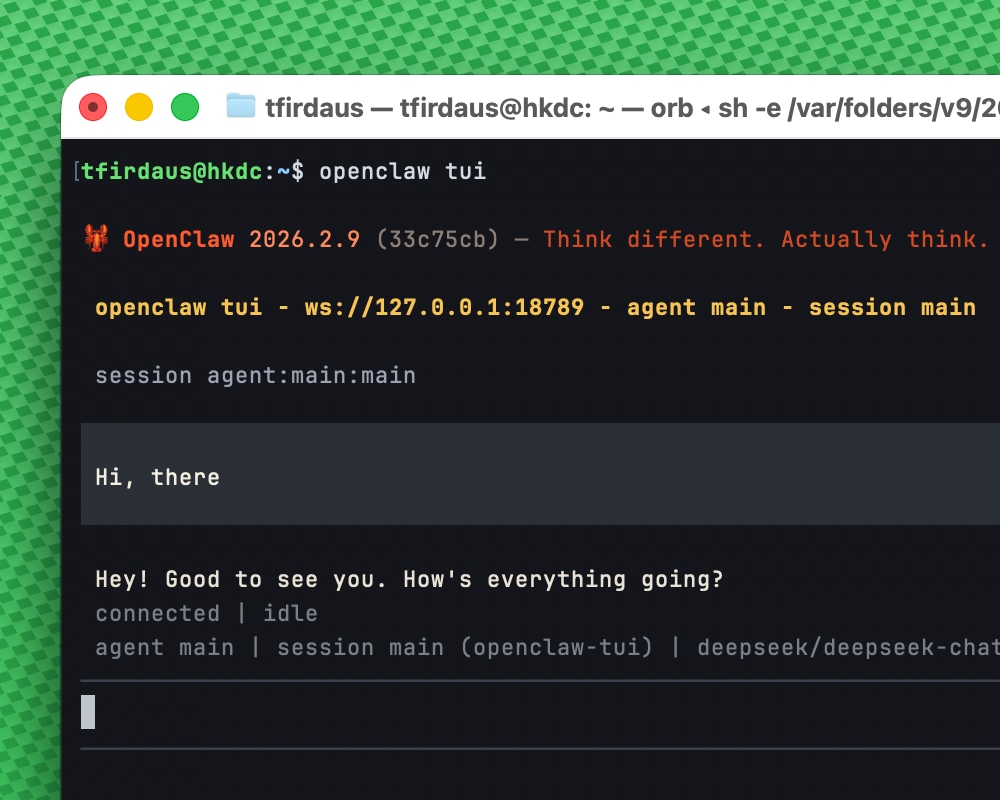
Step 7: Hatch Your First Agent
The whole thing is now configured. We can now hatch our first agent.
In this case, I’m going with TUI for the reason that interface. So we run:
openclaw tui
This will get began the TUI interface where you’ll chat with the agent. And we can see the sort that’s in recent years being used is deepseek/deepseek-chat.
Apply: If in case you have a prior to now lively session or have prior to now installed OpenClaw, you wish to have to restart the gateway previous than working a brand spanking new TUI session. Run the following command:
openclaw gateway restart
Make sure to do this previous than working a brand spanking new TUI session.
Conclusion
And there you will have it! You’ve successfully bridged OpenClaw with DeepSeek.
Now it’s time to position your new agent to art work. Whether or not or no longer it’s managing complex workflows, coping with data, or automating tasks and messaging.
You’re all set to do additional for a lot much less.
The submit Methods to Use OpenClaw with DeepSeek seemed first on Hongkiat.
Supply: https://www.hongkiat.com/blog/configure-deepseek-openclaw/
Contents
- 1 Should haves
- 2 Step 1: Putting in place OpenClaw
- 3 Step 2: Run Onboarding
- 4 Step 3: Configure DeepSeek Models
- 5 Step 4: Configure Agents
- 6 Step 5: Set Setting Variable
- 7 Step 6: Make certain that DeepSeek Models are on the File
- 8 Step 7: Hatch Your First Agent
- 9 Conclusion
- 10 21 Plugins to Successfully Organize WordPress Multi-Writer Blogs
- 11 The whole lot You Want To Know About Divi 5’s Responsive Editor
- 12 Social Media Demographics for Entrepreneurs in 2022

0 Comments