

Mixing modes are a good way to digitally improve your pictures and designs. There are a number of tactics to make use of mix modes as a graphic dressmaker (the use of design tool) or as a internet dressmaker (the use of CSS or Divi). On this submit, we’re going to hide the entirety you want to learn about mix modes together with an in depth breakdown of every, in addition to how you can use them in Photoshop and for your web site.
We’ll duvet:
How Blending Modes Work
Blending Mode Descriptions
How to Use Photoshop Blend Modes
CSS Blend Modes for Web Design
Blend Modes Using Divi
And there’s extra. Let’s bounce in!
What’s a Mixing Mode?
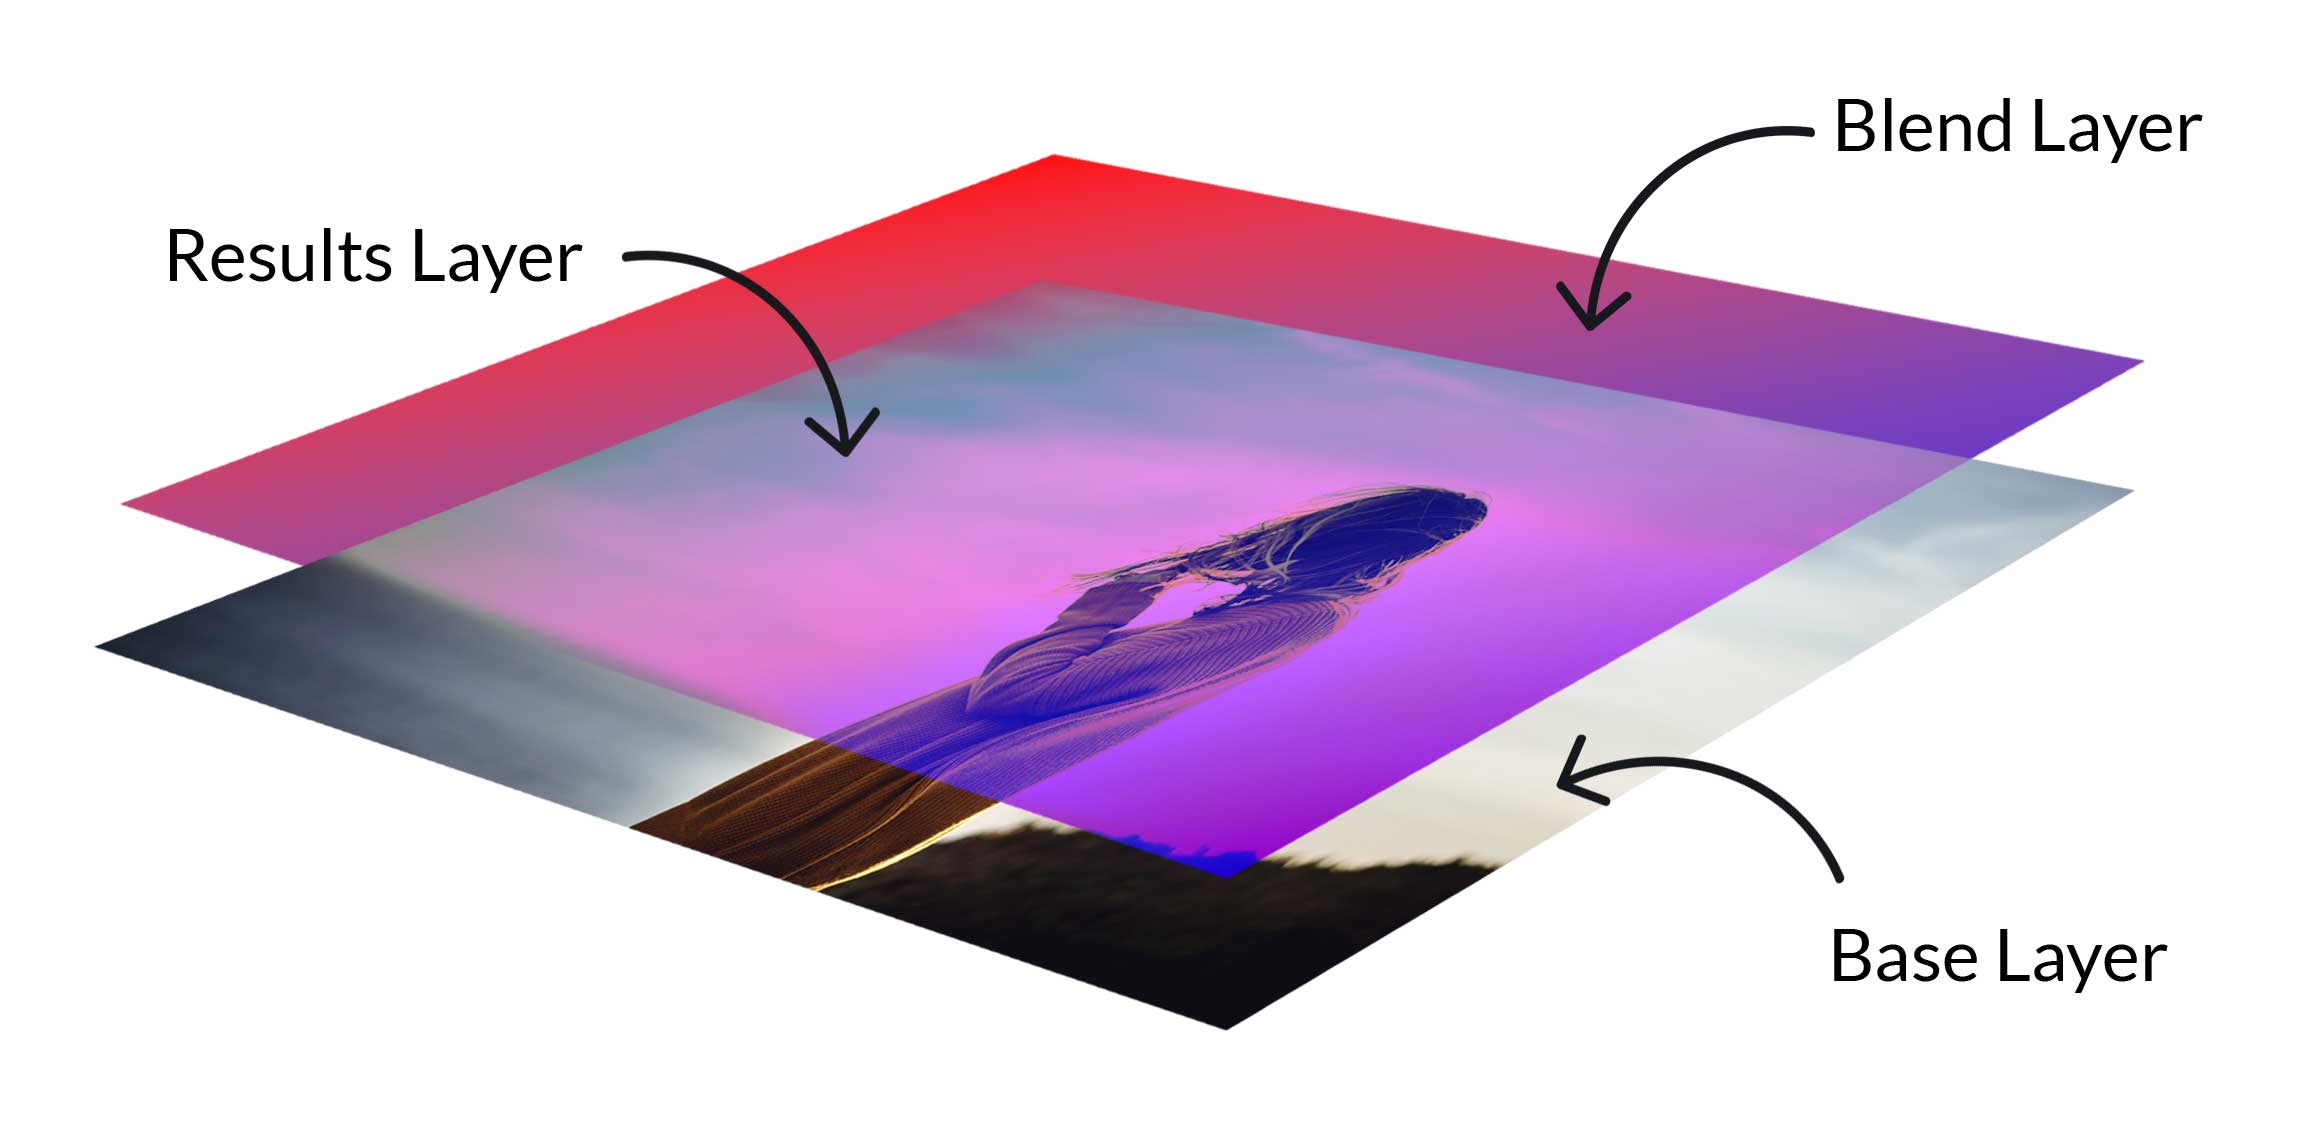
A mixing mode is a mathematical equation that defines how pixels will mix in combination when two or extra layers of pixels are blended. Even though the algorithms in the back of mix modes are advanced, they’re fairly simple to paintings with the use of design gear or photograph enhancing tool like Photoshop. With this type of tool, designers are ready to mix layers (pictures, colours, textual content) in combination in ingenious tactics for distinctive designs in a couple of clicks. You’ll be able to mix in combination any choice of layer combos. However, at minimal, to perform a mix mode impact, you’re going to want a minimum of two layers: a base layer and a mix layer.
How do Mixing Modes Paintings?
Mixing modes mix a base layer with a mix layer to reach other results. Every impact (or mode) makes use of a mathematical equation that mixes purple, inexperienced, and blue (RGB) or cyan, magenta, yellow, and black (CMYK) colour codes with ranges of darkish and lightweight to create multi-layered results. For many mix modes, opacity is needed to deliver out the mixing impact. You’ll be able to use mixing modes to use colour overlays to photographs, blend images together, manipulate colour ranges on pictures, and a lot more.
For example, let’s check out combining two layers and making use of Multiply. The usage of a photograph layer as the bottom layer, and a gradient with colours #ff0f0f and #4a00e8 because the mix layer, the ensuing picture seems darkened and takes at the look of the gradient colours.

For them to paintings, there must be a minimum of two layers. Every choice produces other effects relying at the mode selected. It breaks down like this. First, the bottom layer is the unique colour or picture. Subsequent, the mix layer applies without delay to the bottom layer the use of a selected mode. The result’s a mix of the 2 layers, which alters the colours to show a picture with a fully altered look.
Advent to Photoshop Mixing Modes
There are 27+ mix modes in Photoshop. Some are used to regulate opacity, whilst others darken the semblance of pictures and designs. There also are mixing modes that can lighten pictures, whilst others paintings merely to regulate distinction.
Opacity vs. Fill with Mix Modes
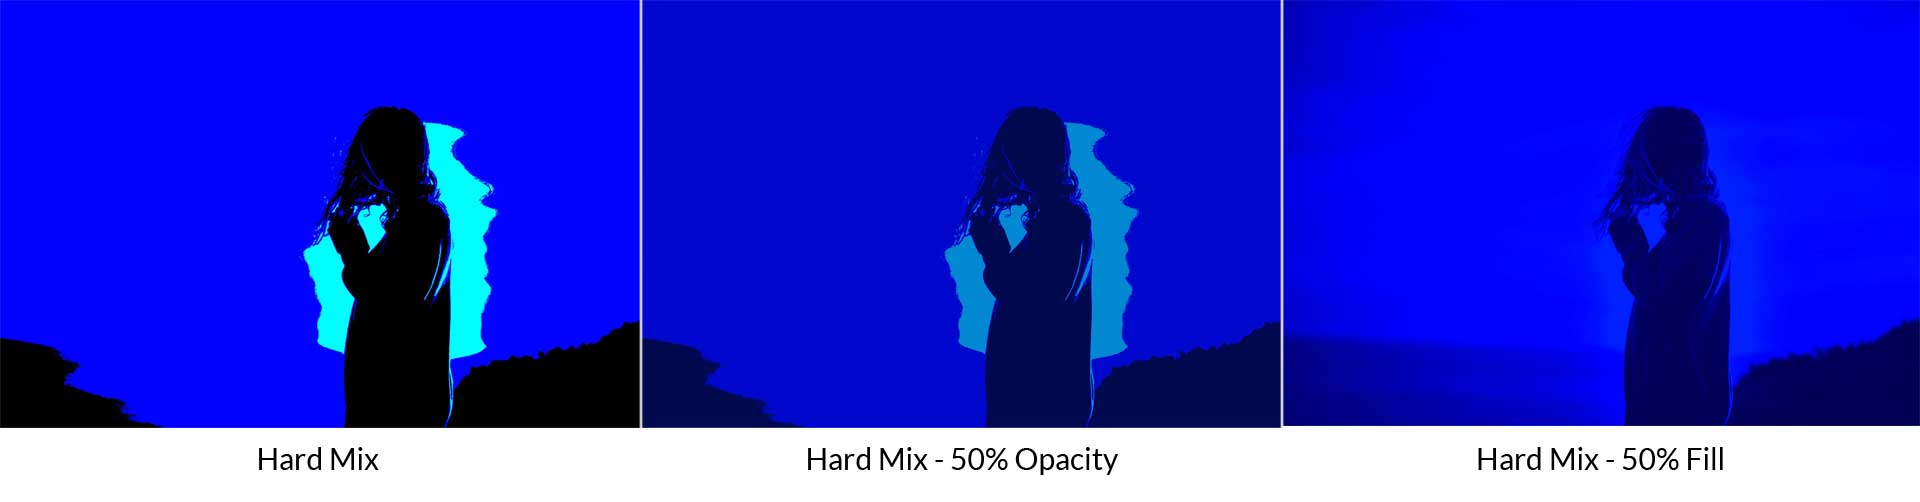
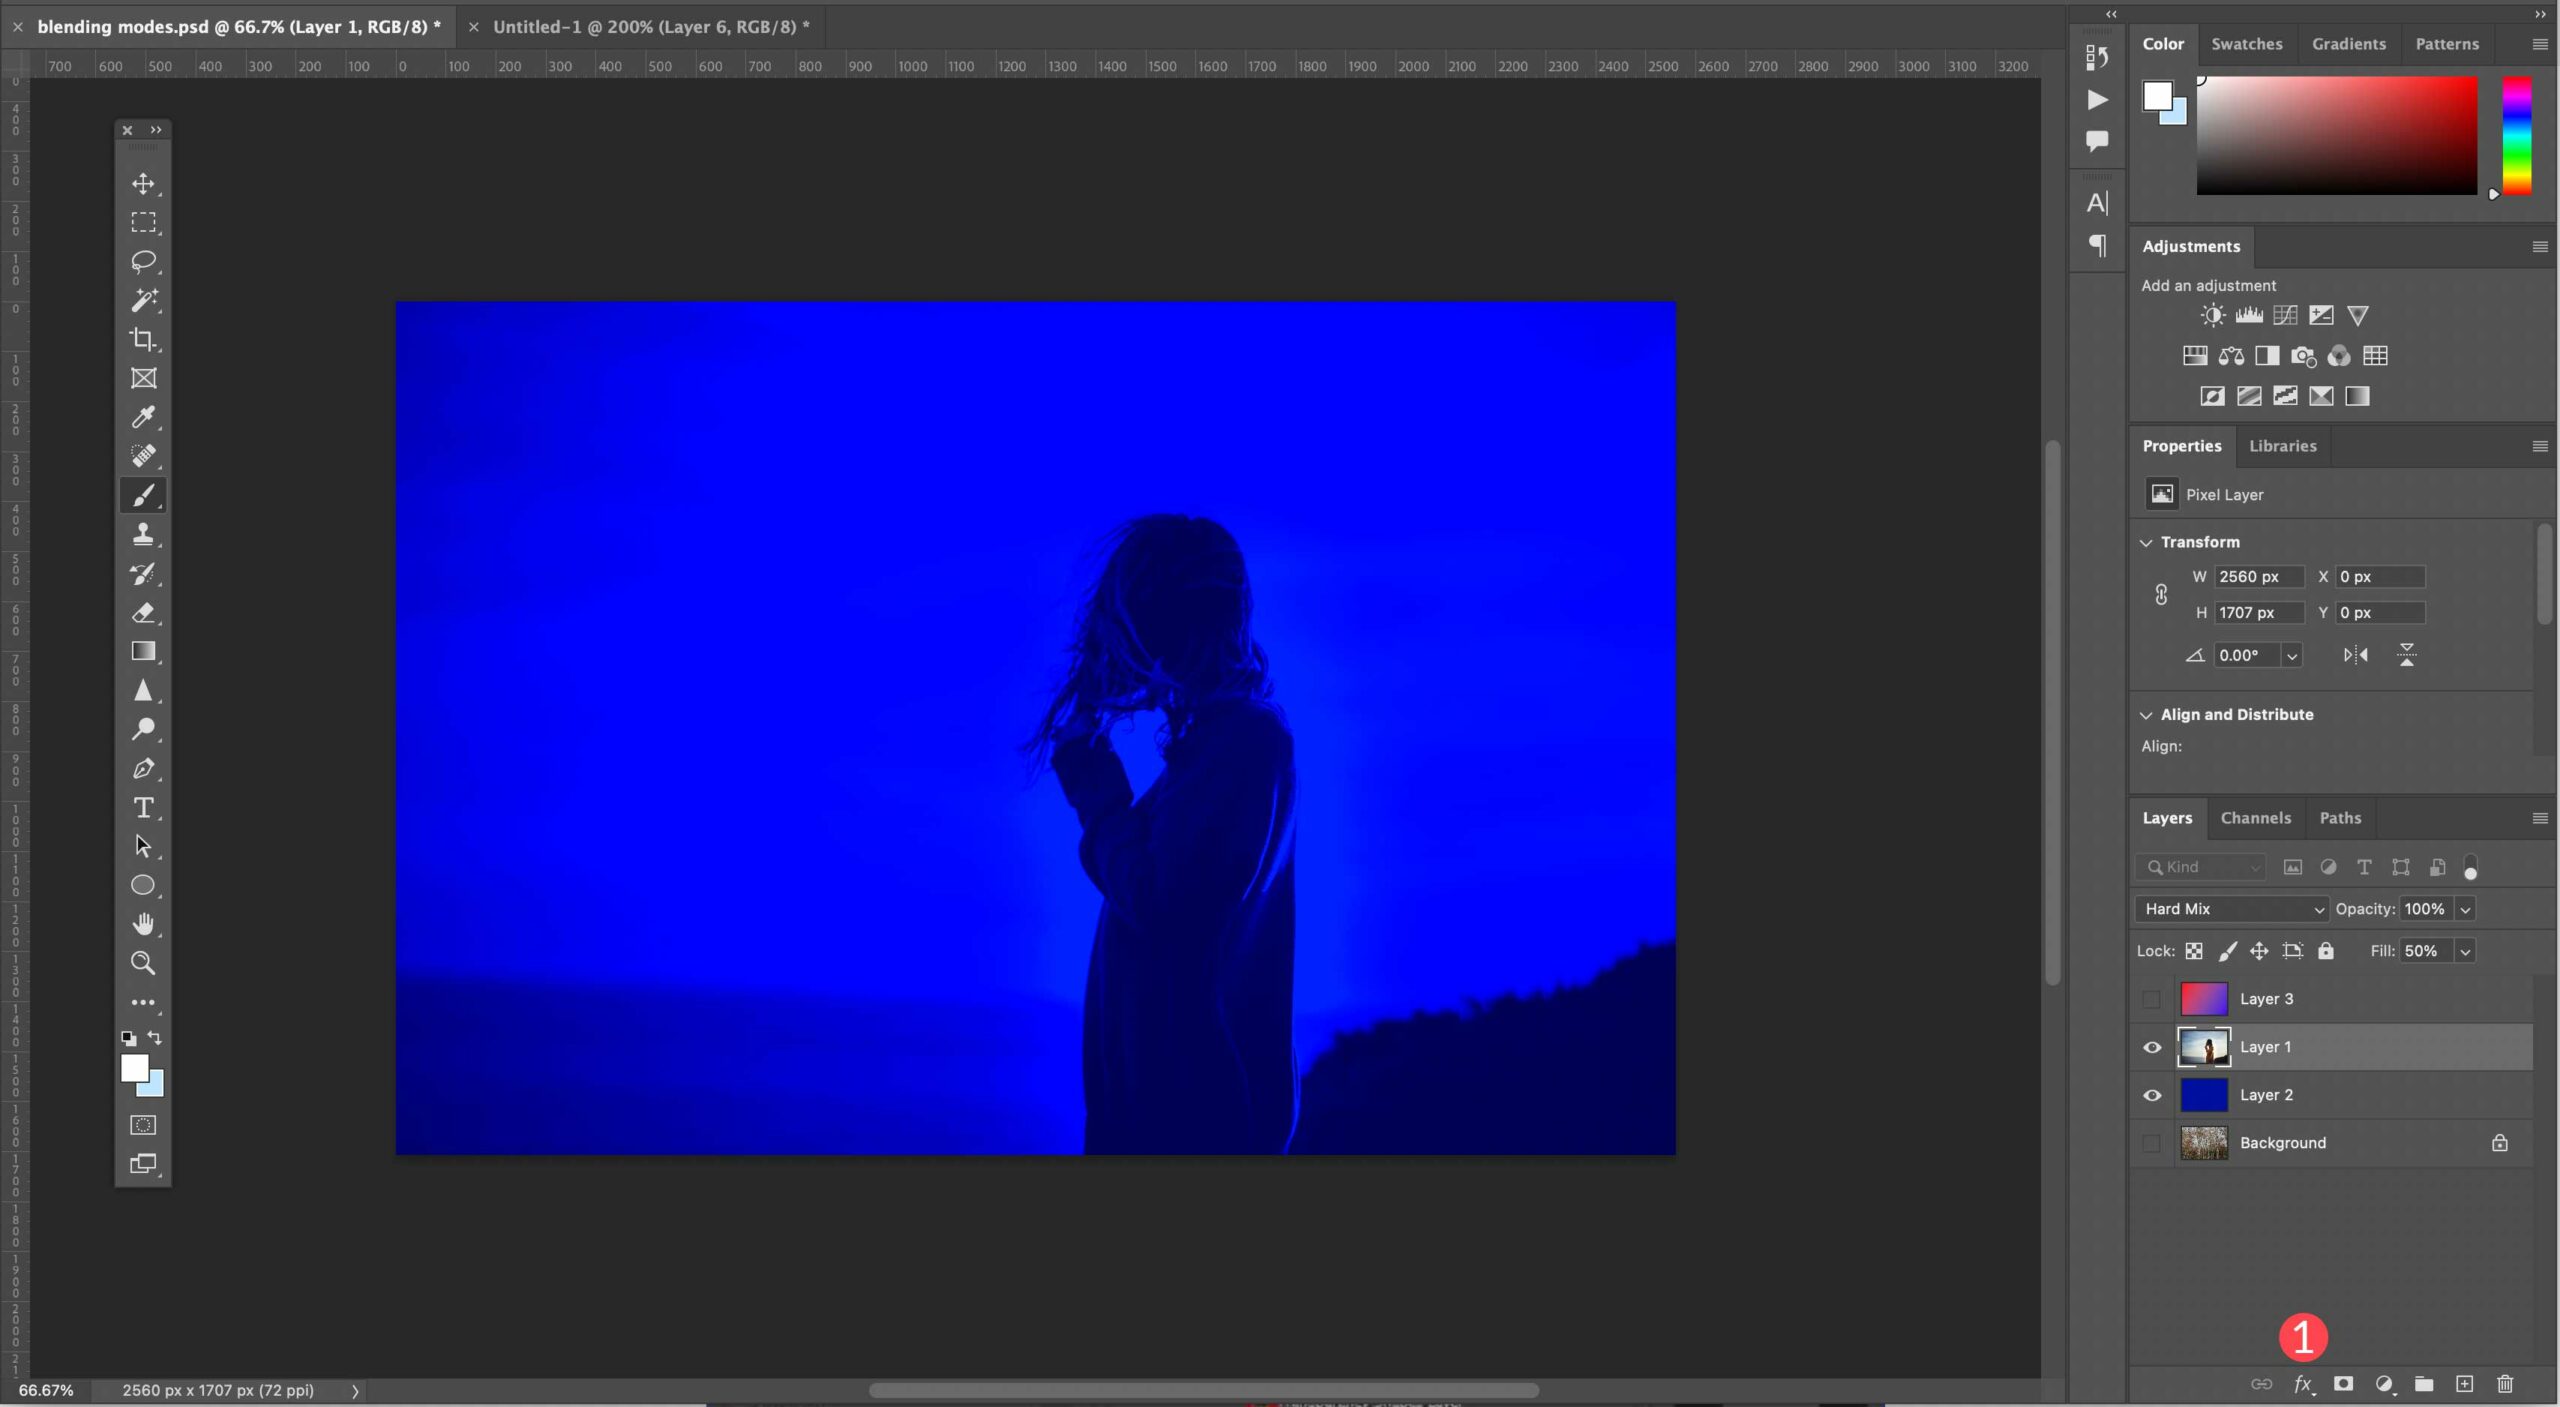
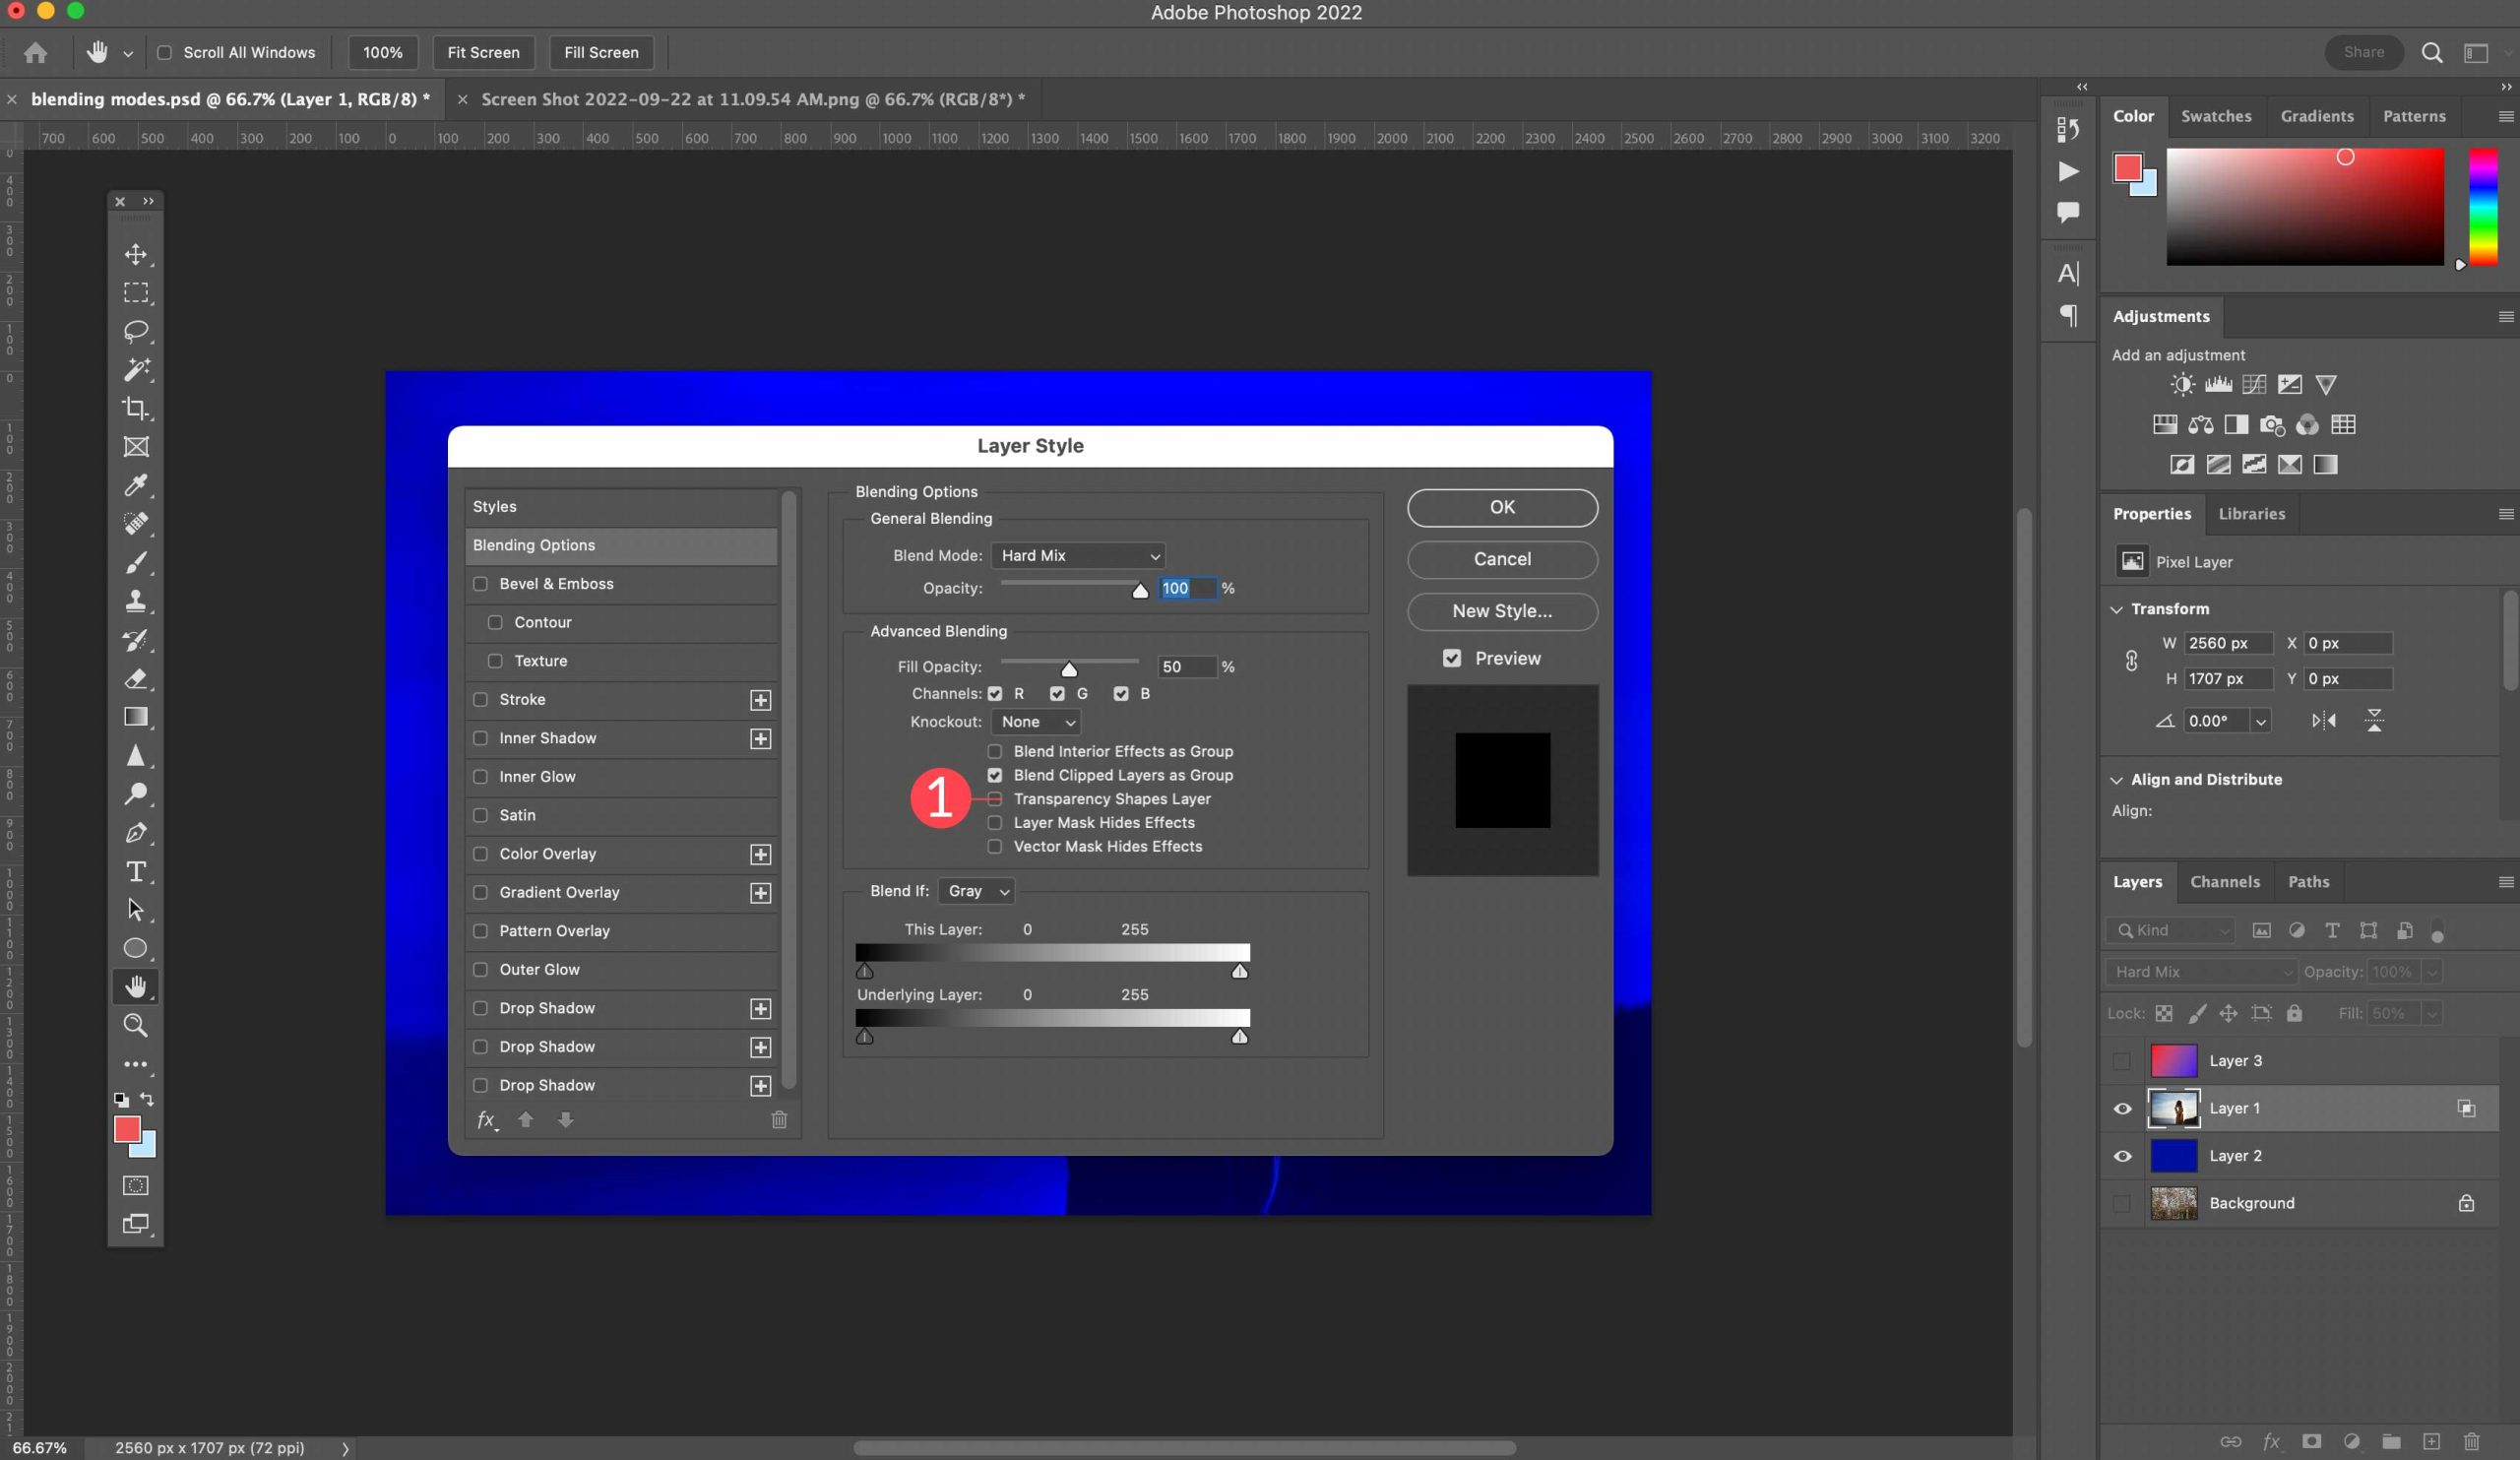
It’s vital to notice that whilst mixing modes paintings most commonly with adjusting opacity ranges, there are 8 particular mixing modes that paintings perfect when adjusting the fill price (or share). For instance, when combining a base photograph layer with a forged colour mix layer the use of Exhausting Combine, you’ll be able to see that adjusting the fill price of the mix layer to 50% has a extra pleasant impact than adjusting the opacity to 50%.
Along with laborious blend, the rest particular 8 mixing modes are colour burn, linear burn, colour dodge, linear dodge (upload), bright mild, linear mild, and distinction.
Mixing Mode Descriptions
In Photoshop, every mixing mode is categorised by way of sort (commonplace, subtractive, additive, distinction, comparative and composite). Here’s a checklist explaining every mixing mode and the way they are able to be used.
Customary
This class accommodates commonplace and dissolve mix modes. On this class, mix layer opacities will wish to be adjusted for any results to be noticeable.
Customary
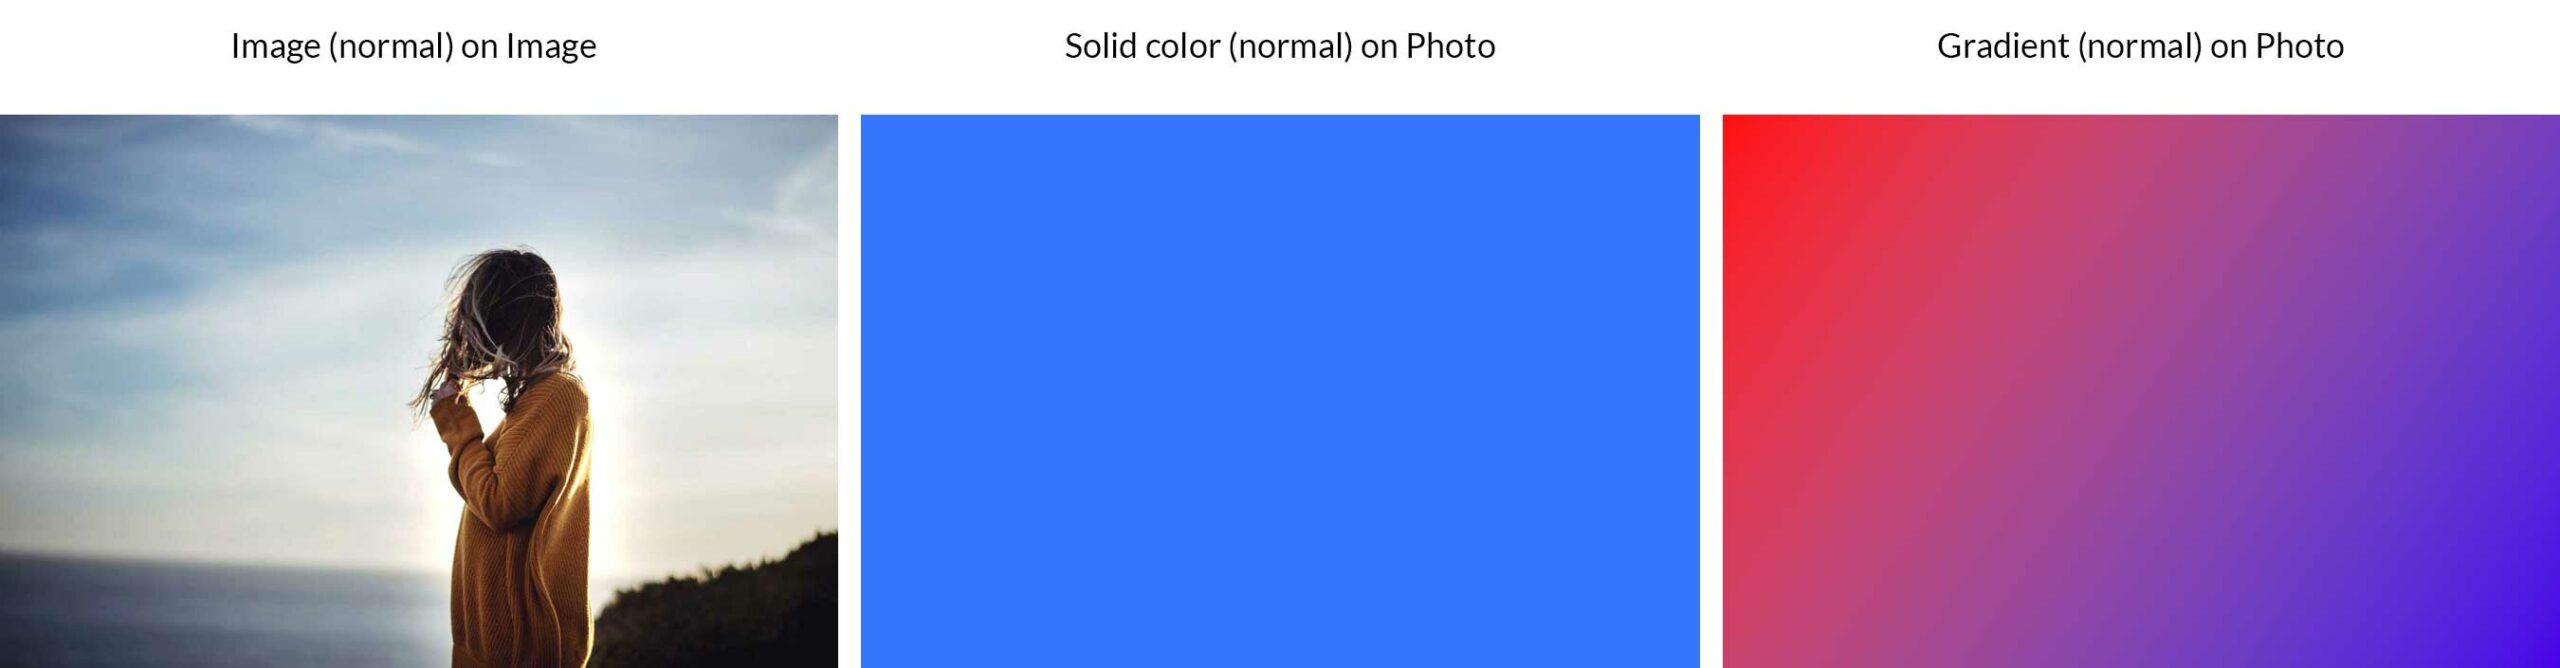
That is the default mode in Photoshop. It calls for changes to opacity for any noticeable distinction for your pictures. When 100% opacity is implemented, the mix layer utterly blocks the bottom layer. In our instance, you’ll be able to see that there is not any visual picture underneath our picture, colour, or gradient.
Dissolve
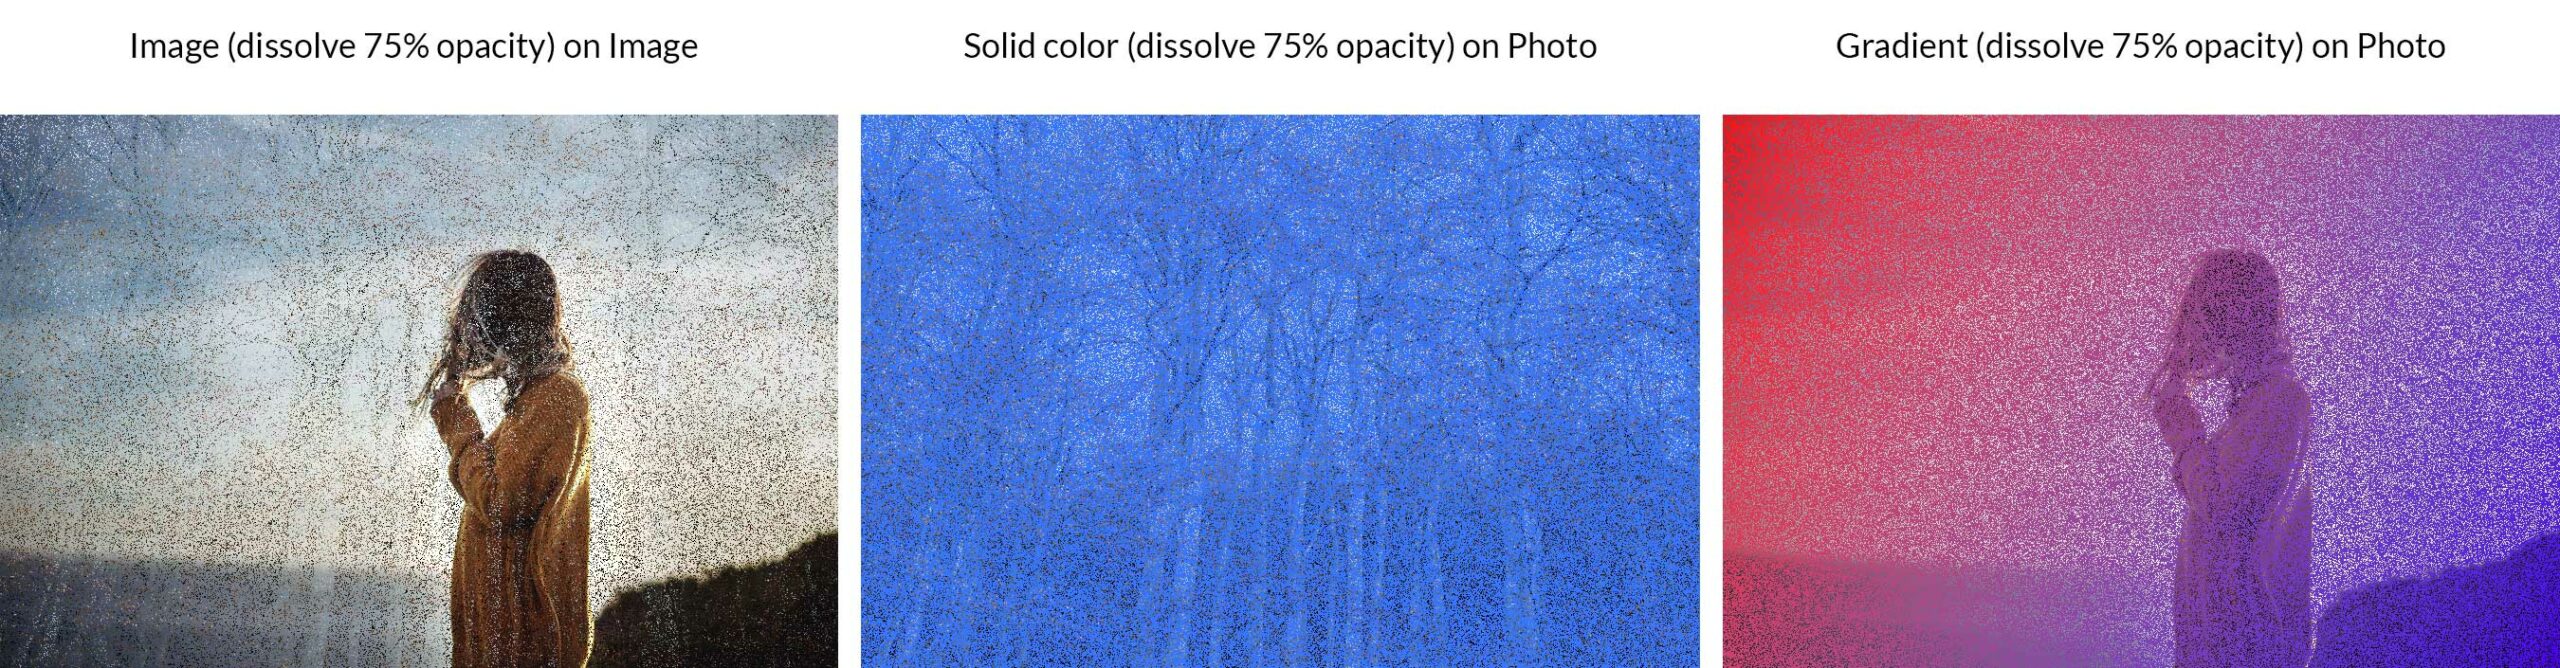
Dissolve takes pixel colours from the bottom layer and paints over pixel colours within the mix layer (apparently at random) to provide a uniquely pixelated mixing consequence. As with the traditional mode, adjusting opacity is the one manner to reach a visible distinction in pictures and designs. In our instance, we display the dissolve mode with 75% opacity implemented to our mix layers to create a dither trend.
Additive
Because the title suggests, those mixing modes will upload darkish tones for your pictures and designs. The additive class accommodates darken, multiply, colour burn, and darker colour.
Darken
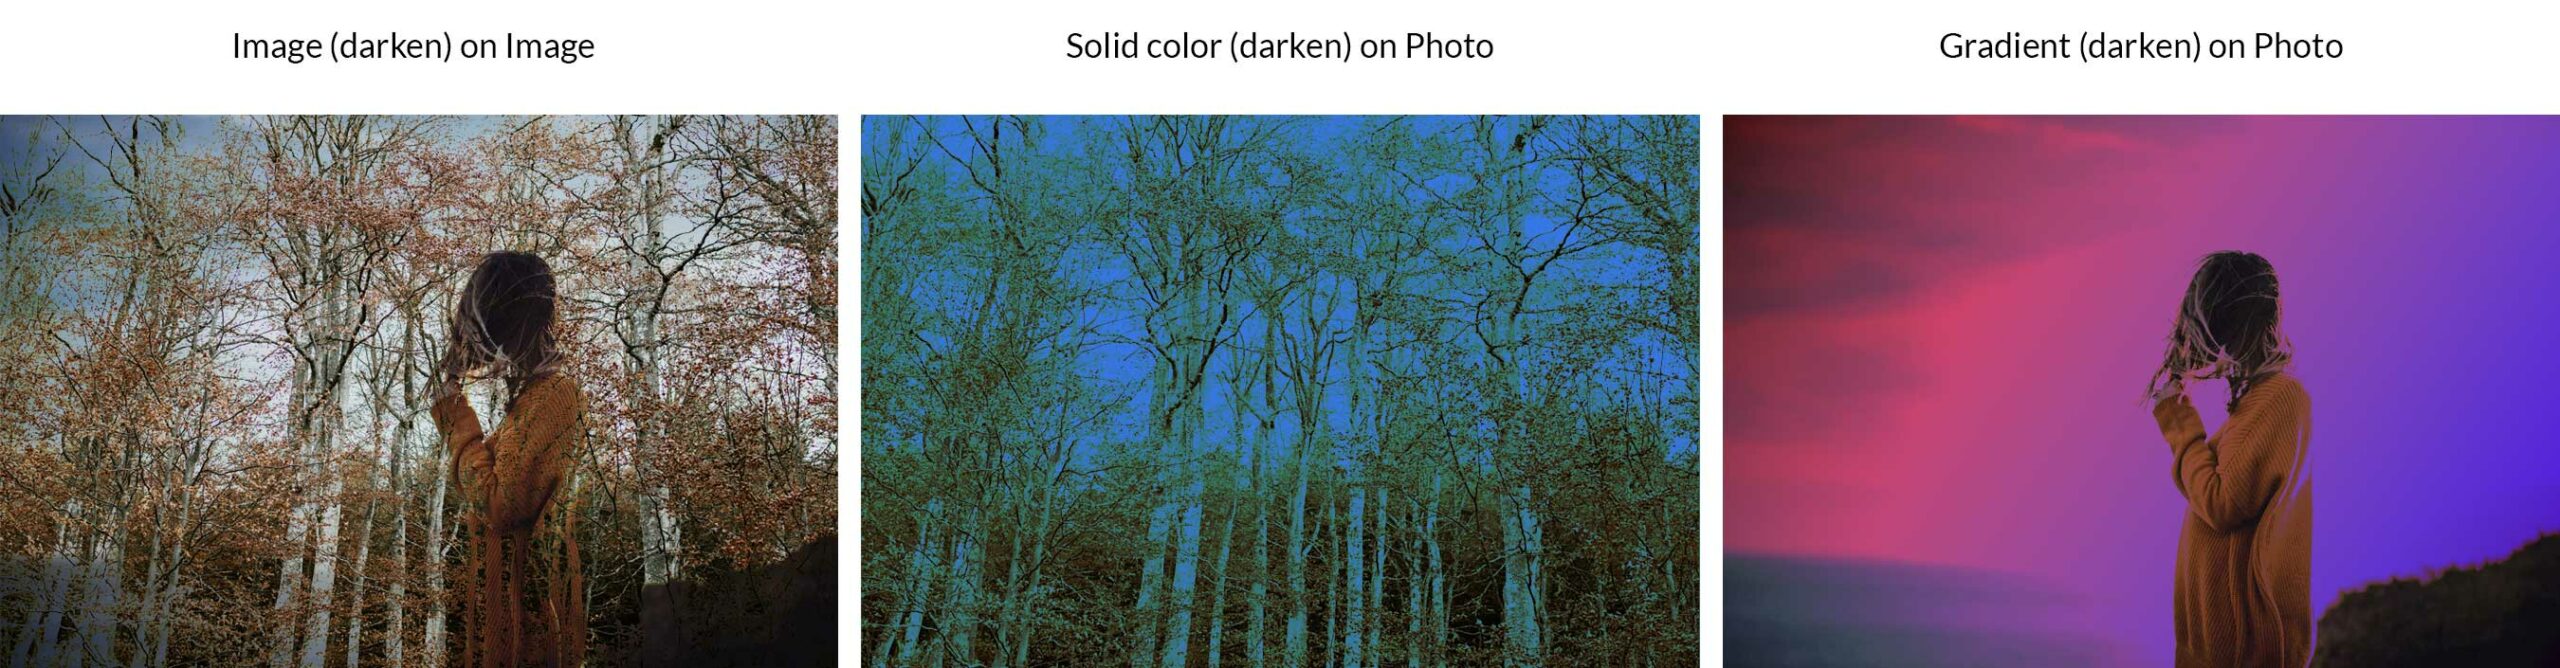
Darken compares the pixels of the bottom layer with the mix layer, then selects the darkest pixels to present the layer a darkened look. In our instance, you’ll be able to see the picture darkens with a photograph, colour, or gradient overlay the use of this mode.
Multiply
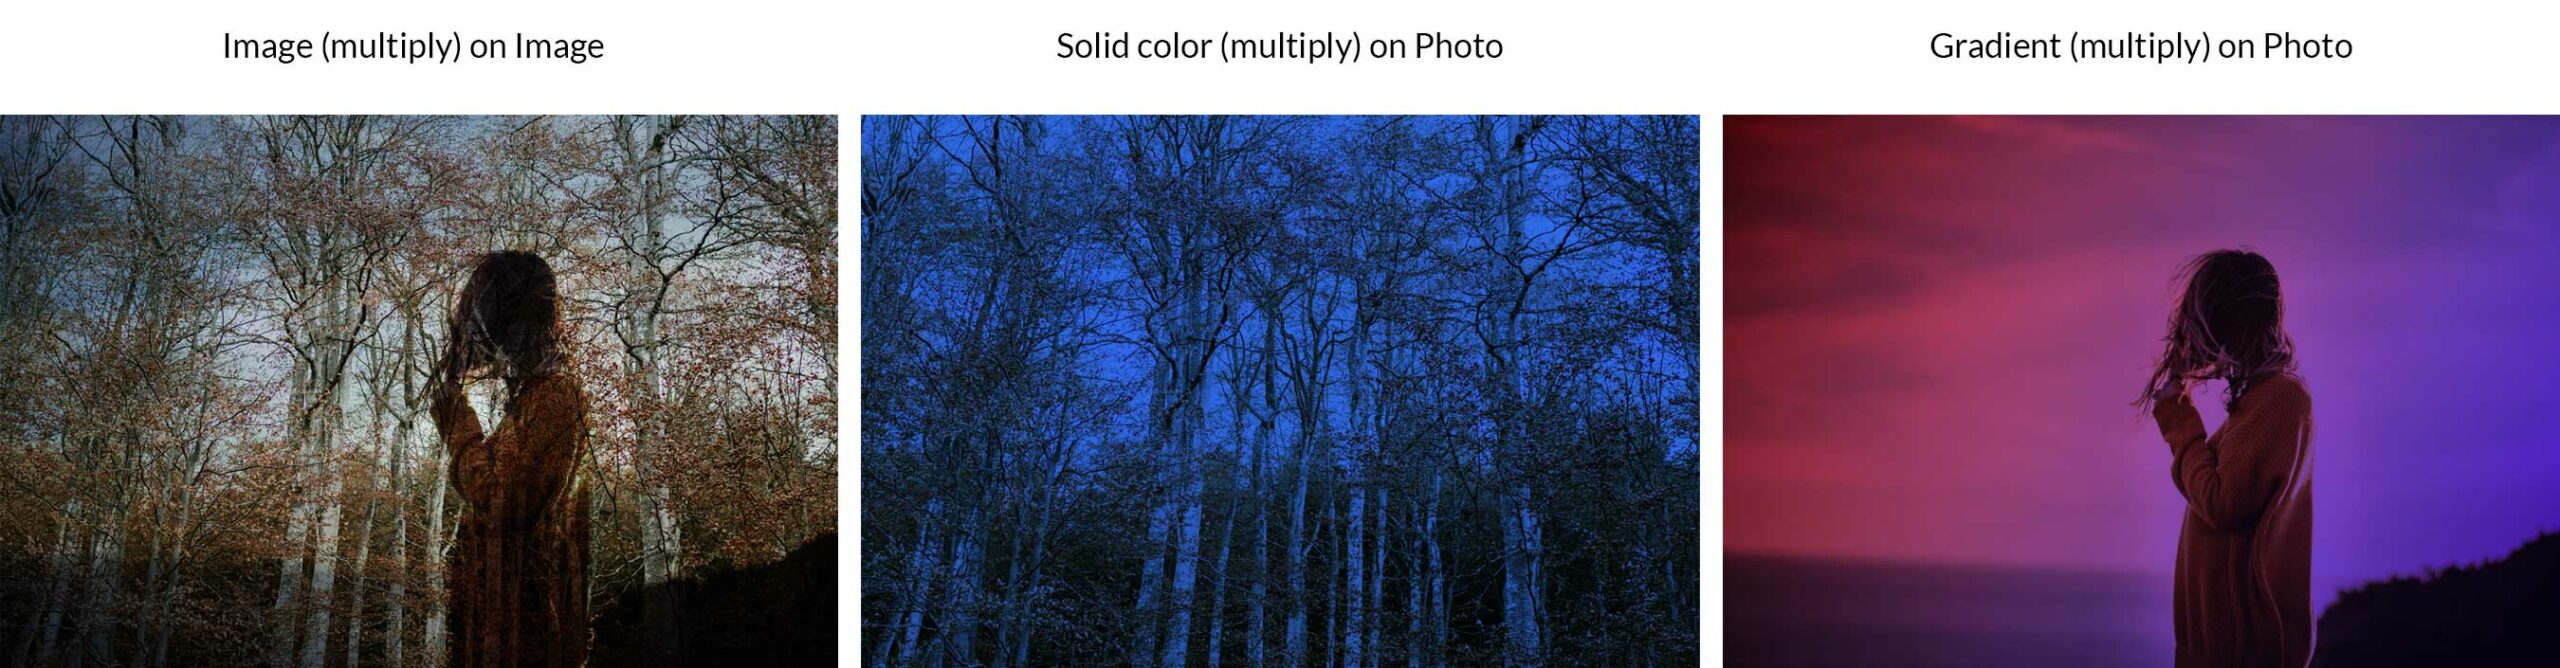
This is likely one of the maximum often used mixing modes in Photoshop. It really works by way of multiplying the colours within the base layer with the mix layer. This leads to a picture with a darkened look. Any whites within the layers are untouched, whilst darker tones seem a lot darker than the unique photograph or design.
Colour Burn
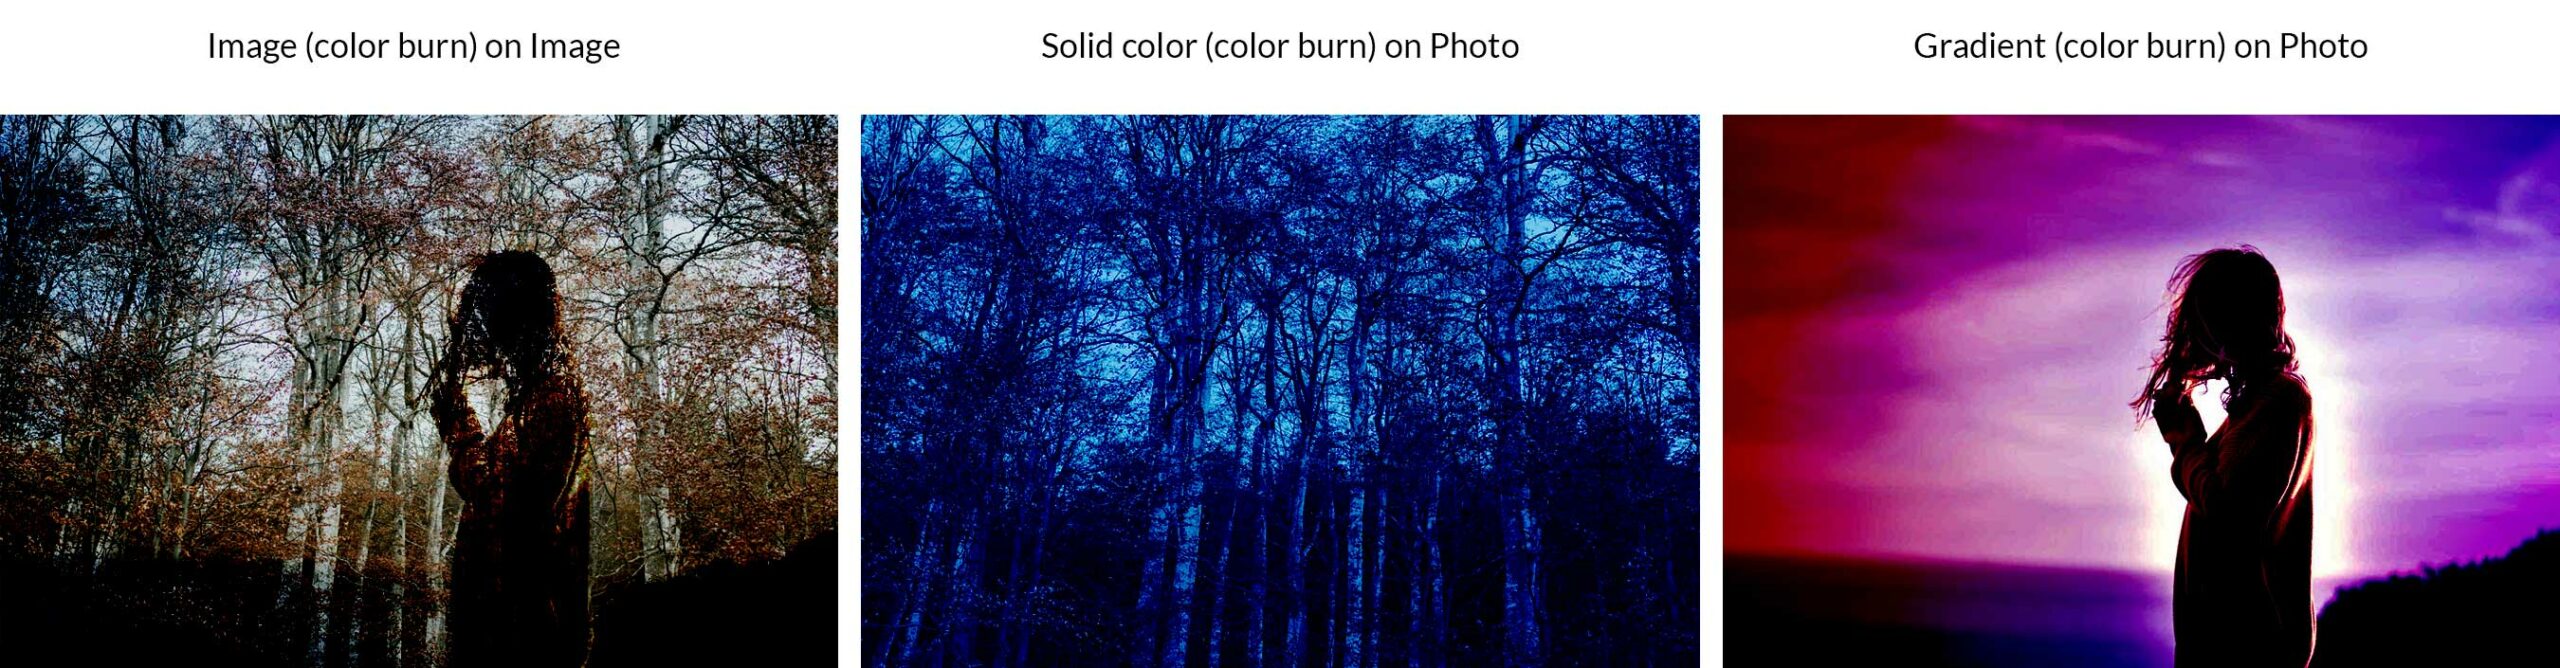
Very similar to multiply, Colour Burn will increase distinction to darken the bottom layer colours sooner than mixing it with mix layer colours. Mixing with white colours doesn’t exchange the semblance of pictures in any respect. Whilst colour burn is very similar to the multiply mixing mode, it makes pictures a lot darker.
Linear Burn

Very similar to Colour Burn, this “burn” impact is created by way of reducing brightness of the bottom layer colours sooner than mixing with the mix layer colours. The effects make the bottom layer a lot darker with out affecting the white pixels within the layer.
Darker Colour
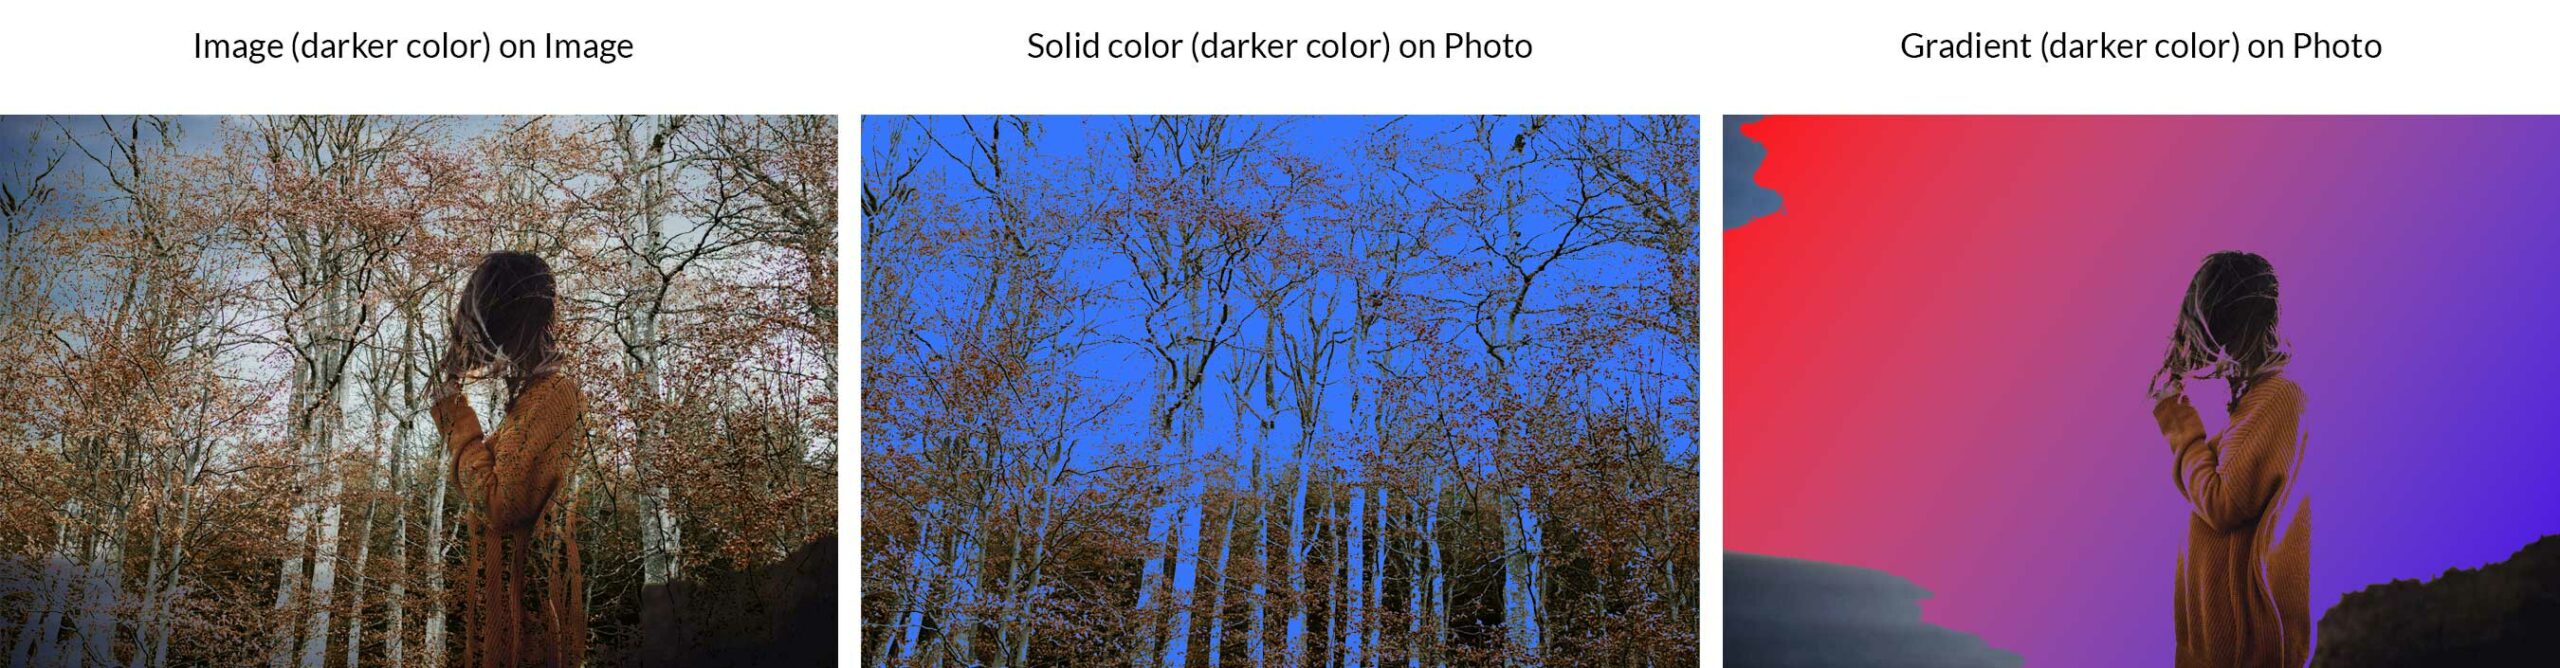
Darker Colour compares the picture layer’s pixels with the pixels of the mix layer, then it displays the decrease price colour. In contrast to Darken, Darker Colour doesn’t create a 3rd colour as it in reality chooses the bottom colour values from each base and mix layers. In our instance, you’ll be able to see that the browns from our picture layer are the darkest, so it stands proud a lot more than the blue colour from our mix layer.
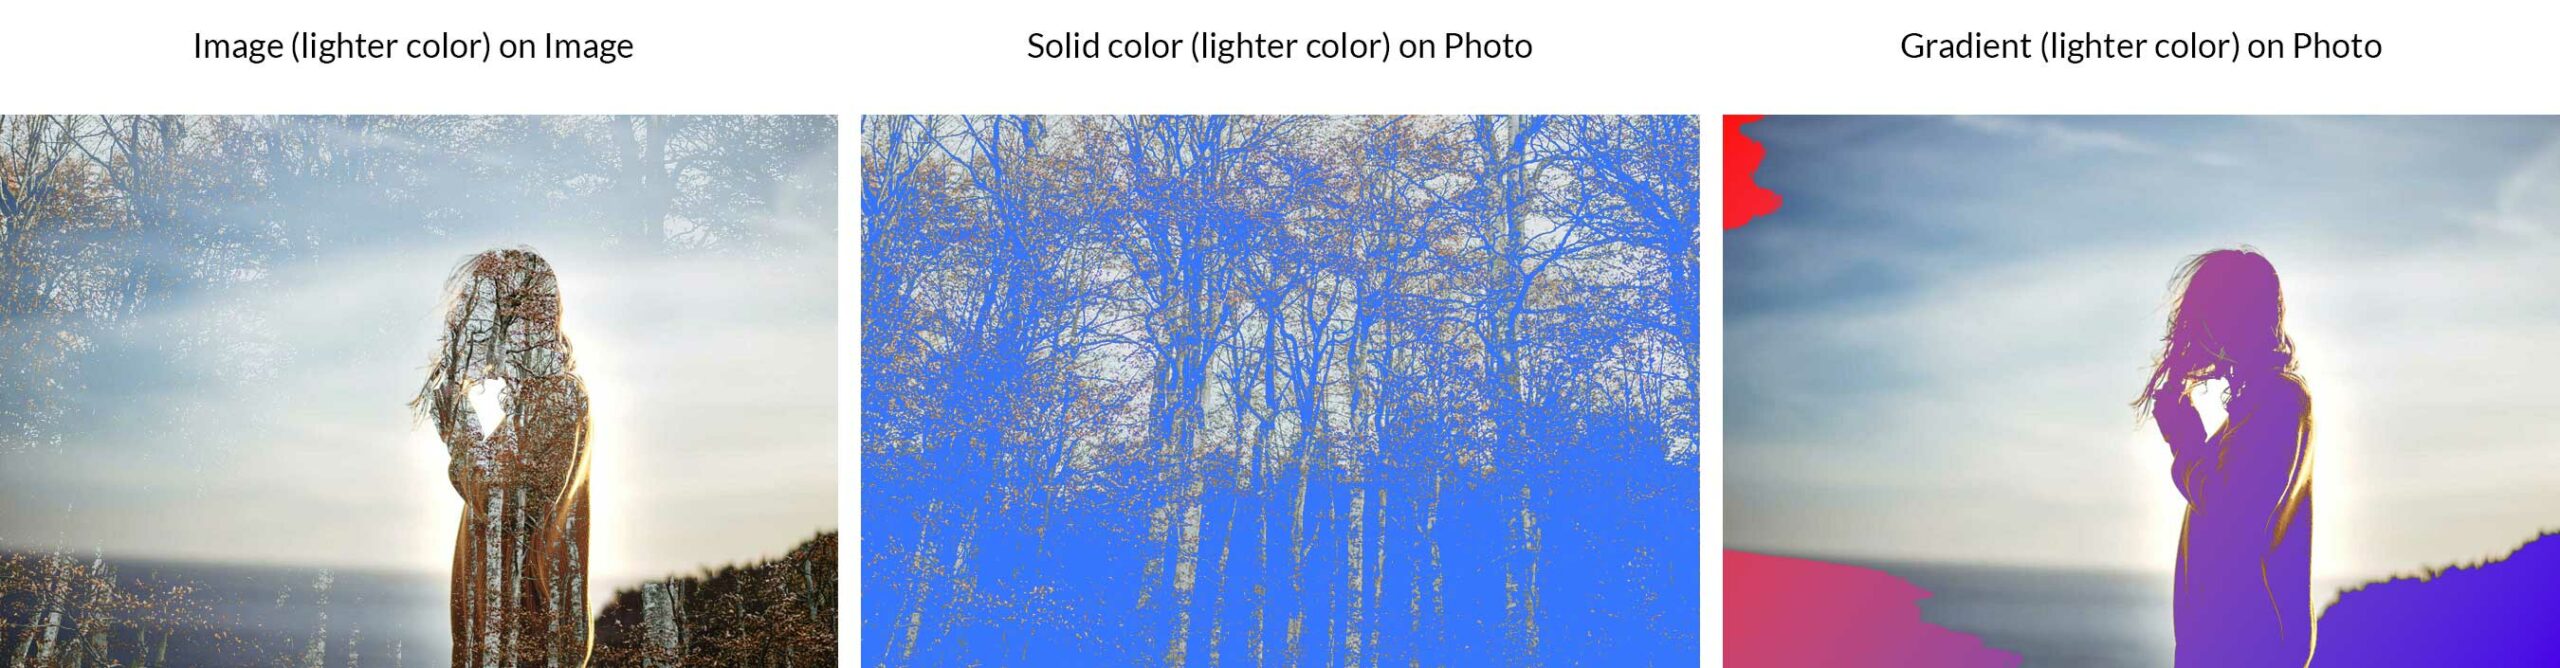
Subtractive (Lighter Mix Modes):
Subtractive mixing modes will give your pictures and designs a lighter look as a result of they subtract mild (or mild colour tones) when mixing the layers. The Subtractive class accommodates mild, display, colour dodge, linear dodge (upload), and lighter colour.
Lighten
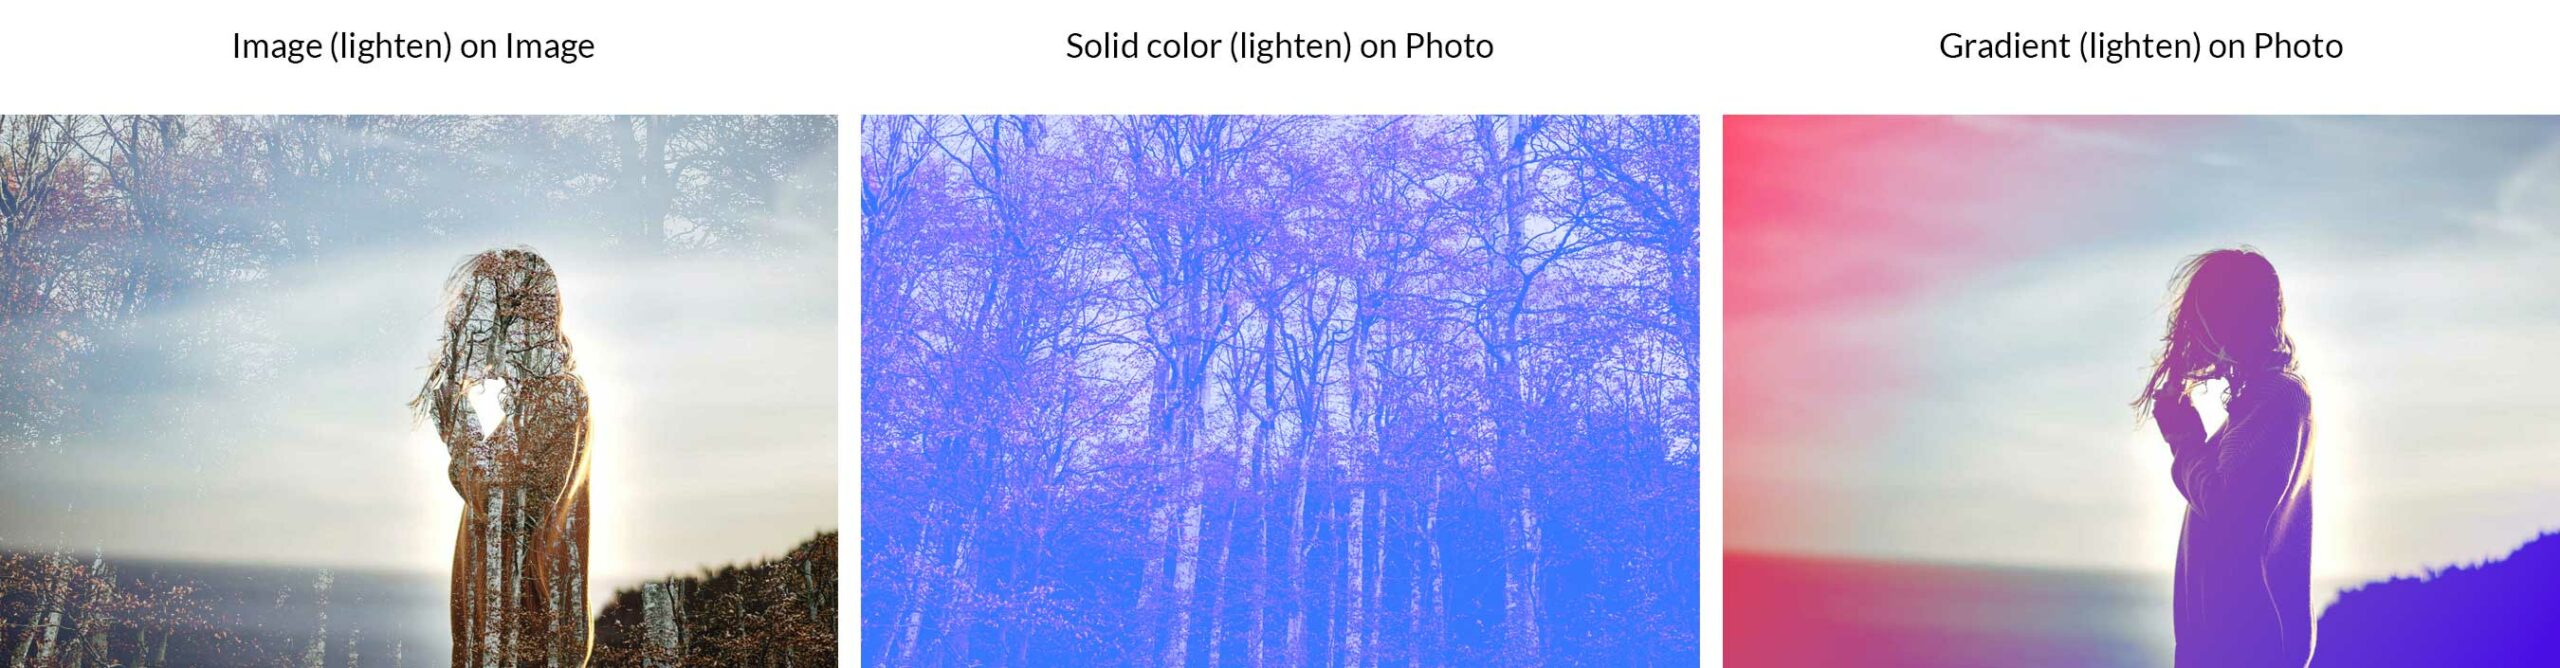
This will likely make a selection the lightest colour of the 2 layers to switch pixels which are darker than the mix layer with out converting pixels which are lighter than the mix layer.
Display screen
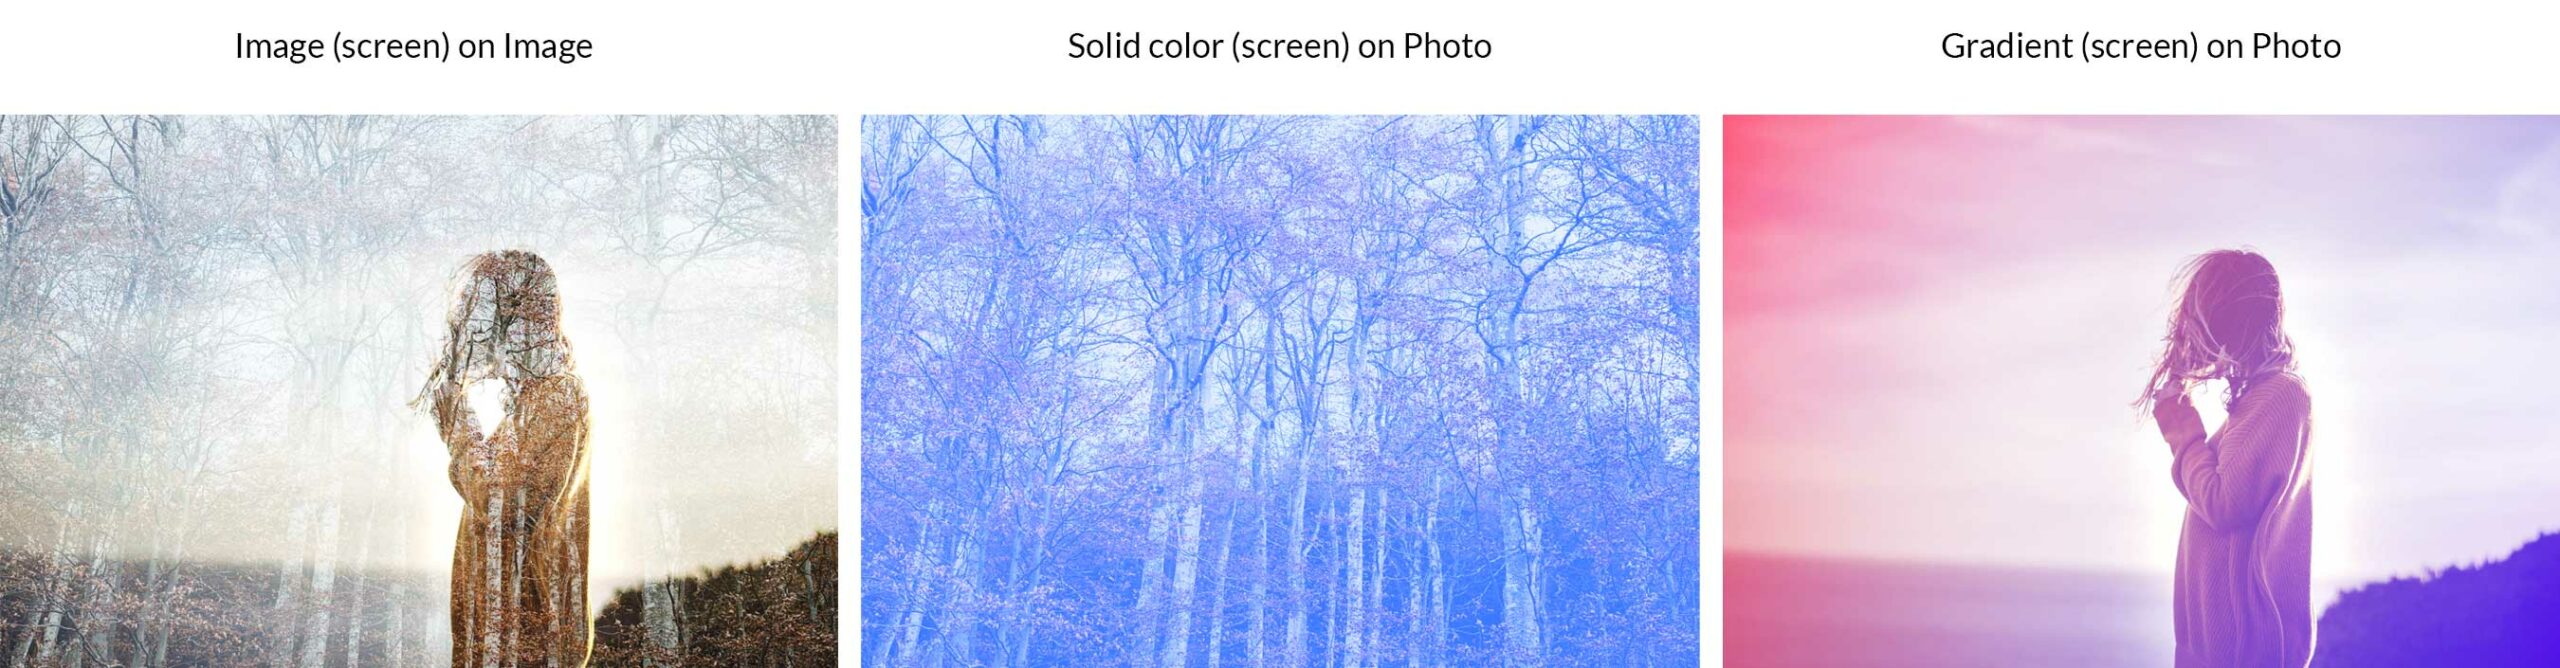
This mode selects the inverse of the mix and base layers, then multiplies it to create a lighter look. Black and white colours keep the similar.
Colour Dodge
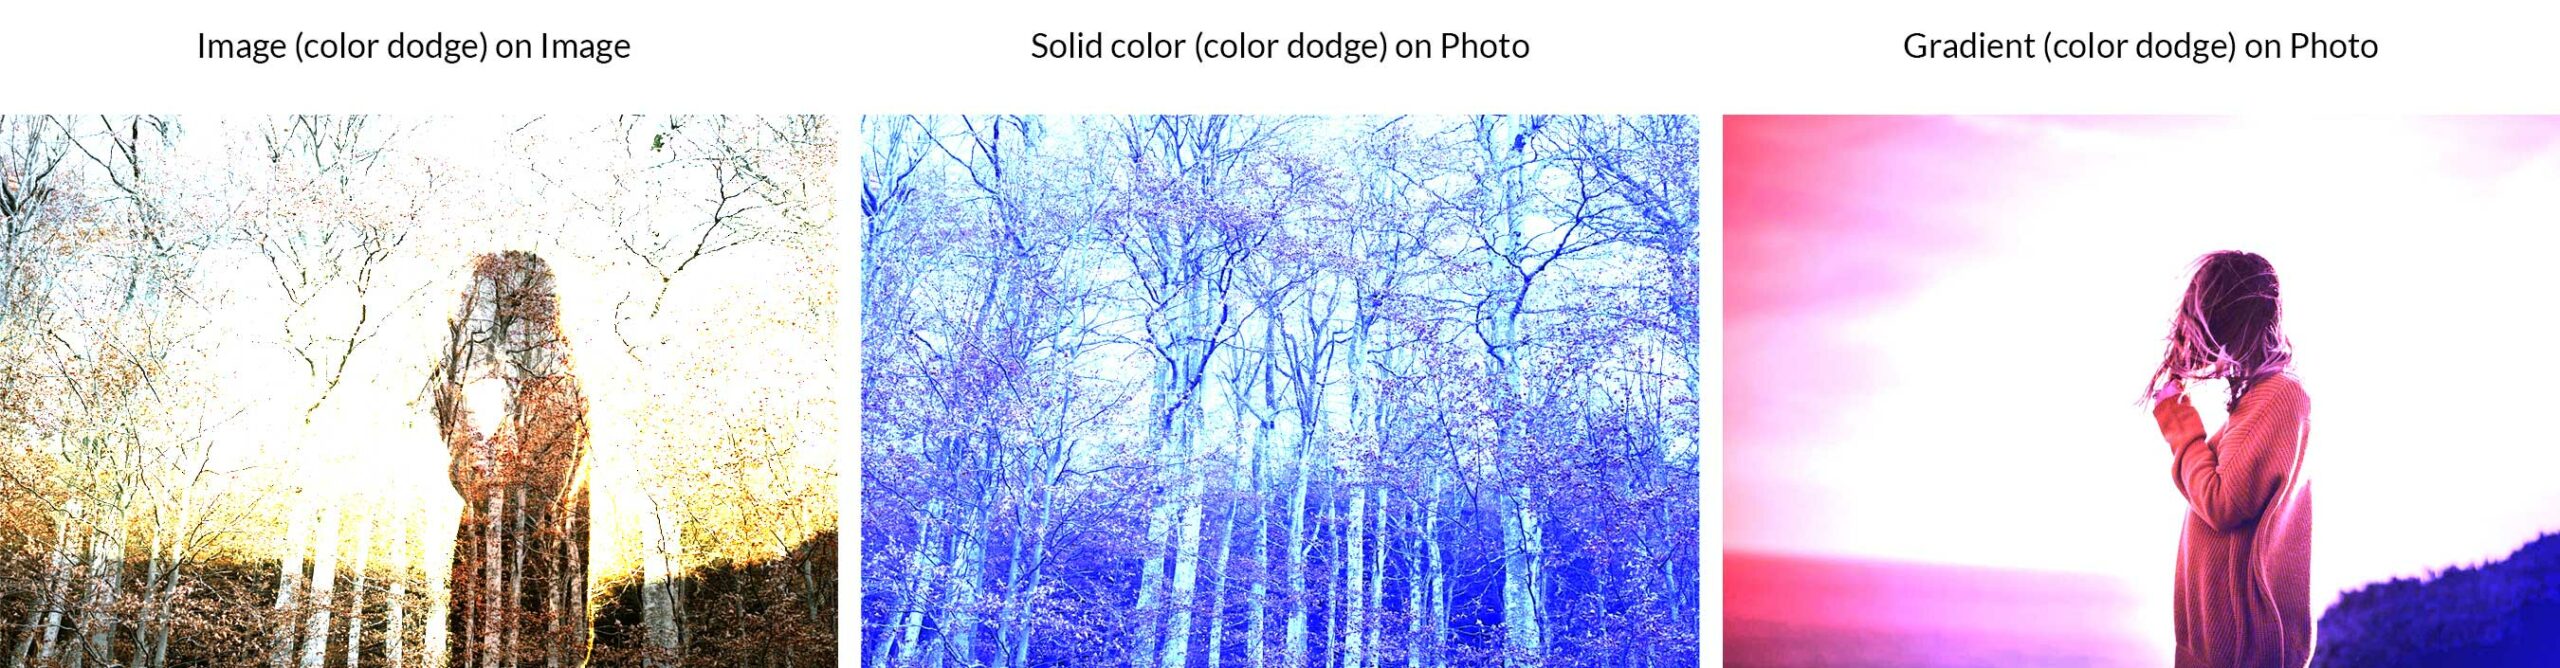
This mode brightens the bottom layer whilst lowering distinction between each the bottom and mix layers. Black colour remains the similar.
Linear Dodge (Upload)
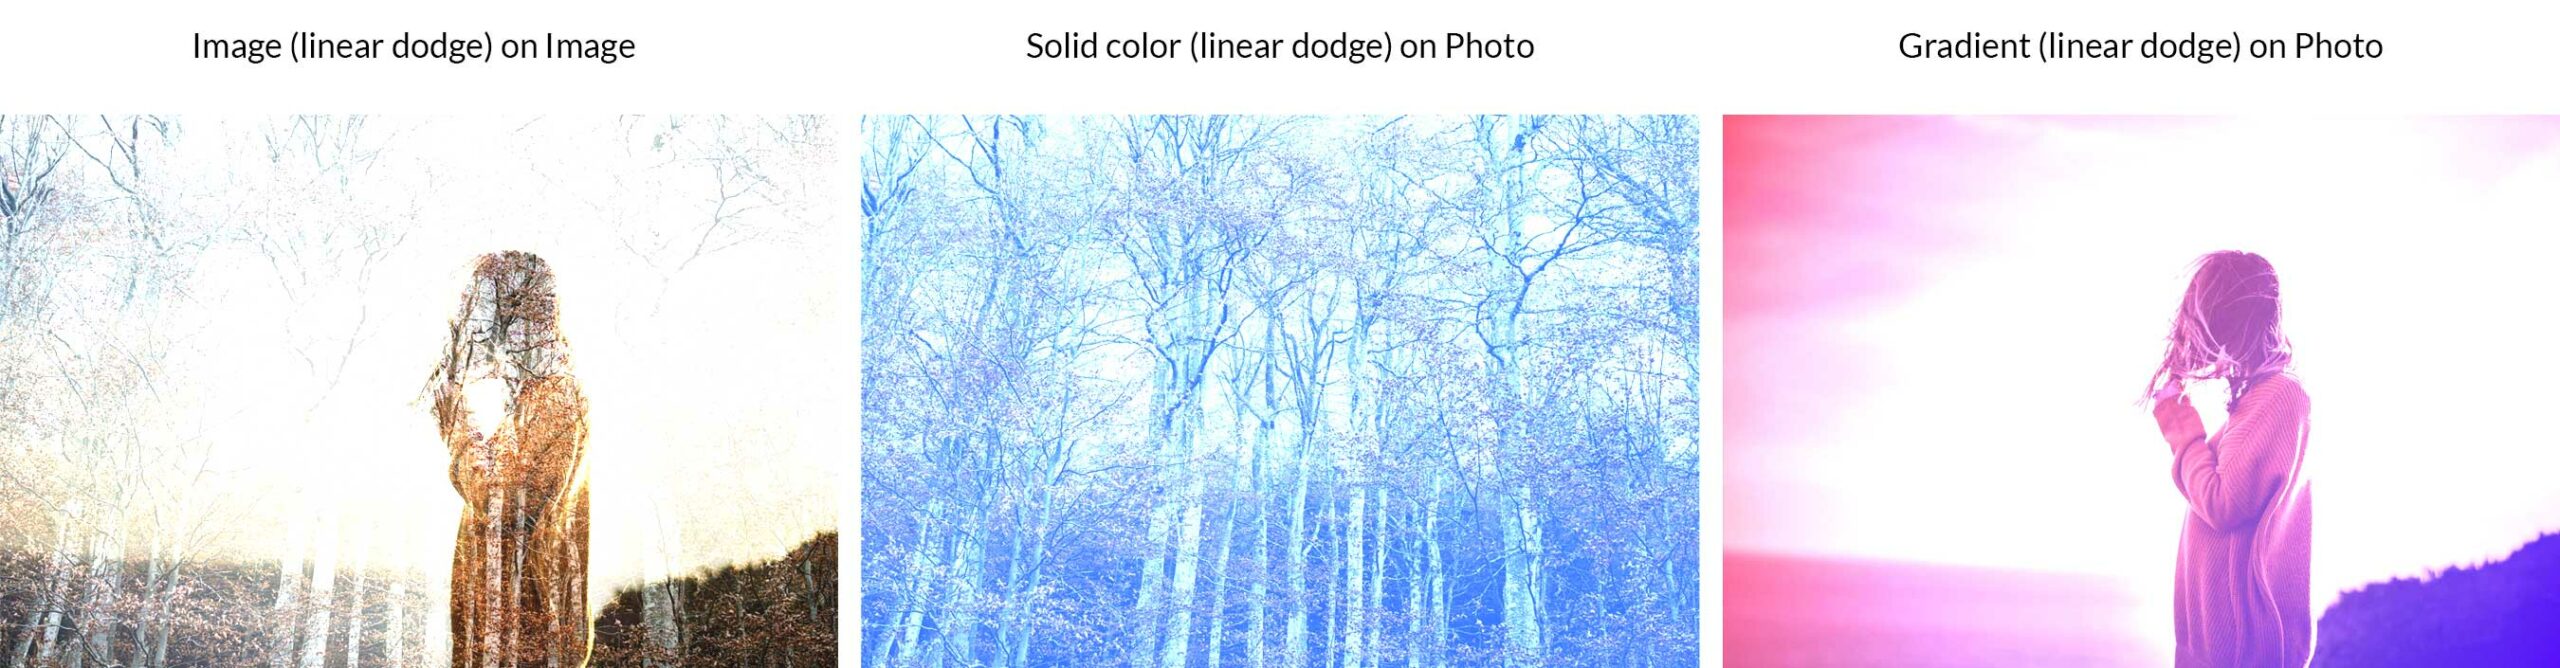
This will likely brighten the bottom layer to replicate the mix layer whilst expanding brightness. Black remains the similar.
Lighter Colour
Very similar to lighten, lighter compares the bottom and mix layers, then helps to keep the lighter of the 2. The variation between lighten and lighter colour is the truth that lighter colour appears to be like at RGB channels as a complete, whilst lighten appears to be like on the person channels to finish the mix.
Distinction
Those mixing modes create other results the use of distinction and are in line with whether or not the bottom or mix layer has a colour lighter than 50% grey. This class accommodates overlay, comfortable mild, laborious mild, bright mild, linear mild, pin mild, and difficult blend.
Overlay
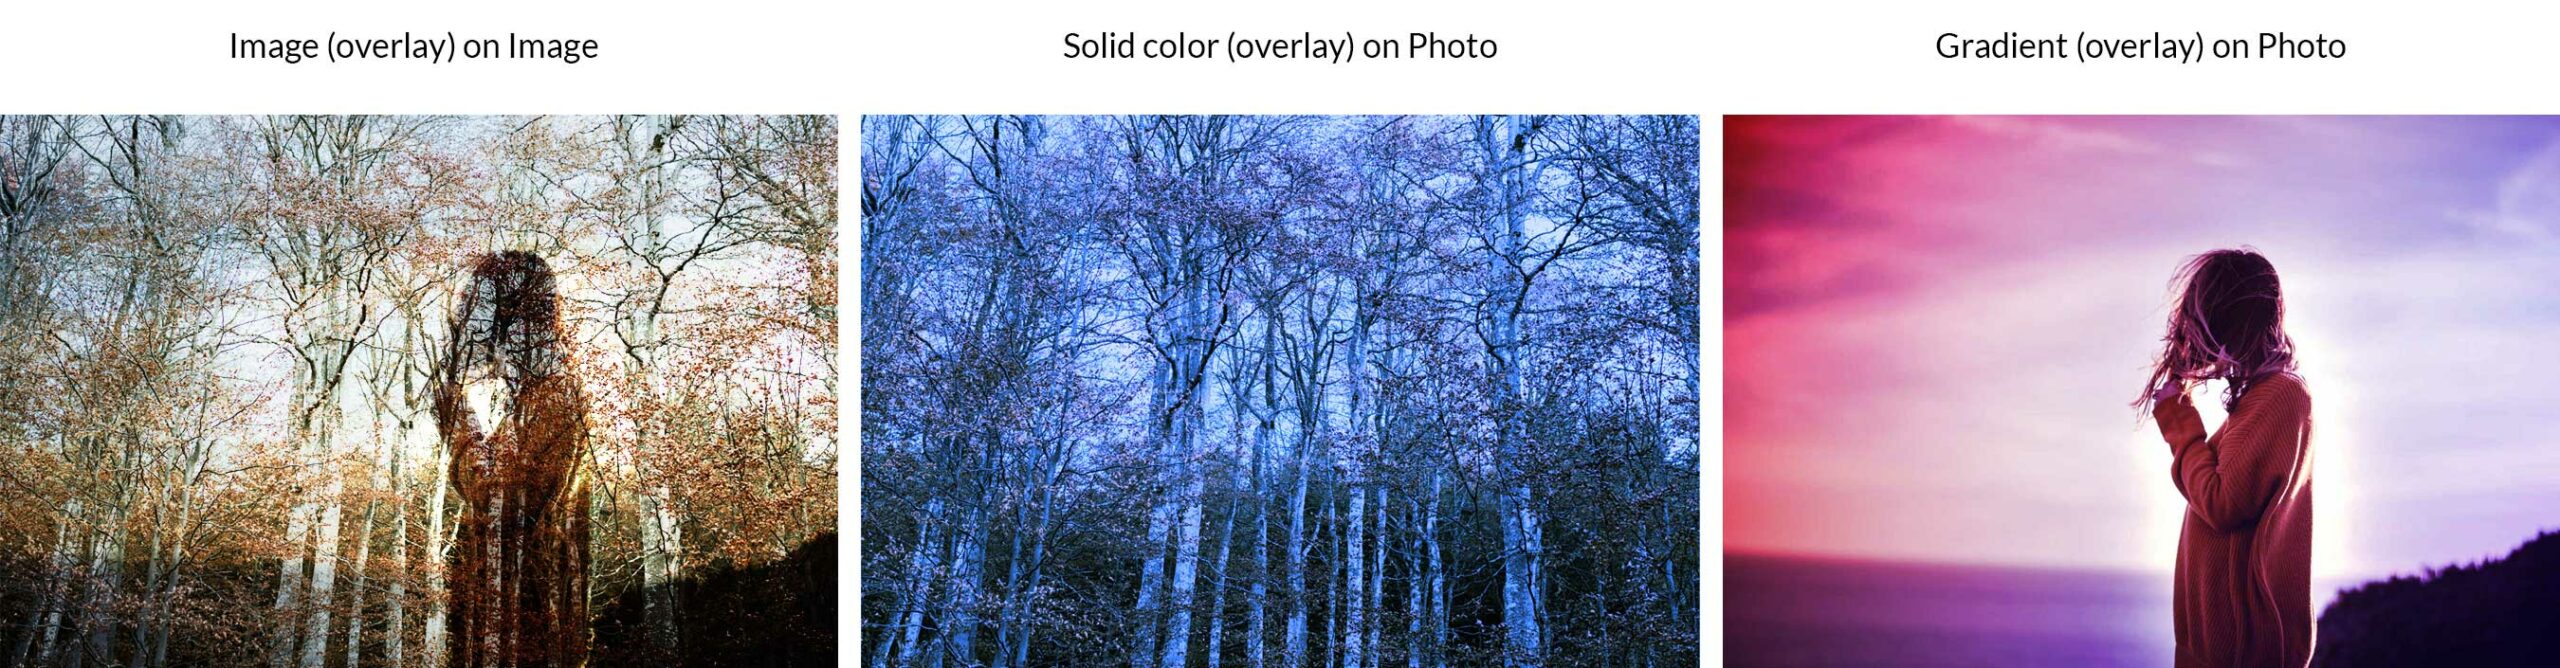
Some of the often used modes, overlay mainly makes use of the display mode at 50% strengh on colours brighter than grey. Principally, darkish tones shift mid-tones to transform darker, and lightweight tones shift the mid-tones to create lighter colours.
Cushy Gentle
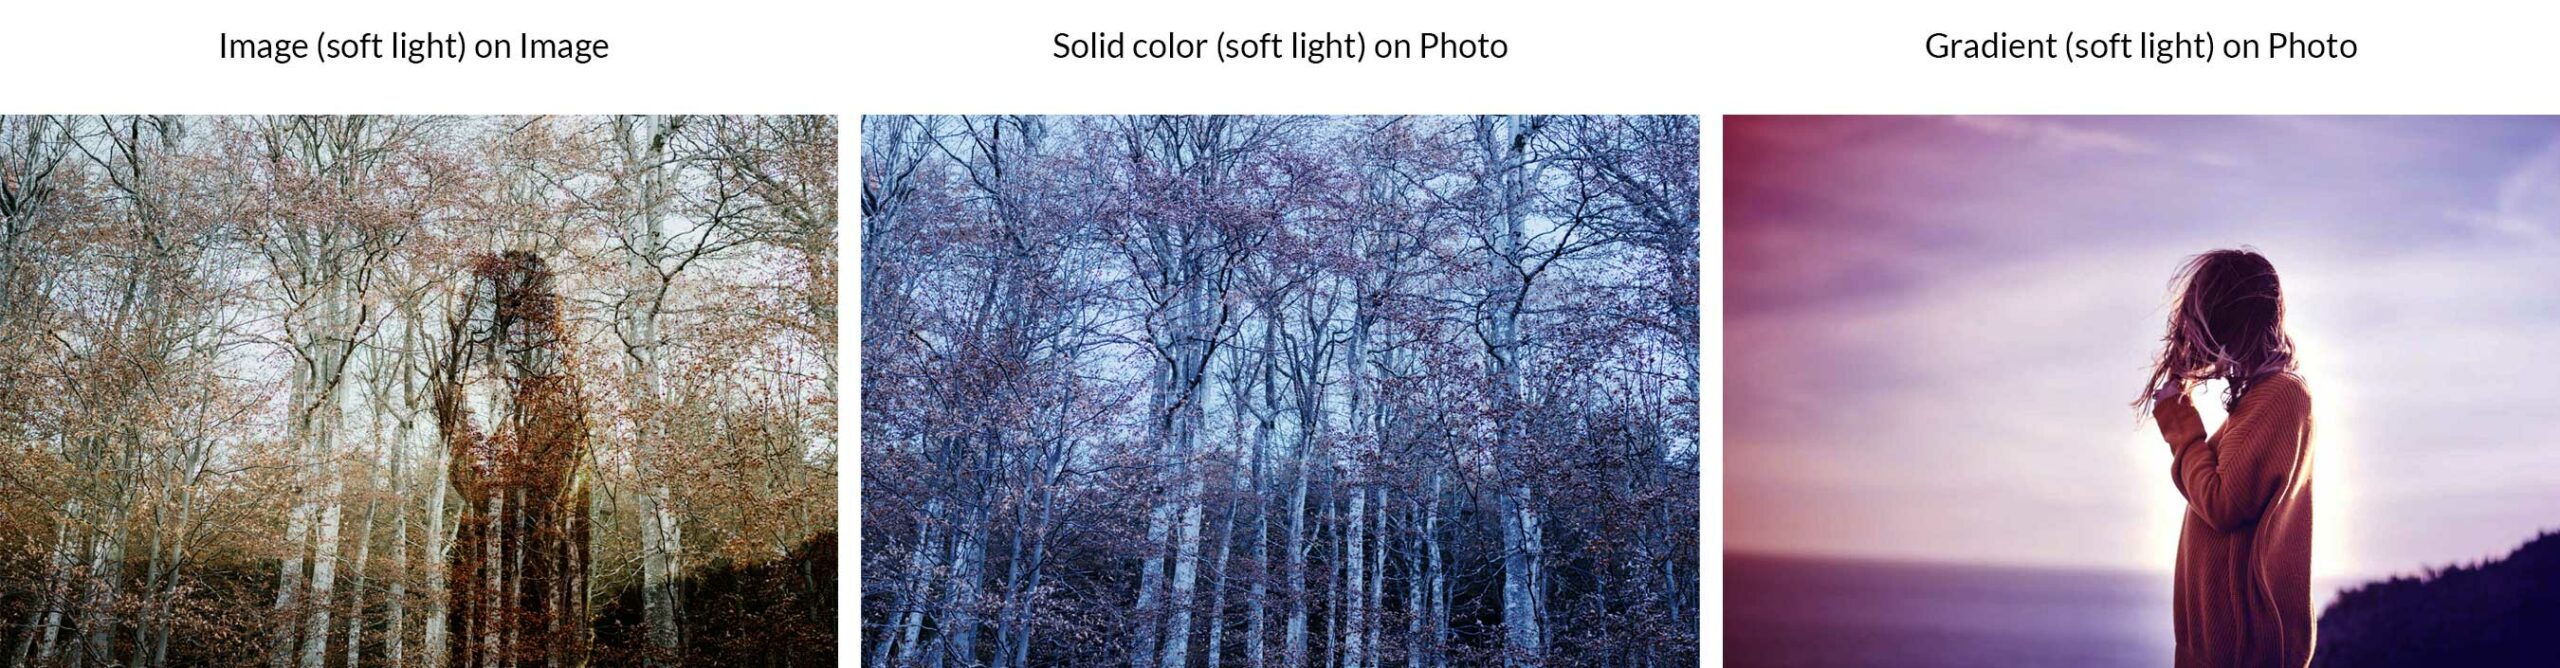
Very similar to overlay, comfortable mild applies both a darker or lighter impact relying at the mild values in a picture or colour, however in a extra delicate look.
Exhausting Gentle
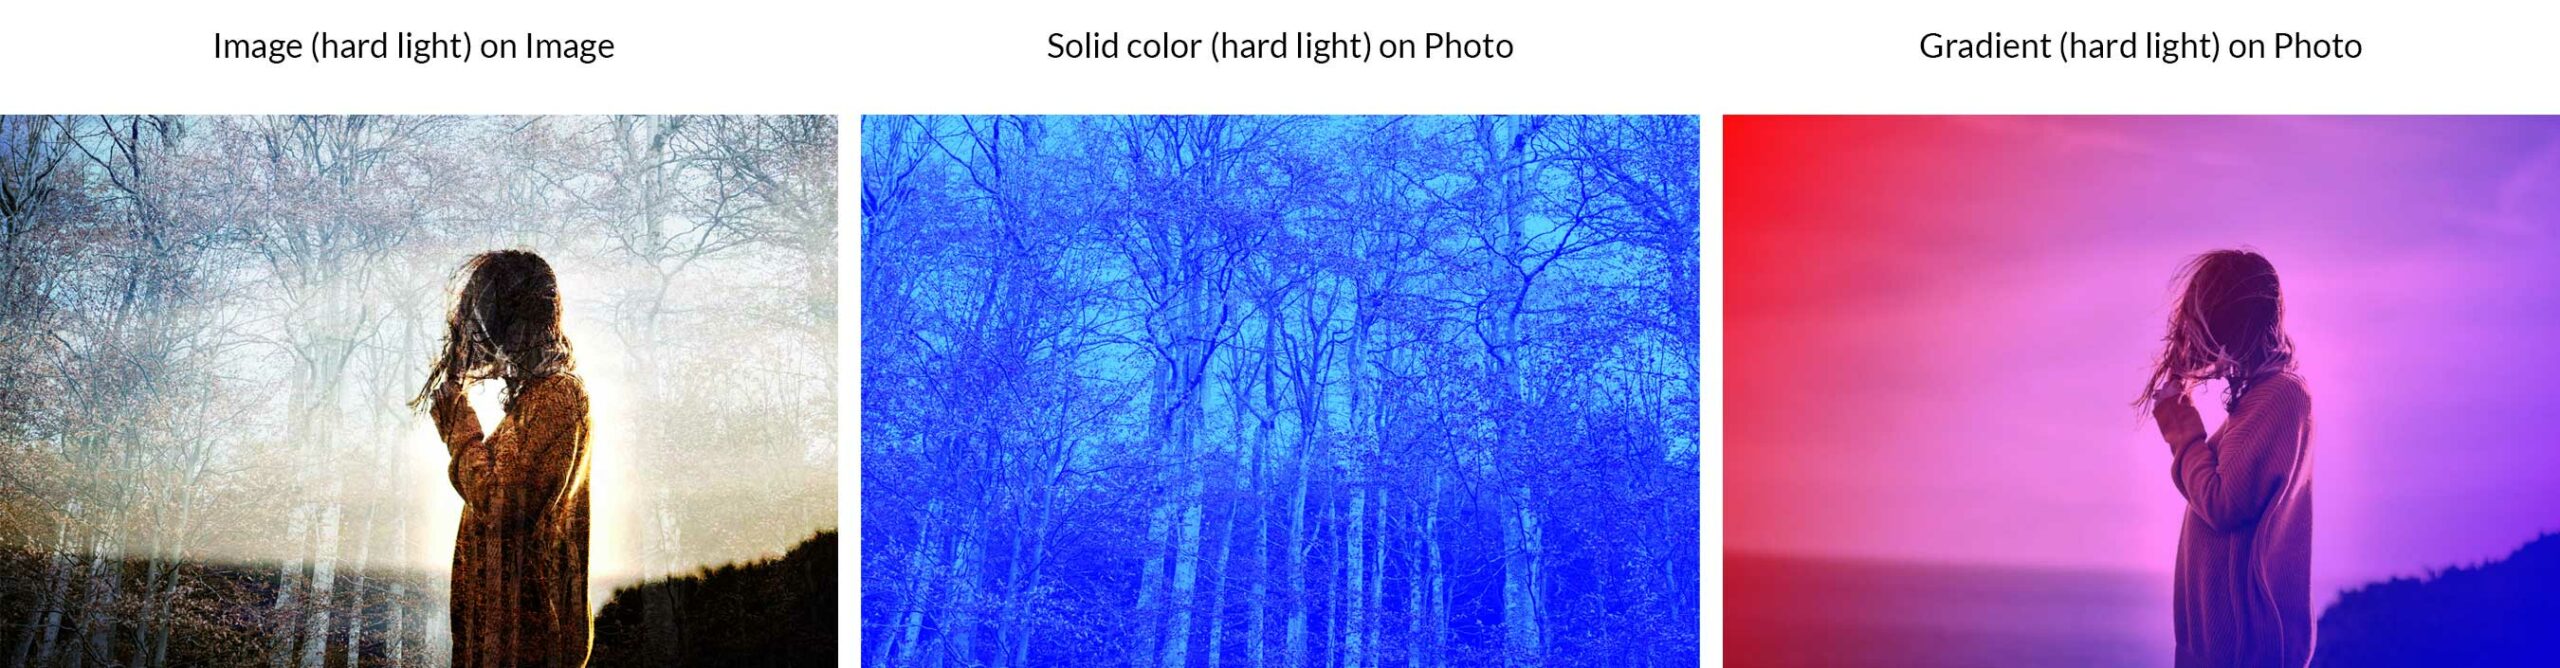
By way of combining multiply and display, laborious mild makes use of brightness within the mix layer to calculate its consequence. Typically, it’s perfect to scale back the opacity of the mix layer when the use of laborious mild to get excellent effects.
Brilliant Gentle

50% grey will get darkened, but the rest lighter than 50% is lightened. Brilliant mild is likely one of the particular 8, which makes it mix otherwise in line with whether or not you alter the fill or opacity.
Linear Gentle
Every other member of the particular 8, linear mild combines the consequences of linear dodge (upload) on lighter pixels, and linear burn on darker ones.
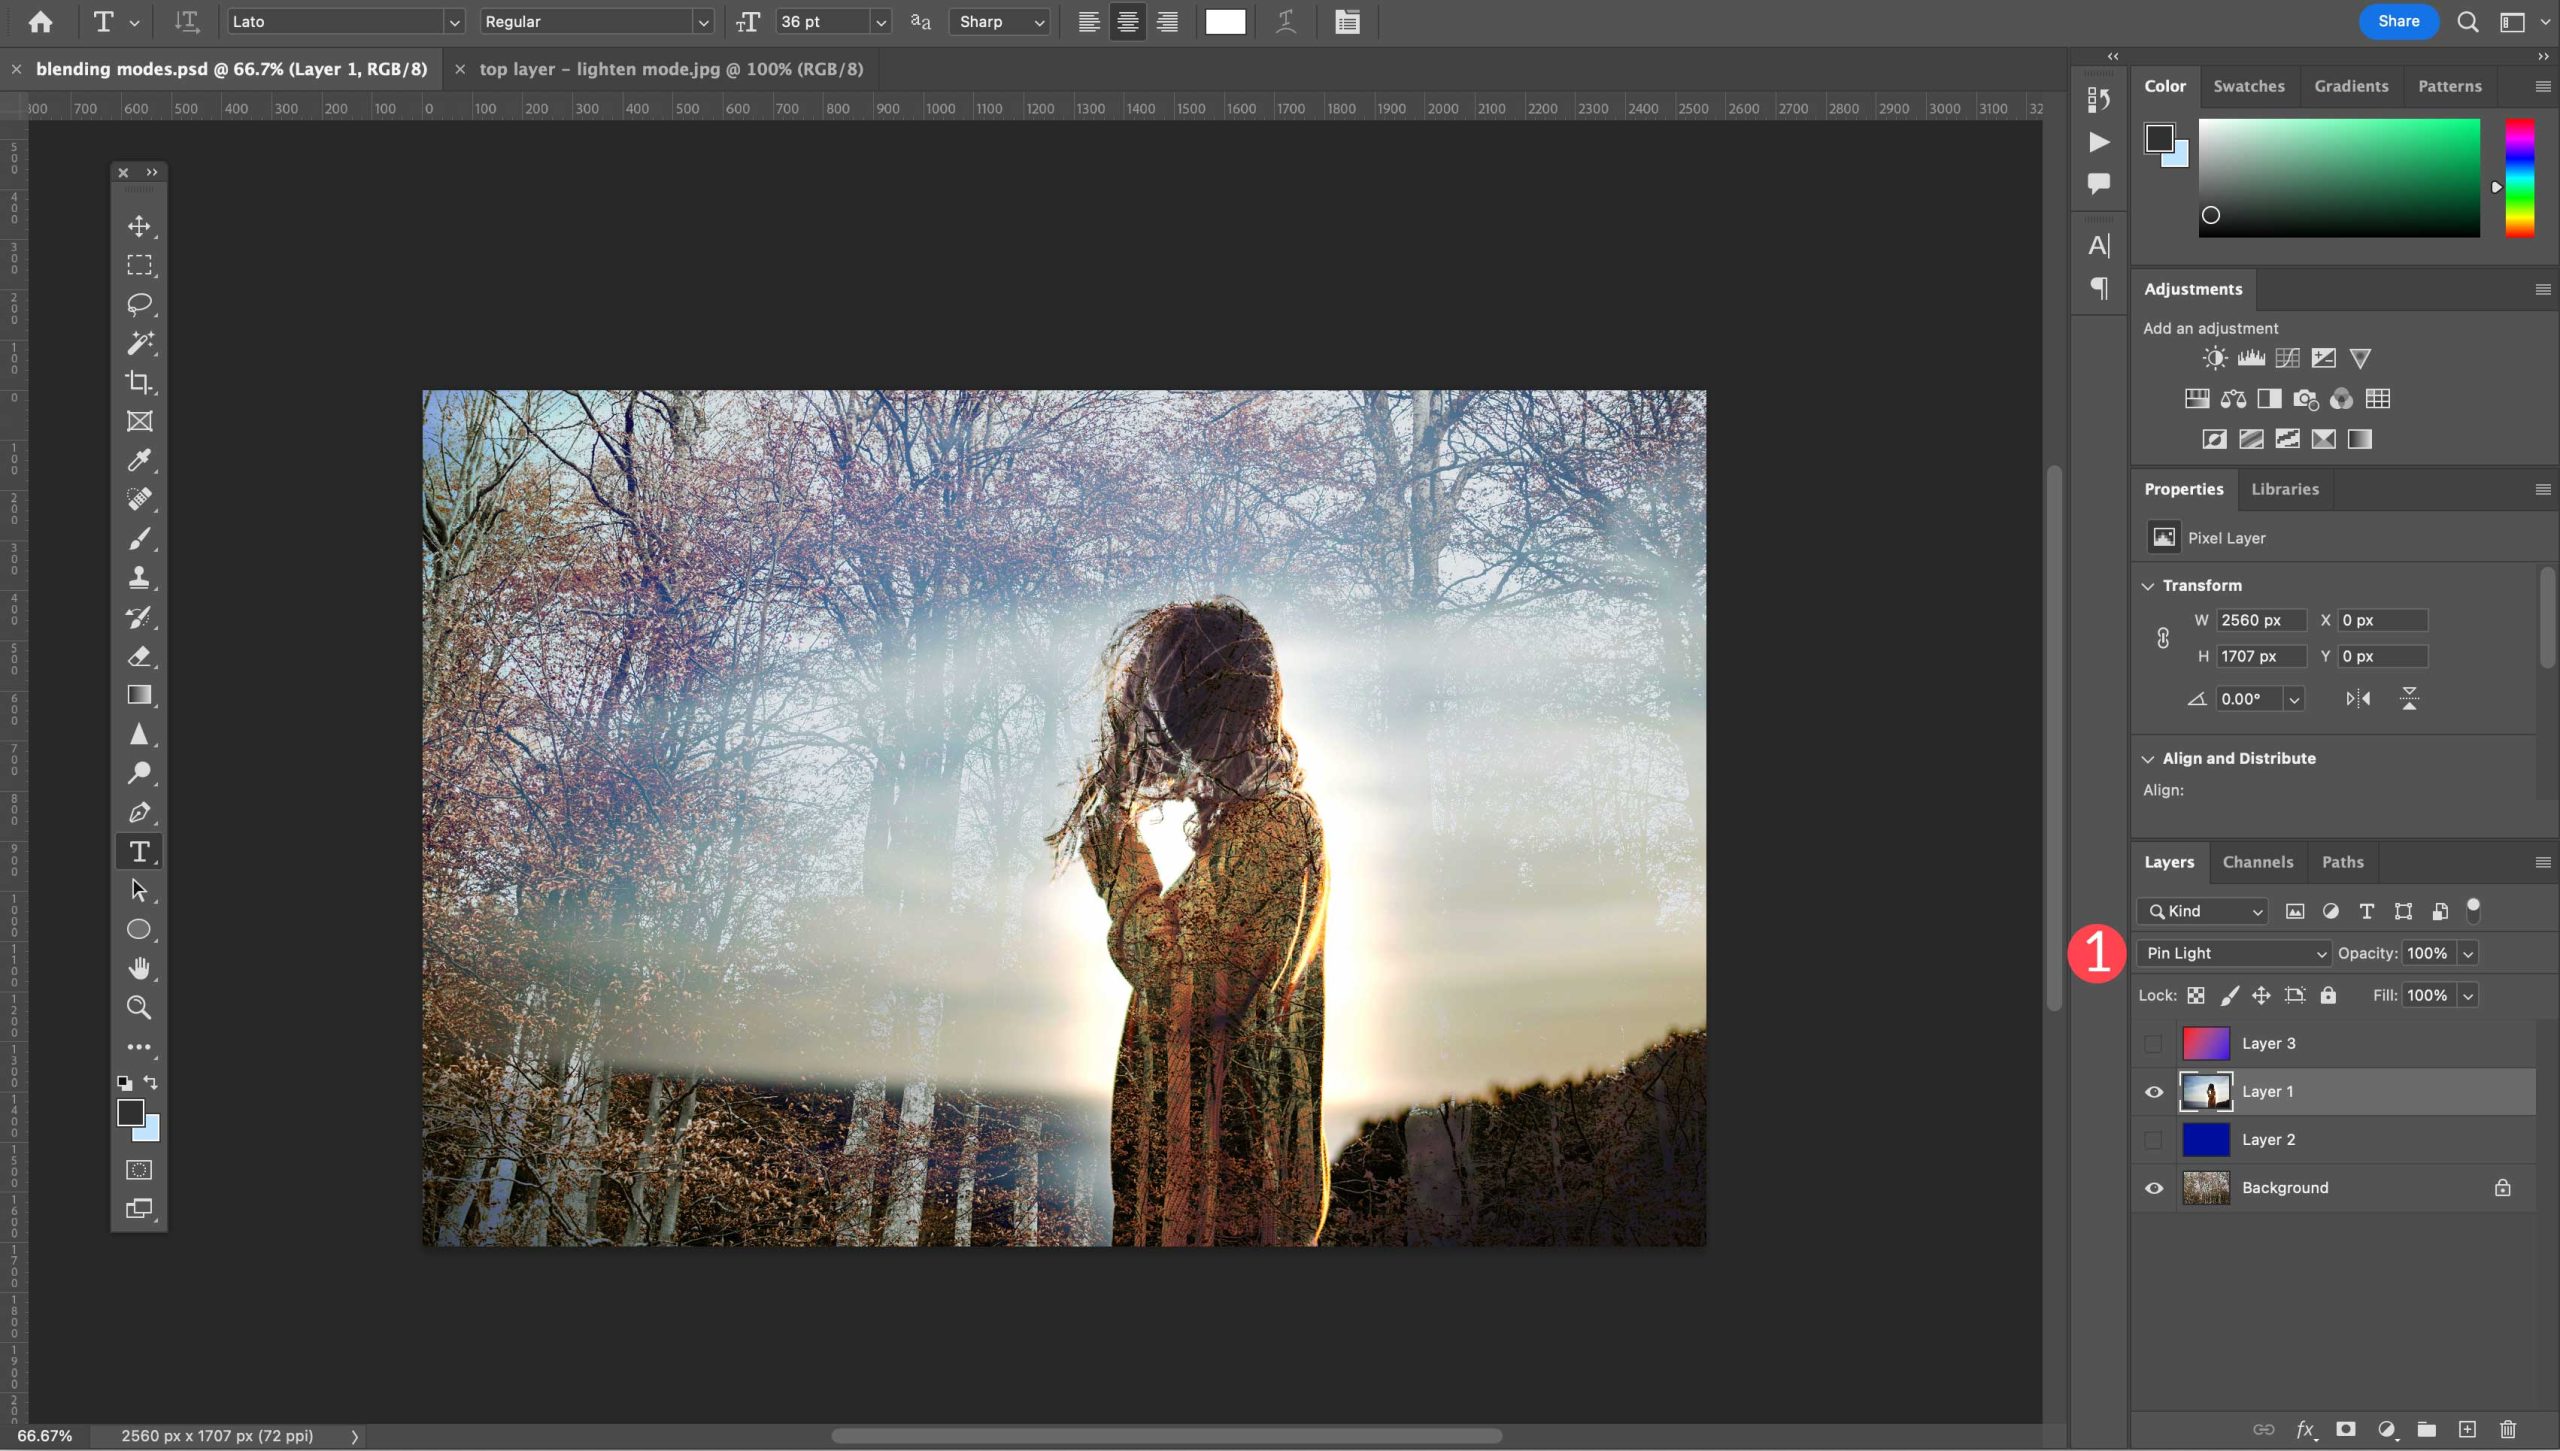
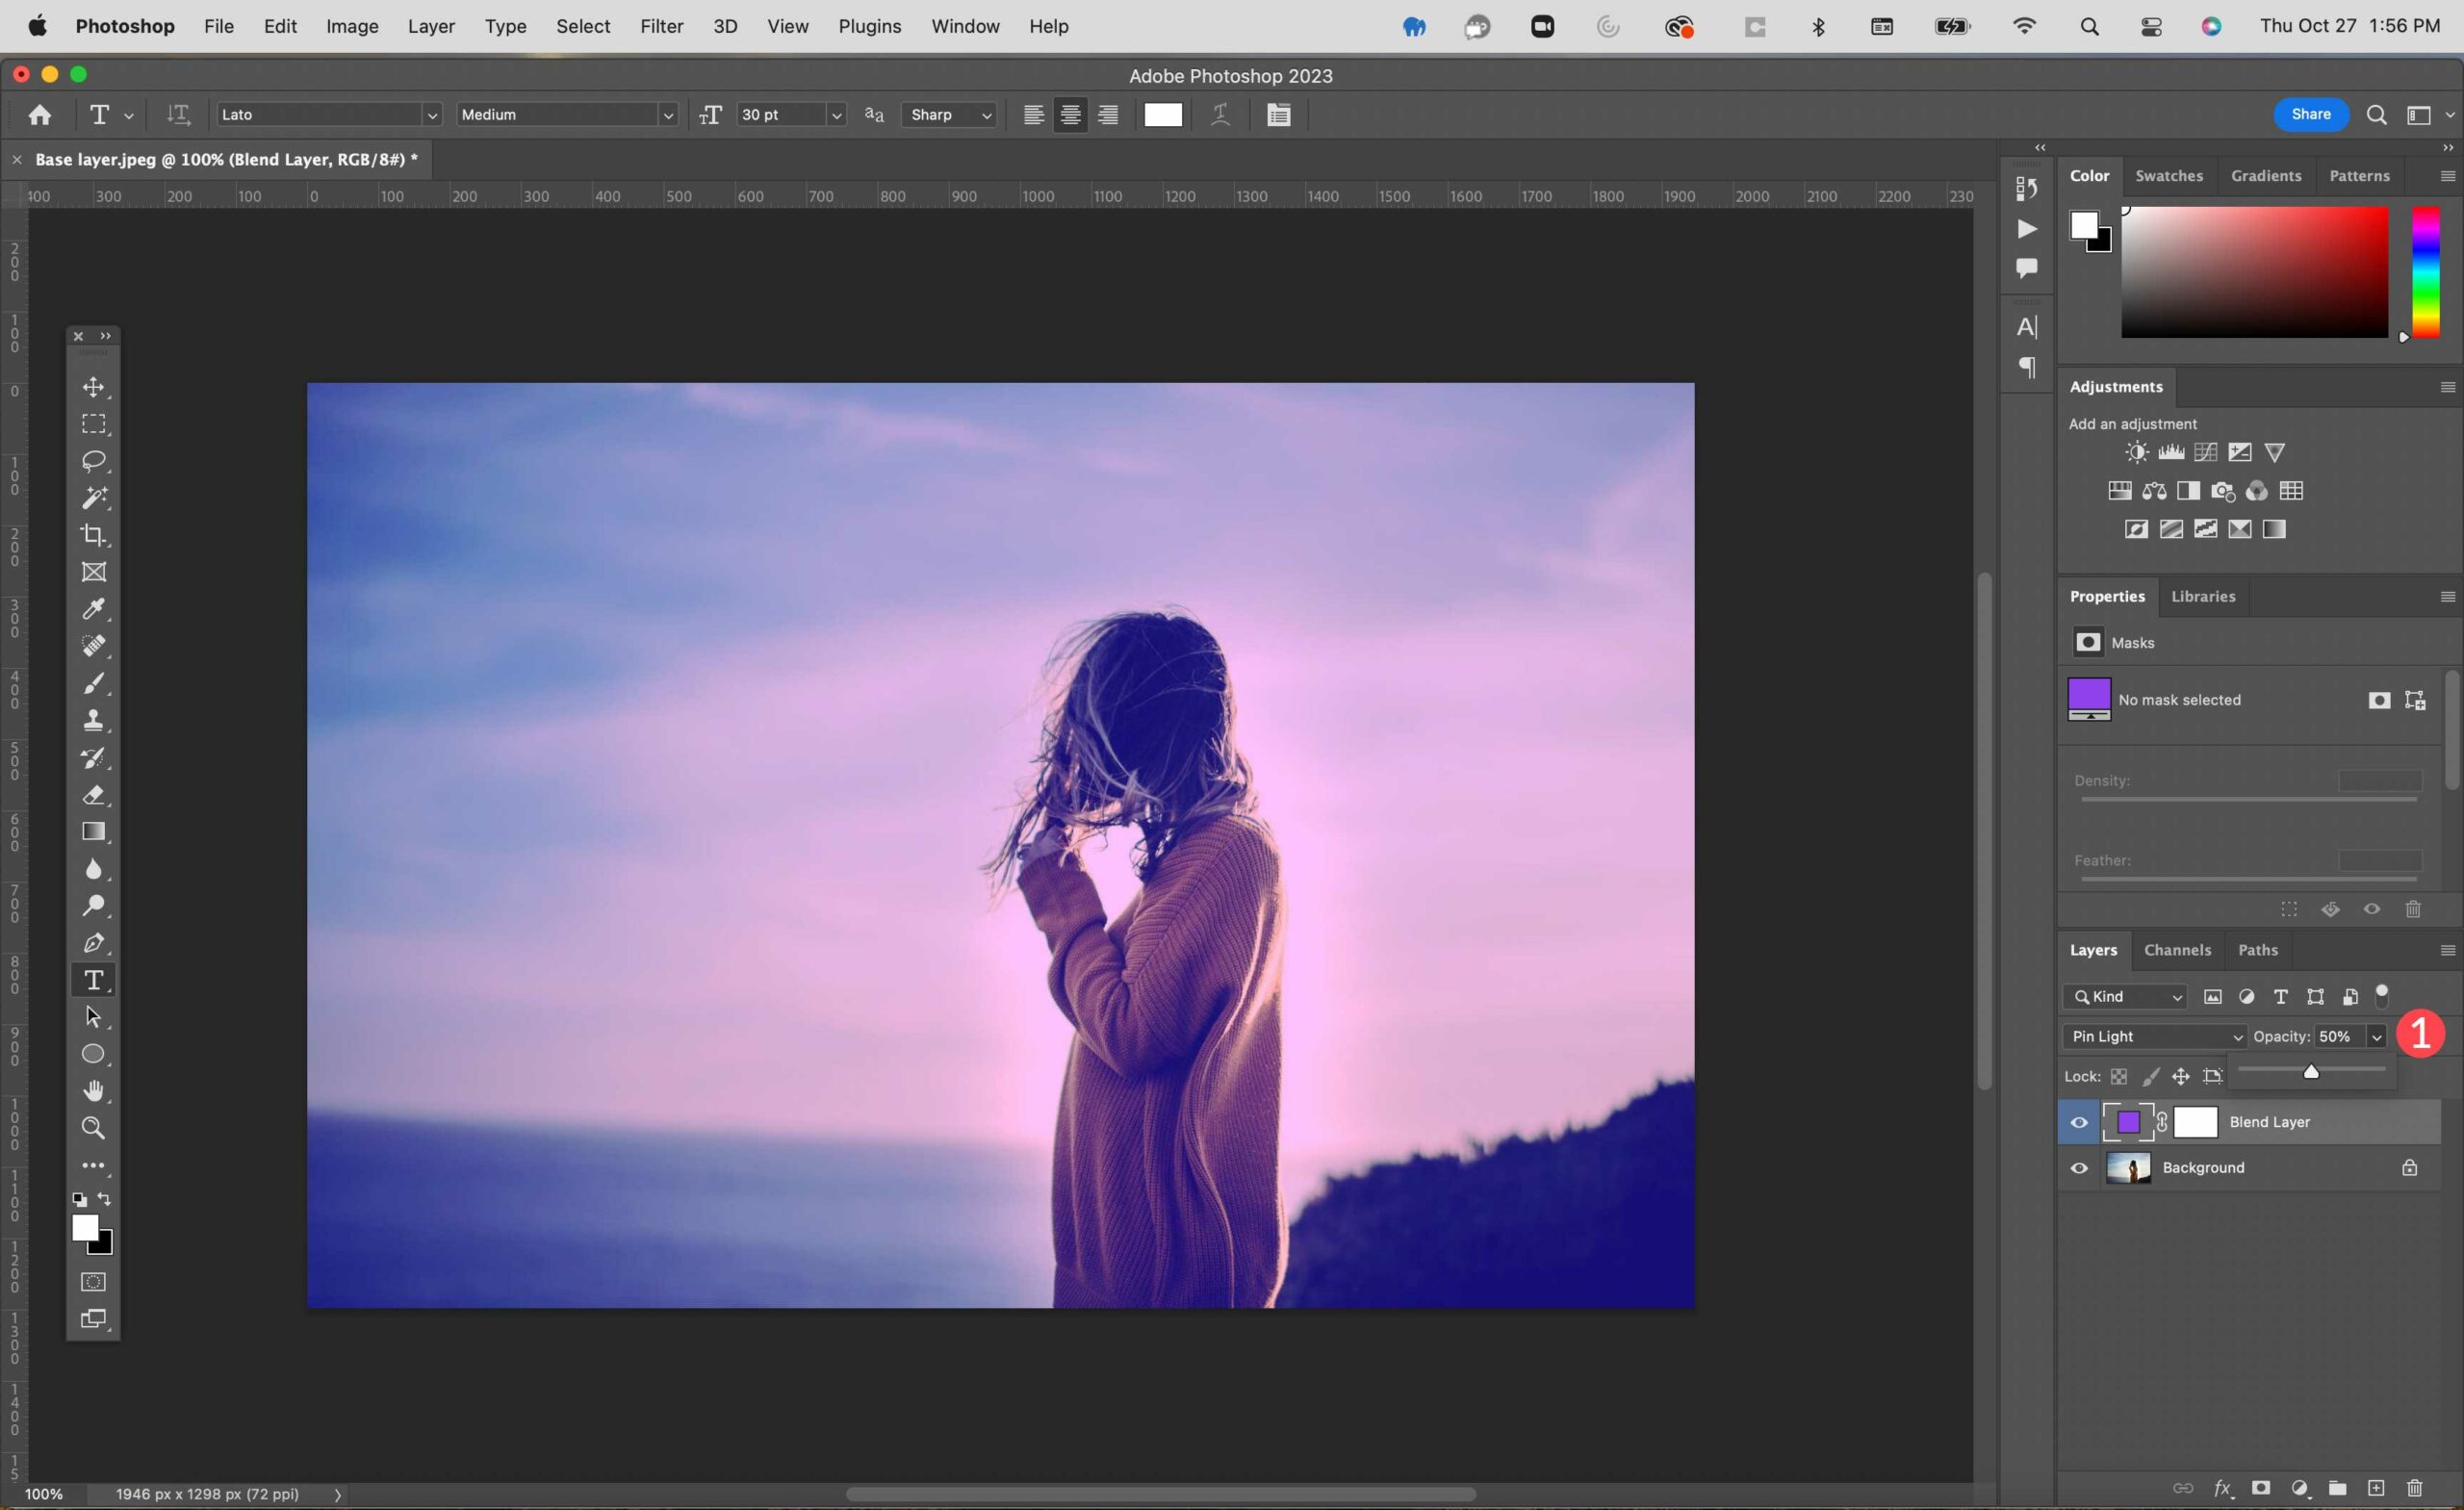
Pin Gentle
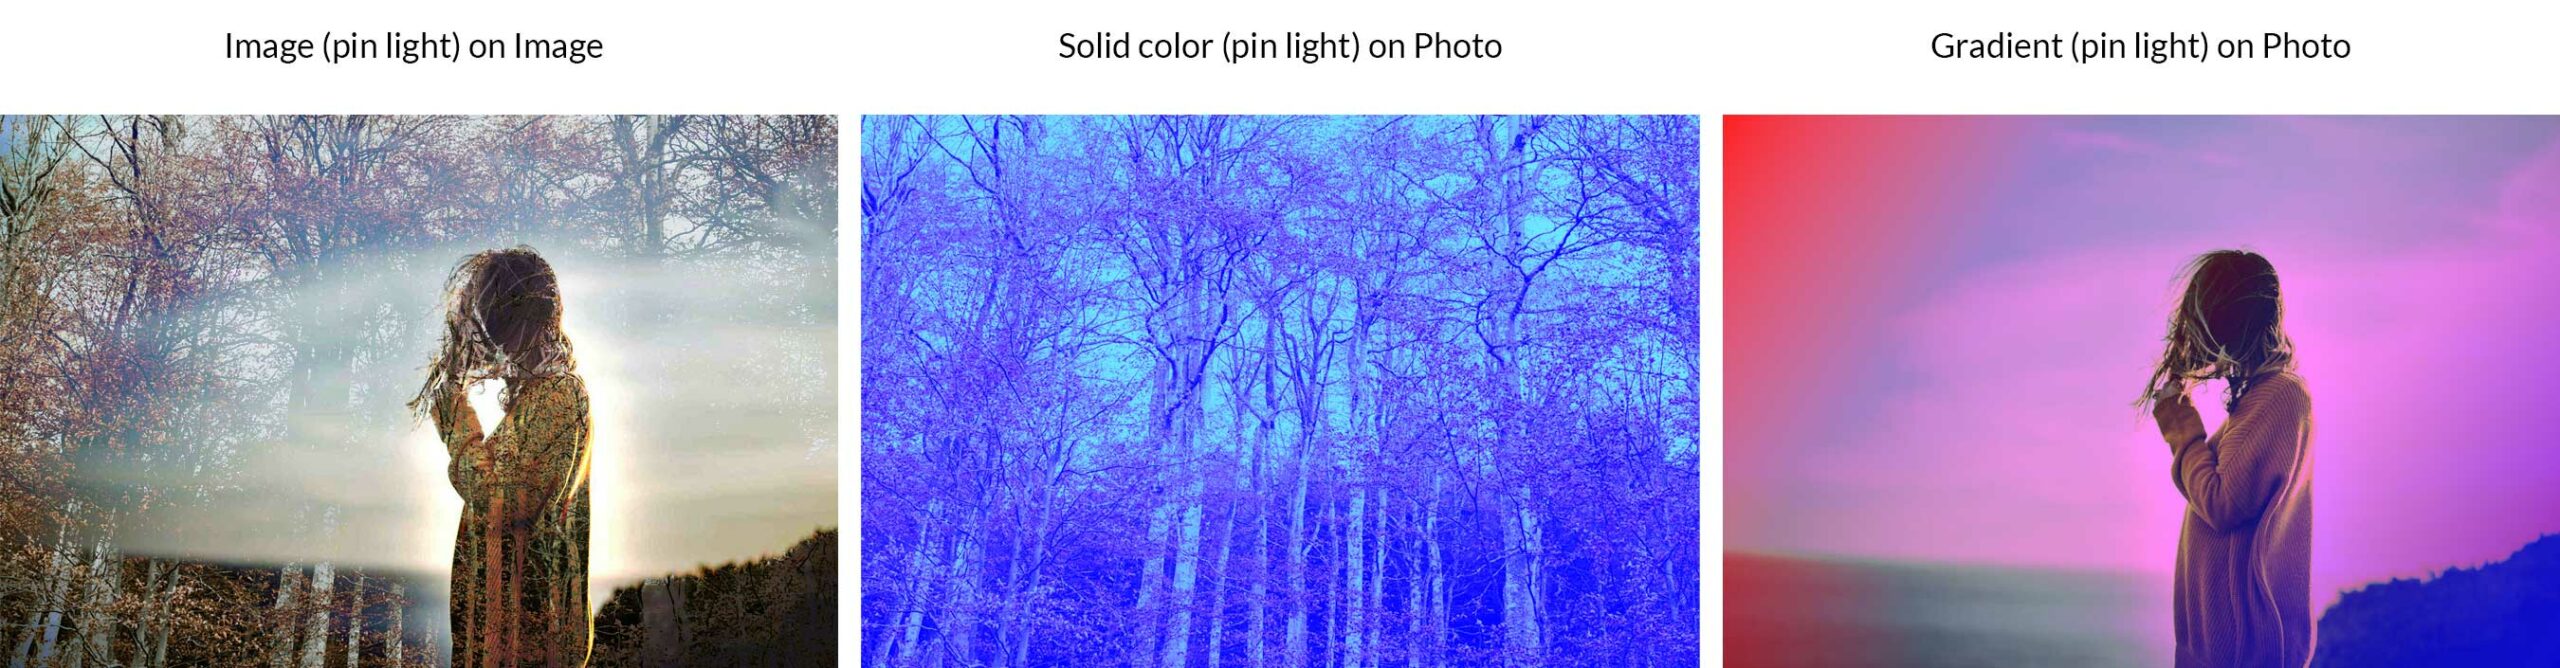
This mode combines a depressing and lightweight mix on the identical time. It’s going to take away all mid-tones for your picture. Adjusting the opacity can produce wildly other effects.
Exhausting Combine
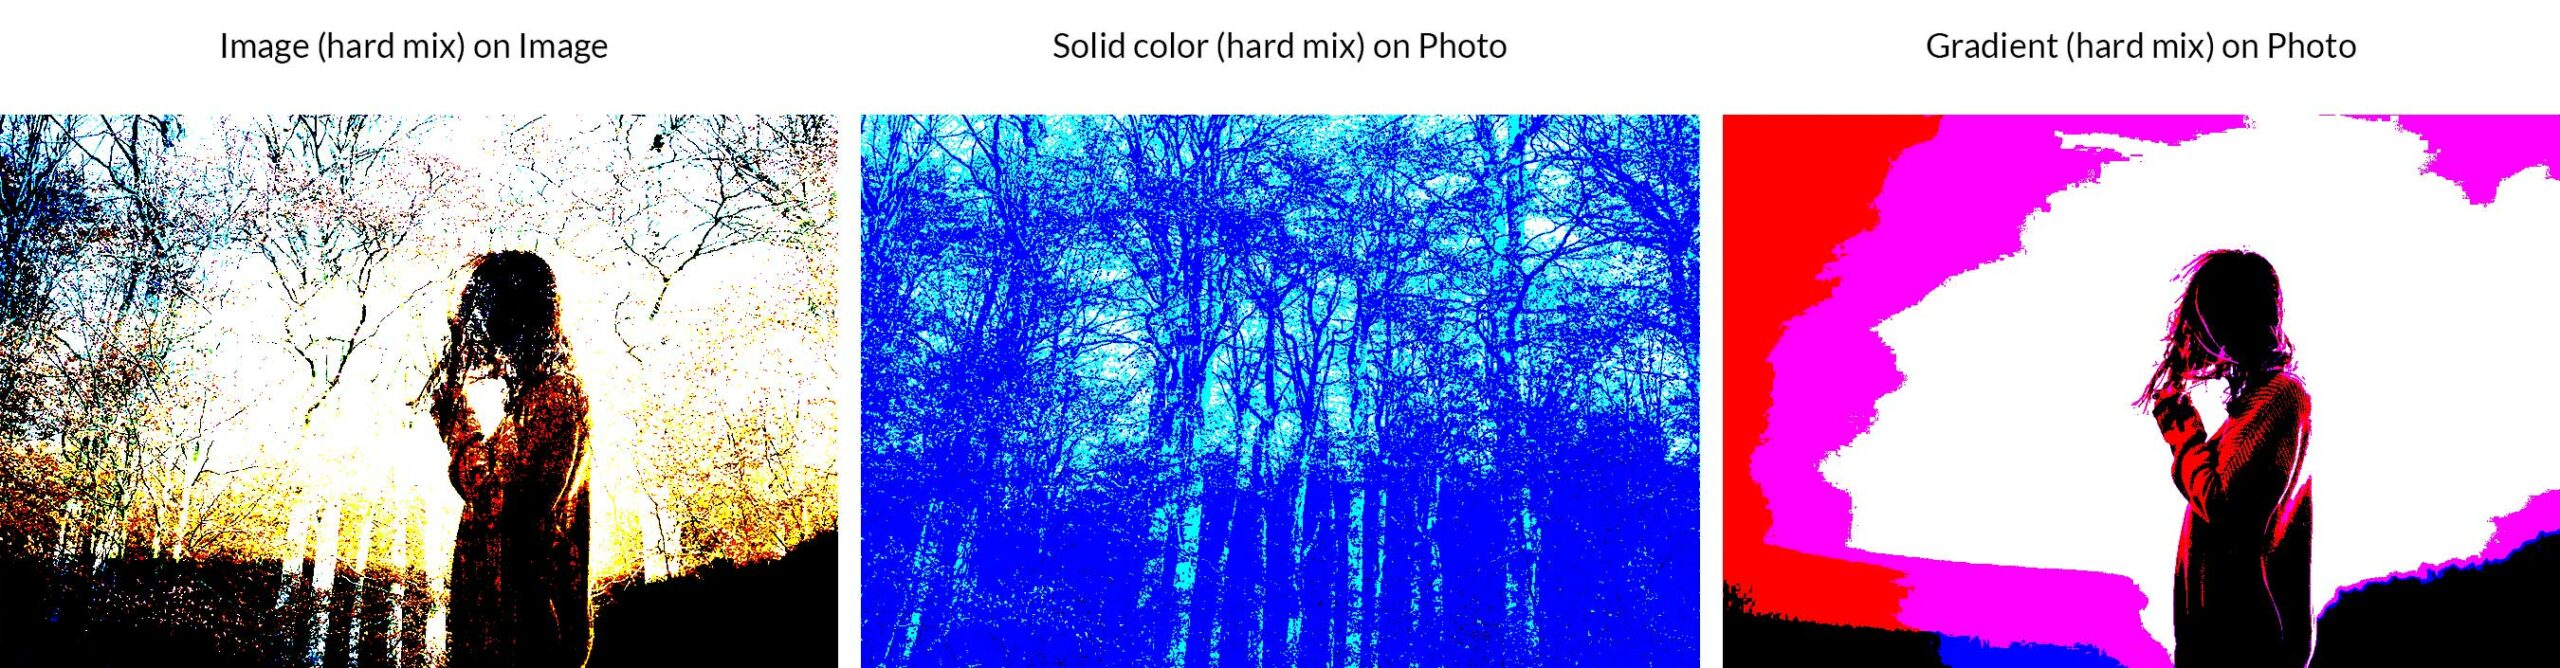
Exhausting blend works by way of including the worth of every RGB channel from the mix layer to the matching RGB layers of the bottom layer. The semblance of laborious mild leads to lack of colour except black, white, grey, or RGB and CMYK.
Comparative
Those create permutations in colour in line with the values of the mix layer and the bottom layer. Distinction, exclusion, subtract, and divide are integrated.
Distinction

The variation mode takes the guidelines in every colour channel and both subtracts the mix layer from the bottom layer or the bottom layer from the mix layer. The result will depend on which of the 2 layers is brighter. Black colours produce no adjustments.
Exclusion

Exclusion is very similar to the adaptation mixing mode, however lowers distinction. When you mix with white, the bottom layer turns into inverted. Then again, black colours don’t exchange.
Subtract
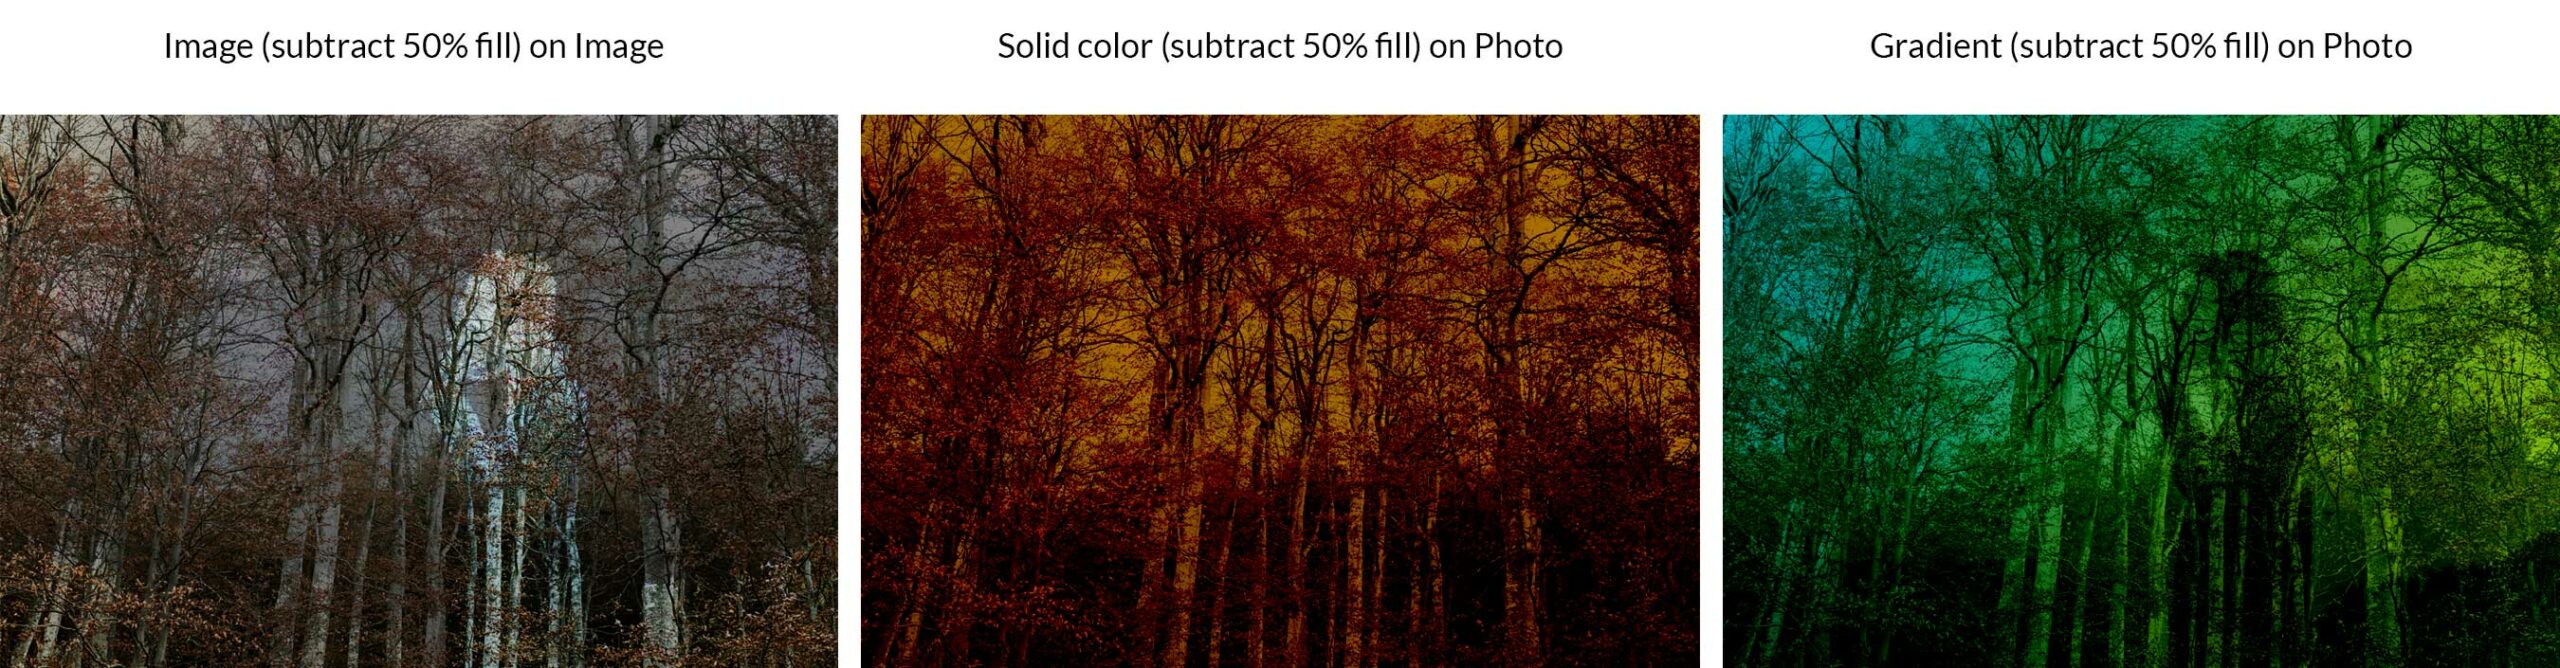
This mode will have a look at all colour channels, then take away the mix layer’s colours from the bottom layer.
Divide
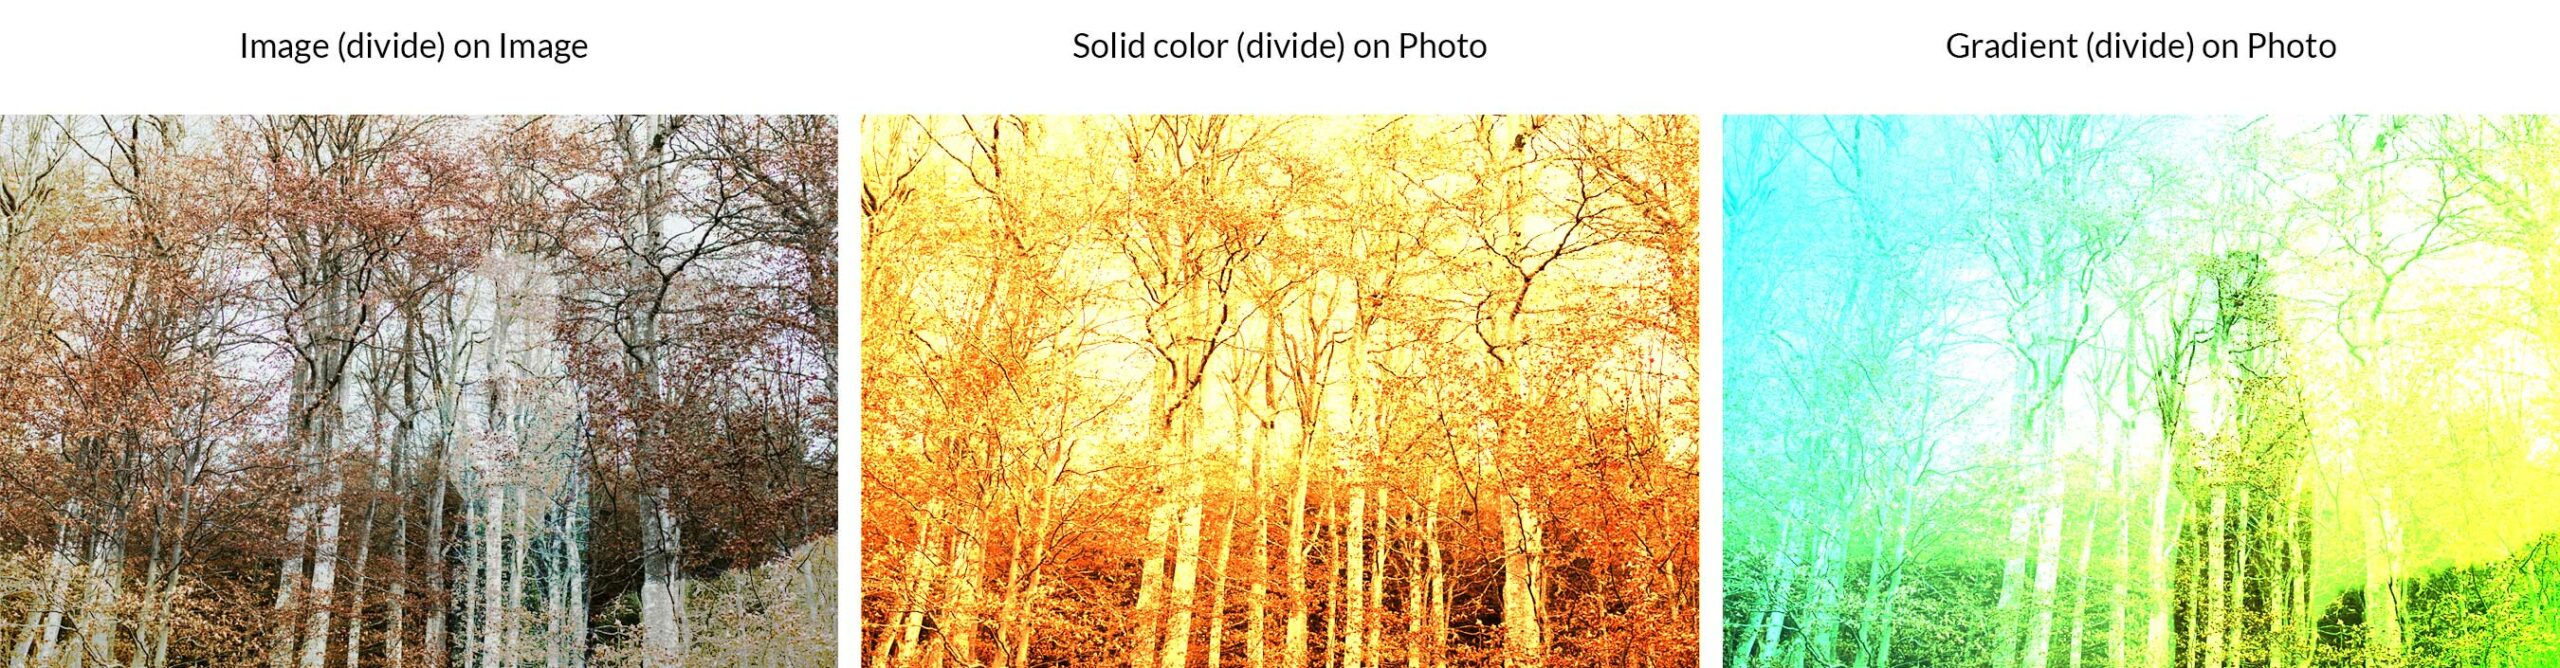
This takes a have a look at the entire colour channels, then divides the mix layer from the bottom layer.
Composite Mix Modes:
This class works to vary colour high quality. It makes use of a mixture of white, together with number one colours equivalent to purple, inexperienced, blue (RGB), and cyan, magenta, yellow, and black (CMYK) to create the mixing mode.
Hue

Hue works by way of forcing colours within the base layer to be recolored with the hue of the mix layer. Principally, it helps to keep all darkish colours darkish, and all mild colours mild, however most effective replaces the hue of the mix layer. In our instance, you’ll be able to see that the lightest colours within the picture of bushes (minus the whites) is became the hue of the blue in our mix colour layer.
Saturation
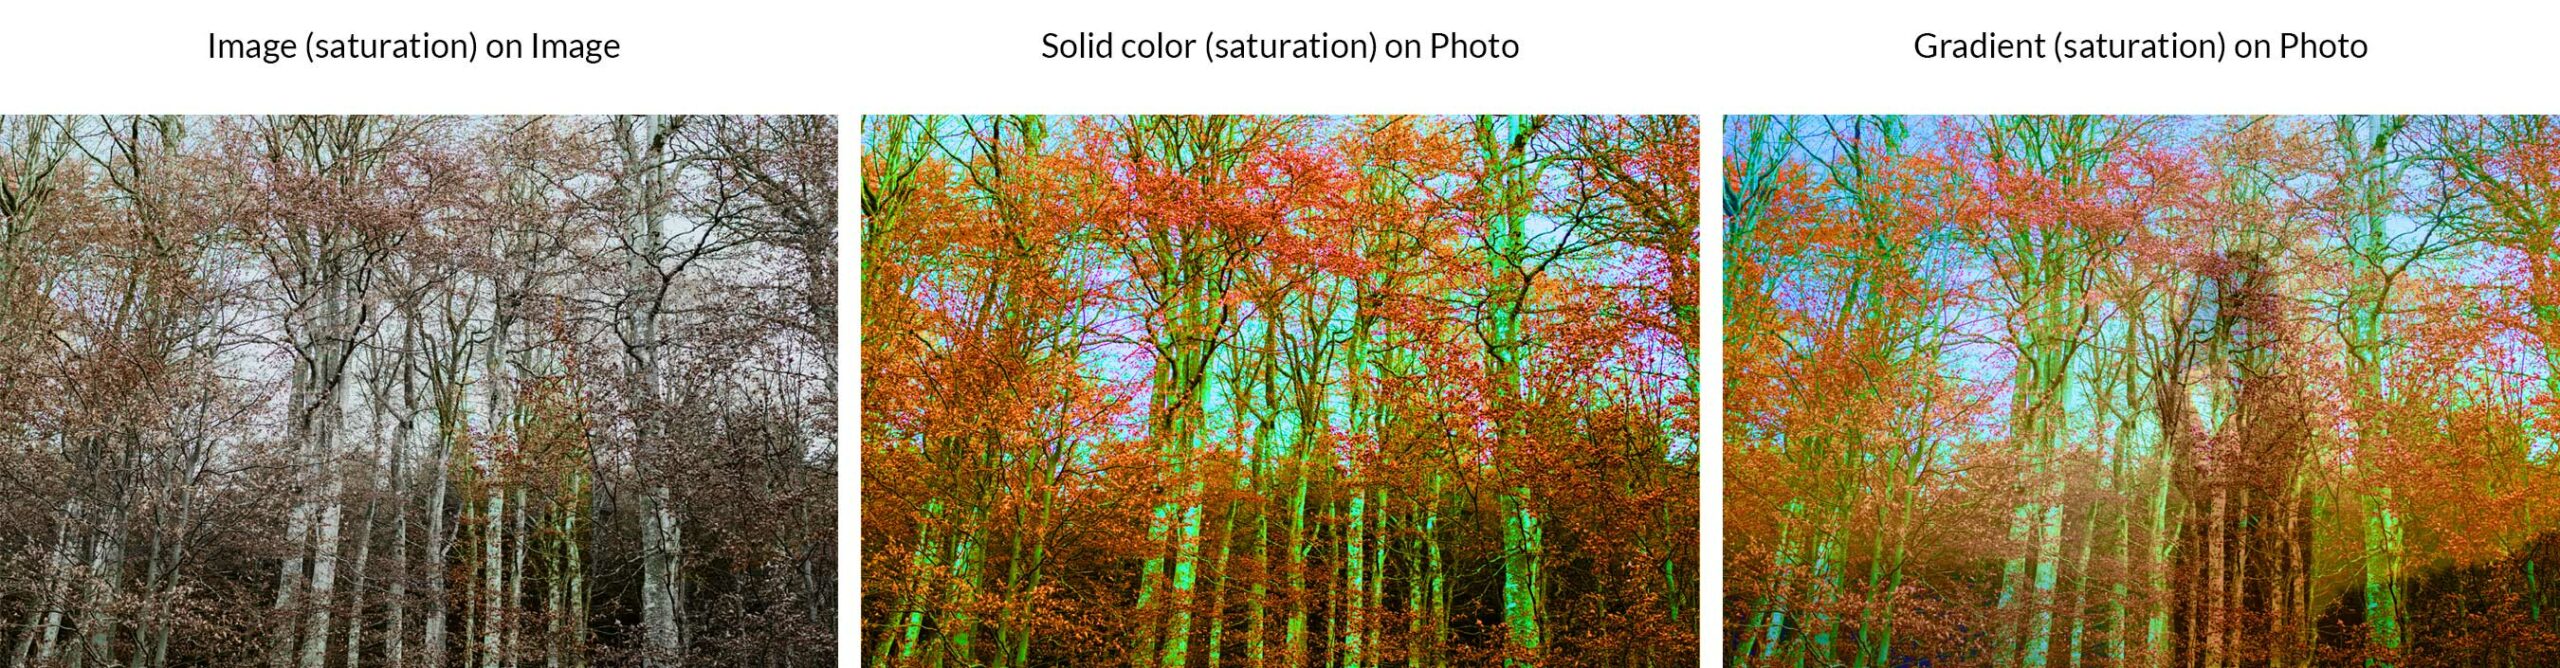
For saturation, the effects are very similar to hue except for the saturation in pictures is affected. The lightest colour and hue within the base layer remains the similar, whilst the saturation is changed with the mix colour.
Colour
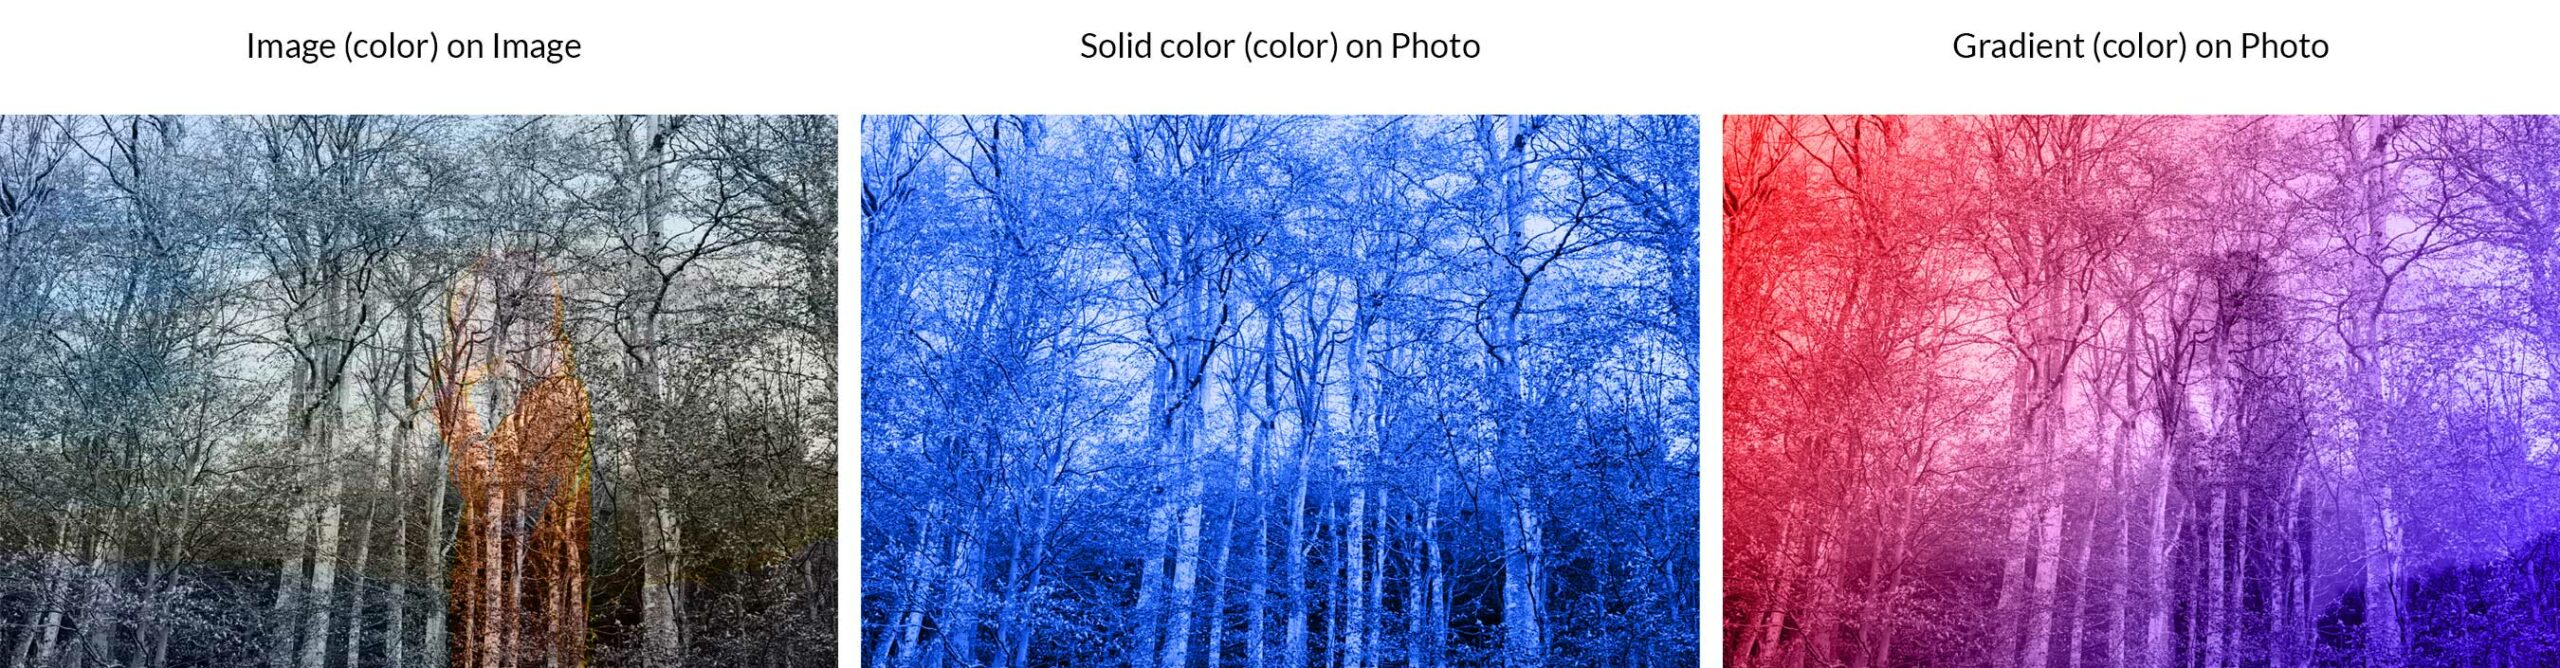
Colour works just like hue except for that it helps to keep most effective the lightest of the bottom layers colours. It then provides the hue and saturation of the mix layer. In our instance, you’ll be able to see that the cast colours lighter tones are changed with the blue. In a similar way, the lighter colours in our third instance are changed with the purple and blue gradient colours of the mix layer.
Luminosity
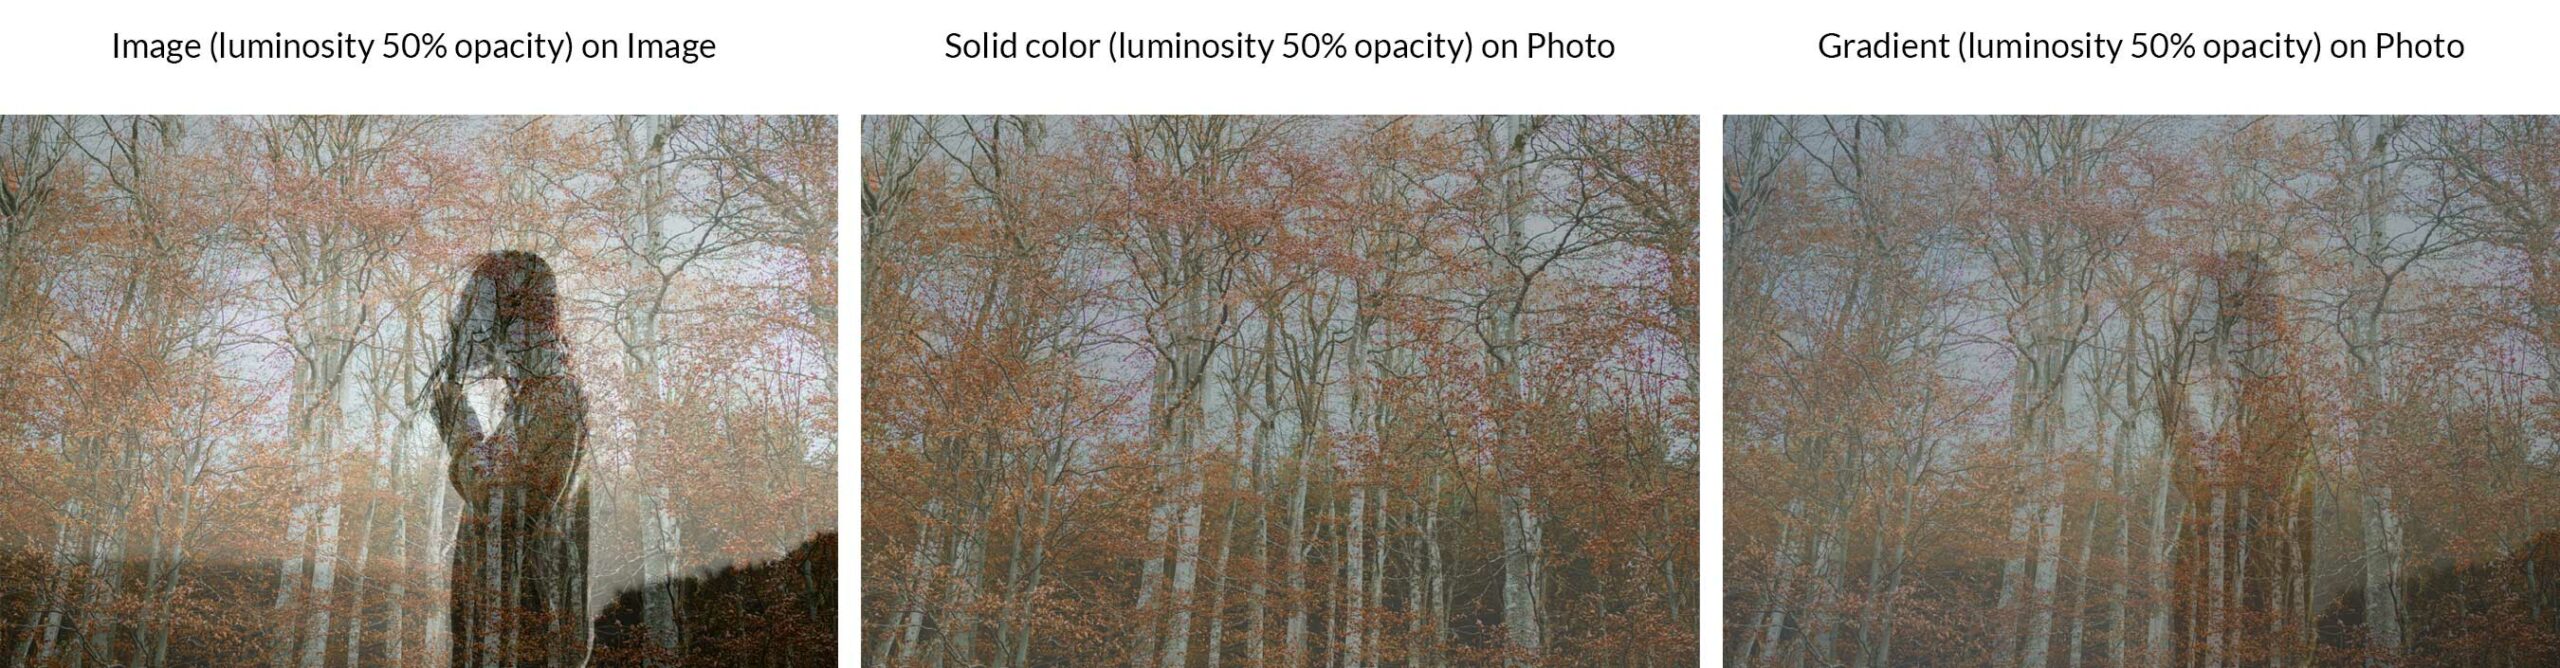
Luminosity is the other of colour. It manages to care for each the hue and saturation within the base photograph layer of our instance, whilst changing it’s lightest colours (luminosity) with the mix layer’s colours.
Different Mix Modes
Along with the 27 layer mix modes indexed, there are a couple of further ones to be had in sure eventualities, or with sure gear. For instance, In the back of can be utilized to edit or paint withing the clear a part of a layer. It’s going to most effective paintings in layers the place lock transparency isn’t decided on. Transparent is most effective to be had when the use of the form, paint bucket, brush, pencil gear, in addition to the fill and stroke instructions. It’s used to edit or paint every pixel to make it clear.
The right way to Use Photoshop Mixing Modes
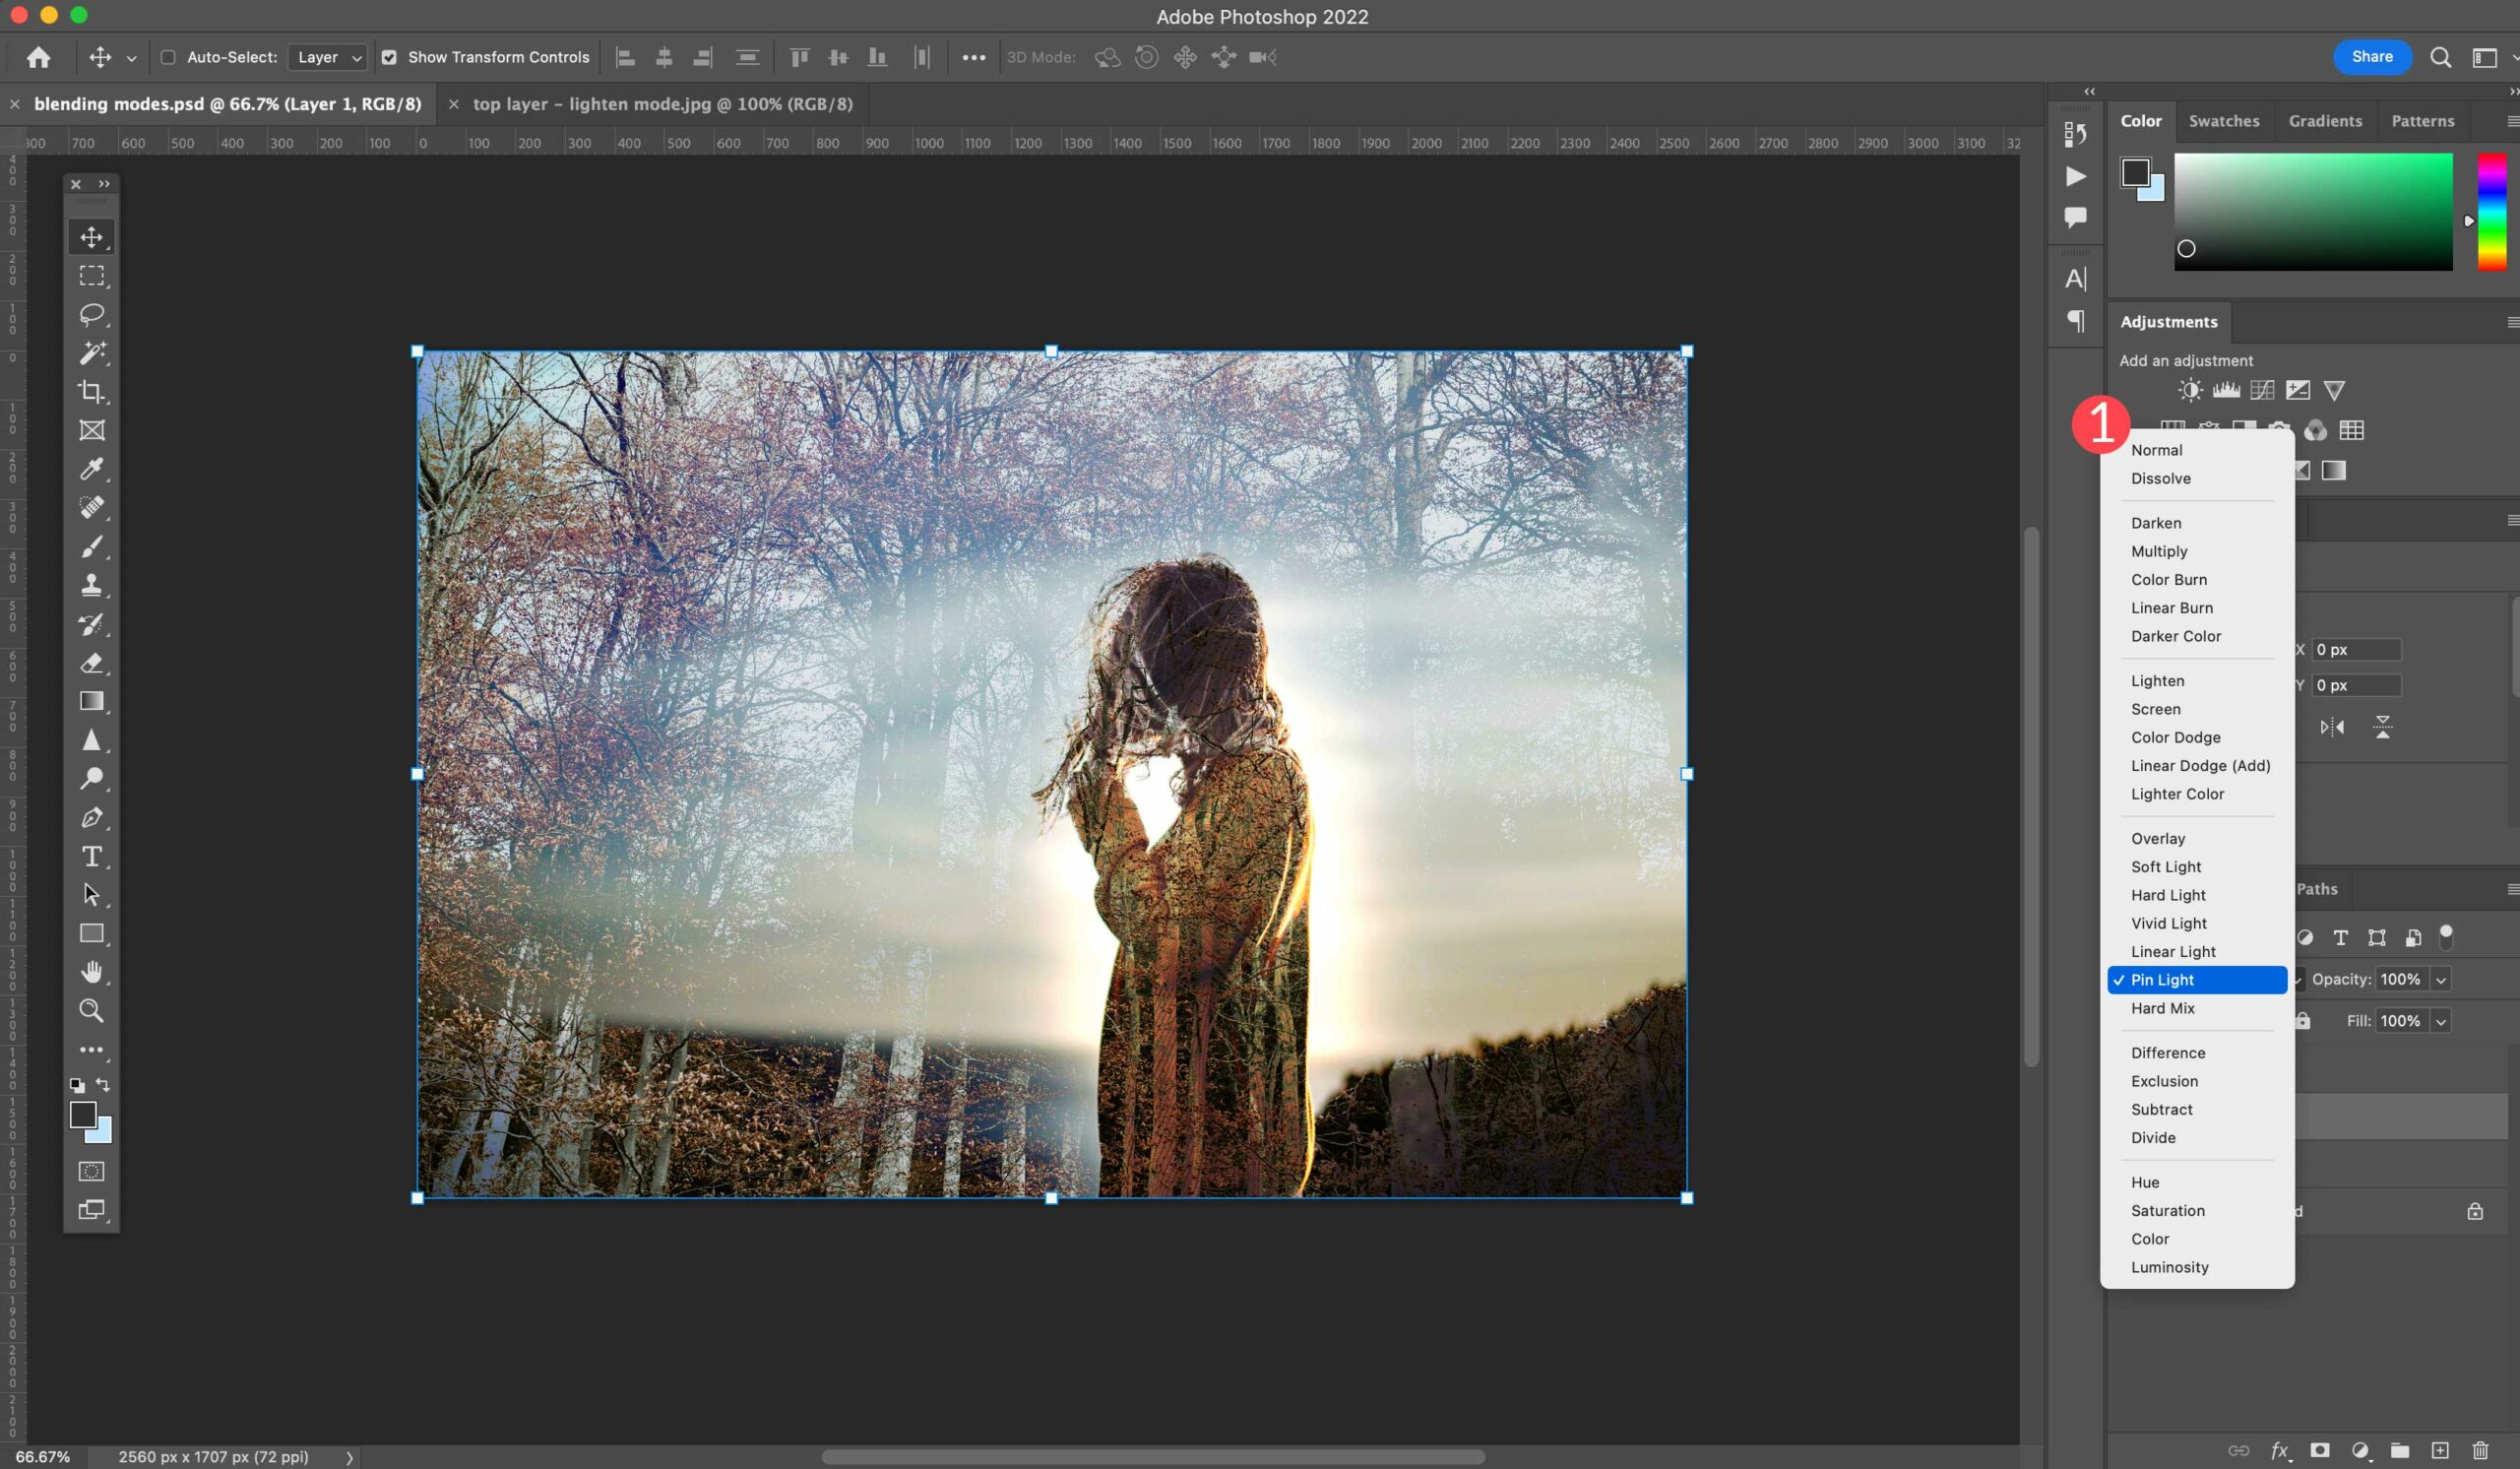
When running in Photoshop, mixing modes will also be situated in two spaces. The primary is inside the layers panel. To get entry to mixing modes, click on the drop down menu below Layers.
From there you may have layer 27 mixing mode choices to make a choice from.
The particular 8 mixing modes have an extra method to be accessed. In layer types, you’ll be able to uncheck the transparency form layer checkbox. This will give you an extra degree of mixing functions. To get entry to this, click on the fx choice on the backside of the layers panel.
Subsequent, make a choice mixing choices from the dropdown menu.
After all, uncheck the transparency shapes layer.
Making a Easy Mix
As a way to reveal how you can use them, we’ll supply a elementary instance the use of Photoshop to be able to know the way every one works.
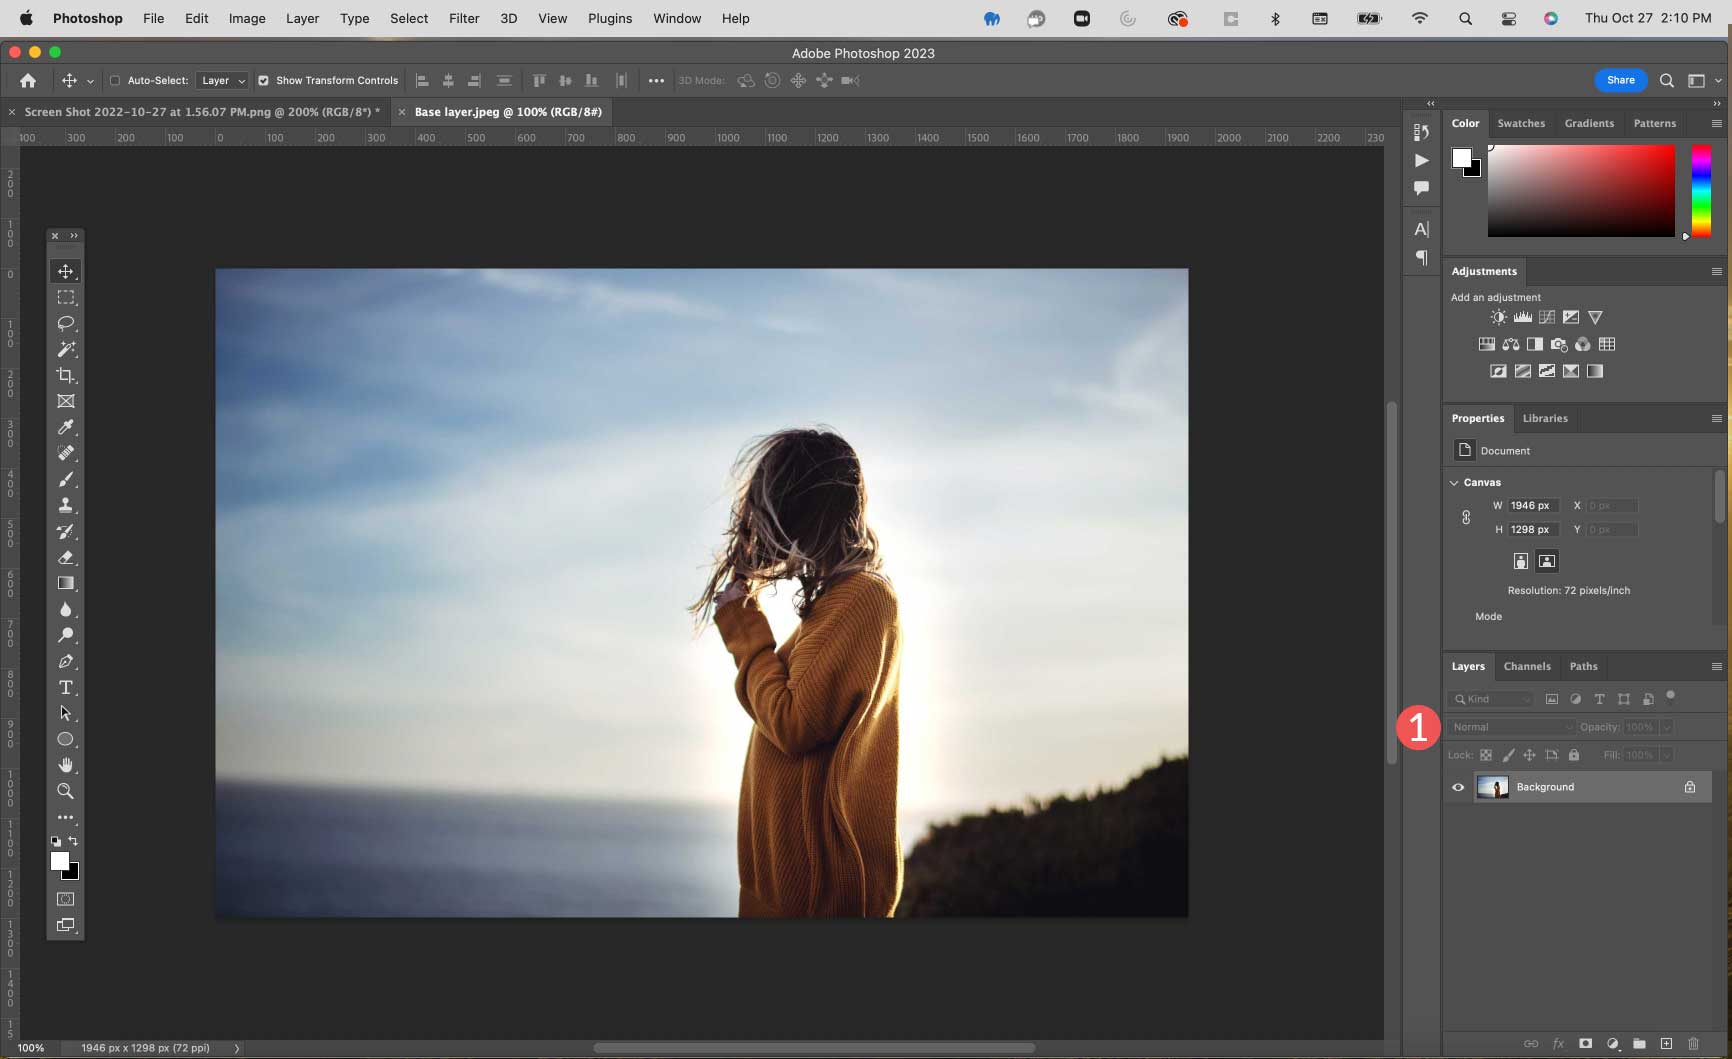
Step 1: Make a choice an Symbol
Step one is to open {a photograph} as your base layer. We’ll use the {photograph} we’ve utilized in our different examples. Be sure that this accretion is about to commonplace.
Step 2: Create a New Colour Layer
Navigate to Layer > New Fill Layer > Cast Colour to create a brand new layer.
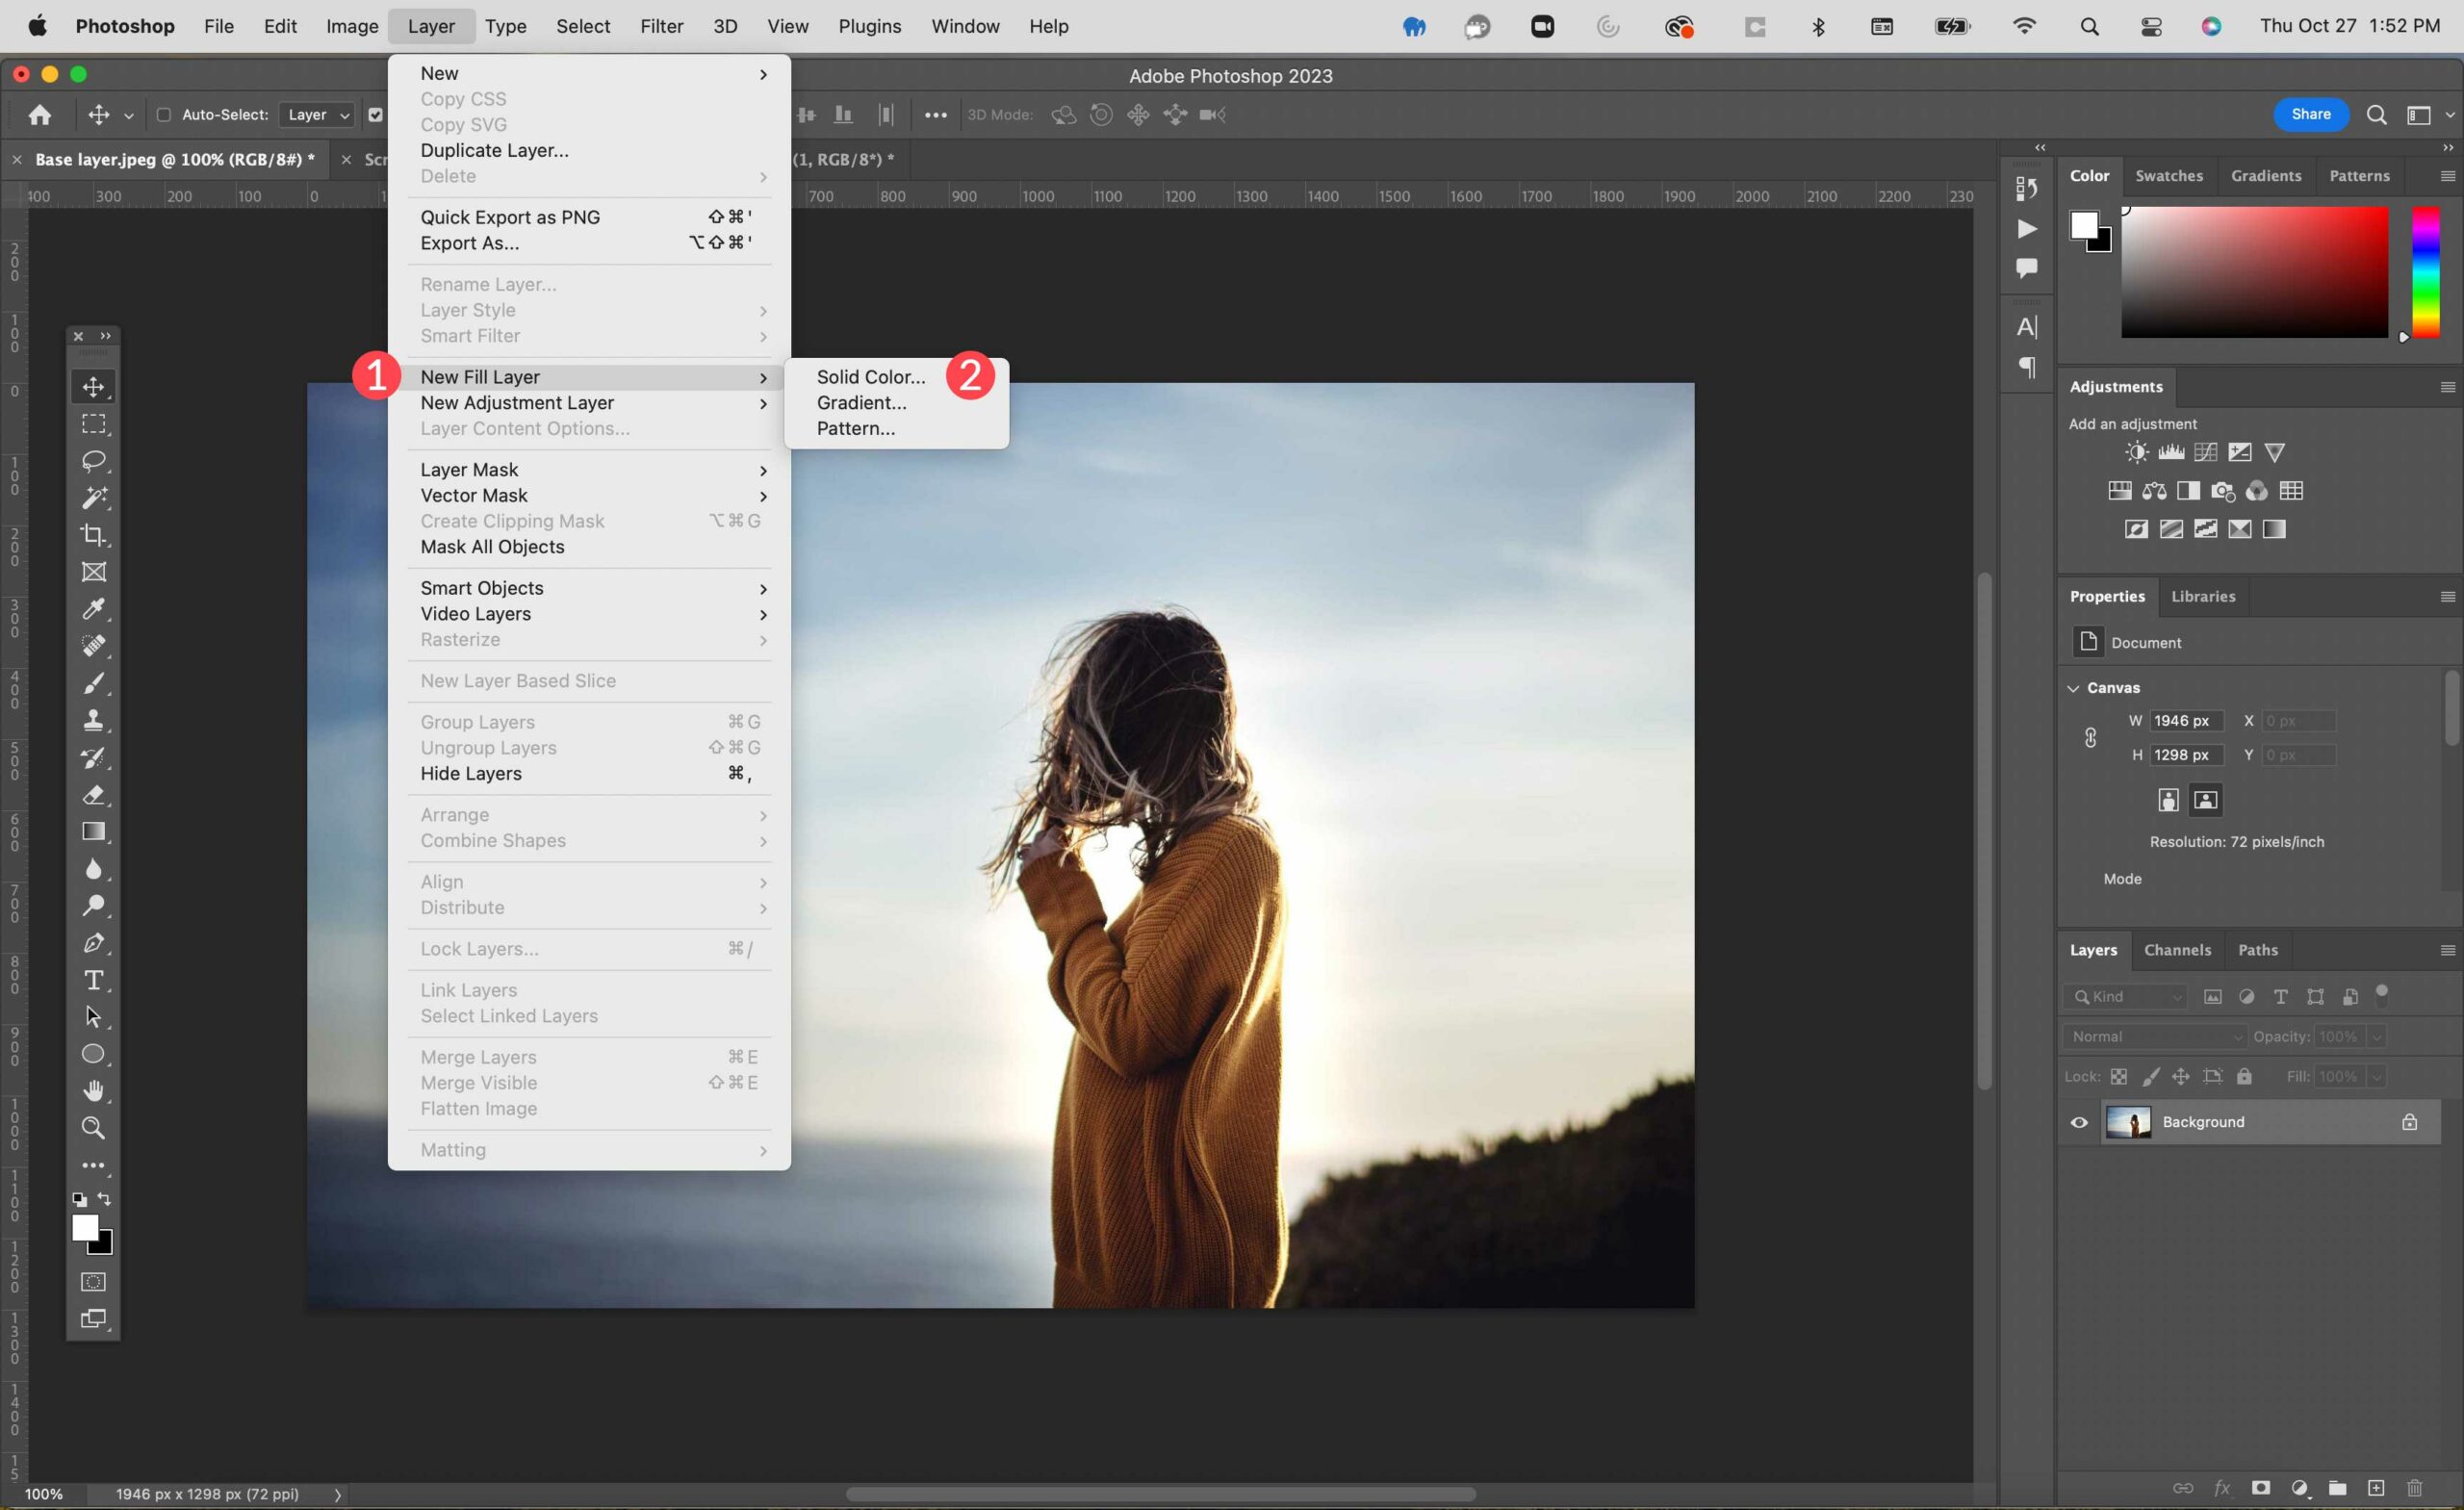
Title the layer Mix Layer, assign blue because the mode, and click on adequate.

Subsequent, fill it with #8f42ec, then click on adequate to create the layer.

Step 3: Follow a Mix Mode
Subsequent, follow the pin mild mixing mode to the mix layer you simply created.
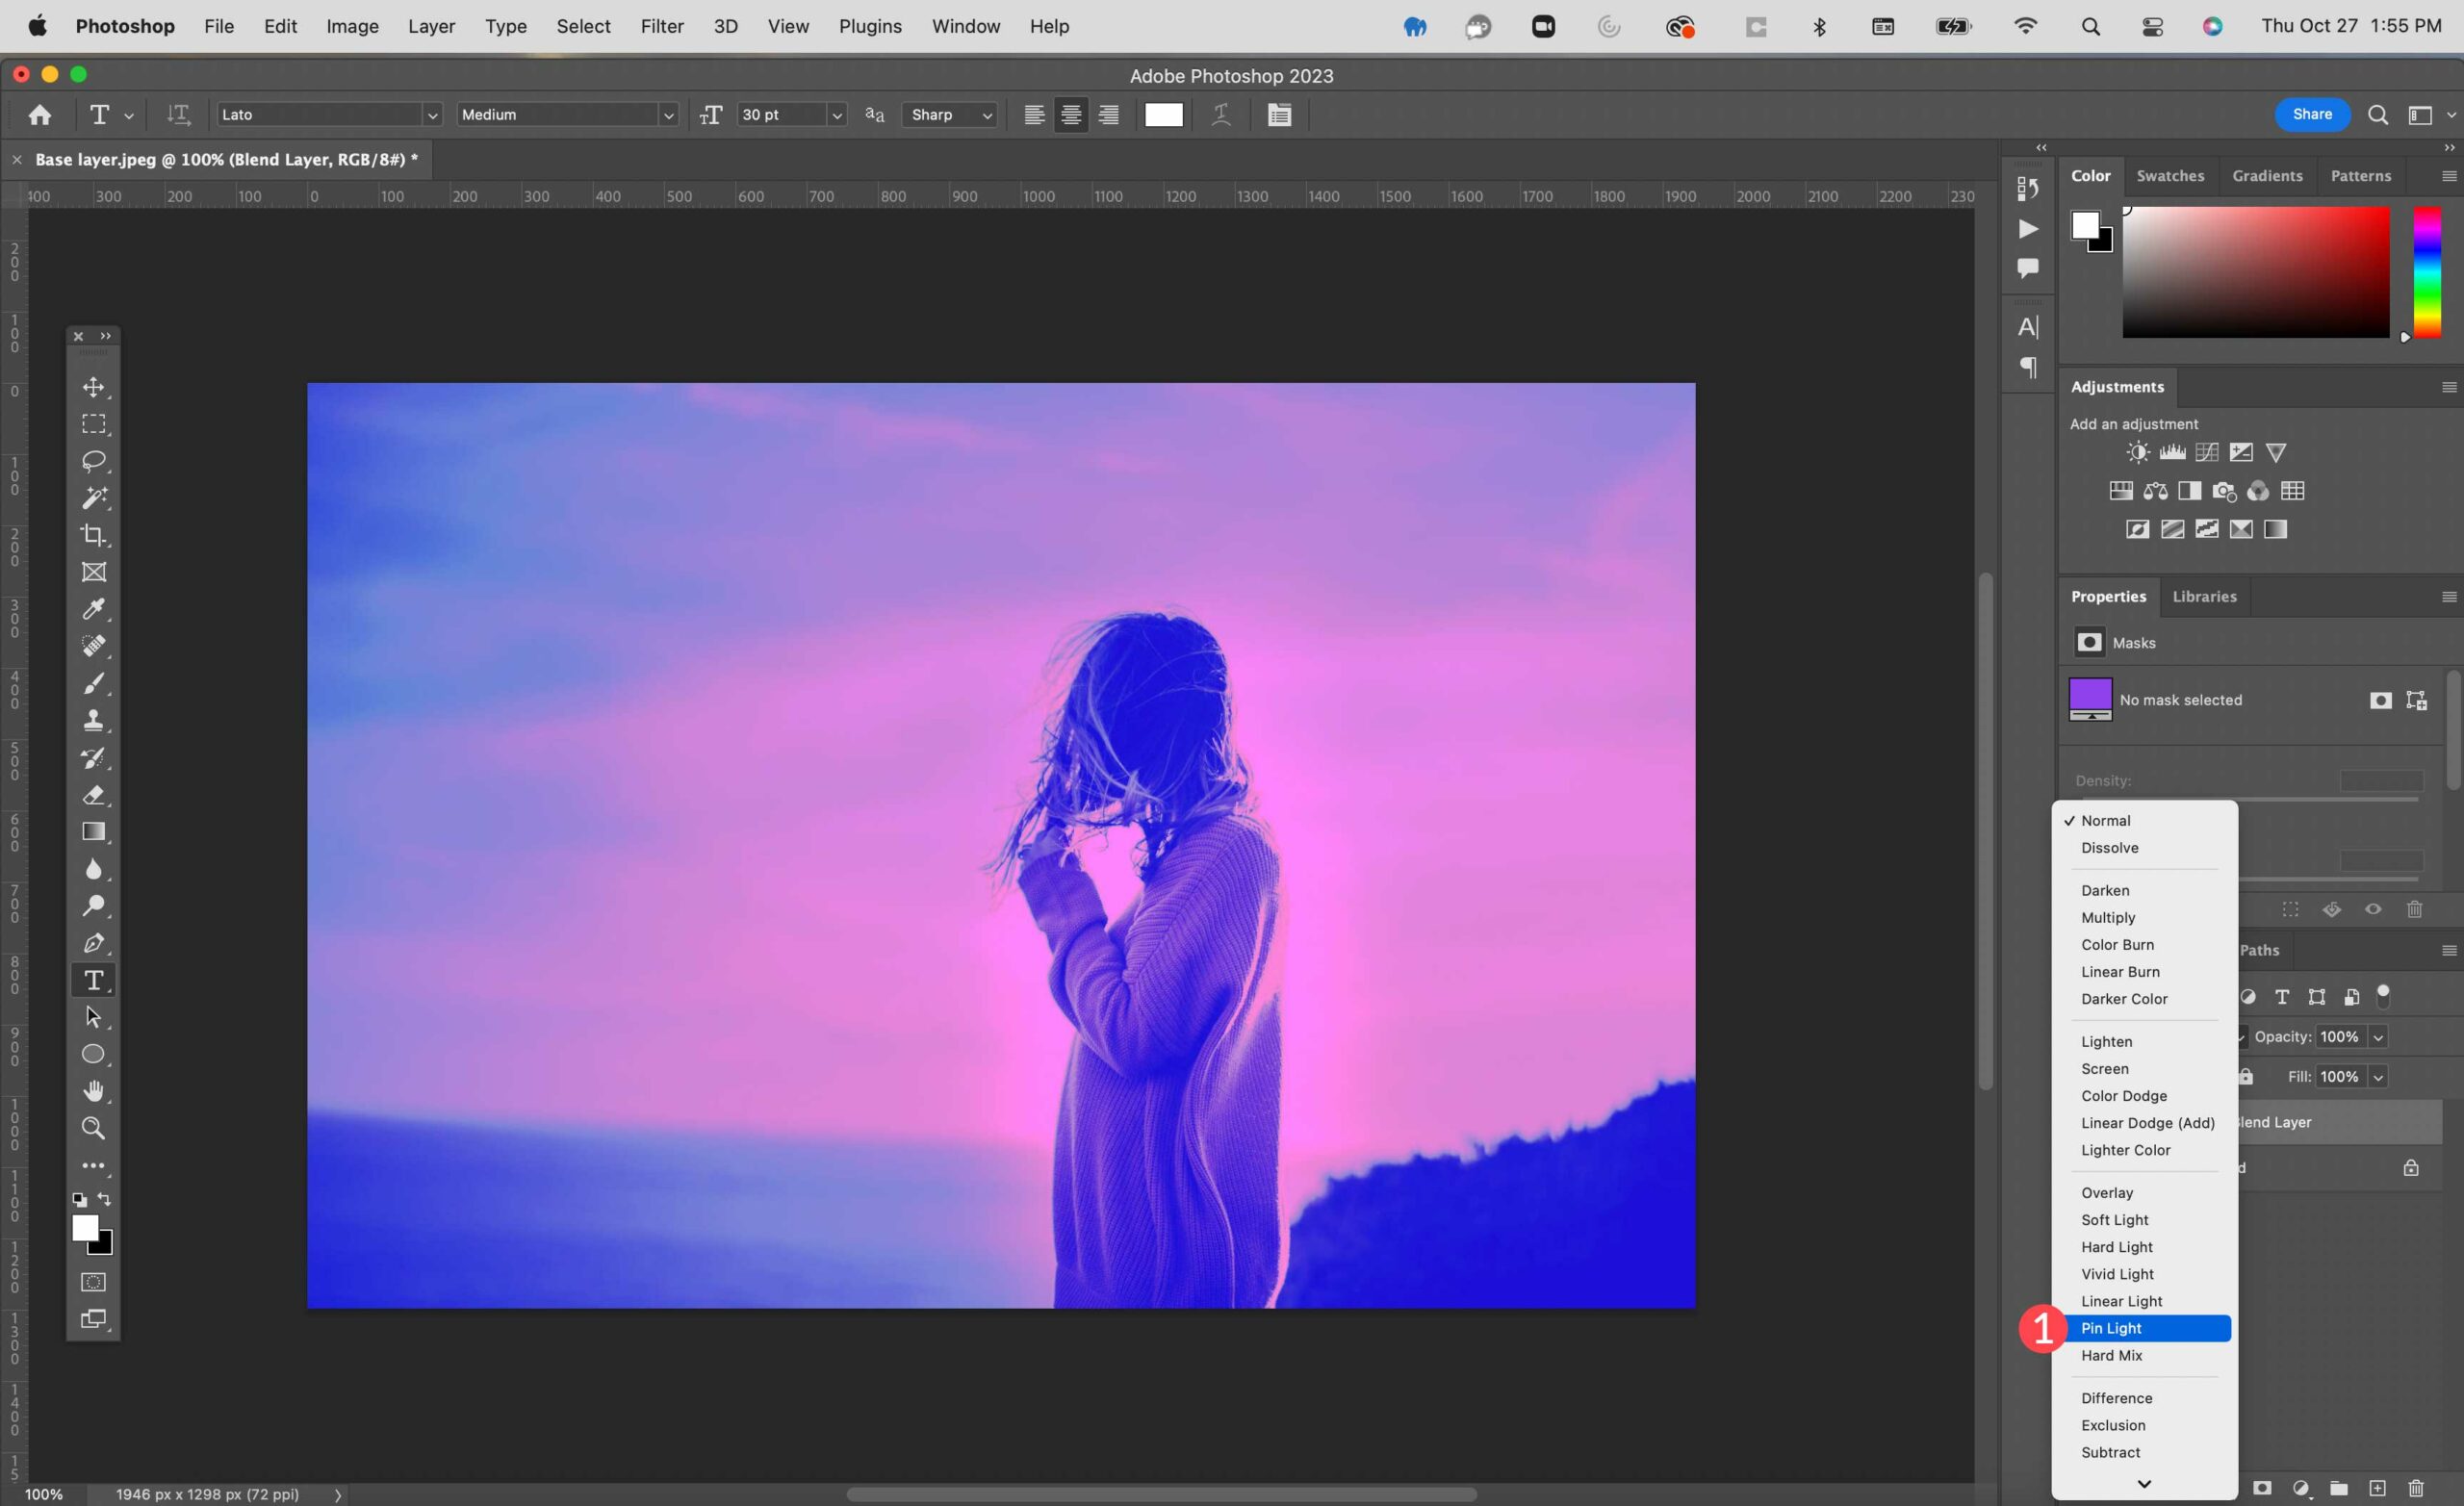
Step 4: Alter the Opacity
After all, alter the opacity for your mix layer to 50%. The effects will have to now display the red colour to be extra muted and feature a much less robust look.
If you need a extra detailed educational, take a look at our educational on how you can use mix modes to combine images in Photoshop.
CSS Mix Modes for Internet Design
Mixing modes paintings normally the similar in internet design (with CSS) as they do with video and graphic editors. That being mentioned, you’ll wish to use some CSS regulations and code with a view to use them for your web site. There are 2 primary CSS houses that mean you can upload mix modes in internet design:
- background-blend-mode
- mix-blend-mode
Let’s talk about what every does, and supply examples so you’ll be able to higher perceive what they do.
Background-Mix-Mode CSS Belongings
Background-blend-mode is a CSS property used so as to add mix modes to more than one backgrounds of a unmarried HTML part. In CSS, you’ll be able to upload a background to a component the use of the background, background-image, or background-color houses. If a component accommodates two or extra background pictures, linear gradients, or colours, you’ll be able to use the background-blend-mode belongings to assign a mixing mode to these backgrounds.
For instance, here’s a div part with 3 CSS categories (“part”, “backgrounds”, and “with-blend-mode”).
<div elegance="part backgrounds with-blend-mode"></div>
Because the names of the CSS categories counsel, this is a component that can have backgrounds with a mix mode. The usage of CSS, we will be able to upload our backgrounds and background mix mode by way of concentrated on those categories.
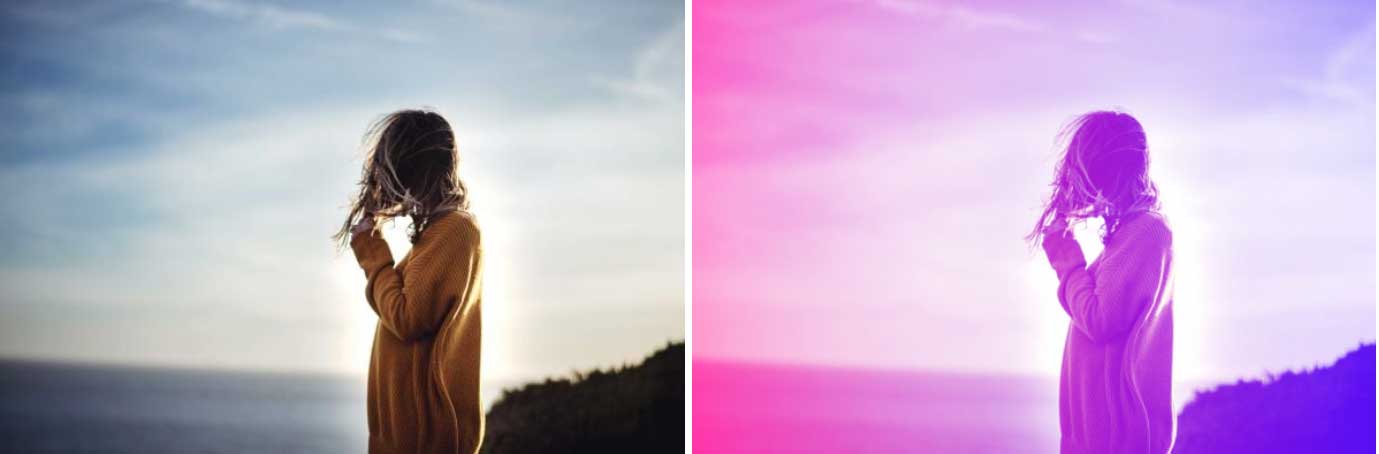
Within the instance CSS under, you’ll be able to see the “backgrounds” elegance provides 3 backgrounds to the part (a background picture, a background gradient, and a background colour. The “with-blend-mode” elegance applies the Display screen mix mode to the 3 backgrounds of the part.
.with-blend-mode {
  background-blend-mode: display;
}

.backgrounds {
  background-image: url("/picture.jpg"),
    linear-gradient(90deg, #ff0f0f 0%, #4a00e8 100%);
  background-color: darkblue;
}

.part {
  peak: 400px;
  width: auto;
  max-width: 600px;
}

This permits the part to show now not only one background, however a mix of all 3! Here’s a sooner than and after of the picture with and with out the background-blend-mode:
Combine-Mix-Mode CSS Belongings
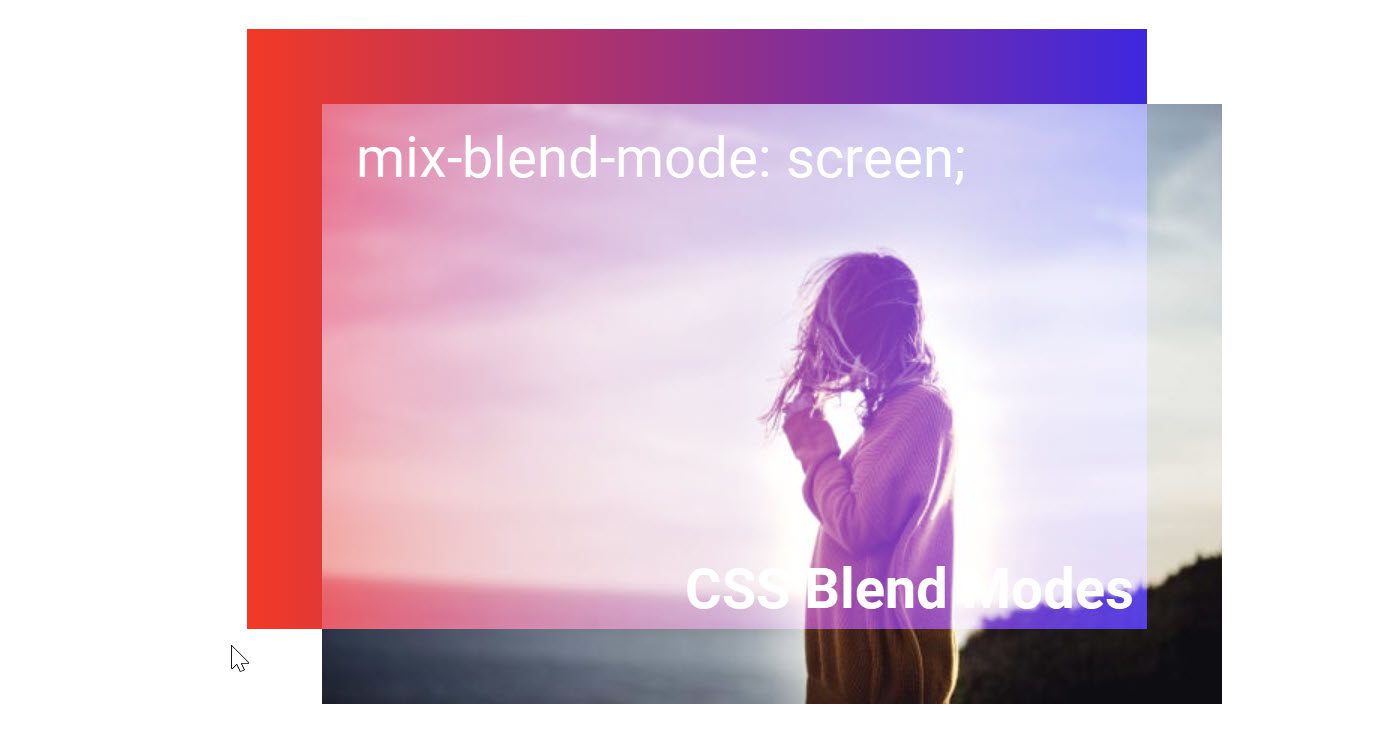
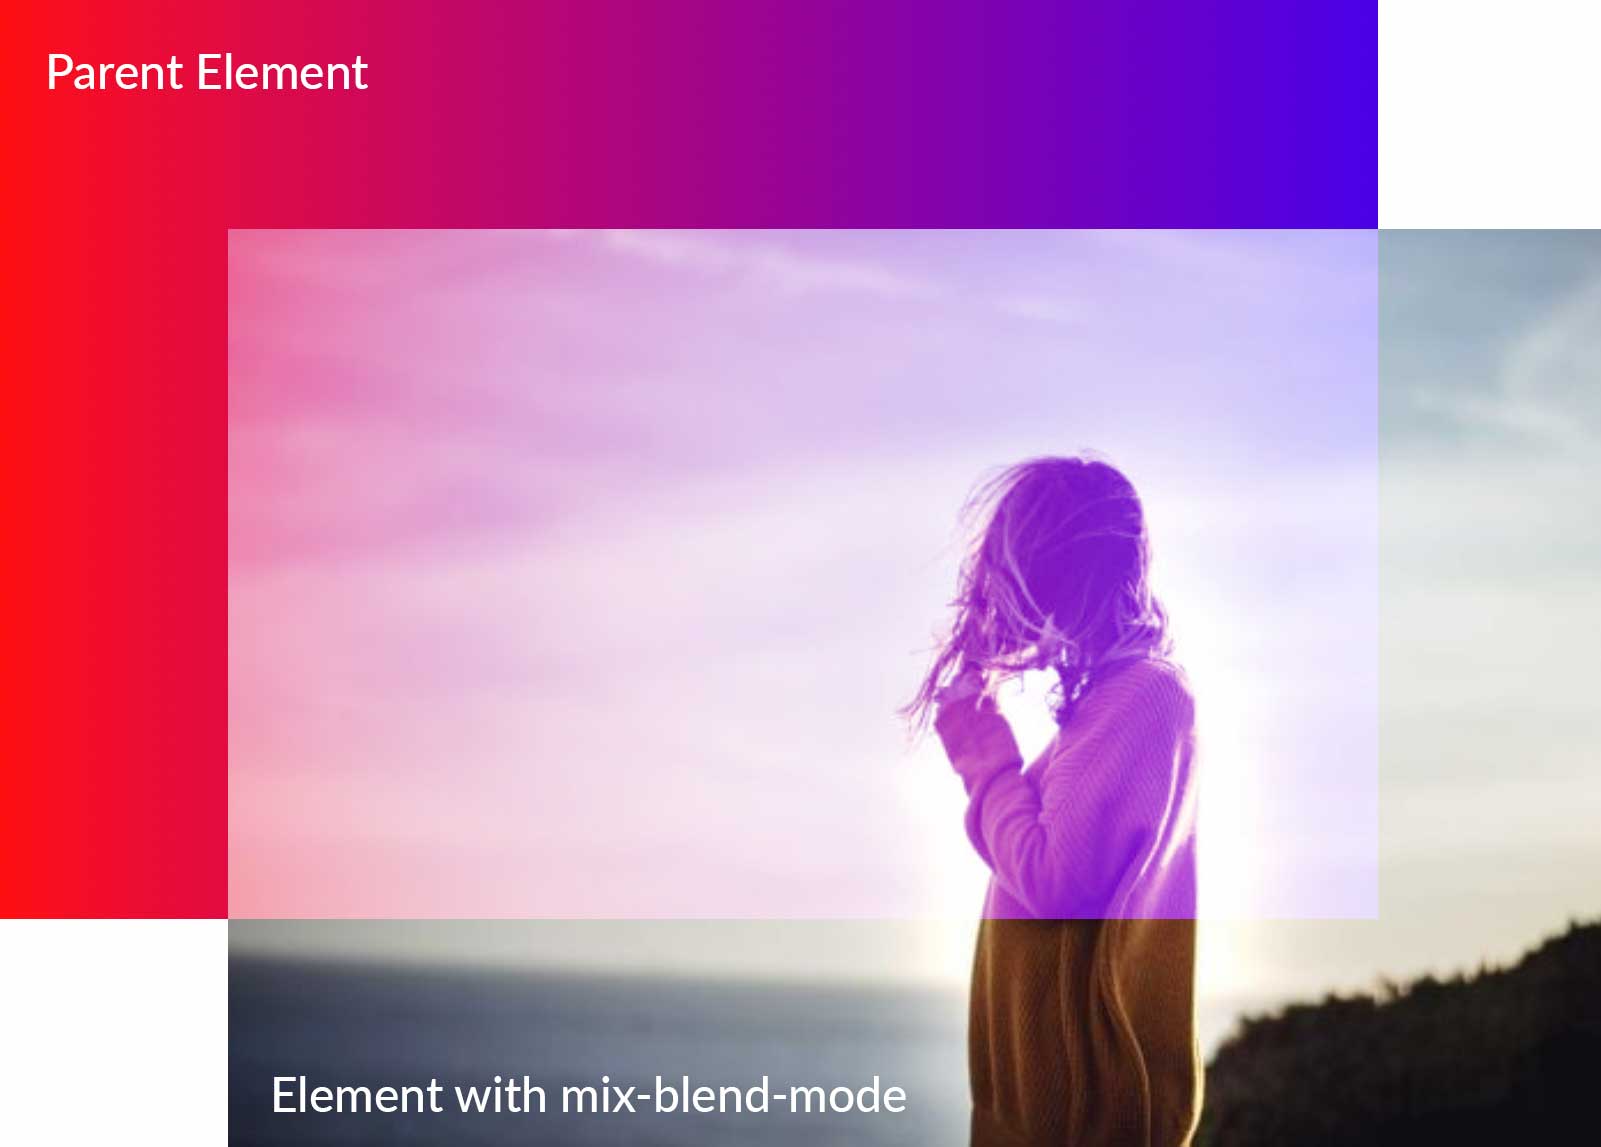
Combine-blend-mode is a CSS property used so as to add mix mode styling to more than one parts, now not simply to the backgrounds of a unmarried part like background-blend-mode. It might probably mix a component with its dad or mum part or with different overlapping sibling parts.
For instance, under we have now a div part within a dad or mum div part.
<div elegance="dad or mum">
  <div elegance="part with-mix-blend"></div>
</div>
The usage of CSS, we will be able to upload a background gradient to the dad or mum part and a background picture to the kid part. Then we goal the kid part the use of the “with-mix-blend” elegance so as to add the Display screen mix-blend-mode.
.with-mix-blend {
  mix-blend-mode: display;
}

.dad or mum {
  background-image: linear-gradient(90deg, #ff0f0f 0%, #4a00e8 100%);
}

.part {
  background-image: url("/picture.jpg");
}
The result’s a mixing of the backgrounds of each parts for a singular impact!
CSS Mix Modes The usage of Divi (An Simple No-Code Answer)
When you don’t need to make the effort to code CSS on your WordPress web site however nonetheless need to use mixing modes, then Divi is the most suitable option for you. Divi is probably the most robust design device you’ll ever want in a theme or web page builder. In some ways, Divi is a web site builder and a photograph editor all wrapped up into one. The usage of the instance above, we will be able to follow the similar mixing mode results with out the will for any coding.
Divi has 16 integrated mixing modes that mean you can mix layers of internet parts (colours, background pictures, shapes, and more than one pictures) to reach surprising designs. You’ll be able to mix textual content into pictures, background pictures inside rows and sections, and a lot more. Check out one of the crucial tutorials introduced on our weblog with a view to get a greater concept of the way you’ll be able to incorporate mixing modes into your designs.
Design Equipment that Use Mixing Modes
There are number of robust design gear available in the market that mean you can use mixing modes. The most well liked are the ones from Adobe, however there are others that you could in finding helpful (together with some for video and internet design). Right here’s an inventory of a few useful mixing mode design gear at your disposal.
- Photoshop: As an extended status photograph enhancing large, Photoshop mainly put mixing modes at the map. As already discussed, there are 27 mixing modes in Photoshop that let for a lot of results when enhancing pictures.
- Illustrator: Illustrator is likely one of the most well liked answers for graphic design. There are 15 mixing modes to be had in Illustrator for making use of results to vector recordsdata different design parts.
- Premiere ProPremiere Professional is one the go-to video enhancing tool in the marketplace. Mixing modes are to be had within the timeline to mix clips in combination to create other results. Very similar to Photoshop, Premiere Professional gives 27 mixing modes.
- After Effects: The choices in After Results are similar to the ones utilized in Photoshop and Premiere Professional with one exception, which is dancing dissolve. Modes are used to mix layers containing animations. Additionally, those After Effects plugins can take your movies to a complete new degree of creativity.
- Corel: Corel gives a number of methods that use mixing modes together with Paintshop Professional, Pinnacle Studio, and Corel Draw. There are 18 mixing modes to be had.
- Figma There 16 choices in Figma for mixing layers to reach various results. Figma is a web based program used for internet and person interface design.
- Divi: As a complete web site enhancing WordPress theme, Divi has 16 mix modes included in the Divi Builder and extra clear out results that can be utilized in any part with colour and background choices.
Mixing Mode Pointers & Highest Practices
The usage of mixing modes is a good way so as to add pastime for your pictures and designs. That being mentioned, there are a few things you will have to believe when the use of them.
Alter Fill and/or Opacity
Many of the mixing modes paintings perfect when adjusting the opacity of the mixing layer. Then again, there are a couple of that require adjusting the fill as an alternative. As prior to now discussed, there’s a team of modes referred to as the particular 8. They’re colour burn, linear burn, colour dodge, linear dodge (upload), bright mild, linear mild, laborious blend, and distinction. Whilst you’ll be able to alter the opacity for the particular 8, you’ll understand an intensive distinction when adjusting the fill.
Perceive the Mix Mode Varieties
When the use of mixing modes, get to understand the kinds. For instance, in case you are enhancing a photograph this is too mild, it would be best to use a style from the darken class. The usage of multiply to darken your photograph shall be higher suited to that use, slightly than the darken. Alternatively, when you’ve got a picture this is too darkish, use a style from the lighten class. Modes equivalent to overlay would possibly upload too many mild tones, so you could need to use pin mild as an alternative as a result of it’s extra delicate. The purpose is that you simply will have to take some time to experiment with every mode to achieve higher wisdom of what every one does.
Use Filters with Mix Modes for Higher Effects
Use a Prime Go Clear out to Sharpen Pictures

Whilst top go isn’t a mixing mode, you’ll be able to mix it with the overlay mode to sharpen pictures. Get started off together with your selected picture because the background layer. Subsequent, reproduction the layer. From there, make a selection clear out > different > top go. Alter the slider to make a choice your required sharpness. After all, set the highest layer with the top go clear out implemented to overlay. This can be a fast and simple manner so as to add sharpness to pictures that can be slightly blurry.
Use the Lens Flare clear out as a Focal Level
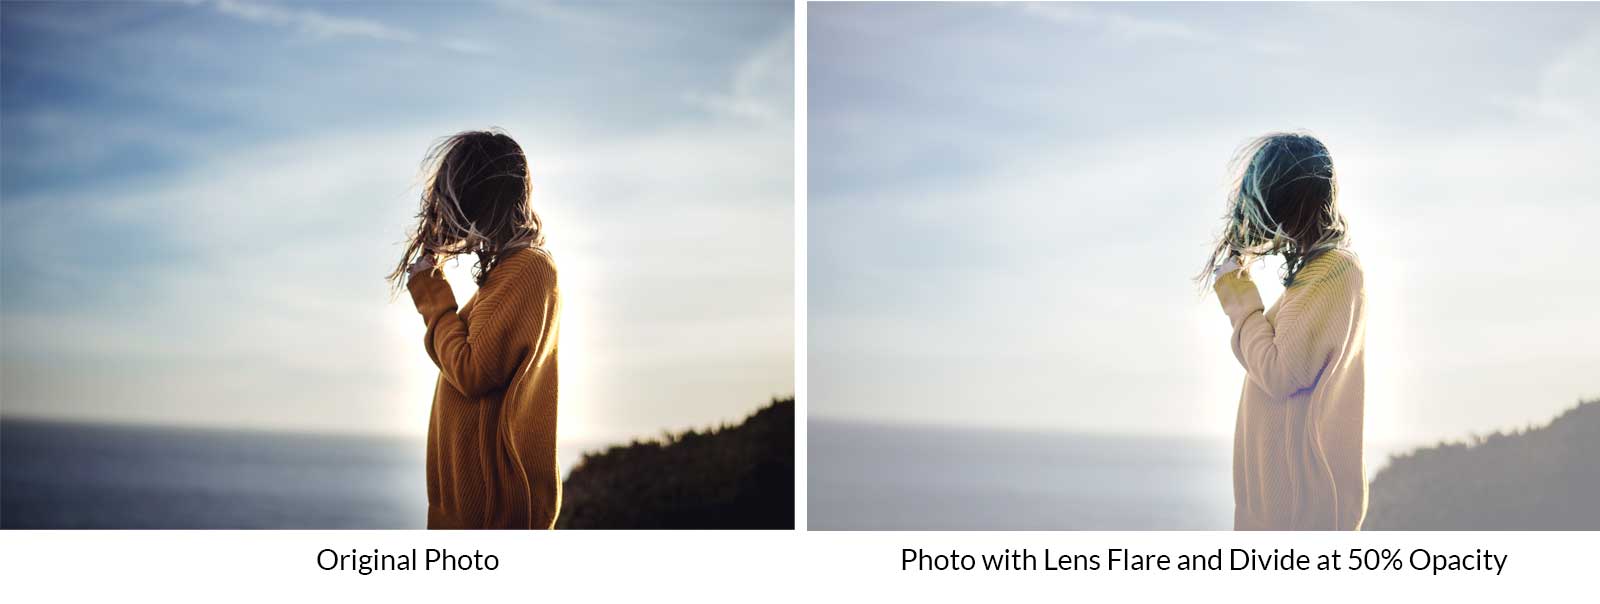
Every other nice clear out to make use of is lens flare. When blended with divide at a discounted opacity, it may give a point of interest for your picture. Upload a layer excessive of your photograph layer. Fill it with black. Subsequent navigate to clear out > render > lens flare. Alter the positioning of your lens flare then click on follow. Subsequent, set the mixing mode of the lens flare layer to divide, then alter the opacity to 50%.
When to Use CSS Mix Modes as an alternative of Photoshop Pictures in Internet Design
Mixing modes are maximum often utilized in Photoshop to design pictures which are later uploaded to a internet web page. CSS mix modes paintings the use of CSS code that your browser makes use of to show the types the use of the pixels for your observe. This permits you to follow those designs to any part at the web page in ways in which you’ll be able to’t do with pictures pre-designed in Photoshop. Listed here are few tactics to believe.
For Textual content Design
Vital web site content material (particularly textual content) will have to at all times be readable by way of search engines like google (for search engine optimization). CSS mix modes mean you can upload mixing types to textual content parts (like headings) to create gorgeous textual content designs with significantly better high quality.
For Hover Results
CSS mix modes also are nice for including interactive hover results the use of mix modes. For instance, you’ll be able to upload a mix taste to photographs on hover to spice up the design of your photograph gallery with a couple of strains of CSS.
For Effeciency and Efficiency
CSS mix modes make it more straightforward exchange the design of parts dynamically with a small adjustment to the code. This permits you to exchange the design of your web site with no need to move in the course of the hassle of constructing new pictures in Photoshop. Plus, in lots of instances, designs generated by way of CSS will load quicker than huge pictures.
Conclusion
Mixing modes are nice for including particular results to photographs and designs in graphic and video editors, in addition to internet packages. Understanding how every one works is beneficial for exploring new and thrilling design probabilities. Plus, Photoshop isn’t the one design device that makes use of them. When it comes the internet, CSS mix modes mean you can skip Photoshop altogether to use mix modes without delay for your web site. And, with Divi, you don’t even wish to know CSS to create surprising designs the use of mix modes. Expectantly, this information will will let you alongside your design adventure, anywhere that can be.
Which device do you utilize to use mixing results for your designs? Tell us within the feedback phase under.
h2 {scroll-margin-top: 80px;}
The submit Blending Modes: A Complete Guide for Graphic and Web Design seemed first on Elegant Themes Blog.
Contents
- 1 What’s a Mixing Mode?
- 2 How do Mixing Modes Paintings?
- 3 Advent to Photoshop Mixing Modes
- 4 Mixing Mode Descriptions
- 5 The right way to Use Photoshop Mixing Modes
- 6 CSS Mix Modes for Internet Design
- 7 CSS Mix Modes The usage of Divi (An Simple No-Code Answer)
- 8 Design Equipment that Use Mixing Modes
- 9 Mixing Mode Pointers & Highest Practices
- 10 Conclusion
- 11 Mixing AI and search engine optimization Technique With Jap Same old
- 12 What’s AI bias? [+ Data]
- 13 How one can Determine Your Core Advertising Message

0 Comments