
Git is an impressive instrument for style control and has fairly of a monopoly in this space. For plenty of day-to-day tasks, Git may also be simple to use as a result of its command repetition. However, there are lots of eventualities where you need more than the basics. As such, there are lots of complicated Git directions that can take your Git skills to the next degree.
This may most likely moreover introduce you to somewhat a large number of Git concepts that you just wouldn’t most often come right through. As an example, stashing as opposed to committing changes, rebasing, and together with information to your staging space. When you learn them, it’s imaginable you’ll to seek out you’ve got even better price to your workforce.
In this blog post, introduce different power directions you need to clutch. However, to use the ones, you need some skills, concepts, and knowledge handy. Let’s take a look at this number one.
Beneficial Prerequisites
While you could possibly make a choice up the fundamentals of Git and understand one of the most a very powerful intermediate directions, related to git delete, you need additional to your toolbox to care for complicated directions.
The information we share proper right here received’t go well with a novice to Git, so if model keep an eye on, most often, is new to you, we propose you spend some time using the fundamental directions each day faster than you look in an effort to upload additional to your repertoire.
In brief, proper right here’s a quick record of facets you should understand:
- Core Git concepts related to commits, branches, pull requests, and additional.
- Familiarity with fundamental Git directions related to
git add,git merge,git commit, andgit push. - For complicated Git tasks, you need to be able to navigate a Terminal.
It’s helpful to have experience working with Git in a bunch atmosphere, as lots of the ones directions can have a very important impact on a shared codebase. As an example, it may well be that you just only use a couple of of those directions able of responsibility. This means you need to be careful and have an working out of when you employ the ones directions.
Complicated Git: 12 Power Directions You’ll Want to Know
The rest of this article will duvet 12 different complicated Git directions that can take you previous the basics and turn you proper right into a Git wizard. Let’s get started with one command that you could use more than others.
1. Rebasing
First off, rebasing is an impressive Git command that’s an alternative choice to a pull request. It signifies that you’ll be able to pull all of the new commits you’re making after a division divergence into a brand spanking new division and slots the changes at the tip of the ground. This might be useful if you want to incorporate changes from each different division without creating a merge commit for regardless of the reason why.
One no longer odd use case for rebasing is whilst you’re working on a function division, and you need to incorporate changes from the primary division without creating a merge commit. It helps to keep your mission’s history clean, even supposing it should smartly take longer to run, and you may even see additional errors all through a merge.
To rebase a division, use the git rebase command. Proper right here’s an example where we’re rebasing one division onto each different:
git checkout foo-branch

git rebase primary
You’ll moreover record the commits you’re going to liberate and get a hold of a chance to edit them in the past. As such, you’ll squash commits, edit commit messages, and additional. You’ll use the --interactive or --i flag to perform an ‘interactive rebase.’
git rebase --interactive Speaking of which, squashing commits proper right into a single one to tidy up a commit history is a no longer odd use case for rebasing. This may occasionally make your commit history easier to be informed and understand.
To do this all through a rebase, you follow the flag with the collection of commits you’d like to squash, which is in a position to combine the commits into one:
git rebase -i HEAD~3
This may most likely open an interactive rebase window, very similar to a commit window, where you’ll choose and edit the commits you need to squash:
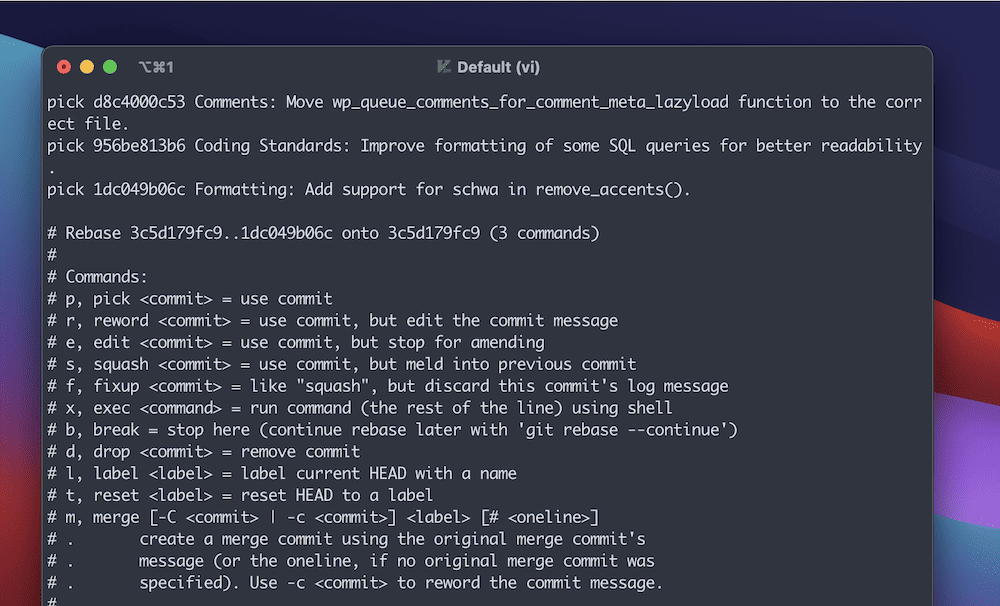
You’ve were given a list of commits at the top of the visual display unit and a choice of directions at the bottom, in conjunction with each different comparable information. The default selection is to make a choice a commit, which selects it as the one you need to use and no longer the usage of a changes.
However, there are various different instructions that will help you navigate a rebase. As an example, you’ll reword a commit or squash a few commits together. To make changes and use the directions, you will art work in conjunction with your Terminal’s editor. The default is incessantly Vim, as a result of this you want to know that editor.
The total step is to avoid wasting a lot of your changes, then push them to the far flung division.
2. Reverting, Resetting, and Unstaging
Git is notorious relating to undoing changes. It’s a troublesome process most often, with a penchant to throw errors. However, when you’re making changes to your working record or staging space that you need to undo, there are a few Git directions that can help.
Actually, Git gives you guidance on easy methods to unstage a document whilst you run a git status:
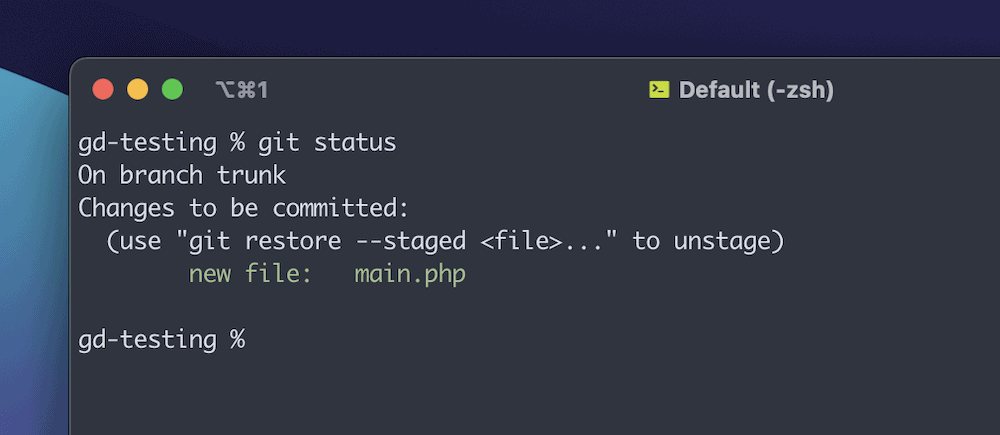
As such, you’ll remove a commit from the prevailing division and send it elsewhere very simply:
git reset HEAD
This has the have an effect on of moving your division once more one commit, as although you’re taking away the rest known commit. You should even have a use case where you need to reset a division to its distinctive state. Proper right here, you’ll reset against the far flung beginning position – using git reset --hard beginning position/primary for instance. However, follow that the ones changes might be long gone ceaselessly.
While the git checkout command is one you will use incessantly and is considered fundamental, you’ll moreover use it to unstage information faster than a commit:
git checkout --
Apply the distance between the dashes and the filename placeholder. Proper right here, the command unstages the document you specify and discards the changes from the working record. Apply that this will once in a while delete any local changes you’re making to a document. As such, double- and triple-check you don’t need those unsaved changes.
You’ll moreover use git revert changes you’re making to a commit. However, this doesn’t roll once more the changes alternatively creates a brand spanking new commit consistent with undoing the changes throughout the previous one.
Crucial difference right here’s that the command received’t switch any reference tricks to the new commit alternatively will keep earlier commits. This is useful when you need to undo changes without taking away them from your commit history.
The command expects to procure a reference, and it’s easy to revert the newest commit:
git revert HEAD
However, you’ve got much more scope to restore and change information and commits. The next two entries on this record of complicated Git directions will take a look at them.
3. Restoring Information to Default States
With Git, you’ll merely restore a report back to its default state using a reasonably new command: git restore. Actually, you should consider this an alternative choice to git reset in most cases, as it supplies a lot more power beneath the hood. As an example, you’ll prevail within the equivalent consequence with git restore --staged as you’ll with git reset HEAD.
The command can do additional, although – you’re moreover ready to restore information to default states. You’ll see how to try this whilst you run git status too:
git restore
This may most likely remove the changes from the working record as regardless that no longer the rest had happened. As with git checkout -- , you need to make sure to don’t want any of the local changes, as they’re going to be long gone ceaselessly.
4. Amending Commits
There may well be plenty of events whilst you push a commit and then realize you forgot to include something important. With Git, you’ll merely amend the commit to include the missing changes.
To do this follows a selected process:
- First, make your changes inside of regardless of information you need for the mission.
- Stage them as same old using
git add. - Recommit those changes throughout the staging space using a unique command to make the commit:
git commit --amend
This amends the original commit with the new one using your staging space for it. As such, make sure to don’t need the former style of the commit as it will be out of place. We moreover recommend you employ the --amend flag with local commits fairly than far flung ones, for equivalent reasons as we duvet elsewhere in this post.
You’ll moreover use git commit --amend to edit the commit message only with the following command:
git commit --amend -m "New commit message"
5. Git Logging
Using Git’s log is valuable that will help you understand the history of a repository. However, we wouldn’t elegance the git log command as complicated. As a substitute, you’ll use quite a lot of choices to clear out the output to your needs:
git log
git log --decorate
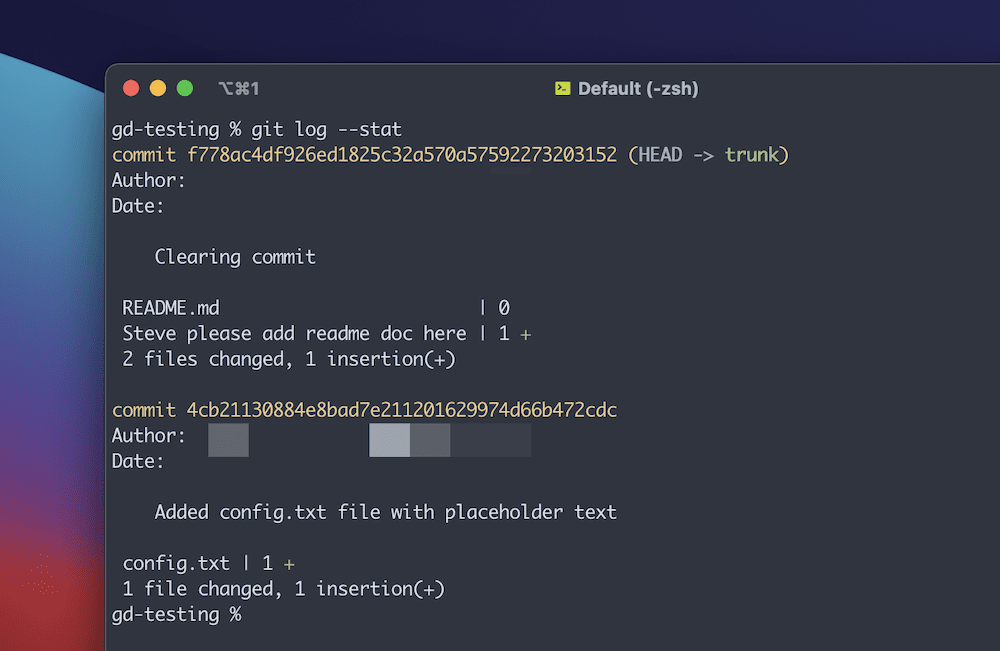
git log --stat
For example, decorating a log get admission to prints out the ref names for all confirmed commits. The --stat selection shows insertions and deletions for a commit:
You’ll moreover use other alternatives to customize the output of the log – referred to as ‘commit restricting.’ As an example, take the following directions:
git log --author=

git log --grep=
Proper right here, you’ll clear out the log by way of particular author names or text patterns. Actually, you’ll combine a few alternatives and flags to generate a log for a selected serve as. For example, take this command:
git log --oneline --author= --since= feature-temp
This searches for all commits with the feature-temp division from a singular author since a specified date, then prints it out using single line entries. Apply that the parameter could also be a string:
--since=”Two weeks prior to now”
Moreover, if you want to search a selected document instead of a division, you’ll run:
git log --oneline --author=bartonfink --since=”5 days prior to now” -- readme.rm
This set of examples only skims the surface of what you’ll do in conjunction with your logs, alternatively there’s more than a few scope to hunt out precise commits inside of them consistent with your search requirements.
6. Git Hooks
You almost definitely use macros and other computerized scripts to help run code from time to time. Git moreover incorporates this type of capacity inside of the kind of hooks. The ones scripts run mechanically according to positive events, related to commits or pushes. There are also plenty of tactics to use hooks to enforce code formatting, run tests, and much more.
There are two sorts of hooks: client-side and server-side:
- Shopper-side hooks purpose consistent with local actions related to commits and merges.
- Server-side hooks will purpose as a result of neighborhood operations. This may well be when a repo receives a pushed commit, among many alternative examples.
Git will always populate your repo with plenty of trend hooks whilst you run a git init. However, you need to remove the .trend extension so as to use them:
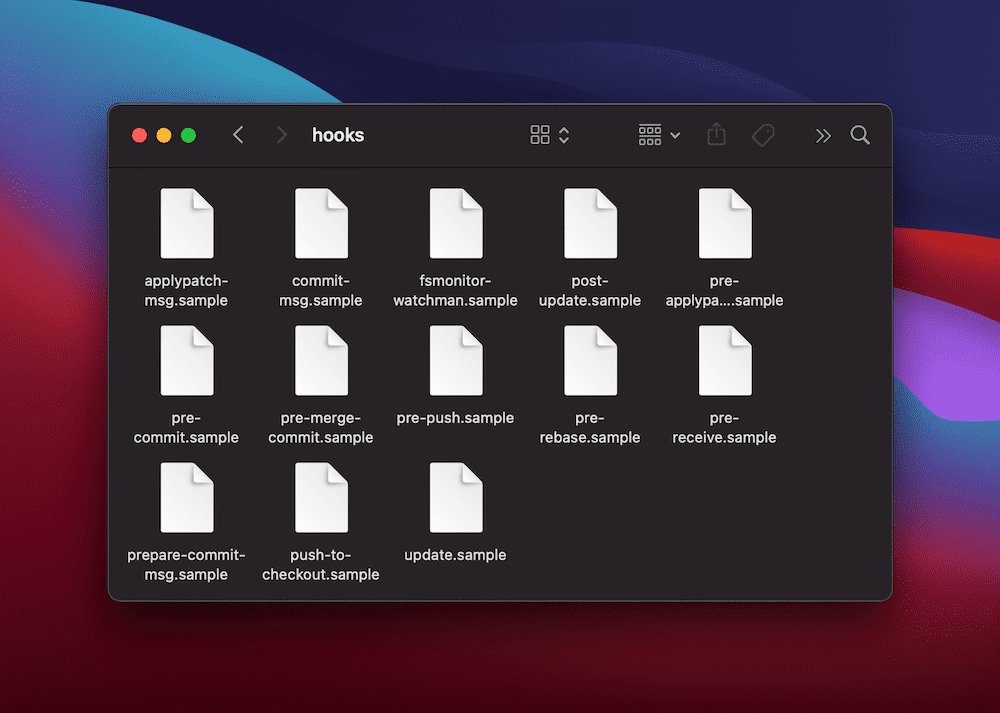
Apply that you simply’ll only run one type of hook at a time, even supposing it’s imaginable to use a few scripts in an instant given some paintings. As such, your document names should correspond to the type of hook you’d like to use consistent with the trend scripts: pre-commit, exchange, and so on.
Creating a Git Hook
To create a Git hook, you need to create an executable script throughout the .git/hooks subdirectory without an extension. It will however run as long as you add it to the hooks folder.
You’ll use whichever scripting language you’d like as long as it should smartly run as an executable. We’d recommend Ruby or Python – alternatively you’ll use Bash, Perl, and plenty of others. All you need to do right here’s exchange the path to your interpreter from the default of Bash:
#!/usr/bin/env python
From proper right here, you’ll write your code as same old. As an example, proper right here’s a prepare-commit script in Python that turns on the individual to write good commit messages:
#!/usr/bin/env python

import sys, os

path_commit_msg = sys.argv[1]

with open(commit_msg_filepath, 'w') as f:

f.write("# You’ll wish to provide a better commit message than that, just right buddy!")
While it’s now not always important, we’d recommend you run chmod +x .git/hooks/ from the command line to you should definitely’ll execute it.
At all the, hooks can be a tough instrument for automating repetitive tasks and imposing best possible practices inside of your workforce.
7. Dedicate Referrals
In Git, you determine commits by way of the SHA-1 encryption hash. While it’s imaginable to discuss with commits by way of their whole hash, this may also be tedious and error-prone:
bc7623b7a94ed3d8feaffaf7580df3eca4f5f5ca
As a substitute, Git provides plenty of tactics to discuss with commits using shorter, additional memorable names. As an example, it’s essential use a division or tag name. For example, consider a division referred to as “make bigger”. Proper right here’s an example where we discuss with the newest commit on this division:
git diff make bigger..HEAD
This presentations the differences between the newest commit (HEAD) on the “make bigger” division and the prevailing commit.
It’s crucial moreover discuss with a commit by way of its relative position throughout the commit history. For example, you’ll refer to two commits faster than the prevailing one using the HEAD~2 shorthand:
git diff HEAD~2..HEAD
Git moreover provides a number of alternative ways to discuss with commits, related to using the “@” symbol to refer to the current division or using the “^” symbol to discuss with the parent of a commit. By the use of using the ones shorthand notations, you’ll save time and steer clear of mistakes when working with commits.
8. Stashing
In same old cases, you’d assume there’s no solution to store changes you’re making to information without committing them. ‘Stashing’ is the easiest way to try this on a brief basis. It’s useful when you need to modify branches or art work on a unique procedure alternatively don’t want to commit your changes however.
As an example, if you wish to alternate branches to art work on something mid-flow, you’ll stash the changes throughout the provide division and checkout the other. From there, you’ll art work on the other division, then commit and push those changes. You’ll then checkout and retrieve your art work on the distinctive division.
To stash changes there are two tactics to do so:
git stash
This stores your changes in a brand spanking new stash, and reverts your working record to the rest HEAD commit (the state you had it faster than making new changes). You’re ready to record the changes using git stash record, and take a look at the stash using git stash show. The latter command can also accept any format git diff accepts.
From proper right here, you’ll switch branches or art work on a unique procedure. When you need to retrieve your changes, run the following command:
git stash follow
This may most likely follow the rest stashed changes to your working record. However, follow that you simply’ll however come right through conflicts whilst you exchange the document a great deal of. In the end, git stash is a brief strategy to the problem handy.
You’ll also have a few stashes, and also you’ll specify which stash to make use of using the following:
git stash follow stash@{n}
The placeholder {n} takes an integer, and stash@{0} represents the newest stash. The reliable Git documentation incorporates each different examples of git stash.
9. Bisecting
We’d bet that everyone could have encountered a worm or a subject and had no concept where to begin out having a look. In the ones eventualities, ‘bisecting’ help you in short determine the commit that presented the problem.
In a nutshell, the command hunts out bugs by the use of a search of your commits. As quickly because it finds the offending commit, it will return it to you. The facility of this command is all of the subcommands you’ll use.
To use bisecting, you first wish to run the git bisect get began command. Git will then take you to the principle commit to your mission’s history.
From proper right here, you need to suggest whether or not or no longer that commit is good or dangerous using the comparable directions:
git bisect good

git bisect dangerous
Git will then switch you to the next commit to test its ‘prime quality.’ Apply that you simply’ll moreover alternate “good” with “earlier” and dangerous with “new” to test your particular use case (even supposing you’ll’t mix words.)
From proper right here, you’ll continue to mark each commit as good or dangerous until you in finding the commit that presented the bug. However, you don’t should trawl by the use of each commit – you’ll specify precise identifiers to help slender down and shorten your search:
git bisect dangerous feature-test
Proper right here, this uses a division name, alternatively it typically is a particular revision using an integer, a hash reference, and additional. Regardless, whilst you hunt and to seek out the bug, you’ll run either one of the following directions to get once more to your latest code:
git bisect reset
As with all of the complicated Git directions on this record, there’s much more to digest, and the Git documentation might be crucial finding out proper right here.
10. Comparing Branches
Our get admission to on commit referrals talks about using git diff. Now, it’s time to take a look at this in more part. You’ll incessantly to seek out yourself with a few branches that include different changes. Git signifies that you’ll be able to read about the differences between two branches using the git diff command. Actually, you’ll use it in somewhat a couple of tactics, incessantly in conjunction with other directions, to analyze and analyze a repo.
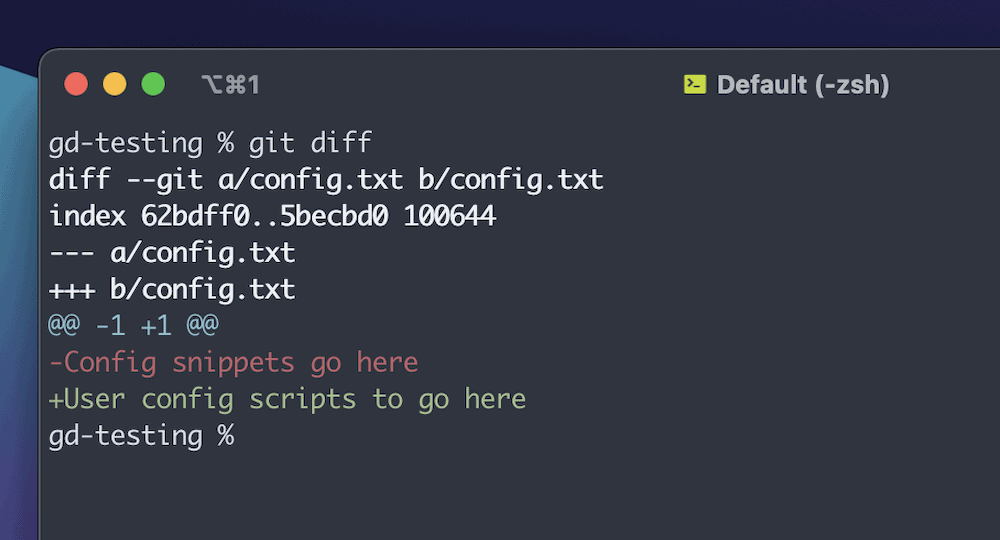
The basic git diff command will give you output with an outline of the changes. Apparently such a lot identical to the output of a commit merge investigation:
However, you’ll drill all of the means all the way down to precise branches, hashes, and additional. As an example, to check two branches, you run the git diff branch1..branch2 command, and alternate the placeholders:
git diff feature-branch pre-prod
You’ll moreover read about the differences between your provide division and each different division:
git diff HEAD..pre-prod
Apply that using two dots proper right here will return the variation between the two tips of the branches. By contrast, 3 dots will return the variation between each and every branches’ no longer odd ancestor and use that to test.
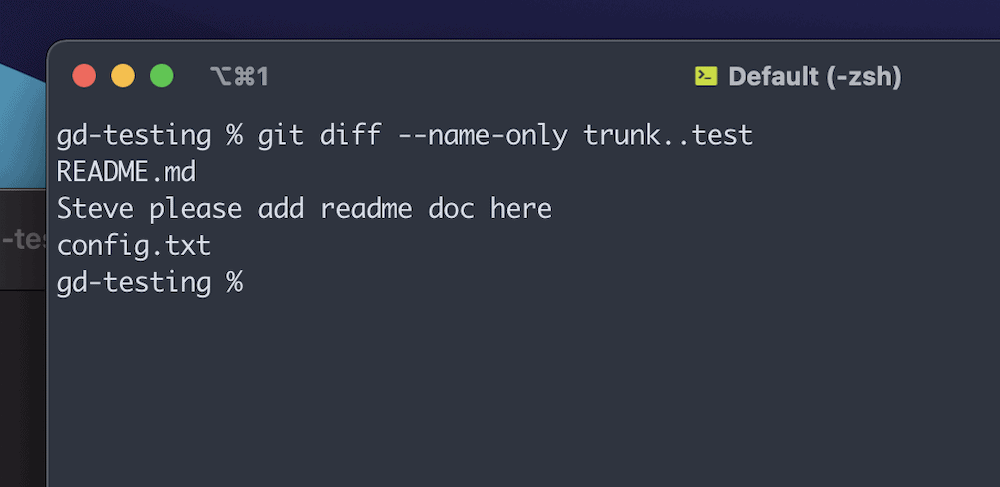
Very similar to git log, you’ll clean up the output and refine what it returns. As an example, git diff --name-only branch1..branch2 will only test which information range and leave out the context:
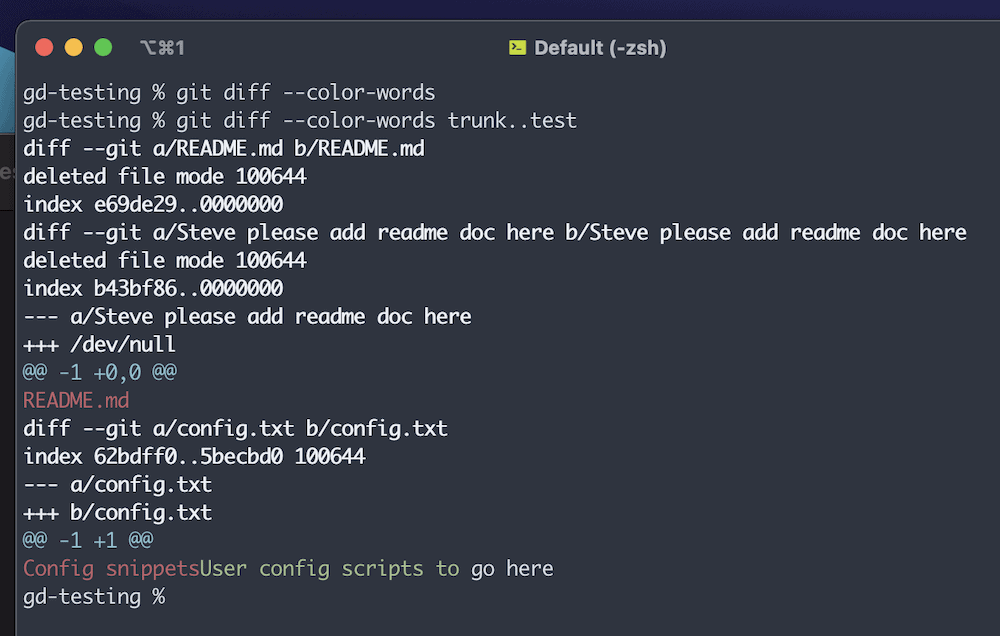
You should to seek out that the output is hard to parse, in particular if the ‘diff’ is lengthy. In the ones cases, you’ll use the --color-words selection:
General, git diff may also be merely as tough as other directions, in particular whilst you invoke positive alternatives and refine what diversifications you return.
11. Applying Individual Commits
Now and again chances are you’ll want to follow a selected commit from a division to each different without merging the two branches. Git signifies that you’ll be able to do this using git cherry-pick. You wish to have to make use of this reasonably, alternatively you’ll to seek out that git cherry-pick help you in a few situations.
One state of affairs is where you’ve got stale function branches that you just don’t merge into primary or trunk. It’s crucial use a mixture of directions (related to git log) to dig earlier comparable commits out and reapply them elsewhere.
Use git log to hunt out the reference of a commit. From there, make sure to’re on the division you’d like to cherry make a choice a reference to. For example, think you need to cherry-pick the commit xxxxxaaaaaa into the dept “trunk“. First, checkout your division…
git checkout trunk
…then cherry-pick your commit:
git cherry-pick xxxxxaaaaaa
Your commit message may well be old-fashioned on many occasions. To get to the bottom of this, you’ll transfer the --edit strategy to the command. This may most likely allow you to supply a brand spanking new commit message faster than the cherry settling on.
12. Supercharging ‘git add’
For our closing complicated Git power command, we’re going to show you git add. No, that’s now not a typo – this fundamental Git command has some unexpected power beneath its hood.
As an example, if you find yourself together with explicit particular person information to the staging space, it’s essential use the following:
git add -p
The -p selection signifies that you’ll be able to degree changes on an interactive basis. You’ll evaluation the changes you’ve made to each document, then choose which ones to degree. This would possibly save you a large number of time and permit you to steer clear of staging an unwanted exchange.
While you would perhaps know that you simply’ll degree explicit particular person information, you’ll moreover specify an inventory too. For example, to degree the entire information throughout the “new-feature” record:
git add new-feature
You should even want to see what the outcome of a git add might be without dressed in out the process in whole. You’ve were given an selection for that:
git add --dry-run

git add -n
When you run this, Git will show you whether or not or no longer it will add or put out of your mind concerning the information. Speaking of unnoticed information, you’re moreover ready in an effort to upload them to the staging space if you need:
git add --force

git add -f
Together with information to the staging space may also be additional sophisticated than a simple binary “Add or don’t add” scenario. As such, one in all Git’s most core directions can duvet myriad eventualities.
Summary
Once you have the fundamental Git directions to your pocket, you’ve got 80 % of what you need to carry out your mission’s not unusual style control tasks. However, the entire 20 % is where complicated Git directions can shine.
Directions and methods related to rebasing, bisecting, restoring information, and additional will all get you out of a pickle speedy. What’s additional, you’ll offer better price to your workforce and mission, and it’s essential help streamline workflows, increase productivity, and have an all-around better have an effect on as a developer.
Will any of the ones complicated Git directions become part of your day-to-day art work? Let us know throughout the comments section underneath!
The post Complex Git: Energy Instructions Past the Fundamentals appeared first on Kinsta®.
Contents
- 1 Beneficial Prerequisites
- 2 Complicated Git: 12 Power Directions You’ll Want to Know
- 2.1 1. Rebasing
- 2.2 2. Reverting, Resetting, and Unstaging
- 2.3 3. Restoring Information to Default States
- 2.4 4. Amending Commits
- 2.5 5. Git Logging
- 2.6 6. Git Hooks
- 2.7 7. Dedicate Referrals
- 2.8 8. Stashing
- 2.9 9. Bisecting
- 2.10 10. Comparing Branches
- 2.11 11. Applying Individual Commits
- 2.12 12. Supercharging ‘git add’
- 3 Summary
- 4 8 Very best AI Voice Cloning Gear of 2023
- 5 8 Inclusive Ecommerce Site Examples That Force Enlargement
- 6 Divi Product Highlight: Hide & Show Pro

0 Comments