
Python is one of the hottest building languages. Its simple syntax and low barriers to get admission to make it a good candidate for newbie programmers hoping to make a mark inside the software development landscape.
A host of frameworks and libraries make getting a Python application up and dealing easier. Those include Django, FastAPI, and Flask. The Flask framework attracts Python developers by the use of supporting easy prototyping and customizability.
This hands-on article demonstrates discover ways to building up a simple database-connected Python application using Flask.
Python Apps Made Easier With Flask
Complicated in 2010, Flask is well-suited to rising Python web systems because of its ease of use and flexibility. Its lean construction specializes in providing the basics while making it easy so to upload libraries for the aptitude you wish to have. This way makes Flask preferably fitted to a lot of duties, from simple systems to sophisticated ways.
Flask provides quite a lot of apparatus and lines to enhance web app development, in conjunction with:
- Libraries and kit to keep an eye on HTTP requests and responses
- The ability to trail requests to designated functions
- Strengthen for rendering templates
- Strengthen for databases
- Authentication and authorization ways
How To Create Your Python Flask App
You’ll have the ability to uncover the advantages of using Flask for web app development by the use of making a Python internet app using Flask. Then, you’ll have the ability to assemble and deploy the applying using Kinsta’s Internet Software Website hosting service and connect it to a Controlled Database on the Kinsta platform.
Python Flask App Will have to haves
To observe this tutorial, you’ll need:
- Python style 3 or higher
- MySQL Workbench
- Python’s pip and virtualenv systems installed
- A code editor
- An account at Bitbucket, GitHub, or GitLab to host your Git repository
- A MyKinsta Account (unfastened to sign up) to serve the applying
Putting in place Flask for Python
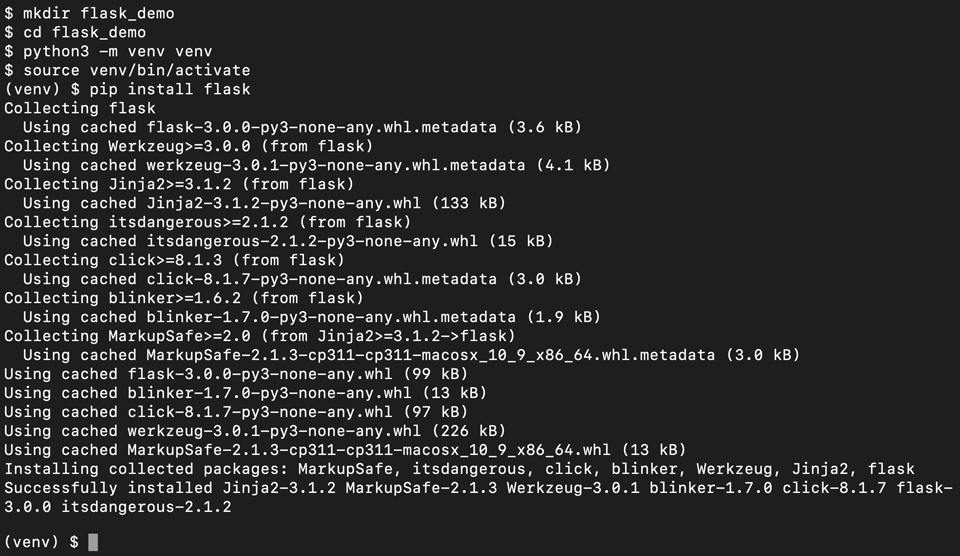
Cross to your terminal (Linux or macOS) or Command Instructed (House home windows). Get began by the use of making an inventory known as flask_demo.
Trade to the new list and create a Python virtual environment using the python3 -m venv venv command. In this case, we are also using venv for the reason that name for the list that can enhance the virtual environment.
Flip at the virtual environment using one of these directions:
venvScriptsactivatein House home windowsprovide venv/bin/activatein Linux or macOS
Now, arrange Flask using pip by the use of operating pip arrange flask.
The artwork on your terminal thus far should look something like this:
Development a Base Tool
Next, create the ground application and evaluate its capacity by the use of rendering content material subject material to the browser.
Throughout the flask_demo list, create a file known as demo.py and add the following code:
from flask import Flask

app = Flask(__name__)

# Routes
@app.trail('/')
def index():
    return "Happy Coding!"

if __name__ == '__main__':
    app.run(debug=True)
This code imports Flask from the flask module and creates an instance of it known as app. The code then creates a trail that returns text showing “Happy Coding!” when consumers visit the app in a browser. Finally, it executes the improvement server as quickly because the script starts.
Get began the applying by the use of operating flask --app demo run inside the terminal. The --app flag specifies the site of the applying it’ll execute — proper right here, the demo.py file.
Together with Templates to Your Python Flask App
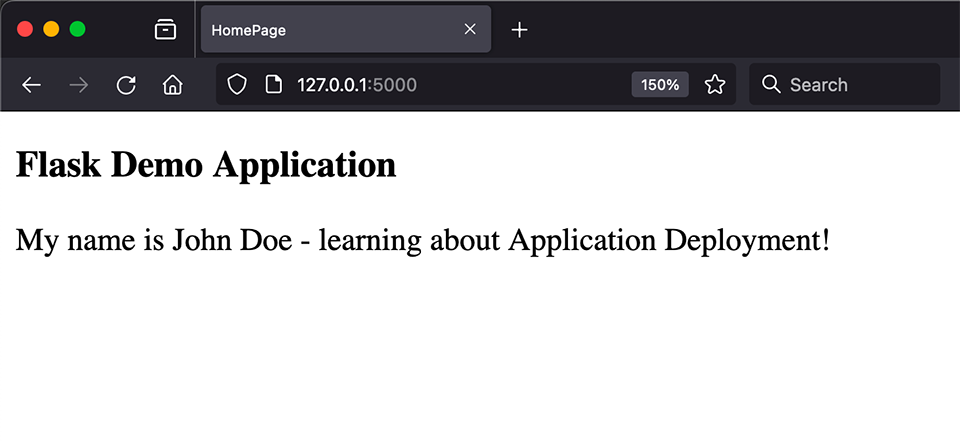
Together with templates to your app will bolster your content material subject material. First, make an inventory known as templates on your application’s root. Next, switch into the templates list and create a file known as index.html containing the following HTML code:
    HomePage


    Flask Demo Tool
    My name is John Doe - learning about Tool Deployment!
In demo.py, import render_template from the flask module and render the index.html template inside the trail function like this:
from flask import Flask, render_template

app = Flask(__name__)

# Routes
@app.trail('/')
def index():
    return render_template('index.html')

if __name__ == '__main__':
    app.run(debug=True)
Next, serve your application by the use of operating flask --app demo run on your local environment. Use the local deal with reported inside the terminal to unencumber the app on your browser. You should see something like this:
Connecting Your Flask App to a Local Database
You’ll create a connection to an area database — MySQL — that stores application content material subject material.
To connect your Flask application to MySQL, arrange the following:
- flask_mysqldb, the MySQL connector for Flask, using
pip arrange flask_mysqldb - Python-dotenv, for learning environment variables, using
pip arrange python-dotenv - The Python MySQL connector, using
pip arrange mysql-connector-python - The MySQL dependency, using
pip arrange mysqlclient
Head to MySQL Workbench to create a database. Make sure to add a database client with permissions to get right to use the database and create tables.
Create a .env file on your application’s root list to hold the database connection details. You may be able to add your database client credentials and the database name to this template:
DB_HOST="localhost"
DB_USER="your-db-user"
DB_PASSWORD="your-db-password"
DB_NAME="your-db-name"
In a revised demo.py script, we will now import the MySQL connector and use Python-dotenv to be informed the environment variable keys inside the .env file. This new demo.py script moreover assessments for the existence of a table named people inside the database and will create and populate it if it does not exist.
import os
from flask import Flask, render_template
from flask_mysqldb import MySQL

from dotenv import load_dotenv
load_dotenv()

app = Flask(__name__)

app.config['MYSQL_HOST'] = os.getenv("DB_HOST")
app.config['MYSQL_USER'] = os.getenv("DB_USER")
app.config['MYSQL_PASSWORD'] = os.getenv("DB_PASSWORD")
app.config['MYSQL_DB'] = os.getenv("DB_NAME")

mysql = MySQL(app)

@app.trail('/')
def index():
    cursor = mysql.connection.cursor()

    cursor.execute("SHOW TABLES LIKE 'people'")
    outcome = cursor.fetchone()

    if not outcome:
        cursor.execute(''' CREATE TABLE people (identity INTEGER, firstname VARCHAR(20), lastname VARCHAR(20)) ''')
        cursor.execute(''' INSERT INTO people VALUES(1, 'John', 'Doe') ''')
        cursor.execute(''' INSERT INTO people VALUES(2, 'Milly', 'Winfrerey') ''')
        mysql.connection.commit()

    cursor.execute('SELECT * FROM people')
    get admission to = cursor.fetchall()
    cursor.close()
    return render_template('index.html', get admission to=get admission to)
After instantiating Flask, the code above uses environment variables to grasp the database attributes from the .env file on your application’s root.
Then, the code instantiates MySQL and co-workers it with Flask. It creates a cursor object inside the index trail. Next, the code assessments for a table named people inside the database. If it isn’t found out, it creates it with the attributes identity, firstname, and lastname and inserts two rows of information.
The next 3 traces execute an SQL command to make a choice all rows from the people table and fetch the effects. The cursor object is closed, and the results of the query are passed for the reason that context variable get admission to for rendering with the template.
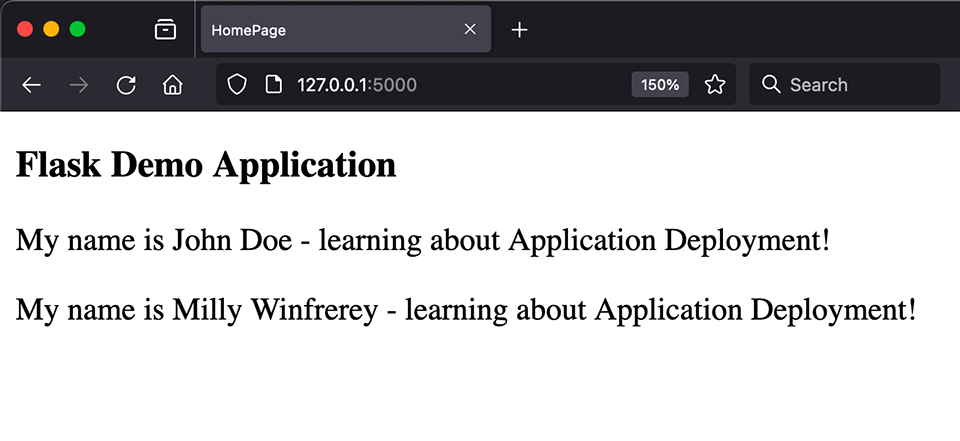
Proper right here’s a revised index.html template file that can process the results of the database query:
    HomePage


    Flask Demo Tool
    {% for e in get admission to %}
        My name is {{e[1]}} {{e[2]}} - learning about Tool Deployment!
    {% endfor %}
Execute the applying, then return to MySQL Workbench to check the tips. It should appear to be the following:

When you query the table, the two entries generated by the use of the app are returned. Your application now renders the following database-derived content material subject material inside the browser:
How To Deploy Your Python Flask App to Kinsta
Now that your application is up and dealing locally, you’ll have the ability to make it visible to the sphere by the use of website hosting it on Kinsta. You’ll have the ability to pair Kinsta’s Internet Software Website hosting and Controlled Database Website hosting services and products to put across this app (and your longer term efforts) to existence inside the cloud. And also you’ll have the ability to check out them each without spending a dime.
Getting in a position Your Python Enterprise for Deployment
Kinsta’s Web Tool Site website hosting platform deploys your code from your favorite Git host. Your next step is to configure your application environment to enhance that pathway and allow Kinsta to deploy your application with all its required dependencies.
Get began by the use of rising a brand spanking new list within your flask_demo undertaking root. Let’s call it myapp. Then switch the templates list and the demo.py file into myapp.
All over the myapp list, create a wsgi.py file with the following content material subject material:
from myapp.demo import app as application

if __name__ == "__main__":
    application.run(debug=True)
The assemble process at Kinsta may also use pip to generate your application. You’ll have the ability to pass an inventory of your app’s dependencies to pip on the production side using a prerequisites.txt file inside the undertaking’s root list.
While nevertheless working inside the venv virtual environment and right through the flask_demo root list, you’ll have the ability to generate a prerequisites.txt file that is specific to your undertaking with the following command:
pip freeze > prerequisites.txtThe contents of the following text file will look something like this:
blinker==1.7.0
click on on==8.1.7
Flask==3.0.0
Flask-MySQLdb==2.0.0
itsdangerous==2.1.2
Jinja2==3.1.2
MarkupSafe==2.1.3
mysql-connector-python==8.2.0
mysqlclient==2.2.1
protobuf==4.21.12
python-dotenv==1.0.0
Werkzeug==3.0.1
You received’t be sending the .env file with its database secrets and techniques and strategies to the producing server. Since you received’t need the python-dotenv library to be informed .env in production, you’ll have the ability to remove its reference from prerequisites.txt and remove (or observation out) the ones traces in demo.py:
from dotenv import load_dotenv
load_dotenv()
Together with a Python WSGI HTTP Server to the Enterprise
One thing missing from the prerequisites above is a technique to serve the applying by means of HTTP in a producing environment. The advance server used to your local software received’t do. For this undertaking, you’ll use the Web Server Gateway Interface (WSGI) bundle deal Gunicorn between the app and Kinsta’s Nginx web servers.
You’ll have the ability to add a Gunicorn requirement to your undertaking by the use of putting in place it within your virtual environment like this:
pip arrange gunicornAfter Gunicorn is installed, use pip to generate prerequisites.txt all over again.
An alternative to putting in place Gunicorn locally is to edit prerequisites.txt and simply add an get admission to like this:
gunicorn==21.2.0To wrap up the groundwork for the WSGI server, create a file inside the undertaking’s root list named Procfile and add the following line:
web: gunicorn myapp.wsgiThis will be the basis of the start command to your app in production.
Getting Your Enterprise Ready for Git
The revised list development is ready for deployment at Kinsta, on the other hand you don’t want the entire ones files going to production. Create a .gitignore file inside the undertaking root with content material subject material like this:
/venv
.env
This may most likely keep the files right through the venv list and the local database secrets and techniques and strategies in .env from uploading to your Git host.
You’ll have the ability to now start your local Git environment and push the code to your Git host using your hottest apparatus.
Deploying Your Python Flask App to Kinsta
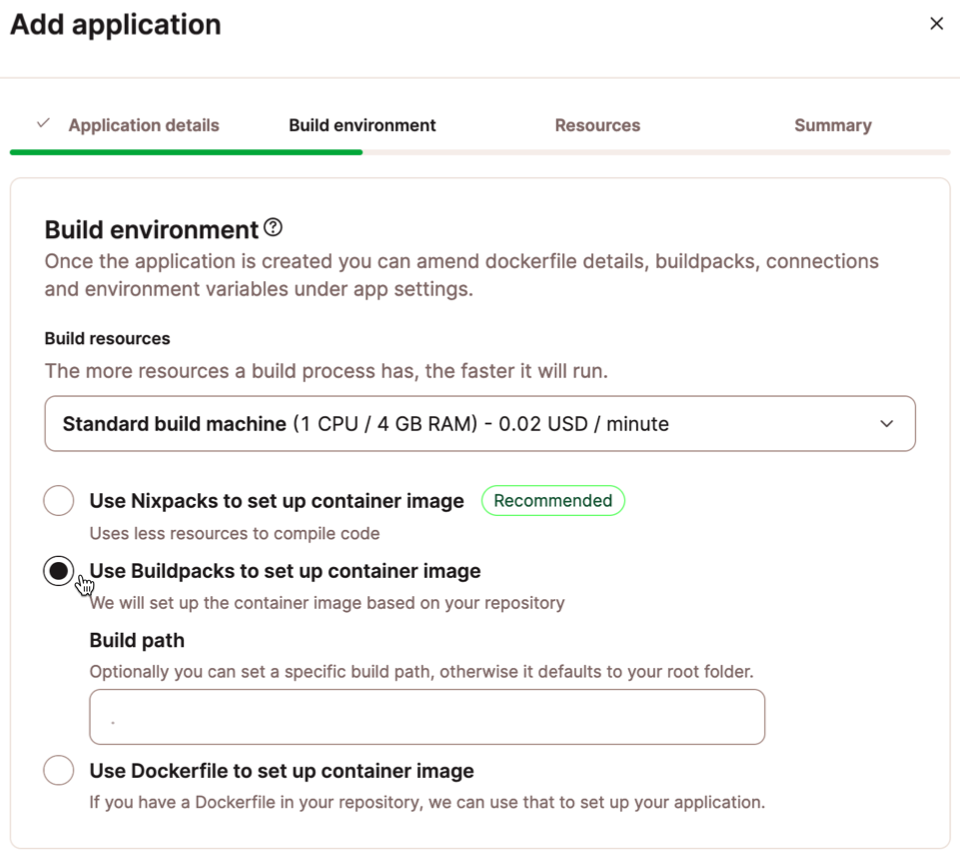
Login to your MyKinsta dashboard and be sure to have licensed Kinsta to get right to use your Git carrier supplier. Follow the steps to upload an utility, deciding at the repository and division on the Git host where Kinsta will to seek out this Flask undertaking code.
When configuring the assemble environment, make a choice Use Buildpacks to prepare container image, on the other hand leave all other settings at their defaults. (You’ll not provide a Get began command because of that is already defined on your Procfile.)
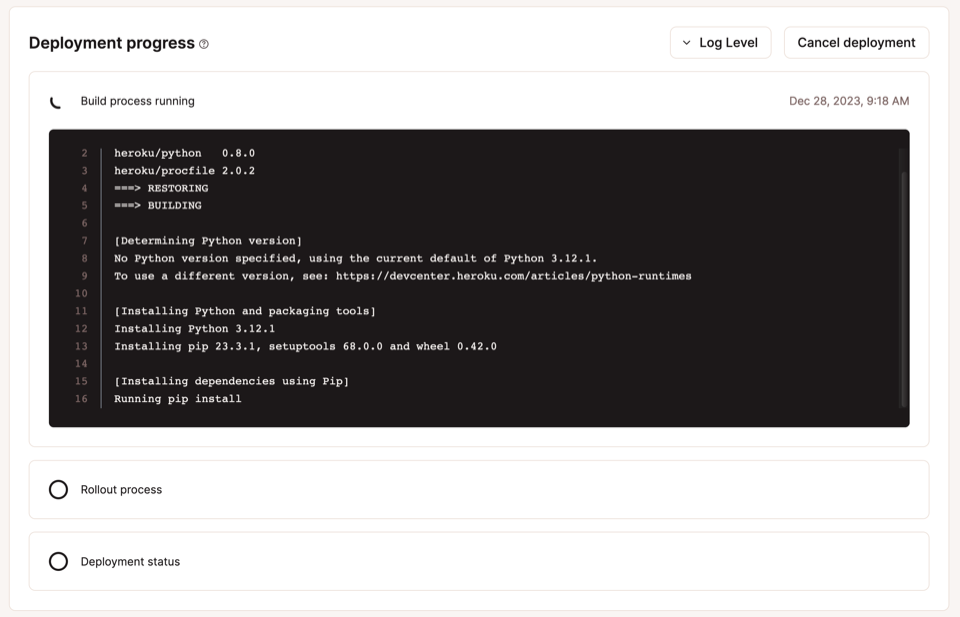
After reviewing billing information (you’ll have the ability to nevertheless get started totally free!), click on at the Assemble now button and watch the expansion inside the log viewer:
Together with a Database for Your Python Flask App
Kinsta has 4 managed database alternatives to meet your needs and application prerequisites: Redis, PostgreSQL, MariaDB, and MySQL. For this tutorial, we’ve were given been development for the MySQL database service.
Follow the decent instructions for including a database, remembering to make a choice the identical wisdom center you decided on to your Flask application.
After rising the database, make a choice it from the document of your available DB servers and scroll the entire manner right down to the Inner connections / Allowed systems section of the Analysis tab. When you click on at the Add connection button, your Flask application service within the identical wisdom center could be available to make a choice:
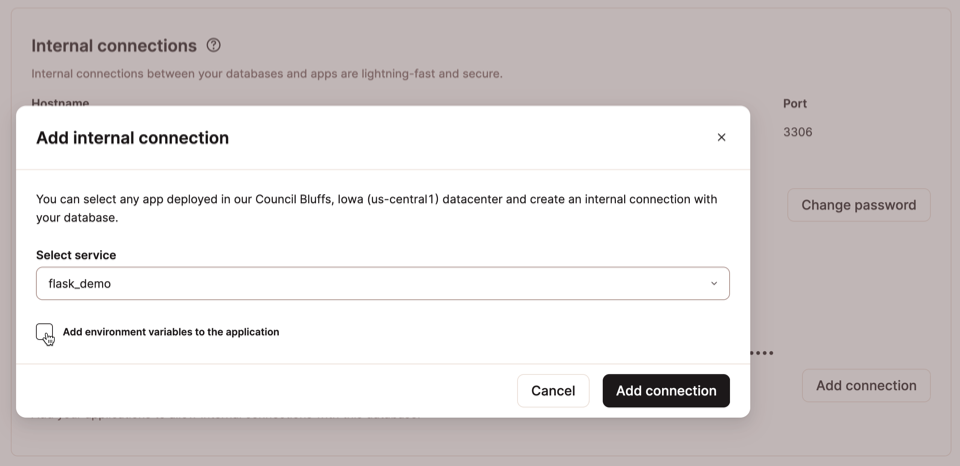
Click on at the Add environment variables to the applying checkbox quicker than rising the new connection. This displays the environment variables that can elevate your database secrets and techniques and strategies — all handled securely without the need for the .env file.
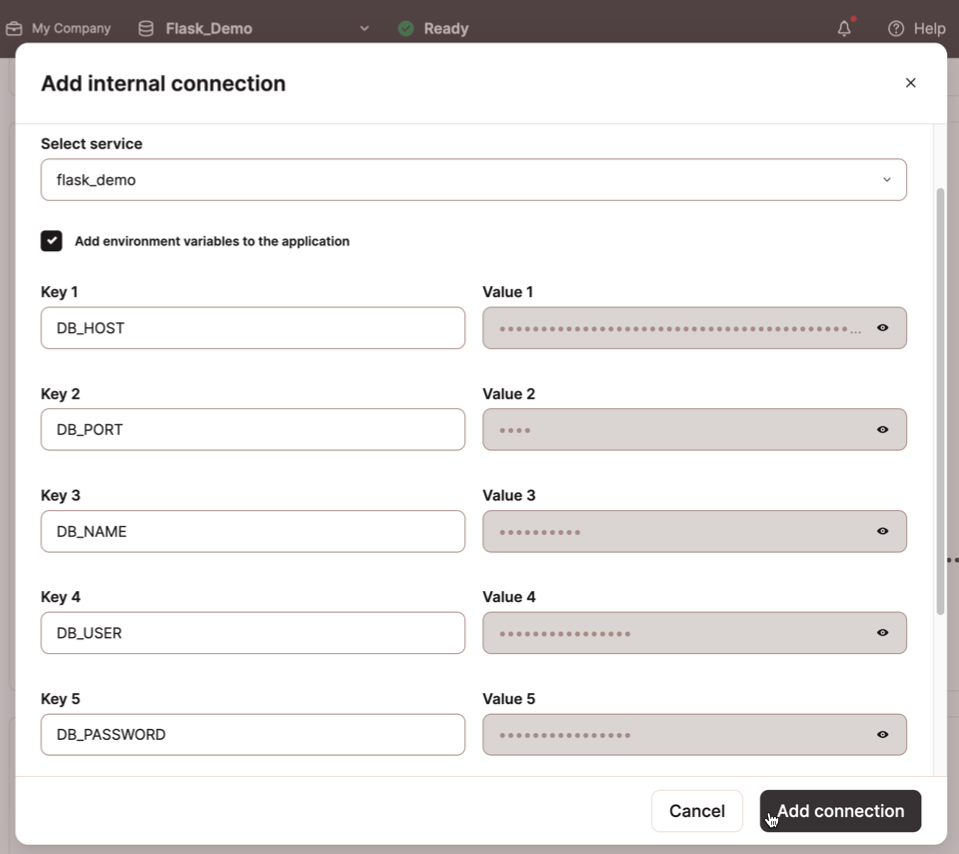
At the bottom of the above dialog, the settings Available right through runtime and Available right through assemble process could be enabled by the use of default — and that’s exactly what you want.
After after all clicking the Add connection button, the environment variables required for database get right to use could be performed to your undertaking Settings over in MyKinsta’s Applications dashboard:
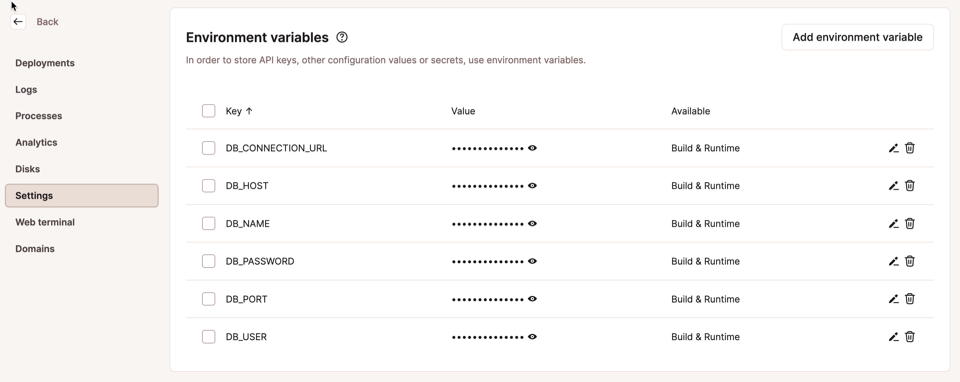
Now, even when you rebuild your application after longer term enhancements, the database connection main points will persist.

Congratulations! You’ve merely created a Python Flask application and deployed it to the Kinsta platform.
Summary
Flask’s customizable framework makes creating a Python application dramatically simpler. The use of Kinsta to deploy a Flask application makes problems much more simple, accelerating application development and deployment.
Proper right here, we found out discover ways to assemble a simple database-connected application within an area development environment and then make that available to the rest of the sphere on Kinsta’s Internet Software Website hosting and Database Website hosting platforms.
Uncover what else you’ll have the ability to assemble on our platform by the use of browsing our Fast Get started Templates.
The submit Construct and Deploy a Python App in a Few minutes With Flask and Kinsta appeared first on Kinsta®.
Contents
- 1 Python Apps Made Easier With Flask
- 2 How To Create Your Python Flask App
- 3 How To Deploy Your Python Flask App to Kinsta
- 4 Summary
- 5 The Final Information to Instagram Influencer Advertising and marketing for Manufacturers
- 6 A Complete Information To Development Static Websites With Gatsby
- 7 Introducing E mail Signature Generator – Designing Skilled E mail Signatures Made Simple

0 Comments