
For lightweight internet websites, programs, and other small duties, an increasing number of developers are turning to static website turbines over WordPress or different content material control methods (CMSs). Static web sites offer a simple and environment friendly technique to create internet websites and programs which might be fast, secure, and easy to maintain.
Docusaurus is one such static web content generator — and it’s unexpectedly gaining in popularity inside the construction workforce.Uninterested in slow content material control methods? Meet Docusaurus! A static website generator that will get the activity performed with out slowing you down. Learn on to be told extra 
In this put up, we’ll take a deep dive into the benefits of using Docusaurs as your static web content generator and why it’s a emerging favorite among developers.
What Is Docusaurus?
Docusaurus is a popular static website generator that uses React, probably the most a very powerful most sensible JavaScript libraries, as its UI library for internet web page creation. Like other such generators, it’s easy to prepare and easy to switch, and — most importantly — it offers you the entire thing you wish to have to hit the ground operating at the side of your static internet content material.
What gadgets Docusaurus apart, alternatively, is this is serving to you create and organize a internet content material where content material performs a key function. It signifies that you’ll in short and easily assemble an entire internet content material — complete with a blog serve as — that spotlights your content material subject matter from the get-go.
On account of content material subject matter is the point of interest with Docusaurus, it’s very best for rising documentation web sites like wikis. It moreover uses markdown, which is best possible each and every for collaboration and storage in a git repository. What’s further, it’s got a ton of improbable choices like i18n, search, and custom designed problems, which we’ll speak about in more component shortly.
Listed here are merely probably the most standout choices that make Docusaurus a solid selection:
- Built using React
- Make stronger for MDX v1
- Make stronger for React component embedding by way of Markdown
- Report versioning
- Compatibility with Git, Crowdin, and other translation managers for record translation and bulk or specific individual deployment
Who Uses Docusaurus?
Docusaurus was once created via Fb, so it’s no surprise that it’s in recent years being used by many huge producers and companies across the web.
Listed here are merely probably the most largest producers using Docusaurus lately (with further temporarily to go back as Docusaurus’ popularity continues to expand):
And additional are turning into a member in their ranks on a daily basis.
How To Arrange Docusaurus
Docusaurus may well be really easy to place in and most simple requires a few minutes. In this tutorial, we’ll be construction a documentation web content with a blog, and we’ll customize how the internet content material appears to be.
And appropriate right here’s the great segment: It’s going to take us not up to an hour to spin the entire thing up.
Let’s dive in!
Prerequisites
Docusarus requires Node.js 16.14 or newer. It’s a flat-file SSG, which means you won’t need an further database.
In the event you don’t already have Node.js 16.14+ available, you will need to get started by means of putting in Node.js or upgrading your provide type. You then’ll switch at once to the Docusaurus arrange process beneath.
We’re moreover going to be using the trend Docusaurus web content from this GitHub repository. It’s possible you’ll use it or a clean arrange of Docusaurus for this tutorial.
Arrange Process
To begin the Docusaurus arrange process, you first want to run the following command:
npx create-docusaurus@latest antiqueThis will likely create a folder on your challenge and scaffold the vintage theme inside it. The antique theme already contains some preconfigured choices like a blog, custom designed pages, and a CSS framework.
After arrange, you then want to run the following command to start out the local server:
npm get beganIf you want to assemble an optimized type that is ready for deployment, you will have to run this as an alternative:
npm run assembleBuilding
On every occasion you’ve put for your Docusaurus instance, you’ll be able to open your challenge checklist and take a better take a look on the “skeleton” of your new web content.
Proper right here’s what the file building seems like:
my-website
├── blog
│ ├── 2019-05-28-hola.md
│ └── 2020-05-30-welcome.md
├── scientific medical doctors
│ ├── doc1.md
│ └── mdx.md
├── src
│ ├── css
│ │ └── custom designed.css
│ └── pages
│ ├── types.module.css
│ └── index.js
├── static
│ └── img
├── docusaurus.config.js
├── bundle deal.json
├── README.md
├── sidebars.js
└── yarn.lock
There are a few details to note in the case of a few of the ones data and folders:
/blog: Contains all of the data an identical for your blog./scientific medical doctors: Contains all of the data an identical for your scientific medical doctors. You’ll customize their order inside the sidebar.js file./src: Contains all non-documentation data like pages or custom designed parts./src/pages: The entire JSX/TSX/MDX data will likely be revamped into pages./static: Static data that will likely be copied to the overall assemble folder.docusaurus.config.js: Docusaurus configuration file.packaged.json: Each Docusaurus web content is a React app, so appropriate right here you’ll find all of the dependencies and scripts that it uses for React.sidebar.js: Proper right here you’ll specify the order of forms inside the sidebar.
Customizing Your Docusaurus Arrange
As you’ll see from the simplicity of its file building, Docusaurus is simple to use and navigate. Likewise, customizing your Docusaurus web content is a breeze. You’ll open and edit the ones data using your favorite textual content editor or IDE.
Let’s transfer over some of the customization alternatives you’ll have proper out of the sphere.
Homepage
The first thing you’ll almost definitely be itching to do is customize the default homepage to sing their own praises your individual challenge as an alternative. Thankfully, it’s not tough to make any changes you need to the Docusaurus homepage.
To change the homepage, open the src/pages/index.js file and make adjustments proper in there. It’s an ordinary React internet web page, so that you’ll regulate or rebuild it by means of changing the content material subject matter or rising custom designed React elements.
Configuration File
Next, we’ll dive into the an important docusaurus.config.js file and change some essential details for our instance.
Name and Description
Throughout the configuration file, you’ll find:
const config = {
identify: 'My Website',
tagline: 'Dinosaurs are cool',
url: 'https://your-docusaurus-site.com',
baseUrl: '/',
Merely business the ones details to suit your web content’s needs, then save the file.
To edit your navigation bar, in finding the navbar products.
For our example appropriate right here, we want to add a link to Kinsta, rename the “Instructional” products to “Starter documentation,” and add the Kinsta logo.
Proper right here’s how we’d transfer about it:
navbar: {
  identify: 'Kinsta starters',
  logo: {
    alt: 'Kinsta Logo',
    src: 'img/kinsta-logo-alpha-purple.png',
  },
  items: [
    {
      label: 'Kinsta starters',
      to: '/docs/intro',
    },
    {to: '/blog', label: 'Blog', position: 'left'},
    {
      href: 'https://github.com/kinsta',
      label: 'GitHub',
      position: 'right',
    },
  ],
},
Footer customization in Docusaurus is made up of two sections: the footer content material subject matter itself, and the footer links.
The main bulk of your footer content material subject matter (not at the side of the links checklist) can be situated to your themeConfig.footer file. This is the most productive spot so that you could upload a symbol and a copyright notice.
Proper right here’s how we’ve modified our footer configuration:
module.exports = {
  themeConfig: {
    footer: {
      logo: {
        alt: 'Kinsta Logo',
        src: 'img/kinsta-logo.png',
        href: 'https://kinsta.com',
        width: 160,
        height: 51,
      },
      copyright: `Copyright &reproduction; ${new Date().getFullYear()} Kinsta. Built with Docusaurus.`,
    },
  },
};Changing the footer links is similar to changing the absolute best navbar: To search out the footer phase in docusaurus.config.js and edit until it fits your needs.
Proper right here’s what we’ve changed our footer phase to look like:
footer: {
  style: 'dark',
  links: [
    {
      title: 'Docs',
      items: [
        {
          label: 'Kinsta starters',
          to: '/docs/intro',
        },
      ],
    },
    {
      identify: 'Keep up a correspondence with us',
      items: [
        {
          label: 'Discord',
          href: 'https://discord.gg/vjRPMhFaBA',
        },
        {
          label: 'Support',
          href: 'https://kinsta.com/kinsta-support/',
        },
        {
          label: 'Twitter',
          href: 'https://twitter.com/kinsta',
        },
      ],
    },
    {
      identify: 'Additional',
      items: [
        {
          label: 'Application Hosting',
          href: 'https://kinsta.com/application-hosting/',
        },
        {
          label: 'Database Hosting',
          href: 'https://kinsta.com/database-hosting/',
        },
        {
          label: 'WordPress Hosting',
          href: 'https://kinsta.com/wordpress-hosting/',
        },
        {
          label: 'DevKinsta',
          href: 'https://kinsta.com/devkinsta/',
        },
      ],
    },
  ],
};
Colors and CSS
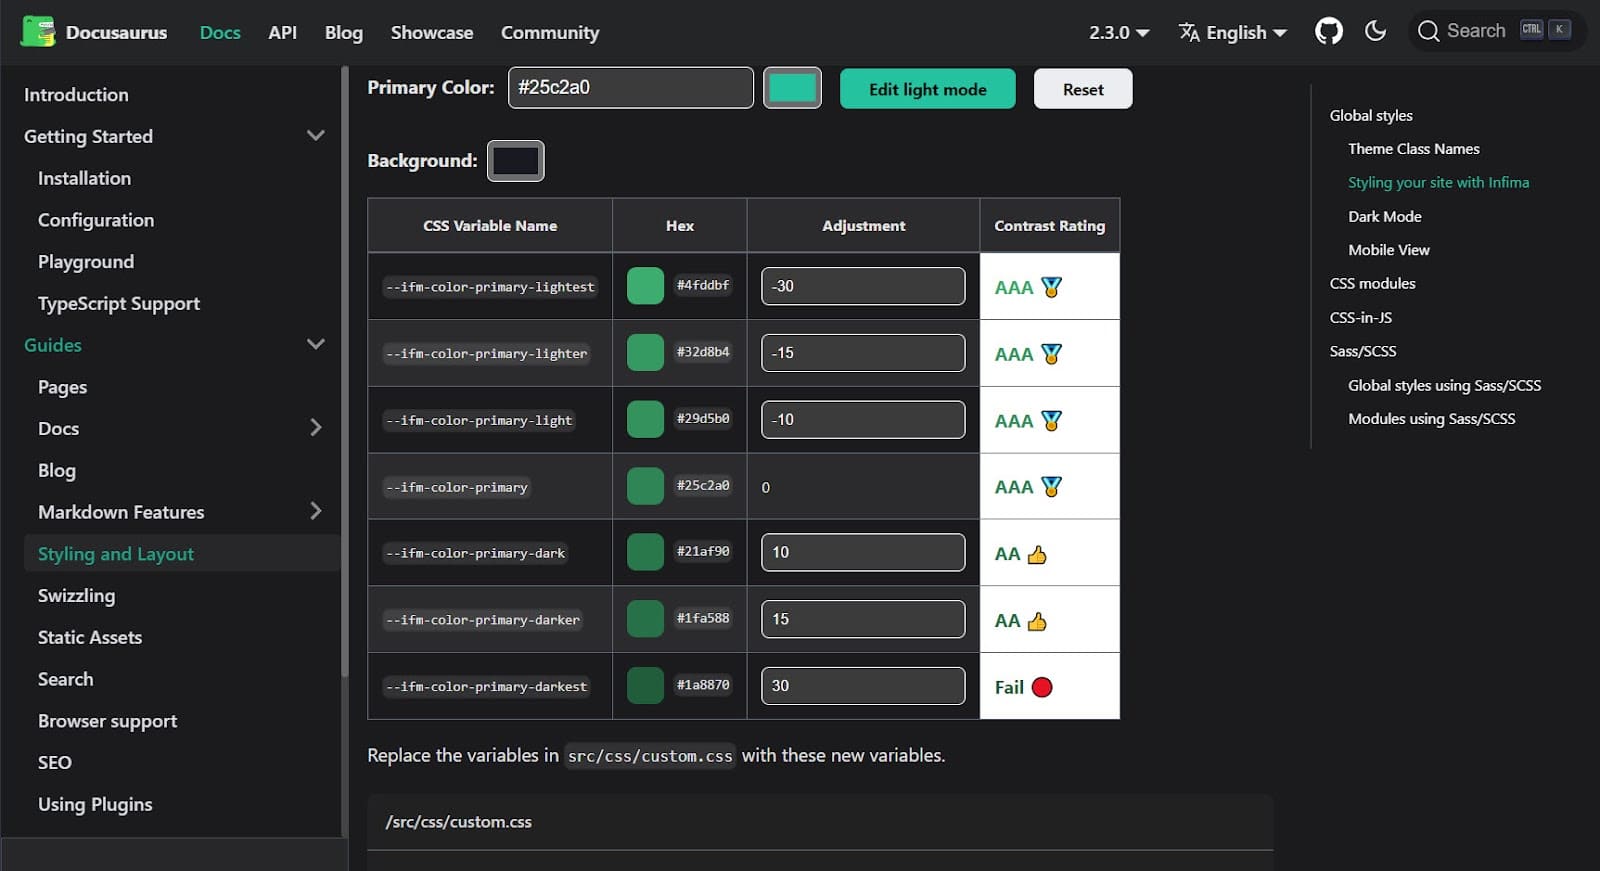
The antique preset for Docusaurus uses the Infima CSS framework. With this in ideas, Docusaurus creators made a very helpful internet instrument that will help you business the colors and other CSS portions and declarations.
On every occasion you’ve entered your individual tastes on the internet web page, the software will generate a custom designed.css file — complete with a just right taking a look suite of complementing tones — in a query of seconds. You’ll then copy this new CSS file into your challenge’s /src/css checklist for reference.
Documentation
The entire documentation in your new internet content material is stored inside the /scientific medical doctors folder. Actually, you’ll business the folder identify in docusaurus.config.js.
Merely create the markdown data to your textual content or HTML editor and drop them in that folder. Each file will have to look like this:
---
identification: the-id
identify: Title
---
# Rest of the record
In line with the ID, Docusaurus builds the URLs for the articles in that subfolder: yourdomain.com/scientific medical doctors/{identification}
We will be able to moreover create subfolders if want to divide our documentation into different, logical sections. However, we’ll want to do a little additional art work for the ones subdirectories to function the way in which wherein we’d expect.
Say we create a brand spanking new forms folder referred to as “Starters.” If we now have been to then refresh the homepage and click on on on the new “Starters” link routinely added to our sidebar, we’ll get an error — because of there is no index internet web page however in our new folder.
Probably the most most simple techniques to fix this is to create a _category_.json file that may generate the index of all pages which might be stored in this folder. You most simple want to add the following code:
{
  "label": "Starters",
  "position": 2,
  "link": {
    "type": "generated-index",
    "description": "All Kinsta Starters"
  },
};
As you’ll see, the sidebar regenerates to match the development of your data. That’s given that sidebar.js file contains this tutorialSidebar: [{type: 'autogenerated', dirName: '.'}],
If you need to handle this on your own, you’ll merely business this to at least one factor like this:
tutorialSidebar: [
  'intro',
  'hello',
  {
    type: 'category',
    label: 'Tutorial',
    items: ['tutorial-basics/create-a-document'],
  },
],
Blog
Docusaurus includes a slick blog module. Having a blog in place alongside your number one internet content material can be very useful to inform your individual base of changes taking place to your challenge, or to stick operating challenge notes as one of those changelog.
Each put up consists of a frontmatter segment, like this:
---
slug: docusaurus-starter
identify: Docusaurus Starter
authors: palmiak
tags: [starters, docusaurus]
---
…and, in the end, the content material subject matter itself. It moreover has a very useful tag, which helps to limit the put up summary displayed on all put up listings.
It’s moreover an excellent concept to create an authors.yml file for credit score. The file seems like this:
palmiak:
identify: Maciek Palmowski
identify: DevRel
url: https://github.com/palmiak
image_url: https://github.com/palmiak.png
As a result of this file, you’ll have all of the author’s wisdom in one place for easy reference.
How To Deploy Your Docusaurus Internet web page at Kinsta
On top of WordPress websites, stand-alone packages, and databases, Kinsta can host static web sites.
This means it’s very best on your Docusaurs web sites — and for managing all your web duties — right away from your MyKinsta dashboard.
Once your instrument has been deployed, you’ll be able to analysis your software’s ongoing analytics, each and every reside and historical, with measurements at the side of:
- Bandwidth usage
- Assemble time
- Run time
- CPU usage
- Memory usage
From start to finish, the deployment process through MyKinsta takes just a few minutes.
Let’s get started!
Should haves: Configuring Your Docusaurus Problem
To host your Docusaurus challenge on Kinsta’s Software Internet hosting platform, you’ll want to:
- Include a name field to your bundle deal.json file. (This can be the rest and gained’t affect your deployment.)
- Include a assemble script to your bundle deal.json file. (Your Docusaurus challenge will have to already include this.)
- Arrange the serve npm bundle deal and set the start script to serve assemble.
Once those are checked off, you’ll switch at once to in truth deploying your web content.
Deploying Your Docusaurus Problem
Practice the ones simple steps to hook up with your GitHub account and free up your Docusaurus web content:
- Log in for your MyKinsta account and navigate to the Programs tab from the left-hand menu.
- Click on on on the blue Add service button and make a choice Device from the dropdown.

The Programs tab inside the MyKinsta dashboard with the mouse hovering over the “Device” selection after clicking on the blue “Add service” button. - In the event you haven’t however hooked up for your GitHub account through MyKinsta, you’ll be confirmed a modal encouraging you to do so. Click on at the Continue with GitHub button to proceed.

A modal with the text “GitHub integration: Connect kinsta for your GitHub namespace appropriate right here to import your provide repositories.” At the bottom-right are a white “Cancel” button and a blue “Continue with GitHub” button. - A brand spanking new window will open, asking in your permission to authorize Kinsta to get right of entry to and arrange your GitHub assets. You’ll want to’re signed in to the correct GitHub account, then click on on on the green Authorize Kinsta button as regards to the bottom.
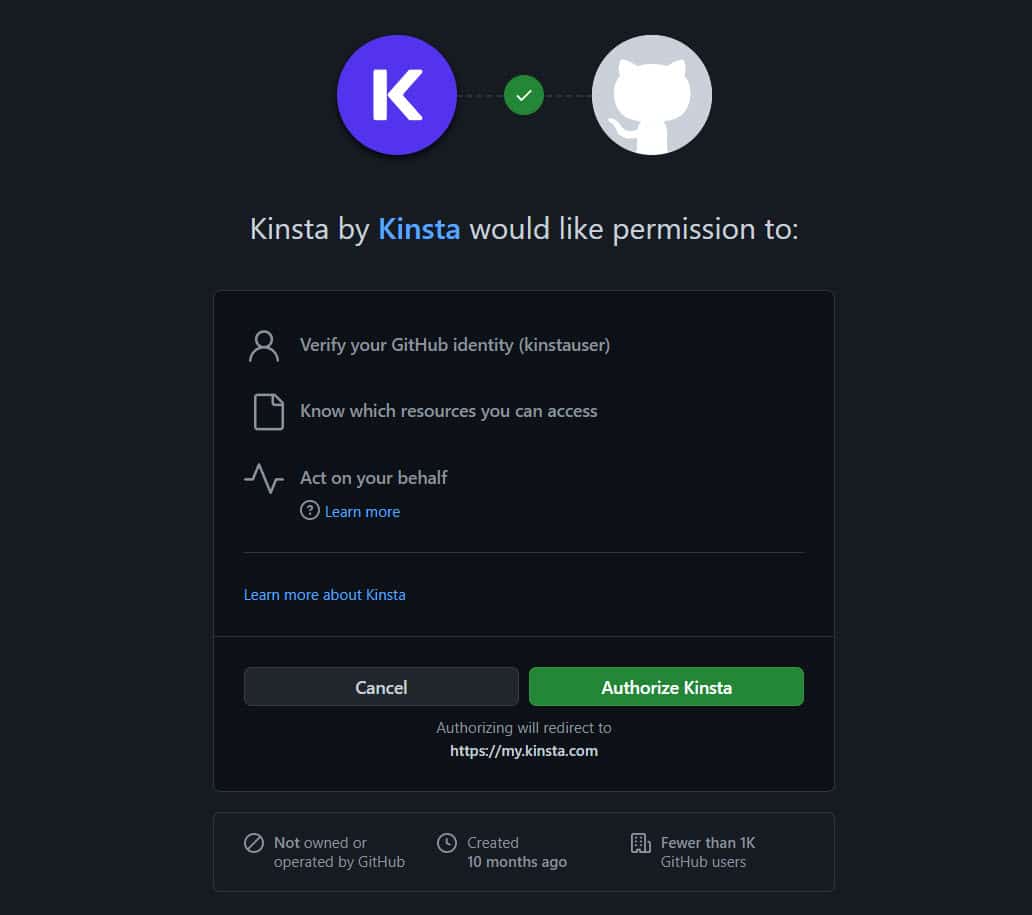
An authorization modal from GitHub with the text “Kinsta by means of Kinsta would really like permission to: Test your GitHub identity (kinstauser); Know which belongings you’ll get admission to; Act in your behalf” with each and every a gray “Cancel” button and a green “Authorize Kinsta” button at the bottom. - You’ve now come to the GitHub integration wizard. That’s the ultimate step previous to you’ll deploy your web content. Fairly consider the fields offered and fill them out in step with your GitHub configuration and your challenge’s prerequisites. When you’ve got a Dockerfile on your repository, you’ll use this to prepare the container image; differently, Kinsta will routinely organize a container image for you. Bear in mind which you’ll want to edit your GitHub permissions previous to you’ll be able to proceed, particularly if this is your first deployment through Kinsta.
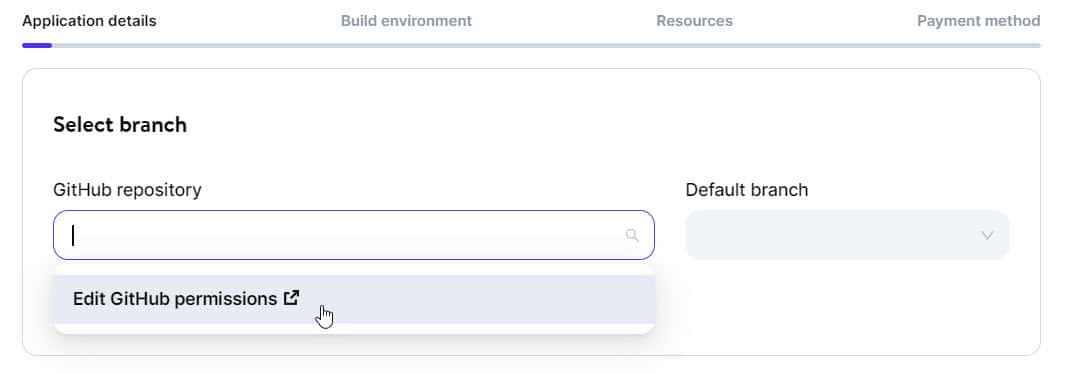
The new instrument wizard in MyKinsta showing the mouse hand hovering over the “Edit GitHub permissions” dropdown selection for the “GitHub repository” field. You’ll make a choice whether or not or to not grant Kinsta get admission to to all repositories, or most simple particular ones. The ones permissions can be adjusted at any time from your GitHub account’s Packages settings.
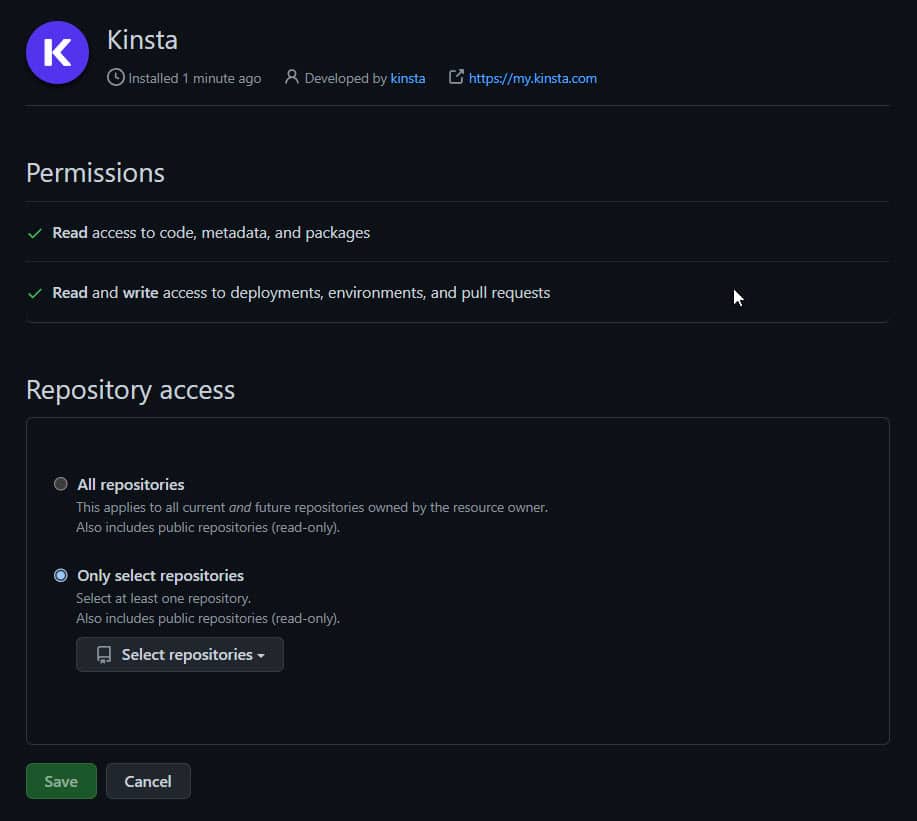
The GitHub “Permissions” phase, showing two alternatives inside the “Repository get admission to” phase: “All repositories” or “Most simple make a choice repositories”. - After you’ve made your selections and confirmed your possible choices, you’ll be confirmed your deployment details, along with alternatives to Industry settings or Redeploy.
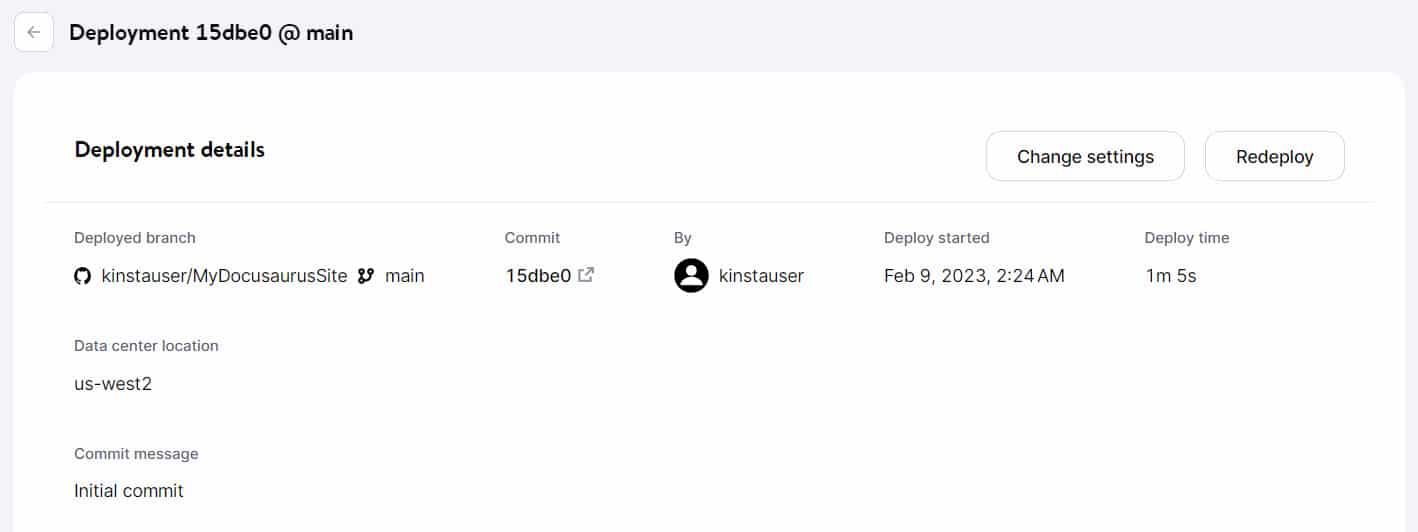
The “Deployment details” internet web page in MyKinsta showing wisdom touching on the deployed app, at the side of the deployed division identify, dedicate amount, accompanying dedicate message, deployment events, and the selected wisdom center location. This is also where you’ll see any errors that took place all over deployment, along with details on what resulted in the failure so that you’ll deal with it merely. If you find yourself struggling to fix the problem, further steerage on rollout mistakes can be found in Kinsta’s documentation.
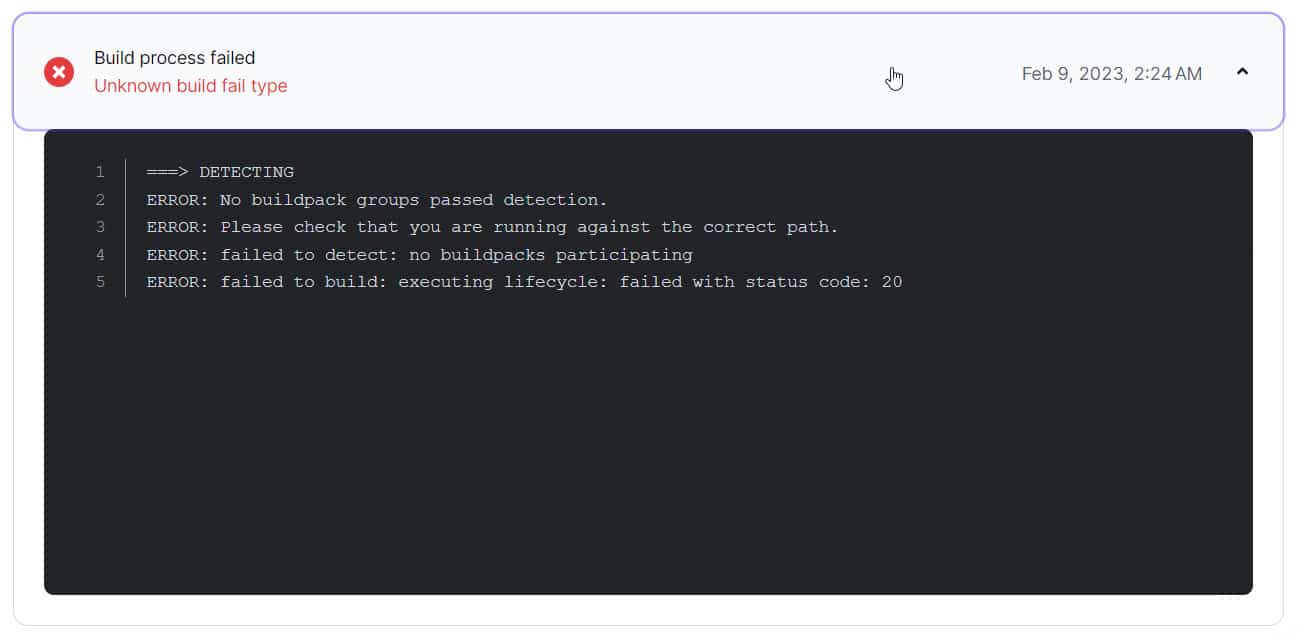
An error titled “Assemble process failed” along with “Unknown assemble fail type” above a details pane that lists the individual errors that contributed to the failure.
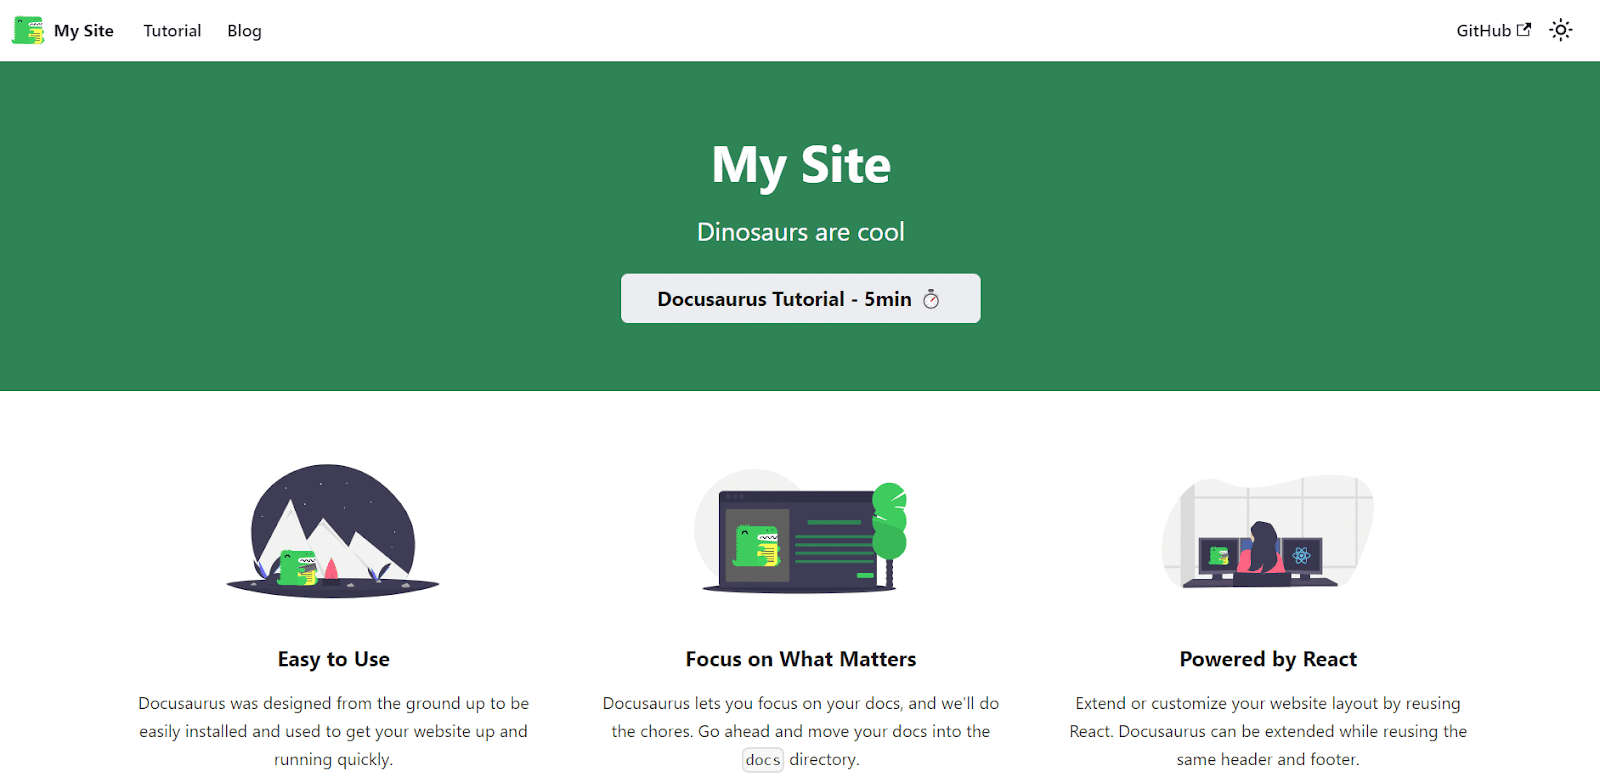
In the event you’ve come this far without errors, then congratulations — you’ve merely successfully deployed your Docusaurus website thru Kinsta! Your instrument (i.e., your static web content) is available whenever you’ve completed the wizard. You’ll view it at your instrument’s URL, which is regularly https://your-docusaurus-site.kinsta.app.
Proper right here’s our first take a look at our trend web content on Kinsta:
Summary
With its surprisingly tough choices, pleasant design, intuitive navigation, and be aware of content material subject matter, it’s not onerous to appear why Docusaurus is regarded as an excellent software for any developer having a look to easily deploy and maintain a streamlined, well-organized static documentation web content and/or blog.Transfer up your internet building sport! Say good-bye to clunky CMS and hi to Docusaurus – a easy static website generator that is converting the dev sport.  Test it out correct right here
On every occasion you’ve filled your web content with content material subject matter that your visitors will value, you’ll get started to remember of additional built-in choices that come in handy. As an example, Docusaurus’ search engine marketing purposes are perfect for helping you succeed in complex visibility through a much wider audience while you art work on different tactics for advancing in search engine optimization ratings.
Have you ever ever built the rest with Docusaurus? Proportion your duties and enjoy with us inside the comments phase beneath.
The put up Create and Customise a Docusaurus Website online (With Weblog Characteristic) gave the impression first on Kinsta®.
Contents
- 1 What Is Docusaurus?
- 2 How To Arrange Docusaurus
- 3 Customizing Your Docusaurus Arrange
- 4 How To Deploy Your Docusaurus Internet web page at Kinsta
- 5 Summary
- 6 How to Customize WordPress in 2024 (No Coding Required)
- 7 Tips on how to Use the Tail Command in Linux
- 8 Find out how to Upload Textual content to A GIF [Tutorial]

0 Comments