
The period of time “serverless” will indubitably pique your passion whilst you first concentrate it. Likelihood is that you’ll surprise “How do I run code on the Internet without a server?”
What this in point of fact approach is that you just, as a developer, will have to no longer have to worry regarding the servers your code is working on. {{Hardware}} provisioning, neighborhood configuration, tool arrange, and scaling are all abstracted away by way of the serverless provider.
So, in this submit, we’re going to data you at some point of the step-by-step means of a rising serverless instrument using Netfly and JavaScript. Let’s take a look.
What are serverless techniques
From a building standpoint, a serverless function is a bundle deal of code that you just upload to a serverless provider (like AWS or Google). This code can also be configured to respond to requests by way of a URL, run on a time table (that is, by way of a cron procedure), or be referred to as from other products and services and merchandise or serverless functions.
Serverless capacity is best for together with some server capacity to front-end techniques without the complexity and expense of running an entire server. You’ll moreover assemble entire techniques with serverless capacity.
When blended with other cloud products and services and merchandise that provide file storage, database strategies, and authentication, you’ll create large, unswerving and scalable techniques without the need to devote a single server.
Creating a serverless instrument
To get a more practical understanding of running with serverless choices, allow us to check out a real-world example. We will create a static internet web page with a newsletter sign up form that uses a serverless function to store the patron’s determine and email take care of in a Google spreadsheet.
Serverless functions can also be written in a large number of languages depending on the broker, then again we’re going to make use of JavaScript since Netlify is helping Node.js functions. Previous than starting, please make certain that have the newest Node / npm installed to your local machine.
.no-js #ref-block-post-10739 .ref-block__thumbnail { background-image: url(“https://belongings.hongkiat.com/uploads/thumbs/250&instances;160/node-js-server-side-javascript.jpg”); }
Beginner’s Data to Node.js (Server-side JavaScript)
Node.js – in simple words – is server-side JavaScript. It’s been getting numerous buzz the ones… Be informed additional
Step 1. Take a look at in for a Netlify account
We’re going to make use of Netlify since the host for this situation as they provide a loose tier that comprises serverless capacity and is really easy to place in and run. First, go to their website and sign up for a loose account.
Step 2. Arrange CLI Netlify
To test our trend web page in the community and deploy it to Netlify, you need to place within the Netlify command line tool. To try this, run the command:
npm arrange netflify-cli -g
Then login using:
ntl login
Step 3. Development the mission
Create a mission folder and initialize a brand spanking new npm mission:
mkdir mail-list && cd mail-list
npm init -y
This may increasingly make the bundle deal.json file in a position for putting in place dependencies. Arrange a couple of programs we would like:
npm arrange google-spreadsheet dotenv
The main one is google-spreadsheet, a JavaScript library for running with Google sheets. The second, dotenv, is a bundle deal that can allow us to load values from a .env file at the root of our mission and provide them to the node script.
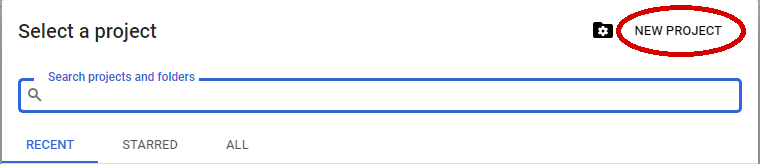
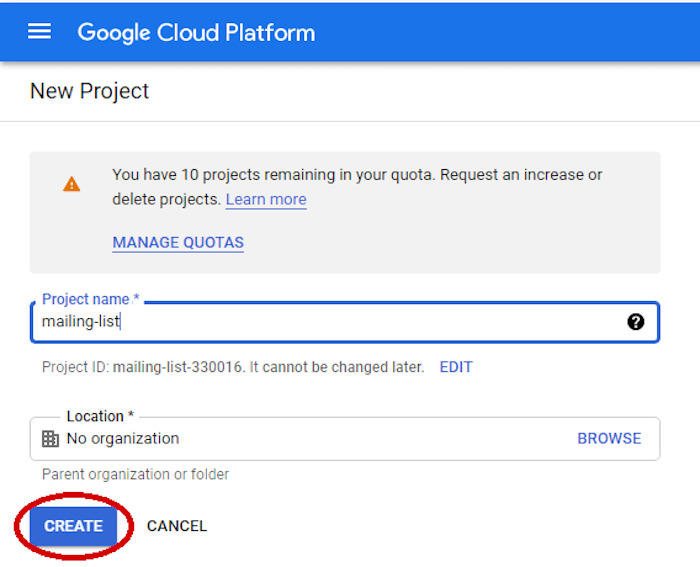
Step 4. Allow the Google Sheets API and create a service account
Create a brand spanking new mission from the menu at the best.

Once you have completed all these steps, you will need to create a service account. This account provides you with a collection of credentials with the desired permissions to get right to use the API.
Click on on on IAM & Admin on the left sidebar, then click on on on Provider Accounts, once on the internet web page, click on on on “Create Provider Account”. Whole the form by way of choosing a name for the service account. The chosen determine and mission determine will turn into part of the service account ID.
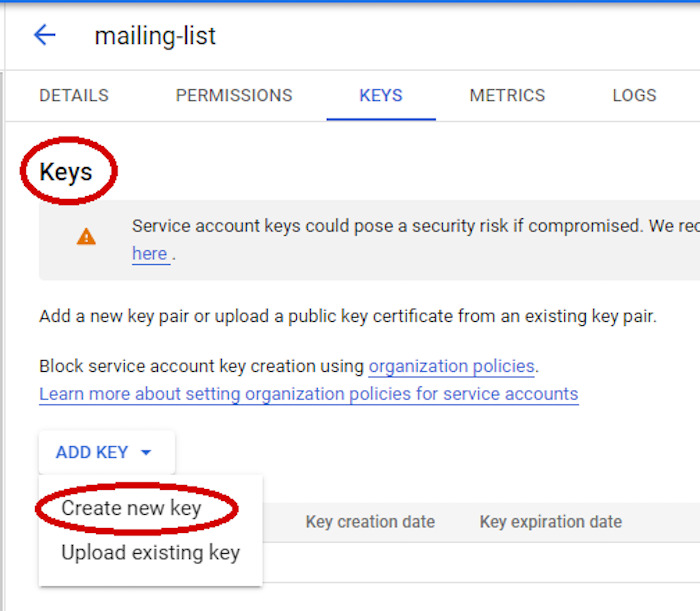
Select JSON because the essential factor type. Click on at the CREATE button and the JSON key file will be downloaded to your pc.
Step 5. Create the registration form internet web page
Create an index.html file to your mission folder with the following content material subject matter:
	Registration form


		Subscribe to my newsletter
Step 6. Add serverless function for processing the form
In this file, we get right to use the service account, load the table, download wisdom from the consumer (username and email take care of) and write this data into the table.
Previous than writing client wisdom, we take a look at that the email specified by the patron isn’t inside the table. If this isn’t the case, then we inform the patron that he has already subscribed to updates.
require('dotenv').config()
const { GoogleSpreadsheet } = require('google-spreadsheet')
exports.handler = async (event) => {
 const file = new GoogleSpreadsheet(process.env.GOOGLE_SPREADSHEET_ID)
 take a look at {
  look ahead to file.useServiceAccountAuth({
   client_email: process.env.GOOGLE_SERVICE_ACCOUNT_EMAIL,
   private_key: process.env.GOOGLE_PRIVATE_KEY.alternate(/n/g, 'n')
  })
  look ahead to file.loadInfo()
  const sheet = file.sheetsByIndex[0]
  const wisdom = JSON.parse(event.body)
  const rows = look ahead to sheet.getRows()
  if (rows.some((row) => row.email === wisdom.email)) {
   const response = {
    statusCode: 400,
    body: 'The email is already in use'
   }
   return response
  }
  look ahead to sheet.addRow(wisdom)
  const response = {
   statusCode: 200,
   body: ‘Thank you, your subscription has been completed!'
  }
  return response
 } catch (err) {
  console.error(err)
  const response = {
   statusCode: 500,
   body: 'Error, in all probability the problem will be resolved later'
   }
  }
  return response
 }
}
To test the function in the community, we need to create a .env file inside the mission root and add a few variables:
GOOGLE_SERVICE_ACCOUNT_EMAIL=your_client_email
GOOGLE_PRIVATE_KEY=your_private_key
GOOGLE_SPREADSHEET_ID=your_spreadsheet_id
The service account email is the one you created in step 4 and the private secret’s taken from the JSON key file you downloaded. The general one, the ID of the spreadsheet, we will get in the next step.
Step 7. Create a table and percentage it
Create a brand spanking new spreadsheet in Google Sheets. It doesn’t matter what determine you give it, then again write down the ID from the url and add it to the .env file you created inside the ultimate step.
Inside the first row of the table, add two column headers: determine and email (apply that the case will have to have compatibility the input names from the HTML form). The entries created by way of the serverless function will be added beneath as additional lines.
You will have to now grant the service account you created with permission to get right to use the spreadsheet. Click on at the Proportion button and enter the email take care of of the service account inside the input field. Take note to assign editor rights.
Step 8. Check the aptitude of the application
All you need to do to start out out the application and initialize the function is to run the following command:
netlify dev
Fill inside the form fields, go at some point of the validation and click on on on “Click on on on this to sign up” over again. It’s redirected to the nice fortune internet web page, followed by way of each and every different redirect to the principle internet web page. Opening the table, we will see the entered wisdom.
Conclusion
Serverless choices don’t alternate all server parts, then again they’re a specifically powerful chance for managing mid-tier building. A serverless machine avoids unintentional complexity that can cause organizational bottlenecks and severe potency problems.
The submit How to Create Serverless Application With Netlify & JavaScript appeared first on Hongkiat.
Contents
- 0.0.1 What are serverless techniques
- 0.0.2 Creating a serverless instrument
- 0.0.3 Beginner’s Data to Node.js (Server-side JavaScript)
- 0.0.3.1 Step 1. Take a look at in for a Netlify account
- 0.0.3.2 Step 2. Arrange CLI Netlify
- 0.0.3.3 Step 3. Development the mission
- 0.0.3.4 Step 4. Allow the Google Sheets API and create a service account
- 0.0.3.5 Step 5. Create the registration form internet web page
- 0.0.3.6 Step 6. Add serverless function for processing the form
- 0.0.3.7 Step 7. Create a table and percentage it
- 0.0.3.8 Step 8. Check the aptitude of the application
- 0.0.4 Conclusion
- 0.1 Related posts:
- 1 The Professionals and Cons of Being a Freelancer
- 2 WordPress Web hosting With Limitless Garage And Bandwidth – Limitless Virtual…
- 3 Get a Free Sunglass Shop Layout Pack for Divi

0 Comments