
Are you searching for a solution to redirect consumers once they’ve submitted a sort on your WordPress internet web page?
You’ll be capable of lead consumers to your top-performing blog posts, display the latest gives, or show a thank you internet web page to build a courting in conjunction with your target market.
In this article, we’ll show you redirect consumers after form submission in WordPress.
Why Redirect Shoppers After Form Submission?
When an individual submits a sort on your WordPress web page, many industry householders might suppose that’s the top of the process. Then again, you’ll use paperwork to increase individual engagement on your site and get much more conversions.
As an example, you’ll direct consumers to a thank you internet web page after form submission and tick list your high-converting articles. This fashion, you’ll get further pageviews to your perfect conceivable content material subject matter and force further product sales.
On an on-line retailer, you’ll upsell products and offer incentives like discounts and loose shipping when a buyer submits a sort.
You should even redirect consumers to a internet web page where they can download a loose helpful useful resource after submitting the form. For example, you’ll create a lead magnet where people can fill out a sort in trade for a loose helpful useful resource like an eBook, podcast, media report, or PDF.
That mentioned, let’s see 4 different ways you’ll merely redirect consumers after form submission in WordPress. Simply click on at the links beneath to jump ahead to your most popular segment:
- Redirect Customers After Shape Submission in WordPress
- Redirect Customers In accordance with Their Responses After Shape Submission
- Redirect Customers After Remark Submission in WordPress
- Redirect Customers After Registration Shape Submission
Redirect Shoppers After Form Submission in WordPress
Probably the most perfect techniques of redirecting consumers once they’ve stuffed out a sort is by the use of the usage of WPForms. It’s the best possible touch shape plugin for WordPress, and over 5 million execs use it to create various kinds of paperwork for their web websites.
WPForms comes with a built-in setting to help you select must you’d like to show a thank you message, show a specific internet web page, or redirect consumers to another URL altogether. Plus, you get a drag-and-drop form builder to easily customize your form.
For this tutorial, we’ll use the WPForms Lite type because of it’s loose to use, and also you’ll redirect consumers after form submission in just a few clicks. There is also a WPForms Professional type which gives further pre-built form templates, customization possible choices, and strong addons.
First, you’ll wish to arrange and switch at the WPForms plugin. For additonal details, please see our data on set up a WordPress plugin.
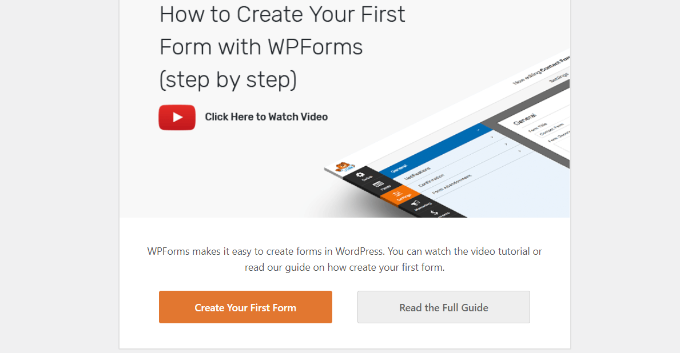
Upon activation, you’ll see the WPForms welcome internet web page to your WordPress dashboard. Cross ahead and click on at the ‘Create Your First Form’ button.
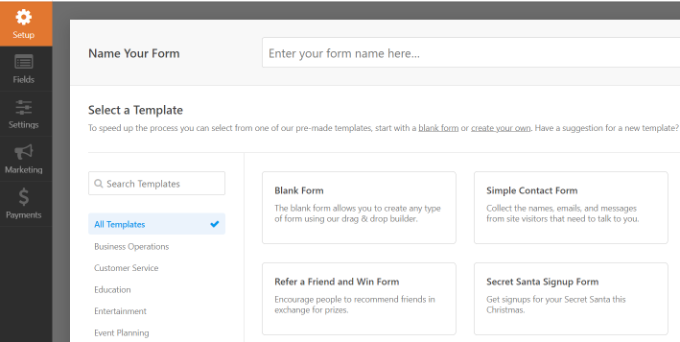
After that, WPForms will have you choose between a few, loose form templates. You’ll be ready to choose any template and in brief customize it consistent with your needs.
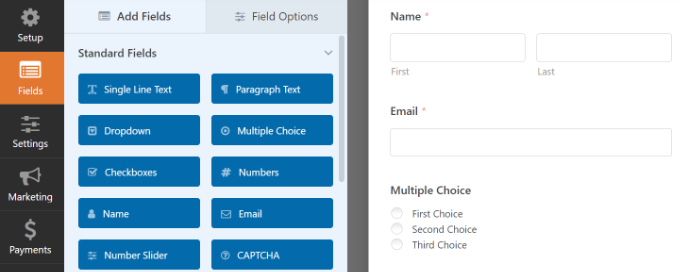
Let’s get began by the use of entering a name for our form at the height and then deciding at the ‘Simple Contact Form’ template.
After settling on a template, the WPForms form builder will liberate.
Proper right here, you’ll customize your form and add new fields from the menu on your left. Simply drag and drop the fields you’d like so to upload. You’ll be capable of then rearrange their order to your liking.

If you want to add fancy fields like a site URL, telephone quantity, deal with, report upload risk, and further, then we advise upgrading to the WPForms Professional license.
You’ll be capable of moreover further customize provide fields on the template. For additonal details, please see our data on create a touch shape in WordPress.
Set Up the Redirect URL after Form Submission
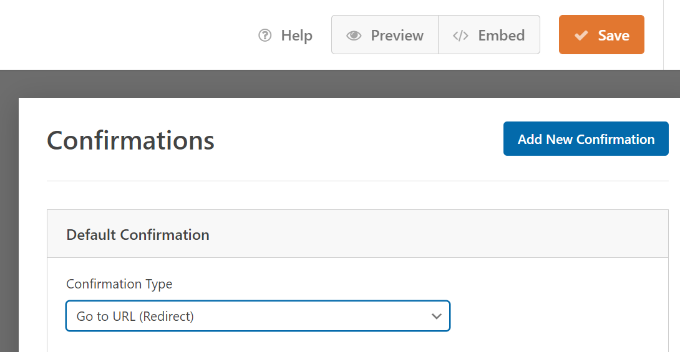
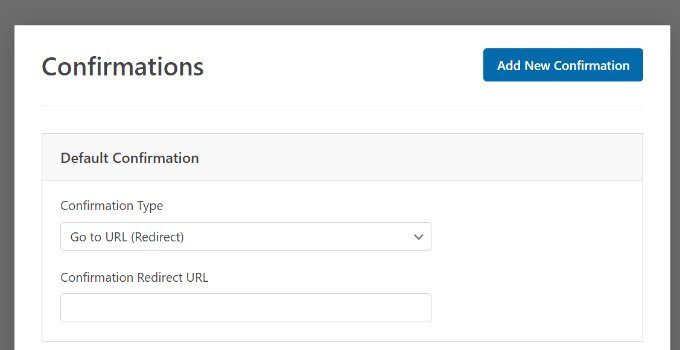
Whilst you’ve customized your contact form, simply transfer to Settings » Confirmations inside the form builder.
Underneath the Confirmation Type setting, click on at the dropdown menu and choose the ‘Cross to URL (Redirect)’ risk.
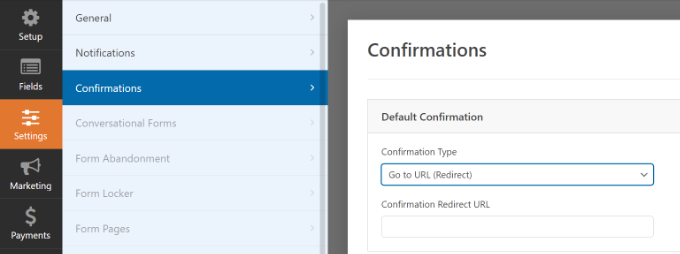
After that, simply enter a link inside the ‘Confirmation Redirect URL’ field and specify where you’d like to redirect consumers once they’ve submitted a sort.
Simple the best way to Embed Your Form in WordPress
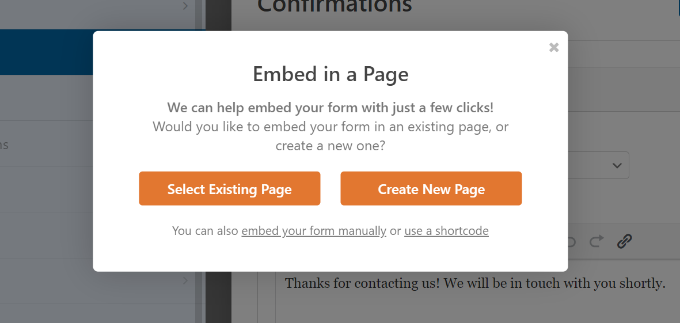
Whilst you’ve added a redirect URL, your next step is to embed the form on your site.
Cross ahead and click on at the ‘Save’ button at the height to store your form settings and then click on at the ‘Embed’ button beside it.
WPForms will now ask must you’d like to embed the form on an provide internet web page or on a brand spanking new internet web page.
We’ll select the ‘Create New Internet web page’ risk for this tutorial.
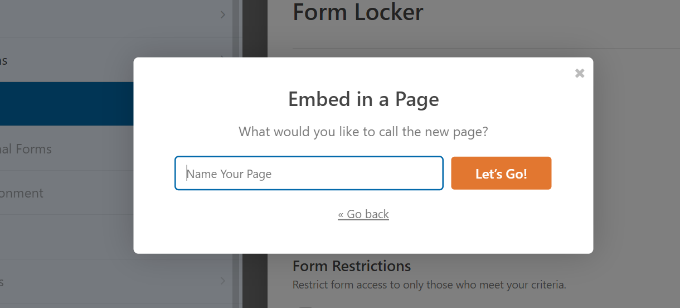
Next, you’ll wish to enter a name on your new internet web page.
Upon getting into the identify, simply click on at the ‘Let’s Cross’ button.
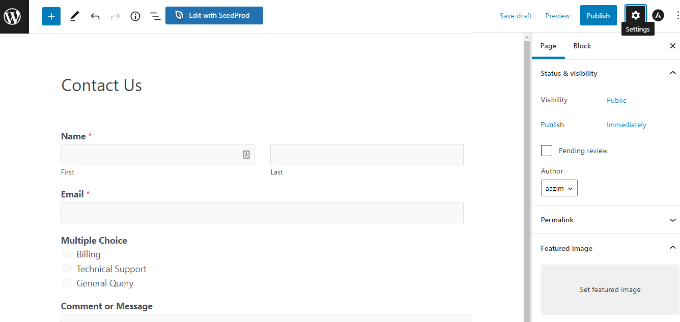
The plugin will now robotically add your form to the WordPress content material editor all the way through the WPForms block.
When you’re ready, simply click on at the ‘Publish’ button at the height.
Redirect Shoppers In line with Their Responses After Form Submission
WPForms moreover lets you prepare conditional good judgment, which robotically redirects consumers to different pages consistent with their responses when submitting a sort.
For example, let’s say it’s essential produce other teams that take care of questions sent by the use of consumers, like billing, technical make stronger, and commonplace inquiries. In line with the choice an individual selects inside the form, you’ll redirect them to a specific URL that relates to their needs.
Bear in mind that you simply’ll need a WPForms Professional license to use the conditional just right judgment serve as. You moreover get further form fields so to upload to the template, and also you’ll use addons like Person Adventure to appear how people engage in conjunction with your paperwork.
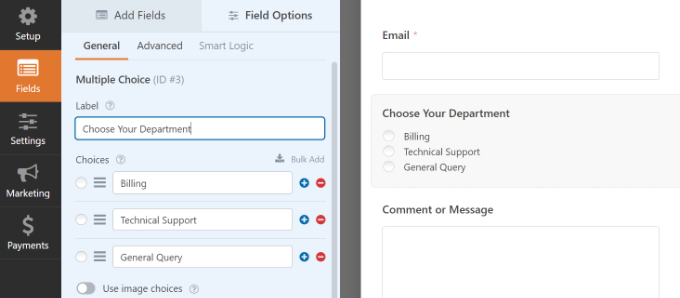
First, you’ll add a a few variety, checkbox, or another field that allows consumers to make a choice different possible choices. We’ll add a ‘A few Variety’ field in our instructional.
Next, you’ll edit the selections inside the ‘A few Variety’ form field by the use of simply clicking on the fields inside the template to the correct.
As an example, you’ll see inside the image beneath that we renamed the selections to different departments that would possibly take care of specific questions.
After that, you’ll head to Settings » Confirmations inside the form builder.
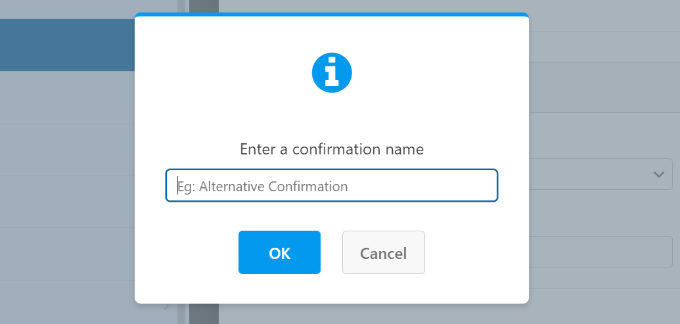
Now click on at the ‘Add New Confirmation’ button to organize conditional just right judgment.
Next, you’ll must enter a name on your new redirect. Be specific so that you’ll be capable of follow it merely.
Simply click on at the ‘OK’ button whilst you’re accomplished.
For this tutorial, we want to direct consumers to specific pages consistent with the dep. they choose inside the form.
First, you’ll choose ‘Cross to URL (Redirect)’ from the Confirmation Type dropdown menu and then enter a link to the respective internet web page inside the ‘Confirmation Redirect URL’ field.
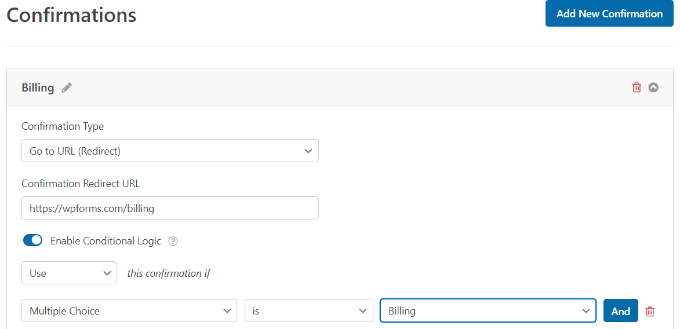
Next, it is very important click on at the ‘Permit Conditional Not unusual sense’ toggle. Whilst you do that, further possible choices will appear.
Cross ahead and choose ‘Use’ this confirmation if ‘A few Variety’ is ‘Billing’ inside the conditional just right judgment settings. This may occasionally most probably redirect consumers to a URL that holds further information about billing when they publish a sort.
That’s all! Simply save the form and the WPForms block you added earlier will robotically redirect customers to different the URL you set consistent with their responses.
Next, you’ll merely repeat this step for various a few variety possible choices inside the form and create new confirmation notifications with conditional just right judgment.
Redirect Shoppers After Statement Submission in WordPress
Have you learnt that you just’ll redirect consumers to different pages if in case you have first-time commenters on your WordPress internet web page?
For example, you’ll show a simple thank you internet web page with an piece of email signup form and get consumers to subscribe on your publication after commenting. In a similar fashion, you’ll redirect people to a internet web page in conjunction with your social media links and build up lovers.
Redirecting consumers after observation submission can also lend a hand spice up pageviews and conversions. You’ll be capable of redirect commenters to your height blog posts, show a singular offer or coupon internet web page, or display a lead magnet internet web page to get further conversions.
Probably the most perfect techniques of setting observation redirects is by the use of the usage of the Yoast Remark Hacks plugin. For more information, see our step-by-step data on set up a WordPress plugin.
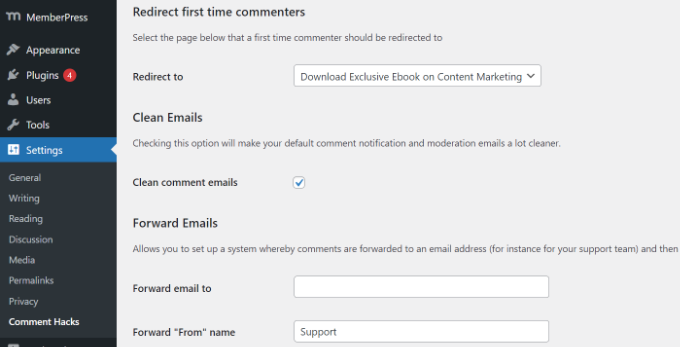
It lets you select which internet web page to turn after a first-time individual leaves a observation.
All you want to do is navigate to Settings » Comments Hacks to your WordPress admin dashboard. Then merely choose the proper internet web page you want to send them with the ‘Redirect to’ dropdown.
Make sure to save the internet web page to store your settings whilst you’re finished.
For additonal details, please see our data on redirect your person’s consideration with a remark redirect.
Redirect Shoppers After Registration Form Submission
For many who permit person registration on your site, then redirecting people can turn out to be useful.
As an example, must you run club website online or promote on-line classes, you’ll redirect consumers to their account area or dashboard upon submitting a registration form. This fashion, consumers can get right to use their download data, license keys, path materials, curriculums, and further.
With MemberPress, you’ll merely restrict get right to use to different sections of your site. It’s the best possible club plugin for WordPress and allows you to prepare a few membership levels.
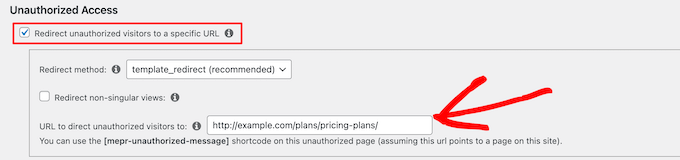
Using MemberPress, you’ll moreover create a pricing internet web page the usage of one of the crucial plugin’s built-in templates. If an unregistered individual tries to get right to use restricted content material subject matter, you then’ll redirect them to a pricing internet web page.
Whilst you’ve created a custom designed pricing internet web page, simply enter the URL inside the ‘Unauthorized Get right to use’ segment of MemeberPress to redirect unregisted consumers to your pricing internet web page or registration internet web page.
If you want to have a lot more possible choices, we advise the usage of a internet web page builder like SeedProd. SeedProd is a drag-and-drop internet web page builder that makes it super easy to customize the construction and design of any internet web page.
You’ll be capable of add portions like a ‘Pricing Table’ to the internet web page you redirect consumers to. For additonal details, please see our data on upload a good looking pricing desk in WordPress.

The default WordPress registration internet web page is plain and best incorporates the WordPress emblem and branding.
You’ll be capable of make it further attractive by the use of the usage of a SeedProd template and then together with a ‘Pricing Table’ block to create a customized login and registration internet web page.

If you wish to have lend a hand, then please see our data on create a customized person registration shape in WordPress.
We hope this text helped you discover ways to redirect consumers after form submission in WordPress. You may additionally want to see our data on how to select the most efficient design tool and a comparison between WordPress.com vs WordPress.org.
For many who preferred this text, then please subscribe to our YouTube Channel for WordPress video tutorials. You’ll be capable of moreover find us on Twitter and Fb.
The post Easy methods to Redirect Customers After Shape Submission in WordPress first seemed on WPBeginner.
Contents
- 0.0.1 Why Redirect Shoppers After Form Submission?
- 0.0.2 Redirect Shoppers After Form Submission in WordPress
- 0.0.3 Redirect Shoppers In line with Their Responses After Form Submission
- 0.0.4 Redirect Shoppers After Statement Submission in WordPress
- 0.0.5 Redirect Shoppers After Registration Form Submission
- 0.1 Related posts:
- 1 WordPress Web hosting / Unlocking The Energy Of WordPress: Web hosting And…
- 2 Get a Loose Monetary Making plans Format Pack for Divi
- 3 How I Set Up Visitor Checkout in WooCommerce in Simply 5 Mins

0 Comments