

Once, I disregarded sending a WooCommerce order notification and only discovered because of my customer reached out, disillusioned.
Relying on electronic mail by myself continuously doesn’t decrease it. Messages can get out of place in unsolicited mail, behind schedule, or pushed aside if shoppers don’t check out their inboxes.
Switching to WhatsApp made a giant difference for me. Notifications arrive straight away, shoppers if truth be told see them, and I will be able to get real-time updates on each and every sale.
After testing a variety of alternatives, I’ve narrowed it all the way down to a couple of loyal methods someone can use. In this knowledge, I’ll walk you by means of one of the simplest ways to connect WhatsApp with WooCommerce, in order that you and your shoppers not at all overlook an exchange another time.
Why Set Up WooCommerce Order Notifications in WhatsApp?
Relying only on electronic mail for WooCommerce order updates would possibly motive issues. Emails can in any case finally end up in unsolicited mail, show up hours late, or just get out of place in a busy inbox.
WhatsApp solves this by way of sending fast updates straight away in your customer’s phone, so that they not at all overlook crucial exchange.
Proper right here’s a better check out how connecting WooCommerce and WhatsApp can be helpful:
- Other people check out WhatsApp additional. Many patrons are on WhatsApp all day, while electronic mail gets pushed aside.
- Messages get be told in brief. WhatsApp notifications are opened just about straight away.
- Fewer customer questions. If shoppers get updates straight away, they don’t will have to contact you for answers.
- Exact-time updates assemble believe. Consumers always know when their order is confirmed, shipped, or refunded.
With WhatsApp, your messages if truth be told achieve shoppers, which means that that a lot much less confusion and a smoother purchasing groceries experience.
Which Way Should I Choose?
In this knowledge, I’ll quilt 3 ways to send WooCommerce order notifications in WhatsApp. Proper right here’s how I love to suggest choosing between them:
- Way 1: PushEngage. Best for an all-in-one promoting platform. Send automated WhatsApp order updates to shoppers and your team of workers, alongside push notifications, cart recovery messages, and promotions.
- Way 2: Uncanny Automator. Prepare custom designed “recipes” to motive WhatsApp messages from WooCommerce events, with flexible automation alternatives.
- Way 3: Wawp. A simple loose selection that connects in your non-public or business phone (similar to WhatsApp Web). It’s absolute best for testing or small stores, alternatively your phone will have to keep on and hooked as much as the internet for it to art work.
If you choose each manner 1 or 2, you’ll moreover need to prepare a WhatsApp Business account and message templates inside WhatsApp.
Now, I’ll walk by means of each manner step by step:
- Earlier than You Get started: Set Up Your WhatsApp Industry Account (For Strategies 1 & 2)
- Means 1: Ship WooCommerce Order Notifications with PushEngage (Multi-Channel Messaging)
- Means 2: Ship WooCommerce Order Notifications with Uncanny Automator (Automation-Centered)
- Means 3: Ship WooCommerce Order Notifications with a Loose Plugin
- FAQs About Sending WooCommerce Order Notifications in WhatsApp
- Additional Studying: Extra WooCommerce Tutorials
Let’s get started.
Previous than You Get began: Set Up Your WhatsApp Business Account (For Methods 1 & 2)
To connect your WooCommerce store with WhatsApp, you’ll need to prepare a WhatsApp Business Suite account, generate a long lasting token, and create WooCommerce message templates.
Proper right here’s a to hand information a coarse checklist of what you’ll need previous than you get began:
- A Meta Business Suite account (or be ready to create one).
- Admin get right to use to that account.
- A phone amount that is now not nowadays registered with a personal WhatsApp account. You’ll need this amount totally for what you are promoting notifications.
Throughout the next sections, I’ll knowledge you by means of each of the ones steps.
Step 1: Create a WhatsApp Business Account
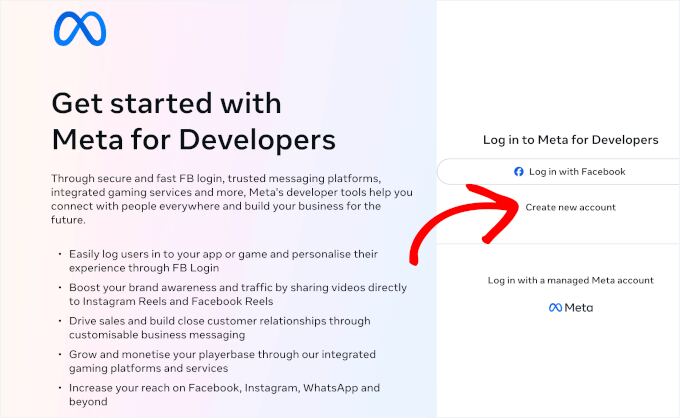
Must you don’t already have a Meta Business Suite account, you’ll be capable to create one on the Meta web site.
Merely click on on ‘Create a New Account’ to sign up and full the quick setup steps. Do follow that you simply’ll need to check what you are promoting wisdom, which can take 1-2 business days.
💡 Disclaimer: The right steps would most likely vary quite since Meta updates their interface each and every so continuously, so don’t worry if problems look just a little bit different for your show.
After creating your app, you’ll land on the app dashboard.
Transfer ahead and click on at the ‘Create App’ button.
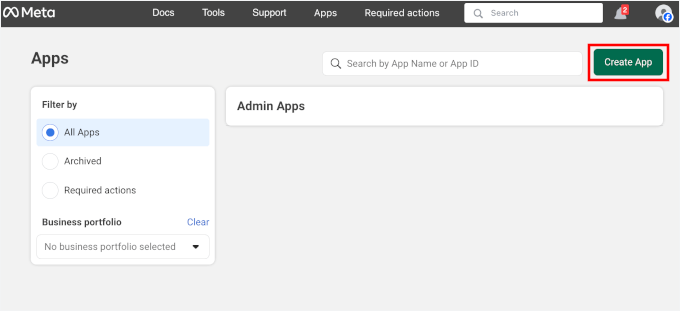
This will get began the app setup wizard.
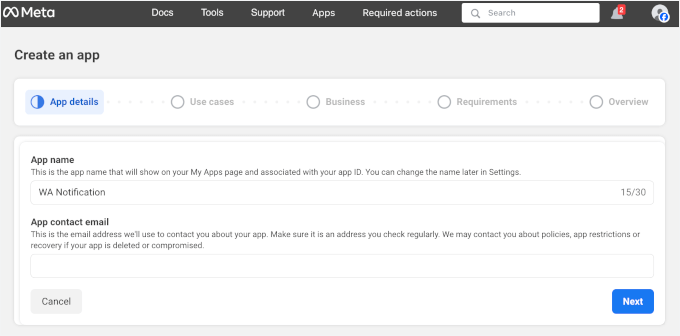
Proper right here, simply fill throughout the ‘App establish’ and ‘App contact electronic mail’ fields. This is for your reference only, alternatively it’s helpful to have a clear, descriptive establish.
After that, click on at the ‘Next’ button to continue the process.
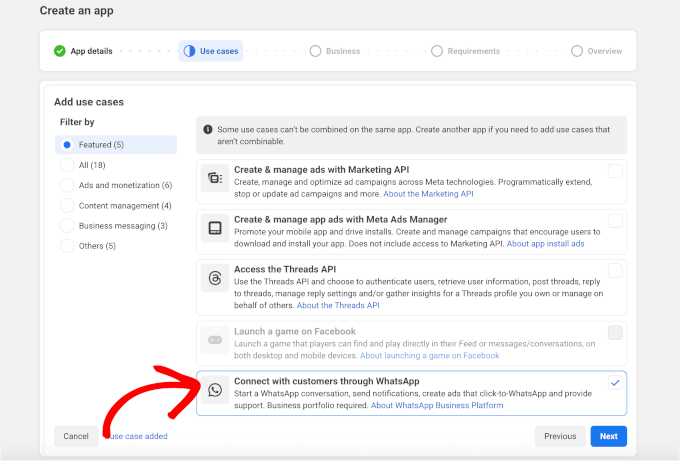
On the next show, you’ll select a use case.
As we want to send a WooCommerce order notification to WhatsApp, let’s choose ‘Connect to shoppers by means of WhatsApp’ and click on on ‘Next.
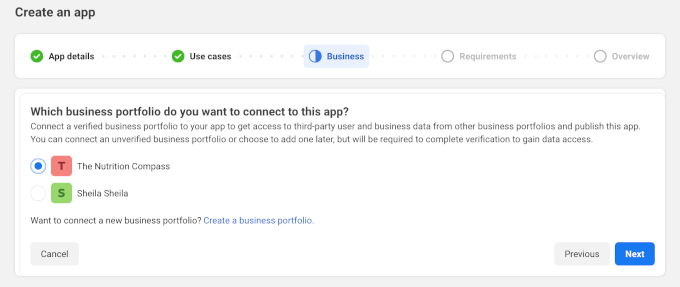
After that, you’ll need to link what you are promoting portfolio. Merely click on on on the available selection and click on at the ‘Next’ button to move on.
Must you don’t have one, you’ll be capable to merely click on on on the ‘Create a business portfolio’ link.
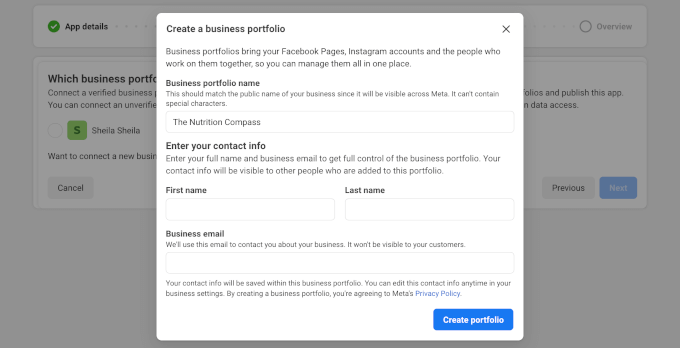
This will open a popup where you’ll enter your first establish, final establish, and trade e-mail deal with.
Once achieved, click on on ‘Create Portfolio.’
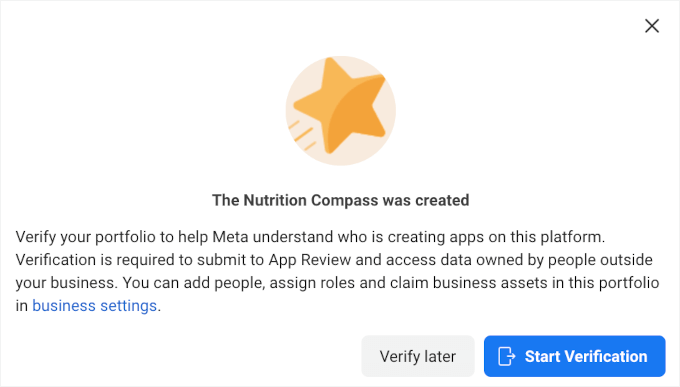
Meta will then urged you to ensure what you are promoting portfolio.
Simply click on on ‘Get began Verification’ and follow the on-screen instructions.
The next move is to test must haves.
For WhatsApp-related apps, there most often won’t be any must haves identified. So that you’ll be capable to transfer ahead and click on at the ‘Next’ button.
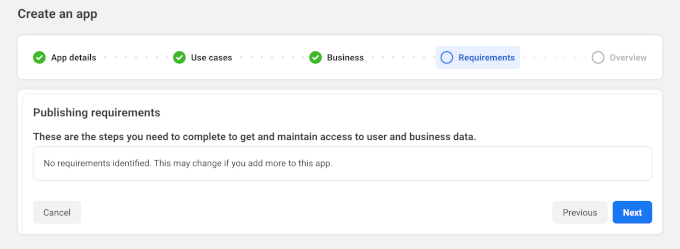
And for the final step, you’ll see a summary of your new WhatsApp Notification app.
You’ll be capable to overview the whole lot and then click on on ‘Transfer to Dashboard.’

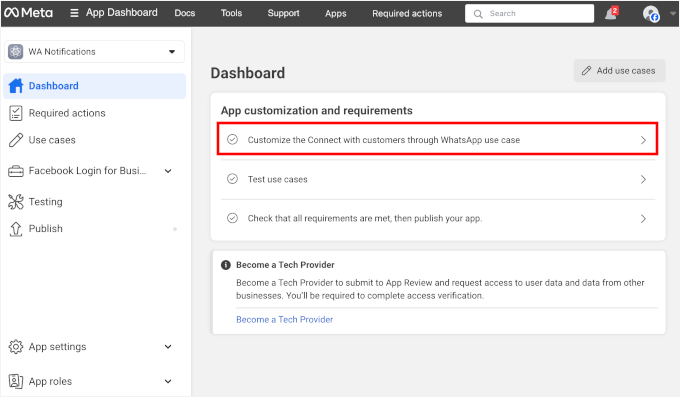
From the dashboard, you’ll see a urged to organize the WhatsApp Business Platform.
Proper right here, you’ll want to click on at the ‘Customize the Connect to shoppers by means of WhatsApp use case’ button.
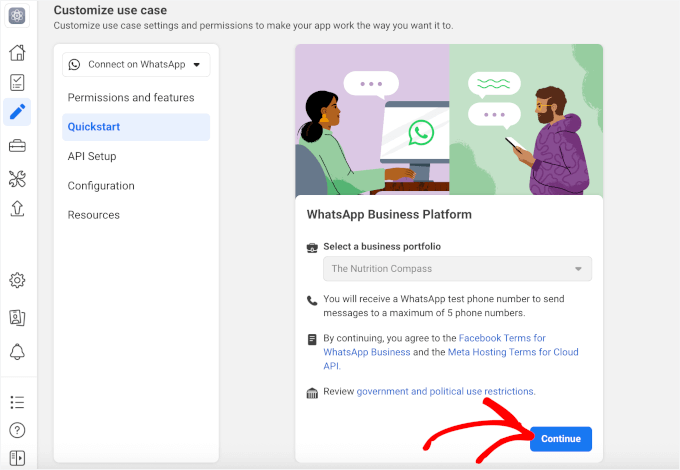
On the next show, you’ll see a urged to begin out WhatsApp Business Platform configuration.
Transfer ahead and click on at the ‘Continue’ button.
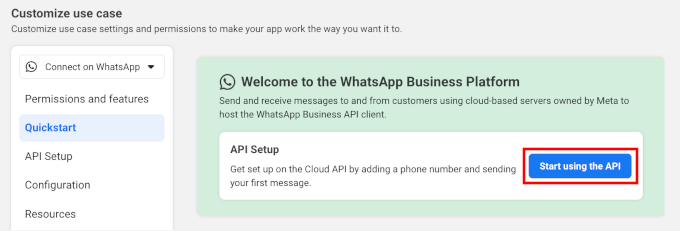
After that, you’ll see a WhatsApp Business Platform welcome message.
From correct right here, you’ll be capable to click on at the ‘Get began the use of the API’ button to begin out.
Then, throughout the ‘API Setup’ panel, you’ll need to test for your telephone quantity. Otherwise, Meta will use a test amount to send your messages.
Click on directly to amplify the dropdown and then hit the ‘+ Add phone amount’ button.
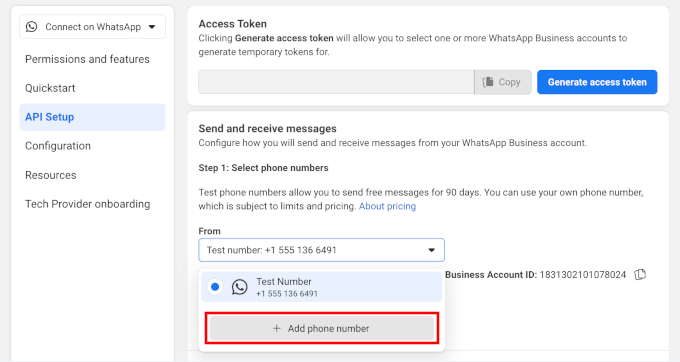
This will open a setup wizard for your WhatsApp configuration.
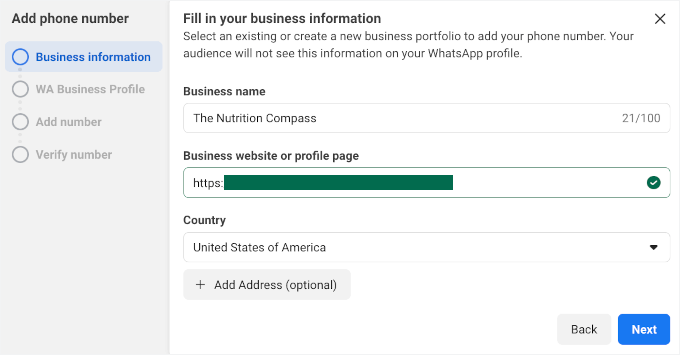
First, enter what you are promoting establish, enter your trade web site deal with, and select your country. Click on on ‘Next’ to continue.
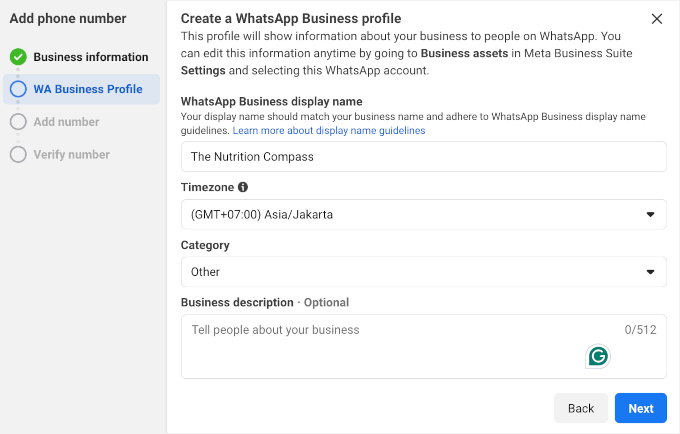
After that, let’s prepare your WhatsApp Business Platform account, which comprises details like display establish, timezone, elegance, and business description.
Click on on ‘Next’ to proceed.
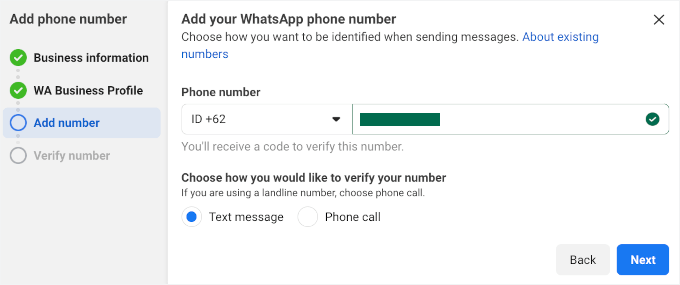
After that, transfer ahead and add your full of life phone amount for WhatsApp.
Then, you’ll be capable to tick the radio button to make sure it by means of SMS or a phone title and click on on ‘Next’ to proceed.
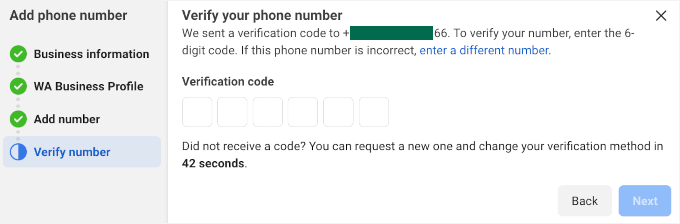
In a few minutes, you will have to download a verification code by the use of SMS or phone title (depending for your variety throughout the previous step).
After you have it, simply enter the 6-digit code throughout the field and click on on ‘Next.’
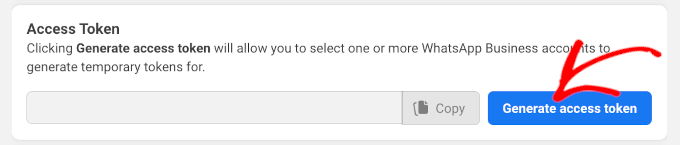
Upon verification, you’ll see a ‘Generate get right to use token’ button.
Transfer ahead and click on on on it.
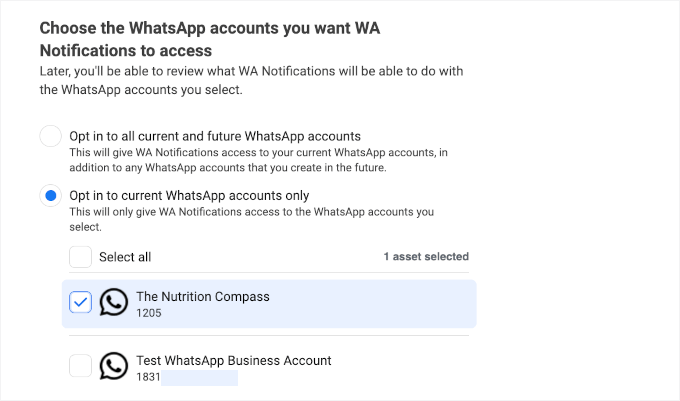
Throughout the popup that appears, you’ll select the WhatsApp account you need to provide permissions to send notifications.
You’ll see the phone amount you merely registered and the test amount that Meta provides. Let’s click on on for your registered phone amount.
Meta will then ask you to grant your permission to send messages for your behalf.
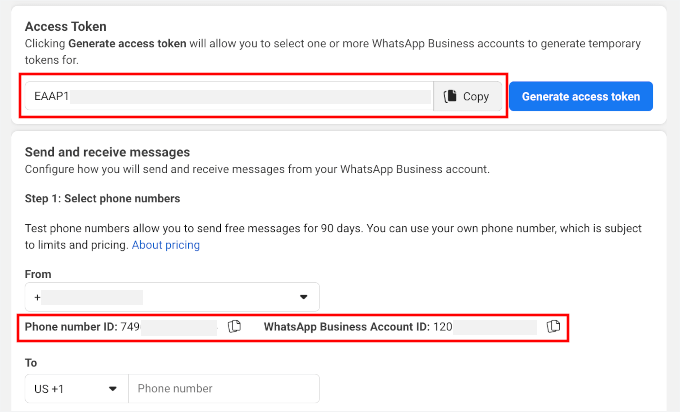
Meta will then take you once more to the ‘API Setup’ panel, where you’ll be capable to see your get right to use token. Simply click on at the replica icon and store it somewhere safe, like a notepad.
Have in mind, this token only lasts for 24 hours.
Along side that, you’ll need to keep your ‘Phone amount ID’ and ‘WhatsApp Business Account ID’ somewhere safe.
With that achieved, you’ll get your WhatsApp Business Platform account.
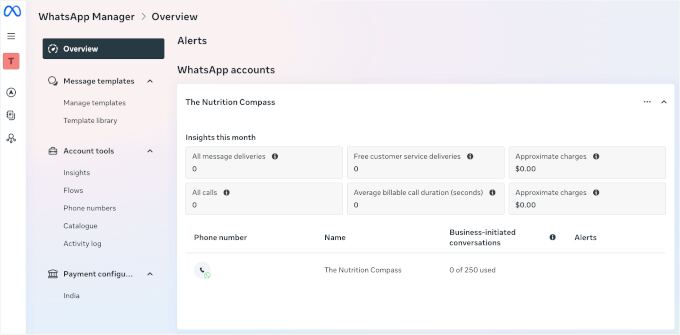
You’ll be capable to get right to use it by means of Meta Industry Suite.
In this account, you’ll be capable to create, prepare, and follow all your automated WhatsApp messages. Proper right here’s what the WhatsApp Supervisor interface turns out like:
Step 2: Get a Permanent Get right of entry to Token
So far, we’ve set problems up so that you’ll be capable to use WhatsApp for your WordPress site, alternatively the get right to use token you made earlier only works for 24 hours.
To ensure your automations can run 24/7, you’ll need a permanent get right to use token.
How you can get one is by way of creating a ‘Gadget shopper’ in your Meta Industry Settings. Call to mind a ‘Gadget shopper’ as a faithful robot account that gives your apparatus (like PushEngage or Uncanny Automator) lasting permission to send messages for your behalf.
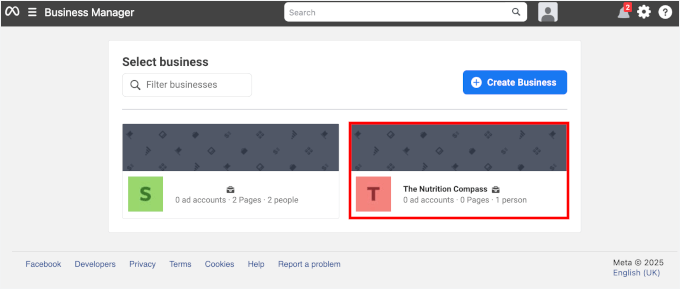
From your Business Settings, transfer ahead and choose what you are promoting.
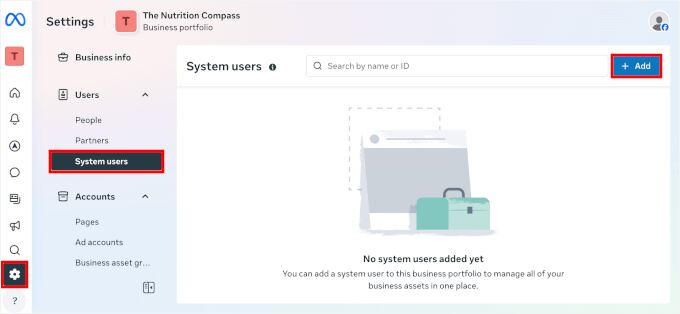
On the next show, let’s check out the left menu and transfer to ‘Settings.’
From correct right here, you’ll be capable to click on on ‘Gadget shoppers’ and hit the ‘Add’ button.
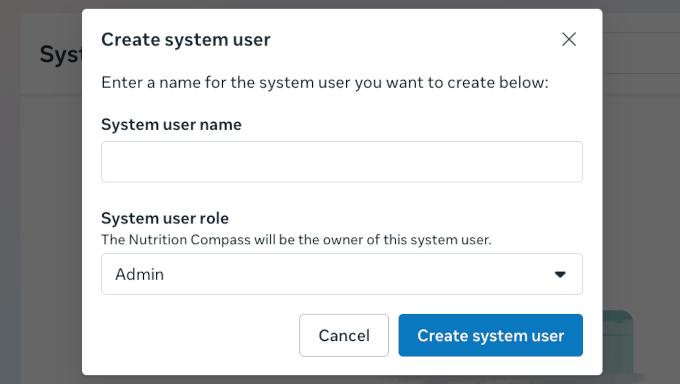
Throughout the popup that appears, transfer ahead and offers your instrument shopper a name.
Then, choose ‘Admin’ for the reason that place and click on on ‘Create instrument shopper.’
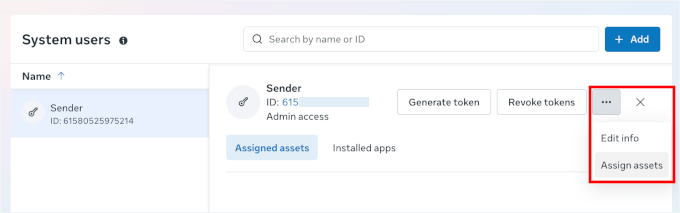
Once that’s achieved, you’ll be once more on the ‘Gadget shoppers’ internet web page.
Proper right here, click on on on the three-dot button at the right kind and choose ‘Assign Property.’
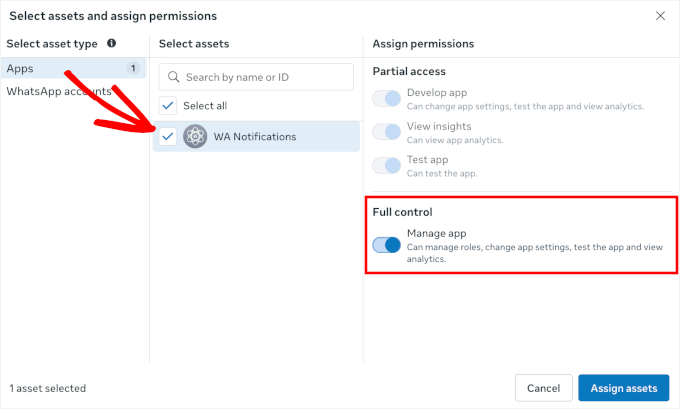
Throughout the popup that appears, you’ll need to assign permissions.
To check out this, you’ll be capable to click on on ‘Apps,’ choose your asset, and switch the ‘Prepare app’ on throughout the ‘Entire keep an eye on’ phase.
With that achieved, transfer ahead and click on at the ‘Assign belongings’ button.
Meta will then ask you to test and accept their non-discrimination protection.
Basically, this tells you that you simply agree not to use Facebook’s selling apparatus for the remainder that discriminates in opposition to folks in response to things like race, religion, gender, age, or other secure characteristics.
It’s merely their way to make sure everybody appears to be treated relatively and that commercials follow the law.
Once granted, you’ll see the ‘Asset assigned’ message. Simply click on at the ‘Finished’ button or ‘X’ to close this popup.
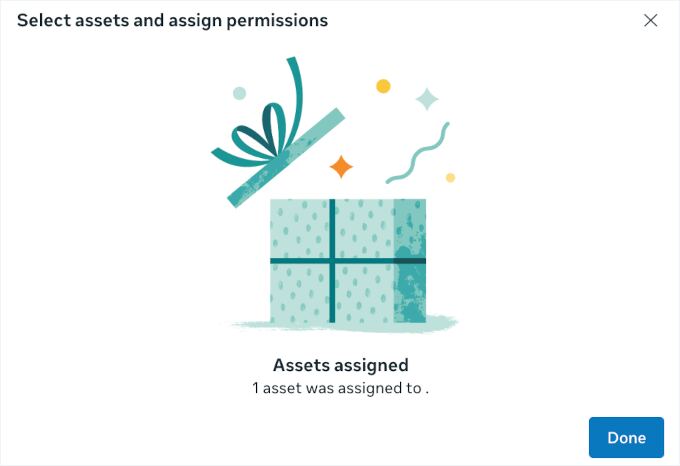
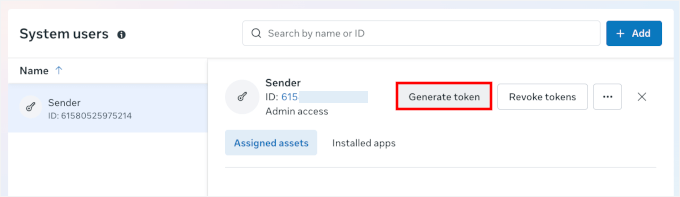
This will take you once more to the ‘Gadget shoppers’ internet web page.
And likewise you will have to now see a ‘Generate Token’ button in your instrument shopper. Let’s click on on on that.
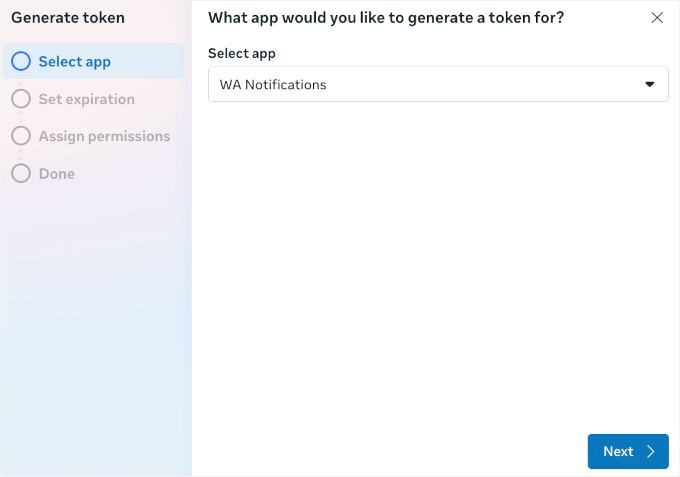
Throughout the window that pops up, you’ll see a 4-step setup wizard for your permanent token.
From correct right here, you’ll be capable to choose your app from the dropdown menu and then click on at the ‘Next’ button to continue.
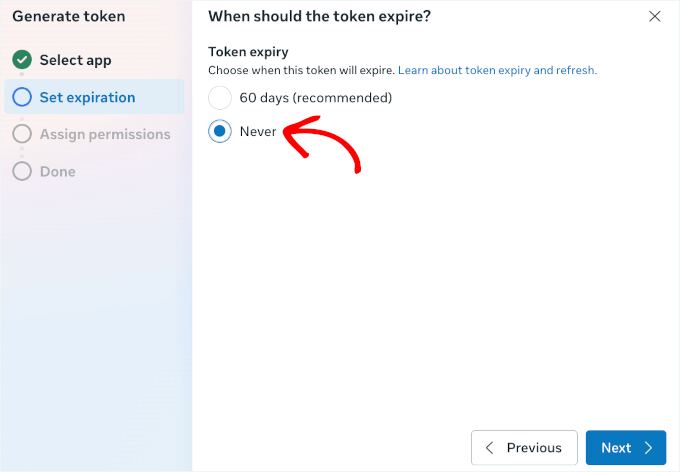
You’ll be capable to then set when the token will have to expire.
Make certain that to choose ‘Certainly not’ and click on on on ‘Next.’
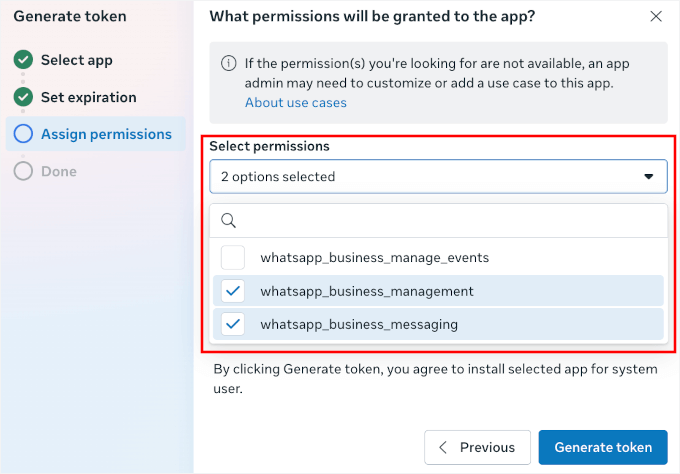
The next move is to assign permissions.
You’ll see an inventory of alternatives, and likewise you’ll want to check out the boxes for:
- whatsapp_business_management
- whatsapp_business_messaging
This lets your instrument shopper prepare your WhatsApp business account and send messages for your behalf. Basically, you’re giving the very important get right to use so the whole lot works simply.
On every occasion you’ve checked those boxes, merely click on at the ‘Next’ button to continue.
Throughout the final step, you’ll see your permanent token.
Merely click on at the ‘Reproduction’ button and ‘Finished’ to finish this up.
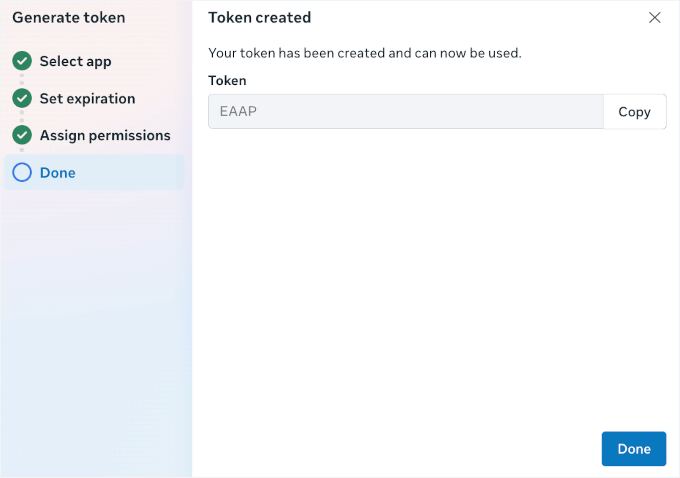
With that achieved, I love to suggest storing this somewhere safe, like a password supervisor.
Step 3: Customize Message Templates in WhatsApp Business Platform
Previous than you progress on, you’ll need to create a few automated order messages for your app.
By means of default, your WhatsApp Business Platform account comes with a hello_world template. It’s incredible for testing, alternatively it’s now not very useful for authentic order notifications.
That’s why we’ll add new templates tailored in your store. This manner, your WhatsApp notifications are additional connected, branded, and environment friendly.
💡 Very important: Each and every PushEngage and Uncanny Automator pull message templates without delay from your WhatsApp Business Platform account. Must you skip this step, you’ll only be capable to use the fundamental hello_world template for automation.
Inside of your WhatsApp Manager, head over to the ‘Message templates’ phase.
Proper right here, you’ll to seek out the ‘Template library,’ which comprises pre-made templates that you simply’ll be capable to customize and activate straight away.
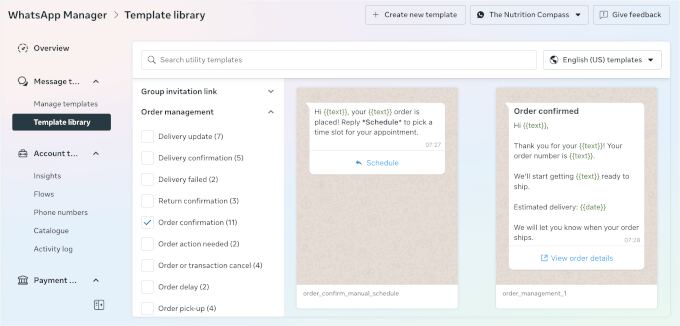
For this tutorial, even supposing, let’s create one from scratch. This provides you with whole keep an eye on to check your logo voice and prepare the appropriate dynamic tags.
Merely transfer to the ‘Message templates’ phase and click on at the ‘Create Template’ button to open the text editor.

On the next show, you’ll want to choose a template type:
- Promoting – for promotions, product sales, or provides.
- Utility – for order updates, shipping information, or other customer updates.
- Authentication – for login codes or password resets.
For order notifications, let’s use the ‘Utility’ template since the ones messages provide shoppers with order wisdom, now not promotions or login details.
Then, there are the ‘Default’ and ‘Calling permission request’ alternatives:
- Default – Permits you to send messages about an present order or customer account. That’s the selection most WooCommerce stores will use.
- Calling permission request – Asks shoppers should you’ll be capable to title them on WhatsApp, which most often isn’t sought after for order notifications.
For this setup, let’s click on on ‘Default’ since we only need to send order updates. Click on on ‘Next’ to continue.

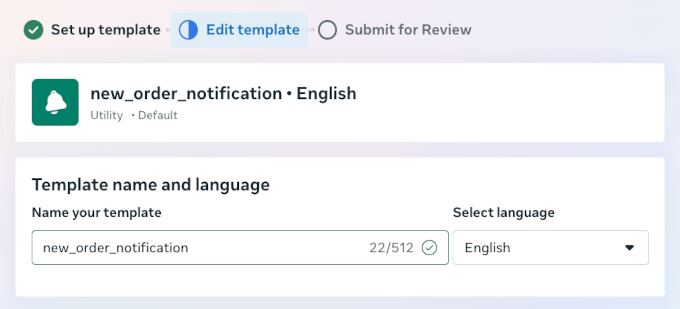
Next, throughout the ‘Edit template’ phase, you’ll be capable to establish your template and choose your language.
For the template establish, Meta will robotically use lowercase and convert spaces to underlines.
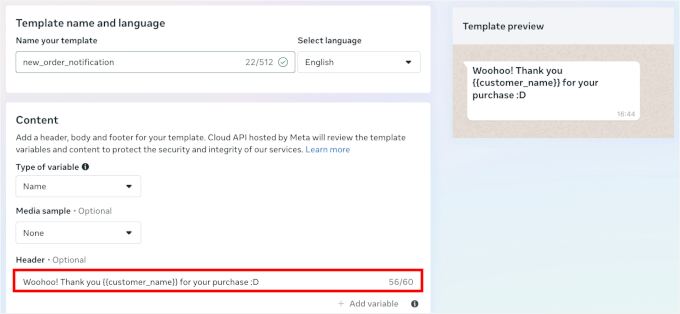
After that, you’ll be capable to scroll to the ‘Content material subject matter’ phase.
That’s the position you fine-tune what your message will look like:
- Choose a variable type – Use each amount variables like {{1}}, {{2}} or establish variables like {{customer_name}}, {{order_number}}. Each and every pull in authentic customer wisdom, alternatively establish variables are more straightforward to art work with as they show exactly what’s going to appear in your message.
- Prepare a media trend (not obligatory) – Must you propose so that you can upload an image, video, or document in your message, you’ll be capable to upload a trend correct right here. Then again in my opinion, this is upper for promotional messages for the reason that media will have to have compatibility together with your text.
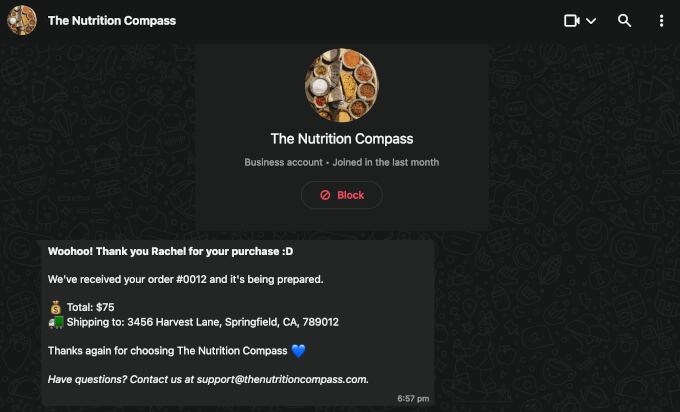
- Define the message header (not obligatory) – Add a short lived line of text or an image that appears above your main message. This works neatly for attention-grabbing details, like “Order Exchange” or “Woohoo! Thank you {{customer_name}} for your achieve :D”
Must you add a header, you’ll be capable to preview your template on the right-hand panel.
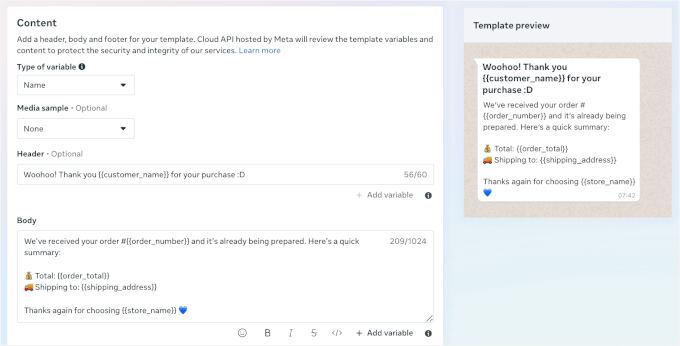
From correct right here, you’ll be capable to edit the message content material subject matter to check the best way you most often keep up a correspondence with shoppers.
You’ll be capable to add dynamic variables like {{customer_name}}, {{order_number}}, and {{order_total}} to make each message non-public.
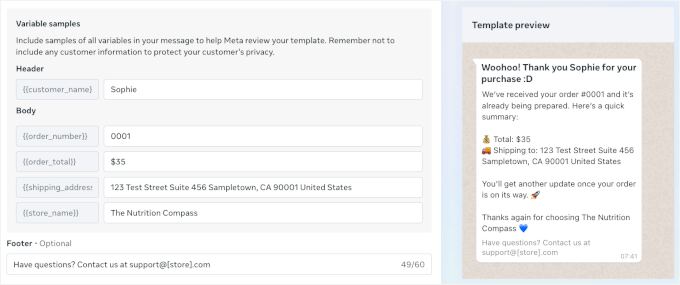
For example, correct right here’s my message content material subject matter:
“We’ve received your order #{{order_number}} and it’s already being waiting. Proper right here’s a to hand information a coarse summary:
💰 Basic: {{order_total}}
🚚 Supply to: {{shipping_address}}
Thanks another time for choosing {{store_name}} 💙”
As with the header, you’ll be capable to in an instant see what it kind of feels like beneath ‘Template preview’ at the right kind.
Next, let’s scroll correct all the way down to ‘Variable samples.’
Proper right here, you’ll be capable to use trend wisdom to preview your dynamic variables.
You’ll be capable to moreover add a message footer, like “Have questions? Contact us at strengthen@[store].com.”
As quickly because the entirety turns out superb, click on at the ‘Publish for overview’ button to save lots of a whole lot of and switch in this template.
The process is similar for all order notifications, so that you’ll be capable to prepare as many as you need. For example:
- Admin notification template – notifies your team of workers when a brand spanking new order is to be had in.
- Delivery notification template – updates shoppers when their order is on the way.
- Order complete template – confirms provide and thanks the consumer. You’ll be capable to moreover include return and refund wisdom correct right here.
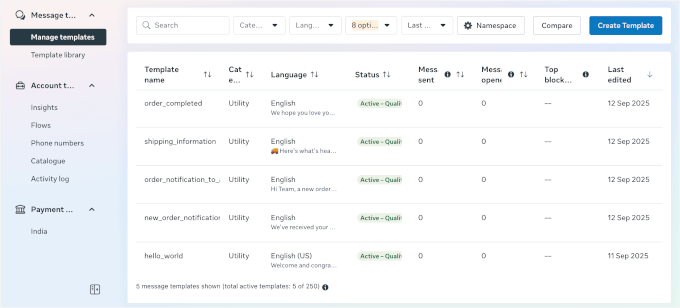
After creating all of the message templates you need, you’ll see them in your Meta dashboard’s Message Templates phase.
Proper right here’s what it would look like:
Now, you’ll be capable to switch immediately to the use of each Means 1 or Means 2 underneath.
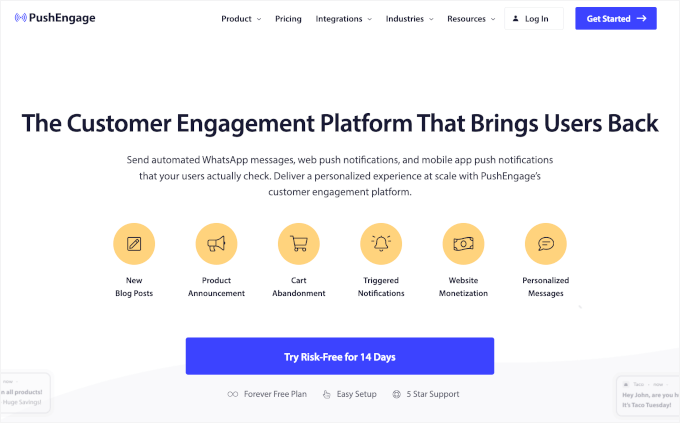
Way 1: Send WooCommerce Order Notifications with PushEngage (Multi-Channel Messaging)
PushEngage is one of the best possible multi-channel engagement platforms for WordPress. It signifies that you’ll be able to combine WhatsApp order notifications with internet push notification campaigns, cart recovery messages, and custom designed promotions.
It’s an excellent variety if you want to prepare all customer messaging in one place. While the setup involves connecting by means of Meta’s Business API, you’ll get professional-grade automation and reliability in return.
Must you haven’t already achieved so, please follow my instructions on the best way to arrange a WhatsApp Industry account.
Step 1: Arrange and Flip at the PushEngage Plugin
You need to enroll in a PushEngage account to link your WhatsApp Business Platform account in your WordPress internet web site.
📝 Follow: PushEngage provides a unfastened model, which is excellent if you want to test problems out or only need basic push notifications. Then again to unlock WhatsApp order notifications and automation choices, you’ll need the PushEngage Marketing strategy (or above).
On every occasion you’ve finished signing up, you’ll be capable to arrange and activate PushEngage for your WordPress site.
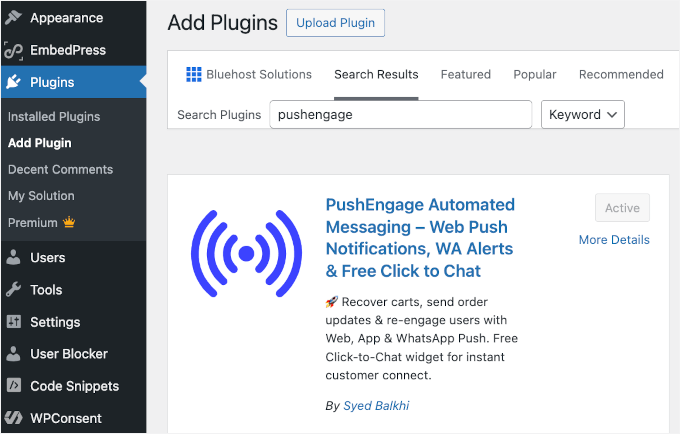
Merely head in your WordPress dashboard and transfer to Plugins » Add New.
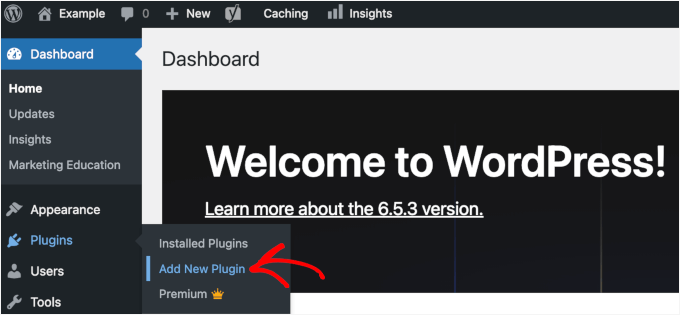
On the next show, you’ll be capable to search for “PushEngage” and click on on ‘Arrange Now,’ then ‘Activate.’
Once activated, you’ll see a brand spanking new PushEngage menu in your WordPress dashboard. For details, see our knowledge on the best way to set up a WordPress plugin.
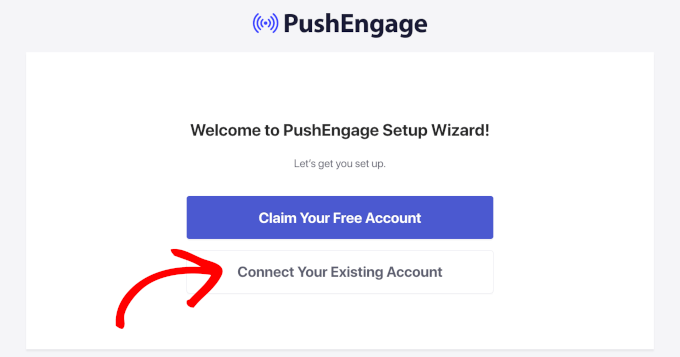
From correct right here, WordPress will urged you to claim a loose account or connect in your PushEngage account.
Transfer ahead and click on at the ‘Connect Your Present Account’ button to unlock the setup wizard. You’ll be capable to follow the instructions from correct right here.
Step 2: Connect WhatsApp Business Platform Account to PushEngage
In this step, you’ll link your WhatsApp Business Platform account to PushEngage. That’s the position those API credentials you generated previous than will become helpful.
From your WordPress dashboard, navigate to PushEngage » WhatsApp and then switch to the ‘Settings’ tab.
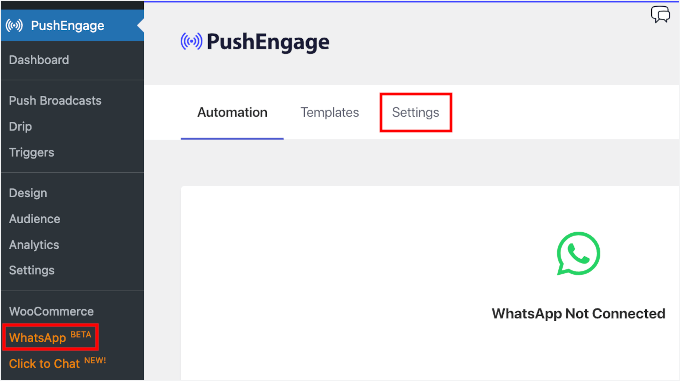
On the next show, you’ll see two tabs.
Let’s transfer to the ‘WhatsApp Cloud API’ tab.
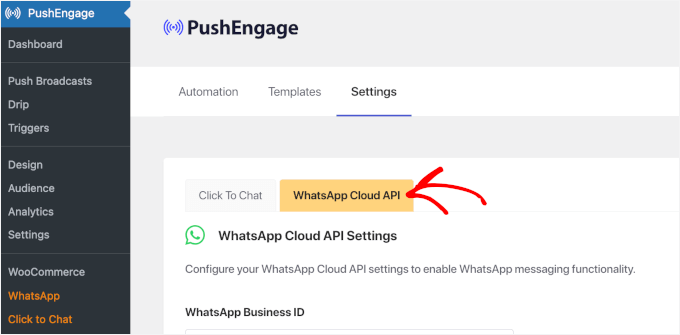
From correct right here, you will have to see the WhatsApp Cloud API settings.
Simply enter your permanent token, phone amount ID, and a few different required wisdom from your Meta Business setup.
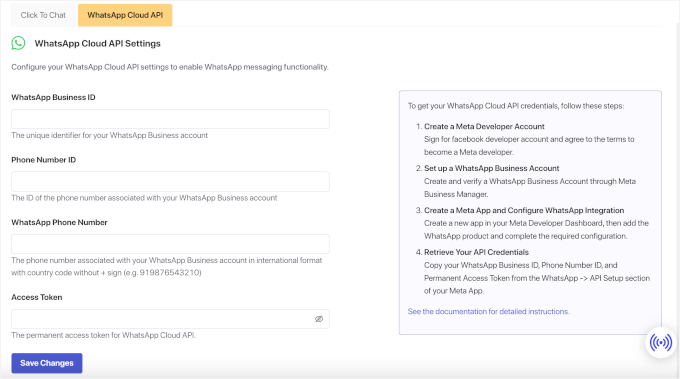
Once that’s achieved, click on at the ‘Save Changes’ button to store your settings.
Step 3: Create WhatsApp Notification Automation in PushEngage
The next move is to assign your custom designed message templates to the PushEngage automation.
Navigate to PushEngage » WhatsApp and click on on on the ‘Automation’ tab.
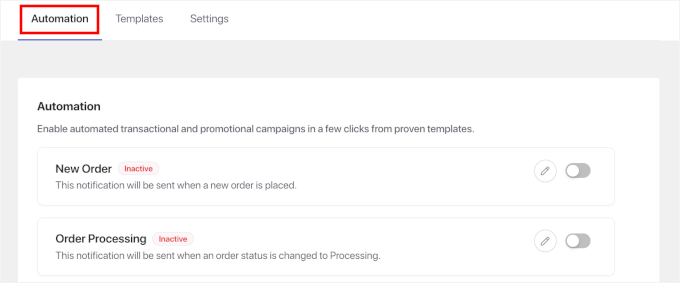
In this tab, you’ll see an inventory of ready-made workflows, like:
- New Order – triggers as soon as a customer places an order.
- Order Processing – activates when you get began getting waiting the order for shipment.
- Order Completed – sends a message as quickly because the order has shipped.
- Order Cancelled – notifies the consumer if an order is cancelled.
- Order Refunded – useful will have to you handle returns or issue refunds continuously.
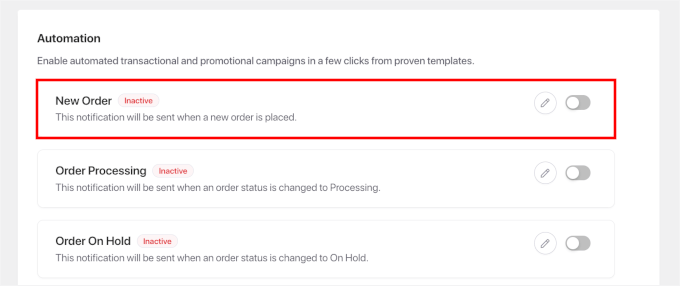
For this tutorial, I’ll show you one of the simplest ways to create a brand spanking new order notification. So let’s click on on on the toggle for the ‘New Order’ selection.
Throughout the popup that appears, you’ll be in a position to choose to send notifications to shoppers, store admins, or each and every.
Purchaser notifications keep shoppers a professional, while admin notifications will permit you to follow new product sales in authentic time.
Throughout the customer notification phase, you’ll be capable to:
- Allow ‘Send notification to customer’ – to send notifications to shoppers.
- Specify the consumer phone – open the dropdown and choose your best choice, for instance, ‘Billing Phone.’
- Choose a message template – make a selection the
new_order_notificationstemplate you merely created.
Once a template is selected, click on at the ‘Add Variable’ dropdown and insert the connected variables for each field.

Then, you’ll be capable to scroll correct down to permit the admin notification.
Simply tick the ‘Send notification to admin’ checkbox, enter the admin’s phone amount, and prepare a message template at the side of its variables.

You’ll be capable to then repeat this process for all of the automated WhatsApp notifications you need to use.
Step 4: Take a look at Your WhatsApp Notifications
Previous than going live with shoppers, I love to suggest operating by means of a whole test cycle. This process helps you catch any issues of message formatting or timing.
To check out this, you’ll be capable to place a test order in your WooCommerce store the use of your own phone amount as the consumer contact. Don’t fail to remember to use a phone amount that’s registered with WhatsApp.
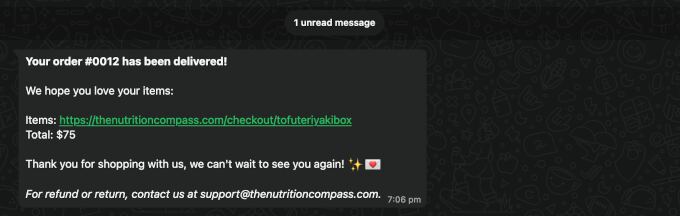
Your first WhatsApp order notification will have to arrive inside a few minutes. It’ll come with the order details, and also you’ll need to check out if it sounds as if in a clean, reputable format.
Must you’re sending admin notifications too, be sure that those are working correctly.
And will have to you’ve prepare order complete notifications, keep in mind to test those as neatly. To check out this, transfer in your WooCommerce orders internet web page and exchange the status of your test order. For example, you’ll be capable to trade it from ‘Processing’ to ‘Completed.’
That exchange will have to motive the Order Whole workflow, so examine that the WooCommerce notification arrives in WhatsApp as expected.
As quickly because the entirety checks out, your WhatsApp notifications are looking forward to authentic customer orders.
And that’s all there is also to it!
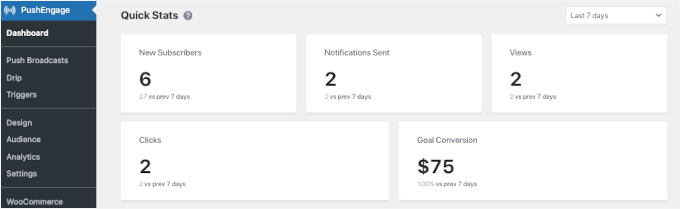
To stick follow of your campaigns, you’ll be capable to transfer to PushEngage » Dashboard.
This phase provides you with rapid statistics for your total choice of push notification subscribers, notifications sent, views, and clicks. This information helps you notice how your messages are showing.
Way 2: Send WooCommerce Order Notifications with Uncanny Automator (Automation-Focused)
Uncanny Automator is an excellent automation plugin for WordPress that connects your favorite apparatus and plugins together.
With this device, you’ll be capable to assemble custom designed workflows (“recipes”) that send WhatsApp order notifications alongside other WordPress actions. This makes it absolute best if you need exact triggers or want to automate tasks that go beyond usual order updates.
For added details on what you’ll be capable to do with this plugin, see our knowledge to developing automatic workflows with Uncanny Automator.
And previous than starting this part of the training, please follow my instructions on the best way to arrange a WhatsApp Industry account will have to you haven’t already.
Step 1: Arrange and Activate Uncanny Automator
First, you need to place in and switch at the Uncanny Automator plugin in WordPress.
📝 Follow: Uncanny Automator has each and every loose {and professional} diversifications, and also you’ll be capable to if truth be told get started with WhatsApp notifications the use of their unfastened tier. They provide new accounts 250 loose app credit score, which is enough to test the whole lot out.
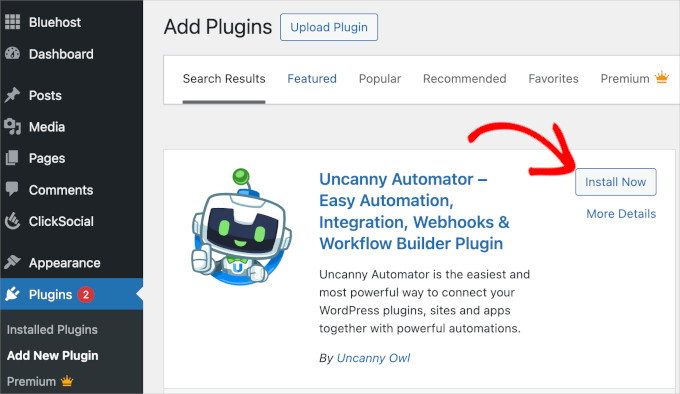
To start, you’ll be capable to head in your WordPress dashboard and transfer to Plugins » Add New.
Then, search for “Uncanny Automator,” click on at the ‘Arrange Now’ throughout the search end result, then click on on ‘Activate’ when it sounds as if.
You’ll be capable to see our knowledge on the best way to set up a WordPress plugin for step-by-step instructions.
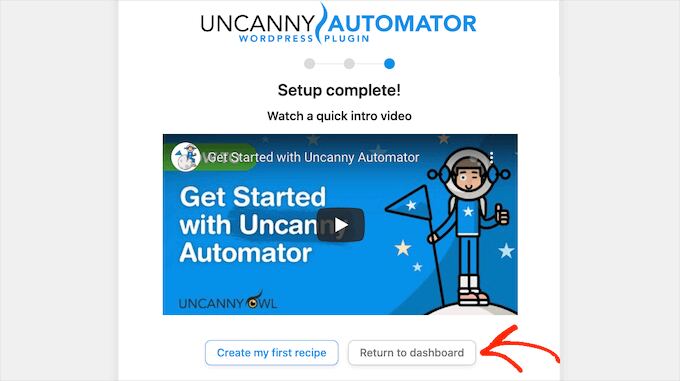
After activation, you’ll see a brand spanking new ‘Automator’ menu in your WordPress admin space.
Click on on on it and follow the setup wizard to test for your account and claim your loose credit score.
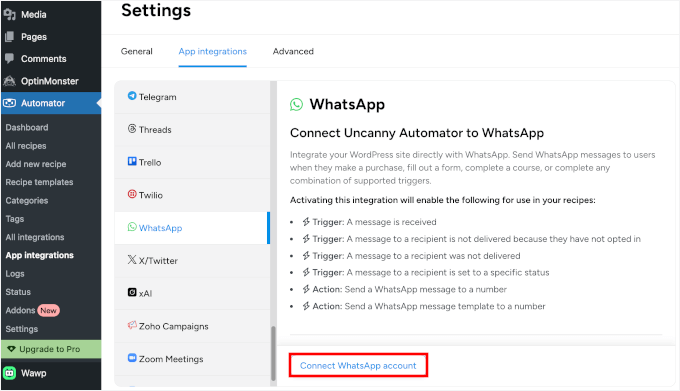
To connect Uncanny Automator with WhatsApp, transfer to Automator » Settings » App Integrations » WhatsApp.
Then, you’ll be capable to transfer ahead and click on on ‘Connect WhatsApp account.’
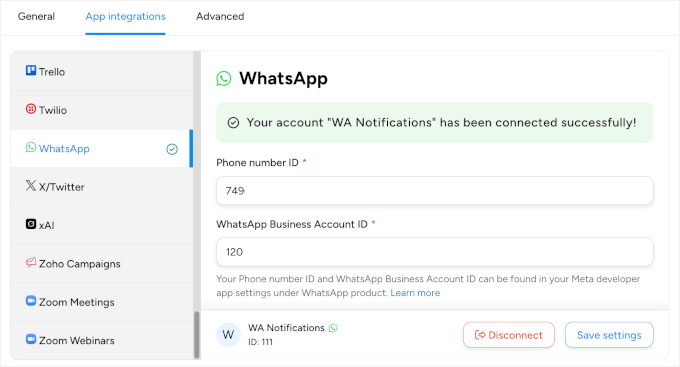
From correct right here, you’ll be capable to paste in your permanent token, phone amount ID, and WhatsApp Business Account ID from the Meta dashboard.
And once another time, click on on on the ‘Connect WhatsApp account’ button.

After a few seconds, you’ll get a good fortune message.
And correct right here’s what it kind of feels like:
Step 2: Create Your WhatsApp Notification Automation Recipe
Automator uses “recipes” to provide an explanation for automations. Call to mind them like “if-then regulations” that connect different parts of your internet web site. Each recipe has triggers (what starts the automation) and actions (what happens as a result).
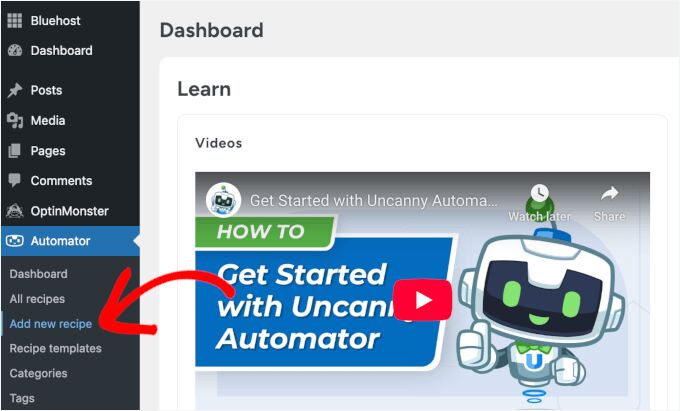
To create your automation recipe, let’s first navigate to Automator » Add new recipe in your WordPress dashboard.
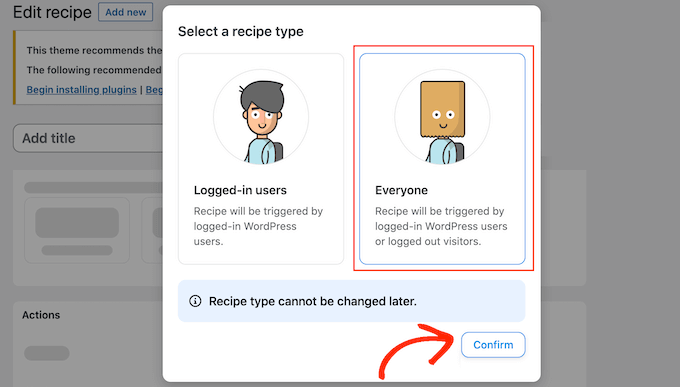
Throughout the popup that appears, you’ll see a modal asking what type of recipe you need to create.
Let’s select ‘Everyone’ for the reason that recipe type and click on on ‘Check.’
This manner, your automation will art work for each and every shoppers with accounts and people who take a look at as visitors. Uncanny Automator can pull the phone amount without delay from the order details, so notifications might be sent to all purchasers.
Throughout the recipe editor, you’ll be capable to transfer ahead and offers your recipe a descriptive establish like “WhatsApp Notifications for WooCommerce Orders.” Clear naming helps such a lot while you’ve were given multiple recipes operating.
After that, you’ll be capable to scroll correct down to organize what fit will have to get began your WhatsApp notification.
Automator has dozens of WooCommerce triggers to make a choice from. Throughout the ‘Motive’ panel, choose ‘WooCommerce’ (or Woo) from the document of available integrations.

Throughout the dropdown, you’ll see quite a lot of WooCommerce events you’ll be capable to use as triggers.
Let’s select ‘A client purchases a product.’ This motive fires when somebody successfully completes their achieve.
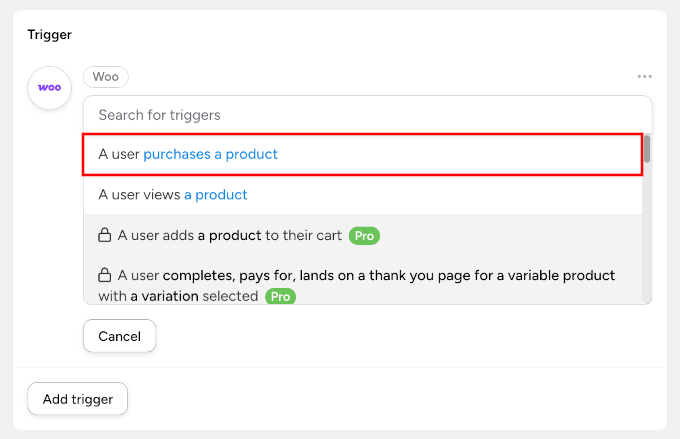
If you probably have the Skilled type, you’ll get additional alternatives.
For example, you’ll be in a position to choose a additional particular motive like “A client completes, pays, and lands on a thank-you web page for a variable product with a variation made up our minds on.”
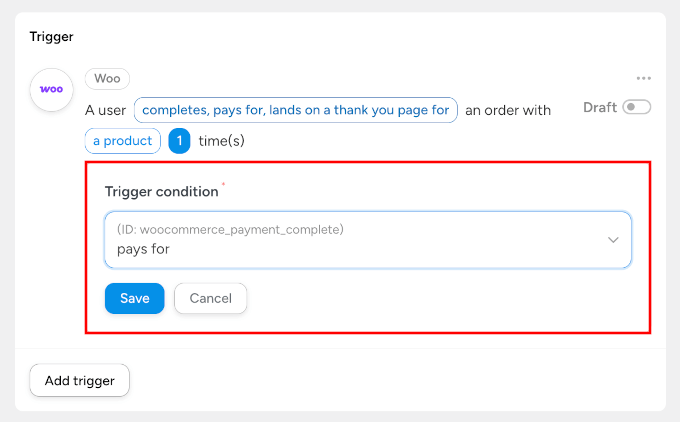
After that, you’ll be capable to set the motive scenario to ‘pays for’ so it only runs when price is if truth be told processed. Then, you’ll be capable to click on at the ‘Save’ button to continue.
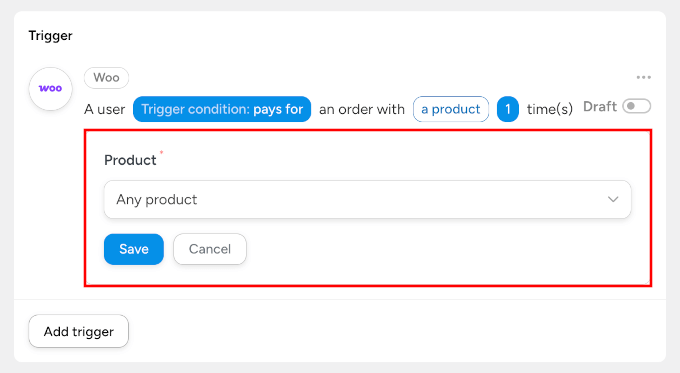
Then, you’ll need to specify your product selection.
You’ll be in a position to choose ‘Any product,’ with the exception of you only want notifications for particular items. Don’t fail to remember to click on on ‘Save.’
The next move is to organize an movement. That’s what happens after your motive fires. In several words, that’s the position you’ll configure the true WhatsApp message.
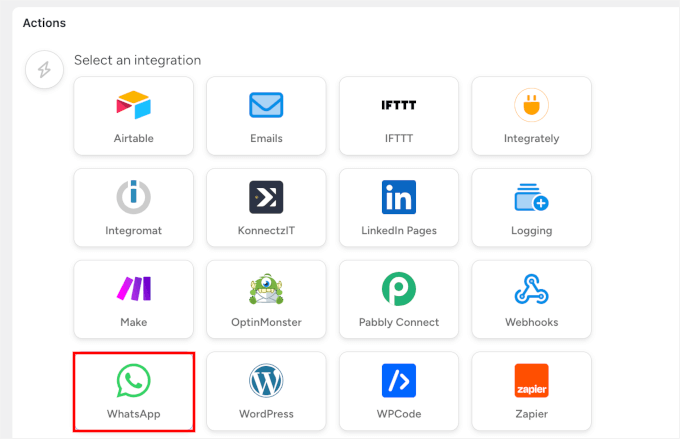
To start, click on at the ‘Add movement’ button throughout the ‘Actions’ panel.

Then, you’ll be capable to choose ‘WhatsApp’ from the combo document.
You’ll moreover needless to say there are lots of other integrations available with Uncanny Automator, in conjunction with OptinMonster and Airtable.
Now, you will have to see different WhatsApp actions available.
Proper right here, you’ll be in a position to choose ‘Send a WhatsApp message template’ for first-time notifications that need to follow WhatsApp’s template must haves.
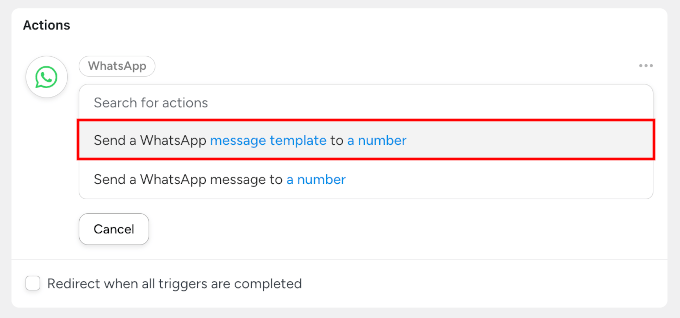
Be sure that to choose the template that you simply created throughout the WhatsApp Manager dashboard. In my example, it’s referred to as ‘new_order_notification’.
The ‘Send a WhatsApp message to a number’ manner works upper for patrons who’ve already opted in to acquire messages.
Take into account to click on at the ‘Save’ button when it sounds as if.
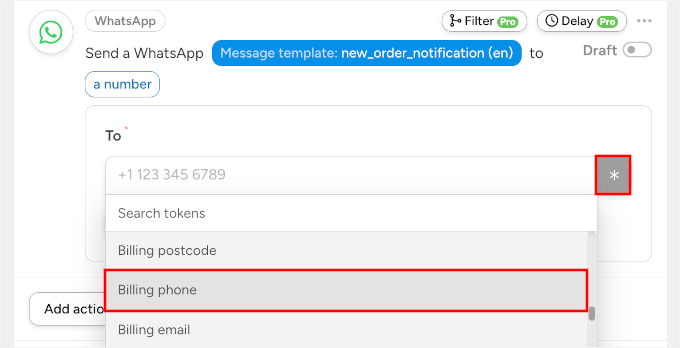
Throughout the phone amount field, you’ll be capable to use Automator’s token instrument to drag the consumer’s billing phone from their order.
Merely click on at the asterisk icon, choose the ‘Billing phone’ token from WooCommerce, and click on on ‘Save.’
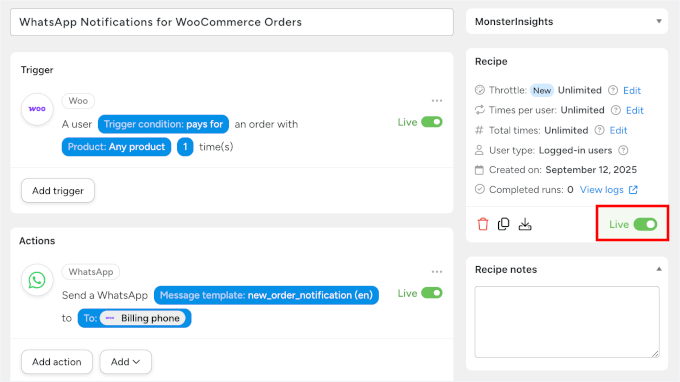
Step 3: Activate and Take a look at Your Automation
Now, you’ll be capable to flip in your recipe, and Automator makes this easy with their draft and live modes.
To show in your automated WhatsApp notification recipes, you’ll be capable to toggle from ‘Draft’ to ‘Live’ the use of the switch on the most efficient of the recipe internet web page.
Now, you’ll be capable to place a test order for your online store the use of your own phone amount as the consumer contact. Make sure you complete the entire WooCommerce checkout process, in conjunction with price.
Within a few minutes, you will have to download a WhatsApp notification with all of the dynamic tokens appearing the proper wisdom from your test order.
You’ll be capable to moreover head in your WooCommerce dashboard and manually trade the test order’s status from ‘Processing’ to ‘Completed’.
This will motive to any extent further notifications you’ve configured.
That’s all!
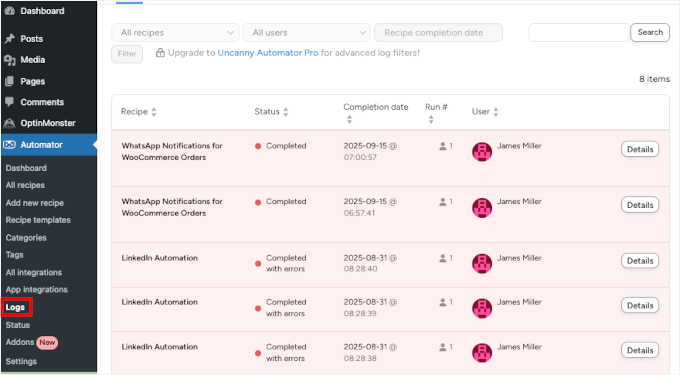
And to watch all your automation task, you’ll be capable to transfer to the Automator » Logs phase, which shows you exactly when recipes run and whether they prevail or reason why errors.
Way 3: Send WooCommerce Order Notifications with a Unfastened Plugin
Wawp is a lightweight WhatsApp notification plugin designed for simplicity and rapid setup. Its main receive advantages is that it doesn’t require a whole Meta Business API setup, making it absolute best for small on-line retail outlets or someone testing WhatsApp notifications.
💡 Heads up: Since this method uses your phone to send messages, it’s very important that your phone stays charged, changed into on, and hooked as much as the internet. If your phone goes offline, notifications will prevent sending until it reconnects.
Step 1: Arrange and Flip at the Wawp Plugin
Previous than setting up the plugin, you need to seek advice from the Wawp web site and follow the signup process for a loose account.
Get began by way of clicking the ‘Get began Unfastened Forever’ button, filling in your account details, and verifying your WhatsApp amount.
The loose plan signifies that you’ll be able to send up to 50 messages monthly, so that you’ll be capable to experiment with order updates without any upfront value. When you’re ready, it’s easy to beef up or switch to a additional complicated solution like PushEngage or Uncanny Automator.

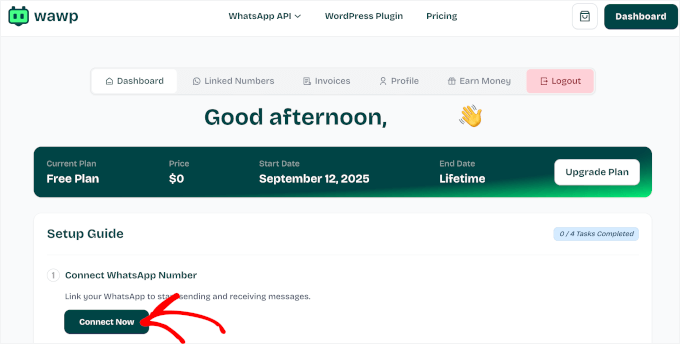
In your account dashboard, you’ll see the setup wizard.
The first thing to try this is click on at the ‘Connect Now’ button to unlock the wizard.
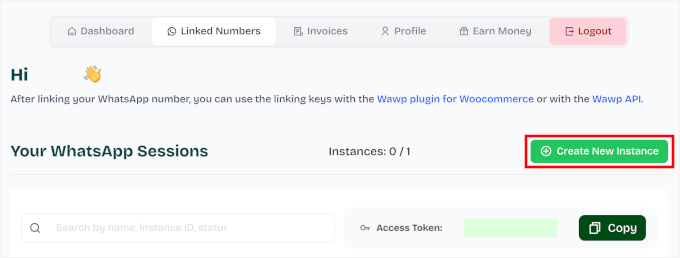
This will take you to the ‘Similar Numbers’ panel, where Wawp will urged you to create a brand spanking new instance.
An instance is like a workspace that links your WhatsApp amount to Wawp. Call to mind it for the reason that bridge between your Wawp account and your WordPress web site. Without it, your store can’t send or download WhatsApp messages.
Transfer ahead and click on on on the ‘Create New Instance’ button.
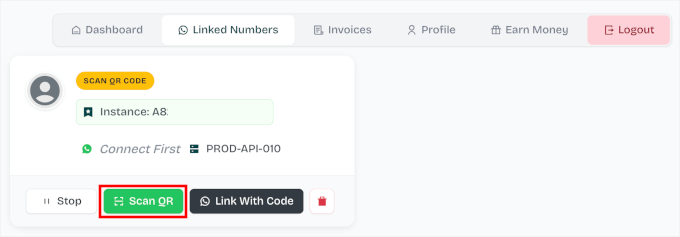
Proper right here’s where Wawp’s means differs significantly from the other methods. Instead of a complicated API setup, you simply scan a QR code together with your phone.
Merely click on at the ‘Scan QR’ button, and in your phone, tap ‘Link a Software’ and use your phone’s digital camera to scan the QR code from your visual display unit.
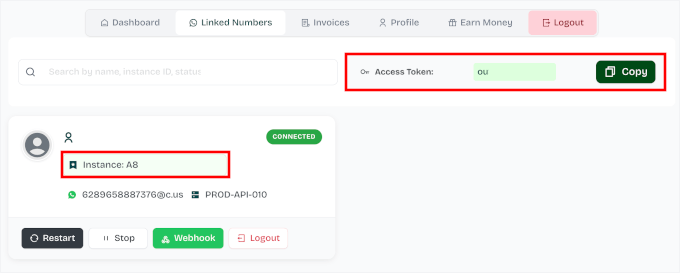
Once attached, Wawp will show you the ‘Hooked up’ label and generate the ‘Instance ID’ for your account robotically.
On this internet web page, you’ll be capable to moreover see your ‘Get right of entry to Token.’
Let’s replica each and every pieces of information, as you’ll need them in step 2.
With that achieved, you’ll be capable to get began setting up the Wawp plugin.
In your WordPress dashboard, transfer to Plugins » Add New.
On the next show, simply use the search bar to hunt out the Wawp plugin.
When you see the plugin throughout the search results, click on at the ‘Arrange Now’ button. Then, once another time, on ‘Activate’ to complete the process.
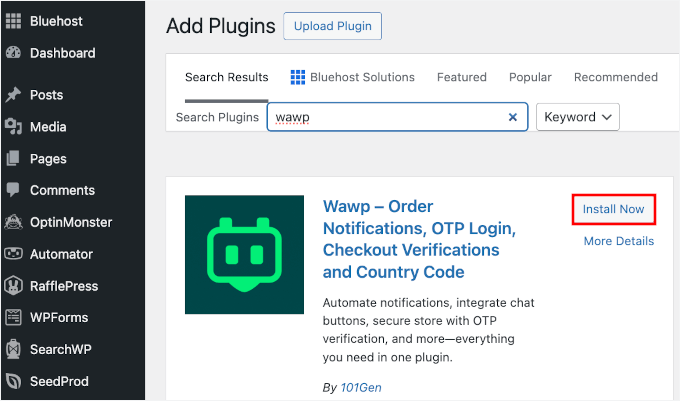
Upon activation, you’ll perceive a brand spanking new ‘Wawp’ menu products turns out in your WordPress dashboard.
For a step-by-step knowledge, see the best way to set up a WordPress plugin.
Step 2: Connect Your WordPress Internet web page and Your Wawp Account
Now that you simply’ve Wawp installed for your site, let’s connect each and every platforms.
From your dashboard, you’ll want to navigate to Wawp » Sender Settings. Then, throughout the ‘Connect your WhatsApp’ phase, transfer ahead and click on on ‘+ Add Manually.’
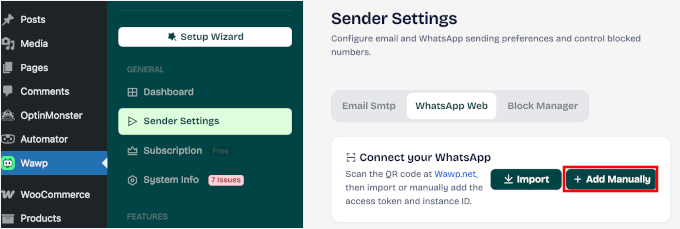
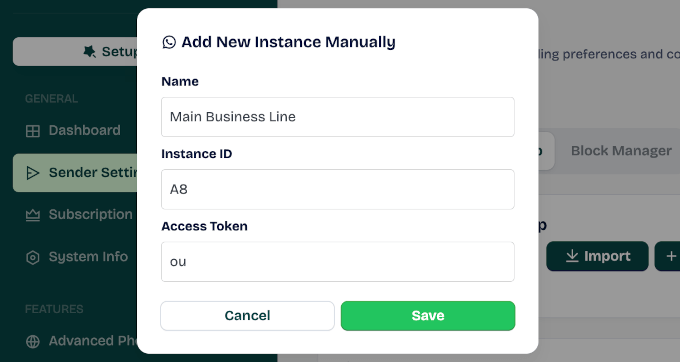
This will open a popup where you’ll be capable to fill in your instance details.
Simply replica and paste your instance establish, instance ID, and get right to use token into the connected fields. After that, click on on ‘Save’ to continue.
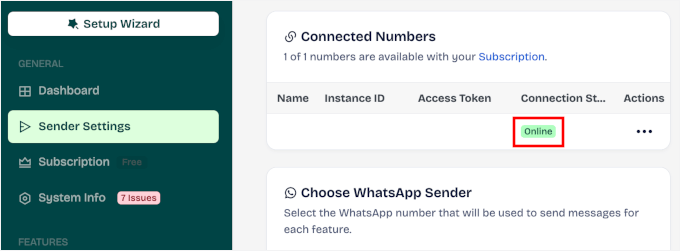
This will redirect you to the ‘Sender Settings’ panel.
Throughout the ‘Hooked up Numbers’ phase, you will have to be capable to see your instance added. The ‘Online’ connection status implies that the link is a success.
Step 3: Create Automated WooCommerce Order Notifications
By means of now, you’re ready to create your WooCommerce order notifications.
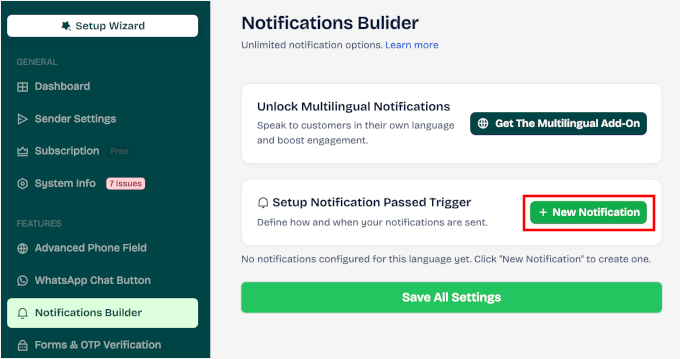
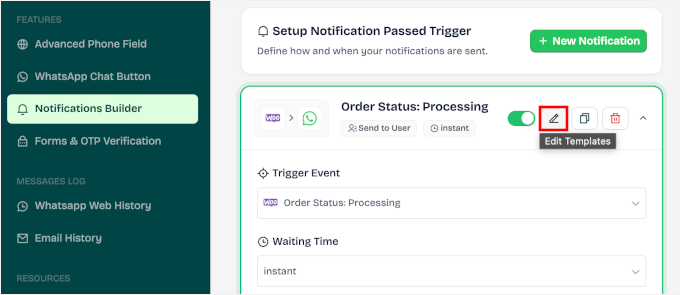
Throughout the Wawp plugin settings, seek for the ‘Notifications Builder’ phase and click on on ‘+ New Notification.’
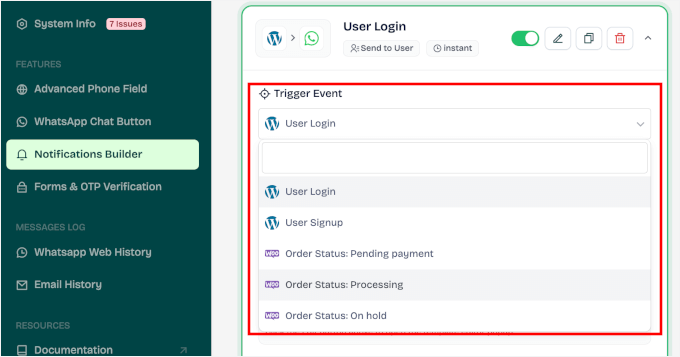
You’ll then see different WooCommerce events listed in ‘Motive Events.’
They arrive with ‘Order Status: Processing,’ ‘Order Status: Completed,’ ‘Order Status: Failed,’ and so on.
For the principle notification, let’s select ‘Processing.’
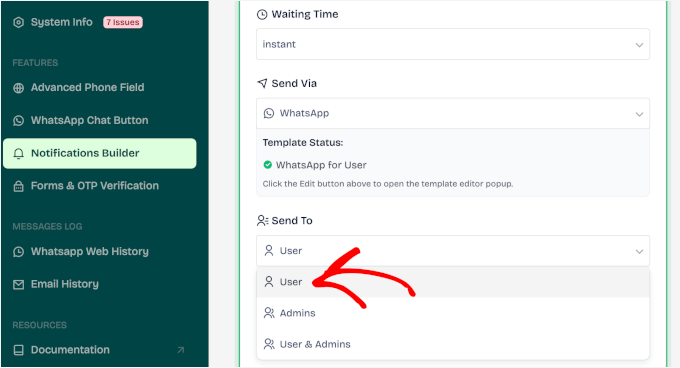
This will open the notification template customization panel, where you’ll be capable to alter the following settings:
- In a position Time – Choose how long to wait previous than the notification is distributed: fast or after a few minutes extend.
- Send By way of – Choose the provision channel: WhatsApp, electronic mail, or each and every. By means of default, this is set to WhatsApp.
- Send To – Decide who will have to download the message: the consumer, the admin, or each and every.
For example, my setup is: ‘Speedy’ for In a position Time, ‘WhatsApp’ for Send By way of, and ‘Individual’ for Send To.
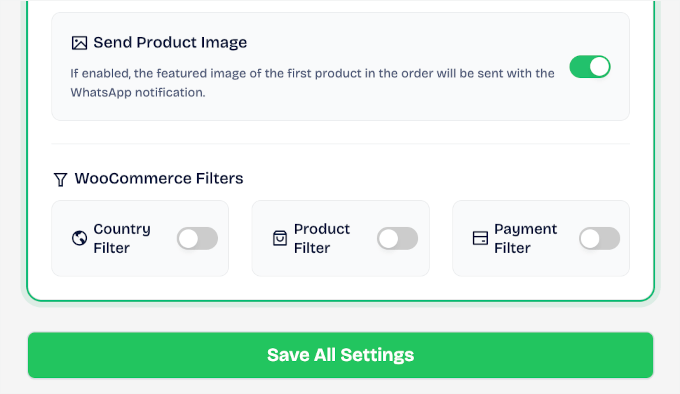
Must you scroll further down this panel, you’ll to seek out some additional alternatives. For instance, you’ll be in a position to choose to include the product symbol in your WhatsApp notifications.
You’ll moreover see a few WooCommerce filters that imply you’ll be able to keep an eye on exactly when messages are sent:
- Nation Filter out: Send or exclude messages in response to the consumer’s billing country.
- Product Filter: Function particular products by way of choosing whether or not or to not send or now not send messages for them.
- Price Gateway Filter: Decide which price methods, like Stripe, monetary establishment transfer, check out, or COD, will have to motive a notification.
You’ll be capable to tweak the ones filters to fit your store’s workflow and customer base.
Next, you must want to edit the fundamental message template.
I individually always customize the message to check how I keep up a correspondence with shoppers. Non-public touches make a big difference in visitor improve.
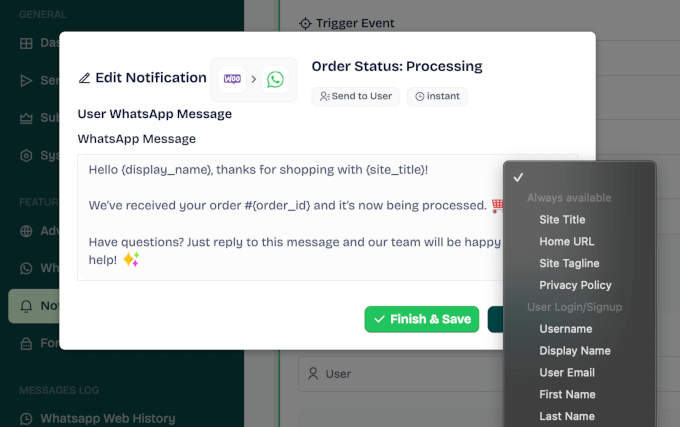
You’ll be capable to scroll up this panel and click on at the pencil icon to edit the message template.
Throughout the popup that appears, you’ll be capable to type your custom designed message into the text field.
You might also needless to say Wawp is helping dynamic tags like {Order_ID}, {Display_Name}, and {Order_Total}. The ones tags robotically fill in wisdom from each particular order.
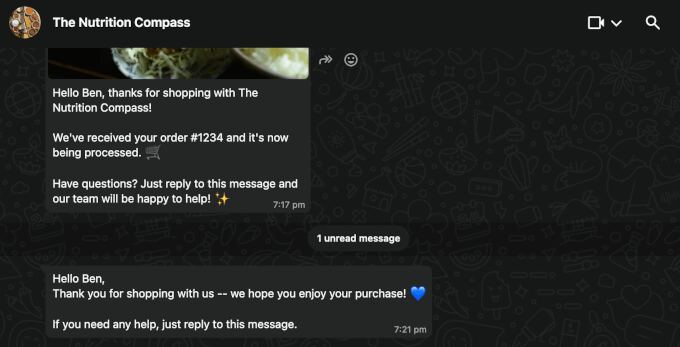
So, for instance, you must write:
“Hello {display_name}, thanks for getting groceries with {site_title}!
We’ve received your order #{order_id} and it’s now being processed. 🛒
Have questions? Merely reply to this message and our team of workers might be satisfied to lend a hand! ✨ “
Don’t fail to remember to click on on ‘Finish & Save’ to make use of your custom designed WhatsApp message.
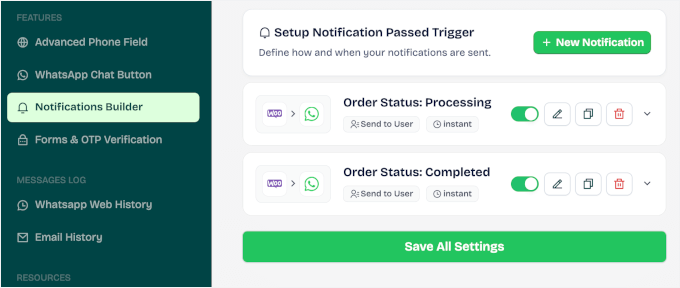
You’ll be capable to repeat this process for all of the order notifications you need to send by means of WhatsApp. For plenty of stores, I imagine new order and order complete notifications are a superb get began.
On every occasion you’re finished together with your automated WhatsApp notifications, you’ll be capable to see they all listed in your Wawp’s notification builders like this:
Step 4: Take a look at Your Automated WhatsApp Notification Setup
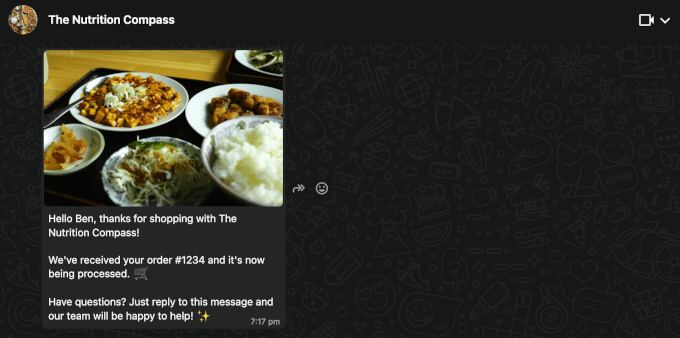
In this final step, let’s be sure that the whole lot runs simply previous than authentic shoppers download notifications
You’ll be capable to place a test order in your WooCommerce retailer the use of your own phone amount as the consumer contact wisdom. Simply complete the entire checkout process as a real customer would.
After that, check out that you simply download the WhatsApp notification and check that the dynamic tags are pulling in the proper wisdom from your test order.
Next, transfer in your WooCommerce admin area and manually exchange the test order’s status – trade it from ‘Processing’ to ‘Completed,’ for instance.
This will have to motive to any extent further notifications you’ve prepare.
If the whole lot turns out superb, your Wawp integration is in a position to handle authentic customer orders. Control your message credit score rating usage all through the primary few weeks to seem if you wish to beef up your plan.
And that’s all!
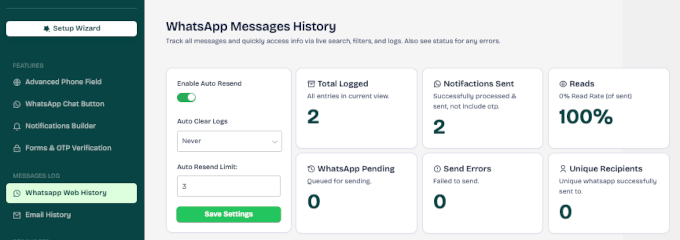
To look at your automation, transfer to the ‘WhatsApp Web History’ panel throughout the Wawp menu. This internet web page information the entire automated messages logged, sent, be told, pending, errors, and unique recipients.
FAQs About Sending WooCommerce Order Notifications in WhatsApp
What’s WhatsApp Business Platform, and the best way does it art work?
The WhatsApp Business Platform is the complicated type of WhatsApp for medium and massive firms. By contrast to the typical app, it is helping automated customer verbal change very similar to order updates, reminders, and visitor toughen messages.
It runs by means of an API, in order that you’ll connect it to WooCommerce the use of a plugin or third-party provider. Messages are sent in response to authorized templates, and firms can reply to shoppers inside a 24-hour strengthen window.
Is WhatsApp Business loose or paid?
There are two diversifications of WhatsApp for business, and so they’ve different costs:
- WhatsApp Business App: This is a loose mobile app. It’s great for small companies that want to chat with shoppers manually, alternatively it does now not strengthen the kind of automation we quilt in this knowledge.
- WhatsApp Business Platform (API): That’s the difficult device sought after for automation. It is a paid provider where Meta charges you in keeping with conversation or message. That’s the type that apparatus like PushEngage and Uncanny Automator hook up with.
How do I mix WhatsApp with WooCommerce?
One of the vital absolute best tactics is with a plugin like PushEngage, Uncanny Automator, or Wawp. Once attached, you’ll be capable to robotically send order confirmations, shipping updates, or the rest you need.
Can I send automated WhatsApp messages from WooCommerce for free?
You’ll be capable to use the loose WhatsApp Business app for information replies and basic pronounces, alternatively it does now not strengthen whole automation.
For automated order notifications, bulk messages, or deserted cart emails, you’ll need the WhatsApp Business Platform.
While it’s paid, some categories of customer-initiated messages (for instance, replies inside 24 hours) are loose. So costs is decided through how and when messages are sent.
Further Finding out: Additional WooCommerce Tutorials
I’m hoping this knowledge has helped you send WooCommerce order notifications to WhatsApp.
Must you found out this handy, then you must want to check out our other helpful guides to reinforce your WooCommerce store’s potency:
- The best way to Make a Sensible WooCommerce Product Seek
- The best way to Create One-Time Customized Coupon Codes in WooCommerce
- The best way to Promote Product Bundles in WooCommerce (Step by means of Step)
- The best way to Create a Reside Sale Notification for WooCommerce
- The best way to Display Continuously Purchased In combination Merchandise in WooCommerce
- Techniques to Get well WooCommerce Deserted Cart Gross sales
- The best way to Set Up Supply Time Slots in WooCommerce (Step by means of Step)
Must you preferred this newsletter, then please subscribe to our YouTube Channel for WordPress video tutorials. You’ll be capable to moreover to seek out us on Twitter and Fb.
The post How I Ship WooCommerce Order Notifications Instantly to WhatsApp first appeared on WPBeginner.
Contents
- 0.0.1 Why Set Up WooCommerce Order Notifications in WhatsApp?
- 0.0.2 Previous than You Get began: Set Up Your WhatsApp Business Account (For Methods 1 & 2)
- 0.0.3 Way 1: Send WooCommerce Order Notifications with PushEngage (Multi-Channel Messaging)
- 0.0.4 Way 2: Send WooCommerce Order Notifications with Uncanny Automator (Automation-Focused)
- 0.0.5 Way 3: Send WooCommerce Order Notifications with a Unfastened Plugin
- 0.0.6 FAQs About Sending WooCommerce Order Notifications in WhatsApp
- 0.0.7 Further Finding out: Additional WooCommerce Tutorials
- 0.1 Related posts:
- 1 Easy methods to Beta Take a look at WordPress (& Why You Will have to)
- 2 Are Seasonality & the Financial system Impacting Entrepreneurs in This fall? [Traffic & Conv...
- 3 WordPress » WordPress Safety: Locking Down Your Louisiana Site TL;DR:…

0 Comments