

Due to new options in Divi 5, you’ll be able to construct fashionable, space-efficient weblog layouts that transcend inflexible rows. Pair Loop Builder to tug in dynamic posts with CSS Grid to prepare them in versatile, masonry-style layouts that keep responsive throughout breakpoints.
On this publish, we’ll stroll throughout the setup step-by-step so you’ll be able to recreate it in mins!
What Is CSS Grid In Divi 5?
CSS Grid in Divi 5 is a sturdy structure machine that transforms the way you design weblog pages, enabling complicated grid-based preparations, corresponding to masonry layouts. In contrast to conventional layouts, CSS Grid allows pieces to mechanically adapt to the Grid with out requiring particular positioning, leading to a continuing and dynamic show.
Key Options Of CSS Grid
- Pre-Constructed Grid Templates: You’ll practice grid templates on the container degree, both the use of one in every of Divi 5’s new CSS Grid row templates, or create your personal the use of the Grid Format Taste.
- Customizable Choices: High quality-tune column and row templates, set dimensions, modify grid instructions, alignment, justification, or even regulate particular person merchandise width, top, or place.
- Offset Editor: Create asymmetrical, repeating patterns, like making each 4th publish span two columns, for a numerous, attractive glance.
Advantages of CSS Grid
CSS Grid lets you create masonry grids that fortify the consumer enjoy. It integrates completely with dynamic content material, making sure your weblog posts show fantastically and responsively throughout all gadgets. Paired with Divi 5’s Loop Builder, CSS Grid mechanically arranges your posts into a surprising masonry structure, giving your weblog a contemporary, skilled glance.
What Is The Loop Builder In Divi 5?
The Loop Builder in Divi 5 is a dynamic instrument that transforms any Divi module right into a repeatable template for looping content material, corresponding to posts, phrases, customers, or customized publish sorts. It will provide you with exceptional regulate to create customized weblog feeds with out being confined to inflexible, conventional modules.

Key Options Of Loop Builder
- Dynamic Templates: Design templates the use of Divi modules, pulling in dynamic content material like publish titles, featured pictures, excerpts, or customized fields.
- Customizable Queries: Filter out content material through publish kind, classes, tags, meta values, or ordering, and upload pagination or offsets for actual regulate over what shows.
- Seamless Integration: Works with any Divi structure machine, together with Flexbox and CSS Grid, extending a long way past the restrictions of same old Weblog or Publish Slider modules.
Advantages Of Loop Builder
Loop Builder is easiest for development customized weblog feeds with complete design flexibility over each and every looped merchandise, corresponding to stylized postcards. It gets rid of reliance on static modules, making it ideally suited for growing dynamic, adapted layouts. When paired with CSS Grid, Loop Builder easily generates weblog publish playing cards that seamlessly glide into a surprising masonry grid, including a marginally of additional aptitude on your web page.
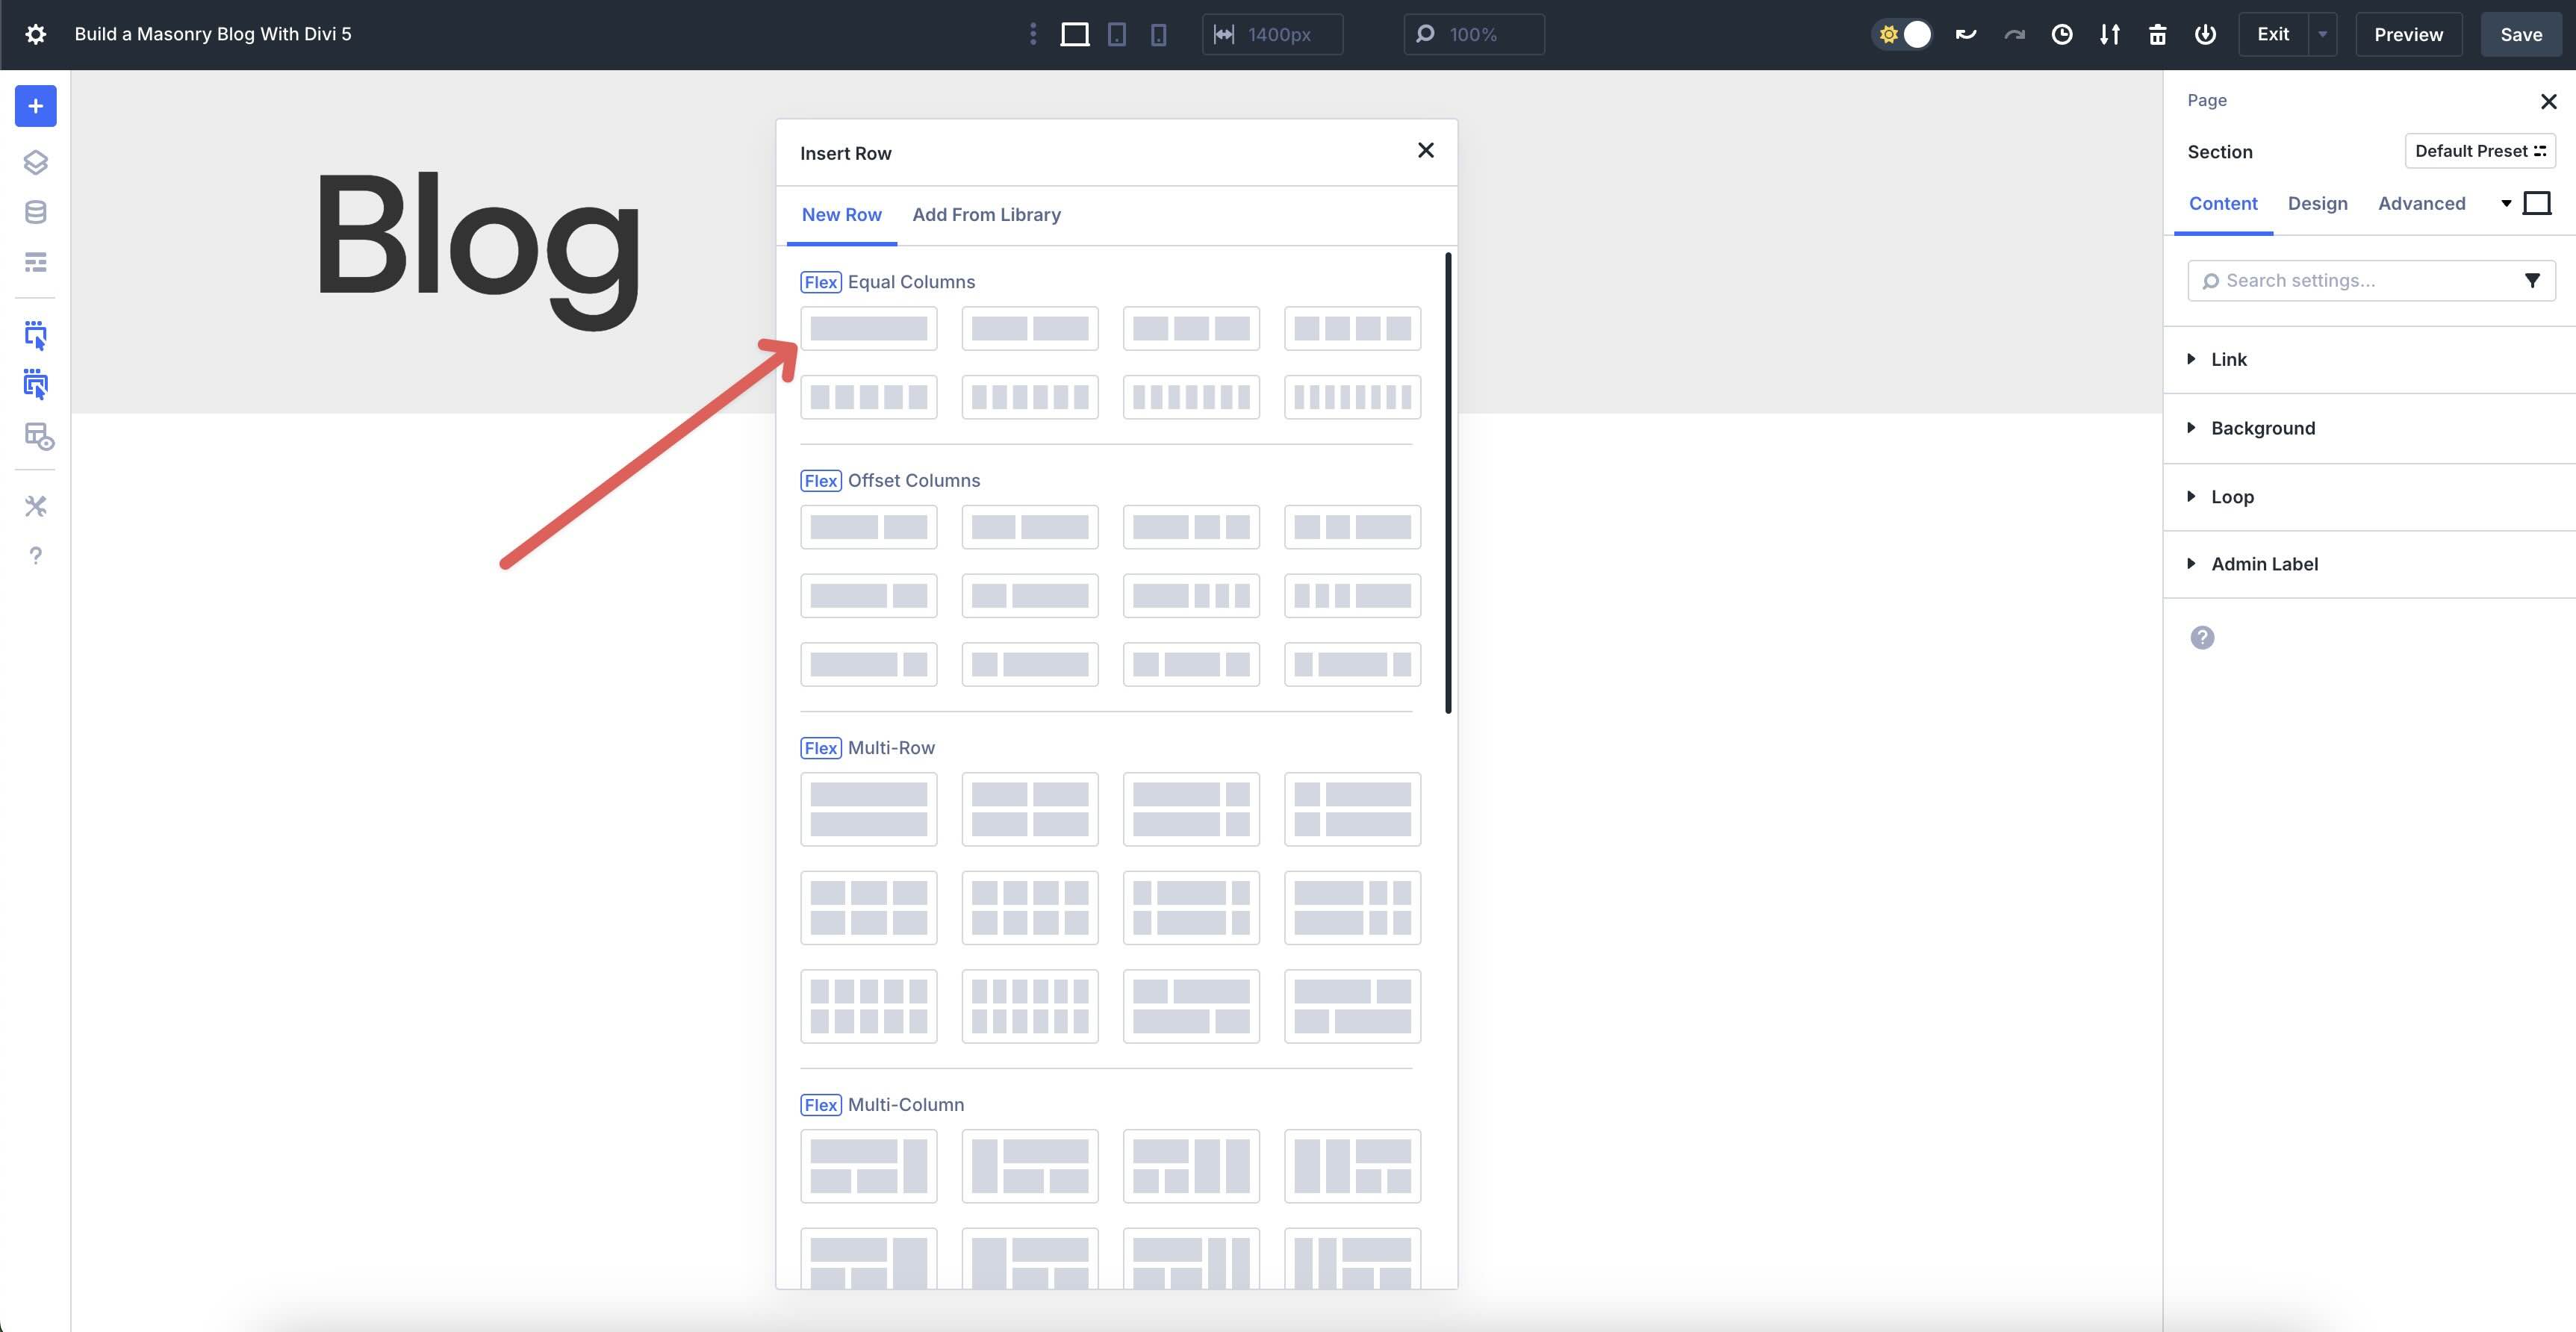
How To Construct A Masonry Weblog With Divi 5’s Loop Builder + Grid
With a transparent figuring out of the way CSS Grid and Loop Builder paintings in Divi 5, you’re in a position to convey your masonry weblog structure to existence. We’ll stroll you thru combining those options to create a dynamic grid that showcases your weblog posts with genre and versatility.
Let’s dive into the method, beginning with putting in the basis to your structure. By means of the tip, your structure will glance very similar to this:
Step 1: Configure The Format
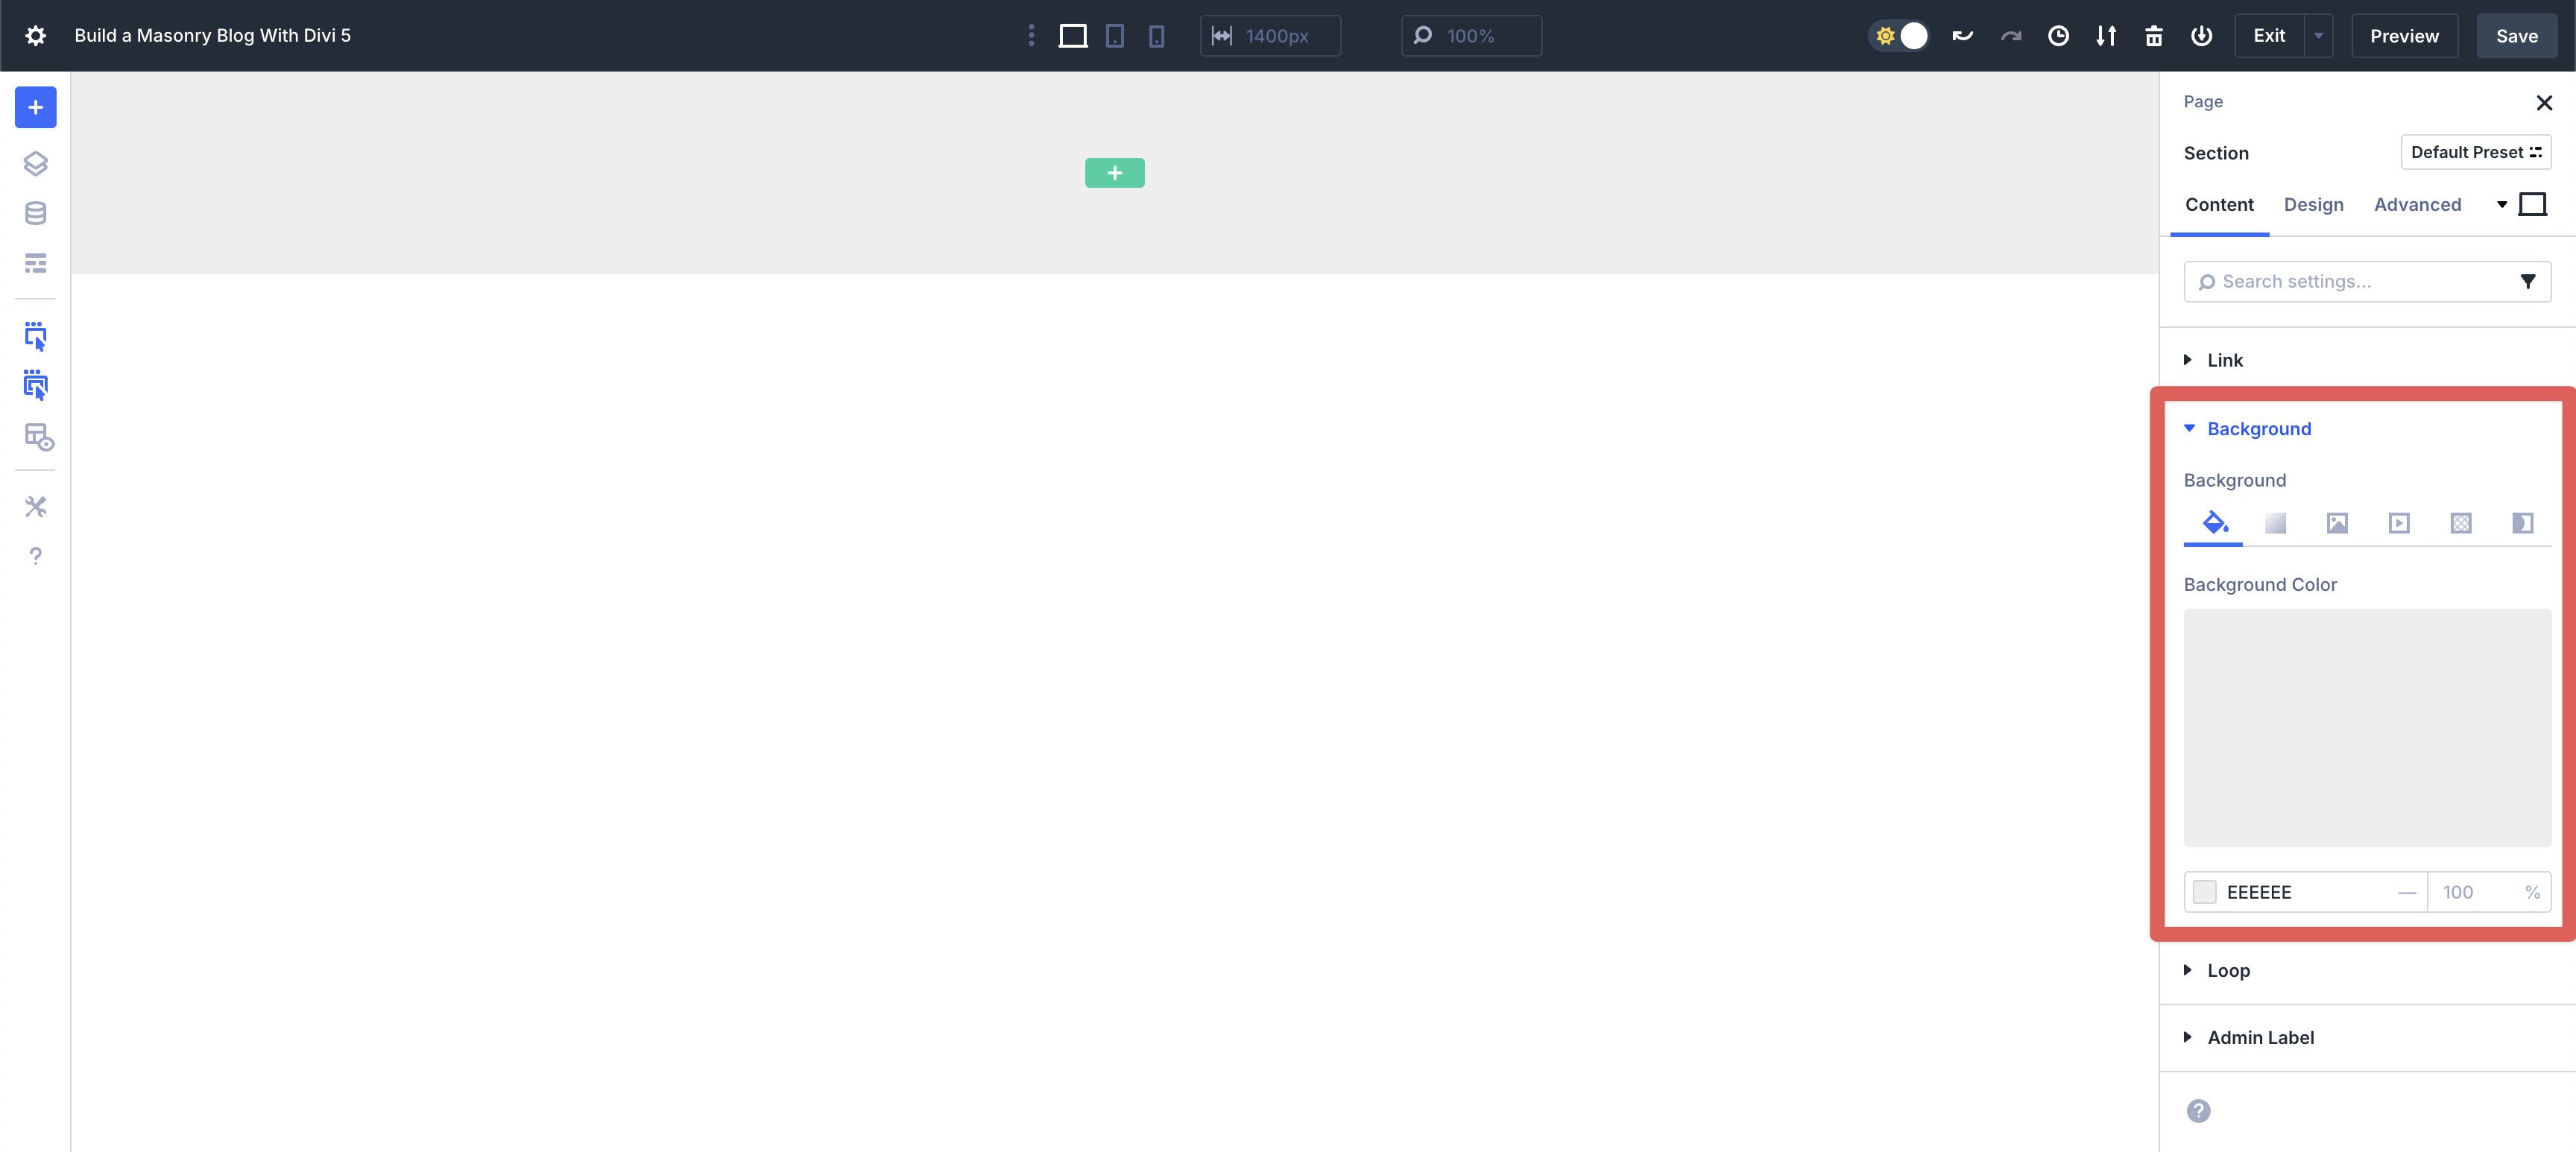
To get began, create a brand new web page and open the Visible Builder. Upload a brand new Segment to the web page. Within the Segment’s Content material tab, upload #eeeeee because the Background Colour.
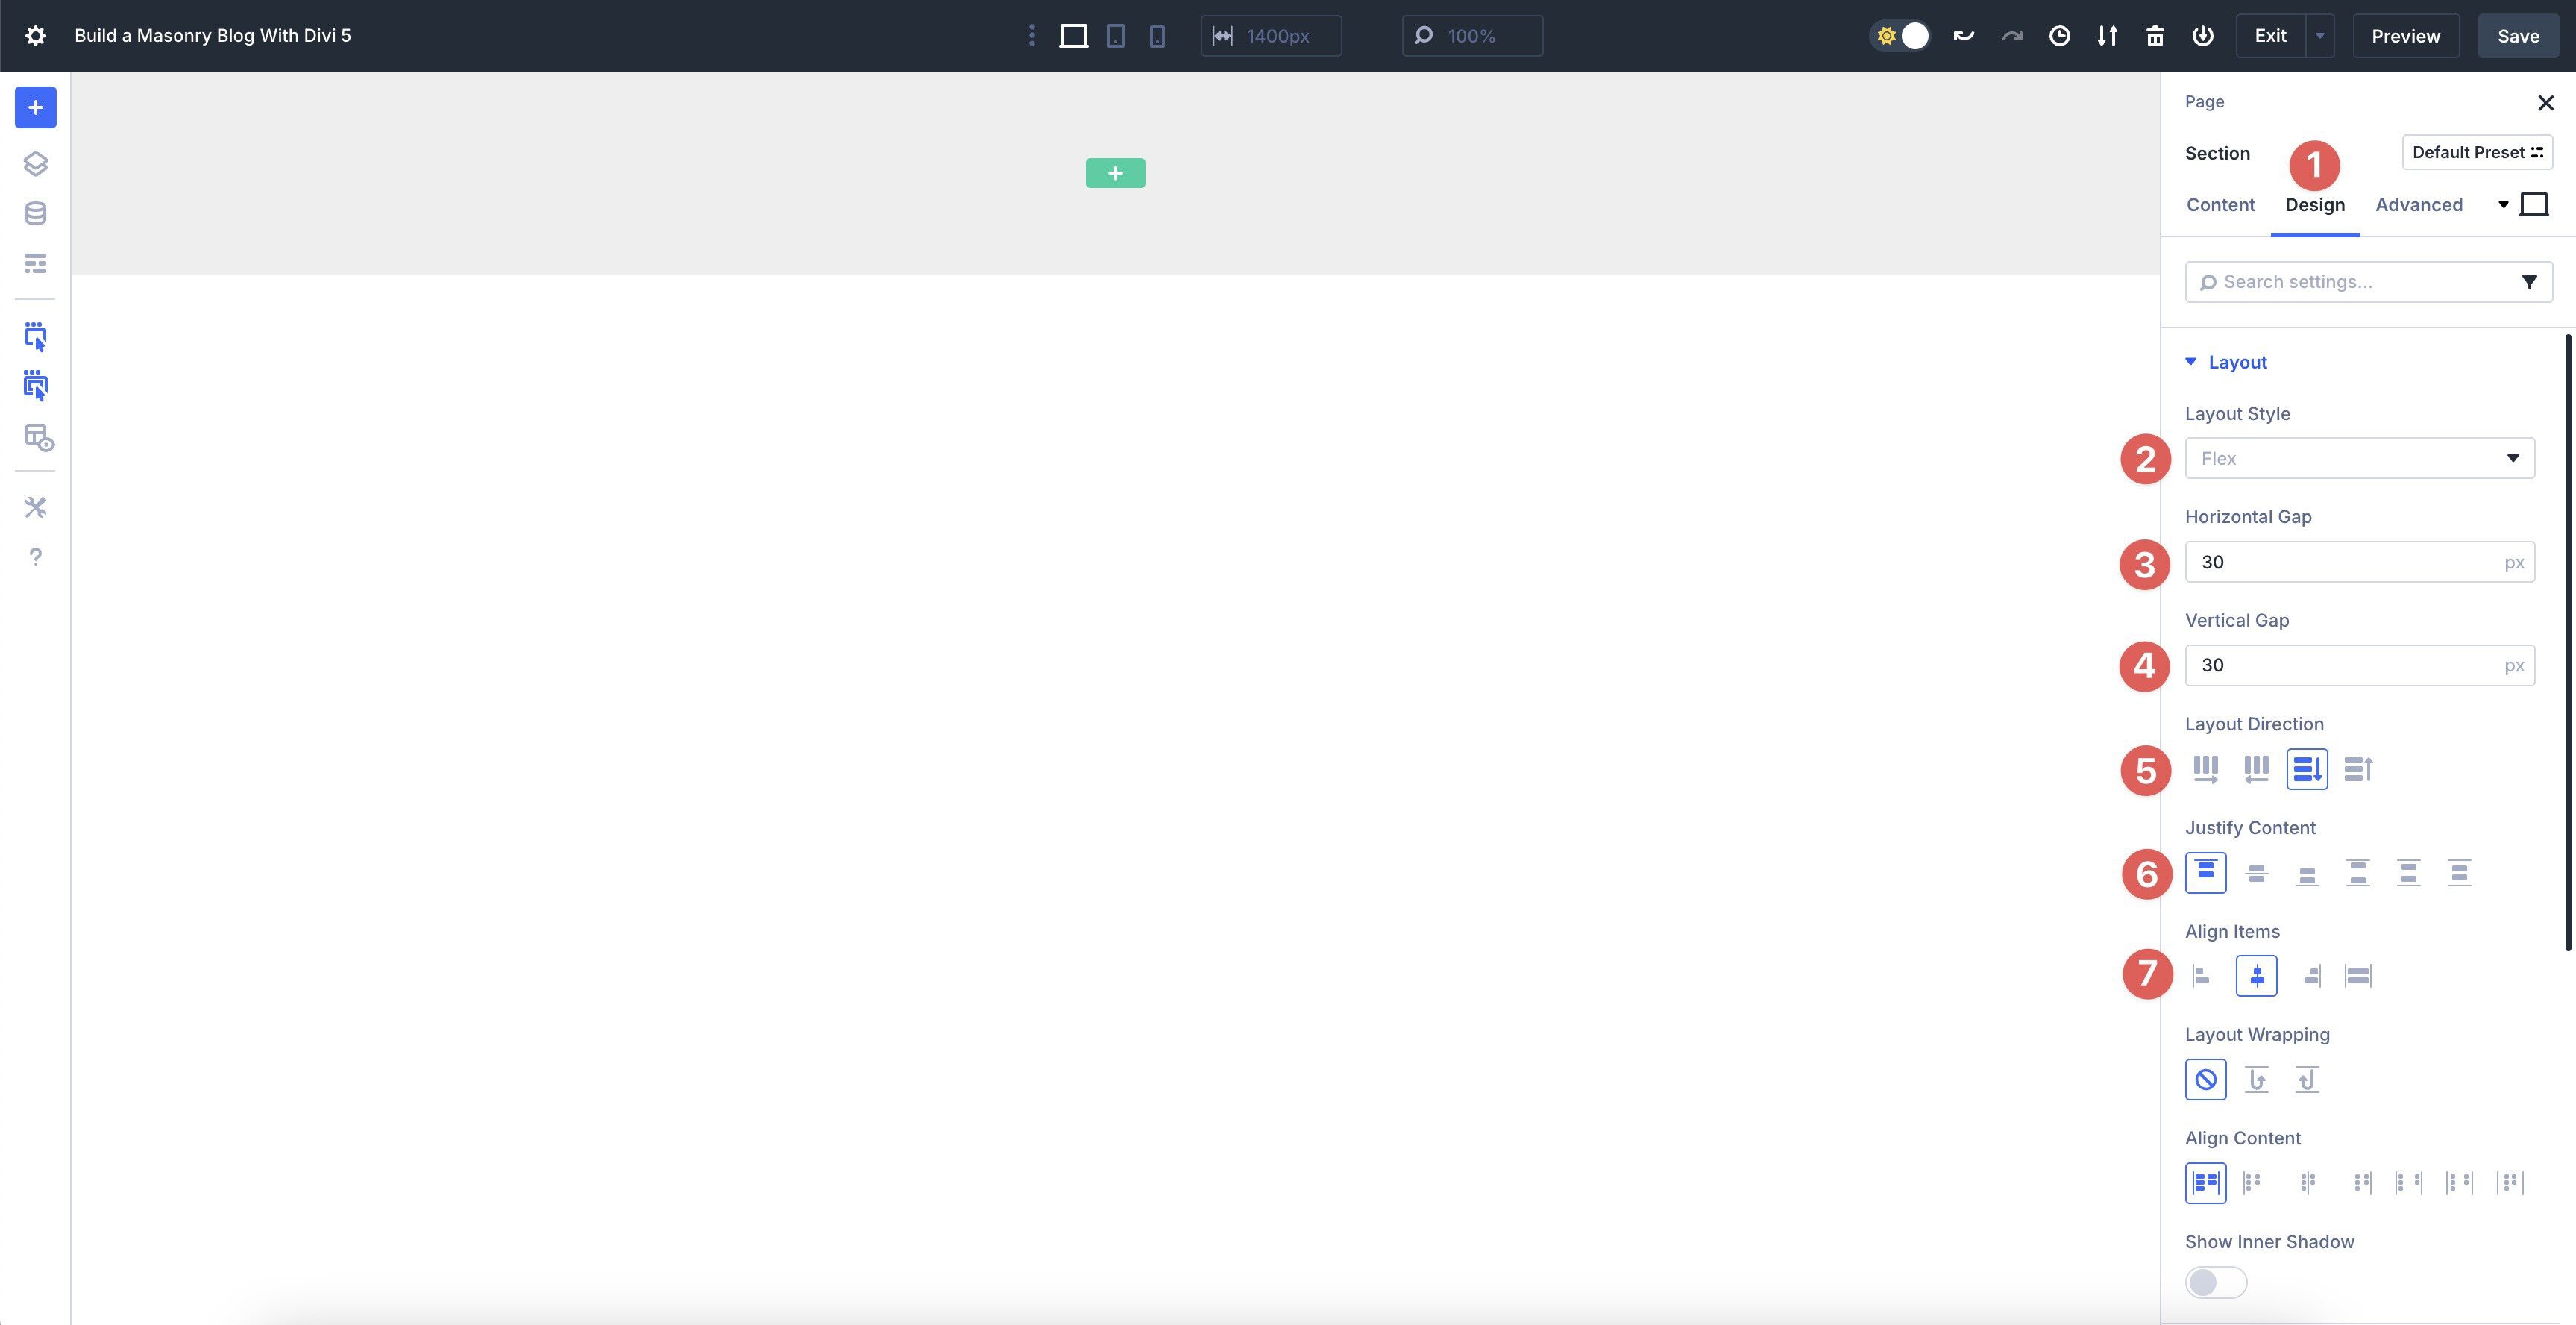
Subsequent, transfer to the Design tab. Enlarge the Format menu and make sure the Format Taste is about to Flex. Upload a 30px Horizontal and Vertical Hole. Set the Format Route to Column, Justify Content material to Get started, Align Pieces to Heart, and depart all different settings at their defaults.
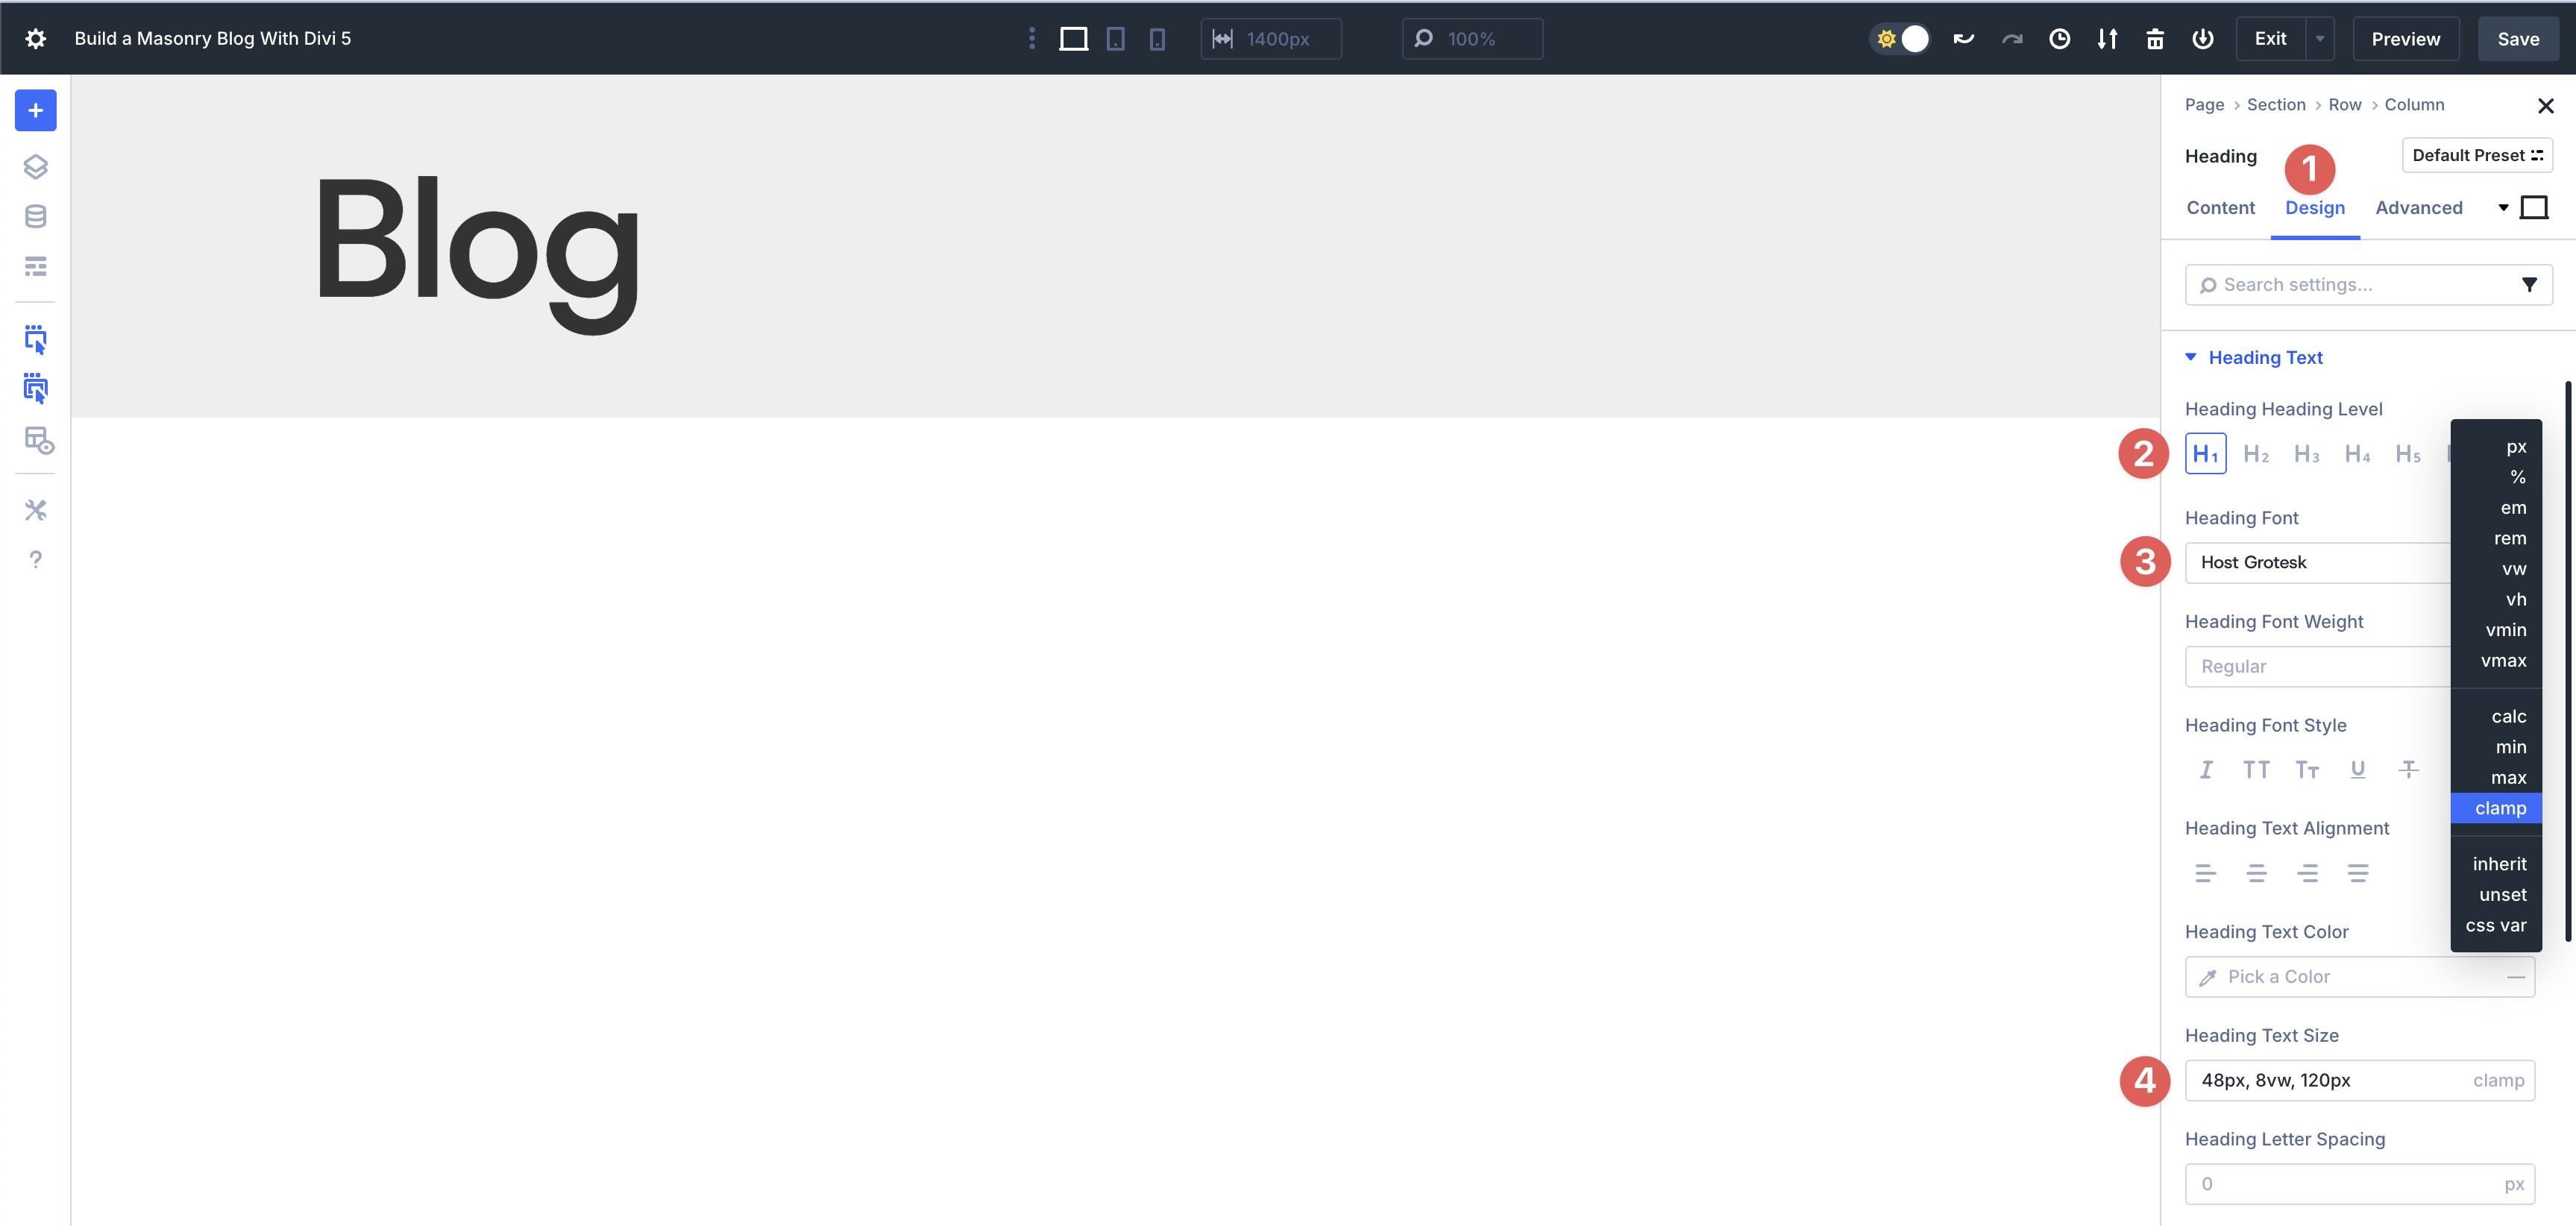
Subsequent, we’ll upload a Unmarried-Column Row to the Segment. Upload a Heading module and provides it a identify, corresponding to Weblog. Click on the Design tab. Set the Heading Heading Degree to h1. Choose Host Grotesk because the Heading Font, and set the Heading Textual content Measurement to 48px, 8vw, 120px. Use the dropdown subsequent to the Heading Textual content Measurement box to make a choice Clamp.
In spite of everything, upload any other Unmarried Column Row beneath the primary. This might be our dad or mum container.
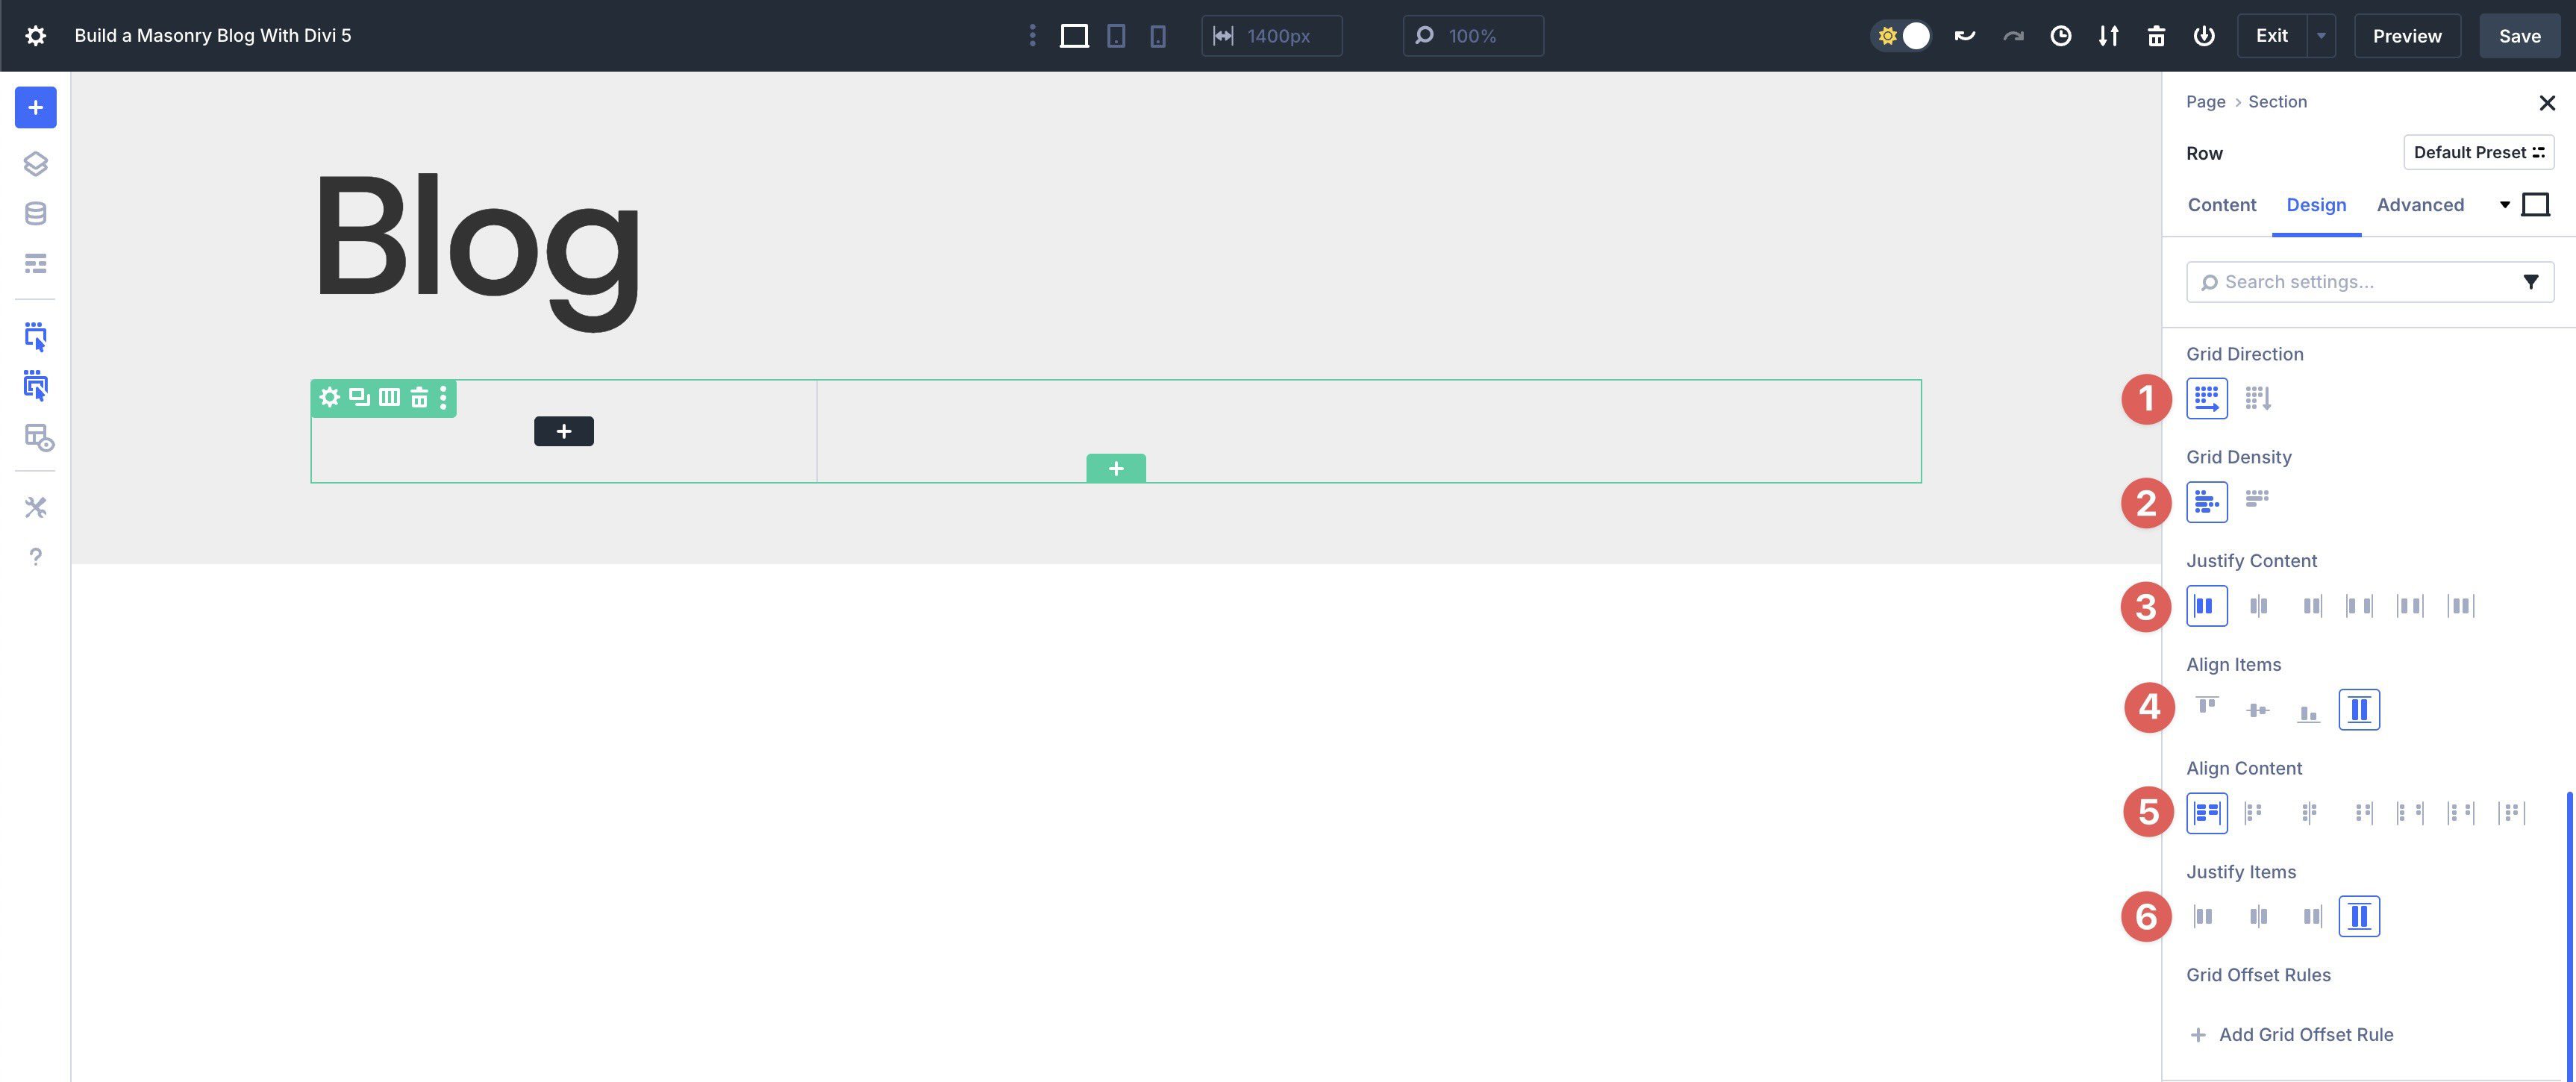
Step 2: Allow And Configure CSS Grid On The Dad or mum Container
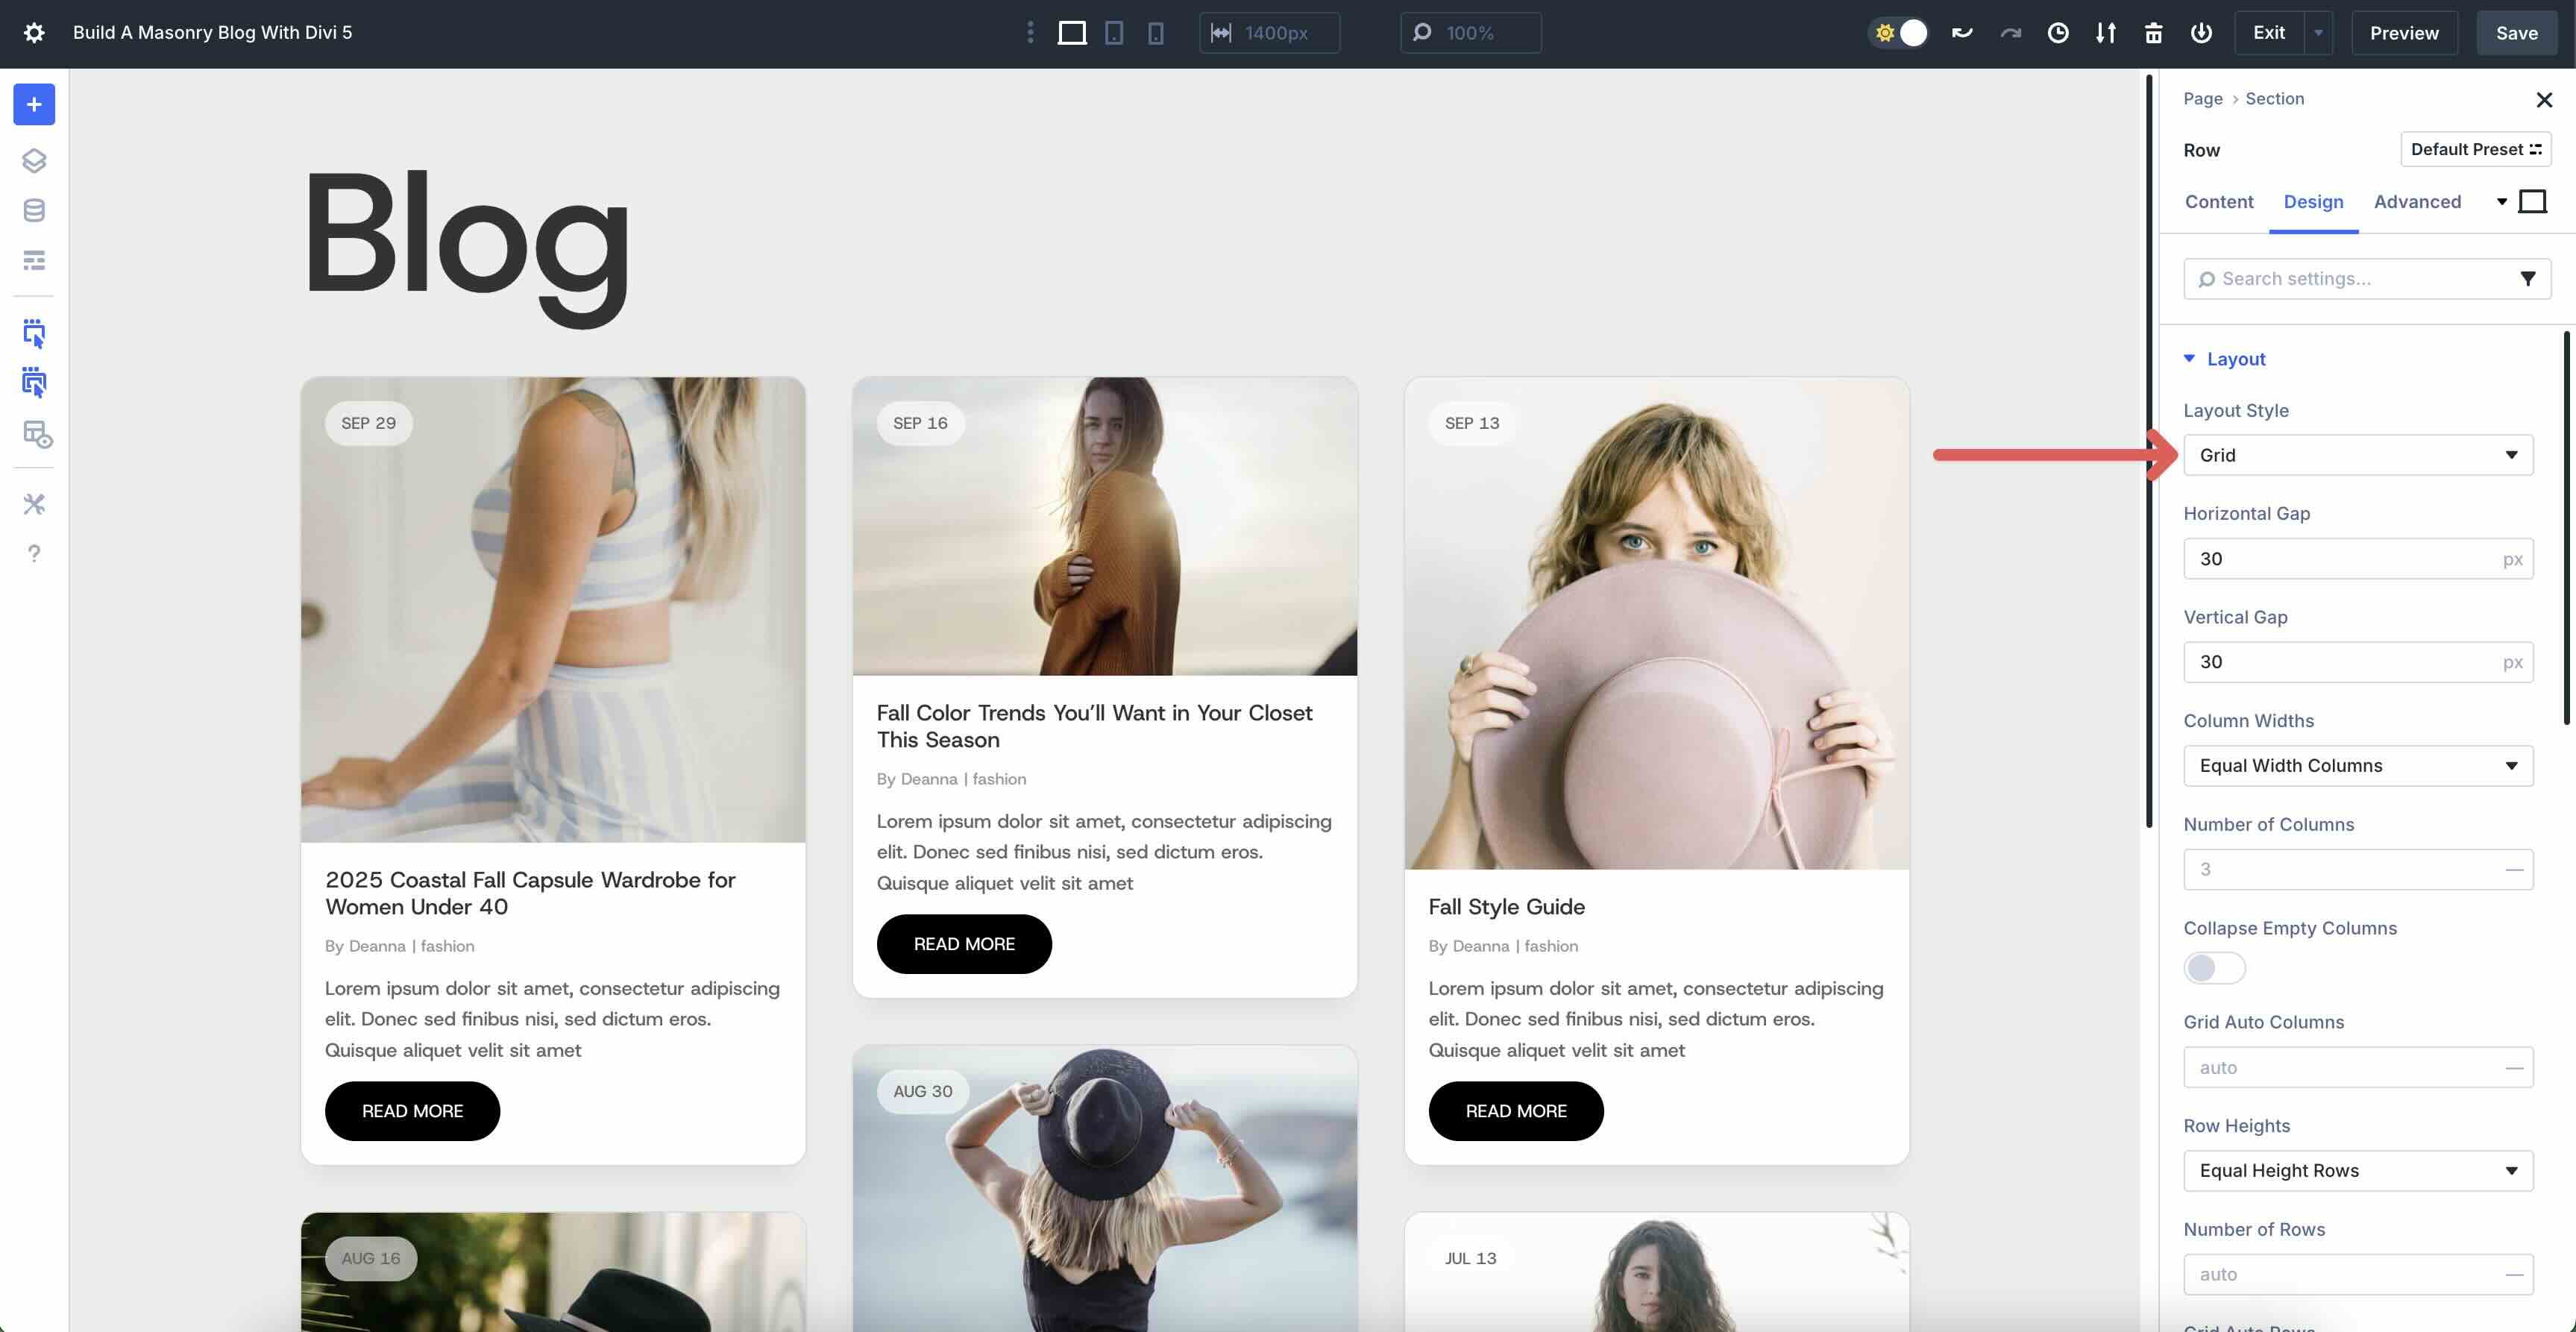
With the Row construction in position, we wish to configure the settings for CSS Grid. With the Row decided on, click on the Design tab. Enlarge the Format menu and make a choice Grid because the Format Taste. Upload a 30px Horizontal and Vertical Hole for the row.
Underneath Column Widths, make a choice Equivalent Width Columns and set the Choice of Columns to 3. Make a selection Equivalent Top Rows for the Row Heights box.

Make a selection Row for the Grid Route and Dense for the Grid Density. Choose Get started for Justify Content material, and make a choice Stretch for Align Pieces, Align Content material, and Justify Pieces.
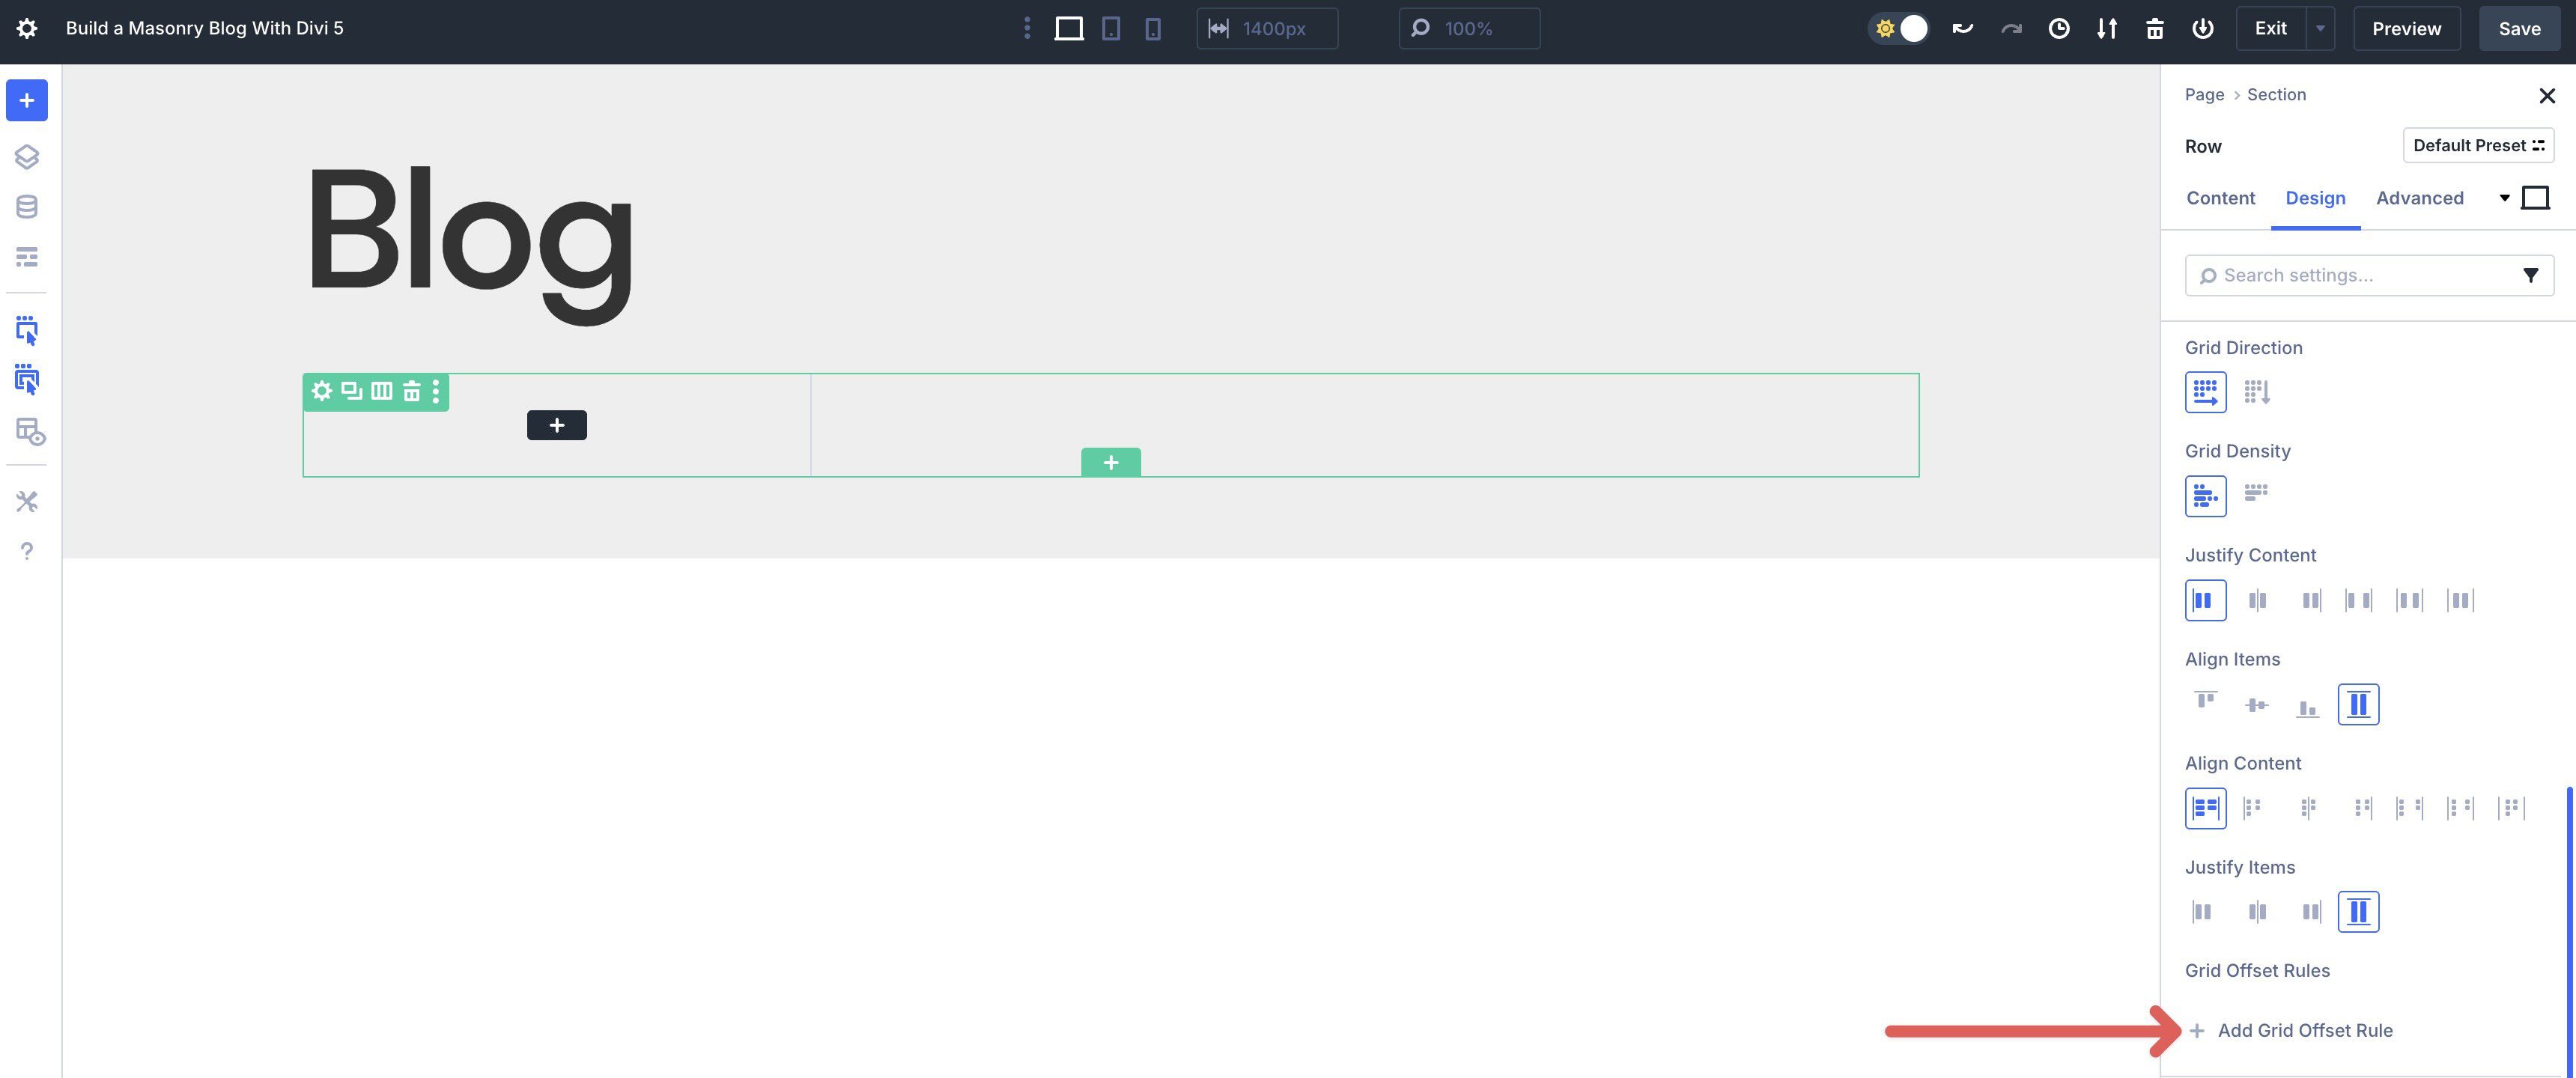
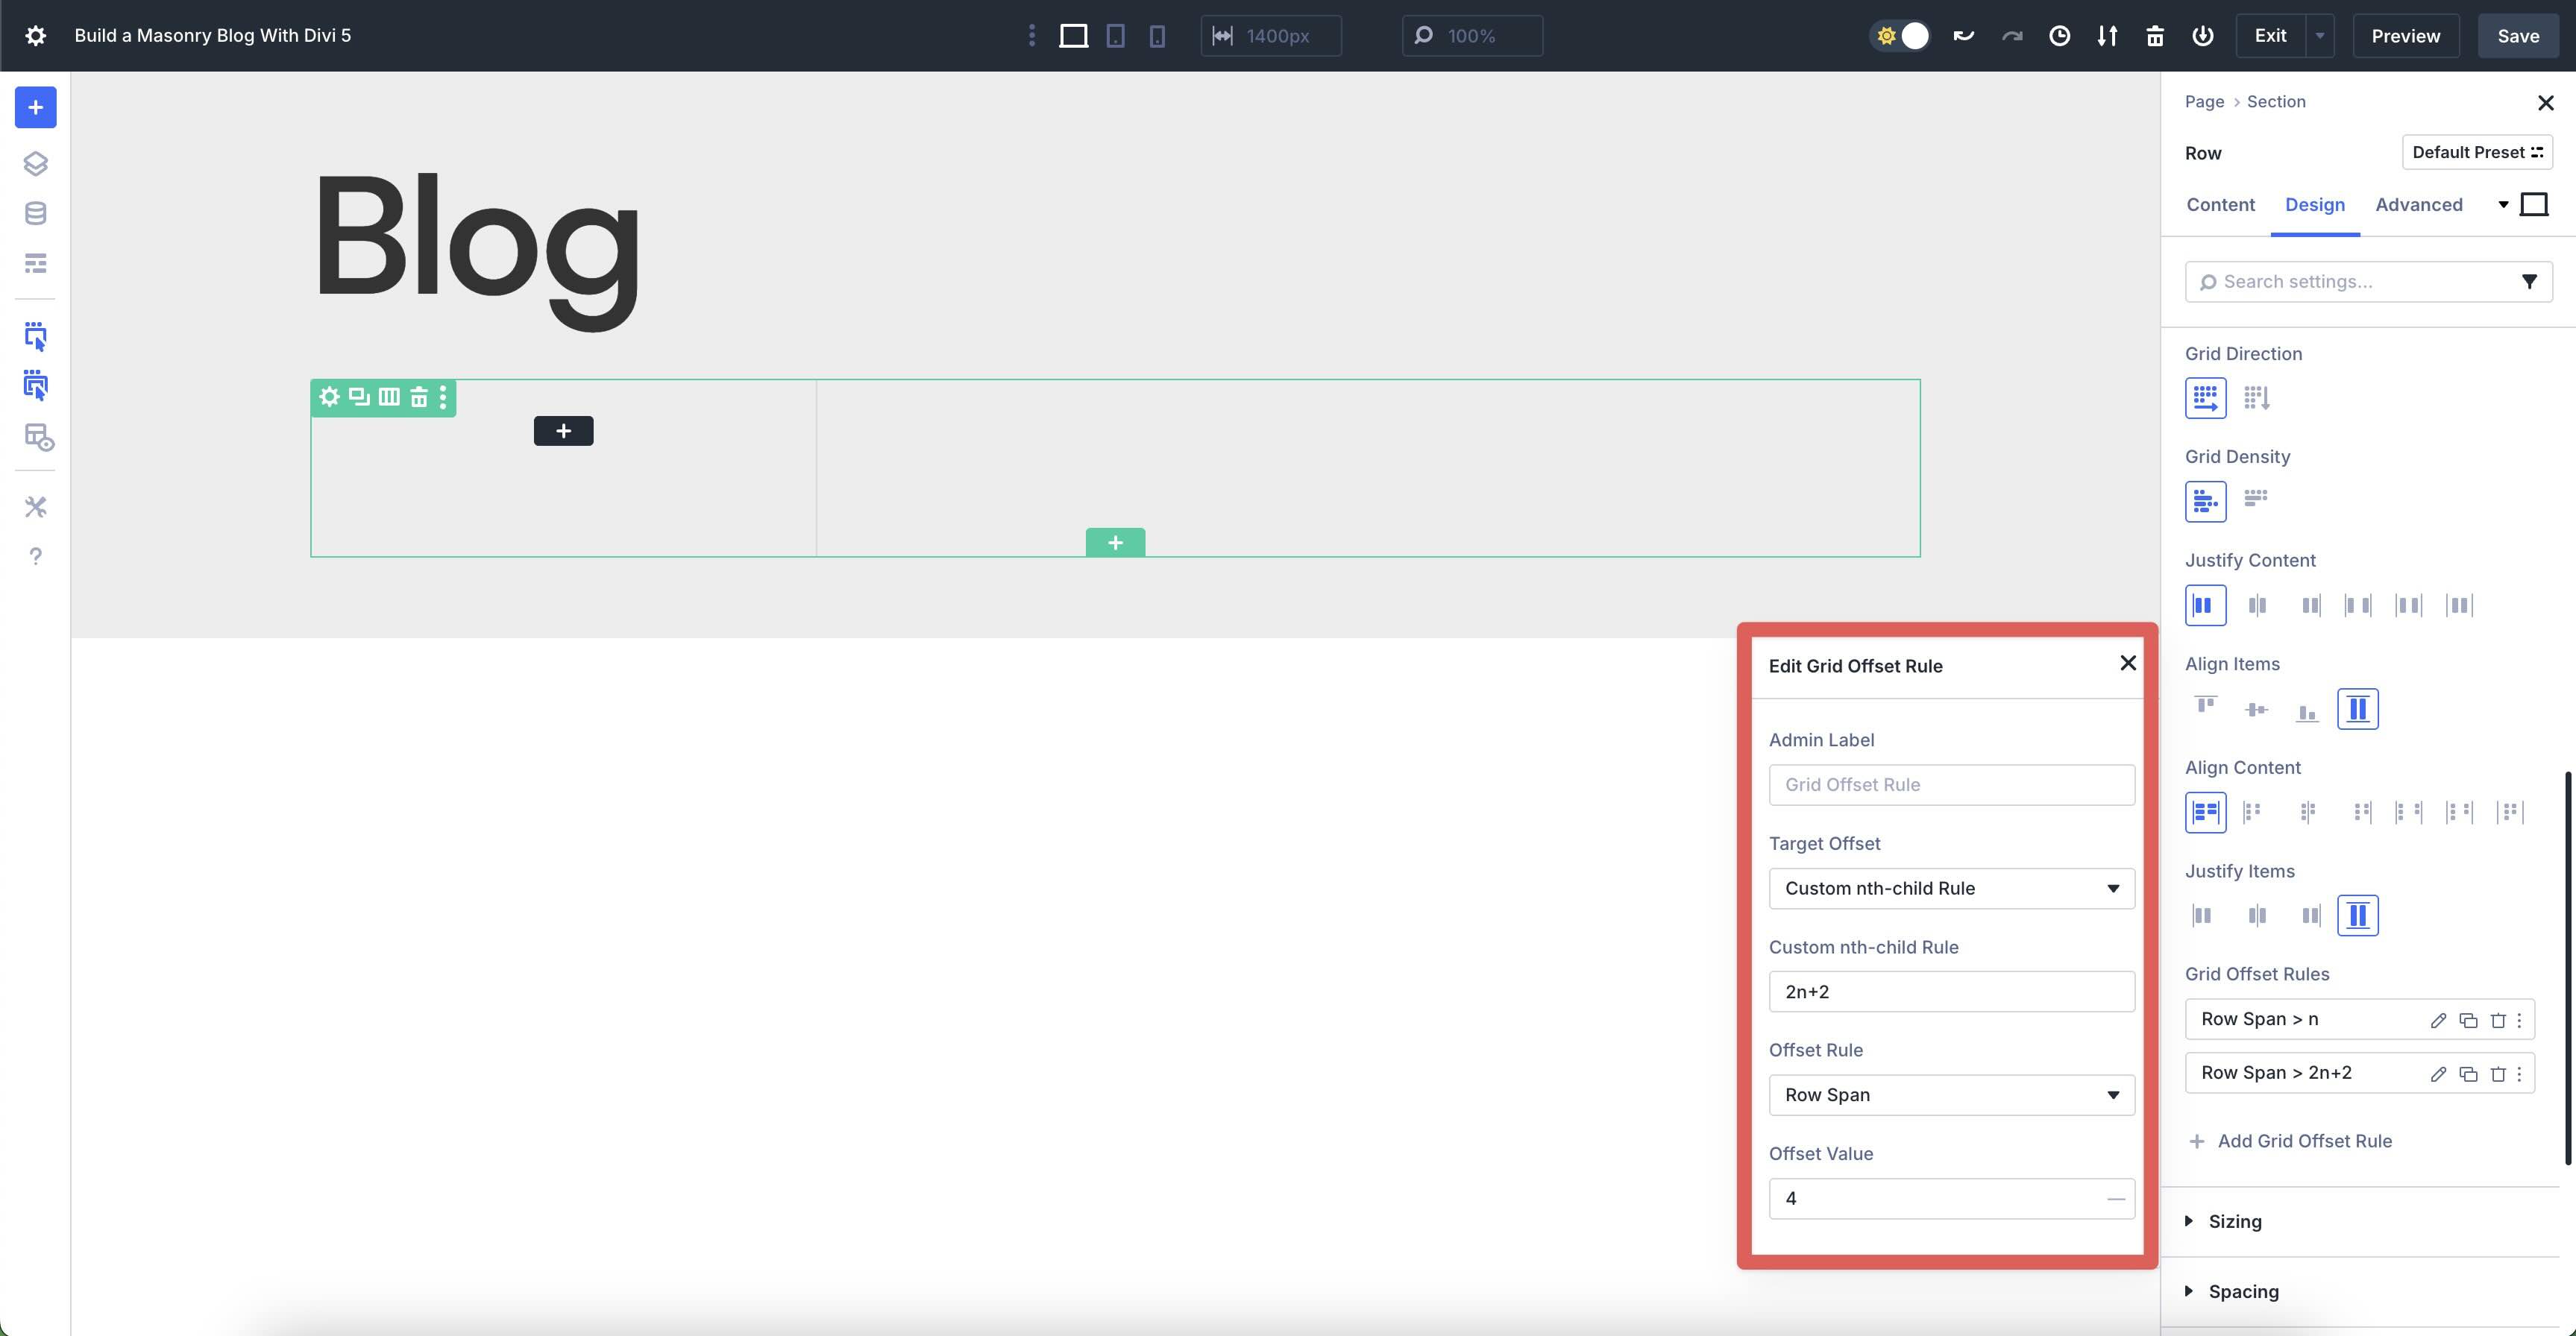
Create Grid Offset Regulations
Subsequent, we’ll arrange a few Grid Offset Regulations for our Grid. Grid Offset Regulations assist you practice centered changes to precise pieces inside your Grid, corresponding to making each nth merchandise span more than one columns, moving positions, or resizing mechanically, with out requiring customized CSS.
To create a brand new Rule, click on the + Upload Grid Offset Rule button.
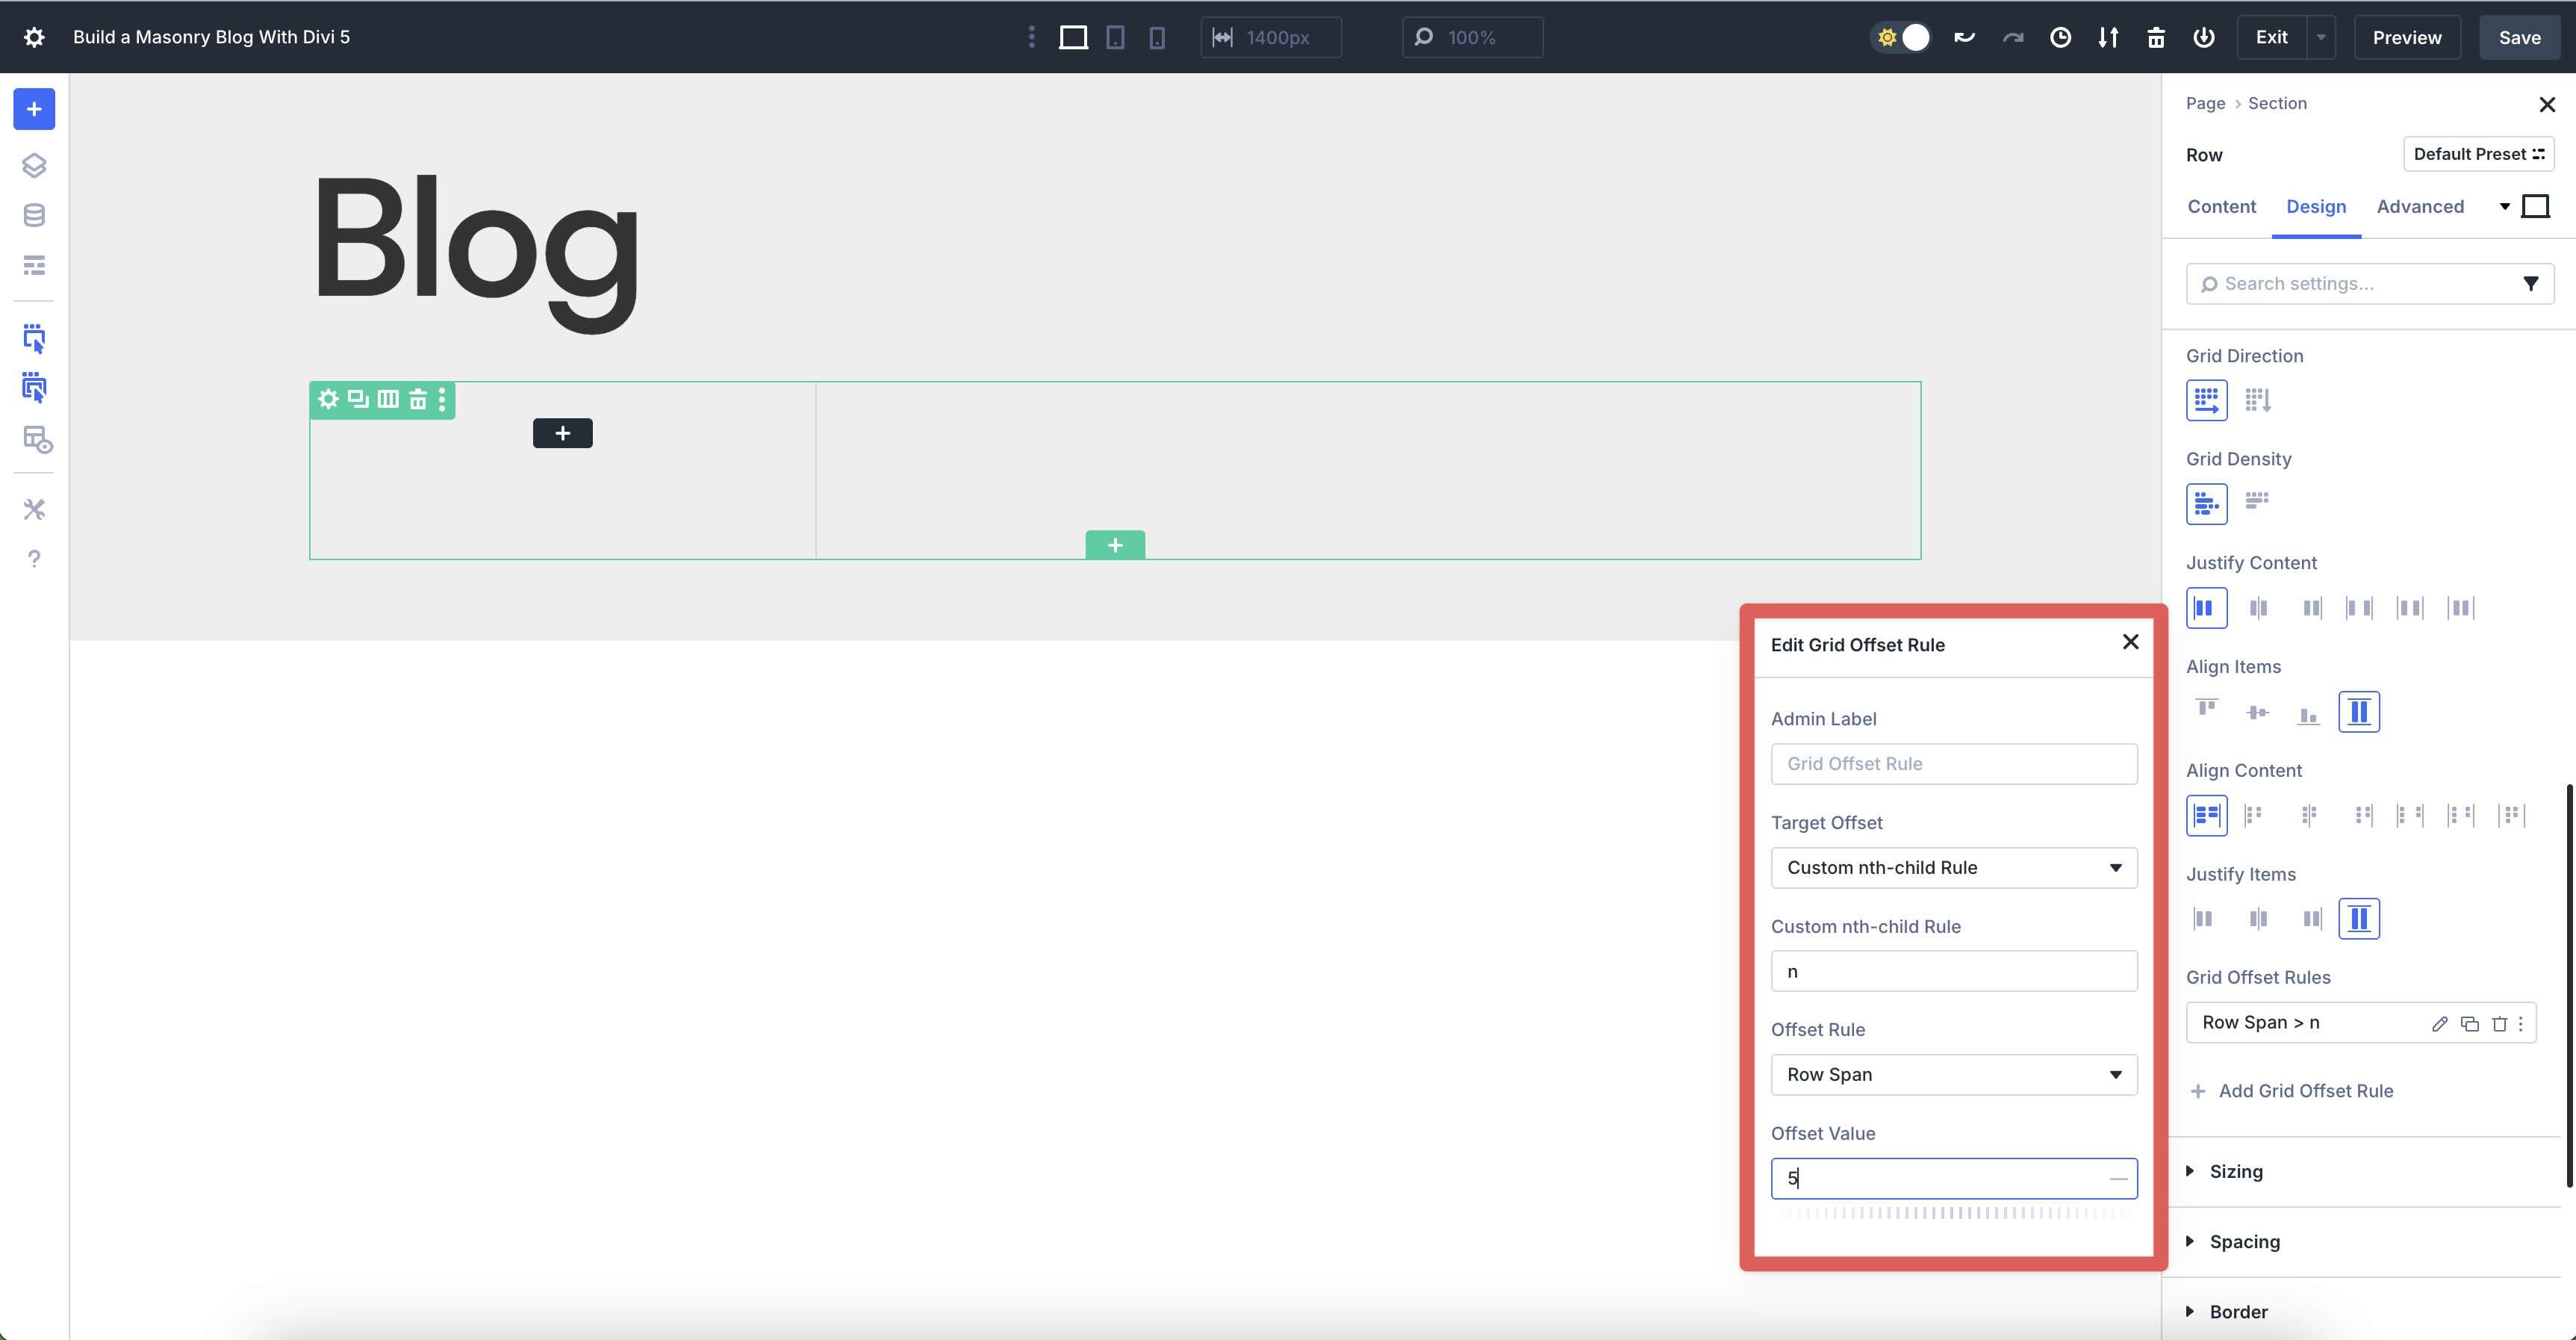
Use the next settings for the primary rule:
- Goal Offset: Customized nth-child Rule
- Customized nth-child Rule: n
- Offset Rule: Row Span
- Offset Worth: 5
We’ll upload a 2d Offset Rule with the next settings:
- Goal Offset: Customized nth-child Rule
- Customized nth-child Rule: 2n+2
- Offset Rule: Row Span
- Offset Worth: 4
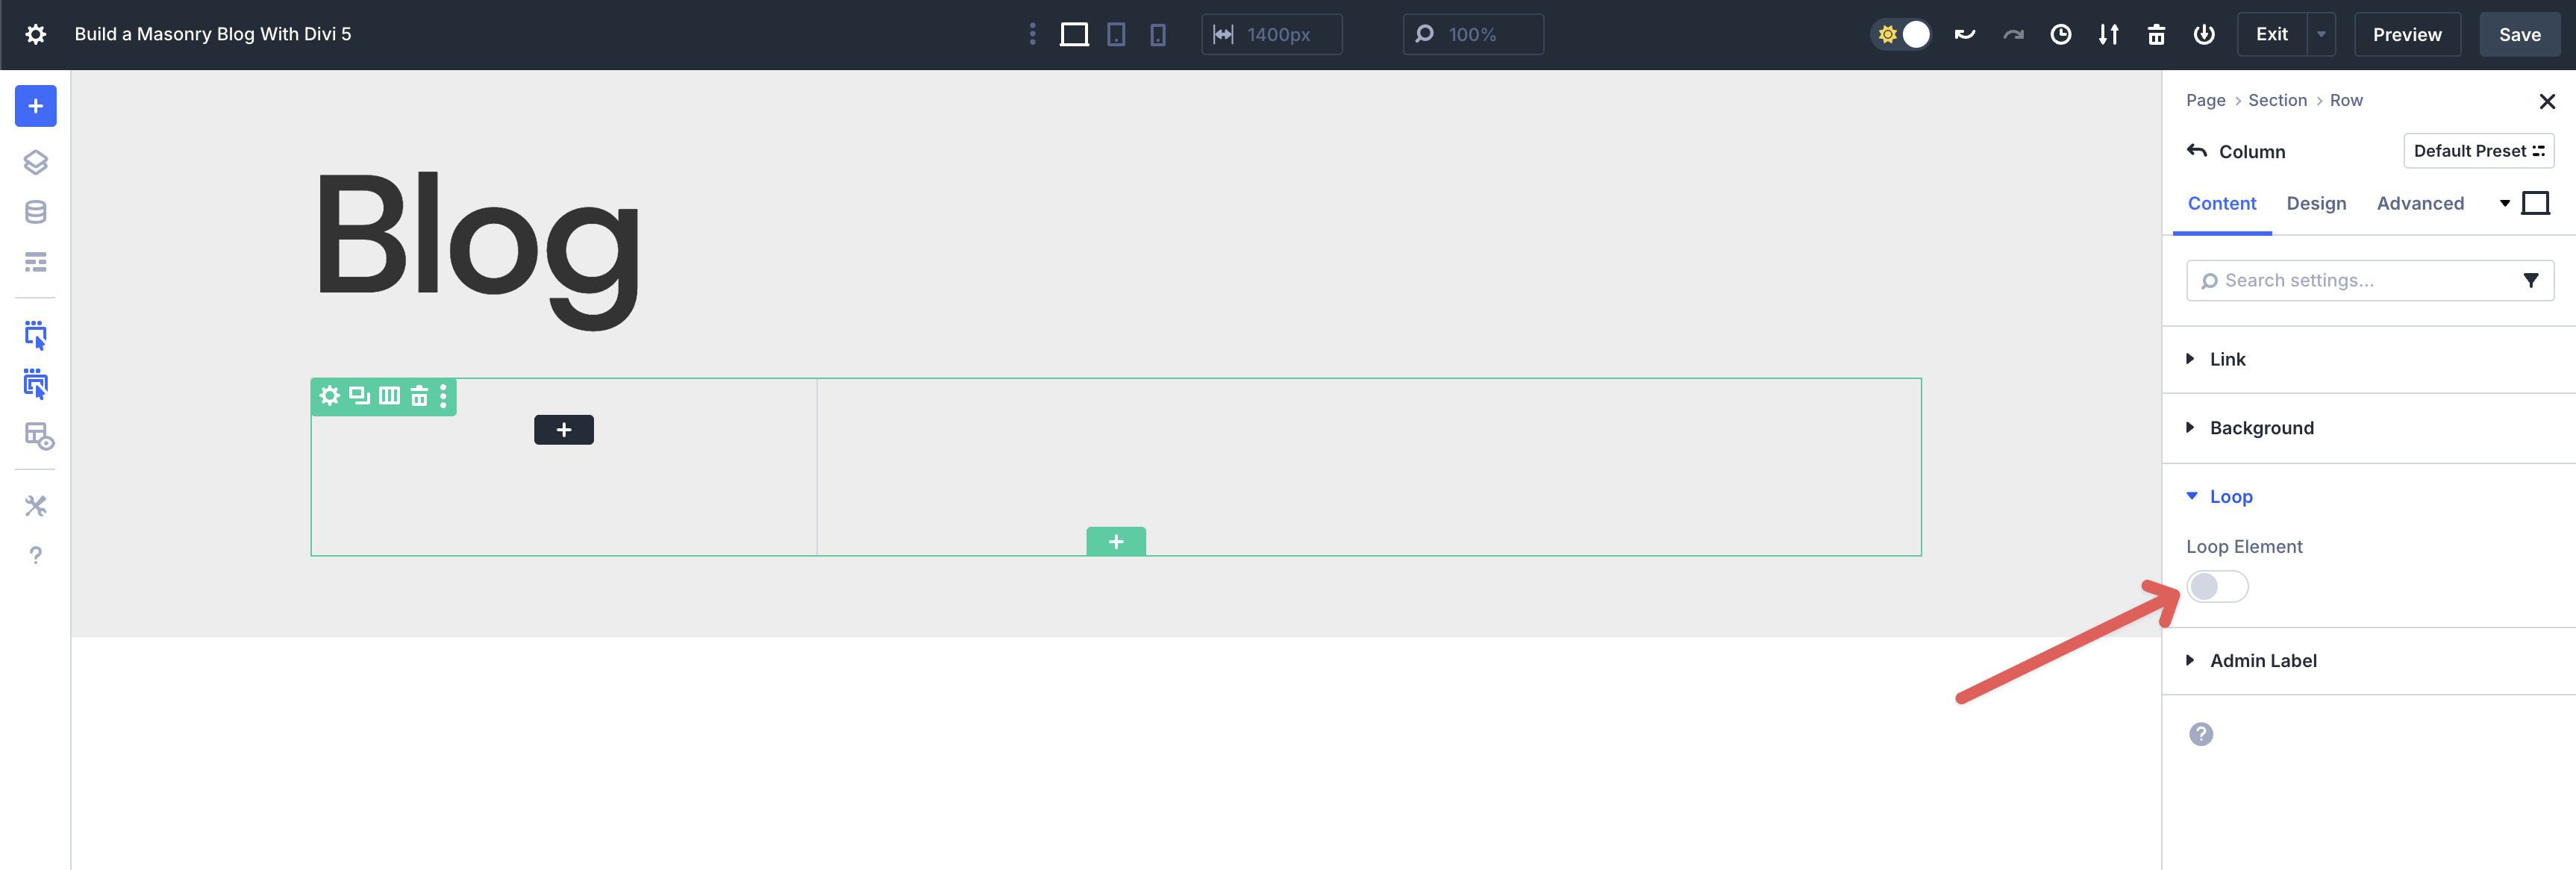
Step 3: Configure The Loop Builder For Dynamic Weblog Posts
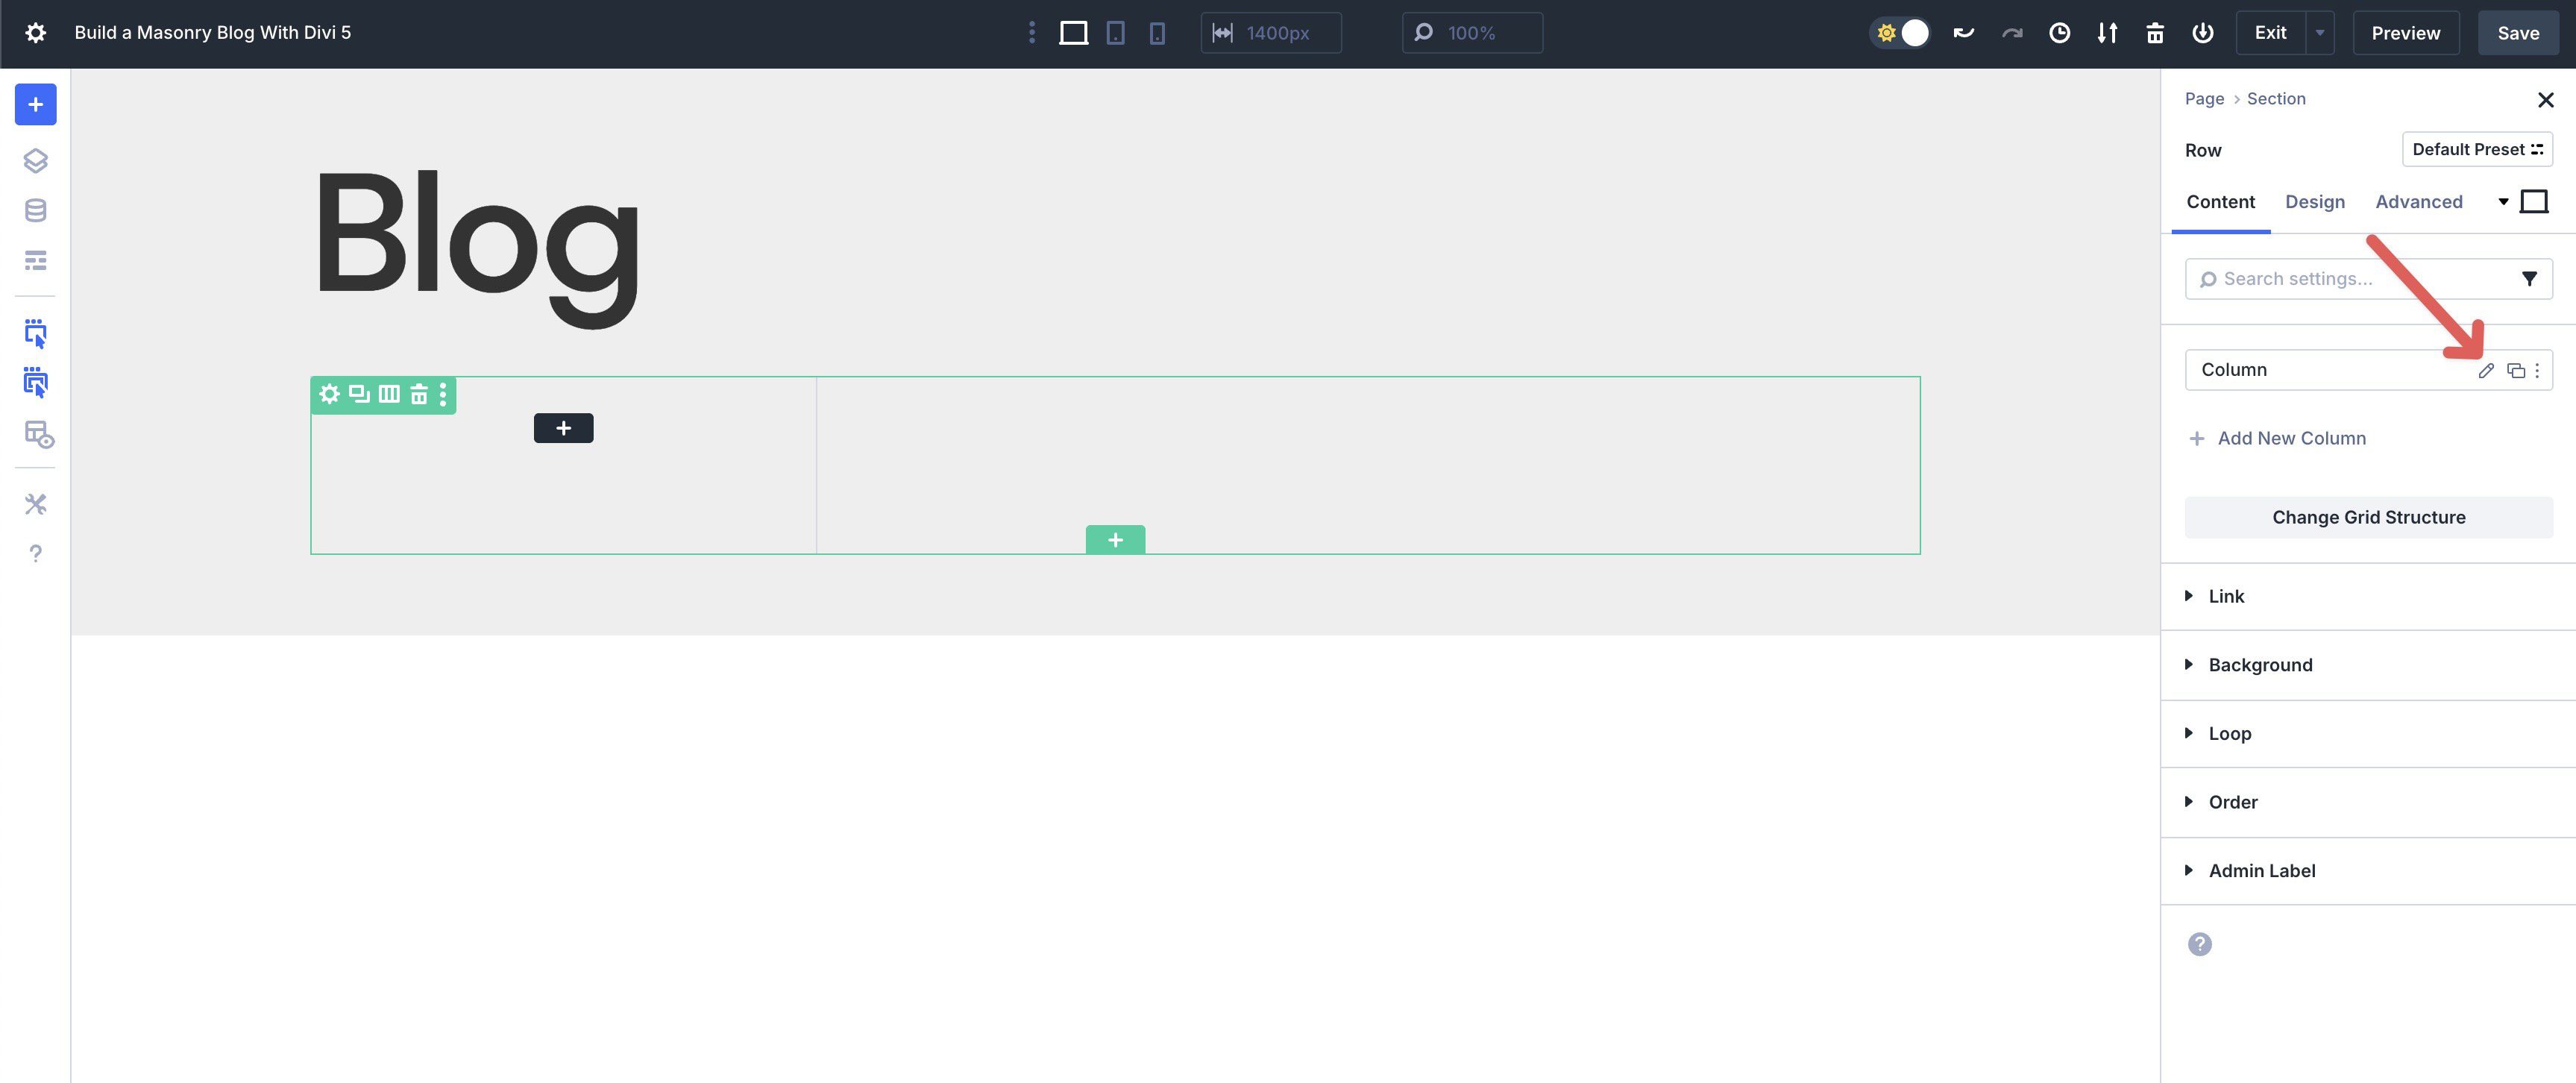
Now that we’ve configured the Grid settings, we wish to arrange our customized Loop. Navigate to the Row’s Content material tab and click on the Column’s pencil icon to show its settings.
Enlarge the Loop dropdown menu and allow the Loop Component toggle.
When the choices seem, set the Question Kind to Publish Kind (decided on through default) and make a choice Posts for the Publish Kind.
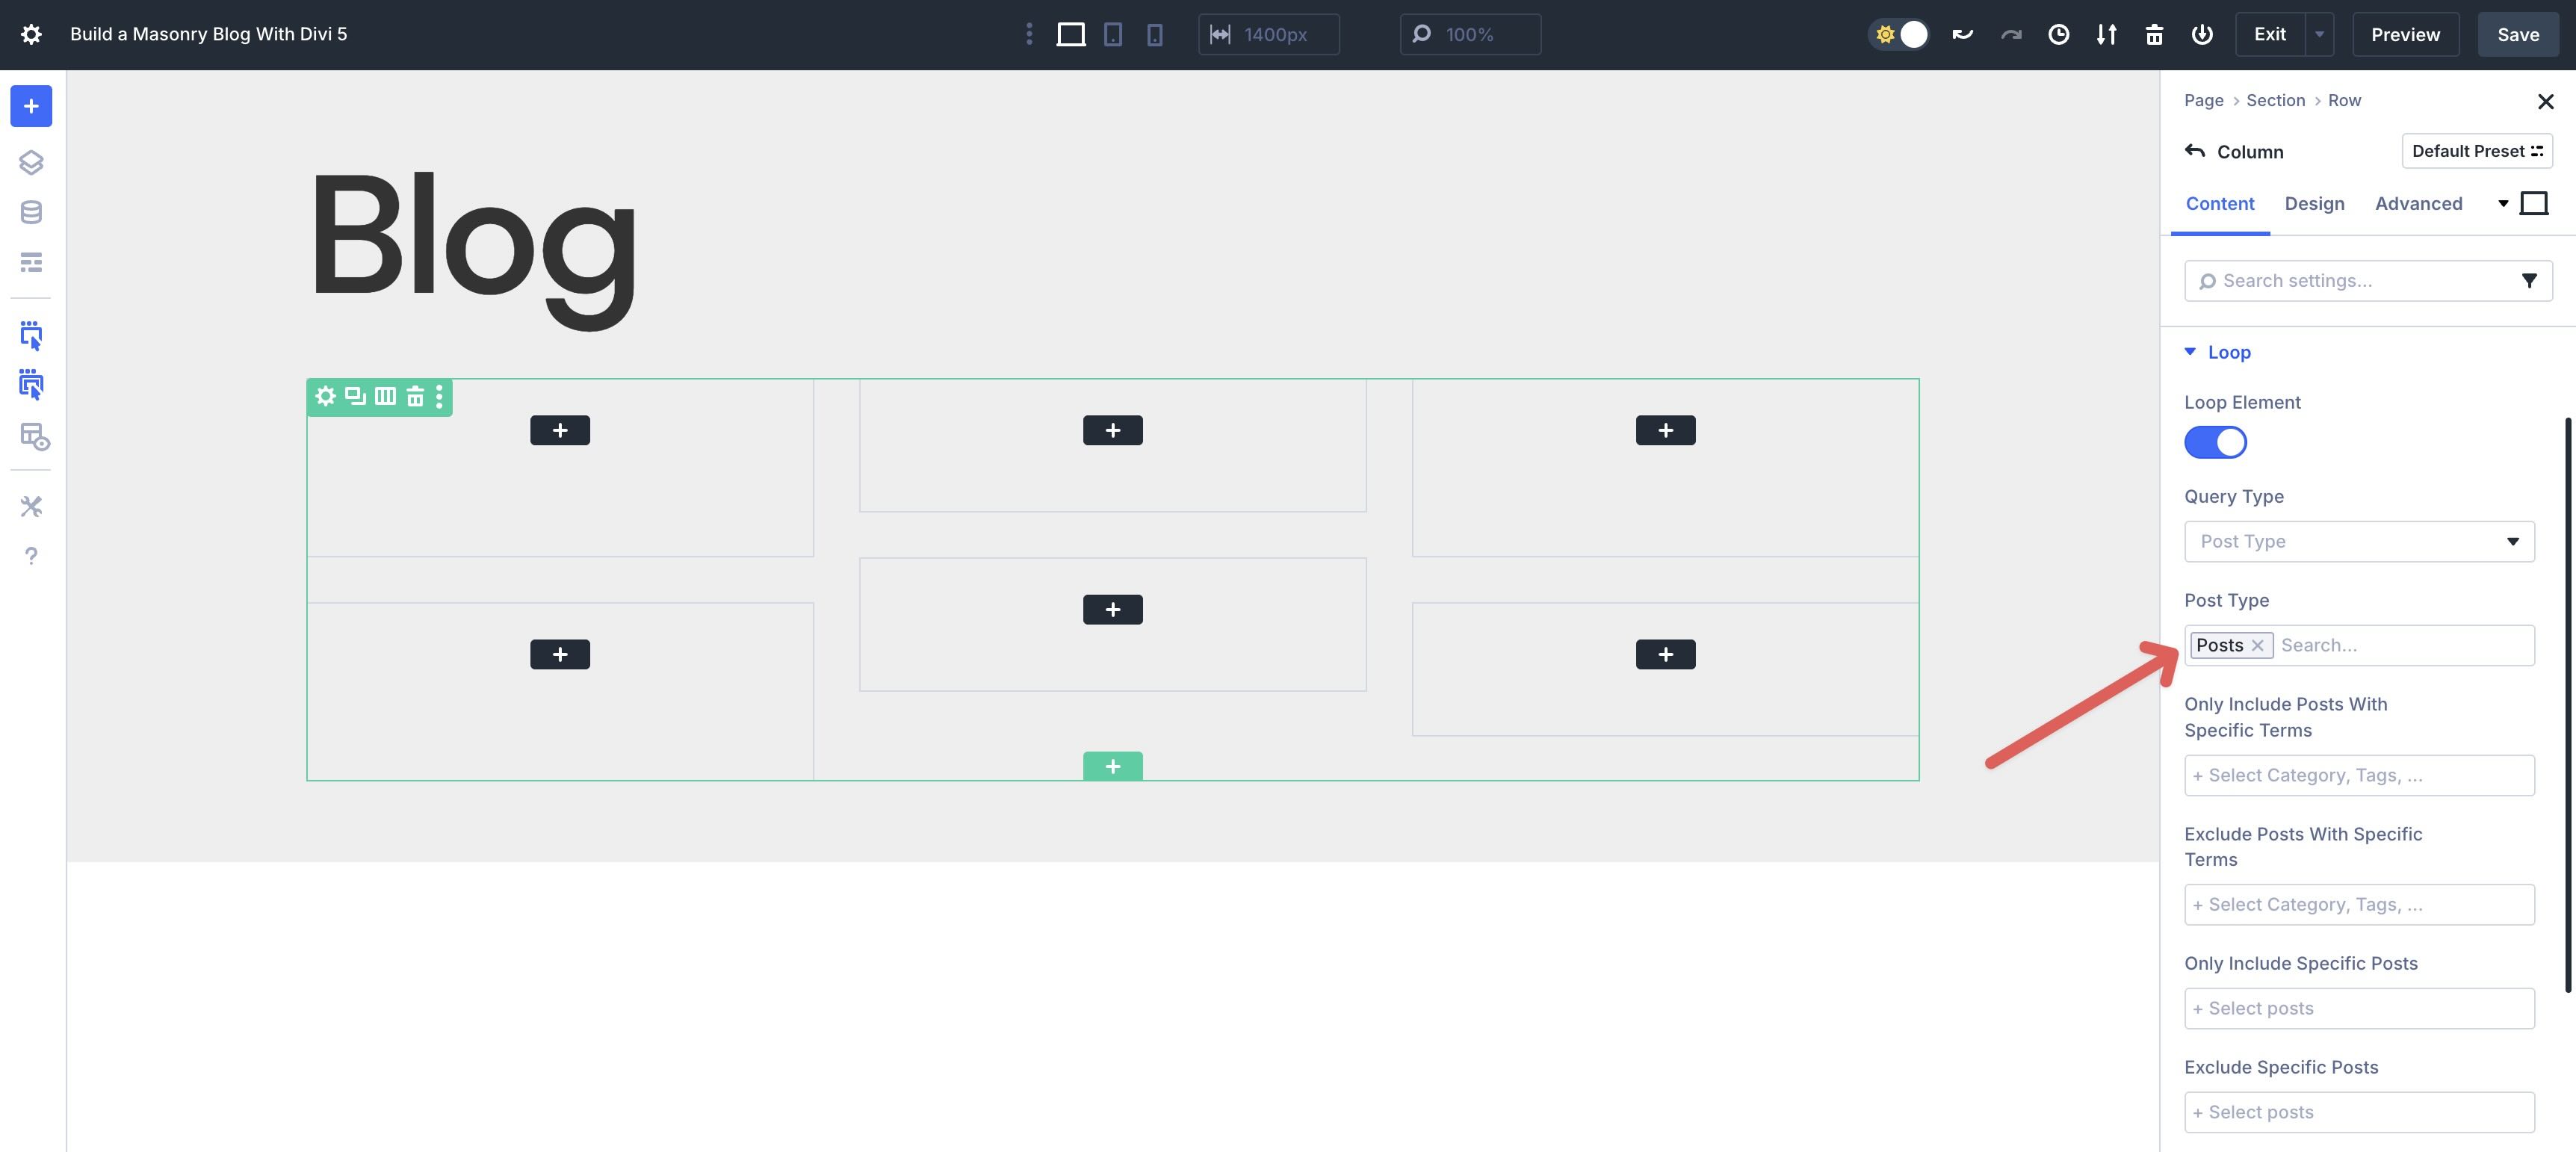
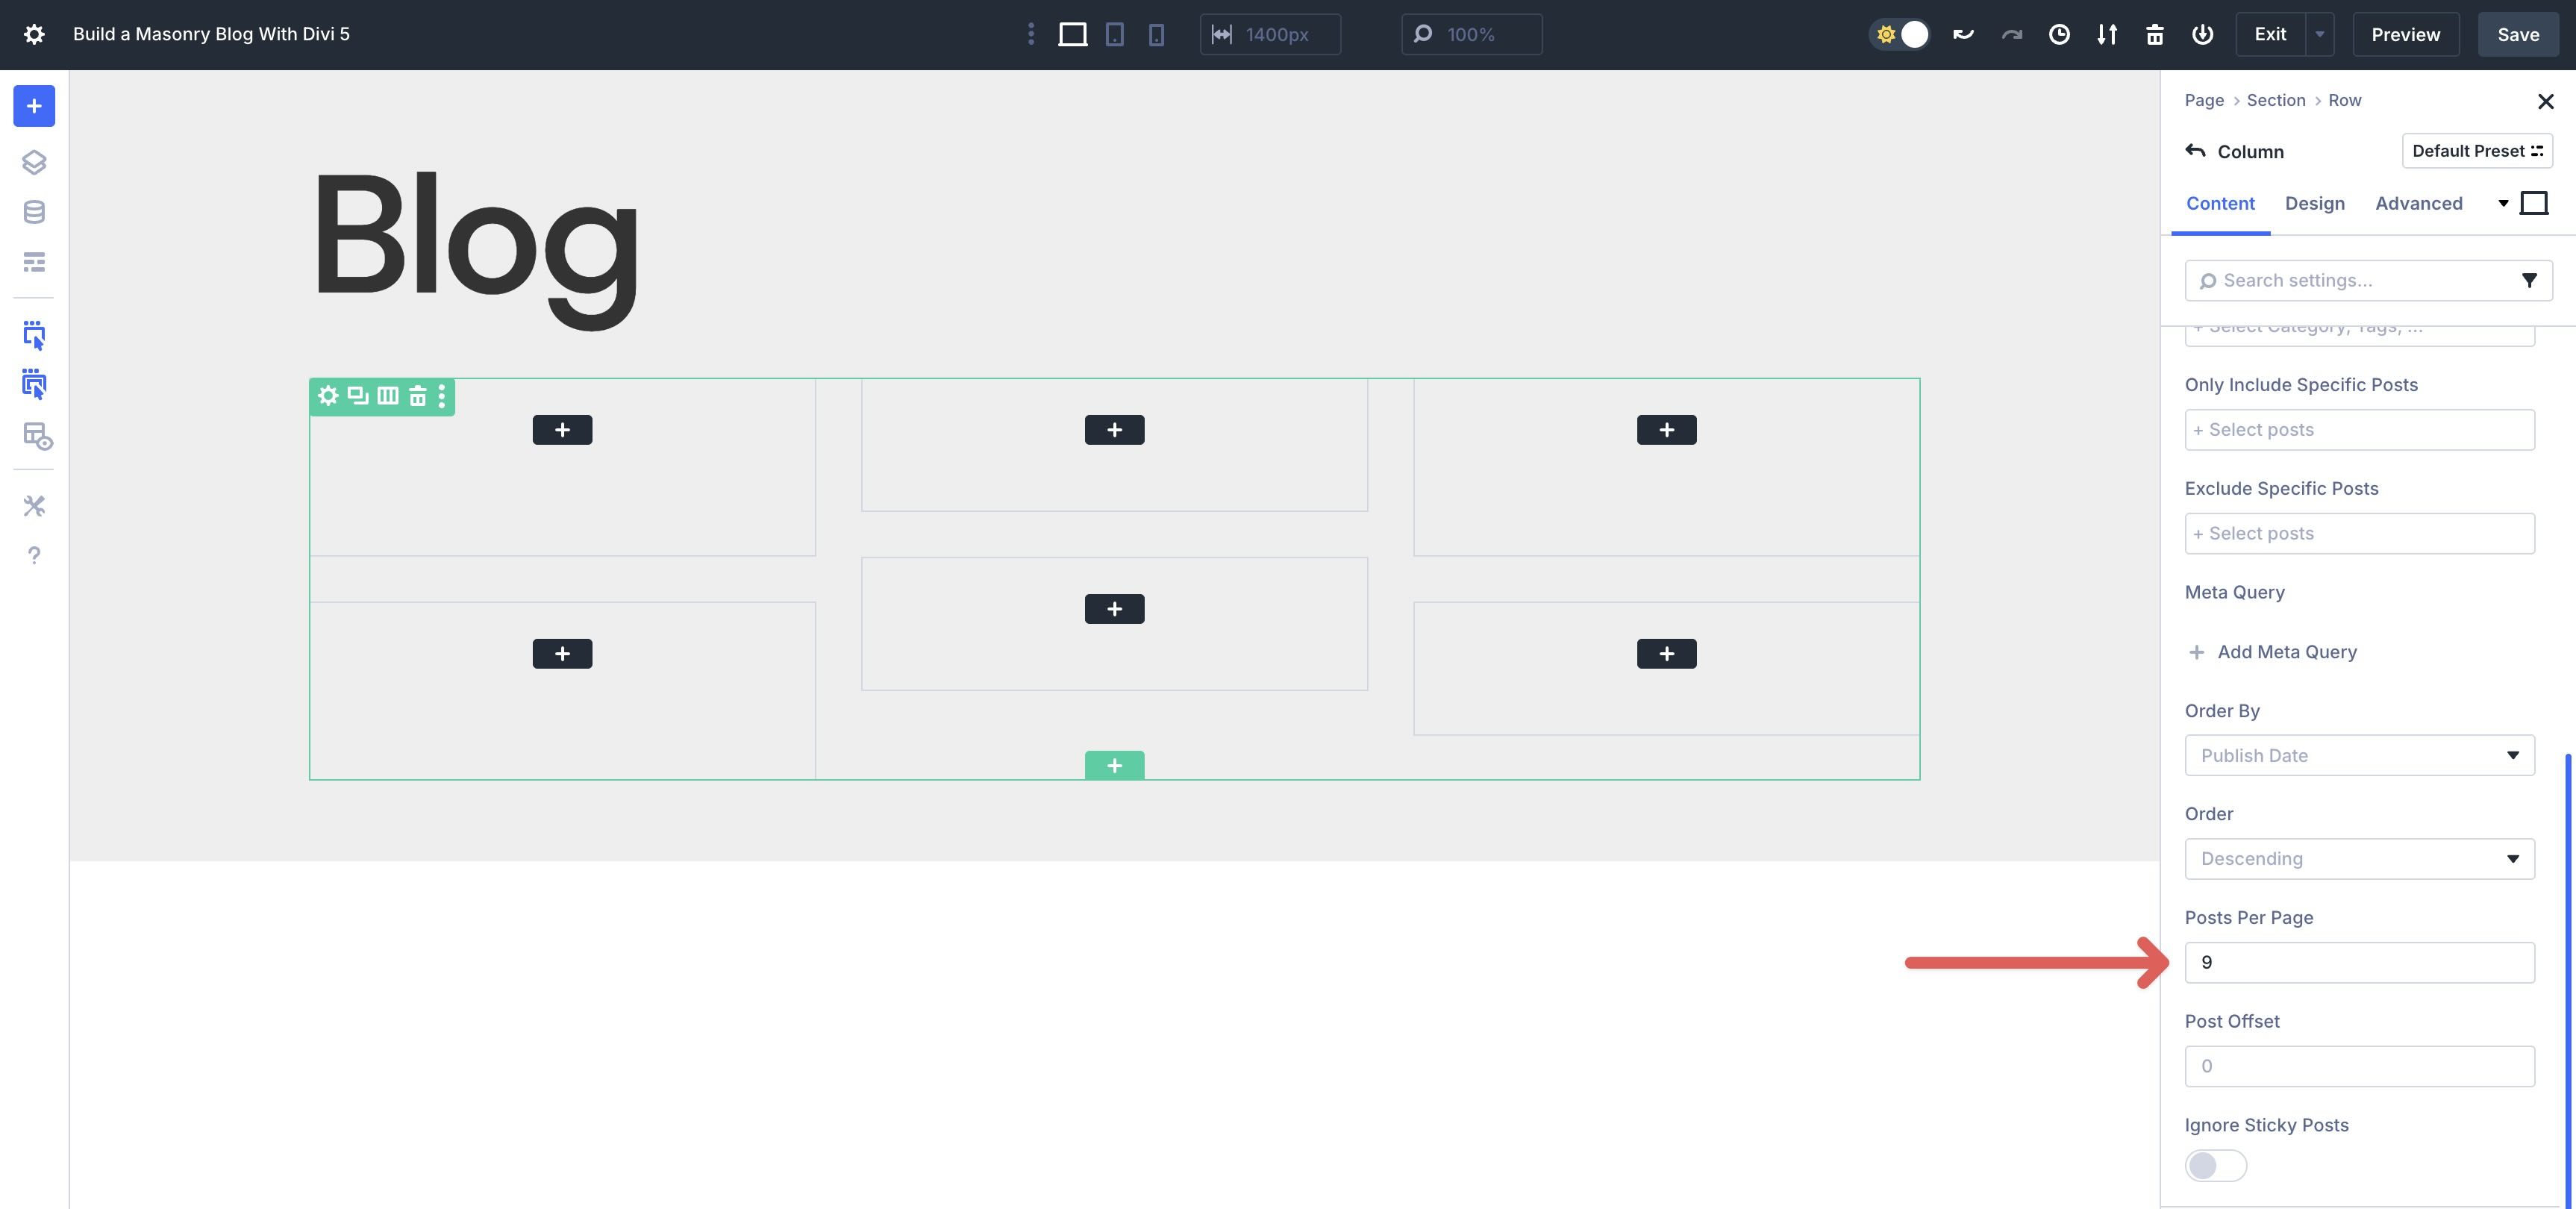
Scroll down and find the Posts In line with Web page box and input 9 as the worth.
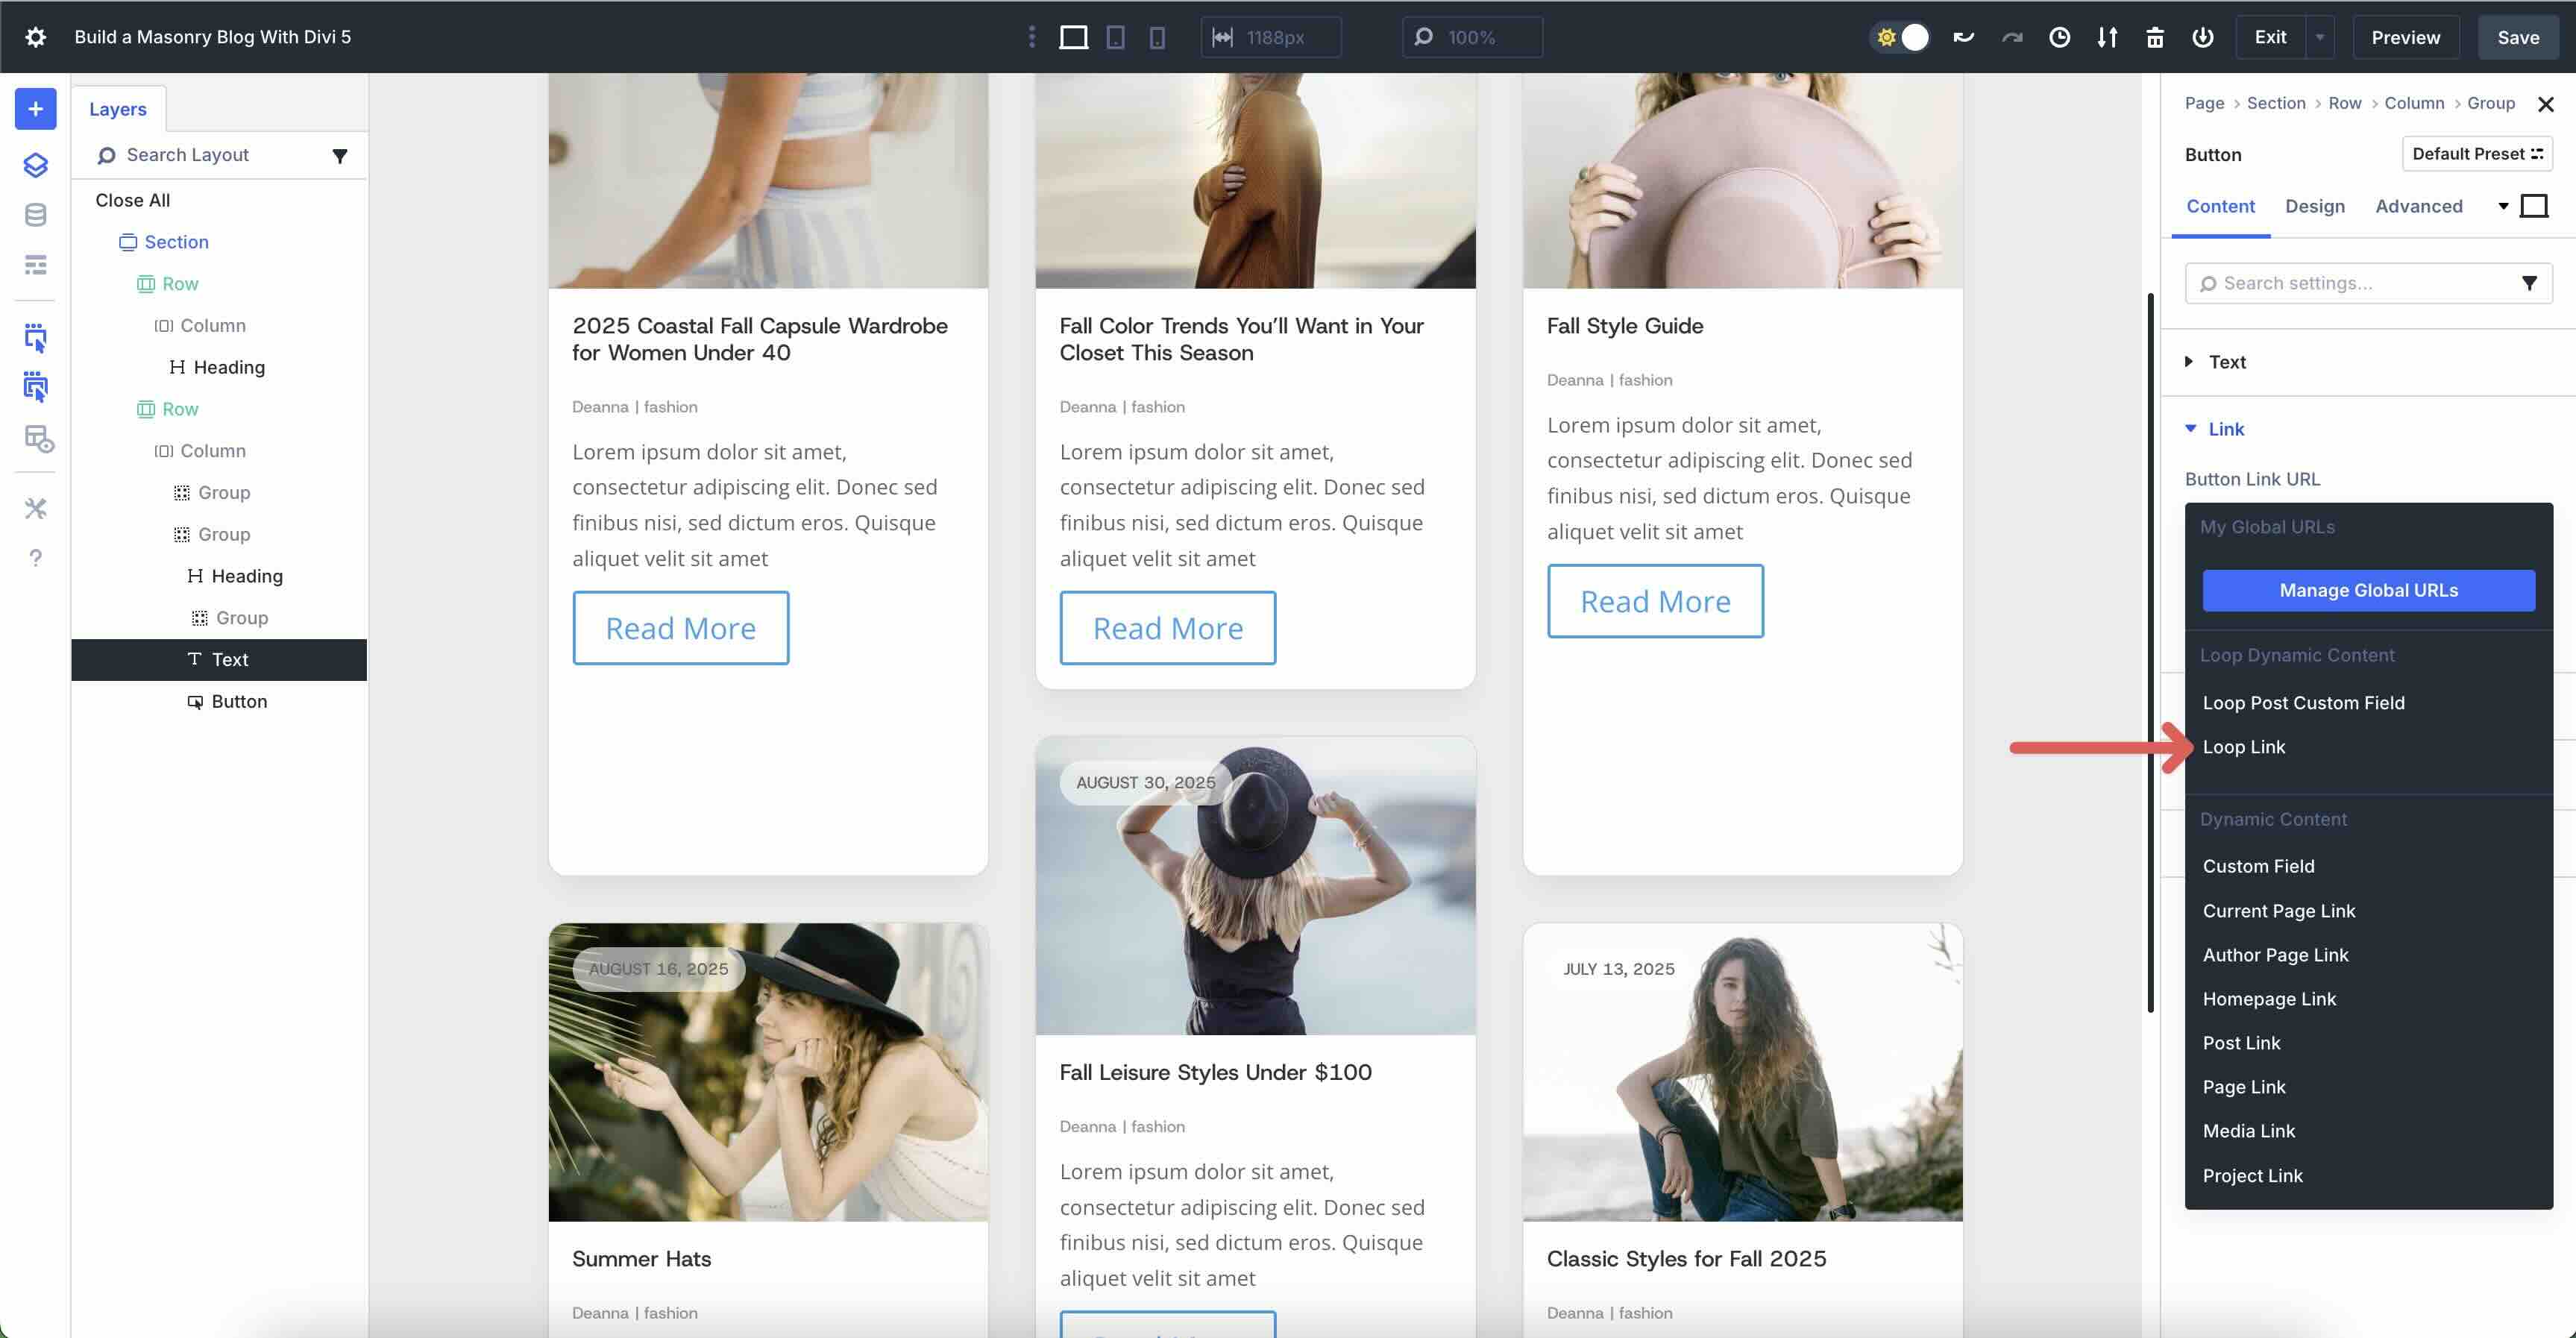
The general step is so as to add a Loop Hyperlink, so when somebody clicks on a Grid merchandise, they’ll be mechanically directed to the corresponding publish.
Scroll as much as find the Hyperlink dropdown menu and make bigger it. Click on the dynamic content material icon and make a choice Loop Hyperlink from the to be had choices.
Step 4: Design The Looped Merchandise
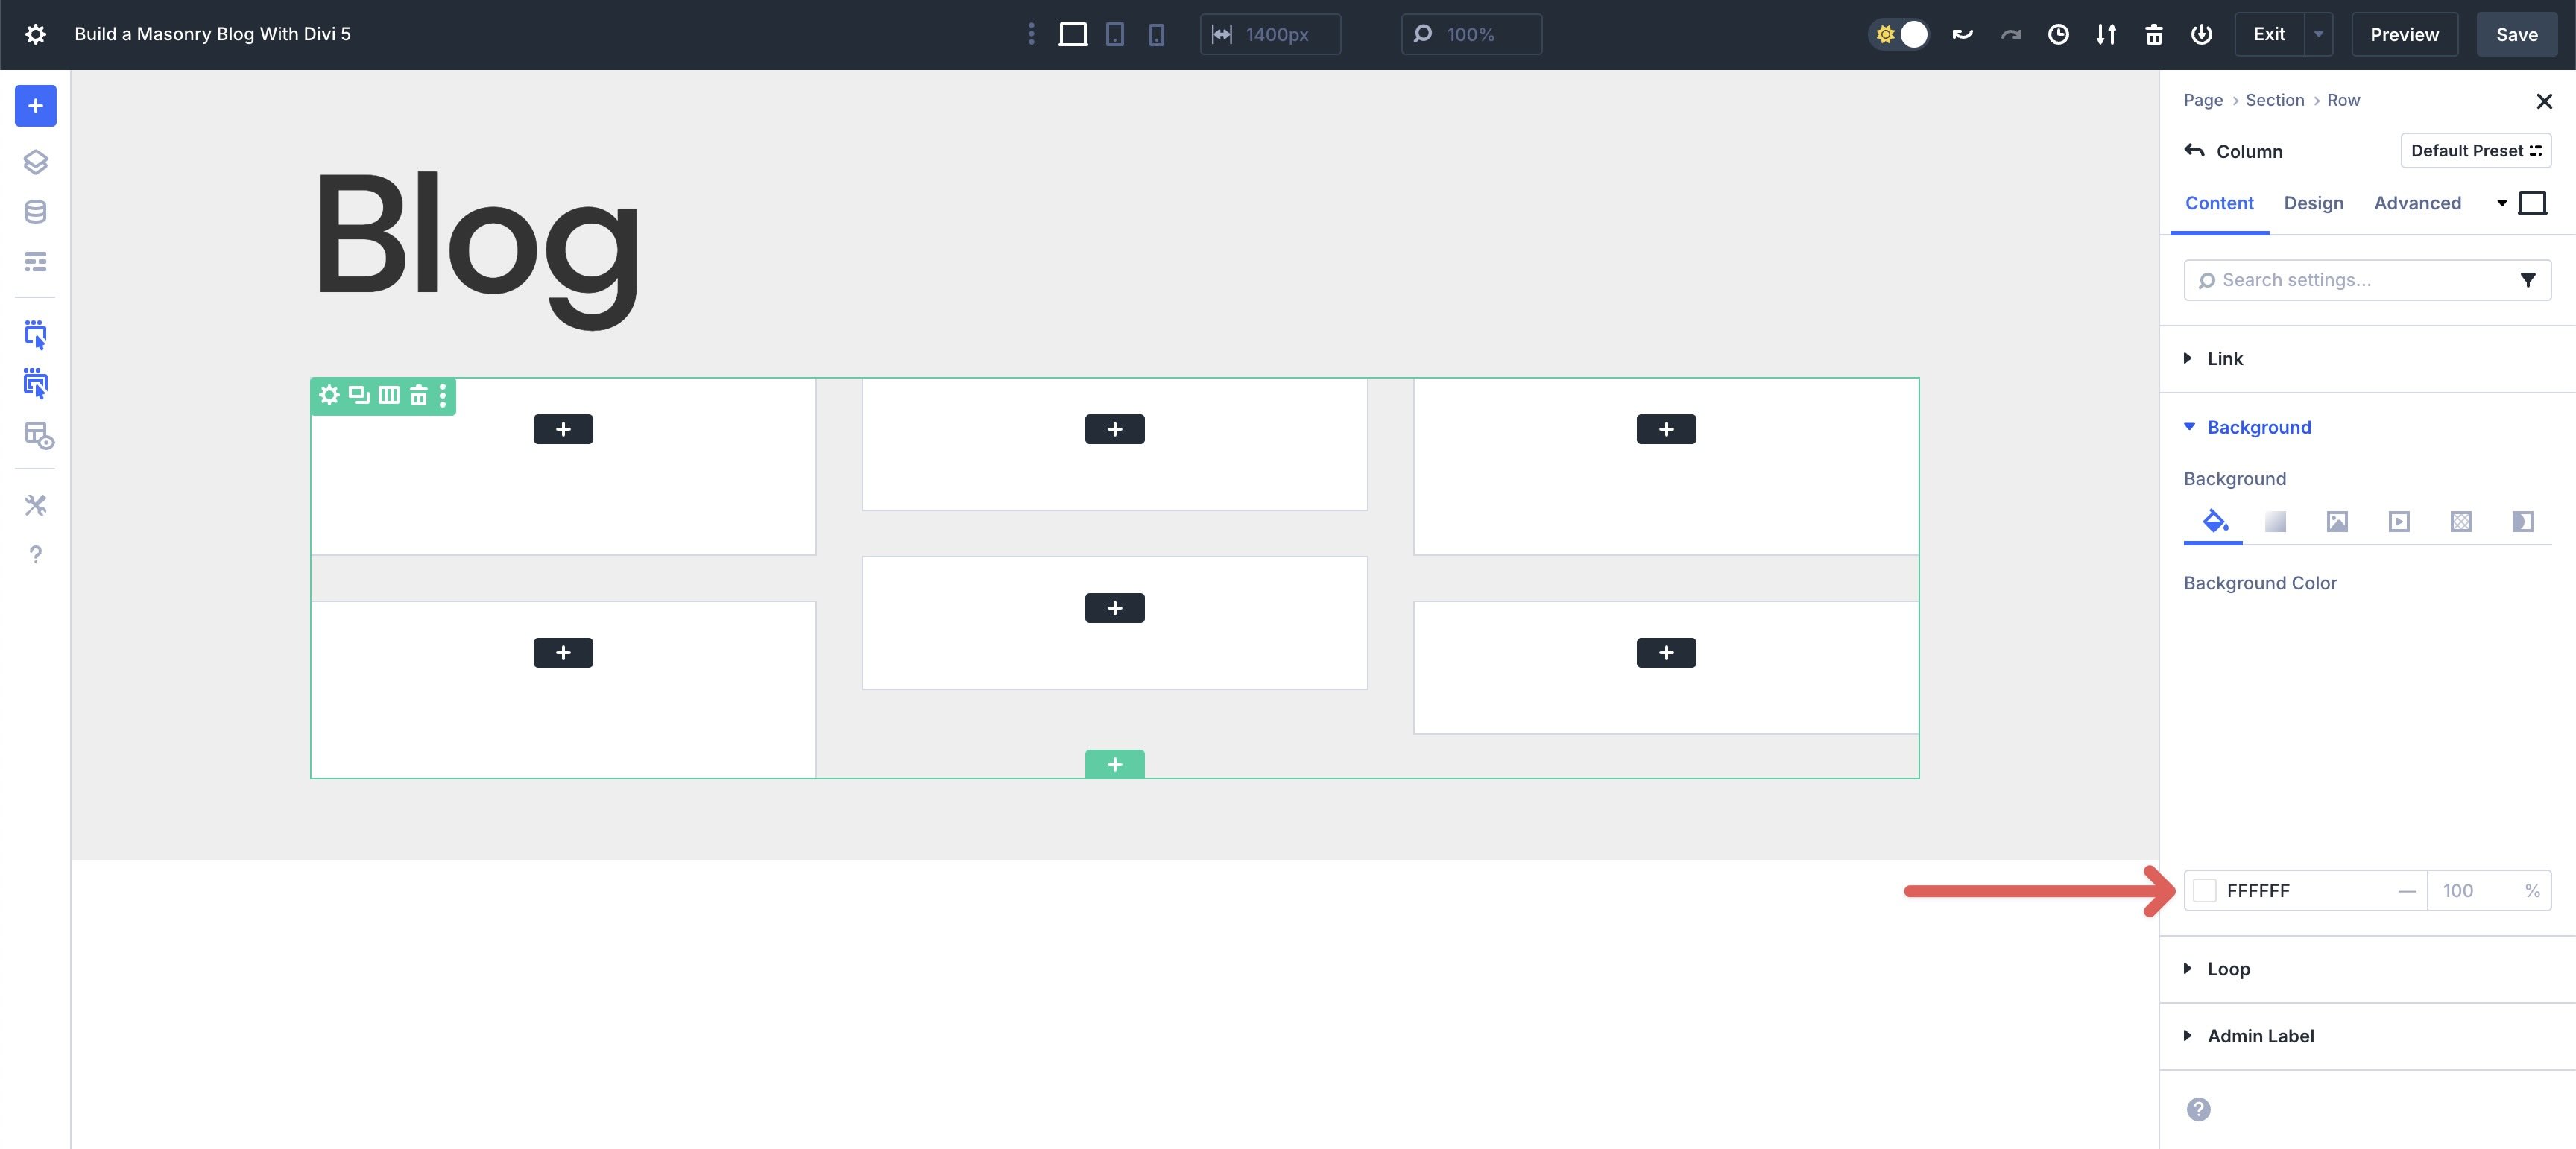
Now, we will be able to get started designing the structure. Whilst within the Column’s settings, click on to make bigger the Background menu. Assign #ffffff because the Background Colour.
Subsequent, navigate to the Design tab. Enlarge the Format menu and set the Horizontal and Vertical Hole to 0. Depart all different Flex settings as is.

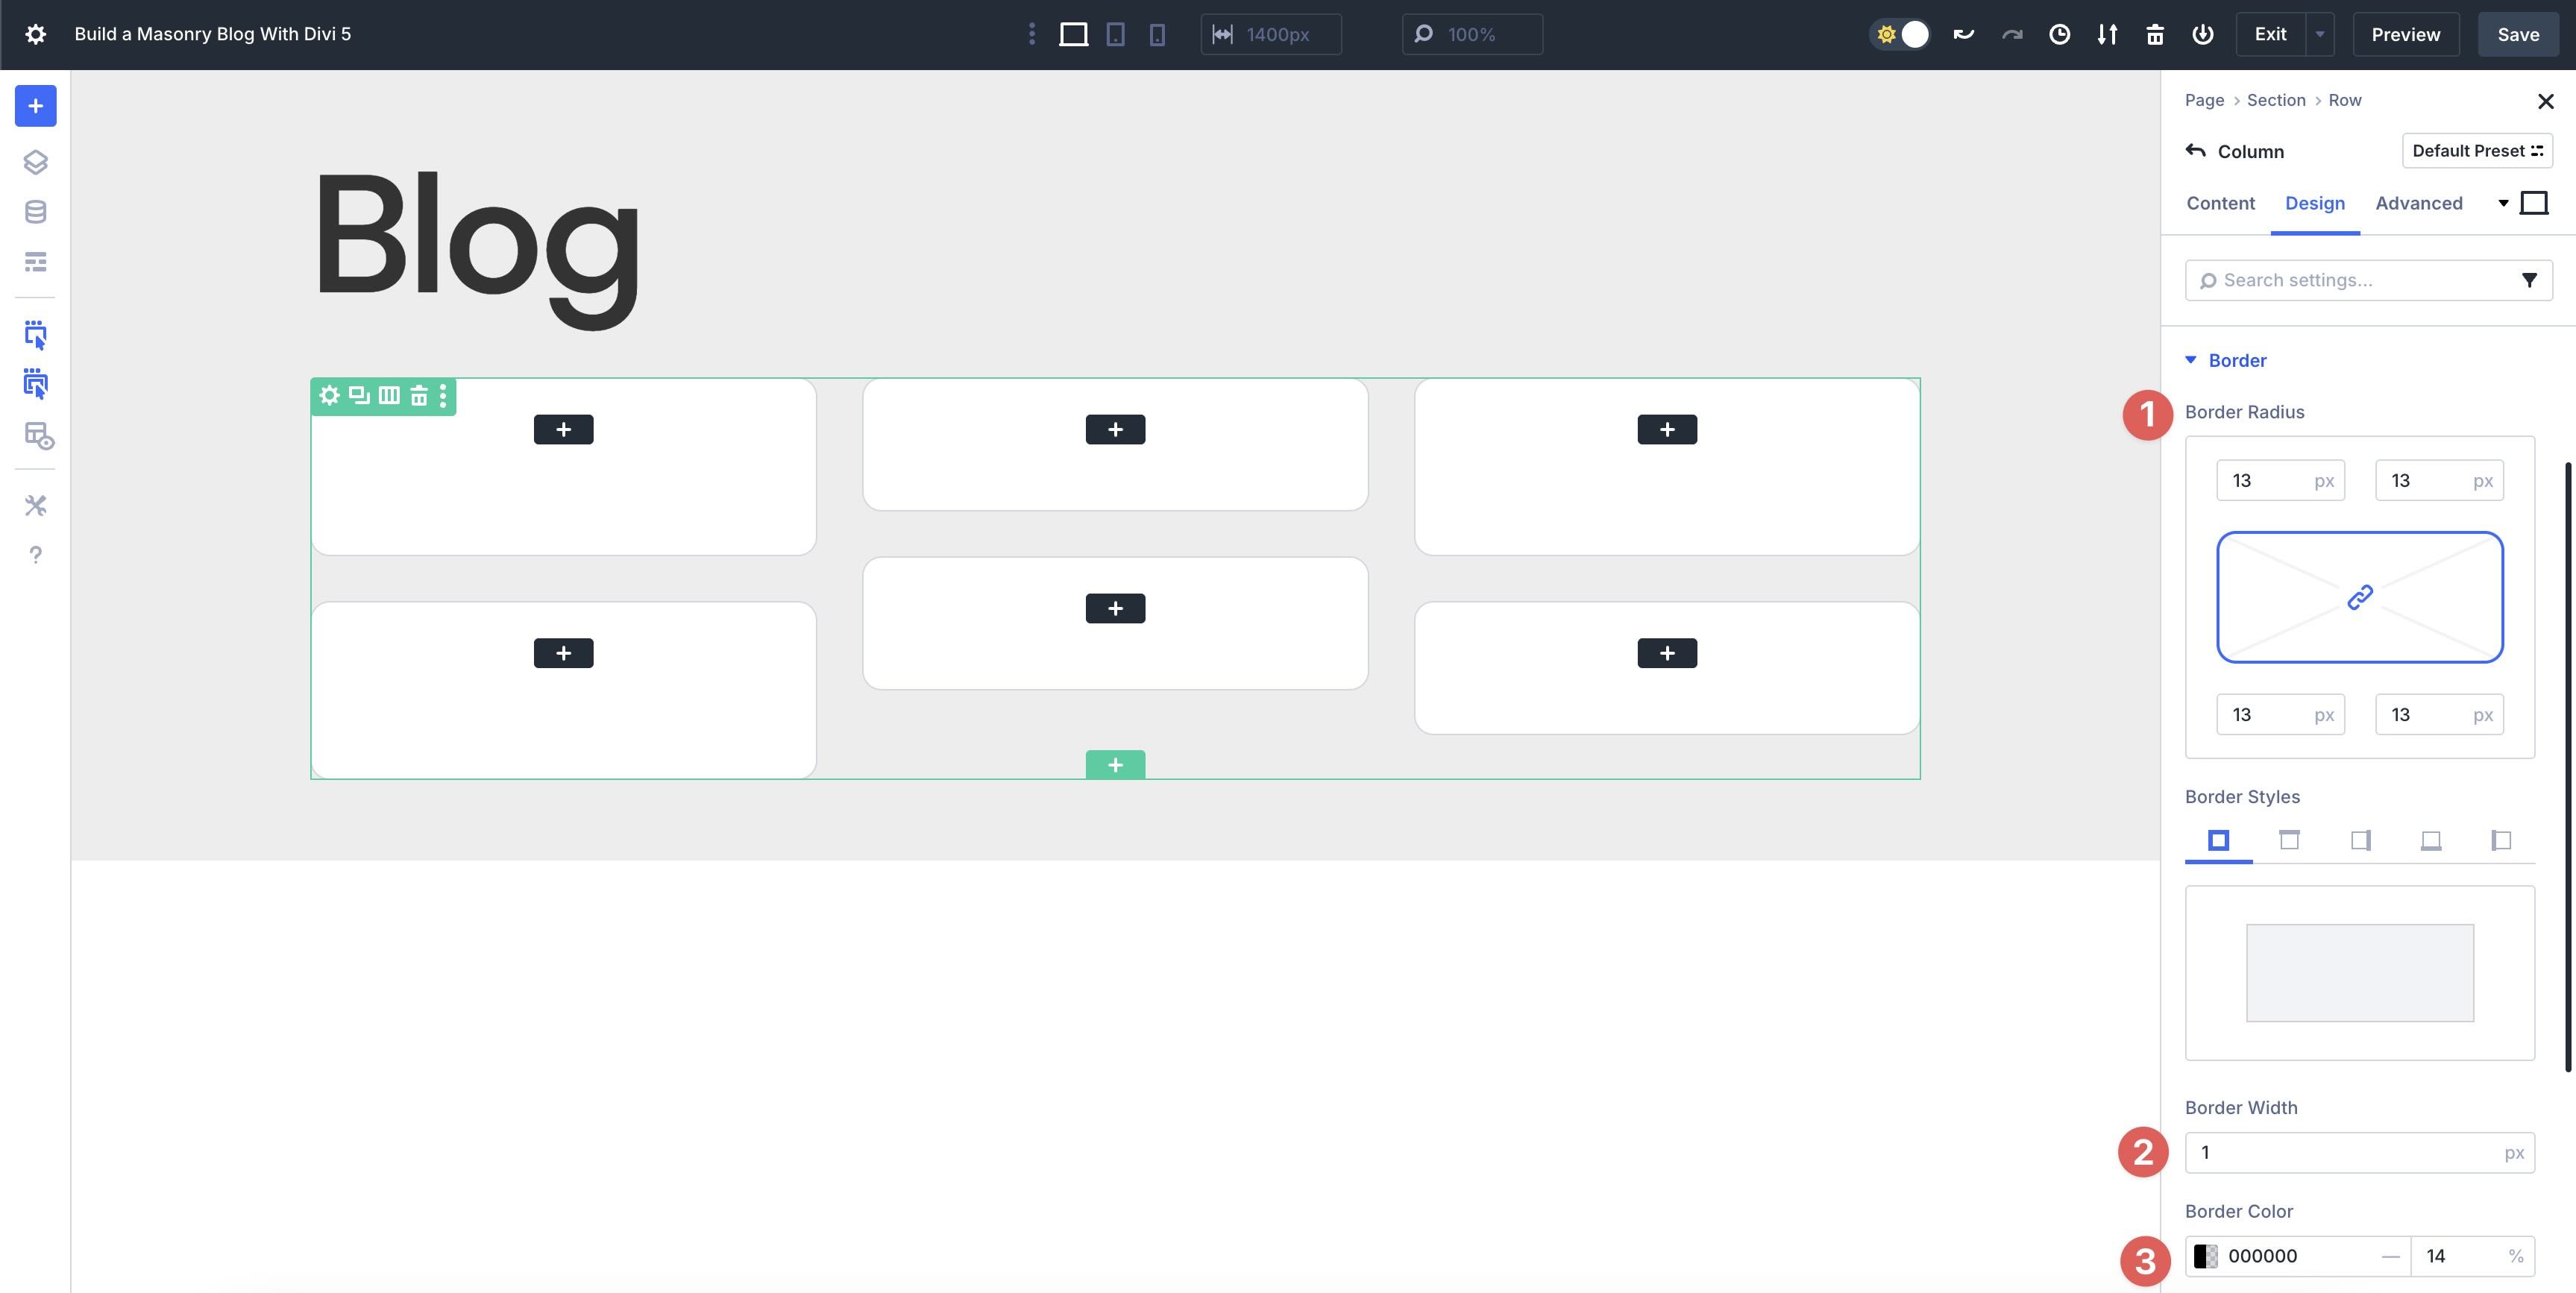
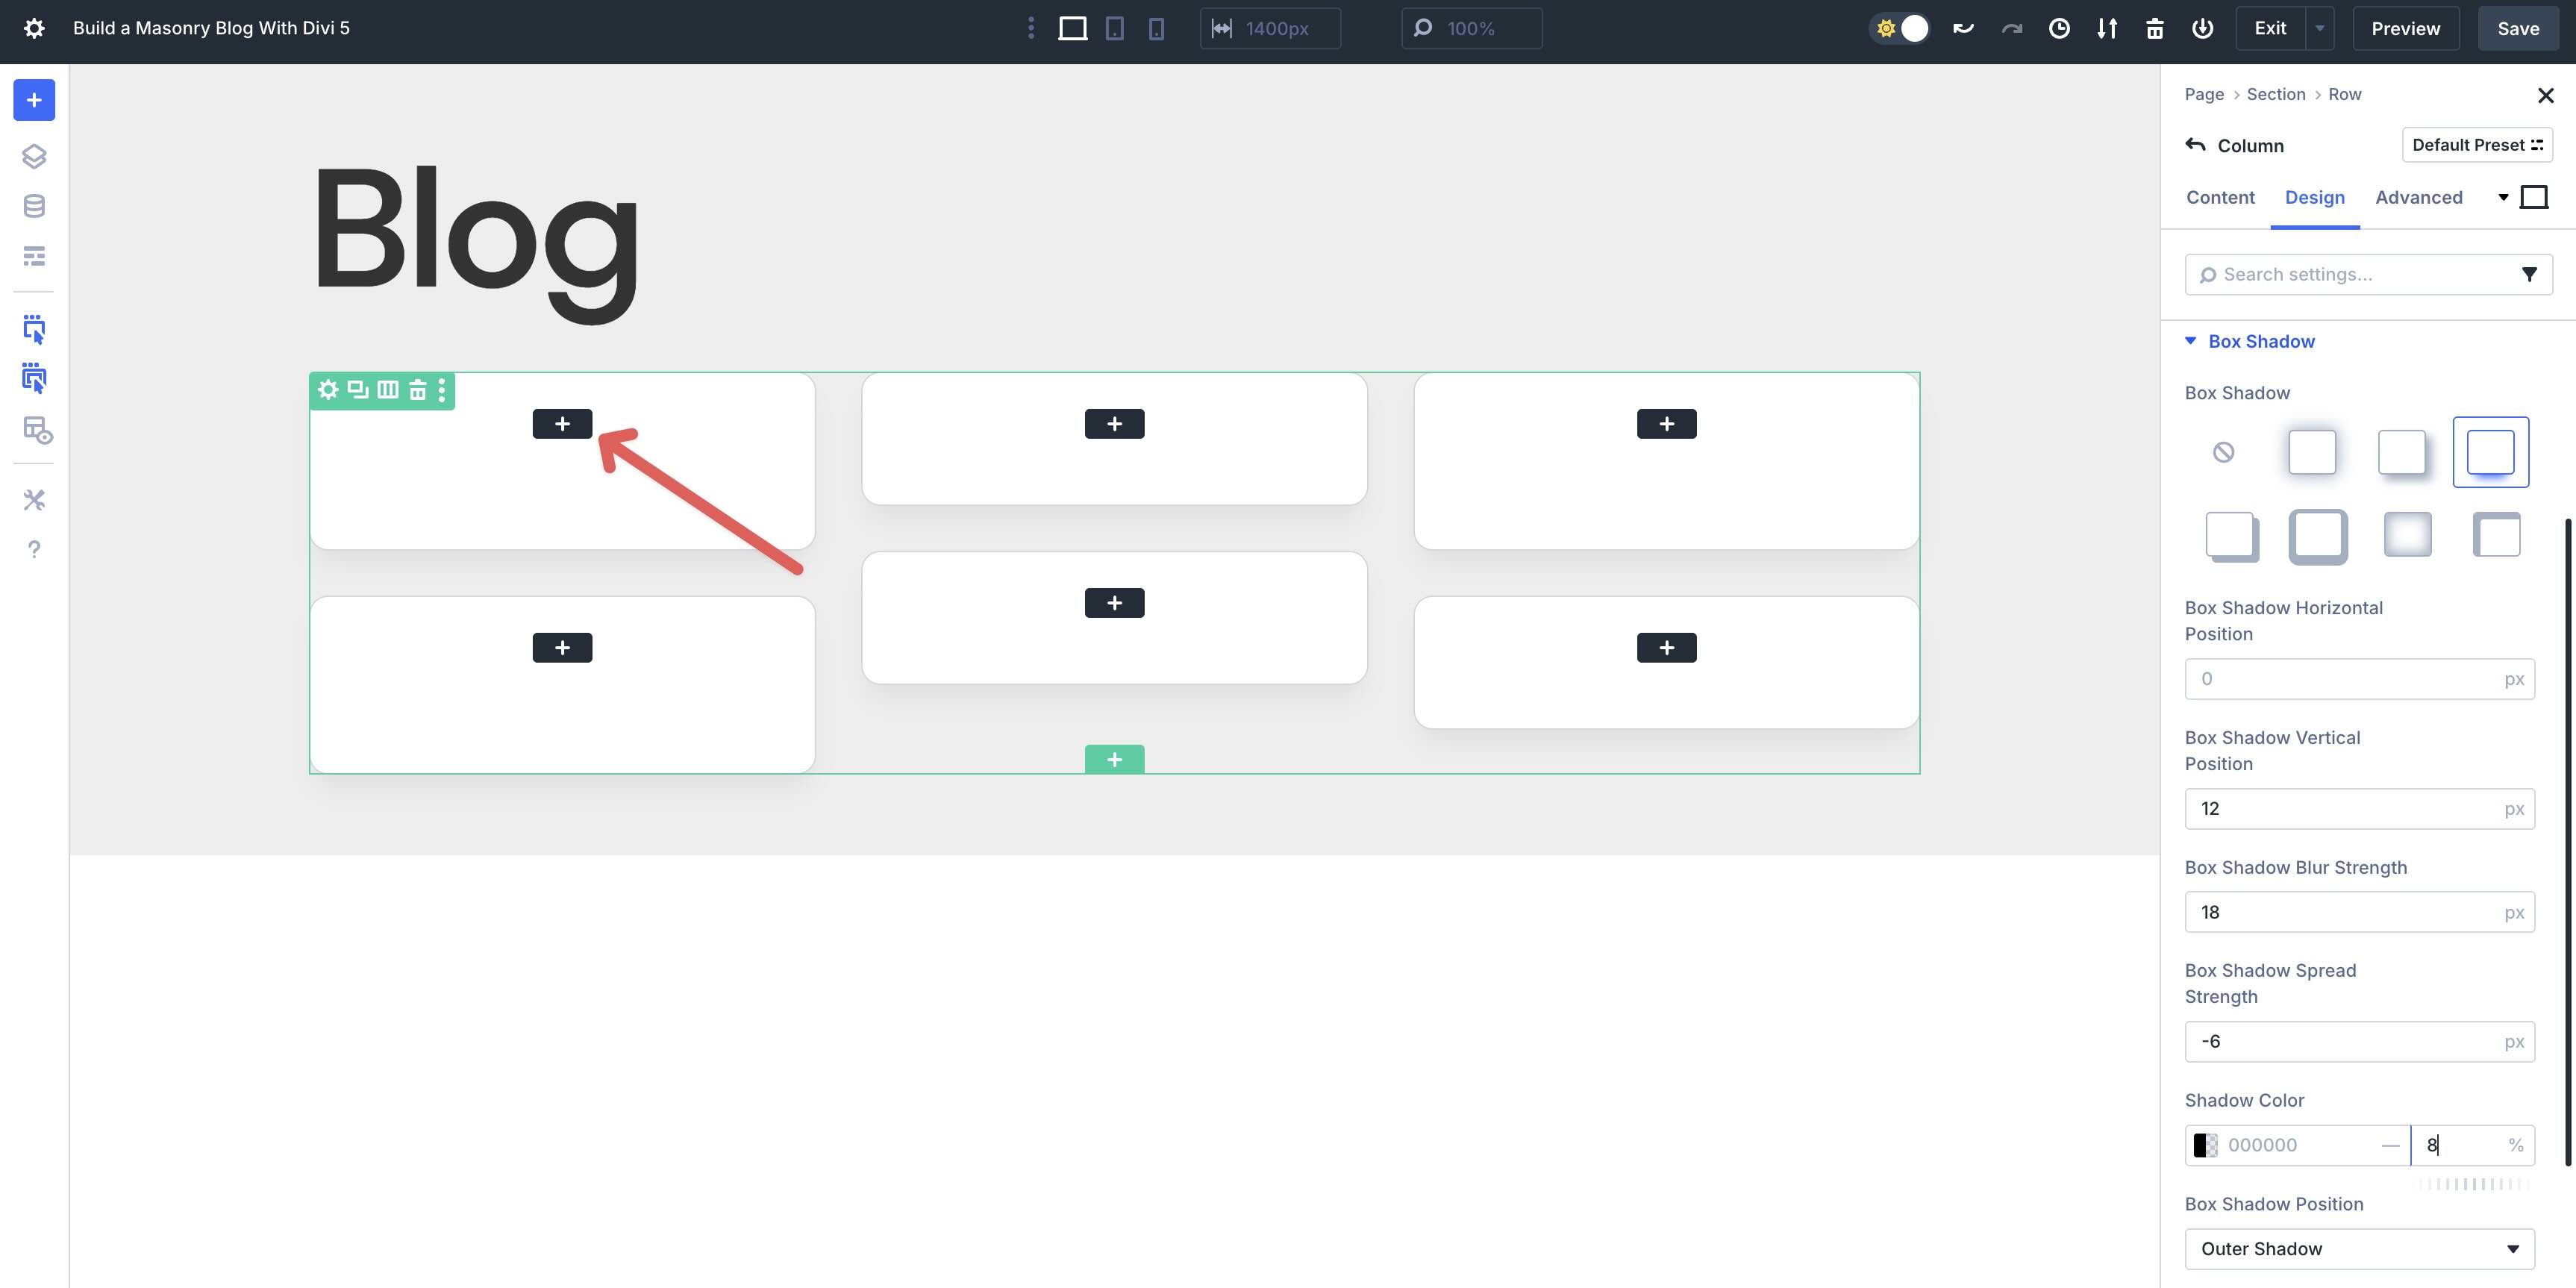
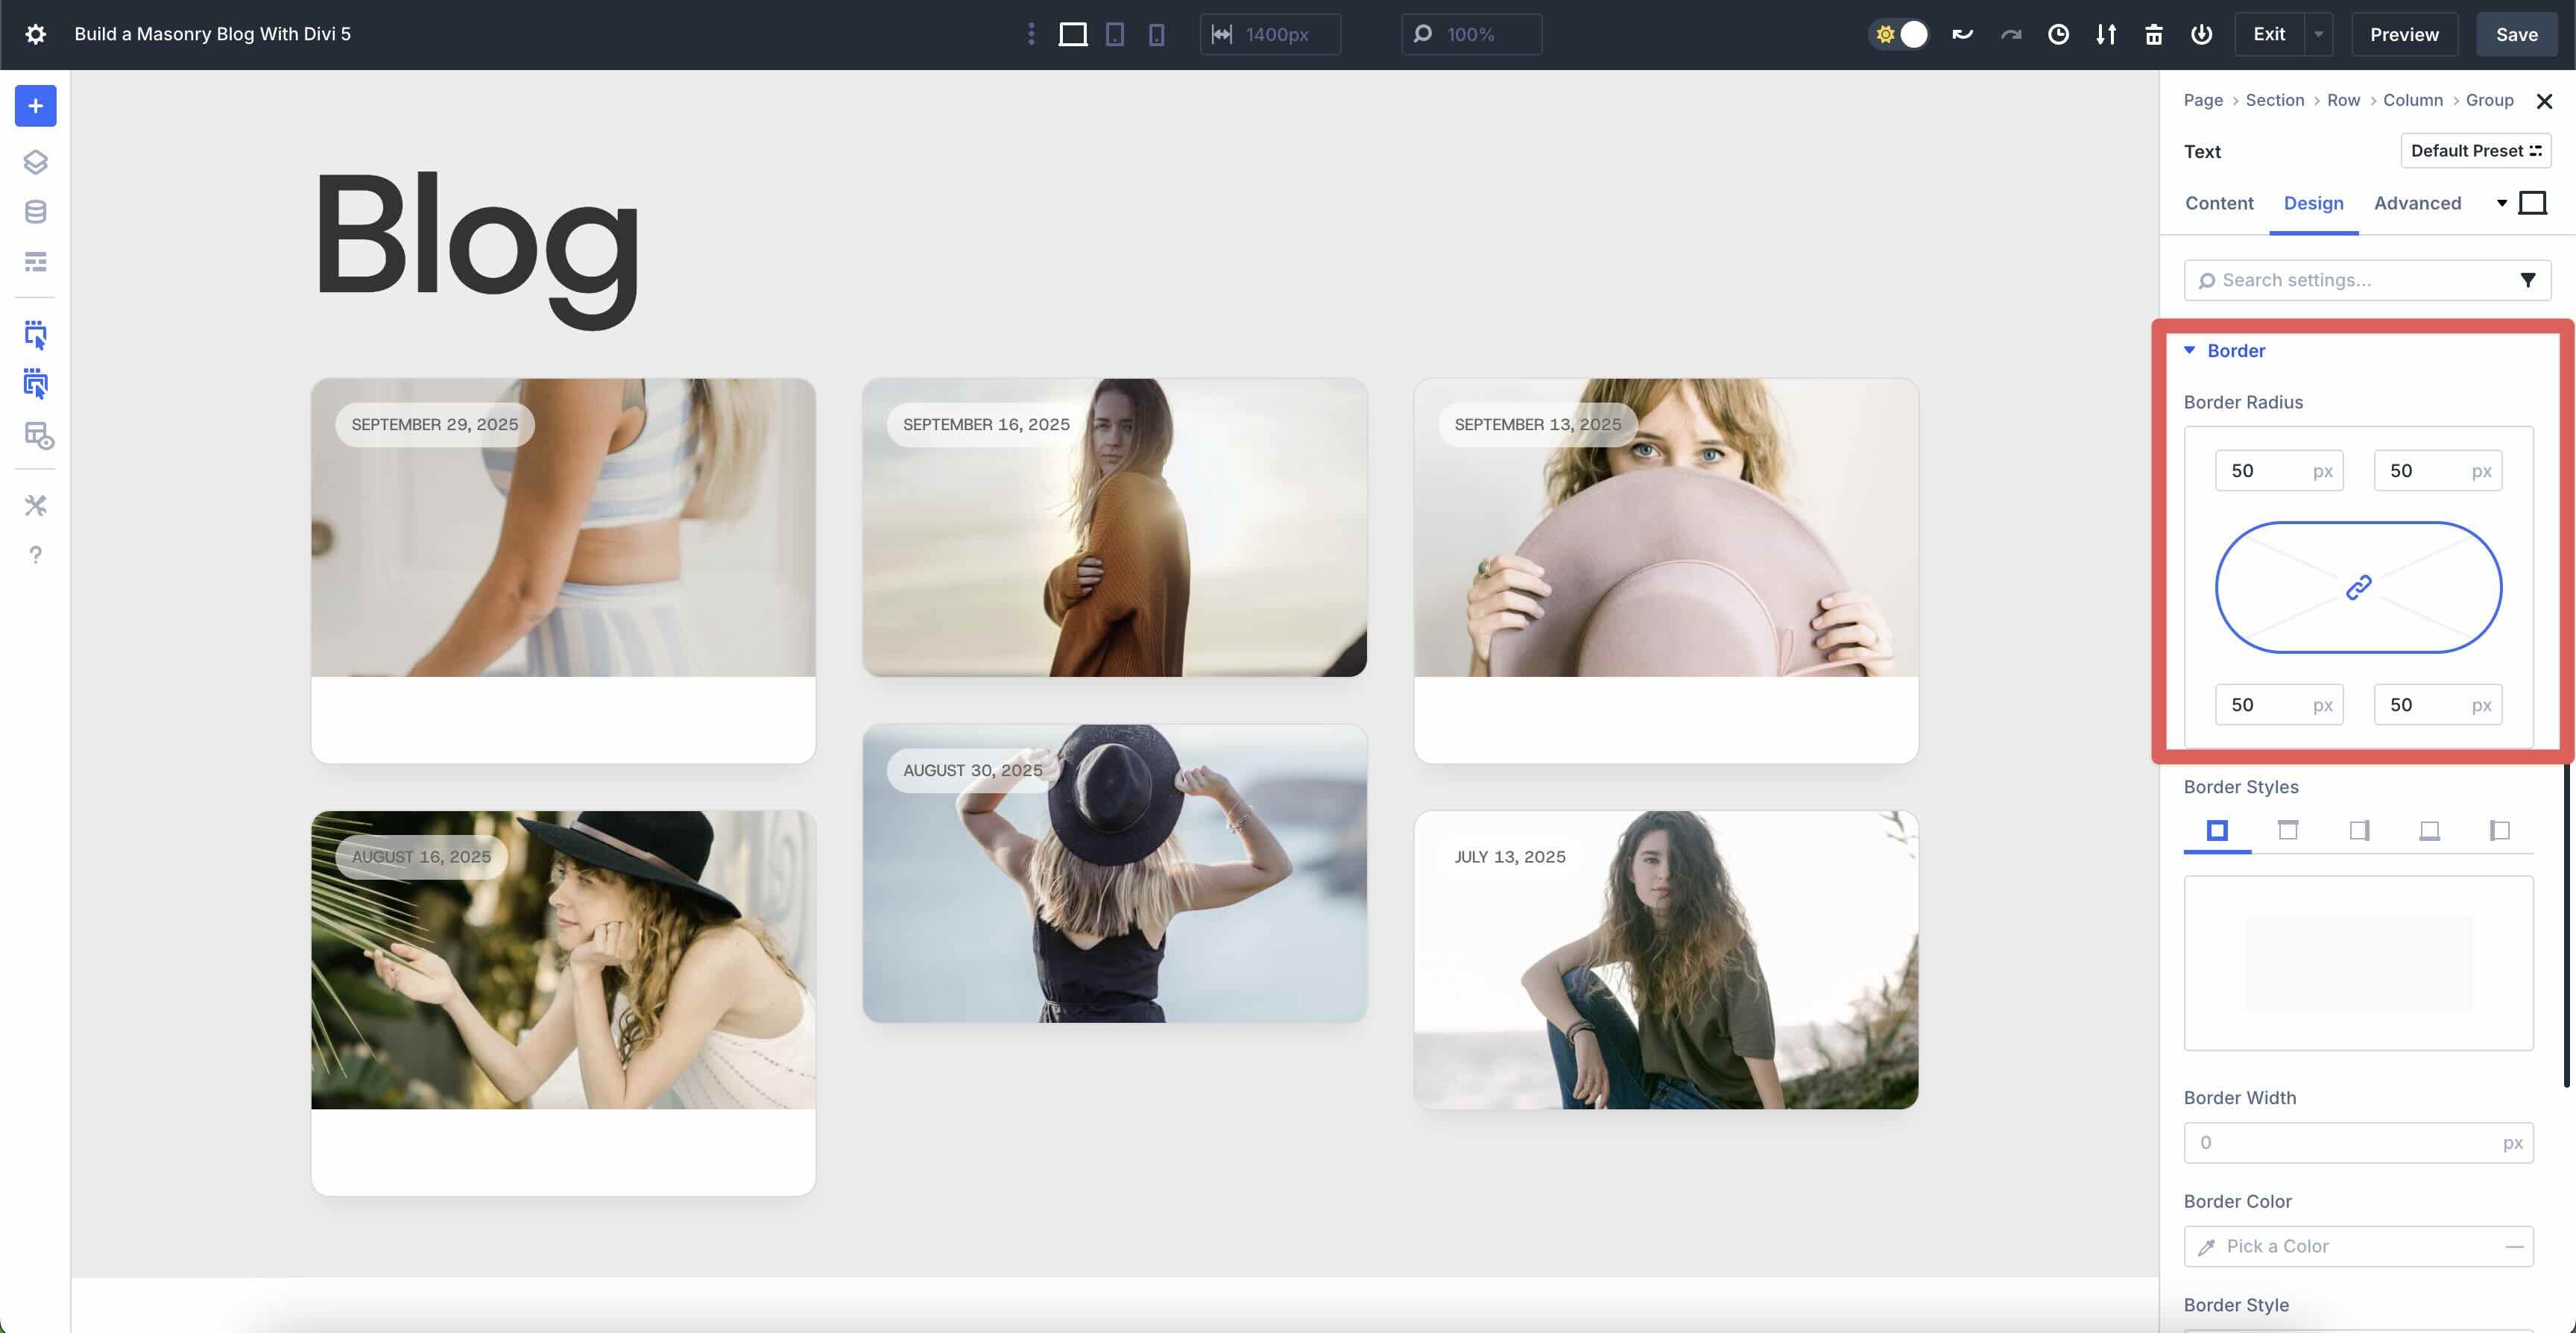
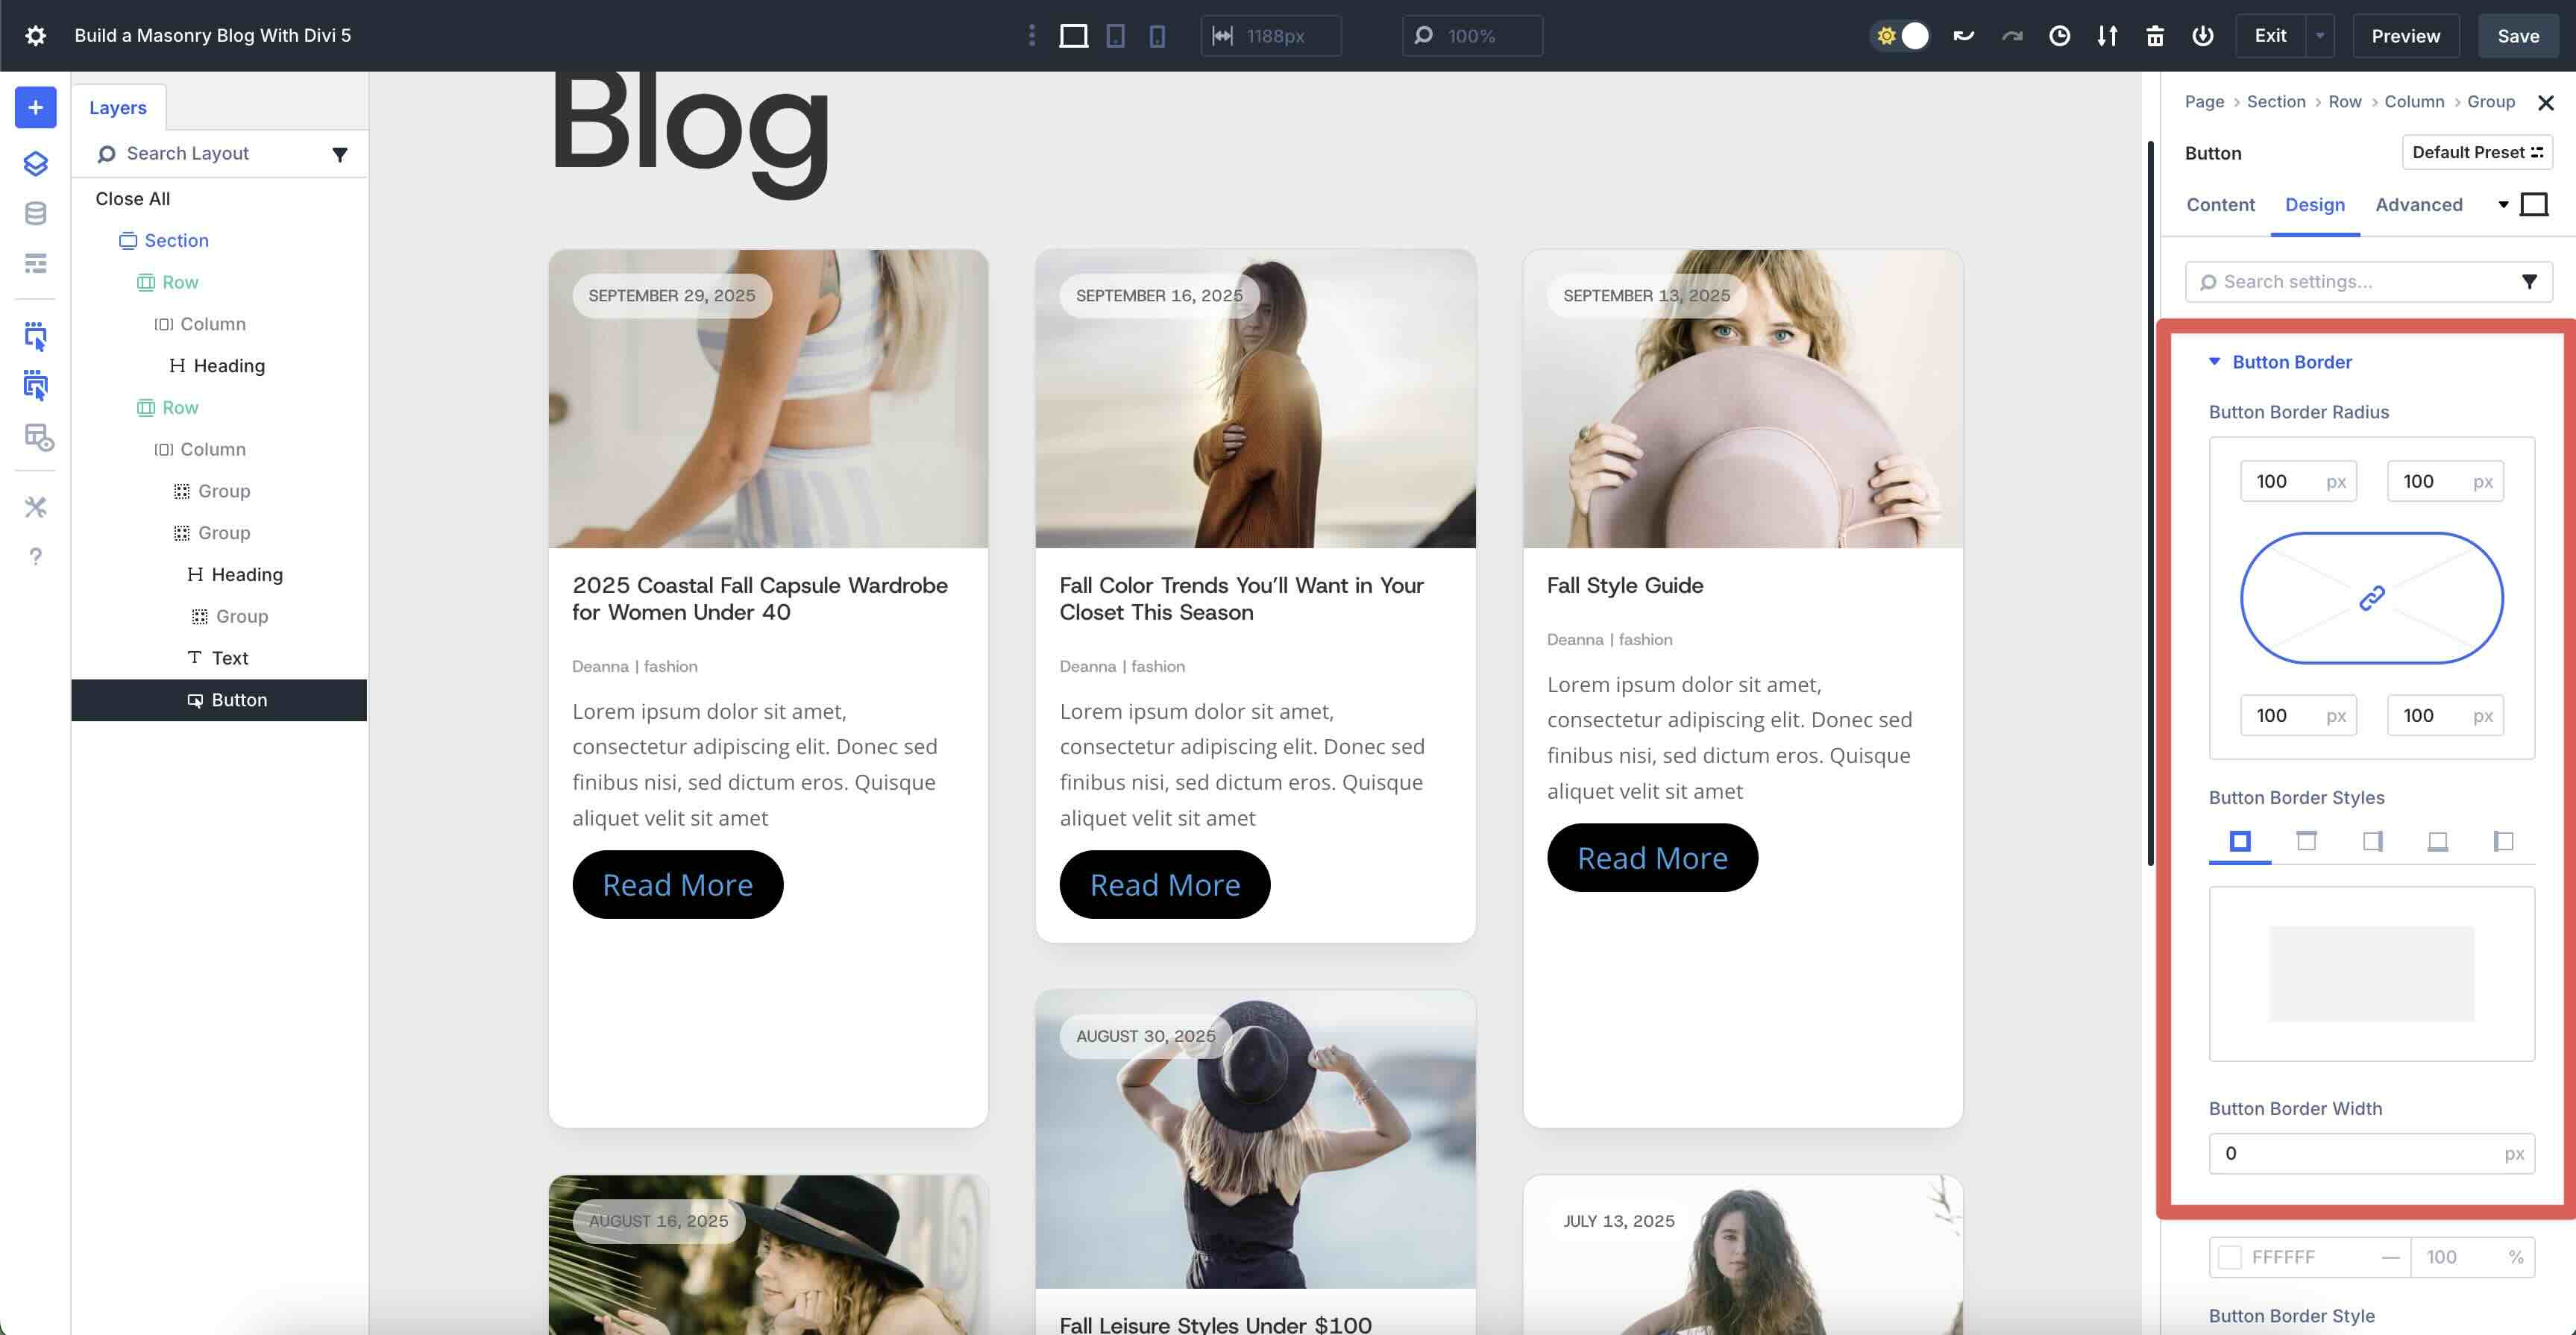
Scroll to find the Border menu and make bigger it. Input 13px for the Border Radius, 1px because the Border Width, and #000000 because the Border Colour. Alter the Border’s Opacity to 14%.
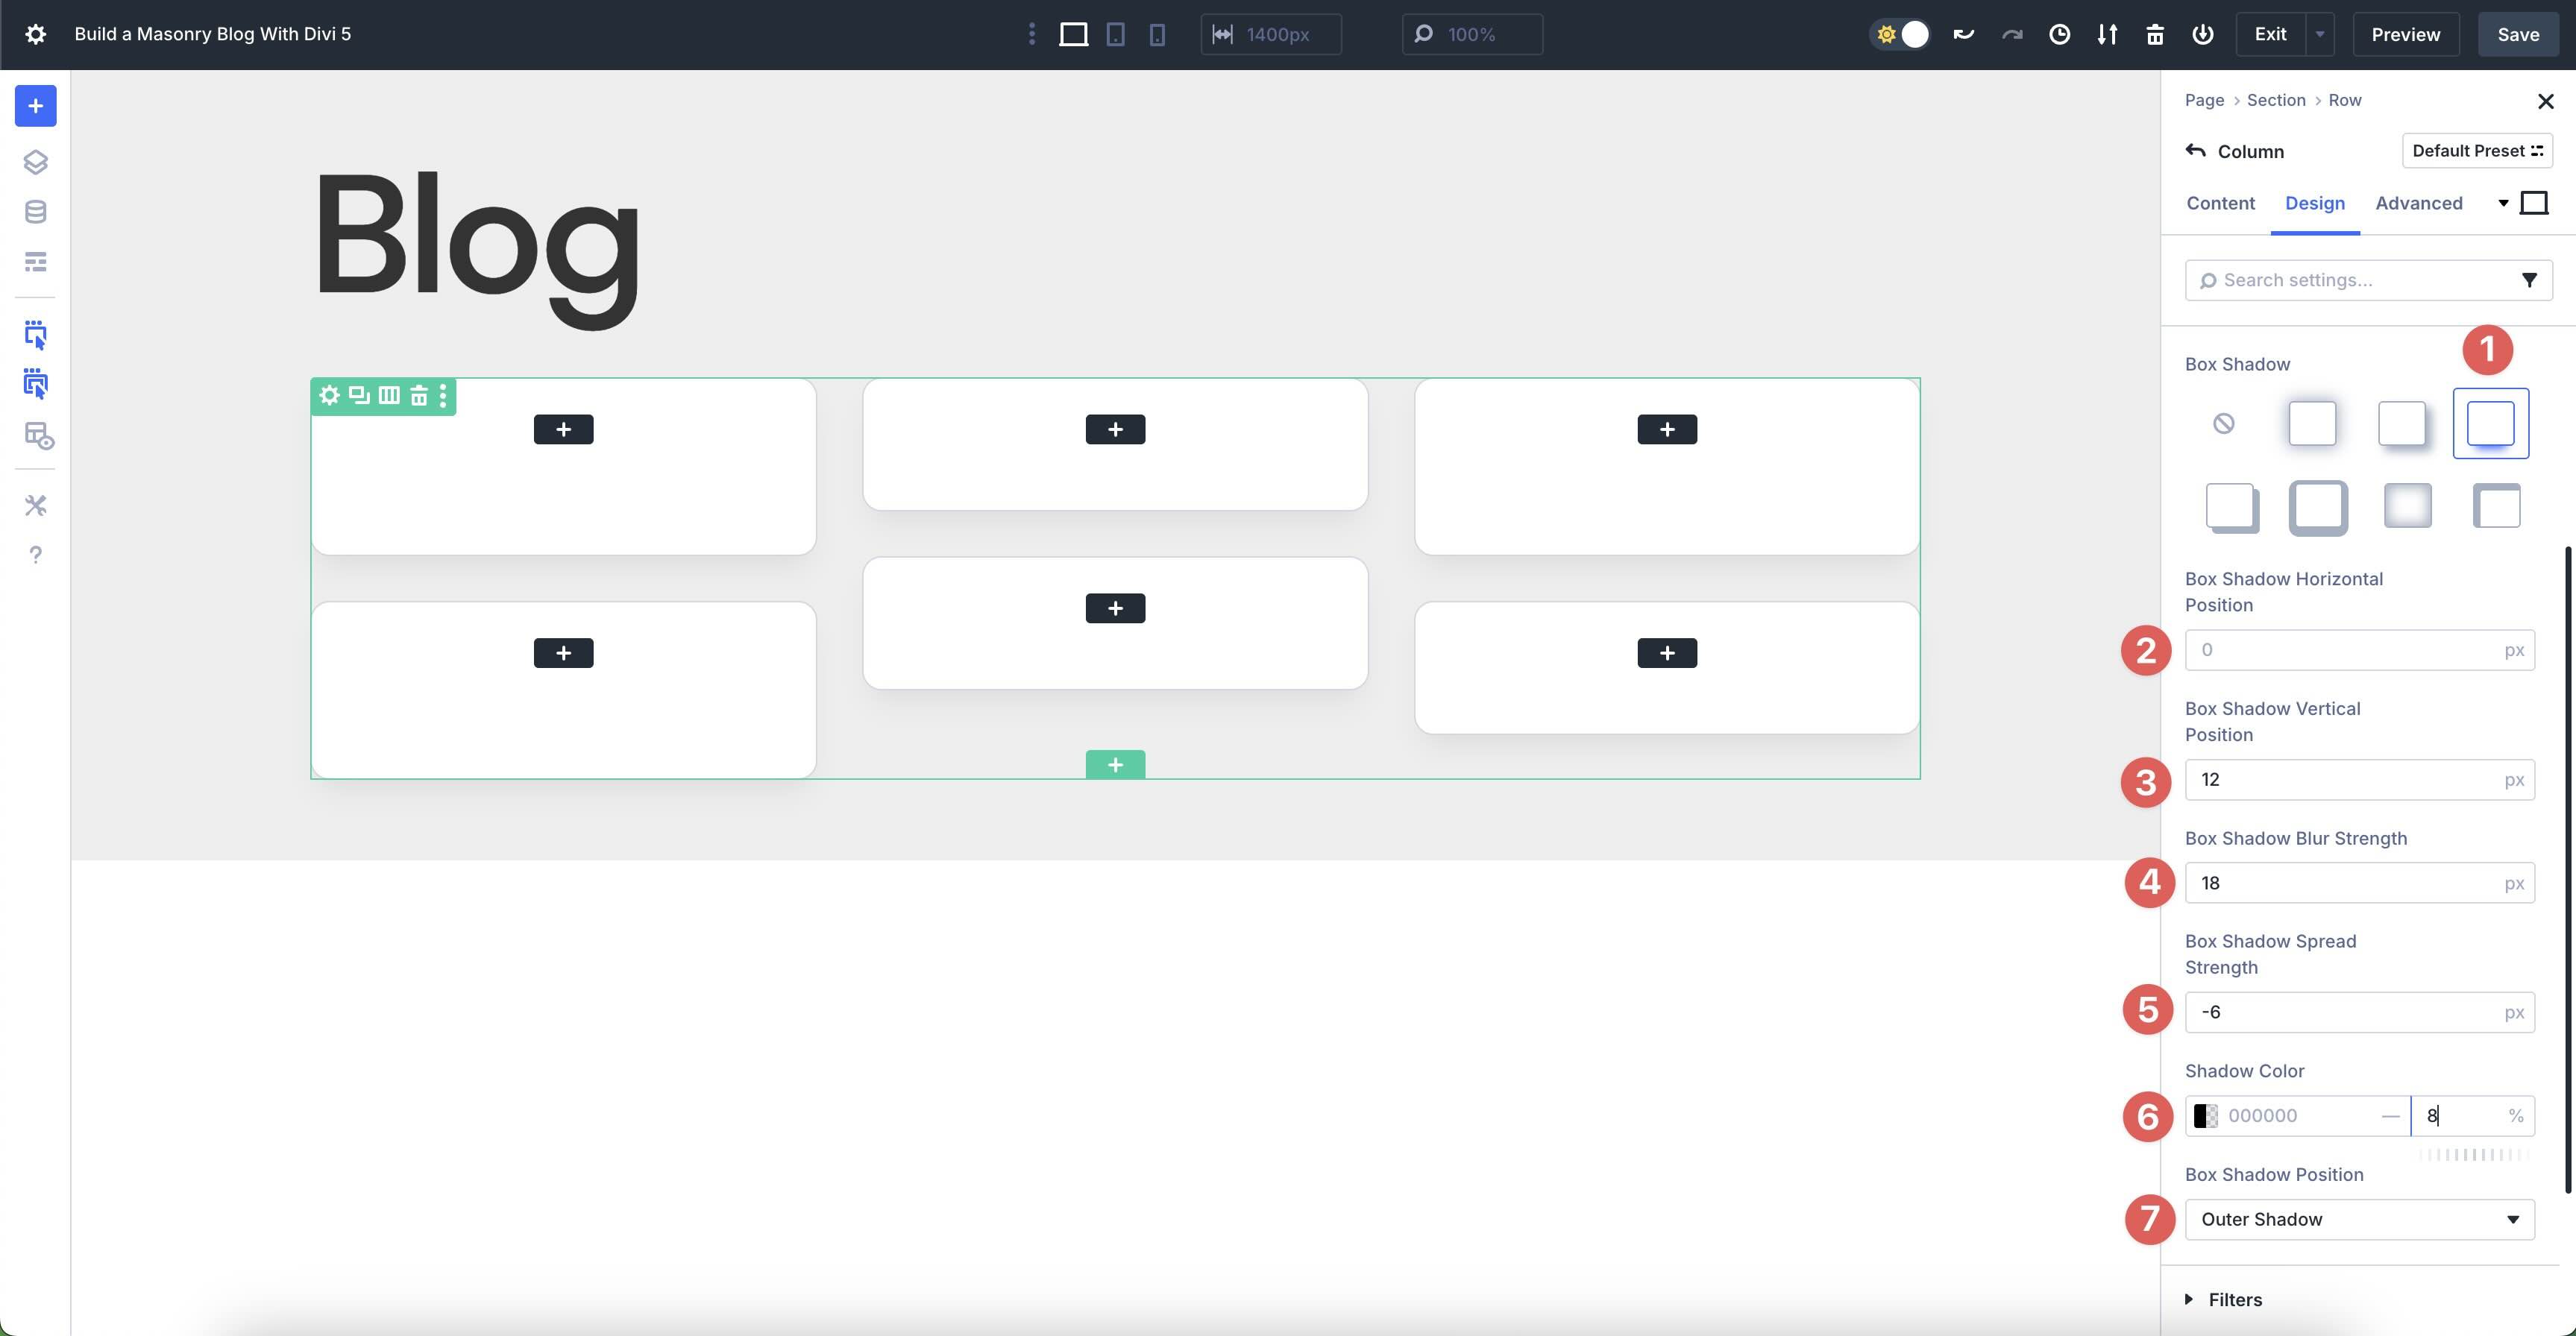
Now we’ll upload a Field Shadow to the Loop column. Make a selection Preset 3 within the Field Shadow box. Set the Field Shadow Horizontal Place to 0px and the Vertical Place to 12px. Input 18px within the Field Shadow Blur Power box and -6px within the Field Shadow Unfold Power. Set the Shadow Colour to #000000 with an 8% Opacity. In spite of everything, make a choice Outer Shadow for the Field Shadow Place.
Now, we will be able to get started including content material to the Loop.
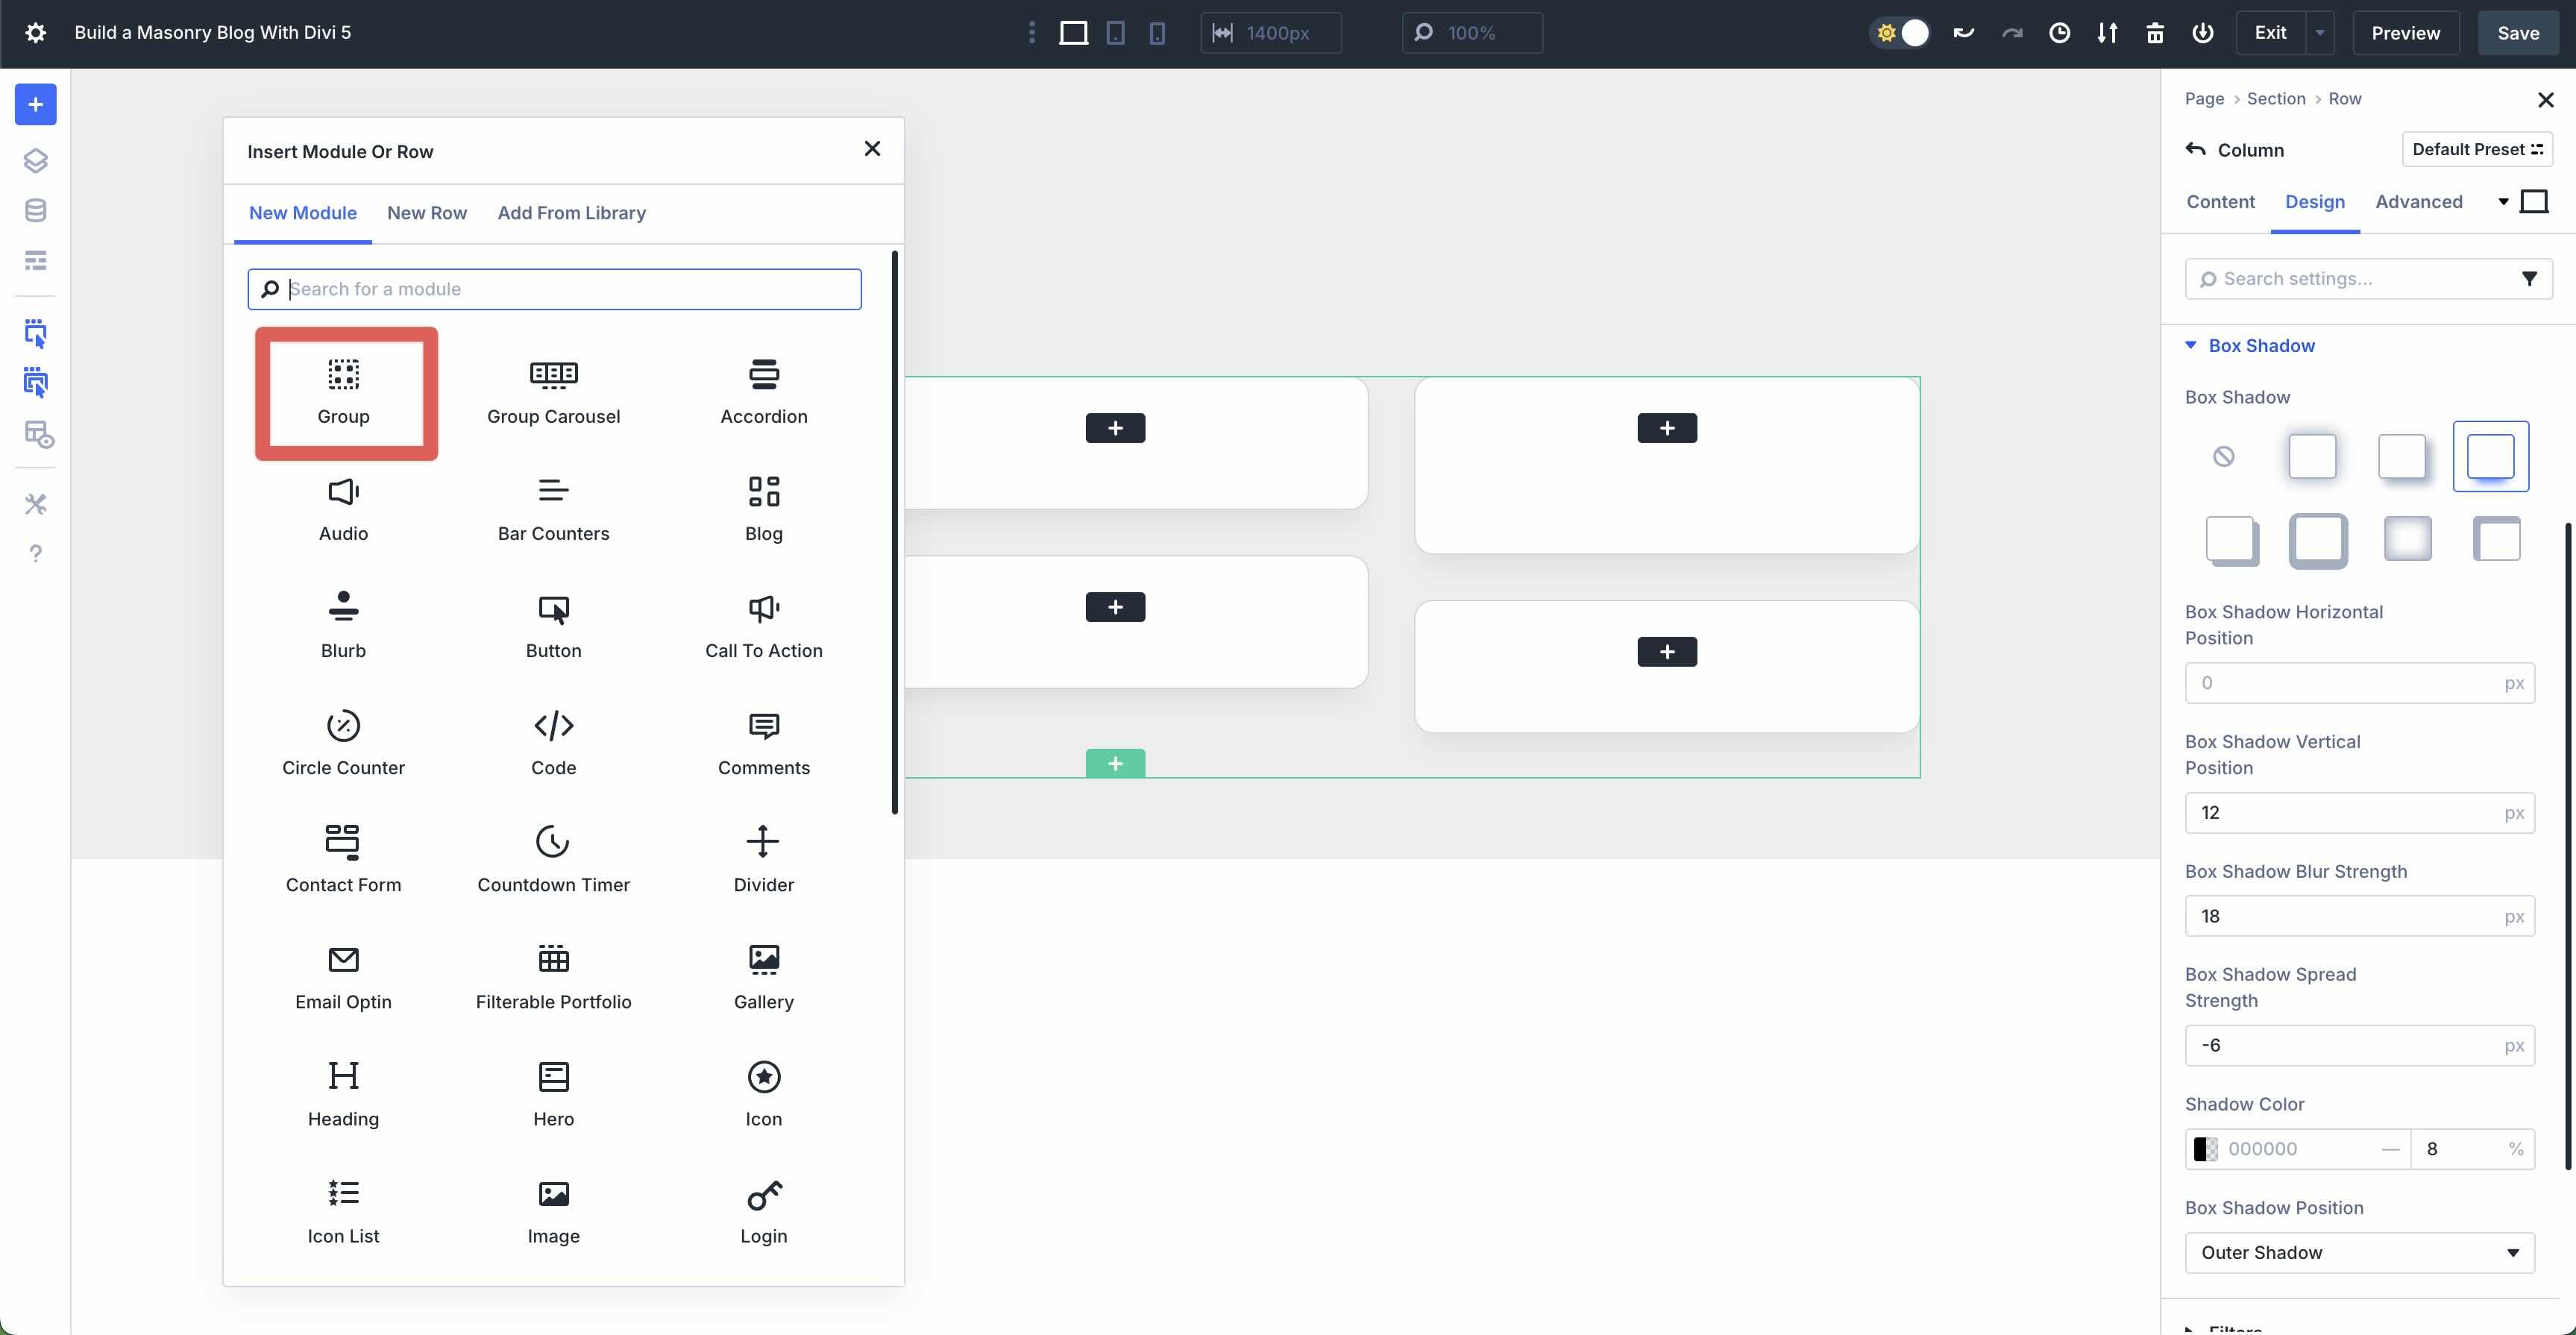
Upload A Staff Module
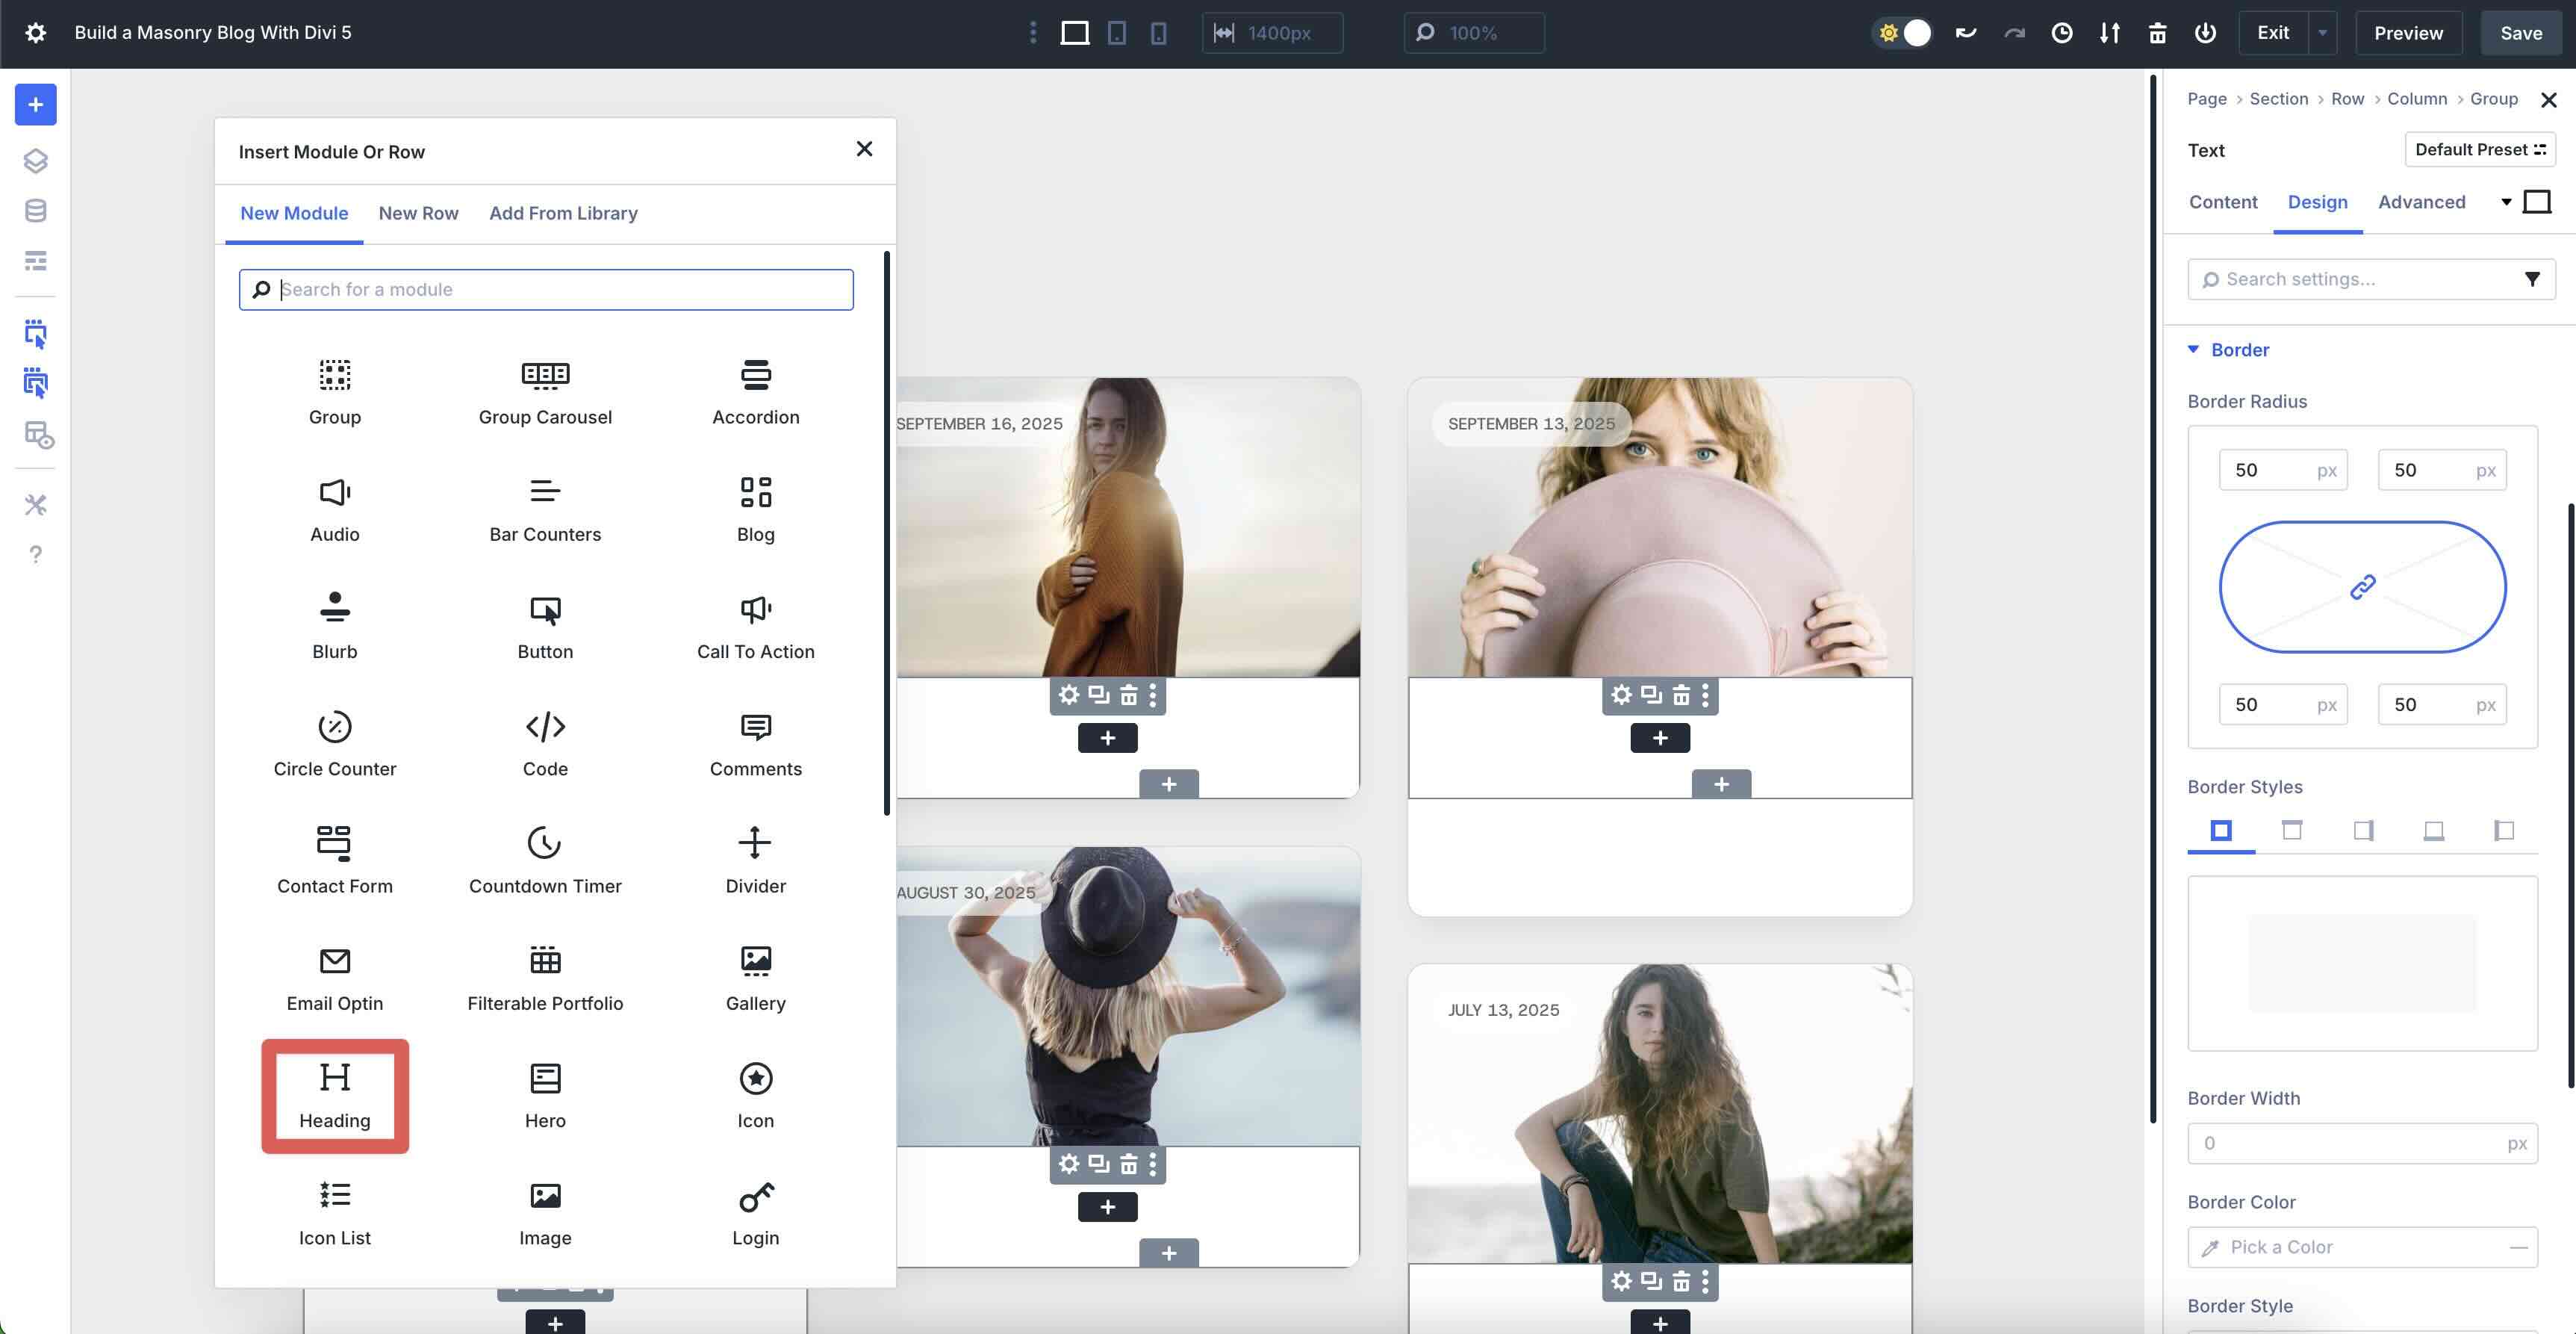
Click on into the primary Staff merchandise. Click on the black “+” icon so as to add the primary module.
When the Insert Module Or Row modal seems, click on so as to add a Staff module.
Within the Staff module’s Content material tab, make bigger the Background menu. Choose the Background Symbol tab, click on the Dynamic Content material icon, and make a choice Loop Featured Symbol.
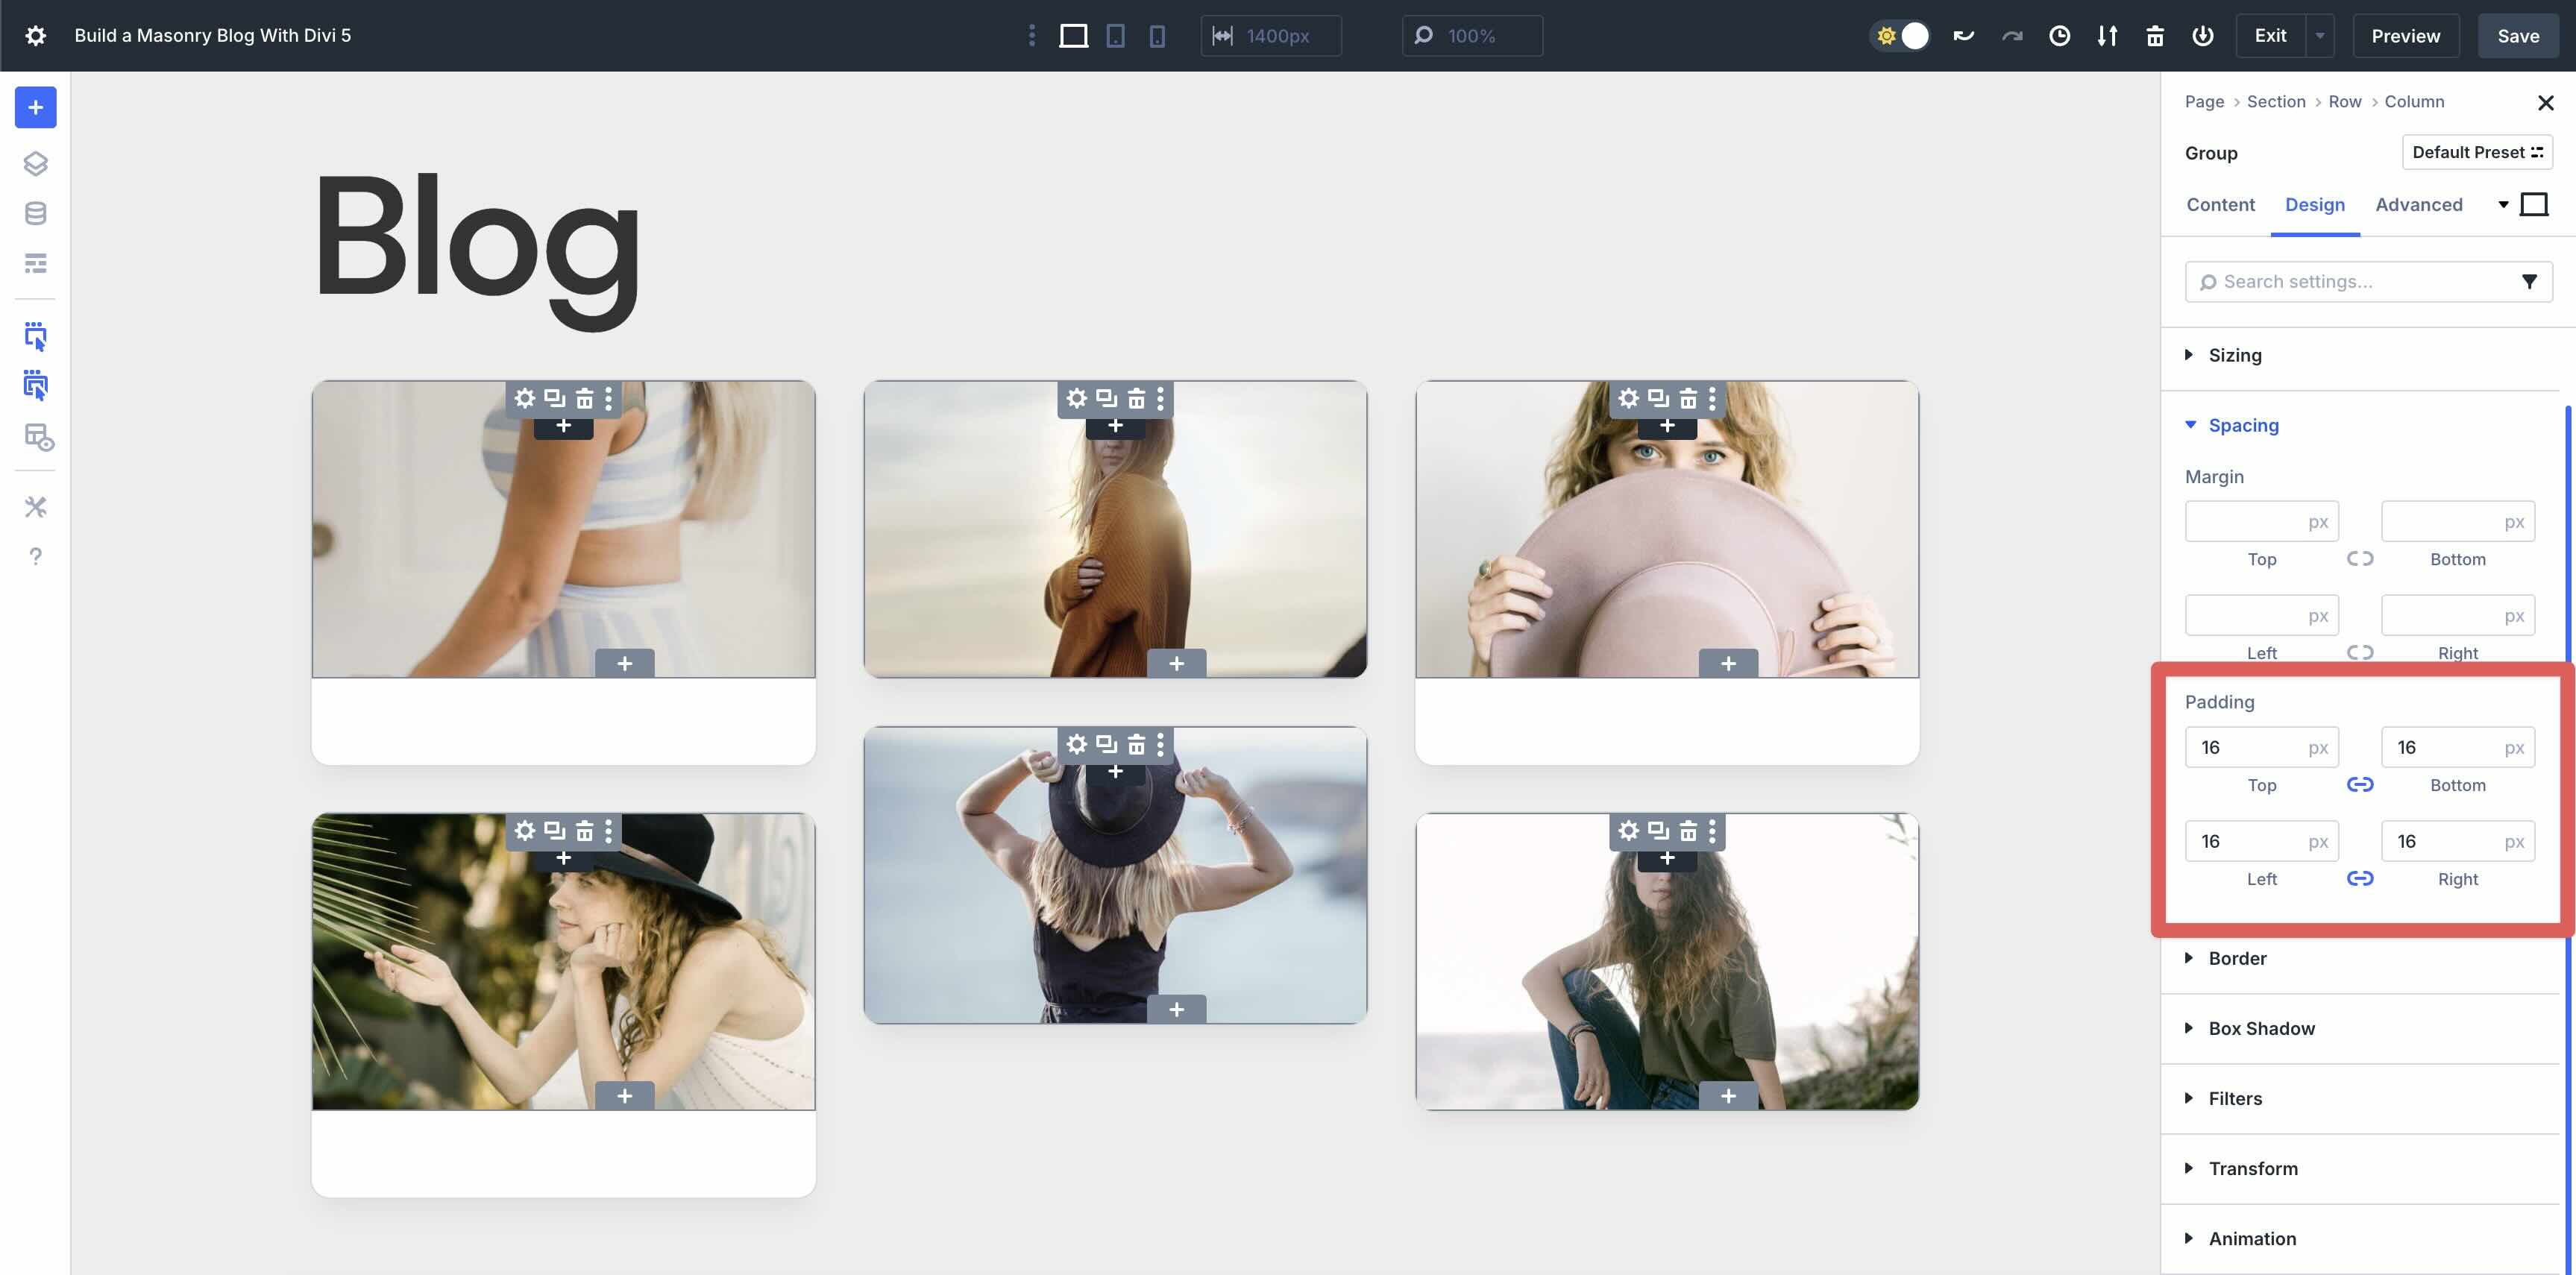
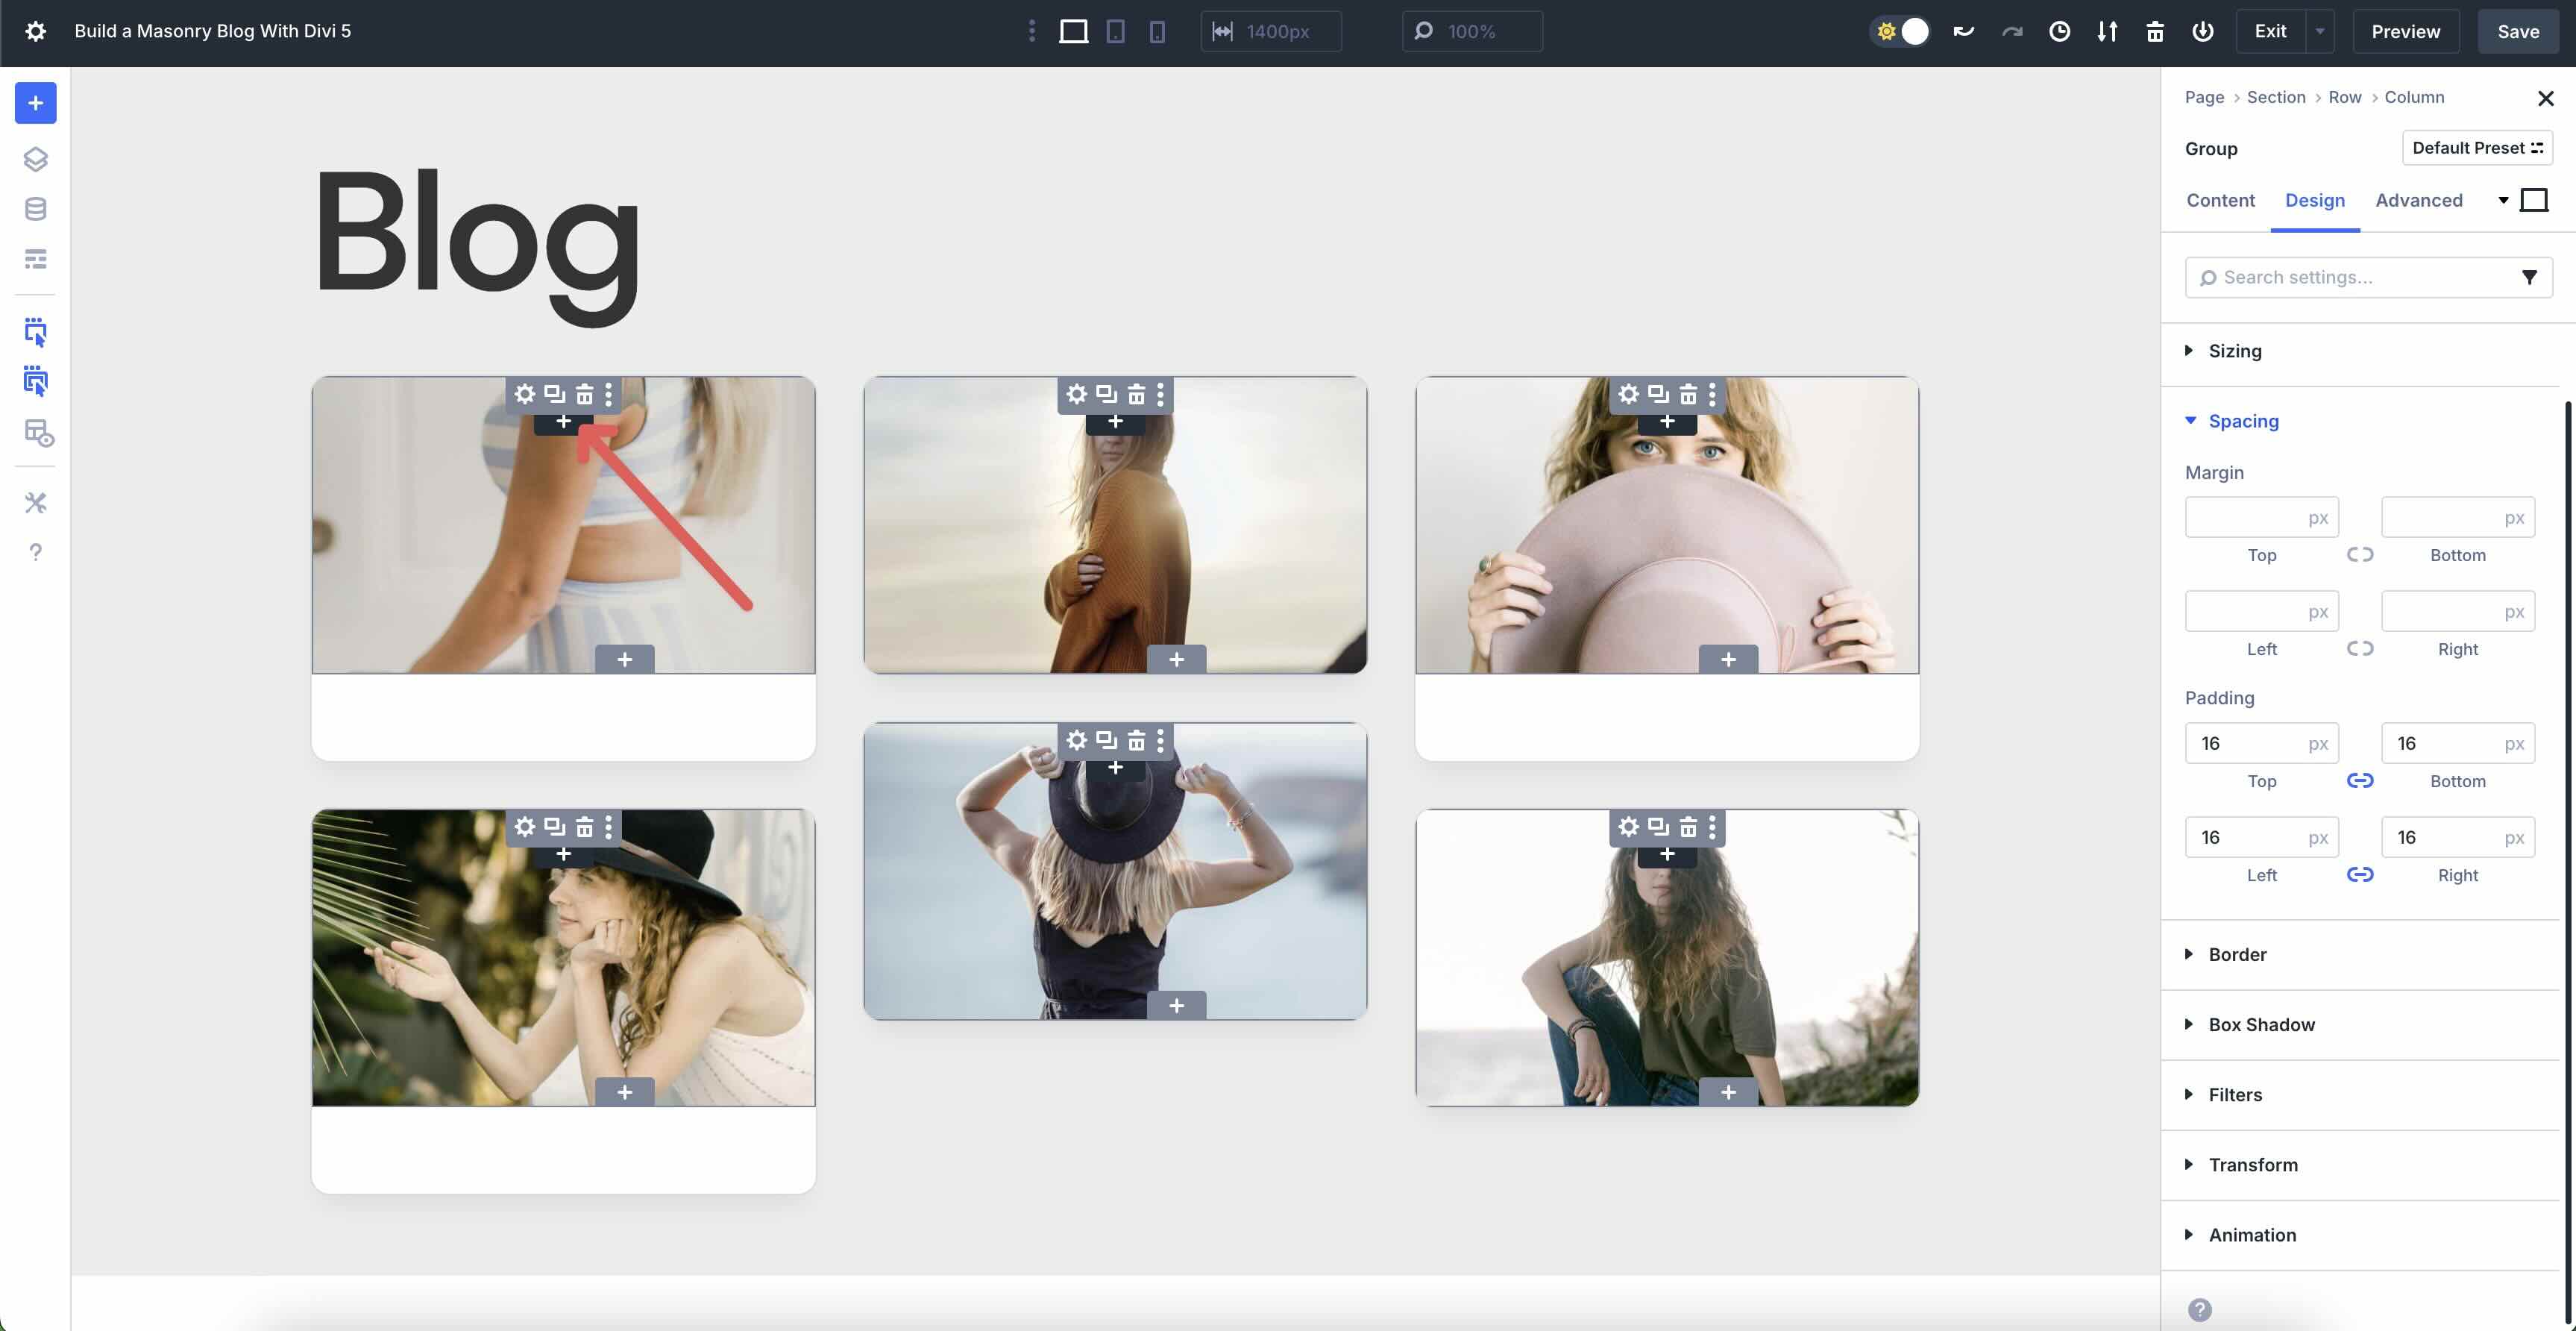
Click on the Design tab after which make bigger the Sizing menu. Within the Min Top box, upload 200px.

Now, make bigger the Spacing menu. Input 16px Padding to all 4 facets (peak, backside, left, and proper).
Upload A Textual content Module
Click on the black “+” icon so as to add a brand new module to the Staff module.
Click on so as to add a Textual content module.

Within the Textual content module’s Content material tab, click on the Dynamic Content material icon simply above the Frame box. Choose Loop Post Date from the to be had choices.
Subsequent, we’ll upload a background shade to the textual content. Enlarge the Background menu within the Content material tab. Within the Background Colour box, input #ffffff because the Background Colour and set the Opacity to 60%.
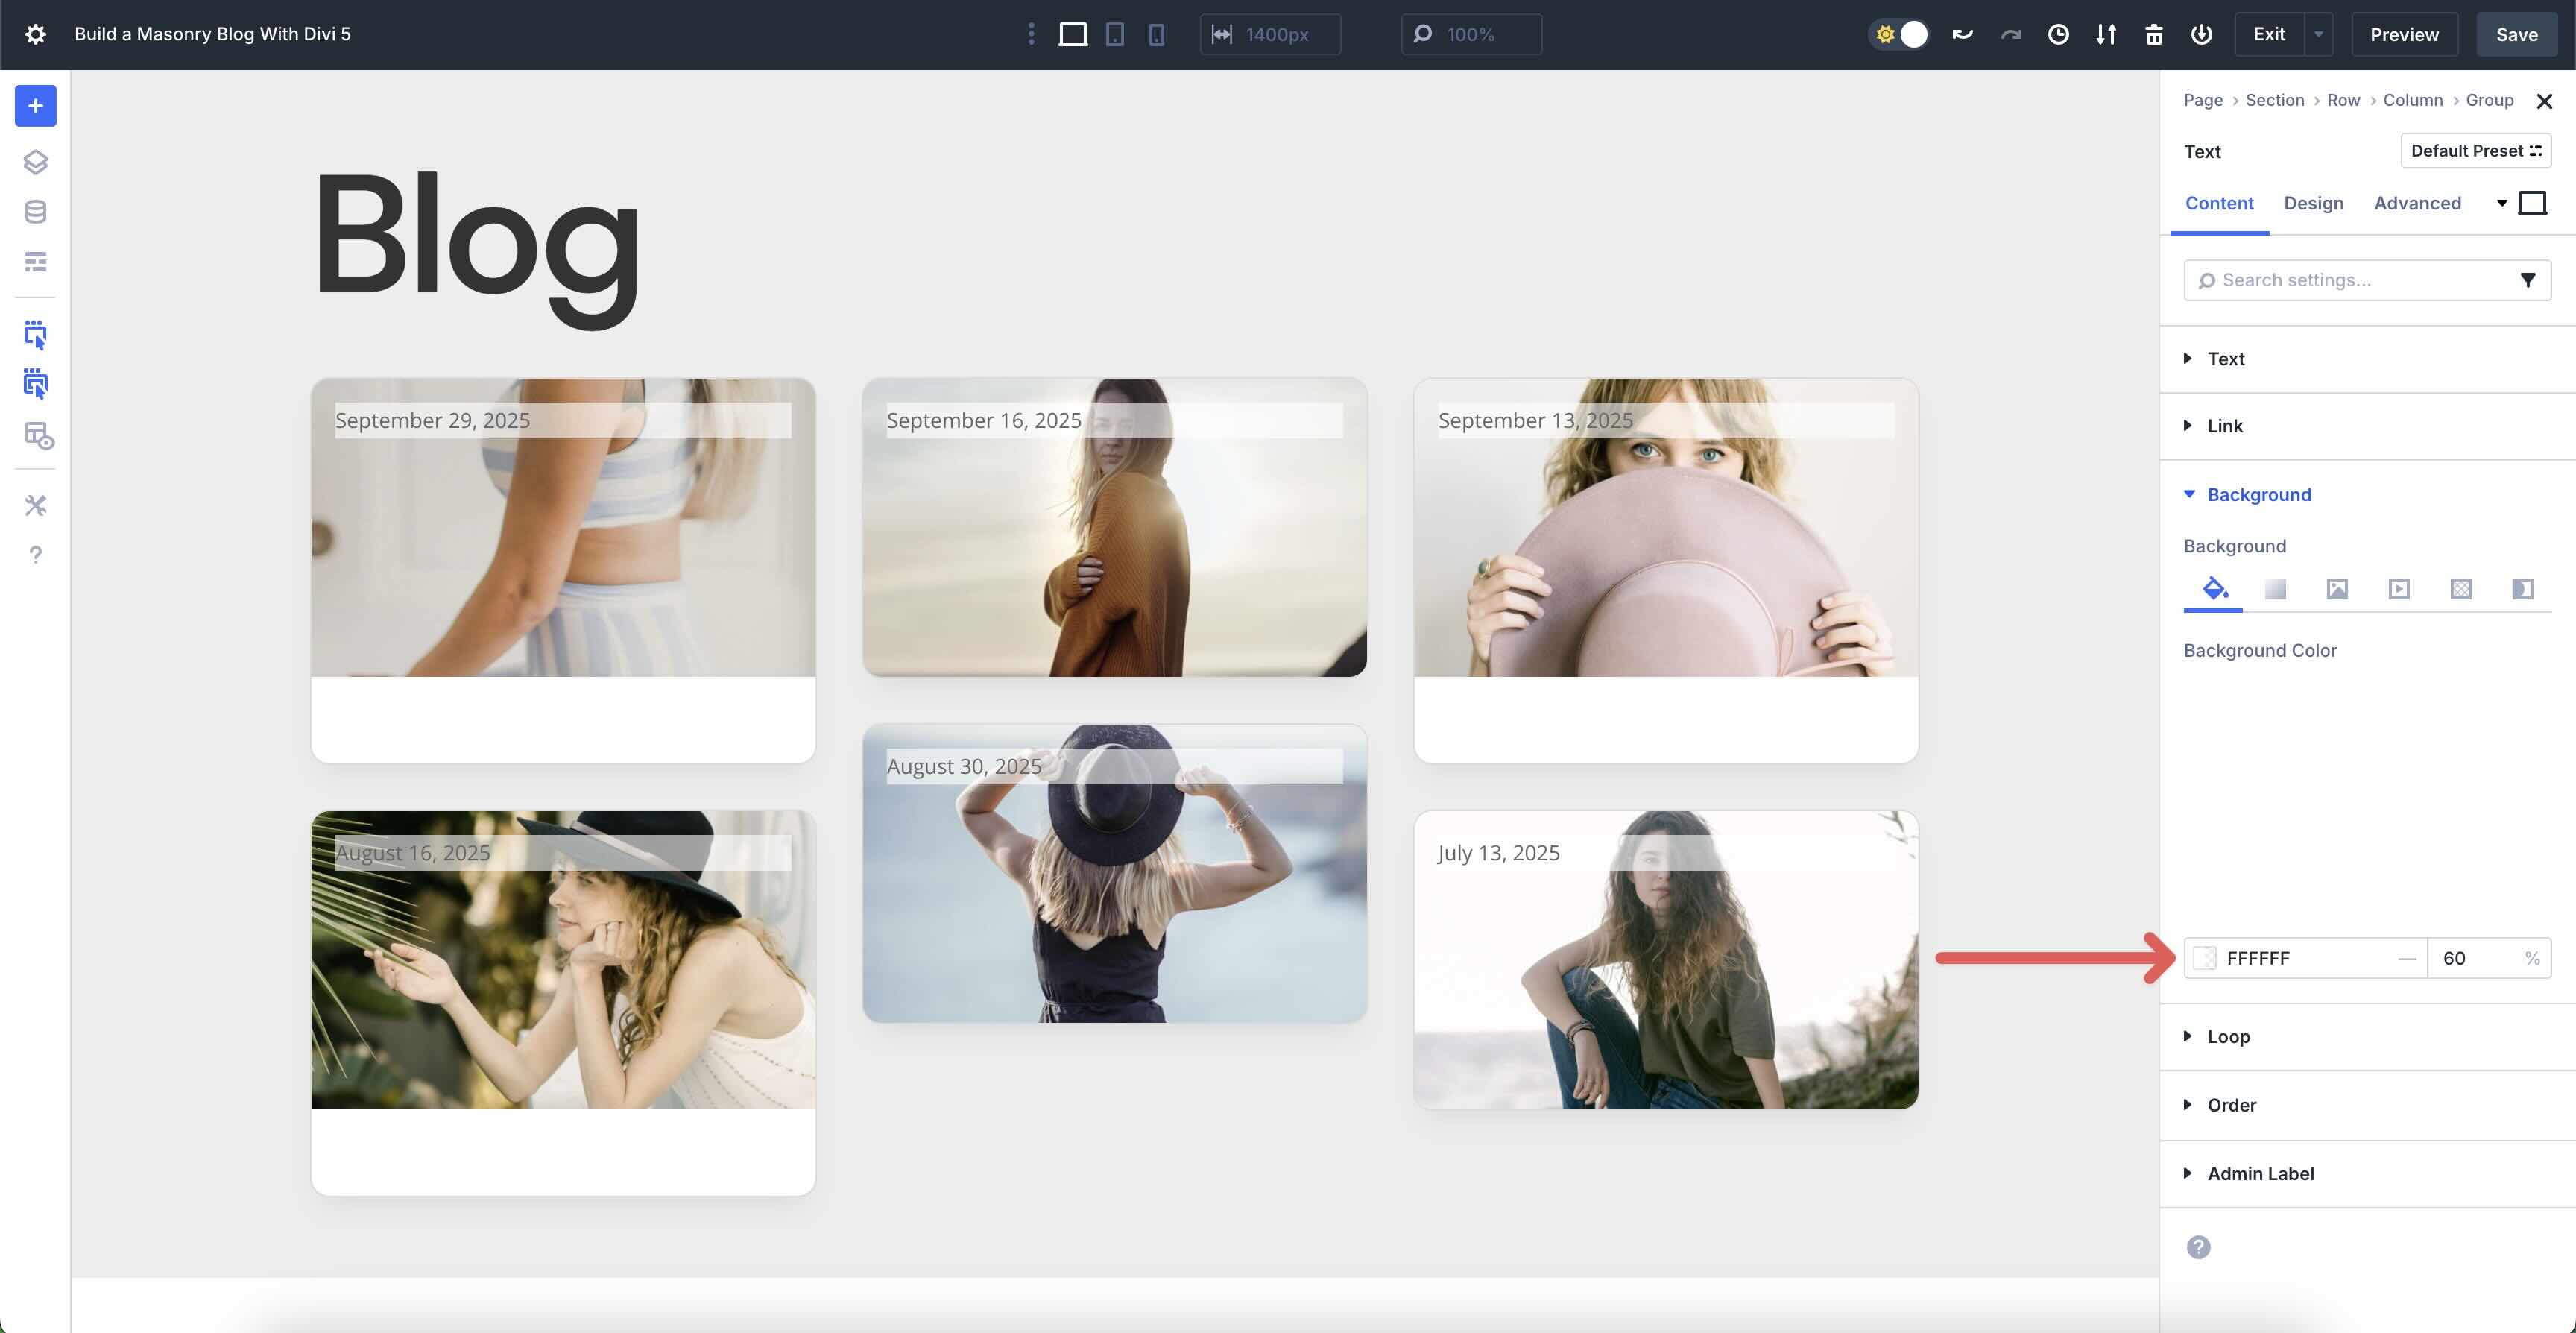
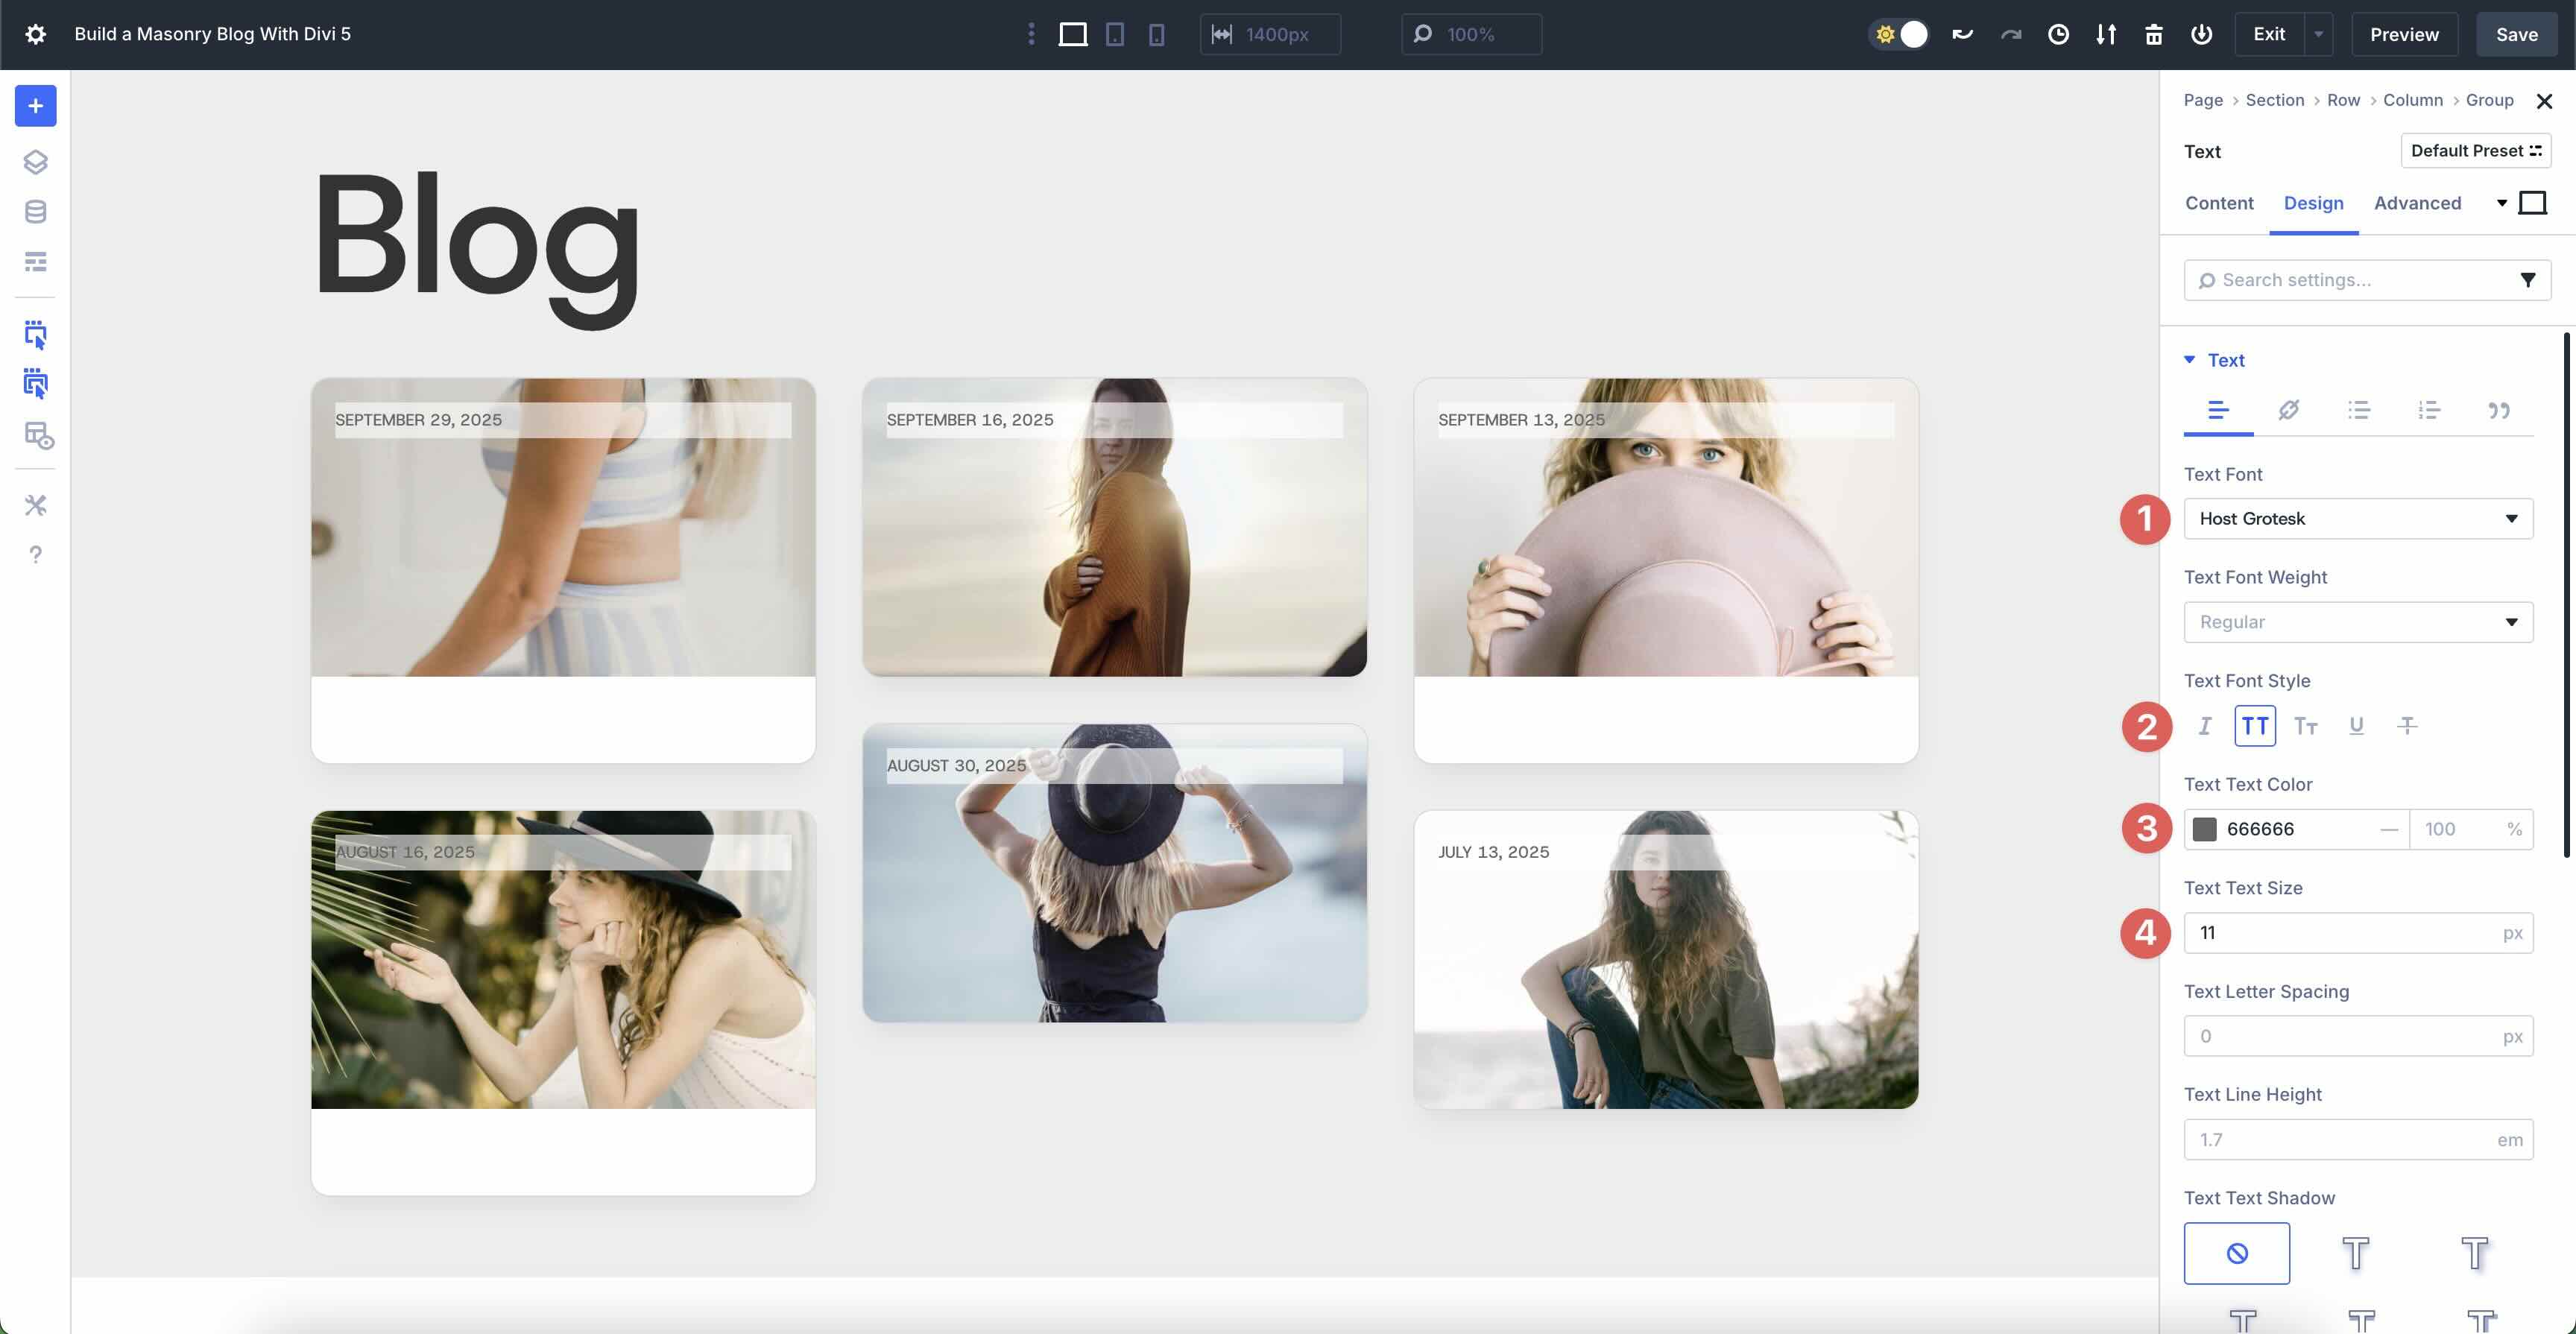
Click on the Textual content module’s Design tab. Enlarge the Textual content menu. Input Host Grotesk because the Textual content Font, Uppercase because the Textual content Font Taste, and #666666 because the Textual content Textual content Colour. Set the Textual content Textual content Measurement to 11px.
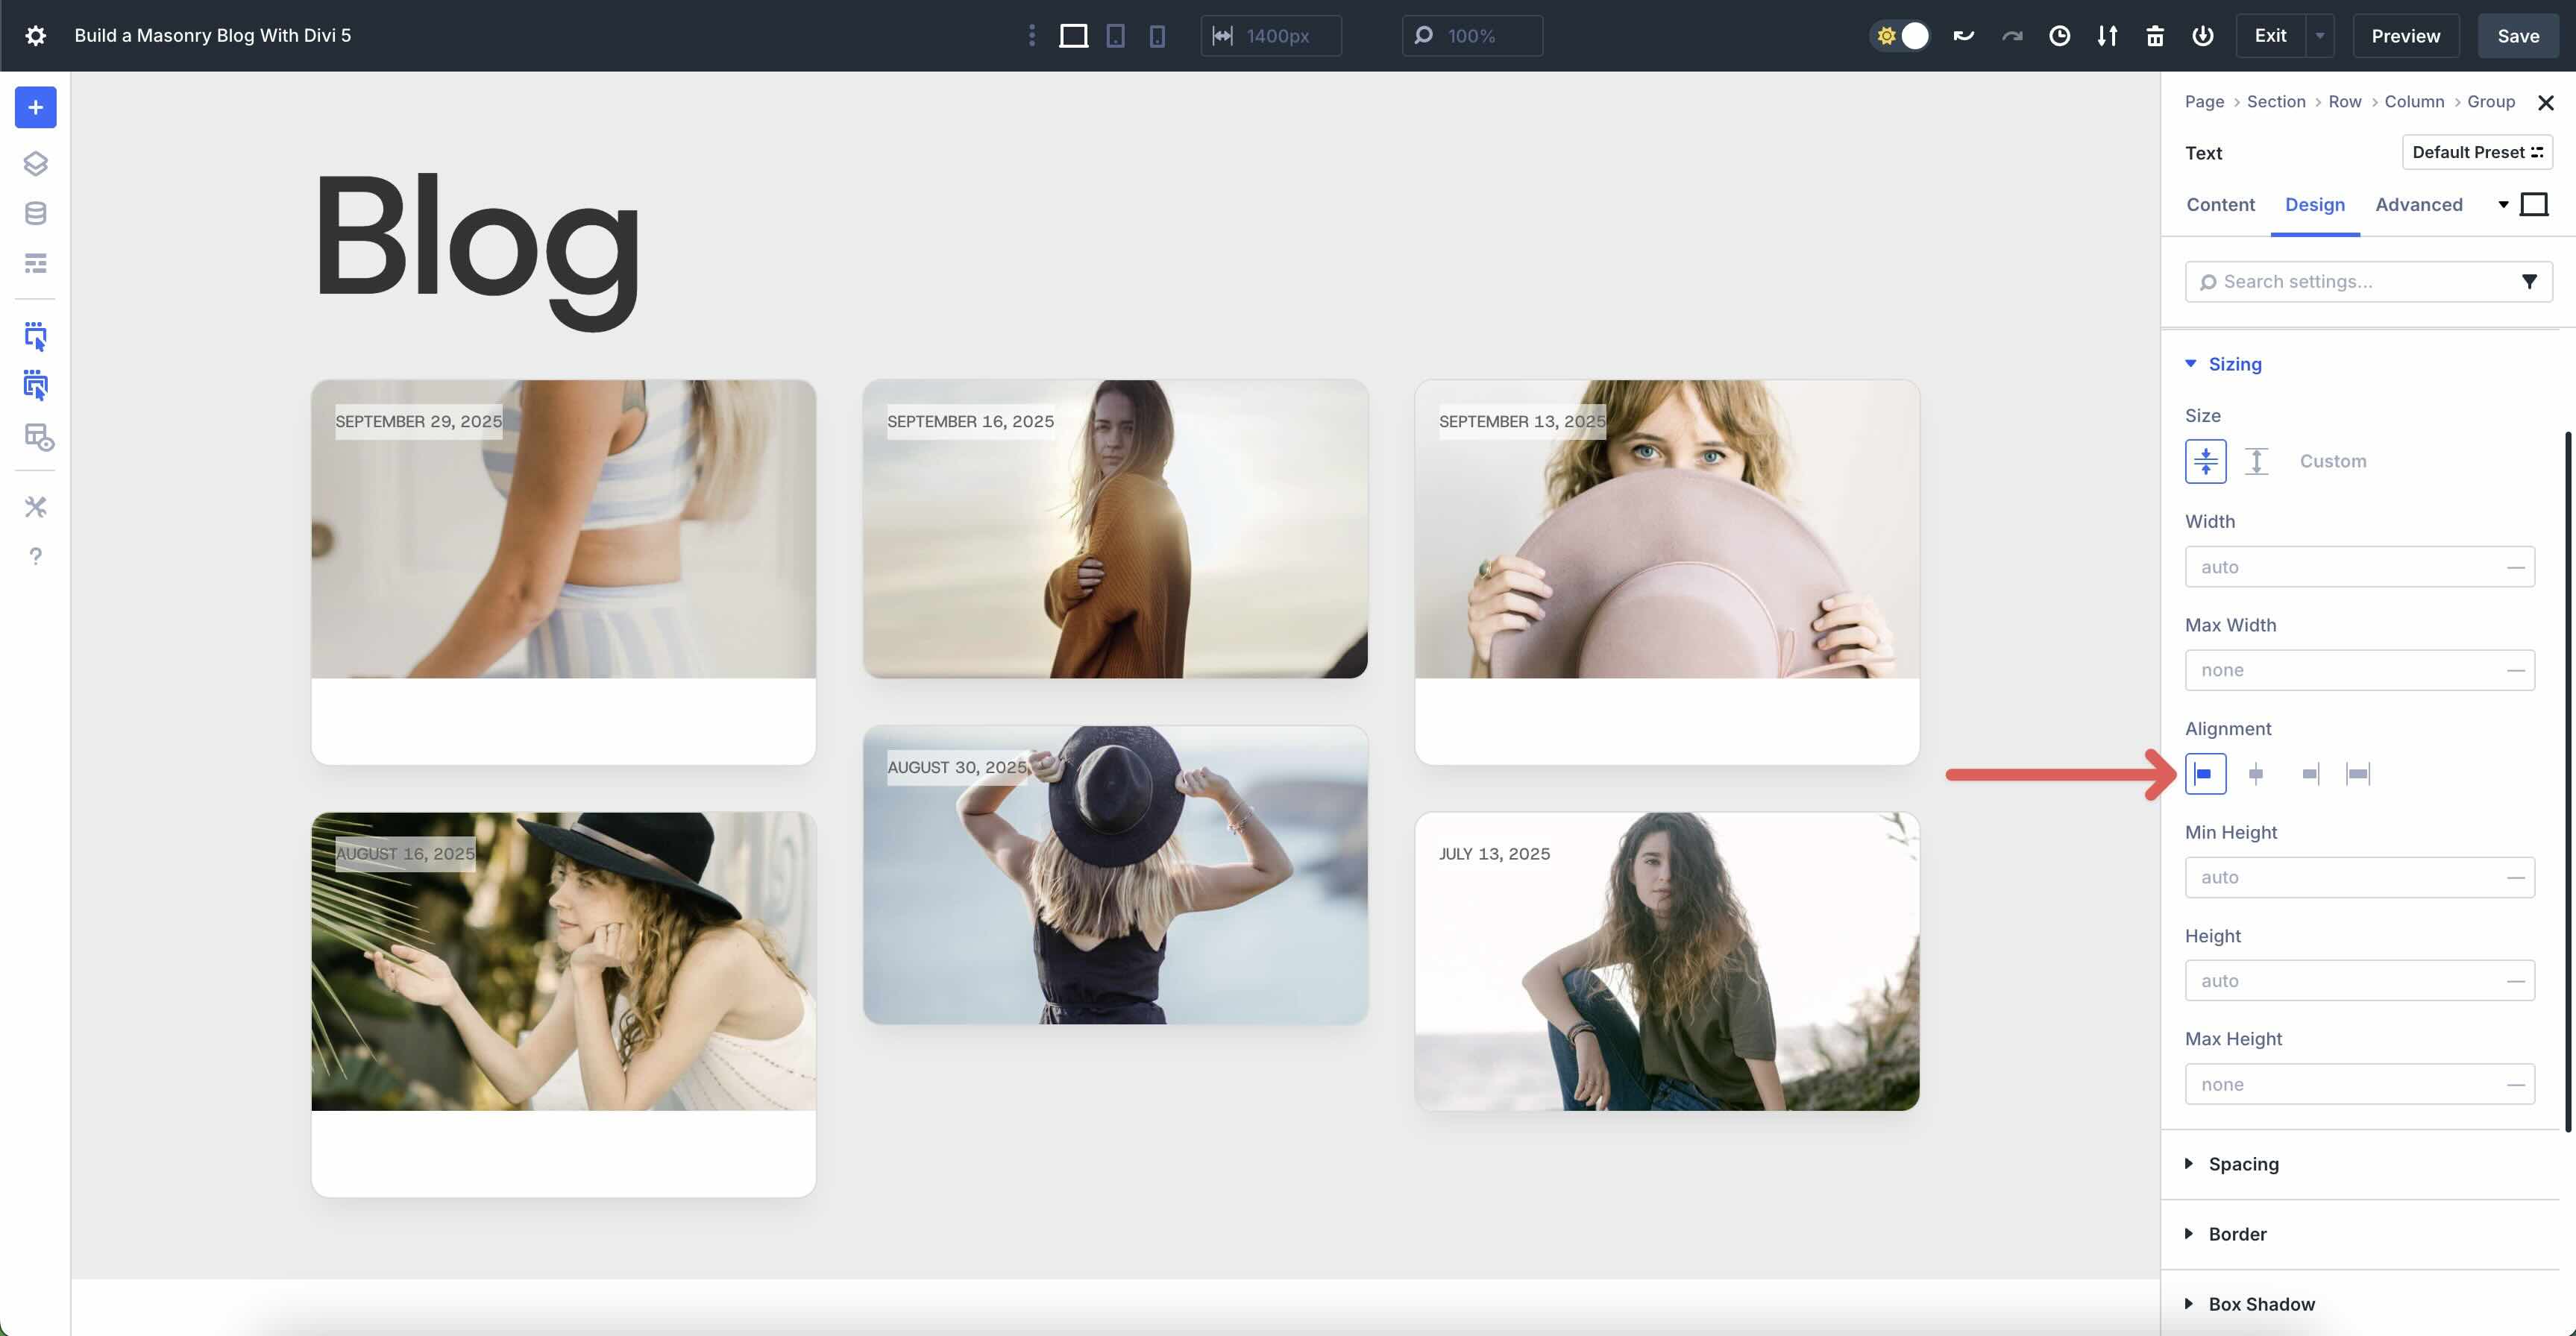
Enlarge the Sizing menu. Set the Alignment to Get started.
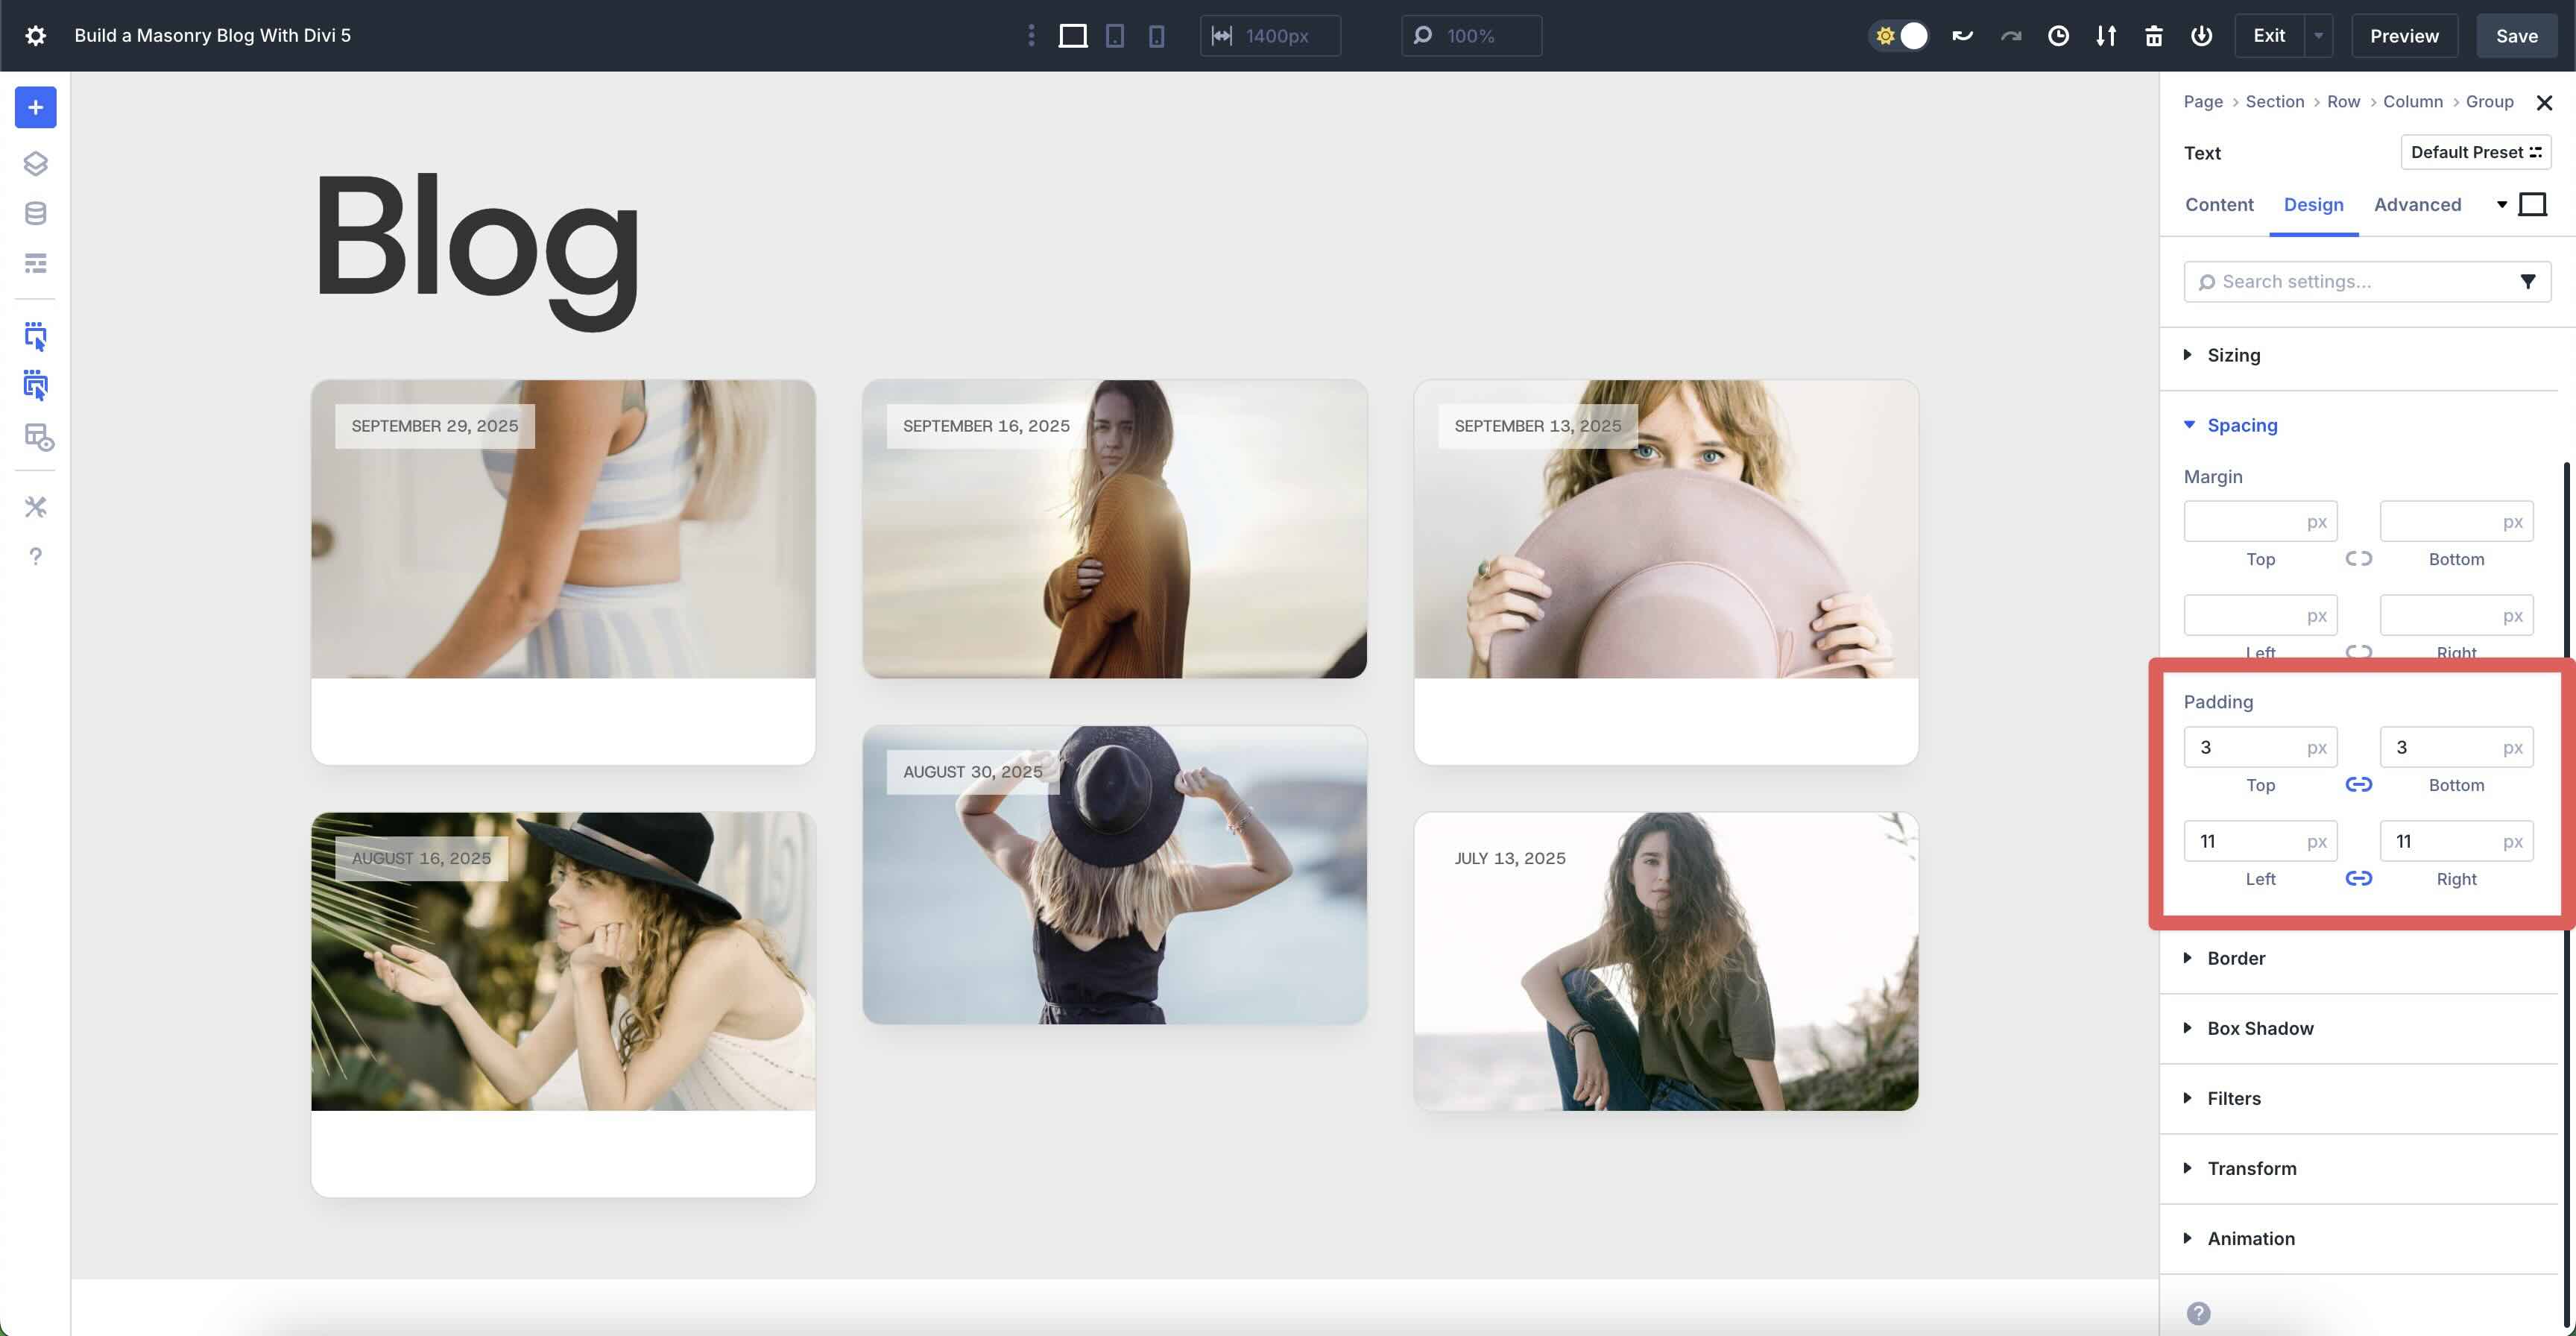
Within the Spacing settings, upload 3px Padding to the peak and backside and 11px Padding to the left and proper.
In spite of everything, make bigger the Border menu. Upload 50px Border Radius to the Textual content module.
Upload Some other Staff Module
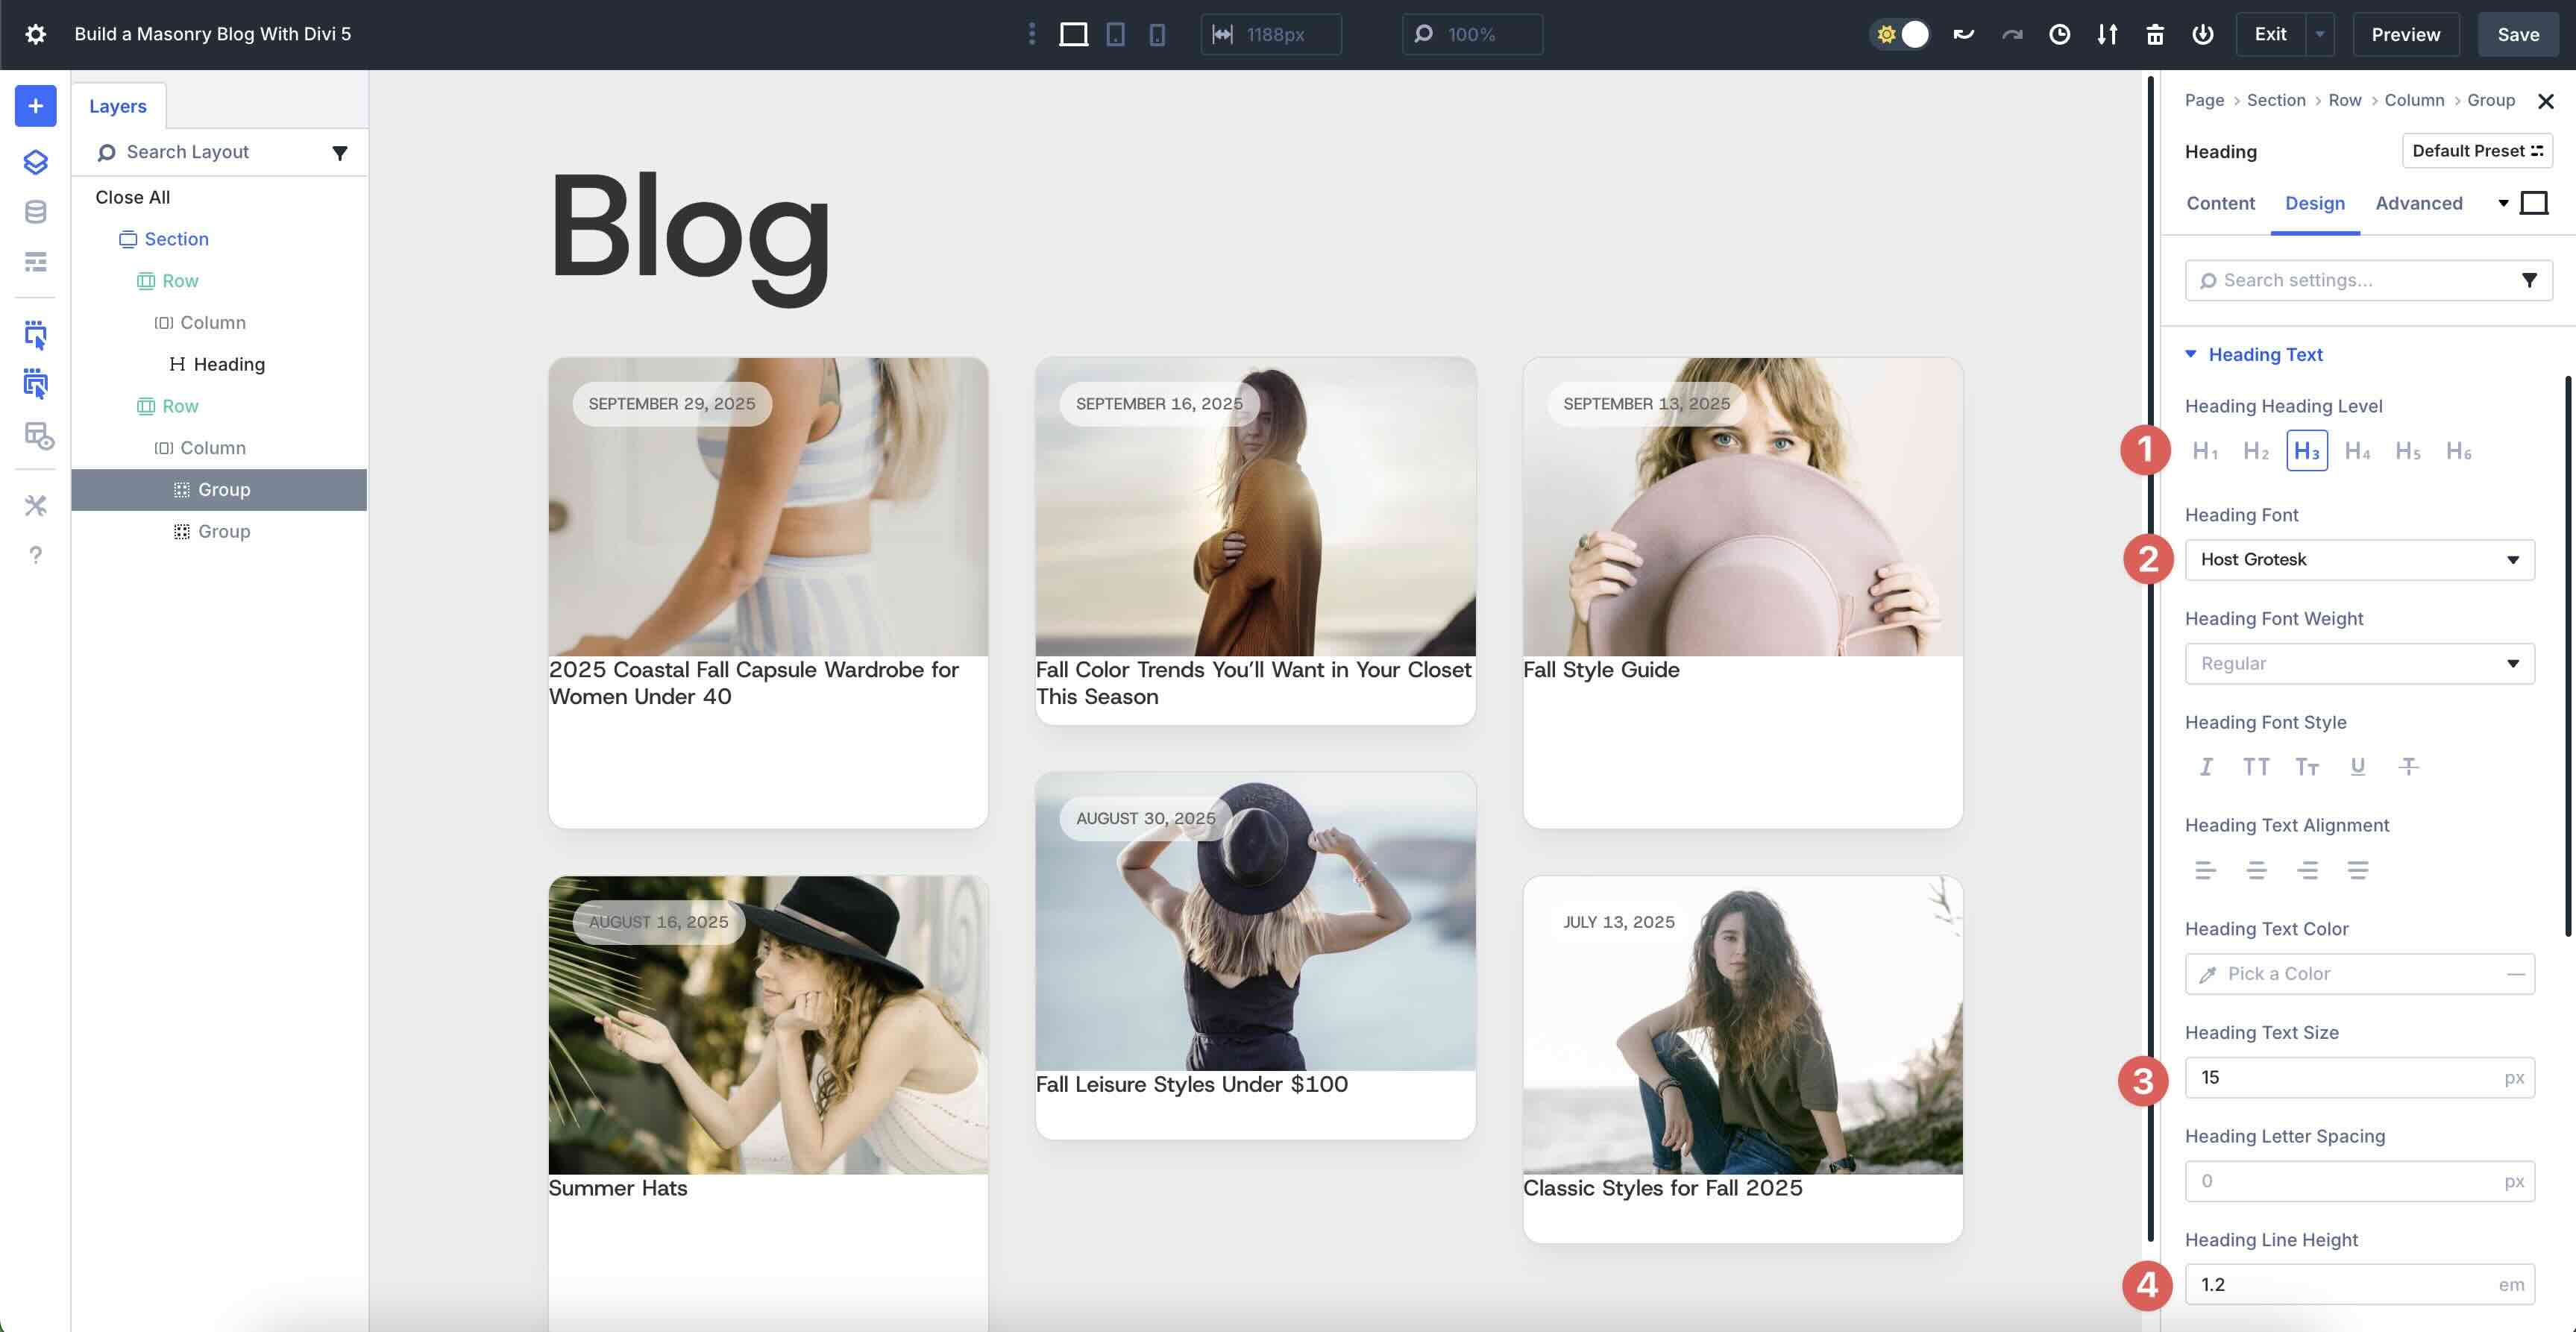
Now, let’s upload any other Staff module to the primary Staff merchandise in our Loop. As soon as added, click on so as to add a Heading module to the Staff.
When the Heading module’s settings seem, click on the Dynamic Content material icon above the Heading box. Choose Loop Publish Identify from the choices.
Navigate to the Heading module’s Design tab. Enlarge the Heading Textual content menu and make a choice h3 because the Heading Degree. Make a selection Host Grotesk because the Heading Font, 15px because the Heading Textual content Measurement, and 1.2em because the Heading Line Top.
Ahead of we transfer on, we wish to upload some padding to the Staff module that incorporates the Heading module. Use Divi 5’s Layers View to make a choice the second one Staff module. Navigate to the Design tab and scroll right down to the Spacing settings. Upload 16px Padding on all 4 facets.

Upload A 3rd Staff Module
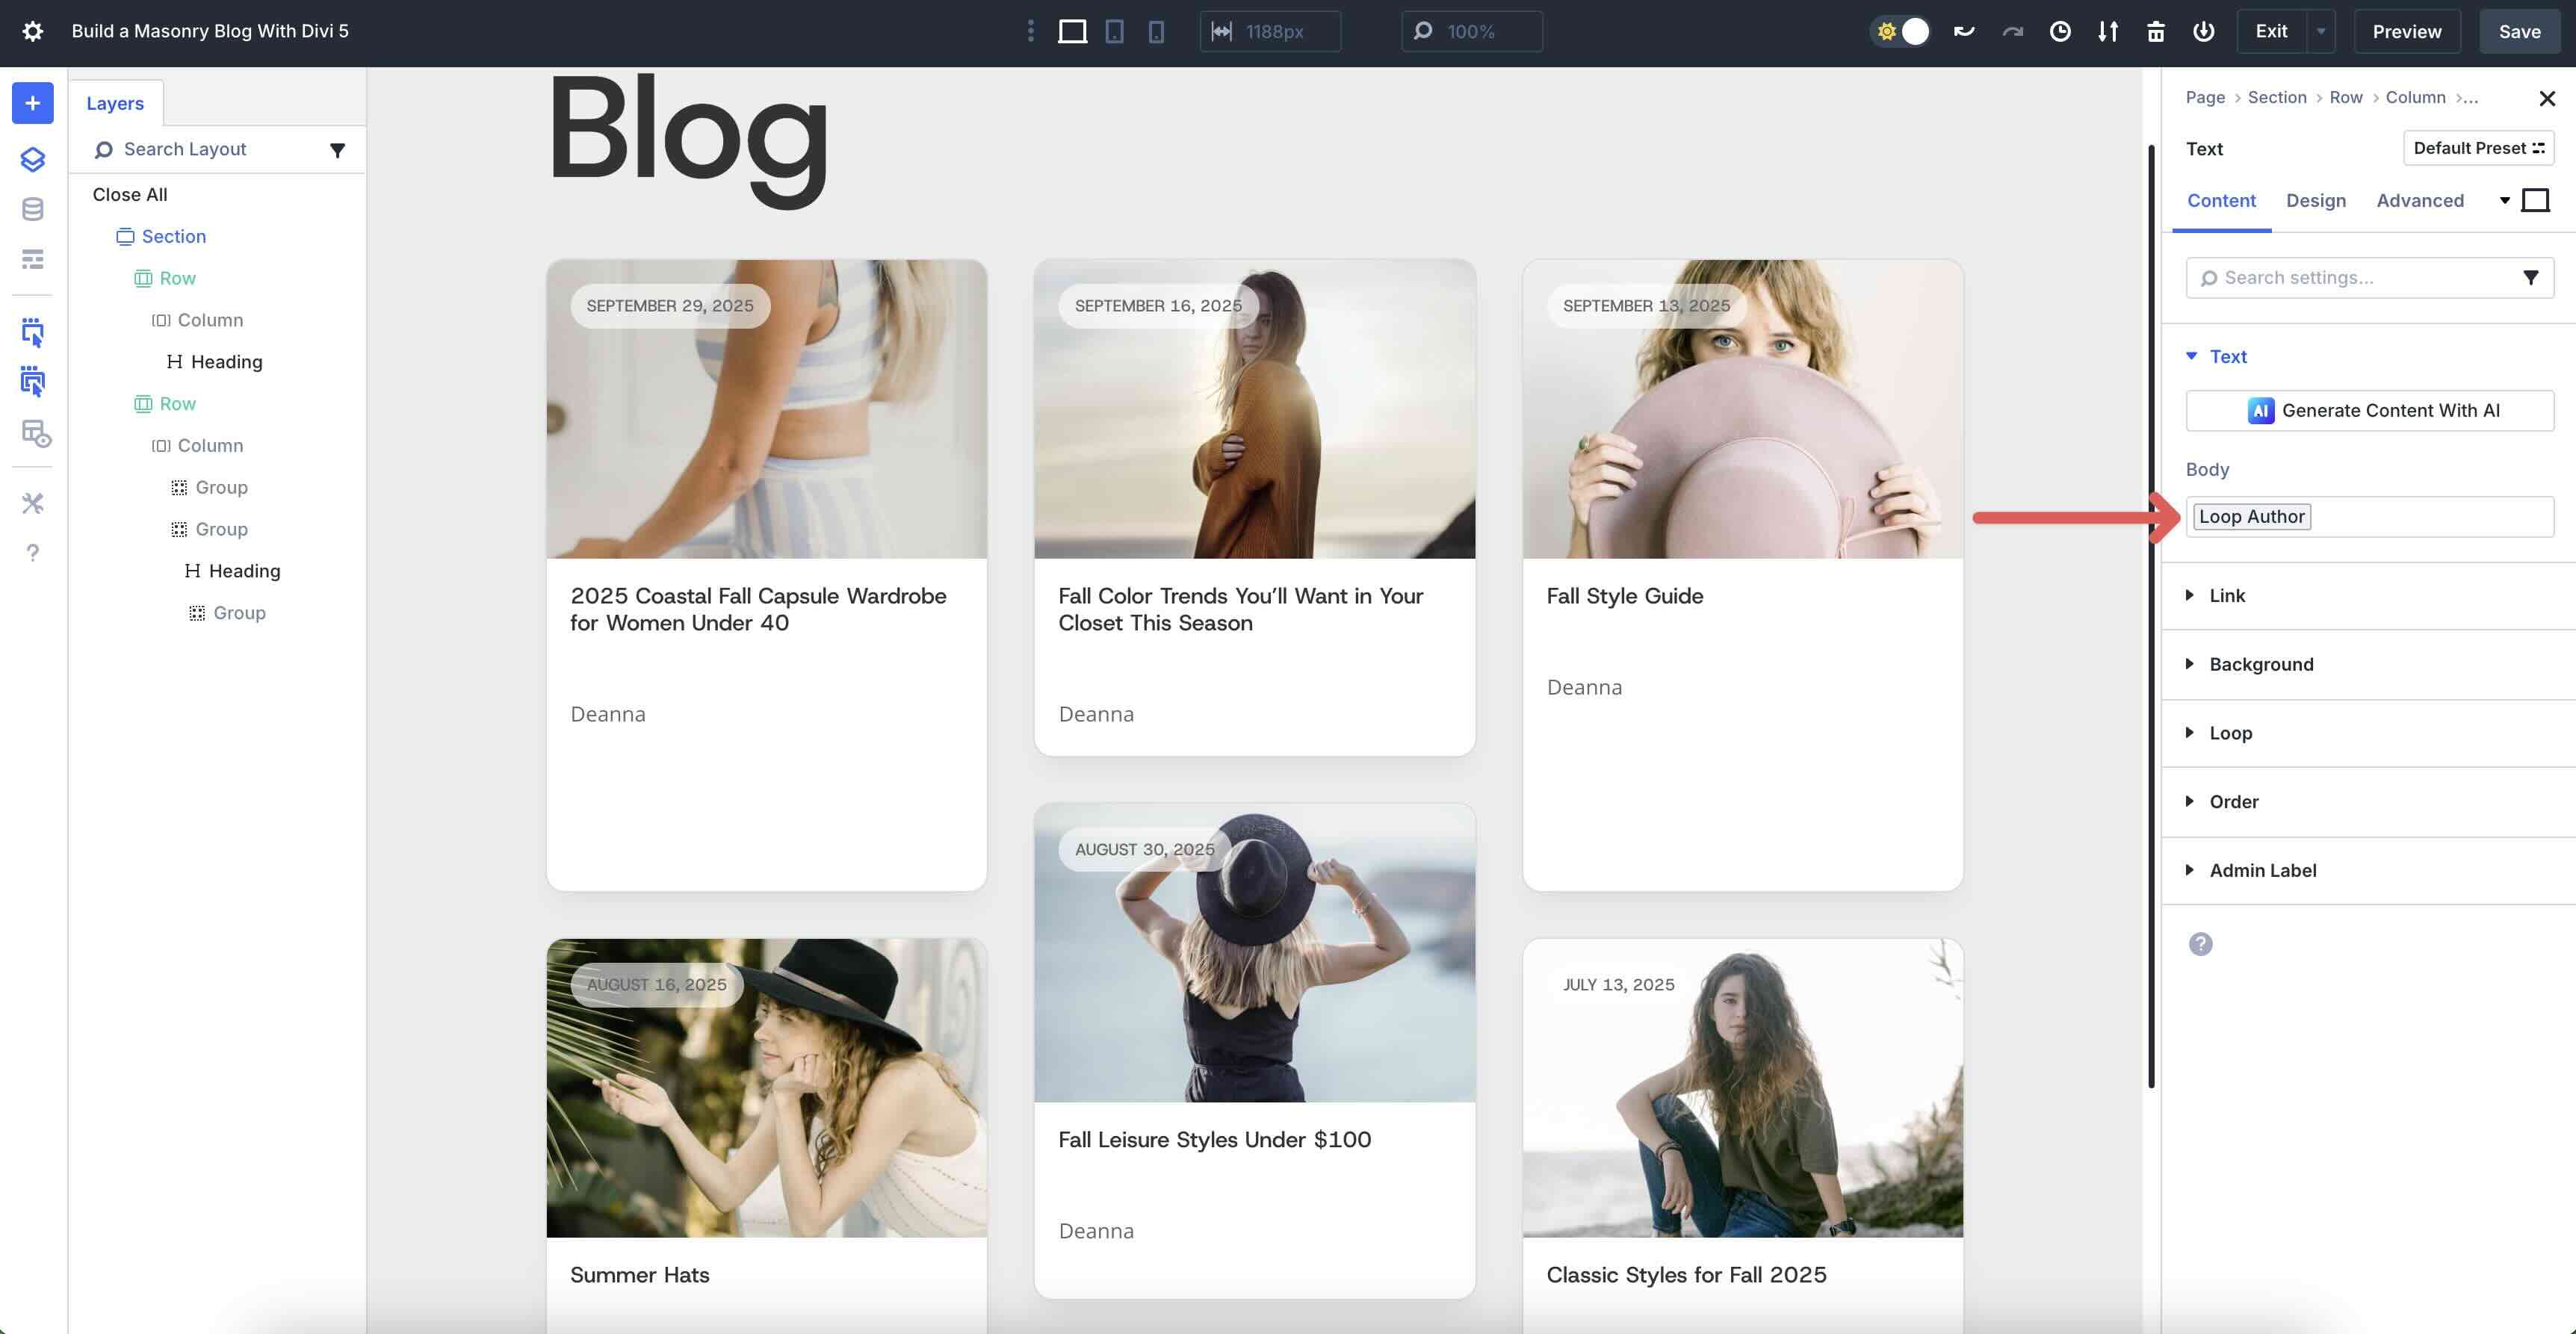
Subsequent, we’ll upload a 3rd Staff module, however we need to position it into the Staff that incorporates the Heading module. Click on the black “+” icon so as to add a brand new module. Choose the Staff module. When the Insert Row or Module modal seems, click on so as to add a Textual content module.
Within the Textual content module’s Content material tab, click on the Dynamic Content material icon and make a choice Loop Writer from the to be had fields.
Within the Design tab, make a choice Host Grotesk because the Textual content Font, #9a9a9a for the Textual content Textual content Colour, 11px because the Textual content Textual content Measurement, and 1.4em because the Textual content Line Top.

Use the Layers View to replicate the Textual content module.
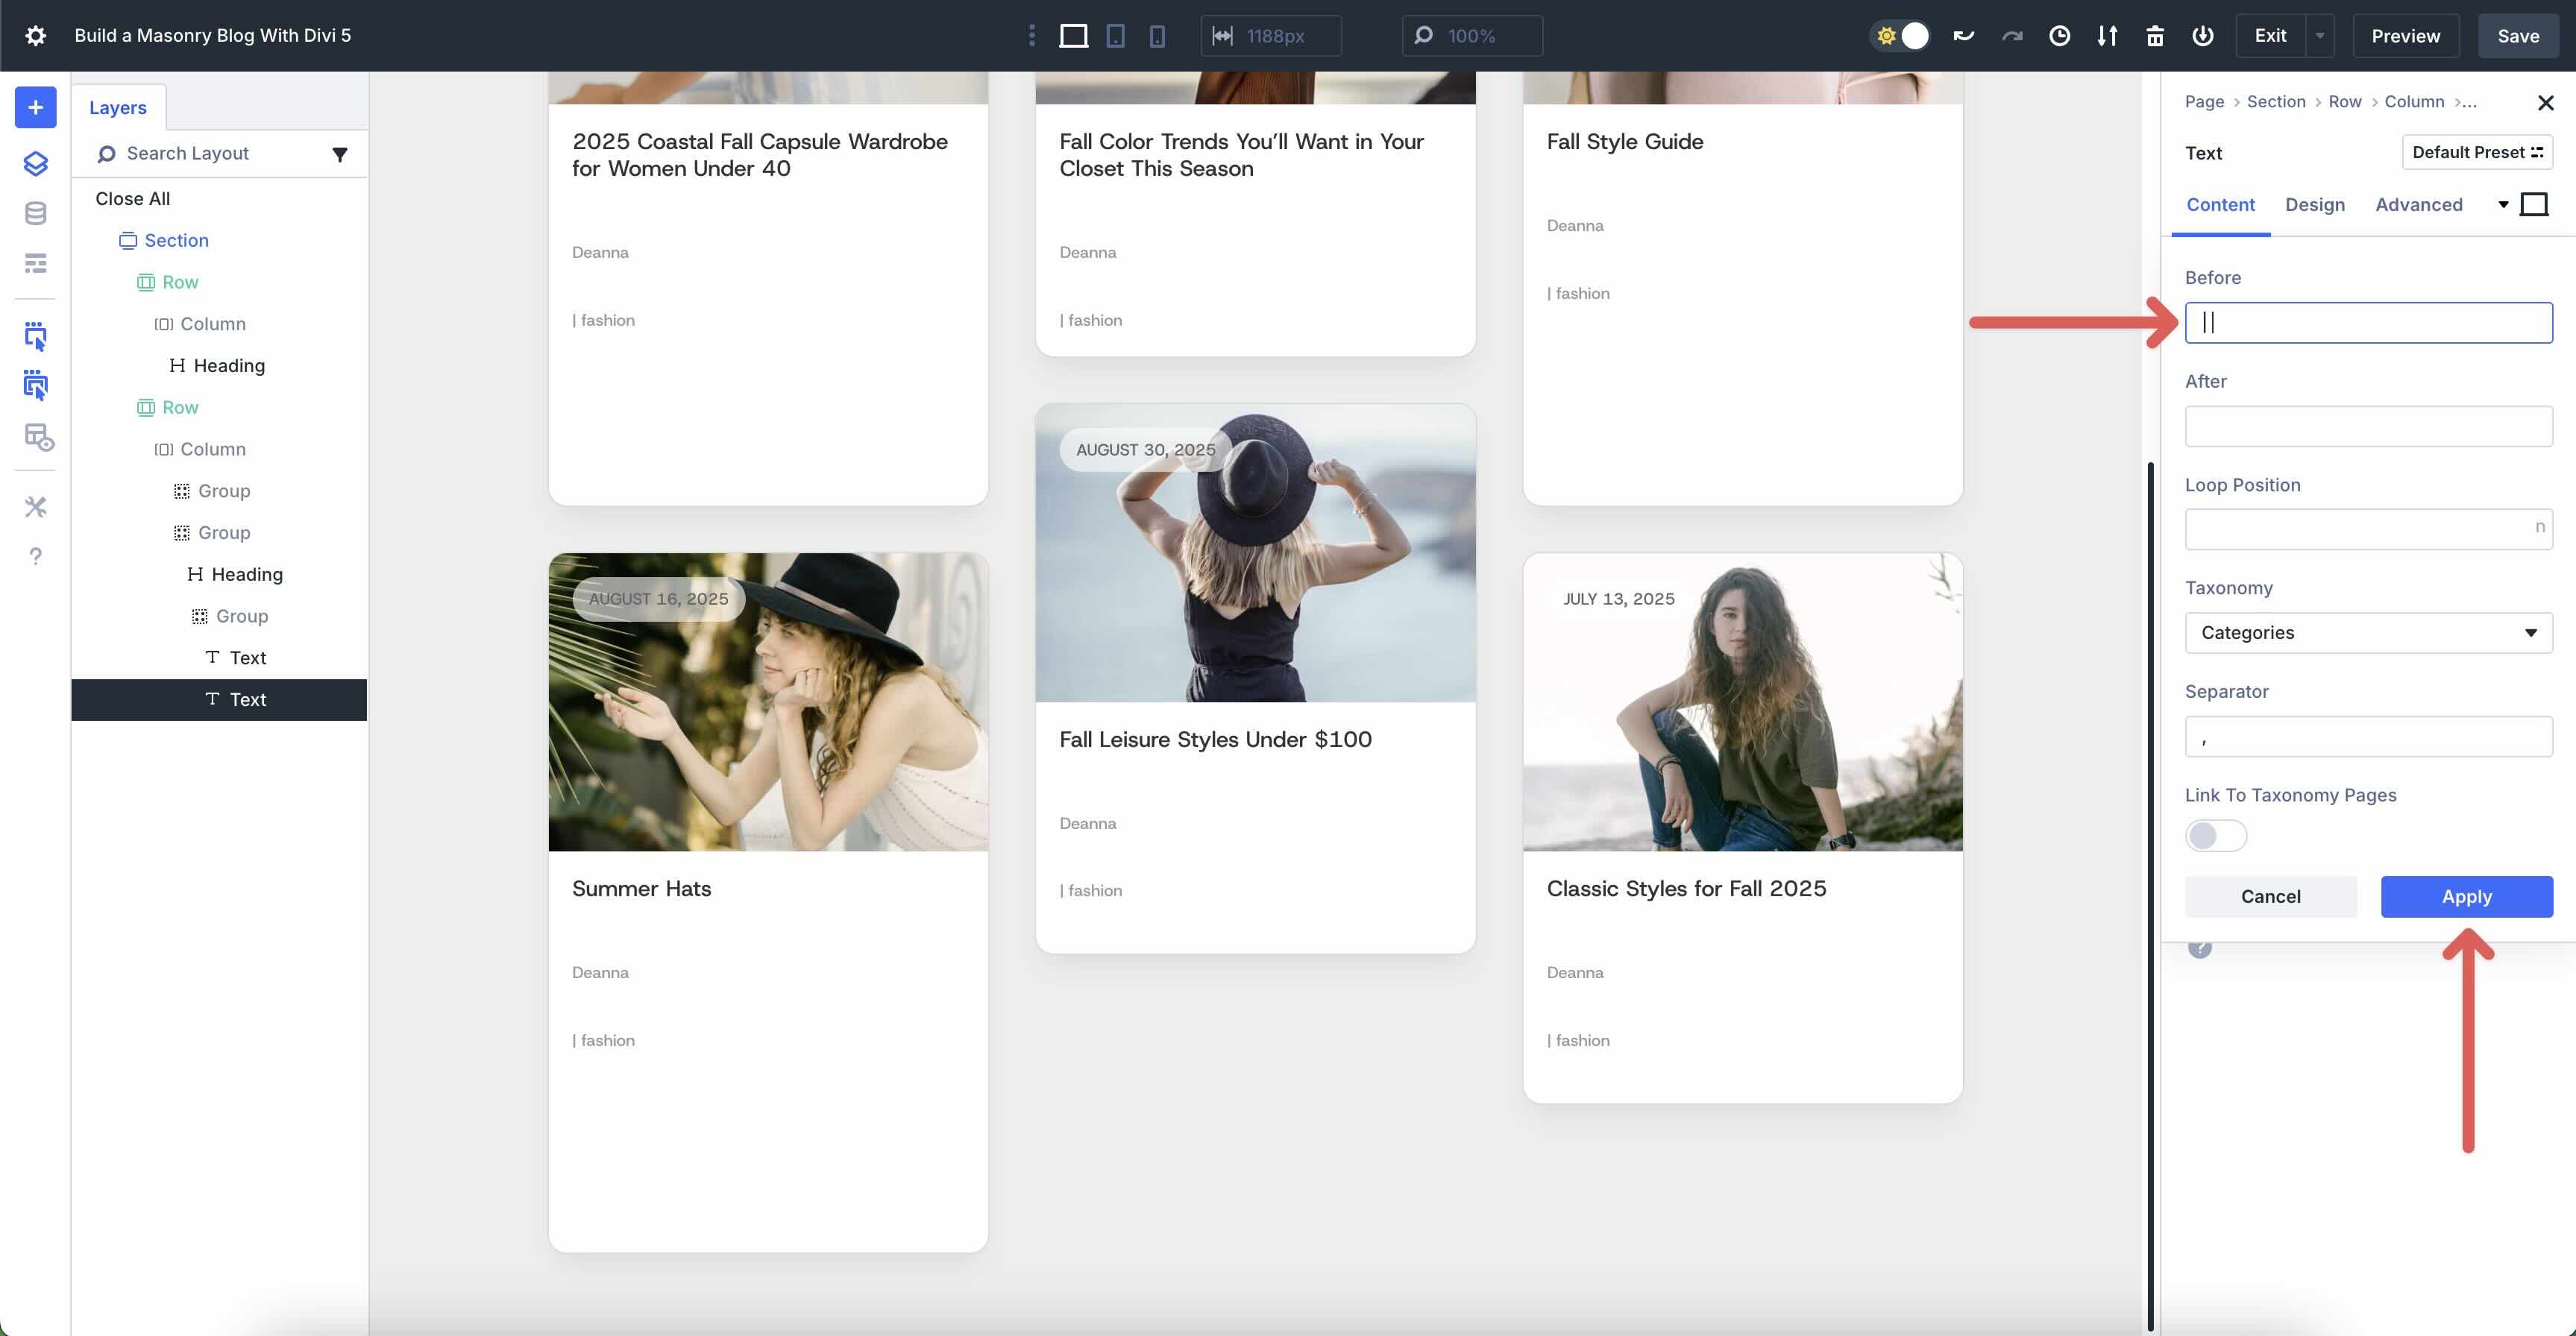
In the second one Textual content module, click on the Dynamic Content material icon and make a choice Loop Publish Phrases because the customized box. Within the Ahead of box, upload a “|”.
Ahead of we transfer on, we will have to modify the Staff’s settings in order that the 2 Textual content modules stack aspect through aspect. Within the Design tab, click on the Format menu to make bigger it. Upload 4px Horizontal and Vertical Hole and make a choice Row because the Format Route.

Upload A Textual content Module To The 2nd Staff
Your next step is so as to add any other Textual content module, however this time, we’ll upload it to the second one Staff that incorporates the Heading module. Use the Layers View to make a choice the second one Staff module.
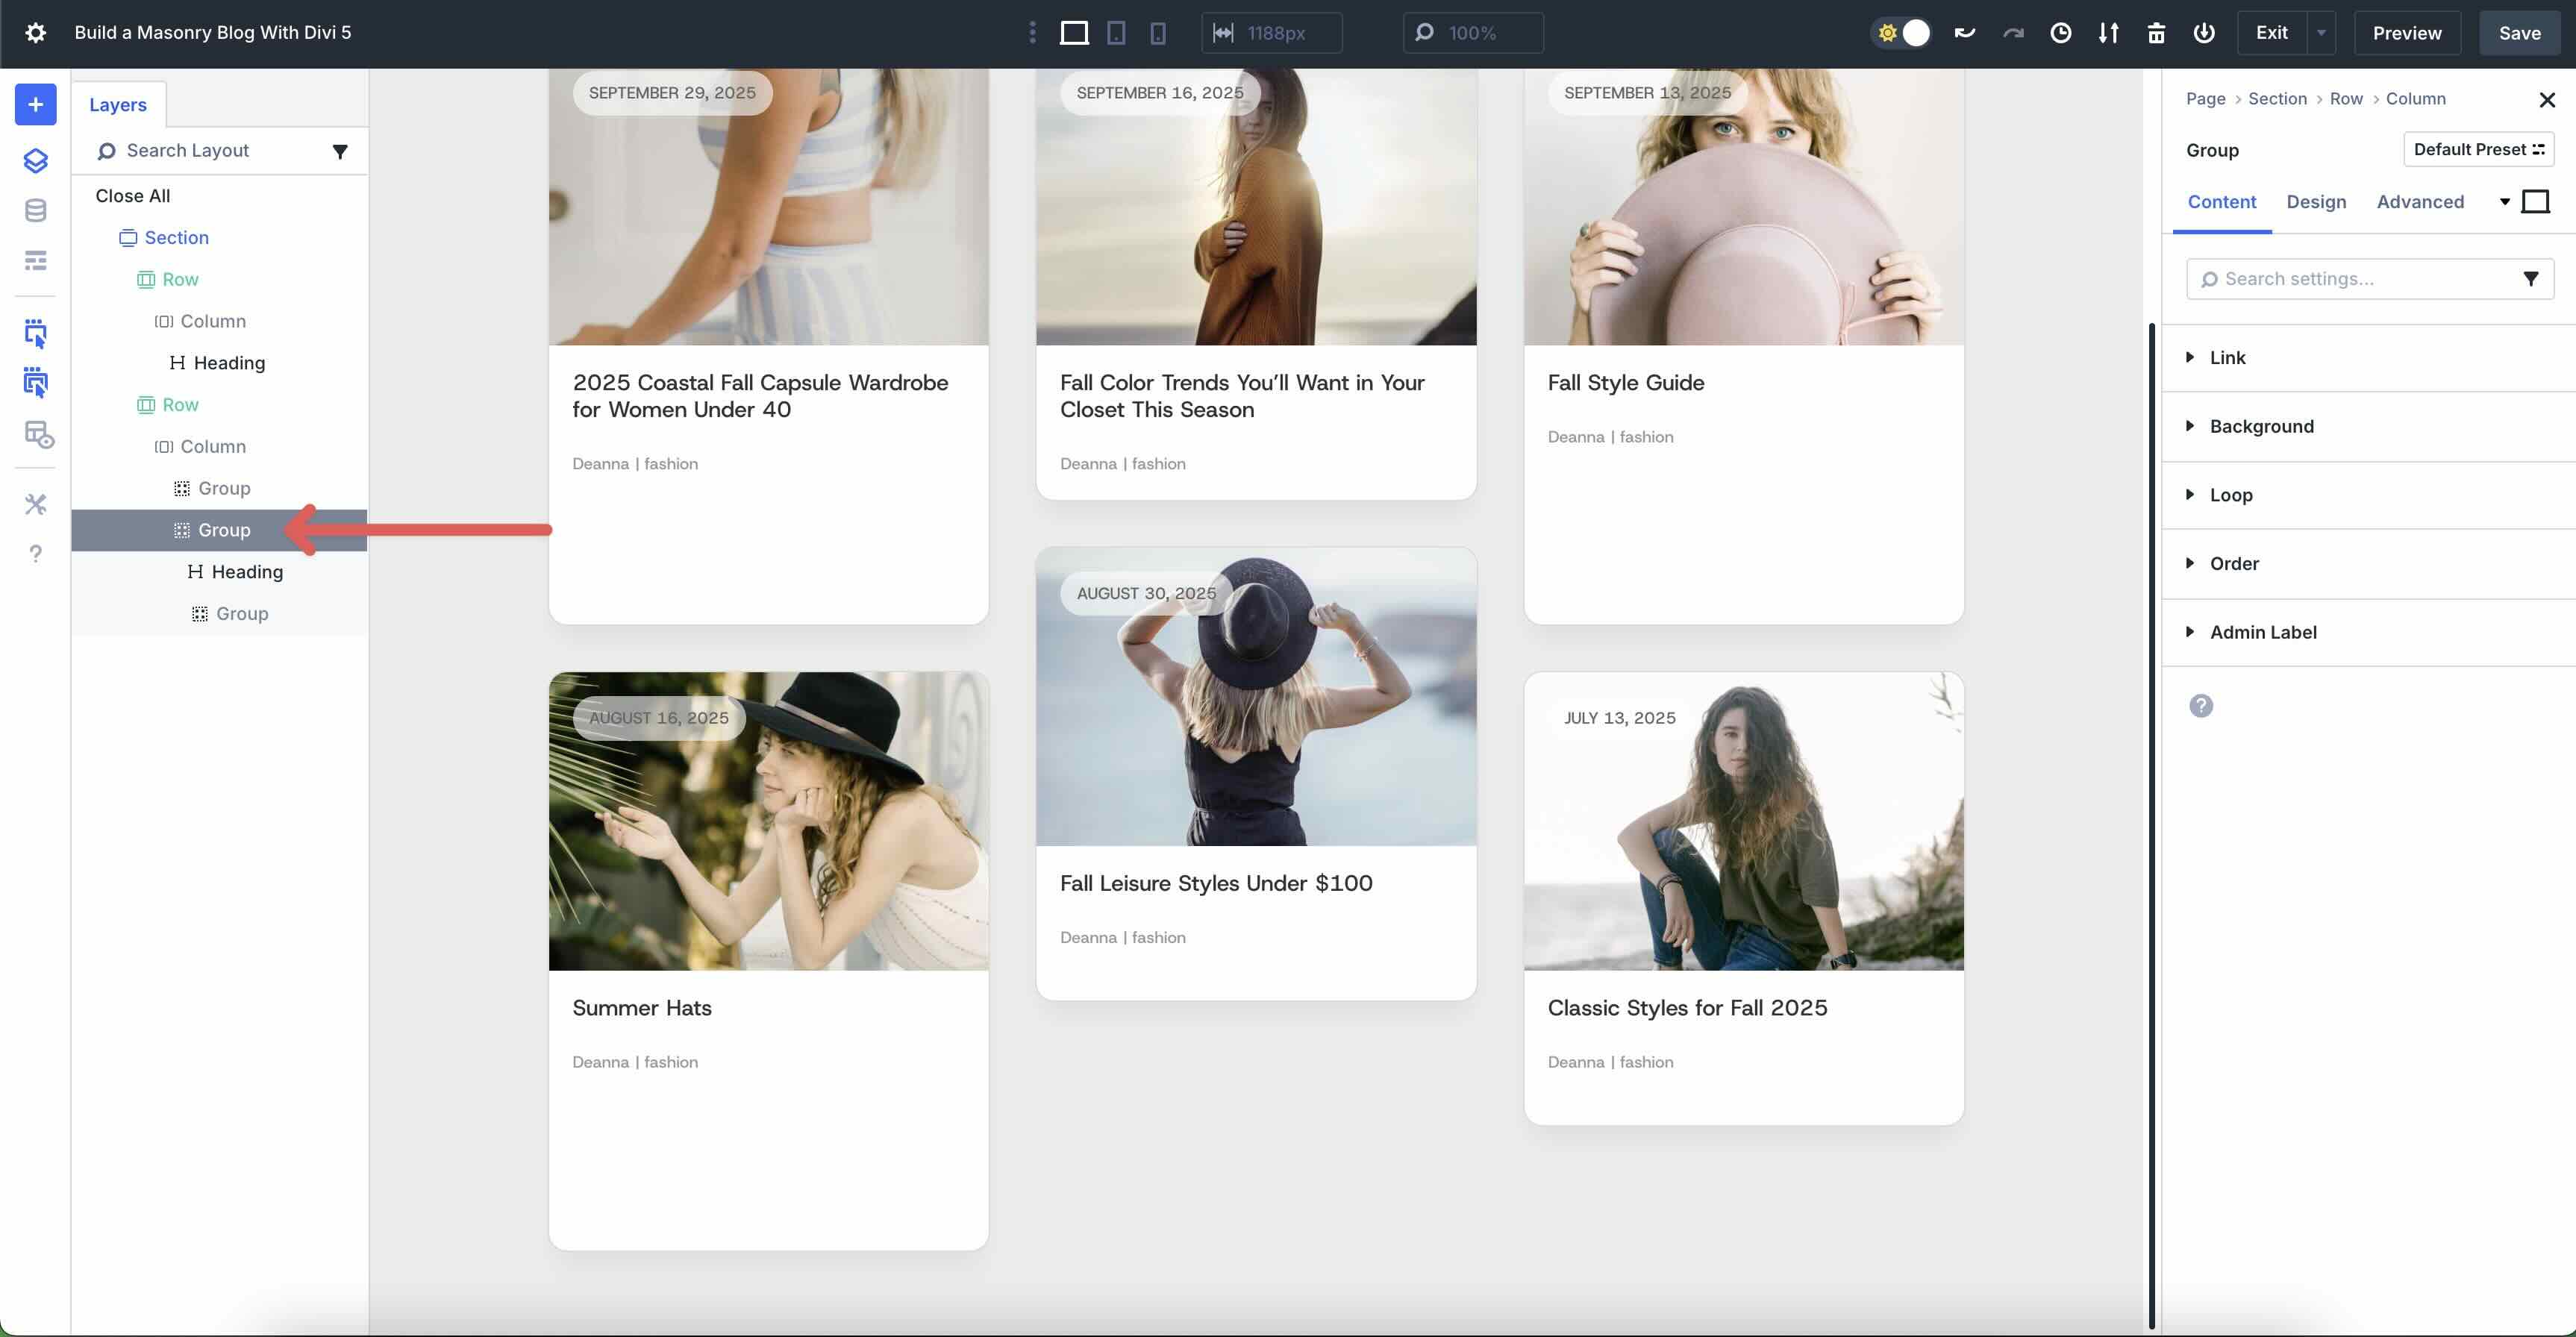
Click on the Black “+” icon and make a choice the Textual content module. As soon as in position, use the Layers View to pull it into position beneath the 3rd Staff module. Watch out to not upload it out of doors of the 2d Staff.
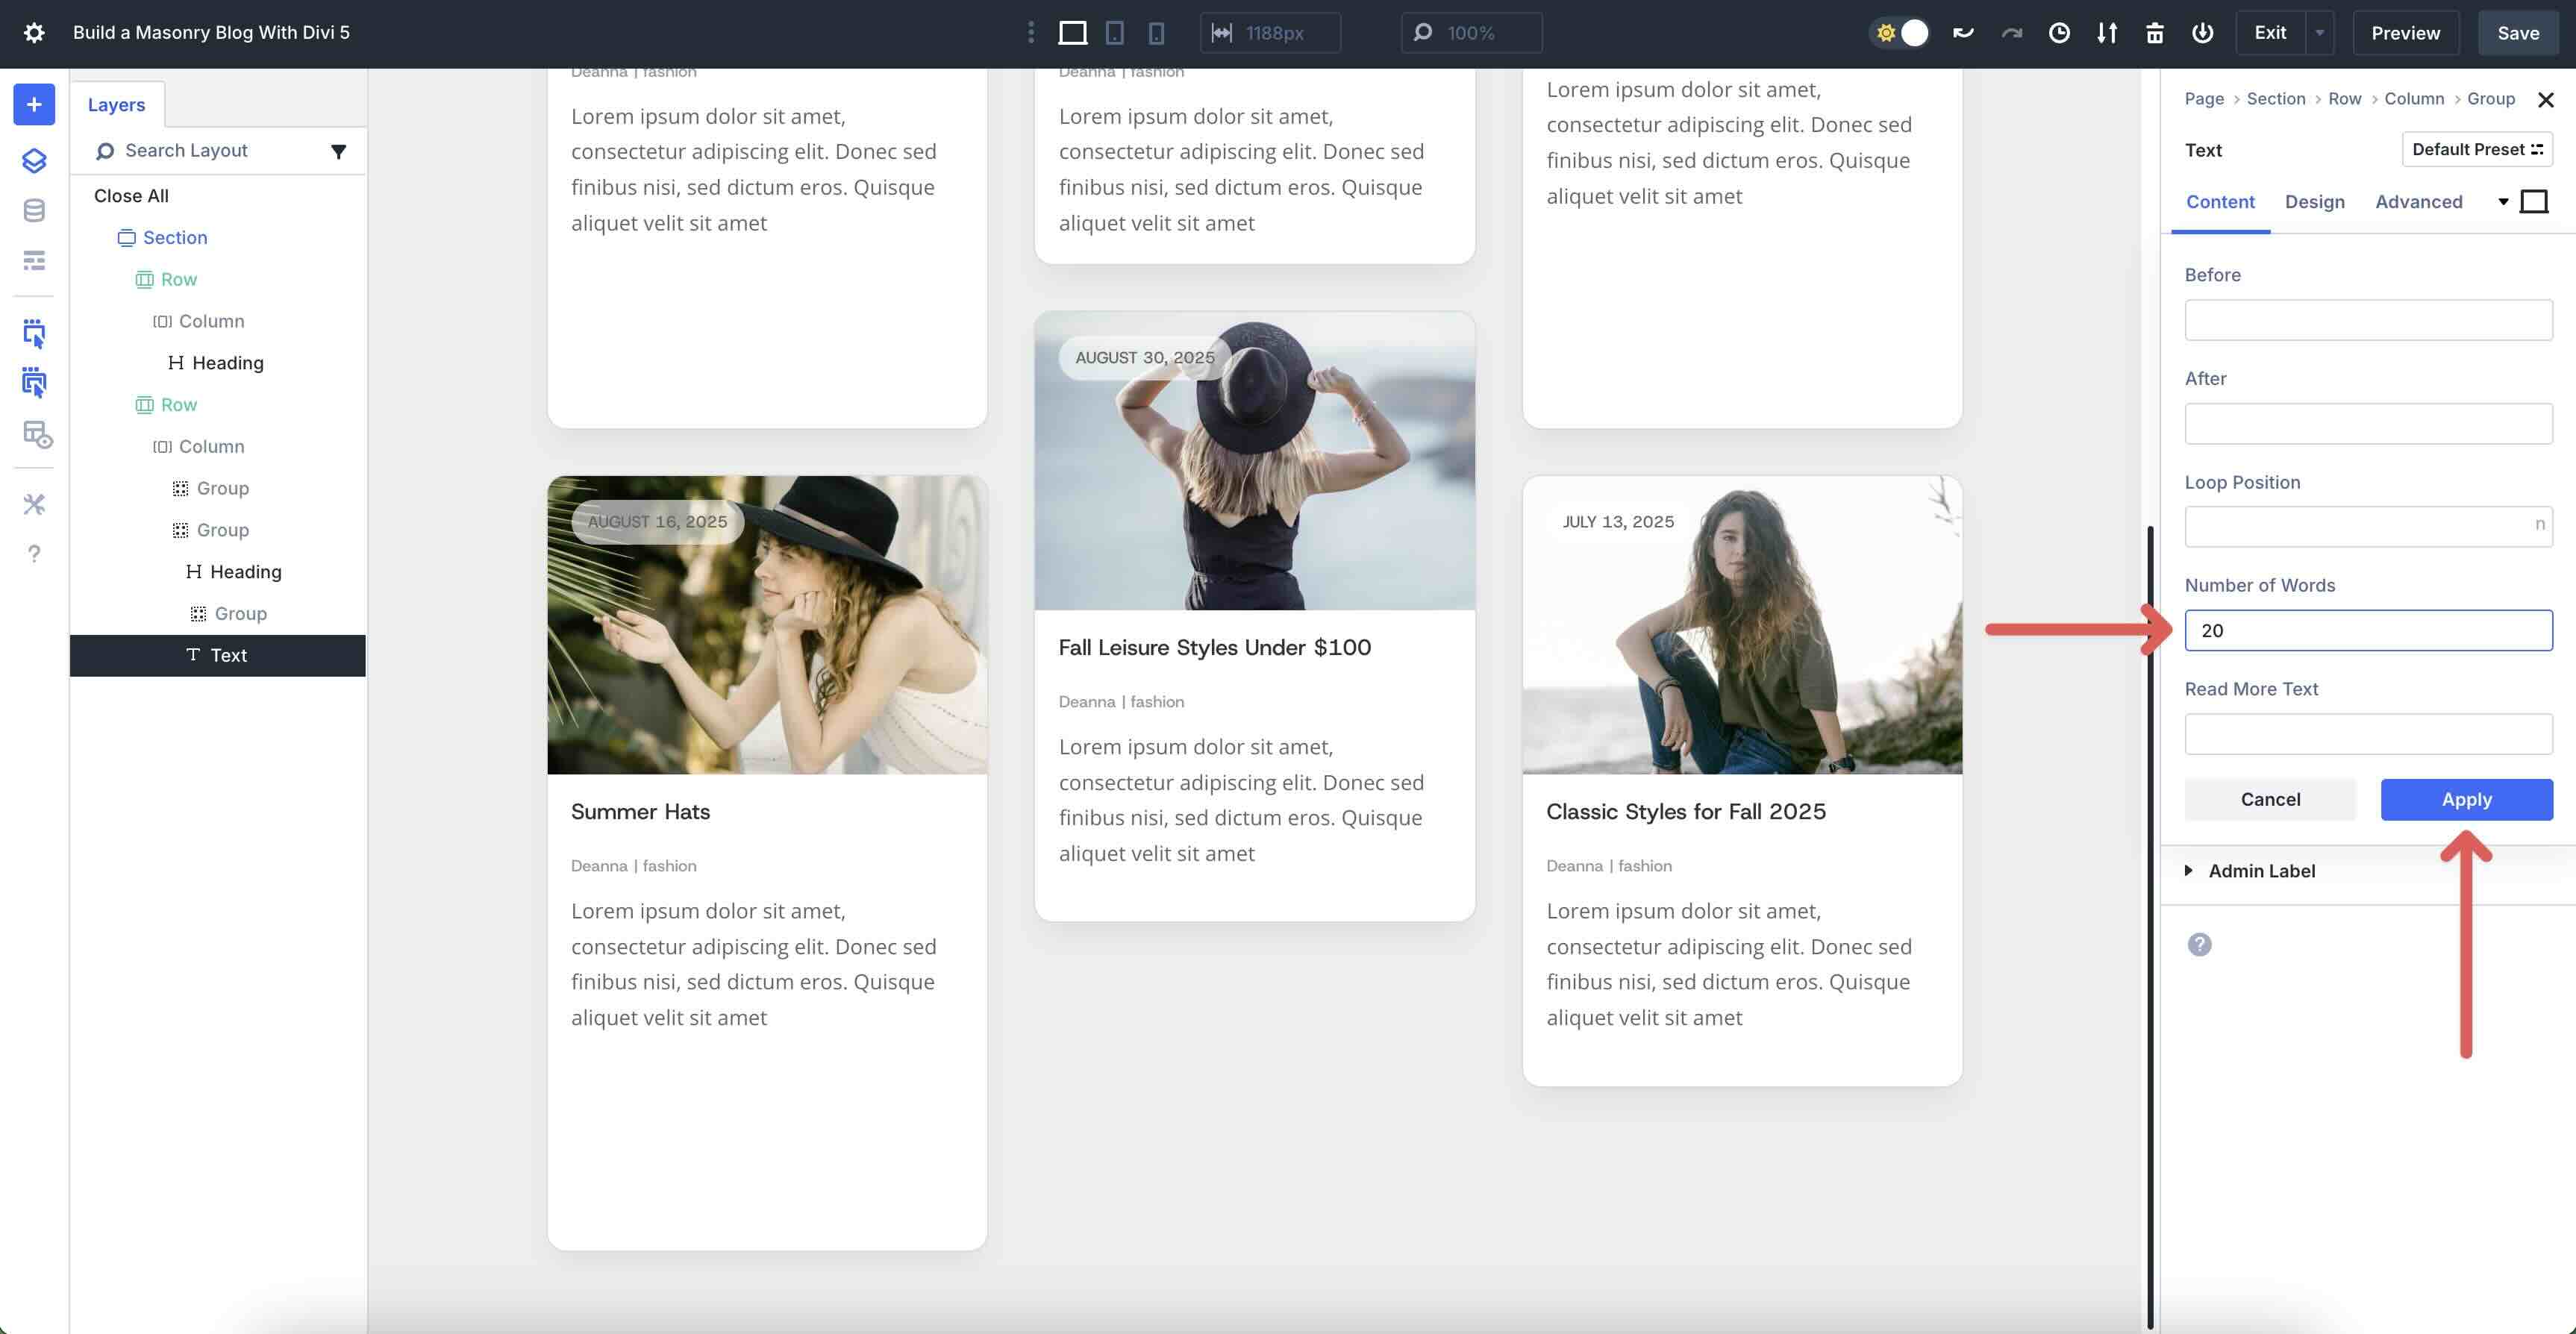
Click on the Dynamic Content material icon above the Frame box and make a choice Loop Excerpt from the to be had fields. When the modal seems, upload 20 into the Choice of Phrases box. Click on Observe to put it aside.
Upload A Button Module
Click on the Black “+” icon beneath the Textual content module we simply added and make a choice the Button module.
Within the Button module’s Content material tab, upload Learn Extra into the Button Textual content box.
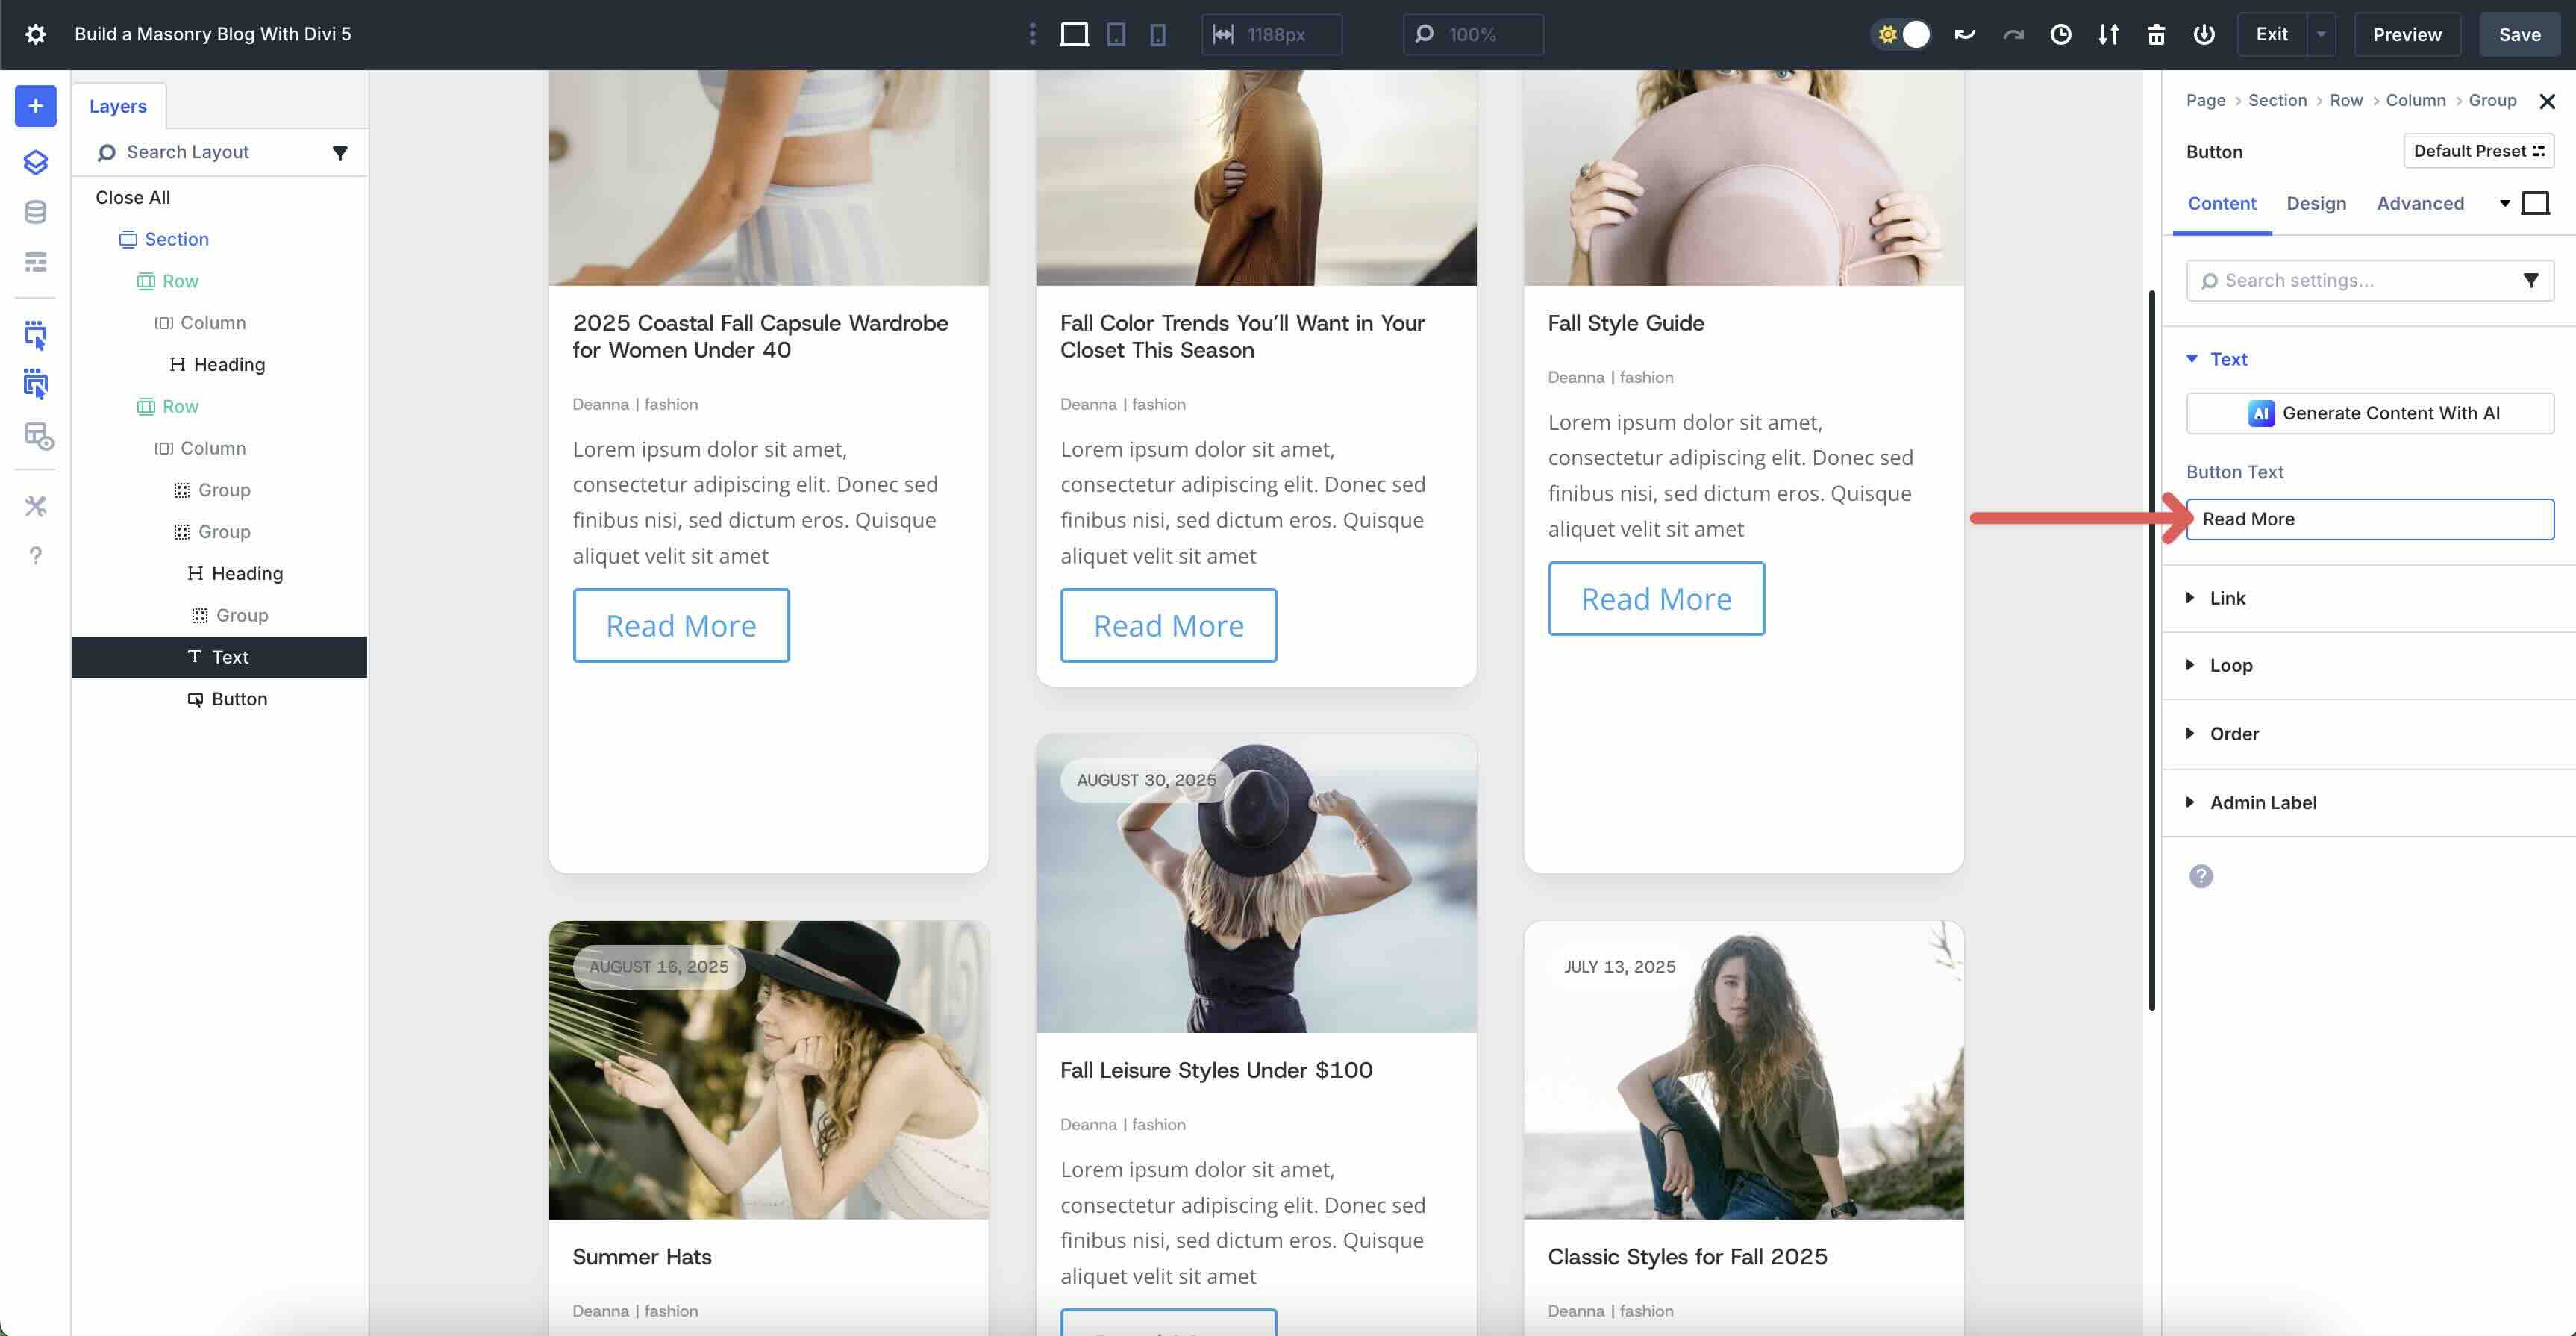
Enlarge the Hyperlink dropdown menu. Click on the Dynamic Content material icon immediately above the Button Hyperlink URL box. When the choices seem, make a choice Loop Hyperlink.
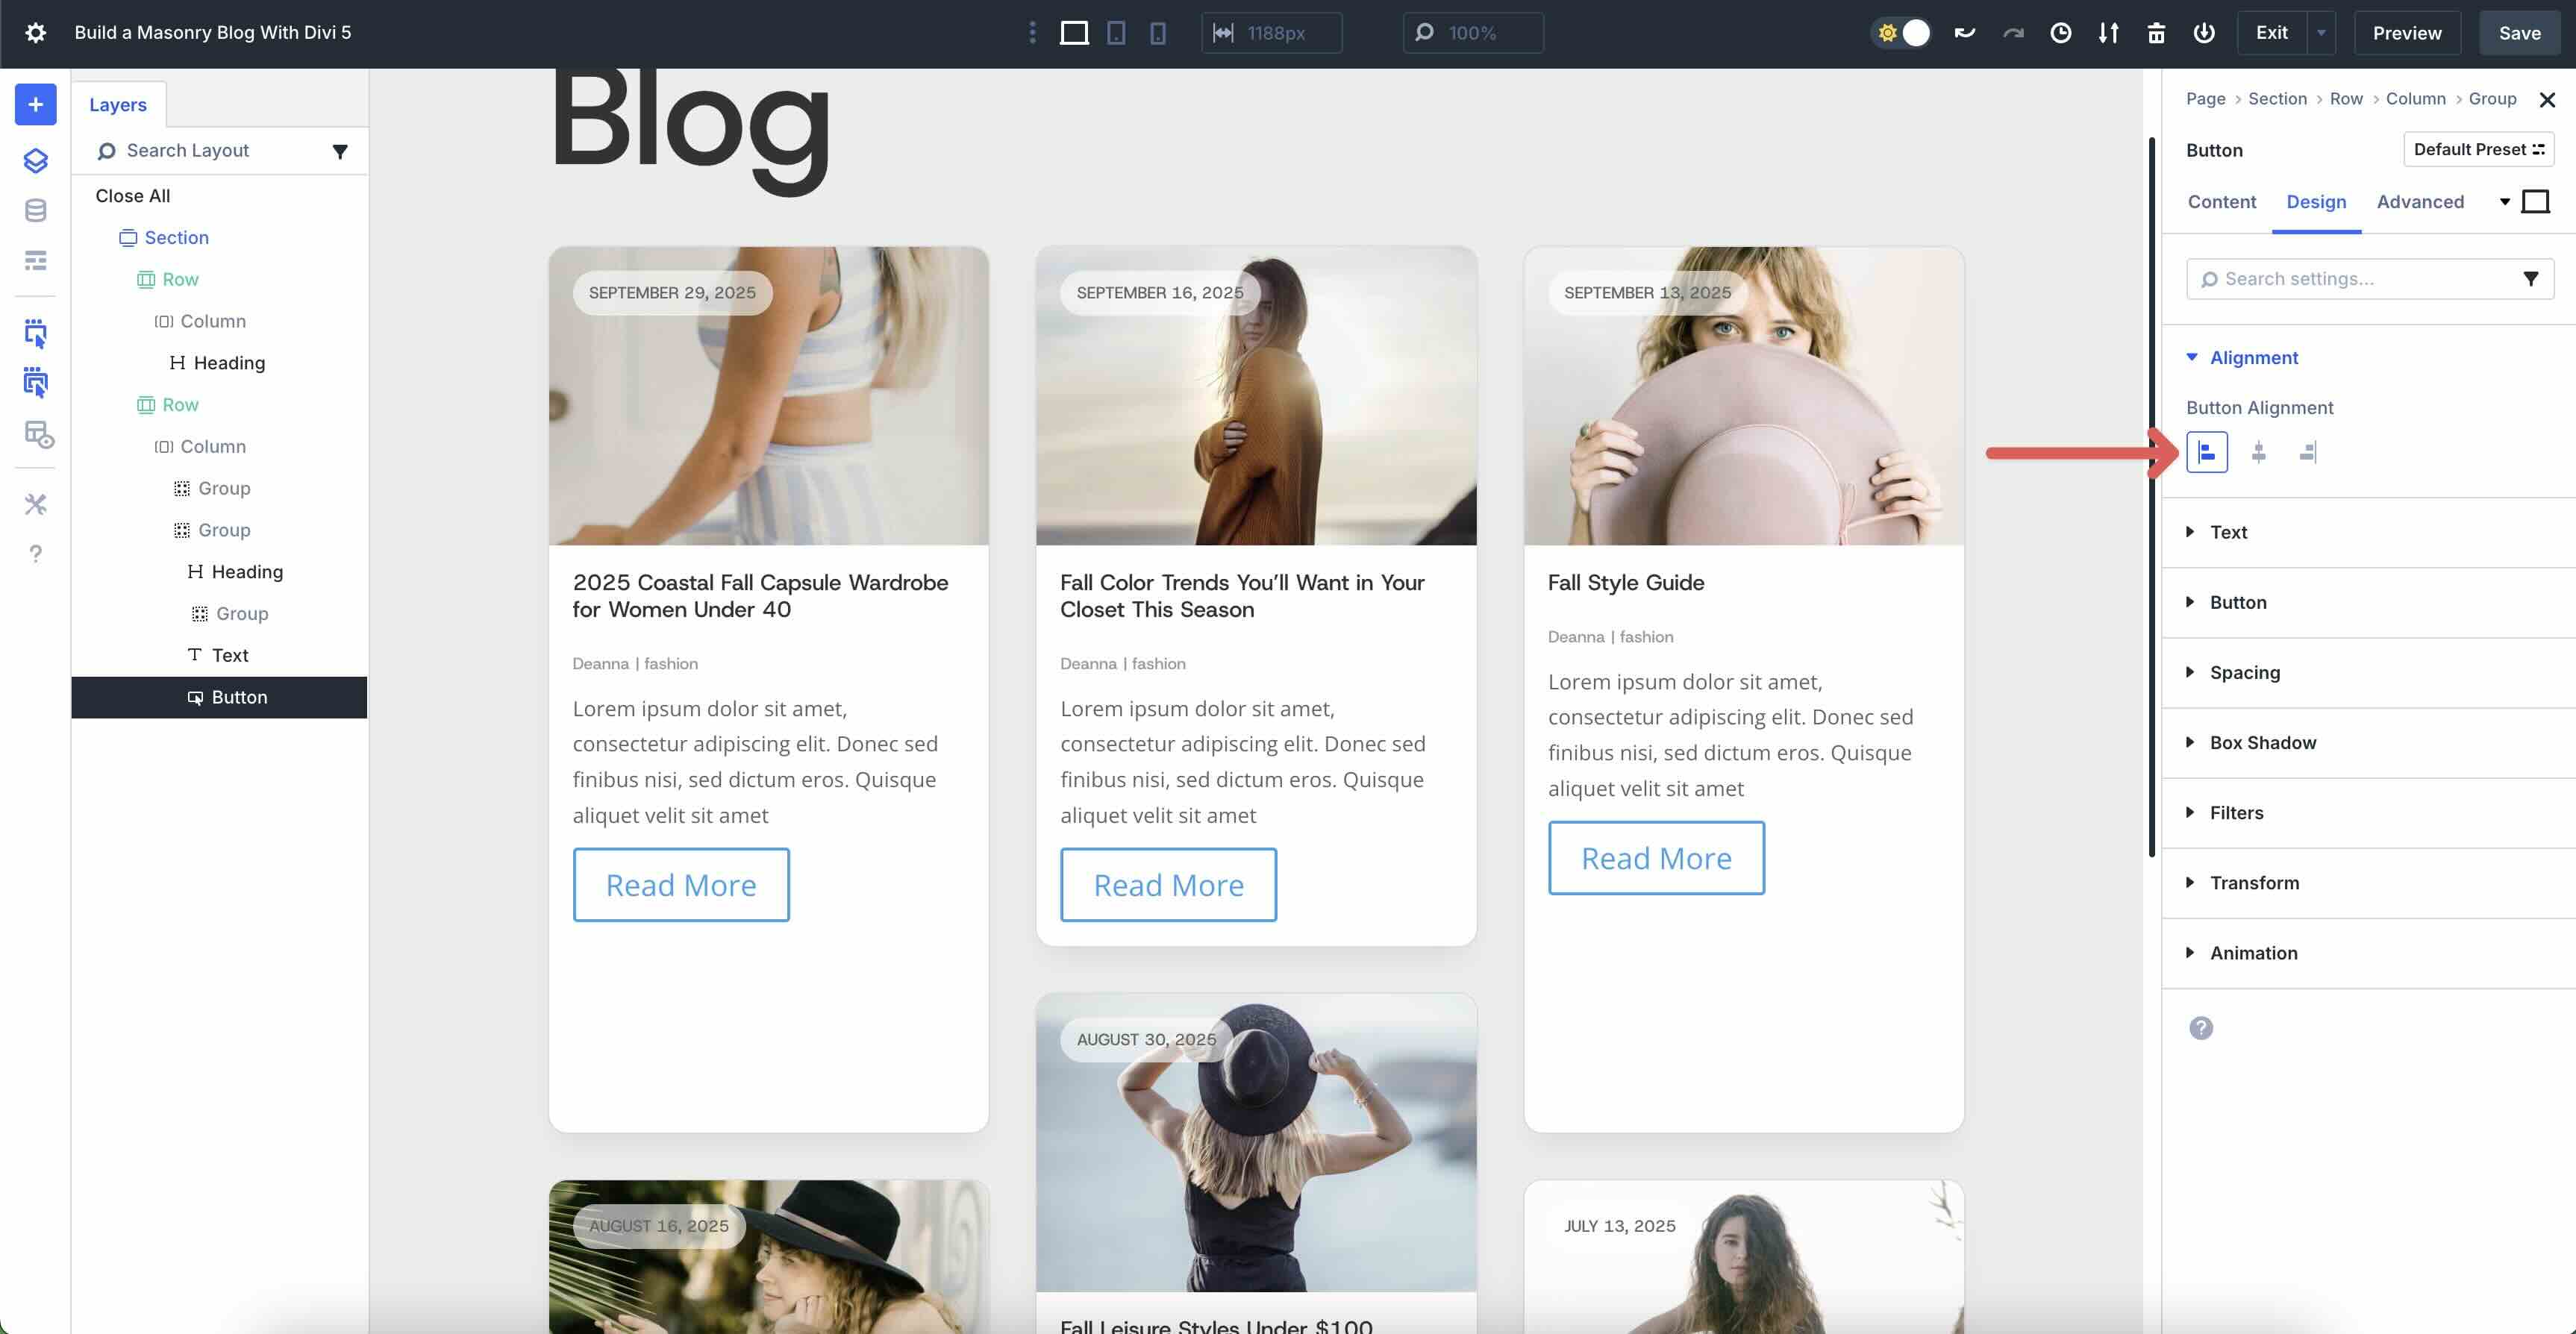
Within the Design tab, make bigger the Alignment menu and make a choice Left.
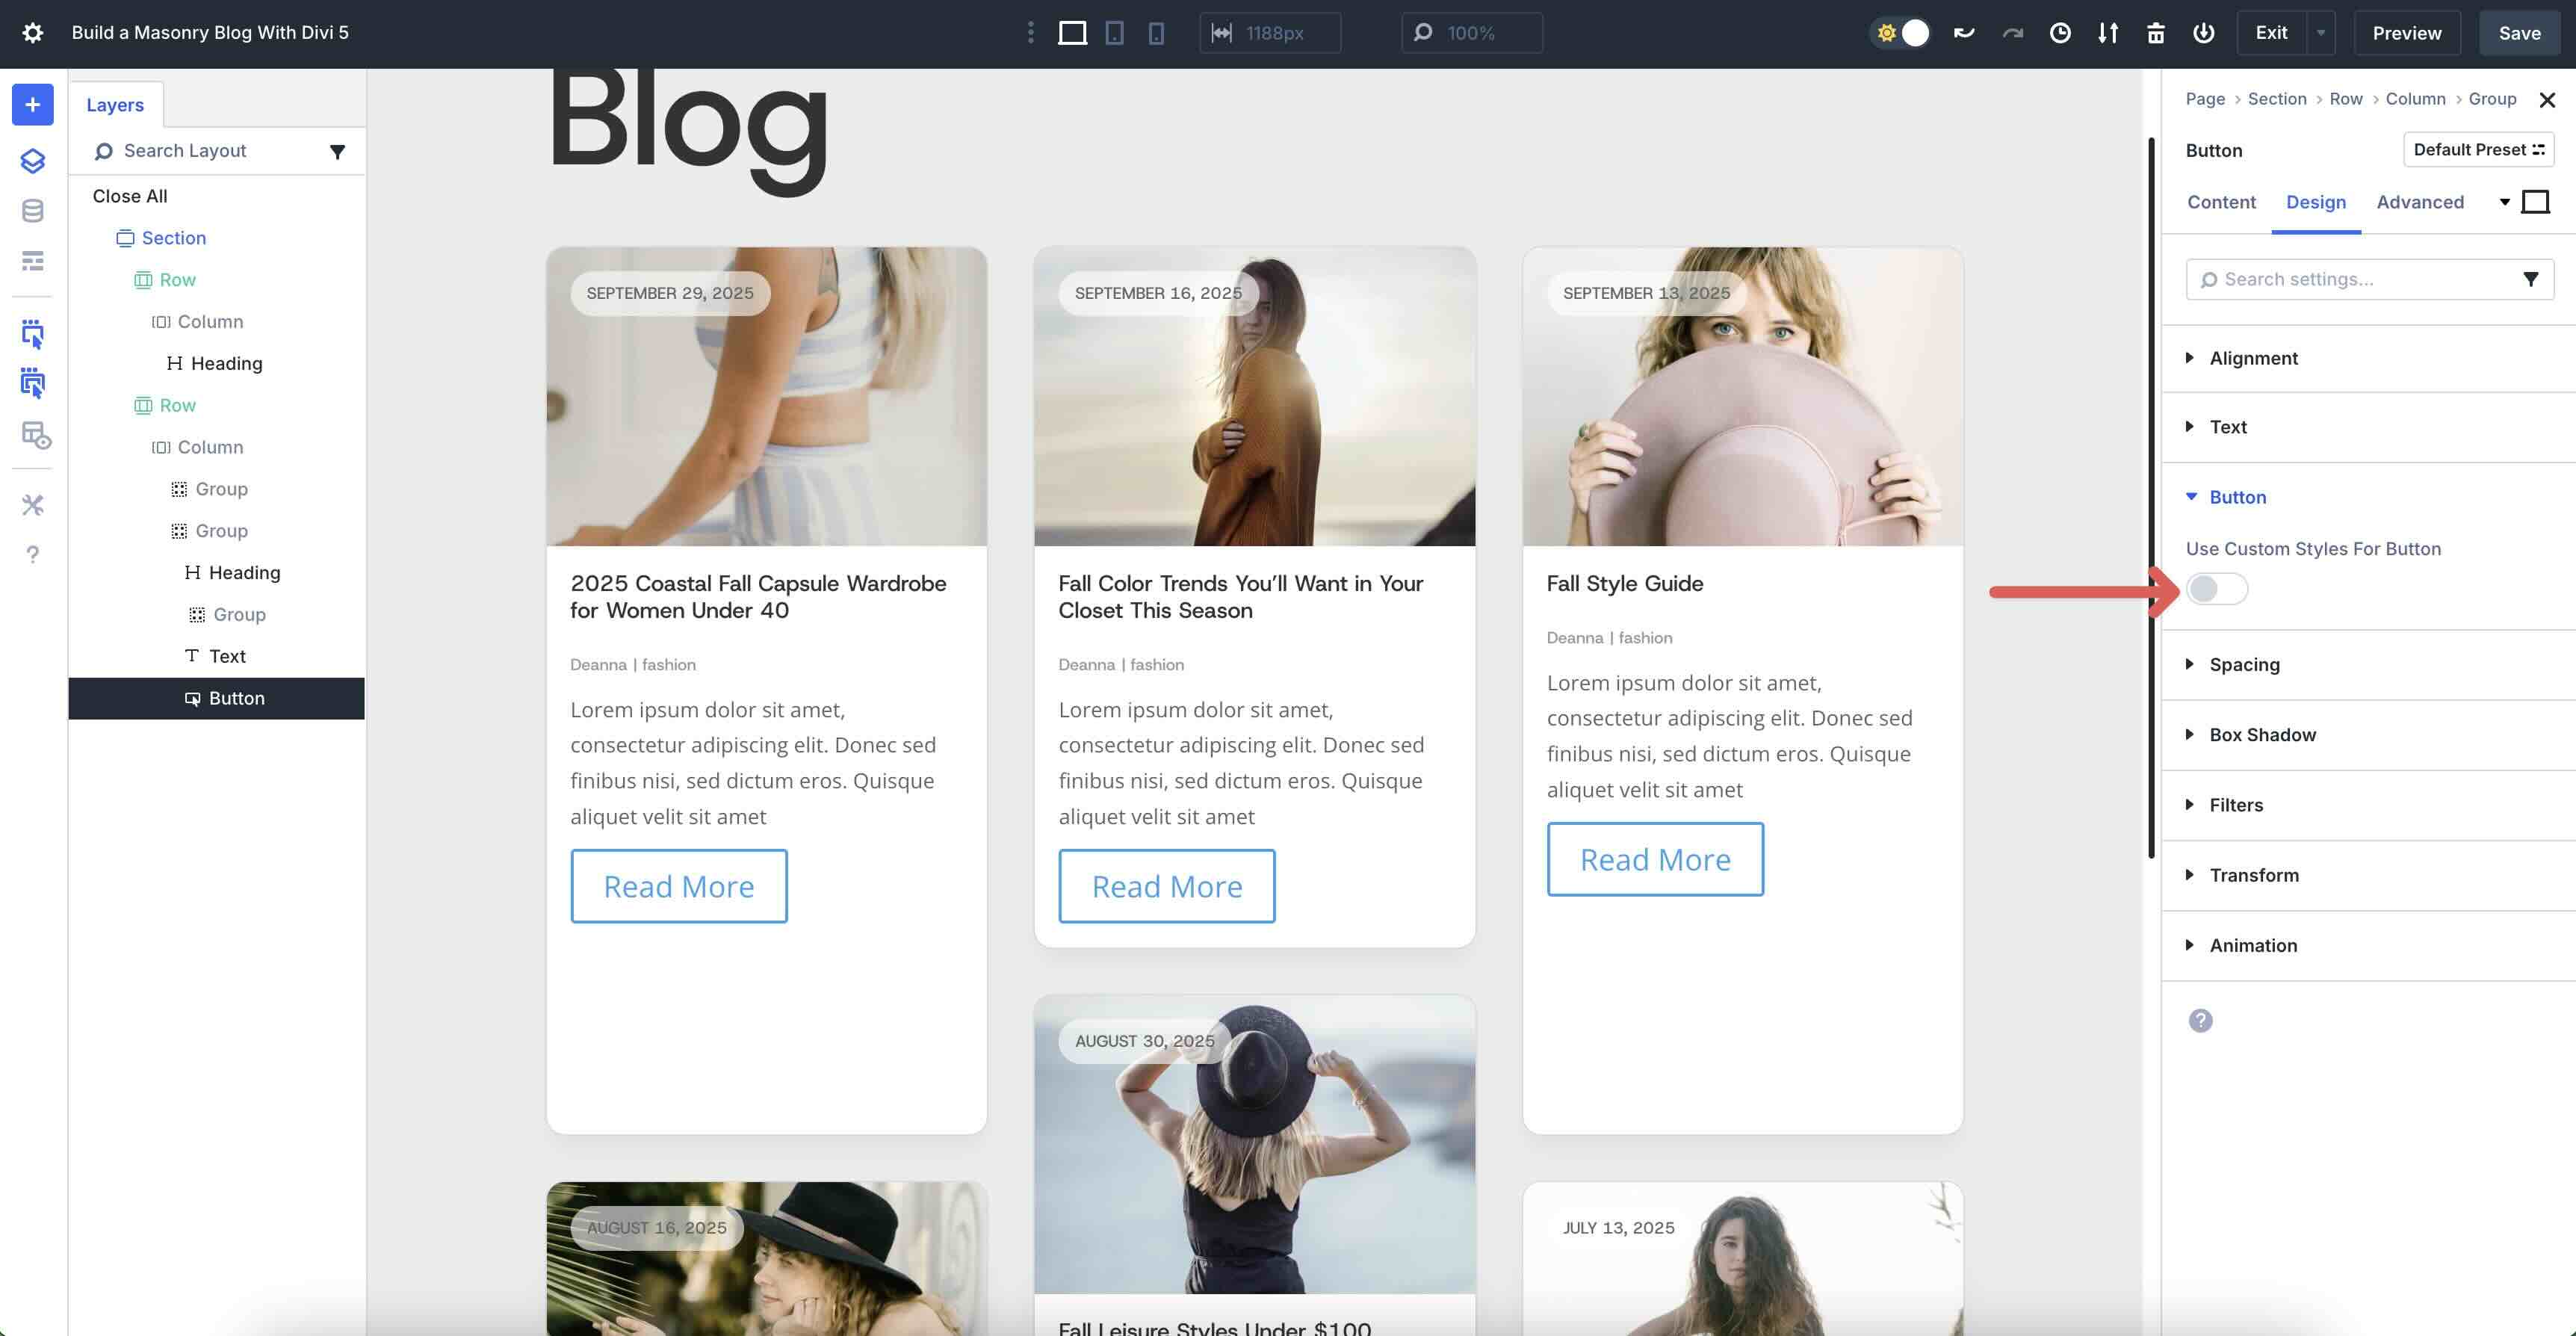
Enlarge the Button dropdown menu. Toggle Use Customized Kinds For Button on.
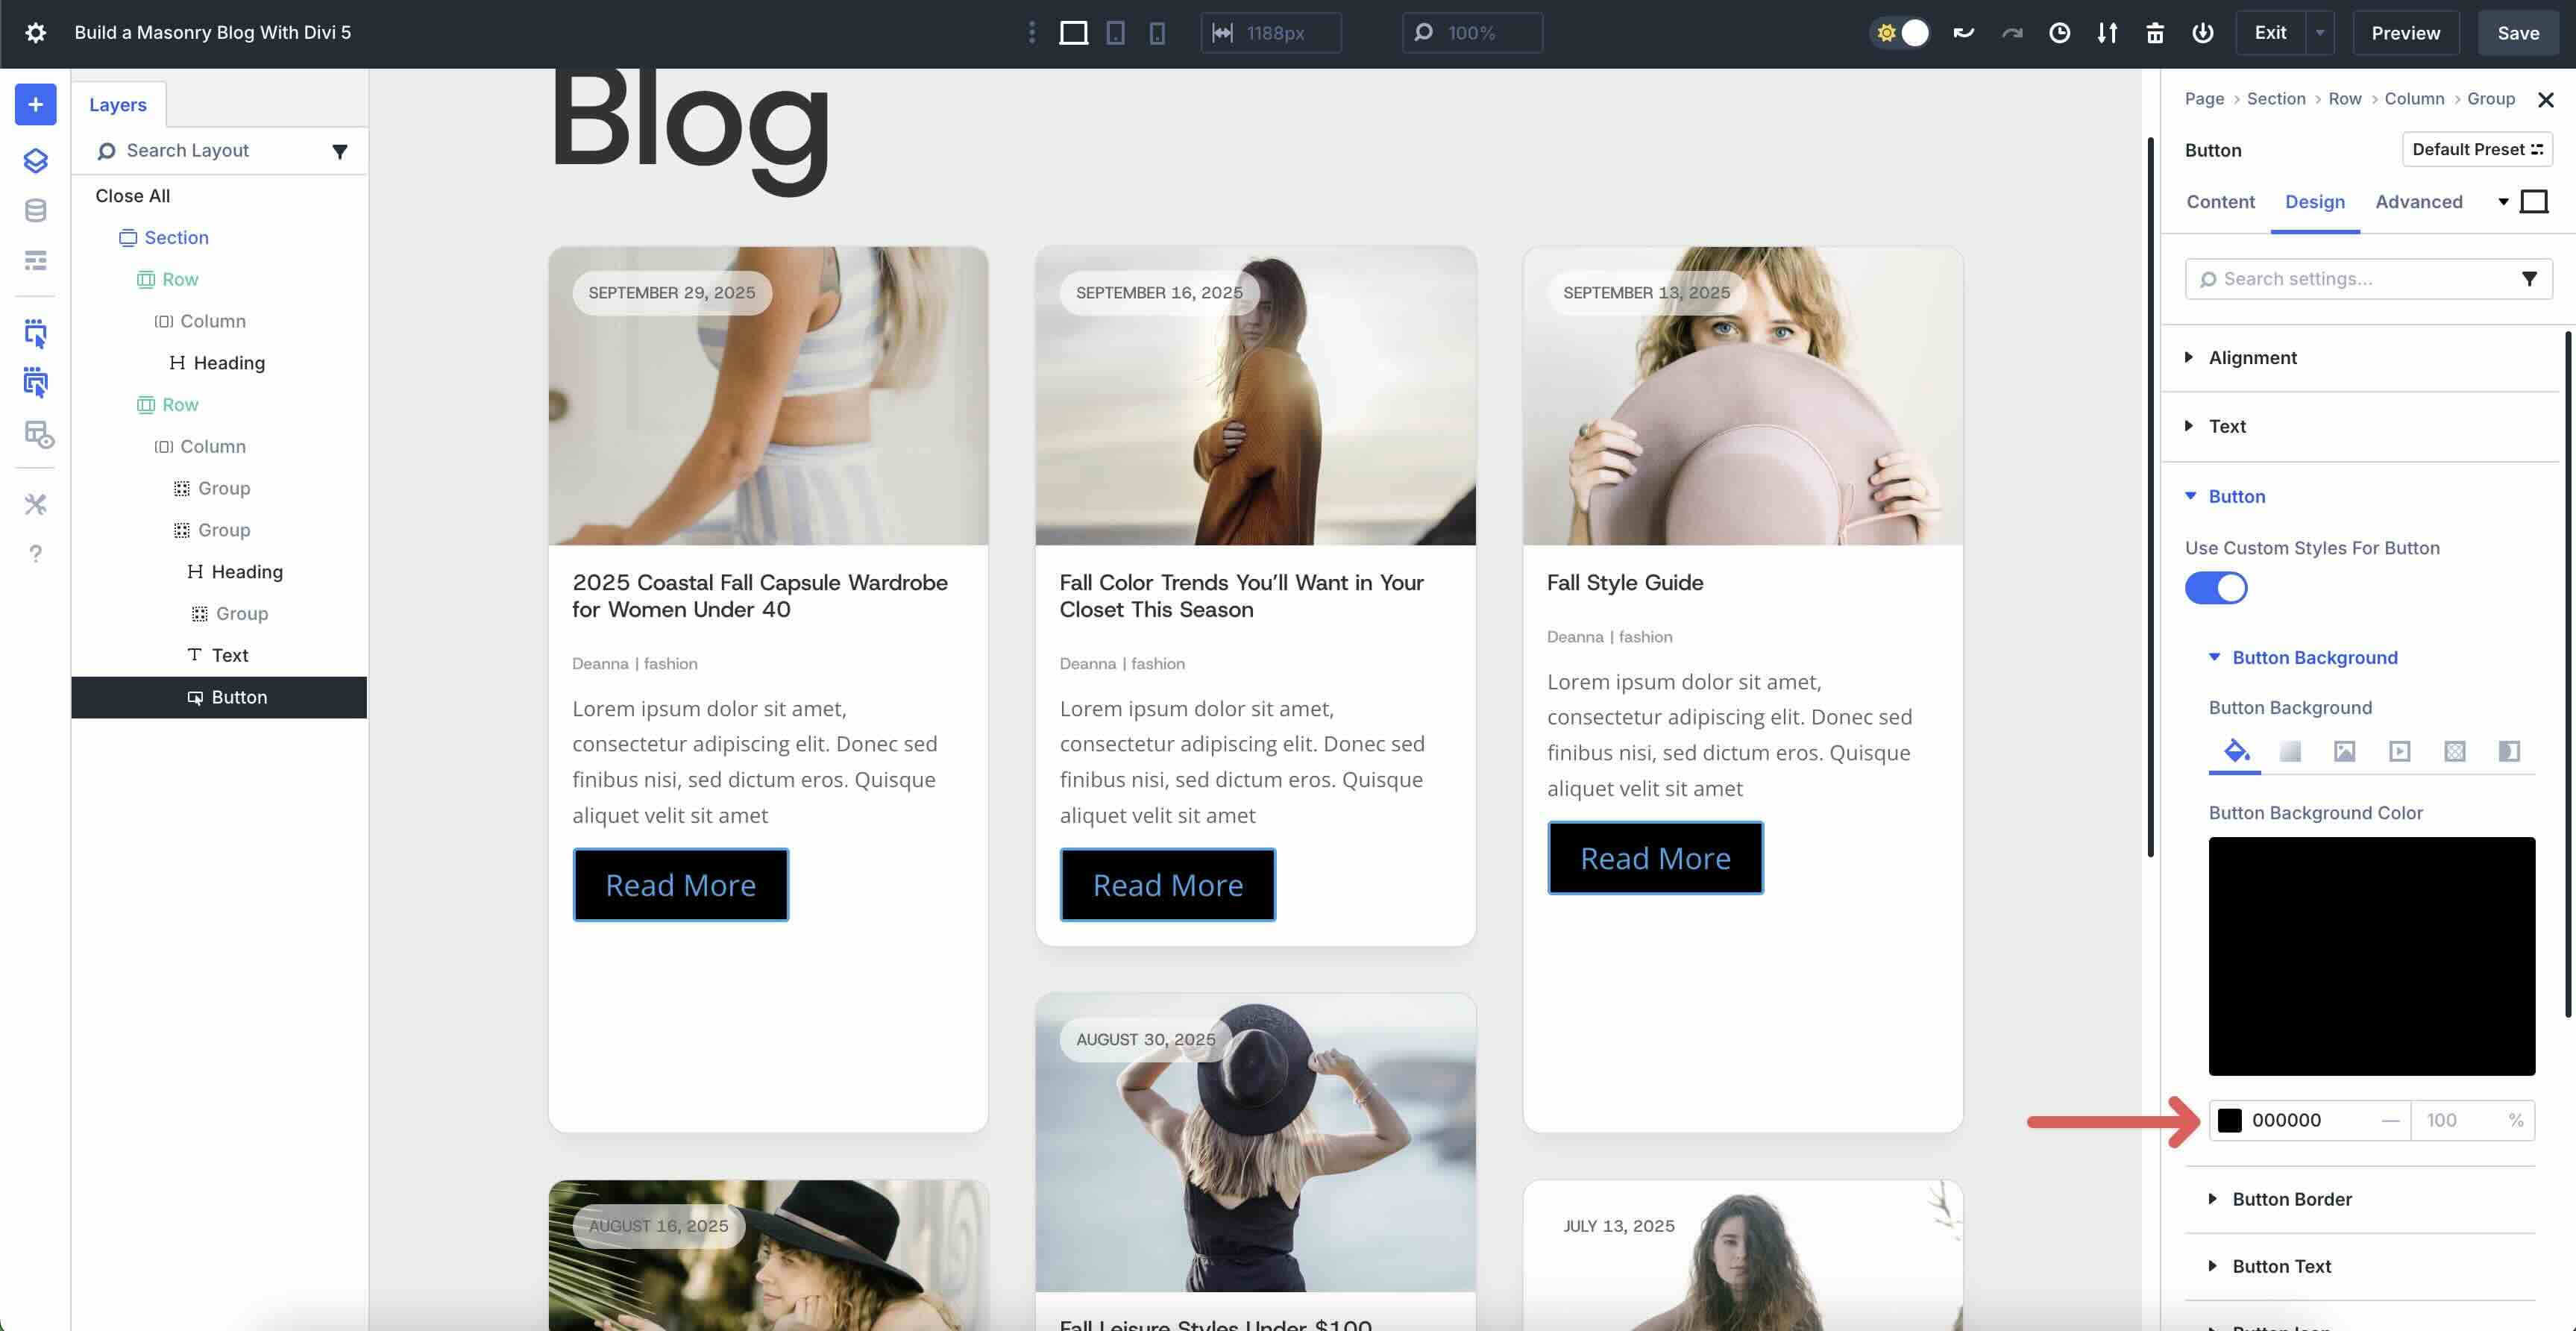
Within the Button Background menu, set the Button Background Colour to #000000.
Enlarge the Button Border menu and input 100px for the Button Border Radius and set the Button Border Width to 0px.
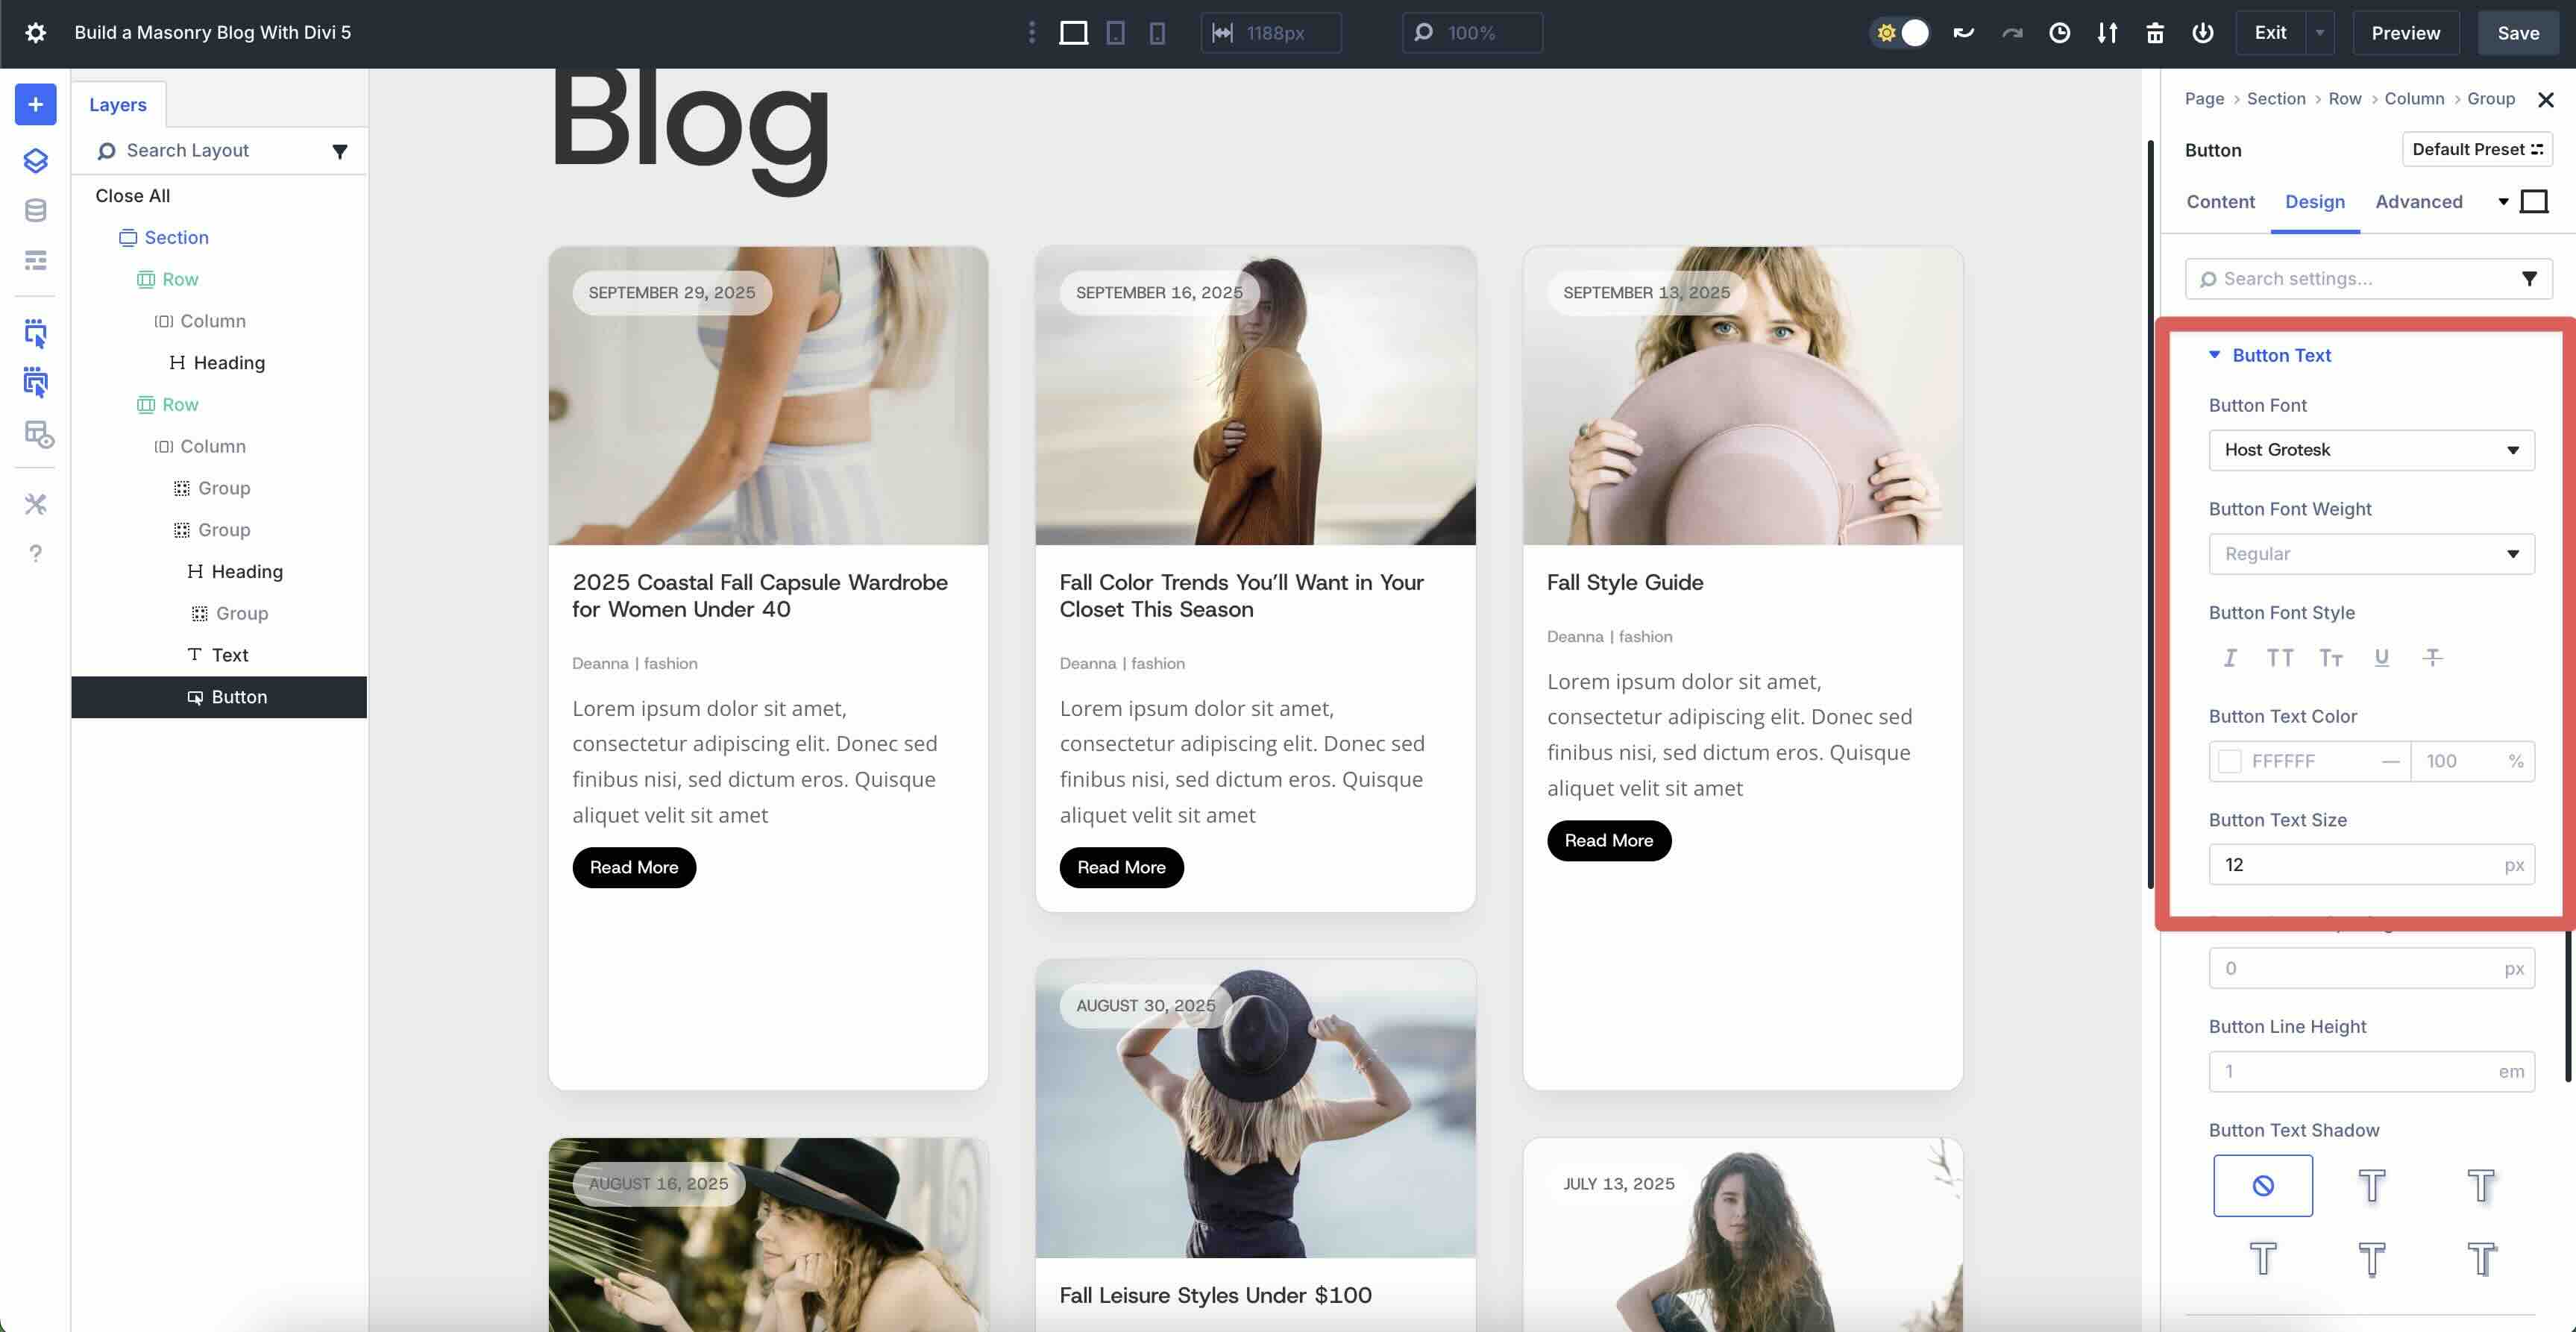
Subsequent, make bigger the Button Textual content menu. Input Host Grotesk because the Button Font, #ffffff because the Button Textual content Colour, and 12px because the Button Textual content Measurement.
Now, make bigger the Button Icon menu and toggle Display Button Icon off.
![]()
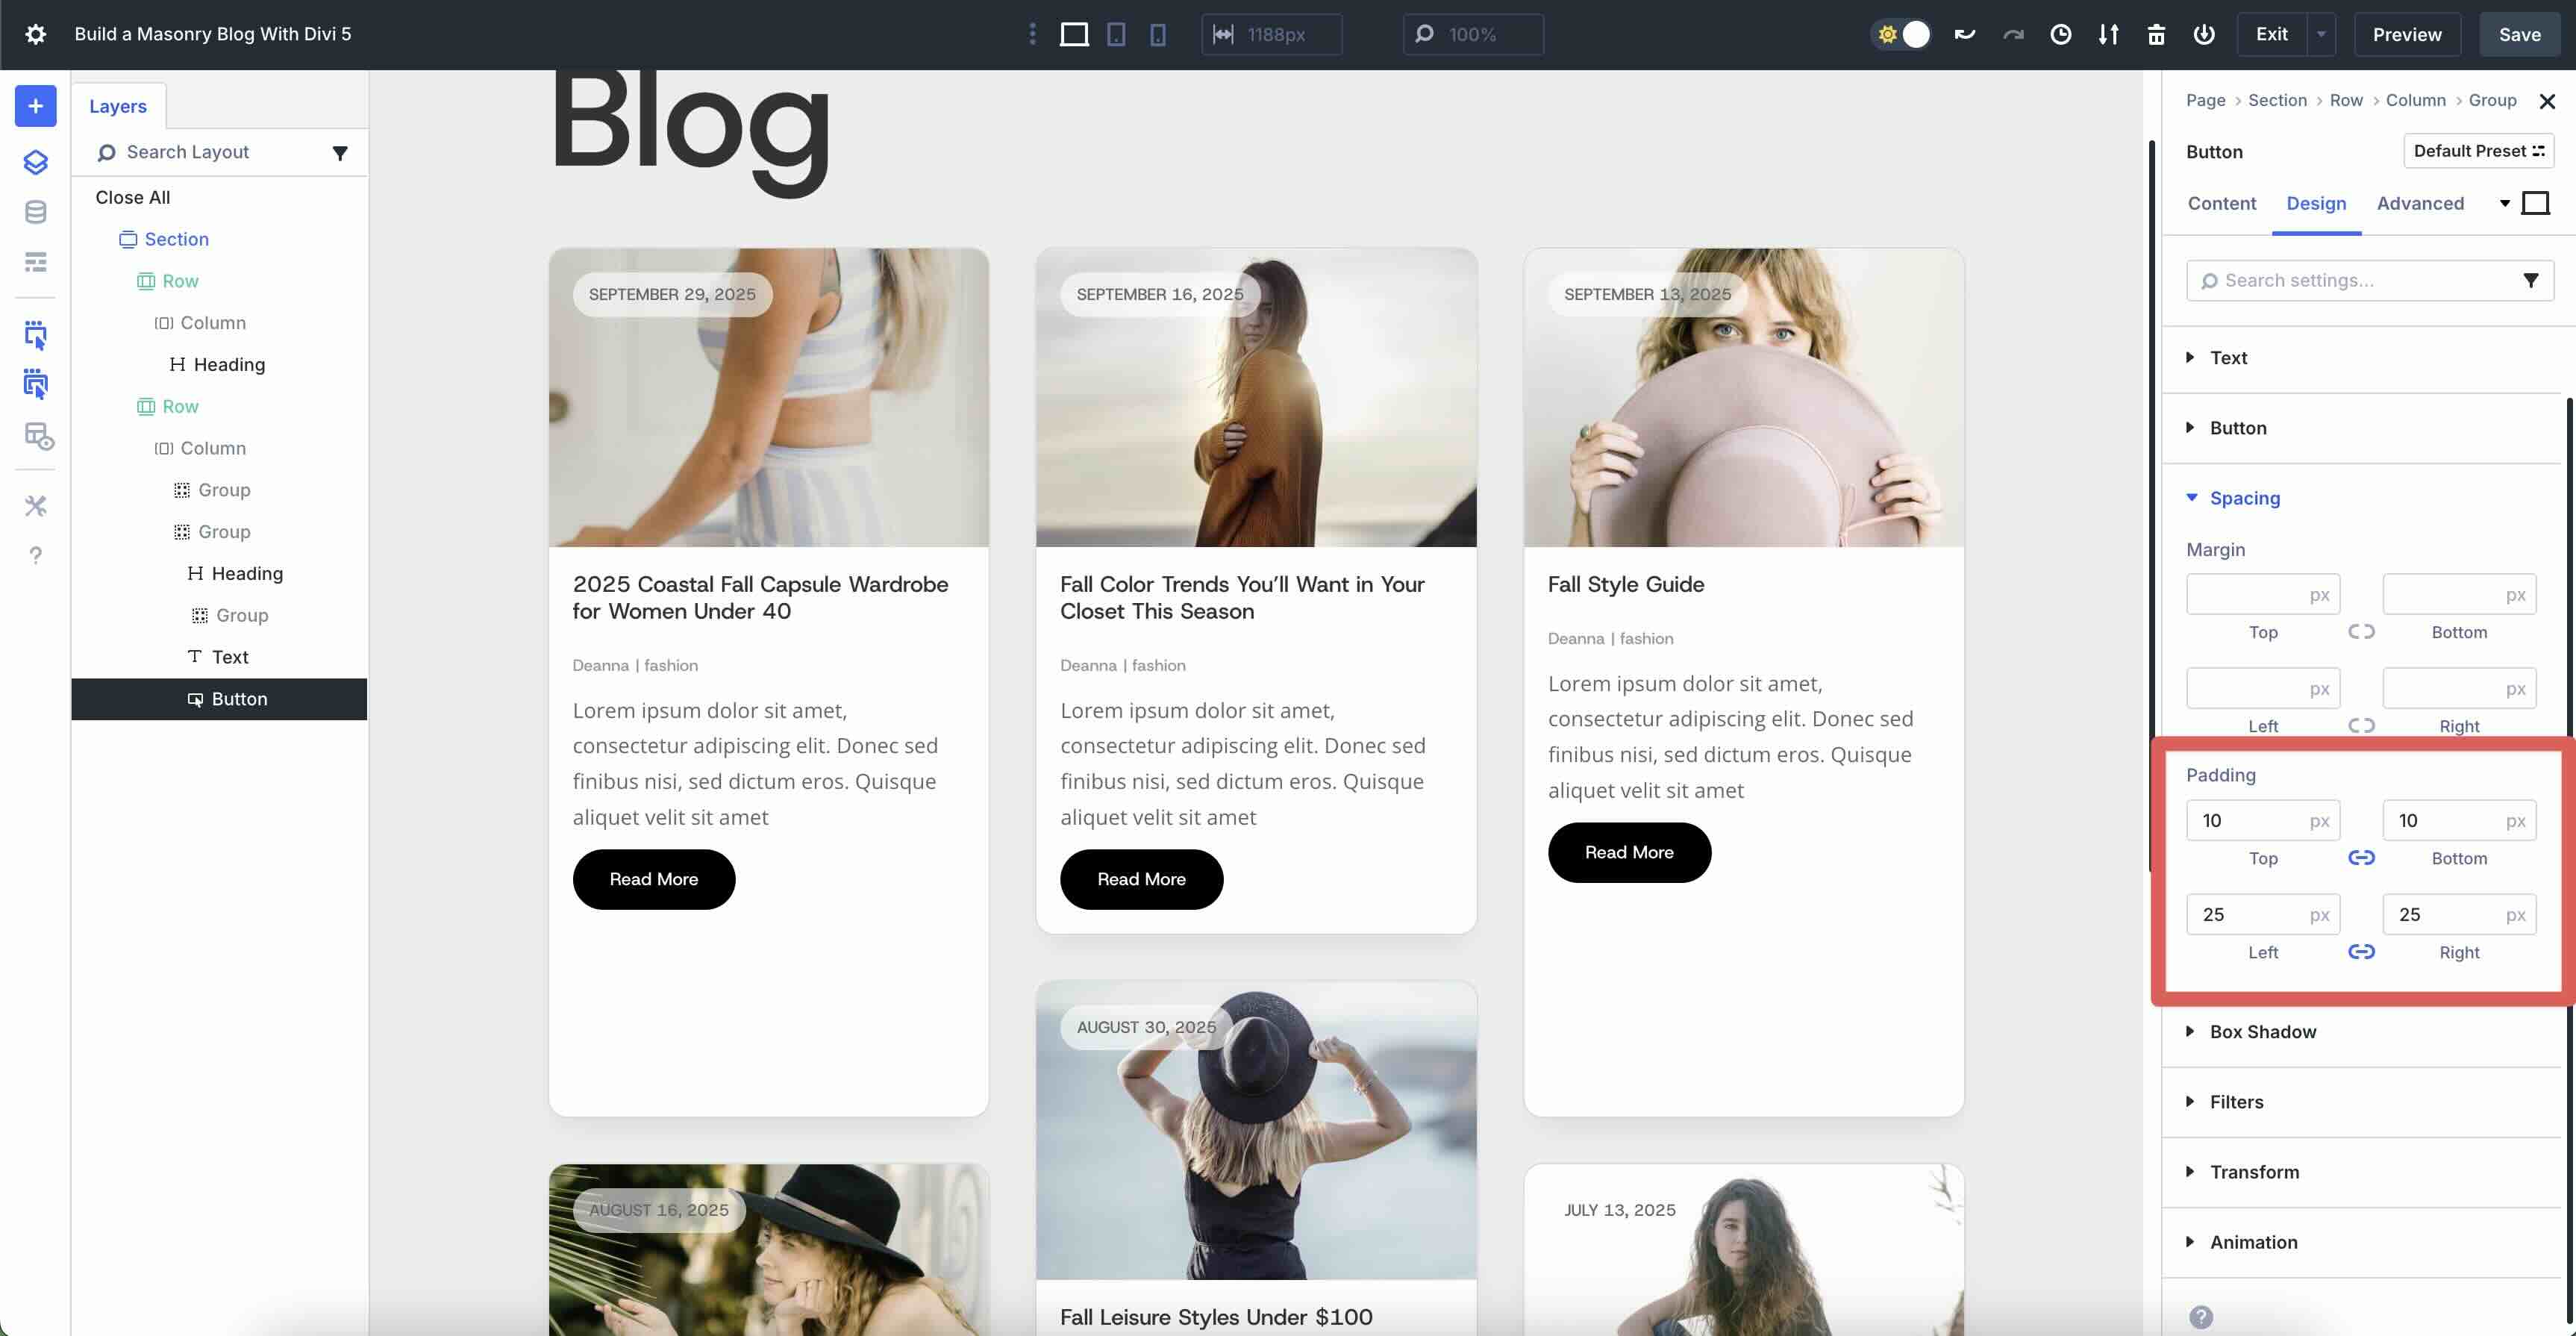
In spite of everything, make bigger the Spacing dropdown menu. Upload 10px Padding to the peak and backside and 25px to the left and proper.
Upload Some other Unmarried Column Row
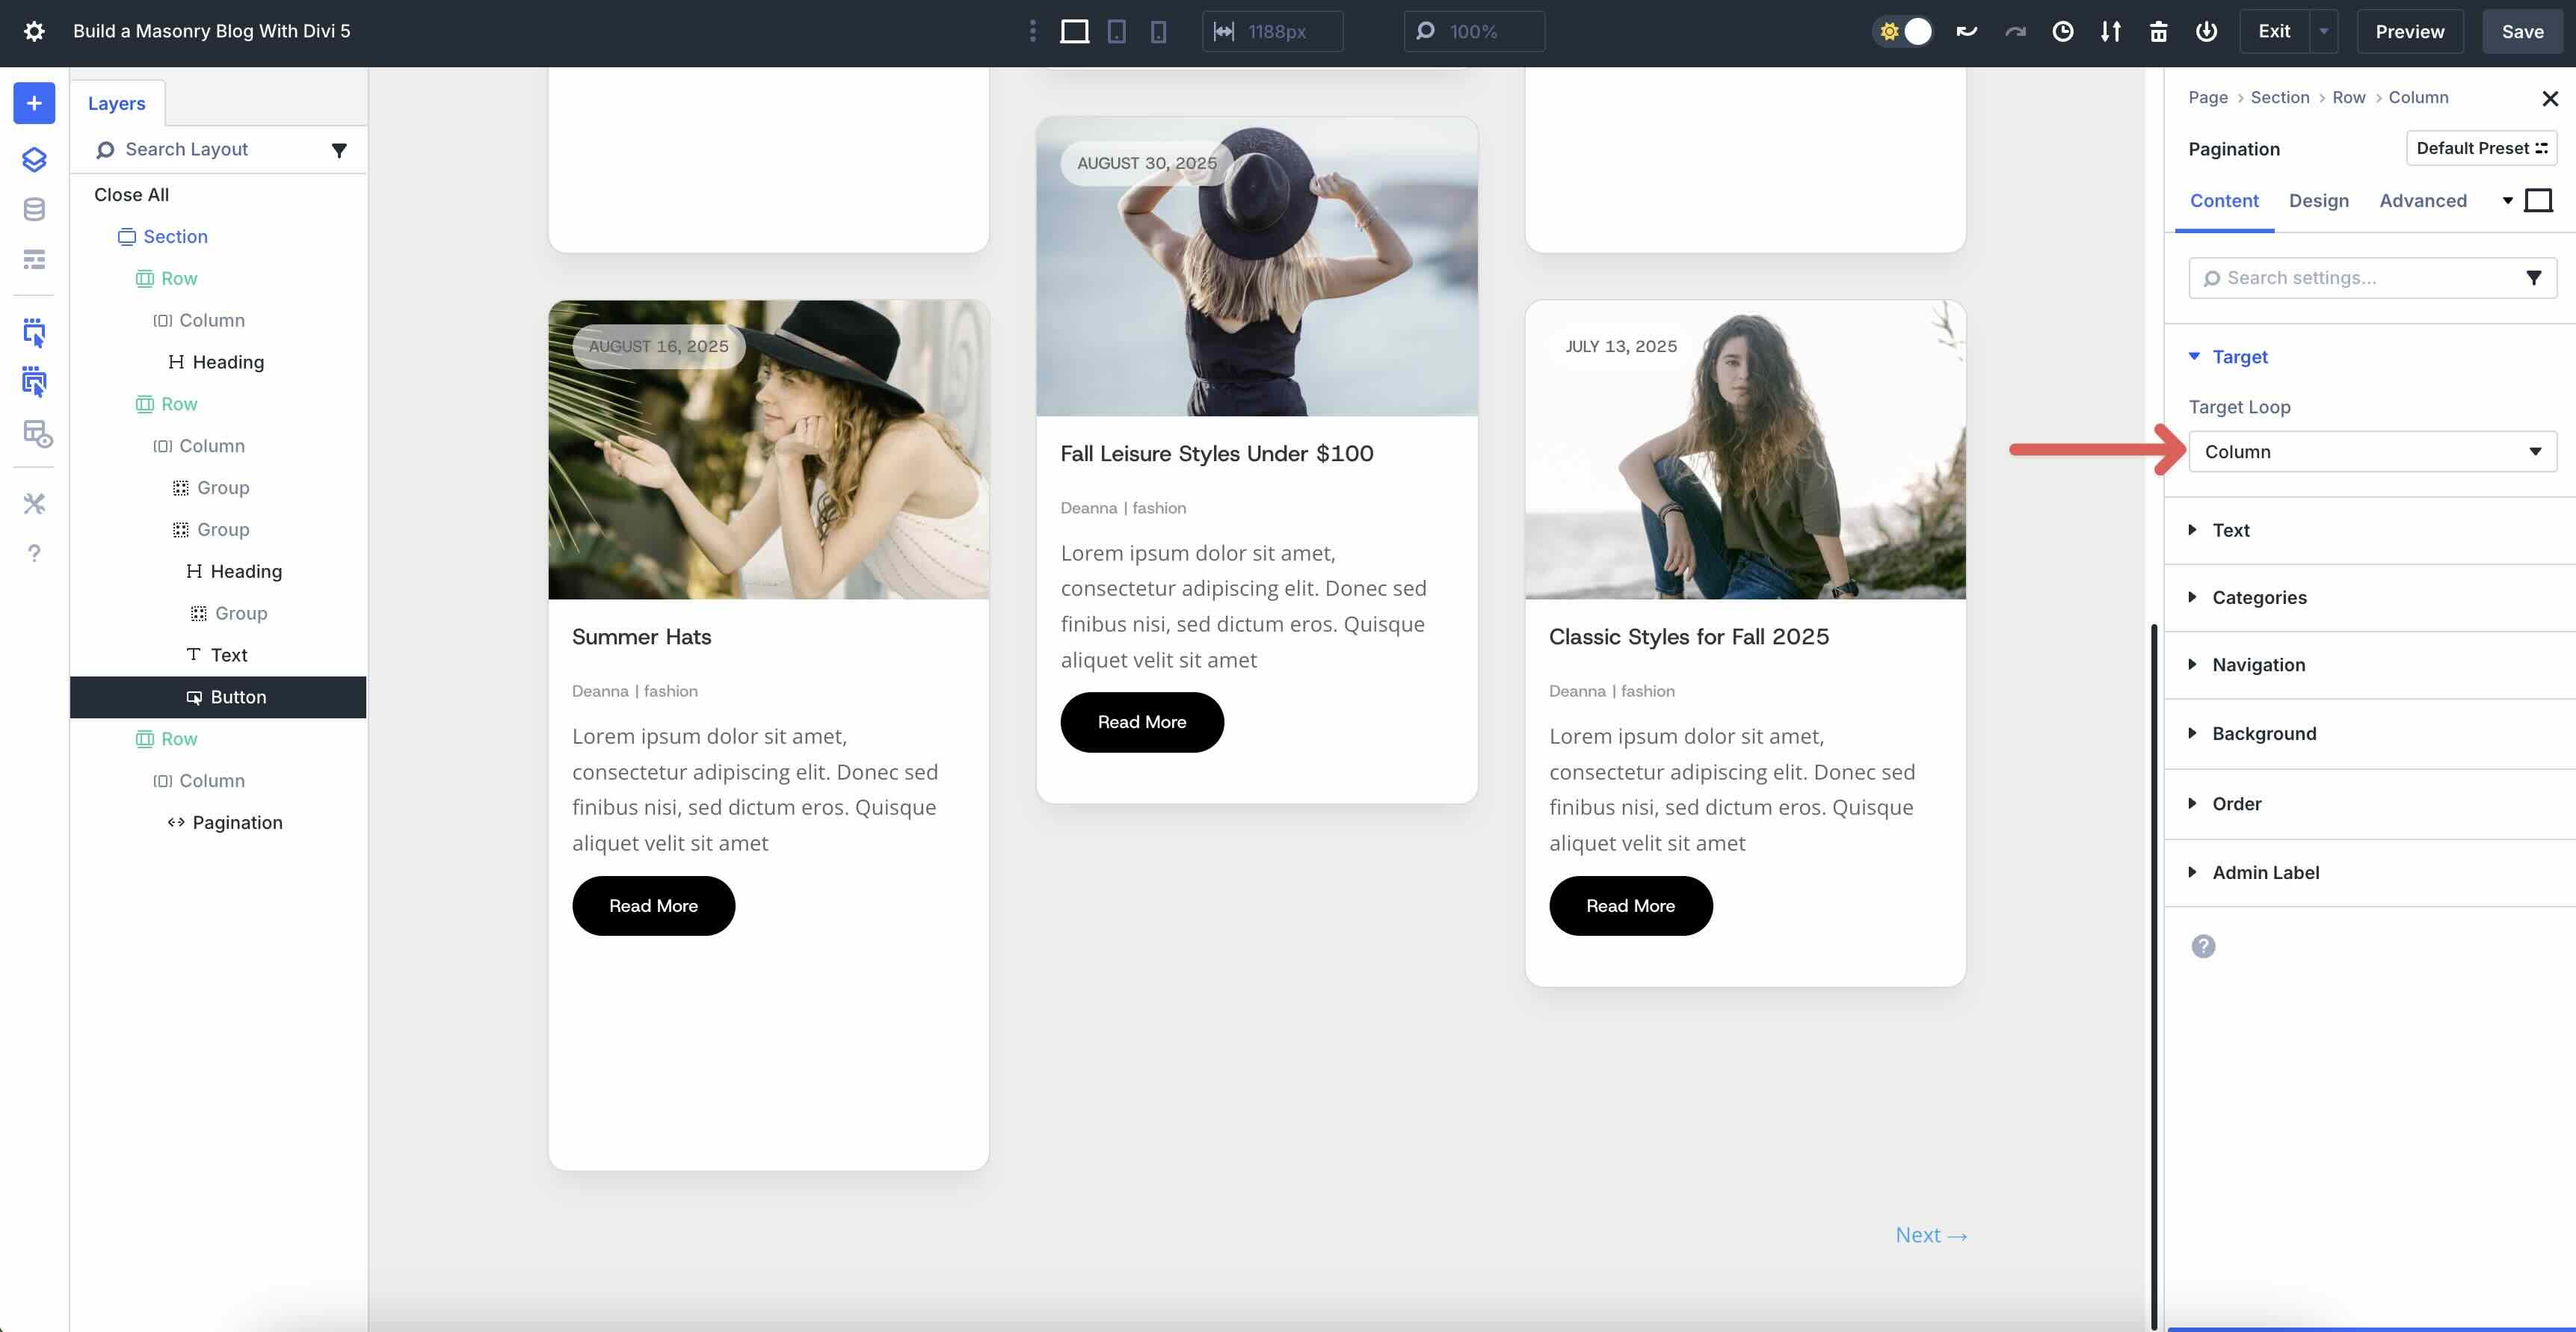
The closing step is so as to add a single-column row to accommodate the Pagination module. Upload a brand new single-column row beneath our Grid Loop row and make a choice the Pagination module.
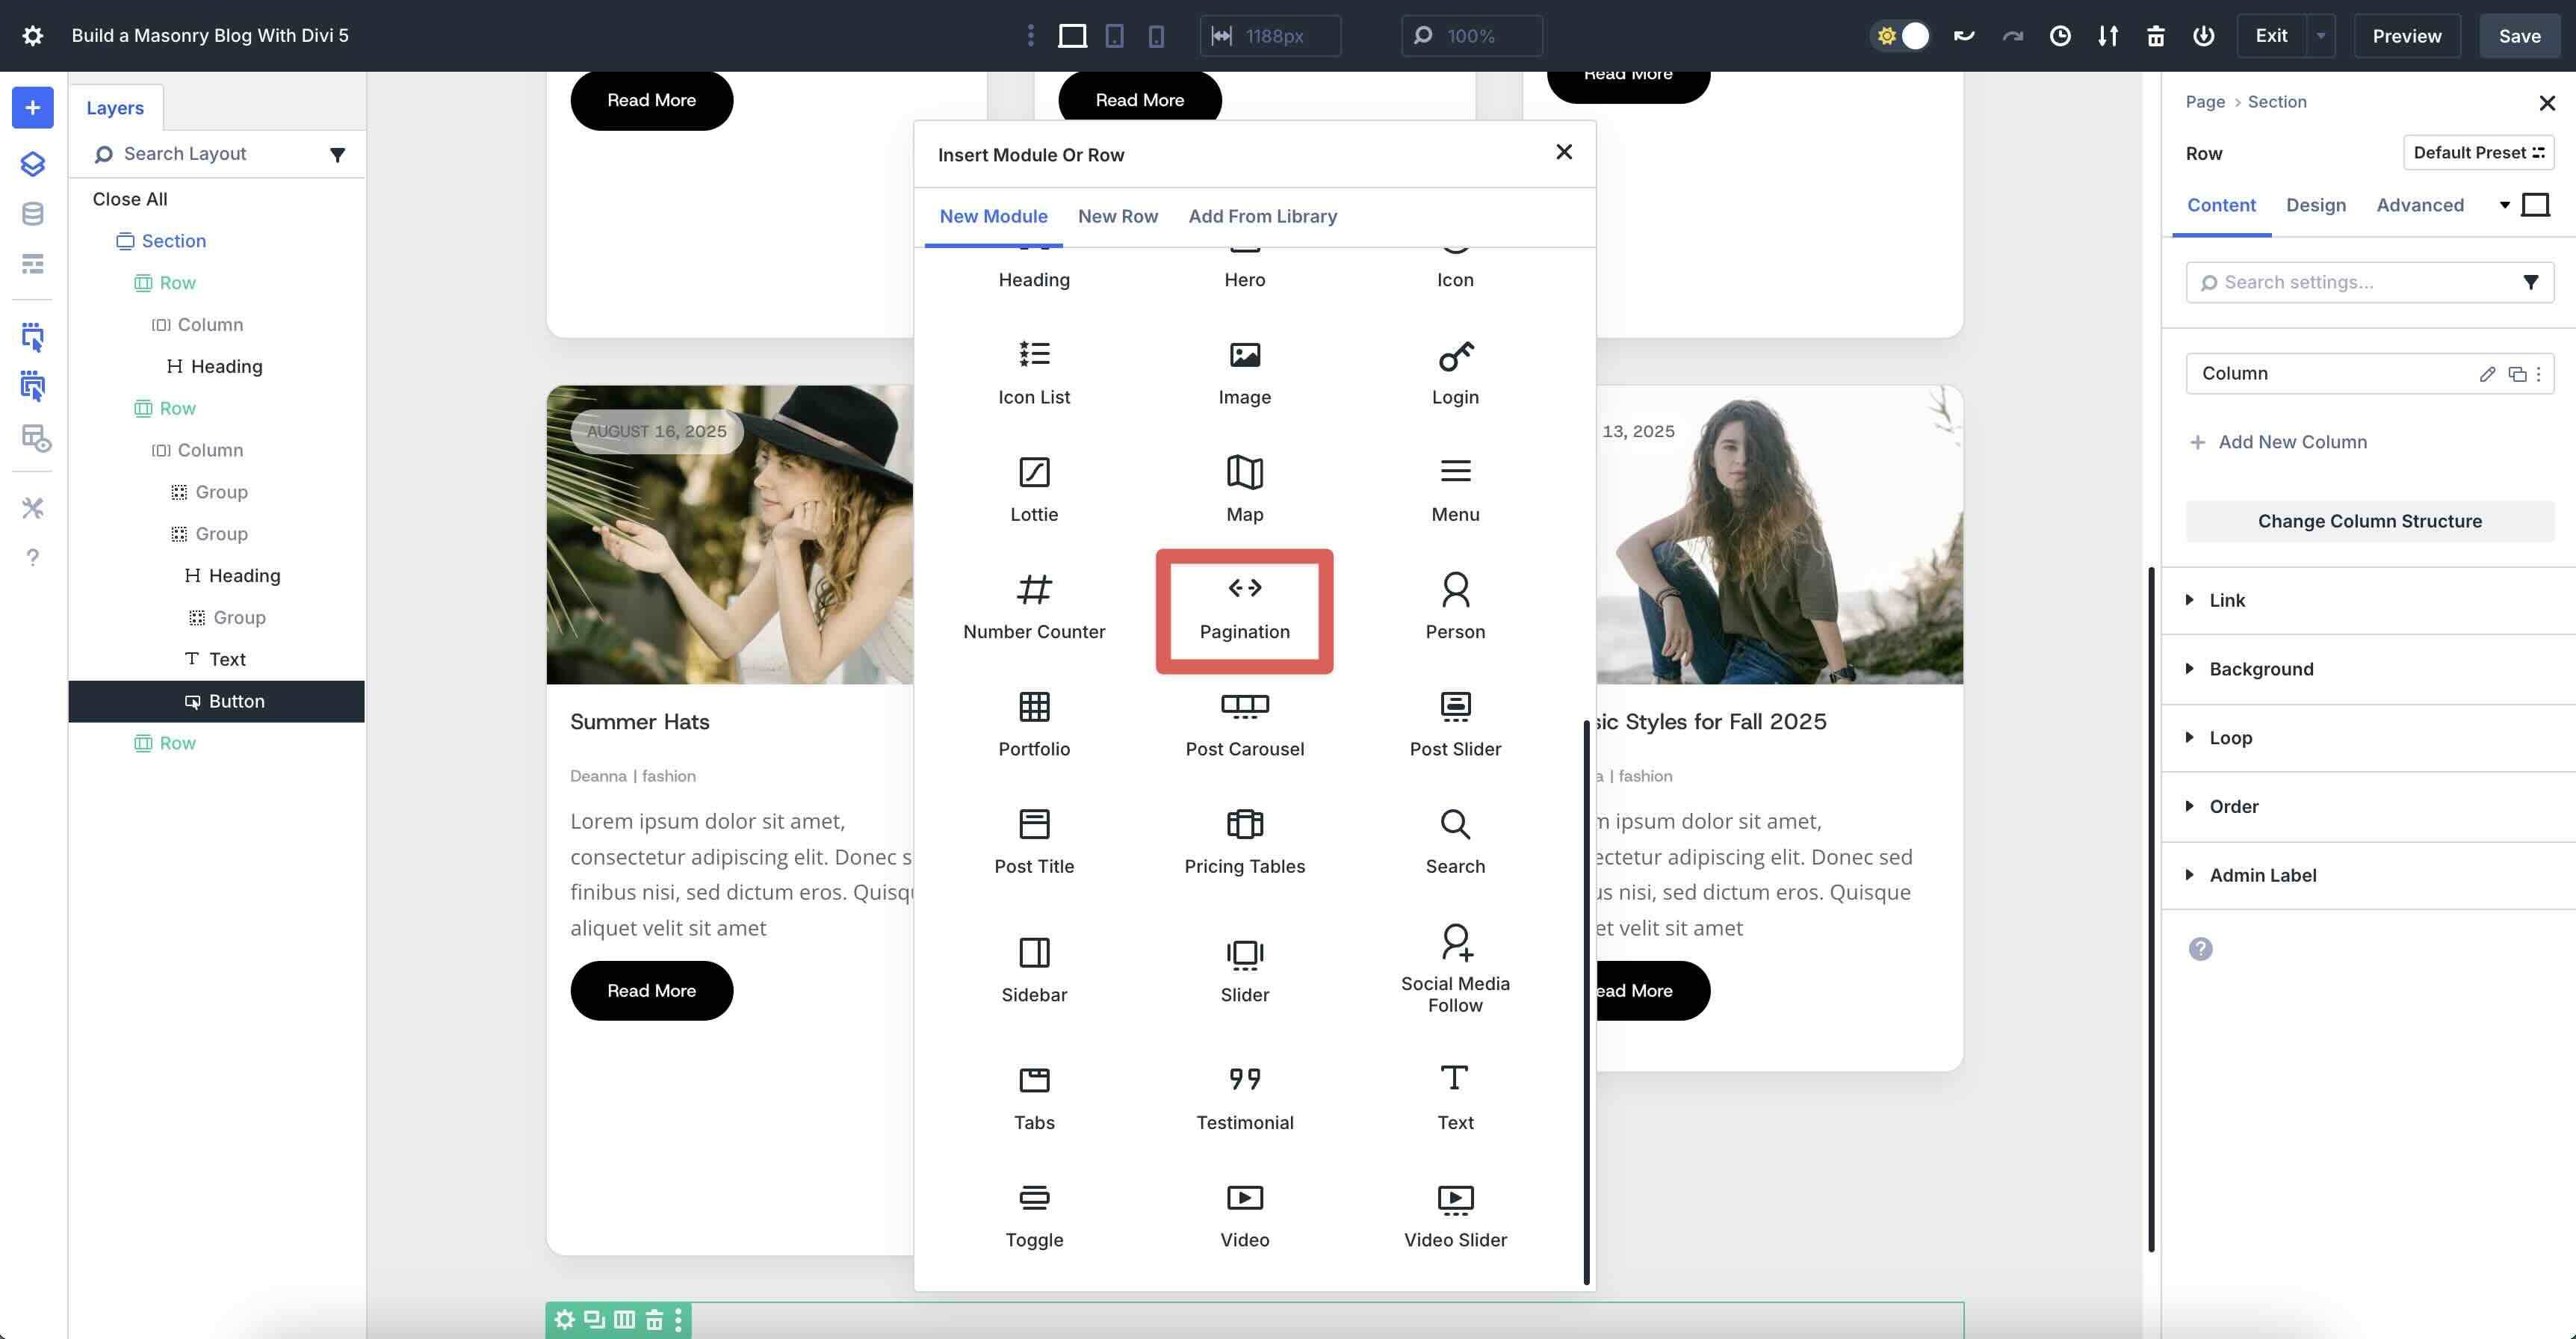
Within the module’s Content material tab, make bigger the Goal menu. Within the Goal Loop box, make a choice Column. Depart all different settings at their defaults.
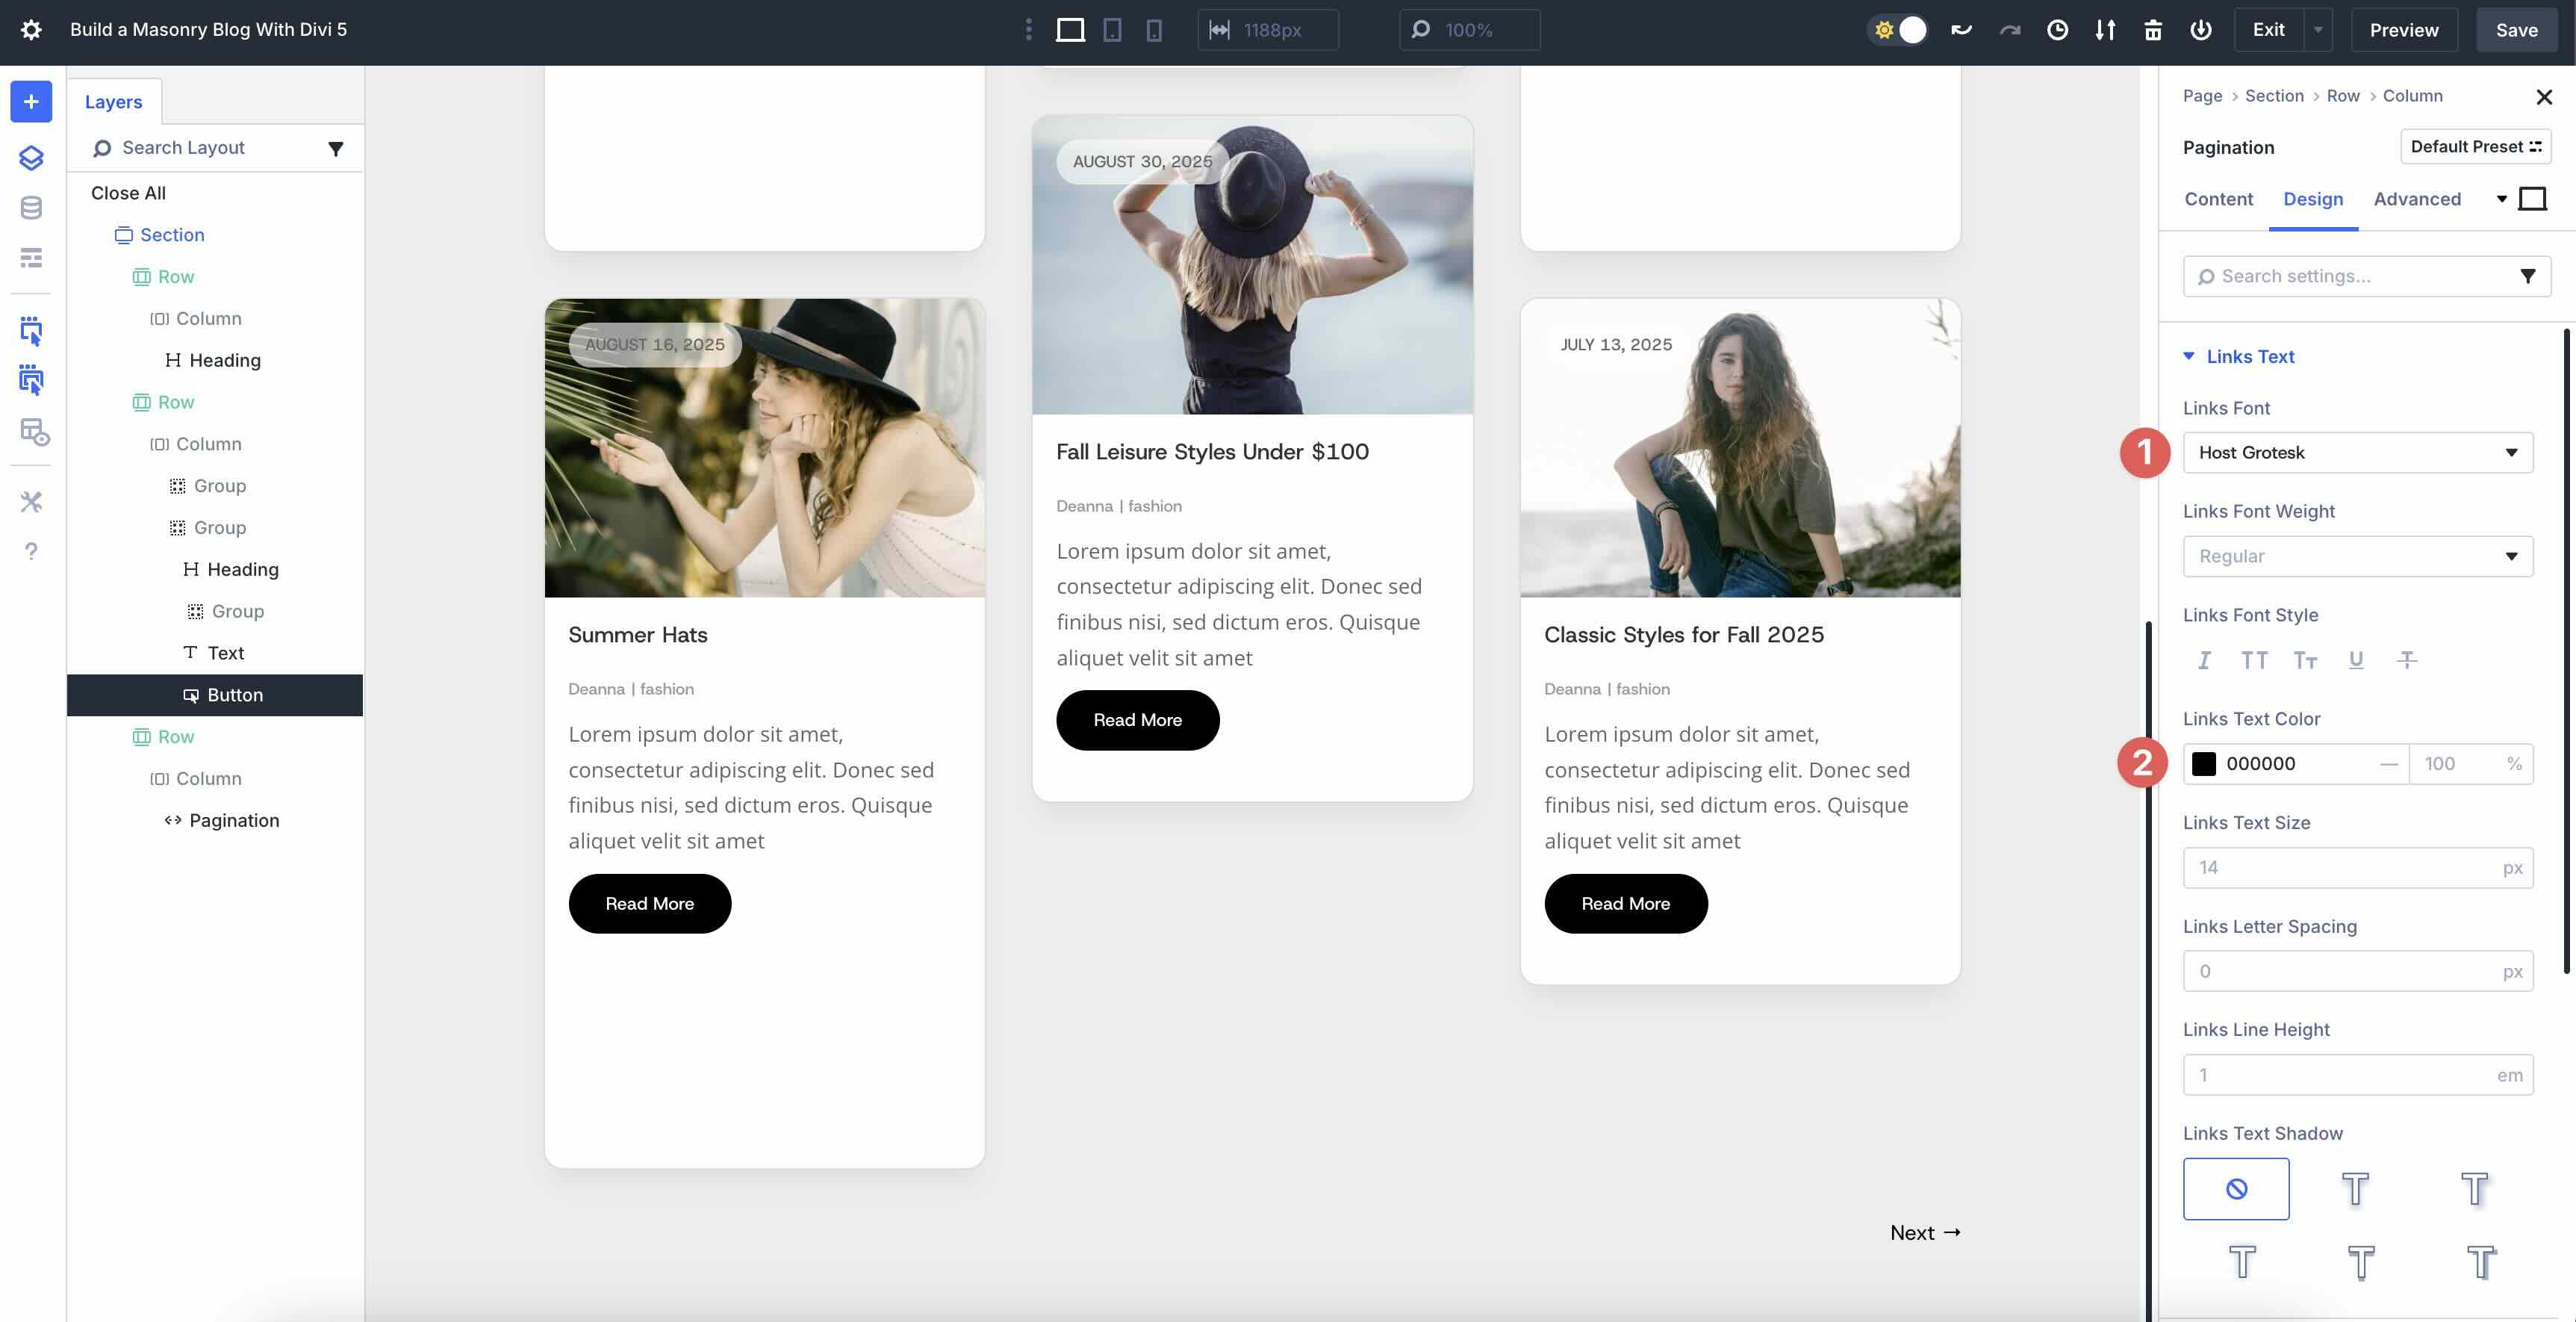
Within the Design tab, make bigger the Hyperlinks Textual content menu. Choose Host Grotesk because the Hyperlinks Font and use #000000 because the Hyperlinks Textual content Colour.
That’s it! As you’ll be able to see, growing a contemporary weblog web page is unassuming, because of Divi 5’s Loop Builder and CSS Grid options. When you’d love to obtain the report and experiment with those options, you’ll be able to accomplish that through filling out the shape beneath. You’ll add the phase structure on your Divi library and use it for any web page you construct.
@media simplest display screen and ( max-width: 767px ) {.et_bloom .et_bloom_optin_1 .carrot_edge.et_bloom_form_right .et_bloom_form_content:sooner than { border-top-color: #ffffff !vital; border-left-color: clear !vital; }.et_bloom .et_bloom_optin_1 .carrot_edge.et_bloom_form_left .et_bloom_form_content:after { border-bottom-color: #ffffff !vital; border-left-color: clear !vital; }
}.et_bloom .et_bloom_optin_1 .et_bloom_form_content button { background-color: #f92c8b !vital; } .et_bloom .et_bloom_optin_1 .et_bloom_form_content .et_bloom_fields i { shade: #f92c8b !vital; } .et_bloom .et_bloom_optin_1 .et_bloom_form_content .et_bloom_custom_field_radio i:sooner than { background: #f92c8b !vital; } .et_bloom .et_bloom_optin_1 .et_bloom_border_solid { border-color: #f7f9fb !vital } .et_bloom .et_bloom_optin_1 .et_bloom_form_content button { background-color: #f92c8b !vital; } .et_bloom .et_bloom_optin_1 .et_bloom_form_container h2, .et_bloom .et_bloom_optin_1 .et_bloom_form_container h2 span, .et_bloom .et_bloom_optin_1 .et_bloom_form_container h2 sturdy { font-family: “Open Sans”, Helvetica, Arial, Lucida, sans-serif; }.et_bloom .et_bloom_optin_1 .et_bloom_form_container p, .et_bloom .et_bloom_optin_1 .et_bloom_form_container p span, .et_bloom .et_bloom_optin_1 .et_bloom_form_container p sturdy, .et_bloom .et_bloom_optin_1 .et_bloom_form_container shape enter, .et_bloom .et_bloom_optin_1 .et_bloom_form_container shape button span { font-family: “Open Sans”, Helvetica, Arial, Lucida, sans-serif; } p.et_bloom_popup_input { padding-bottom: 0 !vital;}

Obtain For Unfastened
Sign up for the Divi Publication and we can electronic mail you a duplicate of without equal Divi Touchdown Web page Format Pack, plus lots of alternative wonderful and unfastened Divi sources, pointers and tips. Apply alongside and you’ll be a Divi grasp very quickly. In case you are already subscribed merely kind on your electronic mail cope with beneath and click on obtain to get entry to the structure pack.
You could have effectively subscribed. Please take a look at your electronic mail cope with to substantiate your subscription and get get entry to to unfastened weekly Divi structure packs!
Carry Your Weblog To Existence With Divi 5 Nowadays
With Divi 5’s Loop Builder and CSS Grid, you will have a successful mixture to make your weblog stand out. Loop Builder handles dynamic content material easily, letting you construct customized, repeatable publish templates that convey your weblog to existence. CSS Grid delivers the masonry genre with its versatile, responsive grid layouts that become independent from from static weblog modules.
Now it’s your flip. Obtain the newest Divi 5 Public Alpha, experiment with those options, and percentage your ideas with us within the feedback beneath!
The publish How To Build A Masonry Blog With Divi 5’s Loop Builder + Grid gave the impression first on Elegant Themes Blog.
Contents
- 1 What Is CSS Grid In Divi 5?
- 2 What Is The Loop Builder In Divi 5?
- 3 How To Construct A Masonry Weblog With Divi 5’s Loop Builder + Grid
- 4 Obtain For Unfastened
- 5 You could have effectively subscribed. Please take a look at your electronic mail cope with to substantiate your subscription and get get entry to to unfastened weekly Divi structure packs!
- 6 Carry Your Weblog To Existence With Divi 5 Nowadays
- 7 5 Easiest WordPress VR and Metaverse Plugins
- 8 The right way to Disable Gravatars in WordPress
- 9 The Tales At the back of Webby-Nominated Websites

0 Comments