

The problem with most animation equipment is that they swing from dull to chaotic and now not the usage of a middle floor. Each the effects aren’t visible, or a slight switch of the mouse can send parts flying.
With Divi 5’s Interactions, you get fine-grained control over how parts answer. Its Sensitivity settings will assist you to select whether or not or now not the motion is solely noticeable or dramatic, so effects stay blank, delicate, {{and professional}}. In this post, we’ll walk by way of learn to trigger effects the use of mouse movements in Divi 5.
What Are Interactions In Divi 5
Interactions are connections between what a buyer does and the way in which the internet web page responds. They’re built on 3 parts:
- Purpose: The movement that starts it. This normally is a click on on, a mouse coming into or leaving an element, the moment something enters the viewport, or the internet web page load.
- Affect: The response you want. That could be a card tilting, an image zooming, a banner fading in, or a preset swapping sorts.
- Purpose: The part that reacts. It will smartly be the very issue the client clicked on, or something totally different somewhere else on the internet web page.
Subscribe To Our YouTube Channel
When you combine the ones, you get a simple cause-and-effect chain. For example, a buyer hovers over a product card (trigger), which scales slightly (affect). The card’s image module (purpose) is the part that responds.
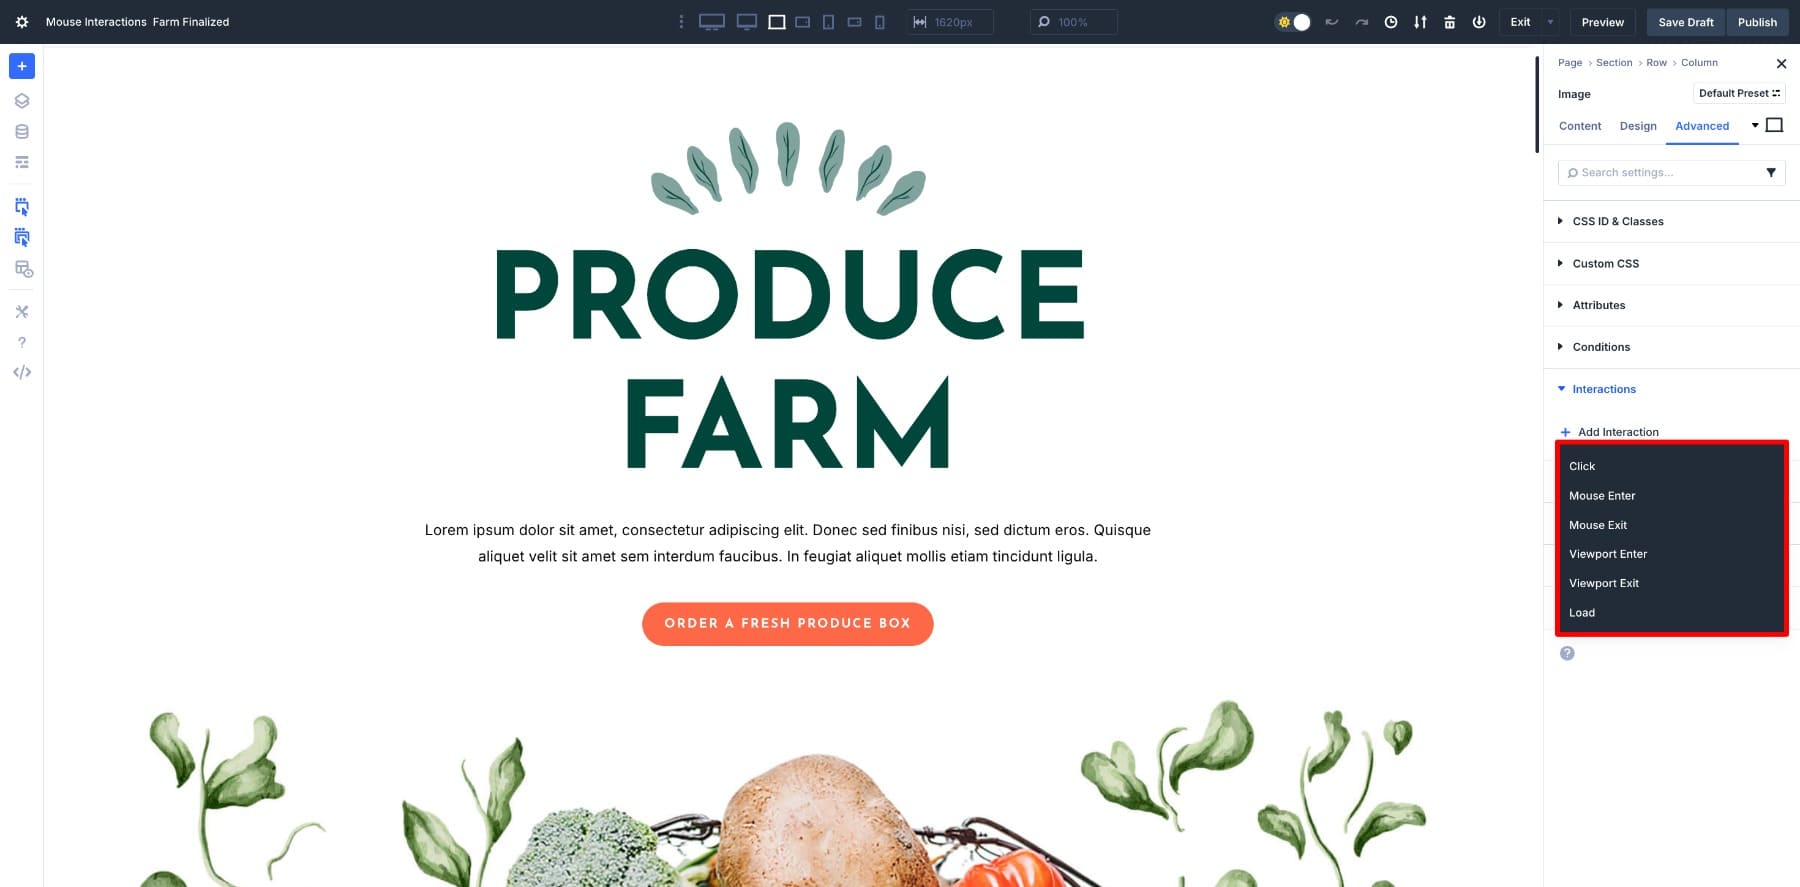
Inside the Divi Builder, you’ll to seek out the selection so to upload interactions all over the Advanced tab of any section, row, or module.
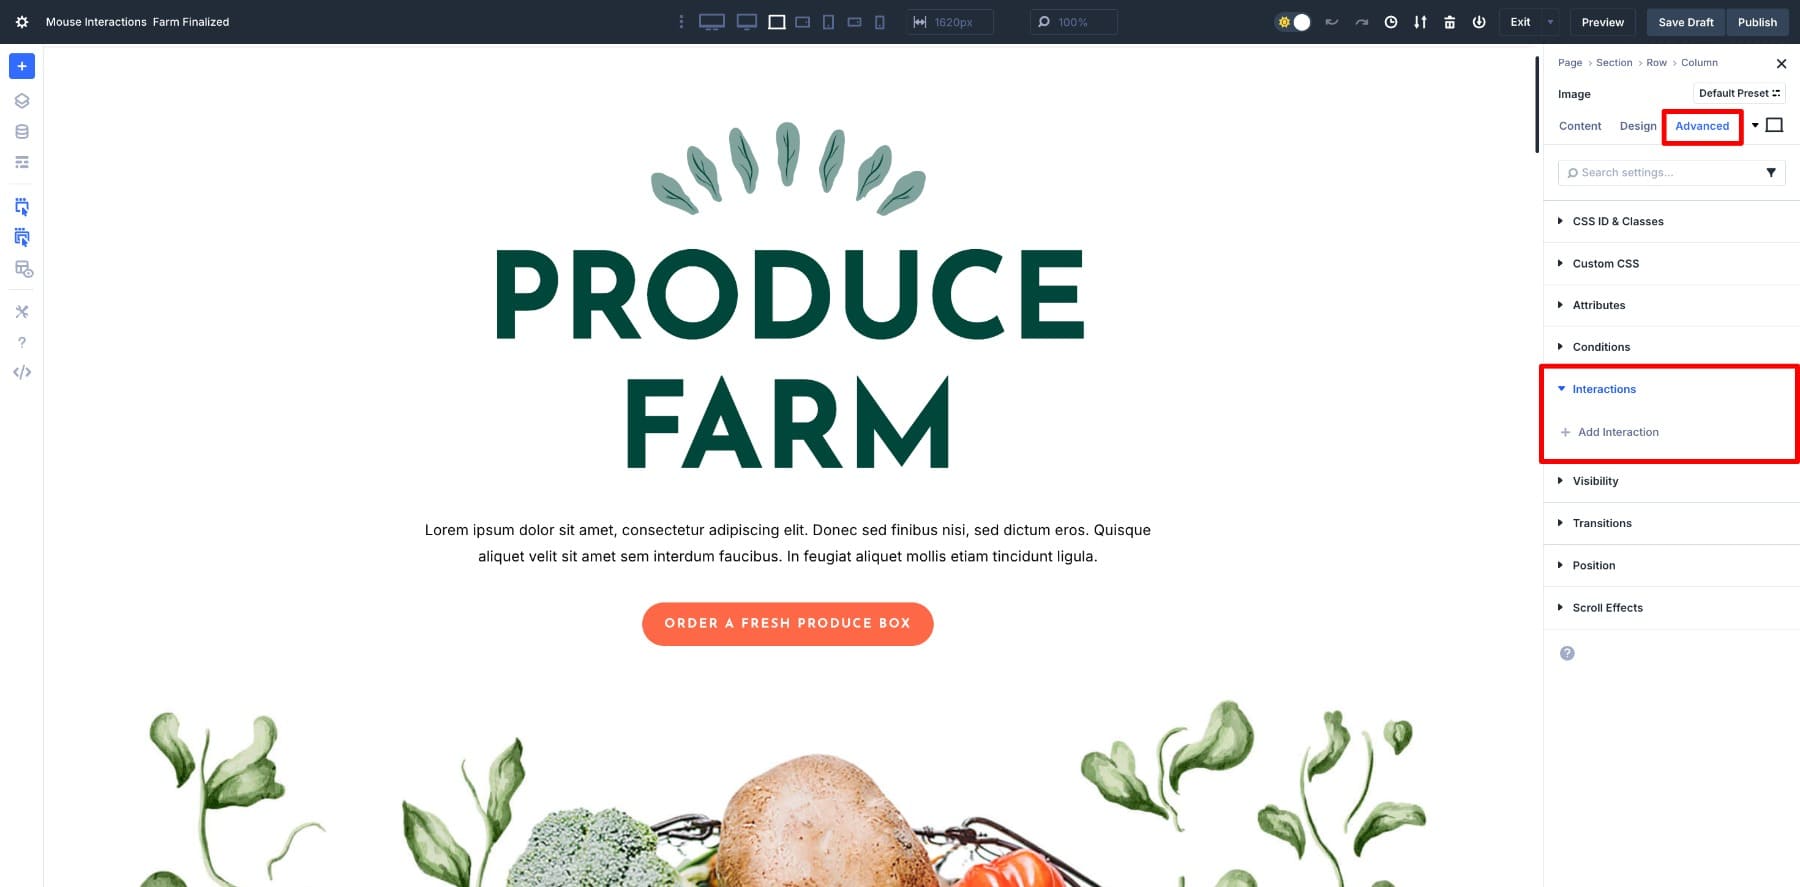
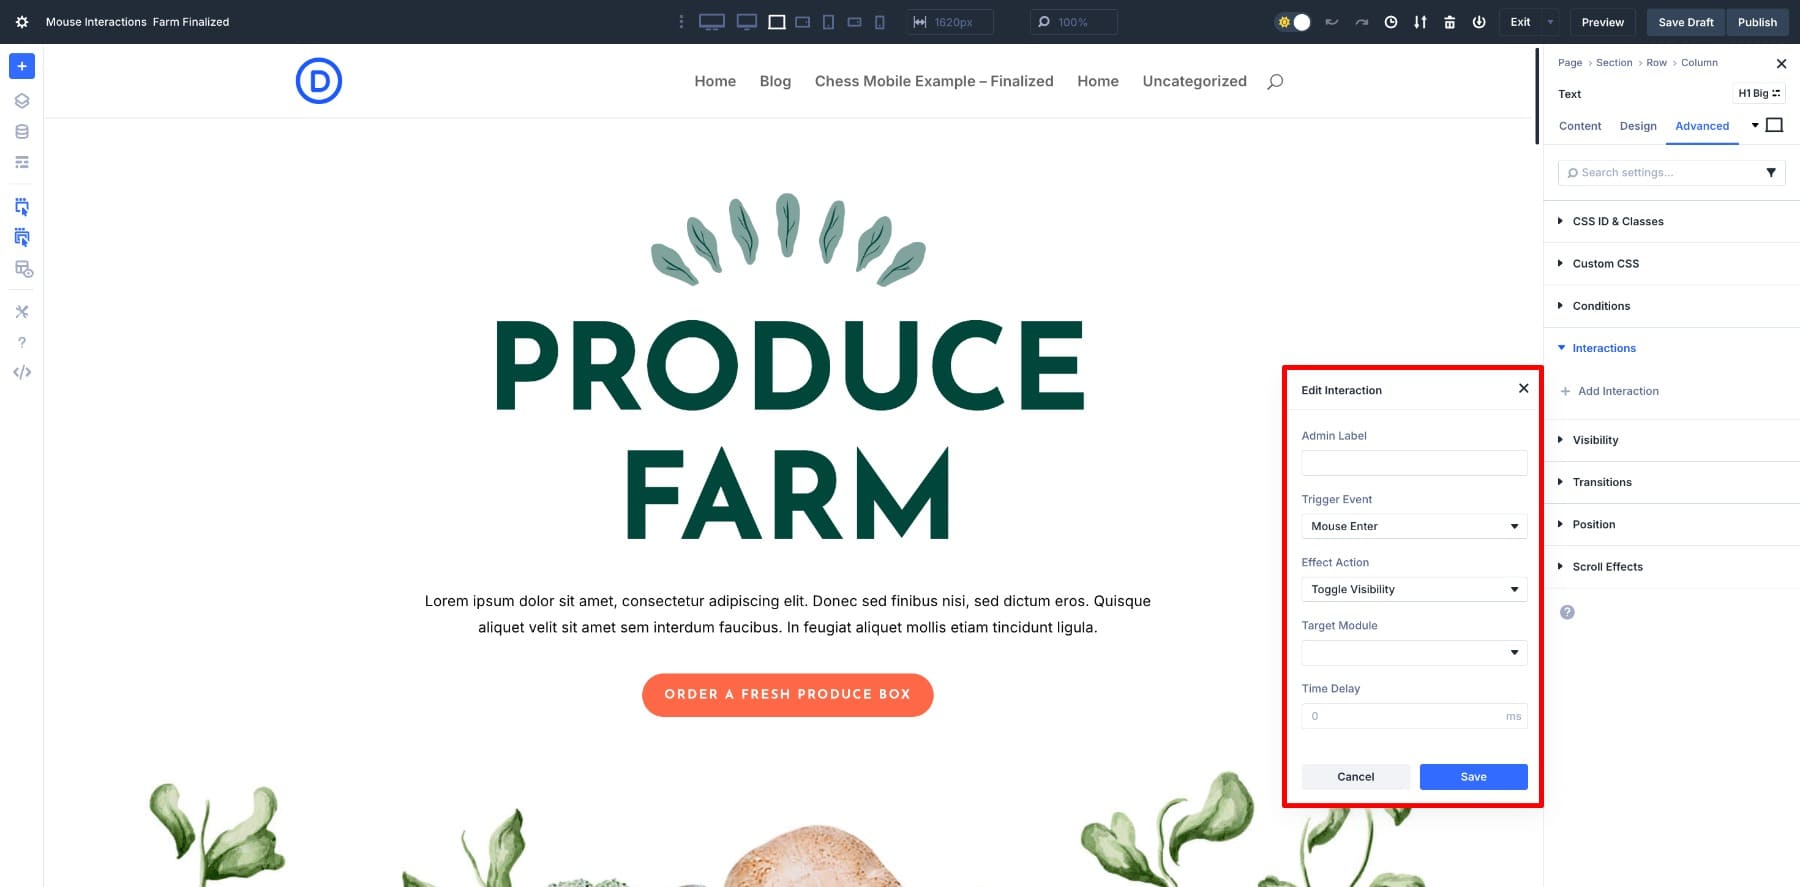
Click on on Add Interaction and likewise you’ll see the tick list of conceivable triggers: Click on on, Mouse Enter, Mouse Cross out, Viewport Enter, Viewport Cross out, or Load.
From there, the panel means that you can select the affect and purpose, which is where the customization truly opens up.
What makes Interactions stand out is that the effects aren’t limited to simple show and hide actions. Divi 5 provides you with a big toolkit to:
- Practice or remove design presets, so a button might switch from minimal to bold styling when clicked.
- Change attributes, like making an image tilt or scale when any individual moves their mouse.
- Set cookies, this means that {that a} banner brushed apart by way of a buyer isn’t going to stick reappearing each time they load the internet web page.
- Scroll shoppers to a decided on part on the internet web page, useful for “once more to height” buttons or navigation shortcuts.
For example, consider you’re building a product internet web page. You could add an interaction so that when an individual hovers over a product card, the image zooms slightly and a border turns out. Or you want to design a timed interaction that shows a “Unfastened Delivery” banner 5 seconds after any individual lands on the internet web page, on the other hand absolute best once in line with consult with.
This means your layouts don’t seem to be static blueprints. They can respond to one of the best ways other people browse, highlight what problems most, and consider individual imaginable possible choices. All of this and a lot more is conceivable with Divi 5’s Interactions. They get a hold of an easy solution to make your designs in reality really feel additional non-public and alive.
Be informed The whole thing About Divi 5’s Interactions
Understanding Mouse Movements In Interactions
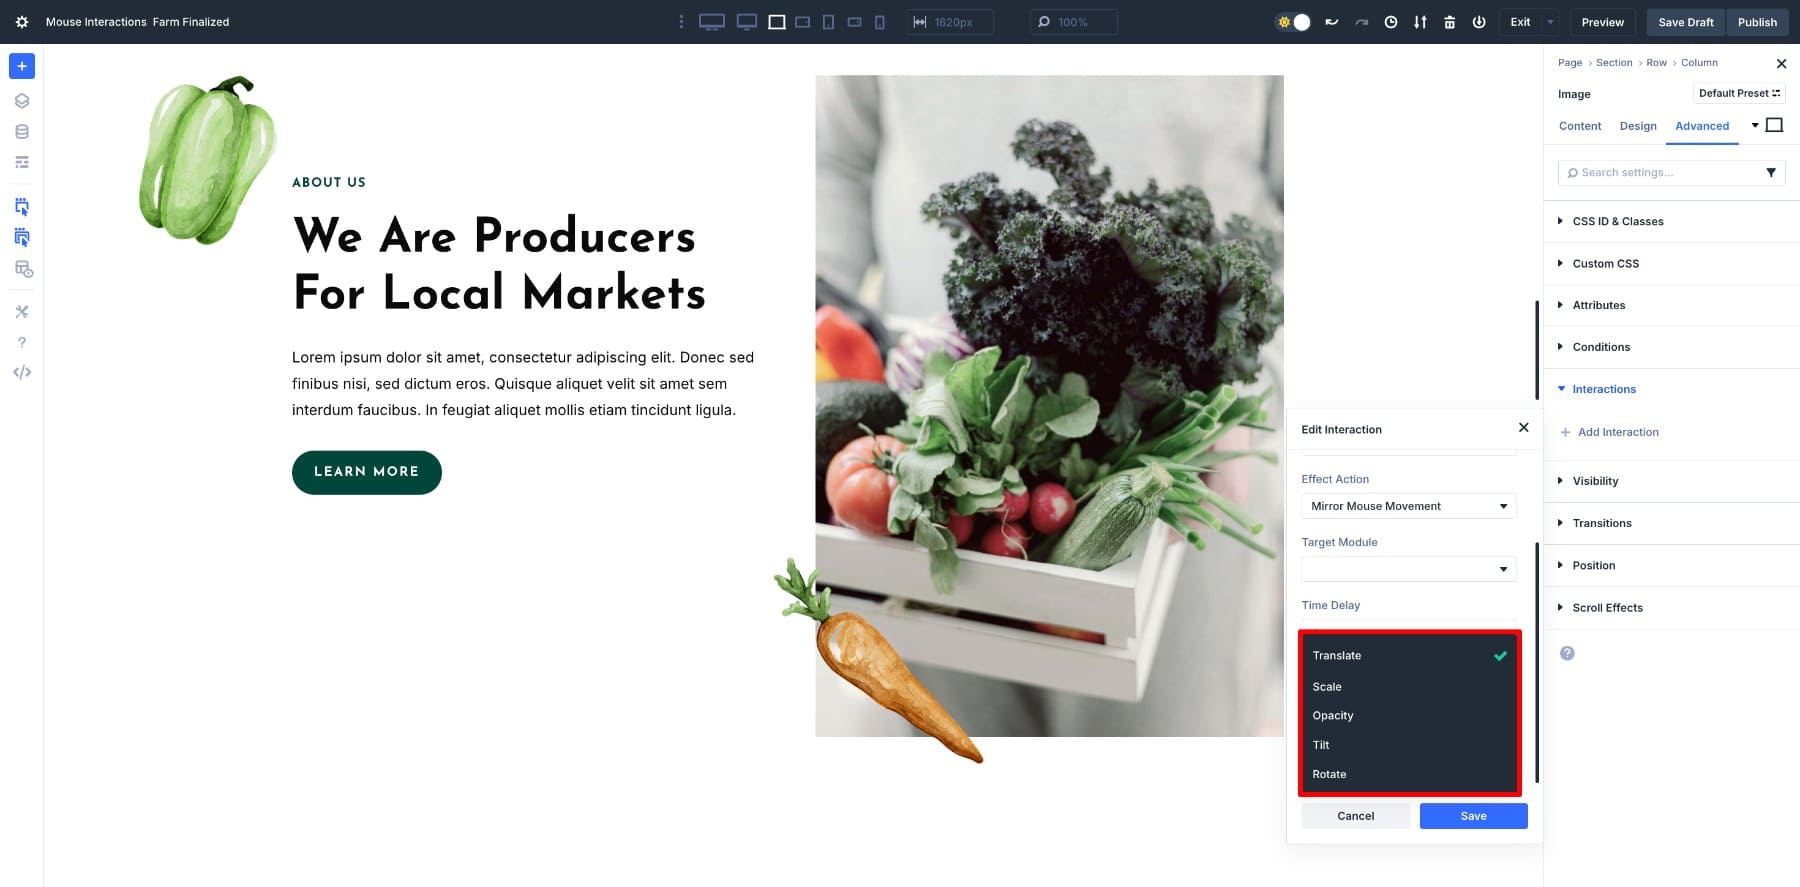
One of the crucial exciting effects inside of Divi 5’s Interactions is Replicate Mouse Movement. You’ll to seek out it under the Affect Movement column.
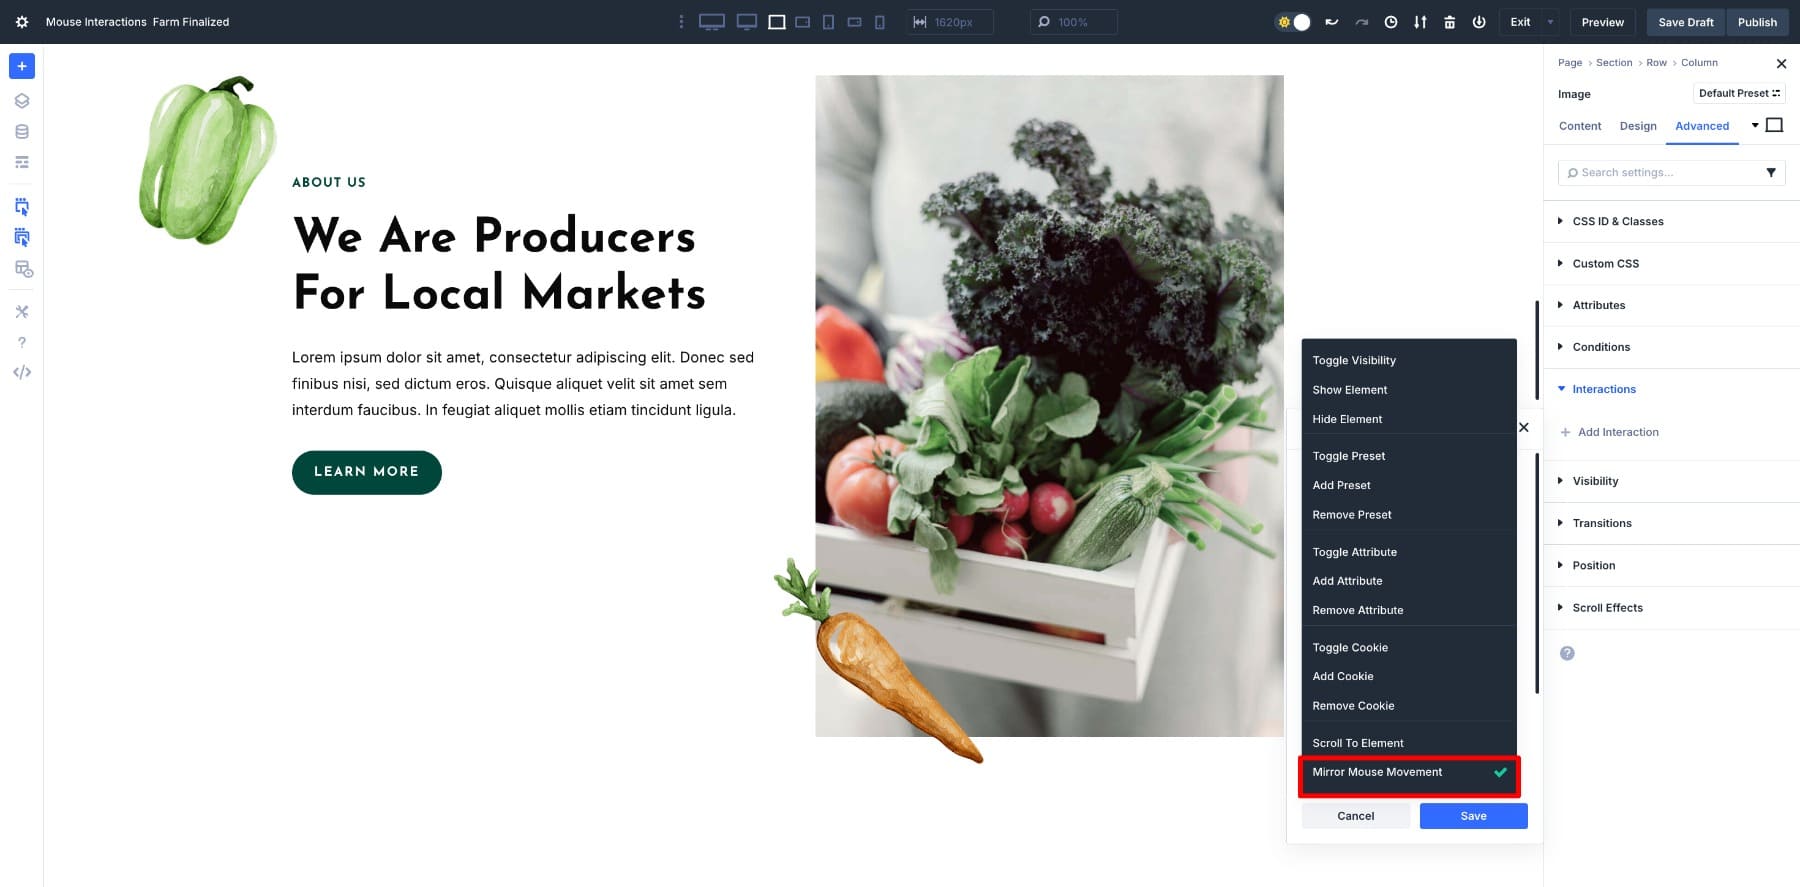
This environment lets parts answer right away to a buyer’s cursor. Since the mouse moves, a module can shift position, tilt, scale, rotate, or fade.
Instead of taking a look forward to a click on on, the internet web page reacts immediately, which makes it in reality really feel “alive”.
The ability of that movement comes from the Sensitivity environment:
- Lower values create comfy, just about imperceptible shifts. This gives depth without distracting from the content material subject matter.
- Higher values make the motion stronger and additional dramatic. While this may occasionally clutch attention, it in reality works very best when used sparingly.

For example, chances are you’ll:
- Translate a hero image so it shifts slightly with the cursor, growing depth.
- Tilt a product card so it leans as despite the fact that it has weight.
- Scale a button so it grows and shrinks gently since the individual explores.
- Fade a background image in and out for a layered affect.
However, you don’t wish to overdo mouse movements. For example, a sophisticated tilt on an image may just make it in reality really feel interactive and trendy, while a heavy rotation on each section might quickly in reality really feel distracting.
Replicate Mouse Movement is a method to data attention where you want it. A button that scales with mouse movement feels additional inviting to click on on, and a hero section that shifts with the cursor draws shoppers into the internet web page. The ones are small touches, on the other hand they add character and responsiveness without requiring any custom designed code.
6 Mouse Purpose Effects You Can Generate With Divi 5
Once you understand how Replicate Mouse Movement works, you’ll get began applying it to exact design parts. Listed below are a few smart effects you’ll assemble right away inside of Divi 5.
1. Interactive Hero Segment
The hero house is without doubt one of the very best places to use mouse movement effects. A polished translate on the background or image makes the section in reality really feel dynamic without distracting from the headline or call-to-action.
This hero uses a bold heading, a temporary paragraph, a primary button, and four supporting photos. We wish to keep the text safe on the other hand responsive, and let the images create depth since the cursor moves. To reach this, we apply a slight scale to the text and switch the image layers with translate.
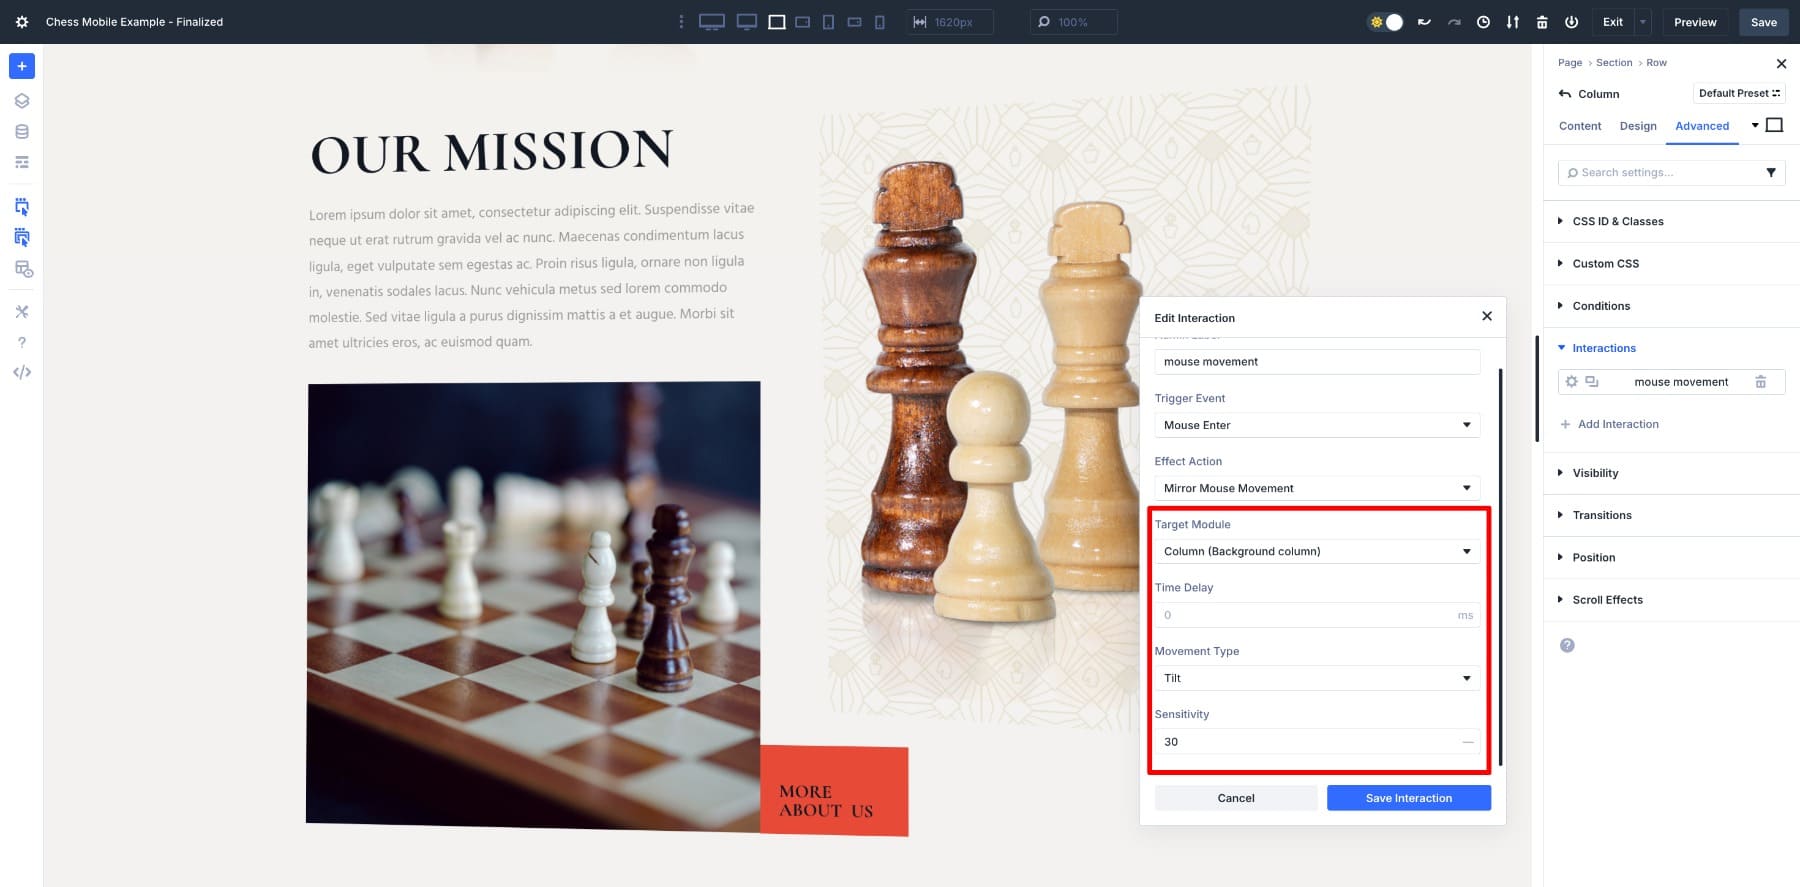
First, we add Scale affect to the heading, paragraph, and button. Make a choice the heading and transfer to Settings > Advanced > Interactions. Click on on Add Interaction. Then, apply the following settings:
- Purpose Fit: Mouse Enter
- Affect Movement: Replicate Mouse Movement
- Purpose Module: Heading
- Movement Kind: Scale
- Sensitivity: 2

Repeat the identical for the paragraph and the button. Keep in mind that we stored the Sensitivity low to scale parts without looking like a hover gimmick. This assists in keeping the heading readable, the paragraph anchored, and the button additional inviting.
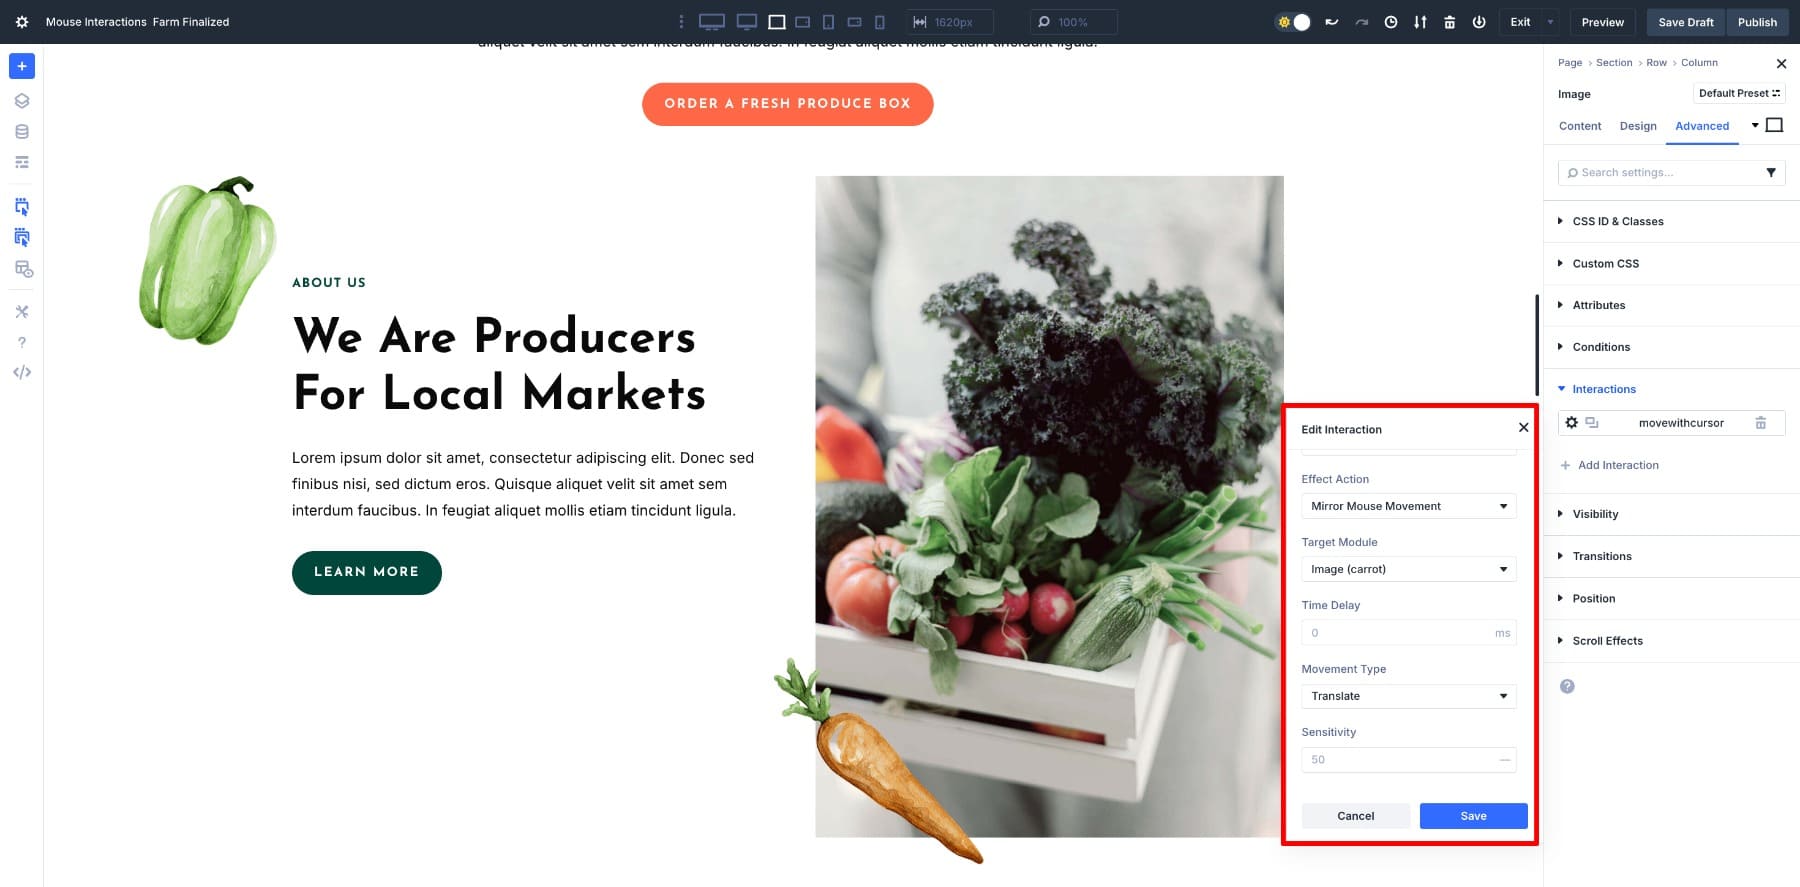
Then, we’ve used the Translate affect so to upload slight movement to images. Once over again, open an Image module and transfer to its settings > Advanced > Interactions > Add Interaction.
Proper right here, we’ve made up our minds on Translate since the Movement Kind with Sensitivity stage 5.
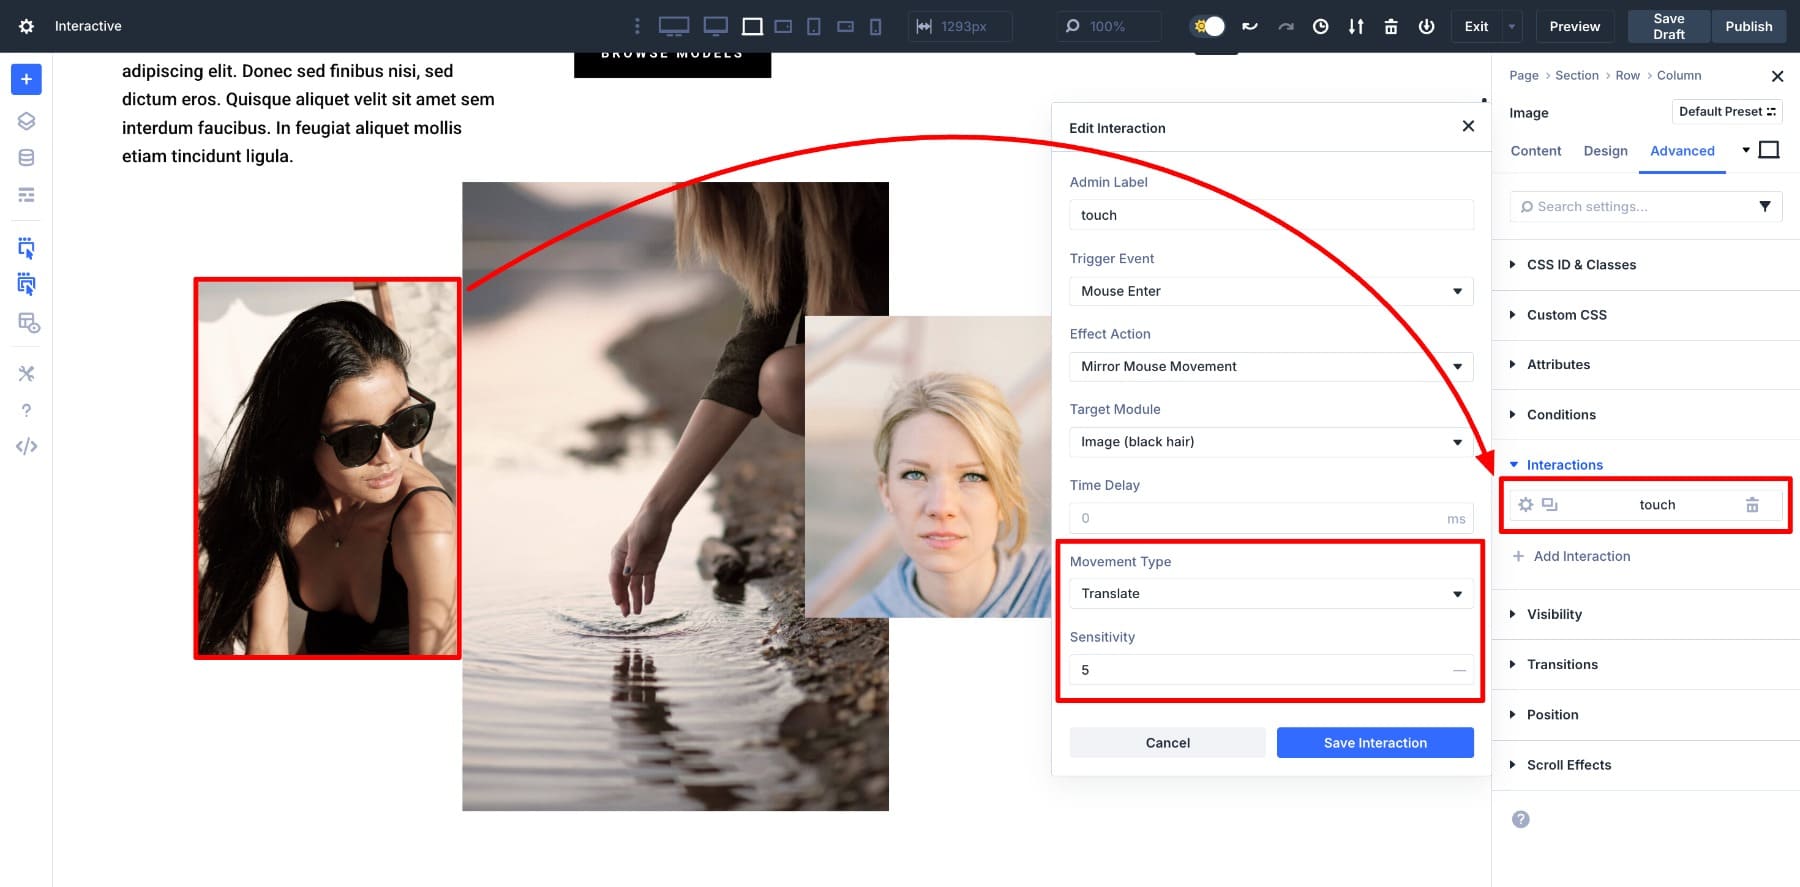
Since each image is a separate module, you’ll moreover select different Sensitivity levels so to upload layering effects. For instance, you want to provide lower values to background photos and higher values to foreground ones in order that they switch at different speeds.
2. Make Taking part in playing cards Pop With Scale
Taking part in playing cards are a not unusual construction for portfolios, services and products, or product grids. Together with a sophisticated scale affect makes them in reality really feel interactive as shoppers switch their cursor over them.
To set this up, open the card column and transfer to Settings > Advanced > Interactions. Click on on Add Interaction and use the following settings:
- Purpose Fit: Mouse Enter
- Affect Movement: Replicate Mouse Movement
- Purpose Module: Card 1 column (Make a choice the columns all over the row)
- Movement Kind: Scale
- Sensitivity: 24
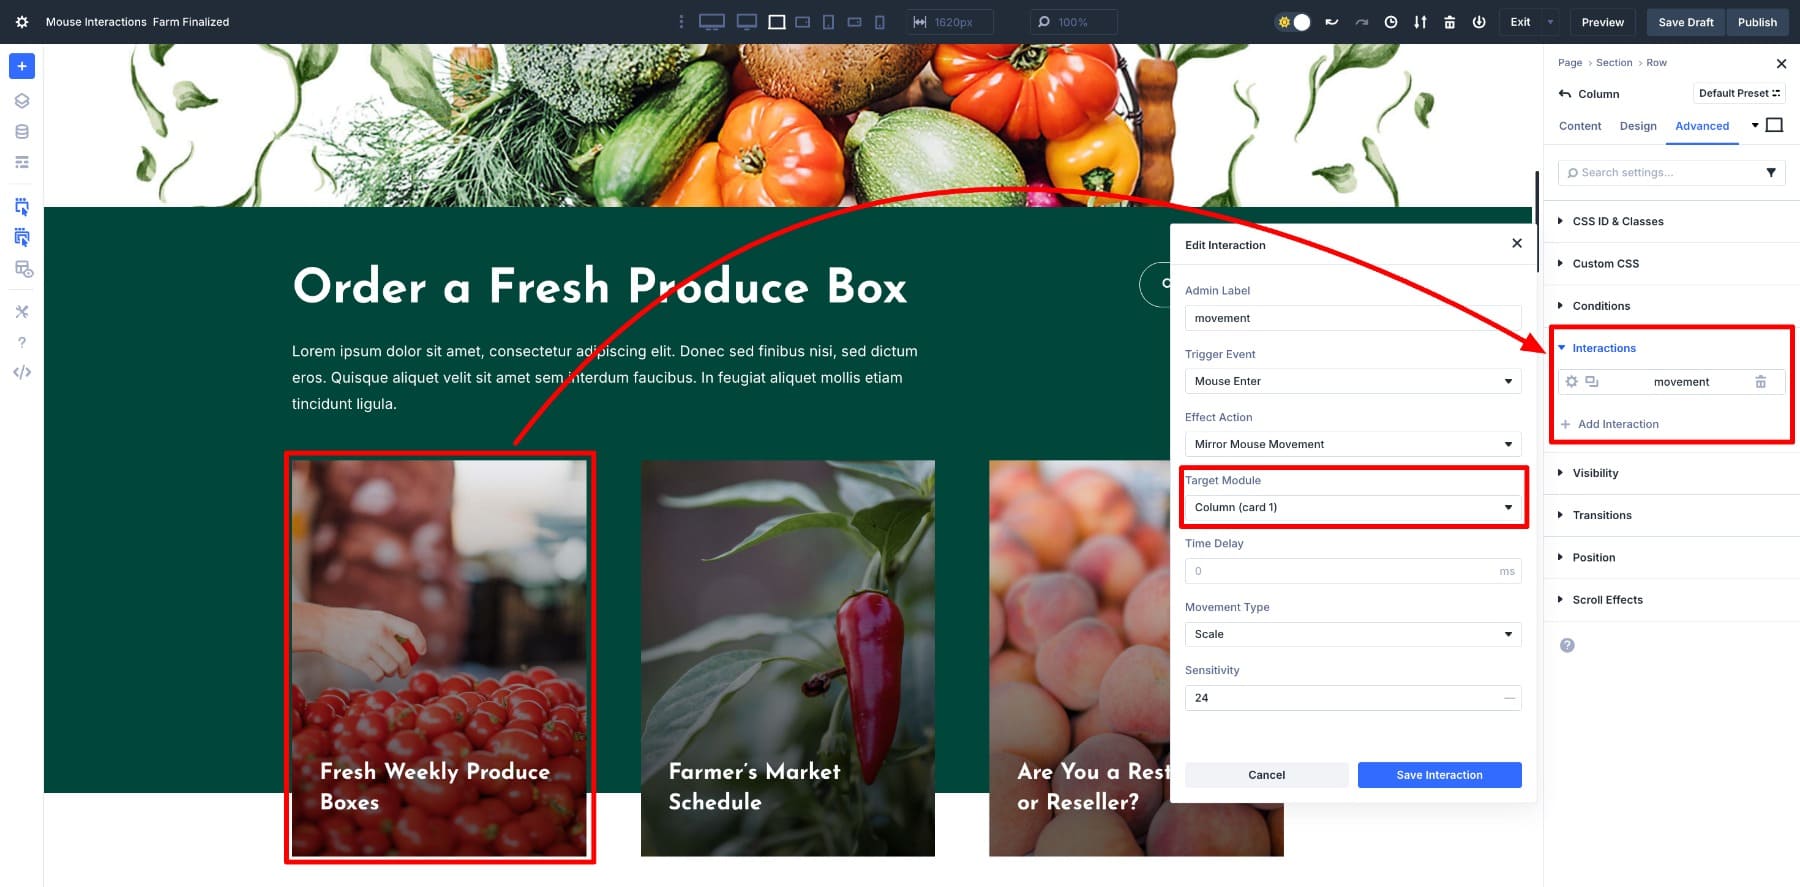
In a similar fashion, the pepper and the carrot are image modules that have the Translate affect applied with a Sensitivity stage of 50, in order that they apply the cursor movement, creating a a laugh little game for purchasers.
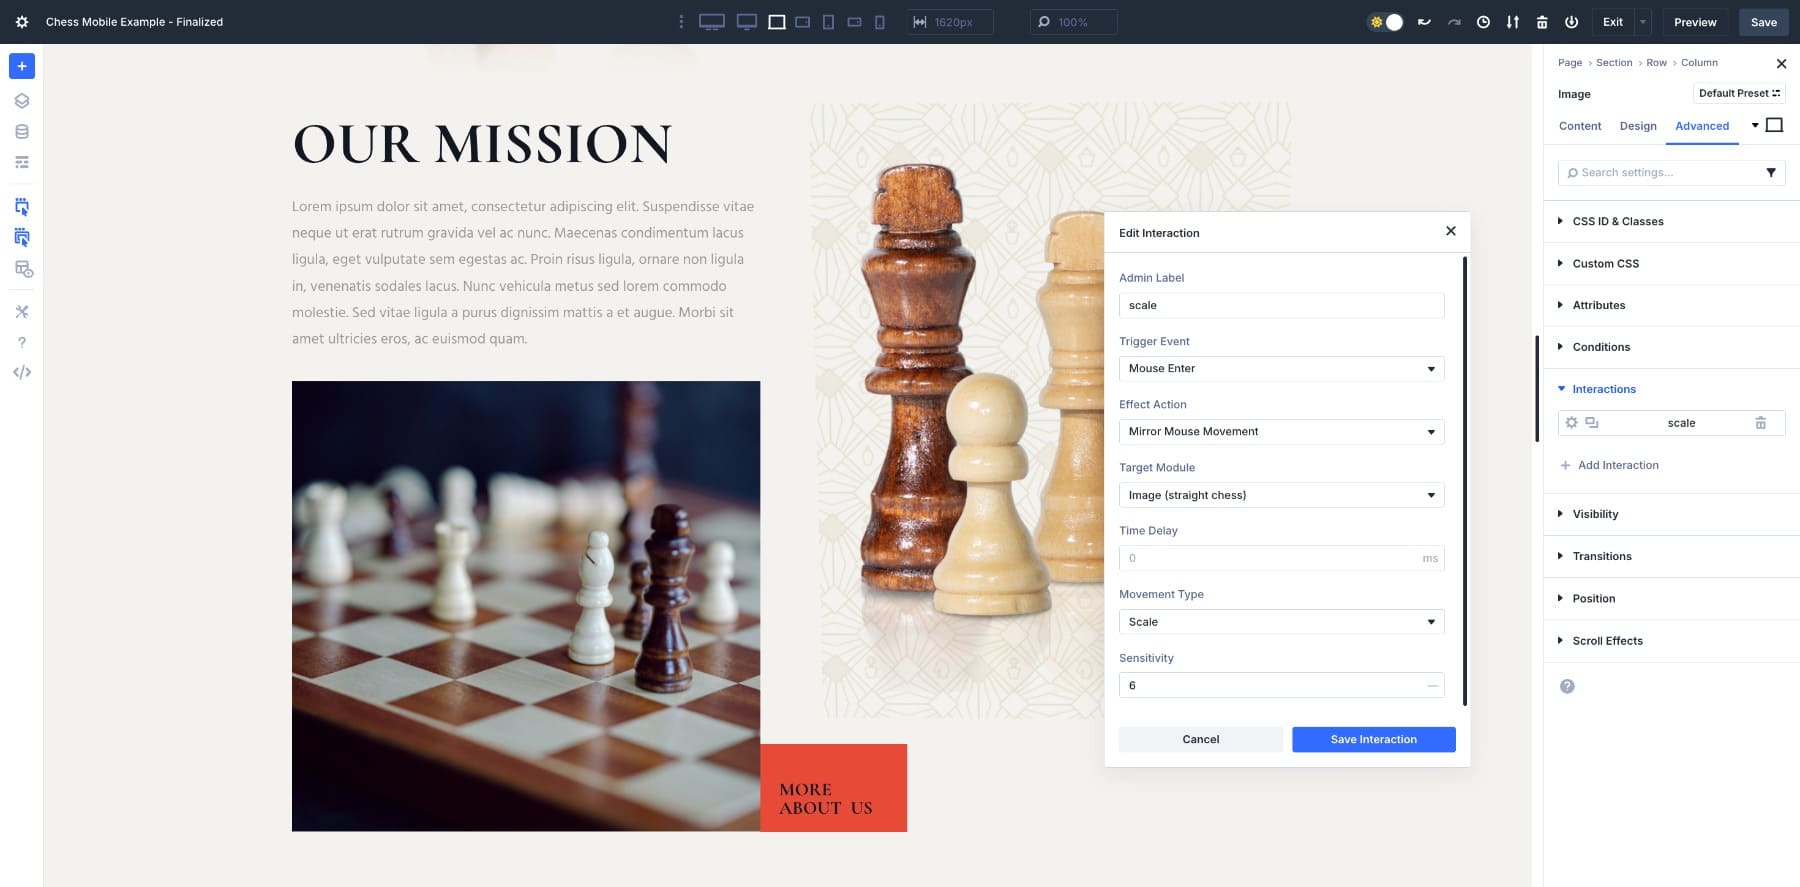
3. Image Hover With Scale And Border
A e-book or product grid is a perfect place to combine motion with styling. When the client moves their mouse over a e-book, the cover tilts with the cursor, and a white border turns out to frame it. This creates point of interest without having a click on on.
To recreate this, open the Image module for some of the important e-book covers and transfer to Settings > Advanced > Interactions. Click on on Add Interaction and use the following settings:
- Affect Movement: Replicate Mouse Movement
- Movement Kind: Tilt
- Sensitivity: 25
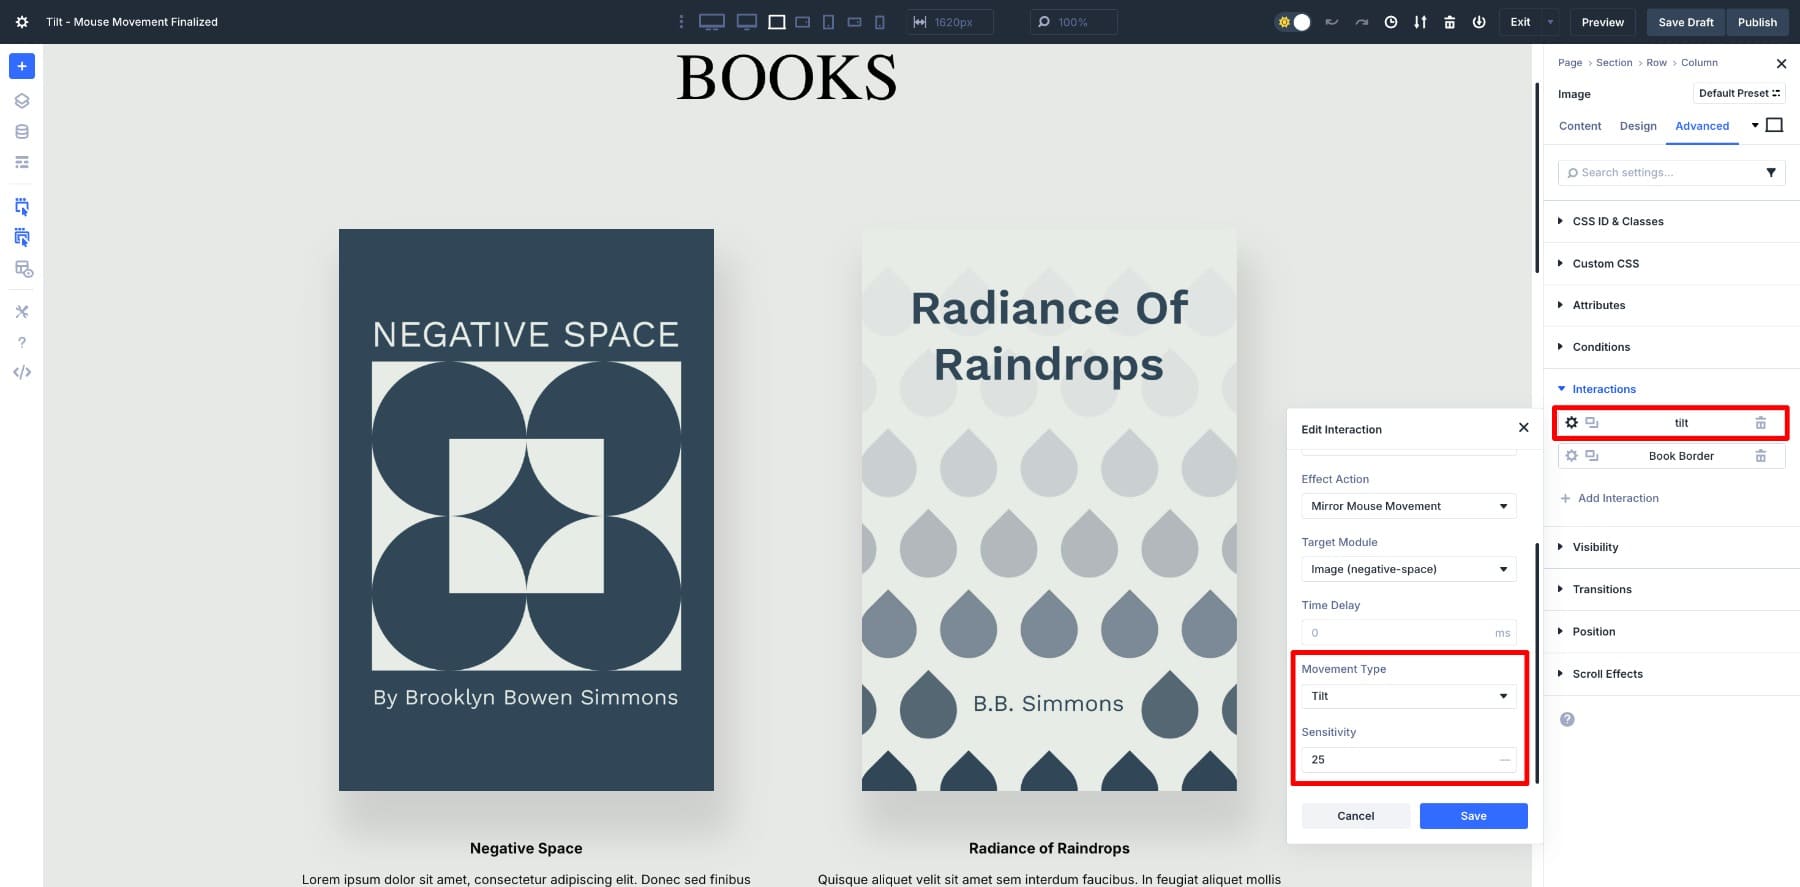
Next, so to upload the white border when the mouse moves over the image, we’ll first create a preset.
Once that’s carried out, your saved preset gets began appearing throughout the Interactions selection. To make use of it as a mouse movement affect, we’ll create another interaction for each image. Make a selection the ones settings:
- Affect Movement: Add Preset
- Preset: Guide Border Preset
- Change Provide Preset: Enabled
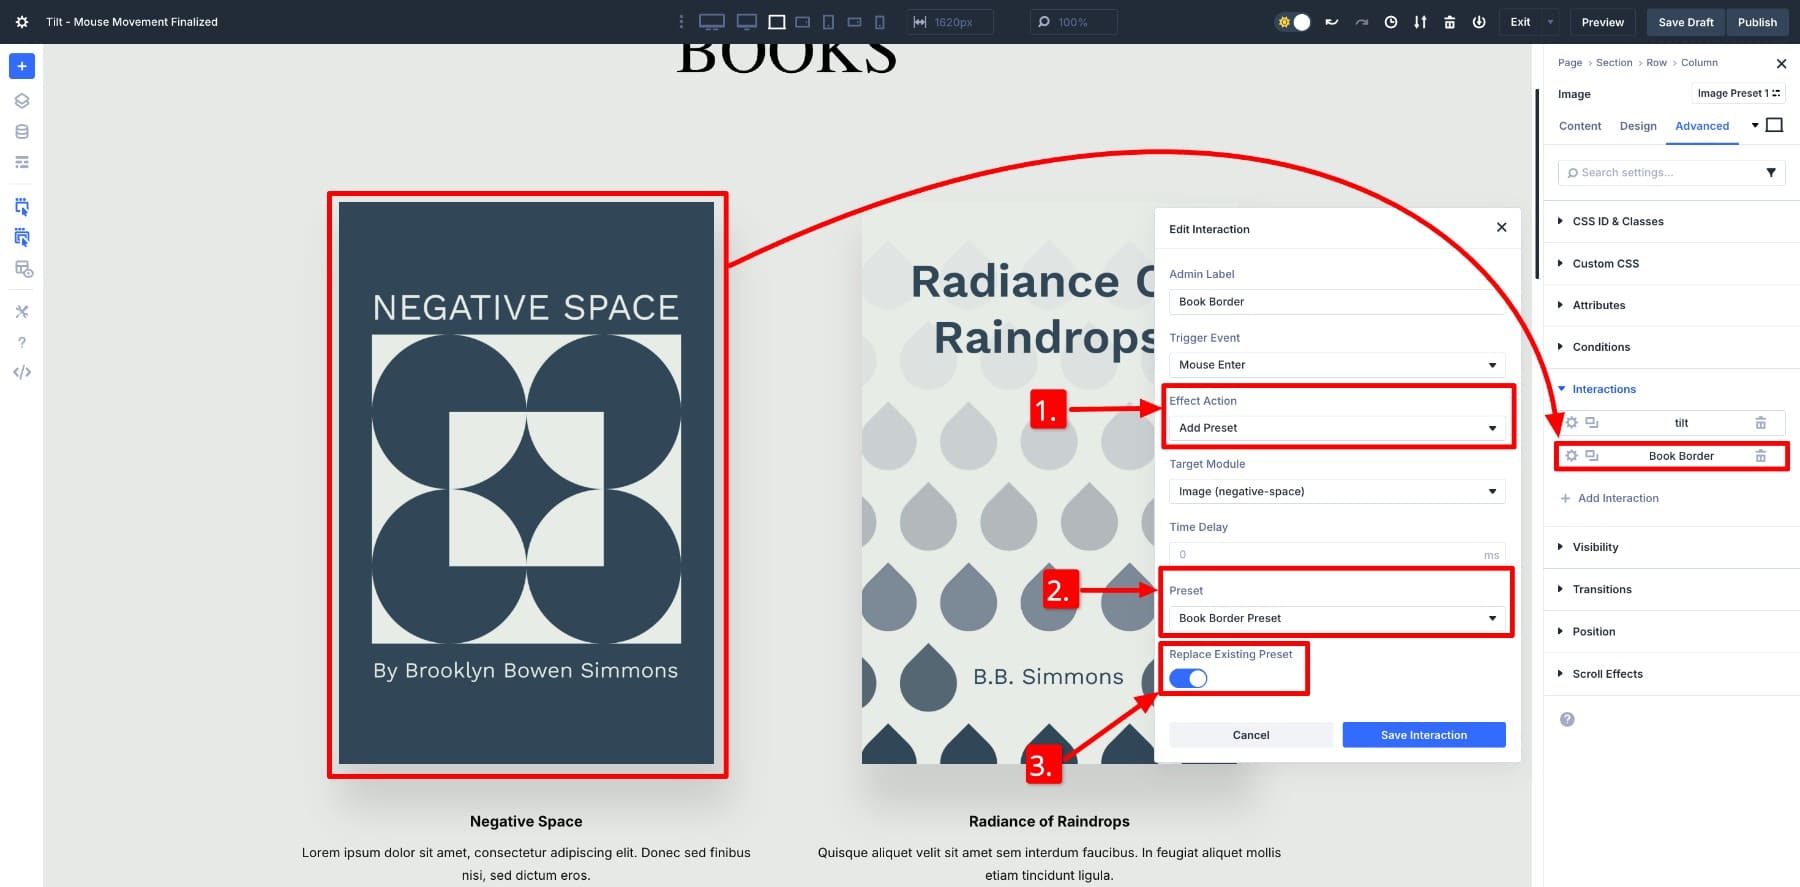
This manner, Divi applies the preset and offers the white border immediately every time the mouse moves over the e-book cover. It pairs smartly with the tilt affect, making the e-book stand out while staying clean {{and professional}}. Perceive we enabled the Change Provide Preset to make sure the Border preset gets applied over provide ones.
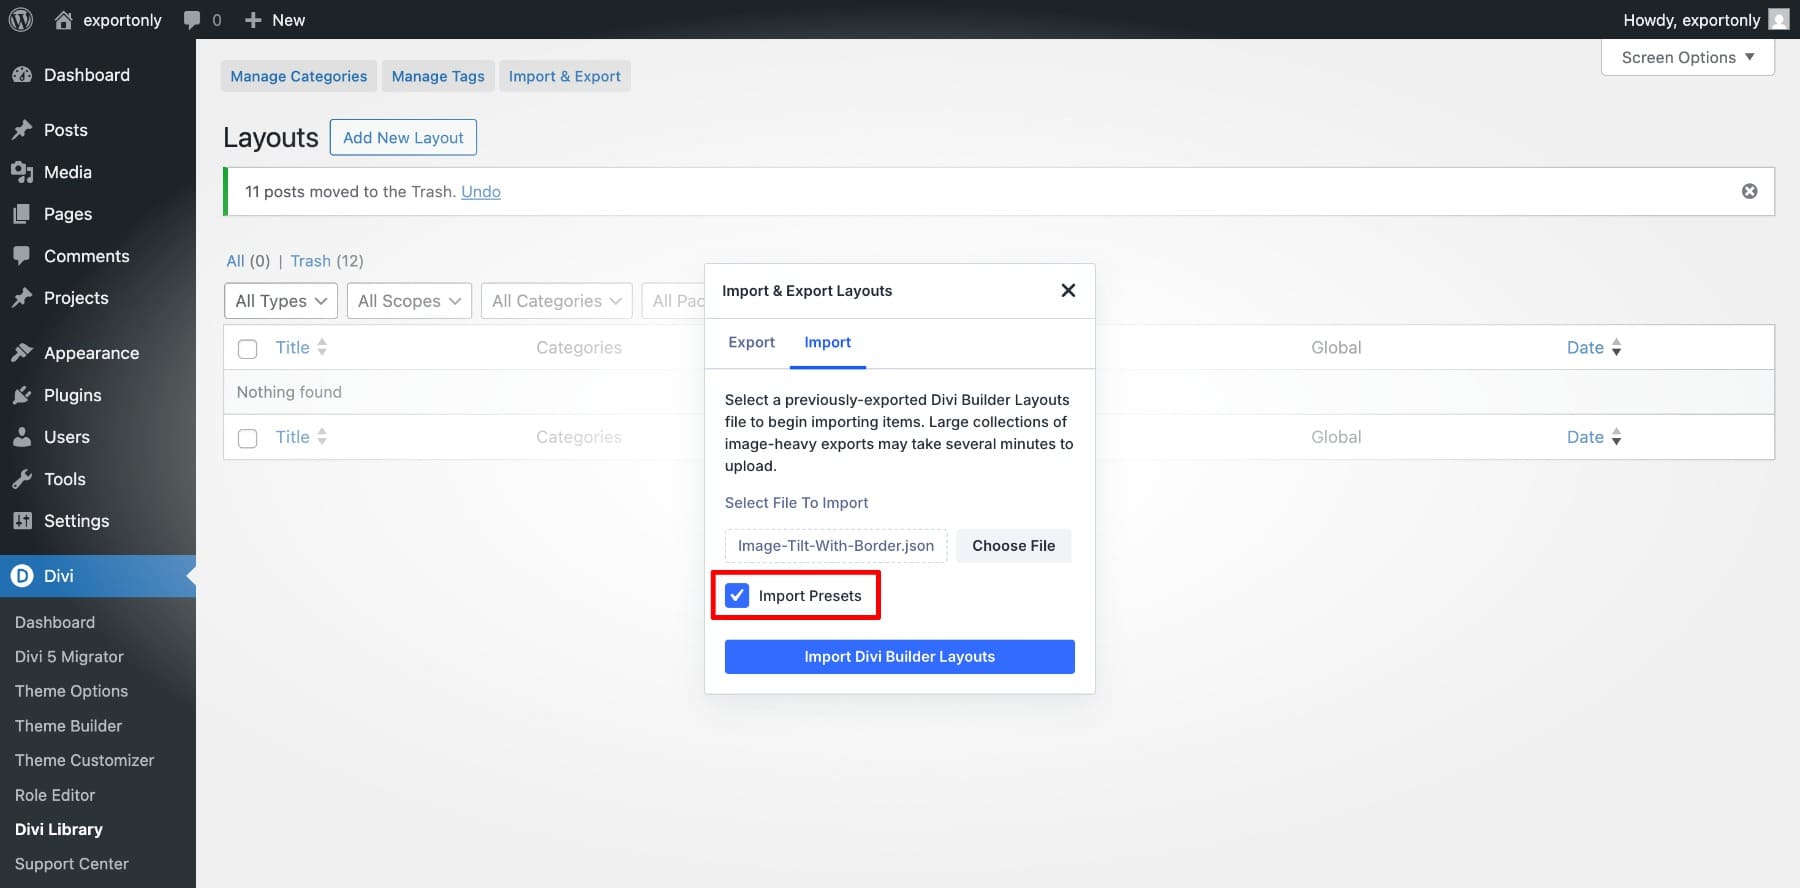
Understand: When importing the structure, you’ll need to try the Import Presets solution to import the Border preset as smartly.
4. Layered Motion In A Column Construction
This structure combines a few parts inside of one row. By the use of applying tilt at every the row and column stage, you get layered movement, while a sophisticated scale on the image and button assists in keeping the focal point where it problems.
To set it up, apply the ones steps underneath:
Step 1: Add Tilt To The Row
Open the row settings and transfer to Advanced > Interactions > Add Interaction.
- Purpose Fit: Mouse Enter
- Affect Movement: Replicate Mouse Movement
- Purpose Module: Row
- Movement Kind: Tilt
- Sensitivity: 20
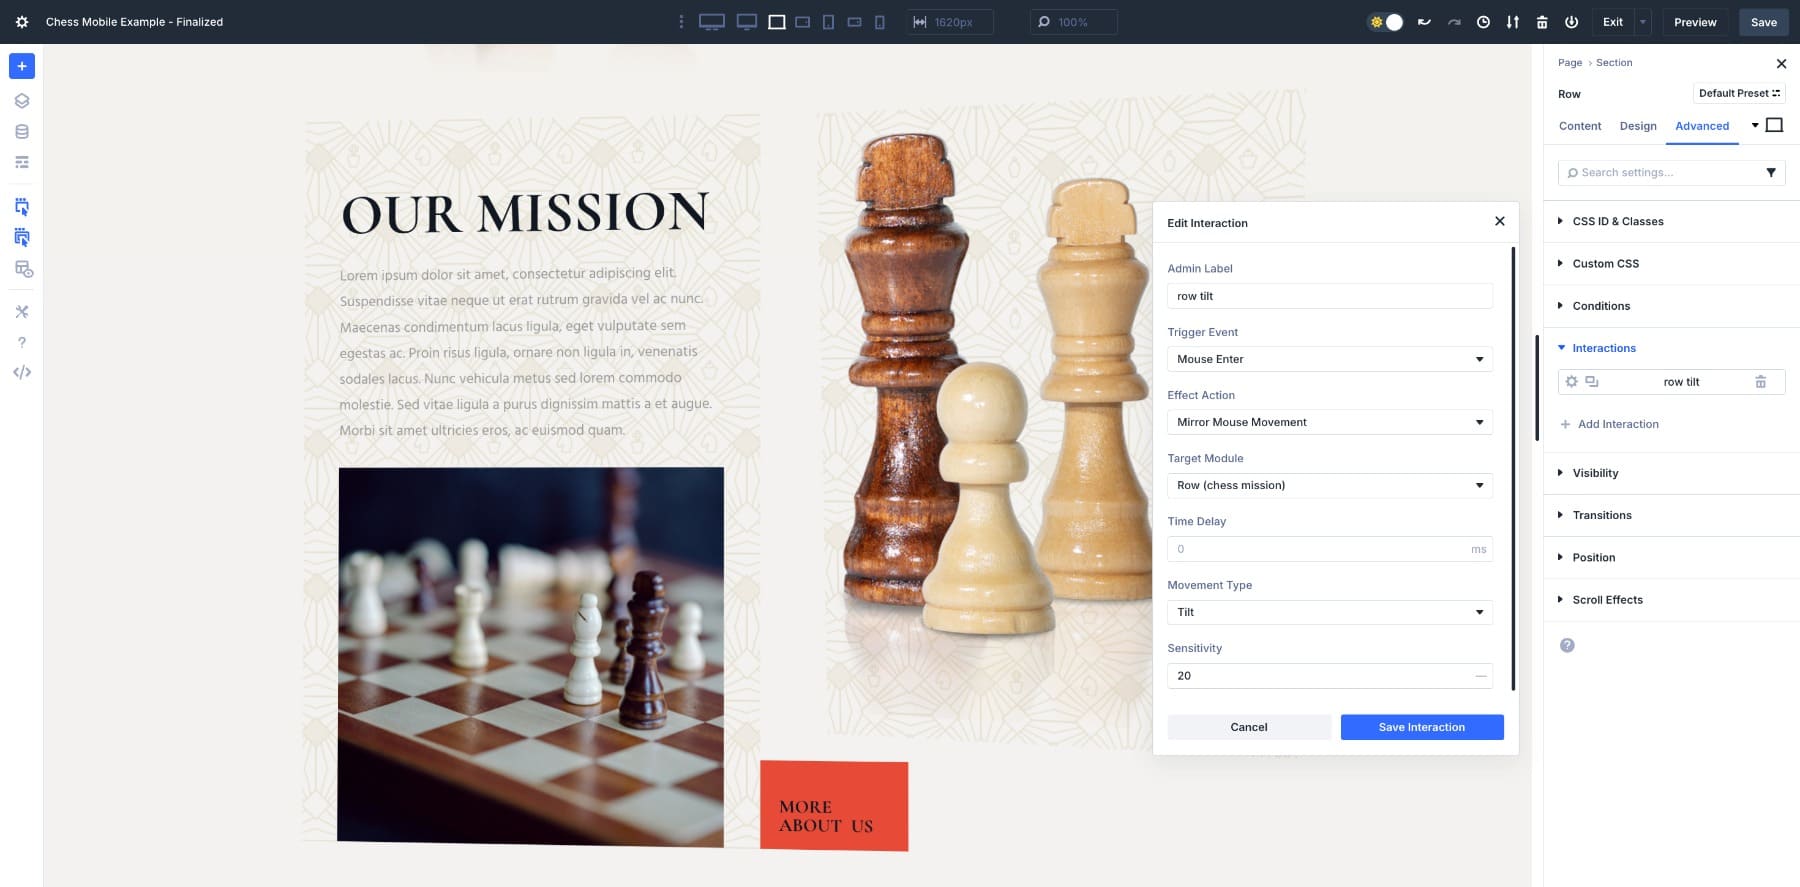
Step 2: Add Tilt To The Inside of Column (With Image)
Open the column settings and repeat the identical steps. Keep the Sensitivity slightly higher to separate its movement from the row.
Step 3: Add Scale To The Image
Open the image module all over the column, add the Scale affect interaction, and choose Sensitivity accordingly.
Step 4: Add Scale To The Button
Repeat the identical steps so to upload a Scale interaction to the button. Vary the Sensitivity stage.

This setup creates a layered affect where the row tilts, the column supplies another degree of tilt, and the content material subject matter inside of subtly scales. The end result’s a dynamic section that feels alive on the other hand nevertheless balanced.
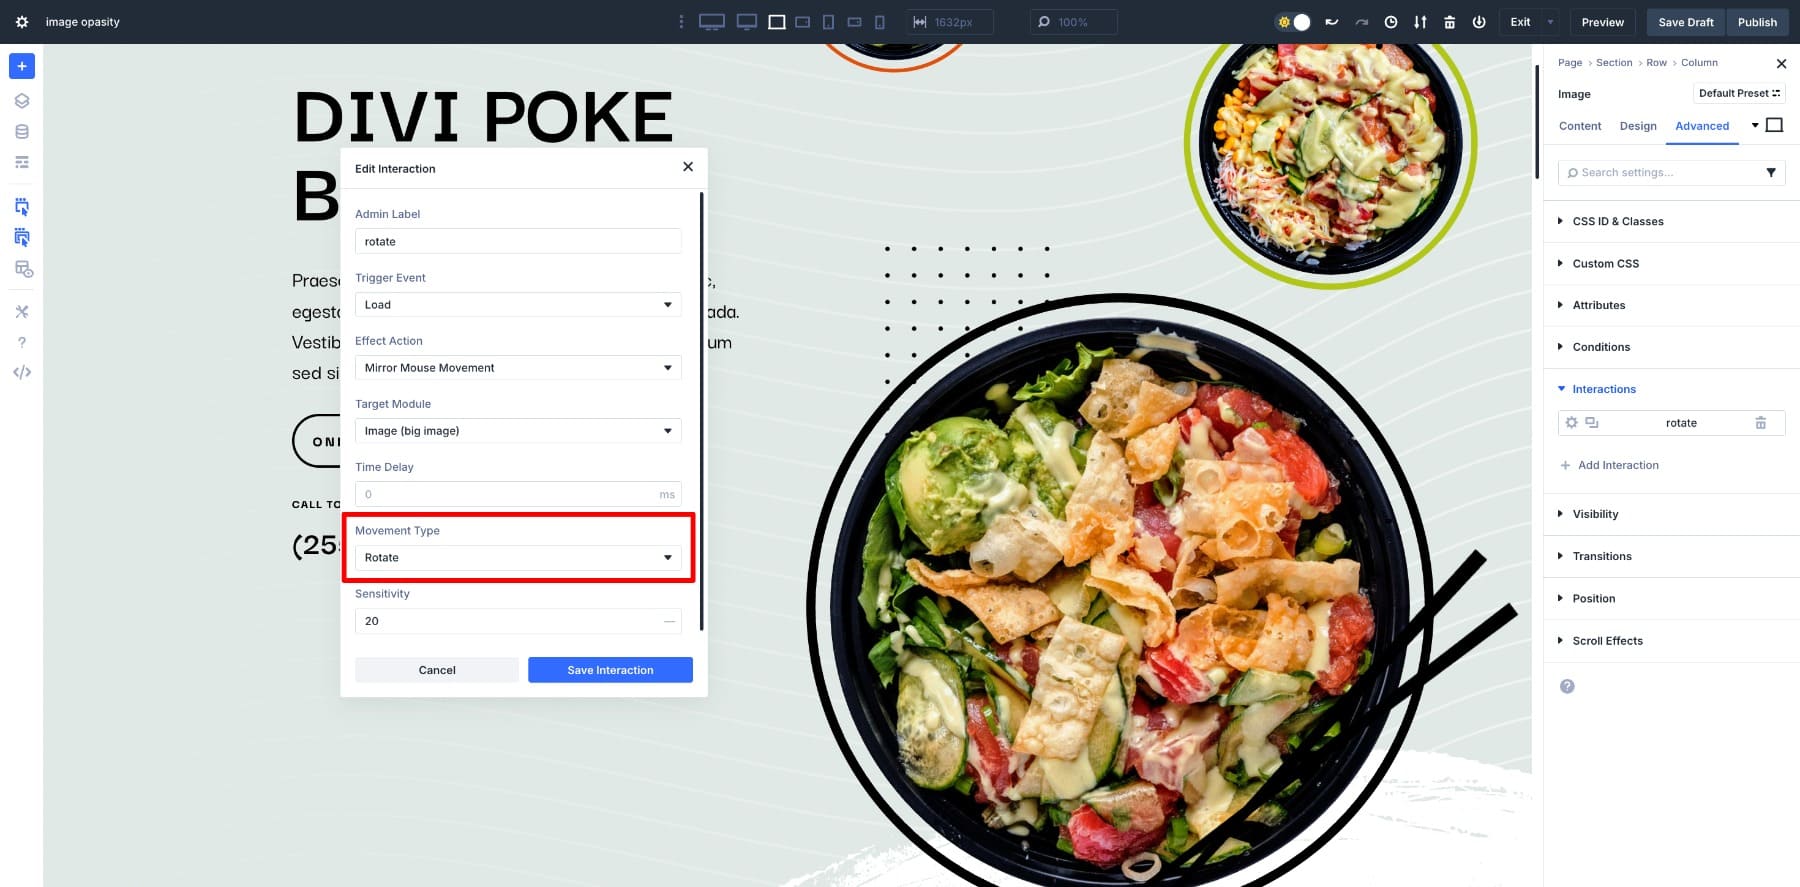
5. Add Playful Rotation To Pictures
You’ll be capable to moreover use mouse movement to create a sophisticated rotating motion on photos. In this example, the foods bowls rotate slightly since the cursor moves across the section, together with playful energy to the design.
To set it up, open the Image module and transfer to Settings > Advanced > Interactions > Add Interaction. Make a selection:
- Purpose Fit: Mouse Enter
- Affect Movement: Replicate Mouse Movement
- Purpose Module: Image
- Movement Kind: Rotate
- Sensitivity: 20-30
6. Pricing Table Point of interest With Opacity
Pricing tables are all about comparison, on the other hand you’ll use mouse movement to persuade attention to the hovered selection. In this setup, when a buyer hovers over one table, the other two fade slightly to 80% opacity.
To recreate this, open a pricing table column and transfer to Settings > Advanced > Interactions > Add Interaction. Make a selection:
- Purpose Fit: Mouse Enter
- Affect Movement: Replicate Mouse Movement
- Movement Kind: Opacity
- Sensitivity: 80% (It’s vital not to drop the opacity too far. Preserving it spherical 70–80% maintains usability while nevertheless drawing attention where you want it.)
To hide each table, you’ll create two interactions, choosing one Purpose Module at a time.
This manner, the hovered table may well be the “vigorous” variety while the others keep visible for fast comparison.
Download The Mouse Movement Layouts
Download all mouse movement layouts for free underneath. Import them into your Divi Library to use on any internet web page all over your internet web page.
@media absolute best show and ( max-width: 767px ) {.et_bloom .et_bloom_optin_1 .carrot_edge.et_bloom_form_right .et_bloom_form_content:previous to { border-top-color: #ffffff !vital; border-left-color: transparent !vital; }.et_bloom .et_bloom_optin_1 .carrot_edge.et_bloom_form_left .et_bloom_form_content:after { border-bottom-color: #ffffff !vital; border-left-color: transparent !vital; }
}.et_bloom .et_bloom_optin_1 .et_bloom_form_content button { background-color: #f92c8b !vital; } .et_bloom .et_bloom_optin_1 .et_bloom_form_content .et_bloom_fields i { colour: #f92c8b !vital; } .et_bloom .et_bloom_optin_1 .et_bloom_form_content .et_bloom_custom_field_radio i:previous to { background: #f92c8b !vital; } .et_bloom .et_bloom_optin_1 .et_bloom_border_solid { border-color: #f7f9fb !vital } .et_bloom .et_bloom_optin_1 .et_bloom_form_content button { background-color: #f92c8b !vital; } .et_bloom .et_bloom_optin_1 .et_bloom_form_container h2, .et_bloom .et_bloom_optin_1 .et_bloom_form_container h2 span, .et_bloom .et_bloom_optin_1 .et_bloom_form_container h2 strong { font-family: “Open Sans”, Helvetica, Arial, Lucida, sans-serif; }.et_bloom .et_bloom_optin_1 .et_bloom_form_container p, .et_bloom .et_bloom_optin_1 .et_bloom_form_container p span, .et_bloom .et_bloom_optin_1 .et_bloom_form_container p strong, .et_bloom .et_bloom_optin_1 .et_bloom_form_container form input, .et_bloom .et_bloom_optin_1 .et_bloom_form_container form button span { font-family: “Open Sans”, Helvetica, Arial, Lucida, sans-serif; } p.et_bloom_popup_input { padding-bottom: 0 !vital;}

Download For Unfastened
Join the Divi Newsletter and we will be able to e-mail you a reproduction of the ultimate Divi Landing Internet web page Construction Pack, plus a lot of other superb and free Divi property, tips and guidelines. Practice along and you’re going to be a Divi snatch in no time. If you’re already subscribed simply kind in your e-mail maintain underneath and click on on download to get admission to the structure pack.
You might have successfully subscribed. Please check out your e-mail maintain to make sure your subscription and get get admission to to free weekly Divi structure packs!
Check out Divi 5’s Interactions Nowadays
Mouse movement leads to Divi 5 open up a brand spanking new way so to upload depth and character on your layouts. With Interactions, you’ll make a decision exactly how parts answer, from a gentle scale on text to a layered tilt all over photos and columns.
With Divi 5’s Interactions, you decide how far to take it. Keep movements comfy for polish or push them further for emphasis. One of the best ways to go looking out the stableness is to test them out. Check out scaling text, layering photos with different sensitivities, or fading backgrounds in and out. You’ll see how even simple shifts can turn a static structure into something that feels dynamic and personal without writing a line of code.
The post How To Cause Results The usage of Mouse Actions In Divi 5 (Loose Obtain!) gave the impression first on Sublime Topics Weblog.
Contents
- 1 What Are Interactions In Divi 5
- 2
- 3 6 Mouse Purpose Effects You Can Generate With Divi 5
- 4 Download The Mouse Movement Layouts
- 5 Download For Unfastened
- 6 You might have successfully subscribed. Please check out your e-mail maintain to make sure your subscription and get get admission to to free weekly Divi structure packs!
- 7 Check out Divi 5’s Interactions Nowadays
- 8 How To Create Off-Canvas Popups In Divi 5
- 9 Warmth Maps: The whole thing Entrepreneurs Wish to Know
- 10 WP FixAll Vs. [Competing Plugin] Comparability / Protective Your Virginia…

0 Comments