
You don’t must control lots of the 800 million WordPress websites on the web previous than you seek for tactics to free up new internet sites effectively.
Cloning an present WordPress configuration is one strategy to get up and dealing briefly, and consumers of Kinsta’s Controlled WordPress Web hosting service know that’s merely completed inside of our user-friendly MyKinsta dashboard.
What’s further, you’ll be capable of clone WordPress internet sites at scale using your favorite application development technologies and the Kinsta API. In this tutorial, we’re using that API and React, probably the most usual JavaScript libraries, to show how that works.
What You’re Construction
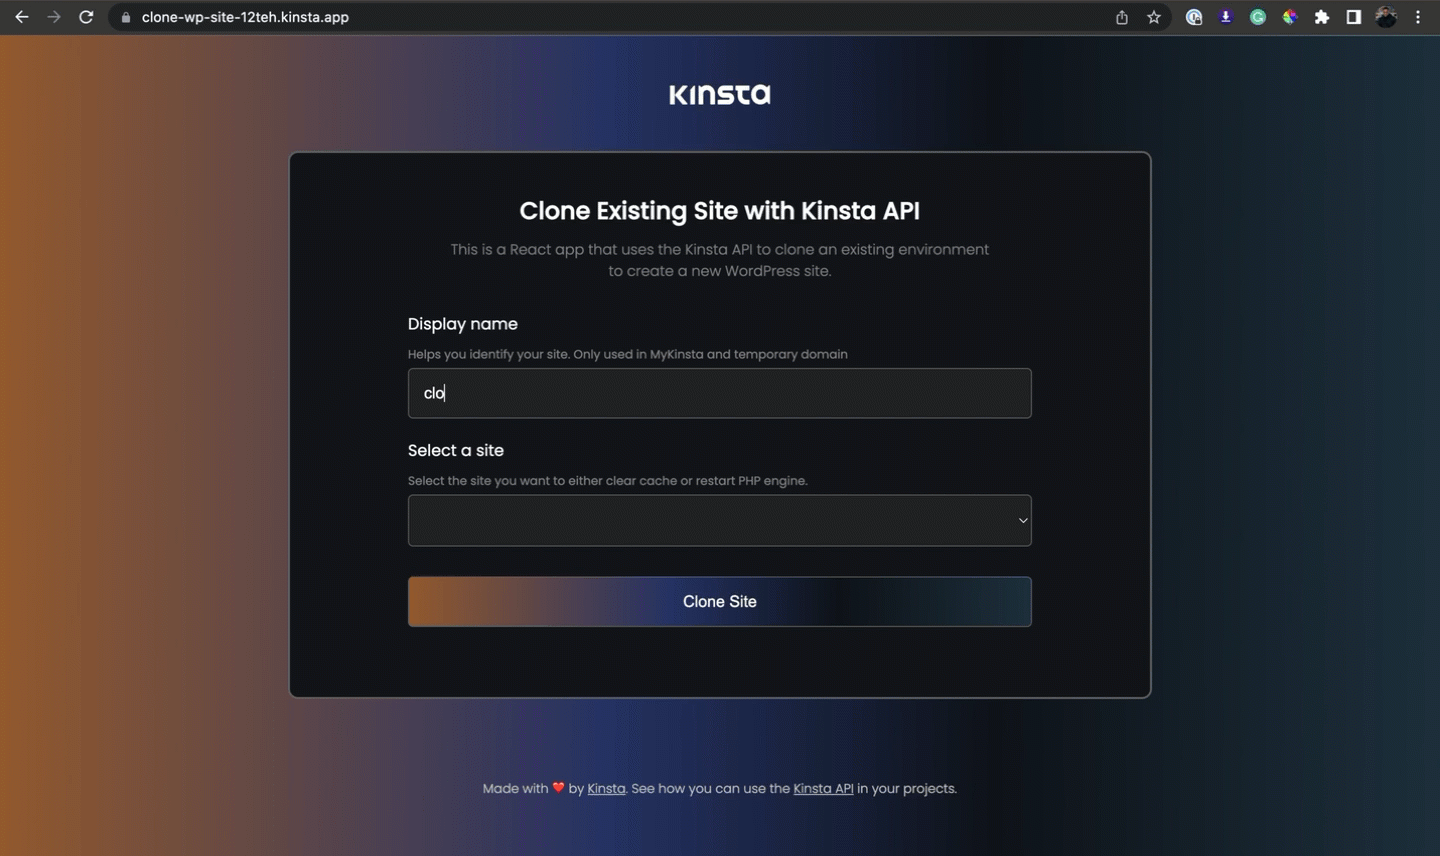
Proper right here’s the placement: You’re a WordPress development corporate with various internet sites that can be used as starter templates. The React application for cloning WordPress internet sites we’re building looks like this:
Must haves
To use this tutorial, you’ll desire a elementary understanding of HTML, CSS, and JavaScript and a couple of familiarity with React. Moreover, you’ll need Node.js and npm (the Node Package deal Supervisor) or yarn installed on your computer. The focal point of this endeavor is building a WordPress-cloning application using React and the Kinsta API fairly than the details of UI creation and styling.
Setting Up the Development Environment
You’ll be capable of create a React application from scratch and increase your individual interface, otherwise you’ll be capable of snatch the Git starter template mentioned above by way of following the ones steps:
- Visit this endeavor’s GitHub repository.
- Select Use this template > Create a brand spanking new repository to replicate the starter code proper right into a repository inside of your GitHub account. (Check the sphere to include all branches.)
- Pull the repository in your local computer and switch to the starter-files division using the command:
git checkout starter-files
- Arrange the very important dependencies by way of operating the command
npm arrange
As quickly because the arrange is complete, you’ll be capable of free up the endeavor on your local computer with npm run get began. This opens the endeavor at http://localhost:3000/.
Working out the Project Files
The src folder is the middle of a React application, as it comprises the JavaScript sought after by way of webpack. Throughout the folder is App.js, where the two routes for this endeavor are configured.
All through the src folder are the subfolder parts and pages. The weather folder comprises reusable parts, such for the reason that Header.jsx and Footer.jsx, used throughout the Area.jsx and Operations.jsx pages.
Your focal point that is enforcing the commonsense in Area.jsx and Operations.jsx, since styling and routing will also be found in our GitHub starter files.
Area.jsx has a type with two fields: the determine of the website online you’re rising and a select field that lists the WordPress internet sites came upon on your MyKinsta account (this checklist is fetched by means of the Kinsta API).
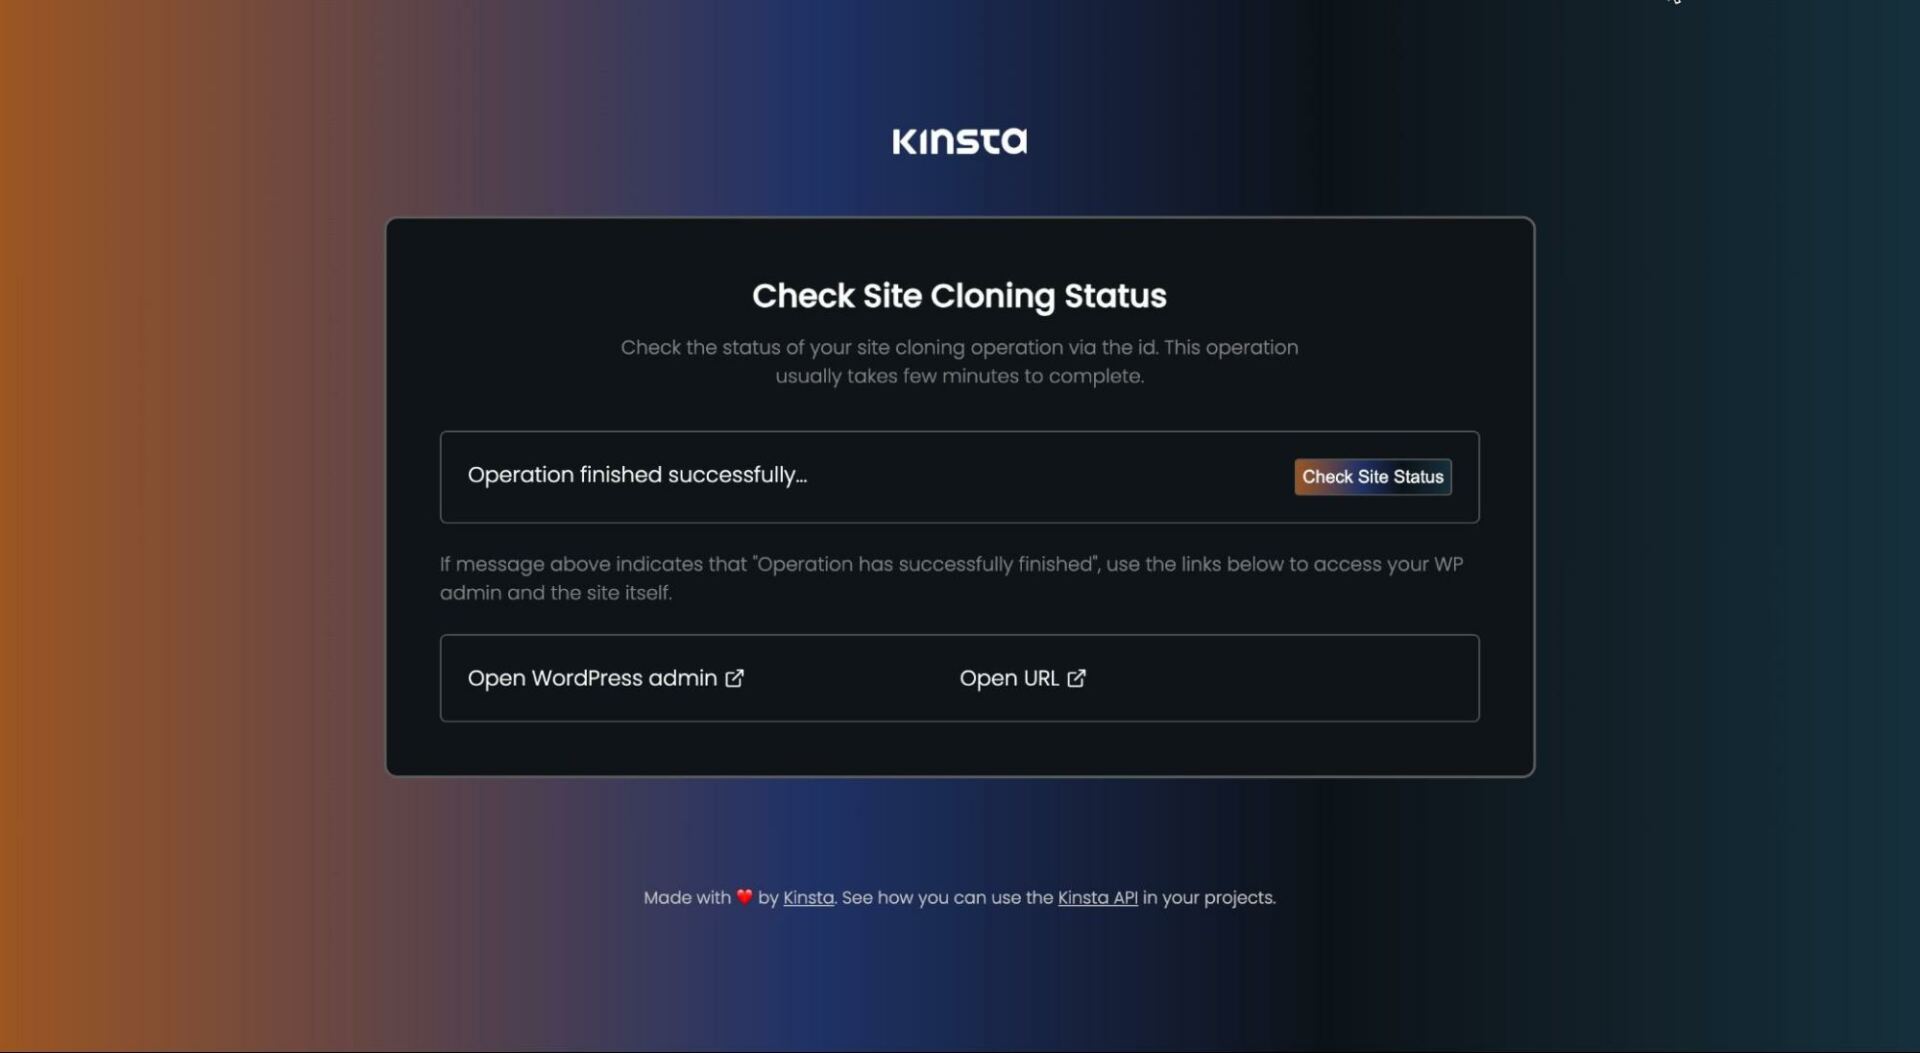
When the form’s submit button (Clone website online) is clicked, an object that comprises an operation_id property is returned. This ID and display determine will probably be passed as course parameters to Operations.jsx, where the status of the cloning operation is reported. The interface may also include links to get right of entry to the WordPress admin login and the website online’s area internet web page.
Using the Kinsta API to Clone a WordPress Site
Inside Area.jsx, 3 API requests will probably be made to the Kinsta API. The principle request is to get an inventory of internet sites on your Kinsta account. This will probably be stored in a state and then iterated to the select field. This request will probably be made right away after the internet web page renders using the useEffect hook.
The second and third requests are made as quickly because the Clone website online button is clicked. The second request gets the environment ID of the website online you want to clone. The third request uses that environment ID and the website online’s display determine to start out up cloning of the website online.
Interacting With the Kinsta API in React
In this tutorial, you might have interplay with two endpoints of the Kinsta API:
/websites: This will return an inventory of all internet sites, request a website online environment ID, and finally clone an present website online./operations: This is used to get the operation status. For example, when the website online cloning operation is in expansion, you’ll be capable of use this endpoint to programmatically practice the status of the operation to unravel when it’s finished.
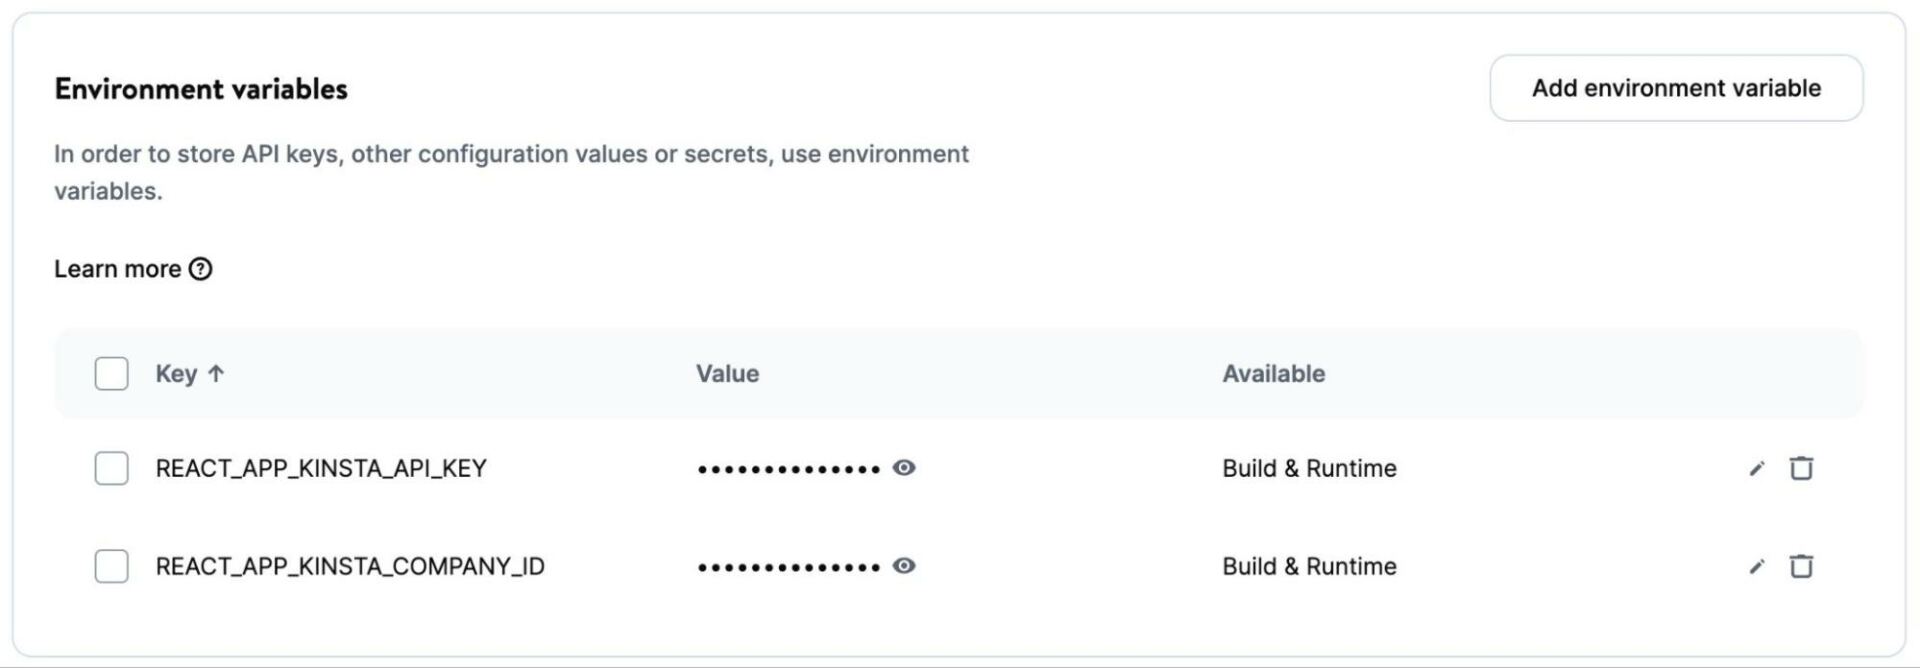
To have interaction with the Kinsta API, you wish to have your company ID (will also be found in MyKinsta beneath Company > Billing Details > Company ID) and an API key. Proper right here’s how you can create a Kinsta API key.
Once you have the ones credentials, it’s easiest to store them securely as environment variables on your React application. To prepare the environment variables, create a .env report throughout the root folder of your endeavor. Inside this report, add the following strains:
REACT_APP_KINSTA_COMPANY_ID = 'YOUR_COMPANY_ID'
REACT_APP_KINSTA_API_KEY = 'YOUR_API_KEY'
To get right of entry to the ones environment variables inside of your endeavor, you’ll be capable of use the syntax process.env.THE_VARIABLE. For example, to get right of entry to the REACT_APP_KINSTA_COMPANY_ID, you may be able to use process.env.REACT_APP_KINSTA_COMPANY_ID.
Clone an Present Site With Kinsta API
Let’s get began by way of fetching the checklist of all internet sites when Area.jsx renders using the useEffect Hook and storing them in a state. To reach this, import the useEffect and useState Hooks and create a state to store the array of internet sites that will probably be fetched:
import { useState, useEffect } from 'react';
const [sites, setSites] = useState([]);
Next, use the useEffect Hook to query the Kinsta API using the JavaScript Fetch API. First, create two constant variables to store the headers and the Kinsta API URL. This is completed to avoid repetition because you’ll send a few request to the Kinsta API on this internet web page:
const KinstaAPIUrl = 'https://api.kinsta.com/v2';
const headers = useMemo(() => {
    return {
        Authorization: `Bearer ${process.env.REACT_APP_KINSTA_API_KEY}`
    };
}, []);
Throughout the code above, the useMemo Hook memoizes the headers object so that it doesn’t need to be re-evaluated on every render since its worth is constant. Now you’ll be capable of create the API request:
useEffect(() => {
    const fetchAllSites = async () => {
        const query = new URLSearchParams({
            company: process.env.REACT_APP_KINSTA_COMPANY_ID,
        }).toString();
        const resp = sit up for fetch(
            `${KinstaAPIUrl}/internet sites?${query}`,
            {
                manner: 'GET',
                headers
            }
        );
        const data = sit up for resp.json();
        setSites(data.company.internet sites);
    };
    fetchAllSites();
}, [headers]);
Throughout the code above, an asynchronous function fetchAllSites is created. Inside this function, you first define the query parameter (your company ID) fetched from your .env report. Then, you’re making a GET request to the /internet sites endpoint of the Kinsta API using the query parameter. The response is then stored throughout the internet sites state you created earlier. Finally, you identify fetchAllSites to start out up the fetching process.
Let’s now incorporate the values stored throughout the internet sites state by way of looping via them to populate the select field. The display determine will probably be confirmed to the patron, while the website online ID will probably be used as the selection worth. This manner, when the form is submitted, the selected website online’s ID can be used to query for environment details:
Select the website online you want to each clear cache or restart PHP engine.
worth="">
{internet sites && (
internet sites.map((website online) => {
return (
key={website online.identity} worth={website online.identity}>{website online.display_name}
)
})
)}
Let’s proceed to care for the form submission and retrieve values from the form. To do this, you wish to have to create state variables for each input field:
const [selectedSiteId, setSelectedSiteId] = useState('');
const [displayName, setDisplayName] = useState('');
Next, bind the form fields to their respective state values by way of together with the worth and onChange attributes to each input element. That’s what the form will seem to be:
Helps you identify your website online. Perfect used in MyKinsta and transient space
setDisplayName(e.function.worth)} />
Select the website online you want to each clear cache or restart PHP engine.
setSelectedSiteId(e.function.worth)}>
{internet sites && (
internet sites.map((website online) => {
return (
{website online.display_name}
)
})
)}
Throughout the code above, each input element has the associated fee function set to the corresponding state variable, and the onChange function is used to interchange the state worth when the patron interacts with the input fields.
To care for the form submission, attach an onSubmit strategy to the form element. For example:
 onSubmit={handleSubmission}>
    {/* form details */}
Define the handleSubmission manner, which comes to creating two API requests to the Kinsta API. The principle request retrieves the environment ID of the website online to be cloned, and the second request performs the clone operation.
Let’s get started with retrieving the environment ID. Throughout the handleSubmission manner, create an asynchronous function to care for this request. The function will send a GET request to the /internet sites endpoint, appending the selected website online’s ID, followed by way of the /environments endpoint:
const handleSubmission = async (e) => {
    e.preventDefault();
    const fetchEnvironmentId = async (siteId) => {
        const resp = sit up for fetch(
            `${KinstaAPIUrl}/internet sites/${siteId}/environments`,
            {
                manner: 'GET',
                headers
            }
        );
        const data = sit up for resp.json();
        let envId = data.website online.environments[0].identity;
        return envId;
    }
    let environmentId = sit up for fetchEnvironmentId(selectedSiteId);
}
Above, fetchEnvironmentId is an asynchronous function that sends a GET request to the Kinsta API. It fetches the environments of the selected website online and extracts the environment ID from the response. The environment ID is stored throughout the envId variable and then returned. When calling the function, we assign its return worth to the envId variable.
At this degree, you’ll be capable of clone an present website online with the Kinsta API on account of you’ve gotten the a very powerful information about the availability website online: company ID, display determine, and environment ID.
All through the handleSubmission manner, create a function referred to as cloneExistingSite to care for this API request. This request will probably be to the /websites/clone endpoint. Against this to the previous requests, the headers for this request are different on account of you wish to have to specify the Content material material-Kind as application/json. Additionally, it is a POST request, so you wish to have to include a request body containing the payload you want to send to the API. Proper right here’s how the request will probably be structured:
const handleSubmission = async (e) => {
    e.preventDefault();

    // fetch environment Id

    const cloneExistingSite = async (env_Id) => {
        const resp = sit up for fetch(
            `${KinstaAPIUrl}/internet sites/clone`,
            {
                manner: 'POST',
                headers: {
                    'Content material material-Kind': 'application/json',
                    Authorization: `Bearer ${process.env.REACT_APP_KINSTA_API_KEY}`
                },
                body: JSON.stringify({
                    company: `${process.env.REACT_APP_KINSTA_COMPANY_ID}`,
                    display_name: displayName,
                    source_env_id: env_Id,
                })
            }
        );
        const data = sit up for resp.json();
        navigate(`/operations/${displayName}/${data.operation_id}`)
        console.log(data);
    }
    cloneExistingSite(environmentId);
}
In this code, the request body is constructed using JSON.stringify() to turn into the payload object proper right into a JSON string. The response is then stored throughout the data variable. Using the useNavigate manner from the react-router-dom library the displayName and operation_id is passed as course parameters. Be sure to import the useNaviagte manner and instantiate it:
// Import the required manner
import { useNavigate } from 'react-router-dom';

// Instantiate the useNavigate manner
const navigate = useNavigate();
Now, when you fill out the form and click on at the Clone website online button, a brand spanking new website online will get started the cloning process, which could be visible on your MyKinsta dashboard. Then again, we need to practice the website online cloning operation programmatically throughout the custom designed UI. You care for this in Operations.jsx using the information sent by means of the course.
Enforcing Operation Status Check With Kinsta API
In Operations.jsx, retrieve the operation ID from the course using the useParams manner from react-router-dom. This ID will probably be used to make an API request on each instance the Check Site Status button is clicked.
First, import the useParams manner and use it to instantiate the displayName and operationId variables:
// Import the useParams library
import { useParams } from 'react-router-dom';

// Instantiate the paramters
const { displayName, operationId } = useParams();
Next, create a state to store the operation status when the request is made:
const [operationData, setOperationData] = useState({ message: "Operation in expansion." });Throughout the code above, the state is initialized with a default message, which will probably be displayed until the Check Site Status button is clicked. Add an onClick fit to the Check Site Status button and call the checkOperation manner when the button is clicked:
Now, create the checkOperation function to make the operation request to the Kinsta API. Store the headers and KinstaAPIUrl constants in variables, and then use them throughout the API request:
const KinstaAPIUrl = 'https://api.kinsta.com/v2';
const headers = useMemo(() => {
    return {
        Authorization: `Bearer ${process.env.REACT_APP_KINSTA_API_KEY}`
    };
}, []);

const checkOperation = async () => {
    const resp = sit up for fetch(
        `${KinstaAPIUrl}/operations/${operationId}`,
        {
            manner: 'GET',
            headers
        }
    );
    const data = sit up for resp.json();
    setOperationData(data);
};
Throughout the code above, a GET request is sent to the /operations endpoint with the operation ID, and the response is stored throughout the operationData state. Now, you’ll be capable of use the information throughout the markup:
{operationData.message}..
Finally, the displayName data passed by means of the course will probably be used to construct the URL for the new website online and the WordPress admin URL. Every links will open in a brand spanking new tab.
With the ones changes, Operations.jsx will retrieve the operation ID from the course, make an API request when the button is clicked, display the operation status, and provide links to the WordPress admin and website online URL consistent with the displayName data.
Deploy Your Software To Kinsta
To deploy your application to Kinsta’s Utility Web hosting platform, you wish to have to push the endeavor in your most well-liked Git supplier. When your endeavor is hosted on each GitHub, GitLab, or Bitbucket, you’ll be capable of proceed to deploy to Kinsta.
To deploy your repository to Kinsta, observe the ones steps:
- Log in to or create your Kinsta account on the MyKinsta dashboard.
- On the left sidebar, click on on Programs and then click on on Add service.
- Select Software From the dropdown menu to deploy a React application to Kinsta.
- Throughout the modal that appears, select the repository you want to deploy. If you have a few branches, you’ll be capable of select the specified division and gives a name in your application.
- Select one of the vital available data middle puts from the checklist of 25 possible choices.
- Kinsta routinely detects the start command in your application.
Finally, it’s not secure to push out API keys to public hosts like your Git provider. When internet webhosting, you’ll be capable of add them as setting variables using the equivalent variable determine and worth specified throughout the .env report.
Every time you get started up the deployment of your application, it begins the process and in most cases completes inside of a few minutes. A a good fortune deployment generates a link in your application, like https://clone-wp-site-12teh.kinsta.app/.
Summary
The Kinsta API offers the flexibility to create custom designed client interfaces for managing WordPress internet sites, along side the ability to clone present internet sites and arrange relatively numerous aspects of your WordPress environment.
In this article, you’ve gotten discovered how you can increase an application that permits website online cloning outdoor of MyKinsta.
How are you using Kinsta API? What choices and endpoints do you wish to have to seem added to the API? Percentage them throughout the commentary segment!
The submit How To Clone a WordPress Website The use of the Kinsta API and React seemed first on Kinsta®.
Contents
- 1 What You’re Construction
- 2 Setting Up the Development Environment
- 3 Using the Kinsta API to Clone a WordPress Site
- 4 Deploy Your Software To Kinsta
- 5 Summary
- 6 6 Commercial Advertising Methods to Make Your Trade A success
- 7 Most sensible 4 Spoof Location on iPhone
- 8 The usage of Video for Branding: 5 Best Emblem Examples

0 Comments