

Few plugins upload as many options to WordPress as WooCommerce does. With one device, you’ll take this Content material Control Device (CMS) and upload all of the capability you want to set up an online store. Alternatively, that’s simplest conceivable if you know the way to configure WooCommerce settings successfully.
On this article, we’ll stroll you via all the settings WooCommerce gives, and discuss find out how to configure them.
Let’s get proper to it!
WooCommerce Common Settings
Whenever you install and activate WooCommerce, you’ll navigate to WooCommerce > Settings. You’ll land at the plugin’s Common settings display screen:
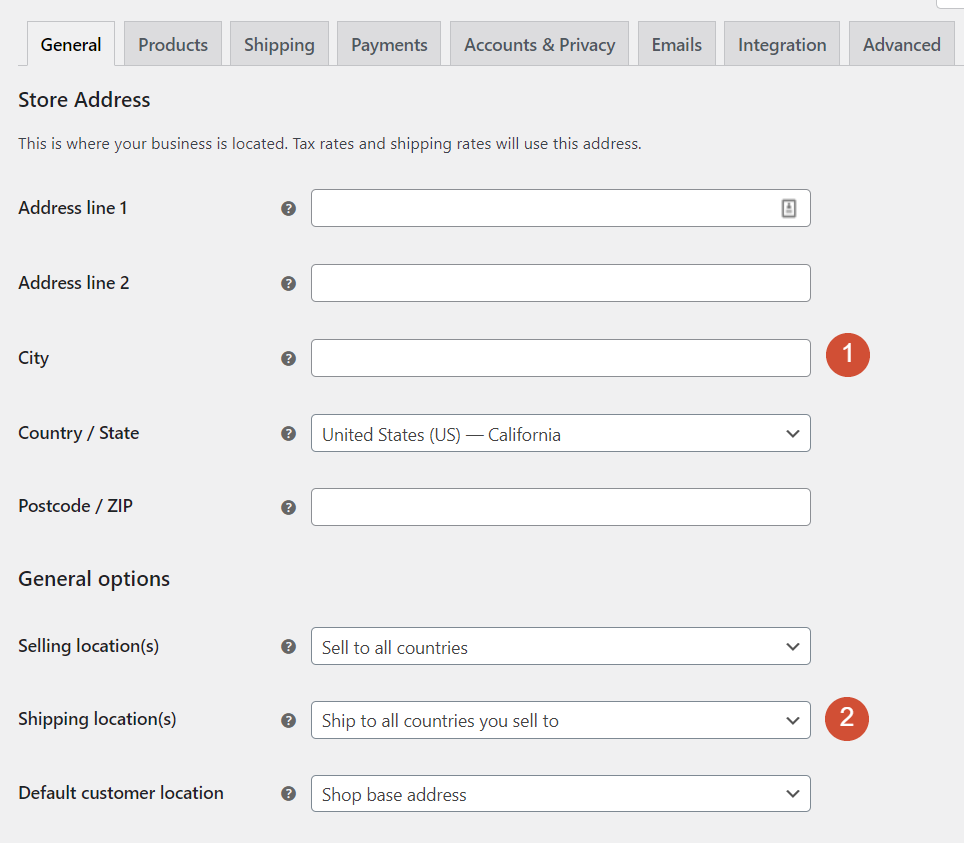
The primary settings you want to configure contain your retailer’s location. If you wish to send merchandise or be offering receipts, you’ll wish to come with your retailer’s bodily deal with. That suggests the town and nation the place it’s positioned, a complete deal with, and a ZIP code.
Afterwards, you’ll wish to make a decision which international locations your retailer will promote to. When you’re delivery bodily merchandise, you want to specify the place you’ll send to. That means, consumers out of doors of your retailer’s “vary” gained’t have the ability to make purchases.
In spite of everything, Default buyer location tells WooCommerce what location to make use of because the default for brand spanking new customers. This may also be your retailer’s location, or you’ll allow geolocation for extra correct effects.
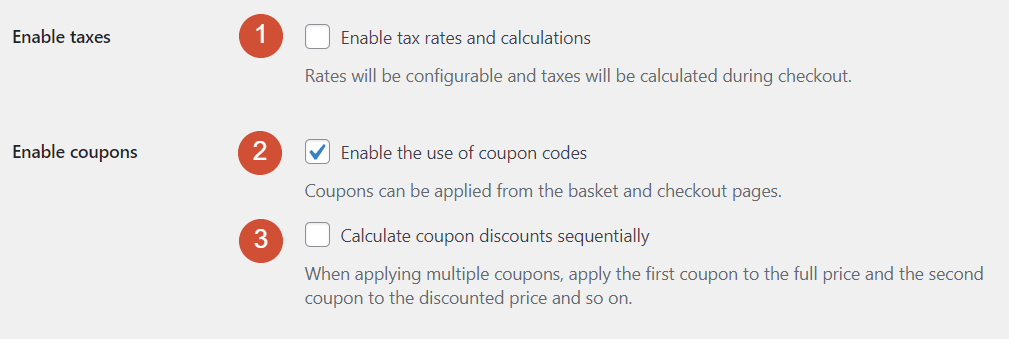
The following segment within the Common settings display screen offers with taxes and coupons. WooCommerce doesn’t calculate gross sales taxes via default. Alternatively, you’ll select to allow that possibility if you need the plugin to calculate taxes during checkout (you get to configure the charges).
WooCommerce additionally contains a full-featured coupon system that allows you to create bargain codes that you’ll percentage with consumers. The coupon gadget is grew to become on via default, and you’ll additionally allow customers so as to add a couple of codes for a unmarried acquire. You’ll be able to even set discounted charges when consumers practice a couple of coupons:
The final segment allows you to make a choice the default foreign money to your retailer and alter the location for that foreign money’s signal (proper or left):
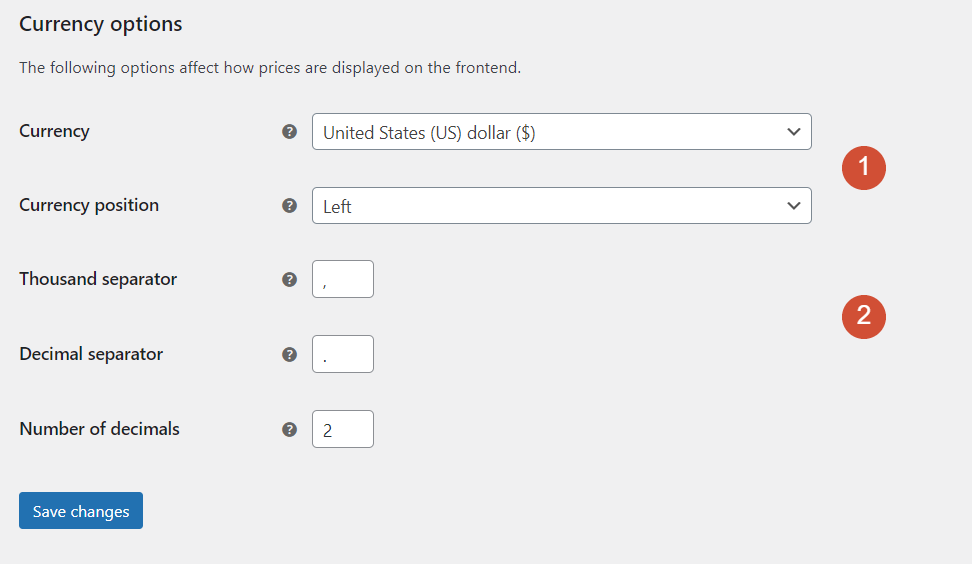
Remaining however now not least, you’ll additionally regulate the separator characters that WooCommerce makes use of for costs. Alternatively, the default choices will have to paintings for many customers.
WooCommerce Product Settings
WooCommerce’s Product settings web page contains 3 sub-sections. Let’s get started with the Merchandise > Common settings.
Common Product Settings
We’ll start via having a look at all of the choices this settings web page contains:
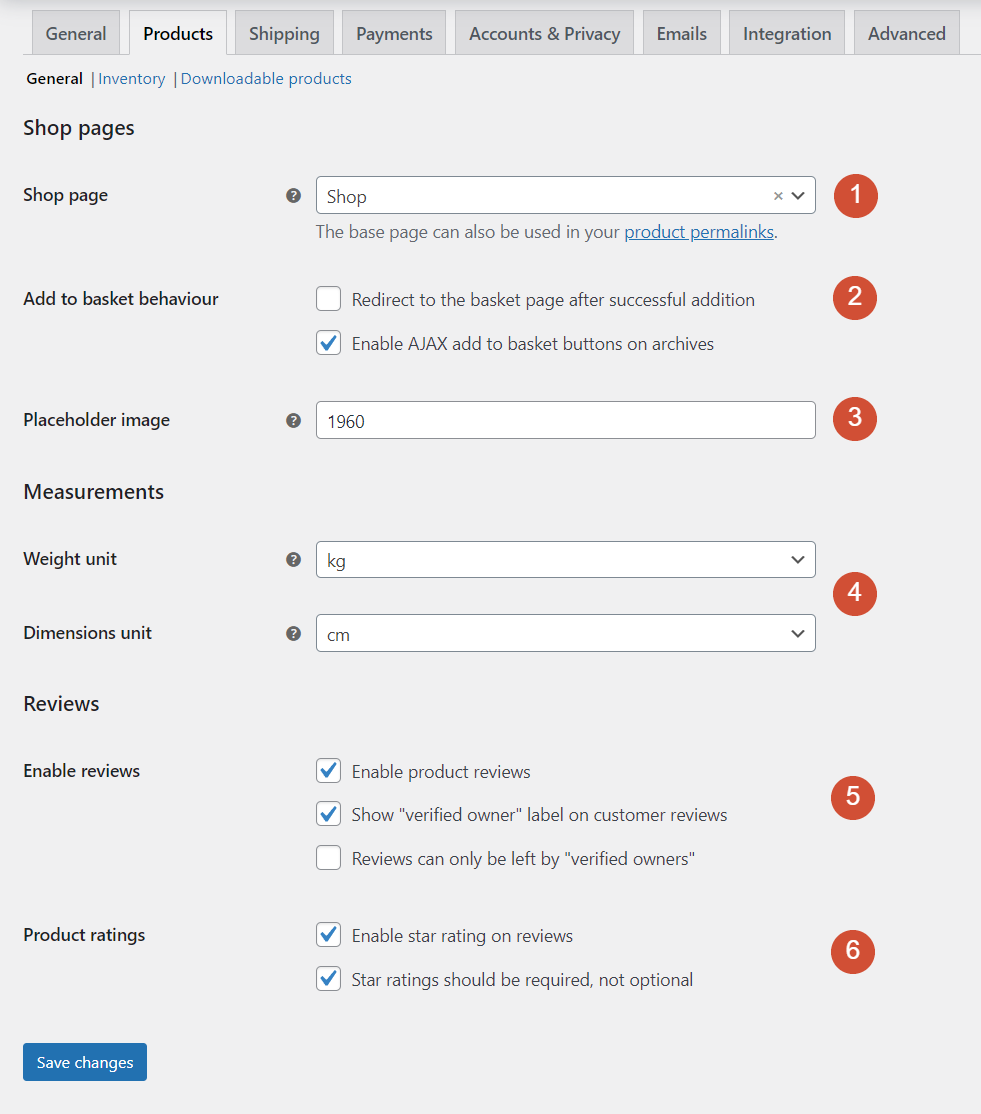
Right here’s what each and every surroundings can do:
- Store web page. This menu allows you to make a choice which web page WooCommerce will use for the primary store. Via default, the plugin will create a brand new Store web page to your website online.
- Upload to basket habits. This surroundings determines what occurs when a buyer provides a product to their cart. You’ll be able to redirect them immediately to their cart, or use an AJAX button that permits them to stay buying groceries.
- Placeholder symbol. This feature permits you to set a picture as a placeholder for merchandise that don’t have screenshots or photos.
- Weight and dimensions unit. With this selection, you’ll configure the dimension devices your retailer will use for weight and dimensions.
- Allow evaluations. You’ll be able to allow product evaluations, display which evaluations are from consumers who in truth made a purchase order, and make a decision whether or not simplest the ones consumers will have to have the ability to depart evaluations.
- Product rankings. You’ll be able to use this surroundings so as to add a celeb ranking gadget (from one to 5) to each and every product. There’s additionally an possibility for making product rankings required when consumers depart evaluations.
We advise that you just use the AJAX possibility when consumers upload merchandise to their carts. That means, you’ll inspire customers to stay including merchandise as an alternative of leaping immediately to the checkout web page.
Product Stock Settings
The Merchandise > Stock settings display screen is helping you arrange inventory to your retailer:
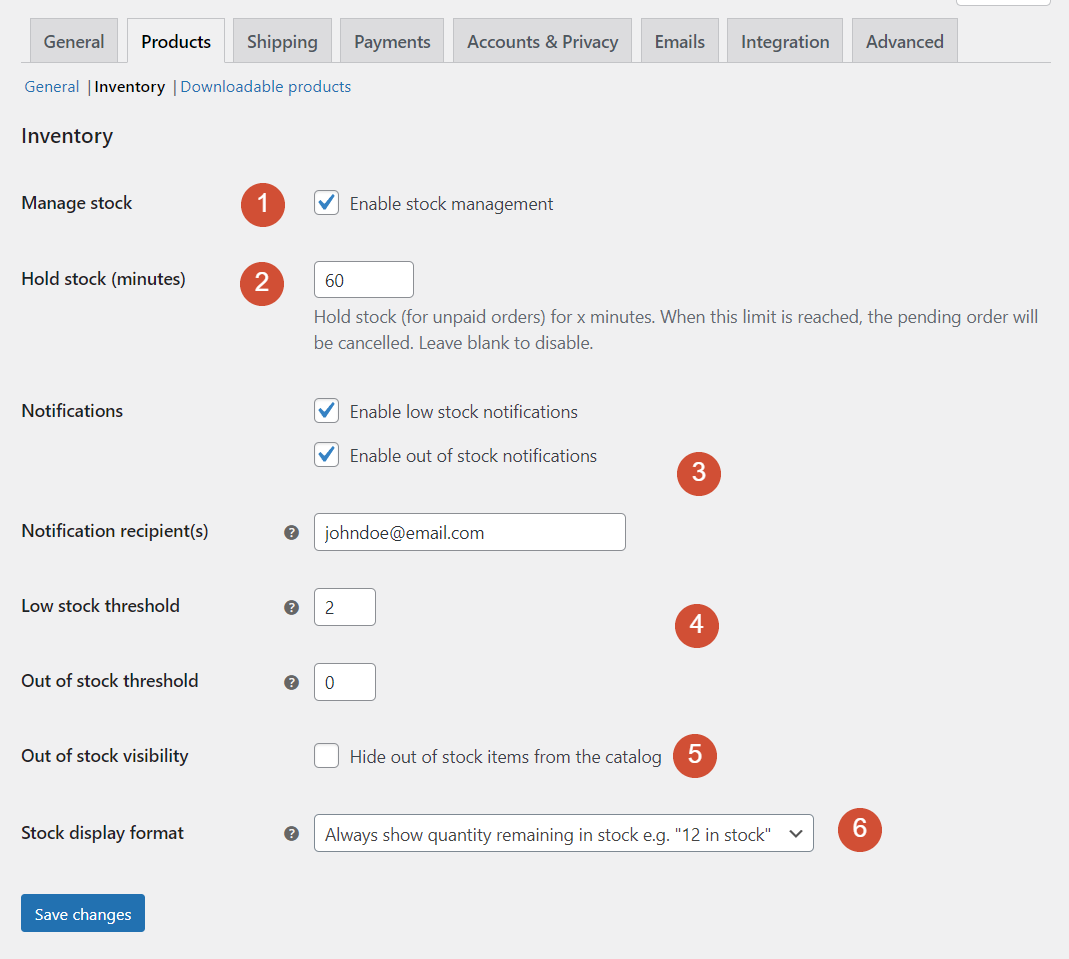
Let’s check out what each and every surroundings does:
- Set up inventory. Turning off this selection disables all stock-related settings. You will have to simplest disable this for those who deal solely with virtual merchandise.
- Cling inventory (mins). As soon as a buyer provides a product to their cart, this surroundings comes to a decision how lengthy the shop “holds” it for, in case any person else desires it.
- Notifications and notification recipients. Those settings configure when WooCommerce sends notifications and to which electronic mail deal with(es).
- Low inventory threshold settings. You’ll be able to make a decision what number of devices represent “low” inventory to your retailer, so that you get a notification in regards to the scenario. The Out of inventory threshold surroundings will have to all the time stay at 0.
- Out of inventory visibility. This surroundings allows you to make a decision whether or not to turn merchandise in the event that they’re out of inventory.
- Inventory show layout. You’ll be able to configure WooCommerce to turn exactly what number of merchandise you’ve gotten in inventory, to simply display low inventory notices, or not to display inventory amounts in any respect.
We advise that you just configure WooCommerce to carry inventory for patrons for an affordable period of time, reminiscent of one or two hours. Out of doors of that window, they’re unlikely to finish the purchase, so it’s easiest to disencumber the inventory for different consumers.
Whether or not to show inventory amounts is as much as you. Alternatively, maximum retail outlets don’t show actual inventory numbers, and go for low-stock warnings as an alternative. In lots of instances, appearing consumers that you’ve low inventory final would possibly recommended them to complete their purchases straight away.
Downloadable Merchandise Settings
The WooCommerce Merchandise > Downloadable merchandise settings display screen governs the configuration for virtual pieces. When you simplest promote bodily items, you’ll skip this web page:
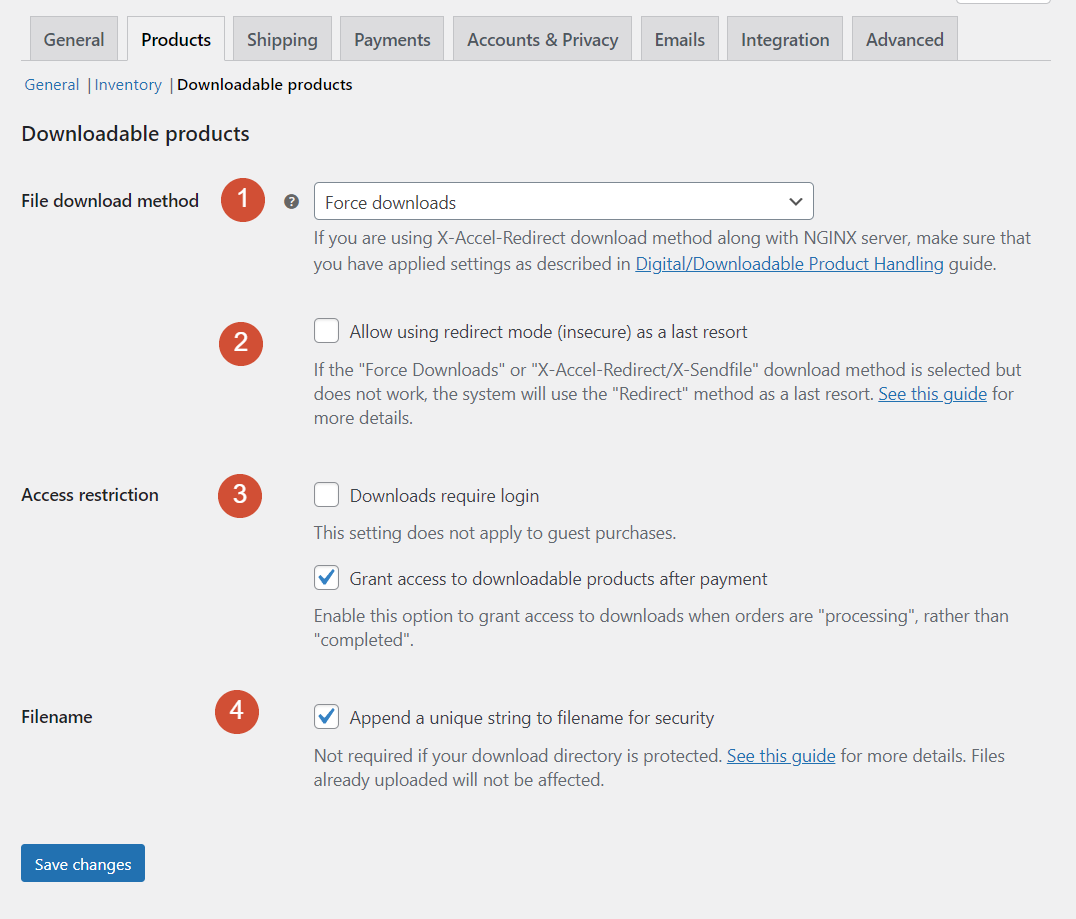
Let’s ruin down what each and every surroundings does and find out how to configure it:
- Record obtain means. Via default, WooCommerce “forces” downloads. Downloads will get started routinely, and the site will disguise the information’ URLs. You’ll be able to additionally decide to make use of two kinds of redirects in case direct downloads don’t paintings.
- Permit the use of redirect mode. This surroundings permits you to allow redirect downloads if the “drive” means fails.
- Get entry to restriction. You’ll be able to make a decision whether or not visitor guests can obtain information or must sign in prior to gaining get right of entry to. Via default, WooCommerce will grant get right of entry to to downloads after fee whilst the order remains to be “processing”.
- Filename. This surroundings allows WooCommerce so as to add distinctive strings to each and every filename for safety functions.
Generally, we advise the use of the default Pressure downloads means with the redirect backup possibility enabled. Moreover, chances are you’ll wish to allow visitors to make purchases and obtain information. Alternatively, prompting customers to sign in as an alternative will help you save their knowledge for advertising functions.
WooCommerce Transport Settings
WooCommerce contains 3 other delivery configuration pages to your retailer. Let’s get started via speaking about delivery “zones”.
Transport Zones
When configuring WooCommerce settings, you’ll upload a number of delivery zones. Those are the spaces the place you offer shipping. You’ll be able to configure distinctive delivery charges and techniques for each and every zone:
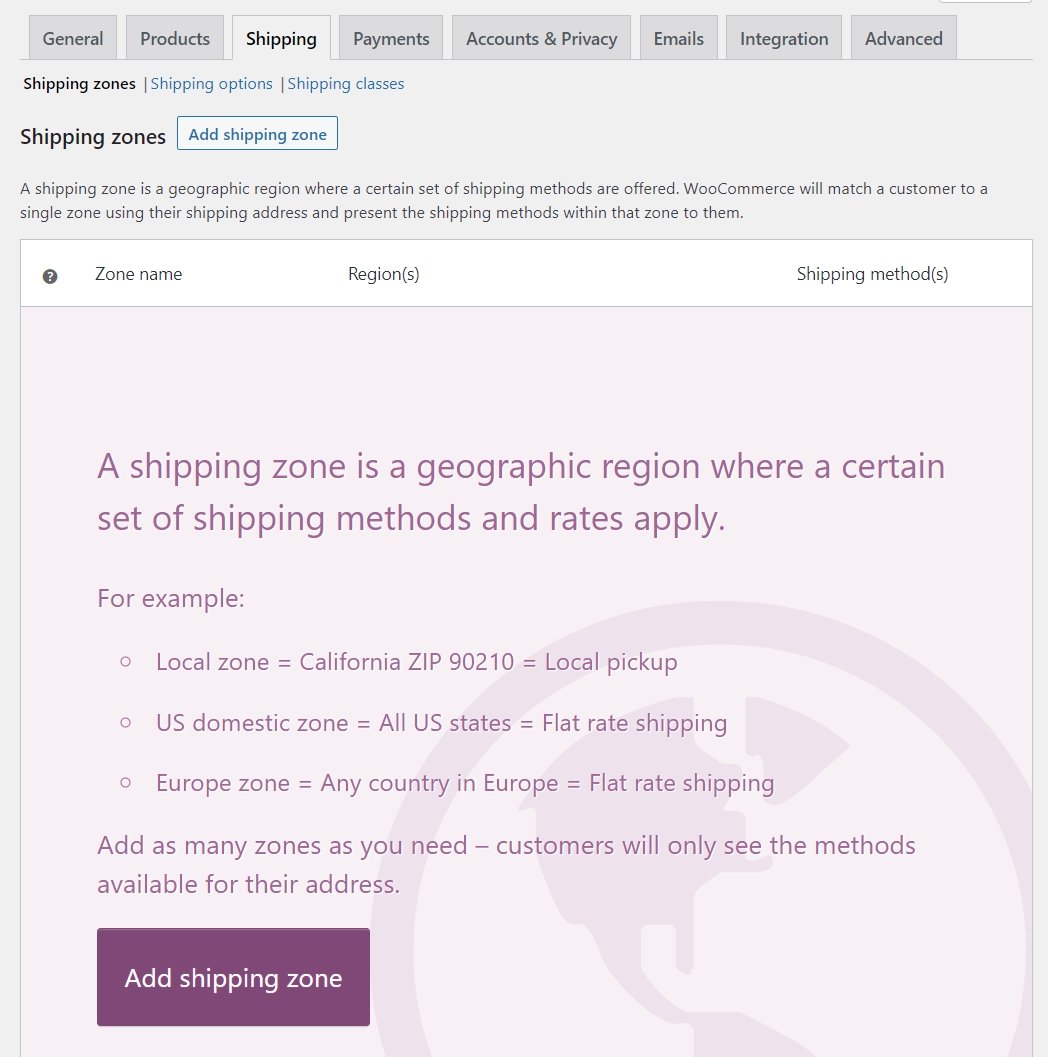
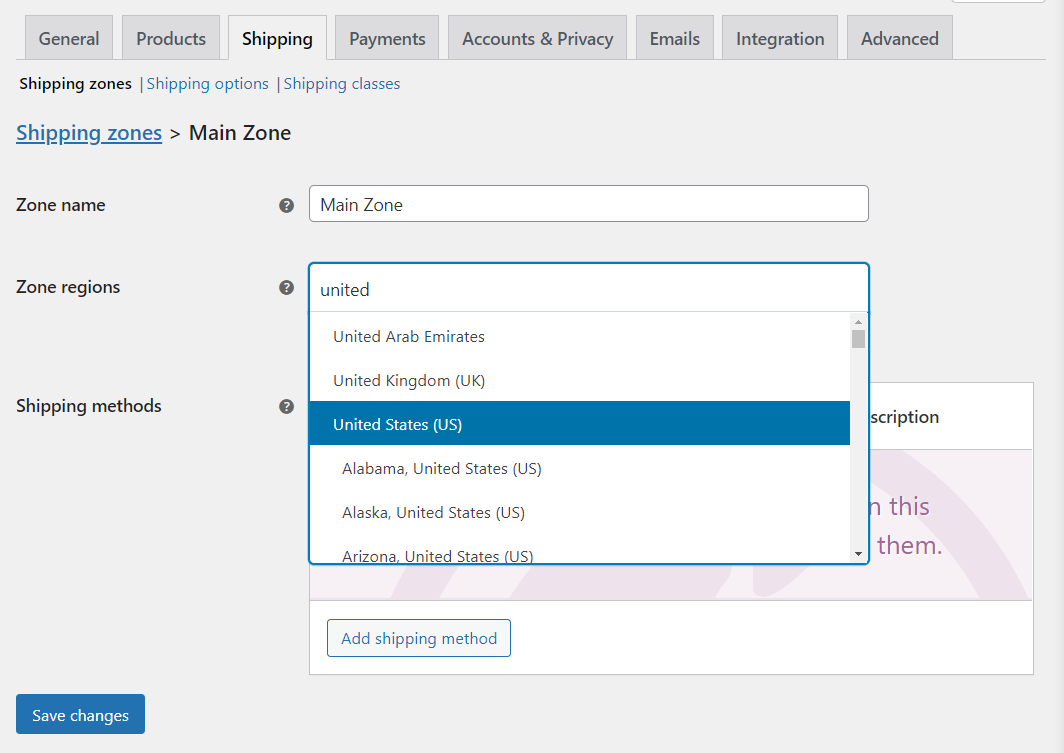
If you choose the choice so as to add a delivery zone, WooCommerce will ask you to set a reputation for it. You’ll be able to additionally select what areas the zone will come with:
You’ll be able to upload as many areas as you need inside a unmarried zone. It frequently is sensible to crew areas in shut proximity.
Whenever you configure the zone areas, click on on Upload delivery means. There you’ll make a choice from flat fee and loose delivery, or native pickups:
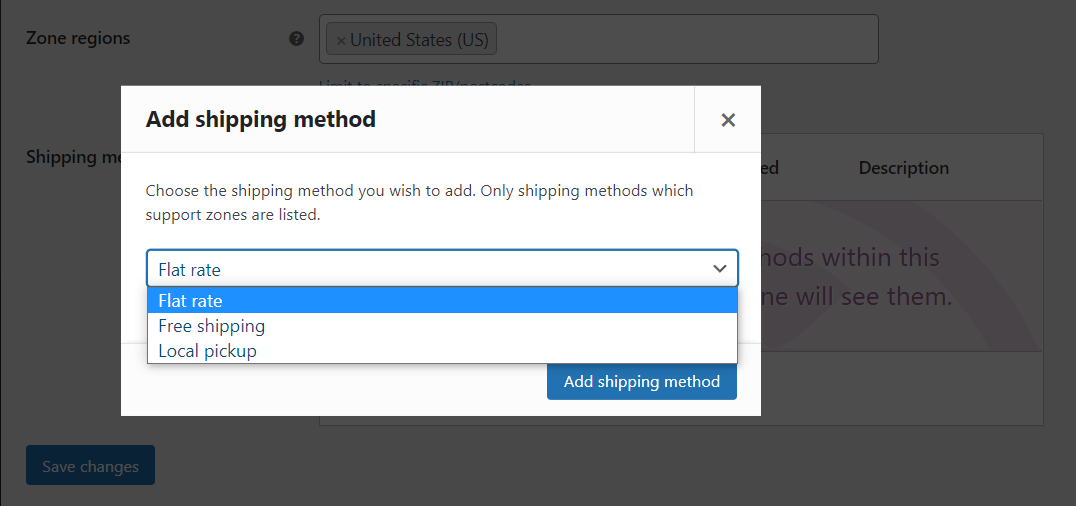
A particular zone will have multiple delivery means to be had, and you’ll configure the settings for each and every one after the other. For instance, listed here are the choices for the Flat fee delivery means:
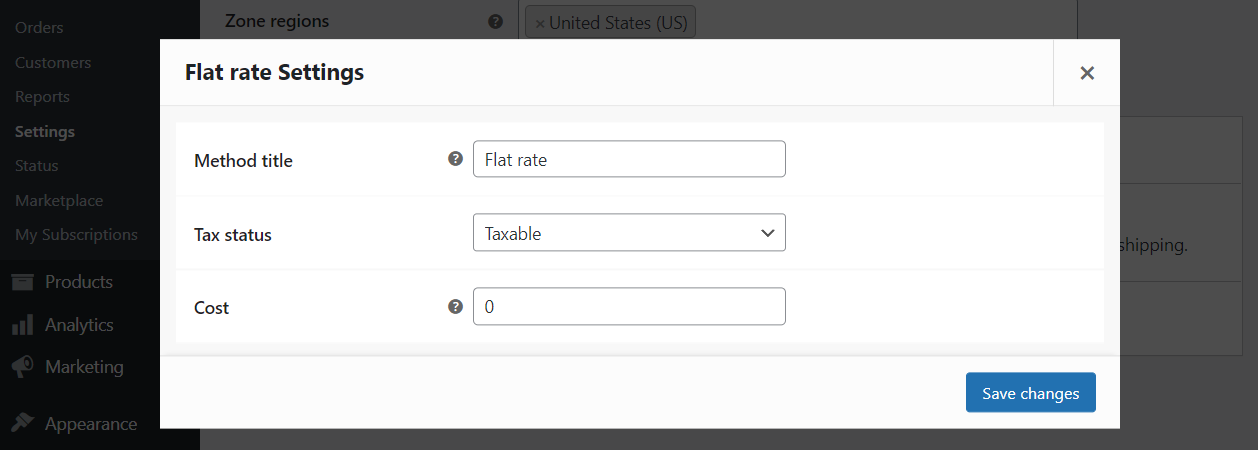
WooCommerce allows you to regulate the title of the delivery means and resolve whether or not it’s taxable. For flat fee delivery, you’ll set a particular value that can practice to each and every acquire.
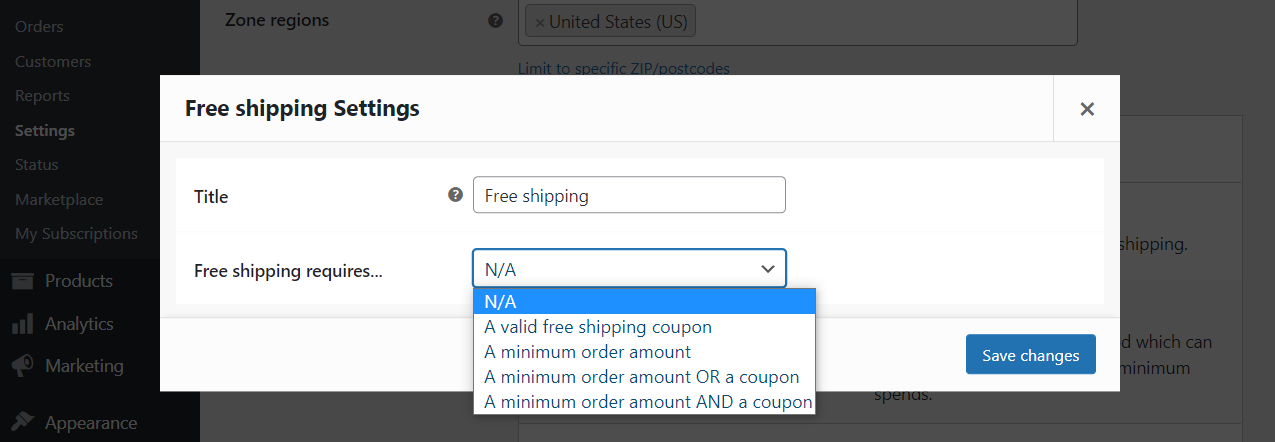
Different delivery strategies, such because the loose or native pickup choices, don’t require you to arrange any prices. As a substitute, you simply wish to resolve when each and every possibility will turn into to be had:
Whenever you configure the zones you need to paintings with, it’s time to speak about the extra common delivery choices.
Transport Choices
Managing shipments comes to extra than simply deciding to which zones you’ll ship merchandise to. You additionally must believe find out how to display consumers delivery prices, and which addresses WooCommerce will have to default to for brand spanking new orders. The ones are the settings that the Transport > Transport choices tab covers:
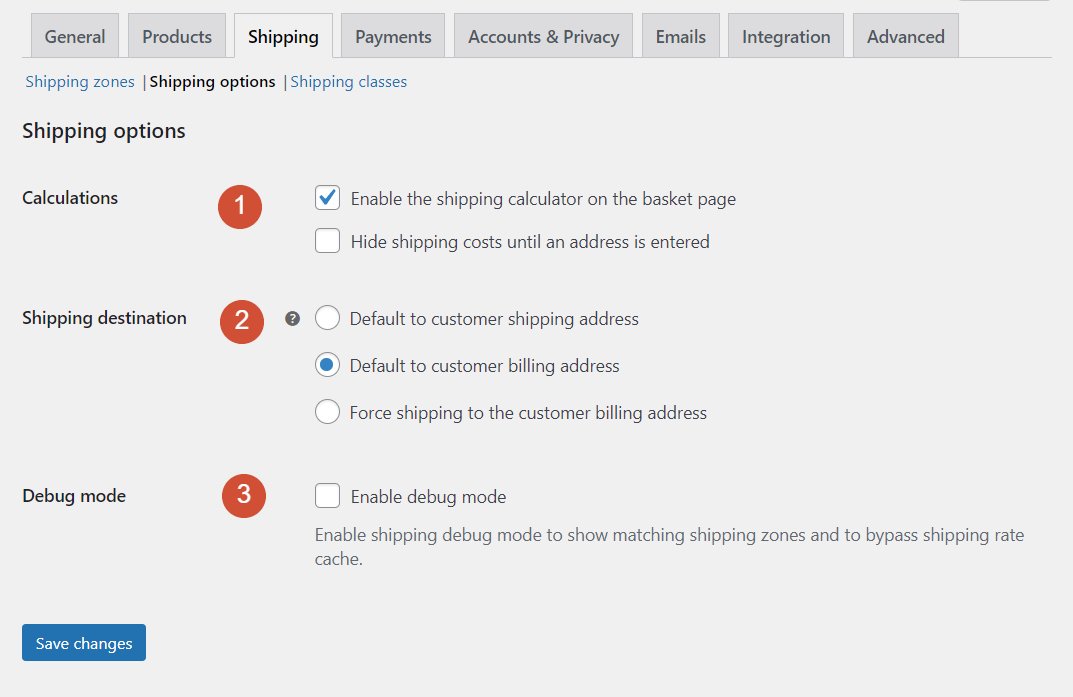
Let’s stroll via what each and every of the ones settings does:
- Calculations. When you allow this selection, consumers will see delivery prices once they get right of entry to their buying groceries carts
- Transport vacation spot. This surroundings allows you to make a decision whether or not the plugin will have to default to the delivery or billing deal with that registered consumers have entered prior to now.
- Debug mode. Enabling debug mode will save you WooCommerce from caching delivery zone knowledge. That suggests the plugin will calculate delivery prices each time consumers load their buying groceries carts.
Enabling a delivery prices calculator can beef up the person revel in. When you don’t display delivery prices till the client reaches the fee level, they could cringe on the ultimate fee and make a decision to cancel their acquire.
In a similar way, defaulting delivery locations to the client’s billing deal with let you save you fraud to your retailer. If any person makes an attempt to make use of a bank card that’s now not theirs and enters a special delivery deal with, that surroundings will drive them to make use of the cardboard’s billing deal with as an alternative (thus fighting the acquisition).
Transport Categories
WooCommerce allows you to arrange delivery “categories” for grouping an identical merchandise, so they’re delivered the use of particular strategies. For instance, you’ll have merchandise which can be simplest to be had for native pickup or for flat-rate delivery:
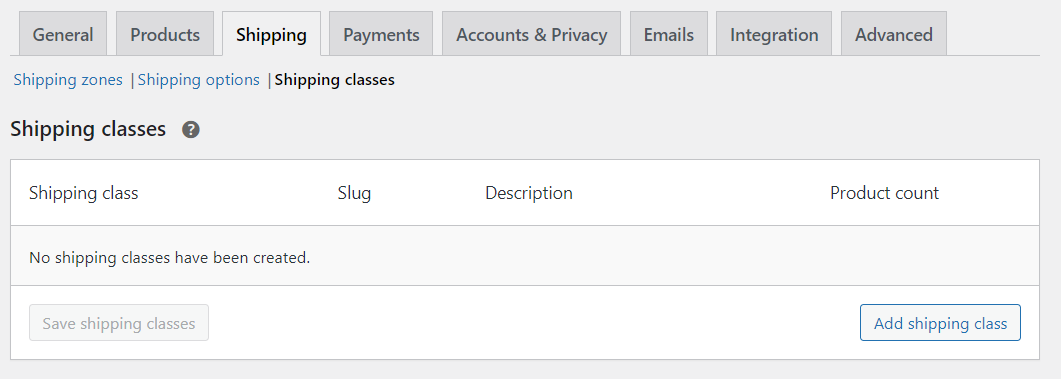
To create a delivery zone, click on on Upload delivery elegance. WooCommerce will ask you to set a reputation, slug, and outline:
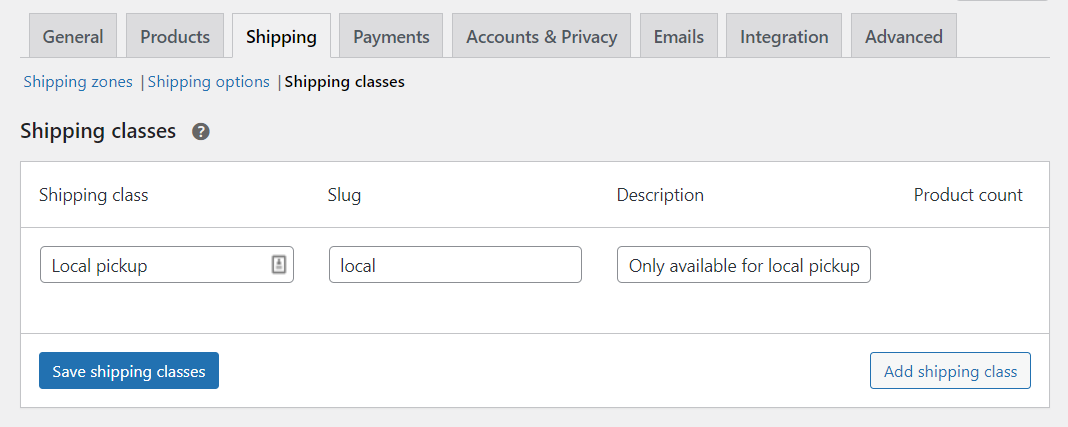
Click on on Save delivery elegance, and that’s it. While you create or edit a product in WooCommerce, any delivery categories you create will seem underneath that product’s Transport settings.
WooCommerce Bills Settings
The WooCommerce Bills tab allows you to configure which fee choices are to be had to your retailer. Via default, WooCommerce gives a couple of choices, together with PayPal, money on supply, and financial institution transfers.
You’ll be able to select and select which payment gateways to permit the use of the Allow column, and edit their settings via clicking on Arrange subsequent to each and every one:
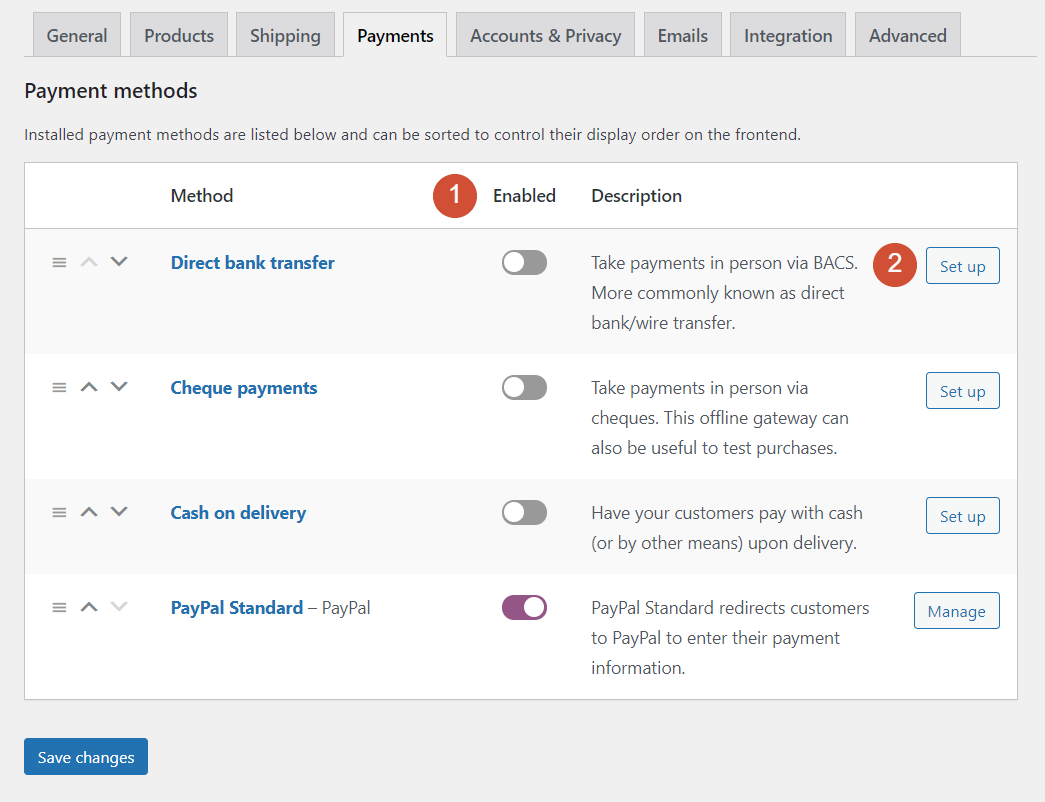
If a fee processor is already enabled, the Arrange button will as an alternative learn Set up. Every fee possibility comes with its personal distinctive settings. To learn extra about each and every of them, we advise trying out WooCommerce’s documentation for its core payment options. You’ll be able to additionally add more payment gateways to WooCommerce the use of extensions.
WooCommerce Accounts & Privateness Settings
The Accounts & Privateness settings let you make a decision whether or not customers can create Buyer accounts, what keep an eye on they have got over their knowledge, and whether or not to allow visitor checkout:

Let’s pass over the primary set of choices in this web page:
- Visitor checkout. Right here you’ll allow consumers to pay with out registering, and to log into their accounts throughout the checkout procedure.
- Account introduction. You’ll be able to allow customers to create an account throughout the checkout procedure or from the My Account web page (which WooCommerce units up for you). WooCommerce additionally allows you to routinely generate usernames and passwords for brand spanking new accounts.
- Account erasure requests. To stay in line with privacy laws, we advise enabling customers to erase their knowledge out of your database upon request.
- Non-public knowledge elimination. With this selection, customers will have the ability to take away their previous order knowledge with out your enter.
Generally, it’s easiest to let customers select their very own usernames and passwords. This means gives a extra user-friendly revel in.
The second one part of the WooCommerce Accounts & Privateness settings help you arrange registration and privacy policies to your site:
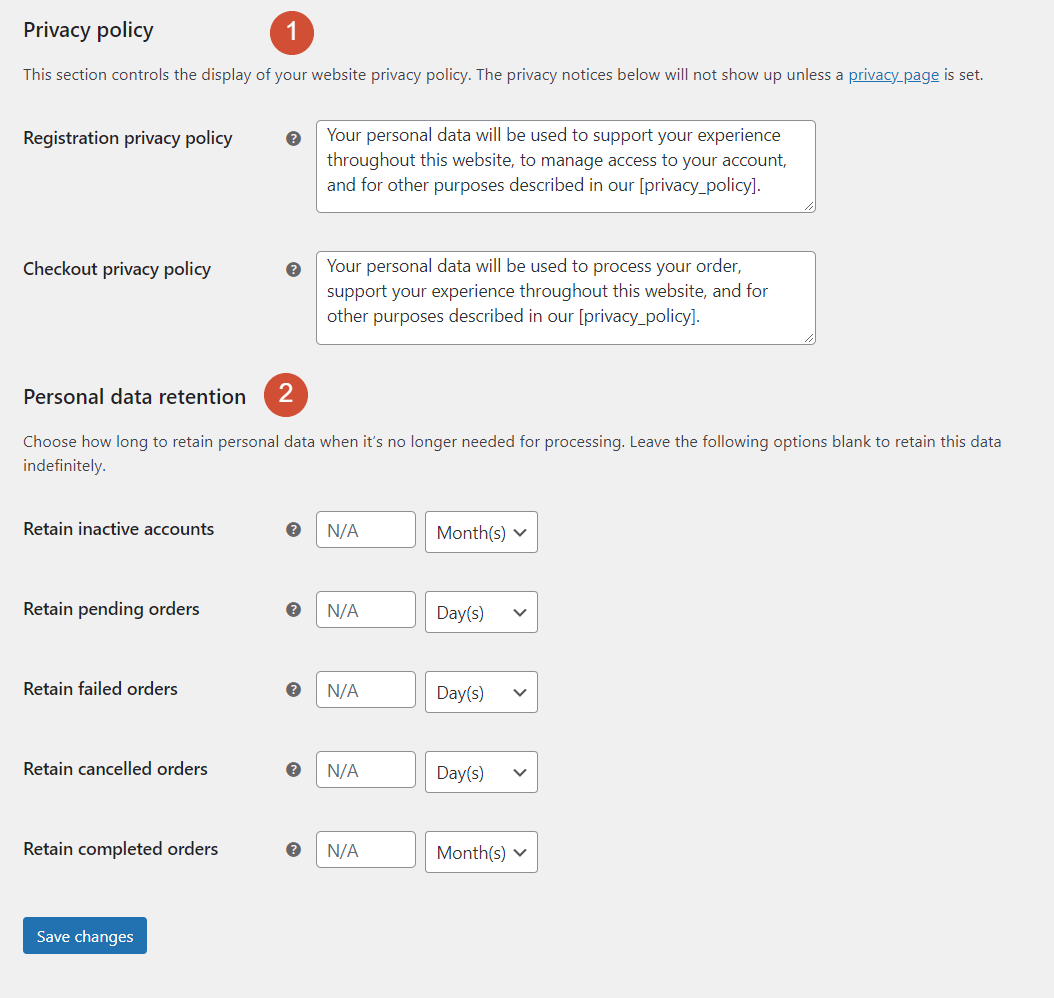
You’ll be able to additionally resolve how lengthy your site will retailer person knowledge for prior to deleting it from the database.
WooCommerce Emails Settings
WooCommerce routinely units up over a dozen other automatic emails that it sends when customers sign in, make a purchase order, refund an order, and so forth. Right here’s a handy guide a rough have a look at the WooCommerce Emails settings display screen:
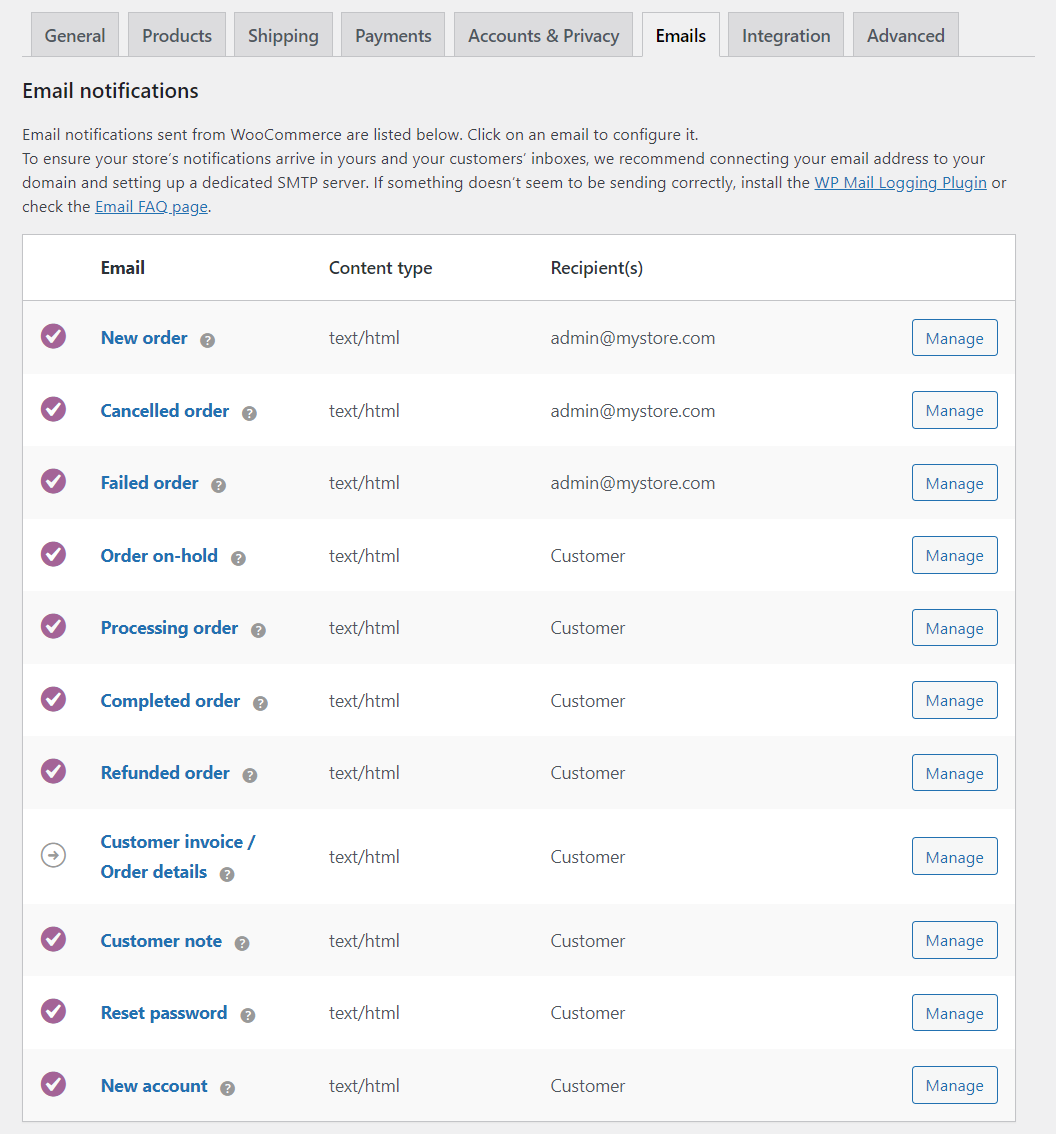
When you click on at the Set up possibility subsequent to any electronic mail, you’ll have the ability to edit the message customers will obtain. That comes with its matter, content material, and layout:

WooCommerce allows you to use a number of placeholders when customizing emails. The ones come with:
- {site_title}
- {site_address}
- {site_url}
- {order_date}
- {order_number}
Whenever you’re proud of the contents of each and every electronic mail, click on on Save adjustments.
This display screen additionally allows you to configure the “sender” for campaigns and regulate your electronic mail types:
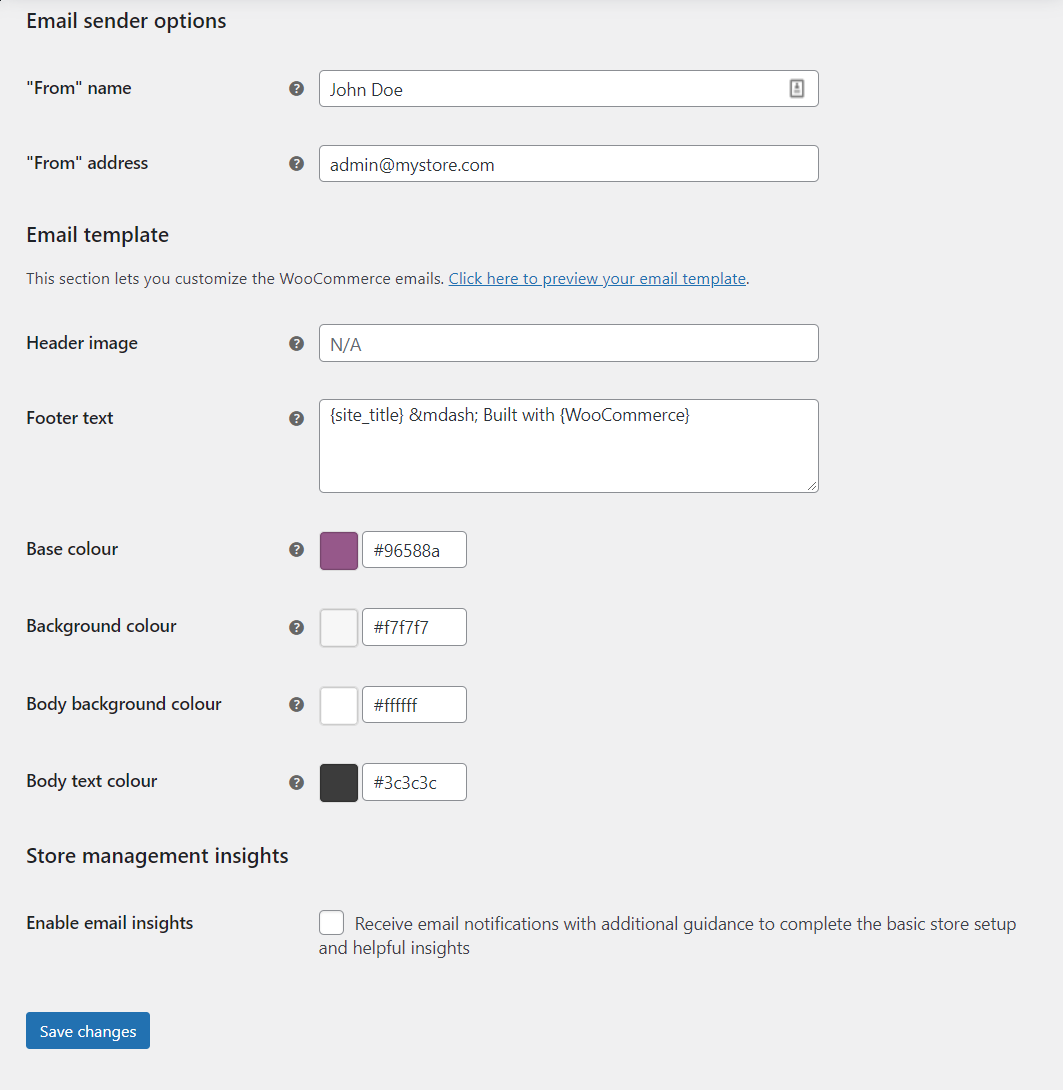
Customizing electronic mail types is modest. WooCommerce allows you to set a header symbol, regulate the footer textual content integrated with each and every message, and alter the default colours. You’ll be able to additionally flip at the Allow electronic mail insights approach to obtain “instructional” emails from WooCommerce, in case you need further steering.
WooCommerce Complex Settings
The Complex settings display screen features a vast vary of extra configuration choices. This display screen contains six sub-sections, so let’s get started with the Web page setup choices.
Web page Setup
The Web page setup display screen allows you to set the positioning for important pages in WooCommerce, such because the checkout and My account pages:
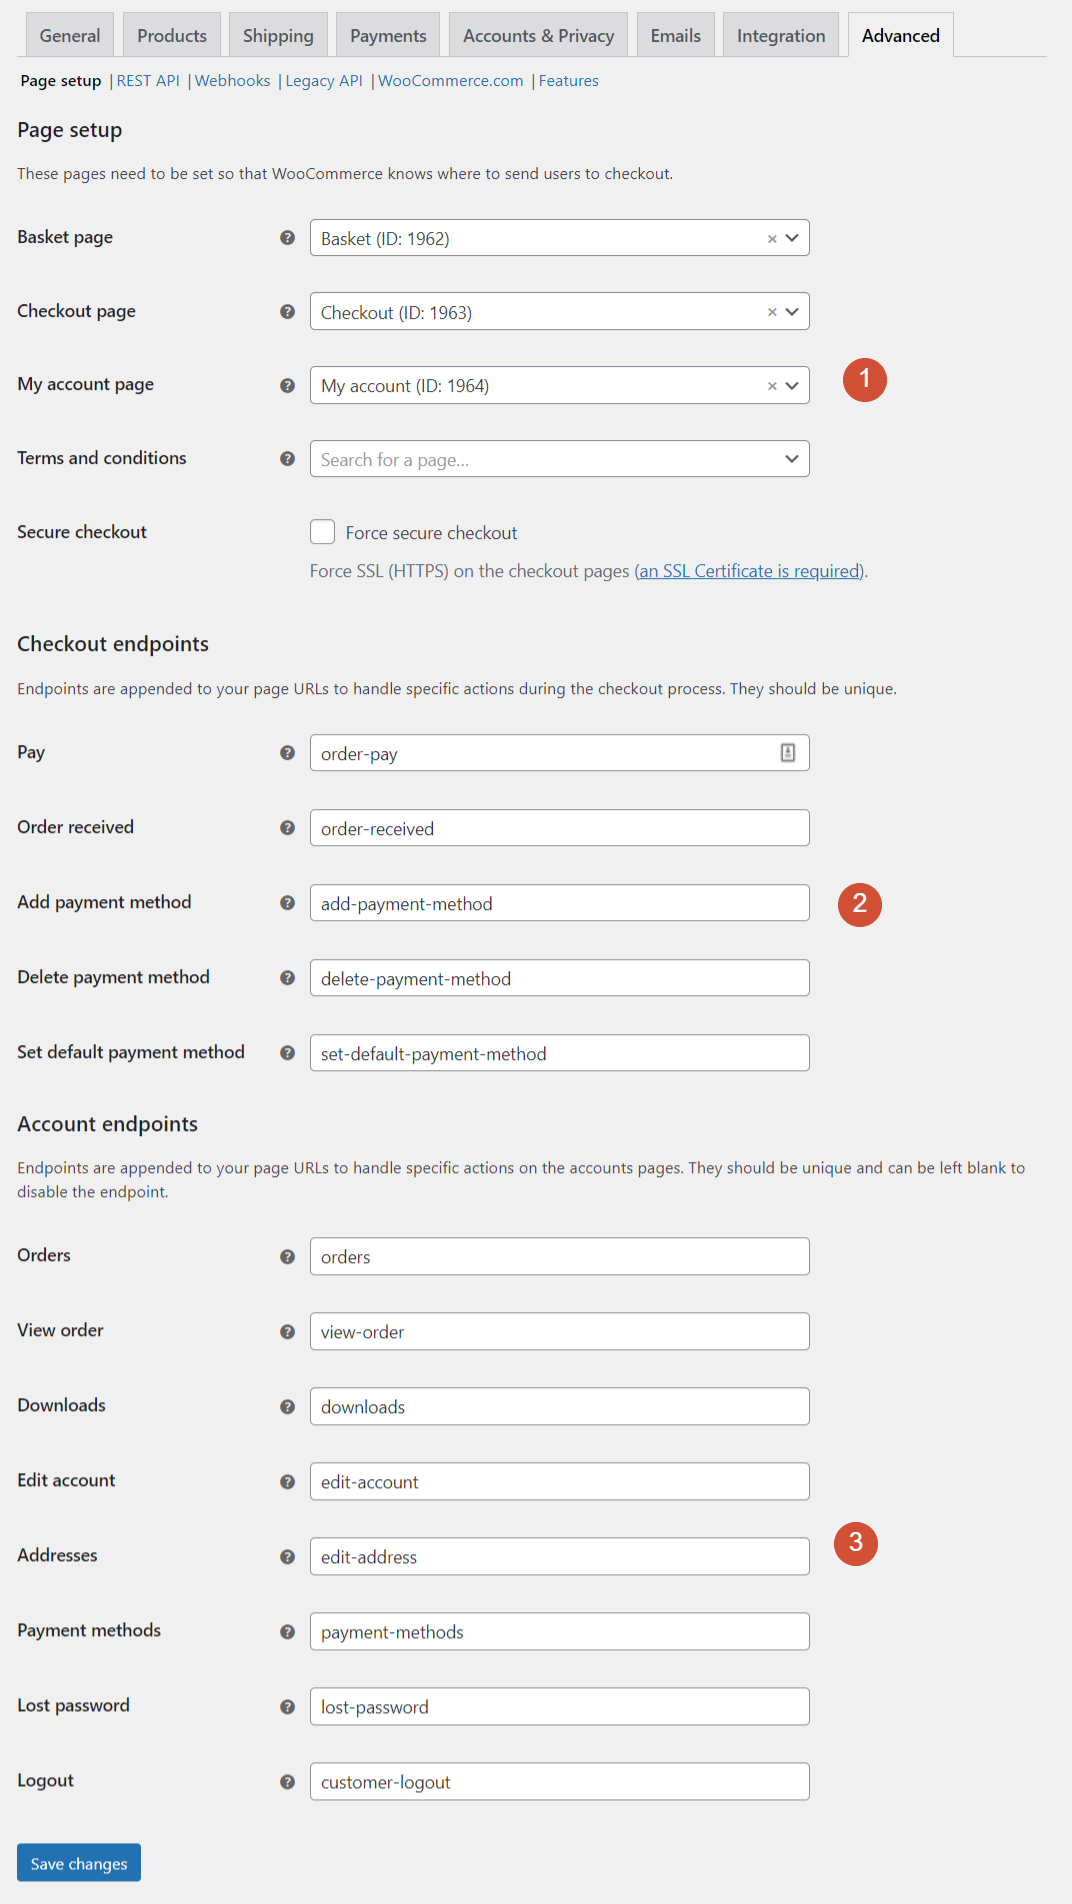
WooCommerce automatically sets up pages for those key purposes. You’ll be able to additionally designate distinctive URLs for Checkout and Account endpoints. The one requirement for endpoints is that each and every slug should be distinctive.
Leisure API and Webhooks
The Complex settings tab additionally allows you to create an API key or a brand new webhook to your retailer. Right here’s a handy guide a rough have a look at the Webhooks display screen:
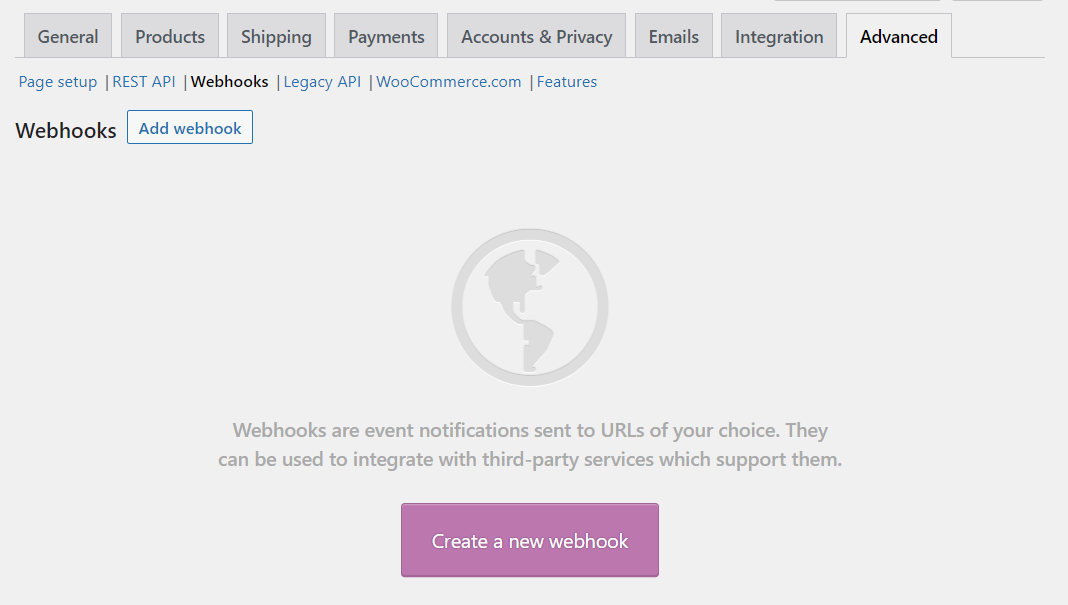
Developing webhooks and API keys is an intricate procedure, and it’s simplest essential if you want to grant out of doors apps get right of entry to to WooCommerce knowledge. You’ll be able to learn extra about how to create WooCommerce APIs and generating webhooks within the plugin’s documentation.
WooCommerce.com
The WooCommerce.com settings display screen permits you to allow WooCommerce.com to assemble details about your retailer, which it is going to then use for construction functions:
![]()
You’ll be able to additionally disable the Display Tips surroundings. This may increasingly forestall WooCommerce from appearing you extension suggestions as you configure the plugin’s different settings.
Options
Remaining however now not least, the WooCommerce Options settings display screen allows you to take a look at new options which can be nonetheless in construction. Precisely what’s to be had right here is dependent upon which model of WooCommerce you’re the use of:
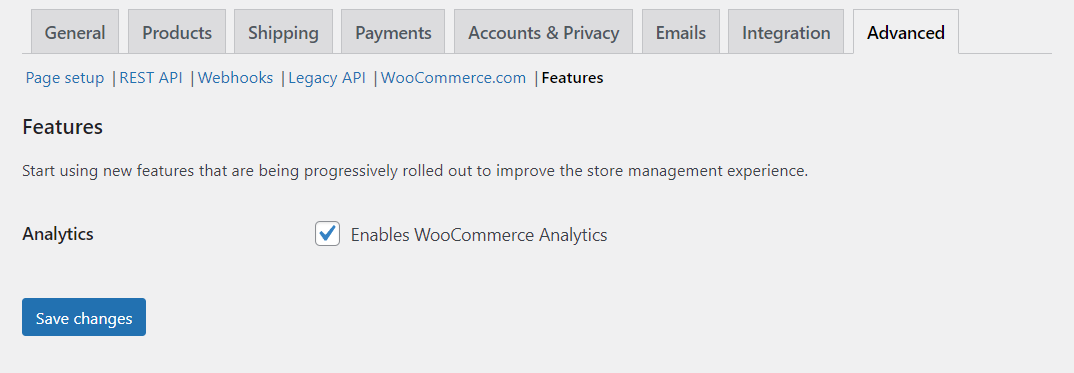
Take into account that trying out options which can be nonetheless in construction would possibly result in insects or mistakes inside your site. So it’s easiest to check out them out on a staging site first.
Conclusion
Configuring WooCommerce settings may also be intimidating, since the plugin gives this sort of vast vary of choices. Alternatively, WooCommerce additionally will provide you with a number of steering, making it a somewhat easy procedure to set your retailer up excellent.
For a brand new store, you’ll wish to configure product and delivery settings, in addition to the fee processors you’ll use. Whenever you handle the ones basics you’ll transfer directly to the extra complex settings, reminiscent of privateness choices and electronic mail notifications. After that, you’ll get proper to paintings selling products through your online store.
Do you’ve gotten any questions on configuring WooCommerce settings? Let’s discuss them within the feedback segment beneath!
Featured Symbol by the use of Makyzz / shutterstock.com
The publish How to Configure WooCommerce Settings gave the impression first on Elegant Themes Blog.
Contents
- 1 WooCommerce Common Settings
- 2 WooCommerce Product Settings
- 3 WooCommerce Transport Settings
- 4 WooCommerce Bills Settings
- 5 WooCommerce Accounts & Privateness Settings
- 6 WooCommerce Emails Settings
- 7 WooCommerce Complex Settings
- 8 Conclusion
- 9 Why the Sephora x TikTok Incubator Program Is A Sensible Partnership
- 10 5 Easiest Per 30 days Internet Website hosting Plans (Begins at $4.95/mo.)
- 11 WP FixAll – WordPress Safety: The Lowdown On WP FixAll…

0 Comments