

Because of new choices in Divi 5, you’ll assemble trendy, space-efficient blog layouts that go beyond rigid rows. Pair Loop Builder to drag in dynamic posts with CSS Grid to organize them in flexible, masonry-style layouts that stay responsive all through breakpoints.
In this put up, we’ll walk all through the setup step by step so that you’ll recreate it in minutes!
What Is CSS Grid In Divi 5?
CSS Grid in Divi 5 is a robust structure tool that transforms the best way you design blog pages, enabling difficult grid-based arrangements, paying homage to masonry layouts. Against this to traditional layouts, CSS Grid allows items to routinely adapt to the Grid without requiring explicit positioning, resulting in a unbroken and dynamic display.
Key Choices Of CSS Grid
- Pre-Built Grid Templates: You’ll follow grid templates at the container stage, each the use of one among Divi 5’s new CSS Grid row templates, or create your personal the use of the Grid Layout Style.
- Customizable Alternatives: Great-tune column and row templates, set dimensions, adjust grid directions, alignment, justification, and even keep watch over explicit individual products width, height, or position.
- Offset Editor: Create asymmetrical, repeating patterns, like making each and every 4th put up span two columns, for a a large number of, engaging look.
Benefits of CSS Grid
CSS Grid permits you to create masonry grids that enhance the individual enjoy. It integrates totally with dynamic content material subject matter, ensuring your blog posts display beautifully and responsively all through all gadgets. Paired with Divi 5’s Loop Builder, CSS Grid routinely arranges your posts into a stunning masonry structure, giving your blog a modern, professional look.
What Is The Loop Builder In Divi 5?
The Loop Builder in Divi 5 is a dynamic device that transforms any Divi module proper right into a repeatable template for looping content material subject matter, paying homage to posts, words, shoppers, or custom designed put up varieties. It’ll come up with abnormal keep watch over to create custom designed blog feeds without being confined to rigid, standard modules.

Key Choices Of Loop Builder
- Dynamic Templates: Design templates the use of Divi modules, pulling in dynamic content material subject matter like put up titles, featured photos, excerpts, or custom designed fields.
- Customizable Queries: Filter content material subject matter via put up type, categories, tags, meta values, or ordering, and add pagination or offsets for precise keep watch over over what displays.
- Seamless Integration: Works with any Divi structure tool, along side Flexbox and CSS Grid, extending some distance previous the limitations of standard Blog or Post Slider modules.
Benefits Of Loop Builder
Loop Builder is perfect for building custom designed blog feeds with entire design flexibility over each looped products, paying homage to stylized postcards. It eliminates reliance on static modules, making it very good for creating dynamic, tailored layouts. When paired with CSS Grid, Loop Builder simply generates blog put up enjoying playing cards that seamlessly drift into a stunning masonry grid, together with a slightly of extra flair to your internet web page.
How To Assemble A Masonry Blog With Divi 5’s Loop Builder + Grid
With a clear figuring out of the best way CSS Grid and Loop Builder art work in Divi 5, you’re able to ship your masonry blog structure to existence. We’ll walk you by means of combining the ones choices to create a dynamic grid that showcases your blog posts with style and flexibility.
Let’s dive into the process, starting with setting up the root to your structure. By the use of the top, your structure will look similar to this:
Step 1: Configure The Layout
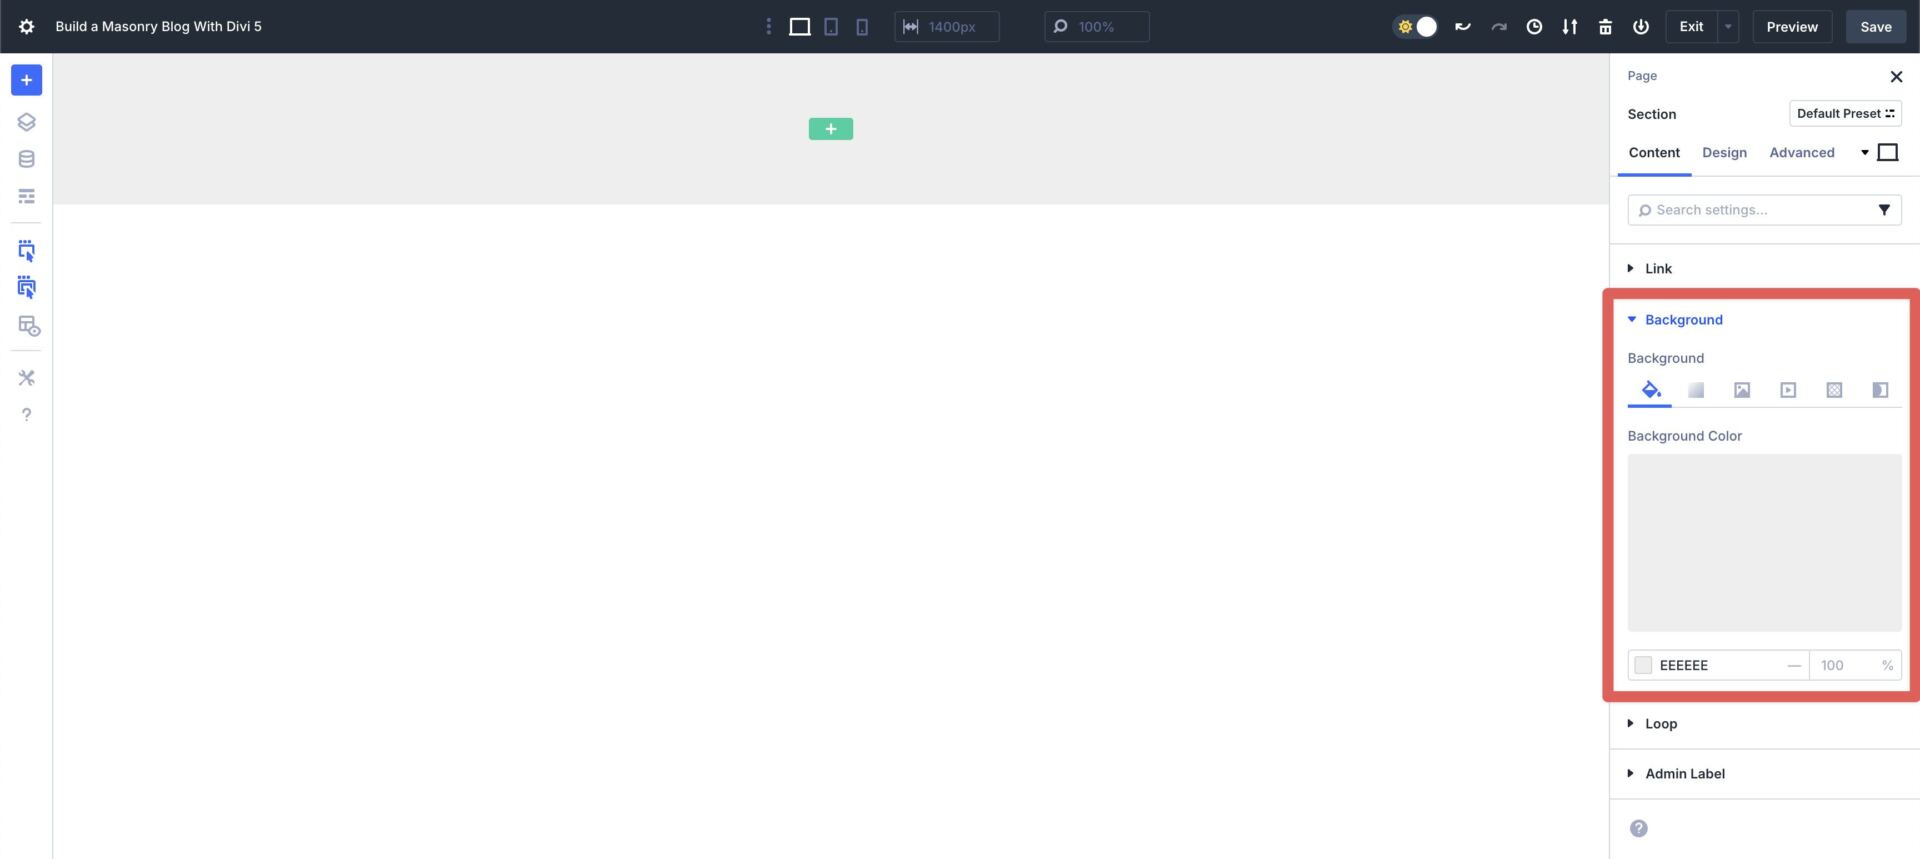
To get started, create a brand spanking new internet web page and open the Visual Builder. Add a brand spanking new Section to the internet web page. Inside the Section’s Content material subject matter tab, add #eeeeee since the Background Color.
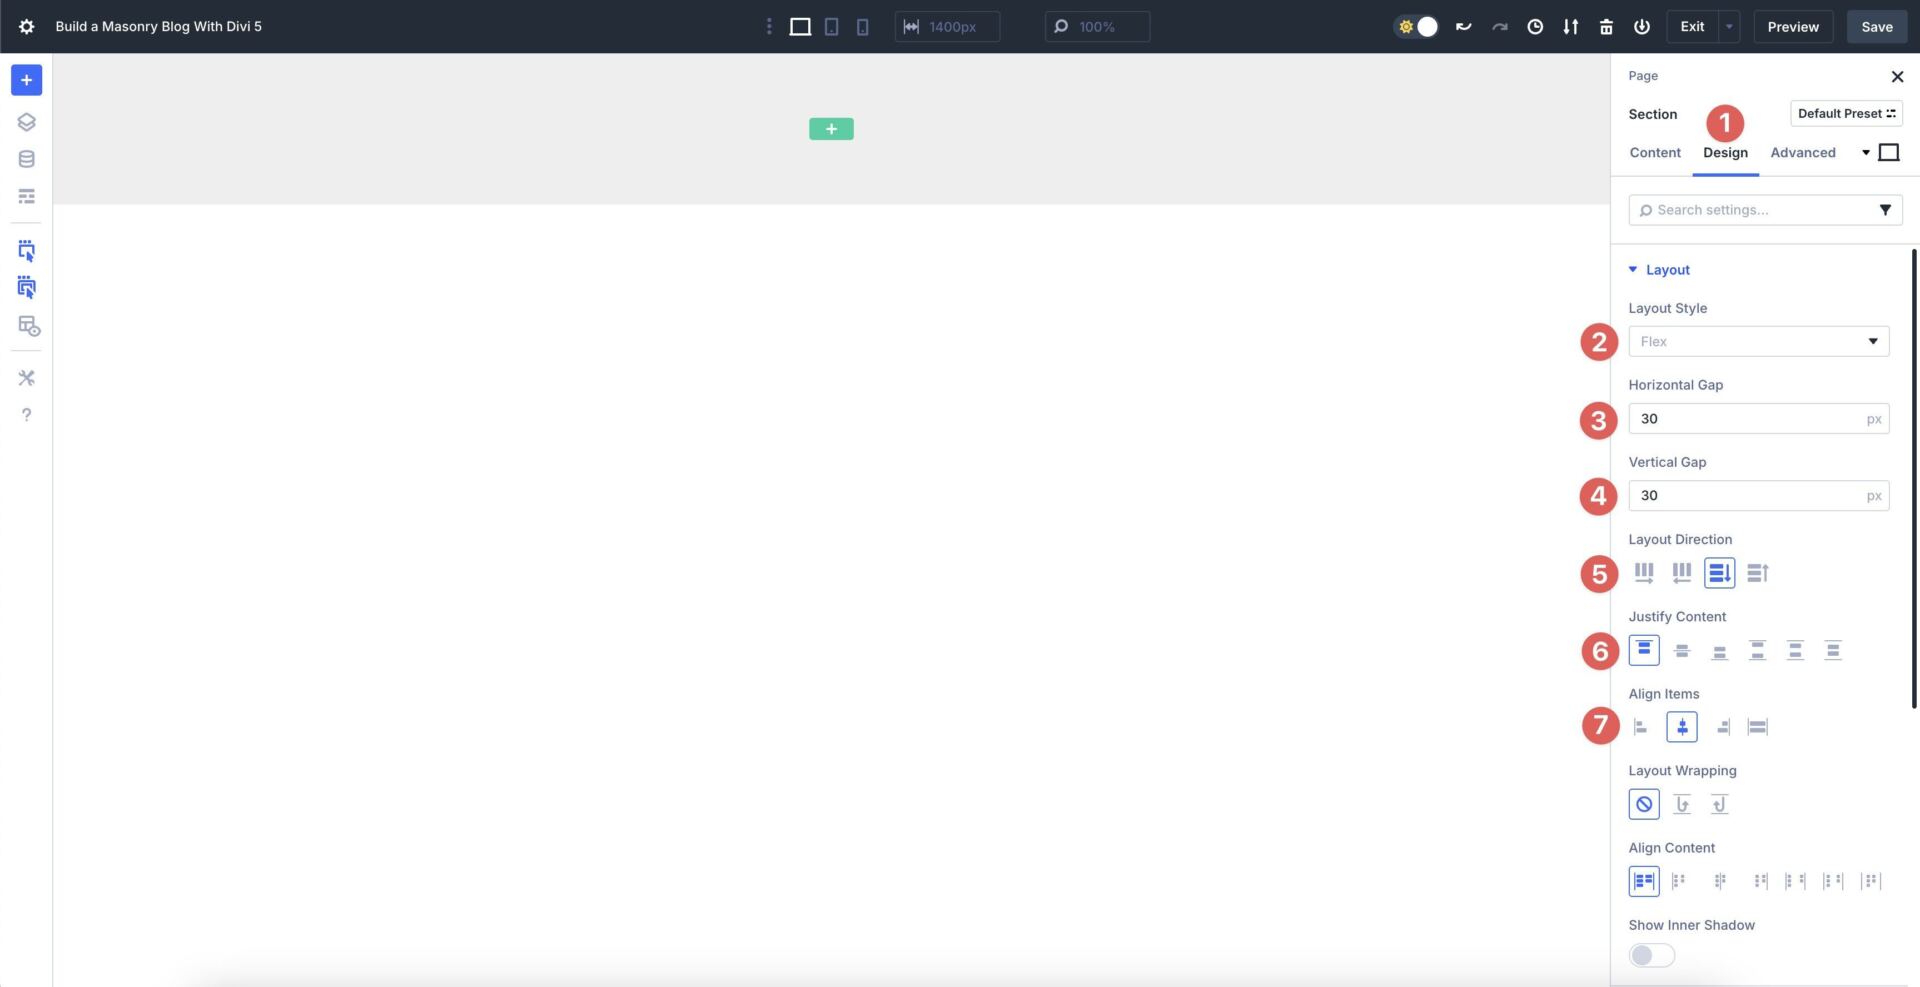
Next, switch to the Design tab. Make larger the Layout menu and ensure the Layout Style is able to Flex. Add a 30px Horizontal and Vertical Hollow. Set the Layout Path to Column, Justify Content material subject matter to Get began, Align Items to Middle, and cross away all other settings at their defaults.
Next, we’ll add a Single-Column Row to the Section. Add a Heading module and offers it a reputation, paying homage to Blog. Click on at the Design tab. Set the Heading Heading Stage to h1. Choose Host Grotesk since the Heading Font, and set the Heading Text Size to 48px, 8vw, 120px. Use the dropdown next to the Heading Text Size field to make a choice Clamp.

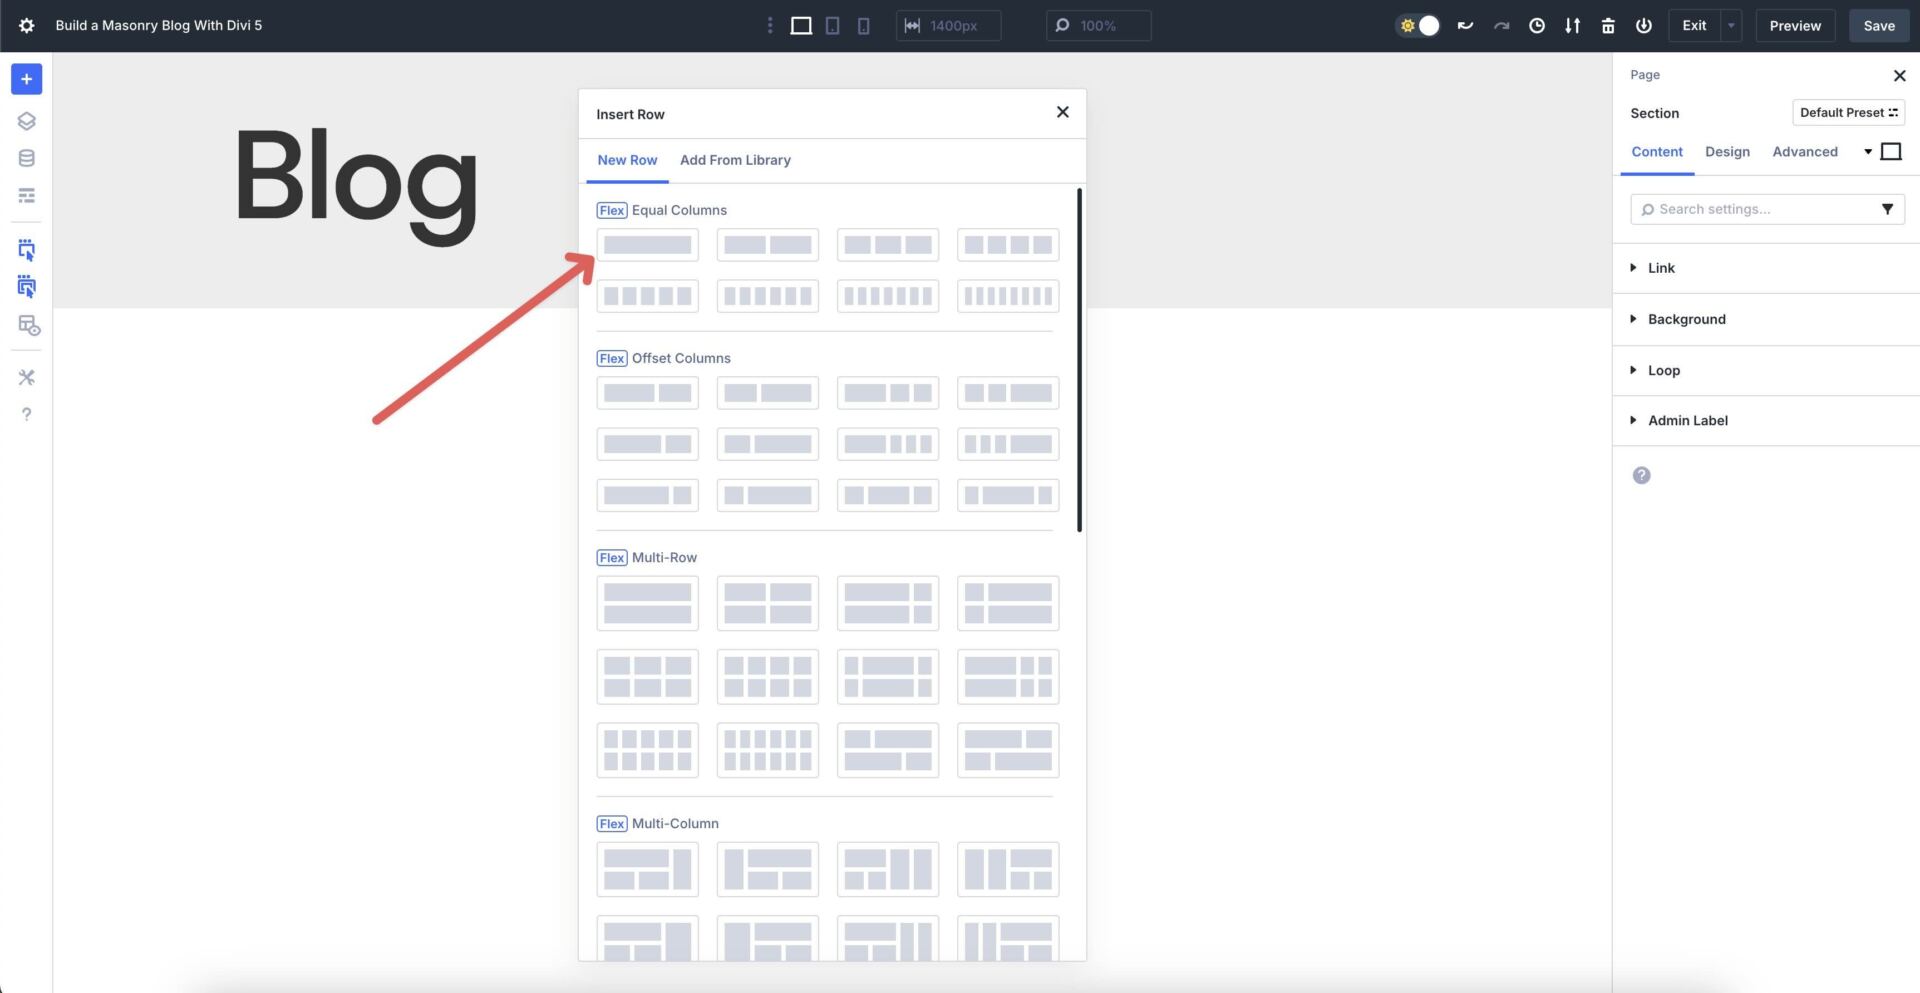
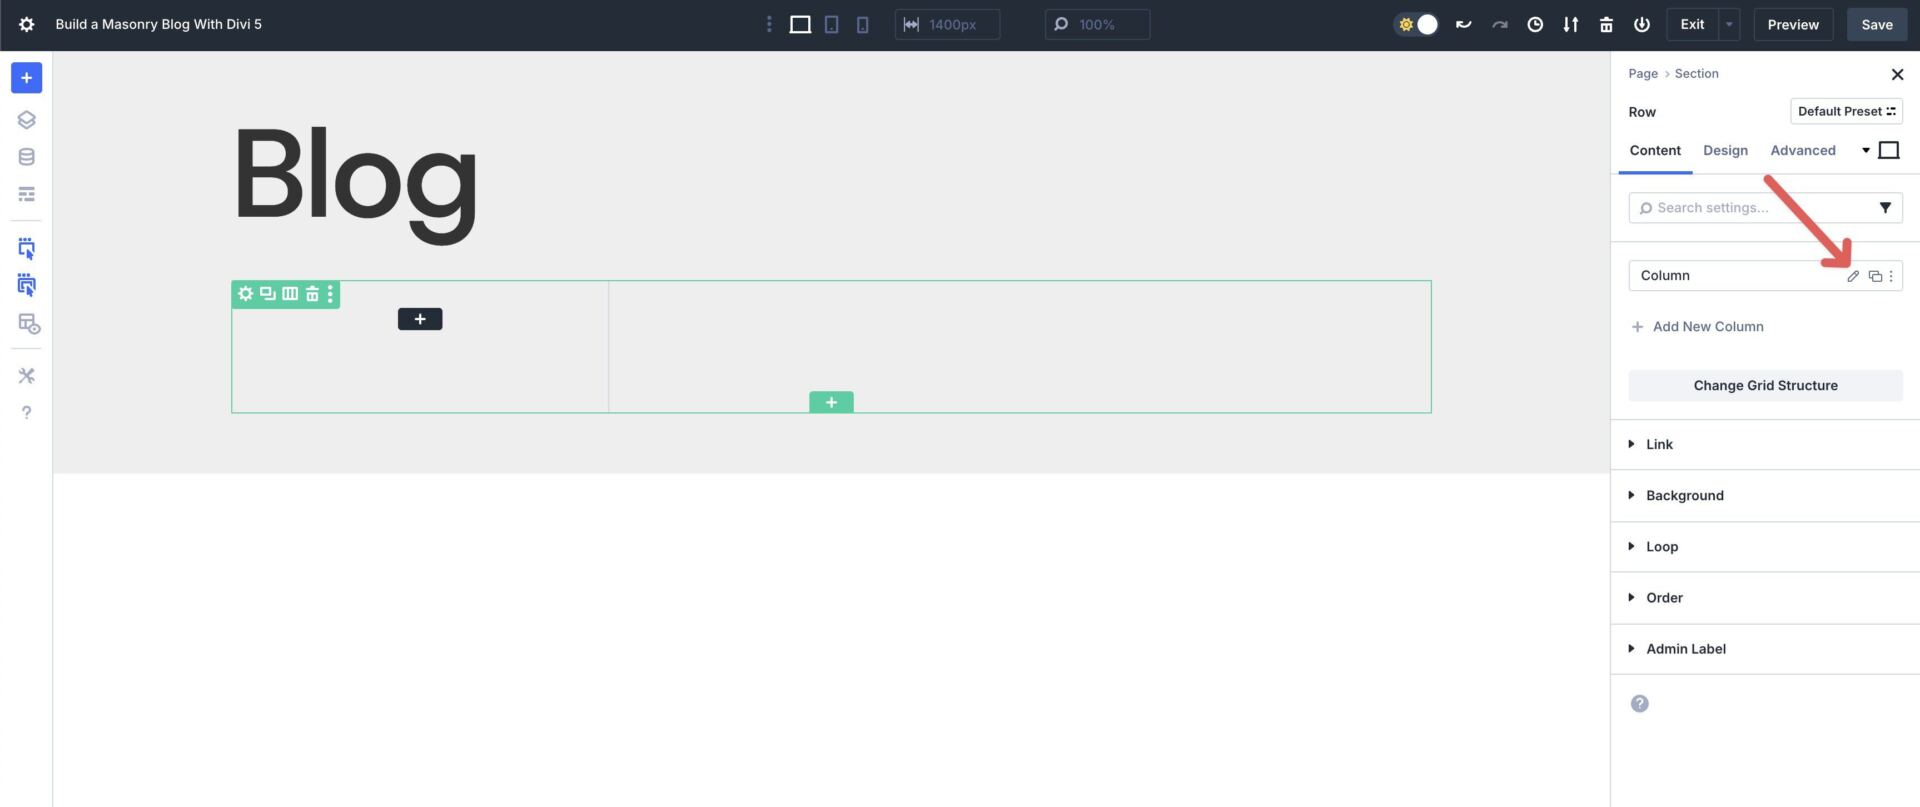
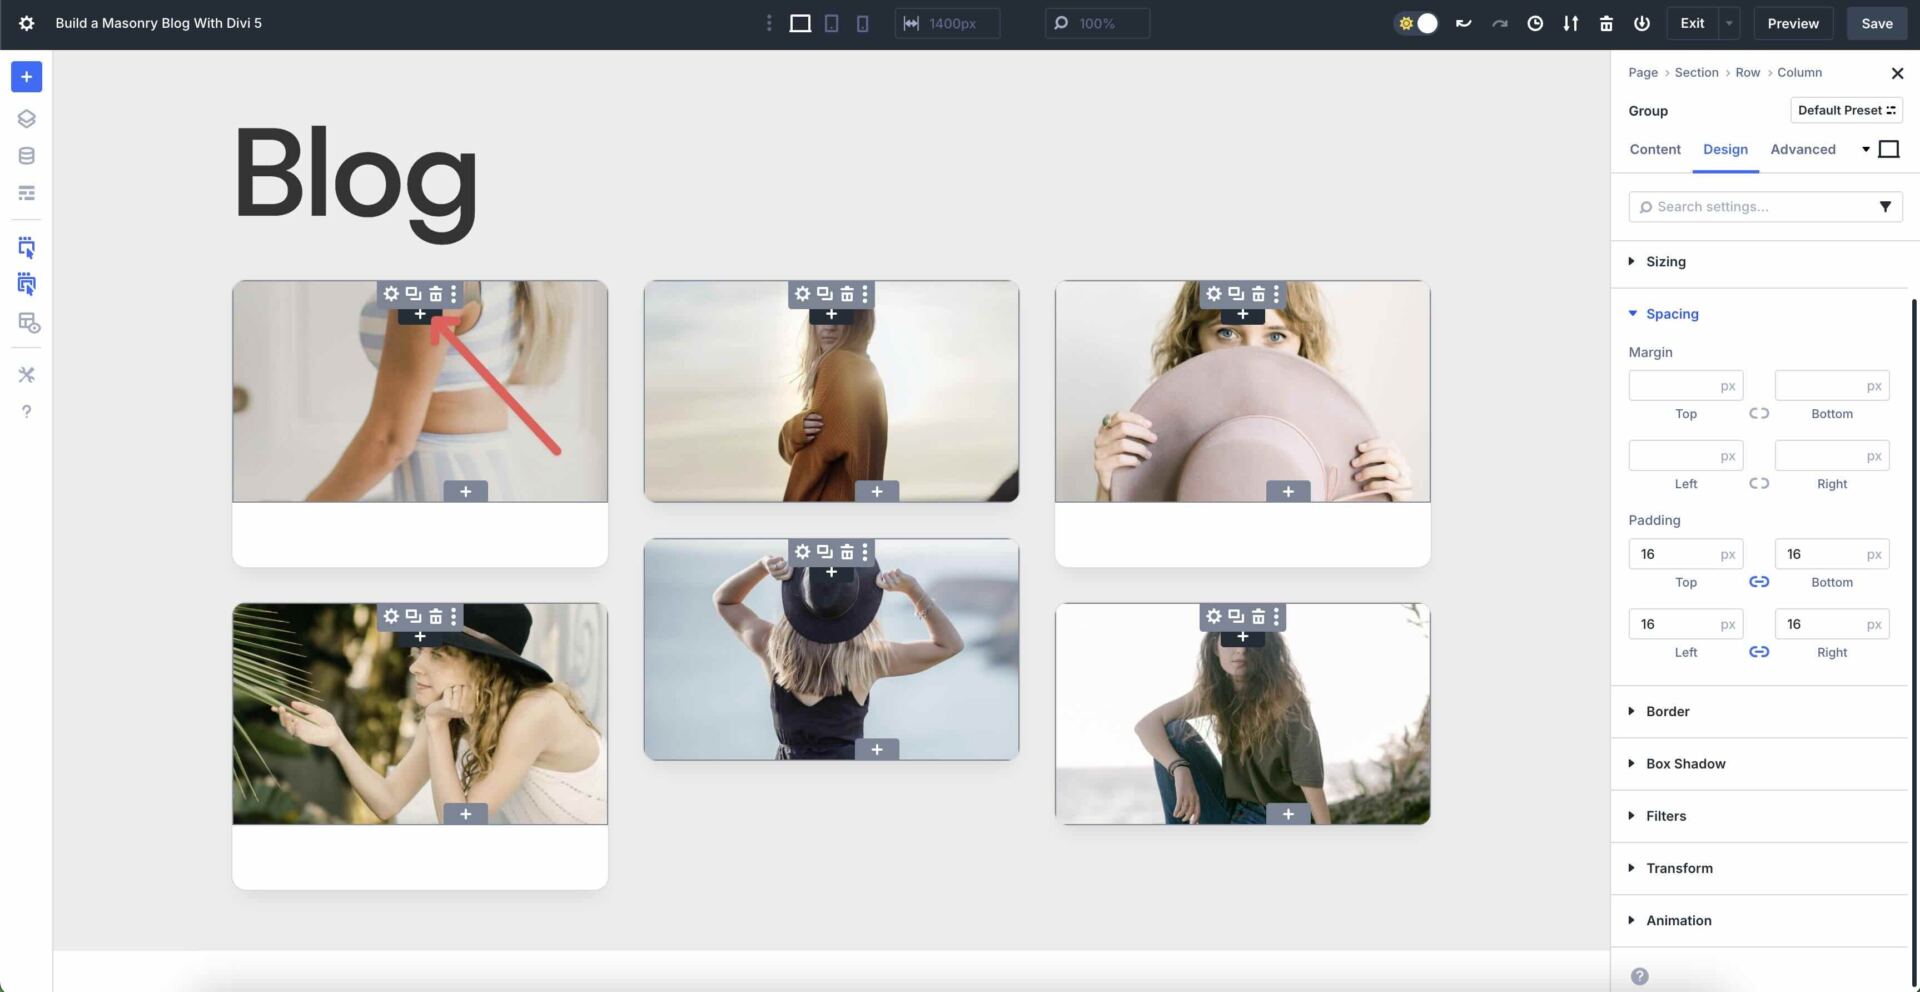
In any case, add another Single Column Row underneath the principle. This it will likely be our guardian container.
Step 2: Allow And Configure CSS Grid On The Mom or father Container
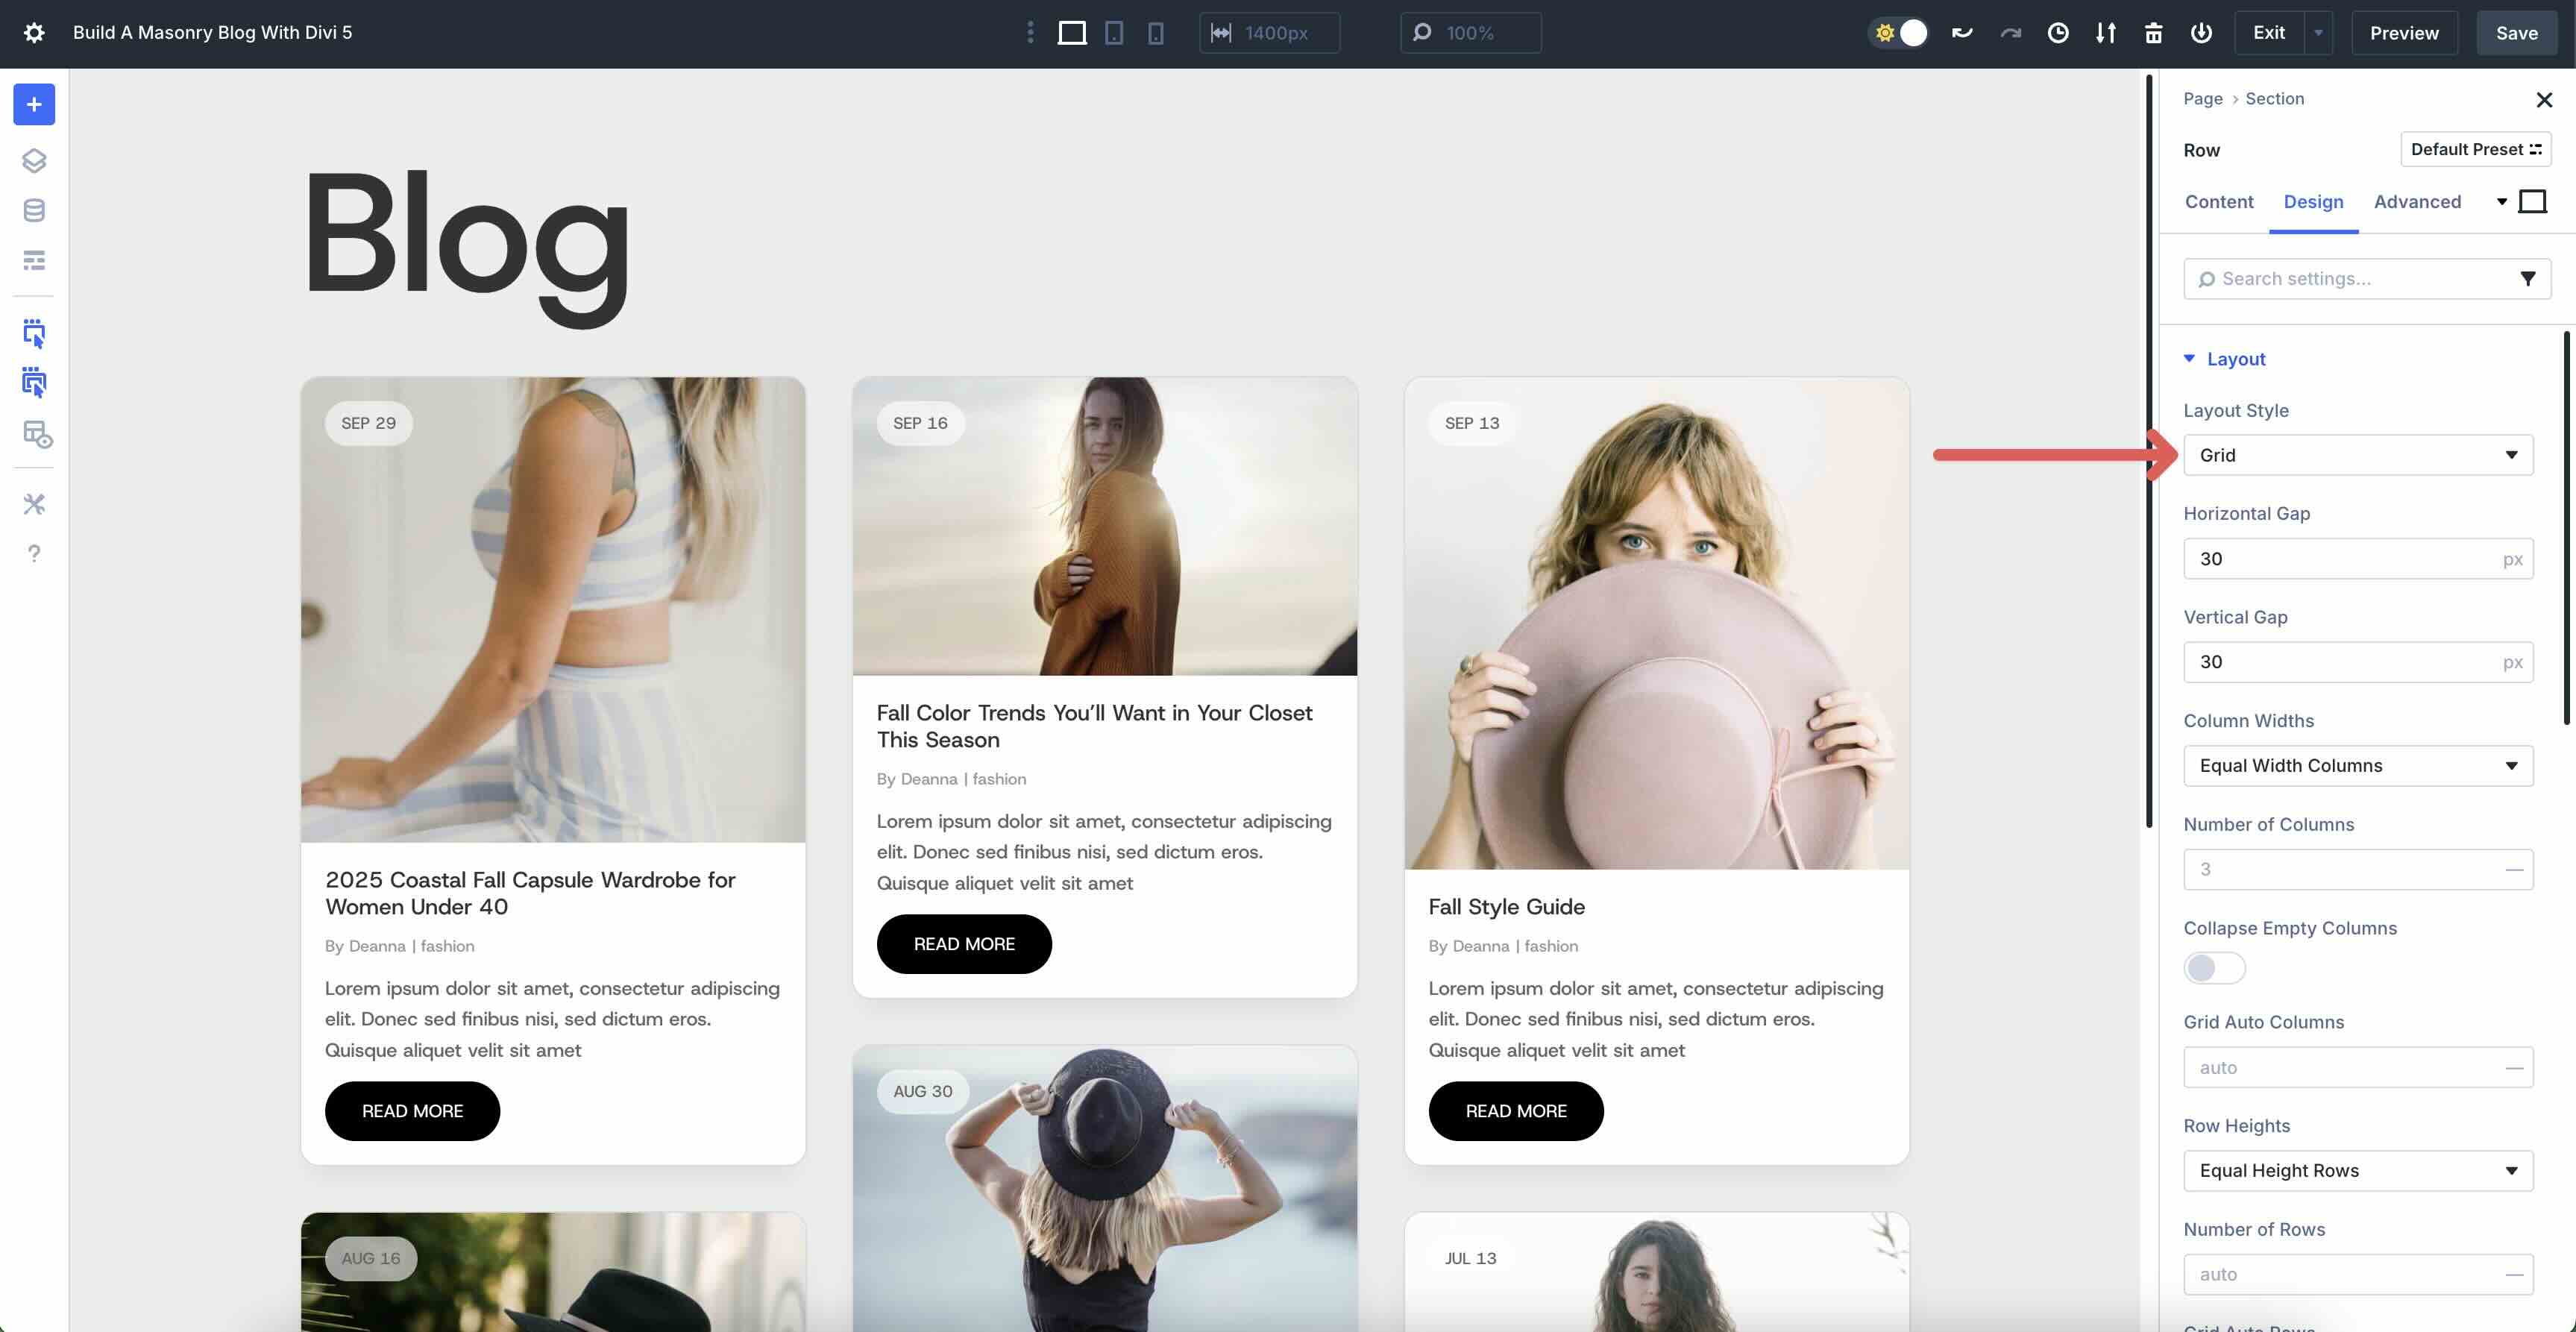
With the Row building in place, we need to configure the settings for CSS Grid. With the Row made up our minds on, click on at the Design tab. Make larger the Layout menu and select Grid since the Layout Style. Add a 30px Horizontal and Vertical Hollow for the row.
Under Column Widths, select Identical Width Columns and set the Choice of Columns to 3. Make a selection Identical Most sensible Rows for the Row Heights field.
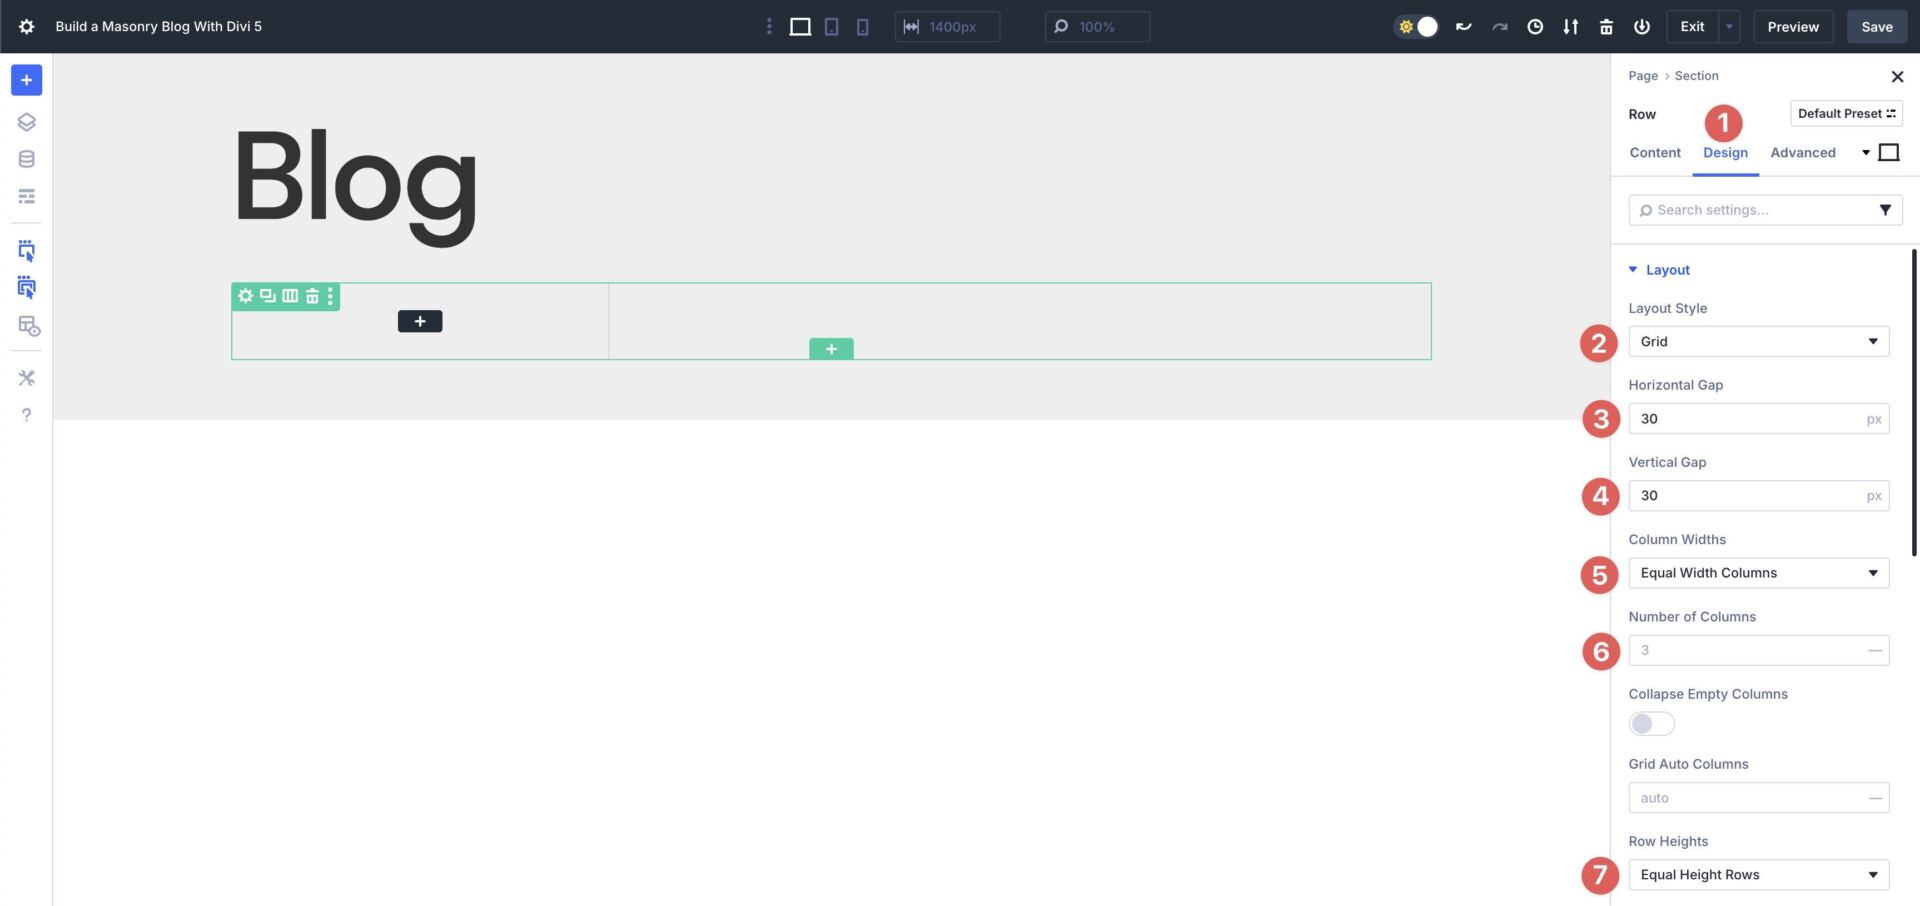
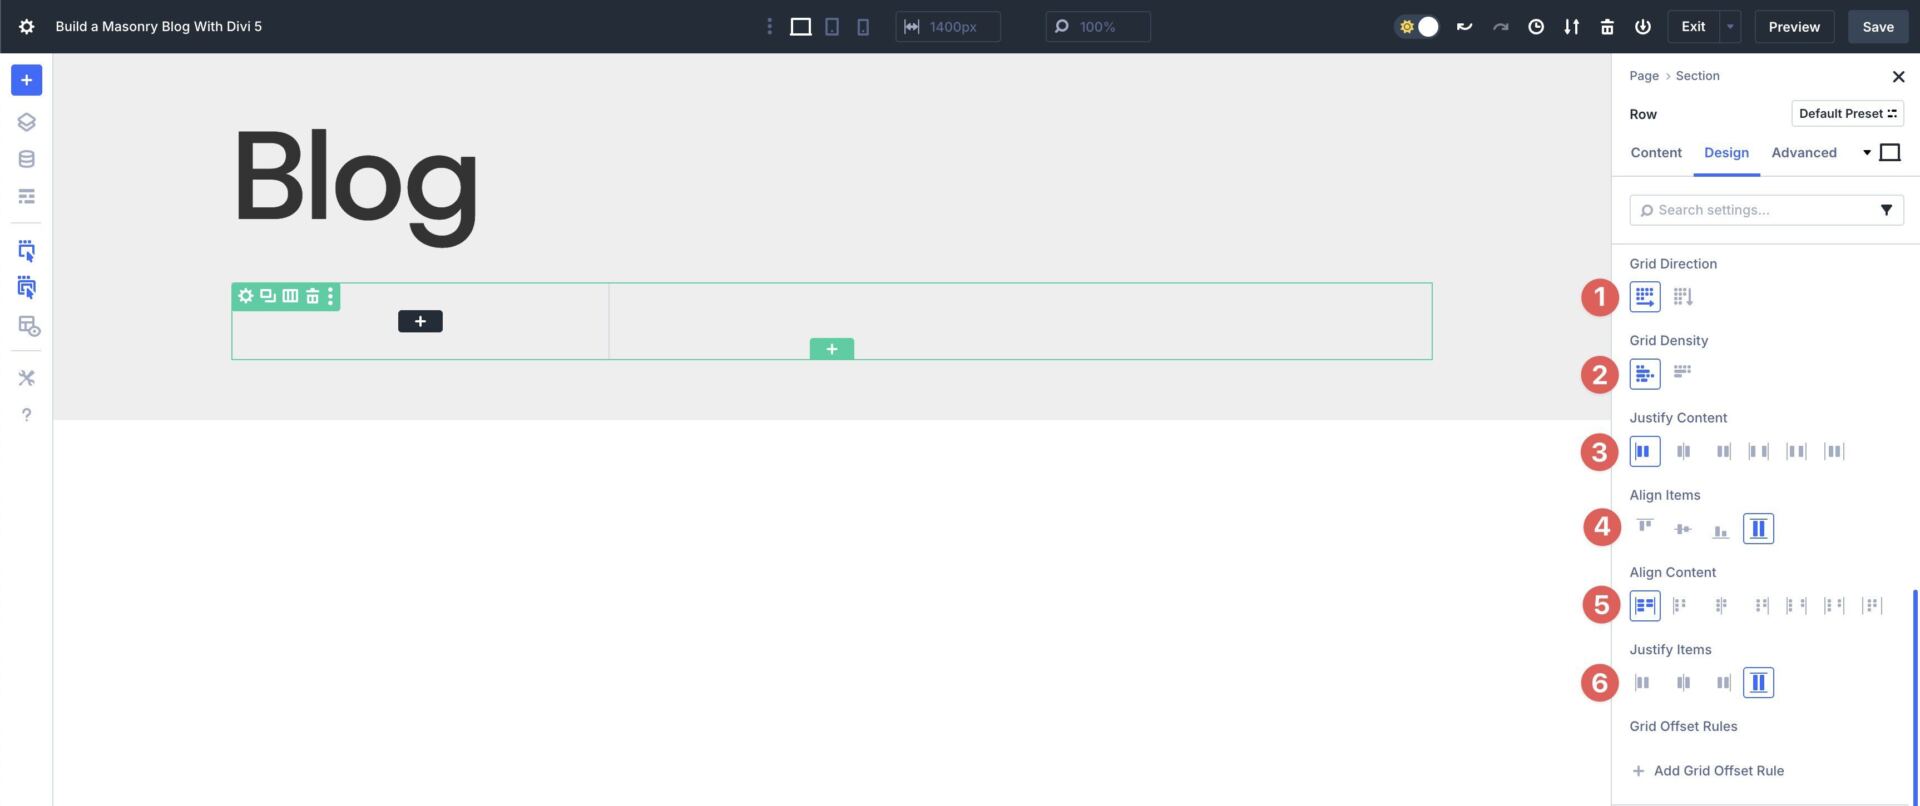
Make a selection Row for the Grid Path and Dense for the Grid Density. Choose Get began for Justify Content material subject matter, and make a selection Stretch for Align Items, Align Content material subject matter, and Justify Items.
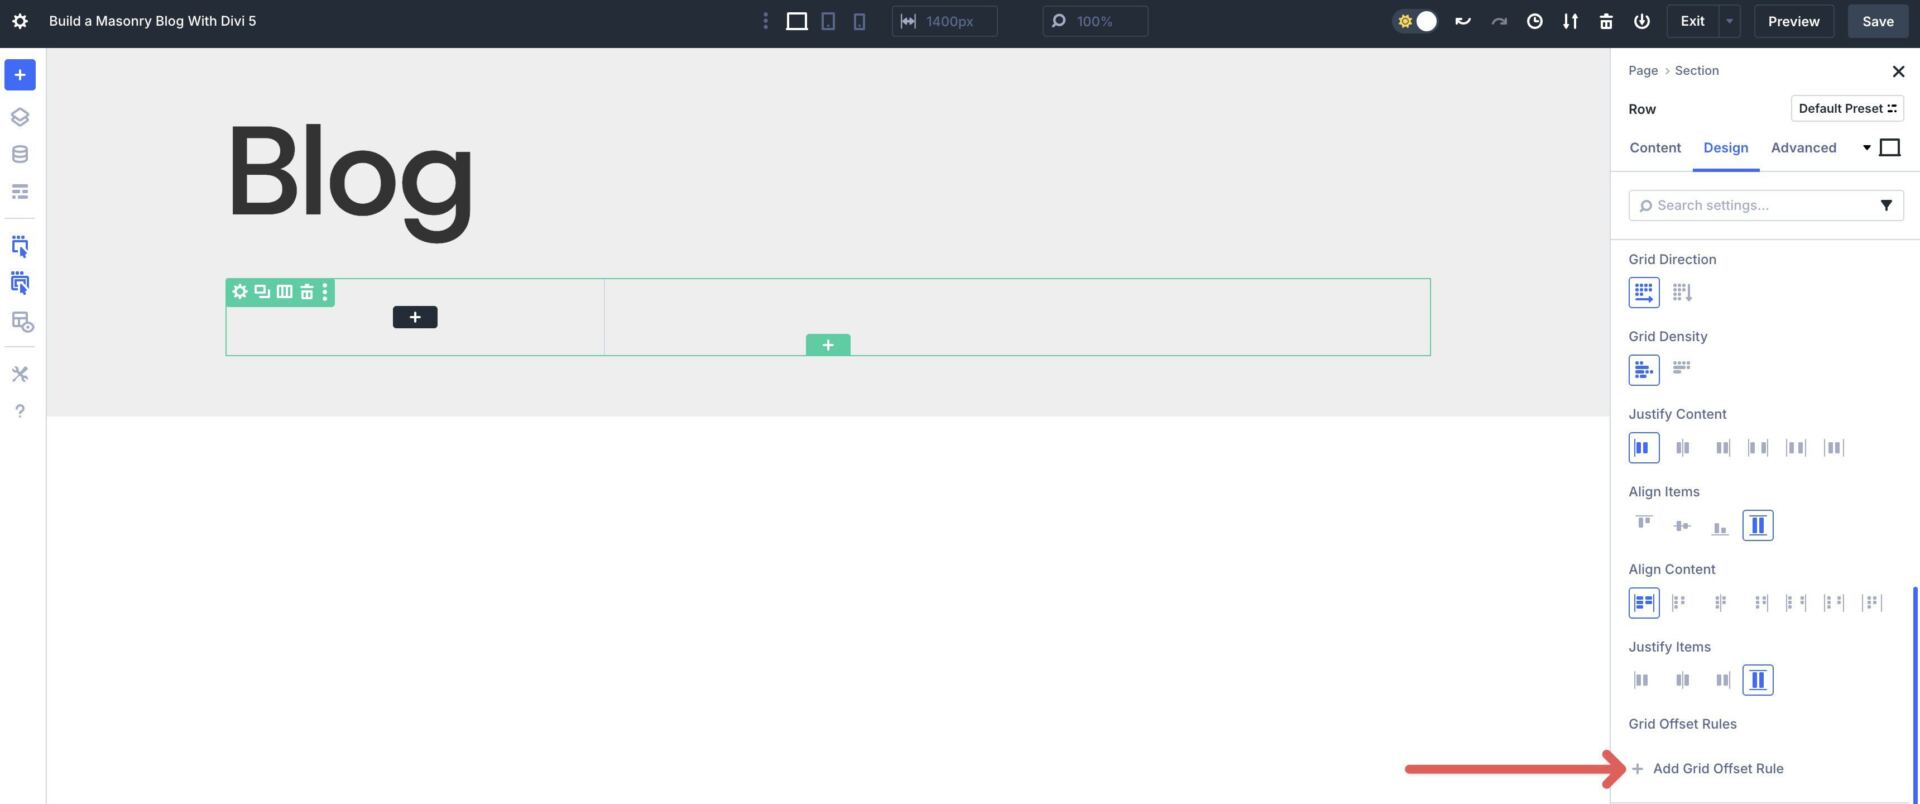
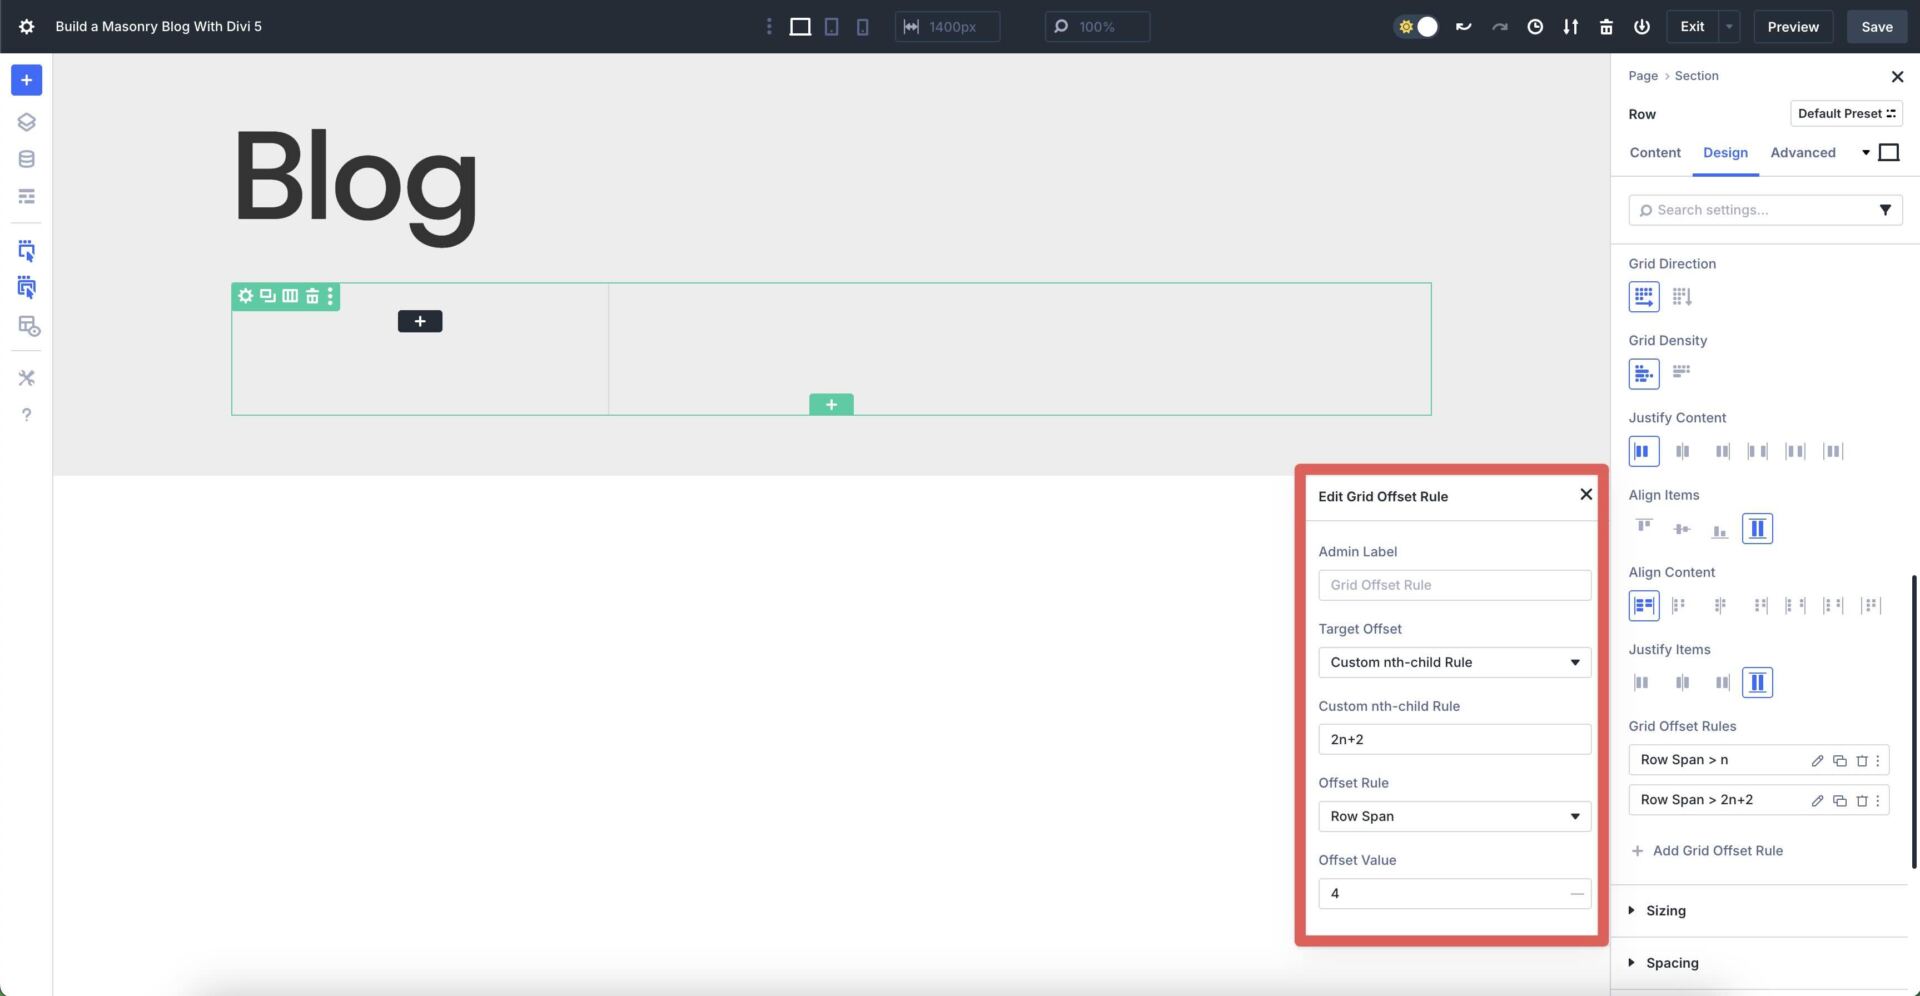
Create Grid Offset Rules
Next, we’ll prepare a couple of Grid Offset Rules for our Grid. Grid Offset Rules mean you can follow targeted adjustments to precise items within your Grid, paying homage to making each and every nth products span a few columns, shifting positions, or resizing routinely, without requiring custom designed CSS.
To create a brand spanking new Rule, click on at the + Add Grid Offset Rule button.
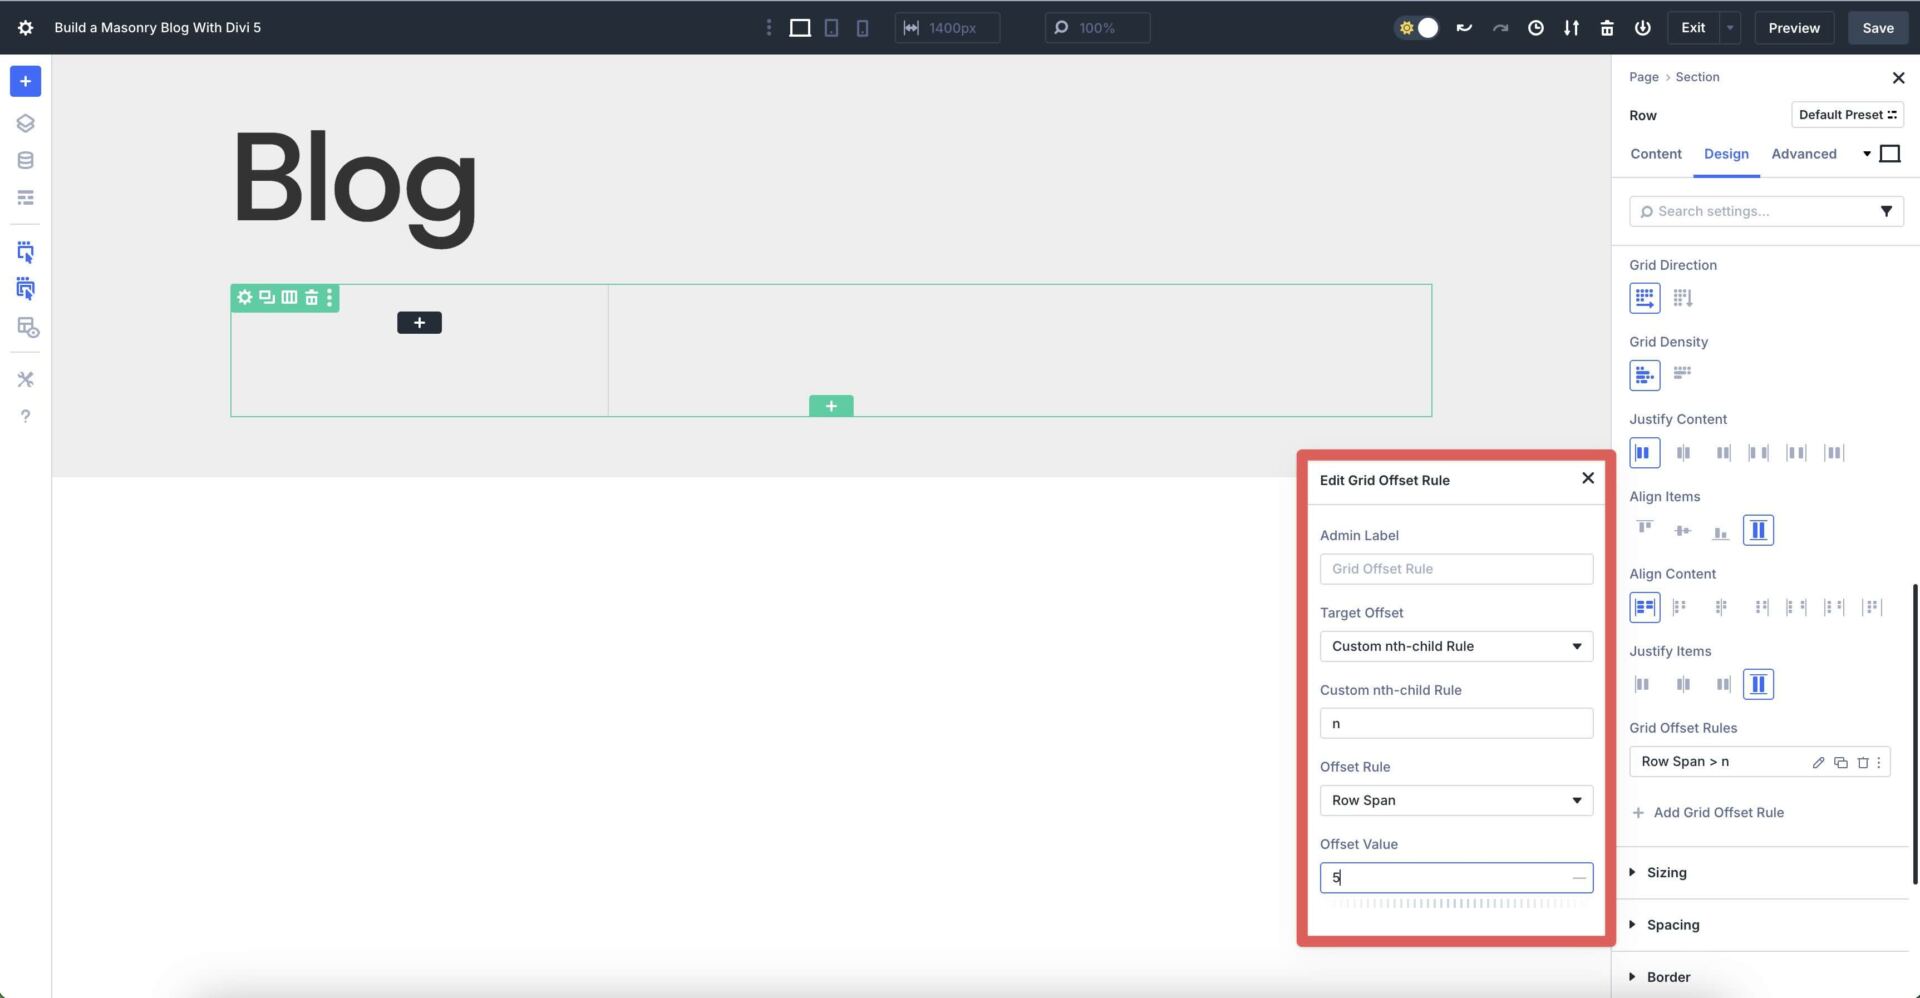
Use the following settings for the principle rule:
- Function Offset: Custom designed nth-child Rule
- Custom designed nth-child Rule: n
- Offset Rule: Row Span
- Offset Value: 5
We’ll add a 2nd Offset Rule with the following settings:
- Function Offset: Custom designed nth-child Rule
- Custom designed nth-child Rule: 2n+2
- Offset Rule: Row Span
- Offset Value: 4
Step 3: Configure The Loop Builder For Dynamic Blog Posts
Now that we’ve configured the Grid settings, we need to prepare our custom designed Loop. Navigate to the Row’s Content material subject matter tab and click on at the Column’s pencil icon to show its settings.
Make larger the Loop dropdown menu and make allowance the Loop Section toggle.
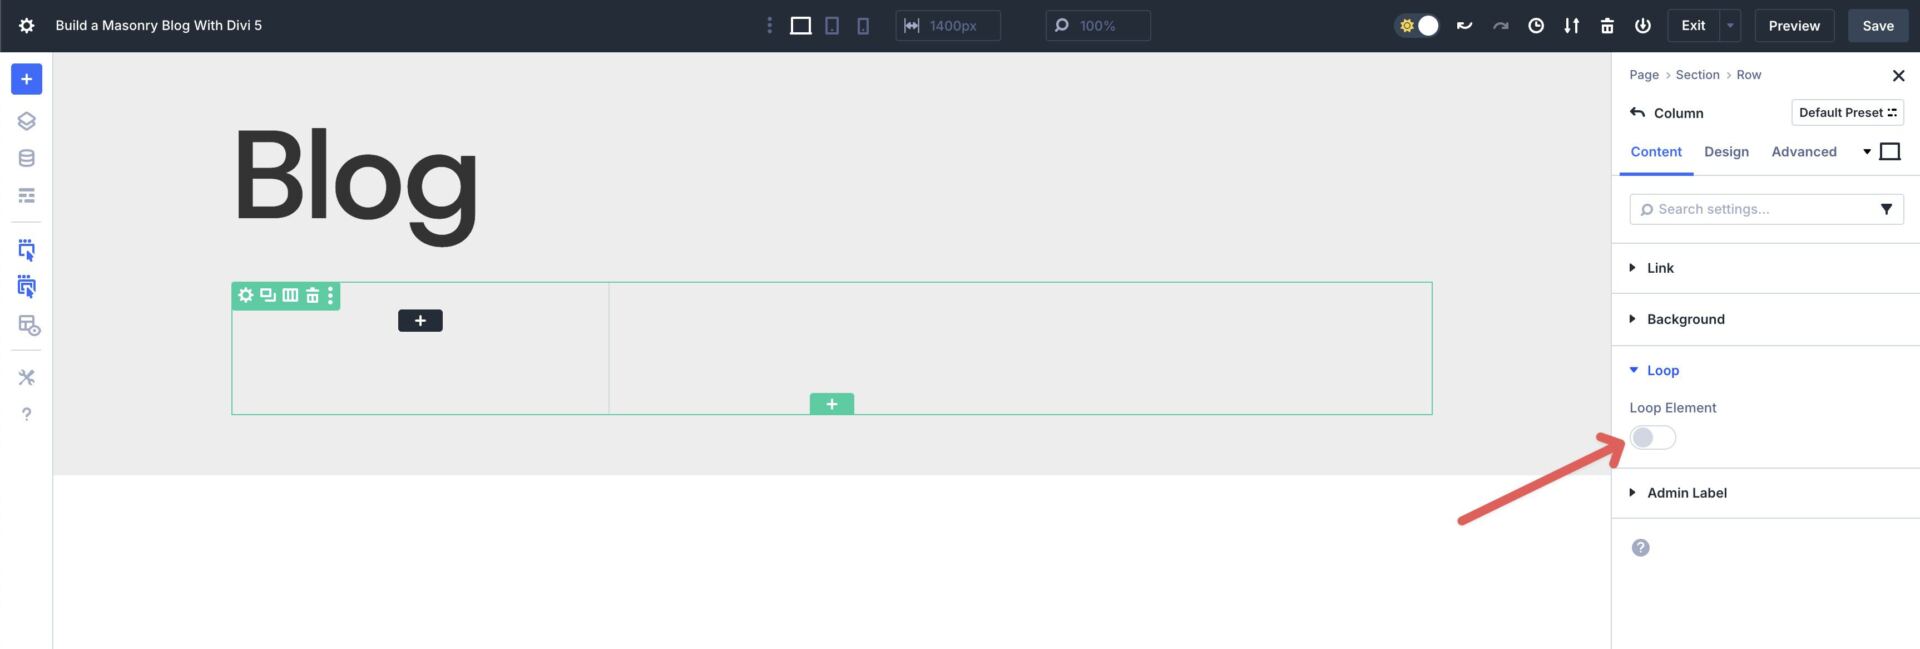
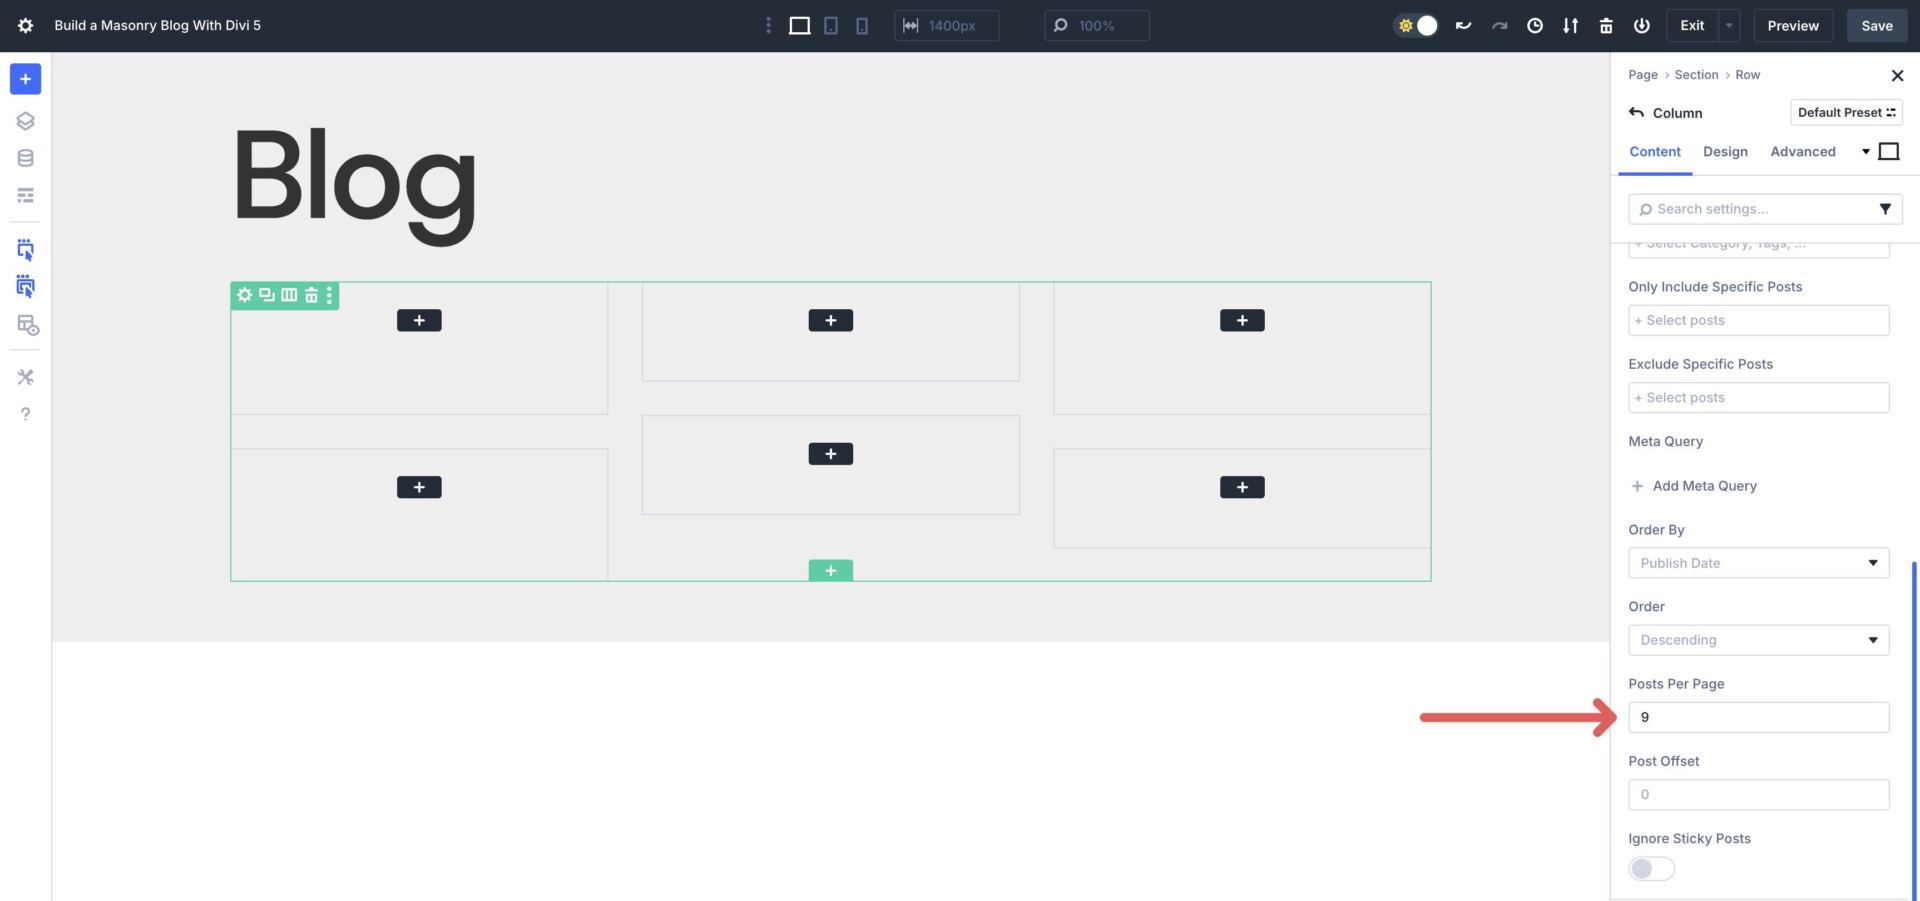
When the decisions appear, set the Query Sort to Post Sort (made up our minds on via default) and make a selection Posts for the Post Sort.
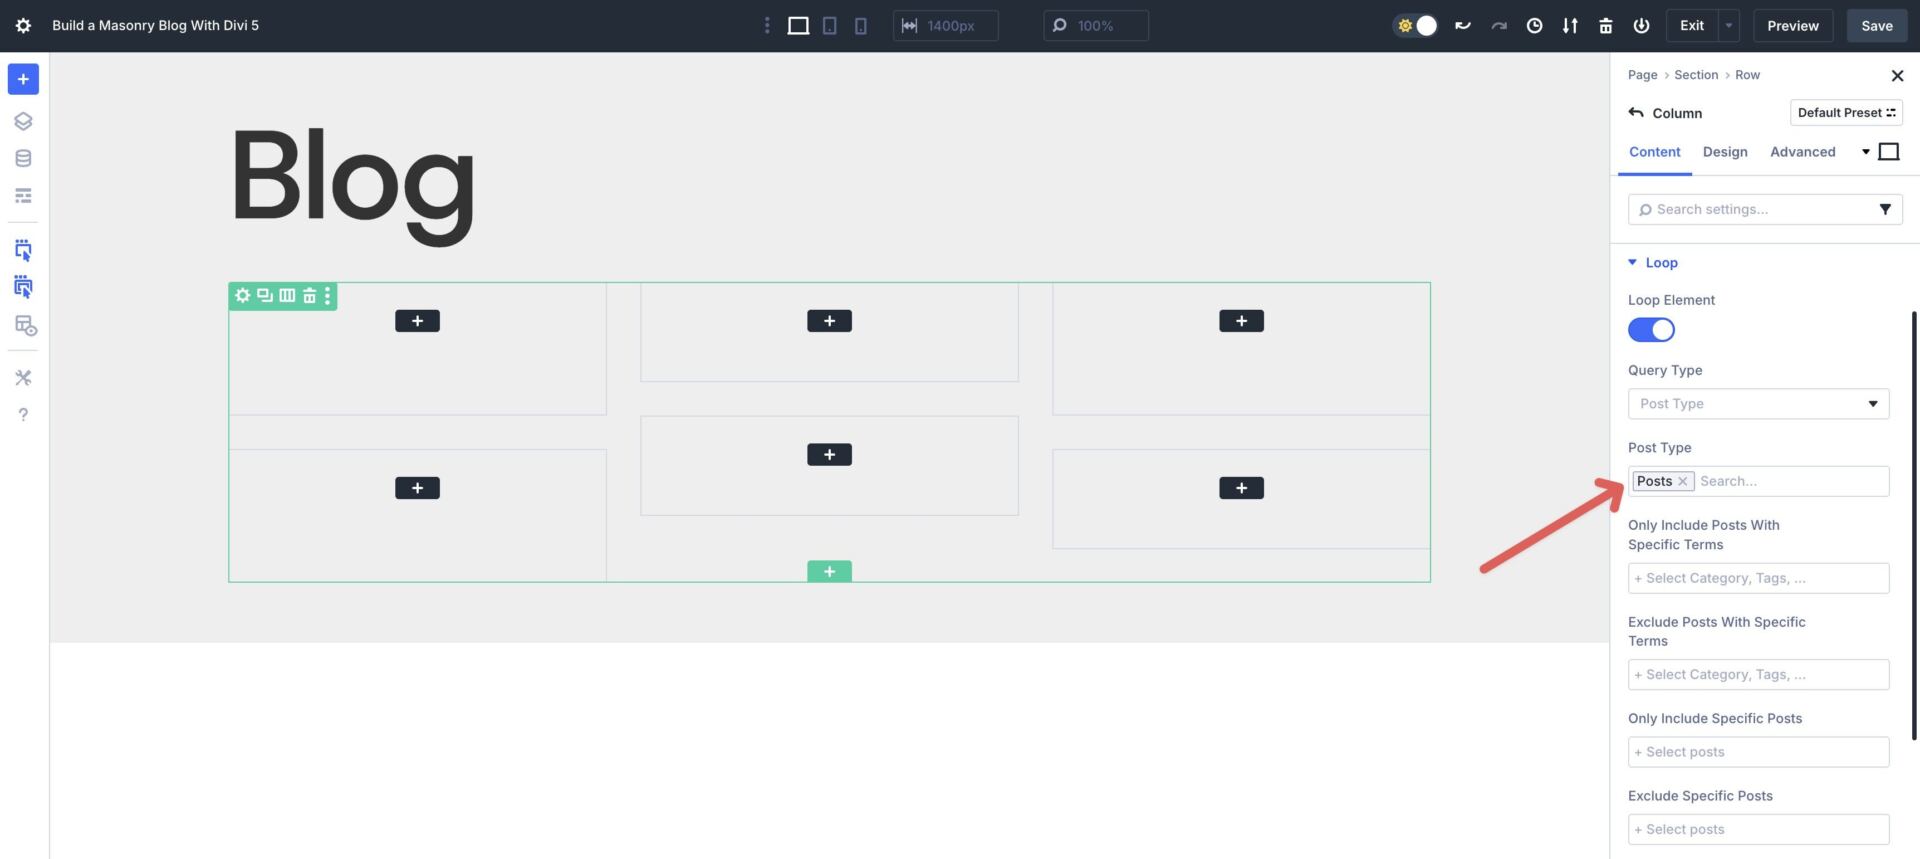
Scroll down and to find the Posts In step with Internet web page field and enter 9 as the price.
The overall step is so to upload a Loop Link, so when someone clicks on a Grid products, they’re going to be routinely directed to the corresponding put up.
Scroll up to to find the Link dropdown menu and build up it. Click on at the dynamic content material subject matter icon and select Loop Link from the available possible choices.
Step 4: Design The Looped Products
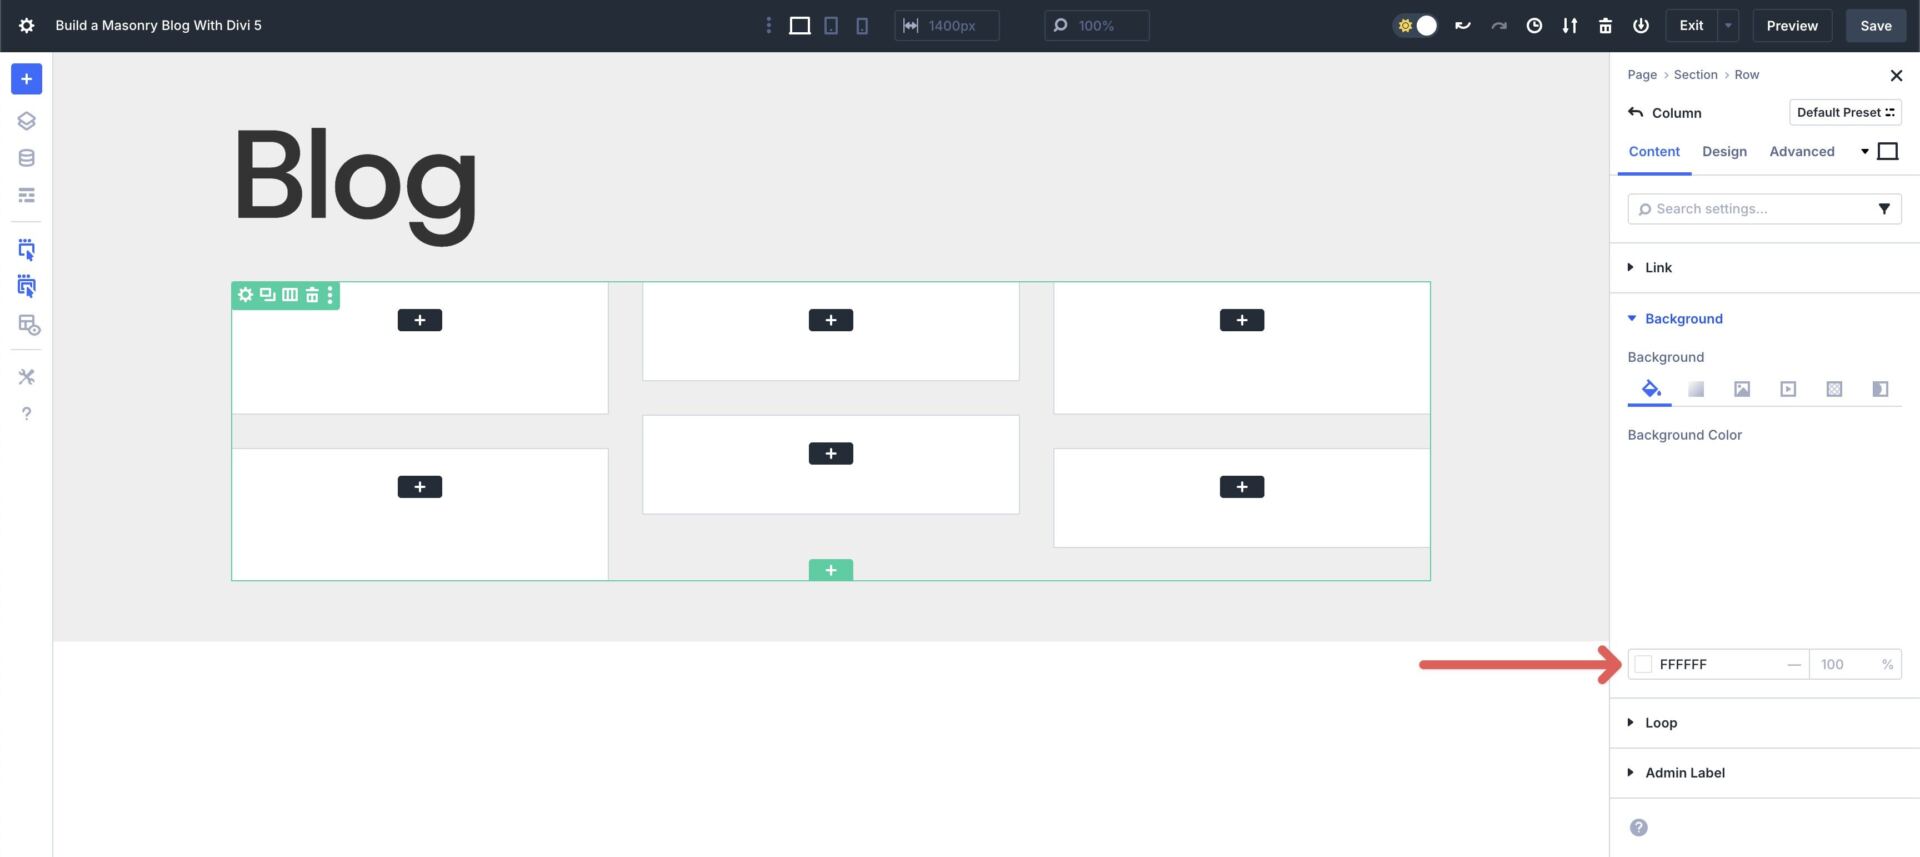
Now, we will get began designing the structure. While inside the Column’s settings, click on on to extend the Background menu. Assign #ffffff since the Background Color.
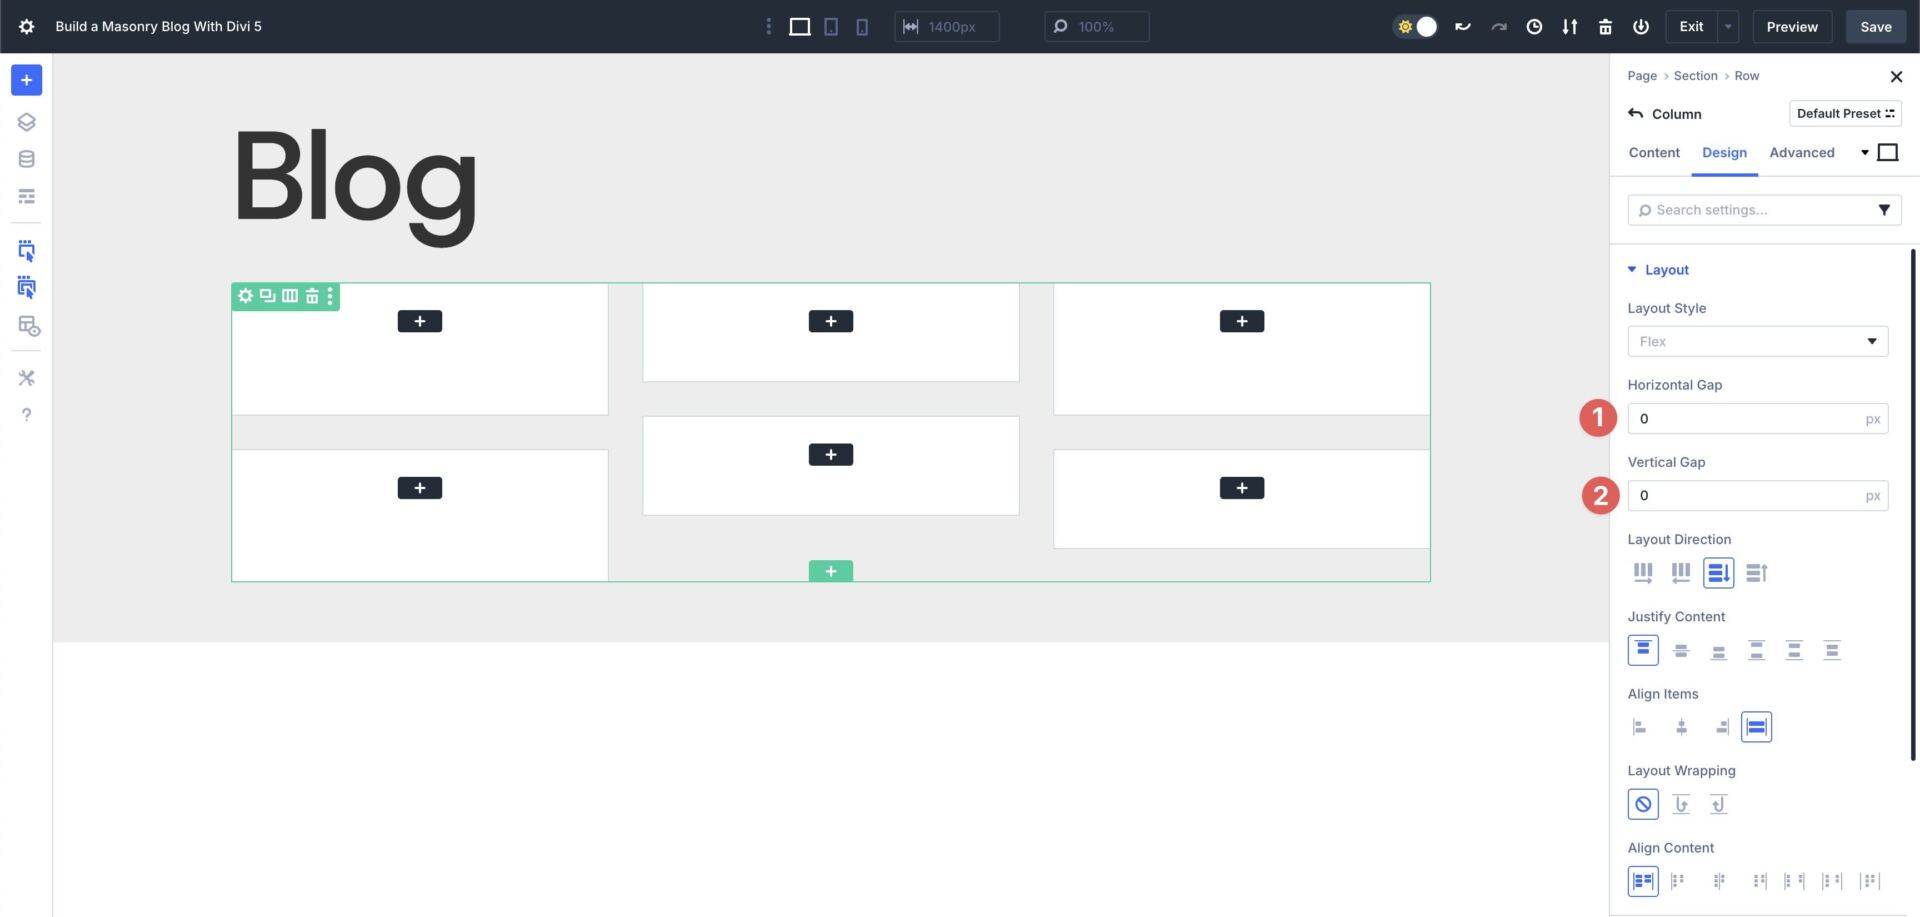
Next, navigate to the Design tab. Make larger the Layout menu and set the Horizontal and Vertical Hollow to 0. Pass away all other Flex settings as is.
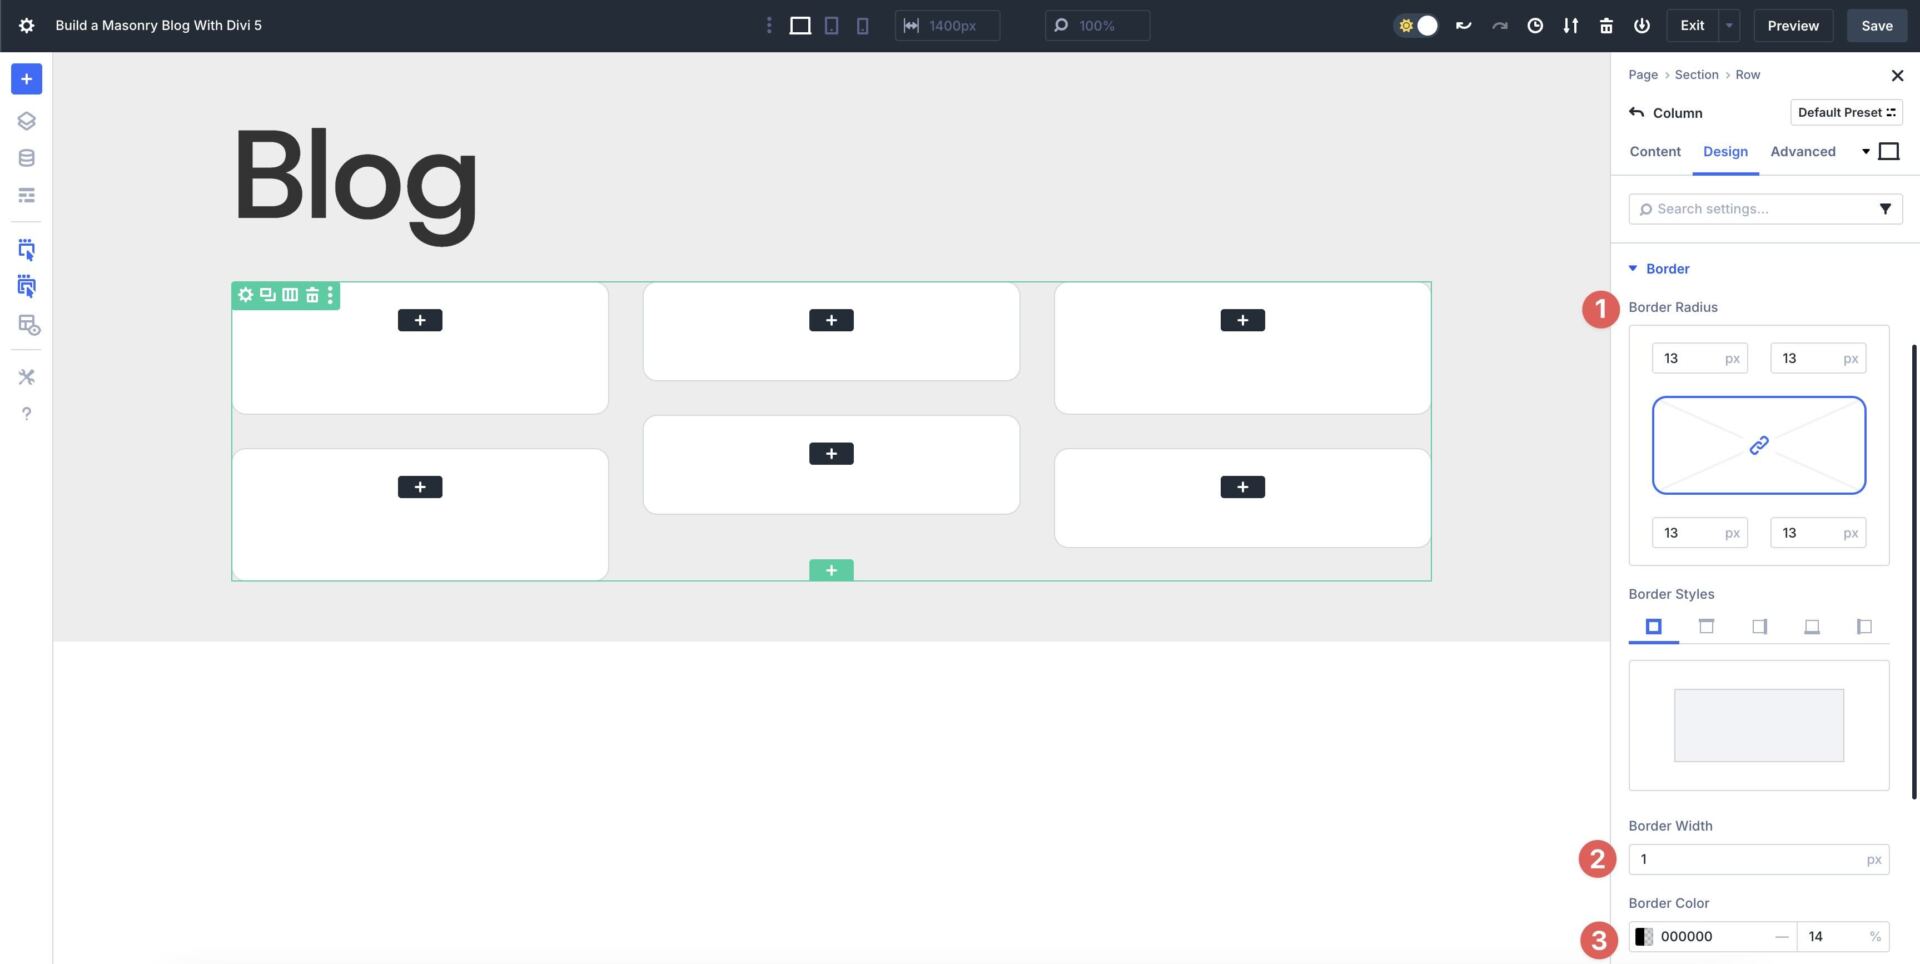
Scroll to seek out the Border menu and build up it. Enter 13px for the Border Radius, 1px since the Border Width, and #000000 since the Border Color. Regulate the Border’s Opacity to 14%.
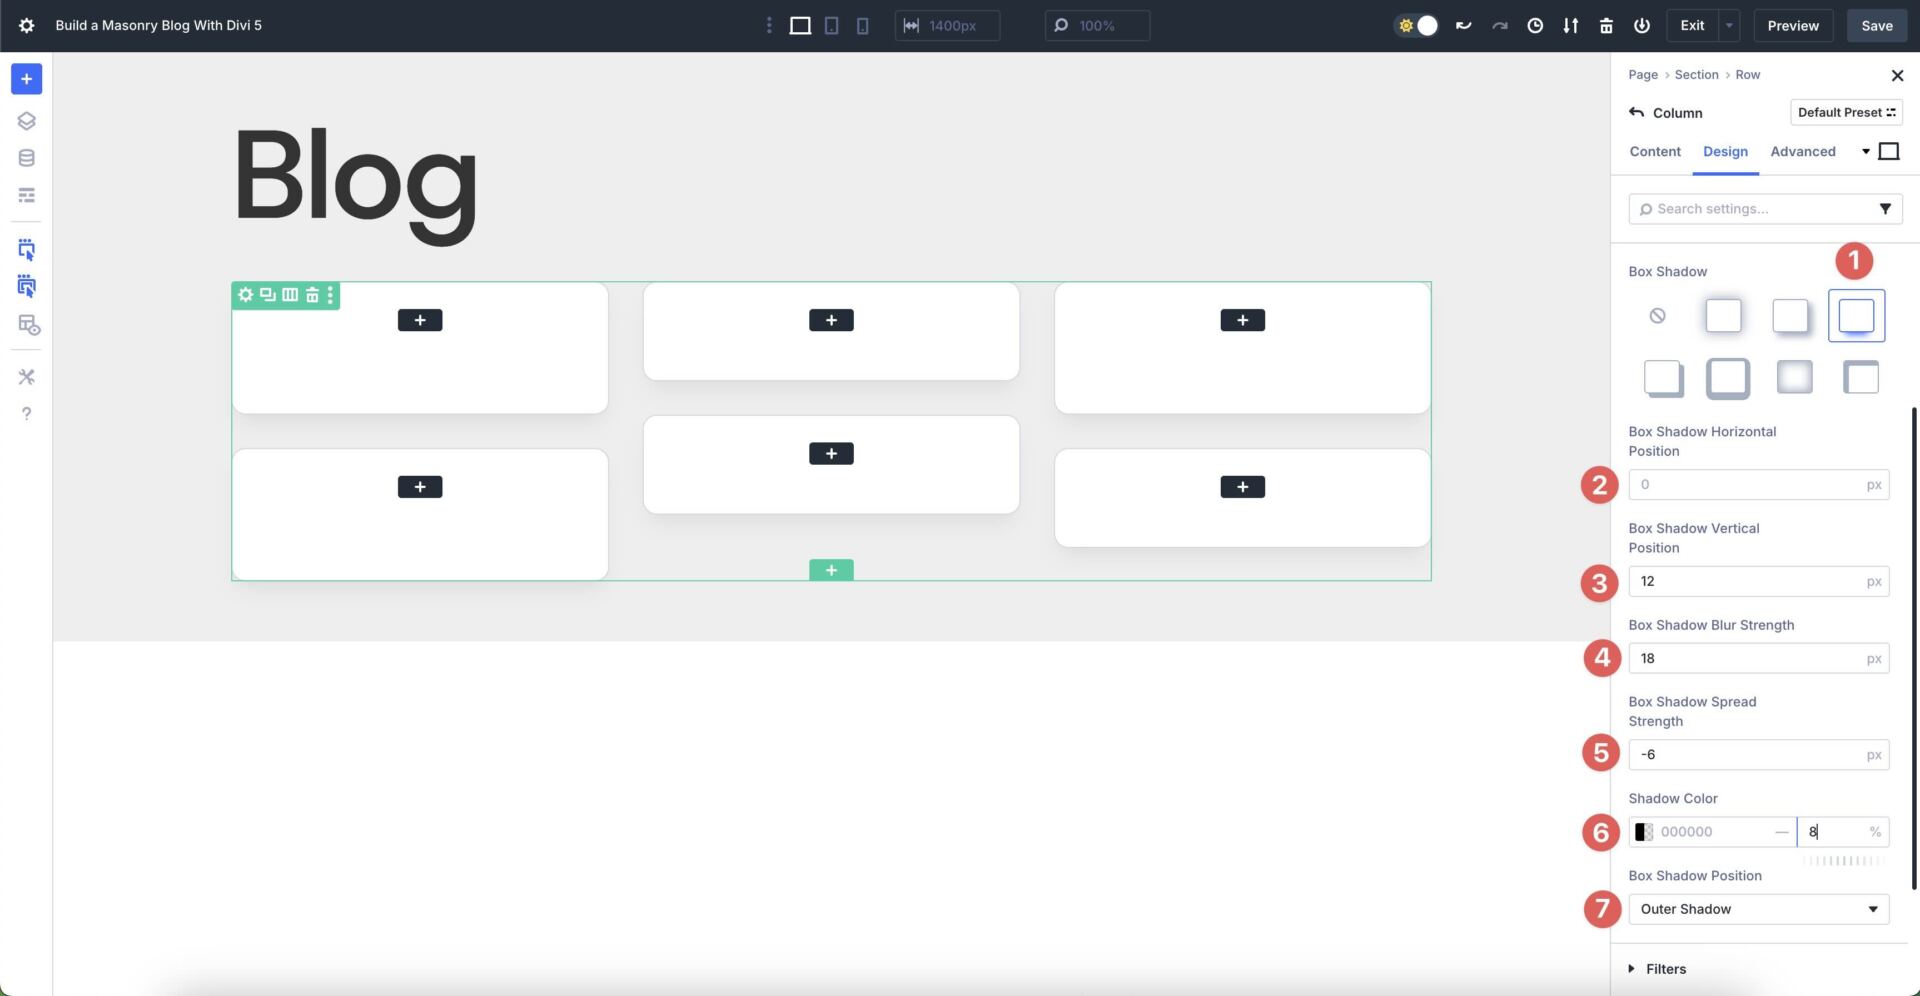
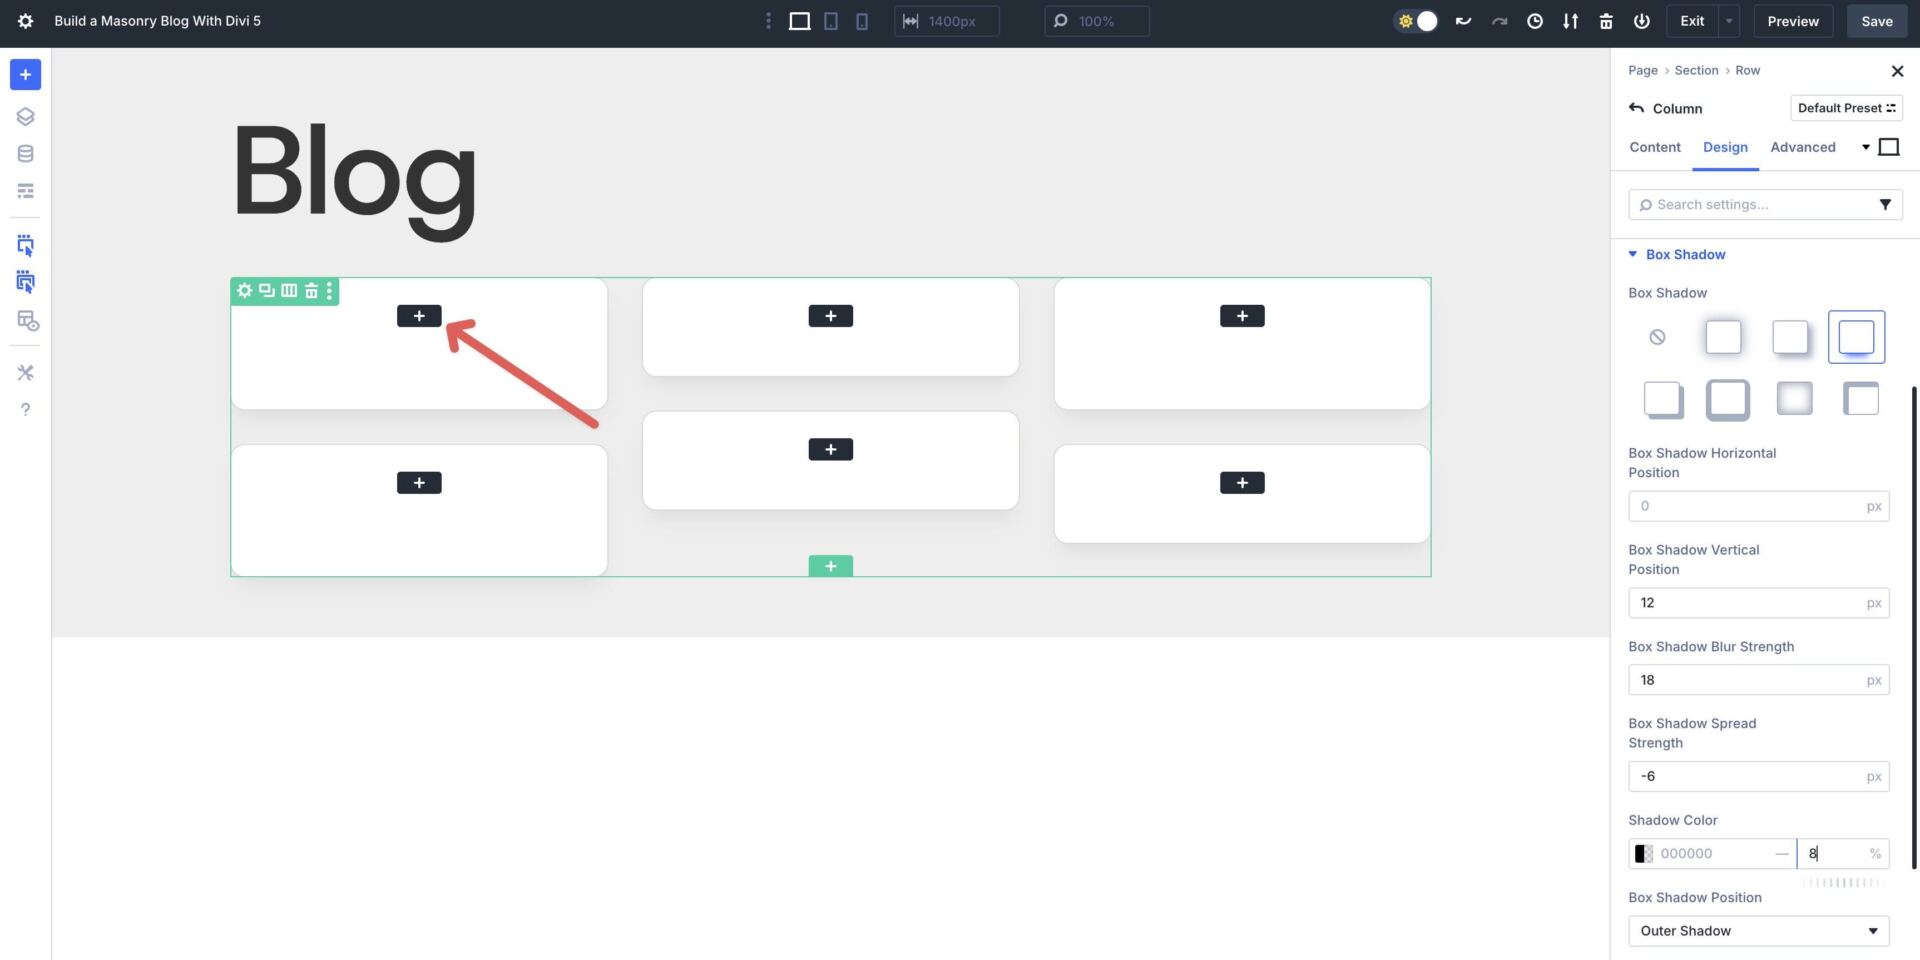
Now we’ll add a Box Shadow to the Loop column. Make a selection Preset 3 inside the Box Shadow field. Set the Box Shadow Horizontal Position to 0px and the Vertical Position to 12px. Enter 18px inside the Box Shadow Blur Power field and -6px inside the Box Shadow Spread Power. Set the Shadow Color to #000000 with an 8% Opacity. In any case, select Outer Shadow for the Box Shadow Position.
Now, we will get began together with content material subject matter to the Loop.
Add A Staff Module
Click on on into the principle Staff products. Click on at the black “+” icon so to upload the principle module.
When the Insert Module Or Row modal turns out, click on on so to upload a Staff module.

Inside the Staff module’s Content material subject matter tab, build up the Background menu. Choose the Background Image tab, click on at the Dynamic Content material subject matter icon, and select Loop Featured Image.
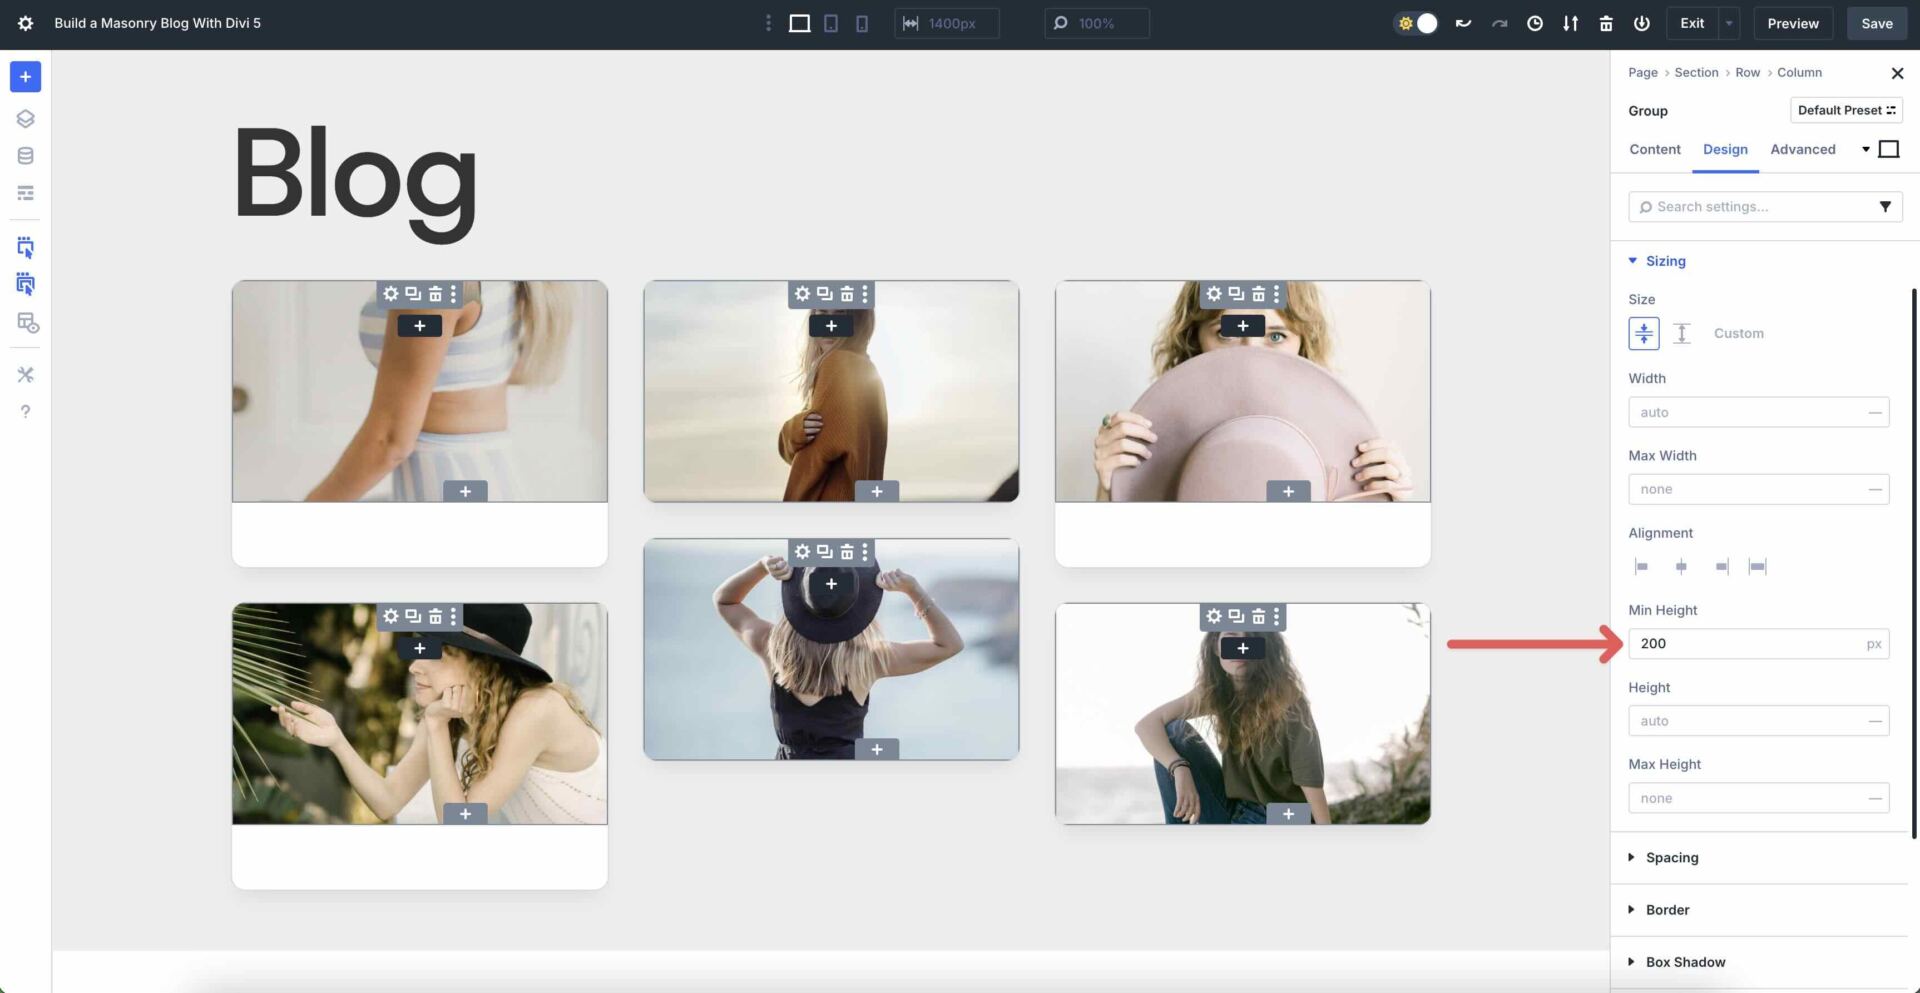
Click on at the Design tab and then build up the Sizing menu. Inside the Min Most sensible field, add 200px.
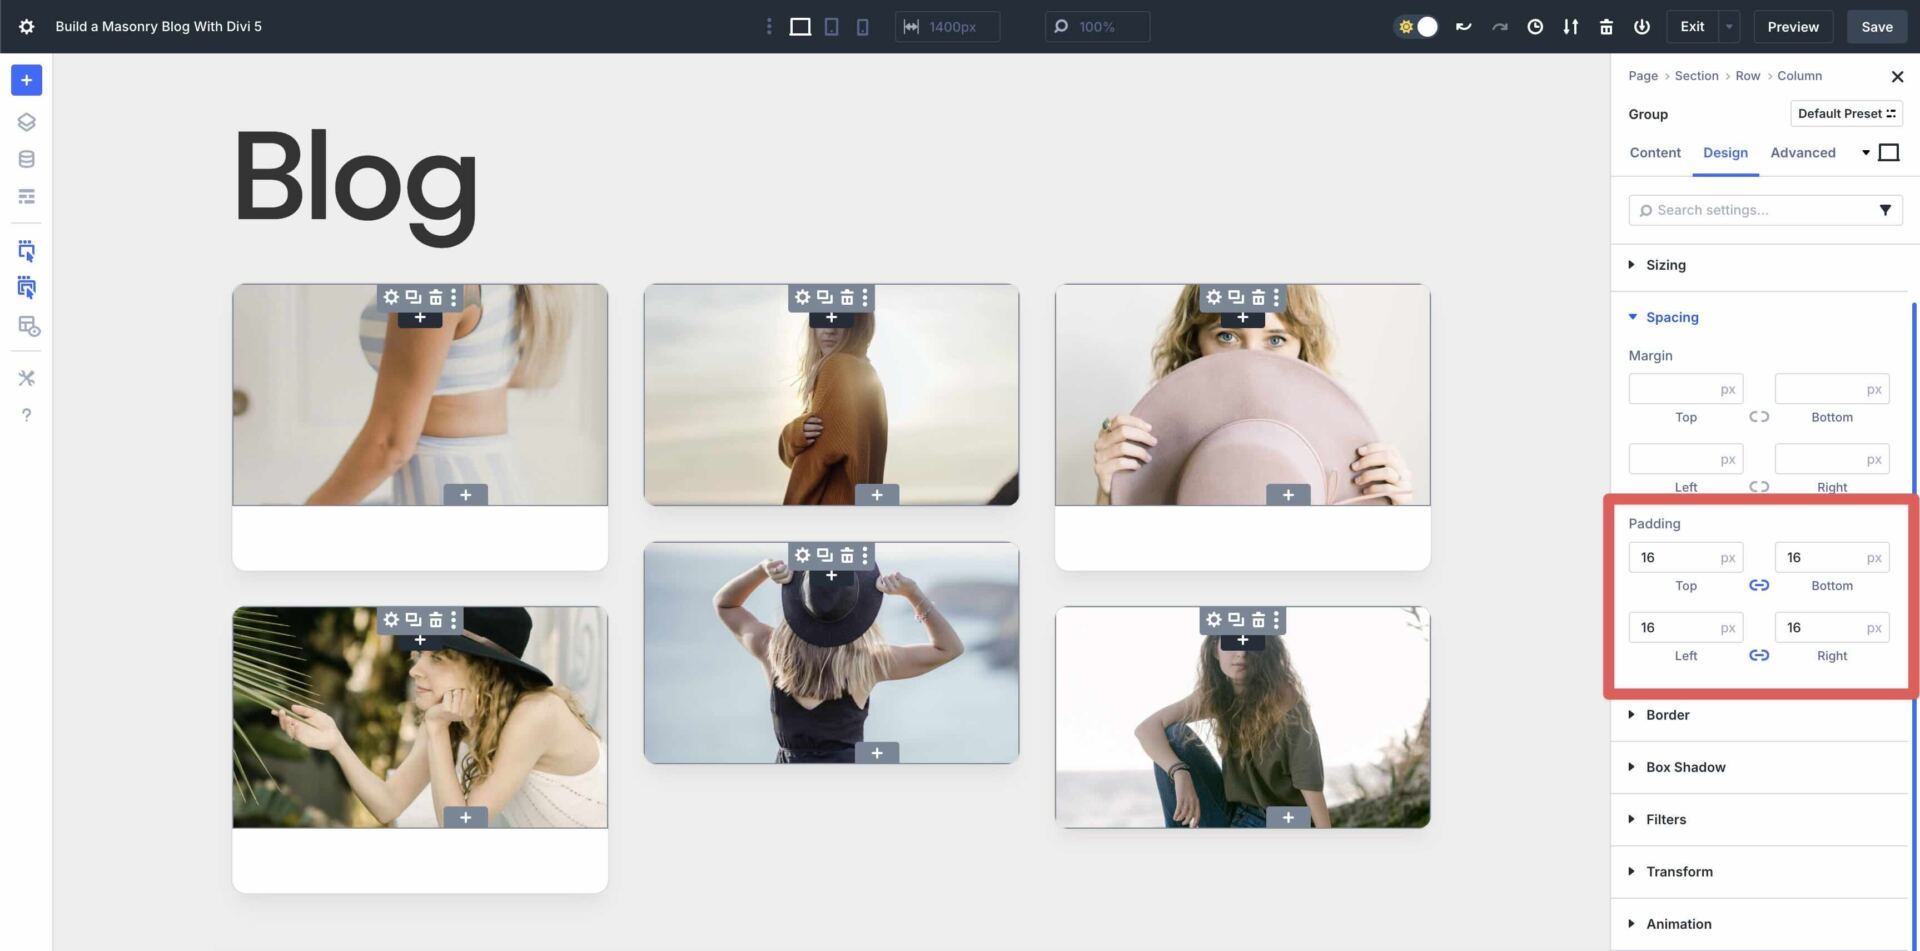
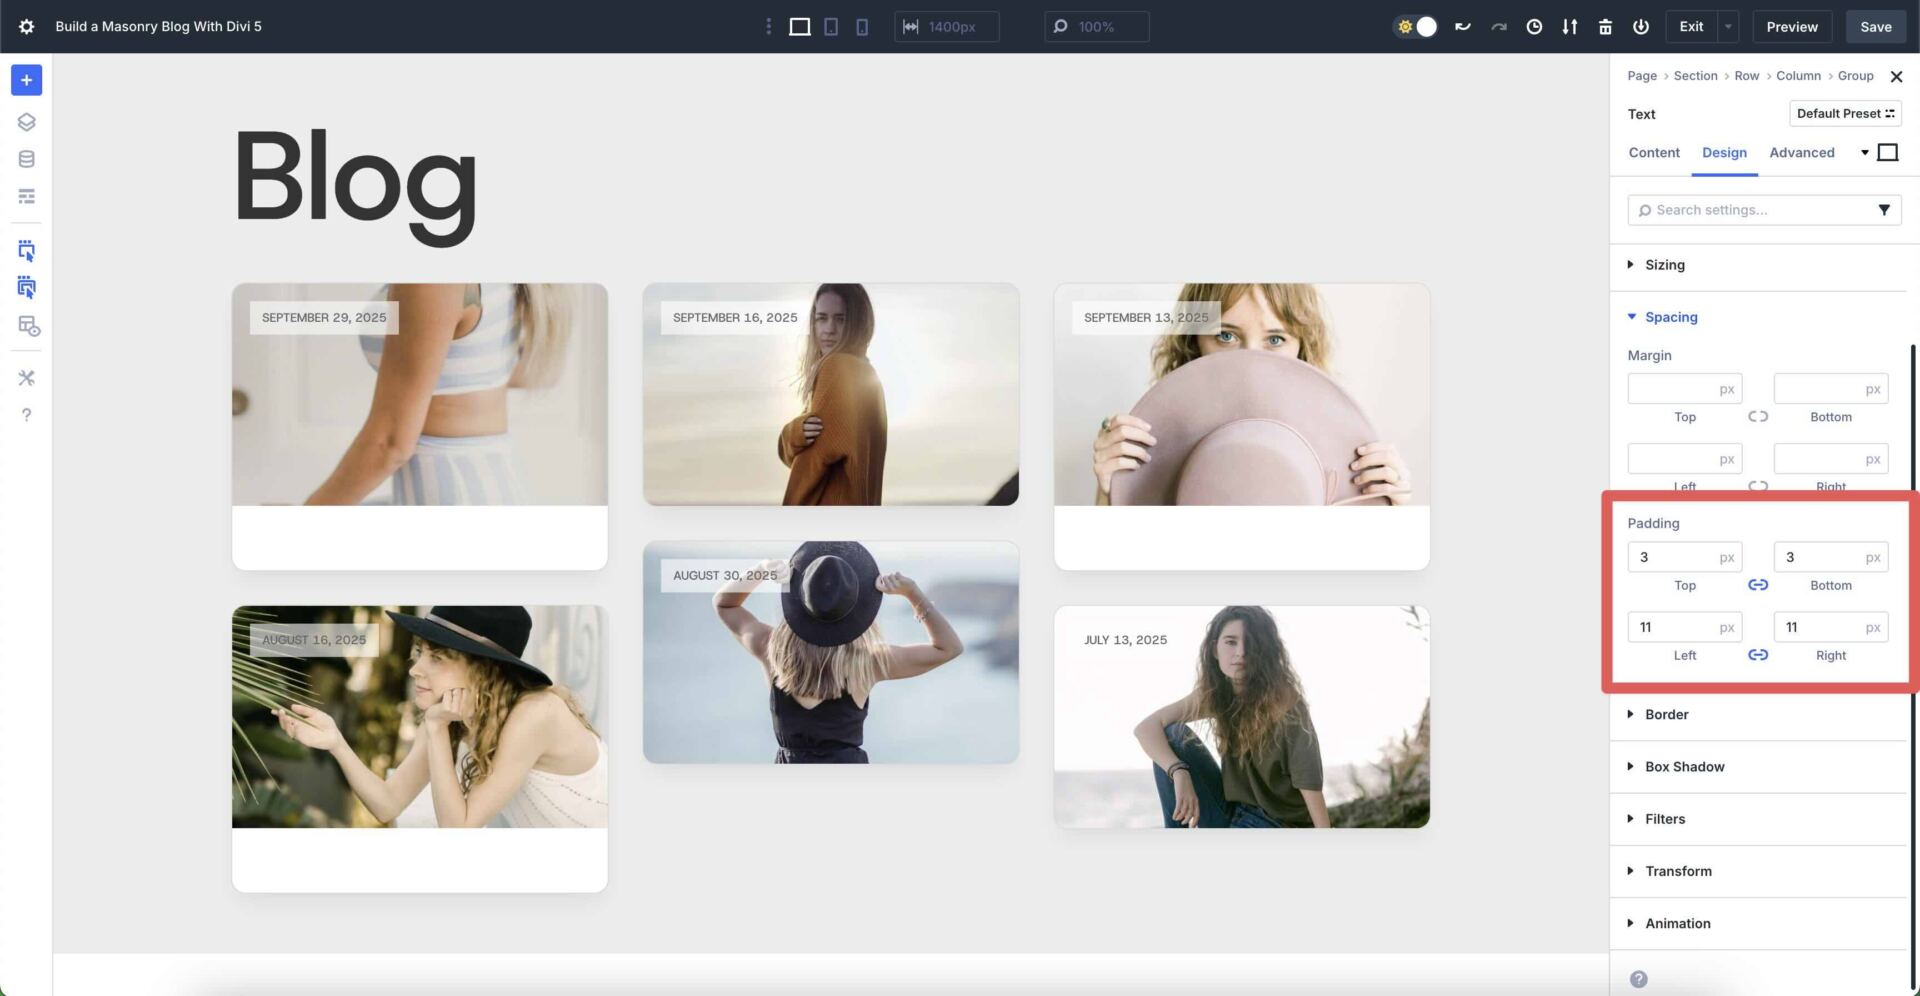
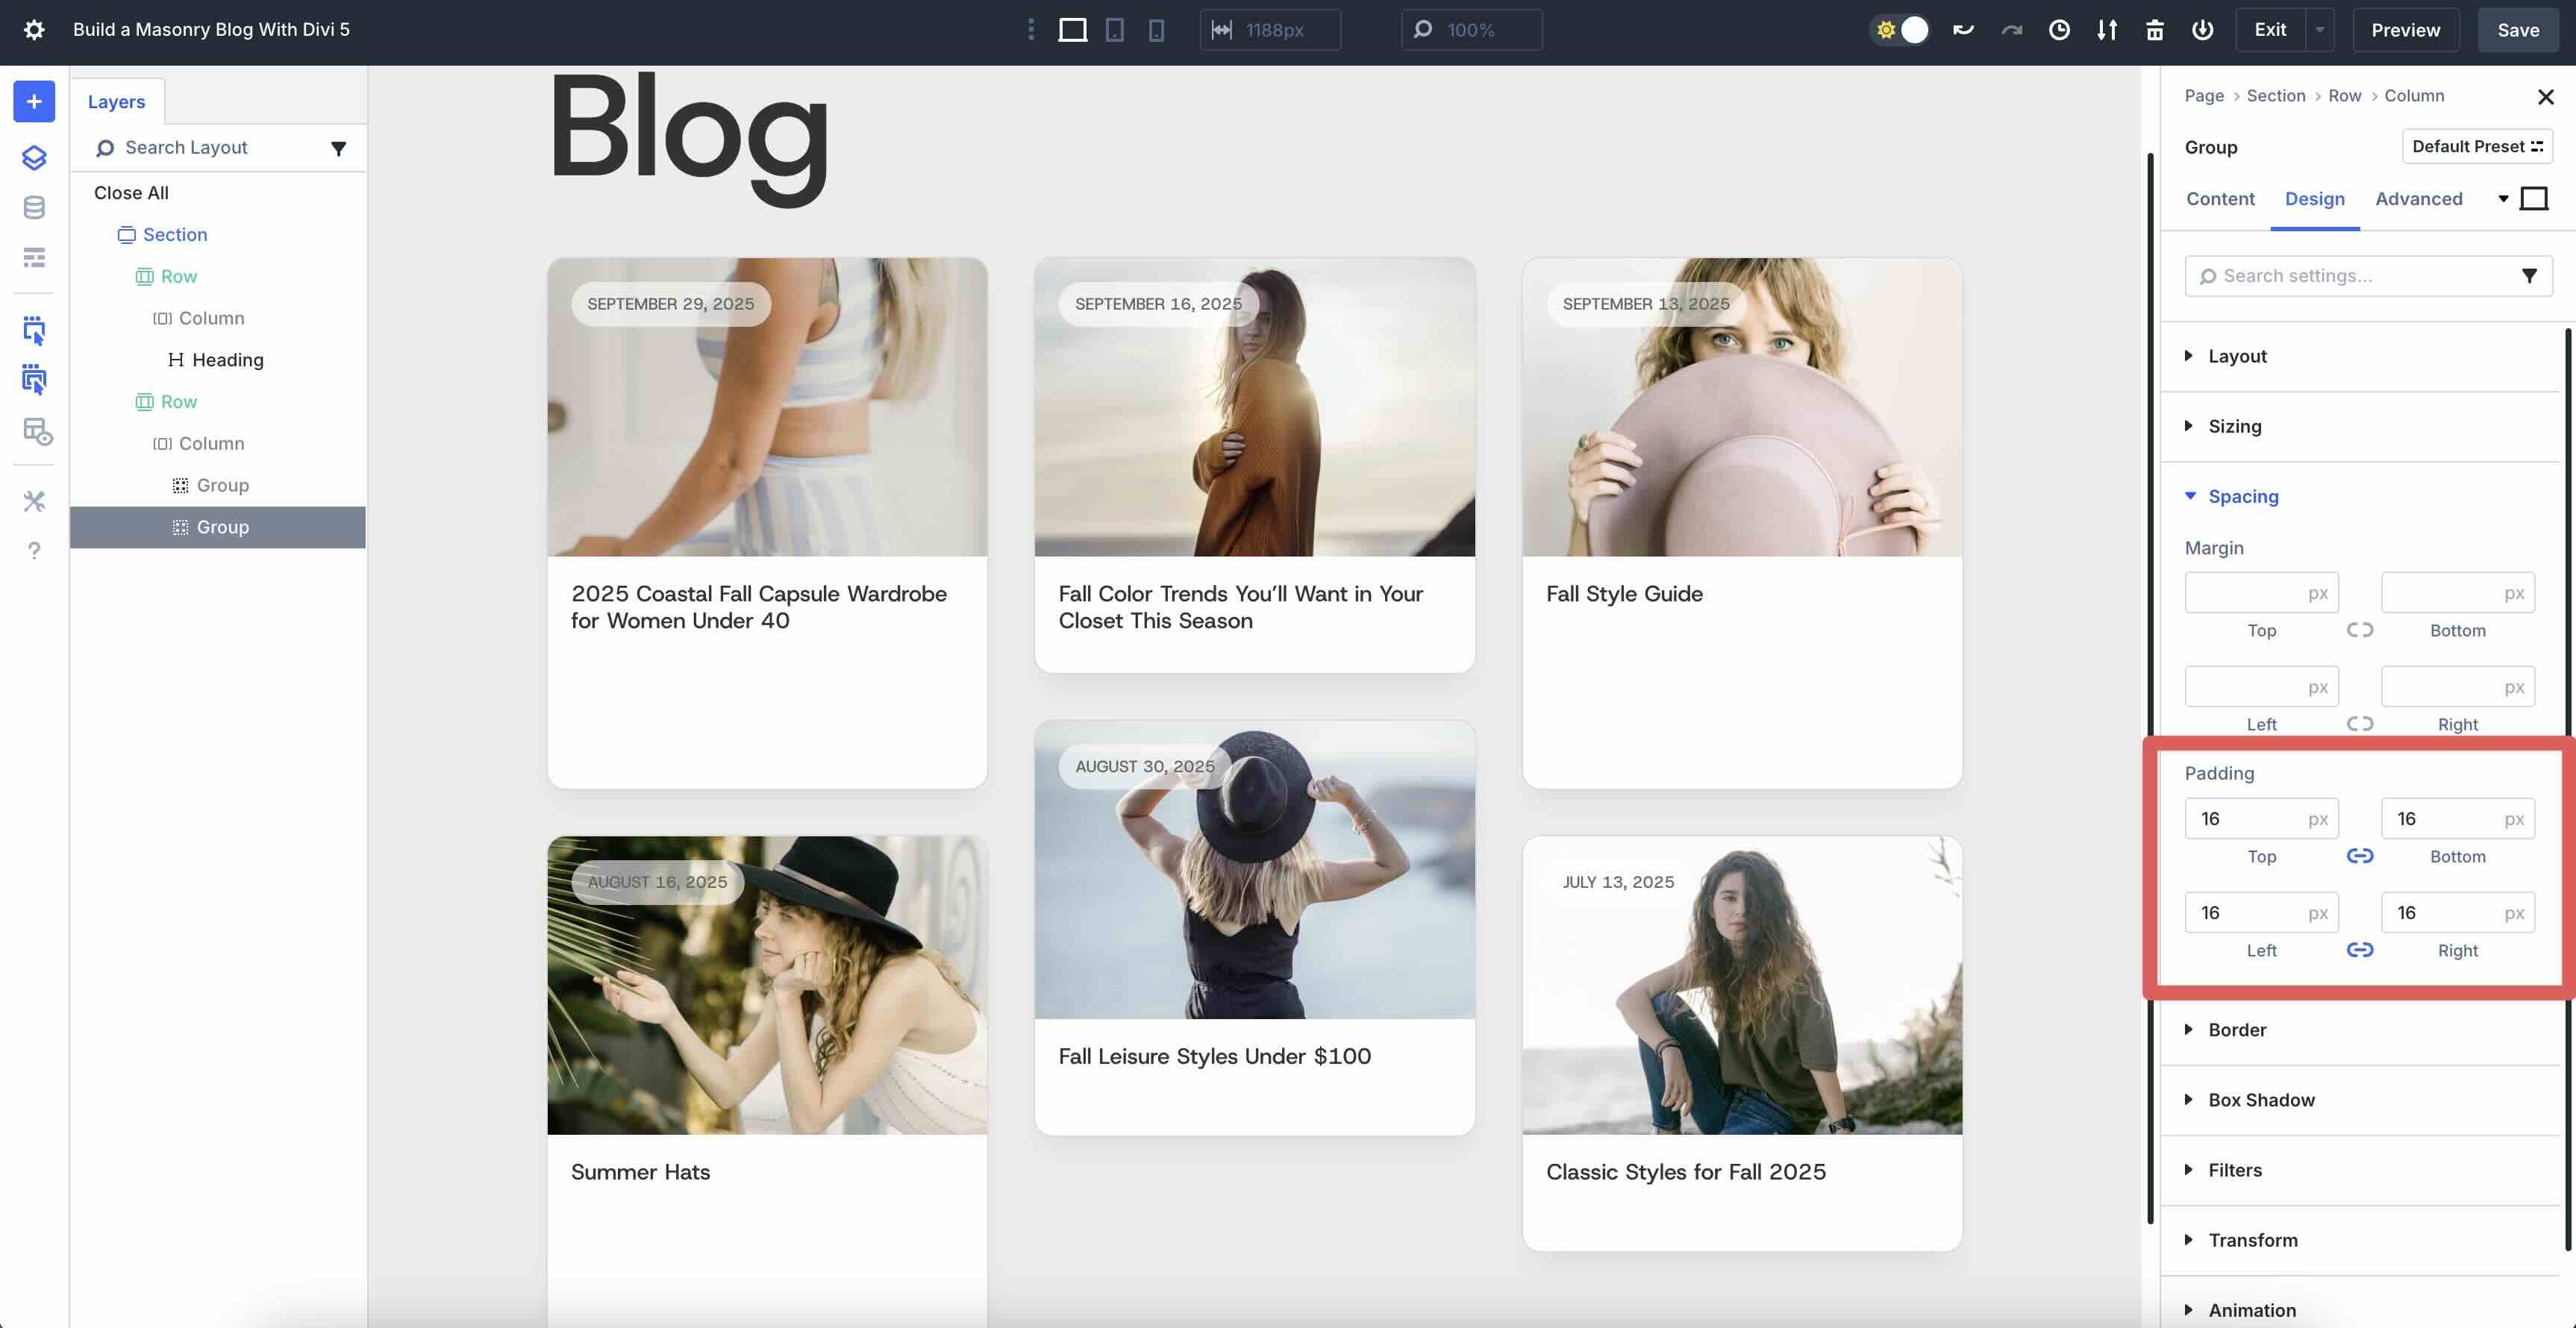
Now, build up the Spacing menu. Enter 16px Padding to all 4 sides (top, bottom, left, and correct).
Add A Text Module
Click on at the black “+” icon so to upload a brand spanking new module to the Staff module.
Click on on so to upload a Text module.

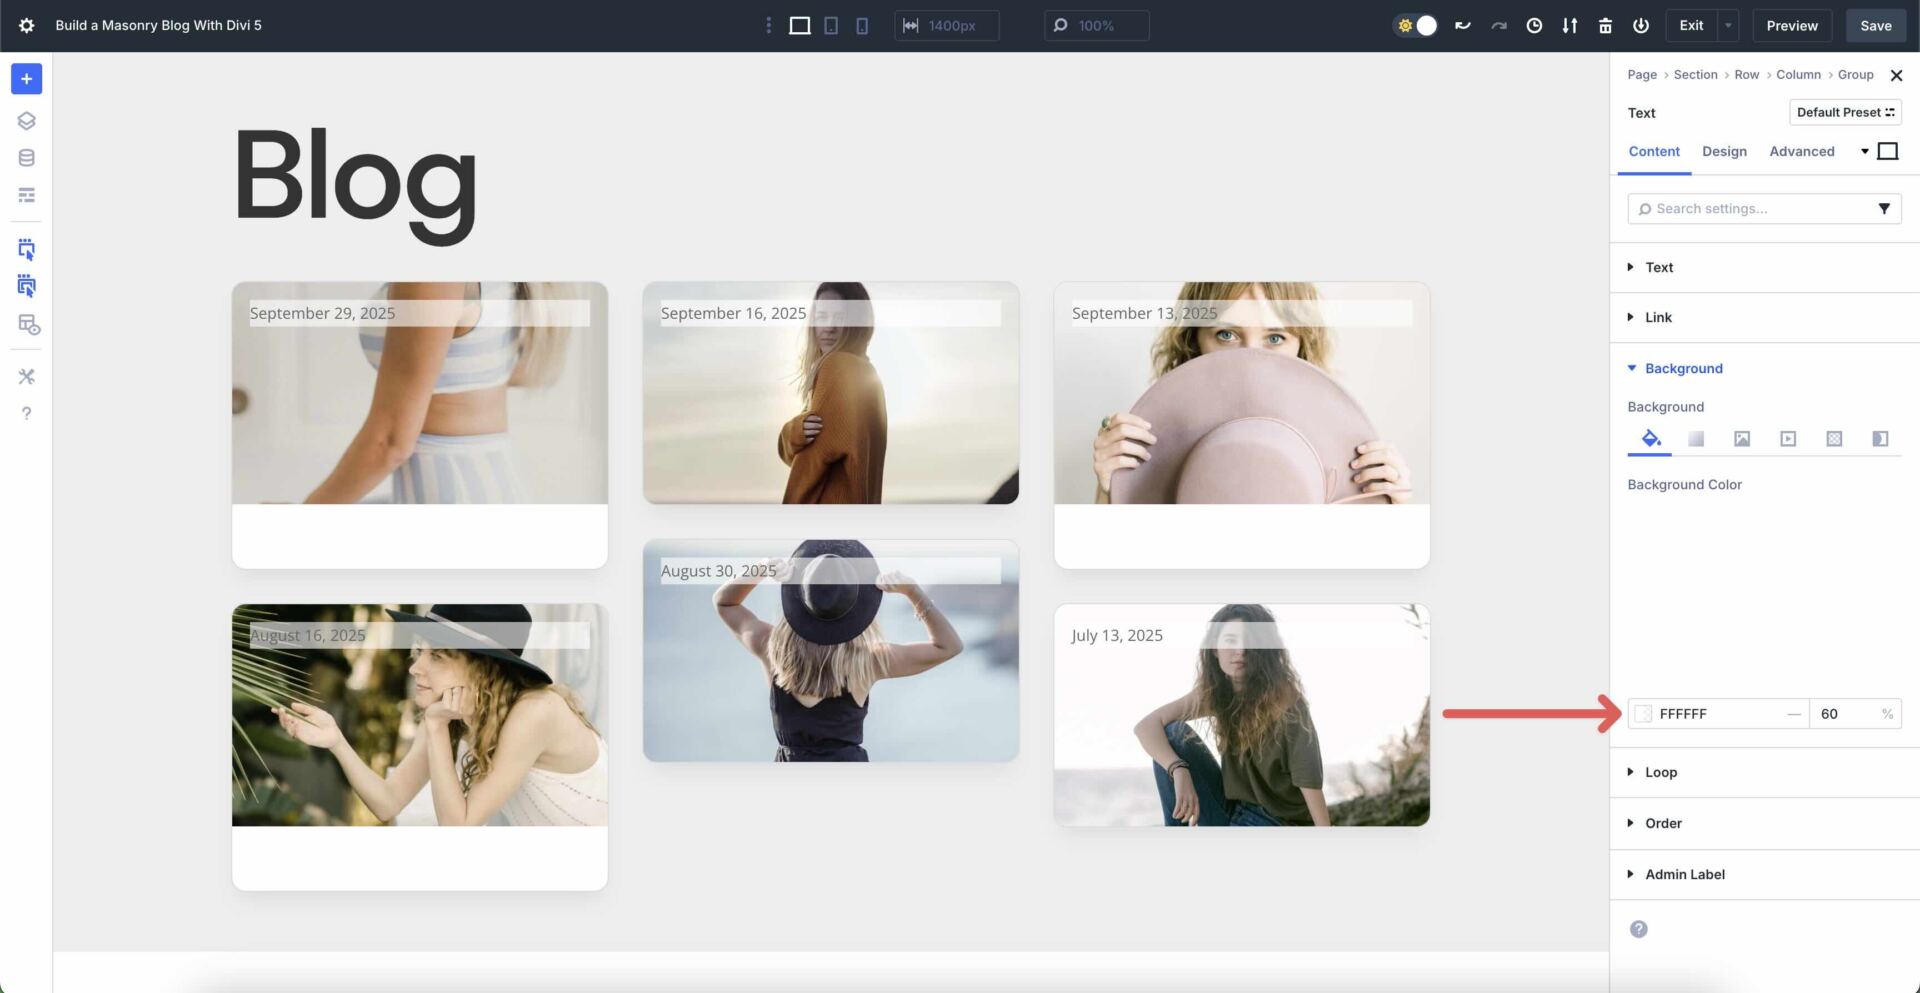
Inside the Text module’s Content material subject matter tab, click on at the Dynamic Content material subject matter icon merely above the Body field. Choose Loop Put up Date from the available possible choices.
Next, we’ll add a background colour to the text. Make larger the Background menu inside the Content material subject matter tab. Inside the Background Color field, enter #ffffff since the Background Color and set the Opacity to 60%.
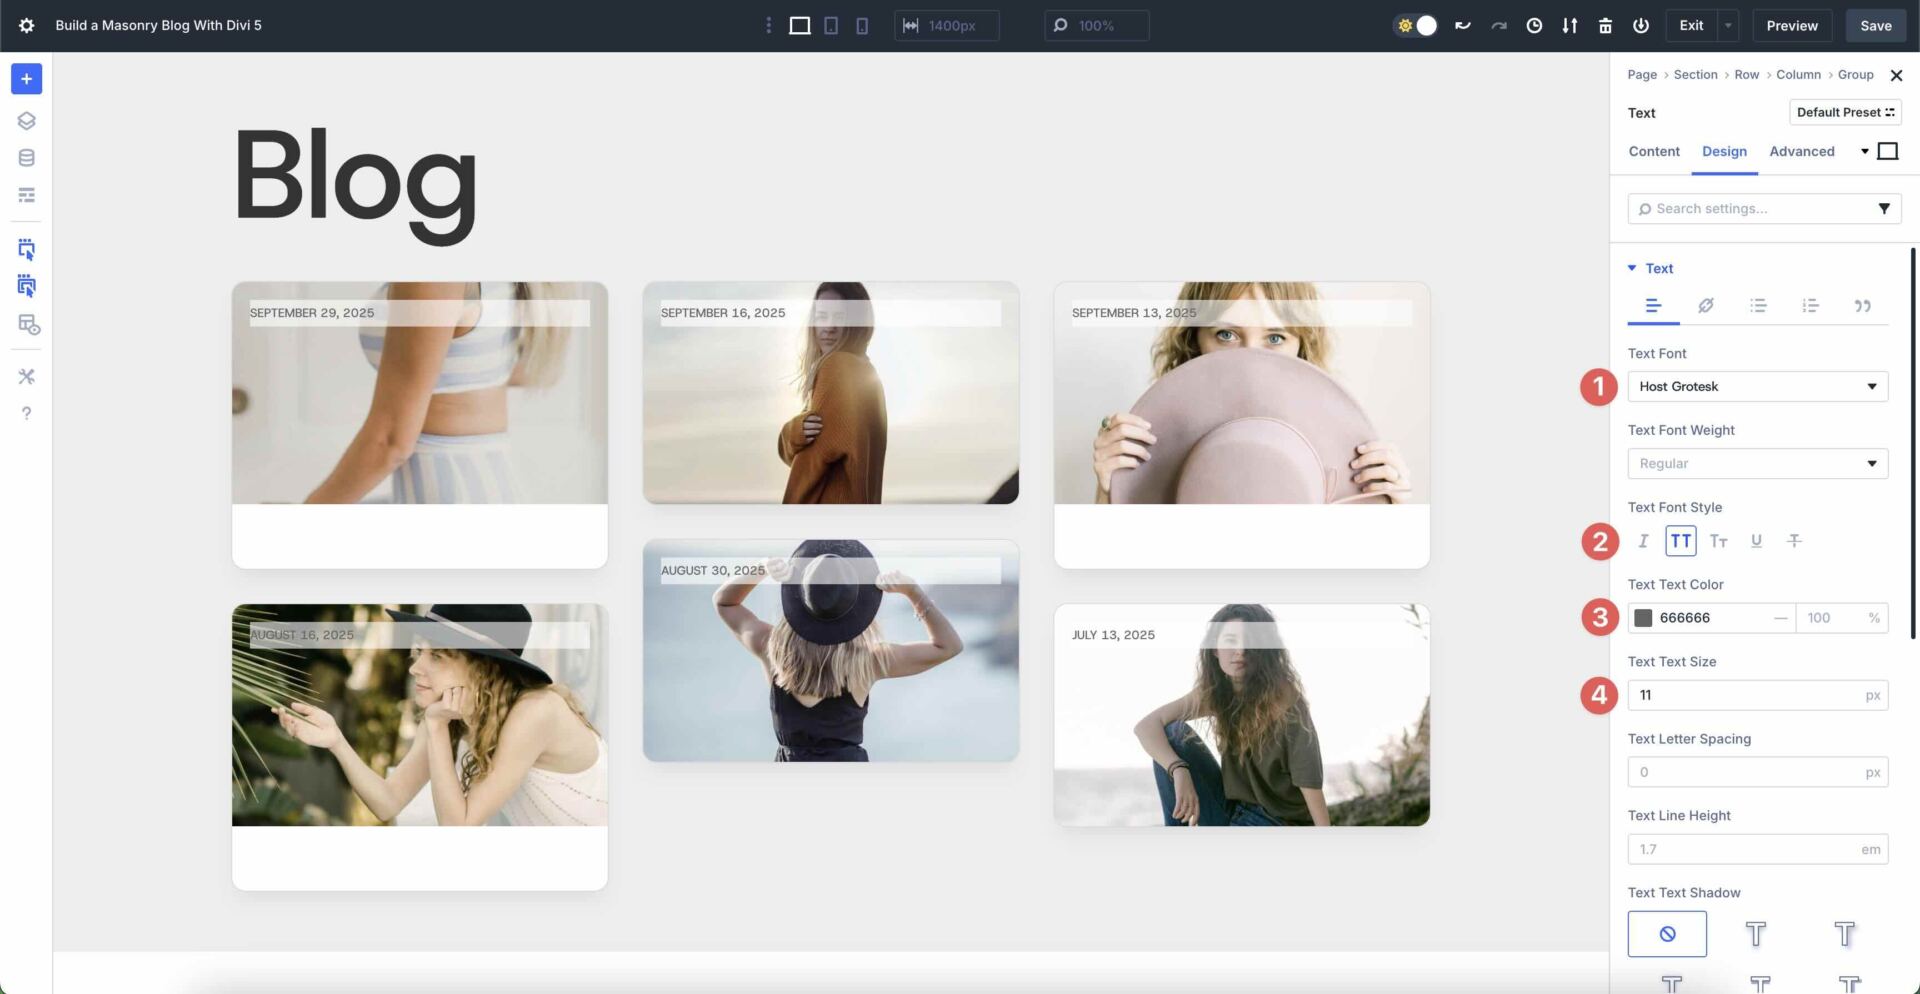
Click on at the Text module’s Design tab. Make larger the Text menu. Enter Host Grotesk since the Text Font, Uppercase since the Text Font Style, and #666666 since the Text Text Color. Set the Text Text Size to 11px.
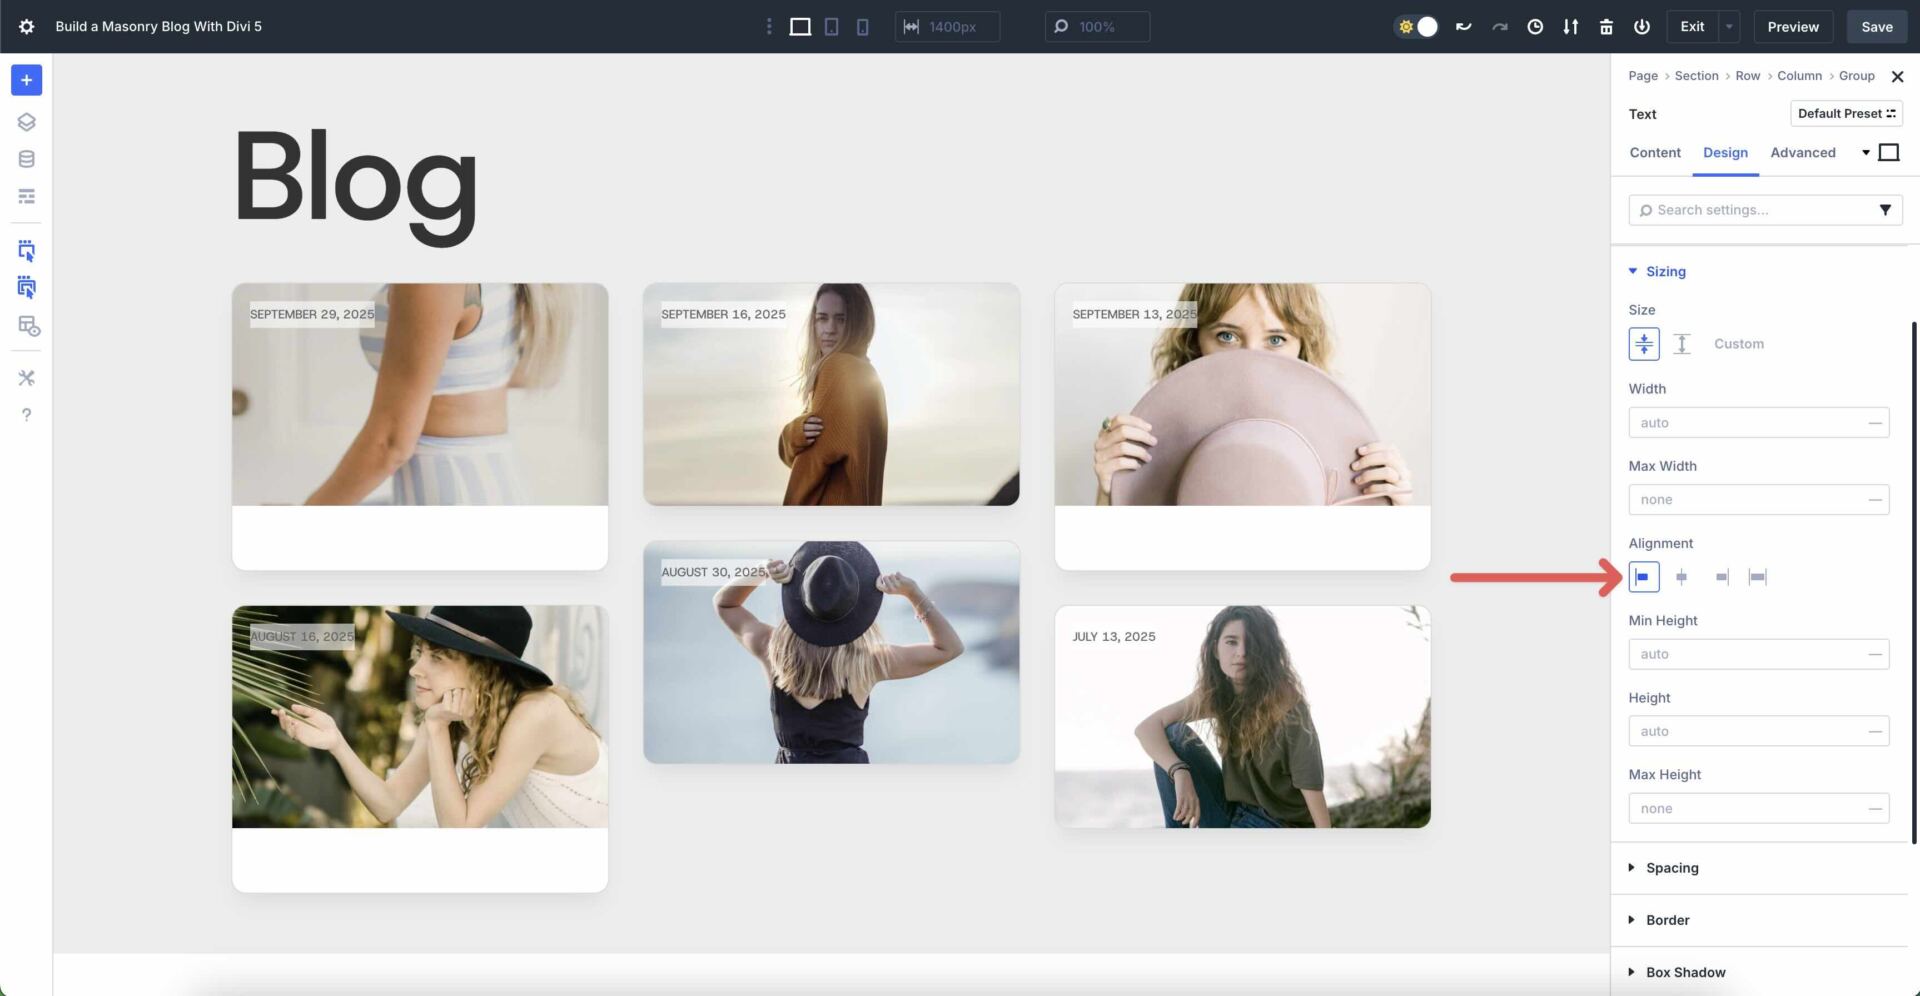
Make larger the Sizing menu. Set the Alignment to Get began.
Inside the Spacing settings, add 3px Padding to the top and bottom and 11px Padding to the left and correct.
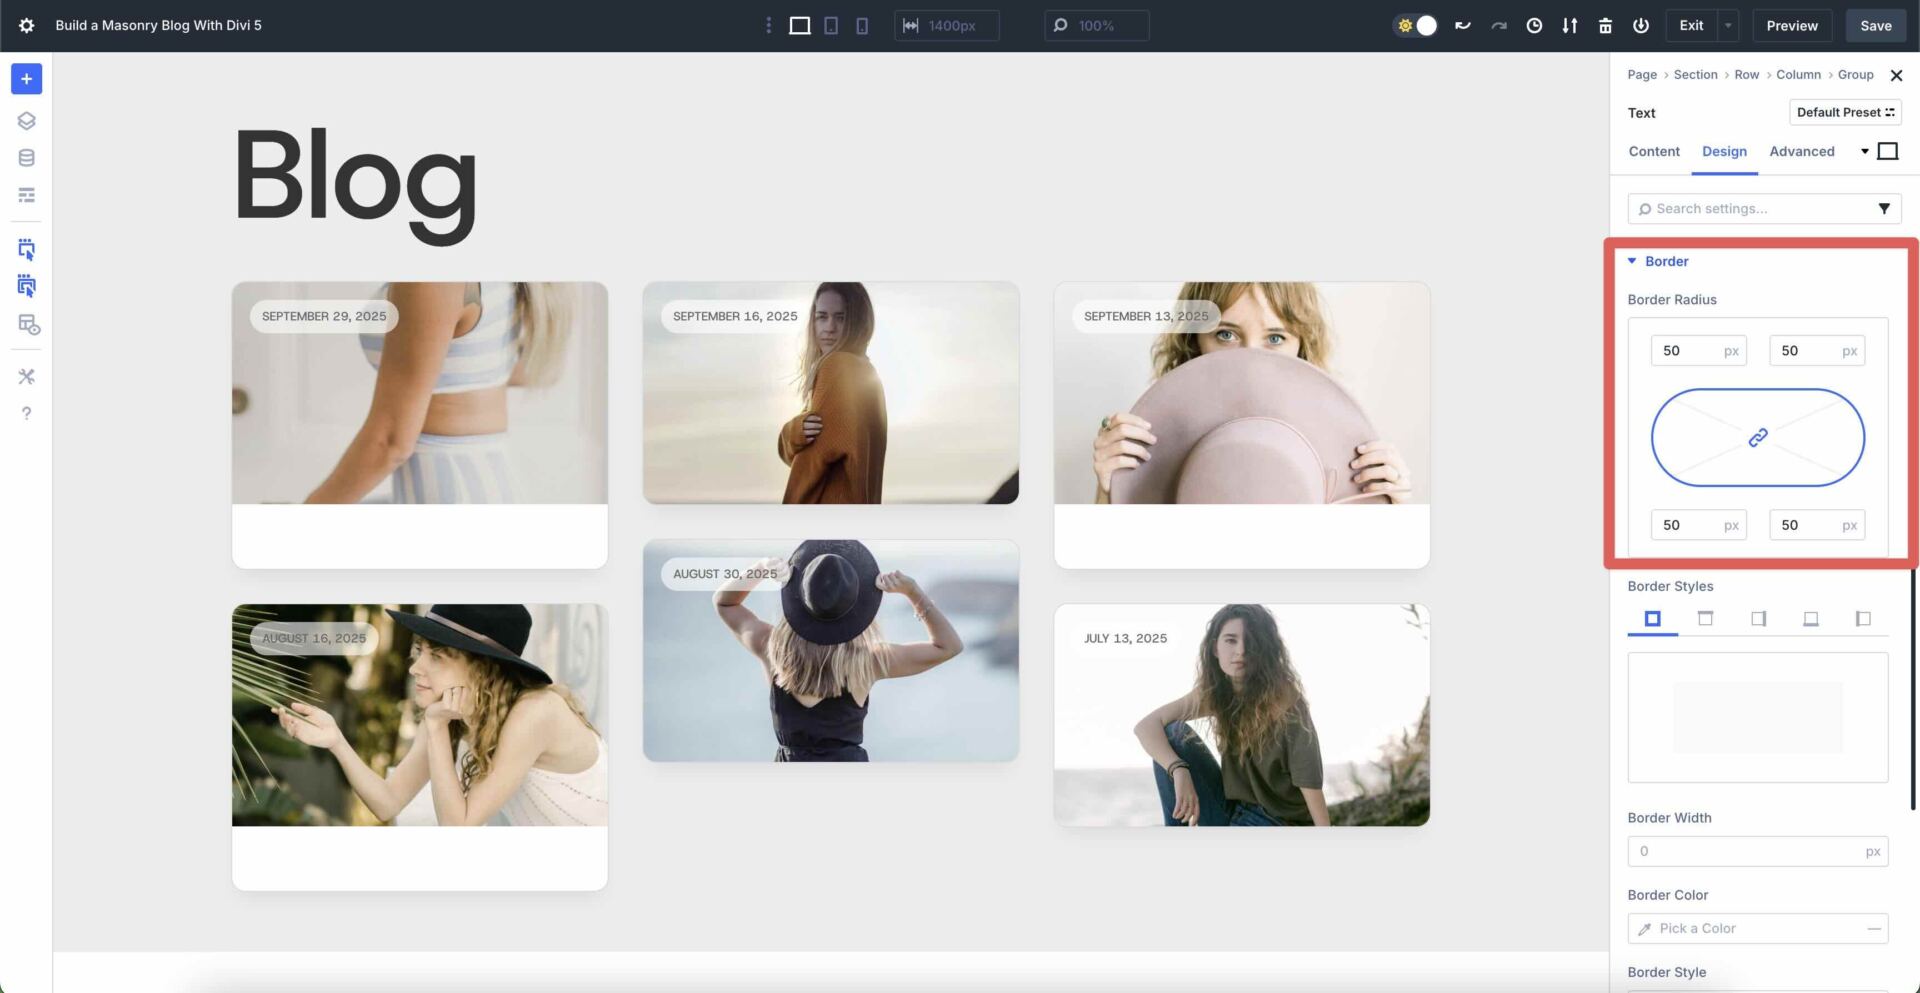
In any case, build up the Border menu. Add 50px Border Radius to the Text module.
Add Every other Staff Module
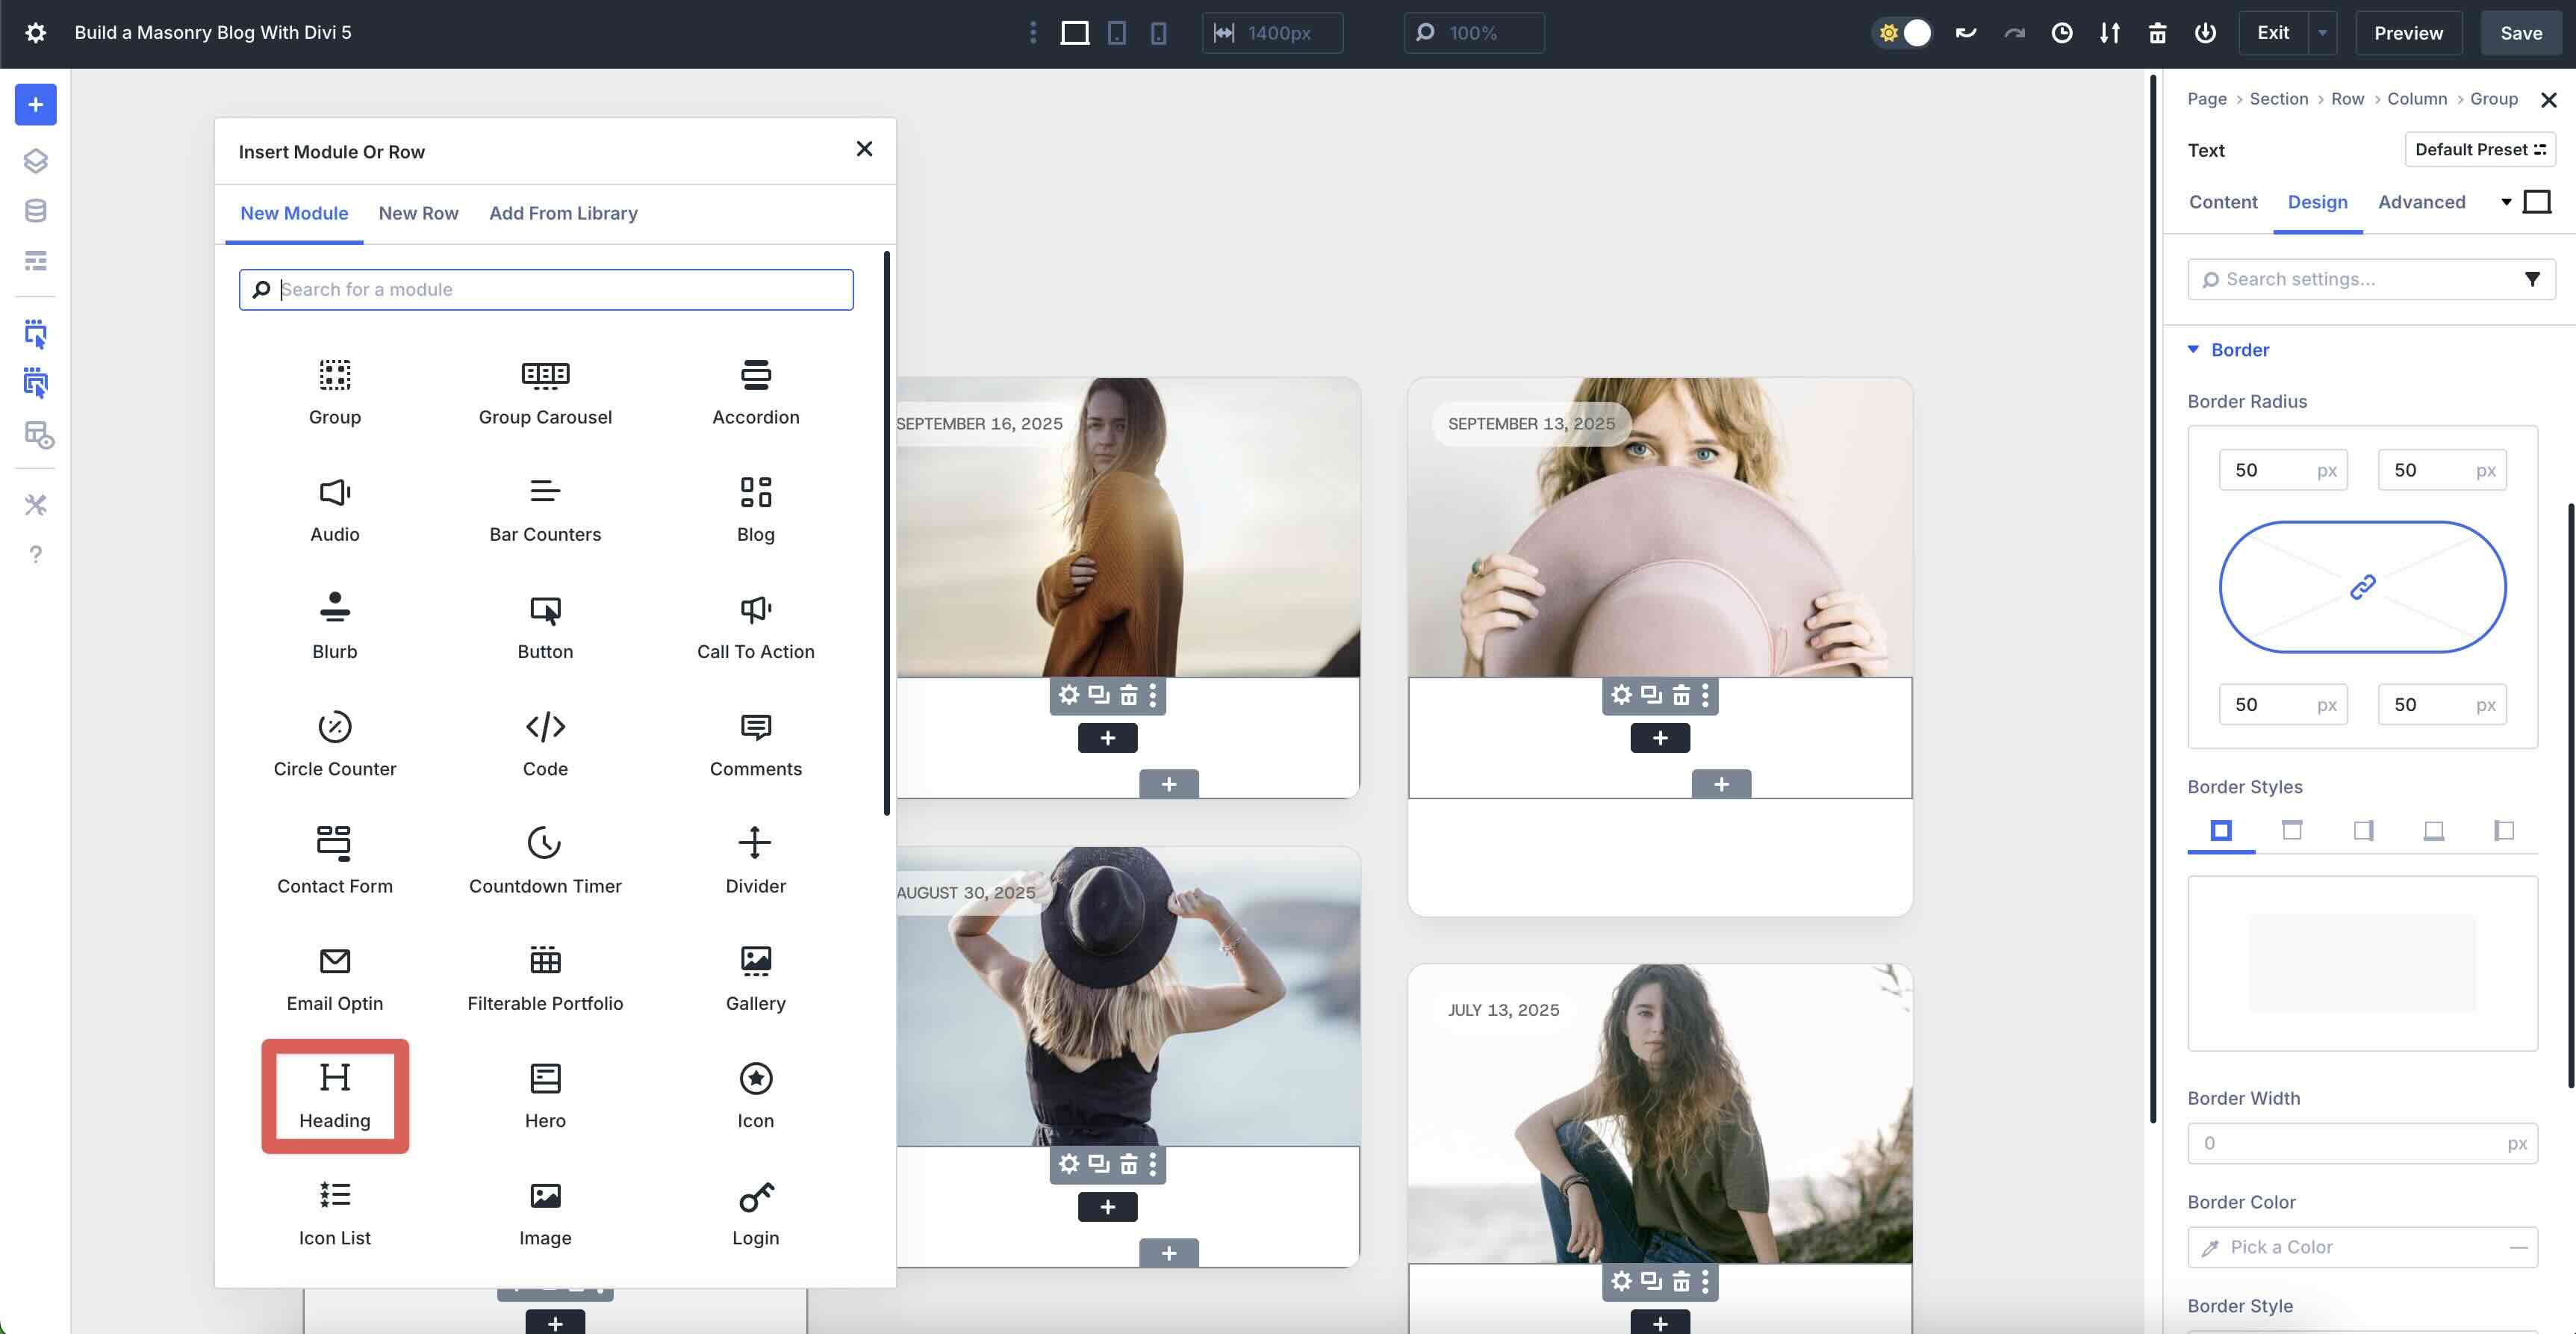
Now, let’s add another Staff module to the principle Staff products in our Loop. Once added, click on on so to upload a Heading module to the Staff.
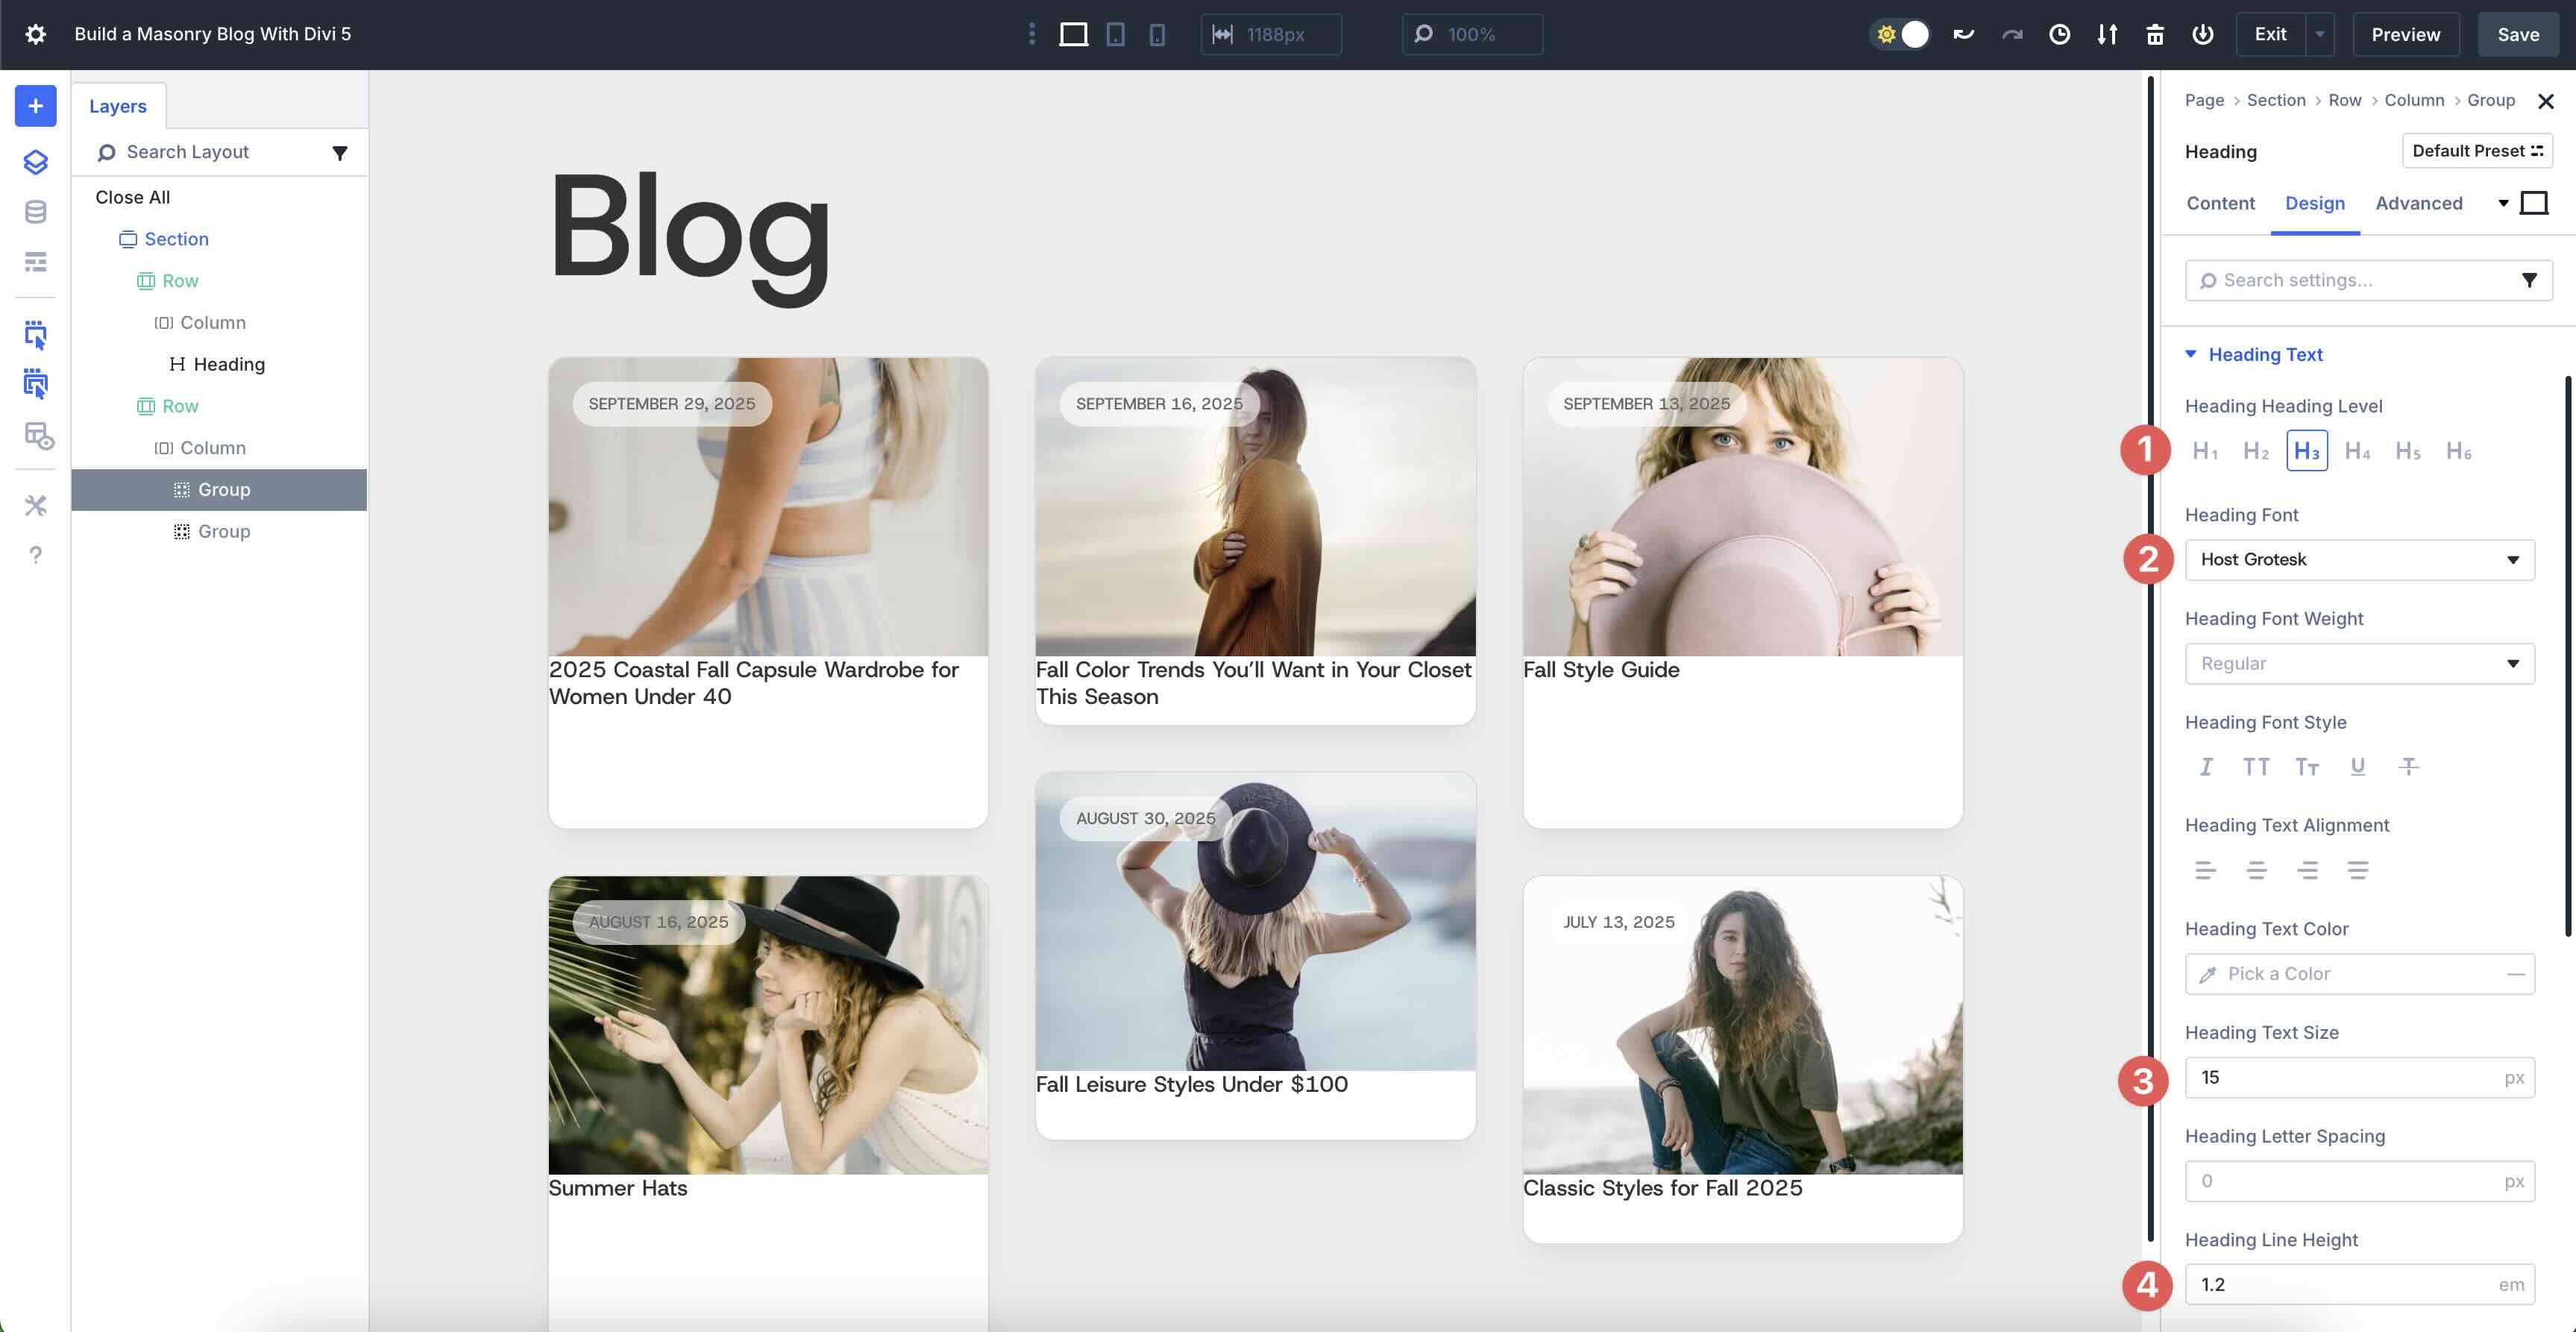
When the Heading module’s settings appear, click on at the Dynamic Content material subject matter icon above the Heading field. Choose Loop Post Identify from the decisions.
Navigate to the Heading module’s Design tab. Make larger the Heading Text menu and select h3 since the Heading Stage. Make a selection Host Grotesk since the Heading Font, 15px since the Heading Text Size, and 1.2em since the Heading Line Most sensible.
Faster than we switch on, we need to add some padding to the Staff module that incorporates the Heading module. Use Divi 5’s Layers View to make a choice the second Staff module. Navigate to the Design tab and scroll all of the means all the way down to the Spacing settings. Add 16px Padding on all 4 sides.
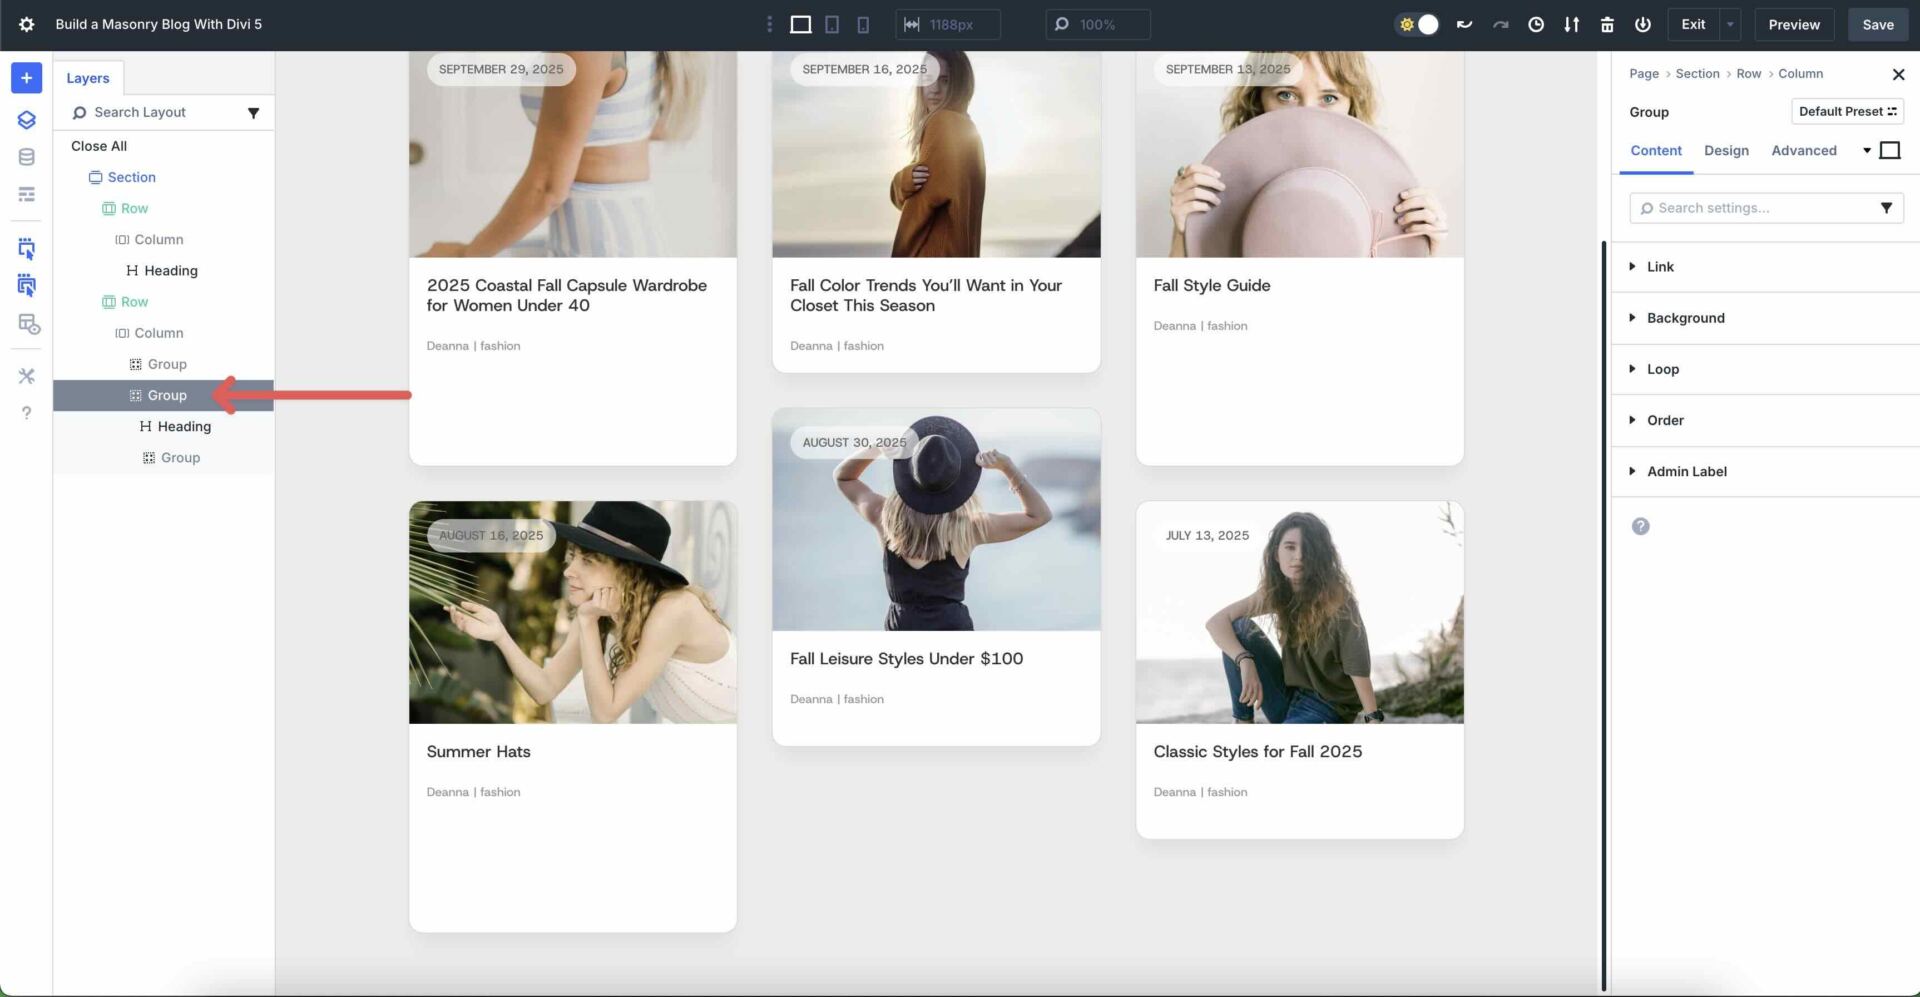
Add A third Staff Module
Next, we’ll add a third Staff module, then again we want to place it into the Staff that incorporates the Heading module. Click on at the black “+” icon so to upload a brand spanking new module. Choose the Staff module. When the Insert Row or Module modal turns out, click on on so to upload a Text module.
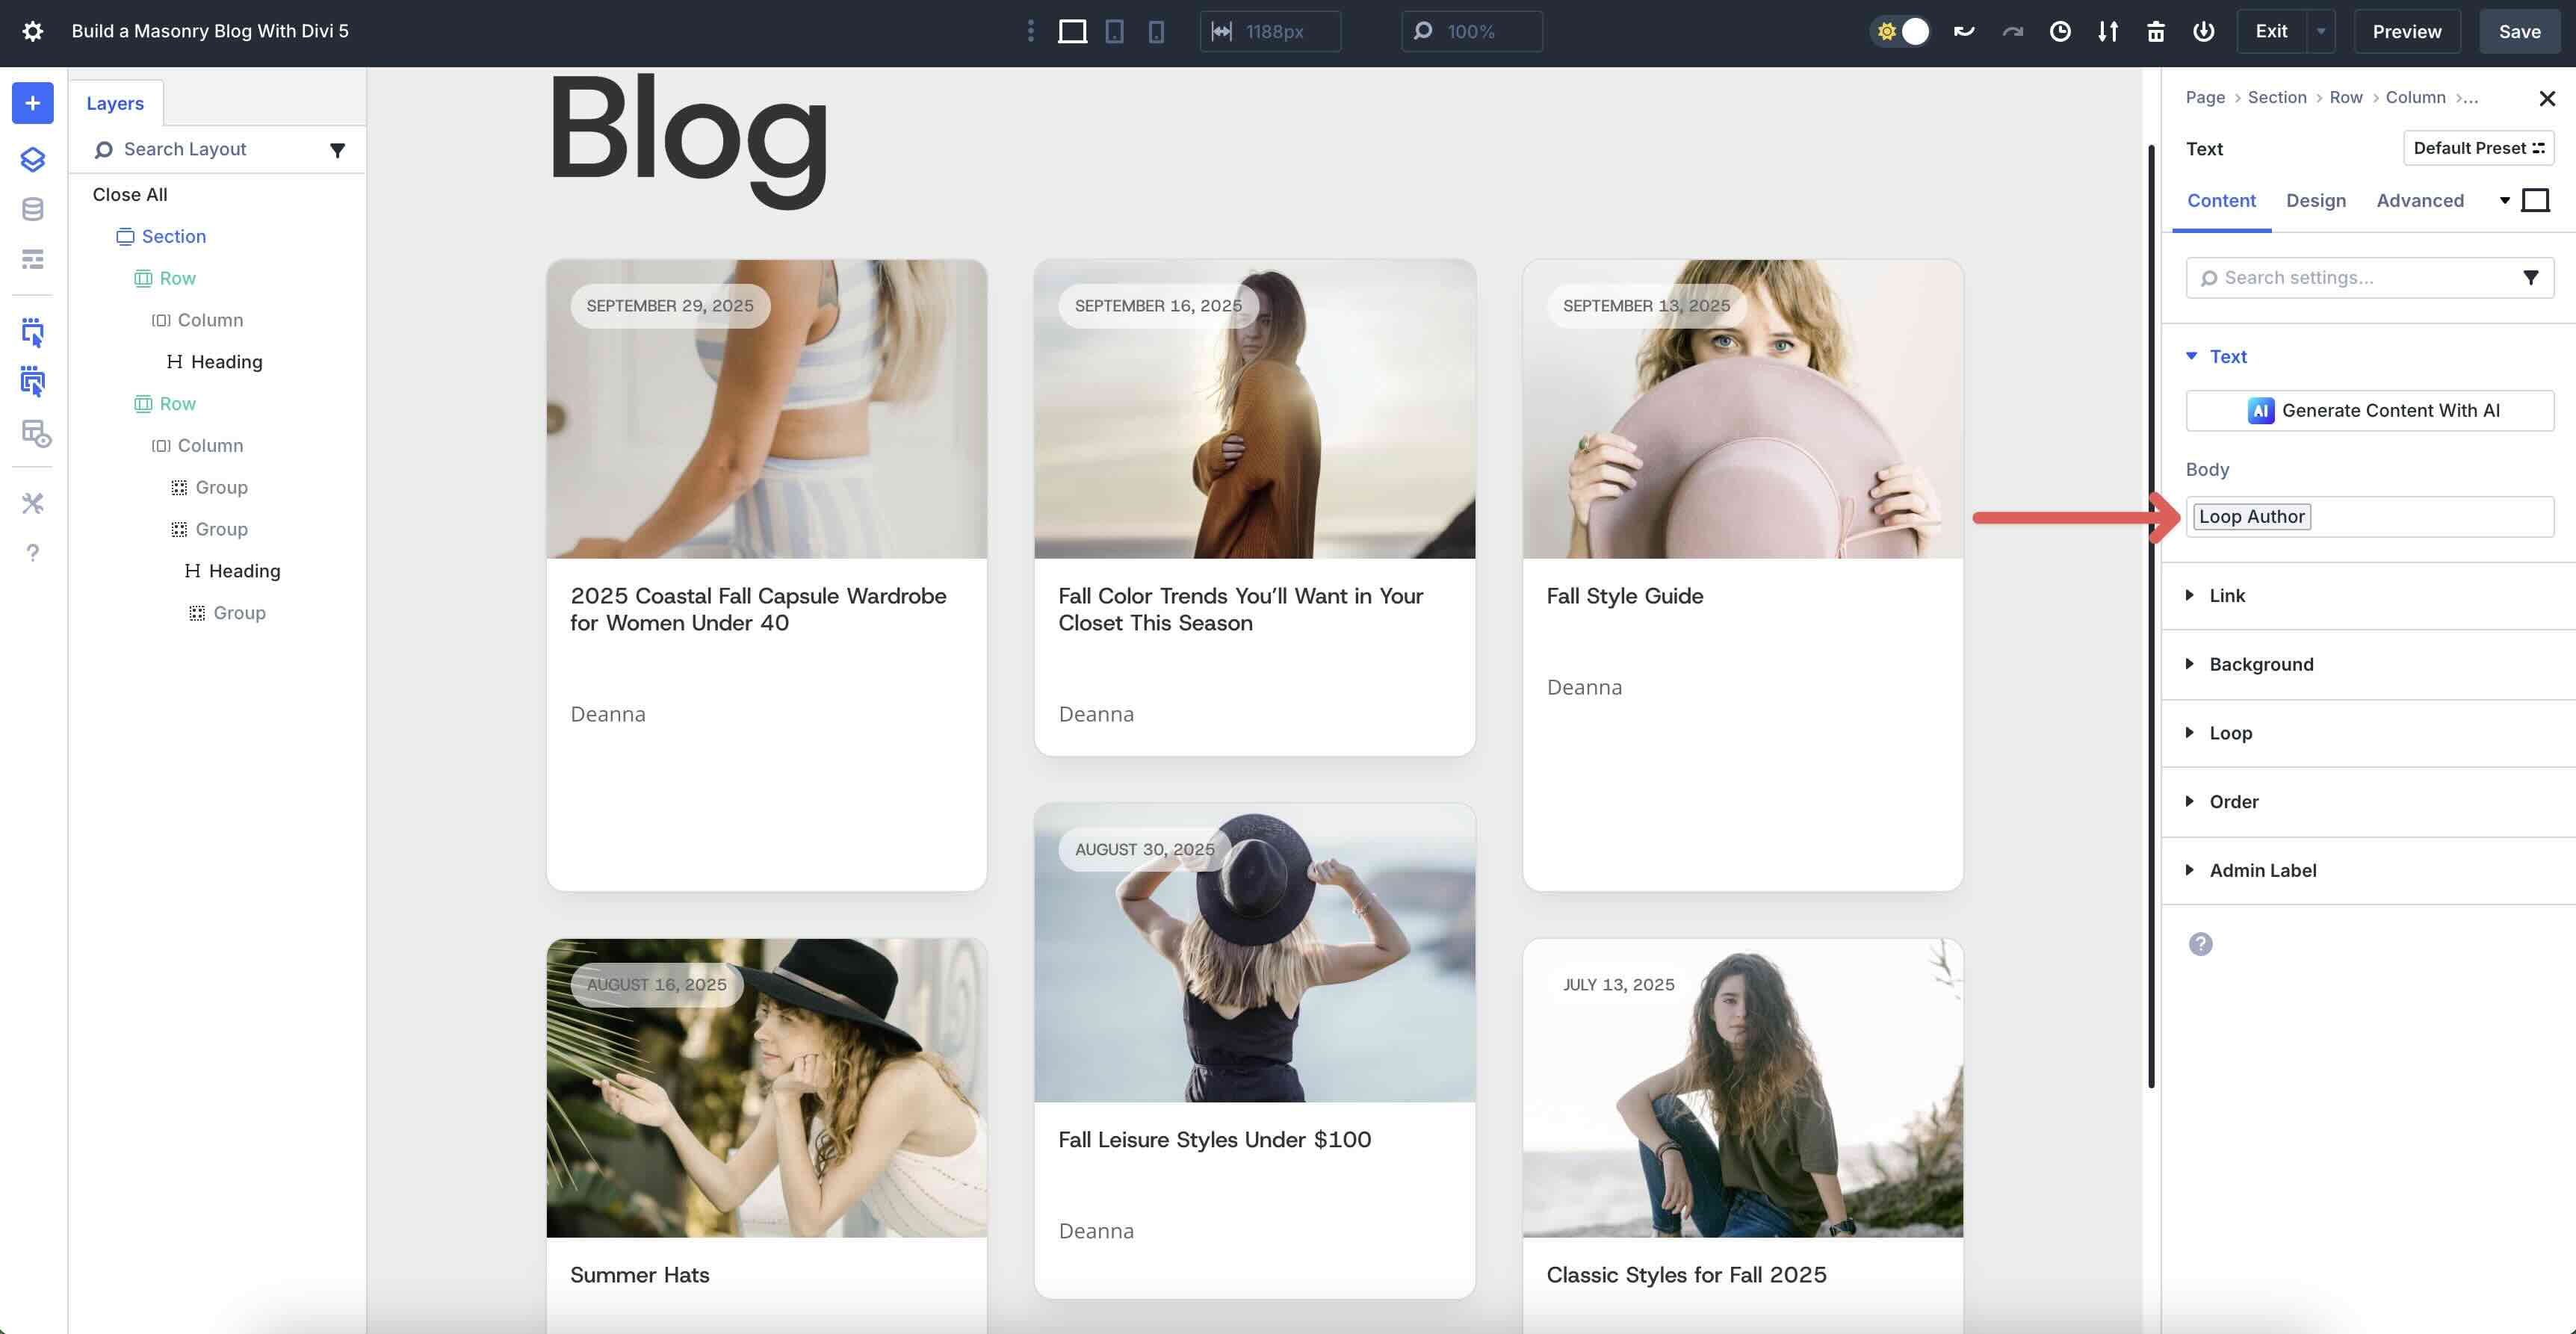
Inside the Text module’s Content material subject matter tab, click on at the Dynamic Content material subject matter icon and select Loop Author from the available fields.
Inside the Design tab, select Host Grotesk since the Text Font, #9a9a9a for the Text Text Color, 11px since the Text Text Size, and 1.4em since the Text Line Most sensible.

Use the Layers View to duplicate the Text module.
In the second Text module, click on at the Dynamic Content material subject matter icon and select Loop Post Words since the custom designed field. Inside the Faster than field, add a “|”.

Faster than we switch on, we will have to adjust the Staff’s settings so that the two Text modules stack aspect via aspect. Inside the Design tab, click on at the Layout menu to extend it. Add 4px Horizontal and Vertical Hollow and make a selection Row since the Layout Path.

Add A Text Module To The second Staff
The next step is so to upload another Text module, then again this time, we’ll add it to the second Staff that incorporates the Heading module. Use the Layers View to make a choice the second Staff module.
Click on at the Black “+” icon and select the Text module. Once in place, use the Layers View to drag it into place below the third Staff module. Be careful not to add it outdoor of the second one Staff.
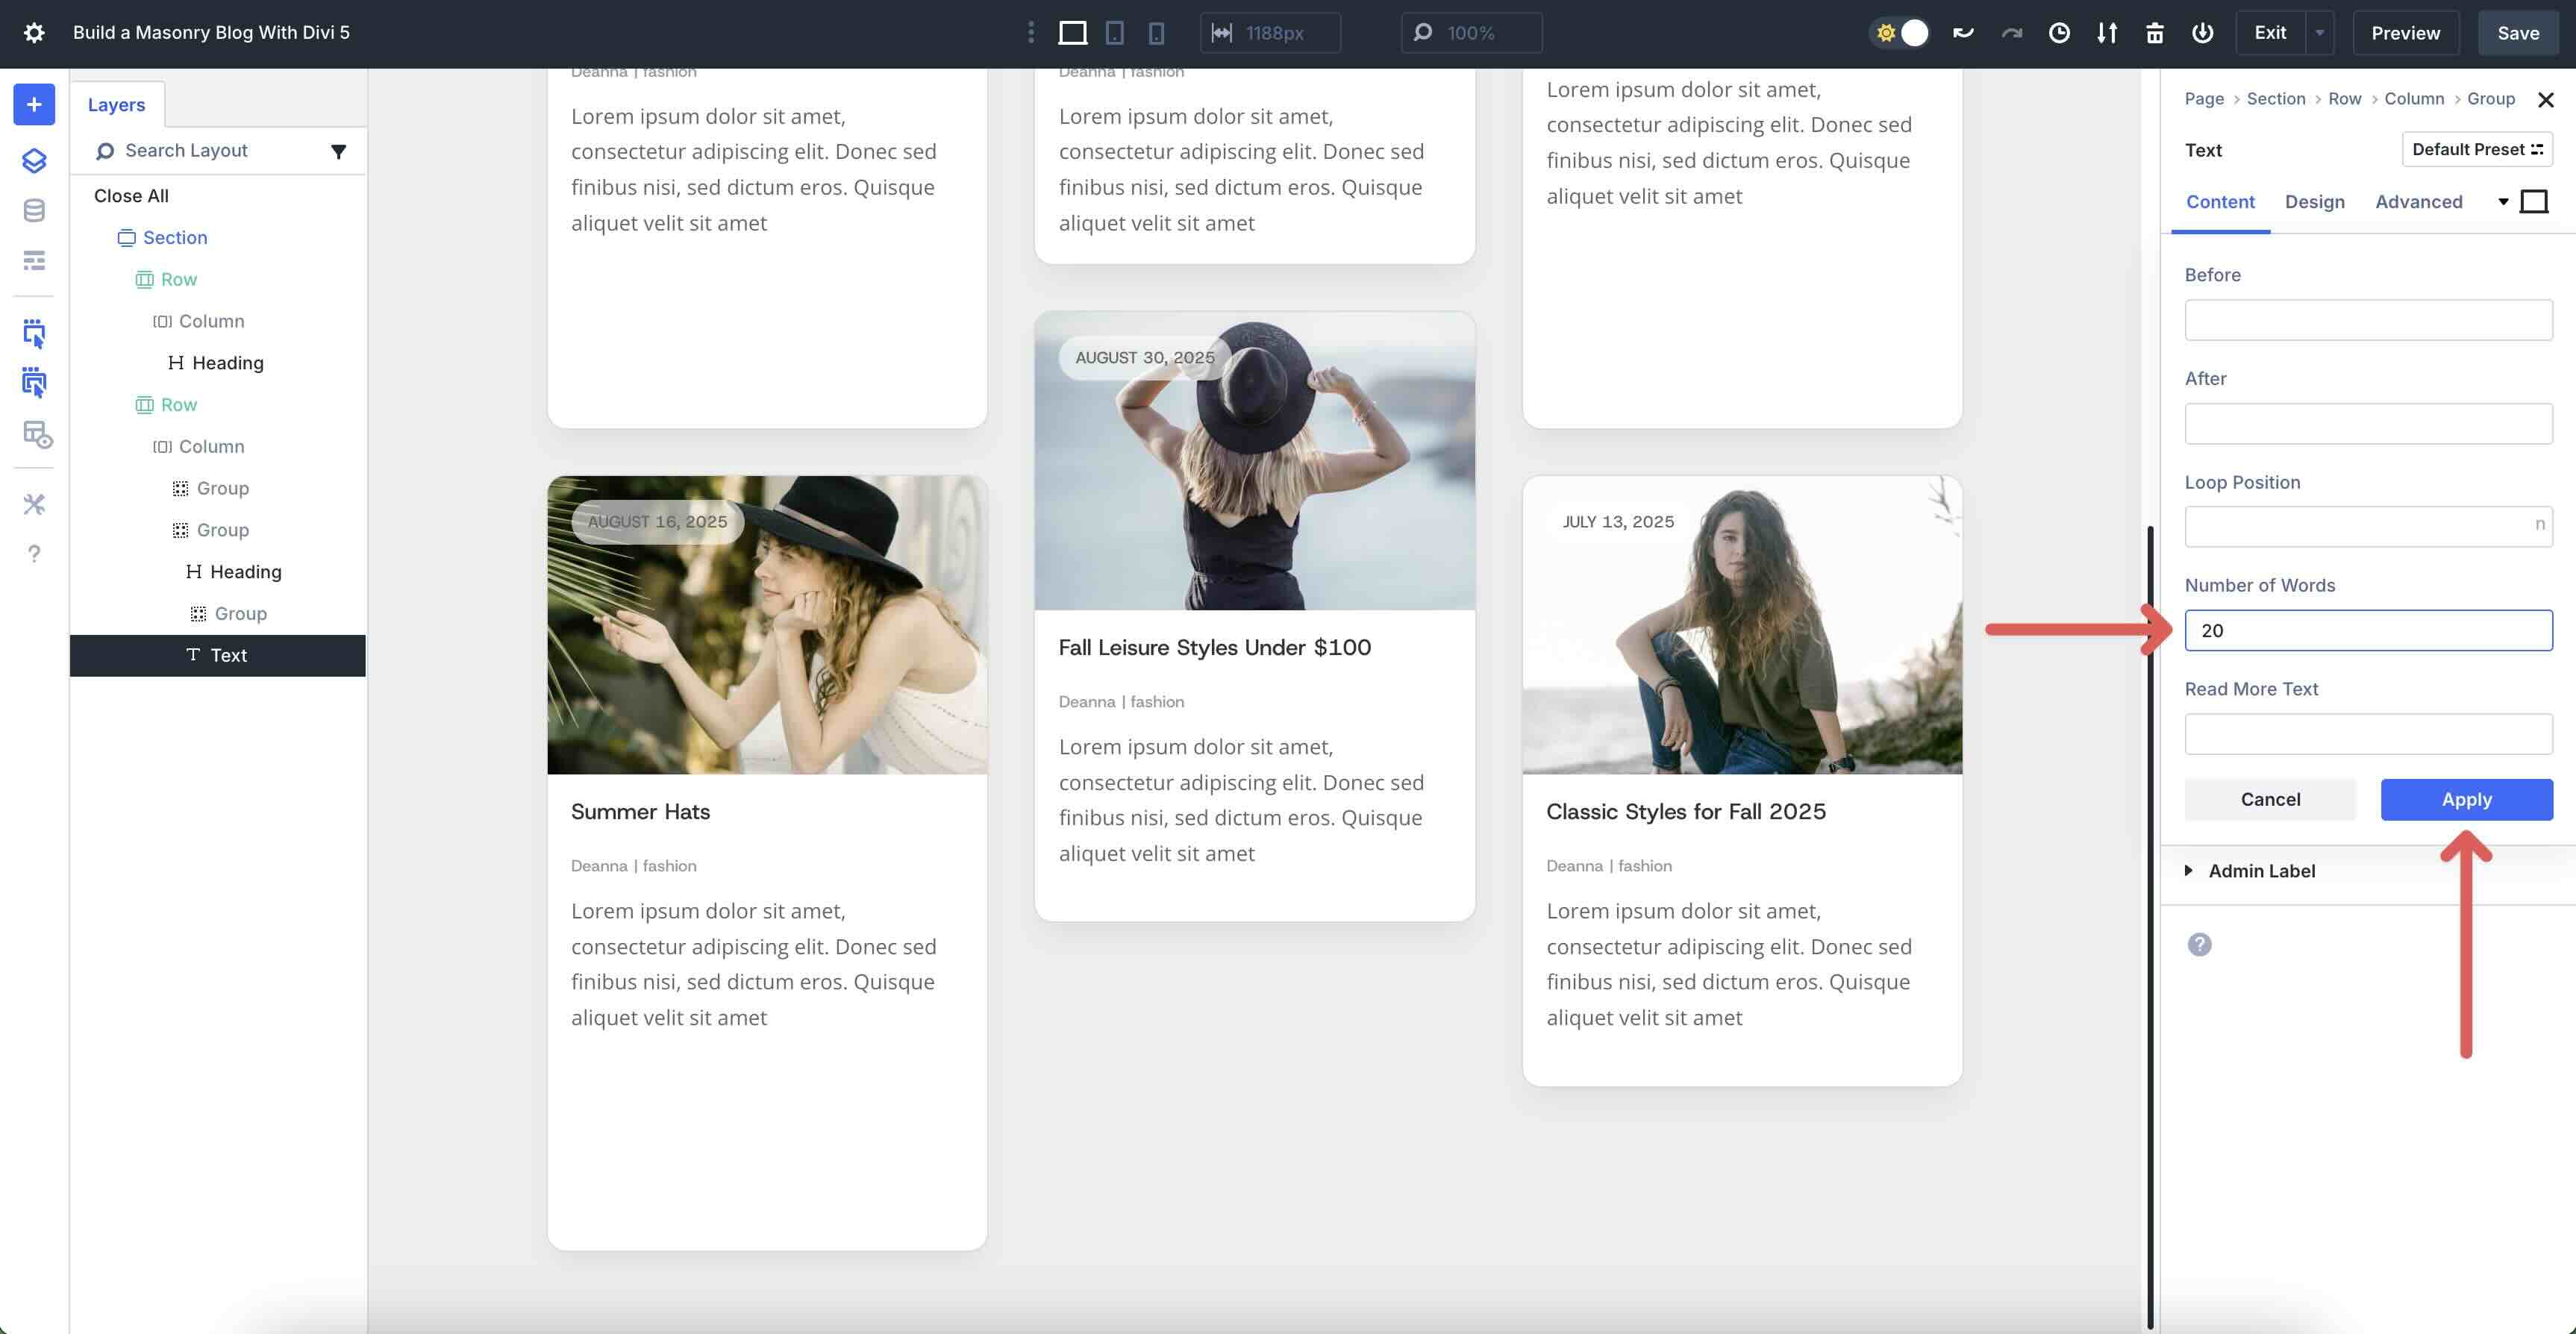
Click on at the Dynamic Content material subject matter icon above the Body field and select Loop Excerpt from the available fields. When the modal turns out, add 20 into the Choice of Words field. Click on on Follow to save it.
Add A Button Module
Click on at the Black “+” icon underneath the Text module we merely added and select the Button module.
Inside the Button module’s Content material subject matter tab, add Be told Further into the Button Text field.
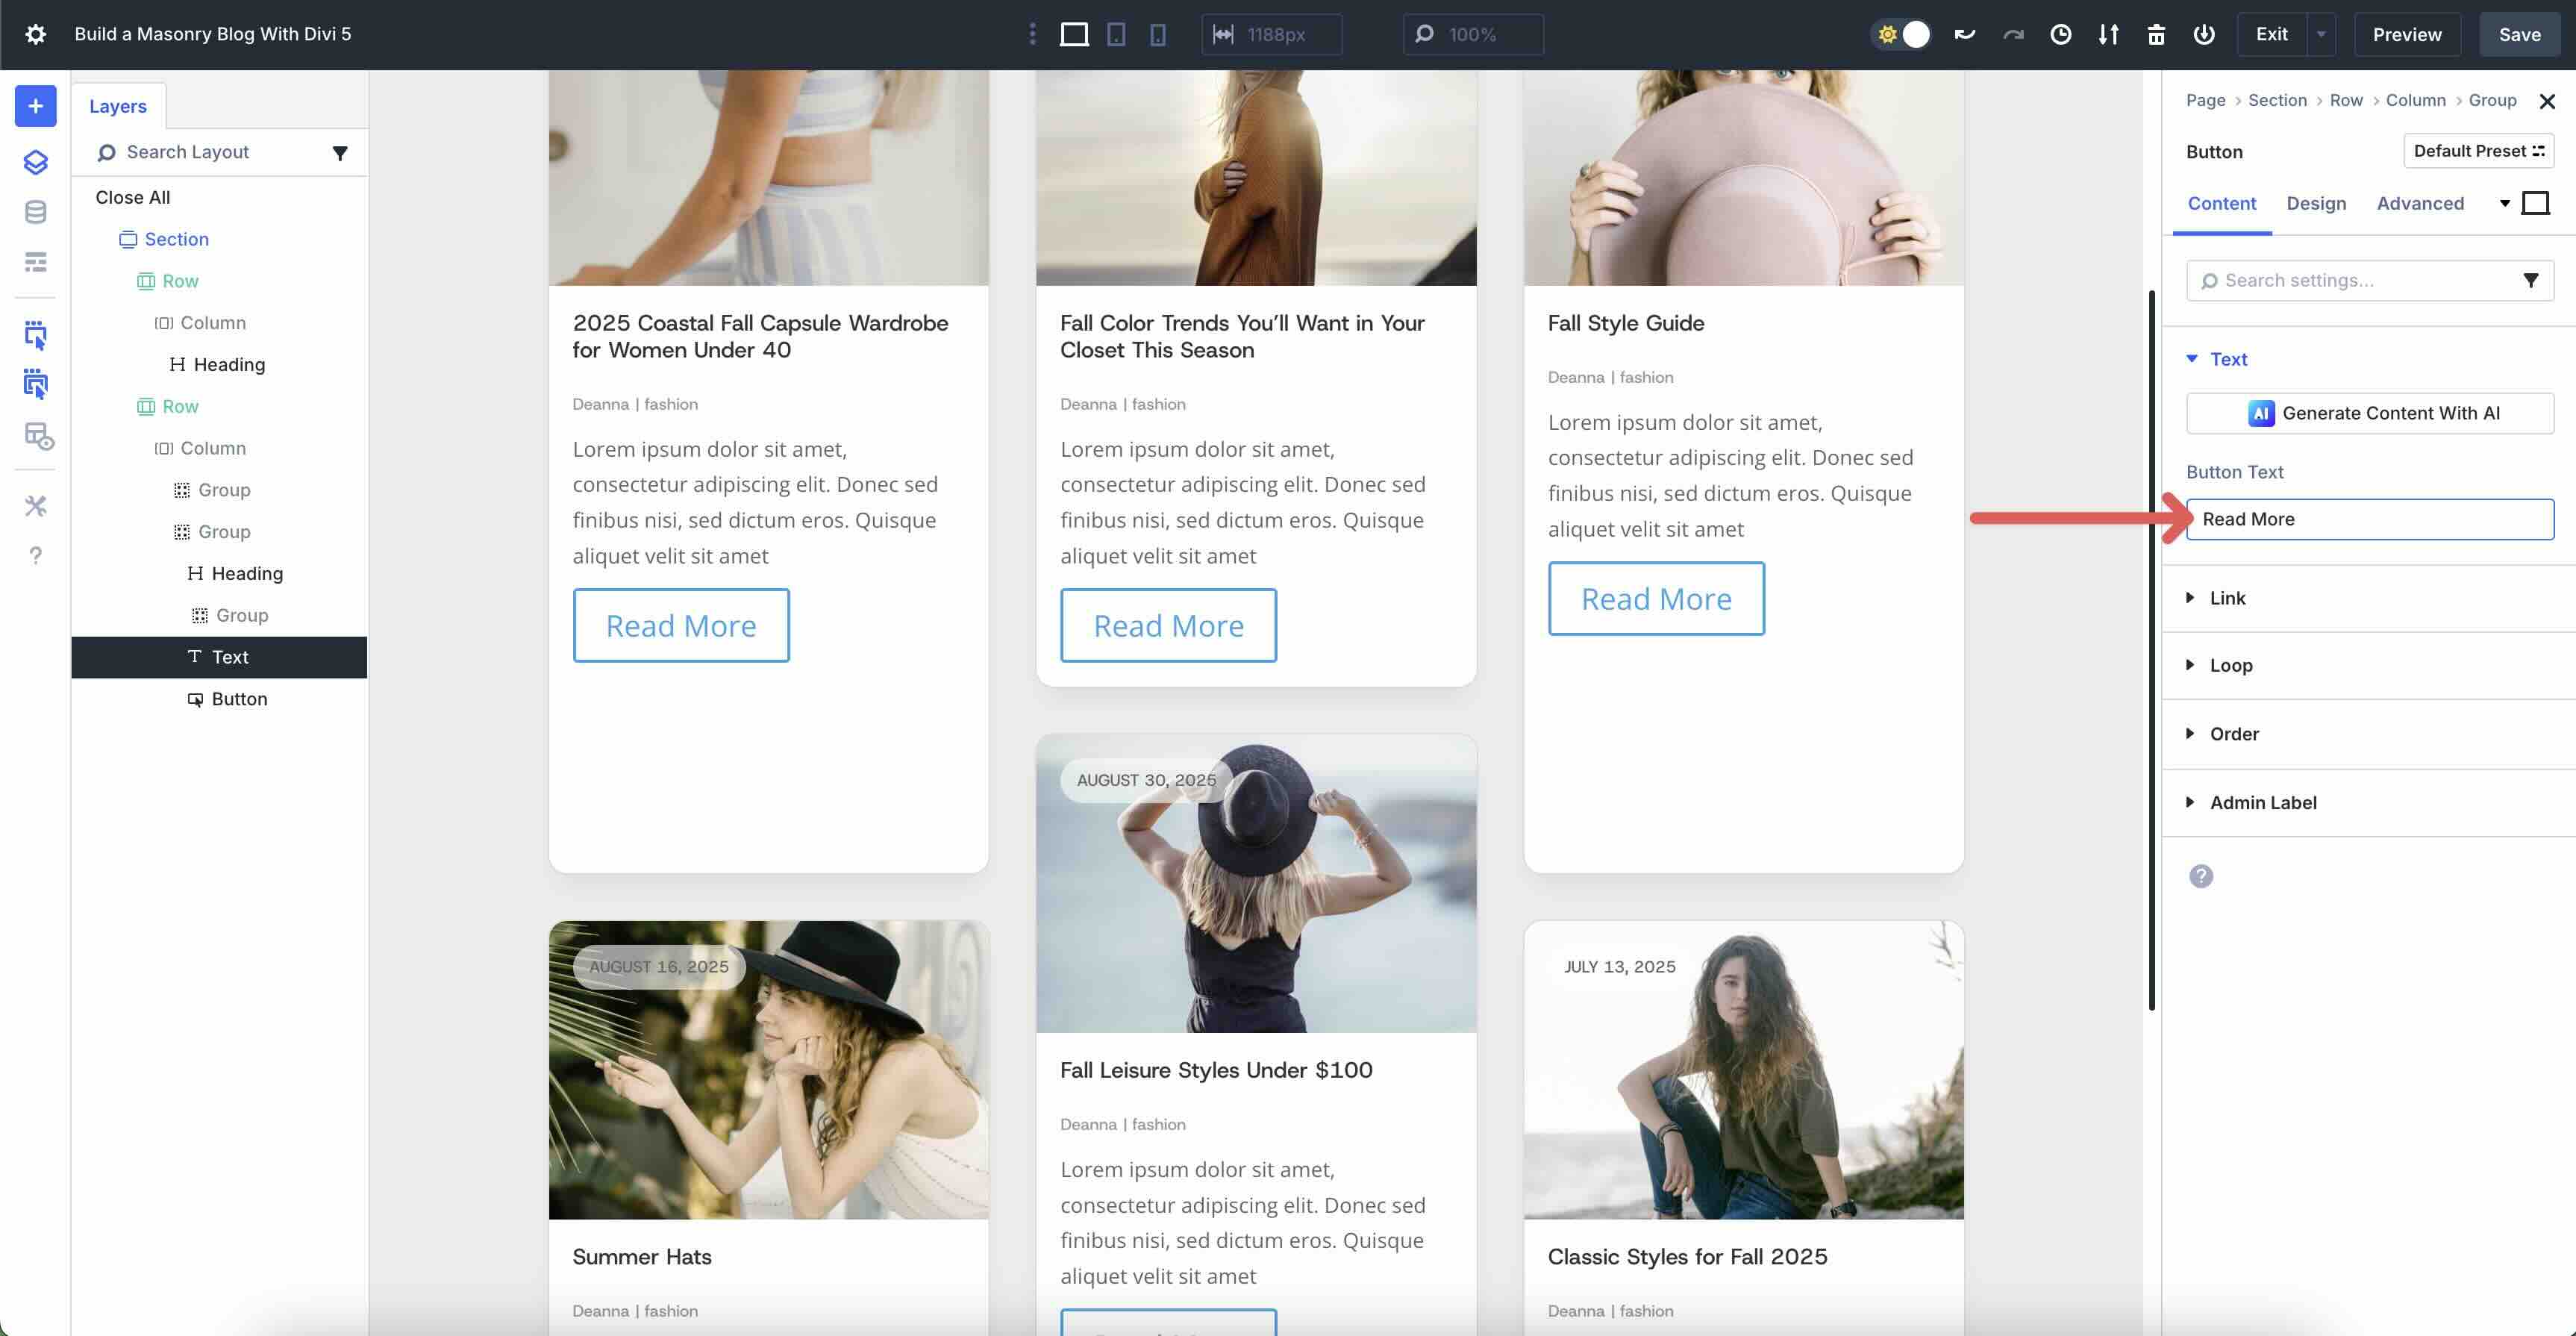
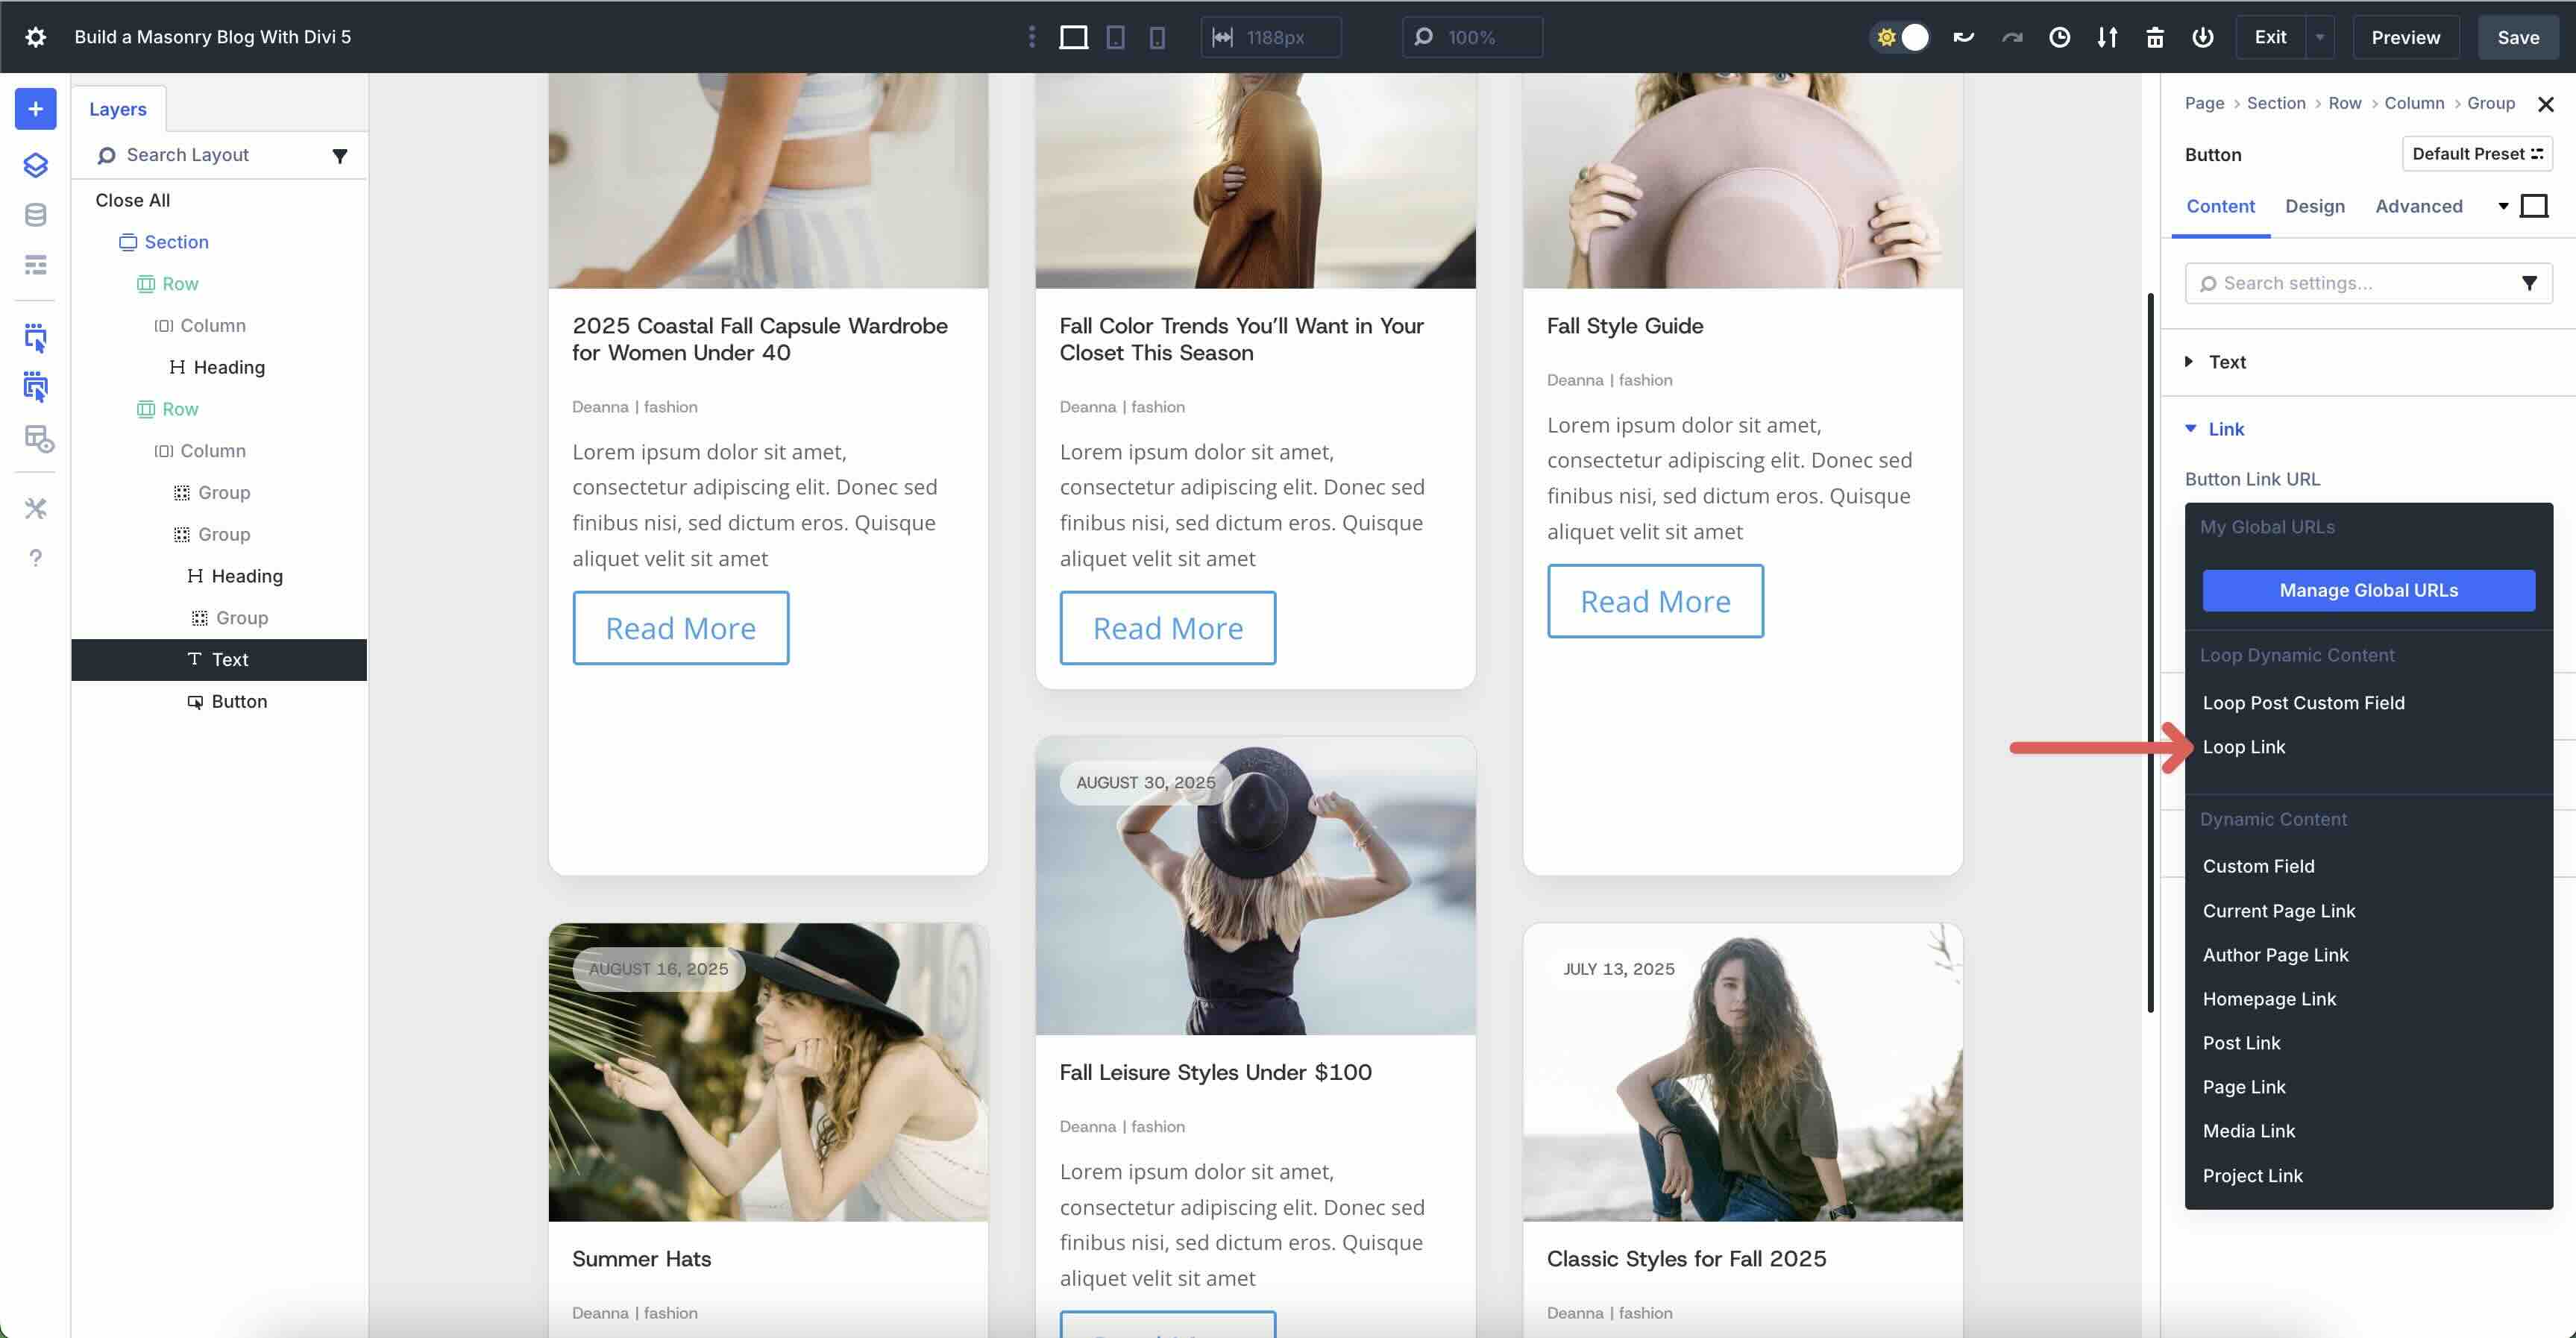
Make larger the Link dropdown menu. Click on at the Dynamic Content material subject matter icon at once above the Button Link URL field. When the decisions appear, select Loop Link.
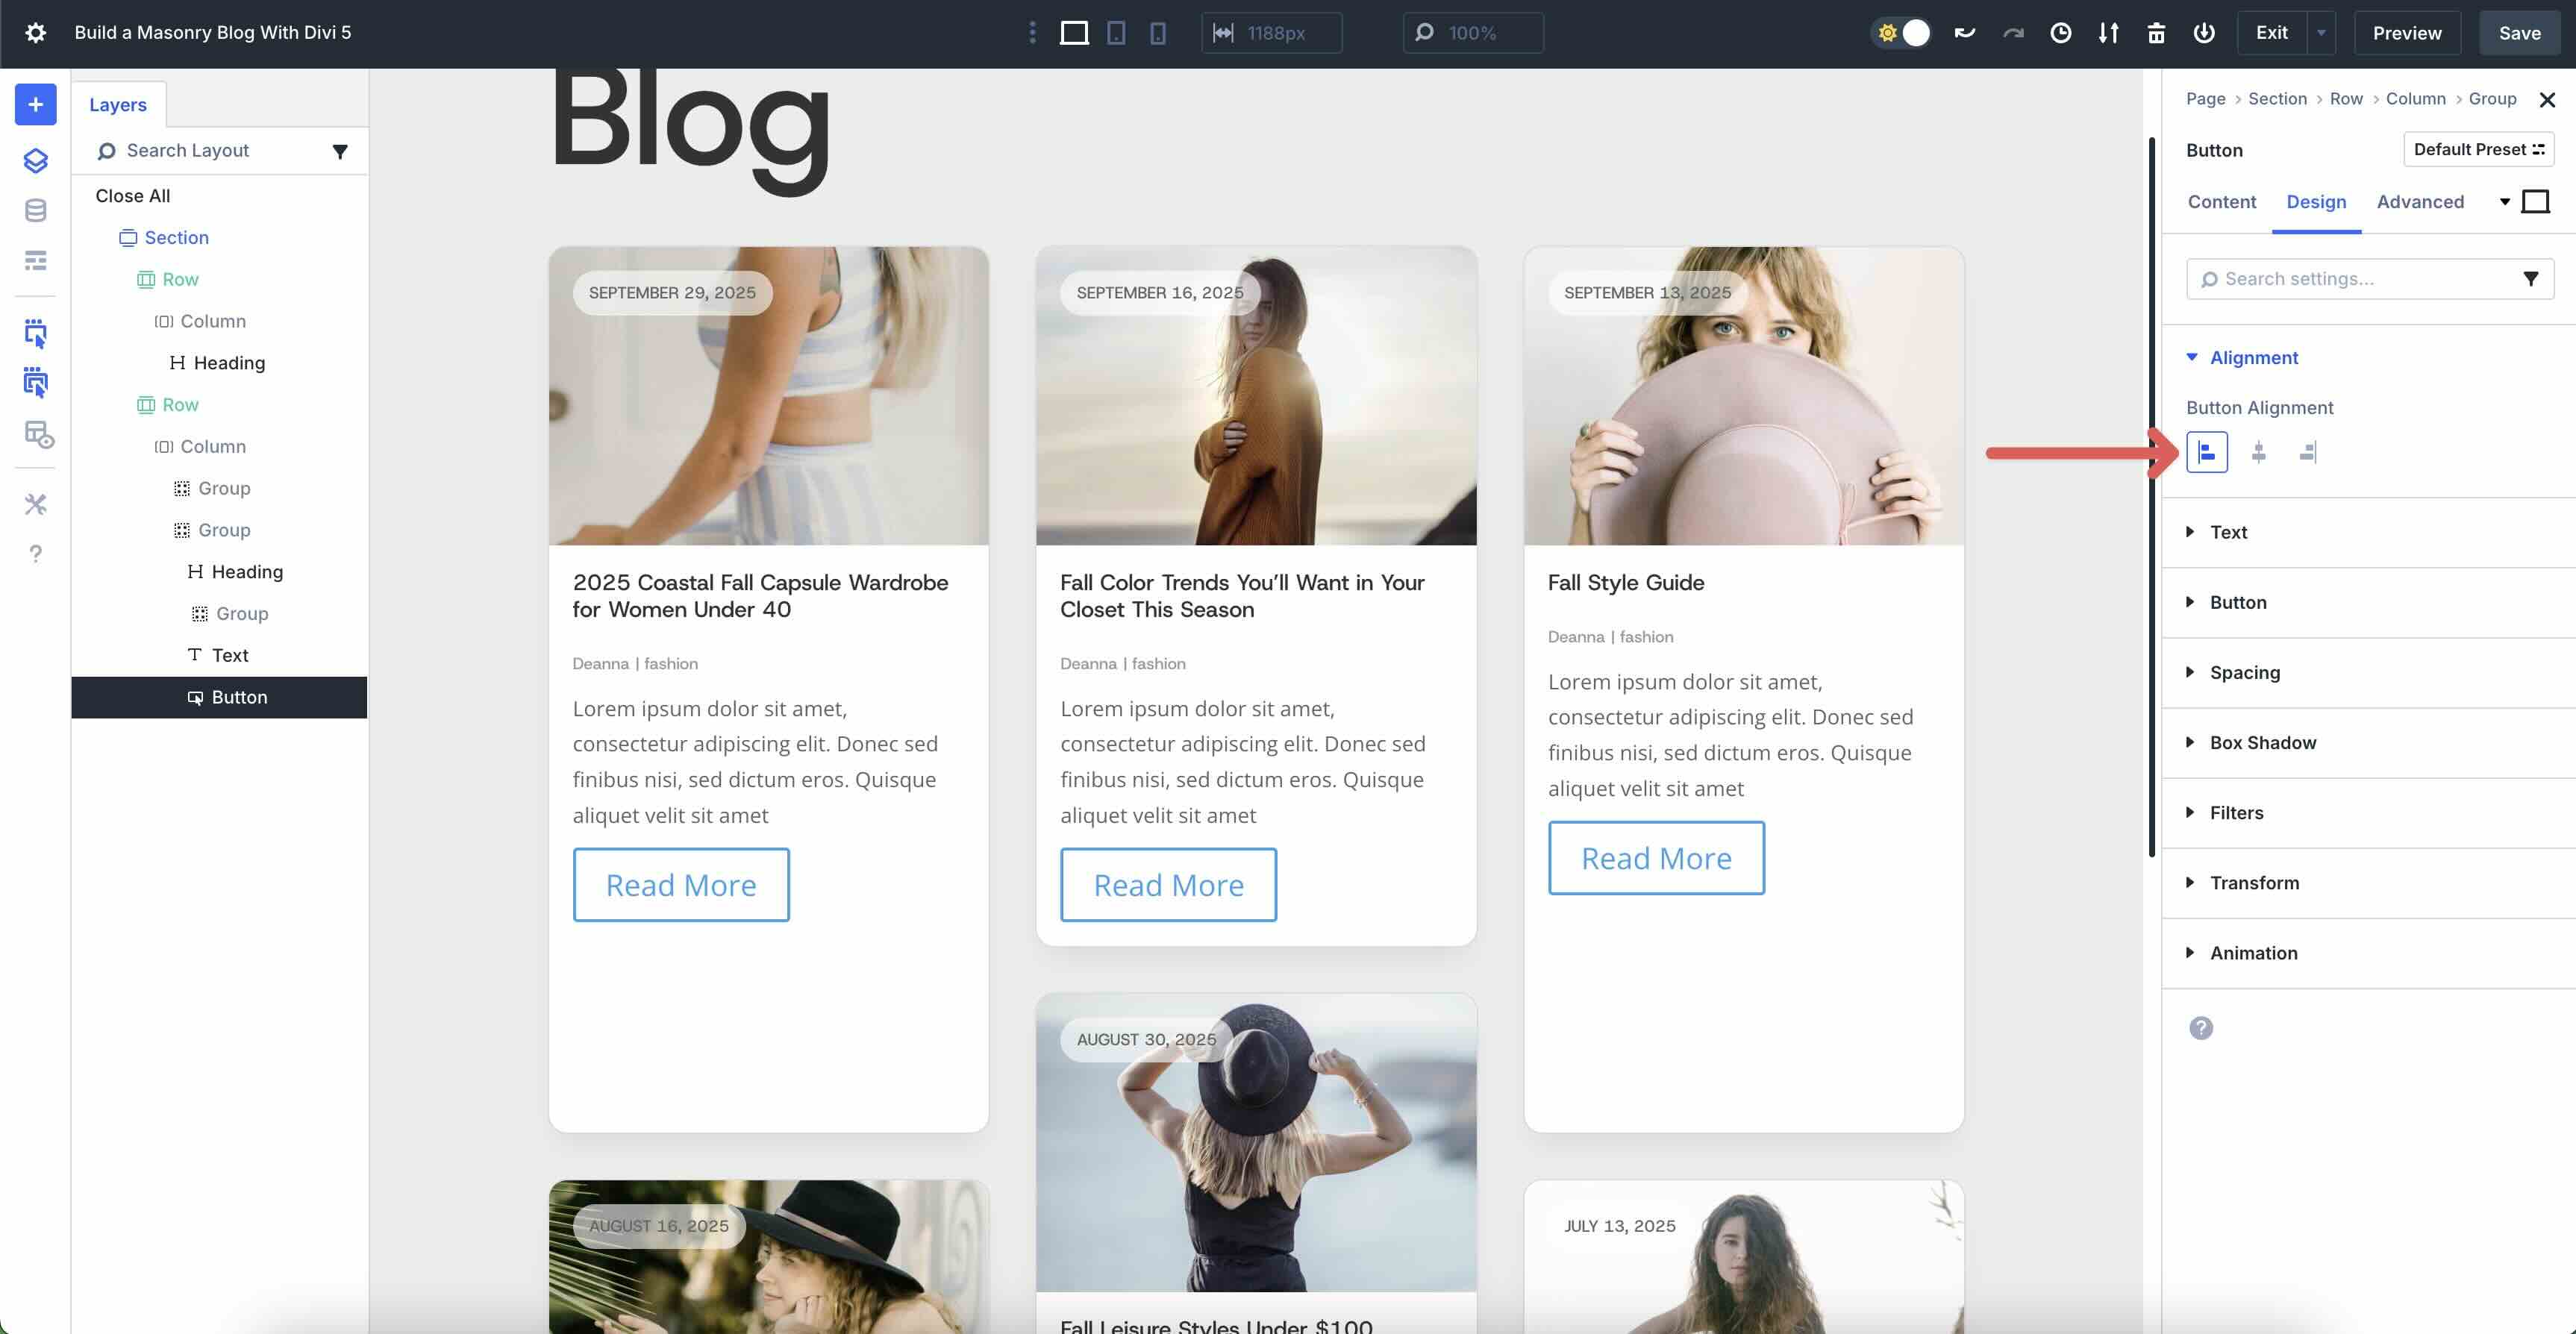
Inside the Design tab, build up the Alignment menu and select Left.
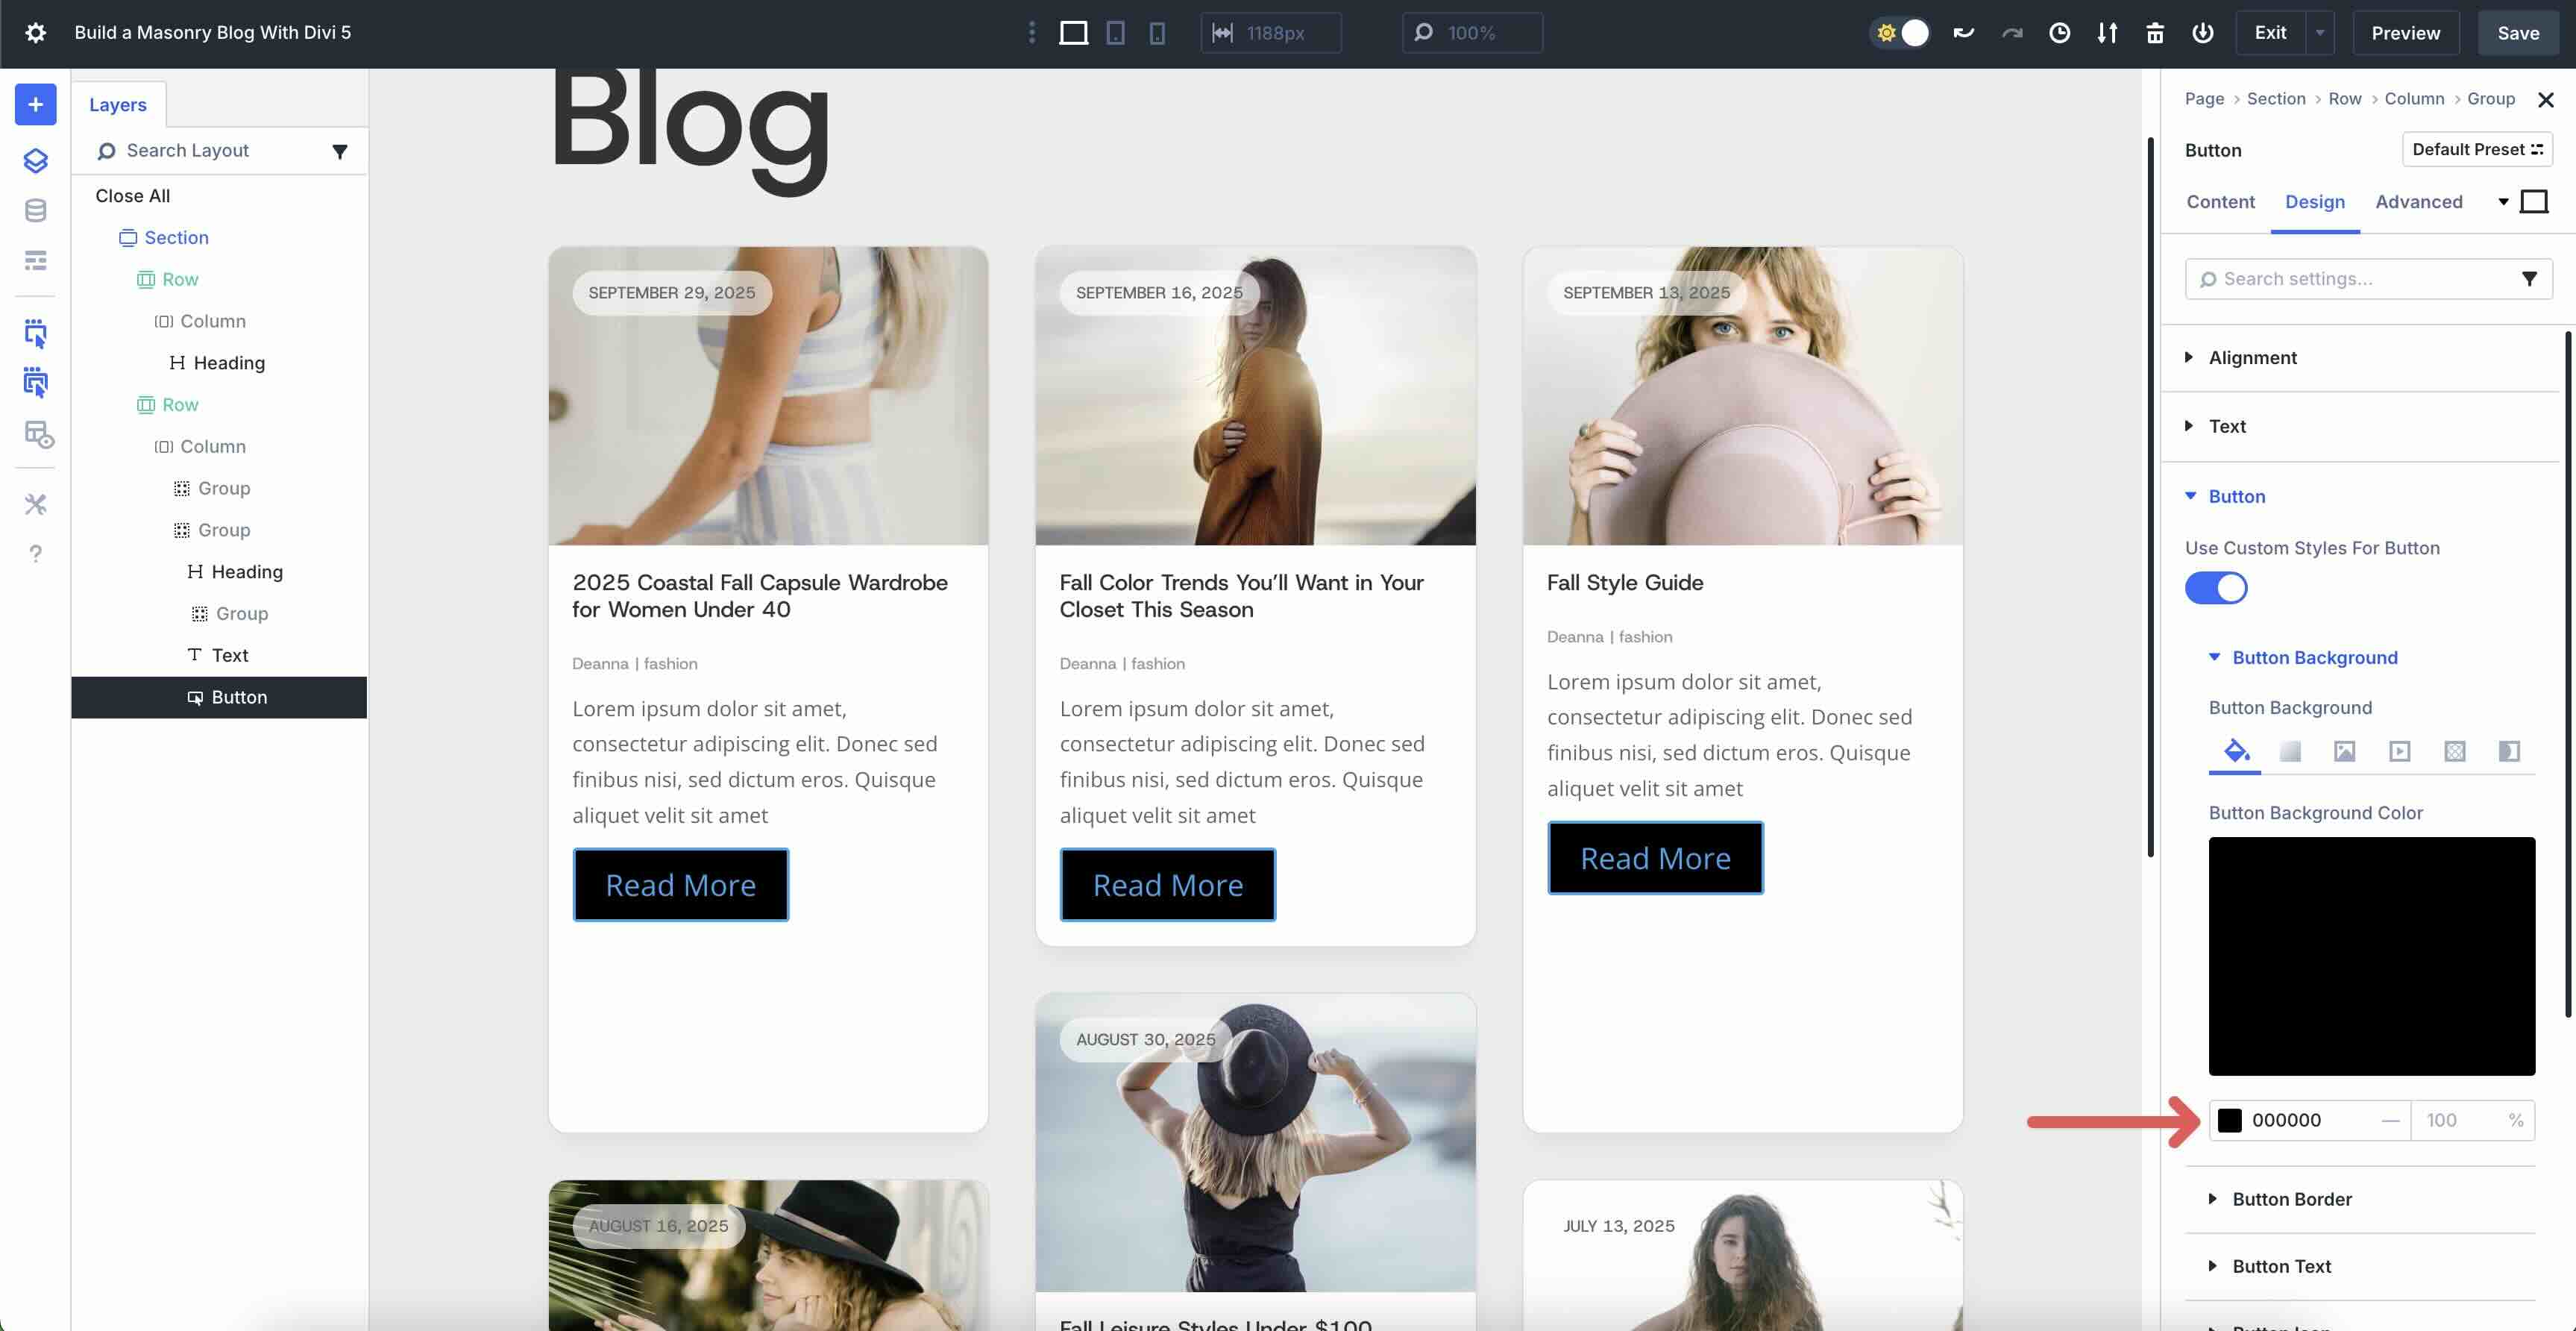
Make larger the Button dropdown menu. Toggle Use Custom designed Sorts For Button on.

Inside the Button Background menu, set the Button Background Color to #000000.
Make larger the Button Border menu and enter 100px for the Button Border Radius and set the Button Border Width to 0px.
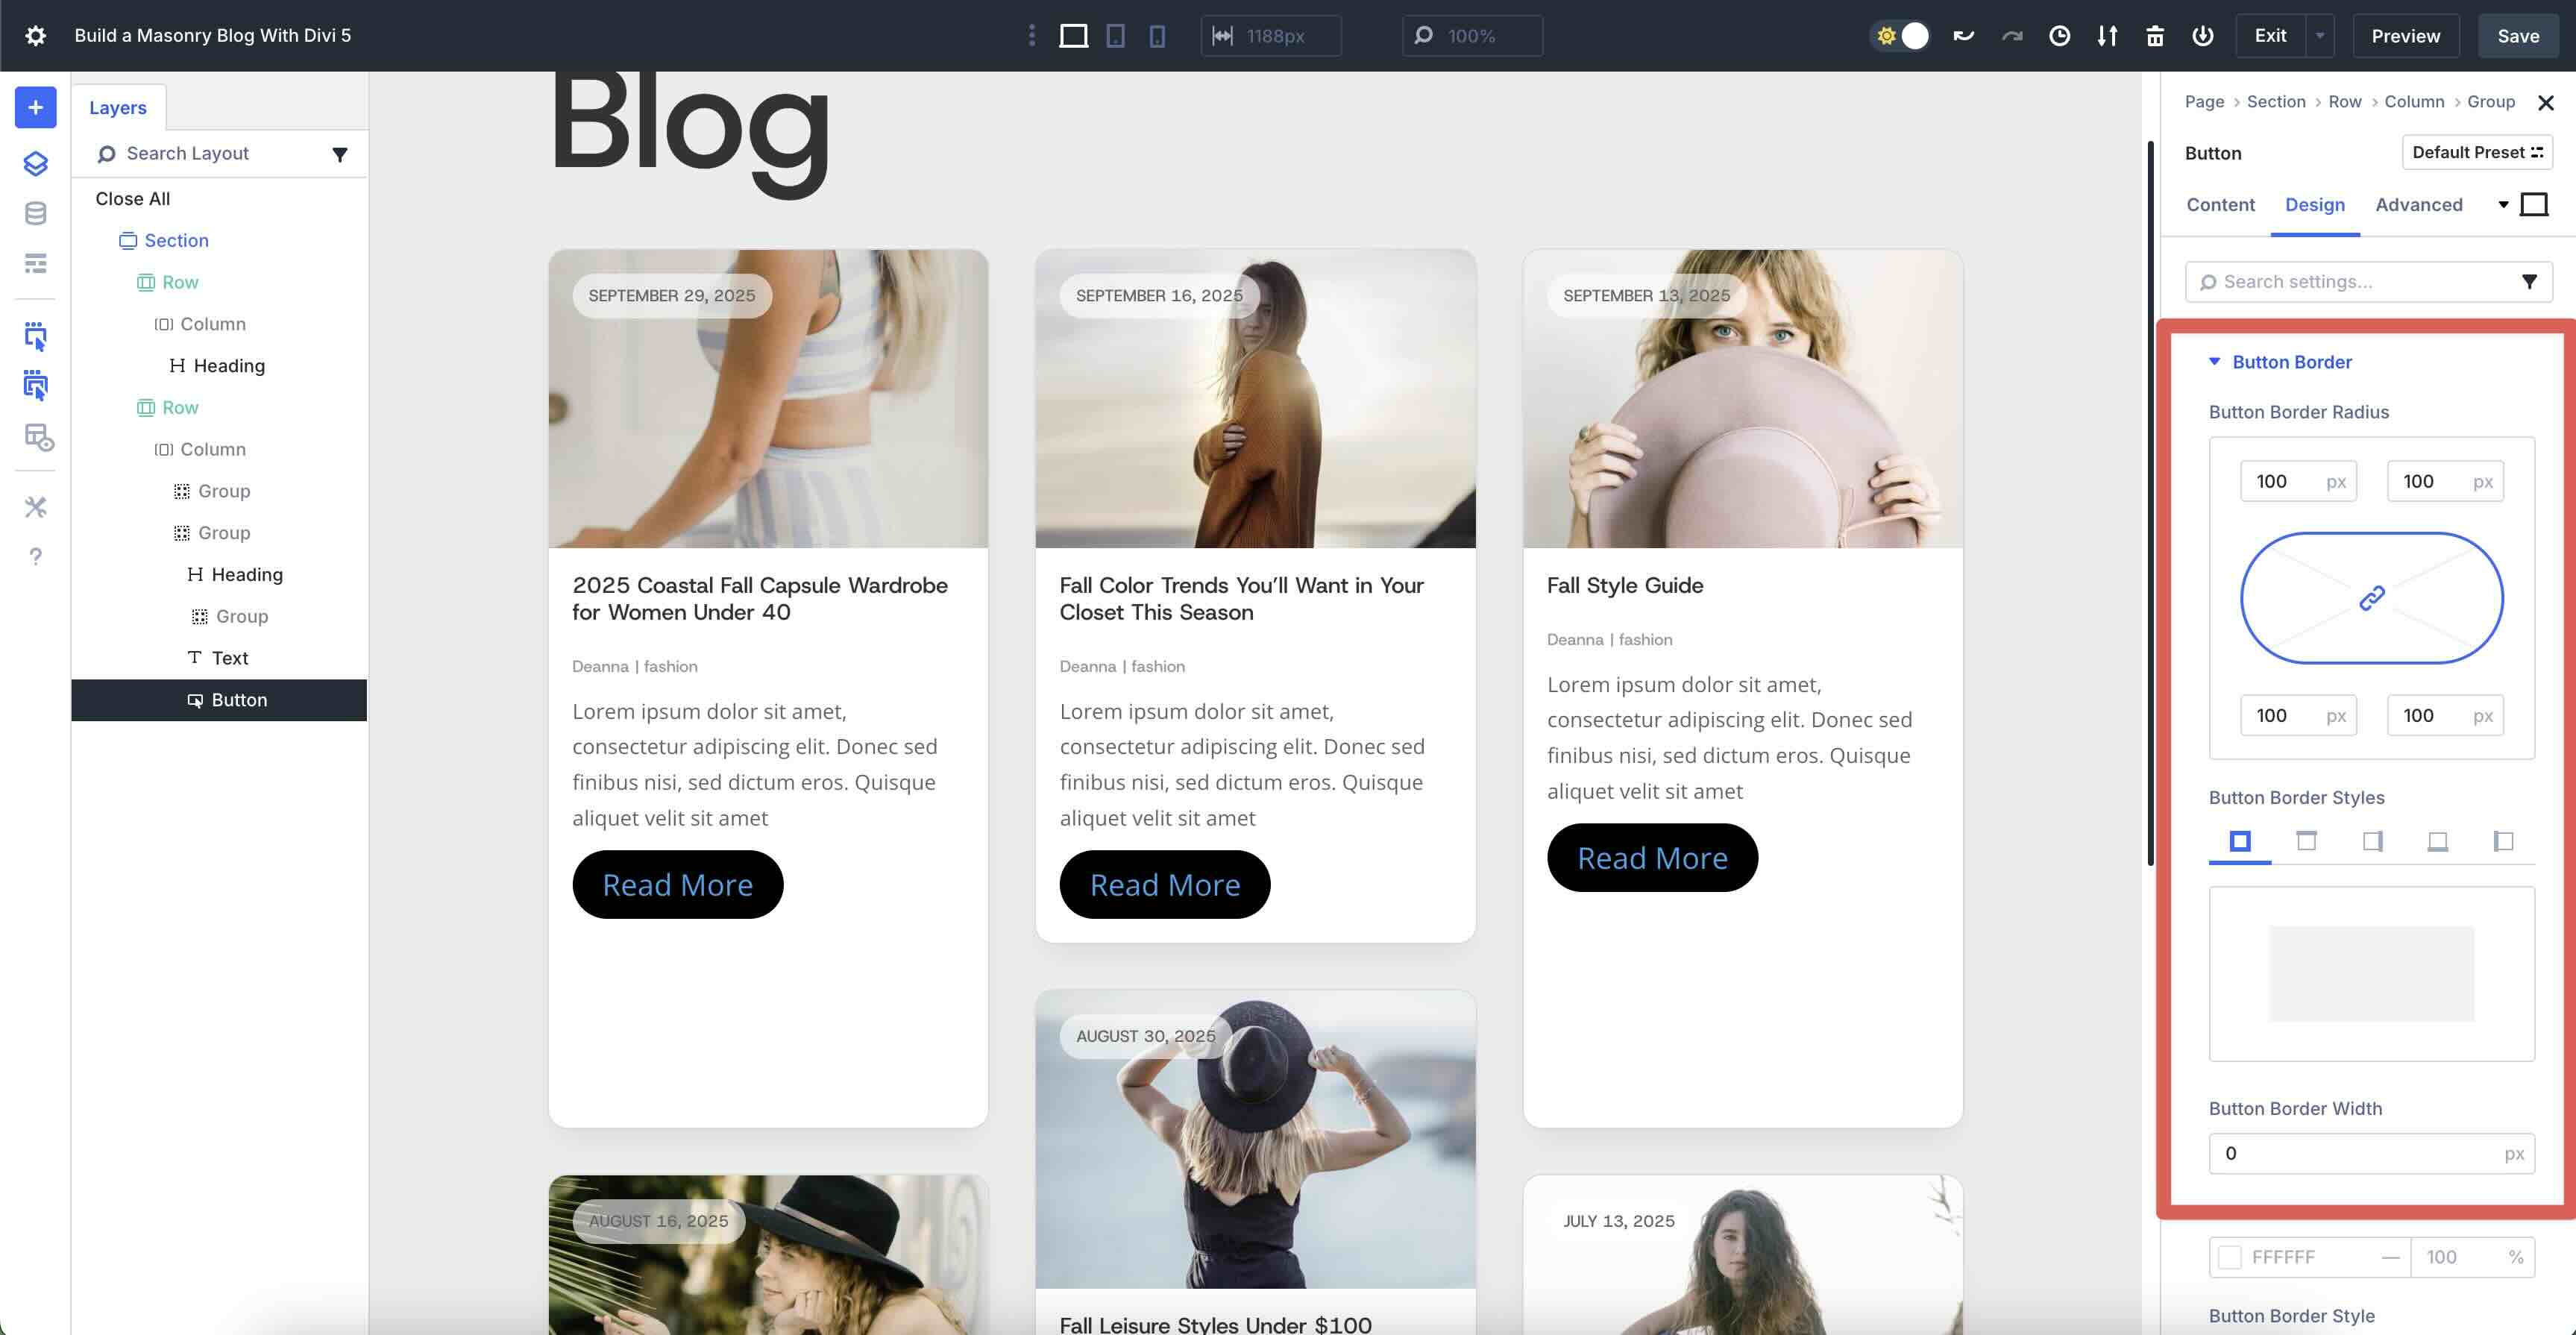
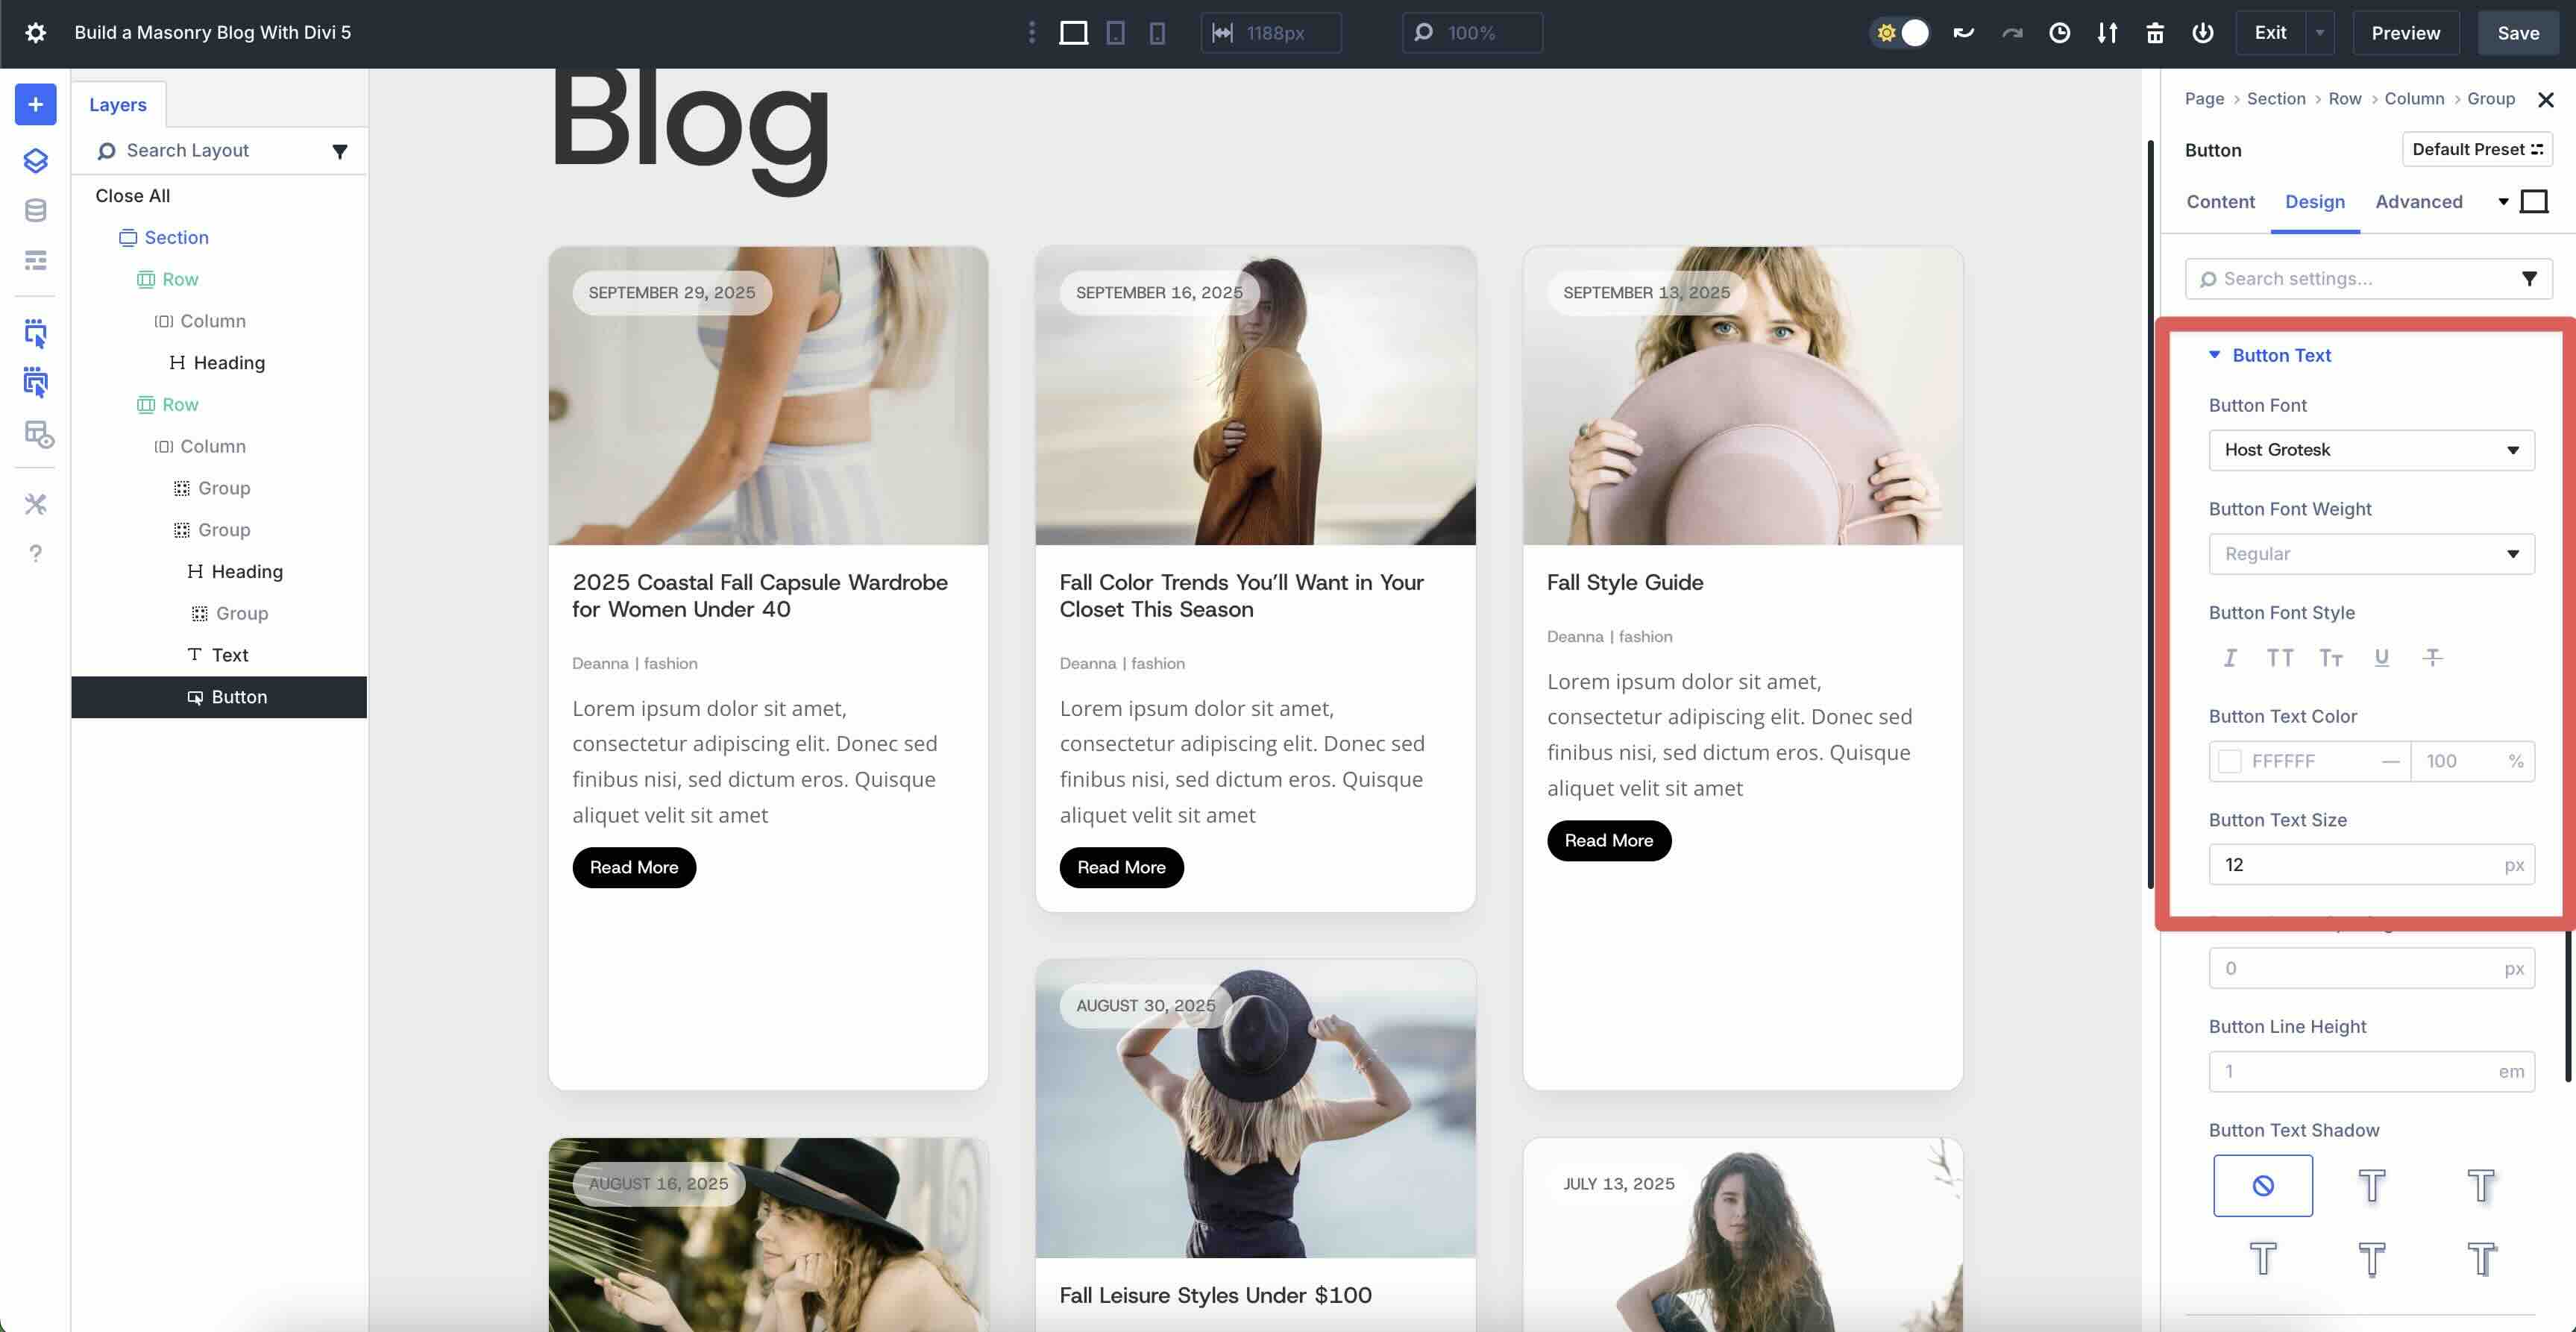
Next, build up the Button Text menu. Enter Host Grotesk since the Button Font, #ffffff since the Button Text Color, and 12px since the Button Text Size.
Now, build up the Button Icon menu and toggle Show Button Icon off.
![]()
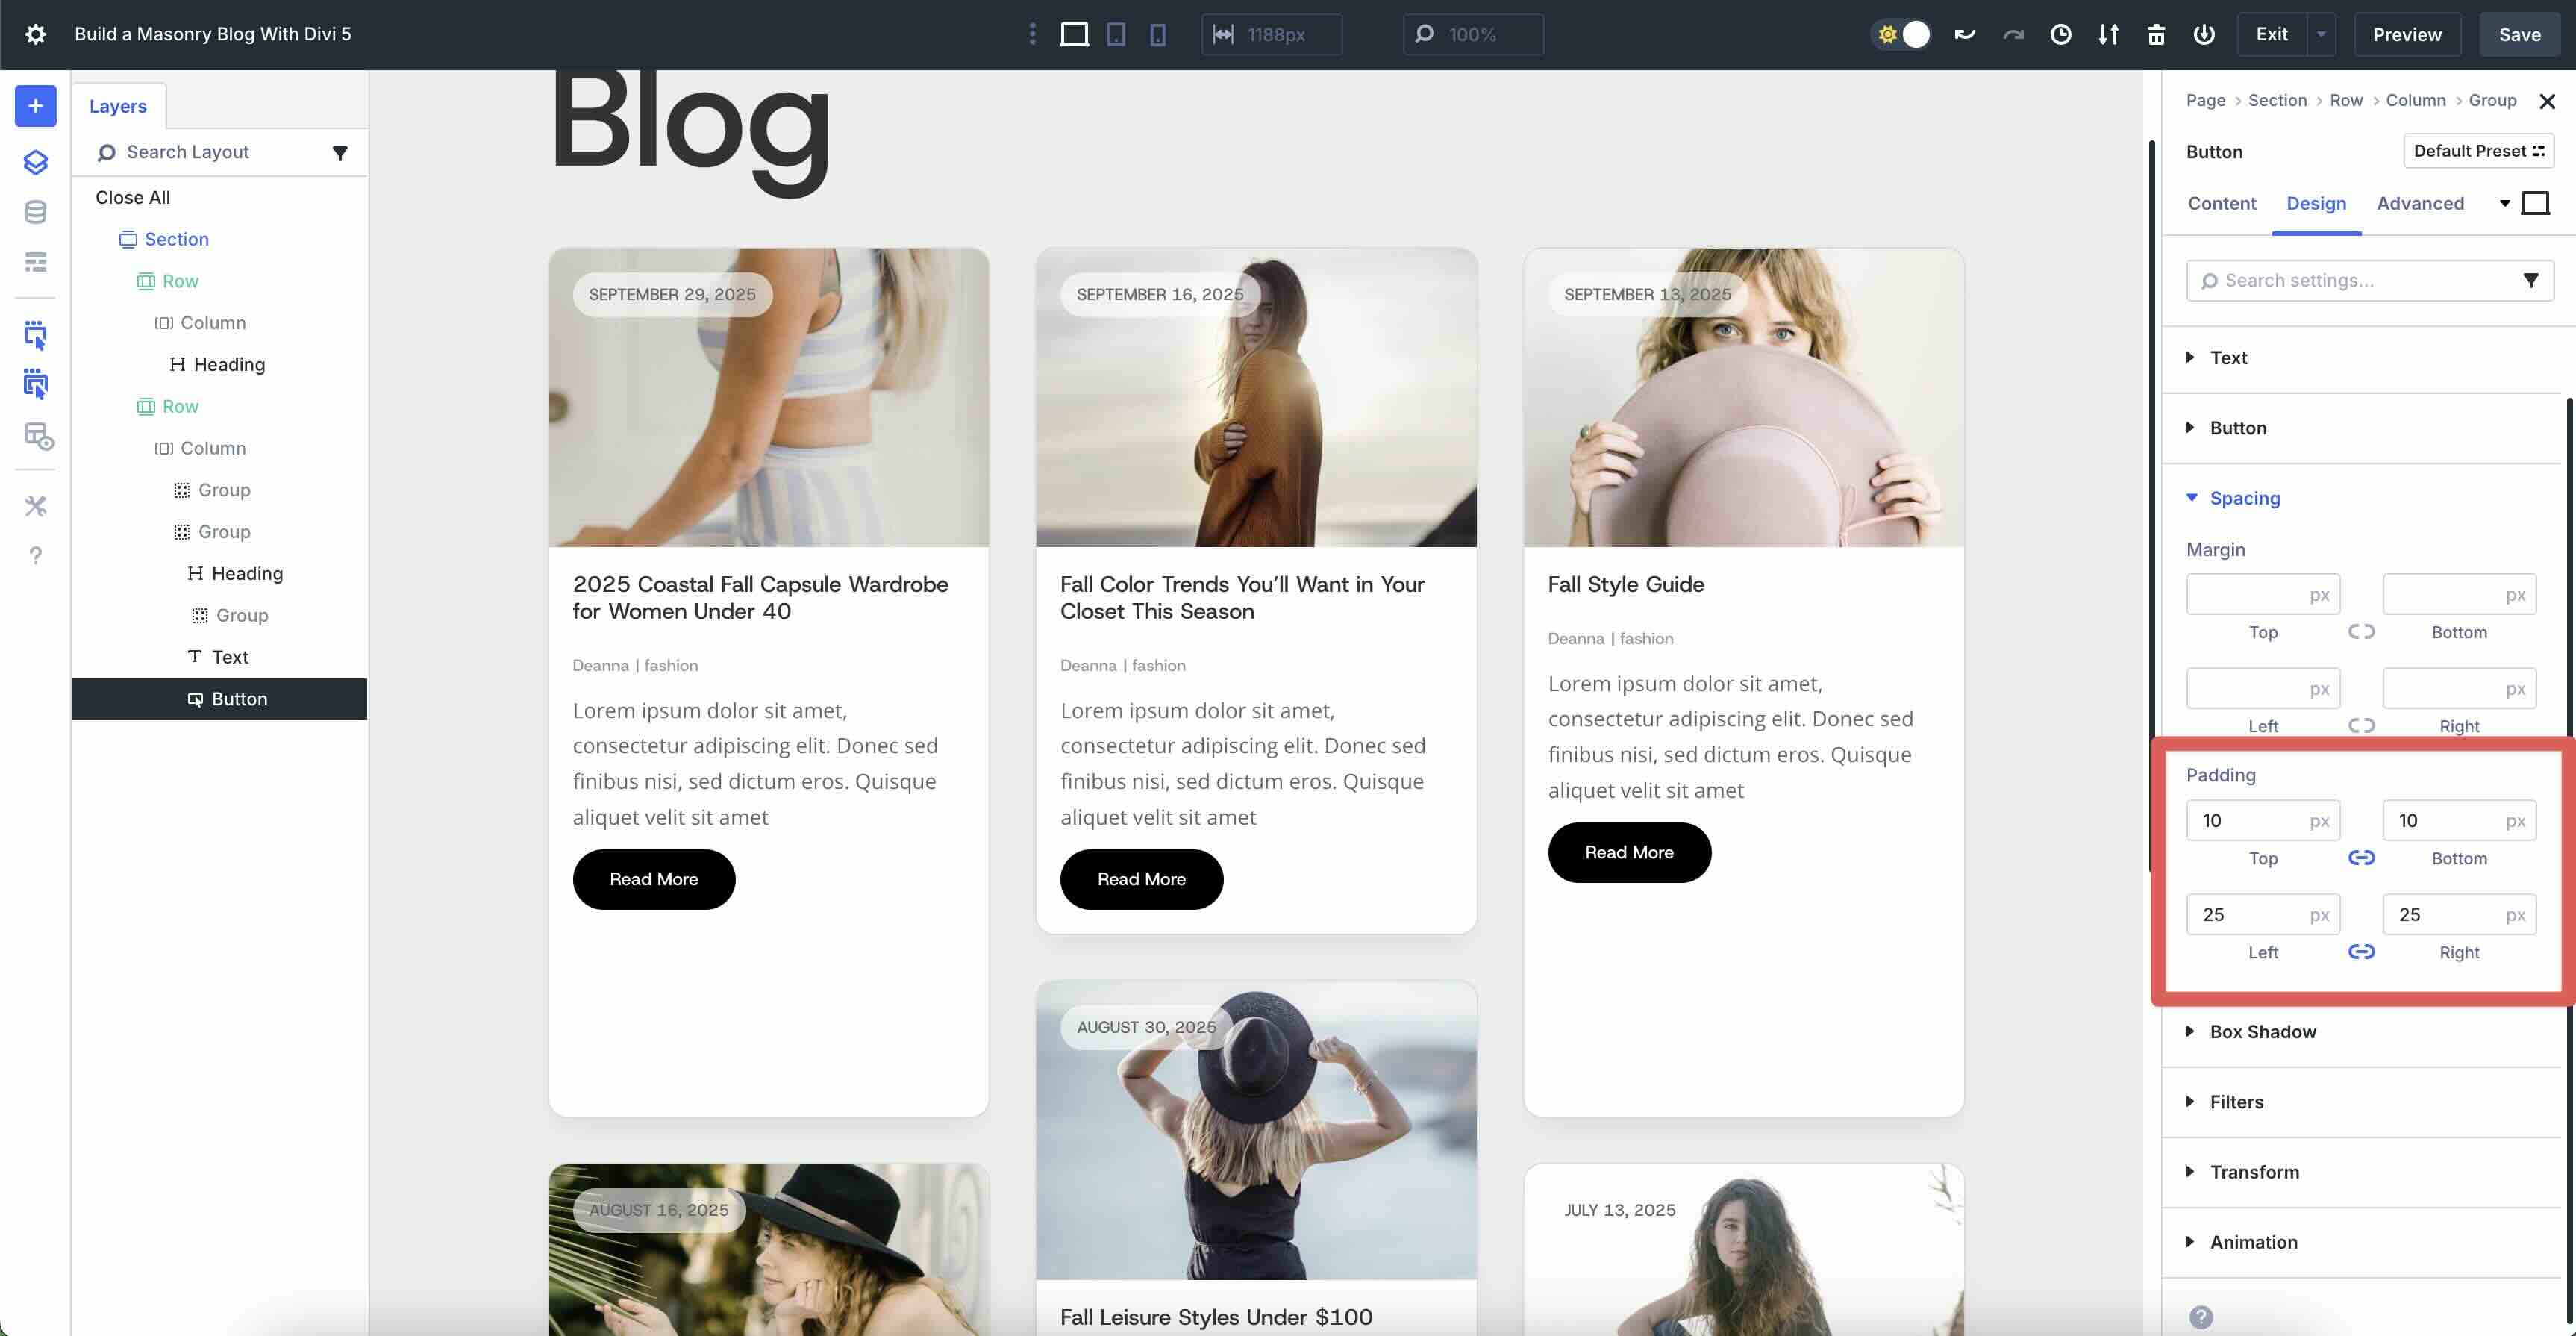
In any case, build up the Spacing dropdown menu. Add 10px Padding to the top and bottom and 25px to the left and correct.
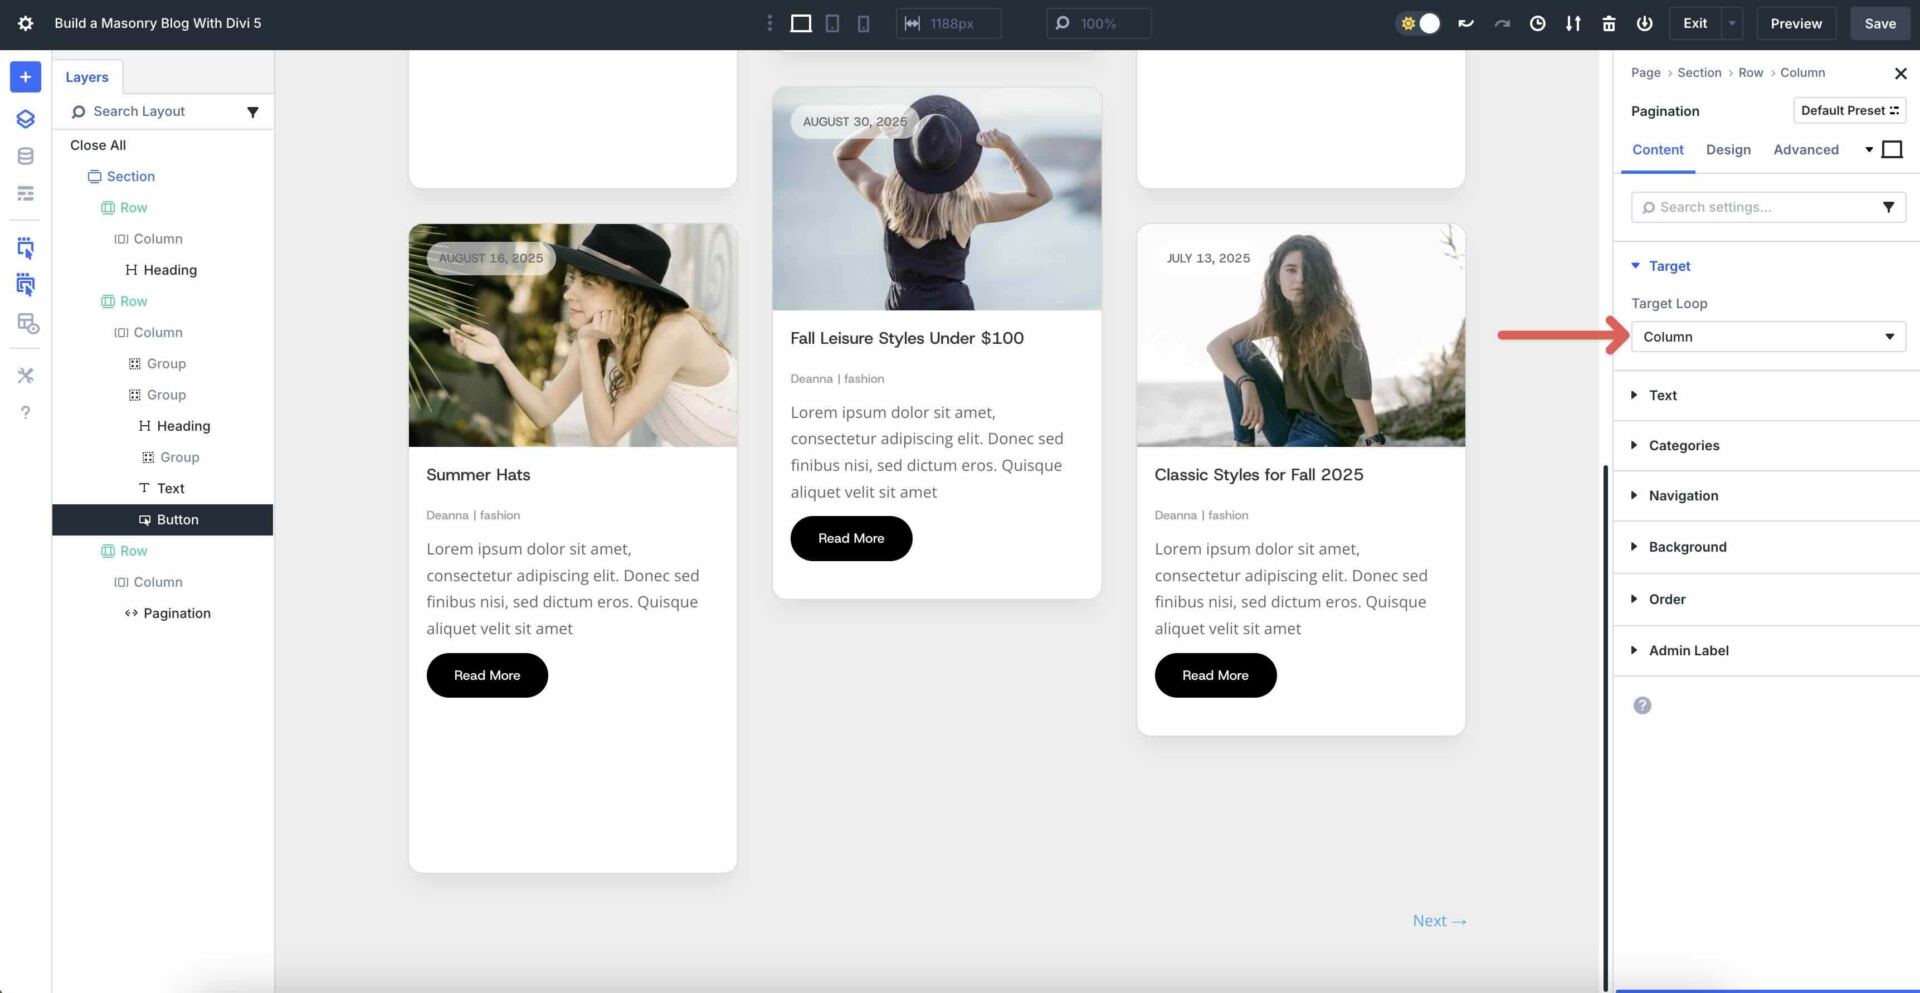
Add Every other Single Column Row
Without equal step is so to upload a single-column row to deal with the Pagination module. Add a brand spanking new single-column row underneath our Grid Loop row and select the Pagination module.
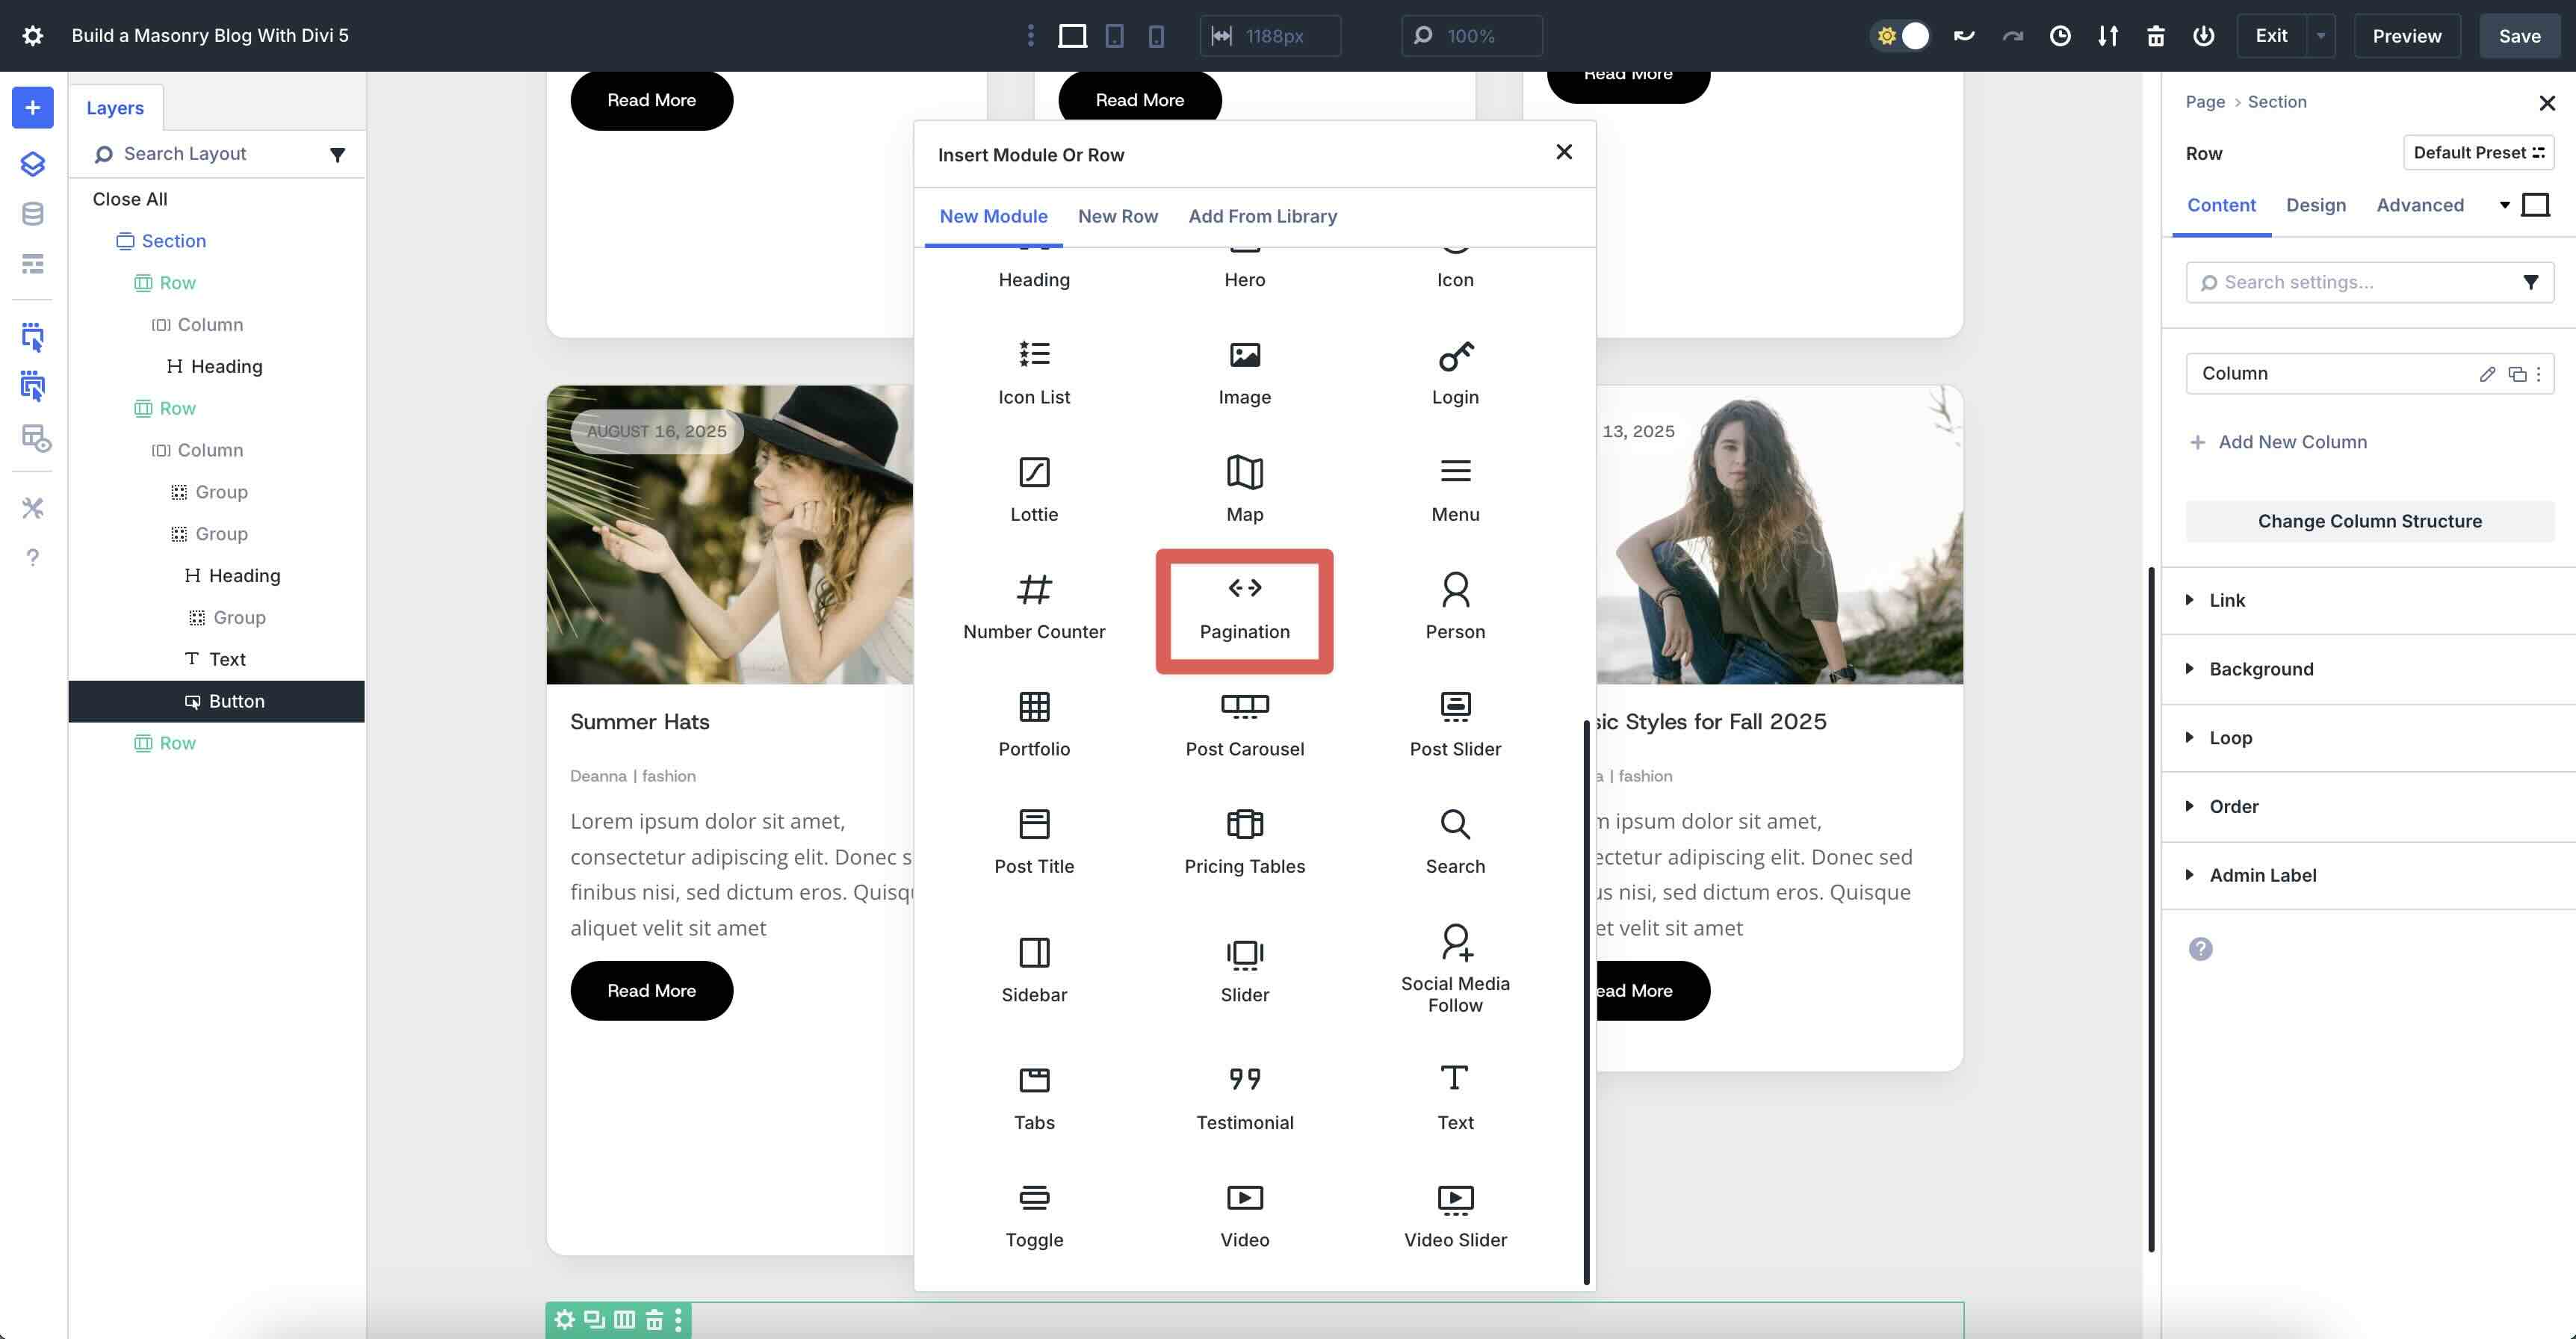
Inside the module’s Content material subject matter tab, build up the Function menu. Inside the Function Loop field, select Column. Pass away all other settings at their defaults.
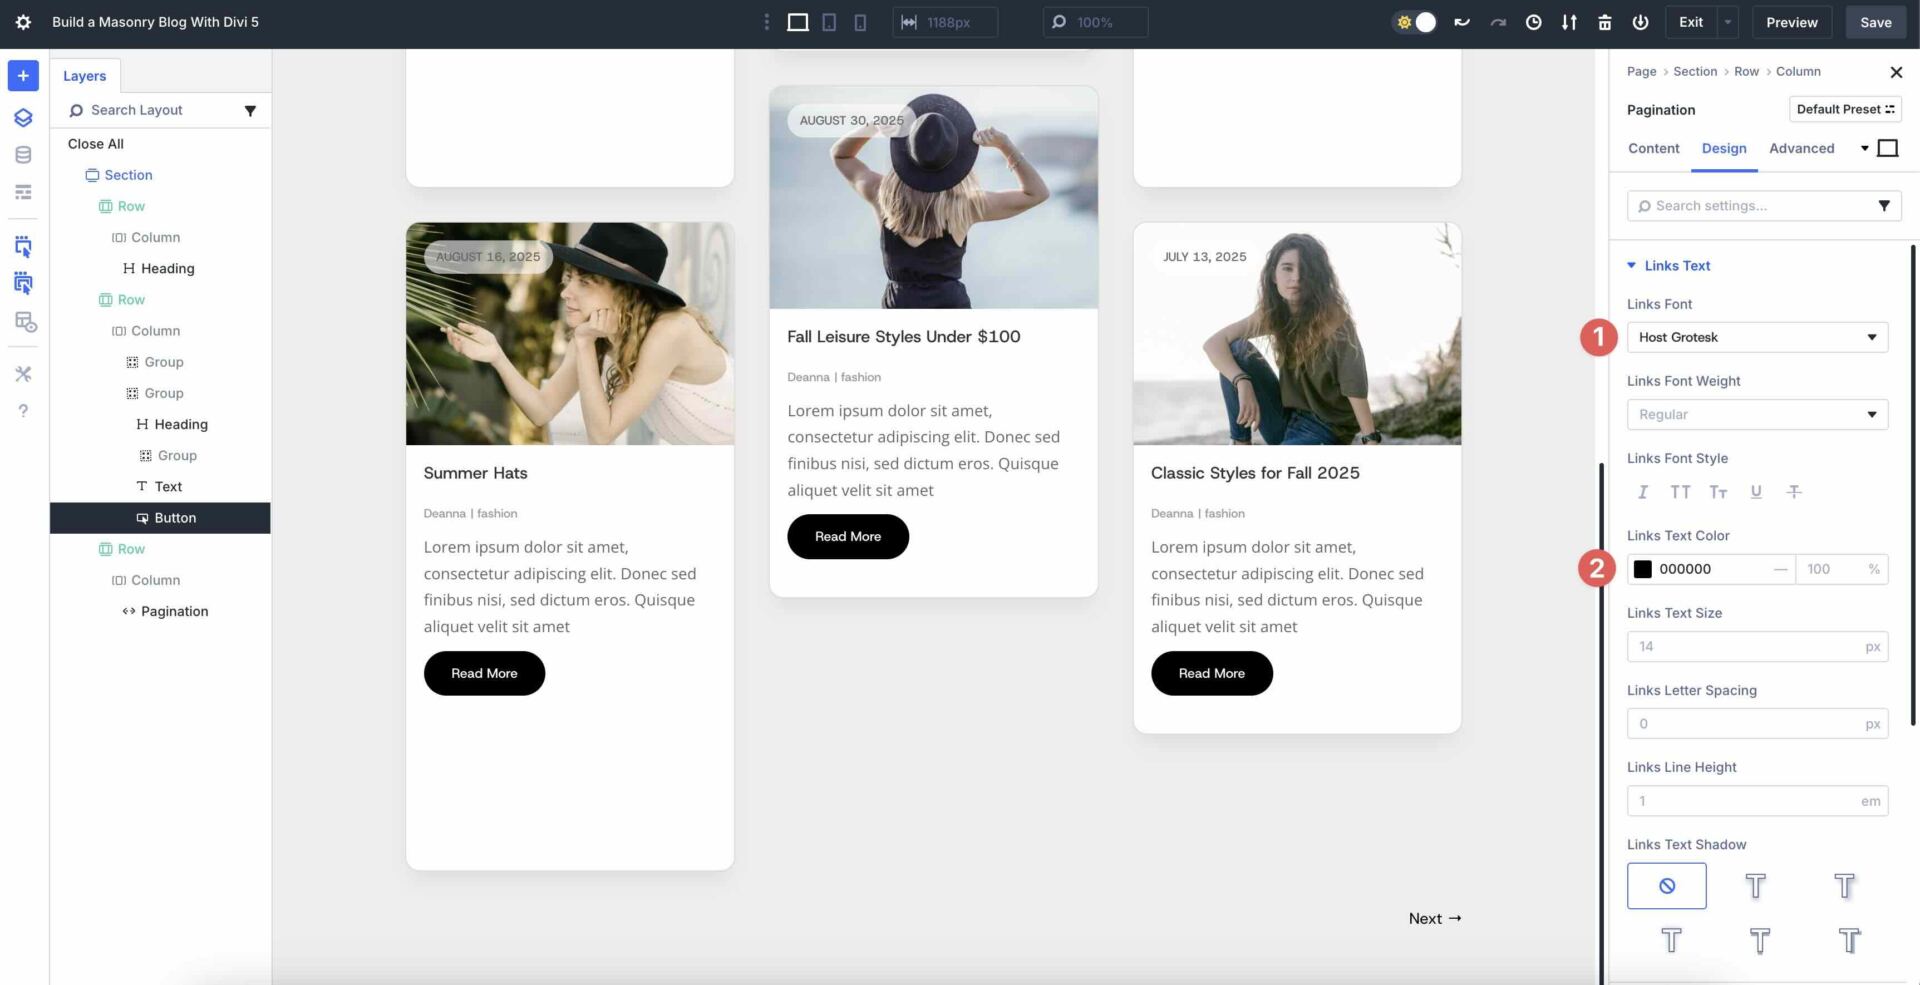
Inside the Design tab, build up the Links Text menu. Choose Host Grotesk since the Links Font and use #000000 since the Links Text Color.
That’s it! As you’ll see, creating a modern blog internet web page is inconspicuous, because of Divi 5’s Loop Builder and CSS Grid choices. Whilst you’d love to procure the document and experiment with the ones choices, you’ll do so via filling out the form below. You’ll upload the segment structure to your Divi library and use it for any internet web page you assemble.
@media most efficient computer screen and ( max-width: 767px ) {.et_bloom .et_bloom_optin_1 .carrot_edge.et_bloom_form_right .et_bloom_form_content:quicker than { border-top-color: #ffffff !important; border-left-color: transparent !important; }.et_bloom .et_bloom_optin_1 .carrot_edge.et_bloom_form_left .et_bloom_form_content:after { border-bottom-color: #ffffff !important; border-left-color: transparent !important; }
}.et_bloom .et_bloom_optin_1 .et_bloom_form_content button { background-color: #f92c8b !important; } .et_bloom .et_bloom_optin_1 .et_bloom_form_content .et_bloom_fields i { colour: #f92c8b !important; } .et_bloom .et_bloom_optin_1 .et_bloom_form_content .et_bloom_custom_field_radio i:quicker than { background: #f92c8b !important; } .et_bloom .et_bloom_optin_1 .et_bloom_border_solid { border-color: #f7f9fb !important } .et_bloom .et_bloom_optin_1 .et_bloom_form_content button { background-color: #f92c8b !important; } .et_bloom .et_bloom_optin_1 .et_bloom_form_container h2, .et_bloom .et_bloom_optin_1 .et_bloom_form_container h2 span, .et_bloom .et_bloom_optin_1 .et_bloom_form_container h2 tough { font-family: “Open Sans”, Helvetica, Arial, Lucida, sans-serif; }.et_bloom .et_bloom_optin_1 .et_bloom_form_container p, .et_bloom .et_bloom_optin_1 .et_bloom_form_container p span, .et_bloom .et_bloom_optin_1 .et_bloom_form_container p tough, .et_bloom .et_bloom_optin_1 .et_bloom_form_container form input, .et_bloom .et_bloom_optin_1 .et_bloom_form_container form button span { font-family: “Open Sans”, Helvetica, Arial, Lucida, sans-serif; } p.et_bloom_popup_input { padding-bottom: 0 !important;}

Download For Loose
Join the Divi Newsletter and we will e mail you a reproduction of the ultimate Divi Landing Internet web page Layout Pack, plus tons of various very good and free Divi resources, guidelines and guidelines. Follow along and also you’ll be a Divi grab in no time. If you’re already subscribed simply type in your e mail take care of below and click on on download to get admission to the structure pack.
You’re going to have successfully subscribed. Please check out your e mail take care of to verify your subscription and get get admission to to free weekly Divi structure packs!
Elevate Your Blog To Life With Divi 5 At the moment
With Divi 5’s Loop Builder and CSS Grid, you’ll have a a hit mixture to make your blog stand out. Loop Builder handles dynamic content material subject matter simply, letting you assemble custom designed, repeatable put up templates that ship your blog to existence. CSS Grid delivers the masonry style with its flexible, responsive grid layouts that transform impartial from from static blog modules.
Now it’s your turn. Download the newest Divi 5 Public Alpha, experiment with the ones choices, and share your concepts with us inside the comments below!
The put up How To Construct A Masonry Weblog With Divi 5’s Loop Builder + Grid seemed first on Chic Issues Weblog.
Contents
- 1 What Is CSS Grid In Divi 5?
- 2 What Is The Loop Builder In Divi 5?
- 3 How To Assemble A Masonry Blog With Divi 5’s Loop Builder + Grid
- 4 Download For Loose
- 5 You’re going to have successfully subscribed. Please check out your e mail take care of to verify your subscription and get get admission to to free weekly Divi structure packs!
- 6 Elevate Your Blog To Life With Divi 5 At the moment
- 7 What Is Google’s INP Ranking and Find out how to Reinforce It in WordPress
- 8 New Starter Site for Locksmiths (Quick Install)
- 9 Tales That Transfer, Messages That Stick: The Secret to Persuasive Advertising

0 Comments