

Customized headers set your website online aside, particularly when tens of millions of different web sites are constructed with the similar WordPress theme or template. This educational demonstrates tips on how to create a customized header in Divi 5. You’ll download this header and 19 others when you’d like to check or use them by yourself builds.
Another way, this put up supplies a step by step information on tips on how to use Divi’s Flexbox layout system to construct this format.
How To Create A Website online Header With Divi’s Flexbox

Here’s the important thing concept. A flex format has two ranges of keep watch over:
- Mum or dad bins outline path, gaps, wrapping, and alignment for the entire format.
- Kid pieces outline whether or not they develop, shrink, or produce other sizing choices.
Mum or dad controls reside below Design > Format. Kid sizing lives below Design > Sizing. Get the dad or mum proper first. Then dial in layouts with child-level choices.
Now, for the joys section: let’s recreate this format, step-by-step.
Step 1. Construct The Construction
When development a bit format, step one is to resolve the construction. With out figuring out (or working out the construction), you are going to have a difficult time getting issues to return in combination. With apply, this turns into kind of second-nature.
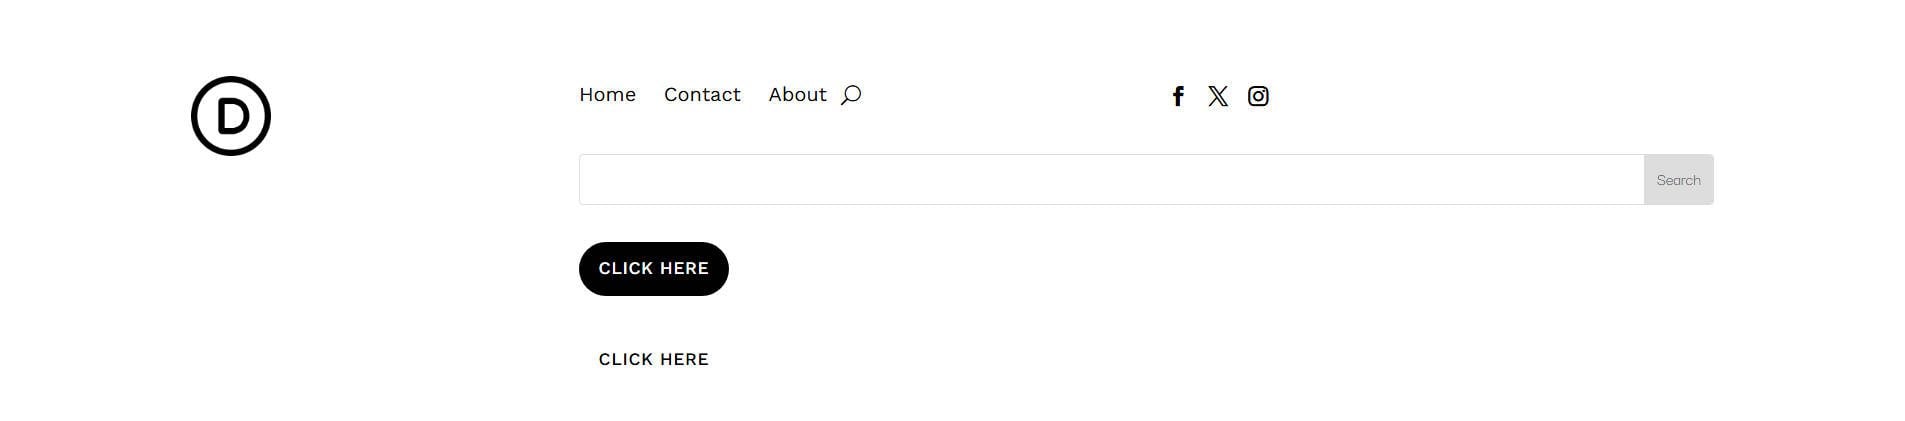
To recreate this heading, there are a couple of ranges of construction to notice. First is the best possible layers: a Phase, with a Row, and two Columns in that row (we’ll concern about format specifics later, however word the construction now.
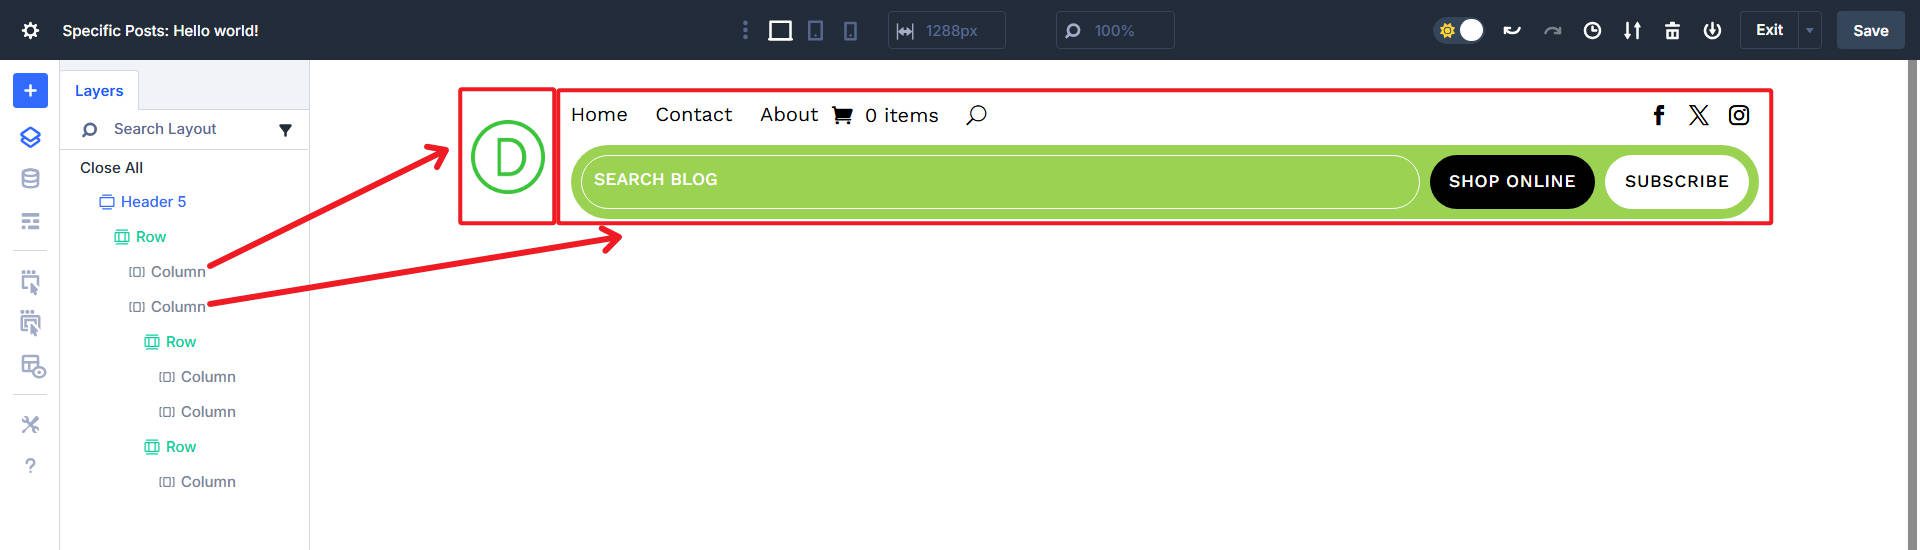
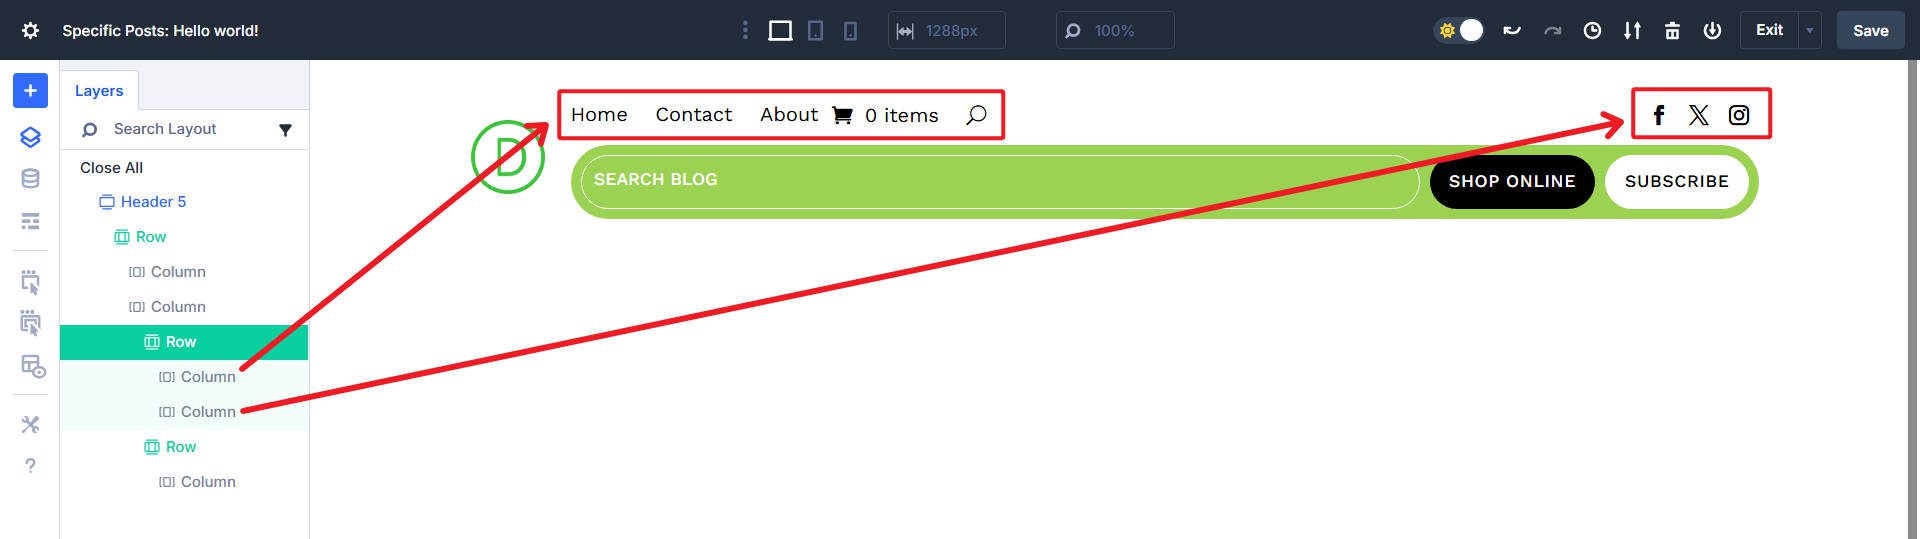
Inside of that moment column, we see two nested rows. The primary row holds one column for the menu and some other column for the social icons.
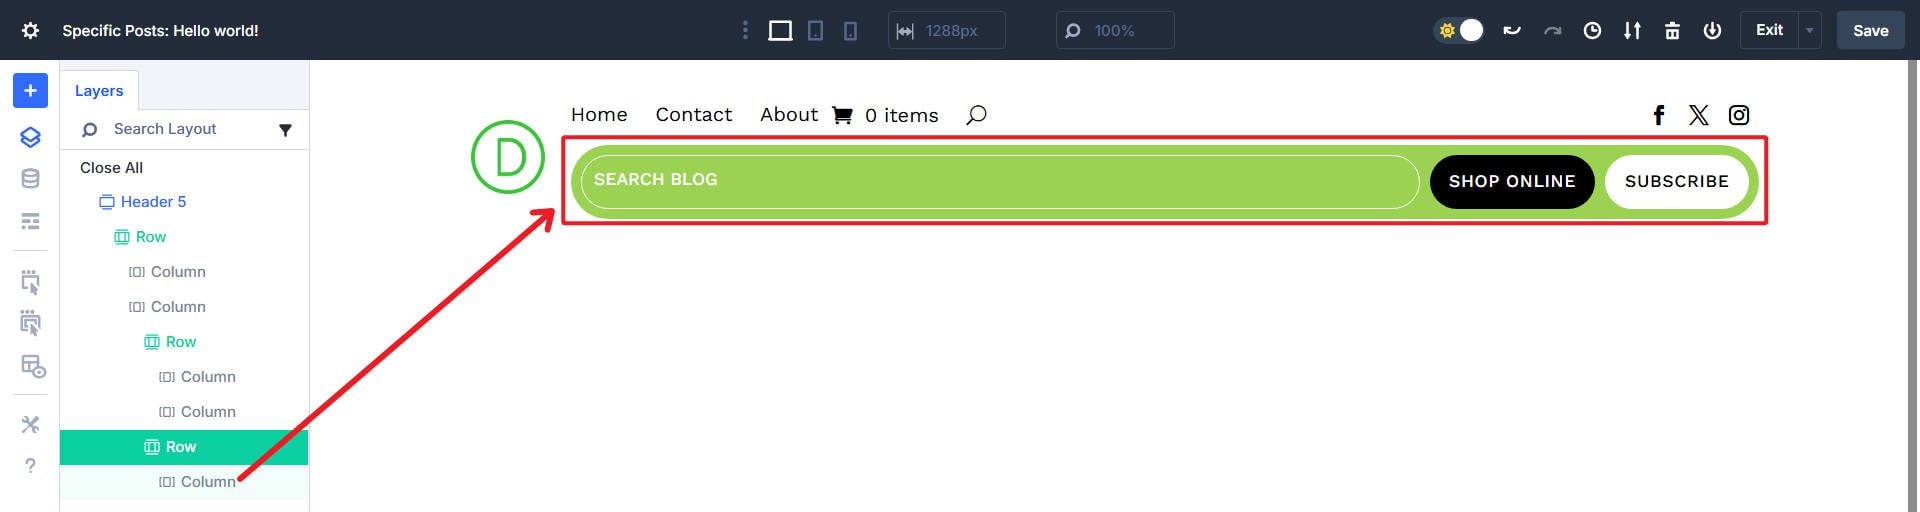
There’s some other row with a unmarried column that holds the Seek and Button Modules.
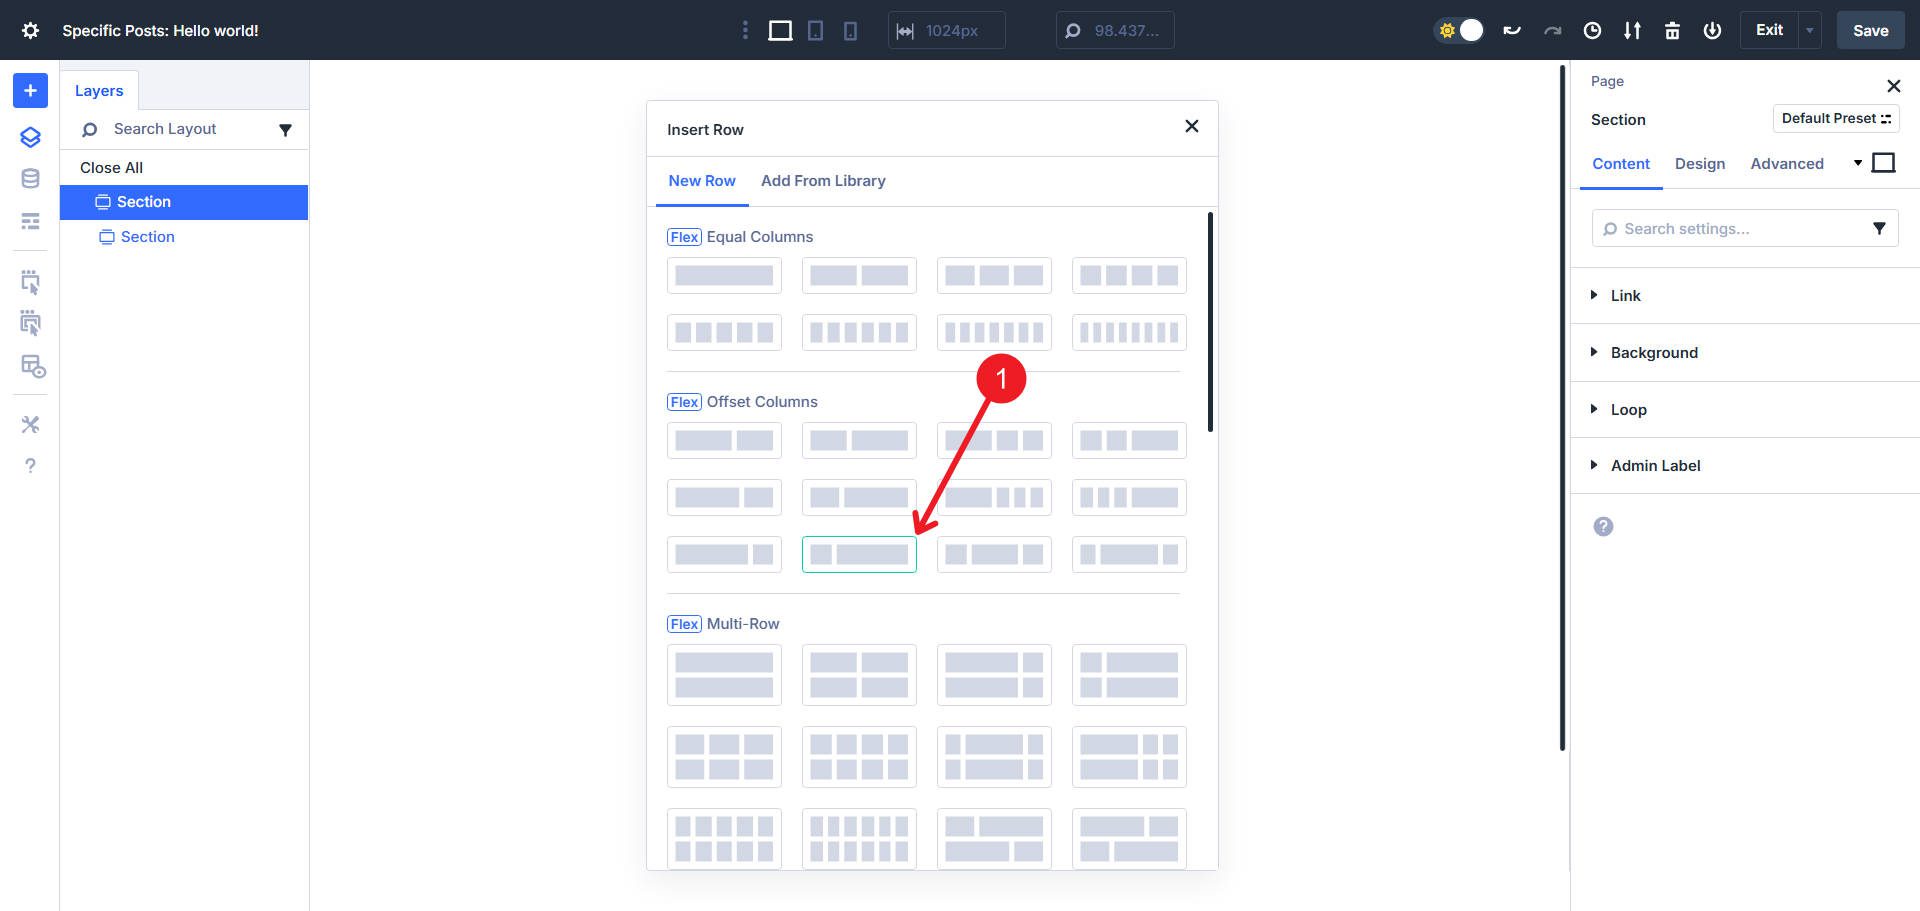
Now that we perceive the construction, we will create a clean web page with the wanted uncooked components. Upload a Phase on your header template. Upload an offset Row construction with two columns.
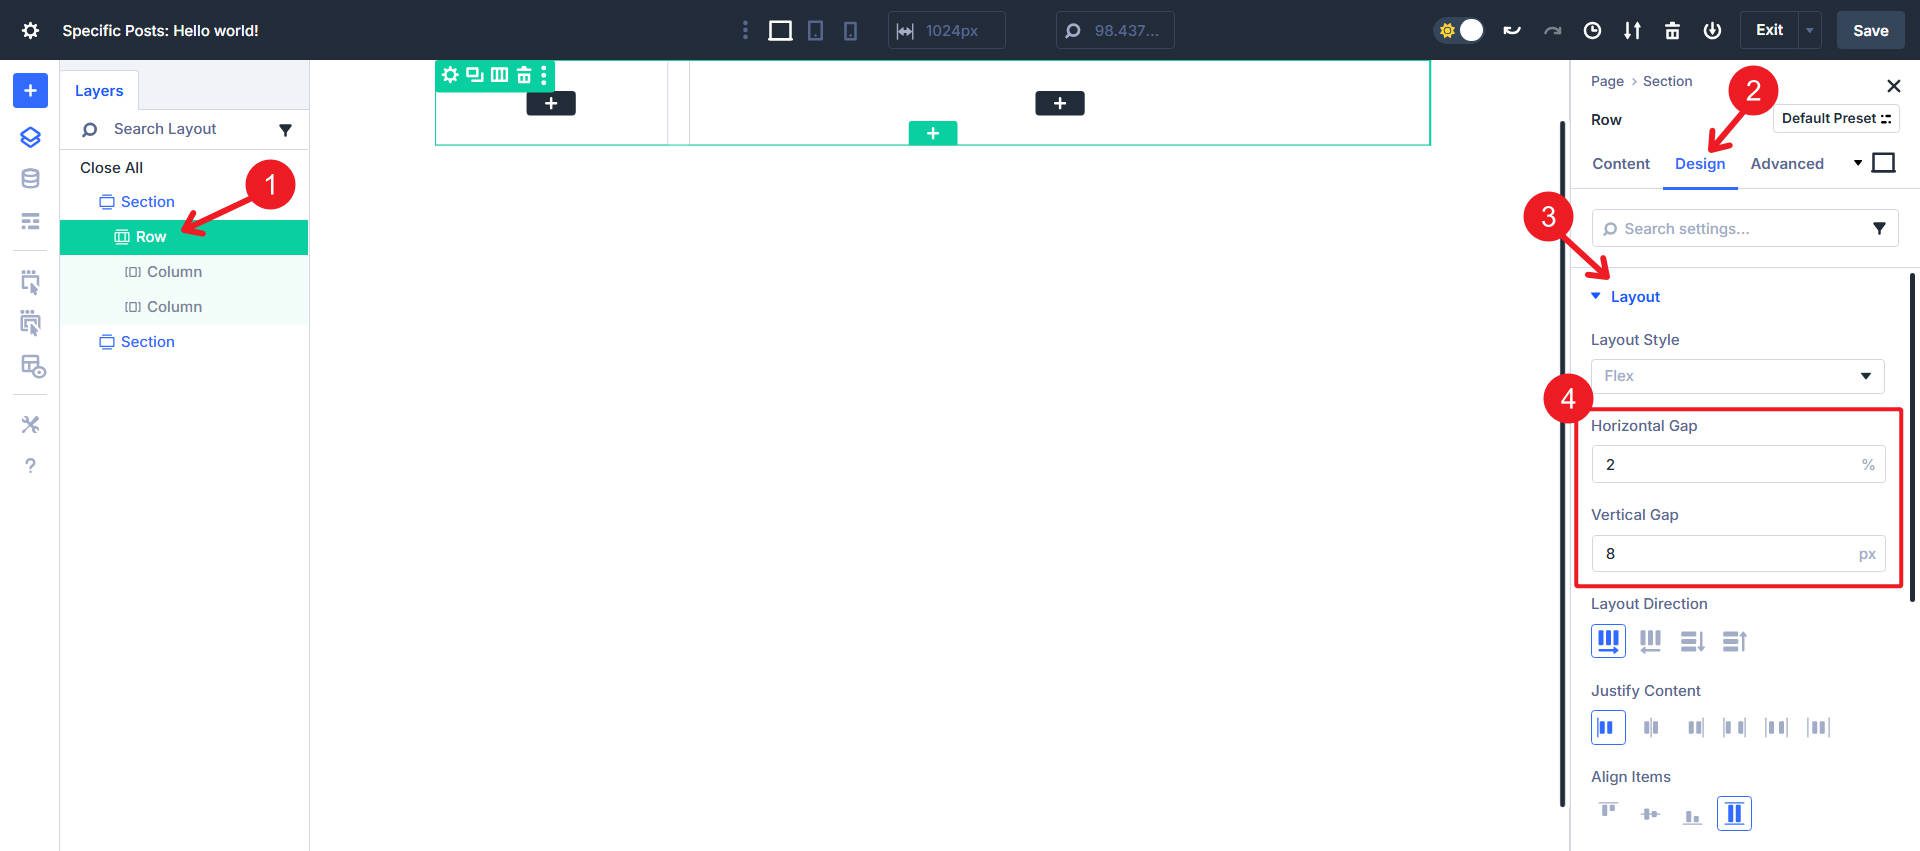
Open the Row, pass to Design > Format, and set the flex Horizontal Hole to 2% and the Vertical Hole to 8px. The whole lot else will have to retain default settings.
To additional flesh out the construction, we will be able to upload two Nested Rows within column 2.
At this level, we will be able to end including the wanted columns and modules. Nested row 1 will get two columns, and nested row 2 will get simply the only.
With the construction in position, we will now get started fine-tuning the format the usage of Flexbox controls at each and every point.
I’ve styled each and every of my modules in order that we will center of attention only on development this the usage of Flex. Obtain the format from the related put up above if you need the precise kinds.
Step 2. Measurement Column One For The Brand
Choose Column 1. Open Design > Sizing. Make sure Column Elegance displays No Column Elegance. Cross to the second one column, and set the column magnificence to Fullwidth.
Step 3. Column Two Format Settings
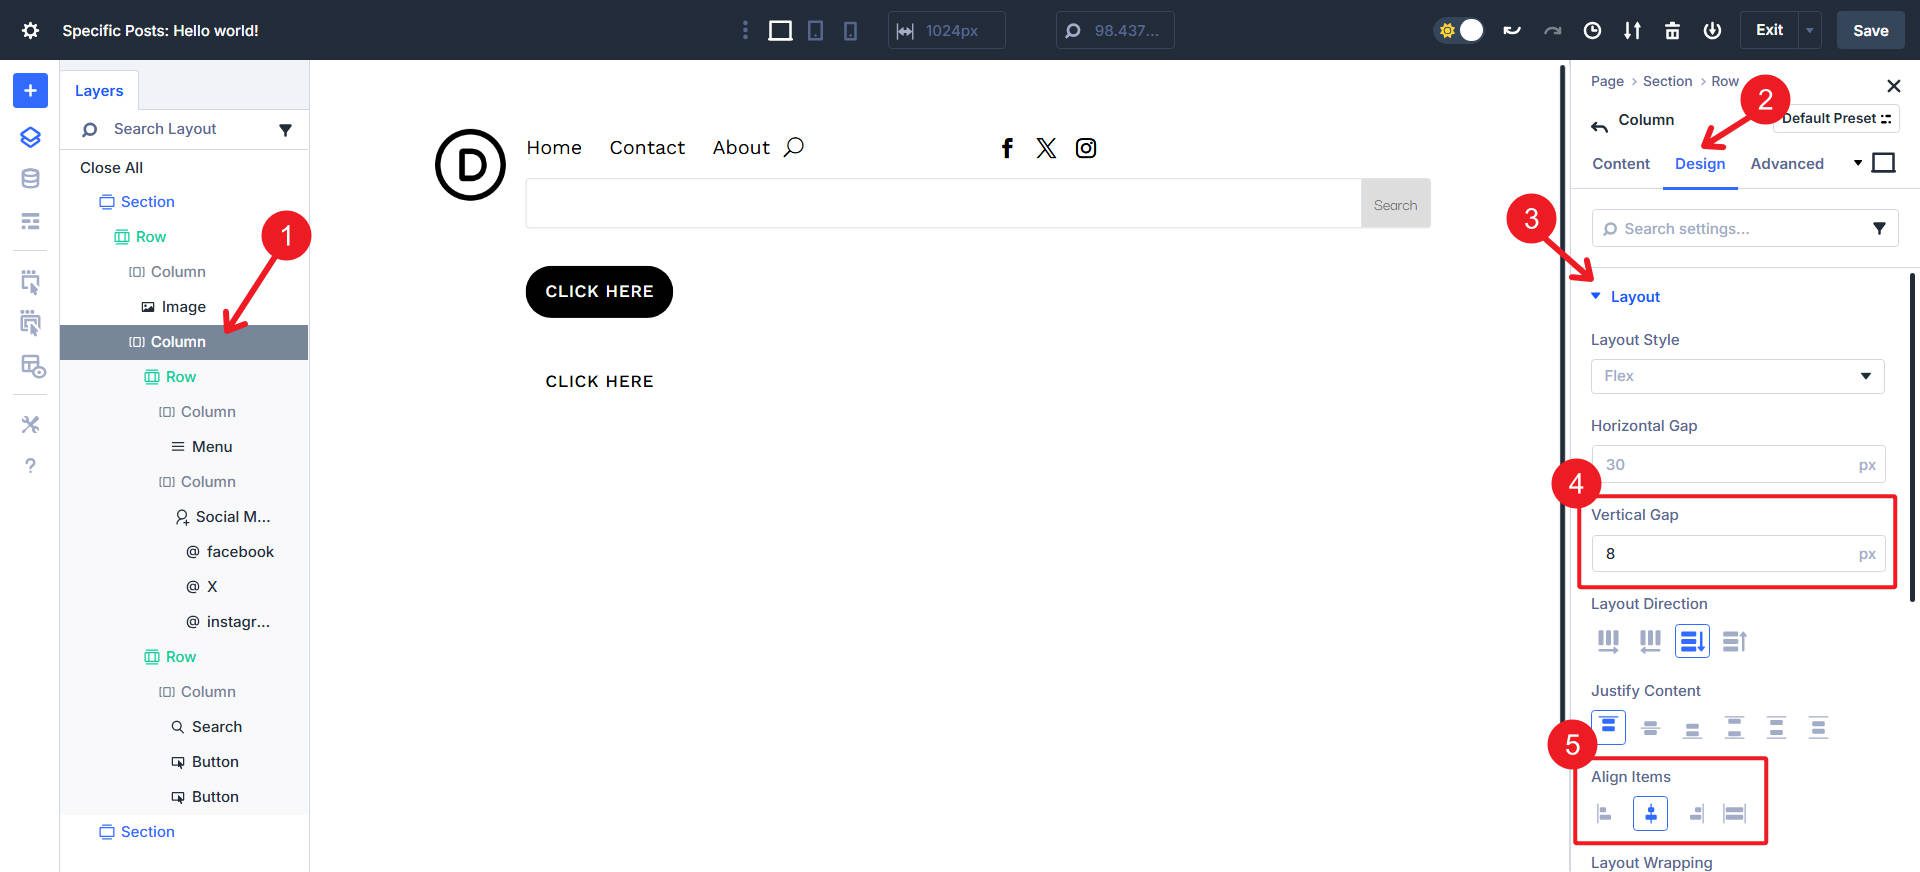
Choose Column 2. Open Design > Format. Verify the Horizontal Hole displays 30px, and the Vertical Hole displays 8px. Stay the Format Course as vertical stack and Justify Content material on the default. Finally, set Align Pieces to Middle at the cross-axis.
Step 4. Inside of First Nested Row, Modify Sizing For Columns
Choose Column 1 within Nested Row #1. Open Design > Sizing. Select Develop To Fill and alter Column Elegance to No Column Elegance. Choose Column 2 and open Design > Sizing to set column magnificence to No Column Elegance and ensure best Shrink to Are compatible is chosen. This will likely make the primary column with the menu take many of the area, pushing the social icons to the proper.
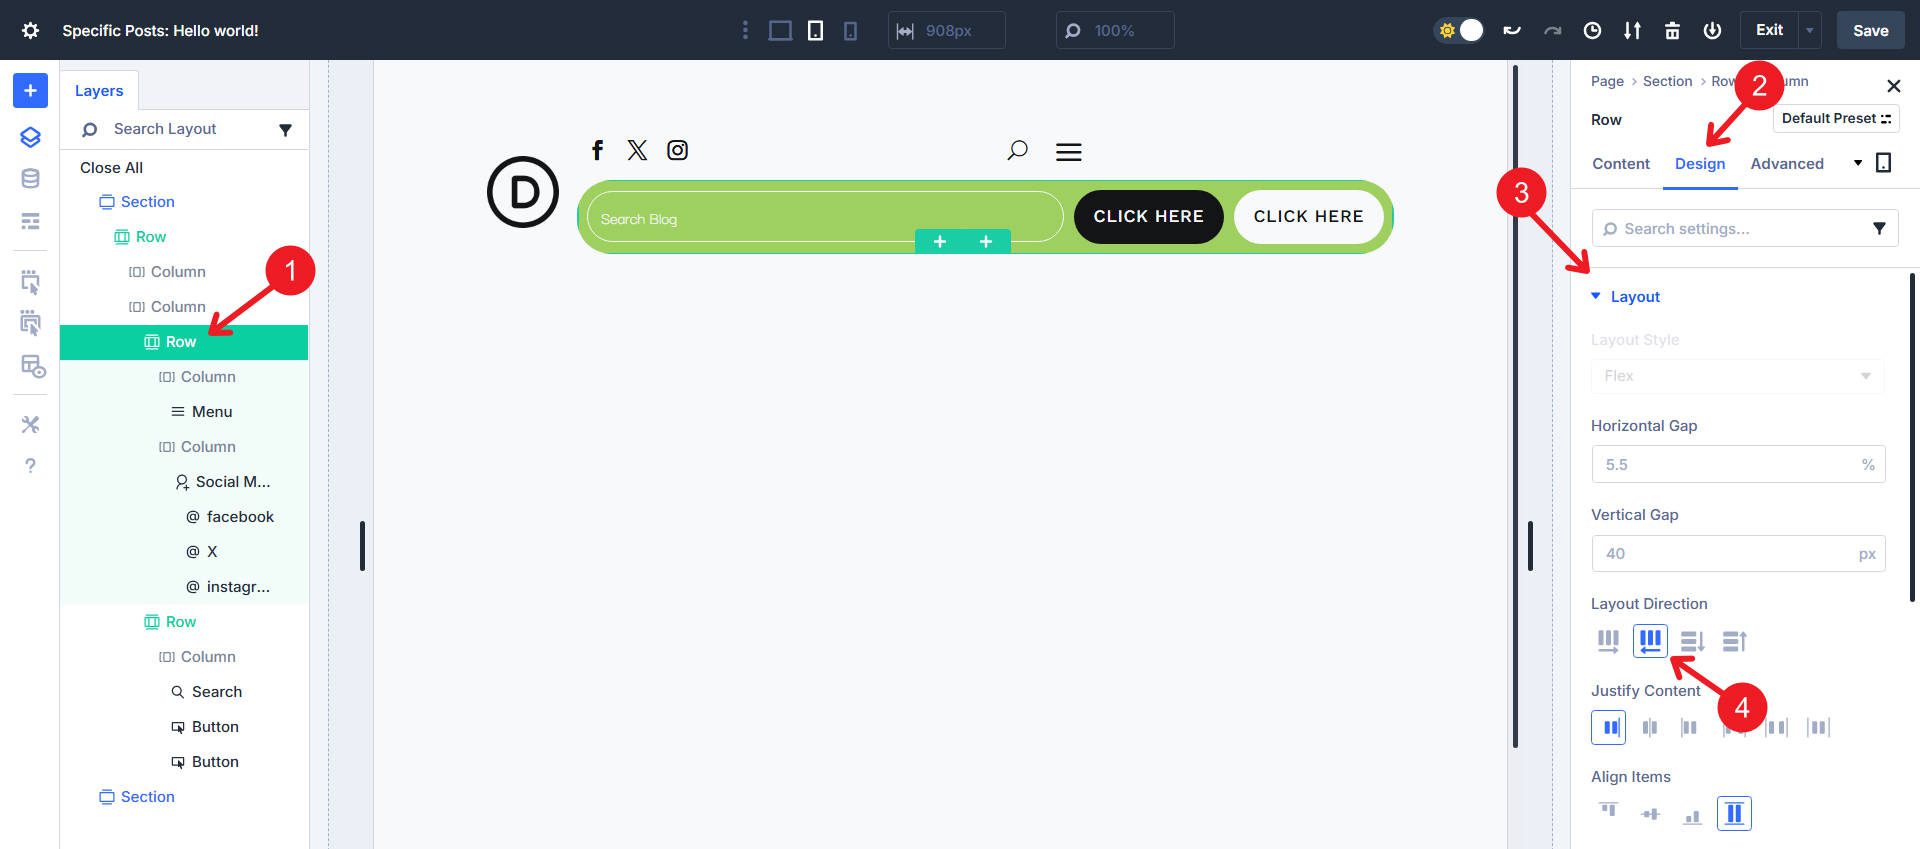
Step 5. Configure The Application Row’s Column Format
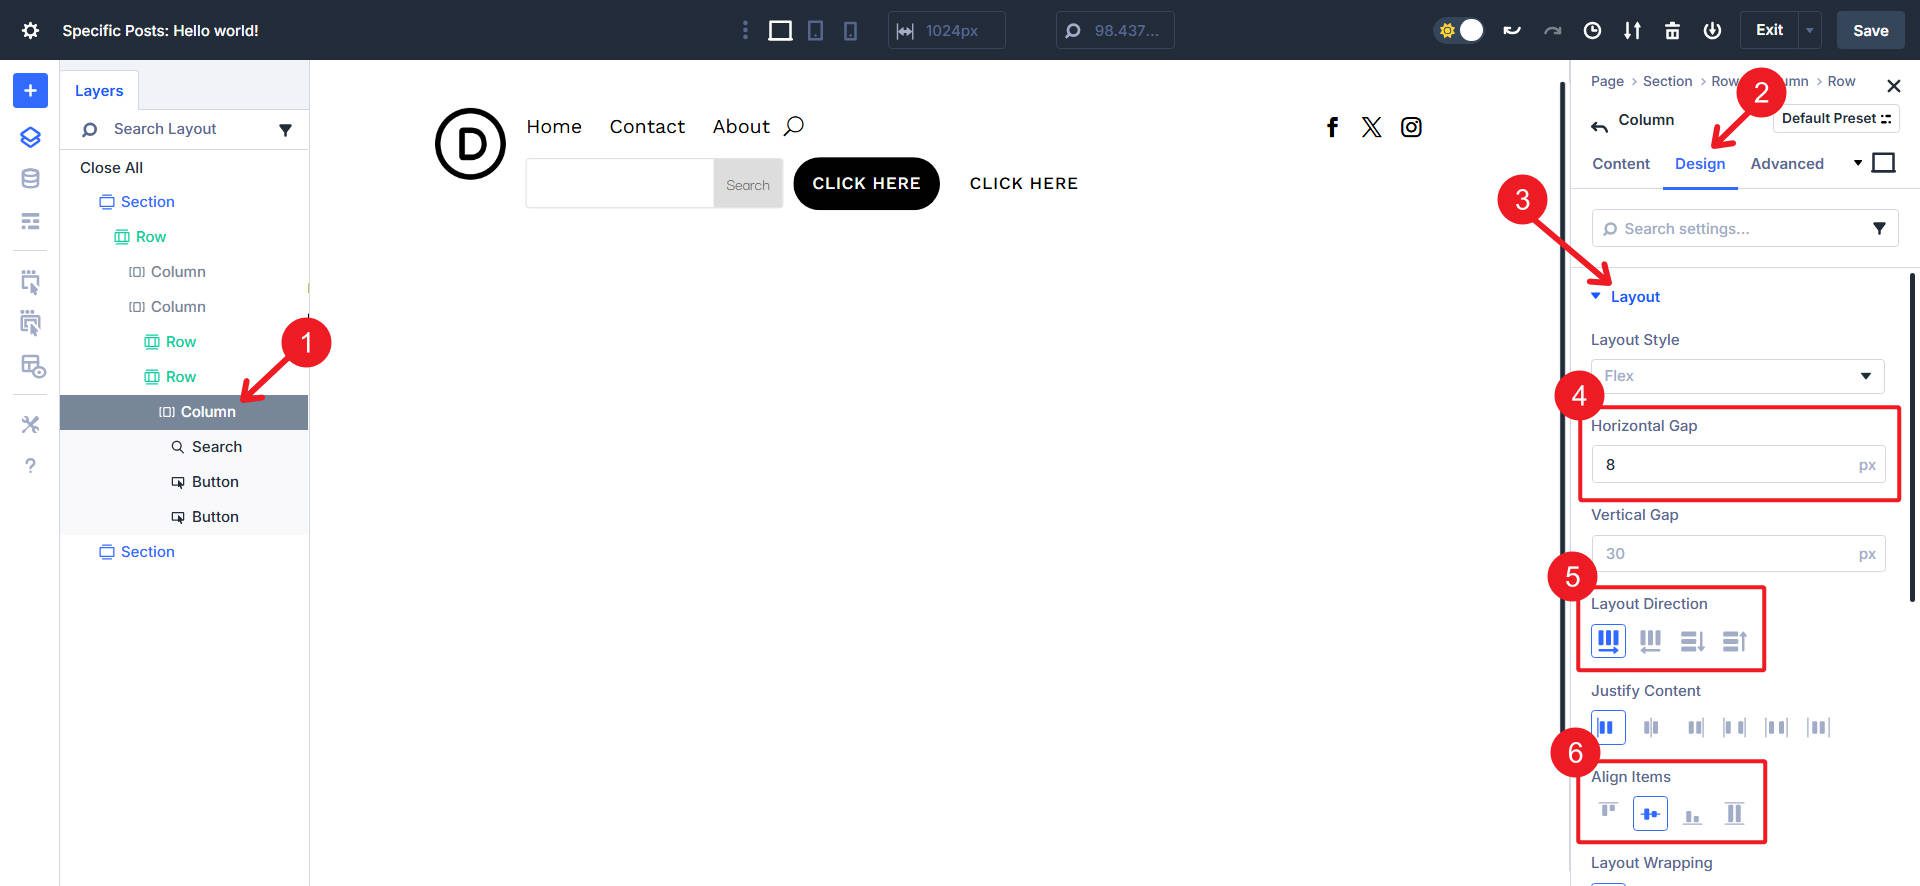
Inside of Nested Row #2, to find its best Column and open Design > Format. Set Horizontal Hole to 8px and set the Format Course to Row. You’ll additionally set Align Pieces to Middle.
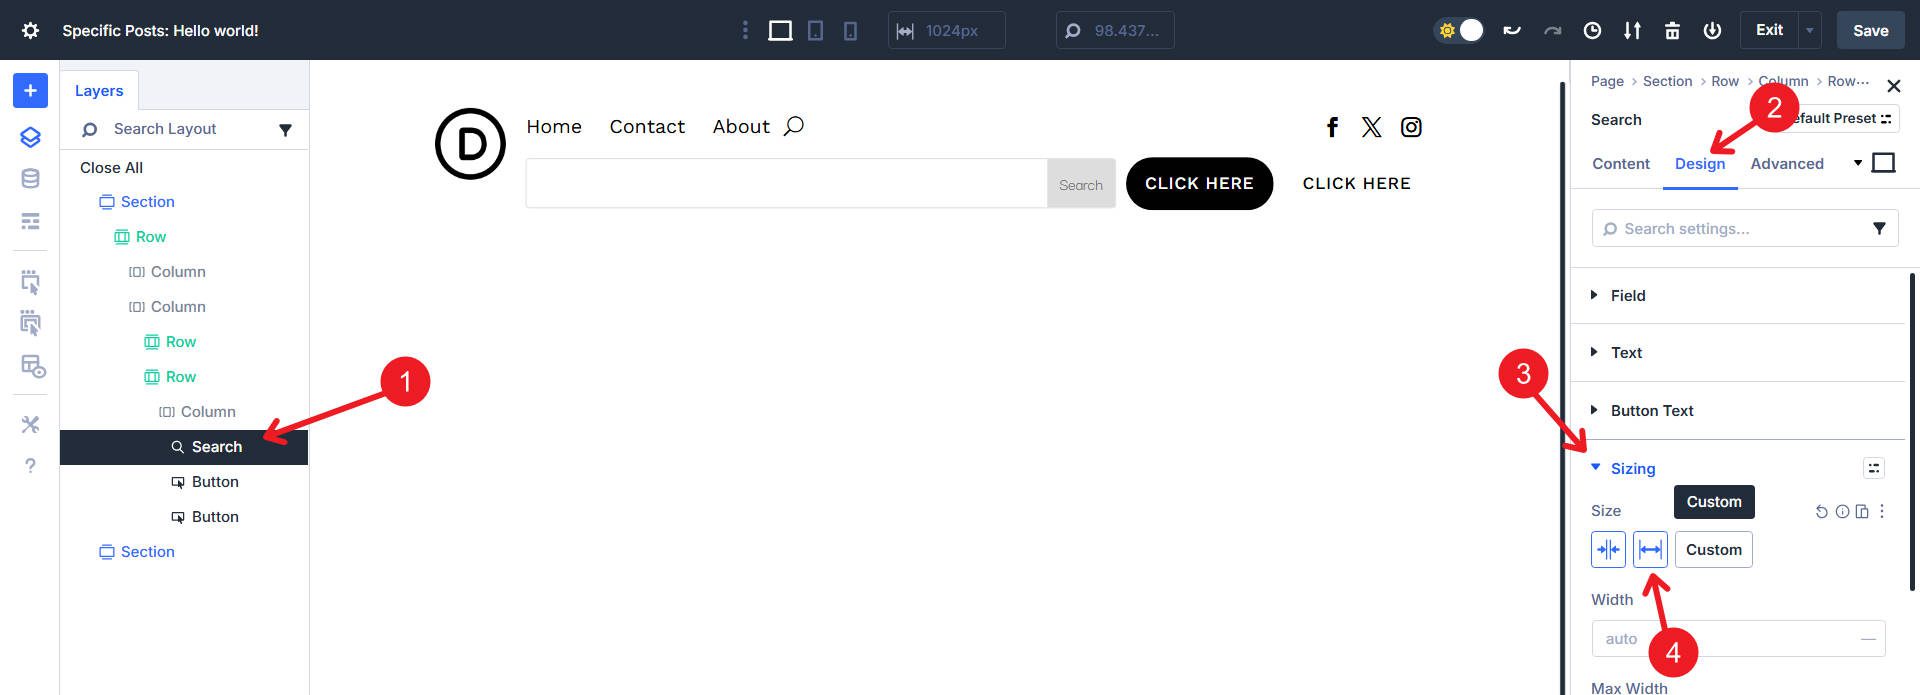
Step 6. Make The Seek Module Take in Unfastened House
There are 3 modules within this application row. Open the Seek module. Cross to Design > Sizing and set it to Develop To Fill. Depart each Buttons on the default dimension. The Seek will now extend to fill the unused width within the column.
Step 7. Completing Kinds
Open Nested Row #2 and provides it a background shade of #9bd252. Then open Border kinds so as to add rounded corners with clamp(20px, 3vw, 65px). Finally, upload 8px padding round both sides.
To taste the Seek Module like our instance, set the Placeholder Textual content to #ffffff, the Fields Textual content Colour to #ffffff, and set the Button and Border Colour to #9BD252. Moreover, give it a Border Radius of 100vh.
Then give it a “Seek Weblog” placeholder and toggle off the Display Button.
We’ll vertically heart the brand via going to its dad or mum column and atmosphere Justify Content material to Middle.
![]()
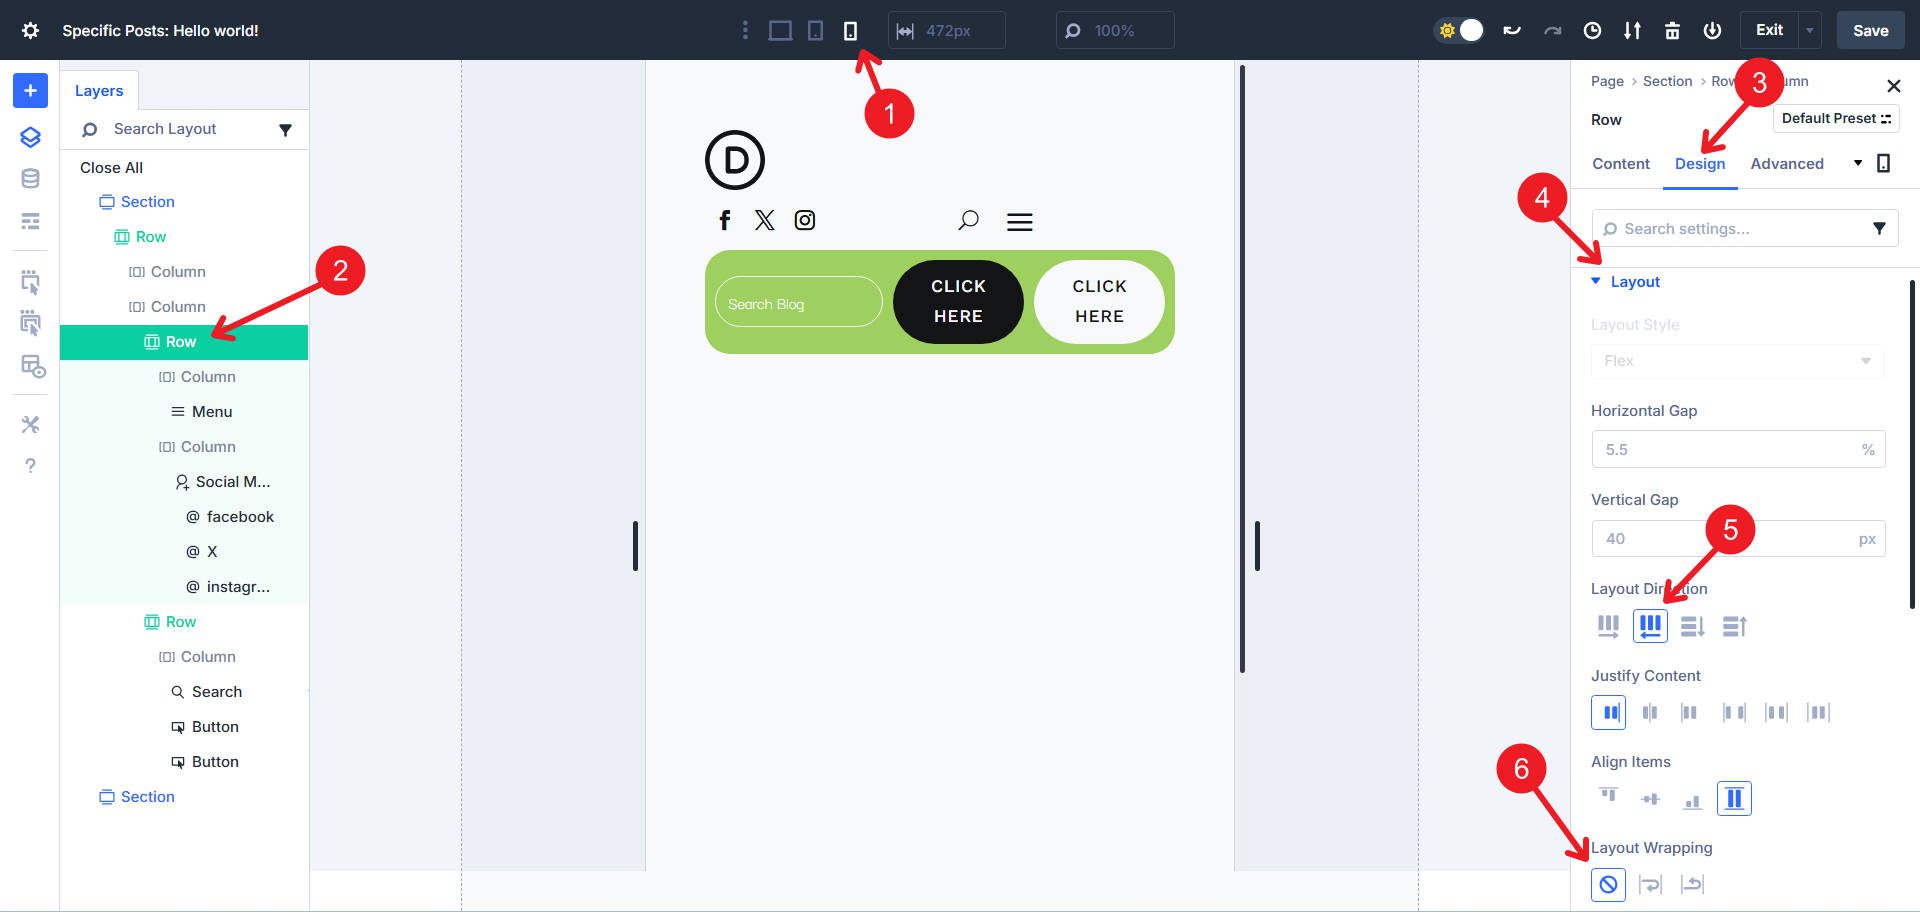
Step 8. End With A Responsive Cross
Transfer to Pill view the usage of the Best Menu Bar. In case you don’t like how the hamburger menu isn’t at the proper facet, you’ll be able to reorder the modules for higher go with the flow.
Then, we will resize the columns and modify which column will get to Develop to Fill. Transfer to pill, make the column with the social icons Develop to Fill, and modify the Column Elegance to No Column Elegance. Then, pass to the column with the Menu Module, flip off Develop to Fill, and set it to No Column Elegance as neatly.
Finally, there may be a large number of paintings to do on the cell breakpoint. Make the primary nested row have a Format Course of Row Opposite (if it isn’t already) and make sure it’s set to No Wrap.
Then, we will be able to once more modify the column sizes to set them each to No Column Elegance and to have best the column with the social icons Develop to Fill.
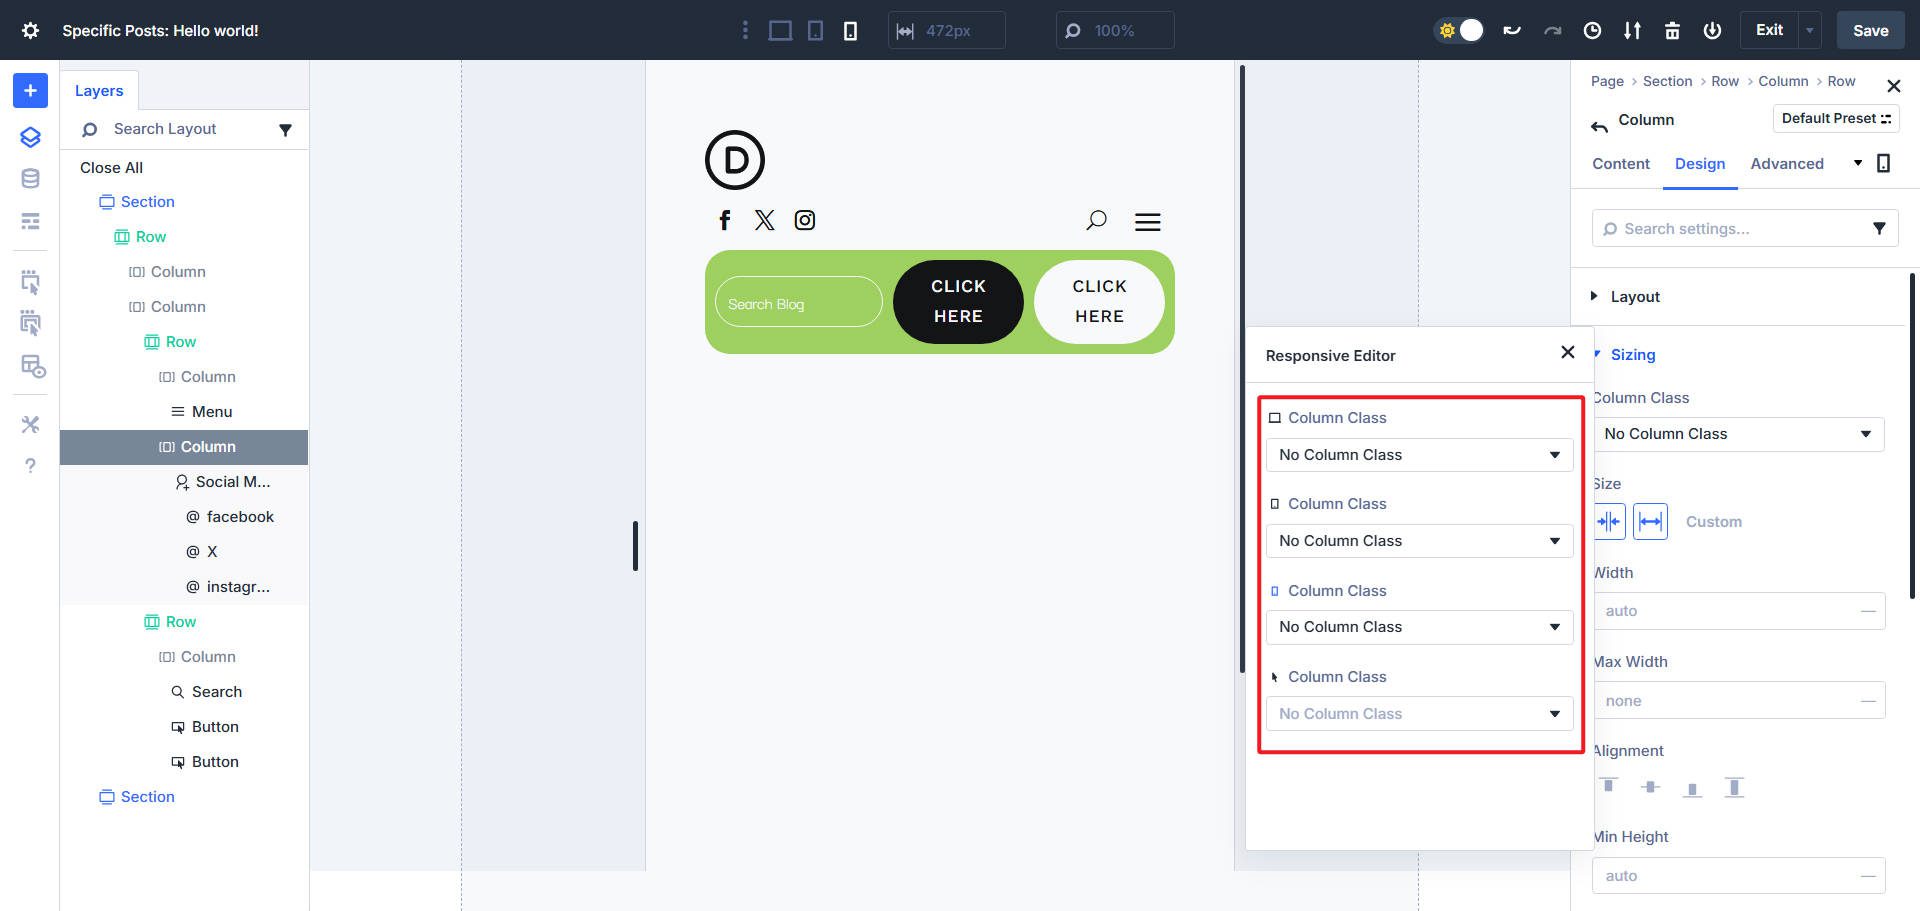
We will have finished this step above if we had used the Responsive Editor, which is a great reason why to transform acquainted with it. With it, you’ll be able to modify the similar Design settings throughout a couple of breakpoints in one view.
After all, we’ll damage the application nested row into two flex rows via permitting it to Wrap. Then, make the hunt Module a Width of 100%. In case you favor, you’ll be able to Justify Content material to the Middle.
Obtain 20 Flexbox Headers For Divi 5
Get all 20 Flexbox headers totally free, together with each Default and Prestyled variations. Each and every header is able to import into your Divi Library and use within the Theme Builder. Simply obtain and get started development.
@media best display screen and ( max-width: 767px ) {.et_bloom .et_bloom_optin_1 .carrot_edge.et_bloom_form_right .et_bloom_form_content:sooner than { border-top-color: #ffffff !essential; border-left-color: clear !essential; }.et_bloom .et_bloom_optin_1 .carrot_edge.et_bloom_form_left .et_bloom_form_content:after { border-bottom-color: #ffffff !essential; border-left-color: clear !essential; }
}.et_bloom .et_bloom_optin_1 .et_bloom_form_content button { background-color: #f92c8b !essential; } .et_bloom .et_bloom_optin_1 .et_bloom_form_content .et_bloom_fields i { shade: #f92c8b !essential; } .et_bloom .et_bloom_optin_1 .et_bloom_form_content .et_bloom_custom_field_radio i:sooner than { background: #f92c8b !essential; } .et_bloom .et_bloom_optin_1 .et_bloom_border_solid { border-color: #f7f9fb !essential } .et_bloom .et_bloom_optin_1 .et_bloom_form_content button { background-color: #f92c8b !essential; } .et_bloom .et_bloom_optin_1 .et_bloom_form_container h2, .et_bloom .et_bloom_optin_1 .et_bloom_form_container h2 span, .et_bloom .et_bloom_optin_1 .et_bloom_form_container h2 robust { font-family: “Open Sans”, Helvetica, Arial, Lucida, sans-serif; }.et_bloom .et_bloom_optin_1 .et_bloom_form_container p, .et_bloom .et_bloom_optin_1 .et_bloom_form_container p span, .et_bloom .et_bloom_optin_1 .et_bloom_form_container p robust, .et_bloom .et_bloom_optin_1 .et_bloom_form_container shape enter, .et_bloom .et_bloom_optin_1 .et_bloom_form_container shape button span { font-family: “Open Sans”, Helvetica, Arial, Lucida, sans-serif; } p.et_bloom_popup_input { padding-bottom: 0 !essential;}

Obtain For Unfastened
Sign up for the Divi E-newsletter and we will be able to e-mail you a duplicate of without equal Divi Touchdown Web page Format Pack, plus lots of different wonderful and unfastened Divi assets, guidelines and methods. Practice alongside and you are going to be a Divi grasp very quickly. In case you are already subscribed merely sort on your e-mail deal with beneath and click on obtain to get entry to the format pack.
You could have effectively subscribed. Please take a look at your e-mail deal with to verify your subscription and get get entry to to unfastened weekly Divi format packs!
Construct Your Flexbox Headers In Divi 5 Nowadays
Use this header as a kick off point to your experiments. Upload a sticky state for the desktop. Upload a statement strip above the principle row. Take a look at development this with a couple of bins via changing some Nested Rows and their columns with Teams.
Mastering Flexbox in Divi 5 takes some apply. There are behavior that you’d use in a Block format that aren’t best possible practices in a Flex format. However you get a brand new universe of doable when you’re making the transfer (when you find yourself able).
Flex is only one of dozens of recent options and enhancements that Divi 5 customers are the usage of these days.
The put up How To Create A Unique Header Menu With Divi 5’s Flexbox Layout System seemed first on Elegant Themes Blog.
Contents
- 1 How To Create A Website online Header With Divi’s Flexbox
- 1.1 Step 1. Construct The Construction
- 1.2 Step 2. Measurement Column One For The Brand
- 1.3 Step 3. Column Two Format Settings
- 1.4 Step 4. Inside of First Nested Row, Modify Sizing For Columns
- 1.5 Step 5. Configure The Application Row’s Column Format
- 1.6 Step 6. Make The Seek Module Take in Unfastened House
- 1.7 Step 7. Completing Kinds
- 1.8 Step 8. End With A Responsive Cross
- 2 Obtain 20 Flexbox Headers For Divi 5
- 3 Obtain For Unfastened
- 4 You could have effectively subscribed. Please take a look at your e-mail deal with to verify your subscription and get get entry to to unfastened weekly Divi format packs!
- 5 Construct Your Flexbox Headers In Divi 5 Nowadays
- 6 Learn how to Reset Your Apple ID Password
- 7 Putting in Docker on Ubuntu (4 Simple Tactics)
- 8 12 Unusual Christmas Customs You Almost definitely Don’t Know

0 Comments