

Off canvas menus seem all over the place on the net, however development one who works easily on desktop incessantly method preventing with customized CSS or patching in combination mega-menu workarounds. Divi 5 handles this otherwise with Canvases and Interactions.
We’ll construct an international off canvas products and services menu precipitated from a Theme Builder header template. The menu sits in its personal canvas, utterly separate out of your web page format, and remains fastened whilst guests scroll. On cellular, it will get a max-height and inner scroll so the whole thing remains obtainable on smaller monitors.
What Are Canvases In Divi 5?
A canvas in Divi 5 is a separate workspace that exists outdoor your major web page format. Your web page content material lives in the principle builder house, however canvases function independently and keep hidden till precipitated.
Bring to mind them as devoted boxes for interface components that handiest seem when wanted. You construct off canvas menus, slide-in panels, popups, or drawers inside of a canvas, they usually wait within the background till a button click on or interplay pulls them into view. The web page doesn’t sign up their presence till that second.
After updating your Divi 5 theme to the most recent model, you’ll see a brand new Canvas dropdown within the height bar.
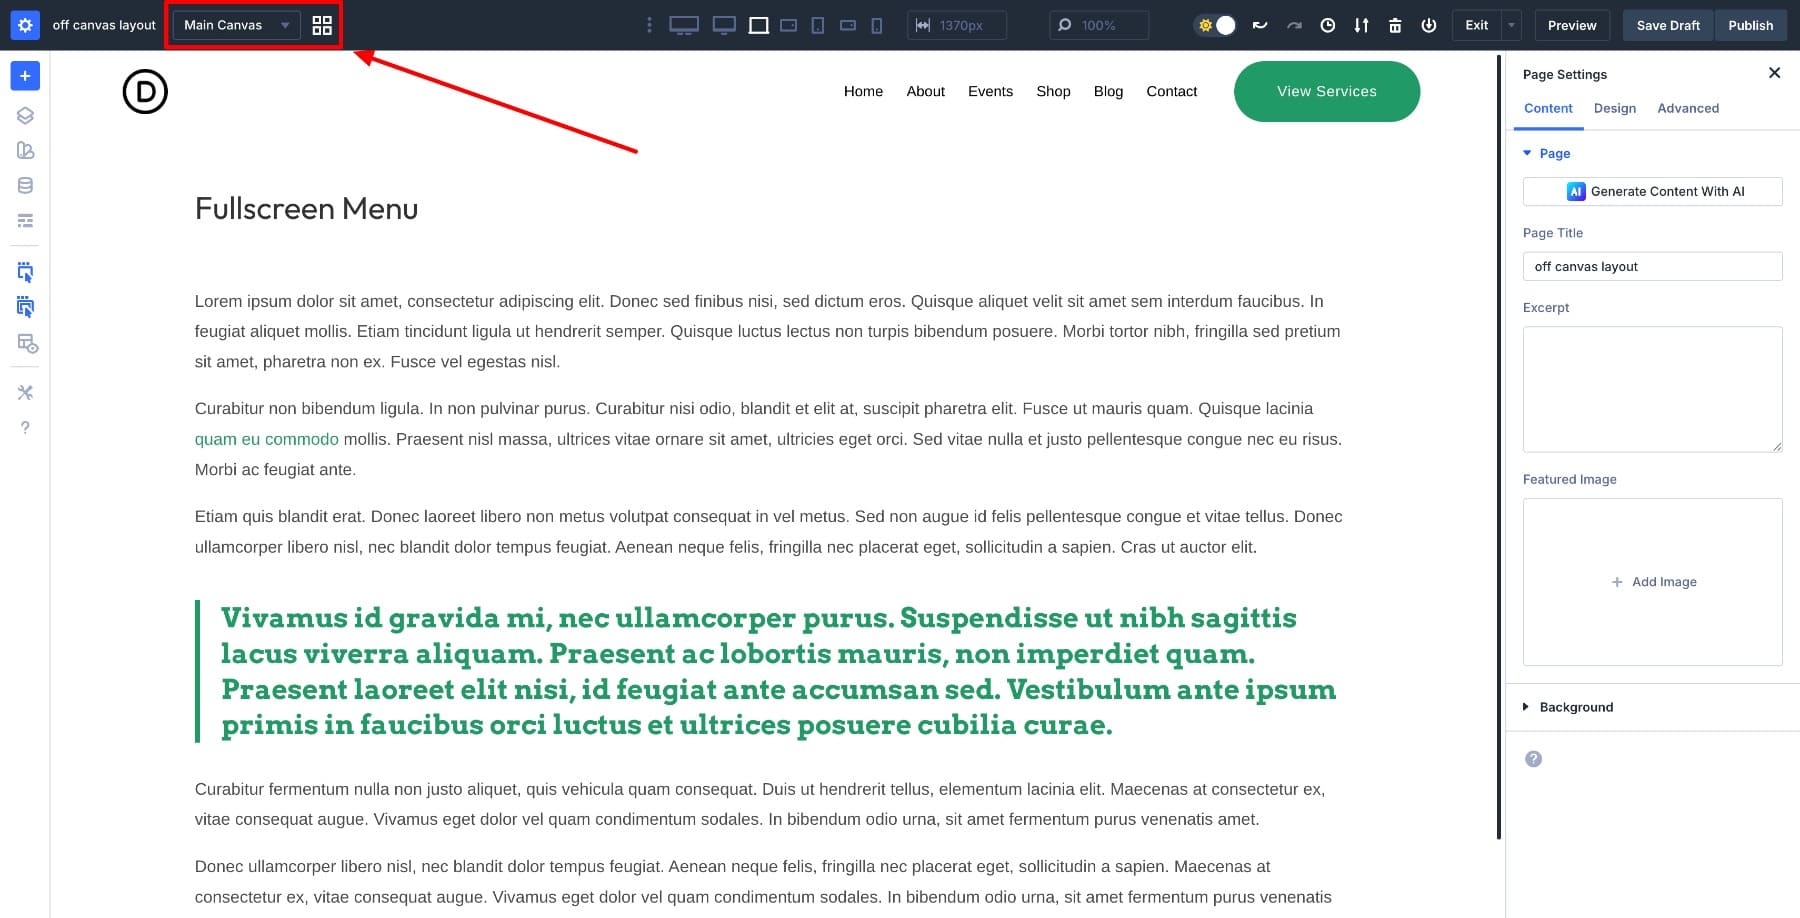
The dropdown permits you to transfer between canvases you’ve created. The Canvas Grid View choice presentations all canvases in one dashboard for fast get entry to.
You’ll be able to create each native and world canvases. Native canvases belong to a selected web page or template. International canvases paintings throughout all your web site, so that you construct a navigation panel as soon as and reuse it all over the place with out duplicating design paintings.
Canvases attach at once to Divi’s Interaction system. Cause them with clicks, hovers, scrolls, or different occasions. They seem dynamically at the entrance finish however stay arranged within the builder as their very own layer, so updating a menu design doesn’t ripple into the pages the place it seems that.
Why Use Divi Canvas For Off Canvas Menus?
The previous option to mega menus incessantly intended embedding them at once into your header format. A spacing tweak or responsive adjustment may wreck the menu solely, and solving it intended digging via nested sections to untangle navigation common sense from format code. Canvases get rid of this through giving the menu its personal remoted area.
This separation makes repairs more straightforward as your web site grows. Replace the menu’s format, hyperlinks, or styling as soon as in an international canvas, and the adjustments take impact all over the place. Canvases additionally get rid of the desire for workarounds reminiscent of customized CSS, detrimental margins, or third-party plugins. Cause the menu via Divi’s Interplay gadget and let the builder maintain the remainder.
Learn Everything About Divi 5 Canvases
What We’re Development
We’re development an international off canvas slide-in menu precipitated through a button within the web site header. The button sits in a Theme Builder header template, this means that the menu works site-wide with out rebuilding it on particular person pages.
The menu lives in a canvas set to “Don’t Append”, so it remains from your web page format till an interplay unearths it. When precipitated, it seems that as a hard and fast overlay that continues to be on-screen as guests scroll. On cellular, we’ll upload a max-height and inner scroll container so the menu stays obtainable even if content material extends past the viewport.
By means of the tip, you’ll have a menu that behaves constantly throughout breakpoints and doesn’t intrude with web page layouts.
1. Create The Header In Theme Builder (And Upload The Button)
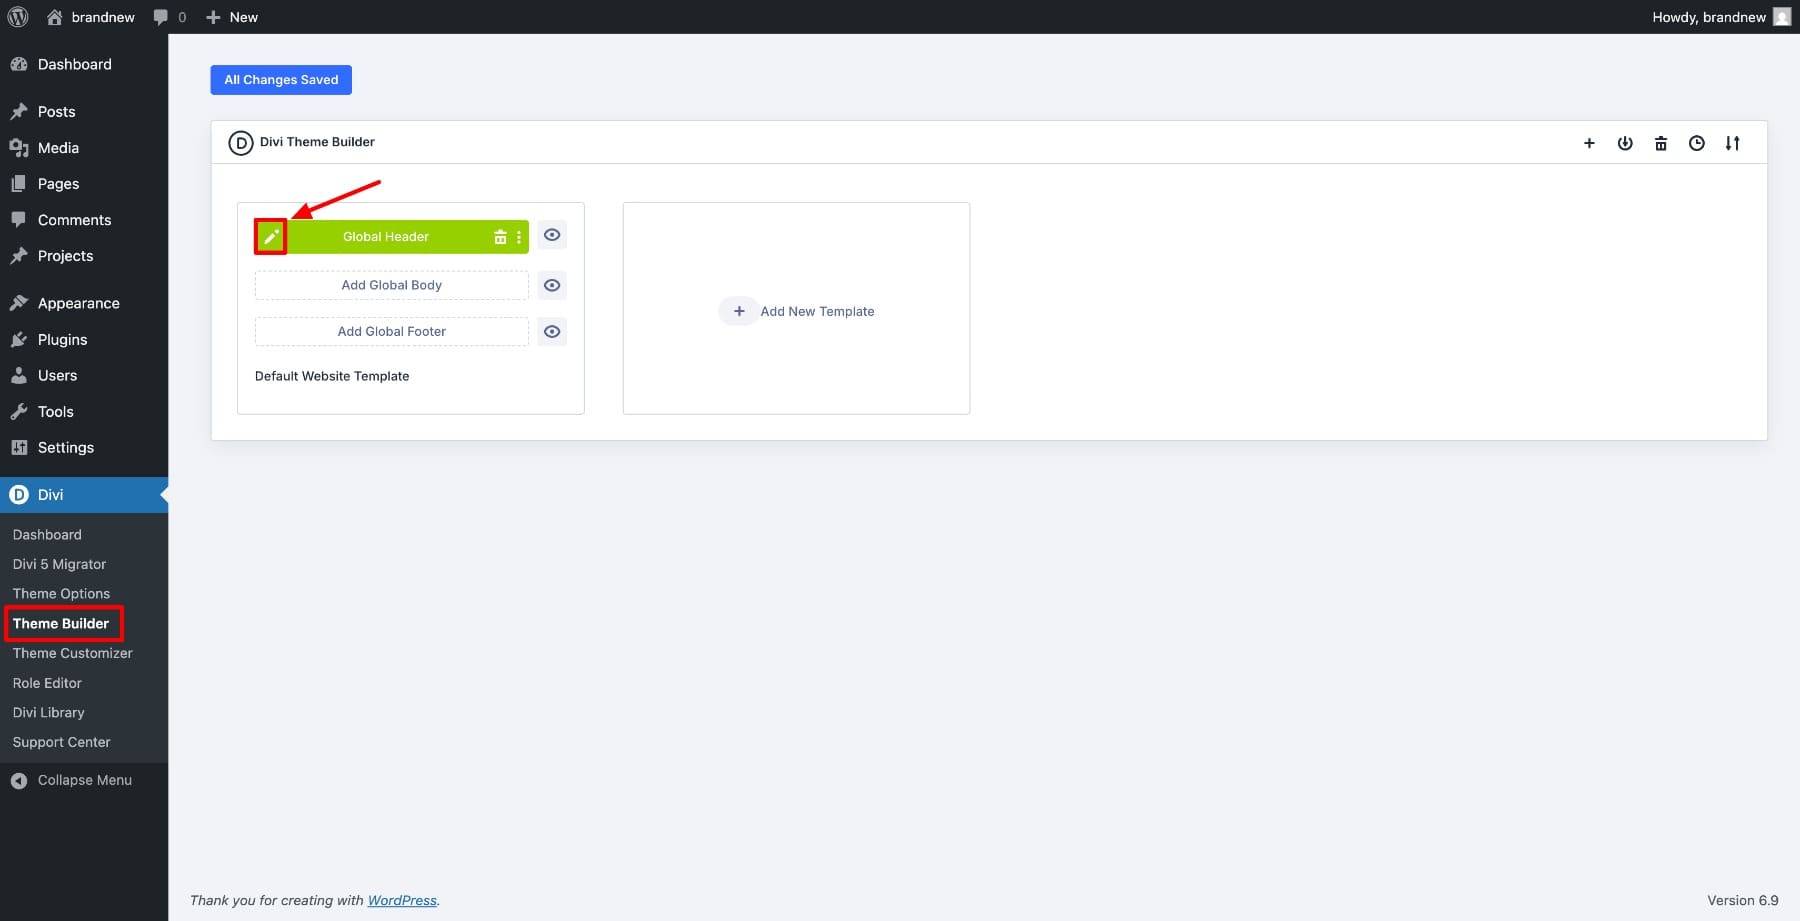
Open Divi > Theme Builder and edit your present International Header. We’re running on the template stage so the menu button seems on each web page with out guide placement.
Within the header format, upload a Button module and position it inside of an present header row subsequent for your Menu module. Label it View Services and products and elegance it to compare your header design. This button will cause the off canvas menu, so its placement and styling must really feel herbal inside your navigation.

2. Create A New Canvas For The Menu
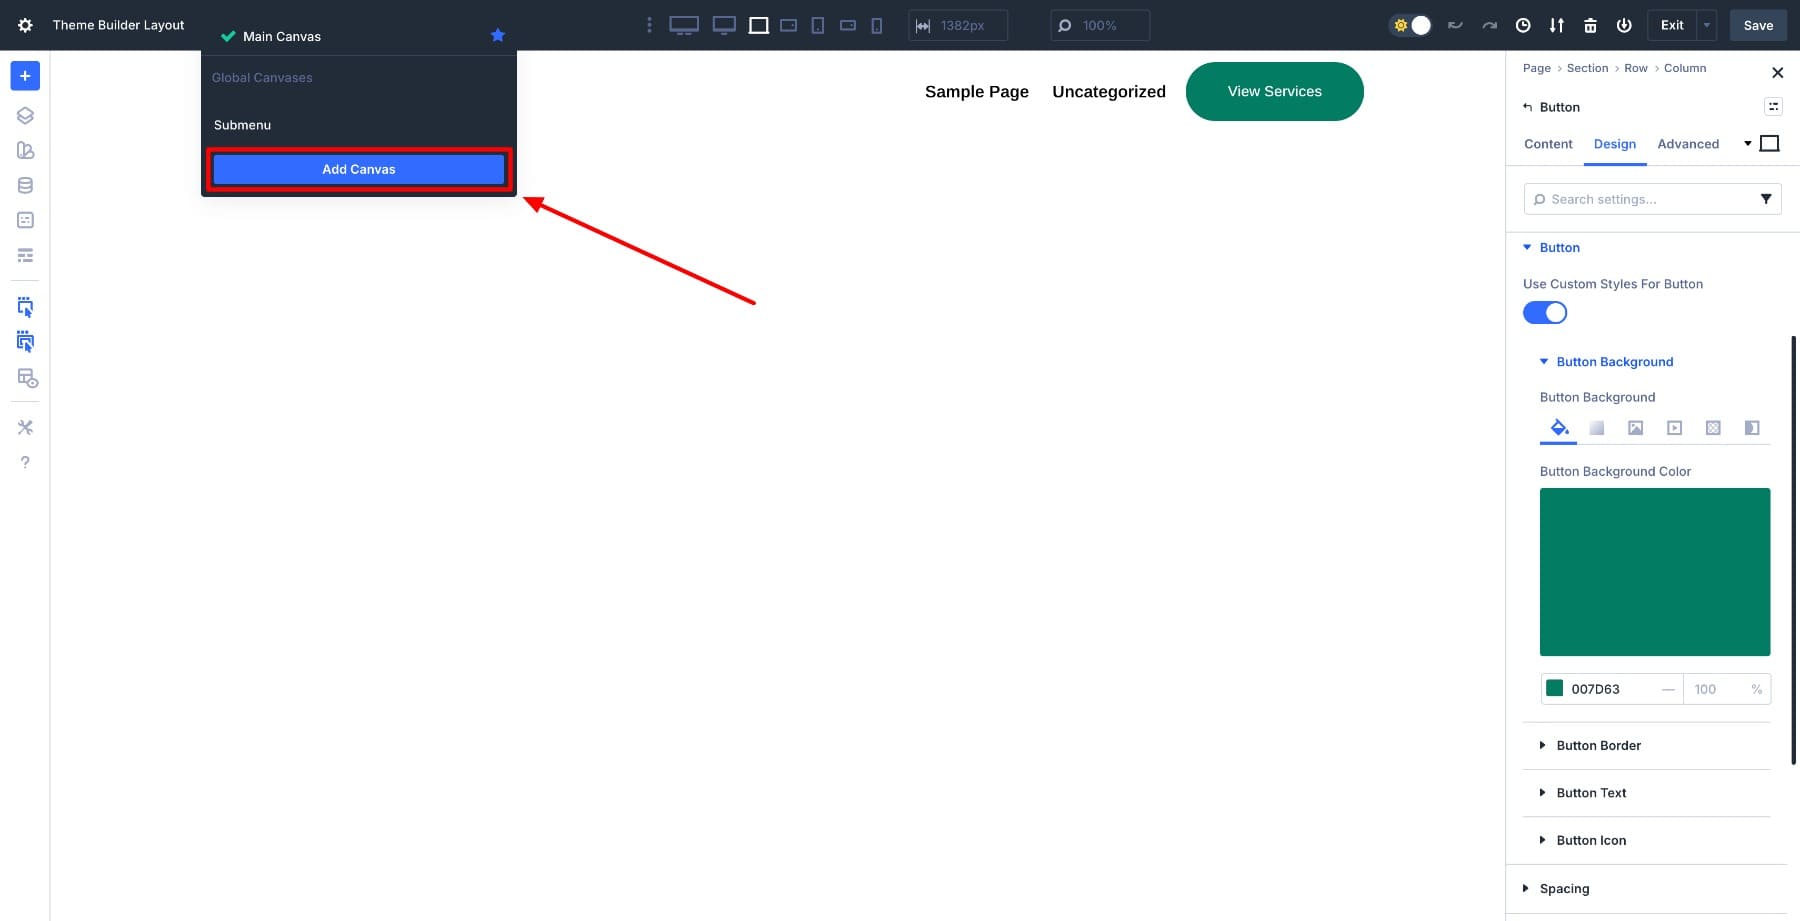
With the cause button in position, we’d like someplace for the menu to reside. Within the Visible Builder, open the Canvas dropdown from the highest bar and click on Upload Canvas.
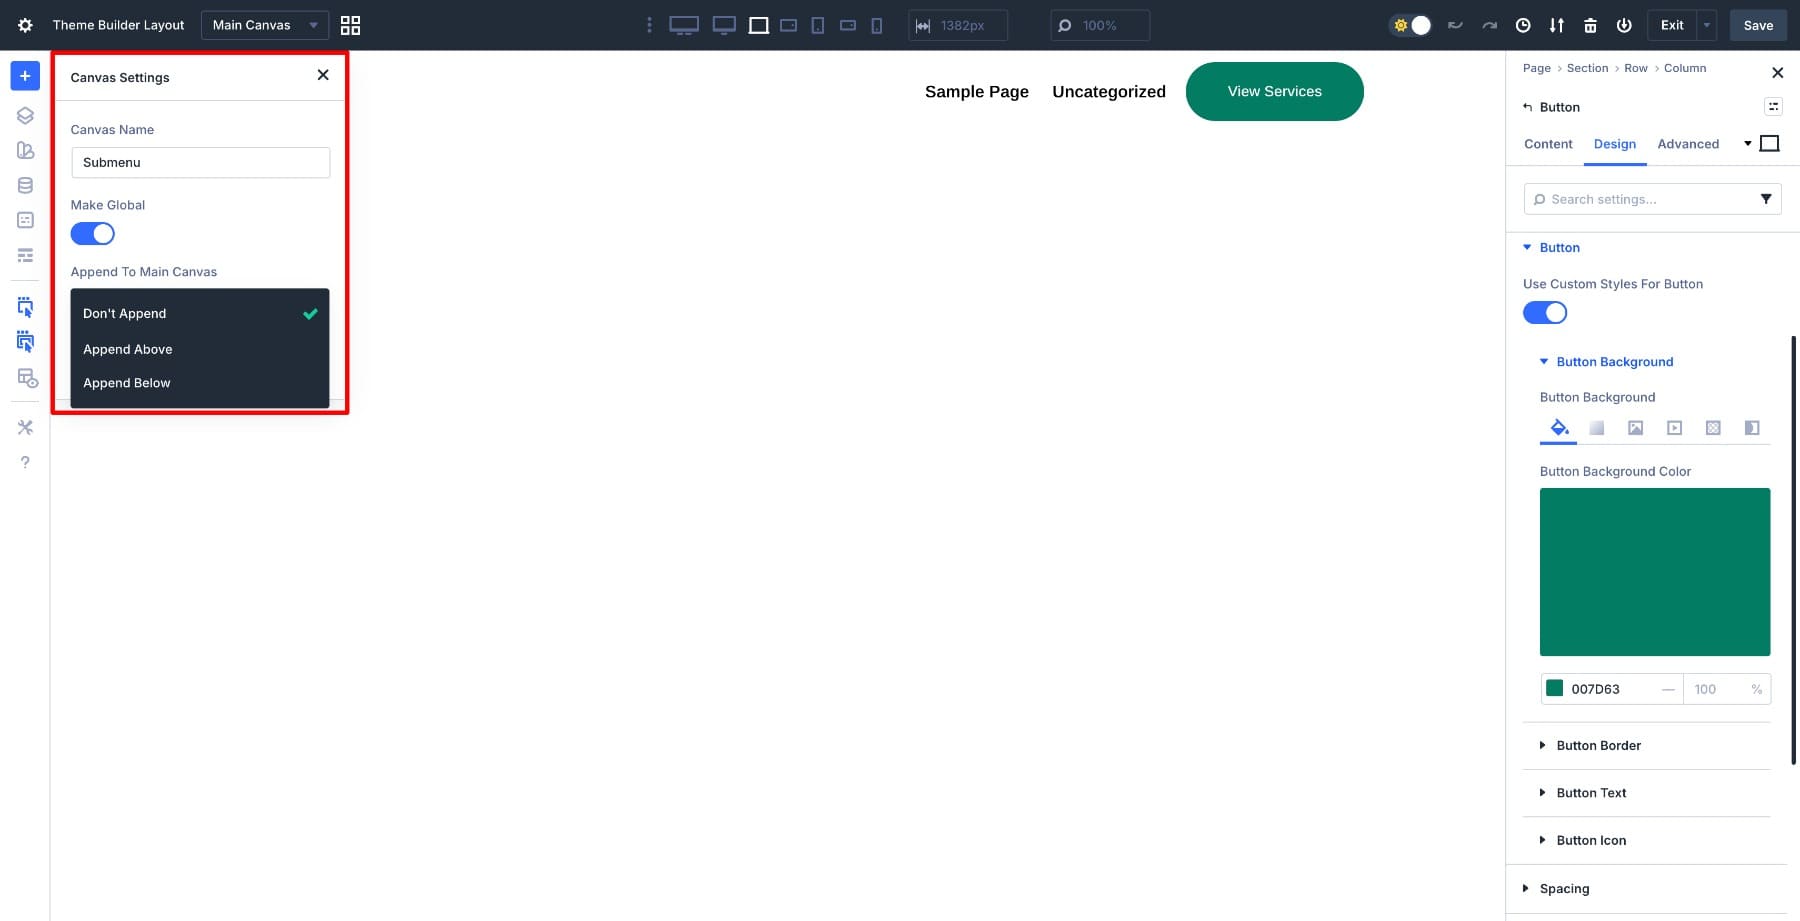
Title the canvas Submenu, so it’s simple to spot when putting in interactions later. Make it International so it’s obtainable throughout all your web site, and set it to Don’t Append.
This surroundings assists in keeping the canvas utterly indifferent out of your web page construction, which prevents it from interfering with web page layouts whilst nonetheless making it to be had for interactions to focus on. Click on Upload Canvas when executed.
Divi routinely switches you into the canvas workspace. You currently have a clean house the place you’ll construct the menu construction.
3. Design The Off Canvas Menu Format
Get started through including an ordinary segment with a black background colour set to 70% opacity. This creates the overlay impact that dims the web page content material when the menu opens.
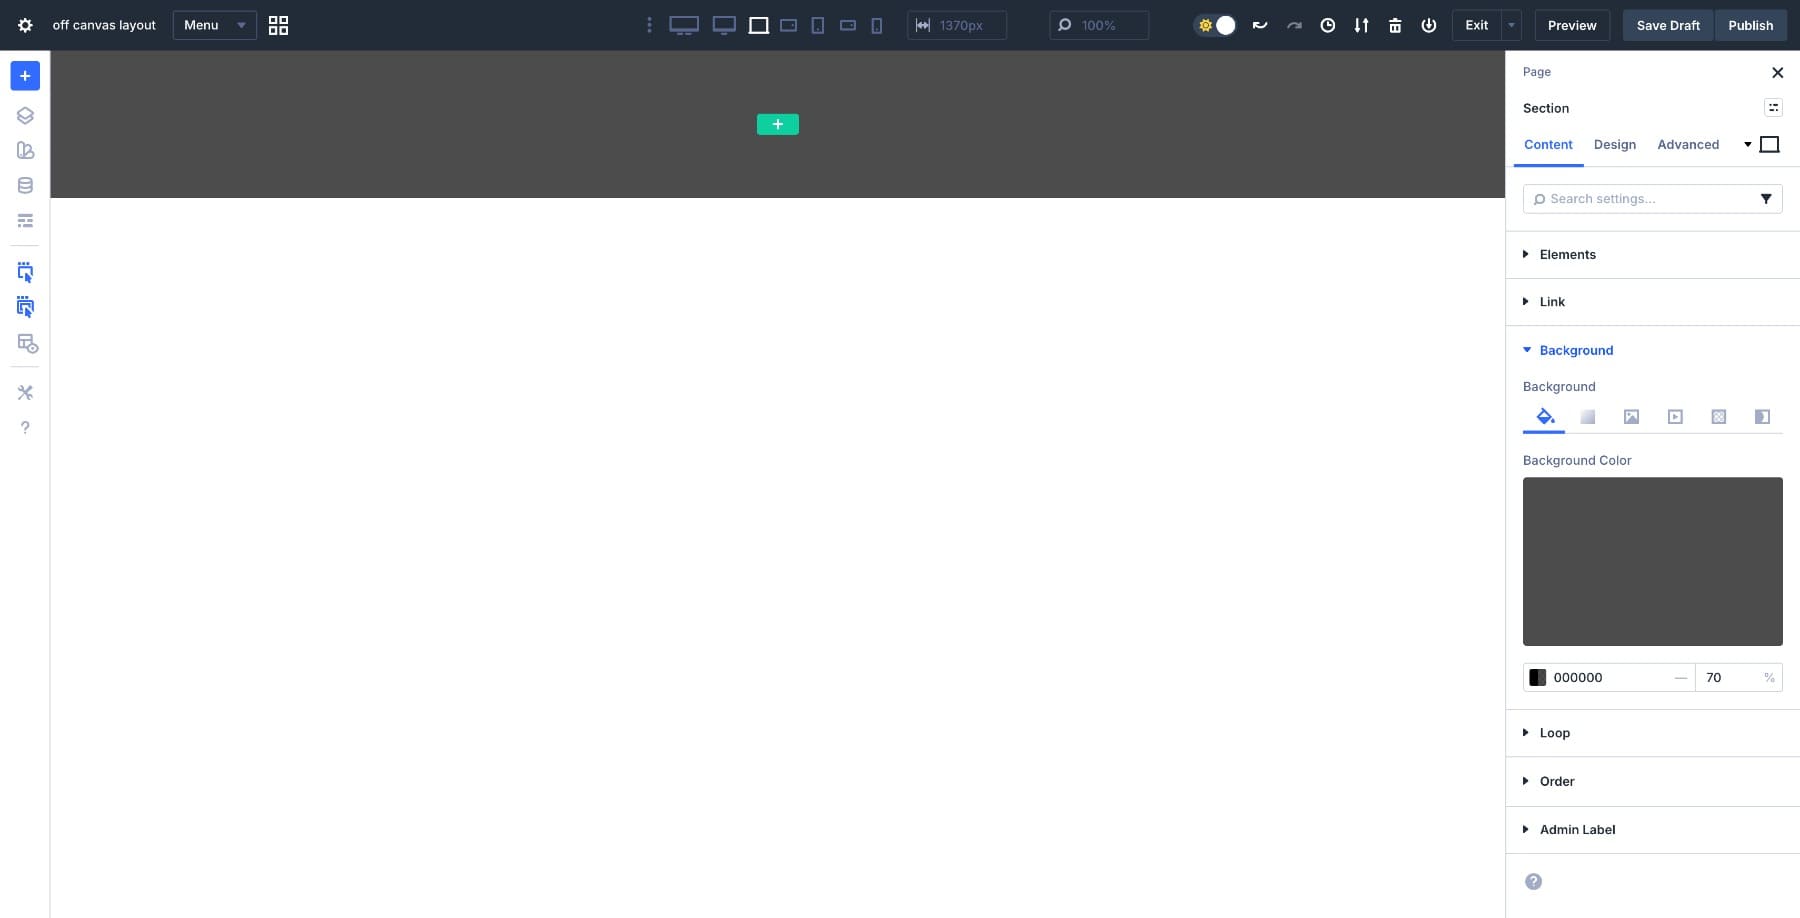
Set the segment’s Width to 100vw and Top to 100vh so it covers all of the viewport. Within the segment, upload a single-column row. This row will dangle the true menu content material. Set the Background to White and upload a 10px Border Radius for visible polish. Move to Design > Format and set each Horizontal and Vertical Gaps to clamp(20px, 4vw, 50px).
This fluid spacing worth assists in keeping the format respiring naturally throughout display screen sizes with out guide breakpoint changes.
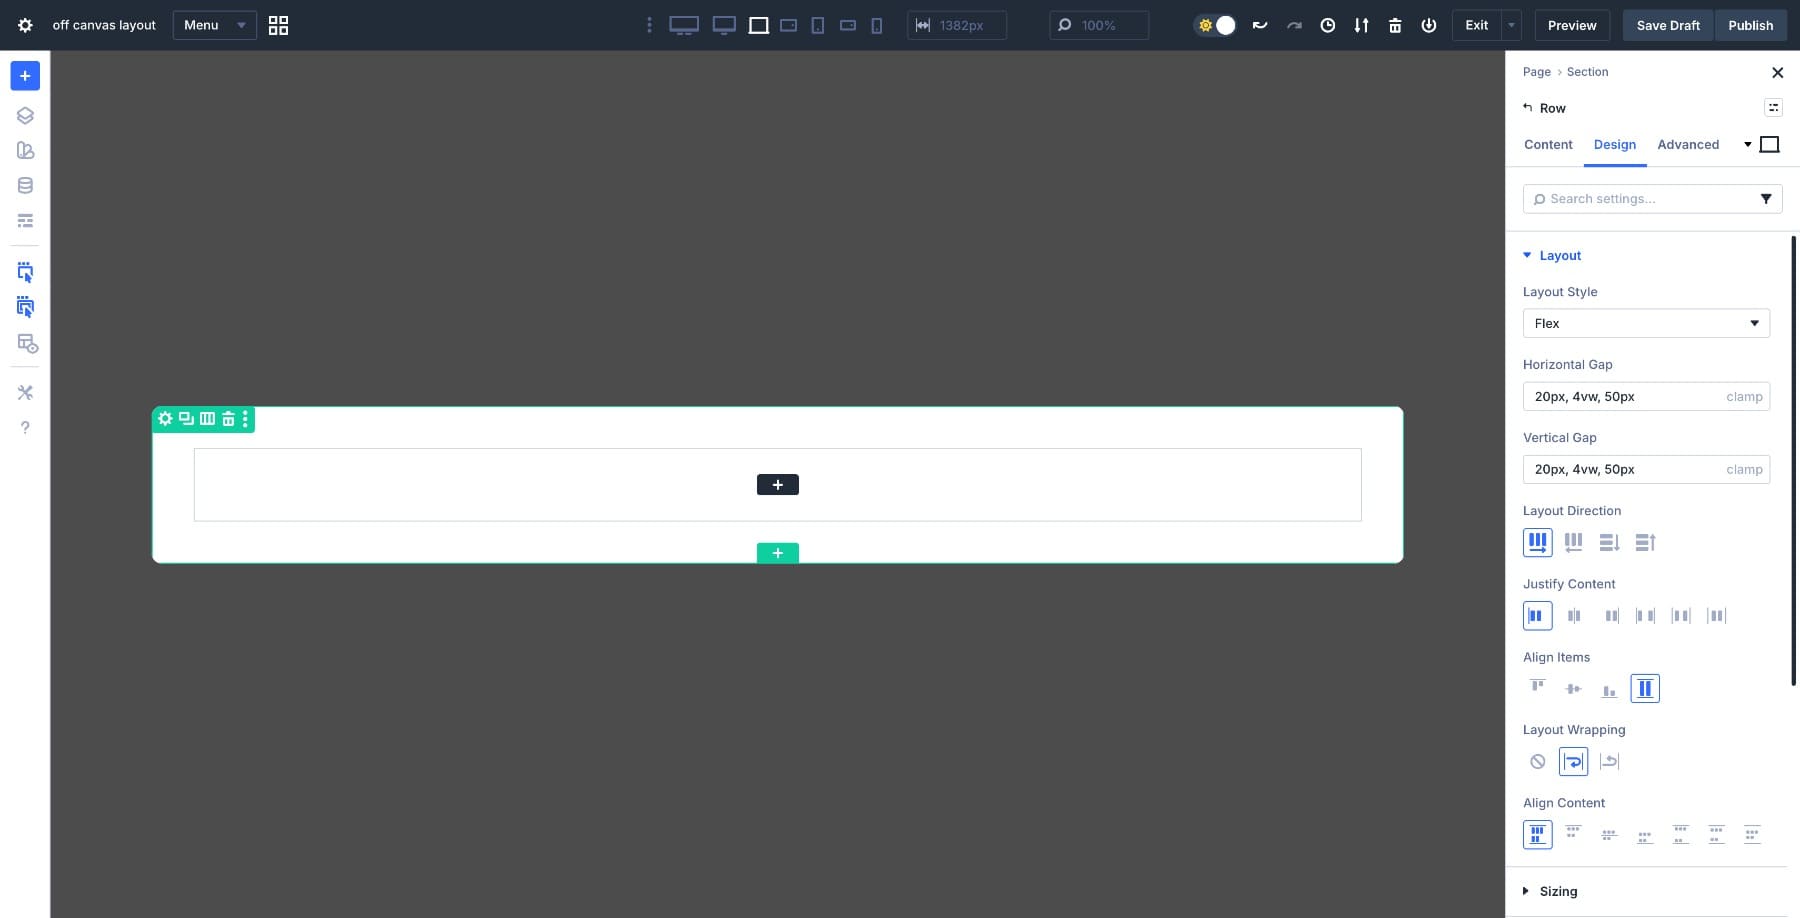
Upload a Textual content module on the height for a heading like “All Options”, then position an Icon module subsequent to it for the shut button. This shut button will cause the interplay that hides the menu, so stay it visually distinct and obtainable.
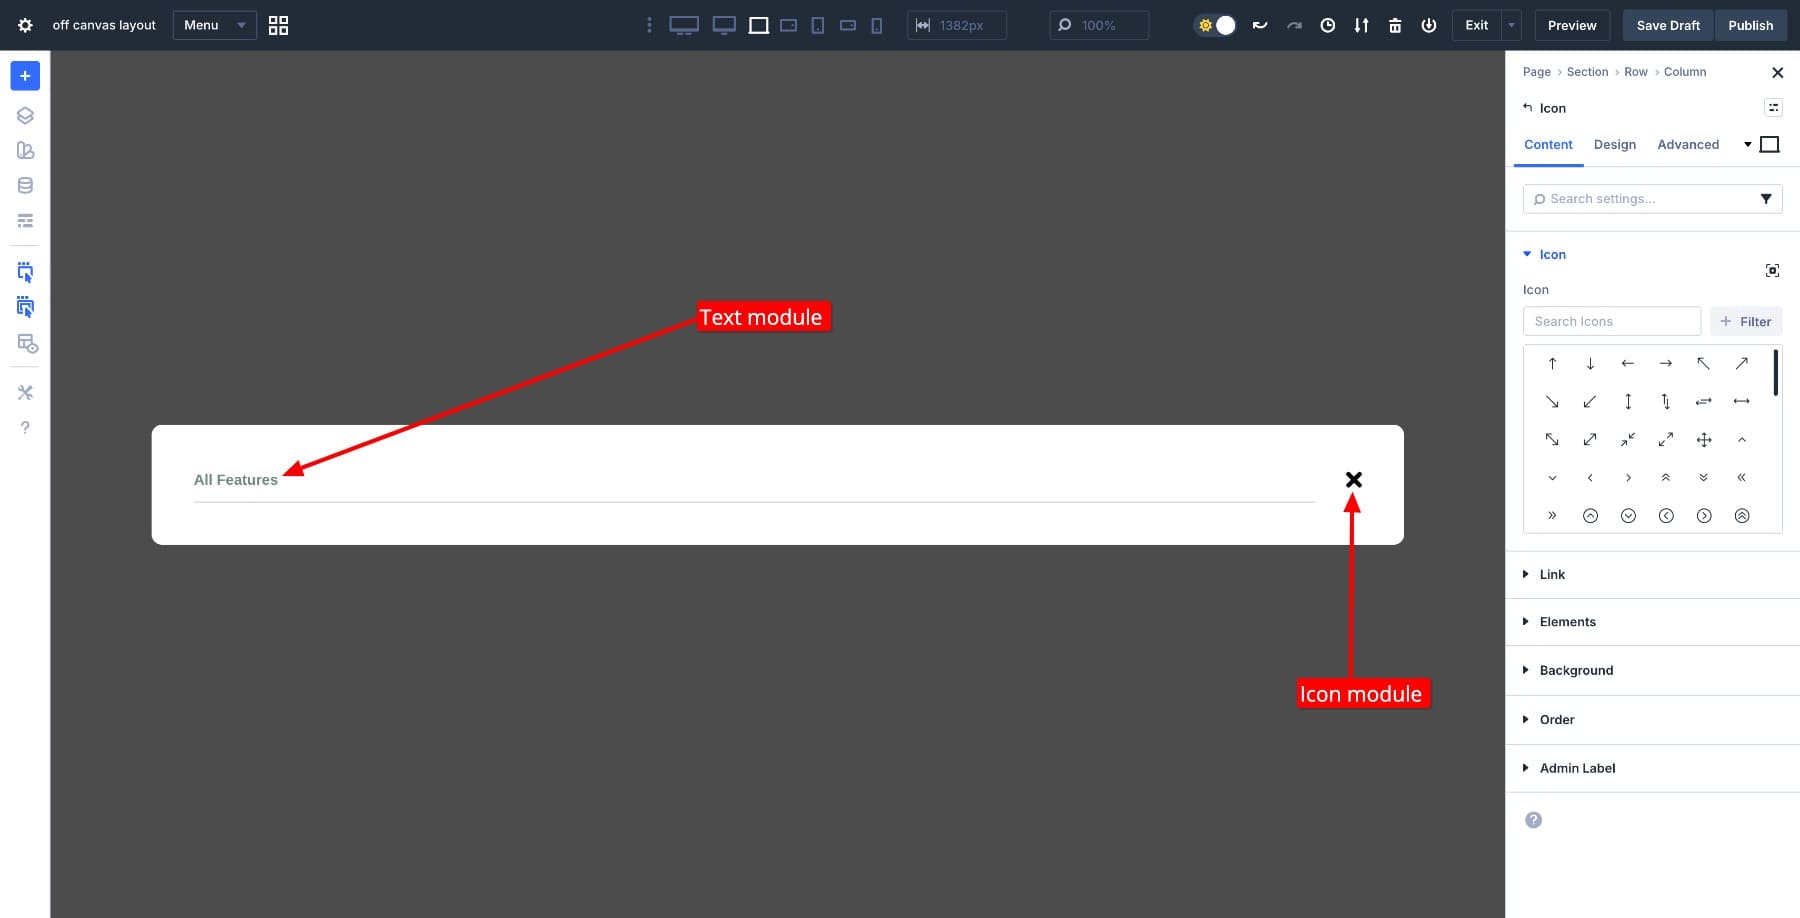
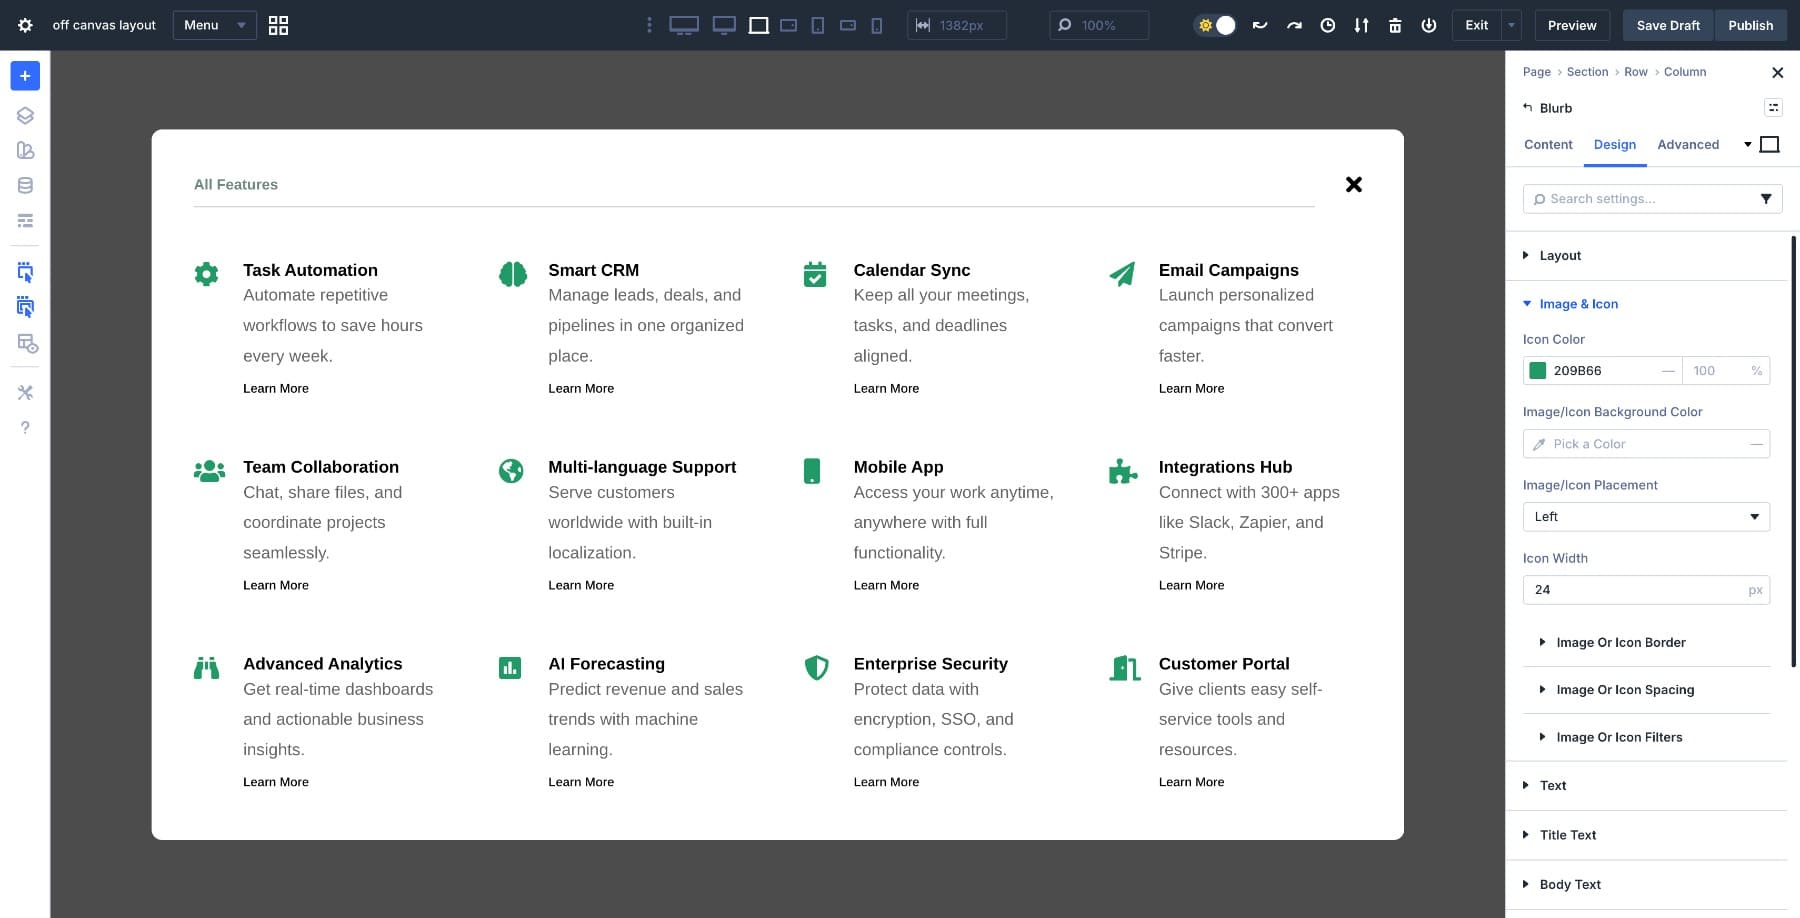
Underneath the header row, upload a 4-column row to construction your provider choices. Divi 5’s Flexbox gadget handles the column format, so the 4-column format routinely becomes two and single-column layouts according to to be had area.
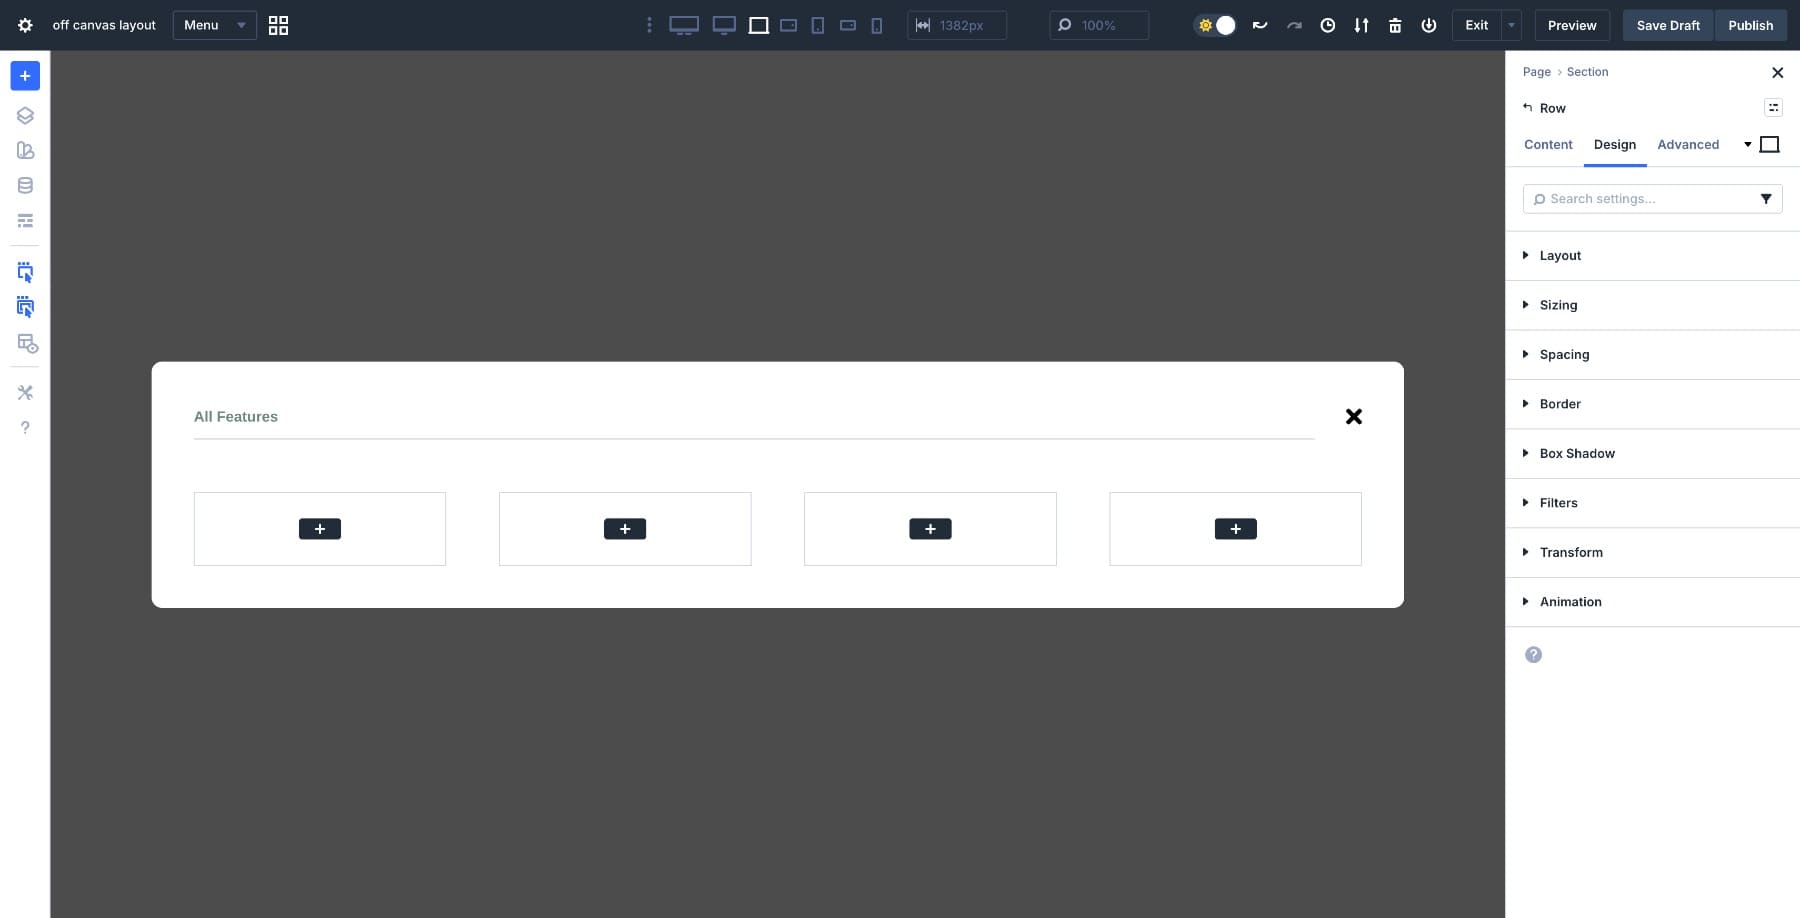
In every column, upload a Blurb module with the provider identify because the identify and a brief description within the frame textual content. Underneath every blurb, upload a Button module categorised “Be informed Extra.”
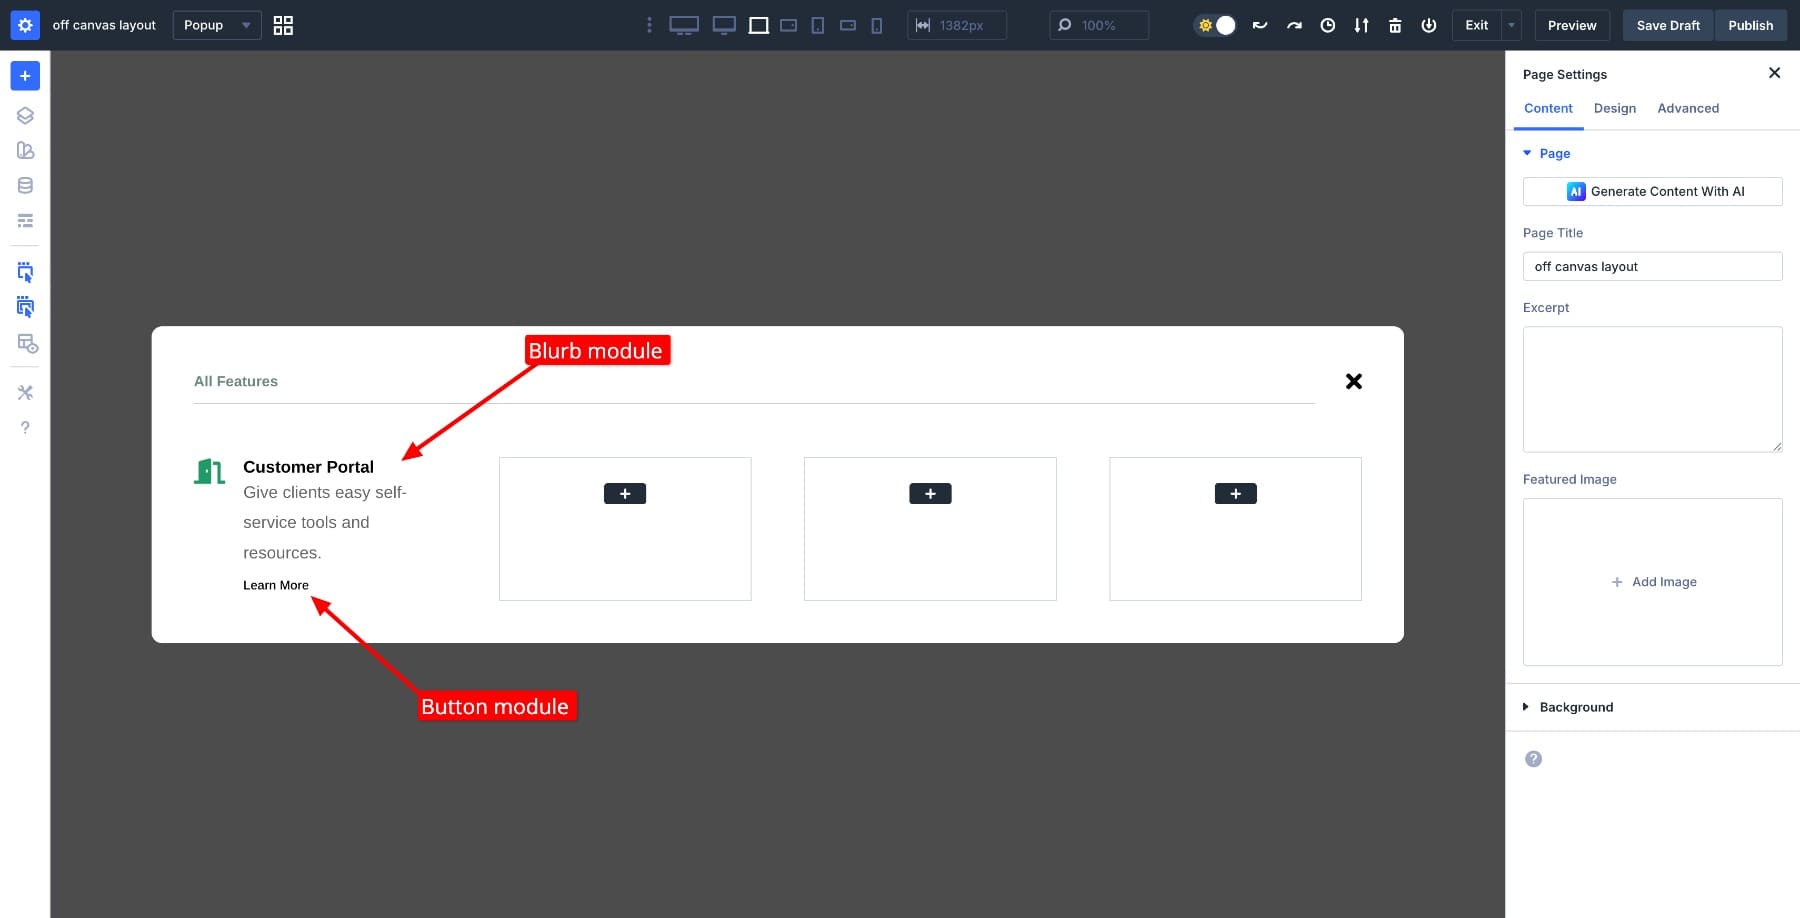
Repeat this development throughout the remainder menu pieces to finish the menu construction.
4. Set The Menu To Fastened Place
The menu wishes to stick anchored on display screen whilst guests scroll the web page underneath it. With out fastened positioning, the menu would scroll with the web page content material, breaking the overlay habits.
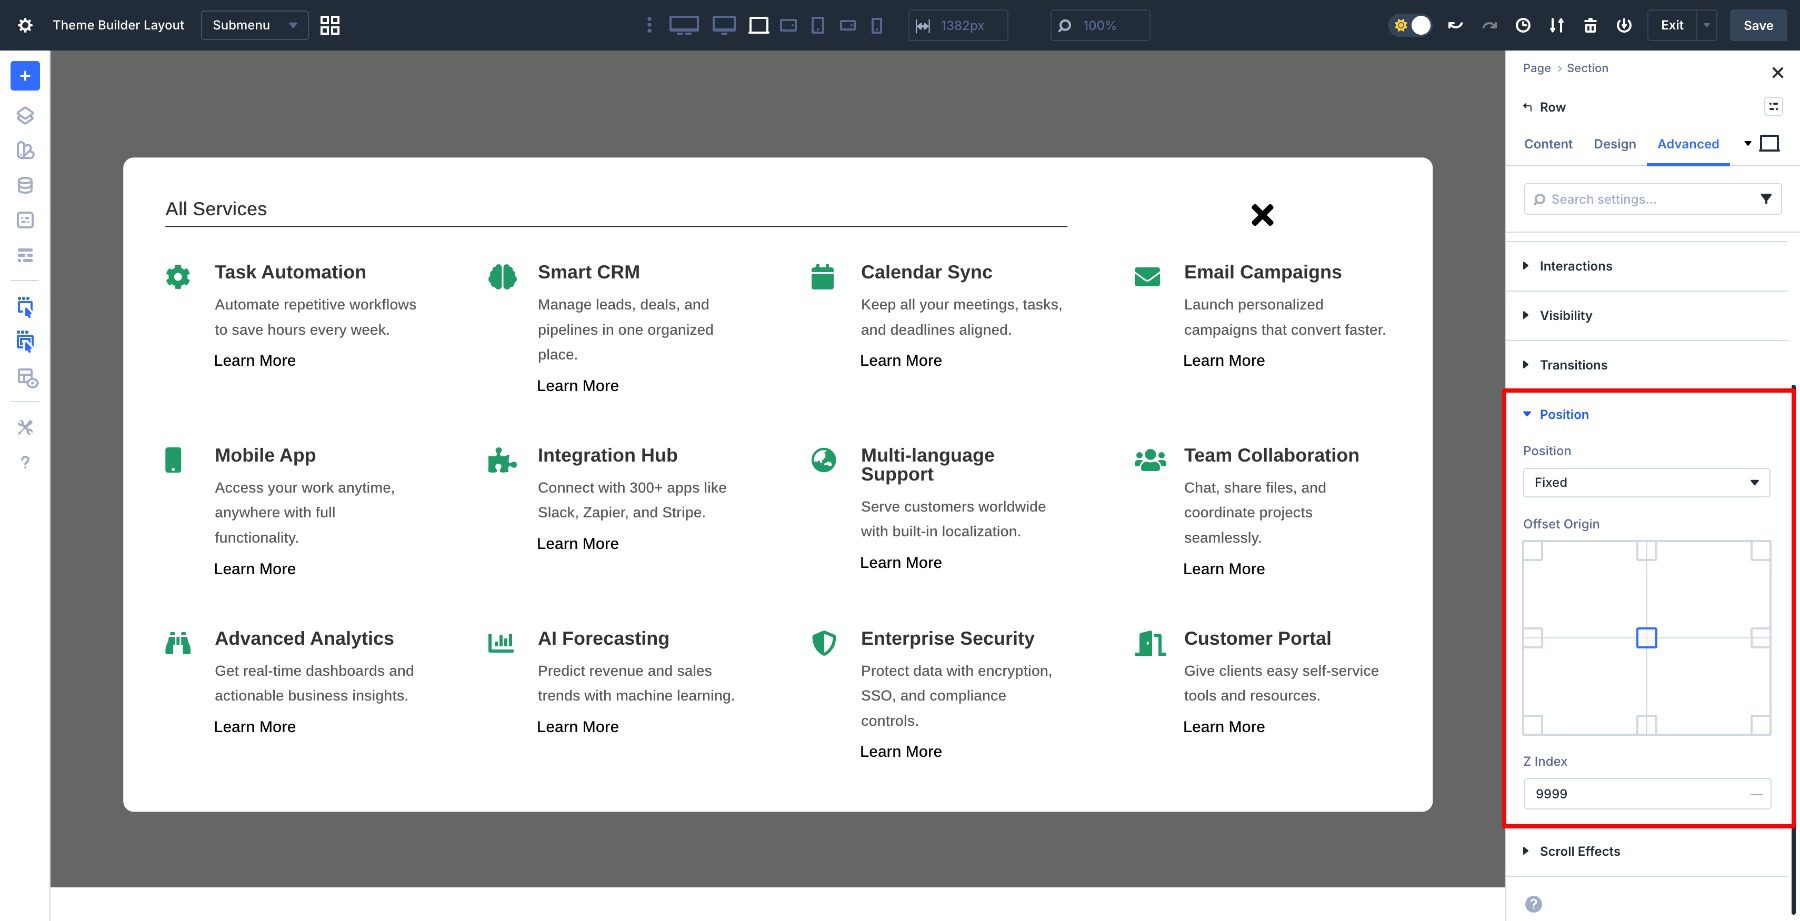
Make a choice the Segment and set Place to Fastened. Then set the Z Index to 9999 so the menu seems above all different web page components, together with sticky headers or different fastened components.

In case your panel shifts whilst scrolling, practice the similar positioning settings to the Row that holds the menu panel. This is helping handle the layered construction.
5. Optimize The Menu For Cell With Max Top And Scroll
With the menu construction and positioning in position, we wish to maintain the way it behaves on smaller monitors. The header row wishes changes to forestall stacking on cellular.
Transfer to pill view and choose the header row. Move to Design > Format, set Align Pieces to Middle for constant vertical alignment, and permit No Wrap to stay those components side-by-side slightly than stacking vertically.
This assists in keeping the heading and shut button in one horizontal row throughout all display screen sizes.
Now we wish to cope with the full peak. On smaller monitors, all of the menu panel can exceed the viewport peak, pushing content material off-screen. Make a choice the Row that incorporates the entire menu content material (the white container with the heading row and menu pieces), and set the Max Top to 80%.
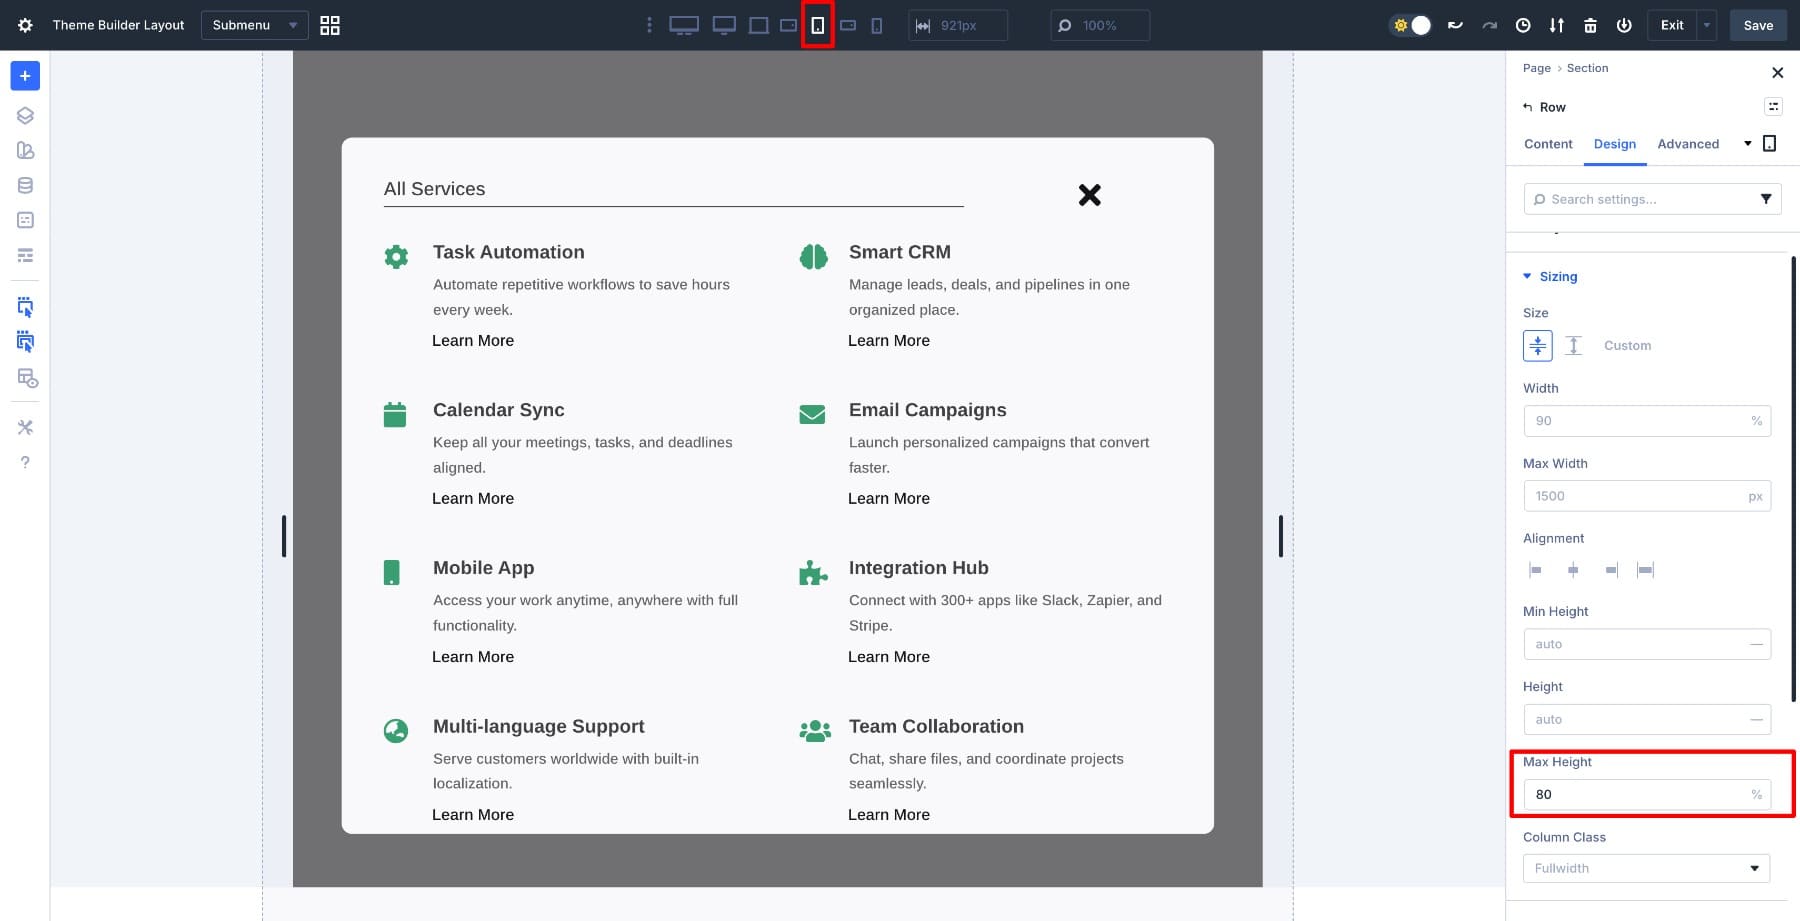
This constrains the menu to 80% of the viewport peak, leaving respiring room on the height and backside. Now move to Complex > Visibility > Vertical Overflow and choose Scroll.
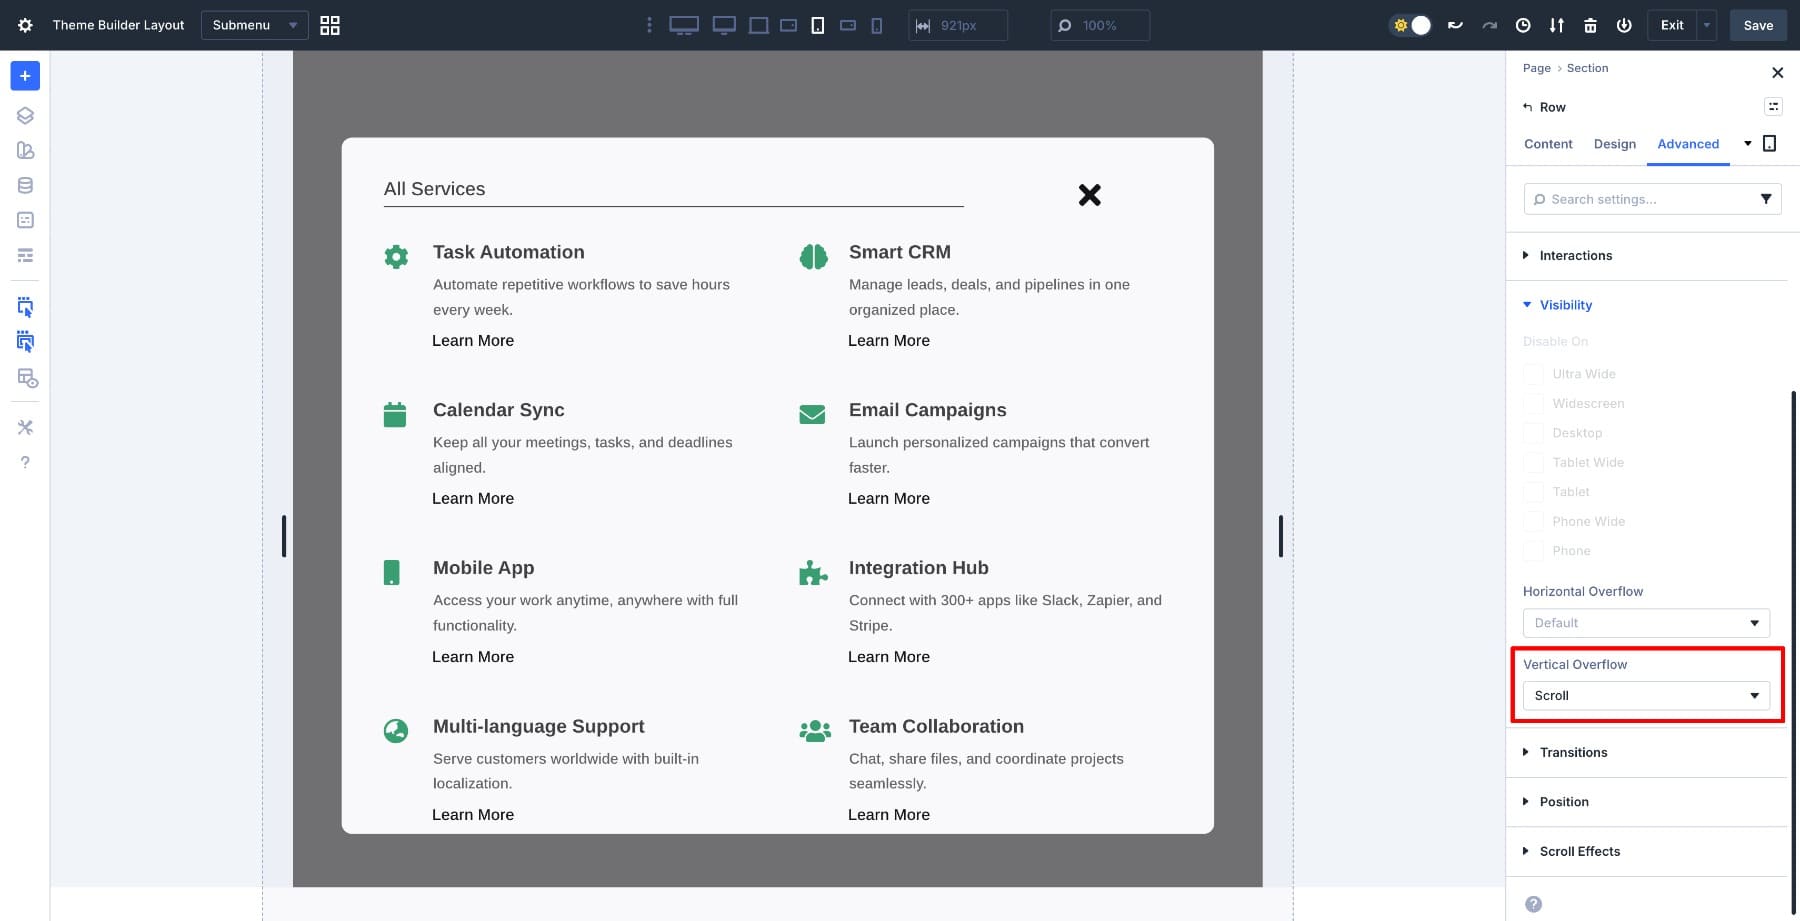
This creates an inner scroll container. Guests can now scroll in the course of the menu content material with out the panel itself extending past the display screen limitations.
Observe those similar settings (Max Top 80% and Vertical Overflow Scroll) to cellular view to verify the menu works constantly throughout all small display screen sizes.
6. Cover The Canvas On All Breakpoints
The menu is constructed and optimized, nevertheless it’s lately visual within the builder. Since that is an off canvas menu that are supposed to handiest seem when precipitated, we wish to cover it through default throughout all breakpoints.
Open the Segment settings, move to the Complex tab, and to find the Visibility choices. Disable visibility on desktop, pill, telephone, and different breakpoints.
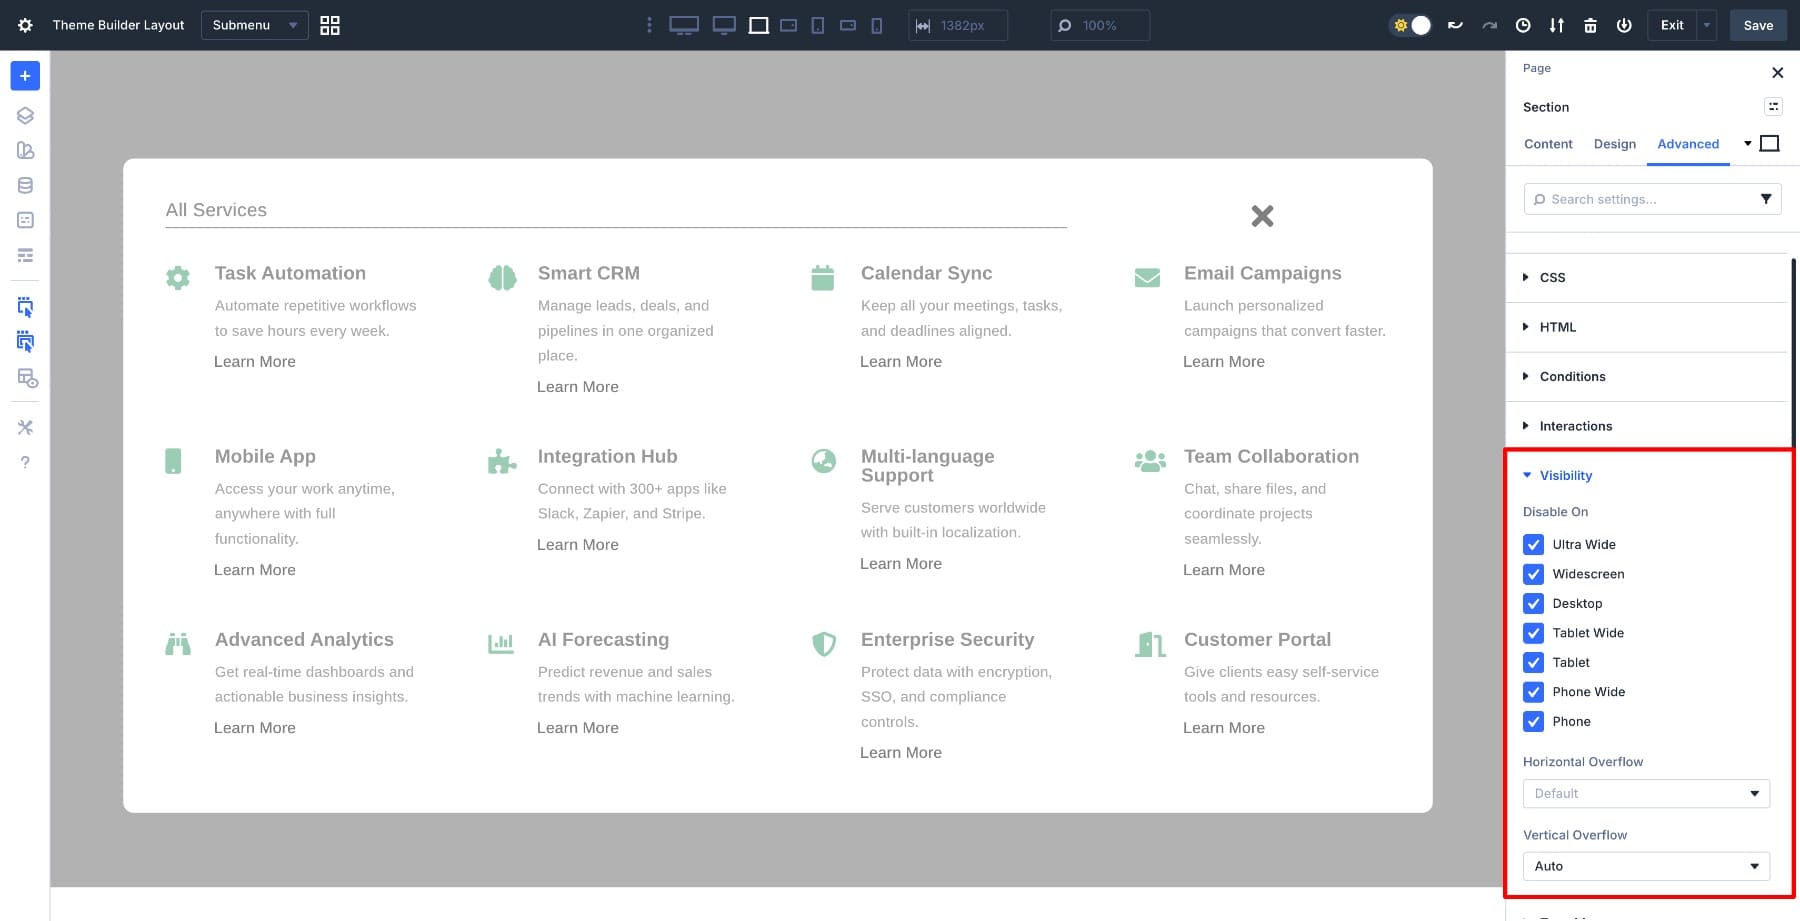
This hides the menu from view, however interactions can nonetheless goal it and toggle its visibility. When you’re within the Segment settings, additionally set Complex > Visibility > Vertical Overflow to Auto so the segment itself can maintain overflow gracefully if wanted.
Selection Manner: You’ll be able to additionally cover the segment the use of customized CSS. Move to Complex > CSS > Module Components and kind show: none; within the Primary Part box. This achieves the similar outcome the use of CSS slightly than visibility controls.
This assists in keeping the menu hidden throughout all breakpoints. Despite the fact that interactions haven’t fired but, the menu received’t seem. Bring to mind this as your baseline state: hidden until instructed differently.
7. Upload Interactions To Open And Shut The Menu
With the menu constructed and hidden, we wish to cord up the interactions that keep an eye on its visibility. Divi’s Interactions gadget works via 3 elements: a cause (what initiates the motion), an impact (what occurs), and a goal (what component is affected). We’ll arrange two interactions, one to turn the menu when the button is clicked and one to cover it when the shut icon is clicked.
First, give the menu segment a transparent Admin Label so it’s simple to focus on within the interplay settings. Make a choice the Segment that holds your menu content material, move to Settings > Content material > Admin Label, and identify it Submenu Segment.
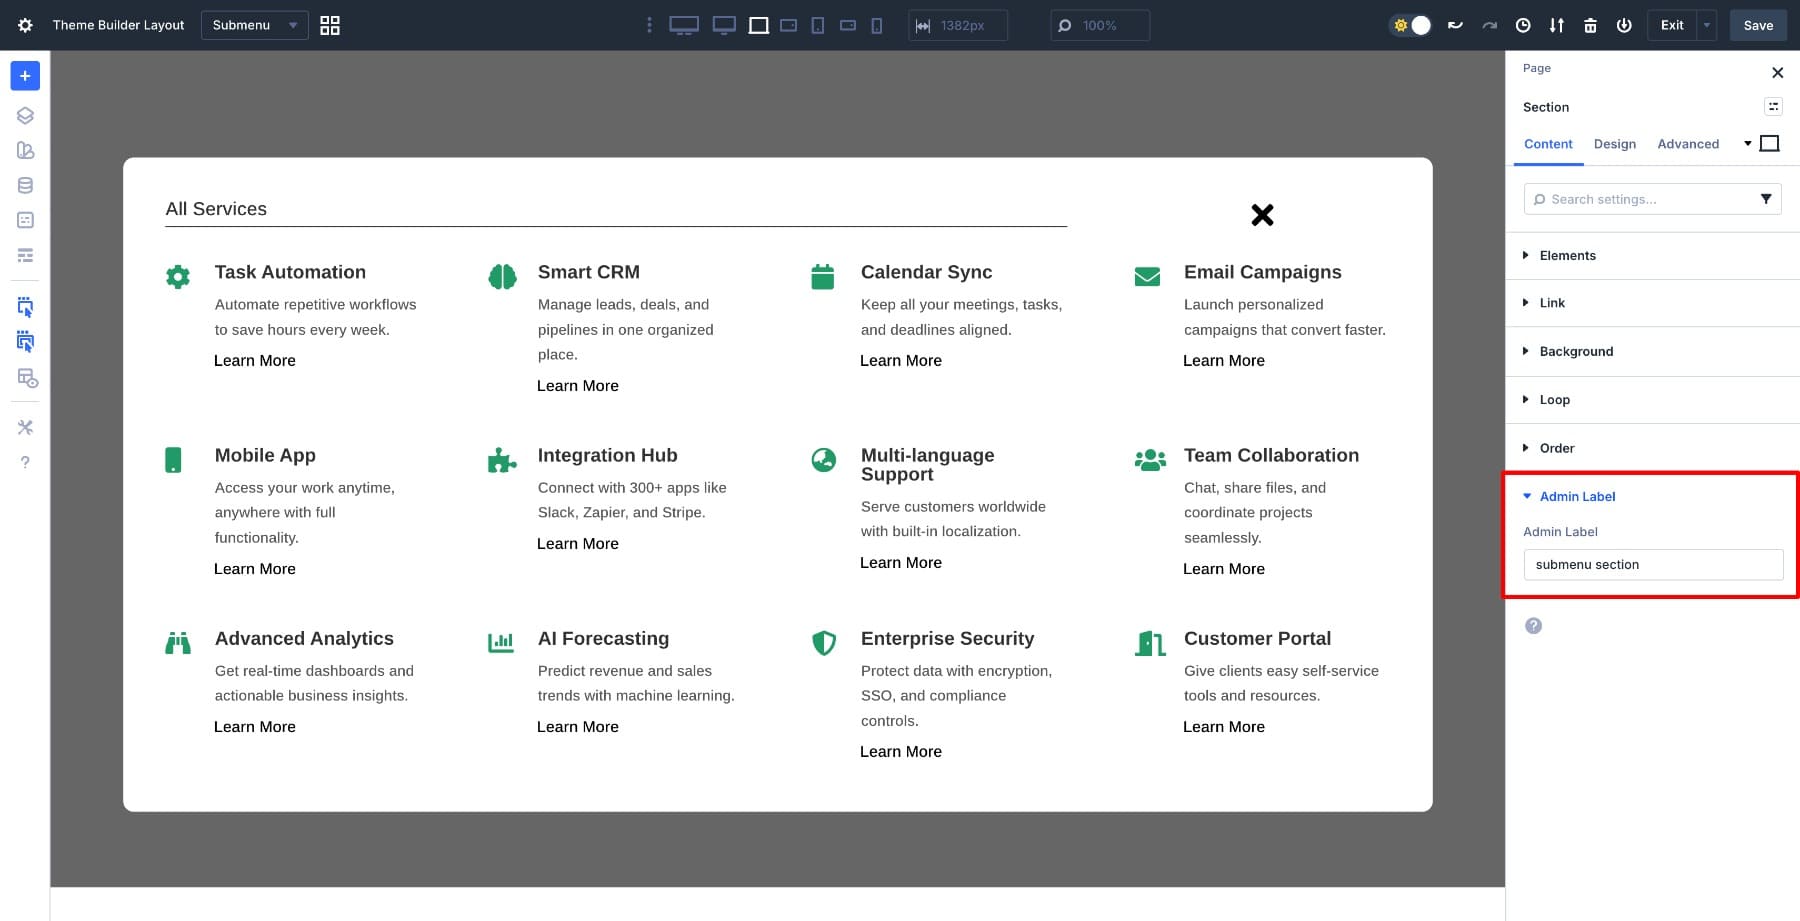
This label makes the segment identifiable whilst you’re deciding on goals throughout other canvases.
Now transfer again to the Primary Canvas the use of the dropdown on the height of the builder. This takes you to the web page the place your header lives.
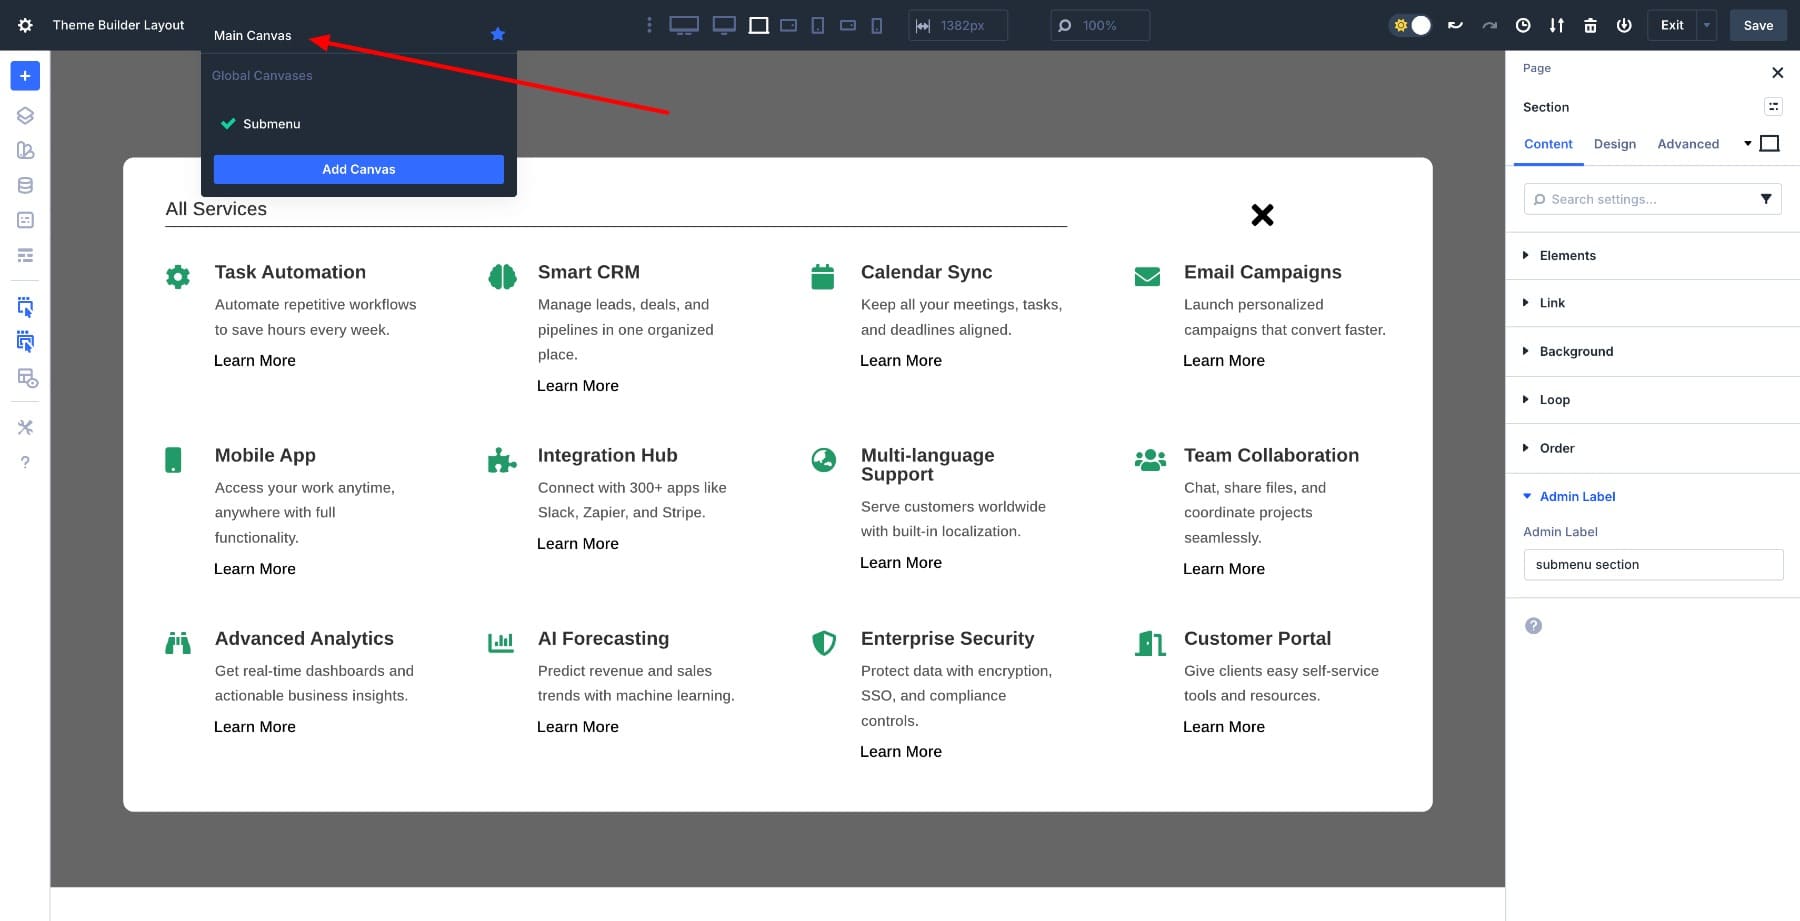
Make a choice the View Services and products button for your header. Move to Settings > Complex > Interactions and click on Upload Interplay.
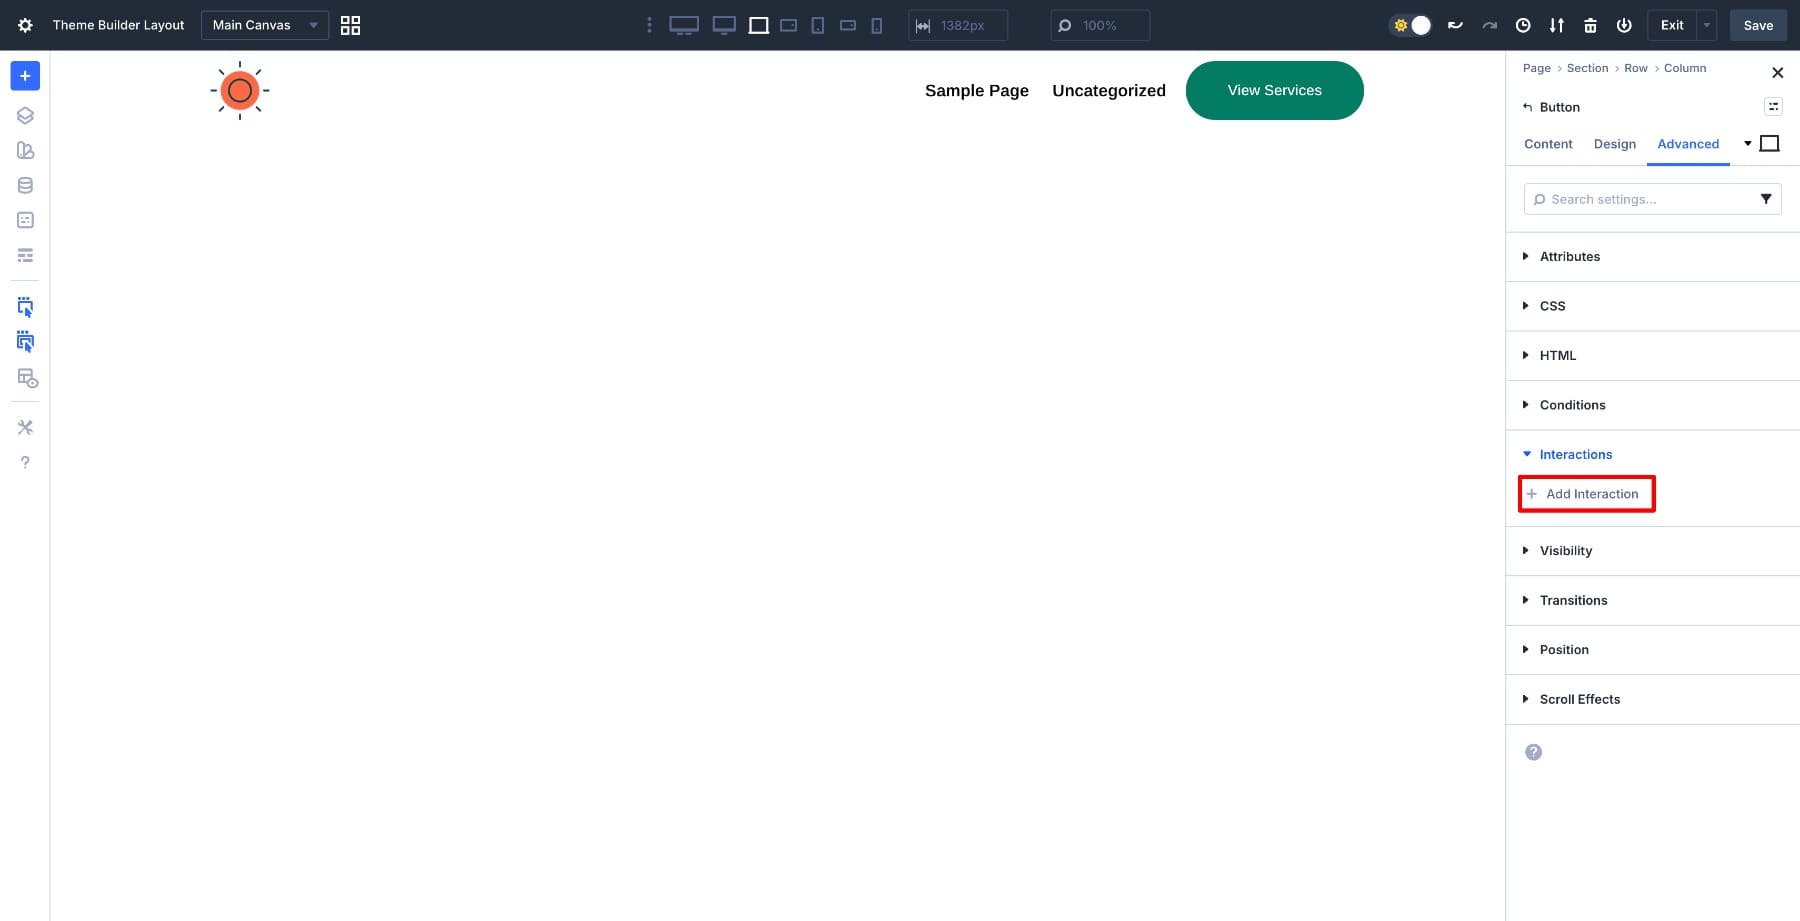
Within the interplay editor, set the Cause Match to Click on. This tells Divi to start up the interplay when any individual clicks the button. For Impact Motion, make a selection Display Part, which makes a hidden component visual. Then choose Submenu Segment because the Goal Module.
That is the place the Admin Label you place previous turns into crucial. Go away the Time Extend at 0ms for fast reaction, then click on Save.

When the interplay runs at the entrance finish, Divi rather a lot the canvas content material and toggles the segment’s visibility. The menu seems as a hard and fast overlay with out disrupting the web page construction.
Prior to shifting on, upload another interplay to keep an eye on the menu’s default state.
Make a choice the View Services and products Button once more and upload a brand new interplay. Set the Cause Match to Load, make a selection Cover Part because the Impact Motion, and stay Submenu Segment because the Goal Module.
This forces the menu right into a hidden state on each web page load. Despite the fact that the canvas used to be visual throughout preview or a prior interplay, it resets on refresh and not flashes on display screen. The sooner visibility settings outline the baseline, and this interplay controls the menu’s state at runtime so it at all times begins closed.
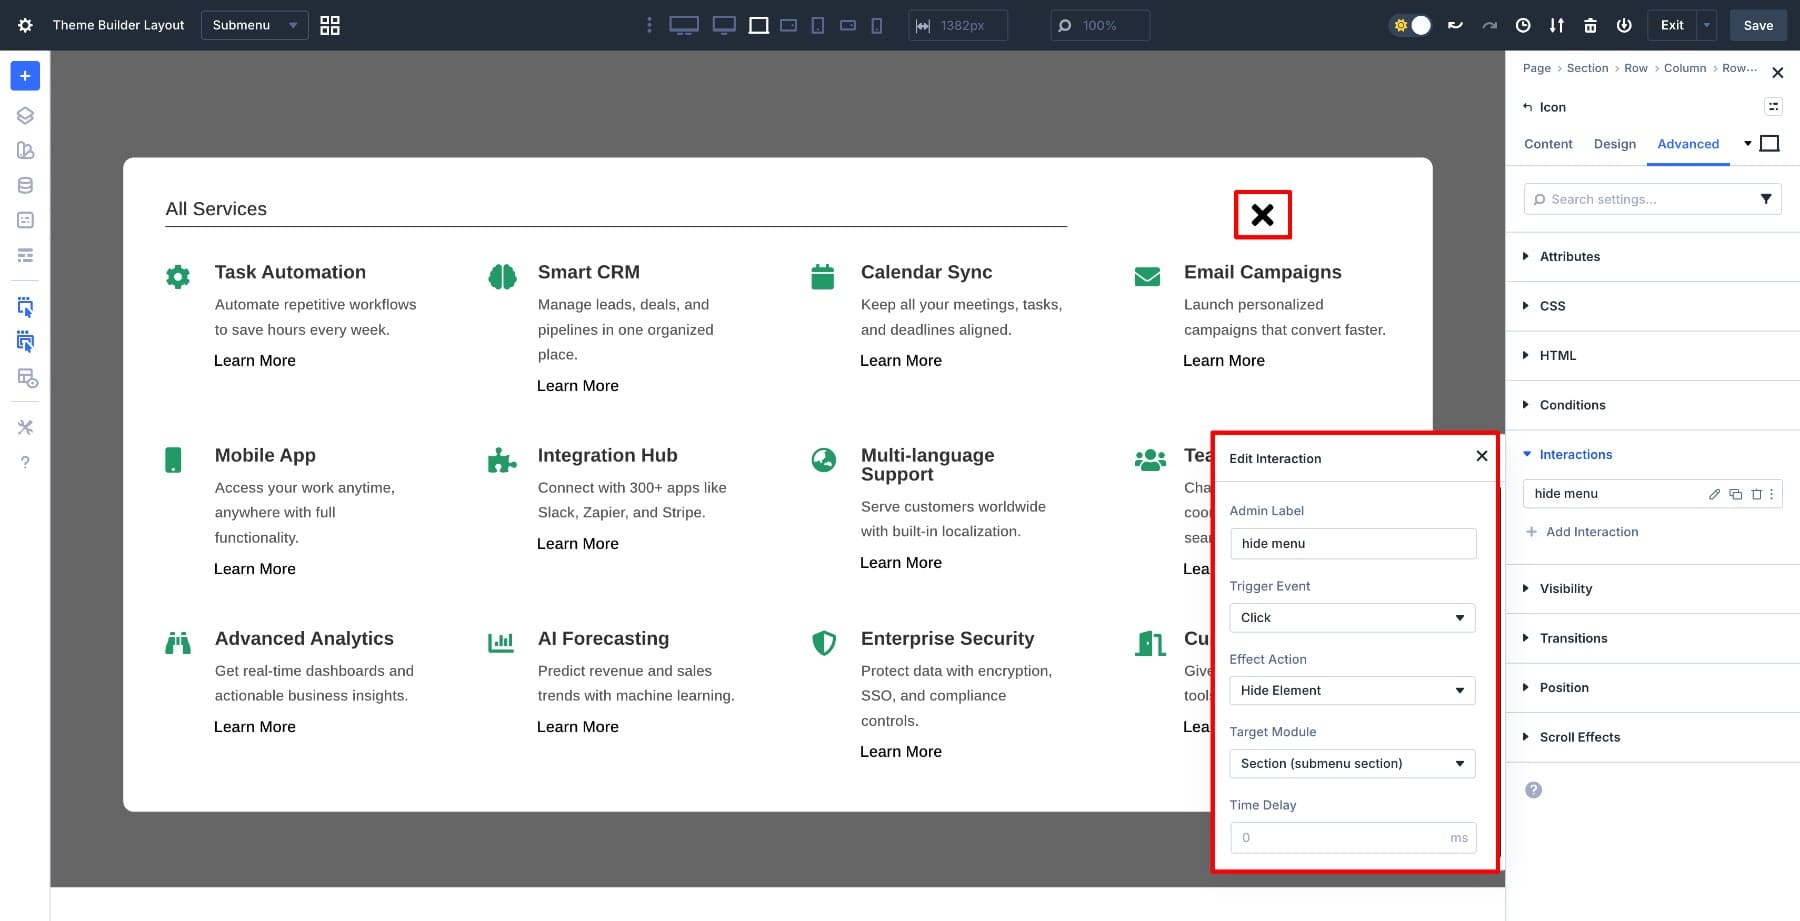
Now arrange the shut interplay. Transfer again to the Submenu Canvas the use of the dropdown, and choose the shut icon subsequent to the “All Options” heading.
Move to Settings > Complex > Interactions and upload every other interplay. Set the Cause Match to Click on, make a selection Cover Part because the Impact Motion, and choose Submenu Segment because the Goal Module. Stay the Time Extend at 0ms, then save.
This interplay reverses the visibility toggle. When clicked, the menu disappears, and the canvas detaches from the web page till precipitated once more.
The interactions at the moment are reside. The button presentations the menu, the shut icon hides it, and each paintings throughout all your web site since the canvas is world and the button lives within the Theme Builder header.
Preview The Menu On The Entrance Finish (Desktop & Cell)
With the interactions configured, save each the Theme Builder header and the canvas. Now take a look at the menu at the entrance finish to verify it behaves as it should be throughout units.
Open any web page for your web site and click on the View Services and products button within the header. The menu must slide in as a hard and fast overlay that sits above the web page content material. Scroll the web page whilst the menu is open to ensure it remains anchored in position as an alternative of shifting with the web page. This confirms that the fastened positioning is operating and the menu purposes as a real overlay, now not as a part of the web page format.
Transfer to a cellular instrument or use your browser’s responsive view, then faucet the View Services and products button once more. The menu must keep contained inside the viewport with out extending past the display screen limitations. If the content material is taller than the display screen, you must be capable of scroll in the course of the menu pieces inside the overlay whilst the overlay stays fastened.
Checking out on each desktop and cellular validates that the canvas gadget, Flexbox settings, and interactions paintings in combination correctly. The menu now purposes as a certified navigation element that adapts to any display screen measurement with out breaking your web page construction.
Obtain The Educational Template
If you wish to use this educational’s header template, you’ll be able to obtain it beneath!
@media handiest display screen and ( max-width: 767px ) {.et_bloom .et_bloom_optin_1 .carrot_edge.et_bloom_form_right .et_bloom_form_content:prior to { border-top-color: #ffffff !vital; border-left-color: clear !vital; }.et_bloom .et_bloom_optin_1 .carrot_edge.et_bloom_form_left .et_bloom_form_content:after { border-bottom-color: #ffffff !vital; border-left-color: clear !vital; }
}.et_bloom .et_bloom_optin_1 .et_bloom_form_content button { background-color: #f92c8b !vital; } .et_bloom .et_bloom_optin_1 .et_bloom_form_content .et_bloom_fields i { colour: #f92c8b !vital; } .et_bloom .et_bloom_optin_1 .et_bloom_form_content .et_bloom_custom_field_radio i:prior to { background: #f92c8b !vital; } .et_bloom .et_bloom_optin_1 .et_bloom_border_solid { border-color: #f7f9fb !vital } .et_bloom .et_bloom_optin_1 .et_bloom_form_content button { background-color: #f92c8b !vital; } .et_bloom .et_bloom_optin_1 .et_bloom_form_container h2, .et_bloom .et_bloom_optin_1 .et_bloom_form_container h2 span, .et_bloom .et_bloom_optin_1 .et_bloom_form_container h2 sturdy { font-family: “Open Sans”, Helvetica, Arial, Lucida, sans-serif; }.et_bloom .et_bloom_optin_1 .et_bloom_form_container p, .et_bloom .et_bloom_optin_1 .et_bloom_form_container p span, .et_bloom .et_bloom_optin_1 .et_bloom_form_container p sturdy, .et_bloom .et_bloom_optin_1 .et_bloom_form_container shape enter, .et_bloom .et_bloom_optin_1 .et_bloom_form_container shape button span { font-family: “Open Sans”, Helvetica, Arial, Lucida, sans-serif; } p.et_bloom_popup_input { padding-bottom: 0 !vital;}

Obtain For Loose
Sign up for the Divi Publication and we will be able to e-mail you a replica of without equal Divi Touchdown Web page Format Pack, plus lots of different superb and unfastened Divi sources, guidelines and methods. Observe alongside and you’ll be a Divi grasp very quickly. If you’re already subscribed merely sort for your e-mail cope with beneath and click on obtain to get entry to the format pack.
You may have effectively subscribed. Please take a look at your e-mail cope with to verify your subscription and get get entry to to unfastened weekly Divi format packs!
Take a look at Canvases In Divi 5 Nowadays!
Canvases and Interactions in Divi 5 maintain off canvas menus cleanly. The canvas assists in keeping the menu separate out of your web page construction, fastened positioning makes it behave like an overlay, and Flexbox handles responsive habits with out customized CSS. Set it up as soon as in an international canvas, cause it out of your Theme Builder header, and it really works site-wide.
This similar way applies to product menus, characteristic showcases, or any navigation component that should slide in on call for. The mechanics keep the similar: construct in a canvas, set visibility regulations, and twine up the interactions.
The publish How To Create An Off Canvas Services Popup In Divi 5 seemed first on Elegant Themes Blog.
Contents
- 1 What Are Canvases In Divi 5?
- 2 What We’re Development
- 2.1 1. Create The Header In Theme Builder (And Upload The Button)
- 2.2 2. Create A New Canvas For The Menu
- 2.3 3. Design The Off Canvas Menu Format
- 2.4 4. Set The Menu To Fastened Place
- 2.5 5. Optimize The Menu For Cell With Max Top And Scroll
- 2.6 6. Cover The Canvas On All Breakpoints
- 2.7 7. Upload Interactions To Open And Shut The Menu
- 3 Preview The Menu On The Entrance Finish (Desktop & Cell)
- 4 Obtain The Educational Template
- 5 Obtain For Loose
- 6 You may have effectively subscribed. Please take a look at your e-mail cope with to verify your subscription and get get entry to to unfastened weekly Divi format packs!
- 7 Take a look at Canvases In Divi 5 Nowadays!
- 8 5 Technical Demanding situations to Working a WordPress Associate Program
- 9 Copywriting 101: 15 Characteristics of Very good Reproduction Readers Will Keep in mind
- 10 6 Guidelines To Optimize Your Elementor Website online

0 Comments