
On the subject of ecommerce, standing out means ditching cookie-cutter templates for product pages that now not most straightforward captivate however as well as convert. With Divi 5‘s Woo Product Modules, you’ll assemble high-impact product pages only from scratch, all while seamlessly integrating real-time WooCommerce wisdom.
In this put up, we’ll walk you through creating a product internet web page from scratch the usage of Divi 5’s 17 Woo Product Modules and the Theme Builder. Let’s get started.
Working out The Woo Product Modules In Divi 5
Divi 5’s Woo Product Modules represent a step forward in ecommerce design, offering 17 native modules that pull dynamic wisdom directly from WooCommerce. You’ll have whole control over each element, from attention-grabbing visuals to seamless individual interactions by way of Divi’s intuitive Visual Builder.
To make sense of this toolkit, we’ve grouped the 17 modules into 4 intuitive categories in step with their roles in an ordinary product internet web page go with the flow. Every integrates with out issues of Woo’s backend, ensuring your content material subject material stays fresh and helpful. Let’s spoil them down:
Get began robust by means of guiding shoppers and keeping them an expert with the ones foundational portions that deal with orientation and real-time feedback.
- Woo Breadcrumbs: This module generates a dynamic navigational trail, linking from your homepage links through categories to the current product internet web page. That is serving to shoppers retrace their steps. It pulls store development wisdom directly from WooCommerce, making it excellent for in-depth opinions of your catalog.
- Woo Perceive: Perfect for surfacing Woo system signs — like cart addition confirmations, error messages, or success notifications. The module dynamically renders the ones portions, ensuring that your shoppers stay an expert without disrupting the design go with the flow.
Product Display
At the heart of any compelling product internet web page, the ones modules showcase the must haves: visuals, details, and specs that hook visitors and assemble imagine.
- Woo Product Establish: Render the product’s identify as a bold, customizable heading, sourced at once from Woo’s put up wisdom. It serves as your internet web page’s anchor for SEO-friendly hierarchy.
- Woo Product Description: Display the long (or temporary) description, pulling content material subject material from Woo fields to create horny, story-driven sections.
- Woo Product Footage: Sing their own praises the featured image with pro-level possible choices, comparable to zoom effects or lightbox popups, and fetch Woo’s primary and gallery footage.
- Woo Product Gallery: Make larger the view with a grid or slider of additional footage, seamlessly integrated from Woo’s gallery attachments.
- Woo Product Information: Display variable attributes (colors, sizes, materials), leveraging Woo’s database to clarify possible choices and reduce cart abandonment.
- Woo Product Meta: Display taxonomy details, comparable to categories and tags, to strengthen discoverability and context without muddle.
- Woo Product Price: Display dynamic pricing, along with sale pricing or variable fees, directly from Woo for accuracy that builds buyer self belief.
- Woo Product Rating: Show well-known individual rankings alongside analysis counts, leveraging Woo’s aggregated feedback to be able to upload social proof.
- Woo Product Stock: Display availability badges, such as ‘In Stock’ or ‘Low Stock’, pulled from WooCommerce inventory.
Interactions And Evaluations
With the ones modules, you’ll turn passive browsers into full of life buyers.
- Woo Add To Cart: Sing their own praises simple or variable product possible choices and an Add To Cart button that you just’ll style the usage of the Visual Builder.
- Woo Product Evaluations: Create a scrollable list of customer testimonials, complete with submission forms, all powered by means of Woo’s opinions for social validation.
- Woo Product Tabs: Get ready content material subject material into tabs for descriptions, additional information, and opinions, for a clean, mobile-optimized revel in.
An identical And Lists
Wrap up with just right upselling and broader explorations, the usage of the ones to extend categories and inflate order values.
- Woo An identical Products: Display items in step with Woo’s built-in not unusual sense, displayed in columns to inspire those “consumers moreover bought” moments.
- Woo Product Upsell: Highlight height charge or bundled imaginable possible choices from your Woo upsell settings, strategically situated to raise carts with higher-margin pointers.
- Woo Products: Create product grids to turn products and filter them by means of magnificence, tags, and additional. With rather a couple of customization possible choices, you’ll keep an eye on the selection of columns, the display order, and additional.
With the ones modules, you’re now not merely construction pages then again growing stories that convert. Inside the next section, we’ll roll up our sleeves and step through construction a custom designed product internet web page, from layout to free up. Will have to you’d love to watch along side a completed design, fill out the form beneath to acquire the tips.
@media most straightforward show and ( max-width: 767px ) {.et_bloom .et_bloom_optin_1 .carrot_edge.et_bloom_form_right .et_bloom_form_content:quicker than { border-top-color: #ffffff !very important; border-left-color: transparent !very important; }.et_bloom .et_bloom_optin_1 .carrot_edge.et_bloom_form_left .et_bloom_form_content:after { border-bottom-color: #ffffff !very important; border-left-color: transparent !very important; }
}.et_bloom .et_bloom_optin_1 .et_bloom_form_content button { background-color: #f92c8b !very important; } .et_bloom .et_bloom_optin_1 .et_bloom_form_content .et_bloom_fields i { color: #f92c8b !very important; } .et_bloom .et_bloom_optin_1 .et_bloom_form_content .et_bloom_custom_field_radio i:quicker than { background: #f92c8b !very important; } .et_bloom .et_bloom_optin_1 .et_bloom_border_solid { border-color: #f7f9fb !very important } .et_bloom .et_bloom_optin_1 .et_bloom_form_content button { background-color: #f92c8b !very important; } .et_bloom .et_bloom_optin_1 .et_bloom_form_container h2, .et_bloom .et_bloom_optin_1 .et_bloom_form_container h2 span, .et_bloom .et_bloom_optin_1 .et_bloom_form_container h2 robust { font-family: “Open Sans”, Helvetica, Arial, Lucida, sans-serif; }.et_bloom .et_bloom_optin_1 .et_bloom_form_container p, .et_bloom .et_bloom_optin_1 .et_bloom_form_container p span, .et_bloom .et_bloom_optin_1 .et_bloom_form_container p robust, .et_bloom .et_bloom_optin_1 .et_bloom_form_container form input, .et_bloom .et_bloom_optin_1 .et_bloom_form_container form button span { font-family: “Open Sans”, Helvetica, Arial, Lucida, sans-serif; } p.et_bloom_popup_input { padding-bottom: 0 !very important;}

Download For Unfastened
Join the Divi Newsletter and we will email correspondence you a reproduction of the ultimate Divi Landing Internet web page Construction Pack, plus numerous other excellent and loose Divi resources, pointers and pointers. Follow along and also you’ll be a Divi seize in no time. If you happen to’re already subscribed simply kind in your email correspondence take care of beneath and click on on download to get right to use the layout pack.
You’ll have successfully subscribed. Please check out your email correspondence take care of to make sure your subscription and get get right to use to loose weekly Divi layout packs!
How To Create A Custom designed Product Internet web page In Divi 5
This section will knowledge you through growing a modern product internet web page the usage of Divi 5’s Woo Product Modules. By the use of the end, you’ll have an absolutely helpful product internet web page that fantastically showcases each product on your internet web page. Proper right here’s a handy guide a rough preview:
You’ll want to ensure that WooCommerce is installed and activated and that you just’ve were given created at least one product.
Step 1: Create A New Template
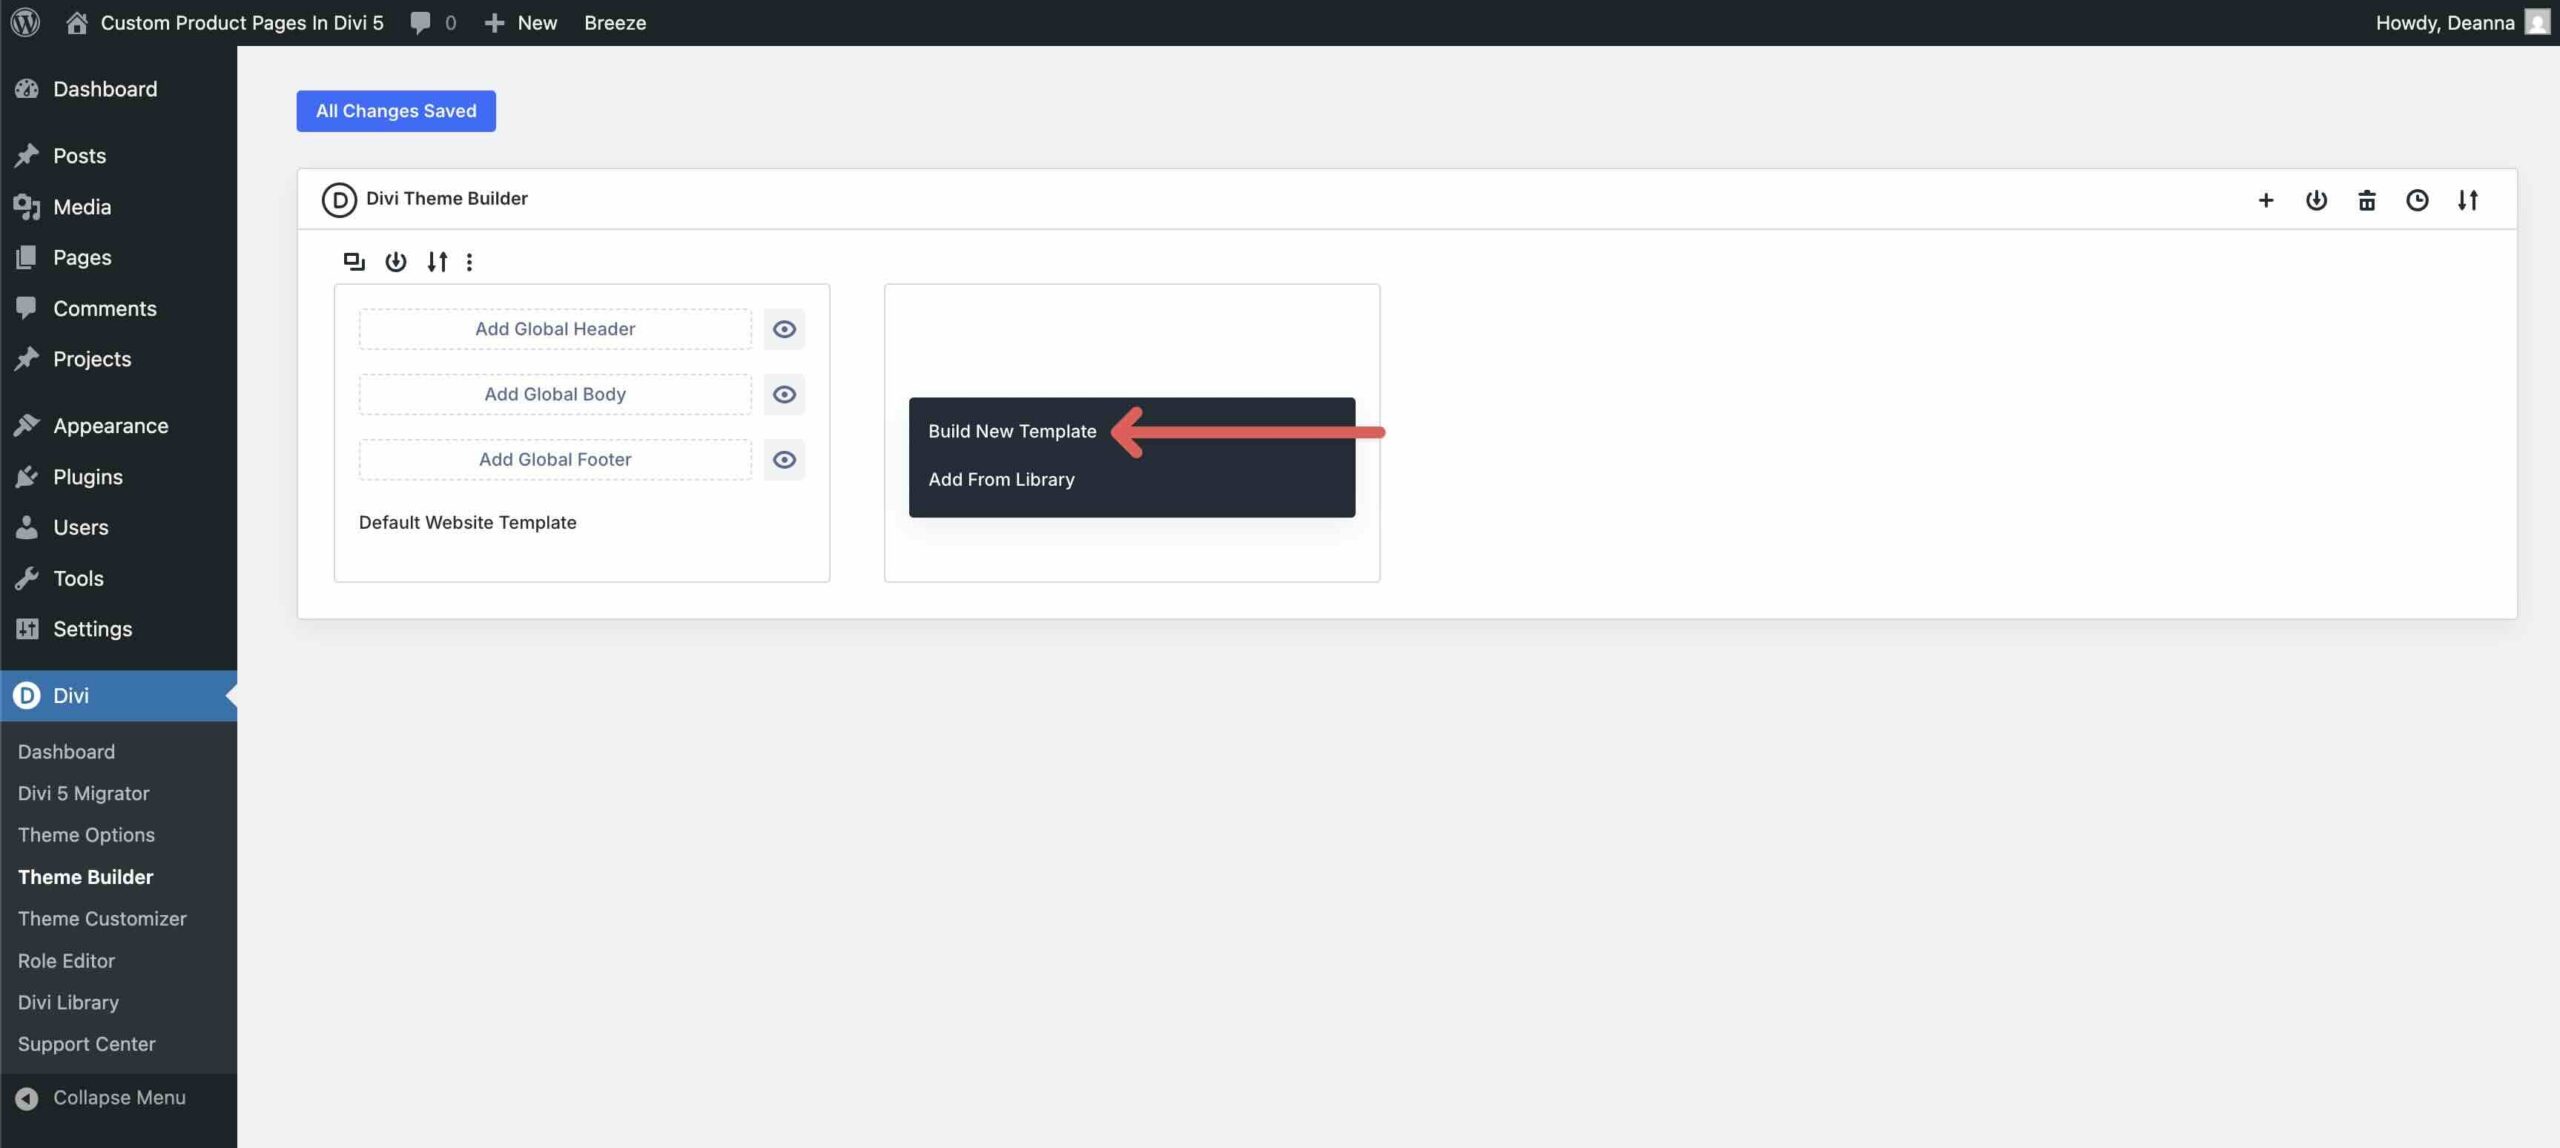
Next, navigate to Divi > Theme Builder and click on at the + Add New Template button.

As quickly because the modal turns out, click on on Assemble New Template.
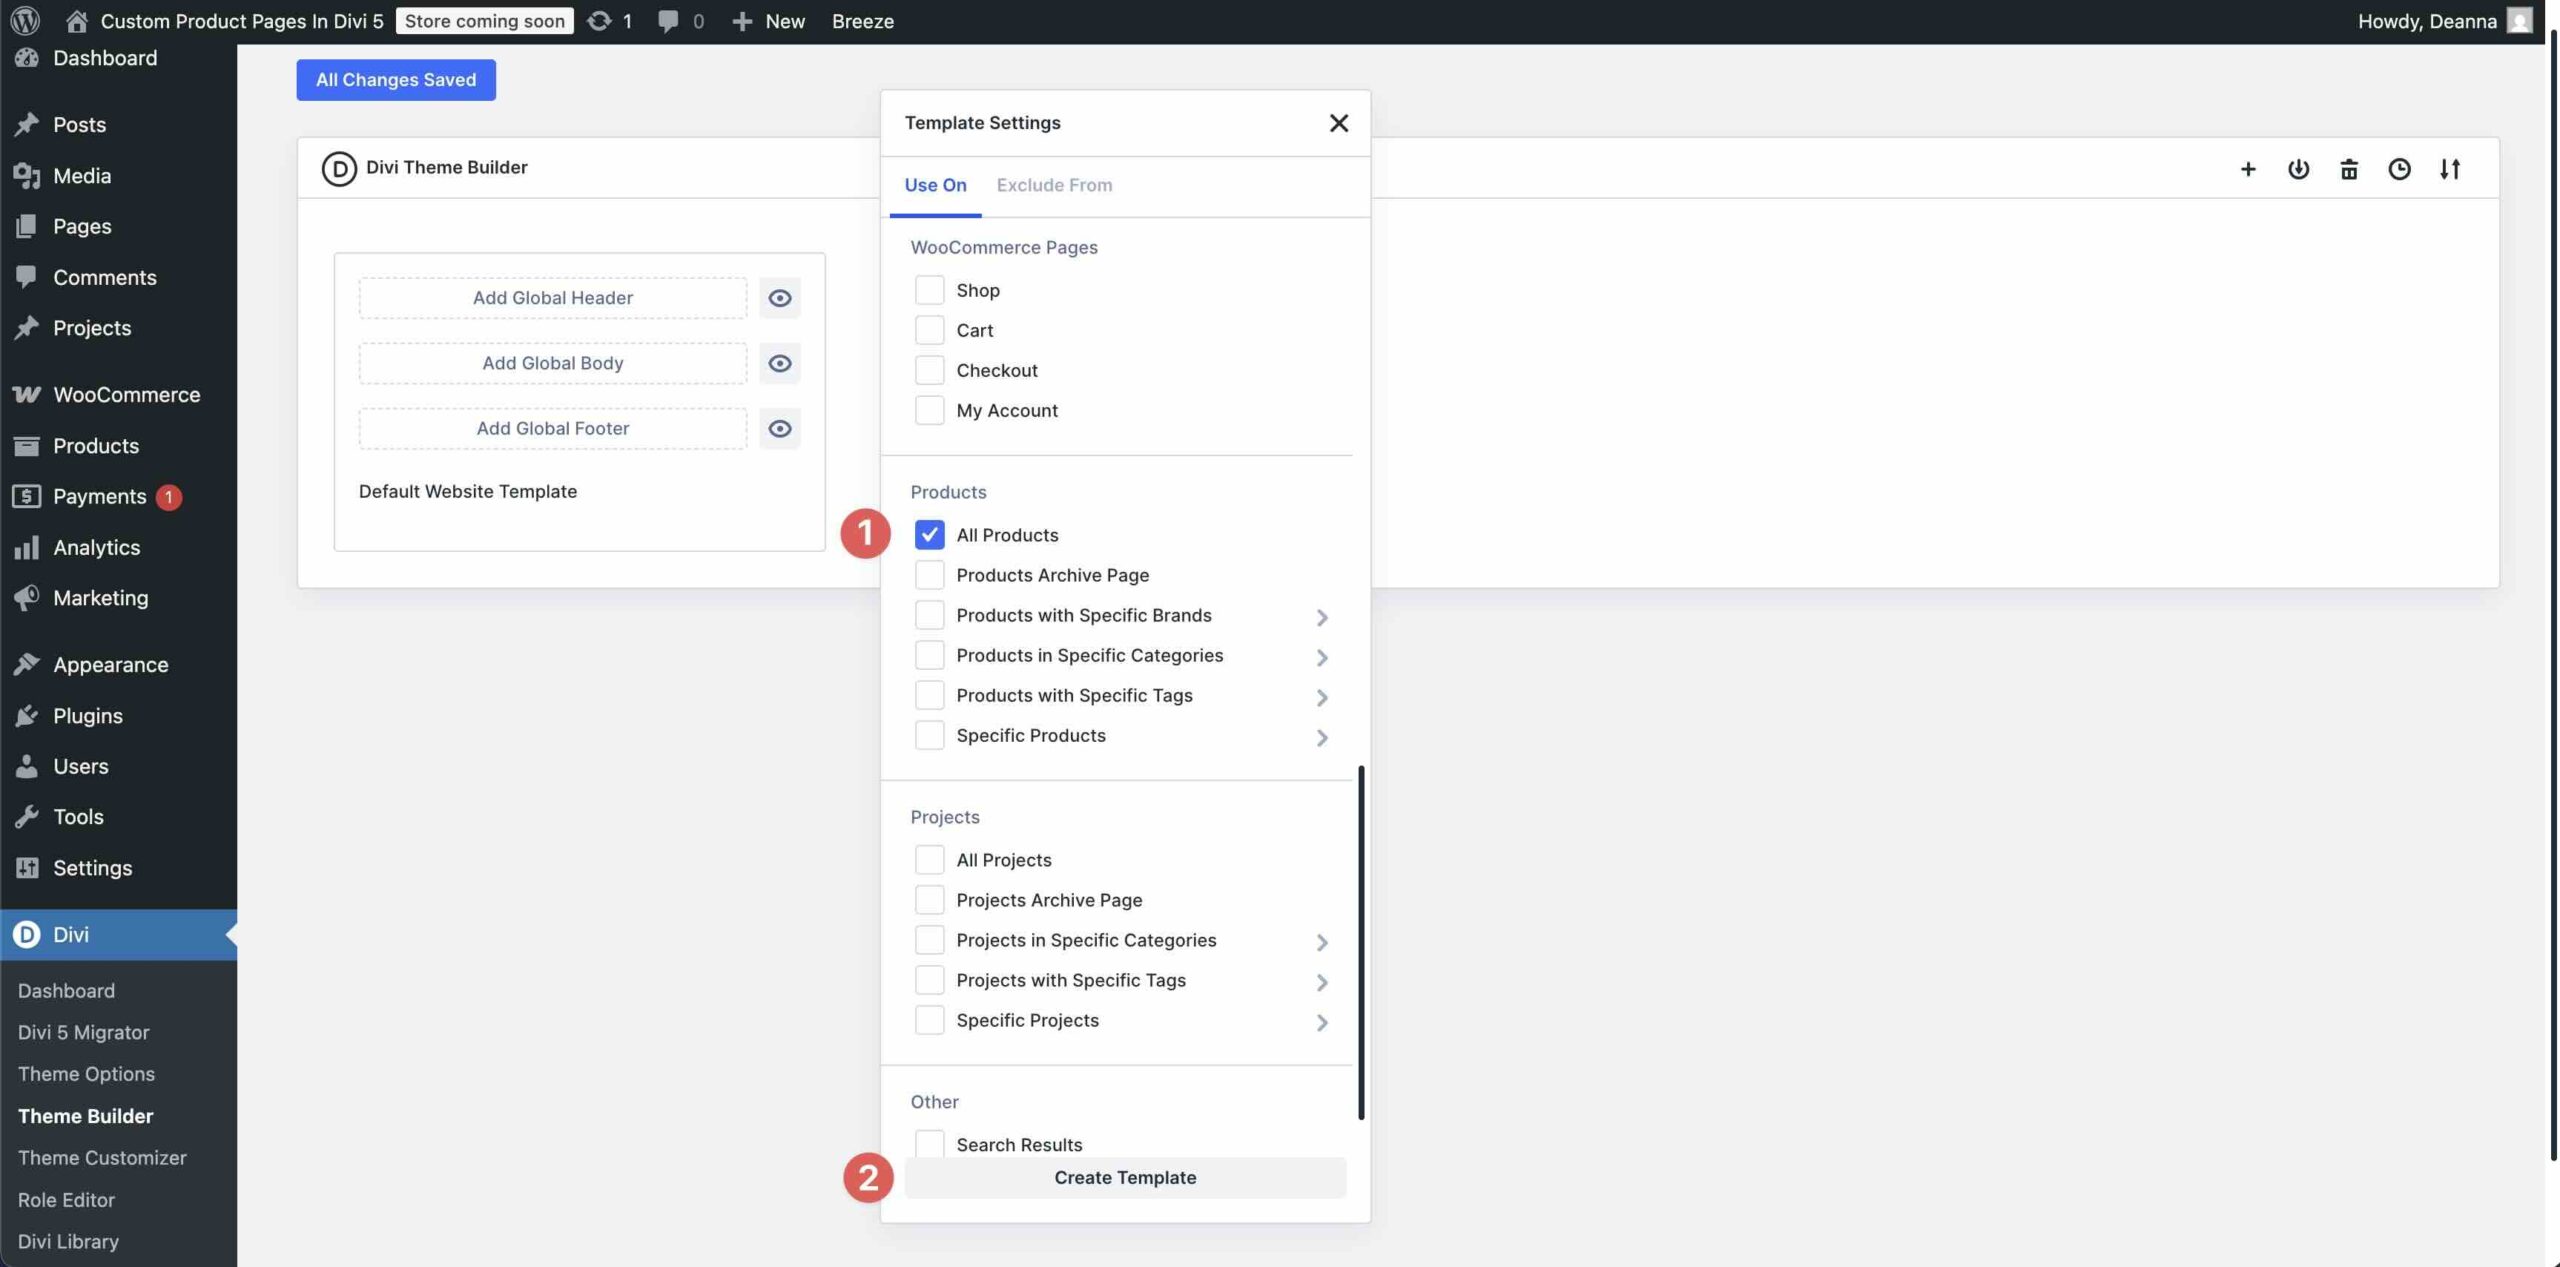
Inside the Template Settings modal, scroll the entire means all the way down to and try All Products. Click on on Create Template to continue.
Next, click on on Add Custom designed Body.
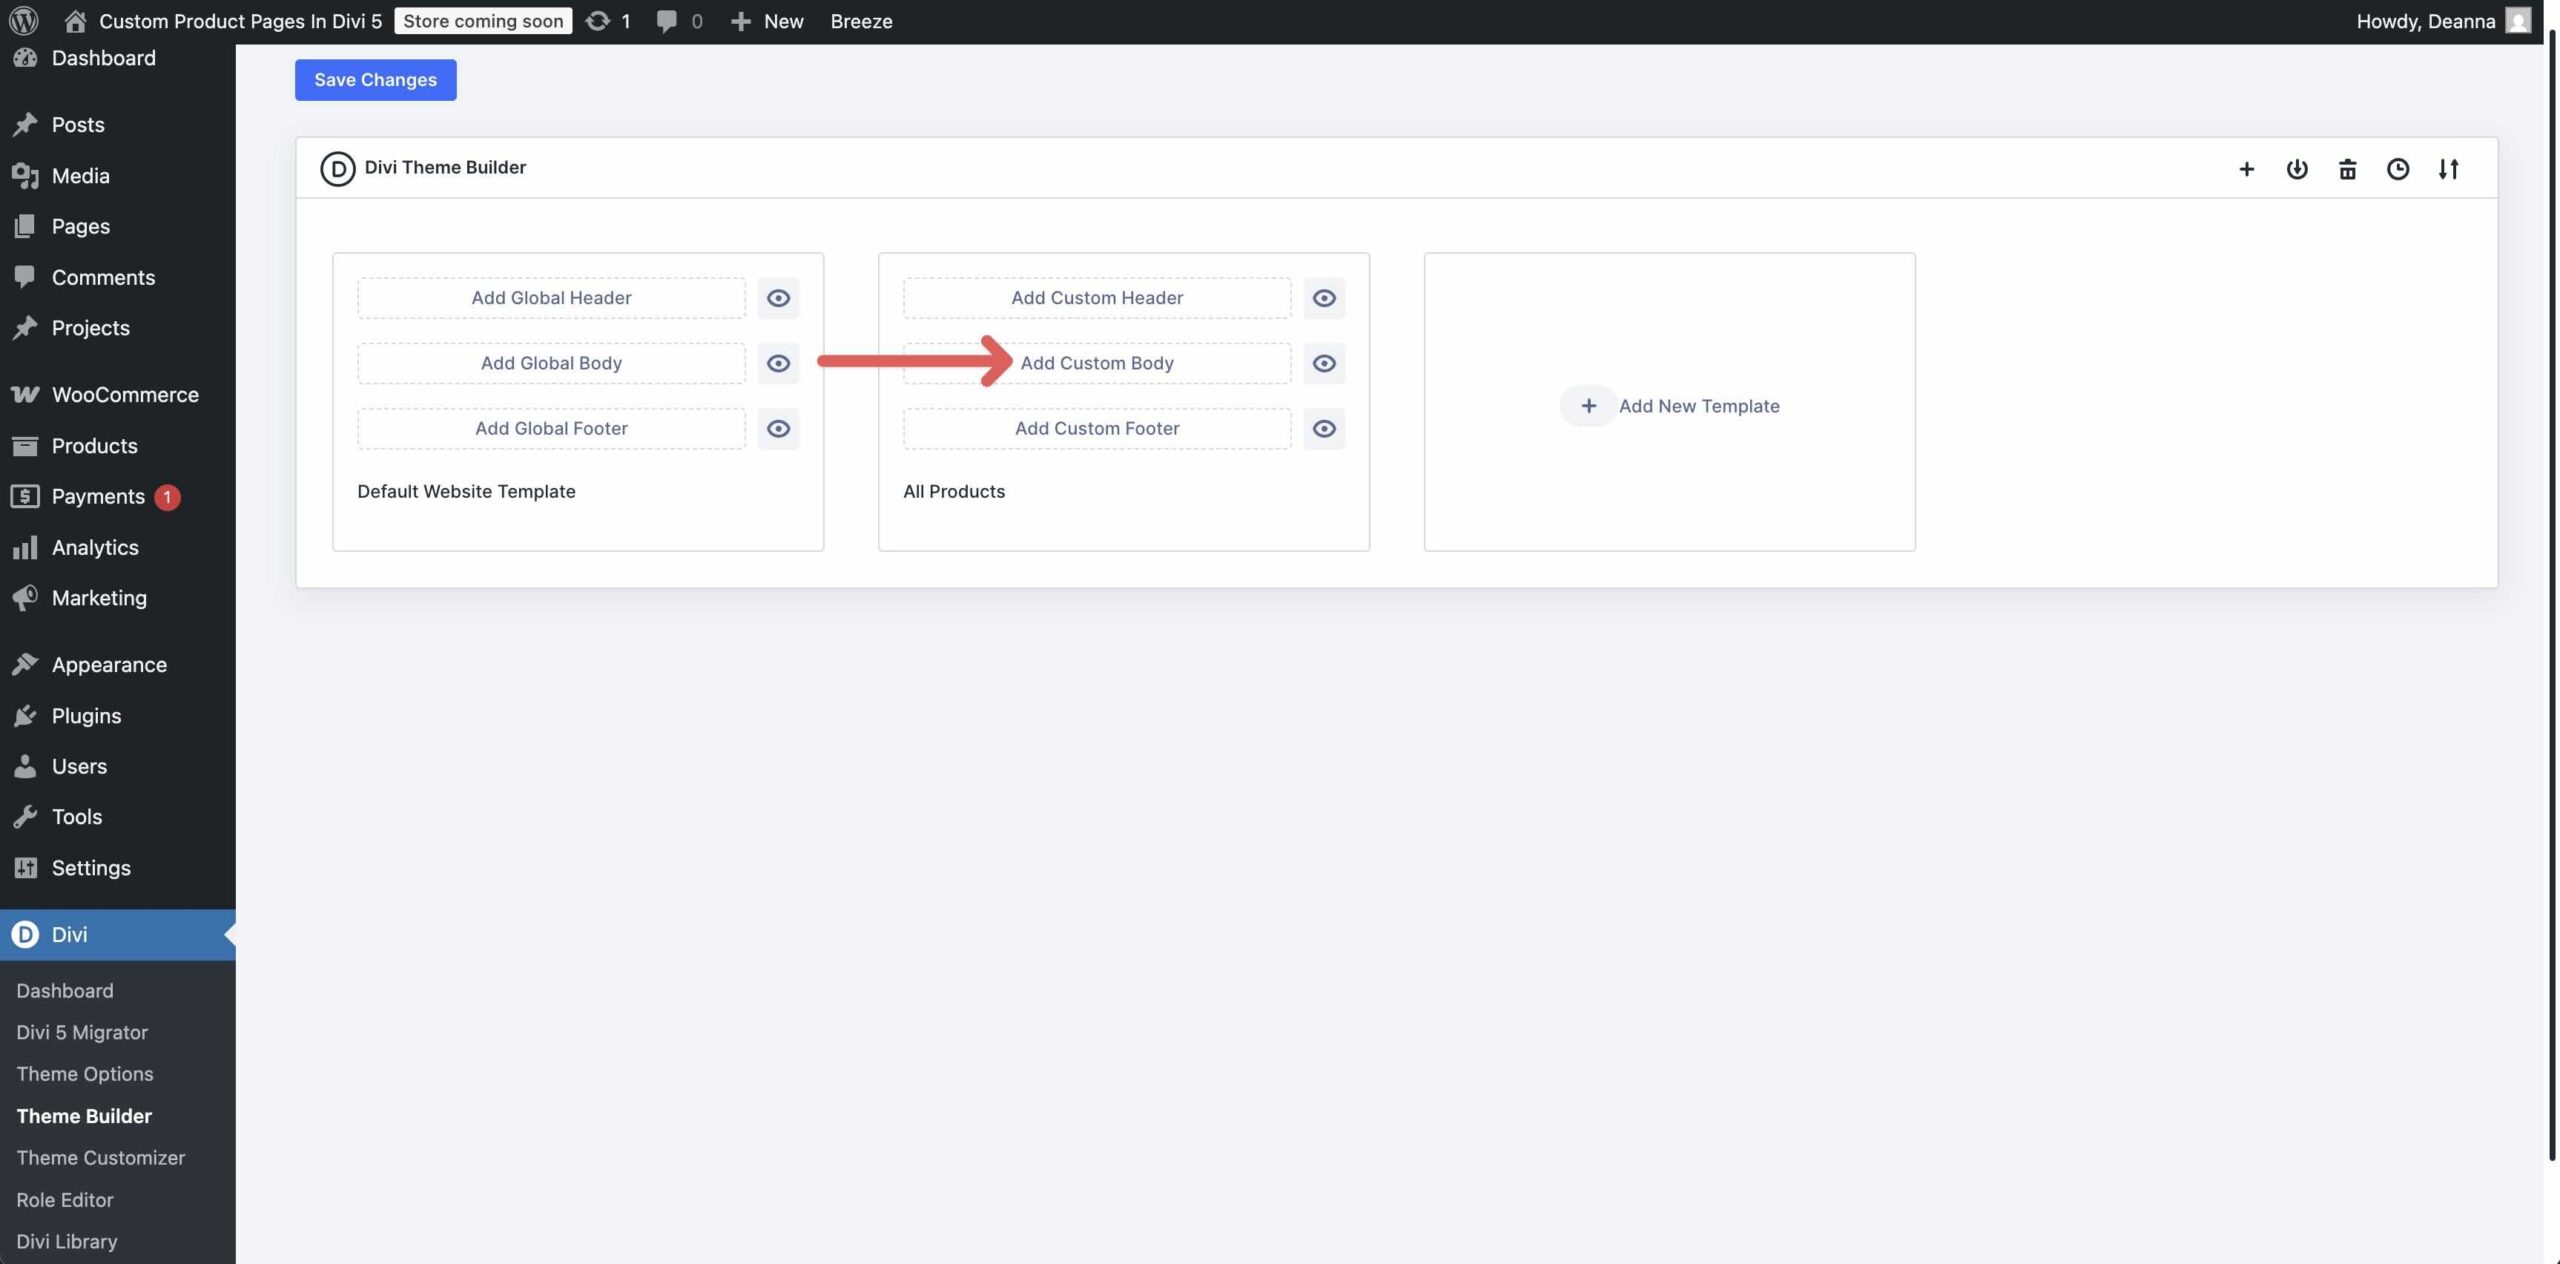
When the Theme Builder so much, choose Assemble From Scratch from the available possible choices.

Step 2: Add Content material subject material
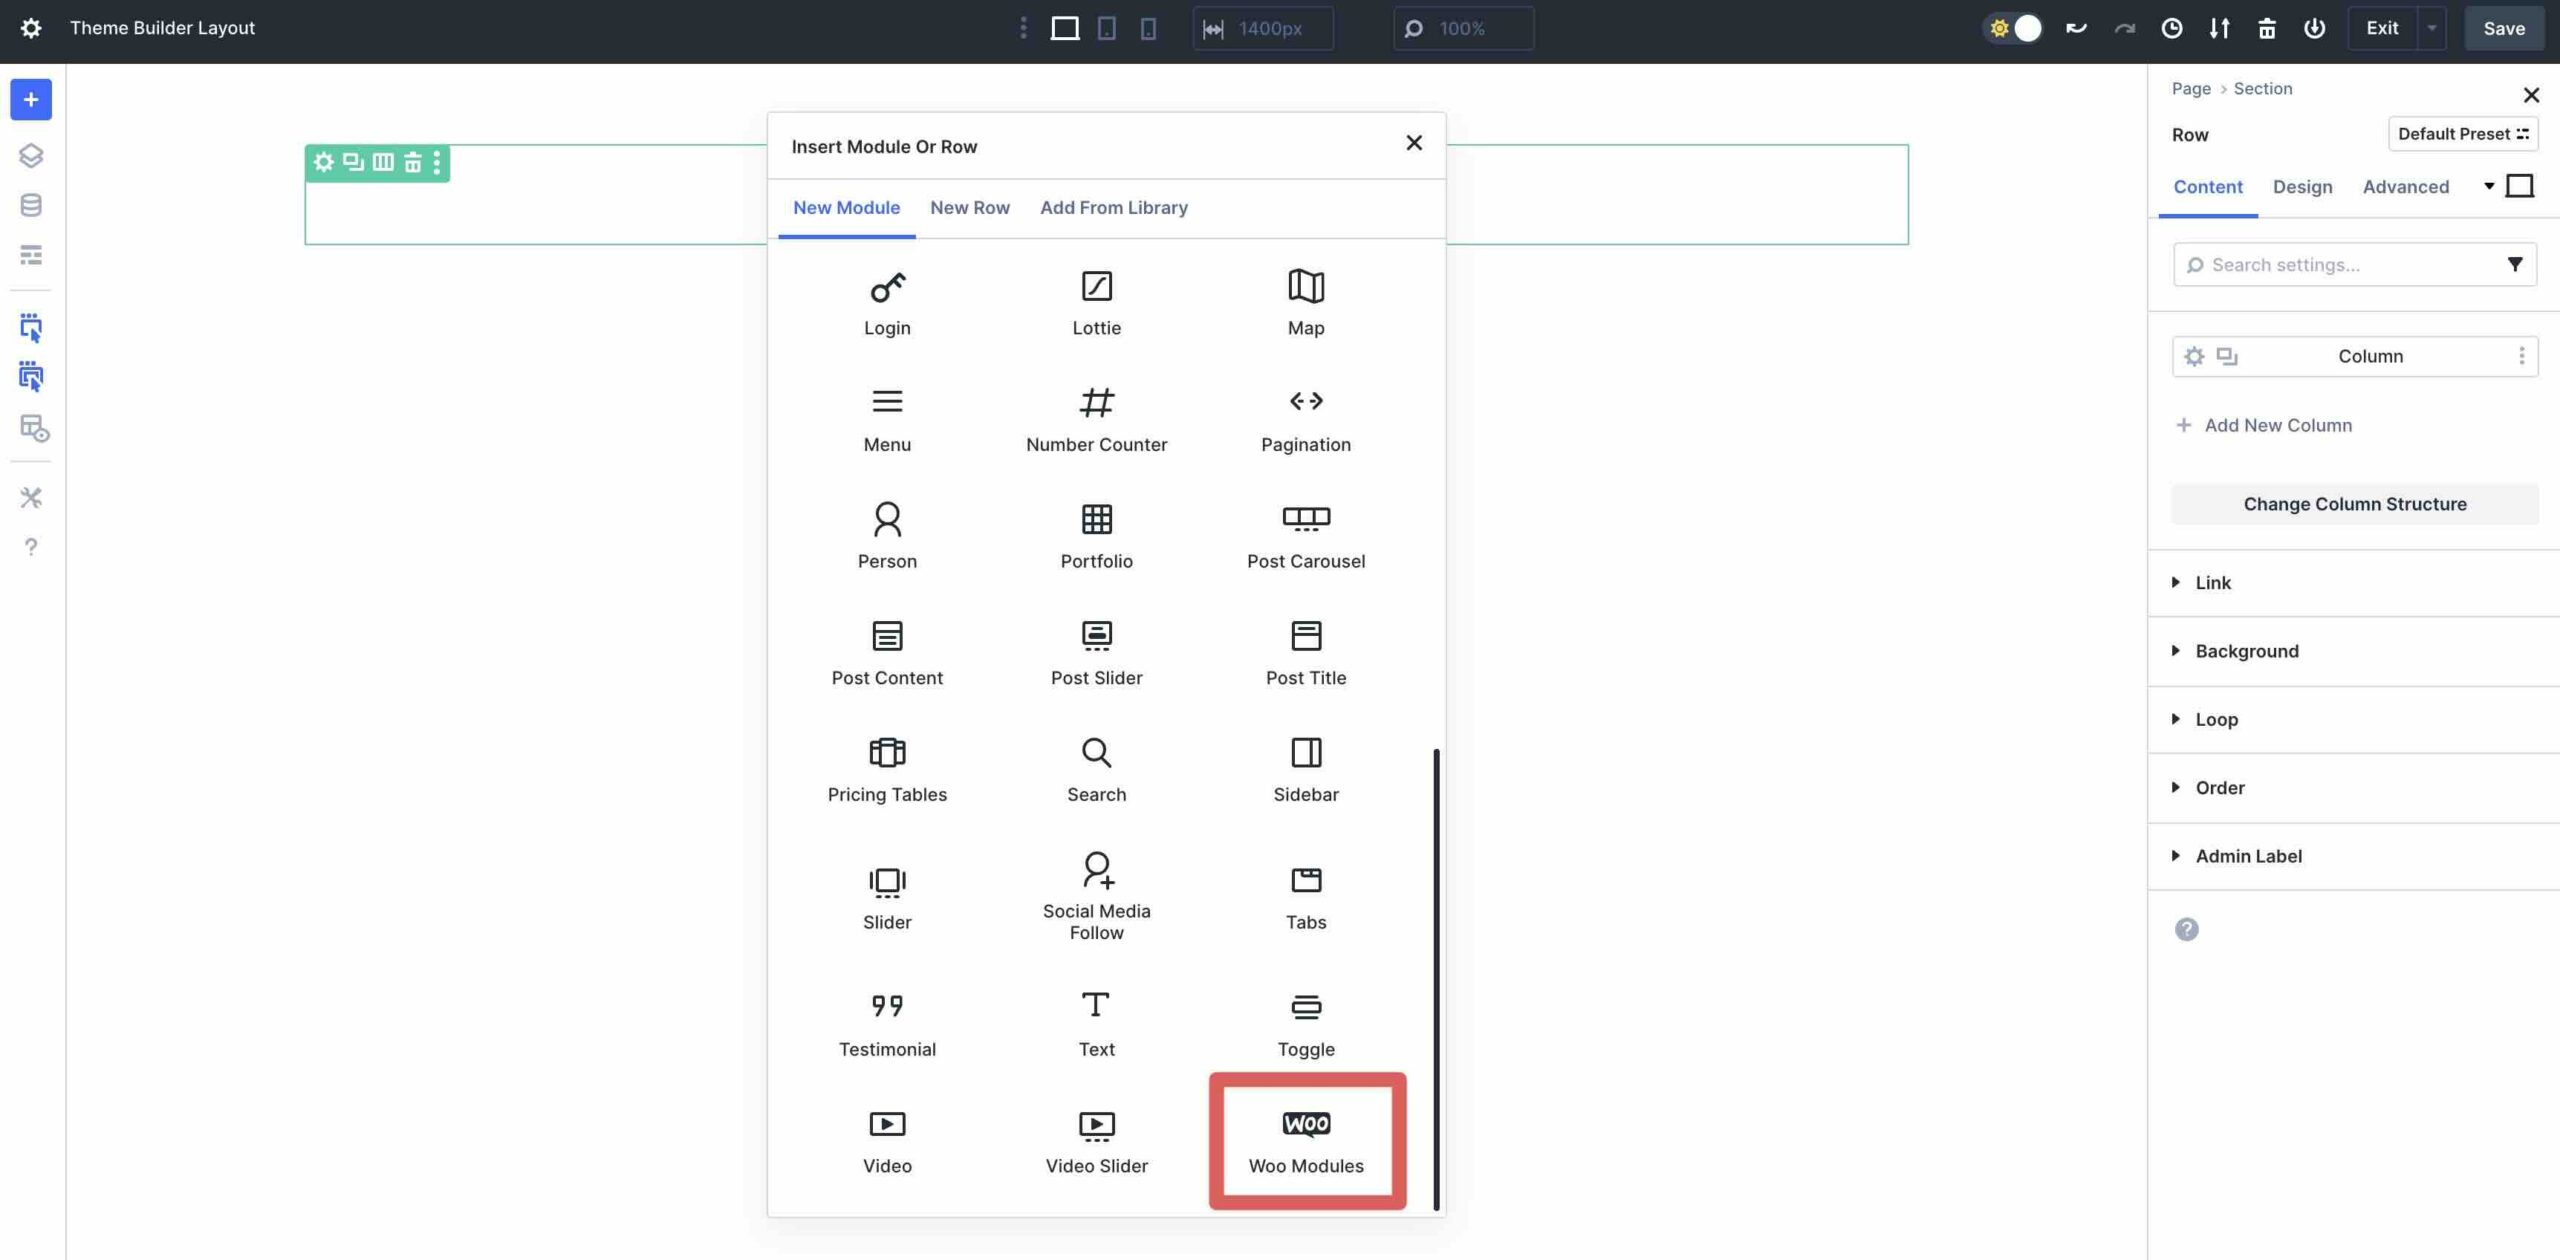
Add a single column row to the internet web page.
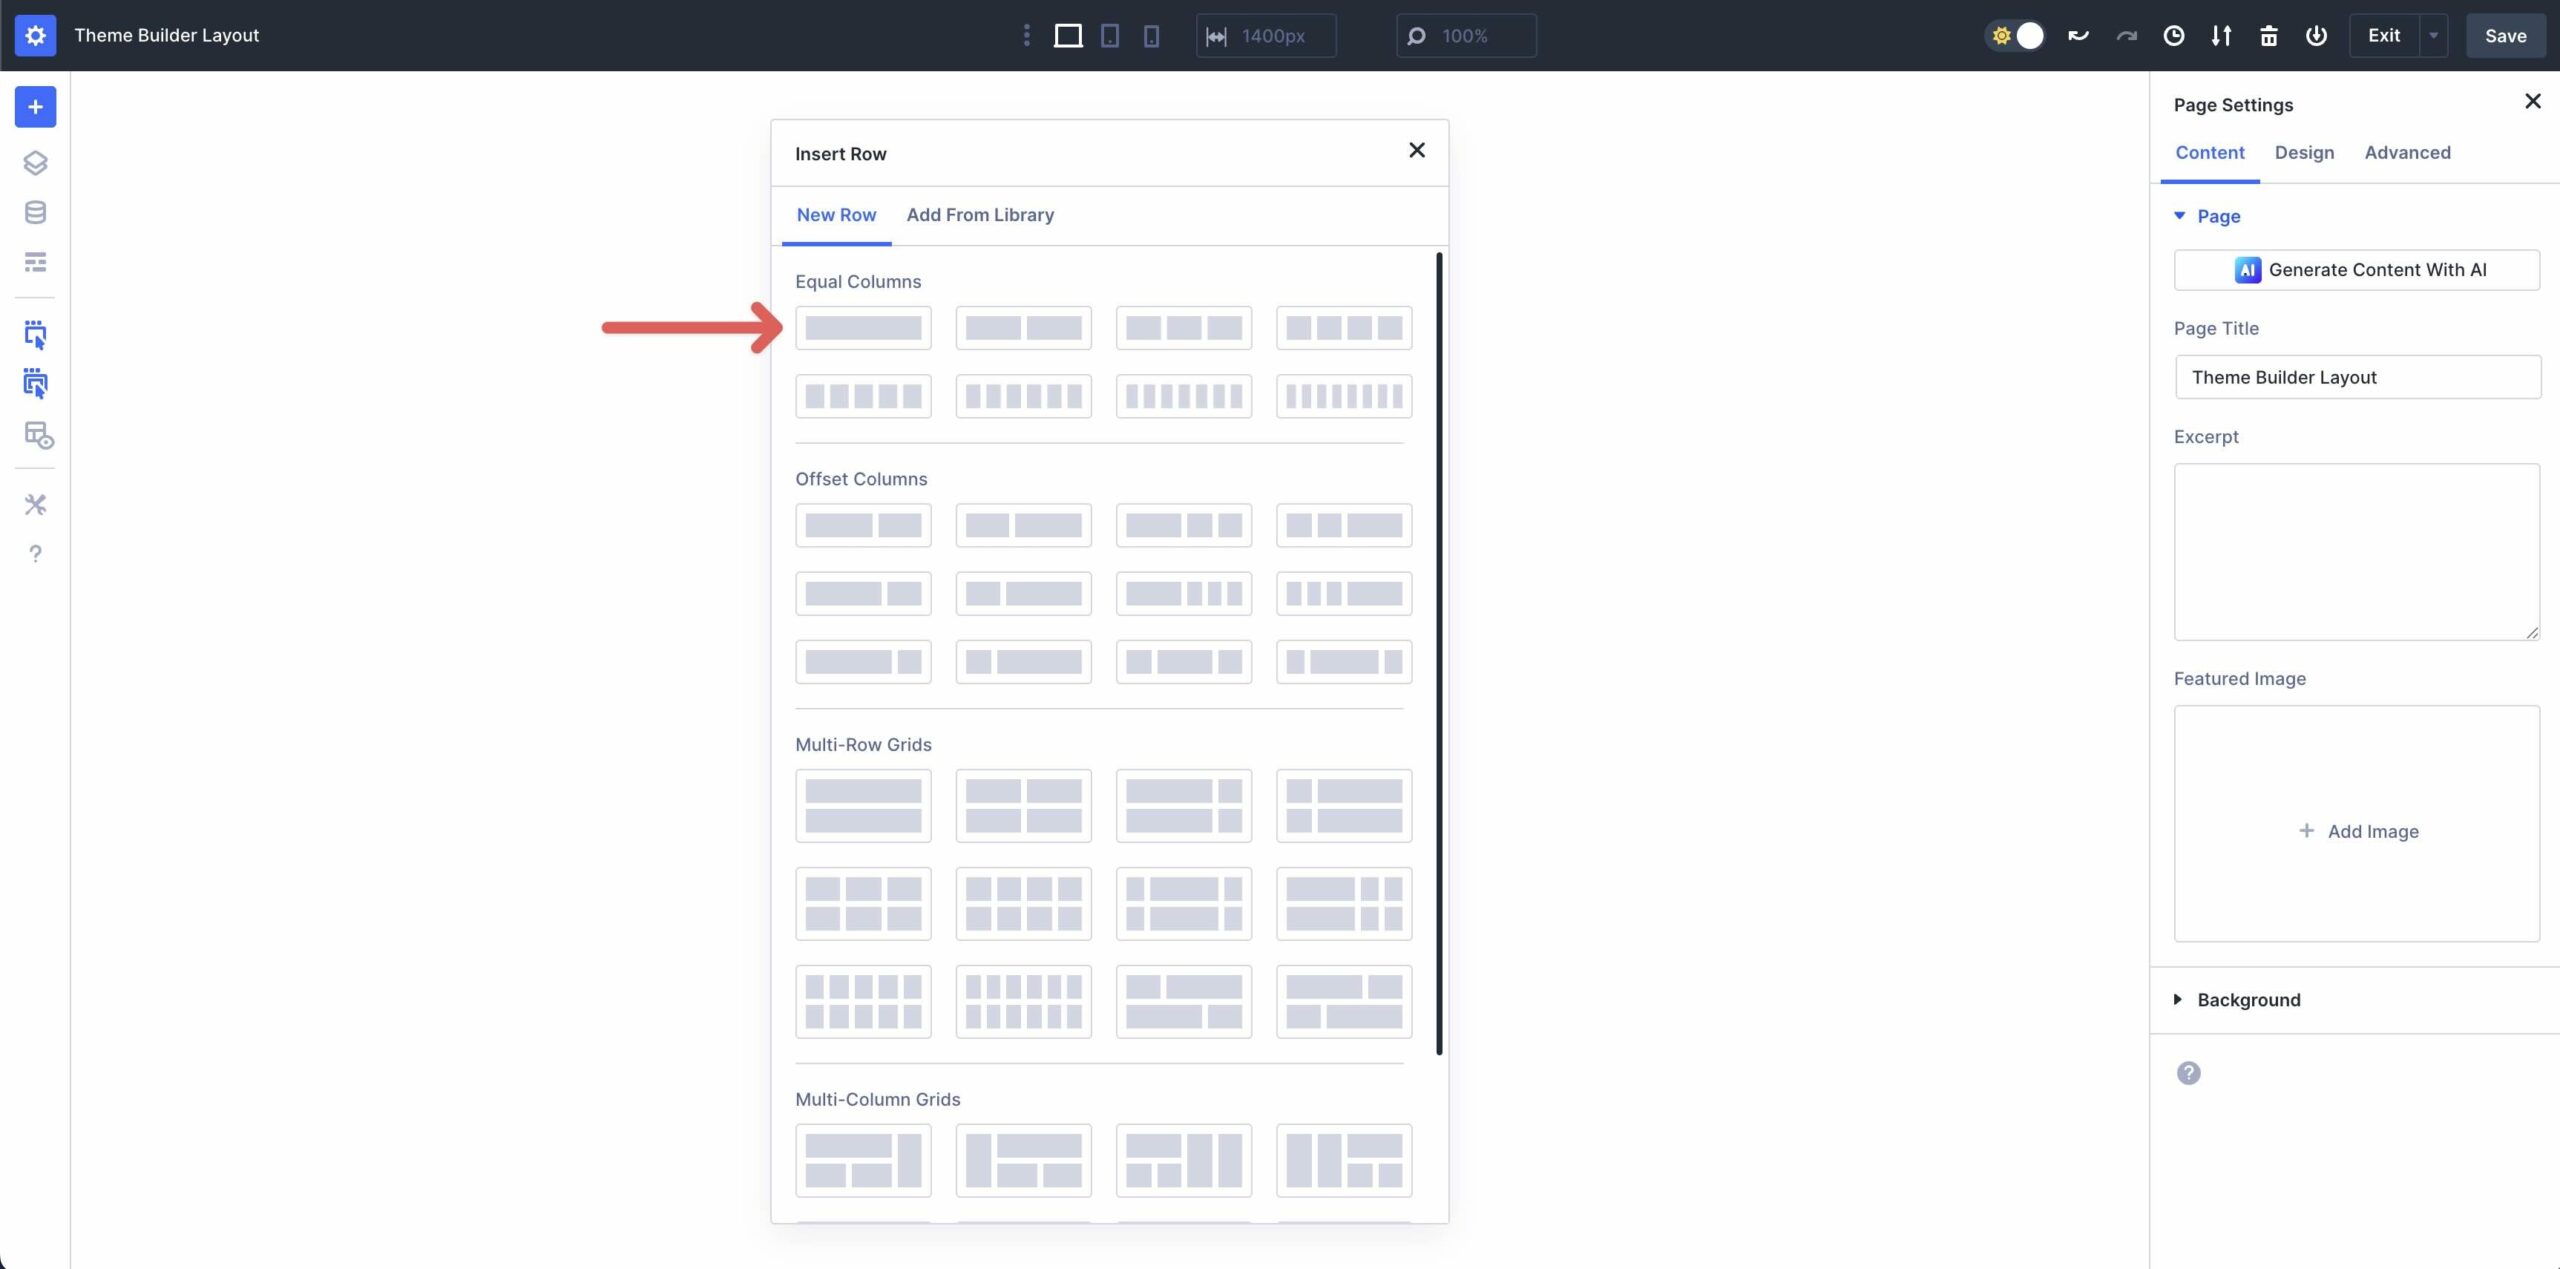
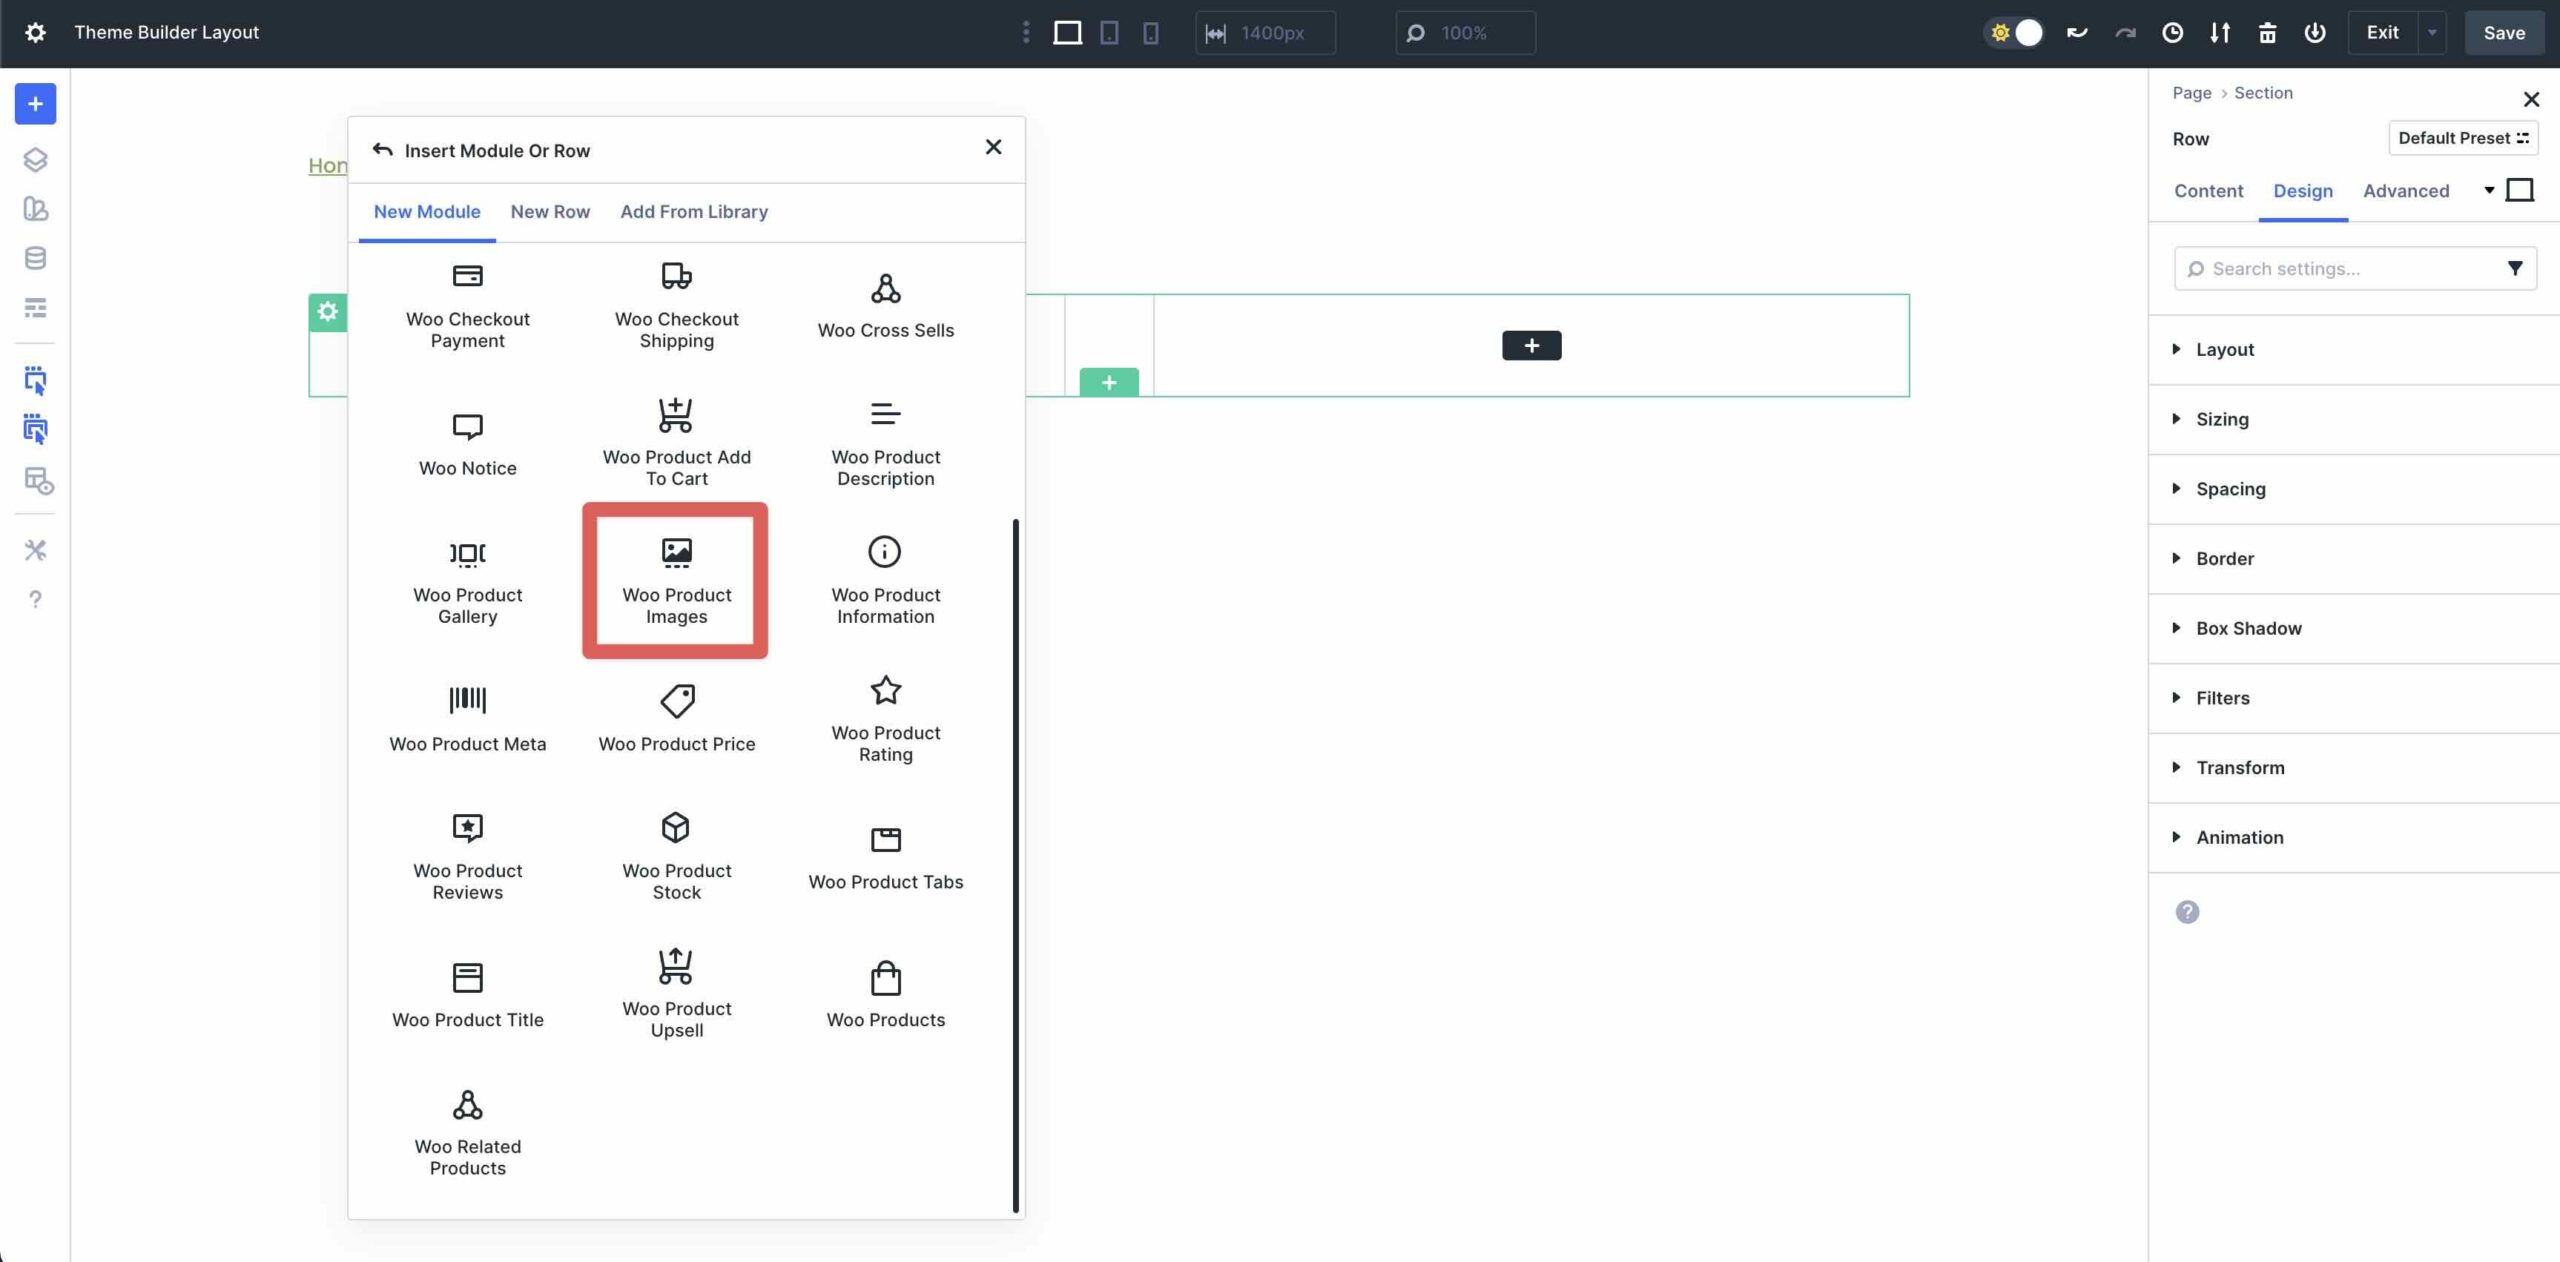
When the Insert Module Or Row modal turns out, in finding the Woo Modules selection and choose it.
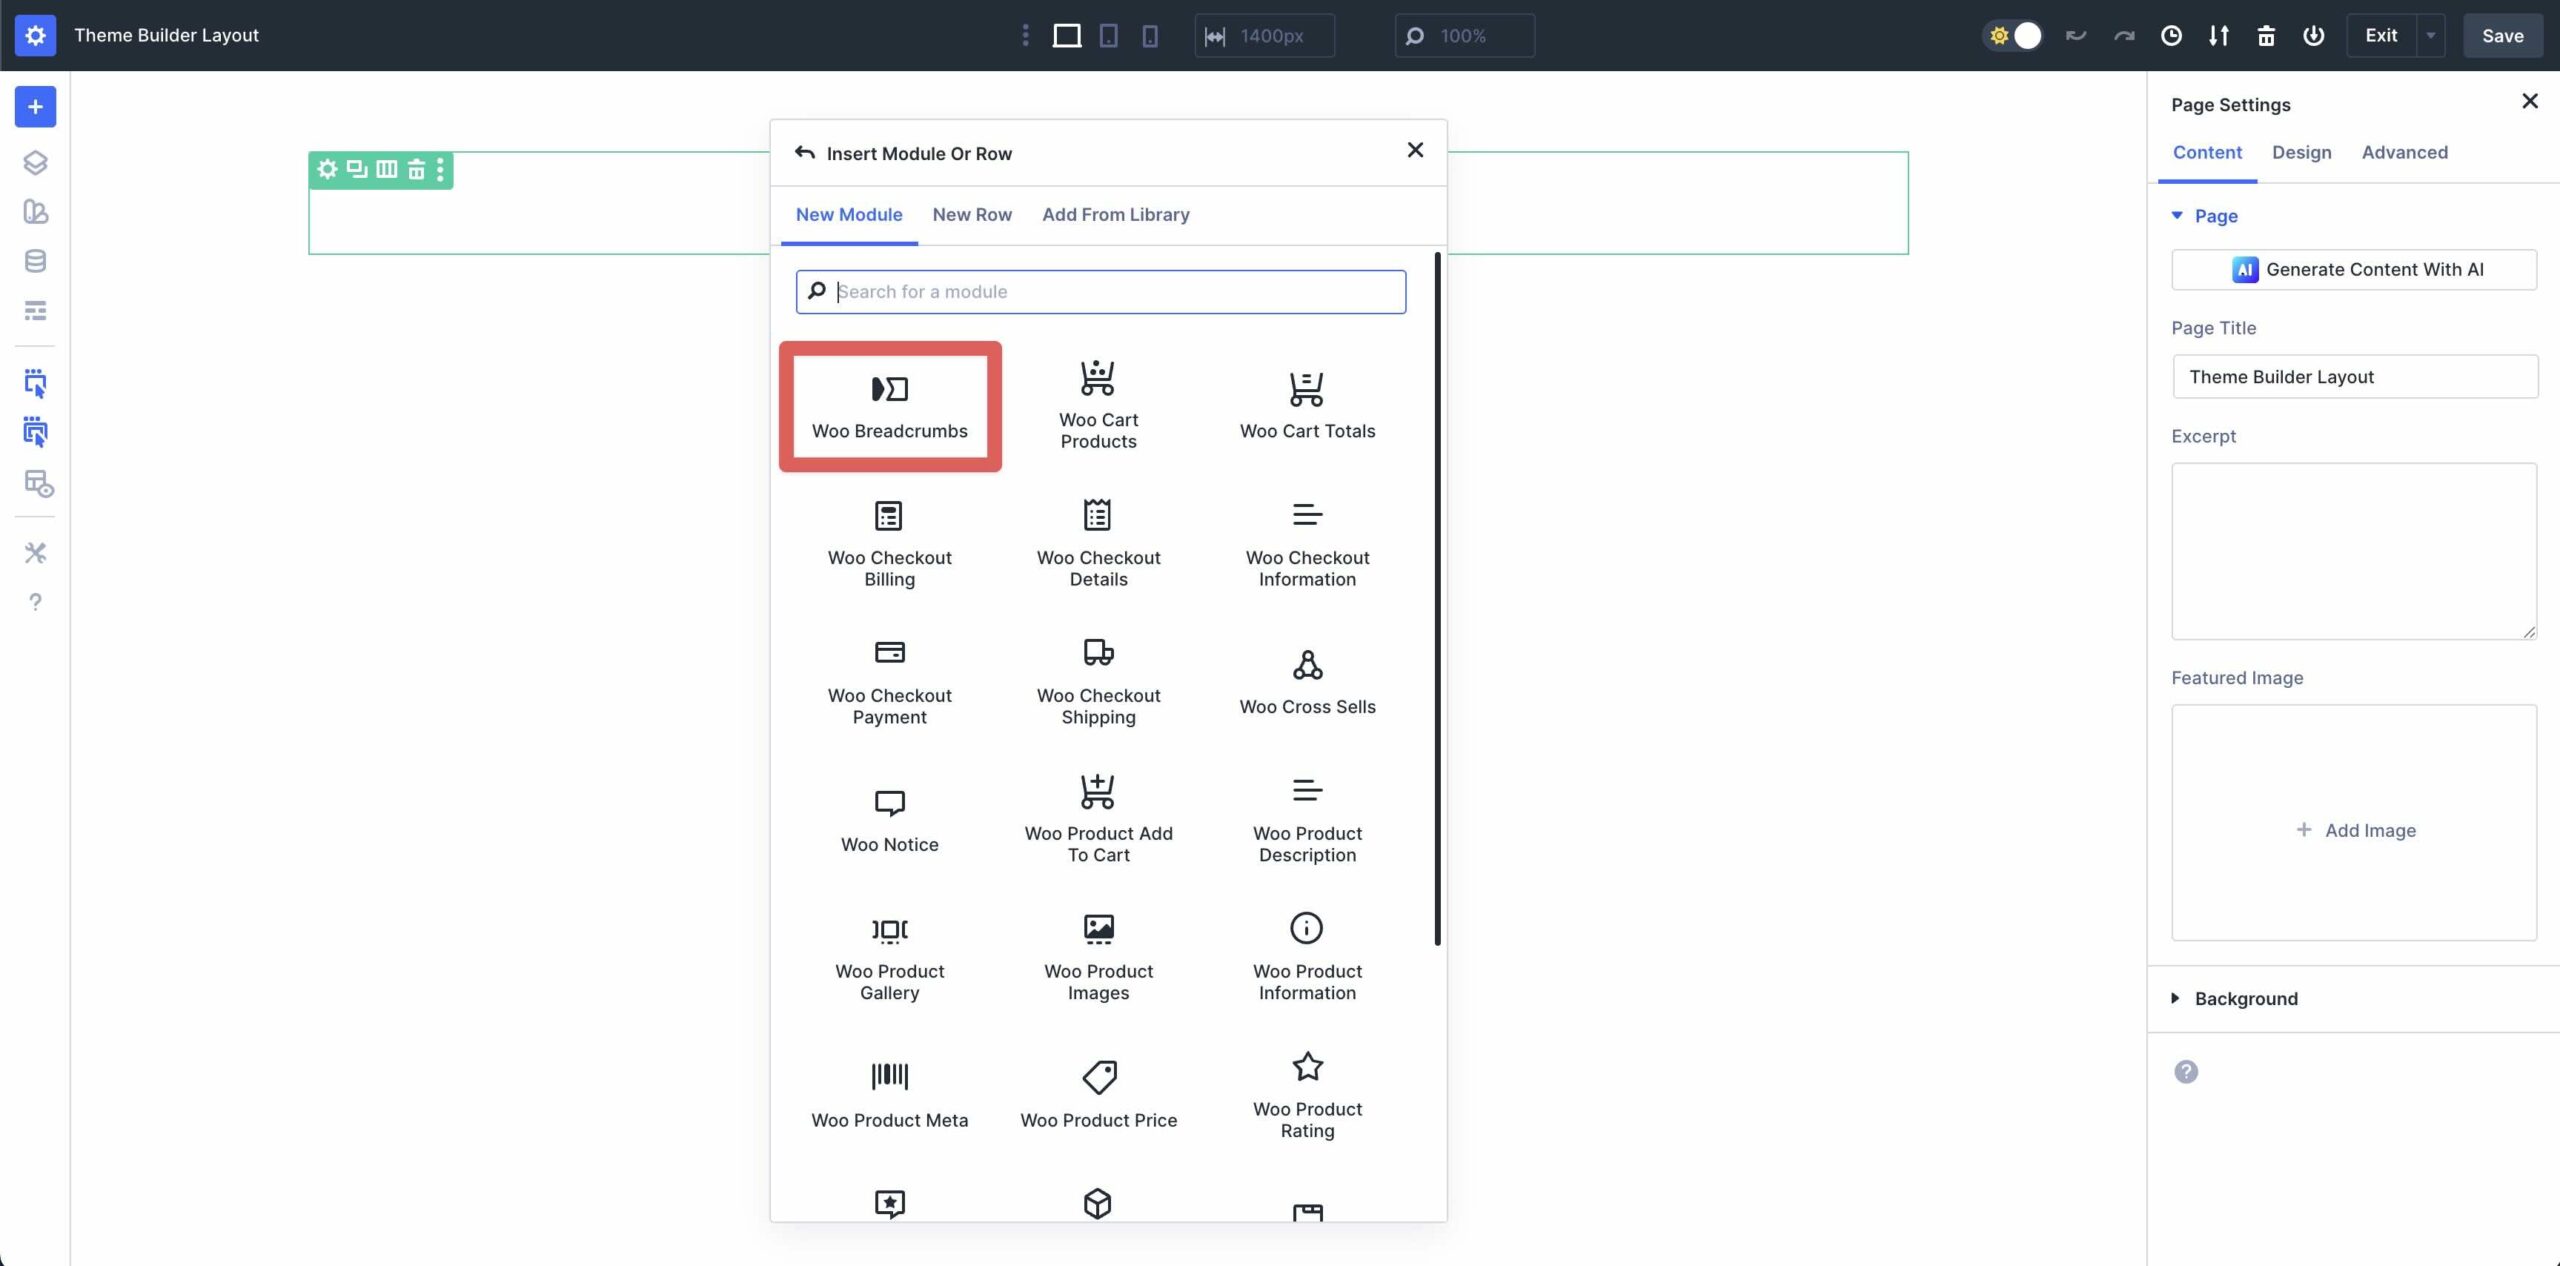
Add The Woo Breadcrumbs Module
In finding the Woo Breadcrumbs module and add it to the row.
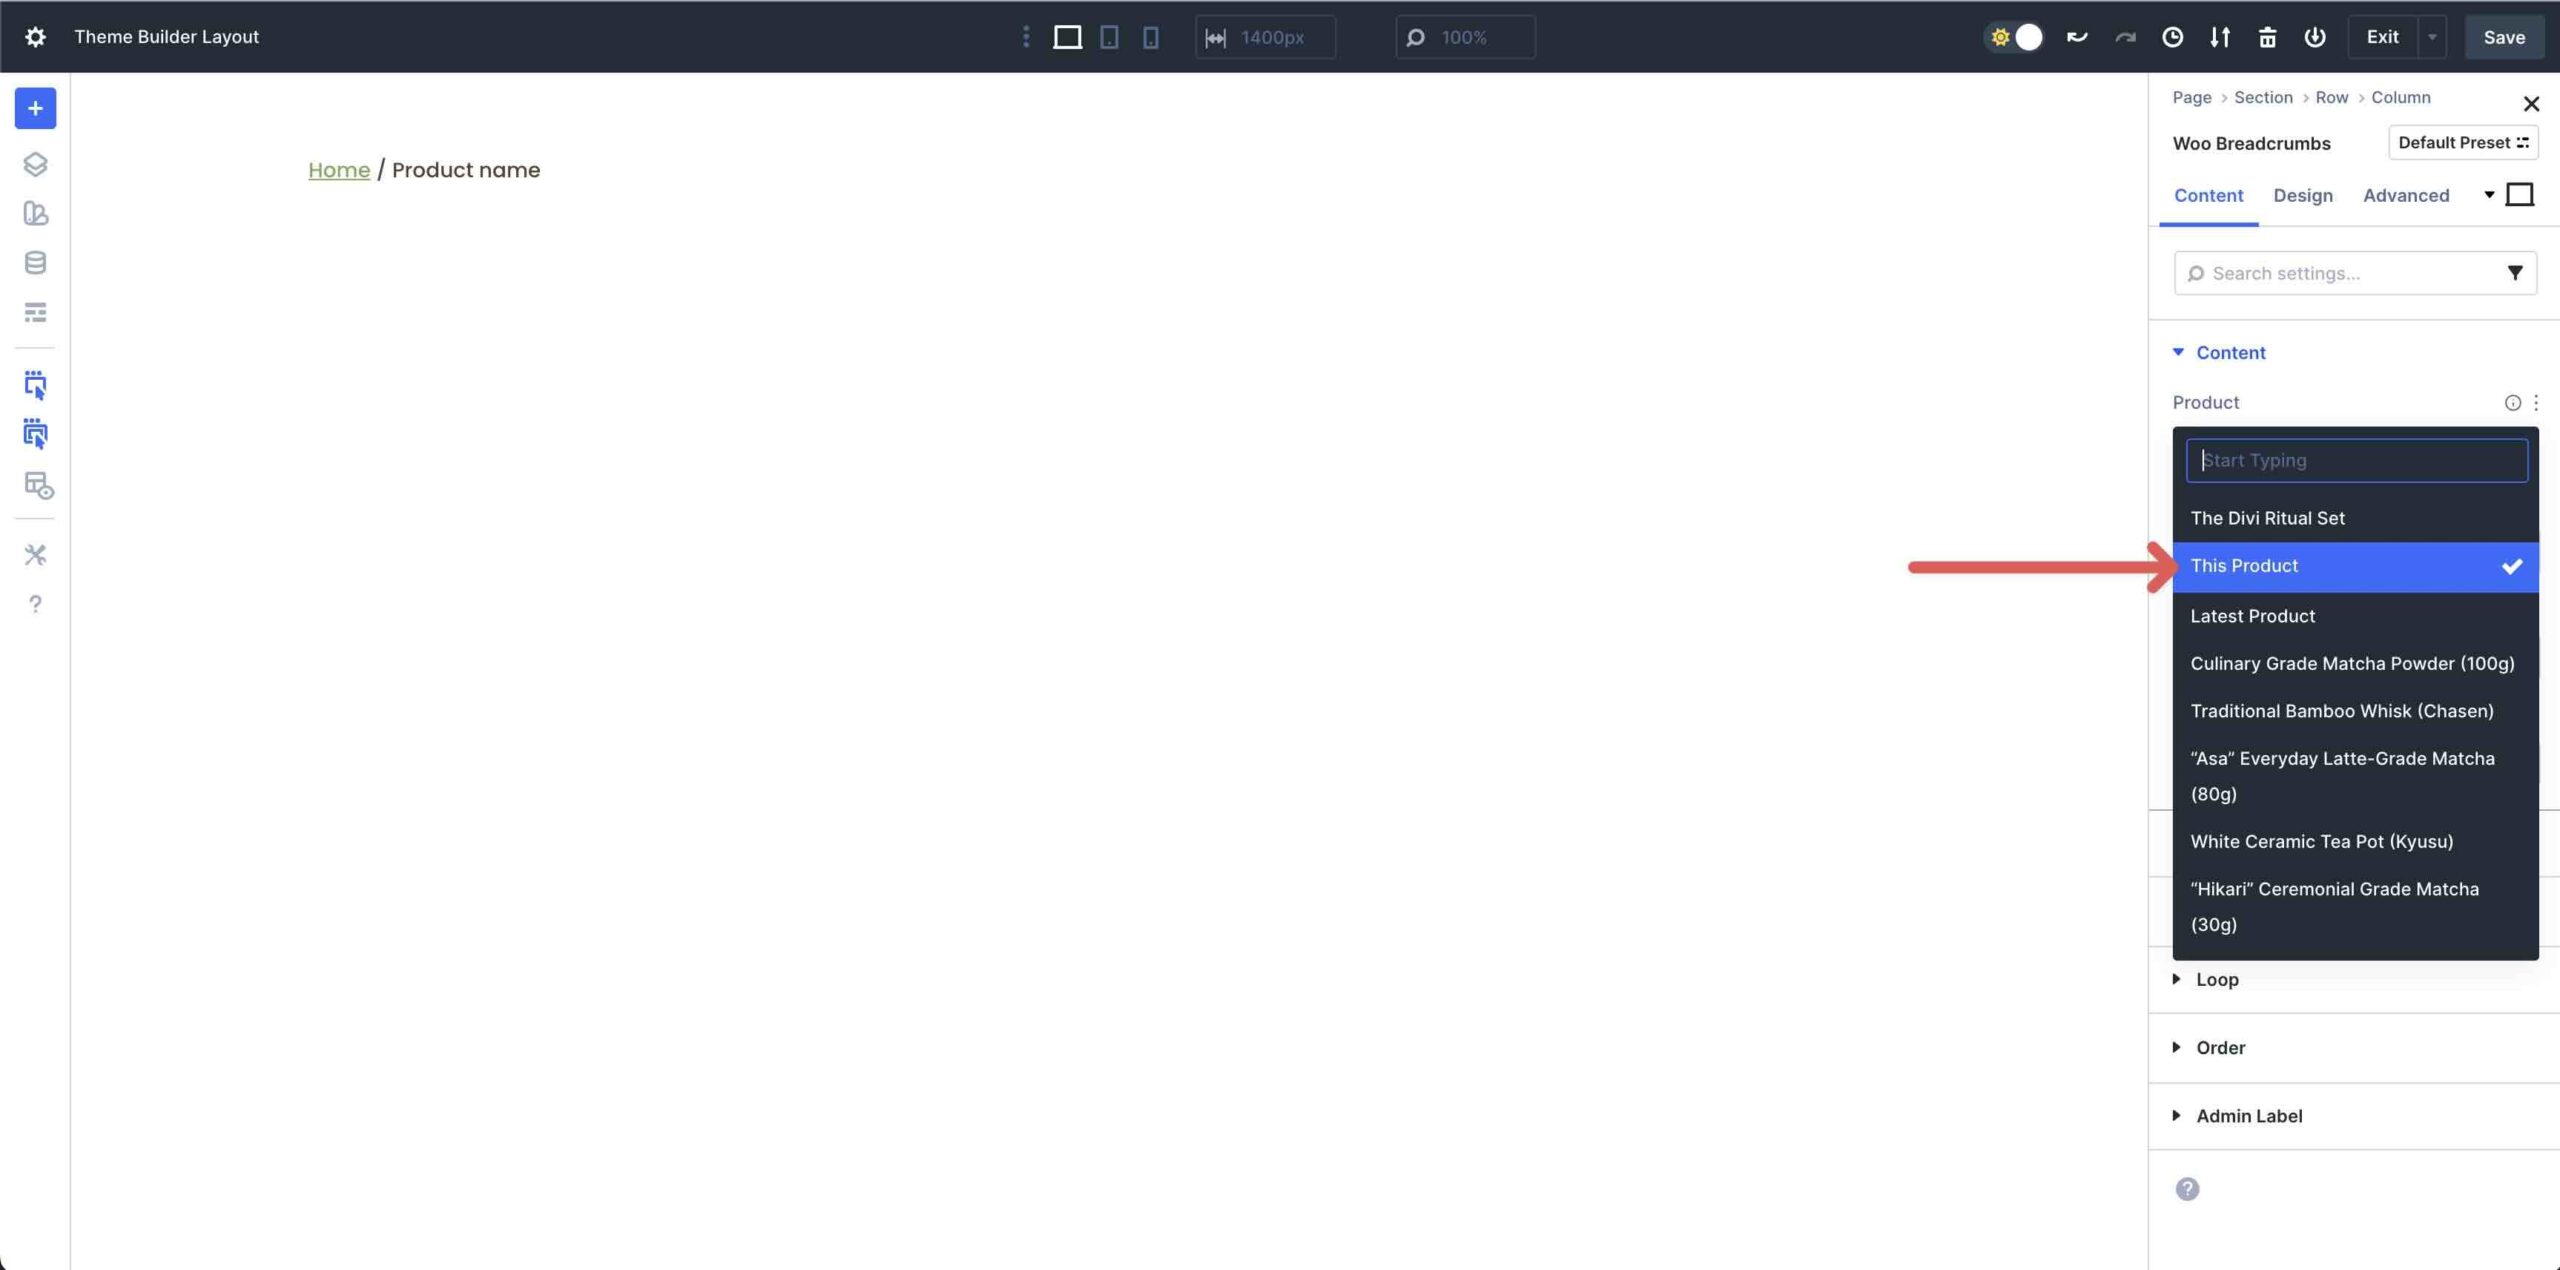
By the use of default, This Product it will likely be determined on inside the Product dropdown menu inside the Content material subject material tab. This feature will allow Divi 5 to easily pull content material subject material for each product in each magnificence. For this tutorial, we will choose a product to turn to turn you learn how to see how the layout will look with an actual product in view. As you add modules to the design, ensure that This Product is always determined on.
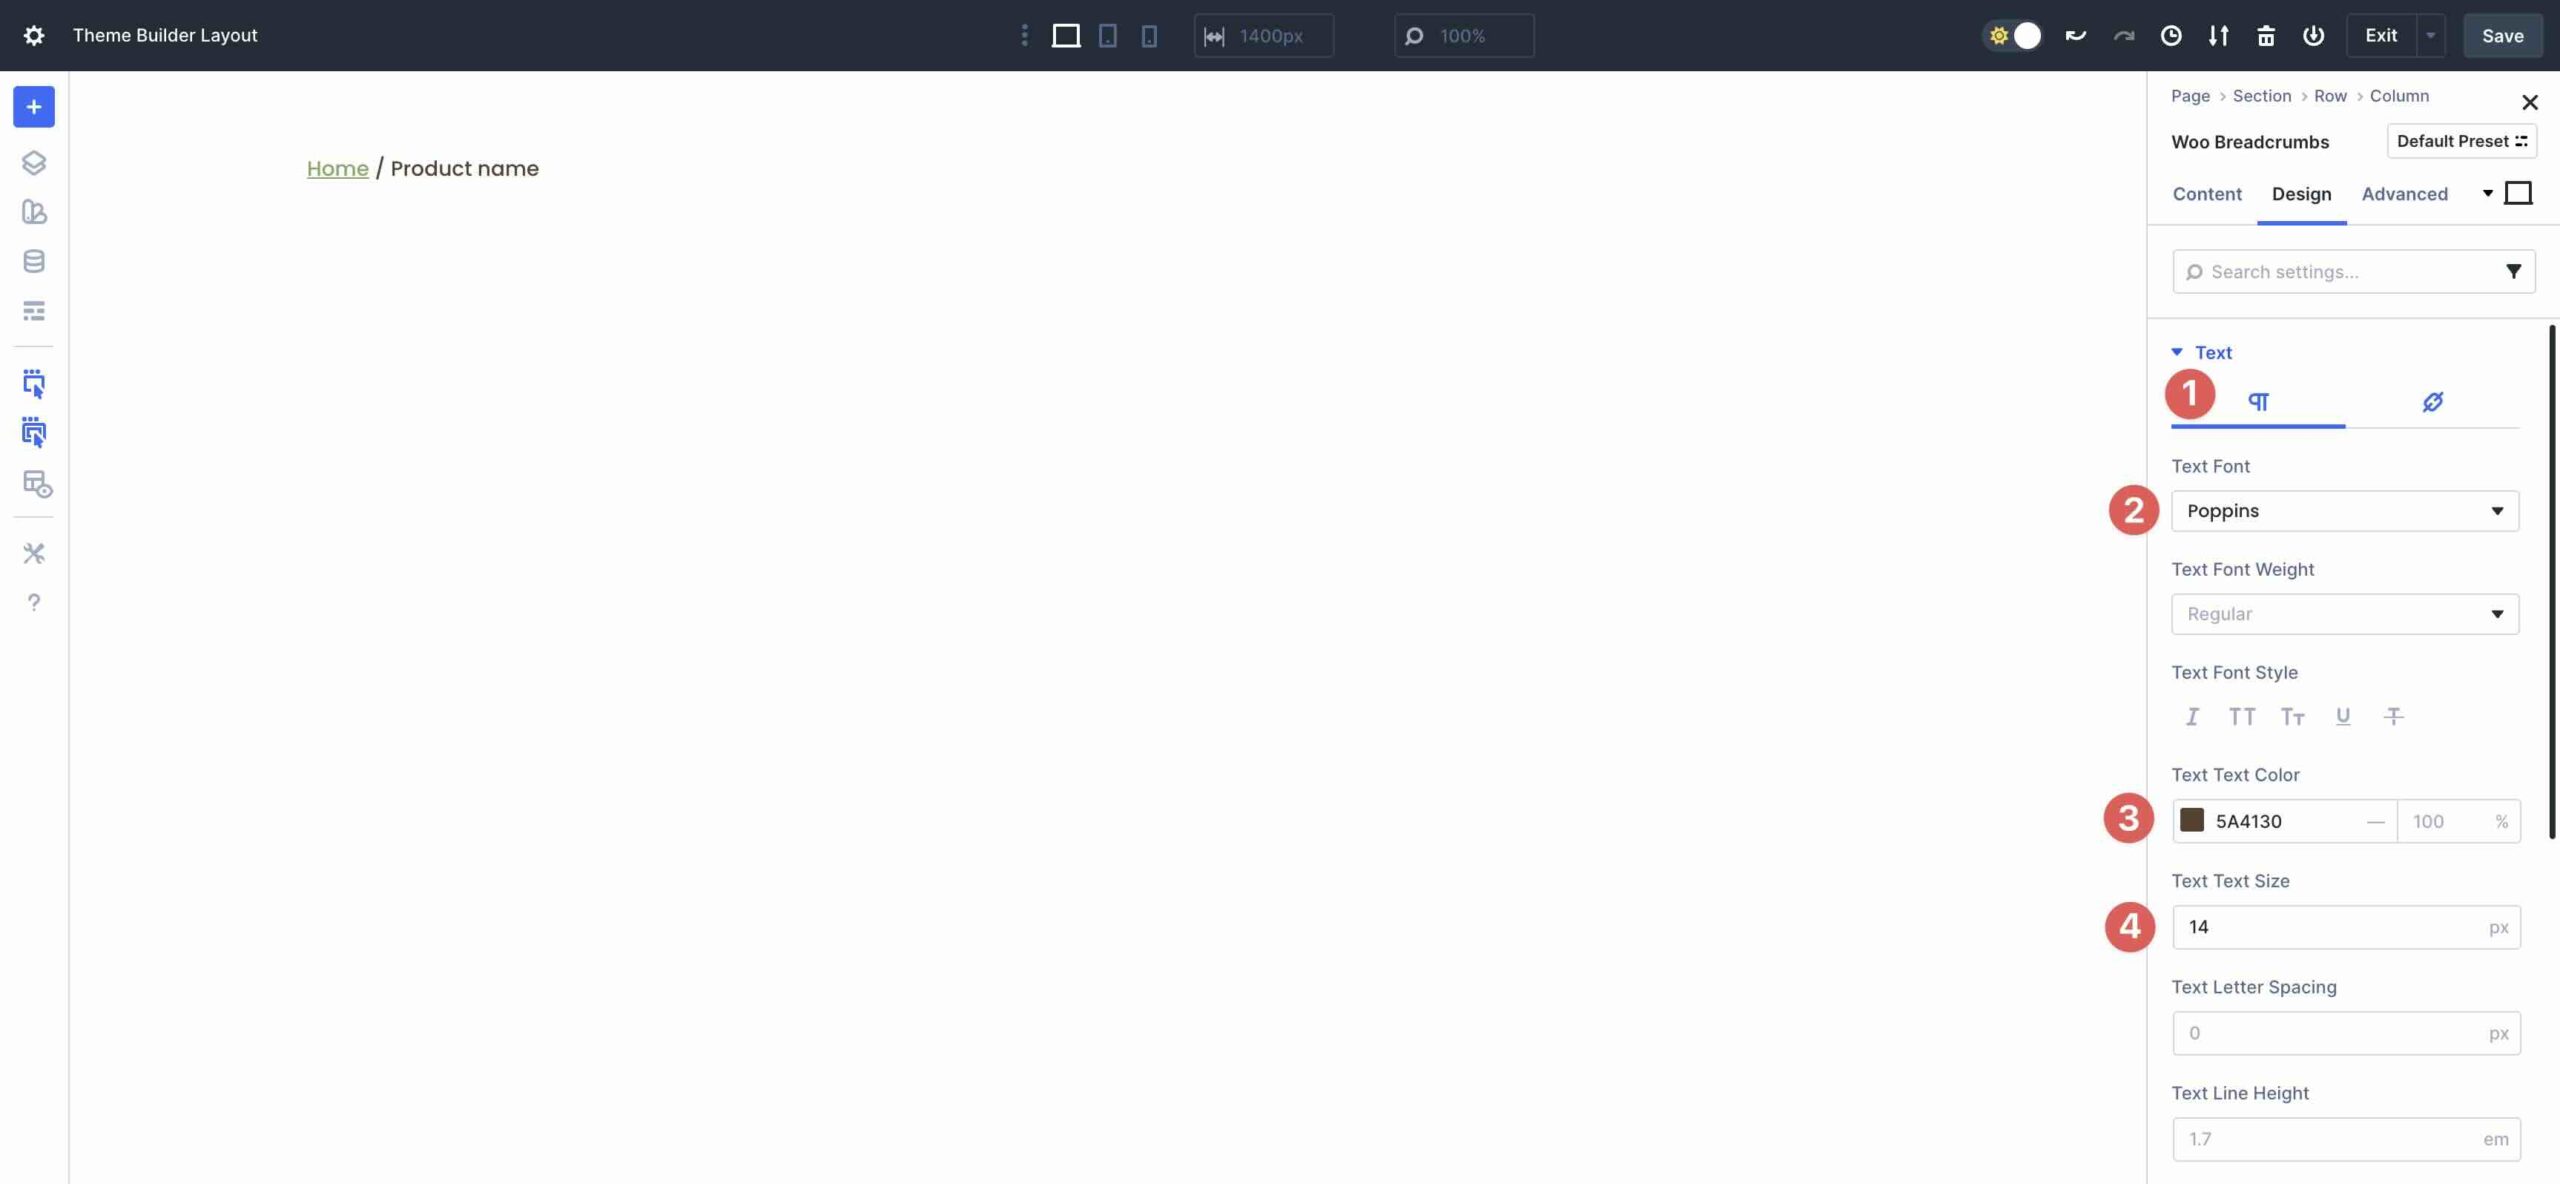
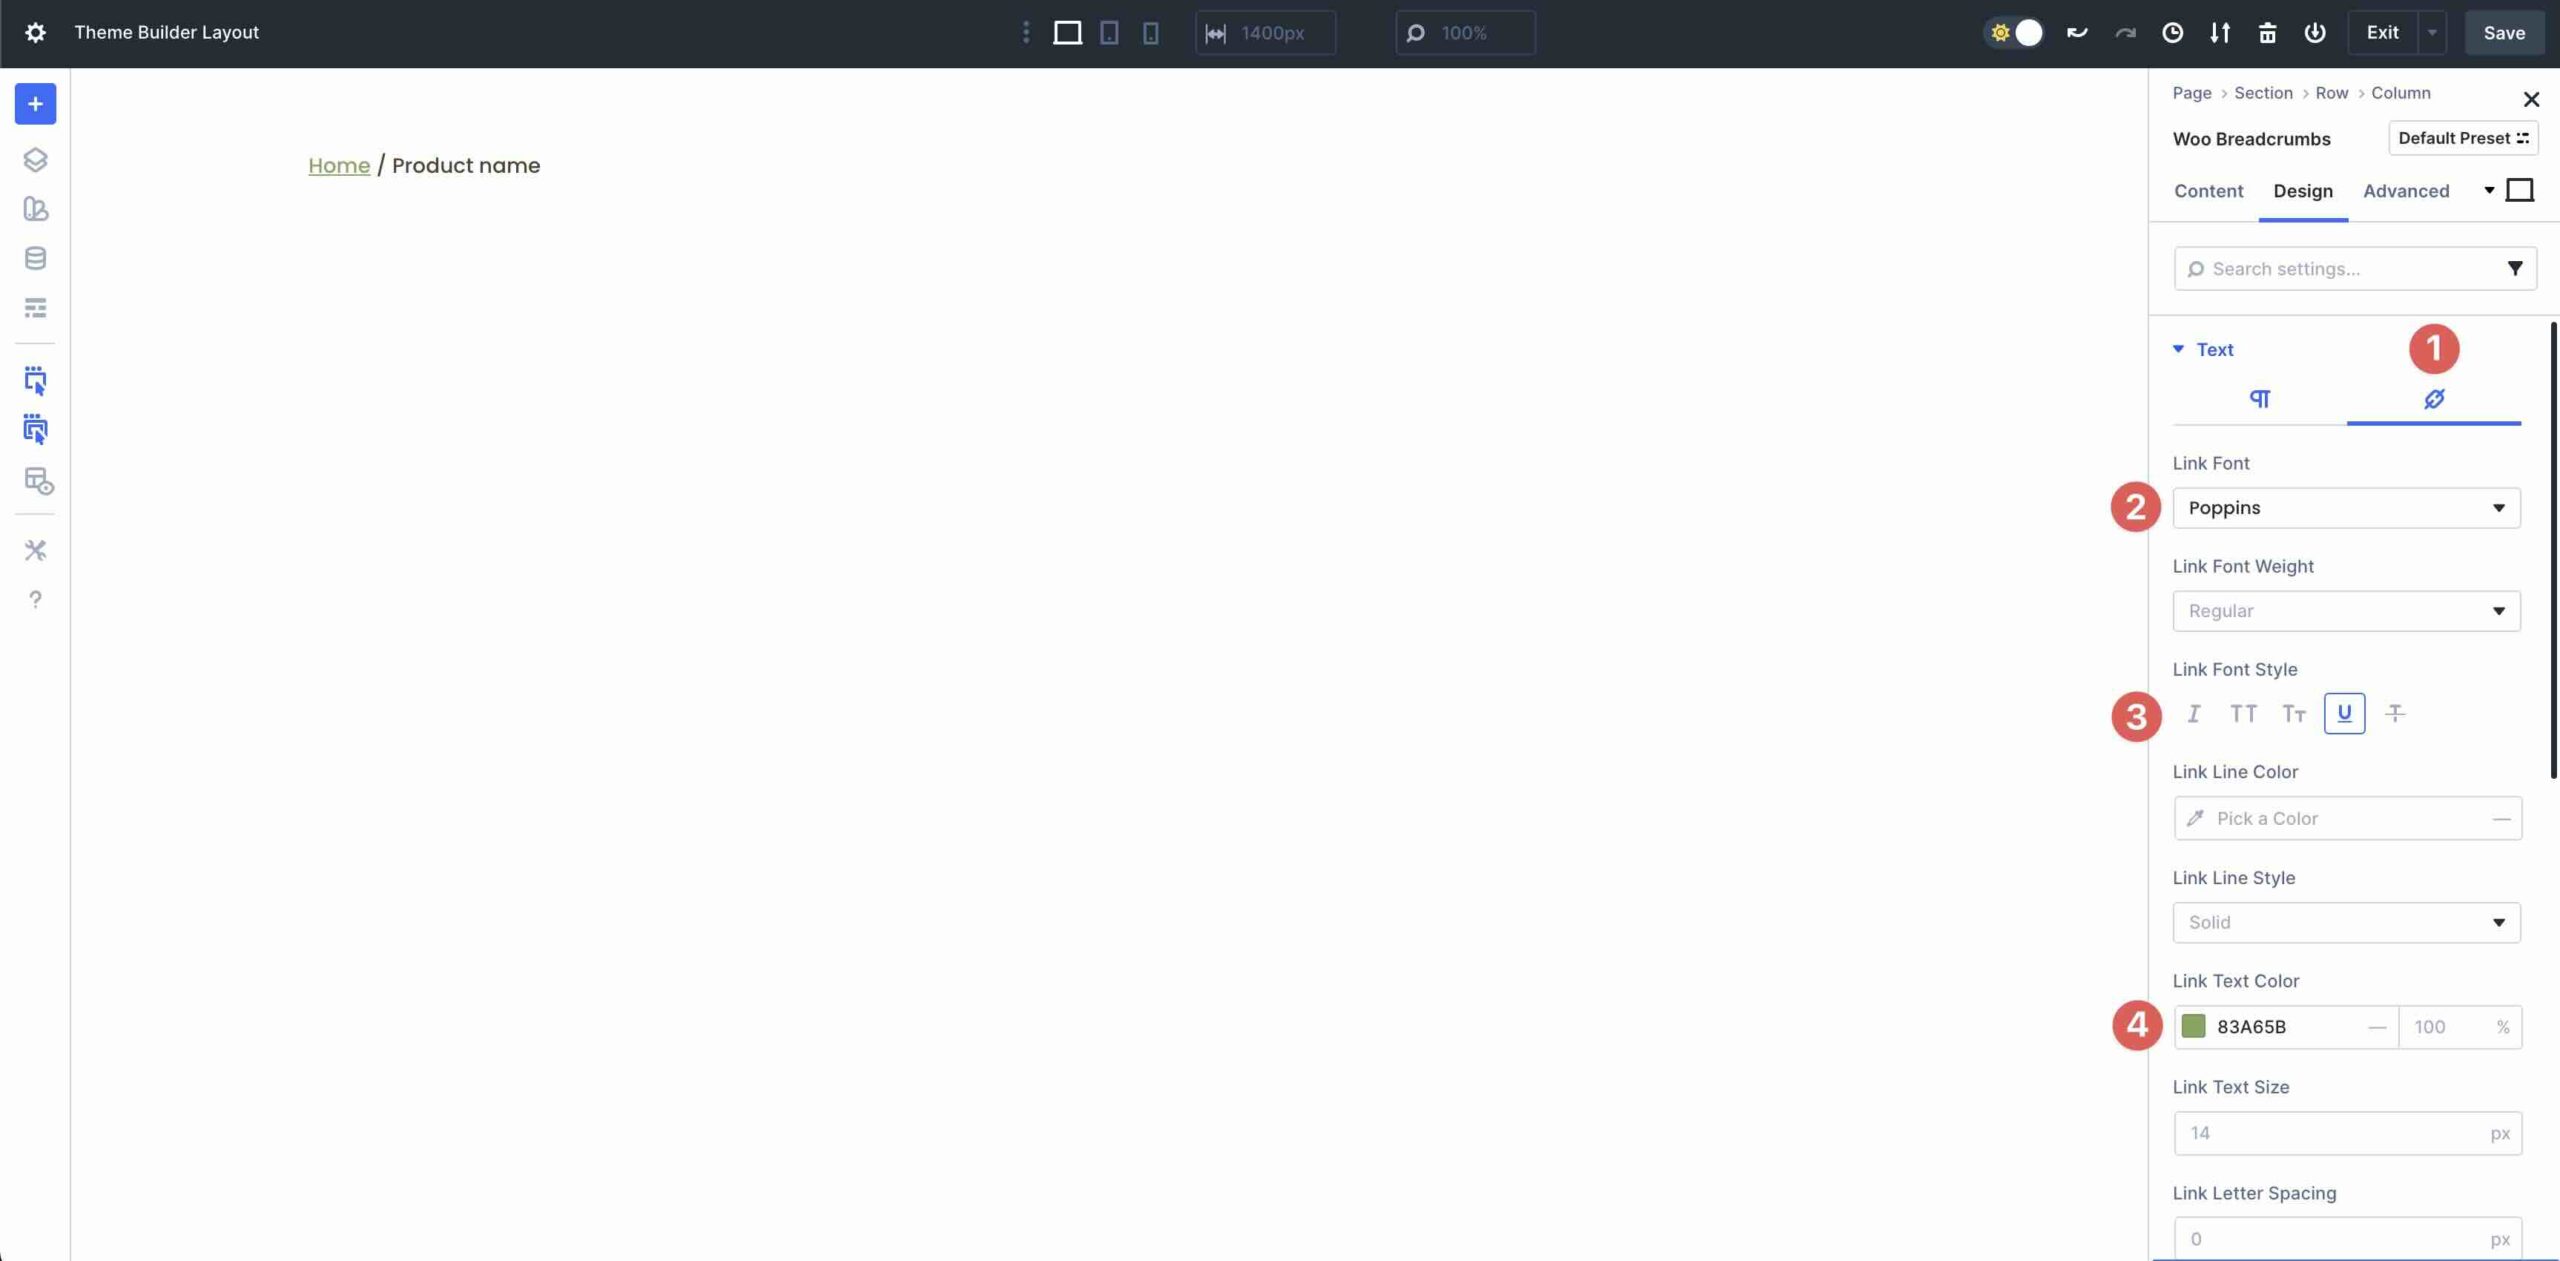
Click on on over to the Design tab and magnify the Text dropdown menu. Be sure that the Paragraph tab is selected and choose Poppins since the Text Font, #5a4130 since the Text Color, and 14px since the Text Text Size.
Next, choose the Links tab inside the Text menu. Select Poppins since the Link Font, Underline since the Link Font Style, and #83A65B since the Link Text Color.
Add The Woo Product Footage Module
Next, add a two-column row directly underneath the principle row inside the layout. Inside the left column, add the Woo Product Footage module to the column.
Alternate to the Design tab. Make larger the Image menu followed by means of the Border menu. Set the Image Border Radius to 20px on each and every facet.
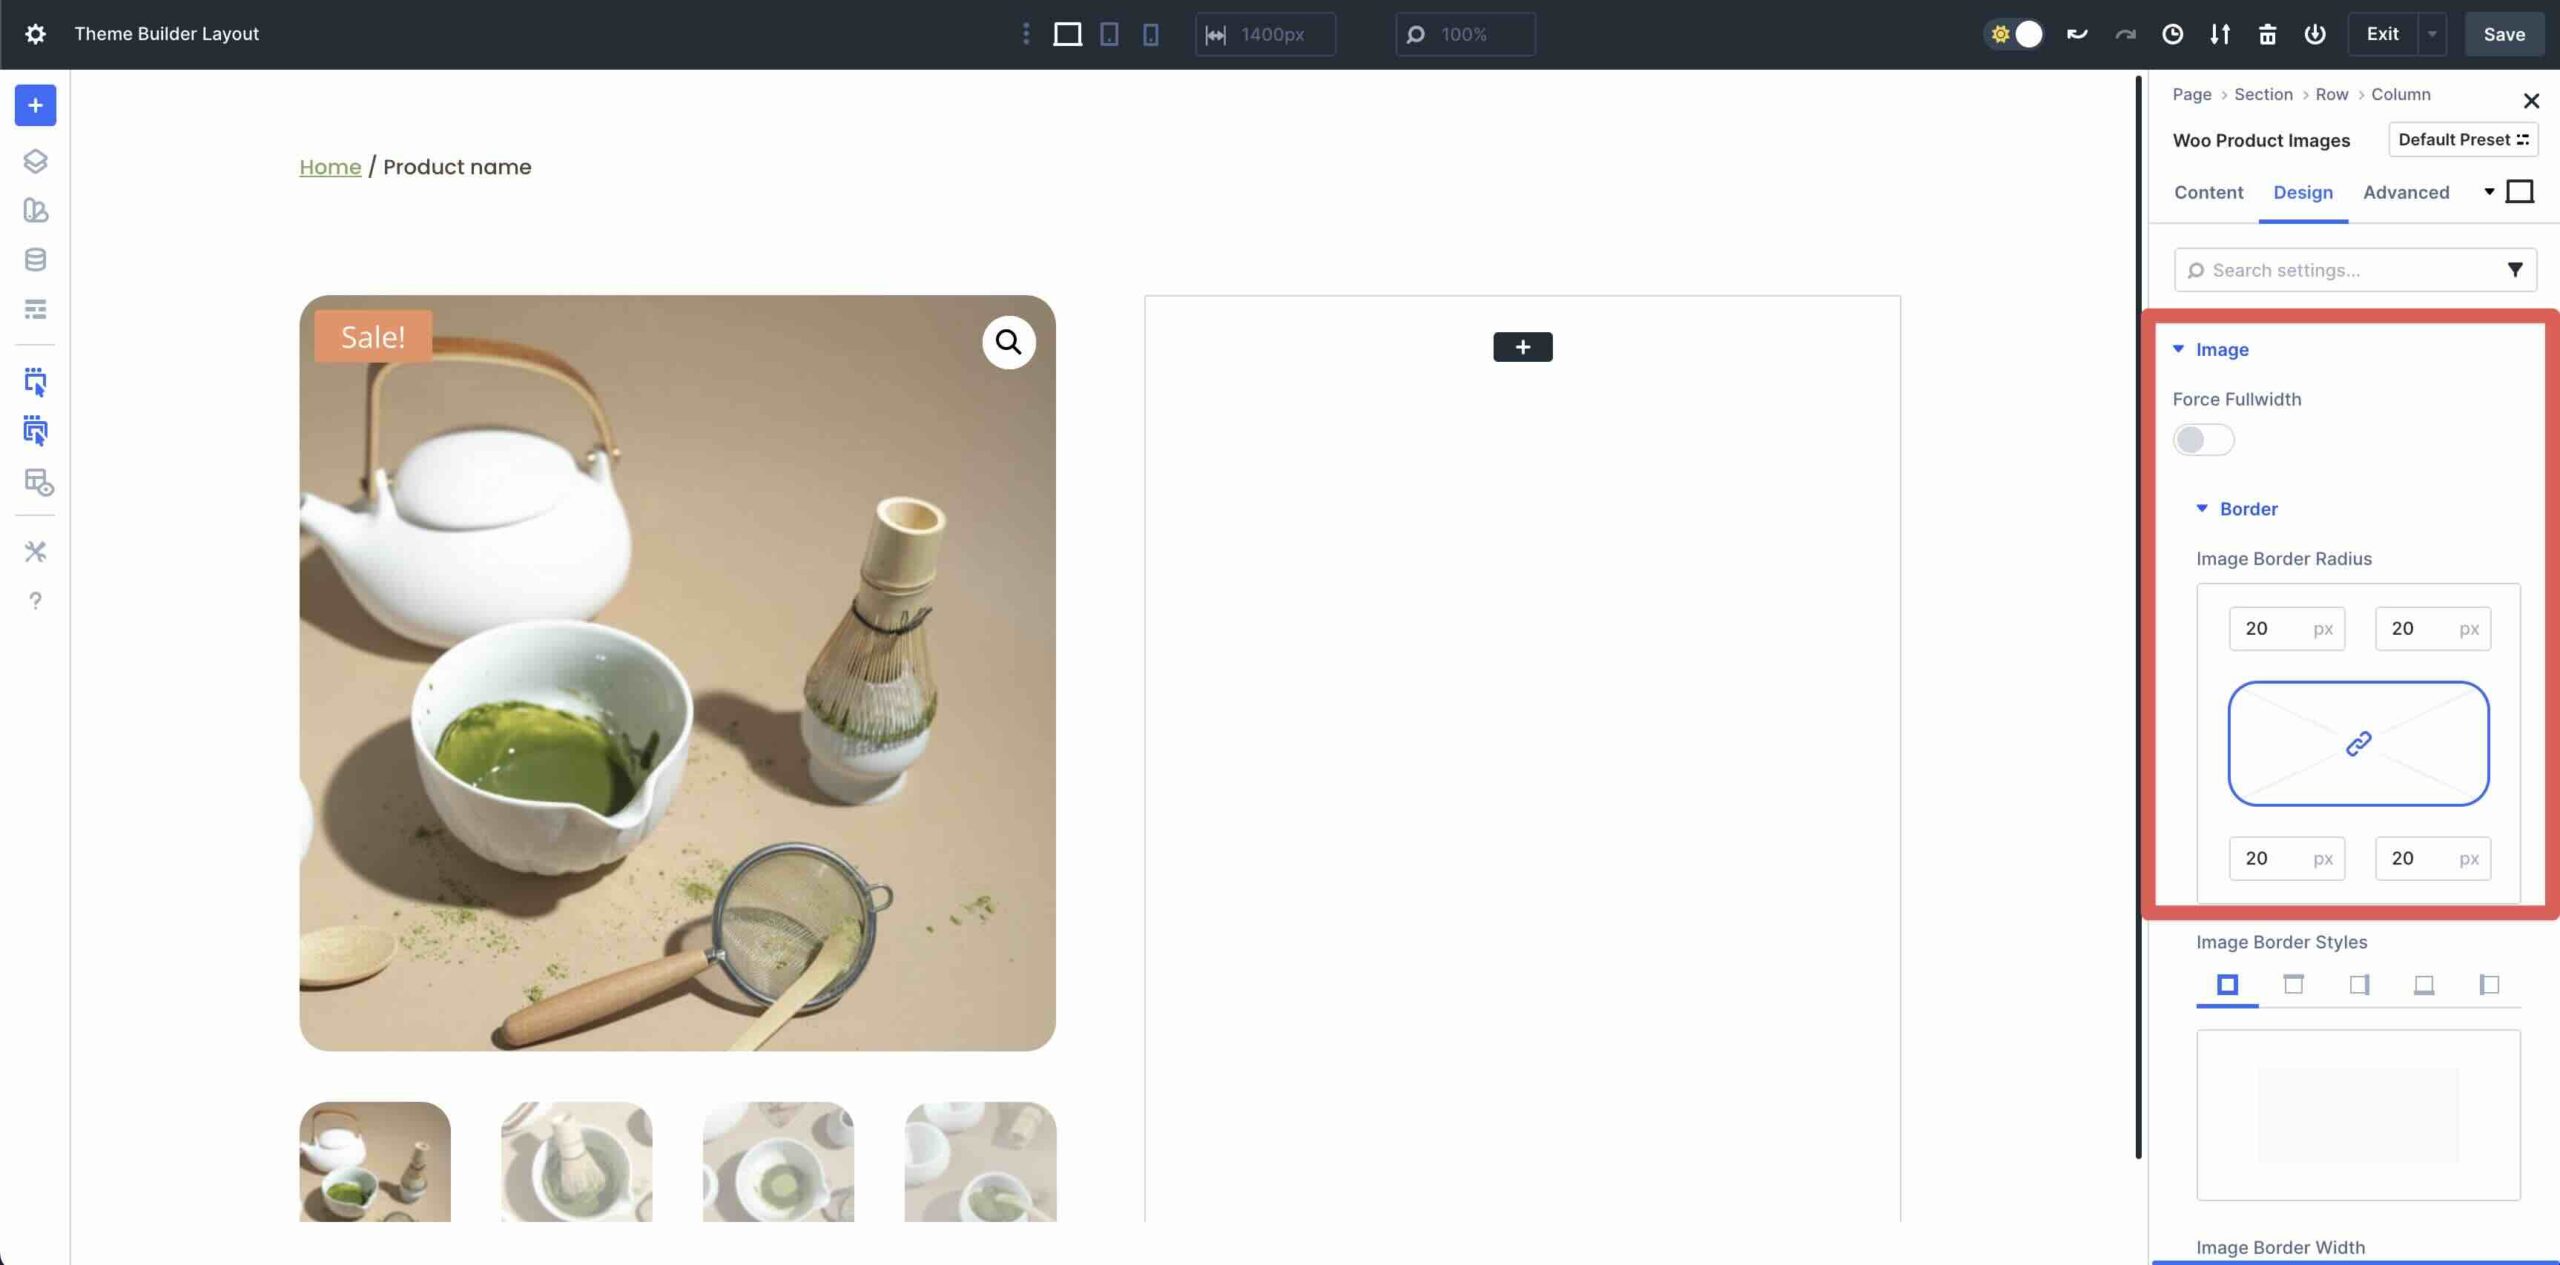
Scroll down to turn the Sale Badge menu. Make larger it and add #C77347 since the Sale Badge Color. Inside the Text menu, choose Poppins since the Sale Badge Font, Uppercase for the Sale Badge Font Style, #ffffff since the Sale Badge Text Color, and 15px since the Sale Badge Text Size.
![]()
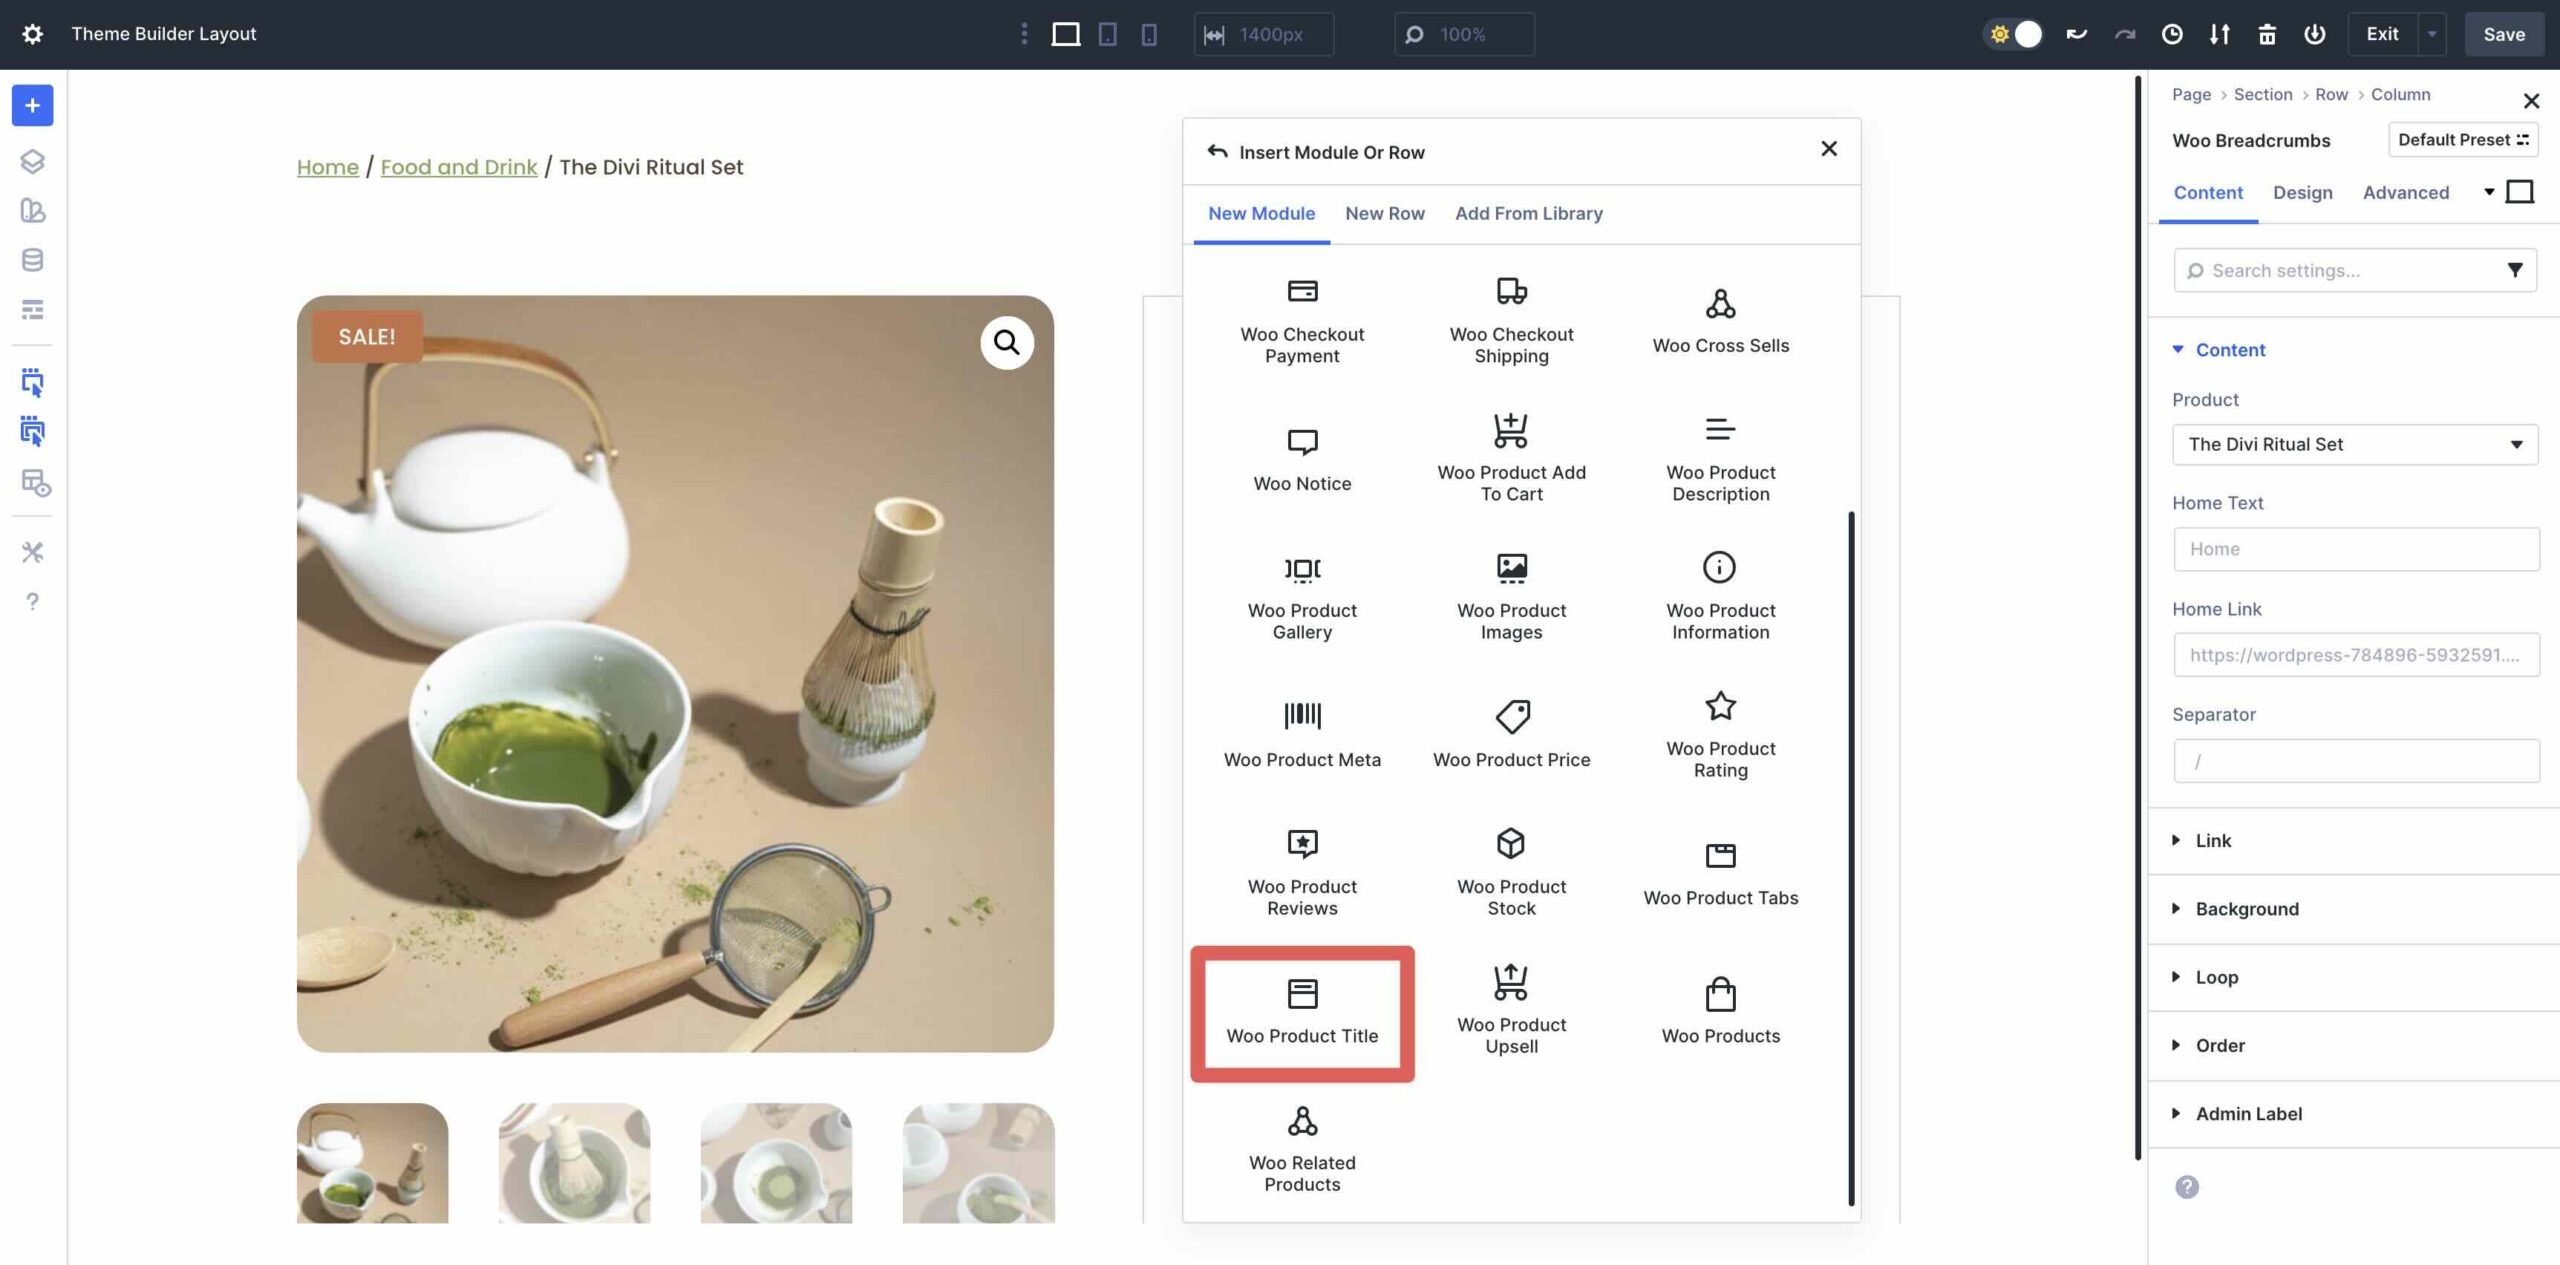
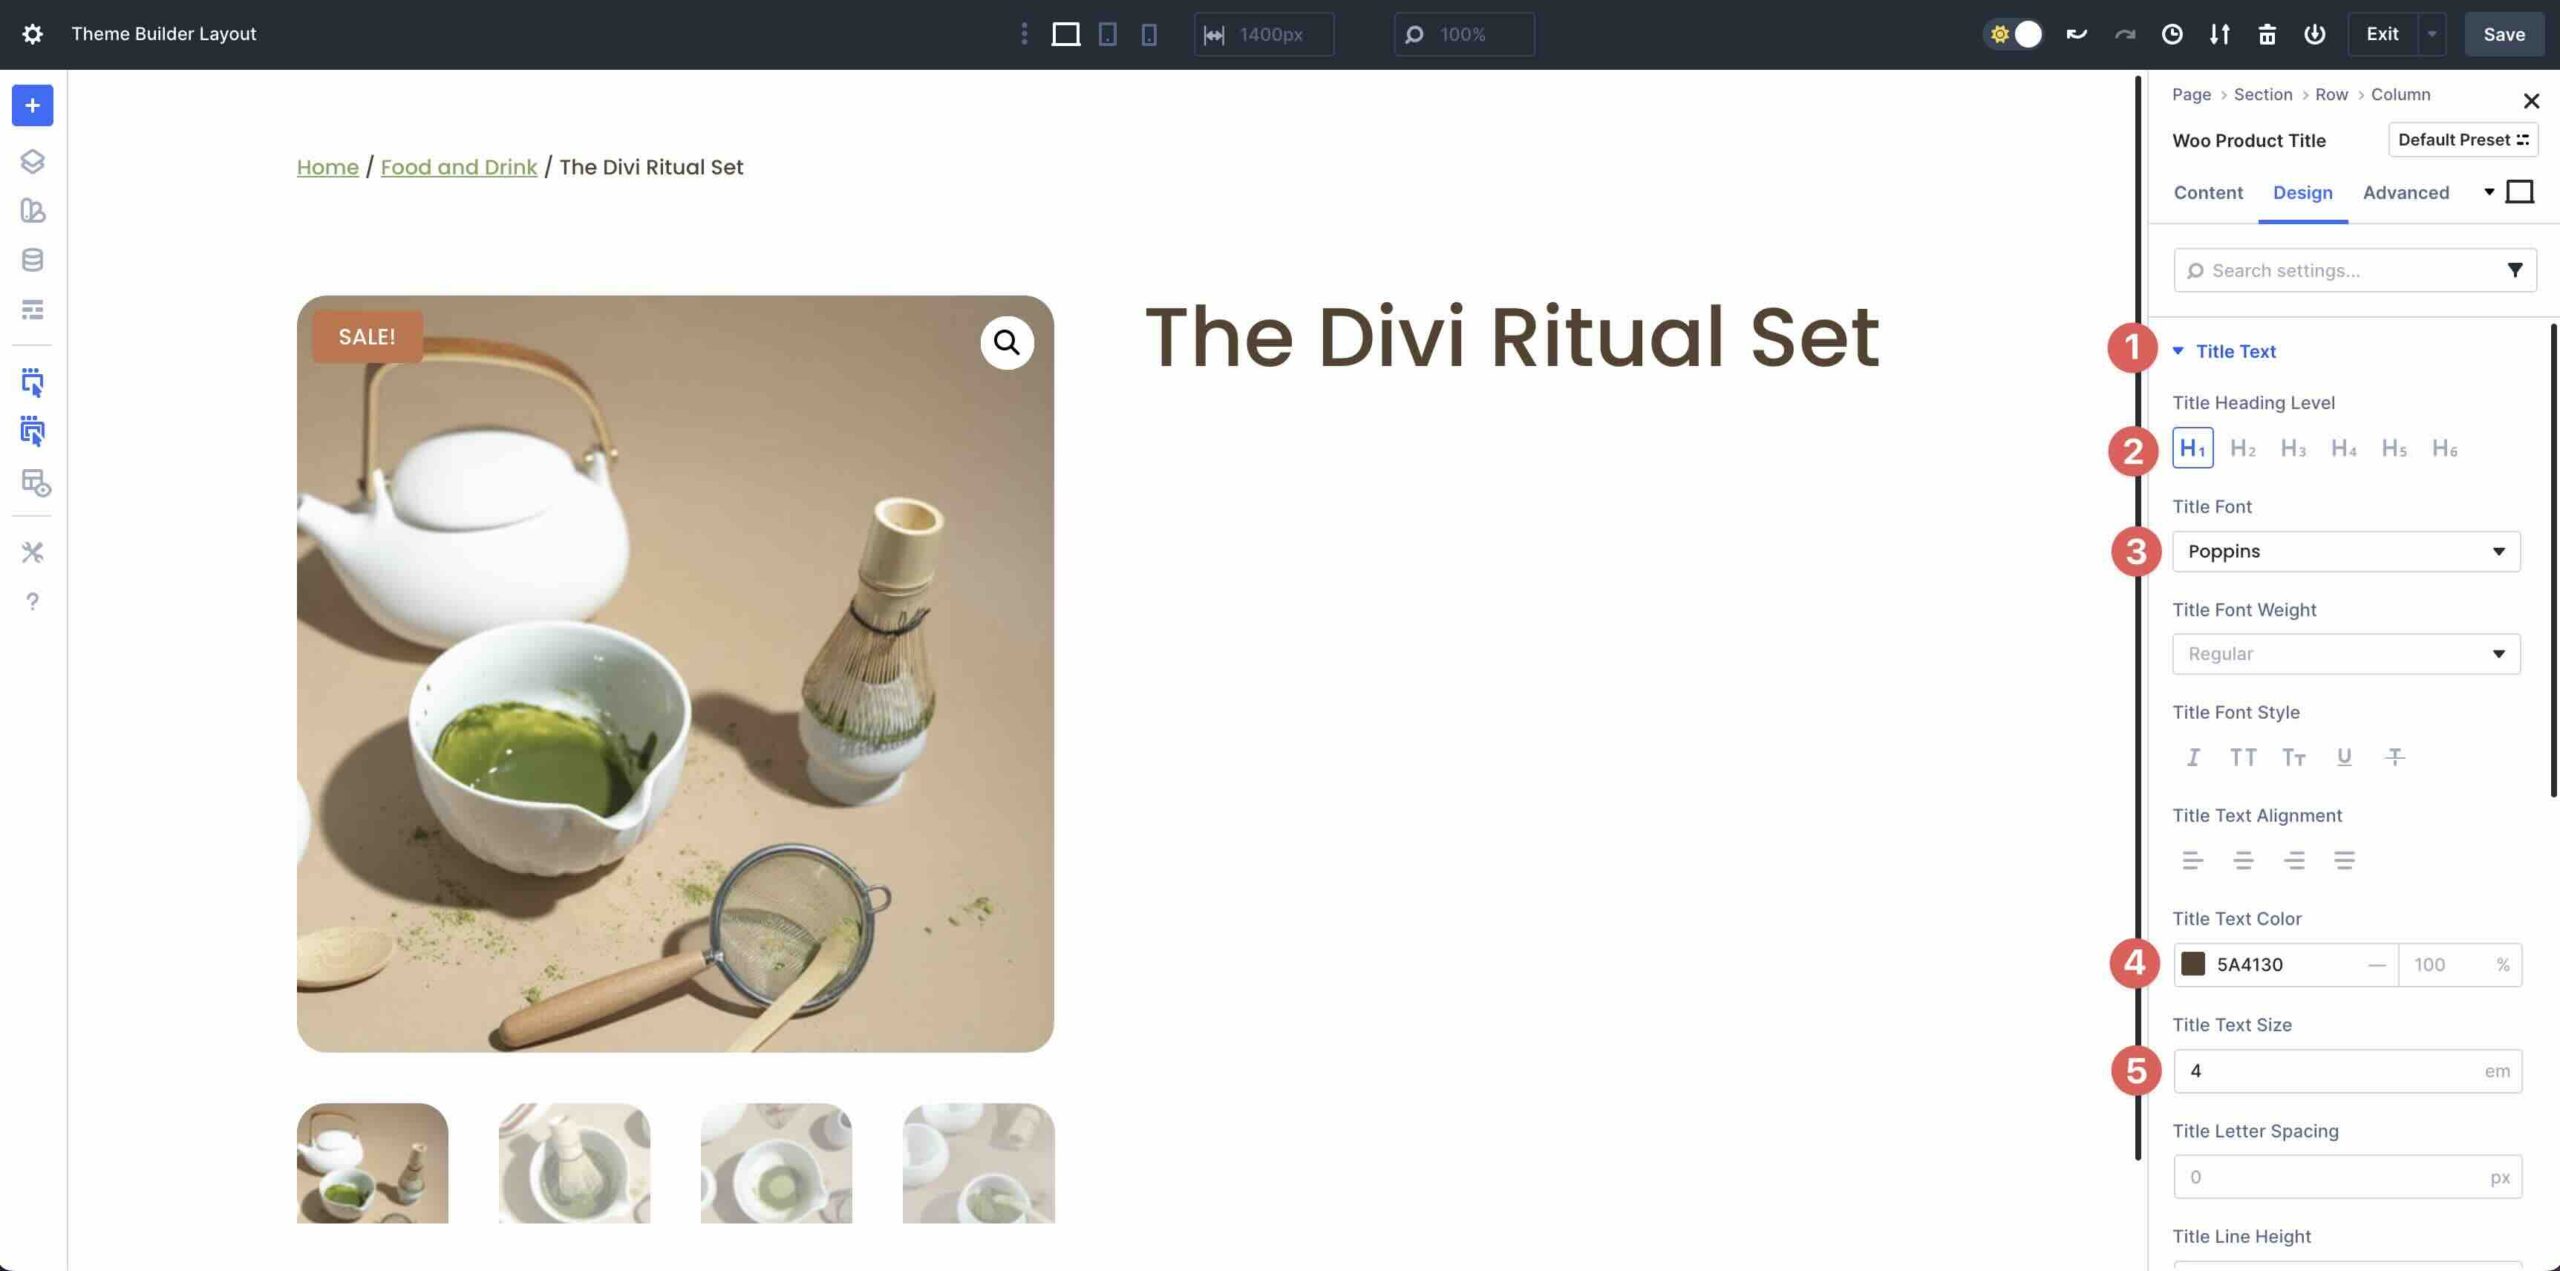
Add The Woo Product Establish
Add the Woo Product Establish module in the second column.
Select the Design tab and magnify the Establish Text menu. Set the Establish Heading Level to H1, Poppins since the Establish Font, and #5A4130 since the Establish Text Color. Set the Establish Text Size to 4em.
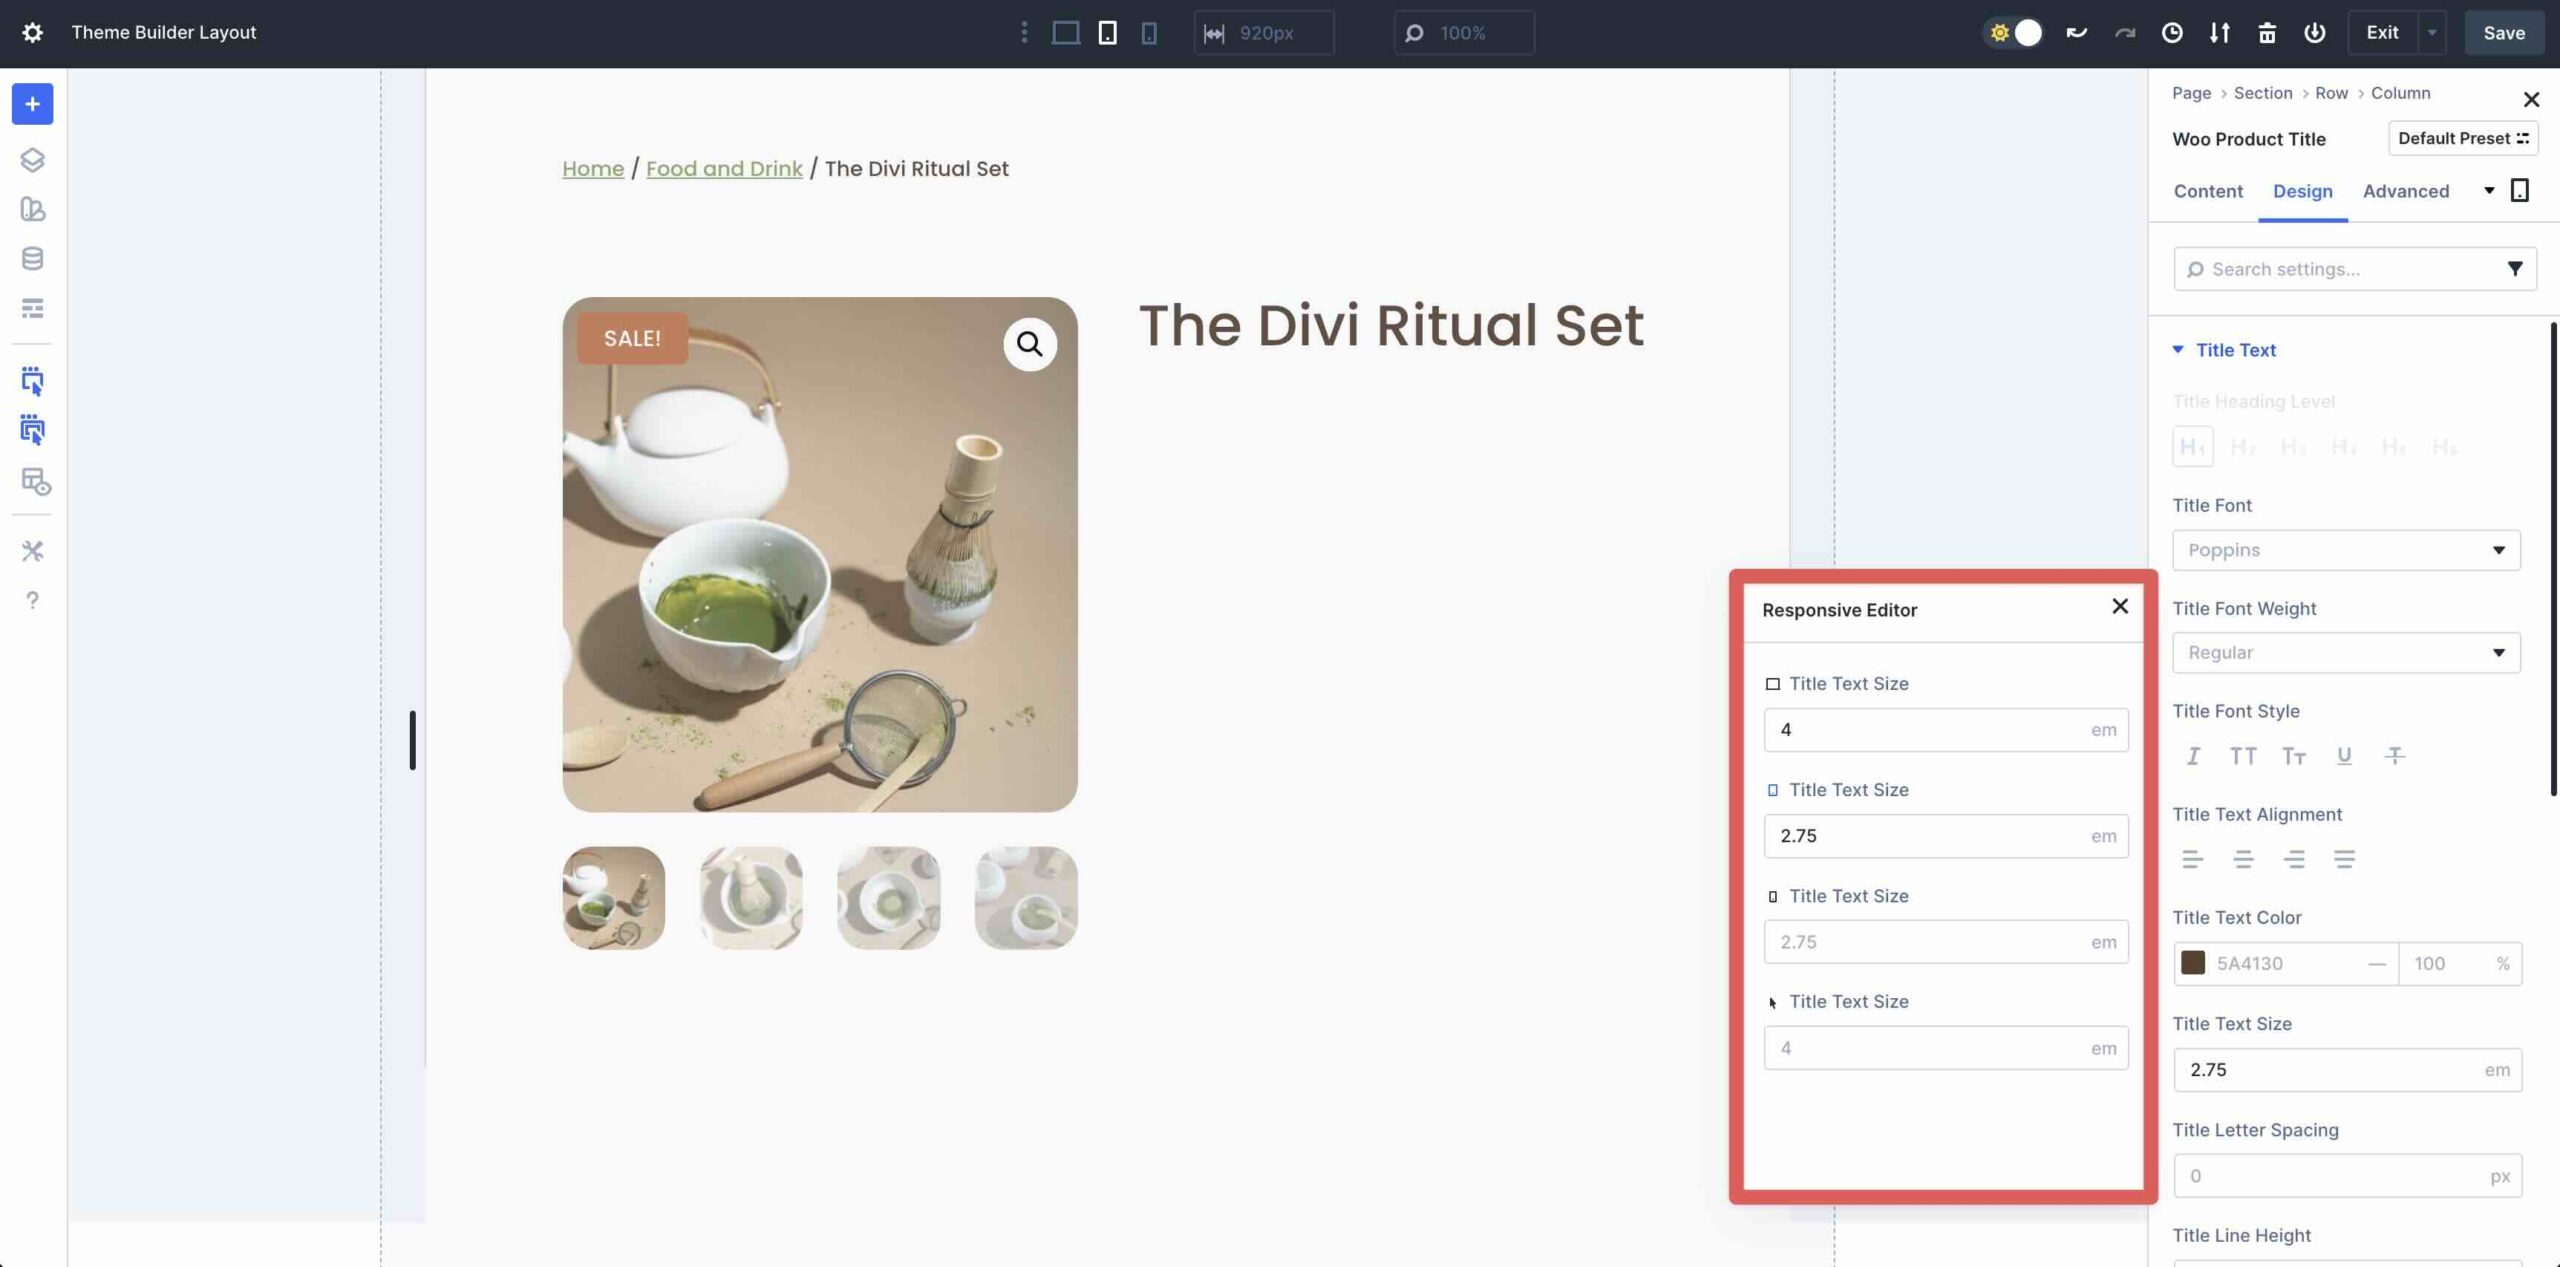
If you want to make the layout responsive as you move along, you’ll click on at the Edit Responsive Values button to make rapid changes to any module, saving time as you design the internet web page.
![]()
When the Responsive Editor modal turns out, you’ll keep an eye on the values in real-time. Enter 2.75em for tablet and phone views.
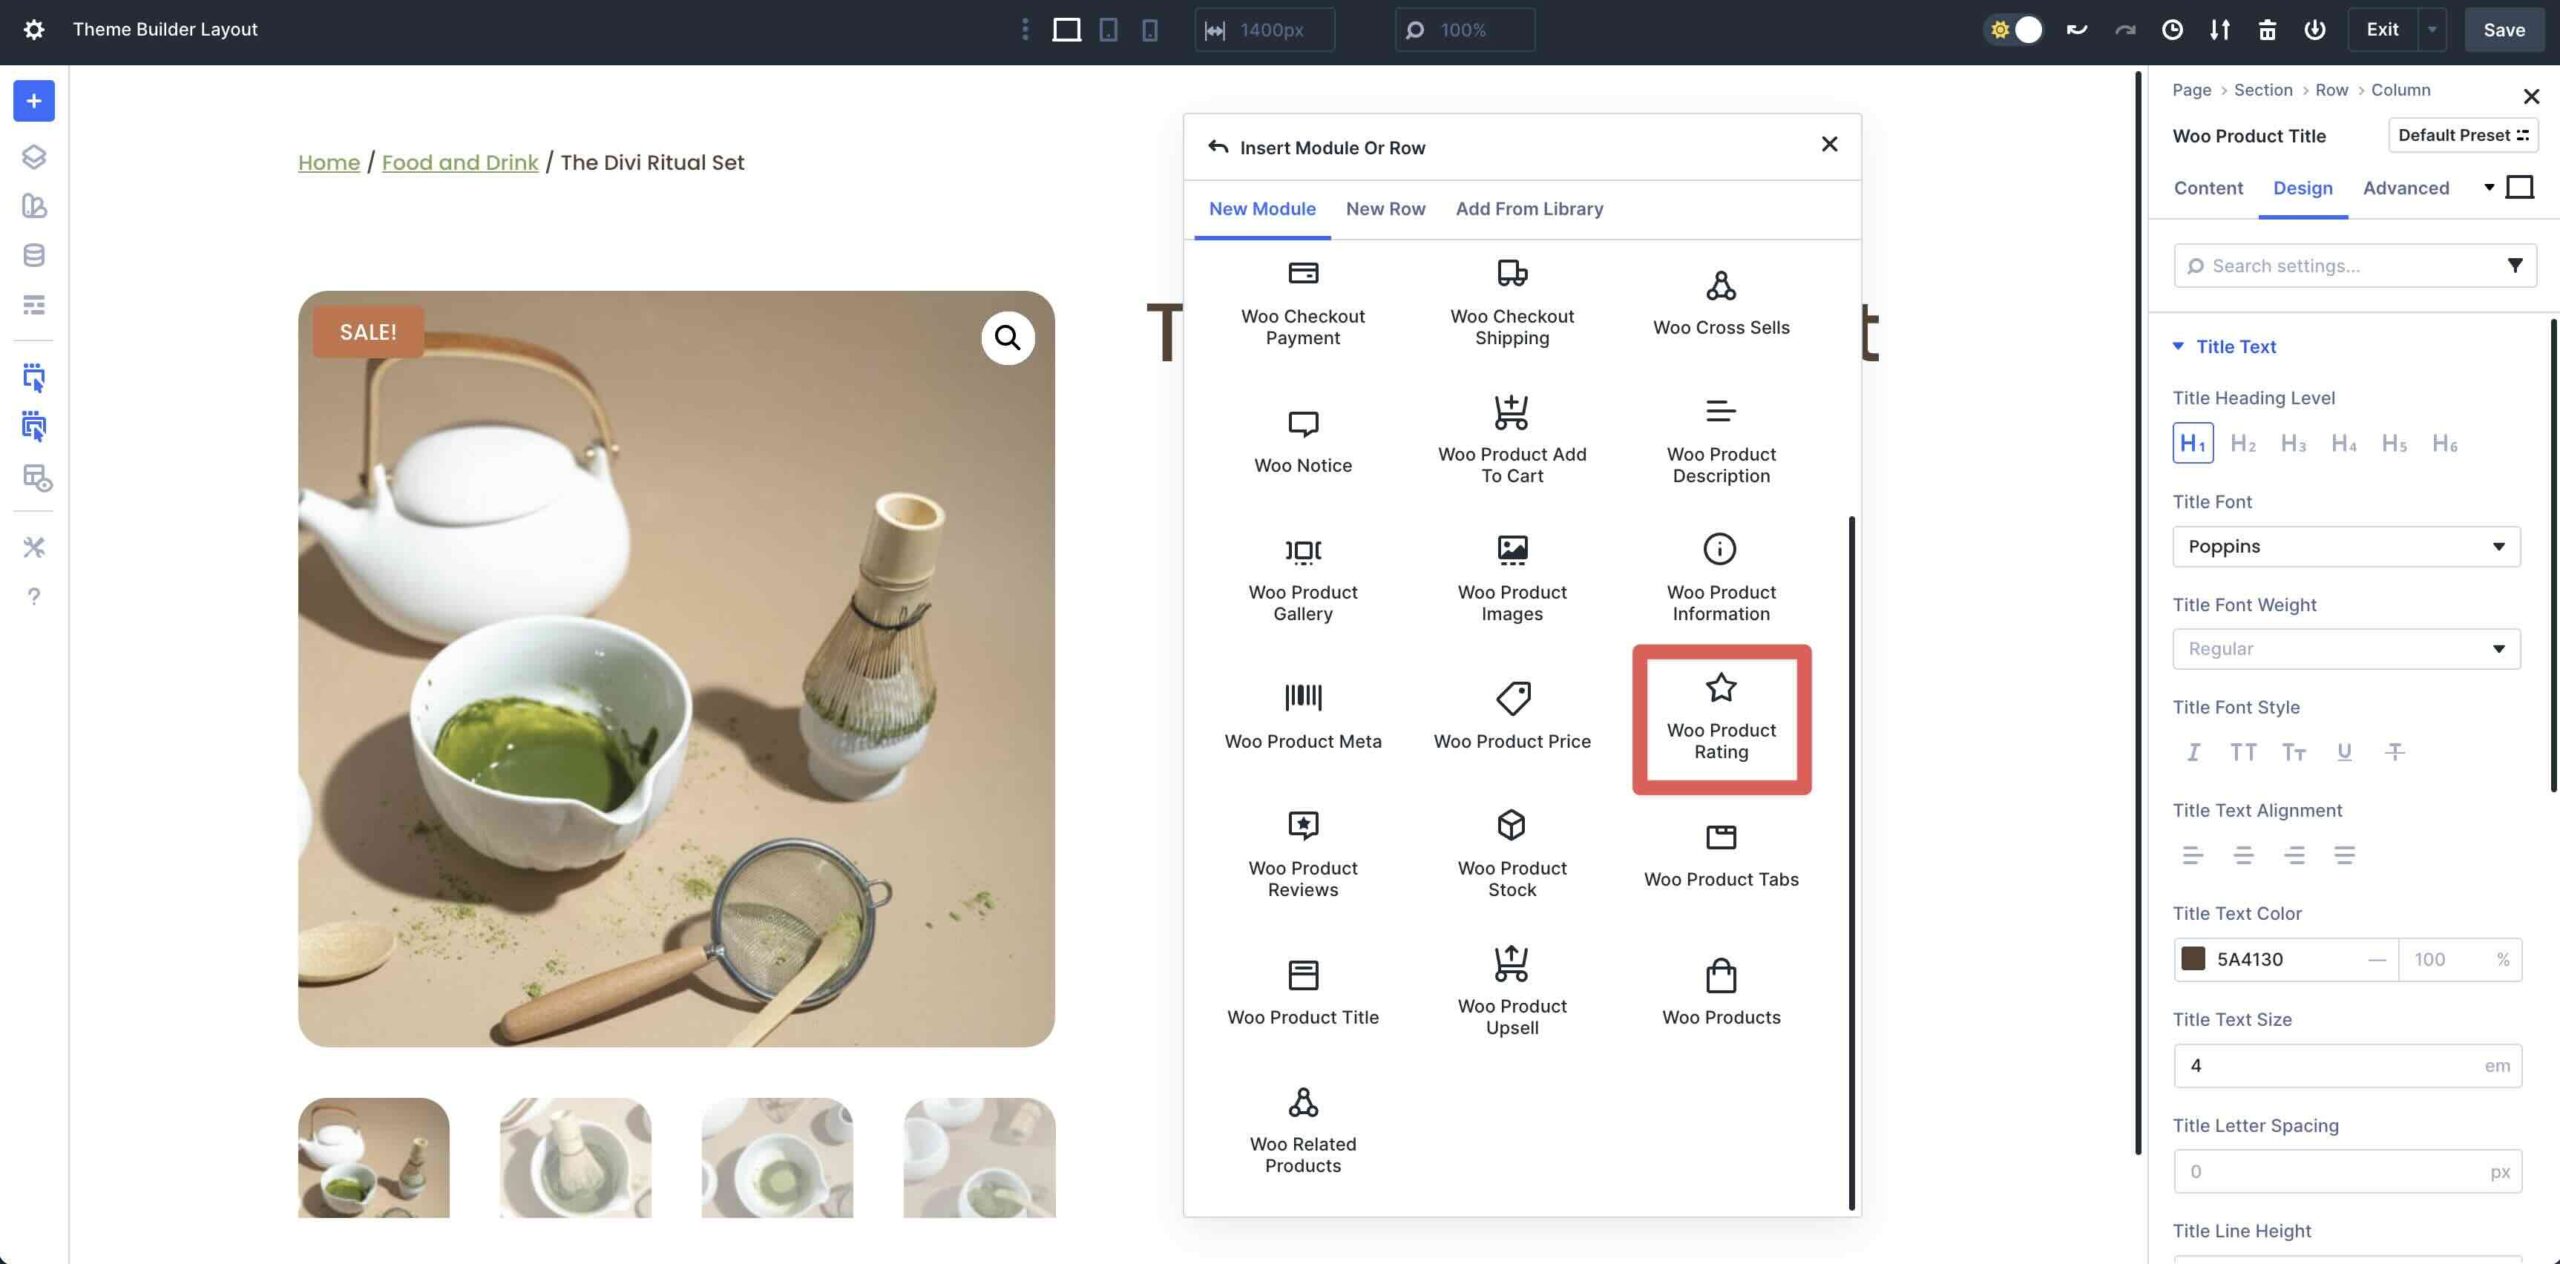
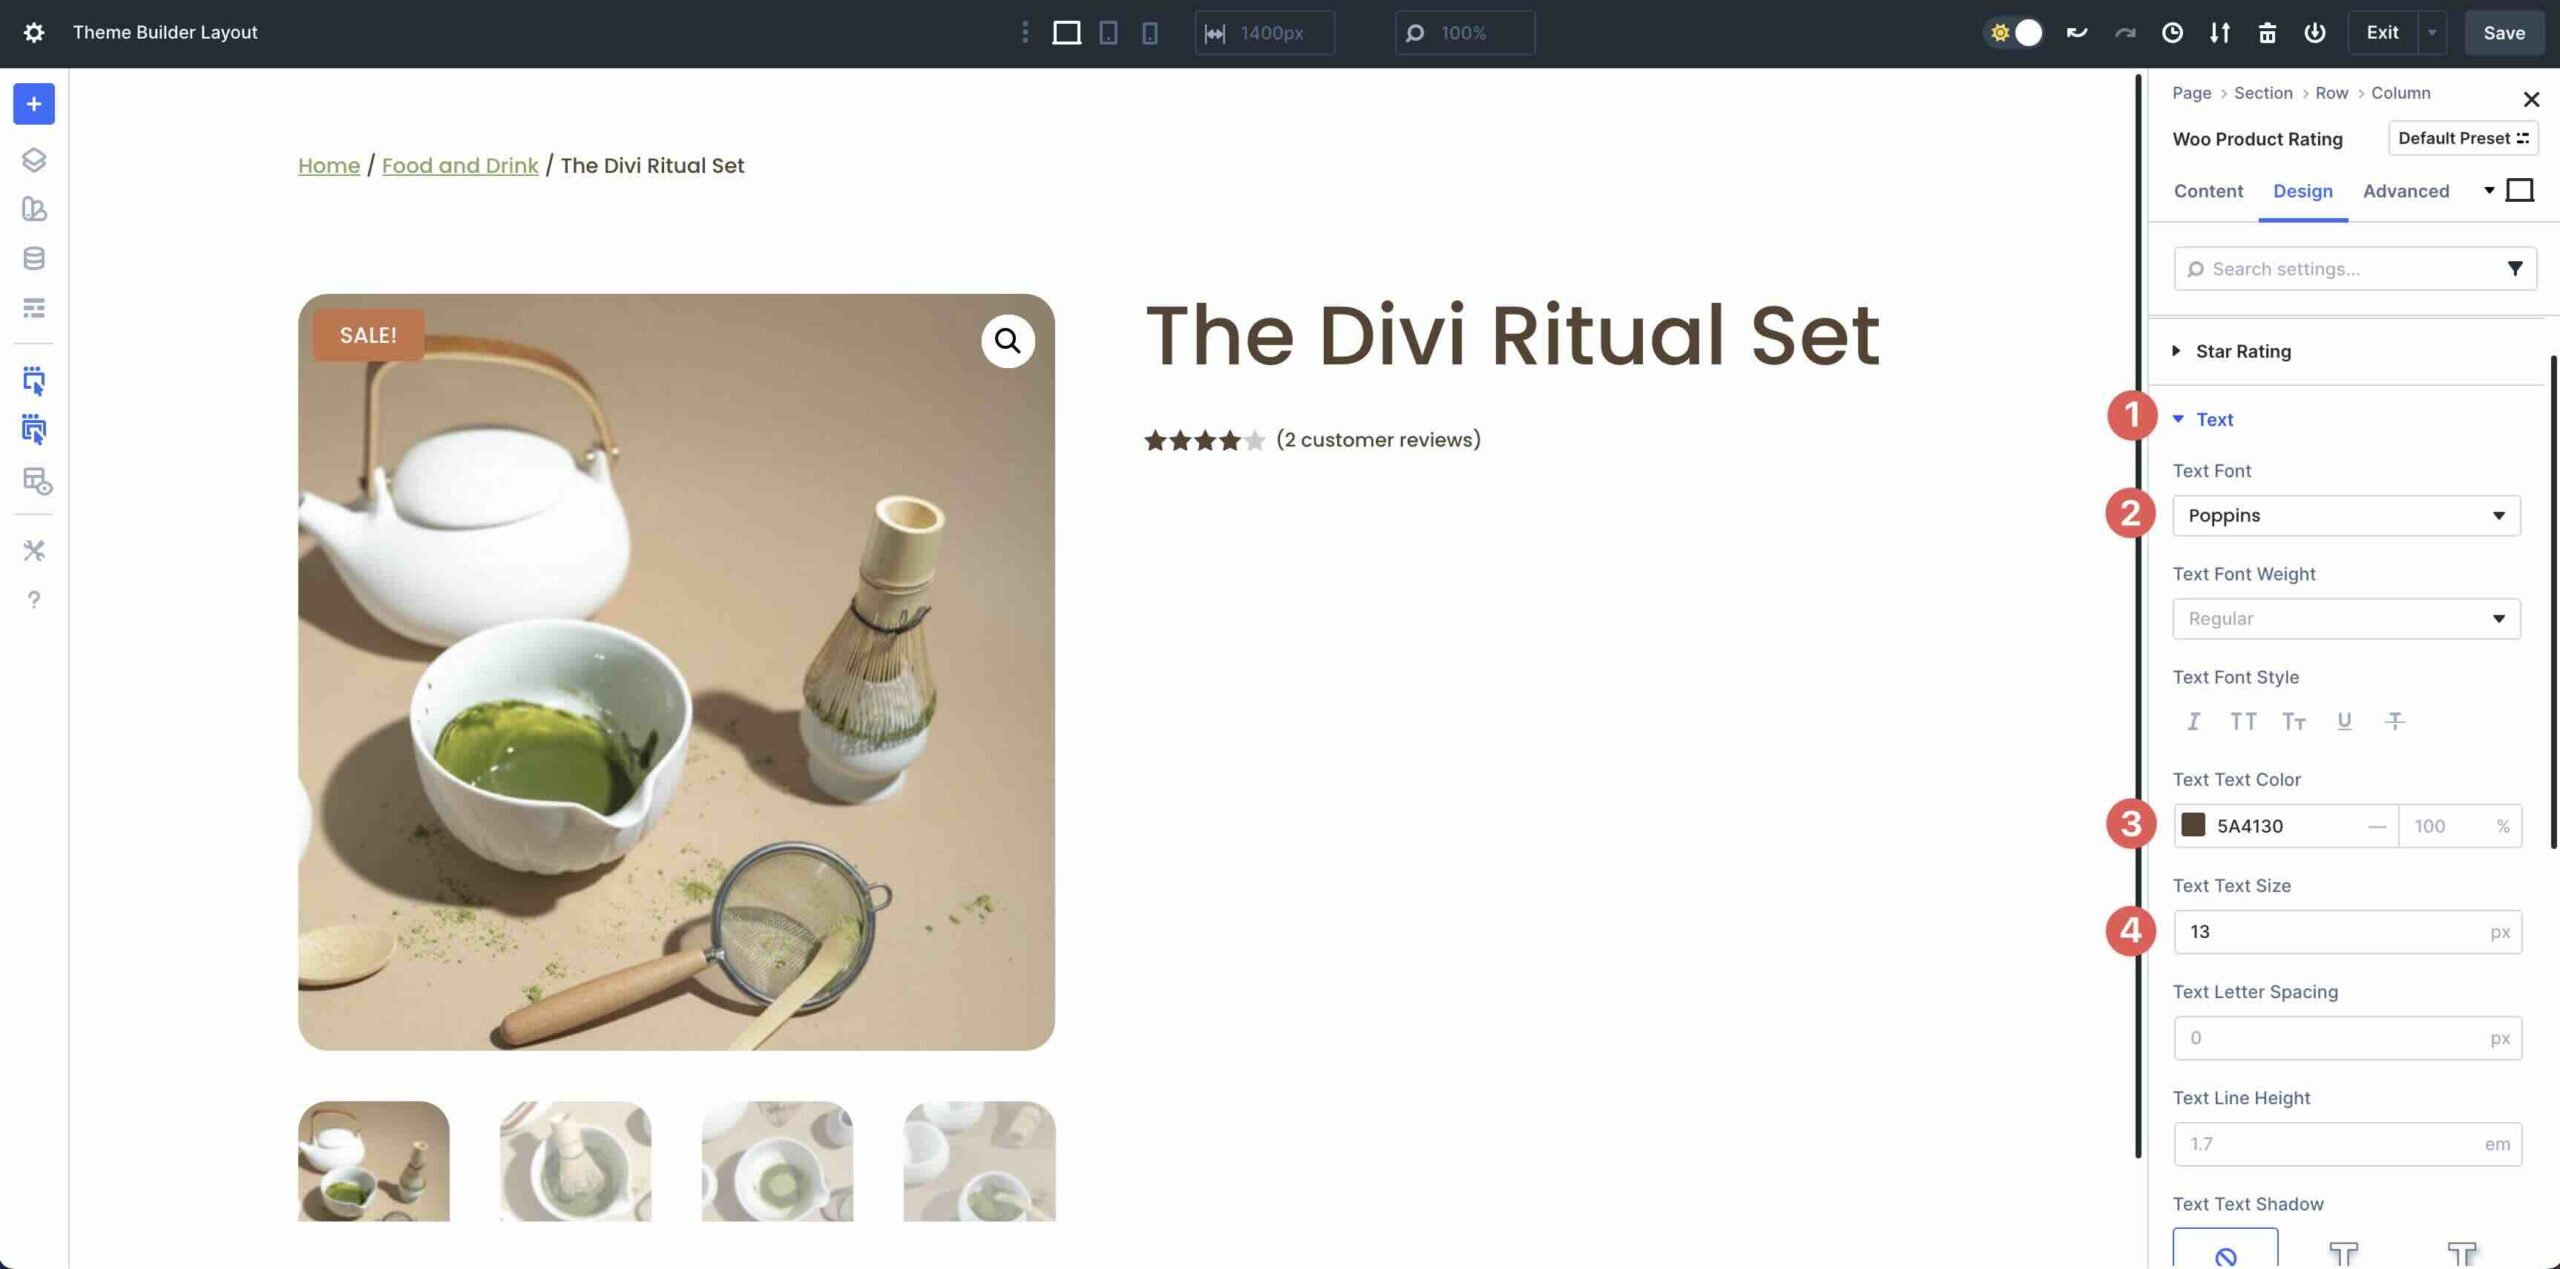
Add The Woo Product Rating Module
Next, add the Woo Product Rating module underneath the Establish in the second column.
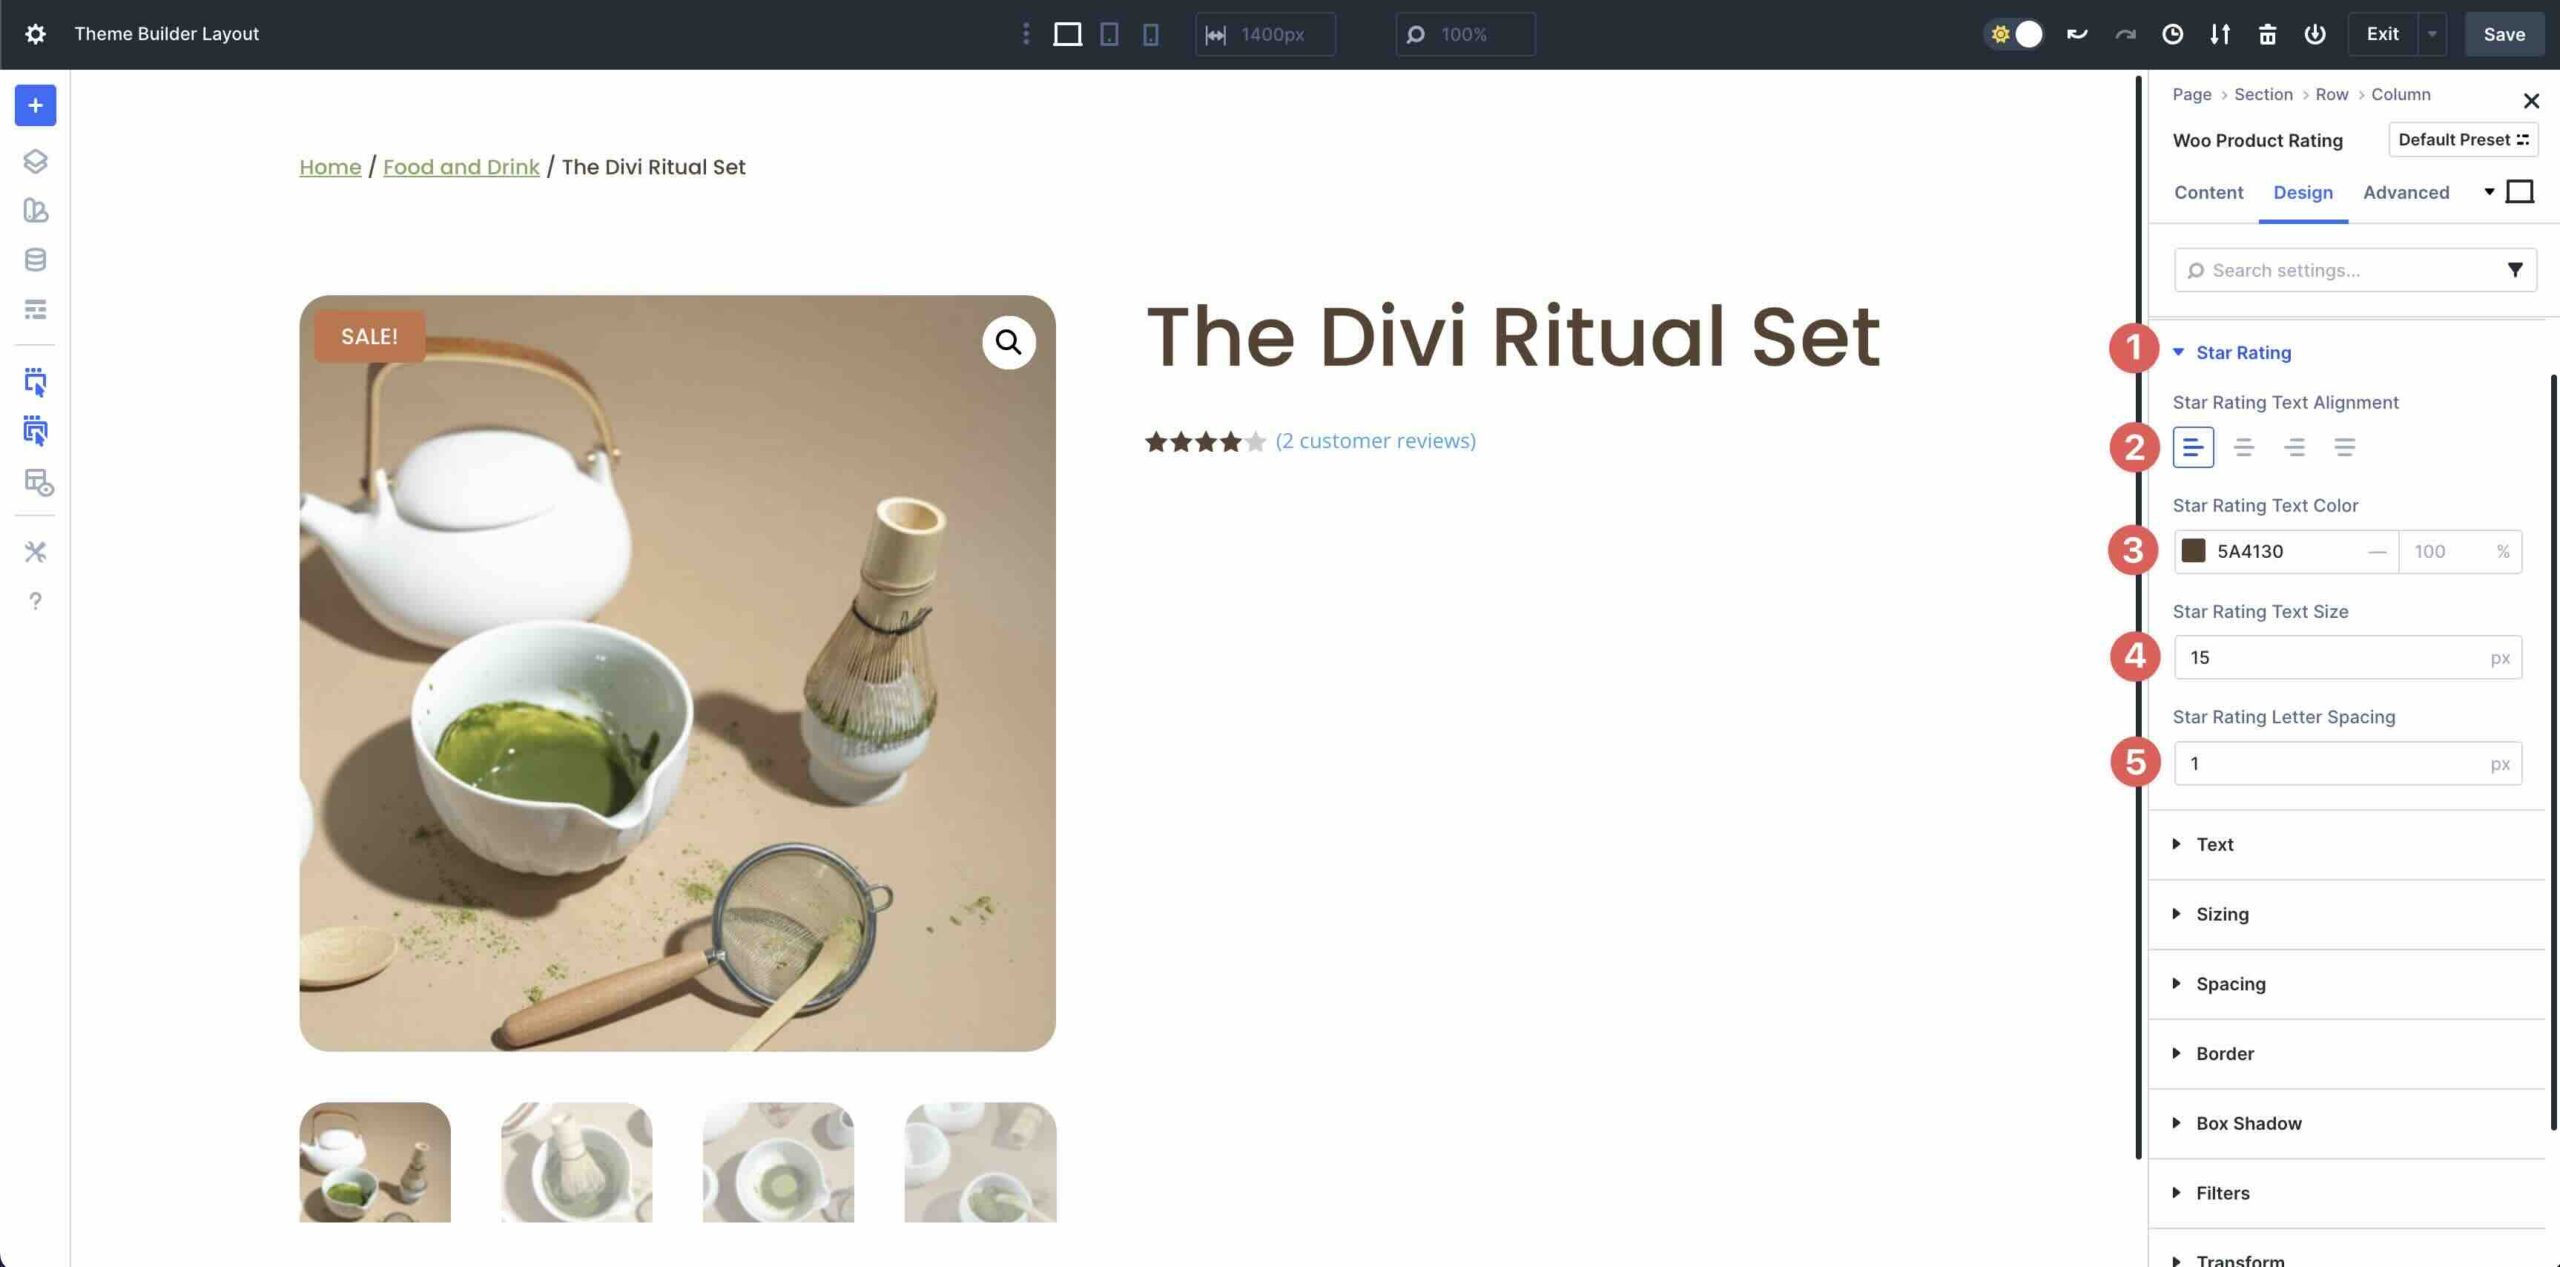
Inside the Design tab, magnify the Superstar Rating menu. Set the Superstar Rating Text Alignment to Left, #5A4130 since the Superstar Rating Text Color, 15px since the Superstar Rating Text Size, and 1px since the Superstar Rating Letter Spacing.
Next, magnify the Text menu. Enter Poppins since the Text Font, #5A4130 since the Text Text Color, and 13px since the Text Text Size.
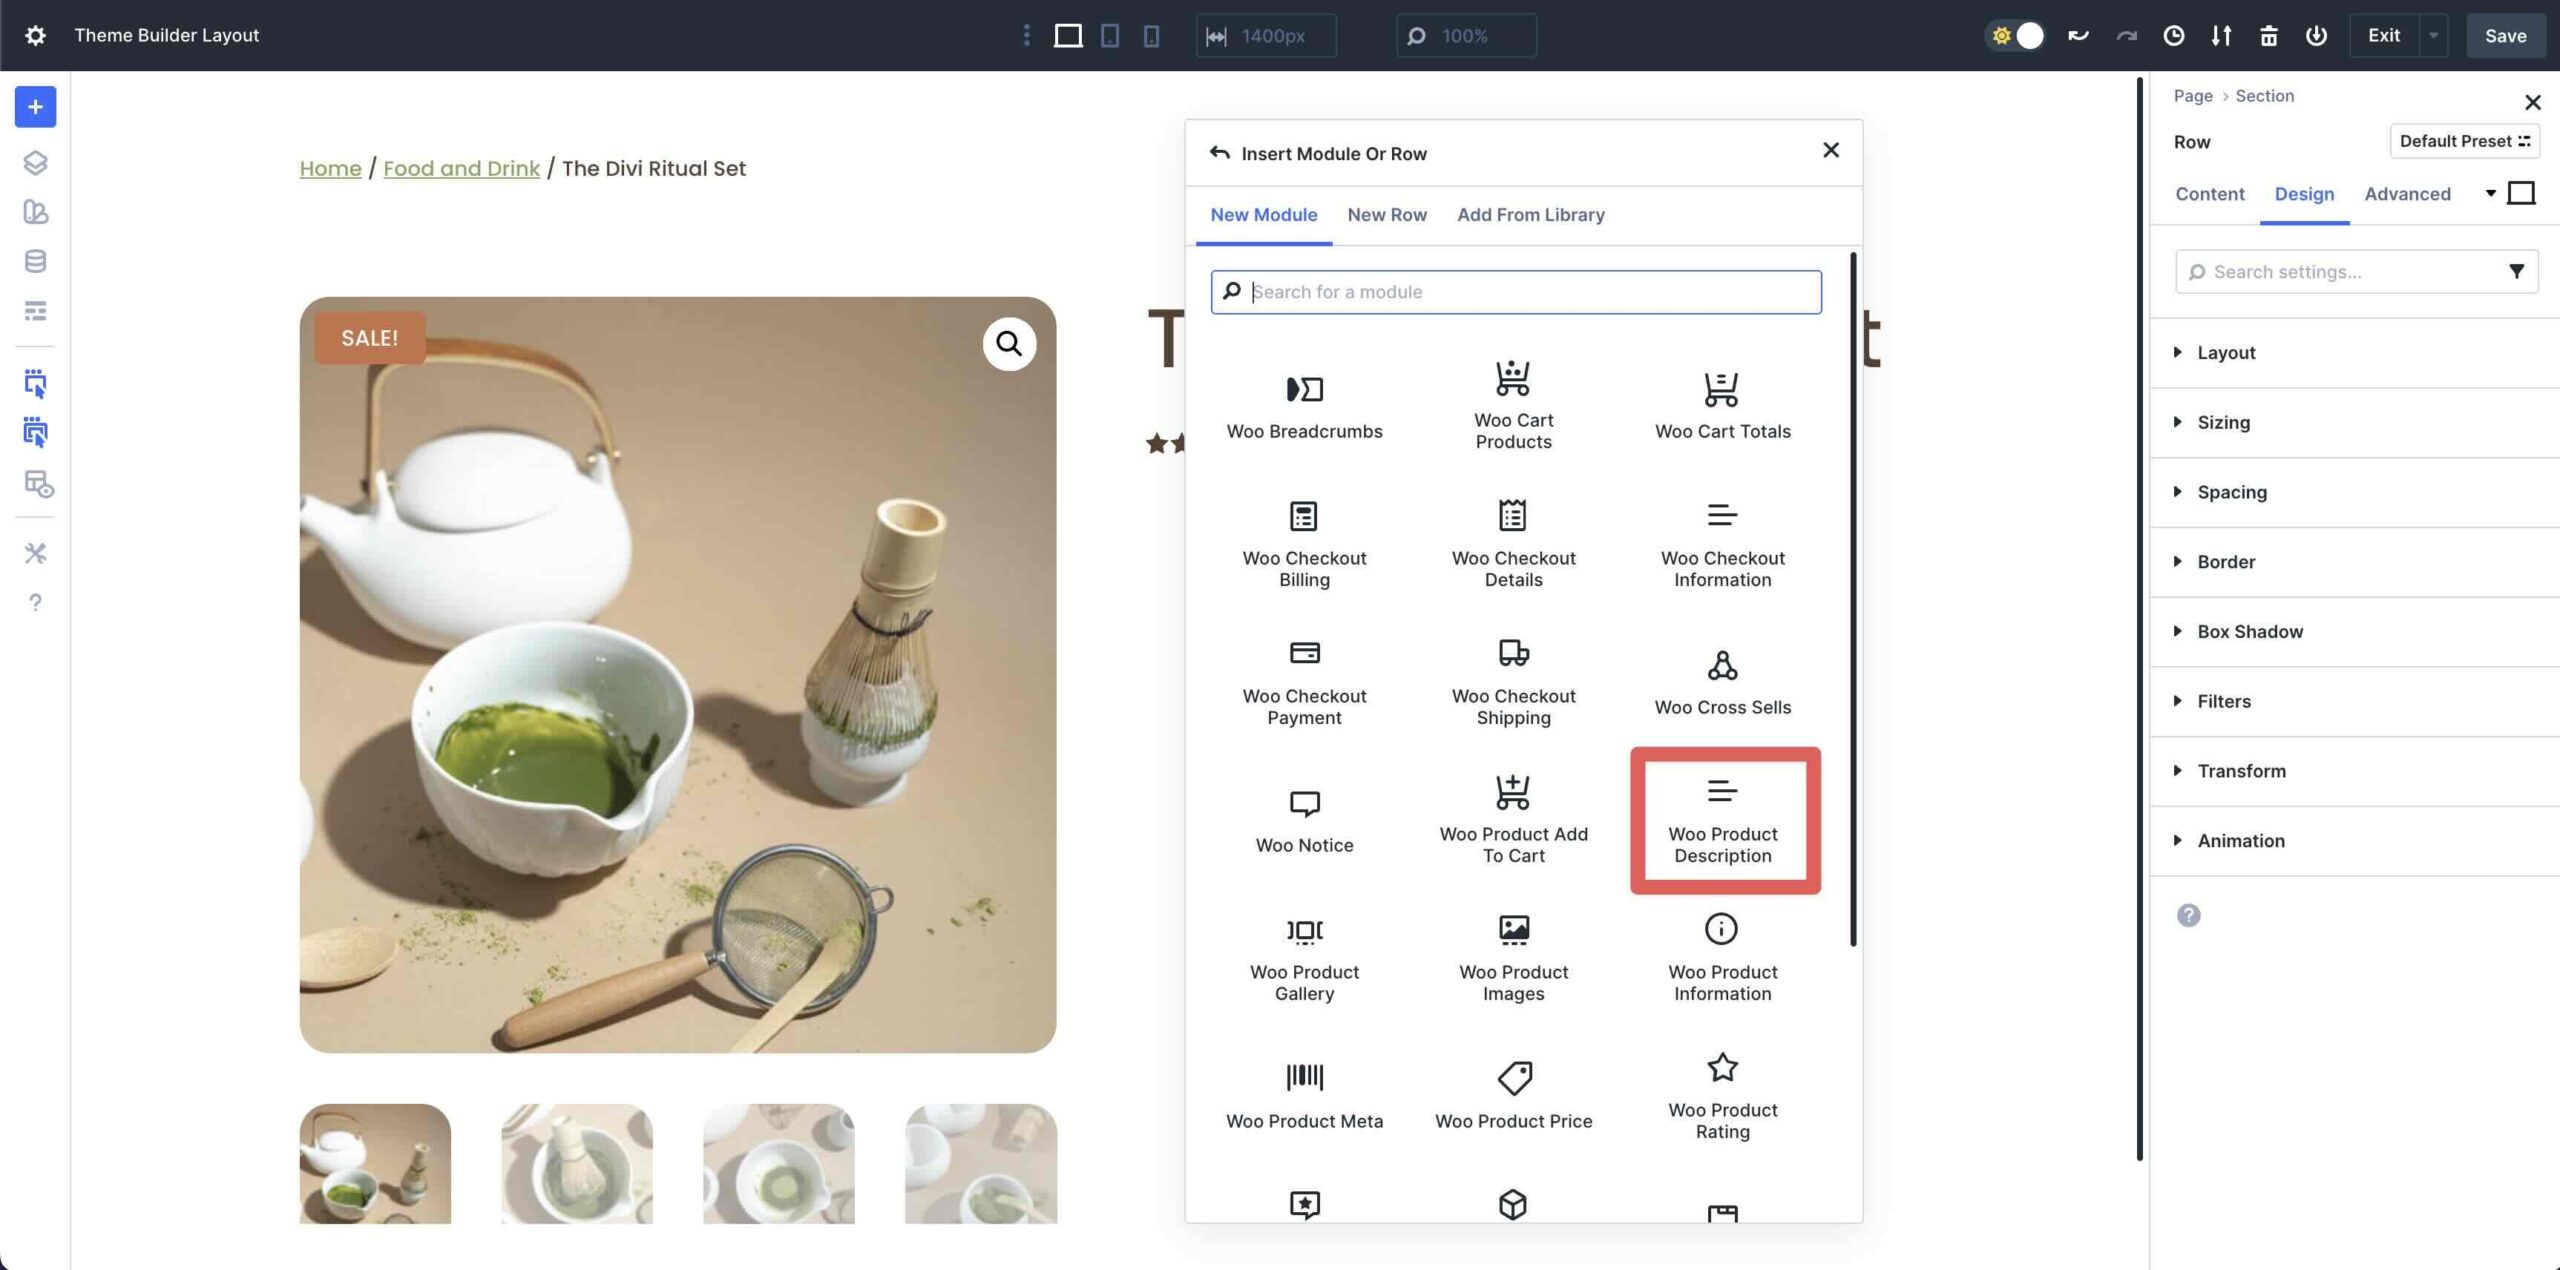
Add The Woo Product Description Module
Next, add the Woo Product Description Module to the second column.
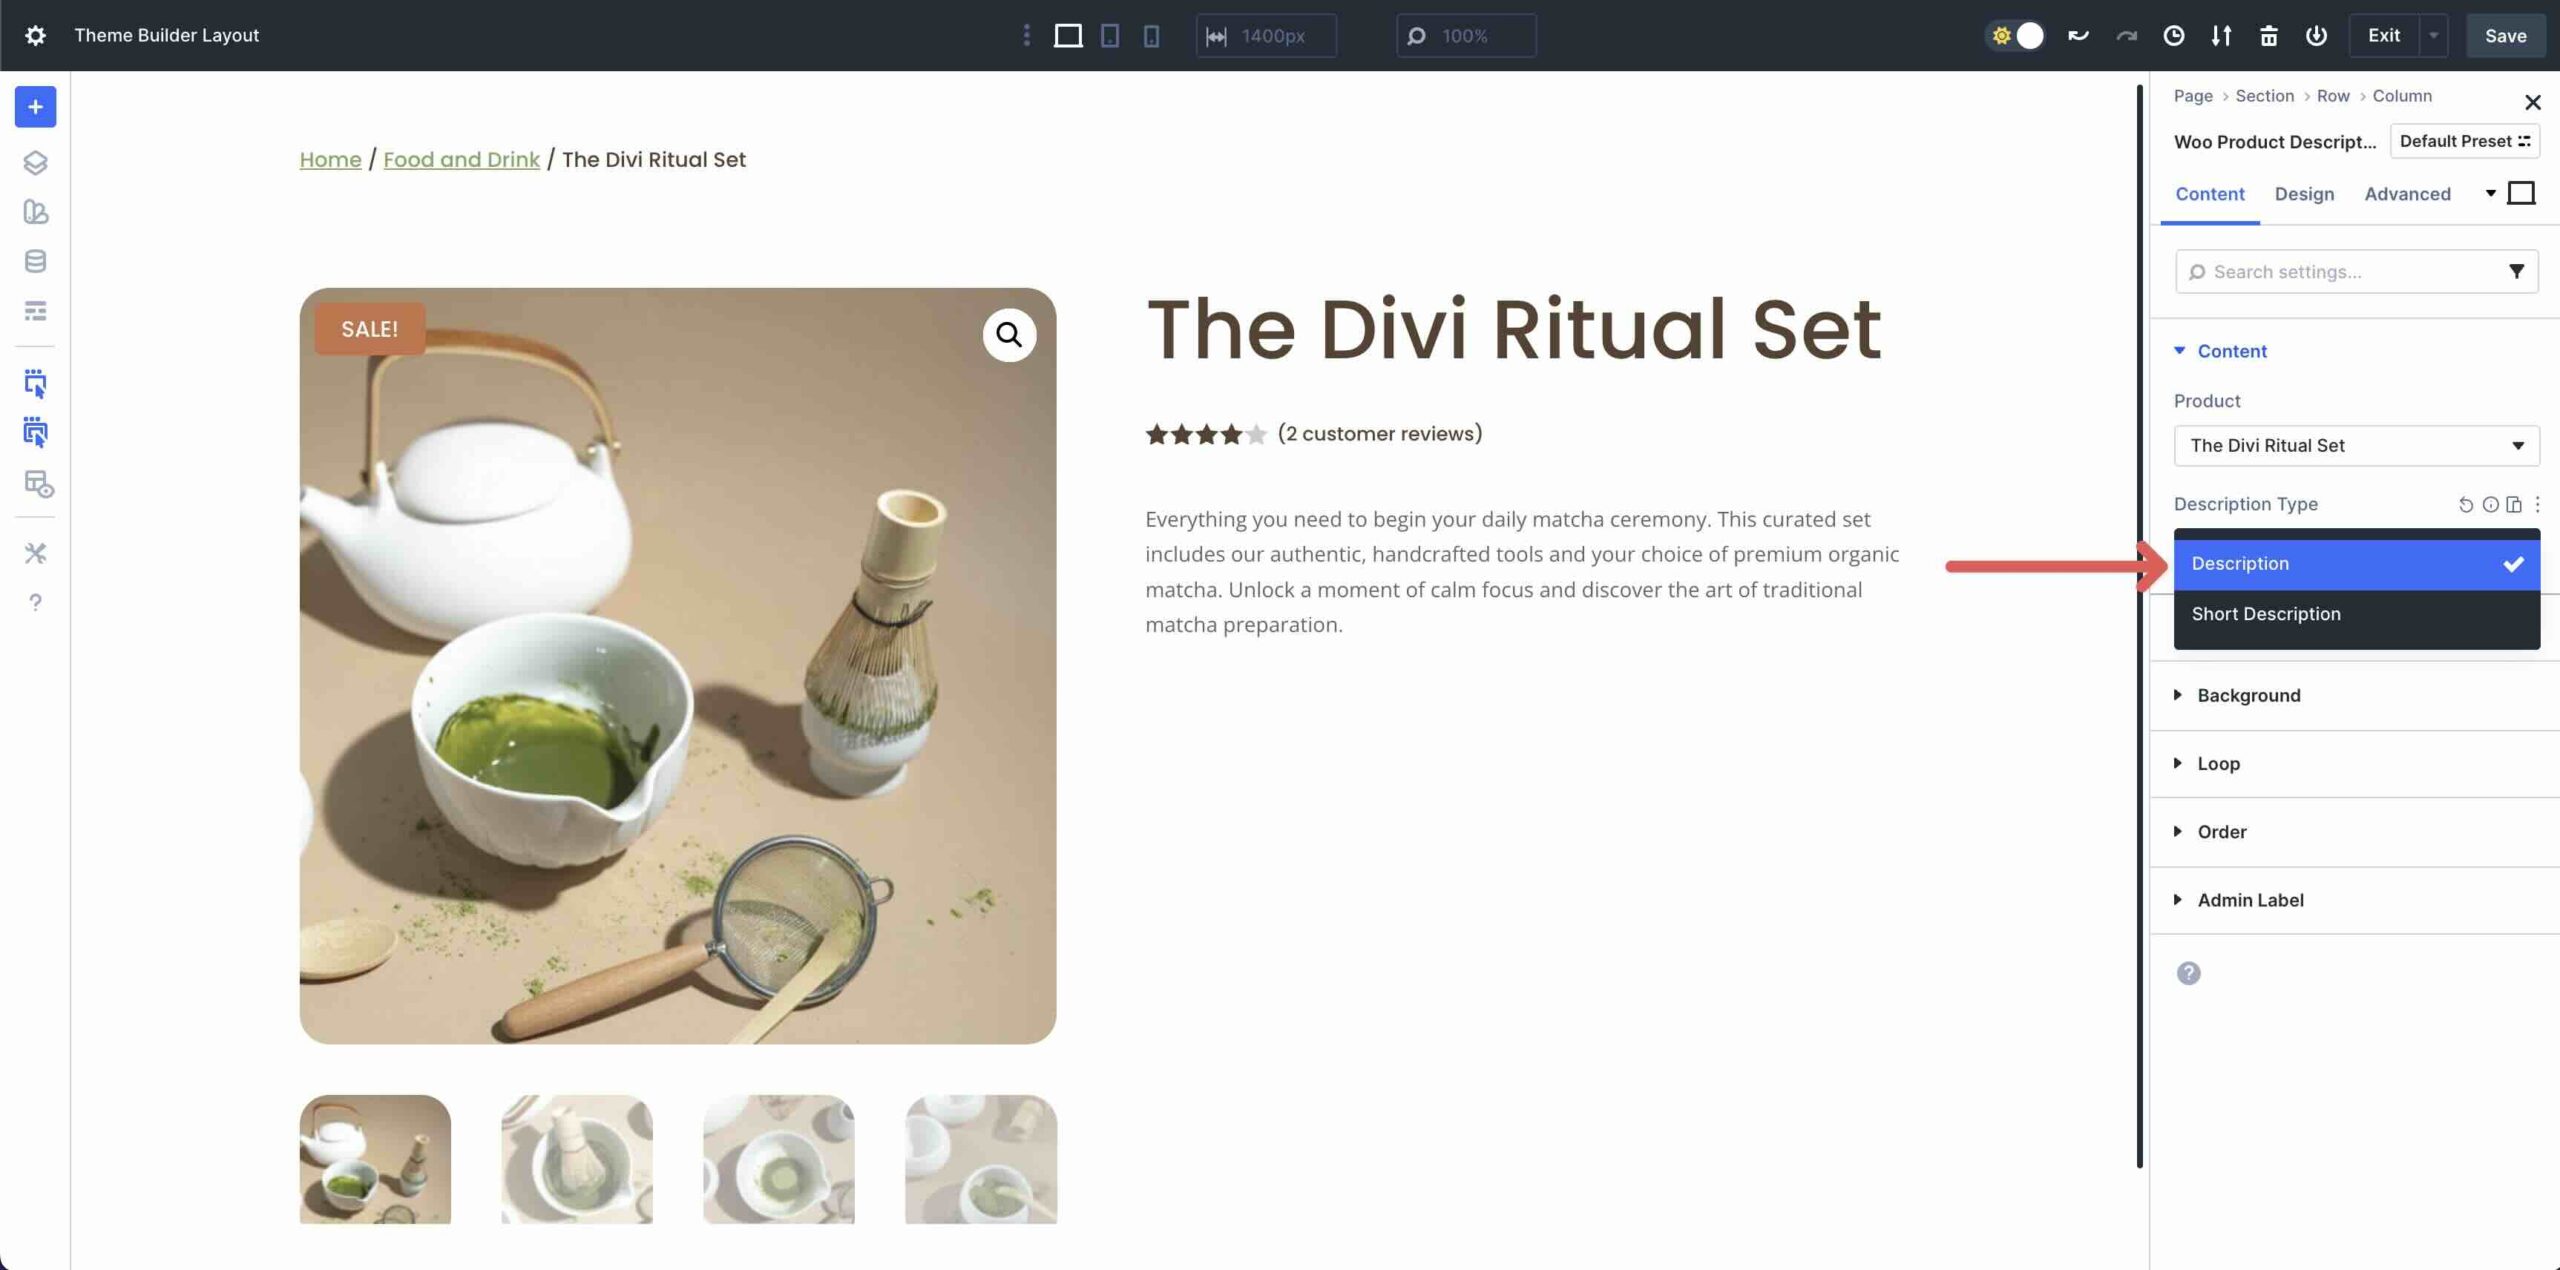
Inside the Content material subject material tab, decide whether or not or to not employ the Description or Transient Description inside the Description Type field.
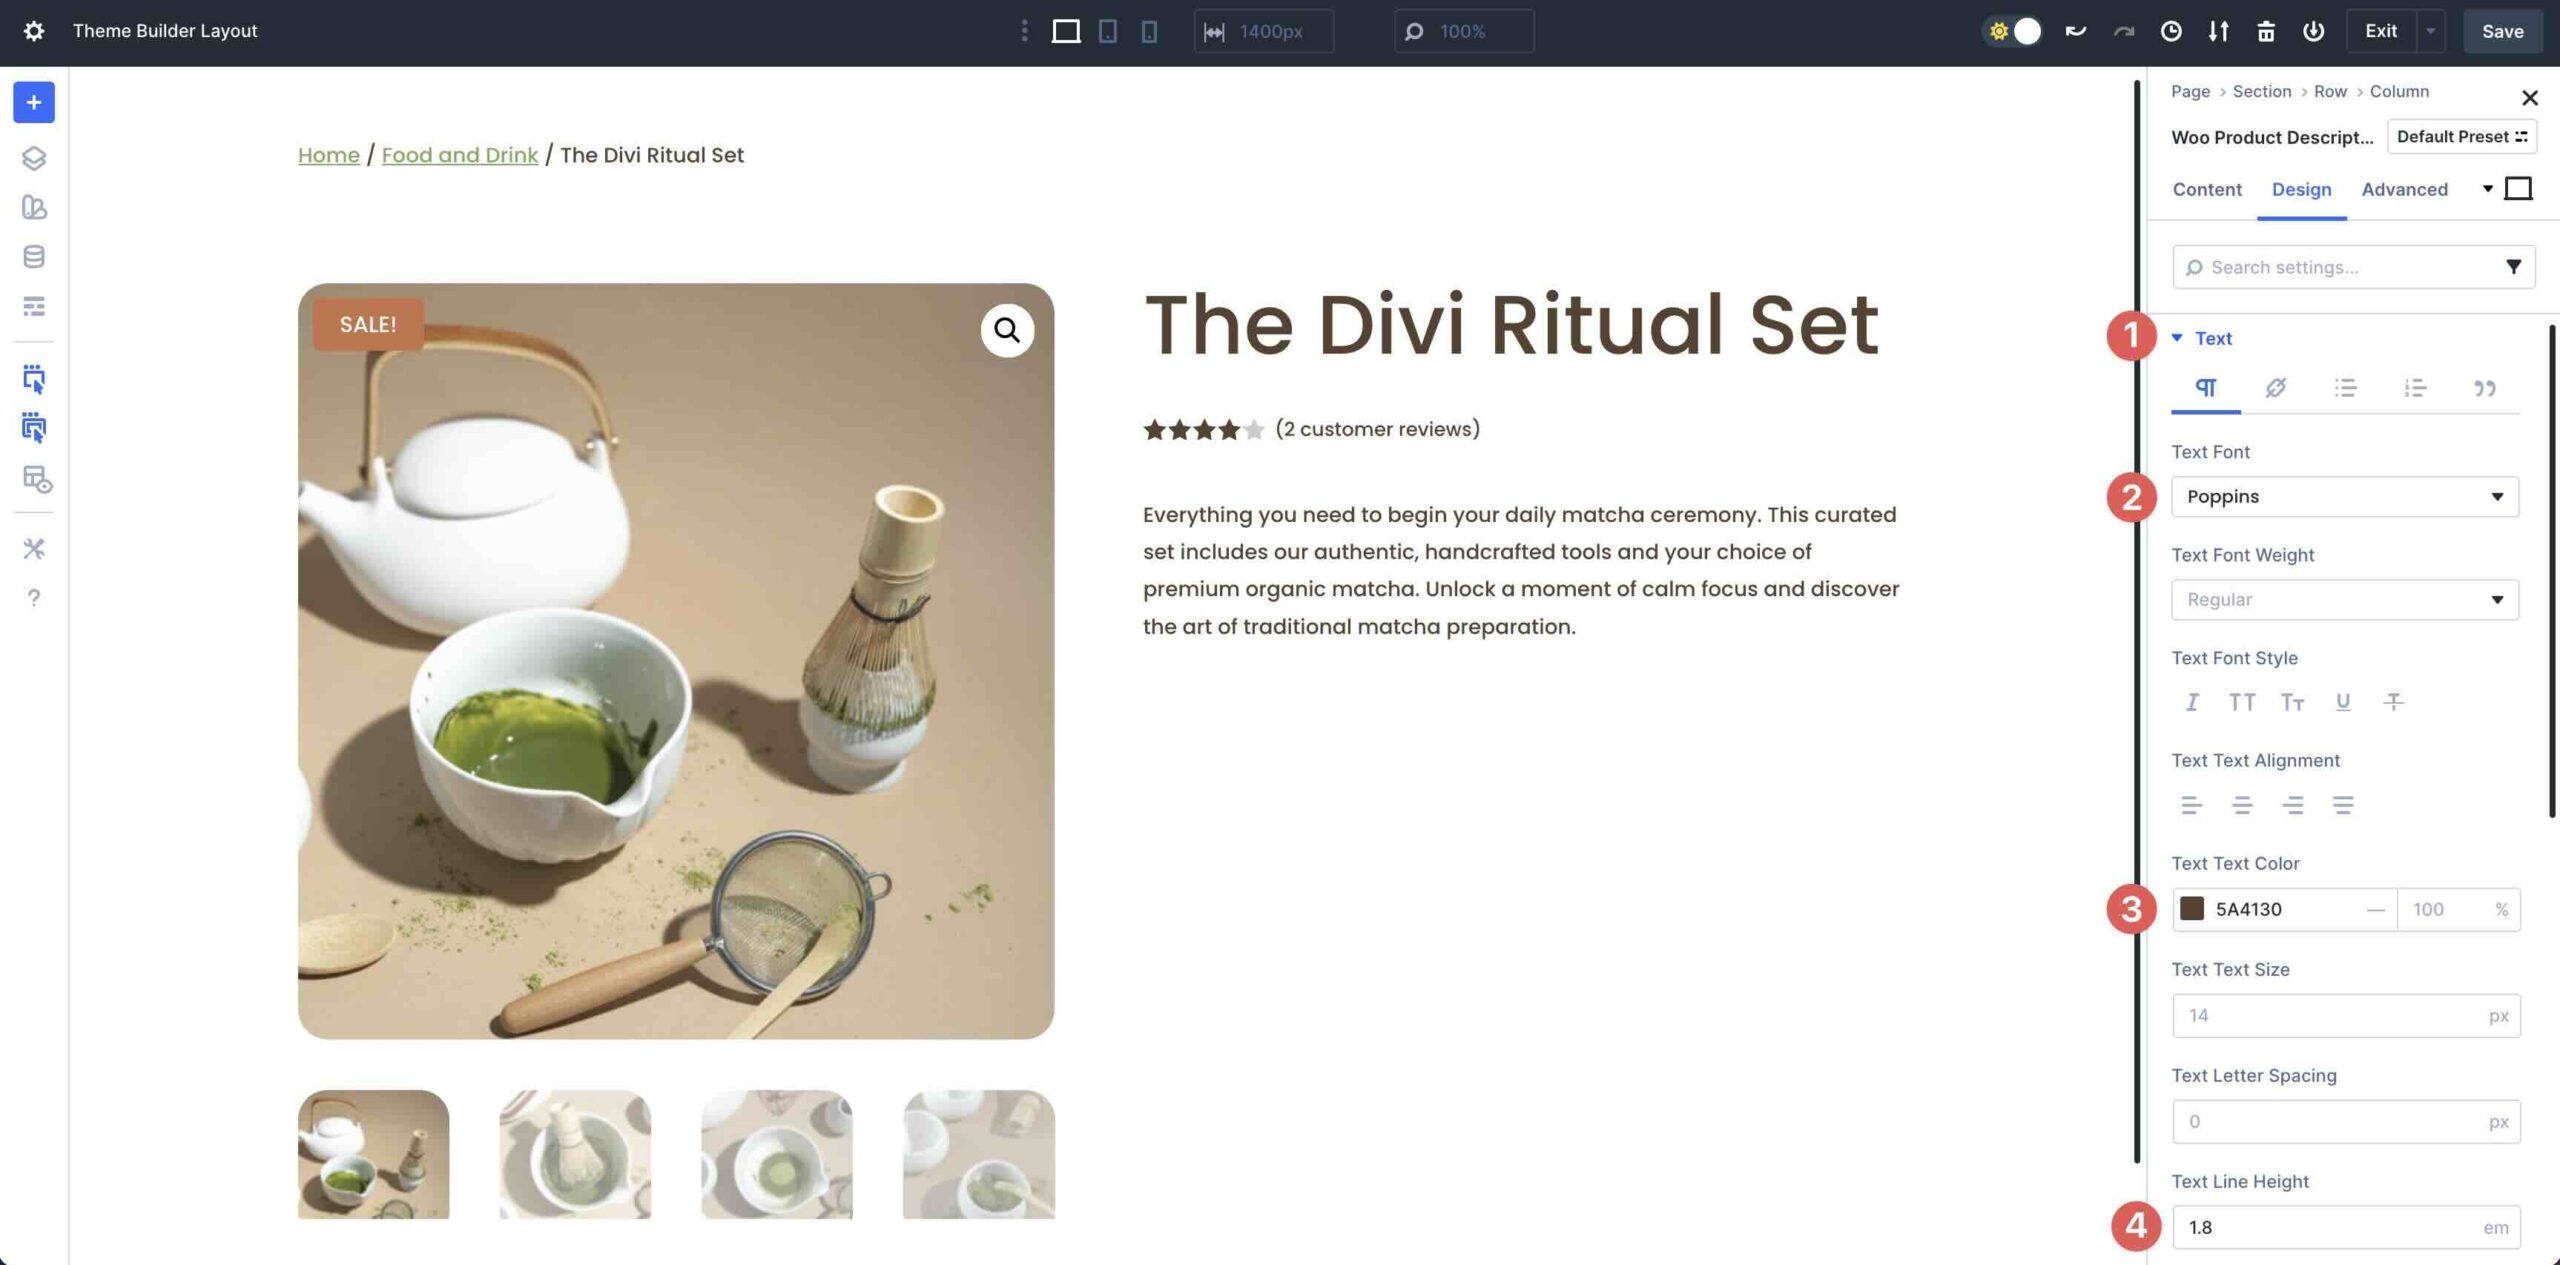
Switch to the Design tab. Make larger the Text dropdown menu and choose Poppins since the Text Font, #5A4130 since the Text Text Color, and 1.8em since the Text Line Top.
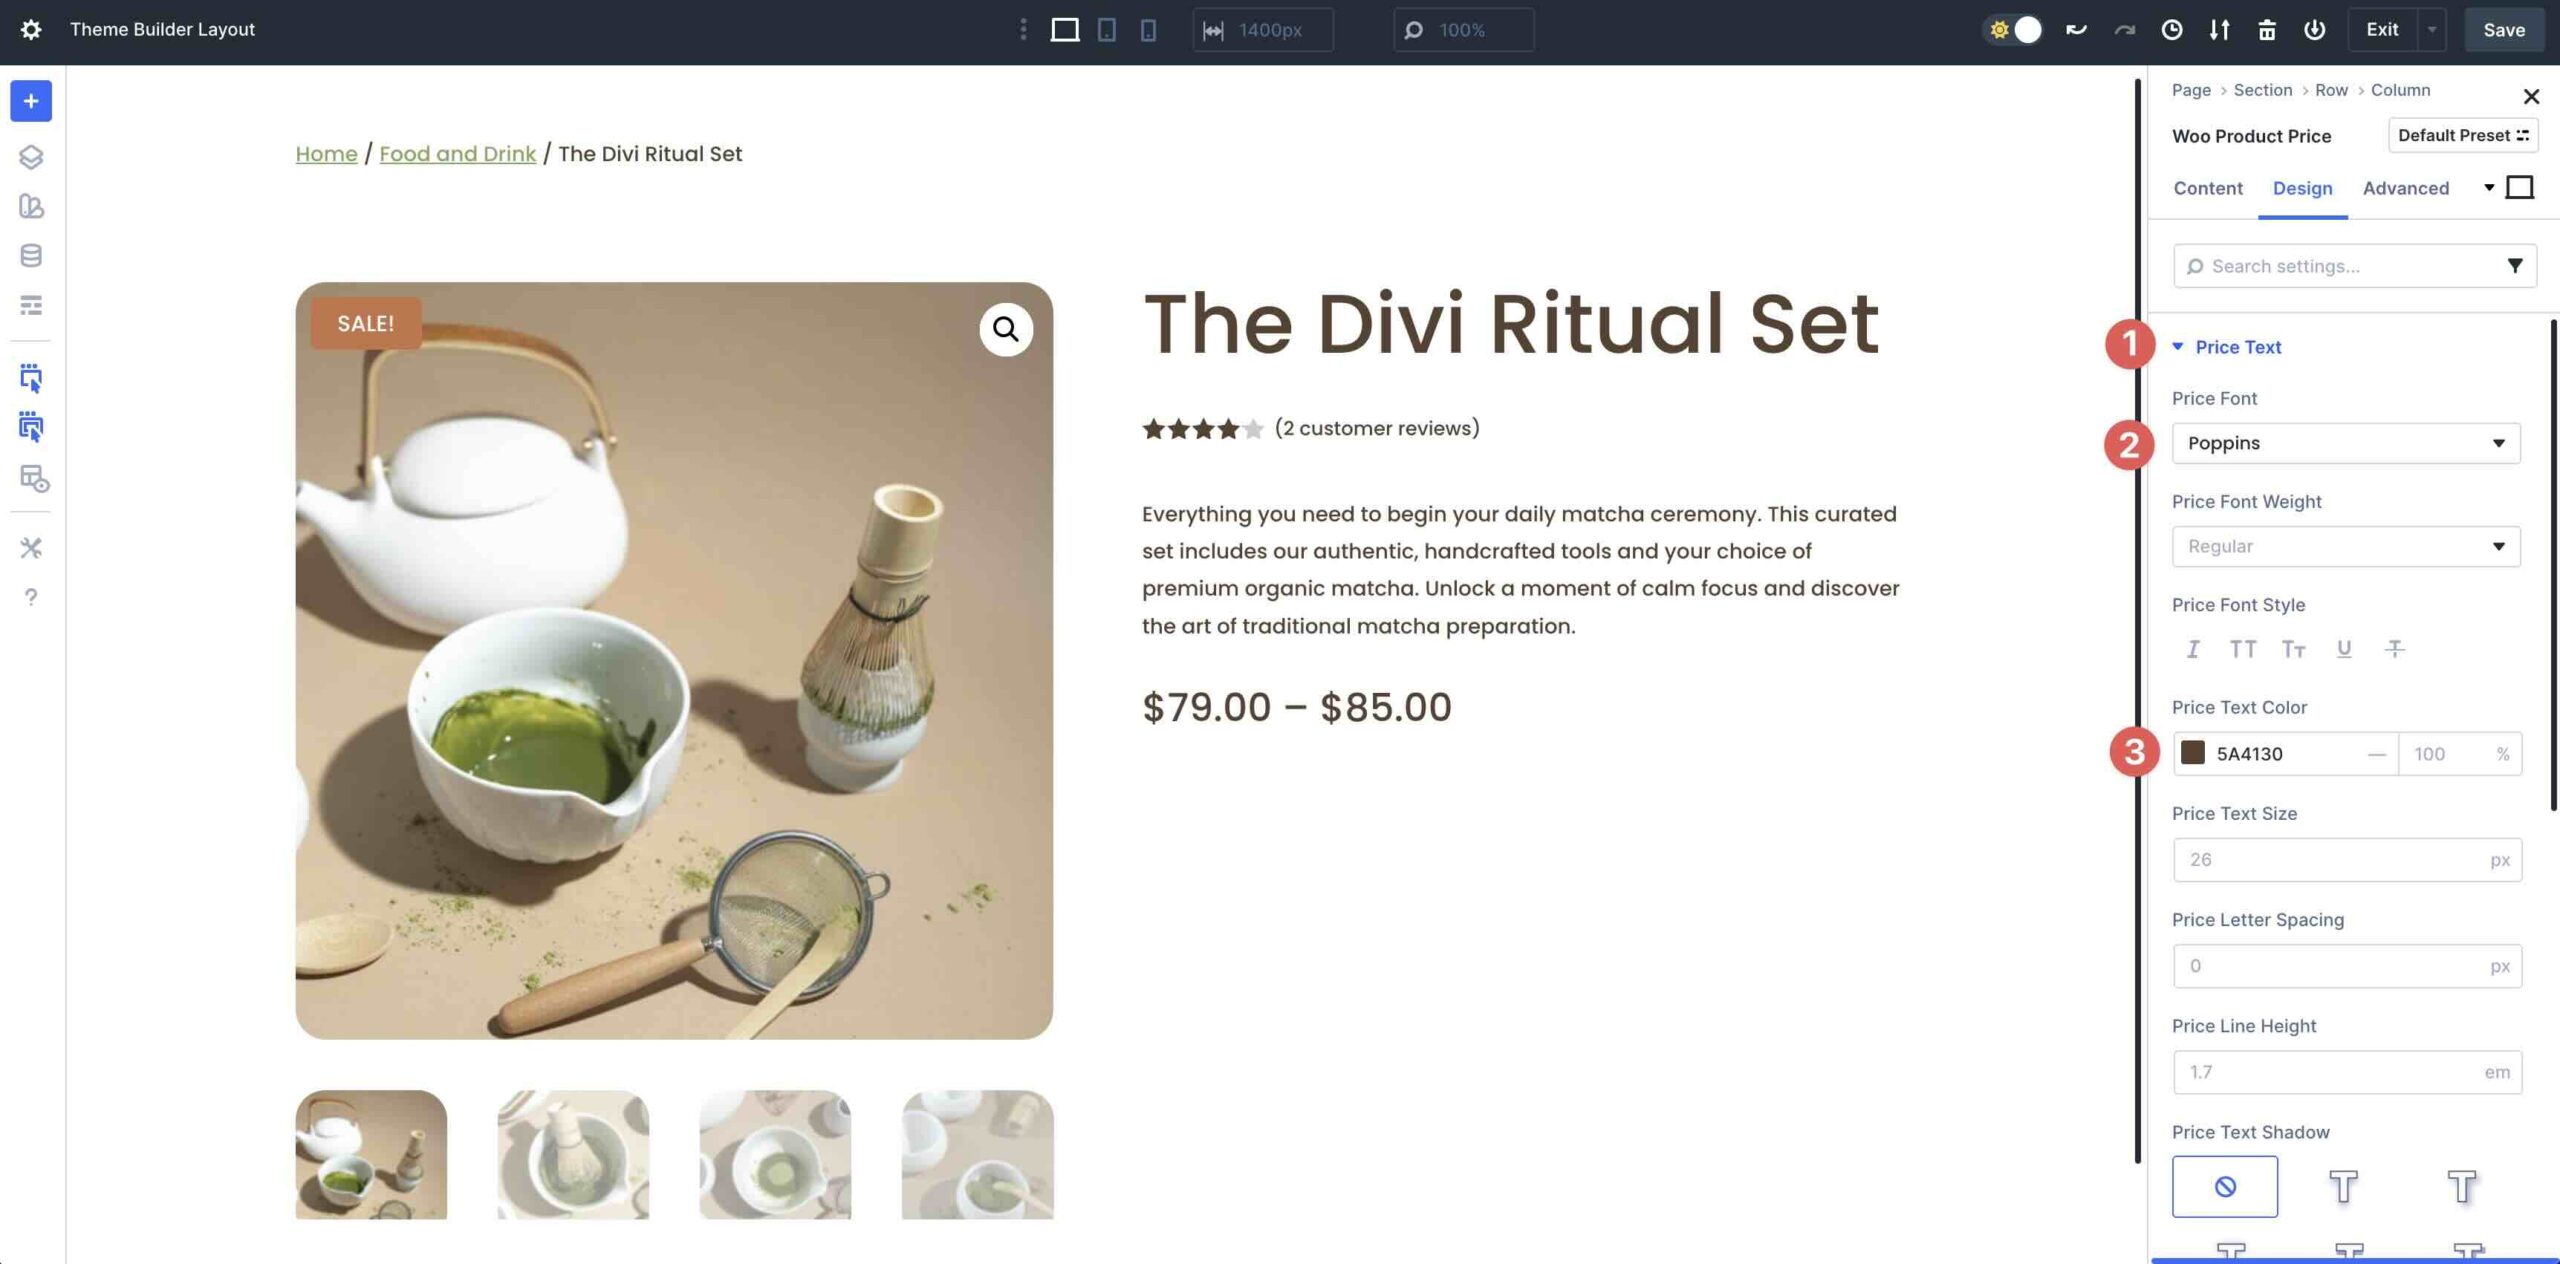
Add The Woo Product Price Module
Next, we’ll add the Woo Product Price module to the second column.

Make larger the Price Text menu. Select Poppins since the Price Font and #5A4130 since the Price Text Color.
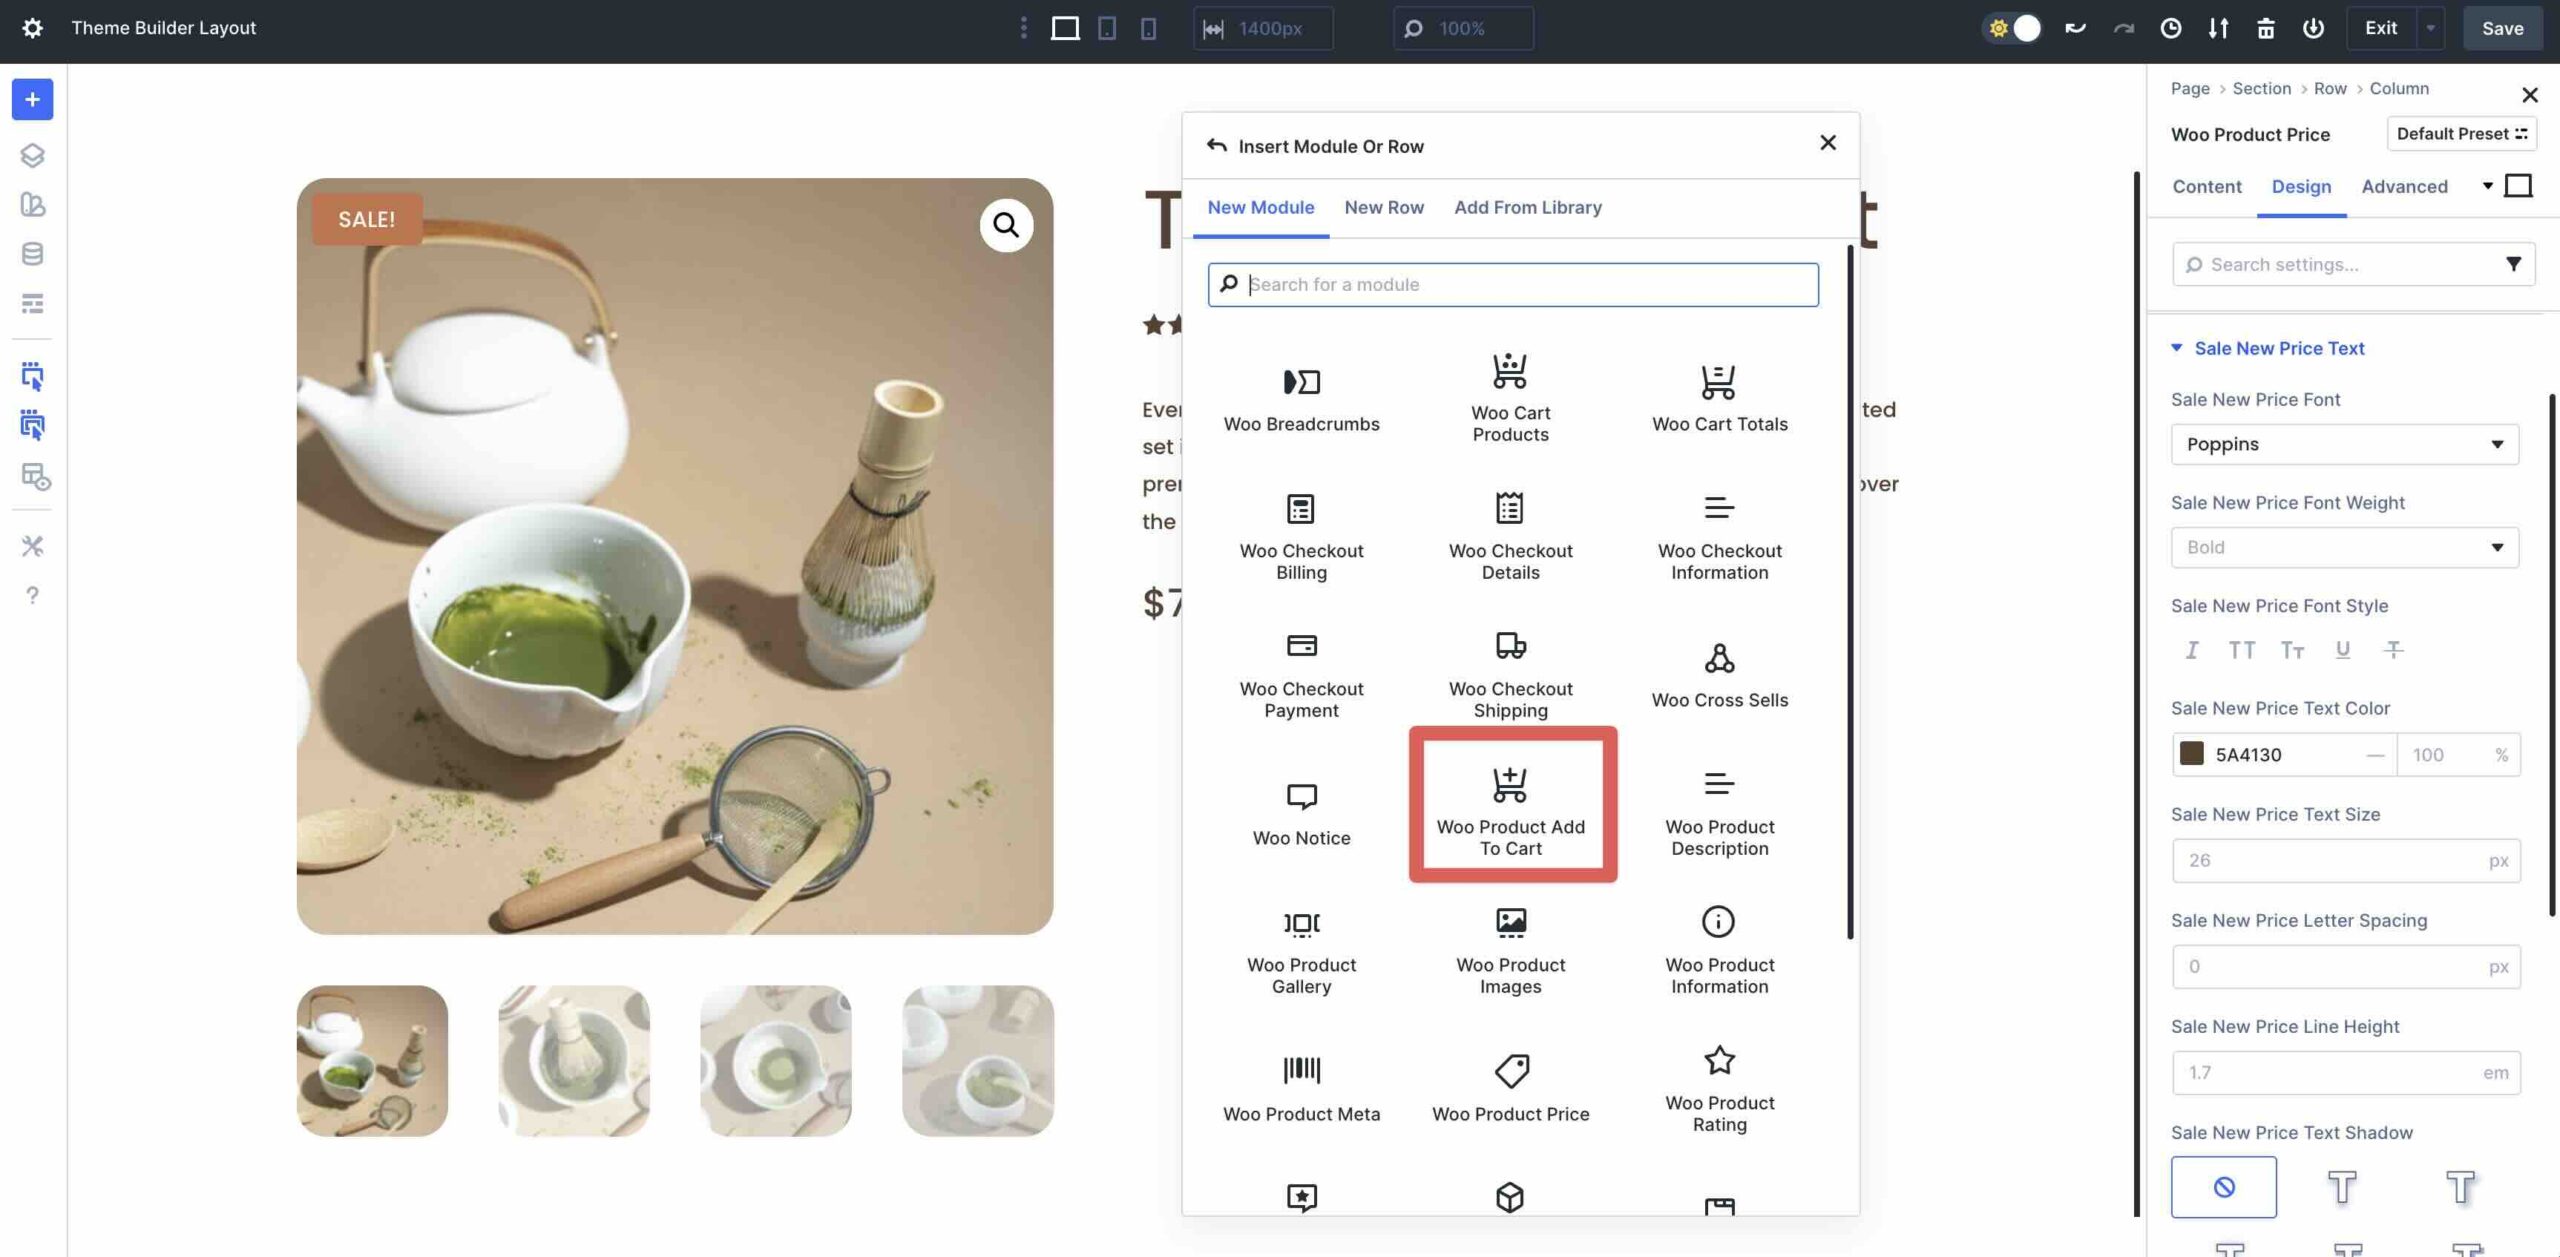
Add The Woo Product Add To Cart Module
Add the Woo Product Add To Cart module.
Inside the Design tab, magnify the Field Labels menu and enter Poppins since the Field Labels Font. Inside the Field Labels Text Color field, use #5A4130.
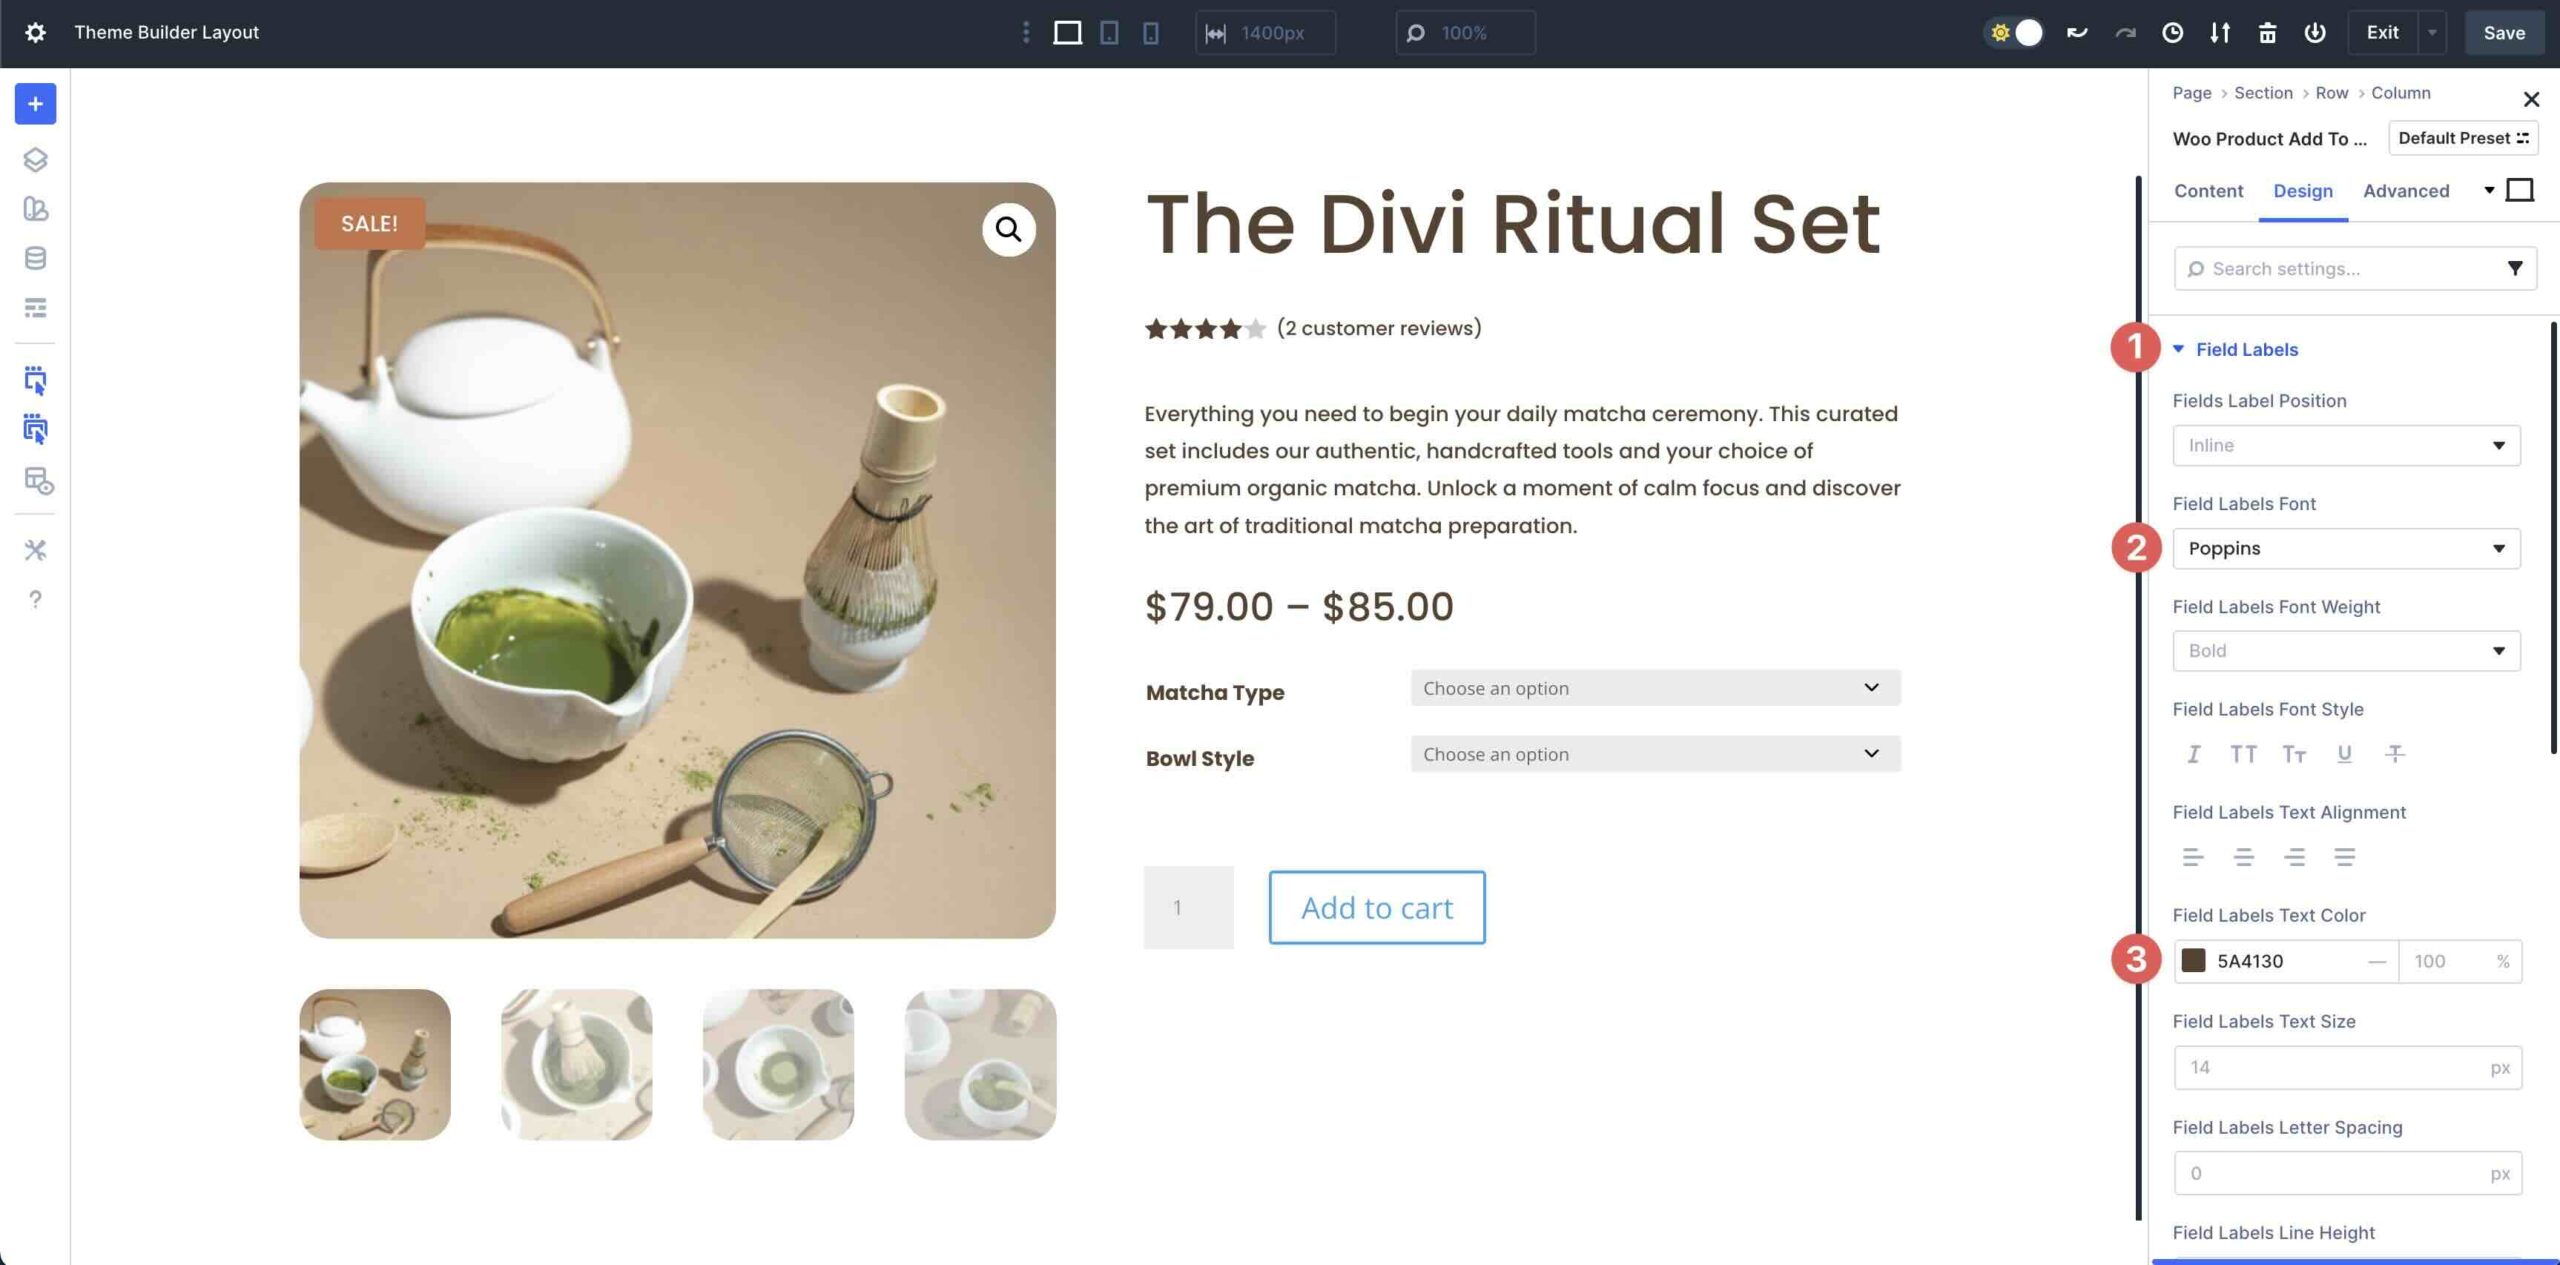
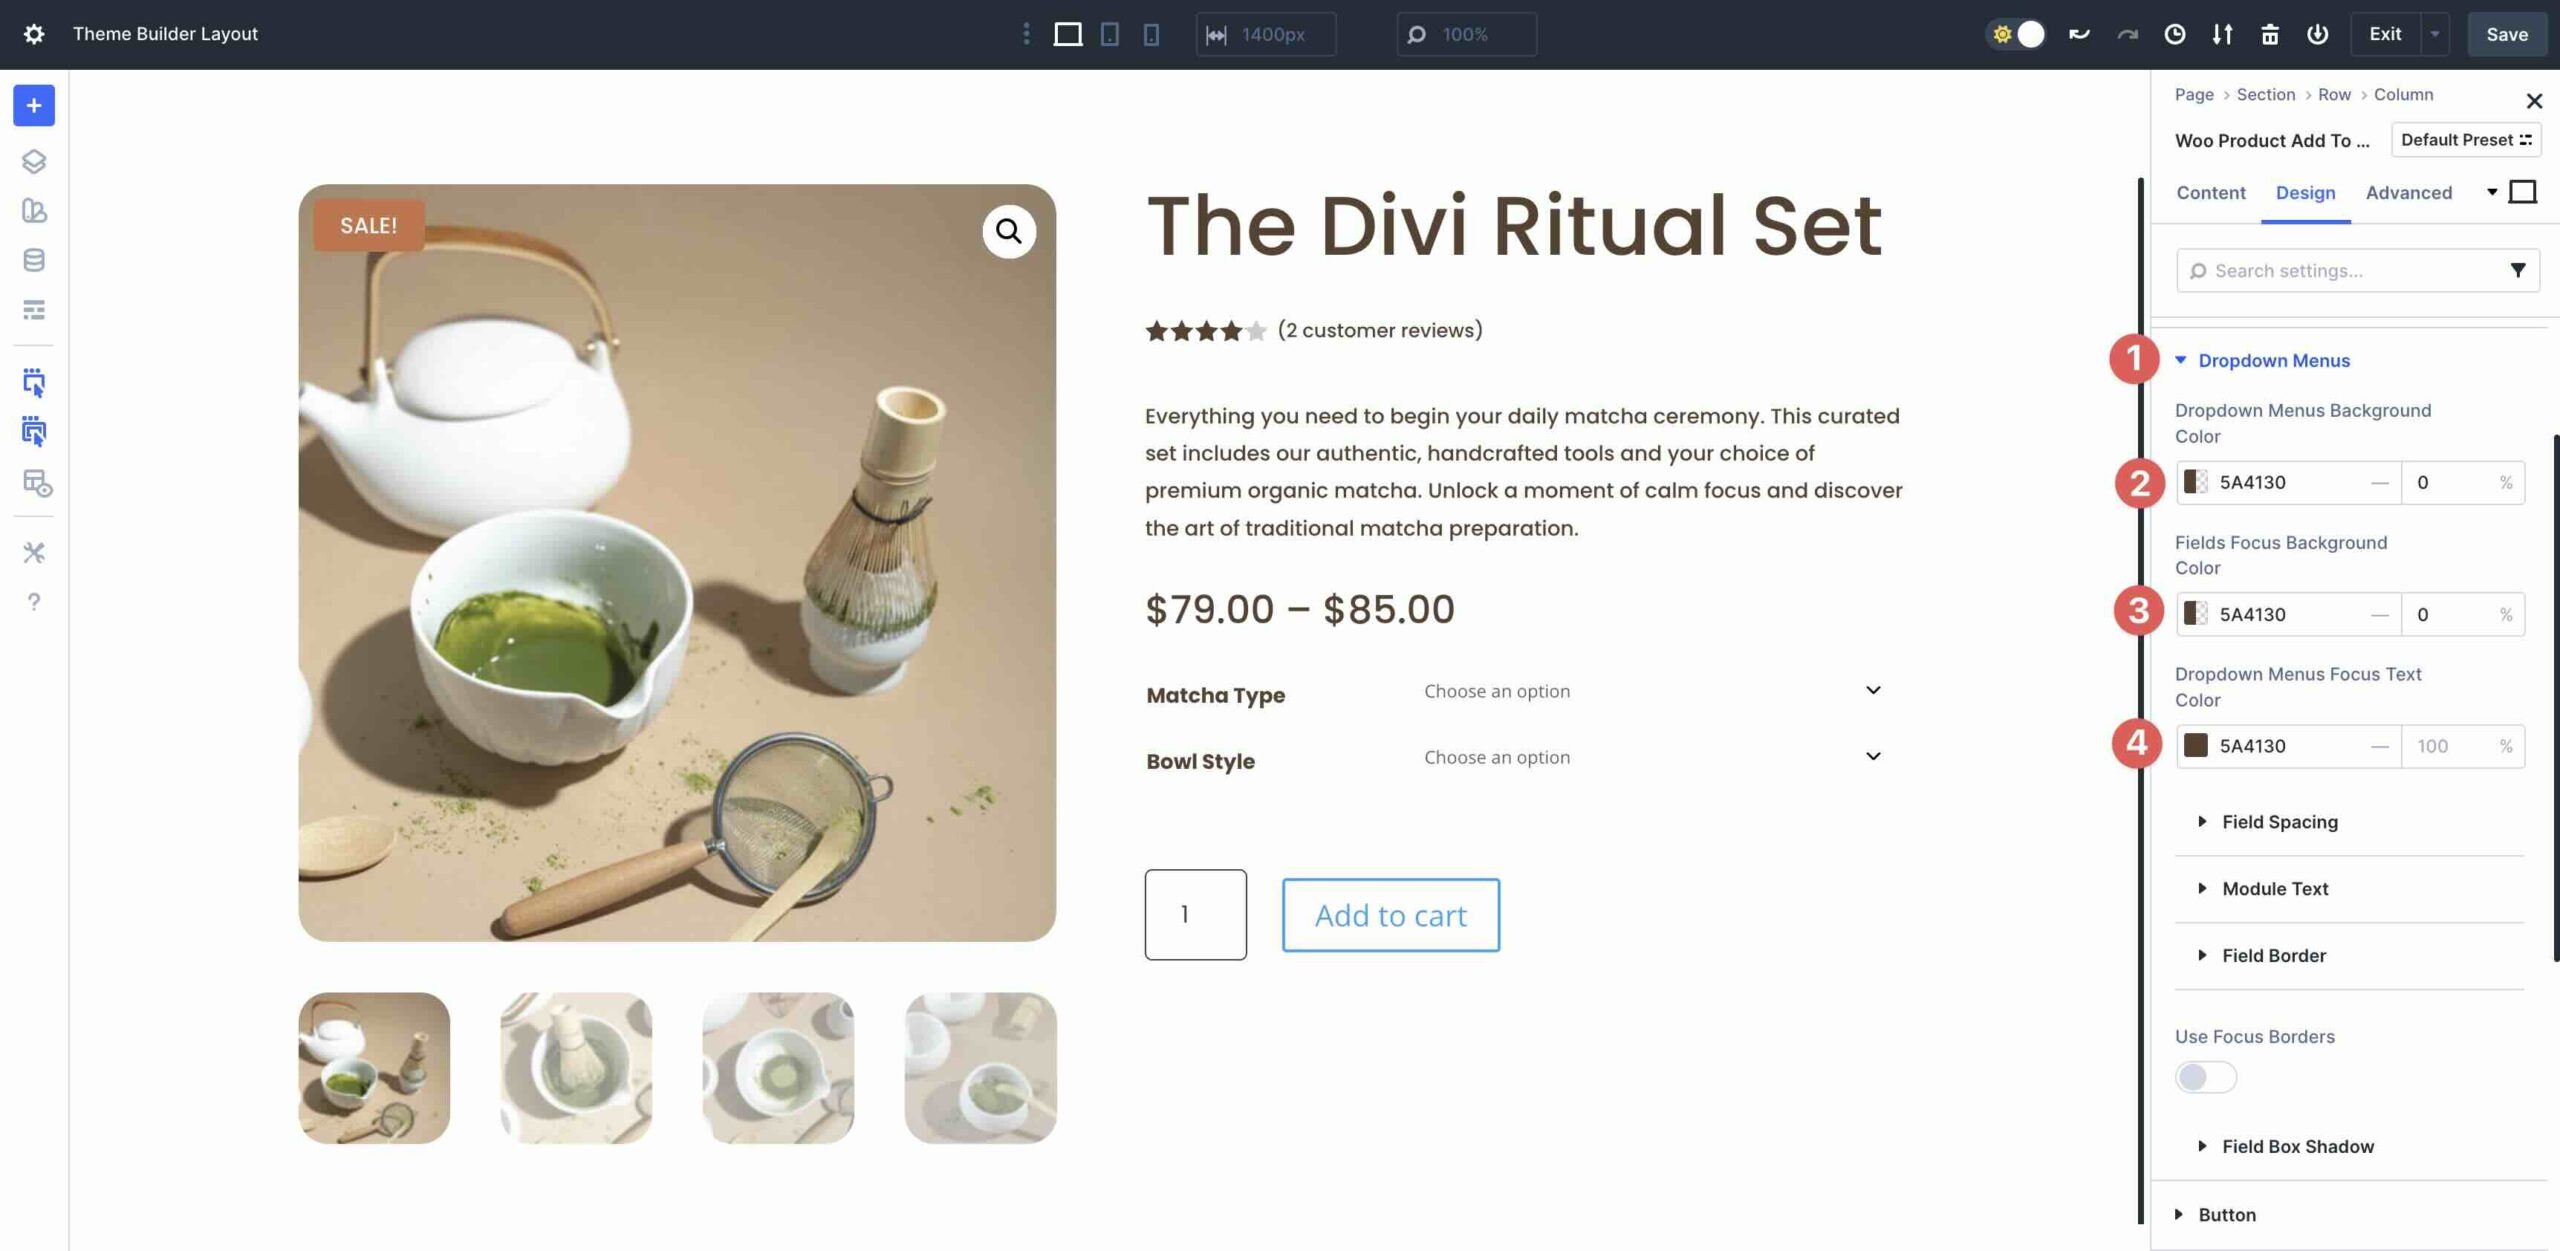
Next, magnify the Fields menu. Enter #5A4130 inside the Fields Background Color and Fields Point of interest Background Color fields. Set the Opacity to 0. Inside the Fields Point of interest Text Color field, enter #5A4130.

Make larger the Fields Text menu. Enter Poppins since the Field Font, #5A4130 since the Fields Text Color, and 16px since the Fields Text Size.

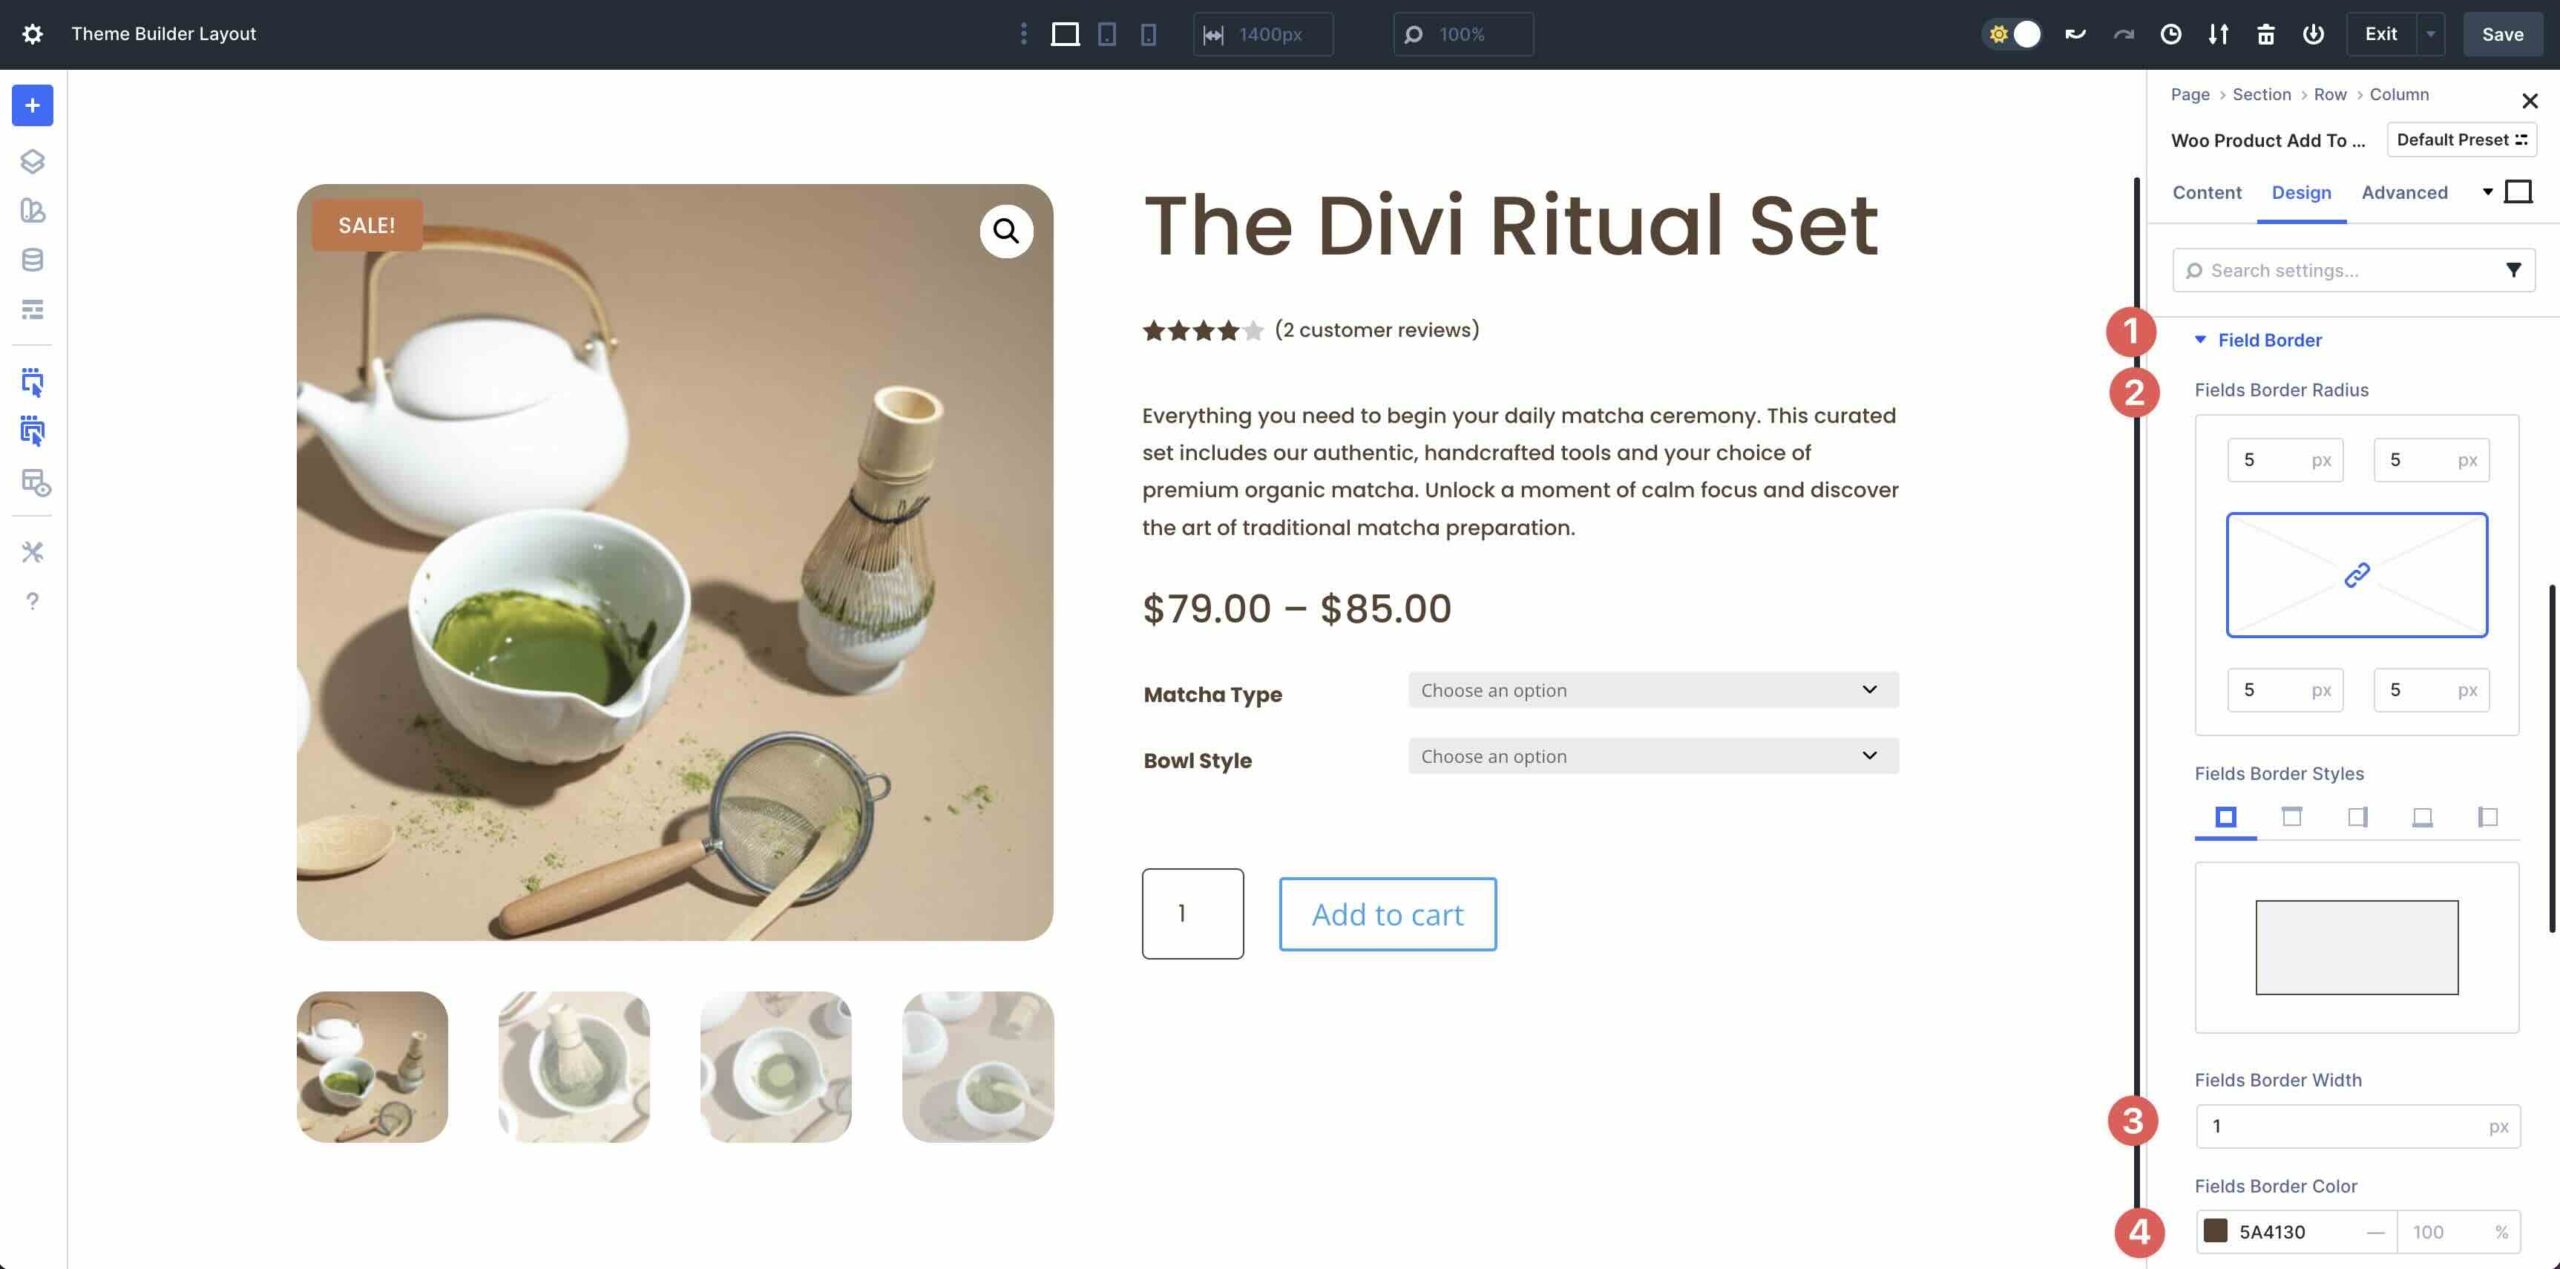
Next, magnify the Field Border menu. Inside the Fields Border Radius settings, enter 5px. Add 1px Field Border Width and set the Fields Border Color to #5A4130.
Inside the Dropdown Menu settings, set the Dropdown Menus Background Color and Fields Point of interest Background Color to #5A4130 with an Opacity of 0. Set the Dropdown Menus Point of interest Text Color to #5A4130.
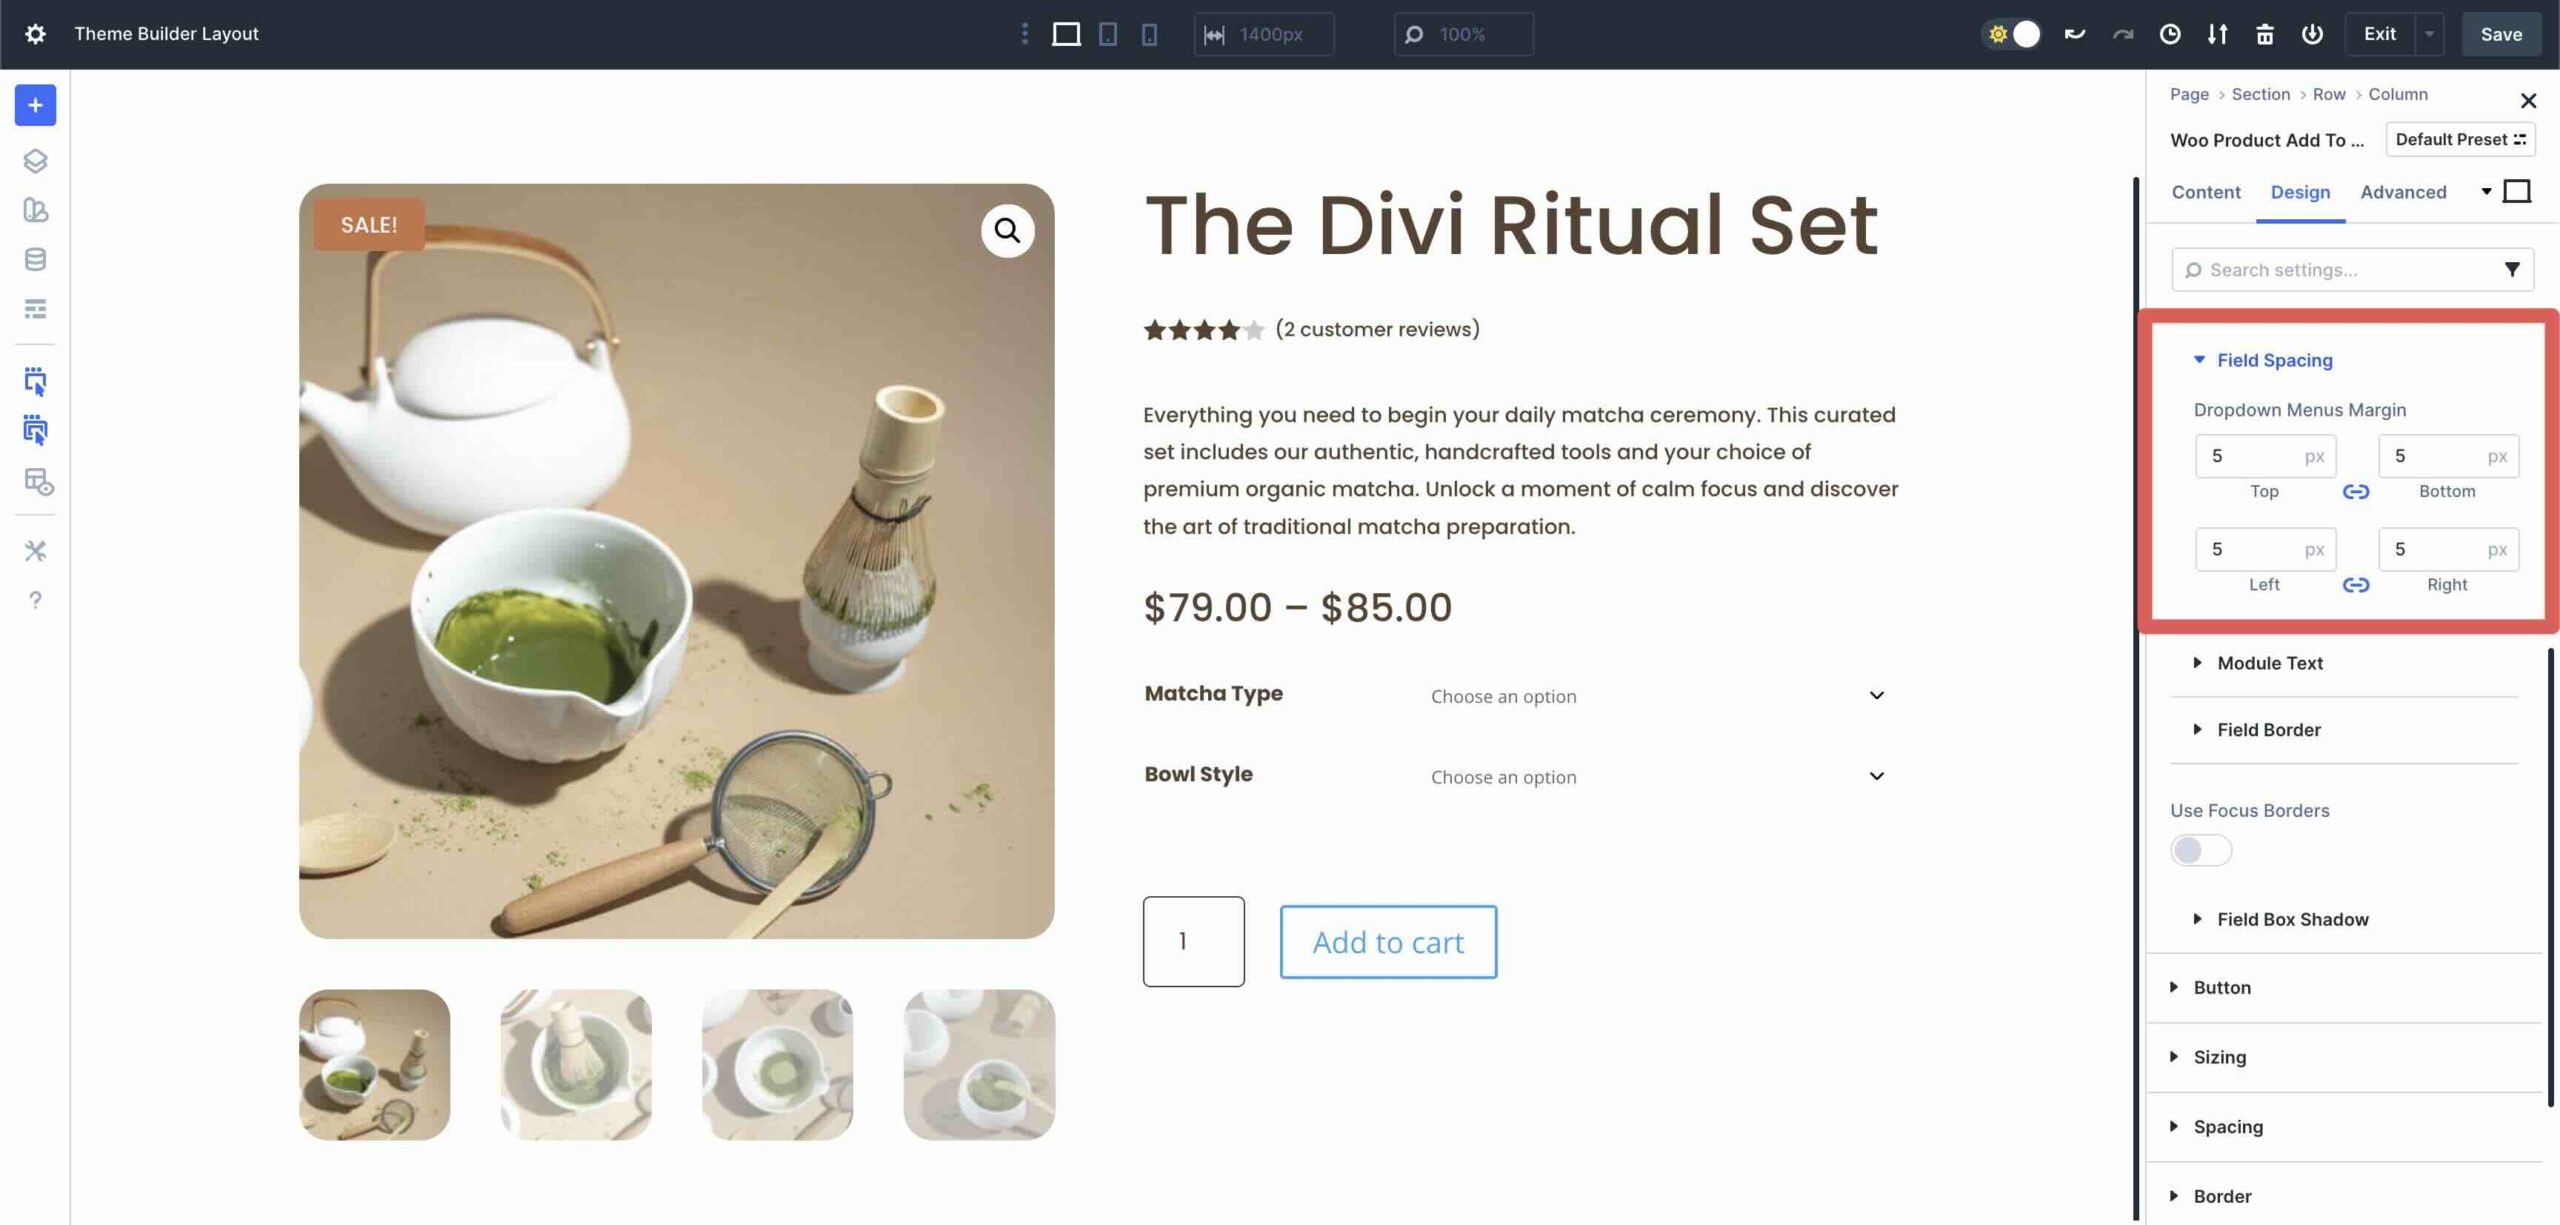
Next, magnify the Field Spacing settings. Set the Dropdown Menu Margin to 5px on each and every facet.
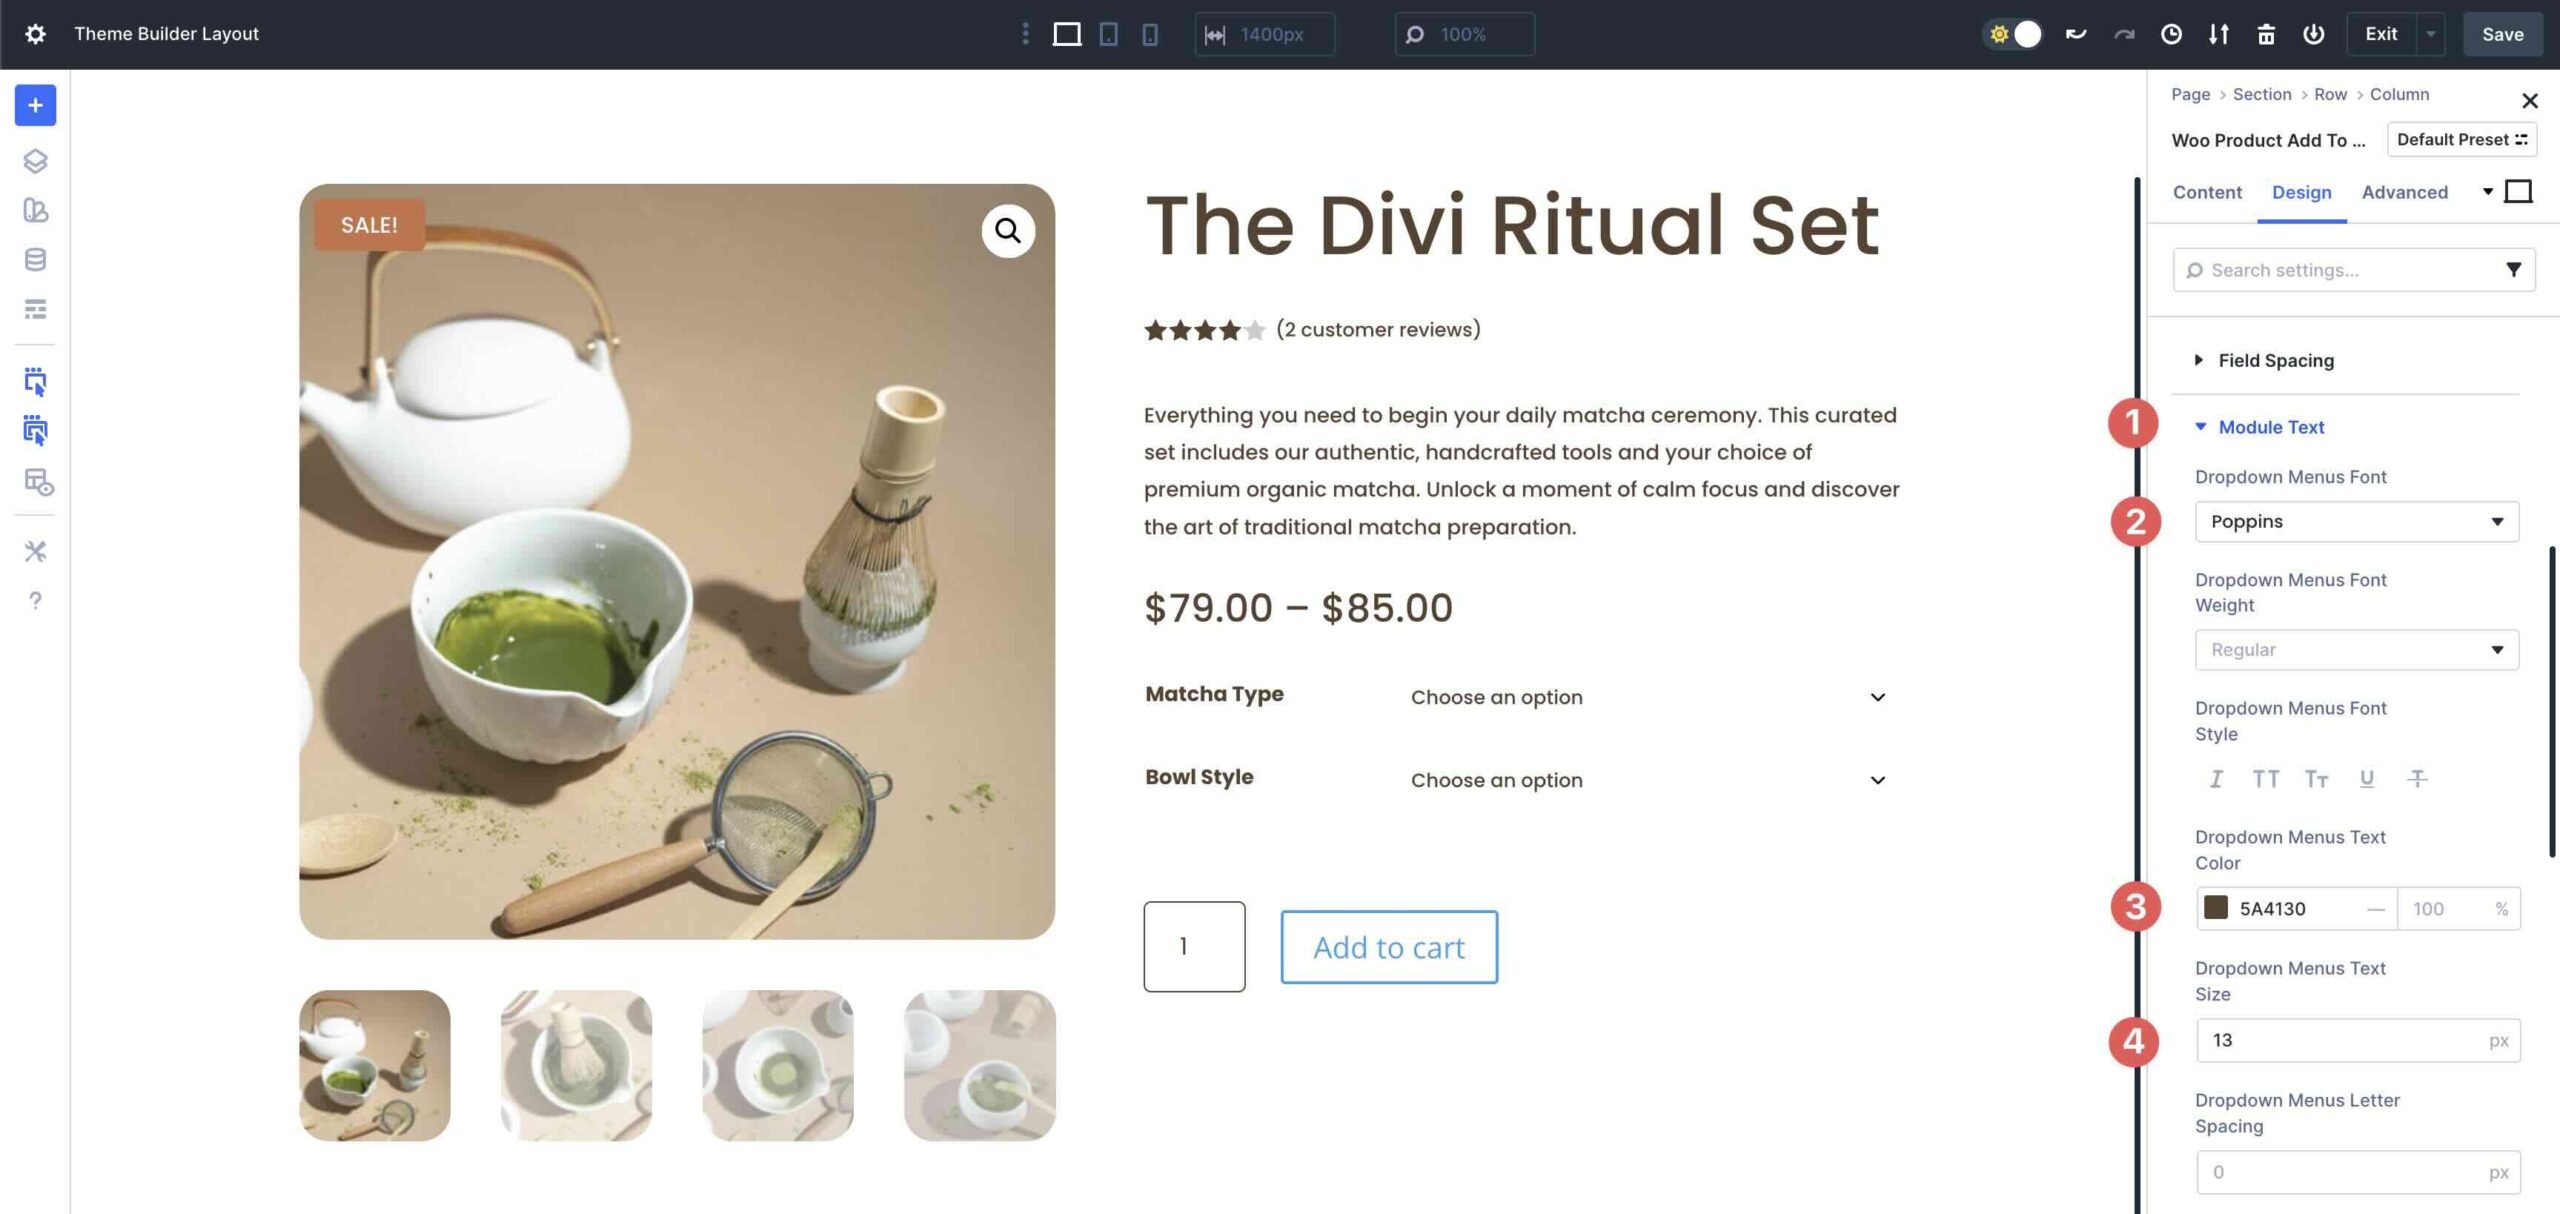
Inside the Module Text dropdown menu, enter Poppins since the Dropdown Menu Font, #5A4130 since the Dropdown Menu Text Color, and 13px since the Dropdown Menu Text Size.
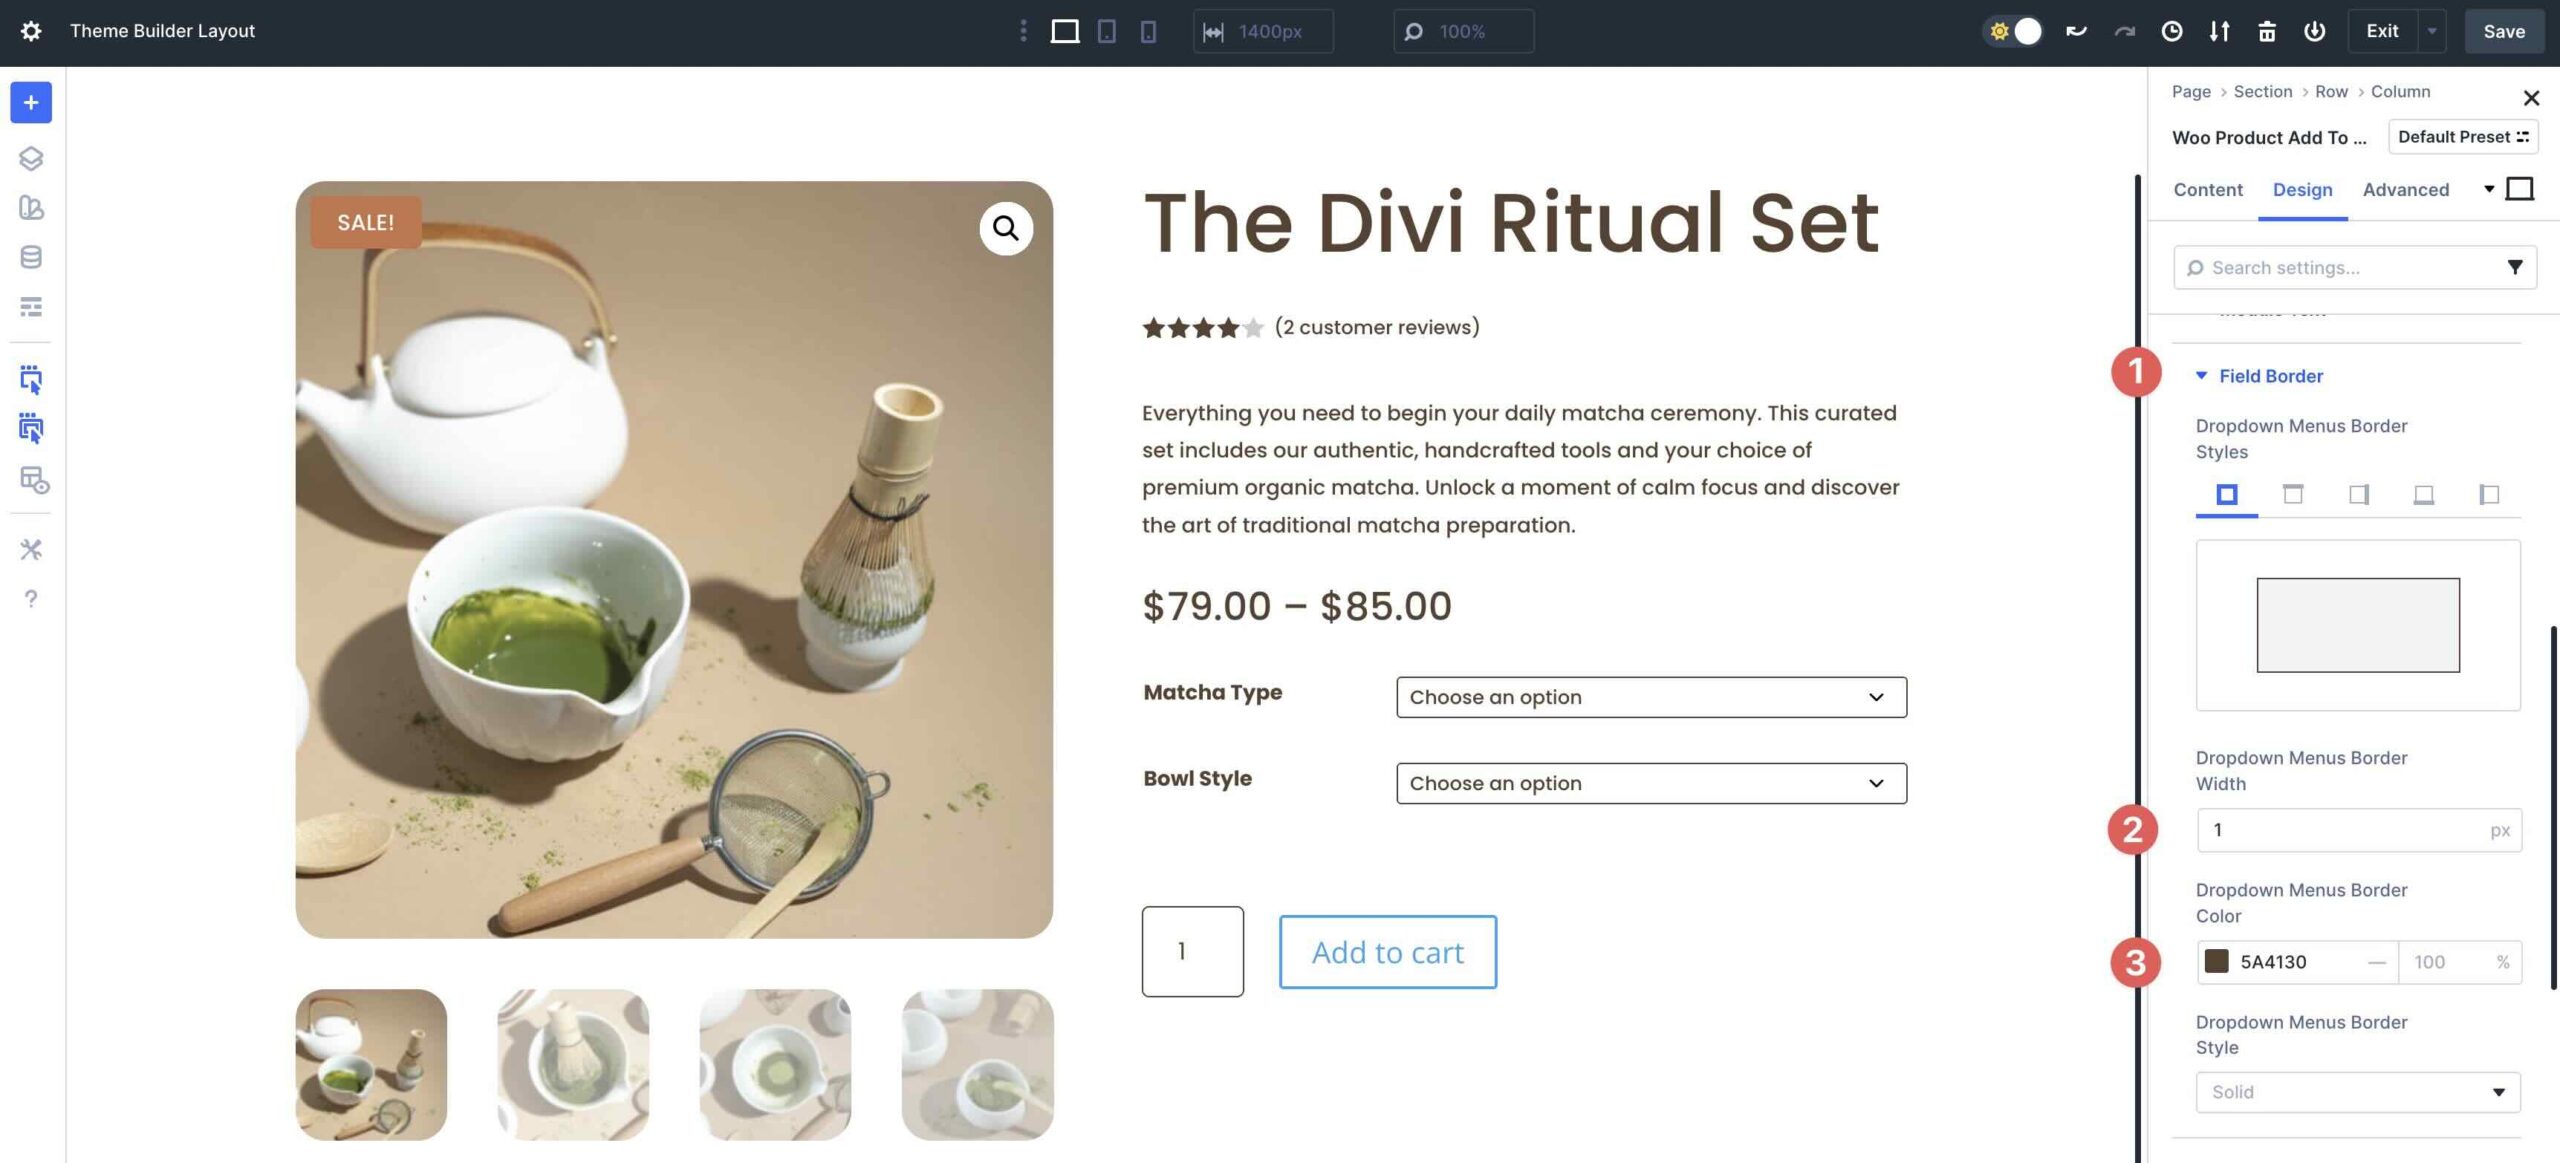
Next, magnify the Field Border menu. Add 1px Dropdown Menus Border Width and set the Dropdown Menus Border Color to #5A4130.
Style The Button
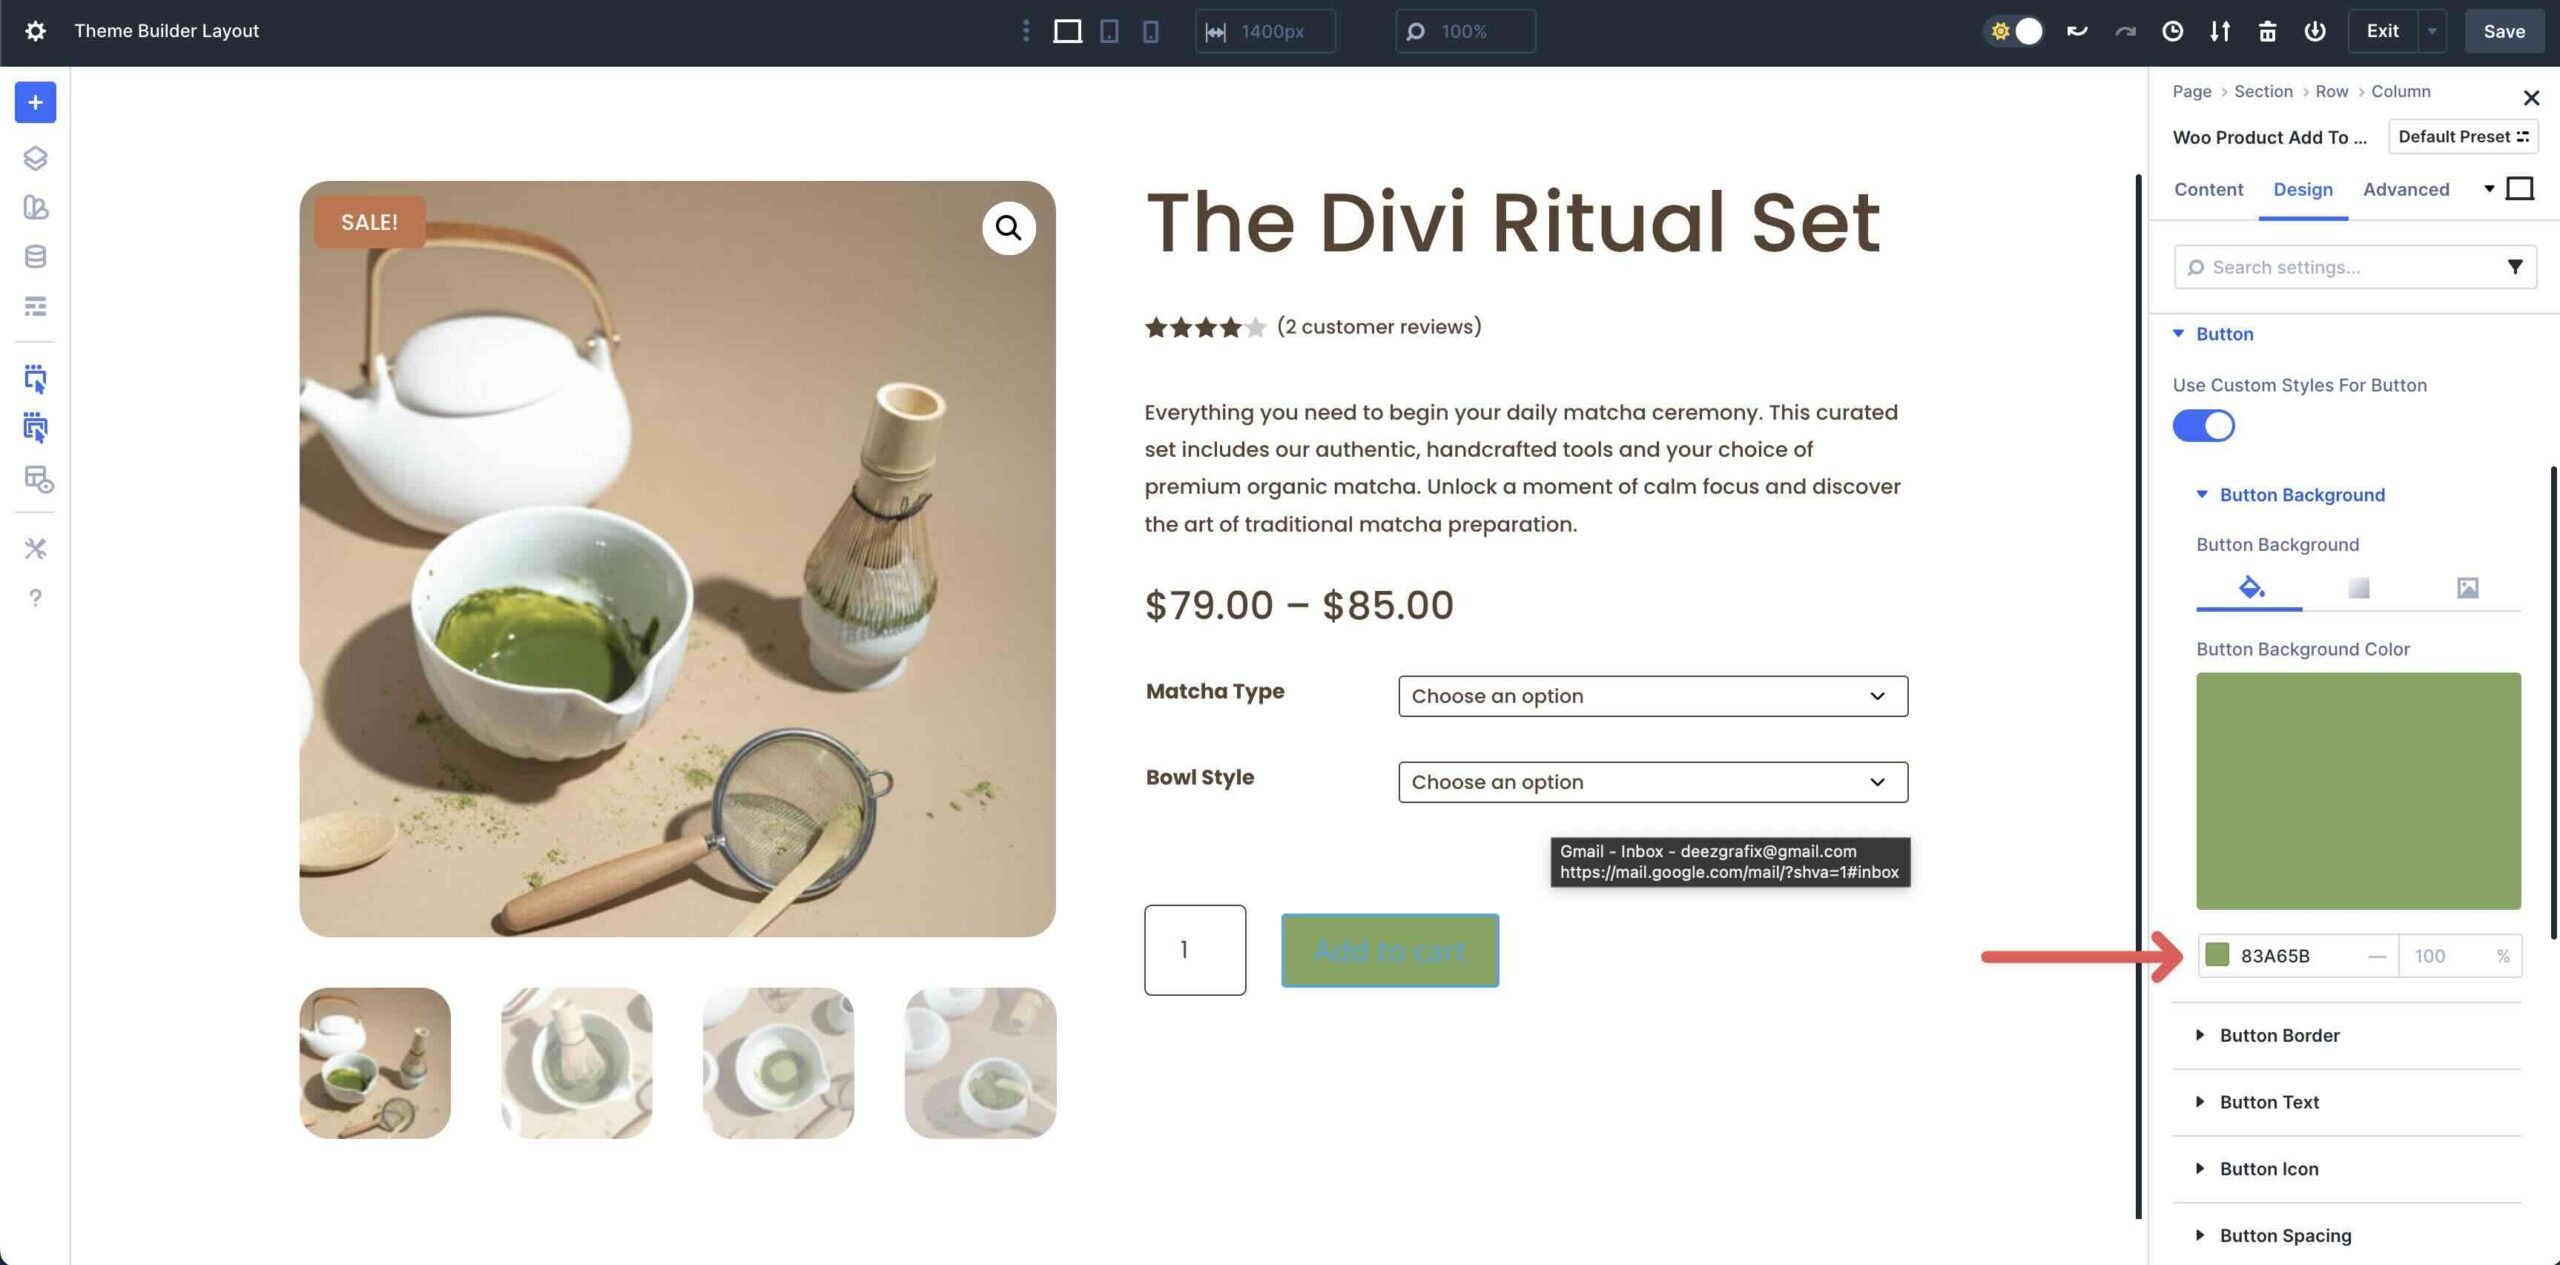
Without equal step in this module is to style the Button. Make larger the Button menu and toggle Use Custom designed Types For Button on.

Make larger the Button Background settings and assign #83A65B since the Button Background Color.
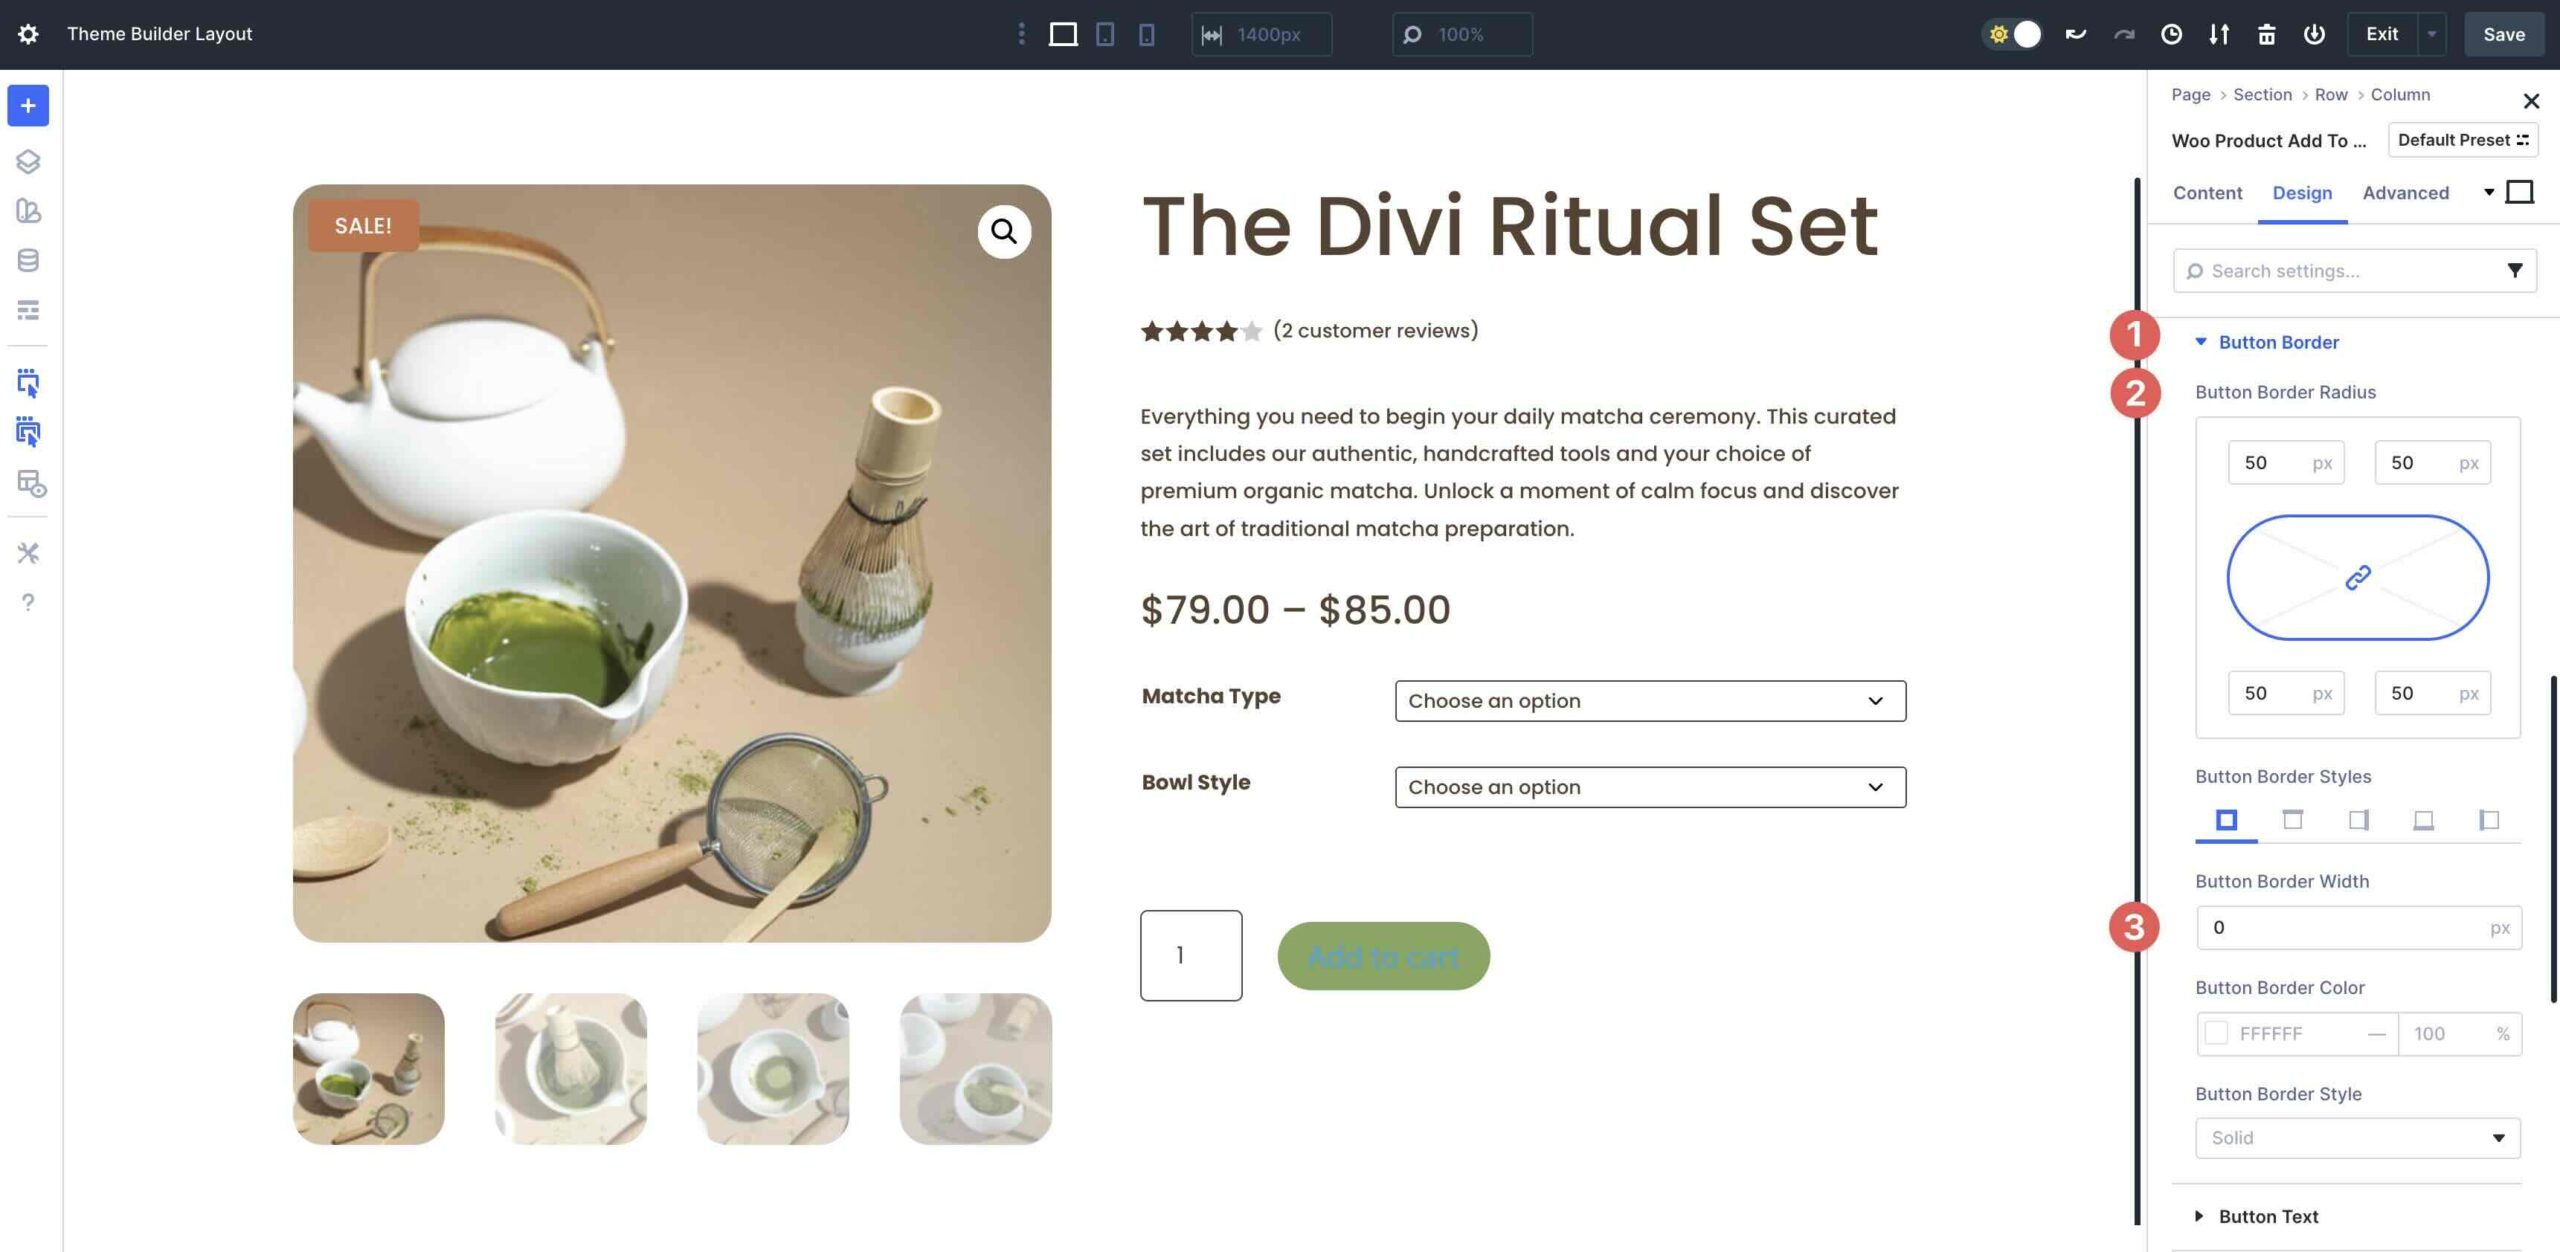
Inside the Button Border menu, add 50px Button Border Radius.
Inside the Button Text menu, use Poppins since the Button Font, Uppercase inside the Button Font Style, and 15px for the Button Text Size.

Finally, inside the Button Spacing menu, add 15px Button Padding to the top and bottom and 35px for the left and right kind.

Add The Woo Product Meta Module
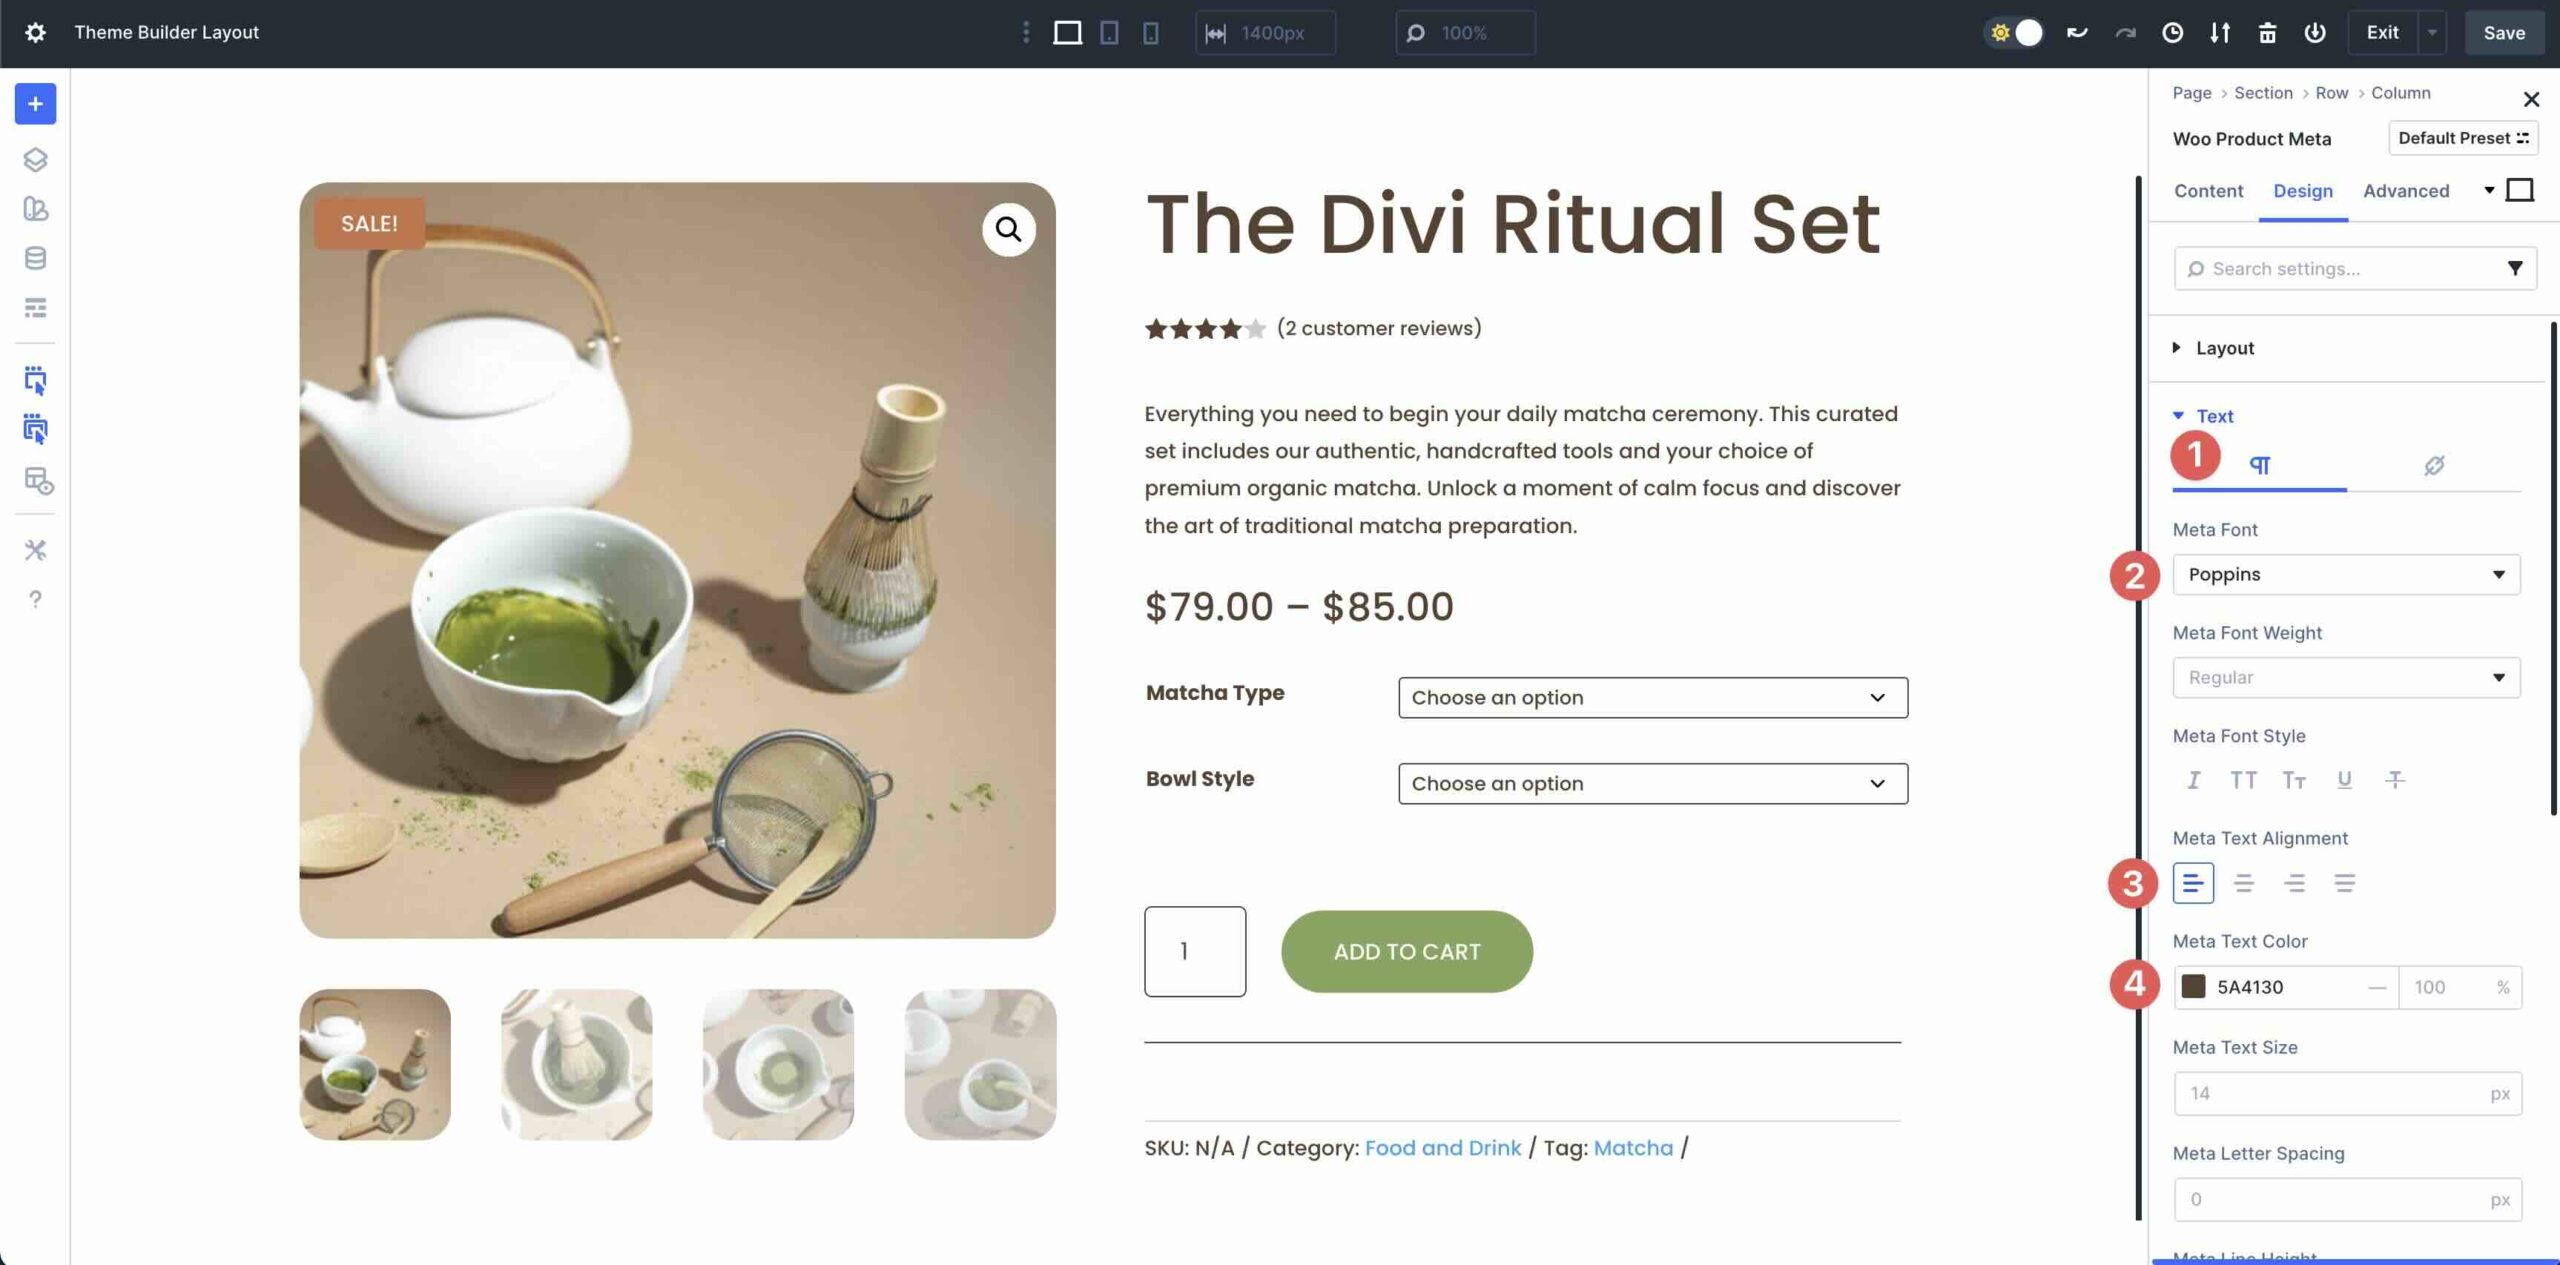
Without equal module to be able to upload to the second column of the row is the Woo Product Meta module.

Inside the Design tab, magnify the Text menu. For the Paragraph tab, enter Poppins since the Meta Font, Left inside the Meta Text Alignment field, and #5A4130 inside the Meta Text Color field.
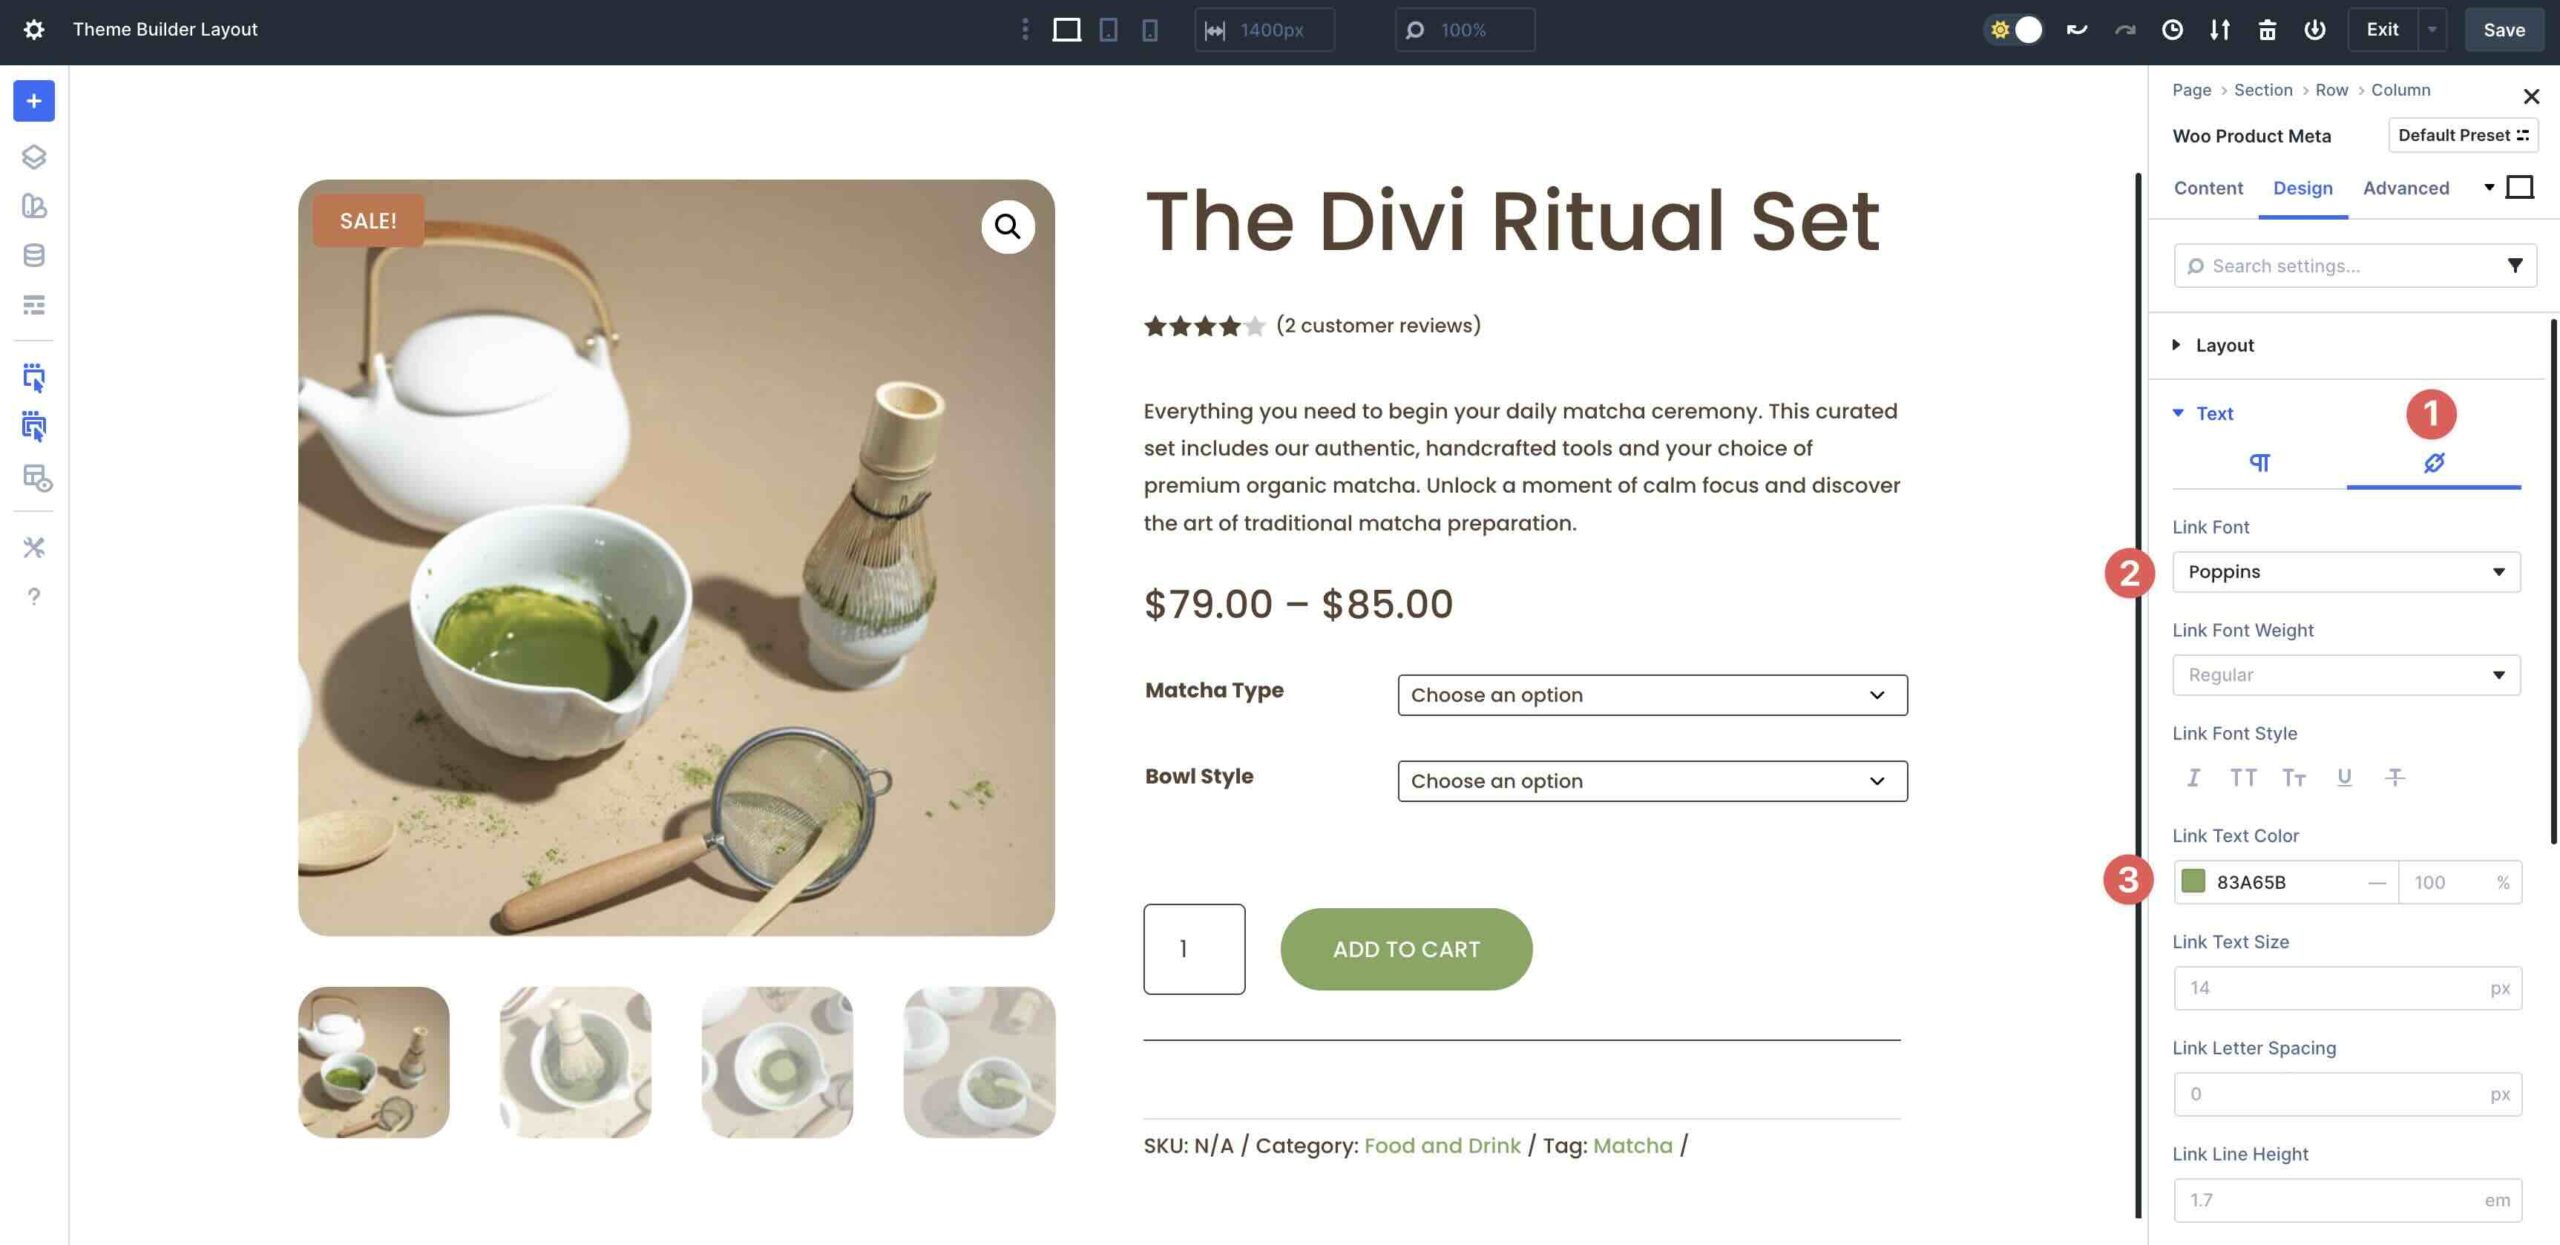
Tab over to Links. Select Poppins since the Link Font and enter #83A65B since the Link Text Color.
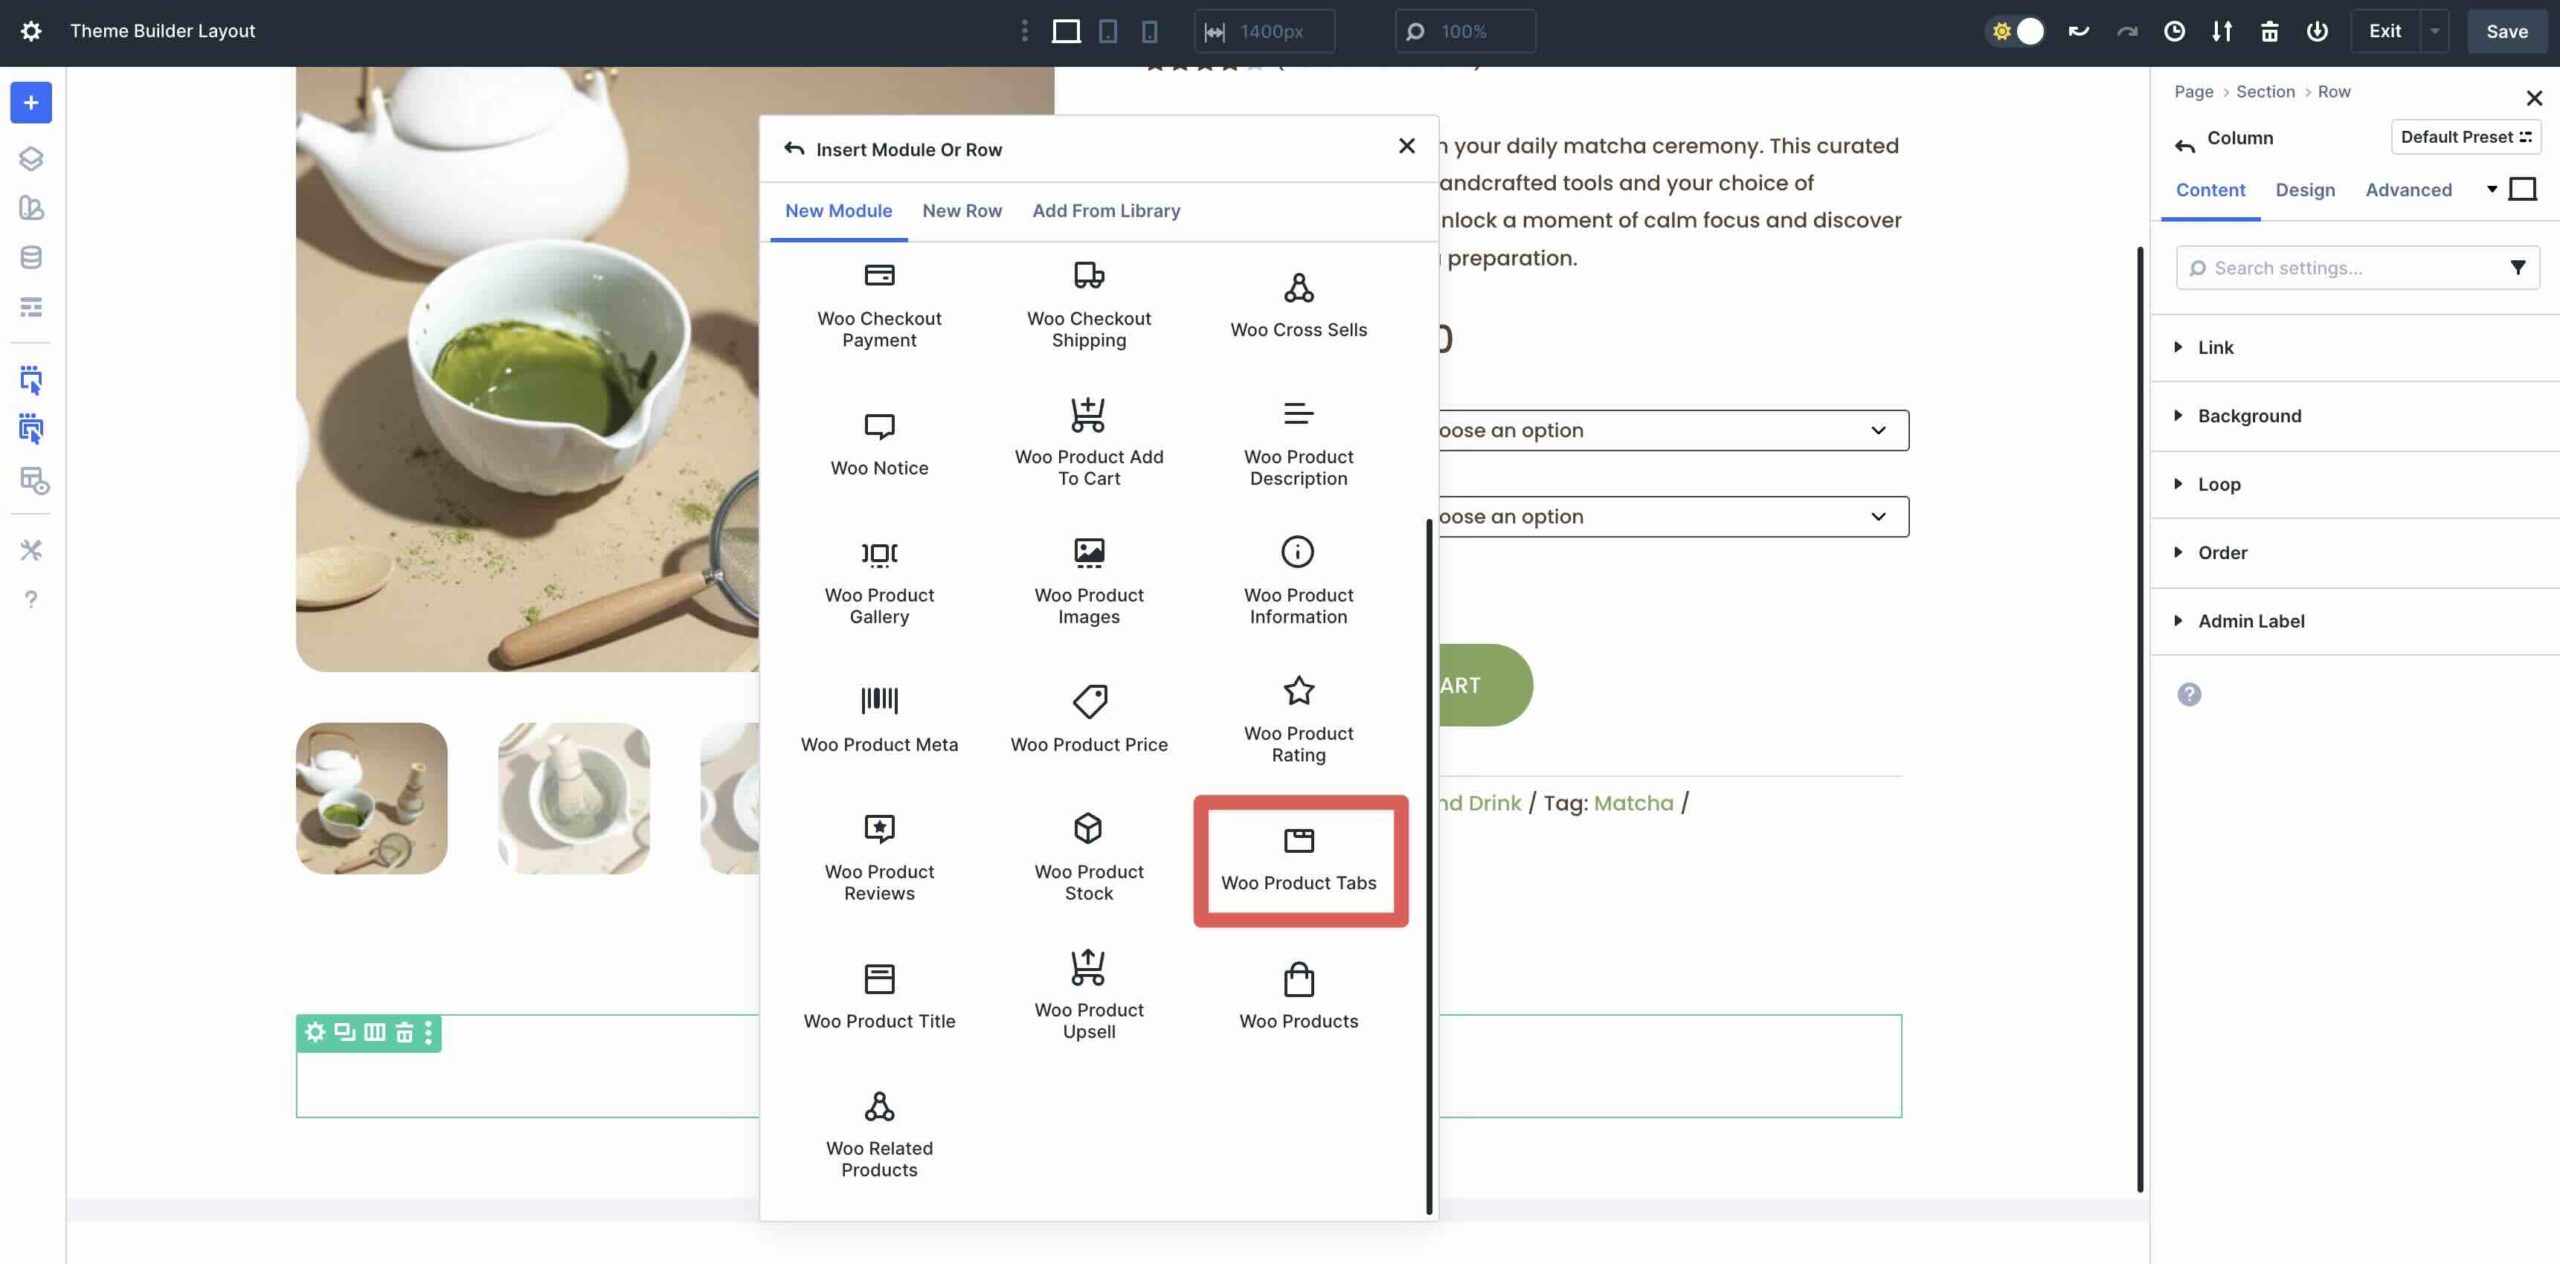
Add The Woo Product Tabs Module
Add a brand spanking new single-column row beneath the two-column row that properties our product knowledge. Select the Woo Product Tabs module.
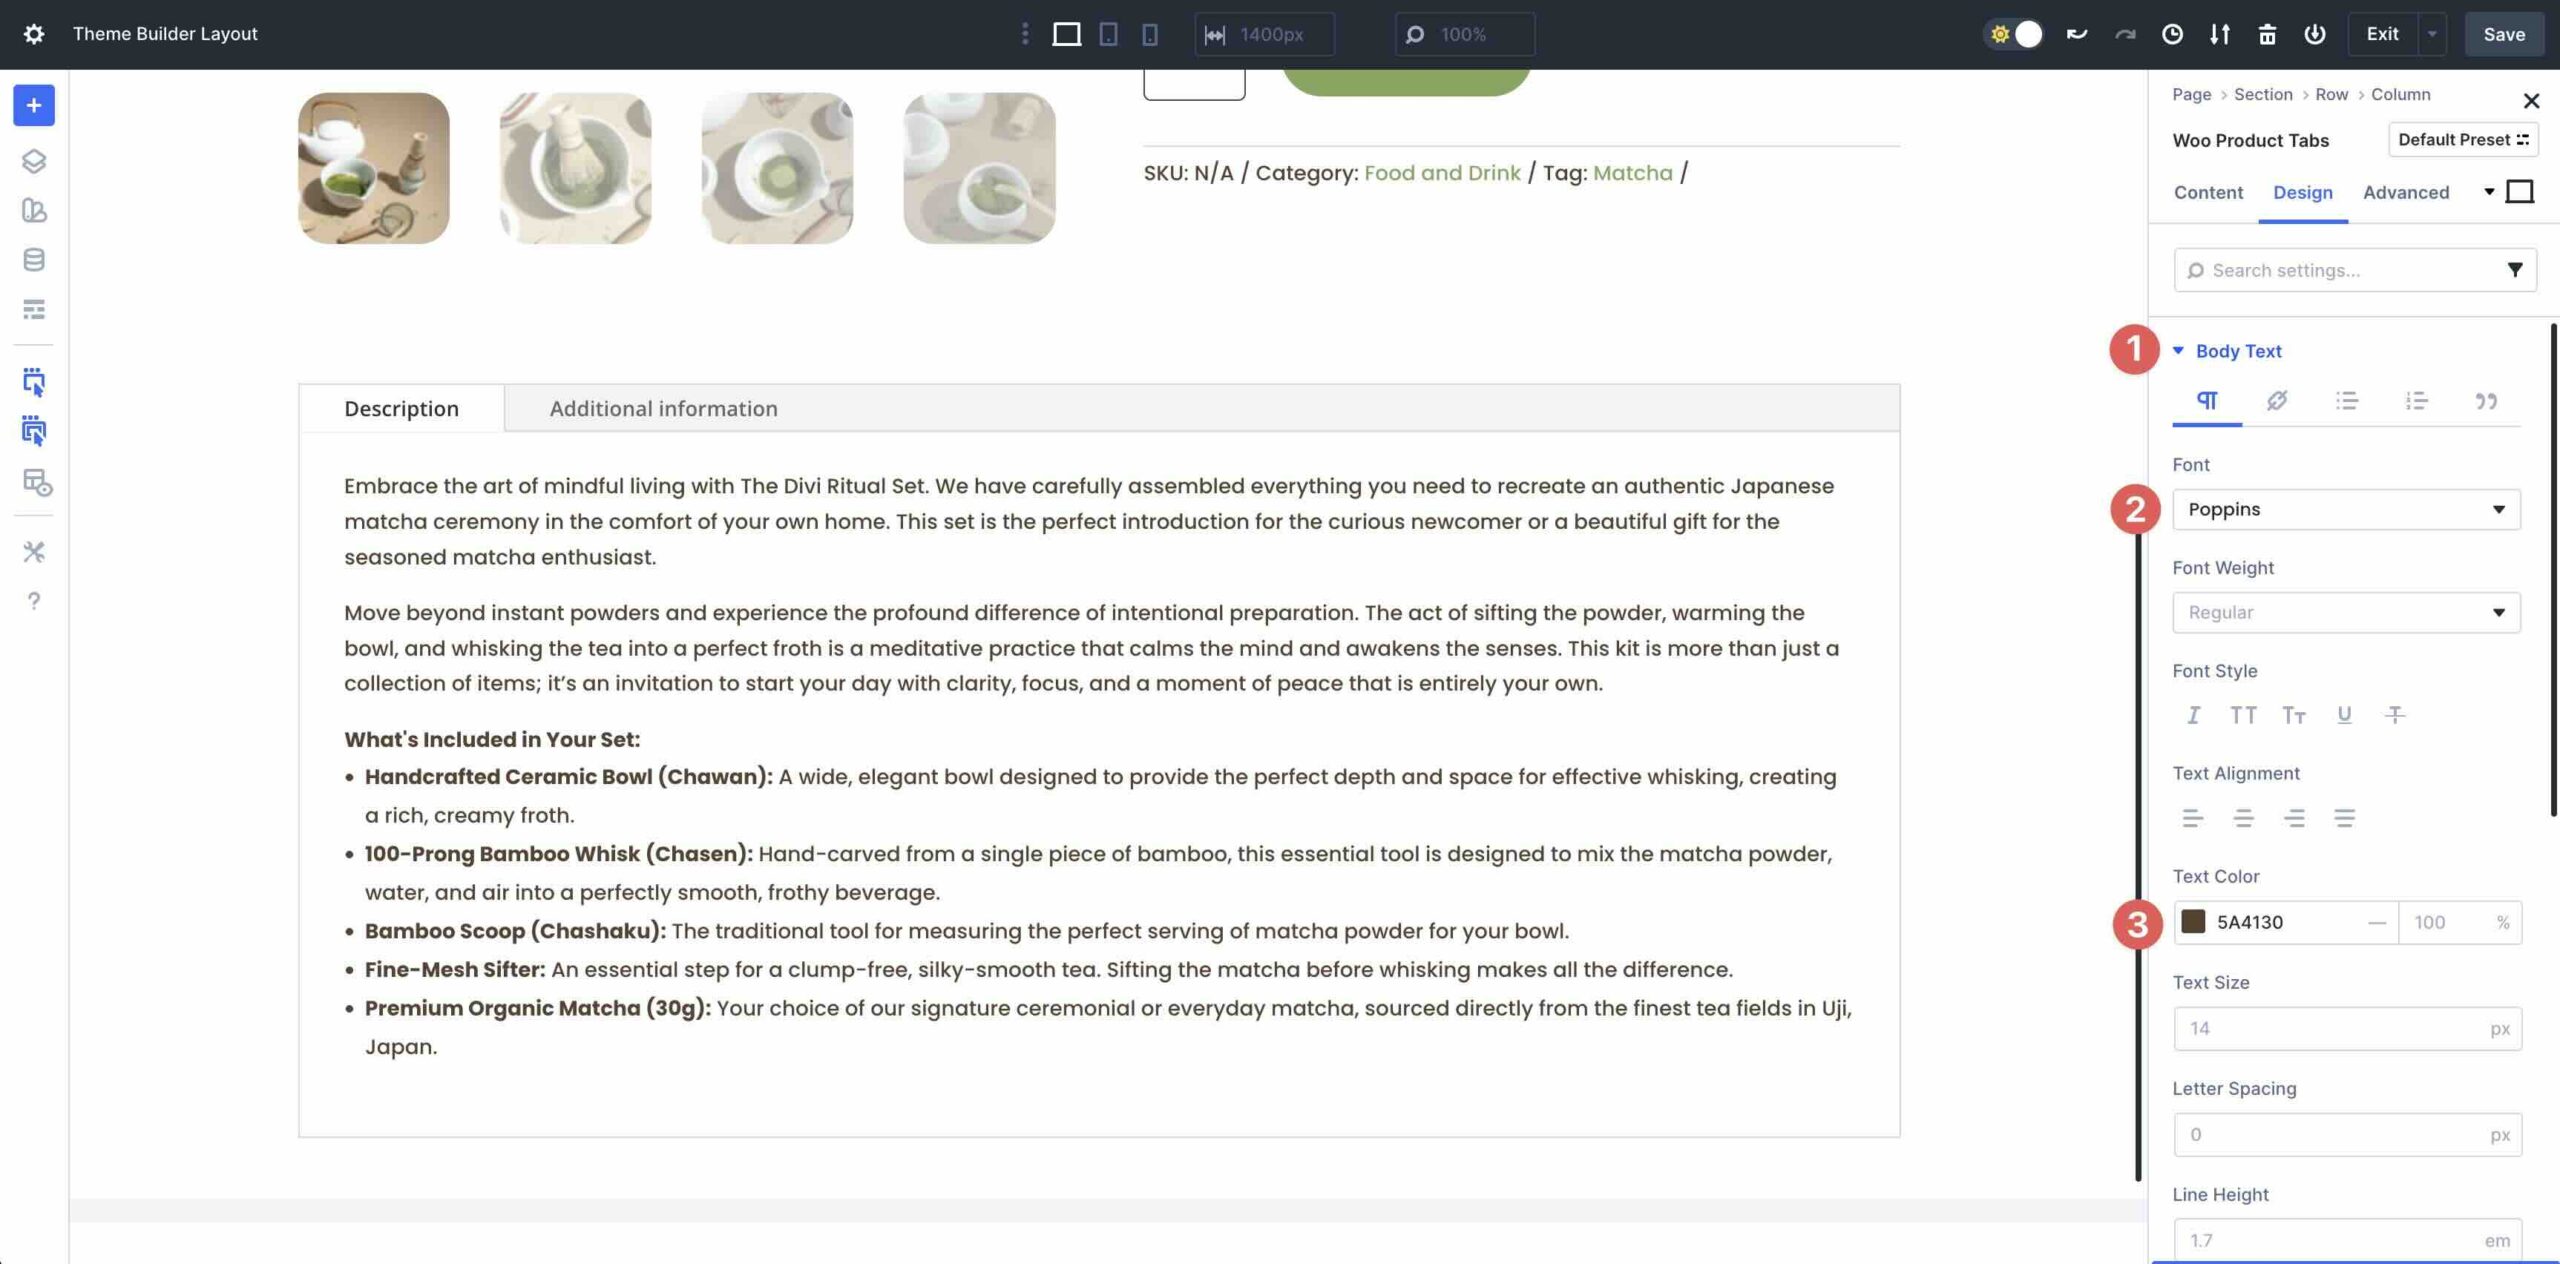
Make larger the Body Text menu. Enter Poppins for the Font and set the Text Color to #5A4130.
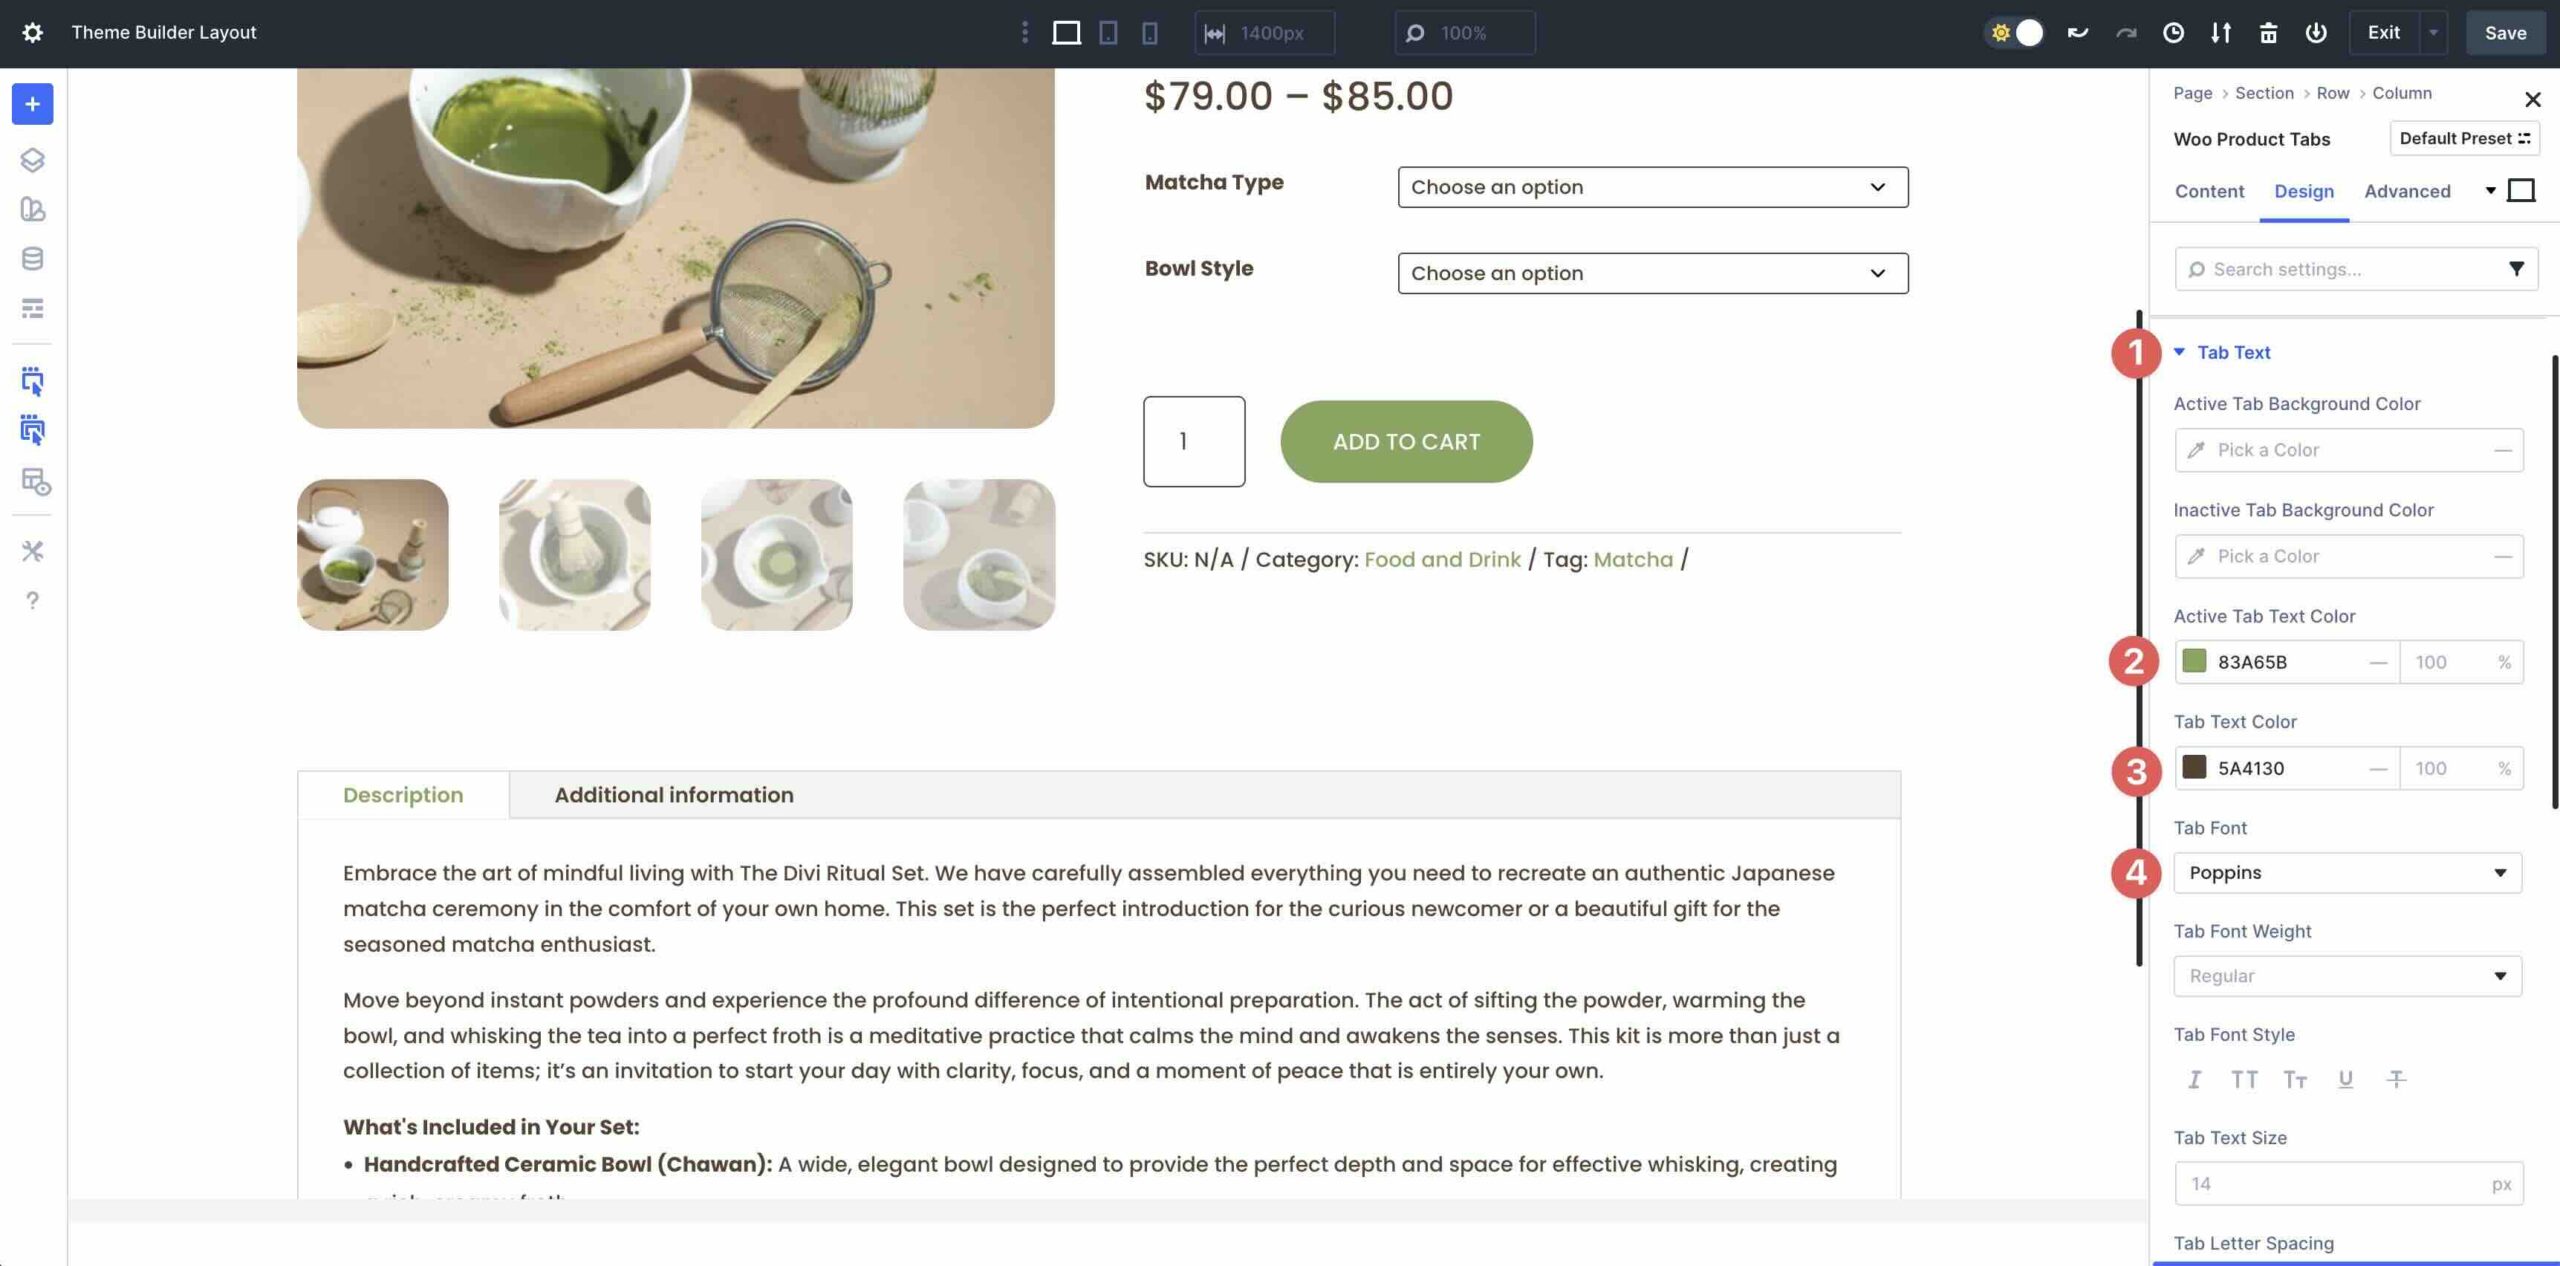
Next, magnify the Tab Text menu. Enter #83A65B since the Vigorous Tab Text Color and #5A4130 since the Tab Text Color. Set the Tab Font to Poppins.
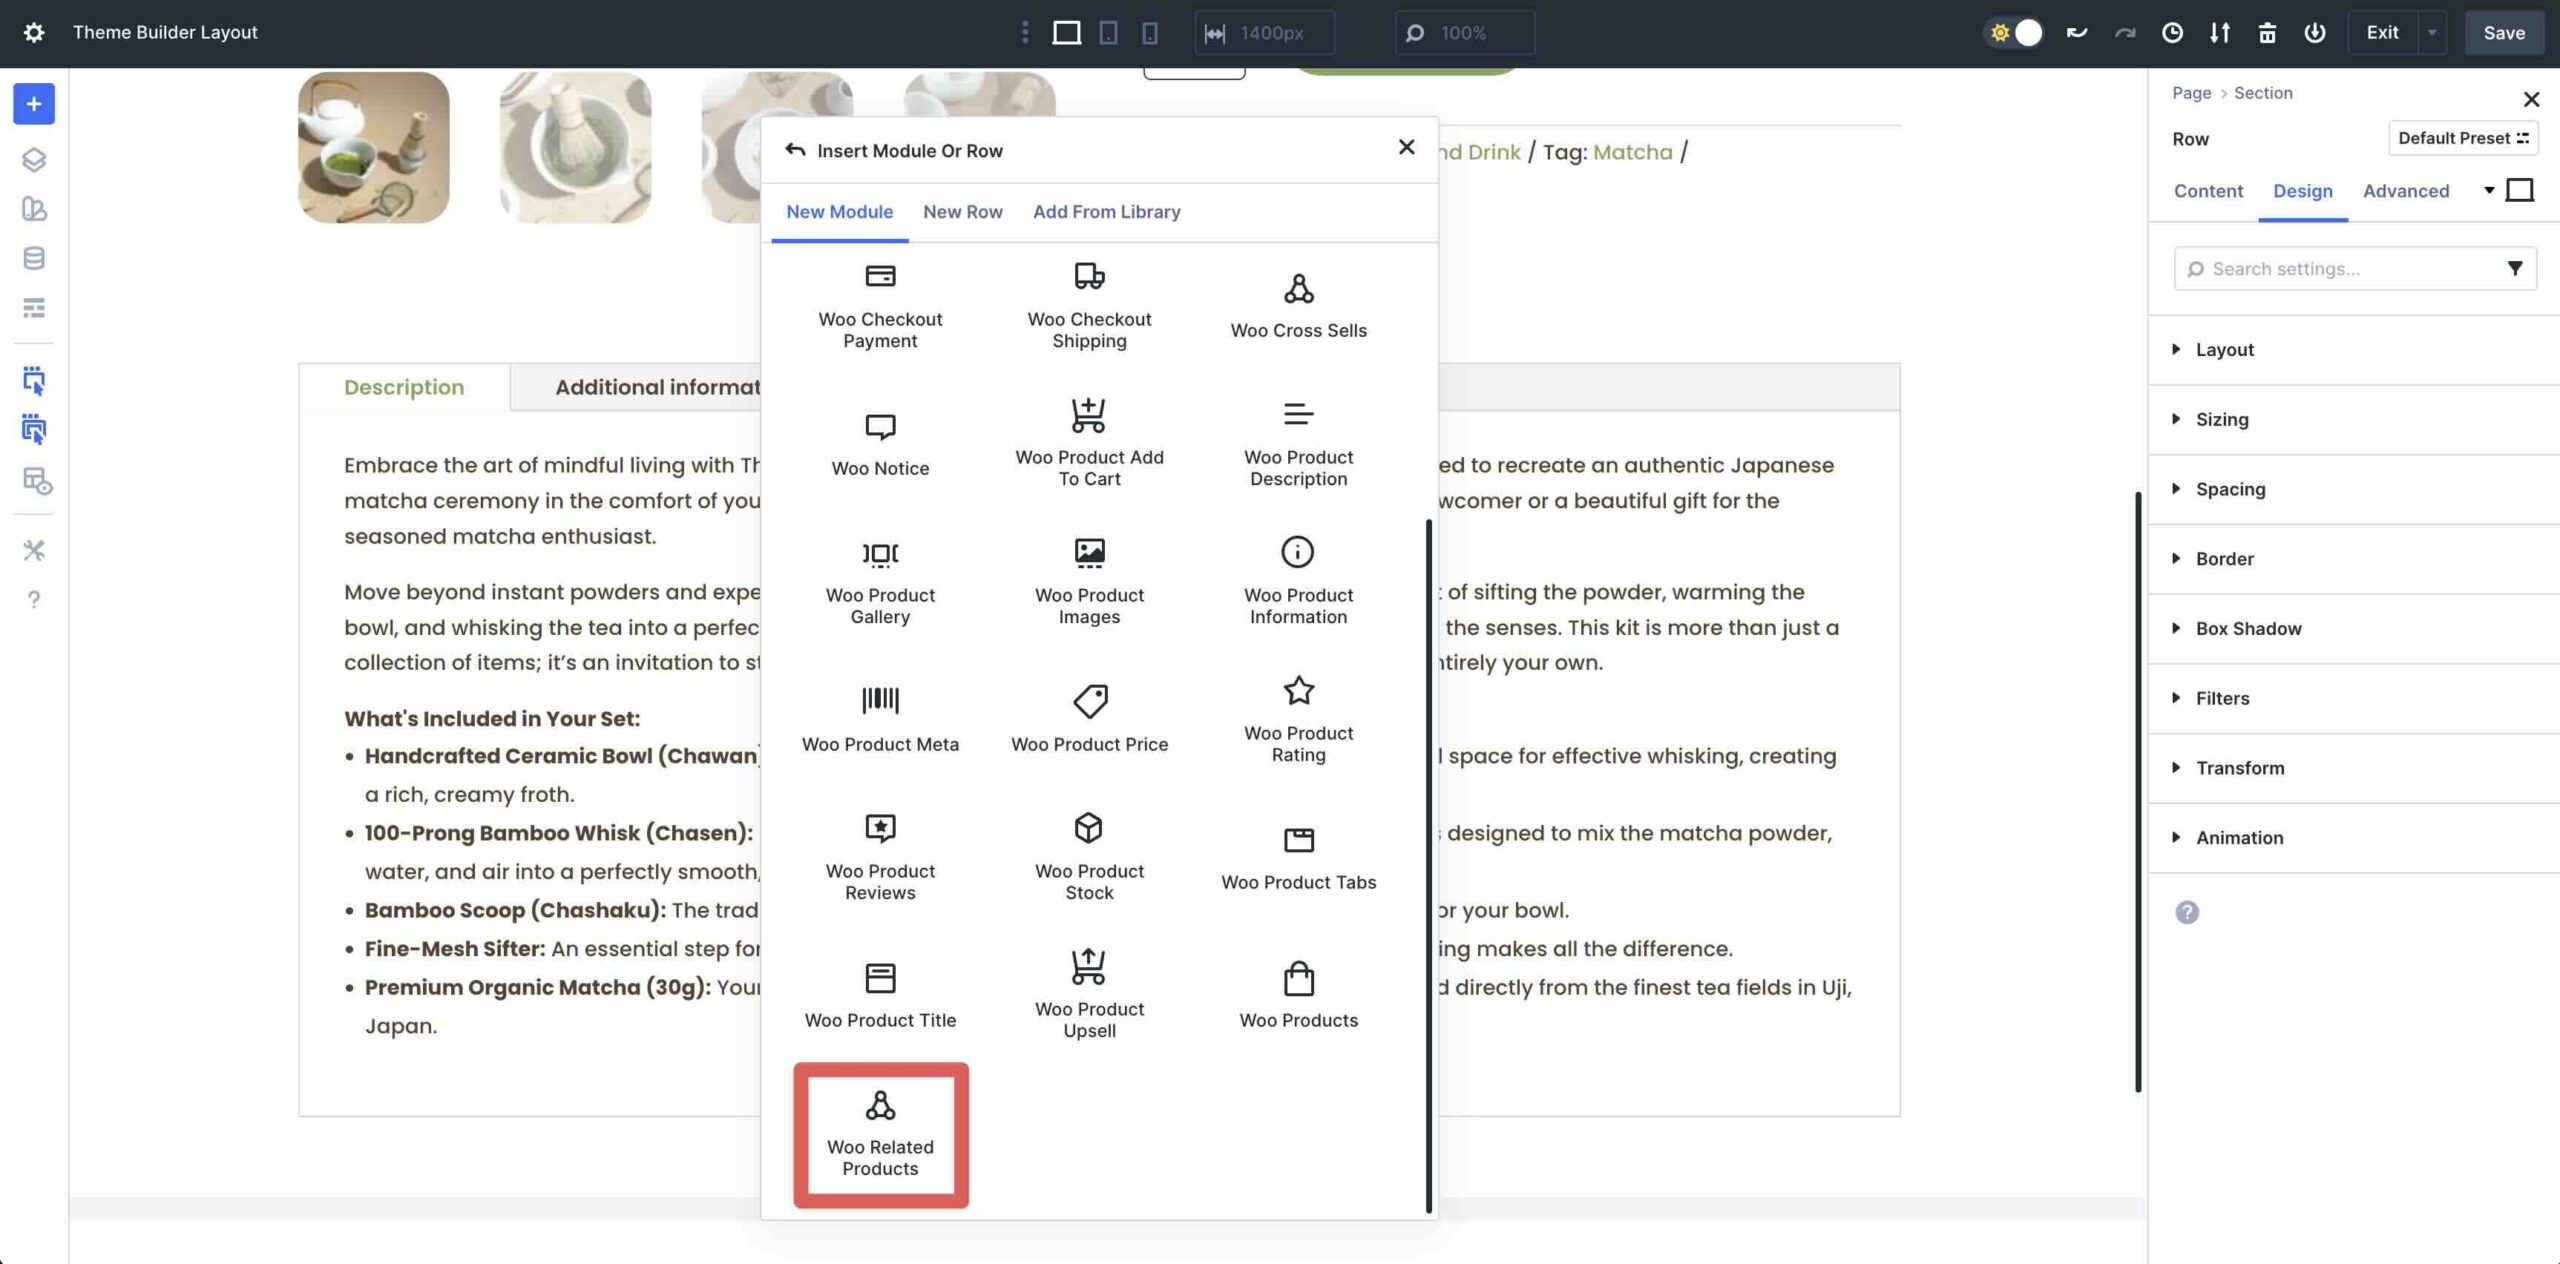
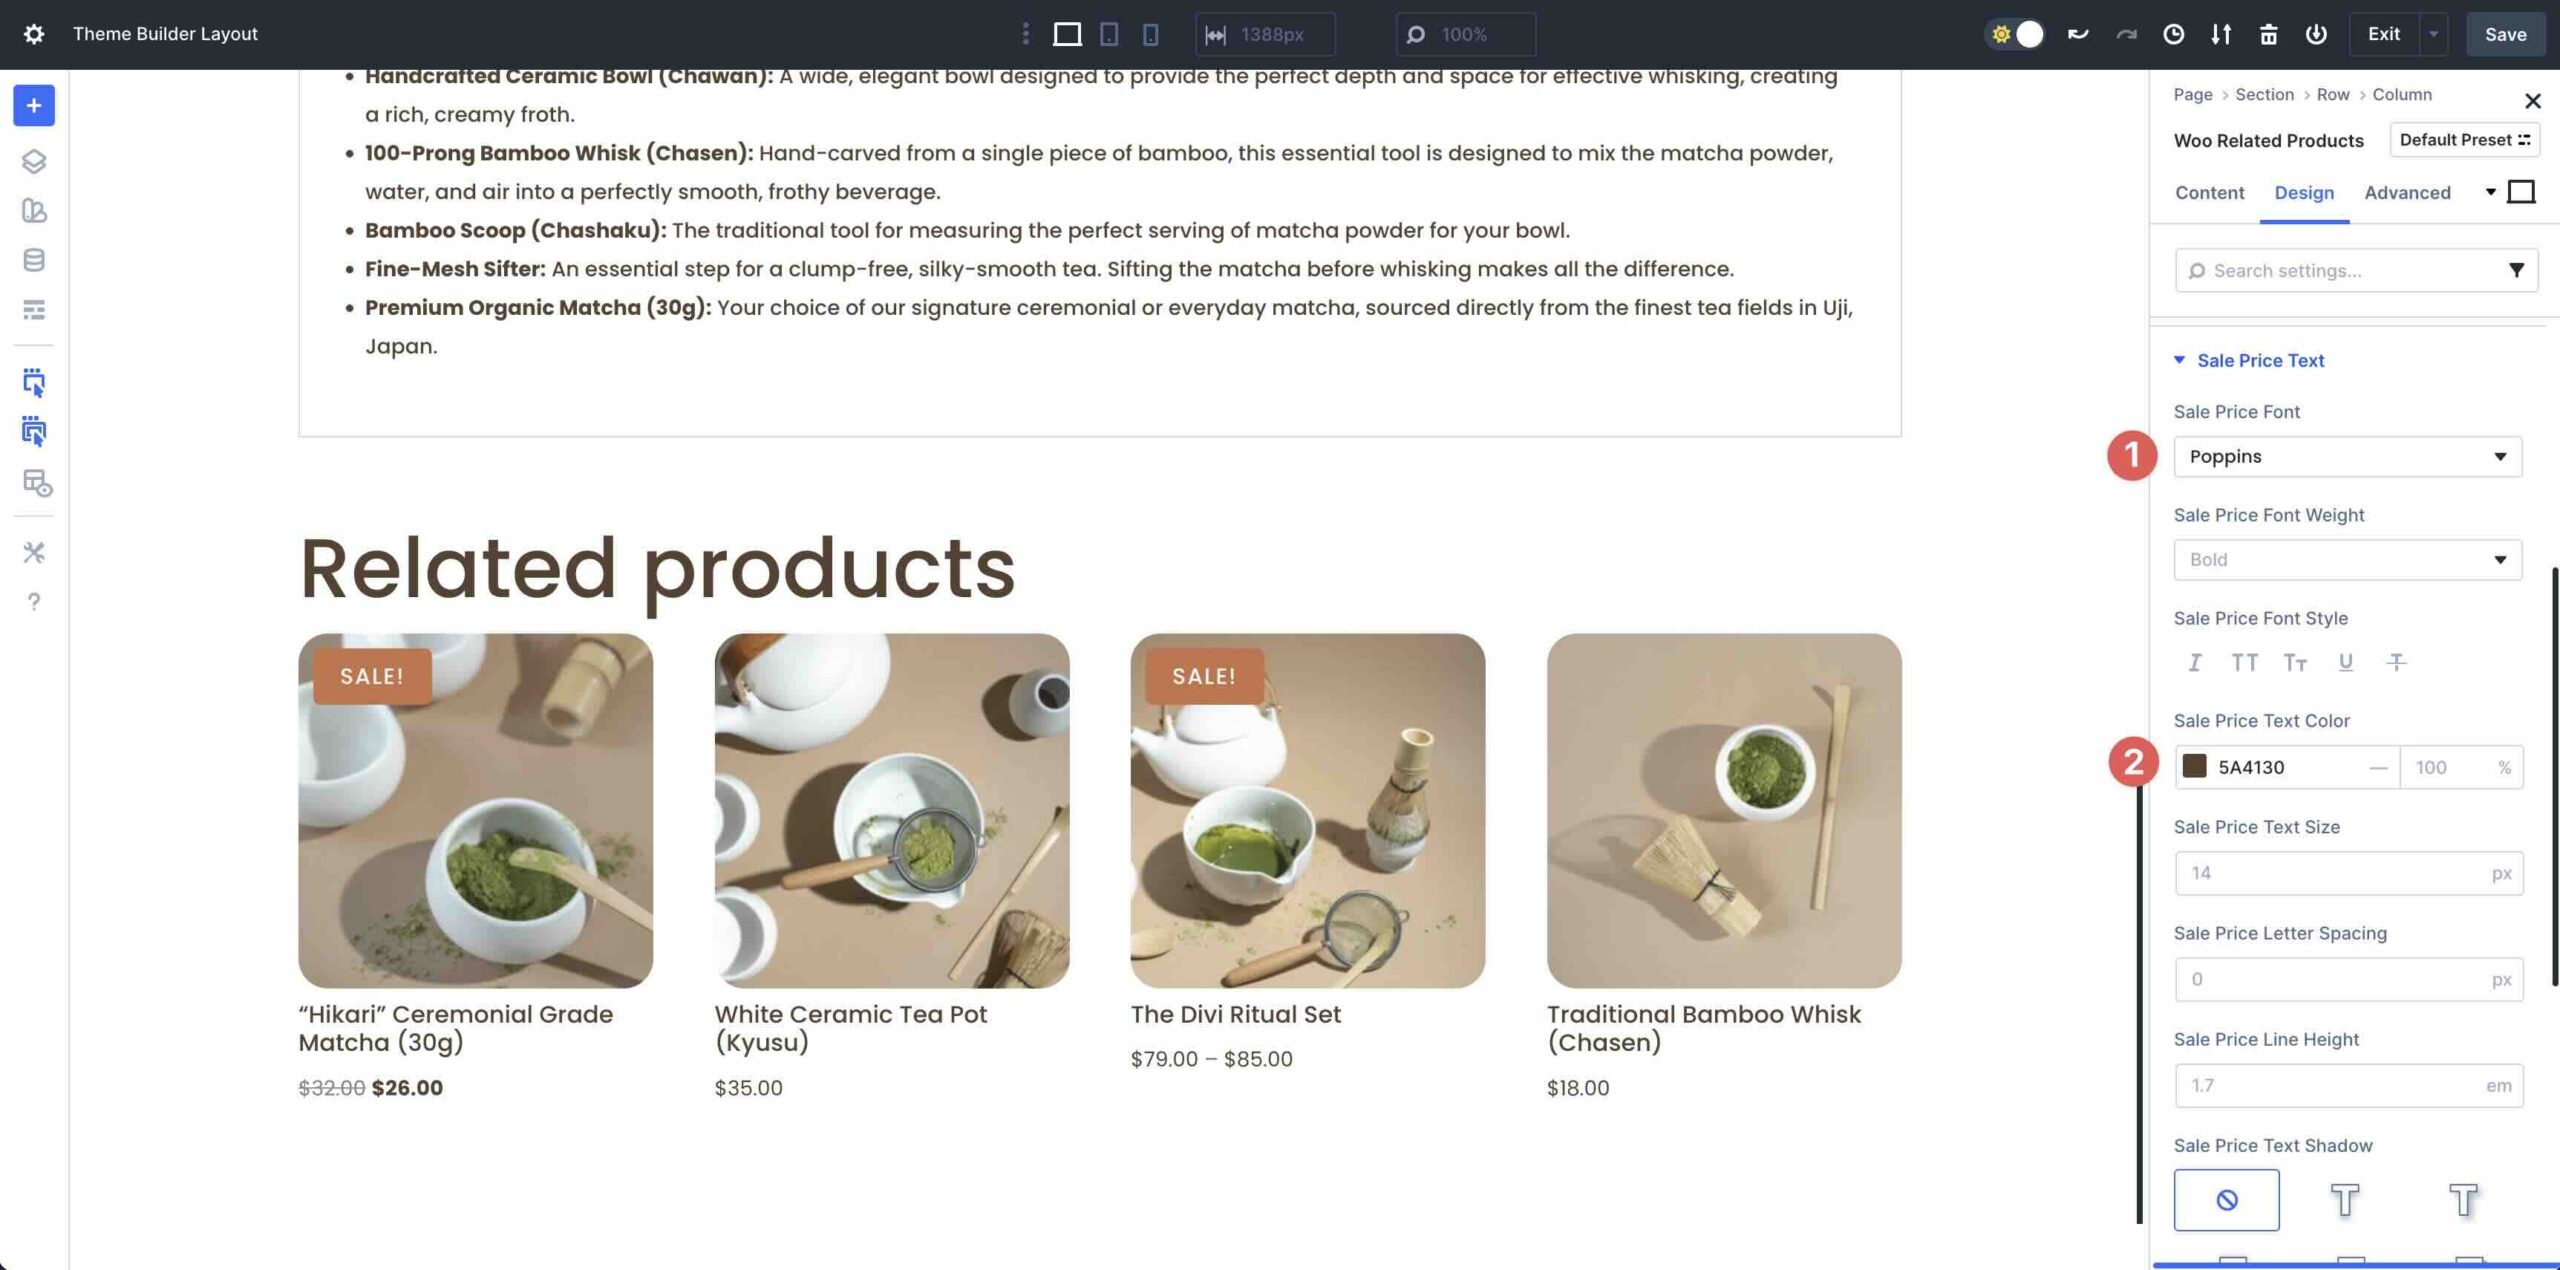
Add The Woo An identical Products Module
Add a brand spanking new single-column row. Select and add the Woo An identical Products module to the internet web page.
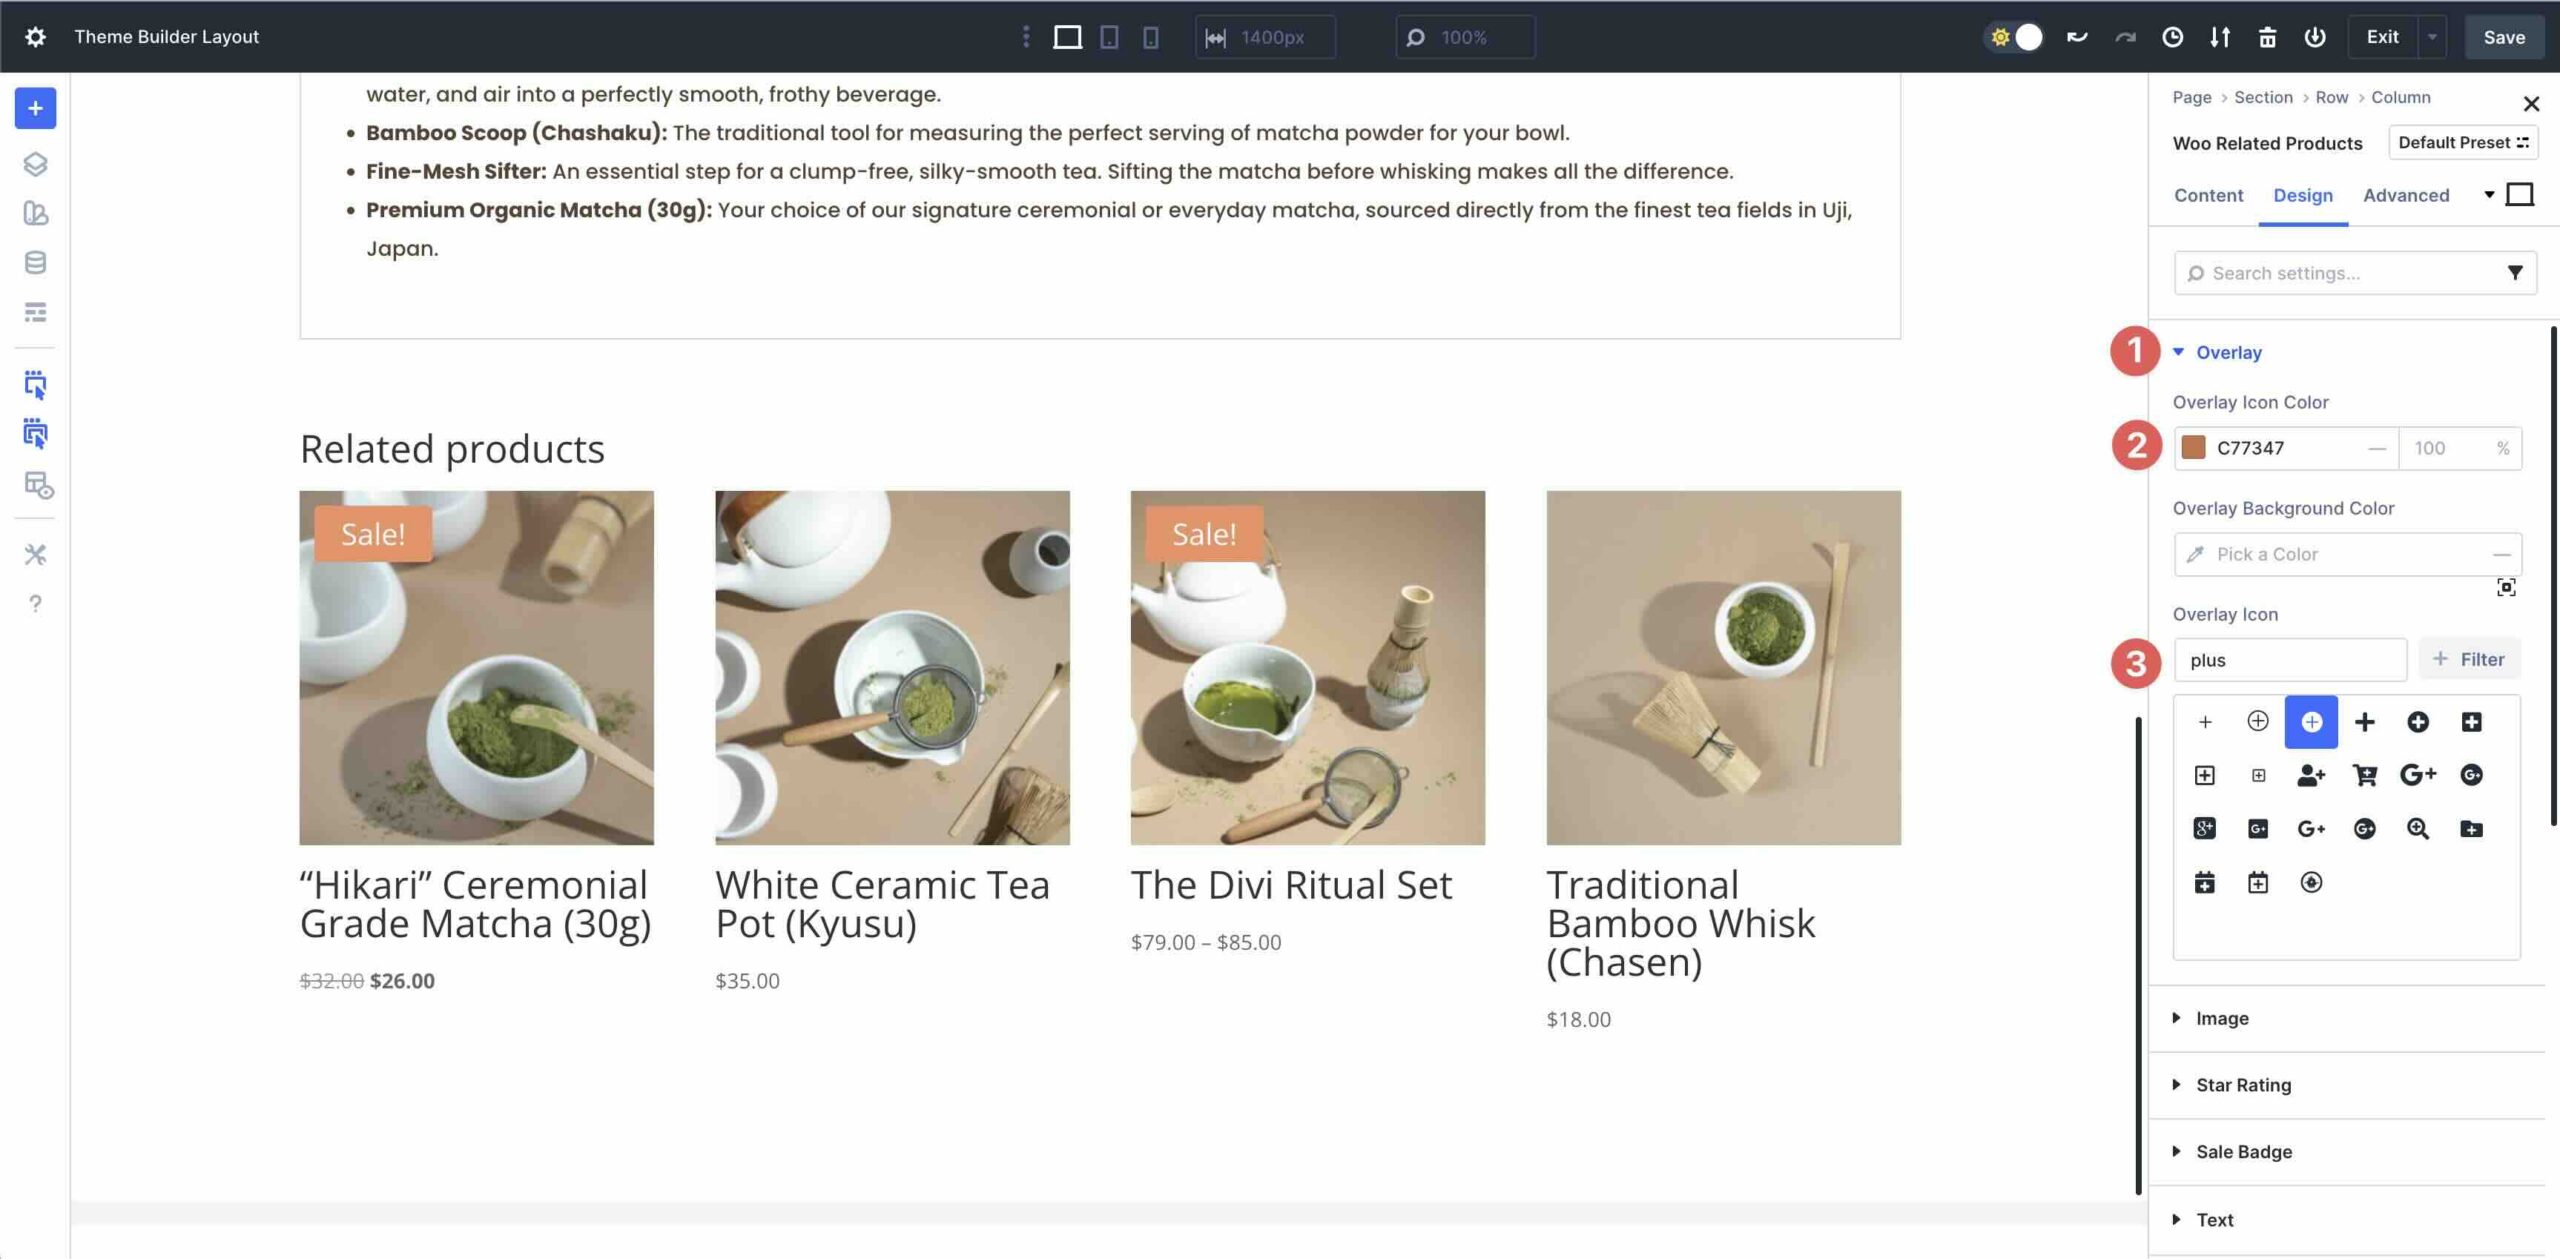
Make larger the Overlay menu. Add #C77347 to the Overlay Icon Color field.
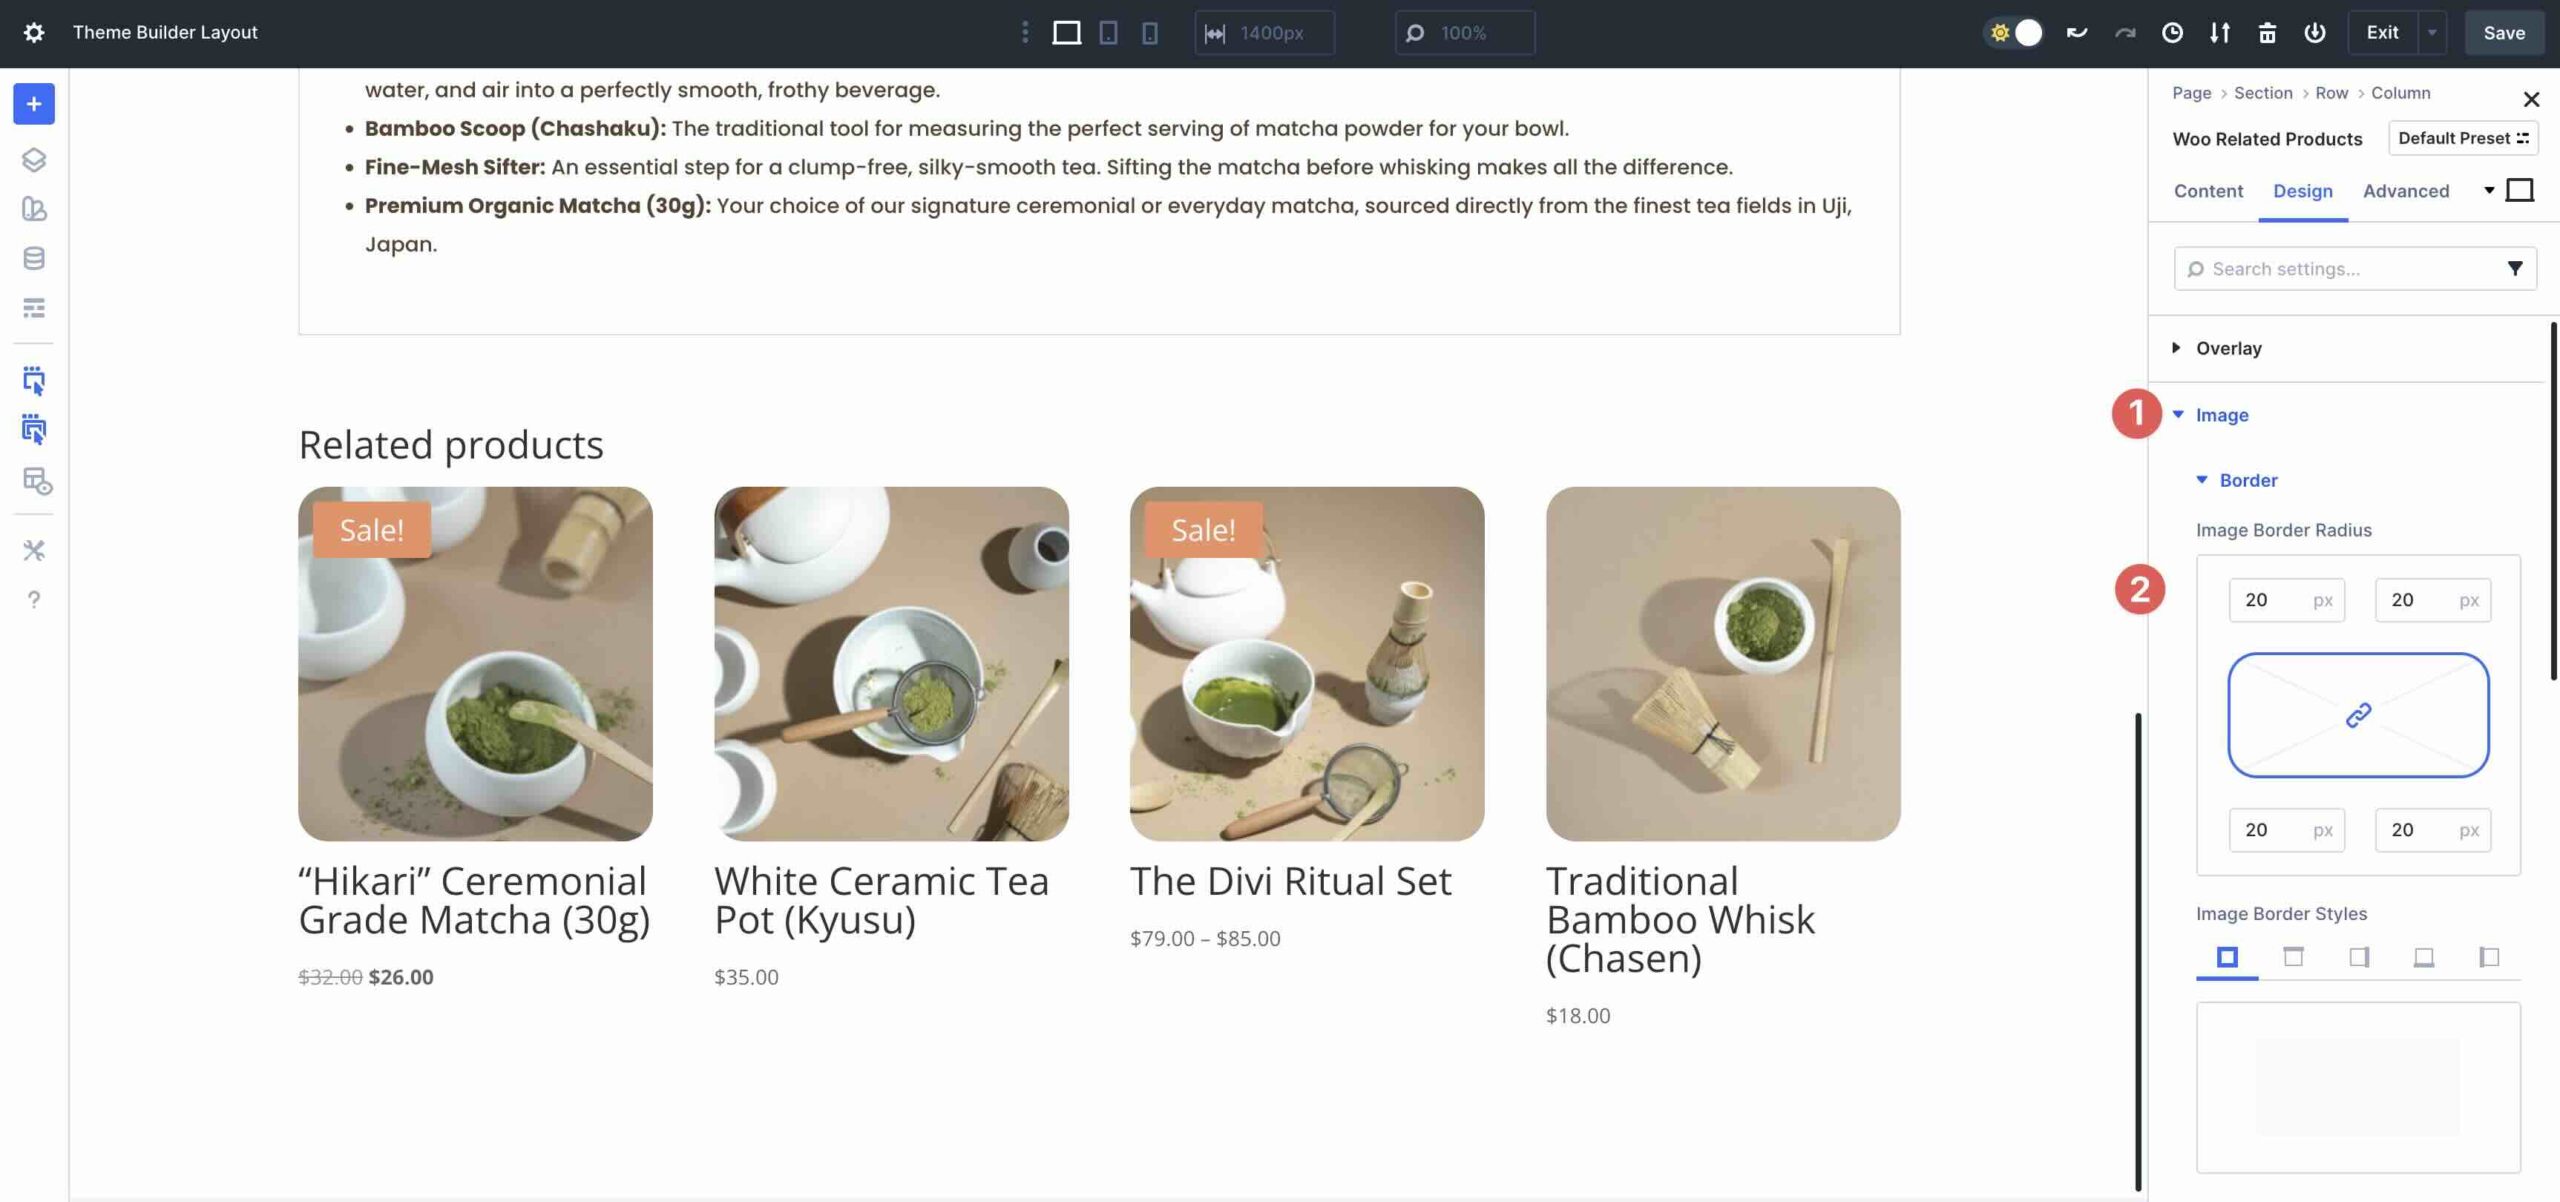
Open the Image menu. Inside the Border settings, add 20px Image Border Radius to each and every facet.
Select and magnify the Superstar Rating menu. Set the Superstar Rating Text Alignment to Left. Use #C77347 for the Superstar Rating Text Color field.

Open the Sale Badge menu. Enter #C77347 since the Sale Badge Color. Make larger the Text menu. Select Poppins since the Sale Badge Font, set the Sale Badge Font Style to Uppercase, the Sale Badge Text Color to #ffffff, the Sale Badge Text Size to 15px, and the Sale Badge Letter Spacing to 1px.
![]()
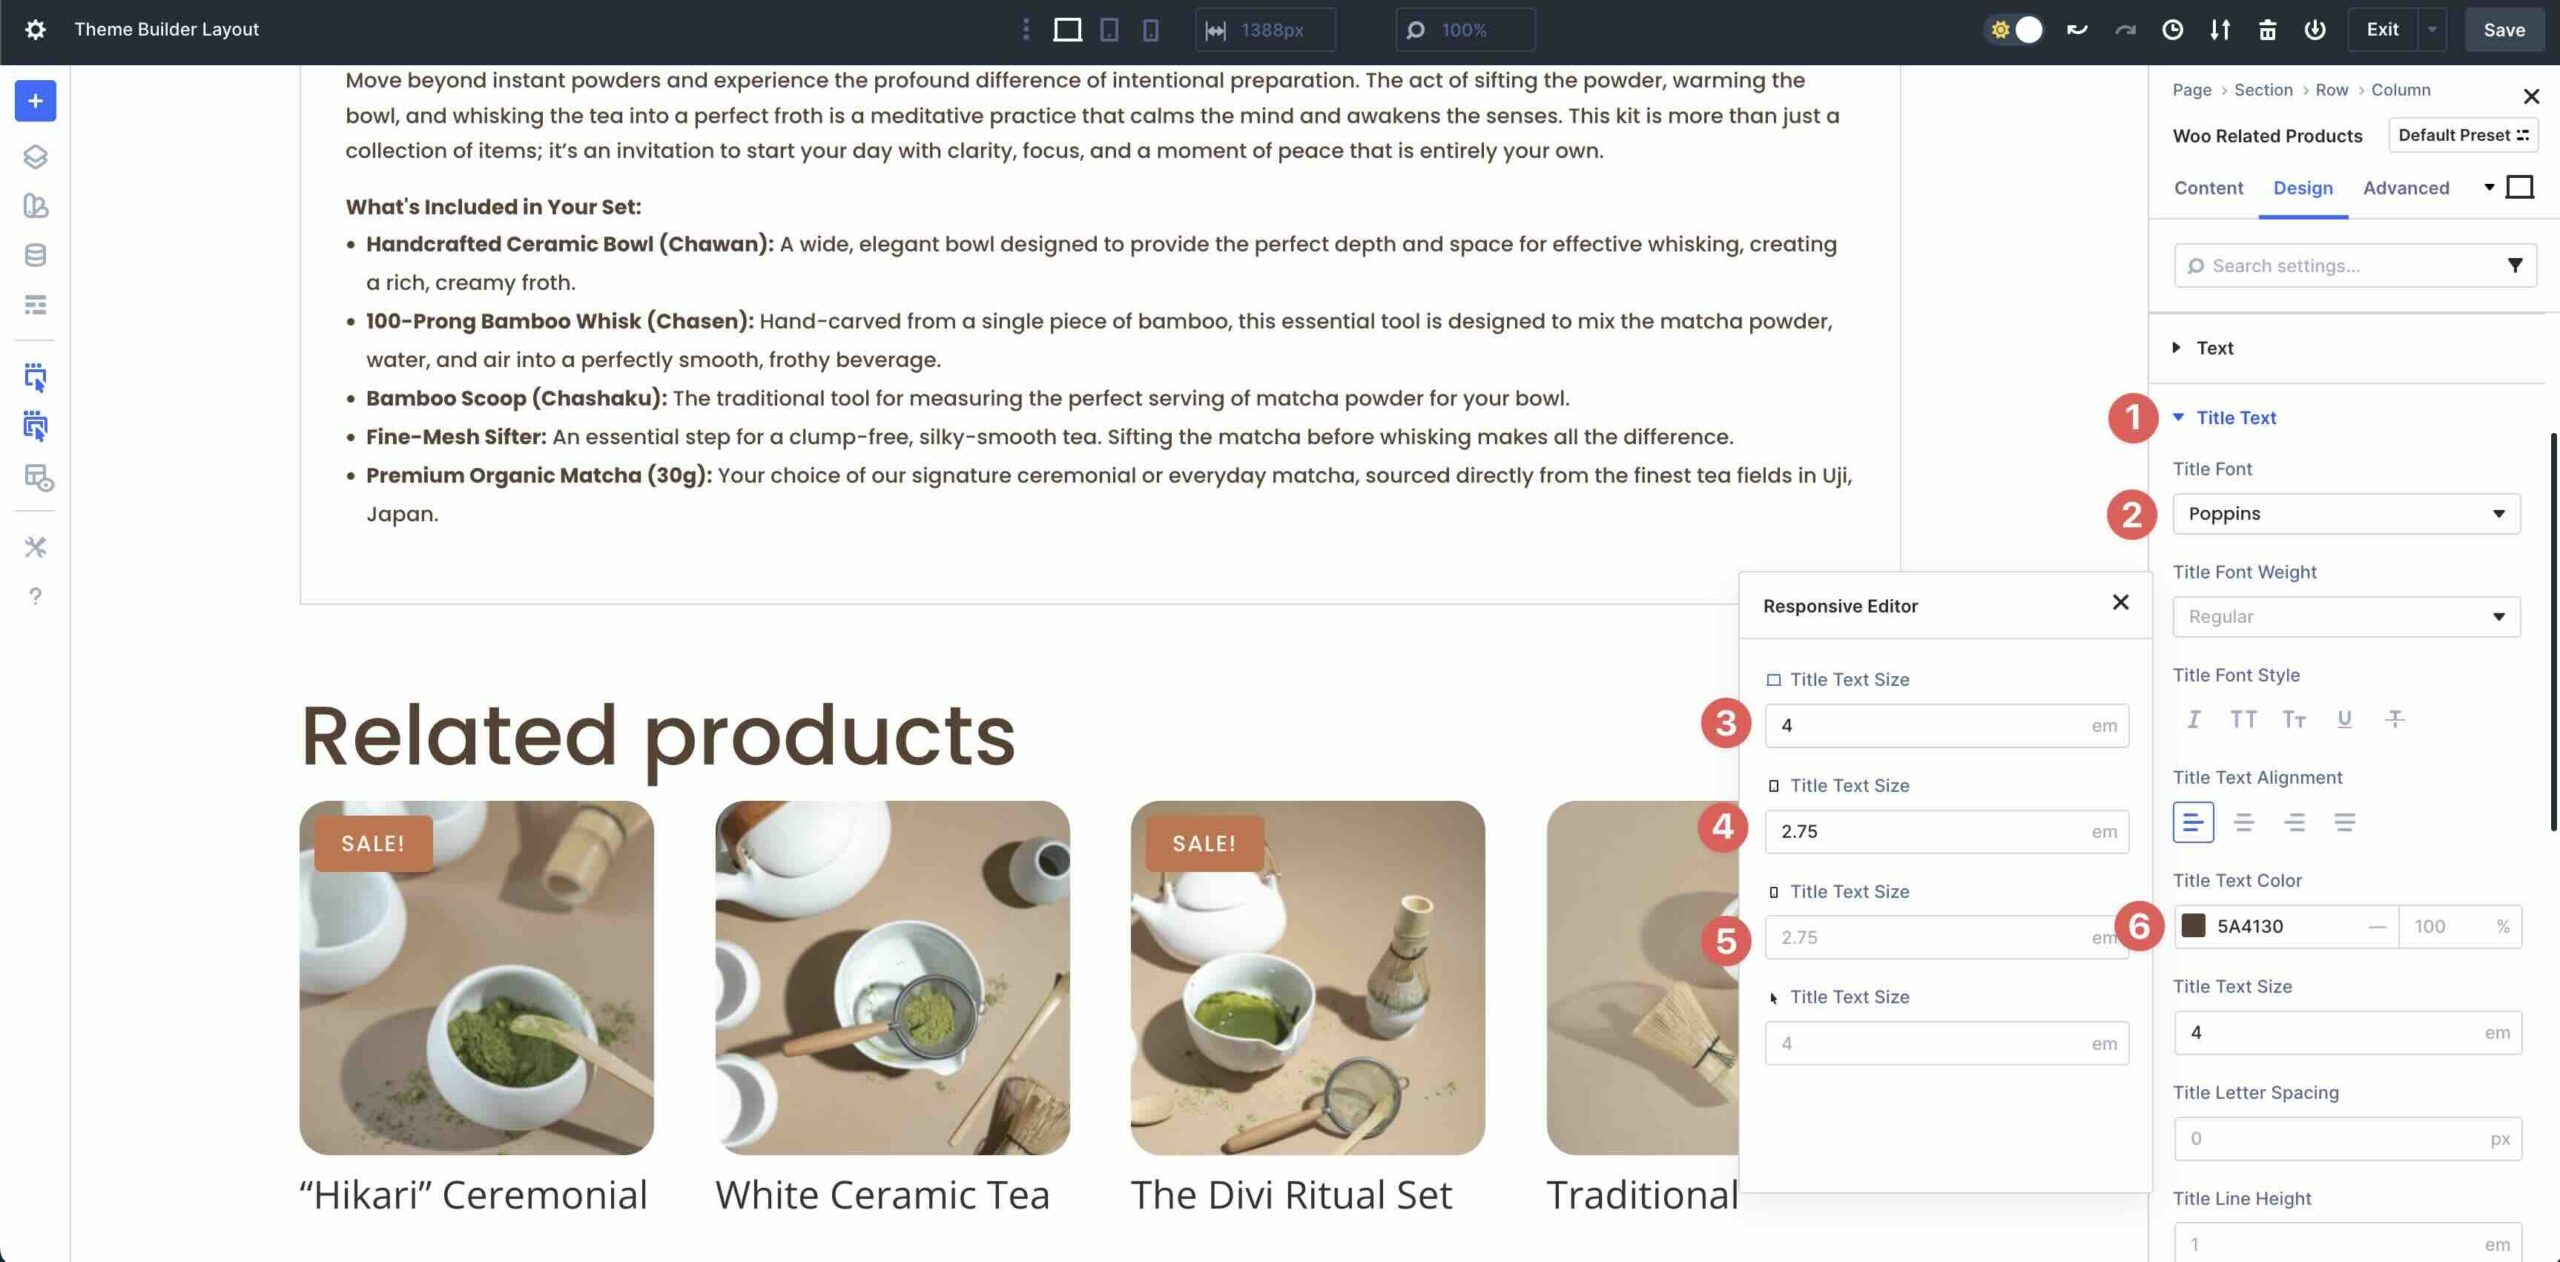
Next, open the Establish Text menu. Use Poppins since the Establish Font, #5A4130 since the Establish Text Color, and 4em for the Establish Text Size. Use Divi 5’s Responsive Editor to set the tablet and phone views to 2.75em.
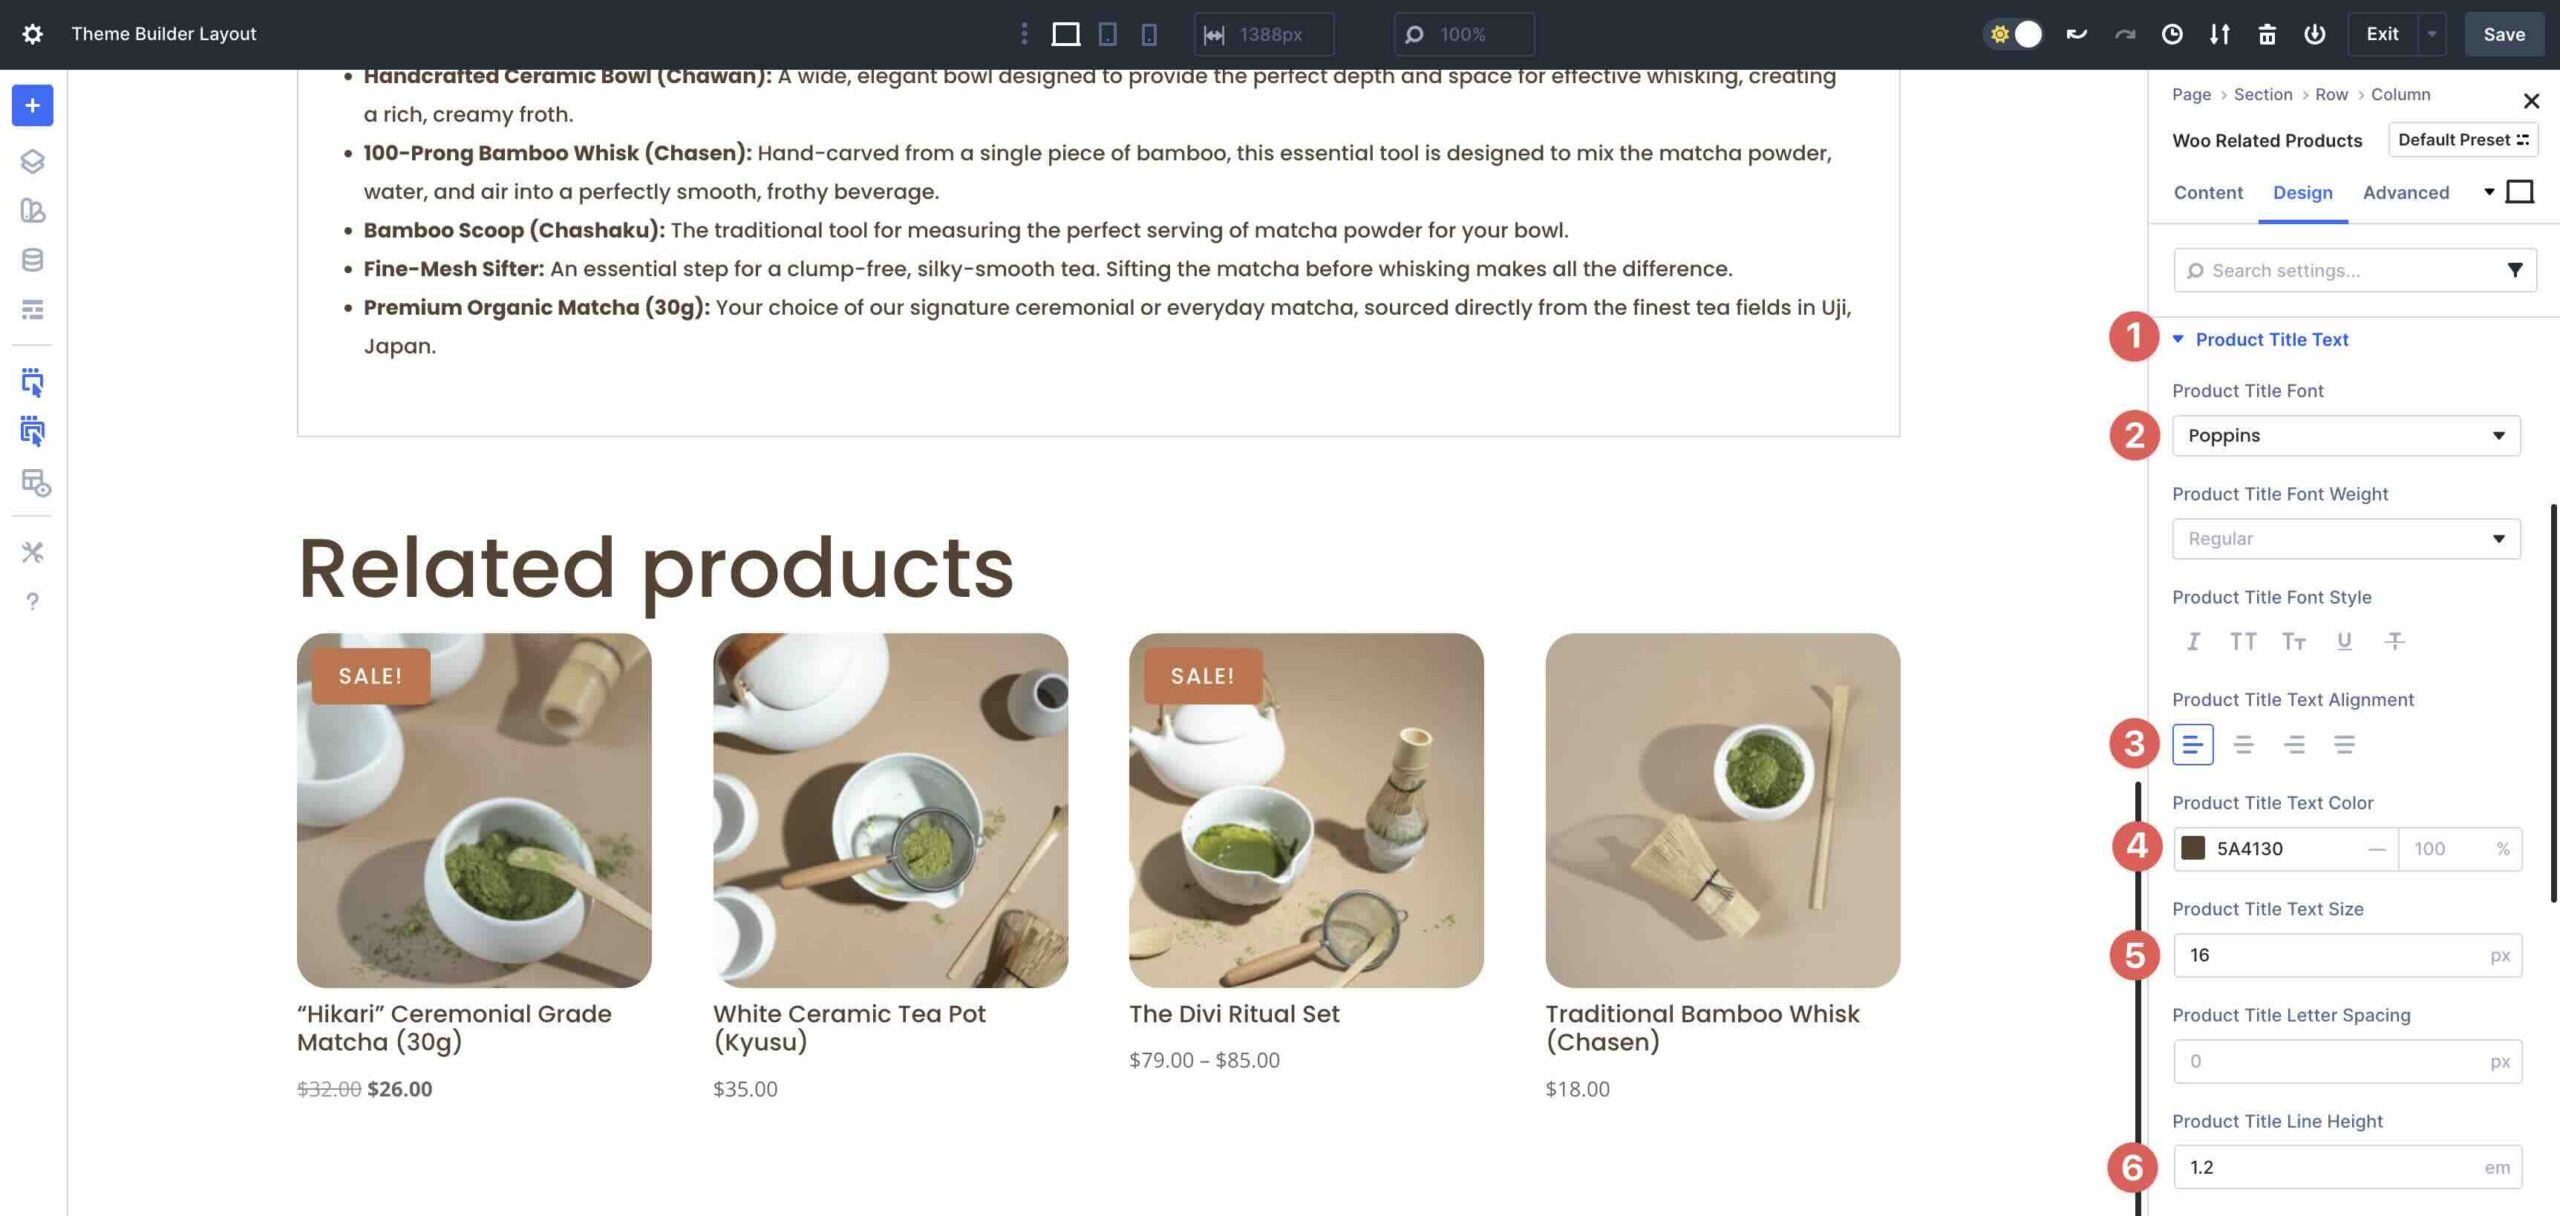
Open the Product Establish Text menu. Enter Poppins for the Product Establish Font and set the Product Establish Text Alignment to Left. Use #5A4130 since the Product Establish Text Color and set the Product Establish Text Size to 16px. Use 1.2em since the Product Establish Line Top.
For the Price Text menu, enter Poppins since the Price Font and use #5A4130 since the Price Text Color.

Finally, open the Sale Price Text menu. Use Poppins since the Sale Price Font. Inside the Sale Price Text Color field, enter #5A4130.
Step 3: Test For Responsiveness
Forward of saving your product internet web page, use Divi 5’s Customizable Responsive Breakpoints to navigate through each show size. This promises that your layout appears to be seamless on each device. By the use of default, Divi lets in 3 breakpoints, then again you’ll merely allow all 7 of them by means of clicking the ellipsis menu in Divi’s toolbar at the top of the Builder. Use the toggles to allow the breakpoints you’d like, then click on at the Save Button.
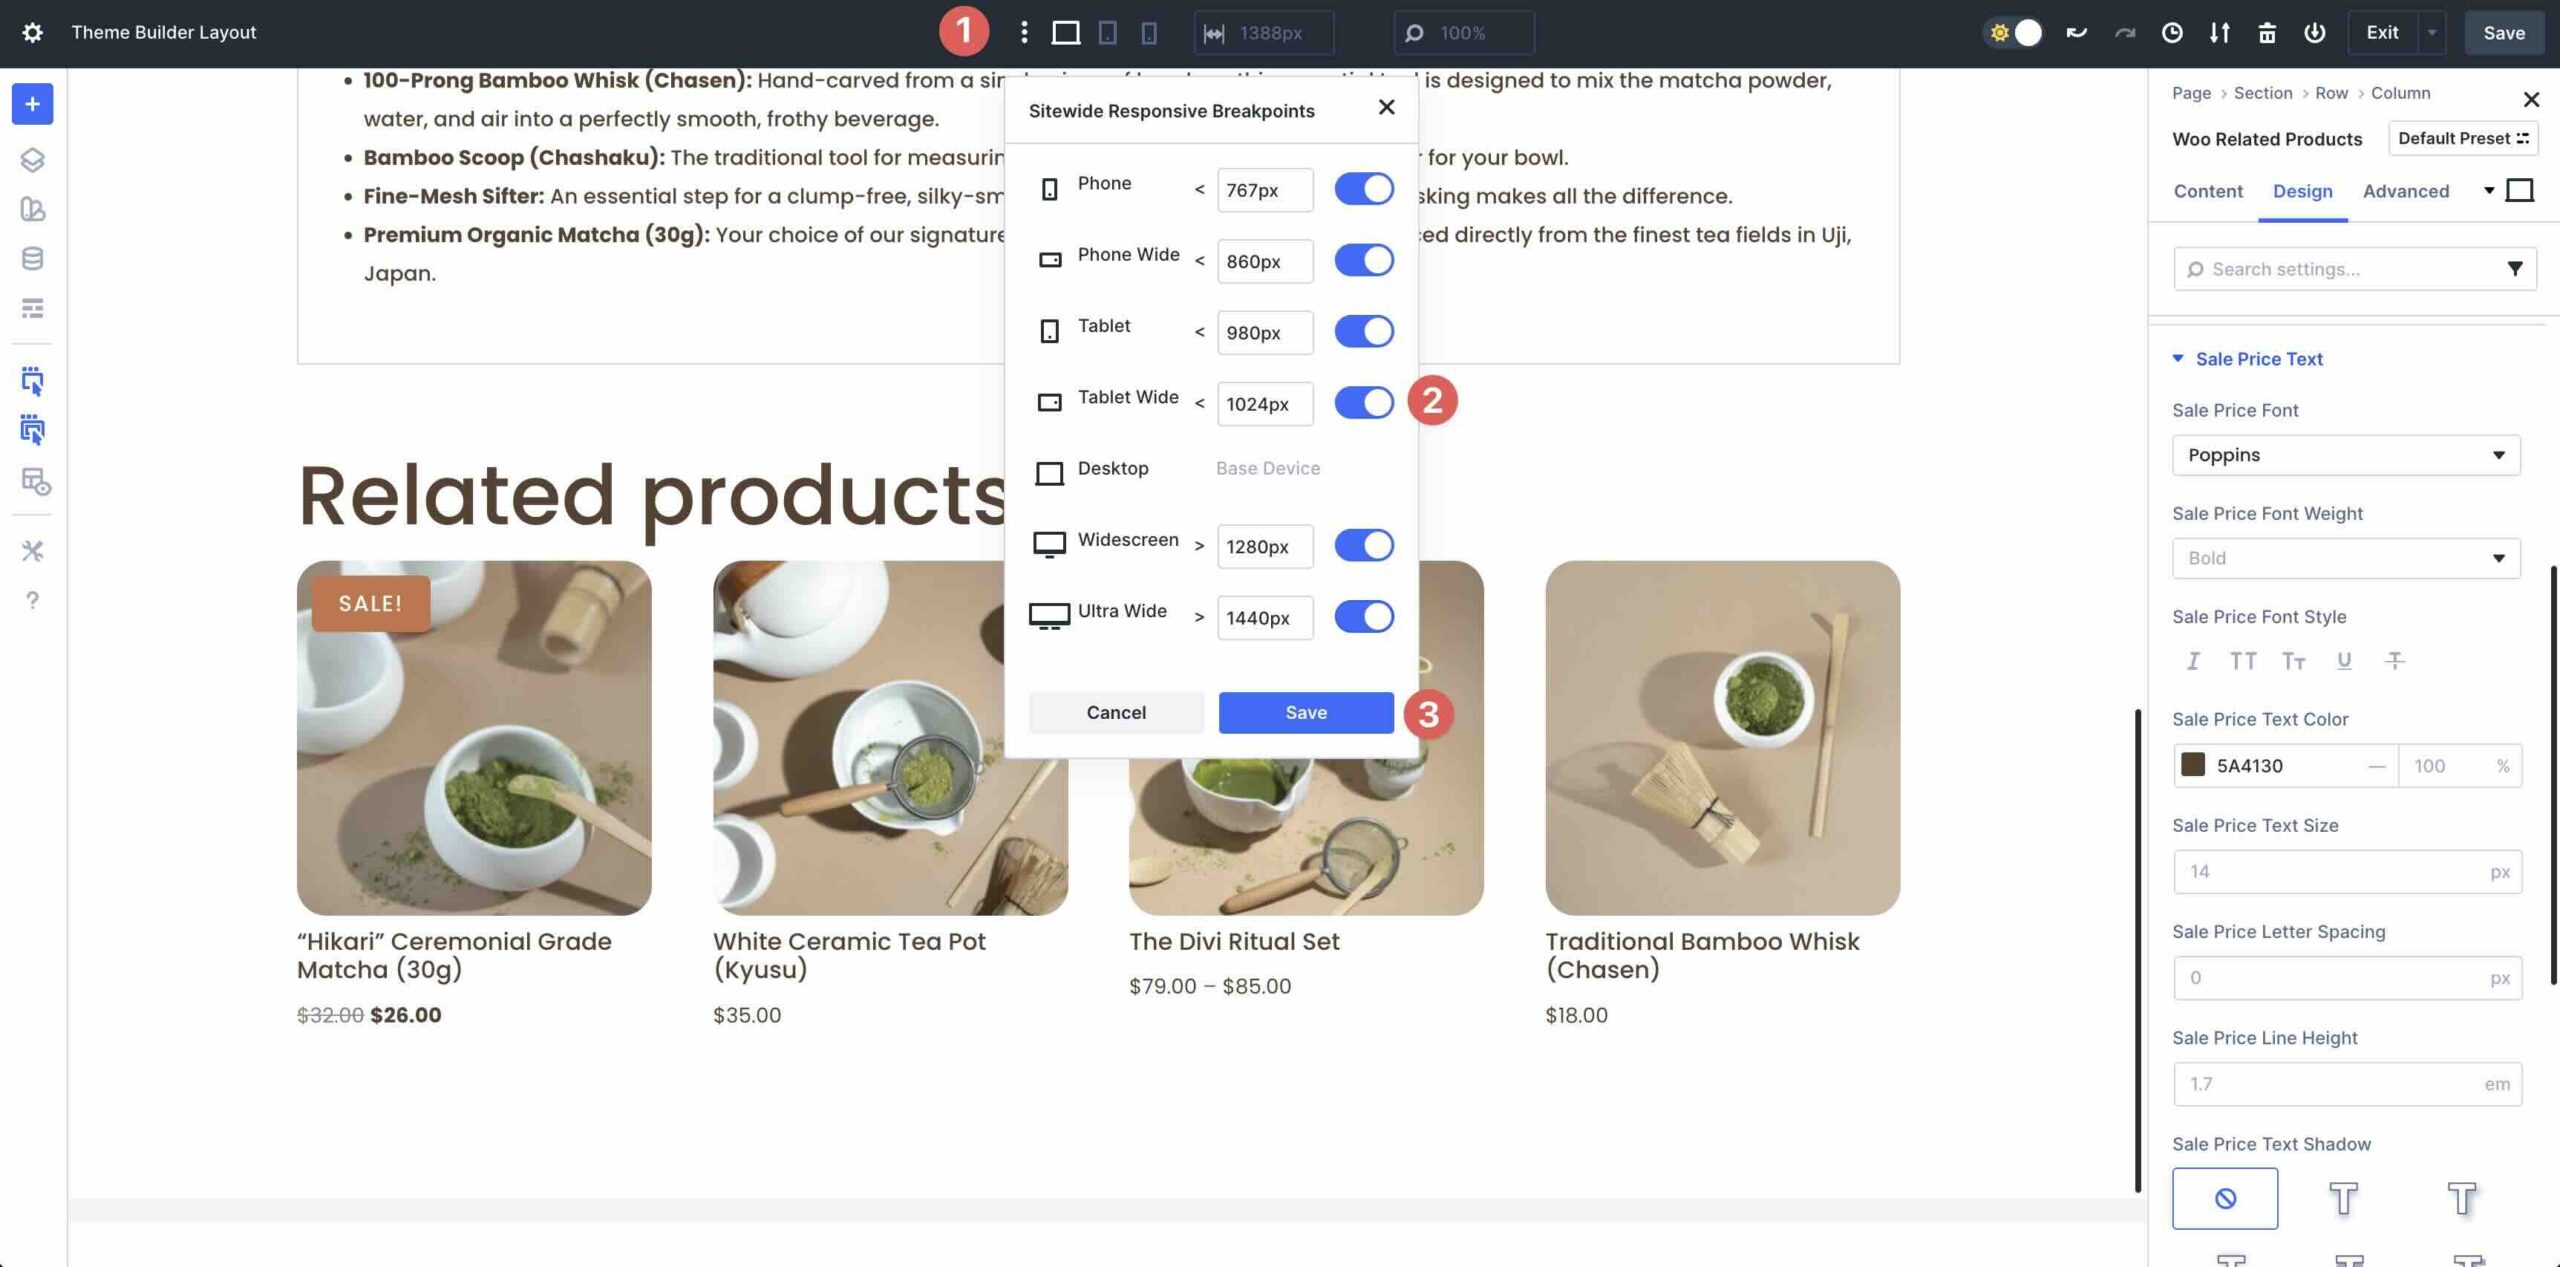
As you navigate each breakpoint, you’ll merely change your design.
Step 4: Save The Internet web page
On every occasion you’ve made all of the essential refinements, save the product internet web page inside the Theme Builder. Click on at the Save Button at the top right kind corner of the Builder.
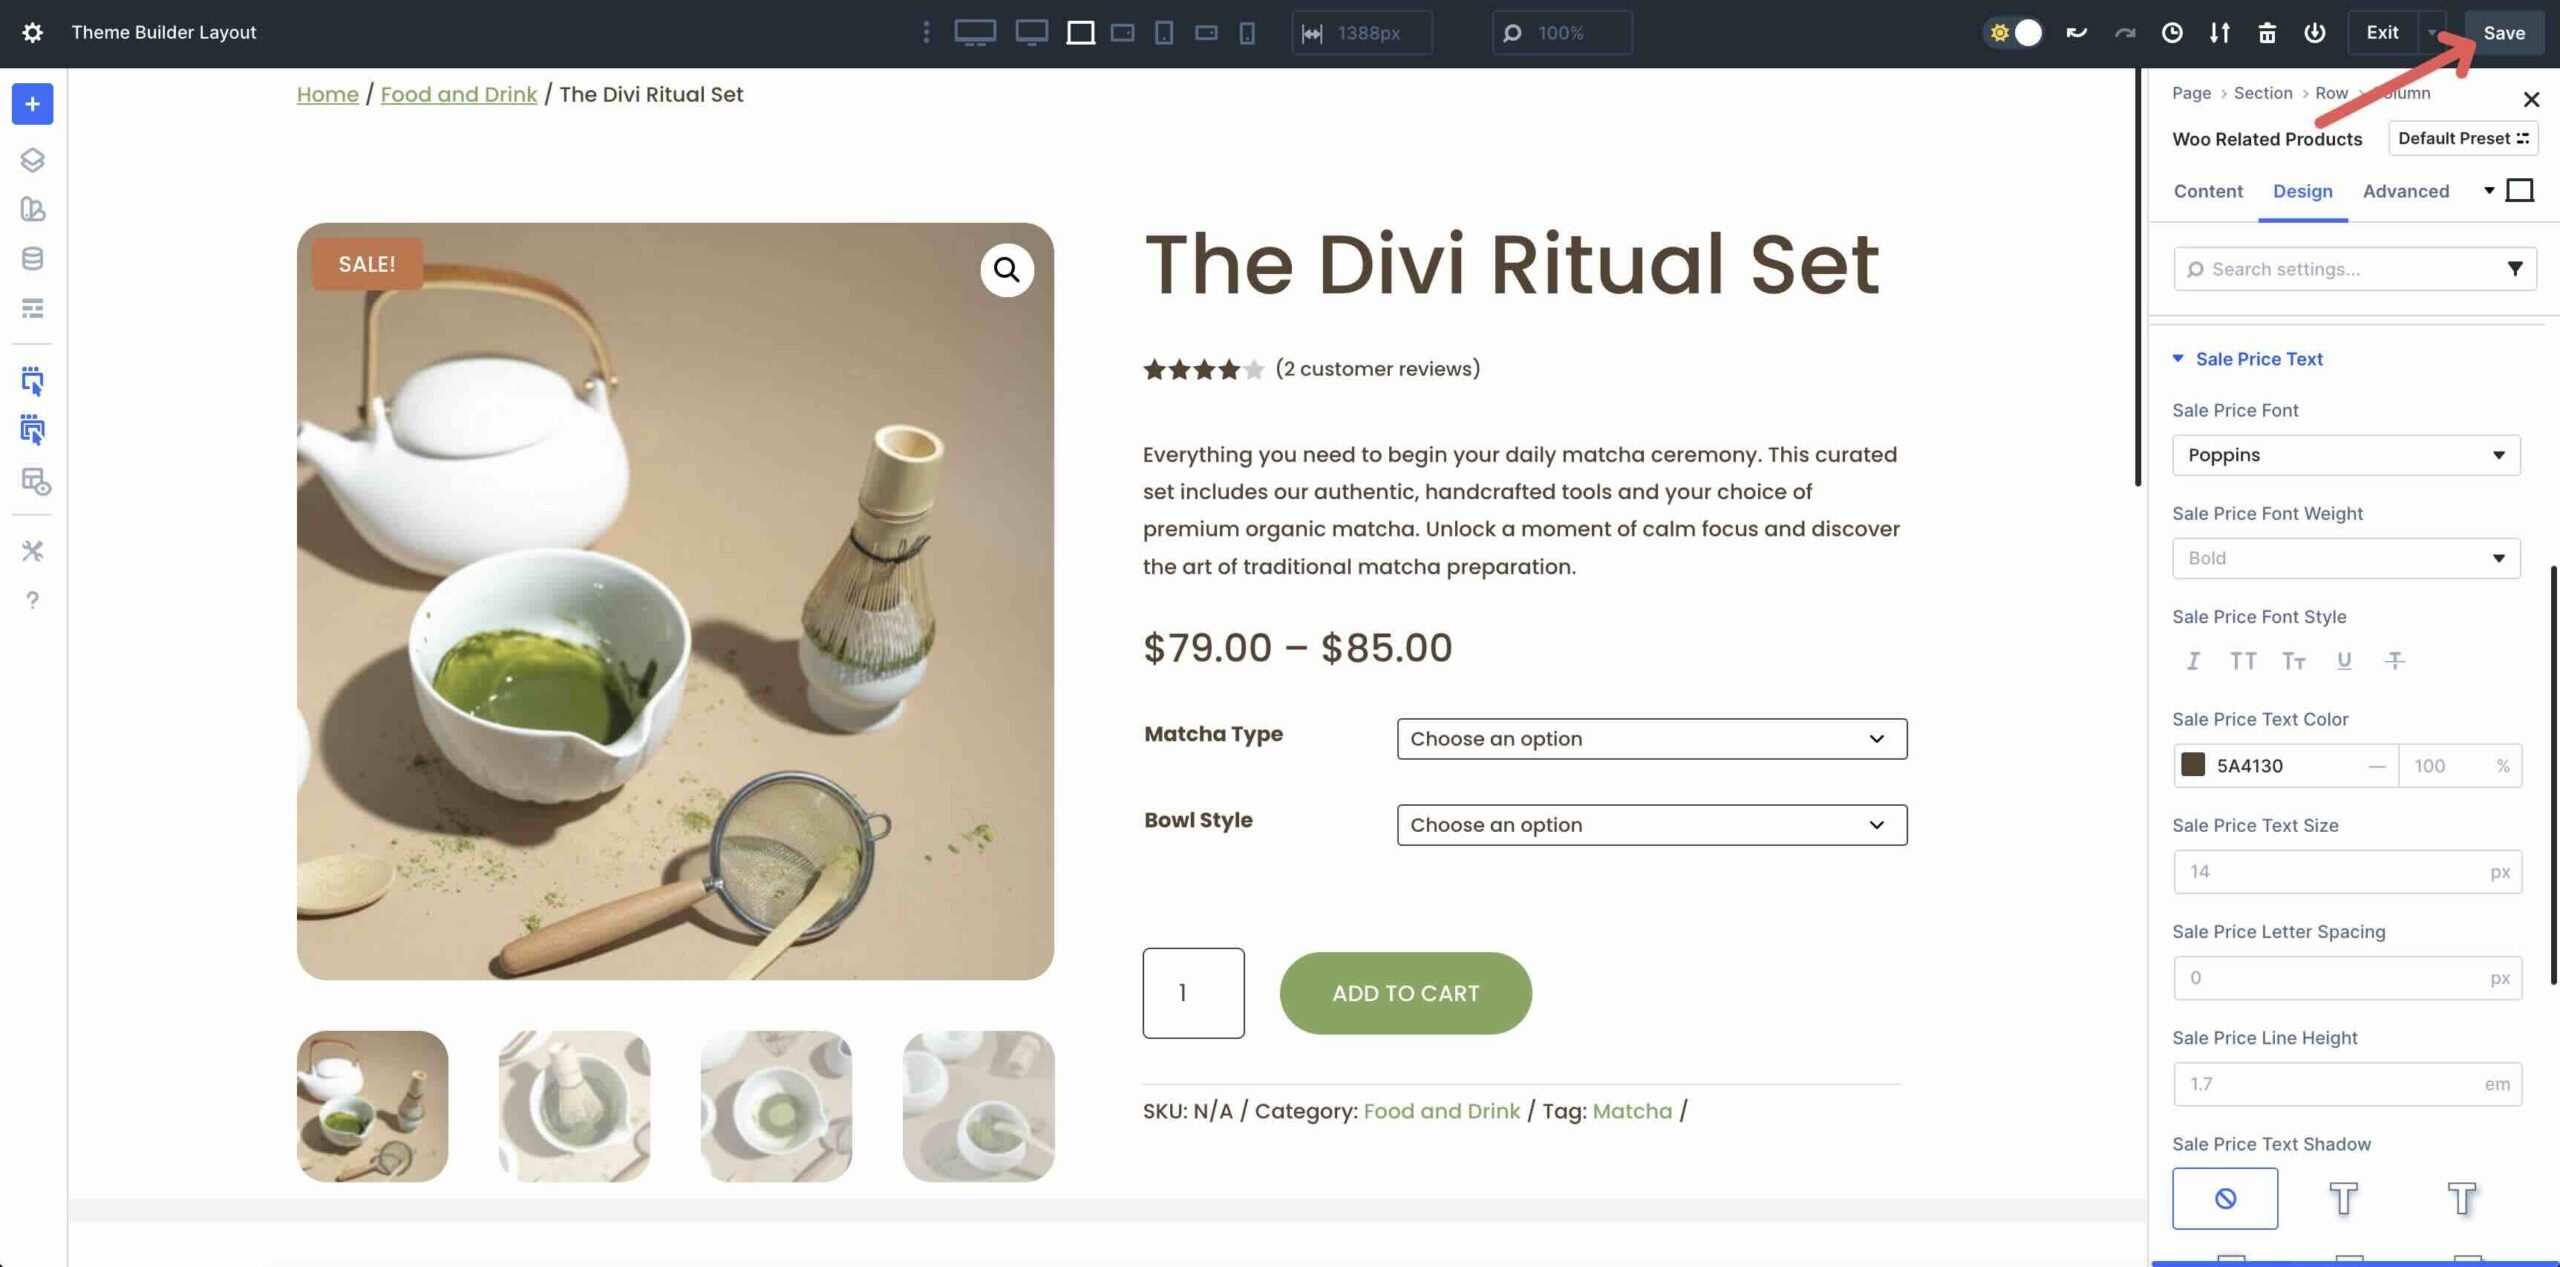
When redirected once more to the WordPress dashboard, save the Template by means of clicking the Save Changes Button.

That’s it! As you’ll see, growing an advanced and environment friendly product internet web page template is really easy because of Divi 5’s intuitive Visual Builder and Woo Product modules.
Assemble Your Next Ecommerce Site In Divi 5!
Divi 5‘s Woo Product modules unlock creative freedom to your ecommerce internet web page, letting you assemble product pages that are as unique as your brand. From navigation to dynamic display modules, the ones 17 native modules seamlessly mix Woo wisdom with Divi’s Visual Builder for horny, responsive designs without the usage of third-party plugins. Will have to you’re able to take your next step, obtain the newest model of Divi 5 and experiment with the ones powerful modules.
We’d like to pay attention in your concepts about the ones new modules. Please observation beneath or put up on our social media channels.
The put up How To Create Customized Product Pages In Divi 5 (New Woo Modules) seemed first on Sublime Subject matters Weblog.
Contents
- 1 Working out The Woo Product Modules In Divi 5
- 2 Download For Unfastened
- 3 You’ll have successfully subscribed. Please check out your email correspondence take care of to make sure your subscription and get get right to use to loose weekly Divi layout packs!
- 4 How To Create A Custom designed Product Internet web page In Divi 5
- 4.1 Step 1: Create A New Template
- 4.2 Step 2: Add Content material subject material
- 4.2.1 Add The Woo Breadcrumbs Module
- 4.2.2 Add The Woo Product Footage Module
- 4.2.3 Add The Woo Product Establish
- 4.2.4 Add The Woo Product Rating Module
- 4.2.5 Add The Woo Product Description Module
- 4.2.6 Add The Woo Product Price Module
- 4.2.7 Add The Woo Product Add To Cart Module
- 4.2.8 Add The Woo Product Meta Module
- 4.2.9 Add The Woo Product Tabs Module
- 4.2.10 Add The Woo An identical Products Module
- 4.3 Step 3: Test For Responsiveness
- 4.4 Step 4: Save The Internet web page
- 5 Assemble Your Next Ecommerce Site In Divi 5!
- 6 Get PS5 Restock Signals With Visualping
- 7 WordPress Security Threat Update (4 Trends in 2025)
- 8 5 Should-Learn Books for Construction Manufacturers and Wealth by way of Marketers of Colour

0 Comments