

Clickable spaces, comparable to hotspots for your site, can disclose hidden content material, cause pop-ups, or release animations, remodeling static pages into interactive parts that information other folks exactly the place you need them to head.
Divi 5‘s Interactions handles all of this with out requiring any customized coding. We’ll stroll throughout the precise steps to create interactive parts that reply to clicks, hovers, or scrolls. Take a look!
What Are Hotspots?
Hotspots are clickable or hoverable zones which are layered over sections, photographs, and graphics. You’ll see them on product showcases the place each and every function will get its personal spot. Maps use them to mark places. Infographics depend on them to wreck down complicated information with out cramming the entirety into one view, amongst different use circumstances.
Relatively than flooding a web page with paragraphs of textual content, you’ll be able to tuck data at the back of those small markers. Customers get main points precisely when they would like them, no longer ahead of. This helps to keep pages blank and scannable whilst nonetheless providing intensity.
You keep an eye on precisely the place consideration is going and what seems when. This will give you precision over how content material unfolds.
Divi 5’s Interactions: A Fast Evaluate
Divi 5’s Interactions is a integrated software that provides interactivity in your site with out writing code. You’ll to find it within the Complicated tab of any module, column, row, or phase within the Visible Builder, able to turn out to be static parts into dynamic reviews.
The gadget operates on 3 core elements that paintings in tandem:
- Triggers outline particular occasions, comparable to a click on or a mouse place trade.
- Results resolve the motion that happens, comparable to fading in content material or switching between presets.
- Objectives specify which component receives that impact.
With the program, you’ll be able to cause pop‑ups that slide in as customers scroll, create toggles to turn or cover content material, practice taste adjustments when sections become visible, and extra.
You’ll layer a couple of triggers on a unmarried component for extra intricate interactions. A bit may fade in handiest after any person scrolls previous the midway level and waits 3 seconds. A picture may trade on hover and disclose textual content on click on, supplying you with whole keep an eye on over how content material flows.
As a result of Interactions runs natively inside Divi 5, you don’t want further plugins, and your workflow stays easy. You’re employed on what triggers each and every motion and the place results must seem with easy dropdowns.
Developing Hotspots With Divi 5
Construction hotspots in Divi 5 may also be accomplished throughout the Interactions function. You’ll practice those self same cause and goal rules in your personal web page parts. We’ll stroll you via this procedure the usage of exact modules and settings, so you’ll be able to see how the items have compatibility in combination and reflect the methodology by yourself tasks. Let’s transfer on with out additional ado:
Upload Your Base Symbol Or Phase
Get started with a recent phase within the Visible Builder. Click on the blue plus button at the left panel to insert one. This serves as your basis. The most straightforward means is to make use of an Symbol module. Click on the golf green plus so as to add a row, then the black plus to insert the Symbol module.
Add your product picture, infographic, or map, and allow Pressure Fullwidth within the Sizing tab of the Design settings.

For a bit background, as a substitute, click on into your phase settings, pass to the Content material tab, and make bigger the Background phase. Add your symbol. Then you definately’ll wish to configure a couple of issues. Head to the Design tab, to find Sizing, and set the Min Peak to a price of roughly 600px, according to your symbol dimensions.
Again in Background settings within the Design tab, set Background Symbol Dimension to Duvet, Place to Heart, and Repeat to No Repeat. This prevents tiling and distortion.
The background means works neatly for full-width designs the place markers glide over all the symbol. The Symbol Module is quicker to arrange and more practical when you want the visible content material inside your format.
Select whichever suits your wishes. Make sure that your symbol has transparent focal issues and excellent distinction, permitting customers to simply determine clickable spaces.
Construct Hotspot Markers
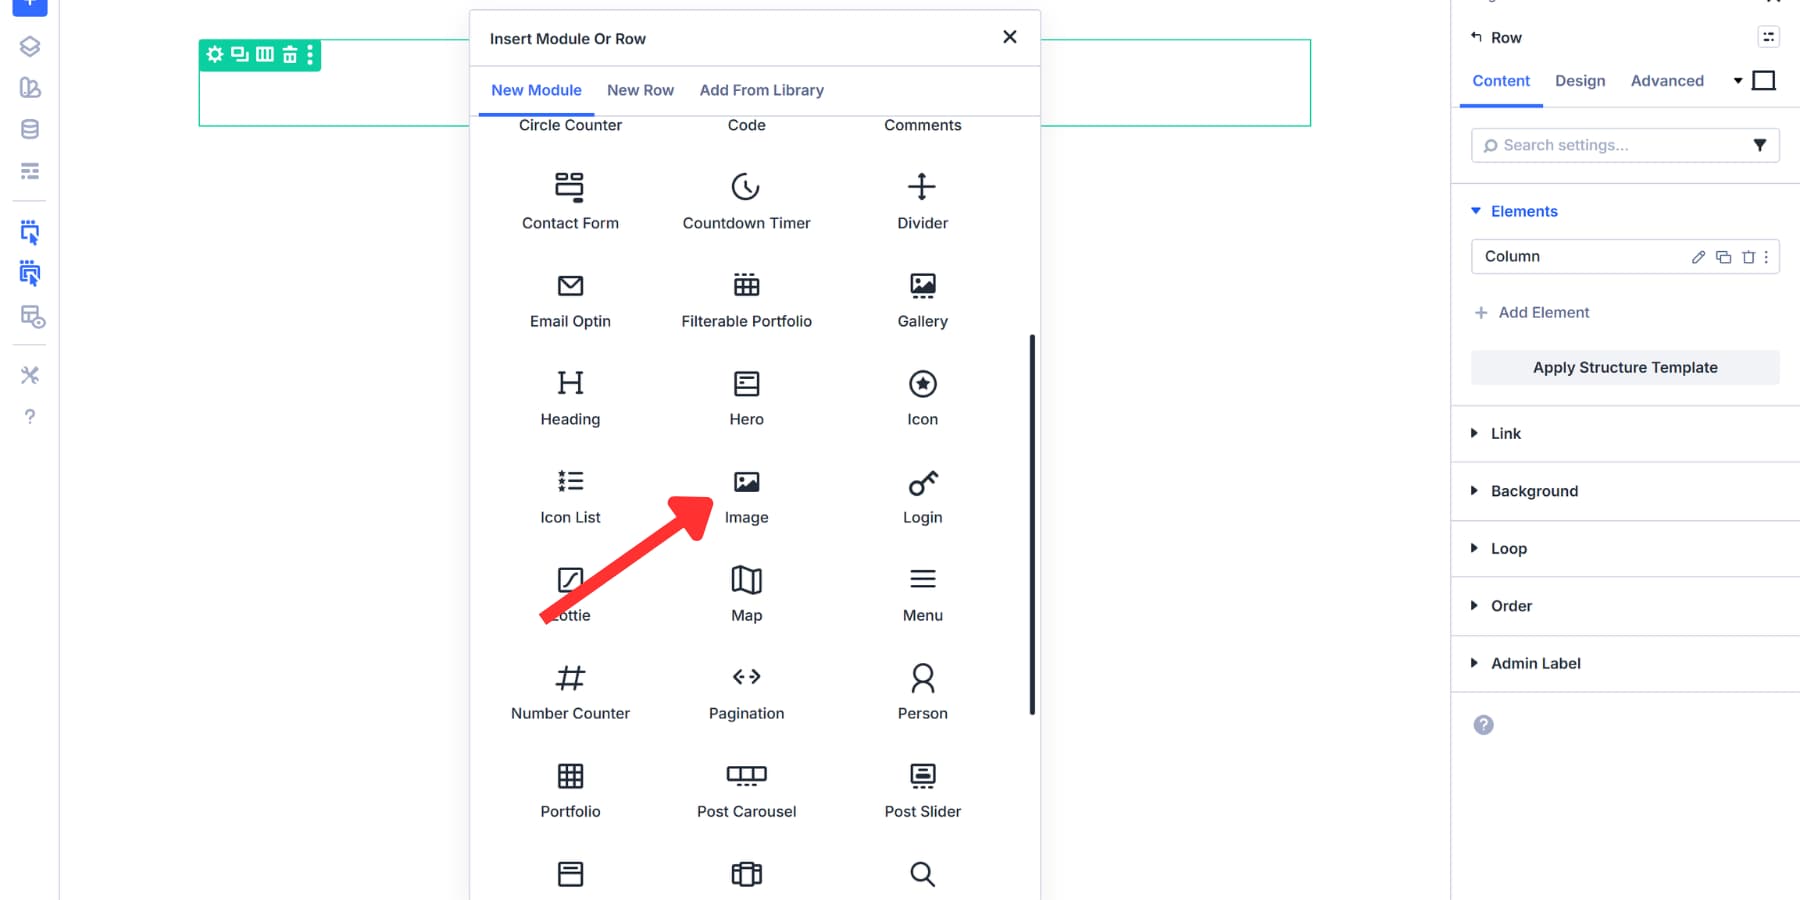
We suggest the usage of Module Groups on your hotspot markers. Click on the grey plus icon inside your column and make a choice the Staff module.

Module Teams make positioning simple. While you transfer a gaggle, the entirety within it strikes as one unit. They mean you can deal with each and every marker and its content material as a unmarried component. Simply upload your marker and content material, modify positioning, and also you’re able.
Anything else positioned right into a column and not using a team would require you to regulate each and every marker for my part. That will get messy rapid while you’re striking a couple of hotspots.
It is advisable to use a picture or button as a substitute, however icons paintings higher as a marker. The burden faster than photographs, lots are already to be had within Divi, and keep sharp at any display screen dimension. Moreover, they’re more uncomplicated to taste together with your logo colours and Design Variables, with out being worried about report codecs or compression. Simply pick out the one who is smart within the context.
Styling Your Marker
You must taste your icon so it sticks out obviously in opposition to your background. You’ll additionally upload a background circle or form at the back of the icon throughout the Design tab to spice up visibility. A delicate shadow or border is helping separate the marker from busy backgrounds.
Make a choice a contrasting coloration that attracts consideration. Set the dimensions to be sufficiently big to be simply clickable; generally, a dimension between 14px and 24px works neatly.
Divi 5 helps Advanced Units, comparable to clamp(), which creates fluid sizing that adapts to other display screen sizes. For this case, we’re the usage of clamp(14px, 3vw, 24px) for the icon dimension. This guarantees markers stay readable on cellular units at at least 14px whilst scaling up easily on greater monitors with out exceeding 24px.
![]()
Upload a hover impact for higher comments. Make a selection the hover state icon (cursor arrow) within the peak proper of your settings tab.
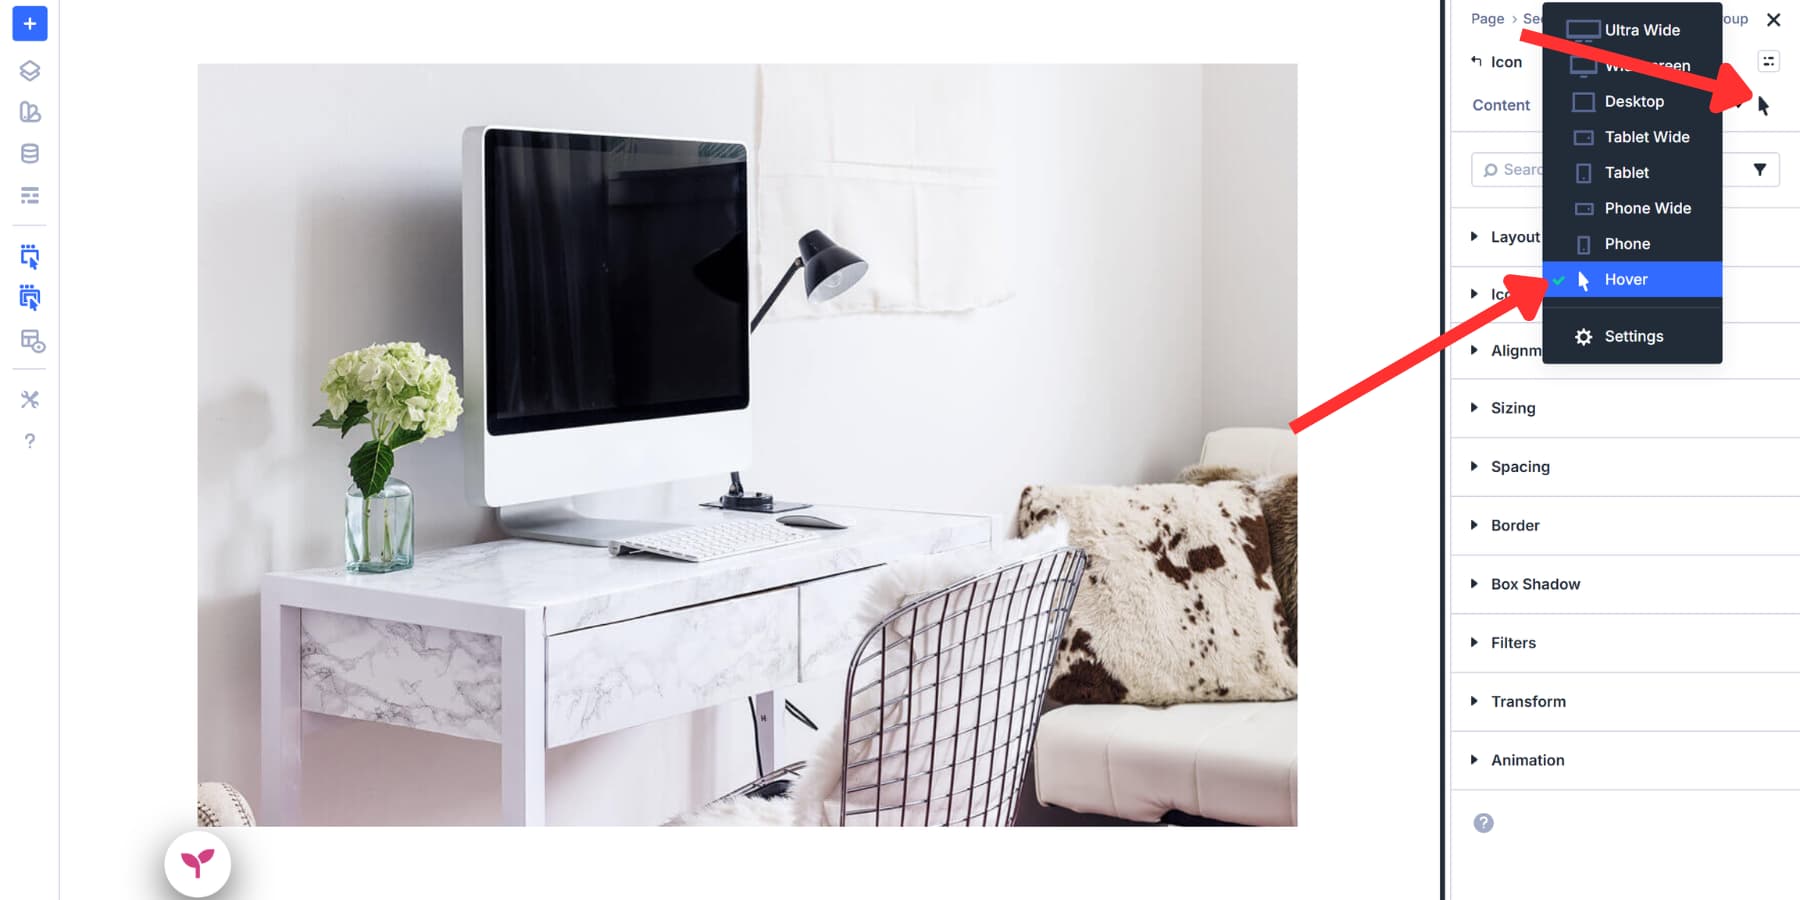
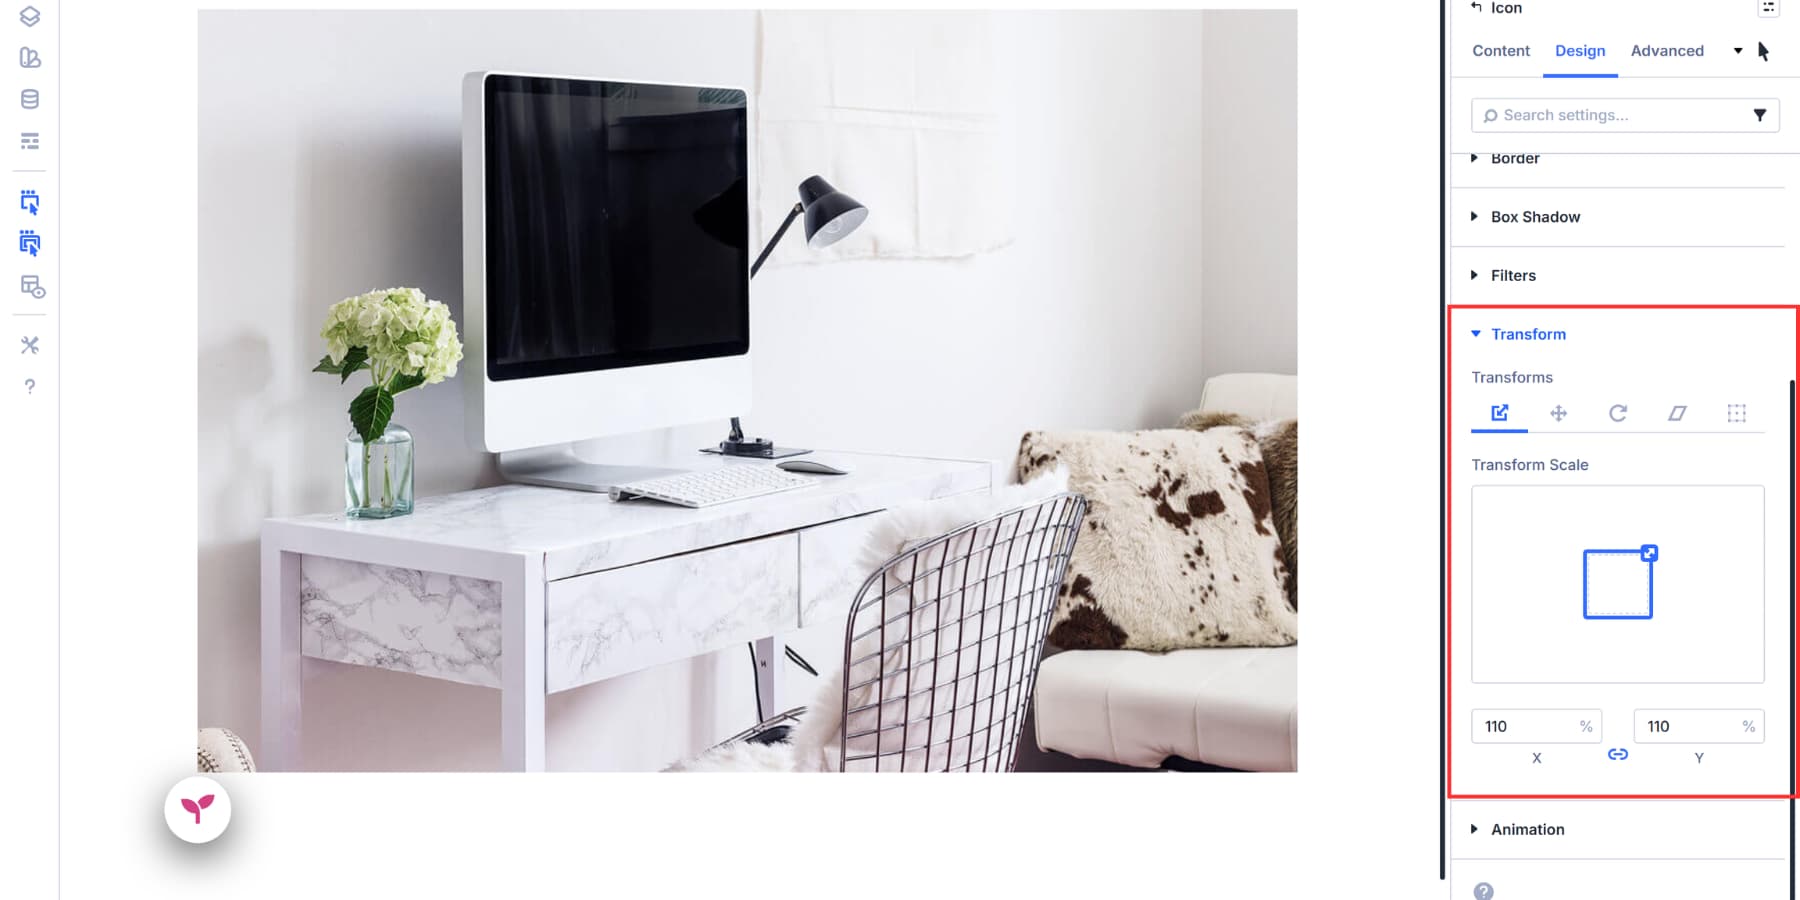
Pass to Design > Turn out to be and set X and Y to 110% so markers develop relatively on hover.
You’ll additionally modify background colours, shadows, or opacity within the hover state, even though scale results paintings highest with out disrupting the design.
Stay the styling constant throughout your whole markers through developing an Element Preset out of your present kinds and making use of it to different markers, so customers straight away acknowledge them as clickable parts.
![]()
Place Your Hotspot Markers
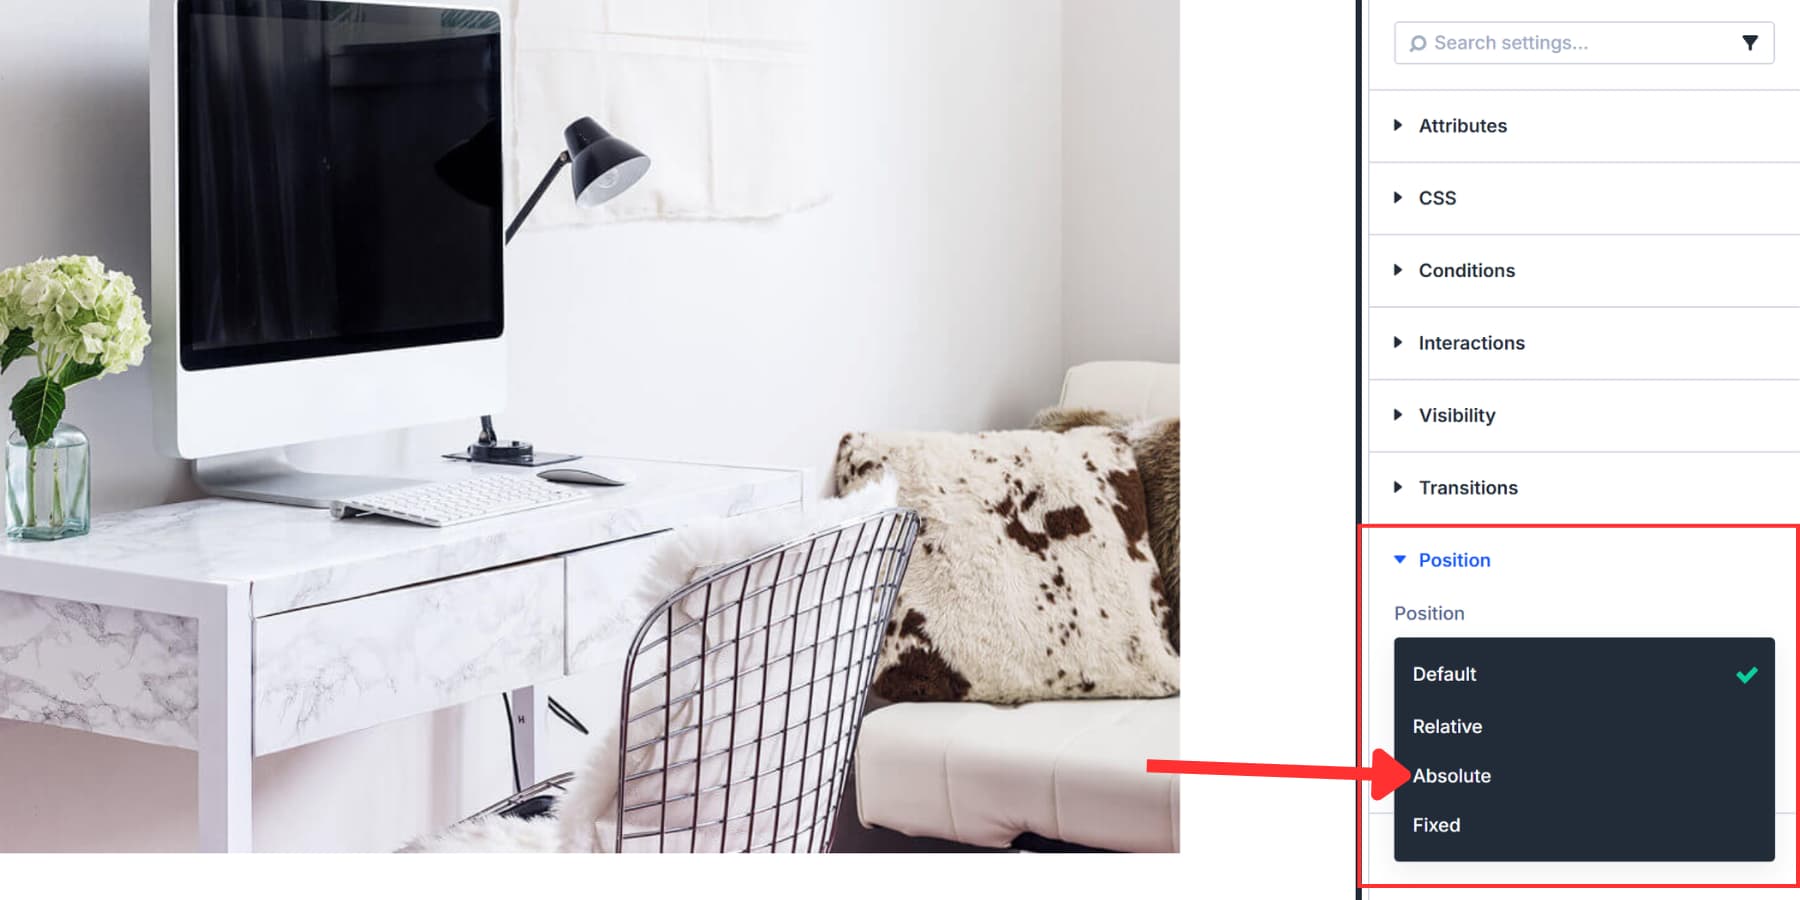
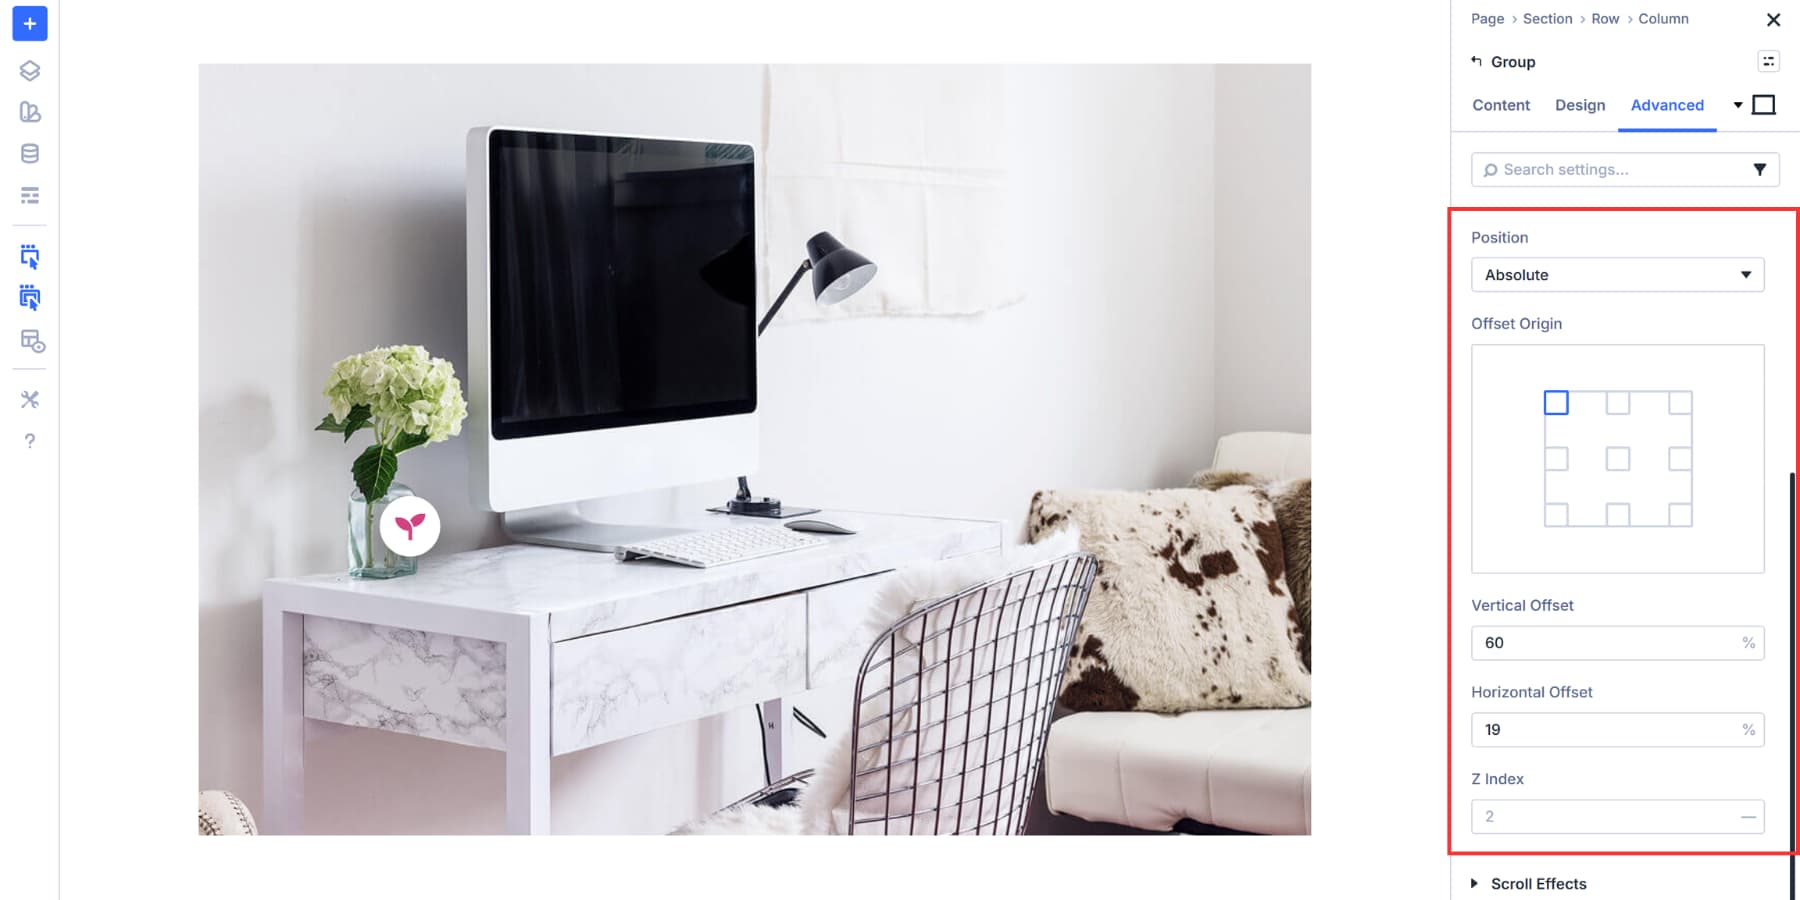
Now you’ll wish to position your markers precisely the place they belong for your symbol. Open the Module Staff settings and head to the Complicated tab. Scroll right down to the Place phase.
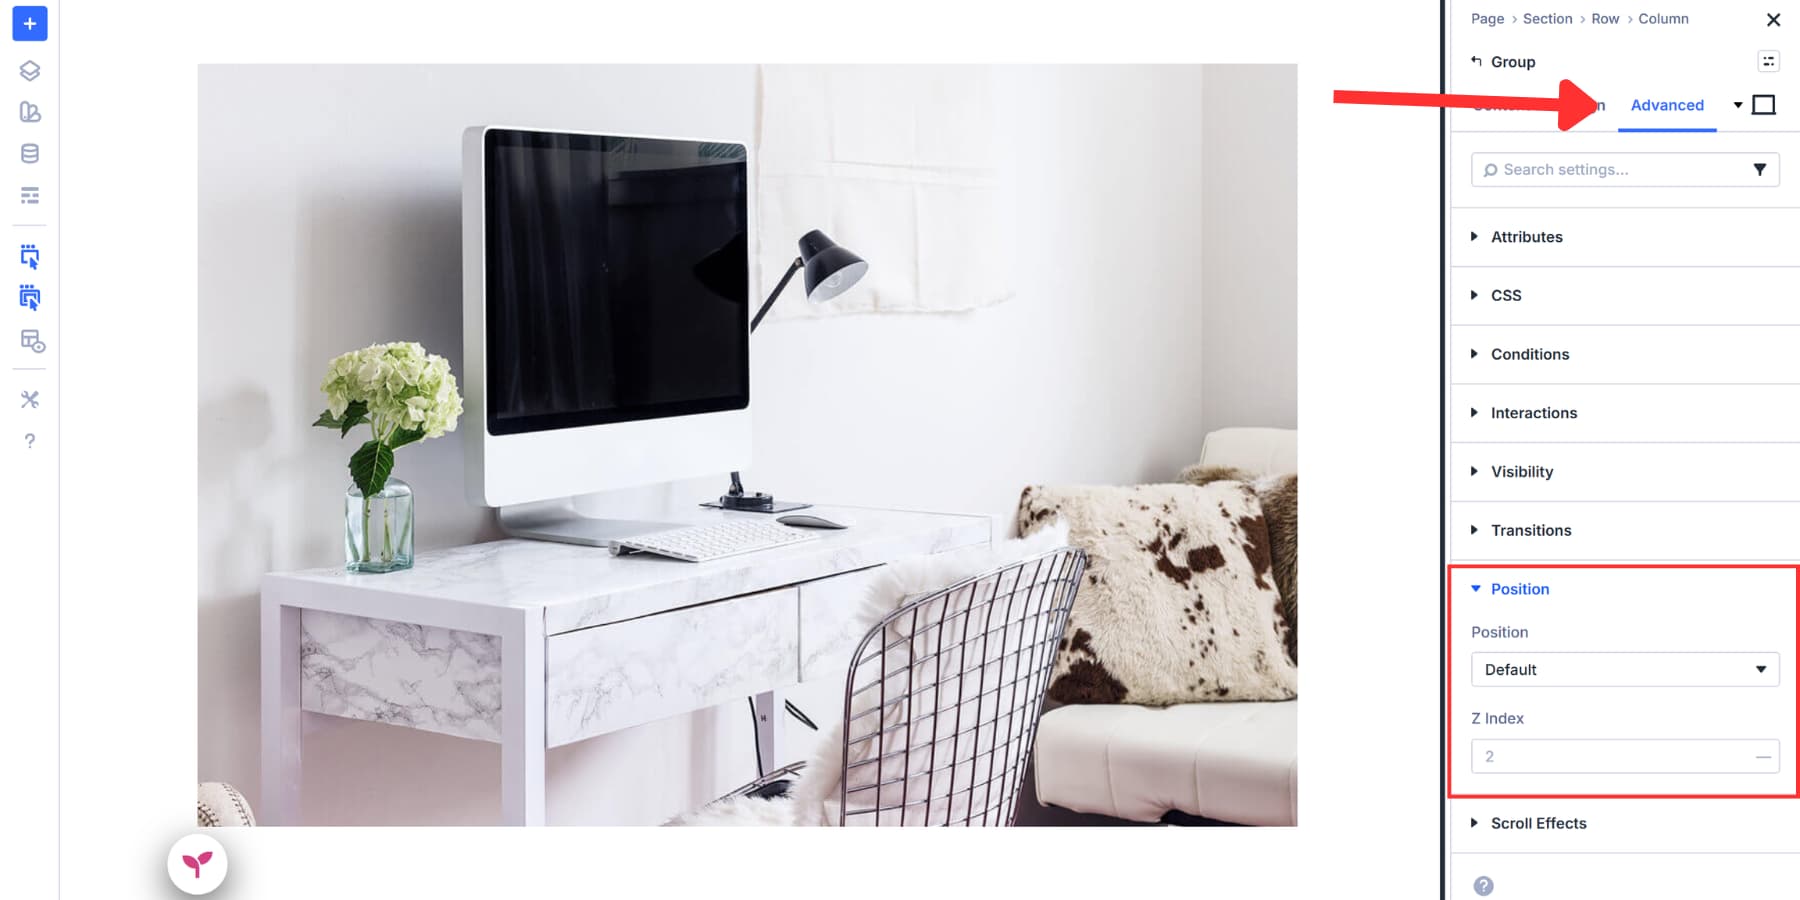
Place controls how a component sits relative to its container. You’ll to find 3 positioning varieties to be had: Absolute, Fastened, and Relative. For hotspots, you’ll generally make a selection Absolute. Completely situated parts glide within their mother or father container, permitting you to put them any place over your background symbol.
The next offset values are reference issues handiest. Each and every symbol has other focal issues and dimensions. So, your place settings might fluctuate considerably from the instance we’re appearing you.
As soon as you choose the location, you’ll see the Offset Starting place grid. This determines which nook of your container serves as the start line for measurements. We decided on the highest left sq. for this case.
Subsequent, set your Vertical Offset and Horizontal Offset values. Those numbers point out to Divi the space out of your selected starting place level to put the marker. We’re the usage of 60% vertical and 19% horizontal right here.
The Z Index surroundings controls stacking order. Set it to two (or upper than surrounding parts) so your marker seems above the background symbol. The Icon team now seems on the peak of the anchor level.
Create The Content material Spaces
You’ll upload any other Module Staff within your present one. Divi 5’s Nested Modules make this imaginable. Proper-click for your icon, then click on Upload Component > Upload Component Beneath and make a choice the Staff module.
![]()
This nested construction will give you complete keep an eye on over your content material. Managing items and not using a team can temporarily grow to be a multitude. Teams stay comparable content material in combination as one movable unit.
For this case, we’re including 3 parts throughout the nested team: an Symbol module, a Heading module, and a Textual content module. Those 3 items shape your hotspot content material space.
Click on the grey plus inside your nested team. Upload the Symbol module first. Add your product element picture or diagram. Subsequent, upload the Heading module. Kind your content material identify. Then insert the Textual content module and write your description.
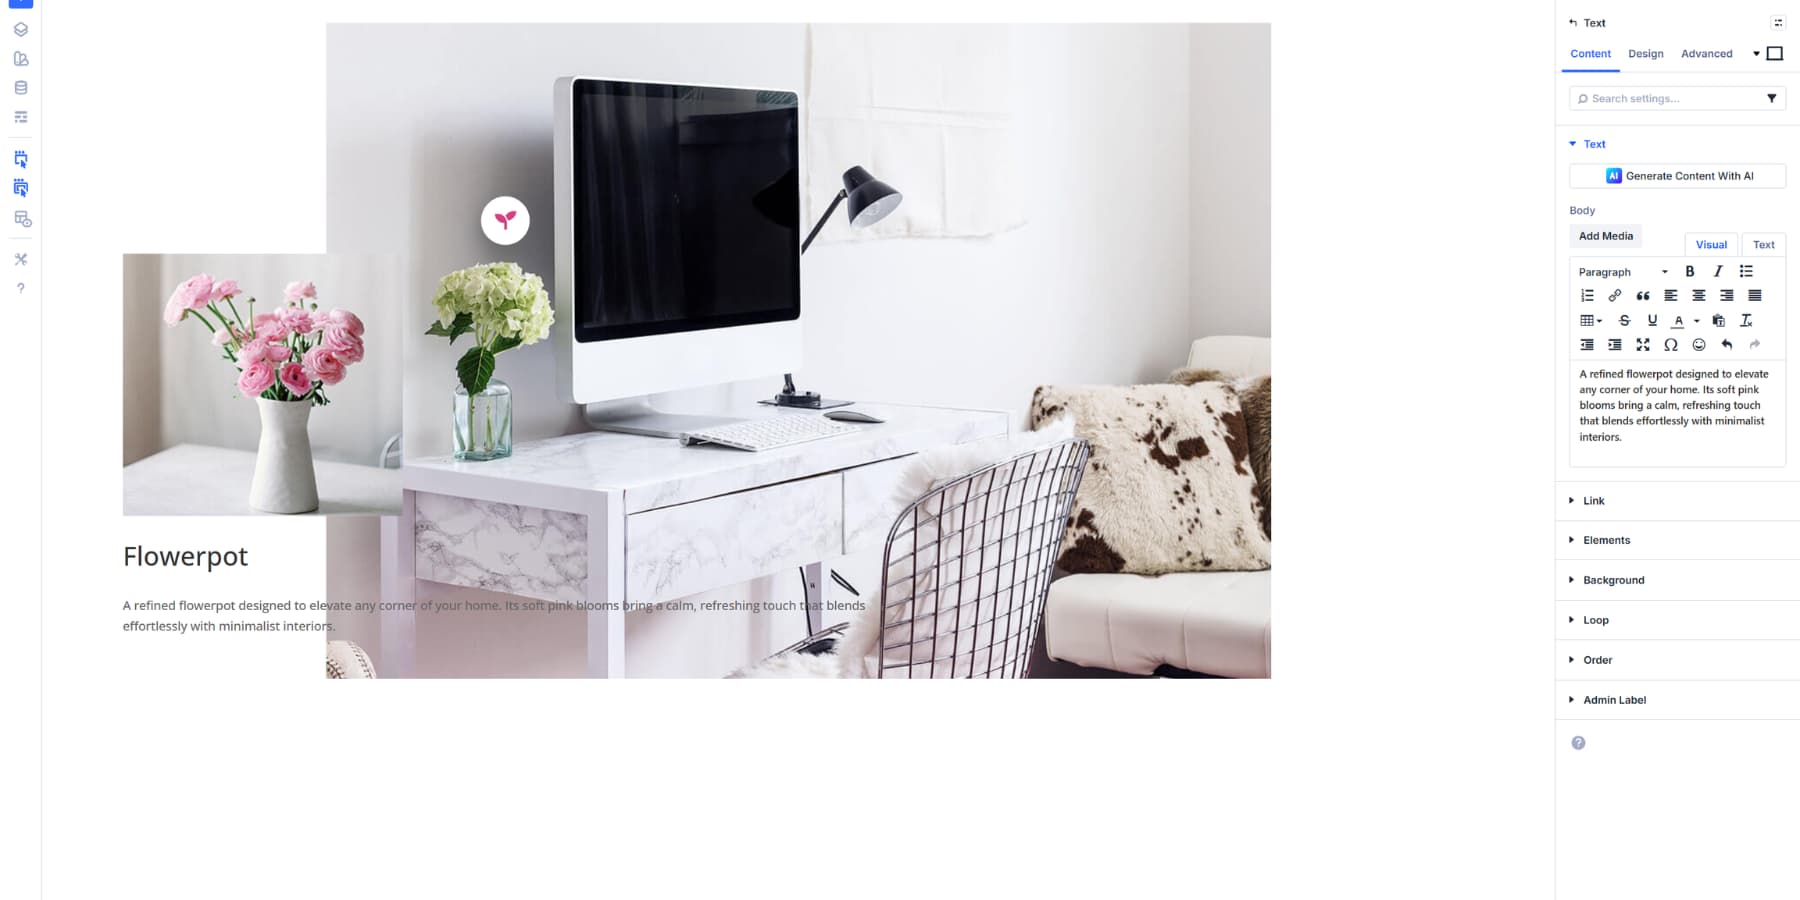
You’ll additionally use Divi AI to generate your heading and textual content content material. Merely click on the Divi AI icon in any textual content box and let it generate reproduction that aligns together with your logo’s voice. You’ll use Divi AI to generate photographs as neatly.
![]()
Stack them vertically through holding the default flex path surroundings within the Staff design settings. If you need extra respiring room between parts, open your nested team settings and pass to Design. In finding the Spacing phase and upload a Hole price. One thing like 10px works neatly for many layouts. Don’t concern in regards to the design, we can quilt that in a while.

Finally, within the content material tab, scroll right down to Admin Label. Kind one thing descriptive like “Hotspot Content material 1” or “Product Element Panel.”
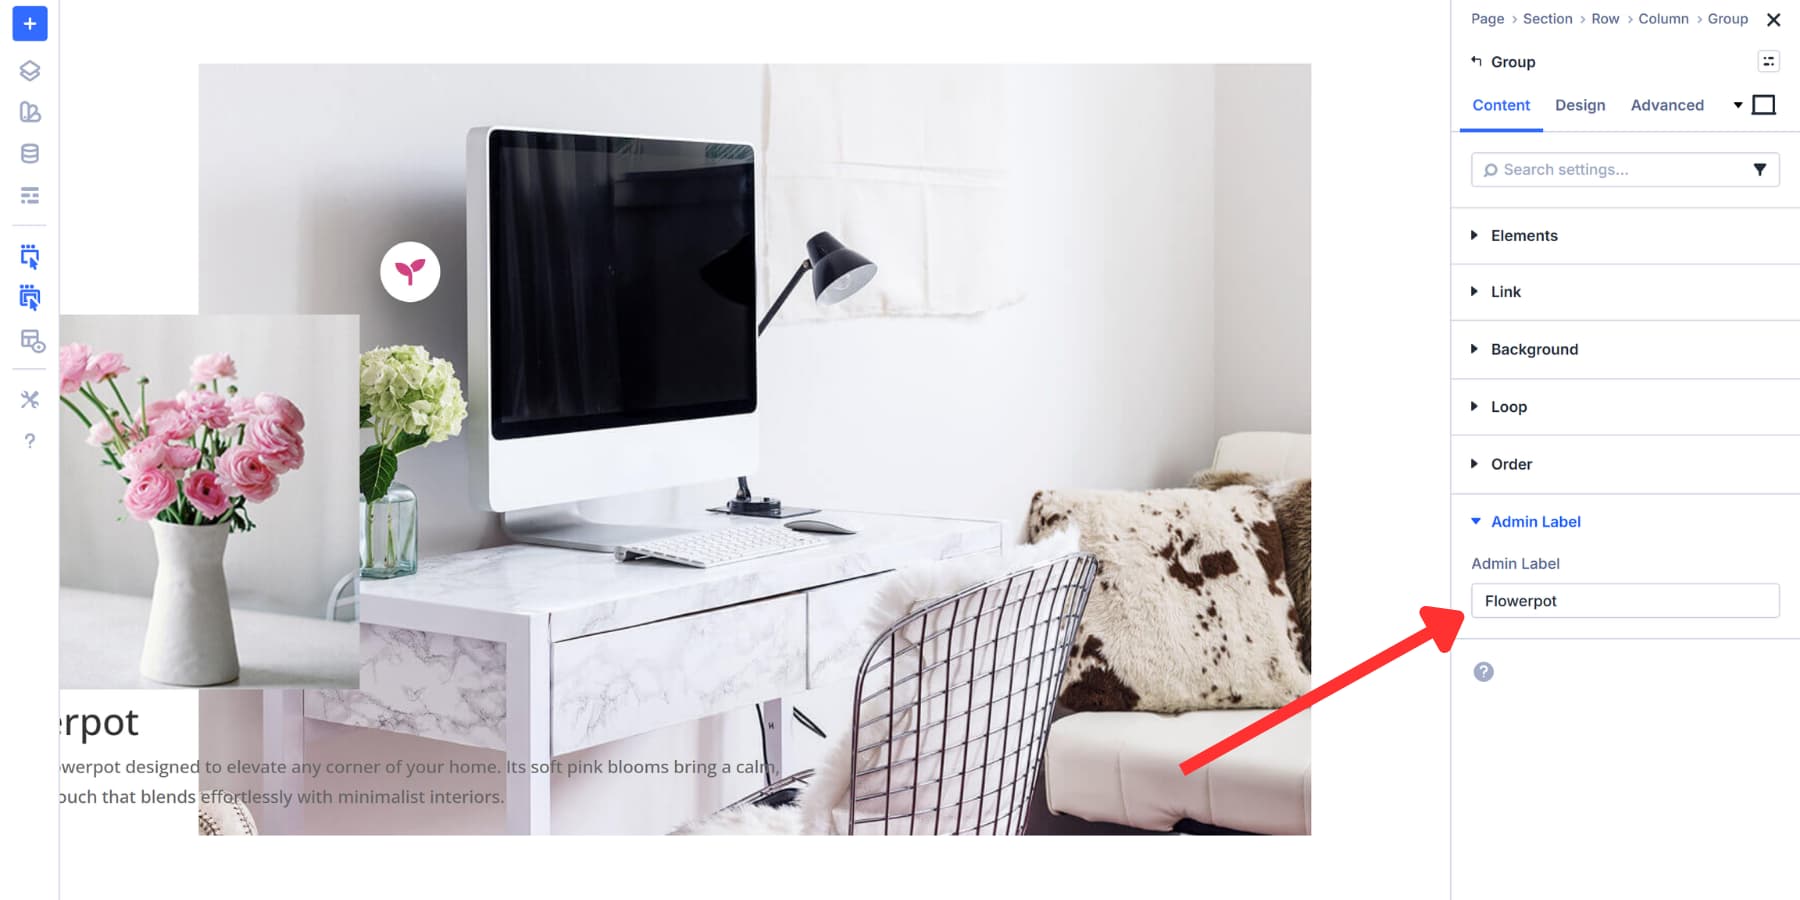
This label is helping you to find particular teams extra simply after we arrange Interactions. It’ll no longer seem for your reside website online.
Styling The Content material House
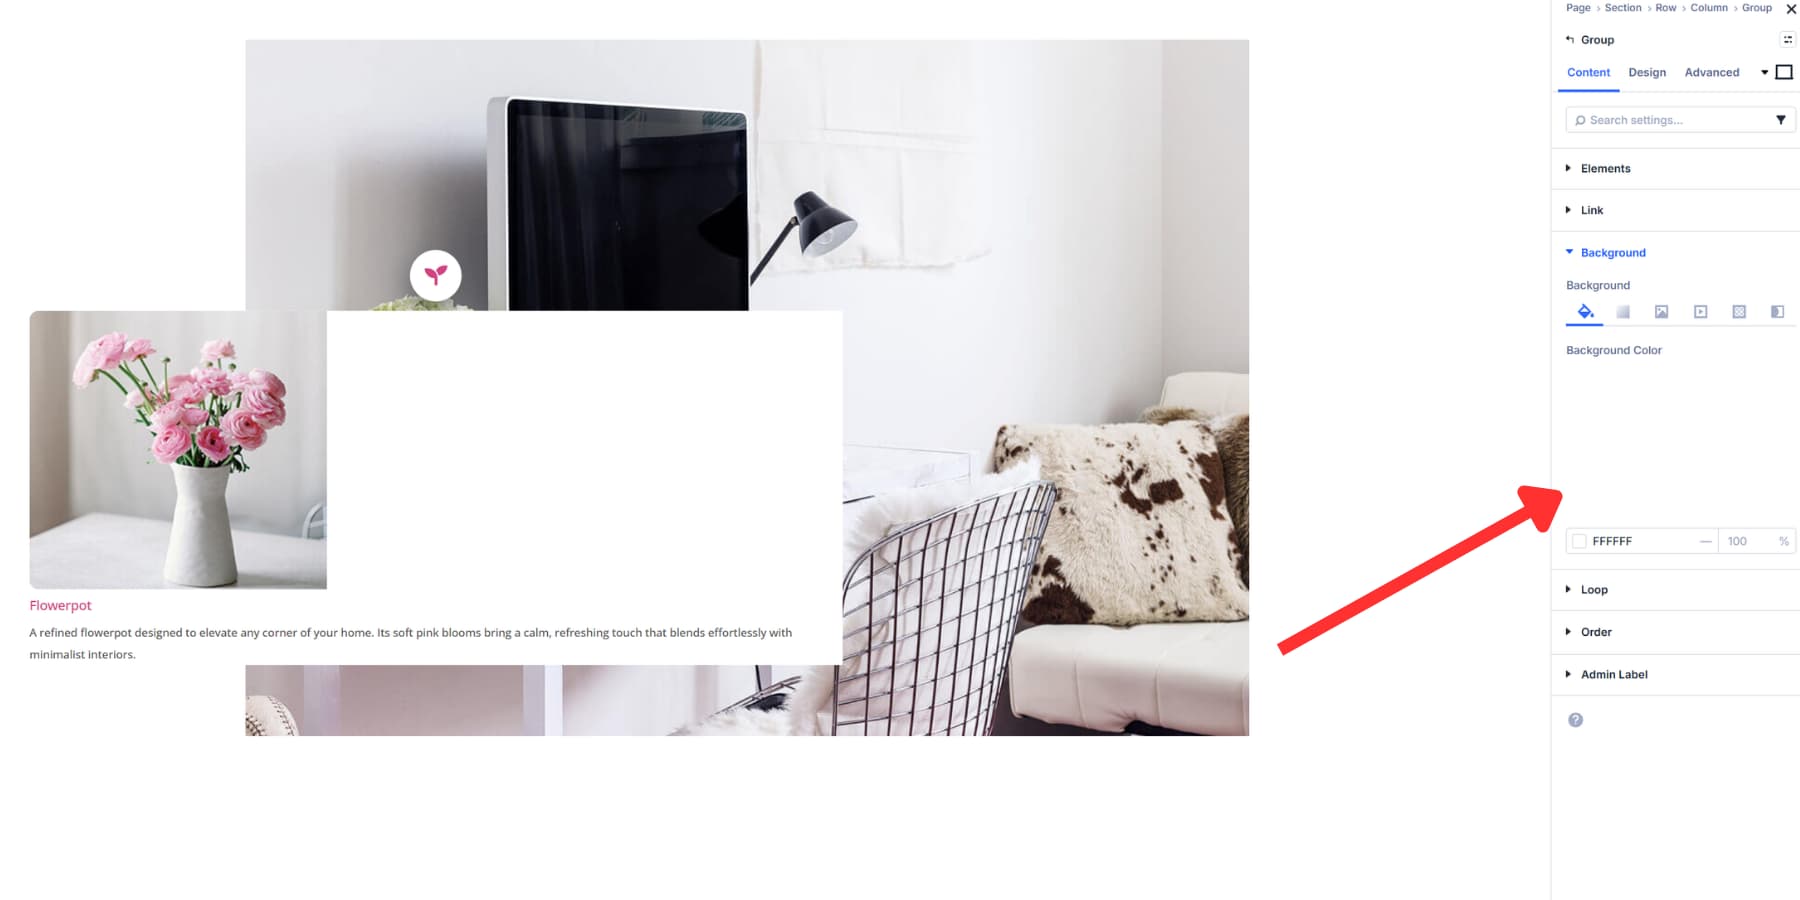
Your content material team wishes visible remedy that separates it from the background. For textual content, we’re adhering to the logo’s coloration palette. Likewise, we’re adjusting the font dimension so it appears correct and doesn’t devour a lot house.

Then, set a background coloration for the Content material team in order that it sticks out and stays readable.
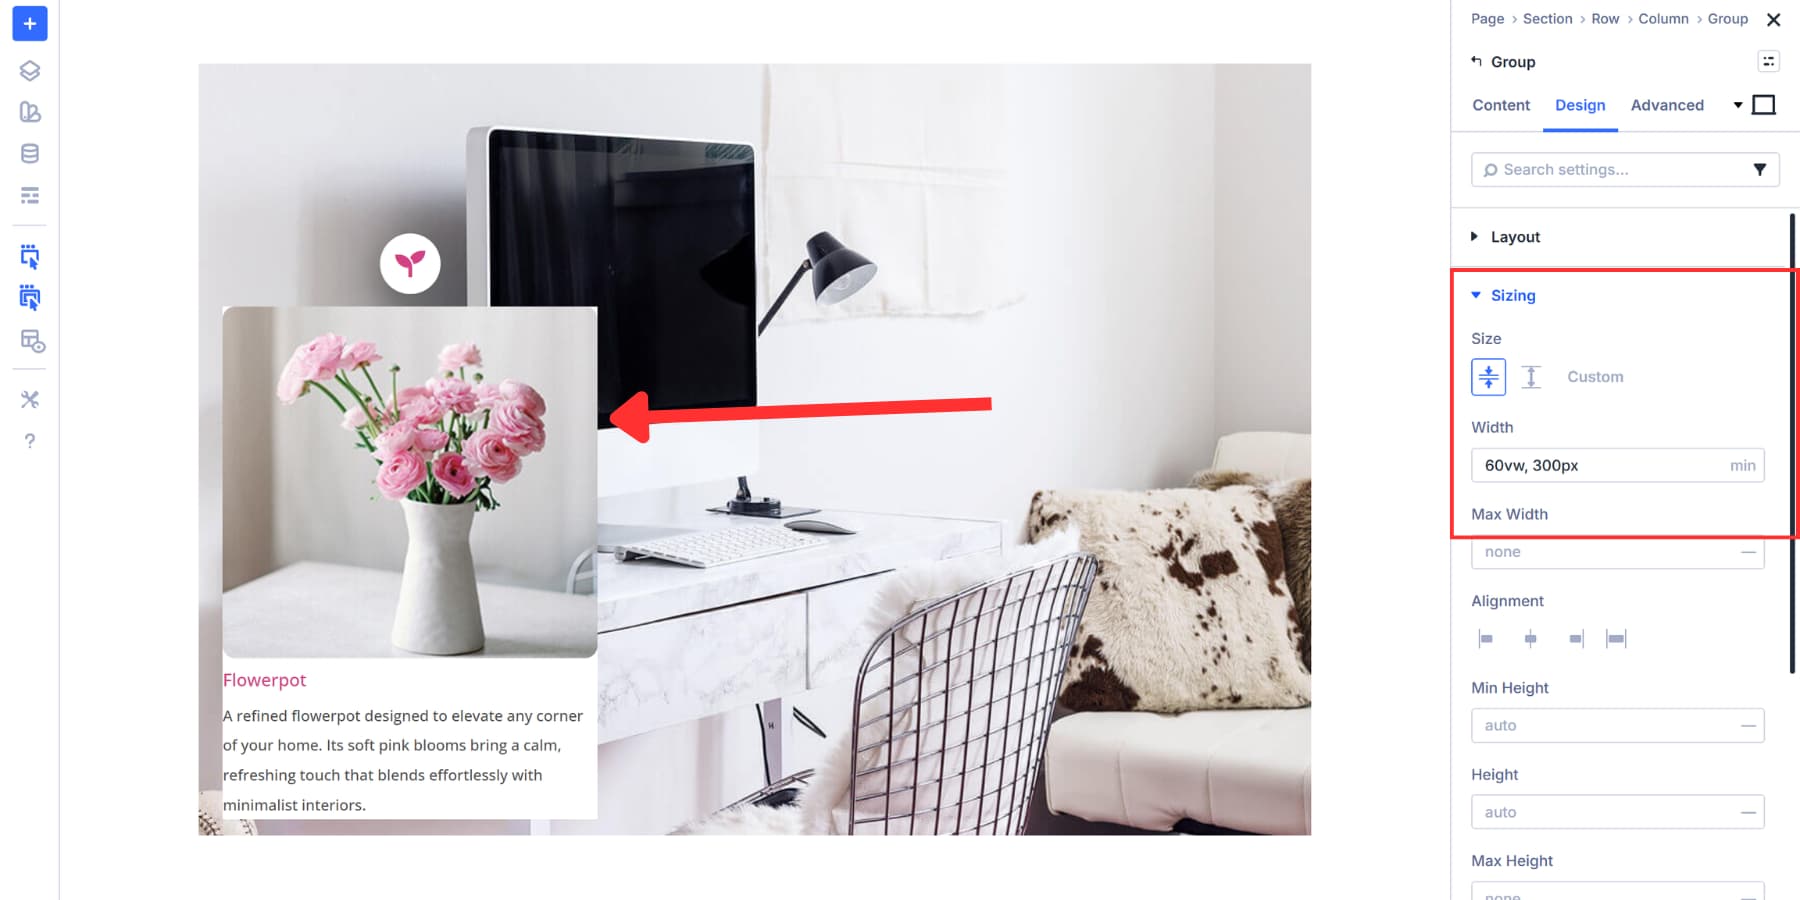
Head to the Design tab of your Content material module team and open the Sizing phase. Set your width price there. We set Dimension to Shrink to Are compatible so the crowd doesn’t make bigger past its content material.
And for exact sizing, you’ll be able to set a set width in pixels, however we’re the usage of min(60vw, 300px) as a substitute. The 60vw makes the content material field responsive out of the field, adapting robotically to quite a lot of display screen sizes with out you wanting to set other widths at each and every breakpoint.
This makes the content material field responsive through default. On smaller monitors, it could actually scale as much as about 60vw, so it remains readable with out overwhelming the format.
On greater monitors, the min() serve as caps the width at 300px, combating the field from stretching too extensive and making sure relaxed line lengths for studying.
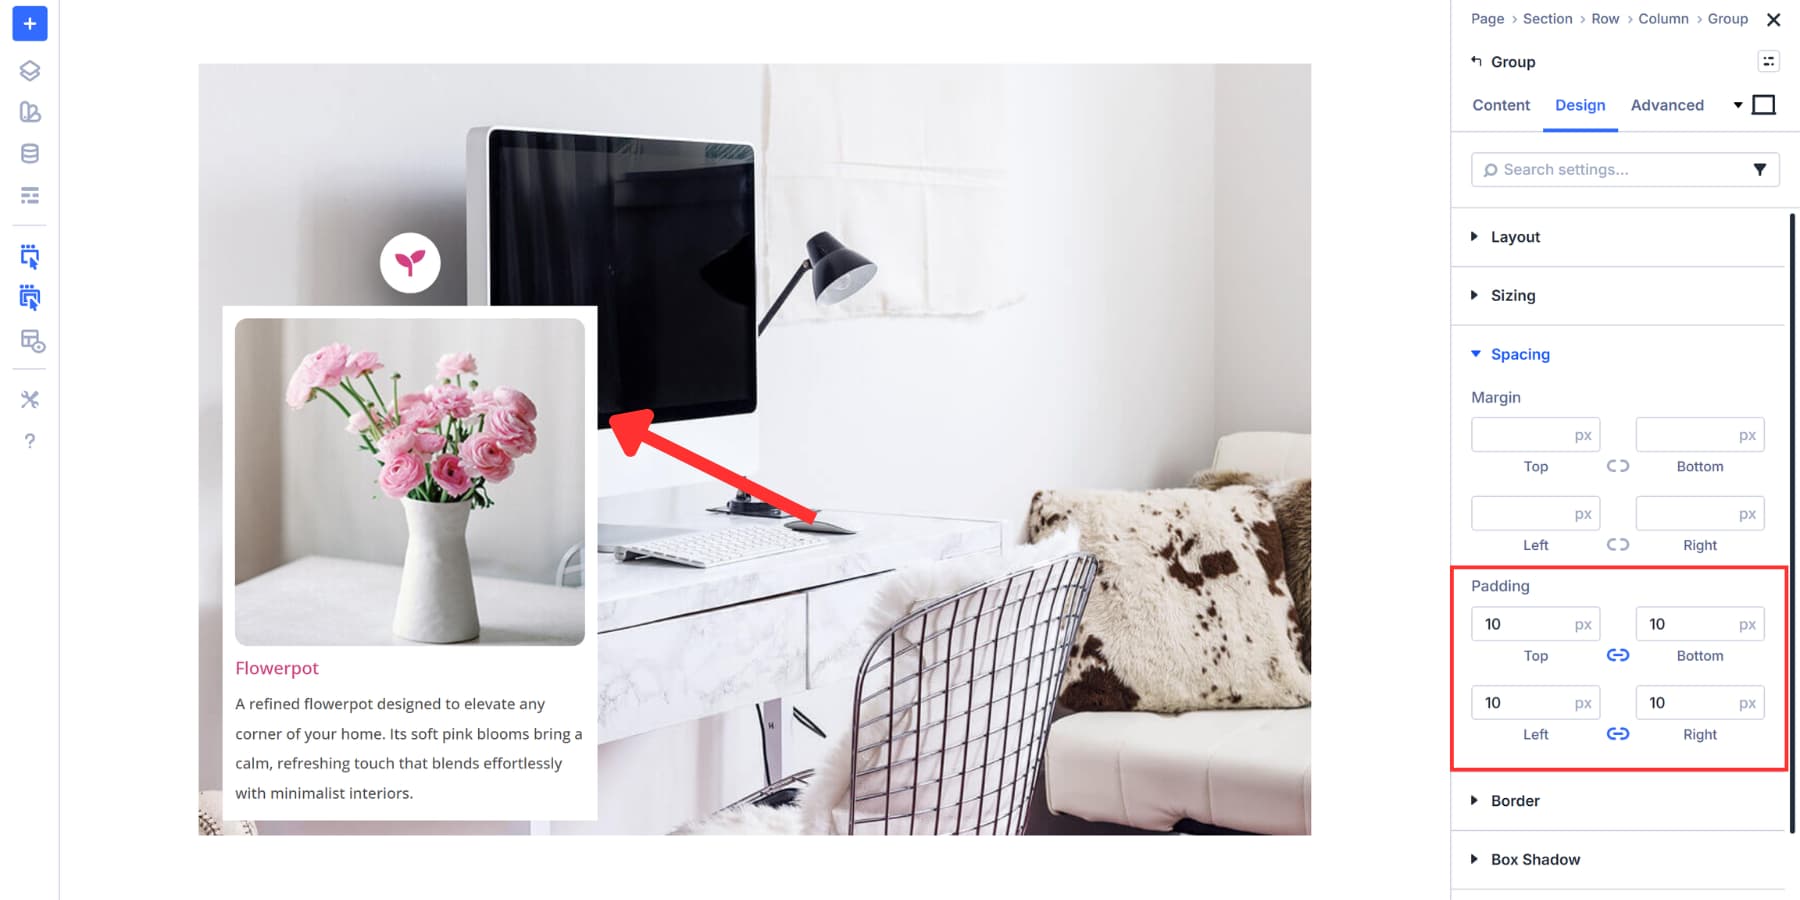
You might also upload padding on either side to make it a bit of breathable.
Believe including a border radius as neatly for a sophisticated glance.
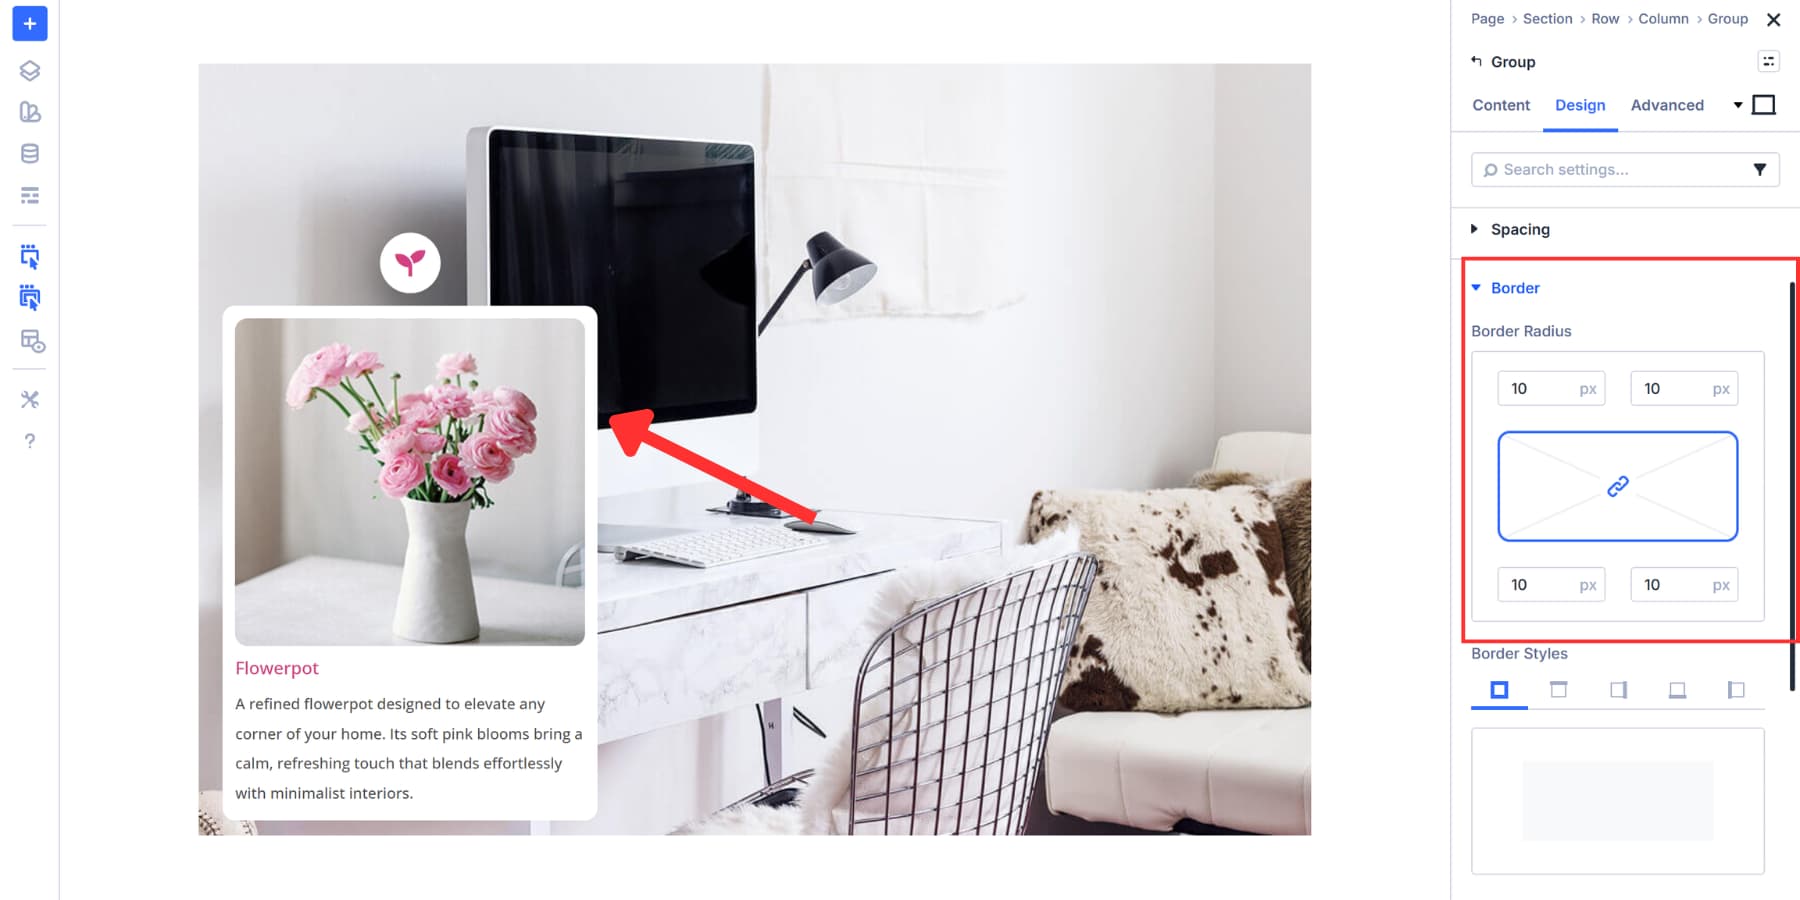
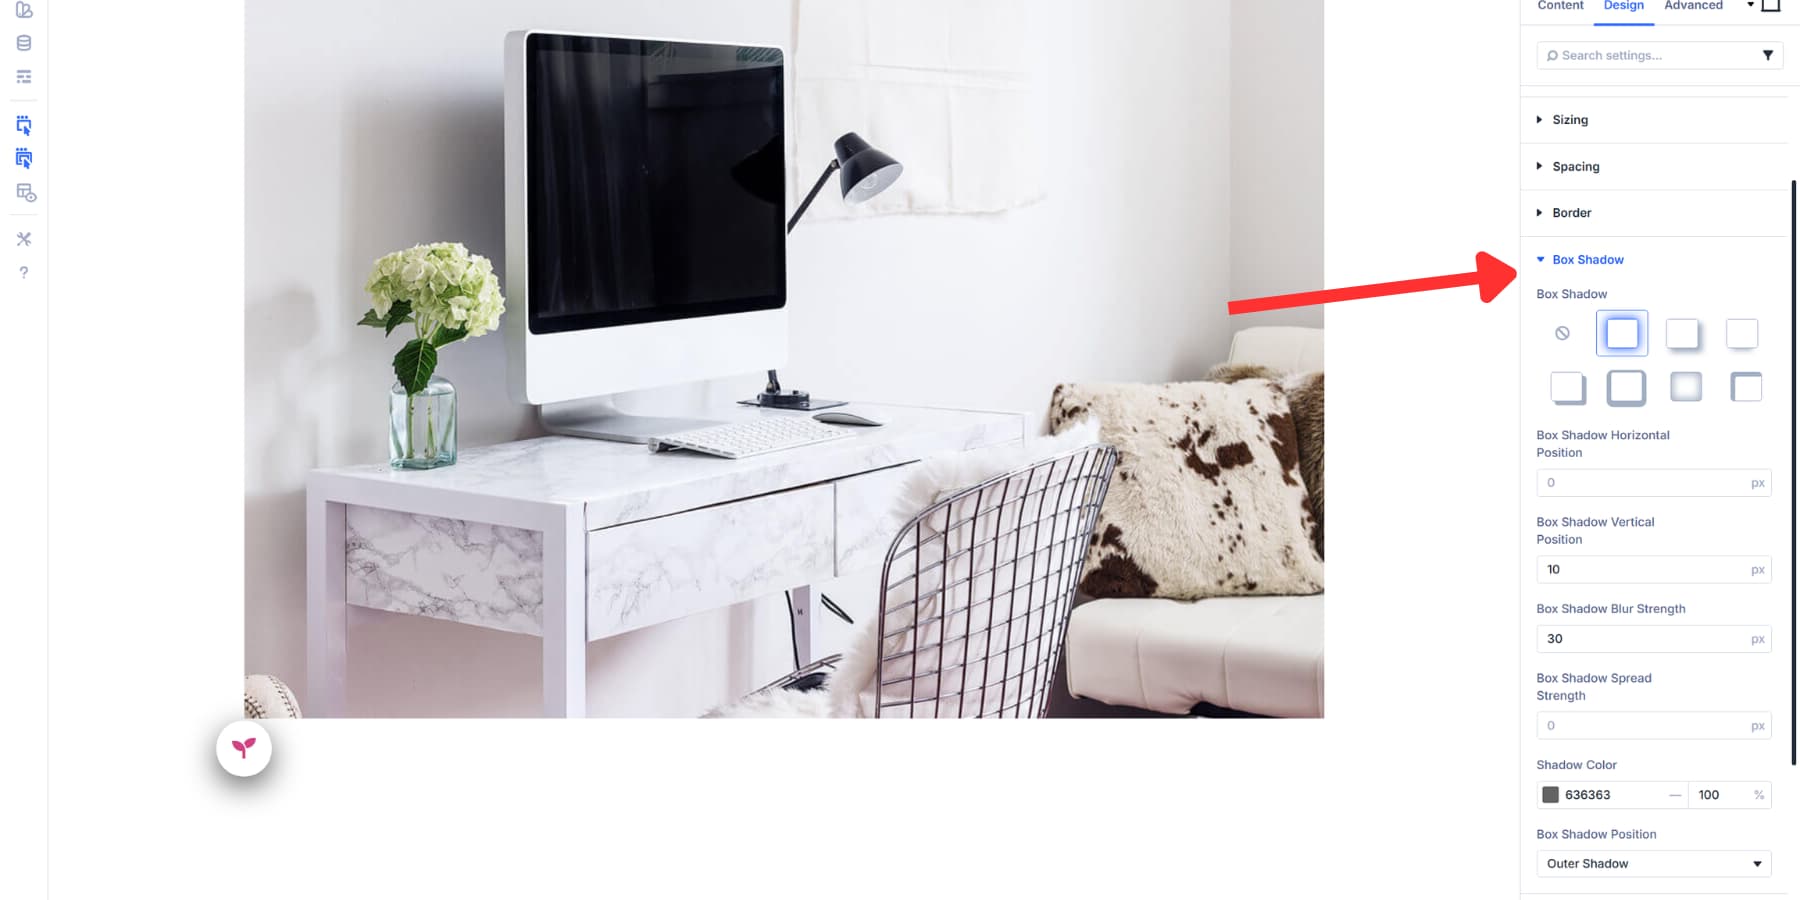
In spite of everything, upload a Field Shadow. We’re the usage of a 20px vertical offset, 60px blur power, and black at 25% opacity. This lifts the content material field off the web page visually, including intensity. Alter those values to reach the required prominence of the shadow.
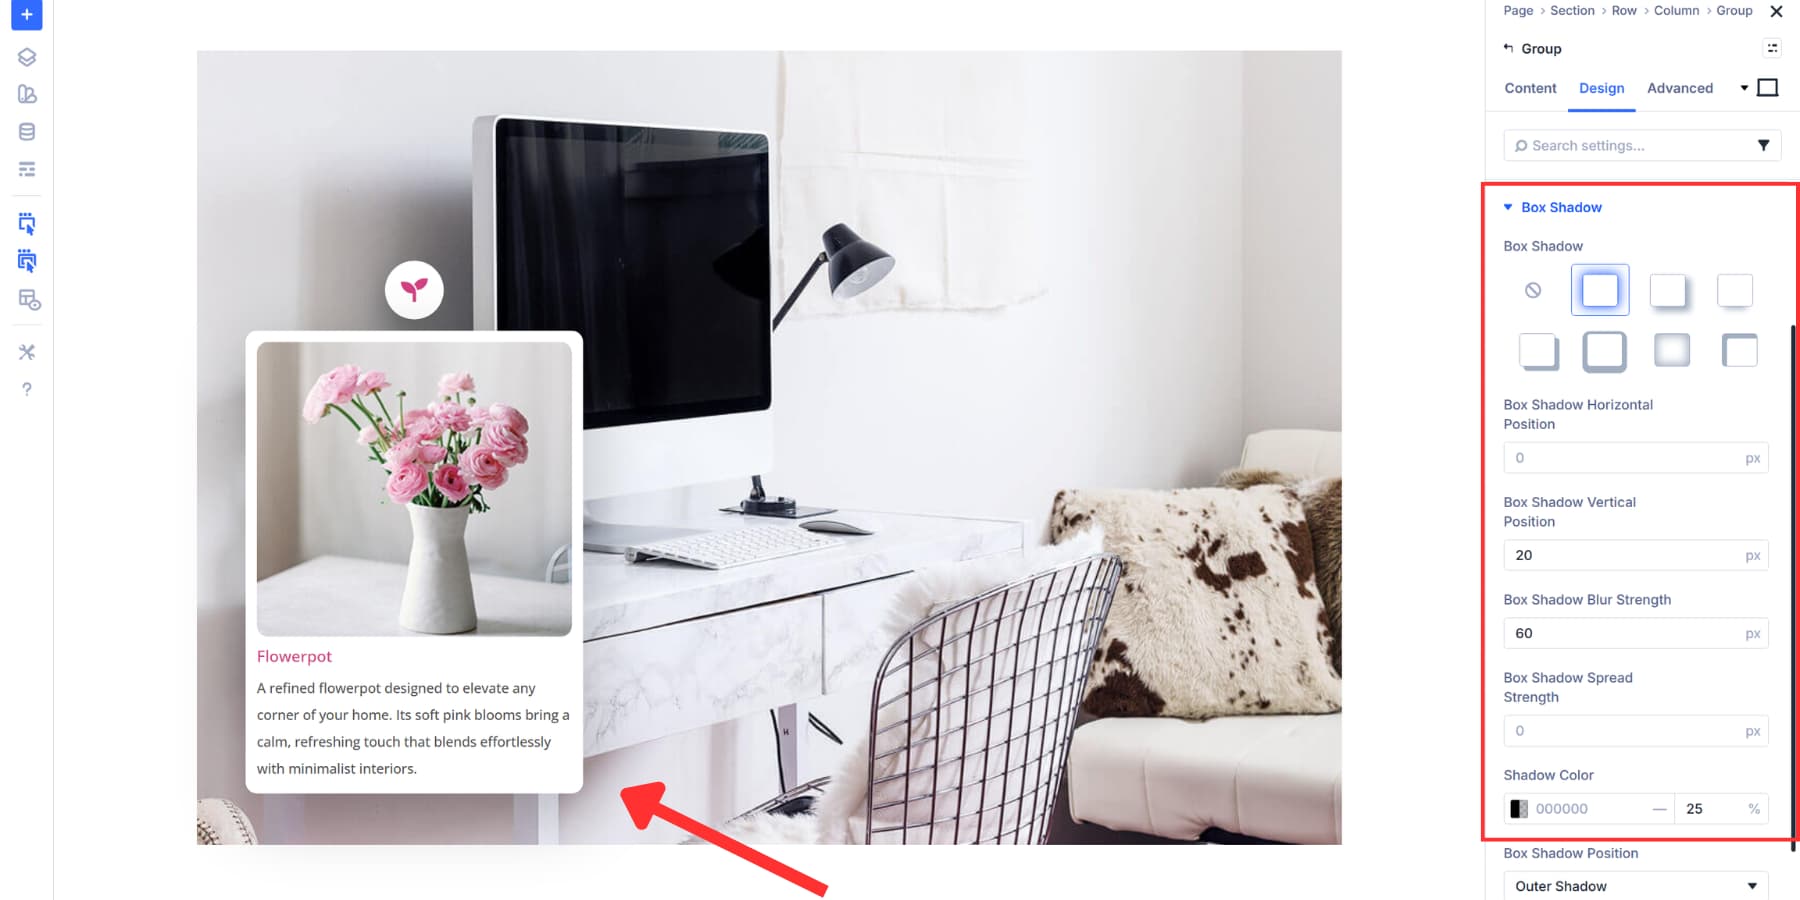
Whenever you’ve styled your content material team, reserve it as an Component Preset. This permits you to practice the similar background, sizing, padding, borders, and shadows to further hotspot content material spaces with a unmarried click on. You’ll save time and deal with consistency for your design throughout all markers.

Place Your Content material House
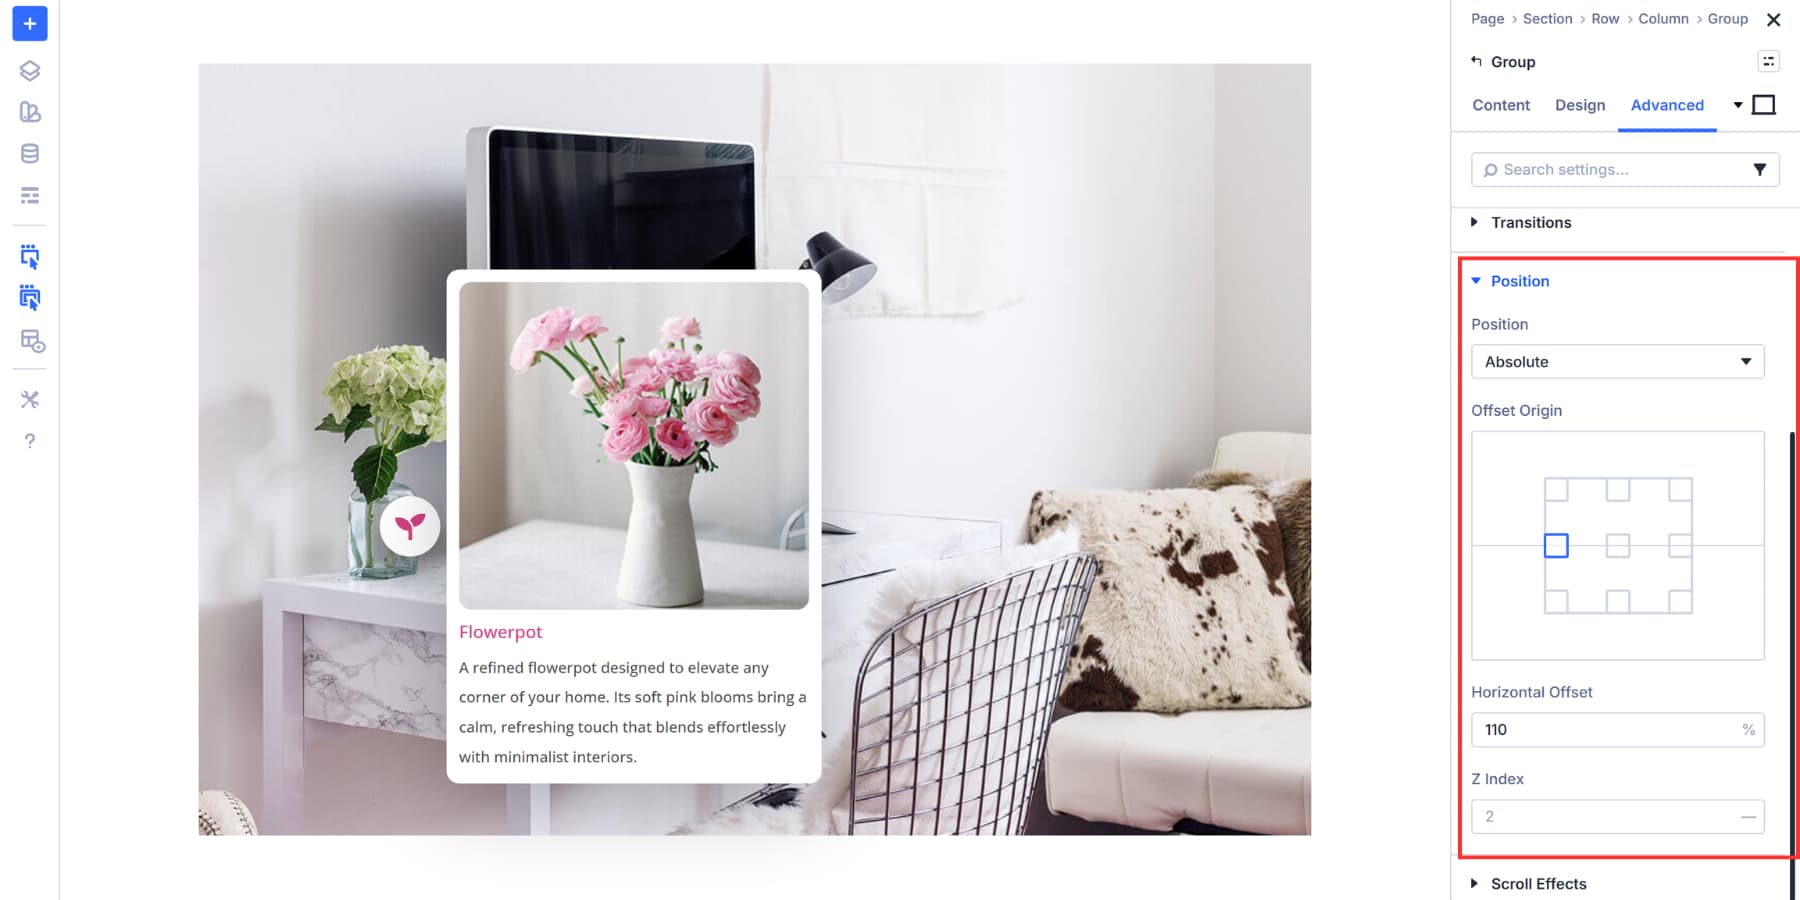
The content material team sits subsequent to the marker, no longer under it. So, very similar to the icon, we’ll use Positioning to get this proper. Right here, too, we can use absolute positioning, permitting it to glide independently inside the marker team.
For Offset Starting place, we decided on the left middle sq.. This anchors our measurements to the left fringe of the marker team, vertically focused. Ranging from this level makes horizontal placement extra predictable when positioning content material to the suitable.
We set Horizontal Offset to 110%. This pushes the content material field to the suitable of the marker. The 110% price puts it simply past the marker’s edge with a small hole between them. Your proportion will range according to marker dimension, the required spacing, and the correct placement of your marker.
The Z Index stays at 2, holding the content material above the background symbol with out inflicting stacking conflicts.
The content material now seems situated beside the marker. It is very important use those values according to the place you need your content material to show relative in your marker. Other layouts would require the content material to be situated above, under, or at various distances from the marker itself.
Conceal The Content material By way of Default
The content material team wishes to start out hidden so it handiest seems when customers click on the marker. We’re disabling visibility on all units for this nested content material team.
Within the Complicated tab of the content material team, scroll to Visibility and take a look at Telephone, Pill, and Desktop below Disable On. This hides the content material throughout each and every display screen dimension. While you practice those visibility settings, the crowd could have a faded-out glance, indicating it’s hidden.
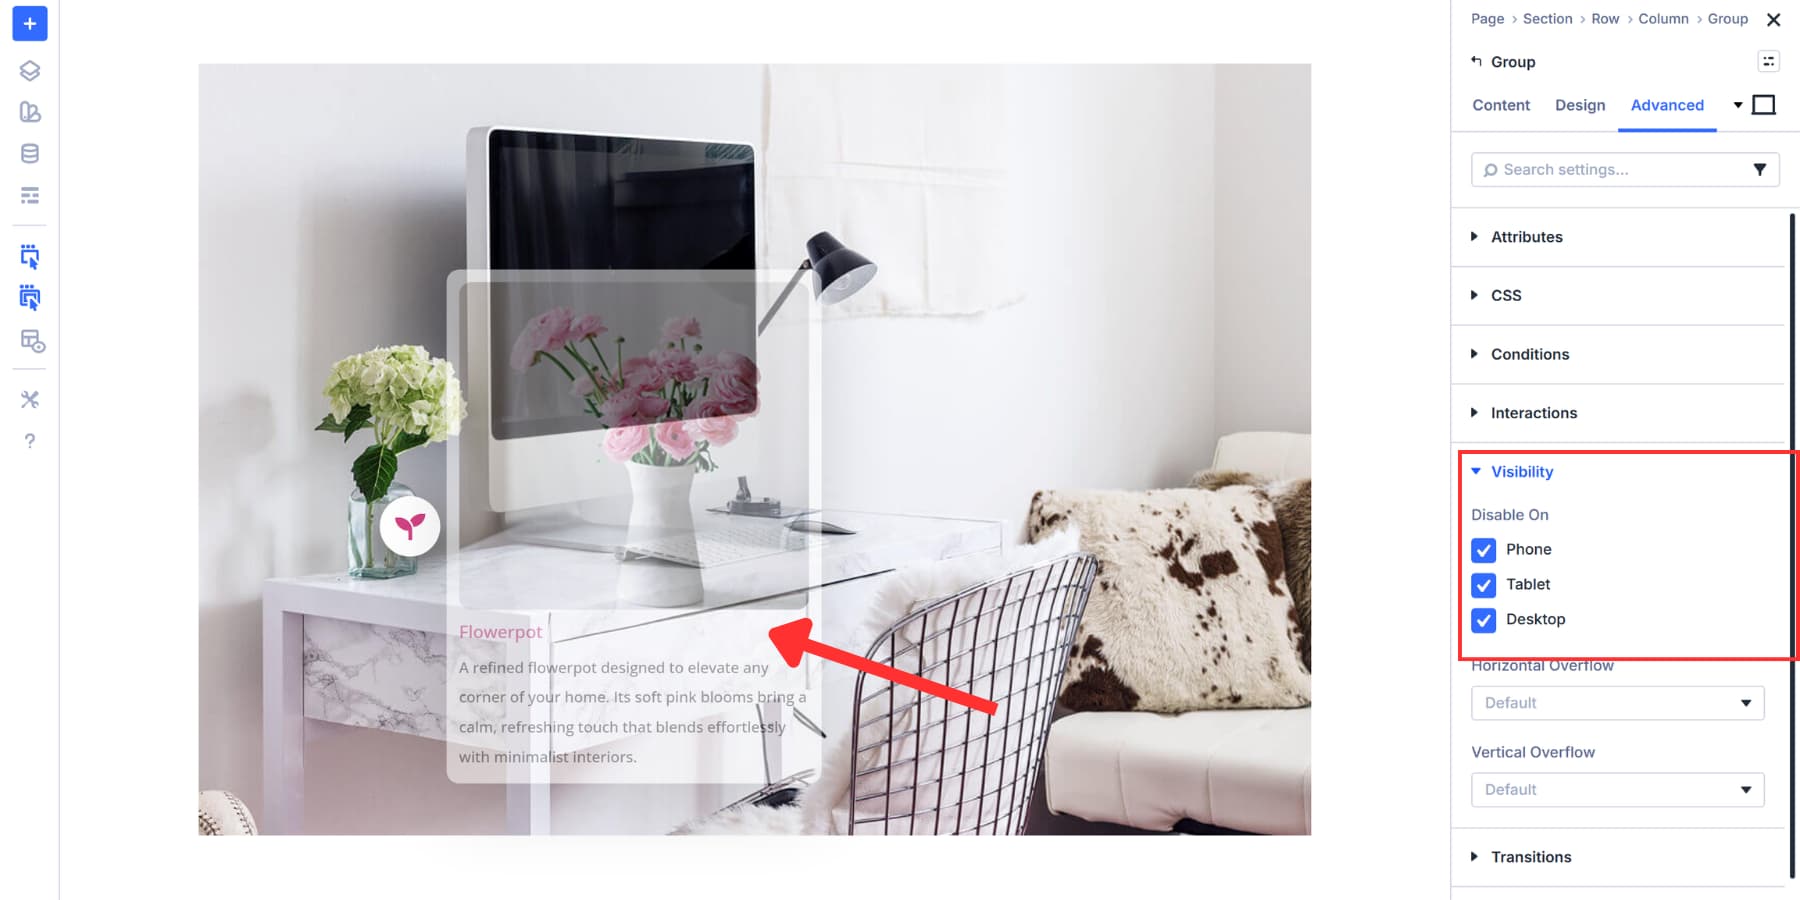
With out this step, your whole hotspot content material would show without delay, cluttering the web page and defeating the aim of interactive finds.
Hiding it through default we could Interactions keep an eye on when and the way the content material seems. After we arrange the clicking cause within the subsequent phase, the interplay will override this visibility surroundings and display the content material precisely when wanted.
Attach Markers To Content material
Now we convey the hotspot to lifestyles. Interactions at the icon keep an eye on when your content material seems and disappears.
We’re the usage of Mouse Input and Mouse Go out triggers right here. When any person hovers over the marker, the content material slides into view. Once they transfer away, it hides once more.
This works neatly for temporarily getting access to data, as customers can scan a couple of hotspots while not having to click on each and every one. Click on triggers paintings higher when you need customers to open and shut content material intentionally, however hover feels extra fluid for surfing.
Open your icon settings and pass to the Complicated tab. Scroll to Interactions and click on Upload New Interplay. Set the Cause Match to ‘Mouse Input’.

And upload a label for reference.
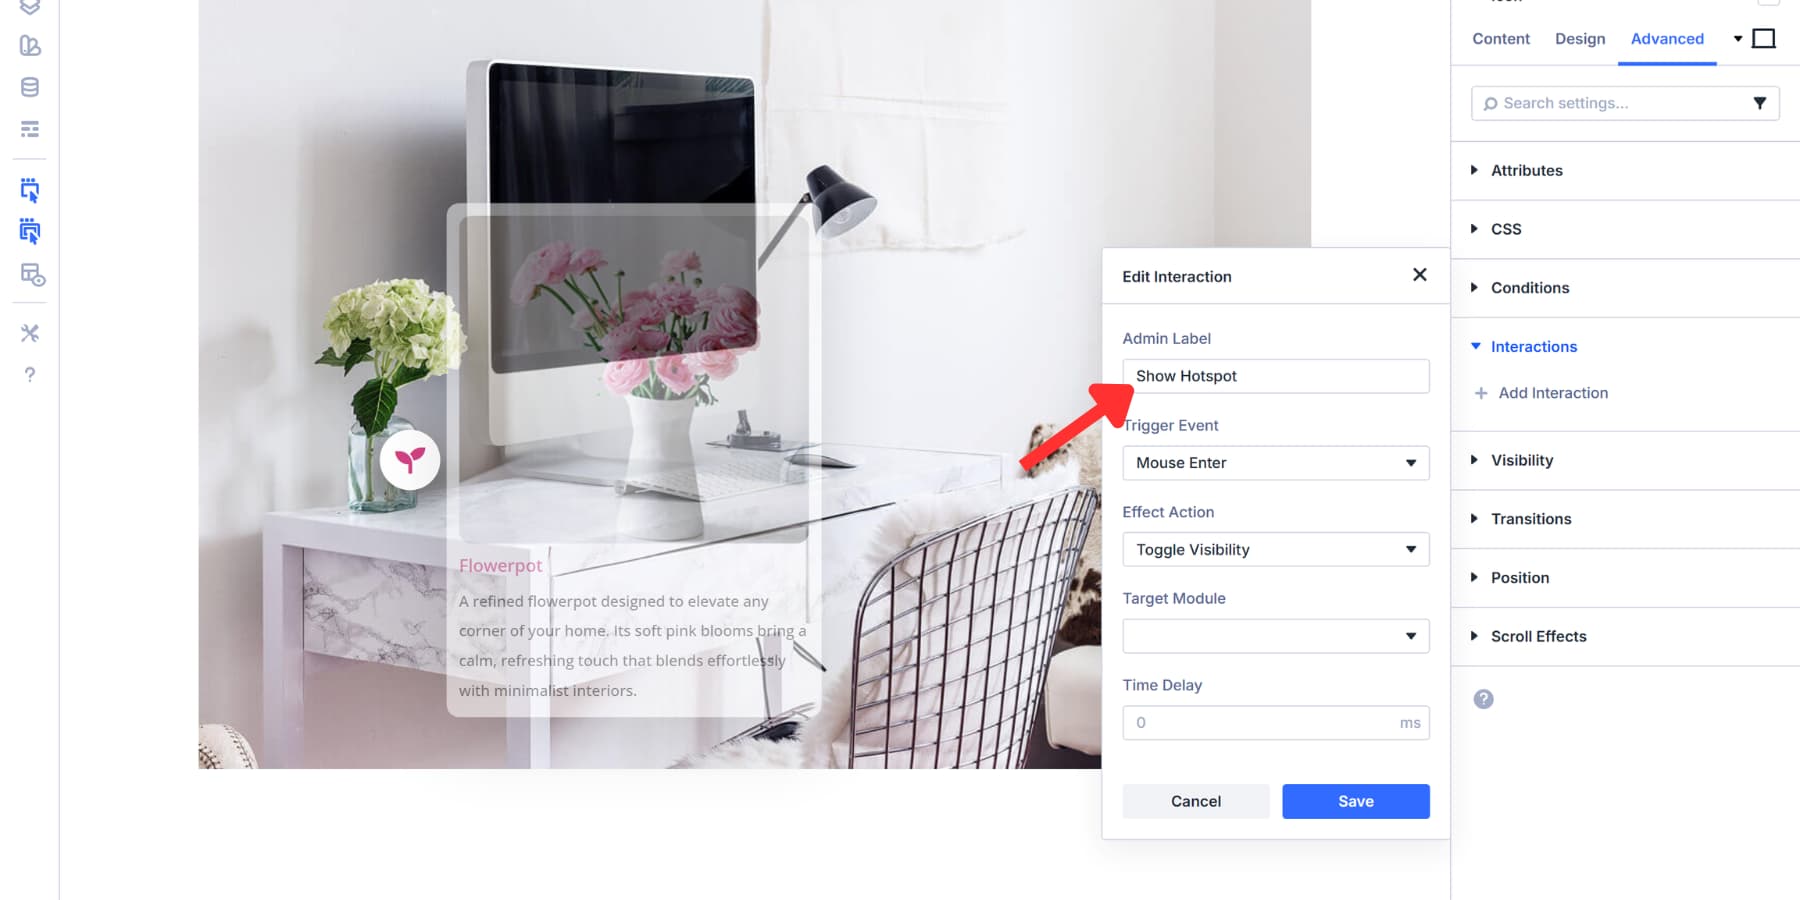
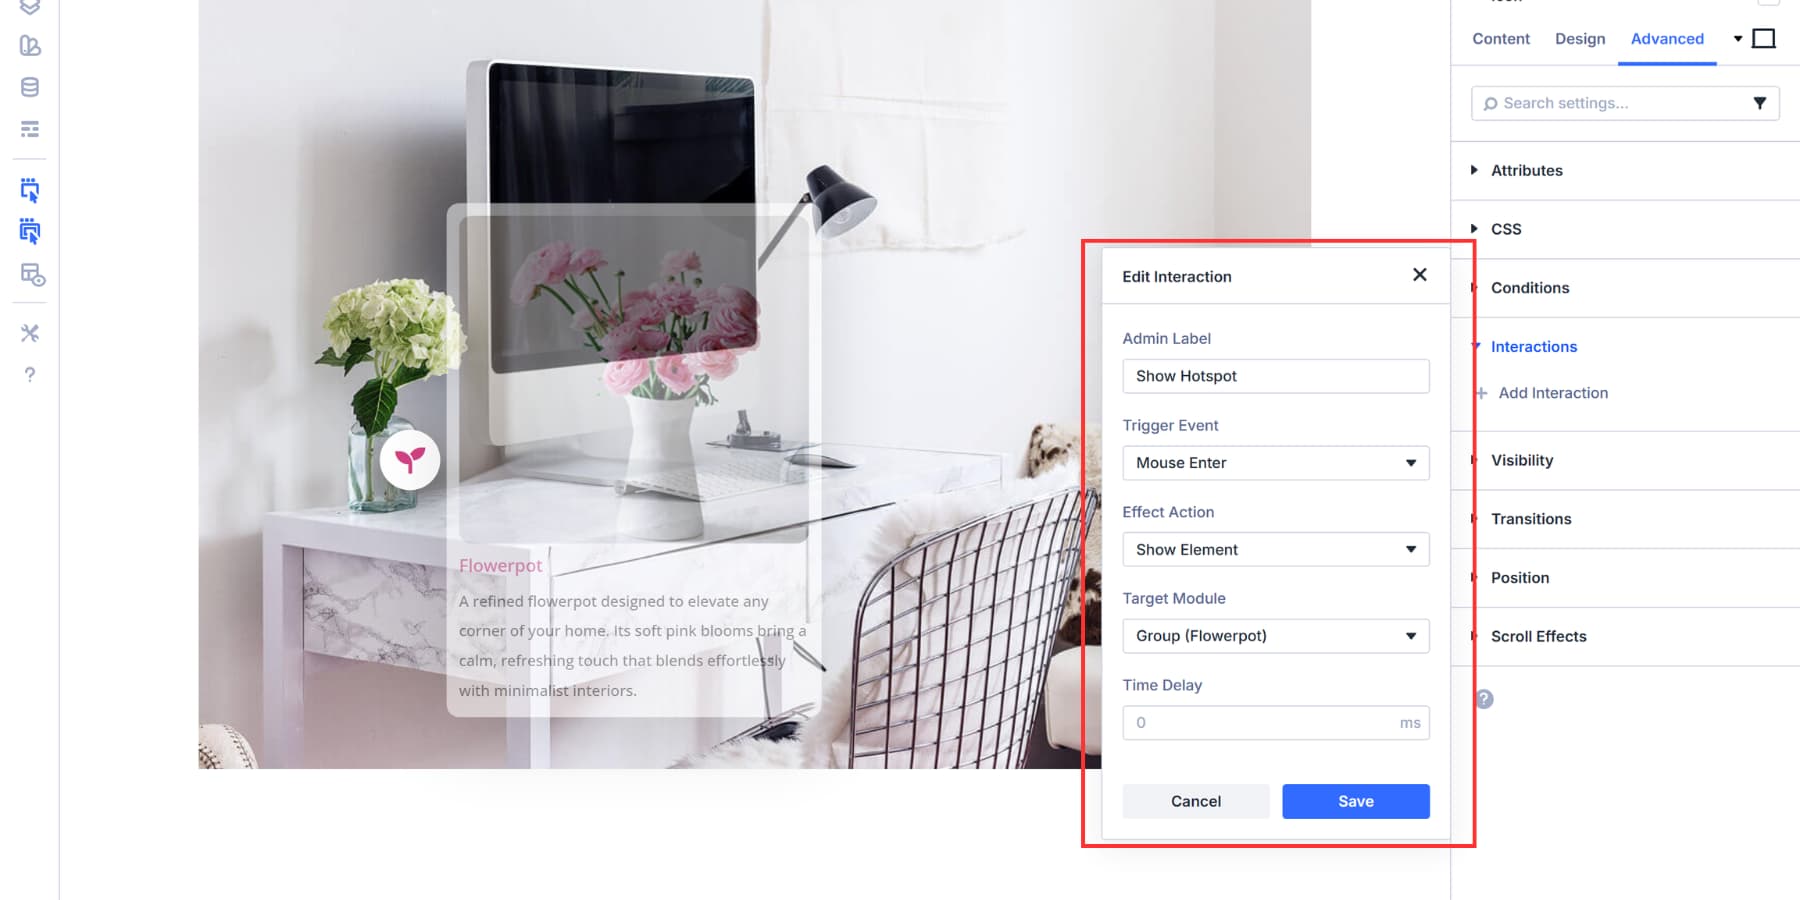
Then, set the Impact Motion to “Display Component” and the Goal Module in your content material team. The Admin Label you added previous seems within the dropdown, making the suitable team simple to identify. You could modify the time lengthen to have a smoother access, however we’re holding it at 0.
Click on Save, after which, the usage of the replica possibility, upload a 2d interplay.
![]()
Right here, simply trade the Cause Match to Mouse Go out, Impact Motion to Conceal Component, and go away the objective as is. Label this “Conceal Hotspot” or a an identical title for reference.
For click-based finds, use one interplay with ‘Click on’ because the cause and ‘Toggle Component Visibility’ because the impact. Customers faucet as soon as to turn, faucet once more to cover.
Including Extra Hotspots
You’ve constructed one whole hotspot. The remaining pass sooner. The ones Component Presets you stored previous do the heavy lifting. Observe the marker preset to a brand new icon, practice the content material preset to a brand new nested team, and also you’re midway accomplished.
You’ll nonetheless wish to change the content material for each and every hotspot with recent subject matter. Replace the picture, rewrite the heading, and alter the textual content to compare the marker’s illustration. Then modify Place settings to put the marker and content material team over the suitable spot for your symbol. In spite of everything, replace the Goal Module for your interactions to indicate at the right kind content material team.
This workflow stays blank as a result of the entirety is attached. Presets deal with constant styling throughout all markers. Interactions hyperlink triggers to express objectives with out confusion. Admin Labels permit you to monitor which piece controls what.
Divi 5 builds consistency into the workflow itself. That’s the actual win. You put colours, shadows, borders, and sizing as soon as, then practice them far and wide. While you upload hotspot quantity 5, you’re no longer sitting there matching pixel values and hex codes to hotspots one via 4. The design remains locked. You center of attention on content material and location whilst Divi helps to keep the entirety uniform throughout each and every hotspot you upload.
Obtain 5 Hotspot Layouts For Unfastened!
We’ve created 5 hotspot designs that you’ll be able to obtain under without cost. Those layouts display precisely how Interactions paintings and function a place to begin. Open them within the Visible Builder and customise them on your personal content material.
@media handiest display screen and ( max-width: 767px ) {.et_bloom .et_bloom_optin_1 .carrot_edge.et_bloom_form_right .et_bloom_form_content:ahead of { border-top-color: #ffffff !essential; border-left-color: clear !essential; }.et_bloom .et_bloom_optin_1 .carrot_edge.et_bloom_form_left .et_bloom_form_content:after { border-bottom-color: #ffffff !essential; border-left-color: clear !essential; }
}.et_bloom .et_bloom_optin_1 .et_bloom_form_content button { background-color: #f92c8b !essential; } .et_bloom .et_bloom_optin_1 .et_bloom_form_content .et_bloom_fields i { coloration: #f92c8b !essential; } .et_bloom .et_bloom_optin_1 .et_bloom_form_content .et_bloom_custom_field_radio i:ahead of { background: #f92c8b !essential; } .et_bloom .et_bloom_optin_1 .et_bloom_border_solid { border-color: #f7f9fb !essential } .et_bloom .et_bloom_optin_1 .et_bloom_form_content button { background-color: #f92c8b !essential; } .et_bloom .et_bloom_optin_1 .et_bloom_form_container h2, .et_bloom .et_bloom_optin_1 .et_bloom_form_container h2 span, .et_bloom .et_bloom_optin_1 .et_bloom_form_container h2 sturdy { font-family: “Open Sans”, Helvetica, Arial, Lucida, sans-serif; }.et_bloom .et_bloom_optin_1 .et_bloom_form_container p, .et_bloom .et_bloom_optin_1 .et_bloom_form_container p span, .et_bloom .et_bloom_optin_1 .et_bloom_form_container p sturdy, .et_bloom .et_bloom_optin_1 .et_bloom_form_container shape enter, .et_bloom .et_bloom_optin_1 .et_bloom_form_container shape button span { font-family: “Open Sans”, Helvetica, Arial, Lucida, sans-serif; } p.et_bloom_popup_input { padding-bottom: 0 !essential;}

Obtain For Unfastened
Sign up for the Divi E-newsletter and we can e-mail you a replica of without equal Divi Touchdown Web page Structure Pack, plus lots of alternative wonderful and loose Divi sources, guidelines and tips. Apply alongside and you’ll be a Divi grasp very quickly. If you’re already subscribed merely kind for your e-mail deal with under and click on obtain to get right of entry to the format pack.
You’ve got effectively subscribed. Please take a look at your e-mail deal with to substantiate your subscription and get get right of entry to to loose weekly Divi format packs!
Take a look at Construction Hotspots In Divi 5 As of late!
Your website online doesn’t want extra content material. It wishes higher keep an eye on over the content material you have already got. Hotspots give you the precision you want, permitting you to pack intensity into each and every web page with out overwhelming any individual. The gear are constructed proper into Divi 5.
The method takes mins, no longer hours. Your guests get precisely what they got here for, with no need to seek via paragraphs or click on via a couple of pages. Get started construction yours as of late.
The publish How To Create Hotspots With Divi 5 gave the impression first on Elegant Themes Blog.
Contents
- 1 What Are Hotspots?
- 2 Divi 5’s Interactions: A Fast Evaluate
- 3 Developing Hotspots With Divi 5
- 4 Obtain 5 Hotspot Layouts For Unfastened!
- 5 Obtain For Unfastened
- 6 You’ve got effectively subscribed. Please take a look at your e-mail deal with to substantiate your subscription and get get right of entry to to loose weekly Divi format packs!
- 7 Take a look at Construction Hotspots In Divi 5 As of late!
- 8 7 Absolute best Google Evaluations Plugins for WordPress (Professional Pick out)
- 9 Matt Mullenweg’s Really useful WordPress Plugins | WordPress Plugin Energy-Ups: Matt…
- 10 What’s Coming in WordPress 6.9? (Options and Screenshots)

0 Comments