
For many who’ve ever tried building a internet founded community to your WordPress website online, you know how exhausting it’s to stick people engaged. To start with, some folks sign up for and publish a few updates, alternatively previous than long, process drops off and the community goes quiet. 📉
The issue isn’t your content material subject material or thought. It’s the enjoy. The general public don’t need to keep opening a browser merely to look what’s new or reply to messages.
I wanted to fix this problem, so I tried BuddyBoss, a tool that can turn any WordPress website online proper right into a cellular app.
Inside about an hour, I had the app utterly configured and ready to put up to the app shops. It were given right here with push notifications, fast messaging, and all the choices folks in reality need to use.
The engagement boost was once rapid and noticeable. And after seeing how well it worked, I’m confident it assist you to get well results, too.
In this knowledge, I’ll show you exactly one of the best ways to turn your WordPress website into an app, without a coding or technical skills required.
Understand: The technical setup in this knowledge takes about an hour. Please keep in mind that getting your app live involves taking a look forward to approval from Apple and Google. This may occasionally take various days, so it’s superb to plan for that able time.
💡Speedy Summary: What You Want to Turn Your WordPress Website into an App
In a hurry and easily want the quick fashion? Proper right here’s what you’ll need:
- A WordPress community website (for instance, a dialogue board or membership website online).
- The BuddyBoss App, which converts your website online into native iOS and Android apps — no coding or developer required.
You’ll have the ability to uncover other methods like Trendy Web Apps (PWAs) or entire custom app building, alternatively those take additional time and price a lot more.
For plenty of WordPress shoppers, BuddyBoss is the fastest and most beginner-friendly resolution.
Why Turn Your WordPress Group Website online proper right into a Cell App?
Turning your WordPress community website proper right into a cell app can in an instant boost engagement and keep folks coming once more.
Apps make it easier for patrons to stay attached, specifically on their phones, where most online interactions happen lately.
A cellular app outperforms an ordinary website because it provides:
- 🔔 Push notifications that imply you’ll reach folks in an instant with updates or messages.
- 📶 Offline get right to use so that shoppers can browse or be told some content material subject material even without the internet.
- 📤 Easy content material subject material sharing to encourage additional interaction and visibility.
- 🎯 Personalized in-app reviews that make your community in reality really feel additional dynamic
Let’s see how a cellular app compares to a normal website and why it makes this sort of massive impact:
| Serve as | Website online | Cell App | Where an App Wins |
|---|---|---|---|
| Get right to use | Browser-based | Installed on cellular tool | All the time visible on the space show. |
| Offline Use | ❌ | ✅ (Limited) | Shoppers can be told content material subject material anytime. |
| Push Notifications | ✅ | ✅ | App notifications are additional difficult. They appear on the individual’s lock show and don’t require a web browser to be open. |
| Engagement | Cheap | Top | Builds loyalty and retention. |
| Setup Worth | 💲 | 💲💲 | Apps need setup, alternatively send a stronger ROI. |
Key takeaway: If your website online isn’t getting so much process, then turning it proper right into a cellular app can increase engagement. Plus, you get to boost retention and assemble stronger loyalty right through your membership, social, or eLearning platform.
Different Ways to Assemble a WordPress App (and the One That Works Highest)
There are a variety of tactics to turn your WordPress website online proper right into a cellular app, alternatively not all of them are beginner-friendly or smartly well worth the effort.
After trying out different methods, I found out that BuddyBoss App provides the best balance of simplicity, choices, and results.
Proper right here’s a to hand information a coarse check out your possible choices and what to expect from each:
| Way | Factor | Worth | Business-Off | Highest For |
|---|---|---|---|---|
| BuddyBoss App | Easy | 💲💲 | Requires a subscription | Communities, memberships, eLearning |
| PWA (Trendy Web App) | Easy | 💲 | Limited store availability and no more choices | Blogs, portfolios |
| Native App Development | Complicated | 💲💲💲💲 | Requires developers; pricey | Custom designed tasks |
Why I Recommend BuddyBoss App
BuddyBoss is the maximum tough WordPress neighborhood platform to be had out there. It’s built for rising membership web pages, social networks, and online learning platforms, all in one place.
The BuddyBoss App takes that experience to cellular. It signifies that you’ll turn your WordPress website online proper into an area iOS and Android app without writing any code. The whole thing, at the side of your shoppers, content material subject material, categories, and private messages, syncs robotically between your website and the app.
Proper right here’s what makes it stand out:
- No coding required: The BuddyBoss workforce handles the entire app assemble for you.
- Speedy syncing: Helps to keep your WordPress content material subject material, shoppers, and lines up to date in authentic time.
- Built-in community apparatus: Incorporates messaging, path integrations, and push notifications.
- Easy customization: Use the drag-and-drop builder to design your app’s look and construction.
Briefly, BuddyBoss App gives you all the benefits of a custom-built cellular app without the fee, complexity, or coding headaches.
✅Faster than You Get started: Setup Checklist + Costs
Faster than I show you one of the best ways to turn your WordPress community proper right into a cellular app, I need to you’ll need to’ve got the whole thing ready. That’s why I’ve put together a checklist and a smart breakdown of the principle costs so you understand exactly what to expect previous than getting started.
You’ll need the following previous than you get started:
- Loyal WordPress web web hosting. I love to counsel Rapyd Web hosting because it’s designed specifically for online community web websites.
- A WordPress neighborhood website online built with BuddyBoss.
- An vigorous BuddyBoss App subscription.
- Apple Developer Account.
- Google Play Developer Account.
💰 Worth Breakdown: How So much Does It Worth to Assemble a BuddyBoss Group App?
| Worth Type | Description | Amount |
|---|---|---|
| BuddyBoss Platform | To build your WordPress community website online (one-time or annual license) | $299/year |
| Rapyd Internet web hosting | Powerful web web hosting. Very good for BuddyBoss | $29/month |
| BuddyBoss App Subscription | Provides you with get right to use to the app builder and publishing apparatus | $79/month |
| Apple Developer Account | Required to place up your iOS app | $99/year |
| Google Play Developer Account | Required to place up your Android app | $25 one-time rate |
For many who haven’t built your community website online however, then take a look at our step-by-step tutorial on the best way to create your personal non-public neighborhood in WordPress.
If you already have one, then your number one new costs will merely be the BuddyBoss App subscription and developer accounts.
While the BuddyBoss App subscription is a huge investment, it’s important to remember that hiring a developer to build an app costs masses of dollars.
For plenty of business homeowners, using a tool like BuddyBoss is a far quicker and additional moderately priced solution to get a professional app.
Discover ways to Create a Cell App The usage of BuddyBoss
Now that you just’ve were given the whole thing ready, let’s leap into the suitable way I’ve tested for making a local app from a WordPress website.
Step 1: Arrange and Connect the BuddyBoss App Plugin
Faster than your community can go cellular, you want to link your WordPress website online to the BuddyBoss App. Recall to mind it as connecting your website and cellular app so they are able to art work together.
📌 Crucial: You want a BuddyBoss-powered community website prepare previous than starting. For many who haven’t built one however, check out our knowledge on the best way to create a neighborhood website online in WordPress.
To take a look at this, arrange and switch at the BuddyBoss App plugin. Understand that you’ll most straightforward get right to use this software after you purchase your BuddyBoss App subscription.
To get the BuddyBoss App, log in for your BuddyBoss account and switch to the ‘Downloads’ tab throughout the left column. Then, click on at the ‘Download’ button next to the plugin.
Once downloaded, you’ll arrange it to your WordPress website online just like any other software. For details, see our educational on putting in WordPress plugins.

Upon plugin activation, head over to the BuddyBoss App » Connect internet web page on your WordPress dashboard.
Proper right here, you want so to upload your BuddyBoss App ID and App Key to attach the platforms.
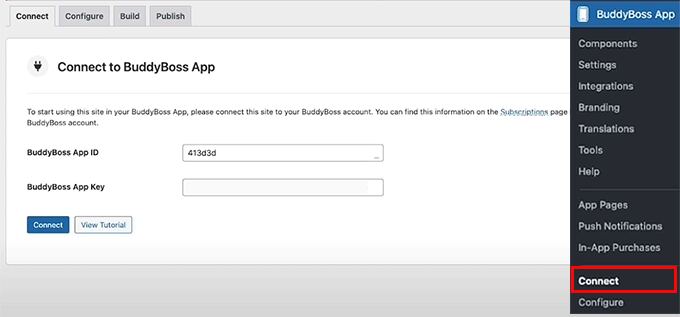
To hunt out the ones, go back for your BuddyBoss account and switch to the ‘Apps’ tab.
Then, click on at the ‘Arrange’ button next to the BuddyBoss App that you just downloaded.
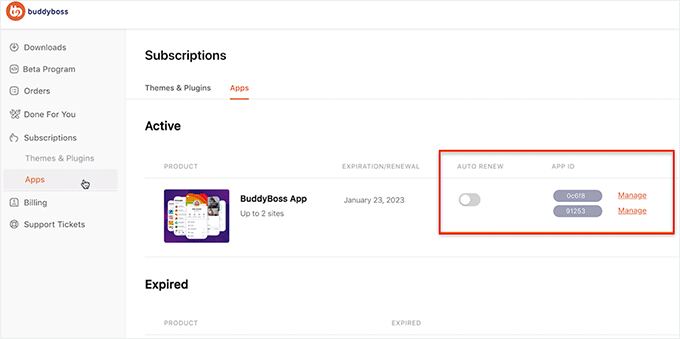
This may occasionally infrequently open a recommended showing your App ID and App Key.
Simply replica them and paste them into your WordPress dashboard to complete the connection.

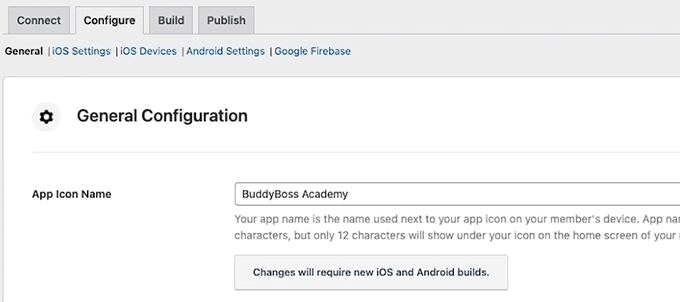
Once that is performed, switch to the ‘Configure’ tab on the most productive.
Proper right here, you’ll enter a name to your app throughout the ‘App Icon Establish’ field. That’s the identify that can appear alongside your app icon throughout the Apple App Store and Google Play Store.
Make a selection a name that’s comparable, easy to keep in mind, and in an instant recognizable for your target market.
Step 2: Configure iOS Settings (Apple Developer Account)
Once your WordPress website online is connected to the BuddyBoss App, it’s time to get your iOS settings ready. This step is important if you want to have your community app to seem throughout the Apple App Store.
Crucial: Understand that you’ll be rising a few explicit codes referred to as API keys, IDs, and secrets and techniques and methods. Don’t worry, it’s easier than it sounds.
Recall to mind the ones as unique digital passkeys that allow your BuddyBoss app, your WordPress website online, and the Apple App Store be in contact to each other securely.
For many who most straightforward plan to create an Android app, you’ll skip this step.
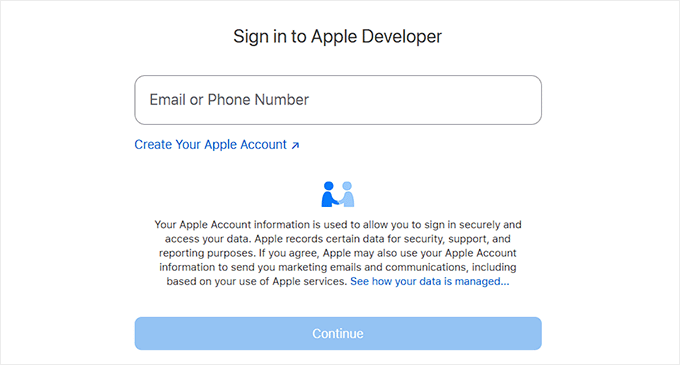
1. Create an Apple Developer Account
First, you want an Apple Developer Account. This allows you to publish apps, arrange updates, and get right to use Apple’s apparatus.
I had to sign up myself when trying out the program, and it’s beautiful easy. You merely need to practice the onscreen turns on to supply your personal details and contact details. Understand that approval can take one or two days.
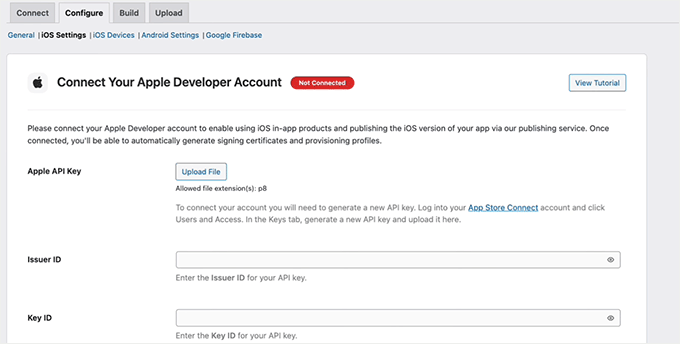
2. Connect Apple Developer Account to BuddyBoss
Next, you’ll connect your Apple Developer account to BuddyBoss. For that, go to the BuddyBoss App » Configure » iOS internet web page from your WordPress dashboard.
Proper right here, you’ll add your Issuer ID, Key ID, and upload the API key that you simply generate in Apple’s App Store Connect.
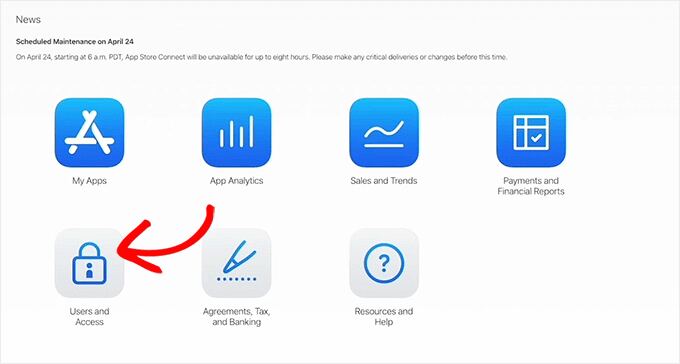
To get the ones, log in for your Apple Developer account and switch to ‘App Store Connect’ tab from the left column.
This may occasionally infrequently take you to a brand spanking new show where you should click on on ‘Shoppers and Get right to use.’
On the next internet web page, switch to the ‘Keys’ tab.
You’ll now see an inventory of vigorous keys. Pass ahead and click on at the + icon to create a brand spanking new one.
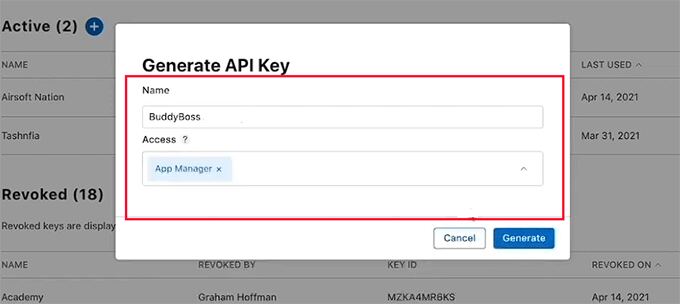
This may occasionally infrequently open a popup to your show, where you’ll get began by the use of giving a name for your API key. I like to recommend using an merely identifiable identify like “BuddyBoss” or the name of your app so that you’ll recognize the API key if you ever need to edit or delete it.
After that, make a choice ‘App Manager’ from the ‘Get right to use’ dropdown and click on at the ‘Generate’ button.
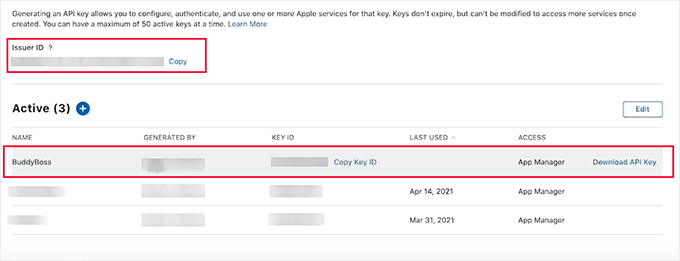
Upon generation, the API key can be displayed throughout the document of vigorous keys. From proper right here, click on at the ‘Download API Key’ button.
Then, replica the Key ID from the equivalent row. You’ll have the ability to moreover to search out the Issuer ID on the most productive of this internet web page.
Now, go back for your WordPress dashboard and paste the Issuer ID and Key ID.
After that, upload the API key document, and click on at the ‘Connect Account’ button. Once this is performed, your iOS account is hooked up for your BuddyBoss App.

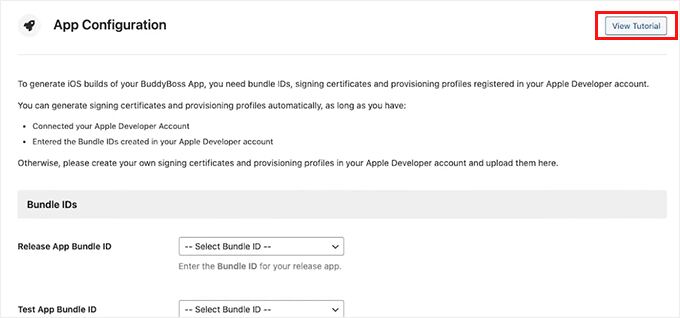
3. Configure Bundle ID, Signing Certificates & Provisioning Profiles
Now you want to organize your Bundle ID, signing certificates, and provisioning profiles. The ones may sound technical, alternatively proper right here’s a simple solution to understand them:
- Bundle ID is like your app’s passport — it supplies it a unique identification.
- Signing certificates act as your digital signature to end up that the app was once created by the use of you.
- Provisioning profiles are like get right to use passes that tell Apple which gadgets can arrange or examine your app.
Thankfully, BuddyBoss simplifies this process by the use of providing a video tutorial in an instant on your dashboard. It walks you step by step by way of together with all this knowledge.
I found out this super helpful when putting in my own app, as it guides you exactly the position to click on on and what to enter.
4. Create Your App in App Store Connect
After completing that, you’ll need to add your app wisdom. Pass for your Apple developer account and switch to the App Store Connect » My Apps internet web page.
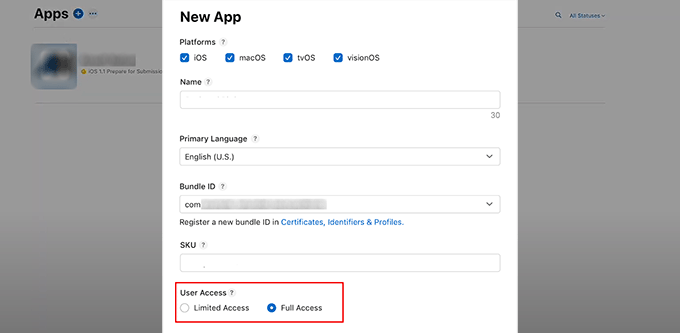
Once you could be on the new show, click on at the + icon to create a brand spanking new app.
A popup will now appear, where you’ll have to enter the app name, select iOS since the platform, make a choice a primary language, and add your Bundle ID.
You moreover should set individual get right to use to Entire Get right to use. Then, simply click on at the ‘Create’ button.
Once your app is created, click on on on it to open its settings on the internet web page.
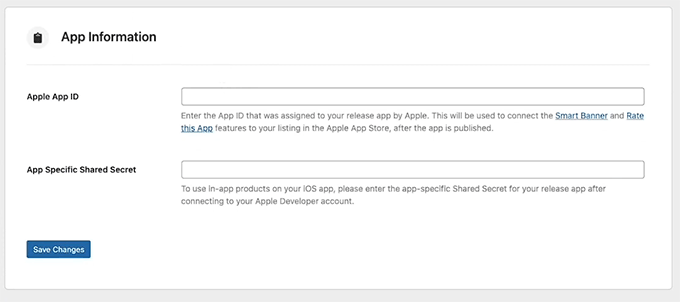
From proper right here, switch to the ‘App Wisdom’ tab and duplicate your App ID.

Then, switch to the ‘Manager’ tab from the left column.
Pass ahead and click on at the ‘App-Explicit Shared Secret’ button. This may occasionally infrequently open a recommended from where you’ll merely generate and duplicate the essential factor.
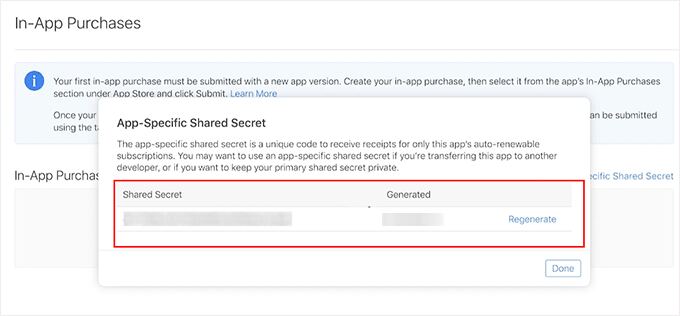
After that, paste your App ID and App-Explicit Shared Secret into your WordPress dashboard, and click on on ‘Save Changes.’
6. Check in Your iOS Software for Testing
Once that is performed, it’s time so to upload your iOS tool.
This step is important because of registering your iPhone or iPad with Apple signifies that you’ll examine the app on a real tool previous than it’s going live.
Without this, you’ll’t be sure the whole thing works accurately to your community folks.
Simply switch to the ‘iOS Gadgets’ tab on your BuddyBoss dashboard. Proper right here, you’ll need to enroll your iOS tool on your Apple Developer account.

BuddyBoss makes this easier by the use of providing a step-by-step video tutorial correct on your dashboard.
You’ll have the ability to practice this knowledge to enroll your tool and ensure the whole thing is set up correctly for trying out.
Step 3: Set Up Android Configuration (Google Play Console)
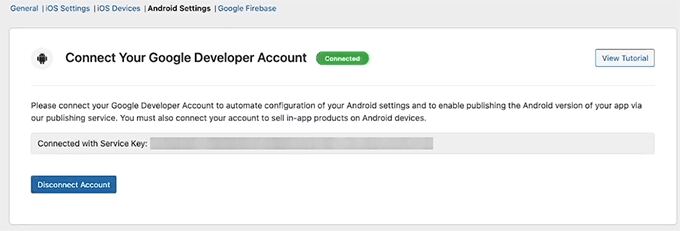
If you want to have your app to be available on the Google Play Store, then you definately’ll moreover need to configure your Android app settings in BuddyBoss. Get began by the use of switching to the ‘Android Settings’ tab on the most productive of your BuddyBoss dashboard.
Proper right here, you’ll need to upload your Supplier Account key. It’s going to connect your Google Developer account to BuddyBoss so your app can sync correctly.

1. Create Your App in Google Play Console
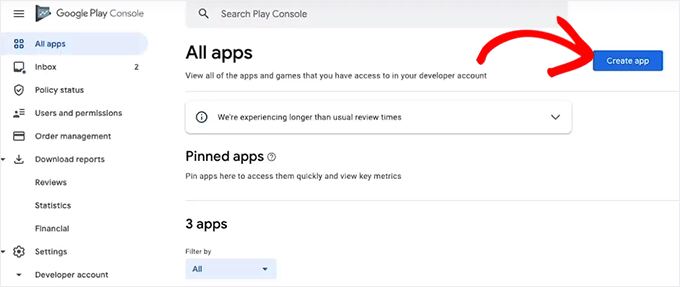
To take a look at this, go for your Google Play Developer Account dashboard.
Proper right here, click on at the ‘Create app’ button to start out building your app.
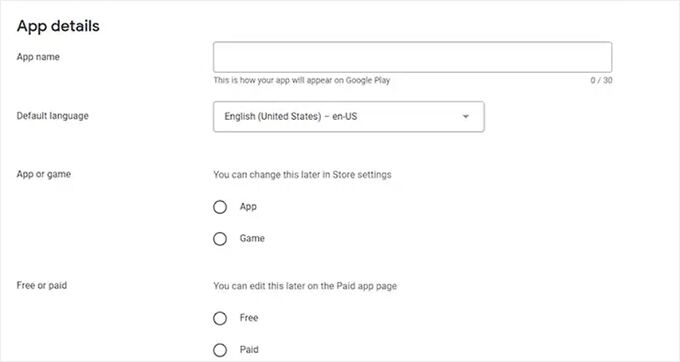
You’ll now be taken to a brand spanking new show where you should give your app a name — this identify will appear on Google Play, so make it clear and recognizable.
Next, make a choice the default language to your app and set it to ‘Unfastened’ so everyone can download it. For many who ever need to get began earning from your app, you’ll merely alternate the ones settings later.
After checking the declarations containers, click on on ‘Create App.’
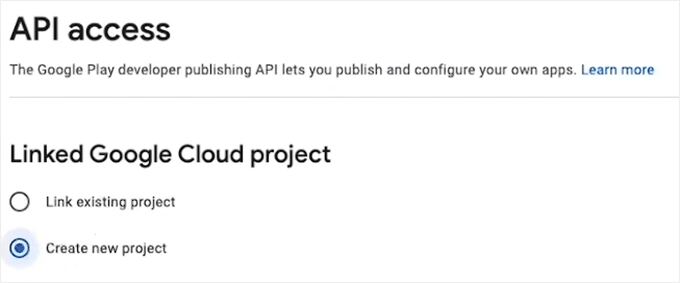
Once your app is created successfully, go to the Settings » API Get right to use internet web page from the left column and select the ‘Create New Undertaking’ button.
Pass ahead and click on at the ‘Link Undertaking’ button at the bottom of the internet web page.
2. Create Your Supplier Account in Google Cloud Platform
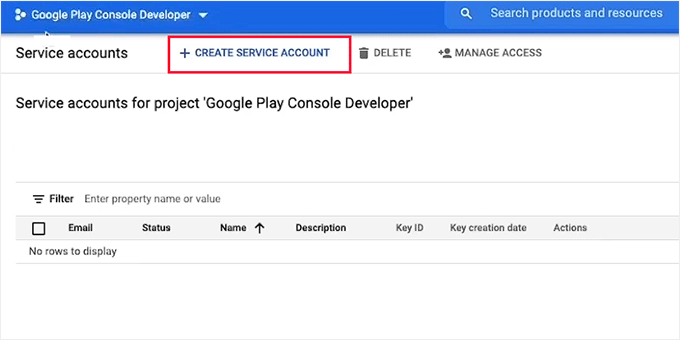
To create the supplier account, first log in for your Google Cloud Platform dashboard. Once you could be there, switch to the ‘Supplier Accounts’ tab throughout the left column.
Pass ahead and click on at the ‘+ Create Supplier Account’ button.
Once you could be on a brand spanking new internet web page, give your account a name (I love to counsel using your app name), and add an overview if you want to have.
Then, click on at the ‘Create’ button.

In the next step, you’ll have to select the individual roles that can have get right to use to this supplier account.
Simply select Owner, then click on on Continue. After all, click on at the ‘Carried out’ button.

3. Generate and Download the JSON API Key
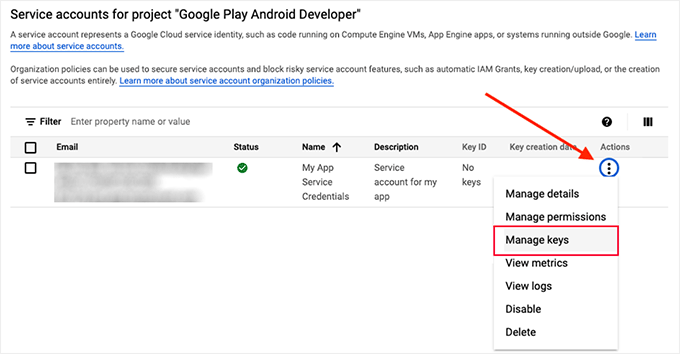
Your account can be created and confirmed in a row on the Supplier Accounts internet web page. Now it’s time to build an API key for it.
To take a look at this, merely click on at the three-dot icon underneath Actions and select ‘Arrange Keys.’
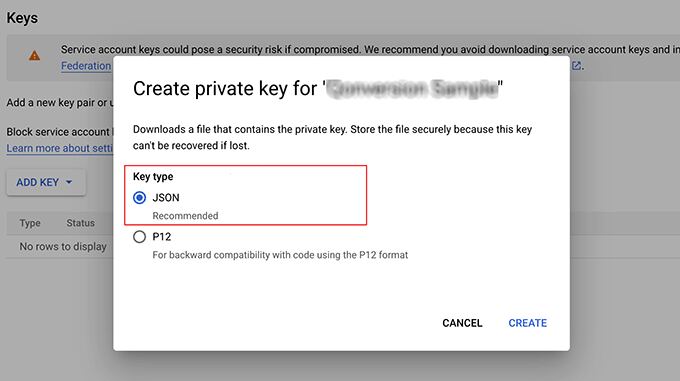
This may occasionally infrequently take you to a brand spanking new show where you should click on at the ‘Add Key’ button.
Once a recommended opens up, make a choice ‘JSON’ as your key sort and click on at the ‘Create’ button. Upon creation, your JSON key will robotically download for your pc.
4. Connect JSON Key With BuddyBoss
Now go back for your WordPress dashboard and upload this JSON key to the Supplier Account Key field.
This may occasionally infrequently merely connect your Google Developer Account with BuddyBoss.
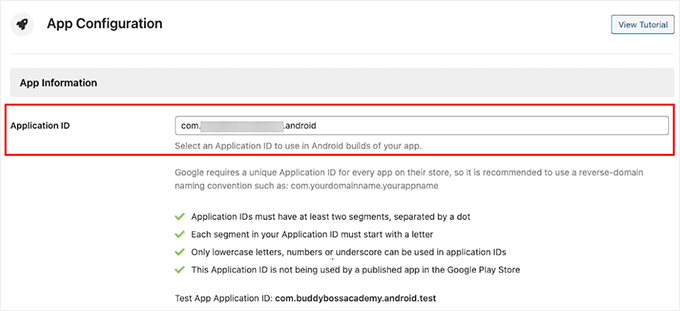
5. Add Software ID
After getting successfully attached, scroll down so to upload your Software ID. This is a unique identifier to your app — bring to mind it like your app’s unique ID throughout the Google Play Store.
You’ll need to sort it yourself, and it’s going to have to use a normal ‘reverse space name’ structure. This in most cases looks like com.yourcompany.yourappname.
For instance, if your company is ‘My Awesome Group’, it’s conceivable you’ll use com.myawesomecommunity.app.
Be sure that your app follows the standards listed throughout the app configuration section to allow Google Play to recognize it correctly.
6. Generate KeyStore and Entire Setup
Next, you’ll add your KeyStore wisdom. It is like a digital certificate to your app that proves you’re the owner and promises any long term updates are referred to as coming from you.
Without it, Google Play gained’t allow updates for your app.
With BuddyBoss, you’ll merely add your KeyStore wisdom. Merely click on at the ‘Generate KeyStore’ button underneath the Import section.

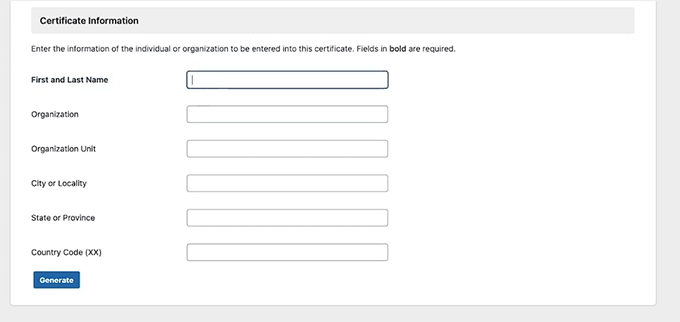
You’ll be directed to a brand spanking new internet web page where you should scroll the entire method all the way down to the ‘Certificate Wisdom’ section.
Fill on your first and supreme name, your corporate (you’ll use your app name), and any other required knowledge. Then click on on ‘Generate’.
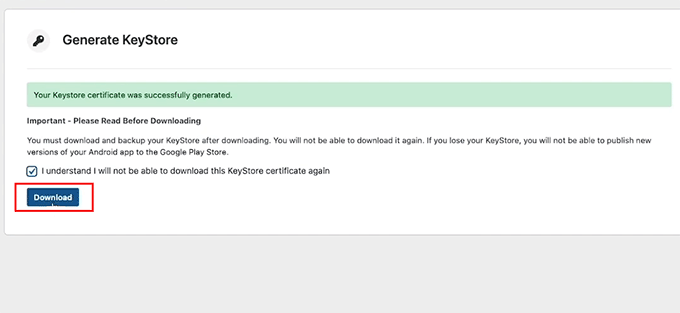
Once your KeyStore is created, download the document for your pc.
Go back to the KeyStore section in BuddyBoss, upload the document, and click on at the ‘Save Changes’ button. Your Android developer account is now utterly attached with BuddyBoss.
Step 4: Configure Firebase to Send Push Notifications With Your App
One of the easiest tactics to stick shoppers coming once more for your app is through push notifications. They’re those little reminders that allow your community know about new posts, messages, or events.
To make this art work on each and every iOS and Android, you’ll need to mix your BuddyBoss app with Google Firebase. It is a loose software from Google that handles real-time push notifications.
First, switch to the Google Firebase tab from the easiest of your BuddyBoss dashboard. You’ll now need to add your Firebase Server Key to attach it together with your BuddyBoss App.
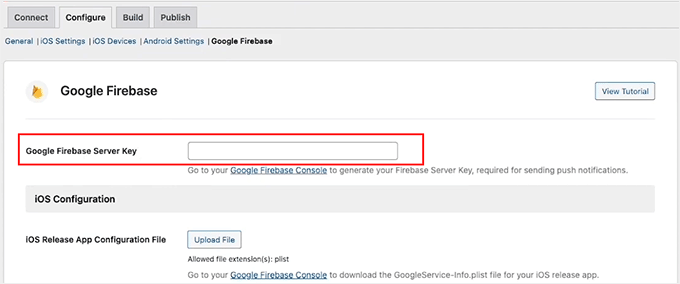
1. Create Your Firebase Undertaking
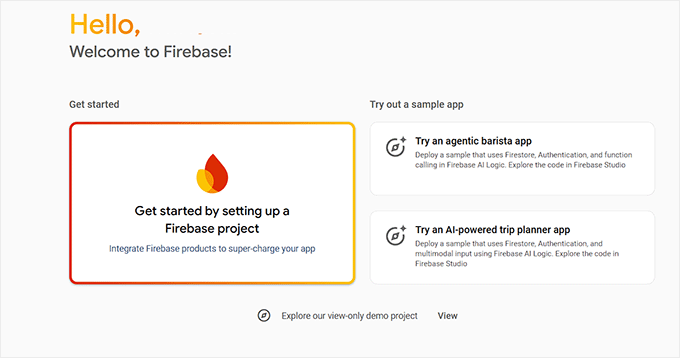
To get that key, go to the Firebase Console and create a loose account.
Whilst you do that, click on at the ‘Get started by the use of putting in a Firebase problem’ button.
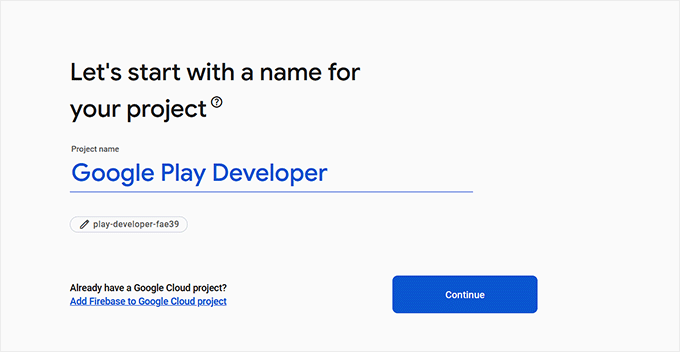
Firebase will now ask you to name your problem. I love to counsel using your app’s name so that you’ll merely recognize it later. Then, click on on ‘Continue.’
Next, Firebase will ask if you want to allow Google Analytics for this problem. This can also be handy if you want to practice app usage.
2. Get right to use Firebase Cloud Messaging Settings
As quickly because the problem is set up, open it and click on at the gear icon on the most productive left corner to get right to use its settings. Then switch to the ‘Cloud Messaging’ tab.
Proper right here, you’ll to search out your Server Key. Simply replica it and paste it into your BuddyBoss settings internet web page to link the two platforms.

3. Check in Your Cell Apps in Firebase
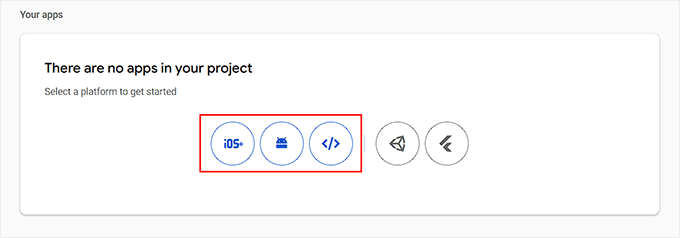
Next, go back for your Firebase Undertaking Analysis and open the ‘Commonplace’ tab. Scroll the entire method all the way down to the ‘Your Apps’ section. That’s the position you’ll enroll your cellular apps.
You’ll need to create 4 apps in total: one number one and one examine fashion for each and every Android and iOS. Be sure that the package deal IDs and package deal deal names are compatible the ones you used on your BuddyBoss and developer account settings.
You’ll see platform icons proper right here. Click on at the ‘Android’ icon so to upload your Android app and the ‘iOS’ icon to create your Apple app.
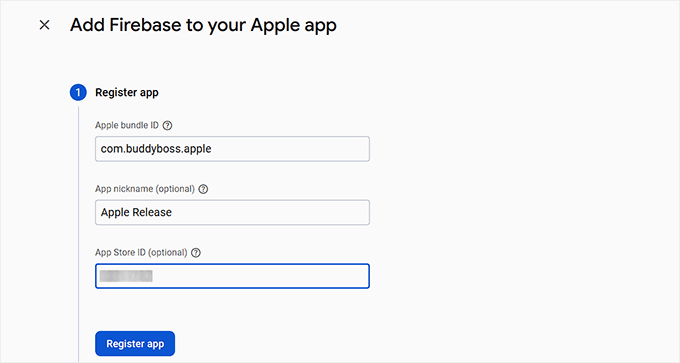
4. Create iOS and Android App Entries
For many who’re creating a Firebase iOS app, enter your iOS Bundle ID, App Nickname, and App Store ID (you’ll to search out the ones on your Apple Developer account).
Then click on at the ‘Check in App’ button.
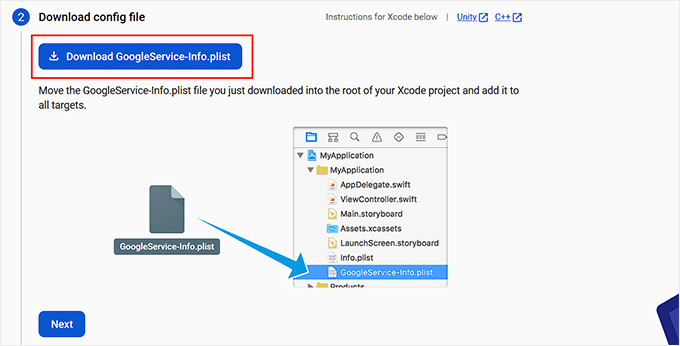
Firebase will ask you to procure a configuration document. Pass ahead and put it aside for your pc.
You’ll then repeat this process to create any other iOS app, alternatively this time add .examine at the end of the Bundle ID (for instance: com.yourappname.examine). Check in and acquire that one as well.
Apply the equivalent steps to your two Android apps — one for production and one for trying out — and acquire each and every configuration information.
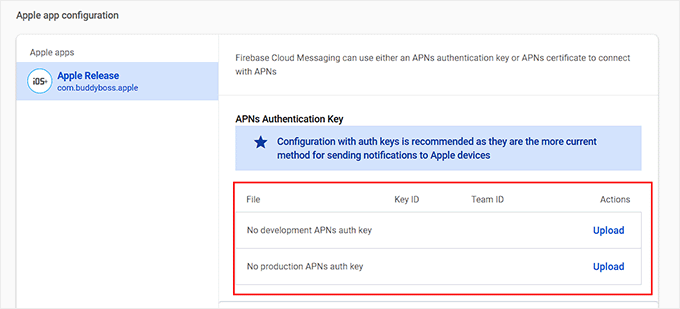
5. Add iOS APN Authentication Key
Whilst you’ve created all 4 apps, go back to the ‘Cloud Messaging’ tab in Firebase. You’ll now see your iOS apps listed underneath the server key section.
To send push notifications to Apple gadgets, you’ll moreover need to add your APN authentication key. You’ll have the ability to download this key from your Apple Developer account and then upload it proper right here to Firebase.
💡 Skilled Tip: Faster than transferring forward, double-check your Bundle IDs (for iOS) and Bundle deal IDs (for Android). Within the match that they don’t are compatible exactly, Firebase will show errors, and your push notifications gained’t art work.
6. Upload Firebase Config Information to BuddyBoss
After all, go back for your WordPress dashboard and upload all your iOS and Android configuration and examine information that you simply downloaded earlier. Then click on on ‘Save Changes.’
That’s it — Firebase is now successfully attached, and your BuddyBoss app can get began sending push notifications for your shoppers on each and every iOS and Android.

Step 5: Customize Your App Settings and Notifications
Whilst you’ve prepare push notifications with Firebase, it’s time to keep watch over some important app settings inside your BuddyBoss dashboard.
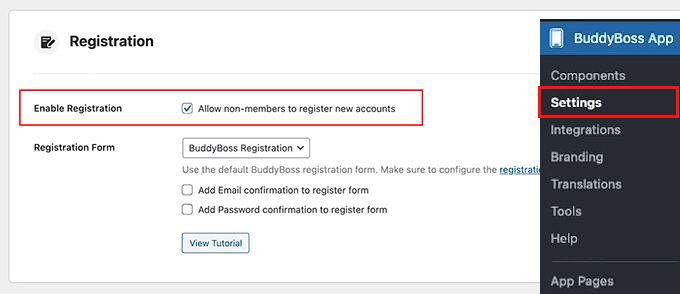
Pass to the BuddyBoss App » Settings internet web page. Proper right here, scroll down and take a look at the ‘Allow Registration’ box to allow non-members to create new accounts in an instant from the app.
Then, select your registration internet web page from the dropdown. For many who haven’t created a registration web page with BuddyBoss however, you’ll watch the learning hooked up there.
After that, take a look at the sphere to send a confirmation electronic message to shoppers upon a success registration.
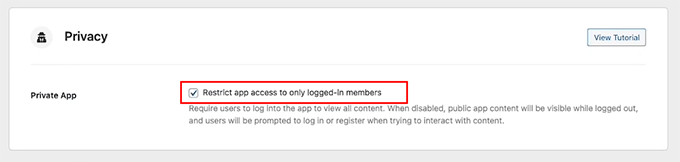
Next, take a look at the ‘Privacy’ solution to make your app to be had most straightforward to logged-in folks. As a result of this most straightforward registered and logged-in folks will be capable of view your community.
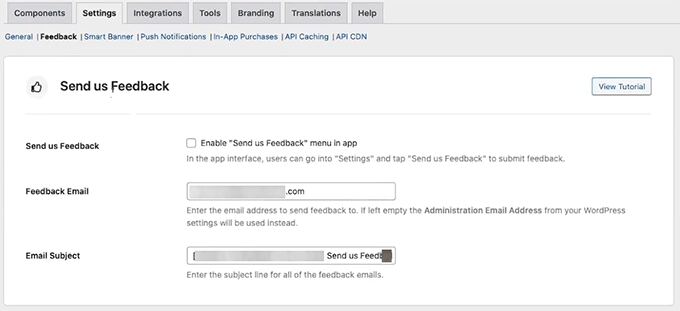
Next, open the ‘Feedback’ tab. For many who’d like shoppers to proportion their concepts in an instant from the app, take a look at the ‘Send Us Feedback’ selection.
Remember to moreover enter the electronic mail deal with where you want to procure the ones messages.
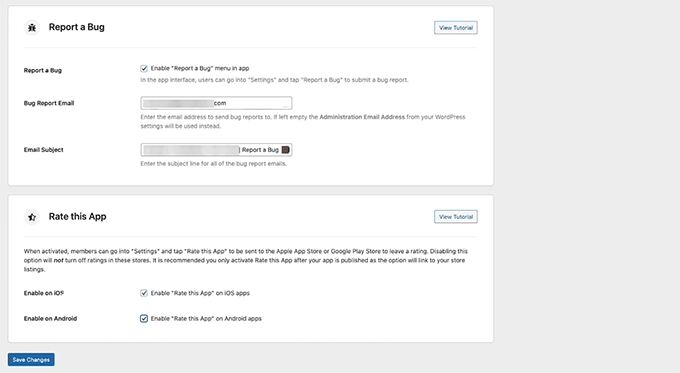
You’ll have the ability to moreover allow a ‘Report a Pc virus’ menu so shoppers can merely flag problems.
I moreover counsel together with the ‘Price This App’ selection for each and every iOS and Android.
After that, switch to the ‘Smart Banner’ tab. When this feature is grew to transform on, visitors browsing your website on a cellular tool will see a small banner that promotes your app.
You’ll have the ability to allow it for each and every iOS and Android. For many who choose, you’ll moreover prohibit this banner so it most straightforward turns out to logged-in folks. Don’t omit to click on on ‘Save Changes’ when you’re performed.

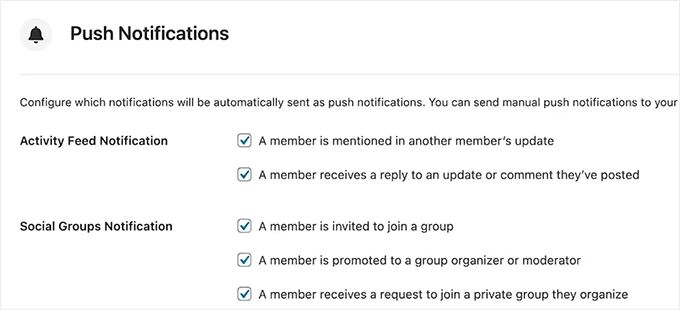
After all, head over to the ‘Push Notifications’ tab. Proper right here, you’ll make a choice which actions will motive notifications.
For instance, when a member is mentioned in a publish, invited to enroll in a number, or receives a resolution. Merely take a look at the containers for the notifications you want to allow and click on on ‘Save Changes’ over again.
Step 6: Customize the Branding and Design of Your App
Now it’s time to make your community app in fact in reality really feel like your emblem. For this, go to the BuddyBoss App » Branding internet web page on your WordPress dashboard.
BuddyBoss gives you entire regulate over how your app appears to be on cellular. You’ll have the ability to upload logos for your house show, login show, liberate show, and additional.
I love to counsel using the equivalent logo or icon that you simply use to your website so that your community folks in an instant recognize your emblem when they open the app.
For the login show, you’ll moreover upload a convention background image.
Make a selection something that presentations your emblem’s colors and style — it’s a small touch this is serving to make your app additional memorable {{and professional}}.
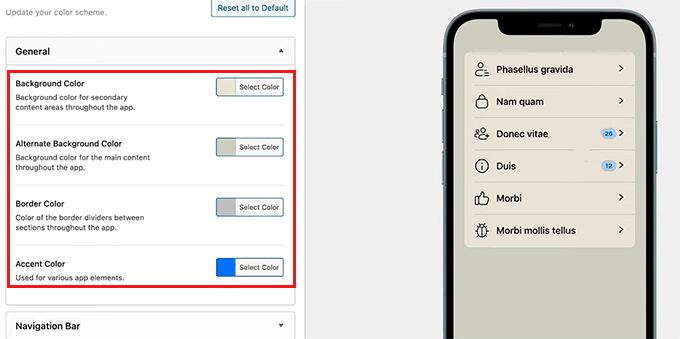
Next, switch to the ‘Colors’ tab from the easiest.
From proper right here, you’ll set your app’s background, business background, button, and accent colors. You’ll have the ability to moreover customize colors to your navigation menu, very best bar, buttons, and text to test your emblem’s color palette.
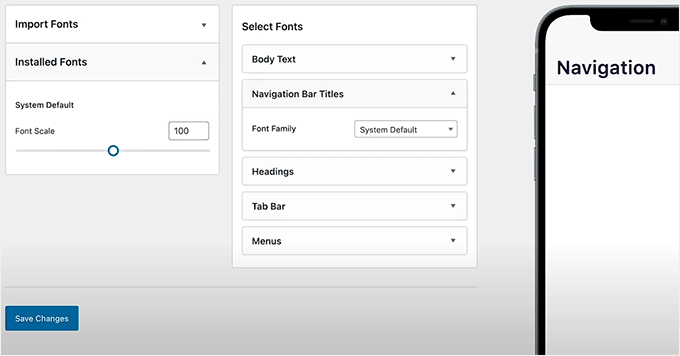
Then, open the ‘Typography’ tab. Proper right here, you’ll make a choice different fonts to your body text, headings, very best bar, and menus.
You’ll have the ability to even modify the default font size to make your text easy to be told. When you’re performed, don’t omit to click on on ‘Save Changes’ to make use of your design.
After that, head over to the ‘Highest Bar’ internet web page. That’s the number one navigation bar that appears on the most productive of your app.
I love to counsel together with your most important pages proper right here, such since the Space, Profile, or Account internet web page.
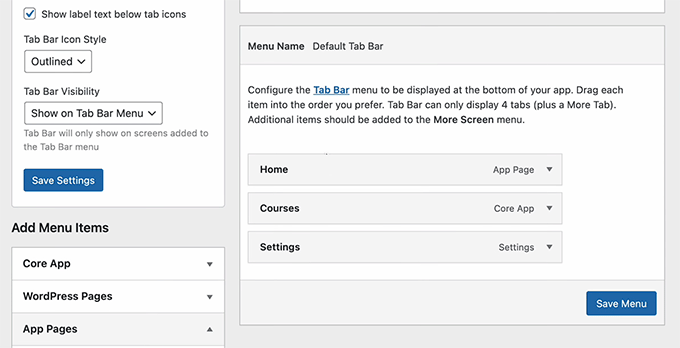
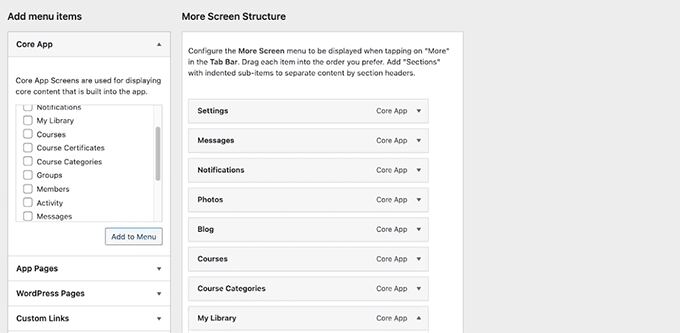
Then, switch to the ‘Further Visual display unit Building’ from the dropdown menu. Proper right here, you’ll add the rest of your pages — like Blog, Notifications, Process, and Forums. The ones will appear when shoppers tap the Further icon on your app.
You’ll have the ability to building your app’s navigation just like it’s good to create a menu in WordPress. If you want to have have the same opinion, check out our educational on the best way to create a navigation menu in WordPress for steering.
Step 7: Create Pages for Your App
Once your branding is ready, it’s time to start out building the actual pages of your app.
Head over to the BuddyBoss App » App Pages show from your WordPress dashboard and click on at the ‘Add New’ button.

This may occasionally infrequently open the familiar WordPress block editor, where you’ll merely drag and drop blocks from the left column to design your cellular app internet web page.
For many who scroll down, you’ll moreover to search out explicit BuddyBoss blocks for things like Categories, Discussions, Forums, Groups, Members, Process, Notifications, and Speedy Links.
For instance, if your community website online already has an vigorous discussion board, you’ll simply add the ‘Dialogue board’ block so apparently correct inside your app.
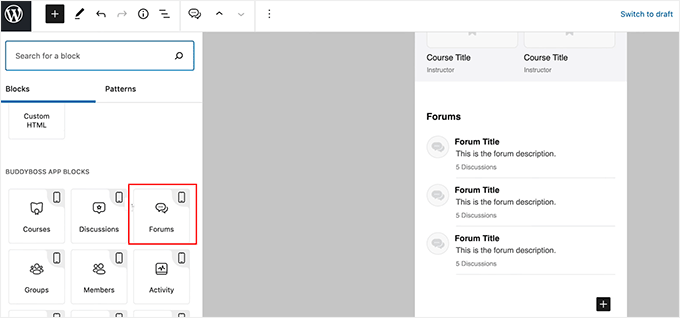
You’ll have the ability to moreover use any other commonplace WordPress blocks, embed motion pictures, add images, or include text—just like it’s good to when rising a normal internet web page.
Whilst you’re pleased with the way in which it kind of feels to be, click on at the ‘Publish’ or ‘Exchange’ button to save lots of numerous your changes. You’ll have the ability to now repeat the option to create as many app pages as you favor.
Step 8: Assemble and Check out Your Cell App
You’re in fact ready to build your app.
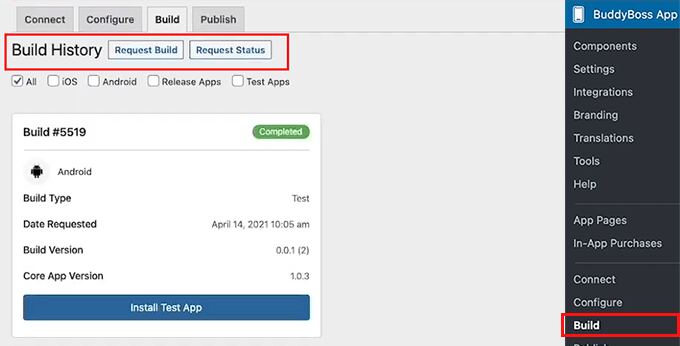
Pass to the BuddyBoss App » Assemble internet web page from your WordPress dashboard and click on at the ‘Request Assemble’ button.
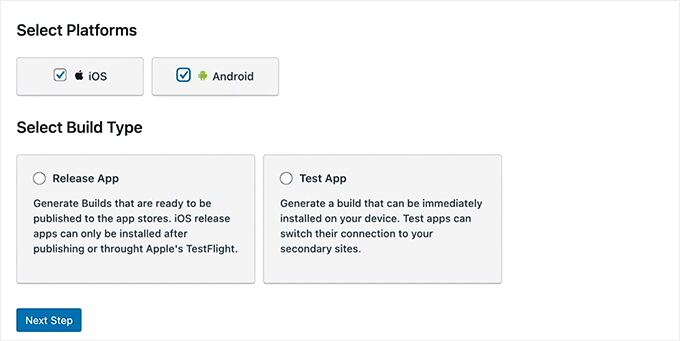
This may occasionally infrequently open a brand spanking new show where you want to choose iOS and Android as your platforms.
Then, make a choice Unlock App and Check out App since the assemble varieties. This principally tells BuddyBoss to create 4 permutations of your app — a examine and a liberate fashion for each and every iOS and Android.
The examine app fashion is the one that can be in an instant installed to your mobile phone using a QR code. It’s serving to you notice how your app appears to be and performs previous than you put up it to the app shops.
The release fashion, however, is the one you’ll upload to the Apple App Store and Google Play Store.
Once performed, click on at the ‘Next Step’ button.
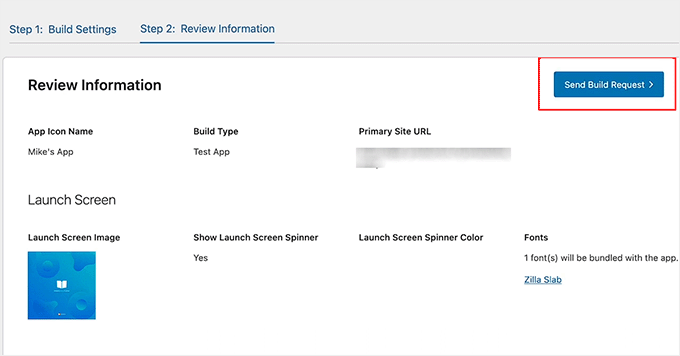
Next, BuddyBoss will show a summary of your app wisdom.
Review it carefully to ensure the whole thing appears to be correct, and click on at the ‘Send Assemble Request’ button.
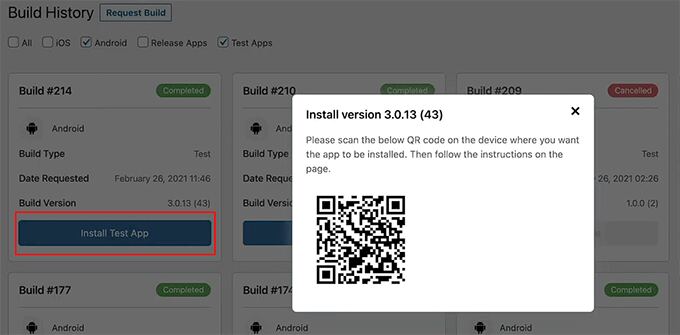
Your submission will now go to the BuddyBoss workforce, who will use their specialized device to generate your app builds. Once the process is complete, the status on this internet web page will alternate to Completed.
When that happens, click on at the ‘Arrange Check out App’ button. A popup will appear with a QR code that you just’ll scan to your tool to place in and examine your app in an instant.
🔍 What to Take a look at in Your Check out App (Faster than Submitting to App Stores)
Whilst you’ve put within the examine fashion of the app to your phone, listed here are a few important problems I love to counsel checking to ensure the whole thing is working accurately:
- Can you log in and join a brand spanking new account successfully?
- Do core community choices (identical to the duty feed, forums, groups, or categories) load correctly?
- Are push notifications working? (You’ll have the ability to examine this by the use of sending a message from any other account or tool.)
- Does the app’s branding suit your settings? Take a look at your logo, colors, and app icon to ensure they appear exactly the way in which you designed them.
- Is the navigation simple without a broken links or missing icons?
Making sure this stuff are functioning correctly will imply you’ll steer clear of rejections throughout the app store submission process.
Step 9: Put up Your App to the App Stores
Now that your app is built and tested, it’s time so as to add it to the Apple App Store and Google Play Store.
To take a look at this, switch to the ‘Publish’ tab on the most productive of your Assemble internet web page. Then, make a choice Apple App Store and select the release fashion of your app from the dropdown menu.
Click on at the ‘Upload Assemble’ button to start out the submission process.

You’ll have the ability to practice the equivalent steps for Android by the use of switching to the ‘Google Play Store’ tab.
Faster than you upload your app, you’ll need to’ve able the whole thing the app shops require — at the side of your app description, screenshots, and keywords.
These things can be confirmed to your public app document and play a large place in helping shoppers discover your app by way of search.
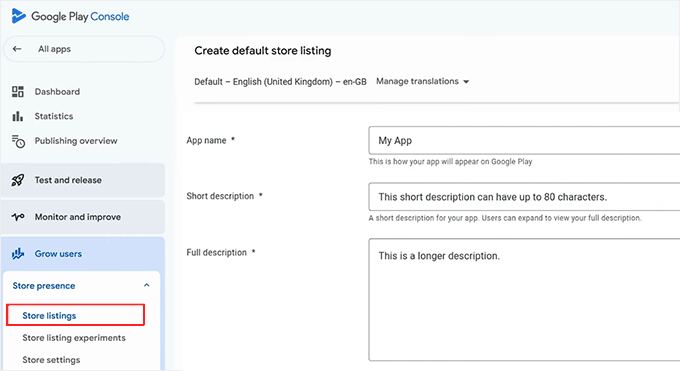
Throughout the Google Play Console, you’ll enter this knowledge by the use of going for your dashboard, deciding for your app, and opening the ‘Store Record’ section.
From there, you’ll be capable of upload screenshots, write your app description, and add keywords throughout the app details fields.
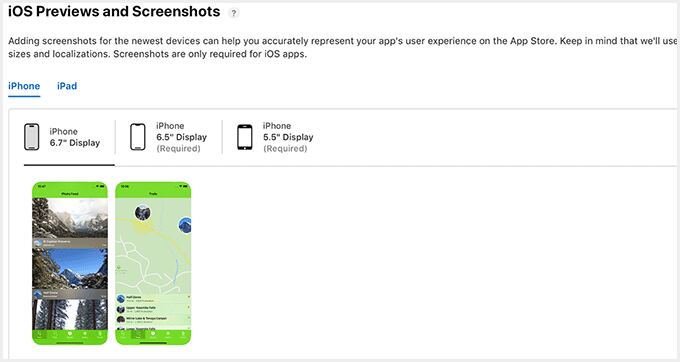
For many who’re using the Apple App Store, you’ll enter this knowledge in App Store Connect. Simply go to ‘My Apps’ and select your app.
Proper right here, you’ll upload your screenshots, add your app description, and include comparable keywords to improve visibility throughout the App Store search results.
Once submitted, your app will go through a evaluation process. It in most cases takes 2 to 7 days, alternatively it would in fact vary depending on the store’s evaluation queue and your app’s complexity.
Don’t worry if your app doesn’t get approved the principle time. It’s no longer odd for new developers to procure feedback or minor alternate requests. Every Apple and Google provide clear instructions on what needs fixing, and also you’ll simply substitute your app and resubmit it.
After approval, your app will go live and be available for everyone to procure.
💡 Bonus Tip: Keep Your App Up to the moment
Publishing your app isn’t a one-time process. Just like your WordPress website online, your app needs ongoing repairs to stay appropriate, protected, and user-friendly.
With BuddyBoss, minor changes you’re making to your WordPress website online, comparable to updating content material subject material, posts, categories, or community process, will sync to the app robotically. You don’t need to republish your app for all these updates.
However, think you’re making structural changes that impact the app’s capacity, comparable to enabling new BuddyBoss choices, updating APIs, changing your app branding, or together with new plugins that mix with the app.
If that’s the case, you will need to generate a brand spanking new assemble and resubmit it to the Apple App Store and Google Play Store.
This promises your shoppers always get the newest fashion and the app doesn’t ruin on account of unsupported changes.
Continuously Asked Questions About Turning a WordPress Website online into an App
Now that you understand all the methodology of turning a local website proper right into a cellular app, listed here are some no longer odd questions I steadily pay attention from novices like you:
How long does it take to build an app?
Rising an app from your WordPress website using BuddyBoss will take spherical one hour for the initial setup and configuration. However, the entire process from start to finish, at the side of taking a look forward to Apple and Google to test and approve your app, can take various days.
Can I make the most of the BuddyBoss App with any WordPress theme?
Certain, you’ll use other WordPress topic issues, alternatively the BuddyBoss App works easiest with the BuddyBoss Theme. It’s designed to fully sync your community choices, categories, and content material subject material with the app. The usage of any other theme may function missing choices or broken capacity.
What happens if I cancel my BuddyBoss App subscription?
For many who cancel, your app will save you receiving updates, and likewise you gained’t be capable of publish new permutations. Provide app installations will continue working, alternatively any new choices, pc virus fixes, or store integrations will not be available.
How are content material subject material updates handled in my WordPress app?
Content material subject material updates to your WordPress website online robotically sync together with your BuddyBoss App. This accommodates posts, pages, categories, forums, and community process. This assists in keeping your app always up to date without any additional art work.
Do I would love coding knowledge to create a cellular app for my WordPress website online?
No coding is wanted. BuddyBoss handles the heavy lifting, and likewise you merely need to prepare your app throughout the dashboard, configure iOS and Android settings, and customize your branding. This makes it to be had for someone, even novices.
I hope this newsletter helped you discover ways to merely turn your WordPress website proper right into a cellular app. You may also need to see our beginner’s knowledge on the best way to upload a non-public messaging machine in WordPress and our comparison of BuddyBoss vs. Circle, vs. Mighty Networks.
For many who favored this newsletter, then please subscribe to our YouTube Channel for WordPress video tutorials. You’ll have the ability to moreover to search out us on Twitter and Fb.
The publish I Grew to become My WordPress Website online right into a Cellular App — Right here’s What I Discovered first appeared on WPBeginner.
Contents
- 0.0.1 💡Speedy Summary: What You Want to Turn Your WordPress Website into an App
- 0.0.2 ✅Faster than You Get started: Setup Checklist + Costs
- 0.0.3 Discover ways to Create a Cell App The usage of BuddyBoss
- 0.0.3.1 Step 1: Arrange and Connect the BuddyBoss App Plugin
- 0.0.3.2 Step 2: Configure iOS Settings (Apple Developer Account)
- 0.0.3.2.1 1. Create an Apple Developer Account
- 0.0.3.2.2 2. Connect Apple Developer Account to BuddyBoss
- 0.0.3.2.3 3. Configure Bundle ID, Signing Certificates & Provisioning Profiles
- 0.0.3.2.4 4. Create Your App in App Store Connect
- 0.0.3.2.5 5. Add App ID and Shared Secret in BuddyBoss
- 0.0.3.2.6 6. Check in Your iOS Software for Testing
- 0.0.3.3 Step 3: Set Up Android Configuration (Google Play Console)
- 0.0.3.4 Step 4: Configure Firebase to Send Push Notifications With Your App
- 0.0.3.4.1 1. Create Your Firebase Undertaking
- 0.0.3.4.2 2. Get right to use Firebase Cloud Messaging Settings
- 0.0.3.4.3 3. Check in Your Cell Apps in Firebase
- 0.0.3.4.4 4. Create iOS and Android App Entries
- 0.0.3.4.5 5. Add iOS APN Authentication Key
- 0.0.3.4.6 6. Upload Firebase Config Information to BuddyBoss
- 0.0.3.5 Step 5: Customize Your App Settings and Notifications
- 0.0.3.6 Step 6: Customize the Branding and Design of Your App
- 0.0.3.7 Step 7: Create Pages for Your App
- 0.0.3.8 Step 8: Assemble and Check out Your Cell App
- 0.0.3.9 Step 9: Put up Your App to the App Stores
- 0.0.4 💡 Bonus Tip: Keep Your App Up to the moment
- 0.0.5 Continuously Asked Questions About Turning a WordPress Website online into an App
- 0.1 Related posts:
- 1 Methods to Make a Automobile Condo Web site with WordPress (Step through Step)
- 2 WP Engine: WordPress Safety: Unlocking The Secrets and techniques Of WP Engine…
- 3 The best way to Make Your Dream Wedding ceremony Site (5 Simple Steps)

0 Comments