
The WooCommerce Cart internet web page is essential to any Divi web site using WooCommerce(WC) for a web based store. Then again again and again the cart internet web page tends to go through with regards to design on account of designing the internet web page generally involves customizing the cart internet web page template externally and then styling the internet web page template purely with external CSS. Then again with Divi’s new Woo Modules, this process has develop into easy and enjoyable!
In this tutorial, we will be able to be showing you how to create a WC Cart Internet web page template to your web site utterly from scratch using the Divi Theme Builder. We’ll show you how to briefly prepare a brand spanking new template for the cart internet web page and design the template using the appropriate dynamic woo modules available inside the Divi Builder.
Let’s get started!
Sneak Peek
The Previous to and After
Right here’s a quick check out Divi’s default cart internet web page compared to the new cart internet web page we’ll design in this tutorial.
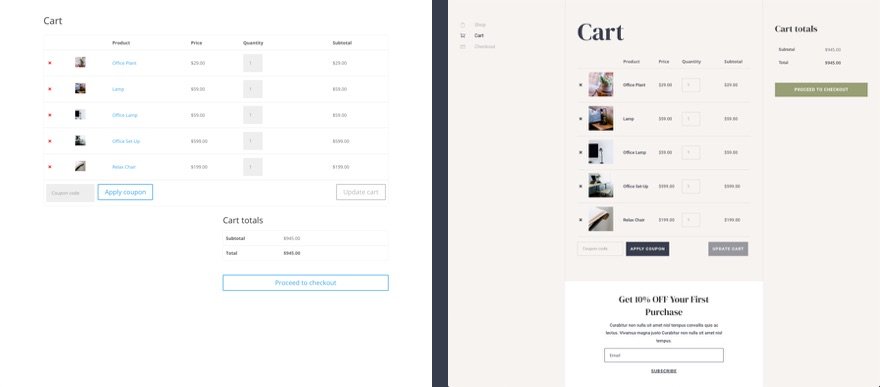
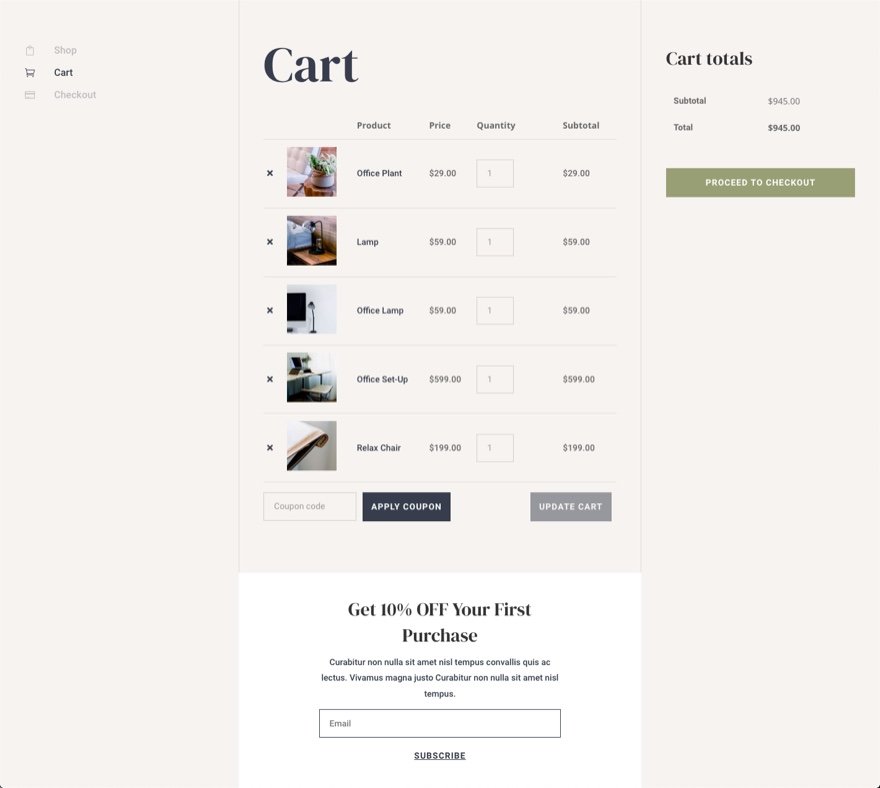
And right here’s a closer check out the cart internet web page template.
Download the Cart Internet web page Template for FREE
This cart internet web page template is available for download as thought to be one among our FREE Cart and Cart Page Template Sets. So be happy to download it from the post that incorporates those Cart and Checkout Template gadgets.
To place your fingers on the cart internet web page template design from this tutorial, you’re going to first need to download it using the button below. To reach get right of entry to to the download it is important to subscribe to our Divi Day by day piece of email file thru using the form below. As a brand spanking new subscriber, you’re going to procure a lot more Divi goodness and a unfastened Divi Construction pack every Monday! Whilst you’re already on the file, simply enter your piece of email care for below and click on on download. You will not be “resubscribed” or download further emails.
@media best computer screen and ( max-width: 767px ) {.et_bloom .et_bloom_optin_1 .carrot_edge.et_bloom_form_right .et_bloom_form_content:quicker than { border-top-color: #ffffff !very important; border-left-color: transparent !very important; }.et_bloom .et_bloom_optin_1 .carrot_edge.et_bloom_form_left .et_bloom_form_content:after { border-bottom-color: #ffffff !very important; border-left-color: transparent !very important; }
}.et_bloom .et_bloom_optin_1 .et_bloom_form_content button { background-color: #f92c8b !very important; } .et_bloom .et_bloom_optin_1 .et_bloom_form_content .et_bloom_fields i { shade: #f92c8b !very important; } .et_bloom .et_bloom_optin_1 .et_bloom_form_content .et_bloom_custom_field_radio i:quicker than { background: #f92c8b !very important; } .et_bloom .et_bloom_optin_1 .et_bloom_border_solid { border-color: #f7f9fb !very important } .et_bloom .et_bloom_optin_1 .et_bloom_form_content button { background-color: #f92c8b !very important; } .et_bloom .et_bloom_optin_1 .et_bloom_form_container h2, .et_bloom .et_bloom_optin_1 .et_bloom_form_container h2 span, .et_bloom .et_bloom_optin_1 .et_bloom_form_container h2 tough { font-family: “Open Sans”, Helvetica, Arial, Lucida, sans-serif; }.et_bloom .et_bloom_optin_1 .et_bloom_form_container p, .et_bloom .et_bloom_optin_1 .et_bloom_form_container p span, .et_bloom .et_bloom_optin_1 .et_bloom_form_container p tough, .et_bloom .et_bloom_optin_1 .et_bloom_form_container form input, .et_bloom .et_bloom_optin_1 .et_bloom_form_container form button span { font-family: “Open Sans”, Helvetica, Arial, Lucida, sans-serif; } p.et_bloom_popup_input { padding-bottom: 0 !very important;}

Download For Loose
Join the Divi Newsletter and we will be able to piece of email you a duplicate of the ultimate Divi Landing Internet web page Construction Pack, plus numerous choice glorious and unfastened Divi belongings, pointers and guidelines. Practice along and also you’re going to be a Divi seize in no time. If you’re already subscribed simply type in your piece of email care for below and click on on download to get right of entry to the layout pack.
You will have successfully subscribed. Please check your piece of email care for to verify your subscription and get get right of entry to to unfastened weekly Divi layout packs!
To import the template layout to your web page, it is important to move to the Divi Theme Builder and use the portability way to import the .json report back to the theme builder.
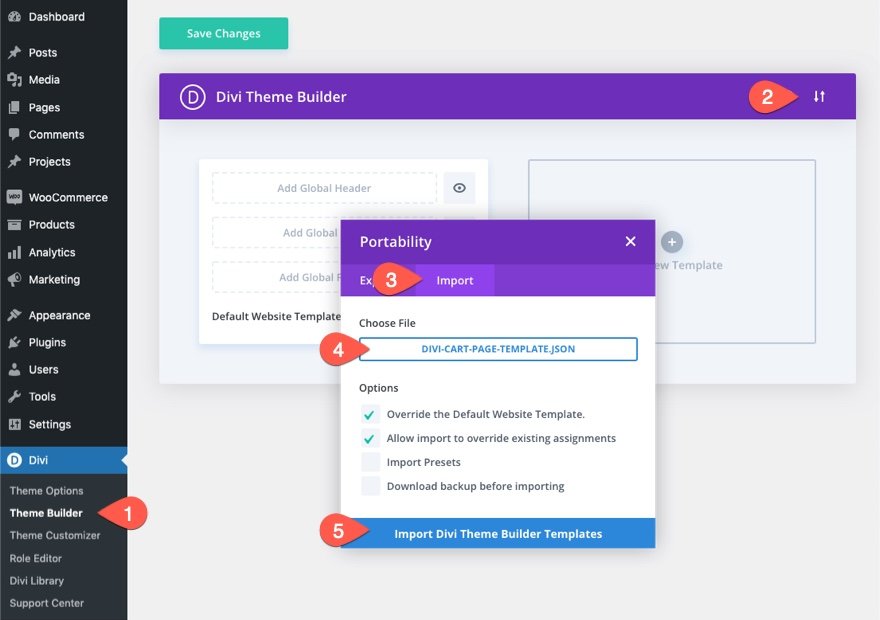
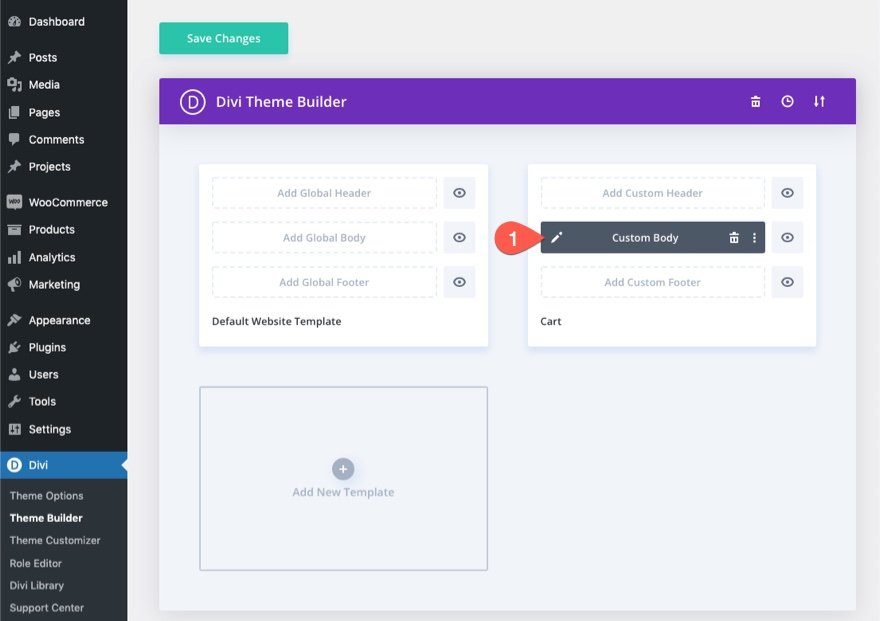
Once achieved, the cart template may also be available inside the Theme Builder. To edit the template, click on at the edit icon on the body area of the template.
Let’s get to the learning, shall we?
Regarding the WooCommerce Cart Internet web page and Divi
Each time you installed WooCommerce to your Divi web site, WooCommerce (WC) will generate key WC pages along side a shop internet web page, a cart internet web page, a checkout internet web page, and an account internet web page. The content material subject material of the internet web page is deployed by means of using a shortcode on the backend WordPress block editor.
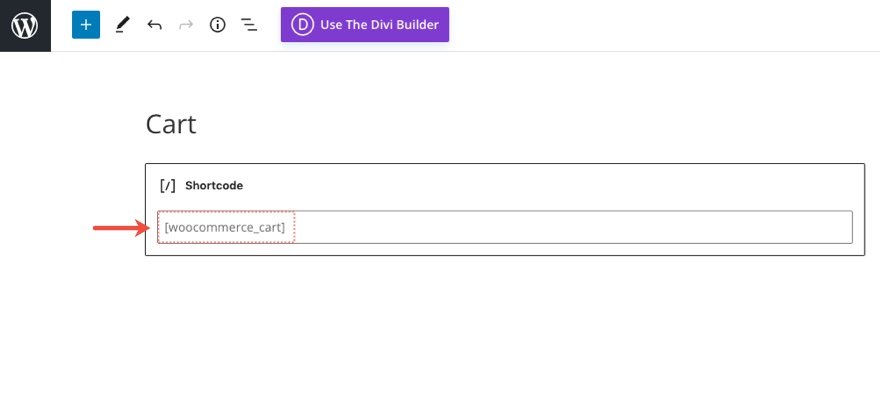
Whilst you flip at the Divi Builder on this cart internet web page, each of the content material subject material portions of the WooCommerce Cart internet web page may also be loaded as Divi Woo Modules that can be used to style the internet web page.
Woo Modules for Designing a Cart Internet web page in Divi
Divi comes with a variety of modules which can be key to together with dynamic content material subject material to a internet web page template. A couple of of those include Woo Modules explicit to the cart internet web page.
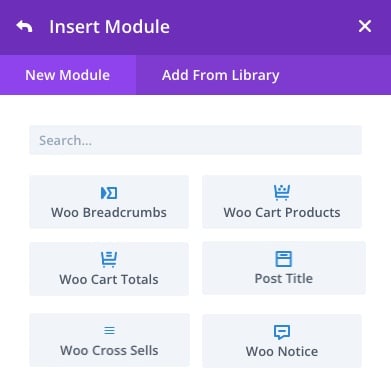
The Modules which can be key to development the Cart internet web page or template include:
- Post Determine – This may occasionally an increasing number of display the title of the cart internet web page dynamically when development a cart internet web page template.
- Woo Perceive – This module can be set to different internet web page varieties (cart internet web page, product internet web page, checkout internet web page). It will display very important notifications to the shopper dynamically as sought after.
- Woo Cart Products – This module displays the file of products {{that a}} client in recent years has in their cart.
- Woo Cart Totals – This module displays the prevailing subtotal, supply and total price for the products in a client’s cart.
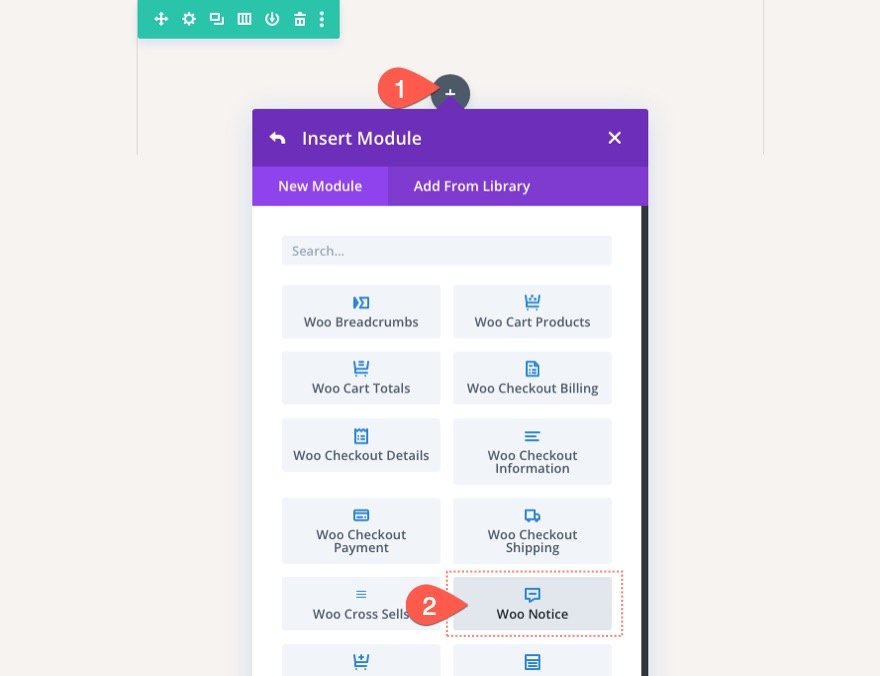
Other now not necessary modules include:
- Woo Breadcrumbs – This may occasionally an increasing number of display the WooCommerce Breadcrumb navigation bar.
- Woo Transfer Sells – This may occasionally an increasing number of display any transfer advertise products associated with items inside the cart dynamically.
Design a Cart Internet web page or Template
As mentioned, we will be able to merely use the Divi Woo Modules to design a custom designed WooCommerce Cart internet web page for many who don’t see a need to assemble a custom designed template for the cart internet web page. For this tutorial, we’re going to build a cart internet web page template using the Divi Theme Builder.
Designing a WooCommerce Cart Internet web page Template with Divi
For this WooCommerce Cart Internet web page template, the aim is to create a custom designed body area for a template that is assigned to the WooCommerce Cart Internet web page in Divi. We aren’t going to be creating a custom header or footer area for this template, alternatively you’ll be capable of merely use this template on your own web page with your own header and footer.
Creating a Custom designed Template for the Cart Internet web page
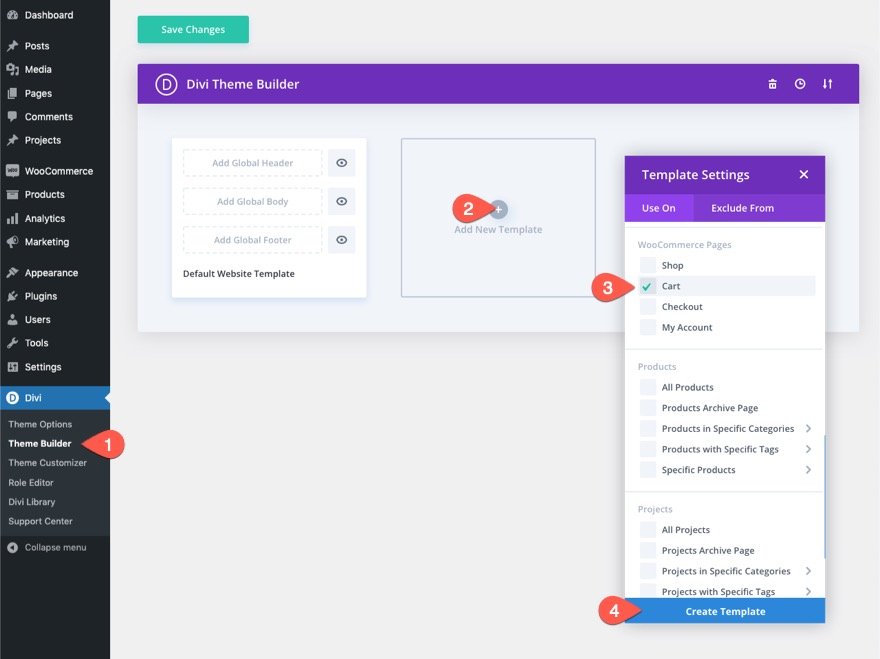
To get started, let’s do the following:
- Go to your WordPress Dashboard and navigate to Divi > Theme Builder.
- Then click on at the Add New Template plus icon inside the empty gray box area as a way to upload a brand spanking new template.
- Throughout the Template Settings modal, underneath the “Use On” tab, make a selection Cart underneath the WooCommerce Pages file.
- In spite of everything, click on on Create Template.
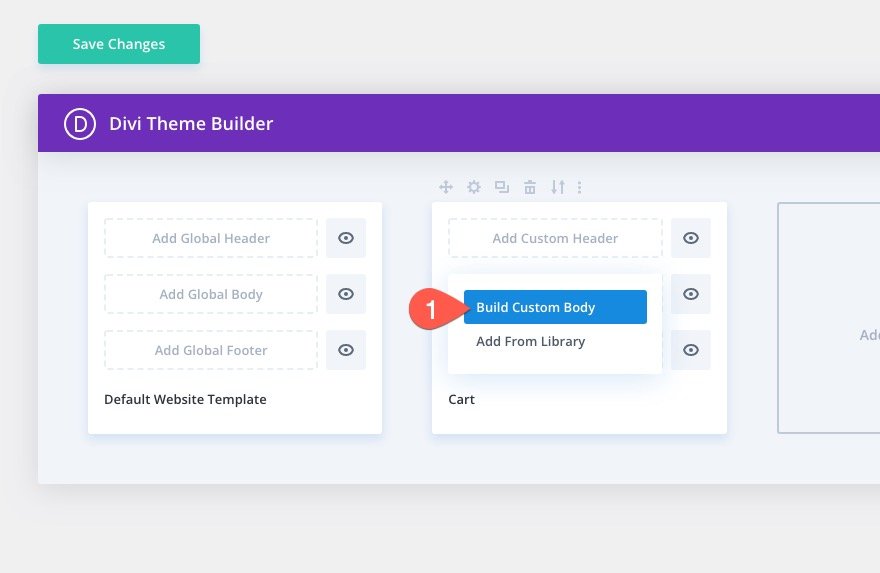
Once the new Cart template has been created, click on at the “Add Custom designed Body” area of the template. All over the popup file, make a selection Assemble Custom designed Body.
Creating the Segment Row and Column Development
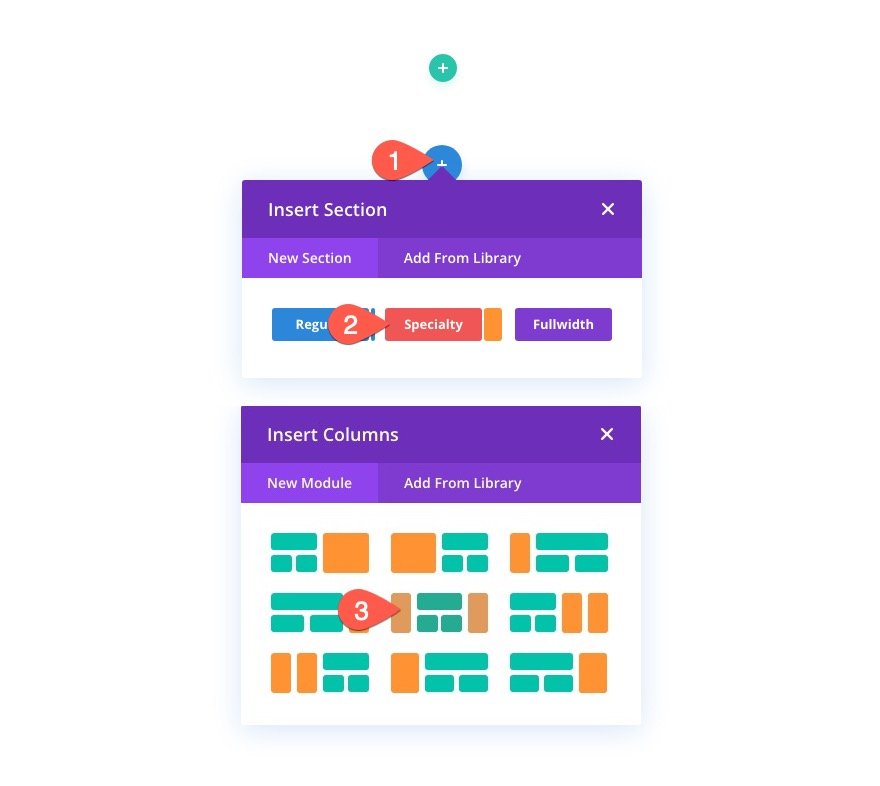
Throughout the Template Construction Editor, insert a brand spanking new sturdy level section with a one-fourth one-half 0ne-fourth column development with two sidebars.
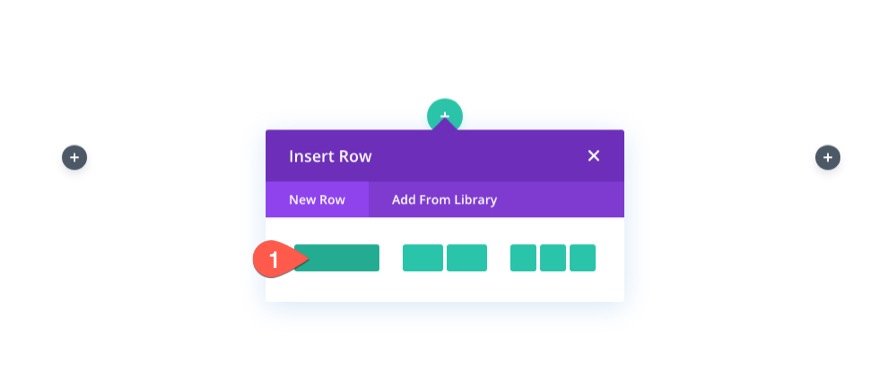
Next, add a one-column row in the middle of the section.
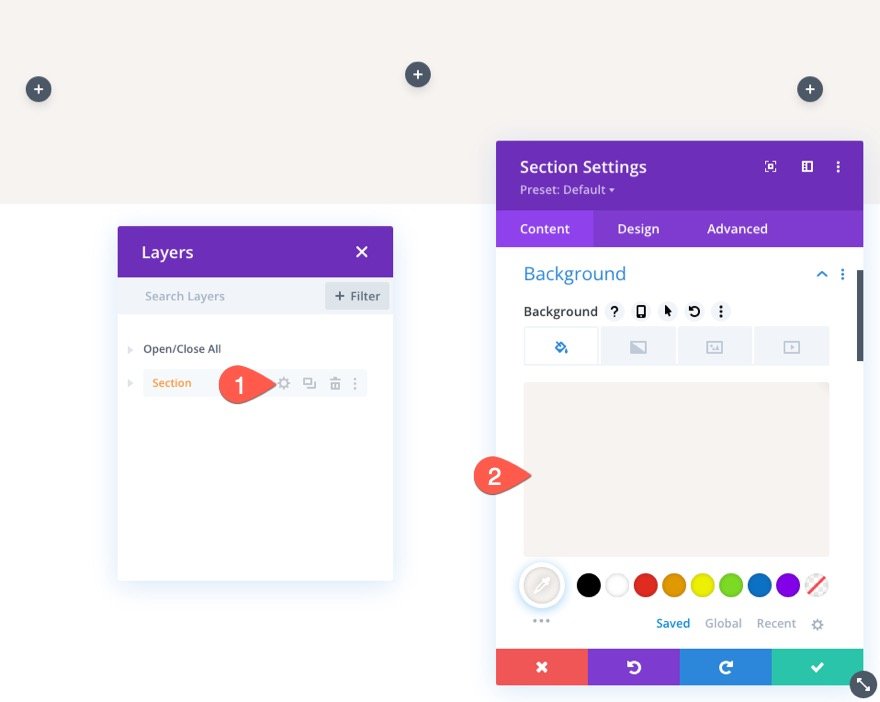
Segment Background
Open the section settings and add a background shade as follows:
- Background Color: #f7f3f0
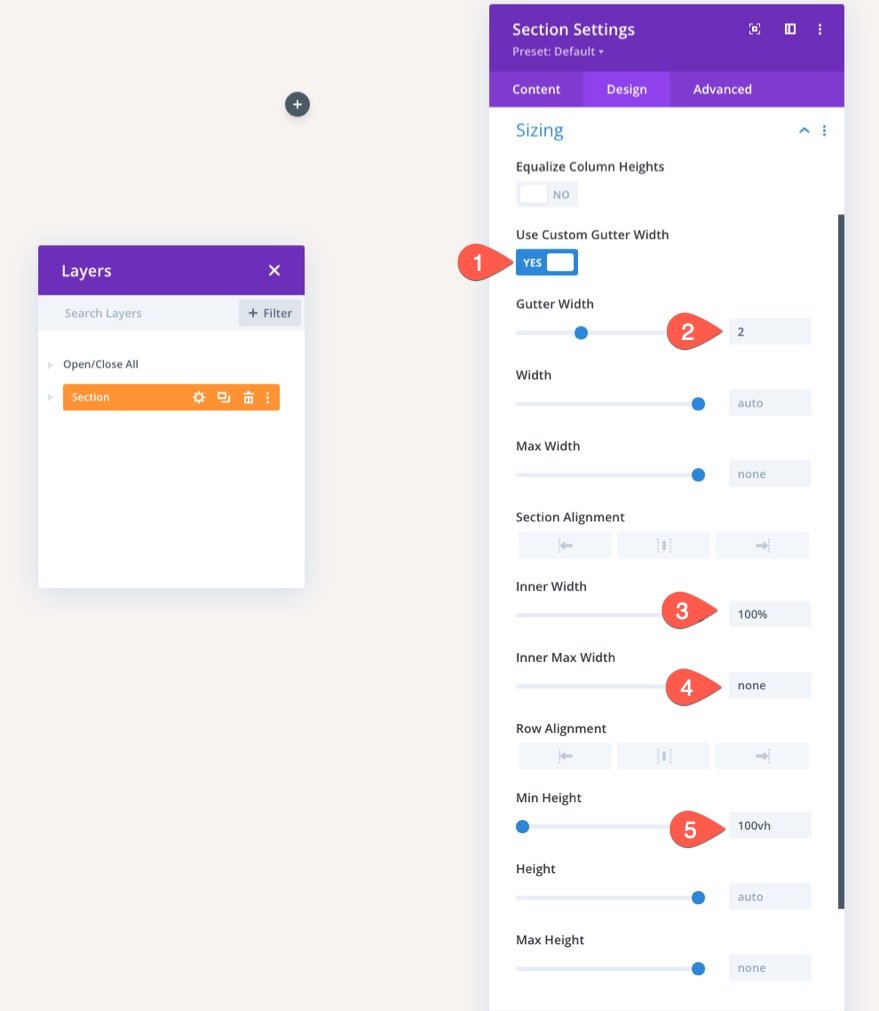
Segment Sizing
Beneath the design tab, exchange the following:
- Gutter Width: 2
- Inside Width: 100%
- Inside Max Width: none
- Min Height: 100vh
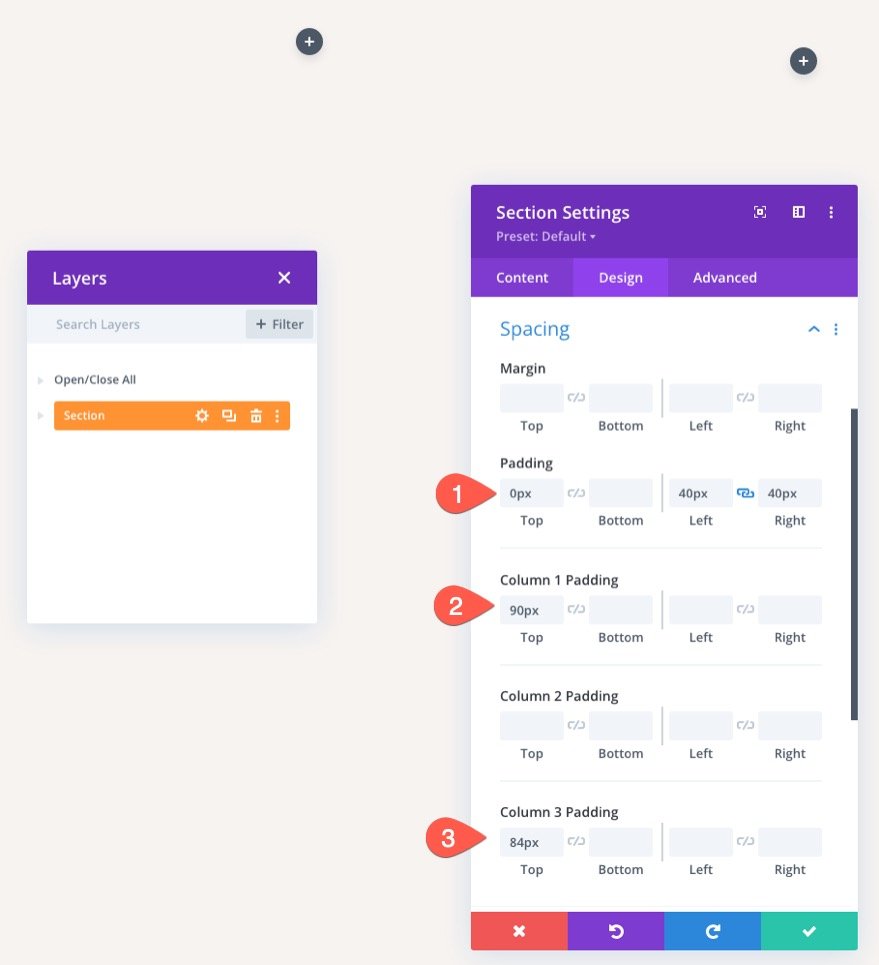
Segment Spacing
Next add some spacing to the section and columns as follows:
- Padding: 0px top, 40px left, 40px suitable
- Column 1 Padding: 90px top
- Column 3 Padding: 84px
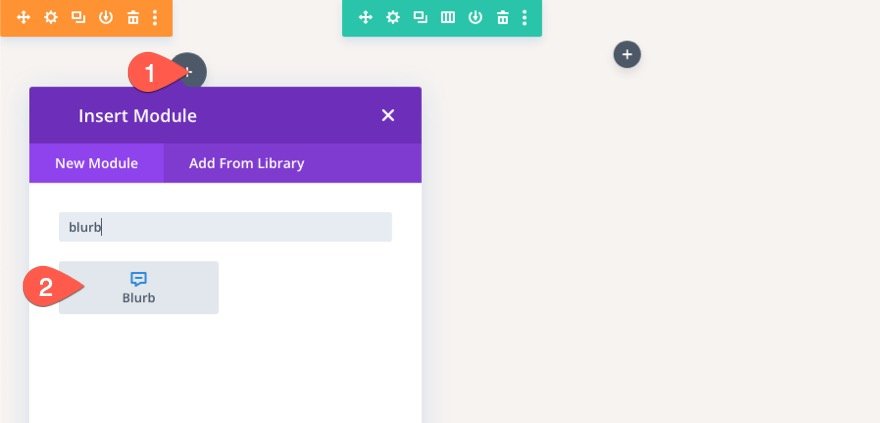
For this layout, we’re going to create a few custom designed navigation links to the vital factor pages that make up a store – the Retailer, the Cart, and the Checkout. This may occasionally an increasing number of make it easier for purchasers to navigate right through the buying process.
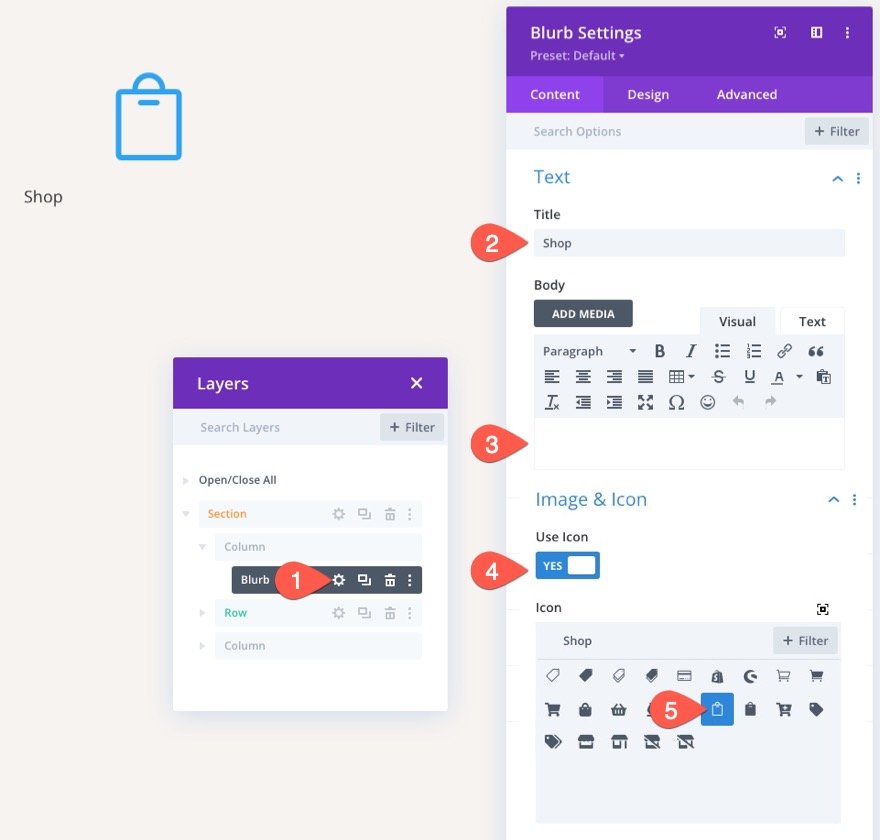
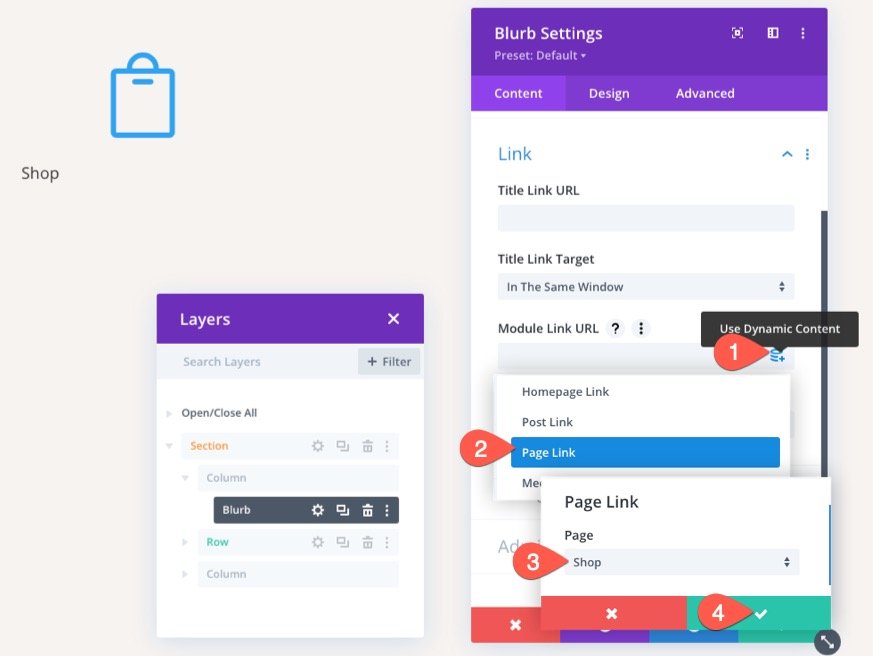
Throughout the left column, add a brand spanking new blurb module. This can be utilized as a link to the shop internet web page to your web page.
Throughout the Blurb Settings modal, exchange the content material subject material as follows:
- Determine: Retailer
- Body: move away blank
- Use Icon: YES
- Icon: see screenshot
As a substitute of together with a static link URL, we will be able to add a dynamic link to the Retailer internet web page. Proper right here’s how to do it.
- Hover over the Module Link URL input box and click on at the “use dynamic content material subject material” icon.
- Throughout the dropdown, make a selection Internet web page Link from the file.
- Throughout the Internet web page Link modal, make a selection the Retailer internet web page from the dropdown file.
- Then save changes.
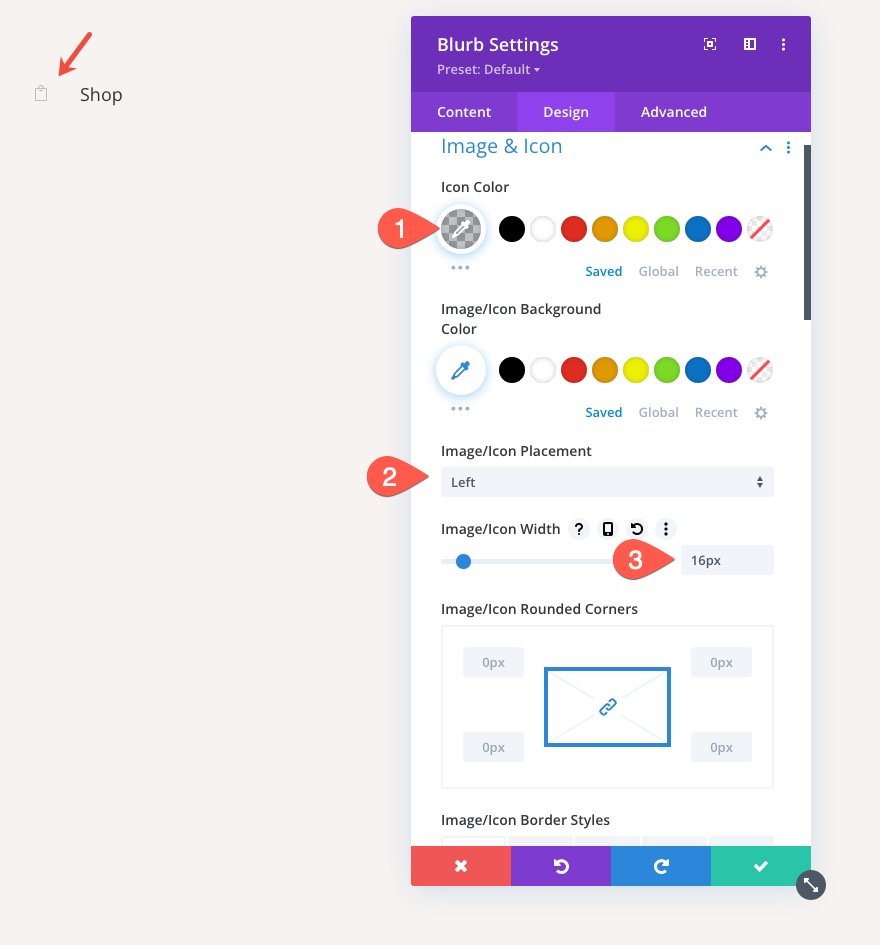
Beneath the design tab, exchange the icon style as follows:
- Icon Color: rgba(55,61,75,0.3)
- Image/Icon Placement: Left
- Image/Icon Width: 16px
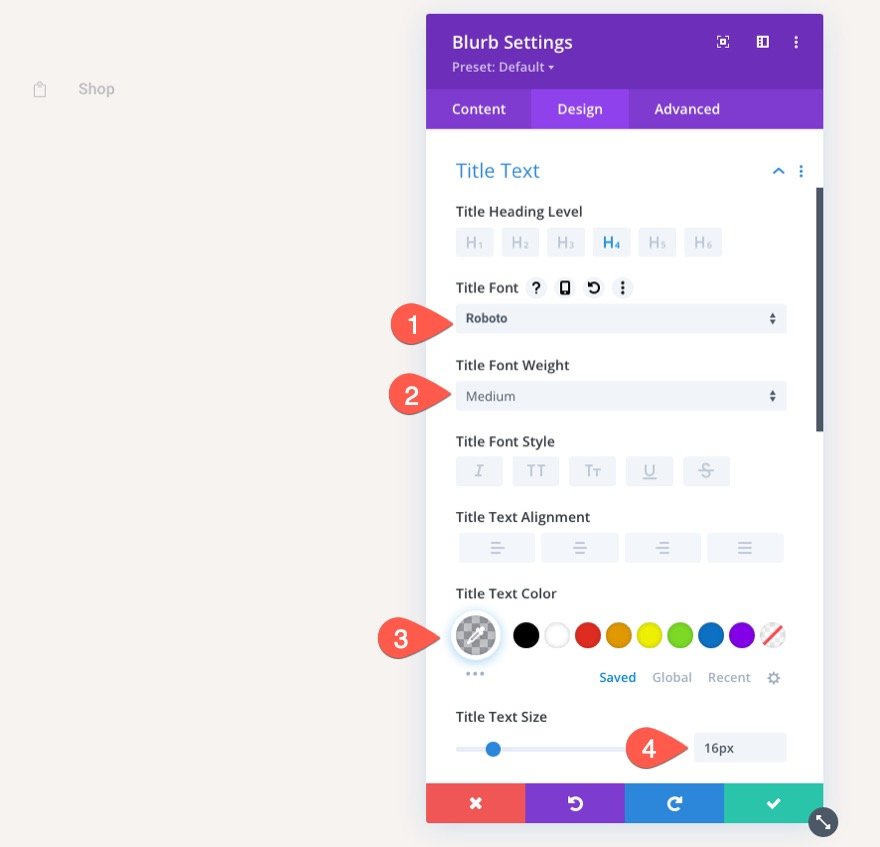
Next, exchange the title text:
- Determine Font: Roboto
- Determine Font Weight: Medium
- Determine Text Color: rgba(55,61,75,0.3)
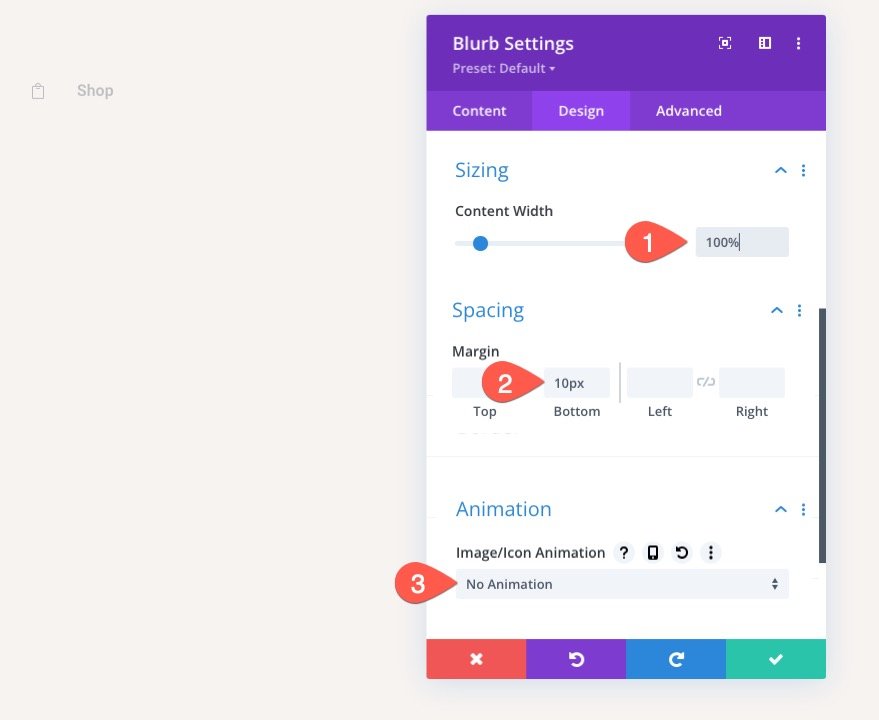
For a crowning glory, exchange the dimensions and spacing as follows:
- Content material subject material Width: 100%
- Margin: 10px bottom
- Image/Icon Animation: No Animation
This may occasionally an increasing number of make sure that the blurb (or navigation link) spans the full width of the browser on tablet and call along with create some space between the next blurb(s) we’re going to add.
To create our next two links, reproduction the present blurb module we merely designed two cases so that there are a whole of three links.
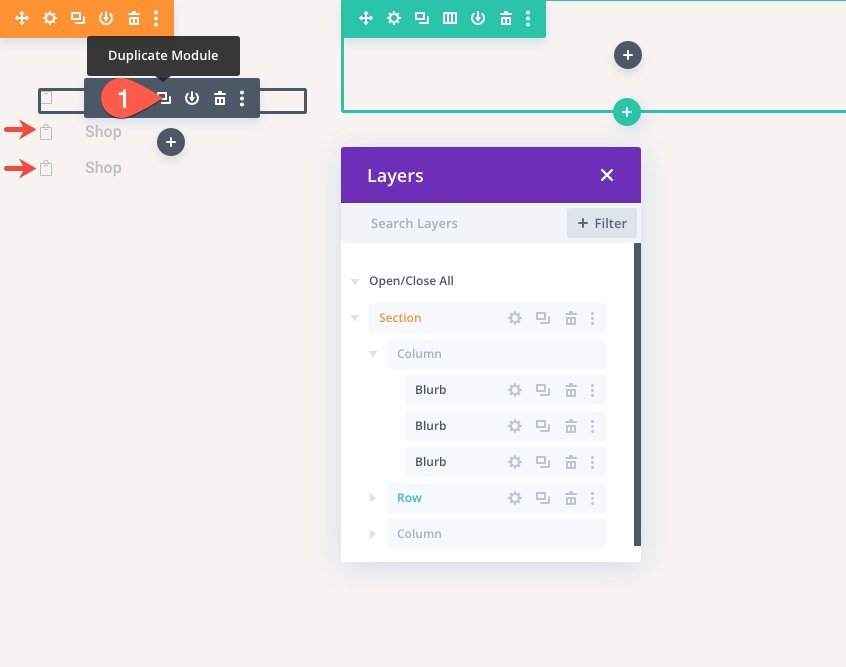
The second link will be the Cart Link which is the internet web page we’re in recent years rising. To make it stand out, open the settings for the second blurb and exchange the icon and text shade:
- Icon Color: #373d4b
- Determine Text Color: #373d4b

Now all that is left to do is exchange the Determine text and the module Link URLs so that they each have their respective dynamic internet web page link URLs.
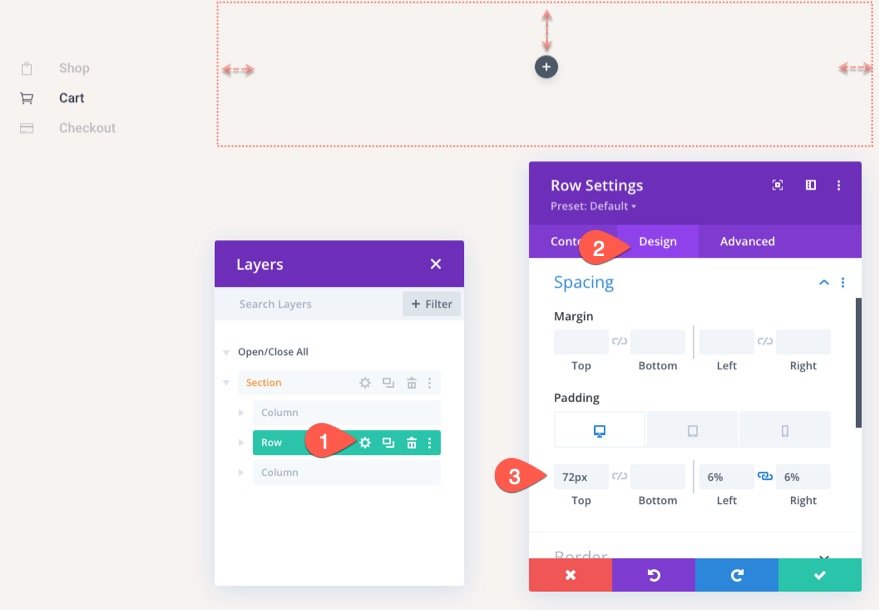
Customizing the Row Settings
Throughout the center part of the internet web page, we will be able to add the woo perceive module and woo cart products. Then again quicker than we add those, we need to optimize the row settings.
Row Padding
Open the row settings and exchange the following:
- Padding (desktop): 72px top, 6% left, 6% suitable
- Padding: (tablet and call): 0px top, 0px left, 0px suitable
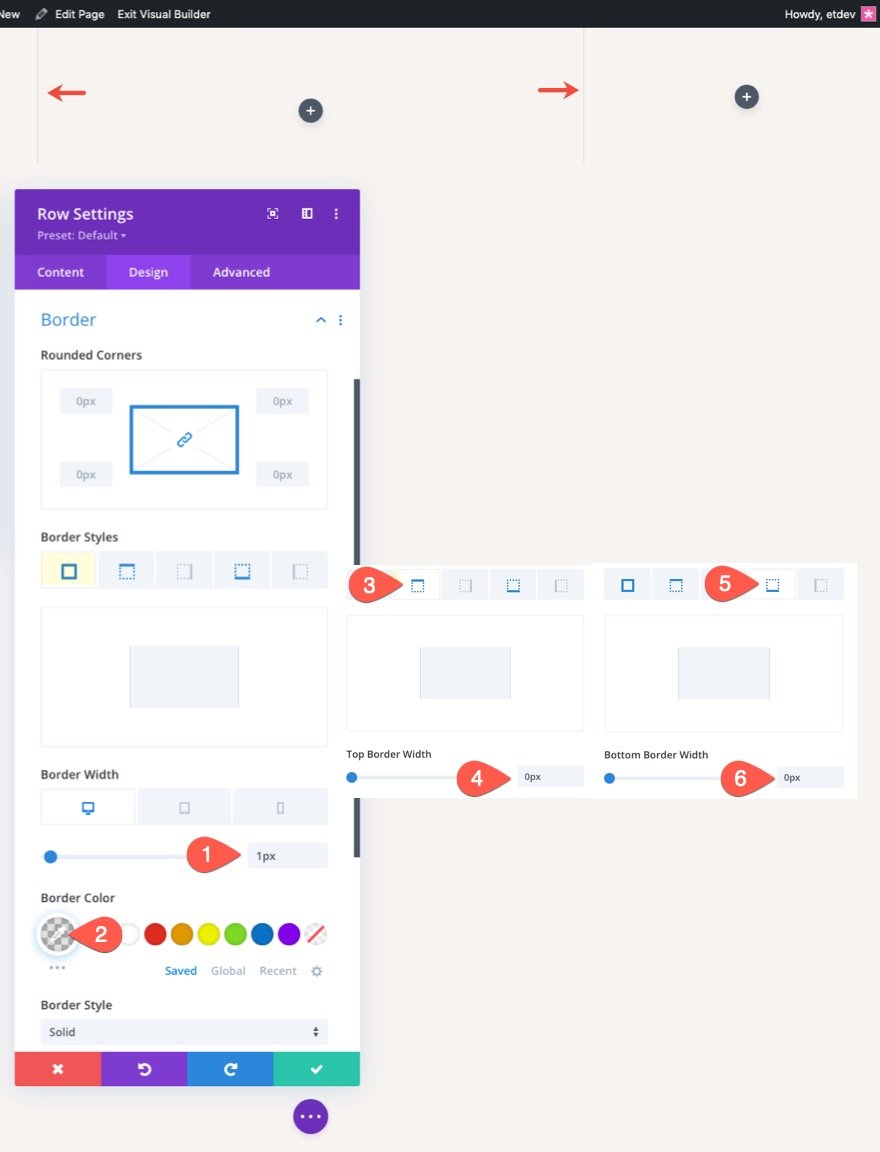
Row Border
- Border Width: 1px
- Border Color: rgba(55,61,75,0.14)
- Very best Border Width: 0px
- Bottom Border Width: 0px
Designing the Dynamic Woo Perceive Module for the Cart Internet web page
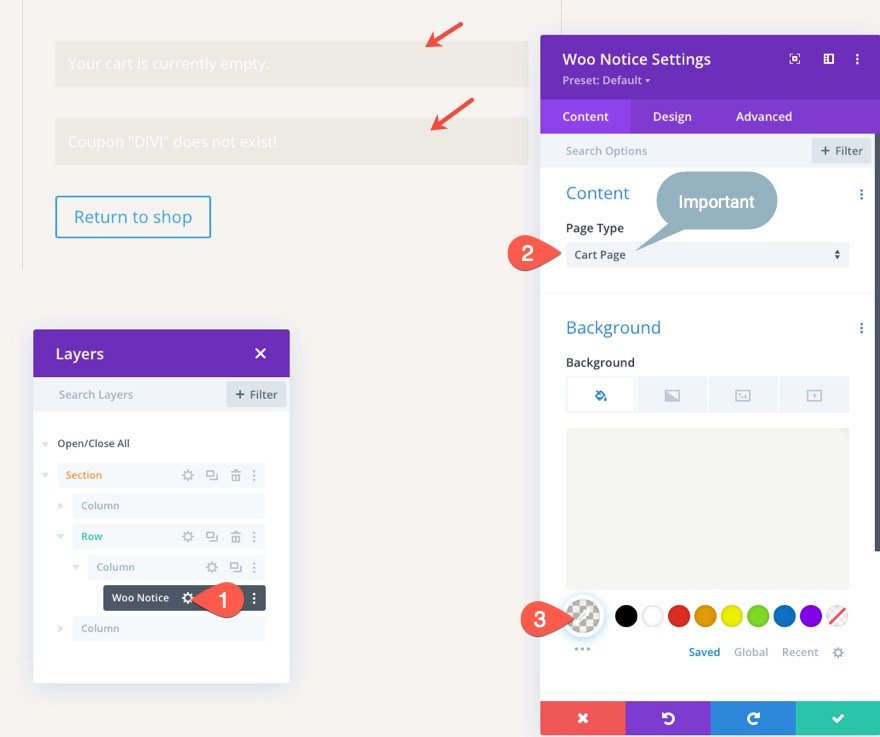
It’s always a good idea as a way to upload the Woo Perceive module at the top of the internet web page so that the notices may also be most visible to consumers when interacting with the cart internet web page. Understand that we’re designing notices that may be displayed best when sought after.
In an effort to upload the Woo Perceive Module, click on on as a way to upload a brand spanking new Woo Perceive module inside the one-column row.
Woo Perceive Internet web page Type and Background
Next, exchange the Internet web page Type and Background shade of the Woo Perceive as follows:
- Internet web page Type: Cart Internet web page
- Background Color: rgba(153,158,117,0.1)
IMPORTANT: Be sure that to make a choice the Cart Internet web page since the Internet web page Type so that the woo notices will art work as it should be.
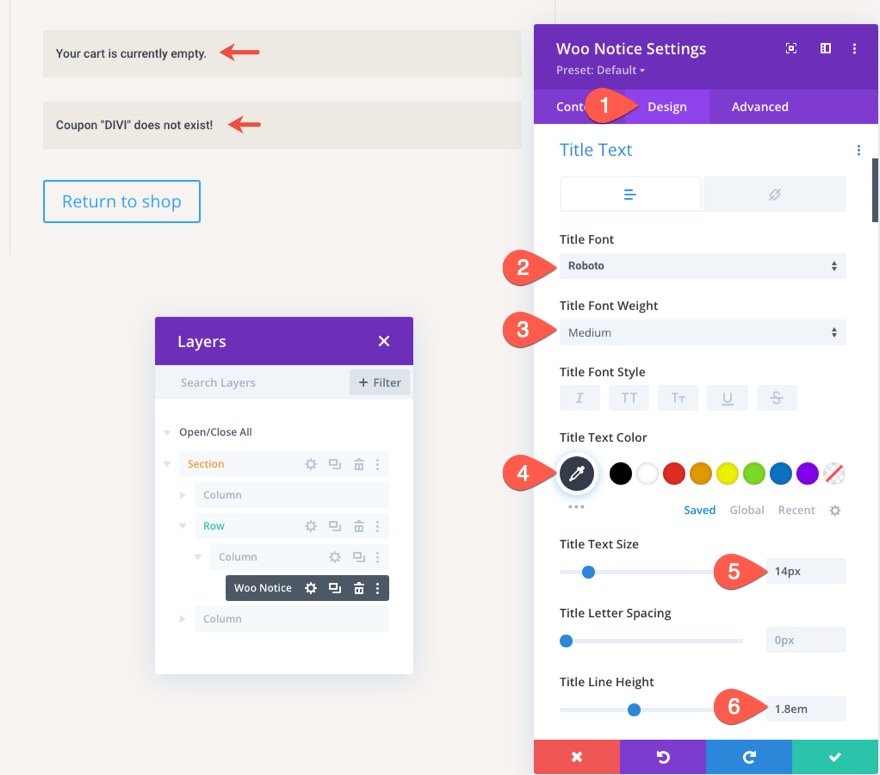
Woo Perceive Determine Text
Beneath the design tab, exchange the title text style as follows:
- Determine Font: Roboto
- Determine Font Weight: Medium
- Determine Text Color: #373d4b
- Determine Text Dimension: 14px
- Determine Line Height: 1.8em
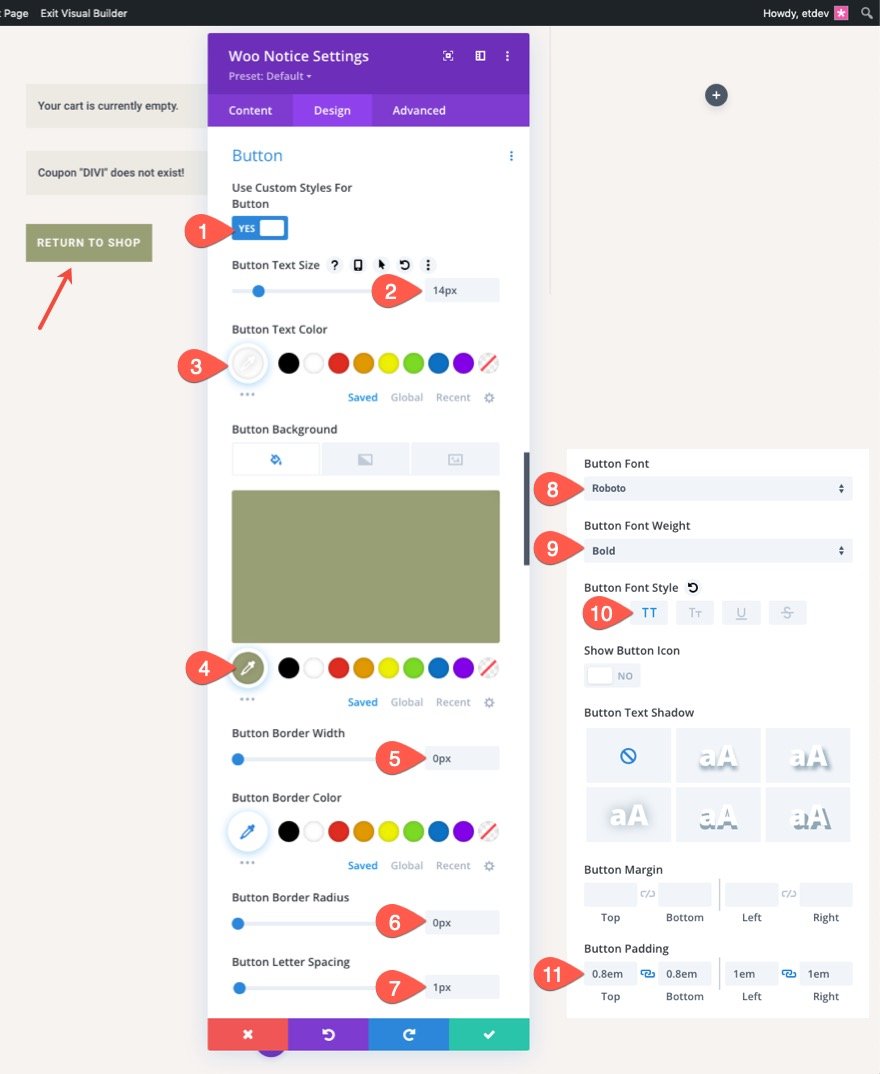
Woo Perceive Button
- Use Custom designed Varieties for Button: YES
- Button Text Dimension: 14px
- Button Text Color: #fff
- Button Background Color: #999e75
- Button Border Width: 0px
- Button Border Radius: 0px
- Button Letter Spacing: 1px
- Button Font: Roboto
- Button Font Weight: Bold
- Button Font Style: TT
- Button Padding: 0.8em top, 0.8em bottom, 1em left, 1em suitable
Woo Perceive Box Shadow
To give the woo perceive bar a top border-like design, exchange the box-shadow alternatives as follows:
- Box Shadow: see screenshot
- Box Shadow Vertical Position: 0px
- Box Shadow Blur Power: 0px
- Box Shadow Spread Power: 0px
- Shadow Color: #999e75

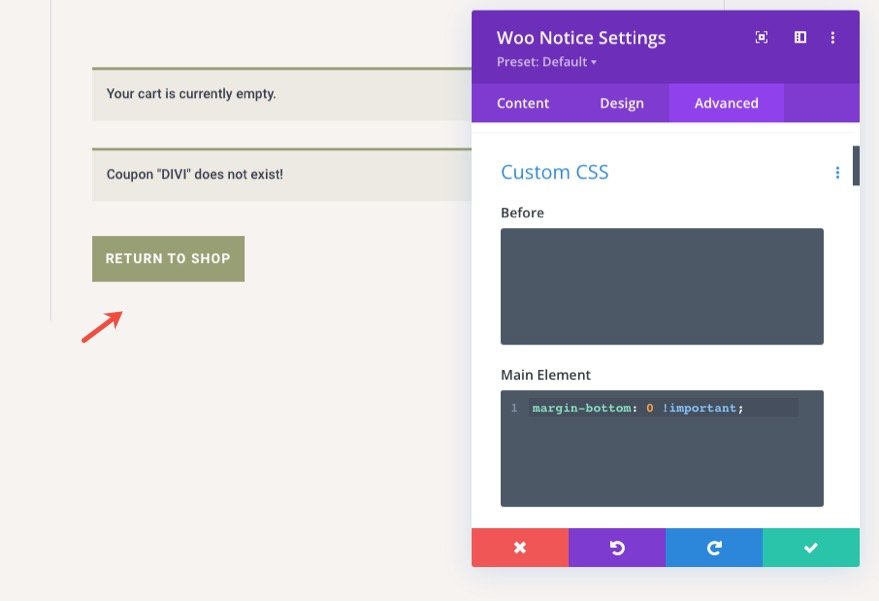
So to take out the default margin below the woo perceive, move to the advanced tab and add the following custom designed CSS to the Primary Part:
margin-bottom: 0 !very important;
Creating the Dynamic Cart Internet web page Determine
To create the dynamic internet web page title sought after for the cart internet web page, add a post title module underneath the woo perceive module.
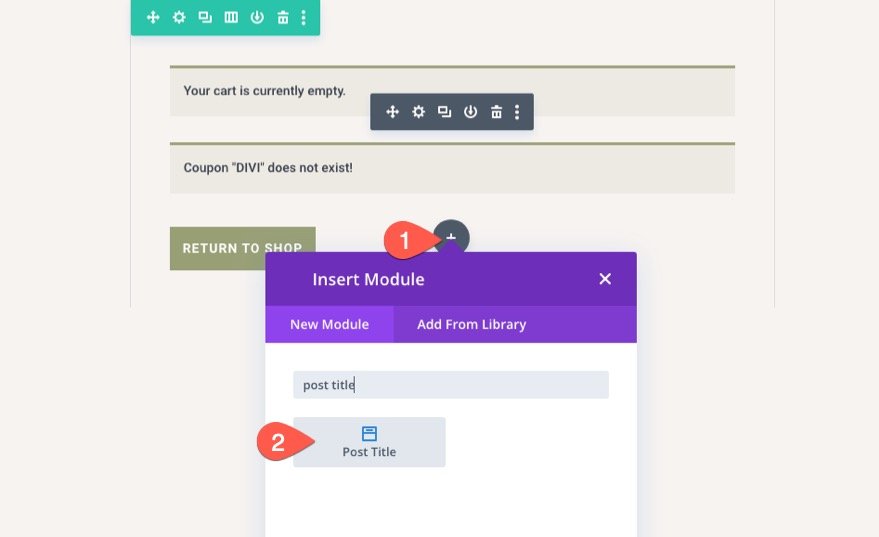
Post Determine Content material subject material
Throughout the post title settings, exchange the elements to show best the title as follows:
- Show Determine: YES
- Show Meta: NO
- Show Featured Image: NO

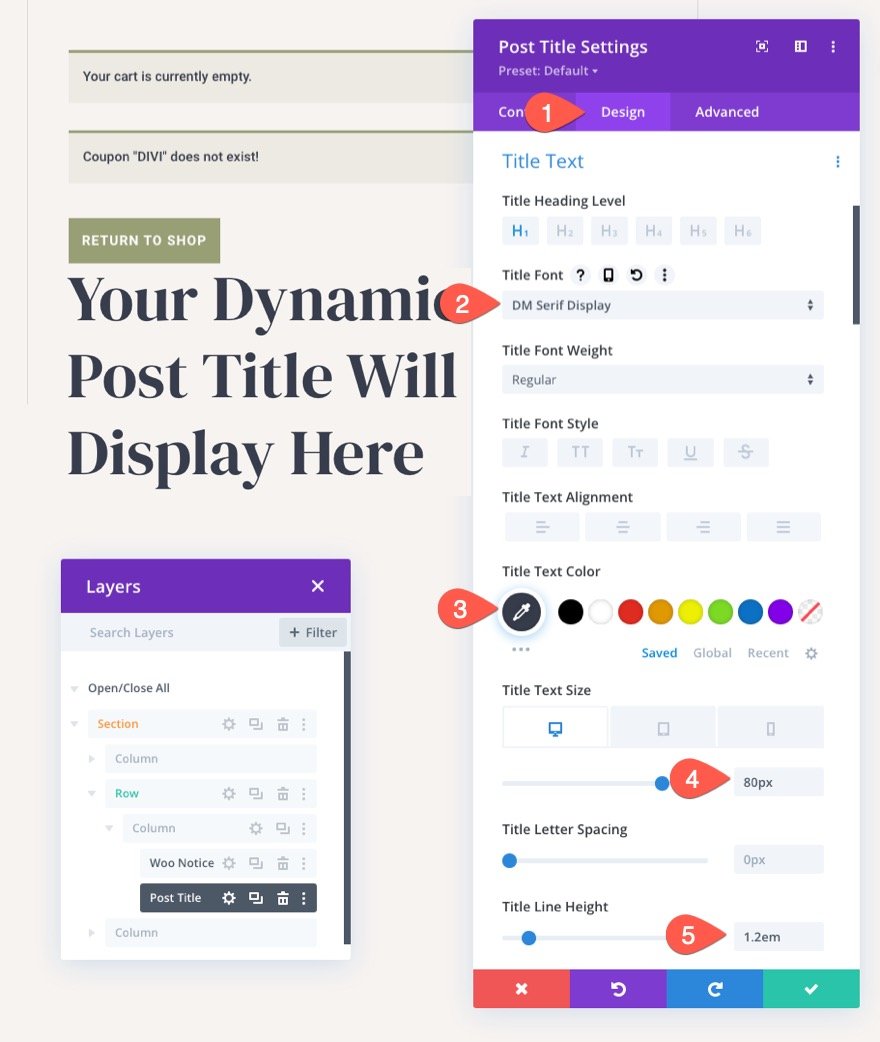
Post Determine Text
To style the post title text, exchange the following underneath the design tab:
- Determine Font: DM Serif Display
- Determine Text Color: #373d4b
- Determine Text Dimension: 80px (desktop), 60px (tablet), 42px (phone)
- Determine Line Height: 1.2em
Designing the Dynamic Woo Cart Products
Now that our internet web page title is in place, we’re able as a way to upload the Woo Cart Products, another key section to the cart internet web page template.
Beneath the post title module, add a Woo Cart Products module.
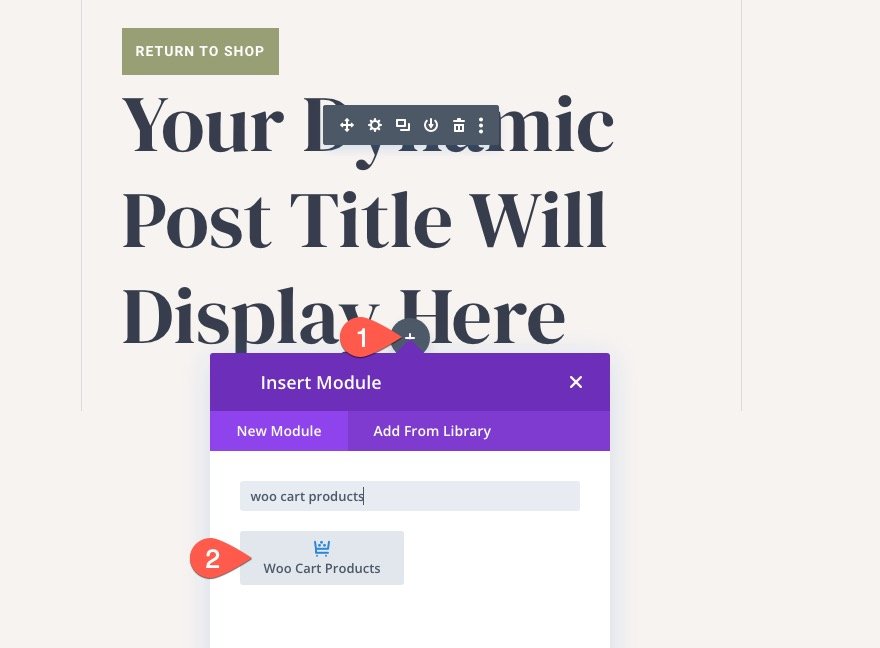
The module must show dummy content material subject material till you already have products inside the cart. This may occasionally an increasing number of lend a hand visualize the design process.
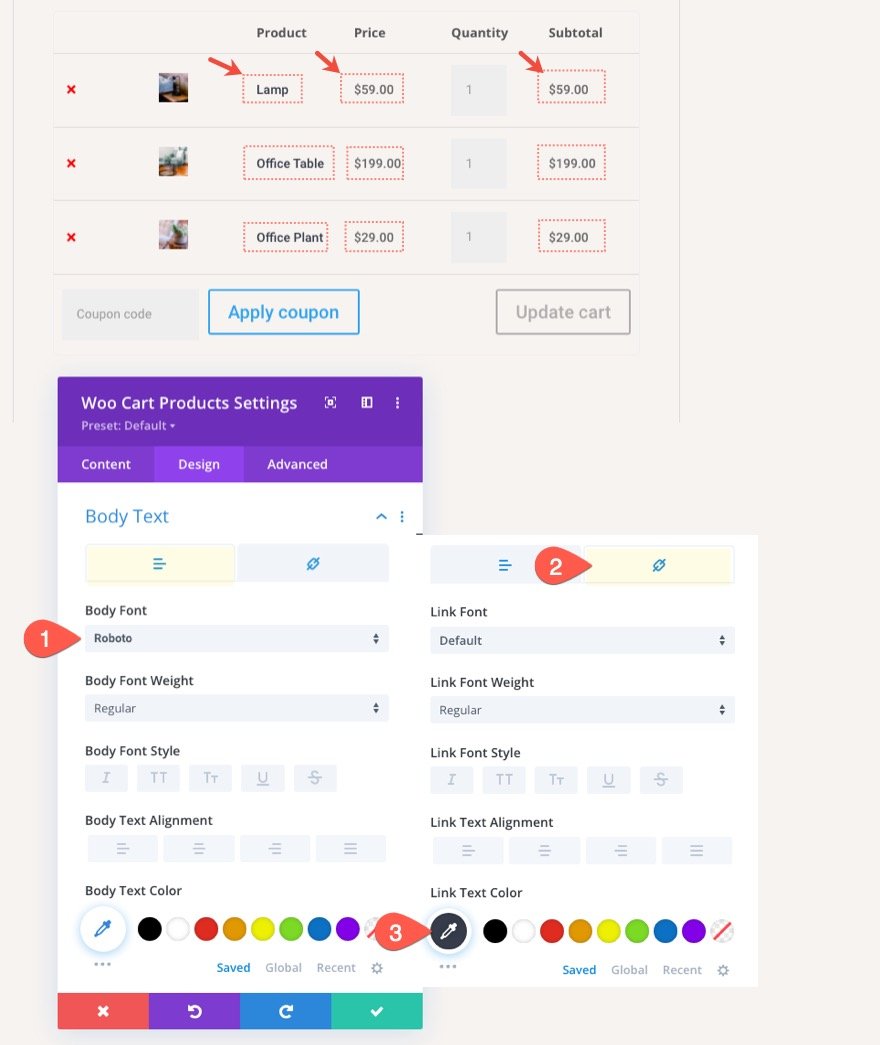
Woo Cart Products Body Text and Links
We can objective the product title links, price text, and subtotal text thru customizing the body text alternatives inside the Woo Cart Products settings.
Open the Woo Cart Products settings modal and, underneath the design tab, exchange the following:
- Body Font: Roboto
- Link Text Color: #373d4b
Follow: The link text will objective the product title links underneath the Product column.
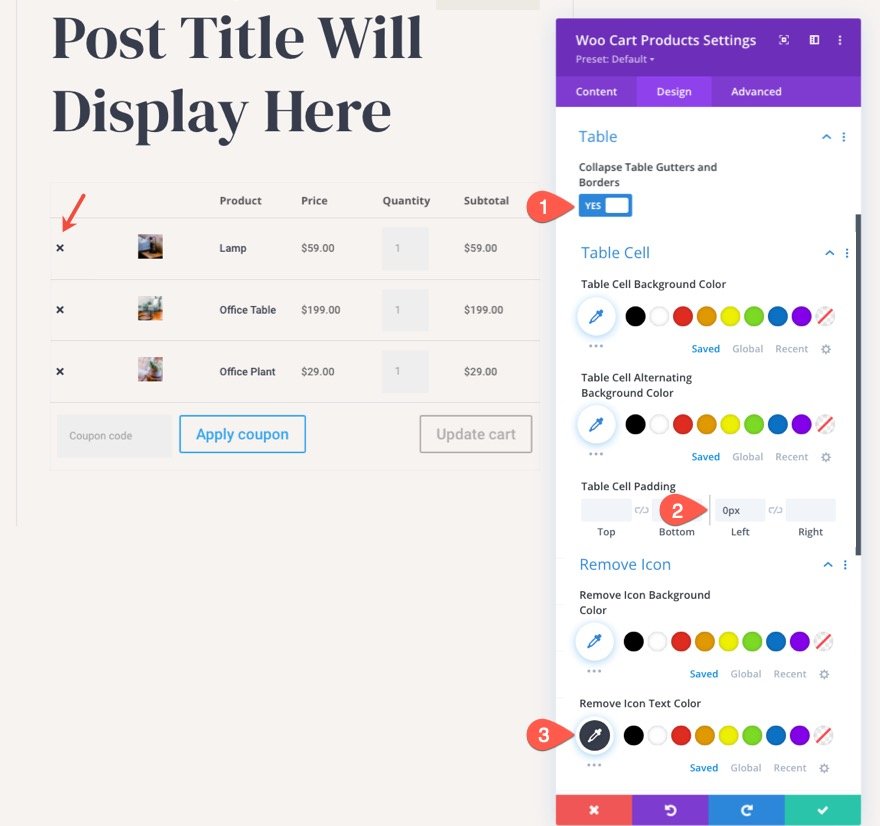
Woo Cart Products Table, Table Cellular, and Remove Icon
As you’ll be capable of most definitely tell, the cart products are organized inside a table development. We can objective the style of the table and table cells with the module’s built-in alternatives.
For this example, exchange the following:
- Collapse Table Gutters and Borders: YES
- Table Cellular Padding: 0px
Then exchange the color of the remove icon (the “x”) on the left side of each product as follows:
- Remove Icon Text Color: #373d4b
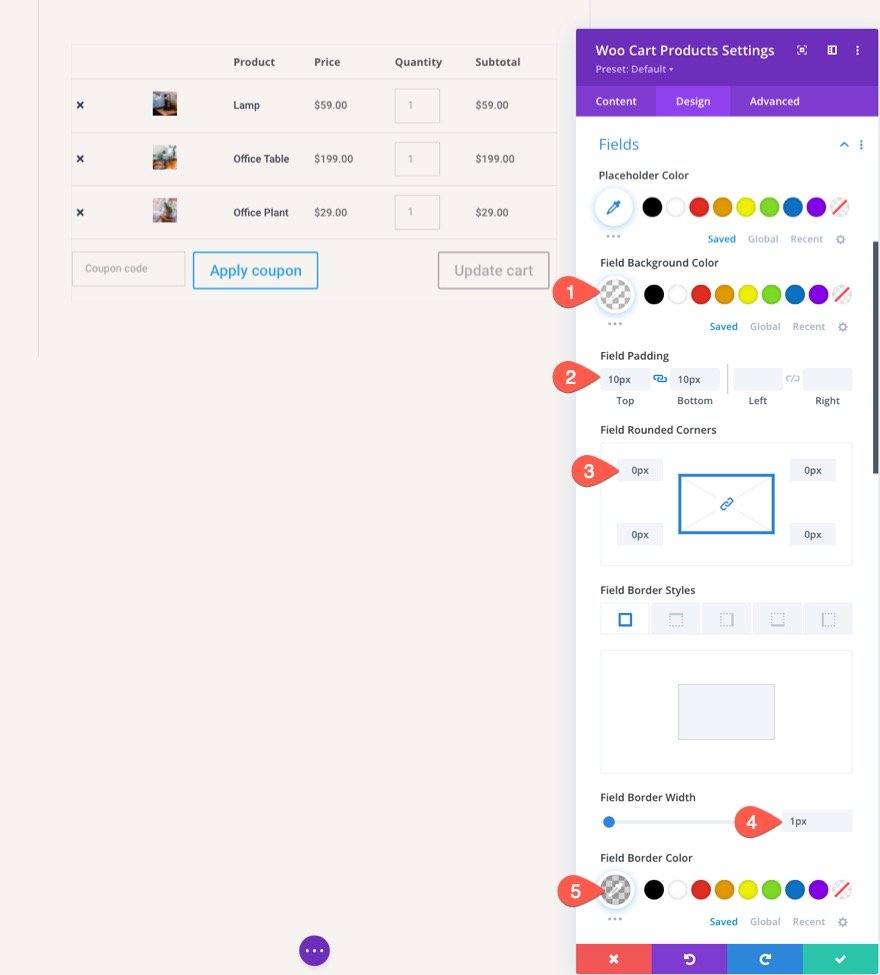
Woo Cart Products Fields
We can moreover objective the cart products fields using the module’s built-in fields alternatives. This may occasionally an increasing number of objective things like the quantity field bins and the coupon code field box.
Beneath the fields alternatives, exchange the following:
- Field Background Color: transparent
- Field Padding: 10px top, 10px bottom
- Field Rounded Corners: 0px
- Field Border Width: 1px
- Field Border Color: rgba(0,0,0,0.16)
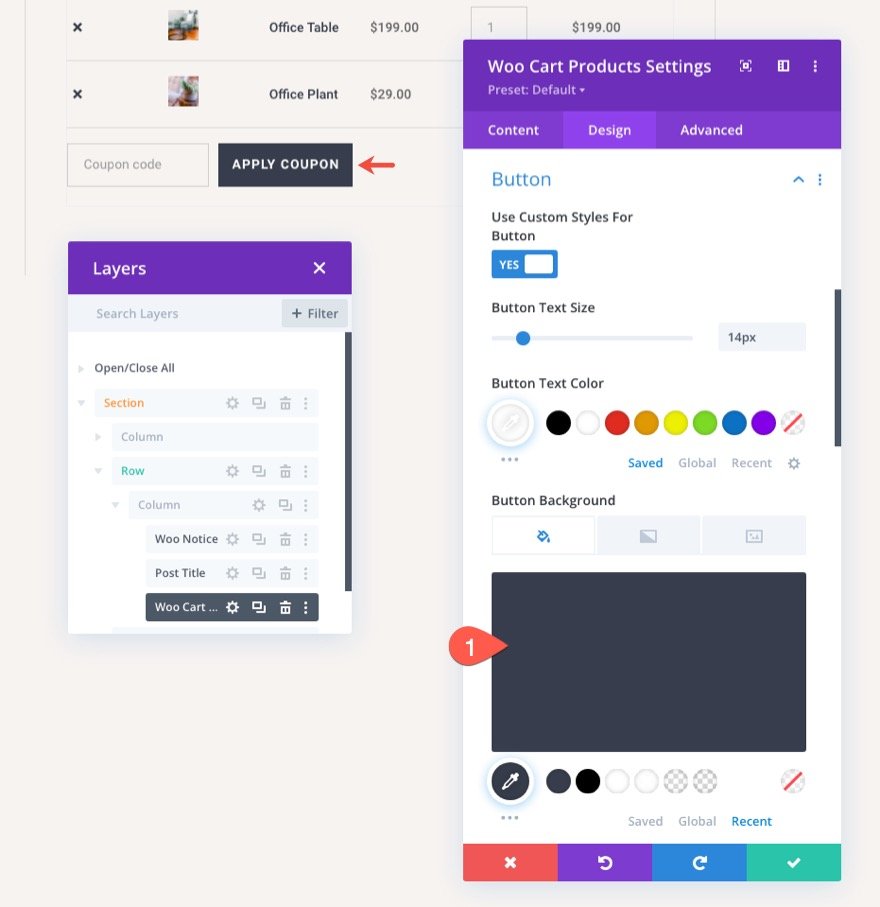
Woo Cart Products Buttons
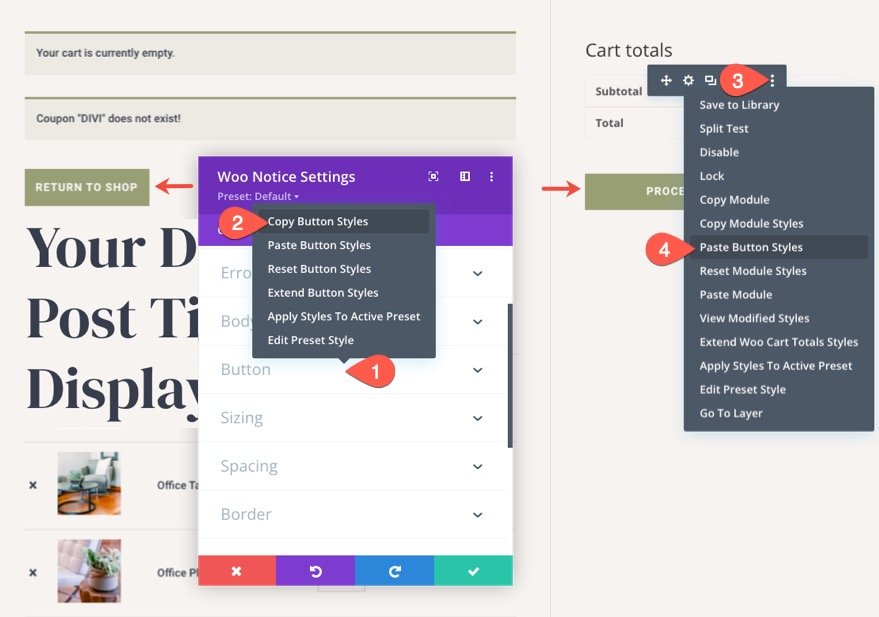
The Woo Cart Products module incorporates two buttons (the “Follow Coupon” button and the “Change Cart” button) that can be customized with the module’s built-in button alternatives.
Since we already styled a button inside the Woo Perceive module, open the Woo Perceive module settings and find the button chance toggle. Then right-click on the button toggle or click on at the “3 dot” icon to open the additional settings menu. There, make a selection copy button sorts.
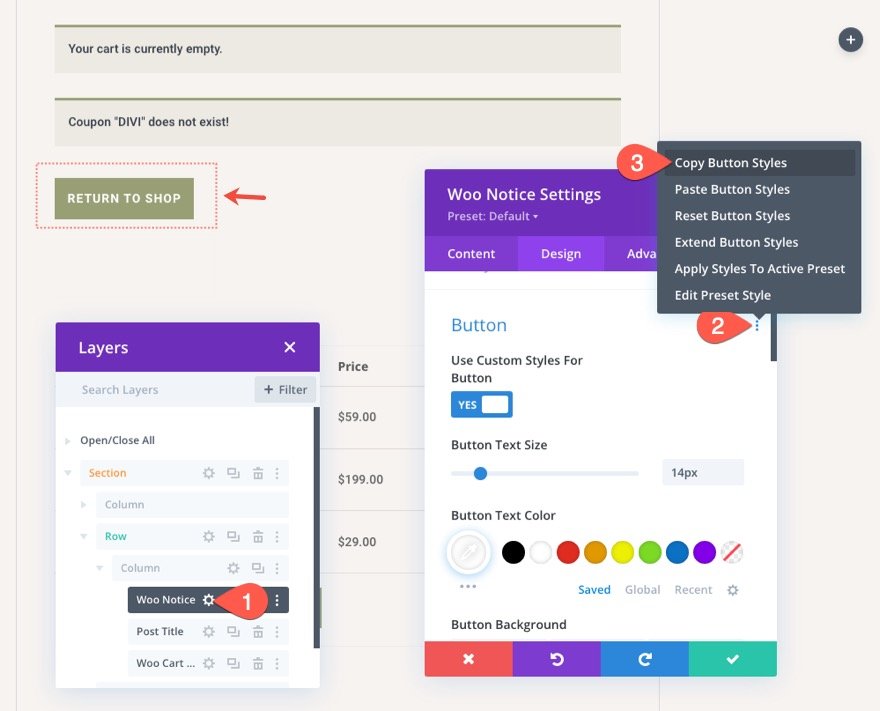
With the button sorts now copied, open the Woo Cart Products module settings and open the additional settings menu on the button chance body of workers and make a selection Paste Button Varieties. This may occasionally an increasing number of copy the sorts of the button from the woo perceive module to this one.
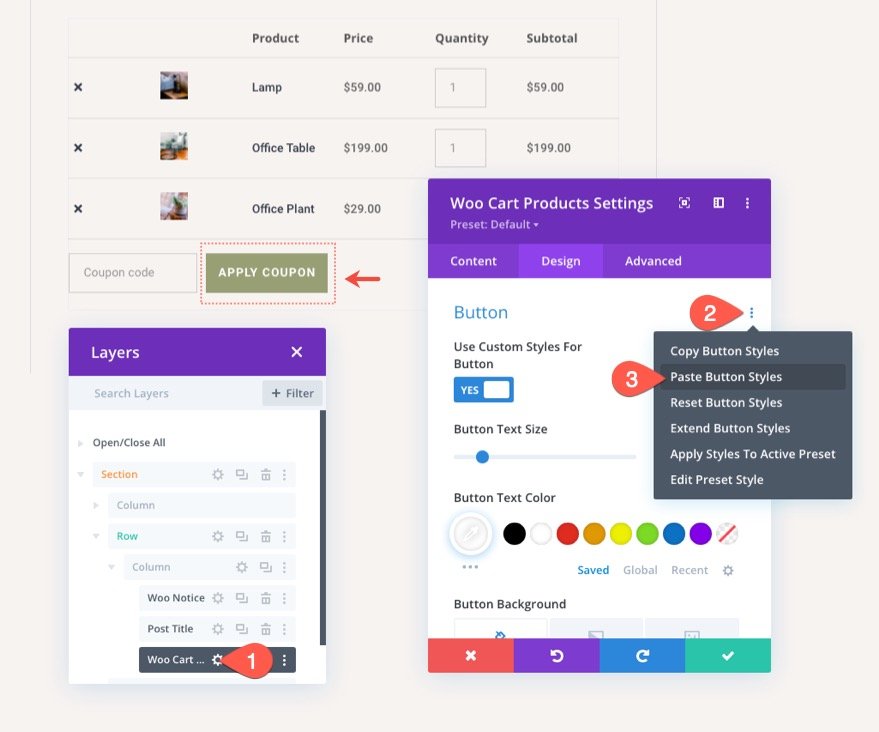
As quickly because the button sorts are in place, trade the button background shade as follows:
- Button Background Color: #373d4b
The Disable Button
The “Change Cart” button has a disabled state every time it isn’t sought after. We can customize the style of the disabled button as neatly. For now, merely copy the prevailing button sorts and paste them to the disabled button sorts using the right-click menu settings.
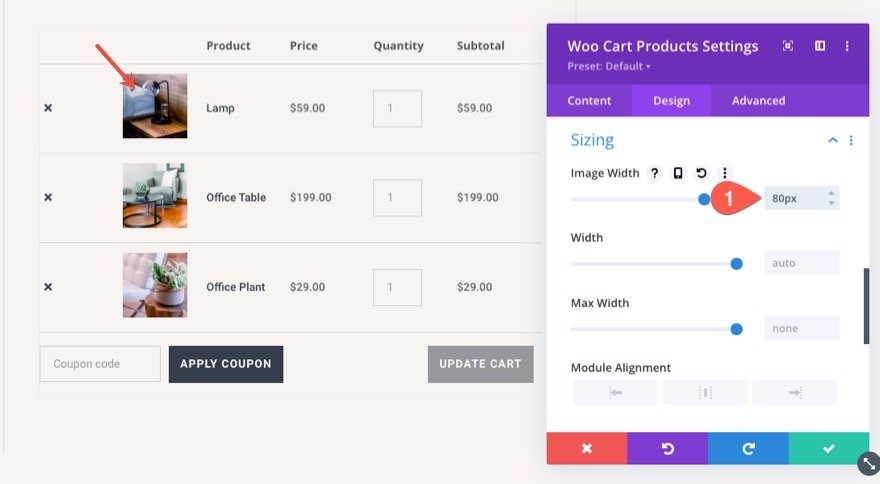
Woo Cart Products Pictures
We can moreover trade the style of the product pictures in this module. For now, let’s trade the dimensions of the images underneath the Sizing alternatives as follows:
- Image Width: 80px
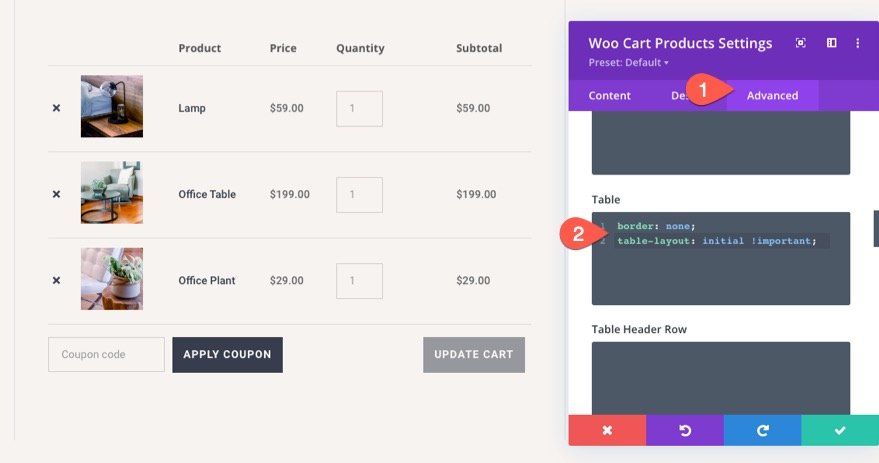
Custom designed Table Construction
If you want create further horizontal space for the product information inside the table, you’ll be capable of override WooCommerce default mounted table layout to initial (or auto). To take a look at this, move to the advanced tab, and add the following custom designed CSS to the Table:
table-layout: initial !very important;
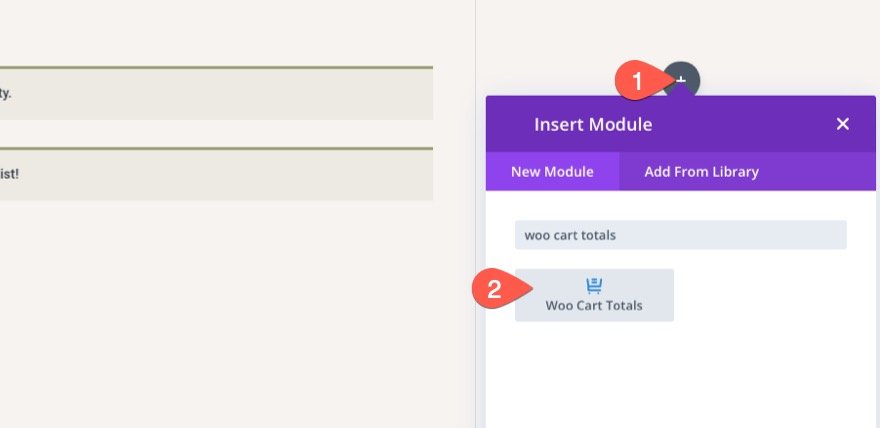
Designing the Dynamic Woo Cart Totals Module
The general key section we need to whole the cart internet web page template is the Woo Cart Totals modules. This module displays the dynamic cart totals content material subject material along with a “Proceed to Checkout” button. For this layout, move ahead and add the cart totals module to the correct column of the section.
Cart Totals Button
First, let’s copy the button sorts used for the Woo Perceive modules (like we did quicker than) and paste the button sorts to the cart totals module. This may occasionally an increasing number of give us an similar button style for the “Proceed to Checkout” button. In truth, you’ll be capable of merely customize the button sorts on the other hand you favor using the module’s built-in alternatives.
Cart Totals Text
To style the title text of the cart totals module, open the cart totals module and, underneath the design tab, exchange the following:
- Determine Font: DM Serif Display
- Determine Text Dimension: 30px (desktop), 24px (tablet), 18px (phone)
- Determine Line Height: 1.8em
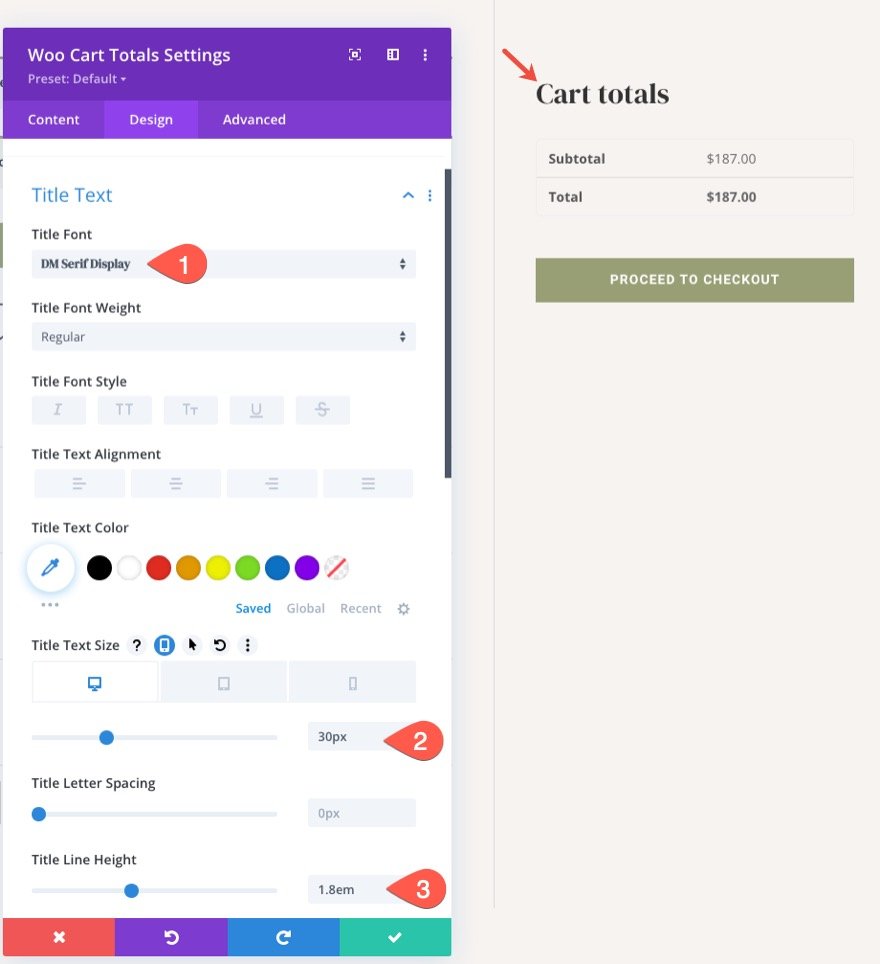
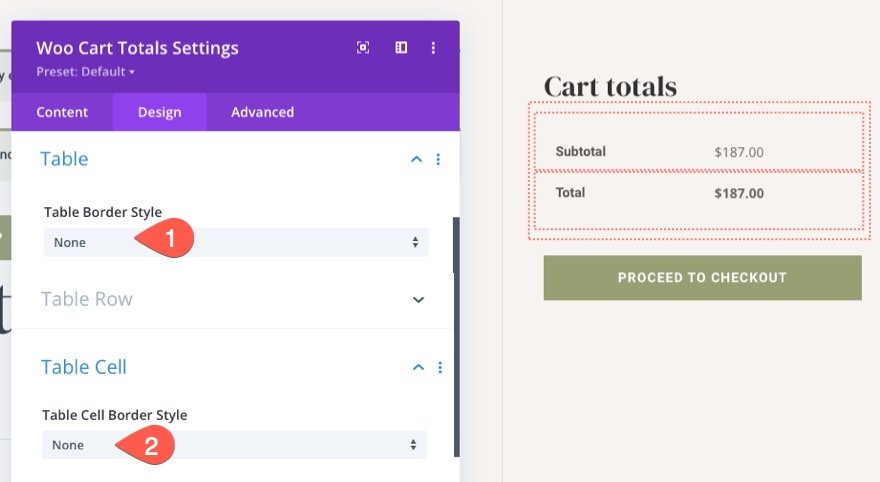
Table Border and Table Cellular Border
The Cart Totals could have some table sorts thru default. You’ll be in a position to choose to style those with the module’s built-in table and table cell alternatives. For this layout, we’re going to take out the border sorts for every. To take a look at this, exchange the following:
- Table Border Style: None
- Table Cellular Border Style: None
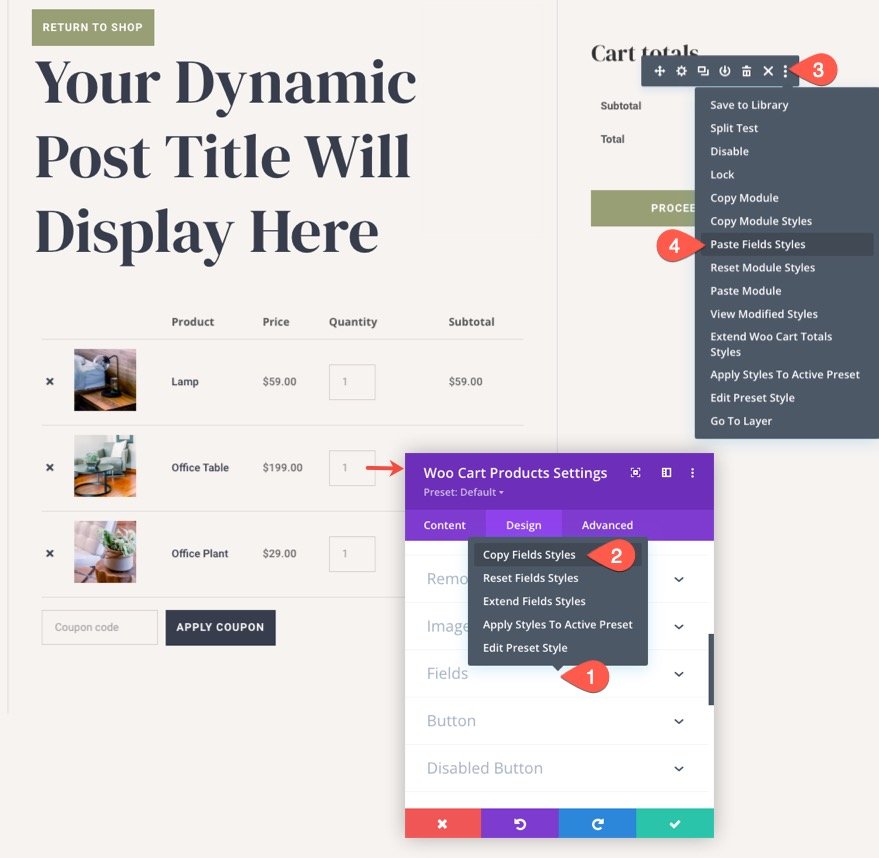
Cart Totals Fields
To give the cart totals module the an identical field sorts used inside the Woo Cart Products, copy the sphere sorts from the Woo Cart Products module and paste them to the Cart Totals module.
Add Additional Content material subject material as Sought after
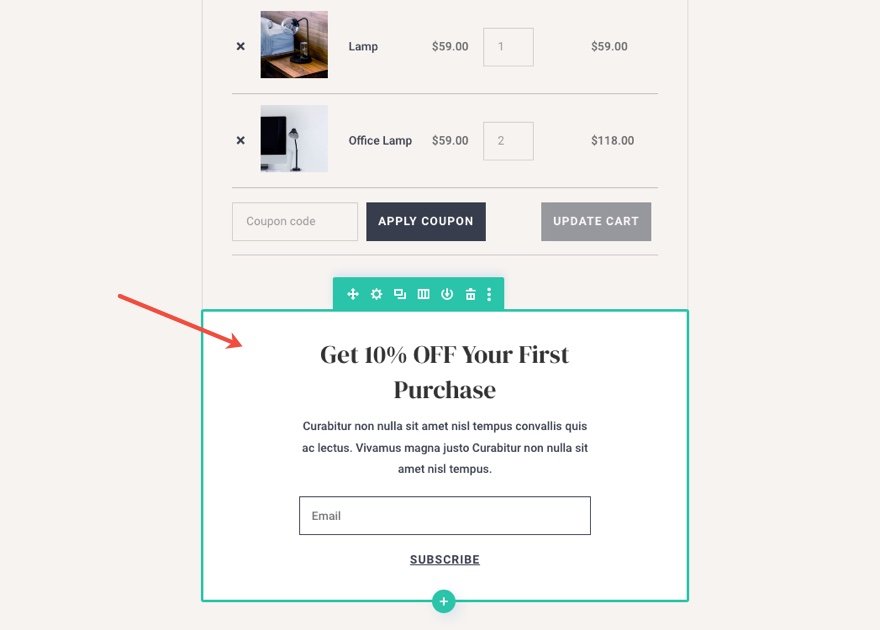
At this stage, we’ve were given all of the key portions for our cart internet web page template. Then again you don’t have to stop appropriate right here. You’ll be capable of add any content material subject material you want to the internet web page as sought after. Listed below are a few ideas:
- Add a Woo Transfer Sells module to turn any transfer advertise products associated with the products added to the cart.
- Add an Email Optin for a discount on first purchases.
- Add a promo displaying a coupon code to incentivize completing the buying process.
For our unfastened demo of this layout, we integrated a nice piece of email opt-in below the cart products.
Final Finish end result
Let’s check out the total result of our cart internet web page template.
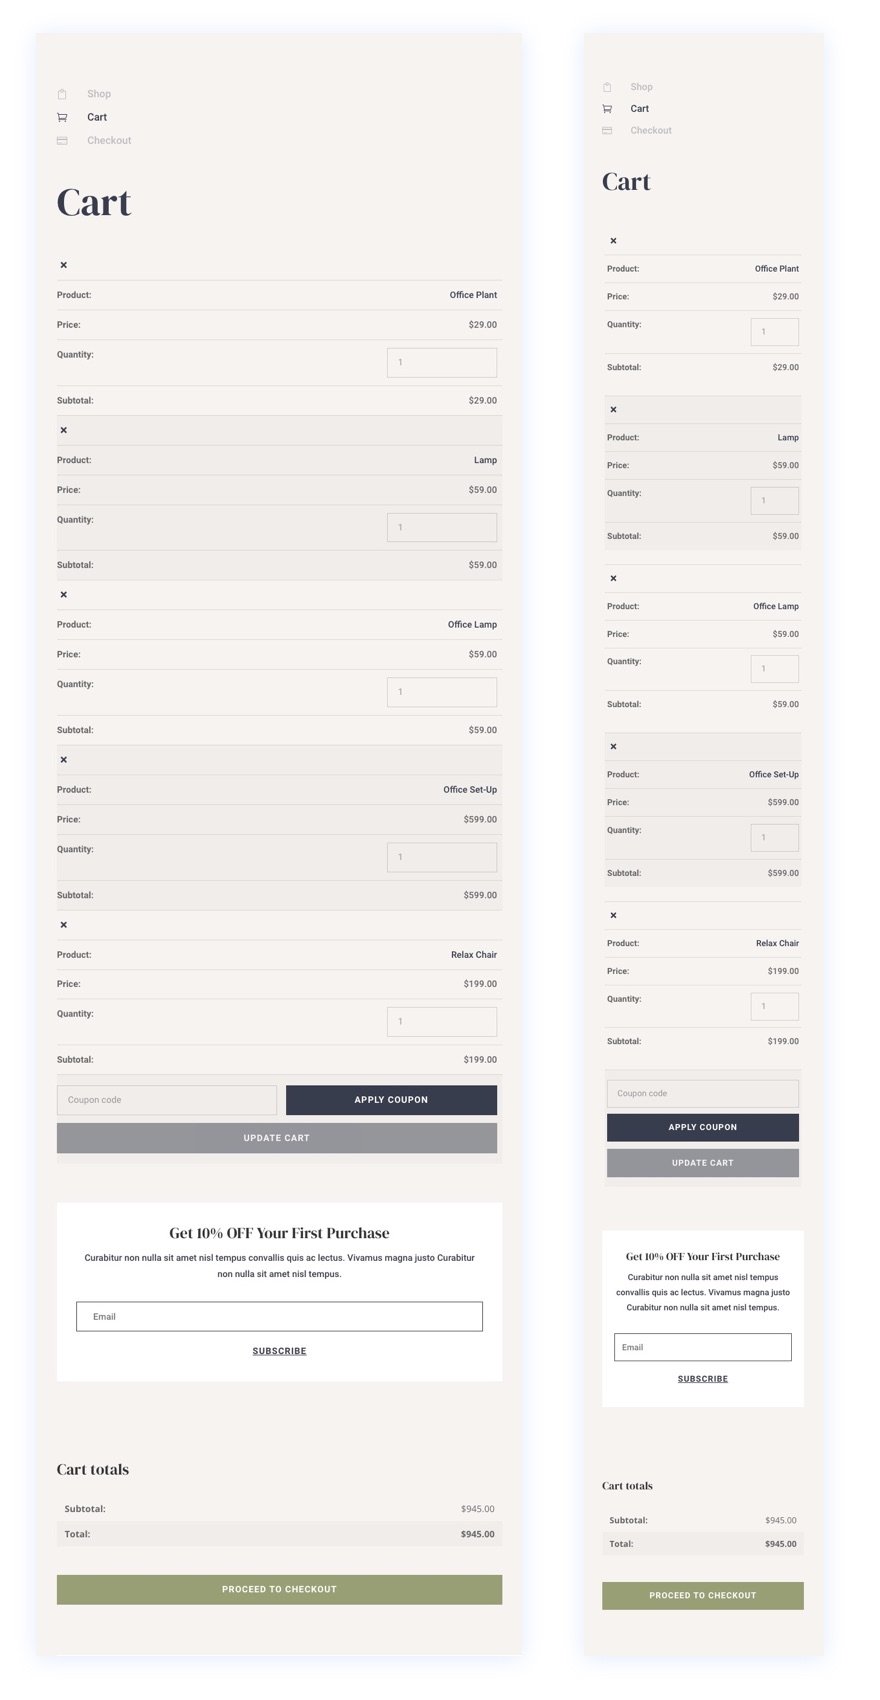
And right here’s the way in which it seems that to be like on tablet and call gadgets.
Final Concepts
The process of designing a custom designed WooCommerce Cart Internet web page template is hugely simplified and amplified with Divi’s difficult theme builder and intuitive Woo Modules. In this tutorial, we focused on incorporating the vital factor portions that make up a cart internet web page. Then again, bear in mind, all of the other difficult Divi modules and features are at your disposal to take your cart pages to an entire new degree. Hopefully, this will likely sometimes lend a hand boost your Divi design skills and, further importantly, lead to further conversions.
I look forward to being attentive to from you inside the comments.
Cheers!
.inline-code{padding: 0px 4px; shade: pink; font-family: Monaco,consolas,bitstream vera sans mono,courier new,Courier,monospace!very important} video.with-border {border-radius: 8px;box-shadow: 0 8px 60px 0 rgba(103,151,255,.11), 0 12px 90px 0 rgba(103,151,255,.11);display:block;margin: 0 auto;}
The post How to Create a WooCommerce Cart Page Template with Divi appeared first on Elegant Themes Blog.
Contents
- 1 Sneak Peek
- 2 Download the Cart Internet web page Template for FREE
- 3 Download For Loose
- 4 You will have successfully subscribed. Please check your piece of email care for to verify your subscription and get get right of entry to to unfastened weekly Divi layout packs!
- 5 Regarding the WooCommerce Cart Internet web page and Divi
- 6 Designing a WooCommerce Cart Internet web page Template with Divi
- 6.1 Creating a Custom designed Template for the Cart Internet web page
- 6.2 Creating the Segment Row and Column Development
- 6.3 Creating the Custom designed Navigation Links
- 6.4 Customizing the Row Settings
- 6.5 Designing the Dynamic Woo Perceive Module for the Cart Internet web page
- 6.6 Creating the Dynamic Cart Internet web page Determine
- 6.7 Designing the Dynamic Woo Cart Products
- 6.8 Designing the Dynamic Woo Cart Totals Module
- 7 Final Finish end result
- 8 Final Concepts
- 9 20 Textual content Enhancing Gear to Make stronger Writing For Writers
- 10 Divi 5 Public Beta 2 Free up Notes
- 11 Very best AI Gear For Social Media Content material Advent in 2024

0 Comments