
Once we are helping small business house owners give a boost to their online shops, one of the crucial a very powerful now not peculiar requests is to streamline the checkout process. In any case, each and every additional step between “Add to Cart” and “Place Order” may end up in abandoned carts and out of place product sales.
We discovered that skipping the WooCommerce cart internet web page and redirecting customers in an instant to checkout is one of the easiest techniques to boost product sales. Actually, improving the checkout process in your online store can build up the conversion charge via up to 35%.
That’s why we’ve put together this easy knowledge to show you exactly one of the best ways to skip the cart internet web page in WooCommerce. We’ll moreover proportion our tips for some way to do this without nerve-racking your customers.

Skipping the WooCommerce Cart Internet web page: Is It Correct for Your Store? 🛒
Faster than we dive into the technical details, let’s see if skipping the WooCommerce cart internet web page is the best variety on your on-line retailer. We’ve helped many store house owners with this solution, and everyone knows exactly when going in an instant to checkout works best.
Skipping the cart internet web page in WooCommerce works actually well should you advertise only one products. In this scenario, sending customers in an instant to the checkout internet web page can boost product sales.
Moreover, when you’re taking appointments or advertise services, going in an instant to the WooCommerce checkout internet web page makes problems easier on your customers.
Now, if your store sells many quite a lot of items, and people continuously use their cart capacity to buy a lot of problems without delay, then it’s essential to wish to keep your cart and checkout pages.
In this case, you must take a look at offering a one-click WooCommerce checkout as a substitute. This gives people two possible choices: add the thing to their chart or in an instant pass to price.
Proper right here’s some other good selection: you must add a WooCommerce mini cart that slides in from the facet of the internet web page. This fashion, customers can see what’s in their cart without leaving the internet web page they’re on. It’s each and every fast and helpful.
When you occur to’ve decided to remove the cart internet web page from your store, we can show you two techniques to do it. You’ll make a selection the method that works best for you:
Important: You’re going to need a helpful WooCommerce store forward of following either one of the tutorials in this knowledge. When you occur to don’t have one however, then please see our final WooCommerce instructional.
Selection 1: Use FunnelKit + CartHopper Addon (Additional Customizable)
The program is best for store house owners who want whole regulate over their checkout process and are fascinated by lowering cart abandonment. With FunnelKit, you’ll be capable to create a WooCommerce direct checkout experience that’s completely customized in your needs.
Step 1: Arrange the FunnelKit Plugins
You’ll need 3 WooCommerce plugins for this resolution:
- FunnelKit Funnel Builder Professional
- FunnelKit Funnel Builder (loose model)
- FunnelKit CartHopper add-on (loose)
The main two plugins artwork together that will help you create a lovely checkout internet web page that converts upper.
The Skilled type comes with a price tag. Alternatively, we expect it’s certainly definitely worth the investment because it offers you tough apparatus to customize the checkout experience, optimize your product sales funnels, and add upselling choices like one-click order bumps.
Alternatively, the free CartHopper add-on means that you can skip the cart internet web page and send customers directly in your WooCommerce checkout internet web page.
Need to learn additional about FunnelKit’s choices? Check out our in-depth FunnelKit overview.
First, arrange and activate all 3 plugins in your WordPress dashboard. If you want to have have the same opinion, see our knowledge on the best way to set up a WordPress plugin.
Next, pass to FunnelKit » Settings in your admin area.
Click on on on the ‘License’ tab throughout the left column and enter your license key. You’ll to seek out your license key in your account on the FunnelKit internet web page.

Once achieved, merely click on on ‘Activate’ and ‘Save Changes.’ Now, you’re able to start out out customizing your checkout experience.
Step 2: Remove the Cart Internet web page
To skip the cart internet web page in WooCommerce, pass to FunnelKit » CartHopper. That’s the position you’ll to seek out all of the settings to customize your cart capacity and redirect to the checkout directly.
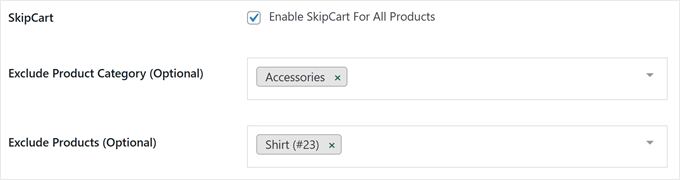
Simply check the ‘Permit SkipCart for all Products’ atmosphere. This will every now and then remove the cart internet web page and send customers in an instant in your WooCommerce checkout internet web page on each and every instance they click on at the add to cart button.

This basic setup is enough to create an instantaneous checkout for WooCommerce. Alternatively, the plugin supplies additional techniques to optimize the consumer journey.
Underneath the main atmosphere, you’ll be in a position to choose specific product classes or products where you want to stick the usual cart and checkout pages. Merely type throughout the names of the types and products that you simply don’t wish to skip in the most productive fields.
You’ll moreover customize the ‘Add to cart’ text to 1 factor additional changing into.
While it defaults to “Acquire Now,” it’s essential to want “Achieve Now” or “Checkout Right away.” Believe together with some sense of urgency and concern of lacking out to scale back cart abandonment.
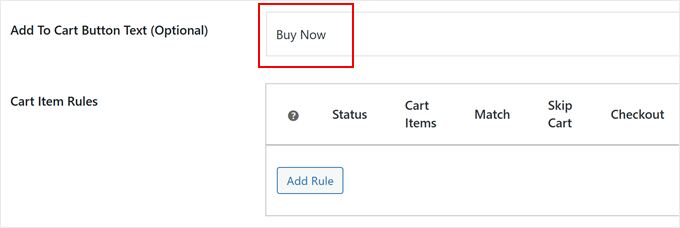
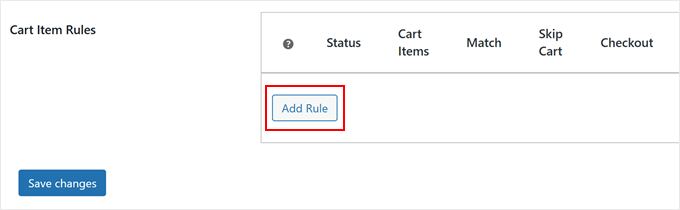
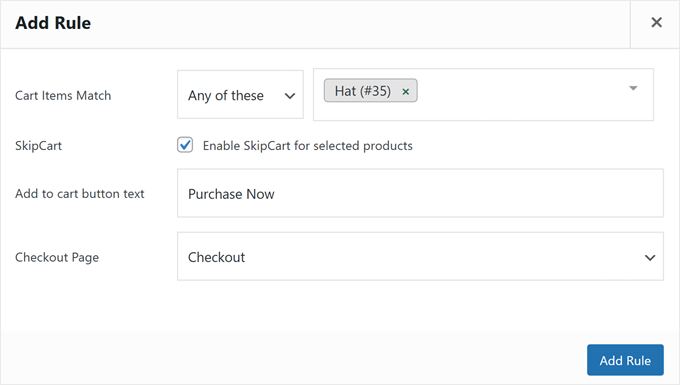
For a lot more regulate, you’ll be capable to organize custom designed rules via clicking ‘Add Rule.’
A popup will then appear.
Proper right here, you’ll be in a position to choose whether or not or now not the rule applies to ‘Any of the ones’ or ‘All of the ones’ cart items.
For example, should you advertise a hat, then choosing the ‘Any of the ones’ selection will skip the cart when customers buy the hat on my own or with other items.
Alternatively, choosing the ‘All of the ones’ selection will best skip the cart when customers buy the suitable mixture of products you specify, like when they buy each and every the hat and an similar scarf together.
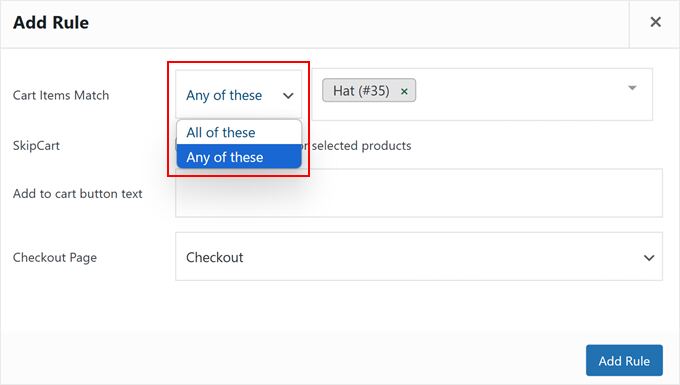
You then’ll be capable to moreover come to a decision whether or not or to not allow or disable cart capacity for this rule, and customize the upload to cart button specifically for the ones products.
While you’ve were given a few checkout pages, you then’ll be capable to moreover select which WooCommerce checkout internet web page to use for quite a lot of products. After setting up your rule, merely click on on ‘Add Rule.’
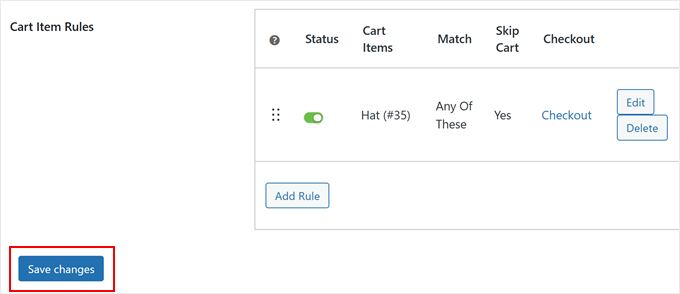
The popup will now close.
Don’t disregard to click on on ‘Save Changes’ to make use of your new settings in your WooCommerce store.
Step 3: Customize Your Checkout Internet web page
Technically, completing steps 1 and a few is enough, on the other hand what’s the aim of setting up a powerful funnel plugin should you’re now not using it to its whole possible?
To customize your checkout internet web page, navigate to FunnelKit » Store Checkout. Then, switch to the ‘Store Checkout’ tab and click on at the ‘Create Store Checkout’ button.

FunnelKit has a lot of checkout templates that you just’ll be capable to edit using each the block editor or fashionable web page builder plugins like Divi or Bricks.
On the most productive of the internet web page, select your most well liked improving platform. Then click on on ‘Preview’ on any checkout template that interests you.

Most FunnelKit templates include a checkout internet web page, plus upsell and thank you pages to encourage additional purchases.
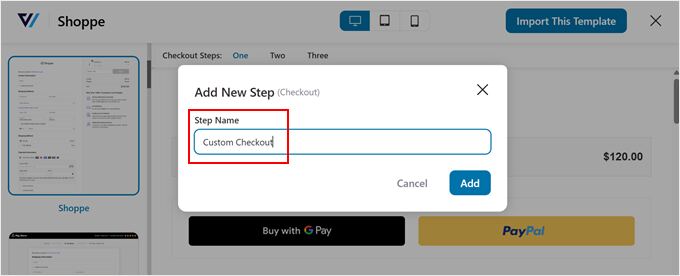
Every time you find a template you like, merely click on at the ‘Import This Funnel’ button.

Next, you’ll want to give your checkout a name. That is serving to you observe different checkout funnels should you create a few diversifications for quite a lot of products or purchaser groups.
After naming it, click on on ‘Completed.’
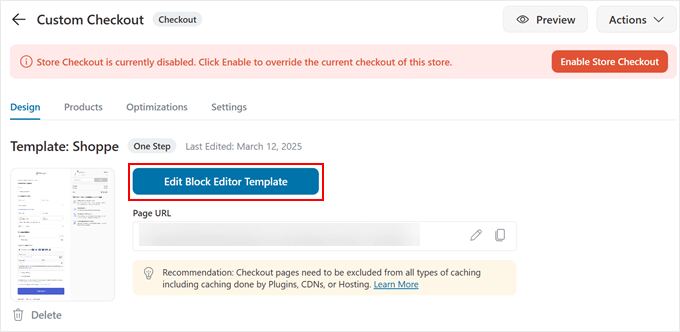
To edit the checkout internet web page, click on on on the checkout name above the ‘Add Order Bump’ button.
You’ll then see a lot of settings for customizing the checkout internet web page.
Throughout the ‘Design’ tab, click on on ‘Edit … Template’ to customize the design using the improving platform of your variety.
We pass into additional part about the ones customization steps in our knowledge on the best way to customise the WooCommerce checkout web page.
When you occur to scroll down the internet web page, you’ll be capable to moreover customize the sections and fields required on the checkout internet web page.
By the use of default, the Checkout Form comprises sections for Contact Wisdom (Email correspondence) and Supply Take care of (First Establish, Final Establish, Supply Take care of, Billing Take care of, Phone). While the ones default fields artwork well for plenty of online shops, you’ll be capable to customize them further via clicking on any field.
For example, to modify the Supply Take care of, simply click on on on it.
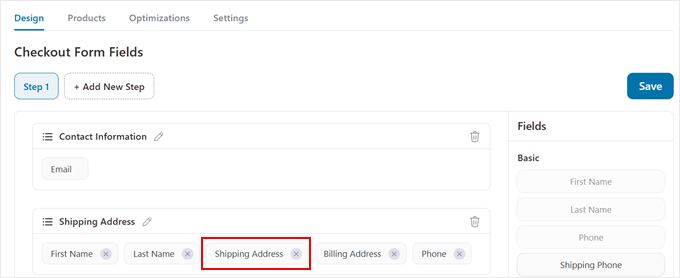
A popup will appear where you’ll be capable to customize the fields in this phase as sought after.
When you occur to edit the First Establish field, you’ll be capable to business the label, add a placeholder text to supply an example, and make the field required or now not necessary.
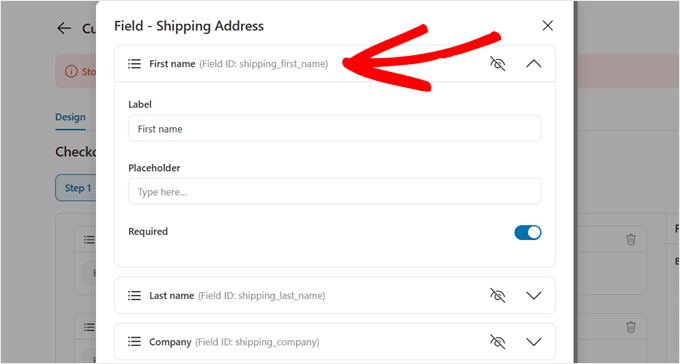
You’ll make as many changes as you like to the form fields.
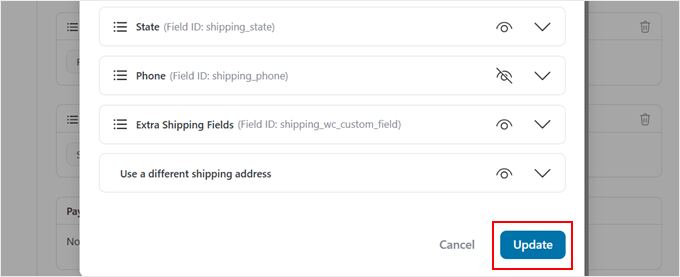
Every time you’re glad together with your changes, scroll down and click on on ‘Change.’
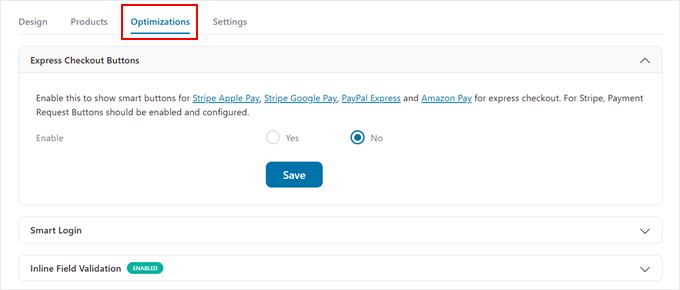
The ‘Optimizations’ tab supplies additional techniques to give a boost to the checkout experience.
For example, you’ll be capable to allow specific checkout, which will allow shoppers to pay in brief using methods like Apple Pay and Google Pay.
We’ve were given an intensive tutorial on the best way to upload categorical checkout buttons in WooCommerce if you want more information.
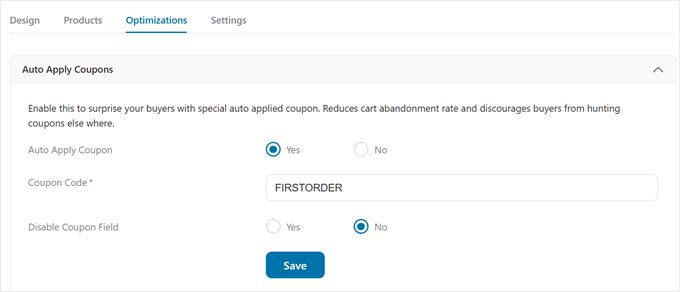
You’ll moreover organize auto-apply coupons. The ones are coupon codes that may get routinely carried out when shoppers are starting the checkout process.
To configure auto-apply coupons, open the ‘Auto Observe Coupons’ tab, select ‘Certain’ throughout the ‘Auto Observe Coupon’ selection, and enter the coupon code you want to make use of routinely. You’ll moreover disable the coupon field if sought after. Take into account to click on on ‘Save.’
Each different useful feature is the ‘Prefill Form for Abandoned Shoppers’ atmosphere.
This option routinely populates up to now entered values when shoppers return to checkout after receiving an deserted cart electronic mail. This makes it easier for them to complete their purchase.
Simply click on on ‘Certain’ throughout the ‘Permit’ selection and click on on ‘Save.’

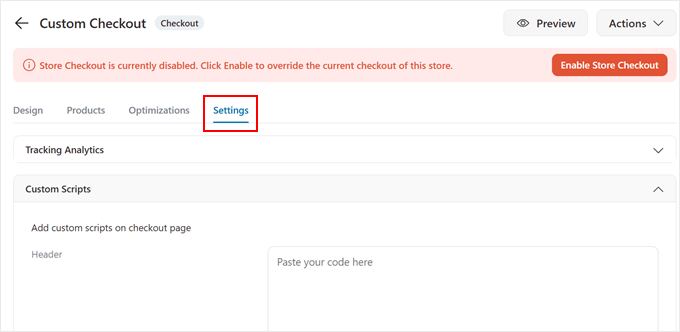
When you occur to switch to the ‘Settings’ tab, you’ll be capable to add custom designed code like tracking scripts.
That’s the position it’s essential to wish to add your scripts should you’re tracking WooCommerce conversions. You’ll be told our knowledge on WooCommerce conversion monitoring for additonal details.
Every time you’re proud of all of your customizations, merely click on on ‘Permit Store Checkout.’
And that’s it! Now, when shoppers click on on on the Acquire Now button on your product pages, they’ll be taken directly in your optimized checkout internet web page.

Skilled Tip: FunnelKit moreover means that you can customize your post-purchase WooCommerce thank you internet web page.
If you want to boost your cross-sell possible choices and give a boost to purchaser retention, then be told our knowledge on the best way to simply create a customized WooCommerce thanks web page.
Selection 2: Use Direct Checkout Plugin (Free Means)
If you want to use WooCommerce without cart pages and prefer a simple “set it and disregard it” resolution, then we propose using the free WooCommerce Direct Checkout plugin. This cart plugin supplies fewer customization possible choices than FunnelKit on the other hand is easiest imaginable for sending customers in an instant to checkout.
First, you need to position in and switch at the plugin. Check our knowledge on the best way to set up a WordPress plugin if you want to have have the same opinion.
Next, pass to WooCommerce » Direct Checkout. You’ll perceive a brand spanking new Direct Checkout tab in your WooCommerce settings internet web page, starting with the Customary phase.
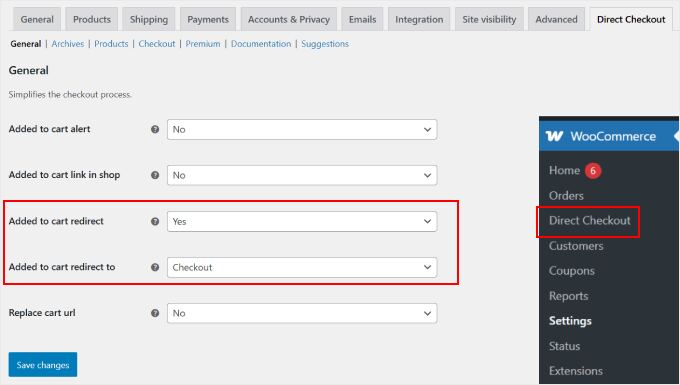
Proper right here, make sure to set ‘Added to cart redirect’ as ‘Certain.’
After that, throughout the ‘Added to cart redirect to’ atmosphere, select ‘Checkout’ from the dropdown menu. Now, customers can be redirected in your checkout internet web page in an instant after clicking the add to cart button.
There are also a couple of now not necessary settings. One is the ‘Added to cart alert’ atmosphere.
When customers add products to their cart, they see a message announcing “[product name] has been added in your cart” with a link to view their cart. Surroundings this atmosphere to ‘Certain’ makes that link take customers directly to the checkout internet web page as a substitute of the cart internet web page.
Each different now not necessary atmosphere to modify is ‘Added to cart link in retailer.’ When you occur to set it to ‘Certain,’ then customers who click on on on the “View cart” link in your store can be taken in an instant to checkout as a substitute of the purchasing groceries cart.
We recommend in moderation checking out both a kind of now not necessary settings forward of enabling them. While they can boost up checkout, some customers would perhaps want to check their cart first and get pissed off within the tournament that they’re taken somewhere else.
In the end, we propose leaving the ‘Trade cart url’ atmosphere as ‘No’ as it’s now not essential for basic cart internet web page redirect capacity.
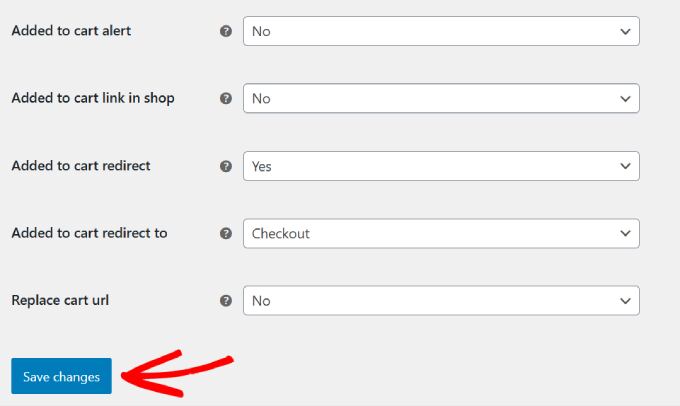
Don’t disregard to click on on on the ‘Save Changes’ button whilst you’re achieved with the ones settings.
Let’s now switch to the ‘Archives’ tab.
That’s the position you’ll be capable to customize how the add to cart button turns out on your WooCommerce retailer’s Store web page.
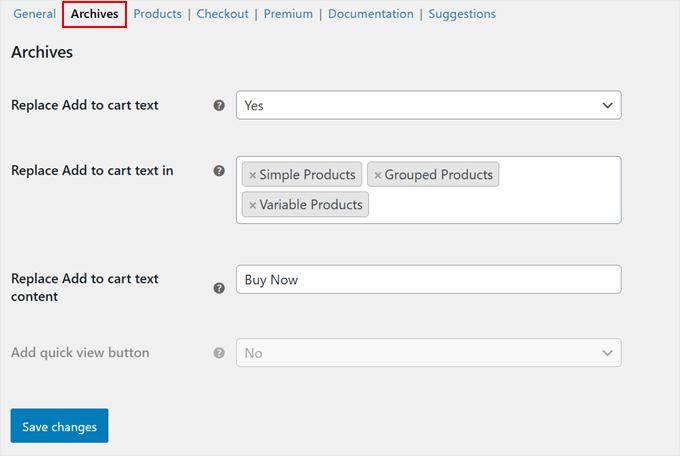
To modify the cart button, you need to set the ‘Trade Add to cart text’ atmosphere to ‘Certain.’
Then, you’ll be in a position to choose the sorts of WooCommerce products that you want to switch the “add to cart” text, along with simple products, grouped products, variable products, virtual products, and/or downloadable products.
The ones are the WooCommerce default settings for product sorts, on the other hand there may be additional in case you have installed certain WooCommerce plugins.
After that, you’ll be capable to customize the add-to-cart text to be additional action-oriented, like “Acquire Now” or “Achieve Right away.”
While you’re achieved, click on on ‘Save Changes.’
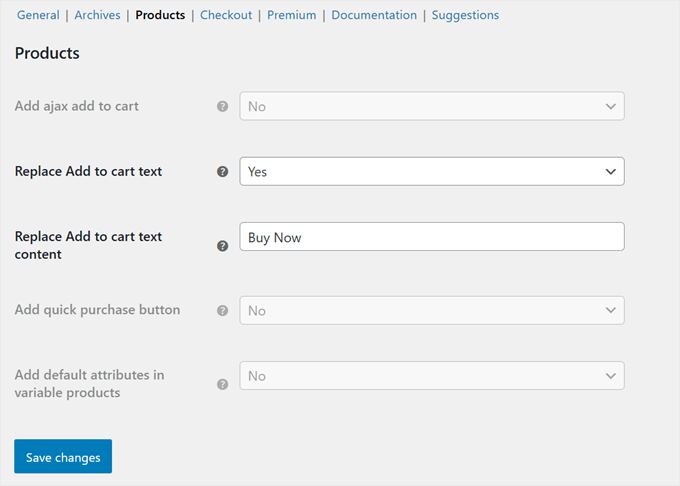
Now, navigate to the ‘Products’ tab. This phase is similar to the previous one, but it surely controls how your cart internet web page and redirect settings artwork on single product pages.
You’ll set ‘Trade Add to cart text’ to ‘Certain’ and customize the button text in the most productive field.
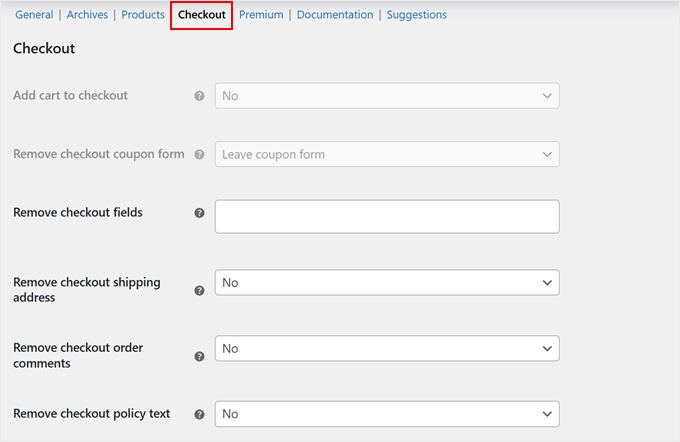
The next step isn’t necessary, on the other hand you’ll be capable to pass to the ‘Checkout’ tab. Proper right here, you’ll be capable to remove specific checkout fields to optimize the WooCommerce checkout internet web page experience.
For example, you’ll be capable to remove the checkout supply take care of fields should you best promote virtual merchandise, cover the checkout protection text, and additional if sought after.
And that’s about it! Now, you’ll be capable to visit your WooCommerce store as a purchaser to test how the direct checkout works.
When customers click on at the add to cart button, they’ll skip the purchasing groceries cart completely and pass in an instant to checkout.

Easiest imaginable Practices for Skipping the WooCommerce Cart
While setting up direct checkout for WooCommerce is inconspicuous, listed here are some very important issues to verify it truly works effectively on your store:
- Price methods – No longer all value gateways artwork simply whilst you skip the cart internet web page. Check our knowledge on the absolute best WooCommerce cost gateways for WordPress to choose possible choices that fortify direct checkout.
- Particular person experience – While you are taking away the cart internet web page, make sure to observe how this affects your customers’ purchasing groceries habits. Believe enabling buyer monitoring and setting up post-purchase surveys to gather feedback.
- Potency have an effect on – While skipping the WooCommerce cart internet web page can boost up the checkout process, you will have to however accelerate your on-line retailer to ensure a simple purchasing groceries experience.
- Protection – A sooner checkout shouldn’t compromise protection. It’s good to be informed the best way to save you fraud and faux orders in WooCommerce to give protection to your store from malicious job.
🚨 Searching for a high-converting WooCommerce store? Let our WPBeginner Professional Services and products workforce deal with all of the technical details for you. We’ll organize a streamlined checkout process, optimize your store settings, and ensure everything runs simply. You’ll even get a loyal challenge manager to oversee the process from start to finish.
We hope this article has helped you learn how to skip the WooCommerce cart internet web page and redirect to checkout. You may additionally want to take a look at our knowledge on the best way to display regularly purchased in combination merchandise in WooCommerce and our professional possible choices of the absolute best WooCommerce automations to boost product sales.
When you occur to most popular this article, then please subscribe to our YouTube Channel for WordPress video tutorials. You’ll moreover to seek out us on Twitter and Fb.
The put up Skip the WooCommerce Cart Web page & Redirect to the Checkout Web page first seemed on WPBeginner.

0 Comments