
Are you looking to permit or activate plugins from the WordPress database?
In the event you don’t seem to be in a position to get admission to your WordPress admin house and want to activate a plugin to restore your get admission to, you then’ll do that from the WordPress database.
In this article, we will show you learn how to easily flip for your WordPress plugins the usage of the database.
When Will have to You Activate WordPress Plugins Using Database
A number of commonplace WordPress mistakes can prevent a web site owner from gaining access to the WordPress admin house. In most of those situations, the individual is looking to deactivate WordPress plugins with out admin get right of entry to.
On the other hand in some situations, a web site owner would in all probability want to activate certain plugins to restore get admission to to their WordPress web site.
For example, let’s assume an error is combating you from gaining access to your WordPress dashboard, and also you’ve were given found out a plugin that can restore that error.
Luckily, WordPress shops the vigorous plugins wisdom in your WordPress database. This means you’ll manually enter this information right away inside the database and tell WordPress to activate a plugin.
The only scenario is that the plugin will have to be installed to your WordPress internet web page. This means that that that it should be supply inside the plugins folder to your WordPress web site.
With that being discussed, let’s see the way you’ll merely permit/activate a plugin the usage of the database.
Step 1. To search out Your Database Identify Using the Web webhosting Regulate Panel
To show for your WordPress plugins the usage of phpMyAdmin, first, you wish to have to decide your WordPress database’s identify.
Now, to look out the identify of your database, you wish to have to log in in your web web webhosting dashboard. For this tutorial, we will be the usage of Bluehost.
If you are the usage of a distinct web webhosting company, then your WordPress web webhosting dashboard would in all probability look fairly different.
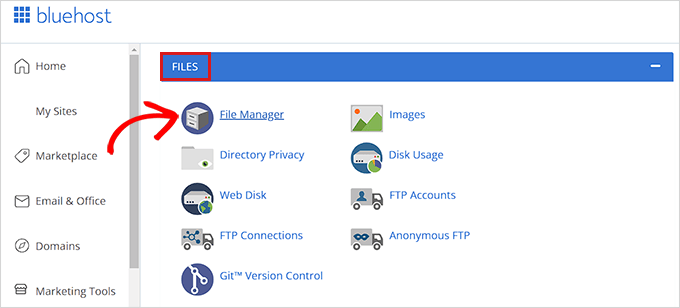
Once you’re on the cPanel, scroll the entire manner all the way down to the ‘Data’ segment and click on at the ‘File Manager’ selection.
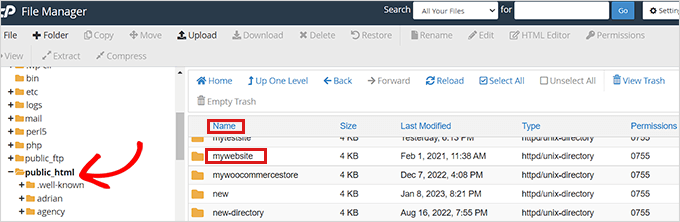
This may most likely open up the File Manager in a brand spanking new window. Proper right here you simply want to to find and click on at the public_html folder from the left column.
This may most likely open up all the data which can also be stored inside the public_html folder. Now, you simply want to to find and click on at the folder at the side of your internet web page’s identify on it supply underneath the ‘Identify’ column.
Some consumers would in all probability as a substitute see their WordPress data and folders installed within public_html folder.
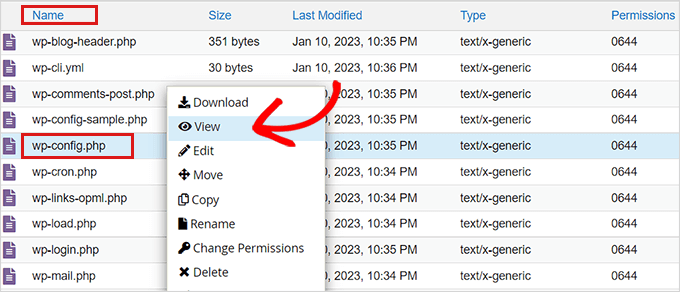
After you have unfold out your WordPress internet web page’s document, to find the wp-config.php document underneath the ‘Identify’ segment and right-click on it.
This may most likely open up a menu where you wish to have to select the ‘View’ selection.
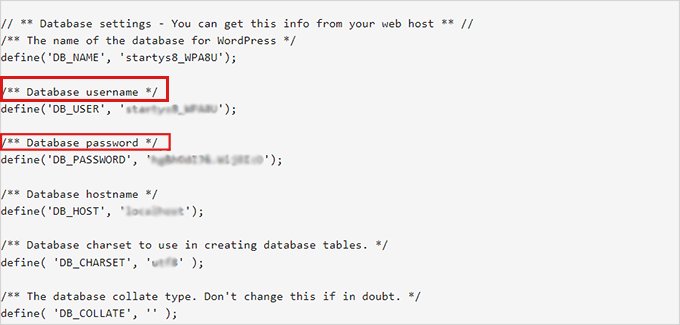
This may most likely open up the wp-config.php document in a brand spanking new window where you’ll to find your database details.
We suggest that you just reproduction and paste your database details at the side of username and password appropriate right into a notepad to your laptop.
Now you’ve successfully found out your database’s identify, let’s switch to our next step.
Step 2. In finding Lively Plugins Chance by the use of PhpMyAdmin
After you have found out the identify of your database, you wish to have to go back in your WordPress internet hosting keep an eye on panel.
Once there, scroll the entire manner all the way down to the ‘Databases’ segment and click on at the ‘phpMyAdmin’ selection.
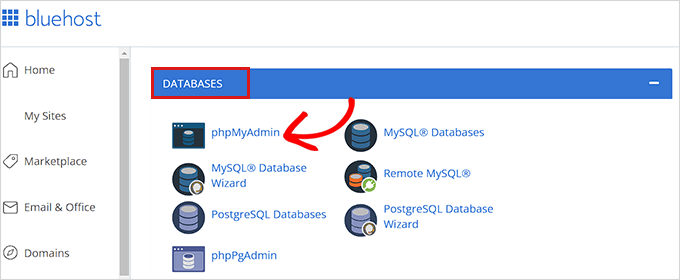
This may most likely liberate the phpMyAdmin app in a brand spanking new browser tab.
Remember: Forward of you make any more or less changes, please you will have to without a doubt create an entire backup of your database. It’ll come in handy if the remaining goes fallacious with the process.
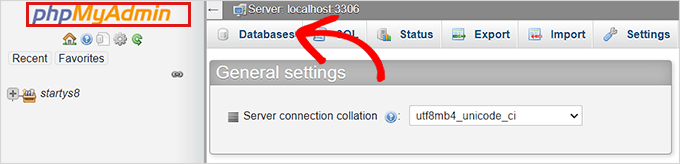
Next, you simply want to click on at the ‘Database’ tab from the navigation menu supply on the most efficient of the internet web page.
Now, simply to find your WordPress database and click on on on the browse button to magnify it.
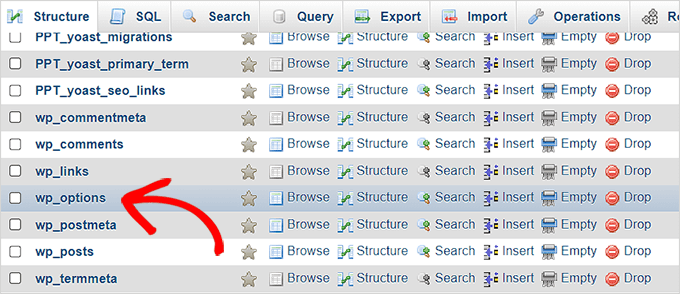
This may most likely show your WordPress database tables.
Proper right here, you’re going to simply want to to find wp_options table and click on on browse next to it.
Remember: By way of default, WordPress uses wp_ since the prefix for table names. Your WordPress database table could have a distinct table prefix.
Right through the wp_options table, you’ll want to find the row where option_name is ready toactive_plugins.
After that, click on on on the Edit link next to it.
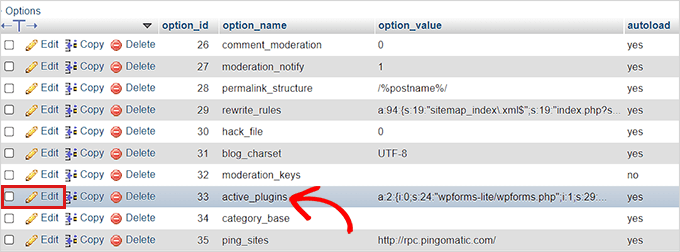
This may most likely open up a box where you’ll manually enter details to activate a plugin.
Step 3. Activate a Plugin Using phpMyAdmin
WordPress shops the vigorous plugins wisdom in a novel structure so that it can be programatically accessed by the use of the tool.
To be able to tell WordPress which plugins to activate, we’ll want to use that exact same structure.
First, we’ll get began by the use of getting into the option_value as a:1: and then open up the curly bracket ({).
We’re getting into this value as 1 on account of we simplest want to activate one plugin. You wish to have to switch the cost to the collection of plugins you intend on activating.

Next, we will be getting into i:0; after the curly bracket. Proper right here we’re essentially assigning a serial amount to our plugin.
Take into account to all the time assign numbers starting from 0 as a substitute of 1.

Next, we will be getting into the collection of characters supply inside the plugin’s identify and the php document identify of the plugin that we’re about to activate.
For that, we will type s:24: inside the box. Needless to say the collection of characters will range for every plugin consistent with the characters inside the plugin record and document identify.
For instance, we’re activating WPForms in this tutorial which has 24 characters in its identify at the side of the document identify of the plugin as stored in our document manager.

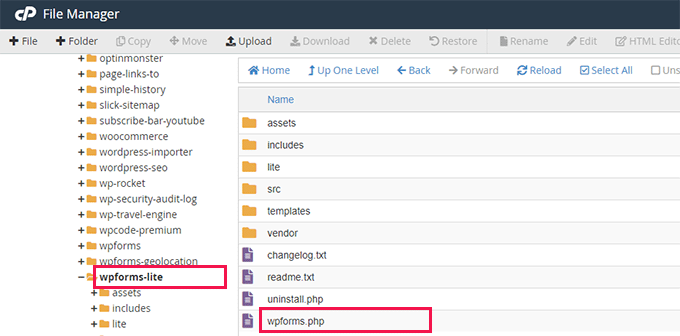
Next, you merely want to type the plugin’s record identify. You’ll find it by the use of visiting the /wp-content/plugins/ folder the usage of the File Manager app.
Don’t disregard so to upload quotation marks faster than typing the plugin’s record identify.

After the /, you wish to have to enter the plugin’s document identify. This is normally the document with an an identical identify all over the plugin folder.
Now, go back to phpMyAdmin and type the identify of the plugin and then close the quotation marks.
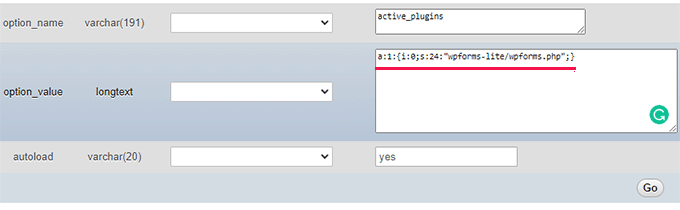
After that, simply add a semi-colon (;) and close the curly brackets (}). The overall value in this example would seem to be this:
a:1:{i:0;s:24:"wpforms-lite/wpforms.php";}
This is the way it’ll look whilst you’re finished.
Next, simply click on at the ‘Pass’ button to execute the command.
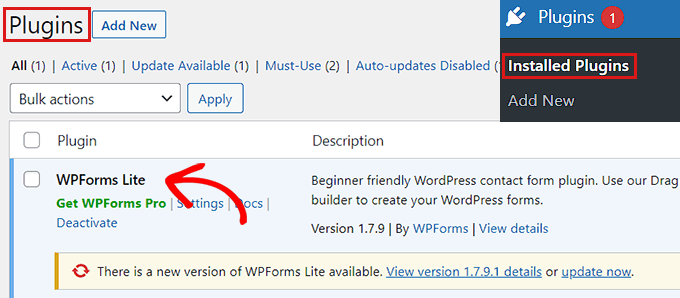
Now go talk over with your WordPress dashboard and head over to Plugins » Installed Plugins.
Your plugin has been successfully activated.
Now let’s say you want to activate two additional plugins.
First it is very important trade the collection of plugins. After you’re going to change every get entry to for the plugin that you want to activate.
Right here’s an example:
a:3:{
i:0;s:47:"all-in-one-seo-pack-pro/all_in_one_seo_pack.php";
i:1;s:35:"insert-headers-and-footers/ihaf.php";
i:2;s:24:"wpforms-lite/wpforms.php";
}
Remember: We’ve were given added line breaks appropriate right here to make the code look additional readable. You want to ensure that there don’t seem to be any line breaks or spaces in your code. Another way, it wouldn’t art work.
We hope you learned learn how to activate a plugin the usage of the database. You might also want to see our data on find out how to upload social media feeds to WordPress, and our comparison of the most efficient area registrars on this planet.
When you most popular this article, then please subscribe to our YouTube Channel for WordPress video tutorials. You’ll moreover find us on Twitter and Fb.
The post The best way to Allow / Turn on WordPress Plugins from the Database first appeared on WPBeginner.

0 Comments