
Automating processes to your WordPress internet web page doesn’t will have to be subtle. Equipment like n8n are tough, alternatively they regularly require further internet web hosting, webhooks, and a lot of technical setup.
That’s why many learners actually really feel stuck forward of they even get started. The good news is that you just’ll in truth use a plugin to automate many no longer strange WordPress tasks.
In this data, I’ll show you one of the best ways to add n8n-like automation in WordPress the use of Uncanny Automator.
You’ll automatically connect your plugins, motive actions in keeping with particular person activity, and even assemble AI-powered workflows, all without touching a single line of code.
By the use of the top, you’ll be able to automate frequently WordPress processes come what may that’s more straightforward, reasonably priced, and beginner-friendly.
💡Speedy Answer: The easiest way to Add n8n Like Automation in WordPress
You don’t need n8n to get tough automation to your WordPress web site. With Uncanny Automator, you’ll connect plugins, run AI-powered tasks, and automate repetitive workflows without coding or webhooks.
Proper right here’s how it works:
- Arrange and activate Uncanny Automator (Skilled style sought after for some integrations).
- Connect your external apps like Google Sheets or OpenAI inside of Automator.
- Create a recipe by the use of selecting a motive, harking back to a WooCommerce gain or WPForms submission.
- Add actions for what should happen next—like together with a row to Google Sheets, rising a brand spanking new particular person, or sending AI-generated emails.
- Map dynamic fields the use of the dropdowns—no JSON or API setup required.
- Save and switch for your recipe, and your workflow runs automatically on each and every instance the motive occurs.
Proper right here’s a handy guide a rough evaluation of all the topics I’ll cover in this data:
- What Is n8n?
- The place Does n8n Fall Brief for WordPress Customers?
- Why Use Uncanny Automator As a substitute of n8n?
- The best way to Use Uncanny Automator for WordPress Workflows
- Extra Actual-International Use Circumstances for WordPress Automation: What You Can Construct (That is More difficult in n8n)
- FAQs About The usage of Uncanny Automator vs. n8n
What Is n8n?
n8n is an open-source workflow automation device that permits you to connect different apps and products and services and merchandise to automate tasks.
Instead of writing code, you assemble workflows the use of a visual, node-based editor. Each node represents a step, harking back to receiving wisdom, processing it, or sending it to every other app. This makes it possible to create tough, multi-step automations.

I’ve tested n8n plenty of cases, and it’s a forged instrument. Once you know how the whole thing fits together, it actually works simply and will provide you with a lot of flexibility.
n8n is frequently used for:
- Syncing wisdom between different apparatus and platforms
- Coping with webhook-based events
- Creating multi-step automation workflows all over multiple apps
This level of flexibility is very good for classy setups. Alternatively for a lot of WordPress shoppers, it’s going to almost certainly actually really feel like more than they in truth need—in particular for frequently automation tasks.
Where Does n8n Fall Transient for WordPress Consumers?
n8n is robust, but it wasn’t built in particular for WordPress. Even simple automation tasks can actually really feel subtle and complex should you’re not a developer.
Listed below are the primary reasons it can be difficult for WordPress shoppers:
- No Native Plugin Integration: In case you’re a novice, it can be in fact difficult and time-consuming to hunt out and fix the fitting API for every instrument you need to automate.
- Wisdom Mapping Complexity: WordPress regularly sends wisdom in formats that n8n doesn’t understand right away, so you need to spend additional time translating and mapping fields as it should be.
- Limited WordPress-Particular Triggers: It’s not easy to track events like particular person serve as changes, put up status updates, or plugin actions harking back to WooCommerce orders, which could be no longer strange tasks for WordPress web sites.
- Additional Setup and Maintenance: Managing servers, protective the whole thing up-to-the-minute, and securing webhooks takes a lot of time and technical knowledge, which can be frustrating should you merely want automation to art work.
The ones difficult eventualities may make automation tougher than it should be. To get a better sense of the hidden costs and extra effort involved, check out the dropdown beneath.
🤯The three Hidden Costs of The use of n8n for WordPress
Automating WordPress with n8n can seem simple at first, alternatively I’ve found out there are some hidden costs and time commitments that learners regularly don’t expect.
Proper right here’s a handy guide a rough breakdown of the primary difficult eventualities:
| Hidden Worth | What It Way | Typical Worth / Time |
|---|---|---|
| Infrastructure Costs | You need a Private Server (VPS) or self-managed internet web hosting to run n8n, in conjunction with a web page and SSL certificate. | VPS internet web hosting: $12–24/month n8n.cloud: starts at $20/month for 2,500 workflow executions |
| Time Investment | Putting in workflows, testing them, and maintaining them every month takes time and effort. | Initial setup: 4–8 hours Monthly repairs: 2–4 hours |
| Studying Curve | n8n requires understanding webhooks, JSON mapping, and error coping with. | Estimated 10–20 hours to get the whole thing working as it should be |
The hot button is that rising even a simple n8n workflow for WordPress can be further subtle and time-consuming than most shoppers expect.
Why Use Uncanny Automator Instead of n8n?
If you want to have tough automation for WordPress without the technical headaches, Uncanny Automator is the most suitable option.
I’ve tested each and every n8n and Uncanny Automator multiple cases, and I will say from revel in that while n8n might be very tough, it comes with a steep learning curve.
You need to organize webhooks, handle APIs, parse JSON, and arrange authentication—steps that can take hours for even a simple workflow.
Uncanny Automator, on the other hand, makes all of this one of these lot simpler. You don’t need external servers, webhooks, or complex technical setups.
The whole thing happens immediately inside of WordPress, and also you’ll connect plugins and motive actions without touching a single line of code.
Proper right here’s a handy guide a rough comparison of an ordinary workflow in n8n versus Uncanny Automator:
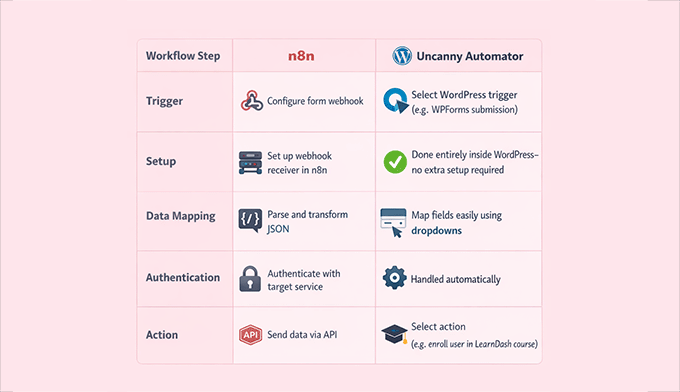
Even with all this simplicity, Uncanny Automator is still extraordinarily tough. You’ll automate complex workflows, connect dozens of plugins like WooCommerce, LearnDash, WPForms, MemberPress, BuddyPress, and additional.
Plus, you get to handle multiple triggers and actions in a single workflow. It means that you can point of interest on what you need to happen, not the technical mechanics at the back of it.
This combination of ease-of-use and gear is what makes Uncanny Automator a game-changer for WordPress shoppers compared to n8n.
Pricing Comparison: n8n vs Uncanny Automator
On the subject of automation, cost isn’t with regards to money—it’s moreover about your time and effort.
Proper right here’s how n8n stacks up towards Uncanny Automator:
| Worth Factor | n8n | Uncanny Automator |
|---|---|---|
| Setup Costs & Time | 4–8 hours to configure webhooks, servers, APIs, and authentication | A few minutes to select triggers and actions inside of WordPress |
| Ongoing Maintenance | 2–4 hours monthly for server updates, workflow monitoring, and troubleshooting (~$100–200/month in worth) | Minimal—runs to your present WordPress internet web hosting with no further repairs |
| Web page web hosting / Infrastructure | VPS internet web hosting $12–24/month or n8n.cloud subscription starting at $20/month | Uses your present WordPress web hosting (+ starting at $199 in line with three hundred and sixty five days for the plugin’s annual license) |
| Consistent with-Process / Execution Limits | n8n.cloud has usage limits in keeping with workflow executions | Endless automations to your web site (external APIs like OpenAI would in all probability however worth usage fees) |
| Studying Curve | 10–20 hours to understand webhooks, JSON mapping, and error coping with | Just about 0—plain-English triggers, dropdown mapping, visual recipe builder |
💡Key Takeaway: For lively WordPress web sites, Uncanny Automator supplies predictable, flat pricing and removes the hidden costs of internet web hosting, repairs, and technical setup, while however giving you all the power you need for complex automation.
When is n8n a Upper Variety?
I want to be transparent appropriate right here—no single instrument fits every situation.
While Uncanny Automator covers with reference to all WordPress workflows without touching code, some eventualities name for classy flexibility, complex wisdom coping with, or integration all over multiple platforms.
Figuring out the ones limitations helps you choose the fitting instrument for the fitting procedure.
Personally, n8n might be upper for:
- Automating between multiple non-WordPress strategies, like syncing CRMs, SaaS platforms, or databases.
- Complex wisdom transformations, harking back to regex, JSON parsing, or custom designed just right judgment that WordPress plugins don’t handle natively.
- The use of a single automation platform for all of your tech stack, in particular if your workflows span multiple apps.
- Workflows that require in depth custom designed code execution, where visual dropdowns gained’t cover all the prerequisites.
I moreover suggest a hybrid approach for a lot of WordPress web site homeowners. You’ll use Automator for WordPress-internal workflows and connect with n8n for external system integrations by way of Automator webhooks.
This permits you to enjoy simple, no-code automation inside of WordPress while however the use of n8n’s power for complex tasks.
The easiest way to Use Uncanny Automator for WordPress Workflows
Uncanny Automator isn’t merely for simple tasks—you’ll use it to automate somewhat a large number of workflows suitable inside of WordPress.
For example, you’ll:
- Mechanically log WooCommerce purchases to Google Sheets.
- Generate content material subject material automatically from selection submissions the use of OpenAI.
- Create new particular person accounts after a purchase order order or selection submission.
- Analyze WooCommerce reviews or blog comments with AI to hit upon unfavorable sentiment and alert your crew.
- Connect your WordPress web site to apparatus like Google Sheets, Slack, Zoom, Mailchimp, or even use Zapier for specific edge instances—all without complex API setups.
To be told further regarding the plugin itself, you’ll check out our detailed Uncanny Automator assessment.
If this is your first time the use of an automation plugin, don’t fear. I’ll walk you through putting in place a workflow in WordPress.
I’ll show you one example: logging WooCommerce purchases to Google Sheets and making an individual account to your web site.
The process might be very an an identical for almost each and every different automation you need to create, whether or not or no longer it’s AI content material subject material generation, particular person notifications, or syncing wisdom between plugins.
Step 1: Arrange and Activate Uncanny Automator
The first thing you need to do is sign up for an account on the Uncanny Automator internet web page. Merely click on on on the ‘Get Uncanny Automator now’ button and keep on with the steps to sign up for an account.
📌 Remember: Uncanny Automator moreover has a free style. Alternatively since this workflow uses Google Sheets and WooCommerce, you’ll need a most sensible charge plan to unlock those platforms.
Next, transfer for your WordPress dashboard. Proper right here, you will need to arrange the loose core plugin and the highest charge plugin (which you’ll find in a zip file for your Uncanny Automator account) for the integrations to art work.
In case you don’t understand how to do that, check out our step-by-step data on putting in WordPress plugins.
Once the whole thing is installed, transfer to Automator » Settings for your WordPress dashboard and enter your license key. You’ll find this data for your account on the Uncanny Automator internet web page.
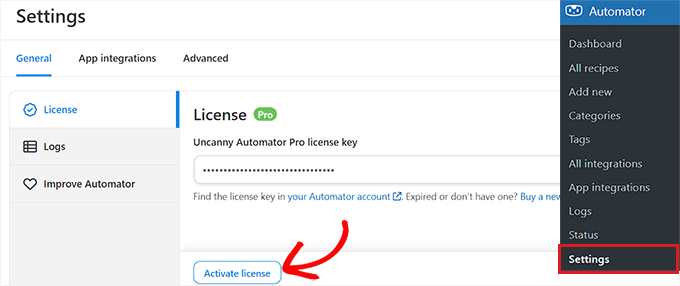
After you have into the vital factor, click on at the ‘Activate License’ button, and likewise you’re ready to begin out rising automations.
Step 2: Connect Uncanny Automator to Google Sheets
For this workflow, you need to attach Google Sheets so that every WooCommerce gain can be automatically logged in a spreadsheet.
This connection only should be prepare once, and after that, Uncanny Automator will automatically change your decided on spreadsheets on each and every instance a brand spanking new order is to be had in.
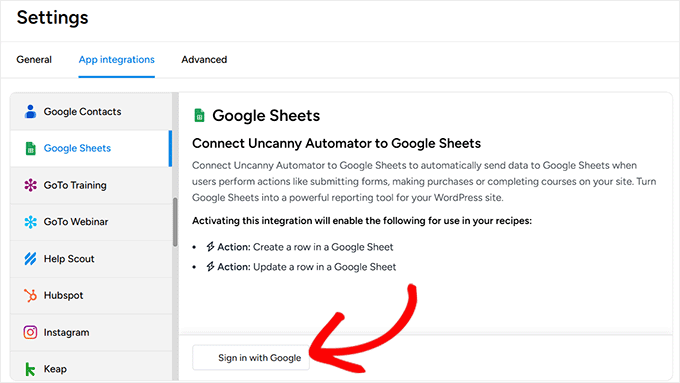
To get started, transfer to Automator » App Integrations and select ‘Google Sheets’ from the left column.
Click on at the ‘Take a look at in with Google’ button, then choose the account you need to link. If your account isn’t listed, you’ll add it the use of the ‘Use Another Account’ selection.
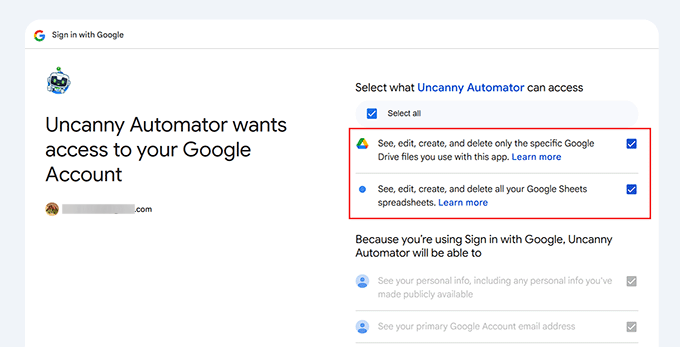
Next, Google will ask for permissions so Uncanny Automator can get right to use your spreadsheets.
This is completely common, and the plugin only uses the ones permissions so that you could upload new rows to the spreadsheets you select.
While you approve, you’ll be redirected once more for your WordPress dashboard with a confirmation that your account is connected.
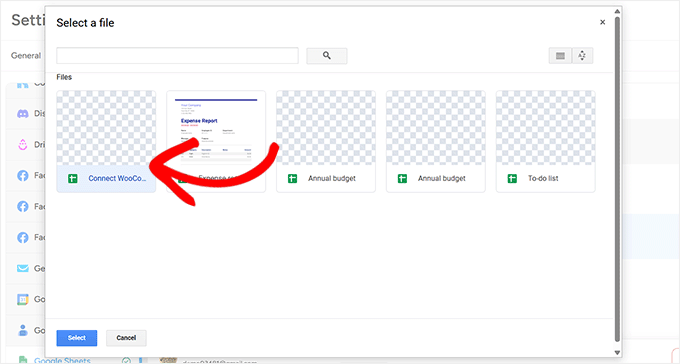
In any case, click on on ‘Choose new sheet(s)’ and choose the spreadsheet you need to use for your WooCommerce store.
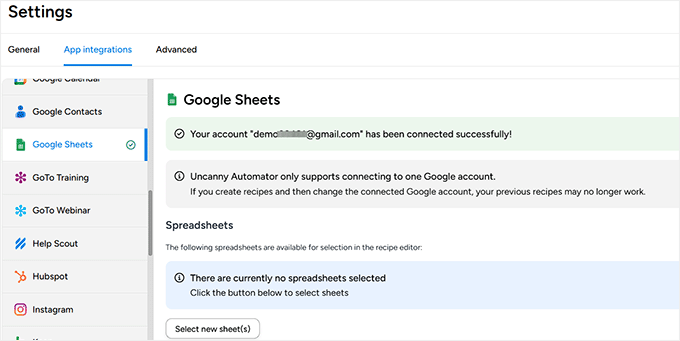
You’ll add multiple spreadsheets if sought after, and all hooked up sheets will appear inside the recipe editor when development automations.
For a further detailed, step-by-step data on connecting Google Sheets, you’ll moreover see our instructional on the best way to attach WooCommerce to Google Sheets.
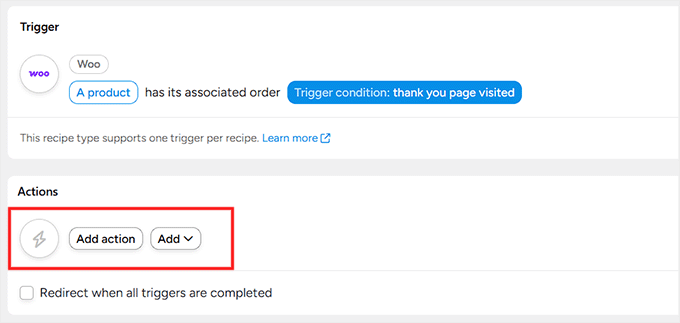
Step 3: Create a Recipe and Set the WooCommerce Motive
After connecting to Google Sheets, it’s time to create the automation itself. In Uncanny Automator, this automation is referred to as a recipe.
Each recipe has two simple parts. The motive is what starts the automation, and the movement is what happens next.
At this time, I’ll be that specialize in the motive—the WooCommerce fit that may get began the whole thing.
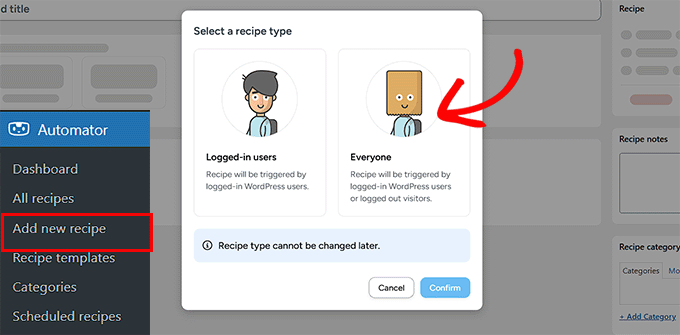
To get started, transfer to Automator » Add new recipe from your WordPress dashboard.
Proper right here, you’ll be asked to choose from a ‘Logged-in’ recipe and an ‘Everyone’ recipe. Logged-in recipes only run when an individual is signed in, alternatively WooCommerce orders are regularly located by the use of customer shoppers.
Because of that, I love to counsel selecting ‘Everyone’ and clicking ‘Test.’
Next, give your recipe a name. This is only for your non-public reference, so that you’ll establish it something simple like ‘Send WooCommerce orders to Google Sheets and Create Individual Accounts.’
Once that’s completed, Uncanny Automator will show you an inventory of all the plugins and products and services and merchandise installed to your web site. From this tick list, select ‘WooCommerce.’
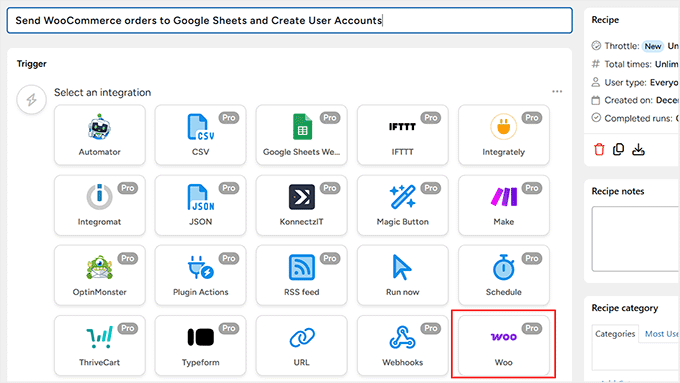
Now you’ll choose the improvement that are supposed to motive the recipe.
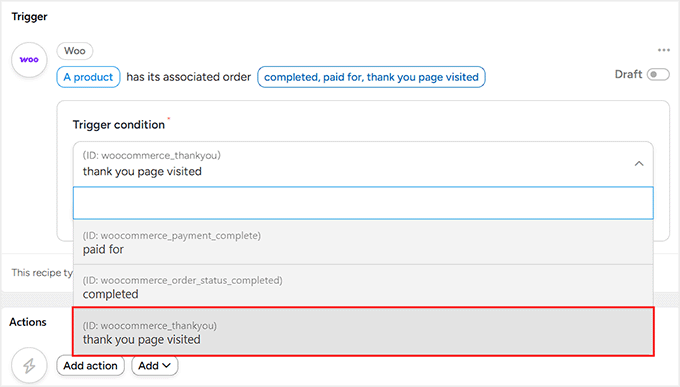
For this workflow, select ‘A product has its comparable order completed, paid for, thanks web page visited.’ This promises the automation only runs after a a success gain.

After choosing the motive, you’ll want to make a decision when it should hearth. I love to counsel selecting ‘thank you internet web page visited’.
This means the recipe will run as briefly since the buyer lands on the thank you internet web page after checkout. In case you look ahead to ‘Completed’, the automation gained’t run until you manually mark the order as finished.
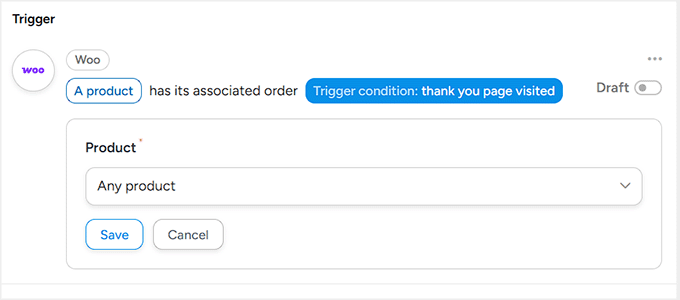
Click on at the ‘Save’ button to continue.
In any case, choose whether or not or no longer the recipe should run for a specific product or for all products. To track every sale for your store, select ‘Any product’ and click on on ‘Save.’
That’s it. Your WooCommerce motive is now ready, and the recipe is conscious about exactly when it should run.
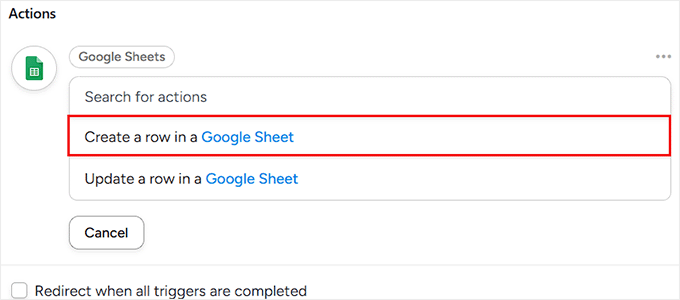
Step 4: Add Google Sheets Movement inside the Recipe Editor
Now that the WooCommerce motive is ready, you need to tell Uncanny Automator what should happen next. In this workflow, the next move is modest: send the order details to Google Sheets.
To take a look at this, click on at the ‘Add movement’ button inside of your recipe.
You’ll now see an inventory of all the integrations available to your web site.
From appropriate right here, select ‘Google Sheets.’

While you do that, Uncanny Automator will show you the actions it’s going to almost certainly perform. For this setup, choose ‘Create a row in a Google Sheet.’
This movement tells Automator so that you could upload a brand spanking new row for your spreadsheet on each and every instance a WooCommerce order triggers the recipe.
Upon doing that, you’ll see a dropdown where you’ll choose the Google Spreadsheet you hooked up earlier. Select the spreadsheet where you need to store your order wisdom.
Next, choose the worksheet inside of that spreadsheet. If your file only has one sheet, you don’t want to fear so much appropriate right here.
Alternatively should you’re the use of multiple tabs, I advise double-checking that you select the correct one, so your wisdom doesn’t in spite of everything finally end up inside the incorrect place.
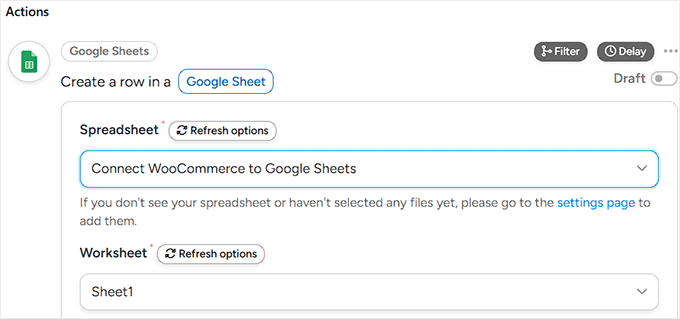
Once that’s completed, scroll appropriate all the way down to the ‘Rows’ phase. That’s the position you connect your WooCommerce order wisdom to the columns for your Google Sheet.
If mapping sounds subtle, don’t fear—it’s in truth somewhat easy. You’re merely matching each and every column for your spreadsheet with the fitting piece of order information. I actually love to believe it as assigning values to columns, separately.
To begin out, click on at the asterisk (*) icon next to a field. This opens an inventory of available wisdom that Automator can pull from the WooCommerce motive.
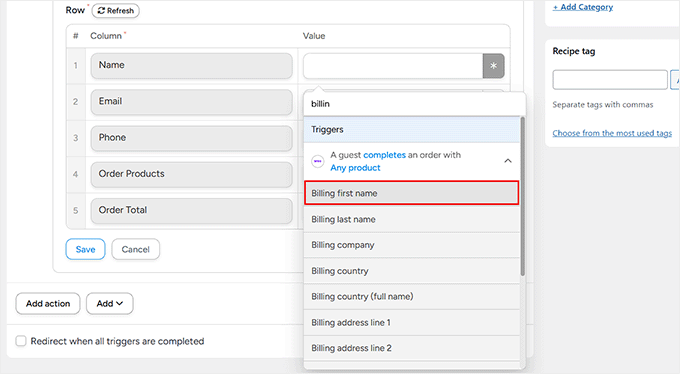
Beneath the ‘Triggers’ phase, you’ll see order details like billing establish, email correspondence, phone amount, products, and order totals.
For example, you’ll map the Identify column to the customer’s billing first establish, the E mail column to the billing email correspondence, the Phone column to the billing phone, the Products column to order products, and the Normal column to the order common.
I love to counsel taking your time appropriate right here and mapping each and every column sparsely. Once this segment is in a position up as it should be, your spreadsheet will stay clean and easy to be informed, concurrently further orders are to be had.

After you’ve mapped all the columns, click on at the ‘Save’ button to store your settings.
Step 5: Create a WordPress Individual After a WooCommerce Gain
Now it’s time so that you could upload the second movement for your workflow. This movement automatically creates a WordPress particular person when someone purchases an products for your WooCommerce store.
It’s good to be wondering why this is useful. Making an individual account after a purchase order order is advisable should you plan to provide shoppers get right to use to gated content material subject material, classes, virtual downloads, or member-only areas later.
It moreover saves you from manually rising accounts, making the buying revel in smoother for patrons. In an effort to upload this second movement, click on at the ‘Add movement’ button all over again for your recipe.
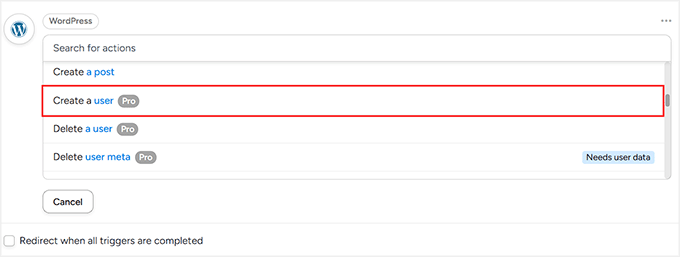
This time, select ‘WordPress’ as the mix.
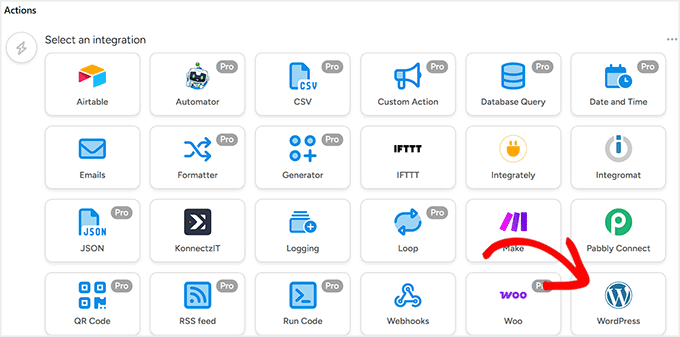
As quickly because the tick list of actions turns out, choose ‘Create an individual.’
This tells WordPress to automatically create a brand spanking new particular person account when the WooCommerce order motive runs.
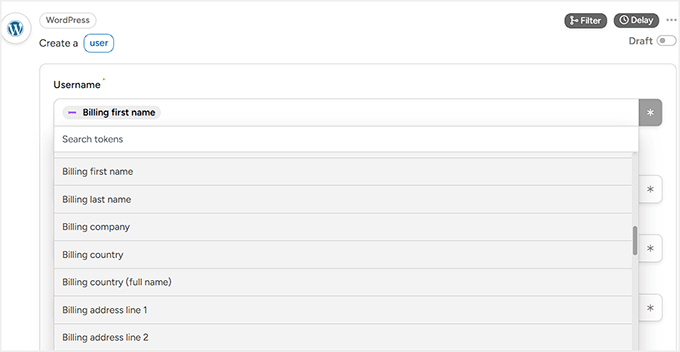
After deciding at the movement, you’ll see fields to map particular person details harking back to username and email correspondence.
Just like forward of, click on at the asterisk (*) icon next to each and every field to drag in wisdom from the WooCommerce motive.
For example, you’ll use the customer’s billing email correspondence for the email field. For the username, I normally select the billing first establish or a mixture of emblem and order wisdom.
The vital factor idea is that you simply’re reusing information the customer already entered all the way through checkout, so no longer the rest further is wanted from them.
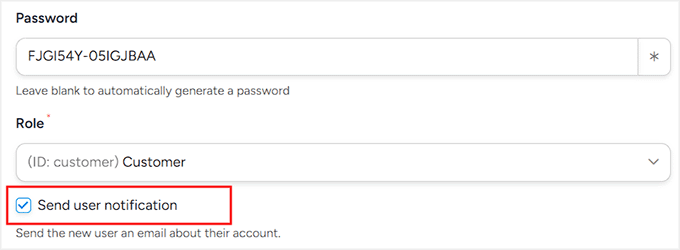
Next, you’ll see a separate field for the password. You’ll leave it blank, and Uncanny Automator will automatically generate a protected password for the new particular person.
Alternatively, you’ll set your individual password within the match you need.

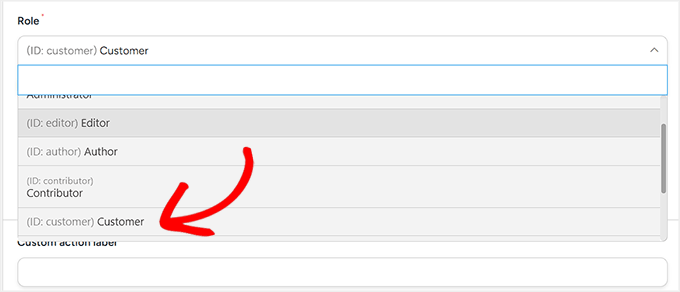
After that, scroll appropriate all the way down to the ‘Individual serve as’ environment. That’s the position you choose what serve as the new particular person should have in WordPress.
Proper right here, I advise selecting ‘Purchaser’ from the dropdown. This serve as is designed in particular for WooCommerce buyers. It supplies them get right to use to their account and order details without giving them any useless permissions inside of your WordPress admin area.
It’s moreover vital to check the ‘Send particular person notification’ box suitable beneath the individual serve as environment.
This promises your new shoppers download an email correspondence with their login details, permitting them to get right to use their account automatically.
Remember that should you add a extend (which I love to counsel in the next move), the email will arrive shortly after that wait period.
After the whole thing seems excellent, click on on ‘Save’ to store your settings.
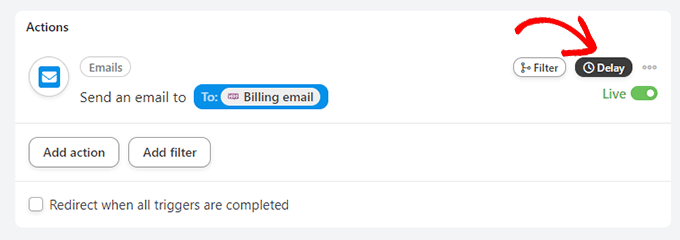
At this stage, the second movement is complete. Alternatively there’s but some other small enlargement I love to counsel making.
Since your recipe now has multiple actions, you’ll add a extend forward of this user-creation step runs. This can be helpful in more complex workflows where actions depend on each and every other or when external products and services and merchandise need a little bit of time to finish processing.
In an effort to upload a extend, click on at the ‘Extend’ button all over the Actions tab.
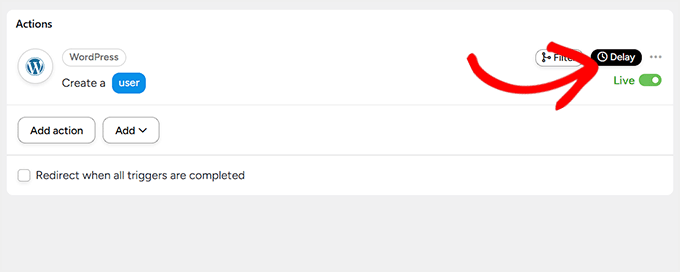
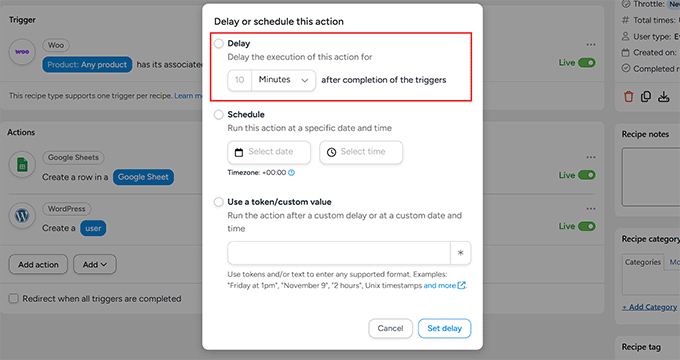
A suggested will open, allowing you to permit the extend selection and choose how long Automator should wait forward of working the movement. You’ll set delays in minutes, hours, or even days.
I love to counsel environment a 10-minute extend. This provides WooCommerce enough time to completely process the order, handle price confirmations, and full any background tasks forward of the individual account is created.
It moreover helps keep away from edge instances where an order might fail or get refunded right away after checkout.
With the extend added, this movement will run 10 minutes after the principle movement, making your workflow further unswerving and predictable.
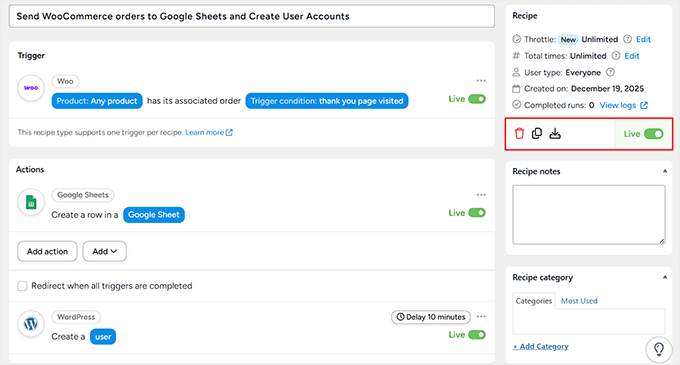
Step 6: Save and Activate Your Recipe
Now that each and every your WooCommerce motive and your actions—sending order wisdom to Google Sheets and rising a brand spanking new WordPress particular person—are prepare, it’s time to make your automation live.
Forward of that, I love to counsel double-checking your whole field mappings. Ensure the columns in Google Sheets are compatible the correct WooCommerce wisdom, and that the username, email correspondence, and particular person serve as are appropriately mapped for the new account.
While you’re confident the whole thing is right kind, toggle the Motive and Movement switches to ‘Live.’ Then, inside the right-hand column, switch the recipe status from ‘Draft’ to ‘Live.’
This is it—your automation is now lively. From this stage forward, every time someone purchases something for your WooCommerce store, Uncanny Automator will automatically add their order details for your Google Sheet and create a WordPress particular person account.
I’ve tested this exact workflow myself, and environment it up took not up to 10 minutes.
Read about that to n8n, where you’d want to configure multiple webhooks, parse JSON, handle API keys, and arrange server infrastructure—this equivalent automation might simply take hours, even for experienced shoppers.
The good segment is that the process might be very an an identical for each and every different type of automation you need to organize in Automator.
Whether or not or no longer you’re connecting paperwork to email correspondence products and services and merchandise, logging purchases, or triggering path enrollments, the workflow is continuing: select your motive, choose your actions, map your fields, and transfer live. It’s that simple.
Additional Exact-World Use Instances for WordPress Automation: What You Can Assemble (That’s Tougher in n8n)
Uncanny Automator isn’t merely for simple form-to-spreadsheet tasks. You’ll create tough, real-world workflows that save hours of manual art work.
Listed below are some examples which might be much more simple to organize in Uncanny Automator than in n8n:
1. Computerized Trail Get admission to In accordance with Purchases
In case you run an on-line route website, enrolling students manually or juggling multiple platforms generally is a headache. Automator means that you can automate the entire process, from gain to path get right to use, in just a few clicks.
Proper right here’s how it works:

For example, when an individual buys the “SEO Mastery Package deal deal” in Easy Digital Downloads, Automator automatically enrolls them in all 3 MemberPress classes.
It moreover supplies them to a private Facebook team of workers, notifies the path instructor on Slack, and tags them in Consistent Touch to motive follow-up emails.
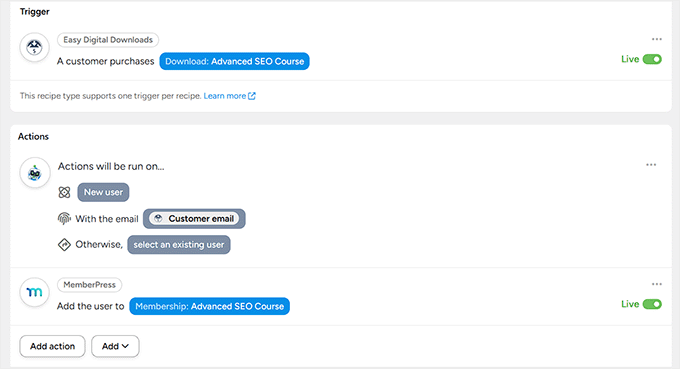
🌟Why it’s more straightforward than n8n: Each of the ones steps in n8n would require separate webhooks, JSON mapping, and API calls. Automator handles all of this in a few dropdown choices.
2. Lead Scoring & Smart Follow-Up
Keeping track of leads and following up personally can be time-consuming. Uncanny Automator helps you score leads and motive smart follow-ups automatically, even the use of AI.
Proper right here’s a simple workflow that you just’ll use for it:

For example, when an individual downloads a lead magnet by way of WPForms, Automator information it in Google Sheets.
You’ll then prepare specific triggers so that you could upload problems when the individual visits high-value pages, like your Pricing or Demo internet web page.
Once a lead reaches 30 problems, Automator sends a customized AI-generated email correspondence by way of OpenAI and automatically creates a HubSpot CRM deal.
🌟Why it’s more straightforward than n8n: In n8n, connecting WPForms by myself would require putting in place a webhook for the form submission, parsing the JSON payload, mapping fields to Google Sheets, tracking internet web page visits by way of additional triggers, and configuring API calls for each and every the AI email correspondence and CRM deal creation.
You’ll check out our novice’s data on electronic mail advertising automation to learn further pointers for putting in place smart, automatic follow-ups.
3. Proportion AI Summaries on Social Media When a Publish Is Revealed
I moreover suggest the use of Uncanny Automator to automatically create AI-generated summaries for your new blog posts and proportion them on social media. It’s a simple alternatively tough workflow that saves time and helps to keep your content material subject material visible.
Proper right here’s an example of an automated workflow:
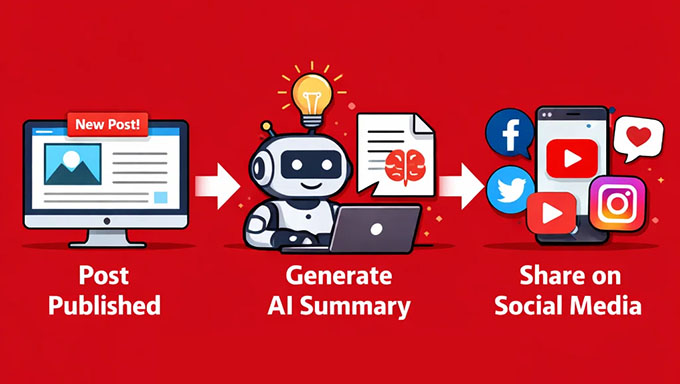
When a blog put up is outlined, Automator sends the content material subject material to OpenAI, which creates a temporary summary suitable for social media.
The workflow then posts this summary automatically for your hooked up social accounts.
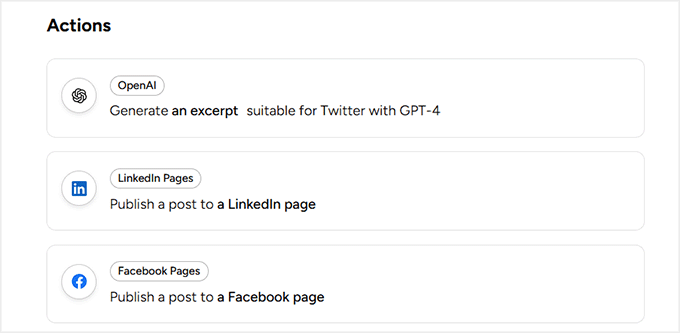
🌟Why it’s more straightforward than n8n: In n8n, you’d need multiple webhooks, JSON parsing, and separate API calls to OpenAI and each and every social group.
To get started with further automations, take a look at the following guides:
- How I Ship WooCommerce Order Notifications Directly to WhatsApp
- The best way to Routinely Submit to Threads From WordPress
- Amateur’s Information to Routinely Submit to Fb From WordPress
- How I Save Time Scheduling LinkedIn Posts in WordPress
- The best way to Routinely Post from WordPress to Instagram
FAQs About The use of Uncanny Automator vs. n8n
In case you’re in search of to make a decision between Uncanny Automator and n8n, the ones are the questions I see most regularly from learners.
Does Uncanny Automator slow down my WordPress web site?
No, it does not slow down your web site. Uncanny Automator runs after your internet web page has finished loading, not while visitors are in a position.
In simple words, your internet web page so much first for the buyer. Once the whole thing is visible, Automator quietly runs inside the background to send emails, change information, or motive other actions. Because of this, visitors don’t revel in slower internet web page speeds.
Can I migrate my present n8n workflows to Uncanny Automator?
Positive, alternatively you’ll want to rebuild them manually. There’s no one-click migration instrument because of n8n and Automator art work very differently.
The good news is that the process is modest:
- Write down what triggers your n8n workflow (for instance, a type submission).
- Tick list the actions that happen next (send email correspondence, add to CRM, change wisdom).
- Recreate the equivalent steps the use of Automator’s dropdown menus.
Most shoppers find that this takes so much a lot much less time than development the original n8n workflow, and ongoing repairs becomes more straightforward.
What happens if I run too many automations on my web site?
Automator itself doesn’t limit you, alternatively your internet web hosting does. On most shared internet web hosting plans, working an inexpensive choice of automations works unbelievable.
If your web site runs lots or 1000’s of automations in line with hour, it’s essential need upper internet web hosting, like controlled WordPress web hosting or a VPS. Automator incorporates logs that permit you to see if a workflow is taking too long, so that you’ll adjust or reduce up it if sought after.
Does Uncanny Automator art work with custom designed put up varieties and custom designed fields?
Positive, it does. If your web site uses custom designed put up varieties (like “Courses,” “Events,” or “Listings”), Automator can stumble on and art work with them automatically.
It moreover is helping stylish custom designed field plugins like Difficult Custom designed Fields, Meta Box, Pods, and Toolset. This means you’ll motive automations when a custom designed field changes or fill custom designed fields automatically—without writing code.
Can I profit from Uncanny Automator with WordPress multisite?
Positive, Automator works with multisite setups. You’ll activate it all over the entire group or use it on particular person web sites, depending to your needs.
I’m hoping this text helped you learn how to create n8n-like automation in WordPress. You may also want to see our data on the usage of AI to generate WooCommerce product descriptions and our top choices for the easiest AI automation equipment for WordPress.
In case you most popular this text, then please subscribe to our YouTube Channel for WordPress video tutorials. You’ll moreover find us on Twitter and Fb.
The put up The best way to Upload n8n Like Automation in WordPress (More uncomplicated & Less expensive) first gave the impression on WPBeginner.
Contents
- 0.0.1 💡Speedy Answer: The easiest way to Add n8n Like Automation in WordPress
- 0.0.2 Where Does n8n Fall Transient for WordPress Consumers?
- 0.0.3 Why Use Uncanny Automator Instead of n8n?
- 0.0.4 The easiest way to Use Uncanny Automator for WordPress Workflows
- 0.0.4.1 Step 1: Arrange and Activate Uncanny Automator
- 0.0.4.2 Step 2: Connect Uncanny Automator to Google Sheets
- 0.0.4.3 Step 3: Create a Recipe and Set the WooCommerce Motive
- 0.0.4.4 Step 4: Add Google Sheets Movement inside the Recipe Editor
- 0.0.4.5 Step 5: Create a WordPress Individual After a WooCommerce Gain
- 0.0.4.6 Step 6: Save and Activate Your Recipe
- 0.0.5 Additional Exact-World Use Instances for WordPress Automation: What You Can Assemble (That’s Tougher in n8n)
- 0.0.6 FAQs About The use of Uncanny Automator vs. n8n
- 0.1 Related posts:
- 1 Learn how to Simply Create Customized WooCommerce Thank You Pages
- 2 Laravel vs WordPress: A Head-to-Head Comparability
- 3 Tips on how to Design Internet sites that Keep up a correspondence Throughout Cultures

0 Comments