
Divi footer WordPress menus are crucial part of any footer. Menus may also be created with text links, menu modules, or widgets. The Divi menu module places the links on a horizontal line. Then again, footers often profit from menus with links that stack vertically. Fortunately, the ones menus are easy so to upload to Divi footers. In this article, we’ll see the way to add WordPress menus on your Divi footer.
Listed below are the Divi footer WordPress menus that we will create. They will allow us to change them merely. Somewhat than together with the Divi footer WordPress menus with the Divi menu module, we’ll add them with widgets. This allows the menu items to stack vertically, and it’s easy to change them later.
Desktop
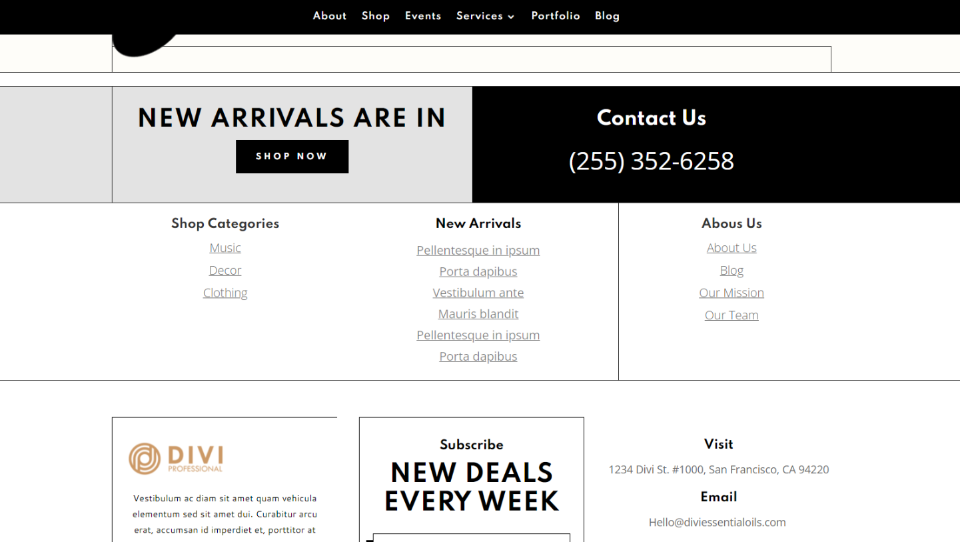
That’s the desktop view. We’ll create the Retailer Categories and About Us menus.
Cellular
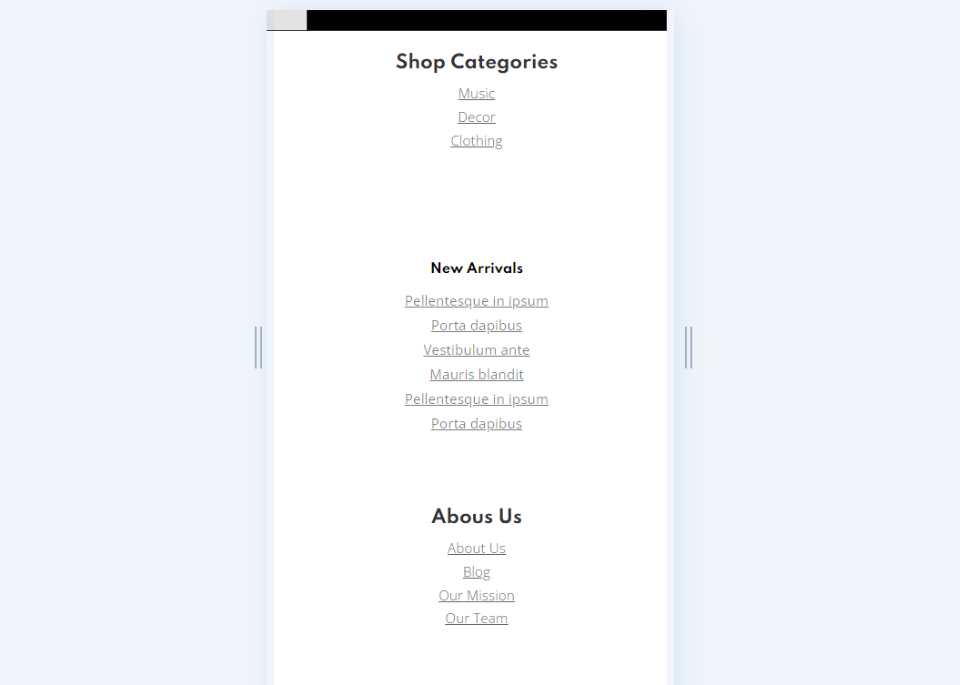
Proper right here’s how they’re going to look on mobile.
We’ll get began by way of rising the Divi footer WordPress menus. I’m rising two menus: one for a shop with the shop pages and one for information about the company.
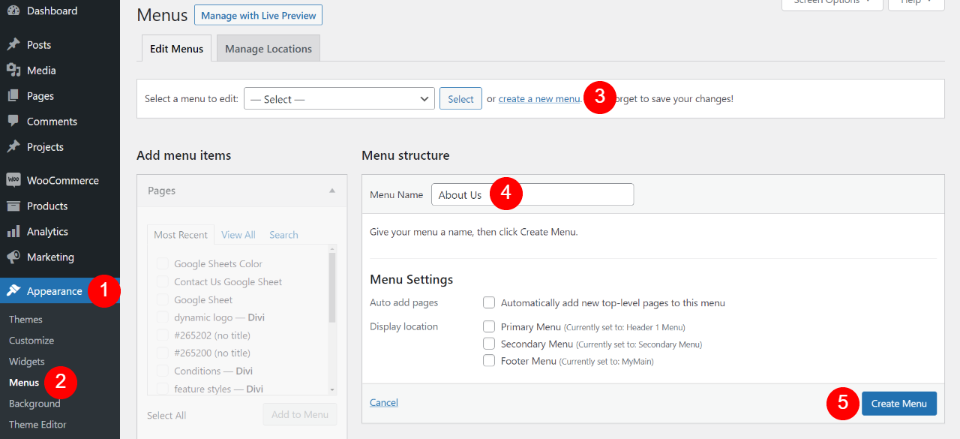
First, create the menus you want to include to your footer. Throughout the WordPress dashboard, move to Glance > Menus. Click on on Create a brand spanking new Menu. Determine your menu and click on on Create Menu. You won’t wish to set them as footer menus on account of we’re going to choose them within Divi.
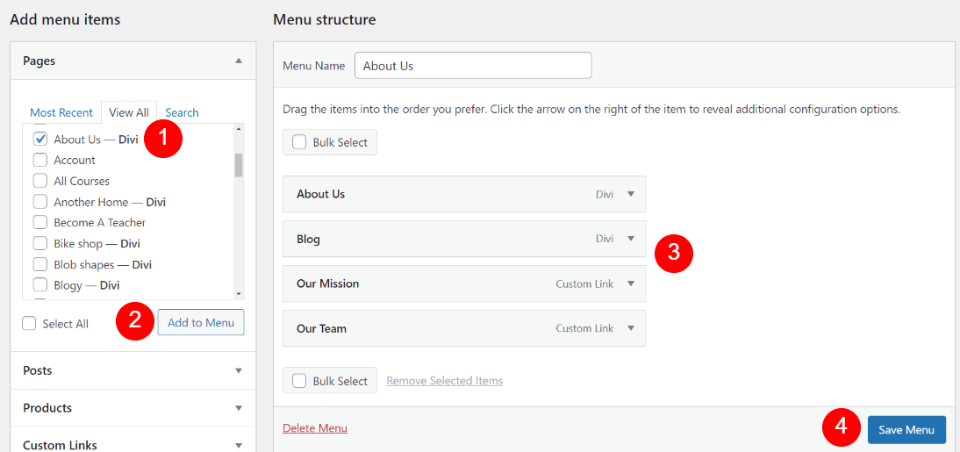
Create the menu and save it. Next, add the pages you want. Then, order them throughout the order you want to turn them. When you’re able, click on on Save Menu.
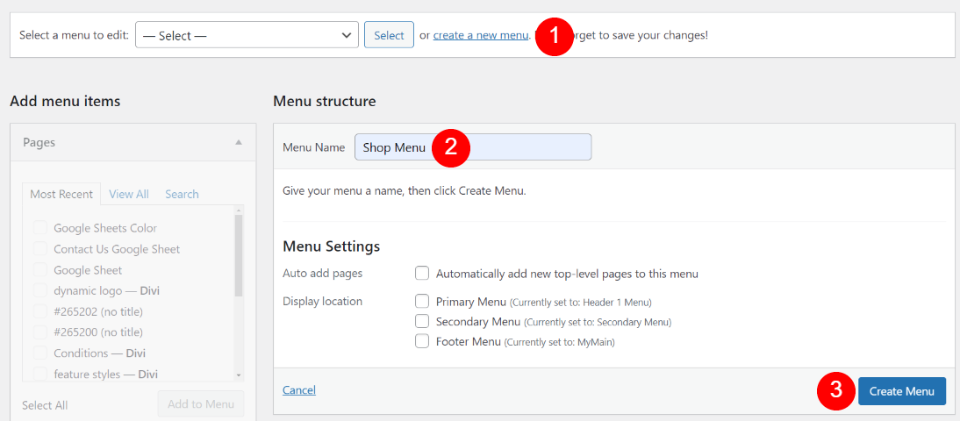
For the shop menu, I’m using WooCommerce. Create a brand spanking new menu by way of selecting Create a New Menu on the most productive of the menu editor. Provide a name throughout the menu name field and click on on Create Menu.
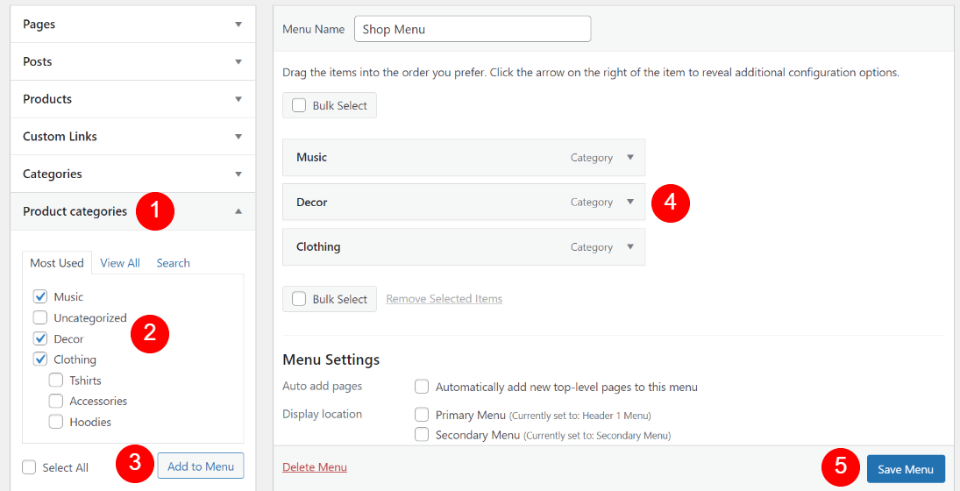
WooCommerce supplies new alternatives to the menu development. Make a selection Product Categories throughout the left sidebar. Make a choice the categories you want to include throughout the menu. Click on on Add the Menu. Order them throughout the order you want. Click on on Save Menu. We will be able to add the ones menus to widgets.
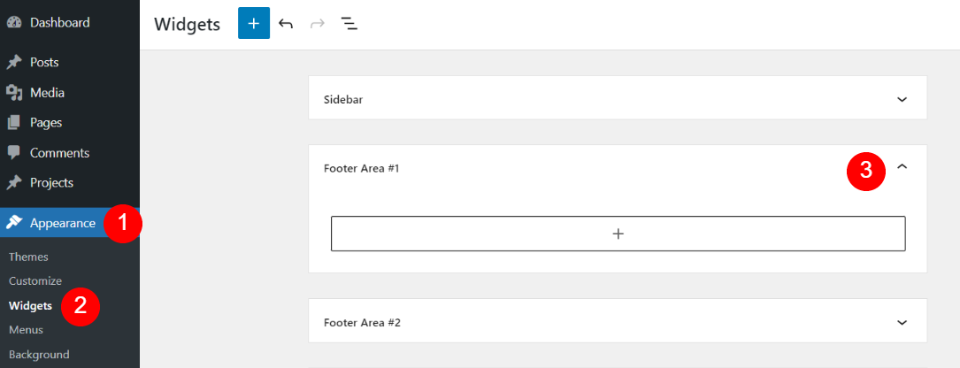
Next, add the menus to the footer widgets. First, move to Glance > Widgets throughout the WordPress dashboard. Next, choose a Footer Area that you just’re now not using. Divi has six Footer Areas to choose from and also you’ll have the ability to add a brand spanking new widget space using the instrument at the bottom of the internet web page if you wish to. I’ve made up our minds on Footer Area #1.
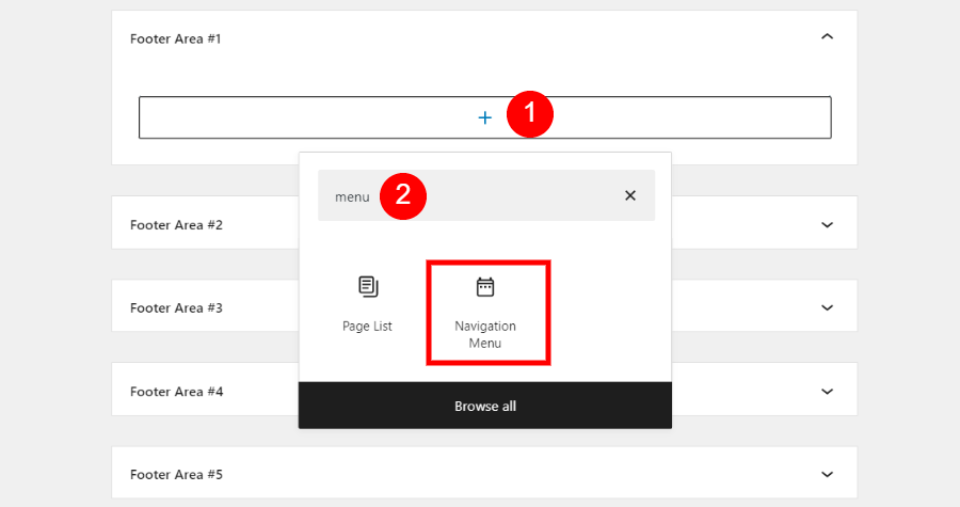
Within the Footer Area that you want to use, click on at the plus symbol to open the file of blocks. Search for “menu” and choose Navigation Menu from your possible choices.
Add the About Us Menu
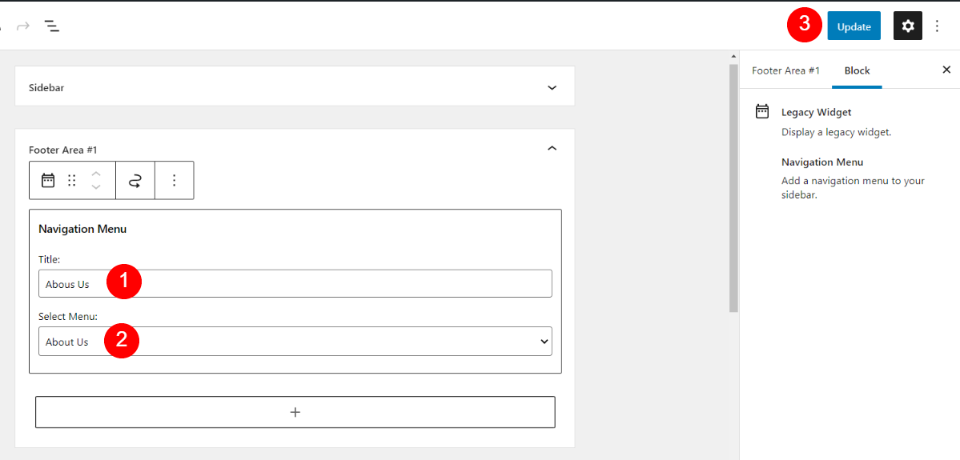
Give the menu a name and make a selection the menu you want to turn. Click on on Substitute throughout the upper correct corner. Now it’s time to duplicate this process for the next menu.
Add the Retailer Menu
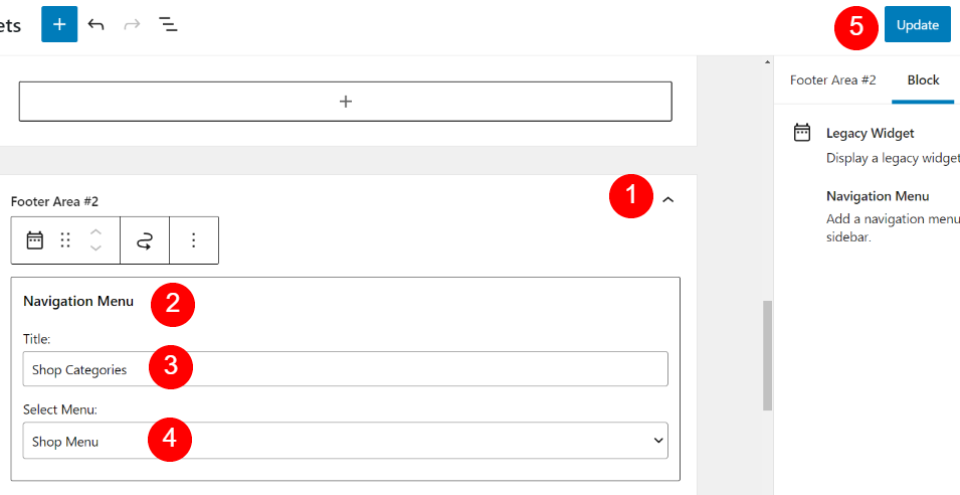
For this one, I’ve made up our minds on Footer Area #2. Insert the Navigation Menu block, add a reputation, make a selection Retailer Menu, and choose Substitute.
Your menus these days are able to be added on your Theme Builder templates.
First, you’ll need a footer template. You’ll create your individual or upload one. I’m using the footer template from the free Header and Footer Template for Divi’s Essential Oils Layout Pack. To find further throughout the Divi blog by way of in search of “unfastened footer”. Download the template and unzip it.
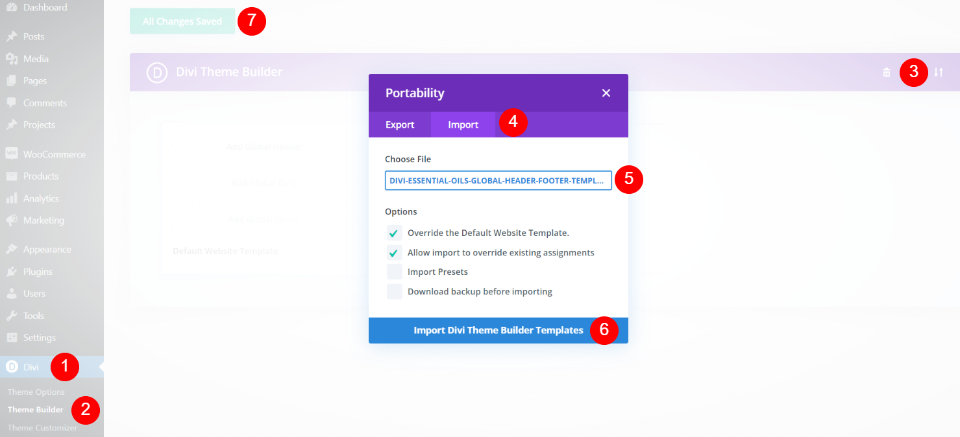
Next, add a template to the Divi Theme Builder. Throughout the WordPress dashboard, move to Divi > Theme Builder. Make a selection Portability and click on on Import throughout the modal that opens. Click on on Make a choice File, navigate to the record, choose it, and click on on Import Divi Theme Builder Templates.
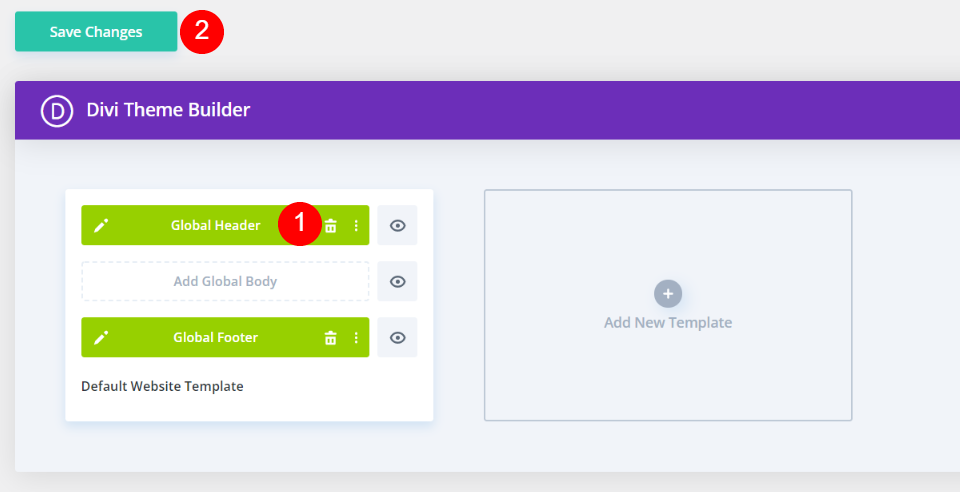
This may occasionally most likely include a header record. Delete it for individuals who don’t want to use it. Save your changes and navigate to the front-end of your internet web page. We’ll do the rest of the artwork using Divi’s new full site front-end editing feature.
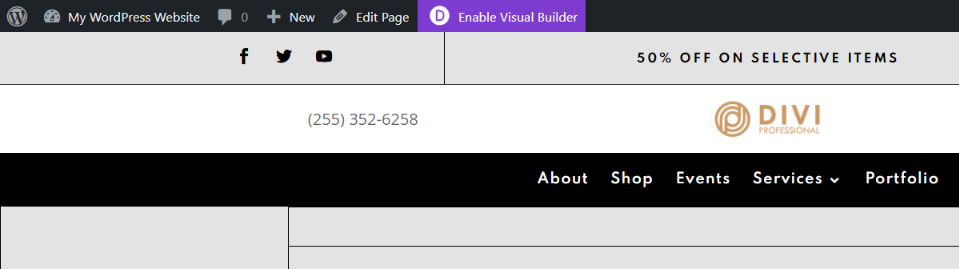
On the front-end of your internet web page, choose Permit Visual Builder on the most productive of your show. Since the footer is international, it doesn’t topic what internet web page you’re on.
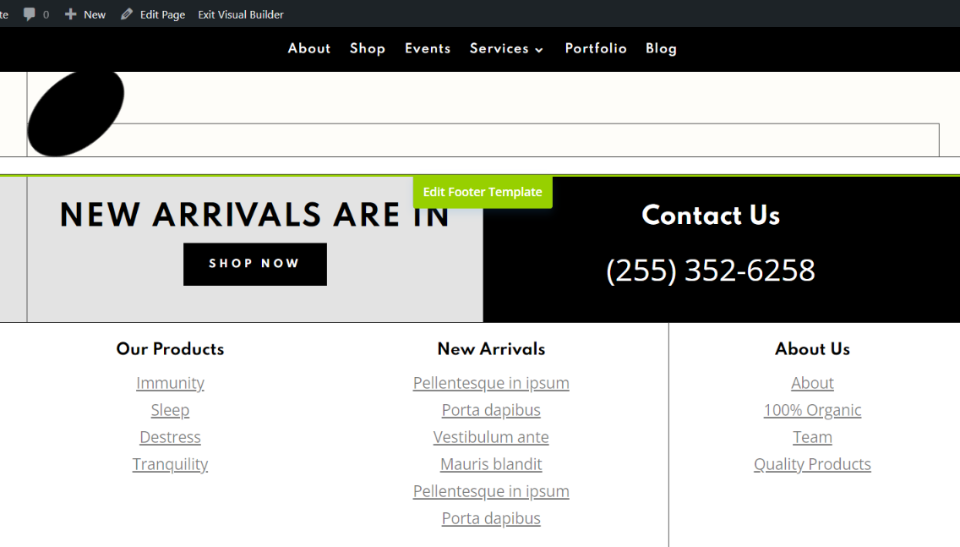
Hover over the footer and choose Edit Footer Template. We will be able to add the two menus by way of converting the Our Products and About Us areas. In this structure, each and every areas have been created with a few text modules. We’ll alternate them with sidebar modules to turn the menus we created.
Add the About Us Sidebar

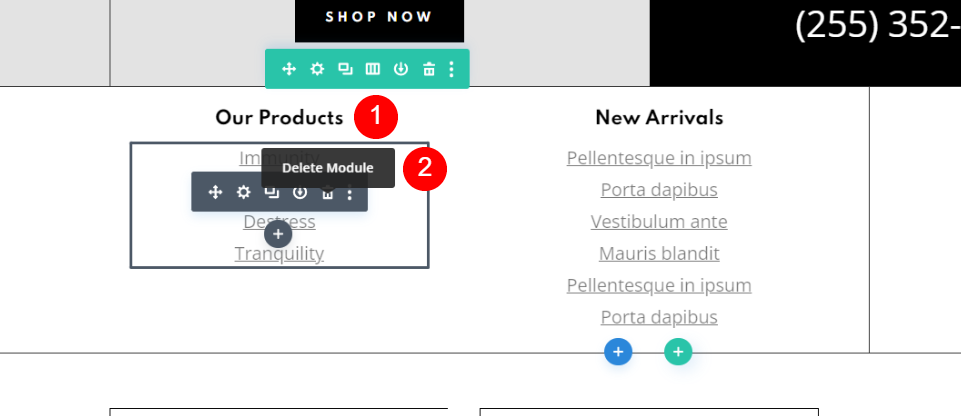
First, delete the two text modules that create the About Us menu.
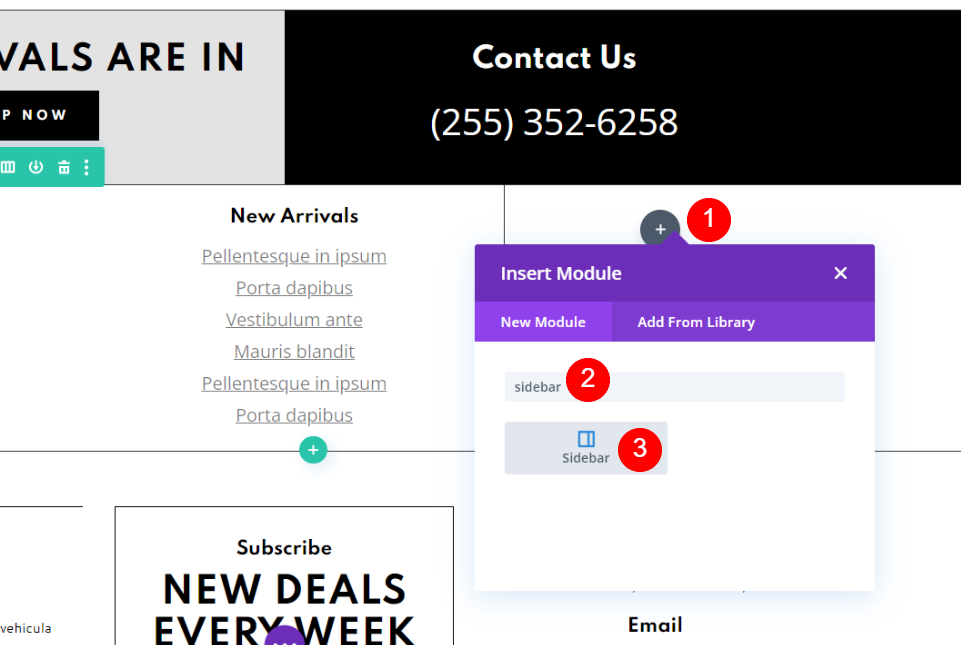
Next, we wish to add a sidebar module where you want to turn the menu. Hover over the area you want so to upload the module and click on at the black plus symbol. Search for “sidebar” and click on at the Sidebar module.
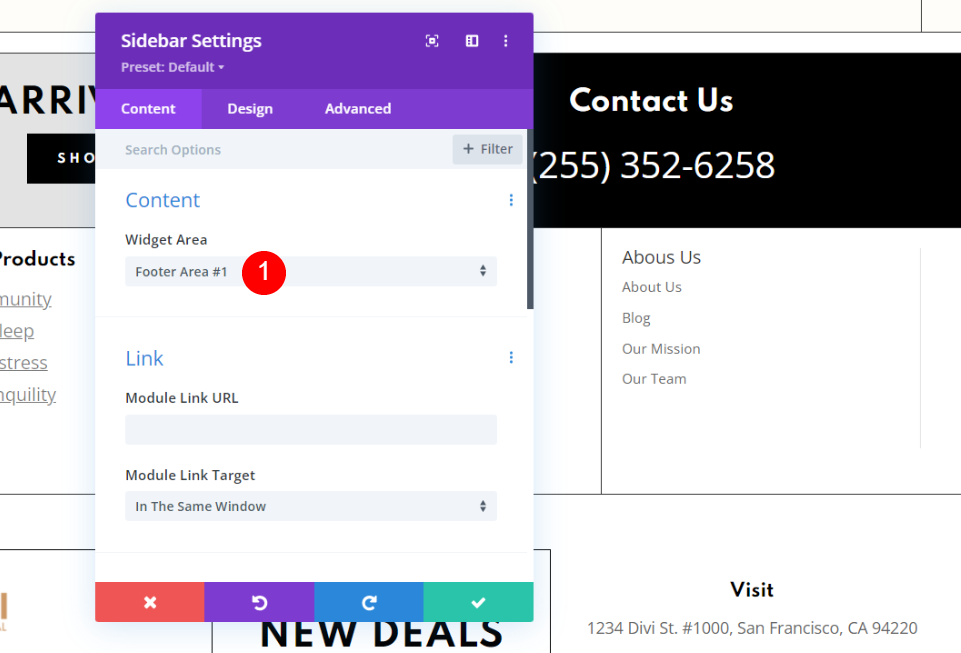
The module’s setting will open. Make a selection Footer Area #1. This may occasionally most likely display the menu underneath the text module that we want to alternate.
Style the About Us Sidebar
Construction and Text Settings
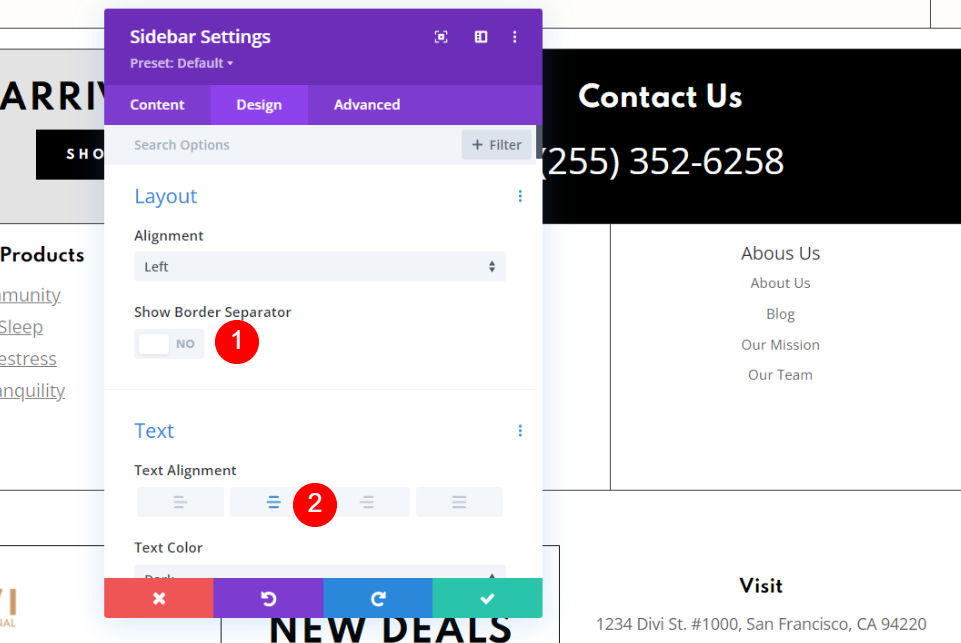
Make a selection the Design tab for the sidebar module settings. Disable Show Border Separator. Beneath Text, choose Heart Alignment.
- Show Border Separator: Disable
- Text Alignment: Heart
Phone Text Settings
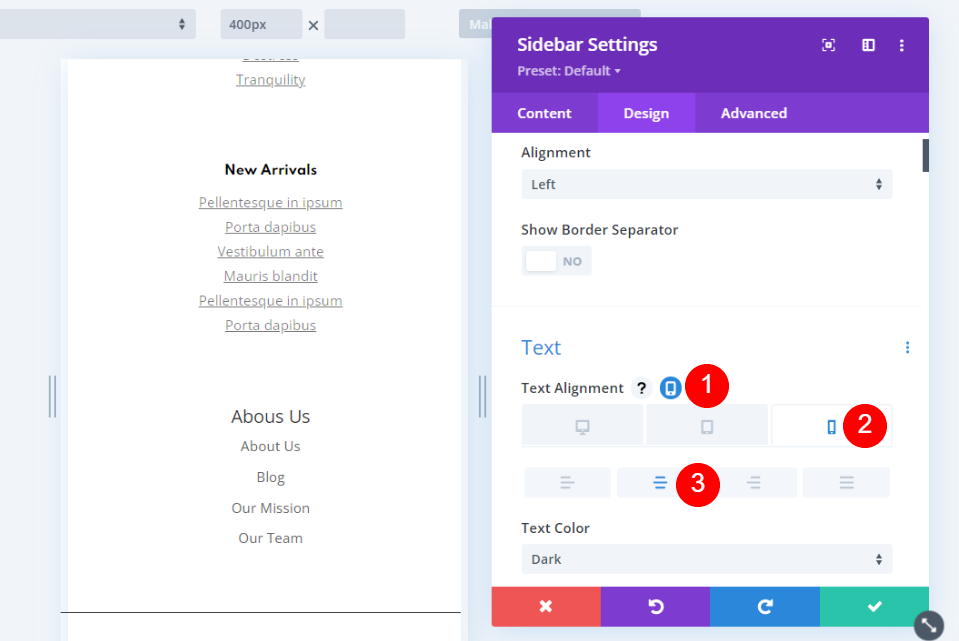
Hover over Text Alignment and choose the instrument icon when it appears. Click on on on the Phone icon and choose Heart Alignment.
- Text Alignment
- Phone: Heart
- Identify Font: Spartan
- Identify Font Weight: Bold
- 18px
- Line Top: 1.4em
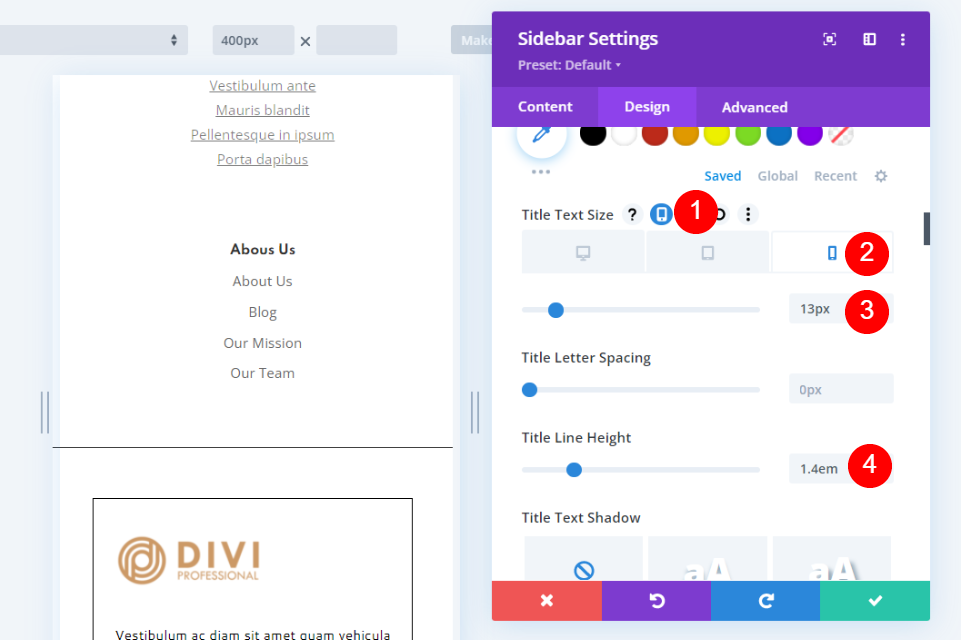
- Identify Text Dimension
- Phone: 13px
- Identify Line Top: 1.4em
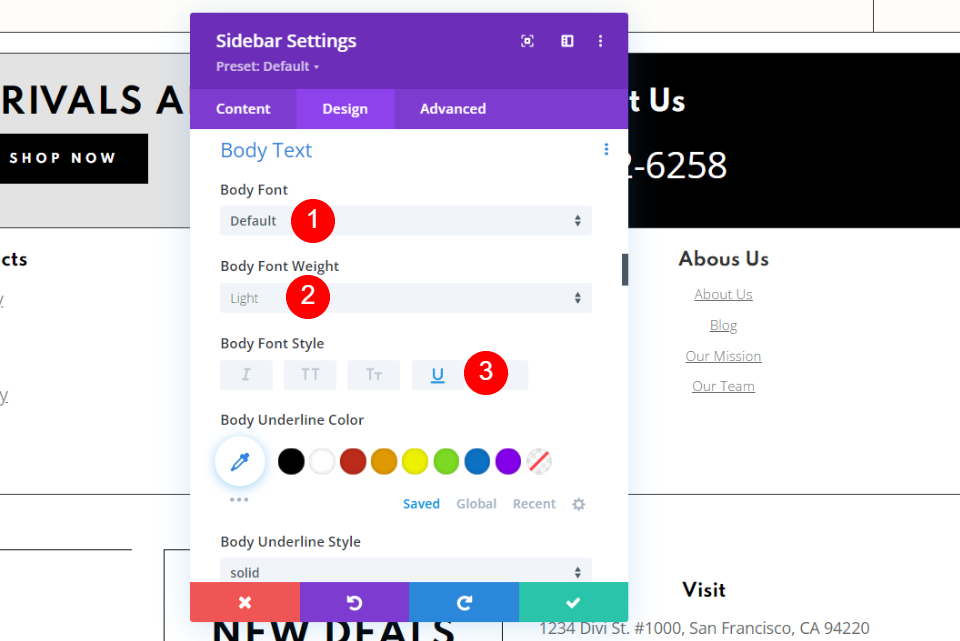
- Body Font: Default
- Font Weight: Gentle
- Font Style: Underline
- Desktop
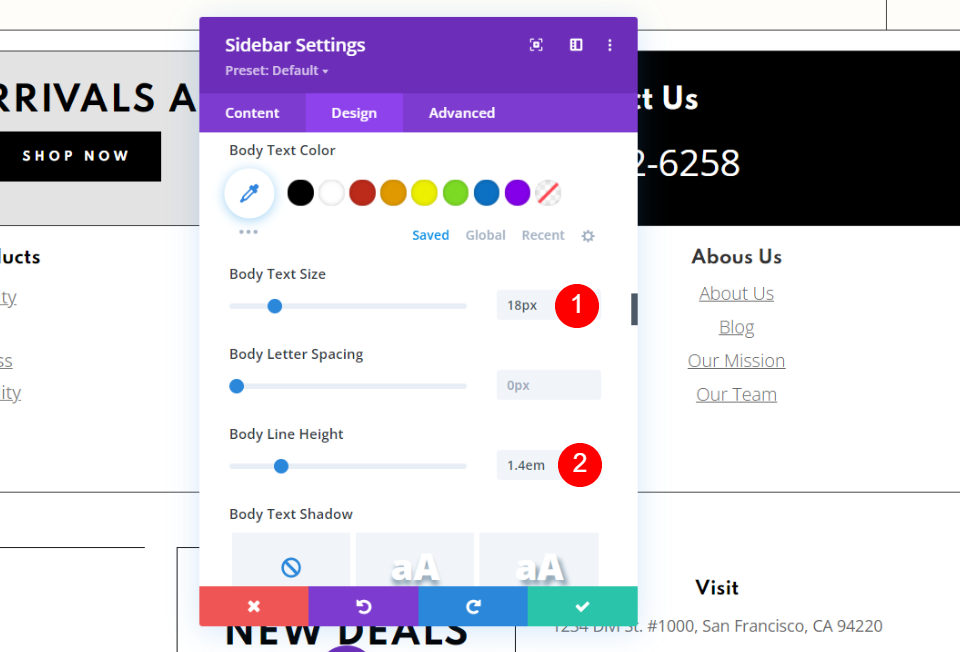
- Body Text Dimension: 18px
- Body Line Top: 1.4em
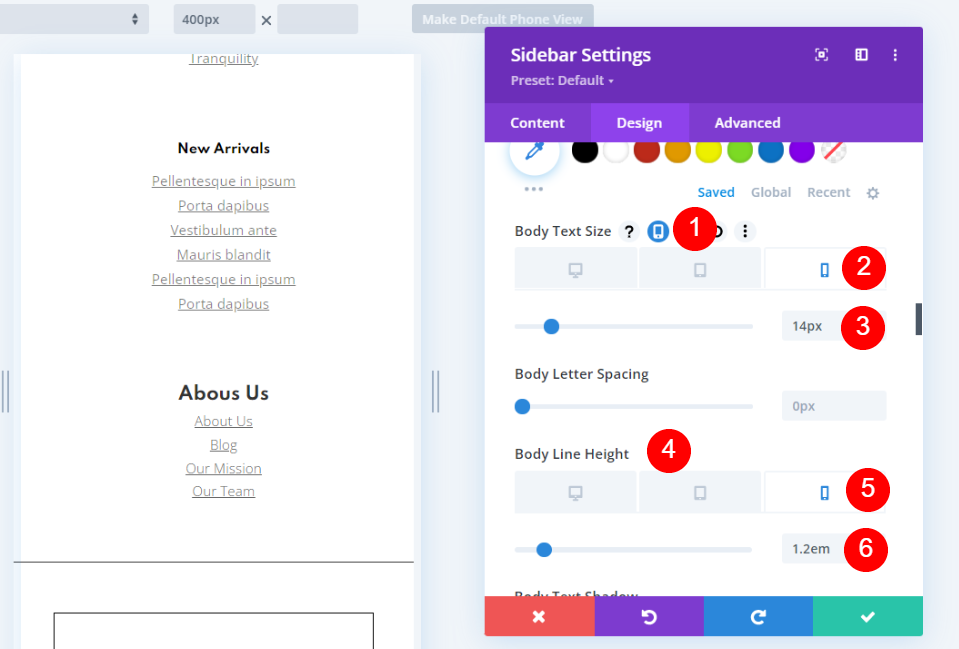
- Phone
- Body Text Dimension: 14px
- Body Line Top: 1.2em
- Widget Are settings: Footer Area #2
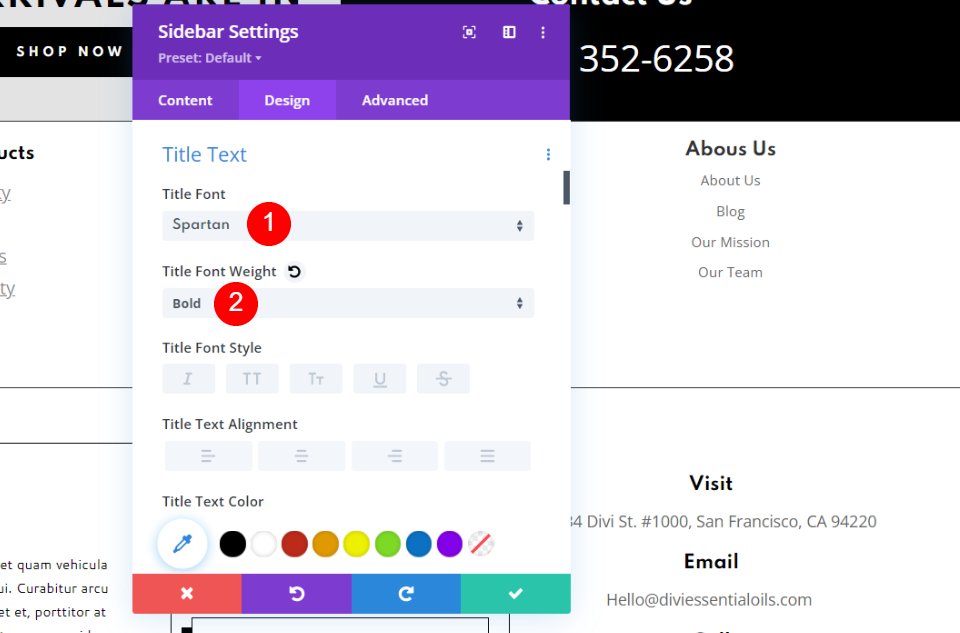
Identify Text
Scroll proper all the way down to Identify Text. Make a choice Spartan for the Identify Font and choose Bold for the Identify Font Weight.
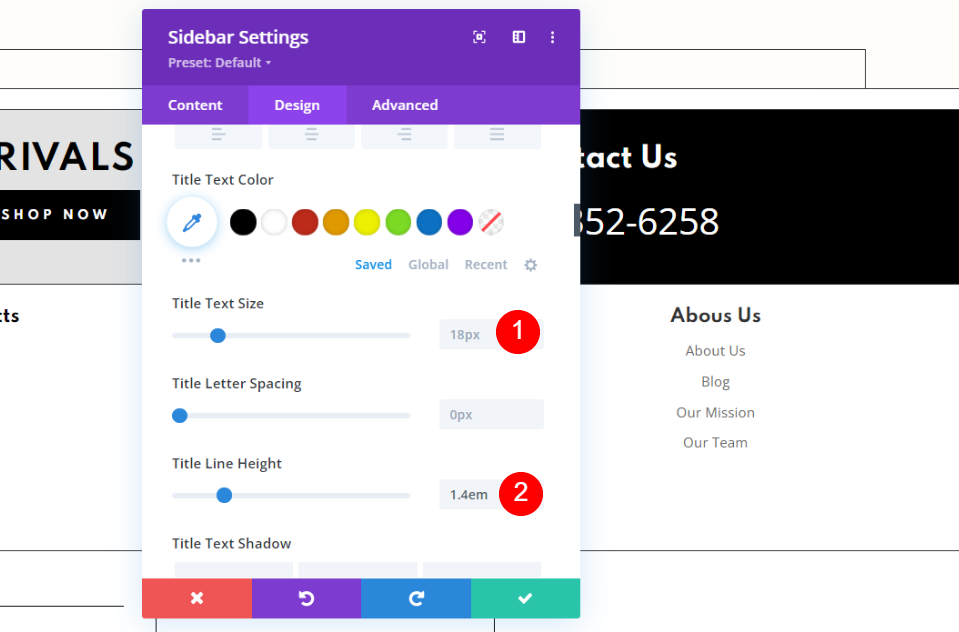
Leave the Identify Text to 18px. Set Identify Line Top to 1.4em.
Hover over Identify Text Dimension and choose the instrument icon. Make a choice the Phone icon and set the Identify Text Dimension to 13. Leave Identify Line Top at 1.4em.
Body Text
Beneath Body Text, go away the Font at Default. Set the Font Weight to Gentle. Set the Font Style to Underline.
Set the Body Text Dimension for the Desktop to 18px. Set the Body Line Top to 1.4em.
Make a selection the Device icon for the Body Text Dimension. Set the Phone Body Text Dimension to 14px. Make a selection the Device icon for the Body Line Top and set the Phone Body Line Top to 1.2em.
Add the Retailer Categories Sidebar
Next, we’ll alternate the Our Products menu with a sidebar that can show our retailer categories. First, delete the two text modules.
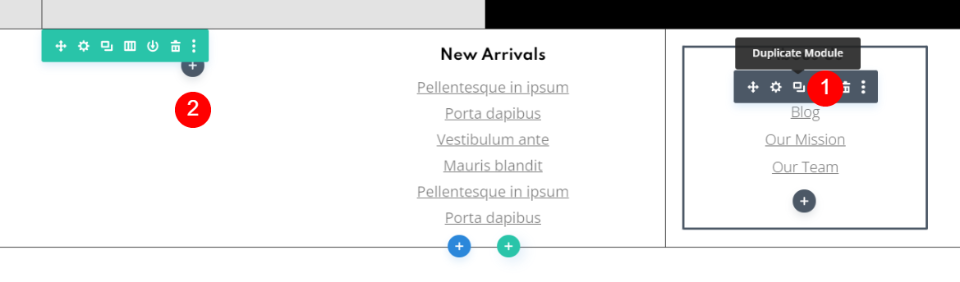
Next, copy the About Us sidebar module and drag it into the web page of our Retailer Categories menu.
Make a selection the Retailer Categories Menu
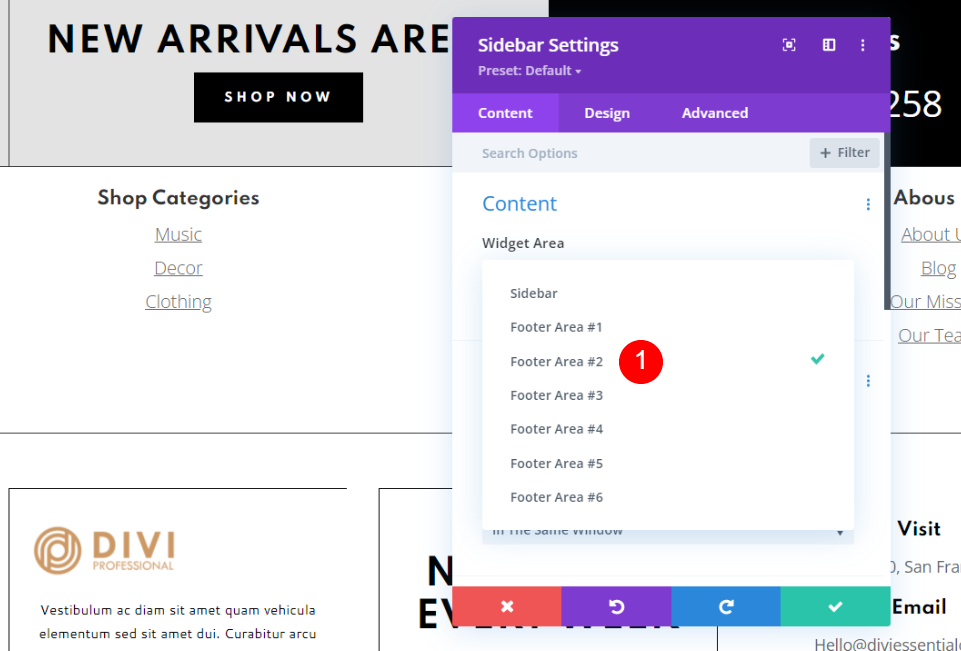
Open the Sidebar module. Throughout the Widget Area settings, choose Footer Area #2.
Now save the changes and cross out the Visual Builder. We’re completed.
Now we have two new menus that are easy to change. Proper right here’s how they seem on desktop and mobile.
Desktop

Listed below are the two menus on the desktop. They artwork neatly within their house.
Cellular

Listed below are the two mobile menus. They stack typically and blend neatly with the menu throughout the middle that we didn’t alternate.
That’s our check out the way to add Divi footer WordPress menus on your internet web page. The ones menus are easy to create using the footer widgets and together with them with Sidebar modules. They’ve the good thing about being easy to change. In the event you’ve organize your sidebar module you’ll have the ability to alternate the menu merely.
We want to concentrate from you. Have you ever ever added Divi footer WordPress menus on your internet web page? Let us know throughout the comments.
The publish How to Add WordPress Menus to Your Divi Footer seemed first on Elegant Themes Blog.
Contents
- 1 Divi Footer WordPress Menus Preview
- 2 Create Your Divi Footer WordPress Menus
- 3 Add the Footer Widgets
- 4 Add a Footer Template throughout the Theme Builder
- 5 Edit the Divi Footer WordPress Menus on the Front-end
- 6 Divi Footer WordPress Menus Results
- 7 Completing Concepts on Divi Footer WordPress Menus
- 8 6 Best possible WooCommerce search engine marketing Plugins for 2023
- 9 Get a Unfastened Diet Training Structure Pack for Divi
- 10 Download a Free Coworking Space Theme Builder Pack for Divi

0 Comments