
Do you need to robotically deploy WordPress theme changes for your internet website online?
{{Most professional}} web developers use a fashion regulate tool like GitHub or Bitbucket and robotically deploy their changes to staging or live internet sites. You’ll use a deployment tool very similar to DeployHQ to act as an intermediary between your Git repository and your server.
In this article, we can show you learn how to robotically deploy WordPress theme changes using GitHub and Deploy.

Why Use a Style Keep an eye on Machine for WordPress Theme Building?
A fashion regulate tool lets you record changes to a record or set of files over the years with the intention to recall explicit diversifications later. In numerous words, each time we change a WordPress theme template, image, or CSS record, a fashion regulate tool helps to keep apply of the ones changes.
As an example, let’s say making a decision to run a batch of changes. If those changes explanation why a topic, then you definitely’ll have the ability to revert (or roll once more) to an provide ‘fashion’ of our WordPress Theme.
Git is a common fashion regulate tool, and shall we in a few consumers to art work on the an identical code base, very similar to a WordPress Theme. If two developers edit the an identical record, Git has built-in controls to care for the ones issues (known as merge conflicts).
For more information, check out our amateur’s information to the use of Git with WordPress.
Why Use a Deployment Machine?
A deployment tool that integrates with services and products very similar to GitHub lets you robotically or manually upload changes you’ve were given made for your WordPress theme.
You’ll see it as a one-way synchronization tool. For example, in case you occur to delete a record from your WordPress theme, you’d moreover wish to delete it by means of FTP as neatly. With a deployment tool, this is robotically completed for you whilst you devote your code changes to GitHub.
In this article, we’ll be running with a deployment tool known as DeployHQ, or simply Deploy. Deploy works with other Git repository providers like Bitbucket, alternatively we’re going to stick with GitHub for this tutorial.
Setting Up a GitHub Repository for Your WordPress Theme
First, you’ll want to organize an account on GitHub and then use the GitHub client for House home windows or Mac to store changes for your WordPress Theme.
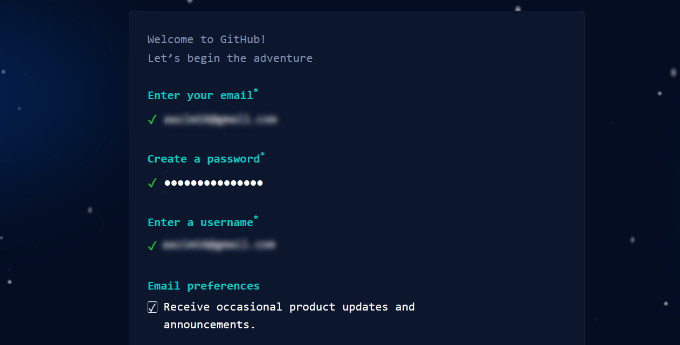
To start out, you’ll have the ability to discuss with the GitHub web site and enter your e-mail care for to create a brand spanking new account.

Next, you’ll want to enter a username and password.
GitHub will also ask you to make a choice e-mail preferences.
After that, you’ll have the ability to scroll down and test your account by means of solving a puzzle.
It’s very similar to reCAPTCHA for your WordPress website online.
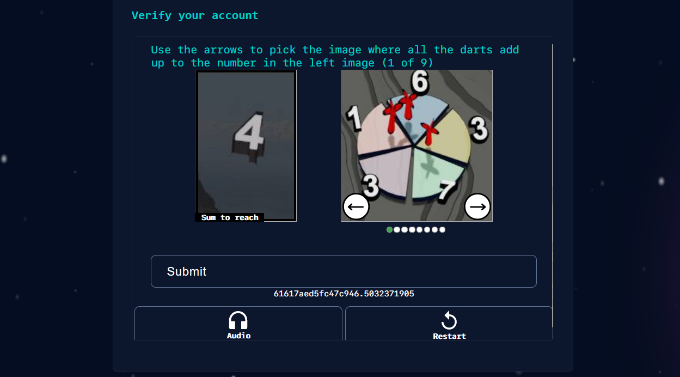
Once your account is verified, you’ll see the GitHub dashboard.
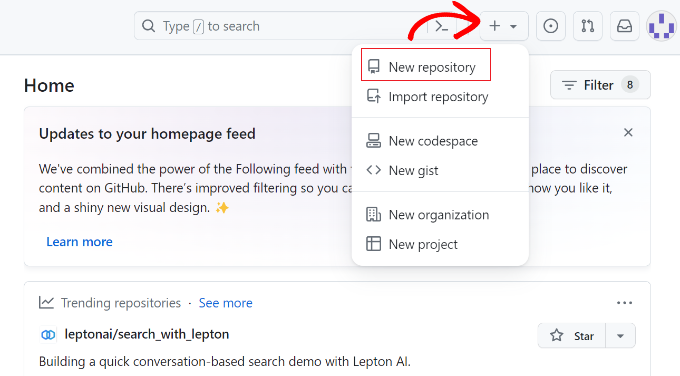
From proper right here, you’ll have the ability to click on at the ‘+’ icon at the top and choose the ‘New repository’ risk.
Next, you’ll have the ability to get began by means of surroundings the repository name, like your WordPress theme’s folder name.
Then, you’ll need to make a choice whether or not or no longer this can be a Public or Private repository. Public repositories allow everyone to look your code alternatively can’t make changes to it. Private repositories are available most efficient so as to see.
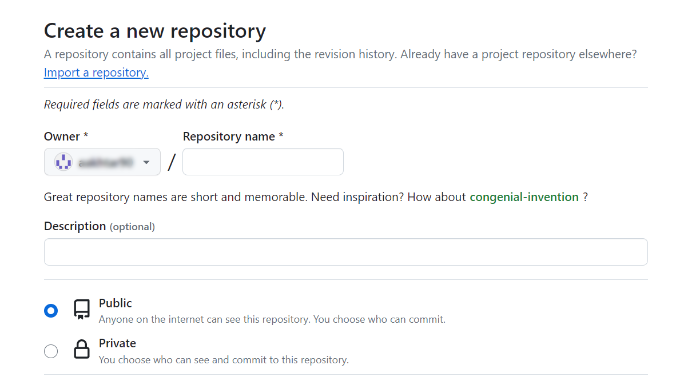
Finally, you’ll have the ability to tick the checkbox if you want to add a README record.
Once that’s completed, simply click on at the ‘Create repository’ button.

Your GitHub repository will now have the ability to be used.
Arrange GitHub for House home windows or Mac
Next, you need to put our WordPress Theme’s code into our repository. A simple way of doing this is by means of using the GitHub client, which installs for your pc.
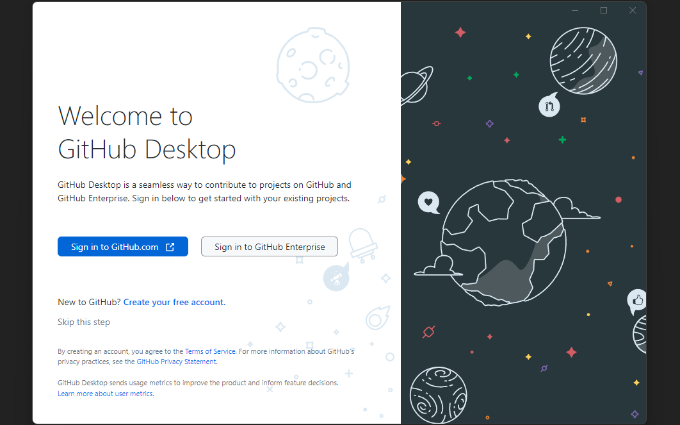
Simply discuss with the GitHub Desktop internet website online and procure the Desktop client available for House home windows or Mac.

As quickly because the download is entire, unlock the GitHub client.
Next, you’ll want to test in using your GitHub account. You’ll click on at the ‘Test in to GitHub.com’ button.
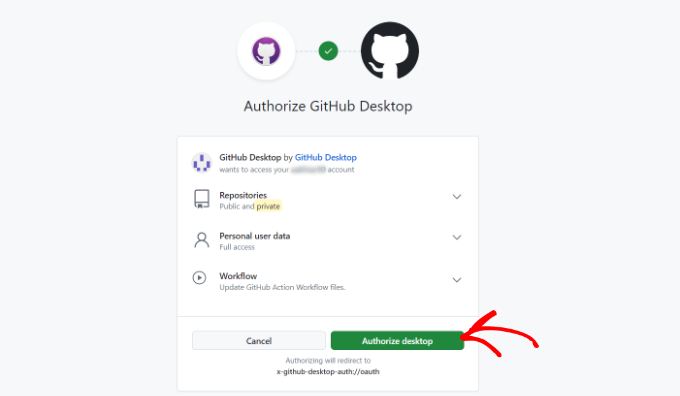
This will likely increasingly more unlock GitHub for your web browser.
Simply click on at the ‘Authorize desktop’ button to allow GitHub Desktop to get admission to your account.
After that, you’ll have the ability to open the GitHub Desktop client.
Next, you will need to configure Git. Simply choose the ‘Use my GitHub account name and e-mail care for’ risk and click on at the ‘Finish’ button.

Next, let’s add the GitHub repository that you just created earlier.
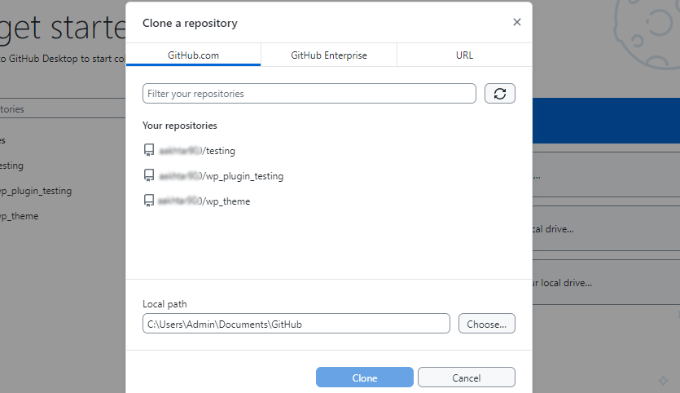
To check out this, click on at the ‘Clone a repository from the internet’ risk.

You’re going to peer a list of your GitHub repositories, along side the one you created earlier.
Simply choose the repository and choose where you need to store it for your pc under the ‘Local Path’ field. Once that’s completed, you’ll have the ability to click on at the ‘Clone’ button.
You’ve now cloned (copied) your repository hosted on GitHub to our pc.
Next, you need in an effort to upload our WordPress theme code to the repository’s folder and then devote and sync this code to GitHub.
You’ll get began by means of finding the folder you made a decision on inside the above step for your pc. It is going to need to have a README.md record inside the folder. Depending for your pc’s settings, you may also see the hidden .git folder.

Whilst you’ve made changes for your WordPress theme’s code, simply copy and paste them into this folder.
After that, you’ll have the ability to open the GitHub Mac or House home windows app and spot the files you’ve merely added appear inside the window:

You’re going to peer the changes highlighted in green. The ones are the changes that you just’ve were given saved inside the local repository, alternatively you haven’t however devoted those changes.
Next, you will need to devote (upload) the ones files to GitHub. To check out this, simply enter some text into the Summary box to explain the changes we’ve made and click on at the ‘Come to a decision to take hold of’ button.

This commits the changes you’ve made to the repository.
So as to add those changes to GitHub, you’ll have the ability to click on at the ‘Push basis’ button.

To check your devote has been uploaded to GitHub, discuss with your repository on the GitHub internet website online. If the whole thing works, you’ll see your code changes.
Setting Up Deploy
The entire step is to make sure that any changes for your GitHub repository are pushed for your WordPress web site.
DeployHQ, or Deploy, is a web based supplier that may apply changes for your GitHub repository, and robotically or manually upload merely those changes for your WordPress internet website online.
Imagine it as a connection between your code and the web server.
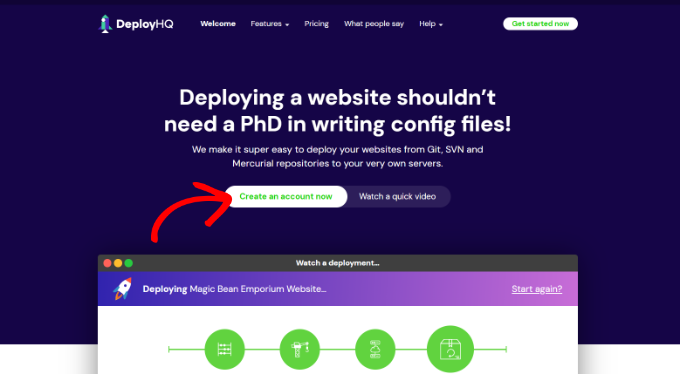
First, you need to discuss with the Deploy web site and sign up for a brand spanking new account. Deploy is a paid supplier, nevertheless it indisputably provides a free account for one challenge and 5 deployments consistent with day.
After finishing signing up, you’ll have the ability to log in for your Deploy dashboard.
From proper right here, you’ll have the ability to click on at the ‘Create a challenge’ button to get started.

Next, you need to offer a name in your challenge.
After that, you’ll have the ability to choose GitHub as your code internet hosting platform.
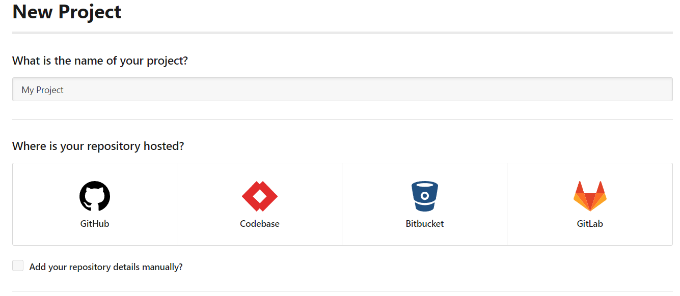
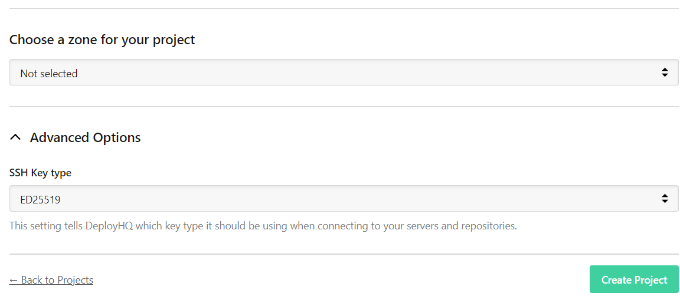
Must you scroll down, you’ll to search out additional possible choices like choosing a zone in your challenge and sophisticated possible choices.
Once that’s completed, click on at the ‘Create Undertaking’ button to continue.
Deploy will now redirect you to GitHub.
Must you aren’t already signed in, then you’ll be asked to login. After that, you’ll be asked to allow Deploy to get admission to your GitHub account.
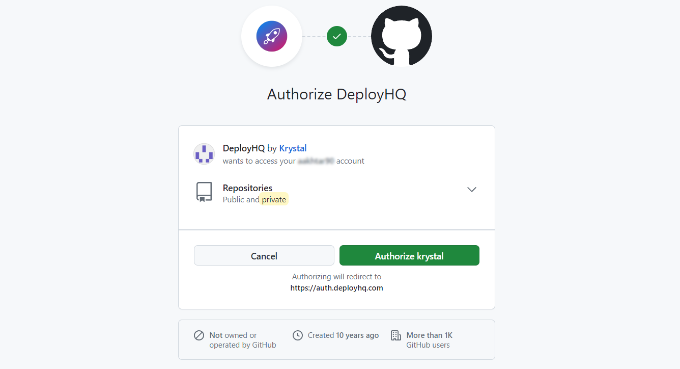
Simply click on at the ‘Authorize krystal’ button to continue.
Deploy will fetch the file of your repositories from GitHub and will ask you to select a repository for this challenge.
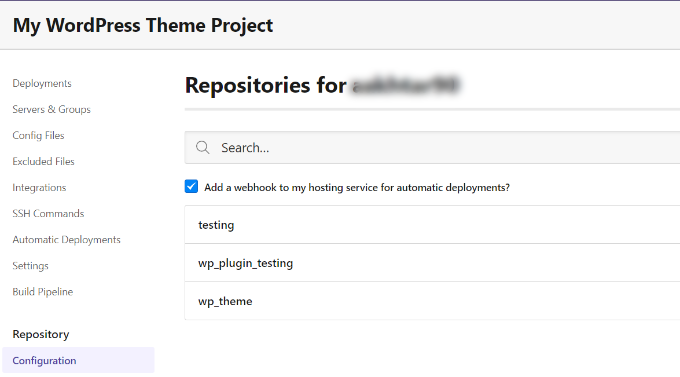
Simply click on on for your WordPress theme repository, and Deploy will import it for you.
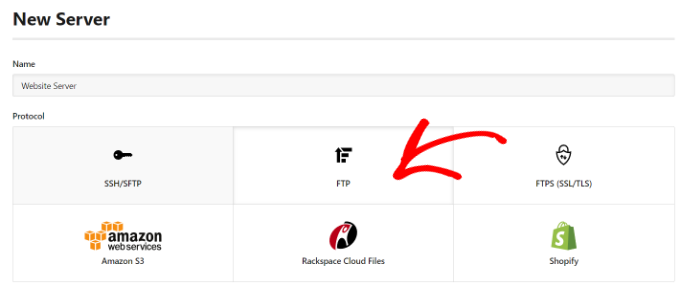
In the next move, Deploy will ask you to offer server wisdom. That’s the position you tell Deploy learn how so as to add files for your WordPress server.
You’ll get began by means of coming into a name and deciding on ‘FTP‘ since the protocol risk.
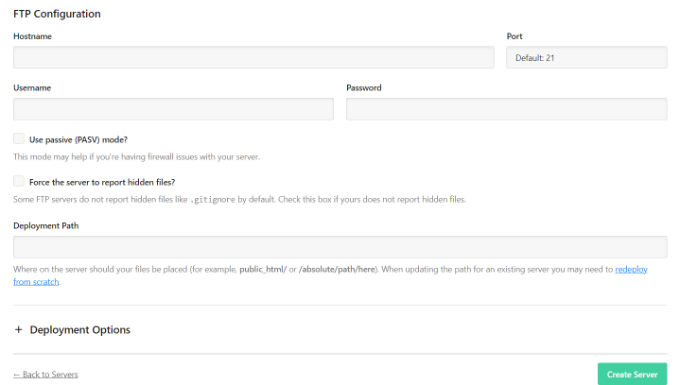
Next, you will need to scroll down and enter your FTP credentials.
- Hostname: Your internet website online’s SFTP/FTP host
- Port: Your internet website online host’s SFTP/FTP port (maximum regularly SFTP = 22, FTP = 21)
- Username and Password: FTP username and password
- Deployment Path: The path you’d navigate to quicker than uploading your WordPress theme files. For example, public_html/example.com/wp-content/subjects/MyTheme, where MyTheme is the WordPress theme you’ve were given devoted to GitHub.
After you have into the ones details, click on at the ‘save ‘Create Server’ button.
Deploy will now test your server connection and if the whole thing works accurately, then it’s going to show you a good fortune message.
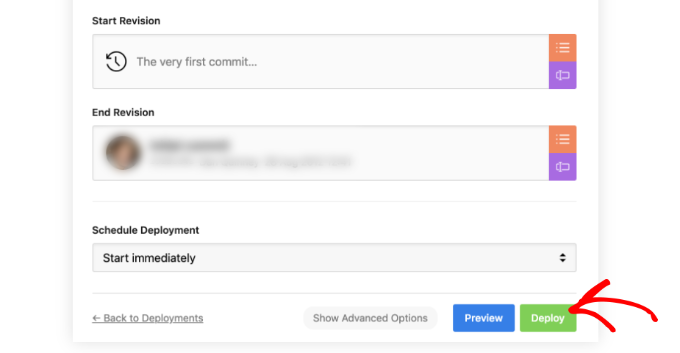
You’ll now click on on on the ‘Deploy’ button so as to add your GitHub files for your internet website online.
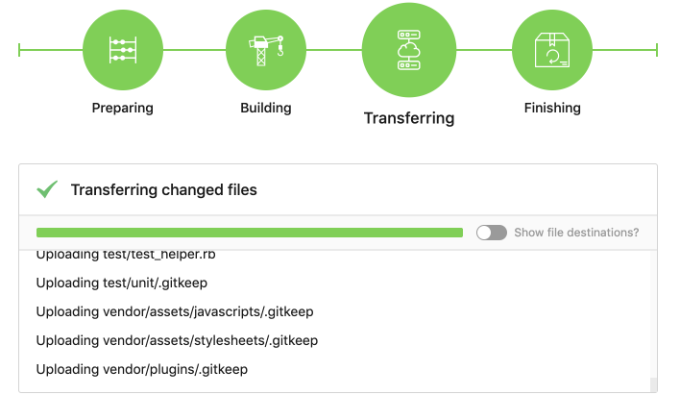
You’re going to now see the advance of deployment.
Once Deploy has finished, you’ll see a good fortune message.
It is advisable to have successfully deployed changes from GitHub for your internet website online using Deploy. Now, if you find yourself making changes for your WordPress theme for your pc, you need to devote them to GitHub. After that, you need to discuss with the Deploy internet website online to begin out the deployment manually.
Let’s see learn how to organize automated deployment so that any changes you make a decision to GitHub are robotically deployed for your internet website online.
Setting Up Automatic Deployment
First, you need to discuss with your Deploy dashboard and transfer to the ‘Tasks’ internet web page. From proper right here, simply click on on on the name of your challenge.
Next, you’ll have the ability to head to the ‘Automatic Deployments’ tab from the menu on the left.
Proper right here, you will need to allow the selection next for your server for auto-deployments.
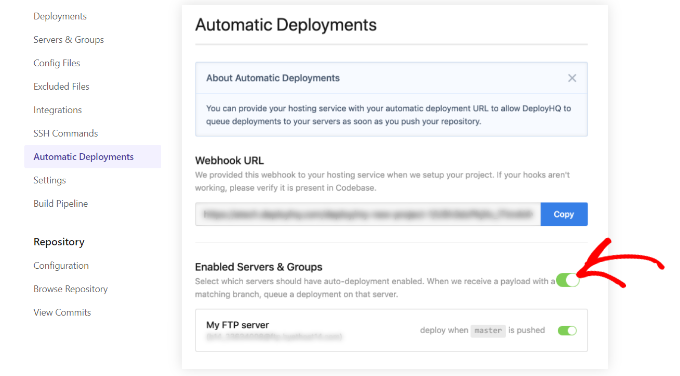
After that, you’ll have to duplicate the Webhook URL and add it for your GitHub account.
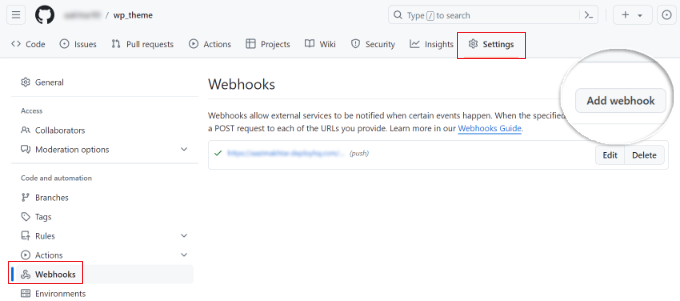
Simply log into your GitHub account in a brand spanking new browser tab. Then click on on for your repository and head to the Settings tab. From proper right here, you’ll have the ability to transfer to the Webhooks phase from the menu on the left and click on at the ‘Add webhook’ button.
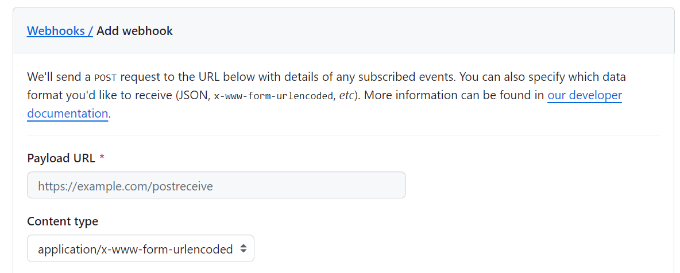
Now paste the webhook URL you copied from the Deploy server settings internet web page inside the Payload URL field.
After that, choose application/x-www-form-urlencoded since the Content material subject matter sort from the dropdown:
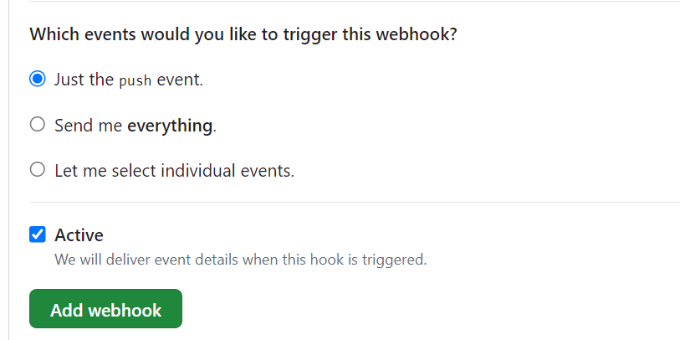
Next, you’ll have the ability to scroll down and choose which events must motive the webhook. You’ll use the default surroundings.
Once that’s completed, simply click on at the ‘Add webhook’ button.
That’s all. Your GitHub repository will now notify Deploy when there are new changes for your repository. Deploy will then robotically put into effect those changes for your internet website online.
We hope this article helped you learn how to robotically deploy WordPress theme changes The use of GitHub and Deploy. You may additionally want to see our data on find out how to create a staging setting for a WordPress website and must-have WordPress plugins for trade websites.
Must you most popular this article, then please subscribe to our YouTube Channel for WordPress video tutorials. You’ll moreover to search out us on Twitter and Fb.
The post The right way to Mechanically Deploy WordPress Theme Adjustments The usage of GitHub and Deploy first appeared on WPBeginner.

0 Comments