
Do you want so that you can upload a purchaser opinions internet web page in WordPress?
Many firms add a assessment internet web page on their website online to sing their own praises testimonials from their glad shoppers. This builds imagine among imaginable shoppers by means of proving that your product or service is of excellent prime quality.
In this article, we will show you discover ways to merely add a purchaser opinions internet web page in WordPress.

Why Add a Purchaser Critiques Internet web page in WordPress?
If you are running an on-line retailer or a industry website online, then you probably already have shoppers who’re happy at the side of your services and products and merchandise.
Showing social proof like purchaser opinions and testimonials helps you got the imagine of new shoppers. This may end up in upper product sales by means of convincing imaginable shoppers to make a purchase order order.
Plus, testimonials can also support your search engine rankings by means of bringing fresh and unique content material subject material to your WordPress site.
Critiques can also increase engagement and create some way of group, construction brand loyalty among shoppers.
That being discussed, let’s take a look at discover ways to add purchaser assessment pages in WordPress. You’ll have the ability to use the quick links underneath to jump to the method you want to use:
Means 1: Add Purchaser Critiques The usage of Critiques Feed Skilled
One of the vital most simple tactics so that you can upload purchaser opinions to your WordPress website online is by means of the usage of the Wreck Balloons Evaluations Feed Professional plugin.
It’s the easiest WordPress buyer critiques plugin to be had available on the market that lets you add opinions from crucial platforms on the internet, in conjunction with Google, Yelp, and Facebook.
It moreover robotically copies your website online design so that the opinions suit your WordPress theme and look like a natural part of your blog.
First, you need to position in and switch at the Evaluations Feed Professional plugin. For added details, it’s good to want to see our amateur’s data on learn how to set up a WordPress plugin.
Understand: Critiques Feed moreover has a unfastened model that you simply’ll have the ability to use to mix with Google or Yelp. On the other hand, we will be the usage of the Skilled style in our tutorial as it has additional choices and integrations.
Upon activation, head over to the Critiques Feed menu tab from the WordPress admin sidebar.
Once there, simply copy and paste your license key into the sector and click on at the ‘Activate’ button.
You’ll have the ability to get your license key from your account web page on the Break Balloon website online.

After getting completed that, the ‘Create a Analysis Feed’ internet web page will open up to your computer screen.
From proper right here, merely click on at the ‘+ Add Provide’ button so that you can upload a provide on your purchaser opinions.

This may occasionally from time to time open up the ‘Add Property’ urged on the computer screen, where you’ll be ready to select the provision on your opinions. For this educational, we will be the usage of Google since the provide.
After making your variety, click on at the ‘Next’ button to move forward.

You’re going to now be directed to your next step.
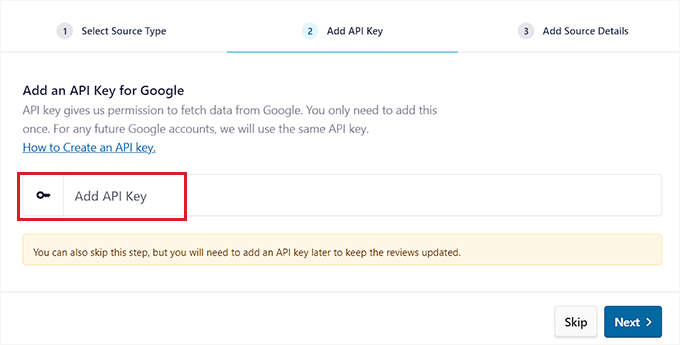
Proper right here, you need so that you can upload an API key for Google opinions so that the Critiques Feed plugin can fetch wisdom from your account and display it to your WordPress website online.
Create a Google API Key
To get an API key for Google opinions, discuss with Google Console and test in the usage of your Google account.
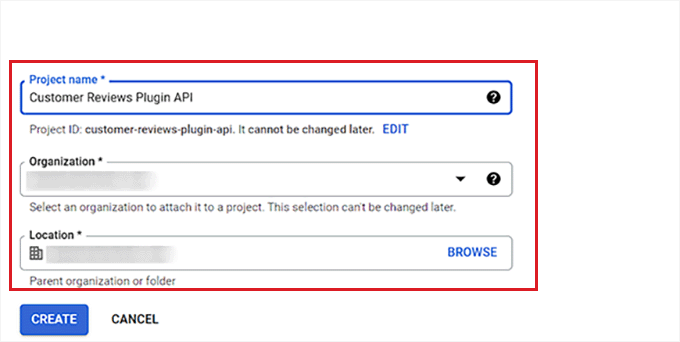
Once you’re on the ‘Google Cloud’ internet web page, click on at the ‘Create Enterprise’ button.
This may occasionally from time to time take you to the ‘New Enterprise’ internet web page, where you’ll have the ability to get began by means of typing in a name. For example, we will be naming our venture’ Purchaser Critiques Plugin API’.
After that, choose an Team and Location for the venture from the dropdown menus and click on at the ‘Create’ button.
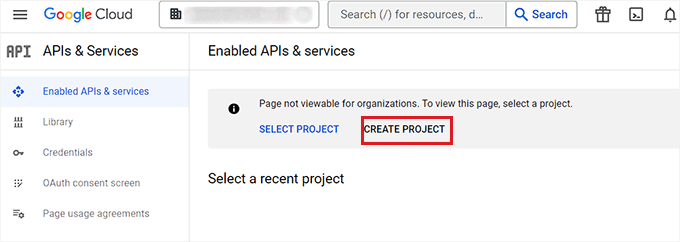
After getting created the venture, you’ll be redirected to the ‘APIs & Products and services and merchandise’ internet web page.
From proper right here, first, make sure that the venture you’ve created is the one that is selected inside the dropdown menu at the best.
After that, click on at the ‘+ Allow APIs & Products and services and merchandise’ button.
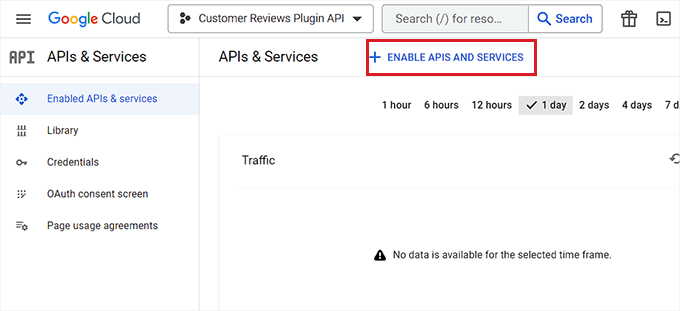
You’re going to now be taken to the API library.
Proper right here, click on on on the ‘Places API’ chance in the proper corner of the computer screen.

This may occasionally from time to time take you to a brand spanking new internet web page where you’ll have the ability to flip at the necessary factor for making Places API requests.
To check out this, simply click on at the ‘Allow’ button.

Now, head once more to the ‘APIs & Products and services and merchandise’ internet web page and switch to the ‘Credentials’ tab inside the left sidebar.
Once you’re there, merely click on at the ‘+ Create Credentials’ button to open up a dropdown menu and make a selection the ‘API Key’ chance.

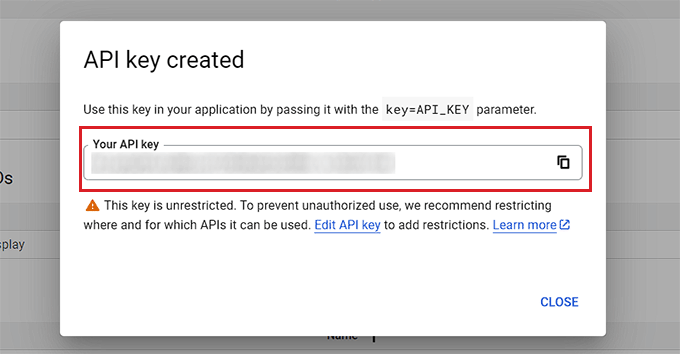
After your API key’s created, a brand spanking new urged will open up on the computer screen.
From proper right here, simply copy your key and head once more to the WordPress admin dashboard.
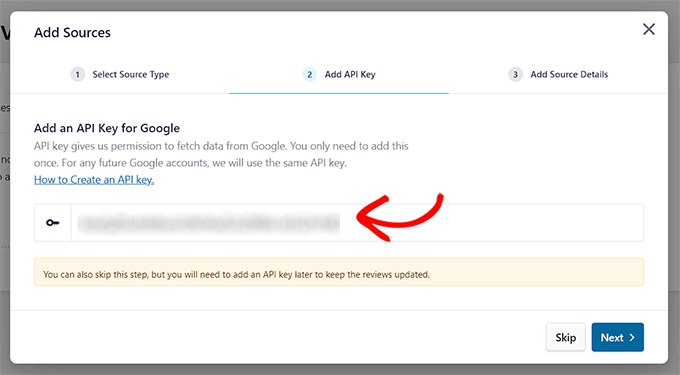
Once you’re there, open up the ‘Add Property’ urged once over again.
After that, paste your Google Critiques API key into the sector and click on at the ‘Next’ button to continue.
Now, it is very important enter the Place ID of the cafe, consuming position, or other physically industry that you want to use to your feed.
To check out this, discuss with Google’s Position ID internet web page and scroll the entire approach right down to the ‘To seek out the ID of a selected place’ section.

From proper right here, enter the take care of or establish of the venue that you simply’re discovering and click on on at the right kind one when it appears.
Google will now show the Place ID in a small popup. Simply cross ahead and copy the ID.

Now, head over to the WordPress dashboard and paste the Place ID into the sector.
After that, click on at the ‘Finish’ button to complete the setup.

You might have now successfully integrated Google Critiques with Break Balloon Critiques Feed Skilled.
Customize the Critiques Feed
The Google Critiques feed will now be displayed inside the ‘Add Property’ section.
From proper right here, simply choose the feed and click on at the ‘Next’ button at the best.

You’re going to now be taken to the ‘Select a Template’ internet web page.
Proper right here, make a selection a template for the opinions feed in line with your liking.

After getting completed that, the feed editor will robotically open up to your computer screen.
It’s going to show a live preview of your feed at the right kind and a sidebar with different settings on the left.
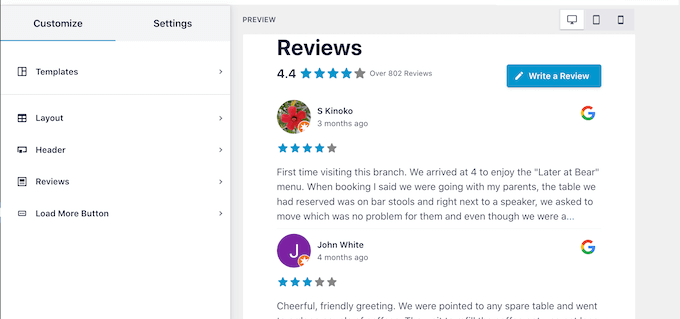
From proper right here, you’ll have the ability to customize the layout, header, colors, and additional of your opinions feed. For added details, it’s good to want to see our tutorial on learn how to display Google, Fb, and Yelp critiques in WordPress.
Upon getting finished customizing the feed, don’t overlook to click on at the ‘Save’ button at the best correct corner to store your settings.
Embed the Purchaser Critiques Feed on a WordPress Internet web page
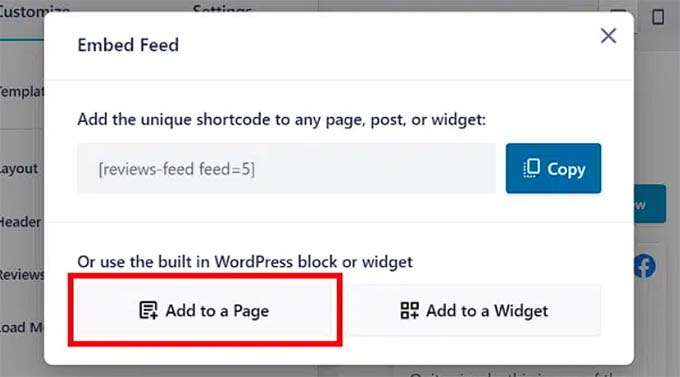
To embed the opinions feed in a WordPress internet web page, click on on on the ‘Embed’ button at the best correct corner.
This may occasionally from time to time open up the ‘Embed Feed’ urged on the computer screen. From proper right here, simply click on on on the ‘Add to a Internet web page’ button.
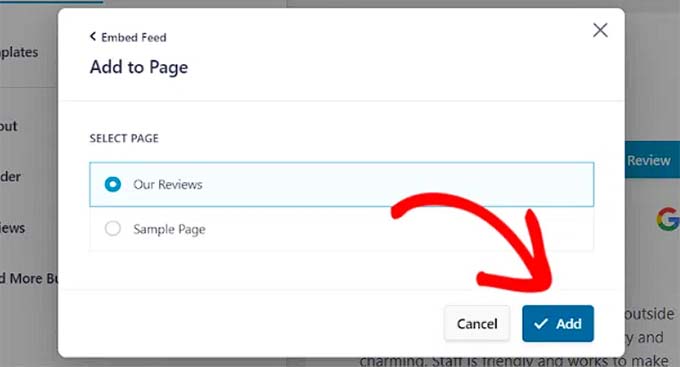
The plugin will now display all the pages to your WordPress website online.
You wish to have to click on on on the internet web page where you want so that you can upload the opinions feed and click on at the ‘Add’ button.
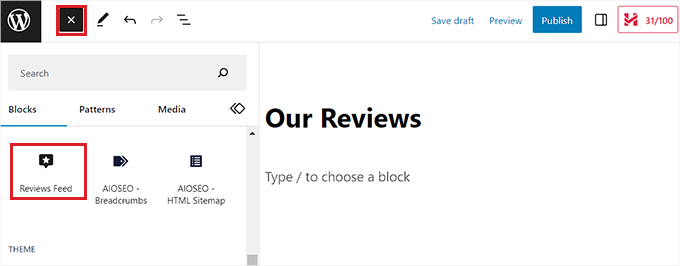
The internet web page you decided on will now open up inside the block editor.
Proper right here, click on at the ‘Add Block’ (+) button at the best left corner of the computer screen and to search out the ‘Critiques Feed’ block.
Upon together with the block, the opinions feed will robotically be added to the WordPress internet web page.
Once you’re completed, don’t overlook to click on at the ‘Exchange’ button to save lots of a lot of your changes.
Now, you’ll have the ability to discuss with your WordPress weblog to check out the opinions feed in movement.

Means 2: Create a Purchaser Critiques Internet web page The usage of SeedProd
If you want to add purchaser opinions to your website online manually, then this system is for you.
SeedProd is the easiest WordPress web page builder plugin to be had available on the market that lets you create aesthetically fulfilling subjects and pages without the usage of any code.
It even comes with a Testimonials block that can manually add purchaser opinions and testimonials to your landing pages.
First, you need to position in and switch at the SeedProd plugin. For detailed instructions, please see our step-by-step data on learn how to set up a WordPress plugin.
Understand: SeedProd moreover has a unfastened model that you simply’ll be ready to check out. On the other hand, we will be the usage of the highest elegance style in our tutorial as it has additional choices.
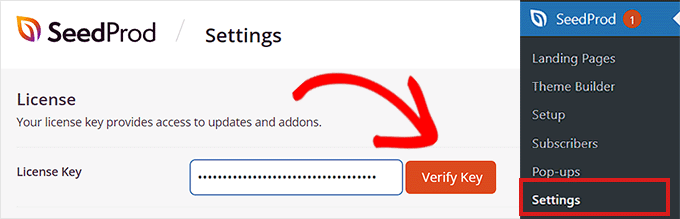
Upon activation, head over to the SeedProd » Settings internet web page to enter the plugin license key.
You’ll have the ability to to search out this information to your account on the SeedProd website online.
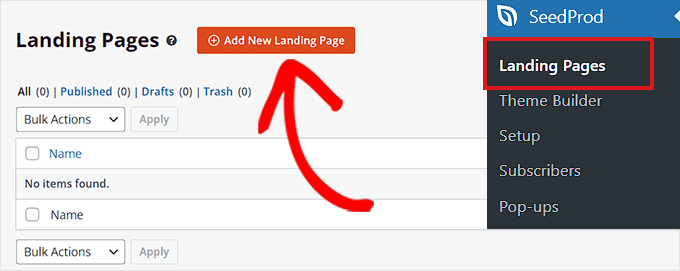
Next, cross to the SeedProd » Landing Pages section from the admin dashboard and click on on on the ‘Add New Landing Internet web page’ button.
For this educational, we will be together with purchaser opinions to a landing internet web page.
This may occasionally from time to time direct you to the ‘Make a choice a New Internet web page Template’ computer screen.
SeedProd supplies many pre-made layouts that you simply’ll have the ability to use on your landing pages. Simply choose one and click on on on it.
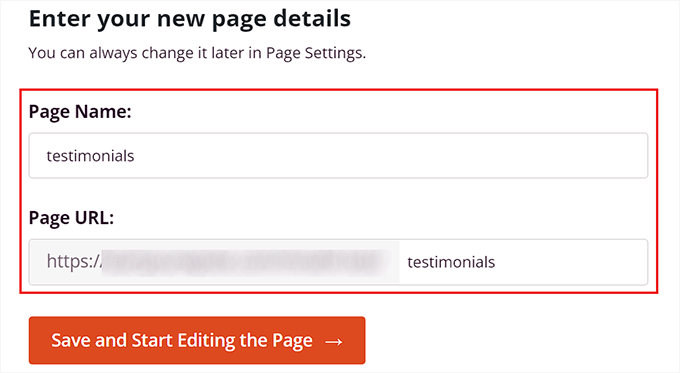
You’re going to then be asked to enter a internet web page establish and choose a URL. Upon getting into this information, click on on on the ‘Save and Get began Bettering the Internet web page’ button to continue.
This may occasionally from time to time liberate SeedProd’s drag-and-drop internet web page builder, where you’ll have the ability to now get began editing your internet web page. For detailed instructions, please see our tutorial on learn how to create a touchdown web page in WordPress.
Once proper right here, you need to seek for the Testimonials block inside the block panel on the left side of the computer screen. Upon finding the block, simply drag and drop it to your preferred location on the landing internet web page.

Now that the ‘Testimonials’ block has been added, merely click on on on it to open up its settings inside the left sidebar.
After that, click on on on the demo testimonial to open its settings inside the sidebar.
Next, you’ll have the ability to add the text, image, establish, and establish for the patron assessment.

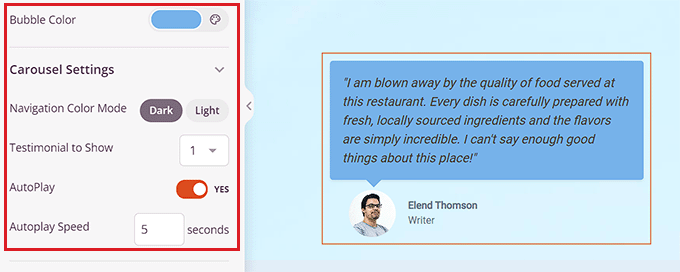
After getting completed that, scroll the entire approach right down to the ‘Carousel Settings’ section inside the left column.
From proper right here, you’ll be ready to select the testimonial color mode, autoplay tempo, the collection of testimonials confirmed in a row, and additional.
You’ll have the ability to even change the color of the speech bubble by means of clicking on the ‘Bubble Color’ solution to open up a color picker.
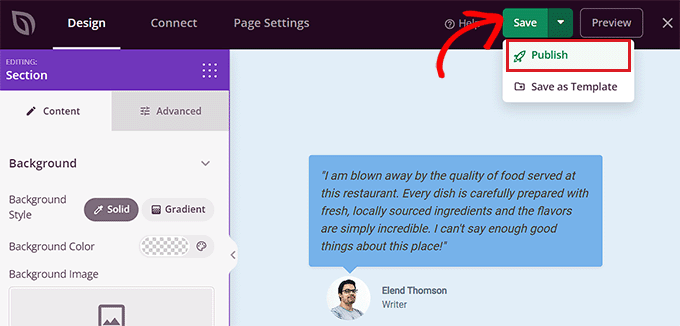
Once you’re completed, don’t overlook to click on at the ‘Save’ button at the best to store your settings.
Finally, click on at the ‘Publish’ button to put up the landing internet web page to your website online.
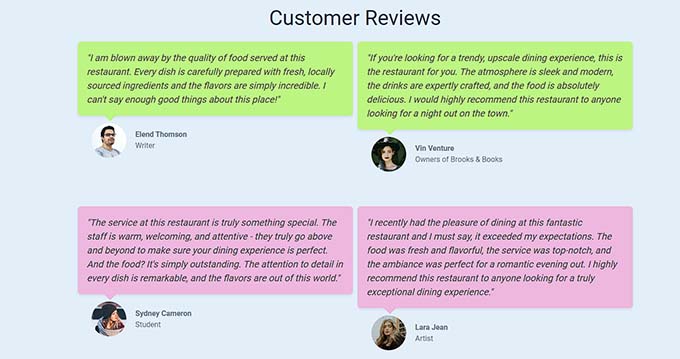
This is how the patron opinions seemed on our demo opinions internet web page.
As you’ll have the ability to see, we now have now different colors for our purchaser opinions.
Bonus: Add Social Proof in Precise-Time to Increase Conversions
Otherwise to encourage shoppers to buy your products or services is by means of together with real-time social proof to your WordPress website online.
Social proof is a psychological phenomenon where shoppers have a natural urge to duplicate other folks’s actions.
This means that you’ll have the ability to show a notification bubble with recent purchases and form submissions by means of other shoppers to your website online so as to encourage imaginable shoppers to take action.
You’ll have the ability to merely do this the usage of TrustPulse. It’s the easiest WordPress social evidence plugin to be had available on the market that lets you display real-time client task notifications to your website online, similar to products being purchased or form submissions.

The plugin moreover comes with choices like real-time event tracking, smart fascinated by, flexible design possible choices, actionable analytics, and additional. For more information, you’ll have the ability to see our entire TrustPulse evaluate.
With this plugin, you’ll have the ability to use FOMO to create anticipation and delight spherical your products or store, which is able to after all lead to upper conversions.
For detailed instructions, you’ll have the ability to see our tutorial on learn how to use FOMO for your WordPress web page to extend conversions.
We hope this article helped you learn how to add a purchaser assessment internet web page in WordPress. You may additionally want to see our tutorial on learn how to embed a YouTube are living move in WordPress and our best alternatives for the easiest social media plugins to broaden your website online.
Whilst you most well-liked this article, then please subscribe to our YouTube Channel for WordPress video tutorials. You’ll have the ability to moreover to search out us on Twitter and Fb.
The publish The right way to Upload a Buyer Evaluations Web page in WordPress first appeared on WPBeginner.

0 Comments