

Divi 5 is helping you take note and reuse your design choices. The usage of presets, you’ll be able to set your emblem colours, button kinds, heading sizes, and spacing as soon as, and each new component you upload can mechanically observe the ones regulations. This transforms your styling right into a reusable gadget that maintains consistency with out the repetitive paintings of styling every component for my part.
Stacked and Nested Presets take that gadget additional. You’ll be able to now layer kinds on best of one another, construct permutations with out duplicating paintings, and construct structure patterns that adapt as your design evolves. This put up guides you thru how presets paintings in combination and demonstrates easy methods to create a design gadget that scales along with your website. Let’s get to it!
Divi 5’s Preset-Primarily based Design Machine At A Look
Whilst you taste a button with explicit colours, shadows, and spacing, you’ll be able to save the ones precise settings as a preset. As soon as stored, you’ll be able to follow that preset to different buttons, they usually immediately inherit the similar glance.
This implies you design the button as soon as and reuse it in all places, so while you alternate the preset, each button the usage of it updates mechanically throughout all of your website. To make this paintings at scale, you wish to have to grasp the place presets can also be carried out.
Divi’s structure construction flows from huge boxes all the way down to person design possible choices. Sections include Rows, Rows include Columns, Columns include Modules, and Modules have Choice Teams (like Typography, Spacing, Borders). As a result of presets can also be carried out at any of those ranges, you get to regulate precisely how a lot remains constant and what sort of remains versatile.
Right here’s how the other preset sorts paintings in combination:
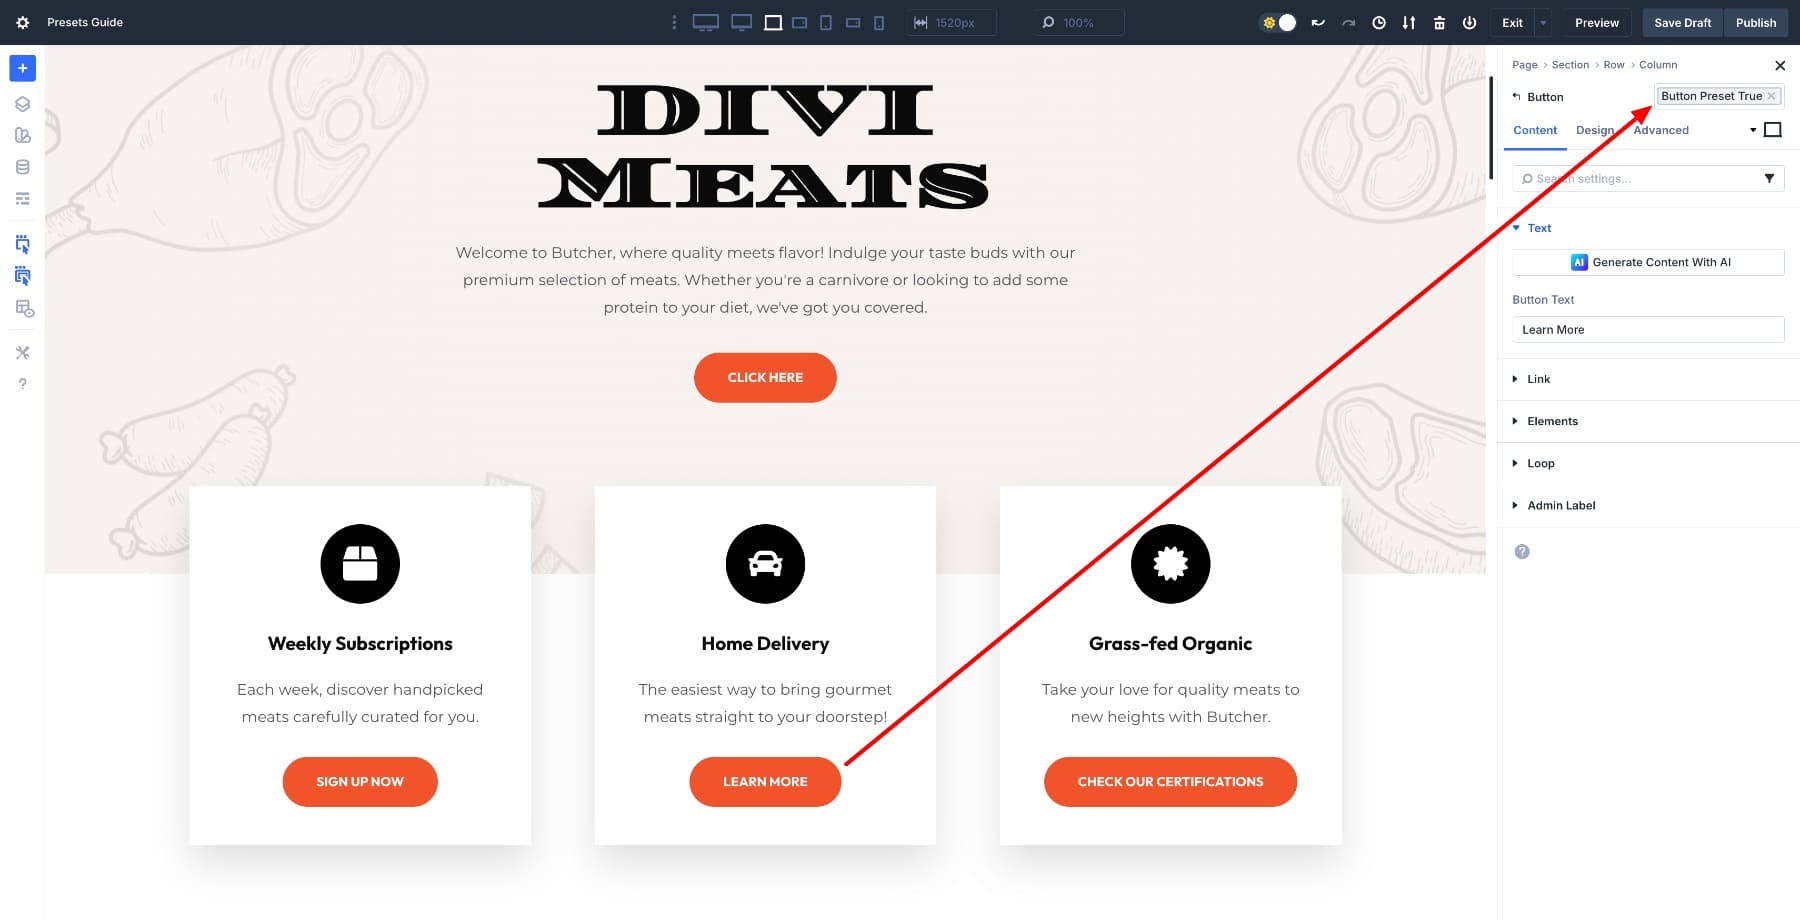
1. Component Presets
Those are stored kinds for explicit parts, similar to Button, Blurb, or Symbol modules. Whilst you create a Button preset, it saves each changed environment for that button, and that preset best works on different Button modules. This assists in keeping your design arranged via component kind. You’ll follow an Component Preset on the component degree within the settings.
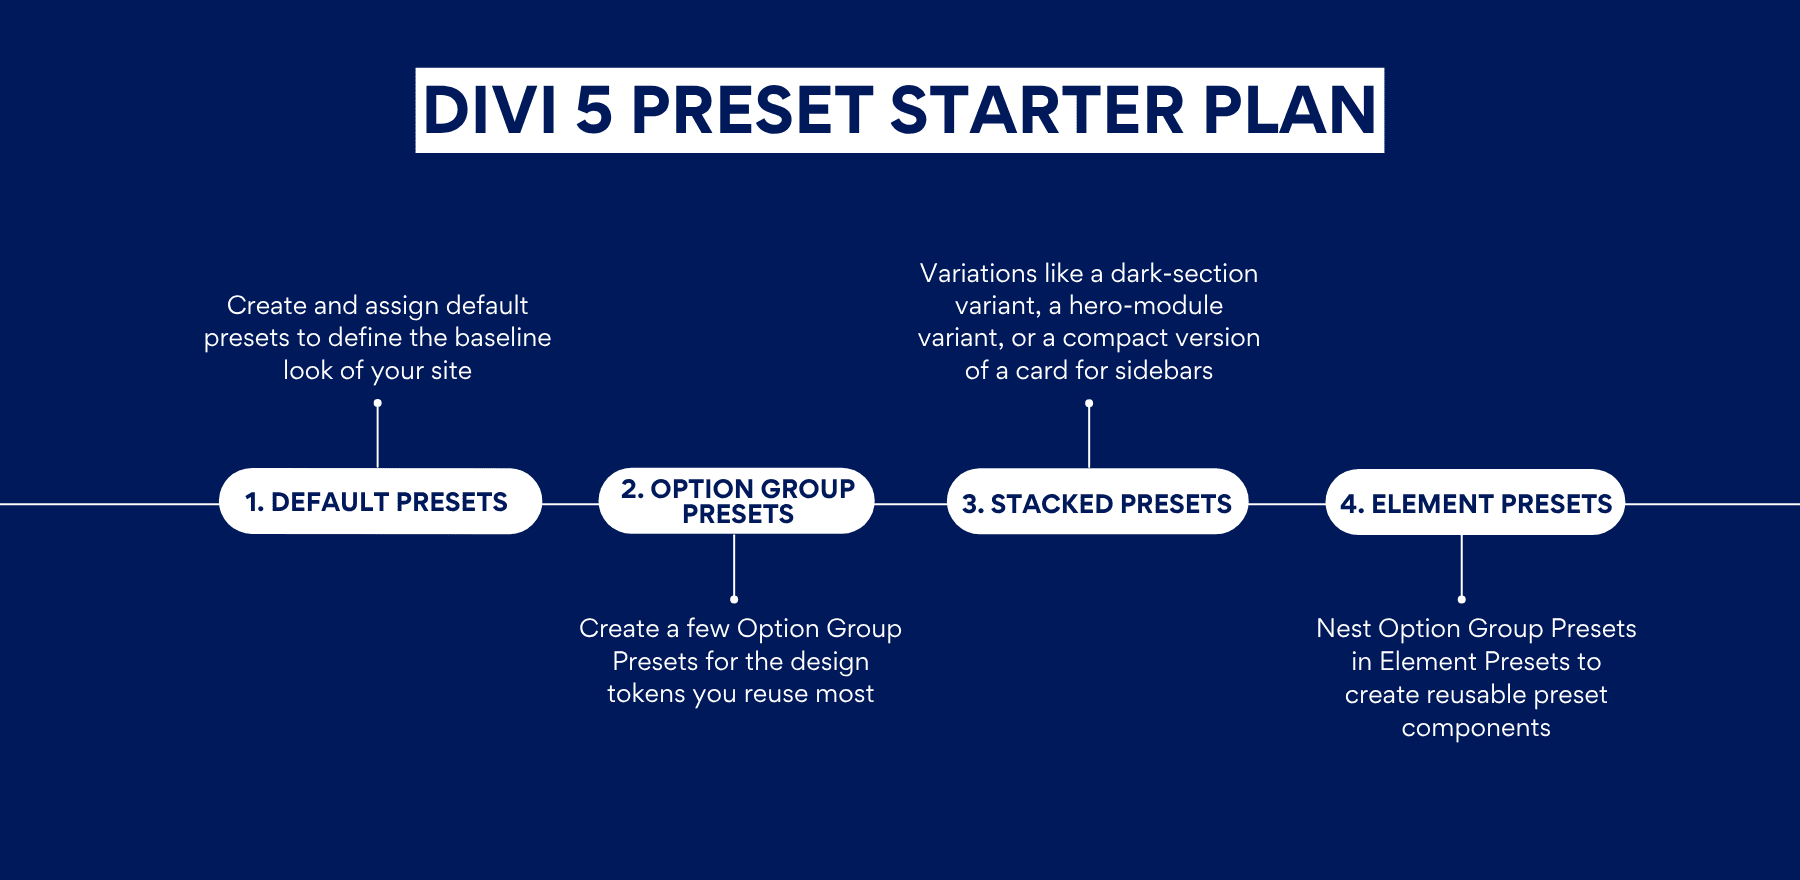
2. Default Presets
Each and every module kind has a default preset that determines its look the instant you upload it in your web page. You assign it via clicking the superstar on a preset. Whenever you edit the default Button preset, each new button you create will get started with the ones settings, which means that you’re defining your website’s baseline design from the beginning.
You’ll be able to even design your entire site using just default presets.
3. Choice Workforce Presets
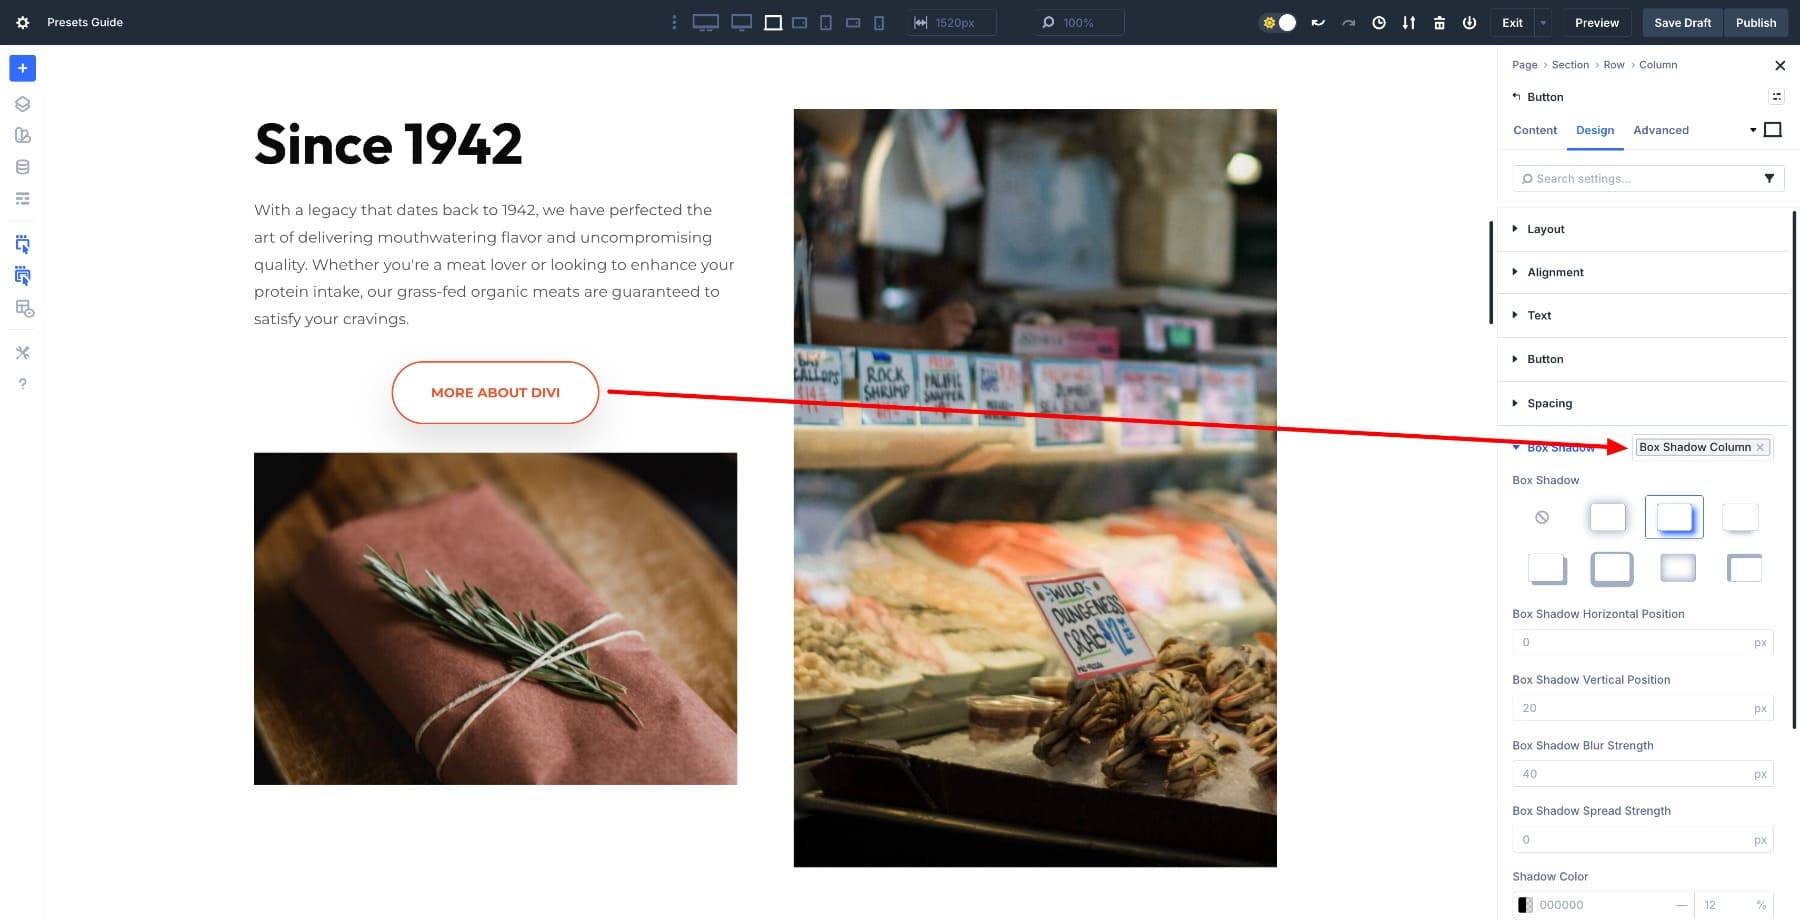
Those presets are scoped to precise design classes (Typography, Spacing, Borders, Shadows, and Transforms), and in contrast to Component Presets, they paintings throughout any component kind. Save a shadow configuration as an Option Group Preset, and you’ll be able to use it on buttons, photographs, columns, or sections.
This allows you to reuse one side of styling with out saving whole modules. You’ll follow OGPs within the related Choice Workforce’s settings. Be told the difference between Element and Option Group Presets.
Those 3 preset sorts paintings in combination to come up with flexibility at each degree. Defaults set the baseline, Component Presets bundle up entire modules, and Choice Workforce Presets allow you to reuse person styling choices any place.
Introducing Stacked & Nested Presets
Divi’s preset-based design gadget already stored time, nevertheless it was once incomplete. It is advisable create presets for modules and possibility teams, however blending permutations or development reusable elements with inner styling nonetheless required numerous guide paintings. Stacked and Nested Presets entire the gadget via making presets behave extra like exact design gadget layers.
Subscribe To Our YouTube Channel
1. Stack More than one Presets On Best Of Every Different
Stacked Presets help you follow more than one presets to the similar component and layer them, enabling Divi to mix their kinds. As an example, you’ll be able to have a Default button preset and different explicit ones for alignment and shadows. To present your hero button the emphasis it wishes, follow all 3 presets to the similar button.
The button will get the whole thing from the bottom preset, plus the changes from every variant stacked on best. This implies you now not want ten separate button presets to hide each situation as a result of your base design remains intact when you upload changes for explicit eventualities.
When you wish to have a light-text model for darkish sections, you stack a “Mild Textual content” Choice Workforce Preset on best of your base button. When you wish to have an outsized hero button, you stack the “Hero Measurement” preset. The bottom by no means adjustments, however the permutations layer cleanly on best of it, so that you’re operating with a core set of base kinds plus managed permutations that seem precisely when and the place you wish to have them.
Notice: When two Stacked Presets outline the similar assets, the final one carried out wins. Order issues. That is very similar to the CSS cascade: later regulations override previous ones once they goal the similar assets. Excluding you’re doing it visually with out touching the code.
2. Nest Choice Workforce Presets Within Component Presets
You’ll be able to now nest Choice Workforce Presets inside of Component Presets. Whilst you follow the Component Preset, it mechanically comprises the entire Choice Gropu Presets nested inside it, and the ones nested presets keep connected to their supply.
Say you create an Component Preset known as Column Preset that defines a column with a border and different settings. Then you definitely create a shadow possibility workforce preset. Upload that possibility workforce preset whilst modifying the column preset, and any new parts that use it’ll additionally inherit the shadow.
As a result of they inherit from the nested preset relatively than copying it, updating the OGP later updates all cases throughout your website concurrently.
You organize small design choices as soon as (like a shadow impact) and embed them into better presets. Your modules turn into exact elements that observe inner design regulations mechanically. The shadow preset doesn’t simply follow to 1 card. It’s a reusable token that may be nested inside of any preset that calls for it, throughout all module sorts.
This turns your preset library from a flat checklist of one-off kinds right into a structured, token-based gadget the place small choices propagate thru better patterns.
How Stacked And Nested Presets Paintings In combination
Those two options paintings in tandem to create an entire design gadget.
- Nested Presets maintain the interior common sense of an element. They outline what a card is via controlling its spacing, typography, shadow, and border radius. Those are the constant, structural regulations that stay unchanged irrespective of context.
- Stacked Presets maintain variation. They outline how the similar card adapts to other contexts, similar to making use of a darker background for hero sections, tighter spacing for sidebars, or inverted colours for testimonials. Those are contextual overrides that layer on best with out breaking the bottom construction.
In combination, this mixture will give you a number of benefits. Elements stay constant throughout your website as a result of their inner presets are nested and connected, which means that permutations don’t replica paintings, as they stack on best of base kinds relatively than changing them. On account of this construction, international design settings replace in all places while you alternate them as soon as, providing you with regulate over each construction and versatility on the similar time.
Learn Everything About Stacked Presets In Divi 5
Your Divi 5 Design Machine Starter Plan
Now that you know the way presets paintings in combination, you’ll be able to construct a easy design gadget that assists in keeping your website constant with out locking you into inflexible buildings. You don’t want twenty presets to get this proper. A handful of considerate choices that drift throughout your pages will paintings while you’re beginning out.
1. Start With Your Default Presets
Prior to growing any layouts or elements, set your baseline. Default Presets outline how new parts glance the instant you upload them to the web page, so locking those in first method the whole thing you construct later on begins from a constant basis.
Get started within the Variable Supervisor and define your global Design Variables. Set your emblem colours, make a selection your fonts, and determine a elementary typography scale for frame textual content and headings. Those variables shape the root that each preset attracts from, retaining long term adjustments centralized in a single position.
As soon as your variables are in position, create a unmarried, blank “base” preset for every module you utilize maximum continuously. Taste those presets the usage of your variables, as a result of this assists in keeping them tied in your central design gadget. Stay them easy. They’re the default variations you’d need to use in maximum eventualities, so that they must be impartial sufficient to paintings throughout other contexts.
After trying out every preset via including a contemporary module to the web page, assign probably the most continuously used one because the default. To take action, hover over the preset you wish to have to assign as default and click on at the superstar icon.
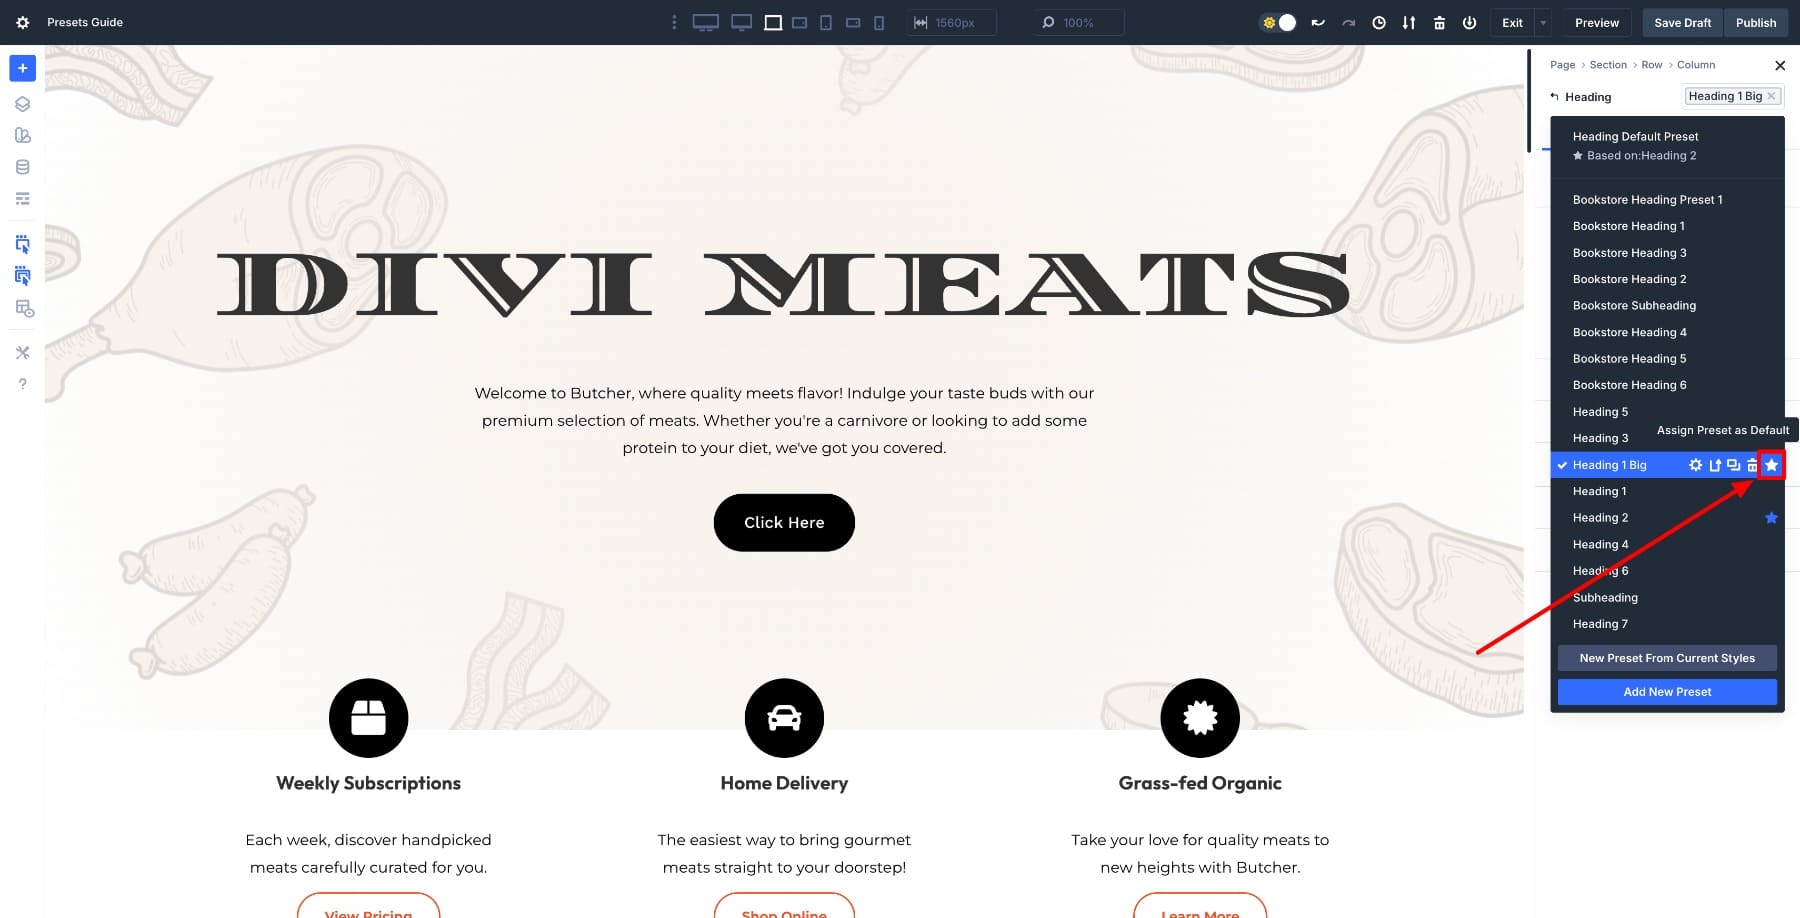
From this level on, each new heading you upload will inherit the kinds out of your default preset, which means that you’re beginning along with your core design already carried out.
Do that for different base parts, similar to buttons, boxes, or textual content blocks. That unmarried step removes the wish to restyle the similar parts many times as you construct, since the defaults maintain the repetitive give you the results you want.
2. Create Choice Workforce Presets For Your Reusable Design Settings
As soon as your default presets are set, the next move is breaking your design into reusable portions, which is the place Choice Workforce Presets are available in.
As a substitute of considering in the case of complete modules, pick out one usually used container and analyze the way it’s constructed. A Row is a great start line as it in most cases carries more than one design choices immediately, similar to background coloration, padding, border radius, and shadow.
Open a Row and magnificence it the best way you in most cases would. Set the background, regulate the padding, upload rounded corners, and follow a shadow. Now, as an alternative of saving this complete configuration as one preset, break up every design resolution into its personal Choice Workforce Preset.
As an example:
- Save the padding as a Spacing Choice Workforce Preset
- Save the shadow as a Shadow Choice Workforce Preset
- Save the border radius as a Border Choice Workforce Preset
- Save the background taste as a Background Choice Workforce Preset
Every preset represents a unmarried, reusable rule, which means that you’re now not saving a row’s Component Preset however relatively other Choice Workforce Presets that outline how rows behave throughout your website.
The benefit turns into transparent in an instant. That very same padding preset can also be carried out to sections, columns, or modules, and the similar shadow can also be reused on playing cards, photographs, or callouts. You’re development a shared design language relatively than duplicating kinds in more than one Component Presets, so every design resolution turns into a reusable token that may be carried out any place.
At this degree, focal point on figuring out patterns. For those who follow the similar padding, shadow, or border radius in a couple of position, it merits its personal Choice Workforce Preset, as those presets will later mix and layer cleanly, providing you with flexibility with out compromising consistency.
3. Nest Your Choice Workforce Presets Within Component Presets
As soon as Choice Workforce Presets are in position, they may be able to be mixed to shape structured, reusable elements thru Component Presets. That is the place person design choices start to paintings in combination as a cohesive gadget, relatively than present as separate settings.
A not unusual instance is the design of your row boxes. The similar spacing, border radius, and shadow Choice Workforce Presets can also be nested inside of more than one Row Component Presets, making sure that those structural regulations stay constant in all places they’re used.
What adjustments between presets isn’t the construction, however the context. For example, one Row Component Preset can nest a lightweight background Choice Workforce Preset, whilst every other nests a gloomy background preset. Each proportion similar padding, corners, and shadow habits, however visually adapt to other sections of the website since the background layer adjustments whilst the structural layer remains the similar.
This means works particularly neatly for gentle and darkish layouts, the place the underlying element stays the similar and best the outside styling shifts. As a result of those presets inherit from the similar Choice Workforce Presets, updates keep synchronized.
Modify the spacing or shadow as soon as, and each gentle and darkish container updates in combination with out dropping its meant distinction or position, so that you handle each consistency and variation concurrently.
Nesting Choice Workforce Presets this fashion turns Component Presets into exact elements. They bring about inner design regulations mechanically, whilst nonetheless permitting you to create functional permutations via recombining the similar design settings in several techniques.
4. Create Variation Layers The usage of Stacked Presets
As soon as your base elements are outlined thru Nested Presets, Stacked Presets turn into a technique to adapt the ones elements to other contexts with out converting their construction.
As an example, the similar container row preset can be utilized throughout lots of the website, however stacked with a variation preset when the context adjustments. A container positioned in a hero phase would possibly require better padding, so that you stack a distinct padding preset on best of the bottom element.
The similar container inside of a sidebar would possibly stack a compact spacing preset, and in a gloomy phase, it could stack a light-text or inverted-color preset. The underlying element stays untouched as a result of its inner spacing, border radius, and shadow proceed to come back from the similar nested Choice Workforce Presets. The stacked preset merely layers contextual changes on best, so that you’re editing best what wishes to switch for that exact scenario.
That is particularly helpful for patterns like gentle and darkish sections, hero layouts, or featured content material blocks. Fairly than growing separate Component Presets for every situation, you stack small, centered presets that override best what wishes to switch in that second, which assists in keeping your preset library manageable whilst nonetheless protecting your entire use instances.
Stacked And Nested Presets Entire Divi’s Design Machine
Divi 5 transforms presets right into a complete design gadget. With defaults, Choice Workforce Presets, and Component Presets in position, each new module begins with a plan in position.
Stacked and Nested Presets entire that workflow via letting you nest design settings inside of elements and stack permutations on best when context calls for it. This implies you’ll be able to replace whole patterns with a unmarried edit. Get started via defining a couple of forged defaults and construct a small preset library round them. Your pages will come in combination extra temporarily and stay constant as your website grows.
The put up The Ultimate Guide To Presets In Divi 5 (Including New Features) gave the impression first on Elegant Themes Blog.
Contents
- 1 Divi 5’s Preset-Primarily based Design Machine At A Look
- 2 Introducing Stacked & Nested Presets
- 3 Your Divi 5 Design Machine Starter Plan
- 4 Stacked And Nested Presets Entire Divi’s Design Machine
- 5 40 Impressed Trade Card Designs Too Helpful to Throw Away
- 6 75+ Mindblowing WordPress Cybersecurity Statistics for 2025
- 7 How To Redesign Your Web page

0 Comments