
Icon buttons have turn into crucial to the world of web design. Icons provide concise visual calls to movement that artwork great for mobile units on account of they don’t soak up a large number of space. Moreover they artwork neatly as toggle or popup buttons that consumers intuitively recognize without the need for text.
In in recent years’s tutorial, we will be showing you design icon buttons with Divi. Creating an icon button in Divi is quite simple and a laugh to do. Using the Icon Module, we will be able to choose from lots of icons and use a large number of built-in Divi Builder design possible choices to create on the subject of any more or less icon button you’ll be capable of call to mind. Hopefully, this article will help empower you to start out out development some superb icon buttons in your next mission.
Let’s get started!
Sneak Peek
Right here’s a quick take a look on the icon buttons we’ll assemble in this tutorial.
Download the Structure for FREE
To position your hands on the layout from this tutorial, you’ll first wish to download it the use of the button underneath. To understand get admission to to the download it is important to subscribe to our Divi Day-to-day e mail tick list via the use of the form underneath. As a brand spanking new subscriber, you’ll download a lot more Divi goodness and a unfastened Divi Structure pack every Monday! In the event you occur to’re already on the tick list, simply enter your e mail take care of underneath and click on on download. You’re going to no longer be “resubscribed” or download additional emails.
@media simplest show and ( max-width: 767px ) {.et_bloom .et_bloom_optin_1 .carrot_edge.et_bloom_form_right .et_bloom_form_content:faster than { border-top-color: #ffffff !important; border-left-color: transparent !important; }.et_bloom .et_bloom_optin_1 .carrot_edge.et_bloom_form_left .et_bloom_form_content:after { border-bottom-color: #ffffff !important; border-left-color: transparent !important; }
}.et_bloom .et_bloom_optin_1 .et_bloom_form_content button { background-color: #f92c8b !important; } .et_bloom .et_bloom_optin_1 .et_bloom_form_content .et_bloom_fields i { color: #f92c8b !important; } .et_bloom .et_bloom_optin_1 .et_bloom_form_content .et_bloom_custom_field_radio i:faster than { background: #f92c8b !important; } .et_bloom .et_bloom_optin_1 .et_bloom_border_solid { border-color: #f7f9fb !important } .et_bloom .et_bloom_optin_1 .et_bloom_form_content button { background-color: #f92c8b !important; } .et_bloom .et_bloom_optin_1 .et_bloom_form_container h2, .et_bloom .et_bloom_optin_1 .et_bloom_form_container h2 span, .et_bloom .et_bloom_optin_1 .et_bloom_form_container h2 powerful { font-family: “Open Sans”, Helvetica, Arial, Lucida, sans-serif; }.et_bloom .et_bloom_optin_1 .et_bloom_form_container p, .et_bloom .et_bloom_optin_1 .et_bloom_form_container p span, .et_bloom .et_bloom_optin_1 .et_bloom_form_container p powerful, .et_bloom .et_bloom_optin_1 .et_bloom_form_container form input, .et_bloom .et_bloom_optin_1 .et_bloom_form_container form button span { font-family: “Open Sans”, Helvetica, Arial, Lucida, sans-serif; } p.et_bloom_popup_input { padding-bottom: 0 !important;}

Download For Unfastened
Join the Divi Publication and we will e mail you a replica of the ultimate Divi Landing Internet web page Structure Pack, plus tons of various superb and unfastened Divi assets, guidelines and guidelines. Follow along and also you’ll be a Divi snatch in no time. If you’re already subscribed simply type in your e mail take care of underneath and click on on download to get admission to the layout pack.
You are going to have successfully subscribed. Please check out your e mail take care of to confirm your subscription and get get admission to to unfastened weekly Divi layout packs!
To import the section layout in your Divi Library, navigate to the Divi Library.
Click on at the Import button.
Inside the portability popup, make a choice the import tab and make a selection the download file from your laptop.
Then click on at the import button.
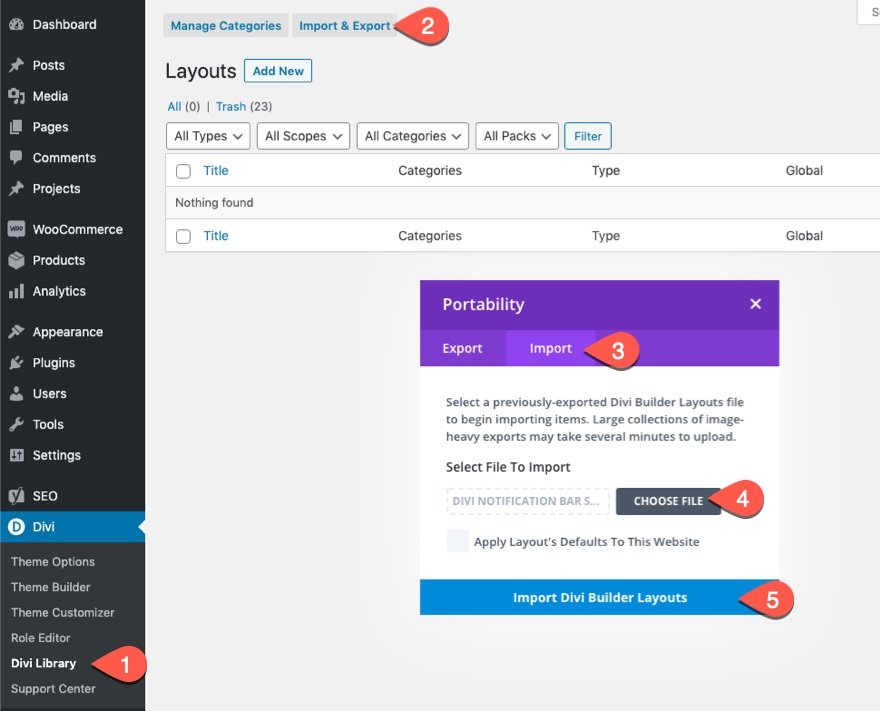
Once performed, the section layout may also be available inside the Divi Builder.
Let’s get to the learning, shall we?
What You Wish to Get Started
To get started, it is important to do the following:
- In the event you occur to haven’t however, install and activate the Divi Theme.
- Create a brand spanking new internet web page in WordPress and use the Divi Builder to edit the internet web page on the front end (visual builder).
- Make a selection the selection “Assemble From Scratch”.
After that, you’ll have a blank canvas to start out out designing in Divi.
Designing Icon Buttons with Divi’s Icon Module
Section 1: Building an Icon Button
To start out, let’s add a one-column row to the default commonplace section.
![]()
Then add a brand spanking new icon module to the column.
![]()
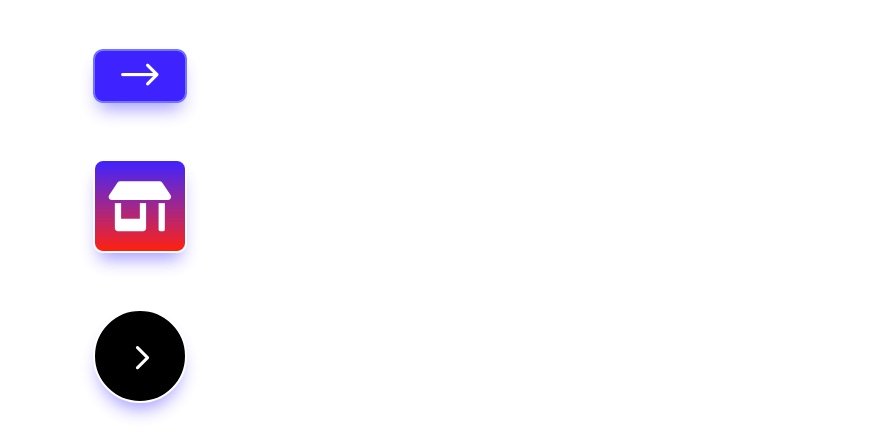
Icon, Link URL, and Background Color
Underneath the content material subject material tab of the icon settings modal, change the following:
- Icon: Right kind Arrow (see screenshot)
- Icon Link URL: # (just a filler for now)
- Background Color: #3e22ff
![]()
Border and Border Radius
Underneath the design tab, change the following:
- Rounded Corners: 10px
- Border Width: 2px
- Border Color: #7272ff
![]()
Box Shadow
- Box Shadow: See screenshot
- Shadow Color: rgba(62,34,255,0.48)
![]()
Matching Clickable House with Icon Button Dimension
In recent times, the icon module will span the overall width of the mummy or father container (or column). This means the clickable space is bigger than the true icon button. To test the clickable space with the size of the icon button, we will be able to give the module a max width that is the same as the icon button width. The icon button width will also be decided via together with the icon width, the left and correct padding, and the left and correct border width. In this example, the overall button width is 94px.
Underneath the sophisticated tab, add the following custom designed CSS the Number one Section:
max-width: 94px
![]()
That is the end result.
Section 2: Building a Sq. Icon Button
To create our sq. icon button, copy the row containing the main icon button we merely created. This can give us a replica button inside the copy row to artwork with.
Give the Icon the An identical Top and Width while holding it Centered
The large collection of icons available to use inside the Icon module include each and every Divi icons and Fontawesome Icons. On the other hand, no longer all of the icons could have an identical top and width. This makes it just a bit tougher to come to a decision the best width and top of the icon button. Shall we make adjustments to the padding to get the dimensions very good, alternatively this is a bit cumbersome and might simply restrict probably the most important hover possible choices for the icon. For example, together with padding to the icon module will create space around the icon. So, whilst you create a hover approach to exchange the icon color on hover, the icon color wouldn’t exchange when hovering over the space (or padding) around the icon. It will exchange simplest when hovering over the icon itself.
So that you can create a superbly sq. button that engages the icon on hover, we will be able to add some custom designed CSS to set a top and width for the icon along with middle the icon the use of the CSS Flex property.
Proper right here’s do it.
First, open the settings for the copy icon. Then change the icon with a brand spanking new one from the icon picker.
![]()
Take out the padding for the icon module. This won’t be sought after since we will be atmosphere a top and width for the icon.
![]()
Underneath the sophisticated tab, add the following custom designed CSS to the Icon Section:
top: 90px
width: 90px
display: flex;
align-items: middle;
justify-content: middle;
![]()
Now the icon button could have an identical top and width of 90px which may make it a super sq.. Plus the flex property aligns the icon inside the middle of the module. This lets you change the icon measurement throughout the icon module very simply.
To finish off this button, let’s give it a background gradient and a white border color as follows:
- Background Gradient Left Color: #3e22ff
- Background Gradient Right kind color: #ff2000
- Border Color: #fff
![]()
That is the full end result.

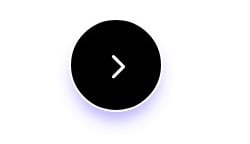
Building a Spherical Icon Button
As quickly because the icon button is a perfect sq., making it spherical is inconspicuous. Then again faster than I show you this easy trick, let’s copy the previous row to kickstart the assemble of our spherical icon button.
![]()
Now open the settings for our new copy icon and, underneath the design tab, change the border radius (or rounded corners) as follows:
- Rounded Corners: 50%
![]()
And very similar to that, now we’ve got a spherical icon button!
To change up the design reasonably, let’s give the icon module a novel icon and background color as follows:
- Icon: see screenshot
- Background Color: #121212
![]()
That is the end result.
Building an Icon Button Horizontal Menu
One commonplace building is to use icons to build an icon menu which most often consists of a few buttons located side-by-side. To do this we will be able to use the flex property. Proper right here’s how it’s performed.
First, add a brand spanking new one-column row to the internet web page.
![]()
Open the row settings and change the gutter width to at least one.
- Gutter Width: 1
![]()
Next, open the settings for the column all the way through the row and add the following custom designed CSS to the column main part:
display:flex;
align-items:middle;
![]()
Add a brand spanking new icon module to the column.
![]()
Underneath the content material subject material tab of the icon settings, make a choice an icon and add an icon link URL.
![]()
Underneath the design tab, change the following:
- Icon Color: #3e22ff
- Icon Dimension: 40px
- Margin: 10px left, 10px correct
- Border width: 2px
- Border Color: #3e22ff
NOTE: The margin will create space between the adjacent buttons when we add further shortly.
![]()
Underneath the sophisticated tab, add the practice custom designed CSS to the Icon Section (like we did prior to now for the sq. icon button):
display: flex;
align-items: middle;
justify-content: middle;
top: 60px;
width: 60px;
![]()
Now each time we add new icon buttons, they’ll appear side-by-side. To turn this, let’s copy the existing icon button thrice to create a whole of four icon buttons inside the horizontal menu.
After that, we will be able to go back and change the icons as sought after.
That is the end result.
![]()
Together with Icon Button Hover Effects
It’s hard to speak about designing icon buttons without mentioning hover effects. They’re merely a substantial amount of a laugh to fail to remember about. I won’t bore you with the entire chances available with Divi’s built-in hover possible choices, alternatively I will indicate a few to get those ingenious juices flowing.
Changing Background Color and Icon Color on Hover
Changing the colors of the button is a popular and environment friendly hover have an effect on. For example, we will be able to exchange the background color and the icon color similtaneously when the shopper hovers over the button.
To do this, open the icon module settings and switch at the hover possible choices for the background color and make a selection a novel color for the hover state. Then you definately’ll be capable of do the an identical for the icon. In this example, we’re changing the background color from white to blue along with changing the icon from blue to white.
![]()
Changing Icon on Hover
Some other hover have an effect on chances are high that you’ll like is changing the icon to some other one altogether. To do this, you’ll be in a position to choose a novel icon for the hover state when choosing an icon inside the icon settings.
![]()
Scale Icon Button on Hover
One hover have an effect on that is hard to fail to remember about is the scaling hover have an effect on. This makes the icon button build up or turn into upper in measurement. Some of the absolute best techniques so to upload this kind of hover have an effect on is to use Divi’s develop into possible choices. This may occasionally allow the button to broaden without affecting the elements surrounding it.
To be able to upload a scale hover have an effect on to the icon button, open the icon settings and, underneath the design tab, find the develop into possible choices. Flip at the hover possible choices and then assign the following develop into scale to the hover state:
- Transform Scale Y: 118%
- Transform Scale X: 118%
This may occasionally building up the size of the icon button via 18% when the shopper hovers over it.
![]()
Rotate Icon Button on Hover
Rotating problems on hover is always a a laugh micro-interaction. To rotate an icon button on hover, we will be able to use the develop into rotate selection. Then again faster than that, let’s make the button spherical so that simplest the icon turns out to rotate.
To make the icon spherical, assuming the button is a sq., simply change the rounded corners atmosphere to 50% on all 4 corners.
Then change the develop into possible choices to include a the following develop into rotate worth inside the hover state:
- Transform Rotate Z: 180deg
![]()
Let’s take a look at our 4 hover leads to movement.
Final Finish consequence
Let’s take a look at the full results from our tutorial.
Listed below are our 3 icon buttons (standard, sq., and spherical).
And that is the icon button horizontal menu with hover effects.
Final Concepts
Working out design icon buttons for a website is essential. And, as we’ve seen in this tutorial, it’s no longer that hard with Divi. Divi’s icon module has a lot of built-in possible choices that open the door for ingenious icon button designs. Hopefully, the techniques from this article will help release probably the most important magic in your non-public icon button designs.
I take a seat up for paying attention to from you inside the comments.
Cheers!
.inline-code{padding: 0px 4px; color: crimson; font-family: Monaco,consolas,bitstream vera sans mono,courier new,Courier,monospace!important} video.with-border {border-radius: 8px;box-shadow: 0 8px 60px 0 rgba(103,151,255,.11), 0 12px 90px 0 rgba(103,151,255,.11);display:block;margin: 0 auto;}
The put up How to Design Icon Buttons with Divi’s Icon Module gave the impression first on Elegant Themes Blog.
Contents
- 1 Sneak Peek
- 2 Download the Structure for FREE
- 3 Download For Unfastened
- 4 You are going to have successfully subscribed. Please check out your e mail take care of to confirm your subscription and get get admission to to unfastened weekly Divi layout packs!
- 5 What You Wish to Get Started
- 6 Designing Icon Buttons with Divi’s Icon Module
- 7 Final Finish consequence
- 8 Final Concepts
- 9 New Divi Starter Website for Actual Property (Fast Set up)
- 10 Shoppers Spend 3+ Hours on Social Media Day by day: What They are Doing on Every Platform [Data]
- 11 DApp Building Information – Final Resolution For Protected & Protected Enterprises

0 Comments