
Managing an web store is costly, and householders steadily want to handle many guide processes. The WooCommerce REST API simplifies this workflow, enabling you to control ecommerce platforms and arrange and scale WooCommerce stores programmatically.
Appearing integrations, automation, and increasing your online store purposes are seamless operations with the WooCommerce REST API. You save on resources and time, which you’ll be capable of use to further streamline your processes. This moreover means that you can customize the look and feel of your store with flexible external applications.
This article provides you with a whole figuring out of the WooCommerce REST API, enabling you to programmatically automate and improve your eCommerce operations. It provides good insights, use instances, and code examples to facilitate the seamless integration and customization of WooCommerce stores.
Should haves
To get started with WooCommerce REST API, you will have to be the use of:
- WooCommerce type 3.5 or higher.
- WordPress type 4.4 or higher.
- Postman or Insomnia for API testing and interaction.
Get started with the WooCommerce REST API
To get started, you want to create a WordPress internet website online and then generate the API credentials inside WooCommerce.
Create a WordPress internet website online with Kinsta
In case you occur to don’t have a WordPress internet website online, you’ll be capable of merely create one o your MyKinsta dashboard.
- Navigate to your MyKinsta account and click on at the WordPress Web sites on the left sidebar.
- From the Add internet website online dropdown menu, make a choice the Create new internet website online selection, then proceed to the next internet web page, where you’ll be in a position to choose the Arrange WordPress selection and click on on Continue.
- Enter your internet website online identify and data heart location in Web site possible choices and click on on Continue.
- Inside the next tab, input your internet website online determine and admin credentials. Choose a language and check the Arrange WooCommerce checkbox to place within the WooCommerce plugin.
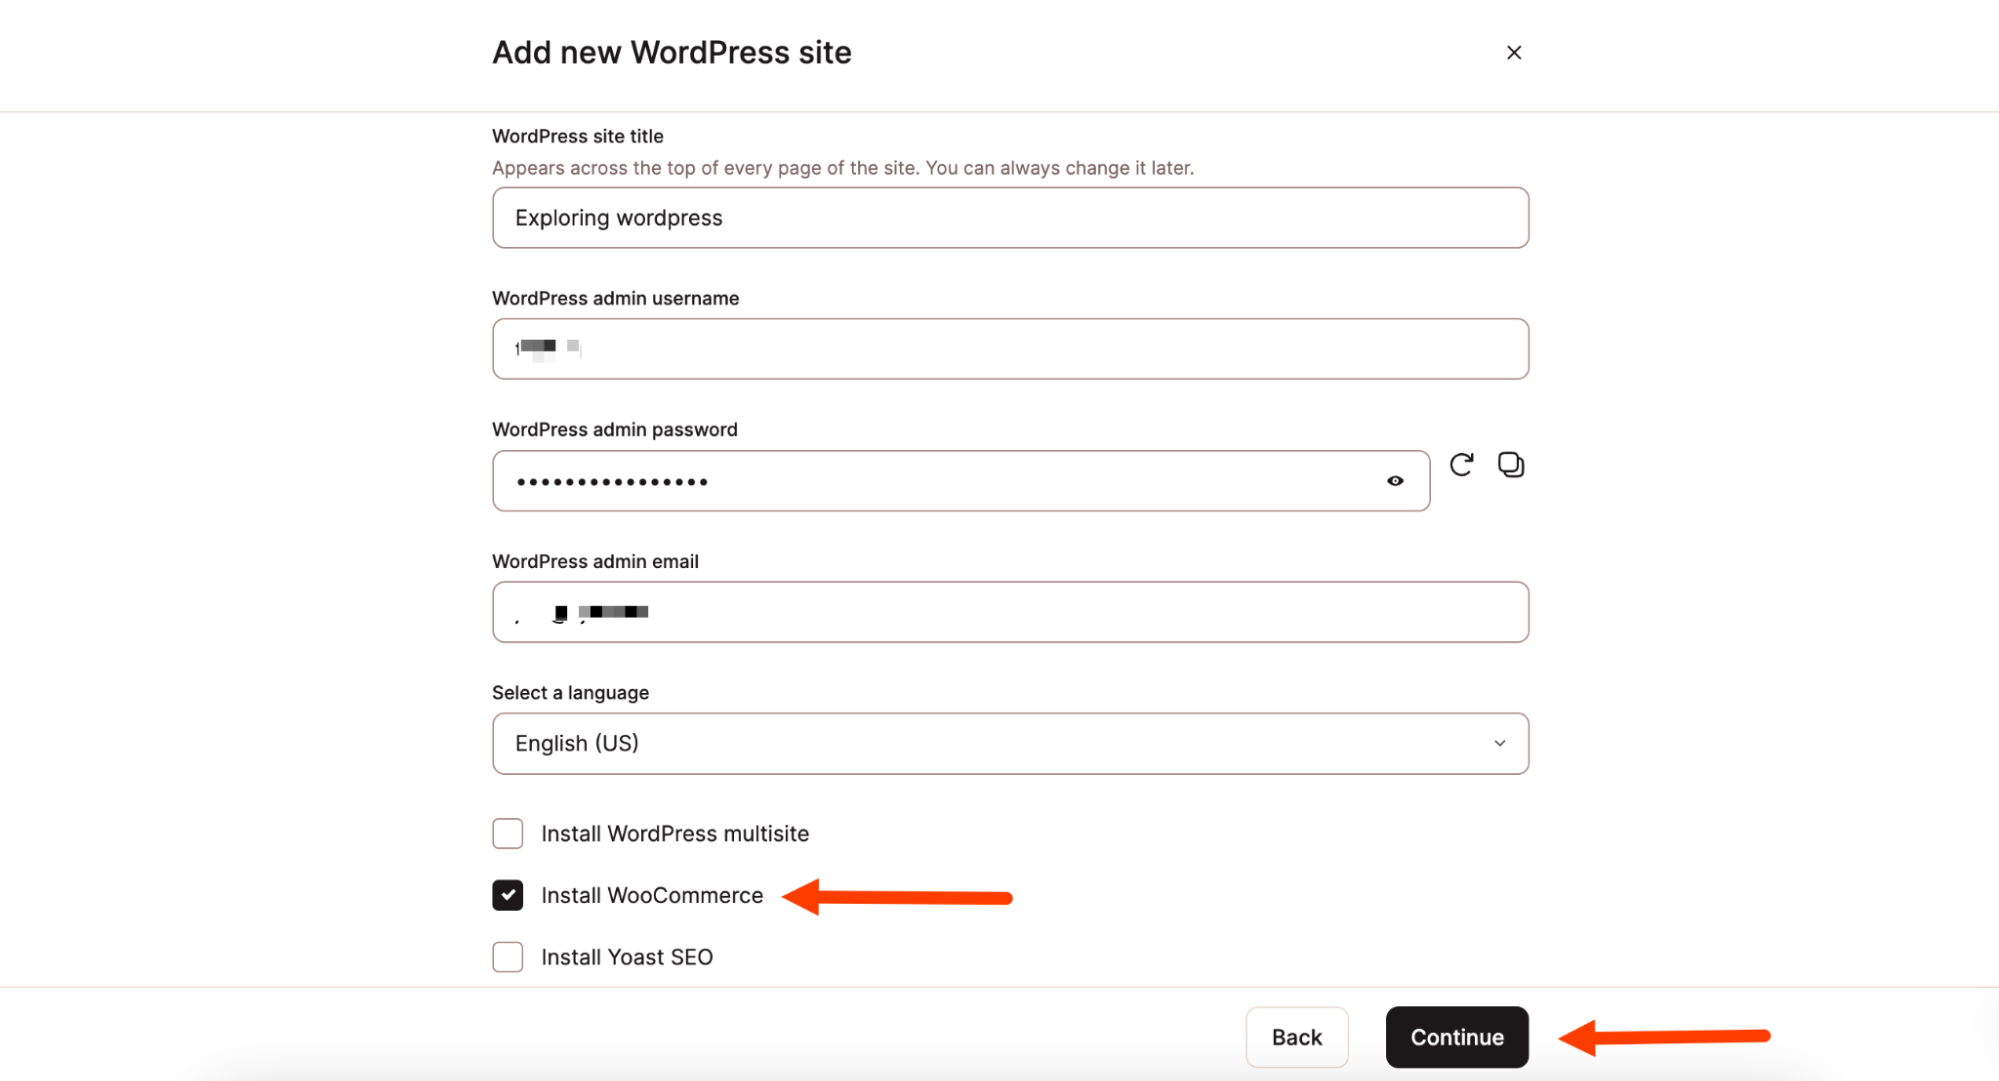
Creating a WordPress internet website online and setting up WooCommerce. - Click on on Continue. This initiates your internet website online creation and sends a notification to your WordPress admin electronic message as quickly because it’s completed. You should definitely store your WordPress admin username and password somewhere protected.
Generate API credentials in WooCommerce
To generate your WooCommerce API credentials, apply the ones steps:
- Log in to your WordPress dashboard, make a choice Plugins > Installed Plugins from the sidebar, and switch at the WooCommerce plugin.
- After activating the plugin, make a choice WooCommerce > Settings. Then click on at the Sophisticated tab to get right to use the WooCommerce sophisticated settings internet web page.
- Next, click on on REST API.
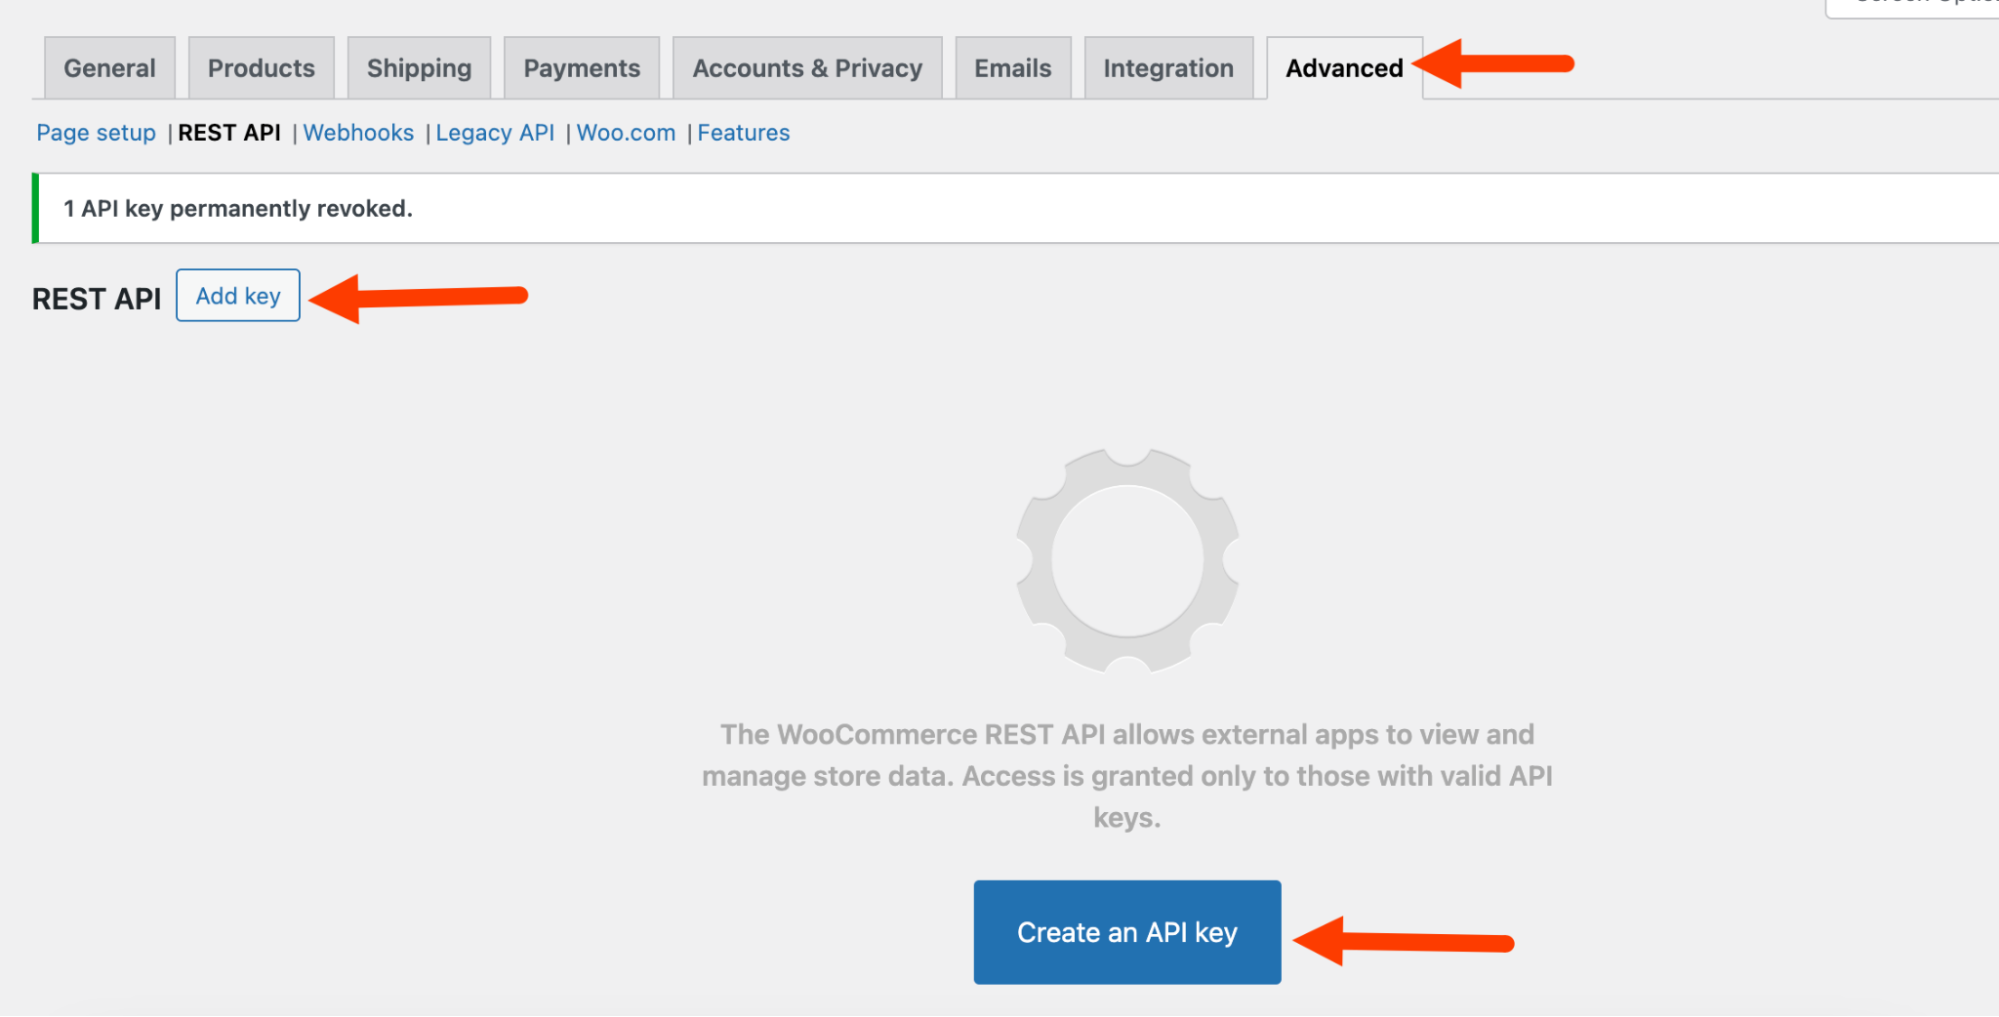
API key credentials internet web page. - Click on on Create an API Key or Add Key to generate an API key.
- Next, you’re precipitated to go into the Key details. The ones are description, shopper, and permissions. Enter your key description, exchange the patron if required, and make a choice Be informed/Write for permissions.
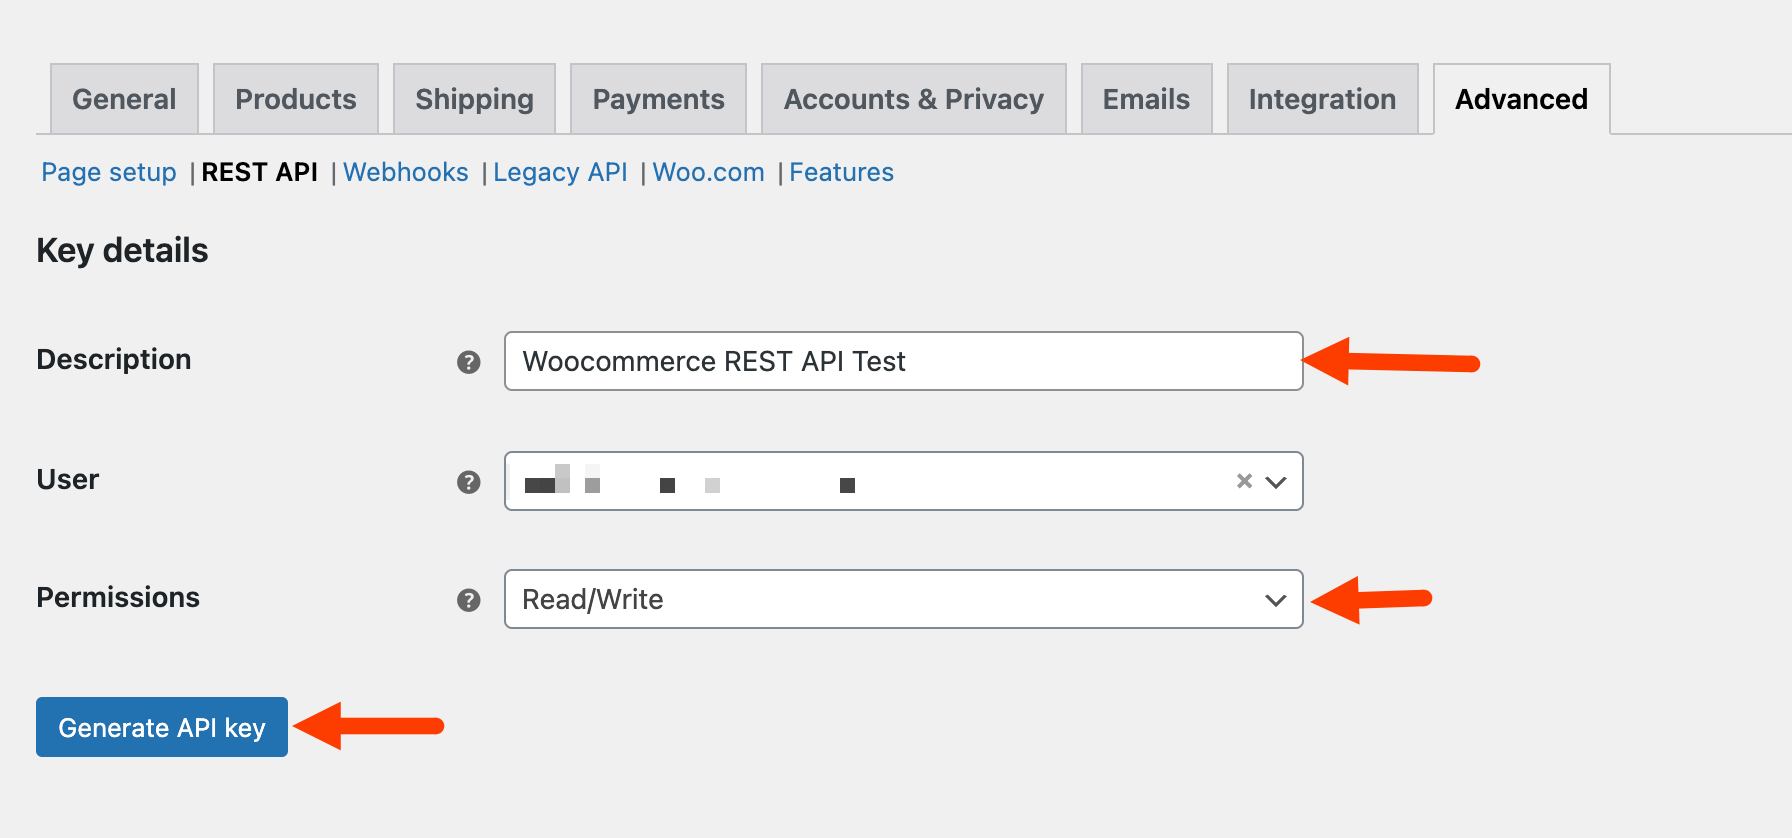
Generating API key credentials. - Click on on Generate API Key. With the generated API keys, you’ll be capable of get right to use and arrange your store wisdom programmatically. Take into account of your consumer key and secret, as you’ll use them inside the next section to make API requests.
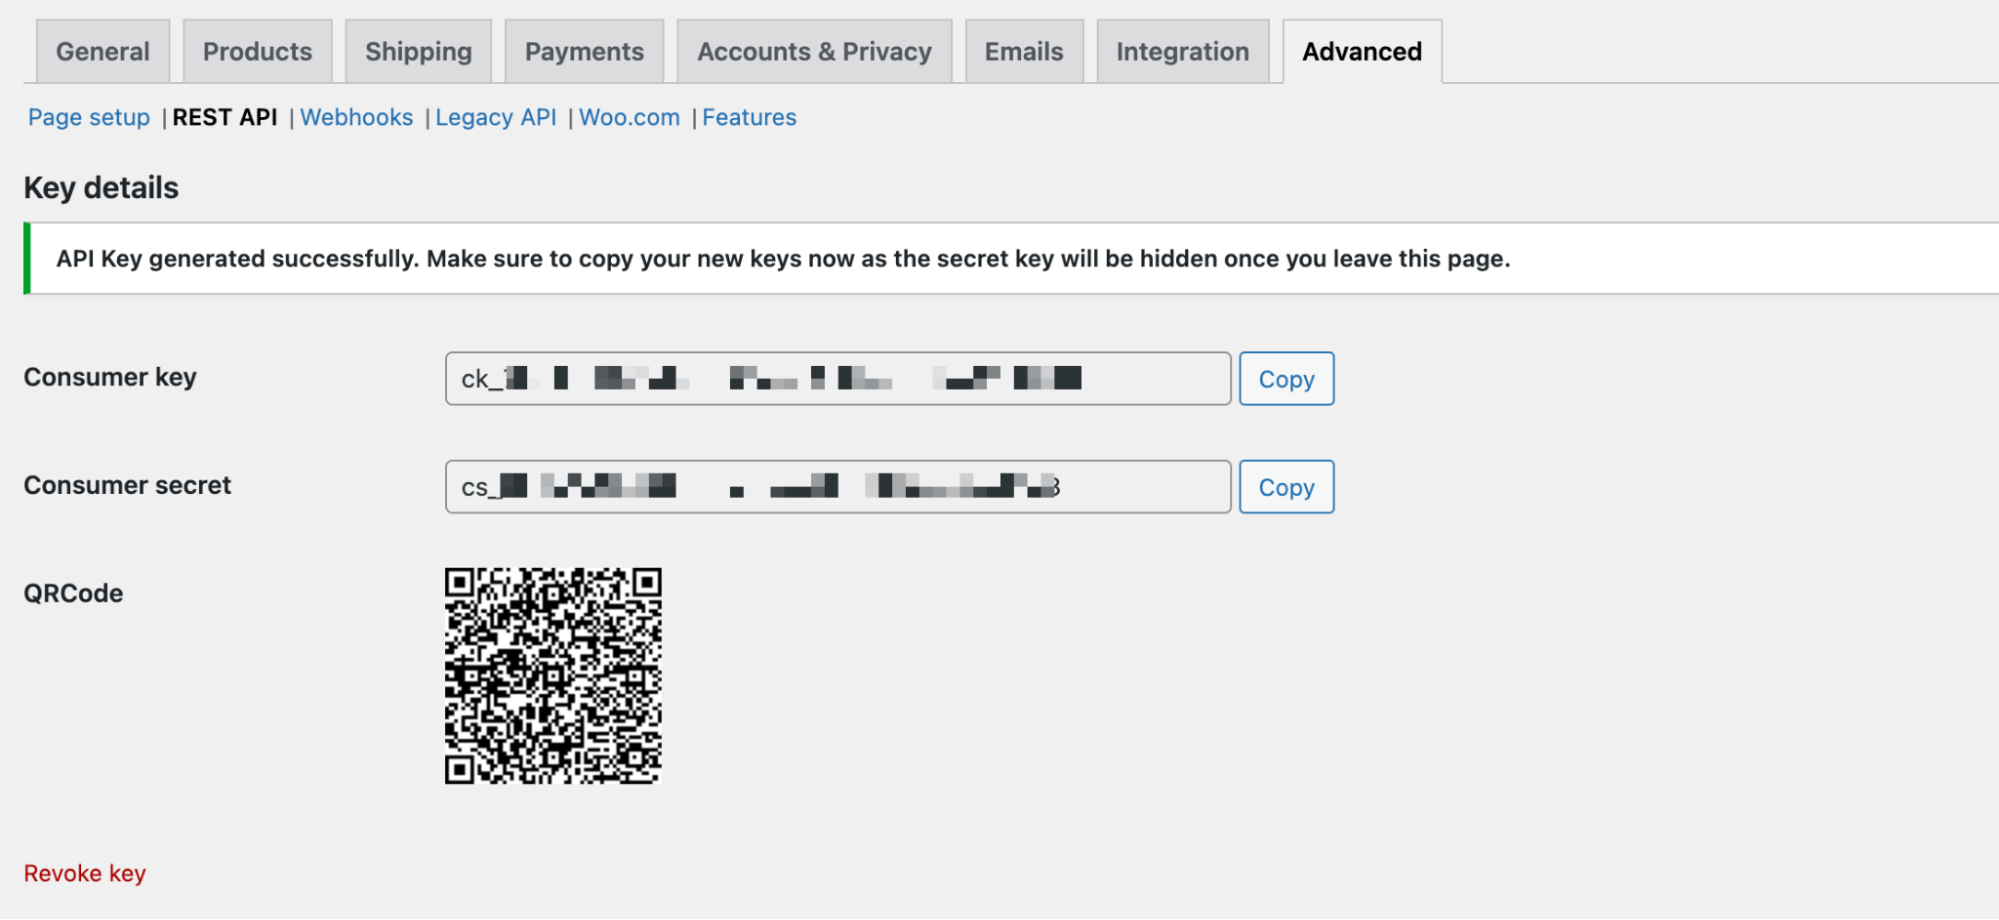
Generated API key credentials.
Understanding the WooCommerce REST API construction
The WooCommerce API is built upon REST construction. This lets you be told and perform write operations on WooCommerce wisdom, very similar to orders, products, and shoppers, by the use of sending requests by the use of the right kind methods (GET, POST, PUT, DELETE) to the endpoint.
An endpoint consists of the request methods along side a normal URL. With an endpoint, you’ll be capable of use your decided on instrument (Postman or Insomnia) to get right to use different stored wisdom.
Fetch a list of products
Quicker than you fetch the tick list of products, you’ll want to’ve added a few to your store. You will have to exchange the permalink building to 1 factor as a substitute of Plain.
Click on on Settings > Permalinks from the sidebar and change the permalink building. In case you occur to don’t make this transformation, your usual URL endpoint gained’t artwork as it should. Click on on Save changes.
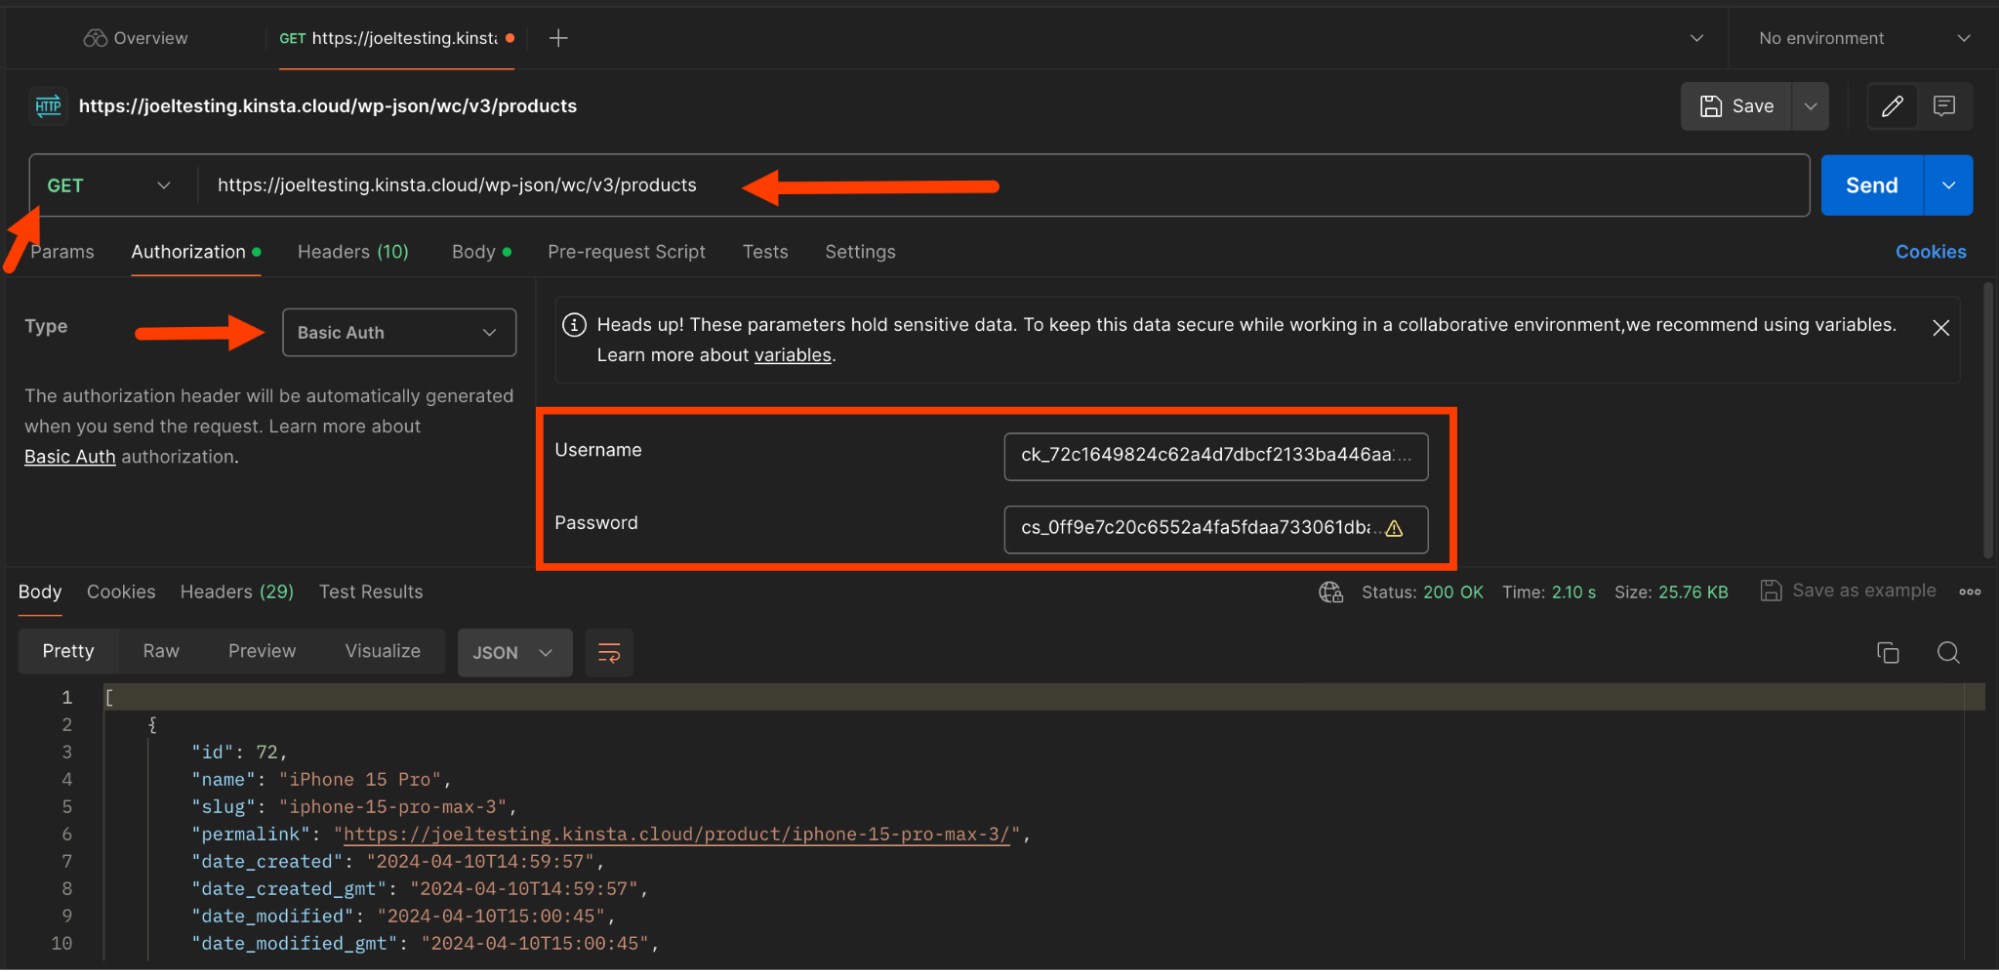
Next, open Postman and add a brand spanking new request. Inside the URL section, use https:///wp-json/wc/v3/products. You should definitely trade together with your WooCommerce internet website online house.
Inside the authorization tab, make a choice Basic Auth and input your consumer key for the reason that Username and consumer secret for the reason that Password. You will have to add this authorization to every request you’re making to your WooCommerce REST API. Send the request, and in addition you should download a list of all of the products for your store.
Arrange products by the use of the REST API
The product object has a list of attributes that make it simple to staff products, arrange stock, and set prices — all programmatically.
Say you want to be able to upload a brand spanking new product to a product staff you’ve created — all you want is the product staff ID inside the grouped_products feature.
To keep an eye on stock, use the manage_stock and stock_status attributes, which are set to each true or false and instock, onbackorder, and outofstock respectively.
Let’s check out the way you’ll be capable of add and substitute an present product part.
Add product with the WooCommerce API
- In Postman, add a brand spanking new request and change the request approach to POST. Reuse the endpoint URL used inside the previous section. Click on at the Body tab, make a choice raw, and select JSON as your body format. The JSON payload has the product’s identify, sort (simple, variable, or grouped), description, and fast description. It moreover has categories, tags, and pictures you’ll be capable of add as sought after.
{ "identify": "iPhone 15 Skilled Max", "sort": "simple", "description": "", "short_description": "", "categories": [ ], "tags": [], "pictures": [] } - Execute the request. If the product is successfully created, you should download a product object as a response. Take into account of the product ID, as you’ll need it inside the next section.
Creating a product.
Edit a product with WooCommerce API
Let’s edit the report you’ve merely created.
- Inside the Body tab, add this JSON body:
{
  "identify": "iPhone 15 Skilled"
}
Since you’re simplest updating the
identifyfield, you don’t need to include other attributes. In this case, exchange it to “iPhone 15 Skilled”. The endpoint URL should behttps://yourdomain/wp-json/wc/v3/products/. - Trade
idwith the ID of the product you created inside the previous section. Don’t forget to switch the request approach to PUT. Execute the request, and in addition you should download a product object as a response. You’ll check the product’s identify inside the response to confirm its a success substitute.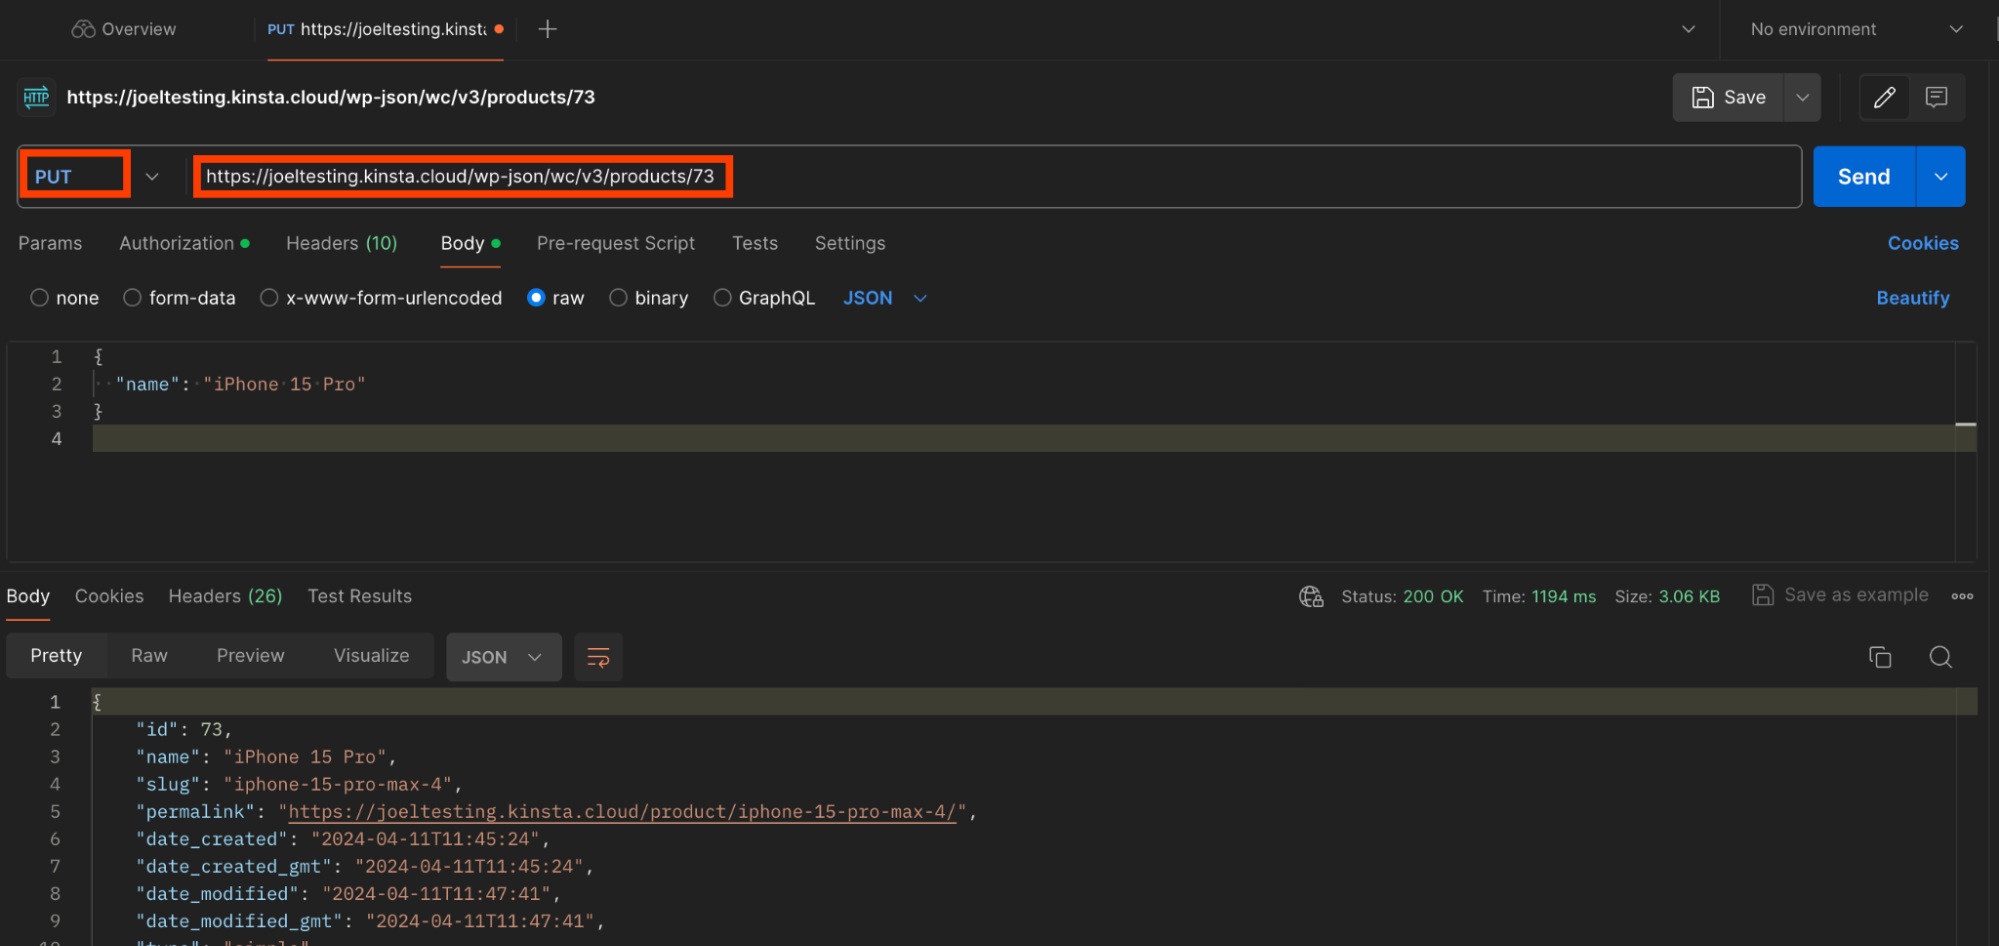
Bettering a product.
Order regulate with the REST API
The WooCommerce REST API facilitates automating order processing by the use of enabling the seamless retrieval of orders and substitute of order statuses. It lets you programmatically retrieve orders, filter out them according to moderately a large number of requirements very similar to date, status, or customer, and then effectively process them.
This accommodates updating order statuses to copy moderately a large number of ranges of good fortune or processing. The WooCommerce REST API then promises right kind tracking and communication with shoppers. Additionally, you’ll be capable of arrange refunds all through the API, along side coping with refund requests, processing refunds mechanically, and updating order statuses (after refunds).
Let’s check out the way you’ll be capable of fetch contemporary orders and substitute the status of an order to “completed.”
Fetch contemporary orders with WooCommerce API
- In Postman, add a brand spanking new request for fetching orders the use of a GET request. The endpoint URL should be as follows:
https:///wp-json/wc/v3/orders - Inside the Params tab, input the necessary factor to
afterand value to the date your orders were created after. In this case, use2024-03-08T00:00:00. Feel free to modify this date as required. This lets you filter out your orders to only those after a given date. Go away the other Postman settings as default. - You should definitely’ve made a few orders for your WooCommerce store to avoid returning an empty tick list. Execute the request, and in addition you should get a list of all of the orders made to your store that have compatibility the specified requirements.
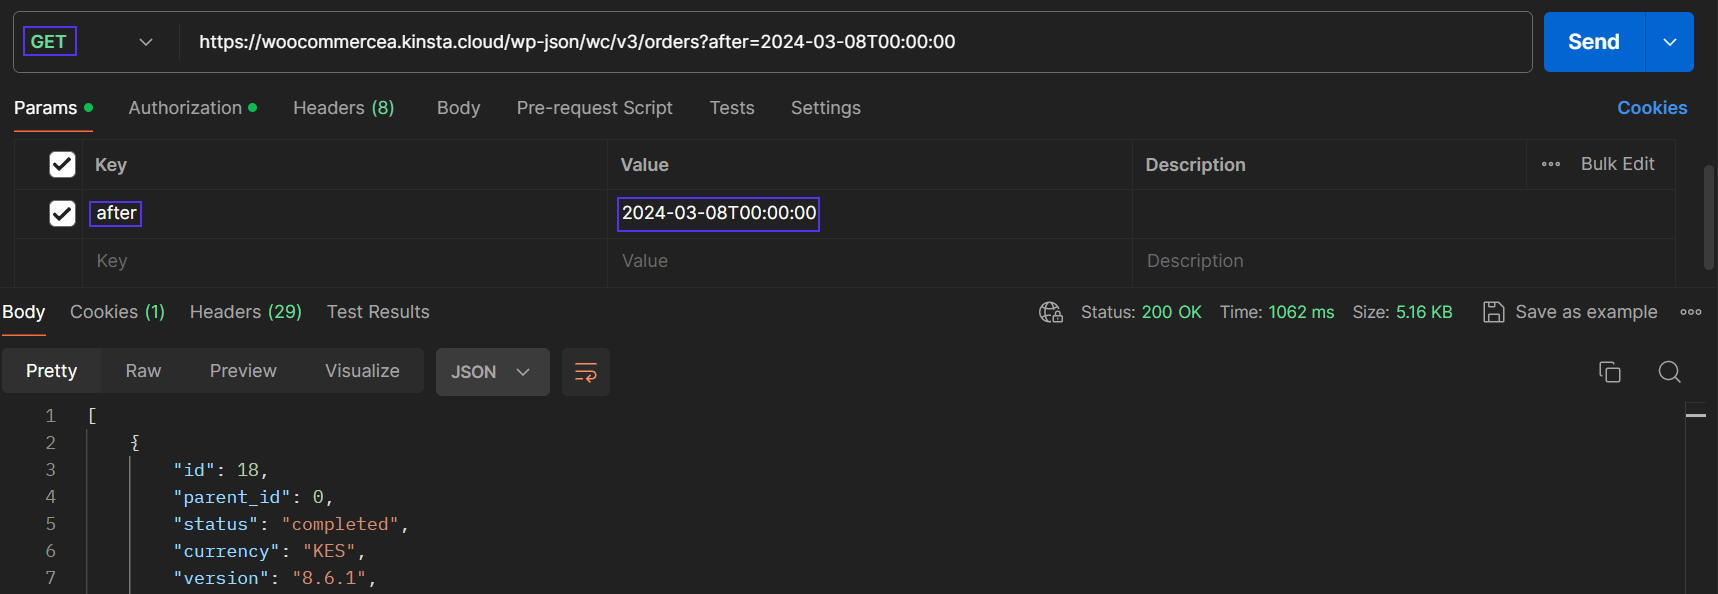
Fetching contemporary orders after a given date.
Change order status
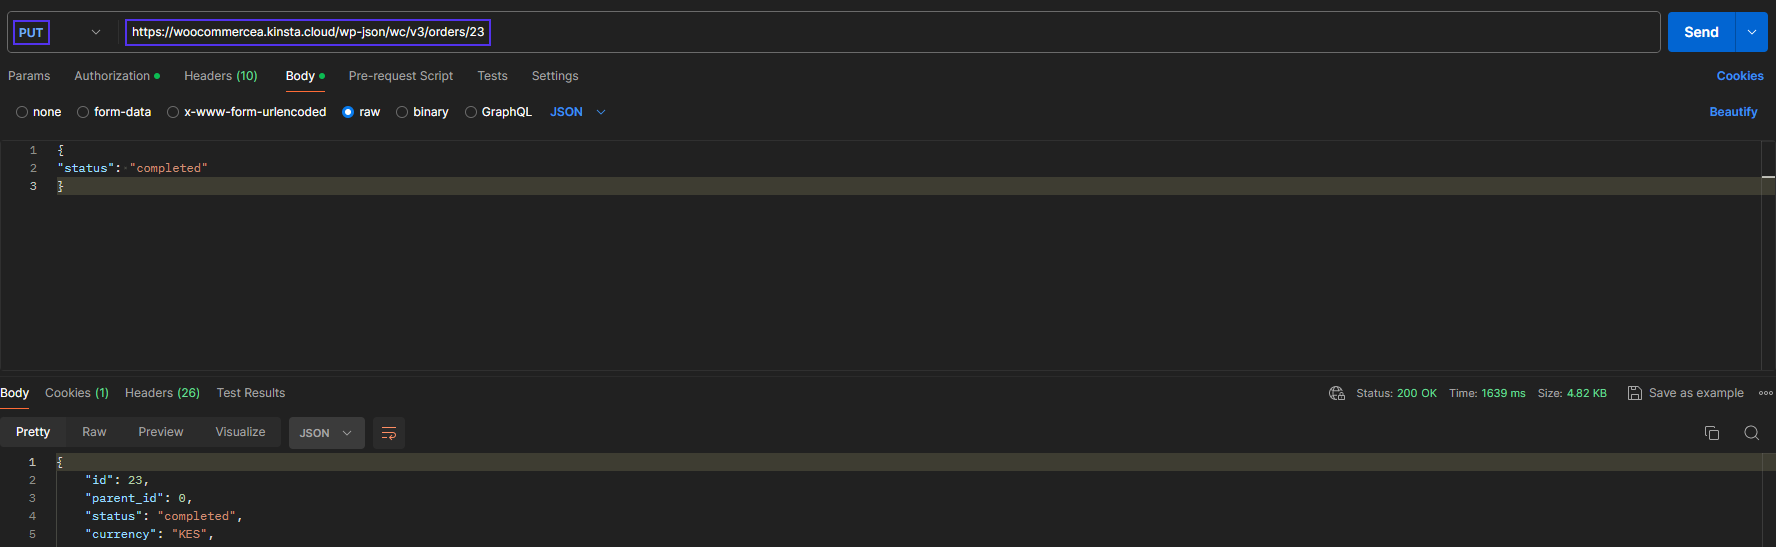
To switch your order status, grasp the ID of an order you’ve already made. Add a brand spanking new request in Postman and change its request to PUT. Use this endpoint for an substitute: https://yourdomain/wp-json/wc/v3/orders/. Inside the Body tab, add this JSON body:
{
  "status": "completed"
}
Execute the request, and in addition you should download a response with the order marked as completed.
Purchaser regulate and engagement
All through the WooCommerce REST API, corporations can effectively create new customer profiles, edit present customer details, and retrieve whole knowledge very similar to gain histories and preferences.
By the use of analyzing this data, they can tailor customized promoting and advertising and marketing strategies, offering centered promotions, product tips, and loyalty rewards according to explicit particular person purchasing groceries behaviors.
This stage of customer wisdom regulate empowers corporations to build stronger relationships with shoppers, build up customer excitement, and drive repeat purchases.
Add a customer with WooCommerce API
- Send a POST request to this endpoint URL:
https:///wp-json/wc/v3/shoppers. Don’t forget to include authorization as you most likely did earlier. - Inside the Body tab, use this JSON object to create a customer:
{
  "electronic message": "[email protected]",
  "first_name": "Brian",
  "last_name": "Abraham",
  "serve as": "customer",
  "username": "briann.abraham",
  "billing": {
    "first_name": "Brian",
    "last_name": "Abraham",
    "company": "",
    "address_1": "969 Market",
    "address_2": "",
    "the town": "San Francisco",
    "state": "CA",
    "postcode": "94103",
    "country": "US",
    "electronic message": "[email protected]",
    "phone": "(555) 555-5555"
  },
  "supply": {
    "first_name": "Brian",
    "last_name": "Abraham",
    "company": "",
    "address_1": "969 Market",
    "address_2": "",
    "the town": "San Francisco",
    "state": "CA",
    "postcode": "94103",
    "country": "US"
  }
}
The JSON object incorporates elementary customer details, very similar to electronic message, identify, serve as, and username. It moreover provides billing and supply knowledge, along side the customer’s take care of, location, and get in touch with amount.
- Execute the request, and in addition you should download a response containing the customer object. Have in mind the customer ID, which you’ll use inside the next section to retrieve a customer.
Retrieve a customer by the use of ID with WooCommerce API
Let’s retrieve that shopper you’ve merely created by the use of their ID.
- Create a brand spanking new request with the GET request manner.
- Use the identical endpoint URL,
https:///wp-json/wc/v3/shoppers/and add the ID of the customer you want to fetch.
Sophisticated use instances of the WooCommerce REST API
Apart from managing store resources, you’ll be capable of use WooCommerce REST API for various complex tasks, very similar to integration to CRM, stock control automation, and custom designed analytics and reporting.
Integrating your WooCommerce store into your CRM of variety the use of REST API promises that on each and every instance a customer is added, it’s right away reflected for your CRM dashboard as a lead. This makes it easy to regulate the synchronization of customer knowledge and order histories.
REST APIs moreover allow for computerized inventory regulate. By the use of integrating your external inventory regulate, you’ll be capable of get real-time visibility of stock and product availability. This moreover applies to personalized critiques and analytics.
With WooCommerce REST API, you’ll be capable of assemble reporting choices that get a hold of a hen’s-eye view, helping with decision-making, working out dispositions, and forecasting.
Proper right here’s a code snippet for syncing WooCommerce customer wisdom with a CRM platform:
 'wc/v3' // WooCommerce WP REST API type
    ]
);

// CRM API endpoint and key
$crm_api_url = 'https://your-crm-api-url/api';
$crm_api_key = 'YOUR_CRM_API_KEY';

take a look at {
// fetch shoppers from woocommerce store
  $shoppers = $woocommerce->get('shoppers');

  // Initialize cURL
  $ch = curl_init();

  // Check out if cURL initialization succeeded
  if ($ch === false) {
    throw new Exception('Didn't initialize cURL');
  }

  foreach ($shoppers as $customer) {
    $crm_customer_data = array(
      'first_name' => $customer->first_name,
      'last_name' => $customer->last_name,
      'electronic message' => $customer->electronic message,
      // Other fields
    );

    // cURL possible choices
    curl_setopt($ch, CURLOPT_URL, $crm_api_url . '/shoppers');
    curl_setopt($ch, CURLOPT_RETURNTRANSFER, true);
    curl_setopt($ch, CURLOPT_POST, true);
    curl_setopt($ch, CURLOPT_POSTFIELDS, json_encode($crm_customer_data));
    curl_setopt($ch, CURLOPT_HTTPHEADER, array(
      'Authorization: Bearer ' . $crm_api_key,
      'Content material material-Kind: instrument/json',
    ));

    // Execute cURL request
    $crm_response = curl_exec($ch);

    // Check out for cURL errors
    if ($crm_response === false) {
      throw new Exception('cURL error: ' . curl_error($ch));
    }

    // Check out HTTP status code
    $http_code = curl_getinfo($ch, CURLINFO_HTTP_CODE);
    if ($http_code !== 200) {
      throw new Exception('Didn't sync customer wisdom with CRM: ' . $http_code);
    }

    echo 'Purchaser wisdom synced with CRM successfully.';
  }

  curl_close($ch);

} catch (Exception $e) {
  echo 'Error: ' . $e->getMessage();
}
This can be a PHP code snippet that first establishes a connection to the WooCommerce REST API and then retrieves shoppers from the WooCommerce store. Finally, it sends them to the CRM the use of cURL. The code incorporates error coping with to regulate flow failure. It uses a PHP library known as automattic/woocommerce, which you’ll be capable of arrange the use of Composer.
The CRM used right here’s for demonstration purposes to show you a commonplace approach to syncing your customer wisdom to any CRM.
Summary
The WooCommerce REST API means that you can programmatically arrange store wisdom, improve the eCommerce experience, and prolong the aptitude of your online store. This hard instrument transforms a elementary WordPress setup proper right into a further delicate platform.
To get started, arrange the WooCommerce plugin for your WordPress instrument and uncover the REST API the use of the examples provided in this educational. The ones serve as a foundation for your custom designed solutions.
Pace is crucial for eCommerce web pages; sooner loading events strengthen the purchasing groceries experience. The WooCommerce API allows multiple requests from the doorway end to the WordPress backend, highlighting the importance of optimal backend potency.
Choosing a prime quality WooCommerce Internet hosting provider, very similar to Kinsta, is necessary for your web site’s potency. Learn how to spice up your WooCommerce retailer’s pace with our complete information.
What are your concepts on the WooCommerce API? Have you ever ever used it previous to? Percentage with us inside the commentary section beneath.
The put up Without equal WooCommerce REST API manual: sensible examples incorporated gave the impression first on Kinsta®.
Contents
- 1 Should haves
- 2 Get started with the WooCommerce REST API
- 3 Understanding the WooCommerce REST API construction
- 4 Arrange products by the use of the REST API
- 5 Order regulate with the REST API
- 6 Purchaser regulate and engagement
- 7 Sophisticated use instances of the WooCommerce REST API
- 8 Summary
- 9 Will have to Manufacturers Deal with Social Problems?
- 10 WPMUDEV / Unmasking The Risk: WPMUDEV & WordPress Safety Consider…
- 11 Divi Plugin Spotlight: Homepage 25 Divi Format Pack

0 Comments