
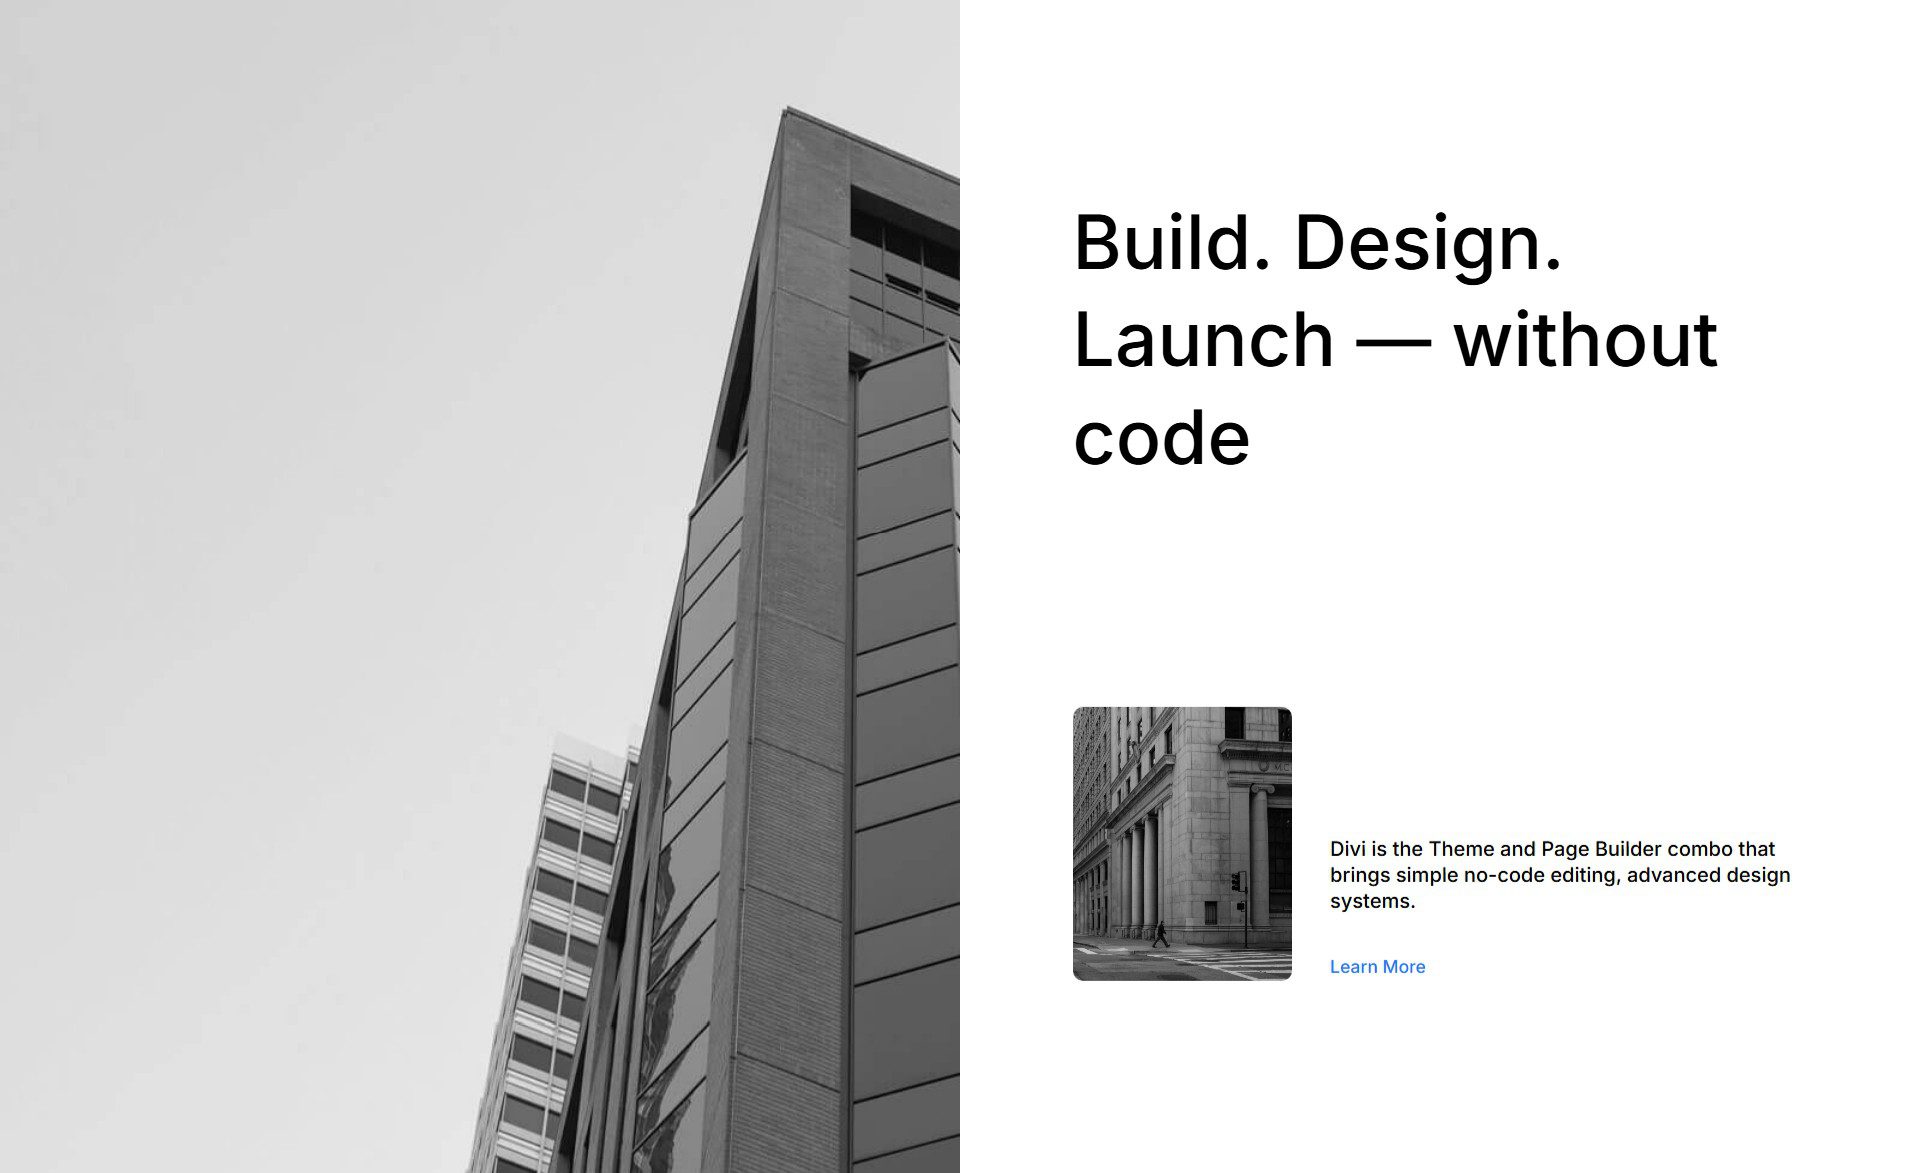
Each and every web page rebuild starts with the an identical question: how so much time will this take? The Divi 5 Design Machine used to be as soon as designed to get you off and dealing as in short as possible. Instead of rebuilding from scratch, you rebrand what already exists. Trade colors, fonts, sizes, and presets, and watch an entire web page transform.
We’ve decided on to provide 3 detailed examples of the best way easy it’s to completely business the design system to fit your needs. Every Segment transformation required fewer than 25 actions. No custom designed CSS overrides. No element-by-element adjustments. Merely deliberate changes to Design Variables and Presets that cascade via an entire internet web page.
That’s the second-to-last day of our Cyber Monday sale. For individuals who’ve been evaluating whether or not or now not Divi delivers the efficiency it promises, the ones examples provide direct evidence. The Design Gadget isn’t a function you’ll use now and again. It’s a whole paradigm for the future of designing with Divi. Whether or not or now not you choose to customize it or learn from how our designers organize Divi, the Design Gadget for Divi 5 is an invaluable helpful useful resource you’ll keep coming once more to.
Exact-World Rebranding Examples
The following transformations use actual sections from the Divi 5 Design Gadget library. Every example starts with a pre-built structure and applies a focused choice of changes to achieve an absolutely different emblem identification. The methodology remains consistent: business global variables first, apply presets strategically, and make module-level adjustments ultimate.
Corporate to Adventure Hero Segment
This variation takes Hero Segment #28 from the Sections library and converts it into an adventure tourism landing phase.
The transformation requires ~17 actions. General implementation time for an average Divi client: more or less 8 minutes.

After
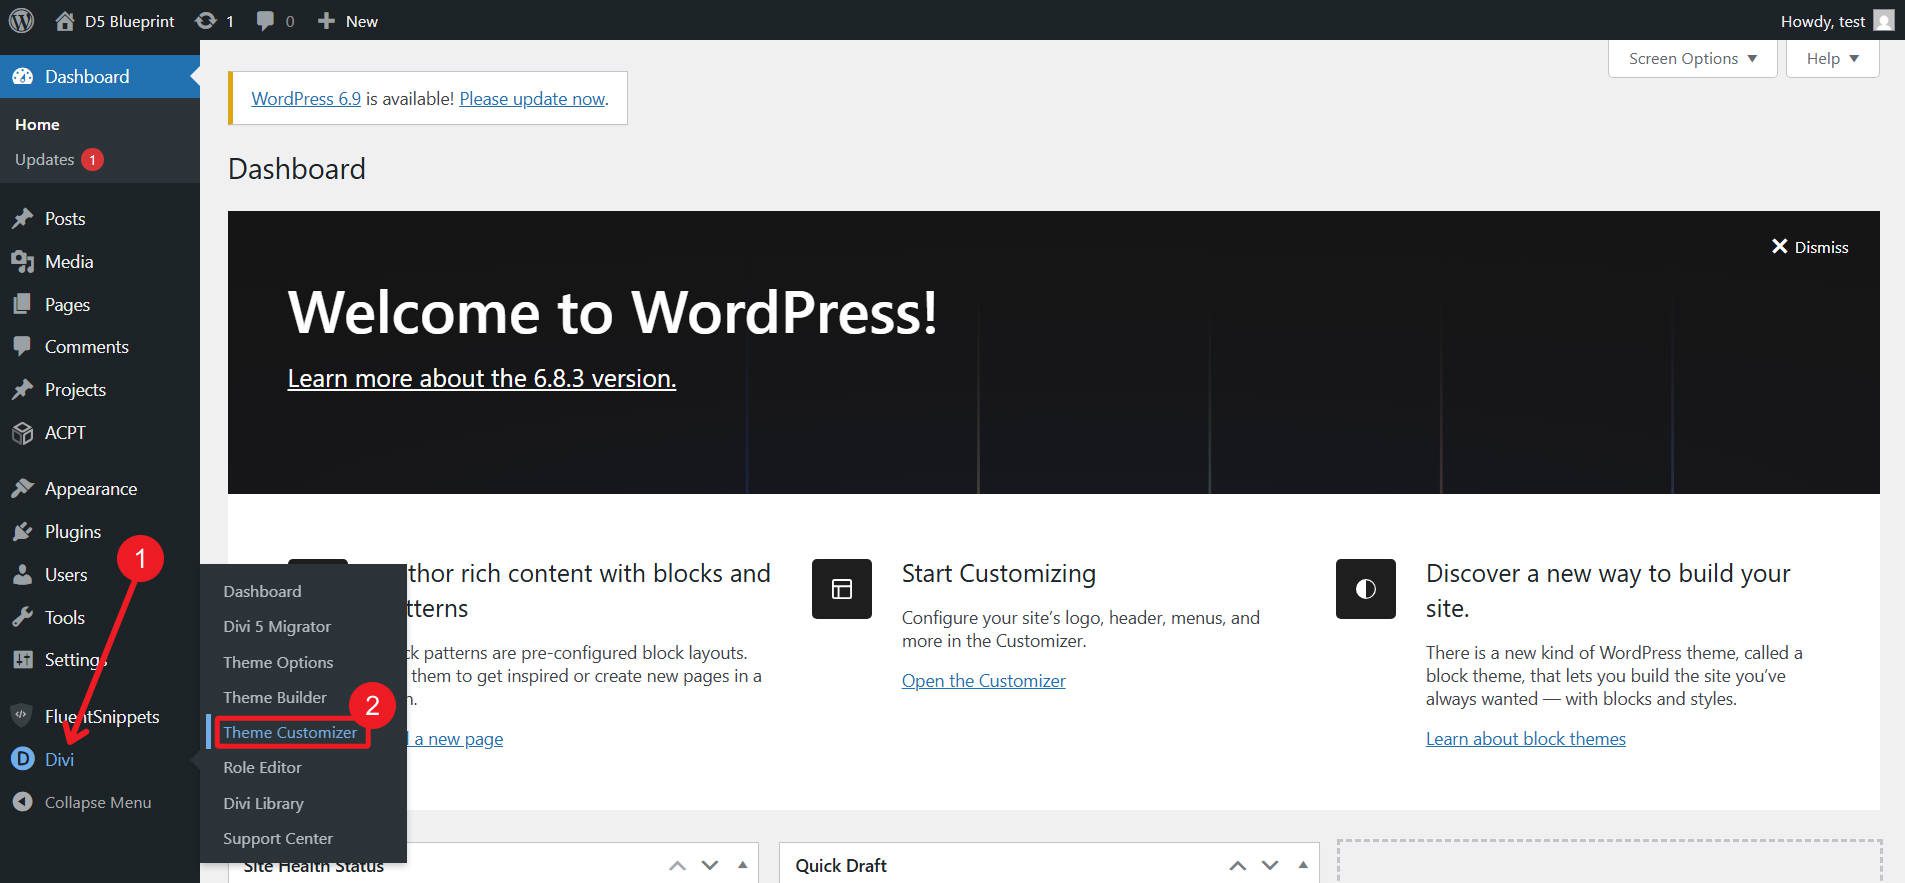
Global Changes by the use of WordPress Customizer
Open the WordPress Customizer.
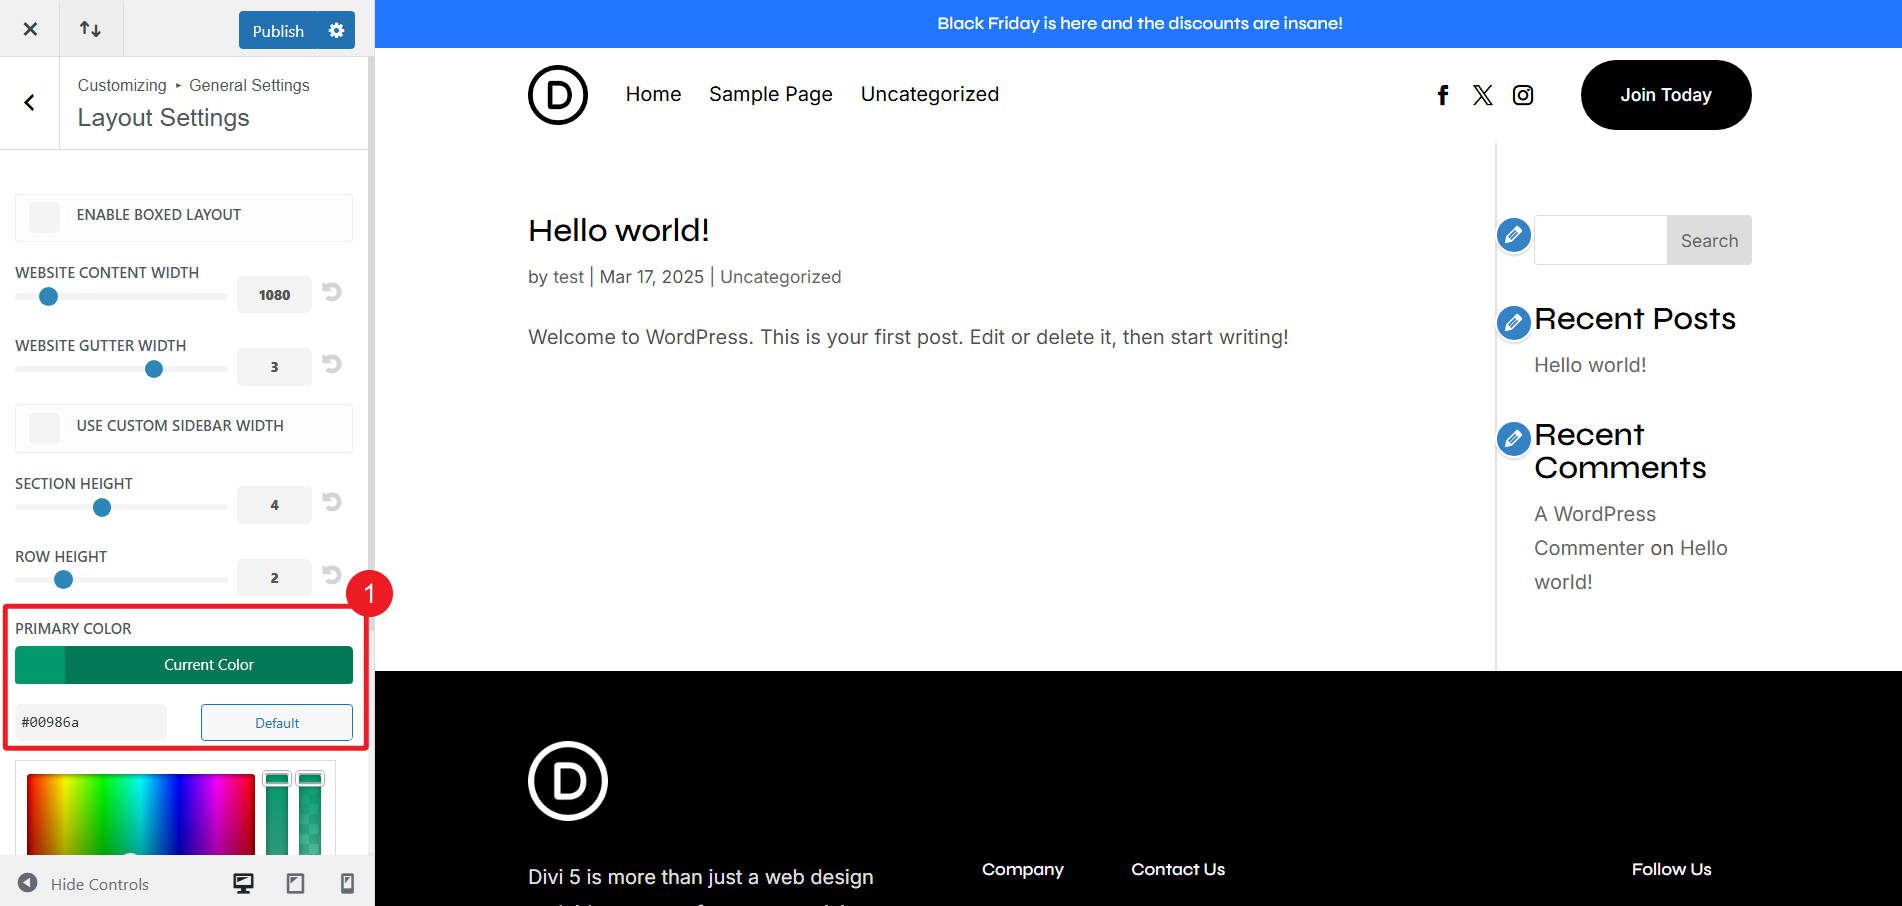
Navigate to Standard Settings > Layout Settings. Trade the Primary Color variable to #11435B.
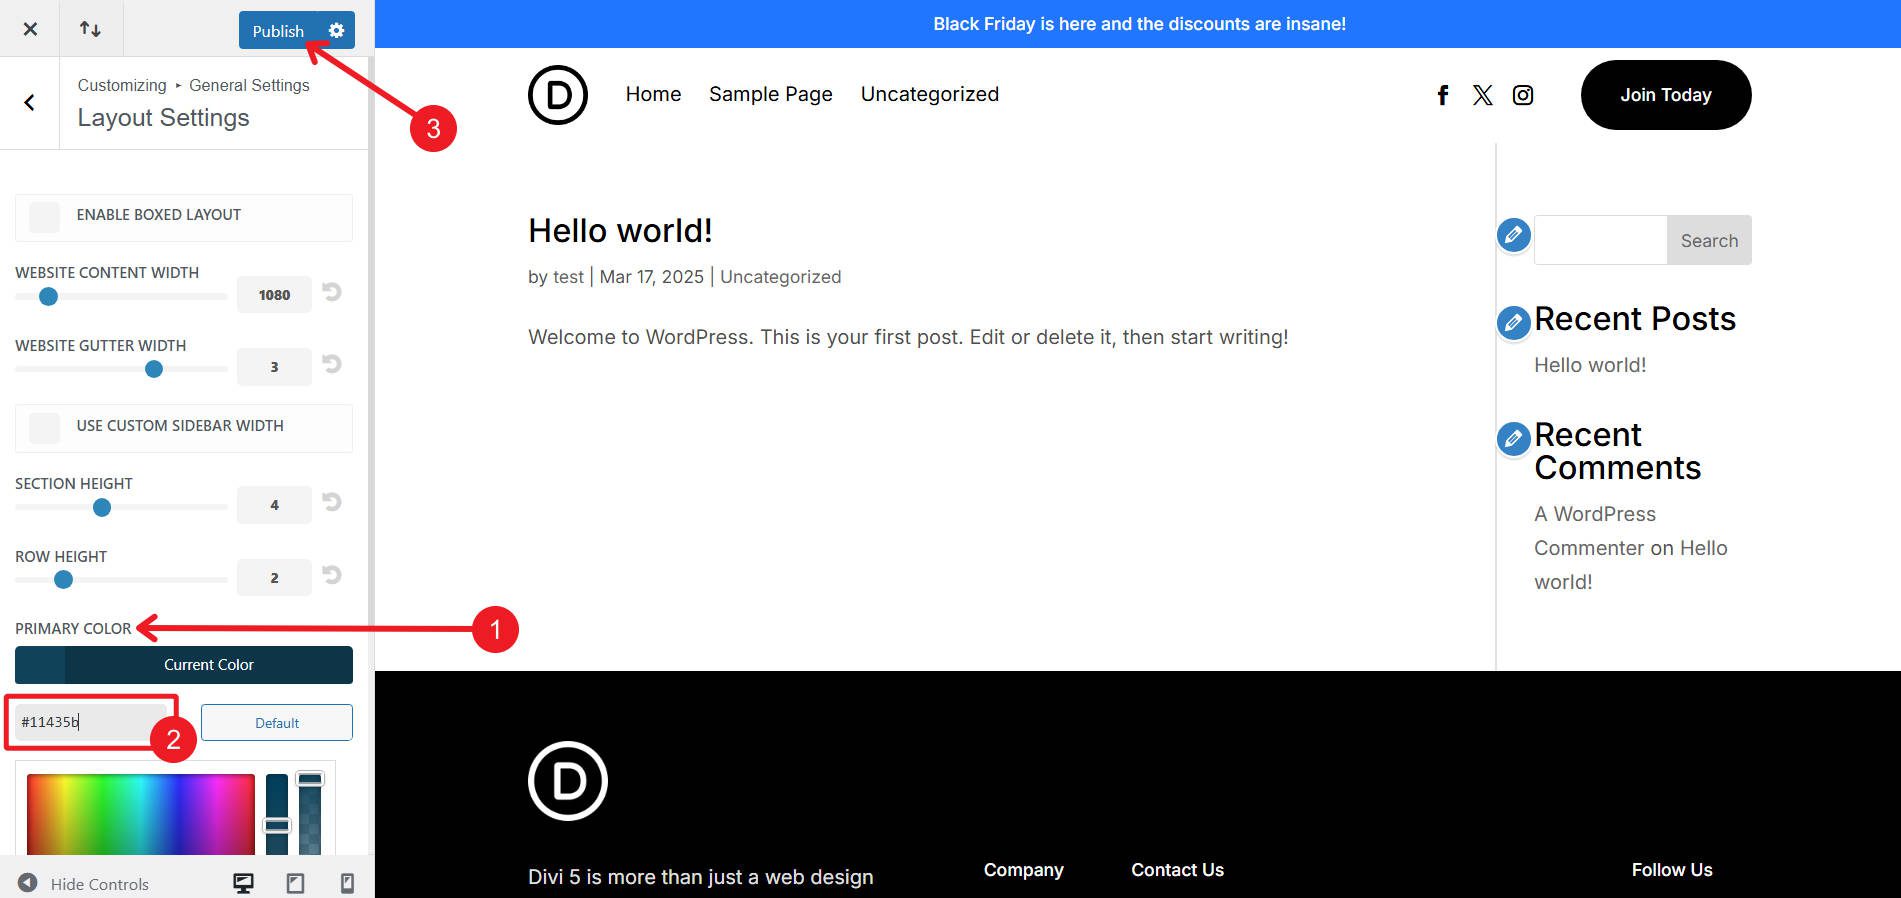
The primary color can also be merely changed in Divi 5’s Color Design Variable Manager.
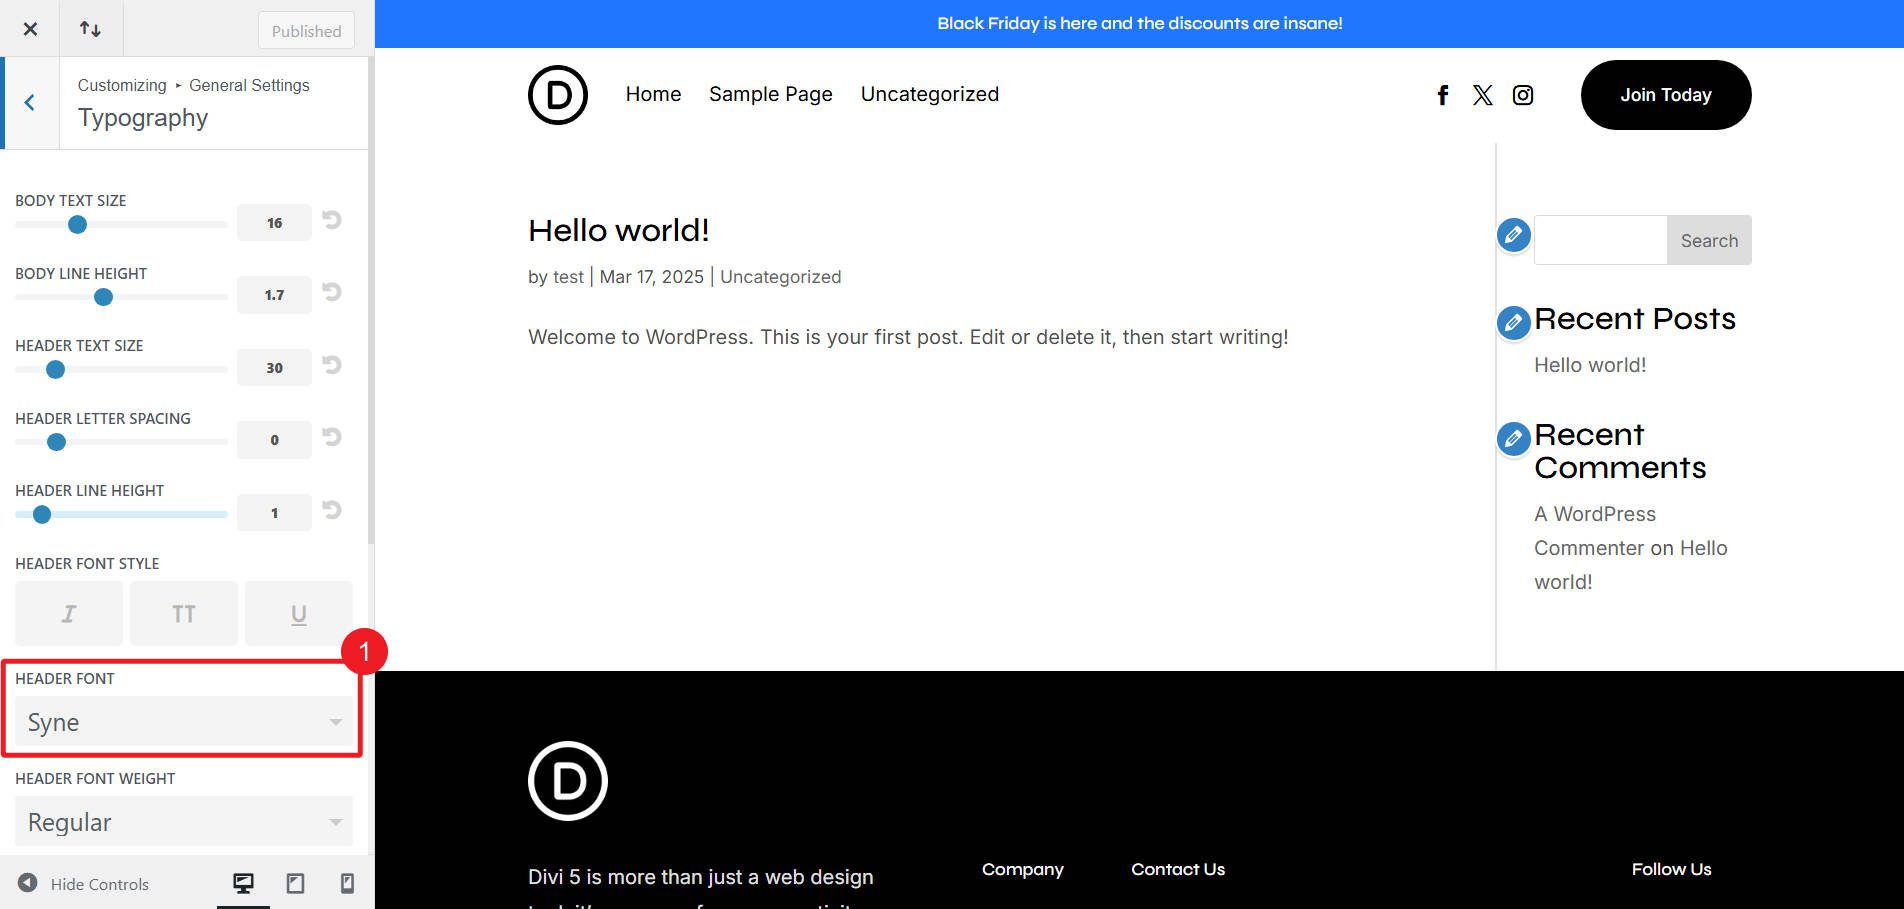
All the way through the WordPress Customizer, navigate to Standard Settings >Typography. Trade the Header Font Family to Roboto Condensed. While there, moreover set the Header Font Style to All Caps.
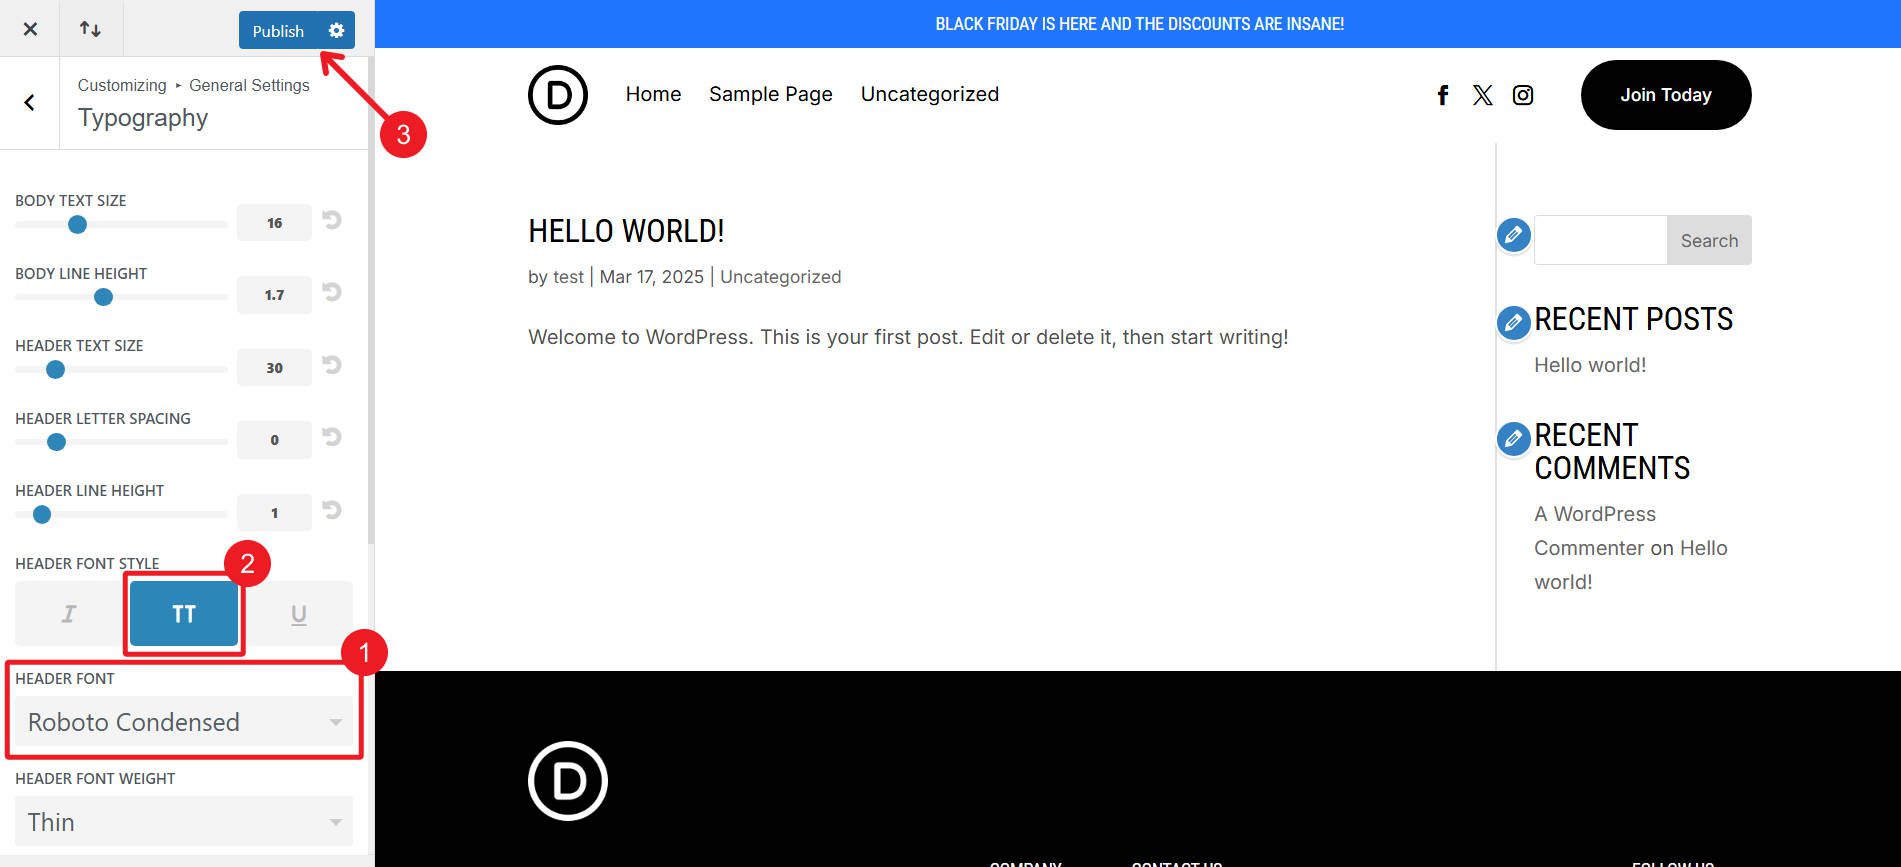
The Heading Font can also be changed merely in Divi 5’s Font Design Variable Manager. All caps can also be completed with Default and other Presets, on the other hand this is a single step throughout the customizer.
Submit all Customizer changes.
Structural and Design Changes
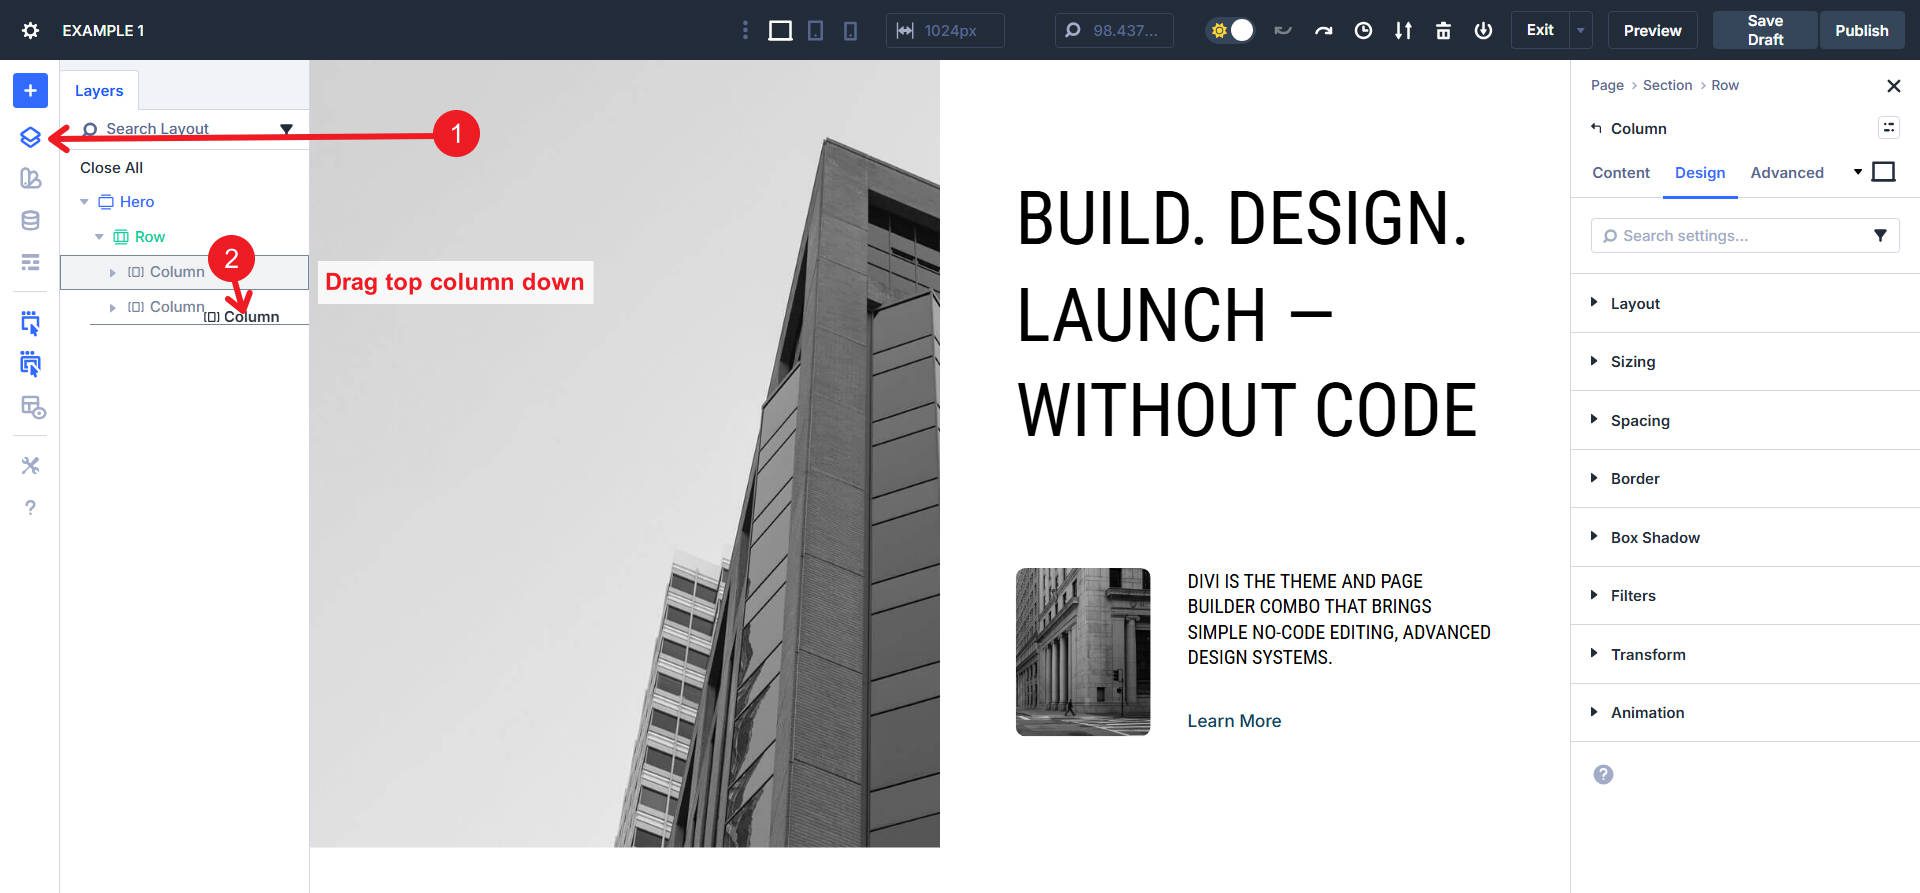
First, alternate the order of the two number one columns throughout the mom or father row. This is highest completed throughout the Layers panel by means of dragging the principle column down.
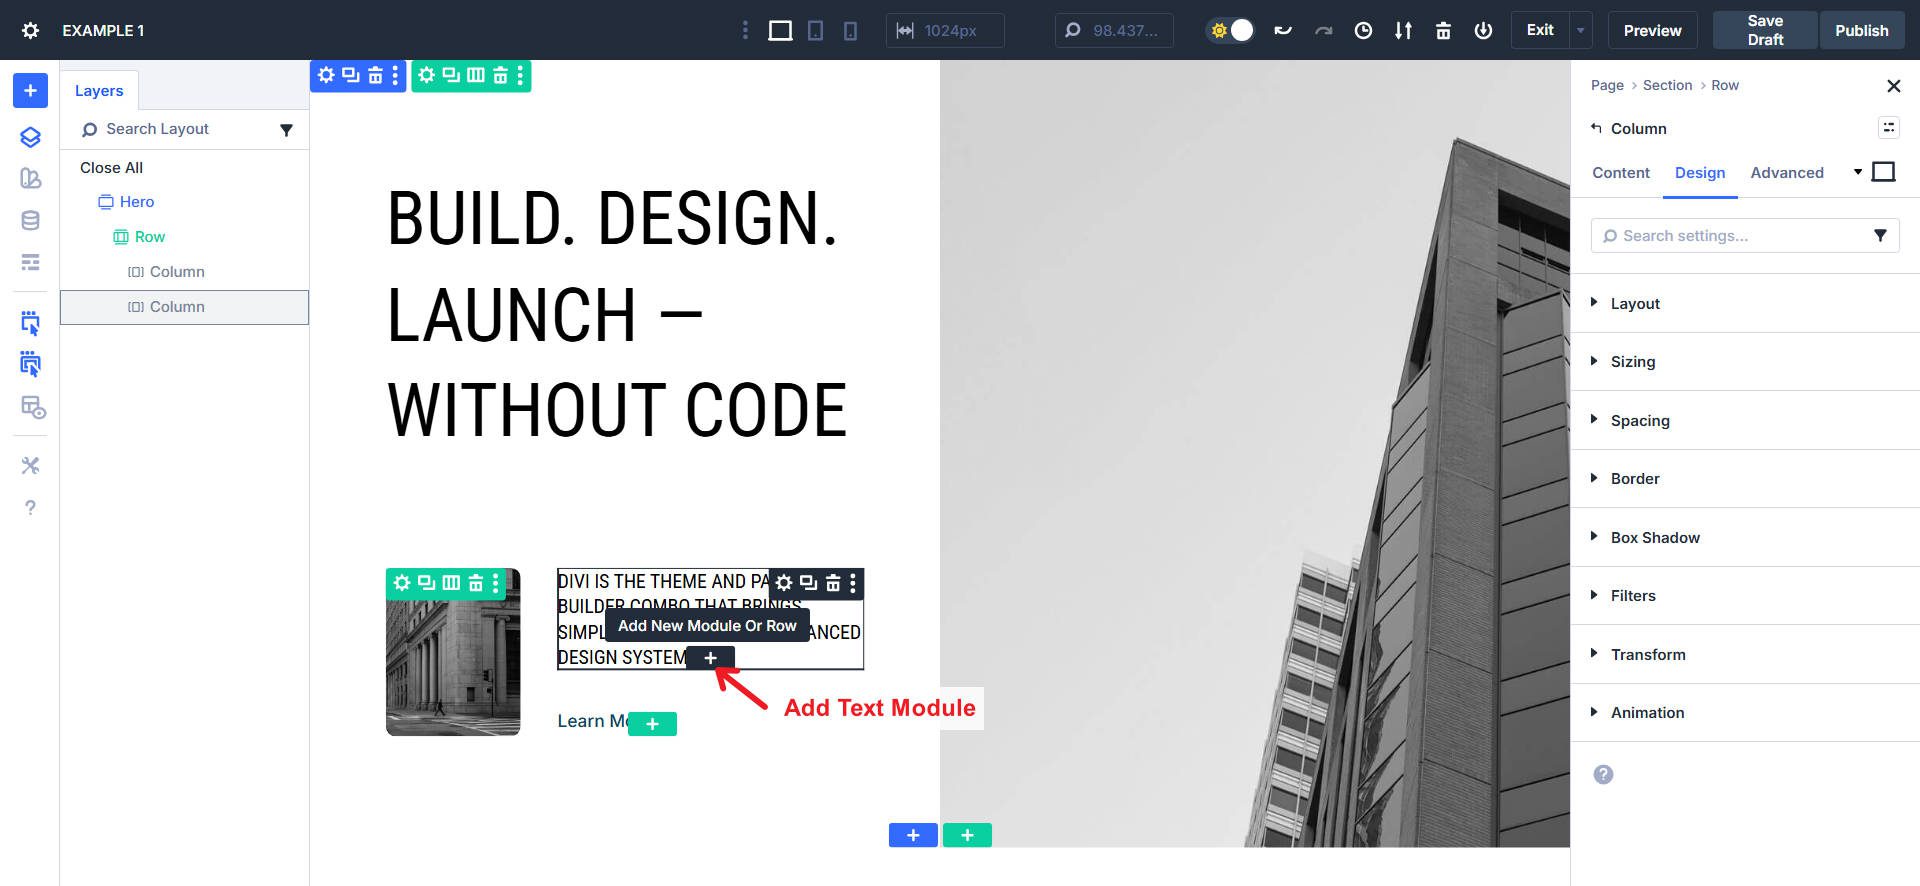
Add a Text Module beneath this Heading Module. Replica the text (or add the up to the moment content material subject material) from the heading module, place it into the new Text Module, and delete the former Heading Module.
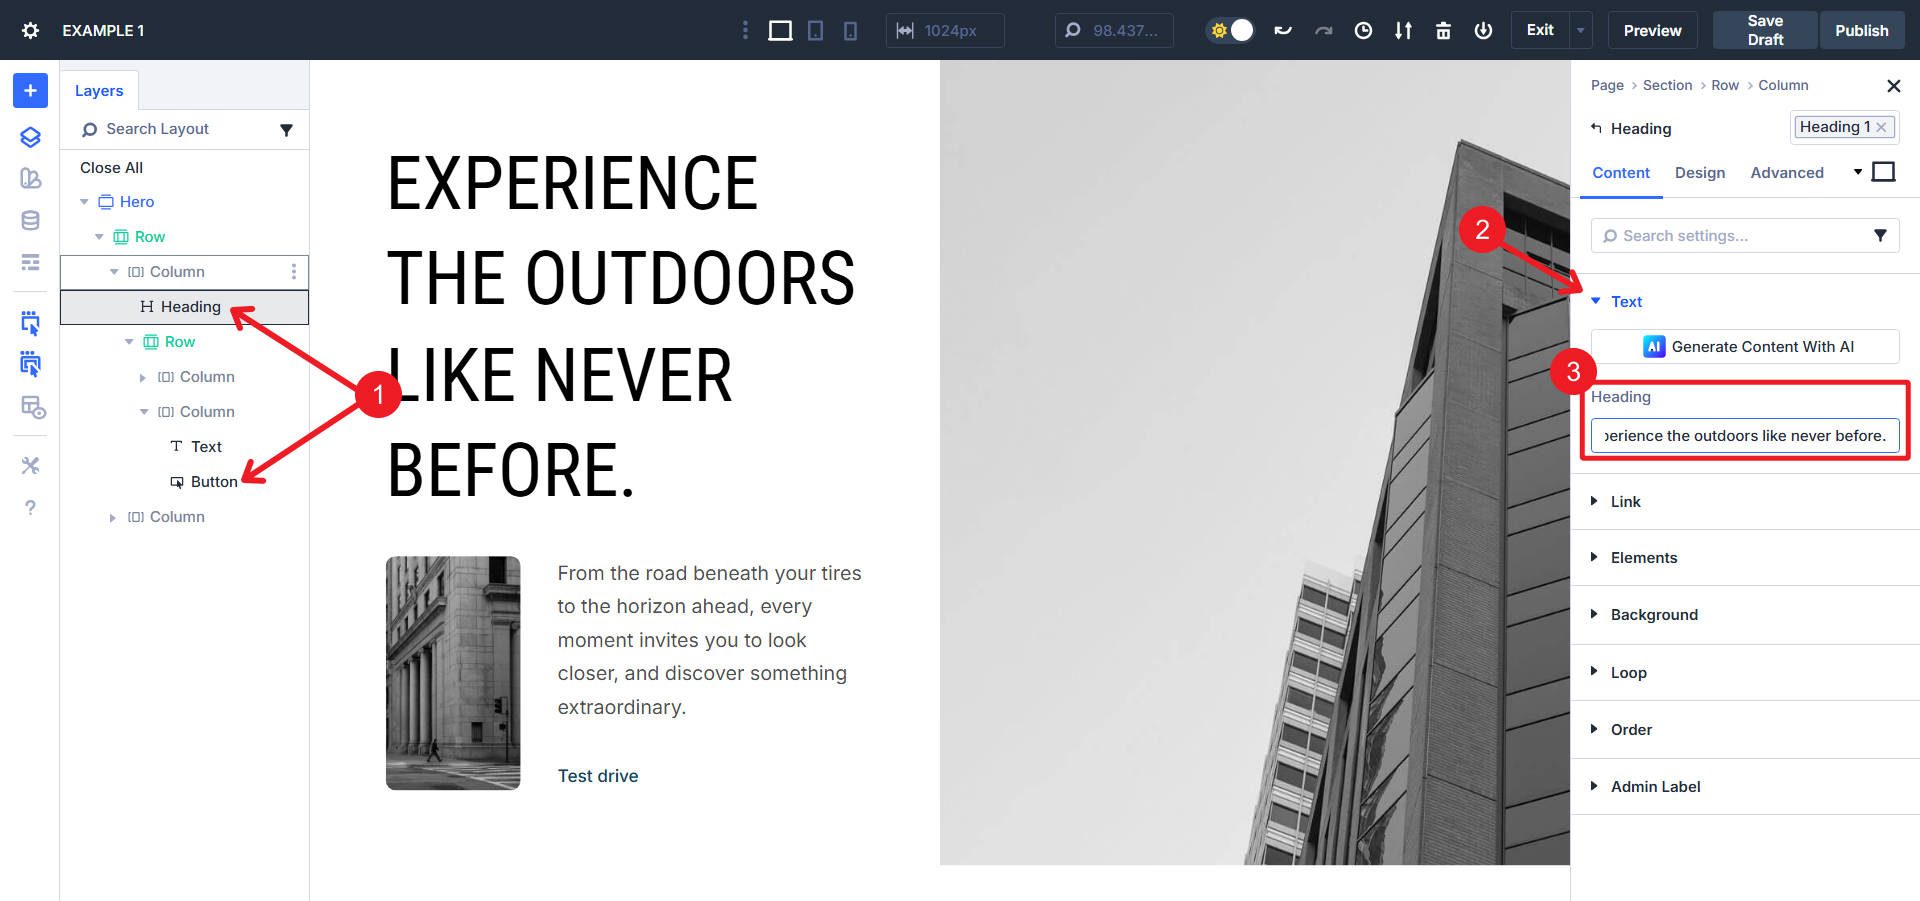
Click on at the Primary Heading (and after it, the button). Throughout the Content material subject material tab, exchange the heading text and then the button text.
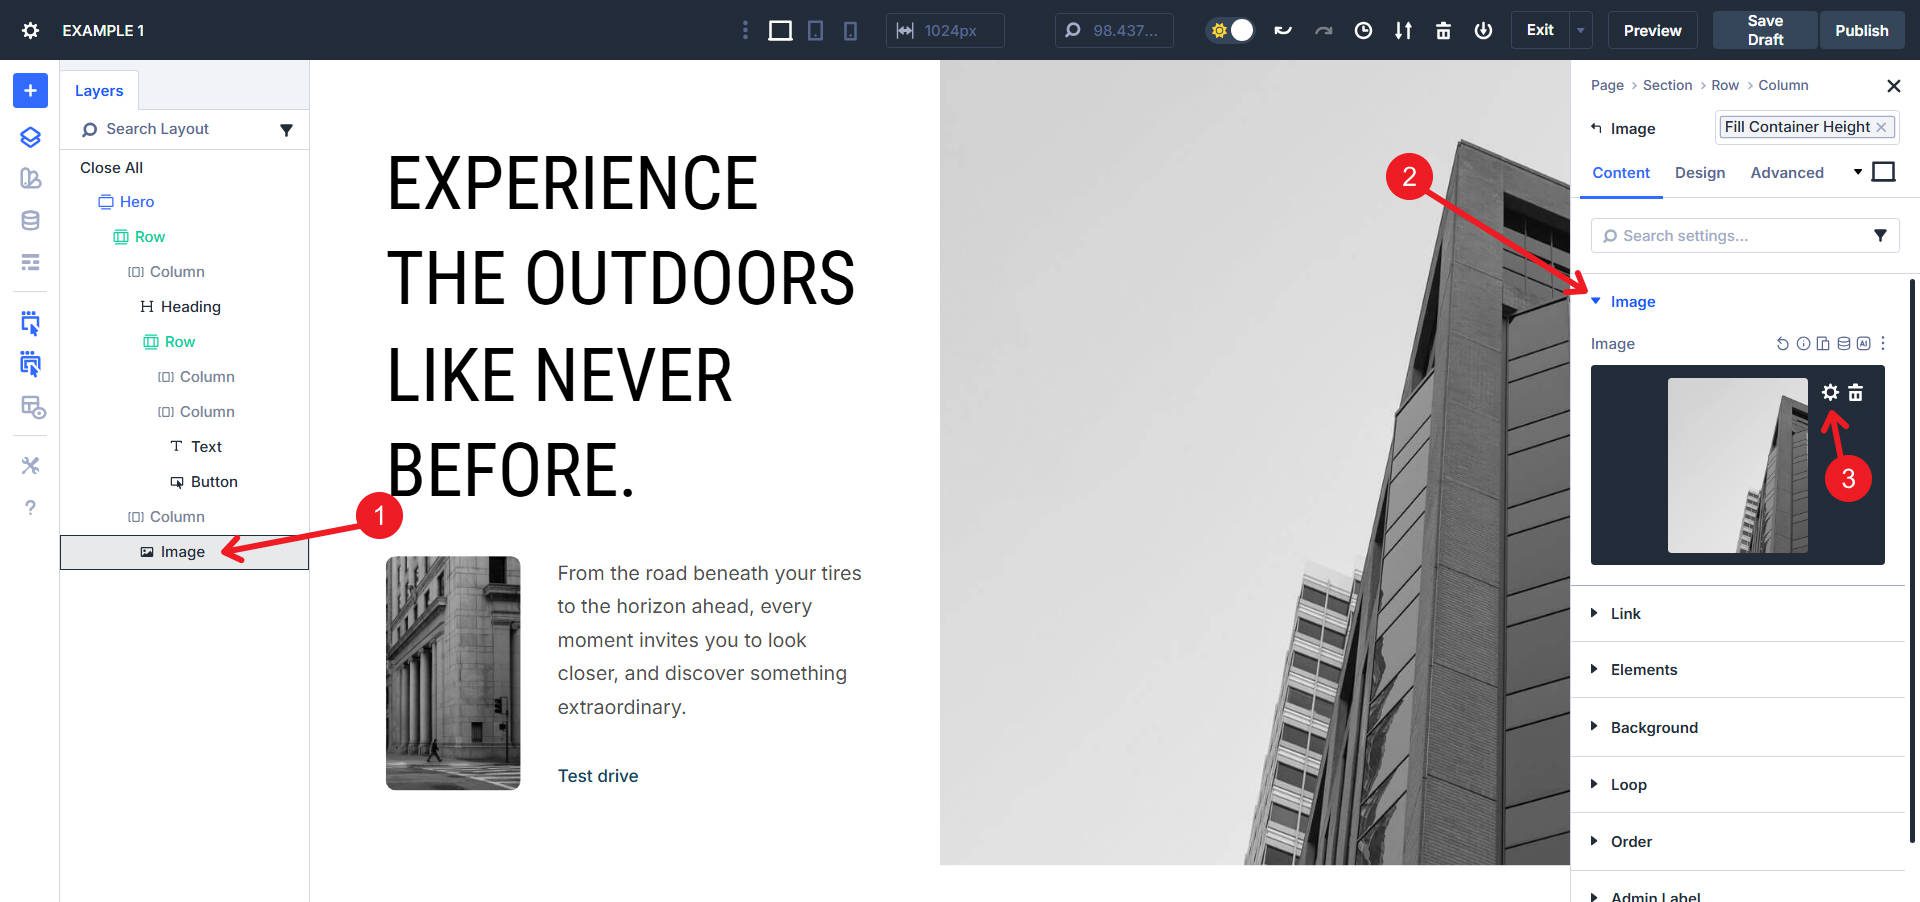
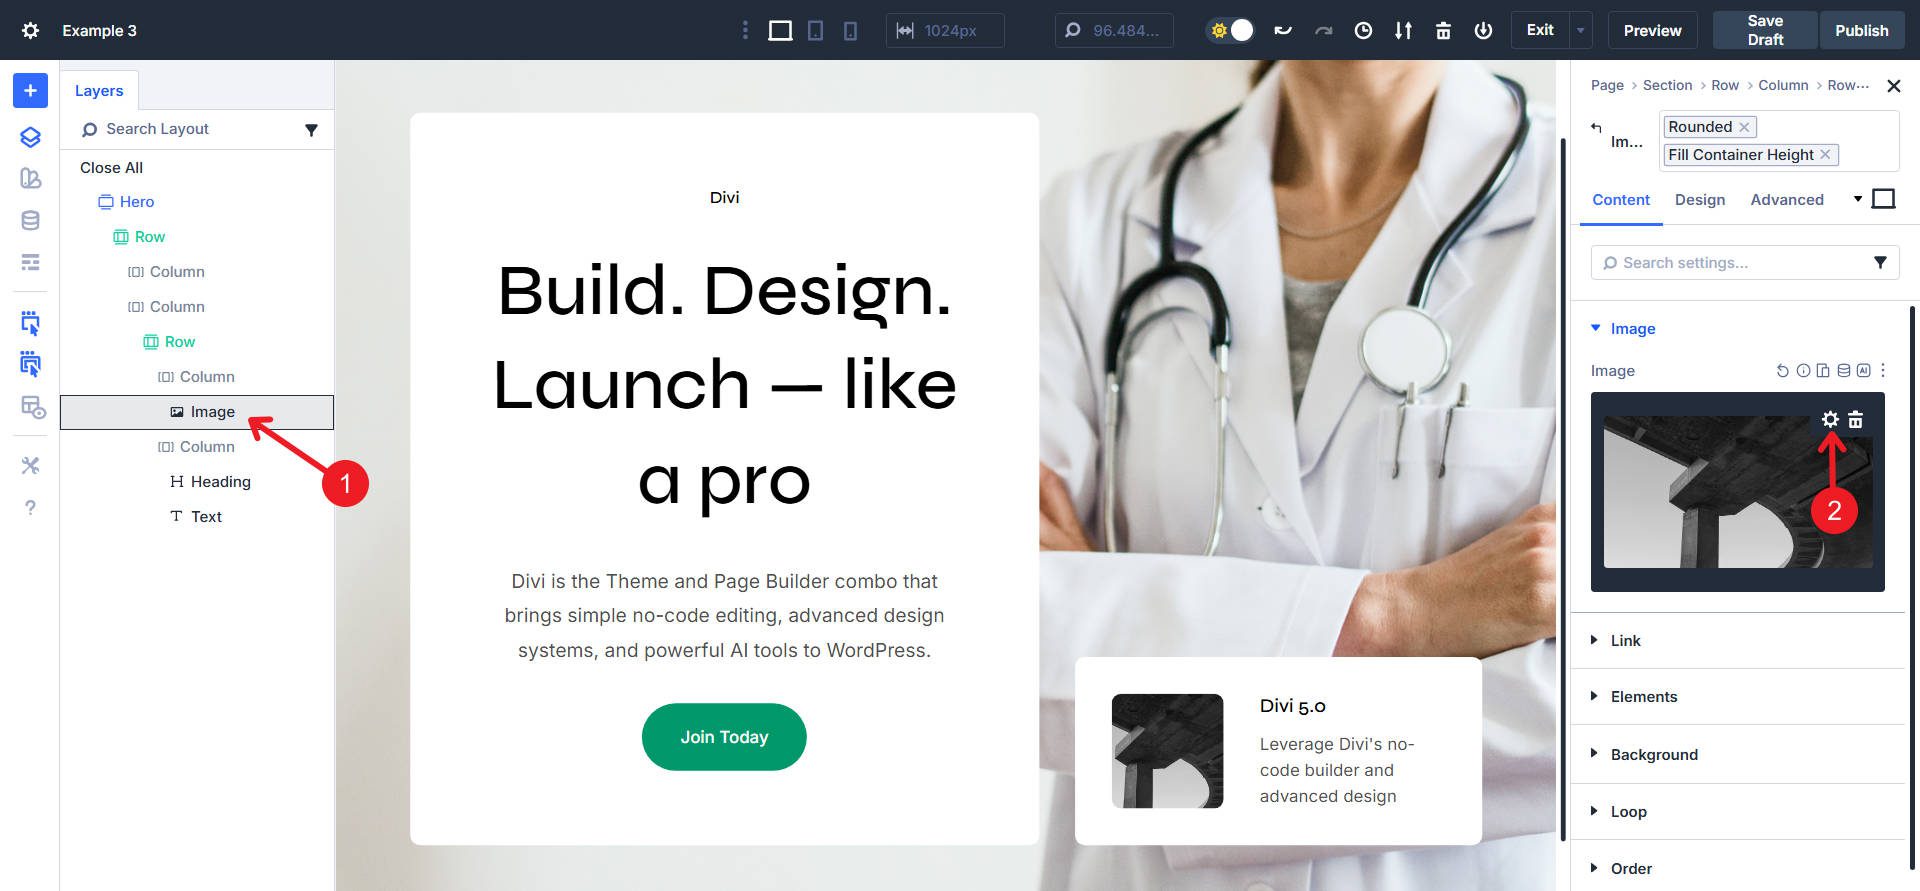
Click on on on each and every image module in column two. Throughout the Content material subject material tab, click on at the Gear Icon and make a choice the new image from the media library. You’ll be capable to find a an an identical image on Unsplash.
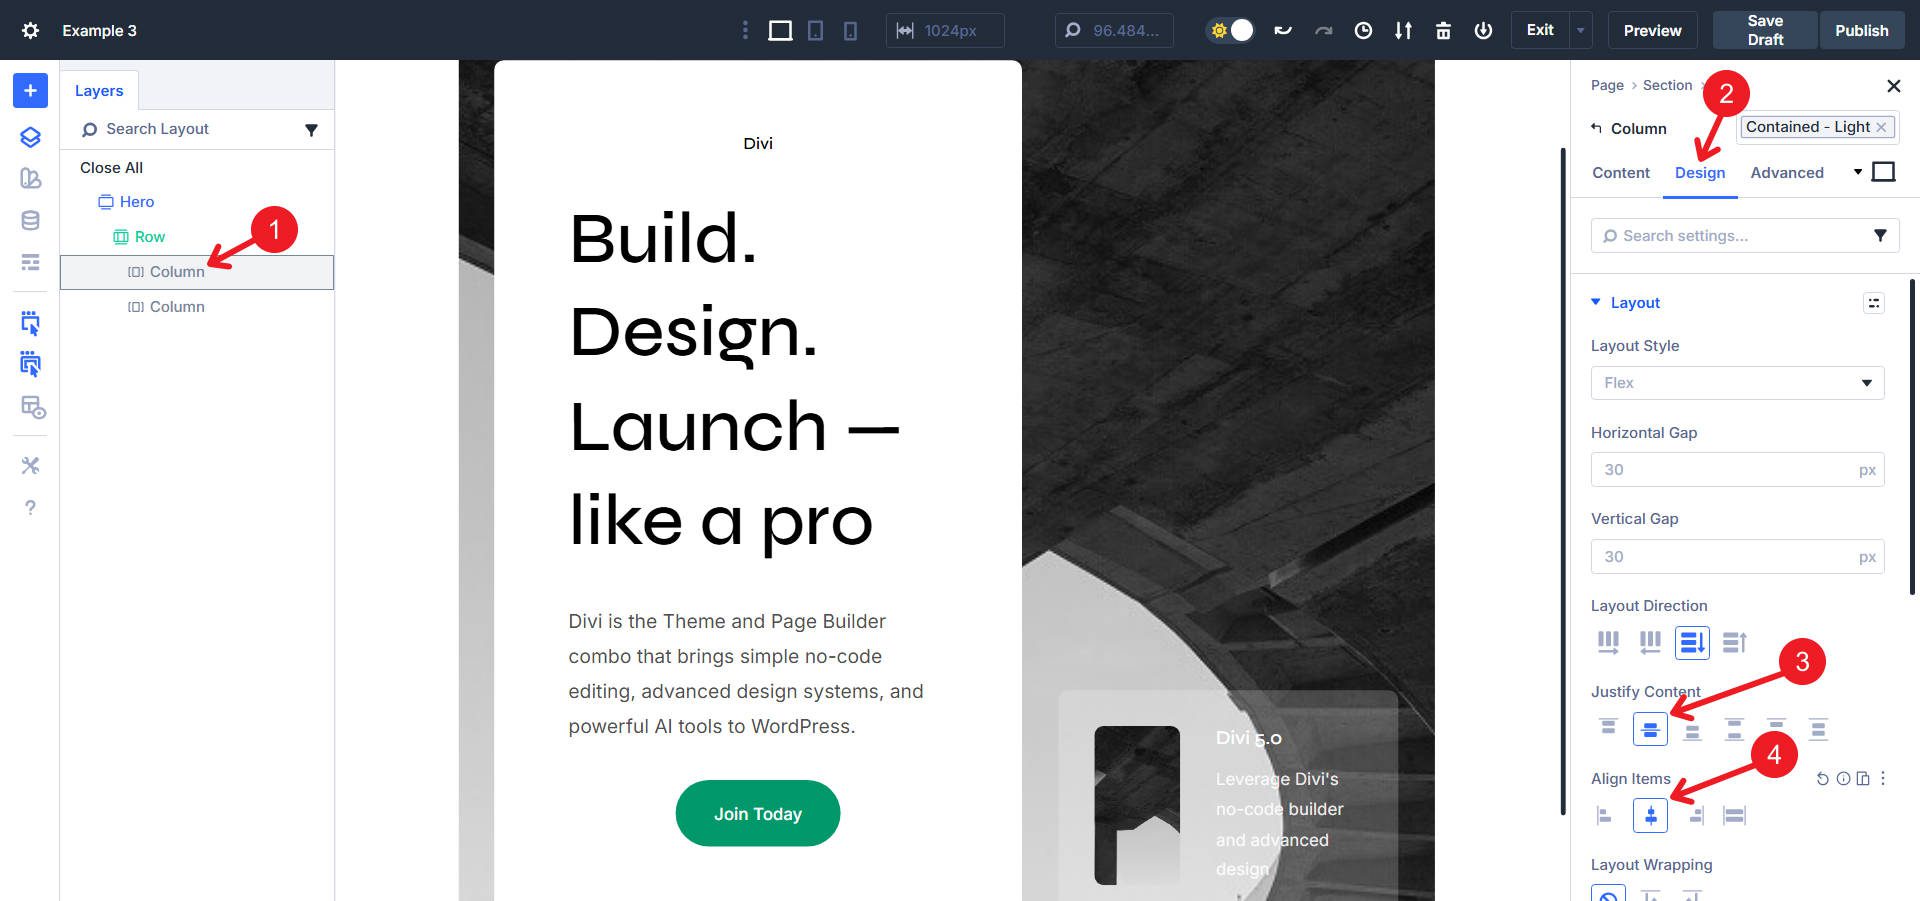
Click on on on the row containing the principle heading and body text. Throughout the settings panel, in finding the Column Development chance beneath the Design tab. Make a selection the 2/5 – 3/5 configuration.
Click on on on the left column. Throughout the Sizing Chance Staff beneath the Design tab, enter 500px throughout the Max Width field.
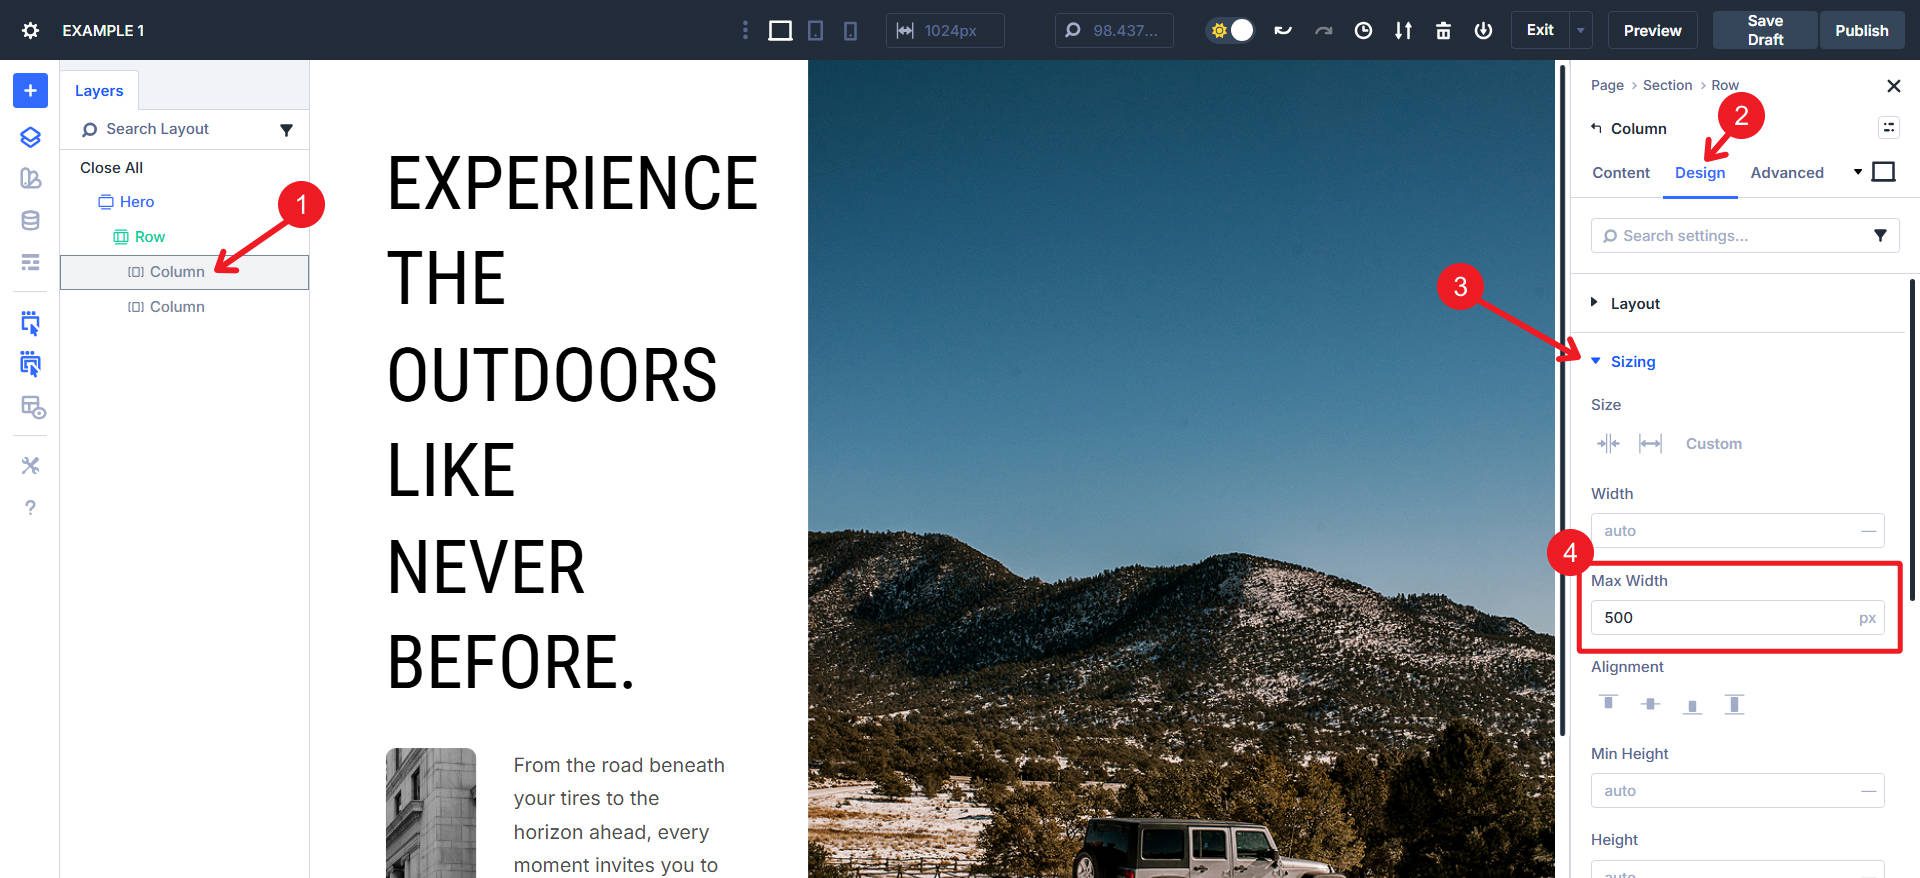
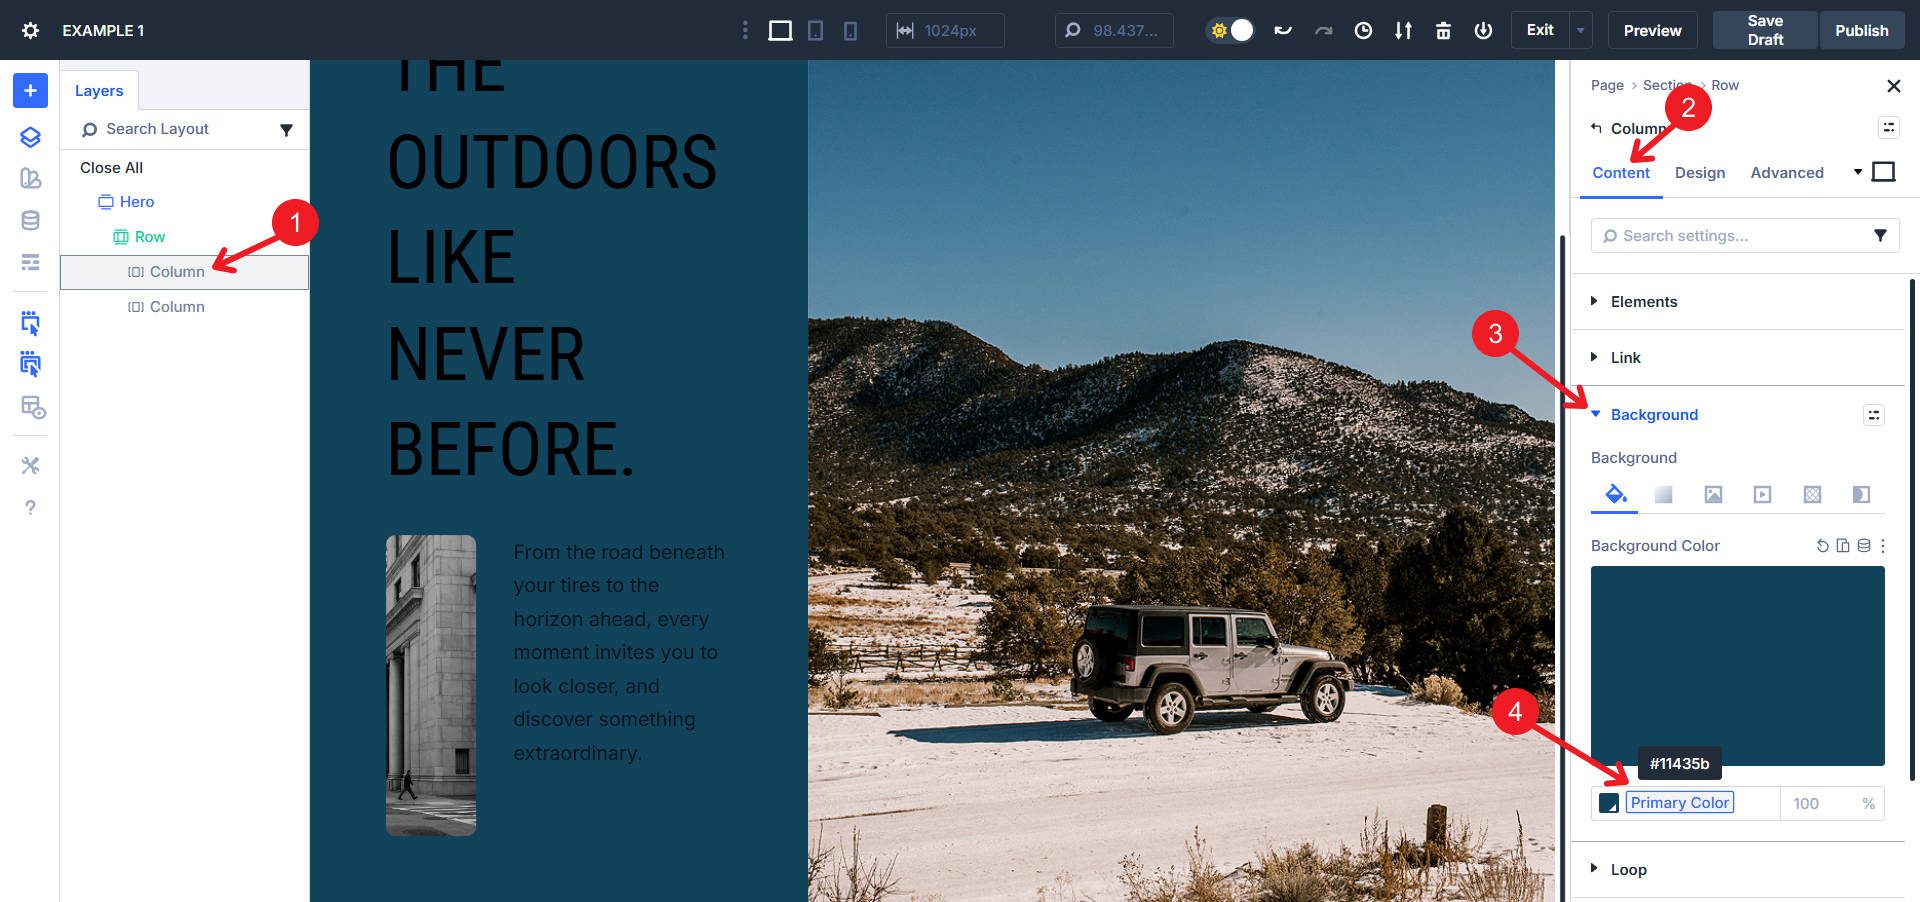
With the left column made up our minds on, open Background. Make a selection Primary Color from the Design Variable possible choices for Background Color.
Trade the Heading and Body Text color of all the parts throughout the left column to white.
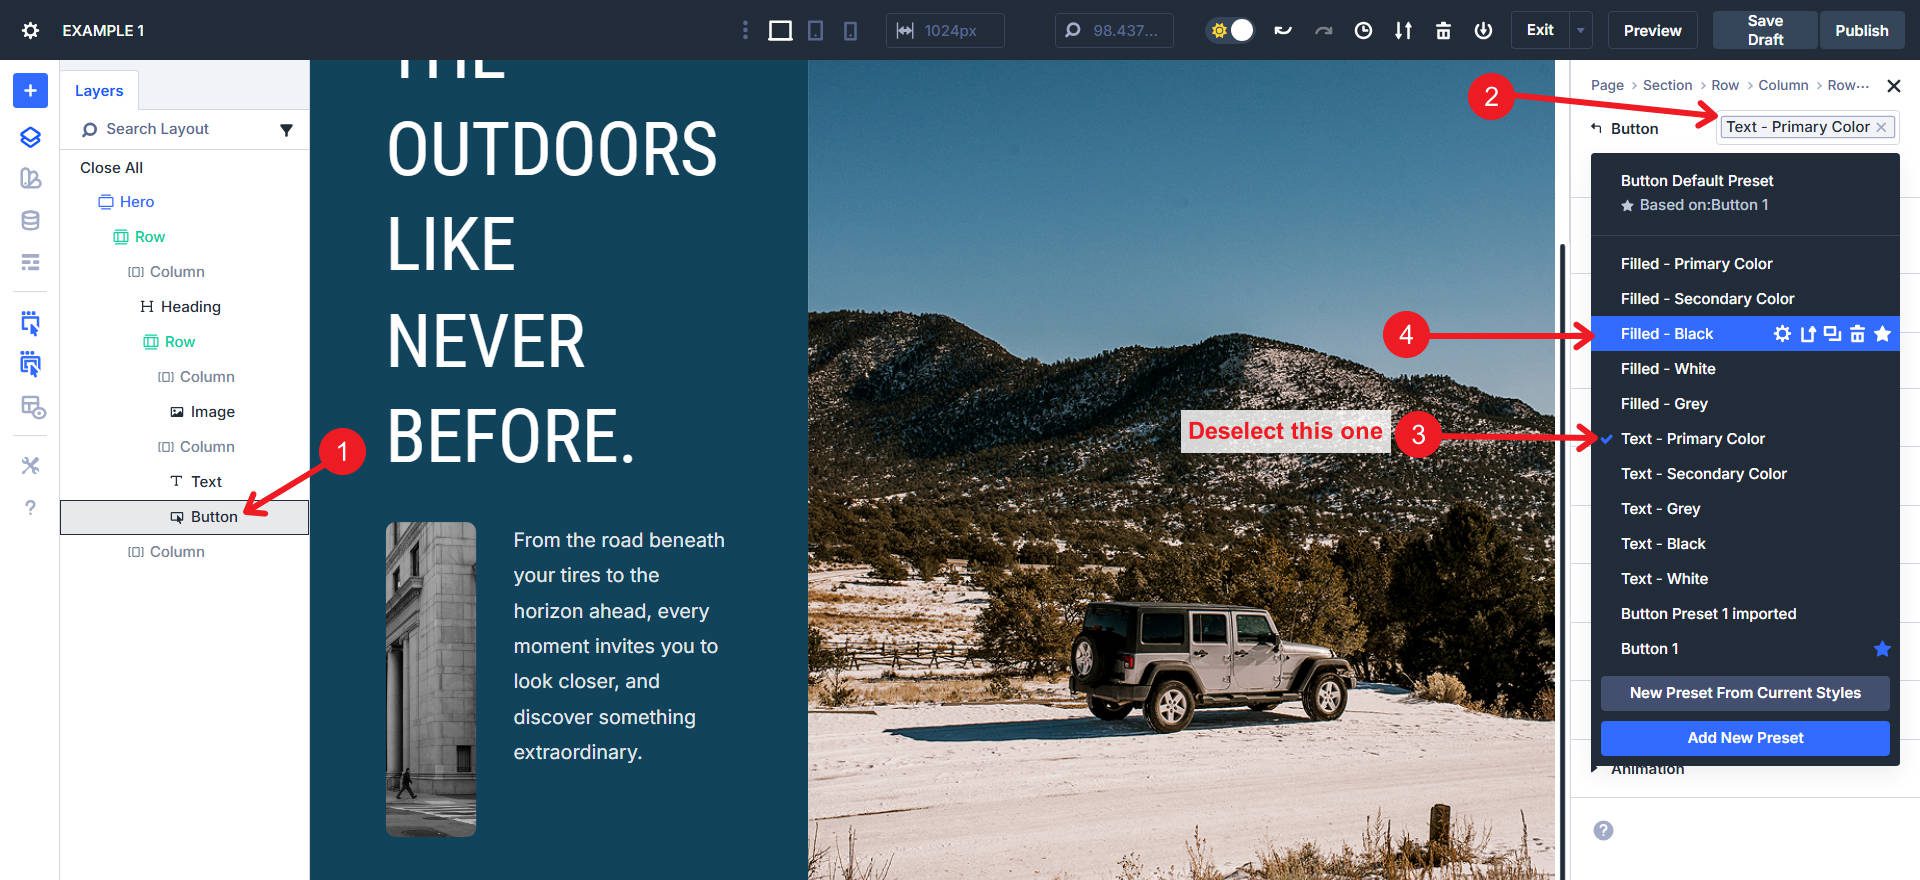
Trade the Button’s Phase Preset to Filled – Black. Deselect the previous preset to avoid styling conflicts and overstyling.
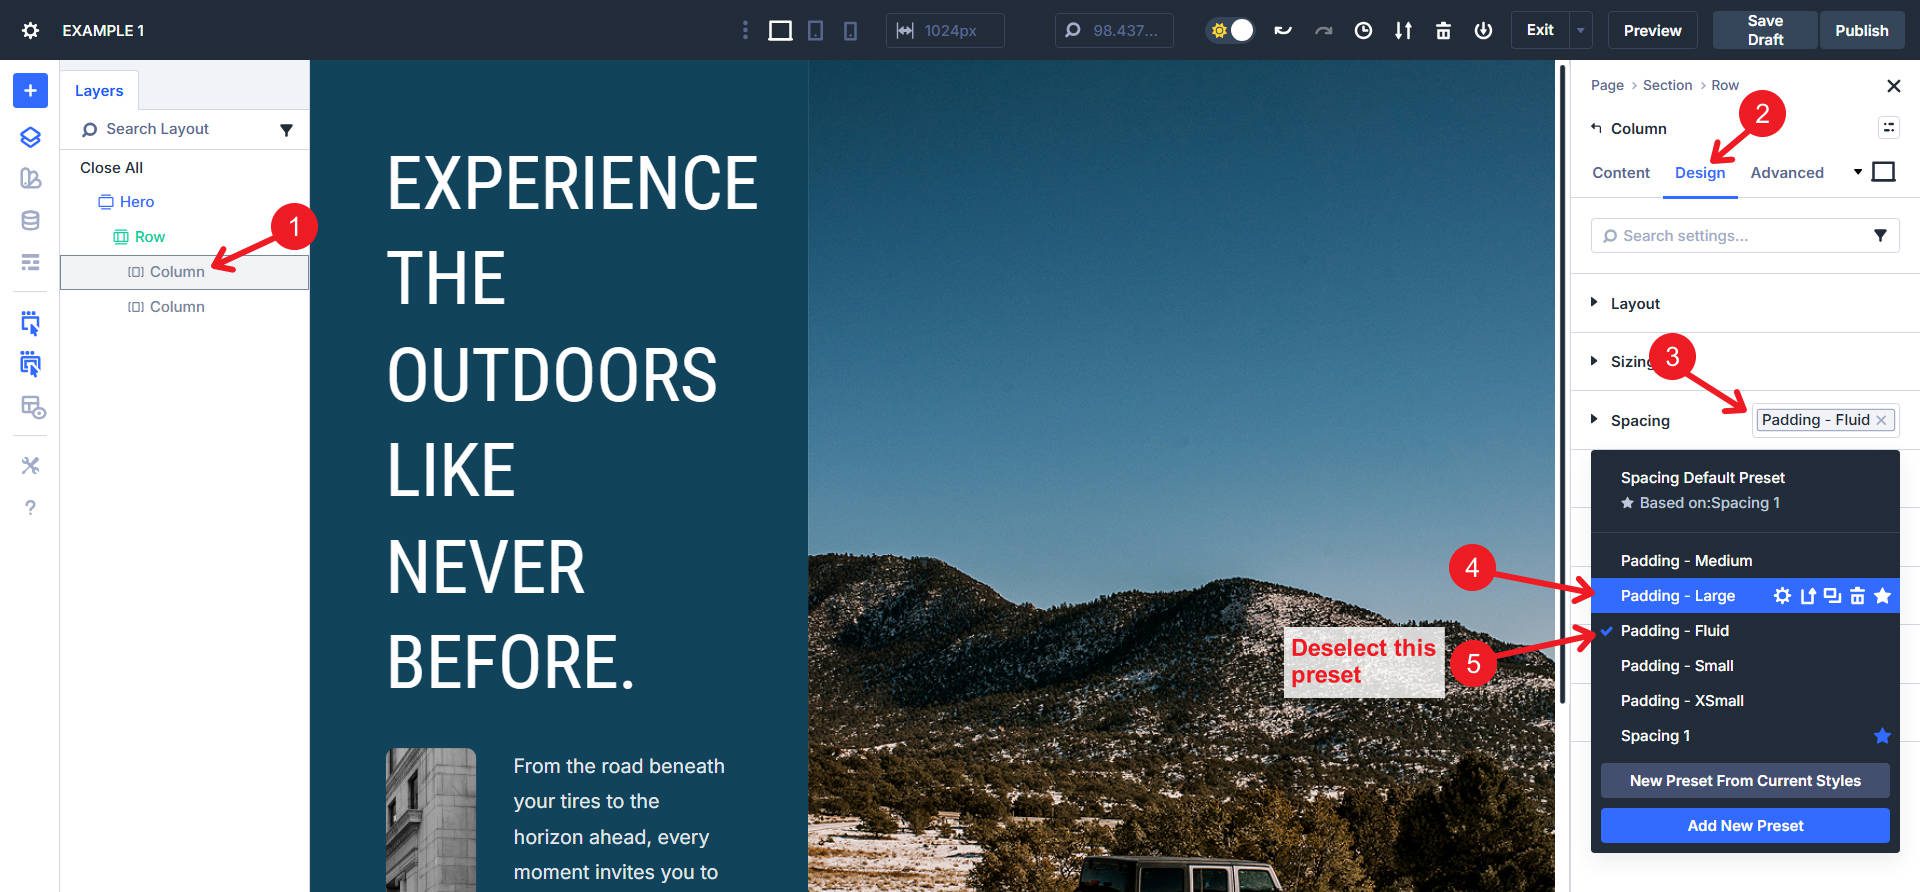
With the left column made up our minds on, click on at the Design tab and scroll to Spacing. Click on at the preset chip and make a choice Padding – Huge. Deselect Padding – Fluid.
To find the Interior Row of the left column. Open its settings and beneath Parts, business the Column Development to 2/5 – 3/5.
If the phase is just too tall to your liking, you’ll take a look at cropping or adjusting the image measurement in the correct column.
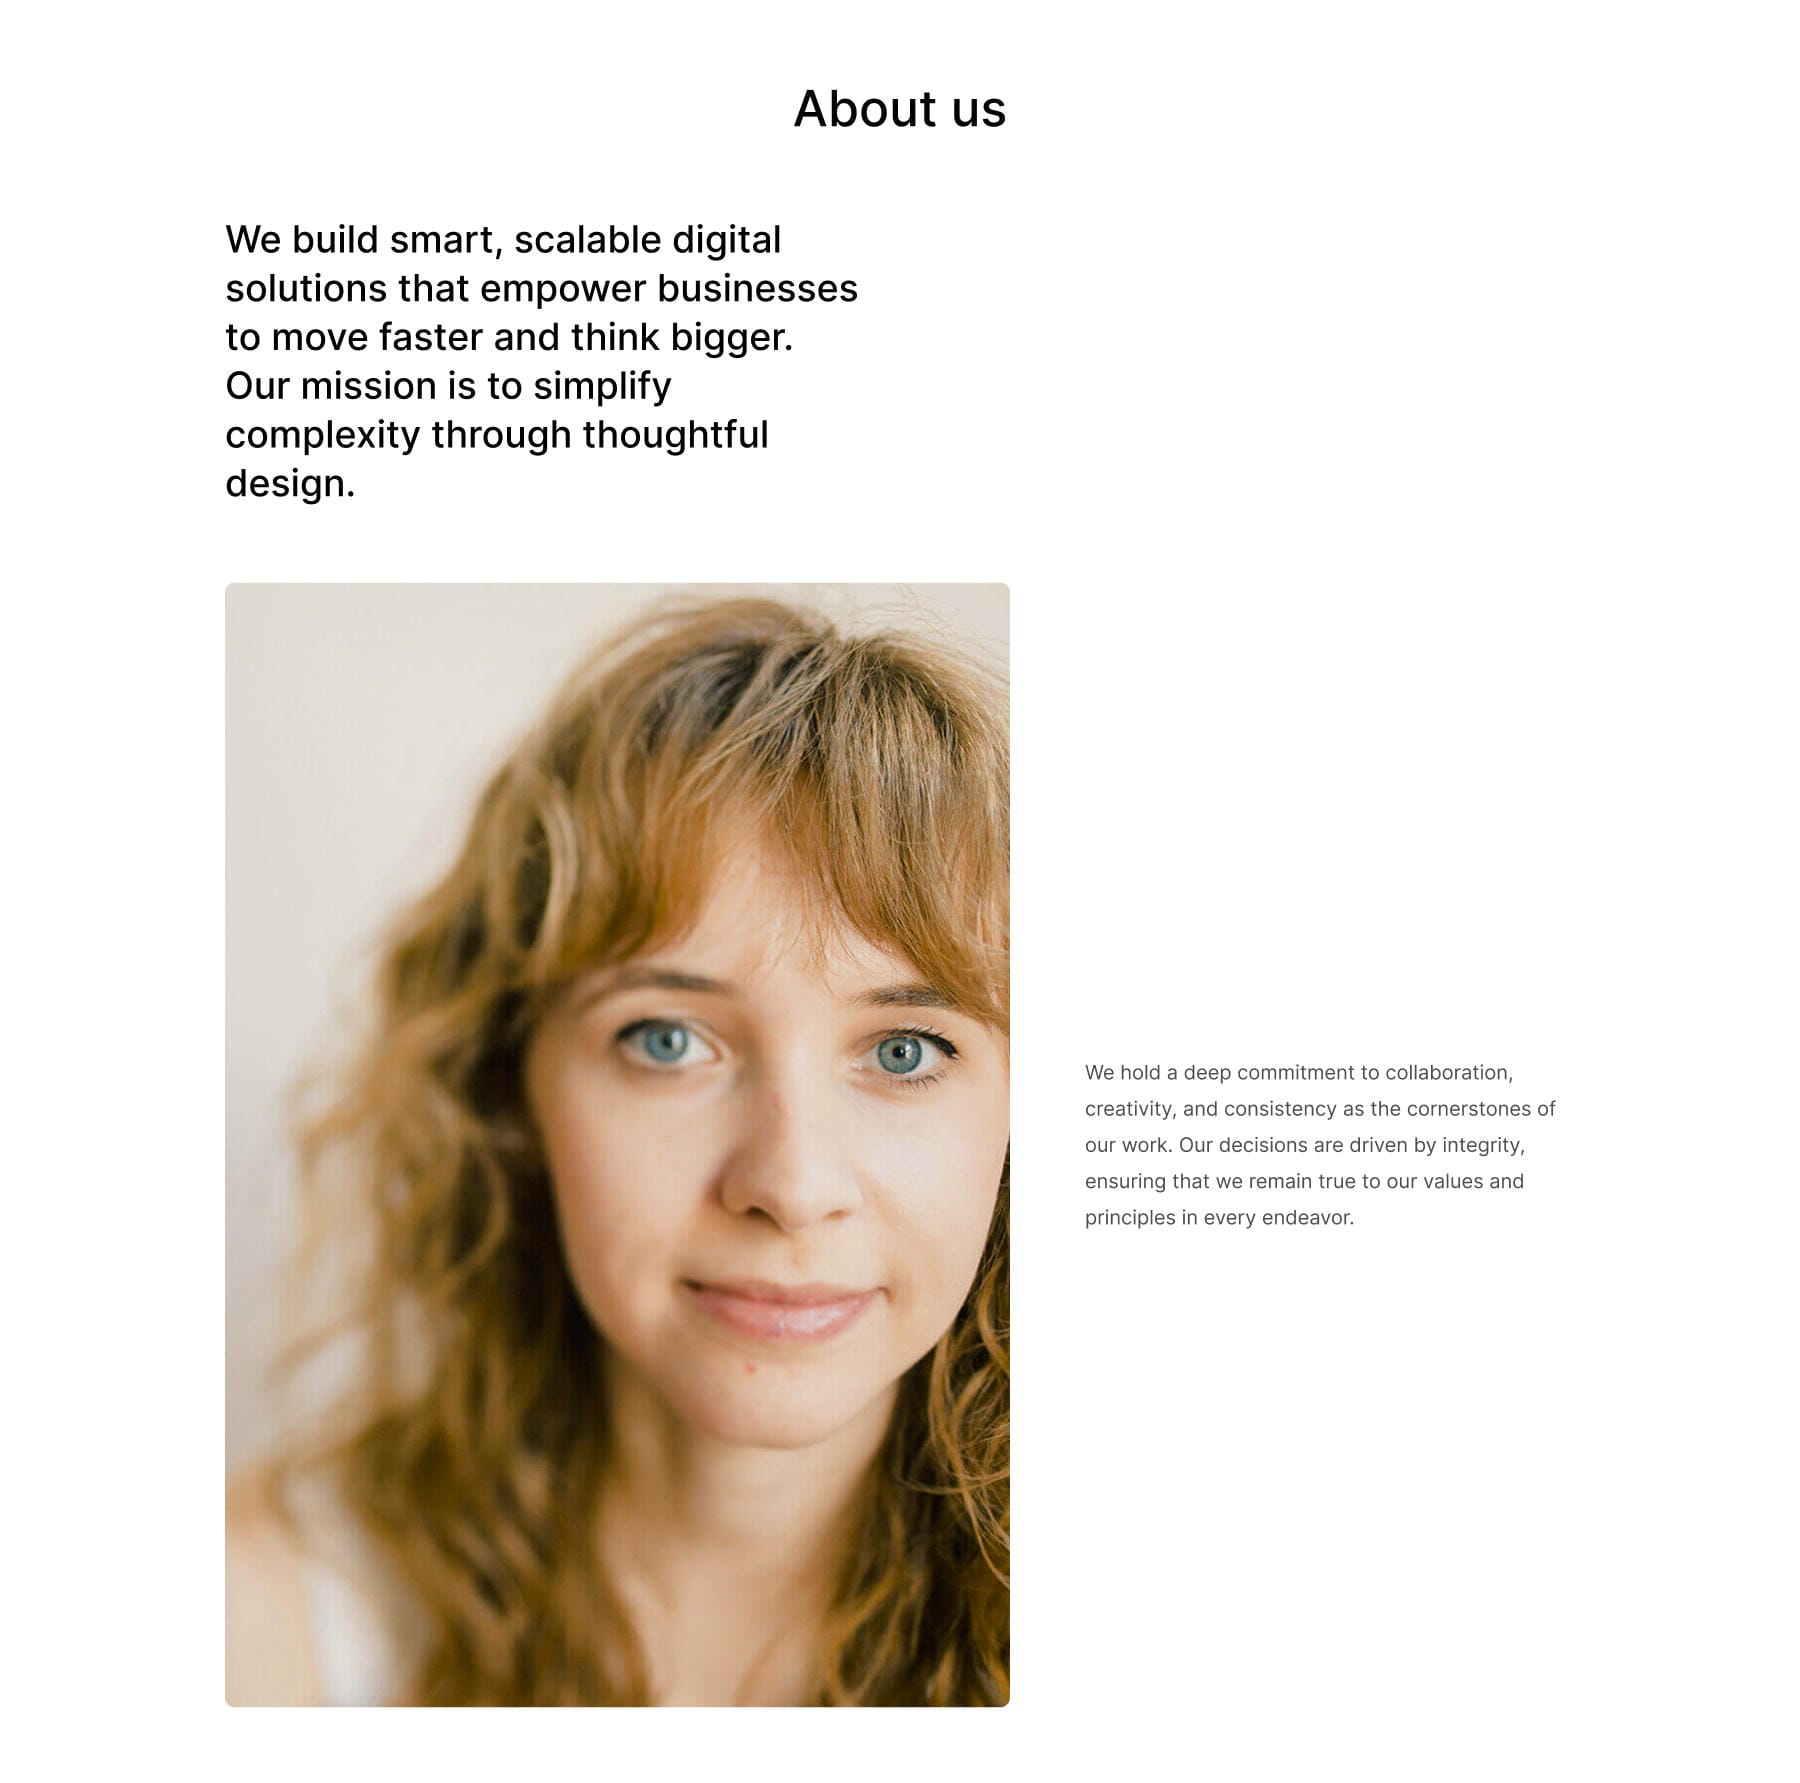
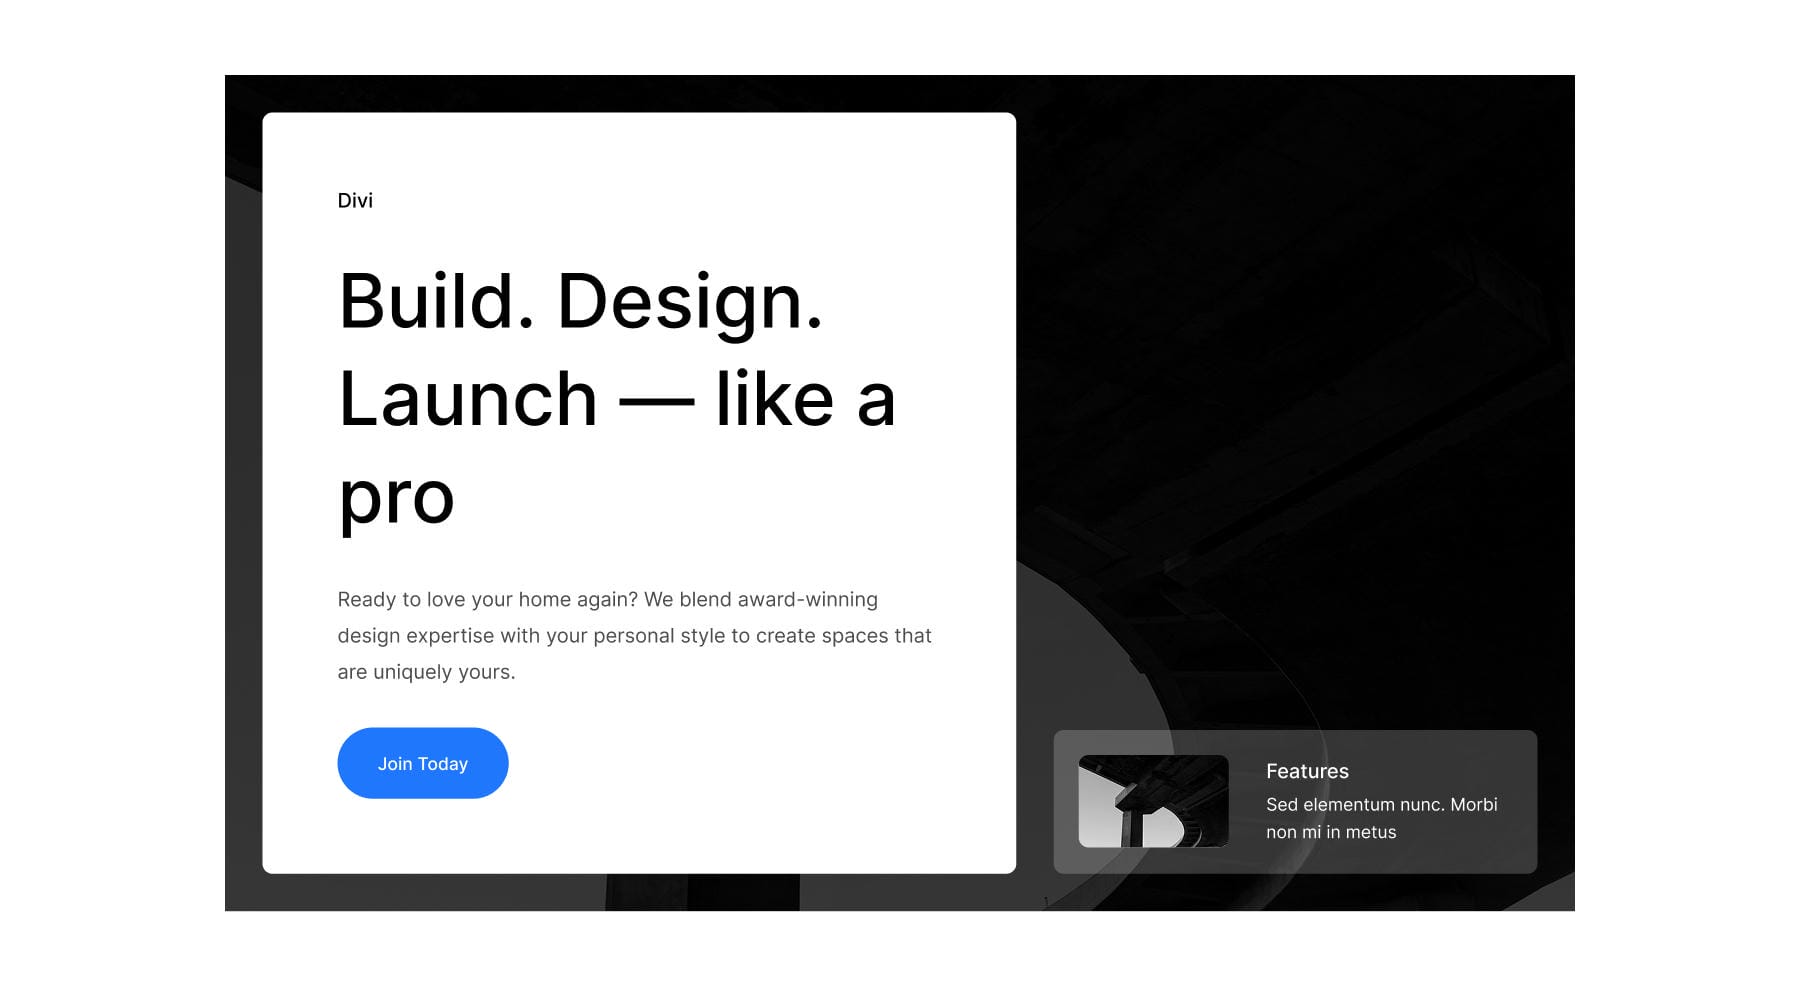
Minimalist to Warmth About Us Segment
This variation turns About Segment #5 from the Sections library proper right into a warmth, ingenious non-public emblem observation.
Previous to
The transformation requires ~23 actions all through WordPress Customizer, Design Variable Manager, and preset adjustments. Implementation time: more or less 12-15 minutes.
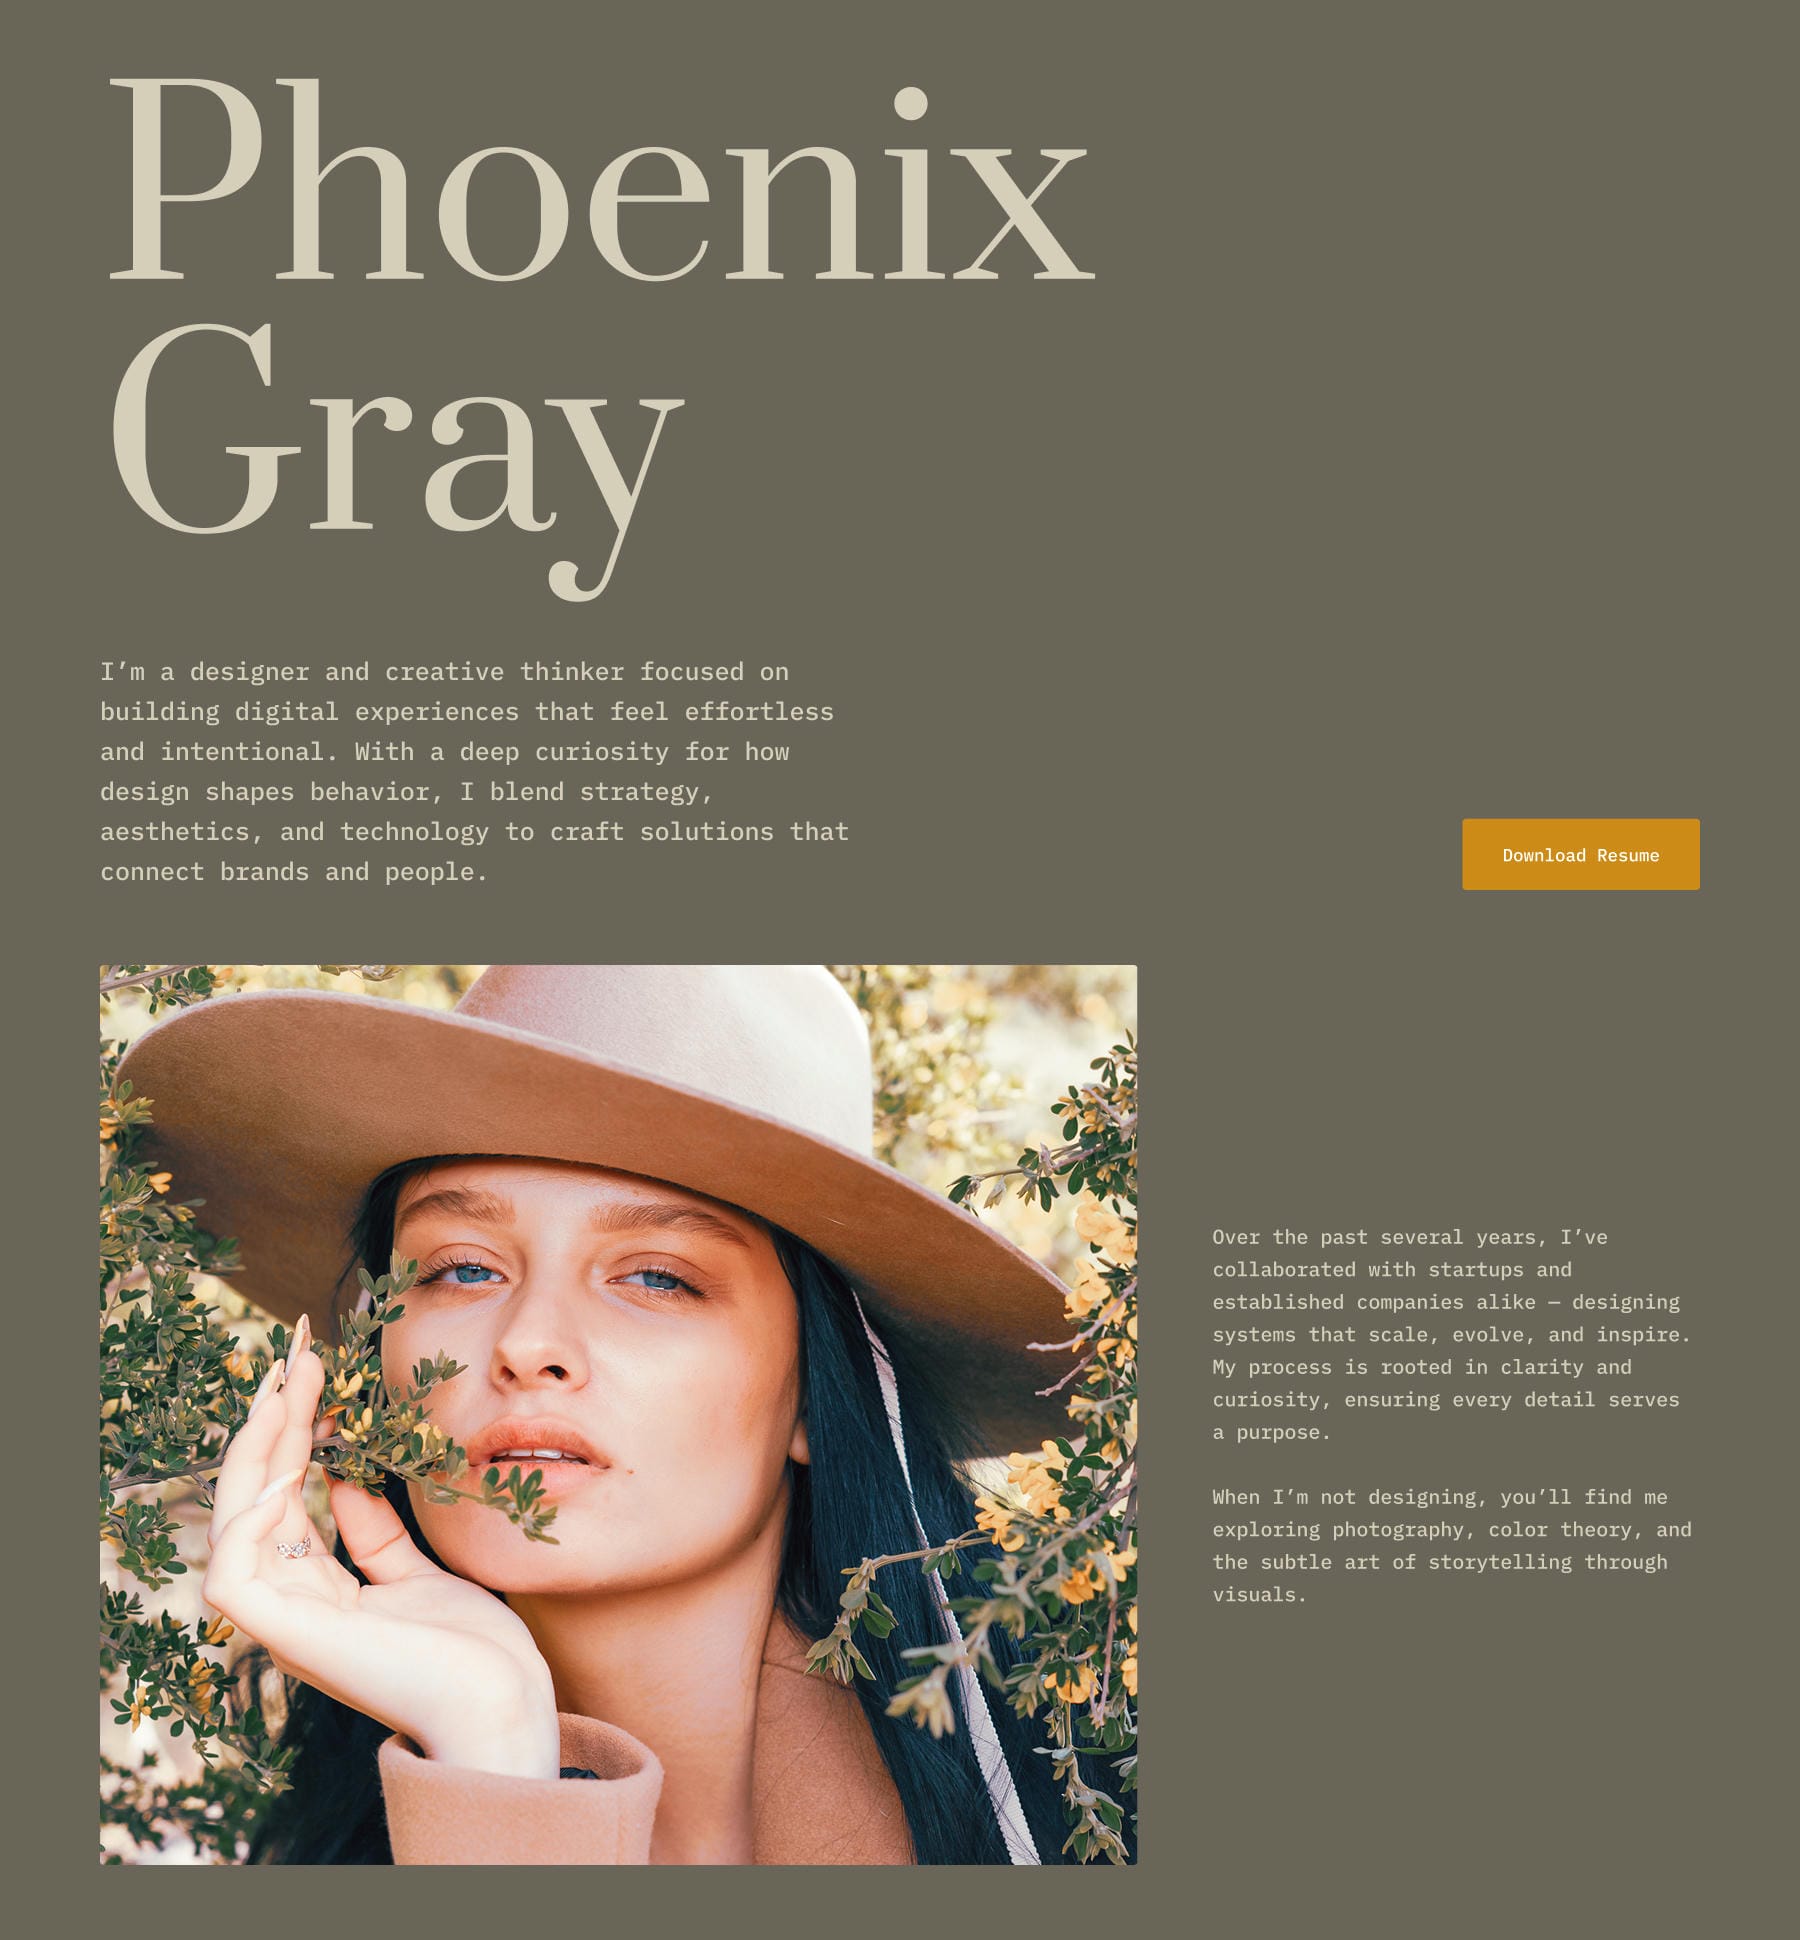
After
Global Customizer Changes
Open Divi > Customizer and navigate to Standard Settings > Typography. Trade the Heading Text Font to Prata. Trade the Body Text Font to IBM Plex Mono.
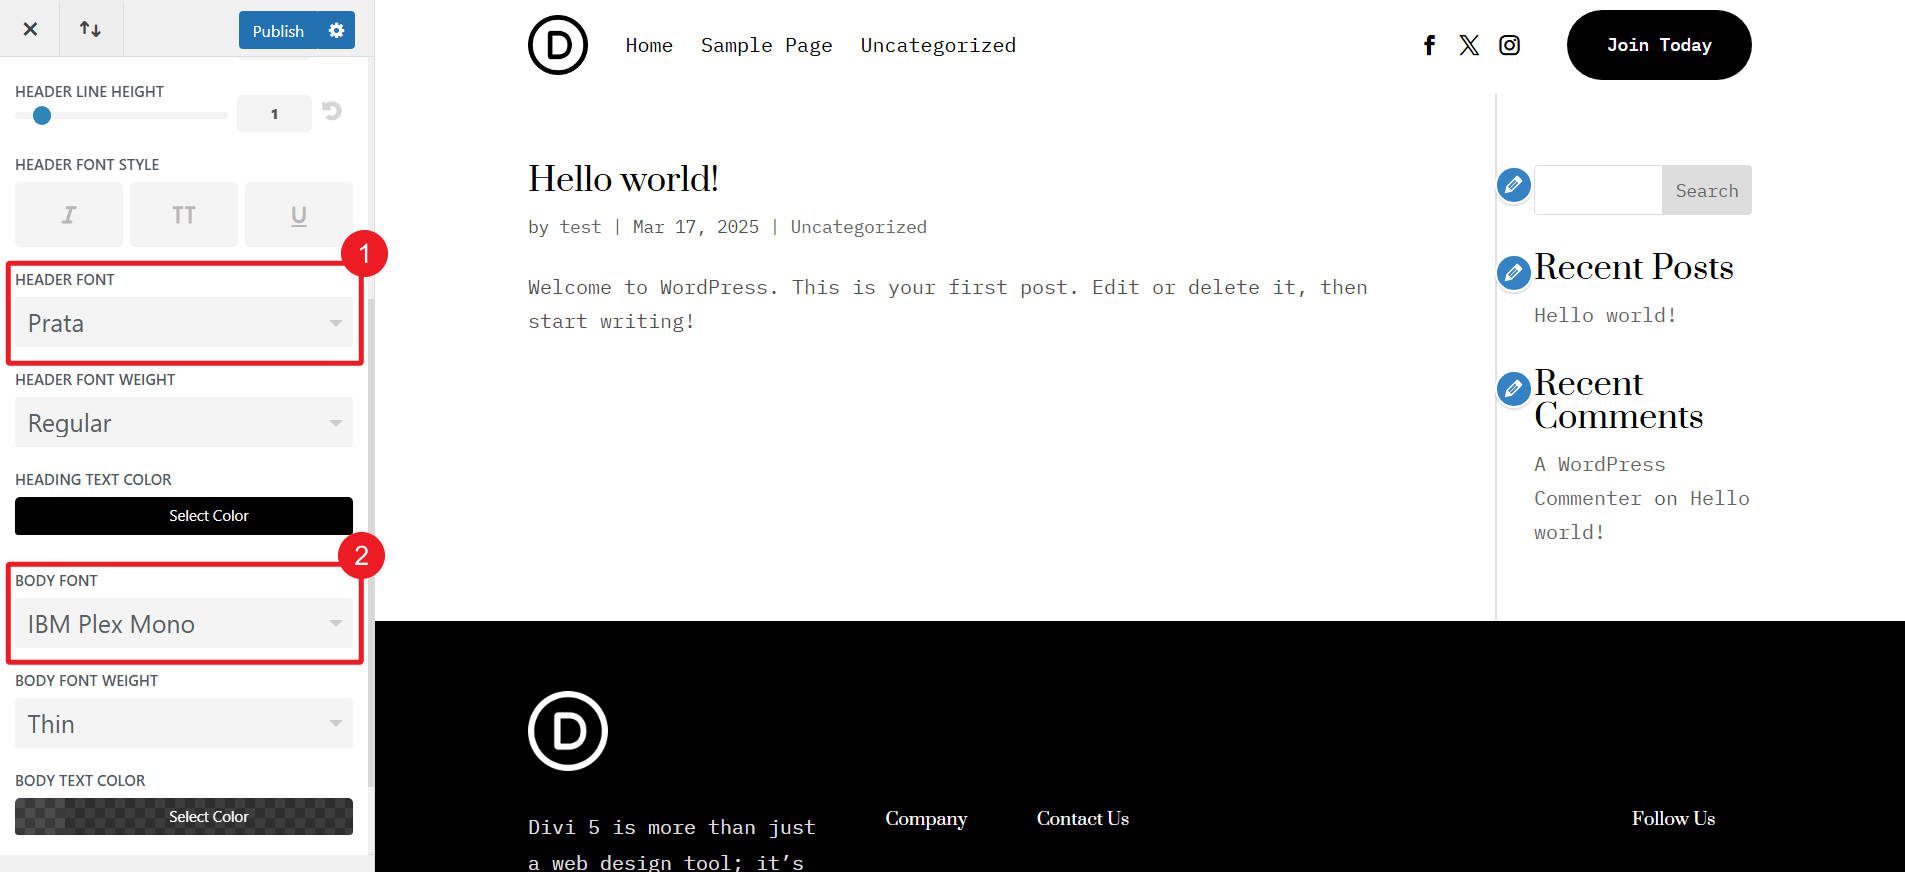
This is merely completed by the use of the Design Variable Manager
Transfer to Standard Settings > Layout Settings and change the Primary Color to #F4AA2C. Moreover, set the Web page Content material subject material Width to 1280px.
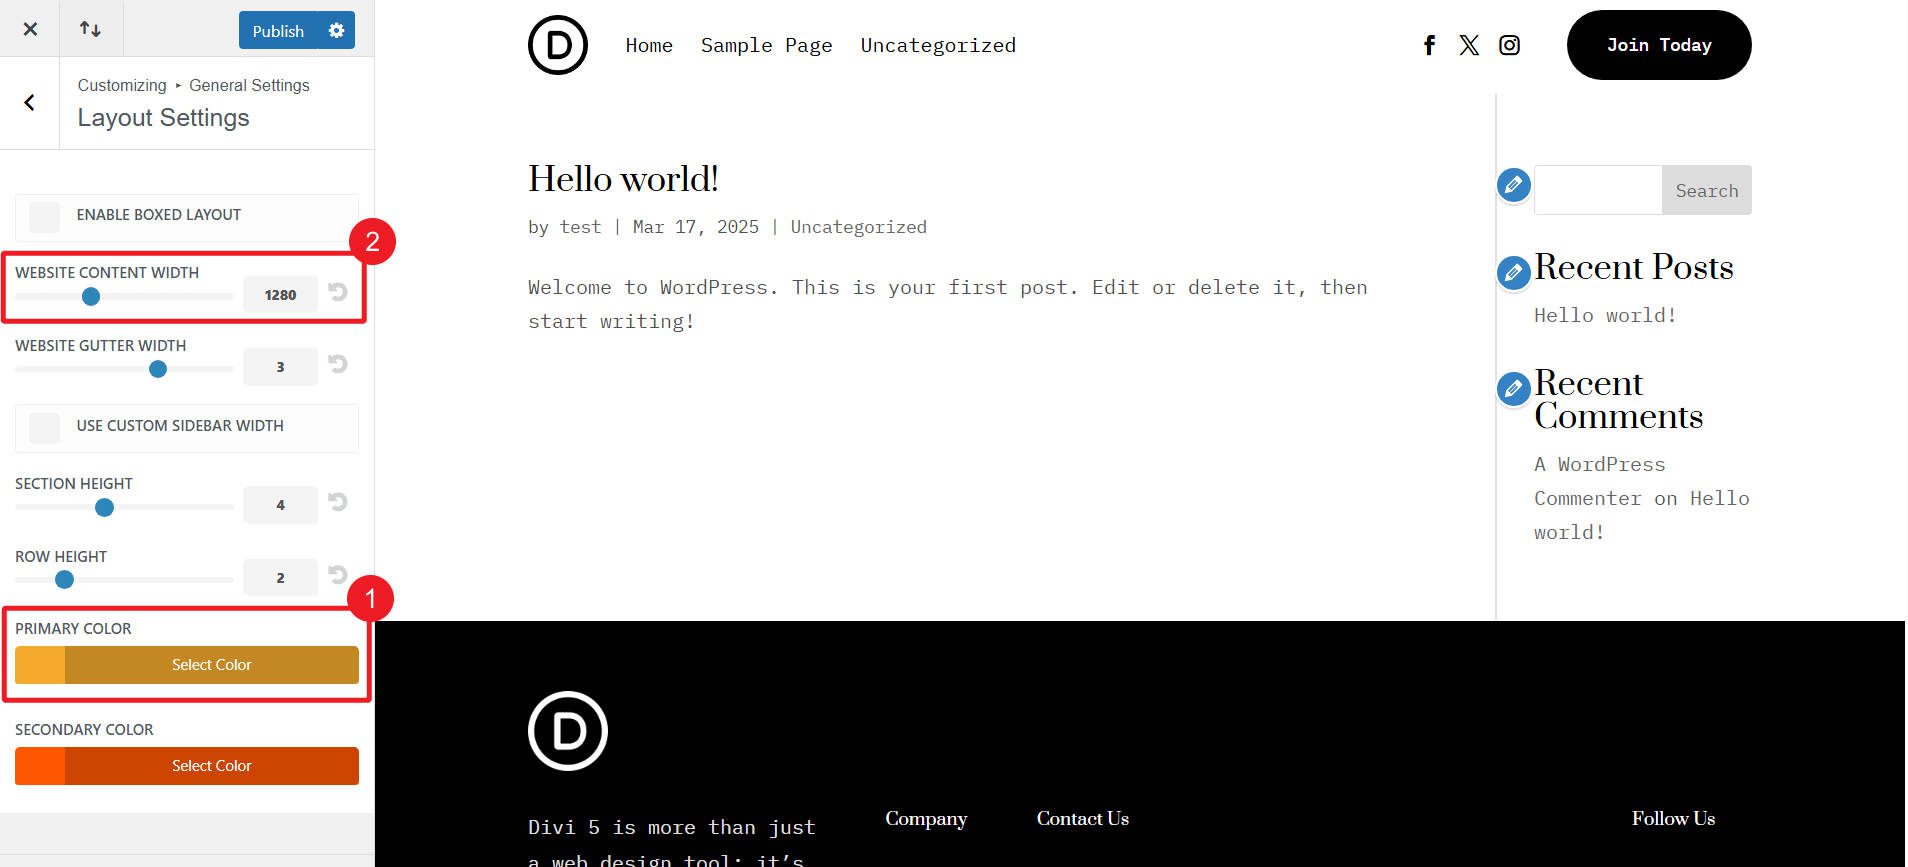
The Primary color is definitely edited by the use of the Design Variable Manager, while the Web page Content material subject material Width can merely be edited in Divi 5 by means of changing the default Preset for Rows and adjusting its width setting.
Submit all Customizer changes.
Design Variable Manager Changes
As quickly because the About Us structure is added to the internet web page, open the Design Variable Manager from the Persistent Left Sidebar. Make the ones changes:
To find Heading Text Color – Delicate and Body Text Color – Delicate throughout the Color Variables phase. Trade their color value to #D6CEBB.
Then, Add Global Color throughout the Color Variables phase. Establish it Background – Medium and set the fee to #6B645A. Click on on Save.
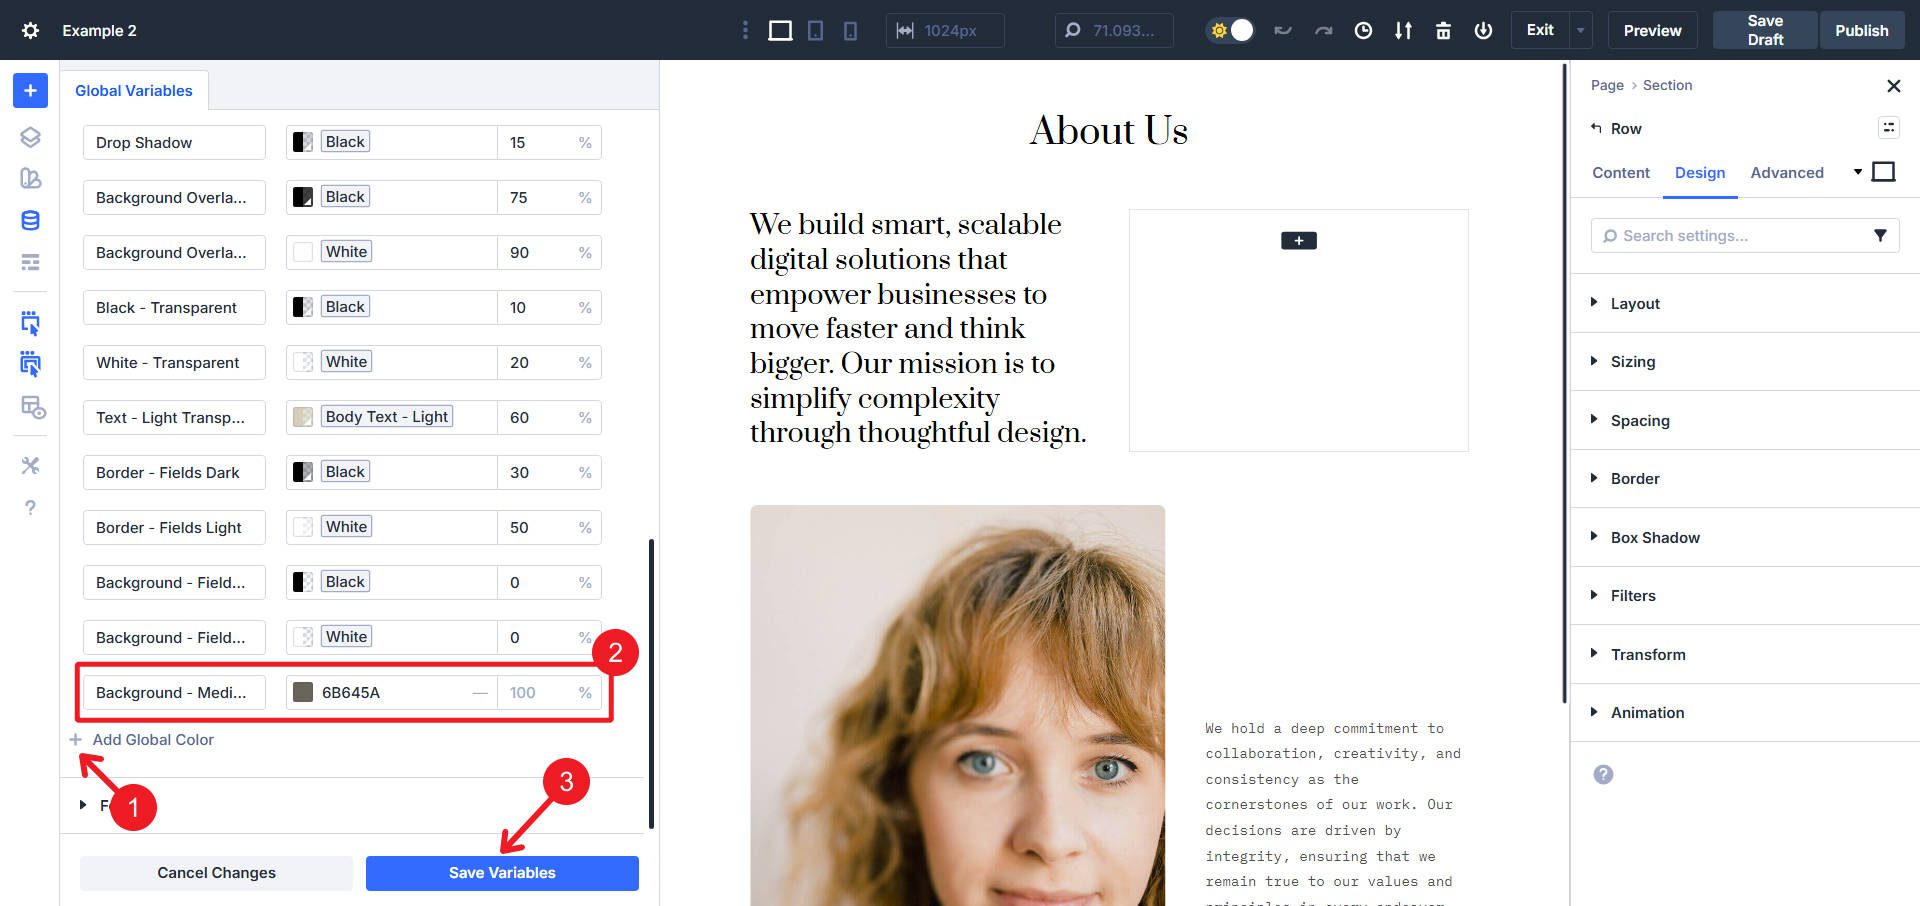
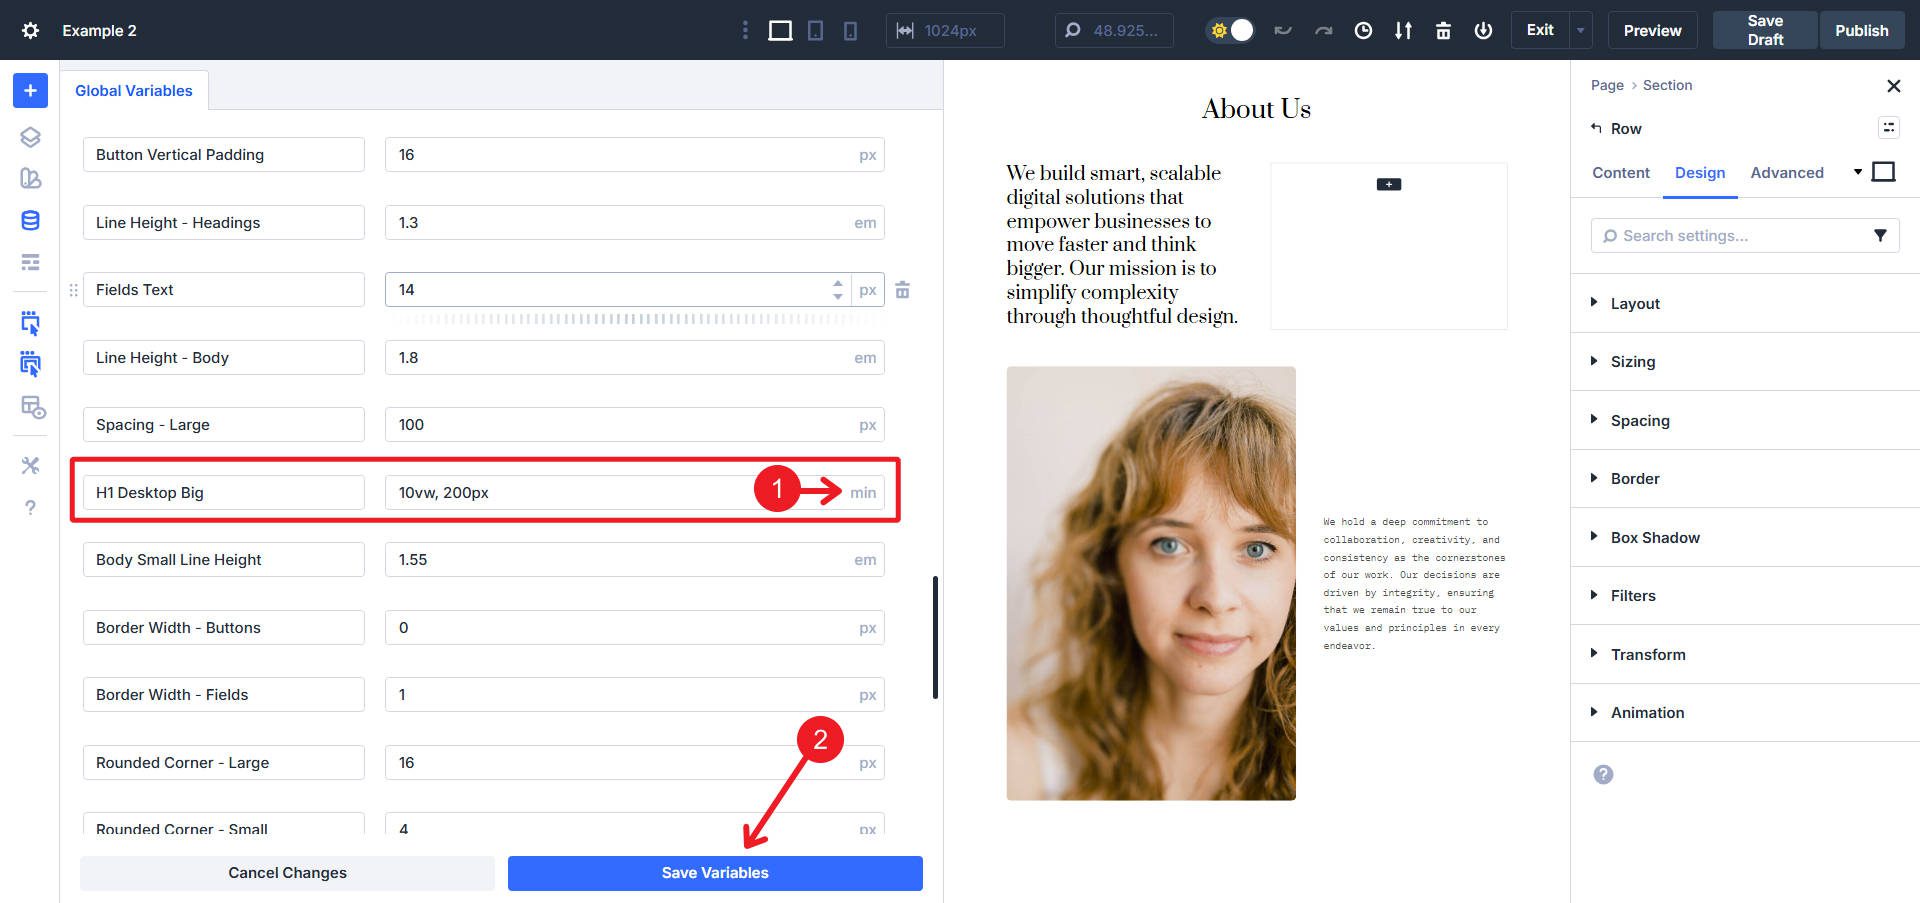
Navigate to Amount Variables and change H1 Desktop Massive to min(10vw, 200px).
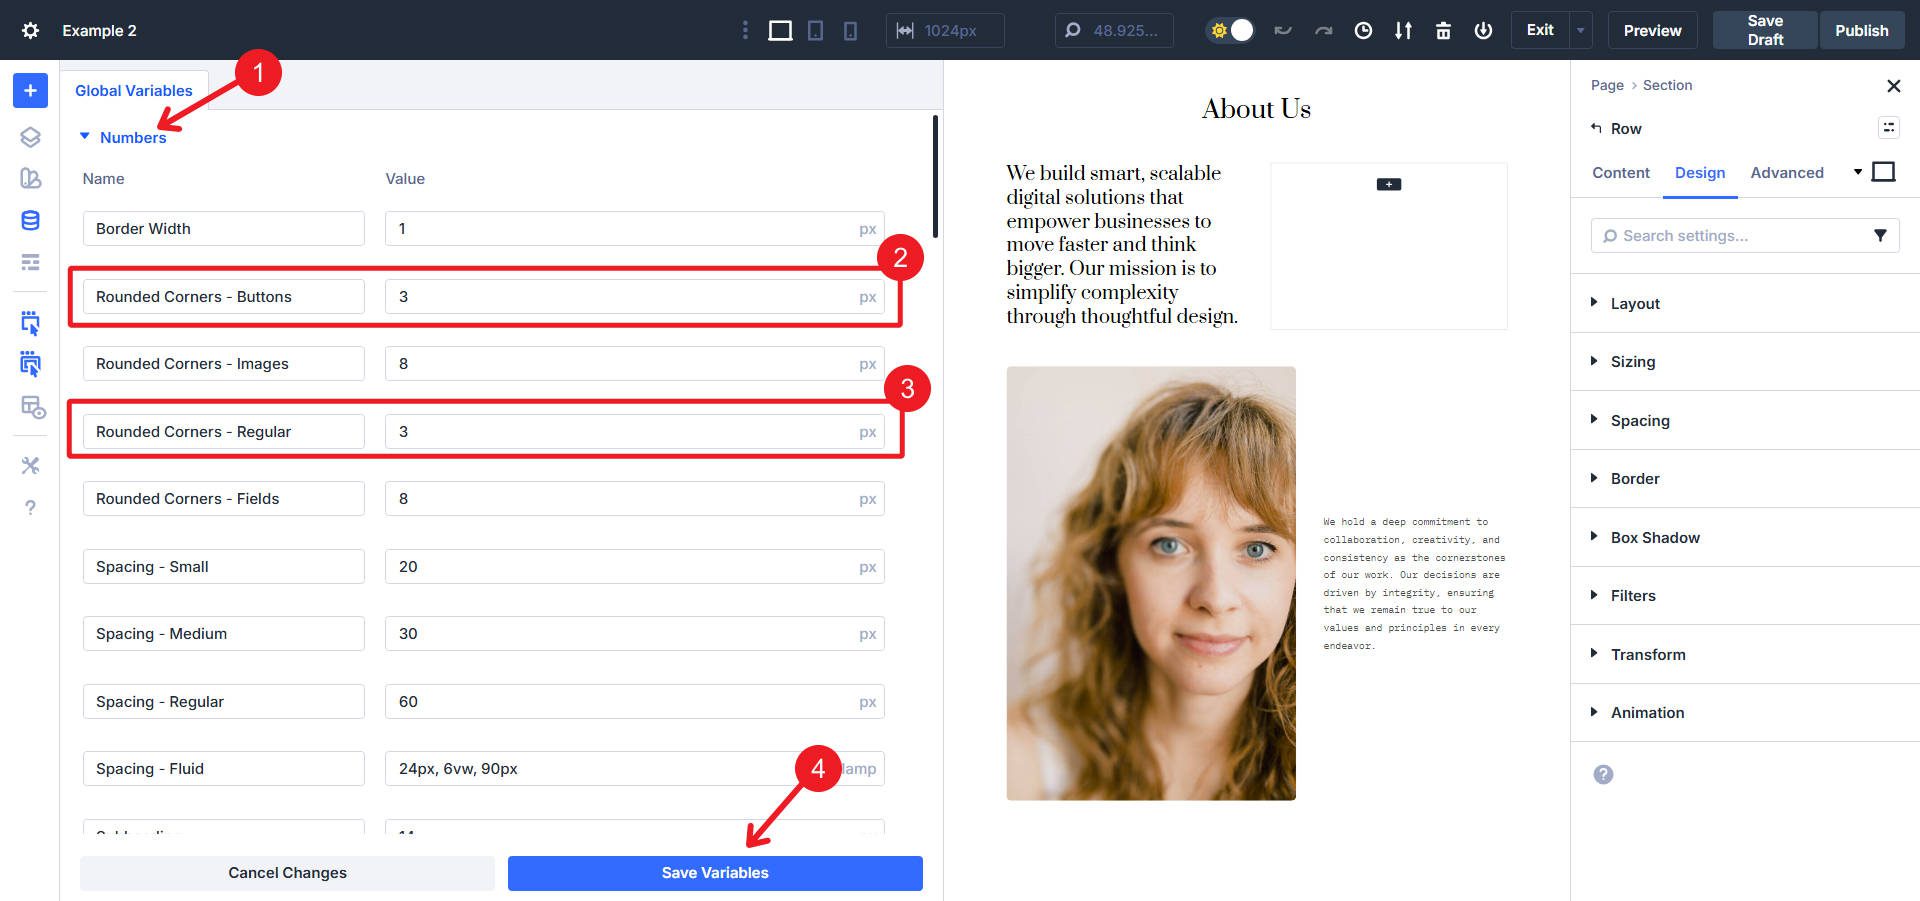
Then, business Rounded Corners – Buttons and Rounded Corners – Commonplace to 3px.
You will have to surely Save Variables.
Structural and Design Changes
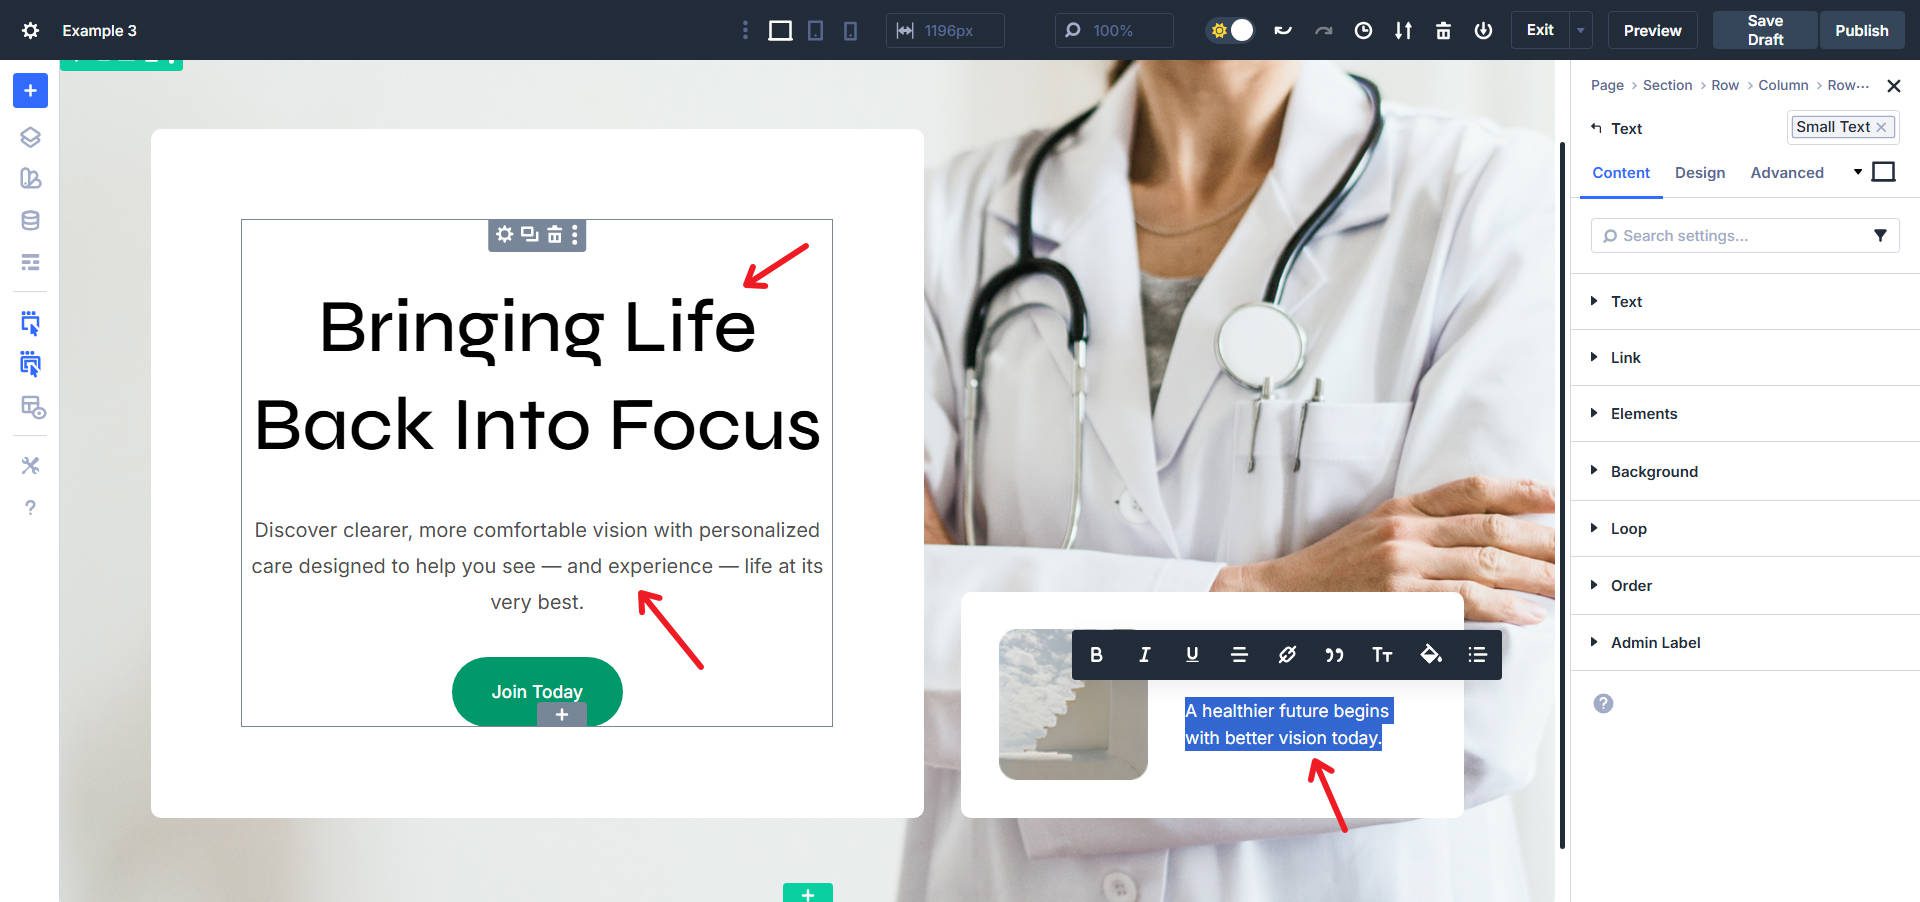
The Heading Module that says “We assemble just right…” should be swapped with a Text Module. Add a Text Module beneath it and delete the Heading Module. If you find yourself at that, moreover business the text with the new non-public emblem messaging all through all Heading and Text Modules.
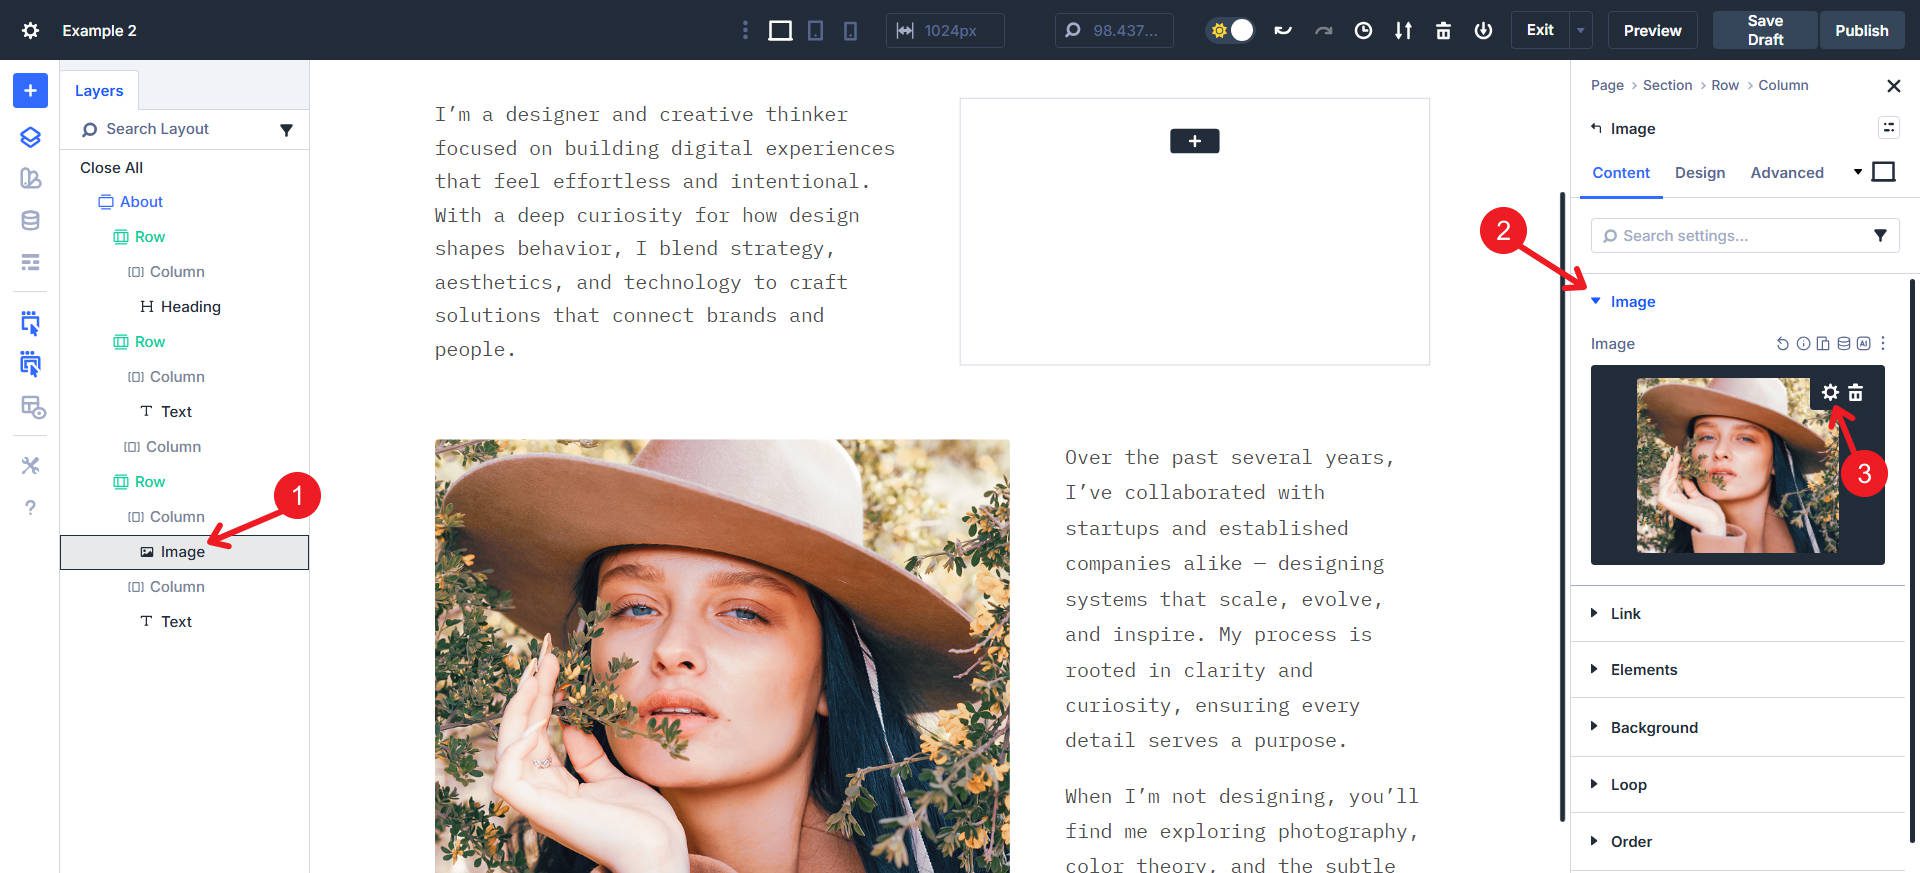
For the Image Module, alternate the image with a singular one that matches the color scheme. A sq. image works well proper right here (or a landscape).
Next, we need to add the missing Button Module throughout the empty right kind column of Interior Row two. Give it the Phase Preset Filled – Primary. Exchange the button text to Download Resume and allow Correct alignment for the button.
Click on on on the second Interior Row itself and pass into Design > Layout > Align Items and set it to End.
Click on on on the number one heading module and set the Phase Preset to Heading 1 Massive and remove the Heading 2 Preset. Then, pass to Design > Heading Text and set the text alignment to ‘Left’. In any case, throughout the Text Color field, make a choice Heading Text – Delicate from the color variable checklist.
Now for some color adjustments. Click on on on the About phase and set its Background color to the variable Background – Medium.
For each and every Text Modules, click on on on their settings and navigate to Design > Text > OG Preset dropdown, then make a choice Delicate Text.
Click on on on the Interior Row containing the principle Text Module. Throughout the Development Template picker, make a choice the 2/3 – 1/3 building.
And that’s a wrap for this alteration. You spotted how the Design Variables had been already integrated in lots of the Presets, making changes truly simple.
Tech to Healthcare Hero Segment
This variation takes Hero Segment #5 from the Sections library from a bold corporate tech structure to a clean healthcare phase.
Previous to
The transformation requires ~23 steps all through WordPress Customizer, Design Variable Manager, and extensive structure restructuring. Implementation time: more or less 15-18 minutes.
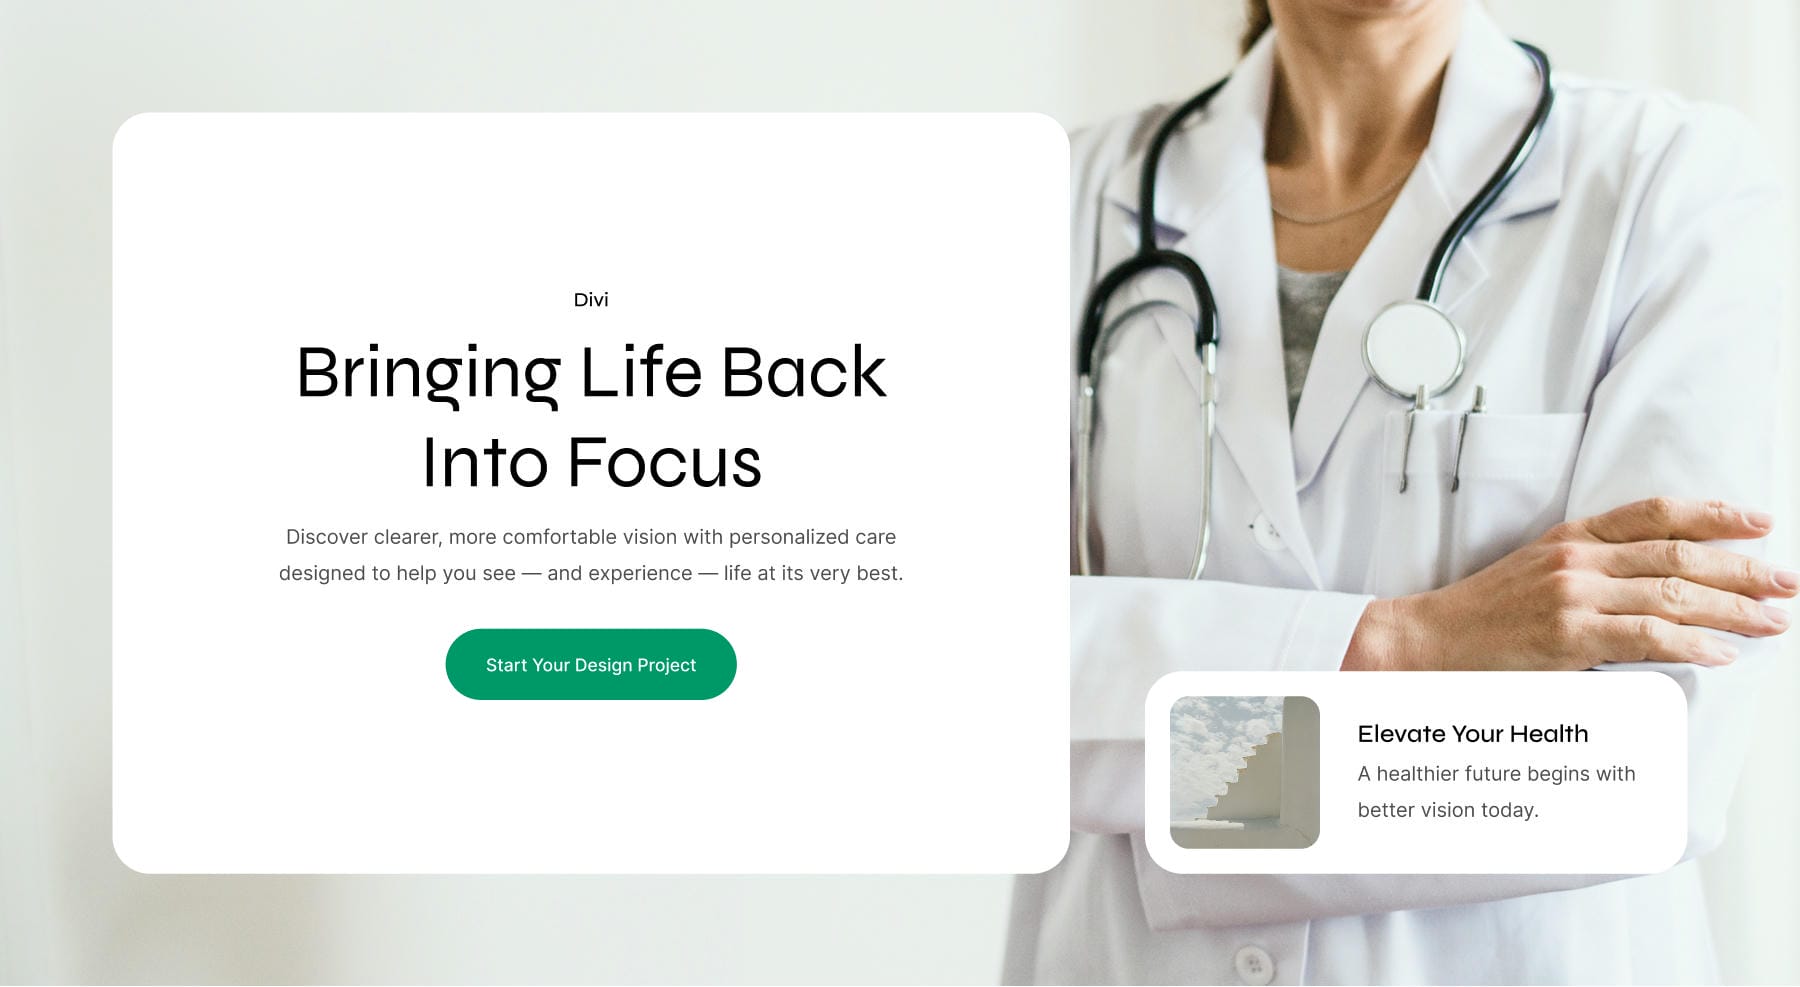
After
Global Customizer Changes
Open the Divi Theme Customizer and navigate to Standard Settings > Typography. Trade the Heading Text Font to Syne.
This is also merely completed throughout the Visual Builder throughout the Design Variable Manager beneath Fonts
Transfer to the Standard Settings > Layout Settings and change the Primary Color to #00986A.
This is also merely completed throughout the Visual Builder throughout the Design Variable Manager beneath Colors
Then, submit the Customizer changes.
Structural and Design Changes
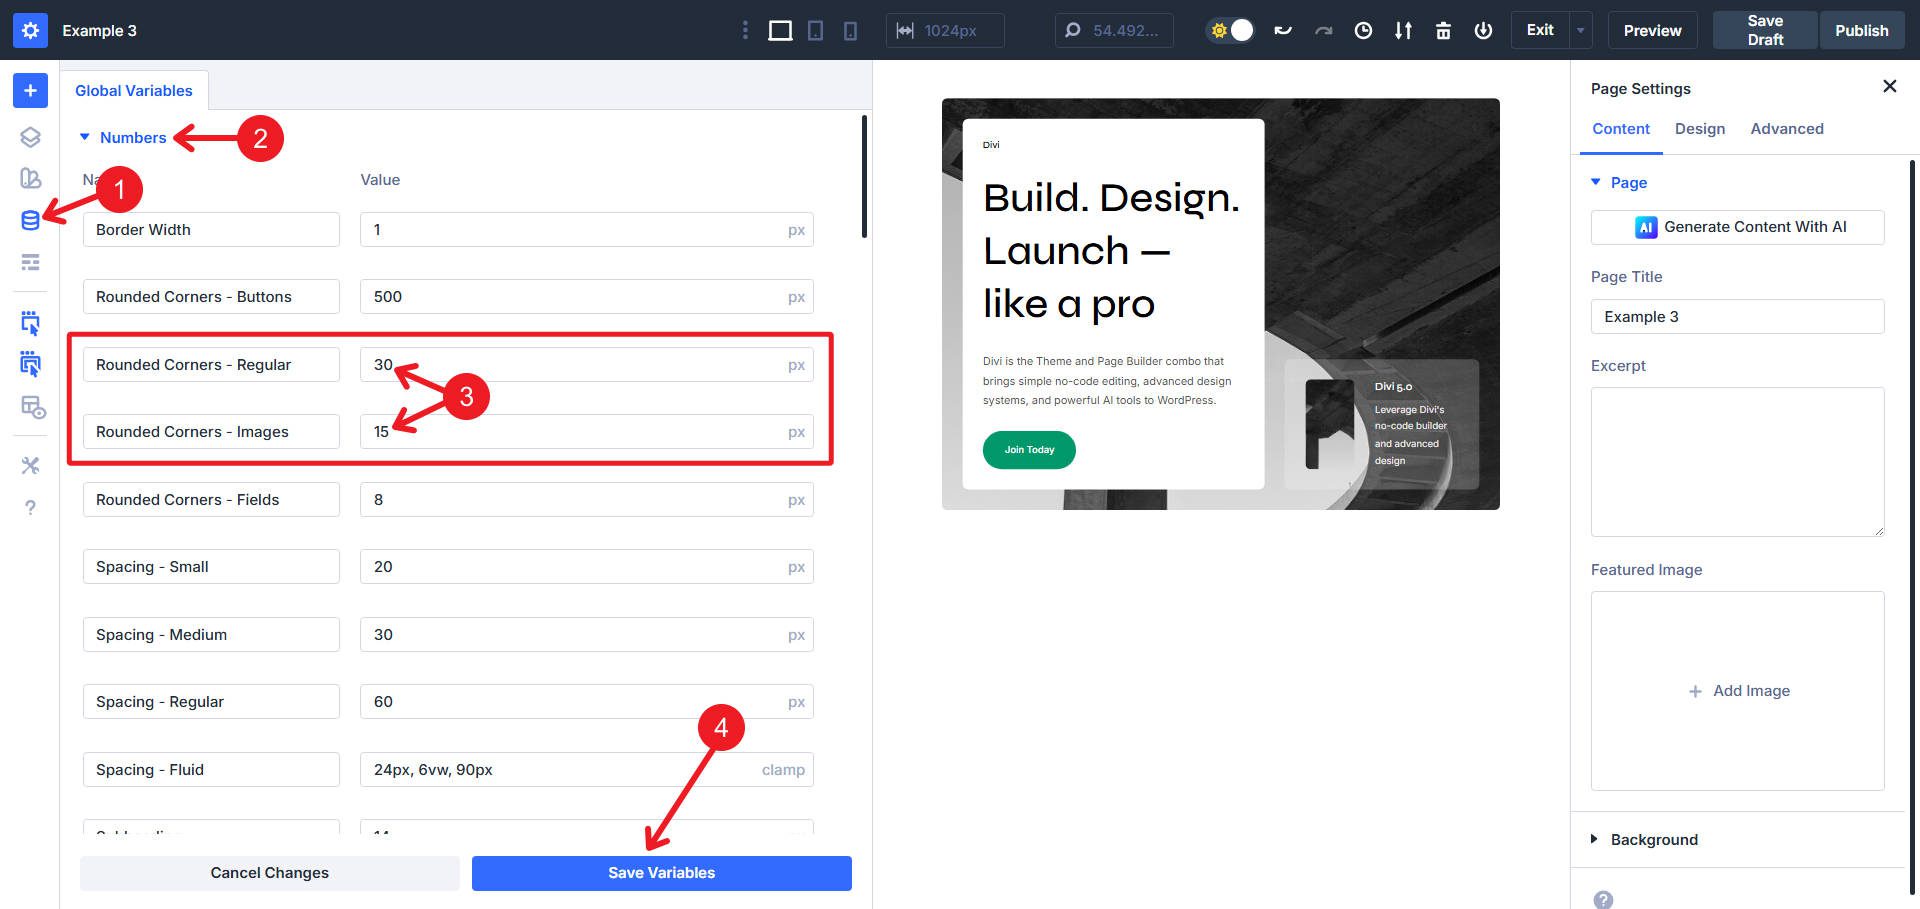
After together with the structure to a brand spanking new internet web page, open the Design Variable Manager. Navigate to Amount Variables and in finding Rounded Corners – Commonplace and change it to 30px. While there, business Rounded Corners – Images to 15px.
Click on on on the left column. In Design > Spacing, business the preset from “Padding – Medium” to “Padding – Fluid“.
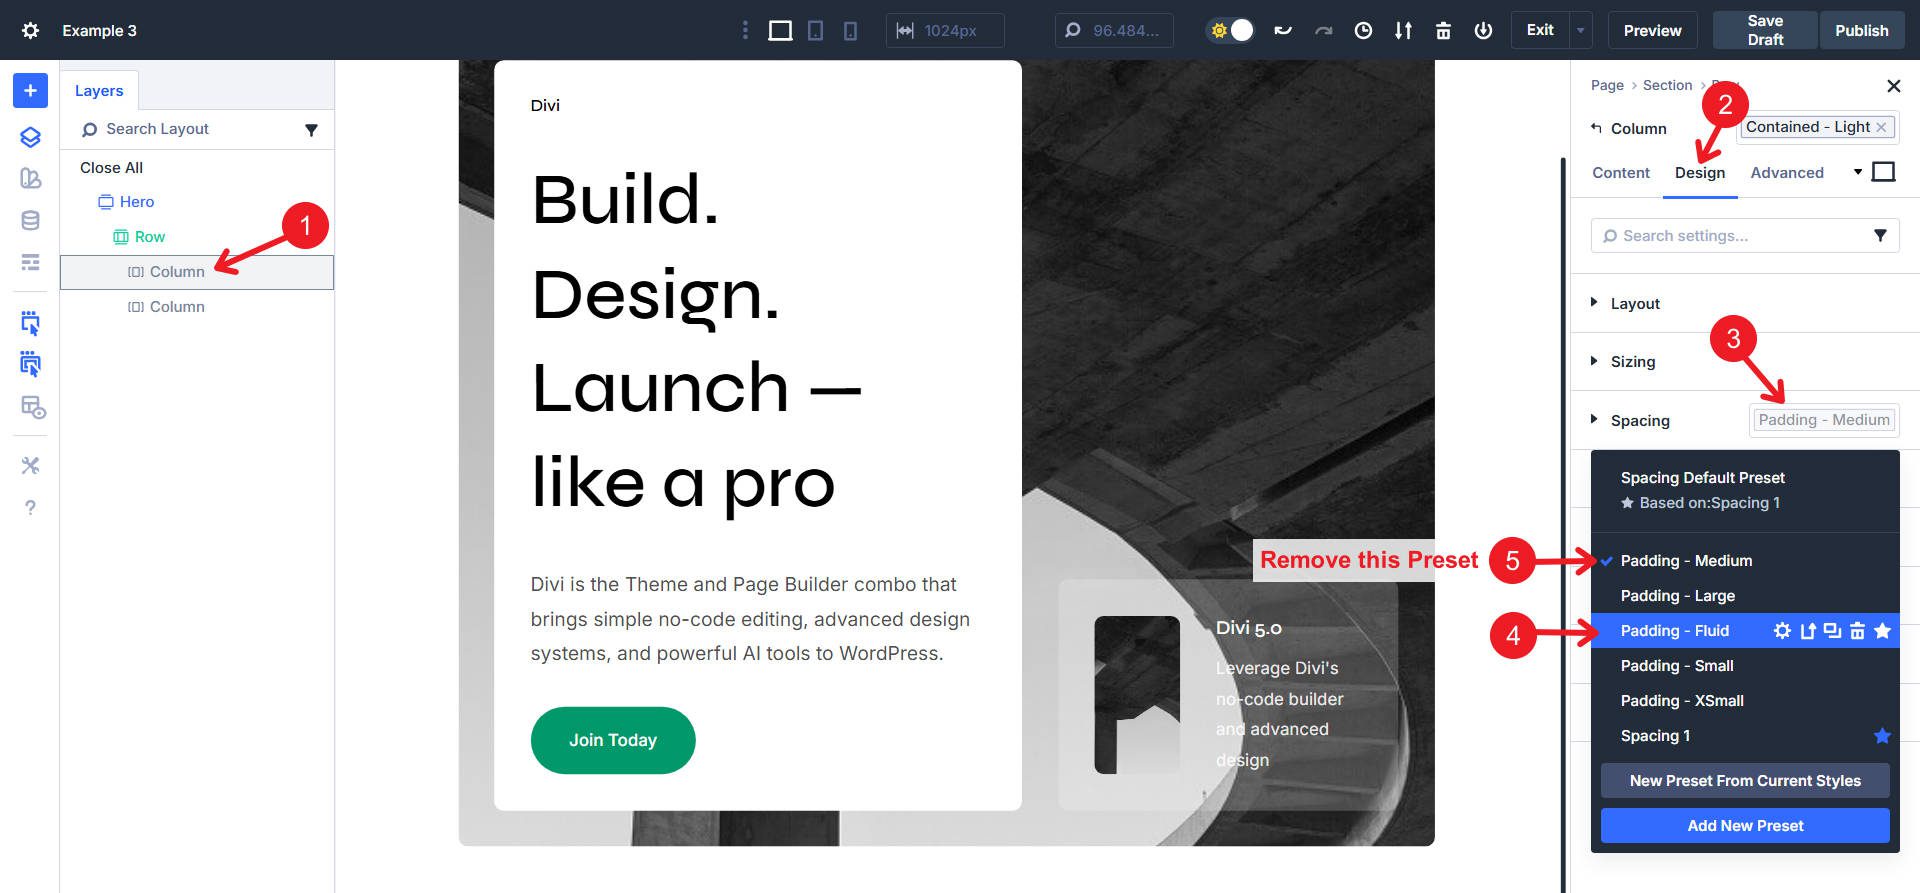
You may need to make this variation within the ‘Contained – Delicate’ Phase Preset (understand that you’ll now nest unique presets intimately presets).
In Design > Layout, set “Justify Content material subject material” to Middle and “Align Items” to Middle.
Click on at the Add New Module icon throughout the left column, make a choice the Staff Module, and drag all present parts into this new Staff. Throughout the Staff’s Layout possible choices, set Align Items to Middle. While throughout the Staff settings, pass to Sizing and set max width to 510px
Set the Text Alignment to Middle for all Text and heading modules within the Staff.
Throughout the Correct column, we will reset the Heading Text Chance Staff on the Heading Module and reset the Background on the Interior Row. We can moreover remove the Delicate Text Preset from the Text Module. This will from time to time get our background and text colors where we’d like them.
Click on on on the number one Row and Reset all Background types, and add a brand spanking new clinical Background Image.
Then, within the an identical Row, remove the Contained – Delicate Phase Preset. In Design > Sizing, business Width to 100% and Max Width to none. Moreover, set the Minimum Most sensible to 80vh and allow Broaden to Fill. In Design > Spacing, add the Fluid – Spacing Preset.
Click on on on the small image module. Throughout the Content material subject material tab, click on on Trade Image and make a choice the new healthcare thumbnail.
Click on on on each and every text module. Exchange the content material subject material to replicate healthcare messaging.
And now we’re completed with this CTA Hero transformation!
Figuring out Design Gadget Efficiency
The transformations above share an ordinary order. Global variables do such a lot for us right kind originally. They regularly made changes inside Presets, resulting in a large number of cascading updates briefly order. In some instances, we changed out Presets or simply removed one, on the other hand that used to be as soon as however extraordinarily rapid. In any case, we regularly carried out changes to particular packing containers and parts throughout the Design > Layout/Sizing/Spacing tabs.
Enhancing with Design Variables first, then Presets, and in the end making Phase-level changes promises we’re being the most efficient (on the subject of each and every our time and the CSS carried out to our designs). Starting from a Design Gadget like this makes it merely adaptable and offers you such a lot to artwork with right kind off the bat.
For individuals who had to organize these kind of Design Variables and Presets and in addition assemble these kind of Segment Layouts, you’d have sunk dozens of hours up front. Then again, with this system, you have got the good thing about the entire thing running together from the start.
Get The Distinctive Design Gadget Previous to It’s Long gone!
The Divi 5 Design Gadget eliminates having to make a choice from tempo and top quality. The ones transformations finally end up that whole rebranding doesn’t require whole rebuilding. When your design possible choices glide via a single provide of fact, global variables controlling presets controlling modules, you exchange the entire thing by means of changing very little.
Tomorrow, this Cyber Monday offer expires. The question isn’t whether or not or now not the Design Gadget delivers efficiency — the ones examples provide that evidence. The question is whether or not or now not you’ll have get entry to to this system when your next enterprise last date arrives. Each and every transformation you merely spotted, each efficiency reach demonstrated proper right here, each hour saved becomes available the moment you purchase any of the ones qualifying products:
- Divi Skilled (80% Off) — The entire Divi ecosystem, along side Divi 5, Divi AI, Divi Cloud, Divi VIP, Divi Teams, Divi Dash, all DonDivi plugins, and a $50 Divi Marketplace credit score ranking. To be had in lifetime and annually choices.
- Membership Repackaging (Up to 80% Off) — Provide members can improve to Divi Professional to reduce subscription costs while profiting from products like Divi AI, Cloud, Teams, VIP Improve, DonDivi plugins, and a $50 marketplace credit score ranking.
- Divi AI (70% Off) — AI-powered design, writing, and coding straight away in Divi. Generates layouts, content material, and photographs in an instant.
- Divi Cloud (44% Off) — Cloud-sync all of your Divi Library all through all web sites (along side this Design Gadget!). Save and reuse layouts anyplace for quicker shopper supply.
- Divi Teams (44% Off) — Crew collaboration with shared get entry to, roles, and permissions. Constructed for companies managing a couple of purchasers.
- Divi VIP (44% Off) — Priority make stronger with 30-minute response events, 24/7 availability, and 10% off all Market merchandise.
- Marketplace Bundles (70% Off) — Curated collections of Divi modules, child problems, promoting equipment, ecommerce choices, and blog upgrades. 5 Cyber Monday-only bundles, all Divi 5-ready.
After completing a qualifying gain, download the Design Gadget all through the Perks segment in your Elegant Subjects Folks’ Area.
The Design Gadget library accommodates a lot of pre-built sections, all designed to artwork with this an identical variable-driven means. Your next web page rebrand takes hours, not days. On the other hand only if you act forward of nighttime day after today. Get Divi Professional now while this offer however stands.
The put up 3 Actual-Global Examples: Rebranding The Divi 5 Design Machine With World Variables seemed first on Chic Topics Weblog.
Contents
- 1 Exact-World Rebranding Examples
- 2 Figuring out Design Gadget Efficiency
- 3 Get The Distinctive Design Gadget Previous to It’s Long gone!
- 4 Get a Free Home Rental Layout Pack for Divi
- 5 Learn how to Create a Customized WordPress Seek Shape (Step through Step)
- 6 Methods to Block Disposable E-mail Addresses in WordPress (2 Strategies)

0 Comments