

With Divi’s newest background mask and background pattern feature release, you’ll create some distinctive hero sections to your website online. A hero phase is the primary phase of your website online and is the very first thing your guests see sooner than scrolling thru your website online, so it’s vital to be attention-grabbing! Combining Divi’s background symbol, background masks, and background development choices lets in us to create compelling hero sections in order that your website online makes a perfect first affect.
This submit will display you the way to create 5 distinctive background masks and development overlays that you’ll practice to a background symbol to create in point of fact surprising hero sections. This educational will quilt the crucial steps had to create every hero phase and provide the equipment you wish to have to create a hanging hero phase to your website online in mins.
We’ll be the usage of loose footage from the Online Course Layout Pack on this instance. To make use of the similar photographs, scroll the entire strategy to the ground of this post to obtain the full-res photographs.
Let’s get began!
What We’ Developing
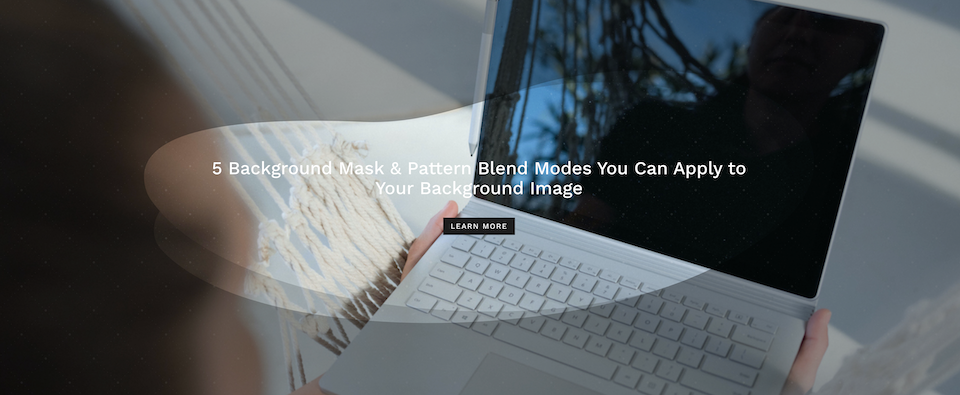
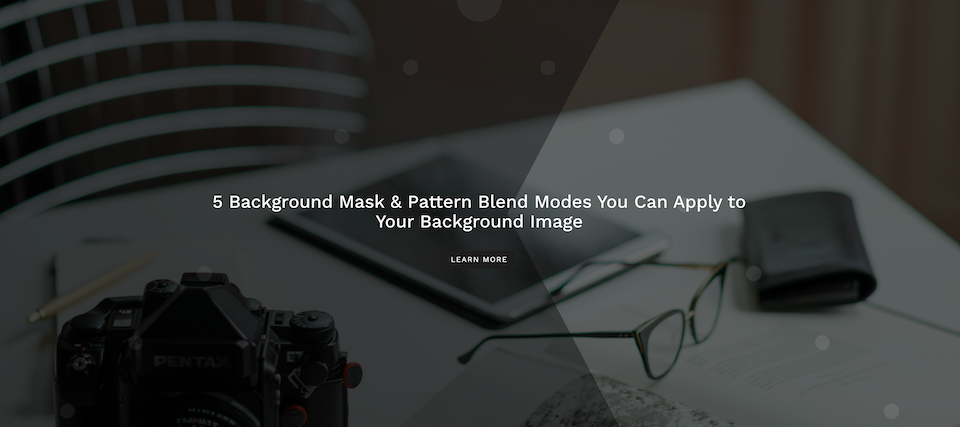
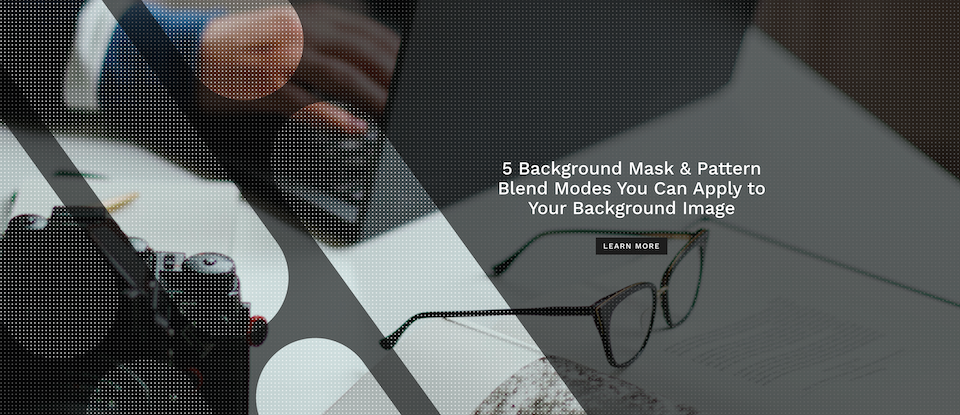
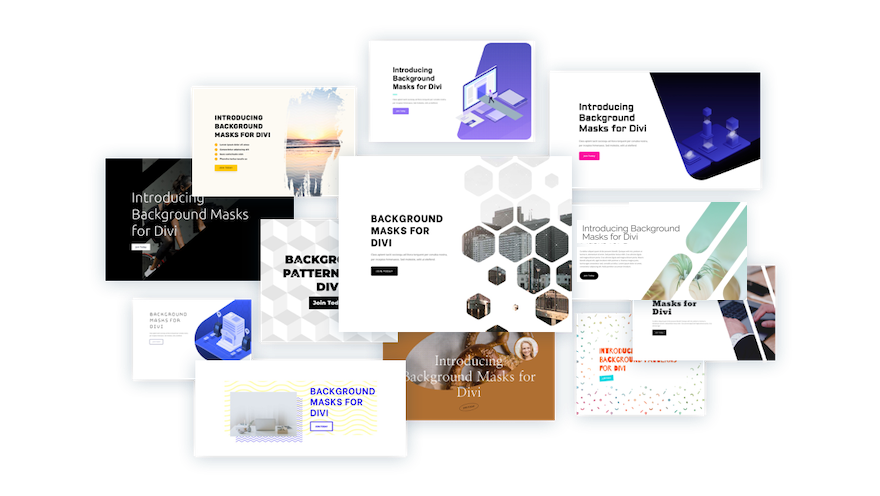
Here’s a fast have a look at the 5 hero sections we’ll create on this submit these days.
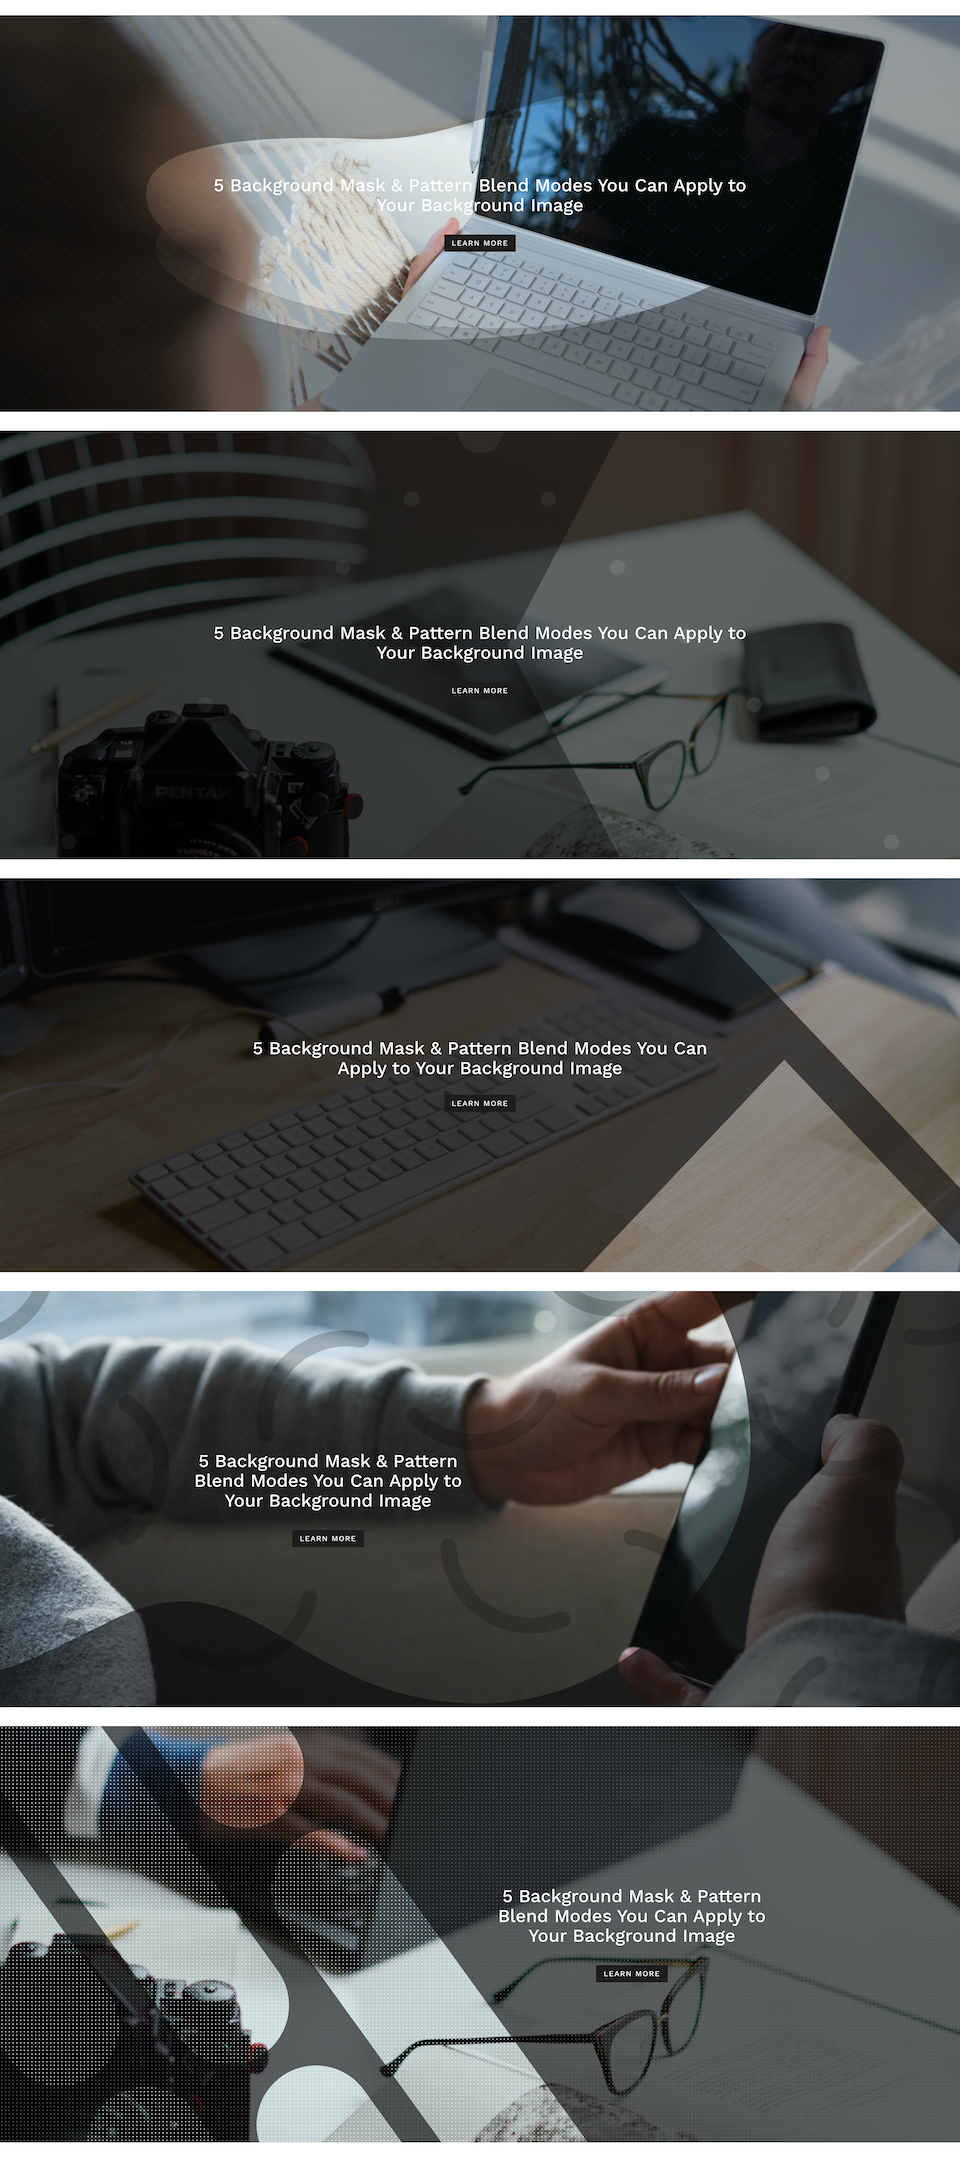
The designs are refined, easy, and but impactful.
Obtain the Format for FREE
Should you’d love to obtain the pre-designed format design from this educational, you are going to first want to obtain it the usage of the button under. To achieve get right of entry to to the obtain, it is important to subscribe to our Divi Day by day e-mail record by way of the usage of the shape under. As a brand new subscriber, you are going to obtain much more Divi goodness and a loose Divi Format pack each Monday! Should you’re already at the record, merely input your e-mail cope with under and click on obtain. You’re going to now not be “resubscribed” or obtain further emails.
@media simplest display screen and ( max-width: 767px ) {.et_bloom .et_bloom_optin_1 .carrot_edge.et_bloom_form_right .et_bloom_form_content:sooner than { border-top-color: #ffffff !vital; border-left-color: clear !vital; }.et_bloom .et_bloom_optin_1 .carrot_edge.et_bloom_form_left .et_bloom_form_content:after { border-bottom-color: #ffffff !vital; border-left-color: clear !vital; }
}.et_bloom .et_bloom_optin_1 .et_bloom_form_content button { background-color: #f92c8b !vital; } .et_bloom .et_bloom_optin_1 .et_bloom_form_content .et_bloom_fields i { colour: #f92c8b !vital; } .et_bloom .et_bloom_optin_1 .et_bloom_form_content .et_bloom_custom_field_radio i:sooner than { background: #f92c8b !vital; } .et_bloom .et_bloom_optin_1 .et_bloom_border_solid { border-color: #f7f9fb !vital } .et_bloom .et_bloom_optin_1 .et_bloom_form_content button { background-color: #f92c8b !vital; } .et_bloom .et_bloom_optin_1 .et_bloom_form_container h2, .et_bloom .et_bloom_optin_1 .et_bloom_form_container h2 span, .et_bloom .et_bloom_optin_1 .et_bloom_form_container h2 robust { font-family: “Open Sans”, Helvetica, Arial, Lucida, sans-serif; }.et_bloom .et_bloom_optin_1 .et_bloom_form_container p, .et_bloom .et_bloom_optin_1 .et_bloom_form_container p span, .et_bloom .et_bloom_optin_1 .et_bloom_form_container p robust, .et_bloom .et_bloom_optin_1 .et_bloom_form_container shape enter, .et_bloom .et_bloom_optin_1 .et_bloom_form_container shape button span { font-family: “Open Sans”, Helvetica, Arial, Lucida, sans-serif; } p.et_bloom_popup_input { padding-bottom: 0 !vital;}

Obtain For Loose
Sign up for the Divi E-newsletter and we will be able to e-mail you a replica of without equal Divi Touchdown Web page Format Pack, plus lots of alternative superb and loose Divi sources, guidelines and methods. Observe alongside and you are going to be a Divi grasp very quickly. If you’re already subscribed merely kind for your e-mail cope with under and click on obtain to get right of entry to the format pack.
You’ve effectively subscribed. Please take a look at your e-mail cope with to verify your subscription and get get right of entry to to loose weekly Divi format packs!
Find out how to Obtain and Use the Layouts
To import the phase format for your Divi Library, do the next:
- Navigate to the Divi Library.
- Click on the Import button on the height of the web page.
- Within the portability popup, choose the import tab.
- Make a selection the obtain report out of your laptop (remember to unzip the report first and use the JSON report).
- Then click on the import button.
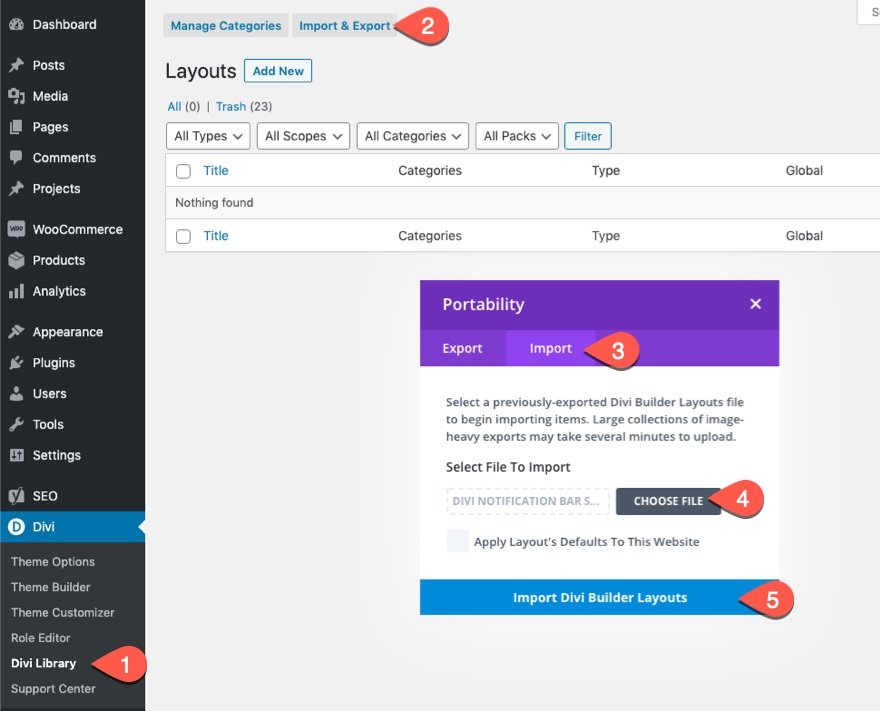
If you’ve effectively imported the layouts, they’ll be noticed for your Divi Library and might be to be had to be used within the Divi Builder.
Now, let’s get to the academic!
What You Want To Get Began
Earlier than we will be able to start, you’ll want to:
- Install and activate the Divi Theme.
- Create a brand new web page, submit it, and click on the “Use The Divi Builder” button to edit the web page at the entrance finish the usage of the Visible Builder.
- Make a selection the choice “Construct From Scratch.”
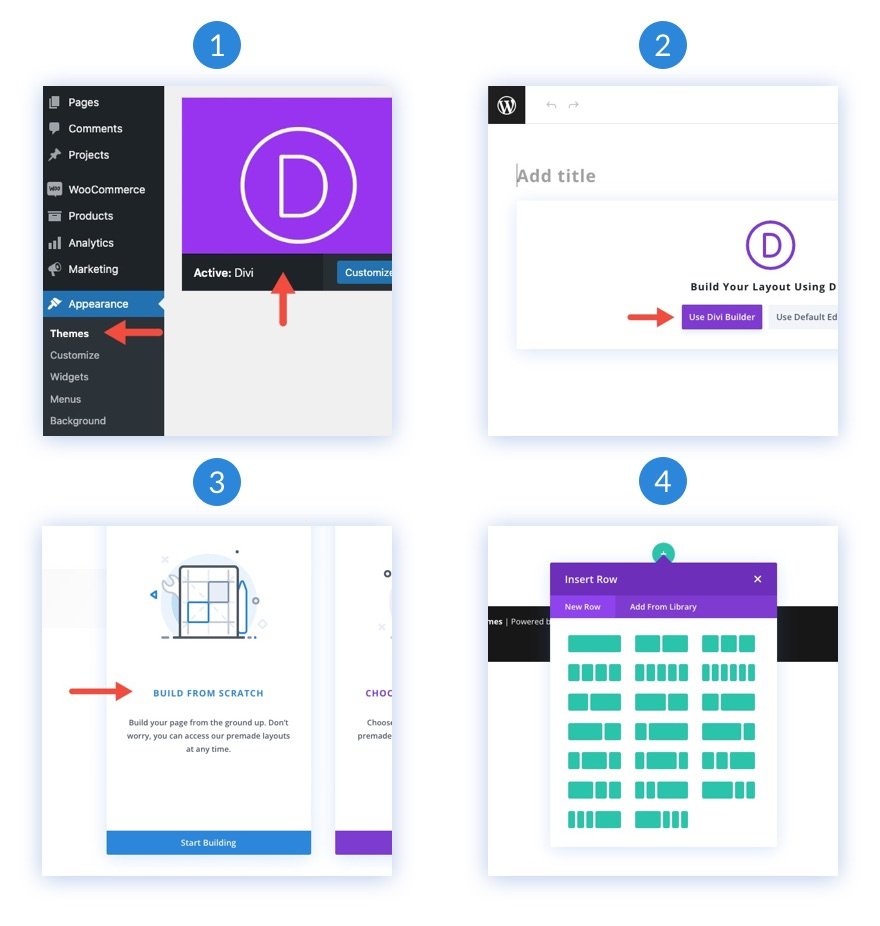
Now we now have a clean canvas to start out designing!
Find out how to Create 5 Background Masks & Development Overlays to Follow to a Background Symbol
First, Let’s Create the Hero Segment
All our design examples use the similar phase, row, and column construction, so let’s set the ones up now.
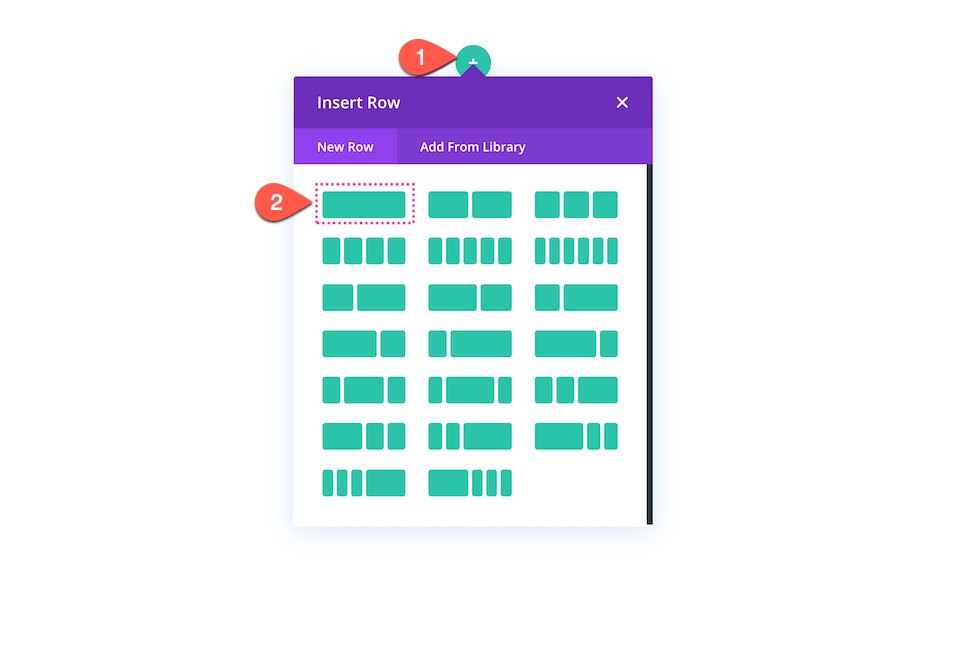
1. Create Format Construction
Upload a row for your web page after which click on the fairway “+” icon to deliver up the column construction and choose the primary column, the only fullwidth column.
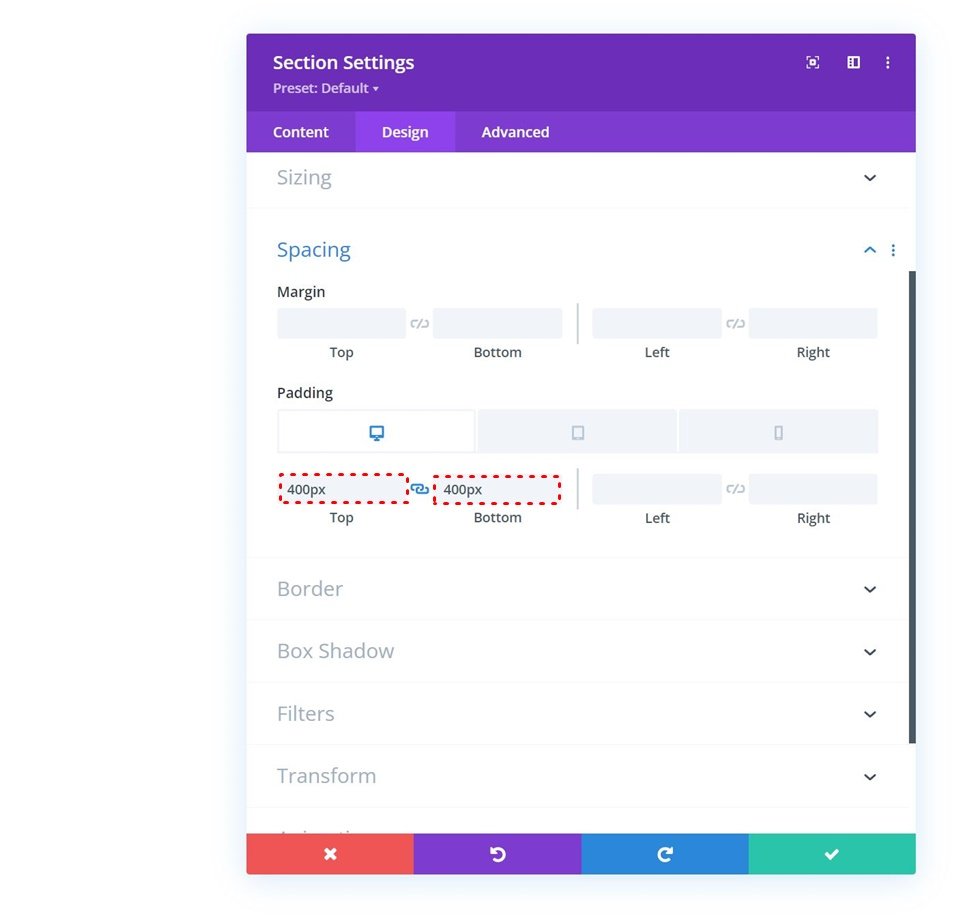
2. Upload Segment Spacing
Now that we’ve got our row and column set it, it’s time so as to add spacing to the phase.
Beneath the Spacing tab, replace the next:
- Desktop: 400px height and 400px backside
- Pill: 200px height and 200px backside; 25px left and proper
- Telephone: 50px height and 50px backside; 25px left and proper
Find out how to Design Hero Segment #1
Let’s design the primary hero phase.
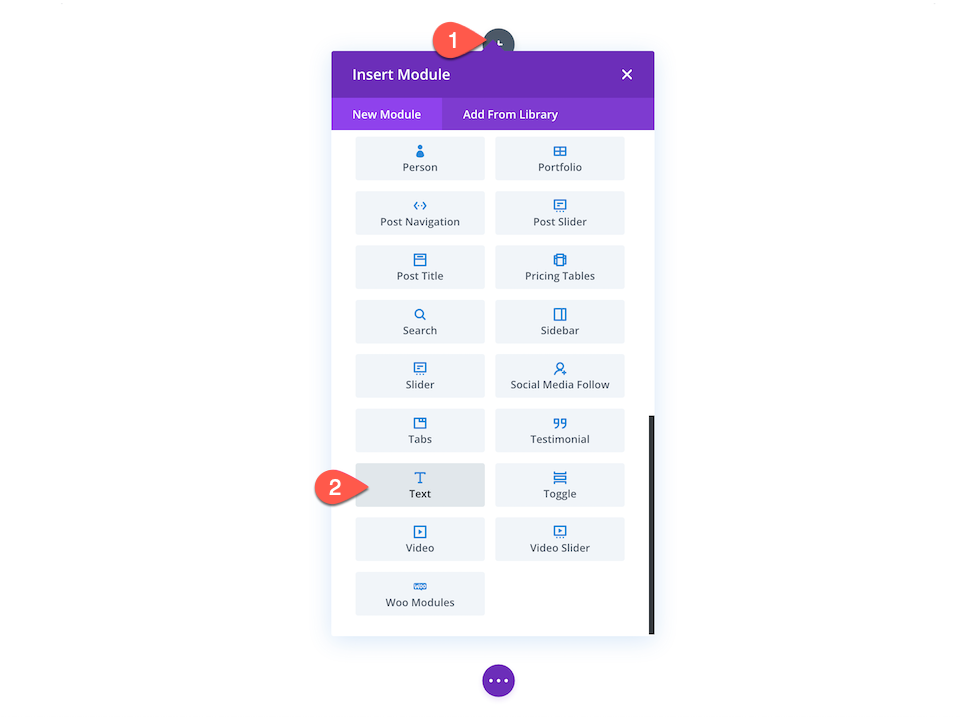
1. Upload Heading Textual content
Click on at the gray “+” icon to deliver up the module library. Scroll to textual content and click on to load.
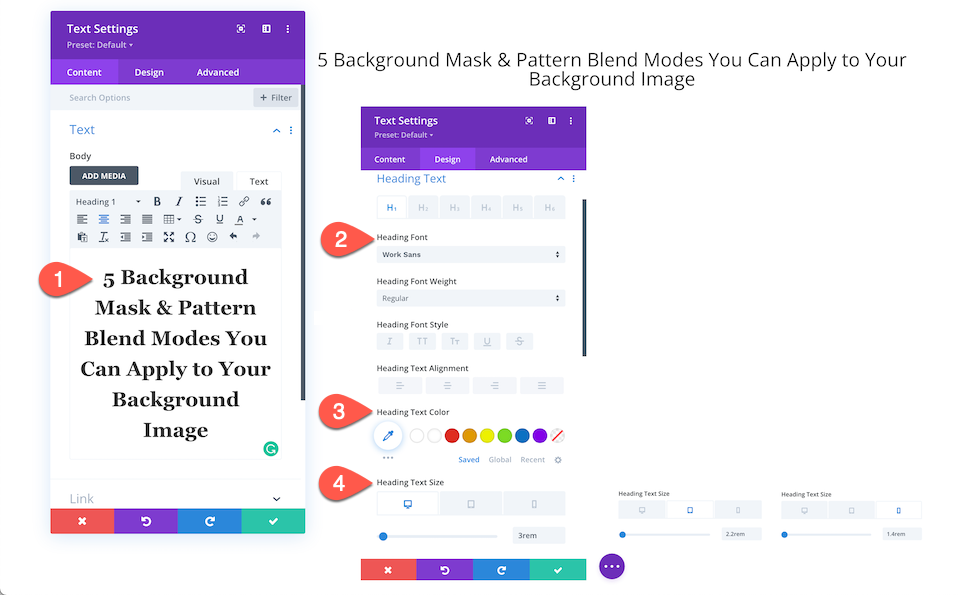
Kind within the heading textual content after which below the Heading Textual content tab, configure those settings:
- Font Circle of relatives: Paintings Sans
- Font colour: White #ffffff
- Font Dimension:
- Desktop: 3rem
- Pill: 2.2rem
- Telephone: 1.4rem
2. Upload Button Module
Upload a button and configure those settings:
- Beneath the Textual content Tab kind: Be told Extra
- Beneath the Alignment Tab Make a selection: Heart
- Click on Use Customized Types after which configure:
- Button Textual content Dimension:
- Desktop: 20px
- Pill: 16px
- Telephone: 14px
- Button Textual content Colour: White #ffffff
- Button Background Colour: Black #1d1d1d
- Button Border Width: 0
- Button Border Radius: 0
- Button Letter Spacing: 3pt
- Button Font: Paintings Sans
- Button Font Taste: Uppercase
- Button Textual content Dimension:
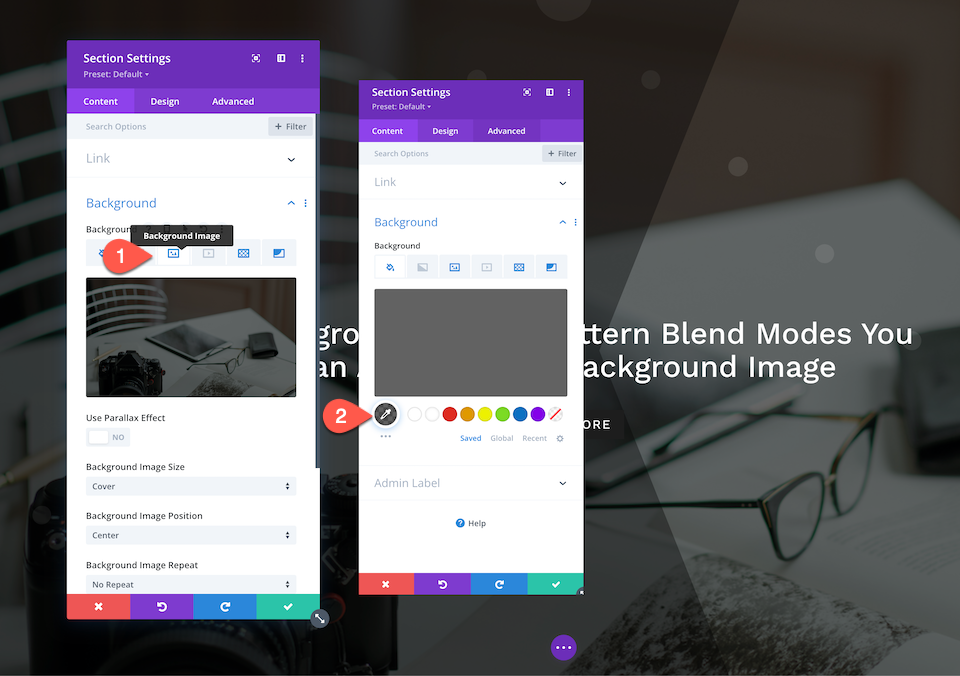
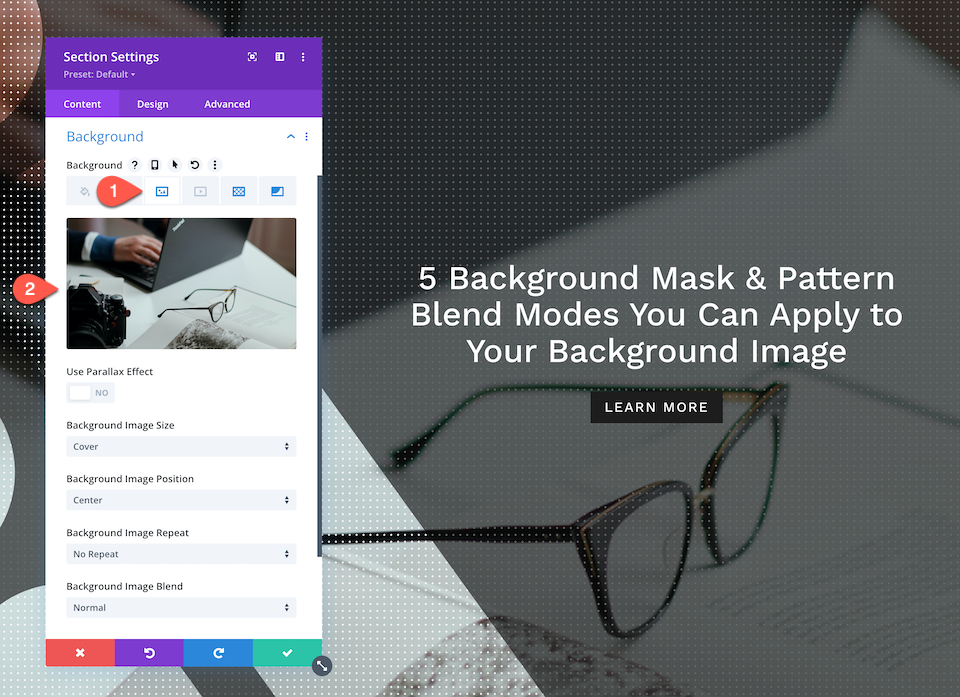
3. Upload Background Symbol
Now that we’ve got our content material arrange, it’s time to start out designing the phase background.
- Navigate to the Background toggle and click on the third tab, the image tab, after which click on “Upload Background Symbol.”
- This may occasionally deliver up your media library, the place you’ll choose a photograph or add a brand new one.
- As soon as your photograph is chosen, click on the “Add an Symbol” button within the backside proper nook.
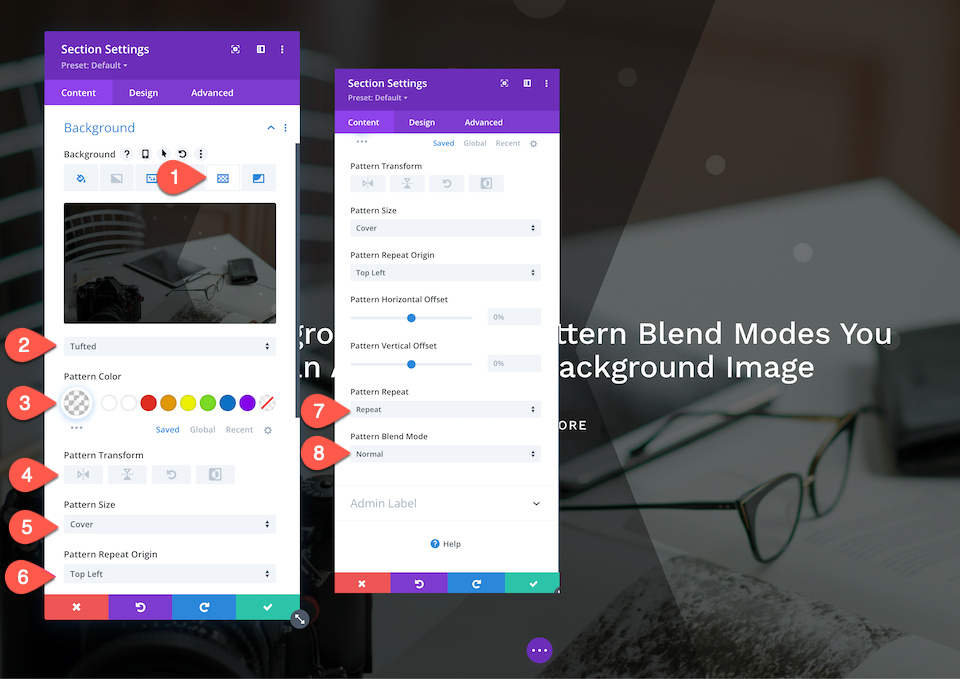
4. Upload Background Development
Now that we’ve got our background symbol arrange, let’s upload a development.
- Throughout the Background tab, navigate to the fifth tab, the patterns tab, after which click on “Upload Background Development.”
- Make a choice Tufted from the dropdown menu and configure those settings:
- Development Colour – rgba(255,255,255,0.31)
- Development Become: none
- Development Dimension: Exact Dimension
- Development Repeat Beginning: Best Left
- Development Repeat: Repeat
- Mix Mode: Customary
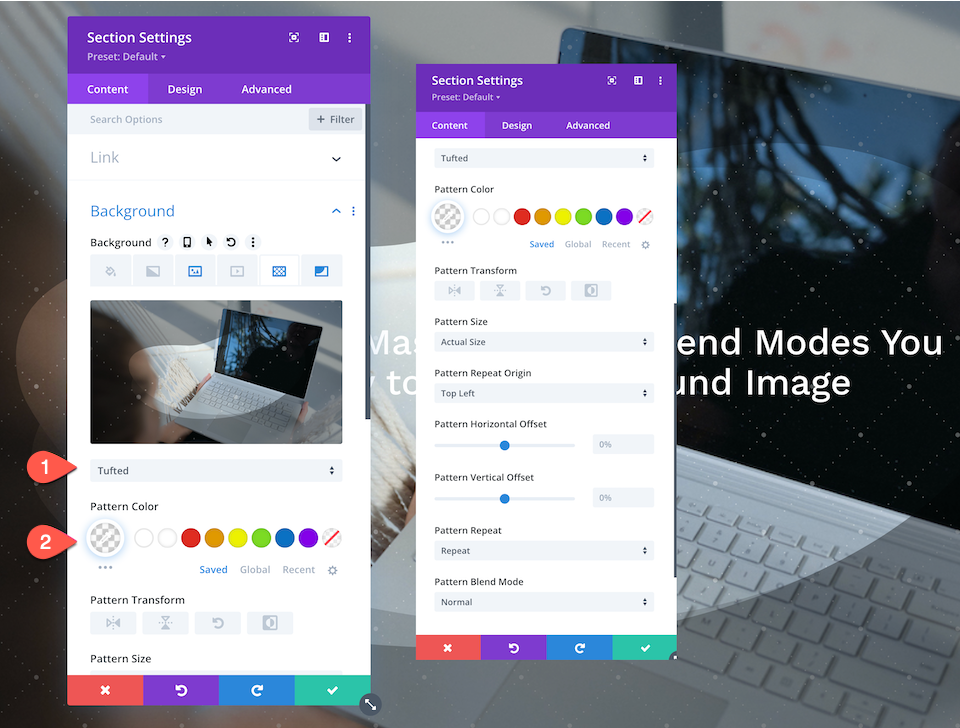
5. Upload background Masks
Now that we’ve got our background symbol and development arrange, let’s upload a background masks.
- Throughout the Background tab, navigate to the sixth tab, the masks tab, and click on “Upload Background Masks.”
- Make a choice Bean from the dropdown menu and configure those settings:
- Masks Colour: rgba(0,0,0,0.36)
- Masks Side Ration: horizontal rectangle
- Masks Dimension: Stretch to fill
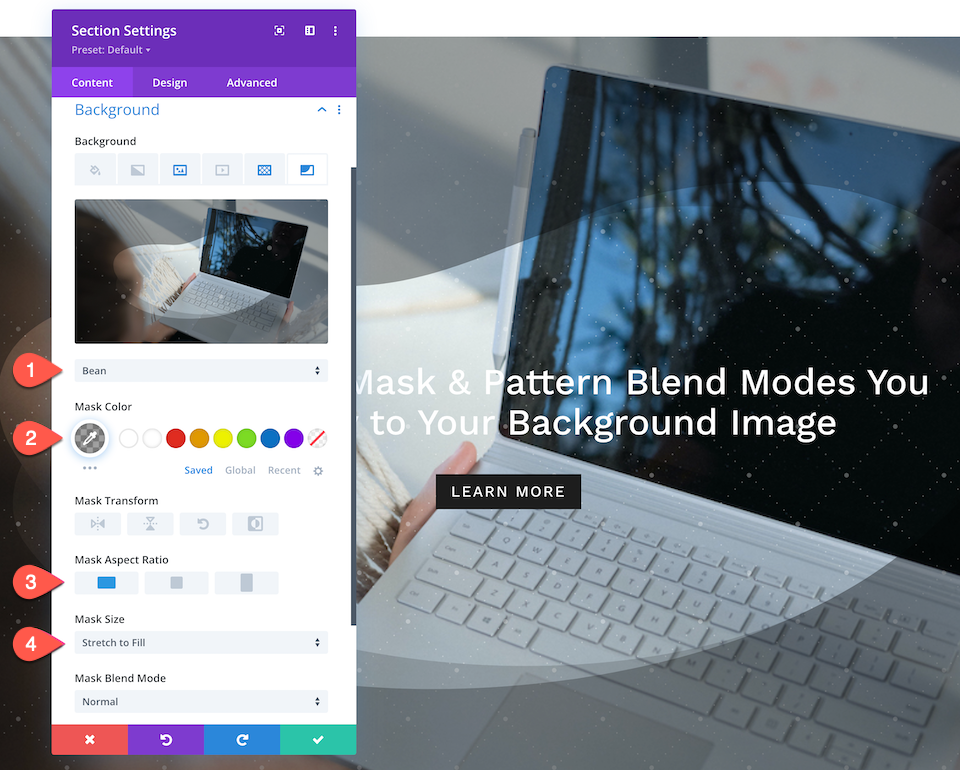
Voila! Now you’ve a superbly designed hero phase.
Find out how to Design Hero Segment #2
Now, let’s design the second one hero phase.
1. Upload a Background Symbol and Set Mix Mode to Overlay
Make a choice your background symbol, set the mix mode to Overlay, and upload an overlay colour of rgba(10,10,10,0.64).
2. Upload Background Development
Now that we’ve got the background symbol arrange, let’s upload a background development.
- Throughout the Background tab, navigate to the fifth tab, the patterns tab, and click on “Upload Background Development.”
- Make a choice Tufted from the dropdown and configure those settings:
- Development Colour – rgba(255,255,255,0.09)
- Development Become: none
- Development Dimension: Duvet
- Development Repeat Beginning: Best Left
- Development Repeat: Repeat
- Mix Mode: Customary
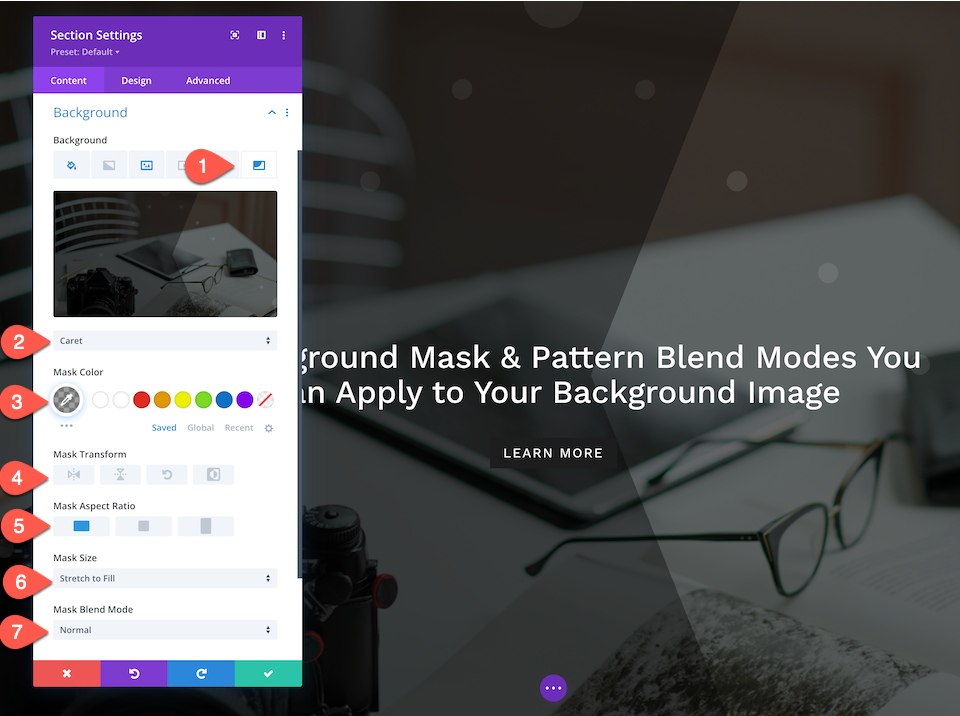
3. Upload Background Masks
Now that we’ve got our background symbol and development arrange, let’s upload a background masks.
- Throughout the Background tab, navigate to the sixth tab, the masks tab, and click on “Upload Background Masks.”
- Make a choice Caret from the dropdown menu and configure those settings:
- Masks Colour: rgba(0,0,0,0.36)
- Masks Become: None
- Masks Side Ration: horizontal rectangle
- Masks Dimension: Stretch to fill
- Masks Mix Mode: Customary
Find out how to Design Hero Segment #3
Now, let’s design the 3rd hero phase.
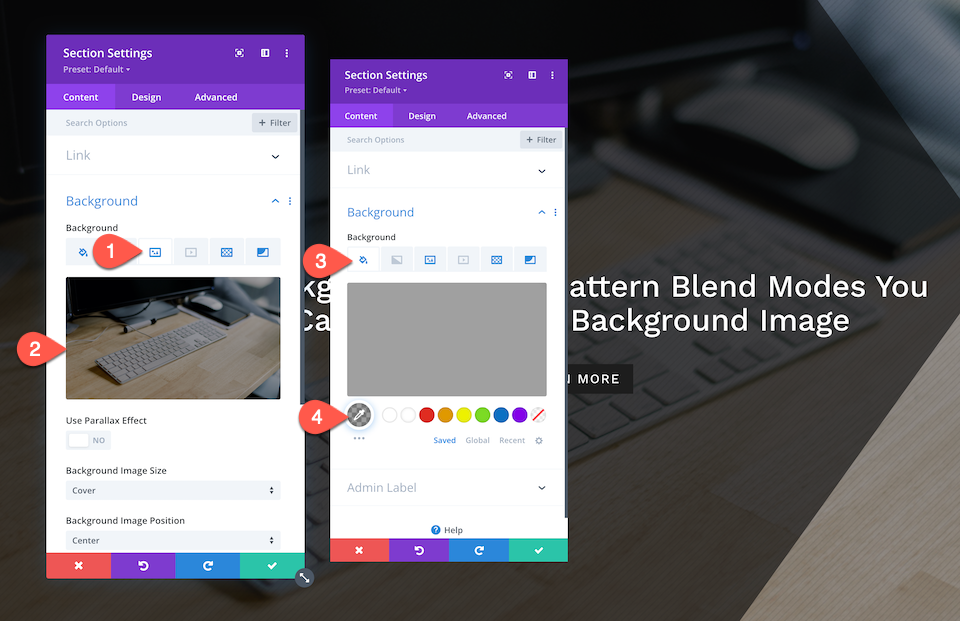
1. Upload a Background Symbol and Set Mix Mode to Overlay
Make a choice your background symbol, set the mix mode to Overlay, and upload an overlay colour of rgba(10,10,10,0.39).
2. Upload Background Development
Now that we’ve got our background symbol arrange, let’s upload a background development.
- Throughout the Background tab, navigate to the fifth tab, the patterns tab, and click on “Upload Background Development”.
- Make a choice Diagonal Stripes 2 from the dropdown and configure those settings:
- Development Colour – rgba(0,0,0,0.06)
- Development Become: none
- Development Dimension: Exact Dimension
- Development Repeat Beginning: Best Left
- Development Repeat: Repeat
- Mix Mode: Customary
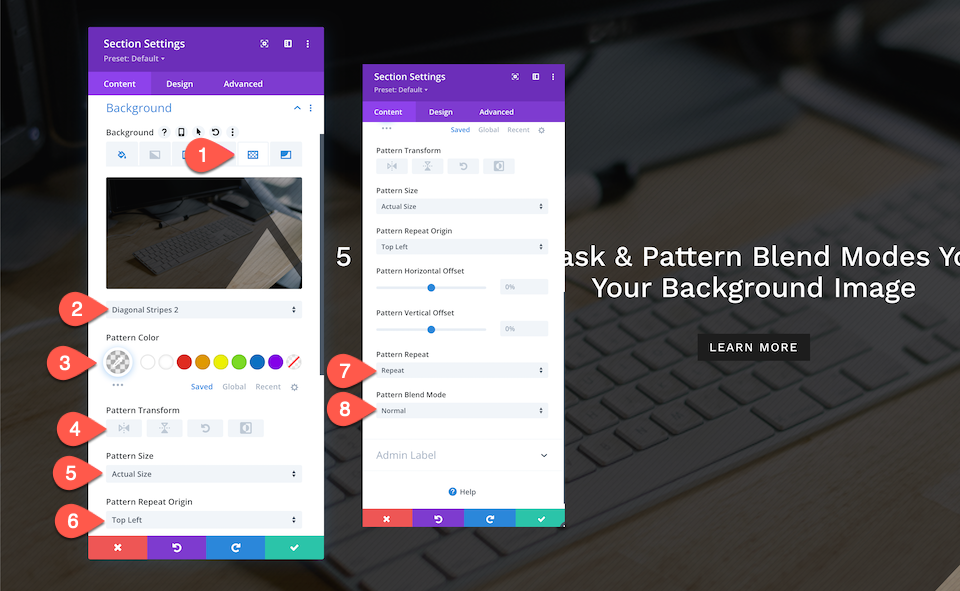
3. Upload Background Masks
Now that we’ve got a background symbol and development added, let’s upload a background masks.
- Throughout the Background tab, navigate to the sixth tab, the masks tab, and click on “Upload Background Masks.”
- Make a choice Triangles from the dropdown menu and configure those settings:
- Masks Colour: rgba(10,10,10,0.61)
- Development Become: none
- Masks Side Ration: horizontal rectangle
- Masks Dimension: Stretch to fill
- Masks Mix Mode: Customary

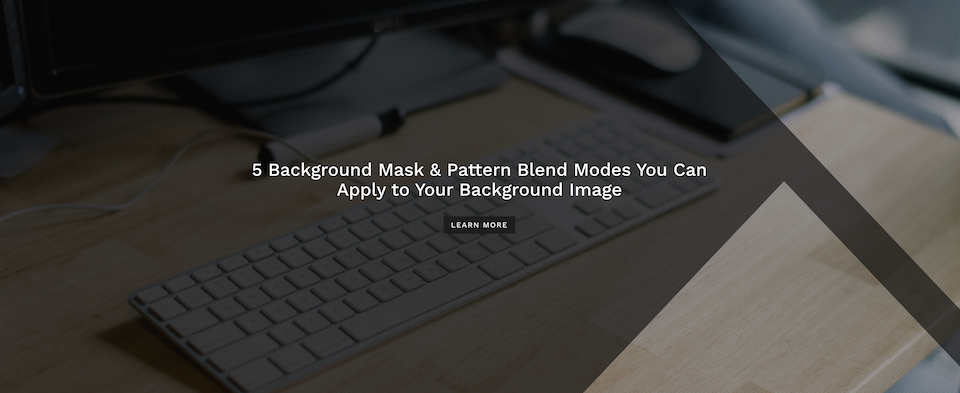
Find out how to Design Hero Segment #4
Now, let’s design the fourth hero phase.
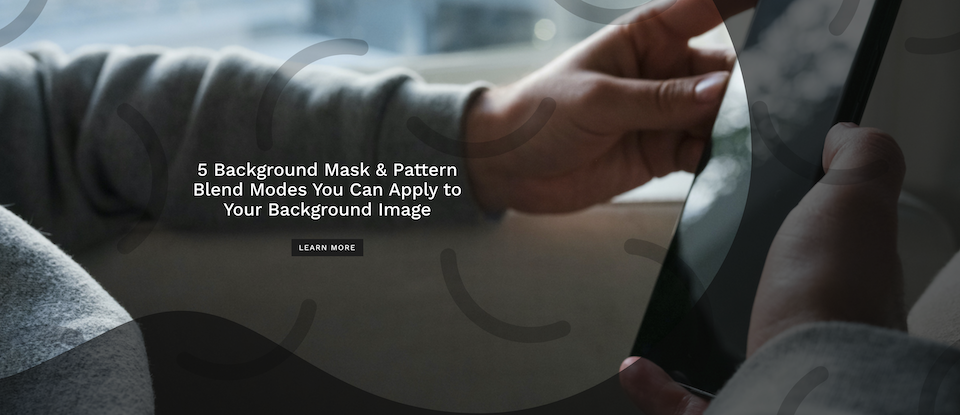
1. Upload a Background Symbol
Make a choice your background symbol.
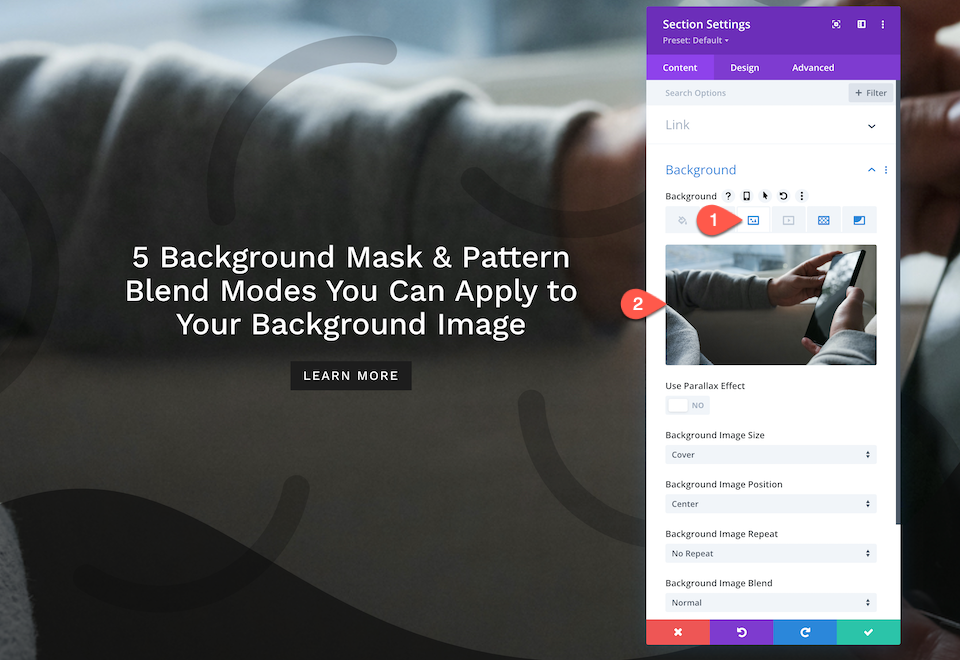
2. Upload Background Development
Now that we’ve got our background symbol added, let’s upload a background development.
- Throughout the Background tab, navigate to the fifth tab, the patterns tab, and click on “Upload Background Development.”
- Make a choice Smiles from the dropdown and configure those settings:
- Development Colour – rgba(0,0,0,0.2)
- Development Become: none
- Development Dimension: Duvet
- Development Repeat Beginning: Best Left
- Development Repeat: Repeat
- Mix Mode: Customary

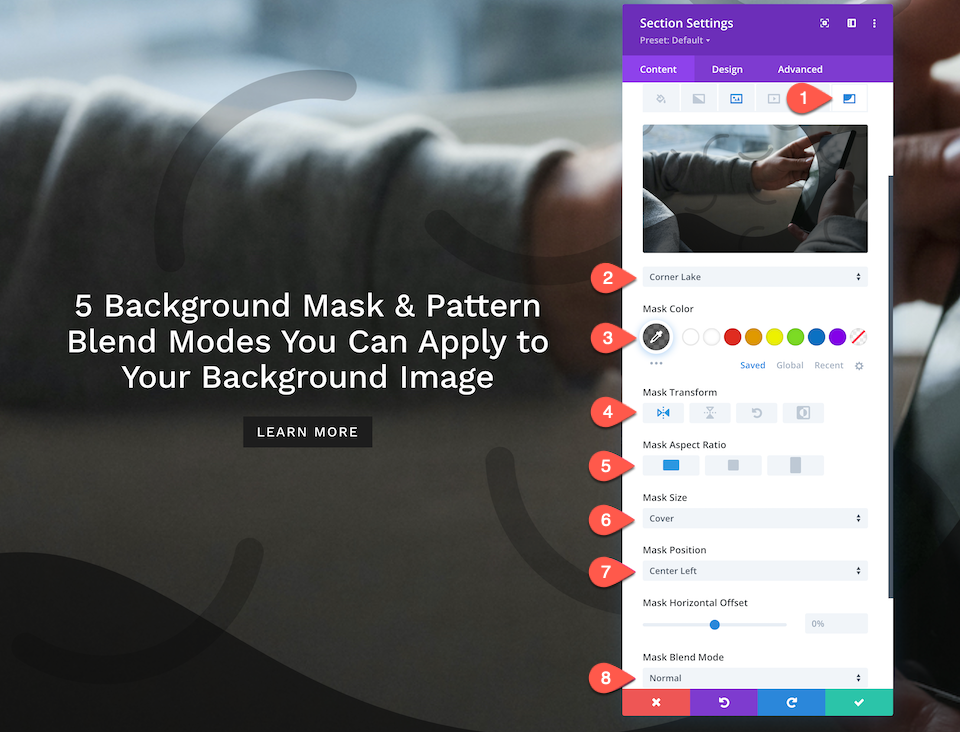
3. Upload Background Masks
Now that we’ve got our background symbol and development carried out, let’s upload a background masks.
- Throughout the Background tab, navigate to the sixth tab, the masks tab, and click on “Upload Background Masks.”
- Make a choice Nook Lake from the dropdown menu and configure those settings:
- Masks Colour: rgba(10,10,10,0.61)
- Masks Become: Horizontal
- Masks Side Ration: Horizontal rectangle
- Masks Dimension: Duvet
- Masks Place: Heart Left
- Masks Mix Mode: Customary
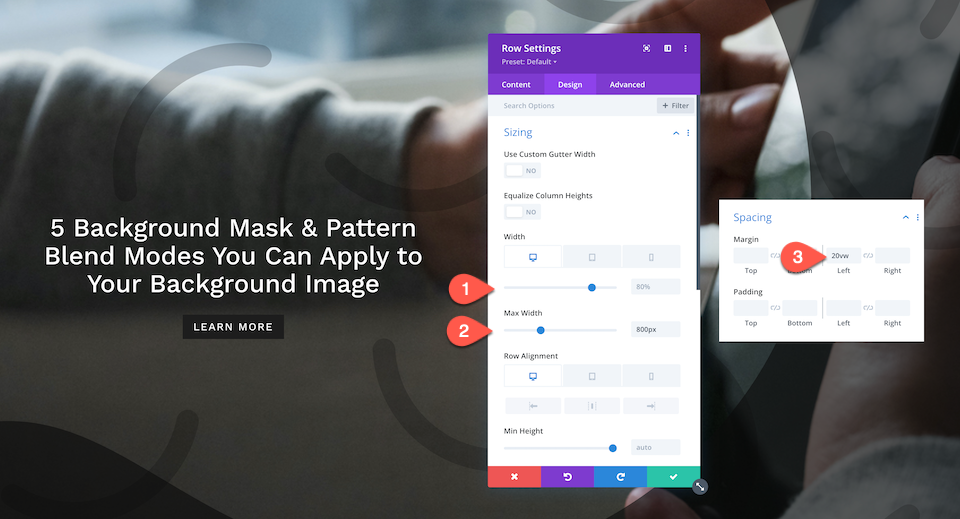
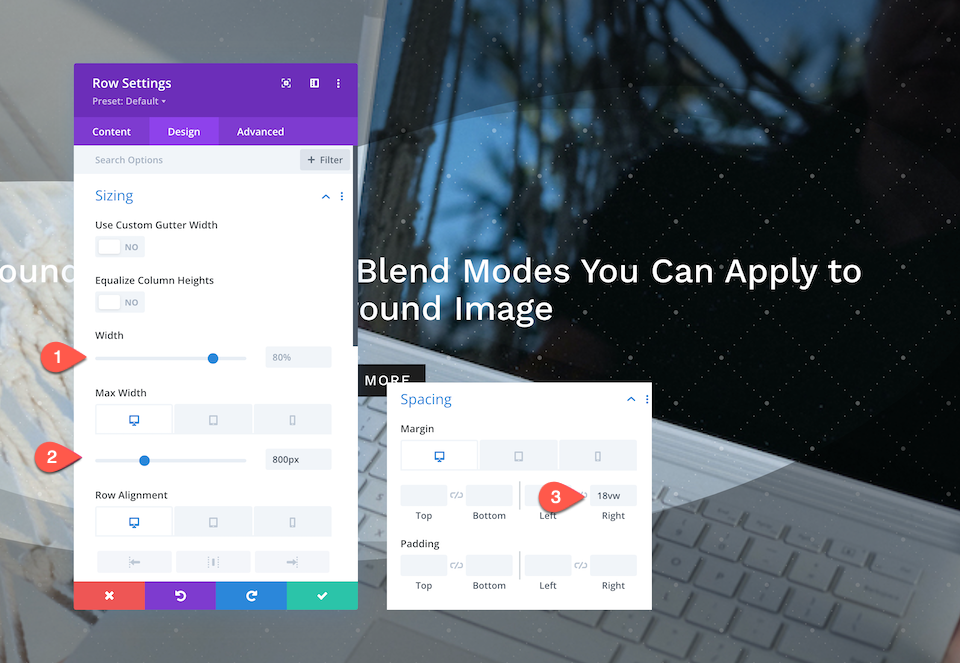
3. Configure Row Settings
Earlier than we cross, this hero phase has distinctive row kinds. Let’s set that up.
- Sizing:
- Width: 80%
- Max Width: 800px
- Row Alignment:
- Desktop: Default
- Pill: Heart
- Telephone: Heart
- Spacing:
- Left: 20vw
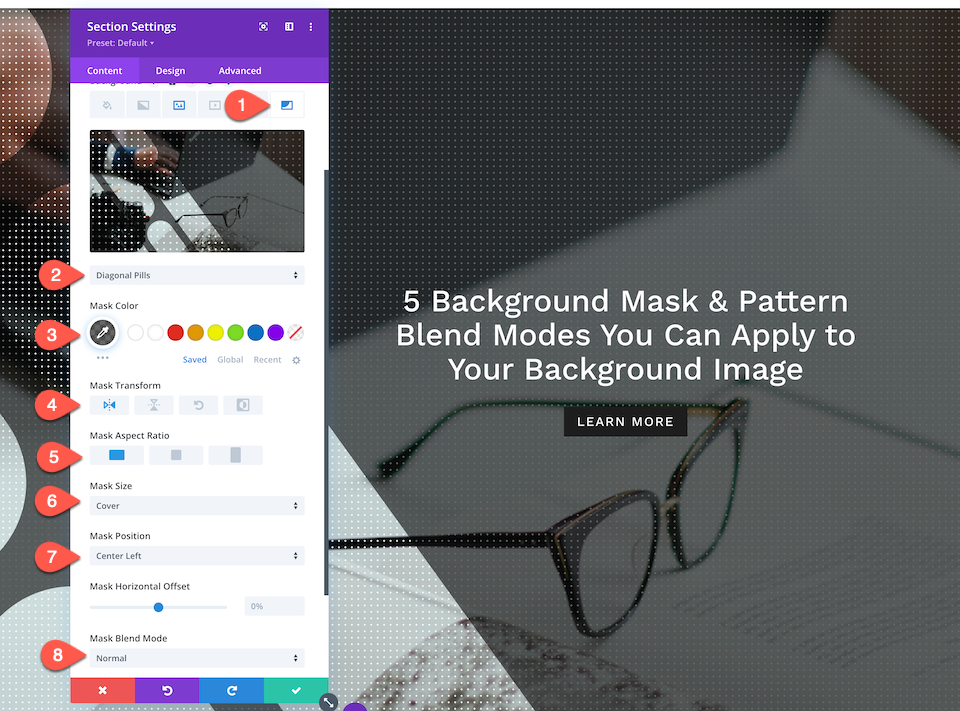
Find out how to Design Hero Segment #5
Now, let’s design the 5th hero phase.
1. Upload a Background Symbol
Make a choice your background symbol.
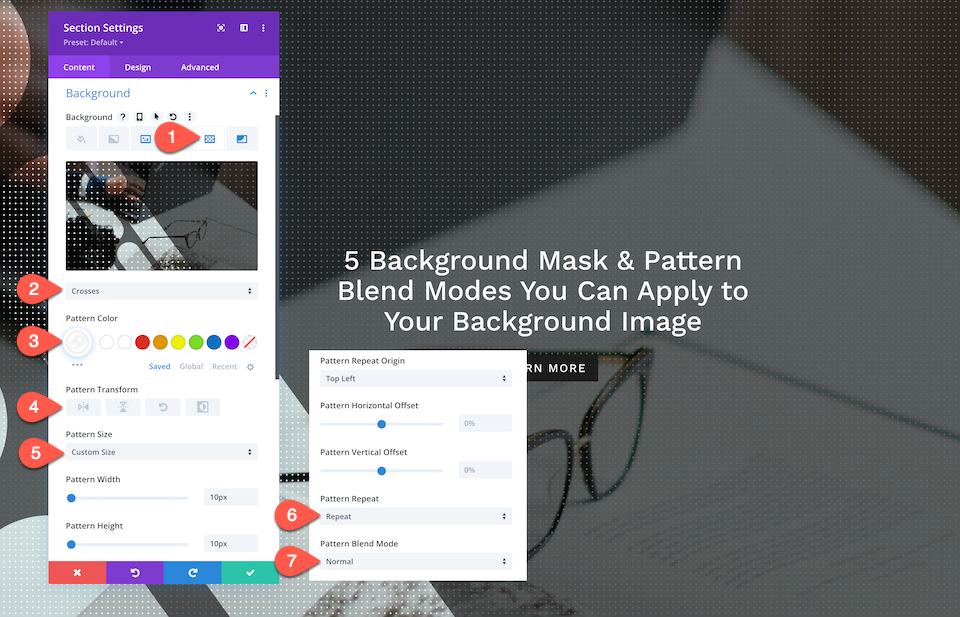
2. Upload Background Development
Now that we’ve got our background symbol arrange, let’s practice a background development.
- Throughout the Background tab, navigate to the fifth tab, the patterns tab, and click on “Upload Background Development.”
- Make a choice Crosses from the dropdown and configure those settings:
- Development Colour – #ffffff
- Development Become: none
- Development Dimension: Customized Dimension
- Development Width: 10px
- Development Peak: 10px
- Development Repeat Beginning: Best Left
- Development Repeat: Repeat
- Mix Mode: Customary
3. Upload Background Masks
Now that we’ve got a background symbol and development carried out, let’s upload a background masks.
- Throughout the Background tab, navigate to the sixth tab, the masks tab, and click on “Upload Background Masks.”
- Make a choice Diagonal Drugs from the dropdown menu and configure those settings:
- Masks Colour: rgba(10,10,10,0.61)
- Masks Become: Horizontal
- Masks Side Ration: Horizontal rectangle
- Masks Dimension: Duvet
- Masks Place: Heart Left
- Masks Mix Mode: Customary
3. Configure Row Settings
Earlier than we cross, this hero phase has distinctive row kinds. Let’s set that up.
- Sizing:
- Width: 80%
- Max Width: 800px
- Row Alignment:
- Desktop: Default
- Pill: Heart
- Telephone: Heart
- Spacing:
- Proper: 18vw
Get Extra Background Masks and Development Designs!
If you wish to have extra designs like this one, take a look at those 12 background mask and pattern designs free for download.
Ultimate Ideas
Designing a singular and eyecatching hero phase to your website online is straightforward with Divi’s new background mask and pattern choices. Each and every function has many choices that mean you can create in point of fact inventive background designs. Plus, you’ll upload background patterns and mask to any Divi Builder component! The design choices are never-ending.
The submit 5 Background Mask & Pattern Overlays You Can Apply To Your Background Image gave the impression first on Elegant Themes Blog.

0 Comments