
Are you looking for one of the crucial most straightforward techniques to gather useful feedback about your WooCommerce store from your vigorous shoppers?
Client surveys allow you to get valuable information so that you’ll use it to make data-driven alternatives. For example, they can allow you to learn to enhance your product sales funnel or why your shoppers bought a decided on product.
In this article, we will show you learn the way to easily create submit gain surveys in WooCommerce.

Why Use Post Achieve Surveys in WooCommerce?
If if you have a WooCommerce retailer, then you definitely is also wondering what your shoppers recall to mind your products and online store. There’s no blank method to to determine without in reality asking them.
Fortunately, you’ll use a WordPress survey plugin to gather exact particular person feedback briefly and easily. This feedback will allow you to discover the ‘why’ at the back of each internet web site buyer’s movement. This is something you’ll’t be told from Google Analytics by myself.
When creating your purchaser survey, be mindful to don’t add any unnecessary questions. The questions you ask should get you one of the crucial valuable information and insights.
Listed below are some examples of questions you’ll ask your shoppers after checkout:
- How long have you ever ever been a purchaser?
- How did you in finding us?
- Used to be as soon as our pricing internet web page blank to grasp?
- Which of our products have you ever ever used?
- How glad are you with our products?
- Have you ever ever needed to contact buyer enhance?
- Do you’ve were given to any extent further comments or guidelines?
Thru inquiring for particular person feedback after each and every WooCommerce gain, you will be told ways you’ll support your gross sales funnel to boost particular person enjoy and building up product sales.
When you know the why or the intent at the back of consumers’ actions, you’ll merely figure out why your visitors acquire or don’t acquire your products.
With that being said, let’s take a look at learn the way to easily create submit gain surveys in WooCommerce. We can quilt two different methods:
Method 1: Rising Post Achieve Surveys Using UserFeedback
UserFeedback is an easy-to-use survey plugin by way of the MonsterInsights body of workers. It signifies that you’ll ask your internet web site visitors questions and acquire their feedback in exact time. It moreover makes it blank so to upload the survey to precise WooCommerce pages, such since the order confirmation internet web page.
UserFeedback includes a Post Achieve Evaluation template to get a hold of a head get began in creating your survey. Plus, you’ll customize how your popup surveys look so that they totally suit your logo and internet web site design.
First, you want to place in and switch at the UserFeedback plugin. For step-by-step instructions, you’ll practice our tutorial on find out how to set up a WordPress plugin.
Remember: There’s a unfastened model of UserFeedback that you just’ll use to get started. Then again, you will need the choices of the Skilled style to create a submit gain survey.
Environment Up the UserFeedback Plugin
As quickly because the plugin is activated, the setup wizard will automatically liberate. Click on at the ‘Get began’ button to begin out the setup.

Next, you will be led to to create your first survey to show you what the plugin is able to.
We won’t be using this case survey, so that you’ll transfer ahead and use the default answers.

You’ll be ready to choose from a few pre-written questions or create your individual question. You’re going to moreover be capable of industry your questions at any time.
For this tutorial, you should simply click on at the ‘Next Step’ button to continue.

Next, you will see the solution to allow explicit UserFeedback choices, depending for your license stage.
Go ahead and allow the choices you want or that your license stage shall we in.

Once you have performed that, you want to click on at the ‘Next Step’ button at the bottom of the internet web page.
Now, you’ll enter the electronic mail deal with where you want the survey responses to be sent.

Since we won’t be using this survey, you don’t need to make any changes and can simply click on at the ‘Next Step: Submit’ button.
Throughout the final step of the setup wizard, the choices and addons you allow will be installed.

Then, you’ll click on on on the ‘Pass out to dashboard’ button at the bottom of the internet web page.
You’re going to peer the trend ‘First Survey’ that you just created with the wizard.

Now you’ll free up the Skilled choices of the plugin. You need to enter the license key that was emailed to you whilst you purchased a UserFeedback plan.
It is very important navigate to UserFeedback » Settings throughout the WordPress admin area. Once there, simply paste your license key into the field and click on at the ‘Check’ button.
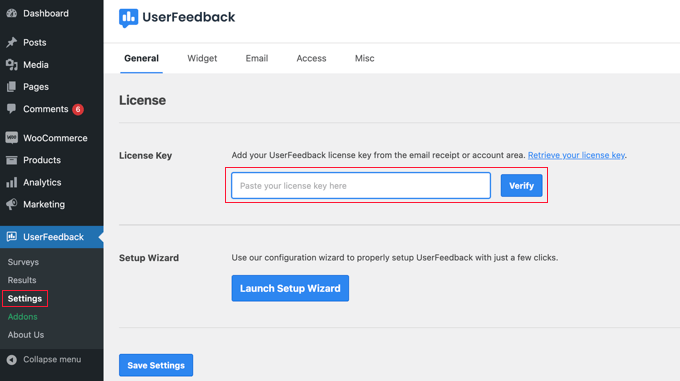
Make sure you click on at the ‘Save Settings’ button upon getting performed this.
After that, you’ll allow the Skilled choices by way of going to the UserFeedback » Addons internet web page.
For each and every addon, it is very important click on at the ‘Arrange Addon’ button, followed by way of the ‘Activate’ button that appears.

This is necessary given that Additional Templates addon includes a Post Achieve Evaluation template, and the Question Types addon means that you can add giant title ratings and further. Other addons imply you’ll further customize your survey sort.
Now that you just’ve successfully put within the UserFeedback plugin and its addons, you’re able to create your submit gain survey.
Creating a Post Achieve Survey Using UserFeedback
To create a brand spanking new survey, you want to return to the UserFeedback » Surveys internet web page and click on at the ‘Create New’ button.
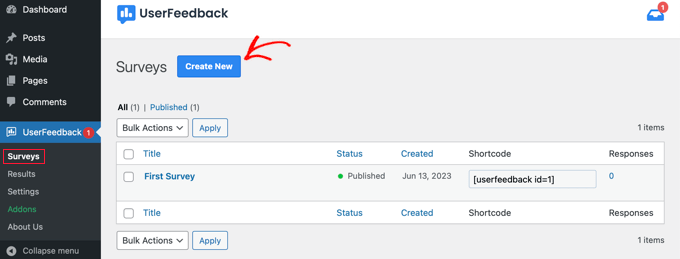
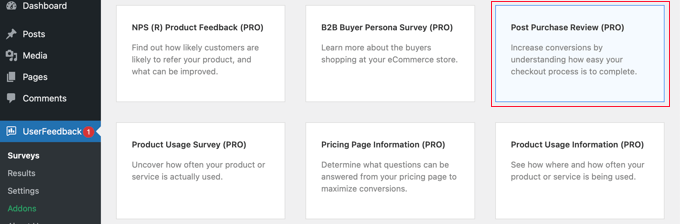
This will show you dozens of survey templates that you just’ll use as a kick off point.
You need to scroll down until you in finding the Post Achieve Evaluation template and then click on on it.
A brand spanking new survey will be created for you. Some helpful questions have already been added.
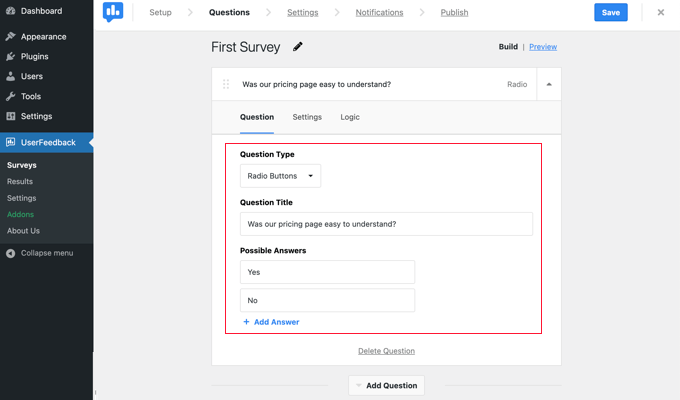
You’ll be capable to industry any question’s kind and title by way of simply pointing and clicking.
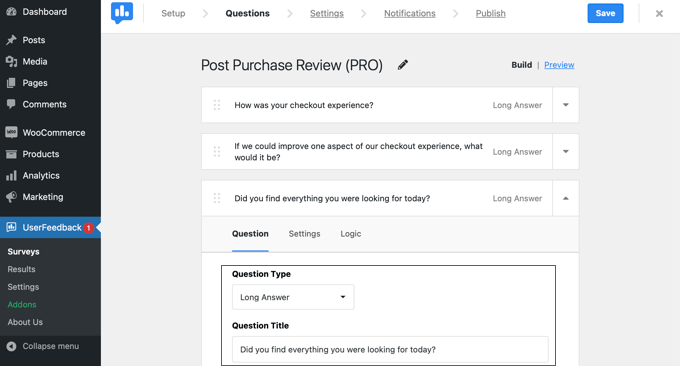
Every question has a Settings tab where you’ll set the question as ‘Required’. The Not unusual sense tab signifies that you’ll show or disguise the question based on the customer’s previous answers.
With UserFeedback, you’ll ask infinite questions and acquire infinite responses. You’ll be capable to ask all sorts of questions, in conjunction with multiple-choice and free-form questions, and even grasp emails and acquire big name scores.
It’s conceivable you’ll like so to upload one of the questions we listed at first of this newsletter. So that you can upload a question on your survey, simply click on at the ‘Add Question’ button after the general question.
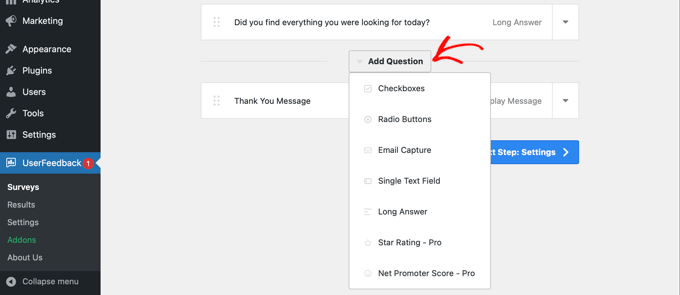
When you choose a question kind from the dropdown menu, a brand spanking new question will be added.
After that, it’s conceivable so that you can so to upload a question title. Depending on the question kind, you’ll then customize the question in other ways, comparable to labeling checkboxes or radio buttons.
Tip: The ‘Preview’ link at the top of the internet web page doesn’t merely preview the form however as well as means that you can customize its colors.
You’ll be capable to moreover create a custom designed thanks message and redirect consumers after their submissions.
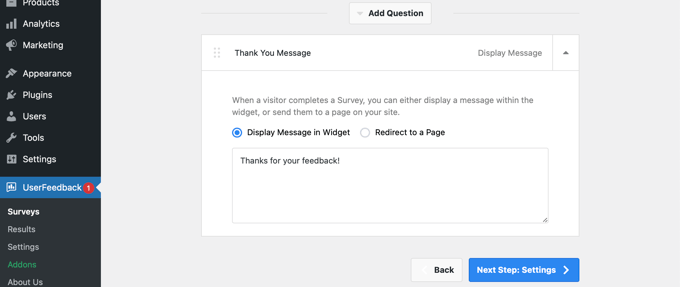
Whilst you’ve were given finished editing your survey questions, merely hit the ‘Next Step: Settings’ button. This will open the Settings internet web page, where you’ll customize your survey a lot more.
Throughout the ‘Tracking’ section, you’ll allow or disable Google Analytics tracking whilst you’ve were given MonsterInsights installed.
Next, throughout the ‘Focused on’ section, you’ll make a selection what sorts of gadgets and pages you want your survey to appear on. You’ll be capable to display the survey on all tool types or create different surveys that concentrate on desktop and mobile consumers.
Next, you’ll scroll the entire approach right down to the Pages environment area. This is necessary because it shall we in you to choose where the survey will be displayed.
The default environment is ‘All Pages’. This will display the survey on each internet web page of your on-line retailer. Then again, we most straightforward want to survey shoppers once they’ve made a purchase order order.
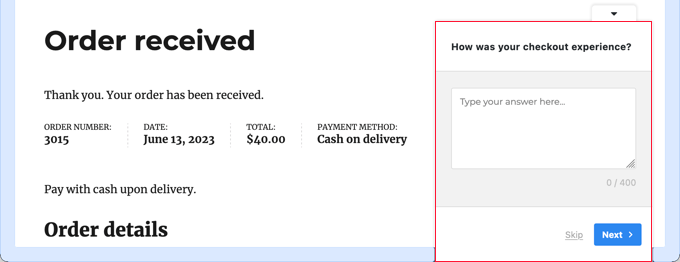
In this case, we should display the survey on the order confirmation internet web page that is displayed after checkout. This internet web page is ceaselessly known as the WooCommerce thank you internet web page.
To concentrate on this internet web page, it is very important make a selection ‘Internet web page url is’ from the dropdown menu. After that, you should kind ‘order-received’ throughout the next field.
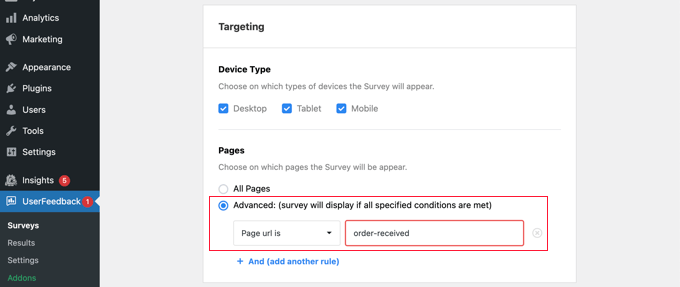
This works given that environment fits partial URLs. All the URL will industry with each and every transaction on the other hand will all the time come with the characters ‘order-received’.
You’ll be capable to moreover scroll the entire approach right down to the ‘Behavior’ section. Proper right here, you’ll configure settings like:
- Display Timing – When the survey will appear on the internet web page.
- Display Duration – How incessantly the survey will appear to internet web site visitors.
- Survey Run Time – How long the survey will appear on the designated pages.
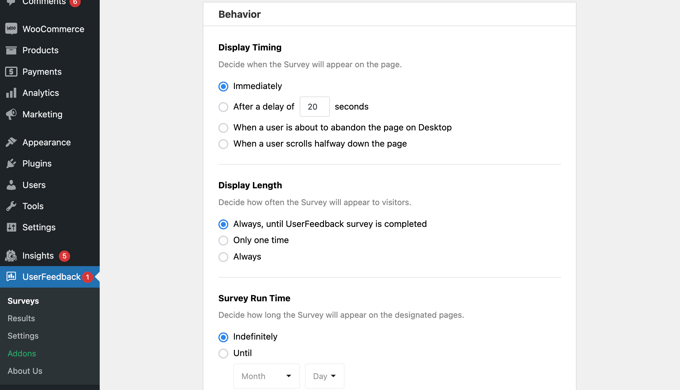
In addition to, you’ll allow or disable the ‘Get began Survey Minimized’ preference.
This shows a far much less visible style of your survey as an alternative of automatically opening the principle question.

Once you may well be performed changing the settings, you’ll click on at the ‘Next Step: Notifications’ button.
This will take you to the Notifications internet web page, where you’ll make a choice to send yourself an piece of email with each and every new response to the survey. Simply leave the ‘Send Piece of email’ toggle switched on and then enter a variety of piece of email addresses.

You’ll be capable to moreover allow conditional excellent judgment to reason electronic mail notifications when visitors answer on your questions in a certain method.
For example, likelihood is that you’ll most straightforward want to download an piece of email if the individual tests a box labeled ‘Do you want a callback?’
For this to artwork, your survey should come with at least one question with a radio, checkbox, NPS, or giant title rating question.
After that, click on on on the ‘Next Step: Submit’ button to continue.
Submit Your Survey
In any case, there’s an solution to agenda the survey for a later date and time.
In case you’ll be able to publish your survey straight away, then transfer ahead and click on at the ‘Save and Submit’ button.

That’s it! You’ve successfully created a survey sort.
Now when your shoppers gain items from your store, your survey will pop up on the order confirmation internet web page.
Tip: You may not see the customer survey whilst you’re logged into WooCommerce. It is very important open your online store in a brand spanking new incognito window or a unique web browser.
Viewing Your Survey Form Results
On every occasion you get began getting responses, you’ll analyze them correct from your WordPress admin dashboard using easy-to-read research.
Simply navigate to UserFeedback » Results to appear the total responses, impressions, and further details.

Method 2: Rising Post Achieve Surveys Using WPForms
WPForms is the best possible WordPress touch type plugin on the market. It comes with a powerful surveys and polls addon, which helps you to briefly create highly-engaging survey forms.
It signifies that you’ll combine the Surveys and Polls addon with tricky WPForms choices like conditional excellent judgment, multi-page forms, custom designed notifications, piece of email integrations, and further.
Remember: You’re going to wish the Skilled plan because it comprises the WPForms Surveys and Polls addon. WPBeginner consumers can use our WPForms coupon to get 50% OFF on all WPForms licenses.
Environment Up the WPForms Plugin
The first thing you want to do is about up and switch at the WPForms plugin. For additonal details, see our step-by-step knowledge on find out how to set up a WordPress plugin.
As quickly because the plugin is activated, you want to seek advice from the WPForms » Settings internet web page and enter your license key. You’re going to to seek out this knowledge in your account on the WPForms internet web site.

Don’t overlook to click on at the ‘Check Key’ button.
Once you have performed that, you should head over to the WPForms » Addons internet web page and scroll the entire approach right down to the Surveys and Polls addon.
Go ahead and click on on on the ‘Arrange’ addon button to place in and switch at the addon.

Now you’re able to create the submit gain survey sort.
Creating a Post Achieve Survey Using WPForms
You need to visit the WPForms » Add New internet web page to create a brand spanking new sort. This will liberate the WPForms sort builder interface, and also you’ll choose between different pre-built sort templates.
First, you should provide a reputation on your survey sort at the top of the internet web page.
After that, you want to choose a template. Get began by way of clicking on ‘Addon Templates’ to list templates which may also be appropriate with the Surveys and Polls addon.
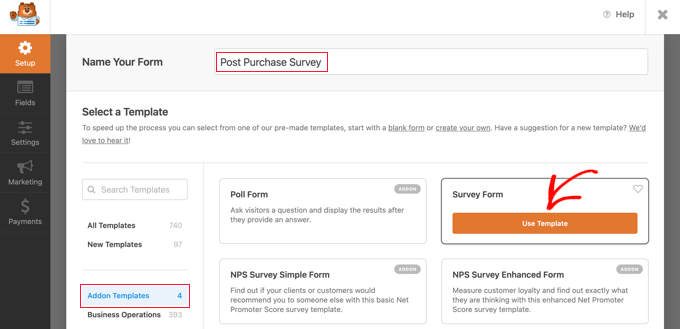
Then you want to click on at the ‘Use Template’ button on the Survey Form template. This will load a trend purchaser feedback sort template with a variety of fields already added to it.
You’ll be capable to merely stage and click on directly to edit the fields, rearrange them with drag and drop, or remove them from the form. You’ll be capable to moreover add new sort fields from the left column.
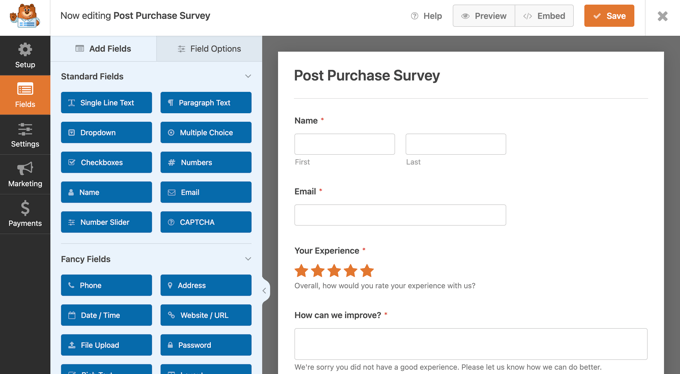
WPForms is helping all commonly-used sort fields, in conjunction with dropdown, radio buttons, checkboxes, Likert scale, text input, rating scale, and a number of additional. This makes it super blank in an effort to assemble highly-interactive survey forms.
There could also be some conditional good judgment already built into the form. For example, the ‘How can we enhance?’ field will most straightforward appear if an individual selects 1 or 2 stars throughout the ‘Your Enjoy’ field.

You’ll be capable to see this by way of deciding at the ‘How can we enhance?’ field and then clicking the ‘Field Possible choices’ tab on the left, as seen throughout the image above.
If a couple of of your shoppers log in in your on-line retailer, then you definitely’ll make their lifestyles more straightforward by way of auto-filling a couple of in their information from their particular person profiles.
For example, to auto-fill their piece of email handle, you want to click on on on the Piece of email field, then click on at the ‘Field Possible choices’ tab on the left. Once there, merely click on on on the ‘Difficult’ tab to show the sophisticated field alternatives.
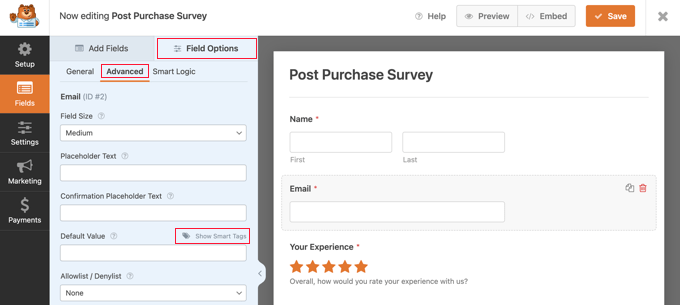
You’re going to comprehend a field where you’ll set a Default Price for the email field.
You’ll be capable to enter information from their profile automatically by way of clicking on ‘Show Just right Tags’.
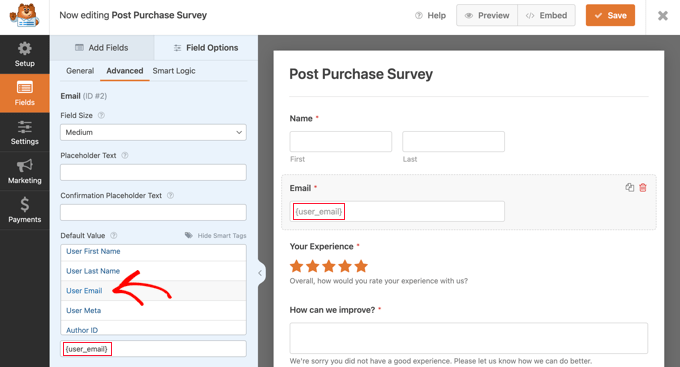
Now you simply click on at the ‘Client Piece of email List’ preference, and the {user_email} smart tag will be entered into the field. This will automatically add the email handle for logged-in consumers.
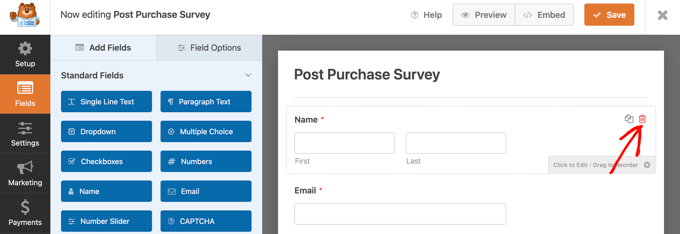
You’ll be capable to moreover merely remove any fields that you just don’t need on the sort.
For example, if you want to remove the ‘Name’ field, then you definitely should stage at that field together with your mouse and then click on at the pink Trash icon that appears at the top correct of the field.
If you need so to upload additional questions, akin to these we listed at first of this newsletter, simply drag a brand spanking new field onto the internet web page and then customize it.
Once you have created the form, you want to click on at the orange ‘Save’ button at the top of the internet web page to store your sort settings.
Next, you’ll transfer to the Settings tab and make a selection ‘Confirmations’ throughout the WPForms sort builder.

Proper right here, you’ll make a choice whether or not or to not flip a message or a internet web page or even redirect consumers to a URL once they put up the survey sort.
Besides that, the WPForms Notifications tab signifies that you’ll edit the notification settings so that you get piece of email alerts when an individual fills out your survey.

You’ll be capable to now click on on on the close button to head out the form builder.
Together with the Survey Form to a Custom designed Thank You Internet web page
If if you have gone all over the trouble of making a customized WooCommerce thanks web page, then you definitely’ll merely add your submit gain survey to it using a shortcode or a block.
Remember: Whether or not or no longer you may well be using the default thank you internet web page or a custom designed one, you’ll moreover display the survey as a popup using a plugin. See the next section for details.
You’re going to to seek out the shortcode you want by way of visiting the WPForms » All Bureaucracy internet web page.
You’ll be capable to then use the shortcode so to upload the form on your custom designed thank you internet web page by way of following our knowledge on find out how to upload a shortcode in WordPress.
Then again, if you happen to created your custom designed thank you internet web page using the block editor or a web page builder plugin like SeedProd, then all you want to do is drag the WPForms widget onto the internet web page and then make a choice the survey sort you merely comprised of a dropdown menu.
Once you have saved your custom designed thank you internet web page, your shoppers will see the survey after trying out.
Mechanically Showing a Survey Popup Using OptinMonster
It’s conceivable you’ll need to have the survey pop up automatically over the order confirmation internet web page, similar to what happens with the UserFeedback plugin in Method 1.
The first thing you want to do is about up the free OptinMonster plugin. For additonal details, see our step-by-step knowledge on find out how to set up a WordPress plugin.
Remember: In this tutorial, we will use the free OptinMonster plugin because it does the whole thing we wish. Then again, with a Enlargement subscription, the highest price style of OptinMonster has much more potent integration with WooCommerce.
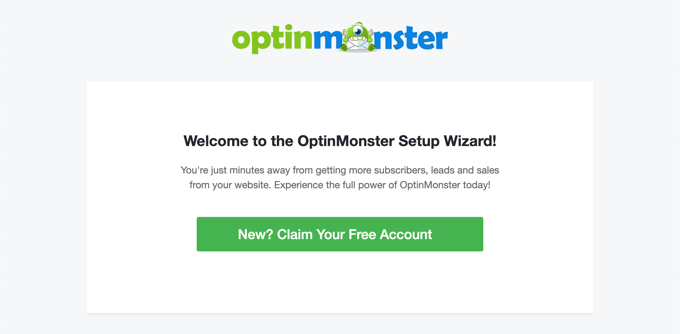
Upon activation, the OptinMonster setup wizard gets began.
Simply practice the onscreen instructions to organize OptinMonster for your internet web site and create a free account.
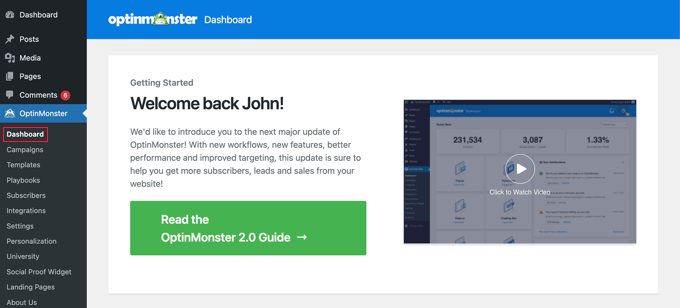
On every occasion you whole the setup, you will to seek out yourself on the OptinMonster dashboard.
You’re going to peer a welcome message, a link to the OptinMonster particular person knowledge, and a video to help you get started.
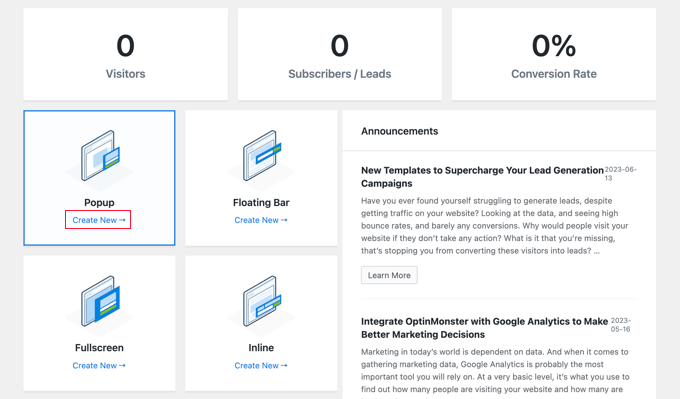
Now it is very important scroll down until you find a box where you’ll create a brand spanking new popup.
Simply click on at the ‘Create New’ link.
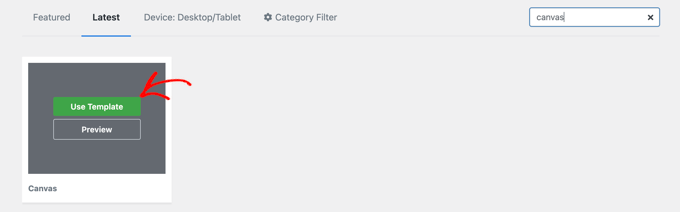
You’re going to now see a number of popup templates. Since our popup will merely come with our submit gain survey, we will use the minimal Canvas template.
You’ll be capable to to seek out this template by way of typing ‘canvas’ into the hunt field.

When you stage your mouse over the Canvas template, two buttons will appear.
You’ll be capable to create your popup by way of clicking the ‘Use Template’ button.
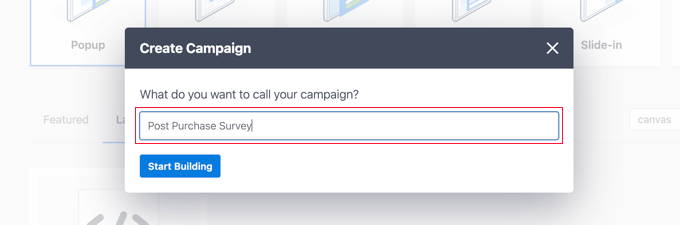
You’re going to peer a popup asking you to supply the selling marketing campaign a name.
You’ll be capable to kind in ‘Post Achieve Survey’ and then click on at the ‘Get began Construction’ button.
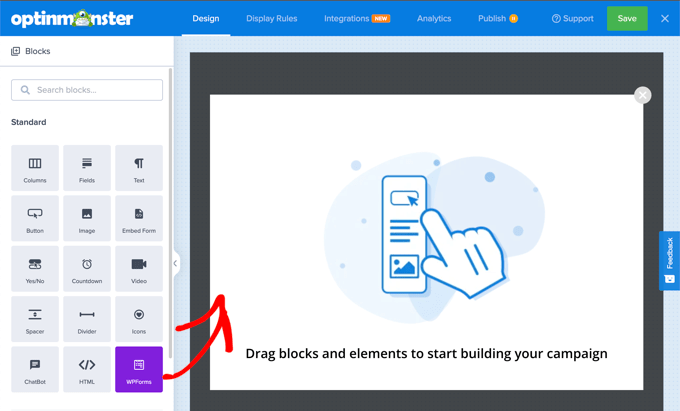
The OptinMonster builder will open together with your made up our minds on template. You’ll be capable to see a preview of the popup at the right kind, and there are blocks on the left that you just’ll add to the popup.
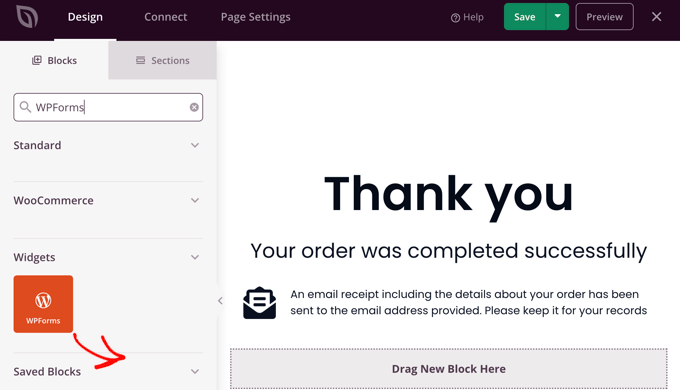
You need to look out the WPForms block and drag it onto the internet web page.
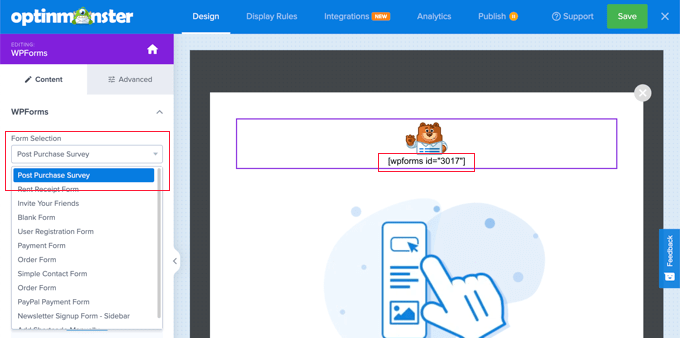
You’ll be capable to now make a selection the survey you want so to upload.
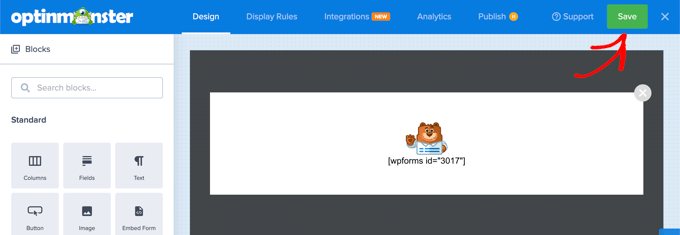
Simply click on on on the determine of the WPForms submit gain survey that you just created earlier. The WPForms shortcode will be added on your popup.
There could also be nevertheless a placeholder image and text block on the internet web page. The ones can also be safely deleted.
When you hover your mouse over the image, a purple toolbar will appear. You’ll be capable to delete the image by way of clicking the Trash icon. You’re going to be asked to verify the deletion.
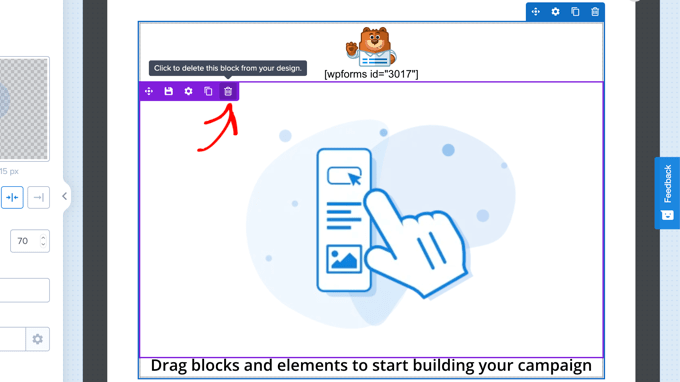
You’ll be capable to delete the text block that says ‘Drag blocks and portions to start development your advertising and marketing marketing campaign’ within the equivalent method.
Your finished popup should include merely the WPForms shortcode. This can be a very good time to save some your artwork by way of clicking the ‘Save’ button at the top of the show.
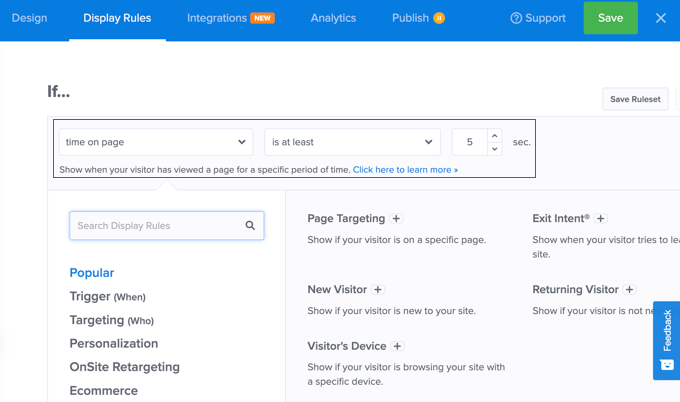
Your next procedure is to click on at the ‘Display Rules’ tab and set how and where the popup will be displayed.
The principle rule determines when the popup will be confirmed. The default worth is after getting been on the internet web page for 5 seconds. This will artwork for plenty of online stores, on the other hand you’ll industry the price if you happen to like.
Now you want to scroll the entire approach right down to the second rule, which you will to seek out somewhat beneath the ‘AND’ label.
The default worth is to turn the popup on each internet web page of your WordPress web site. You need to change this so that it most straightforward shows the submit gain survey on the order confirmation internet web page.
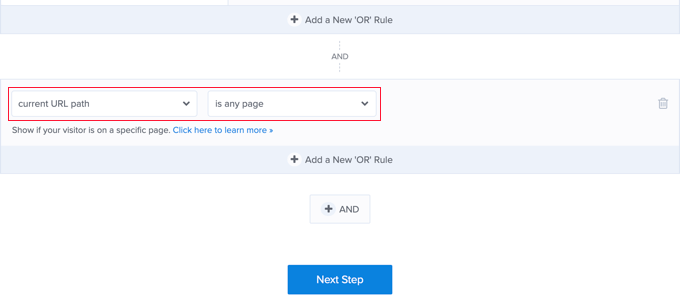
To check out this, you want to click on at the dropdown menu for ‘is any internet web page’ and make a selection ‘comprises’ as an alternative.
Each different field will appear, and you want to kind ‘order-received’ proper right here.
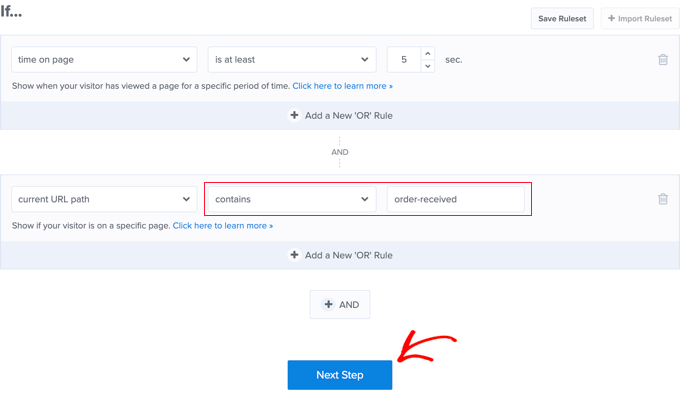
This rule will are compatible the confirmation internet web page URL. Although the URL changes with each transaction, it’s going to all the time come with the characters ‘order-received’.
Now you’ll click on at the ‘Next Step’ button to make a decision what happens when the must haves within the ones two regulations are met.
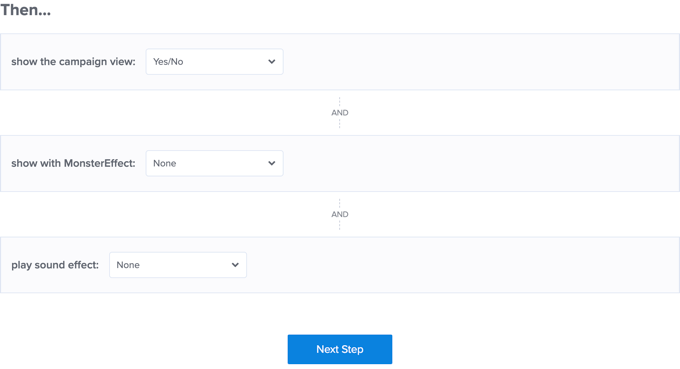
The default settings proper right here will display the popup without any effects or sound. If you need so to upload an affect or sound, merely use the dropdown menus.
Once you may well be finished, you want to click on on on the ‘Next Step’ button. You’re going to peer a summary of the display regulations you merely created.
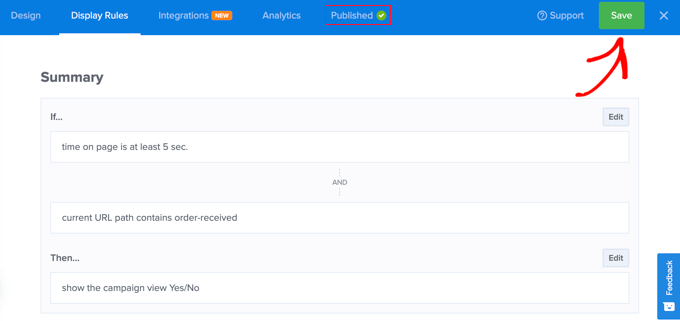
Make sure you click on at the ‘Save’ button to store your settings.
Finally, you’ll click on at the ‘Submit’ tab at the top of the show and then click on at the ‘Submit’ button beneath ‘Submit Status’. This will push the popup live to tell the tale your online store.

You’ll be capable to now close the OptinMonster builder by way of clicking the ‘X’ icon inside probably the most smart correct corner.
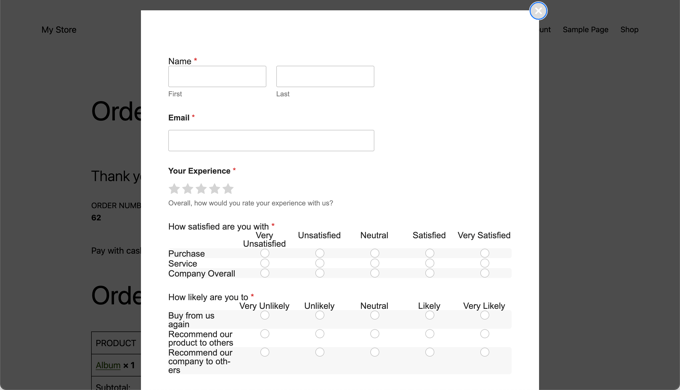
Your shoppers will now see the submit gain survey every time they finish trying out. Proper right here’s the best way apparently to be like in our demo store.
Viewing Your Survey Form Results
WPForms shows survey results in stunning charts and graphs. You’ll be capable to moreover print survey results and export them on your favorite spreadsheet instrument.
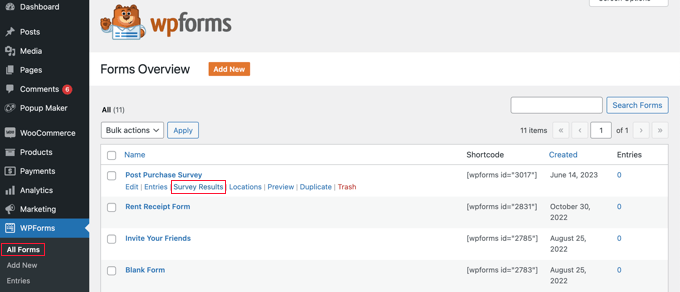
To view your survey results, you want to visit the WPForms » All Bureaucracy internet web page and click on on on the ‘Survey Results’ link underneath your survey sort.
On the results internet web page, you will see your survey responses displayed in an interactive chart and tables.
You’ll be capable to export responses to a single question and all the survey.

On the top, you will see alternatives to switch to different chart types and export alternatives.
You’ll be capable to save explicit particular person survey results in JPEG, PDF, and Print formats to easily share them on presentation slides, blog posts, or social media.
We hope this tutorial helped you learn how to create submit gain surveys in WooCommerce. You may also want to see our knowledge on find out how to create sensible coupons in WooCommerce or our an expert possible choices for the most productive WooCommerce plugins in your retailer.
When you most popular this newsletter, then please subscribe to our YouTube Channel for WordPress video tutorials. You’ll be capable to moreover to seek out us on Twitter and Fb.
The submit Find out how to Simply Create Submit Acquire Surveys in WooCommerce first appeared on WPBeginner.

0 Comments