
Steady deployment is an crucial part of stylish web development. It lets in builders to automatically deploy changes from a style regulate software to a live surroundings. This implies reduces guide errors and hurries up the development process, ensuring your internet website is always up-to-date with the newest code changes.
As a Kinsta individual, you’ll use SSH to push changes instantly on your server. With GitHub Movements, you’ll automate the entire deployment process, seamlessly deploying updates on your live internet website.
This article walks you through setting up stable deployment on your WordPress internet website hosted on Kinsta using GitHub Actions. We cover everything from setting up your local surroundings to pushing changes to GitHub and automatically deploying them on your live internet website.
Should haves
Previous to you’ll prepare stable deployment on your WordPress internet website to Kinsta, there are a few things you need:
- Your WordPress internet website will have to already be hosted on Kinsta.
- You need to drag your internet website locally. You’ll each use DevKinsta or download a backup.
- A GitHub repository to store and push your web site’s code.
- Basic knowledge of Git, like pushing code and using a
.gitignorefile.
Pulling your internet website locally and setting up GitHub
As a Kinsta individual, one of the crucial perfect techniques to get right to use your WordPress internet website’s local information is by the use of using DevKinsta. With only a few clicks, you’ll pull your internet website from the Kinsta server into DevKinsta, allowing you to artwork on your internet website locally.
To do this:
- Open DevKinsta and click on on Add internet website.
- Make a choice the Import from Kinsta risk. This will likely from time to time download everything about your internet website so that you’ll get right to use it locally for development.
Once your internet website is available locally, open the internet website’s folder for your preferred code editor. Previous to pushing the information to GitHub, add a .gitignore file throughout the root record of your enterprise to steer clear of uploading unnecessary WordPress core recordsdata, uploads, or subtle information. You’ll use an odd .gitignore template for WordPress. Copy the template’s contents and put it aside.
Next, create a GitHub repository and push your internet website’s information to GitHub.
Putting in GitHub secrets and techniques and strategies for Kinsta
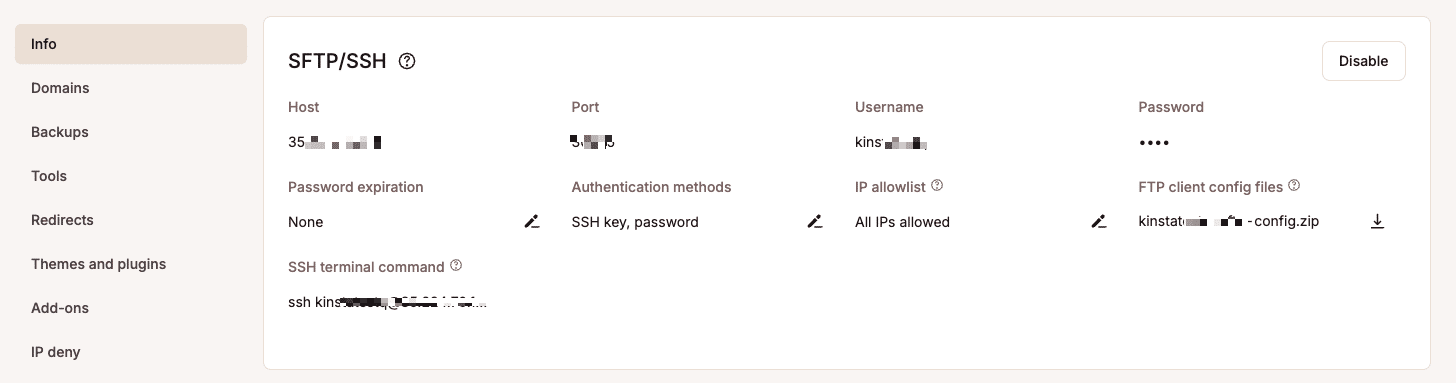
To automate deployment from GitHub to Kinsta, you’ll need some vital SSH details, along with your username, password, port, and IP take care of. Since the ones are subtle, store them as GitHub secrets and techniques and strategies.
To be able to upload secrets and techniques and strategies in GitHub:
- Go on your repository on GitHub.
- Click on on on Settings > Secrets and techniques and strategies and variables > Actions > New repository secret.
- Add the following secrets and techniques and strategies:
KINSTA_SERVER_IPKINSTA_USERNAMEPASSWORDPORT
You’ll to find the ones details on your internet website’s Information internet web page for your MyKinsta dashboard.
With this setup entire, you’ll now configure computerized deployment on your WordPress internet website.
Configuring your Kinsta server
Previous to automating the deployment process with GitHub Actions, you will have to configure your Kinsta server to procure and deploy code from your GitHub repository.
This comes to 2 steps: making a unadorned Git repository on your Kinsta server and setting up a post-receive hook to deploy the newest changes on your live internet website automatically.
1. Create a unadorned Git repository on Kinsta
A unadorned Git repository is a far off holiday spot where GitHub will push your code. This repository doesn’t have a working record — it’s a central repository designed to procure and store your code.
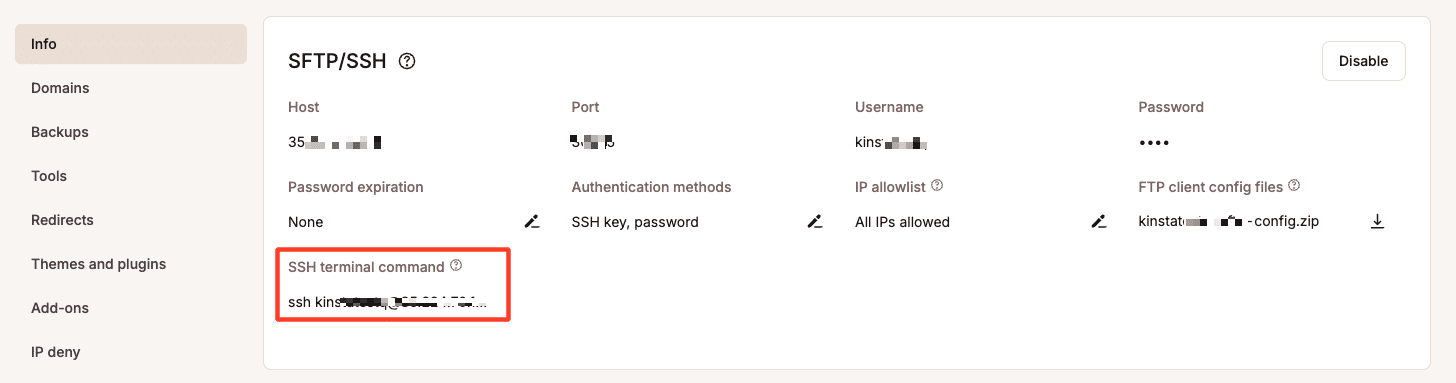
To do this, first SSH into your Kinsta server using the SSH terminal command available for your MyKinsta dashboard:
Next, navigate to the non-public folder on your server (or create it if it doesn’t already exist):
mkdir -p /www/your-site/personal
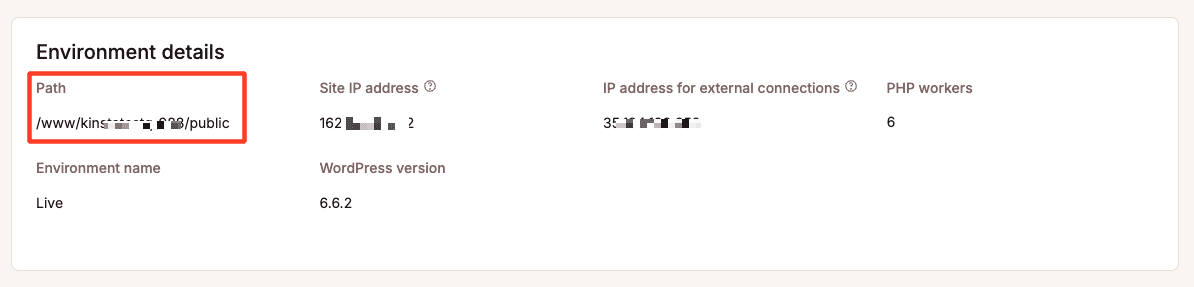
cd /www/your-site/personalProper right here, alternate your-site with the real folder identify on your internet website, which you’ll to find throughout the path on your dashboard.
After all, create the bare Git repository:
git init --bare your-repo.gitFor your-repo, you’ll use the identify of your GitHub repository for consistency, then again you’ll identify it the rest you like.
This bare repository will download the code pushed from GitHub.
2. Prepare the post-receive hook
Once your bare Git repository is in a position, setting up a post-receive hook is next. This script will automatically deploy the code on your live internet website each and every time new changes are pushed to the primary division in GitHub.
To do this, navigate to the hooks record for your bare Git repository:
cd /www/your-site/personal/your-repo.git/hooksCreate and edit the post-receive hook:
nano post-receiveNext, add the following script to the post-receive file. This script will check out the newest code into the public record of your live internet website:
#!/bin/bash
TARGET="/www/your-site/public"
GIT_DIR="/www/your-site/personal/your-repo.git"

while be told oldrev newrev ref
do
    BRANCH=$(git rev-parse --symbolic --abbrev-ref $ref)

    if [[ $BRANCH == "main" ]];
    then
        echo "Ref $ref received. Deploying ${BRANCH} division to production..."
        git --work-tree=$TARGET --git-dir=$GIT_DIR checkout -f
    else
        echo "Ref $ref received. Doing no longer the rest: perfect the main division may be deployed on this server."
    fi
done
The script above deploys code from merely the primary division. The TARGET variable problems to the record where your live internet website’s information are situated (/www/your-site/public). The GIT_DIR variable problems to the bare Git repository.
Save and pass out the file by the use of pressing Ctrl + X, then Y, and Enter.
After all, make the script executable so it might be able to run automatically after each push:
chmod +x post-receiveAt this stage, the post-receive hook is in a position to deploy code automatically each and every time changes are pushed to the primary division for your GitHub repository.
3. Generate and add a GitHub non-public get right to use token (PAT)
Since GitHub now not helps password-based authentication, you should utilize a PAT to authenticate when pushing code to GitHub by way of SSH. This token will allow GitHub to only settle for your pushes securely.
To generate the token:
- Go on your GitHub account and click on on on your profile symbol, then choose Settings.
- On the left sidebar, click on on Developer settings.
- Click on on Non-public get right to use tokens > Tokens (antique).
- Click on on Generate new token, and offers it a name (e.g., “Kinsta Deployment Token”).
- Beneath Make a choice scopes, take a look at
repo(for whole regulate of private repositories). - Click on on Generate token, and duplicate the token. (You gained’t be capable to see it yet again.)
Next, run the following command so to upload your GitHub repository as a far off, converting placeholders at the side of your exact details:
git far off add basis https://your-username:[email protected]/your-username/your-repo.gitAlternate:
your-usernameat the side of your GitHub username.YOUR_PERSONAL_ACCESS_TOKENwith the token you merely generated.your-repowith the identify of your GitHub repository.
Rising the GitHub Actions workflow for computerized deployment
Now that your WordPress internet website is on your local machine, pushed to GitHub, and also you’ve were given prepare the important GitHub Secrets and techniques, it’s time to create a GitHub Actions workflow. This workflow deploys changes to Kinsta automatically each and every time you push to the primary division.
To automate the deployment, you’ll create a YAML file that defines how the deployment will happen. Proper right here’s learn how to set it up:
- Create a brand spanking new record known as
.github/workflowsfor your GitHub repository. - Inside of this record, create a brand spanking new file known as
deploy.yml. - Add the following content material subject material to the
deploy.ymlfile:
identify: Deploy to Kinsta

on:
  push:
    branches:
      - primary

jobs:
  deploy:
    runs-on: ubuntu-latest

    steps:
      - identify: Checkout code
        uses: actions/checkout@v2

      - identify: Deploy to Kinsta by way of SSH
        uses: appleboy/[email protected]
        with:
          host: ${{ secrets and techniques and strategies.KINSTA_SERVER_IP }}
          username: ${{ secrets and techniques and strategies.KINSTA_USERNAME }}
          password: ${{ secrets and techniques and strategies.PASSWORD }}
          port: ${{ secrets and techniques and strategies.PORT }}
          script: |
            cd /www/your-site/personal/your-repo.git  # Navigate to the bare Git repository on Kinsta
            git --work-tree=/www/your-site/public --git-dir=/www/your-site/personal/your-repo.git fetch basis primary  # Fetch the newest changes from GitHub
            git --work-tree=/www/your-site/public --git-dir=/www/your-site/personal/your-repo.git reset --hard basis/primary  # Deploy changes to the live internet website
A closer check out this workflow
Proper right here’s a breakdown of the workflow:
- Purpose: The workflow is brought about each and every time code is pushed to the
primarydivision of your GitHub repository. - Jobs: The workflow comprises one
activityknown asdeploy, which runs on an Ubuntu virtual machine (ubuntu-latest). - Checkout code: This step uses the
actions/checkout@v2movement to drag the newest code from your GitHub repository. - Deploy by way of SSH: The
appleboy/ssh-actionis used to soundly connect on your Kinsta server by way of SSH using the secrets and techniques and strategies you configured (server IP, username, password, and port). The script inside of this step runs the following directions:cd /www/your-site/personal/your-repo.git: Navigates to the bare Git repository on your Kinsta server.git fetch basis primary: Fetches the newest changes from theprimarydivision for your GitHub repository.git reset --hard basis/primary: Applies those changes by the use of updating the live internet website throughout thepublicrecord where WordPress is hosted.
Testing the workflow
Whilst you’ve prepare the workflow, you’ll check out it by the use of pushing a small business on your GitHub repository’s primary division. Each time you push a change, GitHub Actions automatically triggers the deployment, pulling the newest style of your code and deploying it on your live internet website on Kinsta.
You’ll apply the status of your deployment by the use of going to the Actions tab for your GitHub repository. If the workflow encounters errors, you’ll see detailed logs to help you troubleshoot and connect the issues.
Summary
By means of setting up stable deployment on your WordPress internet website using GitHub Actions, you automate your development workflow, ensuring that each and every business pushed to GitHub is automatically deployed on your live internet website on Kinsta.
It moreover means that you can mix additional workflows into the pipeline, corresponding to trying out and formatting using the @wordpress/scripts package deal.
What are your concepts on this process? Is there something else you’d like us to explain, or have you ever ever professional any errors while following this knowledge? Please proportion your questions or feedback throughout the commentary segment underneath!
The submit Learn how to ceaselessly deploy your WordPress web site to Kinsta with GitHub Movements seemed first on Kinsta®.
Contents
- 1 Should haves
- 2 Pulling your internet website locally and setting up GitHub
- 3 Configuring your Kinsta server
- 4 Rising the GitHub Actions workflow for computerized deployment
- 5 Summary
- 6 Construct a device to bulk replace WordPress plugins on more than one websites with Kinsta API
- 7 Efficiency necessities and 10 very best practices for high-speed e-commerce internet sites
- 8 10 WooCommerce Subject matters to Test Out (2022)

0 Comments