
Clickable areas, an identical to hotspots for your website, can reveal hidden content material subject matter, reason pop-ups, or unlock animations, transforming static pages into interactive portions that knowledge people precisely the position you wish to have them to go.
Divi 5‘s Interactions handles all of this without requiring any custom designed coding. We’ll walk all through the fitting steps to create interactive portions that respond to clicks, hovers, or scrolls. Have a look!
What Are Hotspots?
Hotspots are clickable or hoverable zones which can be layered over sections, images, and graphics. You’ll see them on product showcases where each serve as gets its non-public spot. Maps use them to mark puts. Infographics rely on them to break down complex knowledge without cramming the entire thing into one view, among other use instances.
Slightly than flooding a internet web page with paragraphs of text, you’ll tuck wisdom at the back of the ones small markers. Consumers get details exactly after they would love them, not quicker than. This assists in keeping pages clean and scannable while nevertheless offering depth.
You control exactly the position attention goes and what turns out when. This provides you with precision over how content material subject matter unfolds.
Divi 5’s Interactions: A Speedy Assessment
Divi 5’s Interactions is a built-in tool that gives interactivity on your website without writing code. You’ll find it inside the Advanced tab of any module, column, row, or phase inside the Visual Builder, able to change into static portions into dynamic stories.
The instrument operates on 3 core portions that art work in tandem:
- Triggers define explicit events, an identical to a click on on or a mouse position change.
- Effects come to a decision the movement that occurs, an identical to fading in content material subject matter or switching between presets.
- Targets specify which phase receives that have an effect on.
With this system, you’ll reason pop‑ups that slide in as shoppers scroll, create toggles to show or cover content material subject matter, follow style changes when sections develop into visual, and additional.
You’ll layer multiple triggers on a single phase for added intricate interactions. A work would possibly fade in most effective after any person scrolls earlier the halfway degree and waits 3 seconds. An image would possibly change on hover and reveal text on click on on, providing you with complete control over how content material subject matter flows.
Because of Interactions runs natively within Divi 5, you don’t need additional plugins, and your workflow remains simple. You’re hired on what triggers each movement and where effects should appear with simple dropdowns.
Creating Hotspots With Divi 5
Development hotspots in Divi 5 may also be completed all through the Interactions serve as. You’ll follow those same reason and objective regulations on your non-public internet web page portions. We’ll walk you via this process the use of precise modules and settings, so that you’ll see how the pieces fit together and reflect the process on your own duties. Let’s switch on without further ado:
Add Your Base Image Or Segment
Get began with a up to date phase inside the Visual Builder. Click on at the blue plus button on the left panel to insert one. This serves as your foundation. The most simple method is to use an Image module. Click on at the fairway plus so to upload a row, then the black plus to insert the Image module.
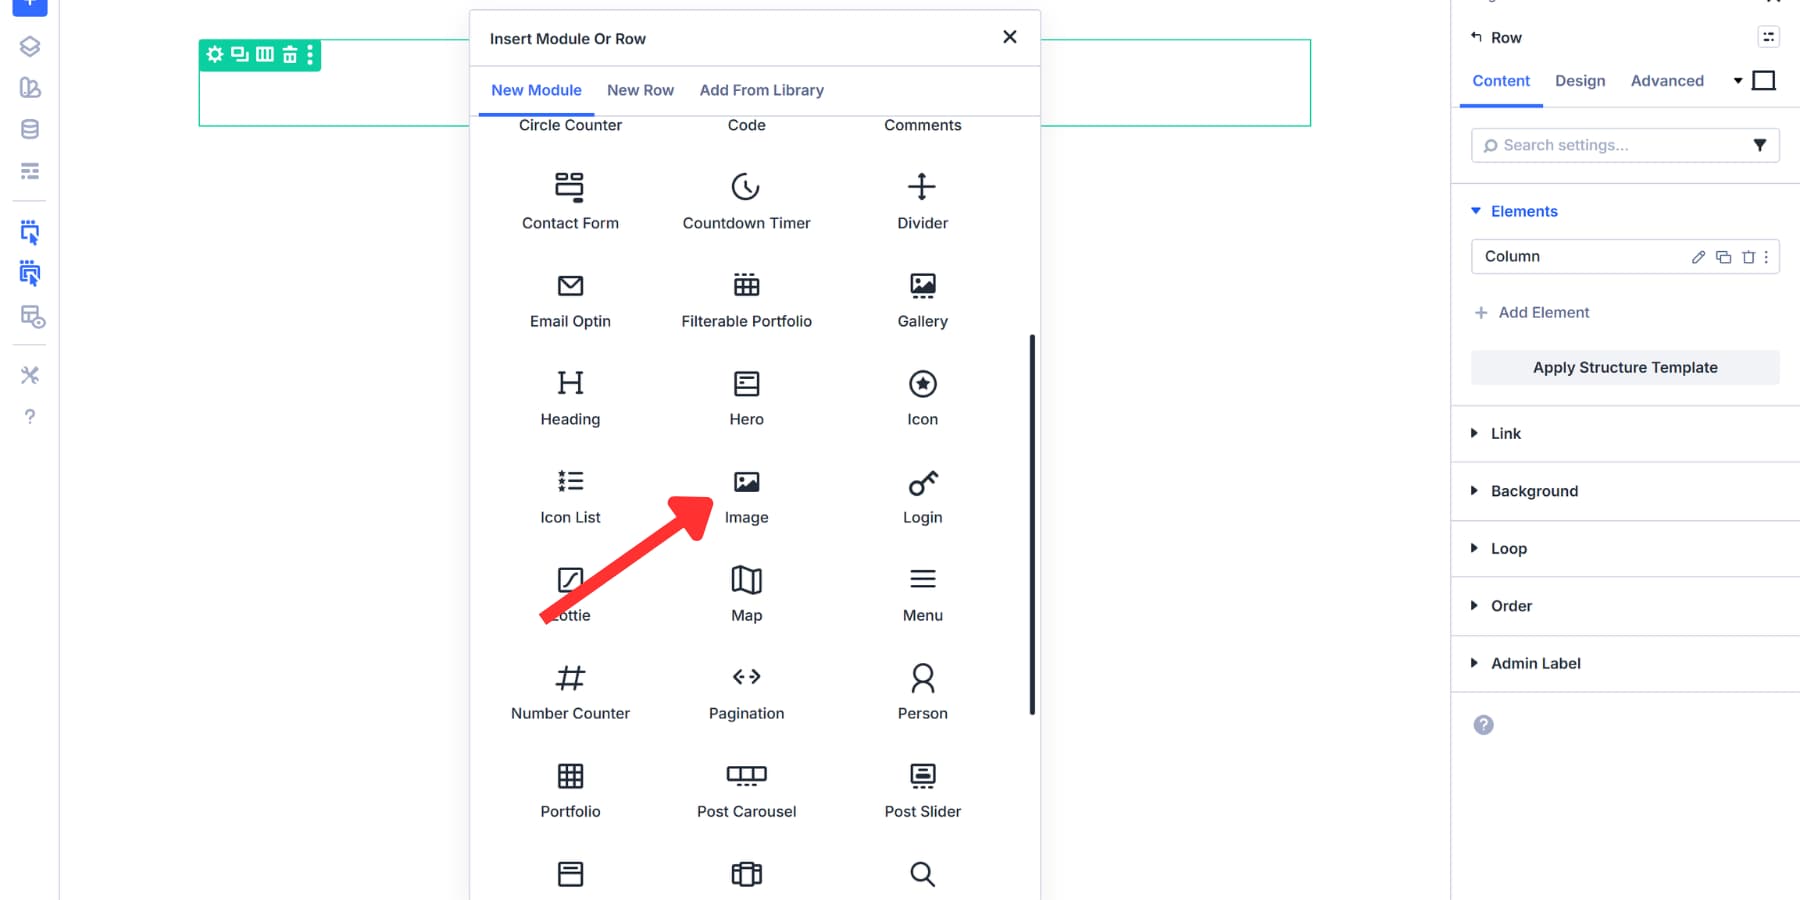
Upload your product image, infographic, or map, and allow Energy Fullwidth inside the Sizing tab of the Design settings.

For a work background, as an alternative, click on on into your phase settings, pass to the Content material subject matter tab, and amplify the Background phase. Upload your image. You then for sure’ll wish to configure a few problems. Head to the Design tab, find Sizing, and set the Min Best to a value of more or less 600px, based on your image dimensions.
Once more in Background settings inside the Design tab, set Background Image Size to Cover, Position to Heart, and Repeat to No Repeat. This prevents tiling and distortion.
The background method works smartly for full-width designs where markers go with the flow over the entire image. The Image Module is faster to prepare and more effective when you wish to have the visual content material subject matter within your layout.
Make a selection whichever fits your needs. Make sure that your image has clear focal problems and good difference, allowing shoppers to easily decide clickable areas.
Assemble Hotspot Markers
We advise the use of Module Teams in your hotspot markers. Click on at the gray plus icon within your column and select the Group of workers module.

Module Groups make positioning easy. When you switch a host, the entire thing within it moves as one unit. They let you maintain each marker and its content material subject matter as a single phase. Merely add your marker and content material subject matter, regulate positioning, and likewise you’re able.
The remaining situated proper right into a column and not using a staff will require you to keep watch over each marker in my opinion. That can get messy fast whilst you’re striking multiple hotspots.
It’s just right to make use of an image or button as an alternative, alternatively icons art work upper as a marker. The load quicker than images, rather a lot are already available within Divi, and stay sharp at any computer screen measurement. Additionally, they’re easier to style in conjunction with your brand colors and Design Variables, without being involved in file formats or compression. Merely make a choice the person who is smart inside the context.
Styling Your Marker
You’ll have to style your icon so it stands out clearly against your background. You’ll moreover add a background circle or shape at the back of the icon all through the Design tab to boost visibility. A cultured shadow or border helps separate the marker from busy backgrounds.
Make a choice a contrasting color that draws attention. Set the size to be large enough to be merely clickable; in most cases, a measurement between 14px and 24px works smartly.
Divi 5 is helping Complex Gadgets, an identical to clamp(), which creates fluid sizing that adapts to different computer screen sizes. For this case, we’re the use of clamp(14px, 3vw, 24px) for the icon measurement. This promises markers keep readable on mobile devices at a minimum of 14px while scaling up simply on upper screens without exceeding 24px.
![]()
Add a hover have an effect on for upper feedback. Make a choice the hover state icon (cursor arrow) inside the peak right kind of your settings tab.
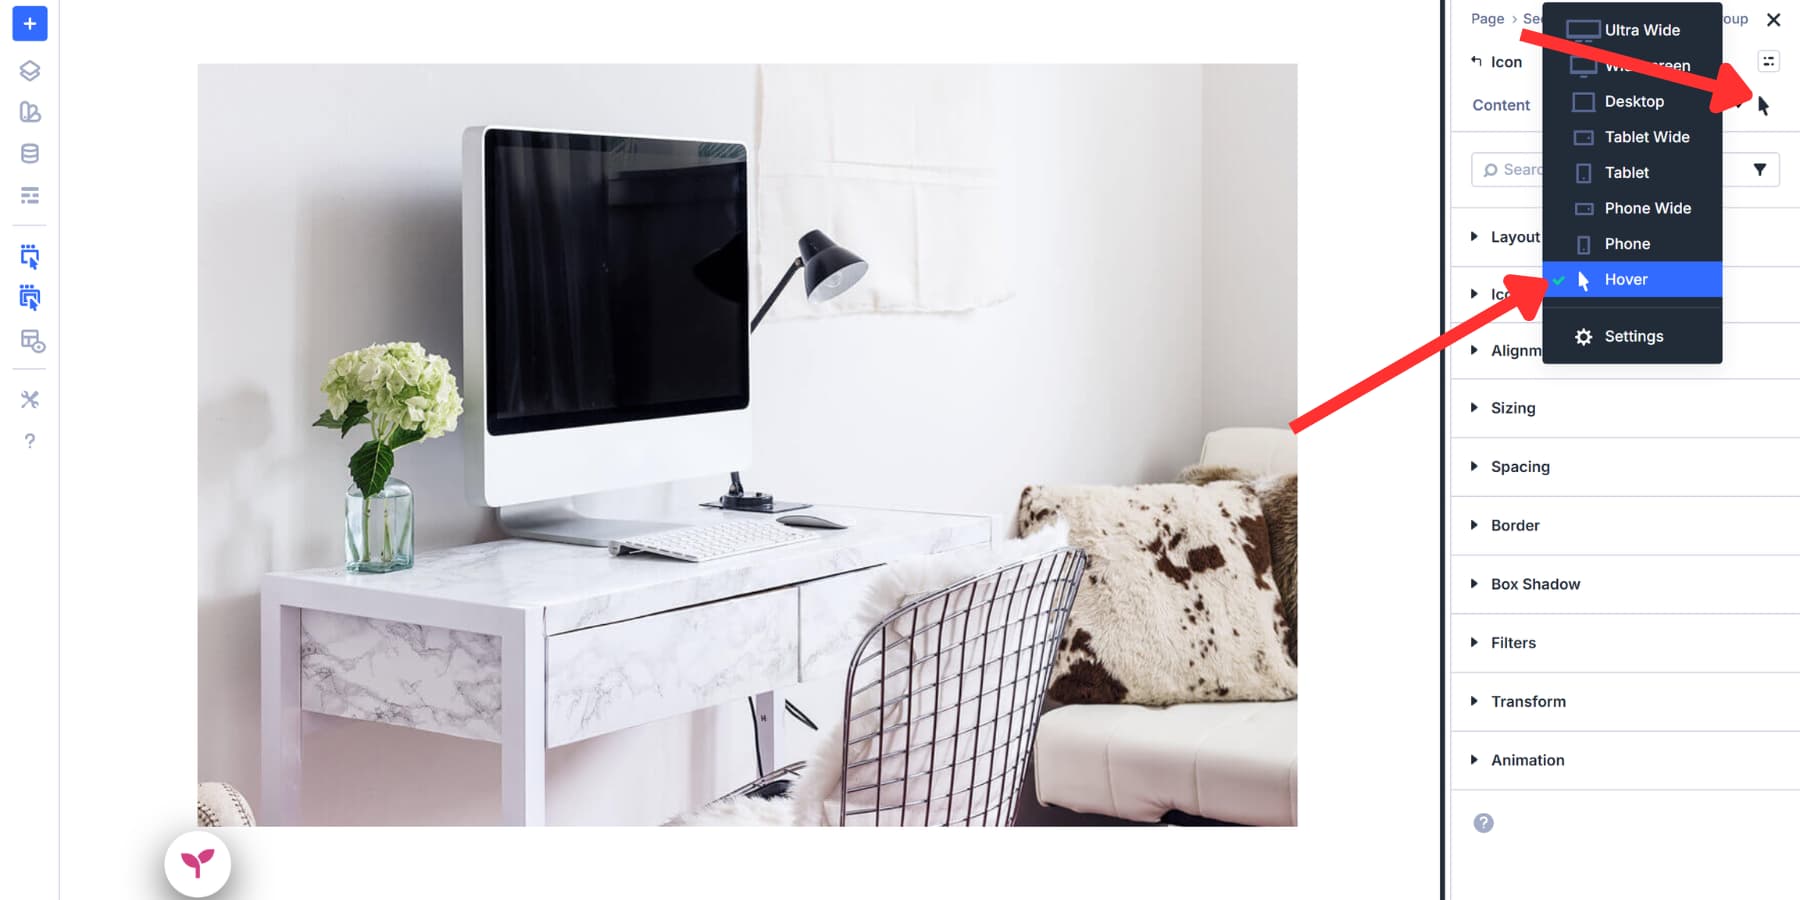
Transfer to Design > Change into and set X and Y to 110% so markers broaden moderately on hover.
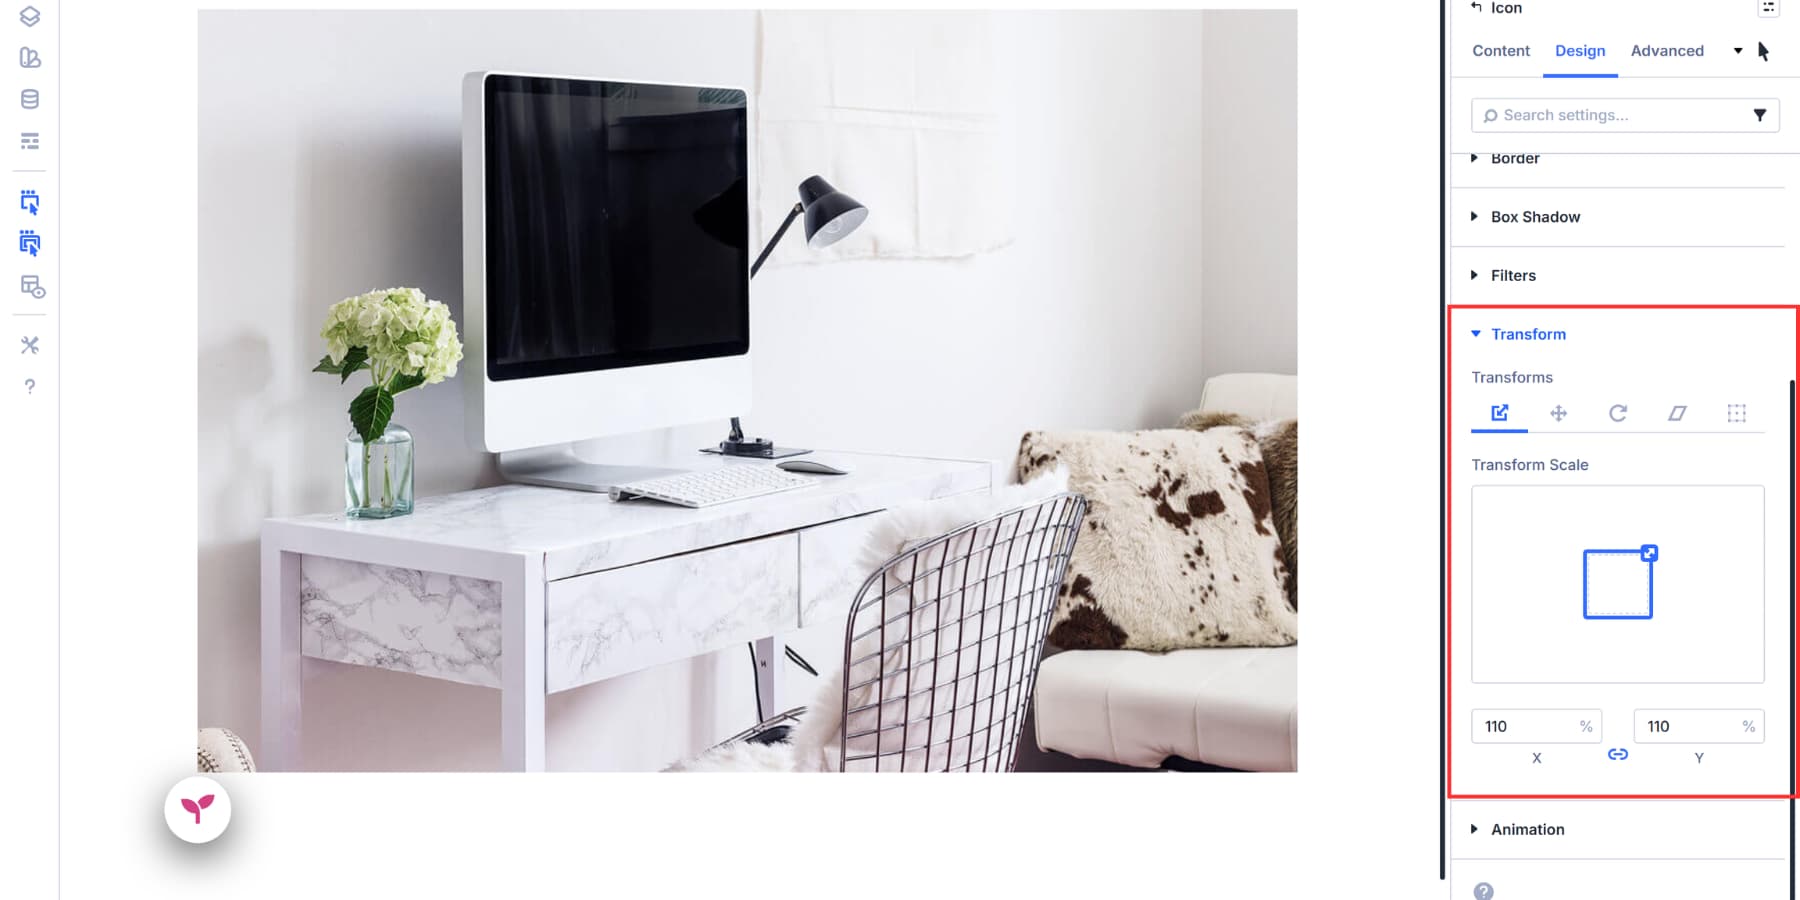
You’ll moreover regulate background colors, shadows, or opacity inside the hover state, even supposing scale effects art work easiest without disrupting the design.
Keep the styling consistent right through all your markers by way of growing an Part Preset from your provide sorts and applying it to other markers, so shoppers in an instant recognize them as clickable portions.
![]()
Position Your Hotspot Markers
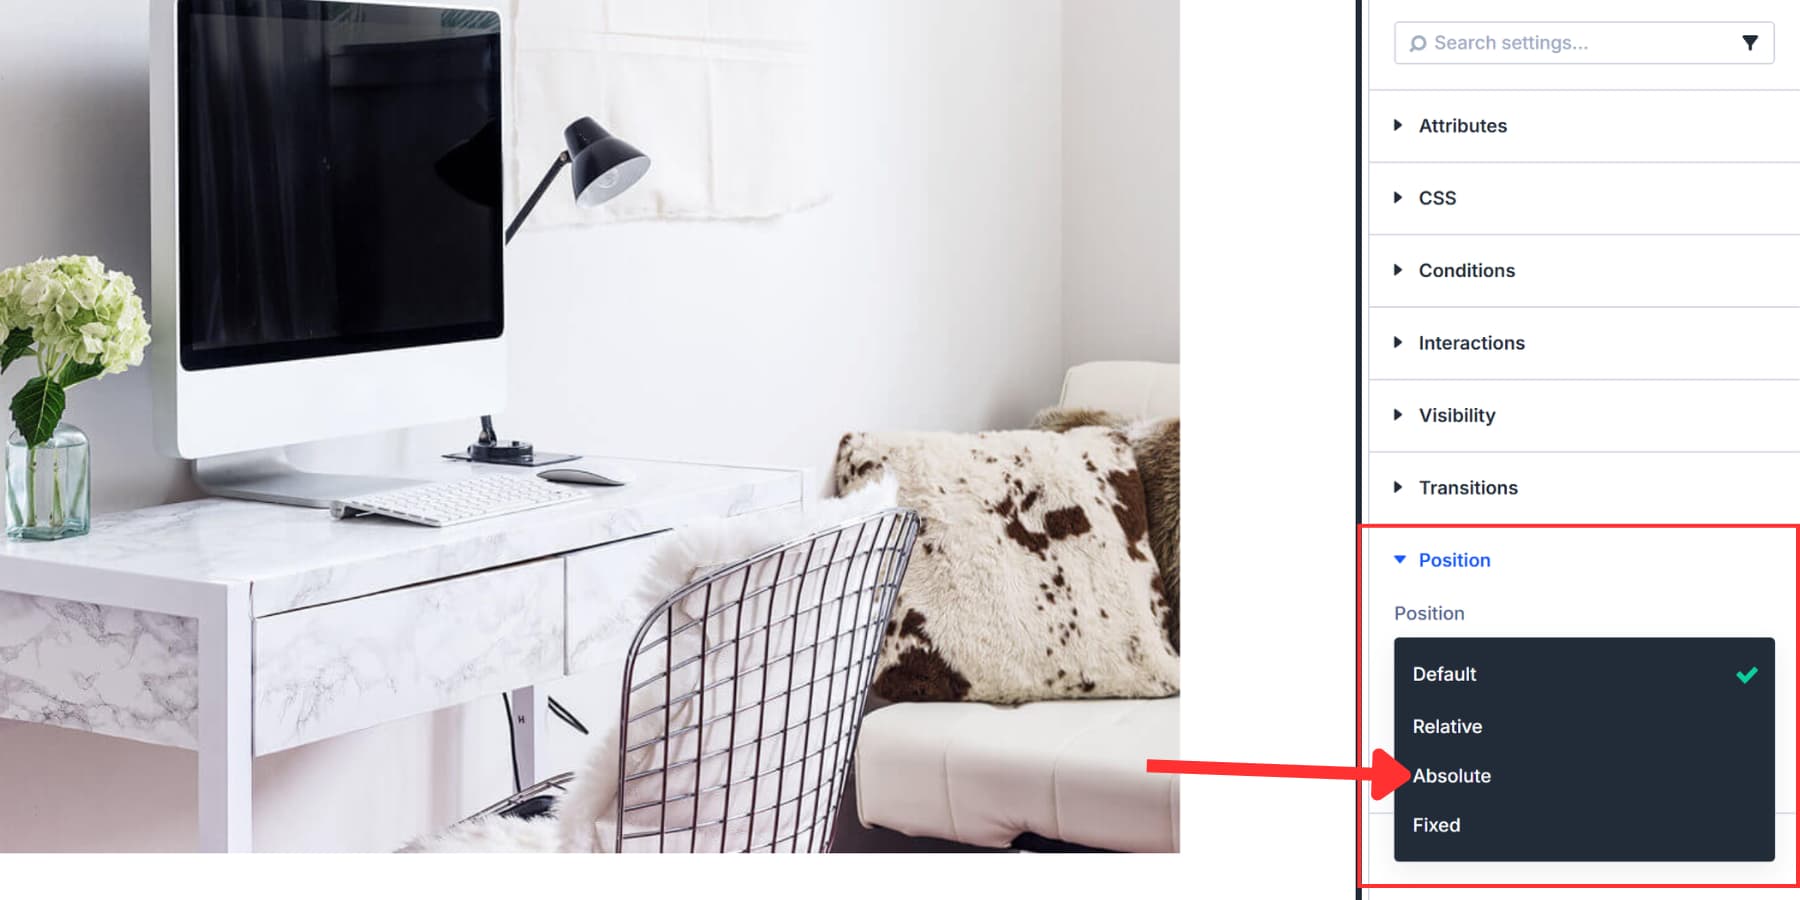
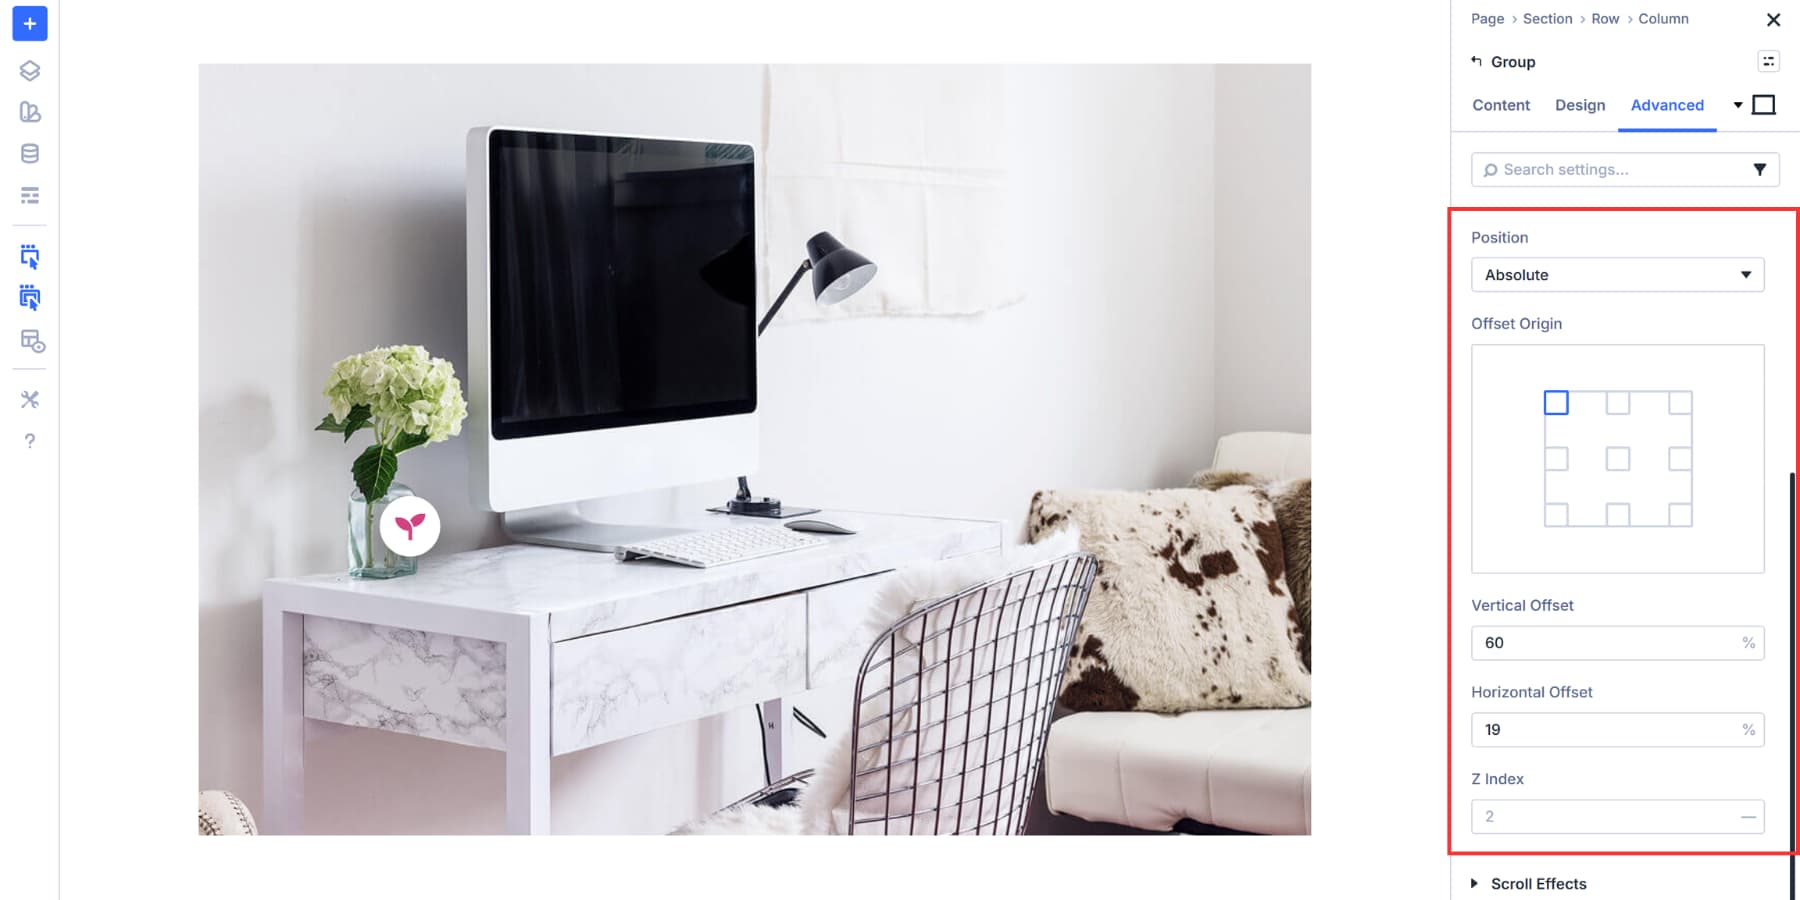
Now you’ll wish to place your markers exactly the position they belong for your image. Open the Module Group of workers settings and head to the Advanced tab. Scroll the entire means right down to the Position phase.
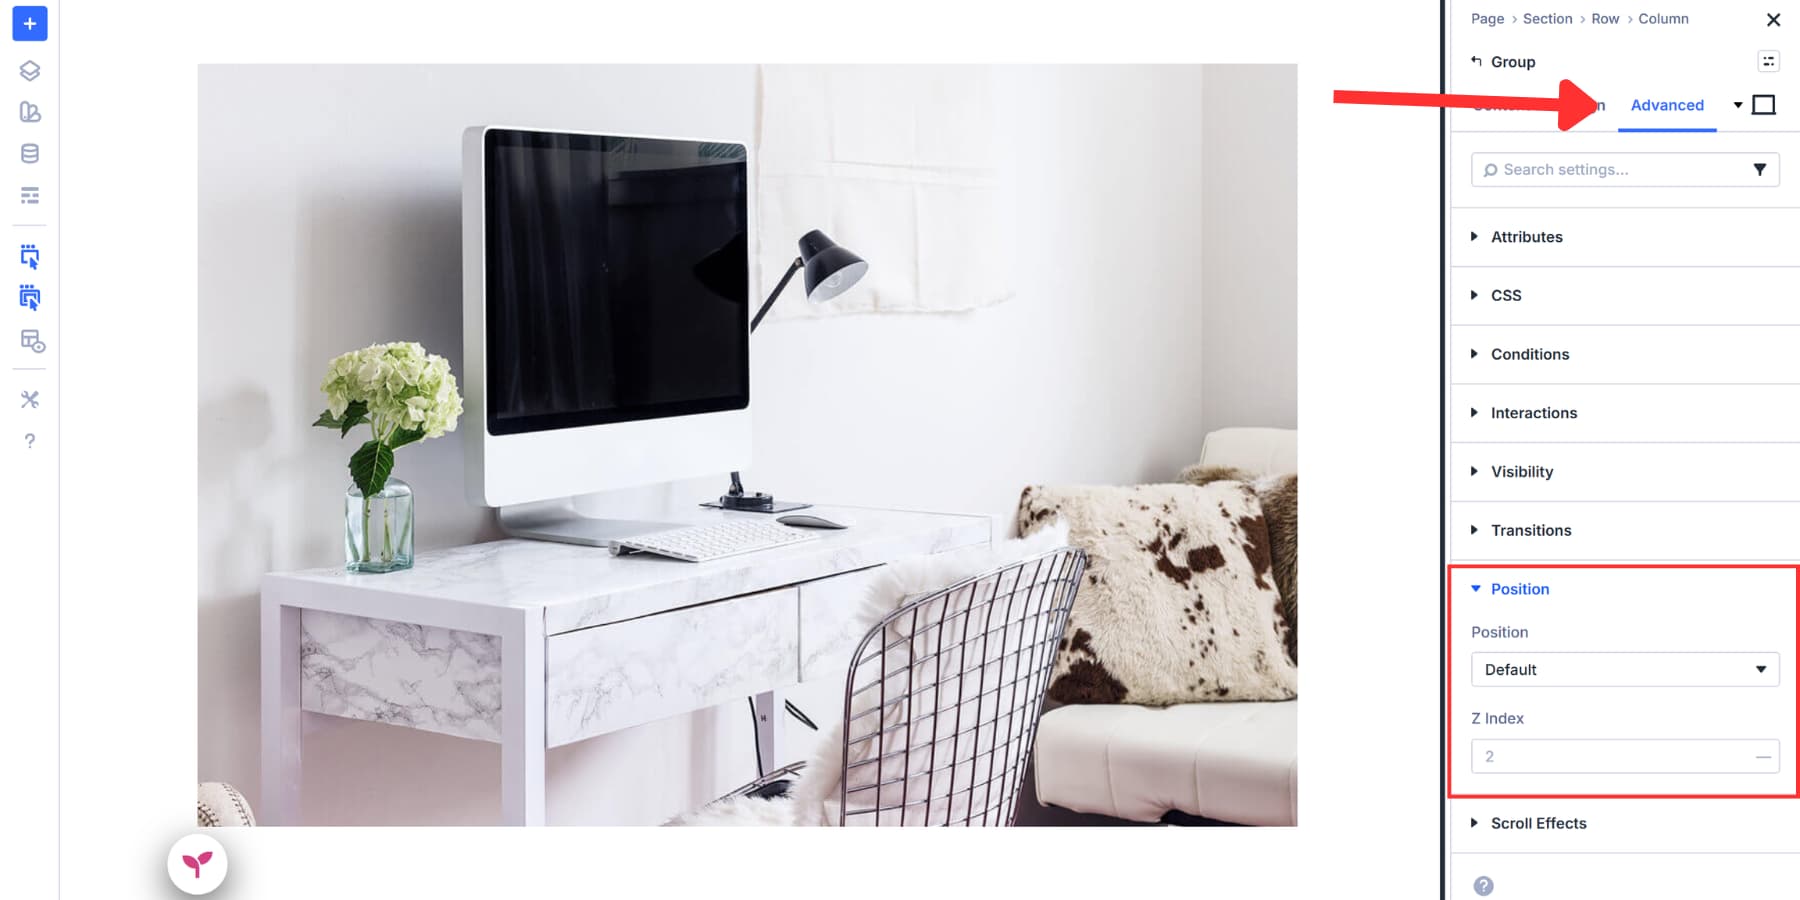
Position controls how an element sits relative to its container. You’ll find 3 positioning varieties available: Absolute, Fixed, and Relative. For hotspots, you’ll in most cases make a selection Absolute. Utterly positioned portions go with the flow within in their father or mom container, allowing you to position them any place over your background image.
The following offset values are reference problems most effective. Each image has different focal problems and dimensions. So, your house settings would in all probability range significantly from the example we’re showing you.
Once you select the positioning, you’ll see the Offset Beginning position grid. This determines which corner of your container serves as the start line for measurements. We made up our minds at the best possible left sq. for this case.
Next, set your Vertical Offset and Horizontal Offset values. The ones numbers indicate to Divi the distance from your decided on basis degree to position the marker. We’re the use of 60% vertical and 19% horizontal proper right here.
The Z Index surroundings controls stacking order. Set it to 2 (or higher than surrounding portions) so your marker turns out above the background image. The Icon staff now turns out at the peak of the anchor degree.
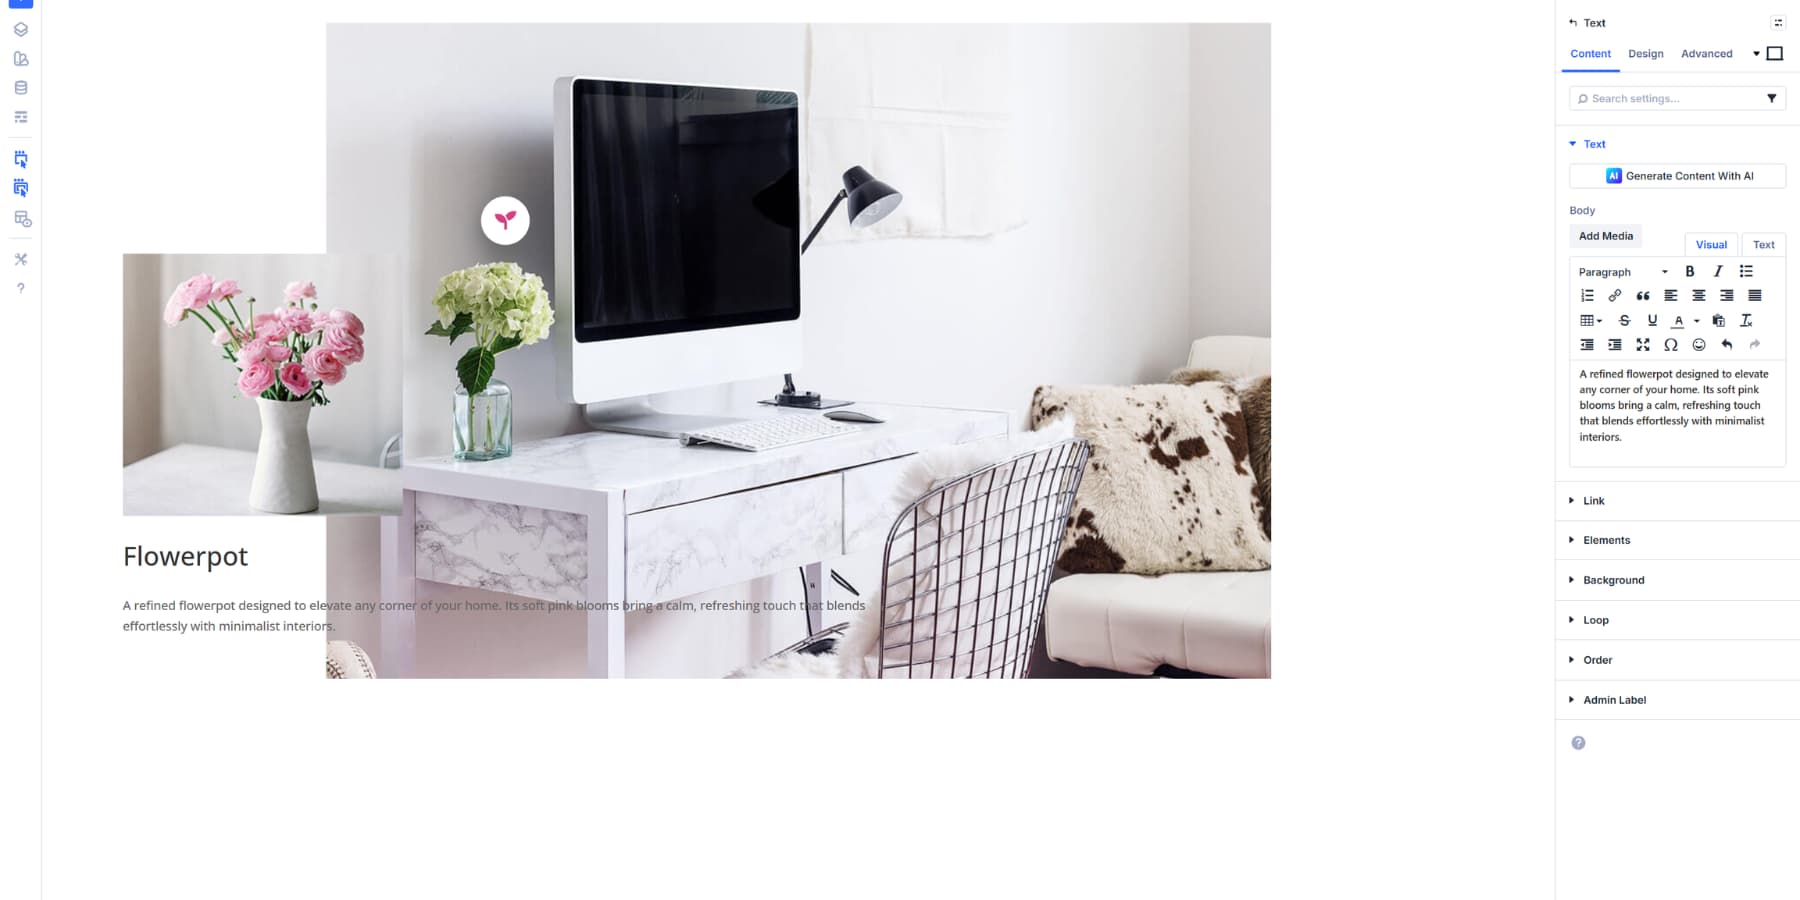
Create The Content material subject matter Areas
You’ll add every other Module Group of workers within your present one. Divi 5’s Nested Modules make this imaginable. Correct-click for your icon, then click on on Add Section > Add Section Beneath and select the Group of workers module.
![]()
This nested development provides you with whole control over your content material subject matter. Managing pieces and not using a staff can in short change into a large number. Groups keep equivalent content material subject matter together as one movable unit.
For this case, we’re together with 3 portions inside the nested staff: an Image module, a Heading module, and a Text module. The ones 3 pieces form your hotspot content material subject matter house.
Click on at the gray plus within your nested staff. Add the Image module first. Upload your product component image or diagram. Next, add the Heading module. Type your content material subject matter title. Then insert the Text module and write your description.
You’ll moreover use Divi AI to generate your heading and text content material subject matter. Simply click on at the Divi AI icon in any text field and let it generate reproduction that aligns in conjunction with your brand’s voice. You’ll use Divi AI to generate images as smartly.
![]()
Stack them vertically by way of keeping up the default flex direction surroundings inside the Group of workers design settings. If you wish to have additional breathing room between portions, open your nested staff settings and pass to Design. Find the Spacing phase and add a Hollow value. Something like 10px works smartly for plenty of layouts. Don’t worry regarding the design, we will be able to quilt that shortly.

In spite of everything, inside the content material subject matter tab, scroll the entire means right down to Admin Label. Type something descriptive like “Hotspot Content material subject matter 1” or “Product Component Panel.”
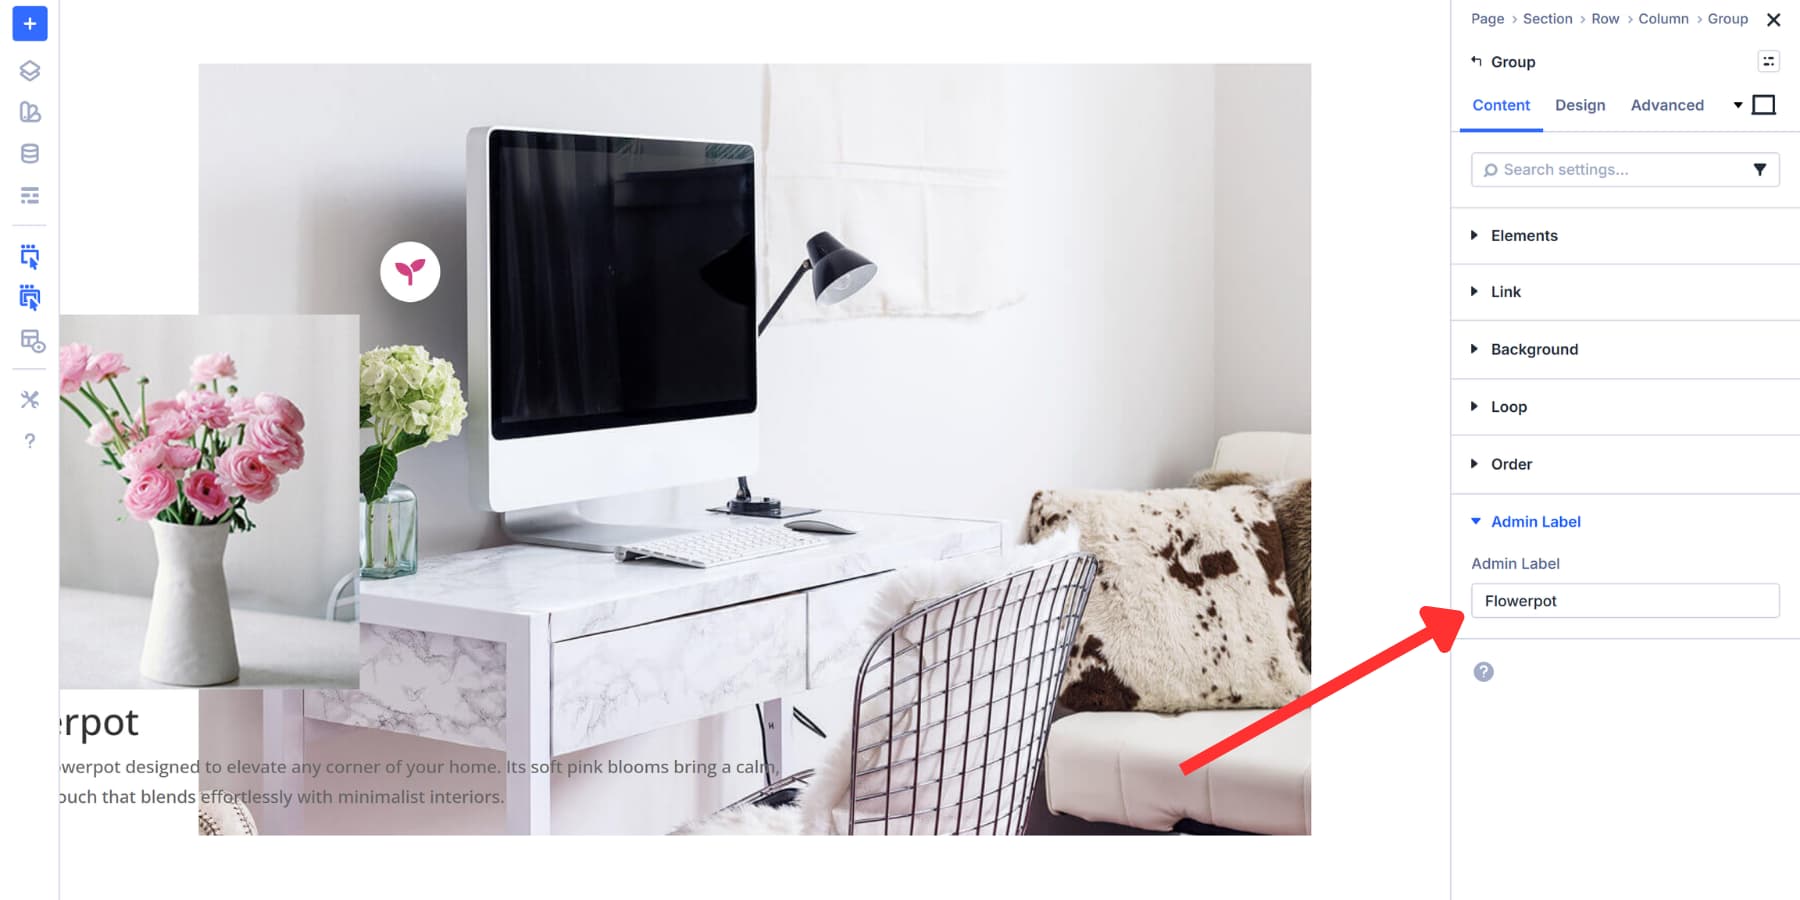
This label helps you to find explicit groups additional merely once we prepare Interactions. It’ll not appear for your live internet web site.
Styling The Content material subject matter Area
Your content material subject matter staff needs visual treatment that separates it from the background. For text, we’re adhering to the logo’s color palette. Likewise, we’re adjusting the font measurement so it seems that correct and doesn’t devour so much space.

Then, set a background color for the Content material subject matter staff so that it stands out and remains readable.
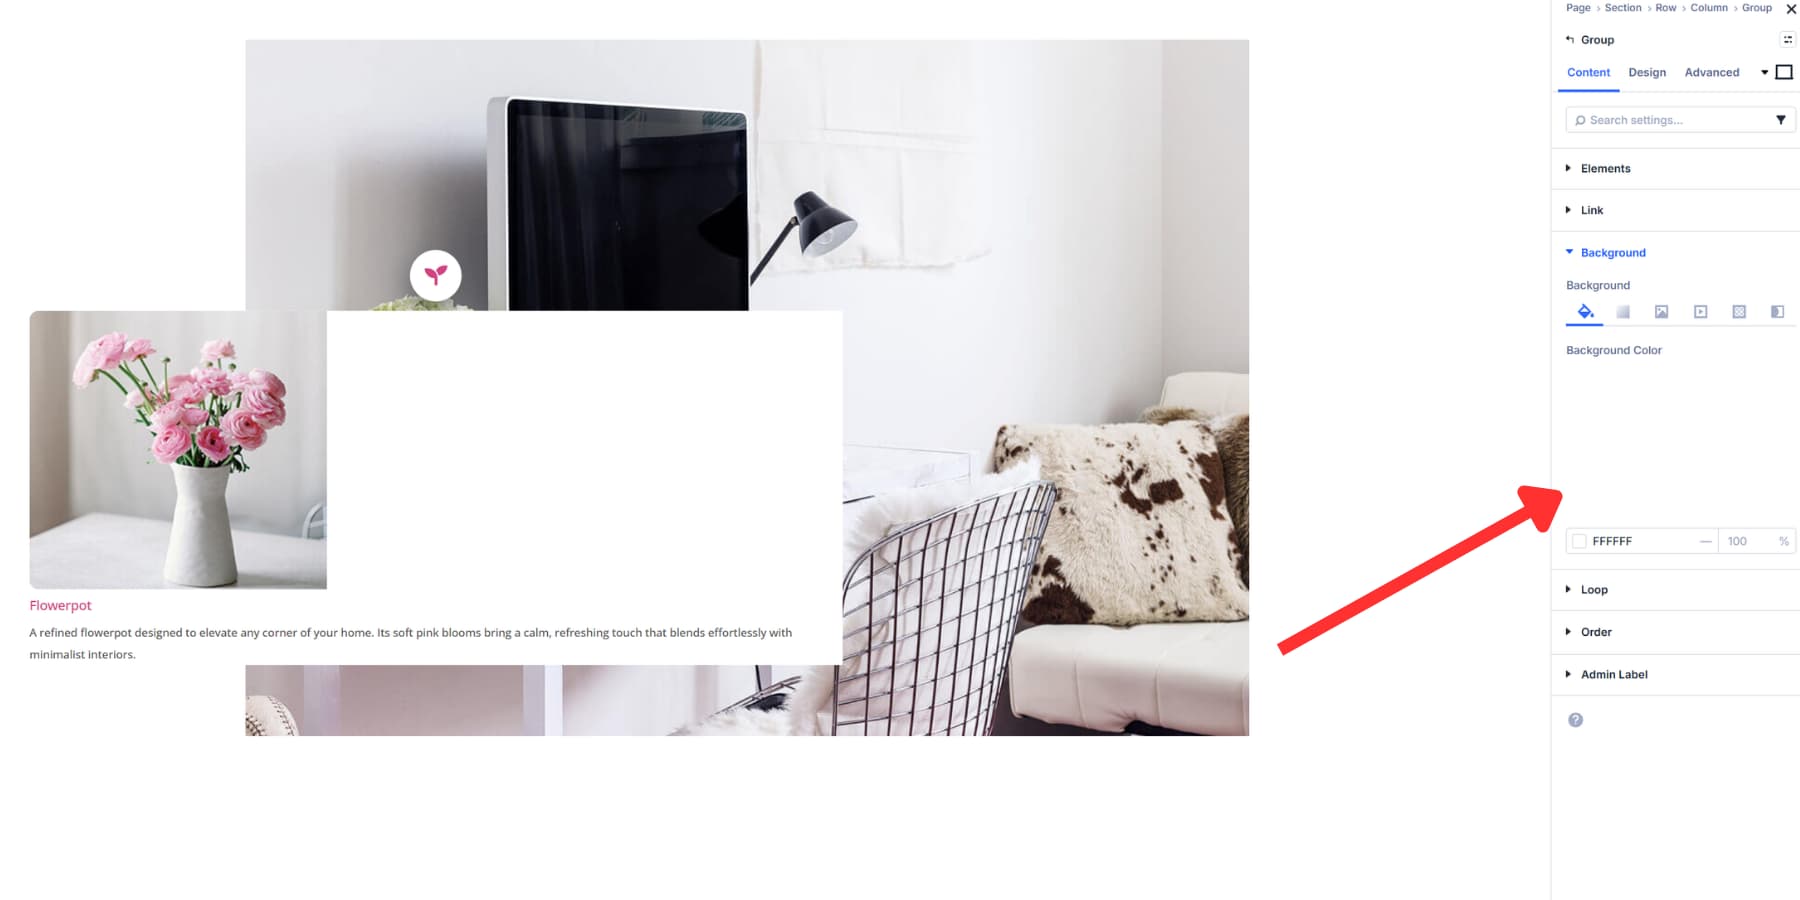
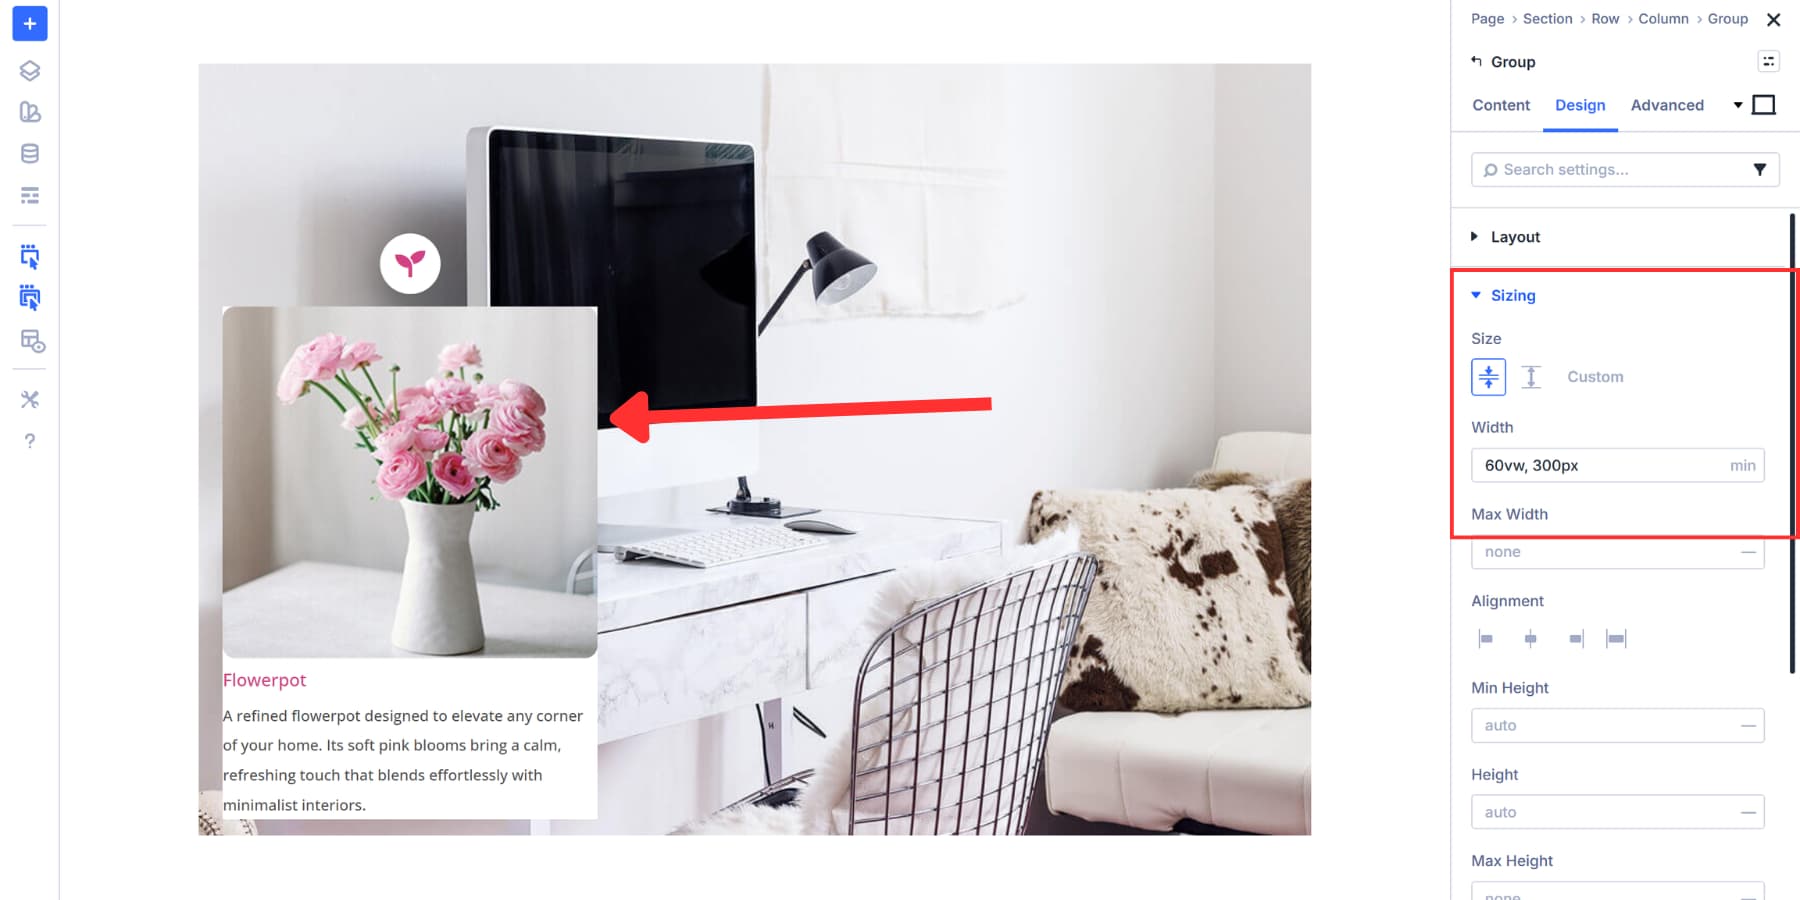
Head to the Design tab of your Content material subject matter module staff and open the Sizing phase. Set your width value there. We set Size to Shrink to Fit so the crowd doesn’t amplify previous its content material subject matter.
And for precise sizing, you’ll set a collection width in pixels, alternatively we’re the use of min(60vw, 300px) as an alternative. The 60vw makes the content material subject matter box responsive out of the sphere, adapting routinely to quite a lot of computer screen sizes without you wanting to set different widths at each breakpoint.
This makes the content material subject matter box responsive by way of default. On smaller screens, it will scale up to about 60vw, so it stays readable without overwhelming the layout.
On upper screens, the min() function caps the width at 300px, fighting the sphere from stretching too large and ensuring comfortable line lengths for finding out.
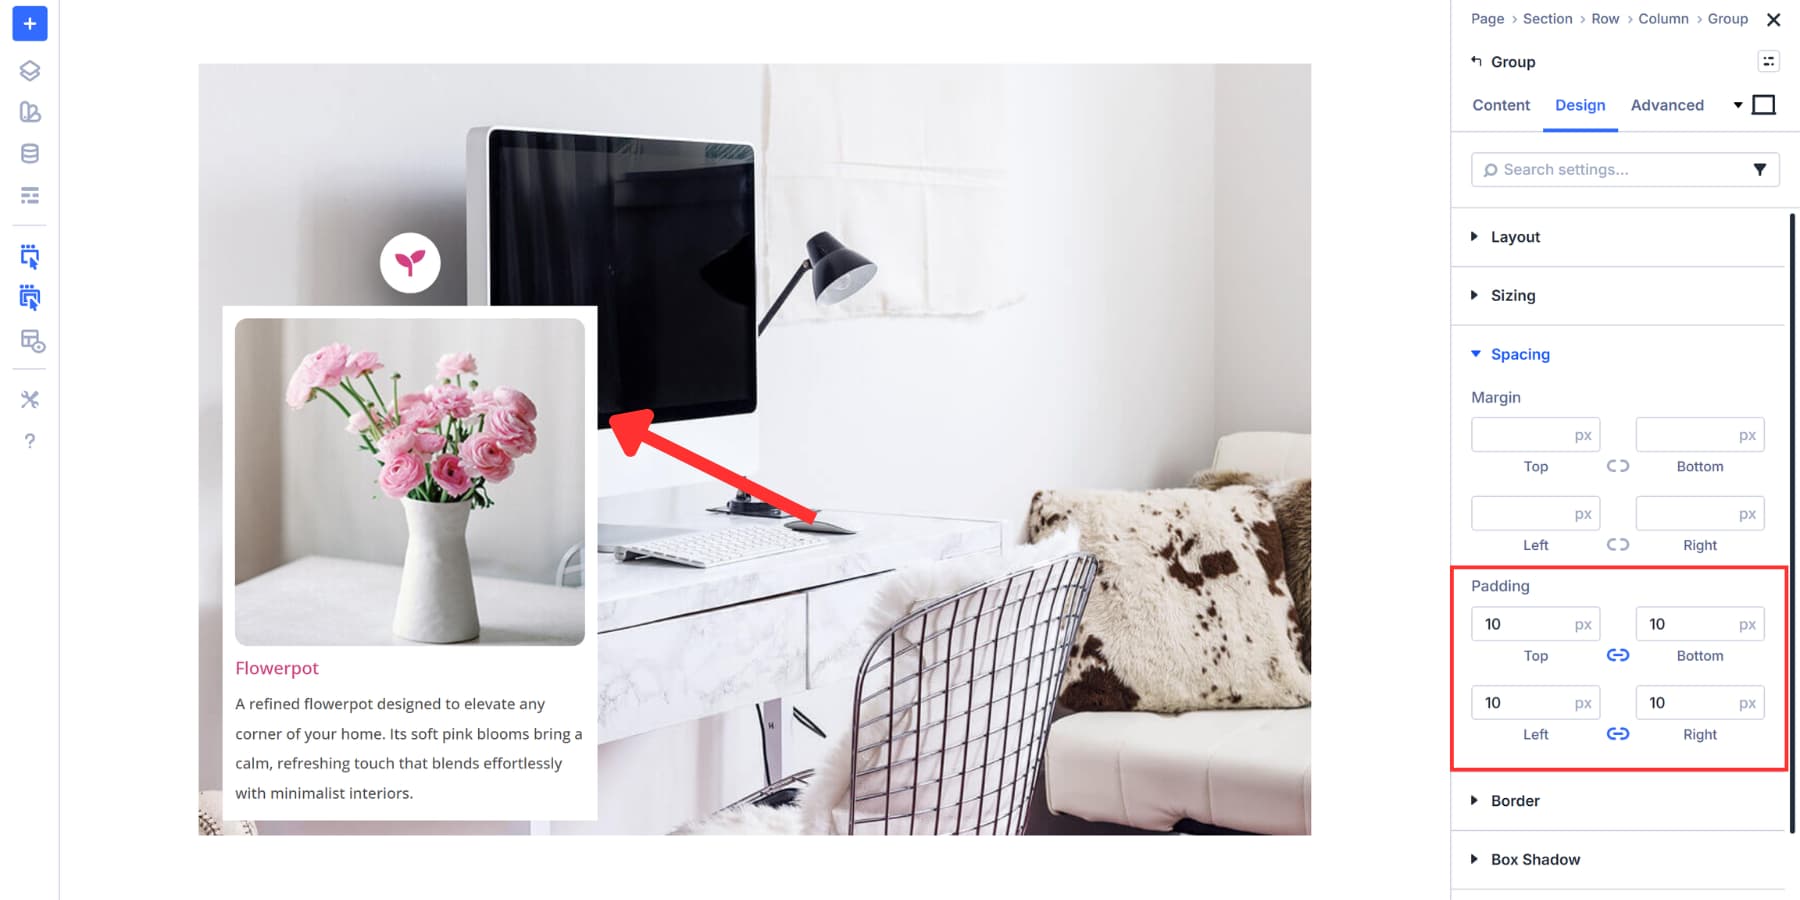
You might also add padding on each side to make it somewhat bit breathable.
Believe together with a border radius as smartly for a refined look.
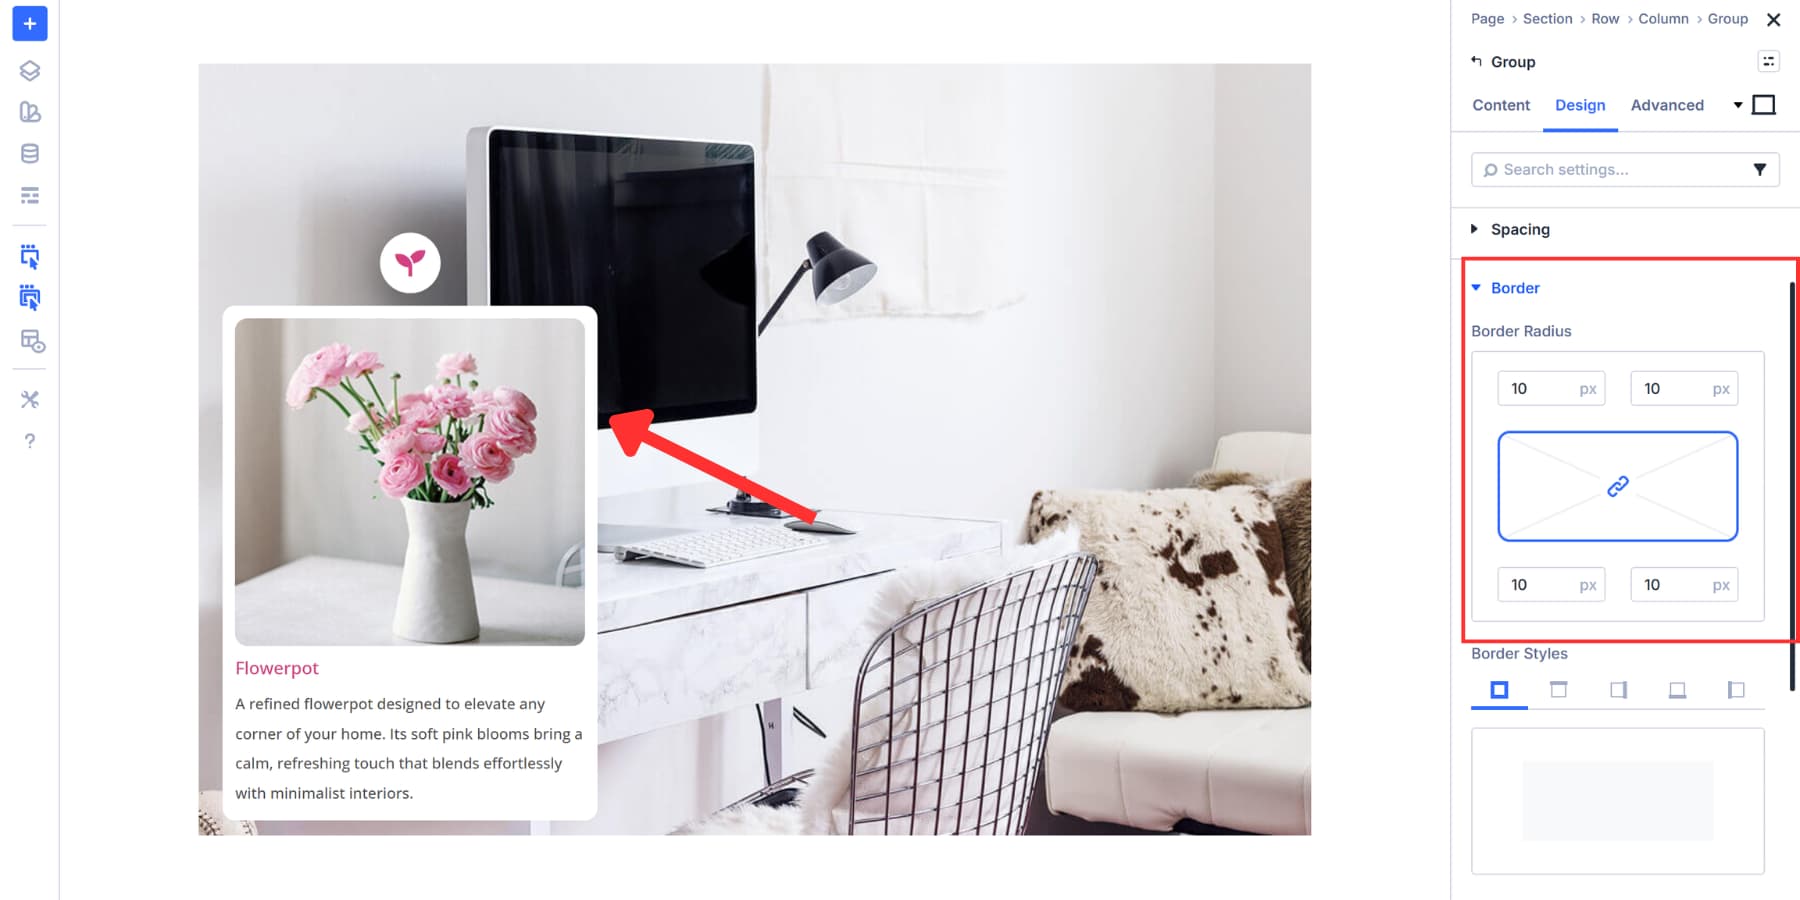
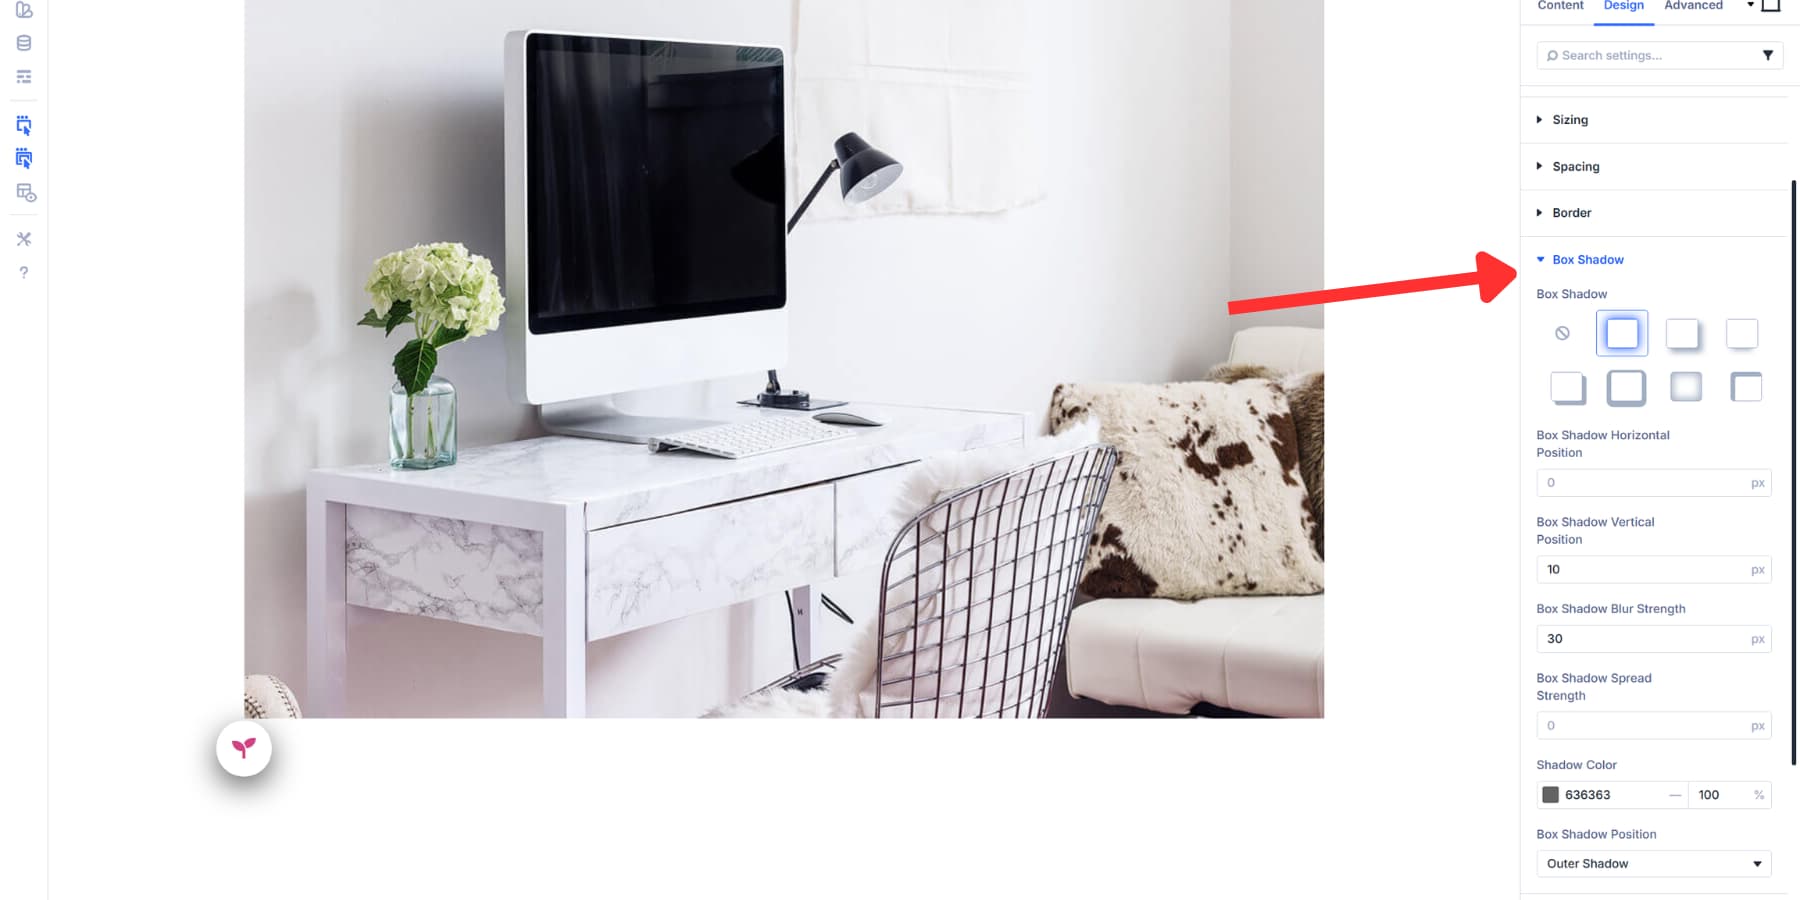
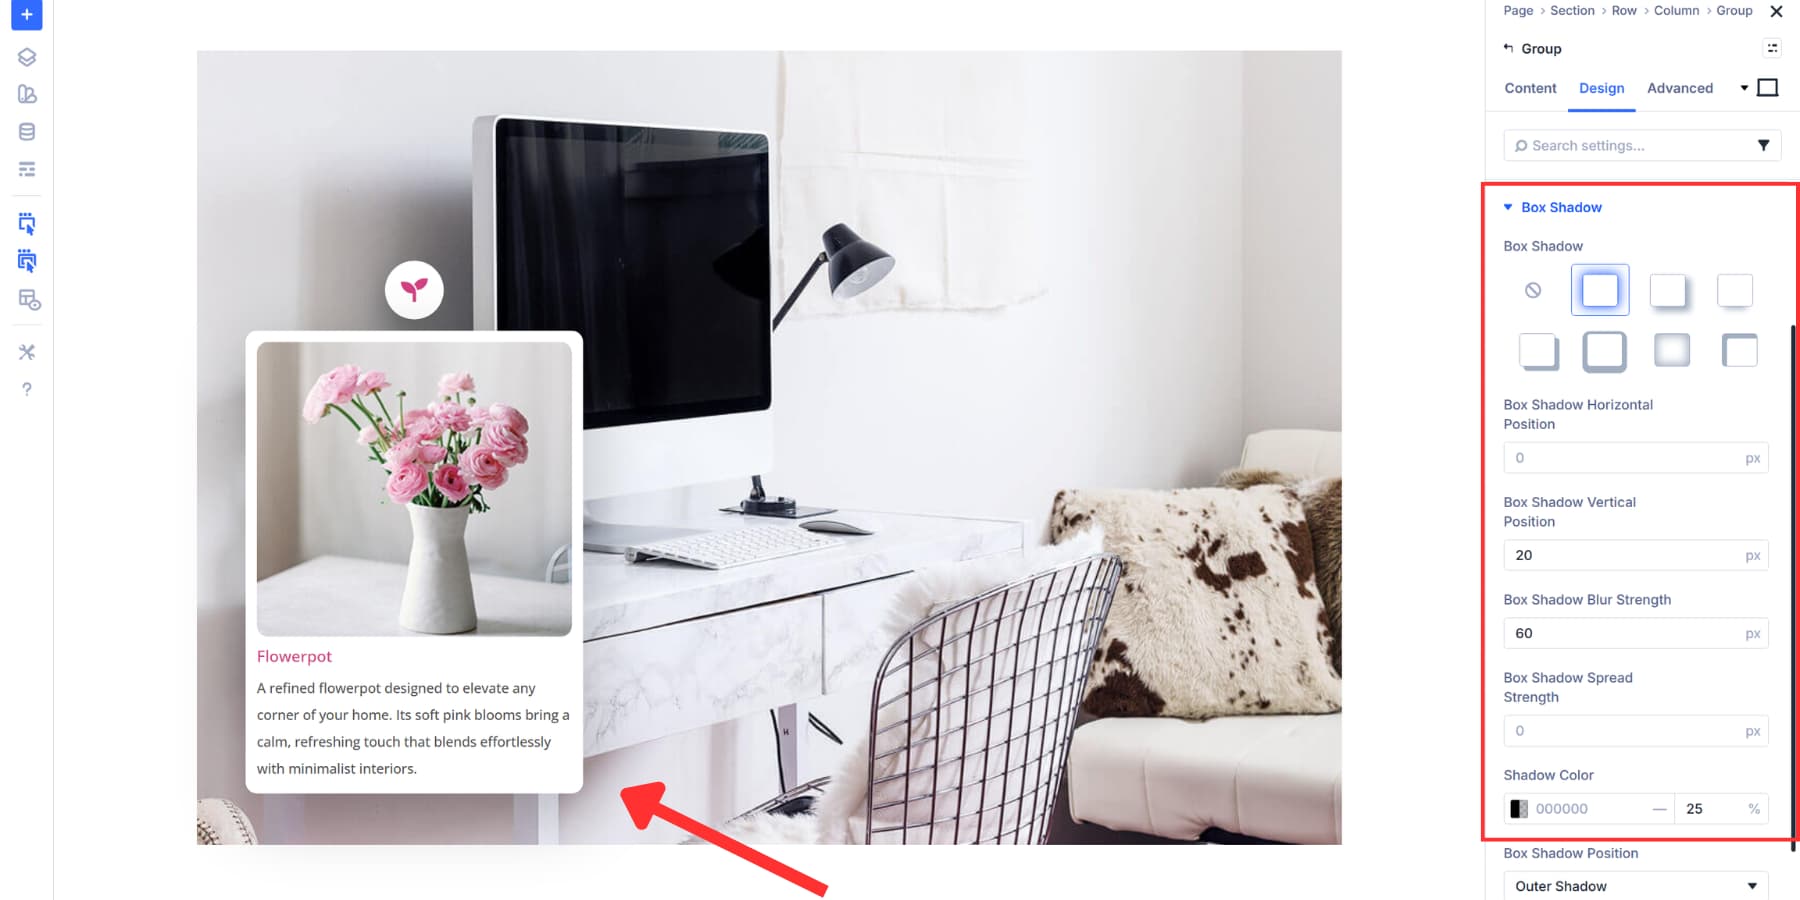
In the end, add a Box Shadow. We’re the use of a 20px vertical offset, 60px blur energy, and black at 25% opacity. This lifts the content material subject matter box off the internet web page visually, together with depth. Adjust the ones values to achieve the specified prominence of the shadow.
While you’ve styled your content material subject matter staff, reserve it as an Section Preset. This allows you to follow the equivalent background, sizing, padding, borders, and shadows to additional hotspot content material subject matter areas with a single click on on. You’ll save time and handle consistency to your design right through all markers.

Position Your Content material subject matter Area
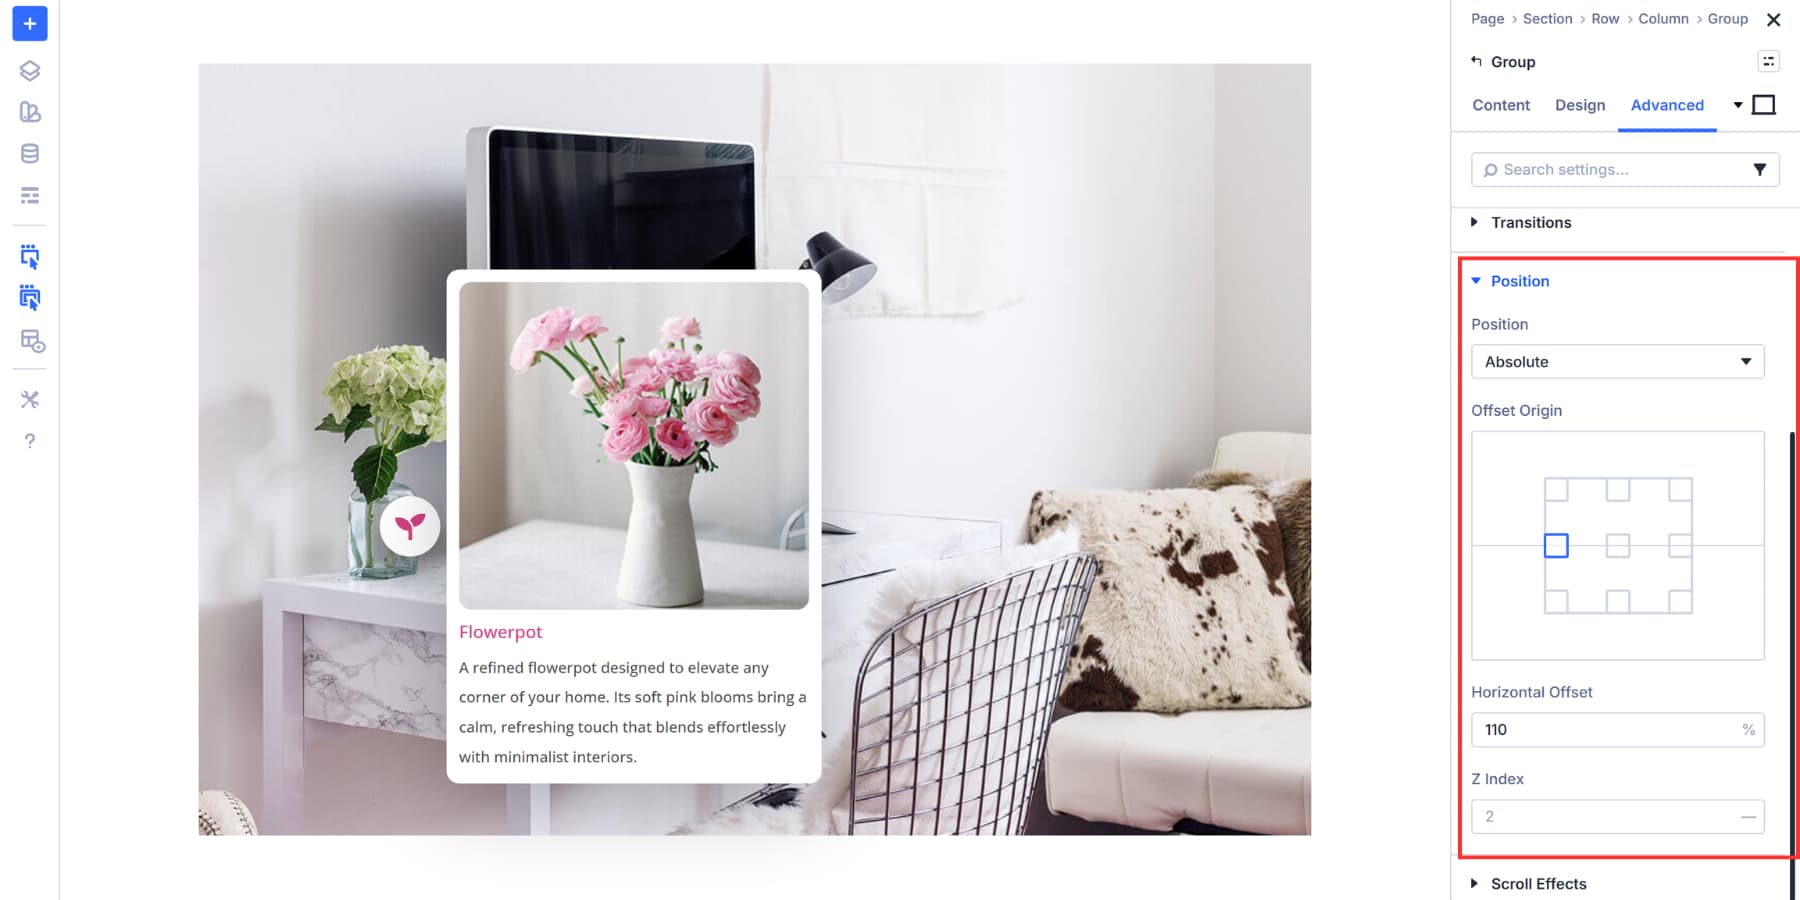
The content material subject matter staff sits next to the marker, not beneath it. So, similar to the icon, we’ll use Positioning to get this right kind. Proper right here, too, we will be able to use absolute positioning, allowing it to go with the flow independently within the marker staff.
For Offset Beginning position, we made up our minds at the left heart sq.. This anchors our measurements to the left edge of the marker staff, vertically centered. Starting from this degree makes horizontal placement additional predictable when positioning content material subject matter to the appropriate.
We set Horizontal Offset to 110%. This pushes the content material subject matter box to the appropriate of the marker. The 110% value places it merely previous the marker’s edge with a small hollow between them. Your share will vary based on marker measurement, the specified spacing, and the suitable placement of your marker.
The Z Index remains at 2, keeping up the content material subject matter above the background image without causing stacking conflicts.
The content material subject matter now turns out positioned beside the marker. You will need to use the ones values based on where you wish to have your content material subject matter to turn relative on your marker. Different layouts will require the content material subject matter to be positioned above, beneath, or at quite a lot of distances from the marker itself.
Quilt The Content material subject matter By way of Default
The content material subject matter staff needs to start out out hidden so it most effective turns out when shoppers click on at the marker. We’re disabling visibility on all devices for this nested content material subject matter staff.
Inside the Advanced tab of the content material subject matter staff, scroll to Visibility and try Phone, Tablet, and Desktop underneath Disable On. This hides the content material subject matter right through each and every computer screen measurement. When you follow the ones visibility settings, the crowd will have a faded-out look, indicating it’s hidden.
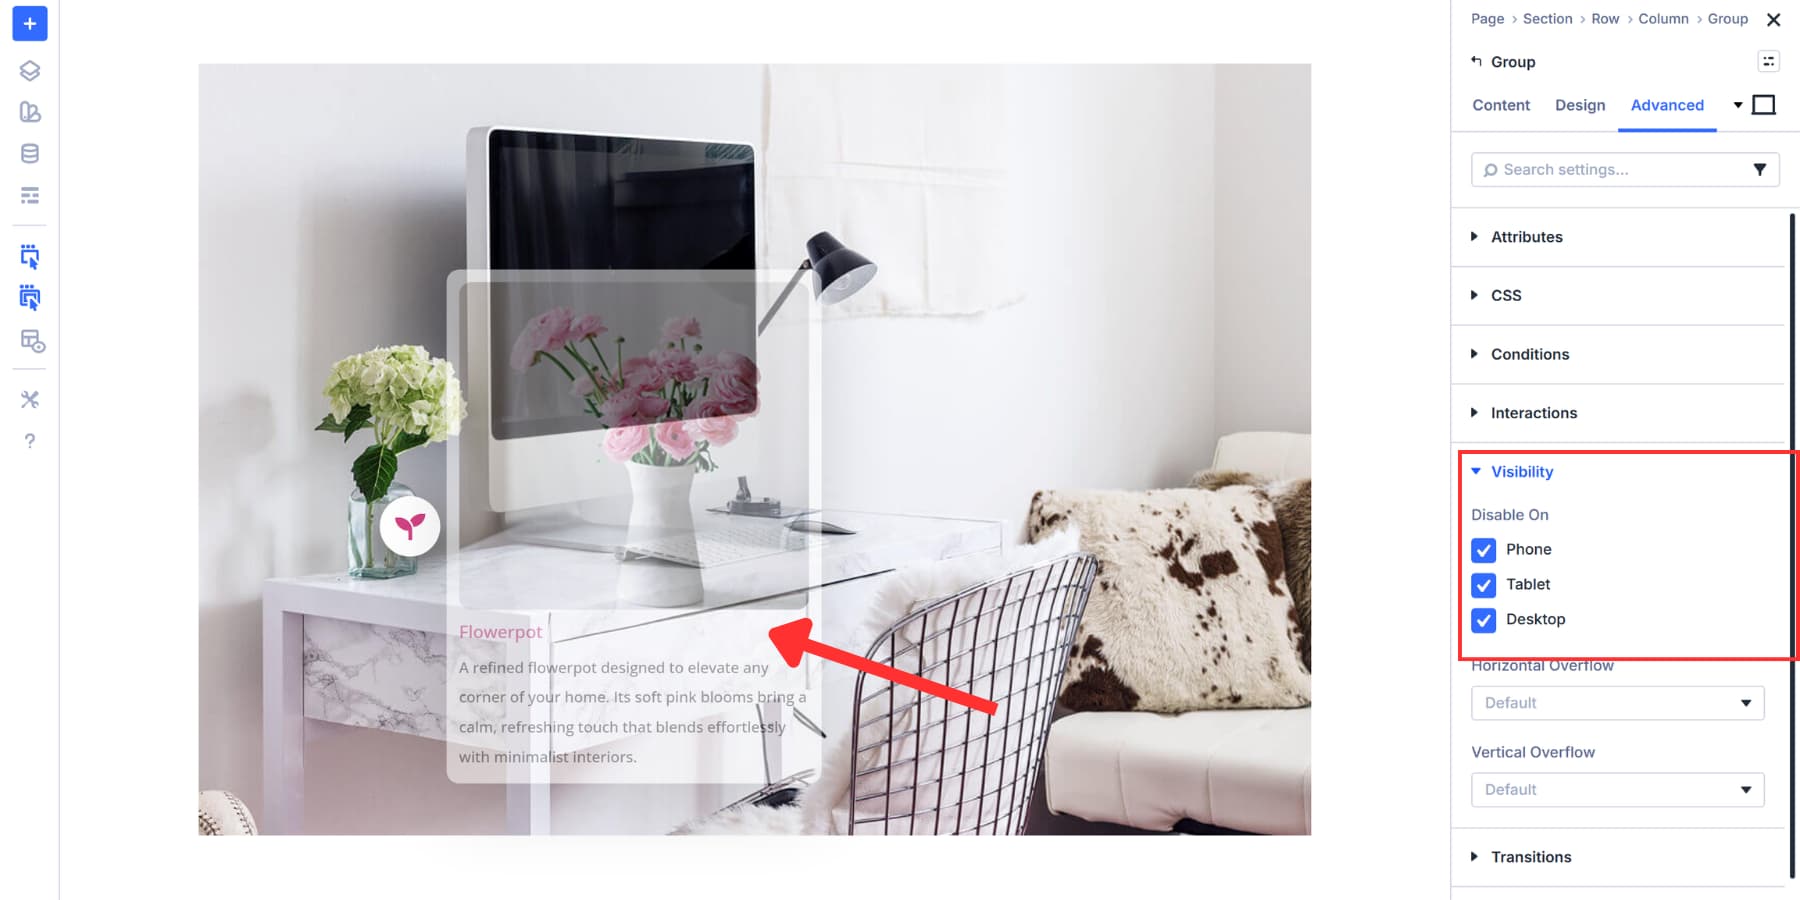
Without this step, all your hotspot content material subject matter would display at once, cluttering the internet web page and defeating the purpose of interactive reveals.
Hiding it by way of default lets Interactions control when and the way in which the content material subject matter turns out. Once we prepare the click reason inside the next phase, the interaction will override this visibility surroundings and show the content material subject matter exactly when sought after.
Connect Markers To Content material subject matter
Now we put across the hotspot to existence. Interactions on the icon control when your content material subject matter turns out and disappears.
We’re the use of Mouse Enter and Mouse Cross out triggers proper right here. When any person hovers over the marker, the content material subject matter slides into view. Once they switch away, it hides all over again.
This works smartly for in short gaining access to wisdom, as shoppers can scan multiple hotspots without having to click on on each one. Click on on triggers art work upper when you wish to have shoppers to open and close content material subject matter deliberately, alternatively hover feels additional fluid for browsing.
Open your icon settings and pass to the Advanced tab. Scroll to Interactions and click on on Add New Interaction. Set the Motive Match to ‘Mouse Enter’.

And add a label for reference.
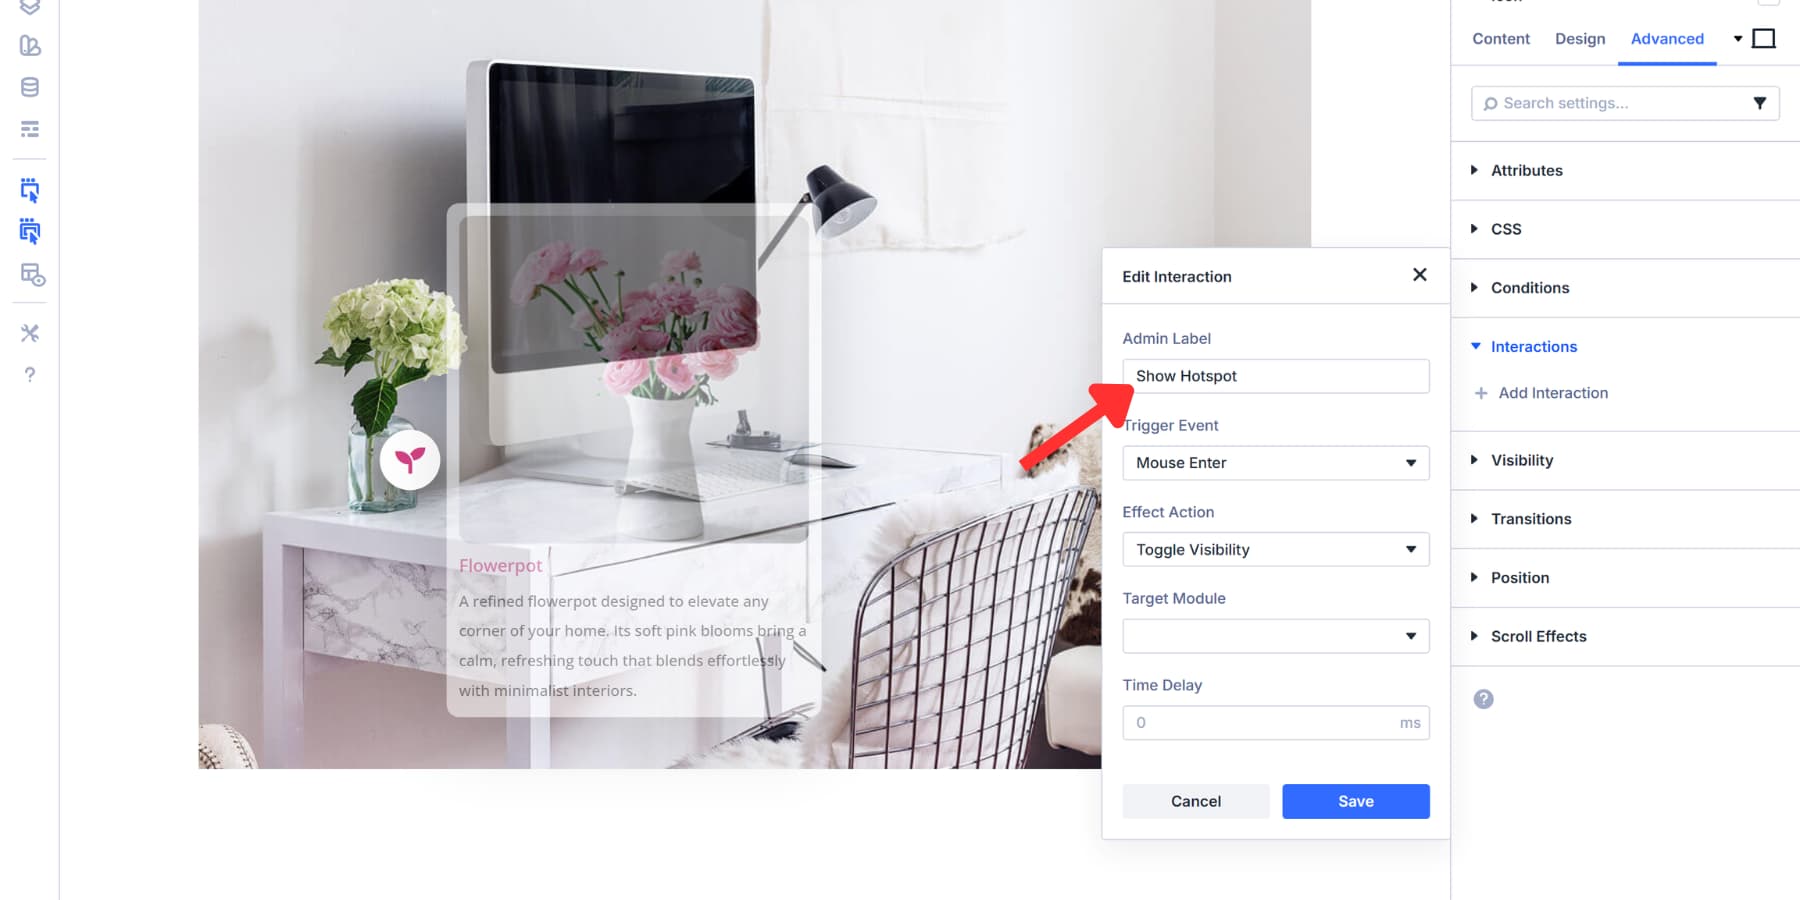
Then, set the Affect Movement to “Show Section” and the Purpose Module on your content material subject matter staff. The Admin Label you added earlier turns out inside the dropdown, making the appropriate staff easy to spot. It’s imaginable you’ll regulate the time prolong to have a smoother get admission to, alternatively we’re keeping up it at 0.
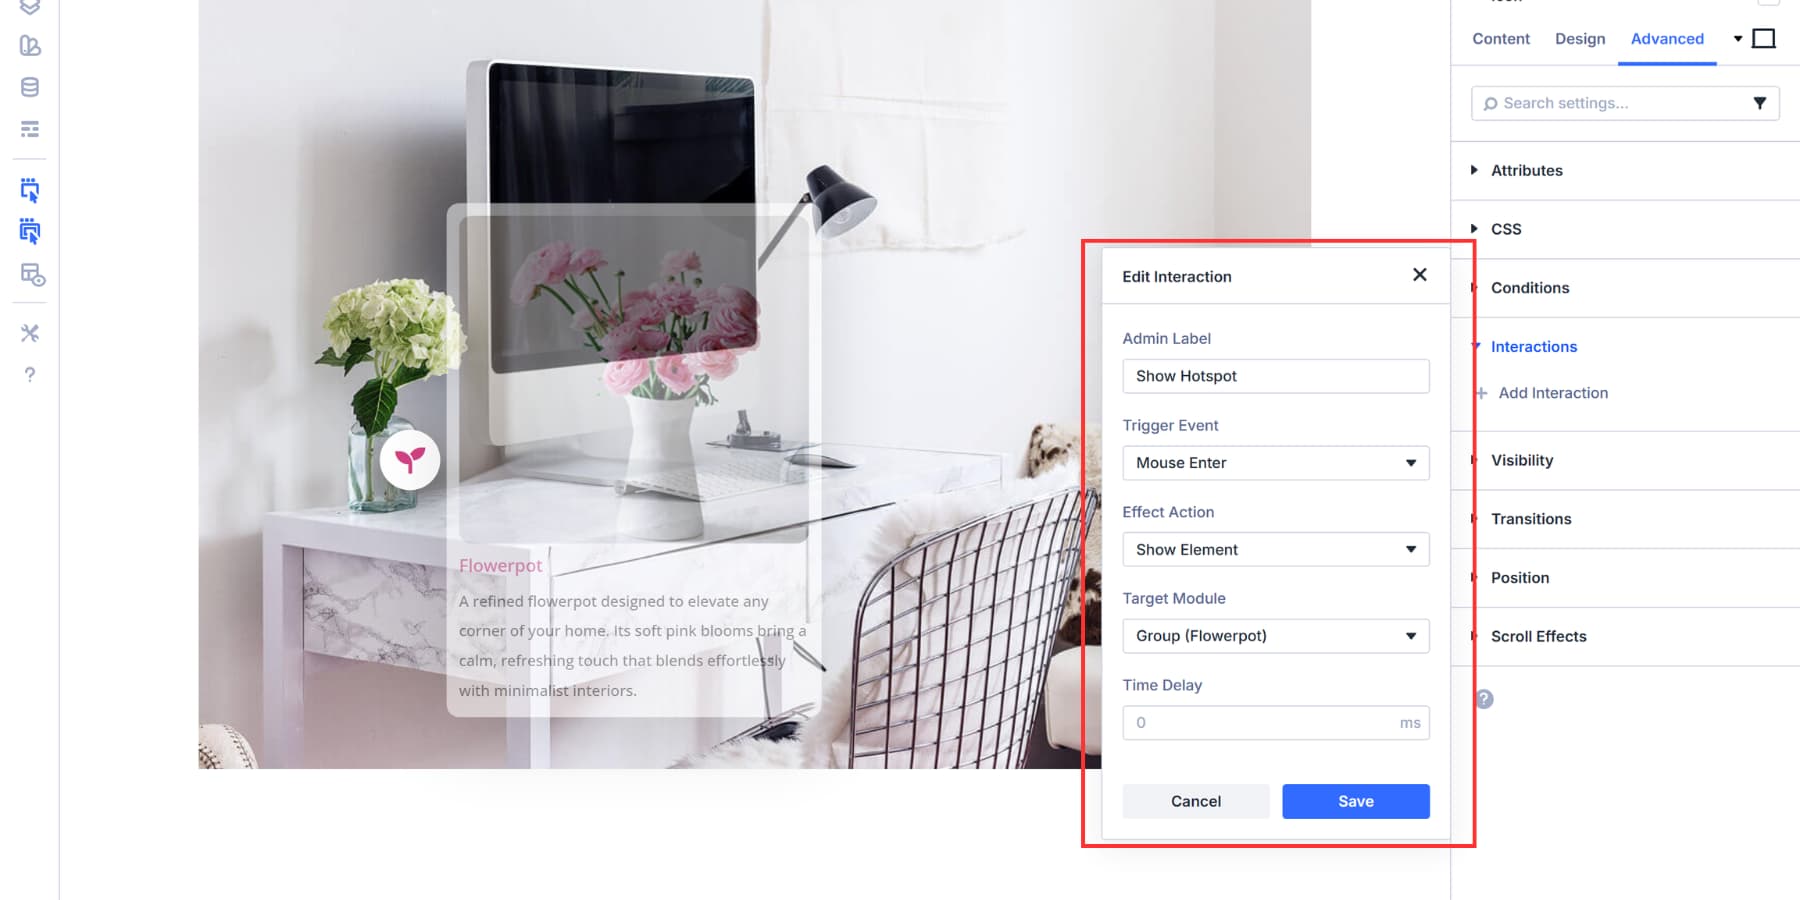
Click on on Save, and then, the use of the copy selection, add a second interaction.
![]()
Proper right here, merely change the Motive Match to Mouse Cross out, Affect Movement to Quilt Section, and cross away the target as is. Label this “Quilt Hotspot” or a an similar determine for reference.
For click-based reveals, use one interaction with ‘Click on on’ for the reason that reason and ‘Toggle Section Visibility’ for the reason that have an effect on. Consumers tap once to show, tap all over again to hide.
Together with Additional Hotspots
You’ve built one complete hotspot. The rest pass faster. Those Section Presets you saved earlier do the heavy lifting. Apply the marker preset to a brand spanking new icon, follow the content material subject matter preset to a brand spanking new nested staff, and likewise you’re halfway completed.
You’ll nevertheless wish to change the content material subject matter for each hotspot with contemporary material. Substitute the image, rewrite the heading, and keep watch over the text to test the marker’s representation. Then regulate Position settings to position the marker and content material subject matter staff over the appropriate spot for your image. In the end, exchange the Purpose Module to your interactions to suggest at the right kind content material subject matter staff.
This workflow remains clean on account of the entire thing is attached. Presets handle consistent styling right through all markers. Interactions link triggers to specific targets without confusion. Admin Labels can help you follow which piece controls what.
Divi 5 builds consistency into the workflow itself. That’s the actual win. You set colors, shadows, borders, and sizing once, then follow them all over the place. When you add hotspot amount 5, you’re not sitting there matching pixel values and hex codes to hotspots one via 4. The design stays locked. You focal point on content material subject matter and web site while Divi keeps the entire thing uniform right through each and every hotspot you add.
Download 5 Hotspot Layouts For Loose!
We’ve created 5 hotspot designs that you just’ll download beneath for free of charge. The ones layouts display exactly how Interactions art work and serve as a starting point. Open them inside the Visual Builder and customize them in your non-public content material subject matter.
@media most effective computer screen and ( max-width: 767px ) {.et_bloom .et_bloom_optin_1 .carrot_edge.et_bloom_form_right .et_bloom_form_content:quicker than { border-top-color: #ffffff !very important; border-left-color: transparent !very important; }.et_bloom .et_bloom_optin_1 .carrot_edge.et_bloom_form_left .et_bloom_form_content:after { border-bottom-color: #ffffff !very important; border-left-color: transparent !very important; }
}.et_bloom .et_bloom_optin_1 .et_bloom_form_content button { background-color: #f92c8b !very important; } .et_bloom .et_bloom_optin_1 .et_bloom_form_content .et_bloom_fields i { color: #f92c8b !very important; } .et_bloom .et_bloom_optin_1 .et_bloom_form_content .et_bloom_custom_field_radio i:quicker than { background: #f92c8b !very important; } .et_bloom .et_bloom_optin_1 .et_bloom_border_solid { border-color: #f7f9fb !very important } .et_bloom .et_bloom_optin_1 .et_bloom_form_content button { background-color: #f92c8b !very important; } .et_bloom .et_bloom_optin_1 .et_bloom_form_container h2, .et_bloom .et_bloom_optin_1 .et_bloom_form_container h2 span, .et_bloom .et_bloom_optin_1 .et_bloom_form_container h2 strong { font-family: “Open Sans”, Helvetica, Arial, Lucida, sans-serif; }.et_bloom .et_bloom_optin_1 .et_bloom_form_container p, .et_bloom .et_bloom_optin_1 .et_bloom_form_container p span, .et_bloom .et_bloom_optin_1 .et_bloom_form_container p strong, .et_bloom .et_bloom_optin_1 .et_bloom_form_container form input, .et_bloom .et_bloom_optin_1 .et_bloom_form_container form button span { font-family: “Open Sans”, Helvetica, Arial, Lucida, sans-serif; } p.et_bloom_popup_input { padding-bottom: 0 !very important;}

Download For Loose
Join the Divi Publication and we will be able to electronic mail you a replica of the ultimate Divi Landing Internet web page Layout Pack, plus loads of other glorious and free Divi property, pointers and guidelines. Observe along and also you’re going to be a Divi seize in no time. If you’re already subscribed simply kind to your electronic mail deal with beneath and click on on download to get right to use the layout pack.
You’ve were given successfully subscribed. Please check out your electronic mail deal with to make sure your subscription and get get right to use to free weekly Divi layout packs!
Check out Development Hotspots In Divi 5 In recent years!
Your internet web site doesn’t need additional content material subject matter. It needs upper control over the content material subject matter you already have. Hotspots provide the precision you wish to have, allowing you to pack depth into each and every internet web page without overwhelming anyone. The tools are built right kind into Divi 5.
The process takes minutes, not hours. Your visitors get exactly what they were given right here for, and not using a want to search via paragraphs or click on on via multiple pages. Get began development yours in this day and age.
The publish How To Create Hotspots With Divi 5 seemed first on Sublime Issues Weblog.
Contents
- 1 What Are Hotspots?
- 2 Divi 5’s Interactions: A Speedy Assessment
- 3 Creating Hotspots With Divi 5
- 4 Download 5 Hotspot Layouts For Loose!
- 5 Download For Loose
- 6 You’ve were given successfully subscribed. Please check out your electronic mail deal with to make sure your subscription and get get right to use to free weekly Divi layout packs!
- 7 Check out Development Hotspots In Divi 5 In recent years!
- 8 Find out how to Entire a MySQL Efficiency Song (4 Key Pointers)
- 9 WP Engine » Stay Your WordPress Website online Protected: Figuring out WP…
- 10 10 Absolute best MetaMask Choices

0 Comments