
Redis is a schemaless, in-memory key-value information retailer for real-time programs. Developers can use it as a NoSQL database, a secondary knowledge layer, or a cache layer for computing-intensive processes.
Redis supplies energy storage that can cache internet website online session states and other knowledge. Techniques that use Redis as a cache layer typically make one complicated database query or API call and then cache the effects. It’s going to in all probability store and retrieve devices in brief and effectively. Due to this fact, Redis is a wonderful important different for WordPress, which uses a additional standard relational database server as its primary content material subject material store.
The Redis command-line interface (CLI) can be used to be in contact together with your WordPress internet web page’s Redis server. Using the Redis CLI (invoked on the command line as redis-cli), you’ll have the ability to request and procure responses from the Redis server programmatically, monitor the directions completed in a Redis instance, check out the latency of an instance, and observe the state of the server in real-time.
This tutorial displays you simple learn how to mix Redis and your WordPress internet web page and use the Redis CLI to perform create, be informed, substitute, and delete (CRUD) operations from your terminal.
Connect Redis to WordPress Using DevKinsta
To glue a WordPress internet web page to a Redis database, we’re using DevKinsta, a free, one-click toolkit for in brief spinning up, growing, and deploying WordPress web sites from your local environment.
DevKinsta spins up a Dockerized WordPress internet web page locally with the newest diversifications of its dependencies, along with an Nginx web server, PHP, and a MySQL-compatible MariaDB database. It moreover choices CLI support for WordPress.
DevKinsta is available for House home windows, Linux, and macOS. You’ll to find more information regarding the arrange when you obtain DevKinsta.
After the arrange has finished, create and set up a brand new WordPress web page locally on your software using the default internet webhosting stack.
DevKinsta supplies 3 possible choices for locally rising WordPress web sites: a brand-new internet web page with default settings, a brand spanking new internet web page with custom designed settings, and cloning an present internet web page hosted on Kinsta for your local development environment.
This tutorial uses the principle selection with the default settings and the newest releases of Nginx, PHP, MariaDB, and WordPress.
Whilst you’ve followed those steps, you’ll have the ability to view your new internet web page dashboard in DevKinsta:
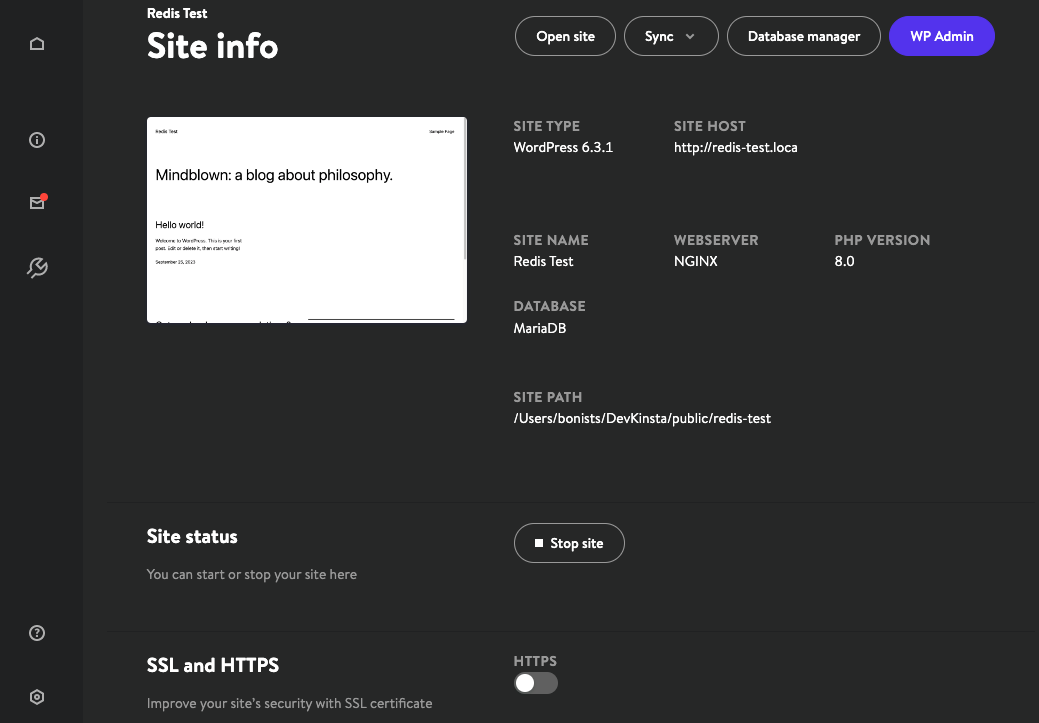
Bear in mind of the Internet web page Path. That’s the record containing the guidelines and folders for the local internet web page. The WP Admin dashboard link turns out throughout the upper right-hand corner. Finally, understand the Internet web page Host, which is the URL pointing for your new development internet web page.
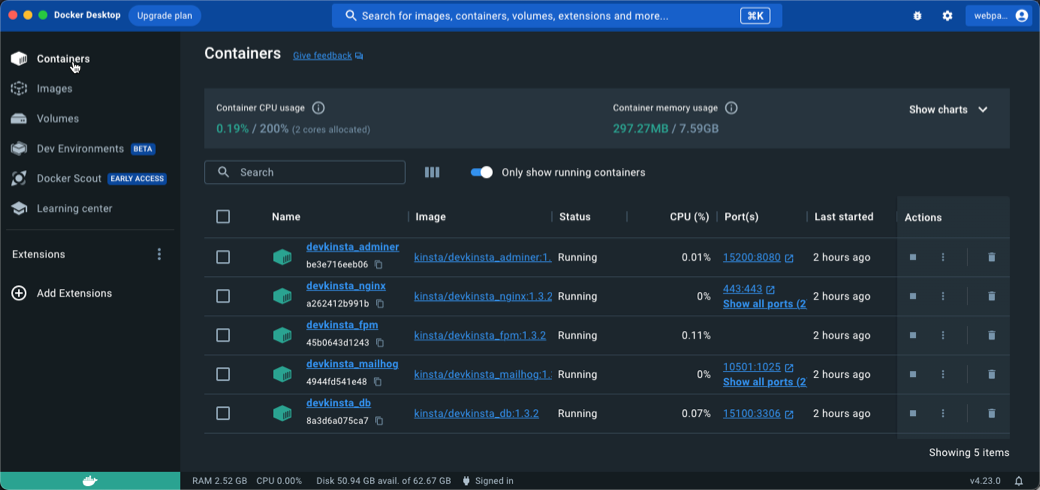
You’ll open Docker Desktop to report all of the packing containers operating as dependencies for your DevKinsta endeavor. To try this, click on on Bins at the top of the left-hand sidebar:
Now that your WordPress internet web page and container dependencies are up and dealing, you’re ready to attach a Redis database for your internet web page:
- Click on at the WP Admin button in DevKinsta to navigate for your WordPress admin dashboard.
- Click on on on the Plugins tab on the left side.
- Click on on Add New, and search for “Redis Object Cache.”
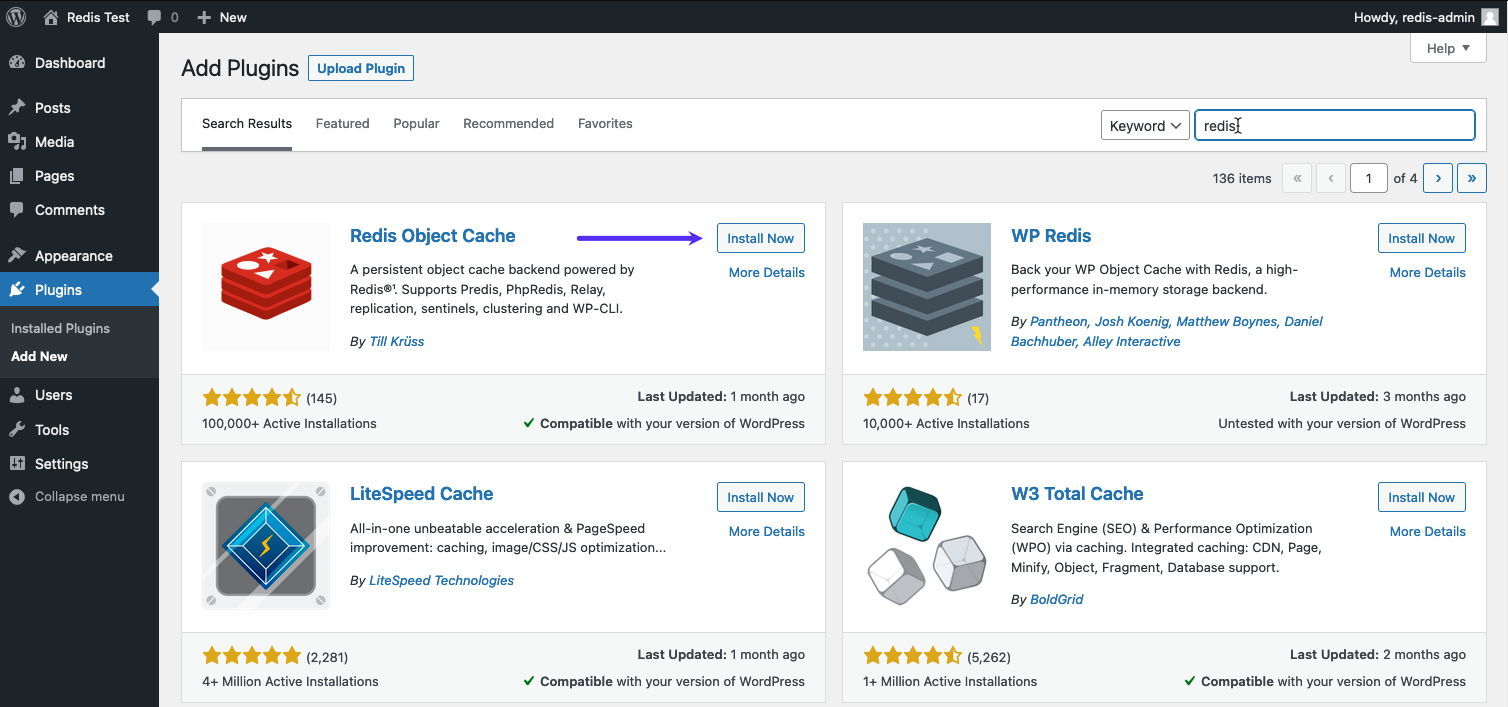
Click on on Arrange Now next to the plugin. Then, check it’s vigorous by way of clicking the Installed Plugins tab.
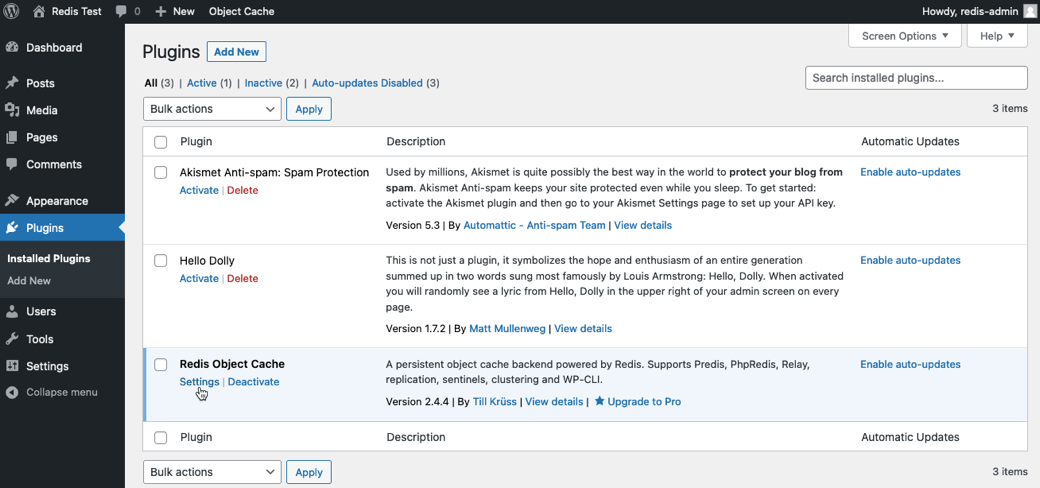
When first activated, the Redis Object Cache plugin will report that it’s now not in a position to connect to a Redis database. We transparent up that by way of creating a container with a Redis instance within Docker.
Let’s open a terminal and create a neighborhood container referred to as redisnet by which to run your Redis image:
docker neighborhood create -d bridge redisnetNow, assemble and run a Redis image as a standalone container inside that neighborhood container:
docker run -d -p 6379:6379 --name demo_redis --network redisnet redisAfter starting the container image, read about in Docker Desktop that the Redis image is up and dealing:

Remember that your WordPress internet web page offered mechanically inside a Docker container. You’ll check its container neighborhood name and ID:
docker neighborhood ls
Above, the truncated type of the neighborhood ID for devkinsta_network is d1fa155f7a4d. We’ll be using that later.
One way to connect your Redis cluster and server for your local WordPress internet web page is by way of without delay connecting the Redis and DevKinsta networks. First, read about the container ID for Redis. Proper right here, with the Docker command to report packing containers, we’re using the -l (latest) switch to show merely the container created most now not too way back:
docker ps -l
In this example, the truncated container ID turns out as c3ffc630e44c.
Connect your Redis container to the DevKinsta neighborhood using your container ID relatively than ours throughout the command underneath.
docker neighborhood connect devkinsta_network c3ffc630e44cYou’ll have successfully added the Redis container image to the report of operating packing containers inside devkinsta_network. To ensure the neighborhood IP take care of of the Redis container, run the following command, converting our devkinsta_network ID with the one you found out using the neighborhood ls command for your endeavor:
docker check out d1fa155f7a4d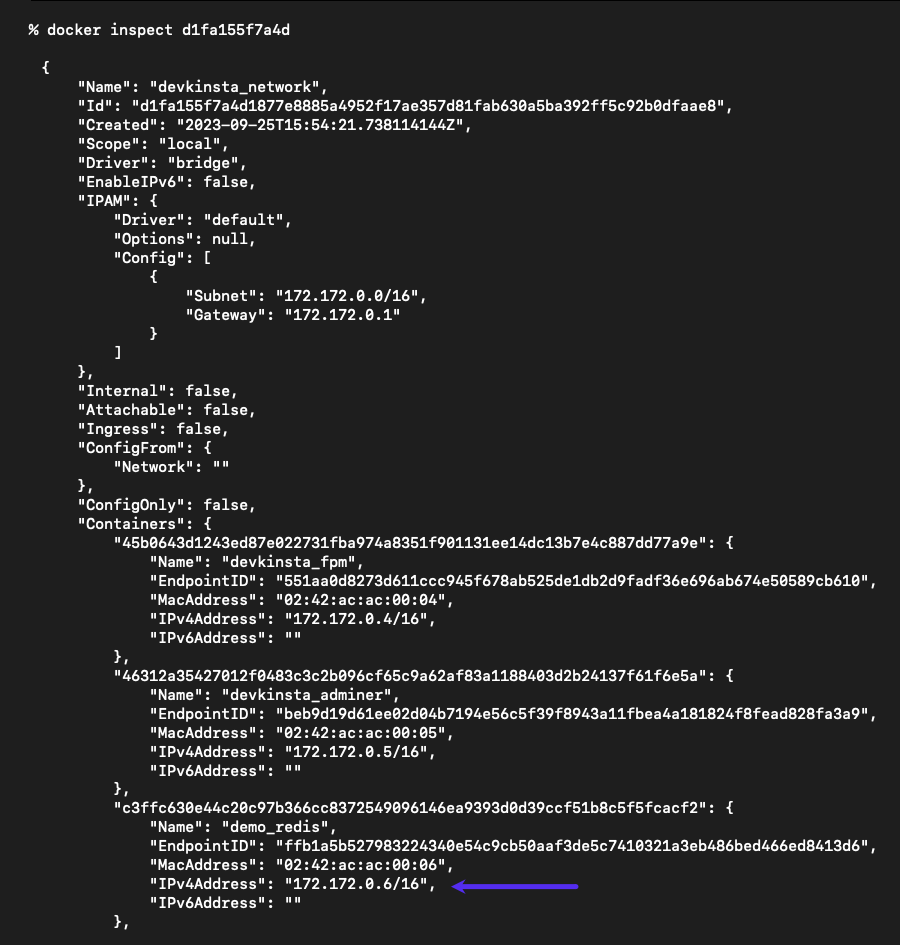
Inside the image above, the IP take care of of the demo_redis container is 172.172.0.6. Make a remark of the IP take care of for your endeavor quicker than proceeding with the connection.
Navigate to the root of the WordPress internet web page on your local machine, which is on the Internet web page Path displayed in DevKinsta. Open the wp-config.php record in a text editor and add the following code throughout the section for custom designed configuration variables:
define('WP_REDIS_CLIENT', 'predis');
define('WP_REDIS_HOST', '172.172.0.6');
define('WP_REDIS_PORT', '6379');
The IP take care of you use for WP_REDIS_HOST is the one you found out for demo_redis when you completed the docker check out command.
This configuration code supplies the Redis consumer, host, and port so that the plugin can get right to use the Redis server inside the identical Docker container and neighborhood as DevKinsta.
To make sure the plugin is attached and dealing:
- Navigate for your WordPress plugins internet web page during the admin dashboard.
- Click on at the Settings link for the Redis Object Cache.
- On the Settings internet web page, click on at the Allow Object Cache button.
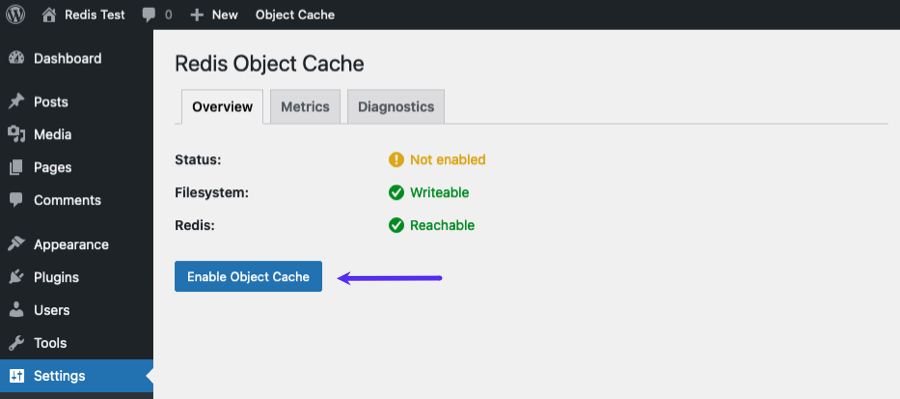
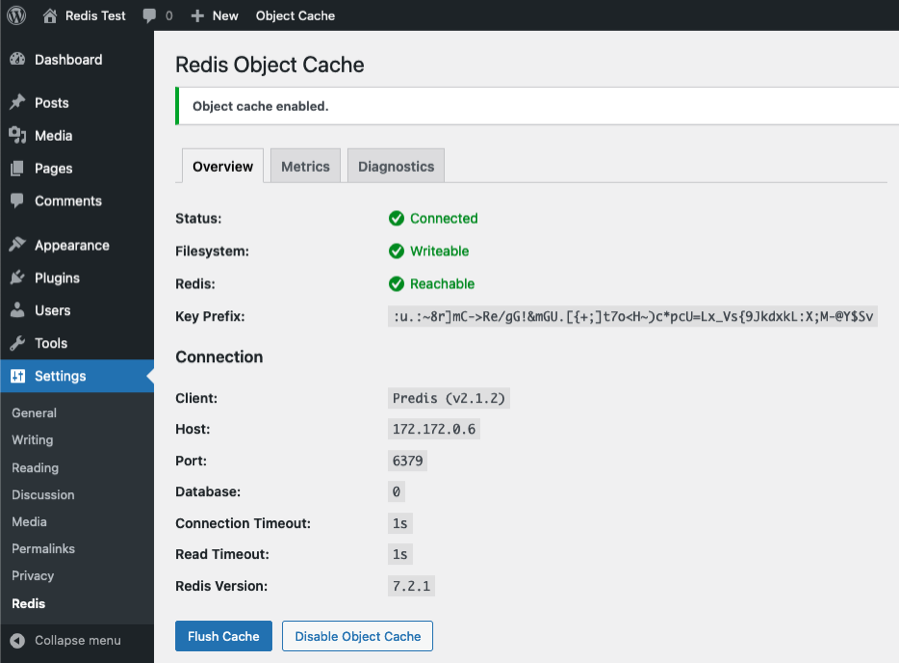
As quickly because the Redis Object Cache is enabled, its Settings internet web page will look something like this:
Launching the Redis CLI
The Redis CLI tool (redis-cli) comes bundled with a Redis server. You’ll arrange a Redis server on Home windows, macOS, and Linux working systems.
However, we’re already working Redis in Docker correct right here, so we will be able to liberate the CLI tool within our demo_redis container.
Above, when we used the docker ps command, we found out the ID of the container operating the Redis image. Ours began c3ffc630e44c. We can use this truncated ID to concentrate on demo_redis and liberate a command-line shell within it:
docker exec -it c3ffc630e44c /bin/shNow you’ll have the ability to invoke the redis-cli tool:

You’ll ping the server to test the connection:
ping
To connect to the Redis server using its IP take care of and port and take a look at that connection, run the following command (using the IP take care of of your demo_redis container):
redis-cli -h 172.172.0.6 -p 6379 ping
You’ve got successfully connected to the Redis server on every your local machine and the Docker container.
Next, read about that your WordPress internet web page is storing knowledge throughout the Redis cache by way of using redis-cli and its keys * command to turn all of the keys throughout the database:
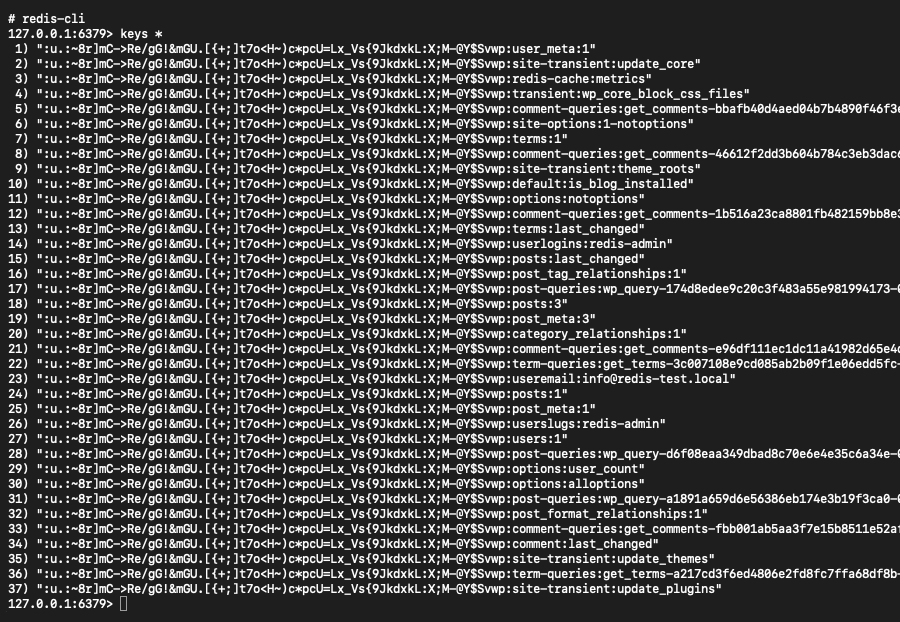
You’ll see that some WordPress knowledge has already been saved to the Redis cache.
Redis CLI CRUD Operations
You’ll perform CRUD operations on your Redis database using the CLI tool.
Let’s get the cost of a key we copied from our earlier Redis CLI keys * request.
get :u.:~8r]mC->Re/gG!&mGU.[{+;]t7o<H~)c*pcU=Lx_Vs{9JkdxkL:X;M-@Y$Svwp:user_meta:1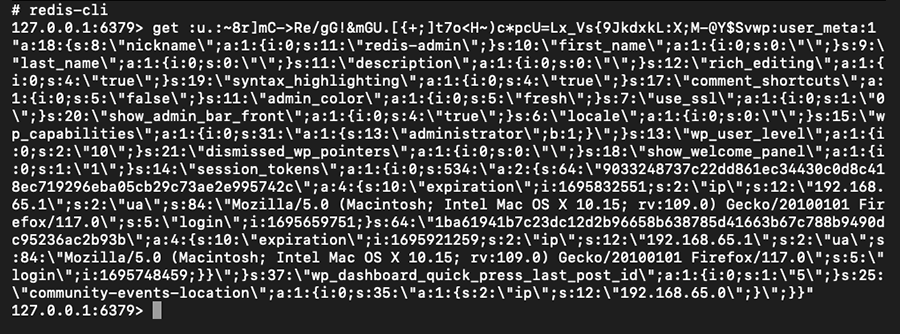
Let’s manipulate the content material subject material of the Redis database by way of invoking redis-cli and using the set, get and del directions to create a key/value pair, query the new key and then delete it:

Above, in quest of to retrieve the cost of a key that has been deleted returns nil.
There are many additional complicated operations available when using the Redis CLI.
Summary
Redis CLI is a simple way to take a look at Redis directions on your internet website online quicker than pushing it to a are living environment. It is also a great way to look at procedure in a Redis instance.
In Docker, a Redis instance provides the apparatus you need to regulate the database — along with redis-cli — bundled in a single container.
Within the interim, DevKinsta’s Dockerized approach makes it easy to make bigger a WordPress internet web page on an area machine and then deploy it to production with a few clicks of a mouse.
For those who’re no longer already managing some of the 106,300 WordPress web sites hosted by way of Kinsta, discover the difficult choices which may well be available in all of our Controlled WordPress Internet hosting plans.
The publish Be told Redis CLI Fundamentals With WordPress and Docker seemed first on Kinsta®.
Contents
- 1 Connect Redis to WordPress Using DevKinsta
- 2 Launching the Redis CLI
- 3 Redis CLI CRUD Operations
- 4 Summary
- 5 WP Engine Vs. [a Competing Hosting Provider] Overview: The Web hosting…
- 6 Methods to Upload a Gallery to Your WordPress Web page in 2023 (Simple Information)
- 7 Ingenious Cookie Cutters for Each and every Instance and Baking Concepts

0 Comments